BMS Quick Reference Guide BMS 110916 - Bill It Now Quick Reference Guide_BMS_110… · Bill It Now...
20
Version 3 9/16/2011
Transcript of BMS Quick Reference Guide BMS 110916 - Bill It Now Quick Reference Guide_BMS_110… · Bill It Now...

Version 39/16/2011

Bill It Now Quick Reference Guide 2
Navigating Bill It NowUsing your internet browser, go to www.billitnow.comClick on the ‘Log In’ link located at the top right hand corner of the screen to display the BMS Login Screen, shown below.Enter your username and password in the Login dialog box and press <ENTER> to access the BillItNow Welcome Page.

Bill It Now Quick Reference Guide 3
The BillItNow Welcome Page provides links to various options. The Tools section provides links to settings and actions. The Accounts section provides links to your policies and other entities. Select the Policy Holder or Policy link to search or browse these levels.
Welcome Page

Bill It Now Quick Reference Guide 4
Selecting the Policy Holder link (shown on page 3) will display the Policy Holder Screen, shown below. From this screen, you may access policy holder detail two ways. Either search for all or part of the name, or point and click on the name of the insured to view the Policy Holder Detail Screen for that client.
Policy Holder Screen

Bill It Now Quick Reference Guide 5
The Policy Holder Detail Screen provides customer contact information, as well as information on the issuing company, the carrier, the MGA, and broker associated with the client.The policyholder’s policies can be accessed from this screen by clicking on the link located in the upper left hand portion of the screen. If multiple policies are held by the same insured, the policy link will bring you to a listing of all policies associated with your insured.Transactions can be viewed at the account level by clicking ‘Account Transactions’.
Policy Holder Detail Screen

Bill It Now Quick Reference Guide 6
Multiple Policy Per Insured Screen
From this screen, both the Policy Holder Detail and Policy Detail Screens may be accessed.Click the POLICY NUMBER to see the policy detail.Click the POLICYHOLDER NAME to see the policyholder details.

Bill It Now Quick Reference Guide 7
Policy Screen
The Policy link, highlighted on page 3, will display the Policy Search Screen, shown below. To access the Policy Detail Screen from here, search for all or part of the name of the policyholder or the policy number. Alternatively, you can scroll through the list of policy numbers and point and click on the policy number to access the policy detail screen of that policy. Please note that selecting the NAME of the policy holder from this screen will bring you to the Policy Holder Detail Screen for the insured, and not to the policy detail.
Active policies appear in bold and inactive policies appear in gray.

Bill It Now Quick Reference Guide 8
Current Balance Due
Pmt. Status indicates if an installment is paid, in full or partially
Transaction History
Links are highlighted when prior/next term exists
Policy Detail Screen
Stmt. Status indicates if an installment statement has been sent.
Scheduled Statement Generation Date
The Policy Detail Screen provides detailed account information for the policy.
Payment Due Date
Click any linked entity to view detail
Total Premium Booked

Bill It Now Quick Reference Guide 9
In addition to providing agencies with detailed policy and policyholder information, BillItNow provides many reports, including commission reports, pending cancellation reports, overdue payment reports, etc.
Commission reports can be run to forecast future disbursements, and past commission statements can be viewed by clicking ‘View Earlier Reports’The Pending Cancellation Report provides a detailed listing of all policies for which a cancellation notice has mailed, but have not yet been paid or cancelled.The Billed Balance report can display all amounts billed, billed and not paid, or billed and now overdue.
All reports feature custom sorting.All reports can be exported and saved to PDF, Excel, or Word files for easy manipulation, storage and reference.To access the available report listing, click the Reports link, located on the main menu bar (shown below), which is displayed on all BMS screens.If you need a report that is not listed, contact us, we may be able to create it for you.
Reporting at Your Fingertips

Bill It Now Quick Reference Guide 10
Available Reports Screen
This screen displays a list of available reports. Click a report link to access the Report Criteria Screen for the report you wish to run.

Bill It Now Quick Reference Guide 11
Report Criteria Screen
From the Report Criteria Screen, shown below, specify the date range, sort, and print to options (as applicable) and click the View Report button to return the results.

Bill It Now Quick Reference Guide 12
Displaying Results
If you chose to print the report to the screen, you can export the results to the file options given by clicking on the drop down box and pressing the Go button, shown below. Once exported, the document can be saved.

Bill It Now Quick Reference Guide 13
Pay Policy Online
To pay a policy online, click the Pay Policy Online link from the Tools section of the Welcome Screen. This will take you to the Pay Online Screen.

Bill It Now Quick Reference Guide 14
Pay Policy Online
Alternatively, you may access the pay online option from the Pay Online link of any active policy, highlighted below.
Bill It Now Quick Reference Guide 15
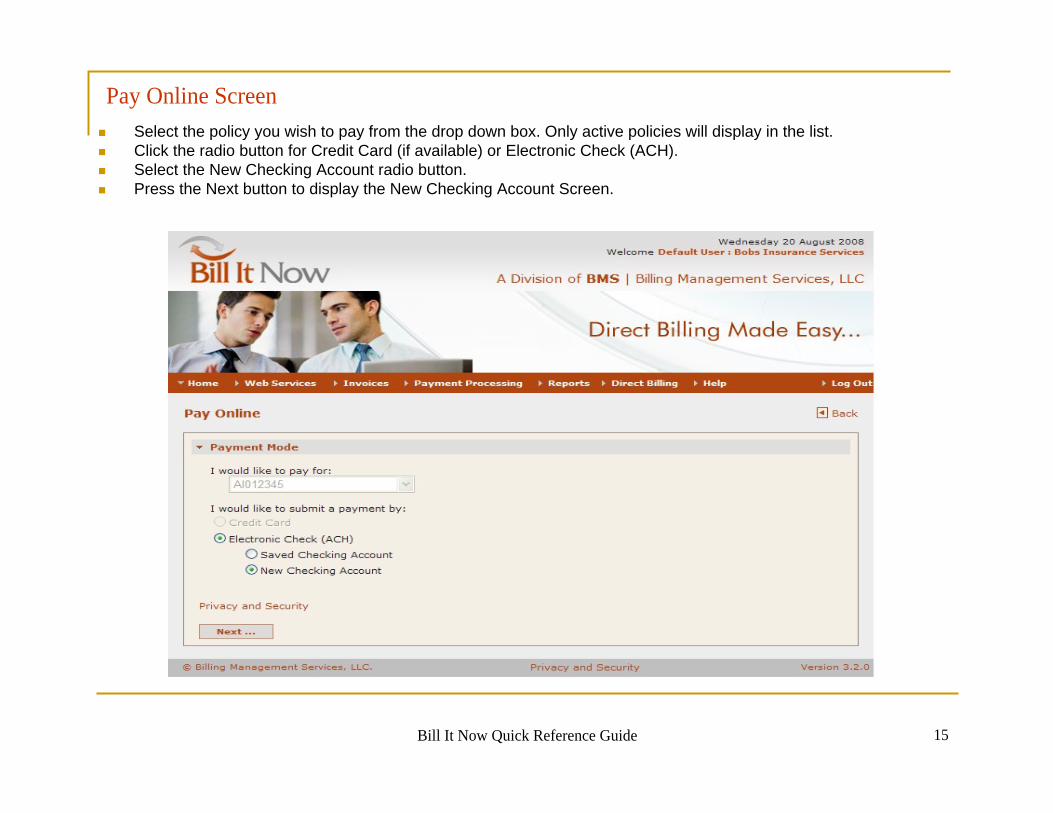
Pay Online ScreenSelect the policy you wish to pay from the drop down box. Only active policies will display in the list.Click the radio button for Credit Card (if available) or Electronic Check (ACH).Select the New Checking Account radio button.Press the Next button to display the New Checking Account Screen.

Bill It Now Quick Reference Guide 16
New Account ScreenFill in the blank fields and press the Next button. The Payment Options Screen will display.The information collected here is different depending on whether a credit card or checking account is being entered.If the billing address on the account is the same as the policy address, clicking ‘Yes’ will use the address shown.You may save this account under your username so that you can easily use it again in the future.
Click the box and enter a description so you can identify it easily later.When ready, click ‘Next’.

Bill It Now Quick Reference Guide 17
Payment Options Screen
Select ‘Make One-Time Payment’ if you are making a single payment.If the amount you wish to pay is different from the amount displayed in the Amount to Pay field, change it at this time. The Pay On field defaults to the current date or the due date. If this is not the date you wish to use, change it at this time. When you are finished making changes, press the Next button. The Payment Review Screen will display.
Select ‘Set up Recurring Payments’ if you want to set up recurring payments on a schedule.A suggested schedule will be presented to you according to the installment schedule set forth by the carrier. You may accept this or change any amount or date. You can also add additional payments to, or delete payments from, the schedule.
When ready, click ‘Next’.
Bill It Now Quick Reference Guide 18
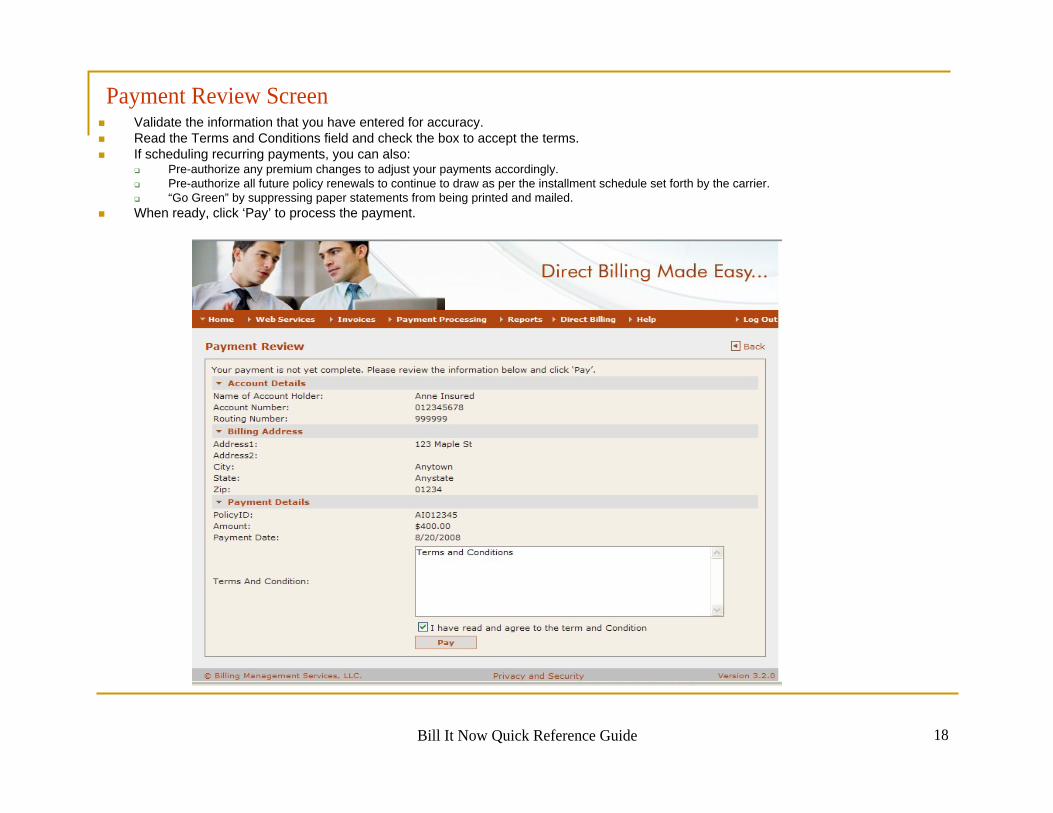
Payment Review ScreenValidate the information that you have entered for accuracy.Read the Terms and Conditions field and check the box to accept the terms.If scheduling recurring payments, you can also:
Pre-authorize any premium changes to adjust your payments accordingly.Pre-authorize all future policy renewals to continue to draw as per the installment schedule set forth by the carrier.“Go Green” by suppressing paper statements from being printed and mailed.
When ready, click ‘Pay’ to process the payment.

Bill It Now Quick Reference Guide 19
Payment Confirmation Screen
From the Payment Confirmation Screen, you may print a copy of the confirmation for your records. When ready, click ‘Return to Account’ to return to the policy detail page.

Bill It Now Quick Reference Guide 20
Contact customer support at BillItNow
[email protected] (888) 778-5051 Option 3
Questions?


![CCNP BCMSN Quick Reference Sheets - Lagout Quick Reference... · CCNP BCMSN Quick Reference Sheets Exam 642-812 ... [ 4 ] CCNP BCMSN Quick Reference Sheets. ... switch would be used](https://static.fdocuments.in/doc/165x107/5a7a6ec87f8b9a05538dccf5/ccnp-bcmsn-quick-reference-sheets-lagout-quick-referenceccnp-bcmsn-quick-reference.jpg)