BluePrint Digital Photography (Mar 2009).pdf
142
Fast Track to Digital Photography By Team Digit
-
Upload
milind-shah -
Category
Documents
-
view
222 -
download
0
Transcript of BluePrint Digital Photography (Mar 2009).pdf

7/30/2019 BluePrint Digital Photography (Mar 2009).pdf
http://slidepdf.com/reader/full/blueprint-digital-photography-mar-2009pdf 1/141
Fast Track
to
DigitalPhotography
By Team Digit
7/30/2019 BluePrint Digital Photography (Mar 2009).pdf
http://slidepdf.com/reader/full/blueprint-digital-photography-mar-2009pdf 2/141
FAST TRACK 3
CreditsThe People Behind This Book
EDITORIAL
Editor-in-chief Edward Henning
Assistant Editor Robert Sovereign-Smith
Head-Copy Desk Nash David
Writer Aditya Madanapalle
DESIGN AND LAYOUT
Layout Design MV Sajeev, Soumya Mohanty
Cover Design Andre Rodrigues
© 9.9 Interactive Pvt. Ltd.
Published by 9.9 Interactive
No part of this book may be reproduced, stored in a retrieval system or transmitted
in any form or by any means without the prior written permission of the publisher.
March 2009
Free with Digit. Not to be sold separately. If you have paid separately for this book,
please email the editor at [email protected] along with details of location of
purchase, for appropriate action.

7/30/2019 BluePrint Digital Photography (Mar 2009).pdf
http://slidepdf.com/reader/full/blueprint-digital-photography-mar-2009pdf 3/141
FAST TRACK 5
Not too far back in history, before the advent of digital
photography, each photo was unique and special. A
photo was the actual card, something you could carry in
your wallet, frame and keep on your desk, or hang on a wall.
Albums used to be meticulously preserved. Often, photogra-
phers used to insert handwritten captions on the back of the
photo describing the event or particulars of the photograph.
Digital photography has changed how we handle photos,how we interact with them and even how we read them. What
was once a costly affair, is now quite affordable. Anyone with
a camera these days can claim to be an amateur photogra-
pher. This is, in a way, good. People are increasingly getting
interested in photography. However, this does backfire at
times as well, especially considering that the proliferation of
images has reduced the ratio of inspiring shots to the run-of-
the-mill ones that you come across everywhere. Although veterans still hold out with film, and at times even
black-and-white film, it would not be fair to classify all kinds of
digital photography as being sub-standard or without merit.
Photography in the past century was a time-consuming
process. Back then, there were no LCD screens on cameras to
instantly know how your photos would turn out. It had to be
the tough way out — trial and error. Enthusiasts and amateurs
alike had to wait for as much as a month, probably more, tofinish a film roll and develop it into hard copies. Photography
was rather actively pursued back then — each photo delicate-
ly sought after, because it was a distinct image of a particular
object, the individuality of each picture stood out.
Moreover, each shot had to be planned, the camera had
to be understood, the lighting conditions evaluated, before
the photographer even dared to open the shutter and
decide to capture a particular scene. These are some of thethings that are missed in these days of digital cameras. It
took years of practice to make a half-decent photographer
in the good old days of film, and digital cameras are now
changing that.
Introduction

7/30/2019 BluePrint Digital Photography (Mar 2009).pdf
http://slidepdf.com/reader/full/blueprint-digital-photography-mar-2009pdf 4/141
Chapter 1 Image Properties 091.1 Megapixel 091.2 Image Parameters 101.3 Shooting Modes 151.4 White Balance 22
Chapter 2 Shooting Settings 252.1 Aperture priority mode 252.2 Aperture Size (f-number) 29
2.3 Shutter Speed 332.4 Shutter Priority Mode 362.5 ISO Rating 38
Chapter 3 Camera Features 413.1 Image Stabilisation 413.2 Exposure Compensation 443.3 Flash sync and intensity 49
Chapter 4 File Formats 53
4.1 RAW 534.2 JPEG 544.3 TIFF 55
Chapter 5 How to shoot 565.1 Macro 565.2 Telescopic 575.3 Portrait 585.4 Landscape 595.5 Night 605.6 Action 615.7 Architectural 62
Chapter 6 Shooting Modes 636.1 Single shoot 636.2 Burst Modes 646.3 Multiple shooting mode 656.4 Self timer 65
Chapter 7 Focussing 667.1 Focussing modes - Continuous / Single focus 667.2 Auto Focus - Spot focus/Area focus/
multi-spot focus 677.3 Light metering - spot / evaluative 687.4 Manual Focus 69
6 FAST TRACK
CONTENTS

7/30/2019 BluePrint Digital Photography (Mar 2009).pdf
http://slidepdf.com/reader/full/blueprint-digital-photography-mar-2009pdf 5/141
Chapter 8 Time-Lapse 708.1 HDR 738.2 Panoramas 75
Chapter 9 Transfer and Printing 789.1 USB / Firewire 789.2 Bluetooth / WLAN 799.3 PictBridge 809.4 AV-out / HDMI 82
Chapter 10 Camera Accessories 8310.1 Tripod 83
10.2 Filters 8410.3 Memory - SD / MMC / XD / CompactFlash 8510.4 Lens 8610.5 Lighting 8710.6 External Flash 8810.7 Portable Image-viewers 8910.8 Remote control 9010.9 Batteries 9010.10 Battery Chargers 92
Chapter 11 Camera Care 9311.1 Lens cleaning and maintenance 9311.2 Carry bag 9511.3 Microfiber cloth 95
Chapter 12 Software 9612.1 Picasa 9612.2 Adobe Photoshop 9712.3 Adobe Lightroom 9912.4 Photography Software for Linux 100
Chapter 13 Web services for photographers 10213.1 Flickr 10213.2 PBase 10713.3 Picasa Web (picasaweb.google.com) 10913.4 Smugmug (www.smugmug.com) 11113.5 Snapfish (www.snapfish.com) 112
Chapter 14 Image Properties 11614.1 Difference between a P&S and a dSLR 11614.2 Kinds of Sensors 12114.3 Image Compression 12614.4 Full-frame Cameras 12714.5 Sensors size and image resolution 129
Chapter 15 Glossary 132
FAST TRACK 7
7/30/2019 BluePrint Digital Photography (Mar 2009).pdf
http://slidepdf.com/reader/full/blueprint-digital-photography-mar-2009pdf 6/141
D
I
G
I
TA
L
P
H
O
T
O
GR
A
P
H
Y
FAST TRACK
IMAGE PROPERTIES 1
9
www.thinkdigit.com
1.1 MegapixelMost digital camera users, brag about their megapixel count,
which is also the most misunderstood aspect of digital cam-
eras. A pixel is like a single tile on a mosaic, only that the tiles
are so small compared to a mosaic that the resulting image
appears very sharp.
In cameras, a pixel is used to denote a single tile on theimage sensor that receives the image. A CCD or CMOS sensor
in the camera has an array of these tiles that receive the light
and convert it into electrical signals that are processed to give
the picture. One such array of 2048x1536 will give a pixel
count of 31,45,728 pixels, that is, 3.1 megapixels (MP).
However, the number of megapixels in a camera is a very
mean measure of the quality of the images that it produces. A
higher MP count does not necessarily signify a better imagequality, but both the consumer and manufacturers are caught
up in a megapixel race. The quality of the lens, algorithms
used to make the photo from raw data collected by the sensor,
and the focusing mechanism are some of the more important
factors contributing to the quality and sharpness of the image
– factors where improvements in the image will be much
more apparent than cramming in ever more pixels.
For all practical purposes, 3 MP is adequate, while 6 MP isample — anything higher is moving towards generosity.
Another important factor to consider here is how large the
sensor itself is. Consumer digital cameras have tiny image sen-
sors – measured in microns, which is a millionth of a metre.
Most sensors are less than 10 microns across. This is largely
due to the size of the cameras, which are designed at least to
fit in your pocket.
Similarly, larger dSLR cameras have much larger sensors,sometimes the size of a conventional frame in a roll of film.
Smaller sensors are also cheaper to manufacture. The size of
the sensor itself is often overlooked while making decisions of
which camera to buy, but it plays a decisive role in the quali-
ty of the image.
Image properties

7/30/2019 BluePrint Digital Photography (Mar 2009).pdf
http://slidepdf.com/reader/full/blueprint-digital-photography-mar-2009pdf 7/141
D
I
G
I
TA
L
P
H
O
T
O
GR
A
P
H
Y
Generally, a smaller sensor produces images that have
more noise than those produced by a larger sensor. A smaller
sensor comes with its own set of problems such as difficulty in focussing on smaller areas. Further, shaking is exaggerated
and despite a high density of cells on the sensor, the image
quality is rather low. Try to get as large a sensor as possible.
Be careful not to drool after that 50 MP camera that every-
one dreams of. In the right hands, a 6-MP camera can take
much better photographs. For publishing purposes, an 8-MP
image is normally used. So that’s the real deal with megapix-
els. Now that the biggest myth in digital photography is hope-fully busted, there are a few real-world scenarios where that
large MP count actually comes into use.
Many photos, taken off hand, reveal startling details in the
background that the photographer might not have noticed
while shooting – like a passer-by with a crazy expression behind a group photograph. A high MP count is also useful for
shooting far away objects such as aeroplanes, or birds using
cameras with a limited optical zoom. This is effectively a dig-
ital zoom, but a higher MP count ensures that the resulting
image is not terribly grainy — a defect typical to digital zoom.
1.2 Image parameters
Basic image parameters are hue, saturation, contrast, sharp-
ness, tone and colour space. Many digital cameras have set-
tings that play around with these image parameters. These
include vividity or beach settings that intensify the colour
blue, but you are not given much control over these settings
10 FAST TRACK
IMAGE PROPERTIES1 www.thinkdigit.com
A comparison of detail in a 3.0 MP camera

7/30/2019 BluePrint Digital Photography (Mar 2009).pdf
http://slidepdf.com/reader/full/blueprint-digital-photography-mar-2009pdf 8/141
D
I
G
I
TA
L
P
H
O
T
O
GR
A
P
H
Y
in any of these cameras. A few dSLR cameras allow you to play
around with these parameters; but again, these are not uni-
formly available. The Nikon D300 and the Nikon D400 allow tweaking image
parameters, both by settings for individual parameters and pre-
sets. The Konika Minolta A2 has bracketing options for image
parameters, which allows you to take the same image using dif-
ferent image parameters. The Canon EOS 30D allows a range of
tone and saturation options. The differences in settings in
these cameras are very subtle. Many Nikon cameras like the
Coolpix P50, and many Canon cameras such as the PowerShotSD850 IS have options for lighter and darker skin tones.
The ideal approach is to shoot in the RAW file option
when available, and later tweak the image using image edit-
ing software. The most commonly used image parameters are
sepia and black and white. While this can make photos very
effective, it is often overused and it is better to take the origi-
nal image in colour and change it according to requirements
later on, instead of shooting the image with a colour loss inthe first place. Many digital cameras have unique options
with regard to image parameters. This portion will focus on
what these parameters are specifically, and how they can be
used to improve photographs digitally.
Colour Space: A colour space is a model used by computers to map colours
using numbers. Different computational methods use differ-ent colour spaces. There are two basic types of colour spaces —
additive colour spaces like RGB and subtractive colour spaces
like CMYK. Additive colour spaces are used on displays and
screens, with a different combination of primary colours giv-
ing the appearance of a particular colour.
Subtractive colour spaces are used more in print applica-
tions, where the colour has to be subtracted from the white
substrate so that the reflected light can be perceived to be of a particular colour. Basically, in an additive colour space, the
screen emits the light of a particular colour using a combina-
tion of primary colours. On the other hand, in a subtractive
colour space, the surface absorbs all wavelengths except the
colour that needs to be perceived.
FAST TRACK
IMAGE PROPERTIES 1
11
www.thinkdigit.com

7/30/2019 BluePrint Digital Photography (Mar 2009).pdf
http://slidepdf.com/reader/full/blueprint-digital-photography-mar-2009pdf 9/141
D
I
G
I
TA
L
P
H
O
T
O
GR
A
P
H
Y
Adobe’s RGB colour space is commonly used in many dSLR
cameras, although some have propriety colour spaces. Before
printing your own photos, it is always a good idea to convertthe image into a CMYK colour space to get an accurate idea of
how the photo would appear when printed. This reduces the
disparity between the perceived colour of the photo on screen
and when printed.
Even if you do not change the colour space manually, the
computer does so before printing. To change the colour space
of an image in Photoshop, go to Image > Mode and select acolour space. An understanding of a colour space is required
to understand how other image parameters such as hue, sat-
uration and brightness work. RGB colour spaces are defined
within computers using these image parameters as axes or
defining guides for the colours. Colour spaces based on the
12 FAST TRACK
IMAGE PROPERTIES1 www.thinkdigit.com
The Adobe RGB Colour space
7/30/2019 BluePrint Digital Photography (Mar 2009).pdf
http://slidepdf.com/reader/full/blueprint-digital-photography-mar-2009pdf 10/141
D
I
G
I
TA
L
P
H
O
T
O
GR
A
P
H
Y
RGB model include HSL (Hue, Saturation, Lightness) and HSV
(Hue, Saturation, Value).
Saturation: This is basically the intensity of a particular colour. An image
with zero colour saturation is a grey-scale image. Some digital
cameras have a vivid or high contrast setting to increase the
saturation of all the colours in an image. Far greater control
can be achieved in Photoshop or other image editing software.
Some image organisers and viewers also allow this option.
In still images, and those depicting flowers or fruits, increas-ing the saturation of the photograph can bring the photo to life,
and bring out the natural coloration in the subject better.
Experiment with digitally reducing the saturation of an image
as well, this gives a subtle rustic effect to the photograph, par-
ticularly good when photographing vehicles such as trucks, cars
or trains. Reducing the saturation and then increasing the con-
trast gives a grunge feel to the photograph, and can be used
effectively for portraits and photographs of pets.Filters are attachments to lenses that increase the satura-
tion of a particular colour. Commonly available filters used in
SLR and dSLR lenses are green, red and blue. Some digital
cameras such as the Nikon Coolpix P50 and the Canon
PowerShot SD850 IS offer saturation controls for these colours
as well as a custom colour option.
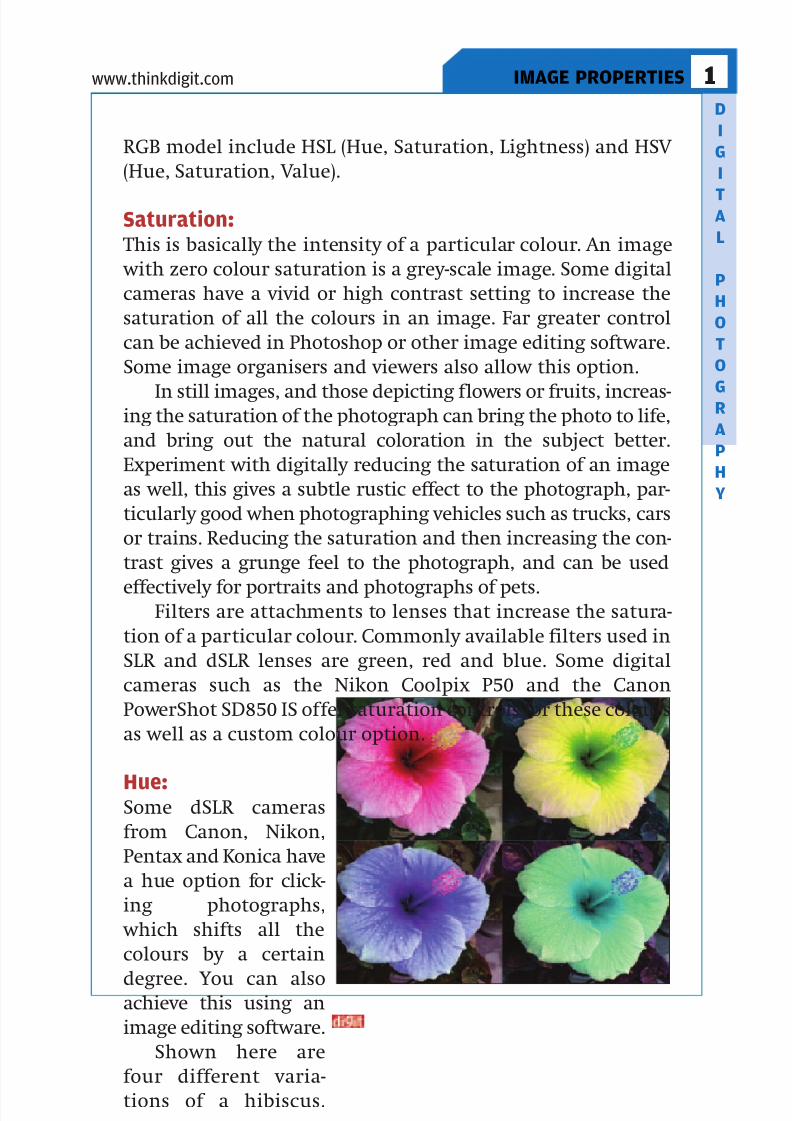
Hue:Some dSLR cameras
from Canon, Nikon,
Pentax and Konica have
a hue option for click-
ing photographs,
which shifts all the
colours by a certain
degree. You can alsoachieve this using an
image editing software.
Shown here are
four different varia-
tions of a hibiscus.
FAST TRACK
IMAGE PROPERTIES 1
13
www.thinkdigit.com
7/30/2019 BluePrint Digital Photography (Mar 2009).pdf
http://slidepdf.com/reader/full/blueprint-digital-photography-mar-2009pdf 11/141
D
I
G
I
TA
L
P
H
O
T
O
GR
A
P
H
Y
This effect can be used to produce abstract or surreal photo-
graphs, depending on the tone of the event, for better impact.
Contrast:Contrast is basically an increased vividity of a colour in terms
of its brightness. A high contrast is used in an image to make
an object stand out against a background, or to bring to focus
a wide array of colourful subjects such as in a busy market-
place or a still life photo. The greater the contrast in an image,
the better is the detail brought out.
Sharpness: Also called acutance in photography terms, sharpness refers
to how detailed the edges in an image are. A greater sharpness
results in a grainier image, while a reduced sharpness yields
a washed out appearance. Most dSLR cameras have an option
to fine tune the sharpness of an image, and so do many digi-
tal cameras. Sharp images are visually appealing mostly in
close-ups, or with images having a high amount of detail. A high sharpness in portraits or landscapes can make the pho-
tos look unnatural.
Tone: The tone of an image sets the mood of the picture. A warm
tone tends to be redder with prominently orange, red and yel-
low colours. A warm tone is also more masculine. On the
other hand, a cold or cool tone tends to be bluer with soft,mellow colours and is more feminine. Some dSLRs come with
a tone setting, with positive or negative steps towards blue or
red. A small increment in the saturation of red or blue is
enough to set the tone for an entire image.
Black and white:Black and white or greyscale images are a standard feature in
most digital cameras and dSLRs. Black-and-white photographshave a definate charm to them, but this effect is often over-
used and abused. Greyscale images tend to produce a wide
range of emotional responses in an individual, from a feeling
of desolation to nostalgia.
It is always a good idea to take a colour photograph and
14 FAST TRACK
IMAGE PROPERTIES1 www.thinkdigit.com
FAST TRACK
7/30/2019 BluePrint Digital Photography (Mar 2009).pdf
http://slidepdf.com/reader/full/blueprint-digital-photography-mar-2009pdf 12/141
D
I
G
I
TA
L
P
H
O
T
O
GR
A
P
H
Y
then turn it into greyscale on a computer. Portraits and land-
scapes are two common and effective subjects for greyscale
images. Increase the contrast to bring out the detailing ingreyscale images. Compare if the image looks better in
greyscale than it does in colour.
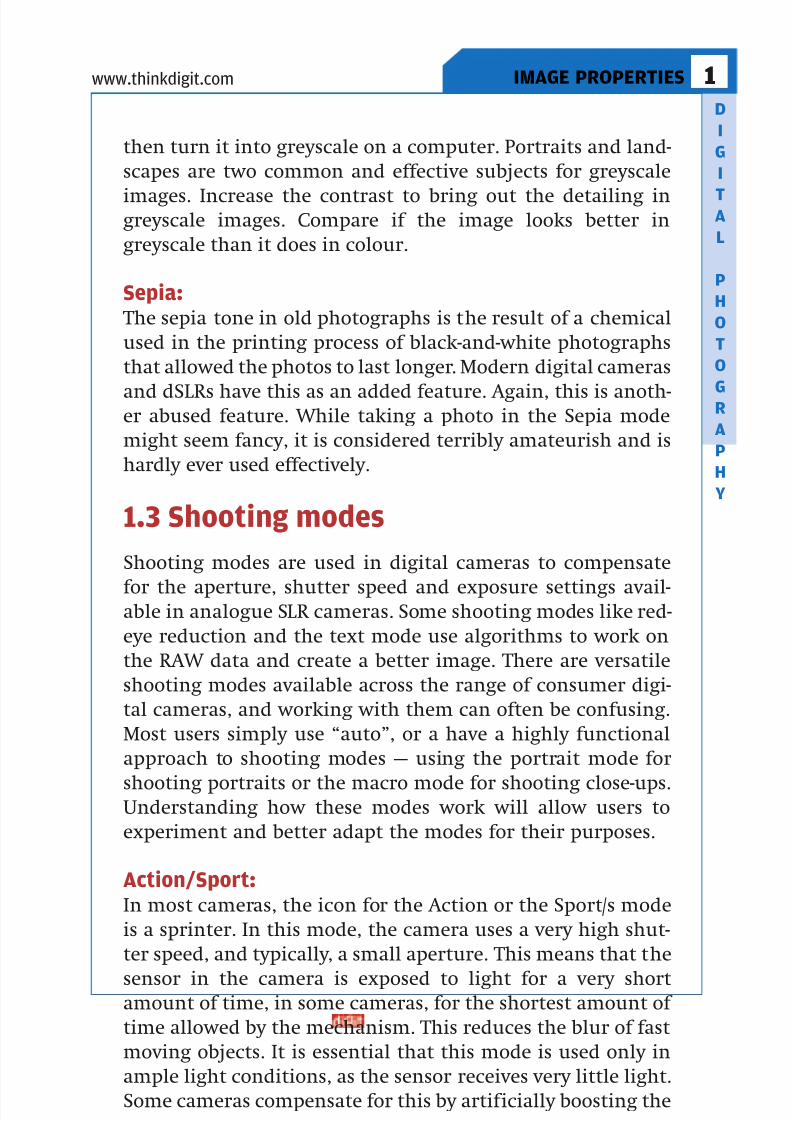
Sepia: The sepia tone in old photographs is the result of a chemical
used in the printing process of black-and-white photographs
that allowed the photos to last longer. Modern digital cameras
and dSLRs have this as an added feature. Again, this is anoth-er abused feature. While taking a photo in the Sepia mode
might seem fancy, it is considered terribly amateurish and is
hardly ever used effectively.
1.3 Shooting modes
Shooting modes are used in digital cameras to compensate
for the aperture, shutter speed and exposure settings avail-able in analogue SLR cameras. Some shooting modes like red-
eye reduction and the text mode use algorithms to work on
the RAW data and create a better image. There are versatile
shooting modes available across the range of consumer digi-
tal cameras, and working with them can often be confusing.
Most users simply use “auto”, or a have a highly functional
approach to shooting modes — using the portrait mode for
shooting portraits or the macro mode for shooting close-ups.Understanding how these modes work will allow users to
experiment and better adapt the modes for their purposes.
Action/Sport:In most cameras, the icon for the Action or the Sport/s mode
is a sprinter. In this mode, the camera uses a very high shut-
ter speed, and typically, a small aperture. This means that the
sensor in the camera is exposed to light for a very shortamount of time, in some cameras, for the shortest amount of
time allowed by the mechanism. This reduces the blur of fast
moving objects. It is essential that this mode is used only in
ample light conditions, as the sensor receives very little light.
Some cameras compensate for this by artificially boosting the
FAST TRACK
IMAGE PROPERTIES 1
15
www.thinkdigit.com
FAST TRACK

7/30/2019 BluePrint Digital Photography (Mar 2009).pdf
http://slidepdf.com/reader/full/blueprint-digital-photography-mar-2009pdf 13/141
D
I
G
I
TA
L
P
H
O
T
O
GR
A
P
H
Y
brightness of the image, or by setting a high ISO. However,
both these methods end up churning out noisy images. This
does not mean that good action or sport photos can be takenonly in this mode. Choosing a wider aperture, and a mid-
range shutter speed, and then tracking a moving object with
the camera can often provide good results with the subject in
focus and the background blurred in movement.
Aperture priority/preferred (Av): The aperture priority mode, is used to manually set a depth of
field in your camera, while the camera automatically does therest. The depth of field decides which aspect of the frame is in
focus. A large depth of field means that everything in the
frame will be in focus, from subjects close to the camera to
details in the background. This setting is used for landscape
photos. A small depth of field means that, say, a subject close
to the camera will be in sharp focus, whereas the background
will be out of focus.
There is a whole range of depth of field settings betweenthese two settings that a user may experiment with. The aper-
ture is measured in f-stops, and a large f-stop number reduces
the amount of light that comes in, but creates a large depth
of field. Using a large f-stop number also means that there
will be a fast shutter speed and a large ISO setting, which
might bring noise into the story. A small f-stop number
increases the amount of light that comes in and produces a
small depth of field; also,the shutter speed is reduced, so thecamera has to be held steady while using this setting. As the
shutter speed is reduced, this setting also uses a proportion-
ally smaller ISO setting. The camera automatically adjusts the
white balance as well.
Aquarium: The aquarium mode uses a fast shutter speed at high ISO set-
tings to capture moving fish in low-light conditions. Thereflection of the flash from the glass of the tank is automati-
cally suppressed, and the white balance is set to tone down
the blues to bring out the natural colours in the aquarium.
This mode is available in a few Canon cameras.
16 FAST TRACK
IMAGE PROPERTIES1 www.thinkdigit.com
FAST TRACK
7/30/2019 BluePrint Digital Photography (Mar 2009).pdf
http://slidepdf.com/reader/full/blueprint-digital-photography-mar-2009pdf 14/141
D
I
G
I
TA
L
P
H
O
T
O
GR
A
P
H
Y
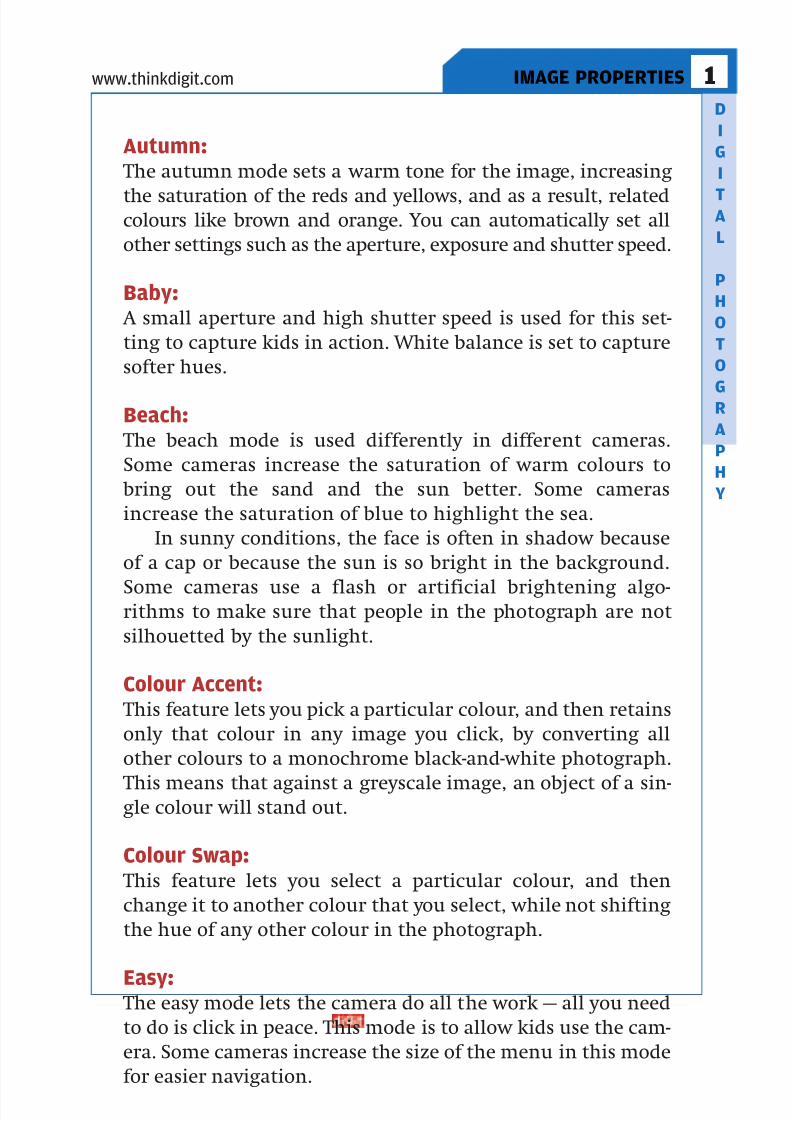
Autumn: The autumn mode sets a warm tone for the image, increasing
the saturation of the reds and yellows, and as a result, relatedcolours like brown and orange. You can automatically set all
other settings such as the aperture, exposure and shutter speed.
Baby: A small aperture and high shutter speed is used for this set-
ting to capture kids in action. White balance is set to capture
softer hues.
Beach: The beach mode is used differently in different cameras.
Some cameras increase the saturation of warm colours to
bring out the sand and the sun better. Some cameras
increase the saturation of blue to highlight the sea.
In sunny conditions, the face is often in shadow because
of a cap or because the sun is so bright in the background.
Some cameras use a flash or artificial brightening algo-rithms to make sure that people in the photograph are not
silhouetted by the sunlight.
Colour Accent: This feature lets you pick a particular colour, and then retains
only that colour in any image you click, by converting all
other colours to a monochrome black-and-white photograph.
This means that against a greyscale image, an object of a sin-gle colour will stand out.
Colour Swap: This feature lets you select a particular colour, and then
change it to another colour that you select, while not shifting
the hue of any other colour in the photograph.
Easy: The easy mode lets the camera do all the work — all you need
to do is click in peace. This mode is to allow kids use the cam-
era. Some cameras increase the size of the menu in this mode
for easier navigation.
FAST TRACK
IMAGE PROPERTIES 1
17
www.thinkdigit.com
FAST TRACK

7/30/2019 BluePrint Digital Photography (Mar 2009).pdf
http://slidepdf.com/reader/full/blueprint-digital-photography-mar-2009pdf 15/141
D
I
G
I
TA
L
P
H
O
T
O
GR
A
P
H
Y
Fireworks: This mode uses the slowest shutter speed possible, so that the
entire explosion of a firecracker is captured on the image. This also means that the aperture will be very small, with con-
sequently a smaller depth of field. Images taken in this mode
are bound to be a little blurred, but that is the idea when pho-
tographing firecrackers.
Flower: The flower mode increases the depth of field by using a small
aperture to bring to focus subjects close to the lens. This modealso increases the saturation of the colours in the photo, to
produce a bright and vivid image of flowers.
Foliage:Not to be confused with the macro mode, the foliage mode
increases the saturation of green or naturally occurring
bright colours to provide clear and vivid images of flowers or
leaves.
Indoor: This mode is for low-light conditions indoors, with changes
made to the white balance to optimise indoor conditions, and
capture the natural ambience of soft lighting conditions. A
high ISO is typically used in this mode.
Kids and Pets:Similar to the action or sports mode, this setting uses a small
aperture and a fast shutter speed. This allows for clear images
of small kids and pets in action. Do not use this mode to cap-
ture stationary kids and pets.
Landscape: The landscape mode narrows the aperture (a large f-stop
value) to increase the depth of field as far as possible. Thisallows objects in the distance to be in sharp focus, as well as
anything close to the camera. A fast shutter speed and a high
ISO are used in this setting, and should be used to capture
anything from cityscapes to photos from a height.
18 FAST TRACK
IMAGE PROPERTIES1 www.thinkdigit.com
FAST TRACK
7/30/2019 BluePrint Digital Photography (Mar 2009).pdf
http://slidepdf.com/reader/full/blueprint-digital-photography-mar-2009pdf 16/141
D
I
G
I
TA
L
P
H
O
T
O
GR
A
P
H
Y
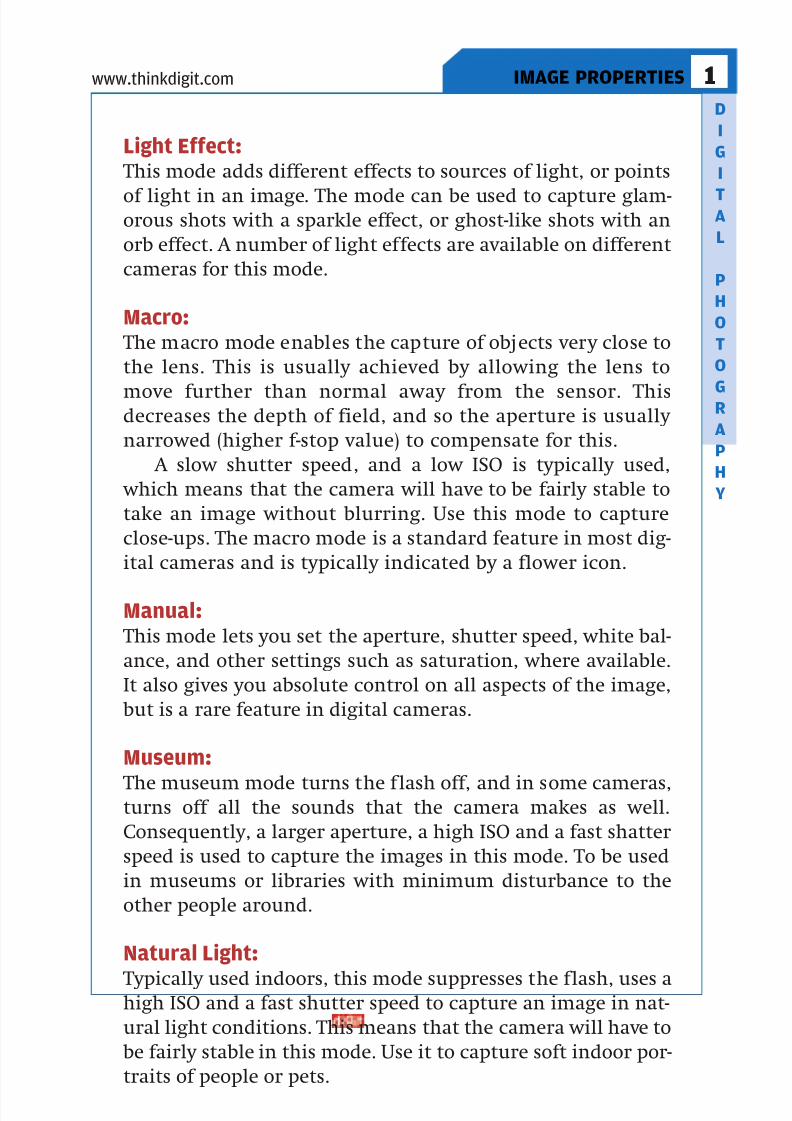
Light Effect: This mode adds different effects to sources of light, or points
of light in an image. The mode can be used to capture glam-orous shots with a sparkle effect, or ghost-like shots with an
orb effect. A number of light effects are available on different
cameras for this mode.
Macro: The macro mode enables the capture of objects very close to
the lens. This is usually achieved by allowing the lens to
move further than normal away from the sensor. Thisdecreases the depth of field, and so the aperture is usually
narrowed (higher f-stop value) to compensate for this.
A slow shutter speed, and a low ISO is typically used,
which means that the camera will have to be fairly stable to
take an image without blurring. Use this mode to capture
close-ups. The macro mode is a standard feature in most dig-
ital cameras and is typically indicated by a flower icon.
Manual: This mode lets you set the aperture, shutter speed, white bal-
ance, and other settings such as saturation, where available.
It also gives you absolute control on all aspects of the image,
but is a rare feature in digital cameras.
Museum:
The museum mode turns the flash off, and in some cameras,turns off all the sounds that the camera makes as well.
Consequently, a larger aperture, a high ISO and a fast shatter
speed is used to capture the images in this mode. To be used
in museums or libraries with minimum disturbance to the
other people around.
Natural Light:
Typically used indoors, this mode suppresses the flash, uses ahigh ISO and a fast shutter speed to capture an image in nat-
ural light conditions. This means that the camera will have to
be fairly stable in this mode. Use it to capture soft indoor por-
traits of people or pets.
FAST TRACK
IMAGE PROPERTIES 1
19
www.thinkdigit.com
FAST TRACK
7/30/2019 BluePrint Digital Photography (Mar 2009).pdf
http://slidepdf.com/reader/full/blueprint-digital-photography-mar-2009pdf 17/141
D
I
G
I
TA
L
P
H
O
T
O
GR
A
P
H
Y
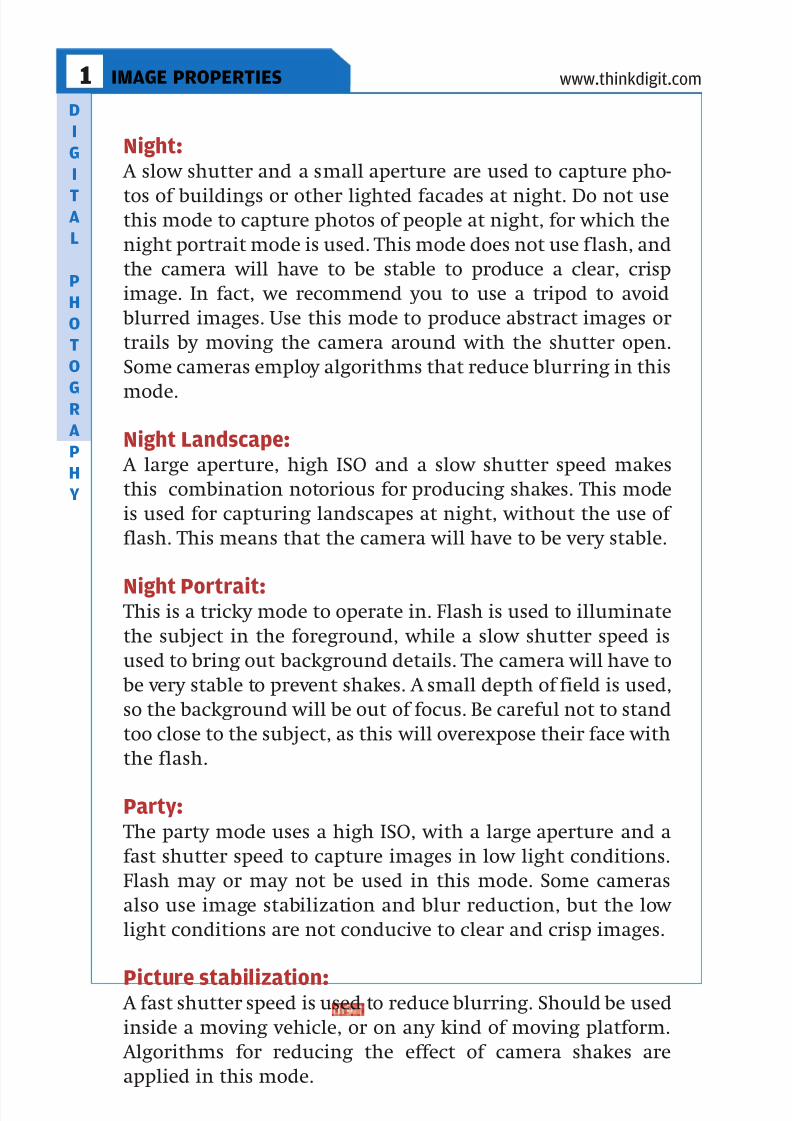
Night: A slow shutter and a small aperture are used to capture pho-
tos of buildings or other lighted facades at night. Do not usethis mode to capture photos of people at night, for which the
night portrait mode is used. This mode does not use flash, and
the camera will have to be stable to produce a clear, crisp
image. In fact, we recommend you to use a tripod to avoid
blurred images. Use this mode to produce abstract images or
trails by moving the camera around with the shutter open.
Some cameras employ algorithms that reduce blurring in this
mode.
Night Landscape: A large aperture, high ISO and a slow shutter speed makes
this combination notorious for producing shakes. This mode
is used for capturing landscapes at night, without the use of
flash. This means that the camera will have to be very stable.
Night Portrait: This is a tricky mode to operate in. Flash is used to illuminate
the subject in the foreground, while a slow shutter speed is
used to bring out background details. The camera will have to
be very stable to prevent shakes. A small depth of field is used,
so the background will be out of focus. Be careful not to stand
too close to the subject, as this will overexpose their face with
the flash.
Party: The party mode uses a high ISO, with a large aperture and a
fast shutter speed to capture images in low light conditions.
Flash may or may not be used in this mode. Some cameras
also use image stabilization and blur reduction, but the low
light conditions are not conducive to clear and crisp images.
Picture stabilization: A fast shutter speed is used to reduce blurring. Should be used
inside a moving vehicle, or on any kind of moving platform.
Algorithms for reducing the effect of camera shakes are
applied in this mode.
20 FAST TRACK
IMAGE PROPERTIES1 www.thinkdigit.com
FAST TRACK

7/30/2019 BluePrint Digital Photography (Mar 2009).pdf
http://slidepdf.com/reader/full/blueprint-digital-photography-mar-2009pdf 18/141
D
I
G
I
TA
L
P
H
O
T
O
GR
A
P
H
Y
Portrait: A standard feature in most digital cameras, the portrait mode
uses a larger aperture size than the macro mode, but smallerthan the landscape mode. This means that when you focus on
subjects in the foreground, but not too close to the camera,
the background will be out of focus. This draws the eye to the
subject in the foreground of the final photo as the back-
ground is out of focus. A small aperture and a small depth of
field are used.
Program AE: The program AE or program mode automatically sets the
shutter speed and the aperture in the camera, letting the user
play around with other features such as the white balance
and whether or not to use the flash.
Red-eye reduction: This mode uses an algorithm that reduces the red eyes in pho-
tos. The camera settings are similar to the settings used inportrait mode.
Shutter priority/preferred (Tv): The shutter priority mode allows a user to set the shutter
speed of the camera, and the camera sets the other settings
automatically. The shutter speed lets the user decide how
sharp or blurred the image should be.
Snow: The snow mode is used to set the white balance in such a way
that a white background does not make people or objects in
the foreground appear dark. Also the overwhelming white
background is toned down, to capture subtler hues of blue or
green. This is similar to the beach mode in terms of not let-
ting a subject appear dark.
Stitch/Panorama: The stitch or panorama mode in cameras typically allows
three photos to provide a wide angle image. A section of the
image appears to one side of the screen to allow users to over-
lay the next shot.
FAST TRACK
IMAGE PROPERTIES 1
21
www.thinkdigit.com
FAST TRACK

7/30/2019 BluePrint Digital Photography (Mar 2009).pdf
http://slidepdf.com/reader/full/blueprint-digital-photography-mar-2009pdf 19/141
D
I
G
I
TA
L
P
H
O
T
O
GR
A
P
H
Y
Sunset: The sunset mode changes the white balance to capture the
deeper and subtler hues that appear during a sunset. Thismode also reduces the glare of shooting the sun directly in
some cameras. A warm tone is applied to the image.
Text/Document: The text or document mode in cameras optimises the white
balance by whitening the white areas, while darkening the
black areas. The image is also made crisper and sharper,
which makes this mode ideal for shooting all forms of writtentext, like a ticker, a road sign, graffiti or documents.
Theatre: The theatre mode suppresses the flash, uses a large aperture
and a slow shutter speed to capture images inside an audito-
rium where flash is not allowed. Some cameras also increase
the vividity, and the brightness or ISO settings artificially.
Underwater: The underwater mode, where available, suppresses flash, uses
high ISO speeds and desaturates the blue coloration to give a
natural photo underwater.
Video: The video mode allows capture of motion on camera. The
duration of the video may vary from 5 seconds to 10 minutesand larger depending on the memory and the camera. There
are also a few image size settings available in most cameras.
The camera settings for the video are handled automatically
with little or no control available to the users.
1.4 White Balance
Whether it is fluorescent lighting, or low-light conditions dur-ing sunset, humans can differentiate between colours without
any effort. This, however, is not the case with a camera. The
sensor in the camera just records the image with respect to the
amount of light falling on it. The reflected light from an object
is affected by the colour temperature of the light source.
22 FAST TRACK
IMAGE PROPERTIES1 www.thinkdigit.com
FAST TRACK

7/30/2019 BluePrint Digital Photography (Mar 2009).pdf
http://slidepdf.com/reader/full/blueprint-digital-photography-mar-2009pdf 20/141
D
I
G
I
TA
L
P
H
O
T
O
GR
A
P
H
Y
FAST TRACK
IMAGE PROPERTIES 1
23
www.thinkdigit.com
FAST TRACK
Tubelights and CFC bulbs, for example, have a high colour
temperature, with the light being a little blue. Candlelight or
a tungsten bulb or a street lamp have a slightly lower temper-ature and tend to reflect with a tint of orange. Outdoors on a
bright sunny day have a very high temperature, also with an
orangish light. The tint of the lighting conditions under which
the photo was taken influences the photo, if the correct white
balance is not used. The most common mistake because of this
are photos like these, which are taken indoors under fluores-
cent lighting without using the correct white balance.
The white balance setting shifts all the colours in the image
sensor according to the source light colour temperature. A
proper white balance essentially ensures that the colour white
shows up as being white in the photograph. Any photo with
some white element in it allows the camera to accurately and
automatically set a white balance for the picture. Using white balance on auto all the time does not really work. Most digital
cameras have white balance settings based on available illumi-
nation. These include cloudy skies, tungsten light, fluorescent
light, daylight and flash. Some cameras may use a term known
as “Kelvin” to adjust the white balance. Here is a rough idea of
the temperature of commonly encountered light sources.
Incorrect white balance (left) Correct white balance (right)
0 W bulbs, candles – 1000 Kelvin Tungsten bulb/sunrise/sunset – 3500 Kelvin
Tube lights/fluorescent lights – 4500 Kelvin
Flash – 5000 Kelvin
Sunlight – 6500 Kelvin
Cloudy sky – 8000 Kelvin

7/30/2019 BluePrint Digital Photography (Mar 2009).pdf
http://slidepdf.com/reader/full/blueprint-digital-photography-mar-2009pdf 21/141
D
I
G
I
TA
L
P
H
O
T
O
GR
A
P
H
Y
Kelvin refers to the temperature — in degrees Kelvin — of the
black body radiation that is equivalent to the light source.
These are approximate values, but should give you someidea of the colour temperatures of different light sources. Use
a visiting card (or any other white object) in front of your cam-
era before you take a photograph so that the camera can
adjust the white balance according to the needs of the image.
24 FAST TRACK
IMAGE PROPERTIES1 www.thinkdigit.com
7/30/2019 BluePrint Digital Photography (Mar 2009).pdf
http://slidepdf.com/reader/full/blueprint-digital-photography-mar-2009pdf 22/141
D
I
G
I
TA
L
P
H
O
T
O
GR
A
P
H
Y
FAST TRACK
SHOOTING SETTINGS 2
25
www.thinkdigit.com
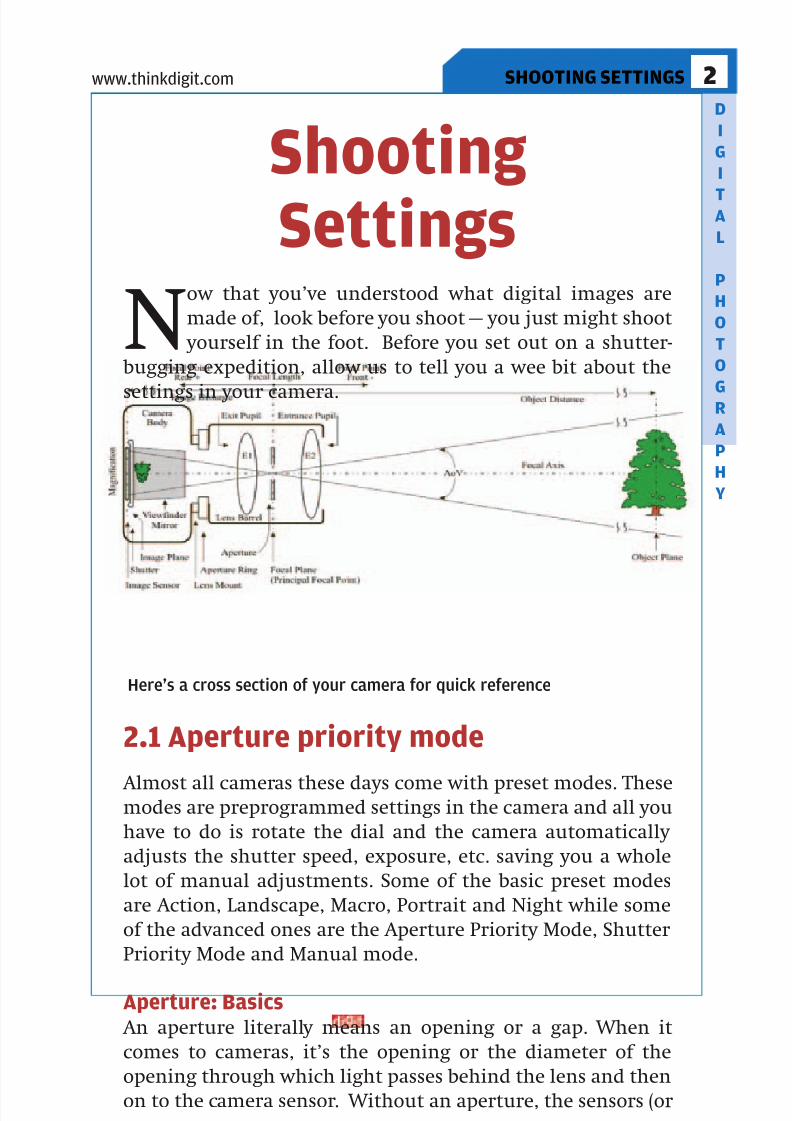
Now that you’ve understood what digital images are
made of, look before you shoot — you just might shoot
yourself in the foot. Before you set out on a shutter-
bugging expedition, allow us to tell you a wee bit about the
settings in your camera.
2.1 Aperture priority mode
Almost all cameras these days come with preset modes. Thesemodes are preprogrammed settings in the camera and all you
have to do is rotate the dial and the camera automatically
adjusts the shutter speed, exposure, etc. saving you a whole
lot of manual adjustments. Some of the basic preset modes
are Action, Landscape, Macro, Portrait and Night while some
of the advanced ones are the Aperture Priority Mode, Shutter
Priority Mode and Manual mode.
Aperture: Basics An aperture literally means an opening or a gap. When it
comes to cameras, it’s the opening or the diameter of the
opening through which light passes behind the lens and then
on to the camera sensor. Without an aperture, the sensors (or
ShootingSettings
Here’s a cross section of your camera for quick reference

7/30/2019 BluePrint Digital Photography (Mar 2009).pdf
http://slidepdf.com/reader/full/blueprint-digital-photography-mar-2009pdf 23/141
D
I
G
I
TA
L
P
H
O
T
O
GR
A
P
H
Y
the film – as used to be the case) inside your camera would
not receive an input at all.
It all becomes much easier to understand if you just com-
pare it with the mechanism of the human eye. The aperture
is nothing but a mechanical iris. The iris of your eye has mus-
26 FAST TRACK
SHOOTING SETTINGS2 www.thinkdigit.com
FAST TRACK
The aperture is the (w)hole thing
The camera is like another eye
7/30/2019 BluePrint Digital Photography (Mar 2009).pdf
http://slidepdf.com/reader/full/blueprint-digital-photography-mar-2009pdf 24/141
D
I
G
I
TA
L
P
H
O
T
O
GR
A
P
H
Y
cles that adjust the size of the pupil to regulate the amount of
light entering the eye. When your eye dilates, more light is
allowed through the lens. Similarly, when the aperture of acamera opens up wide, more light is permitted from the lens
to the sensor.
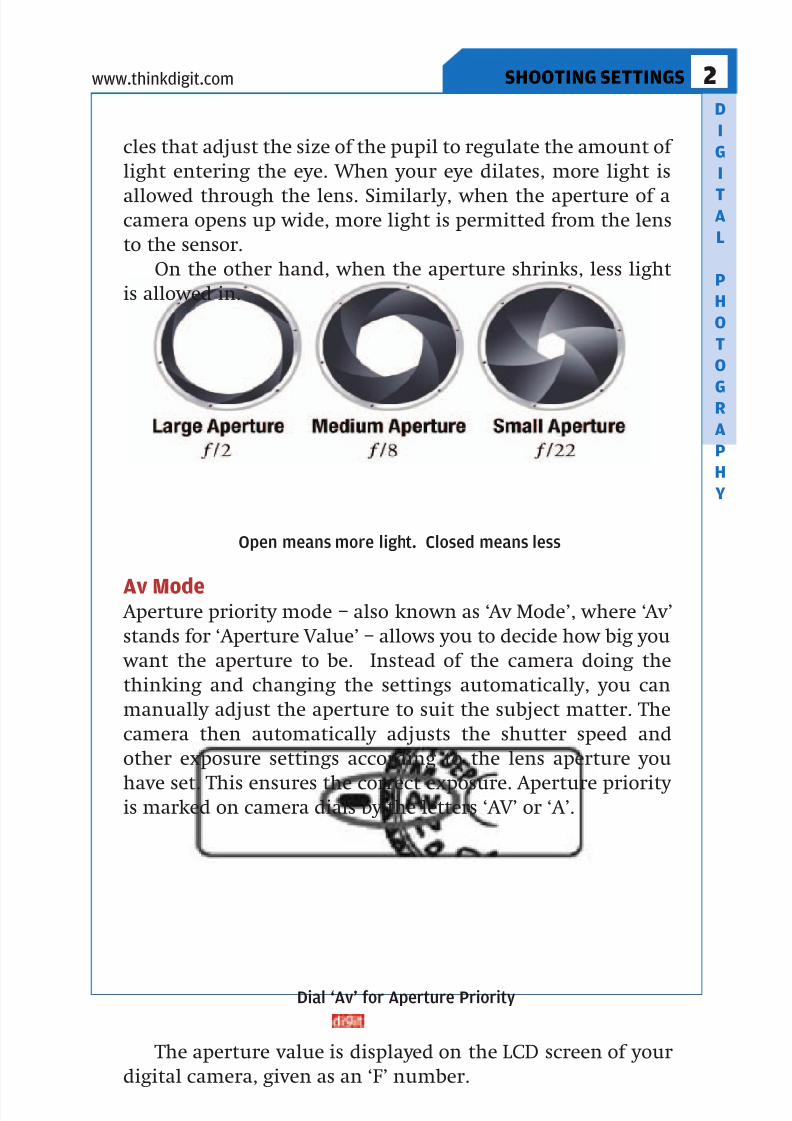
On the other hand, when the aperture shrinks, less light
is allowed in.
Av Mode Aperture priority mode – also known as ‘Av Mode’, where ‘Av’
stands for ‘Aperture Value’ – allows you to decide how big you
want the aperture to be. Instead of the camera doing the
thinking and changing the settings automatically, you can
manually adjust the aperture to suit the subject matter. The
camera then automatically adjusts the shutter speed and
other exposure settings according to the lens aperture you
have set. This ensures the correct exposure. Aperture priority is marked on camera dials by the letters ‘AV’ or ‘A’.
The aperture value is displayed on the LCD screen of your
digital camera, given as an ‘F’ number.
FAST TRACK
SHOOTING SETTINGS 2
27
www.thinkdigit.com
FAST TRACK
Open means more light. Closed means less
Dial ‘Av’ for Aperture Priority

7/30/2019 BluePrint Digital Photography (Mar 2009).pdf
http://slidepdf.com/reader/full/blueprint-digital-photography-mar-2009pdf 25/141
D
I
G
I
TA
L
P
H
O
T
O
GR
A
P
H
Y
This is different from Manual mode (in which you must
choose both the shutter speed and the aperture value, the
Shutter Priority mode (in which you pick only the shutter
speed and the camera adjusts the rest) and the Program mode
(in which the camera chooses both). If you want an audio-
video, step by step set of instructions, just visithttp://www.5min.com/Video/How-to-use-the-AV-Mode-on-Your-dSLR-
72416815.
Av Mode and the Depth of Field The most significant benefit to using A-mode is that it gives
you a higher degree of control over what’s known as the Depth
of Field. What’s that? We’ll tell you.
28 FAST TRACK
SHOOTING SETTINGS2 www.thinkdigit.com
FAST TRACK
F equals ‘Av’
The ‘Big Picture’ needs deeper focus

7/30/2019 BluePrint Digital Photography (Mar 2009).pdf
http://slidepdf.com/reader/full/blueprint-digital-photography-mar-2009pdf 26/141
D
I
G
I
TA
L
P
H
O
T
O
GR
A
P
H
Y
The Digital Photography Manual by Winn L. Rosch defines
depth of field as the range of distances that appears to be sharp or
in focus in a photograph. Greater depth of field means most of the scene in the frame has a high degree of sharpness. Both,
the foreground as well as the background are in sharp focus.
A shallow depth of
field allows a certain
subject or selection
(within the depth of
field) to be in sharp
focus while the rest of the scene appears less
sharp or blurred.
The Av mode,
therefore, gives a
higher degree of con-
trol over the depth of
focus of your photograph. You can set the aperture as
required, depending on whether you’re focusing on a par-ticular object or person or trying to capture a natural scene.
If set to a small aperture, a wide-angle lens, for example,
would give you a nearly infinite depth of field. This is indis-
pensable when it comes to photographing landscapes. A
wide aperture, on the other hand, coupled with a longer
lens, allows you to bring a particular object in the fore-
ground into sharp focus. This setting would be ideal for por-
trait photography. The aperture priority mode tells the camera how it should
choose the shutter speed, minimising the risk of poor expo-
sure or overexposure. Typically, while using Av mode, you
should keep in mind that landscapes would need smaller
apertures and portraits, larger ones.
The expert control of the aperture value is what transforms
photography into an art. And to become that expert, you’ll
need to understand the f that you see on the LCD screen.
2.2 Aperture Size (f-number)
Lens apertures are usually measured as f-stops, denoted by
f-numbers. You’ll find it referred to in books and maga-
FAST TRACK
SHOOTING SETTINGS 2
29
www.thinkdigit.com
FAST TRACK
Less depth brings the subject to theforeground

7/30/2019 BluePrint Digital Photography (Mar 2009).pdf
http://slidepdf.com/reader/full/blueprint-digital-photography-mar-2009pdf 27/141
D
I
G
I
TA
L
P
H
O
T
O
GR
A
P
H
Y
zines by the character ‘f’
followed by a number such
as f/1.4, f/2, f/2.8 and so on. These are basically grada-
tions that let you adjust the
quantity of light or expo-
sure for a particular shot.
As you vary the f-stop val-
ues, you may notice an
apparatus called the
‘diaphragm’ constrictingor expanding behind the
lens to permit a correspon-
ding quantity of light.
Technically, an f-stop number is the focal length of the
lens divided by the diameter of the aperture. Simply put, the
f-number is the ratio of the size of the aperture that the light
passes through, to the focal point of the lens.
Each f-number represents a halving of the light intensity from the previous stop and a decrease of the aperture diame-
ter by a factor of v2 (around 1.414). Therefore, f/11 is half as
much as f/8, and f/5.6 is twice as much light as f/8. Currently,
most lenses use a standardised f-stop scale — which is a geo-
metric sequence of numbers that correspond to the sequence
of the powers of v2 – viz. f/1, f/1.4, f/2, f/2.8, f/4, f/5.6, f/8, f/11,
30 FAST TRACK
SHOOTING SETTINGS2 www.thinkdigit.com
FAST TRACKFAST TRACK
The ‘leaf-shutter’ kind of diaphragmis made of a number of thinoverlapping blades
High school physics now makes sense
7/30/2019 BluePrint Digital Photography (Mar 2009).pdf
http://slidepdf.com/reader/full/blueprint-digital-photography-mar-2009pdf 28/141
D
I
G
I
TA
L
P
H
O
T
O
GR
A
P
H
Y
FAST TRACK
SHOOTING SETTINGS 2
31
www.thinkdigit.com
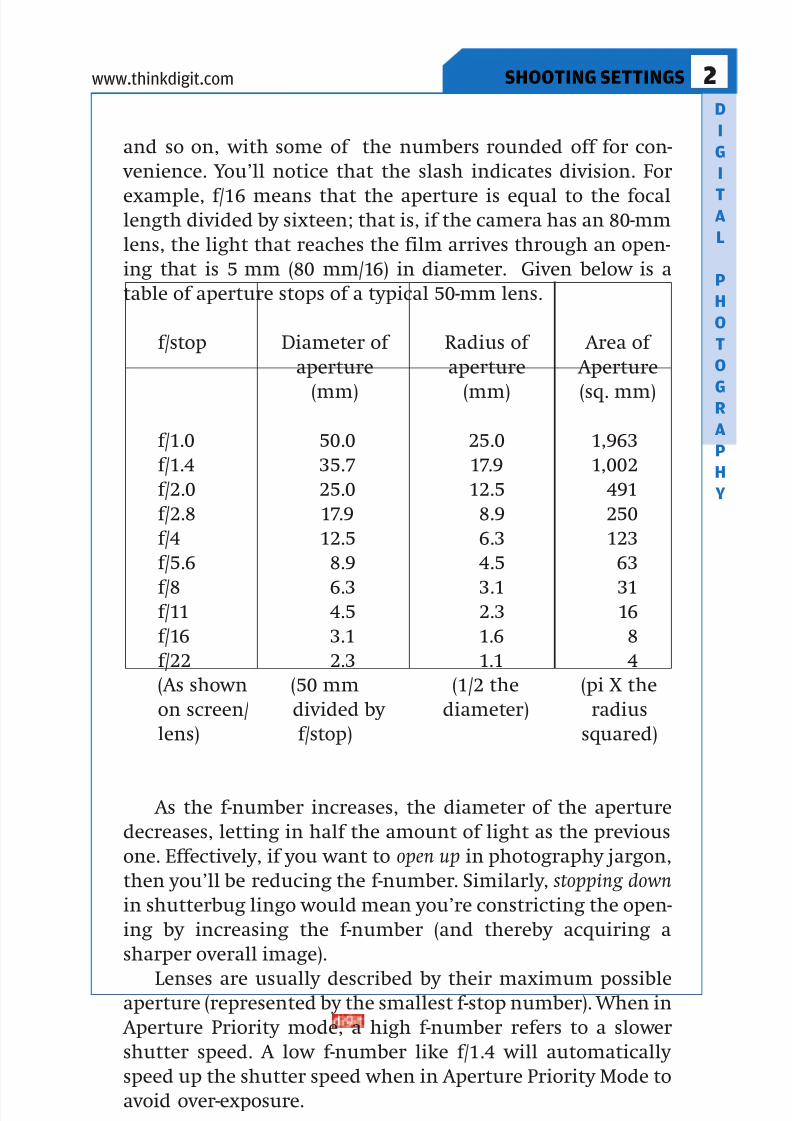
and so on, with some of the numbers rounded off for con-
venience. You’ll notice that the slash indicates division. For
example, f/16 means that the aperture is equal to the focallength divided by sixteen; that is, if the camera has an 80-mm
lens, the light that reaches the film arrives through an open-
ing that is 5 mm (80 mm/16) in diameter. Given below is a
table of aperture stops of a typical 50-mm lens.
As the f-number increases, the diameter of the aperture
decreases, letting in half the amount of light as the previous
one. Effectively, if you want to open up in photography jargon,
then you’ll be reducing the f-number. Similarly, stopping down
in shutterbug lingo would mean you’re constricting the open-
ing by increasing the f-number (and thereby acquiring a
sharper overall image).
Lenses are usually described by their maximum possibleaperture (represented by the smallest f-stop number). When in
Aperture Priority mode, a high f-number refers to a slower
shutter speed. A low f-number like f/1.4 will automatically
speed up the shutter speed when in Aperture Priority Mode to
avoid over-exposure.
FAST TRACKFAST TRACK
f/stop Diameter of Radius of Area of
aperture aperture Aperture
(mm) (mm) (sq. mm)
f/1.0 50.0 25.0 1,963
f/1.4 35.7 17.9 1,002
f/2.0 25.0 12.5 491
f/2.8 17.9 8.9 250
f/4 12.5 6.3 123
f/5.6 8.9 4.5 63
f/8 6.3 3.1 31f/11 4.5 2.3 16
f/16 3.1 1.6 8
f/22 2.3 1.1 4
(As shown (50 mm (1/2 the (pi X the
on screen/ divided by diameter) radius
lens) f/stop) squared)
7/30/2019 BluePrint Digital Photography (Mar 2009).pdf
http://slidepdf.com/reader/full/blueprint-digital-photography-mar-2009pdf 29/141
D
I
G
I
TA
L
P
H
O
T
O
GR
A
P
H
Y
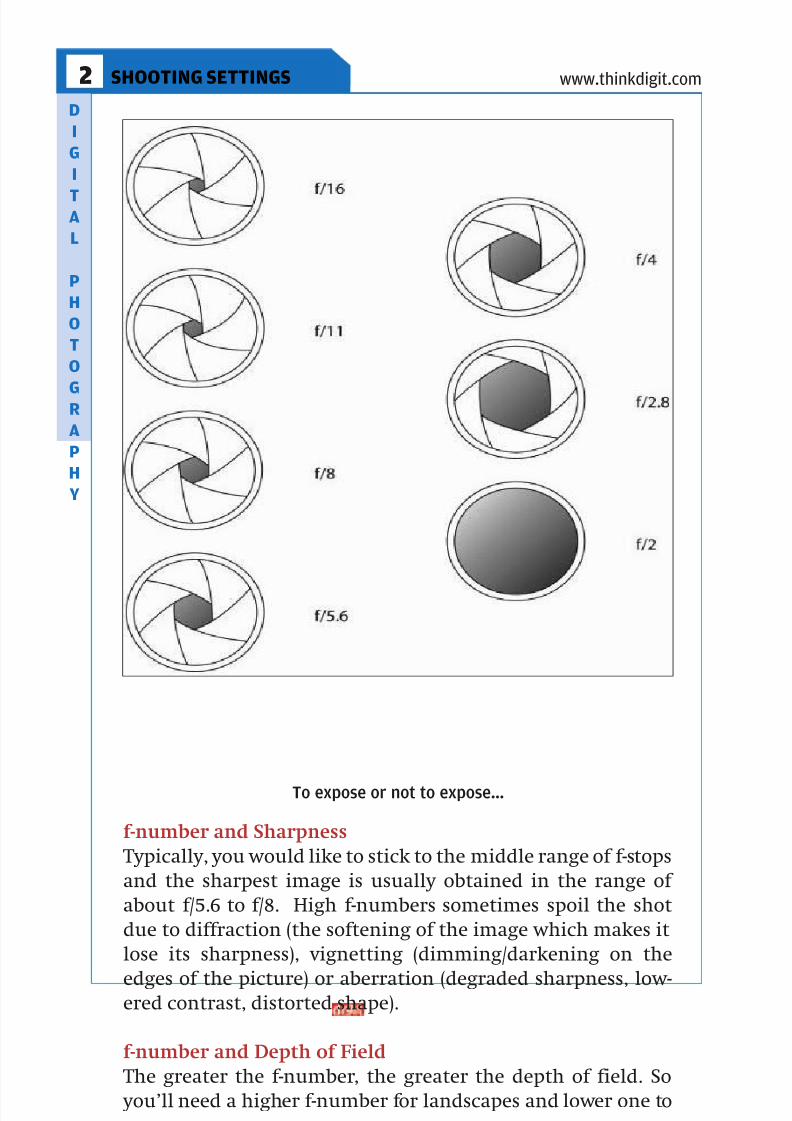
f-number and Sharpness
Typically, you would like to stick to the middle range of f-stops
and the sharpest image is usually obtained in the range of
about f/5.6 to f/8. High f-numbers sometimes spoil the shot
due to diffraction (the softening of the image which makes it
lose its sharpness), vignetting (dimming/darkening on the
edges of the picture) or aberration (degraded sharpness, low-ered contrast, distorted shape).
f-number and Depth of Field
The greater the f-number, the greater the depth of field. So
you’ll need a higher f-number for landscapes and lower one to
32 FAST TRACK
SHOOTING SETTINGS2 www.thinkdigit.com
FAST TRACKFAST TRACK
To expose or not to expose…

7/30/2019 BluePrint Digital Photography (Mar 2009).pdf
http://slidepdf.com/reader/full/blueprint-digital-photography-mar-2009pdf 30/141
D
I
G
I
TA
L
P
H
O
T
O
GR
A
P
H
Y
sharpen the focus on to individual subjects. Depth of field
decreases with lower f-numbers.
Aperture width and shutter speed are inextricably linked.Here we take a look at the importance of shutter speed.
2.3 Shutter Speed
In a digital camera, the shutter serves to adjust the time
during which the image sensor collects the light that it
receives through the lens. Thus, along with determining
the level of brightness of the image, the shutter manages tocapture the image at a particular moment during which
movement is negligible – almost freezing the action to
catch a slice of space and time. A shutter usually stays shut
(to keep the back of the camera – the image sensor – dark
and unexposed) till you click, which is when it opens for a
fraction of a second (anything from 4 to 1/4000th of a sec-
ond) and then shuts again.
If you thought that the shutter is called a shutter because itshuts a lot, allow us to clarify that the name comes from the
fact that it shuts out the unnecessary light. A shutter lets in the
amount of light required for your shot and also protects the
image sensors because they could get damaged if overexposed.
A common misconception is that digital cameras don’t
have mechanical shutters at all. A digital camera could have a
mechanical or electronic shutter – some cameras use both –
but don’t strain your eyes trying to spot them because somedigital cameras (especially the ultra-portable types) don’t have
a shutter at all.
Mechanical Shutters:
A mechanical shutter uses a real (opaque) obstruction con-
trolled by an electronic timer. There are different kinds of
mechanical shutters:
a) Between-the-lens shutters: These are fitted inside thelens itself, usually near the aperture iris. Typically, this is
made of several blades that slide over one another to open or
shut the aperture. The greater the number of blades, the more
circular is the aperture.
b) Focal-plane shutters: These shutters lie really close to
FAST TRACK
SHOOTING SETTINGS 2
33
www.thinkdigit.com
FAST TRACKFAST TRACK
7/30/2019 BluePrint Digital Photography (Mar 2009).pdf
http://slidepdf.com/reader/full/blueprint-digital-photography-mar-2009pdf 31/141
D
I
G
I
TA
L
P
H
O
T
O
GR
A
P
H
Y
34 FAST TRACK
SHOOTING SETTINGS2 www.thinkdigit.com
the image sensor, near the focal plane of the lens. The focal
plane shutter is made of two opaque curtains placed over the
sensor slightly apart.
Electronic Shutters:
Electronic shutters precisely control the time for a particular
exposure according to the duration set. In the case of electronic
shutters, the data that the image sensor has stored up for a par-
ticular image is wiped clean and the sensor then becomes like a
new panel in a photographic film – fresh and ready to collect
light again using the electronic shutter.
Shutter Speeds The time duration that a shutter stays open is called Shutter
Speed – a.k.a. Exposure Time. The better the camera, the wider
range of shutter speeds it offers. Shutter speeds are measured in
fractions of a second and while manufacturers earlier fixed
their speed settings randomly, standardisation has made it a lot
easier now. The standard settings for shutter speeds are
l 1/1000 s
l 1/500 s
l 1/250 s
l 1/125 s
l 1/60 s
l 1/30 s
l 1/15 sl 1/8 s
l 1/4 s
l 1/2 s
l 1 s
In low-light situations, you’ll need a wider aperture and a
longer exposure time – read a slower shutter speed. Very short
shutter speeds are great for ‘stop-action’ pictures where you’d
like to freeze fast-moving subjects, as in sports photography.But for normal shoots, the camera movement can blur photos
if the shutter speed is too slow, making the image seem out of
focus. It’s virtually impossible to hold the camera absolutely
still for long, so unless you have a tripod, a shutter speed of
1/500 with an aperture stop of f/8 would give you a pretty neat
FAST TRACKFAST TRACK

7/30/2019 BluePrint Digital Photography (Mar 2009).pdf
http://slidepdf.com/reader/full/blueprint-digital-photography-mar-2009pdf 32/141
D
I
G
I
TA
L
P
H
O
T
O
GR
A
P
H
Y
picture on a bright day. The following aperture values, cou-
pled with these shutter speed settings would give you the
same exposure.l f/2.8, 1/4000
l f/4, 1/2000
l f/5.6, 1/1000
l f/8, 1/500
l f/11, 1/250
l f/16, 1/125
l f/22, 1/60
As the same amount of light would strike the image sen-sor, all the above settings would give you an equivalent expo-
sure.
Shutter LagPick up your old (non-digital) camera and click and you’ll
notice that there’s a bit of a break between the instant that
you press the button and the opening of the shutter for the
particular exposure. The reason for this shutter lag ismechanical. With digital cameras, there’s a delay too, but
this time it’s more of a processor lag . The reason is that the
camera needs time to set up the circuits and do the calcula-
tion for image cap-
ture. Sensors need to
take measurements,
distances need to be
calculated and light,colour and whiteness
must be balanced. All
this, and it just takes a
second and a half! And
then, it takes the
image data and even
remembers it for you.
The best method to deal with shutter lag problems in auto-focus shots is to: (a) point the viewfinder directly on to your
subject; (b) push the shutter release down – but only halfway
– because this permits the camera to focus even before you
take your photo; (c) keep the shutter release button halfway
down till you feel it’s the right moment to catch the image
FAST TRACK
SHOOTING SETTINGS 2
35
www.thinkdigit.com
FAST TRACKFAST TRACK
Lag ruined this one

7/30/2019 BluePrint Digital Photography (Mar 2009).pdf
http://slidepdf.com/reader/full/blueprint-digital-photography-mar-2009pdf 33/141
D
I
G
I
TA
L
P
H
O
T
O
GR
A
P
H
Y
and then press it all the way down. Most shutter-lag snags will
disappear with just this little bit of care.
2.4 Shutter Priority Mode
Much to the relief of the photography-illiterate, almost all dig-
ital cameras set their shutter speeds automatically. The cam-
era senses the level of light in the environment and even con-
trols the lens aperture. But this is in program mode or when
your camera is on auto-pilot. If you know exactly what set-
tings you want, you can override the camera’s settings and fixthe shutter at the stop you need manually using the Shutter
Priority Mode.
The Shutter Priority Mode (or Shutter Mode) is the reverse
of Aperture Priority Mode (or Aperture Mode). Shutter priori-
ty mode is also called Time Value Mode on some cameras and
you could find it on the dial represented by the letters ‘Tv’ or
just ‘S’. For those cameras without a dial, you’ll need to press
‘Menu’ to access the available modes. This basically allows youto choose the shutter speed yourself. Accordingly, the camera
sets the aperture value to the corresponding f-number.
Shutter mode is the
best choice for action
photos and for particu-
lar photographic
effects. Fast exposures
are excellent for stopaction and slow expo-
sures serve to blur mov-
ing subjects.
Particularly exciting is
burst mode – when the
camera takes a series of photos in rapid succession, letting
you choose the one that caught the crucial moment later.
You could alternate shutter speed and aperture by using‘stops’. A fast shutter speed would need a larger aperture (and
so, a smaller f-number). On the other hand, a slow shutter
speed would need a smaller aperture. Raising the aperture
value while simultaneously lowering the shutter stop value
would give you the same exposure because a stop up and
36 FAST TRACK
SHOOTING SETTINGS2 www.thinkdigit.com
FAST TRACKFAST TRACK
Dial ‘S’ for shutter speed
7/30/2019 BluePrint Digital Photography (Mar 2009).pdf
http://slidepdf.com/reader/full/blueprint-digital-photography-mar-2009pdf 34/141
D
I
G
I
TA
L
P
H
O
T
O
GR
A
P
H
Y
down on each will halve or double the amount of light regu-
lated by each.
Shutter Speed and Sharpness
Shutter speeds are not entirely responsible and aperture val-
ues also play an important role in ensuring sharpness in an
image. Typically, wide apertures (with small f-number like f-
2.8) result in faster shutter speeds which is good for stopping
action.
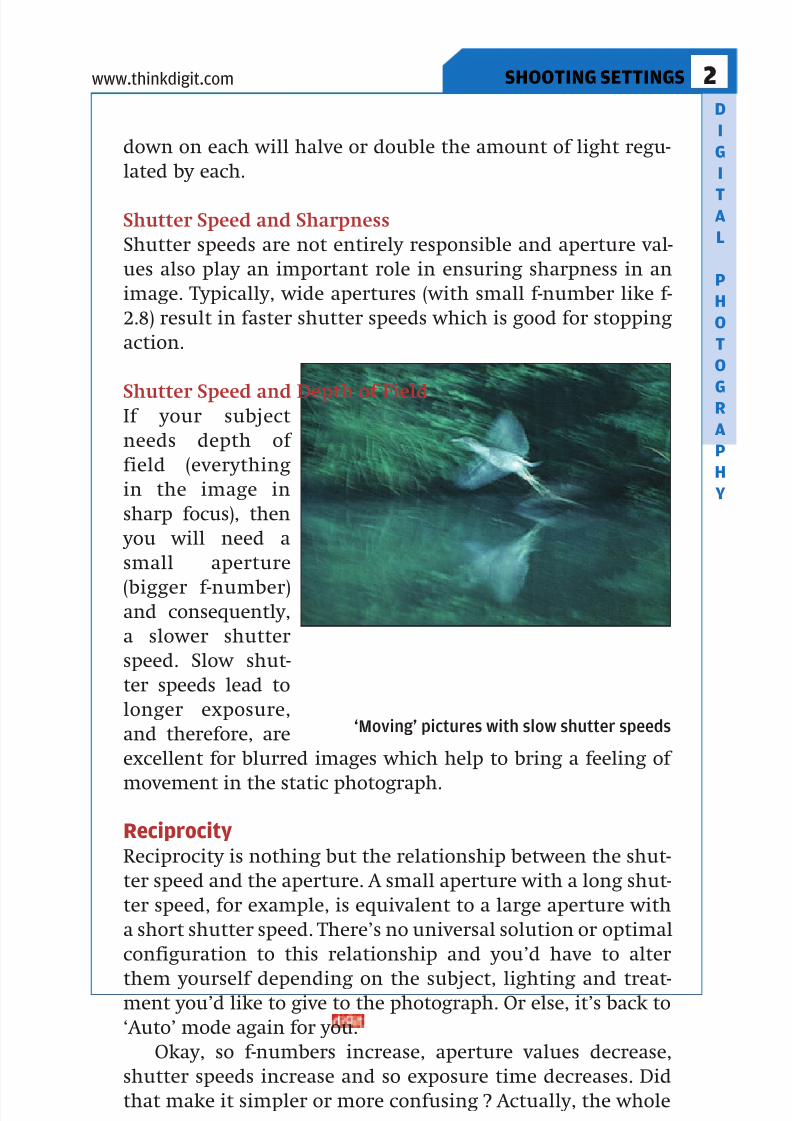
Shutter Speed and Depth of FieldIf your subject
needs depth of
field (everything
in the image in
sharp focus), then
you will need a
small aperture
(bigger f-number)and consequently,
a slower shutter
speed. Slow shut-
ter speeds lead to
longer exposure,
and therefore, are
excellent for blurred images which help to bring a feeling of
movement in the static photograph.
ReciprocityReciprocity is nothing but the relationship between the shut-
ter speed and the aperture. A small aperture with a long shut-
ter speed, for example, is equivalent to a large aperture with
a short shutter speed. There’s no universal solution or optimal
configuration to this relationship and you’d have to alter
them yourself depending on the subject, lighting and treat-ment you’d like to give to the photograph. Or else, it’s back to
‘Auto’ mode again for you.
Okay, so f-numbers increase, aperture values decrease,
shutter speeds increase and so exposure time decreases. Did
that make it simpler or more confusing ? Actually, the whole
FAST TRACK
SHOOTING SETTINGS 2
37
www.thinkdigit.com
FAST TRACKFAST TRACK
‘Moving’ pictures with slow shutter speeds

7/30/2019 BluePrint Digital Photography (Mar 2009).pdf
http://slidepdf.com/reader/full/blueprint-digital-photography-mar-2009pdf 35/141
D
I
G
I
TA
L
P
H
O
T
O
GR
A
P
H
Y
shutter-speed thing becomes much easier thanks to ISO rat-
ings, so let’s shift focus a little and tell you all about the ISO.
2.5 ISO RatingHeard about it before? Then you probably already know that
it stands for the International Organisation for
Standardisation. And you can find all its efforts to make stan-
dardise units – as well as the standards for photography — at
www.iso.ch.
ISO and film Anybody who’s bought a roll of photographic film with some
judgment would have an idea of what ‘ISO’ refers to. All films
are assigned an ISO value – a number which signifies the
film’s reactivity to light. So even though people often call it
the ‘speed rating’ of a film, it’s got nothing to do with speed
at all and actually only refers to its Ev (Exposure value) – the
combination of aperture value and shutter speeds requiredfor the optimal use of the film.
Typically, for the consumer, a slow film (with a low ISO rat-
ing) was supposed to give you better quality images and a fast
film (with a high ISO rating) was for poor lighting conditions
and poorer quality. In reality, it was all about the size of the
granules in the chemicals used on the film.
ISO and digital camerasFilms don’t figure at all in digicams. So why do they still have
an ISO rating anyway? Let’s just say that photographers all
over the world have, over the years, been accustomed to using
the ISO rating to instantly understand how it would work in
different lighting. Digital cameras with an ISO rating of the
faster film mimic its reactivity by amplification of the signal
that the sensor receives.
The ISO control, sometimes labeled as sensitivity – might be located at different places in different cameras. It could be
labelled on the camera’s body or accessed through the ‘Menu’
command. You can now adjust the ISO rating – almost like
changing the kind of film you’re using. Raising the ISO rating
increases shutter speeds and smaller apertures and lowers the
38 FAST TRACK
SHOOTING SETTINGS2 www.thinkdigit.com
FAST TRACKFAST TRACK
7/30/2019 BluePrint Digital Photography (Mar 2009).pdf
http://slidepdf.com/reader/full/blueprint-digital-photography-mar-2009pdf 36/141
D
I
G
I
TA
L
P
H
O
T
O
GR
A
P
H
Y
FAST TRACK
SHOOTING SETTINGS 2
39
www.thinkdigit.com
FAST TRACKFAST TRACK
ISO number. This means slower shutters and larger openings.
The point that most of us miss, however, is that there is just
one sensor in the digital camera that cannot be replaced aseasily as a roll of film. At any given point in time, the number
of pixels stays the same. Changing the ISO, therefore, has no
impact on the detailing of the image. But, strangely, increas-
ing the ISO speed, similar to film cameras, the quality of the
image dwindles due to noise.
Noise
Visual noise is unwanted interference that hinders the accu-rate perception of the image. In digital images, noise appears
as graininess – specks of phoney colour. The longer the expo-
sure, the more noise, but for normal photography, a sensor
manages to produce a bearable and consistent degree of
noise. Noise levels vary according to (a) the size of the sen-
sors and it’s pixels, (b) the processing algorithm and (c) light-
ing conditions.
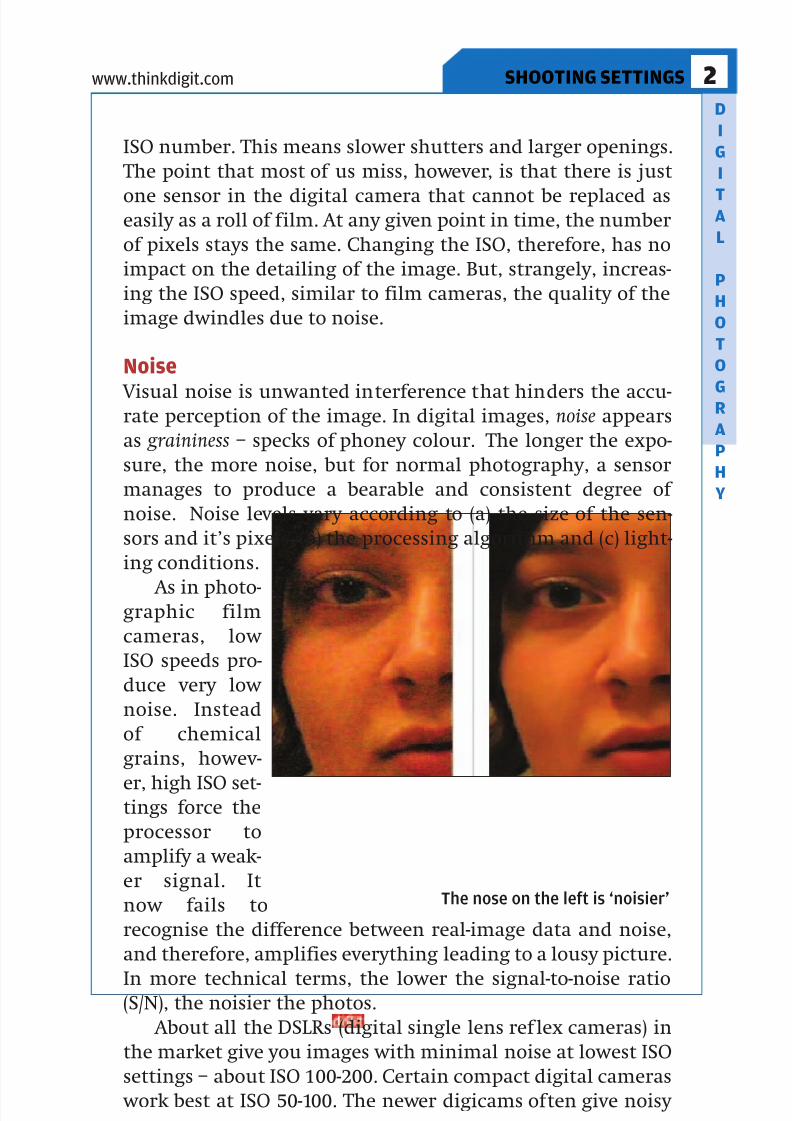
As in photo-graphic film
cameras, low
ISO speeds pro-
duce very low
noise. Instead
of chemical
grains, howev-
er, high ISO set-tings force the
processor to
amplify a weak-
er signal. It
now fails to
recognise the difference between real-image data and noise,
and therefore, amplifies everything leading to a lousy picture.
In more technical terms, the lower the signal-to-noise ratio(S/N), the noisier the photos.
About all the DSLRs (digital single lens ref lex cameras) in
the market give you images with minimal noise at lowest ISO
settings – about ISO 100-200. Certain compact digital cameras
work best at ISO 50-100. The newer digicams often give noisy
The nose on the left is ‘noisier’
7/30/2019 BluePrint Digital Photography (Mar 2009).pdf
http://slidepdf.com/reader/full/blueprint-digital-photography-mar-2009pdf 37/141
D
I
G
I
TA
L
P
H
O
T
O
GR
A
P
H
Y
results if you try ISO 400 or above and only look good if you
take really, really small printouts. After all the technological
advancement, the rule of thumb still stands — more oftenthan not, lower ISO settings will usually lead to photos with
less noise.
Selecting an ISO Speed A camera is usually the most sensitive at values like 400, 800
or 1600 — depending on the one you’ve got. This is the coolest
setting for taking pictures indoors with no fears of ending up
with blurred pics. But you will find the images a little‘grainier’ — although it’ll look okay on the LCD display at the
back. If you select ISO 200, the camera will function more nor-
mally — perfect for indoor photos (with a f lash, of course) and
fine for daylight scenes yielding smoother pictures. The low-
est speeds found on standard compact cameras are typically,
50, 64 and 100. These are meant for long exposures or large
apertures to get better pictures (nights would be a better time
to try this one out).
ConclusionSo, as you can see by now, you can’t understand apertures,
shutters or ISO speeds in isolation, because they are all inter-
related and help you get the optimal exposure for that perfect
picture. But these are just the basics. There are many more
features that cameras provide, which, once you learn to use
them, would make you a better photographer. But that callsfor another chapter, so read on.
40 FAST TRACK
SHOOTING SETTINGS2 www.thinkdigit.com
FAST TRACK
7/30/2019 BluePrint Digital Photography (Mar 2009).pdf
http://slidepdf.com/reader/full/blueprint-digital-photography-mar-2009pdf 38/141
D
I
G
I
TA
L
P
H
O
T
O
GR
A
P
H
Y
FAST TRACK
CAMERA FEATURES 3
41
www.thinkdigit.com
If just pointing and shooting gave you images of absolute
perfection, photography competitions would have van-
ished ages ago. Although you may not prefer signing up for
any of those, but you’d still want to take better pictures, right?
Well, then you’ll first have to get a grip on the features that your camera offers you, and how best you can put them to use.
Digital camera features differ greatly from model to
model. Some might be indispensable, while others might be
required for highly specialised applications. However, no dig-
ital camera worth its microprocessor would lack the very
basic features, viz. image stabilisation, exposure compensa-
tion and flash sync.
3.1 Image Stabilisation
Picture this – you’re waiting in line for hours to see your
favourite movie star to take his / her picture. The moment
finally arrives and you take the snap… but damn! The photo is
out of focus, and the celebrity looks like a bad dream. What
went wrong? Probably, shaky hands. Besides, if there’s very
little natural light for the camera to use, the camera wouldinevitably slow down the shutter speed, lengthening the
exposure time which could be disastrous. In such circum-
stances, you could try tucking your elbows up against your
ribs while taking a shot (this looks pretty weird, but often
helps to keep the hands steady). Alternatively, you could just
use the IS feature on your camera.
What is Image Stabilisation (IS)?Camera manufacturers have come to the rescue with some-
thing called image stabilisation (IS). IS is what Canon (the
first to produce the Optical Image Stabilization technology)
calls it. Nevertheless, different manufacturers tag it different-
ly ( VR – or Vibration Reduction in Nikon, SSS — or Super
CameraFeatures

7/30/2019 BluePrint Digital Photography (Mar 2009).pdf
http://slidepdf.com/reader/full/blueprint-digital-photography-mar-2009pdf 39/141
D
I
G
I
TA
L
P
H
O
T
O
GR
A
P
H
Y
Steady Shot in Sony, VC – Vibration Compensation in Tamron,
SR – or Shake Reduction in Samsung and Pentax, Mega-OIS in
Panasonic, etc.). However, the most common substitute termfor Image Stabilisation is VR.
The functions of ISImage stabilisation performs the function of counteracting
movement that could lead to a loss of sharpness in the photo-graphic image. Typically, IS could allow you to take handheld
shots with the shutter speed set to at least two stops lower
than if image stabilisation was off. VR has no real effect on
exposure, but only assists in making the resultant image a lit-
tle sharper.
Besides, if you
try something
bizarre like tak-ing a photo-
graph of a mov-
ing subject
with a slow
shutter speed
(like a 1/15
shot), your sub-
ject would still be blurred. IS
doesn’t correct
the shaking of
the subject,
just the camera.
42 FAST TRACK
CAMERA FEATURES3 www.thinkdigit.com
FAST TRACK
No IS means a blurry bouquet IS really makes the roses bloom
A Nikon camera with VR
7/30/2019 BluePrint Digital Photography (Mar 2009).pdf
http://slidepdf.com/reader/full/blueprint-digital-photography-mar-2009pdf 40/141
D
I
G
I
TA
L
P
H
O
T
O
GR
A
P
H
Y
This feature could be either built into the lens itself, or
into the body of the camera. There are three basic kinds of
image stabilisation options in cameras – optical (built into thelens), digital (using software algorithms) or mechanical (using
moving sensors).
Optical Image Stabilisation (OIS)Cameras with optical IS use hardware to counter the move-
ments of the camera, usually using gyro sensors and a micro-
processor. In such cases, the OIS changes the optical path to
the sensor when it senses vibration during exposure, andtherefore, succeeds in offsetting the effect of the shake. This
is built into the lens itself. The advantage here is that a cam-
era with a lens-based VR mechanism is usually built ground
up, keeping in mind the requirements of the particular lens.
Nikon and Canon cameras use a floating lens apparatus
that moves orthogonally (at right angles) to the optical axis of
the lens with the help of electromagnets. Shakes and jerks are
perceived by gyroscopic sensors, which are basically piezo-electric angular velocity sensors (crystals that undergo
mechanical stress when exposed to a fluctuating electric /
electromagnetic field). This, of course, serves well for the
minor vibrations of our hands – but would be no good if you
rotated the camera around or jumped around with it. VR, in
short, can typically only correct vertical shake.
Digital Image Stabilisation The trick here is not to use any extra parts, either mechanical or
digital at all. Digital Image Stabilisation merely heightens the
camera’s sensitivity by adjusting the ISO speed to get a faster
shutter speed. The camera senses the vibration and does this on
its own accord. The trouble – a high ISO could lead to noise and
poor image quality. Rather than stabilising, digital image sta-
bilisers just try to minimise blurring by using software akin to
the ones photo editors use after the picture is taken. Digitalimage stabilisation only really comes of use, or makes a notable
difference, in certain digital video cameras (camcorders) which
‘pixel shift’ the image frames to stabilise the video image while
shooting; that is, buffering the motion of the camera by using
pixels that are outside the visible frame of the shot.
FAST TRACK
CAMERA FEATURES 3
43
www.thinkdigit.com
FAST TRACK

7/30/2019 BluePrint Digital Photography (Mar 2009).pdf
http://slidepdf.com/reader/full/blueprint-digital-photography-mar-2009pdf 41/141
D
I
G
I
TA
L
P
H
O
T
O
GR
A
P
H
Y
Mechanical Image Stabilisation This anti-shake system is hardware-based again. However, instead
of getting the lens to jiggle in tandem with your hand, the imagesensor itself moves to compensate the vibration. This system has
a significant advantage over others — any lens compatible with
an image-stabilised camera body can be used to replace the old
one. However, if the VR mechanism fails, you’ll have to send in
the entire camera body for repair whereas in the OIS system, it’s
just the lens mechanism that would need to be fixed.
Non-Linear Editing SystemsNon-linear editing systems are software programs like
Photoshop, Photoline and GIMP. These are used to correct
images by inferring the stabilised image and minimising the
motion blur due to camera shake. These, of course, are after
the fact and not a measure of your photographic skill.
However, if your photograph is a victim of vibration, and
you’re using a non-VR camera, then it’s highly unlikely that
any amount of editing could save it.
What to remember about ISCamera manufacturers, and in particular the marketing guys,
like to impress the customer by talking about vibration reduc-
tion, which is now increasingly packed into low-end compact
digital cameras. The fact is that, IS in digital SLRs can help in
(a) taking sharper photographs of static subjects in low light
conditions (and the flash is not in use), (b) taking clearer pho-tographs from a train or a moving car and (c) taking better pic-
tures while using a lens with a long focal length.
However, it just doesn’t work when the subject itself is
moving fast. Static subjects can make great pictures if you set
the camera on a tripod and give it a slow shutter speed (and
therefore a longer exposure) – and so you don’t need IS at all.
Fast moving subjects can only be caught with a fast shutter
speed, rather than image stabilisation.
3.2 Exposure Compensation
Every digital camera goes through a process called ‘exposure
metering’ or just ‘metering’, which is nothing but the camera
44 FAST TRACK
CAMERA FEATURES3 www.thinkdigit.com
FAST TRACK
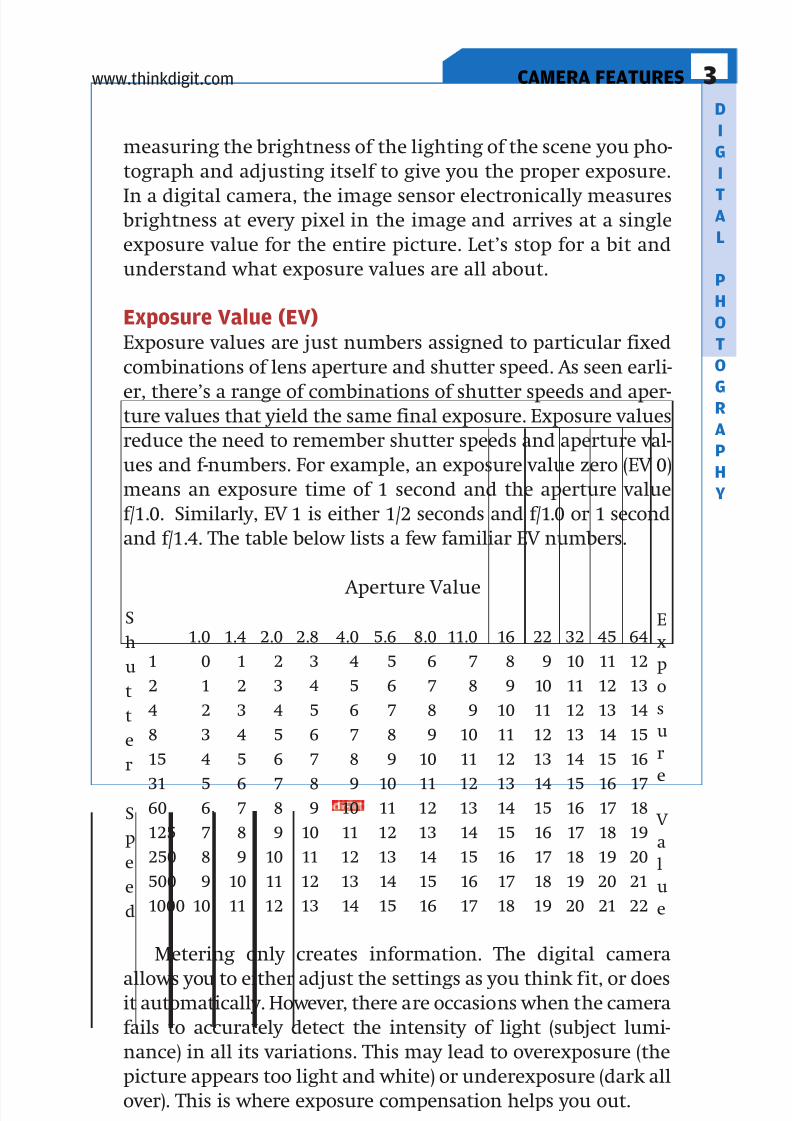
7/30/2019 BluePrint Digital Photography (Mar 2009).pdf
http://slidepdf.com/reader/full/blueprint-digital-photography-mar-2009pdf 42/141
D
I
G
I
TA
L
P
H
O
T
O
GR
A
P
H
Y
measuring the brightness of the lighting of the scene you pho-
tograph and adjusting itself to give you the proper exposure.
In a digital camera, the image sensor electronically measures brightness at every pixel in the image and arrives at a single
exposure value for the entire picture. Let’s stop for a bit and
understand what exposure values are all about.
Exposure Value (EV)Exposure values are just numbers assigned to particular fixed
combinations of lens aperture and shutter speed. As seen earli-
er, there’s a range of combinations of shutter speeds and aper-ture values that yield the same final exposure. Exposure values
reduce the need to remember shutter speeds and aperture val-
ues and f-numbers. For example, an exposure value zero (EV 0)
means an exposure time of 1 second and the aperture value
f/1.0. Similarly, EV 1 is either 1/2 seconds and f/1.0 or 1 second
and f/1.4. The table below lists a few familiar EV numbers.
Metering only creates information. The digital camera
allows you to either adjust the settings as you think fit, or doesit automatically. However, there are occasions when the camera
fails to accurately detect the intensity of light (subject lumi-
nance) in all its variations. This may lead to overexposure (the
picture appears too light and white) or underexposure (dark all
over). This is where exposure compensation helps you out.
FAST TRACK
CAMERA FEATURES 3
45
www.thinkdigit.com
FAST TRACK
Aperture Value
1.0 1.4 2.0 2.8 4.0 5.6 8.0 11.0 16 22 32 45 64
1 0 1 2 3 4 5 6 7 8 9 10 11 12
2 1 2 3 4 5 6 7 8 9 10 11 12 13
4 2 3 4 5 6 7 8 9 10 11 12 13 14
8 3 4 5 6 7 8 9 10 11 12 13 14 15
15 4 5 6 7 8 9 10 11 12 13 14 15 16
31 5 6 7 8 9 10 11 12 13 14 15 16 1760 6 7 8 9 10 11 12 13 14 15 16 17 18
125 7 8 9 10 11 12 13 14 15 16 17 18 19
250 8 9 10 11 12 13 14 15 16 17 18 19 20
500 9 10 11 12 13 14 15 16 17 18 19 20 21
1000 10 11 12 13 14 15 16 17 18 19 20 21 22
S
h
u
t
t
e
r
S
p
e
e
d
E
x
p
o
s
u
r
e
V
a
l
u
e
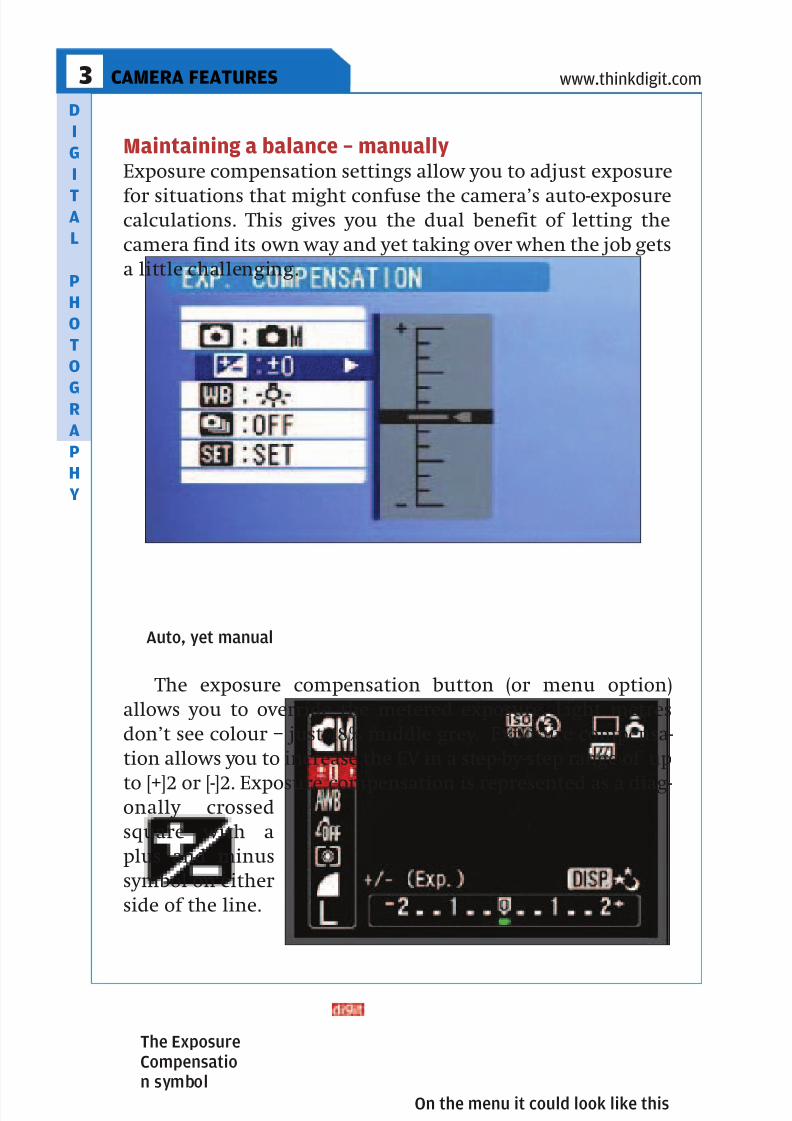
7/30/2019 BluePrint Digital Photography (Mar 2009).pdf
http://slidepdf.com/reader/full/blueprint-digital-photography-mar-2009pdf 43/141
D
I
G
I
TA
L
P
H
O
T
O
GR
A
P
H
Y
Maintaining a balance – manuallyExposure compensation settings allow you to adjust exposure
for situations that might confuse the camera’s auto-exposurecalculations. This gives you the dual benefit of letting the
camera find its own way and yet taking over when the job gets
a little challenging.
The exposure compensation button (or menu option)
allows you to override the metered exposure. Light metres
don’t see colour – just 18% middle grey. Exposure compensa-
tion allows you to increase the EV in a step-by-step range of up
to [+]2 or [-]2. Exposure compensation is represented as a diag-onally crossed
square with a
plus and minus
symbol on either
side of the line.
46 FAST TRACK
CAMERA FEATURES3 www.thinkdigit.com
FAST TRACKFAST TRACK
Auto, yet manual
On the menu it could look like this
The ExposureCompensation symbol

7/30/2019 BluePrint Digital Photography (Mar 2009).pdf
http://slidepdf.com/reader/full/blueprint-digital-photography-mar-2009pdf 44/141
D
I
G
I
TA
L
P
H
O
T
O
GR
A
P
H
Y
Most digital cameras today allow you to compensate the
exposure by 1 to 2 exposure values, plus or minus, in 1/3 or 1/2
increments. Generally, positive exposure settings are ideal forscenes that are predominantly bright and negative exposure
settings for subjects in which large parts of the scene are real-
ly dark. For this, a little deft use of the histogram utility
would go a long way.
Histograms The histogram feature in your camera can be really helpful,
especially when trying to arrive at the ideal exposure for ashot with ambiguous lighting.
The histogram is a straightforward graph that shows you bright and dark areas of the picture. This is displayed from
darkest to brightest (left to right) on the horizontal axis. The
y-axis displays how much of the image is found at a particu-
lar level of brightness. The histogram is usually split into
FAST TRACK
CAMERA FEATURES 3
47
www.thinkdigit.com
FAST TRACKFAST TRACK
Histograms give you peaks and valleys of light and dark
This histogram shows that very little of the photograph is in the(preferable) middle range
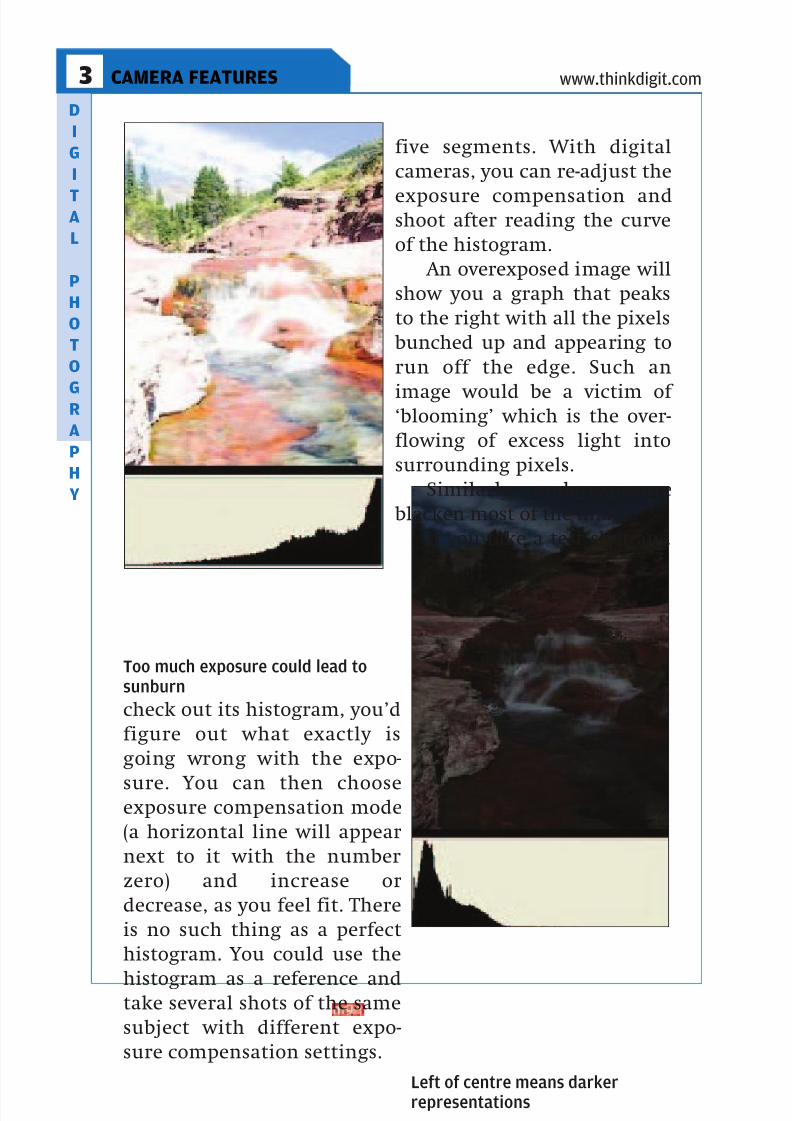
7/30/2019 BluePrint Digital Photography (Mar 2009).pdf
http://slidepdf.com/reader/full/blueprint-digital-photography-mar-2009pdf 45/141
D
I
G
I
TA
L
P
H
O
T
O
GR
A
P
H
Y
five segments. With digital
cameras, you can re-adjust the
exposure compensation andshoot after reading the curve
of the histogram.
An overexposed image will
show you a graph that peaks
to the right with all the pixels
bunched up and appearing to
run off the edge. Such an
image would be a victim of ‘blooming’ which is the over-
flowing of excess light into
surrounding pixels.
Similarly, underexposure
blacken most of the image.
If you take a test shot and
check out its histogram, you’d
figure out what exactly is
going wrong with the expo-
sure. You can then chooseexposure compensation mode
(a horizontal line will appear
next to it with the number
zero) and increase or
decrease, as you feel fit. There
is no such thing as a perfect
histogram. You could use the
histogram as a reference andtake several shots of the same
subject with different expo-
sure compensation settings.
48 FAST TRACK
CAMERA FEATURES3 www.thinkdigit.com
FAST TRACKFAST TRACK
Too much exposure could lead tosunburn
Left of centre means darkerrepresentations

7/30/2019 BluePrint Digital Photography (Mar 2009).pdf
http://slidepdf.com/reader/full/blueprint-digital-photography-mar-2009pdf 46/141
D
I
G
I
TA
L
P
H
O
T
O
GR
A
P
H
Y
3.3 Flash sync and intensity
Practically, all digital camerasinclude a built-in electronic flash
(also called a strobe light). A flash
has two principal purposes: (a) to
light up a subject when there’s not
enough available light, and (b) fill-
ing up light in the dark areas and
shadowy regions of the scene (flash
fill). In short, the flash adds to theintensity of the available light or
provides an even lighting to ensure
a consistent exposure to all ele-
ments of the photographic image.
Here’s a list of the typical flash
modes usually found on digital cameras.
Auto: The camera decides when the flash is required and
fires automatically Manual: Gets the camera to flash even if there’s plenty of
light around, using the flash as a fill-in to eliminate the intru-
sive shadows that could mar your photograph.
Slow Sync: The camera judges exposure by measuring the
light from the flash, and not from elements in the back-
ground. This ensures that the exposure occurs as if flash was
turned off, and then at the end of the exposure, before the
shutter closes, the flash is fired to light up the foregroundsubject.
Red-eye: ‘Red-eye’ is a phenomenon which occurs when
light bounces off the retina of the eye of a subject and cause
the eyes to appear red. The ‘red-eye’ flash mode reduces the
red-eye by either firing the flash twice or thrice in quick suc-
cession before the actual shot or by turning on a small white
light on the camera. The first method is far more effective.
No flash: Disables the flash if you don’t think it’s going tohelp. This is good for shots with minimal light (sunsets, city
life at night, etc.).
How the flash worksEarlier, the badly needed flash of light was provided by ignit-
FAST TRACK
CAMERA FEATURES 3
49
www.thinkdigit.com
FAST TRACKFAST TRACK
Typical high-end flash for adigital SLR camera

7/30/2019 BluePrint Digital Photography (Mar 2009).pdf
http://slidepdf.com/reader/full/blueprint-digital-photography-mar-2009pdf 47/141
D
I
G
I
TA
L
P
H
O
T
O
GR
A
P
H
Y
50 FAST TRACK
CAMERA FEATURES3 www.thinkdigit.com
ing a wad of magnesium powder by hand. Later, flash bulbs
were provided, which contained magnesium filaments which
were electrically ignited via a contact in the shutter. Butthese were strictly meant for single use.
In today’s hi-tech world, flash units use electronic Xenon
flash lamps, through which high voltage electric current is
passed to produce a bright flash of light.
What is Flash Sync?Flash Sync is short for ‘Flash Synchronisation’ and refers to a
flash at the same moment that the shutter is fully open toadmit light on to the image sensor inside. If it’s a mechani-
cal camera, the flash receives a message to fire through an
electrical contact in the shutter mechanism. In the early days
of photography, the camera had to be set to B (bulb) mode and
the surroundings made completely dark. In digital cameras,
an electronic timing circuit takes the message from a shutter
contact. The sync terminals are wired to electrical contacts
that complete the electrical circuit and fire the flash whenthe first shutter curtain fully opens. Other flash units known
as ‘optical slaves’ are light triggered, and thus do not need an
electrical connection to the main flash unit.
FAST TRACKFAST TRACK
The electronic flash is an integral part of your digital camera

7/30/2019 BluePrint Digital Photography (Mar 2009).pdf
http://slidepdf.com/reader/full/blueprint-digital-photography-mar-2009pdf 48/141
D
I
G
I
TA
L
P
H
O
T
O
GR
A
P
H
Y
Flash sync speeds are measured in fractions of seconds
and the only camera setting that the flash sync speed impacts
is shutter speed. Each camera comes with a maximum syncspeed beyond which your shutter cannot go, unless you turn
the built-in flash off.
Shutter CurtainsFocal plane shutters are typically made of two ‘curtains’ – a
front curtain and a rear one. The front one opens to start the
exposure and the rear one closes up behind it to end it.
Usually, the flash sync fires at the same moment as the open-ing of the front curtain and is known as ‘front curtain sync’.
However, certain cameras set the flash sync to fire just before
the rear curtain closes known as ‘rear curtain sync’.
Sometimes, when you take a snap of a moving car in the
night, you’ll find the headlights appear to be trailing ahead of
the subject. This is because of front curtain sync occurring
during a long exposure. Except for such occasions, front cur-
FAST TRACK
CAMERA FEATURES 3
51
www.thinkdigit.com
FAST TRACKFAST TRACK
Shutters are often just a couple of shifty curtains

7/30/2019 BluePrint Digital Photography (Mar 2009).pdf
http://slidepdf.com/reader/full/blueprint-digital-photography-mar-2009pdf 49/141
D
I
G
I
TA
L
P
H
O
T
O
GR
A
P
H
Y
tain sync works fine for most flash-photography. Rear curtain
sync works quite well for stopping motion.
X syncX-sync or Xenon Synchronisation works with the electronic
flashes in typical digital cameras. The best part about X-sync
is that xenon flashes respond more or less instantaneously.
The timing of the contact, therefore, coincides exactly with
the moment that the shutter is fully open, usually at a shut-
ter speed of 1/60 or lower. Several cameras today, offer an X-
sync speed as high as 1/500. If your camera has an electronicshutter, X-sync speeds can be significantly increased.
Cameras that offer faster sync speeds are neither better
nor worse – they only give you more options to play with.
Higher sync speeds help control the brightness of the back-
ground, while maintaining normal flash exposure in the fore-
ground. If you have a camera which provides you with higher
sync speeds, you could use a higher ISO or a larger aperture to
maintain the same exposure to ambient light while increas-ing the sensitivity to the flash.
Faster sync speeds also allow you to move farther away
from the subject and / or use less flash power, thereby aug-
menting battery life. For every single ‘stop’ increase in sync
speed, you can open the aperture up by one f-stop because you
now have a 30-40 per cent increase in range. However, for daily
use and point-and-shoot purposes, the built-in flash in your
camera is enough for fill and you needn’t bother fiddlingaround with the sync speed at all.
To summarise this section, sync speed has the most sig-
nificant benefits for shots in daylight (due to the better fill)
and stopping motion (due to the emphasis on the subject in
the foreground).
52 FAST TRACK
CAMERA FEATURES3 www.thinkdigit.com
FAST TRACKFAST TRACK
7/30/2019 BluePrint Digital Photography (Mar 2009).pdf
http://slidepdf.com/reader/full/blueprint-digital-photography-mar-2009pdf 50/141
D
I
G
I
TA
L
P
H
O
T
O
G
R
A
P
H
Y
FAST TRACK
FILE FORMATS 4
53
www.thinkdigit.com
4.1 Raw A raw file is the unprocessed data from your camera’s sensor.
Very few point-and-shoot cameras offer the raw format as an
output option. One such example is Panasonic’s Lumix DMC-
LX3. Many dSLRs offer the option of raw output, but in differ-ent formats depending on the make and model of the camera.
There are a wide range of extensions for raw files, which are
often undocumented so that only the camera can work on the
data. The raw file, is simply put, the image as captured by the
sensor, without artificial corrections like interpretation of
the picture from the sensor (demosaicing), white balance,
brightness and contrast. These aspects of the image are
processed after the image is captured on the sensor.For many professionals, the raw file is analogous to the
negative in digital photography, and the wide proliferation of
formats is a big problem. For example, Canon uses a CRW
extension, Sony uses SRF and Panasonic uses a RAW exten-
sion. Most algorithms used to store and compress the raw data
are proprietary, and consumers do not have access to them.
Saving files in the raw format allows you to capture every-
thing possible from the camera, and then correct the imageor process it later in the camera itself or using an image edit-
ing software. This means that the raw data has much more
information about the image, and much more subtle grada-
tions in the saturation and hue of the image, than in the com-
pressed formats. Also, the raw format lacks any of the arte-
facts inherent in image compression to the JPEG and TIFF for-
mats. However, raw data takes up more memory space than
standard compressed files.Raw files should be used primarily if you expect extensive
editing work for the photo you are clicking. This means that
changing say the brightness of the image, or the saturation of
particular colours, will come out with a much higher dynam-
ic range than it would have with other formats.
File Formats
7/30/2019 BluePrint Digital Photography (Mar 2009).pdf
http://slidepdf.com/reader/full/blueprint-digital-photography-mar-2009pdf 51/141
D
I
G
I
TA
L
P
H
O
T
O
GR
A
P
H
Y
4.2 JPEG
JPEG is a format that is standard for storing images across a wide range of formats and applications. It is used as a base for
more specific applications such as the MPEG video format.
Digital cameras typically store images in the JPEG / EXIF format.
The exif data of an image store information such as the camera
make and model, aperture, shutter speed, flash status used and
other details of the photograph. Most digital cameras use this
format as an alternative to their native raw file format.
The major advantage with the JPEG format is that it is alossy image format. This means that depending on the com-
pression, different amount of detail can be stored in the
image. The more the compression, the lesser will be the
details that are manifested on the image. This also means that
saving a file over and over again will result in a proportional
amount of depreciation in the quality of the image.
Although compressing the image by compromising on
quality is possible on a computer, cameras do not offer thisoption. Different resolutions are offered in most cameras so
that you can choose a suitable option between quality and
image size. If you are going on a long trip without carrying
too many memory cards, save the images in the camera in a
medium or small size of the image. If, however, you are shoot-
ing at a location where it is easy to transfer images to a com-
puter, you can afford to use the largest image size available.
The JPEG image is saved in the camera after processing theraw data from the image sensor. This means that once the sen-
sor receives the raw information, the camera processes cer-
tain algorithms like the file dimension settings, the white bal-
ance, demosaicing, red-eye reduction, certain image parame-
ters, and then saves the file on the camera. Essentially, every
JPEG file that is stored in your camera is not of the highest
possible quality your camera can produce, because of the loss
of information that occurs during saving the image, some-thing that is inherent to the format.
To avoid this, store images in the raw data format where
available. Most cameras come with imaging software that can
work with the raw data files in the cameras. Another major
problem with JPEGs is the appearance of artefacts on com-
54 FAST TRACK
FILE FORMATS4 www.thinkdigit.com 4
FAST TRACK
7/30/2019 BluePrint Digital Photography (Mar 2009).pdf
http://slidepdf.com/reader/full/blueprint-digital-photography-mar-2009pdf 52/141
D
I
G
I
TA
L
P
H
O
T
O
G
R
A
P
H
Y
pression, a grainier image than in the raw format, and a blur-
ry or washed out feel to edges, especially apparent while tak-
ing images of text.
4.3 TIFF
TIFF stands for Tagged Image File Format, and is somewhere
in between JPEG and raw in terms of quality. It is essentially a
form of lossless compression. This means that when an image
file is stored in the TIFF format, none of the original informa-
tion is lost. Unlike JPEG, which supports only 8 bits per chan-nel of single-layer RGB images, TIFF supports 16 bits per chan-
nel of multi-layer CMYK images. Another advantage of TIFF is
that it is compatible with most image editing and viewing
programs, and is more compatible than proprietary raw for-
mats. Even PC or Mac is not an issue with TIFF. It is therefore
widely used as the final format in the printing and publishing
industry.
Most photographers do not shoot in TIFF in an effort toavoid in camera processing of the image. The alternative is to
shoot in RAW and then convert to a layered TIFF to obtain a
‘Master’ to store on your computer. These days many cameras
offer the option of shooting in TIFF alongside JPEG, and RAW.
However, most offer only 8-bit layered quality due to space
constraints. TIFF takes a longer time to write into the camera’s
memory too, so if you’re shooting in TIFF, you can rule out
taking several pictures in a row.Summing it up, TIFF files open in almost any image editor,
are largest in size compared to other formats, and they don’t
have JPG compression artifacts. The time to open the file in
the image editor is also typically shorter than when opening
a RAW file. Thus, if you are comfortable with the camera set-
tings (e.g. white balance and exposure) and you don’t want to
do much post-processing, then TIFF is an option (though not
a recommended one). Else, raw is better both in terms of image quality and size. TIFF, however, is an excellent format
for scanning. It offers 16-bit scanning and these days there are
many printers that offer the same quality printing. Back in
the days of film, scanning to TIFF was the norm.
FAST TRACK
FILE FORMATS 4
55
www.thinkdigit.com
FAST TRACK
7/30/2019 BluePrint Digital Photography (Mar 2009).pdf
http://slidepdf.com/reader/full/blueprint-digital-photography-mar-2009pdf 53/141
D
I
G
I
TA
L
P
H
O
T
O
GR
A
P
H
Y
56 FAST TRACK
HOW TO SHOOT5 www.thinkdigit.com
5.1 Macro
A macro is a close-up shot of a really small subject, typi-
cally with a small depth of field. There are two impor-
tant considerations to make with the regular point and
shoot cameras. The first, and obvious step is to put the camera
in the macro mode. This increases the aperture, and gives a very narrow plane of focus. The second step is to adjust the
focus. Turn off the autofocus, when you click the photograph,
as the autofocus is likely to get confused and take a long time
adjusting when you take your lens really close to the subject.
There is a very narrow plane of focus, which should ideally be
towards the front of the subject.
While shooting outdoors, the two most common macro sub-
jects are flowers and insects. Often, while photographingextremely small flowers, the camera can focus on the back-
ground foliage, or on blades of grass in the foreground. The
leaves, thorns or other aspects of the flower may show up
focussed, but the flower itself will be blurry. This difference will
not be apparent in the small screen of the camera, and such mis-
takes tend to be discovered only after the photos have been
transferred to a computer. Manual focussing is very important
in macro photography. Do not hesitate to re-arrange the subjecta bit to get a good shot. Ask someone to shield the flower from
wind, if that gives you problems. Macro photography in the
night is not a good idea, and the camera will cast a shadow on
the flash for close-ups. It's a good idea to use reflectors to cast
light on the subject. This does not need complicated equipment,
tissue papers, paper or white sheets will do just great. If the
flash is overexposing the flower, a good idea is to shield or mask
the flash a bit using tissue paper, or covering half the flash with your fingers (this sometimes gives a red cast to the image).
When it comes to photographing flowers, it is always preferable
to take the lens closer rather than using the zoom.
Photographing insects is a bit tricky. This is because they
don't stay still long enough to make elaborate adjustments.
How to shoot
7/30/2019 BluePrint Digital Photography (Mar 2009).pdf
http://slidepdf.com/reader/full/blueprint-digital-photography-mar-2009pdf 54/141
D
I
G
I
TA
L
P
H
O
T
O
GR
A
P
H
Y
Getting too close to them will drive them away. Get the settings
ready, and take as many shots as possible. When photographing
insects, it is a good idea to increase the quality of your photo-graphs as much as possible. A large image size lets you crop to a
relevant area better. If the insect is fickle, it's a good idea to go
for auto-focus and hope for the best. Approach carefully, and
with slow movements, click photos while approaching in case it
gets away. If you are taking photos of insects in flight, track it
with the lens of the camera and click. When it comes to insects,
it is preferable to use the zoom as much as possible, then move
in with the lens.By and large, try to click photos around the afternoon. This
is when the light is ideal for macro photography. At noon, the
shadows are too harsh. Also, remember that going in too close is
not always a good idea. Capturing a bit of the background can
make the subject stand out.
Photographing non-nature macros are relatively easy, and
let you do more preparation. This is where you can set the back-
ground and the lights, as well as luxuriously take a lot of pho-tos. You have a lot of time to experiment. The important thing
here is to bring out the details in your subject. Look at where
the light is falling, what aspects it is highlighting, and where
you are focussing. Experiment with focus brackets here, that is,
take a number of shots with a different focus settings.
5.2 Telescopic
Modern day point-and-shoot cameras have a healthy zoom
available. Filling the frame with remote or inaccessible fea-
tures of a landscape is all well and good, and indeed the only
way to get these shots, but there are many more uses of the
zoom feature.
While photographing people in action, like a cricket
match, the zoom is very helpful in letting you take shots
without getting in the way. Staying away from the scene of action is helpful while taking photographs of pets, children
or candid shots of people without intruding or making
them self-conscious.
When using this feature, an optical zoom is always prefer-
able to a digital zoom. If possible, turn off the digital zoom
FAST TRACK
HOW TO SHOOT 5
57
www.thinkdigit.com
FAST TRACK

7/30/2019 BluePrint Digital Photography (Mar 2009).pdf
http://slidepdf.com/reader/full/blueprint-digital-photography-mar-2009pdf 55/141
7/30/2019 BluePrint Digital Photography (Mar 2009).pdf
http://slidepdf.com/reader/full/blueprint-digital-photography-mar-2009pdf 56/141
D
I
G
I
TA
L
P
H
O
T
O
GR
A
P
H
Y
exotic lighting effects, frame them off-centre or try out a differ-
ent angle. Bring out the individuality in the photograph as
much as possible. An important aspect of portraits is to makethe subject comfortable rather than self-conscious. Crack a joke,
surprise them or give them a compliment just before clicking.
The least you could do, as a photographer, is to engage your sub-
ject and ask them to smile. Just clicking away “candid” shots
while people go about their business is no way to take a portrait
— their attention should not be towards something specific out
of the frame. Also experiment with expressions. This works very
well with young children.
5.4 Landscapes
When it comes to landscape photography, the rule of thirds is
most relevant. The rule of thirds is an aesthetic principle,
where subjects are better represented off-centre, instead of
being right in the middle of the photograph. This means if you
are taking a photograph of the horizon, it is more pleasing toset the horizon along the top third of the photograph or the
bottom third of the photograph. If you are photographing
seascapes for example, positioning the sky for two thirds of the
photograph gives a good impression. Similarly, when shooting
the layout of the land from a high vantage point, it makes sense
to let the land occupy the bottom two-thirds of the photograph.
How the elements closest to the camera are handled or com-
posed into the shot dictates the overall mood and feel of thelandscape. This can be a fence, a signpost or a building.
Experiment with taking shots that are not at eye level in such
cases. If there is a distant object of interest, like an animal or a
human being, include them in the shot and compose accord-
ingly. Placing such animated objects in the middle of the land-
scapes is a good idea, but not a general rule.
In most landscapes, the sky is a very important element.
Photographing during sunrise or sunset yields best results. Atthe same time, the interesting colours are reflected from the
ground and the objects on it as well. A bland, naked sky will
simply spoil the landscape, especially if there are too many
objects cluttering the ground. Make sure that the top half of
the image has something interesting.
FAST TRACK
HOW TO SHOOT 5
59
www.thinkdigit.com
FAST TRACK

7/30/2019 BluePrint Digital Photography (Mar 2009).pdf
http://slidepdf.com/reader/full/blueprint-digital-photography-mar-2009pdf 57/141
D
I
G
I
TA
L
P
H
O
T
O
GR
A
P
H
Y
The easiest way to spoil a landscape shot is to take a diago-
nal shot of the landscape. This need not even be intentional.
Even a slight tilt in the camera while framing a landscape canruin the photograph. The easiest fix for this is to carry around
a tripod. These are lightweight, and will significantly improve
the quality of your photographs. If a tripod is not available,
make sure that the horizon is as horizontal as possible before
clicking. This simple check can bring about dramatic differ-
ences in the quality of your photos.
The “landscape” mode of your camera gives a deep focus,
which means almost everything in the frame will be in focus. If you want to bring out the expanse, make sure to include
objects close to the lens. This could be a rock, a tree, or even
much larger objects like a cliff or a mountain. Changing the
focus settings to focus on a narrow plane of focus dramatically
changes the landscape. While this is not normally done, when
implemented, this effect makes the photograph look like a shot
of a miniature set. This is because the narrow plane of focus is
normally associated with macro photography. This technique iscalled tilt-shift photography, and gives great results when
experimenting from high vantage points taking photos of
cityscapes or urban areas.
5.5 Night
Taking photographs in the night can be a challenging process.
Even while indoors, the night time can give bad results. One of the most common mistakes is that the flash is so bright that
everything within the frame is exposed. This is a result of a too
powerful flash in many cameras. This can be countered by a very
thin piece of paper over the flash, or a strip of scotch tape.
Another common mistake is that the white balance in the cam-
era is not adjusted for the light. Focus on a blank sheet of paper,
or change the white balance settings according to the source of
light. When taking photos in extremely low-light conditions, itmakes sense to use a tripod and ask the subject to stay still.
Most night photos require high ISO settings, so a tripod is
almost a must. The photos tend to be grainy and shaky even
with a tripod. When taking portraits at night, make the per-
son stand approximately four to six feet away, then zoom in
60 FAST TRACK
HOW TO SHOOT5 www.thinkdigit.com
7/30/2019 BluePrint Digital Photography (Mar 2009).pdf
http://slidepdf.com/reader/full/blueprint-digital-photography-mar-2009pdf 58/141
D
I
G
I
TA
L
P
H
O
T
O
GR
A
P
H
Y
and use the flash. This works on many levels, making sure
that the flash is not blinding and giving the face a more nat-
ural, flat appearance, instead of a bulbous one, when the sub- ject is close to the camera.
The night-time is also the best time to capture streaks of
light. This can range from a line of traffic to fireworks or a
meteor shower. For all such cases, keep a very high ISO set-
ting, the camera on a stable surface or a tripod. Invest in a
clicker, which stops the camera from shaking when you click
the photograph, and makes it easier to hold the clicker
pressed if you are using a custom ISO setting.If your photograph has not come out great, don't lose hope.
You can always recover detail by digital manipulation.
Increasing the brightness and contrast usually does the trick.
You may also have to correct the colours a bit, because photos
taken at night tend to have a greenish or bluish hue.
5.6 Action
When it comes to action shots, a high ISO is absolutely essential.
This means that the object is not blurred when the shot is taken.
Also, you will have to use a zoom lens so that you do not inter-
rupt the action. Track the movement with your camera before
taking the shot, and while clicking. This makes the background
blurry, but in the direction of the movement, accentuating the
movement of the object.
Experiment with angles here, tilting in the direction of themotion will also help depict the movement better. The essence
of the image here is to capture the action. If your zoom permits
it, capturing the expressions of the people during concentration
makes for great, and sometimes funny photographs. If all your
camera permits is a wide shot of the entire ground, or you are
positioned very far away from the action, look for other inter-
esting subjects in the foreground (say, an interesting spectator)
and make the action itself the background. When capturing kids or pets in movement, take a series of
photographs, using the burst mode at times. You can delete the
ones you don't want later on, but this increases your chances of
getting a good shot. Position yourself in such a way that you are
not intruding in on the action, and use zoom where necessary.
FAST TRACK
HOW TO SHOOT 5
61
www.thinkdigit.com
FAST TRACKFAST TRACK

7/30/2019 BluePrint Digital Photography (Mar 2009).pdf
http://slidepdf.com/reader/full/blueprint-digital-photography-mar-2009pdf 59/141
D
I
G
I
TA
L
P
H
O
T
O
GR
A
P
H
Y
5.7 Architectural
Architectural shots are all about angles. The most boring kind of architectural photos are taken head on, and in close up. If the
subject is in an urban area, go back a bit, walk around the build-
ing a few times, and look at options for getting into a building
to get a shot. The colours are very important here, but they can
be adjusted later on. Try to get an eccentric angle, if the subject
is eccentric. Repeated patterns filling the frame can be impres-
sive, but only if the angle looks aesthetic. Avoid monolithic
shots of a single subject dominating a frame. Instead, get someof the background. Top down architectural photos are more
interesting than bottom up architectural photos.
Approach the photo according to the subject. If the subject
is a rustic rural building, capture an expanse of the rural land-
scape to go with it. If it is an impressive, but old building, focus
on the features on the building itself, like the windows, statues
or the roofs. If the building is a modern or industrial structure,
include a chimney, cars or some people in the snapshot to bringout the industrial or urban look in the photo.
When it comes to architectural shots, you can go wild
focussing on tiny details. Observation is the key here, look out
for interesting oddities in the building to capture. This could
range from a door frame, to a signboard or a light fixture.
Be careful while photographing heritage structures and reli-
gious monuments. Taking photos inside many religious struc-
tures is not allowed, and is insulting even if there is no sign thatsays so. By and large, heritage sites should not be a problem, but
while capturing frescoes, be polite and turn off the flash in your
camera. When possible, buy postcards, because you are not like-
ly to get better photos anyway. Photographing in some public
areas is also not allowed, for example railway stations. Though
you might not encounter anyone who will stop you, it is not a
good idea to take photos as it is illegal by law.
Architectural photos offer a lot of room for framing. Thismeans that a building can be framed from the gate, or a fort
framed from an entrance in the wall. Explore both symmetric
and asymmetric compositions.
62 FAST TRACK
HOW TO SHOOT5 www.thinkdigit.com
FAST TRACK
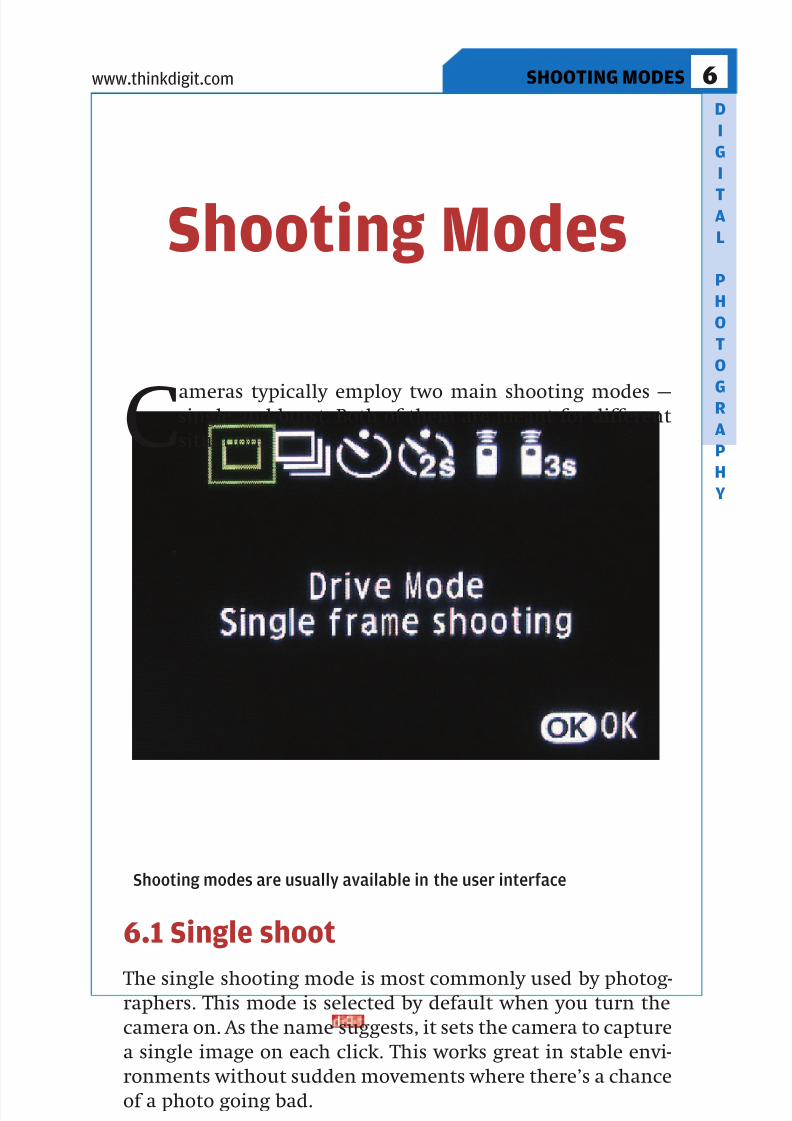
7/30/2019 BluePrint Digital Photography (Mar 2009).pdf
http://slidepdf.com/reader/full/blueprint-digital-photography-mar-2009pdf 60/141
D
I
G
I
TA
L
P
H
O
T
O
GR
A
P
H
Y
FAST TRACK
SHOOTING MODES 6
63
www.thinkdigit.com
Cameras typically employ two main shooting modes —single and burst. Both of them are meant for different
situations.
6.1 Single shoot
The single shooting mode is most commonly used by photog-raphers. This mode is selected by default when you turn the
camera on. As the name suggests, it sets the camera to capture
a single image on each click. This works great in stable envi-
ronments without sudden movements where there’s a chance
of a photo going bad.
Shooting Modes
Shooting modes are usually available in the user interface

7/30/2019 BluePrint Digital Photography (Mar 2009).pdf
http://slidepdf.com/reader/full/blueprint-digital-photography-mar-2009pdf 61/141
D
I
G
I
TA
L
P
H
O
T
O
GR
A
P
H
Y
6.2 Burst Modes
The burst shooting mode is also known as Continuous shoot-ing mode. This is available on most cameras. This mode lets
you take multiple shots without having to repeatedly click.
Using these modes is simple. In the shooting mode, set the
camera to either Burst or Continuous mode. Now to click the
photos, simply hold the shutter release and don’t release it till
you get the right shot. All the images will be stored on the
memory card like normal photos.
Burst modes on most cameras are not unlimited. The per-formance of the burst mode varies from camera to camera.
The burst mode shooting capabilities are usually described as
frames per second. For example, 3 fps means that the camera
can capture 3 images per second. The other number men-
tioned with this specification is the total number of images
that can be captured all in one go.
The burst mode is great for high action scenarios like a car
race or a fast soccer game where there is too much activity.Here, you can take a sequence of photos and later choose the
best from them.
Limitations of burst mode shooting Although the burst mode aids in getting a better photo, there
are a few disadvantages as well.
First, there are several photos generated at once. This only
adds to the confusion and managing these photos is a night-mare. If you have a camera with a mechanical shutter, then
burst shots can be damaging in the long run.
With numerous photos being shot, you also waste a lot of
memory space. With memory cards for cameras also fairly
limited, wasting memory is not an option.
One of the other problems faced with burst mode is the
use of flash and also exposure settings used. Sometimes, the
flash takes long to recharge, so a burst sequence might be tooshort for the camera to charge the flash before the next shot.
The problem with shutter speeds is also similar. If the cur-
rent lighting isn’t sufficient for a good shot, then one of the
ways used to increase exposure is to increase the shutter
speed. If the shutter speed is greater than a certain value,
64 FAST TRACK
SHOOTING MODES6 www.thinkdigit.com
FAST TRACK

7/30/2019 BluePrint Digital Photography (Mar 2009).pdf
http://slidepdf.com/reader/full/blueprint-digital-photography-mar-2009pdf 62/141
D
I
G
I
TA
L
P
H
O
T
O
GR
A
P
H
Y
then you may not be able to set it. For example, if your cam-
era can capture three images per second, then the shutter
speed for each of the shots can’t be two seconds or even onesecond for that matter.
Be sure to have enough space on the memory card to store
the sequence of images and also to have a memory card that
has high data transfer speeds.
6.3 Multiple shooting mode
Cameras these days come with a time-lapse feature with a mixof timer and burst mode features. This feature allows users to
have photos taken at a fixed interval. This comes handy in
time-lapse photography. You can use this to take a time-lapse
sequence of a day cycle or a budding flower. Again, this
depends on the camera and more importantly on the amount
of free space on the memory card. Time-lapse photography is
best attempted with the camera stationary, so positioning and
alignment is very important.
6.4 Self timer
In case you need to capture a photo after a time delay, the
timer feature comes in handy. This feature has been in use
even before digital cameras came along. The self-timer feature
on cameras lets you click a photo after variable time intervals.
Some even let you click two
photos at the end
of the timer peri-
od. First select
the timer mode
you want, then
half press the
shutter release tofocus and then
fully to start the
timer.
FAST TRACK
SHOOTING MODES 6
65
www.thinkdigit.com
FAST TRACK
The self timer feature can be used to automate theshutter release function
7/30/2019 BluePrint Digital Photography (Mar 2009).pdf
http://slidepdf.com/reader/full/blueprint-digital-photography-mar-2009pdf 63/141
D
I
G
I
TA
L
P
H
O
T
O
GR
A
P
H
Y
66 FAST TRACK
FOCUSSING7 www.thinkdigit.com
Focussing is an integral part of photography irrespective
of manual, or automatic digital cameras. A camera
focusses by adjusting the distance of the lens from the
film or sensor of the camera. Depending on the distance of the other objects and the kind of lens used, the objects
around the subject of the photo will appear out of focus and
blurred. With digital cameras and also with automated film
cameras, focussing is done by the camera itself. These days, all
cameras come with auto-focus systems. When you partially
press the shutter release, the camera focusses on the target,
after which you can proceed to click the photo.
7.1 Focussing modes — Continuous /Single focus
Cameras usually have two modes of focus. They are basically
settings that tell the camera when to focus. Focussing in cam-
eras is done when you first press the shutter release half way
through but without actually clicking the button.
Cameras should only focus while you click a photo. This is thesetting that can be found on your camera under the setup menu
of your camera. Turn it on and the camera will only focus when
you half press the trigger when you are about to click a photo.
In the continuous focus mode, the camera lens is con-
stantly adjusting itself to focus on the object in front of it.
This option can also be enabled under the main setup menu
in your camera. Focussing times are cut down a bit. Some
cameras use the continuous focus mode as a pre-focus system where the camera partially focuses on the target to cut down
focus times when you are about to click the photo. This is use-
ful when you trying to focus on moving targets.
Both focus modes have a few advantages and disadvan-
tages. The continuous mode forces the camera to constantly
Focussing

7/30/2019 BluePrint Digital Photography (Mar 2009).pdf
http://slidepdf.com/reader/full/blueprint-digital-photography-mar-2009pdf 64/141
D
I
G
I
TA
L
P
H
O
T
O
GR
A
P
H
Y
keep adjusting the lens. This means more wear and tear and
also continuous use of the battery. In the long run, the cam-
era will run out of power. The flip-side is that focussing will be instantaneous and you won’t have to spend time on half
pressing the button and then pressing the shutter release.
7.2 Auto Focus — Spot focus / Areafocus / multi-spot focus
Focussing manually is both slow and sometimes not as accu-
rate. It’s difficult to determine whether the target is focussed by looking at a small screen or even through the eyepiece.
Automatic focus in many ways is a boon for photographers
and it has significantly reduced the confusion. Cameras use a
couple of techniques to try and focus on the target. They are
not always perfect and accurate, so you should change the
type of focus depending on the kind of lighting and subject
you are shooting.
Spot Focus The spot focus is a single focus point used by the camera to
latch on to the subject. With this focus mode, the target or
object in the centre of the viewport or eyepiece gets
focussed. This is a very good way to focus on most close
ranged products to avoid results with depth of field but
sharp images. If you want an object focussed, but not placed
in the centre of the view, then focus on it first and withoutpressing the trigger, move the camera to a new direction
and then click the photo.
Area Focus The area focus mode is very similar to spot focus. Instead of
focussing a single spot in the centre of the view, it takes on a
larger area from the middle of the view. This works for most
photographs where accurate focus on a single spot is not nec-essary.
Multi-spot focusMulti-spot focus includes multiple spots to focus. This is not
typically the most suited mode to shoot photos with.
FAST TRACK
FOCUSSING 7
67
www.thinkdigit.com
FAST TRACKFAST TRACK
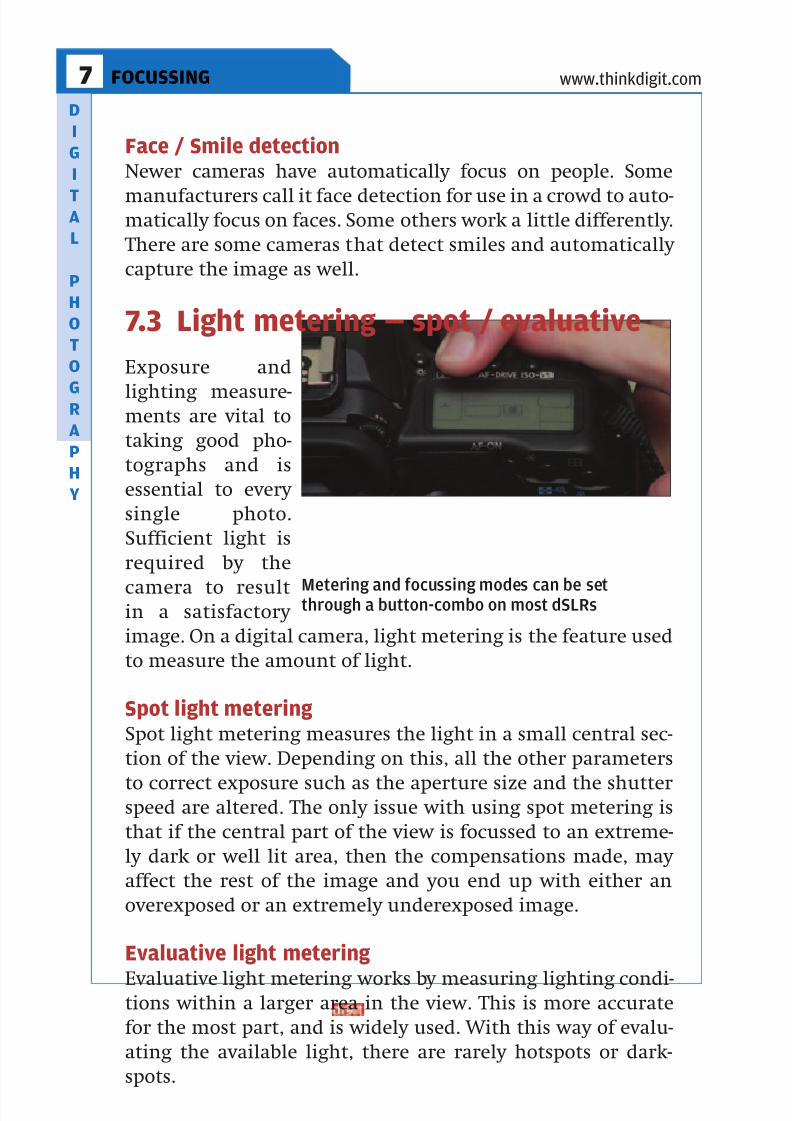
7/30/2019 BluePrint Digital Photography (Mar 2009).pdf
http://slidepdf.com/reader/full/blueprint-digital-photography-mar-2009pdf 65/141
D
I
G
I
TA
L
P
H
O
T
O
GR
A
P
H
Y
68 FAST TRACK
FOCUSSING7 www.thinkdigit.com
Face / Smile detectionNewer cameras have automatically focus on people. Some
manufacturers call it face detection for use in a crowd to auto-matically focus on faces. Some others work a little differently.
There are some cameras that detect smiles and automatically
capture the image as well.
7.3 Light metering — spot / evaluative
Exposure and
lighting measure-ments are vital to
taking good pho-
tographs and is
essential to every
single photo.
Sufficient light is
required by the
camera to resultin a satisfactory
image. On a digital camera, light metering is the feature used
to measure the amount of light.
Spot light meteringSpot light metering measures the light in a small central sec-
tion of the view. Depending on this, all the other parameters
to correct exposure such as the aperture size and the shutterspeed are altered. The only issue with using spot metering is
that if the central part of the view is focussed to an extreme-
ly dark or well lit area, then the compensations made, may
affect the rest of the image and you end up with either an
overexposed or an extremely underexposed image.
Evaluative light metering
Evaluative light metering works by measuring lighting condi-tions within a larger area in the view. This is more accurate
for the most part, and is widely used. With this way of evalu-
ating the available light, there are rarely hotspots or dark-
spots.
FAST TRACK
Metering and focussing modes can be setthrough a button-combo on most dSLRs

7/30/2019 BluePrint Digital Photography (Mar 2009).pdf
http://slidepdf.com/reader/full/blueprint-digital-photography-mar-2009pdf 66/141
D
I
G
I
TA
L
P
H
O
T
O
GR
A
P
H
Y
7.4 Manual Focus
For expert photographers who want to be able to controlthe amount of focus and the object to be focussed, the manu-
al focus feature is what matters the most. This is a feature
found on every dSLR and some of the high-end point-and-
shoot cameras have it too.
Focussing on dSLRs is done by first setting the lens unit or
the camera body to manual focus. With that set, the motor is
disengaged. You can then rotate the focus ring on the camera
till your target gets focussed. The manual focus feature can’t be found in every P&S cam-
era and focussing is also different in this case. There is often
no ring to rotate on the focussing lens. To enable this, set the
camera to manual mode. Set the rest of the settings such as
the ISO, aperture size and shutter speed as you wish. Then,
use the focus button if there is one till you switch to manual
mode. A small scale or indicator will then be displayed at the
bottom of the screen. The distance of the object in focus will be mentioned. Either use the directional keys on the camera
or a gradually rotate the jog dial till the target is in focus.
Macro focussing is slightly tricky as the distance to the
objects is at its minimum. In P&S cameras, turn on the macro
shooting mode
before trying to
focussing on the
target. You willonly be able to
focus once you
get close enough
to the object. This
depends on the
range of your
lens. This applies
to both dSLRs andP&S cameras.
FAST TRACK
FOCUSSING 7
69
www.thinkdigit.com
FAST TRACKFAST TRACK
Manual focus and image stabilisation can beturned on by the flip of a switch

7/30/2019 BluePrint Digital Photography (Mar 2009).pdf
http://slidepdf.com/reader/full/blueprint-digital-photography-mar-2009pdf 67/141

7/30/2019 BluePrint Digital Photography (Mar 2009).pdf
http://slidepdf.com/reader/full/blueprint-digital-photography-mar-2009pdf 68/141
D
I
G
I
TA
L
P
H
O
T
O
GR
A
P
H
Y
be the illusion of smooth motion, and more jerks will be
noticeable in the final video. If you are taking a time-lapse of
rotting fruits, then it depends on how long the fruit will taketo rot. A construction site can be spaced out enough to take a
single photo every day at the same time across a year – for a 22-
FAST TRACK
TIME-LAPSE 8
71
www.thinkdigit.com
FAST TRACKFAST TRACK
A time lapse of a retreating glacier

7/30/2019 BluePrint Digital Photography (Mar 2009).pdf
http://slidepdf.com/reader/full/blueprint-digital-photography-mar-2009pdf 69/141
D
I
G
I
TA
L
P
H
O
T
O
GR
A
P
H
Y
second film. Basically, estimate the amount of time for the
entire duration of the phenomenon you want to capture, fig-
ure out at what rate appreciable change appears in the object,and factor in the total length of the film before you decide on
how many photos to take and at what interval. Be generous in
the number of photos you take, but be very accurate about the
spacing between each photo.
The idea of most time-lapse videos is to have the camera as
still as possible, though this is not essential. Despite using a tri-
pod, you would still inadvertently add some shake, so it is a good
idea to use the remote control to click, rather than by pressingshutter release with your hands. If there is no remote control,
then it is a good idea to invest in a remote trigger. This is just a
chord that allows you to click by pressing a button that reduces
a shake on the camera.
A decent trigger can be purchased for as little as Rs. 150. The
next thing you will require is a timer. Do not try to mentally esti-
mate the time required for the time-lapse video. Some cameras
may have a timer, which can be set up using a remote control, but this is a rather complex approach. The best thing to do is use
a watch and take a shot every few seconds or as and when the
situation demands.
If you plan to take long periods of time-lapse photos, or to
take many of them on a single trip, it would be a good idea to
reduce the file size of the photo to the minimum. This helps free
up some space, and leaves a lot of room to experiment and play
around with. However, you can also use high resolution imagesto generate HD time-lapse videos, but do this in familiar sur-
roundings where transferring images to a digital medium is at
hand. Take as many photos as possible, to ensure you are con-
tent when you make the final video.
An intermediate step between shooting and making the
time-lapse video can be editing the photos on a photo editing
software. This can be used to correct exposure or colouring
problems, or to give a particular hue to the entire time-lapse video. A high contrast black and white time-lapse video of cloud
movement can be more powerful than a blue and white time-
lapse of the same subject. This might be frowned upon by the
purists, but then, this is one of the most significant advantages
of digital photography.
72 FAST TRACK
TIME-LAPSE8 www.thinkdigit.com
FAST TRACK

7/30/2019 BluePrint Digital Photography (Mar 2009).pdf
http://slidepdf.com/reader/full/blueprint-digital-photography-mar-2009pdf 70/141
D
I
G
I
TA
L
P
H
O
T
O
GR
A
P
H
Y
There are software available for making time-lapse videos out
there. One free software that can be used for this purpose is
VirtualDub, (http://www.virtualdub.org). Start the program, go toFile > Open Video File and check ‘Automatically Load
Linked Segments’. Then, open the first file from the series to be
used in the Time-Lapse video. The program automatically loads
the other images if they are serially numbered. A time-lapse video
can be created in Windows Movie Maker, but the lowest duration
allowed for importing a photo is 0.125 seconds, which can be a
pain. You need to render the movie, and then speed it up using
the speed filter. You can use any video editing software for thispurpose. Most video software will render the video in a much
lower resolution than the resolution you selected, which is ideal
for uploading on the internet, or sharing with friends via email.
Once you are familiar with time-lapses, you can move onto
more advanced things. Play around with the exposure timing of
the camera. Using large exposure timings on things like crowds
or a waterfall to give a blurred effect to the video, and accentu-
ate the sense of movement. Taking a long exposure time-lapse video of moving traffic on a road during the night will make
those trails of white and red come alive with movement. For
most time-lapse subjects, a long exposure will have little or no
effect as everything is moving slowly anyway.
Experiment with time lapses where the camera is stationary
inside a moving vehicle – like a train journey or a long drive
with friends captured from the dashboard. Moving the camera
itself while shooting a time-lapse, even a basic movement like apan or a zoom is going to give some startling effect to the time
lapse. Usually, professionals use programmed and customised
rigs for this effect, but there is no reason why you should not
experiment with your digital camera and tripod. Try rotating
the head of the tripod by a fraction of a degree between shots,
or moving the tripod itself.
8.1 HDRHDR stands for high dynamic range, and preserves the details
of an image across a wide range of luminosity. For example, a
façade against the backdrop of a sky during dusk will give an
image where either the sky is too bright and the building is
FAST TRACK
TIME-LAPSE 8
73
www.thinkdigit.com
FAST TRACKFAST TRACK

7/30/2019 BluePrint Digital Photography (Mar 2009).pdf
http://slidepdf.com/reader/full/blueprint-digital-photography-mar-2009pdf 71/141
D
I
G
I
TA
L
P
H
O
T
O
GR
A
P
H
Y
too dark, or vice-versa. While there are a few cameras that
allow native support for HDR photography, this is beyond the
scope of most amateurs. This section discusses how to artifi-cially produce HDR photographs, using an image editor and
any digital camera.
The first question to put out of the way is where HDR should
be used. Practically, all photos taken during harsh lighting con-
ditions, either too much or too little light comes under the
purview of HDR. Landscapes during sunsets or sunrise, indoor
shots with a harsh afternoon sun streaming through an open
window, and buildings at dusk or dawn all look better withHDR. Take a photo of the same subject under a high exposure
setting and a low exposure setting. You will see a few details
stand out in the first photo, and totally different details emerge
in the next photo. An artificial HDR photo will combine the
extremes, bringing out all the possible details in a real-world
like image. Although they replicate real world colours, many
HDR photos look artificial because of the way they are manipu-
lated, and their colours being counter-intuitive to everyday experience with photos.
Taking multiple images of the same subject with different
camera settings is known as bracketing. Some dSLRs come with
a bracketing feature, that lets you take multiple photos in dif-
ferent settings automatically. Bracketing can be used with
attributes other than exposure, like focus or aperture settings.
However, most consumer digital cameras do not have a bracket-
ing facility, so you will have to do this on your own. Threeimages in low, medium and high exposure settings is a bare
minimum for producing an HDR image. If you want to be
absolutely sure of capturing the entire range of natural lumi-
nosity in a subject, take upto six or eight different photographs
on different exposure settings as permitted by the camera.
Photoshop has a feature that lets you combine bracketed
photographs into an HDR image. Another way to create HDR
photos is to bring out the details and the dynamic range with an image editing software. The idea is to digitally com-
pensate for the exposure and then merge the areas with
different exposures.
In this photo for example, details in the sky and the
shadows under the bridge have been preserved because the
74 FAST TRACK
TIME-LAPSE8 www.thinkdigit.com
FAST TRACK

7/30/2019 BluePrint Digital Photography (Mar 2009).pdf
http://slidepdf.com/reader/full/blueprint-digital-photography-mar-2009pdf 72/141
D
I
G
I
TA
L
P
H
O
T
O
GR
A
P
H
Y
image is an HDR image made from multiple exposures,
then tone-mapped.
8.2 Panoramas As far as experimenting with photos goes, dabbling in panora-
mas can be a very rewarding experience. A normal panorama is
a 360-degree view from any location. Digital panoramas can turn
out to be very large in file size even with low resolution photos. There are many kinds of panoramas — there are sphere panora-
mas that cover 360 degrees in all directions, extremely high def-
inition panoramas that are made by using a heavy zoom and
over a thousand photos, vertical panoramas, and more exotic
projections like the cube panorama or the planet panorama.
FAST TRACK
TIME-LAPSE 8
75
www.thinkdigit.com
FAST TRACKFAST TRACKFAST TRACK
An HDR Photo composited using different exposurebrackets and tone mapping
7/30/2019 BluePrint Digital Photography (Mar 2009).pdf
http://slidepdf.com/reader/full/blueprint-digital-photography-mar-2009pdf 73/141
D
I
G
I
TA
L
P
H
O
T
O
GR
A
P
H
Y
Many of the newer digital cameras, and even some mobile
phones have an in-built panorama shooting function, but this
does not extend to more than three photos, giving a very limit-ed view, and not allowing for an automatic shoot of a 360 degree
panorama. It is better to manually shoot 360 degrees and then
stitch up the resulting images on a computer.
To shoot a panorama, take around twelve shots after chang-
ing an angle of about 30 degrees between shots. It is good to use
a tripod, and a protractor too. Get out that geometry box that is
collecting dust at the back of your drawer. However, none of
these things are essential. You can simply take a good panorama by simply estimating the degrees. A digital camera allows you
the luxury of looking at your photo before you take the next
photo, so you can get a very fair approximation of where to
point next. However, if you are not using a tripod, either take
the entire sequence of shots very rapidly, which also helps if you
have moving subjects in the frame or make sure that you align
the shots using the horizon or some other reference. Getting
your photos out of alignment will lead to a panorama like this, which looks pretty ugly.
There will always be some mistakes in the alignment, even
if you are using a tripod, so it makes sense to crop out the excess
areas using an image manipulation tool. However, don’t depend
too much on this while capturing a panoramic view.
Now a panorama does not necessarily have to be a land-
scape from a high altitude. It can be the middle of a market
(you will have to be fast), a cityscape from the top of your ter-race, the interior of your room, or anything that you want. To
capture really memorable images of a monument, for exam-
ple, take a panorama with the monument in the centre, and
a friend in the foreground.
Remember to use the lowest filesize possible for your photos,
to save on space in the camera memory and to save a lot of time
processing the panorama later on. It is also a safe bet to do two
sweeps of the area you want a panorama of, in case you miss outa portion of it. One very important precaution is to set the white
balance manually to a constant setting so that you don’t have a
wide range of brightness across the photographs on the auto-
matic setting. This is particularly important while taking
panoramas with the sun in the picture somewhere. Although
76 FAST TRACK
TIME-LAPSE8 www.thinkdigit.com
FAST TRACKFAST TRACK
7/30/2019 BluePrint Digital Photography (Mar 2009).pdf
http://slidepdf.com/reader/full/blueprint-digital-photography-mar-2009pdf 74/141
D
I
G
I
TA
L
P
H
O
T
O
GR
A
P
H
Y
this can be easily corrected digitally, in many cases, especially in
landscapes, this causes an unnatural colouration.
Once the images are taken, copy them to your computer,and you are ready to make the actual panorama. There are
many free and commercial software for creating panoramas
available on the internet. Panoramic tools is widely used, but
requires a front-end like PTGUI. Another software for panora-
mas is Hugin. However, in our experience, nothing works out
as efficiently as good old Photoshop. It can automatically han-
dle difficult subject matter as leaves, grass and clouds, cor-
recting the brightness errors in the photograph and churnout decent looking panoramas. In Photoshop CS3, go to File
> Automate > Photomerge, select the files to be made into
a panorama, choose the “auto” option as your Layout and
click on ok. Photoshop will run a script and then automati-
cally match up the images and generate a multilayered file.
Flatten the layers, crop off the excess areas and save the file,
and your panorama is ready. Reduce the image dimensions by
half and slash the quality down to 70 to upload a panoramaon the internet if you don’t want to use up too much space.
Once a complete 360-degree panorama is made, you can use
the image to create a planet panorama like the one here. You
have to make sure that the right hand side of the image match-
es up with the left hand side of the image perfectly for this to
work. Make sure that the brightness and contrast of the two
areas also match up. To save disk space, reduce the image
dimensions by half before proceeding. Also, look at the width of your photograph in pixels, and create a new blank square image
with the same dimensions as the width. The image should be as
high as it is wide, or the panorama will not work. Then, drag the
panorama onto this image, and stretch it so that it occupies the
entire height of the image. Now go to Filter > Distort >
Polar Co-ordinates and select “Rectangular to Polar”, and
your planet panorama is ready. You can alternatively make a
cylindrical panorama by leaving a band of white space at the bottom of the image, and following the same procedure.
FAST TRACK
TIME-LAPSE 8
77
www.thinkdigit.com
FAST TRACKFAST TRACKFAST TRACK

7/30/2019 BluePrint Digital Photography (Mar 2009).pdf
http://slidepdf.com/reader/full/blueprint-digital-photography-mar-2009pdf 75/141
D
I
G
I
TA
L
P
H
O
T
O
GR
A
P
H
Y
78 FAST TRACK
TRANSFER AND PRINTING9 www.thinkdigit.com
9.1 USB and Firewire
T
he most common method of transferring digital images
from a camera to the PC, or for that matter, to any stor-
age device is via USB. Most of us are familiar with USB; but for the uninitiated, here is a quick primer. USB stands for
Universal Serial Bus, and is an industry standard used to inter-
face devices with a host computer. It functions via standard-
ised interface sockets. While there are several receptacle types
within USB, the Series A and B are the most commonly used.
Most digital cameras, however, use Micro and Mini receptacles
that are part of the USB 2.0 standard.
You can transfer digital images to a computer via a USBcable, either directly from the camera or using an external
card reader. To transfer images, connect your camera to the PC
via a USB cable. Once the connection is setup, turn on the cam-
era. It should go to transfer mode by default. Most cameras
come with some sort of editing / picture management soft-
ware that you need to install. If such a picture management
application is not installed on the system, the camera is detect-
ed as an external storage device. After this, it’s a simple matterof copying files like any other flash drive. There are also some
proprietary docks that are essentially USB devices meant for
Transfer andPrinting
Types of connectors (l to r) Mini-B plug, B-type plug, A-type receptacle,A-type plug

7/30/2019 BluePrint Digital Photography (Mar 2009).pdf
http://slidepdf.com/reader/full/blueprint-digital-photography-mar-2009pdf 76/141
D
I
G
I
TA
L
P
H
O
T
O
GR
A
P
H
Y
transferring pictures, except that they
also charge the camera. USB offers fair-
ly decent transfer speeds, althoughlarge data (read as 8 GB plus) might
send you off to make some coffee while
the transfer completes.
Firewire, on the other hand, is like a
big brother to USB. It generally outper-
forms USB 2.0 in terms of transfer speeds and reliability. Hence,
Firewire is a common connection these days for high-end digital
cameras and camcorders. The interface is also known by the pro-pitiatory brand names such as FireWire (Apple Inc.), i.LINK
(Sony), and Lynx (Texas Instruments), while its technical nomen-
clature is IEEE 1394. Transferring via Firewire is similar to USB.
Locate the Firewire port on your computer. It resembles a wider
USB port. There are basically three types of Firewire connec-
tions: Firewire 400, Firewire 800 and Firewire S800T. All three
are shaped slightly differently. However, adapters are available.
If your camera supports Firewire, you probably have the cable bundled along with it. Plug one end of the Firewire cable that
came with your digital camera into the Firewire port, and plug
the other end into your camera. The rest is exactly as with USB.
9.2 Bluetooth / WLAN
The beauty of Bluetooth is that there is no need for cables,
plugs, and all the precarious bending and reaching out behindthe PC for sockets; not to mention less clutter of wires on and
around your desk. Many printers, cameras, and laptops these
days, come with Bluetooth connectivity. This allows you to
print wirelessly and transfer pictures. To begin with, ensure
that both devices are Bluetooth enabled. To switch on
Bluetooth navigate the interface menu (usually LCD) of both
the printer and camera and select the appropriate option.
Next, pair both the devices. This can be done from either of thedevices but it’s best if done from the sending device, ie. your
camera. Once the devices are paired, it’s as simple as sending
files via a Bluetooth phone. So, after the pros, let’s look at the
cons. Bluetooth, though convenient, does have its share of has-
sles. Transfer speeds are abysmally slow. So for all practical
FAST TRACK
TRANSFER AND PRINTING 9
79
www.thinkdigit.com
FAST TRACKFAST TRACK
7/30/2019 BluePrint Digital Photography (Mar 2009).pdf
http://slidepdf.com/reader/full/blueprint-digital-photography-mar-2009pdf 77/141
D
I
G
I
TA
L
P
H
O
T
O
GR
A
P
H
Y
purposes, use Bluetooth as just a spontaneous printing or
transferring mode, if you don’t have a USB cable. Also, the pair-
ing of devices can be a bit tricky, requiring a bit of tinkering. And the connection once established, may not be very reliable.
There are a handful of digital cameras such as the Sony
Cyber-shot DSC-G1 that allow you transmit photos over a wire-
less network using WiFi. Some of the newer WiFi-enabled dig-
ital cameras even let you send photos directly to an email
address, or online photo sharing sites. WiFi lets you get over
one of the most inherent crippling limitations in digital cam-
eras - storage space. If your memory card is getting full, all youneed to do is find a WiFi hotspot and you can offload all the
data you want. One of the most important advantages of WiFi
over Bluetooth is speed. So when you’re faced with transfer-
ring 8 GBs of high-res images, all variants of WiFi will manage
the job pretty quickly. But an 802.11 a/g/n camera is recom-
mended. ‘a/g/n’ are the variants or protocols on which the
WiFi 802.11 standard operates. WiFi is easy on the battery too,
since it only operates in bursts while transferring. So, your battery, although being used up, will not dry out in a jiffy.
9.3 PictBridge
PictBridge is an industry standard that
allows images to be printed directly
from digital cameras to a printer, in
effect bypassing the middleman — inthis case, the PC. PictBridge operates
through normal USB wires and connec-
tors. Typically, a printer will have a type-
A connector while a PictBridge-enabled digital camera will have
a Mini-B port. Once the two devices are connected, you can
select and print images through the camera. For viewing and
selecting photos, usually the camera’s LCD interface is used.
The user can navigate all the supported functions via menus onthe LCD screen. The printer then retrieves the images from the
camera and prints them. An advantage of Pictbridge is that it
offers universal compatibility as each PictBridge device is auto-
matically recognised by the other. To find out if a camera or
printer is PictBridge enabled, look for the PictBridge logo on
80 FAST TRACK
TRANSFER AND PRINTING9 www.thinkdigit.com
FAST TRACK

7/30/2019 BluePrint Digital Photography (Mar 2009).pdf
http://slidepdf.com/reader/full/blueprint-digital-photography-mar-2009pdf 78/141
D
I
G
I
TA
L
P
H
O
T
O
GR
A
P
H
Y
the device or on the packaging or documentation. As more and
more manufacturers are implementing the standard in their
devices, printing directly from cameras and other devices isgoing to be quite common. It might even translate into printer
manufacturers entirely doing away with memory card reader
slots on printers. Overall, PictBridge seems to be a viable trans-
fer and printing option with little or no drawbacks. If made to
jot down some, then it’ll have to be that while the printer is
connected to the camera, it uses up battery. Also a few connec-
tivity errors are known to crop up now and then.
FAST TRACK
TRANSFER AND PRINTING 9
81
www.thinkdigit.com
FAST TRACKFAST TRACK
2 Connection of PictBridge compliant devices

7/30/2019 BluePrint Digital Photography (Mar 2009).pdf
http://slidepdf.com/reader/full/blueprint-digital-photography-mar-2009pdf 79/141
D
I
G
I
TA
L
P
H
O
T
O
GR
A
P
H
Y
9.4 AV-out / HDMI
Almost all digital cameras these days, suchas the Sony W35S, come with an AV-out
port. AV-out is provided so that you can con-
nect the camera to a TV or any other display
system that supports AV and view your pic-
tures or videos directly from the camera.
Once the camera is connected, switch to the
video mode on your TV. Next, switch the
camera to play mode. This lets you view your pictures or videos on the TV screen instead of the cam-
era’s LCD. There are, however, some things to keep in mind
like the region specification. TVs usually use the NTSC or PAL
system. India uses PAL, so make sure it’s set accordingly. To
change the settings, navigate the menu to go to video-out and
select PAL. An AV cable has two plugs at one end. One carries
audio (usually white) and the other carries the video signal
(usually yellow). These two plugs go into the TV’s ‘AV in’ recep-tacle. The other end goes into the camera socket. The AV-out
feature comes in handy if you want to show your pictures or
videos to a few people. It can even be used to stream whatever
the camera’s picking up directly to a large screen – very use-
ful when dealing with a much larger audience such as a con-
cert or gathering. You may or may not record the video, but
can still stream it.
HDMI again is like the big brother to AV-out. Since TVs aresurely moving towards High Definition (HD), cameras cannot
be left far behind. HDMI first started appearing on still cam-
eras around the beginning of 2006. These days, even decently
high-end cameras, such as the Nikon Coolpix S60, come with
an HDMI port. HDMI lets you transmit really high resolution
video output to an HDTV or screen directly from the camera.
HDMI stands for high-definition multimedia interface and
transmits uncompressed digital data. It supports up to eightchannels of audio and high clarity visual data with only a sin-
gle cable. While AV falls short in really large screens, HDMI
handles them beautifully. The real difference in quality
between the two will be apparent only when transmitting to
large (say 42-inch plus) HD screens.
82 FAST TRACK
TRANSFER AND PRINTING9 www.thinkdigit.com

7/30/2019 BluePrint Digital Photography (Mar 2009).pdf
http://slidepdf.com/reader/full/blueprint-digital-photography-mar-2009pdf 80/141
D
I
G
I
TA
L
P
H
O
T
O
GR
A
P
H
Y
FAST TRACK
CAMERA ACCESSORIES 10
83
www.thinkdigit.com
Once you purchase a camera, the next thing you need
are the accessories and parts for it. The camera body,
by itself, is hardly of any use. The accessories you pur-
chase can compliment the camera, improve its function and
sometimes are absolutely essential to photography in general.Some of the accessories are as follows.
10.1 Tripod
The tripod is one of the
most important accessories
a hobbyist should have, and
something every profes-sional or enthusiast photog-
rapher must own. The most
important function of the
tripod is to keep the camera
as steady as possible. Shaky
hands are common, and
clicking photos with an
unstable base almostalways means blurred
images. Tripods have a
small stump and a mount that
lets you mount any camera to
the tripod. The mount is a uni-
versal standard, so technically,
you should be able to attach any camera to any tripod.
Tripods prices range from Rs
1,000 to well over Rs 30,000.
Prices vary depending on the
kind of tripod you purchase. The
CameraAccessories
A spirit level can be used to set theright balance for the tripod
Mini tripods like this are greatfor portable use
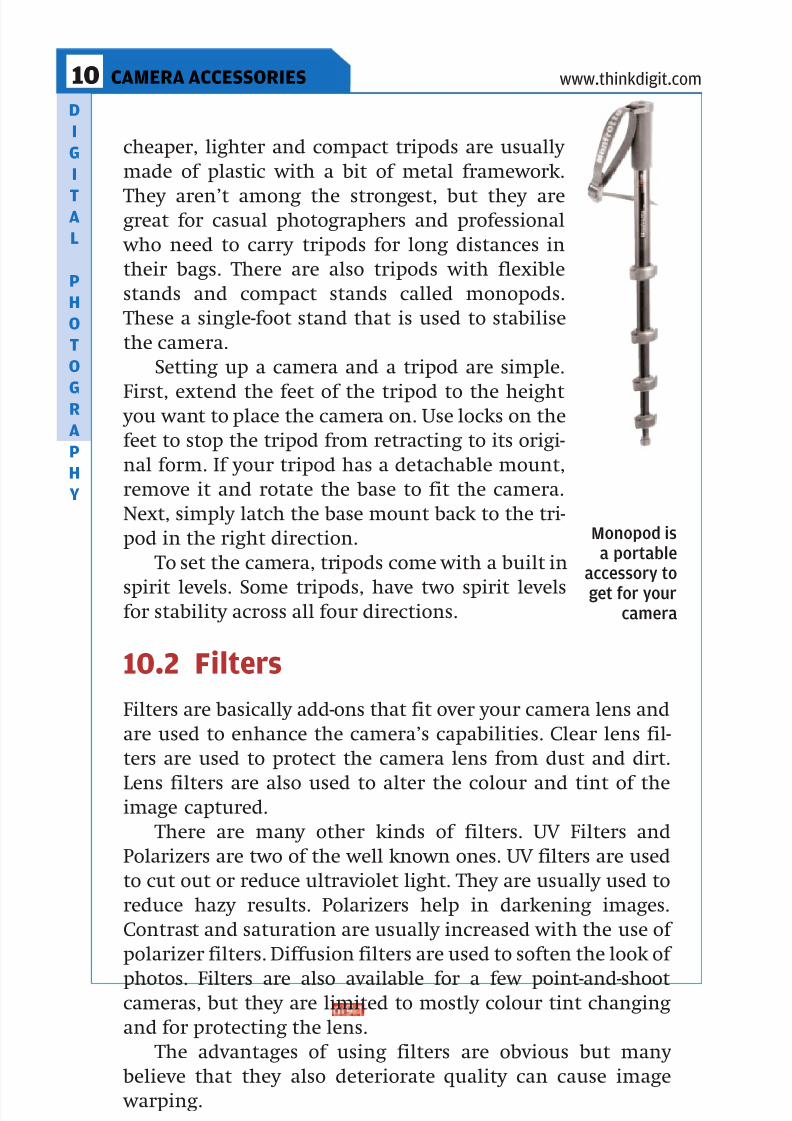
7/30/2019 BluePrint Digital Photography (Mar 2009).pdf
http://slidepdf.com/reader/full/blueprint-digital-photography-mar-2009pdf 81/141
D
I
G
I
TA
L
P
H
O
T
O
GR
A
P
H
Y
cheaper, lighter and compact tripods are usually
made of plastic with a bit of metal framework.
They aren’t among the strongest, but they aregreat for casual photographers and professional
who need to carry tripods for long distances in
their bags. There are also tripods with flexible
stands and compact stands called monopods.
These a single-foot stand that is used to stabilise
the camera.
Setting up a camera and a tripod are simple.
First, extend the feet of the tripod to the height you want to place the camera on. Use locks on the
feet to stop the tripod from retracting to its origi-
nal form. If your tripod has a detachable mount,
remove it and rotate the base to fit the camera.
Next, simply latch the base mount back to the tri-
pod in the right direction.
To set the camera, tripods come with a built in
spirit levels. Some tripods, have two spirit levelsfor stability across all four directions.
10.2 Filters
Filters are basically add-ons that fit over your camera lens and
are used to enhance the camera’s capabilities. Clear lens fil-
ters are used to protect the camera lens from dust and dirt.
Lens filters are also used to alter the colour and tint of theimage captured.
There are many other kinds of filters. UV Filters and
Polarizers are two of the well known ones. UV filters are used
to cut out or reduce ultraviolet light. They are usually used to
reduce hazy results. Polarizers help in darkening images.
Contrast and saturation are usually increased with the use of
polarizer filters. Diffusion filters are used to soften the look of
photos. Filters are also available for a few point-and-shootcameras, but they are limited to mostly colour tint changing
and for protecting the lens.
The advantages of using filters are obvious but many
believe that they also deteriorate quality can cause image
warping.
84 FAST TRACK
CAMERA ACCESSORIES10 www.thinkdigit.com
FAST TRACKFAST TRACK
Monopod isa portable
accessory to
get for yourcamera
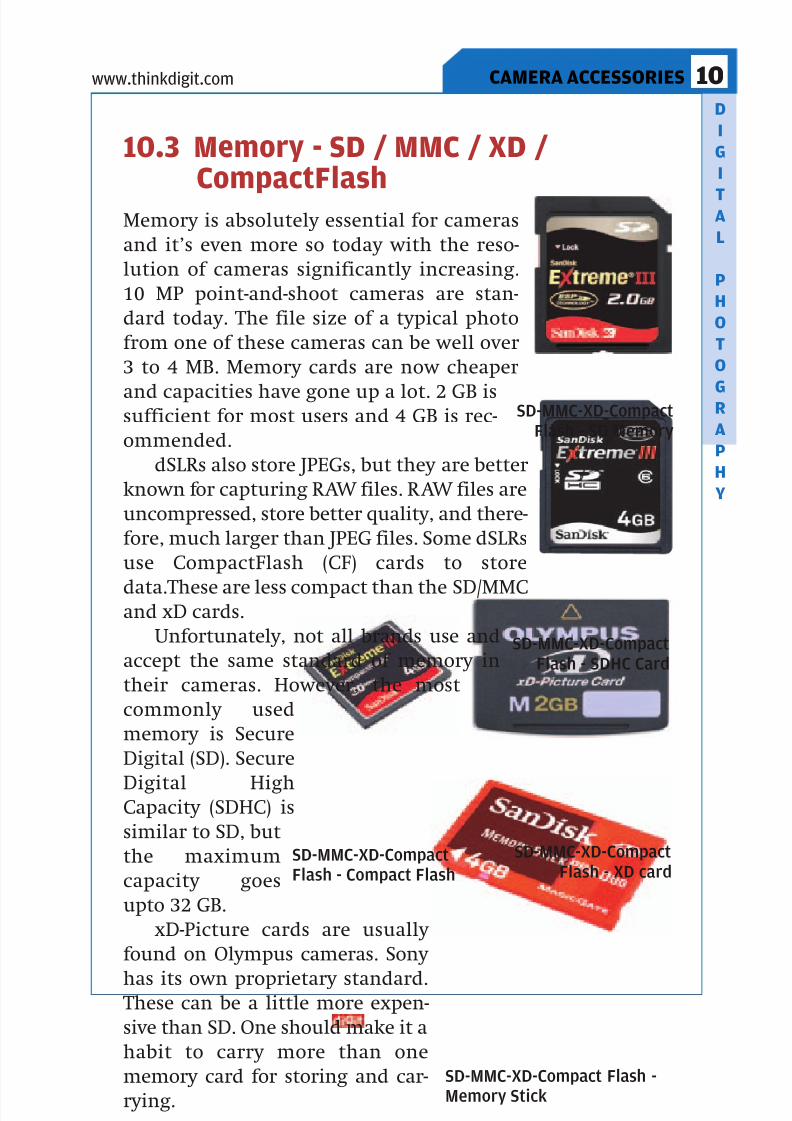
7/30/2019 BluePrint Digital Photography (Mar 2009).pdf
http://slidepdf.com/reader/full/blueprint-digital-photography-mar-2009pdf 82/141
D
I
G
I
TA
L
P
H
O
T
O
GR
A
P
H
Y
10.3 Memory - SD / MMC / XD /CompactFlash
Memory is absolutely essential for cameras
and it’s even more so today with the reso-
lution of cameras significantly increasing.
10 MP point-and-shoot cameras are stan-
dard today. The file size of a typical photo
from one of these cameras can be well over
3 to 4 MB. Memory cards are now cheaper
and capacities have gone up a lot. 2 GB issufficient for most users and 4 GB is rec-
ommended.
dSLRs also store JPEGs, but they are better
known for capturing RAW files. RAW files are
uncompressed, store better quality, and there-
fore, much larger than JPEG files. Some dSLRs
use CompactFlash (CF) cards to store
data.These are less compact than the SD/MMCand xD cards.
Unfortunately, not all brands use and
accept the same standard of memory in
their cameras. However, the most
commonly used
memory is Secure
Digital (SD). Secure
Digital HighCapacity (SDHC) is
similar to SD, but
the maximum
capacity goes
upto 32 GB.
xD-Picture cards are usually
found on Olympus cameras. Sony
has its own proprietary standard. These can be a little more expen-
sive than SD. One should make it a
habit to carry more than one
memory card for storing and car-
rying.
FAST TRACK
CAMERA ACCESSORIES 10
85
www.thinkdigit.com
FAST TRACKFAST TRACK
SD-MMC-XD-CompactFlash - SD Memory
SD-MMC-XD-CompactFlash - SDHC Card
SD-MMC-XD-CompactFlash - XD card
SD-MMC-XD-Compact Flash -Memory Stick
SD-MMC-XD-CompactFlash - Compact Flash

7/30/2019 BluePrint Digital Photography (Mar 2009).pdf
http://slidepdf.com/reader/full/blueprint-digital-photography-mar-2009pdf 83/141
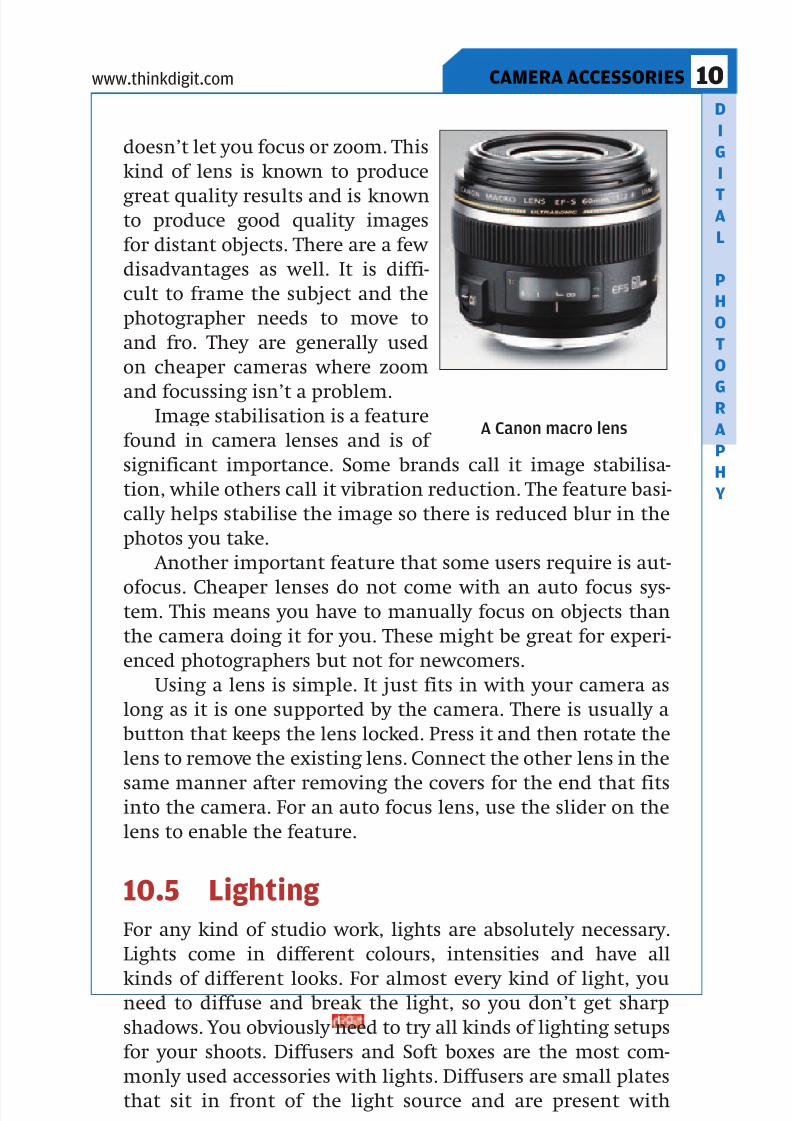
7/30/2019 BluePrint Digital Photography (Mar 2009).pdf
http://slidepdf.com/reader/full/blueprint-digital-photography-mar-2009pdf 84/141
D
I
G
I
TA
L
P
H
O
T
O
GR
A
P
H
Y
doesn’t let you focus or zoom. This
kind of lens is known to produce
great quality results and is knownto produce good quality images
for distant objects. There are a few
disadvantages as well. It is diffi-
cult to frame the subject and the
photographer needs to move to
and fro. They are generally used
on cheaper cameras where zoom
and focussing isn’t a problem.Image stabilisation is a feature
found in camera lenses and is of
significant importance. Some brands call it image stabilisa-
tion, while others call it vibration reduction. The feature basi-
cally helps stabilise the image so there is reduced blur in the
photos you take.
Another important feature that some users require is aut-
ofocus. Cheaper lenses do not come with an auto focus sys-tem. This means you have to manually focus on objects than
the camera doing it for you. These might be great for experi-
enced photographers but not for newcomers.
Using a lens is simple. It just fits in with your camera as
long as it is one supported by the camera. There is usually a
button that keeps the lens locked. Press it and then rotate the
lens to remove the existing lens. Connect the other lens in the
same manner after removing the covers for the end that fitsinto the camera. For an auto focus lens, use the slider on the
lens to enable the feature.
10.5 LightingFor any kind of studio work, lights are absolutely necessary.
Lights come in different colours, intensities and have all
kinds of different looks. For almost every kind of light, youneed to diffuse and break the light, so you don’t get sharp
shadows. You obviously need to try all kinds of lighting setups
for your shoots. Diffusers and Soft boxes are the most com-
monly used accessories with lights. Diffusers are small plates
that sit in front of the light source and are present with
FAST TRACK
CAMERA ACCESSORIES 10
87
www.thinkdigit.com
FAST TRACKFAST TRACK
A Canon macro lens
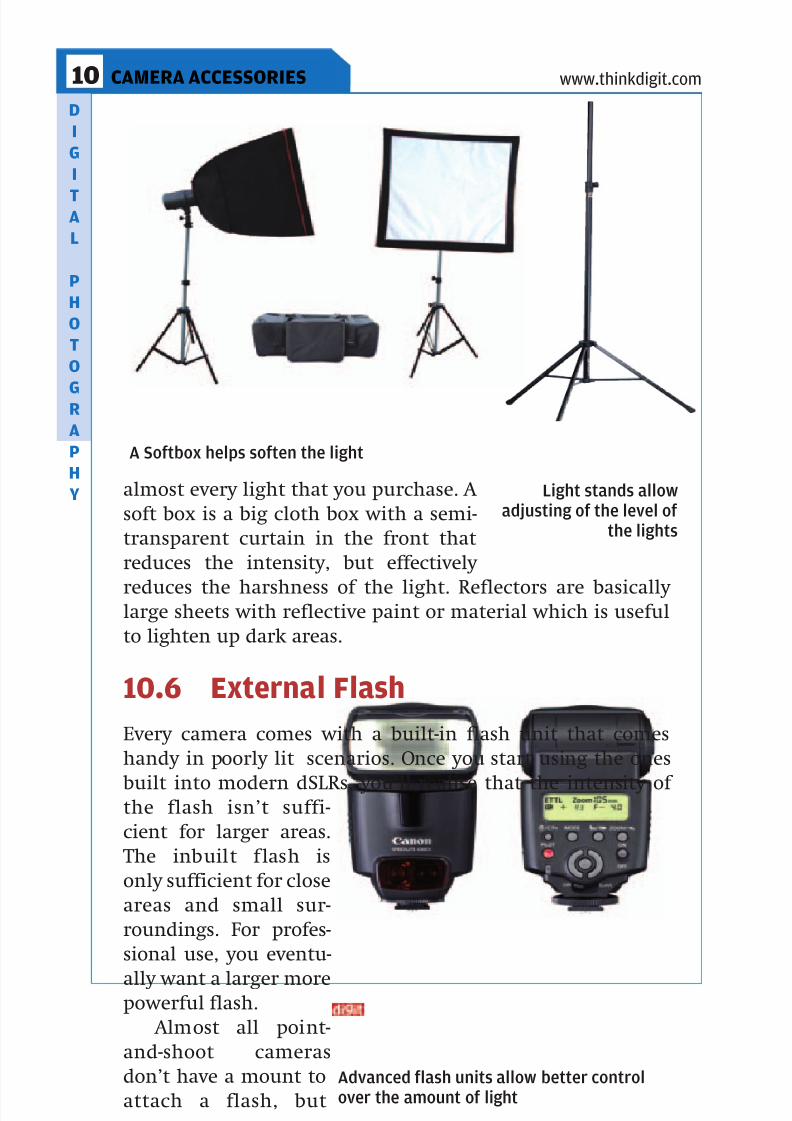
7/30/2019 BluePrint Digital Photography (Mar 2009).pdf
http://slidepdf.com/reader/full/blueprint-digital-photography-mar-2009pdf 85/141

7/30/2019 BluePrint Digital Photography (Mar 2009).pdf
http://slidepdf.com/reader/full/blueprint-digital-photography-mar-2009pdf 86/141

7/30/2019 BluePrint Digital Photography (Mar 2009).pdf
http://slidepdf.com/reader/full/blueprint-digital-photography-mar-2009pdf 87/141
D
I
G
I
TA
L
P
H
O
T
O
GR
A
P
H
Y
players and some even allow basic editing and altering of
images.
10.8 Remote control
The remote control on a camera is a better replacement to the
timer. It allows you to be able to capture photos from a dis-
tance. It allows you to place the camera in places where the
photographer can’t be the centre of action like on a race track.
This kind of functionality is especially useful for wildlife pho-
tography or sometimes even for timelapses. A remote controlalso means that the
user isn’t physically
present with the
camera so there is
even less chance of
any shake.
There are several
kinds of remote trig-gers for the camera.
Some of them are
controlled through
wire, but of late,
most of them can
be fired wirelessly.
The remote control is really simple to use. They are also very
cheap and many of them start at as low as $8 (Rs. 400). Wireless triggers are also available for flash units. These
are useful when you have a completely different lighting
setup with more than a single light or the light itself is to be
placed away from the camera. For this kind of remote control,
the flash unit is replaced with a transmitter that sends the
flash-firing signal to the lights. You also find extension chords
and cables for flash units.
10.9 Batteries
Batteries are basically two types, AA batteries or proprietary
batteries. AA batteries are easily available in the market,
which makes it easy to replace drained batteries. Propriety
90 FAST TRACK
CAMERA ACCESSORIES10 www.thinkdigit.com
FAST TRACKFAST TRACKFAST TRACK
Wired remote control allows the user toeliminate any shake created by the human hand

7/30/2019 BluePrint Digital Photography (Mar 2009).pdf
http://slidepdf.com/reader/full/blueprint-digital-photography-mar-2009pdf 88/141
D
I
G
I
TA
L
P
H
O
T
O
GR
A
P
H
Y
batteries are not easily
available, and if you run
out of charge, the only option is to recharge it.
However, propriety batter-
ies take longer to drain
than AA batteries.
Although AA batteries are
cheap, they have to be pur-
chased often.
Taking care of the bat-teries, and managing
them properly is vital to
the longevity of the equip-
ment, and the amount of photos you can take at one charge.
Batteries drain out when they are in the camera, even if
you’are not using the camera. If your camera is kept in a shelf
without being used, its a good idea to store the battery sepa-
rately. Low quality AA batteries may leak and ruin the equip-ment, or make it require a cleanup. Propriety batteries will
lose charge over time, and when you take the camera out, you
may realise that you have a drained battery. It makes sense to
carry around a set of spares.
If you’re using AA batteries, make sure that you use the
same brands with the same amount of charge. Rechargeable
batteries are a common solution for cameras that use AA bat-
teries. While rechargeable batteries make sense economically,they also get drained quicker than AA batteries. Charging
takes a long time too, so you might require two sets of
rechargeable batteries. In this case, do not mix and match the
sets, and replace an entire set every time you change batteries.
To increase the life of proprietary batteries, charge the bat-
tery to the fullest (don’t overcharge), then drain it completely
and repeat the cycle. Purchasing an extra, or even two extra
batteries at the time of purchasing the camera makes goodsense. This means that you will have a battery to spare if the
battery drains out, and you will not need to hunt for a battery
later on. You might have to go out of your way to a specialist or
enthusiast shop for obtaining a replacement propriety battery.
How you use the camera can increase the battery life dra-
FAST TRACK
CAMERA ACCESSORIES 10
91
www.thinkdigit.com
FAST TRACKFAST TRACKFAST TRACK
AA are cheaper but bulkier and heavy

7/30/2019 BluePrint Digital Photography (Mar 2009).pdf
http://slidepdf.com/reader/full/blueprint-digital-photography-mar-2009pdf 89/141
D
I
G
I
TA
L
P
H
O
T
O
GR
A
P
H
Y
92 FAST TRACK
CAMERA ACCESSORIES10 www.thinkdigit.com
FAST TRACK
matically. If you’re going on a long outing with no spares, its
a good idea to turn off the LCD display. Using just the
viewfinder to take photographs will drastically reduce thepower consumption of the camera. Turn your camera off
when not in use, and don’t waste power by reviewing your
work. If your battery is critically low, and you still have to take
photographs, compose the shot, turn the camera on, click the
trigger, then quickly turn off the camera.
10.10 Battery Chargers
If you own a digital camera, chances are that you use a charg-
er either for the AA batteries or the proprietary battery.
Always use the specified charger that accompanied the bat-
teries. Eventually, the batteries will lose their capacity to be
recharged. Manage sets of batteries in such a way, that they all
have the same amount of charge and usage at any point of time.
Don’t store batteries in the charger. These batteries will
drain slowly, and may leak into the charger. Whenever possibleuse a reputed brand, and consult the manual of the camera for
supported battery types. If the batteries are heating up when
you charge them, replace the entire set, as this means that the
batteries are of a low quality that can damage your camera.
Completely charge a set, then drain it completely in the cam-
era before charging again. Make sure that the charger indi-
cates when the charge is complete, so you do not end up over-
charging the batteries, which can make it heat up or ruin it.If you are using a proprietary battery, it is very important
to invest in another one. Follow the complete charge-drain-
charge cycle for such batteries as well. Use the charger of the
same brand, or the charger that came with the camera. Don’t
keep the battery for charging without monitoring the
process, as overcharging can ruin the battery. Make sure that
there is an automatic cutoff or some kind of indicator for a
complete charge. While traveling, and especially when traveling overseas,
you might face problems with finding compatible power out-
lets. It always makes sense to invest in a plug, with multiple
configurations of pins or a universal adapter.
FAST TRACKFAST TRACK

7/30/2019 BluePrint Digital Photography (Mar 2009).pdf
http://slidepdf.com/reader/full/blueprint-digital-photography-mar-2009pdf 90/141
D
I
G
I
TA
L
P
H
O
T
O
GR
A
P
H
Y
FAST TRACK
CAMERA CARE 11
93
www.thinkdigit.com
Cameras need to be handled with care and require peri-
odical maintenance to keep them in good condition.
Some cameras need extra care while handling. dSLRs
should be serviced regularly. Point-and-shoot cameras, on the
other hand, are a little simpler and have fewer things that can
go wrong if not taken care of. Tasks as simple as wearing aneckstrap with the camera attached can prevent accidents. In
the long run however, there are many other things that can
be done to extend the life of your camera.
11.1 Lens cleaning and maintenance
The lens is one of the most
important parts of the camerathat requires the most clean-
ing. It is after all, the part that
is directly exposed to the open
when in use and also is directly
linked to the quality of the
image. Any dirt or marks on it
will end up in some way or the
other in the images you take.One of the ways you’ll know is
if your photos have unexplain-
able blurry spots in all the
photos.
As much as possible,
the lens should not be
touched. The lens covershould be on the lens at all
times. If you have multiple
lenses, then make sure the
ones not in use are covered
on both ends.
Camera Care
A lens cleaning brush can helpclear any dust on the lens
Lens cleaning kits for cameras areavailable
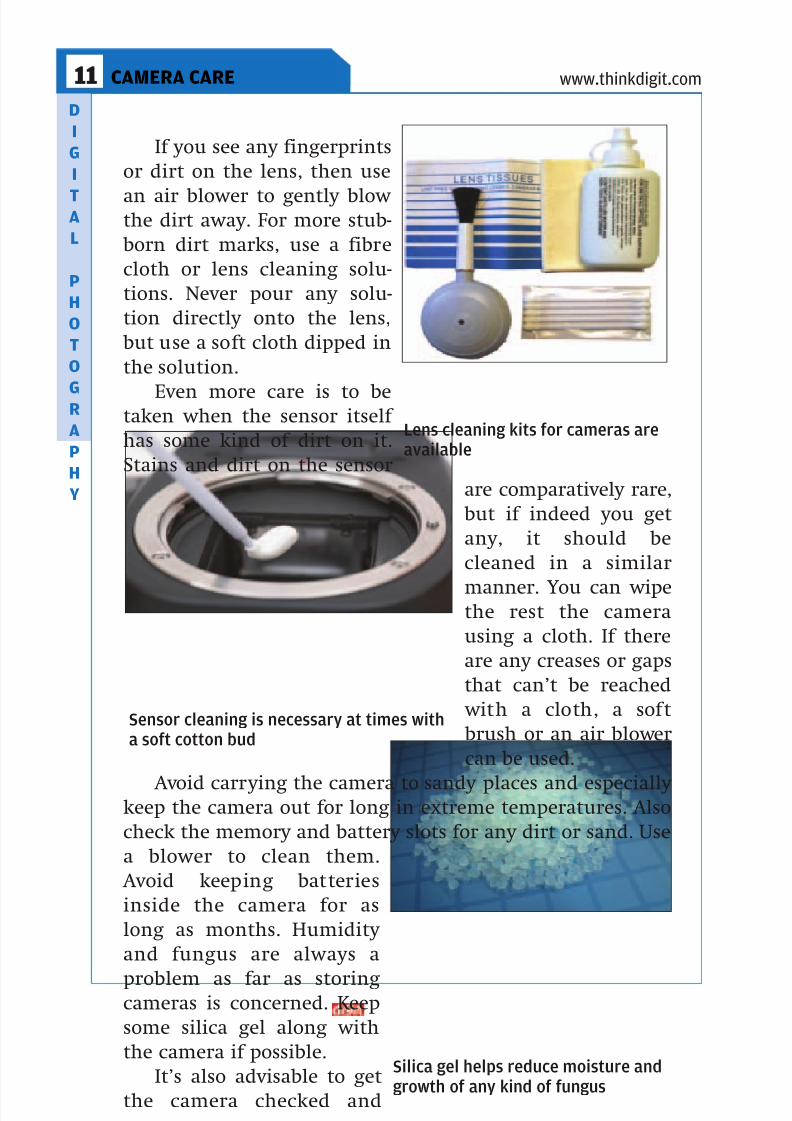
7/30/2019 BluePrint Digital Photography (Mar 2009).pdf
http://slidepdf.com/reader/full/blueprint-digital-photography-mar-2009pdf 91/141
D
I
G
I
TA
L
P
H
O
T
O
GR
A
P
H
Y
If you see any fingerprints
or dirt on the lens, then use
an air blower to gently blow the dirt away. For more stub-
born dirt marks, use a fibre
cloth or lens cleaning solu-
tions. Never pour any solu-
tion directly onto the lens,
but use a soft cloth dipped in
the solution.
Even more care is to betaken when the sensor itself
has some kind of dirt on it.
Stains and dirt on the sensor
are comparatively rare,
but if indeed you get
any, it should be
cleaned in a similar
manner. You can wipethe rest the camera
using a cloth. If there
are any creases or gaps
that can’t be reached
with a cloth, a soft
brush or an air blower
can be used.
Avoid carrying the camera to sandy places and especially keep the camera out for long in extreme temperatures. Also
check the memory and battery slots for any dirt or sand. Use
a blower to clean them.
Avoid keeping batteries
inside the camera for as
long as months. Humidity
and fungus are always a
problem as far as storingcameras is concerned. Keep
some silica gel along with
the camera if possible.
It’s also advisable to get
the camera checked and
94 FAST TRACK
CAMERA CARE11 www.thinkdigit.com
FAST TRACK
Lens cleaning kits for cameras areavailable
Sensor cleaning is necessary at times witha soft cotton bud
Silica gel helps reduce moisture andgrowth of any kind of fungus

7/30/2019 BluePrint Digital Photography (Mar 2009).pdf
http://slidepdf.com/reader/full/blueprint-digital-photography-mar-2009pdf 92/141

7/30/2019 BluePrint Digital Photography (Mar 2009).pdf
http://slidepdf.com/reader/full/blueprint-digital-photography-mar-2009pdf 93/141
D
I
G
I
TA
L
P
H
O
T
O
GR
A
P
H
Y
96 FAST TRACK
SOFTWARE12 www.thinkdigit.com
12.1 Picasa
Picasa is a photo management software by Google. It is
designed for casual photographers to upload images to picas-
aweb — an online photo album. The program is packed with
features, and enables you to noticeably improve photos before
putting them up on the web.
Basic retouching features includes colour correction, set-ting the tone for the image and removing spots and blemish-
es. All editing done on the photograph is non destructive. This
means that any changes you make to the image, will be copied
to another file, and your original image will still be recover-
able. You are also allowed to edit the same photo in different
ways, and upload variations.
Picasa automatically catalogues all the photos on your sys-
tem during start up. This can be irritating thing at times,especially, if it picks up all the graphics in a game folder or
irrelevant images elsewhere on the system. Unless disabled,
Picasa also picks up new images every time it starts, even in
removable media. There are image management capabilities
in Picasa, which include rating and tagging.
Software
Picasa 3, running on a Mac
7/30/2019 BluePrint Digital Photography (Mar 2009).pdf
http://slidepdf.com/reader/full/blueprint-digital-photography-mar-2009pdf 94/141
D
I
G
I
TA
L
P
H
O
T
O
GR
A
P
H
Y
Once edited, the images can be uploaded for hosting online.
A sync feature lets you synchronise changes made to folders on
your computer, to changes made to albums hosted on the inter-net. You can choose to either make these albums public or pri-
vate, and then send the links to your friends and families.
Picasaweb is not as strong a community as Flickr for enthusiasts,
but Flickr is not used for sharing personal photos to the extent
Picasaweb is. If you are uploading photos to share with family
and friends, and these photos are of an event or an activity, it is
better to use Picasa for this purpose. However, if you are taking
artistic photographs, and want professional feedback for your work, then Flickr is a better web site. Picasa allows you to resize
the pictures before you upload them. Use this whenever possible
to save on web space. The free service provides 1 GB of free stor-
age. According to the site, this is enough for 4000 photographs,
but a lot of photographs end up being over 1 MB in size, which
reduces the number to a little less than 1000. When you upload
the photographs from a standard digital camera, you might run
out of web space in about twenty albums, which takes about a year of regular use. If you end up regularly uploading pictures
on Picasaweb, you will eventually end up doing what a lot of
people do, which is to have multiple Picasaweb accounts.
12.2 Adobe Photoshop
This one is the standard across platforms, as it is available for
both Mac OS and Windows machines. Unfortunately, there is noLinux port yet. The prevalence of Photoshop is so much, that
‘photoshopping’ or even just ‘shopping’ has become synony-
mous with image editing. Photoshop’s default format for saving
images is PSD. This formats allows layers, masks, certain effects,
paths and colour profiles to be stored in the image itself. This
format stores far more information than competing formats,
and the wide use of Photoshop means that many image manip-
ulation programs support this format. A user can also storenotes and audio/video commentary in the image itself, which
makes it easy for an image editor and a client to compare notes
and work on a project together.
There are two primary ways to manipulate an image of
Photoshop, the image effects toolbar and the filters. True photo-
FAST TRACK
SOFTWARE 12
97
www.thinkdigit.com
FAST TRACKFAST TRACKFAST TRACK
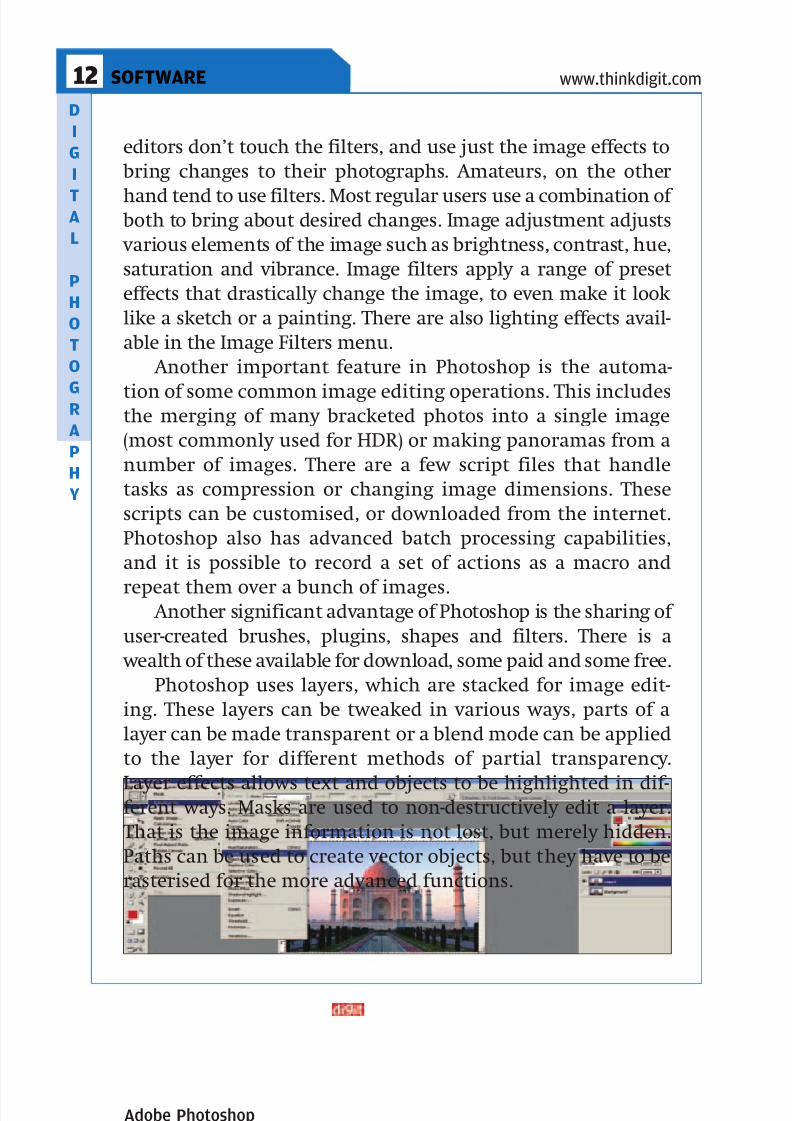
7/30/2019 BluePrint Digital Photography (Mar 2009).pdf
http://slidepdf.com/reader/full/blueprint-digital-photography-mar-2009pdf 95/141
D
I
G
I
TA
L
P
H
O
T
O
GR
A
P
H
Y
editors don’t touch the filters, and use just the image effects to
bring changes to their photographs. Amateurs, on the other
hand tend to use filters. Most regular users use a combination of both to bring about desired changes. Image adjustment adjusts
various elements of the image such as brightness, contrast, hue,
saturation and vibrance. Image filters apply a range of preset
effects that drastically change the image, to even make it look
like a sketch or a painting. There are also lighting effects avail-
able in the Image Filters menu.
Another important feature in Photoshop is the automa-
tion of some common image editing operations. This includesthe merging of many bracketed photos into a single image
(most commonly used for HDR) or making panoramas from a
number of images. There are a few script files that handle
tasks as compression or changing image dimensions. These
scripts can be customised, or downloaded from the internet.
Photoshop also has advanced batch processing capabilities,
and it is possible to record a set of actions as a macro and
repeat them over a bunch of images. Another significant advantage of Photoshop is the sharing of
user-created brushes, plugins, shapes and filters. There is a
wealth of these available for download, some paid and some free.
Photoshop uses layers, which are stacked for image edit-
ing. These layers can be tweaked in various ways, parts of a
layer can be made transparent or a blend mode can be applied
to the layer for different methods of partial transparency.
Layer effects allows text and objects to be highlighted in dif-ferent ways. Masks are used to non-destructively edit a layer.
That is the image information is not lost, but merely hidden.
Paths can be used to create vector objects, but they have to be
rasterised for the more advanced functions.
98 FAST TRACK
SOFTWARE12 www.thinkdigit.com
FAST TRACKFAST TRACK
Adobe Photoshop

7/30/2019 BluePrint Digital Photography (Mar 2009).pdf
http://slidepdf.com/reader/full/blueprint-digital-photography-mar-2009pdf 96/141
D
I
G
I
TA
L
P
H
O
T
O
GR
A
P
H
Y
12.3 Adobe Lightroom
Adobe Photoshop, the industry standard for photoediting lacksone major feature that competing image editors have, which is
a library for sorting, organising and managing photos. This gap
is filled in by a software called Lightroom by Adobe, which is a
very powerful photo manager. Lightroom is a non-destructive
photo editor, like Picasa. The changes made to the photograph
do not alter the actual photograph, but will be used for all prac-
tical purposes by the software, including exporting the amped
up negative to Photoshop for further image editing. The software has five modules for handling photos. The
library module is useful for managing a large database of images.
The image database is called a catalogue within the software,
and instead of indexing all the photos on the system, which is
the most common approach for the software, you can choose to
bunch particular types of photos together into catalogues. This
could be photos from a particular camera, photos from the web
or any other source. You can also mix and match to create a num- ber of catalogues with photos shared between them. There are
powerful tagging features, which includes a colour code, ratings,
flags, keywords and metadata. You can use these as filters for
sorting your photos. A pane on the right allows for basic image
editing, like exposure, tone and vibrance in Lightroom 2. You can
also create custom filters and use keywords.
The develop module brings up more image retouching
tools. These include cropping, red-eye reduction, spot removaland adjustments. You can also correct the exposure, fill light
and other image properties of the photograph. There are drop-
down boxes for advanced options such as tone curve, split ton-
ing and detail. The slideshow module lets you create elaborate
slideshows, with transitions and timings, and lets you view or
save them. The photos need not occupy the entire frame, and
the slideshow features here are vast. The print module lets you
process the image for printing. These include borders, marginsand orientations. The web module automates a process of cre-
ating and exporting HTML or Flash based image galleries for
the web. With Picasa around, the regular user may not use this
feature, but for professional photographers, or serious hobby-
ists, this is a great feature to upload photographs on their own
FAST TRACK
SOFTWARE 12
99
www.thinkdigit.com
FAST TRACKFAST TRACKFAST TRACK
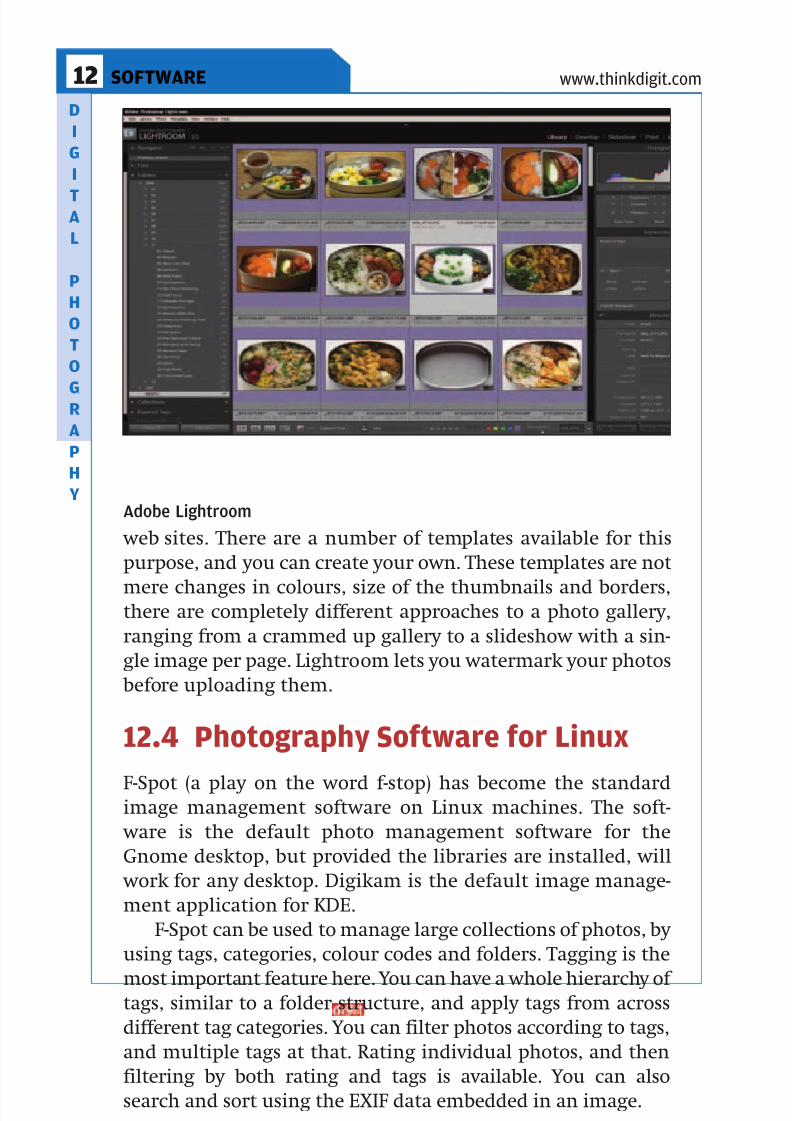
7/30/2019 BluePrint Digital Photography (Mar 2009).pdf
http://slidepdf.com/reader/full/blueprint-digital-photography-mar-2009pdf 97/141
D
I
G
I
TA
L
P
H
O
T
O
GR
A
P
H
Y
web sites. There are a number of templates available for this
purpose, and you can create your own. These templates are not
mere changes in colours, size of the thumbnails and borders,there are completely different approaches to a photo gallery,
ranging from a crammed up gallery to a slideshow with a sin-
gle image per page. Lightroom lets you watermark your photos
before uploading them.
12.4 Photography Software for Linux
F-Spot (a play on the word f-stop) has become the standardimage management software on Linux machines. The soft-
ware is the default photo management software for the
Gnome desktop, but provided the libraries are installed, will
work for any desktop. Digikam is the default image manage-
ment application for KDE.
F-Spot can be used to manage large collections of photos, by
using tags, categories, colour codes and folders. Tagging is the
most important feature here. You can have a whole hierarchy of tags, similar to a folder structure, and apply tags from across
different tag categories. You can filter photos according to tags,
and multiple tags at that. Rating individual photos, and then
filtering by both rating and tags is available. You can also
search and sort using the EXIF data embedded in an image.
100 FAST TRACK
SOFTWARE12 www.thinkdigit.com
FAST TRACK
Adobe Lightroom

7/30/2019 BluePrint Digital Photography (Mar 2009).pdf
http://slidepdf.com/reader/full/blueprint-digital-photography-mar-2009pdf 98/141

7/30/2019 BluePrint Digital Photography (Mar 2009).pdf
http://slidepdf.com/reader/full/blueprint-digital-photography-mar-2009pdf 99/141

7/30/2019 BluePrint Digital Photography (Mar 2009).pdf
http://slidepdf.com/reader/full/blueprint-digital-photography-mar-2009pdf 100/141

7/30/2019 BluePrint Digital Photography (Mar 2009).pdf
http://slidepdf.com/reader/full/blueprint-digital-photography-mar-2009pdf 101/141
D
I
G
I
TA
L
P
H
O
T
O
GR
A
P
H
Y
Flickr also became one of the first web sites to implement
‘tag clouds’ – a visual representation of a collection of tags
with the colour and font/font size of each tag indicating its
importance or popularity.
Signing up: This part is the smoothest. All you need to do is sign up with
your Yahoo! id. If you don’t have one yet, you’ll either have toopen one, or, give up pretending to act interested in photog-
raphy web sites.
Sets: You can organise all your photographs into ‘sets’ in Flickr. So
104 FAST TRACK
WEB SERVICES13 www.thinkdigit.com
FAST TRACKFAST TRACK
This is how we tag it
It’s raining tags
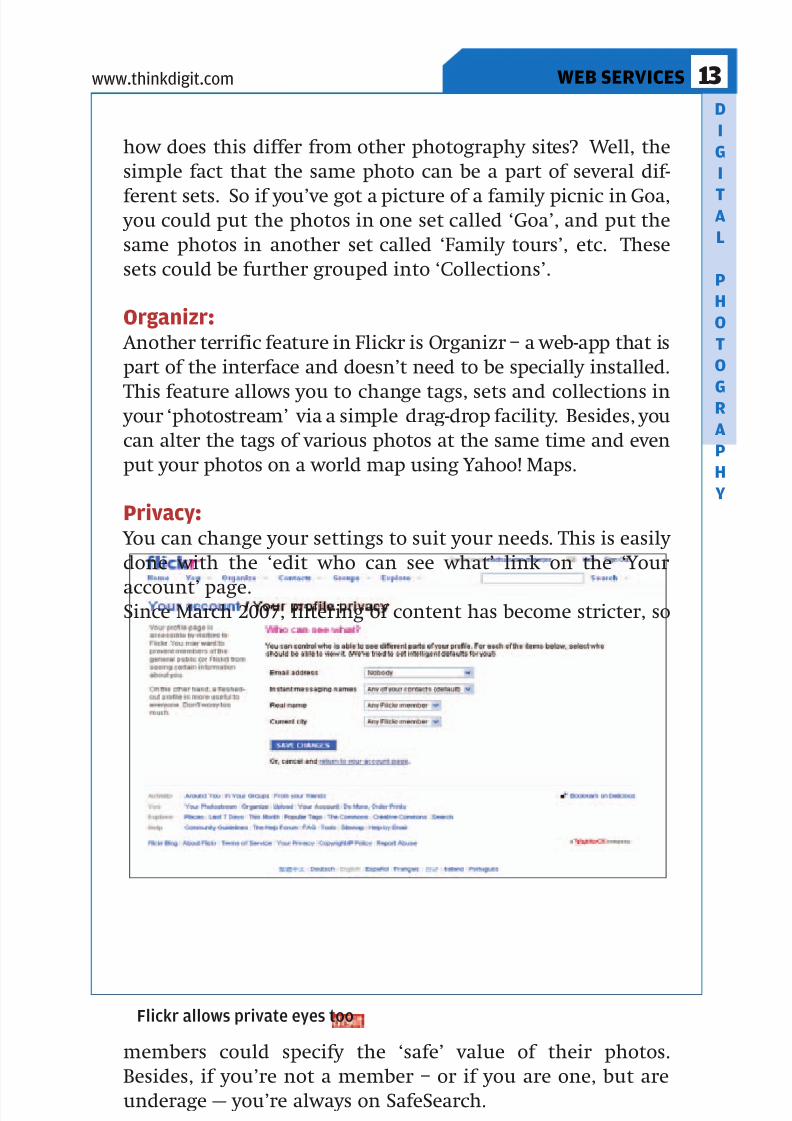
7/30/2019 BluePrint Digital Photography (Mar 2009).pdf
http://slidepdf.com/reader/full/blueprint-digital-photography-mar-2009pdf 102/141
D
I
G
I
TA
L
P
H
O
T
O
GR
A
P
H
Y
how does this differ from other photography sites? Well, the
simple fact that the same photo can be a part of several dif-
ferent sets. So if you’ve got a picture of a family picnic in Goa, you could put the photos in one set called ‘Goa’, and put the
same photos in another set called ‘Family tours’, etc. These
sets could be further grouped into ‘Collections’.
Organizr: Another terrific feature in Flickr is Organizr – a web-app that is
part of the interface and doesn’t need to be specially installed.
This feature allows you to change tags, sets and collections in your ‘photostream’ via a simple drag-drop facility. Besides, you
can alter the tags of various photos at the same time and even
put your photos on a world map using Yahoo! Maps.
Privacy: You can change your settings to suit your needs. This is easily
done with the ‘edit who can see what’ link on the ‘Your
account’ page.Since March 2007, filtering of content has become stricter, so
members could specify the ‘safe’ value of their photos.
Besides, if you’re not a member – or if you are one, but are
underage — you’re always on SafeSearch.
FAST TRACK
WEB SERVICES 13
105
www.thinkdigit.com
FAST TRACKFAST TRACKFAST TRACK
Flickr allows private eyes too

7/30/2019 BluePrint Digital Photography (Mar 2009).pdf
http://slidepdf.com/reader/full/blueprint-digital-photography-mar-2009pdf 103/141
D
I
G
I
TA
L
P
H
O
T
O
GR
A
P
H
Y
Flickr Uploadr:If you don’t want to put your photos directly on the web, you
can pre-organise them with the Uploadr, which is a desktopclient with a cool interface, complete, with tagging and all.
Videos:Since April 2008, Flickr allows you to upload videos with a size
limit of 150 MB or 90 seconds in duration.
Free: That’s the magic word, isn’t it? One of the prime reasons that
people flock to Flickr with their digital images is because,
unlike several photo sites on the web, Flickr charges nothing.
If you’re desperate to spend money, however – or need hi-fi
tools to play and juggle your images with – you could upgrade
to Flickr Pro for less than 25 dollars a year.
There’s other smart stuff here too. You can order prints,
which could be delivered to you at your doorstep. And not just prints. Flickr has partnered with several third-party ven-
dors to allow you to get your photos printed on business cards,
large size prints, photo books, posters, calendars, etc. Flickr’s
RSS and Atom feeds, its facility for posting photos to blogs,
through emails and from camera-phones, all make the site a
106 FAST TRACK
WEB SERVICES13 www.thinkdigit.com
FAST TRACK
Load up before you log in

7/30/2019 BluePrint Digital Photography (Mar 2009).pdf
http://slidepdf.com/reader/full/blueprint-digital-photography-mar-2009pdf 104/141
D
I
G
I
TA
L
P
H
O
T
O
GR
A
P
H
Y
photographer’s delight. Besides, Flickr also uses an API
(Application Programming Interface) which can be tweaked or
expanded by non-commercial users. Also, being one of thosephoto-sharing web sites that is entirely compatible with Linux
and Macintosh, Flickr is quite the universal favourite.
13.2 PBase (www.pbase.com)
This one started off as photobase with a ‘.org’ generic domain
in August 1999. It’s now one of the top photo-storage/sharing
sites on the web, and one of the few to endure the dot-com bubble-burst. Using Linux and Red Hat distribution on an
Apache server, PBase was created – and is still maintained – by
the husband – wife duo, Slug and Emily Lee.
All you need is an email id to gain access to PBase and start
uploading your digital delights. PBase has many features to
brag about, but they’re really humble in stark contrast withtheir stupendous success. In fact, PBase is so low key, you wont
even find an article on it in Wikipedia.
Simple: The PBase interface is a no-frills, straightforward set of
FAST TRACK
WEB SERVICES 13
107
www.thinkdigit.com
FAST TRACKFAST TRACKFAST TRACK
Get your photos to touch Pbase
7/30/2019 BluePrint Digital Photography (Mar 2009).pdf
http://slidepdf.com/reader/full/blueprint-digital-photography-mar-2009pdf 105/141

7/30/2019 BluePrint Digital Photography (Mar 2009).pdf
http://slidepdf.com/reader/full/blueprint-digital-photography-mar-2009pdf 106/141
D
I
G
I
TA
L
P
H
O
T
O
GR
A
P
H
Y
13.3 Picasa Web(picasaweb.google.com)
As is evident from the URL above, this is another fantastic
product from the people at Mountain View, California – the
Google guys. Also known as ‘Picasa Web Albums’, the word
‘album’ which is more associated with the physical kind, is
often, understandably, given a miss. Picasa, evidently, is a
clever blending of the words ‘pic’ (for ‘picture, obviously),
‘Picasso’ (remember that incredible painter?) and ‘mi casa’ (
my house).
If you’re a Google-fan, you’ve definitely heard of — and
downloaded — Picasa (now Picasa 3) and used it to organise
your photos in your own computer.
Originally created by Idealab, Google bought it over in
2004 and has offered it to all Gmail users for free. Using your
Gmail id and password, you can access Picasa. While Picasa 3
is one of their most downloaded products, Picasa Web Albums
(PWA) is jostling for netspace with the likes of Flickr andZooomr. Several features that have been integrated into
Picasa help to make it among our top photo-sharing sites:
Free:Unlike PBase, Picasa Web Albums is free for all to use – that’s
FAST TRACK
WEB SERVICES 13
109
www.thinkdigit.com
FAST TRACKFAST TRACK
Another Google googly

7/30/2019 BluePrint Digital Photography (Mar 2009).pdf
http://slidepdf.com/reader/full/blueprint-digital-photography-mar-2009pdf 107/141
D
I
G
I
TA
L
P
H
O
T
O
GR
A
P
H
Y
if you only need 1 GB of space (but they do add ‘and counting!’
so the capacity seems bound to increase pretty soon). For any-
thing more, you’ll have to pay.
Picasa 3:Picasa automatically scans your computer for all its images
and keeps them on record for your easy access, in case you
want to upload them to PWA. You can easily upload photo-
graphs using Picasa (or the Exporter for iPhoto or the
Uploader on MacOS) and there’s no loss of the quality of the
picture.
No Ads:No advertisements make you view your photographs and oth-
ers in a clutter-free environment.
Sync to Web: The ‘Sync to Web’ is a feature of Picasa 3 ensures that the
changes you make in a photograph are instantly incorporatedinto the copy of the photo that you may have formerly
uploaded onto PWA.
Privacy: You can maintain your very own private album on PWA, let-
ting nobody see them except yourself or your family. If you
want someone else to have access to it, you could just email
an “unlisted number” URL which is specifically assigned to your private album. PWA uses an “unlisted number” approach
for URLs for private photo.
Multiple Word Tags:Finally, you can tag your pictures with multiple words (word-
groups) rather than have them recorded as several different
words.
Face tags:So you’ve got a picture with about a dozen friends in it and it
seems tedious to put all the names in a tag-list. All you need
to do is use Picasa’s face-recognition technology, which can
be accessed using the ‘Add name tags’ button, and which
110 FAST TRACK
WEB SERVICES13 www.thinkdigit.com
FAST TRACK
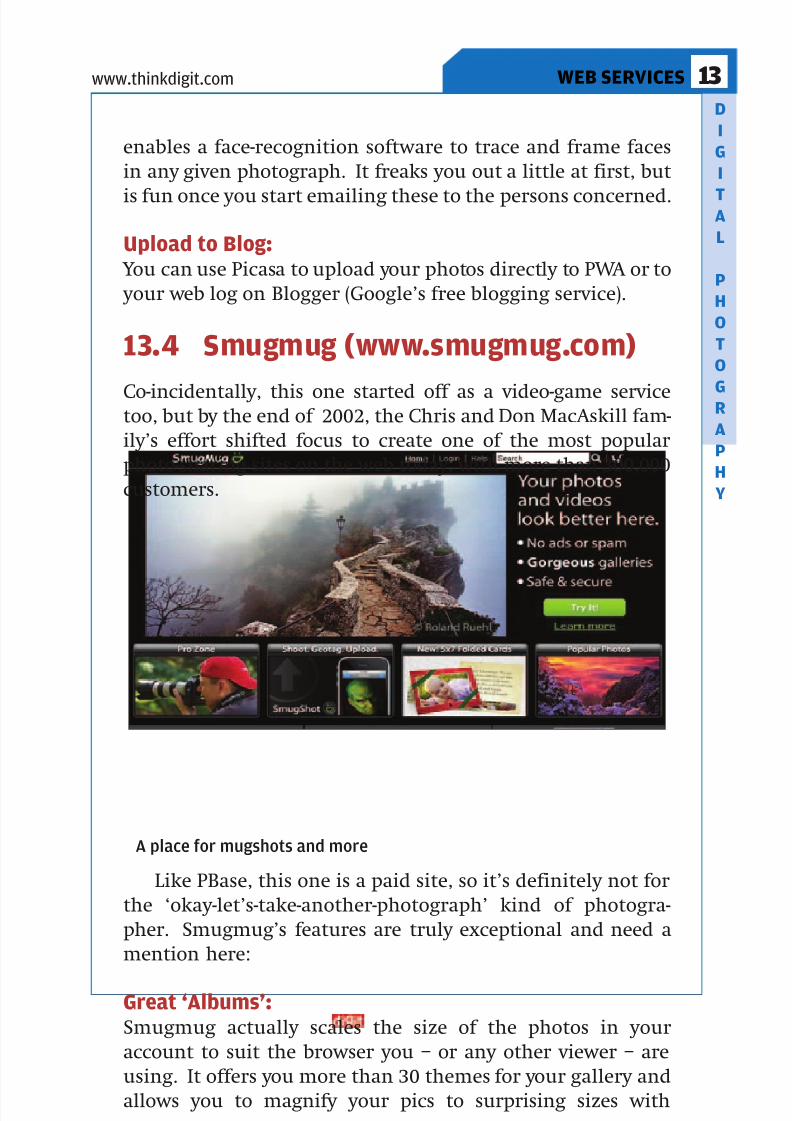
7/30/2019 BluePrint Digital Photography (Mar 2009).pdf
http://slidepdf.com/reader/full/blueprint-digital-photography-mar-2009pdf 108/141
D
I
G
I
TA
L
P
H
O
T
O
GR
A
P
H
Y
enables a face-recognition software to trace and frame faces
in any given photograph. It freaks you out a little at first, but
is fun once you start emailing these to the persons concerned.
Upload to Blog: You can use Picasa to upload your photos directly to PWA or to
your web log on Blogger (Google’s free blogging service).
13.4 Smugmug (www.smugmug.com)
Co-incidentally, this one started off as a video-game servicetoo, but by the end of 2002, the Chris and Don MacAskill fam-
ily’s effort shifted focus to create one of the most popular
photo-sharing sites on the web today, with more than 300,000
customers.
Like PBase, this one is a paid site, so it’s definitely not for
the ‘okay-let’s-take-another-photograph’ kind of photogra-
pher. Smugmug’s features are truly exceptional and need a
mention here:
Great ‘Albums’:Smugmug actually scales the size of the photos in your
account to suit the browser you – or any other viewer – are
using. It offers you more than 30 themes for your gallery and
allows you to magnify your pics to surprising sizes with
FAST TRACK
WEB SERVICES 13
111
www.thinkdigit.com
FAST TRACKFAST TRACK
A place for mugshots and more
7/30/2019 BluePrint Digital Photography (Mar 2009).pdf
http://slidepdf.com/reader/full/blueprint-digital-photography-mar-2009pdf 109/141

7/30/2019 BluePrint Digital Photography (Mar 2009).pdf
http://slidepdf.com/reader/full/blueprint-digital-photography-mar-2009pdf 110/141
D
I
G
I
TA
L
P
H
O
T
O
GR
A
P
H
Y
billion photos stored online, Snapfish is the only photogra-
phy-based site created by ~desis~ in 2000 and bought over by
HP in 2005. Snapfish was launched in India in 2007 and youcan access it directly or through www.indiaplaza.in (which
used to be ‘Fabmall’). Snapfish appeals to the Indian photog-
rapher.
Free:Snapfish allows you unlimited storage for free. Free editing
tools and software are the icing on the cake. You even get your
first 20 prints free — but the delivery charges, of course, are
borne by you.
Merchandise: At a price of Rs. 2.95 per 4 x6” print, you could get high-qual-
ity prints delivered at your doorstep, usually within a week. You can get Snapfish to transform your photo album into flip
books, stationery, T-shirts, posters, calendars, photo books,
coffee mugs and note-cards. They’ll even burn CDs for you and
send them over.
FAST TRACK
WEB SERVICES 13
113
www.thinkdigit.com
FAST TRACKFAST TRACK
Nothing fishy about Snapfish

7/30/2019 BluePrint Digital Photography (Mar 2009).pdf
http://slidepdf.com/reader/full/blueprint-digital-photography-mar-2009pdf 111/141
D
I
G
I
TA
L
P
H
O
T
O
GR
A
P
H
Y
PictureMover: The Snapfish PictureMover is a great tool that can be set to
automatically detect and move pictures from your computer,digital camera or cellphone directly to your online Snapfish
photo albums.
Editing: You can tweak your photos to make them look better with
editing tools on Snapfish that allow you to get rid of red-eye,
change colours, etc. Besides, you can even add captions, which will appear on the reverse side of the prints you order.
All of this, coupled with the really simple interface and the
reliability of HP, makes Snapfish, understandably, one of the
most popular photo-sharing sites on the web.
That pretty much covers the key photography services
online – but not exactly all of them. We’ll quickly breeze you
through a few more that may just turn out to be the ones that
suits your purposes.
Photobucket (www.photobucket.com): Taken over by Newscorp in 2007, Photobucket allows you to
store 1 GB of photos for free – and videos too. You can upload
from your computer, via email, Instant Messenger or your cell
114 FAST TRACK
WEB SERVICES13 www.thinkdigit.com
FAST TRACK
Get your pictures moving
7/30/2019 BluePrint Digital Photography (Mar 2009).pdf
http://slidepdf.com/reader/full/blueprint-digital-photography-mar-2009pdf 112/141
D
I
G
I
TA
L
P
H
O
T
O
GR
A
P
H
Y
phone. It’s got hundreds of themes for your gallery and is
reportedly the most popular photo-sharing site in the U.S.
Zooomr (www.zooomr.com):Similar to Flickr, Zooomr offers storage, editing, tagging and
geotagging. It’s even got its own blog (on which the creators
of the site put up their latest updates) and ‘Zooomr TV’ – a
Ustream service that allows you to access live video streaming
of events online.
Zenfolio (www.zenfolio.com):Great interface, unlimited storage and bandwidth, online
community forums – this ad-free service is a paid site. More
for the professionals – or people intending to go pro – you can
buy and sell photographs too.
DotPhoto: (www.dotphoto.com):DotPhoto is truly unique — it’s a free site through which you
can sell your photographs. You can exhibit your picturesthrough the ‘DotPhoto Show’. You can ‘print, create gifts, tell
a story, share, build a photo web site, sell photos, host pic-
tures, print books, store videos and more’ with DotPhoto.
So now you know exactly how you can use your digital
camera, how to take pictures and edit them, how to connect
it to other devices and where to store them on the web. What
we haven’t told you yet is what exactly happens inside your
digital camera when you take a picture – and that warrantsanother chapter.
FAST TRACK
WEB SERVICES 13
115
www.thinkdigit.com
FAST TRACKFAST TRACK

7/30/2019 BluePrint Digital Photography (Mar 2009).pdf
http://slidepdf.com/reader/full/blueprint-digital-photography-mar-2009pdf 113/141
D
I
G
I
TA
L
P
H
O
T
O
GR
A
P
H
Y
116 FAST TRACK
HOW A CAMERA WORKS14 www.thinkdigit.com
People usually prefer digital cam-
eras over conventional ones
because the output is print-
friendly, web-friendly, editable and
inexpensive. However, going fromfilm to digital isn’t easy because
there is
w h o l e
range of
digital cam-
eras available
in the mar-
kettoday. Broadly, all digial camerascan be classified into two groups:
P&S and dSLR.
14.1 Difference between a P&S and a dSLR The camera commonly flaunted and the one we popularly
know as a ‘digicam’ is of the P&S variety. P&S stands for ‘Point
and Shoot’ and they’re called so for the obvious reason thatall you need to do is point it at the subject and click.
So what exactly are the fundamental differences between
the P&S and dSLR?
The Lens:P&S cameras have lenses fixed to the camera body and
integrate the shutter in to the lens. The lens of a digital
camera, as with the traditional 35-mm camera, is of criti-cal importance. Once you buy a compact digital camera,
you’re stuck with the lens you’re provided. The best thing
about dSLRs is that you can detach the lens with the press
of a button and substitute it with any other lens to best
suit the event.
How a Cameraworks
The Pentax K 100 D is anentry-level D-SLR
The Sony Cybershot is atypical point and shootdigital camera
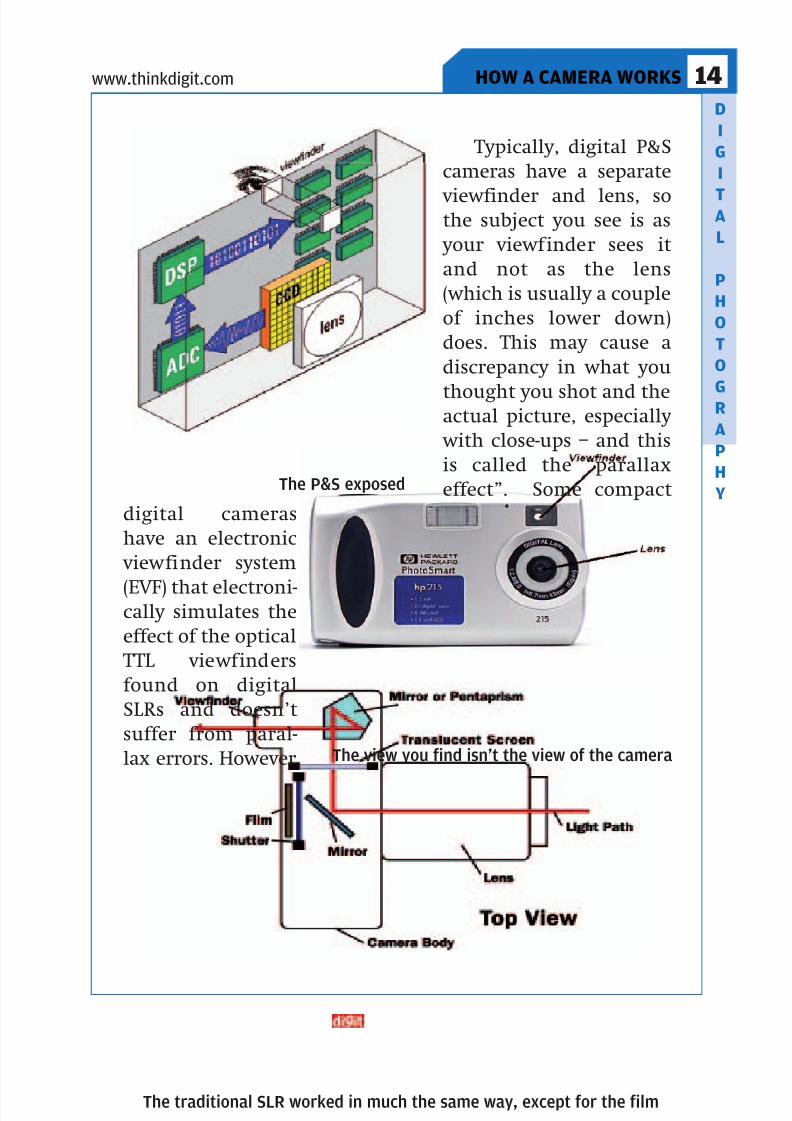
7/30/2019 BluePrint Digital Photography (Mar 2009).pdf
http://slidepdf.com/reader/full/blueprint-digital-photography-mar-2009pdf 114/141
D
I
G
I
TA
L
P
H
O
T
O
GR
A
P
H
Y
Typically, digital P&S
cameras have a separate
viewfinder and lens, sothe subject you see is as
your viewfinder sees it
and not as the lens
(which is usually a couple
of inches lower down)
does. This may cause a
discrepancy in what you
thought you shot and theactual picture, especially
with close-ups – and this
is called the “parallax
effect”. Some compact
digital cameras
have an electronic
viewfinder system
(EVF) that electroni-cally simulates the
effect of the optical
TTL viewfinders
found on digital
SLRs and doesn’t
suffer from paral-
lax errors. However,
FAST TRACK
HOW A CAMERA WORKS 14
117
www.thinkdigit.com
FAST TRACKFAST TRACK
The P&S exposed
The view you find isn’t the view of the camera
The traditional SLR worked in much the same way, except for the film
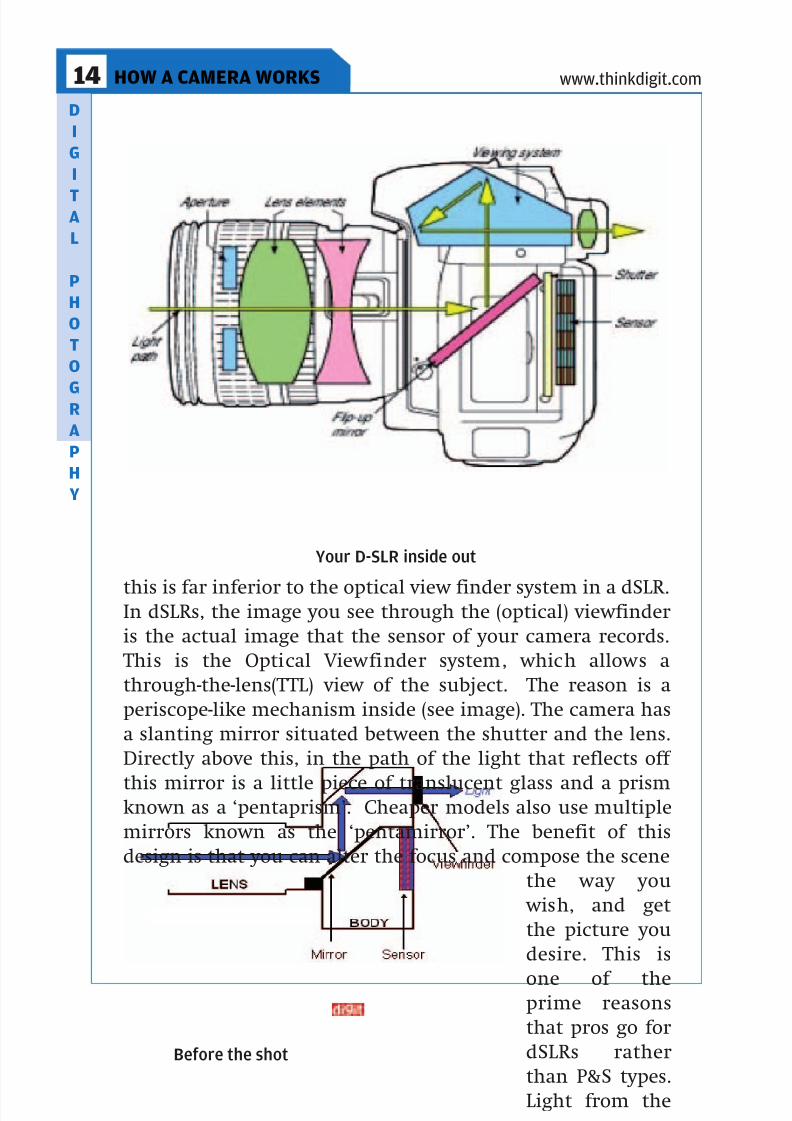
7/30/2019 BluePrint Digital Photography (Mar 2009).pdf
http://slidepdf.com/reader/full/blueprint-digital-photography-mar-2009pdf 115/141
D
I
G
I
TA
L
P
H
O
T
O
GR
A
P
H
Y
this is far inferior to the optical view finder system in a dSLR.In dSLRs, the image you see through the (optical) viewfinder
is the actual image that the sensor of your camera records.
This is the Optical Viewfinder system, which allows a
through-the-lens(TTL) view of the subject. The reason is a
periscope-like mechanism inside (see image). The camera has
a slanting mirror situated between the shutter and the lens.
Directly above this, in the path of the light that reflects off
this mirror is a little piece of translucent glass and a prismknown as a ‘pentaprism’. Cheaper models also use multiple
mirrors known as the ‘pentamirror’. The benefit of this
design is that you can alter the focus and compose the scene
the way you
wish, and get
the picture you
desire. This is
one of theprime reasons
that pros go for
dSLRs rather
than P&S types.
Light from the
118 FAST TRACK
HOW A CAMERA WORKS14 www.thinkdigit.com
FAST TRACK
Before the shot
Your D-SLR inside out

7/30/2019 BluePrint Digital Photography (Mar 2009).pdf
http://slidepdf.com/reader/full/blueprint-digital-photography-mar-2009pdf 116/141
D
I
G
I
TA
L
P
H
O
T
O
GR
A
P
H
Y
image bounces off
the lower mirror,
passes throughthe translucent
glass and into the
pentaprism. What
the prism does, is
invert the
received image on the screen, which, in turn means setting
the image straight. This image now is visible to you through
your viewfinder, right side up.
The Shutter Mechanism When you push down the shutter release on your P&S, the
shutter opens up, exposes the sensor to the light for the
required duration and shuts again. With the dSLR, however,
it’s not as simple. As you have seen already, there’s a mirror
blocking the light from the sensor at the back of the camera.
When you click the shutter button, the camera switches themirror out of the path of the light and directly onto the image
sensor (more about sensors later in this chapter). The timer
keeps the shutter open for the appropriate exposure and dura-
tion. The second shutter then moves in and the mirror flips
back into its original position. This can occur as rapidly as ten
times in a second, or even faster.
Although, for the split second that your camera takes the
picture, the viewfinder blacks out because there is no image being sent through at all, the good thing is that you know
exactly what the picture looked like when you took it. Besides,
dSLRs come with their own LCD displays too, which show you
the photo you’ve taken, allow you to take another one if
you’re not happy with the first. Some current models even
allow you live preview the way compact digital cameras do,
allowing you to verify the focus, framing and depth of field
even before you click.
There are several advantages to the dSLR system:a. Shutter lag is minimal, making action and sports
pho tography smoother.
b. The view is free from parallax.
FAST TRACK
HOW A CAMERA WORKS 14
119
www.thinkdigit.com
FAST TRACKFAST TRACK
During the shot

7/30/2019 BluePrint Digital Photography (Mar 2009).pdf
http://slidepdf.com/reader/full/blueprint-digital-photography-mar-2009pdf 117/141
D
I
G
I
TA
L
P
H
O
T
O
GR
A
P
H
Y
c. The picture you take is much brighter when dis
played on the LCD screen, as it is electronically
amplified in most cameras. The LCD display on acompact digital camera, on the other hand, is virtu
ally impossible to view in daylight.
d. Although several digital cameras today come with
‘super-zoom’ (such as the Panasonic Lumix DMC-
FZ18.1 Digital Camera with 18x wide angle zoom),
the lenses and extensions possible in an SLR cannot
be surpassed for their range and picture quality. P&S
cameras, typically, do not have lenses that can bechanged and do not usually accept filters.
e. Larger sensors guarantee better resolution for your
pic tures on a dSLR.
It would be inaccurate to ignore the fact that P&S digital
cameras have few pluses of their own, and so, here are some
key ones:
a. P&S cameras are really low-cost when you compare
them to the prohibitive prices of dSLRs. The thing with buying the dSLR is that the lens usually has a
separate price tag, not to mention all the other
attachments (external flash units, tripods, filters,
etc.) you’ll need for different occasions.
b. P&S cameras are light and compact. dSLRs, on the
other hand, are bulky, incon venient and obtrusive
to people around.
c. The noise quotient is really high with dSLRs, and we’re talking audio here. P&Ss, in comparison, are
completely silent.
d. The Canon Hackers Development Kit (CHDK) is a free
software kit that works wonders to enhance the
capacities of your digital camera such as faster shut
ter speeds, longer exposure times, automatic expo
sure bracketing, etc. This helps to overcome several
shortcomings one would notice while comparing with digital SLRs.
The long and short of it is that for all ordinary, day-to-
day purposes, the compact digital P&S camera will do just
fine. However, if you’re hunting wildlife down the barrel of
your zoom, trying to capture multiple movements in a sec-
120 FAST TRACK
HOW A CAMERA WORKS14 www.thinkdigit.com
FAST TRACK

7/30/2019 BluePrint Digital Photography (Mar 2009).pdf
http://slidepdf.com/reader/full/blueprint-digital-photography-mar-2009pdf 118/141
D
I
G
I
TA
L
P
H
O
T
O
GR
A
P
H
Y
ond, or are looking to win a few awards, opt for the dSLR.
One feature that P&S cameras often just don’t match up to
is the resolution and quality of the photograph taken by adSLR particularly, if you’re keen to blow up the picture to
poster size or better. The reason lies deep down in the cam-
era – in the sensor.
14.2 Kinds of Sensors
Digital cameras are basically small
computers that convert live imagesinto digital files, by detecting pho-
tons (light) which hit the face of an
electronic image sensor. As it is with
film, the sensor is positioned exactly
at the focal point/plane of the camera
lens. However, unlike film, the sen-
sor never needs to be moved or changed and is fixed in
there permanently.
How sensors workhe face of the sensor is made up of millions of tiny ‘photosites’
– think of them as ‘wells’ that fill up with light – which are
nothing but light-sensitive transistors (semiconductor devices
which can amplify or switch electronic signals – and please
don’t ask us what a semiconductor is). Each individual pho-
tosite represents a single pixel and often when manufacturersrefer to ‘megapixels’, they’re actually talking about the num-
ber of these microscopic photosensitive sensor spots on the
face of the sensor.
The sensors themselves are usually quite small – anything
from 1/6th to 4/3rd of an inch, typically of the aspect ration
4:3 (more about aspect ratios later). Even smaller sensors
have already been created (such as the Pixelplus 1/10 inch
optical format sensor based on 2.2-micron pixel size). Thecamera creates the image from the array of pixels by scan-
ning each pixel electronically. When the shutter snaps open,
a chip inside the camera (the ‘image processor’) reads the
data that the image sensor receives. This little computer
then analyses the data from neighbouring pixels to arrive at
FAST TRACK
HOW A CAMERA WORKS 14
121
www.thinkdigit.com
FAST TRACKFAST TRACKFAST TRACK
Sensors make more sensethan film
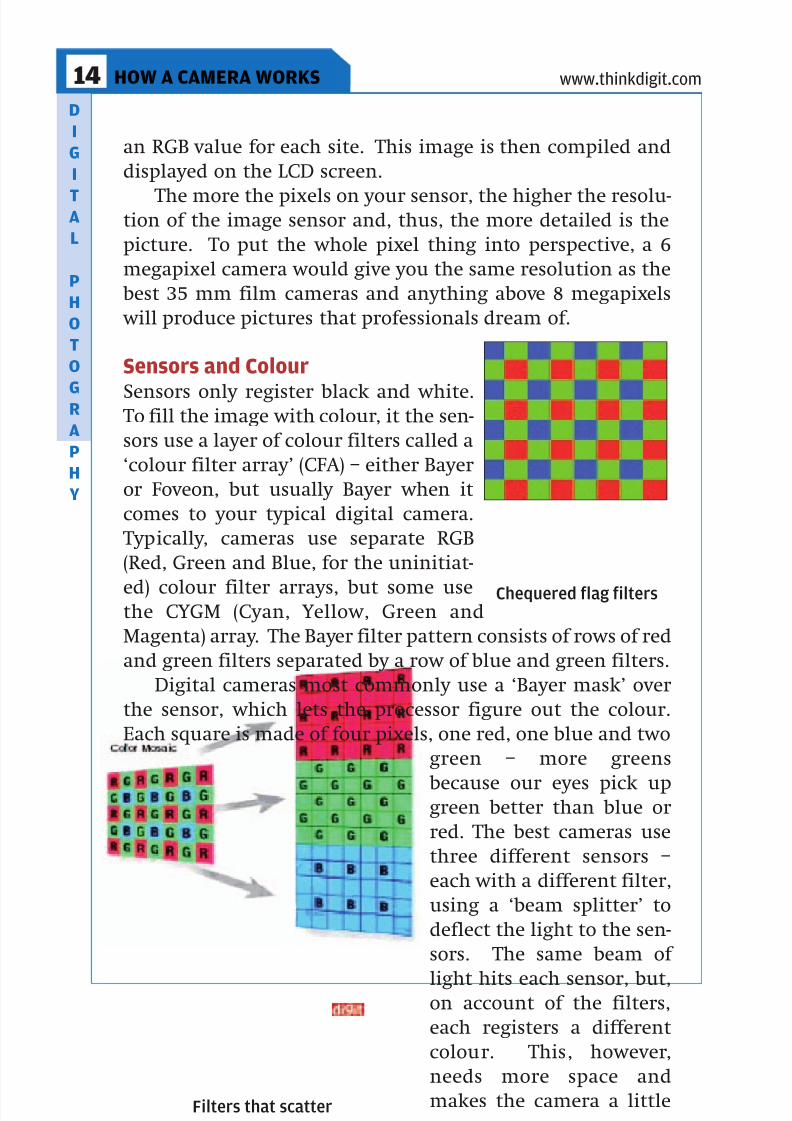
7/30/2019 BluePrint Digital Photography (Mar 2009).pdf
http://slidepdf.com/reader/full/blueprint-digital-photography-mar-2009pdf 119/141
D
I
G
I
TA
L
P
H
O
T
O
GR
A
P
H
Y
an RGB value for each site. This image is then compiled and
displayed on the LCD screen.
The more the pixels on your sensor, the higher the resolu-tion of the image sensor and, thus, the more detailed is the
picture. To put the whole pixel thing into perspective, a 6
megapixel camera would give you the same resolution as the
best 35 mm film cameras and anything above 8 megapixels
will produce pictures that professionals dream of.
Sensors and Colour
Sensors only register black and white. To fill the image with colour, it the sen-
sors use a layer of colour filters called a
‘colour filter array’ (CFA) – either Bayer
or Foveon, but usually Bayer when it
comes to your typical digital camera.
Typically, cameras use separate RGB
(Red, Green and Blue, for the uninitiat-
ed) colour filter arrays, but some usethe CYGM (Cyan, Yellow, Green and
Magenta) array. The Bayer filter pattern consists of rows of red
and green filters separated by a row of blue and green filters.
Digital cameras most commonly use a ‘Bayer mask’ over
the sensor, which lets the processor figure out the colour.
Each square is made of four pixels, one red, one blue and two
green – more greens
because our eyes pick upgreen better than blue or
red. The best cameras use
three different sensors –
each with a different filter,
using a ‘beam splitter’ to
deflect the light to the sen-
sors. The same beam of
light hits each sensor, but,on account of the filters,
each registers a different
colour. This, however,
needs more space and
makes the camera a little
122 FAST TRACK
HOW A CAMERA WORKS14 www.thinkdigit.com
FAST TRACKFAST TRACK
Chequered flag filters
Filters that scatter

7/30/2019 BluePrint Digital Photography (Mar 2009).pdf
http://slidepdf.com/reader/full/blueprint-digital-photography-mar-2009pdf 120/141
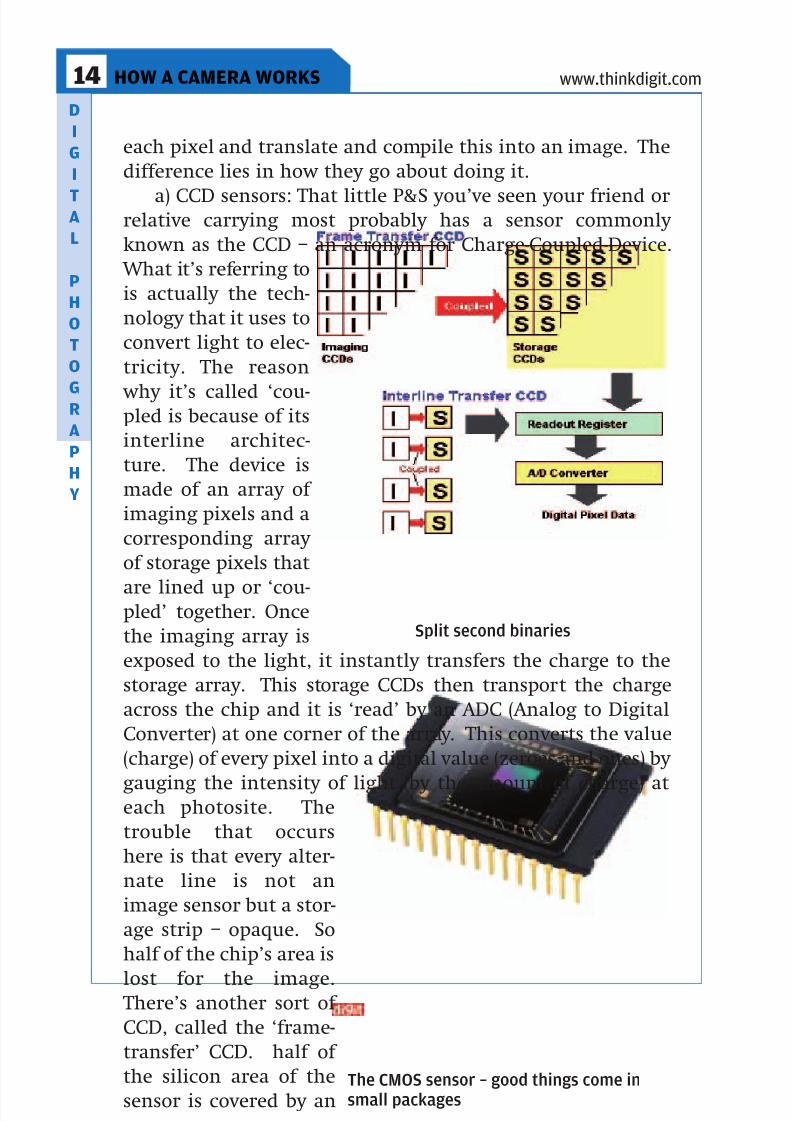
7/30/2019 BluePrint Digital Photography (Mar 2009).pdf
http://slidepdf.com/reader/full/blueprint-digital-photography-mar-2009pdf 121/141
D
I
G
I
TA
L
P
H
O
T
O
GR
A
P
H
Y
each pixel and translate and compile this into an image. The
difference lies in how they go about doing it.
a) CCD sensors: That little P&S you’ve seen your friend orrelative carrying most probably has a sensor commonly
known as the CCD – an acronym for Charge-Coupled-Device.
What it’s referring to
is actually the tech-
nology that it uses to
convert light to elec-
tricity. The reason
why it’s called ‘cou-pled is because of its
interline architec-
ture. The device is
made of an array of
imaging pixels and a
corresponding array
of storage pixels that
are lined up or ‘cou-pled’ together. Once
the imaging array is
exposed to the light, it instantly transfers the charge to the
storage array. This storage CCDs then transport the charge
across the chip and it is ‘read’ by an ADC (Analog to Digital
Converter) at one corner of the array. This converts the value
(charge) of every pixel into a digital value (zeroes and ones) by
gauging the intensity of light (by the amount of charge) ateach photosite. The
trouble that occurs
here is that every alter-
nate line is not an
image sensor but a stor-
age strip – opaque. So
half of the chip’s area is
lost for the image. There’s another sort of
CCD, called the ‘frame-
transfer’ CCD. half of
the silicon area of the
sensor is covered by an
124 FAST TRACK
HOW A CAMERA WORKS14 www.thinkdigit.com
FAST TRACKFAST TRACK
Split second binaries
The CMOS sensor – good things come insmall packages

7/30/2019 BluePrint Digital Photography (Mar 2009).pdf
http://slidepdf.com/reader/full/blueprint-digital-photography-mar-2009pdf 122/141
7/30/2019 BluePrint Digital Photography (Mar 2009).pdf
http://slidepdf.com/reader/full/blueprint-digital-photography-mar-2009pdf 123/141
D
I
G
I
TA
L
P
H
O
T
O
GR
A
P
H
Y
14.3 Image Compression
Anybody who’s attempted sending across files over the web would know that the bulkier the file, the tougher it gets.
Exchanging or saving such files also may encounter difficul-
ties due to their copious size. This is where the format of the
data becomes crucial. Luckily for us, there’s a whole lot of
image-compression software available and universally accept-
able in the world today.
File compression basically shrinks files by (a) coding infor-
mation more efficiently and (b) eliminating redundancies orrepetitions. So if, for example, a large part of an image is con-
stituted by a single colour or charge value (like the sky or a
grassland), the program reduces it to just s few bytes – some
to record the colour and some to record the number of pixels
that should be rendered in that colour.
Image compression could be ‘lossy’ or ‘lossless’. Lossless
ones (like TIFF) are great for medical photography or high-
fidelity image scans but for all general purposes, lossy com-pression programs (such as JPEG) suit us fine. File compres-
sion is pretty effective with photographs because we don’t
notice the minor loss of detail that results due to the attempt
to compress and reduce the bit rate. About 80% of the data in
an image file is redundant and can be eliminated through
compression. JPEG (Joint Photographic Experts Group) and
GIF (Graphics Interchange Format) already use algorithms
similar to those used by ZIP compression programs. Thus ‘zip-ping’ .jpg files is a bit counterproductive because the program
must compress a file that is already compressed. Zipping
works best with BMP images but nobody in the whole wide
world uses bitmap files to store photographic images for the
obvious reason that they’re not compressed at all and there-
fore hog a lot of the disk space.
The most common image formats are TIFF, PSD, BMP,
PCX, GIF AND JPEG, some of which we’ll discuss here (you’llfind the full monty on all these compression formats in
Chapter 4 earlier).
TIFF: The Tagged Image File Format (now under the con-
trol of Adobe systems) is a versatile compressing program
which can be compressed or uncompressed and can be stored
126 FAST TRACK
HOW A CAMERA WORKS14 www.thinkdigit.com
FAST TRACKFAST TRACK
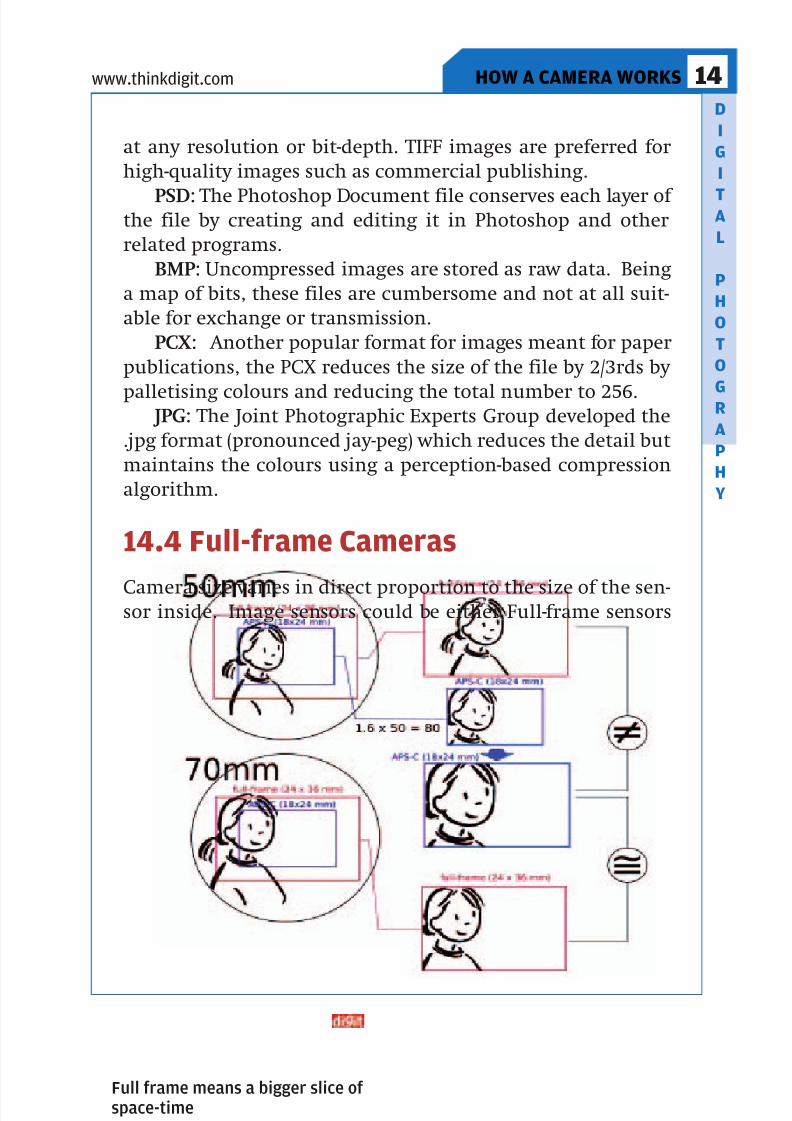
7/30/2019 BluePrint Digital Photography (Mar 2009).pdf
http://slidepdf.com/reader/full/blueprint-digital-photography-mar-2009pdf 124/141
D
I
G
I
TA
L
P
H
O
T
O
GR
A
P
H
Y
at any resolution or bit-depth. TIFF images are preferred for
high-quality images such as commercial publishing.
PSD: The Photoshop Document file conserves each layer of the file by creating and editing it in Photoshop and other
related programs.
BMP: Uncompressed images are stored as raw data. Being
a map of bits, these files are cumbersome and not at all suit-
able for exchange or transmission.
PCX: Another popular format for images meant for paper
publications, the PCX reduces the size of the file by 2/3rds by
palletising colours and reducing the total number to 256. JPG: The Joint Photographic Experts Group developed the
.jpg format (pronounced jay-peg) which reduces the detail but
maintains the colours using a perception-based compression
algorithm.
14.4 Full-frame Cameras
Camera size varies in direct proportion to the size of the sen-sor inside. Image sensors could be either Full-frame sensors
FAST TRACK
HOW A CAMERA WORKS 14
127
www.thinkdigit.com
FAST TRACKFAST TRACKFAST TRACK
Full frame means a bigger slice ofspace-time

7/30/2019 BluePrint Digital Photography (Mar 2009).pdf
http://slidepdf.com/reader/full/blueprint-digital-photography-mar-2009pdf 125/141
D
I
G
I
TA
L
P
H
O
T
O
GR
A
P
H
Y
or crop sensors. A full-sensor is the kind of image sensor
that is equivalent to a typical 35 mm frame (36x24mm) of
photographic film. Virtually all P&S cameras, includingsome D-SLRs use a frame that is smaller than the 35mm one
because its smaller, cheaper to make and leads to cheaper,
lighter cameras.
Cameras – like Canon’s DSLRs, which use EOS – 1Ds or
EOS-5D full frame sensors (where EOS stands for Electro
Optical System) – end up becoming heavier and bulkier
because you need better, bigger, hi-tech lenses and a body to
match. Point and shoot cameras usually use smaller sensors,typically of a size equivalent to APS-C-size film – significant-
ly smaller than a full 35 mm frame. Smaller sensors record
only a part of the image, giving a ‘zoomed in’ effect
‘Full-frame’ also refers to the CCD sensors in which the
sensor elements occupy the entire face of the sensor, instead
of devoting half the space to storage sites.
A camera is built to suit the needs of the sensor, so a full-
frame sensor would need a lens that successfully projects theimage on the entire sensor. If the full-frame lens is set on a
camera with a small sensor, it just captures the central por-
tion of the image, cropping off the edges. The ratio of the size
of the image to the size of the sensor is called “crop factor”,
where the reference is usually the 35mm full frame sensor.
128 FAST TRACK
HOW A CAMERA WORKS14 www.thinkdigit.com
FAST TRACKFAST TRACK
Size does matter
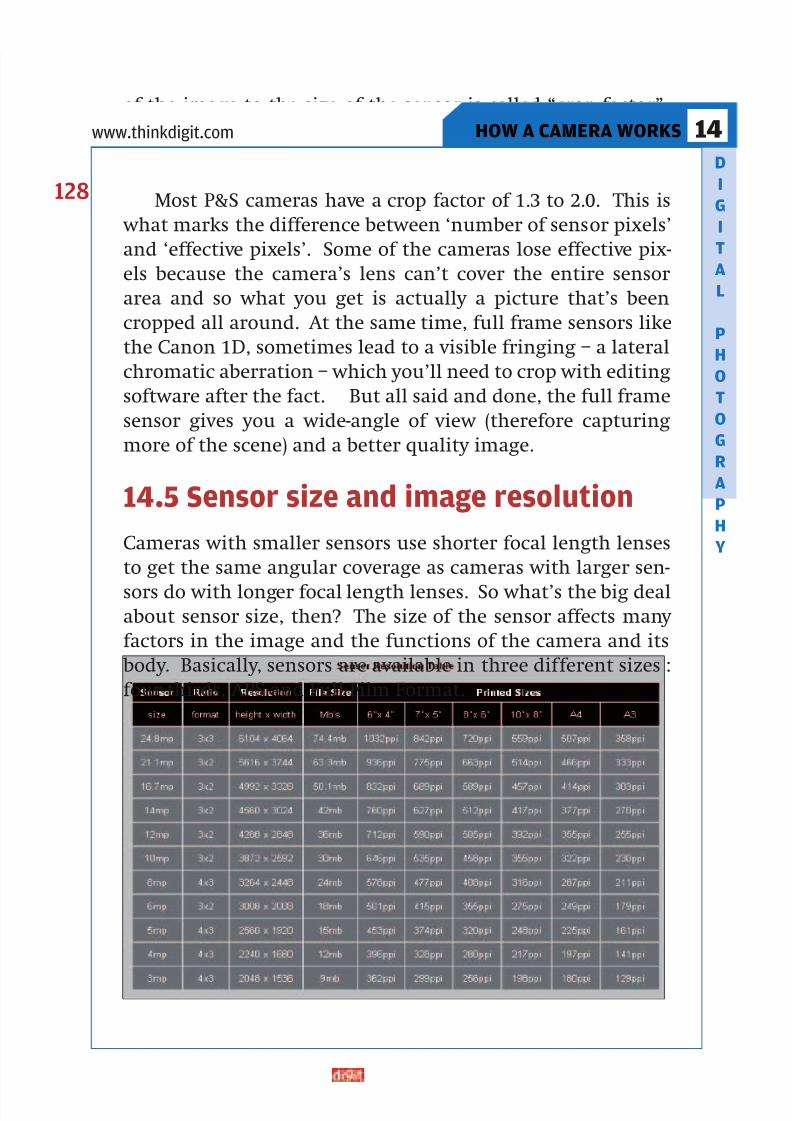
7/30/2019 BluePrint Digital Photography (Mar 2009).pdf
http://slidepdf.com/reader/full/blueprint-digital-photography-mar-2009pdf 126/141
D
I
G
I
TA
L
P
H
O
T
O
GR
A
P
H
Y
Most P&S cameras have a crop factor of 1.3 to 2.0. This is
what marks the difference between ‘number of sensor pixels’
and ‘effective pixels’. Some of the cameras lose effective pix-els because the camera’s lens can’t cover the entire sensor
area and so what you get is actually a picture that’s been
cropped all around. At the same time, full frame sensors like
the Canon 1D, sometimes lead to a visible fringing – a lateral
chromatic aberration – which you’ll need to crop with editing
software after the fact. But all said and done, the full frame
sensor gives you a wide-angle of view (therefore capturing
more of the scene) and a better quality image.
14.5 Sensor size and image resolution
Cameras with smaller sensors use shorter focal length lenses
to get the same angular coverage as cameras with larger sen-
sors do with longer focal length lenses. So what’s the big deal
about sensor size, then? The size of the sensor affects many
factors in the image and the functions of the camera and its body. Basically, sensors are available in three different sizes :
four thirds, APS and Full Film Format.
FAST TRACK
HOW A CAMERA WORKS 14
129
www.thinkdigit.com
FAST TRACKFAST TRACKFAST TRACK
Making sense of sensor resolution

7/30/2019 BluePrint Digital Photography (Mar 2009).pdf
http://slidepdf.com/reader/full/blueprint-digital-photography-mar-2009pdf 127/141
D
I
G
I
TA
L
P
H
O
T
O
GR
A
P
H
Y
130 FAST TRACK
HOW A CAMERA WORKS14 www.thinkdigit.com
FAST TRACKFAST TRACK
Effects of Sensor Size on the image The sensor with the larger individual pixels will record the
light it receives with greater precision than those withsmaller pixels. Larger the sensor, larger are the pixels on
it, implying that they are more receptive and sensitive to
light and can therefore produce more detailed images.
An 8 megapixel Point and Shoot camera has the same
number of pixels as an 8 megapixel DSLR camera. But the
DSLR has a larger sensor with larger pixels than the teeny-
weenie sensor on your point and shoot.
These pixels can collect more light, recording the highsand lows of the intensity of light at each pixel more accu-
rately, reducing noise and bettering detail and image quality.
Being more sensitive to light, the larger image sensor can
give you much better pictures in low light conditions than the
standard P&S ones.
If the sensor is smaller than actual requirement, then the
camera is unable to capture the full view of the image.
The smaller the sensor the more the pixels have to becrammed into the space available. Diffraction, that is the
spreading of light when it passes through an aperture, spoils
the image, leading to ‘noise’.
Noise level is directly connected to the actual size of
the pixels on a sensor and while several noise reduction
techniques are being used in modern digital cameras, the
fact remains that larger sensors are liable to produce less
noisy photographs. The downside here is that as thepixel size increases, so does the size of the file – thus
requiring more memory space to be stored in – and longer
processing time.
A large sensor, however would give the same resolution
as a small one if both of them have the same number of pix-
els. Pixel size does not affect resolution, which remains
constant for the sensor count.
A 3-megapixel sensor, for example, would give you thesame result, whatever the size of the sensor – whether it’s
the little digicam type or the big DSLR one.
It’s the size of the pixels that makes all the
difference.The table would help to elucidate what we’ve
been talking about.
7/30/2019 BluePrint Digital Photography (Mar 2009).pdf
http://slidepdf.com/reader/full/blueprint-digital-photography-mar-2009pdf 128/141
D
I
G
I
TA
L
P
H
O
T
O
GR
A
P
H
Y
Conclusion That about wraps up this Fast Track to Digital Photography,
but hold on a minute. You may have figured out the digitalcamera, back to front and in and out but none of it will real-
ly sink in until you grab that digital camera, set out into the
world, juggle the f-stops, zoom around, and go photoshop-
ping and flickring. Nothing beats the real thing. So now
that you’ve got the theory in you head, put your hand to
practice. Happy shutterbugging.
FAST TRACK
HOW A CAMERA WORKS 14
131
www.thinkdigit.com
FAST TRACKFAST TRACK

7/30/2019 BluePrint Digital Photography (Mar 2009).pdf
http://slidepdf.com/reader/full/blueprint-digital-photography-mar-2009pdf 129/141
D
I
G
I
TA
L
P
H
O
T
O
GR
A
P
H
Y
132 FAST TRACK
GLOSSARY15 www.thinkdigit.com
360 degree panorama: A complete, gapless panorama that
forms a cylindrical image around the point of view.
AA Batteries: The standard batteries for many digital cameras.
NiCd and NiMH variants are rechargeable.
ATA: A standard for storage devices that makes the system
treat them as hard drives.
Accessories: A variety of additional equipment to be used
with a camera.
Adapter: A device to allow small storage devices to be read by
slots in a machine or card readers.
Album: A collection of photographs, can be digital or real.
Ambient Light: The natural lighting conditions that are
prevalent at a scene.
Anti-Static cloth: A bit of fabric that prevents the accumula-
tion of static energy.
Aperture: The opening through which the diaphragm allows
light into the camera.
Artefact: A blemish on the image.
Aspect Ratio: The ratio of the horizontal to vertical dimen-
sions of the image.
BMP: A bitmap image format.
Battery: The source of energy for the camera. Can be standard
or proprietary.
Glossary

7/30/2019 BluePrint Digital Photography (Mar 2009).pdf
http://slidepdf.com/reader/full/blueprint-digital-photography-mar-2009pdf 130/141
D
I
G
I
TA
L
P
H
O
T
O
GR
A
P
H
Y
Bayer Pattern: One of the patterns in which colour specific
photocells are arranged on a sensor.
Bitmap: An image made up of an array of pixels, with each
pixel being of a particular colour or shade of grey.
Black and White: A photograph without any colour, using dif-
ferent shades of grey from black to white.
Blade: The units on a diaphragm.
Blurry: An indistinct, unclear or fuzzy image primarily due to
movement of the subject or the camera.
Bracketing: Taking a series of shots with different settings of
the same subject from the same position.
Brackets: The photos taken in a bracketing operation.
Brightness: The intensity of light in an image, ranging from
dark to light.
CCD: Charged couple device — one of the two main types of
image sensors used in cameras. This is the component that
detects photons and produces the captured electrical signals.
CCD raw format: The image collected by the sensor beforealgorithms are implemented by the camera to produce the
finished image.
CD: Compact disk, a standard medium of storage for data.
CMOS sensor: Complementary metal oxide semiconductor
(CMOS) sensors are now being used in cameras. These use pos-
itive or negative polarity circuits, and require comparatively less energy.
Camera: A light-sealed device with a small aperture for light
that imprints images on a sensor or film when exposed.
FAST TRACK
GLOSSARY 15
133
www.thinkdigit.com
FAST TRACKFAST TRACK

7/30/2019 BluePrint Digital Photography (Mar 2009).pdf
http://slidepdf.com/reader/full/blueprint-digital-photography-mar-2009pdf 131/141
D
I
G
I
TA
L
P
H
O
T
O
GR
A
P
H
Y
Camera Angle: The angle of the camera lens with reference to
the subject.
Card: A memory card, portable memory for the camera.
Card Reader: A device that reads the memory stored in a card.
Charged-coupled device: See CCD
Click: The act of taking a picture, opening the shutter in the
camera.
Clicker: A device that springs the shutter without using the
default camera button, but by using a cable. Used for control
and to reduce shakes.
Colour Correction: The process of digitally tweaking the rep-
resentation of colours in an image to enhance it.
Colour Space: The range of colours, or the colour model used
in a particular image or camera. Popular colour spaces
include RGB, CMYK and HSL.
Colour depth: Also known as bits-per-pixel, this is the memo-
ry space allocated to each pixel in a digital photograph. The
colour depth may range from 1-bit monochrome images to 24-
bit true colour images and beyond.
Composition: The arrangements of forms and elements with-
in the frame.
Compression: Algorithms used to reduce the filesize of an
image.
Contrast: The difference between the highlights and shadowsin an image, or the darker and lighter portions.
Cropping: Cutting off an edge or multiple edges of a photo is
called cropping.
134 FAST TRACK
GLOSSARY15 www.thinkdigit.com
FAST TRACK

7/30/2019 BluePrint Digital Photography (Mar 2009).pdf
http://slidepdf.com/reader/full/blueprint-digital-photography-mar-2009pdf 132/141
D
I
G
I
TA
L
P
H
O
T
O
GR
A
P
H
Y
DPI: Dots-per-inch, a measure of the resolution of a printer
using the density of the ink used.
Demosaicing: The process of extracting an image from the
raw data in the sensor for further processing.
Depth of field: The distance between the nearest and farthest
points in focus.
Diameter of Aperture: The degree to which the diaphragm in
a shutter opens, allowing light to enter the camera.
Digital Zoom: Artificial zoom in a camera, analogous to crop-
ping.
dSLR: A digital SLR camera. Uses a digital image sensor
instead of a negative film.
Docking Station: A unit for connecting the camera to a sys-tem and charging it at the same time. Serves as a stand for
converting the camera into a webcam in some models.
Drivers: Software that allows the computer to interface with
the hardware.
Durability: The resistance to damage from environmental fac-
tors and physical strain during use.
EXIF: The information about the photo stored within an
image file. EXIF data includes camera model, exposure, aper-
ture, etc.
Edges: The region of distinction between objects and ele-
ments within a photo.
Embed: To insert an object in an application without making
any changes to the application. Changes made to the applica-
tion do not affect the object.
Exposure: The action of exposing the film or sensor to light.
FAST TRACK
GLOSSARY 15
135
www.thinkdigit.com
FAST TRACKFAST TRACK

7/30/2019 BluePrint Digital Photography (Mar 2009).pdf
http://slidepdf.com/reader/full/blueprint-digital-photography-mar-2009pdf 133/141
D
I
G
I
TA
L
P
H
O
T
O
GR
A
P
H
Y
Exposure Value: Numbers which indicate combinations of
aperture and shutter speed.
Exposure compensation: The function of adjusting upwards
or downwards the exposure value that would be automatical-
ly used by a camera in particular lighting conditions.
Exposure lock: The process of half-clicking in traditional
SLRs, where the same settings are used when the camera
angle is changed and clicked.
f-number: A measure for the diameter of the diaphragm. Also
known as the f-ratio or the relative aperture. Divide the focal
length by the diameter of the aperture to arrive at the f-num-
ber.
Fill Flash: A flash used to fill in the darker areas of a photo.
Film: Photosensitive strips, also known as a negatives, used intraditional cameras.
Filter: A filter can mean a preset set of commands in a pho-
toediting application, a physical accessory to the lens of the
camera, or a set of algorithms implemented in a camera to
process an image.
Flash: A light source that emits a brief burst of light.
Flash Sync: Synchronising the firing of the flash at the pre-
cise moment of time when the shutter is open.
FlashPix: An image format that stores the same image in mul-
tiple resolutions, with each image being independently
editable and even drastically different at different resolu-
tions.
Focal plane: The plane in which the lens focuses an image.
Focus: The process of bringing an object into sharp focus.
136 FAST TRACK
GLOSSARY15 www.thinkdigit.com
FAST TRACK

7/30/2019 BluePrint Digital Photography (Mar 2009).pdf
http://slidepdf.com/reader/full/blueprint-digital-photography-mar-2009pdf 134/141
7/30/2019 BluePrint Digital Photography (Mar 2009).pdf
http://slidepdf.com/reader/full/blueprint-digital-photography-mar-2009pdf 135/141
D
I
G
I
TA
L
P
H
O
T
O
GR
A
P
H
Y
Hot Shoe: A clip on top of a camera for attaching the flash.
Hue: The hue is one of the three defining properties of colourused in a colour scale (the others are saturation and light-
ness), it is the untainted colour, without any lightness or dark-
ness.
IEEE 1394: A port on the computer for rapid data transfer.
IS: Image Sensor, a solid-state device that captures an image
on exposure.
ISO Rating: The value of ISO in a capture, ranges from 25 to
2000 and above.
ISO speed: See ISO Rating.
Image Stabilisation: Mechanical, electronic or digital meas-
ures taken to reduce blurring of an image due to the shakingof the camera.
Image parameters: A number of attributes of an image, may
range from colour tone, hue, saturation, vibrancy and others.
Infrared: All sub-red frequencies in the electromagnetic spec-
trum. Used for low-light photography. Gives a greenish or
sometimes bluish tinge to photos.
Interface: An on-screen appearance of the firmware in the
camera or software on the computer.
Interpolation: The process of creating a larger image from
the data captured by the sensor.
Inverse square law: A physical law relevant to camera flashes,used to judge the strength of flash at a distance. The illumi-
nation from the flash falls by a factor of four for every dou-
bling of distance from the flash.
IrDA: A standard for transferring data over infra-red.
138 FAST TRACK
GLOSSARY15 www.thinkdigit.com
FAST TRACKFAST TRACK
7/30/2019 BluePrint Digital Photography (Mar 2009).pdf
http://slidepdf.com/reader/full/blueprint-digital-photography-mar-2009pdf 136/141
D
I
G
I
TA
L
P
H
O
T
O
GR
A
P
H
Y
JPEG: A popular digital camera file format that uses lossy
compression, developed by the Joint Photographic Experts
Group.
Kelvin: A unit to measure the colour temperature of lighting
in a scene.
LCD: Liquid Crystal Display, the most commonly used device
for digital camera displays, which act as a convenient
viewfinder.
LZW: Lempel-Ziv-Welch, a compression standard for images.
Landscape: Horizontal photographs of a layout of land.
Lens: One or more glass fixtures to focus an image on the sen-
sor or negative.
Lossless compression: A method for compressing and storingimages but without losing any image data, produces large file
sizes for proportionally larger images.
Lossy compression: A method for storing images where
image information is lost with consecutive saves. There is a
quality mode, that can produce low file sizes for large images.
Macro: Close-up photography.
Manual Override: Taking manual control of focus, exposure,
aperture, shutter speed and other camera settings. Can be par-
tial or total.
Megapixel: One million pixels
Memory: The external or internal storage for a digital camera, where the pictures are stored. Can interface with a computer
through a card reader, or directly from the camera through a
cable.
Memory Space: The free space in the external storage used for
FAST TRACK
GLOSSARY 15
139
www.thinkdigit.com
FAST TRACKFAST TRACKFAST TRACK

7/30/2019 BluePrint Digital Photography (Mar 2009).pdf
http://slidepdf.com/reader/full/blueprint-digital-photography-mar-2009pdf 137/141
D
I
G
I
TA
L
P
H
O
T
O
GR
A
P
H
Y
the camera.
Metering: The act of measuring the amount of light to calcu-late the exposure.
Microns: A unit of length one millionth of a metre.
Mirror: Used behind the lens of an SLR camera to direct the
light to the viewfinder.
Mosaic: A grid of small elements, usually pixels or elementsin digital photography.
Multiple Exposure: Capturing multiple images on the same
frame or negative, opening the shutter a number of times for
taking a single image. Used to capture objects in motion, such
as the path of the sun across the sky.
Negatives: A roll of film with images imprinted on them, usedto develop pictures. A digital equivalent is the raw data from
the sensor before it has been processed.
NiCd battery: Nickel-cadmium battery.
NiMH battery: Nickel Metal Hydride battery. Ecologically safe
and very efficient.
Optical Resolution: The degree to which detail is resolved in
an image.
Optical Viewfinder: The viewfinder is a small window used
for framing the image.
Optical Zoom: A mechanism for adjusting the focal length of
a lens.
Orientation Sensor: A sensor in the camera that adjusts the
orientation of the image according to the angle in which the
camera is held.
140 FAST TRACK
GLOSSARY15 www.thinkdigit.com
FAST TRACKFAST TRACK

7/30/2019 BluePrint Digital Photography (Mar 2009).pdf
http://slidepdf.com/reader/full/blueprint-digital-photography-mar-2009pdf 138/141
D
I
G
I
TA
L
P
H
O
T
O
GR
A
P
H
Y
FAST TRACK
GLOSSARY 15
141
www.thinkdigit.com
FAST TRACK
Overexposed: An image that has a large portion in highlight,
with detail lost in these areas. An image that appears unnat-
urally bright.
P&S: Point and Shoot, a regular digital camera.
PAL: The European standard for video broadcast.
PC Card: A card that plugs directly into a notebook or hand-
held devices. A common storage device.
PCX: One of the earliest file formats for storing raster images.
PNG: Portable Network Graphic, a commonly used file format
on the internet and on Linux systems.
PSD: The default format for Adobe Photoshop, an image edit-
ing software.
Panorama: A series of images stitched together to form a con-
tinuous landscape.
Parallax: The difference in the point of view from the
viewfinder and the lens. An SLR camera has zero parallax.
Parallel port: An interface for computers to connect auxil-
liary and peripheral devices.
Pentamirror: Three mirrors instead of a pentaprism to cor-
rect the inverted images in SLR cameras.
Pentaprism: A five sided prism that redirects light by a 90
degree angle, used in SLR cameras.
Perspective: The spatial positioning or angle of elements andforms in an image, with reference to the eye or lens.
Photoshopping: Editing an image on Photoshop.
Pixel: An element on a sensor, or a single unit of colour rep-
FAST TRACKFAST TRACK

7/30/2019 BluePrint Digital Photography (Mar 2009).pdf
http://slidepdf.com/reader/full/blueprint-digital-photography-mar-2009pdf 139/141
D
I
G
I
TA
L
P
H
O
T
O
GR
A
P
H
Y
resentation on a monitor.
Pixelation: This effect occurs when the resolution of theimage is smaller than the resolution of the monitor, when
fewer digital pixels are spread out over many real pixels.
Portrait: An image of a person or people.
Preset: A set of functions, algorithms or camera settings that
are programmed into the camera and accessible through but-
tons or the menu.
Preview Screen: A small LCD screen at the back of the camera,
used to preview images in cameras. Acts as a viewfinder for
non-SLR digital cameras.
Prism: A transparent glass device that refracts or redirects
light.
RAW: A variety of image formats, the data received directly
from the sensor.
RGB: An additive colour model, used for display or projection.
Colours are made by adding two or more colours together.
Red-eye: A visual artefact where the eyes of a person appears
red because of flash reflecting off the retina.
Red-eye reduction: A feature in image editing software that
removes red eyes.
Render: The process of creating an image from a description
or algorithm.
Resolution: The level of detail in an image.
SLR: Single-lens reflex camera, a camera with zero parallax.
Saturation: The purity of a colour. Fully saturated colours
have no grey in them.
142 FAST TRACK
GLOSSARY15 www.thinkdigit.com
FAST TRACKFAST TRACK

7/30/2019 BluePrint Digital Photography (Mar 2009).pdf
http://slidepdf.com/reader/full/blueprint-digital-photography-mar-2009pdf 140/141
D
I
G
I
TA
L
P
H
O
T
O
GR
A
P
H
Y
Scan: The process of converting a printed image to a digital
image by using a scanner.
Sepia: A reddish brown tinge that old prints using a particu-
lar chemical process acquired over time.
Sharpness: The edge contrast of an image is its sharpness.
Shoot: The act of capturing an image on the camera.
Shutter: A device that opens, closes and controls the expo-sure.
Shutter Speed: The length of time light is allowed to go
through an open shutter.
Shutter lag: The time between clicking the button and the
shutter opening.
Shutter release: The clicker, or any mechanism that opens the
shutter.
Shutter priority: An automatic exposure system in which you
set the shutter speed, and the camera selects the aperture for
the correct exposure.
Speed: The same as shutter speed, the total duration of theexposure.
Stitching: Combining the edges of a number of photographs
to form a panorama.
Stop down: To increase the aperture, or reduce the f-stop.
TIFF: A lossless image standard for saving image files digital-ly.
TTL: Through-the lens, a system in which the flash is metered
through the lens in order to determine how long the flash
light should be discharged.
FAST TRACK
GLOSSARY 15
143
www.thinkdigit.com
FAST TRACKFAST TRACKFAST TRACK
7/30/2019 BluePrint Digital Photography (Mar 2009).pdf
http://slidepdf.com/reader/full/blueprint-digital-photography-mar-2009pdf 141/141
D
I
G
I
TA
L
P
H
O
T
O
GR
A
P
H
Y
Tags: Short, descriptive words for a photo, saved digitally or by
a software index. Used massively on the internet for filtering
and tracking photos.
Telephoto lens: A lens with very long focal length.
Telescopic: Analogous to zoom.
Thru-the-lens: See TTL
Time Lapse: A series of photos with a delay in time of thesame subject, usually in motion or changing over time.
Timer: An mechanism where the exposure is delayed by a
specified duration after the click.
Tone: The warmth or coolness of an image, that is indicative
of the amount of reddish or bluish colours it contains.
Trigger: A mechanism for clicking without moving the cam-
era or using the click.
Tripod: Typically a three-pronged stand for holding the cam-
GLOSSARY15 www.thinkdigit.com


![Blueprint for a Creative Culture [Commonwealth Club of SF, Mar 2011]](https://static.fdocuments.in/doc/165x107/5418f57c7bef0a48248b6d87/blueprint-for-a-creative-culture-commonwealth-club-of-sf-mar-2011.jpg)