BLED5 INSTALLATION INSTRUCTIONS - … · BLED5 INSTALLATION INSTRUCTIONS Thank you for buying RAB...
6
BLED5 INSTALLATION INSTRUCTIONS Thank you for buying RAB lighting fixtures. Our goal is to design the best quality products to get the job done right. We’d like to hear your comments. Call the Marketing Department at 888-RAB-1000 or email: [email protected] IMPORTANT READ CAREFULLY BEFORE INSTALLING FIXTURE. RETAIN THESE INSTRUCTIONS FOR FUTURE REFERENCE . RAB fixtures must be wired in accordance with the National Electrical Code and all applicable local codes. Proper grounding is required for safety. THIS PRODUCT MUST BE INSTALLED IN ACCORDANCE WITH THE APPLICABLE INSTALLATION CODE BY A PERSON FAMILIAR WITH THE CONSTRUCTION AND OPERATION OF THE PRODUCT AND THE HAZARDS INVOLVED. WARNING: Make certain power is OFF before installing or maintaining fixture. No user servicable parts inside. LOCATION 1. The Bollard should be mounted to a firm level surface. 2. Anchor bolts may be used in new concrete installations. Use the template provided. 3. For all other applications use anchors suitable for the mounting surface. ANCHOR BOLTS INSTALLATION CAUTION: Install according to all applicable local codes. 1. Install two Anchor Bolts in concrete foundation (by others) using the template provided. Mounting Plate may also be used as the template. Anchor Bolts should protrude no more than 3”. Concrete Conduit Anchor Bolts Mounting Plate MOUNTING PLATE Assemble fixture(s) to bollard before mounting the Bollard to the Mounting Plate. 1. Place the Mounting Plate over Anchor Bolts. 2. Use four Leveling Screws or shims to level the Mount- ing Plate. 3. Tighten assembly using the washers, lockwashers and nuts provided. 4. Make sure supply leads extend far enough to make fixture connections. 5. Slide Gasket down around the bottom of the Mounting Plate. 6. Use the four screws to mount the Bollard to the Mount- ing Plate. Tighten securely. Mounting Plate Anchor Bolts Gasket Leveling Screws Mounting Screws Bollard BLED5 Square BLEDR5 Round BLED2X5 Square BLEDR2X5 Round
Transcript of BLED5 INSTALLATION INSTRUCTIONS - … · BLED5 INSTALLATION INSTRUCTIONS Thank you for buying RAB...

BLED5 INSTALLATION INSTRUCTIONSThank you for buying RAB lighting fixtures. Our goal is to design the best quality products to get the job done right. We’d like to hear your comments. Call the Marketing Department at 888-RAB-1000 or email: [email protected]
IMPORTANTREAD CAREFULLY BEFORE INSTALLING FIXTURE. RETAIN THESE INSTRUCTIONS FOR FUTURE REFERENCE. RAB fixtures must be wired in accordance with the National Electrical Code and all applicable local codes. Proper grounding is required for safety. THIS PRODUCT MUST BE INSTALLED IN ACCORDANCE WITH THE APPLICABLE INSTALLATION CODE BY A PERSON FAMILIAR WITH THE CONSTRUCTION AND OPERATION OF THE PRODUCT AND THE HAZARDS INVOLVED. WARNING: Make certain power is OFF before installing or maintaining fixture. No user servicable parts inside.
LOCATION1. The Bollard should be mounted to a firm level surface.
2. Anchor bolts may be used in new concrete installations. Use the template provided.
3. For all other applications use anchors suitable for the mounting surface.
ANCHOR BOLTS INSTALLATIONCAUTION: Install according to all applicable local codes.
1. Install two Anchor Bolts in concrete foundation (by others) using the template provided. Mounting Plate may also be used as the template. Anchor Bolts should protrude no more than 3”.
Concrete
Conduit
Anchor Bolts
Mounting Plate
MOUNTING PLATEAssemble fixture(s) to bollard before mounting the Bollard to the Mounting Plate.
1. Place the Mounting Plate over Anchor Bolts.
2. Use four Leveling Screws or shims to level the Mount-ing Plate.
3. Tighten assembly using the washers, lockwashers and nuts provided.
4. Make sure supply leads extend far enough to make fixture connections.
5. Slide Gasket down around the bottom of the Mounting Plate.
6. Use the four screws to mount the Bollard to the Mount-ing Plate. Tighten securely.
Mounting PlateAnchor
Bolts
Gasket
Leveling Screws
Mounting Screws
Bollard
BLED5 Square BLEDR5 Round BLED2X5 Square BLEDR2X5 Round

BLED5 INSTALLATION INSTRUCTIONSThank you for buying RAB lighting fixtures. Our goal is to design the best quality products to get the job done right. We’d like to hear your comments. Call the Marketing Department at 888-RAB-1000 or email: [email protected]
MOUNTING FIXTURESFor BLED5 & BLEDR5 the window is available on one side of Bollard. Secure Bollard before installing the housing.
1. Loosen Housing Screws and remove Mounting Plate. Screws will remain in place with O-ring retaining gaskets. Fixture may hang from the tether while installing.
2. Place Bollard Gasket and Mounting Plate over recessed box.
3. Attach Mounting Plate with supplied Mounting Plate Screws.
4. Pull supply wires from box through mounting plate and wire fixture as shown in the wiring section.
5. Check Housing Gasket. It should remain firmly around the inside of the Housing.
6. Align Housing to Mounting Plate.
7. Make sure all gaskets are properly seated. Tighten Housing Screws.
8. Secure the Cap Gasket and tighten the Bollard Cap with supplied screws.
Bollard
Housing screws
Bollard Cap
Cap Gasket
HousingMounting Plate
Bollard Cap
Cap GasketBollard
Gasket

BLED5 INSTALLATION INSTRUCTIONSThank you for buying RAB lighting fixtures. Our goal is to design the best quality products to get the job done right. We’d like to hear your comments. Call the Marketing Department at 888-RAB-1000 or email: [email protected]
MOUNTING FIXTURESFor BLED2x5 & BLEDR2x5, cutouts are provided on both sides of Bollard. Secure Bollard before installing the housings.
1. Loosen Housing Screws and remove Mounting Plate. Screws will remain in place with O-ring retaining gaskets. Fixture may hang from the tether while installing.
2. Place Bollard Gasket and Mounting Plate over cut out on Bollard.
3. Attach Mounting Plate with supplied mounting plate screws.
4. Pull supply wires from bollard through mounting plate and wire fixture as shown in the wiring section.
5. Check Housing Gasket. It should remain firmly around the inside of the Housing.
6. Align Housing to Mounting Plate.
7. Make sure all gaskets are properly seated. Tighten Housing Screws.
8. Follow same steps for second fixture.
9. Secure the Cap Gasket and tighten the Bollard Cap with provided screws.
Bollard
Housing screws
Bollard Cap
Cap Gasket
Housing
Housing Gaskets
Mounting Plate
Housing-Screws
Bollard CapCap
Gasket
Bollard
Mounting Plate
Bollard Gasket
Bollard Gasket

BLED5 INSTALLATION INSTRUCTIONSThank you for buying RAB lighting fixtures. Our goal is to design the best quality products to get the job done right. We’d like to hear your comments. Call the Marketing Department at 888-RAB-1000 or email: [email protected]
ACCESSORIES Bollard base: BOLBASEBollard base Retro kit: BOLBASE RETRO
Suffix “Y” = Warm 3000K LEDSuffix “N” = Neutral 4000K LED,
CLEANING & MAINTENANCE CAUTION: Be sure fixture temperature is cool enough to touch. Do not clean or maintain while fixture is ener-gized.
1. Clean glass lens with non-abrasive glass cleaning solution
2. Do not open fixture to clean the LED.
TROUBLESHOOTING 1. Check that the line voltage at fixture is correct. Refer to
wiring directions.
2. Is the fixture grounded properly?
3. Is the photocell is functioning properly (if used)?
SLED Round: US pat. D612,974, CN: ZL201030129138.4, TW: pat. D140455, CA: D RAB Lighting Inc. SLED Square:.US pat. D612,975, CN: ZL201030129140.1, TW: pat. D140456, CA: D RAB Lighting Inc.
Note: These instructions do not cover all details or variations in equipment nor do they provide for every possible situation during installation, operation or maintenance.
BLED5 Cool LED Square Steplight BLEDR5 Cool LED Round Steplight
WIRINGUniversal voltage driver permits operation at 120V to 277VAC, 50 or 60Hz1. Connect the bare copper Ground wire from fixture to
supply ground.2. Connect the BLACK fixture lead to the (+) LINE supply
lead.3. Connect the WHITE fixture lead to the (-) COMMON
supply lead.
“COM”
PHOTOCELL
WP2FC
BLACK
WHITE
PHOTOCELL
PHOTOCELL INSTALLATIONPhotocell may be wired in the field. Apply weatherproof silicone sealant to all plugs and unused conduit entries.1. Install photocell and wire as per diagram.
2. Use photocell rated for your supply voltage.
DRIVER
BLACKWHITE
RED

BLED5 INSTALLATION INSTRUCTIONSThank you for buying RAB lighting fixtures. Our goal is to design the best quality products to get the job done right. We’d like to hear your comments. Call the Marketing Department at 888-RAB-1000 or email: [email protected]
BLED5Y Warm LED Square Steplight BLEDR5Y Warm LED Round Steplight
BLED5N Neutral LED Square Steplight BLEDR5N Neutral LED Round Steplight
Easy Installation & Product HelpTech Help LineCall our experts 888 RAB-1000
©2014 RAB LIGHTING Inc.Northvale, New Jersey 07647 USA
rabweb.comVisit our website for product info
emailAnswered promptly [email protected]
BLED5-IN-0814
BLED5 INSTALLATION INSTRUCTIONSThank you for buying RAB lighting fixtures. Our goal is to design the best quality products to get the job done right. We’d like to hear your comments. Call the Marketing Department at 888-RAB-1000 or email: [email protected]
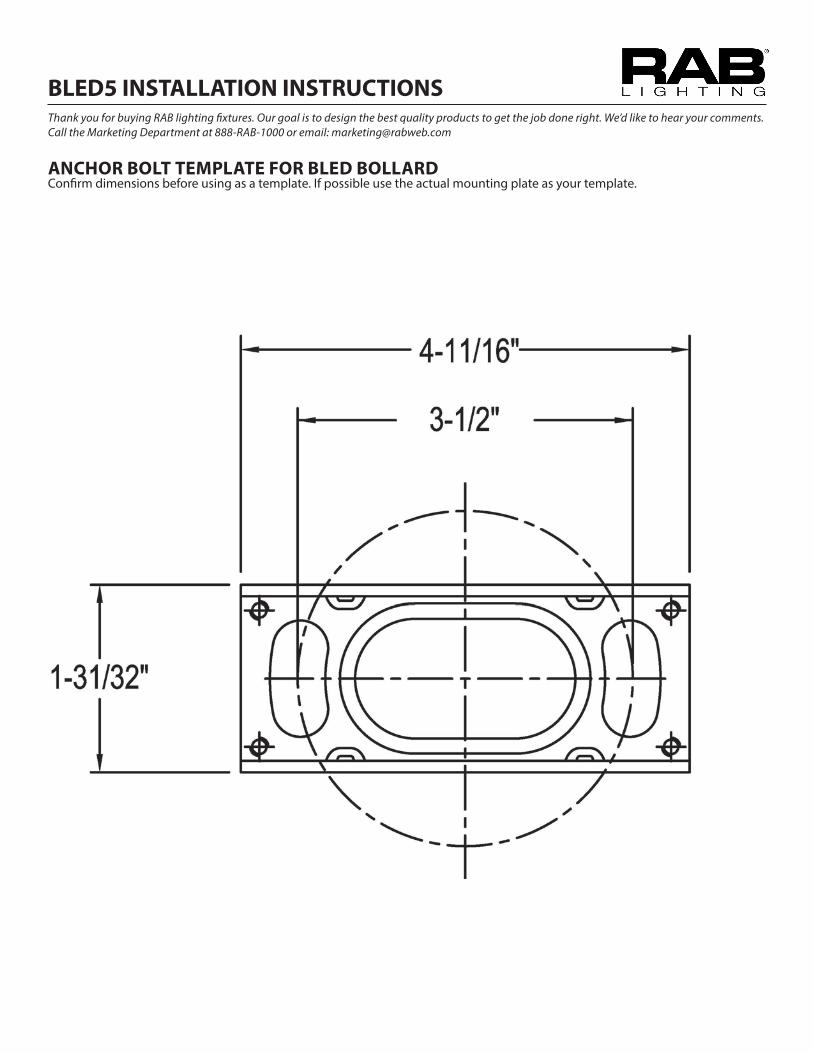
ANCHOR BOLT TEMPLATE FOR BLED BOLLARDConfirm dimensions before using as a template. If possible use the actual mounting plate as your template.