Blackboard 201 Communication Workshop Barbara Cooper. OCC Faculty Online Coordinator.
Blackboard Help
• Best Practice: Interactive Tools in Action
• Discussions
• About Forums and Threads
• Set Up Discussions
• Create Forums
• Create Threads
• Best Practice: Effective Discussion Questions
• Manage Discussions
• Moderate Discussions
• Reply to Discussion Posts
• Search and Collect Discussions
• Grade Discussions
• View Discussion Statistics
• Group Discussions
• Blogs
• Create a Blog
• Edit and Manage Blogs
• Grade Blogs
• Journals
• Best Practice: Benefits of Reflective Learning
• Create a Journal
• Edit and Manage Journals
• Grade Journals
• Wikis
• Best Practice: Wikis in Action
• Create Wiki Topics
• Create Wiki Pages
• Edit and Manage Wikis
1
Reviewed March 2017

• Grade Wikis
2

Best Practice: Interactive Tools in Action
To build a successful online community, students needthe tools to interact and have conversations. Throughconversation, we learn about each other, ourselves, thetopic, how to get along, and make group decisions.Though time and geography limit some of ourconversations, the power of the connection using variedconversation technologies build community.
Students report that their satisfaction with online coursesrelates to instructor presence, and the collaboration andsense of community they experience. In a successfulonline learning community, students support oneanother and help each other accomplish what they might
not have on their own. When the students interact and direct their efforts toward a common goal, collaborationexists.
Blackboard Learn offers four communication tools for self-reflection, collaboration, and communication. Thediscussion board, blogs, journals, and wikis tools allow you to provide rich assignments and evaluate students inauthentic ways where students can share and create knowledge.
Each of the four interactive tools can serve distinct purposes. You can use one or all of them in your course, andthey can work well in combination. Select the tools that meet your course goals and allow students to interact inthe most efficient ways.
Suggested Uses
In the following table, find suggested uses for the tools to help you decide how they could play a role in yourcourse. As you progress through the list of tools, the level of interaction required from your students increases.
Journals
Students can express their thoughts, questions, and concerns to you privately.
Examples:Examples:
3
• Ask students to record observations.
• Question the content.
• Identify areas for help.
• Develop a plan for improvement.
• Set goals.
• Evaluate their educational journeys.
• Submit prewriting for a graded assignment for guidance and feedback.
Discussions
Students can express their ideas, gathering feedback and help with refining their opinions and plans.
Examples:Examples:
• Post ideas for projects and papers, and ask classmates to weigh in.
• Share initial thoughts about a topic before it is discussed in-depth in individual blogs.
• Brainstorm ideas for a wiki project.
• Express opinions to help divide students into work groups.
Blogs
Students can interpret what they learned, showcase their grasp of the material, and present information totheir classmates.
Students often incorporate rich media into their posts to entice and inform others.
Examples:Examples:
• Interpret a case study.
• Submit the final draft of a written, graded assignment.
• Analyze a topic, adding information over several weeks or the entire term.
• Deliver arguments and supporting evidence.
• Provide commentary on a subject.
4

Wikis
Students can create course content together. Divide students into pairs or groups, or generate work as a classunit. Because each course member is a trusted source of information, everyone may edit and organize thecontent.
Examples:Examples:
• Class summaries and outlines.
• Course glossary.
• Resources repository. Ask students to post links to pictures, articles, and media files that relate to thelesson and explain why they were chosen.
• Lab experiments.
• Group project presentations.
• Research notebooks.
• Connecting student writing to form a book, student solutions for scenarios and case studies.
• Final test reviews.
Tools in Combination
Blackboard’s interactive tools provide the opportunity for you to build rich assignments and offer another meansfor evaluating students. With these essential tools, you can provide students with constructive comments,guidance, and assessment. You can also use the tools in combination to meet your goals.
Discussions + Wikis
On the discussion board, students post their ideas for a course wiki assignment. As students present theirideas and posts develop, they narrow the topic and divide the work before they transition to the wiki. In thecourse wiki, students provide text, images, and rich media to support the course content and the topic theychose in the discussion board.
Journals + Blogs
Assign a graded blog requiring students to fully explore a topic, adding entries as the term progresses.However, the topic planning begins in the journals tool where you offer guidance and support. Helpstudents clarify the main points and ask for writing samples before they post their ideas for the entire classto read and comment on.
5

Discussions + Blogs
Ask students to post an internet source on the discussion board that expands on the most recent lecture.Next, in their blogs, students can select a source and synthesize that information with the course material,extending their understanding beyond the classroom. Ask all students to provide comments for at least twoclassmates’ entries that include potential test questions.
6

Discussions
Online discussions provide some unique benefits. Because students cantake time to ponder before posting ideas, you may see more thoughtfulconversations play out. You can observe as students demonstrate theirgrasp of the material and correct misconceptions. You can extend youroffice hours by reaching students more often during the week so learning iscontinuous.
Building a sense of community among students is crucial for a successfulonline experience. With the discussion board tool, course members canreplicate the robust discussions that take place in the traditional classroom.
Discussions can serve a range of purposes:
• An online meeting place for social interaction among peers.
• An additional medium for collaboration and the exchange of ideas.
• A medium to pose questions about homework assignments, readings, and course content.
• A way to demonstrate the understanding or application of course material.
• A record of discussion that members can review at a later point.
• A graded activity that demonstrates understanding or application of course material.
Flexible and Reflective Communication
After you determine what you need, you can create asynchronous interactions occurring over extended periods oftime. This allows for more flexibility, as well as reflective communication.
Asynchronous communication offers convenience and flexibility to all participants, including the followingbenefits:
• Locations and time zones do not affect participation.
• Participants can carefully consider and reflect on the initial message before responding. Hopefully, morethoughtful conversations can occur.
• You can accommodate different learning styles. For example, students who are shy about speaking inclass may feel more comfortable responding to discussion threads.
7
For smaller course groups, you can also offer the group discussion board tool, available only to the members ofthe group.
Note: Your institution controls whether this tool is available.
In this section...
• About Forums and Threads
• Set Up Discussions
• Create Forums
• Create Threads
• Manage Discussions
• Moderate Discussions
• Reply to Discussion Posts
• Search and Collect Discussions
• Grade Discussions
• View Discussion Statistics
• Group Discussions
8
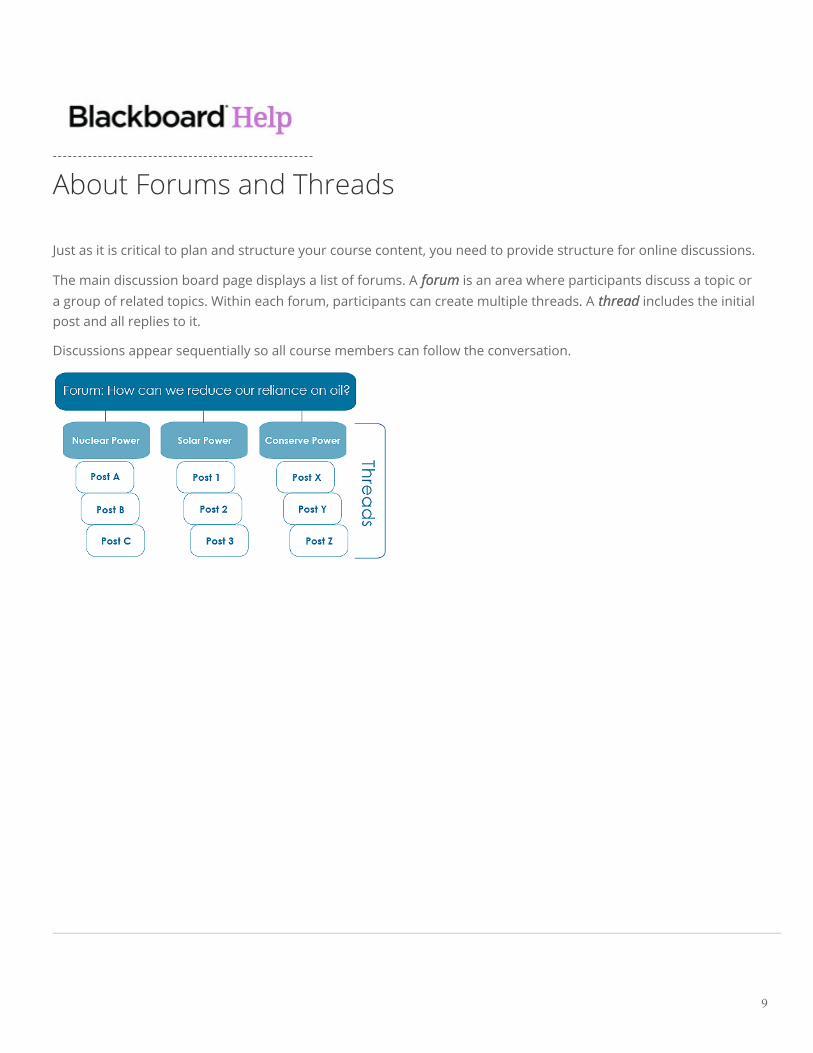
About Forums and Threads
Just as it is critical to plan and structure your course content, you need to provide structure for online discussions.
The main discussion board page displays a list of forums. A forumforum is an area where participants discuss a topic ora group of related topics. Within each forum, participants can create multiple threads. A threadthread includes the initialpost and all replies to it.
Discussions appear sequentially so all course members can follow the conversation.
9
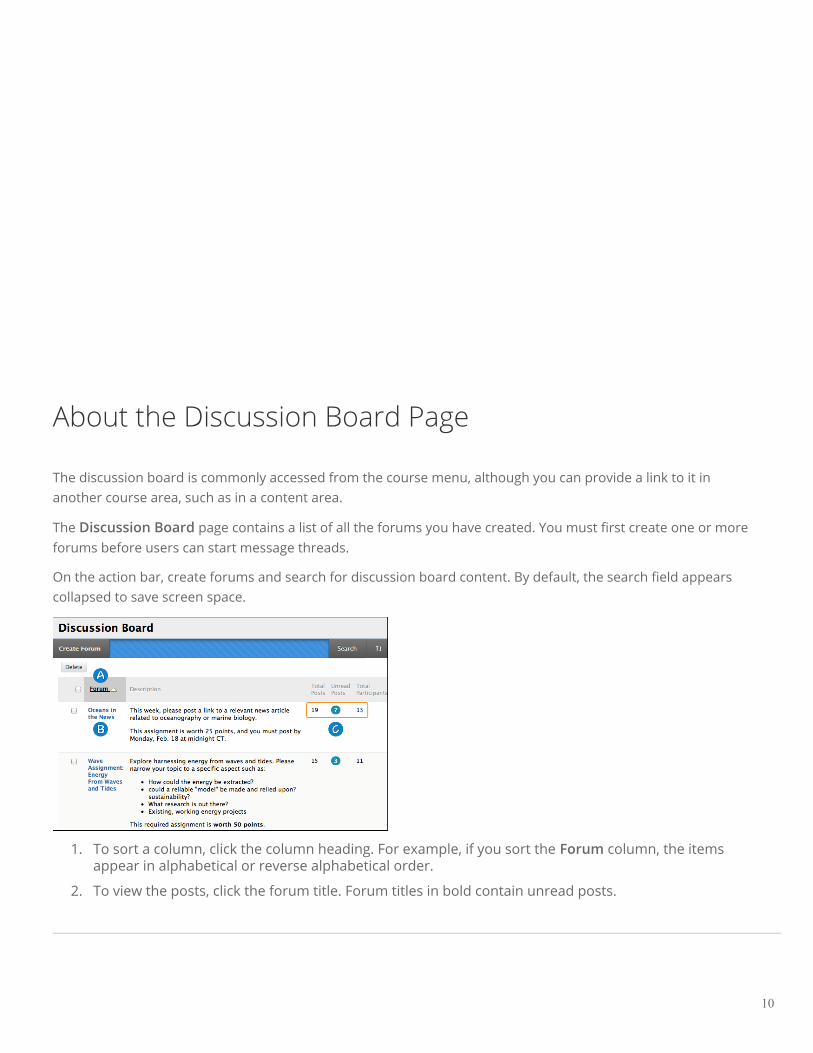
About the Discussion Board Page
The discussion board is commonly accessed from the course menu, although you can provide a link to it inanother course area, such as in a content area.
The Discussion Board page contains a list of all the forums you have created. You must first create one or moreforums before users can start message threads.
On the action bar, create forums and search for discussion board content. By default, the search field appearscollapsed to save screen space.
1. To sort a column, click the column heading. For example, if you sort the Forum column, the itemsappear in alphabetical or reverse alphabetical order.
2. To view the posts, click the forum title. Forum titles in bold contain unread posts.
10
3. For each forum, view the total number of posts, the number of unread posts, and the number of userswho have participated in the forum. For one-click access to the forum's unread messages, click the linkin the Unread Posts column.
About a Discussion Forum
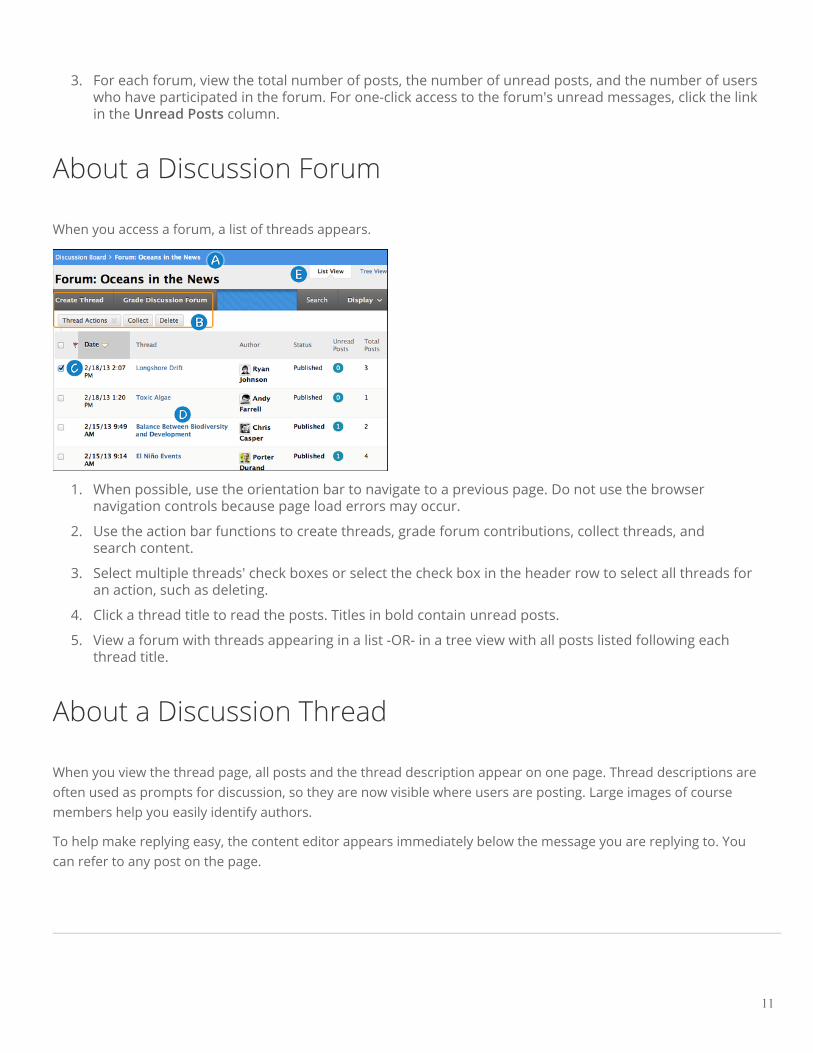
When you access a forum, a list of threads appears.
1. When possible, use the orientation bar to navigate to a previous page. Do not use the browsernavigation controls because page load errors may occur.
2. Use the action bar functions to create threads, grade forum contributions, collect threads, andsearch content.
3. Select multiple threads' check boxes or select the check box in the header row to select all threads foran action, such as deleting.
4. Click a thread title to read the posts. Titles in bold contain unread posts.
5. View a forum with threads appearing in a list -OR- in a tree view with all posts listed following eachthread title.
About a Discussion Thread
When you view the thread page, all posts and the thread description appear on one page. Thread descriptions areoften used as prompts for discussion, so they are now visible where users are posting. Large images of coursemembers help you easily identify authors.
To help make replying easy, the content editor appears immediately below the message you are replying to. Youcan refer to any post on the page.
11

1. Use Expand All and Collapse All to manage the visibility of posts on the page.
2. Move your mouse pointer anywhere on the page and action bar functions appear at the top, such asSearch and Refresh.
3. Click the number of unread posts to view a page containing only the unread posts in a thread.
4. When viewing threads, a badge appears next to a forum manager or moderator's name. Point to thebadge to see the user’s course role and forum role. If your institution has custom roles, they aredisplayed. Role highlighting is available only in the discussion board.
5. View dates for posts, which appear as relative dates, such as "7 days ago." When you point to therelative date, you can view the absolute date of creation or editing, and the number of views.
6. Mark posts as read as you scroll down the page, after a slight delay. Blue icon = unreadunread. White icon =readread. Only expanded posts that you view onscreen are marked as read. Posts are not automaticallymarked read by quickly scrolling down the page. Click the icon to manually change the status of amessage. You can also flag posts you want to review again later or indicate as important.
7. Point to a post to see Reply, Quote, Expand/Collapse, and other available functions. Click Collapse tofold up a post. This increases the vertical screen space available for viewing posts.
8. If you enabled the rate posts feature in a forum's settings, view the Overall Rating for the averagerating for a post. When you point to the rating area, it changes to show Your Rating.
12

Set Up Discussions
The most common form of interaction in an online course is through the discussion board using forumsestablished by an instructor. Participation and interaction in the discussion board does not occur naturally. Youmust intentionally design it into your courses. To encourage engaging, quality discussion, craft discussionquestions carefully and create inquiry.
If you want to encourage participation, consider allowing students to post anonymously. Also, allow students tocreate new threads. This flexibility may encourage members to post their ideas and questions. You can alsoprovide incentive by grading the discussion or adding exam questions based on discussion content.
Develop Successful Online Discussions
You can help your students feel comfortable and provide them with guidelines as they begin to use the discussionboard.
The following list describes four steps for developing successful online discussions to help build community andfulfill assignments.
1. Define participation requirementsDefine participation requirements
◦ Share your expectations. Create a forum where students can read about etiquette and accessgrading information.
◦ Model proper online interaction and reinforce appropriate behavior with public recognition.
2. Craft an effective questionCraft an effective question
◦ Incorporate multimedia resources into your questions to reduce the monotony of purely text-based interactions. With the popularity of services like YouTube™, you can ask students to viewa clip and ask for responses.
◦ Use the mashups feature to include images, videos, and slide presentations to your questions.Students can also add mashups to their replies.
3. Encourage new ideasEncourage new ideas
◦ If discussion posts contain too much agreement and not enough questioning of ideas, tryassigning students with the last names A–M to support one side and N–Z to support the other.
4. ModerateModerate
13

◦ Establish your presence by asking for clarification, resources, or input from silent participants.
Suggestions for Forum Settings
Forum settings allow you to use the discussion board in different ways. For example, to fully control a forum, youcreate all threads, moderate, and grade the posts. For a student-led discussion, allow students to create newthreads and posts anonymously.
The following table includes some of the ways you can control the behavior of forums in a discussion board.
Goal Forum Setting
Promote originality and avariety of ideas
You can create "post first" forums where you ask students to respond before theycan read and reply to their classmates' posts.
Create effective socialforums
Allow students to post anonymously and without worrying about receiving agrade. Allowing students to post anonymously is important at the beginning of acourse when they are still becoming comfortable with discussions.
Monitor quality andbehavior
Assign a moderator to review each post before making it public.
Allow students to controlthe discussion
Allow students to edit, delete, and rate posts. Also, you can allow students tocreate new threads and direct the discussion.
Have a tightly controlledforum and use it toevaluate studentperformance
Select the grading and moderating options. To be sure students focus on theexisting threads, do not allow the creation of new threads.
Allow authors to edittheir published posts
Consider locking the thread after grading. Users cannot change locked posts.
You cannot select some settings in combination. For example, if you are grading forums or threads, anonymousposts are not allowed. Also, if you enable thread grading, members cannot create new threads.
Access the Discussion Board
You can allow users to access the discussion board in several ways. You can add a customized link to the coursemenu and to a course area. When you provide a link to the discussion board in a course area, students can accessthe tool alongside other course content.
As an instructor, on the Control Panel, expand the Course Tools section and click Discussion Board. From thislink, access the course discussion board and the group discussion boards for the groups in your course.
14
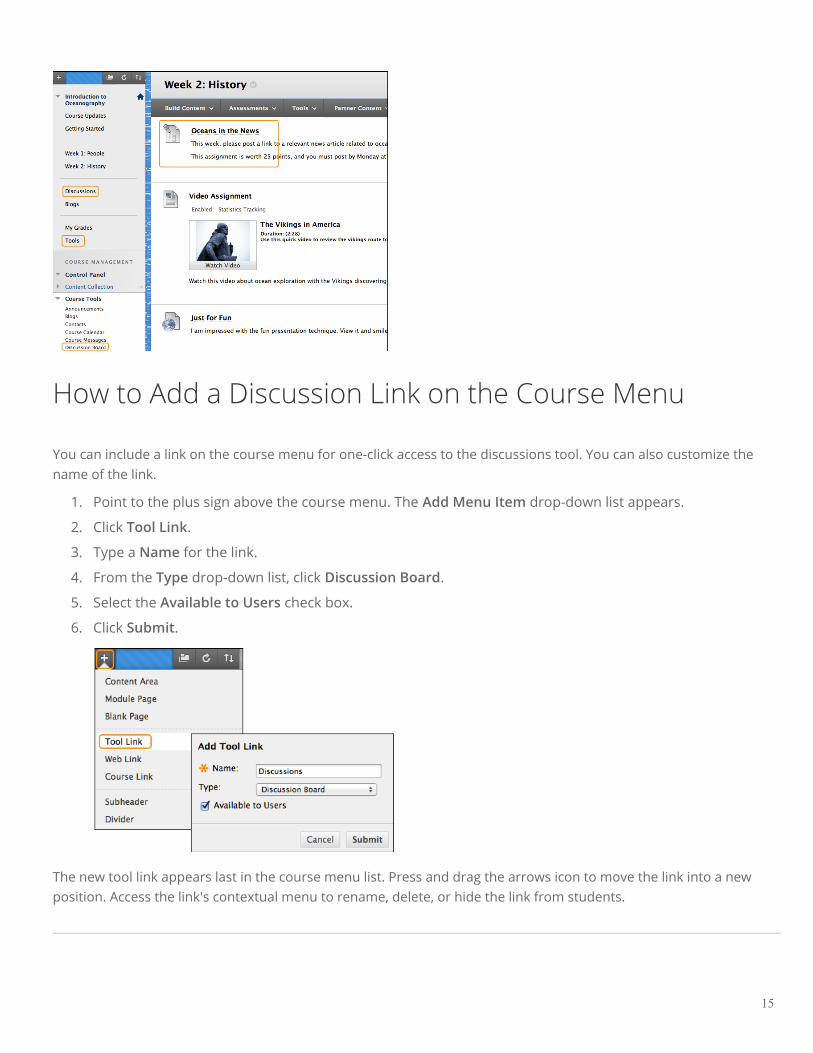
How to Add a Discussion Link on the Course Menu
You can include a link on the course menu for one-click access to the discussions tool. You can also customize thename of the link.
1. Point to the plus sign above the course menu. The Add Menu Item drop-down list appears.
2. Click Tool Link.
3. Type a Name for the link.
4. From the Type drop-down list, click Discussion Board.
5. Select the Available to Users check box.
6. Click Submit.
The new tool link appears last in the course menu list. Press and drag the arrows icon to move the link into a newposition. Access the link's contextual menu to rename, delete, or hide the link from students.
15

How to Add a Discussion Link in a Course Area
You can incorporate the discussion board into course areas, allowing students to access the tool alongsidecontent.
In a content area, you can add a forum link following lecture notes to gather questions on the material presentedor after an assignment to gather students' perceptions on how they did. You can add adaptive release rules ordate availability restrictions to limit students' access. This allows them to access content in a specified order, suchas reading a PDF before adding posts to the discussion board.
1. Access the content area or folder where you want to link to the discussion board or forum.
2. On the action bar, point to Tools and click Discussion Board.
3. On the Create Link: Discussion Board page, click the Link to Discussion Board Page option to link tothe discussion board itself.
-OR-
Click Select a Discussion Board Forum and select a forum from the list.
-OR-
Click Create New Forum to add a link to a forum you create at this time. You select all forum settings atthe time of creation. The newly created forum appears in the list of forums to choose from when adding thelink in your course.
4. Click Next.
5. On the next Create Link: Discussion Board page, type a Link Name. The Link Name cannot exceed 50characters. Students click the name to access the discussion board or forum.
6. Optionally, type instructions or a description in the Text box.
7. For the Available option, click Yes.
8. For the Track Number of Views option, click Yes or No. If you enable tracking, the number of times thelink is viewed, when it is viewed, and by whom is recorded.
9. Select the Display After and Display Until check boxes to enable the date and time selections. Displayrestrictions do not affect the availability of the discussion board or forum content, only when itappears.
10. Click Submit. The discussion link appears in the course area.
16
Learn More
For steps to assign a moderator, see Moderate Discussions.
To learn about adaptive release, see Release Content.
To learn how to rate posts, see Reply to Discussion Posts.
To learn how to lock a thread, see Create Threads.
To learn how to provide a link to the discussion board in a course area, see How to Add a Link to the Discussion
Board in a Course Area.
17
Create Forums
A discussion board forum is an area where participants discuss a topic or a group of related topics. Within eachforum, users can create multiple threads. A thread includes the initial post and all replies to it. You can createforums and threads to organize discussions into units or topics relevant to your course.
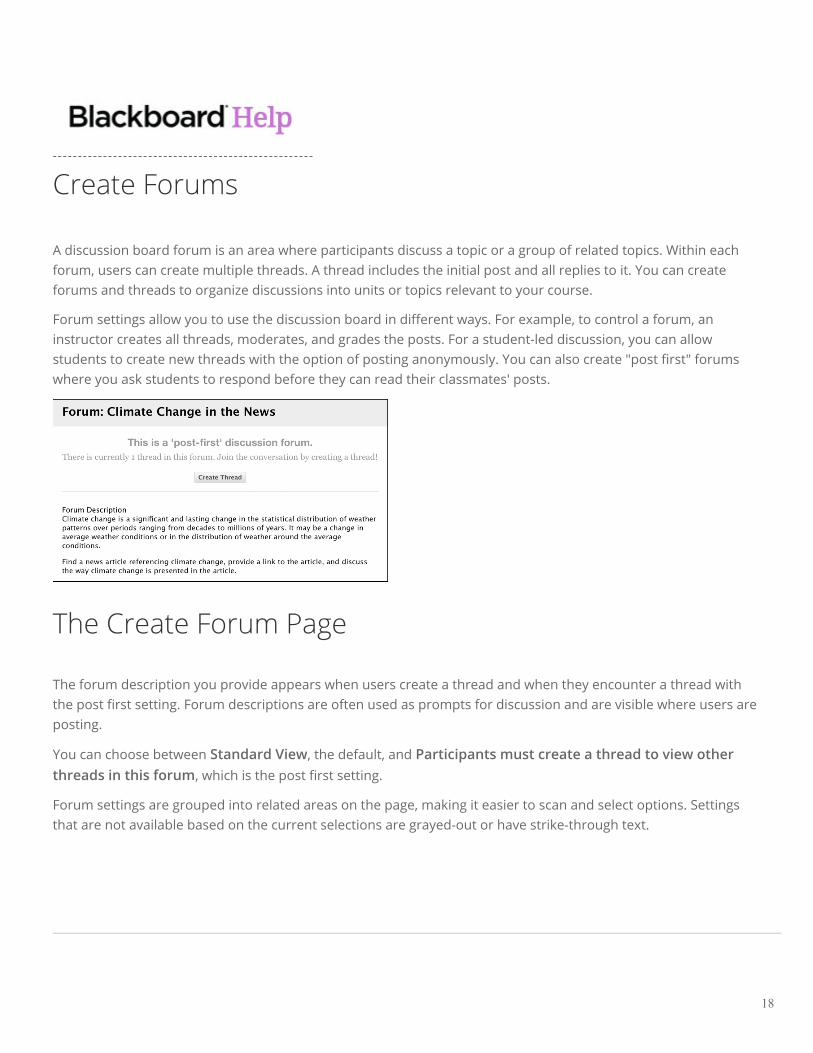
Forum settings allow you to use the discussion board in different ways. For example, to control a forum, aninstructor creates all threads, moderates, and grades the posts. For a student-led discussion, you can allowstudents to create new threads with the option of posting anonymously. You can also create "post first" forumswhere you ask students to respond before they can read their classmates' posts.
The Create Forum Page
The forum description you provide appears when users create a thread and when they encounter a thread withthe post first setting. Forum descriptions are often used as prompts for discussion and are visible where users areposting.
You can choose between Standard View, the default, and Participants must create a thread to view otherthreads in this forum, which is the post first setting.
Forum settings are grouped into related areas on the page, making it easier to scan and select options. Settingsthat are not available based on the current selections are grayed-out or have strike-through text.
18
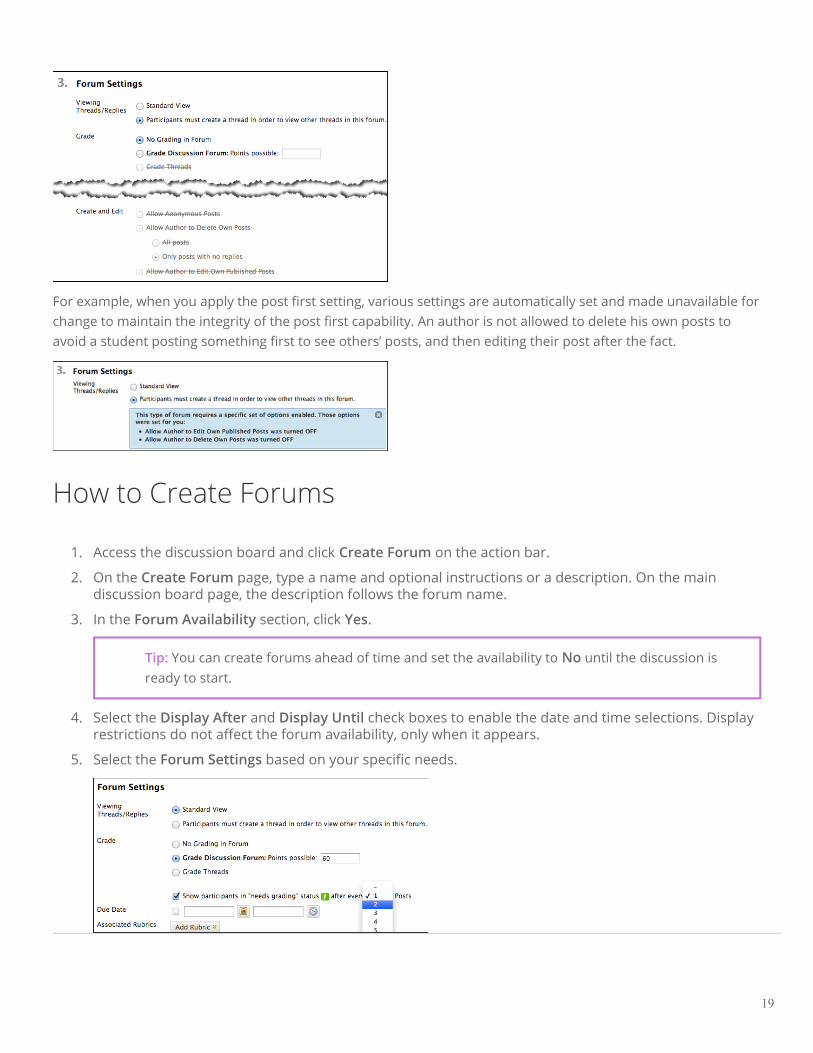
For example, when you apply the post first setting, various settings are automatically set and made unavailable forchange to maintain the integrity of the post first capability. An author is not allowed to delete his own posts toavoid a student posting something first to see others’ posts, and then editing their post after the fact.
How to Create Forums
1. Access the discussion board and click Create Forum on the action bar.
2. On the Create Forum page, type a name and optional instructions or a description. On the maindiscussion board page, the description follows the forum name.
3. In the Forum Availability section, click Yes.
Tip: You can create forums ahead of time and set the availability to No until the discussion isready to start.
4. Select the Display After and Display Until check boxes to enable the date and time selections. Displayrestrictions do not affect the forum availability, only when it appears.
5. Select the Forum Settings based on your specific needs.
19

Viewing Threads/Replies Settings
To promote originality, creativity, and a variety of responses, you can choose Participants must create athread to view other threads in this forum, which is the post first setting. Students must respond beforethey can read their classmates' posts.
In Standard View, users can see all previously created threads in the forum.
Grade Settings
You can create a graded forum or thread and a column is created automatically in the Grade Center.
Click Grade Discussion Forum and type a point value to evaluate participants on performance throughouta forum.
Click Grade Threads to evaluate participants on performance in each thread.
If you are grading posts and want to retain the posts as they were at the time of grading, clear the checkbox for Allow Author to Edit Own Published Posts.
If you enable grading for the forum, select the check box for Show participants in needs grading statusand select the number of posts from the drop-down list. Applying this setting displays the needs gradingicon in the Grade Center and places the posts in the queue on the Needs Grading page after users makethe specified number of posts. If you select a grading option and do NOT select the check box, the needsgrading icon does not appear in the Grade Center and posts do not appear on the Needs Grading page.\
Note: If you choose three posts from the drop-down list and a user submits two, the inprogress icon appears in the Grade Center cell and the discussion board until the specifiednumber of posts is met.
Due Date and Rubric Settings
When you enable grading, you can provide a Due Date. Due dates are used to organize and assigngradable items to grading periods in the Grade Center. Graded posts made after the due date are markedLATE on the Grade Details page in the Grade Center and on the Needs Grading page.
20

You can also associate a rubric to use for grading by pointing to Add Rubric.
6. Click Submit.
On the Discussion Board page, the new forum appears at the bottom of the list.
List View and Tree View
After you click a forum title, a page loads displaying all forum threads. View the page in either list view or treeview. This choice remains in effect until you change it. You may change it at any time. Change the view on theforum page, in the upper-right corner.
21
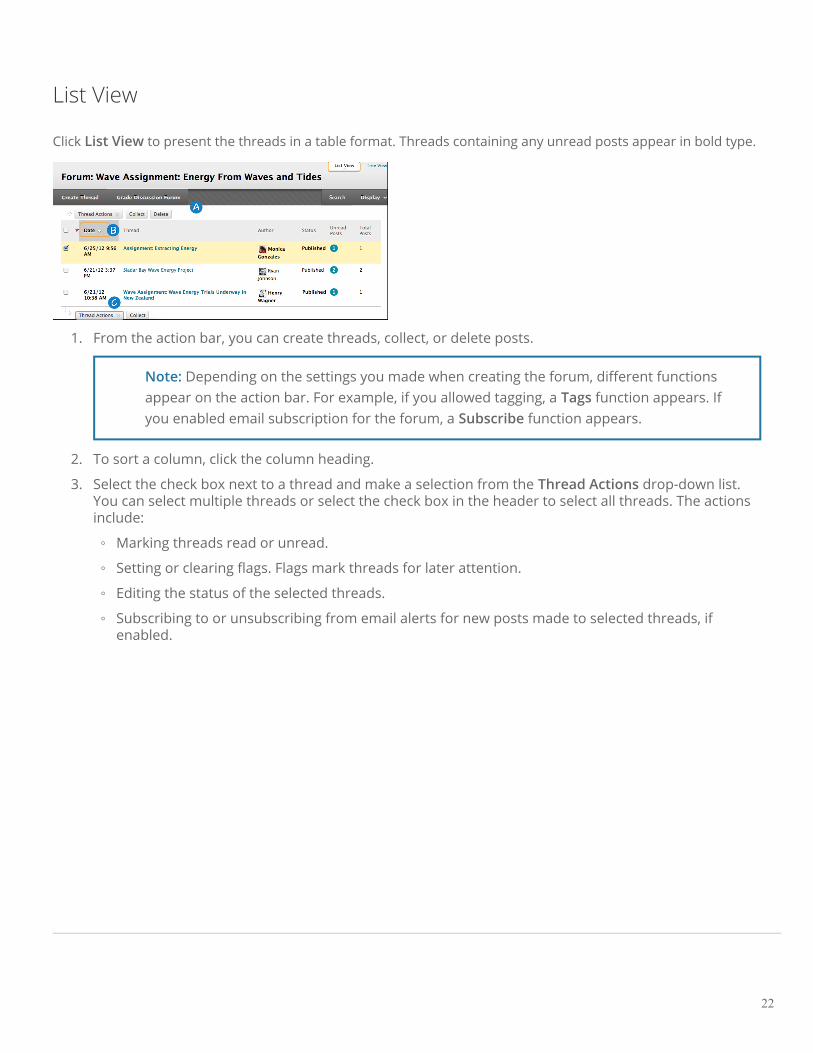
List View
Click List View to present the threads in a table format. Threads containing any unread posts appear in bold type.
1. From the action bar, you can create threads, collect, or delete posts.
Note: Depending on the settings you made when creating the forum, different functionsappear on the action bar. For example, if you allowed tagging, a Tags function appears. Ifyou enabled email subscription for the forum, a Subscribe function appears.
2. To sort a column, click the column heading.
3. Select the check box next to a thread and make a selection from the Thread Actions drop-down list.You can select multiple threads or select the check box in the header to select all threads. The actionsinclude:
◦ Marking threads read or unread.
◦ Setting or clearing flags. Flags mark threads for later attention.
◦ Editing the status of the selected threads.
◦ Subscribing to or unsubscribing from email alerts for new posts made to selected threads, ifenabled.
22

Tree View
Click Tree View to show the thread starter messages and their replies. From the action bar, you can createthreads, collect, or delete posts.
Expand and collapse threads with the plus and minus icons next to the titles. If a thread starter message containsunread posts, the thread starter title appears in bold type. On the action bar, use the Collapse All and Expand Allfunctions to hide or see all posts included in all threads.
Select the check box next to a thread and make a selection from the Message Actions drop-down list on theaction bar. You can select multiple threads or select the check box in the header to select all threads. Actionsinclude marking threads read or unread and setting or clearing flags. Flags mark threads for later attention.
23

How to Allow Email Alerts for New Discussion Posts
When you enable email subscription, students can receive email alerts for new posts or replies. You can allowstudents to subscribe to an entire forum or to specific threads within a forum.
1. Access a forum's contextual menu and click Edit.
2. On the Edit Forum page, select the Subscribe options:
◦ Allow members to subscribe to threads: Users can select specific threads within the forum.
◦ Allow members to subscribe to forum: Users can subscribe to all threads within the forum.
◦ Include body of post in the email: Displays the message text and a link to reply to the message inthe email notification.
◦ Include link to post: Displays a link to the message in the email notification.
3. Click Submit.
Learn More
To distinguish between forums and threads, see About Forums and Threads.
To learn more about which forum settings to choose to fit your pedagogical requirements, see Set Up
Discussions.
To learn more about other grading workflows, see Rubrics and the Needs Grading Page.
To learn how to change the order of forums, see How to Reorder Discussion Forums.
24

Create Threads
In a discussion board forum, you can start new threads to begin a conversation. A thread includes the initial postand all replies to it. When you create a forum, you can allow or not allow members to start threads. Generally, thepurpose of the forum dictates whether members can start threads. A moderated, graded forum used to evaluatestudent performance is usually tightly controlled, and members cannot create threads. Other forums are designedfor members to share opinions and thoughts on tangential or unrelated topics. In this case, you might allowmembers to create threads and spark discussions.
To help organize your view, you can change the status of existing threads and determine which threads appear ina forum.
Note: Instructors and students create threads in the same way. If you enabled grading, you canalso set the thread to be graded.
Example:Example:
You create a forum that addresses a broad subject, such as "Addicted to Oil." Next, you create two threadscontaining the specific issues to be discussed, such as replacing oil usage with nuclear power, and the pros andcons of conservation. To ensure students post only to existing threads, consider disallowing thread creation in theforum settings.
Example:Example:
You create a forum and ask a question or provide the instructions or details in the description, such as "How canwe reduce our reliance on oil?" Then, students create threads for each solution to the problem of oil addiction. All
25
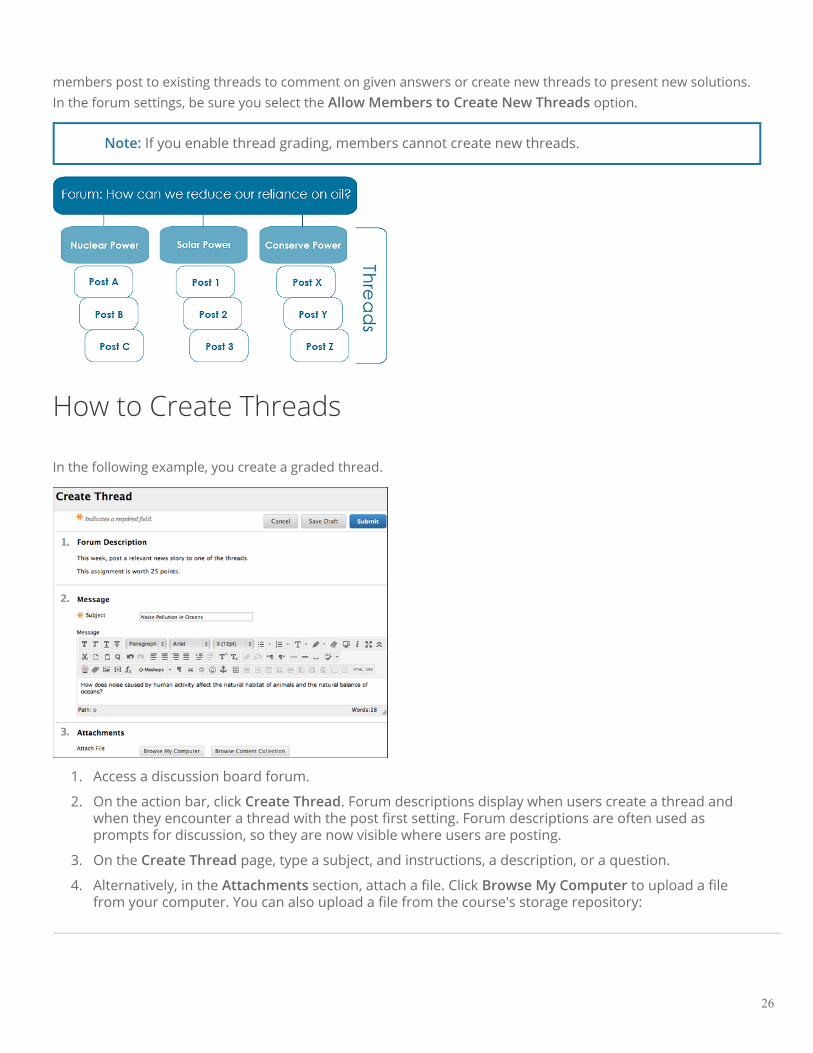
members post to existing threads to comment on given answers or create new threads to present new solutions.In the forum settings, be sure you select the Allow Members to Create New Threads option.
Note: If you enable thread grading, members cannot create new threads.
How to Create Threads
In the following example, you create a graded thread.
1. Access a discussion board forum.
2. On the action bar, click Create Thread. Forum descriptions display when users create a thread andwhen they encounter a thread with the post first setting. Forum descriptions are often used asprompts for discussion, so they are now visible where users are posting.
3. On the Create Thread page, type a subject, and instructions, a description, or a question.
4. Alternatively, in the Attachments section, attach a file. Click Browse My Computer to upload a filefrom your computer. You can also upload a file from the course's storage repository:
26

◦ If Course Files is the course's storage repository, click Browse Course.
-OR-
◦ If your institution licenses content management, click Browse Content Collection.
Note: Files uploaded by students are not saved to Course Files or the Content Collection.
5. If you chose to grade threads when you created the forum, you decide on a thread-by-thread basiswhether to grade a thread. In the Grading section, select the check box for Grade Thread and typePoints possible. Select the check box for Show participants in needs grading status and select thenumber of posts from the drop-down list. Applying this setting displays the needs grading icon in theGrade Center and places the posts in the queue on the Needs Grading page after users make thespecified number of posts. If you select a grading option and do NOT select the check box, the needsgrading icon does not appear in the Grade Center and posts do not appear on the Needs Gradingpage.
Note: If you choose three posts from the drop-down list and a user submits two, the inprogress icon appears in the Grade Center cell and the discussion board until the specifiednumber of posts is met. You can also associate a rubric to use for grading by pointing to AddRubric.
6. Click Save Draft to store a draft of the post or click Submit to create the thread.
The newly created thread appears in the forum.
If you enabled thread grading, two functions appear in the Grade column:
1. Click Grade Thread to evaluate the posts.
2. Click Grade to enable grading for a thread and assign a value.
27
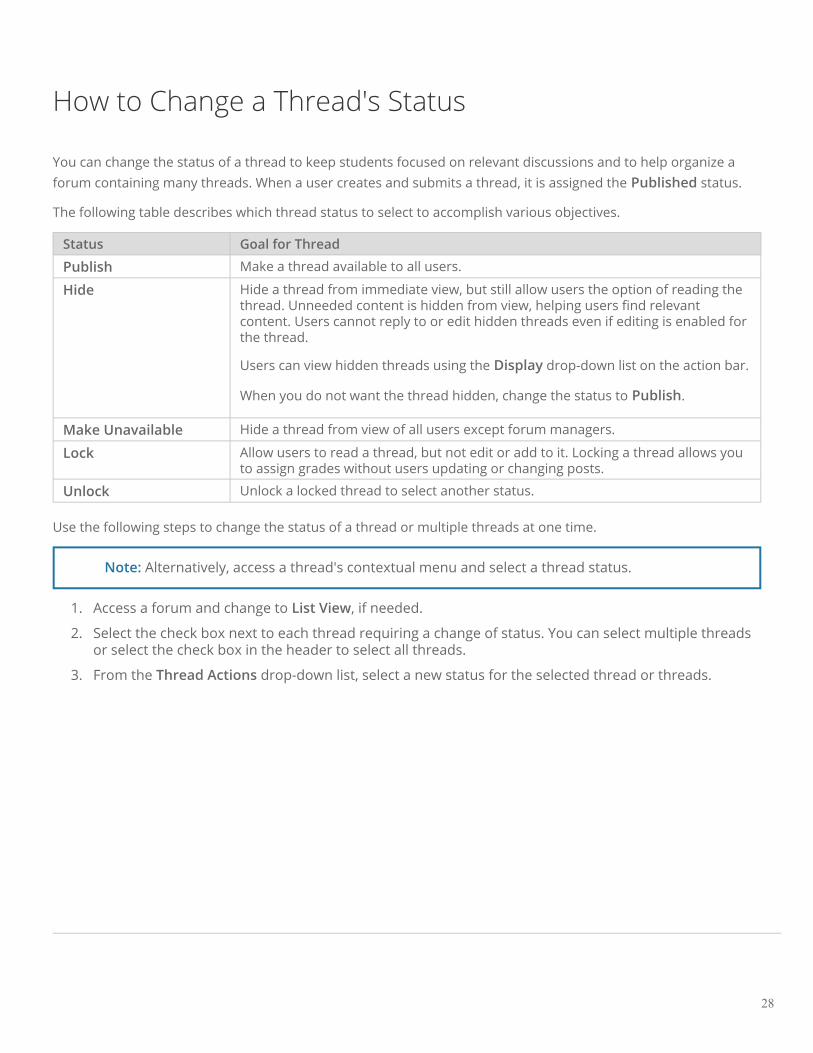
How to Change a Thread's Status
You can change the status of a thread to keep students focused on relevant discussions and to help organize aforum containing many threads. When a user creates and submits a thread, it is assigned the Published status.
The following table describes which thread status to select to accomplish various objectives.
Status Goal for Thread
Publish Make a thread available to all users.
Hide Hide a thread from immediate view, but still allow users the option of reading thethread. Unneeded content is hidden from view, helping users find relevantcontent. Users cannot reply to or edit hidden threads even if editing is enabled forthe thread.
Users can view hidden threads using the Display drop-down list on the action bar.
When you do not want the thread hidden, change the status to Publish.
Make Unavailable Hide a thread from view of all users except forum managers.
Lock Allow users to read a thread, but not edit or add to it. Locking a thread allows youto assign grades without users updating or changing posts.
Unlock Unlock a locked thread to select another status.
Use the following steps to change the status of a thread or multiple threads at one time.
Note: Alternatively, access a thread's contextual menu and select a thread status.
1. Access a forum and change to List View, if needed.
2. Select the check box next to each thread requiring a change of status. You can select multiple threadsor select the check box in the header to select all threads.
3. From the Thread Actions drop-down list, select a new status for the selected thread or threads.
28

The status for each thread appears in the Status column. If you save a draft of a thread to edit in the future,Draft appears in the Status column. To access your drafts, you must select Show All or Drafts Only fromthe Display drop-down list on the action bar.
How to Change Which Threads Appear
If you have many threads in a forum and assign different statuses to the threads, you can choose which threadsappear in a forum. For example, if you start several threads and save them as drafts, you can choose to show onlythose drafts and select the threads to edit and publish.
1. Access the forum and change to List View, if needed.
2. On the action bar, point to Display and click the type of threads to view in the forum.
The forum page displays only those threads that have the status selected from the Display drop-down list.
29
Save a Post as a Draft to Submit Later
The Save Draft function is available if you need to return to your post at a later time. This function saves yourcomments and files on the page.
To access your post later, return to the forum page. Point to Display on the action bar and click Drafts Only toview the saved post. While viewing your post, point to it to view the functions for Edit and Delete. When you clickEdit, the content editor opens.
After making your updates, click Submit to publish the post.
Learn More
To learn more about other grading workflows, see Rubrics and the Needs Grading Page.
30

Best Practice: Effective Discussion Questions
The quality of the first post in a thread influences the thought level of subsequent postings. A carefully wordeddiscussion question is perhaps the most important factor in using discussions to satisfy your learning objectives.
Using Bloom’s Taxonomy
You can use Bloom’s Taxonomy to determine what type of question to develop, as well as how to word it. In thisclassification system, the least complex level, information recall, resides at the bottom of the pyramid as aknowledge base. At the top, evaluation, synthesis, and analysis require the most complex and abstract thinking.Discussions, along with creative assignments and group work, are for higher order thinking.
Essential and Guiding Questions
Essential and guiding questions may also draw out higher order thinking.
31

• Essential questions require skills, such as analyzing, synthesizing, or evaluating. Answers to essentialquestions cannot be readily found on the internet and copied; they must have personal meaning andinsight constructed by the student.
• Guiding questions help students answer the essential question. These questions are subcategories of themain topic and may tap into lower levels of Bloom's Taxonomy.
Ideas for Guiding Questions
You can develop guiding questions and use them in a number of ways:
• Students can work in small groups to develop their own guiding questions to help them answer theessential question.
• You can start with guiding questions and lead up to the essential question through the course of thediscussion.
• You can include them with the initial post to help students get started.
• You can interject guiding questions when a lull occurs.
Example:Example: Essential Question
How would you design the perfect online instructor?
Example:Example: Guiding Questions
• What assumptions do you hold about teaching effectiveness?
• How would you assess an instructor’s performance?
• Identify a list of traits that describe the qualification of perfect. Think about your own experiences as astudent.
• List traits you would avoid in designing the perfect instructor.
32

Manage Discussions
You can perform tasks to manage both the discussion board itself and the content within forums and threads. Forexample, to keep students focused as the term progresses, edit forum settings or organize forums and threads toattract attention again. You can also add forums to other locations, edit content, and delete unneeded forums orthreads. To help students locate important posts, you can enable tagging and attach tags.
You can assign forum roles to limit access to a forum or to help with forum administration. For example, to helpcontrol the discussion board content that is presented to your students, you can assign a responsible user the roleof moderator.
Frequently Asked Questions
You can make some simple changes to help you successfully manage your discussion board content.
A discussion forum has been available for two weeks with fewcontributions. What changes can I make to the forum to encourageparticipation?
You can make two changes:
• If the topic is potentially controversial, allow anonymous posts.
• If you are not grading threads, allow students to create new threads. This flexibility may encouragestudents to post their ideas and questions.
By the end of the semester, my discussion board contains dozens offorums. What can I do to provide better organization and flow?
To keep your discussion board organized, you can perform the following actions:
• Change the order of the forums, placing the most current forums at the top of the list.
• Delete ungraded forums that were not used or contain few postings.
33

How to Edit Forums
As the discussion progresses, you can solve some discussion issues by editing forum settings. For example, ifstudents are posting to the wrong topic, you can fine-tune the forum name or description to clarify the forum'spurpose.
Tip: You can create all forums at the beginning of the term and make them unavailable. When you needa forum, edit the forum to make it available.
1. Access a forum's contextual menu and click Edit.
2. On the Edit Forum page, change the forum's name, description, availability, and settings.
3. Click Submit.
How to Edit Threads
You can edit posts in any thread. If a student added inappropriate or inaccurate content, you can edit the post.When you create or edit a forum, you determine whether students are allowed to edit their published posts.
1. Access a forum and select a thread.
2. On the thread's page, point to a post so all of the functions appear and click Edit.
3. The page expands to allow you to make edits in the content editor while viewing the original post.
34

4. Click Submit. Your edits appear in the post.
How to Delete Forums and Threads
When you delete a forum or thread, all content is permanently deleted. You will not be able to refer to the posts ifa student wants to dispute a grade. For a less permanent solution, you can make a forum unavailable.
When you delete graded discussion content, you determine if the Grade Center column and scores are alsodeleted.
1. Access a forum or thread's contextual menu and click Delete to permanently delete the forum orthread's content.
2. Click OK in the pop-up window.
3. On the Delete Confirmation page, you have two options:
◦ Do not select check boxesDo not select check boxes: The graded forum or thread will be deleted, but the Grade Center columnand scores you assigned are retained. For example, you graded all students' posts and want tokeep the Grade Center column for the final grade calculations. If you delete the forum or thread,yet retain the Grade Center column, you can delete that column from the Grade Center at anytime.
◦ Select the check boxesSelect the check boxes: The grade column in the Grade Center andand the forum or thread are deleted.For example, if you do not want to include the grade column for the discussion posts in the finalgrade, you can safely delete both.
4. Click Remove.
35
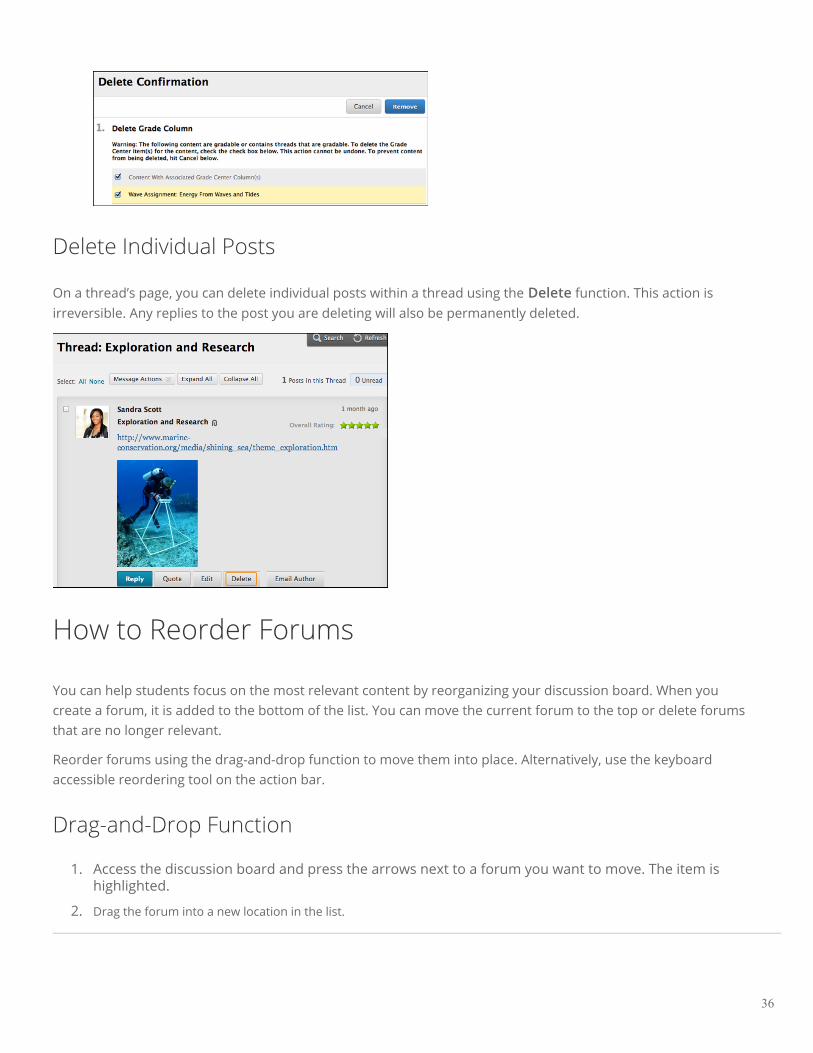
Delete Individual Posts
On a thread’s page, you can delete individual posts within a thread using the Delete function. This action isirreversible. Any replies to the post you are deleting will also be permanently deleted.
How to Reorder Forums
You can help students focus on the most relevant content by reorganizing your discussion board. When youcreate a forum, it is added to the bottom of the list. You can move the current forum to the top or delete forumsthat are no longer relevant.
Reorder forums using the drag-and-drop function to move them into place. Alternatively, use the keyboardaccessible reordering tool on the action bar.
Drag-and-Drop Function
1. Access the discussion board and press the arrows next to a forum you want to move. The item ishighlighted.
2. Drag the forum into a new location in the list.
36

3. Release the forum to place it in its new location.
Keyboard Accessible Reordering Tool
1. On the action bar, click the keyboard accessible reordering icon represented by two arrows.
2. In the Reorder box, click a forum title.
3. Below the Reorder box, use the up and down arrows to adjust the order.
4. Click Submit. A pop-up box states: Items have been reordered.
5. Click OK.
How to Copy Forums
You can copy discussion forums and add them to the current discussion board or to a group discussion board inthe same course. Copying does not delete the content from the original location in a course. You have the optionto copy a forum, the settings, and the posts, or to copy just a forum's settings.
Note: To copy discussion board forums to another course, use the copy course utility.
Example:Example: Copy the entire forum
If two distinct topics emerge during a discussion, you can create separate forums for these topics. Copy the forumand delete the off-topic posts from each forum.
When you copy content, all threads and replies appear in the new location, along with any file attachments.
Example:Example: Copy forum settings only
37

You can base a new forum on the settings from another forum. If you want students to submit a second researchpaper, copy the settings of the first research paper's forum. The forum is added with no threads.
1. Access a forum's contextual menu and click Copy.
2. On the Copy Forum page, type a Name.
3. Click the option to copy either: Entire forum or Forum settings only.
4. In the Location box, select a discussion board to copy to. To select the course's discussion board, clickthe course ID.
5. Click Submit. On the Discussion Board page, the copied forum is added to the bottom of the list.
Note: Discussion forums you copy to a group discussion board only include messages authored bythe group’s members.
Learn More
To learn more about assigning a moderator, see Moderate Discussions.
To learn about disabling the grading setting, see How to Disable Discussion Grading.
To learn how to copy discussion board forums to another course using the copy course utility, see Copy Courses.
38
Moderate Discussions
You can employ both the art and science of moderating discussions to maintain discussion activity throughout theterm. Without vigilance on the your part, even discussions starting out with ample excitement can dwindle as theterm progresses.
The art of moderatingart of moderating involves finding the right balance between guiding the conversation and standing back toallow students to discover new ideas.
The science of moderatingscience of moderating involves using the discussion board functions to keep students focused on relevantdiscussions and to determine a student’s level of access.
About Forum Roles
You can assign forum roles to limit access to a forum or to help with forum administration. For example, to helpcontrol the discussion board content that is presented to your students, you can assign a responsible user the roleof moderator.
In a forum, each user has a forum role and can have only one role per forum. By default, instructors have the roleof manager and students have the role of participant. When you are logged in as an instructor, you cannot changeyour own forum role.
Note: Your institution determines which course roles are available.
The following table describes the forum roles and their permissions.
Role Permissions
Manager Managers have full control over a forum and can change forum settings, moderateposts, and assign roles and grades.
Users with a course role of instructor or teaching assistant are granted this role bydefault.
Builder Course builders can edit, copy, and delete forums, but not grade or manageforums. Inside a forum, a course builder can perform the same actions on postsas an instructor, with the exception of grading threads.
39
Role Permissions
Course builders can also create new threads in a forum, and can enable gradingfor a thread and type a value.
Users with a course role of course builder are granted this forum role by default.
Moderator Moderators can delete, edit, and lock all posts in any forum, even if the forumdoes not use the moderation queue.
If you use a moderation queue, the moderator approves or rejects posts in thequeue before they are made available to all users.
Users with a course role of instructor or course builder are granted this forum roleby default.
Grader Graders can read, reply to, and grade posts. The grader role has some access tothe Grade Center, but cannot assign grades to their own work.
Users with a course role of grader are granted this forum role by default.
Participant Participants can read and reply to posts.
Users with a course role of student are granted this role by default.
Reader Readers can read the contents of a forum, but cannot post responses or addthreads.
Blocked (Block userfrom forum
Blocked users cannot access the forum.
How to Assign Forum Roles
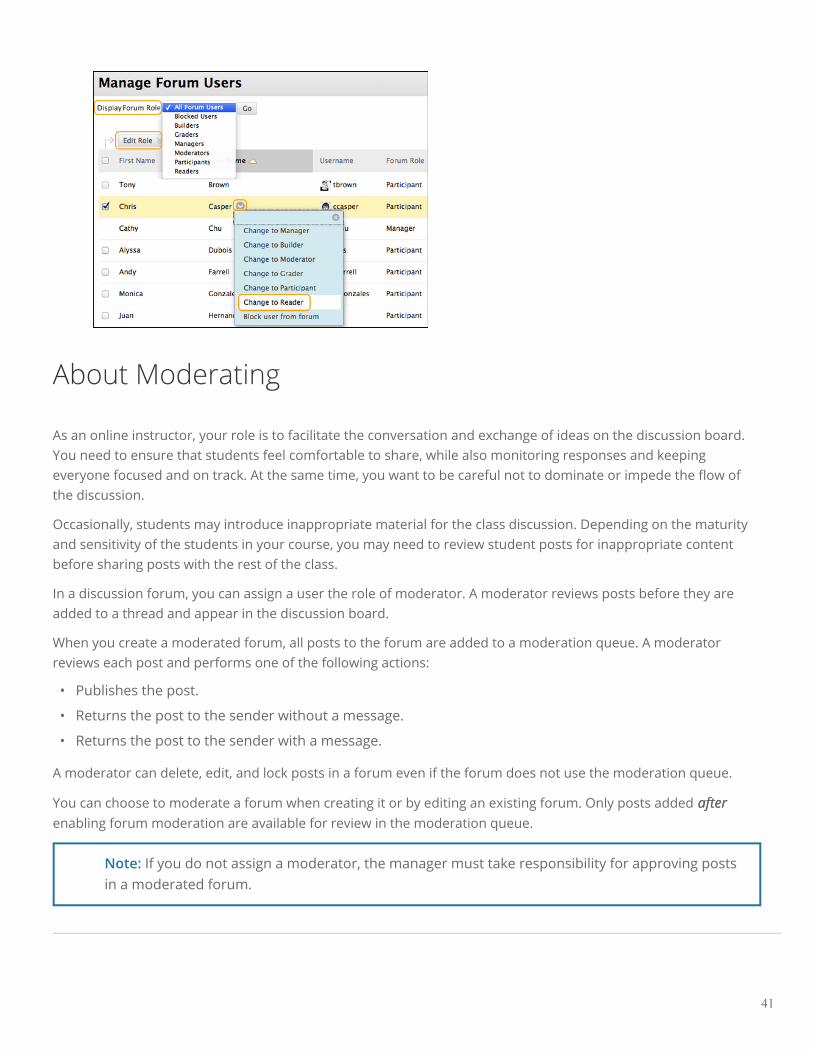
1. Access a forum's contextual menu and click Manage.
2. On the Manage Forum Users page, a list of users appears. Access a user's contextual menu.
Tip: If you want to show only one role at a time, make a selection in the Display Forum Roledrop-down list on the action bar and click Go.
3. Select a new forum role. The new role appears in the Forum Role column for the user.
4. Click OK to return to the discussion board. Alternatively, click the forum title on the orientation bar toreturn to the forum.
Tip: To change multiple roles at one time, select the users' check boxes and point to Edit Role onthe action bar. Select the check box in the header row to select all users.
40
About Moderating
As an online instructor, your role is to facilitate the conversation and exchange of ideas on the discussion board.You need to ensure that students feel comfortable to share, while also monitoring responses and keepingeveryone focused and on track. At the same time, you want to be careful not to dominate or impede the flow ofthe discussion.
Occasionally, students may introduce inappropriate material for the class discussion. Depending on the maturityand sensitivity of the students in your course, you may need to review student posts for inappropriate contentbefore sharing posts with the rest of the class.
In a discussion forum, you can assign a user the role of moderator. A moderator reviews posts before they areadded to a thread and appear in the discussion board.
When you create a moderated forum, all posts to the forum are added to a moderation queue. A moderatorreviews each post and performs one of the following actions:
• Publishes the post.
• Returns the post to the sender without a message.
• Returns the post to the sender with a message.
A moderator can delete, edit, and lock posts in a forum even if the forum does not use the moderation queue.
You can choose to moderate a forum when creating it or by editing an existing forum. Only posts added afterafterenabling forum moderation are available for review in the moderation queue.
Note: If you do not assign a moderator, the manager must take responsibility for approving postsin a moderated forum.
41

How to Allow Moderation of Posts
1. Access a forum's contextual menu and click Edit.
2. On the Edit Forum page, select the Force Moderation of Posts check box and click Submit.
Tip: When choosing a moderated forum, do not allow students to edit or delete posts. Thisensures that the post approved is the one viewed by users.
3. After posts are submitted, access the forum. In the moderator view, no posts appear because themessages are waiting approval. On the action bar, click Moderate Forum.
Note: The Moderate Forum function appears only to those users who have a forum role ofmanager or moderator. In the student view, the author can see the post in Tree View with areminder it is in the moderation queue.
4. On the Moderation Queue page, the posts appear in alphabetical order by title. Click the columntitle to sort by post title, author, or date. To review a post, click Moderate.
42

5. On the Moderate Post page, read the post and click Publish or Return. Published messages areimmediately posted to the thread.
6. Optionally, type feedback in the text box. Though feedback is optional, this is an opportunity to provideguidance, ask questions, redirect a student's focus, and explain why a post was returned.
7. Click Submit.
Returned posts no longer appear in the moderation queue. In tree view, students see their returned posts in theforum. Expand the post using the plus sign. If feedback was included, students can see why their posts werereturned. On the thread page, returned posts display Returned next to the post's title.
From the thread page, students can edit their posts while viewing the moderator's feedback and resubmit them.The posts are returned to the moderation queue. Moderation Queue appears next to the post's title.
43

Reply to Discussion Posts
In the discussion board, threads grow as users respond to the initial and subsequent posts. Replies build on oneanother to construct a conversation. As the number of posts grows, users can filter, sort, collect, and tag posts, iftagging is enabled.
To help students understand your expectations, establish discussion etiquette immediately. You can model properonline interaction and reinforce appropriate behavior with public recognition. In addition, you can provide specificguidelines:
• Use descriptive subject lines to make threads easy to follow and scan.
• Keep posts short and use uncomplicated language. Your audience is reading onscreen and may haveseveral messages to read.
• Back up your statements when you agree or disagree with others.
• Use professional language, including proper grammar, in academic-related posts. No slang, emoticons, orchat acronyms allowed.
• Use attachments or links to websites for long, detailed information.
• Stay on topic. If you want to introduce a new tangent, find a suitable forum or start a new thread if it isallowed.
• Be respectful of other people's opinions and remember the golden rule—to treat others as you want tobe treated.
For graded forums and threads, tell students specifically what you expect both in terms of quantity and quality ofposts, and consider sharing some exemplary posts. You can also use rubrics to help students understand yourobjectives. By compiling your grading criteria in a rubric, you can provide students with clear performancestandards and grade consistently.
How to Reply to a Thread
Note: Users can reply to published threads, but cannot reply to locked or hidden threads.
1. Access a forum and select a thread.
2. On the thread's page, you can view the text of the post and information, such as the author andposted date. All replies appear on the same page with the parent post.
44

3. For the first post, click Reply. Point to the post to see other functions such as Quote, Edit, Delete, andEmail Author. The Quote function includes the post's text as part of your reply. For other posts on thepage, point to the message and Reply and the other functions appear.
Note: If you want to view only the unread posts in the thread, click the unread link on theaction bar. The unread posts appear on one page.
4. The page expands below the post you are responding to, allowing you to view the post and access thecontent editor.
5. If needed, edit the Subject. Type your reply in the Message box.
Note: Files uploaded by students are not saved to Course Files or the Content Collection.
6. Alternatively, following the Message box, attach a file. Click Browse My Computer to upload a file fromyour computer. You can also upload a file from the course's storage repository:
◦ If Course Files is the course's storage repository, click Browse Course.
45

-OR-
◦ If your institution licenses content management, click Browse Content Collection.
7. Click Save Draft to store a draft of the post or click Submit to publish your reply.
On the thread page, your reply appears at the end of the list. If you attached a file, a paper clip icon appears nextto the post's title. If you used the Insert/Edit Image function, the image appears with the text.
How to Rate Posts
You can use the discussion board for peer review. Students start threads and include their work in their initialposts. Other users review the work, assign a rating to the initial post, and include comments in a response.
Rating posts also allows users to focus on messages considered especially informative or useful by others. If youenabled rating, users can rate posts using a five star system. You can also rate posts.
Note: In a forum's settings, you must enable Allow Members to Rate Posts.
1. Access a forum and select a thread.
2. On the thread's page, when you point to a thread's rating area, it changes to show Your Rating.
3. Click one to five stars. You can add and delete stars at any time.
4. Your rating is included in the Overall Rating—the combined rating of all users.
46

Learn More
To learn more about tagging, see How to Tag Threads.
To learn more about locked or hidden threads, see How to Change a Thread's Status.
To learn more about rating posts, see How to Edit Forums.
47

Search and Collect Discussions
In the discussion board, you can search for specific text, such as a phrase, word, or part of a word. The resultsappear on a search results page.
How to Search Discussions
1. Access the discussion board, a forum, or a thread and click Search. The Search field expands.
2. Type a search criterion in the Search box.
3. In the drop-down list, select an area to search:
◦ Current Discussion Board
◦ All Forums in Course
◦ Current Forum
◦ Current Thread
Note: The options in the drop-down list depend on where your search began. All Forumsin Course includes any group discussion boards in your course. Students do not seeresults from group discussion boards unless they are members of that group.
4. To further narrow your search results, select the After and Before check boxes to enable the date andtime selections. Type dates and times in the boxes or use the pop-up Date Selection Calendar andTime Selection Menu to select dates and times.
5. Click Go.
48
On the Search Results page, you can read and print the results. On the action bar, click Print Preview to openthe page in a new window in a printer-friendly format. Posts print in the order they appear on the page. To selectwhich posts appear and in which order, you can filter and sort posts using the Filter function and the Sort By andOrder drop-down lists on the action bar.
On this page, you can also reply to posts and mark messages read or unread. Click the Quote function to includethe post's text as part of your reply. To view the responses to a post, click the post's hyperlinked title to navigate tothe thread's page.
How to Collect Posts
On a thread page, you can read all the posts made to the initial post. If many posts appear, you can reduce the listusing the collect function. After collecting posts, you can filter, sort, print, and tag them.
The collect function is also available from the forum page where you can gather all the posts made to differentthreads. After collecting posts, filter and sort the messages to further organize them.
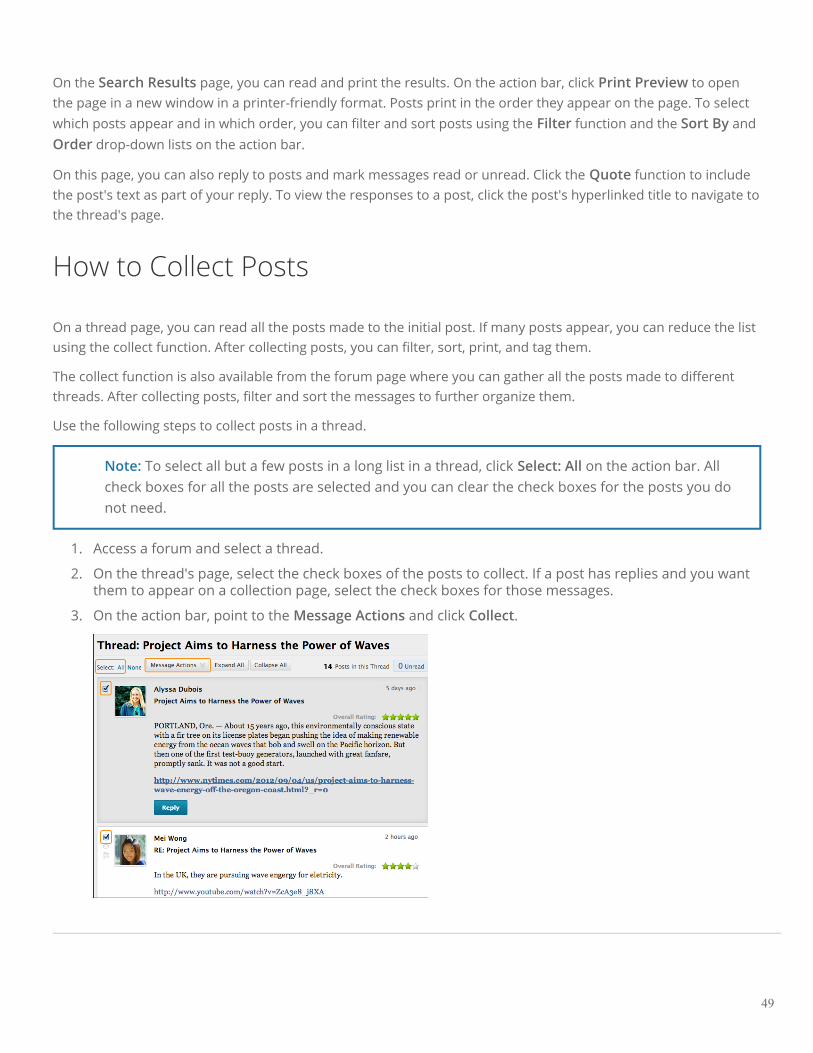
Use the following steps to collect posts in a thread.
Note: To select all but a few posts in a long list in a thread, click Select: All on the action bar. Allcheck boxes for all the posts are selected and you can clear the check boxes for the posts you donot need.
1. Access a forum and select a thread.
2. On the thread's page, select the check boxes of the posts to collect. If a post has replies and you wantthem to appear on a collection page, select the check boxes for those messages.
3. On the action bar, point to the Message Actions and click Collect.
49
On the Collection page, you can read and print the results. On the action bar, click Print Preview to open thepage in a new window in a printer-friendly format. Posts print in the order they appear on the page. To selectwhich posts appear and in which order, you can filter and sort posts using the Filter function and the Sort By andOrder drop-down lists on the action bar.
On this page, you can also reply to posts and mark messages read or unread. Click the Quote function to includethe post's text as part of your reply. To view the responses to a post, click the post's hyperlinked title to navigate tothe thread's page.
How to Filter Posts After Searching or Collecting
To narrow your search results or sort a collection, you can use the filter function. If you print the posts afterfiltering, they print in the order they appear on the page.
Note: If the author or authors of some posts are no longer enrolled in your course, the posts mayappear out of order.
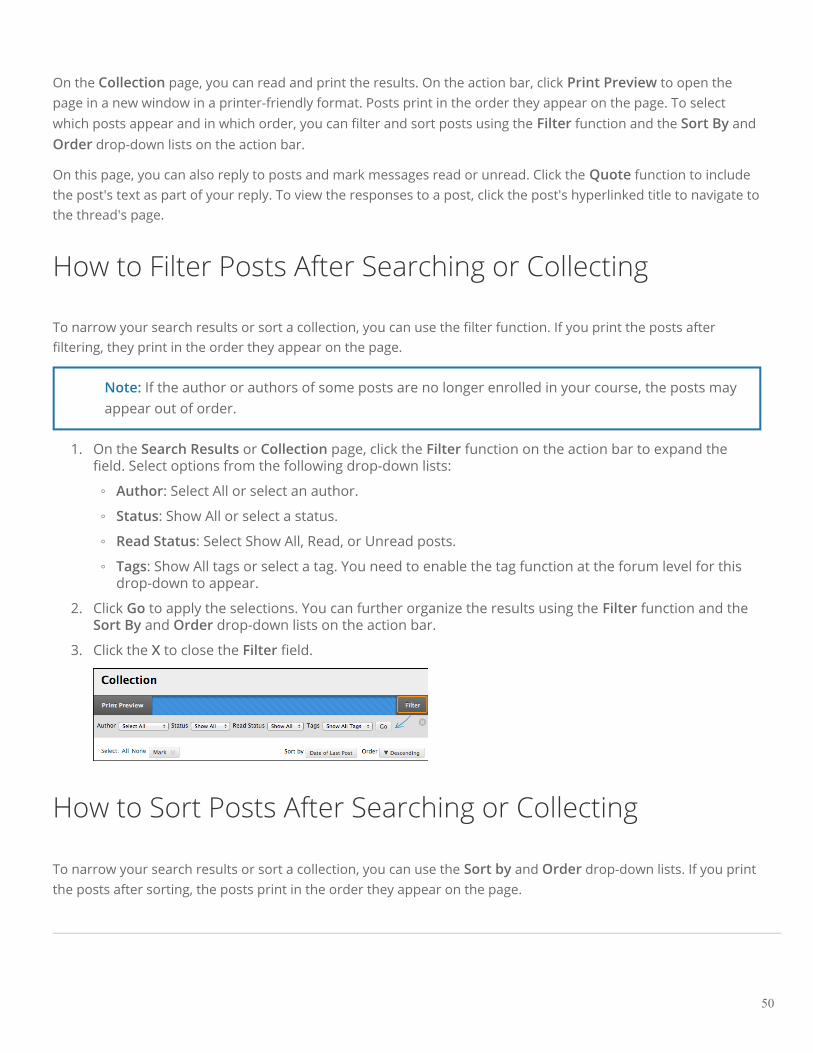
1. On the Search Results or Collection page, click the Filter function on the action bar to expand thefield. Select options from the following drop-down lists:
◦ Author: Select All or select an author.
◦ Status: Show All or select a status.
◦ Read Status: Select Show All, Read, or Unread posts.
◦ Tags: Show All tags or select a tag. You need to enable the tag function at the forum level for thisdrop-down to appear.
2. Click Go to apply the selections. You can further organize the results using the Filter function and theSort By and Order drop-down lists on the action bar.
3. Click the X to close the Filter field.
How to Sort Posts After Searching or Collecting
To narrow your search results or sort a collection, you can use the Sort by and Order drop-down lists. If you printthe posts after sorting, the posts print in the order they appear on the page.
50
Note: If the author or authors of some posts are no longer enrolled in your course, the posts mayappear out of order.
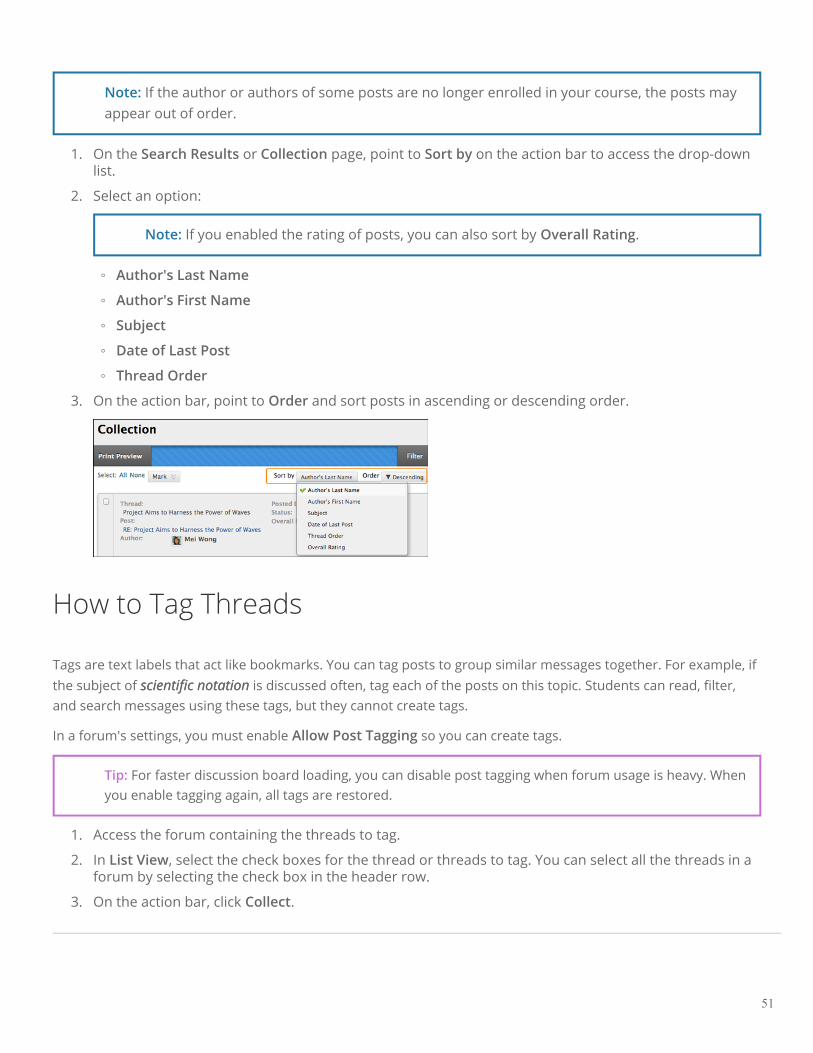
1. On the Search Results or Collection page, point to Sort by on the action bar to access the drop-downlist.
2. Select an option:
Note: If you enabled the rating of posts, you can also sort by Overall Rating.
◦ Author's Last Name
◦ Author's First Name
◦ Subject
◦ Date of Last Post
◦ Thread Order
3. On the action bar, point to Order and sort posts in ascending or descending order.
How to Tag Threads
Tags are text labels that act like bookmarks. You can tag posts to group similar messages together. For example, ifthe subject of scientific notationscientific notation is discussed often, tag each of the posts on this topic. Students can read, filter,and search messages using these tags, but they cannot create tags.
In a forum's settings, you must enable Allow Post Tagging so you can create tags.
Tip: For faster discussion board loading, you can disable post tagging when forum usage is heavy. Whenyou enable tagging again, all tags are restored.
1. Access the forum containing the threads to tag.
2. In List View, select the check boxes for the thread or threads to tag. You can select all the threads in aforum by selecting the check box in the header row.
3. On the action bar, click Collect.
51

4. On the Collection page, you can filter and sort your results.
5. Type a tag name in the Tag Text box.
6. Select the check boxes of the messages to assign the tag name to. To select all the messages, clickSelect: All above the list.
7. Click Add next to the Tag Text box.
On the Collection Page
On the Collection page, the tag you provided appears below each message you selected. If you provide multipletags, all appear. You can include more tags following the same steps. To delete a tag, click the red X next to it.
Alternatively, you can add a tag to an individual message. Below the message, type the tag in the Add Tag box andclick OK or click Choose from Existing to choose a tag from a list of tags that appear on the Collection page.
52
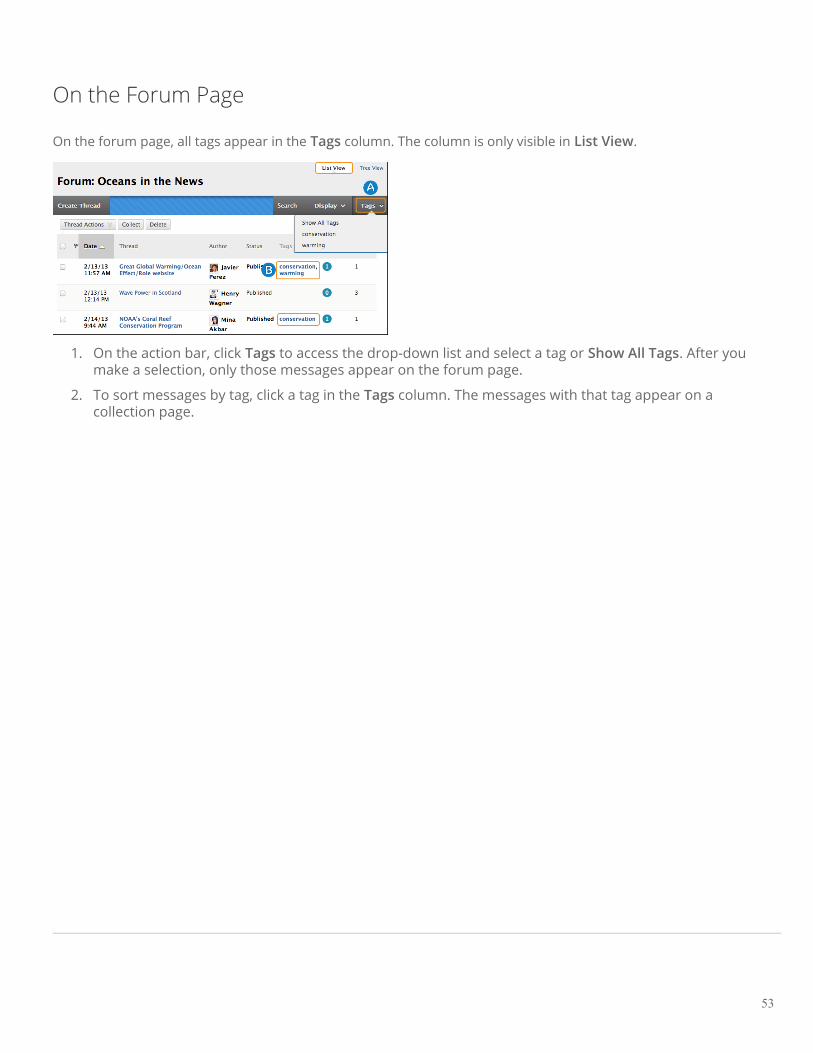
On the Forum Page
On the forum page, all tags appear in the Tags column. The column is only visible in List View.
1. On the action bar, click Tags to access the drop-down list and select a tag or Show All Tags. After youmake a selection, only those messages appear on the forum page.
2. To sort messages by tag, click a tag in the Tags column. The messages with that tag appear on acollection page.
53
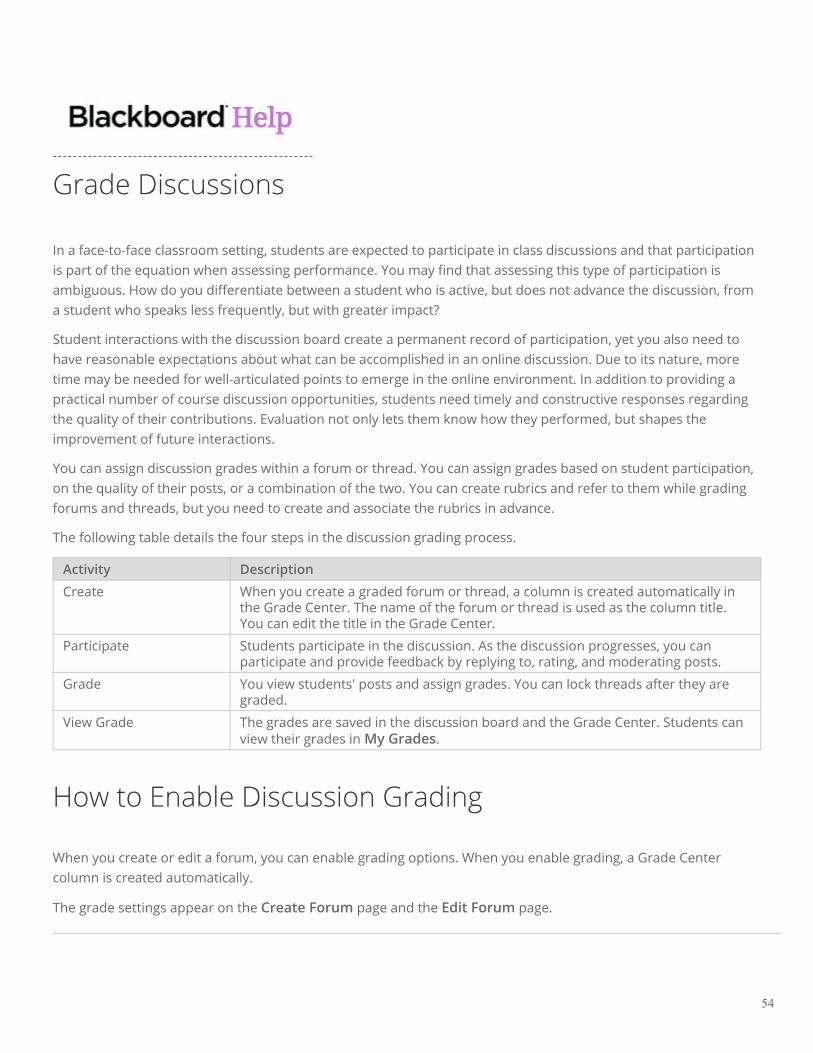
Grade Discussions
In a face-to-face classroom setting, students are expected to participate in class discussions and that participationis part of the equation when assessing performance. You may find that assessing this type of participation isambiguous. How do you differentiate between a student who is active, but does not advance the discussion, froma student who speaks less frequently, but with greater impact?
Student interactions with the discussion board create a permanent record of participation, yet you also need tohave reasonable expectations about what can be accomplished in an online discussion. Due to its nature, moretime may be needed for well-articulated points to emerge in the online environment. In addition to providing apractical number of course discussion opportunities, students need timely and constructive responses regardingthe quality of their contributions. Evaluation not only lets them know how they performed, but shapes theimprovement of future interactions.
You can assign discussion grades within a forum or thread. You can assign grades based on student participation,on the quality of their posts, or a combination of the two. You can create rubrics and refer to them while gradingforums and threads, but you need to create and associate the rubrics in advance.
The following table details the four steps in the discussion grading process.
Activity Description
Create When you create a graded forum or thread, a column is created automatically inthe Grade Center. The name of the forum or thread is used as the column title.You can edit the title in the Grade Center.
Participate Students participate in the discussion. As the discussion progresses, you canparticipate and provide feedback by replying to, rating, and moderating posts.
Grade You view students' posts and assign grades. You can lock threads after they aregraded.
View Grade The grades are saved in the discussion board and the Grade Center. Students canview their grades in My Grades.
How to Enable Discussion Grading
When you create or edit a forum, you can enable grading options. When you enable grading, a Grade Centercolumn is created automatically.
The grade settings appear on the Create Forum page and the Edit Forum page.
54
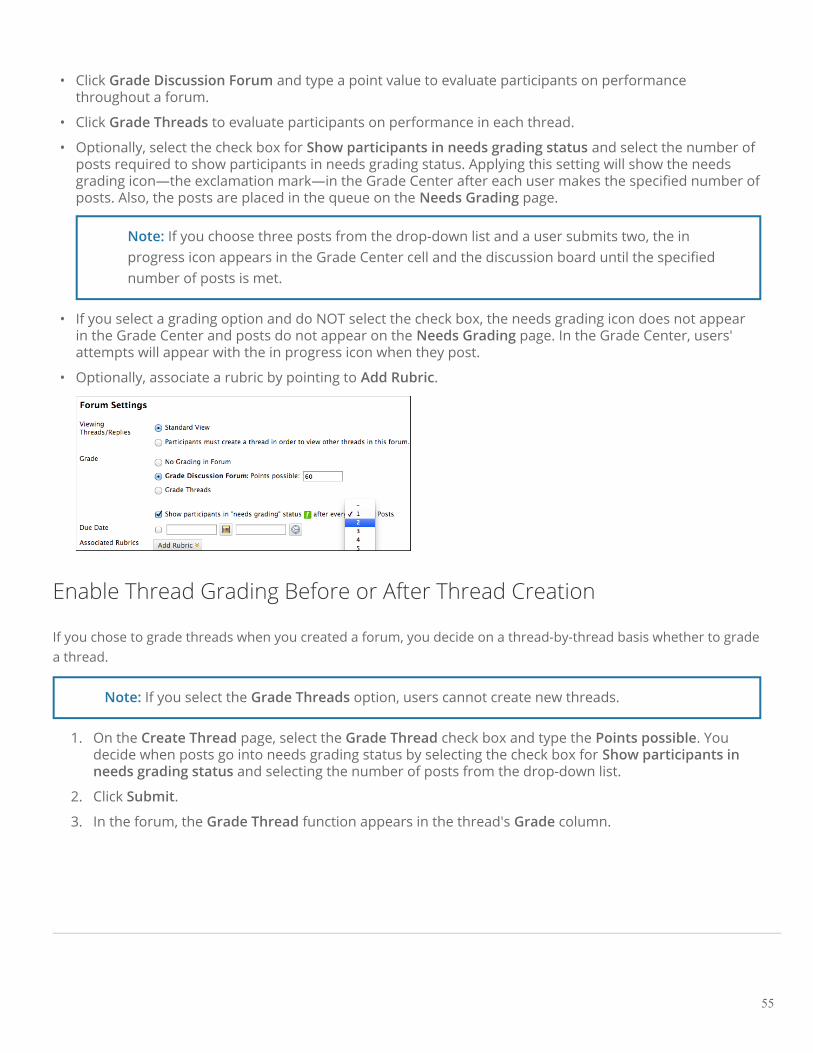
• Click Grade Discussion Forum and type a point value to evaluate participants on performancethroughout a forum.
• Click Grade Threads to evaluate participants on performance in each thread.
• Optionally, select the check box for Show participants in needs grading status and select the number ofposts required to show participants in needs grading status. Applying this setting will show the needsgrading icon—the exclamation mark—in the Grade Center after each user makes the specified number ofposts. Also, the posts are placed in the queue on the Needs Grading page.
Note: If you choose three posts from the drop-down list and a user submits two, the inprogress icon appears in the Grade Center cell and the discussion board until the specifiednumber of posts is met.
• If you select a grading option and do NOT select the check box, the needs grading icon does not appearin the Grade Center and posts do not appear on the Needs Grading page. In the Grade Center, users'attempts will appear with the in progress icon when they post.
• Optionally, associate a rubric by pointing to Add Rubric.
Enable Thread Grading Before or After Thread Creation
If you chose to grade threads when you created a forum, you decide on a thread-by-thread basis whether to gradea thread.
Note: If you select the Grade Threads option, users cannot create new threads.
1. On the Create Thread page, select the Grade Thread check box and type the Points possible. Youdecide when posts go into needs grading status by selecting the check box for Show participants inneeds grading status and selecting the number of posts from the drop-down list.
2. Click Submit.
3. In the forum, the Grade Thread function appears in the thread's Grade column.
55
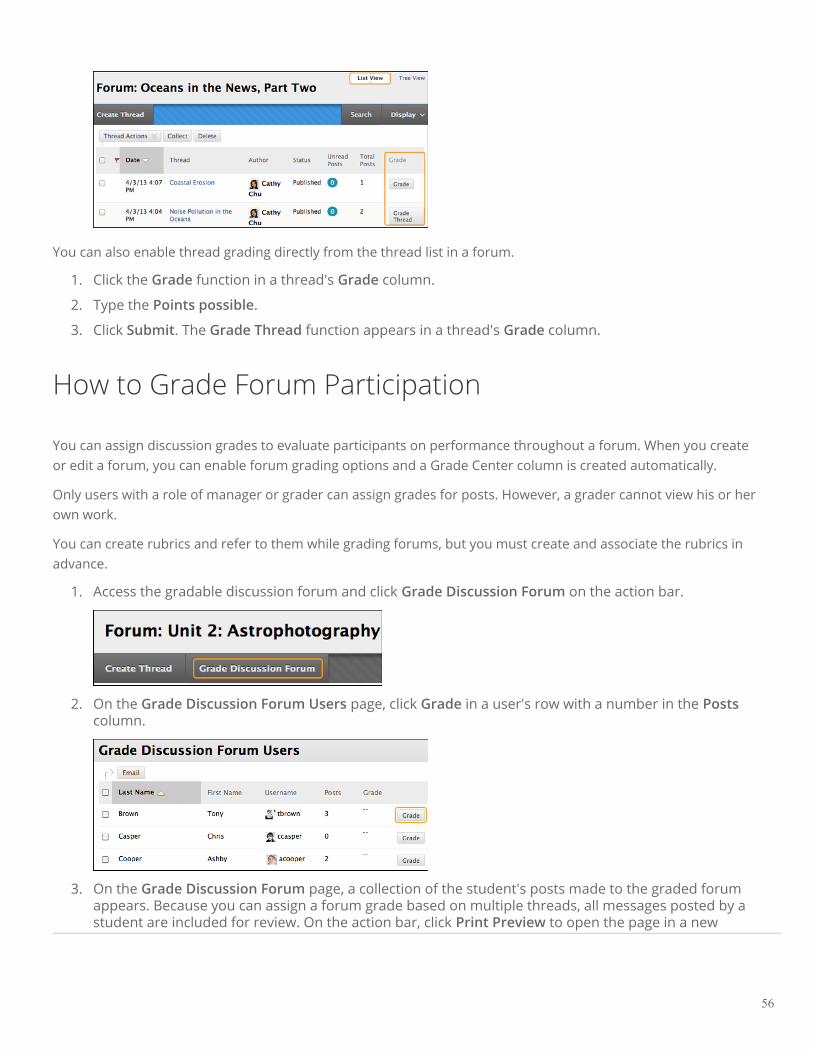
You can also enable thread grading directly from the thread list in a forum.
1. Click the Grade function in a thread's Grade column.
2. Type the Points possible.
3. Click Submit. The Grade Thread function appears in a thread's Grade column.
How to Grade Forum Participation
You can assign discussion grades to evaluate participants on performance throughout a forum. When you createor edit a forum, you can enable forum grading options and a Grade Center column is created automatically.
Only users with a role of manager or grader can assign grades for posts. However, a grader cannot view his or herown work.
You can create rubrics and refer to them while grading forums, but you must create and associate the rubrics inadvance.
1. Access the gradable discussion forum and click Grade Discussion Forum on the action bar.
2. On the Grade Discussion Forum Users page, click Grade in a user's row with a number in the Postscolumn.
3. On the Grade Discussion Forum page, a collection of the student's posts made to the graded forumappears. Because you can assign a forum grade based on multiple threads, all messages posted by astudent are included for review. On the action bar, click Print Preview to open the page in a new
56
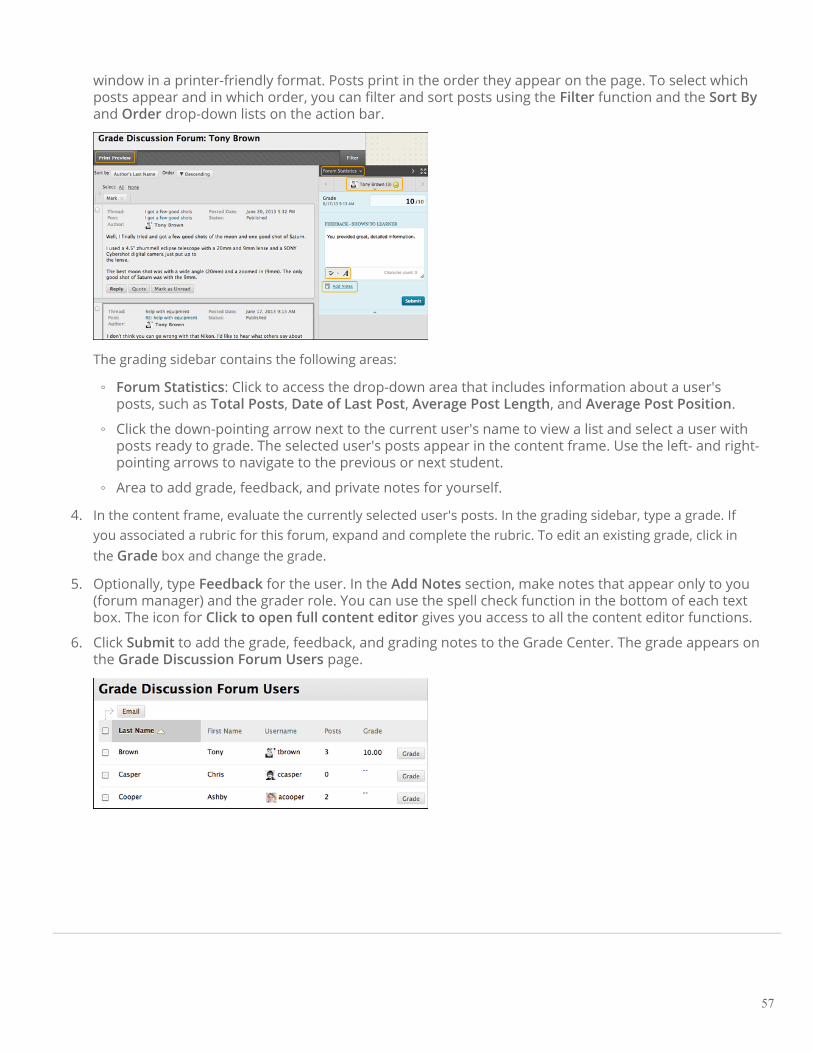
window in a printer-friendly format. Posts print in the order they appear on the page. To select whichposts appear and in which order, you can filter and sort posts using the Filter function and the Sort Byand Order drop-down lists on the action bar.
The grading sidebar contains the following areas:
◦ Forum Statistics: Click to access the drop-down area that includes information about a user'sposts, such as Total Posts, Date of Last Post, Average Post Length, and Average Post Position.
◦ Click the down-pointing arrow next to the current user's name to view a list and select a user withposts ready to grade. The selected user's posts appear in the content frame. Use the left- and right-pointing arrows to navigate to the previous or next student.
◦ Area to add grade, feedback, and private notes for yourself.
4. In the content frame, evaluate the currently selected user's posts. In the grading sidebar, type a grade. Ifyou associated a rubric for this forum, expand and complete the rubric. To edit an existing grade, click inthe Grade box and change the grade.
5. Optionally, type Feedback for the user. In the Add Notes section, make notes that appear only to you(forum manager) and the grader role. You can use the spell check function in the bottom of each textbox. The icon for Click to open full content editor gives you access to all the content editor functions.
6. Click Submit to add the grade, feedback, and grading notes to the Grade Center. The grade appears onthe Grade Discussion Forum Users page.
57
How to Access Threads for Grading
You can assign discussion grades to evaluate participants on performance in each thread. When you create or edita forum, you can enable thread grading options and a Grade Center column is created automatically.
Only users with a role of manager or grader can assign grades for posts. However, a grader cannot view his or herown work.
Note: Students cannot create new threads in a forum where threads are graded.
You can create rubrics and refer to them while grading threads, but you must create and associate the rubrics inadvance.
After accessing the user's threads to grade, follow the steps outlined in the previous section for inline forumgrading.
1. Access the discussion forum containing a thread you want to grade.
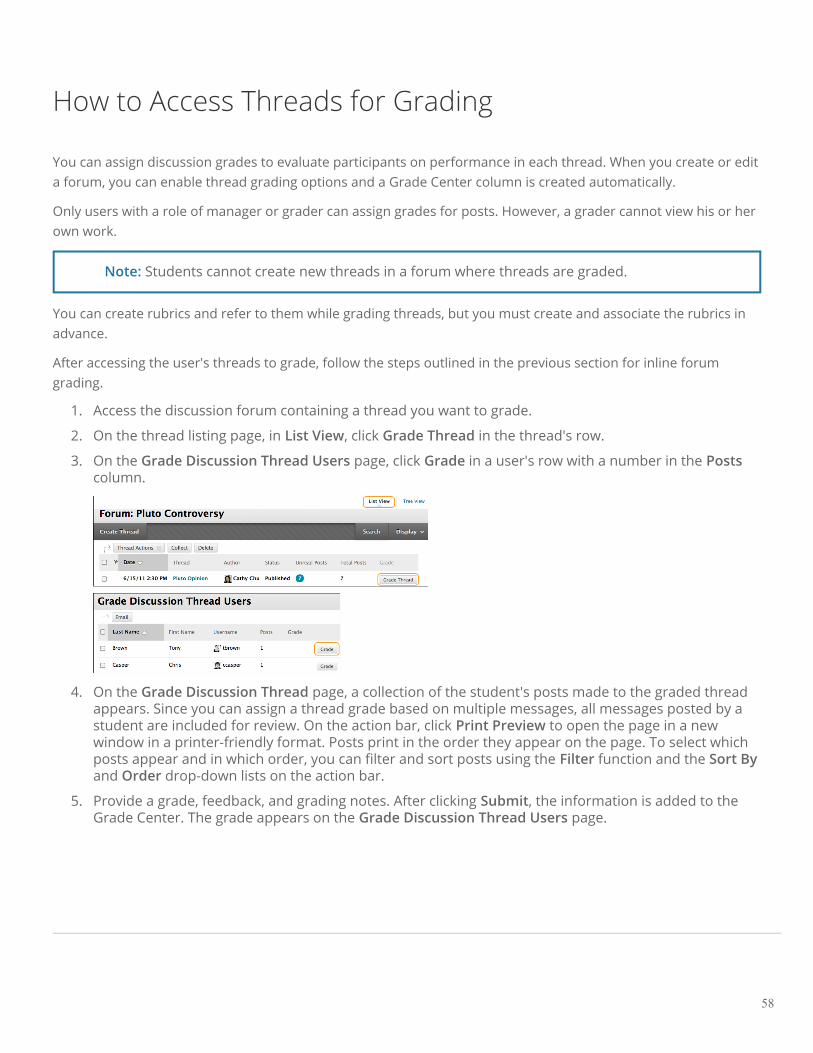
2. On the thread listing page, in List View, click Grade Thread in the thread's row.
3. On the Grade Discussion Thread Users page, click Grade in a user's row with a number in the Postscolumn.
4. On the Grade Discussion Thread page, a collection of the student's posts made to the graded threadappears. Since you can assign a thread grade based on multiple messages, all messages posted by astudent are included for review. On the action bar, click Print Preview to open the page in a newwindow in a printer-friendly format. Posts print in the order they appear on the page. To select whichposts appear and in which order, you can filter and sort posts using the Filter function and the Sort Byand Order drop-down lists on the action bar.
5. Provide a grade, feedback, and grading notes. After clicking Submit, the information is added to theGrade Center. The grade appears on the Grade Discussion Thread Users page.
58

How to Email Users While Grading Discussions
While assigning grades, you can use the email tool in the discussion board to contact students. For example, senda student a question prior to assigning a grade.
1. Access a forum or thread.
2. On the Grade Discussion Thread Users page -OR- the Grade Discussion Forum Users page, select oneor multiple users' check boxes, or select the check box in the header row to select all the users youwant to email.
3. On the action bar, click Email.
4. On the Email Forum User page, edit the Subject, if needed.
5. Type a question or feedback in the Message box.
6. Click Submit.
How to Disable Discussion Grading
Even if grades exist, you can disable grading for graded forums and threads.
1. Access a forum's contextual menu and click Edit.
2. On the Edit Forum page, change the grading option to No Grading in Forum.
3. Click Submit. If you already assigned grades for a forum or its threads, a warning message appearsstating that disabling grading will delete all existing grades. This action is final.
4. Click OK to continue or click Cancel to preserve the Grade Center items.
Group Discussion Grading
Unlike other graded group activities, when you set a group discussion board to graded, each member is gradedindependently of other group members. Each group member must make the designated number of posts to earnhis or her own grade. You do not assign a group grade for contributions to the group discussion board.
59

To Learn More
To learn about other grading workflows, see Rubrics and the Needs Grading Page.
To learn more about giving feedback rating, and moderating posts, see Reply to Discussion Posts and Moderate
Discussions.
To learn more about forum roles, see About Forum Roles.
60
View Discussion Statistics
The Performance Dashboard is a valuable tool you can use to monitor student progress throughout your course.A summary of access and progress for each student appears in a table format. As the term progresses, you canquickly see if students are accessing your course regularly, reviewing course content, and contributing to thediscussion board. This information can help you identify students who are outside the normal range ofparticipation or who need help and encouragement.
Note: Your institution controls whether the Performance Dashboard is available. Your institutioncan also disable the discussion board tool, which will affect the information appearing in thePerformance Dashboard.
How to View Discussion Statistics
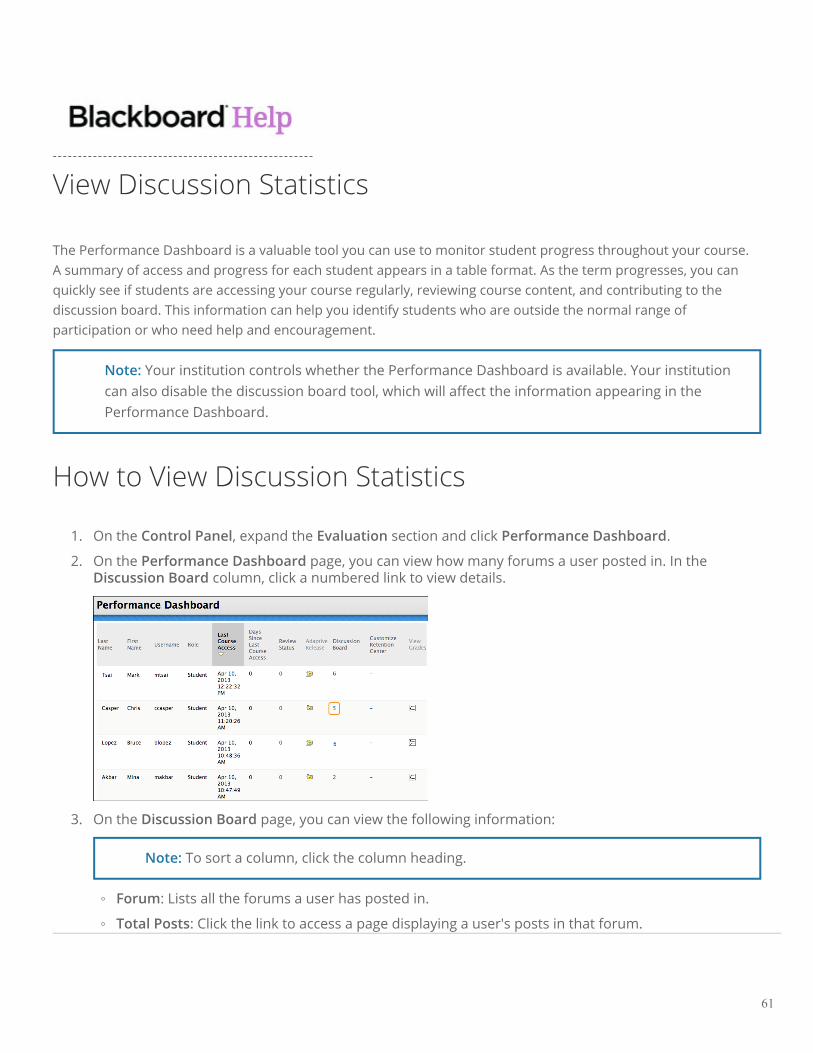
1. On the Control Panel, expand the Evaluation section and click Performance Dashboard.
2. On the Performance Dashboard page, you can view how many forums a user posted in. In theDiscussion Board column, click a numbered link to view details.
3. On the Discussion Board page, you can view the following information:
Note: To sort a column, click the column heading.
◦ Forum: Lists all the forums a user has posted in.
◦ Total Posts: Click the link to access a page displaying a user's posts in that forum.
61
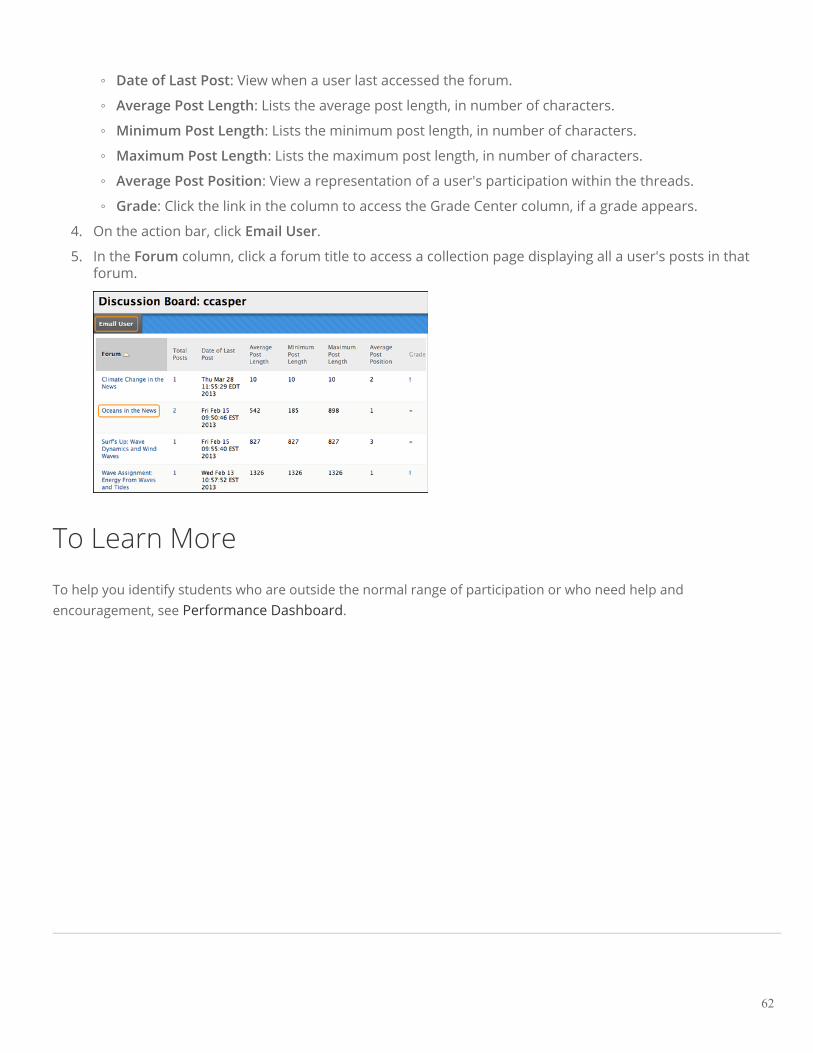
◦ Date of Last Post: View when a user last accessed the forum.
◦ Average Post Length: Lists the average post length, in number of characters.
◦ Minimum Post Length: Lists the minimum post length, in number of characters.
◦ Maximum Post Length: Lists the maximum post length, in number of characters.
◦ Average Post Position: View a representation of a user's participation within the threads.
◦ Grade: Click the link in the column to access the Grade Center column, if a grade appears.
4. On the action bar, click Email User.
5. In the Forum column, click a forum title to access a collection page displaying all a user's posts in thatforum.
To Learn More
To help you identify students who are outside the normal range of participation or who need help and encouragement, see Performance Dashboard.
62
Group Discussions
You can create formal groups of students to collaborate on course work, and provide each group with its owngroup area. You can include links to group tools to help students collaborate and communicate. For example, youcan create a special group discussion board, available only to the members of a course group.
Group discussion boards are separate from the regular course discussion board, which is available to all coursemembers. Members of a group can create and manage their own forums.
Example:Example:
You assign students to groups, providing each group with a problem or situation to explore and develop into aclass presentation. The groups can use the chat tool and their group discussion boards to come to consensusabout topic choices. They can also use their group discussion boards to post internet source links, and thenmembers can post replies on their value. Also, they can use the group discussion board to divide up tasks andrefine the outline. Members post portions of the presentation, and all members post replies regarding usefulness,grammar, flow, and for agreement on the final product.
Note: Your institution controls whether this tool is available.
How to Enable Group Discussions
When you create a course group, enable the discussion board tool to help groups collaborate and communicate.
1. On the Create Group page, select the check box for Discussion Board in the Tool Availability section.
2. Click Submit.
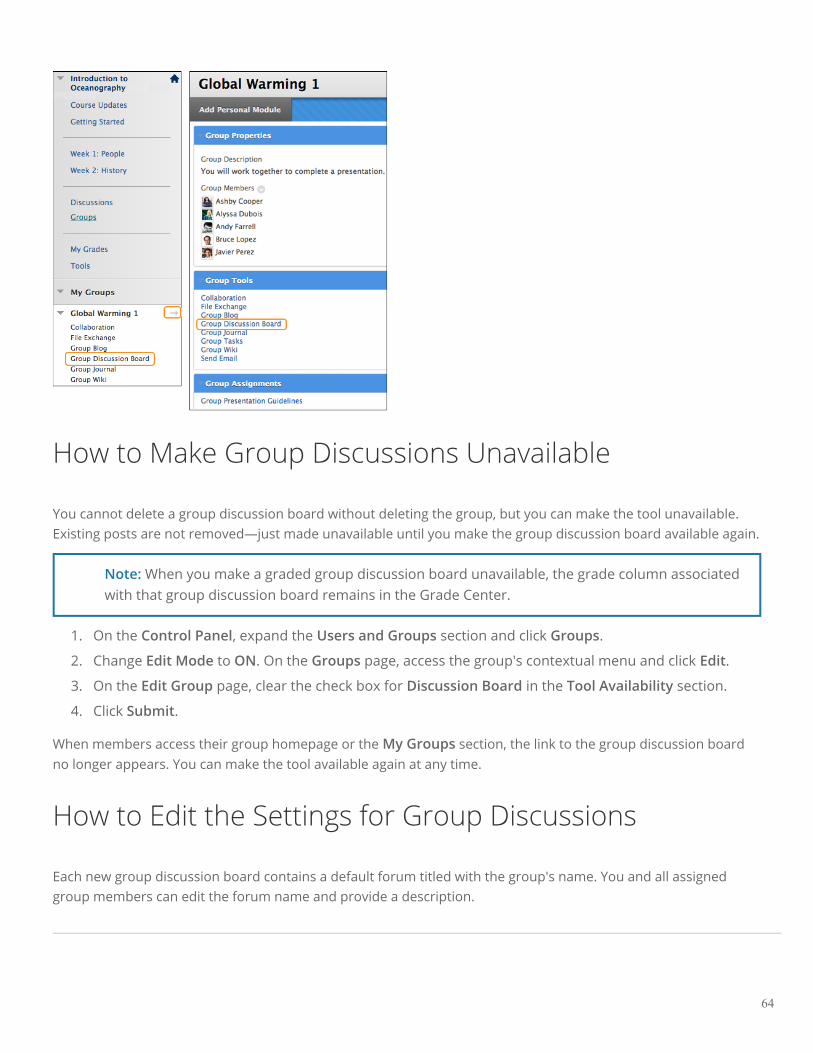
The Group Discussion Board tool appears in the My Groups section and on the group homepage.
63
How to Make Group Discussions Unavailable
You cannot delete a group discussion board without deleting the group, but you can make the tool unavailable.Existing posts are not removed—just made unavailable until you make the group discussion board available again.
Note: When you make a graded group discussion board unavailable, the grade column associatedwith that group discussion board remains in the Grade Center.
1. On the Control Panel, expand the Users and Groups section and click Groups.
2. Change Edit Mode to ON. On the Groups page, access the group's contextual menu and click Edit.
3. On the Edit Group page, clear the check box for Discussion Board in the Tool Availability section.
4. Click Submit.
When members access their group homepage or the My Groups section, the link to the group discussion boardno longer appears. You can make the tool available again at any time.
How to Edit the Settings for Group Discussions
Each new group discussion board contains a default forum titled with the group's name. You and all assignedgroup members can edit the forum name and provide a description.
64

Important: If you want to grade participation in a group discussion board, you can edit a forum'ssettings and enable grading in the forum or threads. Unlike other graded group activities, when you seta group discussion board to graded, each member is graded independently of other group members.Each group member must make the designated number of posts to earn his or her own grade. You donot assign a group grade for contributions to the group discussion board.
1. On the Control Panel, expand the Course Tools section and click Discussion Board.
2. On the Discussion Board page, the course discussion board and all group discussion boards appear.Click a group discussion board link.
3. On the next Discussion Board page, access the forum's contextual menu and click Edit.
4. On the Edit Forum page, change the Name, provide a Description, and edit the Forum Availabilityand Forum Settings. If you want to grade the group's posts, you can enable grading for the forum orthreads and type the Points possible.
If you provided a description, it appears in the Description column on the group discussion board page.
You or any group member can create more forums.
To Learn More
To learn more about creating groups, see Create Groups.
To learn more about creating forums, see How to Create Forums.
65

Blogs
A blog—a shorthand term that means web log—is a personal online journal that is frequently updated andintended for general public access and use. Most blogs also have some kind of commenting system, so thatpeople can respond to and interact with one another. Blogs encourage students to clearly express their ideas andaddresses the need to expand various aspects of social learning. Moreover, they are an effective means of gaininginsight into students' activities and provide a way to share the knowledge and materials collected.
In Blackboard Learn, instructors create and manage blogs, and only enrolled users can view and create entriesand comments in them.
Blog Types in Blackboard Learn
In Blackboard Learn, blogs consist of two elements:
• Blog entriesBlog entries: Text, images, links, multimedia, mashups, and attachments added by course members openfor comments.
• CommentsComments: Remarks or responses to blog entries made by other course members, including theinstructor.
You can choose to allow students to participate in blogs in three ways:
• Course BlogsCourse Blogs: You can create a course blog and determine the topic you want addressed. All coursemembers can add blog entries and comment on blog entries.
• Individual BlogsIndividual Blogs: Each person can add entries only to their own blog. All other course members can viewand add comments to it.
• Group BlogsGroup Blogs: If you enable the blogs tool for a group of users, they can perform the following tasks:
◦ Group members can add blog entries and make comments on blog entries, building upon oneanother.
◦ All course members can view group blogs, but non-group members can only add comments.
Note: You have full control over all blogs in your course and can edit and delete entries in any ofthe blog types. You can also delete user comments.
66

In this section...
• Create a Blog
• Edit and Manage Blogs
• Grade Blogs
67

Create a Blog
You can use blog writing assignments as another medium for reflective learning. With this type of assignment,students are expected to display their research, analytical, and communication skills through a series ofcommentaries meant for public consumption and comment.
In the course environment, only enrolled users can view blogs. Similar to journals, you can use blogs for a gradedassignment or gather opinions and information without assigning a grade. To learn more, see Journals.
You can create one or more blogs for use by students. You must create blog topics before students can add theirentries.
How to Create a Blog Topic
1. On the Control Panel, expand the Course Tools section and click Blogs.
2. On the Blogs listing page, click Create Blog on the action bar.
3. On the Create Blog page, type a name and optional instructions. Make the blog available.
4. Select the Display After and Display Until check boxes to enable the date and time selections. Displayrestrictions do not affect the blog availability, only when it appears.
5. In the Blog Participation section, decide if the blog is for individuals or the course. You may also allowsome anonymous posting.
6. In the Blog Settings section, select Monthly or Weekly Index Entries. Optionally, select check boxes toallow users to edit and delete entries, or delete comments.
7. In the Grade Settings section, select No grading or the Grade option and type the number of Pointspossible. Points possible will apply to one or more entries made by a user to the blog topic. After youenable grading, a column is created automatically in the Grade Center. It is permanently gradable, andyou cannot change the setting to No grading.
8. Optionally, select the check box for Show participants in "needs grading" status and from the drop-down list, select the number of entries required. Applying this setting will show the needs grading iconin the Grade Center and place the entries in the queue on the Needs Grading page after the specifiednumber of entries are made.
68

9. Optionally, add a rubric. To learn more, see Rubrics.
10. Click Submit.
The blog topics appear in alphabetical order on the Blogs listing page. You can sort columns by clicking thecolumn title. To learn more, see The Blog Topic Page.
You can also provide links to blogs in course areas, such as content areas and folders. To learn more, see Link to Tools in a Course Area.
How to Create Blog Entries
You and your students create blog entries and other course members can make comments on the entries. As theinstructor, you can use blog entries to provide structure for discussions on class topics and other issues.
69
On the Blogs listing page, following each blog title, students can see if the blog belongs to a group, the course, orto individual students. All course members can read group blogs, but to make an entry, a user must be a groupmember.
1. On the Blogs listing page, click a blog title.
2. On the blog's topic page, click Create Blog Entry on the action bar.
3. On the Create Blog Entry page, type a title and entry.
4. If enabled and appropriate, select the check box for Post Entry as Anonymous.
5. Optionally, browse for a file to attach.
6. Click Post Entry to submit the blog entry or click Save Entry as Draft to add the entry later.
View Drafts
To view or add to saved drafts, click View Drafts on the action bar on the Blogs listing page.
How to Comment on a Blog Entry
Because blogs are meant to be read by others, students can comment on one another’s blog entries in individual,course, and group blogs.
You decide if users may make anonymous comments and delete them. As the instructor, you can delete any user’scomment by clicking the X. After they are posted, users cannot edit their comments.
1. On the Blogs listing page, click a blog title.
2. On the blog’s topic page, select a blog to view by clicking the user’s name in the sidebar in the AllCourse Members drop-down list. The user’s blog entries open in the content frame.
3. Click Comment following the user’s entry and type a comment.
4. If enabled and appropriate, select the check box for Comment on Entry as Anonymous.
5. Click Add. Click the numbered Comments link to view all comments.
70

71

Edit and Manage Blogs
You can edit basic properties of a blog topic, including the name, instructions, availability, and other settings. Afteryou designate a blog topic for individuals or the course, you cannot change it to the other.
You can edit any user's blog entries and delete blog topics. You can also delete comments, but you cannot editthem.
How to Edit a Blog
1. On the Blogs listing page, access a blog's contextual menu and click Edit.
2. On the Edit Blog page, make changes.
3. Click Submit.
How to Delete a Blog
If you no longer need a blog, you can delete it. Deleting a blog is permanent.
Note: If a blog is gradable, the Delete Confirmation page appears. You need to perform extrasteps to remove a gradable blog.
1. On the Blogs listing page, access a blog's contextual menu and click Delete.
2. Click OK in the pop-up warning. If the blog is gradable, the Delete Confirmation page appears. Youhave two options:
◦ Do not select check boxes: The blog is deleted, but the Grade Center column and scores you haveassigned are retained. For example, all student entries are graded and you want to keep the GradeCenter column for the final grade calculations. If you delete a blog, yet retain the Grade Centercolumn, you can delete that column from the Grade Center at any time.
◦ Select the check boxes: The grade column in the Grade Center andand the blog are deleted. Forexample, if you do not want to include the grade column for the blog entries in the final grade, youcan safely delete all.
72
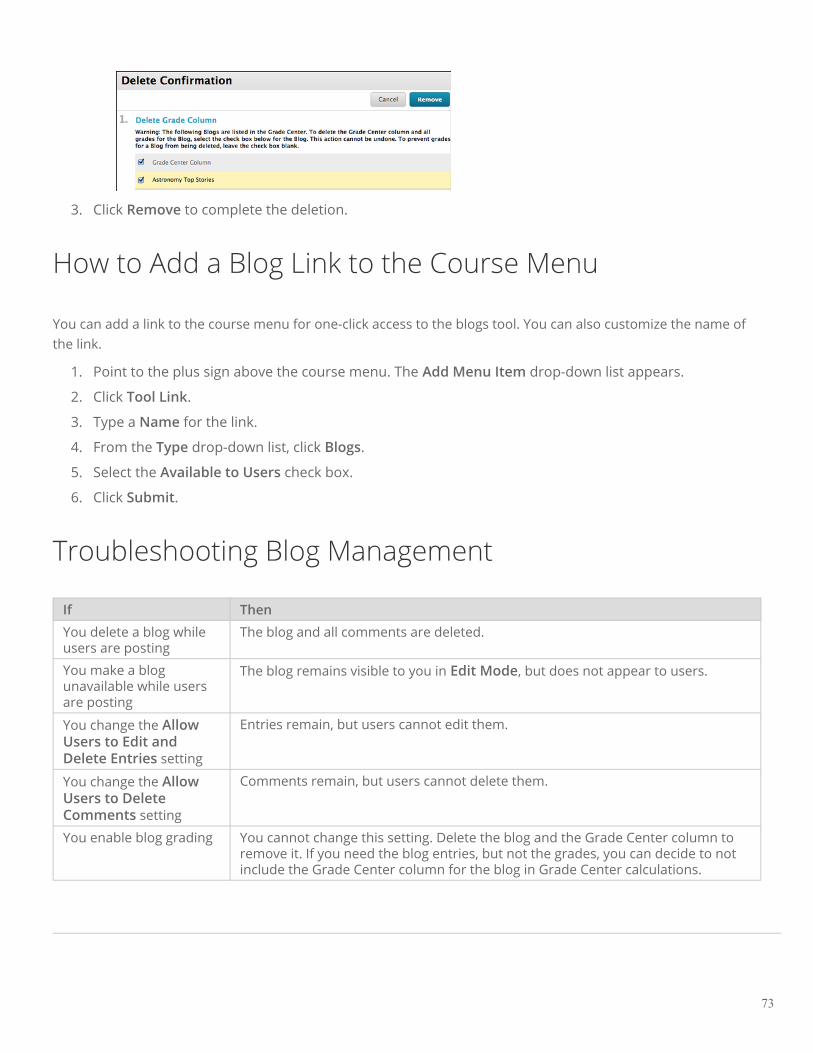
3. Click Remove to complete the deletion.
How to Add a Blog Link to the Course Menu
You can add a link to the course menu for one-click access to the blogs tool. You can also customize the name ofthe link.
1. Point to the plus sign above the course menu. The Add Menu Item drop-down list appears.
2. Click Tool Link.
3. Type a Name for the link.
4. From the Type drop-down list, click Blogs.
5. Select the Available to Users check box.
6. Click Submit.
Troubleshooting Blog Management
If Then
You delete a blog whileusers are posting
The blog and all comments are deleted.
You make a blogunavailable while usersare posting
The blog remains visible to you in Edit Mode, but does not appear to users.
You change the AllowUsers to Edit andDelete Entries setting
Entries remain, but users cannot edit them.
You change the AllowUsers to DeleteComments setting
Comments remain, but users cannot delete them.
You enable blog grading You cannot change this setting. Delete the blog and the Grade Center column toremove it. If you need the blog entries, but not the grades, you can decide to notinclude the Grade Center column for the blog in Grade Center calculations.
73
Grade Blogs
You can grade participation in blogs for individuals and groups. You can grade the quality of the discussion, as wellas the number of entries and comments that are made by an individual or a course group.
When you enable grading, a column is created automatically in the Grade Center. You grade students’ blog entriesfrom the blog topic page. All of an individual student's entries—and comments made by others—appear as youdetermine the grade. The grades show immediately in the Grade Center.
You access the blog topic page in the following ways:
• In the blogs tool, access a blog and select a user from the All Course Members drop-down list.
• On the Needs Grading page, access a blog’s contextual menu and click Grade All Users. To learn more, see the Needs Grading Page.
• In the Grade Center, locate the column for the blog you want to grade. Move the mouse pointer over acell containing the needs grading icon—the exclamation mark—to access the blog’s contextual menu.Click Grade User Activity.
You can decide whether or not students can view their grades and feedback in My Grades by editing the column
information in the Grade Center. To learn more, see How to Edit, Hide, and Select Options for Columns. When
you edit an assigned grade from the blog topic page, the Grade Center is updated.
Change a Topic From Graded to Ungraded
You cannot change a graded blog topic to ungraded. You need to delete the graded blog topic from the Blogslisting page and the Grade Center and create a new ungraded topic.
Alternatively, to retain entries, set the blog's Grade Center column to not be included in calculations. In essence,the blog continues to be considered graded by the Grade Center, but any results or grades assigned are ignored.
The Blog Topic Page
The blog topic page is divided into two main sections. You can view the entries in the content frame. In thesidebar, you can view information about the blog topic or entry, expand the Index, grade the blog entry if the blogis gradable, and select an individual user’s name to view his or her entries alone in the content frame.
74

Note: If you do not see the grading feature in the sidebar, you school has not turned this featureon.
1. On the action bar, click Create Blog Entry to add your thoughts.
2. Below the action bar, the Blog Instructions are expanded by default. You can minimize them. ClickAlignments to add alignments.
3. In the sidebar, you can expand the Blog Details section to display information about the currentselection, including the author and number of entries and comments. Click the right-pointing arrow tocollapse the sidebar for more viewing room for entries. Click the four arrows to view the blog entriesand sidebar in full screen.
4. For All Course Members, click the down-pointing arrow to view a list and select a member. Theselected member’s entries appear in the content frame. Optionally, click Show members withoutentries.
5. The Index section displays the titles of the entries created during the selected time period. Click theminus sign to collapse the title list.
6. Use the left- and right-pointing arrows to navigate to the previous or next student.
7. For graded blogs, icons designate the status of a user’s activity. The needs grading icon—theexclamation mark—indicates that a user has met the minimum activity for grading you set for theblog. The in progress icon appears when a user has some activity, but has not yet met the minimumnumber required to trigger needs grading status.
8. In the grading sidebar, provide a grade and feedback for a student.
How to Grade Blog Entries for Individuals
You can begin the grading process for blogs from the Grade Center, the Needs Grading page, and the CourseTools section in the Control Panel.
75

While specifying blog settings, if you did NOT select the Show participants in "needs grading" status box andselect a minimum number of entries, the needs grading icon will not appear in the Grade Center, on the blog topicpage, and items do not appear on the Needs Grading page.
The in progress icon shows in the Grade Center cell and in a blog:
• For student activity that does not meet the minimum number you set.
• If you did not select the Show participants in "needs grading" status check box.
Use the following steps to grade blog entries:
1. Access the blog topic page and select the blog entry or entries to grade. The user’s blog entry orentries open in the content frame.
2. Type a point total in the Grade box. If you associated a rubric for this graded blog, expand and complete the rubric. To learn more, see Rubrics. To edit an existing grade, click in the Grade box and change the grade.
3. Optionally, type Feedback for the student. In the Add Notes section, make notes that appear only toyou and the grader role. You can also use the spell check function in the bottom of each text box. Theicon for Click to open full content editor gives you access to all the content editor functions.
4. Click Submit to add the grade, feedback, and grading notes to the Grade Center.
Group Blog Grading
On the blog topic page, you can read all the entries for a group blog and add one grade. Users with entries thatneed grading are indicated with the needs grading icon—the exclamation mark—in the Grade Center and on theblog topic page in the All Group Members drop-down list. In addition, the group blog is listed on the NeedsGrading page.
On the group blog page, the grading sidebar appears, listing all group members.
When you add a grade for a group blog, the grade is automatically given to all members of the group and ispopulated in the corresponding column in the Grade Center for each group member.
76
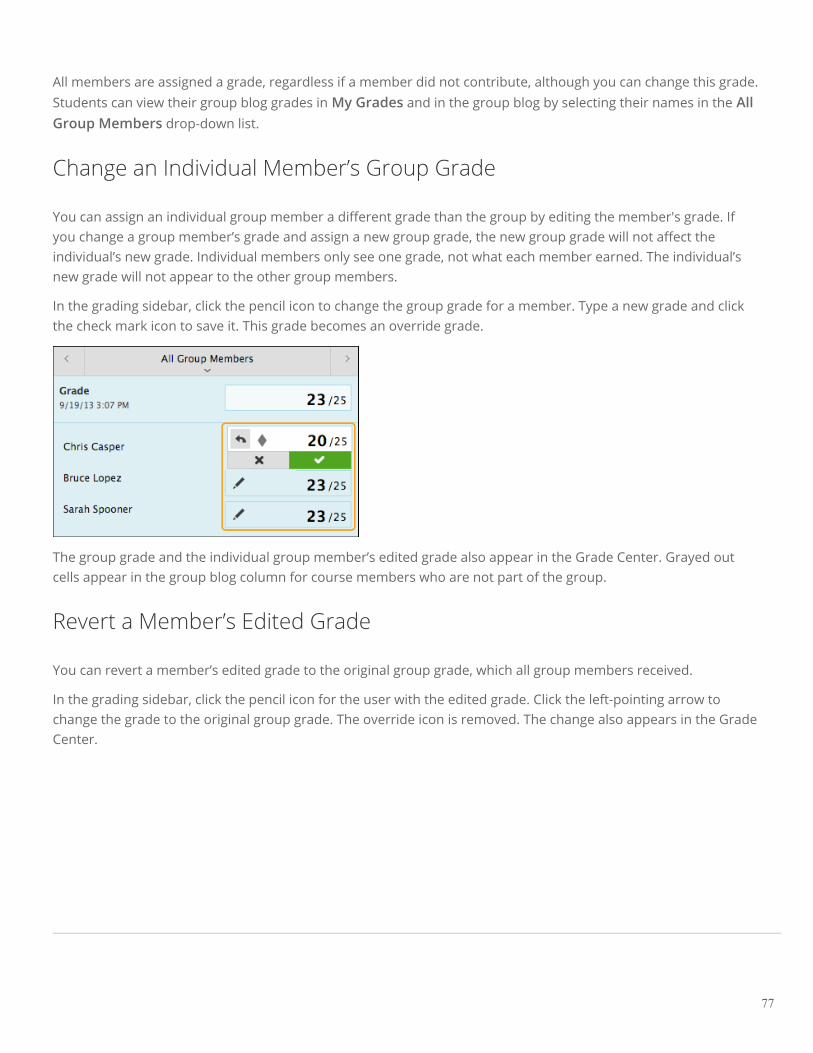
All members are assigned a grade, regardless if a member did not contribute, although you can change this grade.Students can view their group blog grades in My Grades and in the group blog by selecting their names in the AllGroup Members drop-down list.
Change an Individual Member’s Group Grade
You can assign an individual group member a different grade than the group by editing the member's grade. Ifyou change a group member’s grade and assign a new group grade, the new group grade will not affect theindividual’s new grade. Individual members only see one grade, not what each member earned. The individual’snew grade will not appear to the other group members.
In the grading sidebar, click the pencil icon to change the group grade for a member. Type a new grade and clickthe check mark icon to save it. This grade becomes an override grade.
The group grade and the individual group member’s edited grade also appear in the Grade Center. Grayed outcells appear in the group blog column for course members who are not part of the group.
Revert a Member’s Edited Grade
You can revert a member’s edited grade to the original group grade, which all group members received.
In the grading sidebar, click the pencil icon for the user with the edited grade. Click the left-pointing arrow tochange the grade to the original group grade. The override icon is removed. The change also appears in the GradeCenter.
77

Journals
Journals are a personal space for students to communicate privatelywith you. Students can also use journals as a self-reflective tool topost their opinions, ideas, and concerns about the course, or discussand analyze course related materials. You can create journalassignments that are broad and student-directed as your studentsreflect on the learning process and document changes in theirperceptions and attitudes. Students can describe problems faced andhow they solved them. Also, you can create instructor-directed
journal entries that are more formal in nature and that narrow the focus by listing topics for discussion.
Journals are ideal for individual projects. For example, in a creative writing course, the owner of each journalcreates entries and an instructor comments. In this manner, a student can refine a section of a writing assignmentover a period of time, using an instructor’s guidance and suggestions. A student can also comment on his or herentries to continue the conversation.
You can choose to make journal entries public, allowing all course members to view all entries. For example, youmay choose to make a journal public when asking for opinions on how to improve the evaluation process.Students can read what other students wrote and build upon those ideas.
When used in the group area, members of a group can view and comment on each other’s entries for the groupjournal. The group, as a whole, can communicate with you and all members benefit from the comments.
You can grade journal entries or use them solely for communication. In either instance, a student can makemultiple entries for one journal topic.
In this section...
• Best Practice: Benefits of Reflective Learning
• Create a Journal
• Edit and Manage Journals
• Grade Journals
78
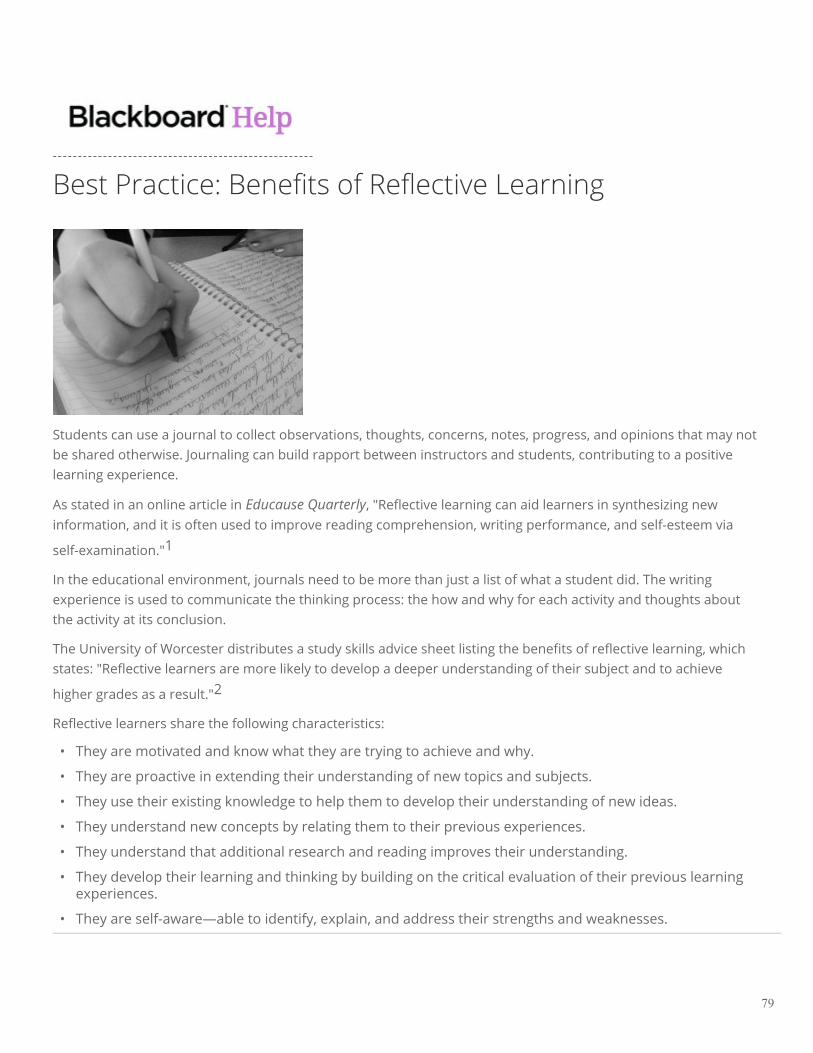
Best Practice: Benefits of Reflective Learning
Students can use a journal to collect observations, thoughts, concerns, notes, progress, and opinions that may notbe shared otherwise. Journaling can build rapport between instructors and students, contributing to a positivelearning experience.
As stated in an online article in Educause Quarterly, "Reflective learning can aid learners in synthesizing newinformation, and it is often used to improve reading comprehension, writing performance, and self-esteem via
self-examination."1
In the educational environment, journals need to be more than just a list of what a student did. The writingexperience is used to communicate the thinking process: the how and why for each activity and thoughts aboutthe activity at its conclusion.
The University of Worcester distributes a study skills advice sheet listing the benefits of reflective learning, whichstates: "Reflective learners are more likely to develop a deeper understanding of their subject and to achieve
higher grades as a result."2
Reflective learners share the following characteristics:
• They are motivated and know what they are trying to achieve and why.
• They are proactive in extending their understanding of new topics and subjects.
• They use their existing knowledge to help them to develop their understanding of new ideas.
• They understand new concepts by relating them to their previous experiences.
• They understand that additional research and reading improves their understanding.
• They develop their learning and thinking by building on the critical evaluation of their previous learningexperiences.
• They are self-aware—able to identify, explain, and address their strengths and weaknesses.
79

SourcesSources
1Phipps, Jonnie Jill. “E-Journaling: Achieving Interactive Education Online.” Educause Quarterly. 28.1 (2005): n.pag.Web. 18 Nov. 2009.
2Learning Journals. University of Worcester, Aug. 2007. Web. 18 Nov. 2009.
80
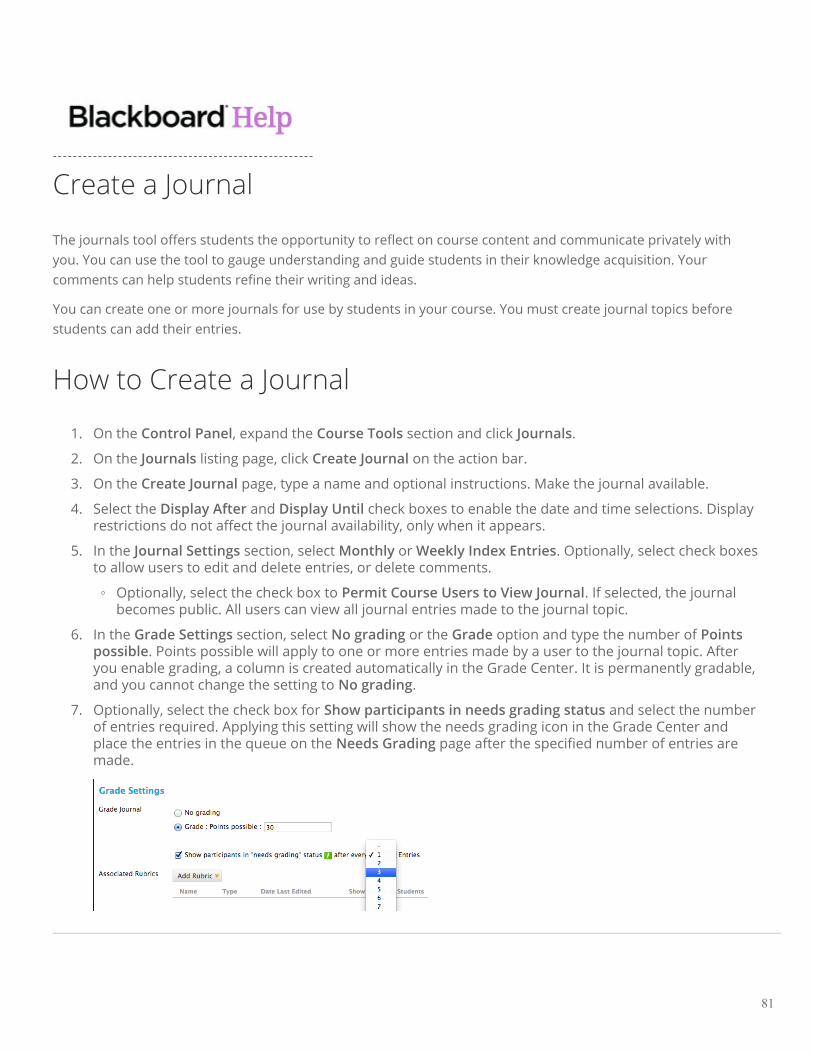
Create a Journal
The journals tool offers students the opportunity to reflect on course content and communicate privately withyou. You can use the tool to gauge understanding and guide students in their knowledge acquisition. Yourcomments can help students refine their writing and ideas.
You can create one or more journals for use by students in your course. You must create journal topics beforestudents can add their entries.
How to Create a Journal
1. On the Control Panel, expand the Course Tools section and click Journals.
2. On the Journals listing page, click Create Journal on the action bar.
3. On the Create Journal page, type a name and optional instructions. Make the journal available.
4. Select the Display After and Display Until check boxes to enable the date and time selections. Displayrestrictions do not affect the journal availability, only when it appears.
5. In the Journal Settings section, select Monthly or Weekly Index Entries. Optionally, select check boxesto allow users to edit and delete entries, or delete comments.
◦ Optionally, select the check box to Permit Course Users to View Journal. If selected, the journalbecomes public. All users can view all journal entries made to the journal topic.
6. In the Grade Settings section, select No grading or the Grade option and type the number of Pointspossible. Points possible will apply to one or more entries made by a user to the journal topic. Afteryou enable grading, a column is created automatically in the Grade Center. It is permanently gradable,and you cannot change the setting to No grading.
7. Optionally, select the check box for Show participants in needs grading status and select the numberof entries required. Applying this setting will show the needs grading icon in the Grade Center andplace the entries in the queue on the Needs Grading page after the specified number of entries aremade.
81
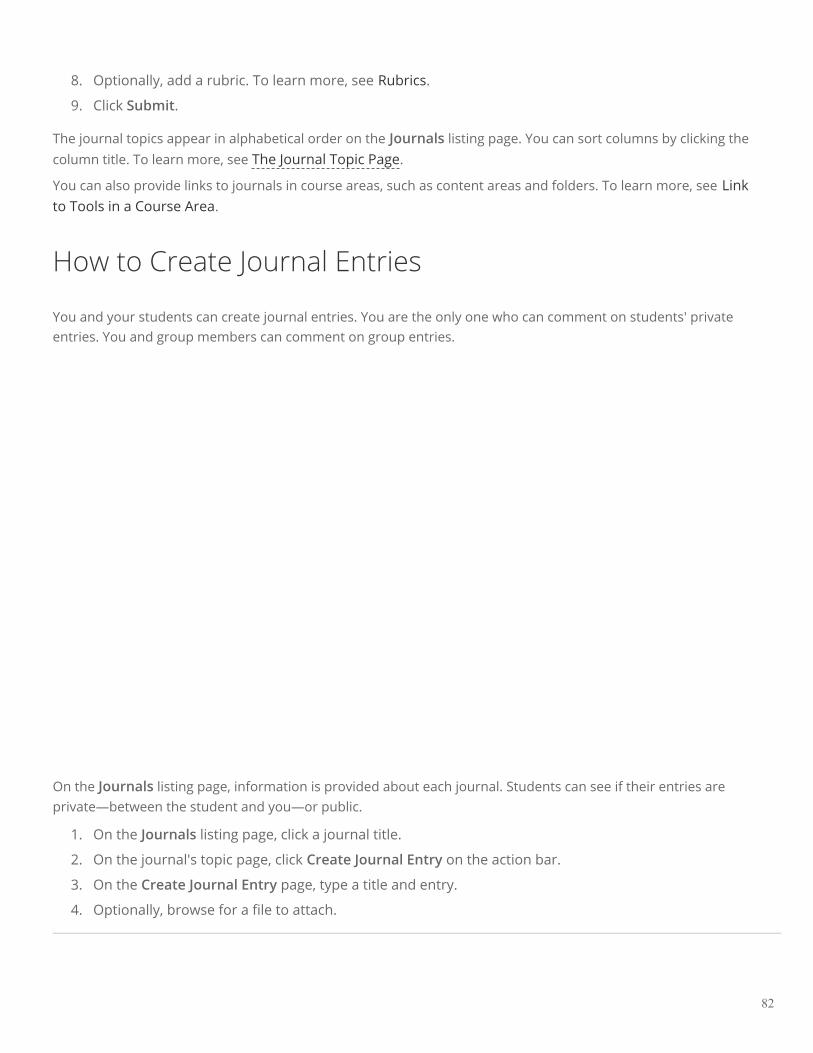
8. Optionally, add a rubric. To learn more, see Rubrics.
9. Click Submit.
The journal topics appear in alphabetical order on the Journals listing page. You can sort columns by clicking thecolumn title. To learn more, see The Journal Topic Page.
You can also provide links to journals in course areas, such as content areas and folders. To learn more, see Link to Tools in a Course Area.
How to Create Journal Entries
You and your students can create journal entries. You are the only one who can comment on students' privateentries. You and group members can comment on group entries.
On the Journals listing page, information is provided about each journal. Students can see if their entries areprivate—between the student and you—or public.
1. On the Journals listing page, click a journal title.
2. On the journal's topic page, click Create Journal Entry on the action bar.
3. On the Create Journal Entry page, type a title and entry.
4. Optionally, browse for a file to attach.
82
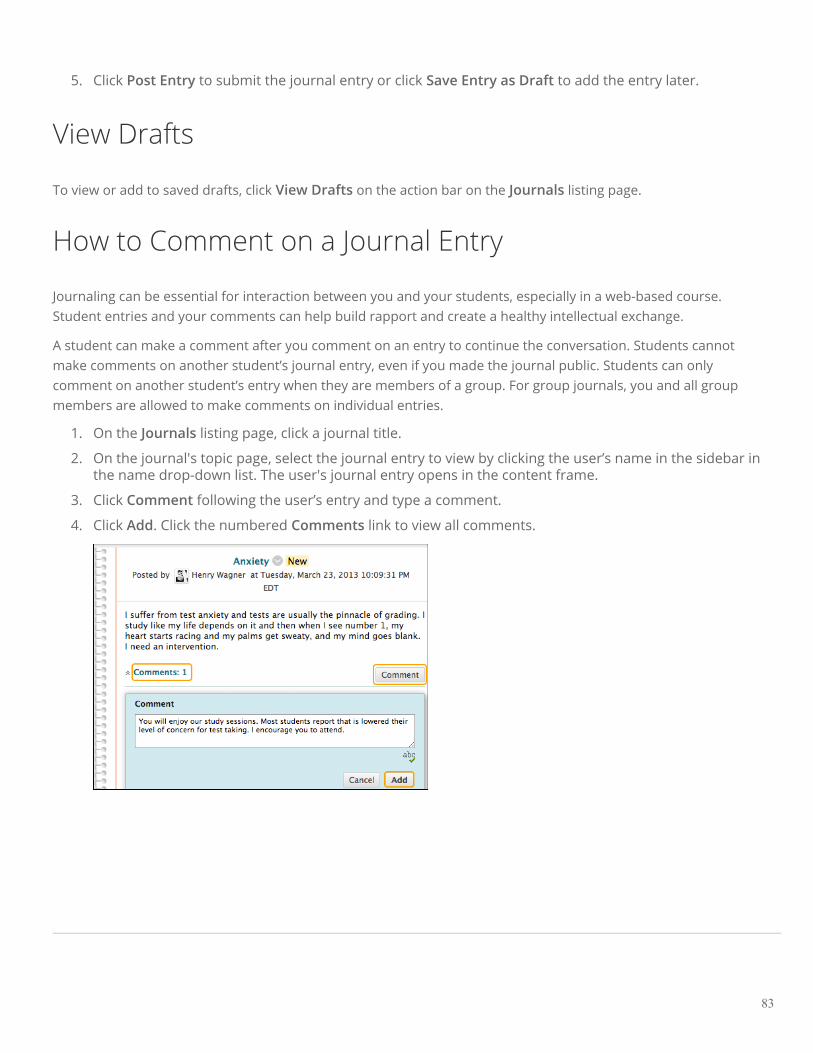
5. Click Post Entry to submit the journal entry or click Save Entry as Draft to add the entry later.
View Drafts
To view or add to saved drafts, click View Drafts on the action bar on the Journals listing page.
How to Comment on a Journal Entry
Journaling can be essential for interaction between you and your students, especially in a web-based course.Student entries and your comments can help build rapport and create a healthy intellectual exchange.
A student can make a comment after you comment on an entry to continue the conversation. Students cannotmake comments on another student’s journal entry, even if you made the journal public. Students can onlycomment on another student’s entry when they are members of a group. For group journals, you and all groupmembers are allowed to make comments on individual entries.
1. On the Journals listing page, click a journal title.
2. On the journal's topic page, select the journal entry to view by clicking the user’s name in the sidebar inthe name drop-down list. The user's journal entry opens in the content frame.
3. Click Comment following the user’s entry and type a comment.
4. Click Add. Click the numbered Comments link to view all comments.
83
Edit and Manage Journals
You can edit basic properties of a journal topic, including the name, instructions, availability, and some settings.You can also edit any user's journal entries, and delete journal topics and comments.
How to Edit a Journal
1. On the Journals listing page, access a journal's contextual menu and click Edit.
2. On the Edit Journal page, make changes.
3. Click Submit.
How to Delete a Journal
If you no longer need a journal, you can delete it. Deleting a journal is permanent.
Note: If a journal is gradable, the Delete Confirmation page appears. You need to perform extrasteps to remove a gradable journal.
1. On the Journals listing page, access a journal's contextual menu and click Delete.
2. Click OK in the pop-up warning. If the journal is gradable, the Delete Confirmation page appears. Youhave two options:
◦ Do not select check boxes: The journal is deleted, but the Grade Center column and scores youhave assigned are retained. For example, all student entries are graded and you want to keep theGrade Center column for the final grade calculations. If you delete a journal, yet retain the GradeCenter column, you can delete that column from the Grade Center at any time.
◦ Select the check boxes: The grade column in the Grade Center andand the journal are deleted. Forexample, if you do not want to include the grade column for the journal entries in the final grade,you can safely delete all.
84
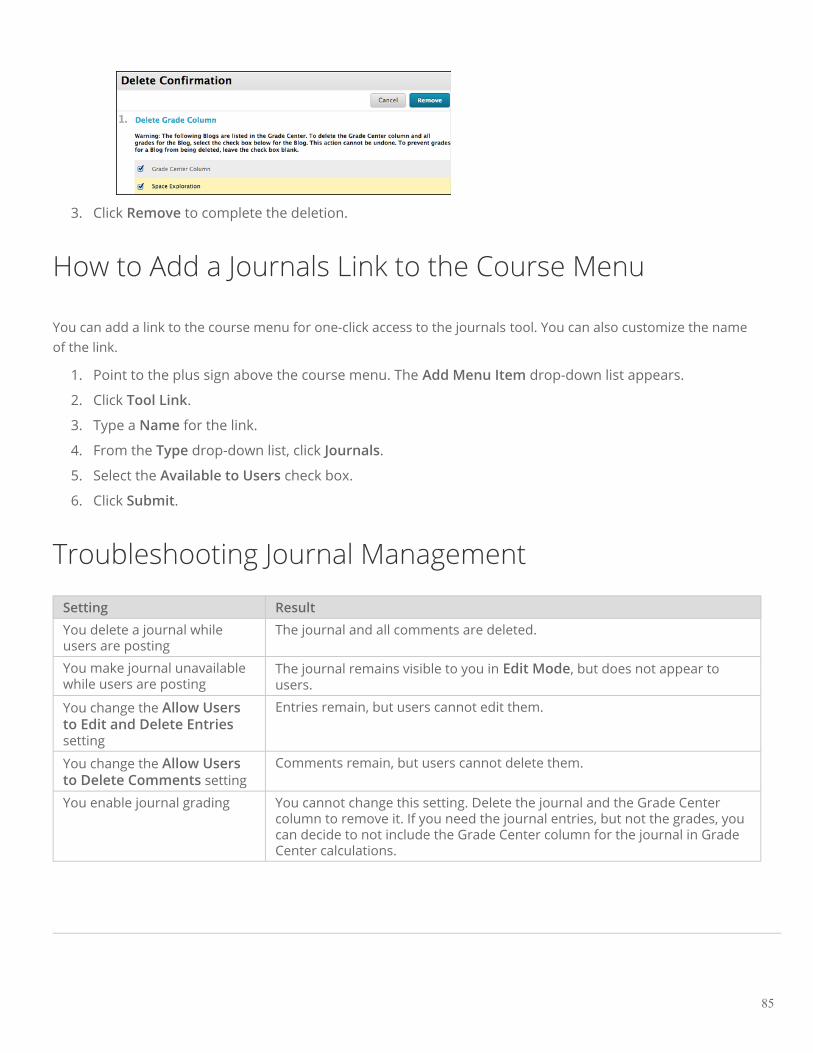
3. Click Remove to complete the deletion.
How to Add a Journals Link to the Course Menu
You can add a link to the course menu for one-click access to the journals tool. You can also customize the nameof the link.
1. Point to the plus sign above the course menu. The Add Menu Item drop-down list appears.
2. Click Tool Link.
3. Type a Name for the link.
4. From the Type drop-down list, click Journals.
5. Select the Available to Users check box.
6. Click Submit.
Troubleshooting Journal Management
Setting Result
You delete a journal whileusers are posting
The journal and all comments are deleted.
You make journal unavailablewhile users are posting
The journal remains visible to you in Edit Mode, but does not appear tousers.
You change the Allow Usersto Edit and Delete Entriessetting
Entries remain, but users cannot edit them.
You change the Allow Usersto Delete Comments setting
Comments remain, but users cannot delete them.
You enable journal grading You cannot change this setting. Delete the journal and the Grade Centercolumn to remove it. If you need the journal entries, but not the grades, youcan decide to not include the Grade Center column for the journal in GradeCenter calculations.
85
Grade Journals
You can grade participation in journals for individuals and groups.
When you enable grading, a column is created automatically in the Grade Center. You grade students’ journalentries from the journal topic page. All of an individual student's entries and comments appear as you determinethe grade. The grades show immediately in the Grade Center.
You access the journal topic page in the following ways:
• In the journals tool, access a journal. In the sidebar, click the drop-down with your name to access allcourse members.
• On the Needs Grading page, access a journal’s contextual menu and click Grade All Users. To learn more, see the Needs Grading Page.
• In the Grade Center, locate the column for the journal you want to grade. Move the mouse pointer over acell containing the needs grading icon—the exclamation mark—to access the journal’s contextual menu.Click Grade User Activity.
You can decide whether or not students can view their grades and feedback in My Grades by editing the column
information in the Grade Center. To learn more, see How to Edit, Hide, and Select Options for Columns. When
you edit an assigned grade from the journal topic page, the Grade Center is updated.
Change a Topic From Graded to Ungraded
You cannot change a graded journal topic to ungraded. You need to delete the graded journal topic from theJournals listing page and the Grade Center, and create a new ungraded topic.
Alternatively, to retain entries, set the journal's Grade Center column to not be included in calculations. In essence,the journal continues to be considered graded by the Grade Center, but any results or grades assigned areignored.
The Journal Topic Page
The journal topic page is divided into two main sections. You can view the entries in the content frame. In thesidebar, you can view information about the journal topic or entry, expand the Index, grade the entry if thejournal is gradable, and select an individual user's name to view his or her entries alone in the content frame.
86

Note: If you do not see the grading feature in the sidebar, your school has not turned it on.
1. In the sidebar, you can expand the Journal Details section to display information about the currentselection, including the number of entries and comments. Click the right-pointing arrow to collapse thesidebar for more viewing room for entries. Click the four arrows to view the journal entries andsidebar in full screen.
2. Below the action bar, the Journal Instructions are expanded by default. You can minimize them. ClickAlignments to add alignments.
3. To view all course members, click the down-pointing arrow next to the user's name to view a list andselect a member. The selected member’s entries appear in the content frame. Use the left- and right-pointing arrows to navigate to the previous or next student. Optionally, click Show Empty Journals.
4. For graded journals, icons designate the status of a user’s activity. The needs grading icon—theexclamation mark—indicates that a user has met the minimum activity for grading you set for thejournal. The in progress icon appears when a user has some activity, but has not yet met the minimumnumber required to trigger needs grading status.
5. In the grading sidebar, provide a grade and feedback for the student.
6. The Index section displays the titles of the entries created by an author during the selected timeperiod. Click the minus sign to collapse the title list.
How to Grade Journal Entries for Individuals
You can begin the grading process for journals from the Grade Center, the Needs Grading page, and the CourseTools section in the Control Panel.
While specifying journal settings, if you did NOT select the Show participants in needs grading status box andselect a minimum number of entries, the needs grading icon will not appear in the Grade Center, on the journaltopic page, and items do not appear on the Needs Grading page.
The in progress icon shows in the Grade Center cell and in a journal:
• For student activity that does not meet the minimum number you set.
87
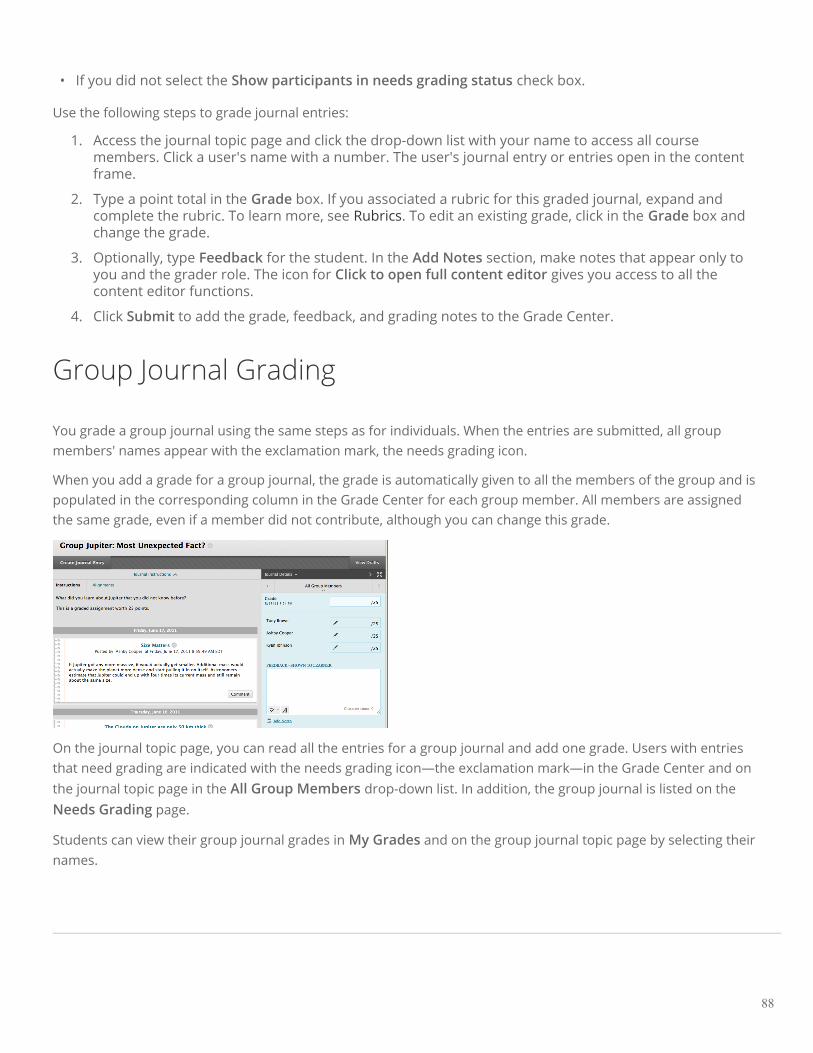
• If you did not select the Show participants in needs grading status check box.
Use the following steps to grade journal entries:
1. Access the journal topic page and click the drop-down list with your name to access all coursemembers. Click a user's name with a number. The user's journal entry or entries open in the contentframe.
2. Type a point total in the Grade box. If you associated a rubric for this graded journal, expand and complete the rubric. To learn more, see Rubrics. To edit an existing grade, click in the Grade box and change the grade.
3. Optionally, type Feedback for the student. In the Add Notes section, make notes that appear only toyou and the grader role. The icon for Click to open full content editor gives you access to all thecontent editor functions.
4. Click Submit to add the grade, feedback, and grading notes to the Grade Center.
Group Journal Grading
You grade a group journal using the same steps as for individuals. When the entries are submitted, all groupmembers' names appear with the exclamation mark, the needs grading icon.
When you add a grade for a group journal, the grade is automatically given to all the members of the group and ispopulated in the corresponding column in the Grade Center for each group member. All members are assignedthe same grade, even if a member did not contribute, although you can change this grade.
On the journal topic page, you can read all the entries for a group journal and add one grade. Users with entriesthat need grading are indicated with the needs grading icon—the exclamation mark—in the Grade Center and onthe journal topic page in the All Group Members drop-down list. In addition, the group journal is listed on theNeeds Grading page.
Students can view their group journal grades in My Grades and on the group journal topic page by selecting theirnames.
88

Change an Individual Member’s Group Grade
You can assign an individual group member a different grade than the group by editing the member's grade. Ifyou change a group member’s grade, and you assign a new group grade, the new group grade will not affect theindividual’s new grade. Individual members only see one grade, not what each member earned. The individual’snew grade will not appear to the other group members.
In the grading sidebar, click the pencil icon to change the group grade for a member. Type a new grade and clickthe check mark icon to save it. This grade becomes an override grade.
The group grade and the individual group member’s edited grade also appear in the Grade Center. Grayed outcells appear in the group journal column for course members who are not part of the group.
Revert a Member’s Edited Grade
You can revert a member’s edited grade to the original group grade, which all group members received.
In the grading sidebar, click the pencil icon for the user with the edited grade. Click the left-pointing arrow tochange the grade to the original group grade. The override icon is removed. The change also appears in the GradeCenter.
89

Wikis
Wikis allow course members to contribute and modify one or more pages of course related materials, providing ameans of sharing and collaboration. Users can create and edit pages quickly, while tracking changes andadditions, allowing for effective collaboration between multiple writers. You can create one or more wikis for allcourse members to contribute to and wikis for specific groups to use to collaborate.
All course members can use the wikis tool to record information and serve as a repository for course informationand knowledge. A course wiki is a vast source of information compiled by course members. Wikis can help build acommunity of collaboration and learning by increasing social interaction during the exchange of information.
Students use a wiki to collaborate on shared content from different times and locations. They can view previouschanges, comment on content or changes, include new content, and revise existing content. Similar to thediscussion board, you act as a facilitator instead of the provider of all course content. Unlike a blog, which can bequite personal, wikis require intense collaboration, where information is linked to and built upon.
Use Wikis to Assess Student Engagement
You can grade student contributions to a wiki or use it solely for course content review. In either instance, astudent can contribute multiple pages to a single wiki and make unlimited revisions to pages submitted by anycourse member. You can also enable the group wiki tool to help groups share and interact.
You can view all changes to all pages in a wiki. You can view the changes at a high level, and you can drill down tosee information about contributions by any individual.
90

In this section...
• Best Practice: Wikis in Action
• Create Wiki Topics
• Create Wiki Pages
• Edit and Manage Wikis
• Grade Wikis
91

Best Practice: Wikis in Action
Wiki Uses
Wikis can help users build a shared repository of knowledge. As the knowledge base grows over time, you canexpect the wiki to have some degree of seriousness and permanence.
With dedicated use, you can use wikis for the following educational purposes:
• Provide an easy to use environment for communication.
• Promote collaboration rather than competition.
• Foster a social and interactive approach to learning.
• Build partnerships where you can benefit from the strengths of others.
• Increase network building, trust, and negotiation skills.
• Provide support and prompt feedback.
• Provide a one-stop area where information is searched, updated, and accessed easily and quickly.
• Increase and enhance the possibility of creativity, spontaneity, and innovation through the application ofreflective thinking.
You can use wikis as course content or graded assignments, including the following items:
• A glossary.
• A white paper.
• Class summaries and outlines.
• Connecting student writing to form a book.
• A resources repository.
92

• Lab experiments.
• Student solutions for scenarios and case studies.
• A research notebook.
• Group project presentations
93

Create Wiki Topics
Instructors create course wikis. Any course member can create pages, unless you intend to be the sole author and use the wiki as course content. Groups can also use wikis. To learn more, see Course Groups and Tools.
How to Create a Wiki Topic
1. On the Control Panel, expand the Course Tools section and click Wikis.
2. On the Wikis listing page, click Create Wiki on the action bar.
3. On the Create Wiki page, type a name and optional instructions. Make the wiki available.
4. Select the Display After and Display Until check boxes to enable the date and time selections. Displayrestrictions do not affect the wiki availability, only when it appears.
5. Choose the Student Access option. You can change the student access at any time.
94
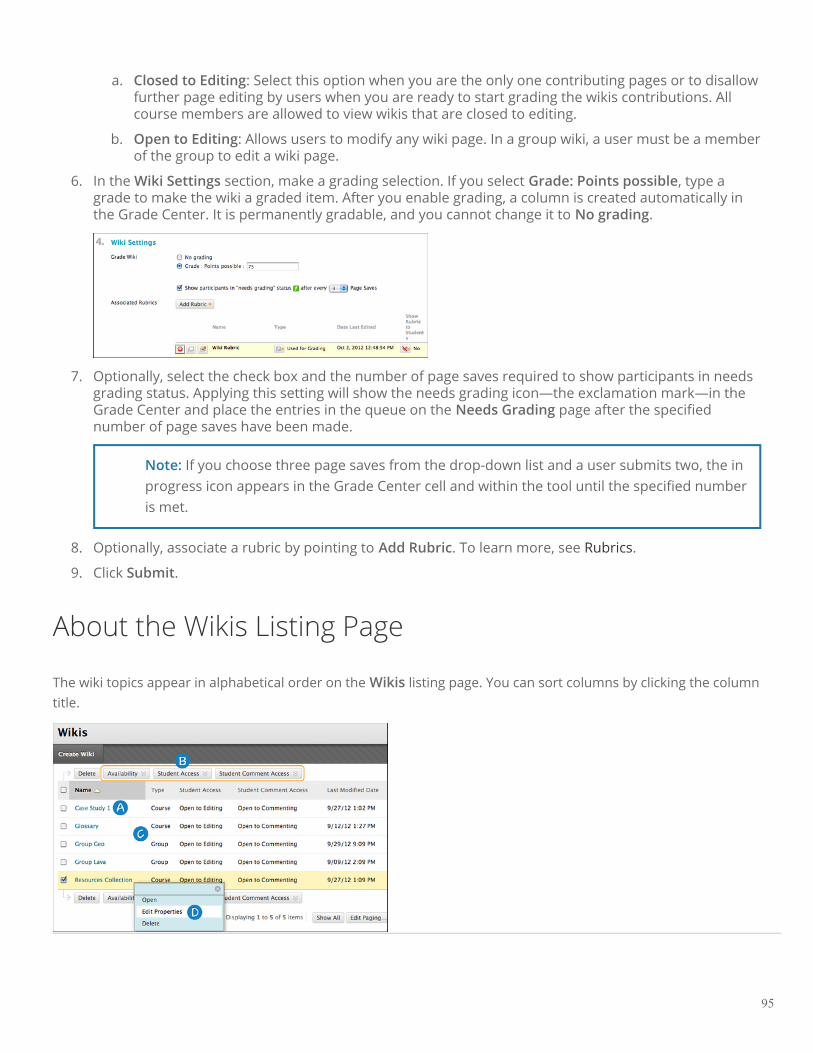
a. Closed to Editing: Select this option when you are the only one contributing pages or to disallowfurther page editing by users when you are ready to start grading the wikis contributions. Allcourse members are allowed to view wikis that are closed to editing.
b. Open to Editing: Allows users to modify any wiki page. In a group wiki, a user must be a memberof the group to edit a wiki page.
6. In the Wiki Settings section, make a grading selection. If you select Grade: Points possible, type agrade to make the wiki a graded item. After you enable grading, a column is created automatically inthe Grade Center. It is permanently gradable, and you cannot change it to No grading.
7. Optionally, select the check box and the number of page saves required to show participants in needsgrading status. Applying this setting will show the needs grading icon—the exclamation mark—in theGrade Center and place the entries in the queue on the Needs Grading page after the specifiednumber of page saves have been made.
Note: If you choose three page saves from the drop-down list and a user submits two, the inprogress icon appears in the Grade Center cell and within the tool until the specified numberis met.
8. Optionally, associate a rubric by pointing to Add Rubric. To learn more, see Rubrics.
9. Click Submit.
About the Wikis Listing Page
The wiki topics appear in alphabetical order on the Wikis listing page. You can sort columns by clicking the columntitle.
95

1. On the Wikis listing page, click the title to access a wiki -OR- access a wiki's contextual menu andclick Open.
2. To change a wiki's availability or student access, select one or more check boxes and use theAvailability and Student Access drop-down lists on the action bar.
3. The Type column lists whether a wiki is for the course or for a group.
4. Access a wiki's contextual menu and click Edit Properties to change a wiki's name, instructions, andsettings.
96
Create Wiki Pages
Each newly created course or group wiki requires a first page, which is the home page. When you access a newwiki for the first time, a message appears at the top of the page prompting you to create a home page. The homepage always appears first in the wiki page list, making it an ideal page for instructions.
You or any course or group member can create the home page. No one can delete the home page, but if the wikiis open to editing, any course or group member may edit it.
The home page and all subsequent pages are created in the same way.
How to Create Wiki Pages
1. On the Wikis listing page, click a wiki title.
2. On the wiki’s topic page, click Create Wiki Page on the action bar.
97
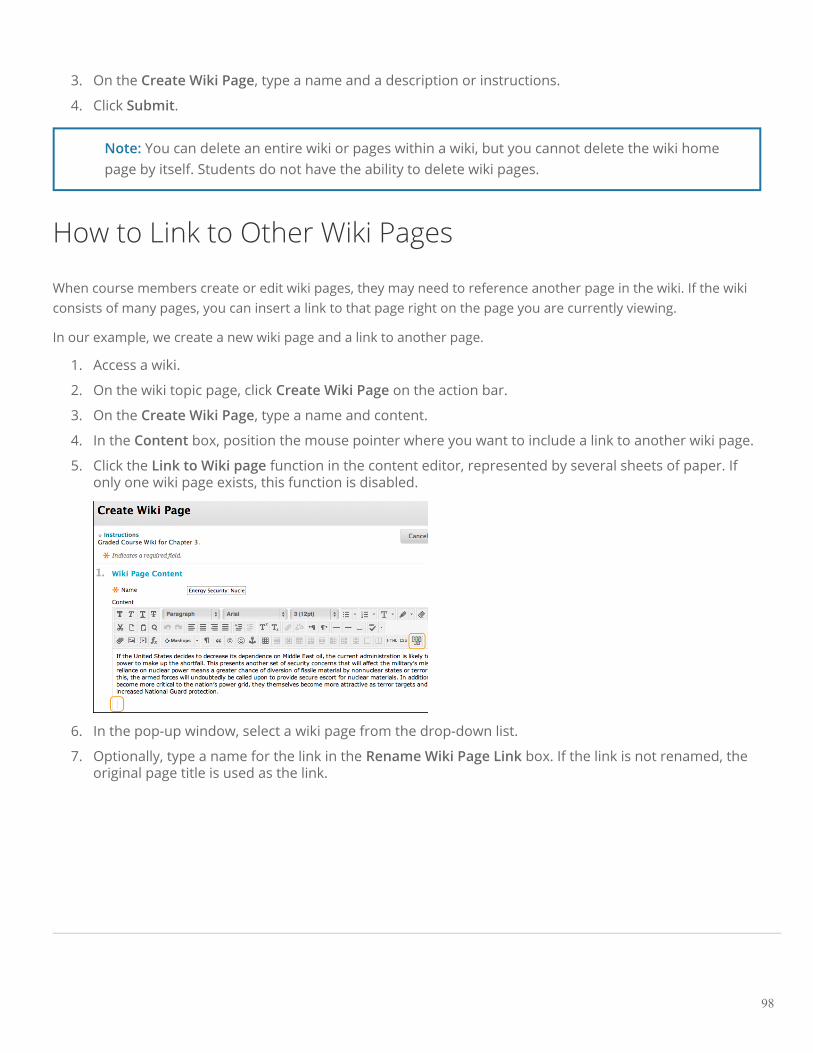
3. On the Create Wiki Page, type a name and a description or instructions.
4. Click Submit.
Note: You can delete an entire wiki or pages within a wiki, but you cannot delete the wiki homepage by itself. Students do not have the ability to delete wiki pages.
How to Link to Other Wiki Pages
When course members create or edit wiki pages, they may need to reference another page in the wiki. If the wikiconsists of many pages, you can insert a link to that page right on the page you are currently viewing.
In our example, we create a new wiki page and a link to another page.
1. Access a wiki.
2. On the wiki topic page, click Create Wiki Page on the action bar.
3. On the Create Wiki Page, type a name and content.
4. In the Content box, position the mouse pointer where you want to include a link to another wiki page.
5. Click the Link to Wiki page function in the content editor, represented by several sheets of paper. Ifonly one wiki page exists, this function is disabled.
6. In the pop-up window, select a wiki page from the drop-down list.
7. Optionally, type a name for the link in the Rename Wiki Page Link box. If the link is not renamed, theoriginal page title is used as the link.
98

8. Click Submit. The link appears in the content editor.
9. Click Submit. The new page with the link to the other page is added to the wiki.
How to Comment on Wiki Pages
Course members can comment on wiki pages rather than contribute to or edit a page. Commenting provides away for you and your students to offer feedback and suggestions. Comments are visible to all course members. Allcomments for all wiki pages are counted in the About This Wiki section in the sidebar.
No one can edit comments after they are posted. Users can delete the comments they authored.
For group wikis, the default setting allows all course members to read them, but you must be a member of thegroup to make a comment. You can change the default setting to allow only group members to view a group wiki.
99
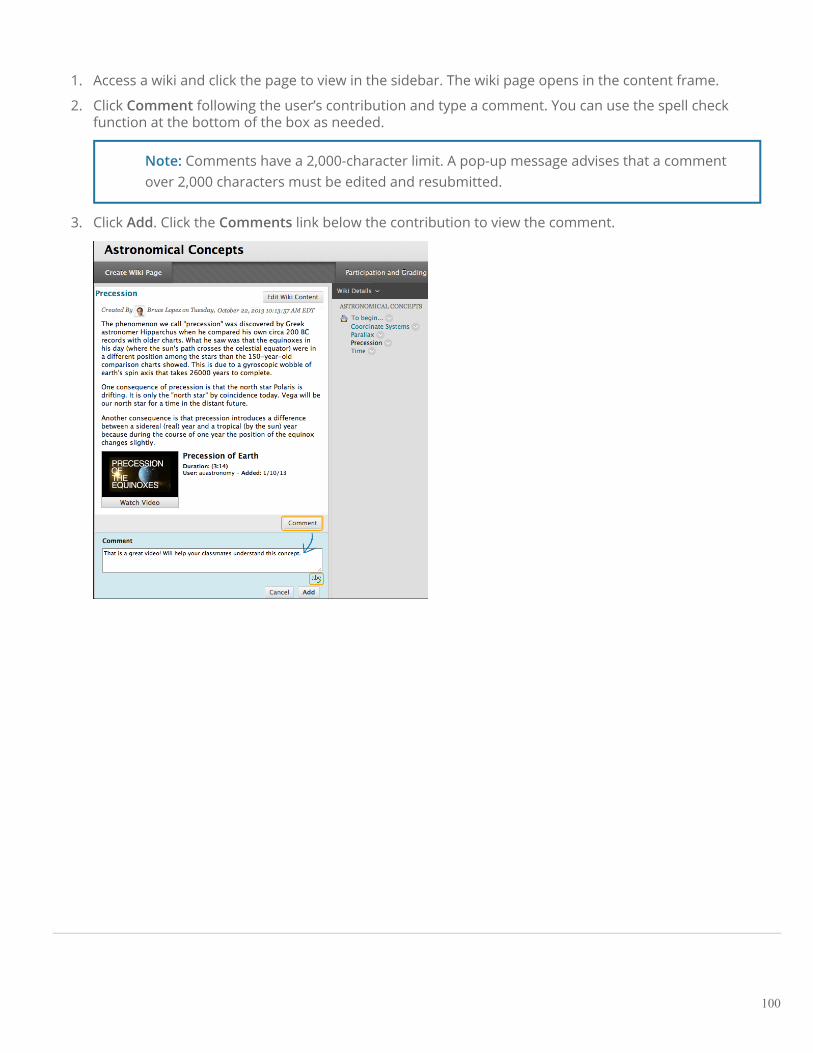
1. Access a wiki and click the page to view in the sidebar. The wiki page opens in the content frame.
2. Click Comment following the user’s contribution and type a comment. You can use the spell checkfunction at the bottom of the box as needed.
Note: Comments have a 2,000-character limit. A pop-up message advises that a commentover 2,000 characters must be edited and resubmitted.
3. Click Add. Click the Comments link below the contribution to view the comment.
100
Edit and Manage Wikis
Any course member can edit a course wiki page and any group member can edit a group wiki page, unless youhave disabled this function. You might choose to disable editing when it is time to grade the wiki pages. However,you can still edit student pages. All course members, including instructors, edit in the same way.
When a user is editing a wiki page, it is locked for a duration of 120 seconds to prevent others from editing thesame page. Users are informed that another user is currently editing the page. The lock will expire in 120 secondsregardless of a user's activity/inactivity. After 120 seconds, another user can start editing the page and a new 120seconds lock is placed on the page.
You cannot edit the lock or amount of time.
How to Edit Wiki Content
Because a wiki stores each version in its history, which includes who made changes, you have an opportunity toretrieve information about the development and contributions for any individual. You can click History in a page’scontextual menu to see how a page was modified, view any version, and compare two versions side by side.
Use the following steps to edit a wiki page.
1. Access the wiki. The wiki topic page appears.
2. Select the page to review and edit. The wiki page opens in the content frame.
3. In the sidebar, access the page’s contextual menu and click Edit Properties.
-OR-
Click Edit Wiki Content next to the page’s title in the content frame.
4. On the Edit Wiki Page, you can make changes to the name and content of the page.
5. Click Submit.
How to Delete a Wiki
If you no longer need a wiki, you can delete it. Deleting a wiki is permanent.
101
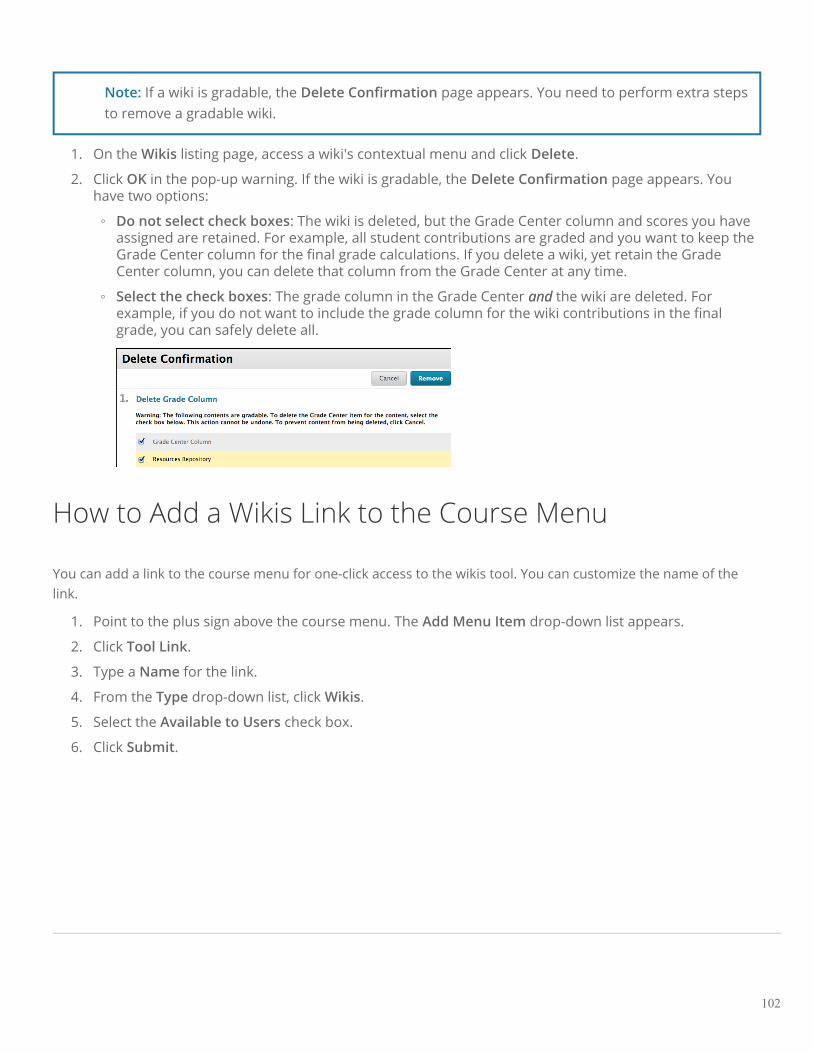
Note: If a wiki is gradable, the Delete Confirmation page appears. You need to perform extra stepsto remove a gradable wiki.
1. On the Wikis listing page, access a wiki's contextual menu and click Delete.
2. Click OK in the pop-up warning. If the wiki is gradable, the Delete Confirmation page appears. Youhave two options:
◦ Do not select check boxes: The wiki is deleted, but the Grade Center column and scores you haveassigned are retained. For example, all student contributions are graded and you want to keep theGrade Center column for the final grade calculations. If you delete a wiki, yet retain the GradeCenter column, you can delete that column from the Grade Center at any time.
◦ Select the check boxes: The grade column in the Grade Center andand the wiki are deleted. Forexample, if you do not want to include the grade column for the wiki contributions in the finalgrade, you can safely delete all.
How to Add a Wikis Link to the Course Menu
You can add a link to the course menu for one-click access to the wikis tool. You can customize the name of thelink.
1. Point to the plus sign above the course menu. The Add Menu Item drop-down list appears.
2. Click Tool Link.
3. Type a Name for the link.
4. From the Type drop-down list, click Wikis.
5. Select the Available to Users check box.
6. Click Submit.
102
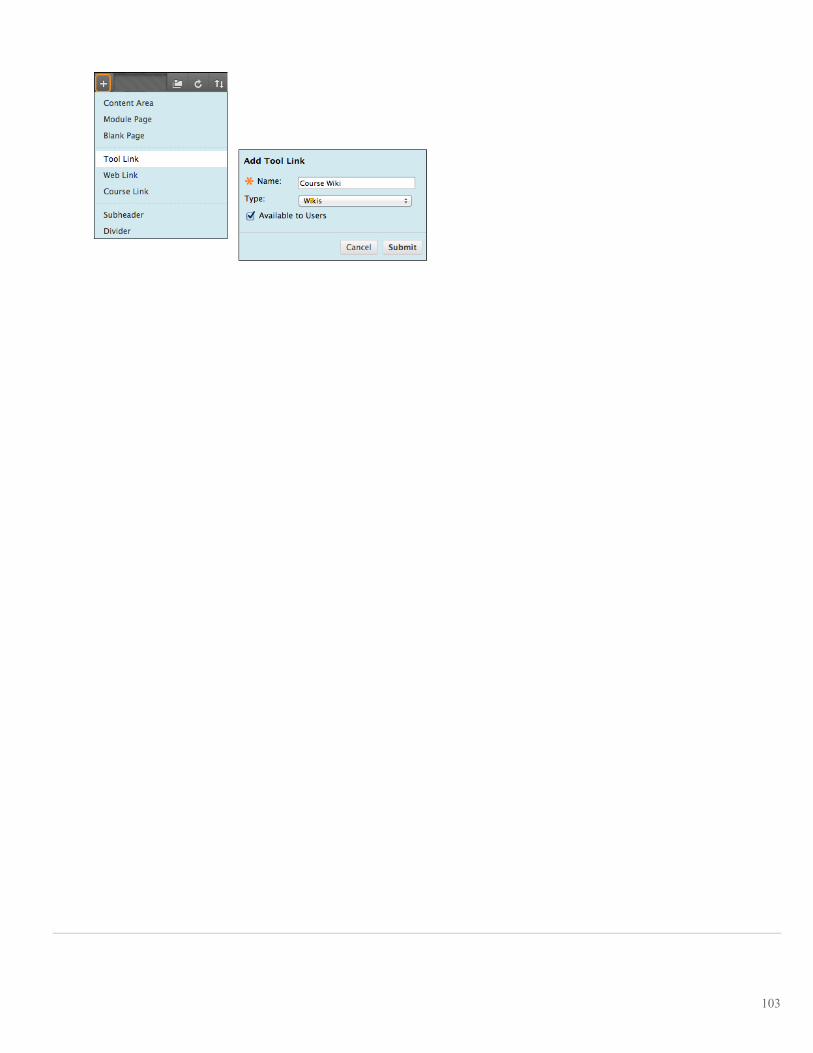
103
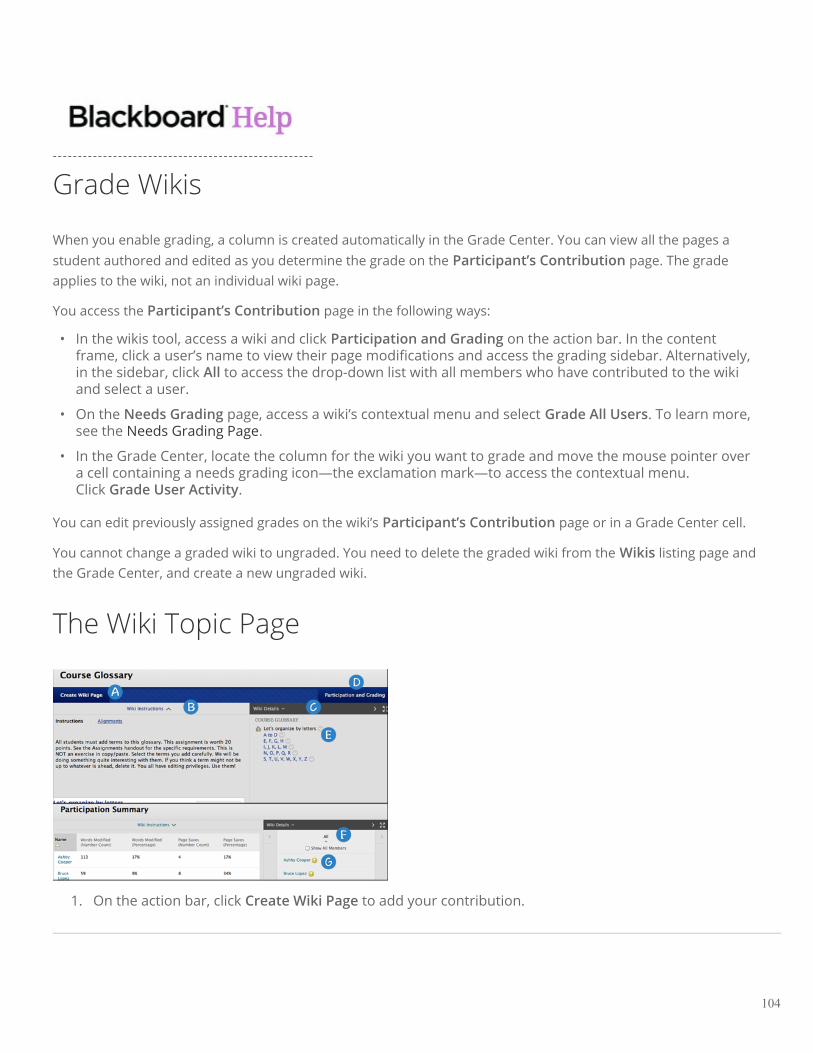
Grade Wikis
When you enable grading, a column is created automatically in the Grade Center. You can view all the pages astudent authored and edited as you determine the grade on the Participant’s Contribution page. The gradeapplies to the wiki, not an individual wiki page.
You access the Participant’s Contribution page in the following ways:
• In the wikis tool, access a wiki and click Participation and Grading on the action bar. In the contentframe, click a user’s name to view their page modifications and access the grading sidebar. Alternatively,in the sidebar, click All to access the drop-down list with all members who have contributed to the wikiand select a user.
• On the Needs Grading page, access a wiki’s contextual menu and select Grade All Users. To learn more, see the Needs Grading Page.
• In the Grade Center, locate the column for the wiki you want to grade and move the mouse pointer overa cell containing a needs grading icon—the exclamation mark—to access the contextual menu.Click Grade User Activity.
You can edit previously assigned grades on the wiki’s Participant’s Contribution page or in a Grade Center cell.
You cannot change a graded wiki to ungraded. You need to delete the graded wiki from the Wikis listing page andthe Grade Center, and create a new ungraded wiki.
The Wiki Topic Page
1. On the action bar, click Create Wiki Page to add your contribution.
104

2. Below the action bar, the Wiki Instructions are expanded by default. You can minimizethem. Click Alignments to add alignments.
3. In the sidebar, you can expand the Wiki Details section to display information such as the type,creation date, and number of pages and comments. Click the right-pointing arrow to collapse thesidebar for more viewing room in the content frame. Use the four arrows to view the wiki in fullscreen.
4. To view a summary of student activity, click Participation and Grading for graded wikis orParticipation Summary for wikis with no grading. Both links open a Participation Summary pagewhere you can view participation for the students who have contributed to the wiki.
5. In the sidebar, the wiki pages appear in alphabetical order after the home page, appearing with thehouse icon. The home page always appears first in the list. Click a wiki page title to view it in thecontent frame. Access its contextual menu to view the page history. You can view the changes made toa single page in the wiki. All versions of the page appear on the Page History page with the mostrecent version appearing first. From this page, you can delete versions. You might delete pagesbecause of offensive, inaccurate, or flawed content. If you delete the latest version, then the versionnext in line becomes the most current version and is the page viewed in the wiki. You can delete morethan one version of a wiki page, but at least one version must remain. When you delete a version, allparticipation history for that version is deleted.
6. To view all users who contributed to the wiki, click All to expand the drop-down list and select amember. Optionally, click Show All Members to also view users who have not contributed to the wiki.
7. For graded wikis, icons designate the status of a user’s activity. The needs grading icon—theexclamation mark—indicates that a user has met the minimum activity for grading you set for the wiki.The in progress icon appears when a user has some activity, but has not yet met the minimumnumber required to trigger needs grading status.
Grading Status Icons
Users with wikis that need grading are indicated with the needs grading icon in the Grade Center and on a wiki’sParticipation Summary page in the All drop-down list in the sidebar. In addition, they are listed on the NeedsGrading page.
If during wiki creation you did notnot select the Show participants in needs grading status check box and select aminimum number of page saves, the needs grading icon will not appear in the Grade Center, on the wiki’sParticipation Summary page, and items do not appear on the Needs Grading page.
The in progress icon shows in the Grade Center cell and in a wiki:
• For student activity that does not meet the minimum number of page saves you set.
• If you did not select the Show participants in needs grading status check box.
105

How to View the Participation Summary
On the Participation Summary page, you can view a list of all student participation for the current wiki you areviewing. The information provided can help you understand how students contributed to the overall wiki content.This information can be especially useful when determining individual grades for gradable wikis.
1. Access a wiki.
2. On the wiki topic page, click Participation and Grading for graded wikis or Participation Summary forwikis with no grading.
3. On the Participation Summary page, view participation for the students who have contributed to thewiki.
4. In the sidebar, view information about the wiki and select a user to view his or her Participant'sContribution page.
◦ Page Versions: Displays all pages created and edited by a user. This allows you to see preciselyhow and what content a user contributed and edited. If many pages appear, narrow what is shownusing the Display Pages drop-down list on the action bar. A new version is created each time apage is edited. When you compare versions, the difference between any version and its previousversion are shown on the Page Comparison page. Click the Legend tab to understand thedifferences in how one version was changed in comparison to the other version.
◦ Words Modified: Tally of any words added, deleted, or edited in all pages and each page’s versionof the wiki.
◦ Page Saves: Tally of any time Submit is clicked on the Edit Wiki Page in the wiki, regardlesswhether or not content has been changed.
Example:Example: Page Comparison Page
When you compare two versions, the Page Comparison page opens in a new window. The Comparison Detailstab lists basic information about the two versions side by side.
Click the Legend tab to view the comparison with a legend or explanation of the formatting used to communicateversion differences. Collapse either tab by clicking the X to allow for more room to view the page.
106

In the preceding image, contributed text is highlighted green and removed text is red and uses a strike-throughthe words. An image is highlighted green with a plus sign in the corner to indicate it is new. The removed image ishighlighted pink with a diagonal strike-through pattern.
How to Grade Wiki Contributions
In our example, grading starts from the wikis tool.
1. Access a wiki.
2. On the wiki topic page, click Participation and Grading on the action bar.
3. On the Participation Summary page, click a student's name in the content frame or in the All drop-down list in the sidebar. In the drop-down list, students with contributions ready for grading appearwith exclamation marks, the needs grading icon. Use the left- and right-pointing arrows to navigate tothe previous or next student.
4. On the Participant’s Contribution page, a list of the student’s pages and page versions open in thecontent frame. You can also view information about the contributions. In the Page Version column,click a page’s title to review it.
107

5. In the grading sidebar, type a numeric grade in the Grade box. If you associated a rubric with thisgraded wiki, expand and complete the rubric. To learn more, see Rubrics. To edit an existing grade,click in the Grade box and change the grade.
6. Optionally, type Feedback for the student. In the Add Notes section, make notes that appear only toyou and the grader role. You can use the spell check function in the bottom of each box. The icon forClick to open full content editor gives you access to all the content editor functions.
7. Click Submit to add the grade, feedback, and grading notes to the Grade Center.
Group Wiki Grading
On the Participation Summary page, the grading sidebar appears, listing all group members.
The needs grading icon appears in the All drop-down list for contributing group members. When you add a gradefor a group wiki, the grade is automatically given to all the members of the group and is populated in thecorresponding column in the Grade Center for each group member. All members are assigned a grade, regardlessif a member did not contribute. Students can view their group wiki grades in My Grades and on their MyContribution pages.
108

Change an Individual Member's Grade
You can assign an individual group member a different grade than the group by editing the grade for the member.If you change a group member’s grade, and you assign a new group grade, the new group grade will not affect theindividual’s new grade. Individual members only see one grade, not what each member earned. The individual’snew grade will not appear to the other group members.
On the Participation Summary page, in the grading sidebar, click the pencil icon to change the group grade for amember. Type a new grade and click the check mark icon to save it. This grade becomes an override grade.
The group grade and the individual group member’s edited grade also appear in the Grade Center. Grayed outcells appear in the group wiki column for course members who are not part of the group. You can also edit thegrade from the Grade Center.
Revert a Member’s Edited Grade
You can revert a member’s edited grade to the original group grade, which all group members received.
On the group's Participation Summary page, click the pencil icon for the user with the edited grade. Click theleft-pointing arrow to change the grade to the original group grade. The override icon is removed. The change alsoappears in the Grade Center.
109