Blackboard Help - IRSC Virtual Campus...
40
Blackboard Help • Log In to Learn • Find the Right Help • Notifications • My Grades • Courses Tab • Course Content Areas • Types of Course Content • Calendar • Submit Assignments • Messages • Discussion Board • Posts • File Attachments • Blackboard Mobile • Browser Support for SP 14 • Blackboard Videos Powered by 1
Transcript of Blackboard Help - IRSC Virtual Campus...
Blackboard Help• Log In to Learn
• Find the Right Help
• Notifications
• My Grades
• Courses Tab
• Course Content Areas
• Types of Course Content
• Calendar
• Submit Assignments
• Messages
• Discussion Board
• Posts
• File Attachments
• Blackboard Mobile
• Browser Support for SP 14
• Blackboard Videos
Powered by
1
Log In to LearnThe first step in using Blackboard Learn is to log in to the system. Your institution will provide you with the URL,username, and password.
How to Log In to Blackboard LearnIn most cases, the URL given by your institution directs you to the gateway page for logging in. If instead, you aredirected immediately to the My Institution tab, you may also log in through a button on the header frame or a specialportal module.
1. Navigate to the URL provided by your institution.
2. Type your Username.
3. Type your Password. Passwords are case sensitive.
4. Click Login.
◦ New users see a welcome page that invites them to create a profile. Before creating a profile, you mustaccept the Blackboard Profiles Terms of Service in the pop-up window. If you do not agree to the terms ofservice, you will not be granted access to some tools. You can choose to create a profile later. To learn more,see Profiles.
◦ Exiting users see the My Institution tab.
Passwords enable access to personal information. To maintain security, do not share passwords withothers. If you forget your password, see Forgot Your Password? If you want to change yourpassword, see How to Change Your Password.
Frequently Asked Questions
What do I do if I can't log in?
Please contact the computing help desk at your institution. If you are not sure how to contact them, look for thetechnology office on your institution’s website or search the internet for your institution’s name + Blackboard + help orsupport.
What is the gateway page?
The gateway page welcomes you and provides a login button to access Blackboard Learn. Gateway pages arecustomized by your institution. You must have a valid username and password to log in.
If the gateway page does not appear, you may also log in through a button on the header frame or a special portalmodule.
Powered by
2
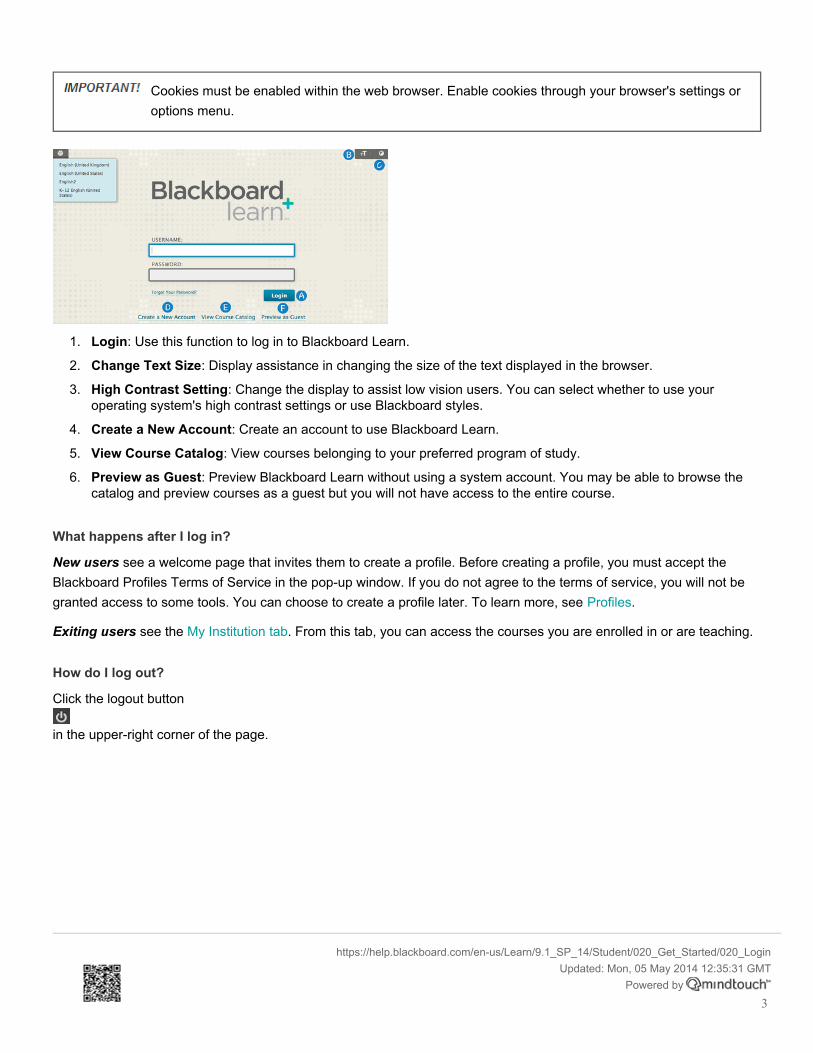
Cookies must be enabled within the web browser. Enable cookies through your browser's settings oroptions menu.
1. Login: Use this function to log in to Blackboard Learn.
2. Change Text Size: Display assistance in changing the size of the text displayed in the browser.
3. High Contrast Setting: Change the display to assist low vision users. You can select whether to use youroperating system's high contrast settings or use Blackboard styles.
4. Create a New Account: Create an account to use Blackboard Learn.
5. View Course Catalog: View courses belonging to your preferred program of study.
6. Preview as Guest: Preview Blackboard Learn without using a system account. You may be able to browse thecatalog and preview courses as a guest but you will not have access to the entire course.
What happens after I log in?
New users see a welcome page that invites them to create a profile. Before creating a profile, you must accept theBlackboard Profiles Terms of Service in the pop-up window. If you do not agree to the terms of service, you will not begranted access to some tools. You can choose to create a profile later. To learn more, see Profiles.
Exiting users see the My Institution tab. From this tab, you can access the courses you are enrolled in or are teaching.
How do I log out?
Click the logout button
in the upper-right corner of the page.
https://help.blackboard.com/en-us/Learn/9.1_SP_14/Student/020_Get_Started/020_LoginUpdated: Mon, 05 May 2014 12:35:31 GMT
Powered by
3
Find the Right Help
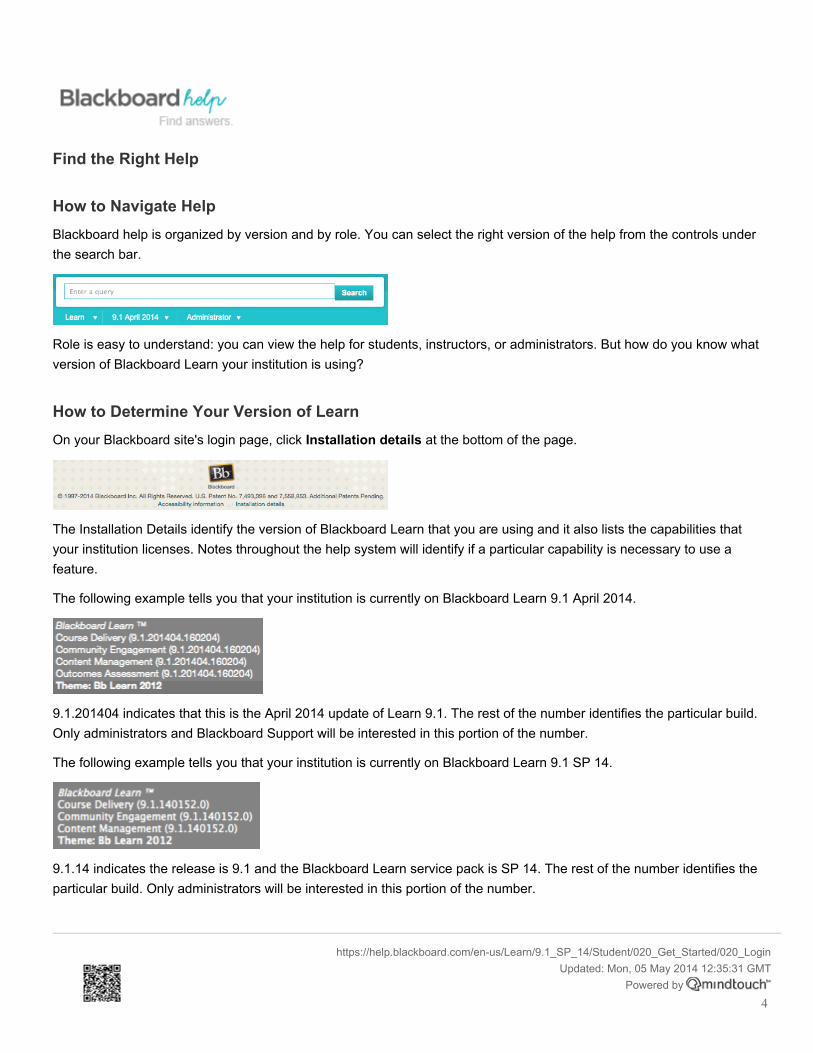
How to Navigate HelpBlackboard help is organized by version and by role. You can select the right version of the help from the controls underthe search bar.
Role is easy to understand: you can view the help for students, instructors, or administrators. But how do you know whatversion of Blackboard Learn your institution is using?
How to Determine Your Version of LearnOn your Blackboard site's login page, click Installation details at the bottom of the page.
The Installation Details identify the version of Blackboard Learn that you are using and it also lists the capabilities thatyour institution licenses. Notes throughout the help system will identify if a particular capability is necessary to use afeature.
The following example tells you that your institution is currently on Blackboard Learn 9.1 April 2014.
9.1.201404 indicates that this is the April 2014 update of Learn 9.1. The rest of the number identifies the particular build.Only administrators and Blackboard Support will be interested in this portion of the number.
The following example tells you that your institution is currently on Blackboard Learn 9.1 SP 14.
9.1.14 indicates the release is 9.1 and the Blackboard Learn service pack is SP 14. The rest of the number identifies theparticular build. Only administrators will be interested in this portion of the number.
https://help.blackboard.com/en-us/Learn/9.1_SP_14/Student/020_Get_Started/020_LoginUpdated: Mon, 05 May 2014 12:35:31 GMT
Powered by
4
Help for Earlier Service PacksThis site contains content for Learn SP 10 and later, but also includes links to help for SP 6 through SP 9 in the oldformat on help-archives.blackboard.com. If you are on SP 6 or later, you can access the help for your version byselecting the right version from the controls under the search bar.
To access the help for these versions in another language, replace the language code portion of the target URL (EN-US/NAHE) with your 4-letter country code, such as FR-FR for French. For K-12 and ProEd, use EN-US/K12 and EN-US/ProEd, respectively.
If you are on an service pack prior to SP 6, you can download the PDFs and host them locally. Click the desiredlanguage to download the complete PDF documentation package (ZIP). If the only language listed is English (en_US),the help was not translated for that version. You should download the help for the previous service pack.
Version PDFs in Available LanguagesLearn 9.1 SP 5 English (en_US)Learn 9.1 SP 4 English (en_US)Learn 9.1 SP 3 English (en_US) | Arabic (ar_SA) | Chinese, Simplified
(zh_CN) | Chinese, Traditional (zh_TW) | Dutch(nl_NL) | French (fr_FR) | German (de_DE) | Italian(it_IT) | Japanese (ja_JP) | Spanish (es_ES)
Learn 9.1 SP 1 & SP 2 English (en_US) | Arabic (ar_SA) | Chinese, Simplified(zh_CN) | Chinese, Traditional (zh_TW) | Dutch(nl_NL) | French (fr_FR) | German (de_DE) | Italian(it_IT) | Japanese (ja_JP) | Spanish (es_ES)
Learn 9.1 GA English (en_US)
Where to Find More InformationIn addition to Help, use these resources to help you find the information that you need:
• YouTube Blackboard Channel: The Blackboard YouTube channel includes dozens of video tutorials to help facultyand students learn how to use Blackboard Learn.
• Ask the Doctors: Ask the Doctors is a discussion board where users can get answers from other users. TheDoctors forums are moderated by a group of client experts who can help you with a wide-range of questions.
• Behind the Blackboard:
◦ Students and Faculty can access the public portions of this site, which provide links to various self service andcommunity resources, including listservs. Blackboard listservs provide a quick way to get your questionsanswered or make your opinions known.
◦ Administrators must log in to Behind the Blackboard to access information about support tickets, softwaredownloads, and the support knowledge base.
• Upgrade Center: Administrators can log in to the Upgrade Center to access the information and resources neededto help you make and execute a plan to upgrade to Blackboard Learn, Release 9.1.
https://help.blackboard.com/en-us/Learn/9.1_SP_14/Student/000_Find_HelpUpdated: Mon, 05 May 2014 12:35:31 GMT
Powered by
5
NotificationsThe notification system alerts you when events occur in your courses, such as when items are due, grades areavailable, new content and tests are made available, and when you have unread discussions and blogs. Notificationsare generated automatically whenever their associated events occur.
Your institution determines if notifications are enabled and the settings that users are allowed to control.
Notifications are delivered in the following ways:
• My Blackboard: The Updates page displays notifications for all of your courses and the Posts page displays unreaddiscussions, blogs, journals, and wikis.
• Email messages: Select this option if your institution enables this feature.
• Mobile phone text or voice messages: Select this option if your institution enables this feature.
• Home Page modules: Within a course, Home Page modules display notifications for that course only.
• Blackboard Mobile Learn push notifications: If your institution enables Blackboard Mobile Learn, you can opt tohave push notifications pop up on your device's screen.
• Notifications Dashboard: If your institution licenses community engagement, the Notifications Dashboard appearson the My Institution tab as an additional way to see notifications for all courses.
Watch a TutorialDouble-click the video to enlarge the viewing area.
https://help.blackboard.com/en-us/Learn/9.1_SP_14/Student/000_Find_HelpUpdated: Mon, 05 May 2014 12:35:31 GMT
Powered by
6
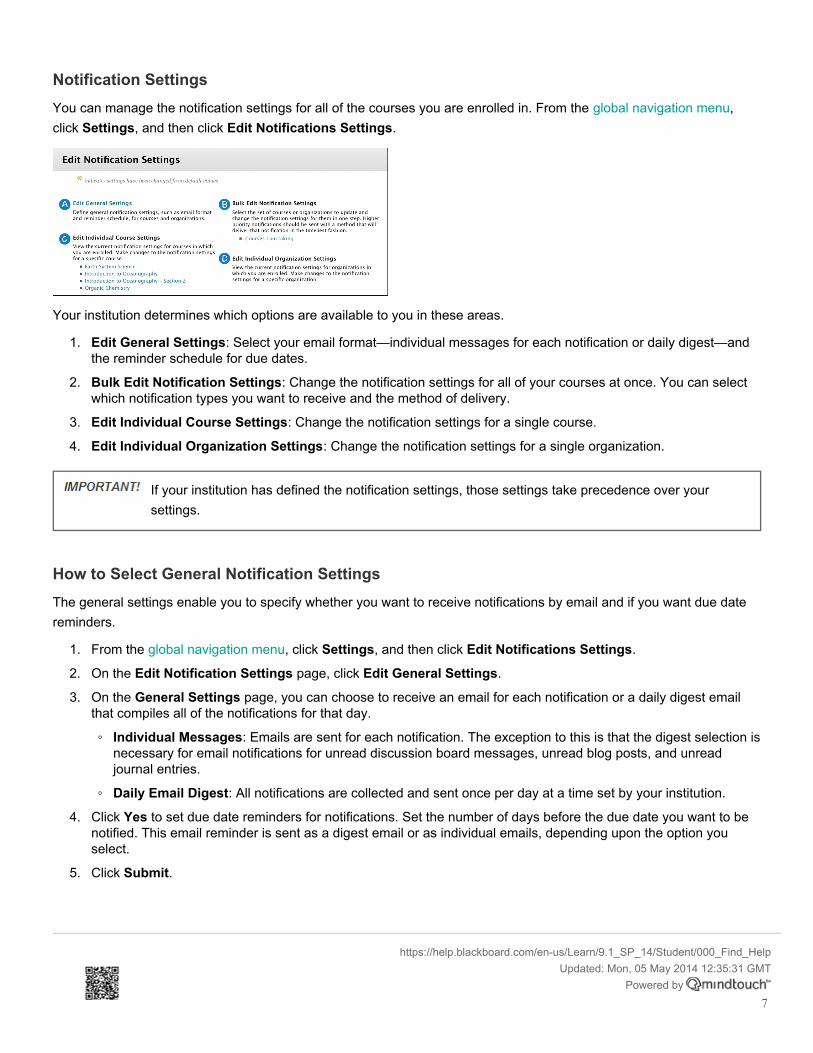
Notification SettingsYou can manage the notification settings for all of the courses you are enrolled in. From the global navigation menu,click Settings, and then click Edit Notifications Settings.
Your institution determines which options are available to you in these areas.
1. Edit General Settings: Select your email format—individual messages for each notification or daily digest—andthe reminder schedule for due dates.
2. Bulk Edit Notification Settings: Change the notification settings for all of your courses at once. You can selectwhich notification types you want to receive and the method of delivery.
3. Edit Individual Course Settings: Change the notification settings for a single course.
4. Edit Individual Organization Settings: Change the notification settings for a single organization.
If your institution has defined the notification settings, those settings take precedence over yoursettings.
How to Select General Notification SettingsThe general settings enable you to specify whether you want to receive notifications by email and if you want due datereminders.
1. From the global navigation menu, click Settings, and then click Edit Notifications Settings.
2. On the Edit Notification Settings page, click Edit General Settings.
3. On the General Settings page, you can choose to receive an email for each notification or a daily digest emailthat compiles all of the notifications for that day.
◦ Individual Messages: Emails are sent for each notification. The exception to this is that the digest selection isnecessary for email notifications for unread discussion board messages, unread blog posts, and unreadjournal entries.
◦ Daily Email Digest: All notifications are collected and sent once per day at a time set by your institution.
4. Click Yes to set due date reminders for notifications. Set the number of days before the due date you want to benotified. This email reminder is sent as a digest email or as individual emails, depending upon the option youselect.
5. Click Submit.
https://help.blackboard.com/en-us/Learn/9.1_SP_14/Student/000_Find_HelpUpdated: Mon, 05 May 2014 12:35:31 GMT
Powered by
7
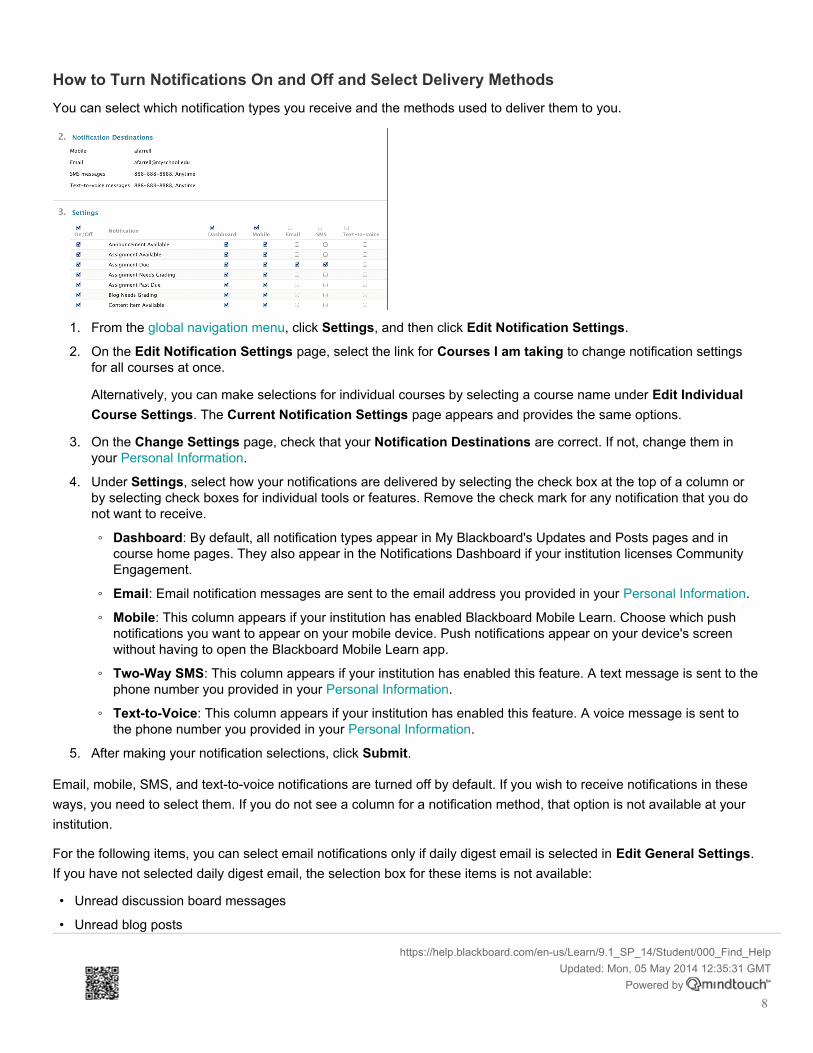
How to Turn Notifications On and Off and Select Delivery MethodsYou can select which notification types you receive and the methods used to deliver them to you.
1. From the global navigation menu, click Settings, and then click Edit Notification Settings.
2. On the Edit Notification Settings page, select the link for Courses I am taking to change notification settingsfor all courses at once.
Alternatively, you can make selections for individual courses by selecting a course name under Edit IndividualCourse Settings. The Current Notification Settings page appears and provides the same options.
3. On the Change Settings page, check that your Notification Destinations are correct. If not, change them inyour Personal Information.
4. Under Settings, select how your notifications are delivered by selecting the check box at the top of a column orby selecting check boxes for individual tools or features. Remove the check mark for any notification that you donot want to receive.
◦ Dashboard: By default, all notification types appear in My Blackboard's Updates and Posts pages and incourse home pages. They also appear in the Notifications Dashboard if your institution licenses CommunityEngagement.
◦ Email: Email notification messages are sent to the email address you provided in your Personal Information.
◦ Mobile: This column appears if your institution has enabled Blackboard Mobile Learn. Choose which pushnotifications you want to appear on your mobile device. Push notifications appear on your device's screenwithout having to open the Blackboard Mobile Learn app.
◦ Two-Way SMS: This column appears if your institution has enabled this feature. A text message is sent to thephone number you provided in your Personal Information.
◦ Text-to-Voice: This column appears if your institution has enabled this feature. A voice message is sent tothe phone number you provided in your Personal Information.
5. After making your notification selections, click Submit.
Email, mobile, SMS, and text-to-voice notifications are turned off by default. If you wish to receive notifications in theseways, you need to select them. If you do not see a column for a notification method, that option is not available at yourinstitution.
For the following items, you can select email notifications only if daily digest email is selected in Edit General Settings.If you have not selected daily digest email, the selection box for these items is not available:
• Unread discussion board messages
• Unread blog posts
https://help.blackboard.com/en-us/Learn/9.1_SP_14/Student/000_Find_HelpUpdated: Mon, 05 May 2014 12:35:31 GMT
Powered by
8
• Unread journal entries
How to Enable Two-Way SMS and Text-to-Voice NotificationsTwo-Way SMS and Text-to-Voice messages are available if your institution enables these features. These messagetypes are delivered by the Blackboard Learn system every 20 minutes by default. Your institution can set a delivery timeframe so that you don't send or receive messages in the middle of the night. Messages that are created outside of thedelivery time frame are held until the next time frame begins. This time frame affects only Two-Way SMS and Text-to-Voice messages.
Two-Way SMS (Short Message Service) enables instructors to send text messages from a Blackboard Learncourse to students' mobile phones. Instructors need to initiate a message before students can reply.
Text-to-Voice reads aloud notifications sent to your phone. This option is only available when the system defaultlanguage pack is set to English or Spanish.
If your institution has set up Two-Way SMS and Text-to-Voice messages, the features are listed on your EditNotification Settings page. Instructors choose whether or not to use these tools. To receive Two-Way SMS and Text-to-Voice messages on your phone, you must list a mobile phone number on your Personal Information page andsubscribe to those notification types in your notification settings.
1. On the Edit Notification Settings page, in the Bulk Edit Notification Settings section, Courses I am Taking.
Alternatively, you can make selections for individual courses by selecting a course name in the Edit IndividualCourse Settings section.
2. On the Change Settings page, verify that your Notification Destinations contain the correct mobile phonenumber and email address. If they are incorrect or blank, edit them in your Personal Information.
3. On the Change Settings page, subscribe to Two-Way SMS and Text-to-Voice notifications by selecting thecheck boxes in those columns. You can subscribe to all listed notifications by selecting the check box at the top ofa column.
4. Click Submit.
Notification TypesThe types of notifications that Blackboard Learn generates are:
• Announcement Available
• Assignment Available
• Assignment Due or Past Due
• Assignment Needs Grading
• Content Item Available
• Course/Organization Available
• Course Message Received
• Discussion Board Forum Needs Grading
• Discussion Board Thread Needs Grading
https://help.blackboard.com/en-us/Learn/9.1_SP_14/Student/000_Find_HelpUpdated: Mon, 05 May 2014 12:35:31 GMT
Powered by
9
• Item Due
• Item Graded
• Journal or Blog Needs Grading
• Survey Available
• Survey Due
• Survey Overdue
• Test Available
• Test Due
• Test Overdue
• Unread Blogs, Journals, and Discussions
• Wiki Needs Grading
https://help.blackboard.com/en-us/Learn/9.1_SP_14/Student/020_Get_Started/050_NotificationsUpdated: Mon, 05 May 2014 12:35:31 GMT
Powered by
10
My Grades
The My Grades page shows the status of gradable items, such as tests, assignments, journal and blog entries, anddiscussion posts.
The My Grades page may include item names, details, due dates, student and instructor dates of activity, postedgrades, points possible, links to rubrics used for grading, and your instructor's comments about the items.
Access My GradesYour instructor and institution control which tools are available.
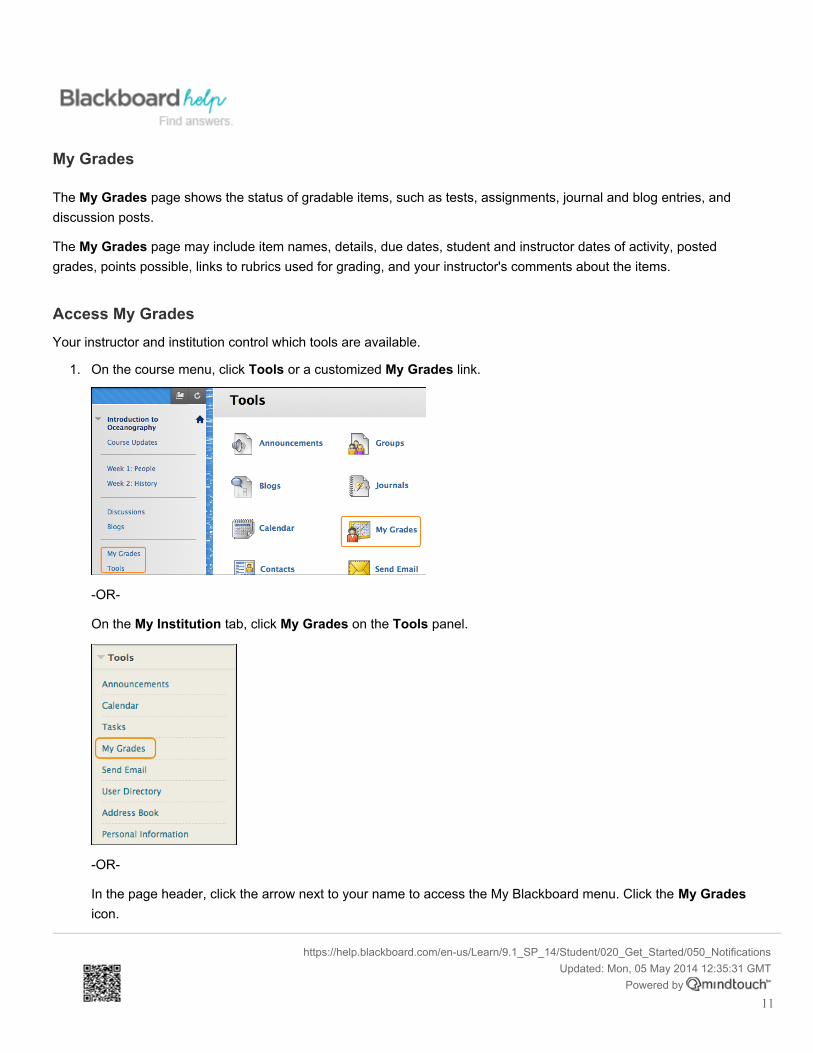
1. On the course menu, click Tools or a customized My Grades link.
-OR-
On the My Institution tab, click My Grades on the Tools panel.
-OR-
In the page header, click the arrow next to your name to access the My Blackboard menu. Click the My Gradesicon.
https://help.blackboard.com/en-us/Learn/9.1_SP_14/Student/020_Get_Started/050_NotificationsUpdated: Mon, 05 May 2014 12:35:31 GMT
Powered by
11
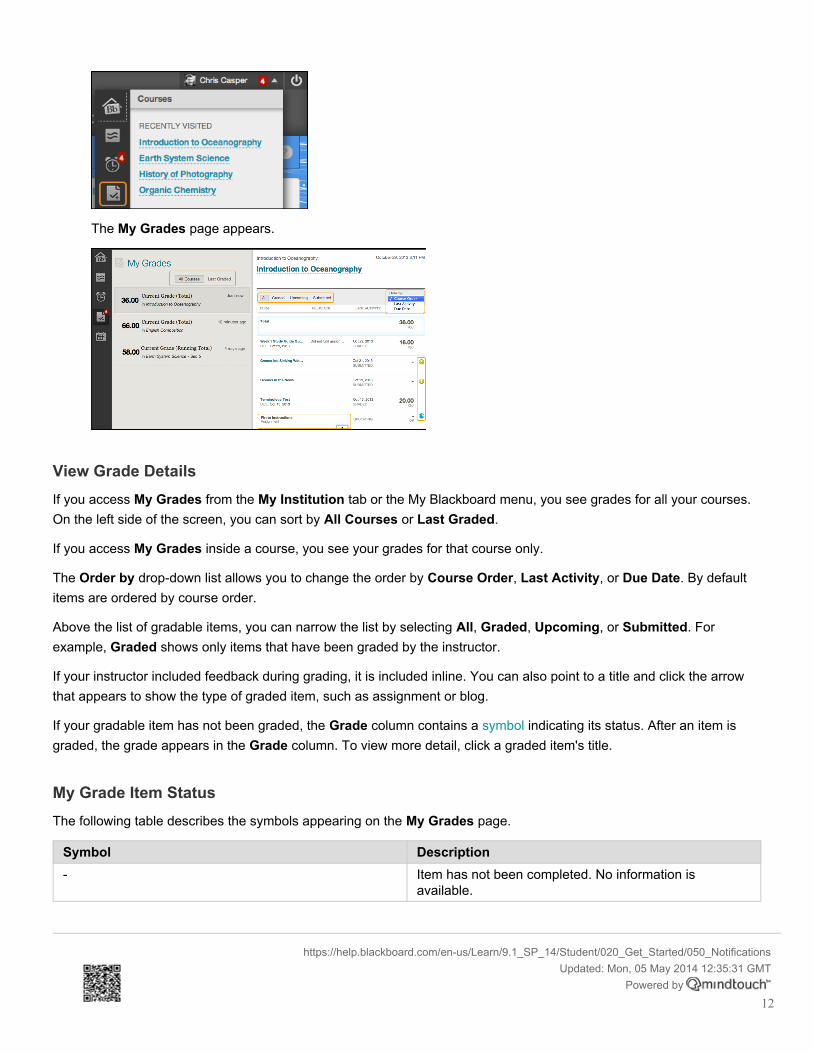
The My Grades page appears.
View Grade DetailsIf you access My Grades from the My Institution tab or the My Blackboard menu, you see grades for all your courses.On the left side of the screen, you can sort by All Courses or Last Graded.
If you access My Grades inside a course, you see your grades for that course only.
The Order by drop-down list allows you to change the order by Course Order, Last Activity, or Due Date. By defaultitems are ordered by course order.
Above the list of gradable items, you can narrow the list by selecting All, Graded, Upcoming, or Submitted. Forexample, Graded shows only items that have been graded by the instructor.
If your instructor included feedback during grading, it is included inline. You can also point to a title and click the arrowthat appears to show the type of graded item, such as assignment or blog.
If your gradable item has not been graded, the Grade column contains a symbol indicating its status. After an item isgraded, the grade appears in the Grade column. To view more detail, click a graded item's title.
My Grade Item StatusThe following table describes the symbols appearing on the My Grades page.
Symbol Description- Item has not been completed. No information is
available.
https://help.blackboard.com/en-us/Learn/9.1_SP_14/Student/020_Get_Started/050_NotificationsUpdated: Mon, 05 May 2014 12:35:31 GMT
Powered by
12
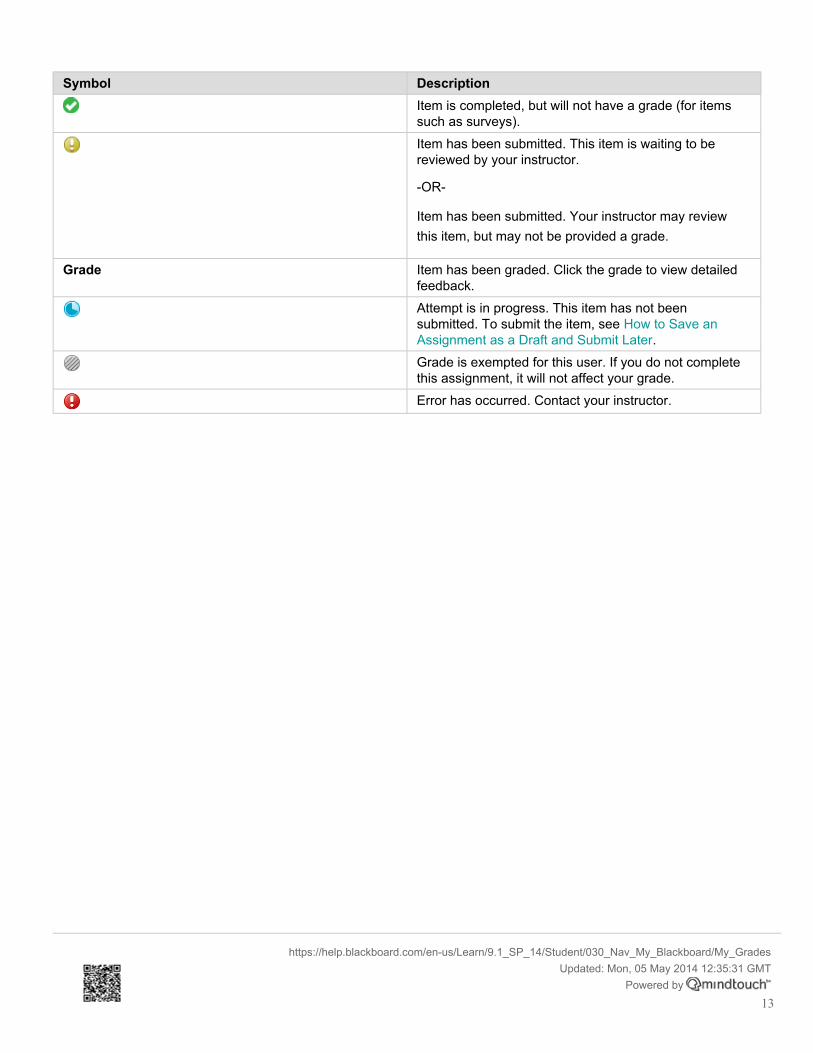
Symbol DescriptionItem is completed, but will not have a grade (for itemssuch as surveys).Item has been submitted. This item is waiting to bereviewed by your instructor.
-OR-
Item has been submitted. Your instructor may reviewthis item, but may not be provided a grade.
Grade Item has been graded. Click the grade to view detailedfeedback.Attempt is in progress. This item has not beensubmitted. To submit the item, see How to Save anAssignment as a Draft and Submit Later.Grade is exempted for this user. If you do not completethis assignment, it will not affect your grade.Error has occurred. Contact your instructor.
https://help.blackboard.com/en-us/Learn/9.1_SP_14/Student/030_Nav_My_Blackboard/My_GradesUpdated: Mon, 05 May 2014 12:35:31 GMT
Powered by
13
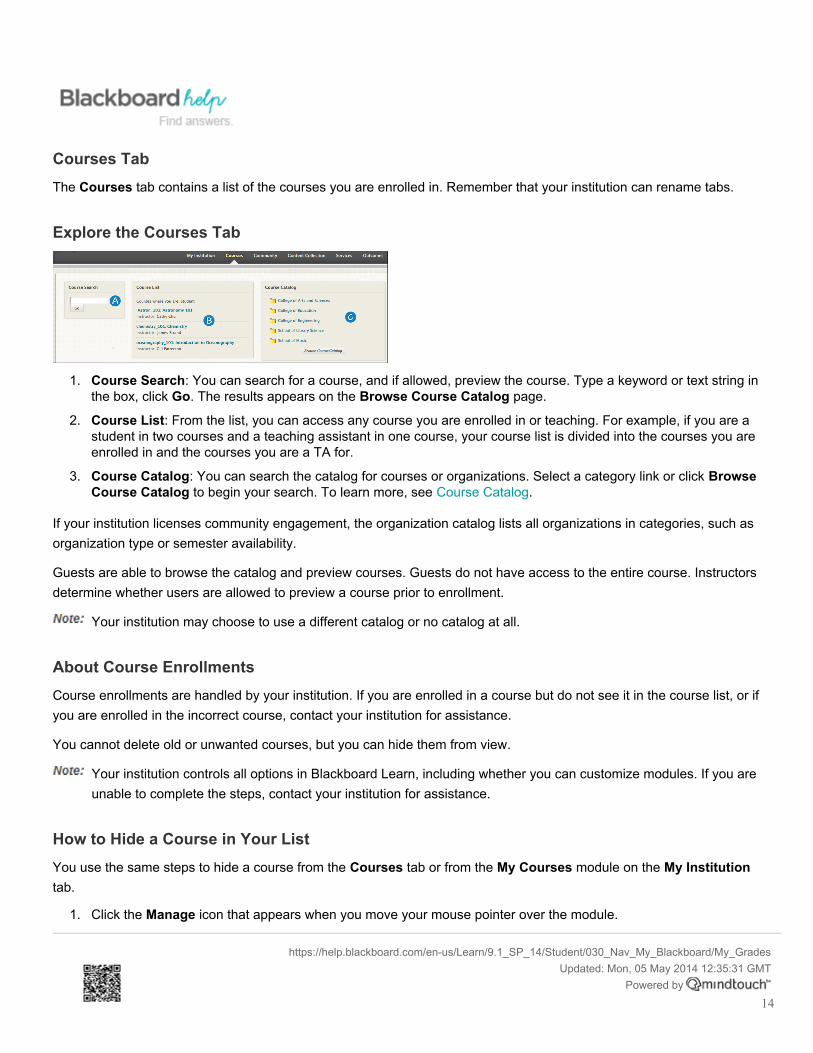
Courses TabThe Courses tab contains a list of the courses you are enrolled in. Remember that your institution can rename tabs.
Explore the Courses Tab
1. Course Search: You can search for a course, and if allowed, preview the course. Type a keyword or text string inthe box, click Go. The results appears on the Browse Course Catalog page.
2. Course List: From the list, you can access any course you are enrolled in or teaching. For example, if you are astudent in two courses and a teaching assistant in one course, your course list is divided into the courses you areenrolled in and the courses you are a TA for.
3. Course Catalog: You can search the catalog for courses or organizations. Select a category link or click BrowseCourse Catalog to begin your search. To learn more, see Course Catalog.
If your institution licenses community engagement, the organization catalog lists all organizations in categories, such asorganization type or semester availability.
Guests are able to browse the catalog and preview courses. Guests do not have access to the entire course. Instructorsdetermine whether users are allowed to preview a course prior to enrollment.
Your institution may choose to use a different catalog or no catalog at all.
About Course EnrollmentsCourse enrollments are handled by your institution. If you are enrolled in a course but do not see it in the course list, or ifyou are enrolled in the incorrect course, contact your institution for assistance.
You cannot delete old or unwanted courses, but you can hide them from view.
Your institution controls all options in Blackboard Learn, including whether you can customize modules. If you areunable to complete the steps, contact your institution for assistance.
How to Hide a Course in Your ListYou use the same steps to hide a course from the Courses tab or from the My Courses module on the My Institutiontab.
1. Click the Manage icon that appears when you move your mouse pointer over the module.
https://help.blackboard.com/en-us/Learn/9.1_SP_14/Student/030_Nav_My_Blackboard/My_GradesUpdated: Mon, 05 May 2014 12:35:31 GMT
Powered by
14
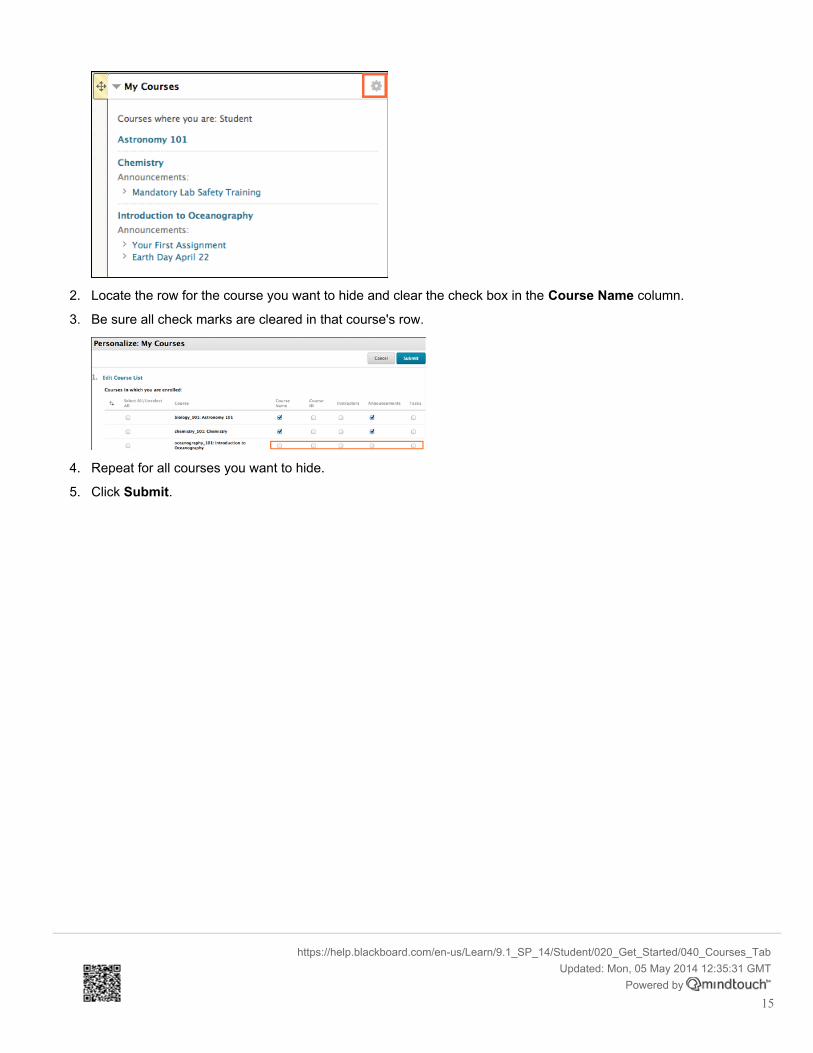
2. Locate the row for the course you want to hide and clear the check box in the Course Name column.
3. Be sure all check marks are cleared in that course's row.
4. Repeat for all courses you want to hide.
5. Click Submit.
https://help.blackboard.com/en-us/Learn/9.1_SP_14/Student/020_Get_Started/040_Courses_TabUpdated: Mon, 05 May 2014 12:35:31 GMT
Powered by
15
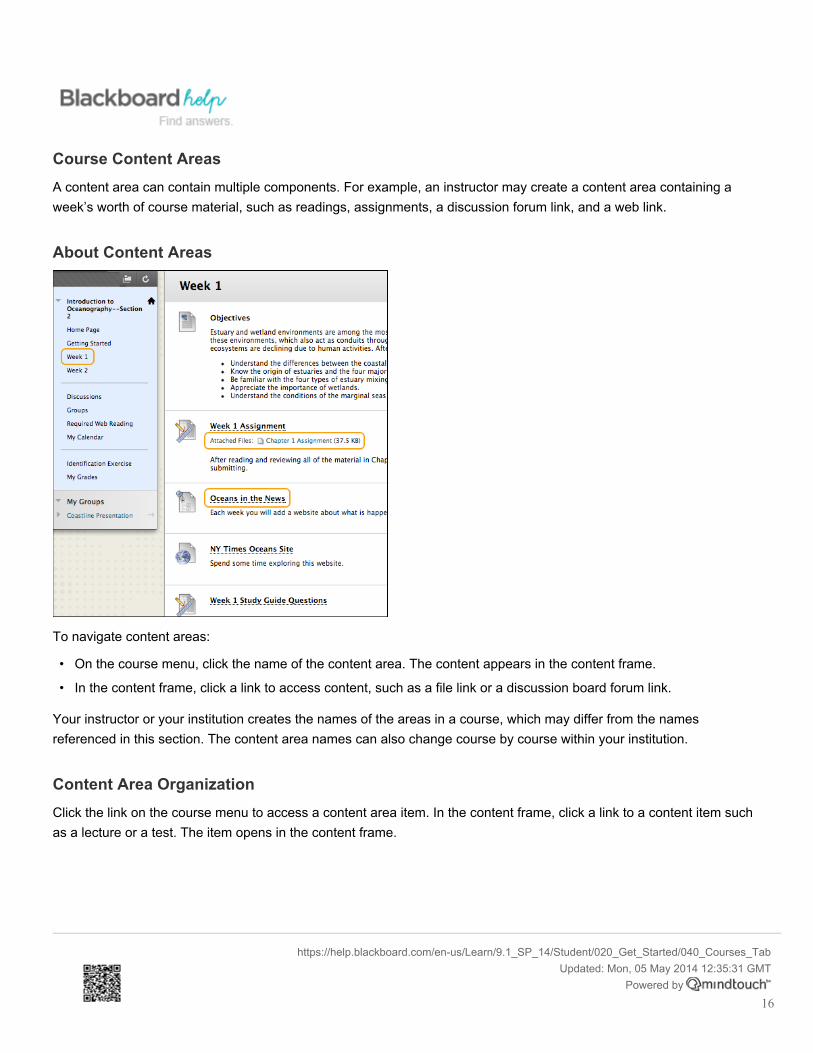
Course Content AreasA content area can contain multiple components. For example, an instructor may create a content area containing aweek’s worth of course material, such as readings, assignments, a discussion forum link, and a web link.
About Content Areas
To navigate content areas:
• On the course menu, click the name of the content area. The content appears in the content frame.
• In the content frame, click a link to access content, such as a file link or a discussion board forum link.
Your instructor or your institution creates the names of the areas in a course, which may differ from the namesreferenced in this section. The content area names can also change course by course within your institution.
Content Area OrganizationClick the link on the course menu to access a content area item. In the content frame, click a link to a content item suchas a lecture or a test. The item opens in the content frame.
https://help.blackboard.com/en-us/Learn/9.1_SP_14/Student/020_Get_Started/040_Courses_TabUpdated: Mon, 05 May 2014 12:35:31 GMT
Powered by
16
Learning Modules
Learning modules are containers for packaging and presenting course content. Learning modules have a table ofcontents where your instructor organizes the presentation of content. All types of content, such as items, assignments,and tests can appear in a learning module.
Lesson Plans
A lesson plan is a container for content similar to a learning module or folder that holds and organizes content items.Your instructor can create lesson plans to hold lesson profiles, instructional objectives, and the content items you needto complete a lesson.
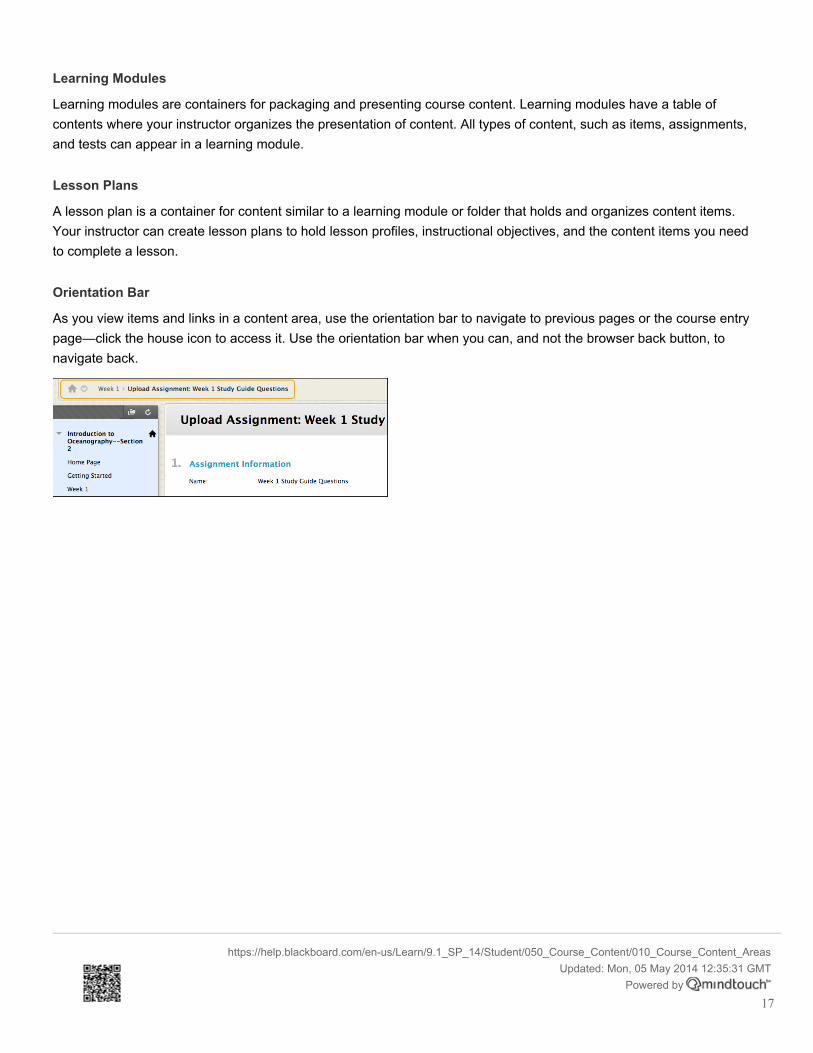
Orientation Bar
As you view items and links in a content area, use the orientation bar to navigate to previous pages or the course entrypage—click the house icon to access it. Use the orientation bar when you can, and not the browser back button, tonavigate back.
https://help.blackboard.com/en-us/Learn/9.1_SP_14/Student/050_Course_Content/010_Course_Content_AreasUpdated: Mon, 05 May 2014 12:35:31 GMT
Powered by
17
Types of Course ContentA content item is any type of file, text, image, or link that appears in a content area, learning module, lesson plan, orfolder. Your instructors add different types of content to these course areas.
Types of ContentDifferent types of content appear in a content area. Many types of content allow your instructor to add a description andset options, such as availability and date restrictions.
Each institution can select a different set of icons so your courses may look different.
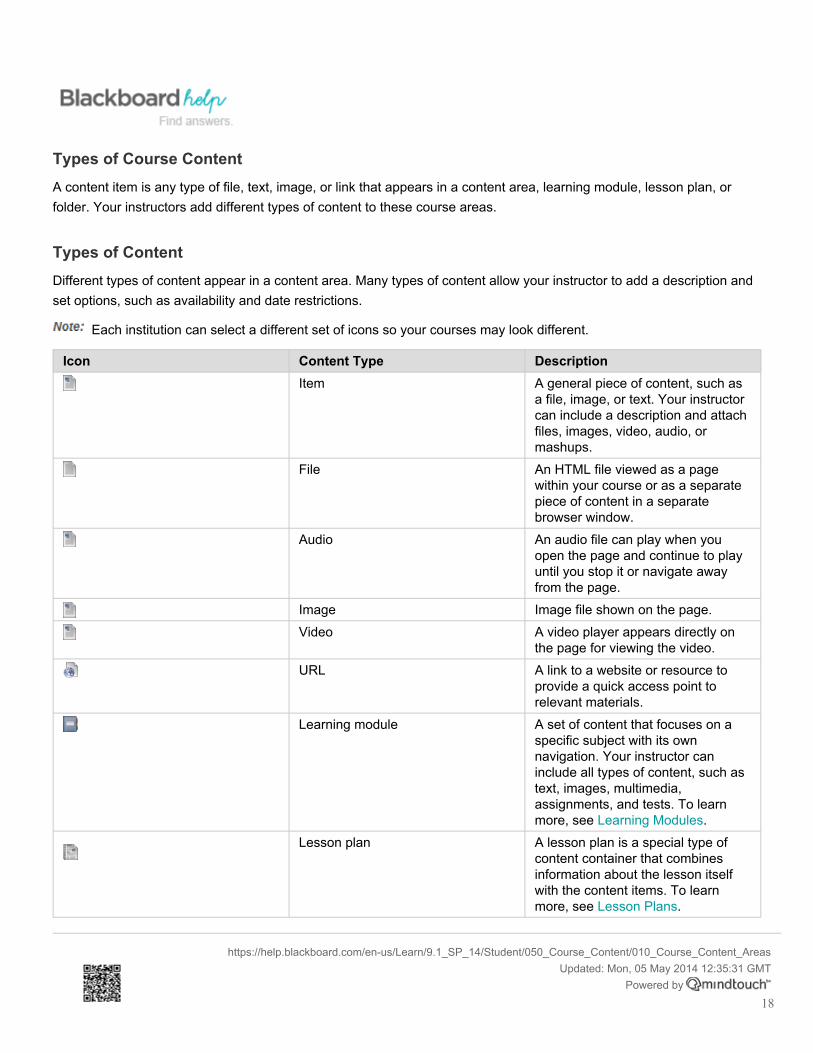
Icon Content Type DescriptionItem A general piece of content, such as
a file, image, or text. Your instructorcan include a description and attachfiles, images, video, audio, ormashups.
File An HTML file viewed as a pagewithin your course or as a separatepiece of content in a separatebrowser window.
Audio An audio file can play when youopen the page and continue to playuntil you stop it or navigate awayfrom the page.
Image Image file shown on the page.Video A video player appears directly on
the page for viewing the video.URL A link to a website or resource to
provide a quick access point torelevant materials.
Learning module A set of content that focuses on aspecific subject with its ownnavigation. Your instructor caninclude all types of content, such astext, images, multimedia,assignments, and tests. To learnmore, see Learning Modules.
Lesson plan A lesson plan is a special type ofcontent container that combinesinformation about the lesson itselfwith the content items. To learnmore, see Lesson Plans.
https://help.blackboard.com/en-us/Learn/9.1_SP_14/Student/050_Course_Content/010_Course_Content_AreasUpdated: Mon, 05 May 2014 12:35:31 GMT
Powered by
18
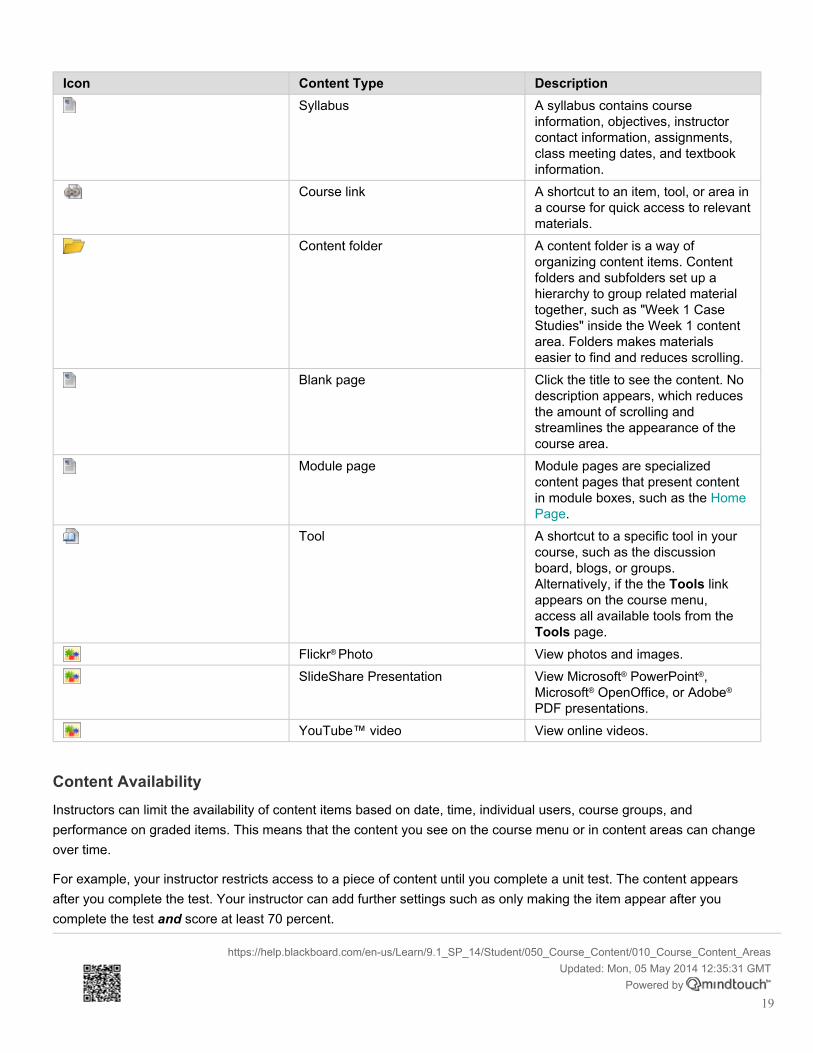
Icon Content Type DescriptionSyllabus A syllabus contains course
information, objectives, instructorcontact information, assignments,class meeting dates, and textbookinformation.
Course link A shortcut to an item, tool, or area ina course for quick access to relevantmaterials.
Content folder A content folder is a way oforganizing content items. Contentfolders and subfolders set up ahierarchy to group related materialtogether, such as "Week 1 CaseStudies" inside the Week 1 contentarea. Folders makes materialseasier to find and reduces scrolling.
Blank page Click the title to see the content. Nodescription appears, which reducesthe amount of scrolling andstreamlines the appearance of thecourse area.
Module page Module pages are specializedcontent pages that present contentin module boxes, such as the HomePage.
Tool A shortcut to a specific tool in yourcourse, such as the discussionboard, blogs, or groups.Alternatively, if the the Tools linkappears on the course menu,access all available tools from theTools page.
Flickr® Photo View photos and images.SlideShare Presentation View Microsoft® PowerPoint®,
Microsoft® OpenOffice, or Adobe®
PDF presentations.YouTube™ video View online videos.
Content AvailabilityInstructors can limit the availability of content items based on date, time, individual users, course groups, andperformance on graded items. This means that the content you see on the course menu or in content areas can changeover time.
For example, your instructor restricts access to a piece of content until you complete a unit test. The content appearsafter you complete the test. Your instructor can add further settings such as only making the item appear after youcomplete the test and score at least 70 percent.
https://help.blackboard.com/en-us/Learn/9.1_SP_14/Student/050_Course_Content/010_Course_Content_AreasUpdated: Mon, 05 May 2014 12:35:31 GMT
Powered by
19
If you have questions about content that your instructor mentions is available that you don't see, make sure to ask if it isavailable to everyone or to some based on specific criteria.
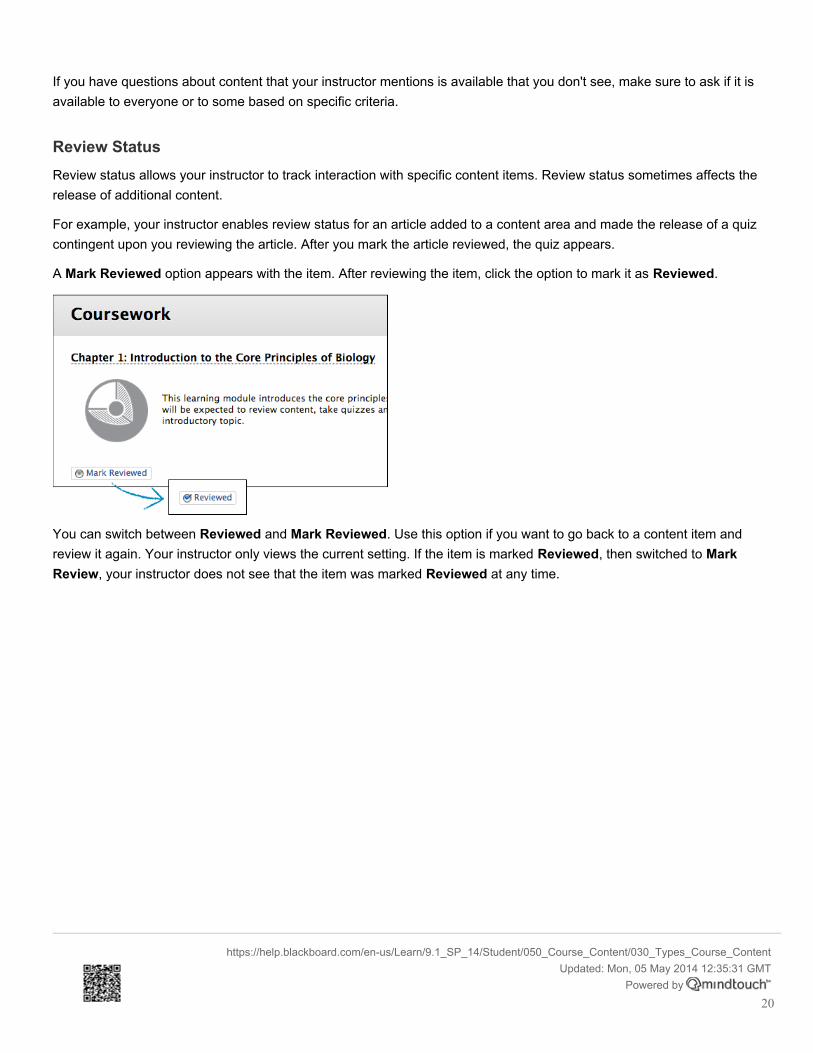
Review StatusReview status allows your instructor to track interaction with specific content items. Review status sometimes affects therelease of additional content.
For example, your instructor enables review status for an article added to a content area and made the release of a quizcontingent upon you reviewing the article. After you mark the article reviewed, the quiz appears.
A Mark Reviewed option appears with the item. After reviewing the item, click the option to mark it as Reviewed.
You can switch between Reviewed and Mark Reviewed. Use this option if you want to go back to a content item andreview it again. Your instructor only views the current setting. If the item is marked Reviewed, then switched to MarkReview, your instructor does not see that the item was marked Reviewed at any time.
https://help.blackboard.com/en-us/Learn/9.1_SP_14/Student/050_Course_Content/030_Types_Course_ContentUpdated: Mon, 05 May 2014 12:35:31 GMT
Powered by
20
Calendar
Instructors and your institution control which tools are available.
The calendar displays a consolidated view of all your institution, course, organization, and personal calendar events.You can view events by day, week, or month. You can also view and organize upcoming and past events intocategories.
Course calendar events appear to all members of the course. Common entries include upcoming tests, due dates forassignments, or special lectures. Course items with due dates automatically appear in the course calendar. Onlyinstructors may create course calendar events.
Watch a TutorialDouble-click the video to enlarge the viewing area.
The Calendar InterfaceYou can access the calendar from your course, from the Tools panel on the My Institution tab, or from the MyBlackboard menu.
https://help.blackboard.com/en-us/Learn/9.1_SP_14/Student/050_Course_Content/030_Types_Course_ContentUpdated: Mon, 05 May 2014 12:35:31 GMT
Powered by
21
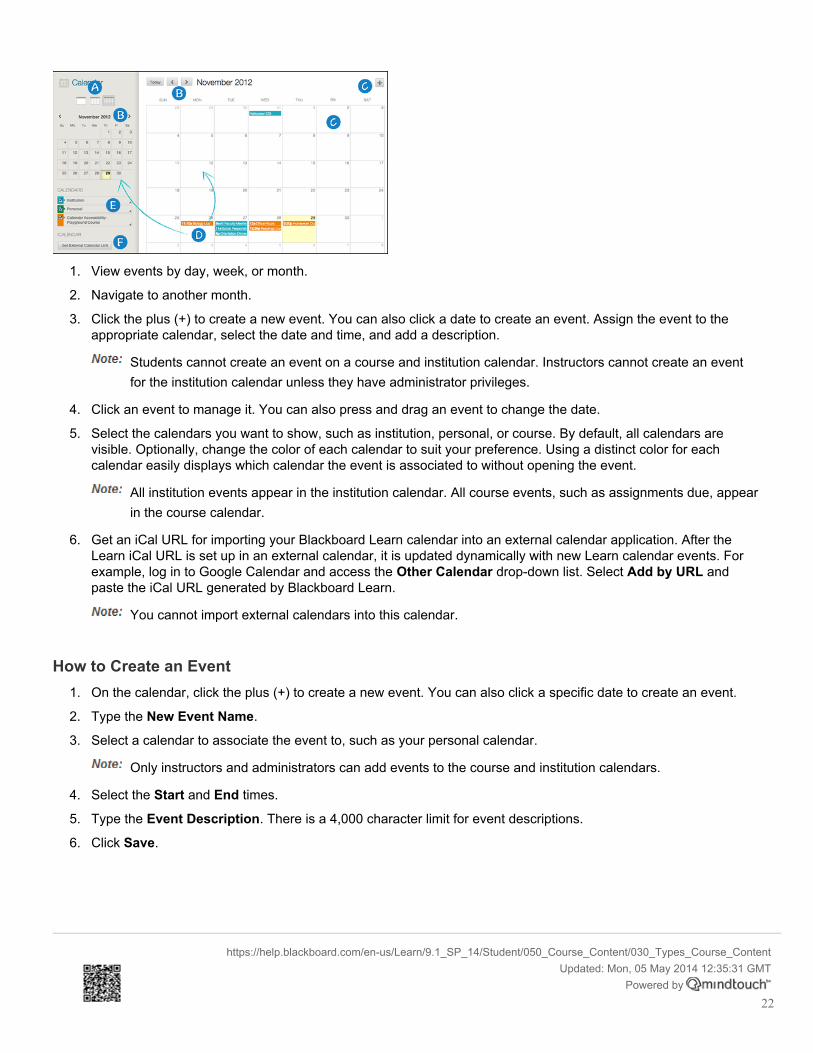
1. View events by day, week, or month.
2. Navigate to another month.
3. Click the plus (+) to create a new event. You can also click a date to create an event. Assign the event to theappropriate calendar, select the date and time, and add a description.
Students cannot create an event on a course and institution calendar. Instructors cannot create an eventfor the institution calendar unless they have administrator privileges.
4. Click an event to manage it. You can also press and drag an event to change the date.
5. Select the calendars you want to show, such as institution, personal, or course. By default, all calendars arevisible. Optionally, change the color of each calendar to suit your preference. Using a distinct color for eachcalendar easily displays which calendar the event is associated to without opening the event.
All institution events appear in the institution calendar. All course events, such as assignments due, appearin the course calendar.
6. Get an iCal URL for importing your Blackboard Learn calendar into an external calendar application. After theLearn iCal URL is set up in an external calendar, it is updated dynamically with new Learn calendar events. Forexample, log in to Google Calendar and access the Other Calendar drop-down list. Select Add by URL andpaste the iCal URL generated by Blackboard Learn.
You cannot import external calendars into this calendar.
How to Create an Event1. On the calendar, click the plus (+) to create a new event. You can also click a specific date to create an event.
2. Type the New Event Name.
3. Select a calendar to associate the event to, such as your personal calendar.
Only instructors and administrators can add events to the course and institution calendars.
4. Select the Start and End times.
5. Type the Event Description. There is a 4,000 character limit for event descriptions.
6. Click Save.
https://help.blackboard.com/en-us/Learn/9.1_SP_14/Student/050_Course_Content/030_Types_Course_ContentUpdated: Mon, 05 May 2014 12:35:31 GMT
Powered by
22
Recurring EventsOptionally, you can make events repeat by selecting the Repeat check box. Additional options appear that allow you tocreate multiple events based on a repeating pattern.
Specifics on Repeating Events and Limitations
Repeat Options Daily, Weekly, and Monthly SupportedDaily End after X number of times -OR- on a particular date.Weekly Repeat Day of the week supported. End after X number of times -OR- on a particular date.Monthly Repeat Day of the month (1-31) or day of week (first Sunday, second Monday, and so on)
supported. End after X number of times -OR- on a particular date.Bulk Add (Series) Create a series with the repeat options.Bulk Delete (Series) Delete the entire series created using the repeat options.Edit an Instance Edit an instance of the series. If you change the date/time of the instance, that particular
instance has a “broken” icon to indicate that it no longer conforms with the original seriesrules.
Changing the name or description of an instance does not break the instance fromthe series.
Edit Series (KnownLimitation)
At this time, you cannot edit the series. After you create a series, you can bulk delete ormake changes to individual instance.
Edit or Delete an EventOn the calendar, navigate to the date of the event in the main view to perform the following tasks:
• Click the event to edit or delete it.
• Press and drag an event to another date in the main view to change the date of the event. The time of the event andcalendar it is associated with remain the same.
https://help.blackboard.com/en-us/Learn/9.1_SP_14/Student/050_Course_Content/030_Types_Course_ContentUpdated: Mon, 05 May 2014 12:35:31 GMT
Powered by
23
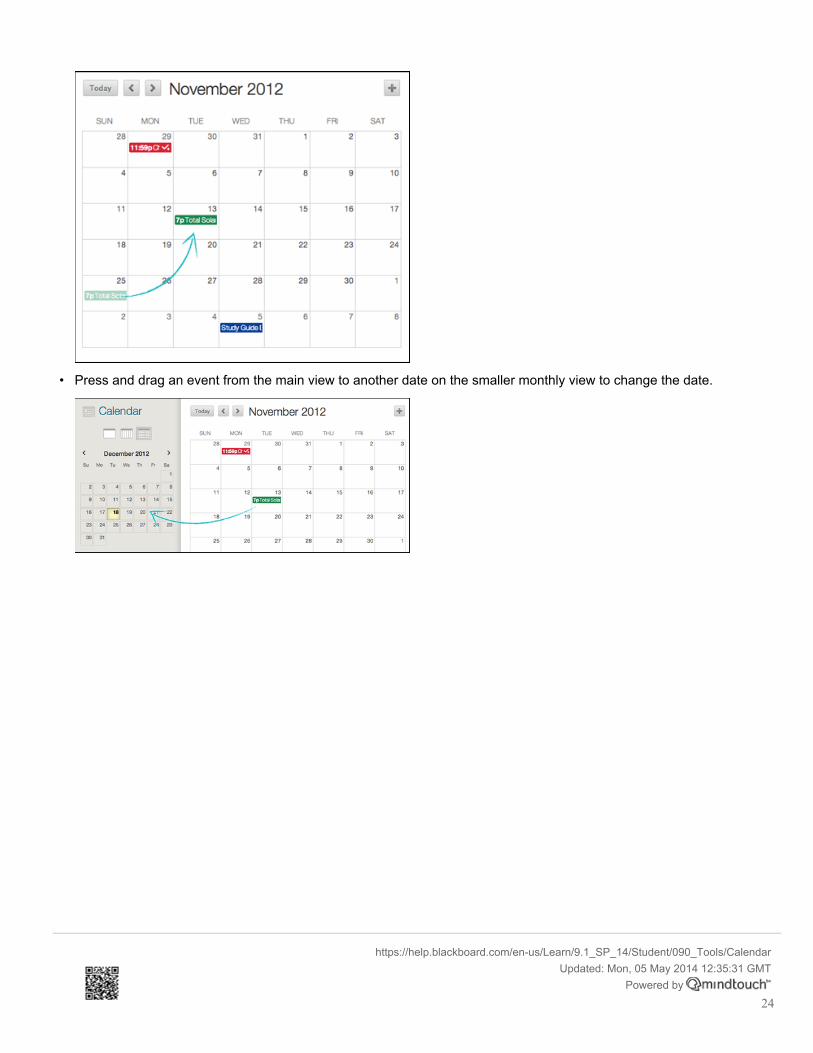
• Press and drag an event from the main view to another date on the smaller monthly view to change the date.
https://help.blackboard.com/en-us/Learn/9.1_SP_14/Student/090_Tools/CalendarUpdated: Mon, 05 May 2014 12:35:31 GMT
Powered by
24

Submit AssignmentsThe assignments tool presents a variety of learning activities. You view and submit assignments from one location.
Assignments list the name, description, and attachments for class work. Your instructor provides you all the informationyou need to complete the assignment. You can include comments for your instructor before you submit your work. Youmay upload files to complete the assignment from your computer. If your school licenses content management, you canattach files from the Content Collection.
To learn about submitting SafeAssignments, see SafeAssign.
Watch a TutorialDouble-click the video to enlarge the viewing area.
How to Submit an AssignmentWhen you finish your assignment, you must click Submit. If you do not, your instructor will not receive your completedassignment.
If your instructor has not allowed multiple attempts, you can submit your assignment only once. Beforeyou click Submit, be sure that you have attached any required files to your assignment.
1. On the course menu, select the content area that holds the assignment. For example, your instructor might createan Assignments content area.
https://help.blackboard.com/en-us/Learn/9.1_SP_14/Student/090_Tools/CalendarUpdated: Mon, 05 May 2014 12:35:31 GMT
Powered by
25
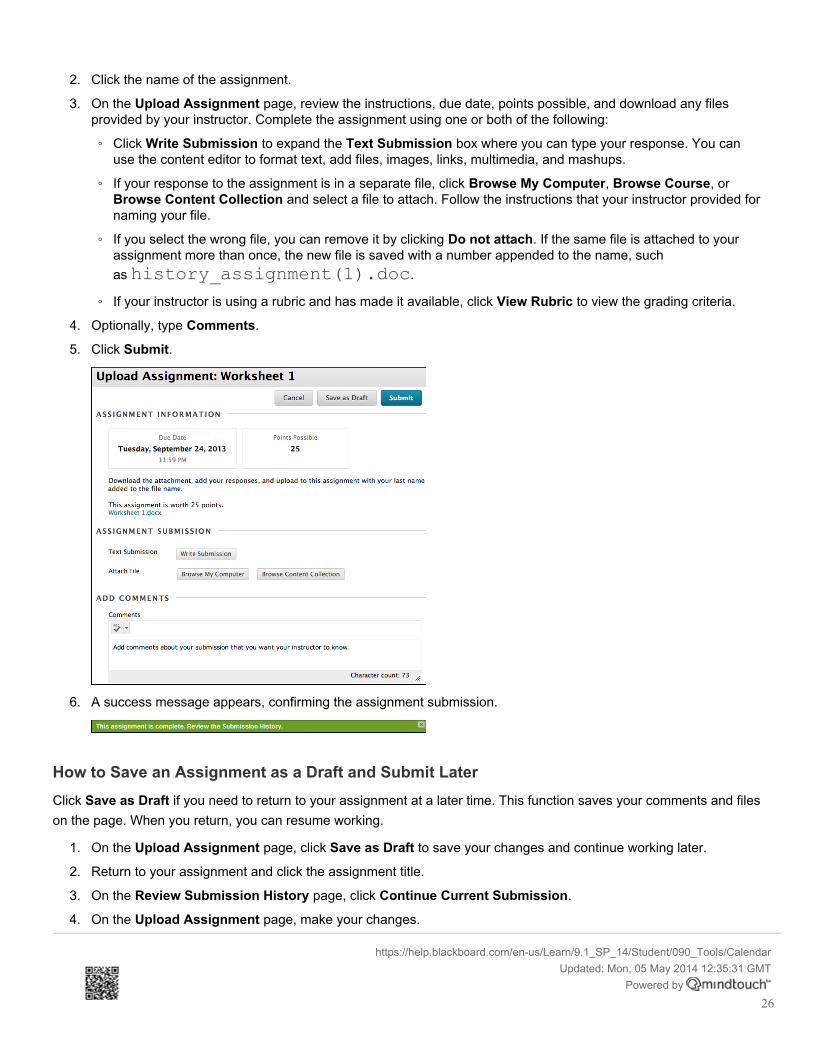
2. Click the name of the assignment.
3. On the Upload Assignment page, review the instructions, due date, points possible, and download any filesprovided by your instructor. Complete the assignment using one or both of the following:
◦ Click Write Submission to expand the Text Submission box where you can type your response. You canuse the content editor to format text, add files, images, links, multimedia, and mashups.
◦ If your response to the assignment is in a separate file, click Browse My Computer, Browse Course, orBrowse Content Collection and select a file to attach. Follow the instructions that your instructor provided fornaming your file.
◦ If you select the wrong file, you can remove it by clicking Do not attach. If the same file is attached to yourassignment more than once, the new file is saved with a number appended to the name, suchas history_assignment(1).doc.
◦ If your instructor is using a rubric and has made it available, click View Rubric to view the grading criteria.
4. Optionally, type Comments.
5. Click Submit.
6. A success message appears, confirming the assignment submission.
How to Save an Assignment as a Draft and Submit LaterClick Save as Draft if you need to return to your assignment at a later time. This function saves your comments and fileson the page. When you return, you can resume working.
1. On the Upload Assignment page, click Save as Draft to save your changes and continue working later.
2. Return to your assignment and click the assignment title.
3. On the Review Submission History page, click Continue Current Submission.
4. On the Upload Assignment page, make your changes.
https://help.blackboard.com/en-us/Learn/9.1_SP_14/Student/090_Tools/CalendarUpdated: Mon, 05 May 2014 12:35:31 GMT
Powered by
26
5. Optionally, type Comments.
6. Click Submit. The Review Submission History page appears showing the information about your submittedassignment.
When you finish your assignment, you must click Submit. If you do not, your instructor will not receiveyour completed assignment.
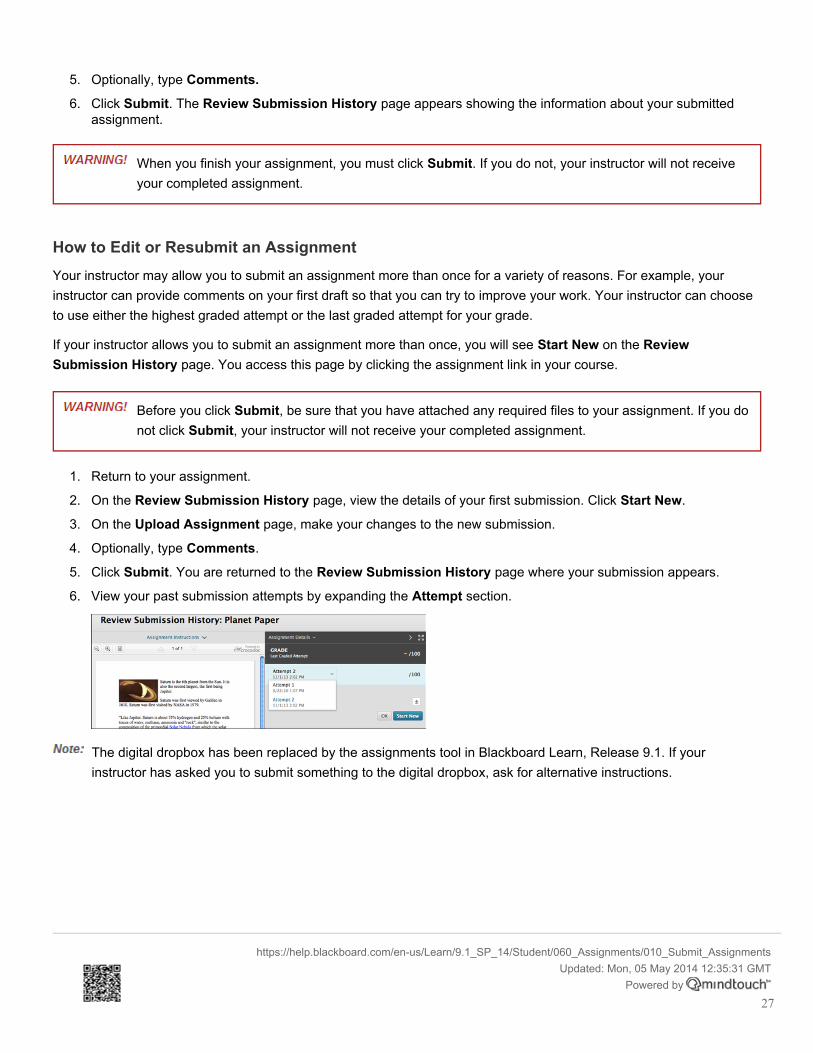
How to Edit or Resubmit an AssignmentYour instructor may allow you to submit an assignment more than once for a variety of reasons. For example, yourinstructor can provide comments on your first draft so that you can try to improve your work. Your instructor can chooseto use either the highest graded attempt or the last graded attempt for your grade.
If your instructor allows you to submit an assignment more than once, you will see Start New on the ReviewSubmission History page. You access this page by clicking the assignment link in your course.
Before you click Submit, be sure that you have attached any required files to your assignment. If you donot click Submit, your instructor will not receive your completed assignment.
1. Return to your assignment.
2. On the Review Submission History page, view the details of your first submission. Click Start New.
3. On the Upload Assignment page, make your changes to the new submission.
4. Optionally, type Comments.
5. Click Submit. You are returned to the Review Submission History page where your submission appears.
6. View your past submission attempts by expanding the Attempt section.
The digital dropbox has been replaced by the assignments tool in Blackboard Learn, Release 9.1. If yourinstructor has asked you to submit something to the digital dropbox, ask for alternative instructions.
https://help.blackboard.com/en-us/Learn/9.1_SP_14/Student/060_Assignments/010_Submit_AssignmentsUpdated: Mon, 05 May 2014 12:35:31 GMT
Powered by
27
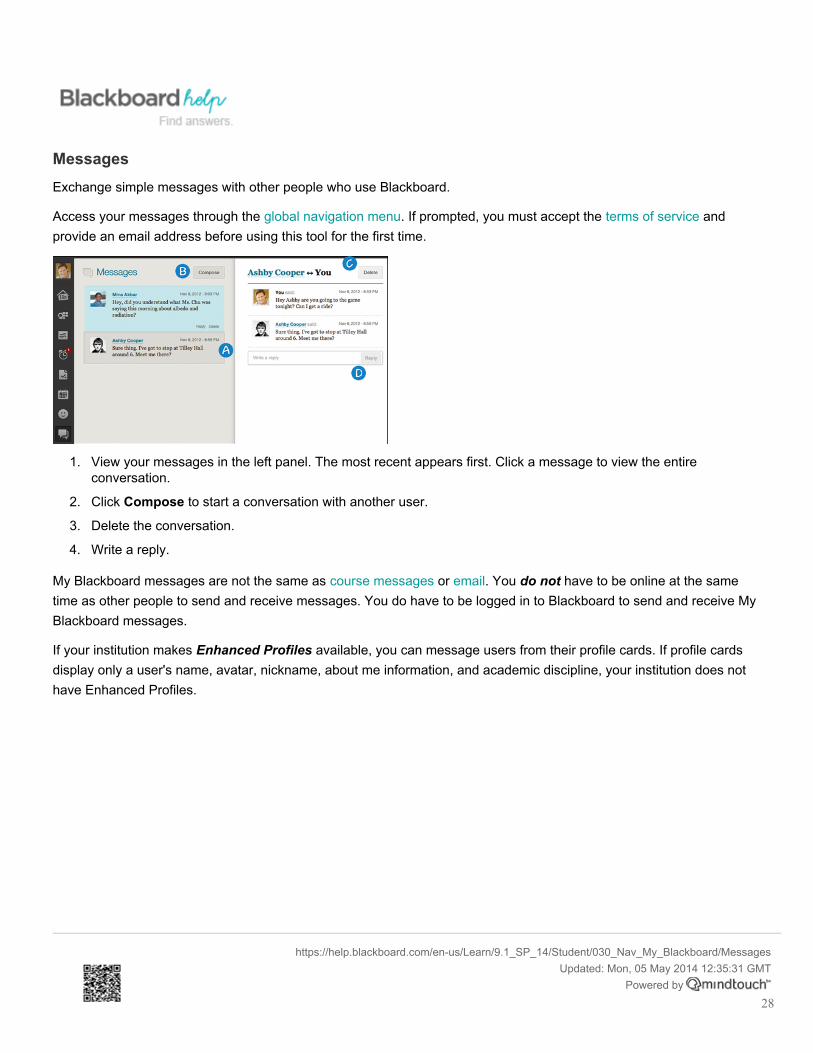
MessagesExchange simple messages with other people who use Blackboard.
Access your messages through the global navigation menu. If prompted, you must accept the terms of service andprovide an email address before using this tool for the first time.
1. View your messages in the left panel. The most recent appears first. Click a message to view the entireconversation.
2. Click Compose to start a conversation with another user.
3. Delete the conversation.
4. Write a reply.
My Blackboard messages are not the same as course messages or email. You do not have to be online at the sametime as other people to send and receive messages. You do have to be logged in to Blackboard to send and receive MyBlackboard messages.
If your institution makes Enhanced Profiles available, you can message users from their profile cards. If profile cardsdisplay only a user's name, avatar, nickname, about me information, and academic discipline, your institution does nothave Enhanced Profiles.
https://help.blackboard.com/en-us/Learn/9.1_SP_14/Student/030_Nav_My_Blackboard/MessagesUpdated: Mon, 05 May 2014 12:35:31 GMT
Powered by
28
Discussion Board
Your instructor and institution control which tools are available.
The discussion board is a tool for sharing thoughts and ideas about class materials. Course members can replicate therobust discussions that take place in the traditional classroom. An advantage of using the discussion board is itsasynchronous nature. Participants do not need to be in the same location or time zone, and can take time to considertheir responses carefully.
You can use the discussion board for the following tasks:
• Meet with your peers for collaboration and social interaction.
• Pose questions about homework assignments, readings, and course content.
• Demonstrate your understanding or application of course material.
Watch a TutorialDouble-click the video to enlarge the viewing area.
How to Access the Discussion Board1. On the course menu, click Discussions.
-OR-
On the course menu, click Tools and click Discussion Board.
https://help.blackboard.com/en-us/Learn/9.1_SP_14/Student/030_Nav_My_Blackboard/MessagesUpdated: Mon, 05 May 2014 12:35:31 GMT
Powered by
29
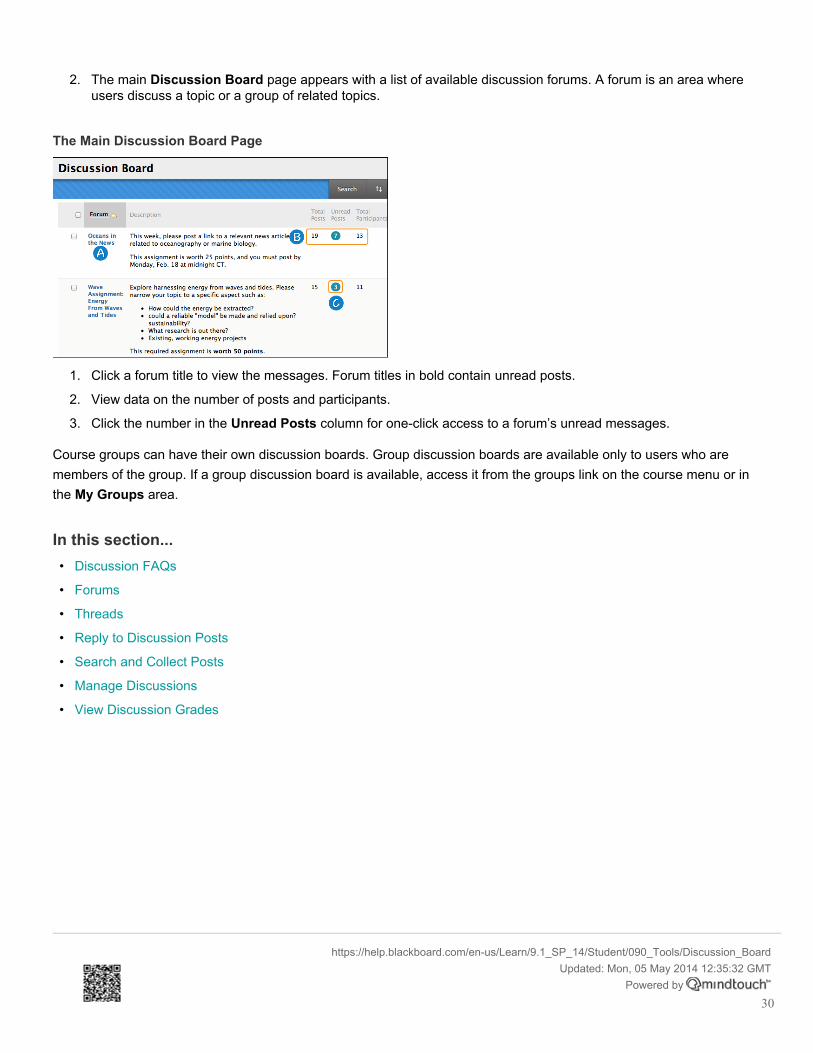
2. The main Discussion Board page appears with a list of available discussion forums. A forum is an area whereusers discuss a topic or a group of related topics.
The Main Discussion Board Page
1. Click a forum title to view the messages. Forum titles in bold contain unread posts.
2. View data on the number of posts and participants.
3. Click the number in the Unread Posts column for one-click access to a forum’s unread messages.
Course groups can have their own discussion boards. Group discussion boards are available only to users who aremembers of the group. If a group discussion board is available, access it from the groups link on the course menu or inthe My Groups area.
In this section...• Discussion FAQs
• Forums
• Threads
• Reply to Discussion Posts
• Search and Collect Posts
• Manage Discussions
• View Discussion Grades
https://help.blackboard.com/en-us/Learn/9.1_SP_14/Student/090_Tools/Discussion_BoardUpdated: Mon, 05 May 2014 12:35:32 GMT
Powered by
30
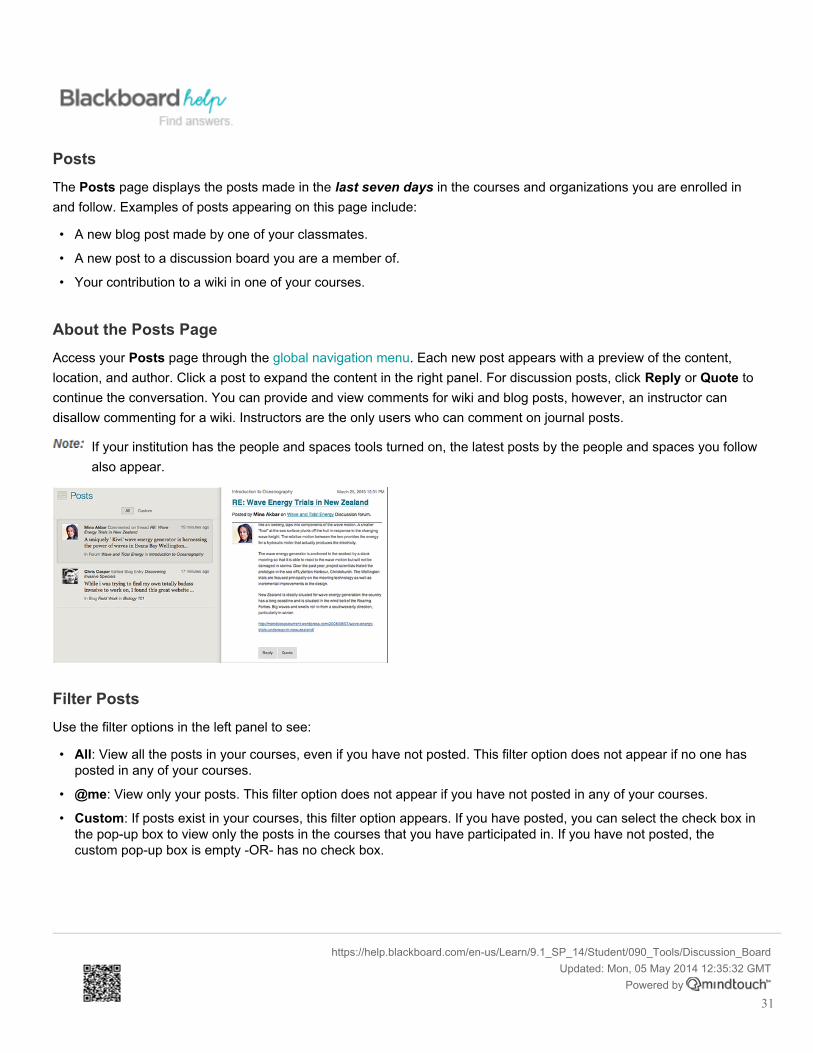
PostsThe Posts page displays the posts made in the last seven days in the courses and organizations you are enrolled inand follow. Examples of posts appearing on this page include:
• A new blog post made by one of your classmates.
• A new post to a discussion board you are a member of.
• Your contribution to a wiki in one of your courses.
About the Posts PageAccess your Posts page through the global navigation menu. Each new post appears with a preview of the content,location, and author. Click a post to expand the content in the right panel. For discussion posts, click Reply or Quote tocontinue the conversation. You can provide and view comments for wiki and blog posts, however, an instructor candisallow commenting for a wiki. Instructors are the only users who can comment on journal posts.
If your institution has the people and spaces tools turned on, the latest posts by the people and spaces you followalso appear.
Filter PostsUse the filter options in the left panel to see:
• All: View all the posts in your courses, even if you have not posted. This filter option does not appear if no one hasposted in any of your courses.
• @me: View only your posts. This filter option does not appear if you have not posted in any of your courses.
• Custom: If posts exist in your courses, this filter option appears. If you have posted, you can select the check box inthe pop-up box to view only the posts in the courses that you have participated in. If you have not posted, thecustom pop-up box is empty -OR- has no check box.
https://help.blackboard.com/en-us/Learn/9.1_SP_14/Student/090_Tools/Discussion_BoardUpdated: Mon, 05 May 2014 12:35:32 GMT
Powered by
31
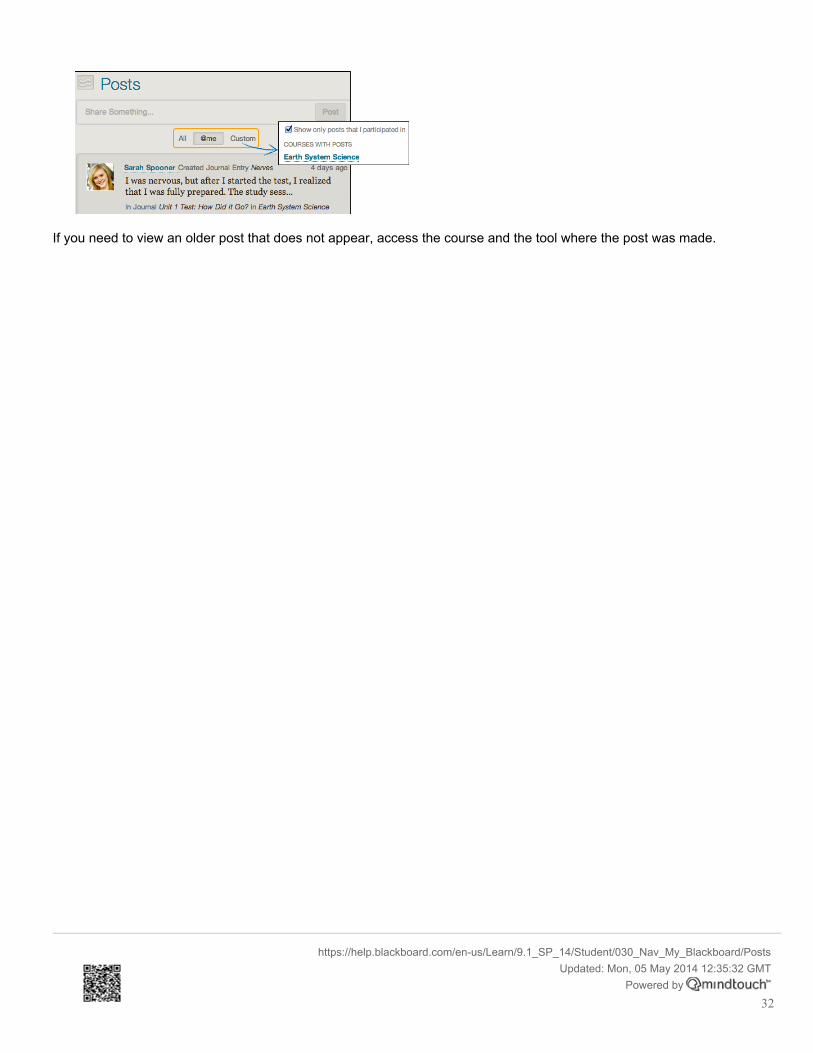
If you need to view an older post that does not appear, access the course and the tool where the post was made.
https://help.blackboard.com/en-us/Learn/9.1_SP_14/Student/030_Nav_My_Blackboard/PostsUpdated: Mon, 05 May 2014 12:35:32 GMT
Powered by
32
File Attachments
You can add file attachments to different areas in your course, such as to a content item, an assignment, or a discussionboard post. Users open a file by clicking a link to the file that appears in the course.
Locate the file you want to attach:
• To upload a file from your computer, click Browse My Computer.
• To upload a file from the course's storage repository:
◦ If Course Files is the course's storage repository, click Browse Course.
-OR-
◦ If your institution licenses content management, click Browse Content Collection.
After selecting a file to attach, you may add a name for the link to the file. This link title appears to users, instead of thename of the document. For example, type "Biology Lab" as the link title instead of using the file name
lab_bio_101.doc.
Accepted Characters in File NamesBlackboard Learn allows the use of all characters in file names. However, a user's operating system and browser maylimit the types of characters accepted. For example, some browsers do not accept multi-byte characters, and some maynot have the languages installed to display the special alphabetic characters specific to them.
Recognized Attachment File TypesThe following file types are recognized by Blackboard Learn. These files can appear within a content item.
Blackboard Learn can recognize additional file types and associated applications if a MIME extension is added. Contactyour institution to learn more about adding MIME extensions.
Extension File TypePrograms associated with the FileType
AAM Multimedia Adobe® Authorware® plug-in. Notethat the AAM file is the starting pointfor a series of files that must beenclosed in a ZIP file.
AIFF Audio Audio media playerASF Multimedia Microsoft® .NET™ ShowAU Audio Real Audio Player™
https://help.blackboard.com/en-us/Learn/9.1_SP_14/Student/030_Nav_My_Blackboard/PostsUpdated: Mon, 05 May 2014 12:35:32 GMT
Powered by
33
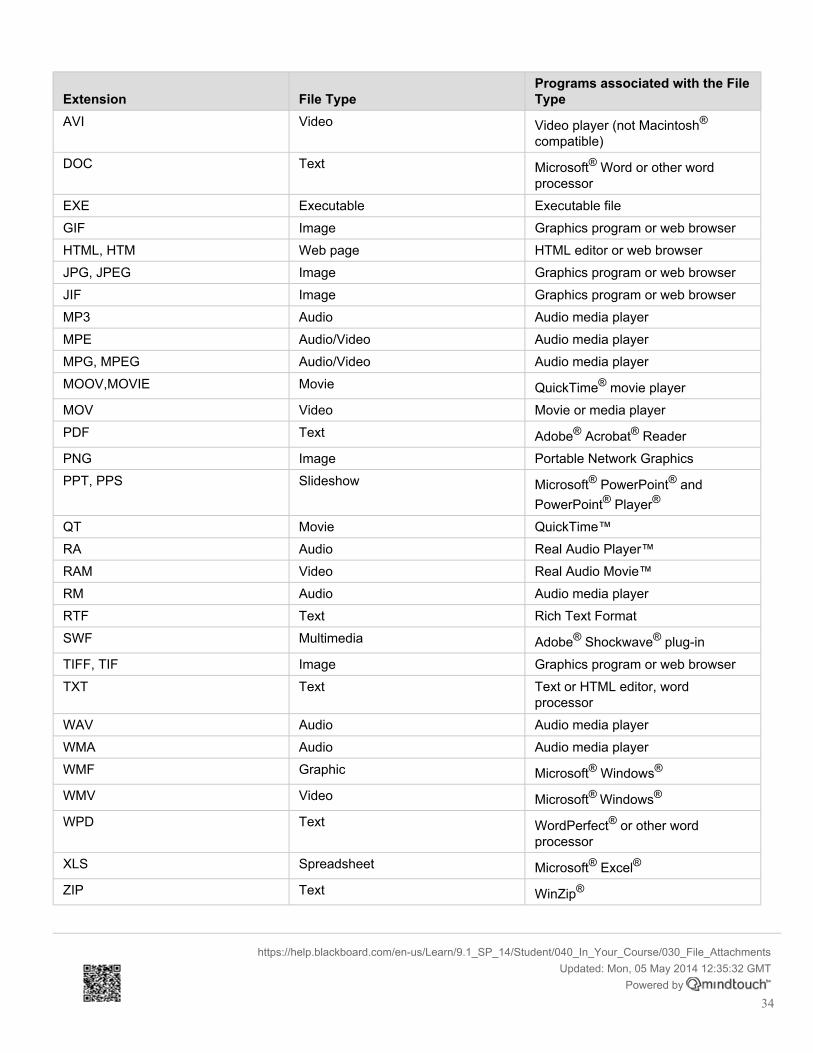
Extension File TypePrograms associated with the FileType
AVI Video Video player (not Macintosh®
compatible)DOC Text Microsoft® Word or other word
processorEXE Executable Executable fileGIF Image Graphics program or web browserHTML, HTM Web page HTML editor or web browserJPG, JPEG Image Graphics program or web browserJIF Image Graphics program or web browserMP3 Audio Audio media playerMPE Audio/Video Audio media playerMPG, MPEG Audio/Video Audio media playerMOOV,MOVIE Movie QuickTime® movie playerMOV Video Movie or media playerPDF Text Adobe® Acrobat® ReaderPNG Image Portable Network GraphicsPPT, PPS Slideshow Microsoft® PowerPoint® and
PowerPoint® Player®
QT Movie QuickTime™RA Audio Real Audio Player™RAM Video Real Audio Movie™RM Audio Audio media playerRTF Text Rich Text FormatSWF Multimedia Adobe® Shockwave® plug-inTIFF, TIF Image Graphics program or web browserTXT Text Text or HTML editor, word
processorWAV Audio Audio media playerWMA Audio Audio media playerWMF Graphic Microsoft® Windows®
WMV Video Microsoft® Windows®
WPD Text WordPerfect® or other wordprocessor
XLS Spreadsheet Microsoft® Excel®
ZIP Text WinZip®
https://help.blackboard.com/en-us/Learn/9.1_SP_14/Student/040_In_Your_Course/030_File_AttachmentsUpdated: Mon, 05 May 2014 12:35:32 GMT
Powered by
34
Blackboard MobileThe Blackboard Mobile Learn application gives students and faculty access to their courses, content, and organizationson a variety of mobile devices including Android™, BlackBerry® and iPhone OS.
Extend your existing Blackboard Learn implementation in an engaging and intuitive way. Students and instructors canaccess documents in multiple formats, read announcements, create discussion threads, upload media, create contentitems within the course map, comment on blogs and more—all on the mobile devices they love.
To learn more, visit Blackboard Mobile.
https://help.blackboard.com/en-us/Learn/9.1_SP_14/Student/090_Tools/Blackboard_MobileUpdated: Mon, 05 May 2014 12:35:32 GMT
Powered by
35
Browser Support for SP 14Not sure what version you're uisng? See How to Determine Your Version of Learn.
Supported BrowsersBlackboard supports four primary browsers for Learn releases. Links to the vendor sites for the browsers are included inthis topic.
To learn more about Blackboard's general browser support policy as well as information about Javascript, Cookies, andother software, see the Browser Support Policy topic in this section.
The browser versions listed are those that were available when Blackboard Learn 9.1 Service Pack13 was released in June 2013. These are not the only browsers supported on this release. Tolearn more, see the Browser Support Policy topic in this section.
Traditionally Released Browsers
The dates listed are the original release dates for general availability.
• Internet Explorer® 10 from Microsoft (26 October 2012 for Windows 8, 26 February 2013 forWindows 7)
• Internet Explorer 9 from Microsoft (14 March 2011)
• There are some configuration options for Internet Explorer that may make some features ofBlackboard Learn difficult to use. To learn more, see Internet Explorer Security Zones andCompatibility View in this section.
• Safari® 6 from Apple (25 July 2012)
• Safari 5 from Apple (7 June 2010)
• Safari 5 for Windows is an exception. Apple's continued support for this browser is unclear, andBlackboard does not test it.
Automatically Updated Channel-based Browsers
The dates listed are the latest numbered patch release dates.
https://help.blackboard.com/en-us/Learn/9.1_SP_14/Student/090_Tools/Blackboard_MobileUpdated: Mon, 05 May 2014 12:35:32 GMT
Powered by
36
• Firefox® 24 (stable channel) from Mozilla (17 September 2013)
• Firefox 24 (ESR channel) from Mozilla (17 September 2013)
• Chrome™ 30 (stable channel) from Google (3 October 2013)
Don't See Your Browser or Version Listed?Both newer and older browsers from these vendors may be supported. To learn more, see the Browser Support Policytopic in this section.
Java and Other Browser PluginsA handful of features in Blackboard Learn require particular additional software to be installed. Without these, thefeatures themselves do not function. For this service pack of Learn, the following features have plugin requirements:
• Multiple file uploads in Course Files and Content Collection requires the Java Runtime Environment (JRE) fromOracle enabled as a browser plugin. The single file upload tool does not have this requirement. The upload applet issigned by Blackboard and includes a timestamping authority that allows the applet to run even after the certificatehas expired.
• The Virtual Classroom Tools in courses require the JRE from Oracle enabled as a browser plugin. The VirtualClassroom applet is signed by Blackboard and includes a timestamping authority that allows the applet to run evenafter the certificate has expired.
• The Meeting Room and Blackboard Collaborate synchronous communication features, available via Building Block,require the JRE for access to the rooms, but do not require the browser plugin. Blackboard also has additionalinformation about how Blackboard Collaborate uses Java in the Blackboard Collaborate Support Portal.
• The Record from Webcam feature of the Content Editor requires the Flash Player browser plugin from Adobe tosuccessfully save the recordings to YouTube.
JRE version 7 is the recommended version for features that depend on it. JRE version 6 may work, but could result inunexpected behavior. Oracle has acknowledged some security issues with JRE version 6.
On Apple Mac OS X, Google's Chrome browser does not support Java 7 because of incompatibilities between64-bit Java and 32-bit Chrome. Firefox and Safari browsers do not have this limitation on Mac OS X. Users of theChrome browser on Mac OS X must configure Java 6 support in order to access the features listed above.
Adobe Flash Player version 11 is the recommended version of the Adobe Flash Player plugin, but the YouTubeservice ultimately determines the version required for this plugin.
Blackboard Learn does not require any other browser plugins. To learn more about browser plugins, assistivetechnology, and other supporting software, see the Browser Support Policy topic in this section.
Plugin Links• Download link for JRE on Oracle's site.
• Windows auto-download .cab files for JRE on Oracle's site - scroll down to links for version 7.
https://help.blackboard.com/en-us/Learn/9.1_SP_14/Student/090_Tools/Blackboard_MobileUpdated: Mon, 05 May 2014 12:35:32 GMT
Powered by
37
• To learn more about security and JRE, see this Blackboard Security Advisory.
• Directions from Apple for configuring Java 6 for Chrome browsers on Mac OS X on Apple's site.
• Download link for Adobe Flash Player on Adobe's site.
• More information about the Blackboard applet timestamping authority on GeoTrust's site.
https://help.blackboard.com/en-us/Learn/9.1_SP_14/Student/015_Browser_Support/010_Browser_Support_SP_14Updated: Mon, 05 May 2014 12:35:32 GMT
Powered by
38
Blackboard Videos
The On Demand Learning Center landing pages now redirect to this page in help. The videos remainlive and can be accessed with a direct link. You can also access them from the Video Archives pagein help. Newer versions of the videos in MP4 format are available on YouTube.
You can watch many videos to learn about how to use Blackboard. This page summarizes the Blackboard Learn videoresources.
These videos are available in English only.
BlackboardTV on YouTubeBlackboardTV is our official YouTube™ channel offering many different types of videos. Some are produced byBlackboard and others are produced by institutions, IT professionals, teachers, and instructional designers. Topicsrange from a short overview of a new feature to longer recordings of webinars. Use existing playlists that group videostogether or create your own.
Blackboard Learn: For Students: A series of short video tutorials to help students use the various Blackboard Learn toolsto be successful online.
Blackboard Learn: For Instructors: The complete series of short video tutorials to help instructors learn how to use tools,design their courses, and assess students.
Blackboard Learn: On Demand Tutorials: The complete playlist for the entire series of video tutorials for students andinstructors.
Quick Hit Video Playlist: A series of very short videos that give an overview to new features in Blackboard Learn.
If you are interested in submitting your video to BlackboardTV, send us a message with a link to your video.
On Demand Learning Center*
Blackboard has updated the Learn videos to MP4 format and is serving them from YouTube. Thelinks to the existing Flash format Learn 9.1 videos on the On Demand Learning Center remain liveand you can access them from the Video Archives page in help. However, the On Demand landingpages redirect to this topic.
If you have added links to existing On Demand videos in your training materials and websites, they will not break.However, links to the On Demand landing pages will redirect to help.blackboard.com.
https://help.blackboard.com/en-us/Learn/9.1_SP_14/Student/015_Browser_Support/010_Browser_Support_SP_14Updated: Mon, 05 May 2014 12:35:32 GMT
Powered by
39
To ensure that you have the latest versions of the tutorials, review our videos on YouTube and update your links.
*The videos served from this site are in Flash and do not play on all devices.
https://help.blackboard.com/en-us/Learn/9.1_SP_14/Student/120_Blackboard_VideosUpdated: Mon, 05 May 2014 12:35:32 GMT
Powered by
40