
BlackBerry UEM Administration · Managing devices beyond smartphones, tablets, and laptops ......
497
BlackBerry UEM Administration Guide 12.10 Maintenance Release 1
Transcript of BlackBerry UEM Administration · Managing devices beyond smartphones, tablets, and laptops ......

BlackBerry UEMAdministration Guide
12.10 Maintenance Release 1

2019-02-25Z
| | 2
Contents
Getting started................................................................................................ 13Supported features by device type.....................................................................................................................14Managing BlackBerry Dynamics apps in BlackBerry UEM................................................................................20BlackBerry devices powered by Android............................................................................................................21Device management options...............................................................................................................................22Managing devices beyond smartphones, tablets, and laptops........................................................................ 22Managing wearable devices................................................................................................................................22Managing Apple TV devices................................................................................................................................23What is the BlackBerry UEM Client?...................................................................................................................23What is BlackBerry UEM Self-Service?............................................................................................................... 25BlackBerry Enterprise Mobility Suite services....................................................................................................25Log in to BlackBerry UEM .................................................................................................................................. 27
Administrators.................................................................................................28Steps to set up UEM administration.................................................................................................................. 28Setting console login options............................................................................................................................. 28
Set the minimum password complexity for local administrators......................................................... 29Configure certificate-based console authentication.............................................................................. 29Create a login notice for the consoles................................................................................................... 30
Customizing the appearance of the consoles...................................................................................................30Customize the color of the consoles......................................................................................................30Customize the login page and menu bar............................................................................................... 31
Create website bookmarks in the consoles.......................................................................................................31Change the language for automated email messages.....................................................................................32Creating and managing administrator roles...................................................................................................... 32
Preconfigured roles...................................................................................................................................32Create a custom role................................................................................................................................54View a role.................................................................................................................................................55Change role settings.................................................................................................................................55Delete a role.............................................................................................................................................. 56How BlackBerry UEM chooses which role to assign............................................................................. 56
Create an administrator.......................................................................................................................................56Change role membership for administrators.....................................................................................................57Set the session timeout parameters.................................................................................................................. 58Delete an administrator....................................................................................................................................... 58
Using profiles, variables, and email templates................................................ 60Profiles.................................................................................................................................................................. 60
Assigning profiles..................................................................................................................................... 60How BlackBerry UEM chooses which profiles to assign.......................................................................60Copy a profile............................................................................................................................................61View a profile............................................................................................................................................ 62Change profile settings............................................................................................................................ 62Remove a profile from user accounts or user groups...........................................................................62Delete a profile..........................................................................................................................................63
| | iii

Rank profiles..............................................................................................................................................63Profiles reference......................................................................................................................................64
Variables................................................................................................................................................................69Using variables in profiles........................................................................................................................69Default variables....................................................................................................................................... 69Custom variables...................................................................................................................................... 72
Email templates....................................................................................................................................................73Default email templates........................................................................................................................... 74Suggested text.......................................................................................................................................... 76Create an activation email template....................................................................................................... 82Create a template for compliance email notifications.......................................................................... 83Create an event notification email template.......................................................................................... 83Edit an email template............................................................................................................................. 83
Wi-Fi, VPN, BlackBerry Secure Connect Plus, and other work connections.....85Steps to set up work connections for devices..................................................................................................85Best practice: Creating work connection profiles............................................................................................. 85Setting up work Wi-Fi networks for devices...................................................................................................... 86
Create a Wi-Fi profile................................................................................................................................86Setting up work VPNs for devices......................................................................................................................87
Create a VPN profile.................................................................................................................................88Enabling VPN on demand for iOS or macOS devices............................................................................89Enabling per-app VPN...............................................................................................................................89
Setting up proxy profiles for devices................................................................................................................. 90Create a proxy profile...............................................................................................................................91
Using enterprise connectivity and BlackBerry Secure Connect Plus for connections to work resources..... 93Steps to enable BlackBerry Secure Connect Plus..................................................................................94Server and device requirements..............................................................................................................94Load balancing and high availability for BlackBerry Secure Connect Plus.......................................... 95BlackBerry Secure Connect Plus and the BlackBerry Connectivity Node.............................................95Enabling and configuring enterprise connectivity and BlackBerry Secure Connect Plus.....................96Troubleshooting BlackBerry Secure Connect Plus.................................................................................99
Setting up network connections for BlackBerry Dynamics apps................................................................... 102Create a BlackBerry Dynamics connectivity profile............................................................................. 103Routing all BlackBerry Dynamics app data through BlackBerry Proxy............................................... 103Add an app server to a BlackBerry Dynamics connectivity profile..................................................... 103
Using BlackBerry 2FA for secure connections to critical resources..............................................................104Setting up single sign-on authentication for devices......................................................................................104
Prerequisites: Using Kerberos authentication for devices.................................................................. 105Certificate-based authentication for iOS 8 and later........................................................................... 105Create a single sign-on profile.............................................................................................................. 105
Filtering web content on iOS devices...............................................................................................................107Create a web content filter profile........................................................................................................ 107
Managing email and web domains for iOS devices........................................................................................108Create a managed domains profile.......................................................................................................109
Create an AirPrint profile...................................................................................................................................109Configuring AirPlay profiles for iOS devices....................................................................................................110
Create an AirPlay profile........................................................................................................................ 110Controlling network usage for work apps on iOS devices..............................................................................111
Create a network usage profile............................................................................................................. 111
| | iv

Email, calendar, and contacts........................................................................112Setting up work email for devices....................................................................................................................112
Create an email profile...........................................................................................................................112Create an IMAP/POP3 email profile..................................................................................................... 113Protecting email data using the BlackBerry Secure Gateway............................................................. 114Extending email security using S/MIME...............................................................................................115Extending email security using PGP..................................................................................................... 118Enforcing secure email using message classification........................................................................ 119
Using Exchange Gatekeeping............................................................................................................................119Allow a device to access Microsoft ActiveSync.................................................................................. 120Block a device from accessing Microsoft ActiveSync........................................................................ 120Verifying that a device is allowed to access work email and organizer data.................................... 120Creating a gatekeeping profile.............................................................................................................. 121
Setting up CardDAV and CalDAV profiles for iOS and macOS devices......................................................... 121Create a CardDAV profile.......................................................................................................................121Create a CalDAV profile......................................................................................................................... 122
Certificates....................................................................................................123Steps to use certificates................................................................................................................................... 123Integrating BlackBerry UEM with your organization's PKI software...............................................................123
Connect BlackBerry UEM to your organization’s Entrust software.....................................................124Connect BlackBerry UEM to your organization’s Entrust IdentityGuard server to use smart
credentials..........................................................................................................................................124Connect BlackBerry UEM to your organization's OpenTrust software............................................... 125Connect BlackBerry UEM to your organization’s BlackBerry Dynamics PKI Connector.....................125Connect BlackBerry UEM to your organization’s app-based PKI solution..........................................126
Providing client certificates to devices............................................................................................................ 126Sending certificates to devices using profiles.................................................................................................128
Choosing profiles to send client certificates to devices..................................................................... 129Sending CA certificates to devices....................................................................................................... 129Using user credential profiles to send certificates to devices............................................................131Using SCEP to send client certificates to devices...............................................................................139Sending the same client certificate to multiple devices......................................................................140Specify the certificate used by an app................................................................................................. 140
Device policies, standards, and compliance.................................................. 142Steps to set up your organization's policies and standards for devices....................................................... 142Managing devices with IT policies................................................................................................................... 142
Restricting or allowing device capabilities........................................................................................... 143Setting device password requirements................................................................................................ 143How BlackBerry UEM chooses which IT policy to assign................................................................... 154Creating and managing IT policies....................................................................................................... 155Controlling BlackBerry OS device capabilities using IT policies......................................................... 158
Controlling BlackBerry Dynamics on users devices........................................................................................158Create a BlackBerry Dynamics profile.................................................................................................. 158
Enforcing compliance rules for devices...........................................................................................................159Create a compliance profile...................................................................................................................159Create a template for compliance email notifications........................................................................ 160Managing BlackBerry Dynamics compliance profiles......................................................................... 160
| | v

Configuring the Enterprise Management Agent.............................................................................................. 161Create an Enterprise Management Agent profile.................................................................................162
Limiting devices to a single app.......................................................................................................................162Create an app lock mode profile...........................................................................................................162
Controlling the software releases that are installed on devices.................................................................... 163Create a device SR requirements profile for Android Enterprise devices with Work space
only activations..................................................................................................................................164Create a device SR requirements profile for Samsung KNOX devices...............................................165Create a device SR requirements profile for BlackBerry 10 devices.................................................. 165View users who are running a revoked software release....................................................................166
Displaying organization information on devices............................................................................................. 166Create organization notices...................................................................................................................167Create a device profile........................................................................................................................... 168
Using location services on devices.................................................................................................................. 169Configure location service settings.......................................................................................................169Create a location service profile........................................................................................................... 170
Turning off notifications outside of work hours............................................................................................. 170Create a Do not disturb profile..............................................................................................................171
Managing iOS features using custom payload profiles..................................................................................171Create a custom payload profile...........................................................................................................172
Configure the layout of apps on supervised iOS devices...............................................................................173Setting up Windows Information Protection for Windows 10 devices.......................................................... 173
Create a Windows Information Protection profile............................................................................... 174
Apps..............................................................................................................175Adding apps to the app list...............................................................................................................................175
Adding public apps to the app list........................................................................................................175Adding internal apps to the app list......................................................................................................182Adding or changing an app configuration............................................................................................ 187Adding app shortcuts............................................................................................................................. 188
Preventing users from installing specific apps............................................................................................... 189Steps to prevent users from installing specific apps.......................................................................... 189Add an app to the restricted app list....................................................................................................190
Managing apps on the app list.........................................................................................................................191Delete an app from the app list............................................................................................................ 191Change whether an app is required or optional...................................................................................191Device notifications for new and updated apps.................................................................................. 192App behavior on iOS devices.................................................................................................................192App behavior on Android devices......................................................................................................... 196App behavior on Android Enterprise devices....................................................................................... 197App behavior on Samsung KNOX devices........................................................................................... 198App behavior on BlackBerry devices.....................................................................................................203App behavior on Windows 10 devices..................................................................................................204Managing app groups............................................................................................................................ 204View the status of apps and app groups assigned to user accounts................................................ 206View which apps are assigned to user groups.................................................................................... 206Viewing and customizing the apps list.................................................................................................206Update the app list................................................................................................................................. 207Update app permissions for Android Enterprise apps........................................................................ 207Accept app permissions for Android Enterprise apps.........................................................................208Set runtime app permissions for Android work apps..........................................................................208
Managing BlackBerry Dynamics apps..............................................................................................................209
| | vi

Manage settings for a BlackBerry Dynamics app................................................................................209Manage BlackBerry Dynamics app services........................................................................................ 213Configuring Kerberos for BlackBerry Dynamics apps..........................................................................215Add the work app catalog to the BlackBerry Dynamics Launcher......................................................216Generate access keys for BlackBerry Dynamics apps........................................................................ 216Send a BlackBerry Dynamics app unlock key to a user...................................................................... 217
Managing apps protected by Microsoft Intune............................................................................................... 218Create a Microsoft Intune app protection profile................................................................................ 218Wipe apps managed by Microsoft Intune............................................................................................ 219
Managing Apple VPP accounts........................................................................................................................ 219Add an Apple VPP account................................................................................................................... 219Edit an Apple VPP account....................................................................................................................220Update Apple VPP account information...............................................................................................220Delete an Apple VPP account............................................................................................................... 220Assigning Apple VPP licenses to devices............................................................................................ 220
Rank app installation......................................................................................................................................... 221Edit the app installation ranking list..................................................................................................... 221Remove an app from the app installation ranking list.........................................................................221
Viewing personal app lists................................................................................................................................ 222View the personal apps list in the management console................................................................... 222Turn off personal apps collection......................................................................................................... 222
Rating and reviewing apps................................................................................................................................ 223Enable or disable app ratings and reviews for all apps...................................................................... 223Enable app ratings and reviews for existing apps...............................................................................223View app reviews in the management console................................................................................... 224Specify app rating and review settings for multiple apps...................................................................224Delete app ratings and reviews.............................................................................................................224
Managing the Work Apps icon for iOS devices...............................................................................................225Customize the Work Apps icon.............................................................................................................225Disable the Work Apps app for iOS...................................................................................................... 225
Managing notifications for apps on supervised iOS devices......................................................................... 226Create a per-app notification profile..................................................................................................... 226
Set the organization name for BlackBerry World............................................................................................ 227Managing apps on BlackBerry OS devices...................................................................................................... 227
Preparing to distribute BlackBerry Java Applications ........................................................................ 227Configuring application control policies............................................................................................... 228Application control policies for unlisted applications......................................................................... 231Creating software configurations..........................................................................................................232Install BlackBerry Java Applications on a BlackBerry OS device at a central computer................... 234View the users that have a BlackBerry Java Application installed on their BlackBerry OS devices... 234Reconciliation rules for conflicting settings in software configurations............................................234
Users and groups..........................................................................................241Steps to create groups and user accounts..................................................................................................... 241Creating user roles.............................................................................................................................................241
BlackBerry UEM Self-Service capabilities............................................................................................. 241Create a user role................................................................................................................................... 242How BlackBerry UEM chooses which user role to assign...................................................................242Rank user roles....................................................................................................................................... 243Assign a user role to a group................................................................................................................243Assign a user role to a user.................................................................................................................. 243
Creating and managing user accounts............................................................................................................ 243
| | vii

Create a user account............................................................................................................................243Creating user accounts from a .csv file............................................................................................... 246View a user account...............................................................................................................................249Add notes to a user account.................................................................................................................249Manage multiple user accounts at one time....................................................................................... 249Send an email to users.......................................................................................................................... 250Send a BlackBerry UEM Self-Service password to multiple users......................................................250Edit user account information............................................................................................................... 251Synchronize information for a directory user.......................................................................................251Remove services from a user................................................................................................................252Enable services for a user..................................................................................................................... 252Delete a user account............................................................................................................................ 253Add users to user groups...................................................................................................................... 253Remove a user from a user group........................................................................................................ 254Change which user groups a user belongs to..................................................................................... 254Assign a profile or IT policy to a user account....................................................................................254Add a client certificate to a user account............................................................................................ 255Change a client certificate for a user account.....................................................................................255Renew or remove a BlackBerry Dynamics certificate for a user account.......................................... 256Add a client certificate to a user credential profile............................................................................. 256Change a client certificate for a user credential profile...................................................................... 257Assign an app to a user account..........................................................................................................257Assign an app group to a user account............................................................................................... 258Assign a BlackBerry OS IT policy, profile, or software configuration to a user account....................260View the resolved BlackBerry OS IT policy rules that are assigned to a user account...................... 260
Creating and managing user groups................................................................................................................261Creating directory-linked groups............................................................................................................261Create a local group...............................................................................................................................263View a user group.................................................................................................................................. 263Change the name of a user group........................................................................................................ 264Delete a user group................................................................................................................................ 264Add nested groups to a user group......................................................................................................264Remove nested groups from a user group.......................................................................................... 264Assign a profile or IT policy to a user group....................................................................................... 265Assign an app to a user group..............................................................................................................265Assign an app group to a user group...................................................................................................266Assign a BlackBerry OS IT policy, profile, or software configuration to a user group....................... 268
Creating and managing shared device groups................................................................................................270Create a shared device group............................................................................................................... 270Activate a shared device........................................................................................................................270View the check-out history for a user...................................................................................................271Edit the user membership for a shared device group......................................................................... 271Remove a device from a shared device group.................................................................................... 271Delete a shared device group................................................................................................................271Assign an app to a shared device group..............................................................................................272Assign an IT policy or a profile to a shared device group.................................................................. 272
Creating device groups......................................................................................................................................273Create a device group............................................................................................................................ 273Edit a device group.................................................................................................................................275Defining parameters for device groups................................................................................................ 275View a device group...............................................................................................................................276Change the name of a device group.................................................................................................... 276Delete a device group.............................................................................................................................276
Viewing and customizing the user list............................................................................................................. 277
| | viii

Set the default or advanced view..........................................................................................................277Select the information to display in the user list................................................................................. 277Filter the user list....................................................................................................................................277Sort the user list..................................................................................................................................... 278Export the user list to a .csv file........................................................................................................... 278Change the device ownership label...................................................................................................... 278
Device activation...........................................................................................279Steps to activate devices.................................................................................................................................. 279Requirements: Activation...................................................................................................................................279Managing activation passwords.......................................................................................................................280
Specify the default settings for activation passwords........................................................................ 280Allowing users to activate multiple devices with different activation types...................................... 281Manually expire an activation password.............................................................................................. 282Set an activation password and send an activation email message..................................................282Send an activation email to multiple users..........................................................................................283Allow users to set activation passwords in BlackBerry UEM Self-Service......................................... 283
Turn on user registration with the BlackBerry Infrastructure......................................................................... 284Enable user notification when a device has been activated.......................................................................... 284Supporting Android Enterprise activations...................................................................................................... 284
Support Android Enterprise activations with a G Suite domain..........................................................285Support Android Enterprise activations with a Google Cloud domain................................................285Enable a unified BlackBerry Hub........................................................................................................... 285
Supporting Windows 10 activations.................................................................................................................286Creating activation profiles............................................................................................................................... 286
Create an activation profile....................................................................................................................286Activation types: BlackBerry 10 devices...............................................................................................288Activation types: iOS devices................................................................................................................ 288Activation types: macOS devices.......................................................................................................... 290Activation types: Android devices......................................................................................................... 290Activation types: Windows devices.......................................................................................................293
Activation step-by-step for users......................................................................................................................294Activating Android devices.................................................................................................................... 294Activate an iOS device........................................................................................................................... 297Activate a BlackBerry 10 device............................................................................................................297Activate a Windows 10 Mobile device..................................................................................................298Activate a macOS device....................................................................................................................... 299Activate an Apple TV device..................................................................................................................299Activate a Windows 10 tablet or computer..........................................................................................300Activate a device using a QR Code.......................................................................................................301Activate a BlackBerry OS device........................................................................................................... 301
Activate multiple devices using KNOX Mobile Enrollment............................................................................. 302Activate multiple devices using zero-touch enrollment for Android Enterprise devices...............................302Activating iOS devices that are enrolled in DEP..............................................................................................303
Steps to activate devices that are enrolled in DEP..............................................................................303Register iOS devices in DEP and assign them to the BlackBerry UEM server....................................304Assign an enrollment configuration to iOS devices.............................................................................304Add an enrollment configuration...........................................................................................................304Remove an enrollment configuration that is assigned to iOS devices............................................... 305Delete an enrollment configuration.......................................................................................................306Change the settings for an enrollment configuration..........................................................................306View the settings for an enrollment configuration that is assigned to a device................................306
| | ix

View user details for an activated device............................................................................................ 306Activating iOS devices using Apple Configurator 2........................................................................................ 306
Steps to activate devices using Apple Configurator 2........................................................................ 307Add BlackBerry UEM server information to Apple Configurator 2...................................................... 307Prepare iOS devices using Apple Configurator 2.................................................................................307
Using Activation Lock on iOS devices..............................................................................................................308Enable Activation Lock...........................................................................................................................308Disable Activation Lock..........................................................................................................................309View the Activation Lock bypass code.................................................................................................309
Restricting unsupervised iOS devices.............................................................................................................. 309Activating BlackBerry 10 devices using the BlackBerry Wired Activation Tool............................................. 309
Configure the BlackBerry Wired Activation Tool and log in to a BlackBerry UEM instance...............310Activate BlackBerry 10 devices using the BlackBerry Wired Activation Tool.....................................310
Tips for troubleshooting device activation...................................................................................................... 311Device activation can't be completed because the server is out of licenses. For assistance,
contact your administrator............................................................................................................... 312Please check your username and password and try again.................................................................312Profile failed to install. The certificate "AutoMDMCert.pfx" could not be imported...........................312Error 3007: Server is not available........................................................................................................ 313Unable to contact server, please check connectivity or server address.............................................313iOS or macOS device activations fail with an invalid APNs certificate.............................................. 313Users are not receiving the activation email........................................................................................314
Device commands and controls.................................................................... 315Sending commands to users and devices.......................................................................................................315
Send a command to a device............................................................................................................... 315Send a bulk command........................................................................................................................... 315Set an expiry time for commands.........................................................................................................317Commands reference............................................................................................................................. 317
Deactivating devices.......................................................................................................................................... 326Locate a device.................................................................................................................................................. 326
Using Lost Mode for supervised iOS devices...................................................................................... 327View available updates for iOS devices...........................................................................................................327Update the OS on supervised iOS devices...................................................................................................... 328Creating device support messages.................................................................................................................. 328
Create device support messages..........................................................................................................328Allowing BlackBerry 10 users to back up device data....................................................................................329
Generate encryption keys.......................................................................................................................329Export encryption keys........................................................................................................................... 329Import encryption keys...........................................................................................................................330Remove encryption keys........................................................................................................................ 330
Maintenance, monitoring, and reporting........................................................331Using log files.....................................................................................................................................................331
Managing BlackBerry UEM log files......................................................................................................331Change the log level to Warn for Microsoft Intune customers...........................................................333Finding log files...................................................................................................................................... 334Reading log files..................................................................................................................................... 335Auditing app activity on BlackBerry 10 and BlackBerry OS devices................................................... 340Viewing device actions...........................................................................................................................341Retrieving device logs............................................................................................................................ 342
| | x

Auditing events in BlackBerry UEM.................................................................................................................. 344Configure audit settings.........................................................................................................................344View and filter the administrator audit events.....................................................................................345Export administrator audit events to a .csv file................................................................................... 345Export security audit events to a .csv file............................................................................................ 346Delete audit records............................................................................................................................... 346
Creating event notifications.............................................................................................................................. 346Create an event notification.................................................................................................................. 346Create a schedule for an event notification......................................................................................... 347Create a distribution list for an event notification............................................................................... 347Disable an event notification................................................................................................................. 348Event types.............................................................................................................................................. 348
Manage BlackBerry Dynamics jobs.................................................................................................................. 350Using SNMP to monitor BlackBerry UEM........................................................................................................ 350Using dashboard reports................................................................................................................................... 351
Change the type of graph...................................................................................................................... 351Export a dashboard report to a .csv file...............................................................................................351
Logging phone call and SMS/MMS activity for Android Enterprise and Samsung KNOXWorkspace devices.......................................................................................................................................352
View and save a device report......................................................................................................................... 352Exporting app deployment reports................................................................................................................... 352
Export an app deployment report to an .html file................................................................................353Activity and compliance violation reports for BlackBerry Dynamics apps.................................................... 353
Export BlackBerry Dynamics app reports to a .csv file....................................................................... 353Monitoring the performance of the BlackBerry Work app..............................................................................353
Enable BlackBerry Work monitoring......................................................................................................353View device performance alert notifications........................................................................................354View a performance alert for a single device...................................................................................... 354
Profile settings..............................................................................................355Email profile settings......................................................................................................................................... 355
Common: Email profile settings............................................................................................................355BlackBerry 10: Email profile settings...................................................................................................356iOS: Email profile settings......................................................................................................................365macOS: Email profile settings............................................................................................................... 369Android: Email profile settings.............................................................................................................. 369Windows: Email profile settings............................................................................................................ 375
IMAP/POP3 email profile settings....................................................................................................................377Common: IMAP/POP3 email profile settings.......................................................................................377iOS and macOS: IMAP/POP3 email profile settings............................................................................378Android: IMAP/POP3 email profile settings......................................................................................... 380Windows: IMAP/POP3 email profile settings.......................................................................................381
Wi-Fi profile settings.......................................................................................................................................... 381Common: Wi-Fi profile settings............................................................................................................. 382BlackBerry 10: Wi-Fi profile settings..................................................................................................... 382iOS and macOS: Wi-Fi profile settings..................................................................................................387Android: Wi-Fi profile settings.............................................................................................................. 393Windows: Wi-Fi profile settings............................................................................................................. 397
VPN profile settings...........................................................................................................................................402BlackBerry 10: VPN profile settings......................................................................................................402iOS and macOS: VPN profile settings...................................................................................................416Android: VPN profile settings................................................................................................................ 424
| | xi

Windows 10: VPN profile settings ....................................................................................................... 430SCEP profile settings......................................................................................................................................... 436
Common: SCEP profile settings............................................................................................................ 436BlackBerry 10: SCEP profile settings.................................................................................................... 438iOS: SCEP profile settings......................................................................................................................441macOS: SCEP profile settings............................................................................................................... 443Android: SCEP profile settings.............................................................................................................. 444Windows 10: SCEP profile settings.......................................................................................................447BlackBerry Dynamics: SCEP profile settings........................................................................................450
Compliance profile settings.............................................................................................................................. 453Common: Compliance profile settings................................................................................................. 453BlackBerry 10: Compliance profile settings......................................................................................... 455iOS: Compliance profile settings........................................................................................................... 456macOS: Compliance profile settings.....................................................................................................459Android: Compliance profile settings....................................................................................................460Windows: Compliance profile settings................................................................................................. 463
BlackBerry Dynamics profile settings...............................................................................................................466BlackBerry Dynamics connectivity profile settings......................................................................................... 471Enterprise connectivity profile settings............................................................................................................472
Common: Enterprise connectivity profile settings............................................................................... 473BlackBerry 10: Enterprise connectivity profile settings....................................................................... 473iOS: Enterprise connectivity profile settings.........................................................................................473Android: Enterprise connectivity profile settings................................................................................. 474
Enterprise Management Agent profile settings...............................................................................................475BlackBerry 10: Enterprise Management Agent profile settings.......................................................... 476iOS: Enterprise Management Agent profile settings............................................................................478Android: Enterprise Management Agent profile settings.................................................................... 478Windows: Enterprise Management Agent profile settings.................................................................. 479
Windows Information Protection profile settings............................................................................................479Windows 10: Windows Information Protection profile settings..........................................................480
Microsoft Intune app protection profile settings.............................................................................................484Common: Microsoft Intune app protection profile settings................................................................484iOS: Microsoft Intune app protection profile settings......................................................................... 487Android: Microsoft Intune app protection profile settings.................................................................. 488
Policy reference spreadsheet........................................................................490
Glossary........................................................................................................ 491
Legal notice.................................................................................................. 495
| | xii

Getting startedBlackBerry UEM is a multiplatform EMM solution from BlackBerry that provides comprehensivedevice, app, and content management with integrated security and connectivity, and helps youmanage iOS, macOS, Android, Windows 10, and BlackBerry 10 devices for your organization.
Steps to get started with BlackBerry UEM
Step Action
Plan your BlackBerry UEM installation.
Install BlackBerry UEM or upgrade to the latest version of BlackBerry UEM.
If you are using BlackBerry Work or BlackBerry Connect, install or upgrade and configurethe BlackBerry Enterprise Mobility Server.
Log in to BlackBerry UEM.
Configure BlackBerry UEM according to your organization's requirements.
If you want to share administration work with other IT staff, create administrators.
Set up work connections. For example, create email, Wi-Fi, and VPN profiles.
Set rules to manage the security and behavior of devices using IT policies.
Set up device standards. For example, compliance rules.
If your organization is using BlackBerry Dynamics, configure BlackBerry Dynamics settings.
Determine which apps to send to devices and add them to BlackBerry UEM.
Control how devices are activated and managed in BlackBerry UEM using activationprofiles.
| Getting started | 13

Step Action
Create any necessary user groups or user accounts.
Assign profiles and IT policies to user groups or user accounts.
Assign apps to user groups or user accounts.
Instruct users to activate devices on BlackBerry UEM.
Supported features by device typeThis quick reference compares the supported capabilities of BlackBerry 10, BlackBerry OS (version 5.0 to7.1), iOS, macOS, Android, and Windows devices in BlackBerry UEM.
Support for BlackBerry OS devices requires an upgrade from BES5 to BlackBerry UEM.
For more information about supported OS versions, see the Compatibility matrix.
Device features
Feature BlackBerry10
BlackBerry OS iOS macOS Android Windows
Wireless activation √ √ √ √ √ √
Wireless activationusing a QR code
√ √
Wiredactivation usingthe BlackBerryWired ActivationTool
√
Client app requiredfor activation
√ 1 √
Customize terms ofuse agreement foractivation
√ √ √ √ √ 2
Restrict activationby device model
√ √ √ √ √ 3
| Getting started | 14
Feature BlackBerry10
BlackBerry OS iOS macOS Android Windows
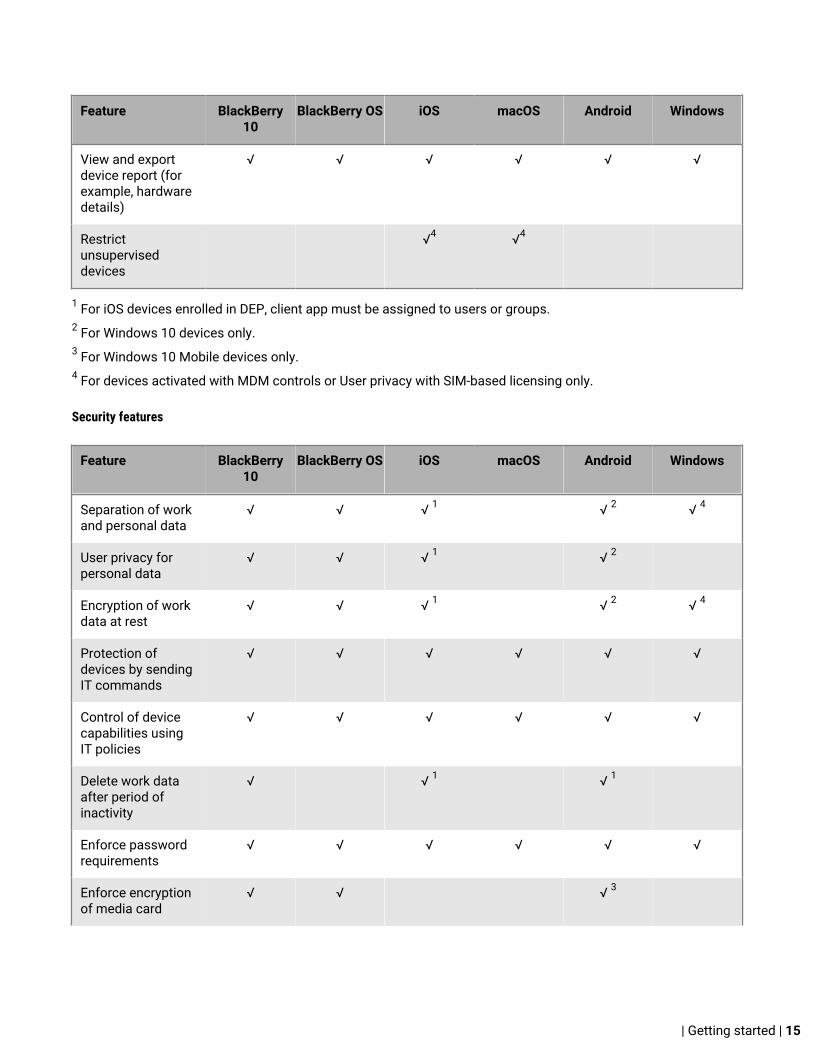
View and exportdevice report (forexample, hardwaredetails)
√ √ √ √ √ √
Restrictunsuperviseddevices
√4 √4
1 For iOS devices enrolled in DEP, client app must be assigned to users or groups.2 For Windows 10 devices only.3 For Windows 10 Mobile devices only.4 For devices activated with MDM controls or User privacy with SIM-based licensing only.
Security features
Feature BlackBerry10
BlackBerry OS iOS macOS Android Windows
Separation of workand personal data
√ √ √ 1 √ 2 √ 4
User privacy forpersonal data
√ √ √ 1 √ 2
Encryption of workdata at rest
√ √ √ 1 √ 2 √ 4
Protection ofdevices by sendingIT commands
√ √ √ √ √ √
Control of devicecapabilities usingIT policies
√ √ √ √ √ √
Delete work dataafter period ofinactivity
√ √ 1 √ 1
Enforce passwordrequirements
√ √ √ √ √ √
Enforce encryptionof media card
√ √ √ 3
| Getting started | 15
Feature BlackBerry10
BlackBerry OS iOS macOS Android Windows
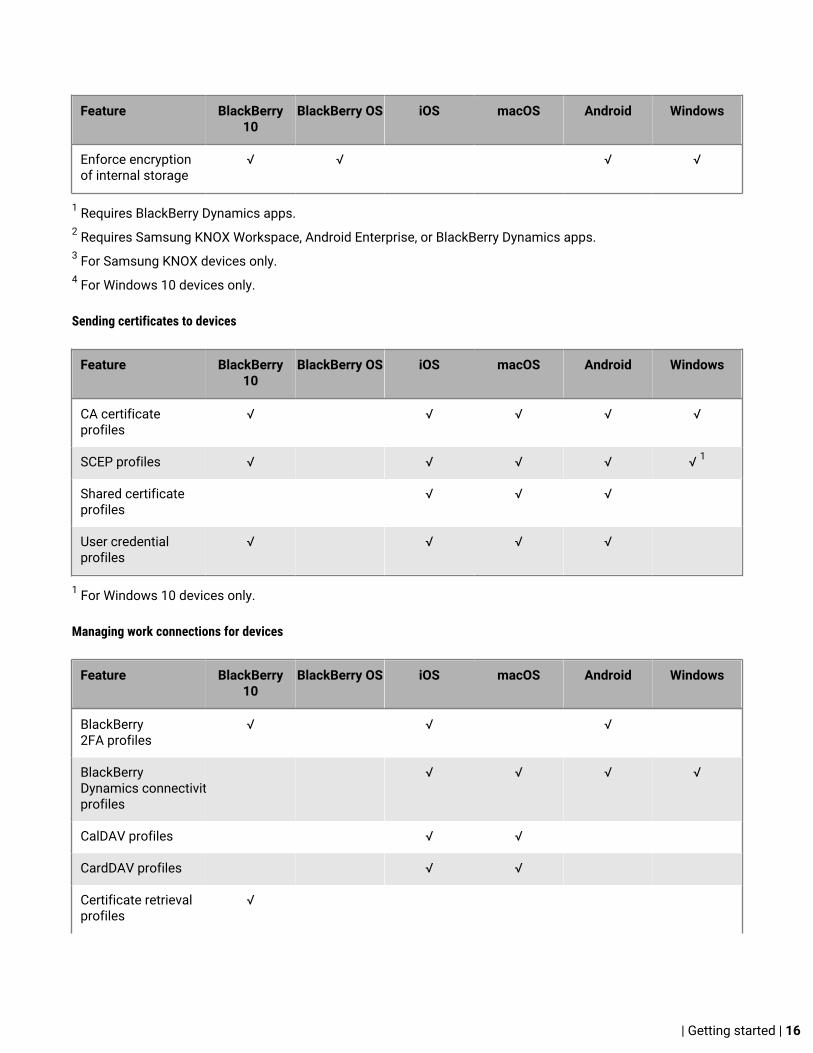
Enforce encryptionof internal storage
√ √ √ √
1 Requires BlackBerry Dynamics apps.2 Requires Samsung KNOX Workspace, Android Enterprise, or BlackBerry Dynamics apps.3 For Samsung KNOX devices only.4 For Windows 10 devices only.
Sending certificates to devices
Feature BlackBerry10
BlackBerry OS iOS macOS Android Windows
CA certificateprofiles
√ √ √ √ √
SCEP profiles √ √ √ √ √ 1
Shared certificateprofiles
√ √ √
User credentialprofiles
√ √ √ √
1 For Windows 10 devices only.
Managing work connections for devices
Feature BlackBerry10
BlackBerry OS iOS macOS Android Windows
BlackBerry2FA profiles
√ √ √
BlackBerryDynamics connectivityprofiles
√ √ √ √
CalDAV profiles √ √
CardDAV profiles √ √
Certificate retrievalprofiles
√
| Getting started | 16

Feature BlackBerry10
BlackBerry OS iOS macOS Android Windows
Enterpriseconnectivity
√
BlackBerry SecureConnect Plus
√ √ 1 √ 2
ExchangeActiveSync emailprofiles
√ √ √ √ 3 √
BlackBerry SecureGateway
√
IMAP/POP3 emailprofiles
√ √ √ √
Proxy profiles √ √ √ √ √ 4
Single sign-onprofiles
√ √
VPN profiles √ √ √ √ √ 5 √ 6
Wi-Fi profiles √ √ √ √ √ √
Other OS-specificprofiles
CRL profiles
OCSPprofiles
CRLprofiles 7
Windows InformationProtectionprofiles 7
1 Only for devices running iOS 9.0 and later.2 Only for Android Enterprise devices and KNOX Workspace devices.3 Only for Motorola devices that support the EDM API, Android Enterprise devices, and KNOX devices.4 Only for Windows 10 devices (configure proxy settings in VPN profiles) and Windows 10 Mobile devices(configure proxy settings in Wi-Fi profiles).5 For KNOX Workspace devices only.6 For Windows 10 devices only.7 Only for BlackBerry devices powered by Android with Android 7.0 and later.
Managing your organization’s standards for devices
Feature BlackBerry10
BlackBerry OS iOS macOS Android Windows
Activation profiles √ √ √ √ √
| Getting started | 17

Feature BlackBerry10
BlackBerry OS iOS macOS Android Windows
App lock modeprofiles
√ 1 √ 1 √ 1
BlackBerryDynamics profiles
√ √ √ √
BlackBerryDynamics complianceprofiles 2
√ √ √ √
Complianceprofiles
√ √ √
Device profiles √ √ √ √ 3
EnterpriseManagementAgent profiles
√ √ √ √
Location serviceprofiles
√ √ √ 4
Other OS-specificprofiles
Device SRrequirementsprofiles
Accesscontrolrules
Softwareconfiguration
AirPlay profiles
AirPrint profiles
Custompayloadprofiles
Manageddomainsprofiles
Networkusageprofiles
Per-appnotificationprofiles 5
Webcontentfilterprofiles
1 Only for supervised iOS devices, KNOX devices that are activated with MDM controls, Windows 10 Education,and Windows 10 Enterprise devices.2 If your environment includes both Good Control and BlackBerry UEM, after you upgrade and synchronize GoodControl with BlackBerry UEM, existing compliance profiles in Good Control are imported to BlackBerryUEM as BlackBerry Dynamics compliance profiles that contain the Good Control compliance settings.
| Getting started | 18

4 For Windows 10 devices only.5 For Windows 10 Mobile devices only.6 Only for supervised iOS devices running iOS 9.3 and later.
Protecting lost or stolen devices
Feature BlackBerry10
BlackBerry OS iOS macOS Android Windows
Specify devicepassword
√ √ √ √ 1
Lock device √ √ √ √ √ √ 1
Activation lock √ 2
Specifywork spacepassword andlock
√ 3
Unlock deviceand clearpassword
√ √
Delete alldevice data
√ √ √ √ √ 4 √
Delete onlywork data
√ √ √ √ √ √
1 For Windows 10 Mobile devices only.2 Only for devices running iOS 7.0 and later.3 Only for Android Enterprise devices running Android 7.0 and later.4 For Motorola devices that support the EDM API, information on the media card is also deleted. For KNOXWorkspace devices, you can choose to delete information on the media card.
Configuring roaming
Feature BlackBerry10
BlackBerry OS iOS macOS Android Windows
Disableautomaticsynchronizationwhen roaming
√ 1 √ √ 2
| Getting started | 19

Feature BlackBerry10
BlackBerry OS iOS macOS Android Windows
Disable datawhen roaming
√ √3 √ 4 √
1 For synchronization with the mail server only.2 For KNOX devices only.3 For devices running iOS 9.0 or later, you can configure data roaming settings in a network usage profile.4 For Android Enterprise and KNOX devices only.
Managing apps
Feature BlackBerry10
BlackBerry OS iOS macOS Android Windows
Distributepublic appsfrom storefront(BlackBerryWorld, AppStore, GooglePlay, WindowsStore)
√ √ √ √
Manage workapp catalog
√ √ √ √ √
Brand work appcatalog
√ √
Managerestricted apps
√ √ 1 √ 1
Distributeinternal apps
√ √ √ √ √
Add appshortcuts todevices
√ √ √
1 The restricted app list is not required for Android Enterprise, KNOX Workspace, or Windows 10 devices becauseonly apps that an administrator assigns can be installed in the work space or on devices.
Managing BlackBerry Dynamics apps in BlackBerry UEMBlackBerry Dynamics productivity apps provide users with access to work data and productivity tools. BlackBerryDynamics apps developed by BlackBerry include the following apps:
| Getting started | 20

App Description
BlackBerry Work The BlackBerry Work app provides secure access to work email and allows usersto view and send attachments, create custom contact notifications, and managetheir messages.
BlackBerry Access BlackBerry Access is a secure browser that allows users to access work intranetsand web applications. BlackBerry Access also allows you to enable access towork resources or build and deploy rich HTML5 apps, while maintaining a highlevel of security and compliance.
BlackBerry Connect BlackBerry Connect allows communication and collaboration with secure instantmessaging, company directory lookup, and user presence from an easy-to-useinterface on users' devices.
BlackBerry Tasks BlackBerry Tasks allows users to create, edit, and manage tasks that aresynchronized with Microsoft Exchange.
BlackBerry Notes BlackBerry Notes allows users to create, edit, and manage notes that aresynchronized with Microsoft Exchange on their mobile device of choice.
BlackBerry Docs To Go BlackBerry Docs To Go allows users to create, edit, and format MicrosoftWord documents and Microsoft Excel spreadsheets that are stored in the appor shared from other BlackBerry Dynamics apps. Users can also view, edit, andpresent Microsoft PowerPoint presentations from their devices.
For more information about managing BlackBerry Dynamics apps, see Managing BlackBerry Dynamics apps andthe administrator resources for each app.
You can also use BlackBerry Dynamics apps developed by one of BlackBerry's many third-party applicationpartners. For a full list of publicly available apps, visit the BlackBerry Marketplace for Enterprise Software.
You can also develop your own BlackBerry Dynamics apps using the BlackBerry Dynamics SDK. For moreinformation, see the BlackBerry Dynamics SDK content.
BlackBerry devices powered by AndroidPRIV, DTEK and KEYone are examples of BlackBerry devices powered by Android. To manage these deviceswith BlackBerry UEM, you can follow the instructions for Android devices.
The following activation types are available for BlackBerry devices powered by Android:
• Work and personal - user privacy• Work and personal - user privacy (Premium)• Work space only• Work space only (Premium)• MDM controls• User privacy
We recommend that you activate BlackBerry devices powered by Android using a "Work and personal" or "Workspace only" activation type to achieve the optimum experience.
| Getting started | 21

Device management optionsBlackBerry UEM supports various options for managing devices. The options that you choose depend on thetypes of devices that you manage and your organization's security requirements.
BlackBerry UEM supports the following management options:
• MDM controls• Work and personal• User privacy• Work space only
For each management option, you must have the right licenses available and the appropriate activation profileassigned to users.
For more information about activation profiles, see Creating activation profiles.
For more information about BlackBerry UEM licenses, see the Licensing content.
For more information about security for the different management options, see the Security content.
Managing devices beyond smartphones, tablets, and laptopsYou can activate and manage more than smartphones, tablets, and laptops with BlackBerry UEM.
BlackBerry UEM also manages the following devices:
• Certain Android based wearable devices• Apple TV devices
Managing wearable devicesYou can activate and manage certain Android based wearable devices in BlackBerry UEM. Wearable devices,such as smart glasses provide users with hands-free access to visual information such as notifications, step-by-step instructions, images, and video and allow users to issue voice commands, scan barcodes and use GPSnavigation.
BlackBerry UEM supports the following wearable devices:
• Vuzix M300 Smart Glasses
To manage wearable devices, follow the instructions for Android devices. The following BlackBerry UEM featuresare supported for wearable devices:
• Device activation using a QR Code• IT policies• Wi-Fi, VPN, enterprise connectivity, compliance, and certificate profiles• BlackBerry Secure Connect Service• Device commands• App management• Device groups• Location services
Wearable devices use the BlackBerry UEM Client for activation. You can activate wearable devices using a QRcode instead of an activation password. For more information, see Activate a device using a QR Code.
| Getting started | 22
Managing Apple TV devicesYou can activate and manage Apple TV devices in BlackBerry UEM. Apple TV is a digital media player that canreceive data and stream it to a televsion over an HDMI cable.
BlackBerry UEM supports Apple TV versions that are second generation or later.
To manage Apple TV devices, follow the instructions and use the profile settings for iOS devices. The followingBlackBerry UEM features are supported for Apple TV:
• Device activation using BlackBerry UEM Self-Service• MDM controls activation type• Wi-Fi and certificate profiles• App lock mode profiles• Device commands
To prevent users from activating Apple TV devices, set the device model restriction in the activation profile to notallow any Apple TV devices.
To activate Apple TV devices, you must use BlackBerry UEM Self-Service. For more information, see Activate anApple TV device.
What is the BlackBerry UEM Client?The BlackBerry UEM Client is an app that lets users activate devices on BlackBerry UEM. The UEM Client isrequired to activate the following devices:
• iOS• Android, including Android wearable devices
Users can download the UEM Client from the App Store, or Google Play.
The following table summarizes the functions of the UEM Client:
BlackBerry UEMClient function
Description
Communicationwith BlackBerry UEM
The UEM Client allows BlackBerry UEM to communicate with devices for thepurpose of device activation and device management.
For more information about activation data flows, see the Architecture content.
| Getting started | 23

BlackBerry UEMClient function
Description
Activation Users must download the latest version of the UEM Client from the appropriateapp store and use their email address and activation password or QR Code toactivate devices on BlackBerry UEM.
In the following cases, users don't need the UEM Client to activate devices:
• For iOS devices, if you use Apple Configurator 2 or Apple's Device EnrollmentProgram, users don't need the UEM Client to activate devices. Users mustinstall and start the UEM Client app after activation if you want to enforcecompliance rules.
• For iOS and Android devices that don't need MDM, users canactivate BlackBerry Dynamics apps using access keys instead of usingthe UEM Client. However, using the UEM Client provides benefits, such as aconsistent activation experience that doesn't require access keys, accessto the work app catalog in the UEM Client or the BlackBerry DynamicsLauncher (if configured), and the ability for users to authorize location services(if configured).
For more information, see Device activation.
Deactivation Users can click "Deactivate My Device" in the About section of the UEM Client toremove the device from BlackBerry UEM and delete all work data from the device.
Work apps The UEM Client allows users to find and download the apps that you assign tothem, and if configured, users can provide ratings and reviews for the apps.
For iOS devices activated with user privacy, users can access the work appcatalog from a browser link in the UEM Client. For iOS devices activated withMDM, a customizable icon for work apps is provided on the home screen.
For Android devices, users can access the work app catalog in the UEM Client.
For more information, see Apps.
Profiles and policies The profiles, policies, and certificates that you assign to users are displayed inthe UEM Client.
Compliance On the home screen of the UEM Client, users can tap "Compliant" or "Notcompliant" to see a status report for their device based on the compliance profilethat you assigned to them.
For devices that are activated using Apple Configurator 2 or Apple's DeviceEnrollment Program, users must install and start the BlackBerry UEM Client afteractivation if you want to enforce compliance rules.
For more information, see Enforcing compliance rules for devices.
BlackBerry 2FA If configured, users can bypass the two factor authentication requiredby BlackBerry 2FA by preauthenticating in the UEM Client.
For more information, see the BlackBerry 2FA content.
| Getting started | 24

BlackBerry UEMClient function
Description
Location service If you create a location service profile and assign it to user accounts, users areprompted to allow the UEM Client to access their device location.
Device log files Users can send device log files by email from the UEM Client.
For more information, see Retrieving device logs.
About In the About section of the UEM Client, users can see some or all of the followinginformation depending on the device type and activation type:
• The version of the UEM Client• The date and time that the device was activated• Organization information that you configure in the device profile (for example,
your organization's contact information)• The BlackBerry UEM server URL• End-user license agreement• A button that lets users deactivate their device
What is BlackBerry UEM Self-Service?BlackBerry UEM Self-Service is a web application that you can make available to users so that they can performcertain tasks such as creating activation passwords, locking devices, or deleting data from devices. Users do notneed to install any software on their computers to use BlackBerry UEM Self-Service.
You must provide the BlackBerry UEM Self-Service login information to users. You can send this informationin an email message, or edit the activation email template to include the information. Users need the followinginformation:
• Web address: The web address for BlackBerry UEM Self-Service is displayed in the management console atSettings > Self-Service.
• Username and password: Company directory users can log in with their organization usernames andpasswords. For local users, you must create the usernames and temporary passwords.
• Domain name: The domain name is required for Microsoft Active Directory users.
You can also create a login notice that users must read and accept before they can log in to BlackBerry UEM Self-Service.
For more information about using BlackBerry UEM Self-Service, see the BlackBerry UEM Self-Service User Guide.
Related tasks
Create a login notice for the consoles
BlackBerry Enterprise Mobility Suite servicesBeyond the security and productivity features that BlackBerry UEM provides, BlackBerry offers more services thatcan add value to your BlackBerry UEM domain to help meet your organization’s unique needs. You can add thefollowing services and manage them through the BlackBerry UEM management console:
| Getting started | 25

Service type Service name and description
Enterprise services • BlackBerry Workspaces allows users to securely access, synchronize, edit,and share files and folders from Windows and Mac OS tablets and computersor Android, iOS, and BlackBerry 10 devices. BlackBerry Workspaces protectsfiles by applying DRM controls to limit access, even after they are shared withsomeone outside of your organization.
• BlackBerry Enterprise Identity gives users single sign-on access to serviceproviders such as BlackBerry Workspaces, Box, Workday, WebEx, Salesforce,and more. You can also add support for custom SaaS services.
• BlackBerry 2FA protects access to your organization’s critical resources usingtwo-factor authentication. BlackBerry 2FA uses a password that users enterand a secure prompt on their Android, iOS, or BlackBerry 10 devices each timethey attempt to access resources.
• BlackBerry UEM Notifications allows administrators to message users viaSMS, phone, and email directly from the UEM console. This add-on simplifiescommunications to end users and user groups, by eliminating the need foradditional messaging solutions.
BlackBerryDynamics platform
• The BlackBerry Enterprise Mobility Server (BEMS) provides additionalservices for BlackBerry Dynamics apps. BEMS integrates the followingservices: BlackBerry Mail, BlackBerry Connect, BlackBerry Presence,and BlackBerry Docs. When these services are integrated, users cancommunicate with each other using secure instant messaging, view the real-time presence of users in BlackBerry Dynamics apps, and access, synchronize,and share work file server and Microsoft SharePoint documents.
• The BlackBerry Dynamics SDK allows developers to create secure appsfor Android and iOS devices and Mac OS and Windows computers. It is theclient side of the BlackBerry Dynamics platform.
BlackBerryDynamics productivityapps
• BlackBerry Work provides everything users need to securely mobilizetheir work, including email, calendar, and contacts (full synchronizationwith Microsoft Exchange). The app also provides advanced documentcollaboration. BlackBerry Work separates work data from personal data andallows seamless integration with other work apps without requiring MDMprofiles on the device.
• BlackBerry Access enables users to securely access their organization'sintranet with their mobile device of choice.
• BlackBerry Connect enhances communication and collaboration with secureinstant messaging, corporate directory lookup, and user presence, all from aneasy-to-use interface on the user’s device.
• BlackBerry Tasks allows users to create, edit, and manage notes that aresynchronized with Microsoft Exchange on their Android and iOS devices.
• BlackBerry Notes allows users to create, edit, and manage notes that aresynchronized with Microsoft Exchange on their mobile device of choice.
For more information about the different BlackBerry Enterprise Mobility Suite licenses and how to obtainthem, see the Licensing content.
| Getting started | 26
Log in to BlackBerry UEM The management console allows you to perform administrative tasks for devices in your organization that aremanaged by BlackBerry UEM.
Before you begin:
• Locate the web address (for example, https://<hostname>/admin/index.jsp.) and login information for themanagement console. You can find the information in the inbox of the email account that is associated withyour BlackBerry UEM account.
• If you are using Microsoft Active Directory authentication, you must know the Microsoft ActiveDirectory domain.
1. In the browser, type the web address for the BlackBerry UEM management console of your organization.2. In the Username field, type your username.3. In the Password field, type your password.4. If necessary, in the Sign in using drop-down list, do one of the following:
• Click Direct authentication.• Click LDAP authentication.• Click Microsoft Active Directory authentication. In the Domain field, type the Microsoft Active
Directory domain.5. Click Sign in.
After you finish: You can change your login password by clicking the user icon in the top-right corner of themanagement console.
| Getting started | 27
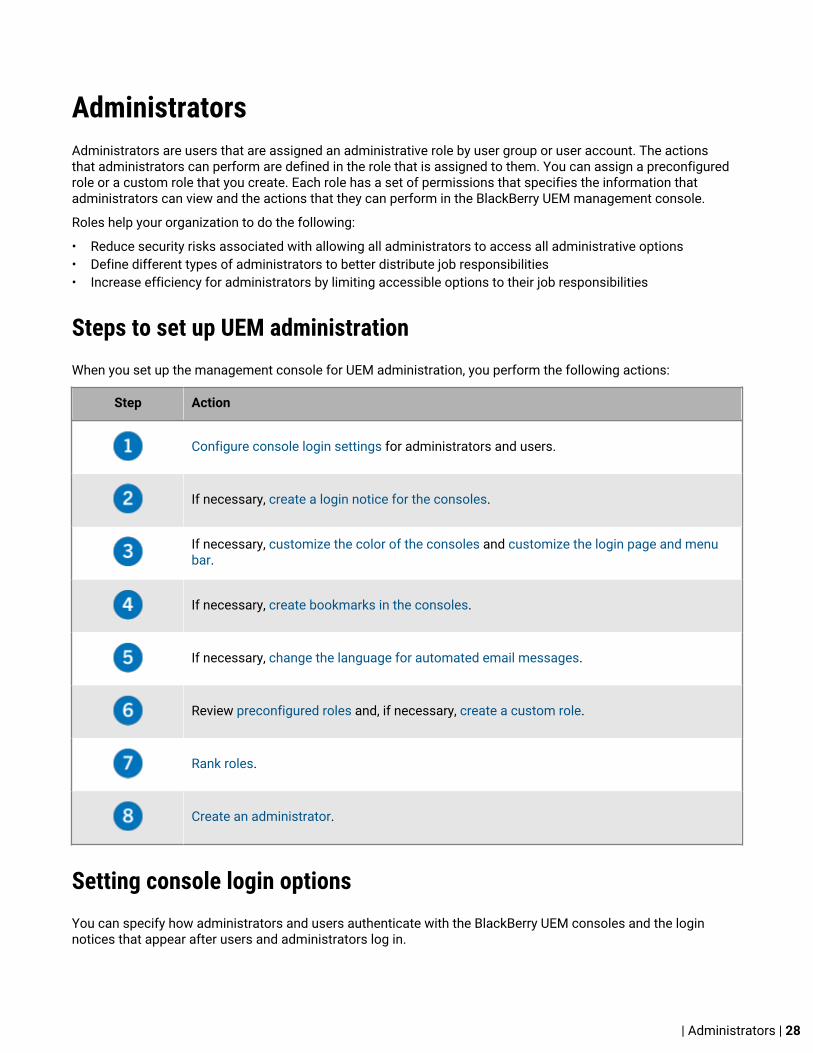
AdministratorsAdministrators are users that are assigned an administrative role by user group or user account. The actionsthat administrators can perform are defined in the role that is assigned to them. You can assign a preconfiguredrole or a custom role that you create. Each role has a set of permissions that specifies the information thatadministrators can view and the actions that they can perform in the BlackBerry UEM management console.
Roles help your organization to do the following:
• Reduce security risks associated with allowing all administrators to access all administrative options• Define different types of administrators to better distribute job responsibilities• Increase efficiency for administrators by limiting accessible options to their job responsibilities
Steps to set up UEM administrationWhen you set up the management console for UEM administration, you perform the following actions:
Step Action
Configure console login settings for administrators and users.
If necessary, create a login notice for the consoles.
If necessary, customize the color of the consoles and customize the login page and menubar.
If necessary, create bookmarks in the consoles.
If necessary, change the language for automated email messages.
Review preconfigured roles and, if necessary, create a custom role.
Rank roles.
Create an administrator.
Setting console login optionsYou can specify how administrators and users authenticate with the BlackBerry UEM consoles and the loginnotices that appear after users and administrators log in.
| Administrators | 28

You can allow administrators and users to log in using the following authentication methods:
Authentication option Description
Single sign-on If you connect BlackBerry UEM to Microsoft Active Directory, you can configuresingle sign-on authentication to permit administrators or users to bypass thelogin webpage and access the management console or BlackBerry UEM Self-Service directly.
If single sign-on is enabled, BlackBerry UEM does not request a password orcertificate to log in.
For more information, see the BlackBerry UEM configuration content.
Directory-based authentication
If you connect BlackBerry UEM to your company directory, administrators andusers can log in using their directory credentials.
For more information, see the BlackBerry UEM configuration content.
Local password-basedauthentication
Local administrators and users can authenticate with a username and password.
Certificate-basedauthentication
You can set up certificate-based authentication so that administrators and userscan log in using an authentication certificate.
Set the minimum password complexity for local administratorsYou can set the minimum password length and complexity requirements for local administrator accounts. Thissetting takes effect when administrators change their account password.
1. On the menu bar, click Settings > General settings > Console.2. In the Minimum number of characters field, enter the minimum number of characters that a console password
must have.3. In the Minimum password complexity field, select the minimum complexity for a console password:
• No restriction• 1 letter, 1 number• 1 letter, 1 number, 1 special character• 1 uppercase letter and lowercase letter, 1 number, 1 special character
4. Click Save.
Configure certificate-based console authenticationYou can set up certificate-based authentication so that administrators and users can log in using anauthentication certificate. BlackBerry UEM verifies certificates against the issuer, verifies that the certificate isvalid using the certificate OCSP or CRL settings, and verifies that the certificate matches a user in the BlackBerryUEM database.
Before you begin: Obtain copies of the CA certificates that issue your administrators' and users' client certificatesin .cer or .der format.
1. On the menu bar, click Settings > General settings > Certificate-based console authentication.2. Select Enable certificate-based authentication.3. Click Browse and navigate to the location where you saved the CA certificate files. Select a file and
click Open to upload the certificate to BlackBerry UEM.
| Administrators | 29

BlackBerry UEM trusts all certificates issued by that CA. Repeat this step to upload additional certificates.4. Select Check for user principal name for SAN to require BlackBerry UEM to verify that the user principal name
in the certificate matches a user in the BlackBerry UEM database.If the user principal name in the certificate matches a known user, BlackBerry UEM grants access according tothe user's permissions.
5. Select Check for email address to require BlackBerry UEM to verify that the user email address in thecertificate matches a user email address in the BlackBerry UEM database.If the user email address in the certificate matches a known user, BlackBerry UEM grants access accordingto the user's permissions. If you select both Check for user principal name for SAN and Check for emailaddress, BlackBerry UEM checks the principal name before the email address and grants access if theprincipal name matches. If neither check finds a match between the certificate and a known user, BlackBerryUEM denies access.
6. Click Save.
After you finish: If users access BlackBerry UEM using Mozilla Firefox, the user must add their client certificate tothe Firefox certificate store to authenticate with BlackBerry UEM using certificate-based authentication.
Create a login notice for the consolesYou can create a login notice to display to administrators or users when they access the management consoleor BlackBerry UEM Self-Service. The notice informs administrators or users about the terms and conditions theymust accept to use the management console or BlackBerry UEM Self-Service.
1. On the menu bar, click Settings.2. In the left pane, expand General settings.3. Click Login notices.4. Click .5. Perform any of the following tasks:
Task Steps
Configure a login notice forthe management console
a. Select the Enable a login notice for the management console check box.b. Enter the information that you want to display to administrators when
they access the management console.
Configure a login noticefor BlackBerry UEM Self-Service
a. Select the Enable a login notice for the self-service console check box.b. Enter the information that you want to display to users when they
access BlackBerry UEM Self-Service.
6. Click Save.
Customizing the appearance of the consolesYou can customize the appearance of the consoles by selecting a customized color scheme and by changing thetext and images on the log in screen and the image on the menu bar. The colors, images, and text that you selectare used in both the management console and the BlackBerry UEM Self-Service console.
Customize the color of the consolesYou can select a customized color scheme for the consoles. The colors that you select are used in both themanagement console and the BlackBerry UEM Self-Service console.
| Administrators | 30

1. On the menu bar, click Settings > General settings.2. Click Customize console.3. Select two colors for the console. Perform one of the following actions:
• Click the box to the left of the color code and select a color from the color palette.• Type hexadecimal color codes in the selection fields.• Select a color from the sample color boxes to the right of the color code.
A preview of the color scheme displays on the page.4. Click Save.
After you finish: Log out and log in again to see the updated color scheme.
Customize the login page and menu barYou can customize the appearance of the consoles by selecting customized images and heading text for thelogin page and a customized image for the menu bar. The images and text that you select are used in both themanagement console and the BlackBerry UEM Self-Service console. Custom images can't be larger than 2 MB.
1. On the menu bar, click Settings > General settings.2. Click BlackBerry UEM customization.3. Click the login page or menu bar image you want to change.4. Click Browse to select an image, then click Submit.
The login page background image scales to fit the width of the browser window and maintains the aspect ratioof the image. The images for the menu bar and company logo on the login page scale to fit the height of thearea and maintain the aspect ratio.
5. Click the login page heading text to change or delete the text.6. Click Save.
After you finish: Log out and log in again to see the updated text and images.
Create website bookmarks in the consolesYou can create website bookmarks in the BlackBerry UEM management console and the BlackBerry UEM Self-Service console. You can create different bookmarks for each console. For example, you might create a bookmarkin BlackBerry UEM Self-Service that links to customized help files for users' devices.
Before you begin: You must be a Security Administrator to create or edit bookmarks in the consoles.
1. Log in to BlackBerry UEM or BlackBerry UEM Self-Service.2. In the upper-right corner, click .3. Under Add web address, add bookmark information:
a) Enter a name for the bookmark.b) Enter the URL for the website. The URL must begin with "http://" or "https://".
4. Click Save.
After you finish: Click to view your bookmarks. All users can access the bookmarks, but you must be aSecurity Administrator to create or edit bookmarks.
| Administrators | 31

Change the language for automated email messagesIn the management console, you can change the language for automated email messages. BlackBerry UEMuses the language that you specify in email messages that you cannot edit (for example, notifications aboutadministrator access and console passwords).
1. On the menu bar, click Settings.2. In the left pane, expand General settings.3. Click Language.4. In the drop-down list, click the language that you want to use in automated email messages from BlackBerry
UEM.5. Click Save.
Creating and managing administrator rolesYou can review the preconfigured roles available for administrators in BlackBerry UEM to determine if you needto create custom roles or change role settings to meet your organization's requirements. You must be a SecurityAdministrator to create custom roles, view information about a role, change role settings, delete roles, and rankroles.
Preconfigured rolesThe Security Administrator role in BlackBerry UEM has full permissions to the management console, includingcreating and managing roles and administrators. At least one administrator must be a Security Administrator.
BlackBerry UEM includes preconfigured roles in addition to the Security Administrator role. You can edit or deleteall roles except the Security Administrator role.
The following preconfigured roles are available:
• Security Administrator: Full permissions• Enterprise Administrator: All permissions except for creating and managing roles and administrators• Senior HelpDesk: Permissions to perform intermediate administrative tasks• Junior HelpDesk: Permissions to perform basic administrative tasks
Permissions for preconfigured roles
The following tables list the permissions that are turned on by default for each preconfigured role in BlackBerryUEM. The Security Administrator role in BlackBerry UEM has full permissions to the management console,including creating and managing roles and administrators.
Roles and administrators
By default, the Security Administrator role in BlackBerry UEM includes permissions to create and manage rolesand administrators. These permissions are not available in the management console and cannot be turned on forany other role.
Permission SecurityAdministrator
EnterpriseAdministrator
Senior HelpDesk Junior HelpDesk
View roles √ NA NA NA
| Administrators | 32

Permission SecurityAdministrator
EnterpriseAdministrator
Senior HelpDesk Junior HelpDesk
Create and edit roles √ NA NA NA
Delete roles √ NA NA NA
Rank roles √ NA NA NA
Create administrators √ NA NA NA
Delete administrators √ NA NA NA
Edit non-administrativeattributes ofadministrators
√ NA NA NA
Change password forother administrators
√ NA NA NA
Change rolemembership foradministrators
√ NA NA NA
Directory access
You can specify the company directories that the administrator can search.
Permission SecurityAdministrator
EnterpriseAdministrator
Senior HelpDesk Junior HelpDesk
All companydirectories
√ √ √ √
Selected companydirectories only
Group management
You can specify the groups that the administrator can manage. To manage users that do not belong to a group,administrators must have permission to manage all groups and users.
Permission SecurityAdministrator
EnterpriseAdministrator
Senior HelpDesk Junior HelpDesk
All groups and users √ √ √ √
Selected groups
| Administrators | 33

Users and devices
Permission SecurityAdministrator
EnterpriseAdministrator
Senior HelpDesk Junior HelpDesk
View users andactivated devices
√ √ √ √
Create users √ √ √
Edit users √ √ √ √
Assign user roles √ √ √ √
Delete users √ √ √
Export user list √ √
Generate an activationpassword and sendemail
√ √ √ √
Generate activationpasswords and sendactivation emailmessages to multipleusers
√ √ √
Specify an activationpassword
√ √ √ √
Specify multipleactivation passwordswith unique activationprofiles for a user
√ √
Specify whetheractivation passwordsexpire after first deviceis activated
√ √
View user activationQR codes and accesskeys
√ √
Specify accountpassword
√ √ √ √
Change multipleaccount passwords
√ √ √
| Administrators | 34
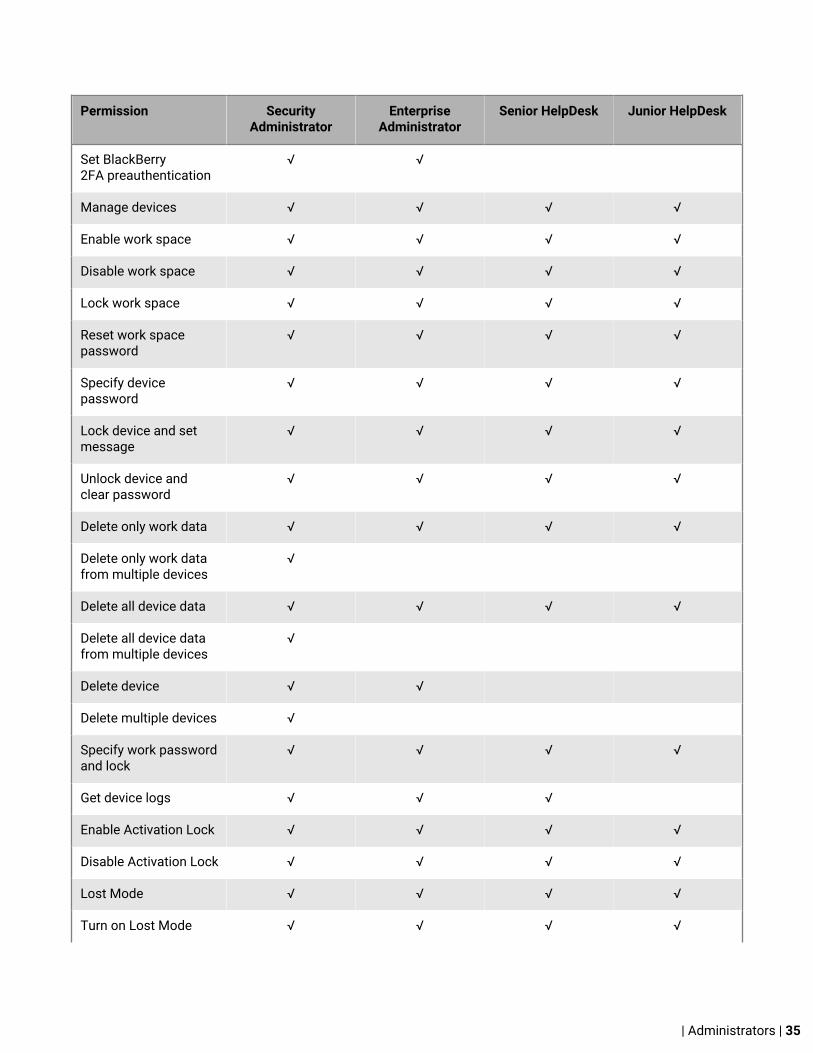
Permission SecurityAdministrator
EnterpriseAdministrator
Senior HelpDesk Junior HelpDesk
Set BlackBerry2FA preauthentication
√ √
Manage devices √ √ √ √
Enable work space √ √ √ √
Disable work space √ √ √ √
Lock work space √ √ √ √
Reset work spacepassword
√ √ √ √
Specify devicepassword
√ √ √ √
Lock device and setmessage
√ √ √ √
Unlock device andclear password
√ √ √ √
Delete only work data √ √ √ √
Delete only work datafrom multiple devices
√
Delete all device data √ √ √ √
Delete all device datafrom multiple devices
√
Delete device √ √
Delete multiple devices √
Specify work passwordand lock
√ √ √ √
Get device logs √ √ √
Enable Activation Lock √ √ √ √
Disable Activation Lock √ √ √ √
Lost Mode √ √ √ √
Turn on Lost Mode √ √ √ √
| Administrators | 35

Permission SecurityAdministrator
EnterpriseAdministrator
Senior HelpDesk Junior HelpDesk
Turn off Lost Mode √ √ √ √
Locate device √ √ √ √
Check in device √ √ √
Restart device √ √ √ √
Update iOS software √ √ √ √
Update iOS softwareon multiple devices
√
Turn off device √ √ √ √
View device locationdetails
√ √ √
View device locationhistory
√ √
View Exchangegatekeepinginformation
√ √
View Apple DEP deviceinformation
√ √ √ √
Assign enrollmentconfigurations
√ √
View One-timePassword tokens
√ √ √ √
Assign One-timePassword tokens
√ √
Send email to users √ √ √
View Activation Lockbypass history
√ √ √
Manage BlackBerryDynamics apps
√ √ √ √
Lock app √ √ √
Unlock app √ √ √ √
| Administrators | 36

Permission SecurityAdministrator
EnterpriseAdministrator
Senior HelpDesk Junior HelpDesk
Delete app data √ √ √ √
Control logging for app √ √ √
View shared devicegroup settings
√ √
Create and edit shareddevice groups
√ √
Delete shared devicegroups
√ √
Manage Intune apps √ √ √
Groups
Permission SecurityAdministrator
EnterpriseAdministrator
Senior HelpDesk Junior HelpDesk
View group settings √ √ √ √
Create and edit usergroups
√ √ √
Assign user roles √ √ √
Add and remove usersfrom user groups
√ √ √
Delete user groups √ √
Create and edit devicegroups
√ √ √
Delete device groups √ √
Policies and profiles
Permission SecurityAdministrator
EnterpriseAdministrator
Senior HelpDesk Junior HelpDesk
View IT policies √ √ √ √
Create and edit ITpolicies
√ √
| Administrators | 37

Permission SecurityAdministrator
EnterpriseAdministrator
Senior HelpDesk Junior HelpDesk
Delete IT policies √ √
View email profiles √ √ √ √
Create and edit emailprofiles
√ √
Delete email profiles √ √
View IMAP/POP3email profiles
√ √ √ √
Create and edit IMAP/POP3 email profiles
√ √
Delete IMAP/POP3email profiles
√ √
View enterpriseconnectivity profiles
√ √ √ √
Create and editenterprise connectivityprofiles
√ √
Delete enterpriseconnectivity profiles
√ √
View device SRrequirements profiles
√ √ √ √
Create and edit deviceSR requirementsprofiles
√ √
Delete device SRrequirements profiles
√ √
View activation profiles √ √ √ √
Create and editactivation profiles
√ √
Delete activationprofiles
√ √
View Wi-Fi profiles √ √ √ √
| Administrators | 38

Permission SecurityAdministrator
EnterpriseAdministrator
Senior HelpDesk Junior HelpDesk
Create and edit Wi-Fi profiles
√ √
Delete Wi-Fi profiles √ √
View VPN profiles √ √ √ √
Create and edit VPNprofiles
√ √
Delete VPN profiles √ √
View VPN profiles √ √ √ √
Create and edit VPNprofiles
√ √
Delete VPN profiles √ √
View complianceprofiles
√ √ √ √
Create and editcompliance profiles
√ √
Delete complianceprofiles
√ √
View device profiles √ √ √ √
Create and edit deviceprofiles
√
Delete device profiles √ √
View proxy profiles √ √ √ √
Create and edit proxyprofiles
√ √
Delete proxy profiles √ √
View web content filterprofiles
√ √ √ √
Create and edit webcontent filter profiles
√ √
| Administrators | 39

Permission SecurityAdministrator
EnterpriseAdministrator
Senior HelpDesk Junior HelpDesk
Delete web contentfilter profiles
√ √
View FileVault profiles √ √ √ √
Create andedit FileVault profiles
√ √
Delete FileVault profiles √ √
View location serviceprofiles
√ √ √ √
Create and editlocation serviceprofiles
√ √
Delete location serviceprofiles
√ √
View app lock modeprofiles
√ √ √ √
Create and edit applock mode profiles
√ √
Delete app lock modeprofiles
√ √
View single sign-onprofiles
√ √ √ √
Create and edit singlesign-on profiles
√ √
Delete single sign-onprofiles
√ √
View CA certificateprofiles
√ √ √ √
Create and edit CAcertificate profiles
√ √
Delete CA certificateprofiles
√ √
View shared certificateprofiles
√ √ √ √
| Administrators | 40

Permission SecurityAdministrator
EnterpriseAdministrator
Senior HelpDesk Junior HelpDesk
Create and edit sharedcertificate profiles
√ √
Delete sharedcertificate profiles
√ √
View SCEP profiles √ √ √ √
Create and edit SCEPprofiles
√ √
Delete SCEP profiles √ √
View OCSP profiles √ √ √ √
Create and edit OCSPprofiles
√ √
Delete OCSP profiles √ √
View certificateretrieval profiles
√ √ √ √
Create and editcertificate retrievalprofiles
√ √
Delete certificateretrieval profiles
√ √
View CRL profiles √ √ √ √
Create and edit CRLprofiles
√ √
Delete CRL profiles √ √
View manageddomains profiles
√ √ √ √
Create and editmanaged domainsprofiles
√ √
Delete manageddomains profiles
√ √
View user credentialprofiles
√ √ √ √
| Administrators | 41

Permission SecurityAdministrator
EnterpriseAdministrator
Senior HelpDesk Junior HelpDesk
Create and edit usercredential profiles
√ √
Delete user credentialprofiles
√ √
View custom payloadprofiles
√ √ √ √
Create and edit custompayload profiles
√ √
Delete custom payloadprofiles
√ √
Assign IT policies andprofiles to users
√ √ √ √
Assign IT policies andprofiles to user groups
√ √ √ √
Assign IT policiesand profiles to devicegroups
√ √ √ √
Assign IT policiesand profiles to shareddevice groups
√ √
Rank IT policies andprofiles
√ √
View CardDAV profiles √ √ √ √
Create and editCardDAV profiles
√ √
Delete CardDAVprofiles
√ √
View AirPrint profiles √ √ √ √
Create andedit AirPrint profiles
√ √
Delete AirPrint profiles √ √
View network usageprofiles
√ √ √ √
| Administrators | 42

Permission SecurityAdministrator
EnterpriseAdministrator
Senior HelpDesk Junior HelpDesk
Create and editnetwork usage profiles
√ √
Delete network usageprofiles
√ √
View AirPlay profiles √ √ √ √
Create andedit AirPlay profiles
√ √
Delete AirPlay profiles √ √
View EnterpriseManagementAgent profiles
√ √ √ √
Create andedit EnterpriseManagementAgent profiles
√ √
Delete EnterpriseManagementAgent profiles
√ √
View BlackBerryDynamics complianceprofiles
√ √ √ √
Delete BlackBerryDynamics complianceprofiles
√ √
View BlackBerryDynamics profiles
√ √ √ √
Create andedit BlackBerryDynamics profiles
√ √
Delete BlackBerryDynamics profiles
√ √
View BlackBerryDynamics connectivityprofiles
√ √ √ √
| Administrators | 43

Permission SecurityAdministrator
EnterpriseAdministrator
Senior HelpDesk Junior HelpDesk
Create andedit BlackBerryDynamics connectivityprofiles
√ √
Delete BlackBerryDynamics connectivityprofiles
√ √
View do not disturbprofiles
√ √ √ √
Create and edit do notdisturb profiles
√ √
Delete do not disturbprofiles
√ √
View BlackBerry2FA profiles
√ √ √ √
Create andedit BlackBerry2FA profiles
√ √
Delete BlackBerry2FA profiles
√ √
View Windows InformationProtection profiles
√ √ √ √
Create andedit Windows InformationProtection profiles
√ √
Delete Windows InformationProtection profiles
√ √
View per-appnotification profiles
√ √ √ √
Create and edit per-appnotification profiles
√ √
Delete per-appnotification profiles
√ √
View gatekeepingprofiles
√ √ √ √
| Administrators | 44

Permission SecurityAdministrator
EnterpriseAdministrator
Senior HelpDesk Junior HelpDesk
Create and editgatekeeping profiles
√ √
Delete gatekeepingprofiles
√ √
View MicrosoftIntune app protectionprofiles
√ √ √ √
Create andedit MicrosoftIntune app protectionprofiles
√ √
Delete MicrosoftIntune app protectionprofiles
√ √
View home screenlayout profiles
√ √ √ √
Create and edit homescreen layout profiles
√ √
Delete home screenlayout profiles
√ √
View EnterpriseIdentity authenticationpolicy
√ √
Create andedit EnterpriseIdentity authenticationpolicy
√ √
Delete EnterpriseIdentity authenticationpolicy
√ √
Assign EnterpriseIdentity authenticationpolicy to users andgroups
√ √
| Administrators | 45
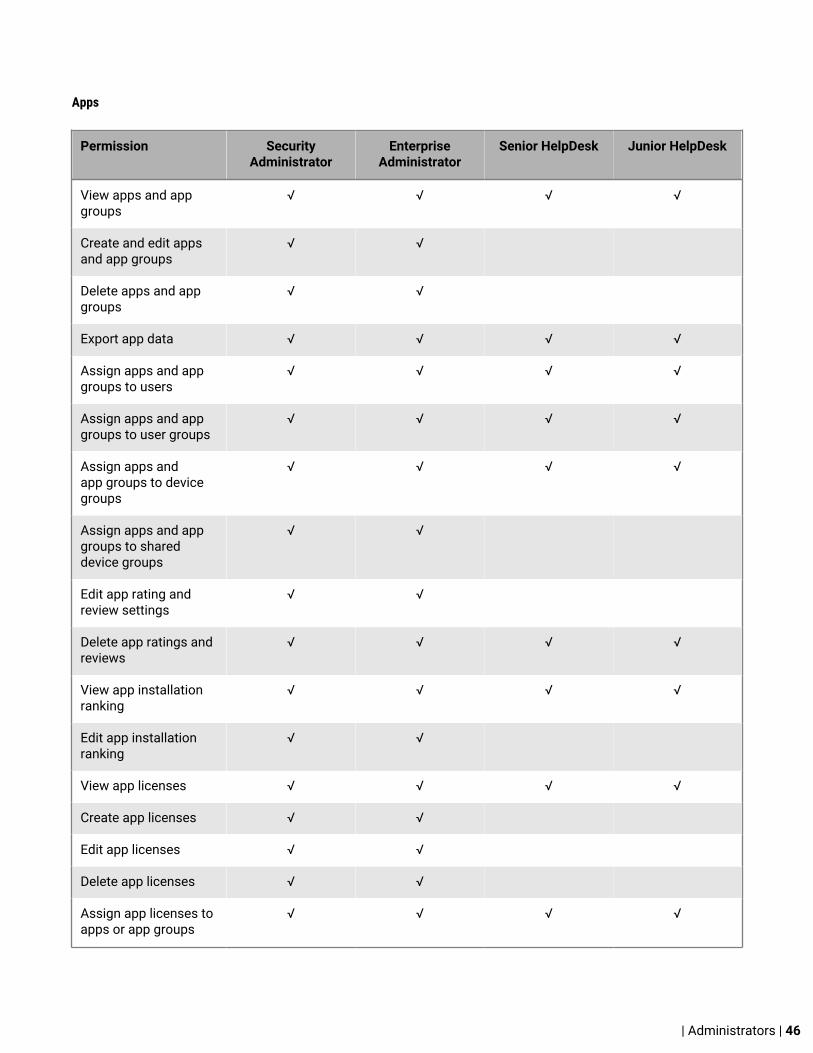
Apps
Permission SecurityAdministrator
EnterpriseAdministrator
Senior HelpDesk Junior HelpDesk
View apps and appgroups
√ √ √ √
Create and edit appsand app groups
√ √
Delete apps and appgroups
√ √
Export app data √ √ √ √
Assign apps and appgroups to users
√ √ √ √
Assign apps and appgroups to user groups
√ √ √ √
Assign apps andapp groups to devicegroups
√ √ √ √
Assign apps and appgroups to shareddevice groups
√ √
Edit app rating andreview settings
√ √
Delete app ratings andreviews
√ √ √ √
View app installationranking
√ √ √ √
Edit app installationranking
√ √
View app licenses √ √ √ √
Create app licenses √ √
Edit app licenses √ √
Delete app licenses √ √
Assign app licenses toapps or app groups
√ √ √ √
| Administrators | 46

Restricted apps
Permission SecurityAdministrator
EnterpriseAdministrator
Senior HelpDesk Junior HelpDesk
View restricted apps √ √ √ √
Create restricted apps √ √
Delete restricted apps √ √
Personal apps
Permission SecurityAdministrator
EnterpriseAdministrator
Senior HelpDesk Junior HelpDesk
View personal apps √ √
Settings
Permission SecurityAdministrator
EnterpriseAdministrator
Senior HelpDesk Junior HelpDesk
View general settings √ √ √ √
Edit activation defaults √ √
Create and edit emailtemplates
√ √
Delete email templates √ √
Edit console settings √ √
Edit language forautomated emails
√ √
Edit self-serviceconsole settings
√ √
Create work spacebackup and restoresettings
√ √
Delete work spacebackup and restoresettings
√ √
Edit default variables √ √
| Administrators | 47

Permission SecurityAdministrator
EnterpriseAdministrator
Senior HelpDesk Junior HelpDesk
Edit login notices √ √
Edit custom variables √ √
Edit organizationnotices
√ √
Edit email domains √ √
Edit location servicesettings
√ √
Edit customize consolesettings
√ √
Edit delete commandexpiration settings
√ √
Edit attestationsettings
√ √
Edit certificate settings √ √
Create and edit eventnotifications
√ √
Delete eventnotifications
√ √
Edit device supportmessages
√ √
View app management √ √ √ √
Edit BlackBerryWorld for Work
√ √
Edit internal appstorage
√ √
Edit Work Apps for iOS √ √
Edit Windows 10 apps √ √
Edit default app ratingand review settings
√ √
View externalintegration settings
√ √ √ √
| Administrators | 48

Permission SecurityAdministrator
EnterpriseAdministrator
Senior HelpDesk Junior HelpDesk
Edit Apple PushNotification settings
√ √
Edit SMTP serversettings
√ √
Edit Apple DEPsettings
√ √
Edit BlackBerry2FA server settings
√ √
View one-timepassword tokens
√ √ √ √
Create and edit one-time password tokens
√ √
Edit company directorysettings
√ √
Edit MicrosoftIntune settings
√ √
Edit MicrosoftExchange gatekeepingsettings
√ √
Edit AndroidEnterprise settings
√ √
Edit certificationauthority settings
√ √
Edit SamsungKNOX bulk enrollmentsettings
√ √
View trustedcertificates
√ √
Add trustedcertificates
√ √
Delete trustedcertificates
√ √
| Administrators | 49
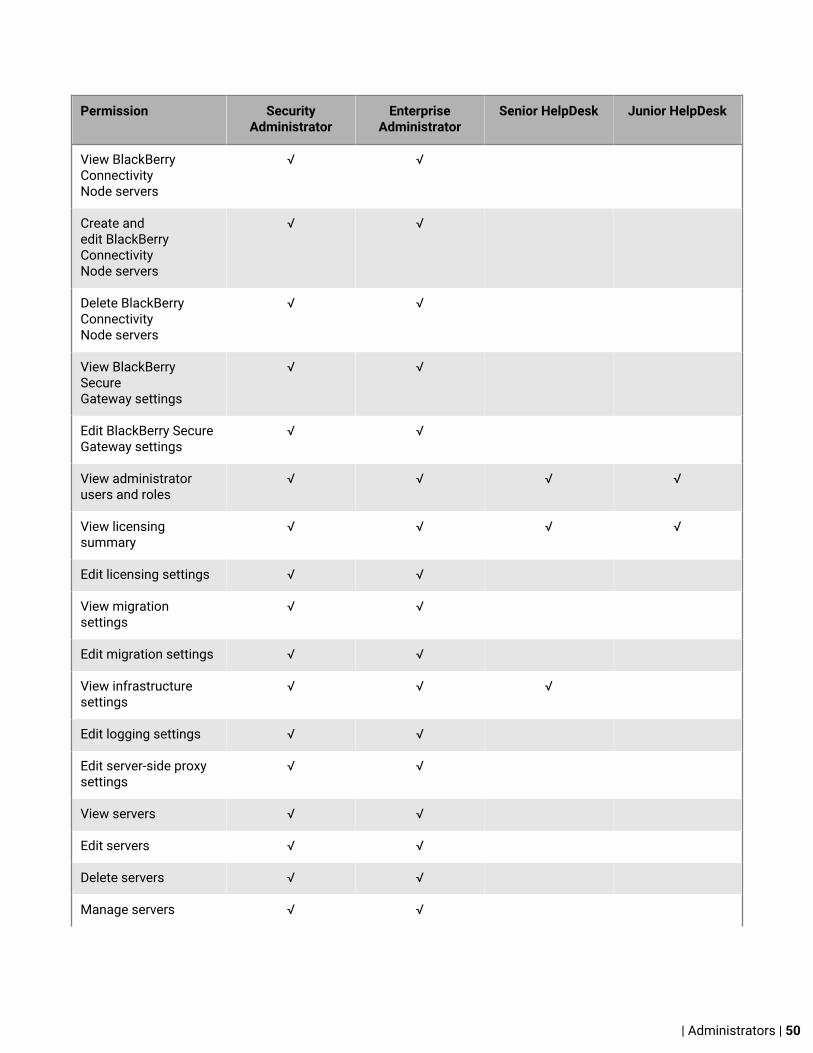
Permission SecurityAdministrator
EnterpriseAdministrator
Senior HelpDesk Junior HelpDesk
View BlackBerryConnectivityNode servers
√ √
Create andedit BlackBerryConnectivityNode servers
√ √
Delete BlackBerryConnectivityNode servers
√ √
View BlackBerrySecureGateway settings
√ √
Edit BlackBerry SecureGateway settings
√ √
View administratorusers and roles
√ √ √ √
View licensingsummary
√ √ √ √
Edit licensing settings √ √
View migrationsettings
√ √
Edit migration settings √ √
View infrastructuresettings
√ √ √
Edit logging settings √ √
Edit server-side proxysettings
√ √
View servers √ √
Edit servers √ √
Delete servers √ √
Manage servers √ √
| Administrators | 50
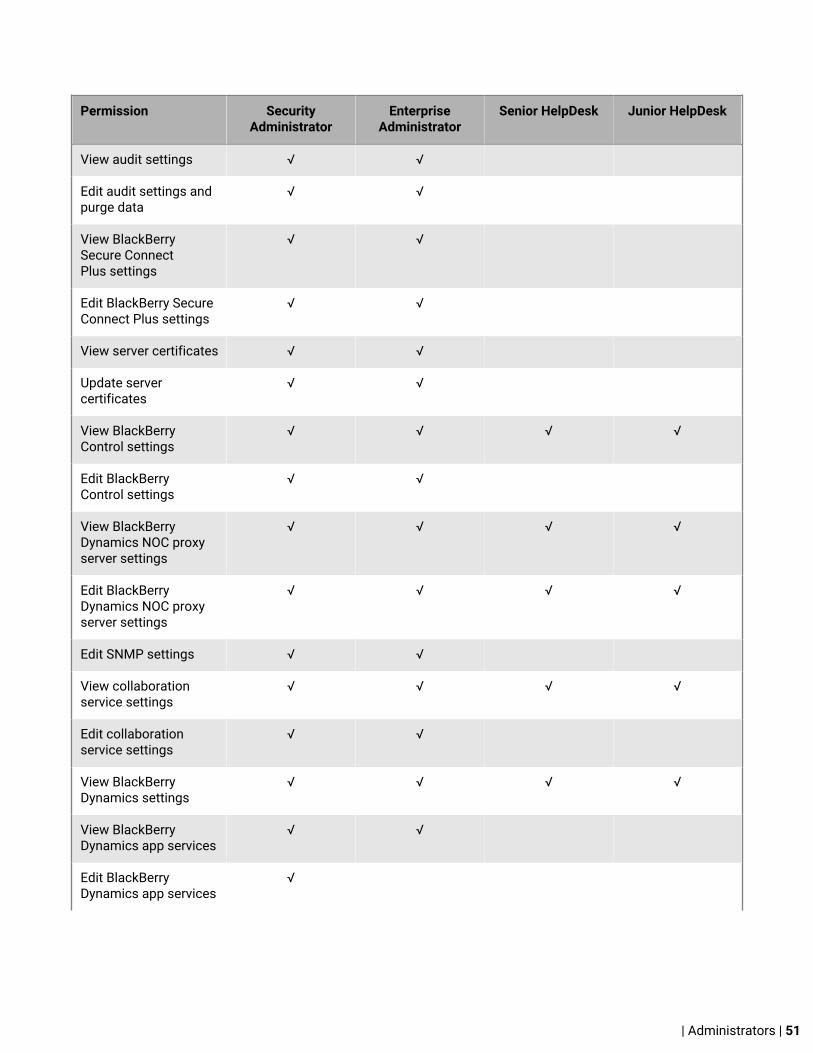
Permission SecurityAdministrator
EnterpriseAdministrator
Senior HelpDesk Junior HelpDesk
View audit settings √ √
Edit audit settings andpurge data
√ √
View BlackBerrySecure ConnectPlus settings
√ √
Edit BlackBerry SecureConnect Plus settings
√ √
View server certificates √ √
Update servercertificates
√ √
View BlackBerryControl settings
√ √ √ √
Edit BlackBerryControl settings
√ √
View BlackBerryDynamics NOC proxyserver settings
√ √ √ √
Edit BlackBerryDynamics NOC proxyserver settings
√ √ √ √
Edit SNMP settings √ √
View collaborationservice settings
√ √ √ √
Edit collaborationservice settings
√ √
View BlackBerryDynamics settings
√ √ √ √
View BlackBerryDynamics app services
√ √
Edit BlackBerryDynamics app services
√
| Administrators | 51

Permission SecurityAdministrator
EnterpriseAdministrator
Senior HelpDesk Junior HelpDesk
Create BlackBerryDynamics app services
√
Delete BlackBerryDynamics app services
√
View BlackBerryDynamics serverproperties
√ √
Edit BlackBerryDynamics serverproperties
√
View BlackBerryDynamics DirectConnect settings
√ √
Edit BlackBerryDynamics DirectConnect settings
√
View BlackBerryDynamics server jobs
√ √
Delete BlackBerryDynamics server jobs
√
View BlackBerryDynamics servercluster settings
√ √
Edit BlackBerryDynamics servercluster settings
√
View BlackBerryDynamics reporting
√ √ √
View BlackBerryDynamics communicationsettings
√ √ √
Edit BlackBerryDynamics communicationsettings
√
View EnterpriseIdentity settings
√ √
| Administrators | 52

Permission SecurityAdministrator
EnterpriseAdministrator
Senior HelpDesk Junior HelpDesk
View EnterpriseIdentity Enterprisesettings
√ √
Edit EnterpriseIdentity settings
√ √
View EnterpriseIdentity servicesettings
√ √
Edit EnterpriseIdentity servicesettings
√ √
Dashboard
Permission SecurityAdministrator
EnterpriseAdministrator
Senior HelpDesk Junior HelpDesk
View dashboard √ √ √ √
Auditing
Permission SecurityAdministrator
EnterpriseAdministrator
Senior HelpDesk Junior HelpDesk
View system audit logs √ √
View deviceperformance logs
√ √
BlackBerry OS permissions
If you upgrade from BES5, the following additional permissions are available:
• View BlackBerry OS IT policies• Create and edit BlackBerry OS IT policies• Delete BlackBerry OS IT policies• View jobs• Edit jobs• View default distribution settings for jobs• Edit default distribution settings for jobs• Manage job tasks• Change status of job tasks
| Administrators | 53

Note: If you upgrade from BES5, the roles configuration in BES5 is copied to BlackBerry UEM. Roles that arecopied may have similar names but different permissions. You should review the permissions for each role todetermine if you need to turn on or turn off any permissions.
Create a custom roleIf the preconfigured roles available in BlackBerry UEM do not meet your organization's requirements, you cancreate custom roles for administrators. You can also create custom roles to restrict administrative tasks toa defined list of user groups. For example, you can create a role for new administrators that restricts theirpermissions to a user group for training purposes only.
Before you begin: You must be a Security Administrator to create a custom role.
1. On the menu bar, click Settings.2. In the left pane, expand Administrators.3. Click Roles.4.
Click .5. Type a name and description for the role.6. To copy permissions from another role, click a role in the Permissions copied from role drop-down list.7. Perform one of the following tasks:
Task Steps
Allow administrators in this roleto search all company directories
a. Select the All company directories option.
Allow administrators in this roleto search selected companydirectories
a. Select the Selected company directories only option.b. Click Select directories.c. Select one or more directories and click .d. Click Save.
8. Perform one of the following tasks:
Task Steps
Allow administrators in this roleto manage all users and groups
a. Select the All groups and users option.
Allow administrators in this roleto manage selected groups
a. Select the Selected groups only option.b. Click Select groups.c. Select one or more groups and click .d. Click Save.
9. Configure the permissions for administrators in this role.10.Click Save.
After you finish: Rank roles.
Related tasks
Rank roles
| Administrators | 54
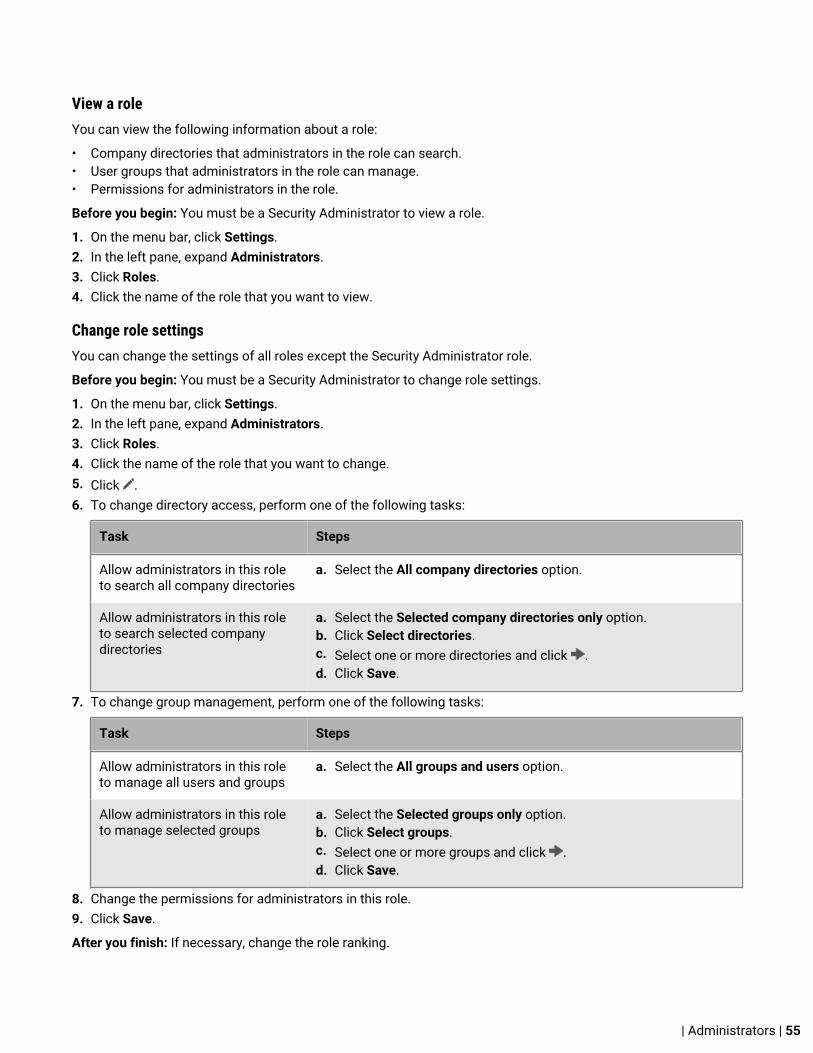
View a roleYou can view the following information about a role:
• Company directories that administrators in the role can search.• User groups that administrators in the role can manage.• Permissions for administrators in the role.
Before you begin: You must be a Security Administrator to view a role.
1. On the menu bar, click Settings.2. In the left pane, expand Administrators.3. Click Roles.4. Click the name of the role that you want to view.
Change role settingsYou can change the settings of all roles except the Security Administrator role.
Before you begin: You must be a Security Administrator to change role settings.
1. On the menu bar, click Settings.2. In the left pane, expand Administrators.3. Click Roles.4. Click the name of the role that you want to change.5. Click .6. To change directory access, perform one of the following tasks:
Task Steps
Allow administrators in this roleto search all company directories
a. Select the All company directories option.
Allow administrators in this roleto search selected companydirectories
a. Select the Selected company directories only option.b. Click Select directories.c. Select one or more directories and click .d. Click Save.
7. To change group management, perform one of the following tasks:
Task Steps
Allow administrators in this roleto manage all users and groups
a. Select the All groups and users option.
Allow administrators in this roleto manage selected groups
a. Select the Selected groups only option.b. Click Select groups.c. Select one or more groups and click .d. Click Save.
8. Change the permissions for administrators in this role.9. Click Save.
After you finish: If necessary, change the role ranking.
| Administrators | 55
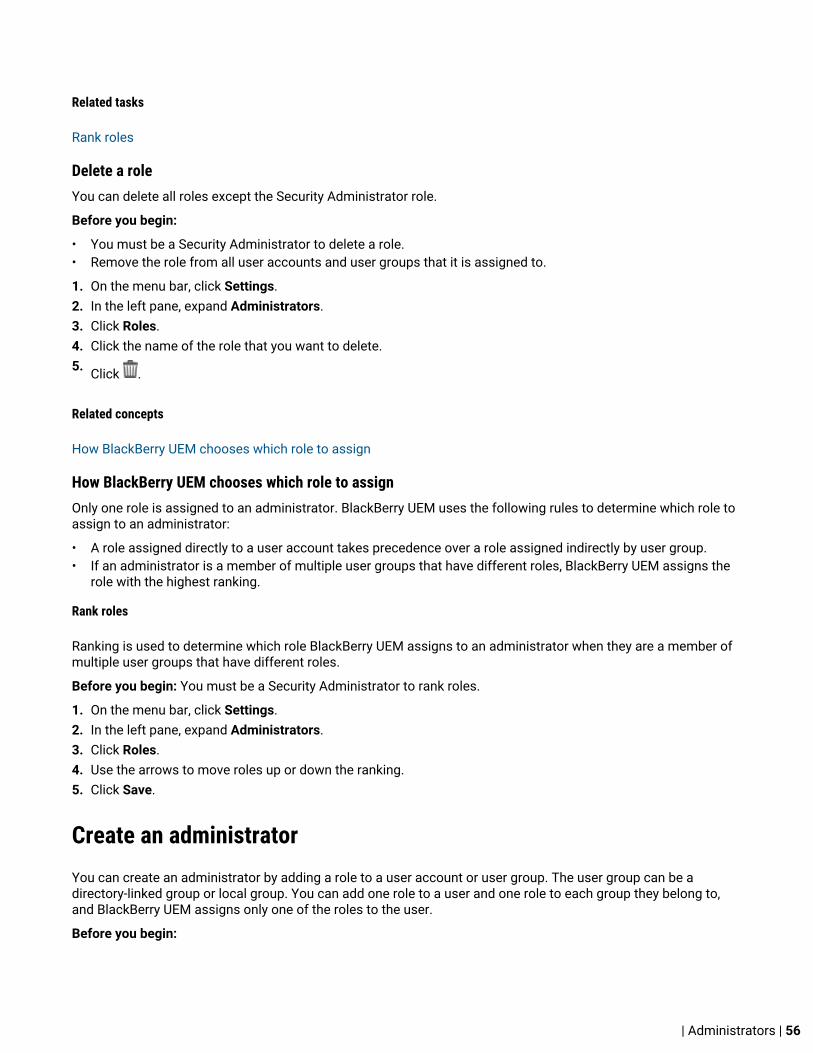
Related tasks
Rank roles
Delete a roleYou can delete all roles except the Security Administrator role.
Before you begin:
• You must be a Security Administrator to delete a role.• Remove the role from all user accounts and user groups that it is assigned to.
1. On the menu bar, click Settings.2. In the left pane, expand Administrators.3. Click Roles.4. Click the name of the role that you want to delete.5. Click .
Related concepts
How BlackBerry UEM chooses which role to assign
How BlackBerry UEM chooses which role to assignOnly one role is assigned to an administrator. BlackBerry UEM uses the following rules to determine which role toassign to an administrator:
• A role assigned directly to a user account takes precedence over a role assigned indirectly by user group.• If an administrator is a member of multiple user groups that have different roles, BlackBerry UEM assigns the
role with the highest ranking.
Rank roles
Ranking is used to determine which role BlackBerry UEM assigns to an administrator when they are a member ofmultiple user groups that have different roles.
Before you begin: You must be a Security Administrator to rank roles.
1. On the menu bar, click Settings.2. In the left pane, expand Administrators.3. Click Roles.4. Use the arrows to move roles up or down the ranking.5. Click Save.
Create an administratorYou can create an administrator by adding a role to a user account or user group. The user group can be adirectory-linked group or local group. You can add one role to a user and one role to each group they belong to,and BlackBerry UEM assigns only one of the roles to the user.
Before you begin:
| Administrators | 56

• You must be a Security Administrator to create an administrator.• Create a user account that has an email address associated with it.• If necessary, create a user group.• If necessary, create a custom role.
1. On the menu bar, click Settings.2. In the left pane, expand Administrators.3. Perform any of the following tasks:
Task Steps
Add a role to a user account a. Click Users.b.
Click .c. If necessary, search for a user account.d. Click the name of the user account.e. In the Role drop-down list, click the role that you want to add.f. Click Save.
Add a role to a user group a. Click Groups.b. Click .c. If necessary, search for a user group.d. Click the name of the user group.e. In the Role drop-down list, click the role that you want to add.f. Click Save.
BlackBerry UEM sends administrators an email with their username and a link to the managementconsole. BlackBerry UEM also sends administrators a separate email with their password for the managementconsole. If an administrator does not have a account password, BlackBerry UEM generates a temporary passwordand sends it to the administrator.
After you finish: If necessary, add user accounts to a user group that has a role assigned to it. Only SecurityAdministrators can add or remove members of a user group that has a role assigned to it.
Related concepts
How BlackBerry UEM chooses which role to assignCreating and managing user groupsCreating and managing user accounts
Related tasks
Create a custom role
Change role membership for administratorsYou can change the role assigned directly to other administrators. You cannot change your own role.
Before you begin: You must be a Security Administrator to change role membership for administrators.
| Administrators | 57
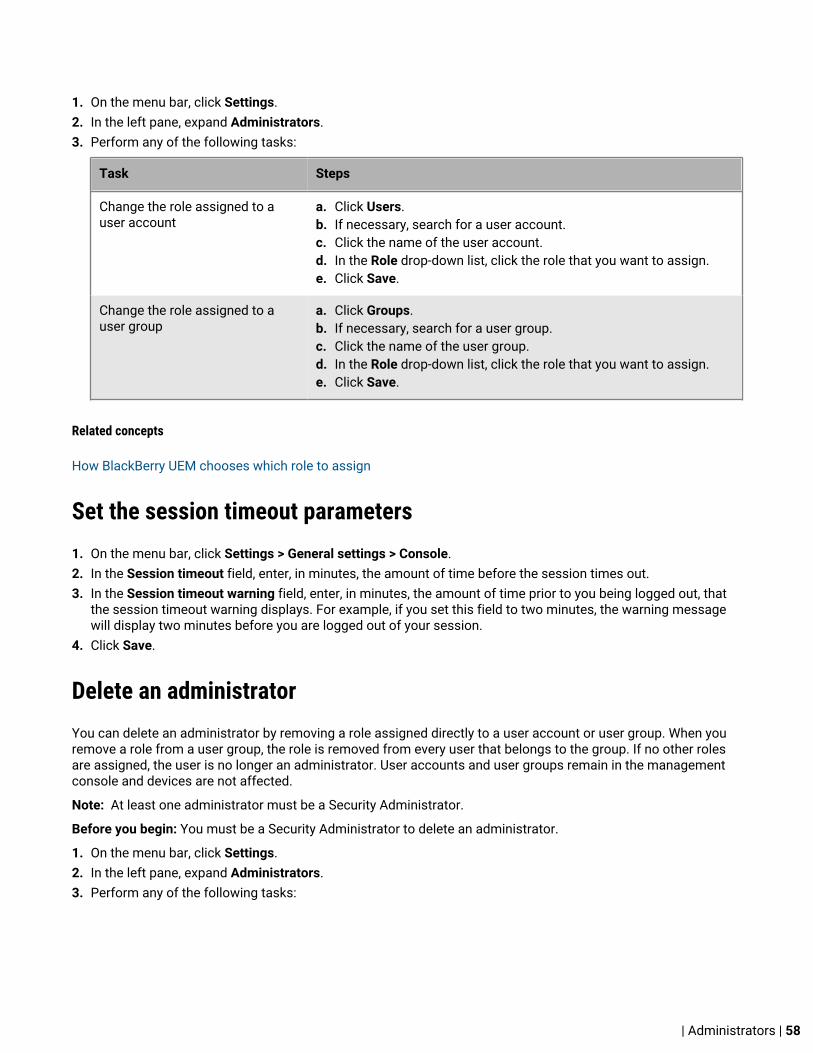
1. On the menu bar, click Settings.2. In the left pane, expand Administrators.3. Perform any of the following tasks:
Task Steps
Change the role assigned to auser account
a. Click Users.b. If necessary, search for a user account.c. Click the name of the user account.d. In the Role drop-down list, click the role that you want to assign.e. Click Save.
Change the role assigned to auser group
a. Click Groups.b. If necessary, search for a user group.c. Click the name of the user group.d. In the Role drop-down list, click the role that you want to assign.e. Click Save.
Related concepts
How BlackBerry UEM chooses which role to assign
Set the session timeout parameters1. On the menu bar, click Settings > General settings > Console.2. In the Session timeout field, enter, in minutes, the amount of time before the session times out.3. In the Session timeout warning field, enter, in minutes, the amount of time prior to you being logged out, that
the session timeout warning displays. For example, if you set this field to two minutes, the warning messagewill display two minutes before you are logged out of your session.
4. Click Save.
Delete an administratorYou can delete an administrator by removing a role assigned directly to a user account or user group. When youremove a role from a user group, the role is removed from every user that belongs to the group. If no other rolesare assigned, the user is no longer an administrator. User accounts and user groups remain in the managementconsole and devices are not affected.
Note: At least one administrator must be a Security Administrator.
Before you begin: You must be a Security Administrator to delete an administrator.
1. On the menu bar, click Settings.2. In the left pane, expand Administrators.3. Perform any of the following tasks:
| Administrators | 58
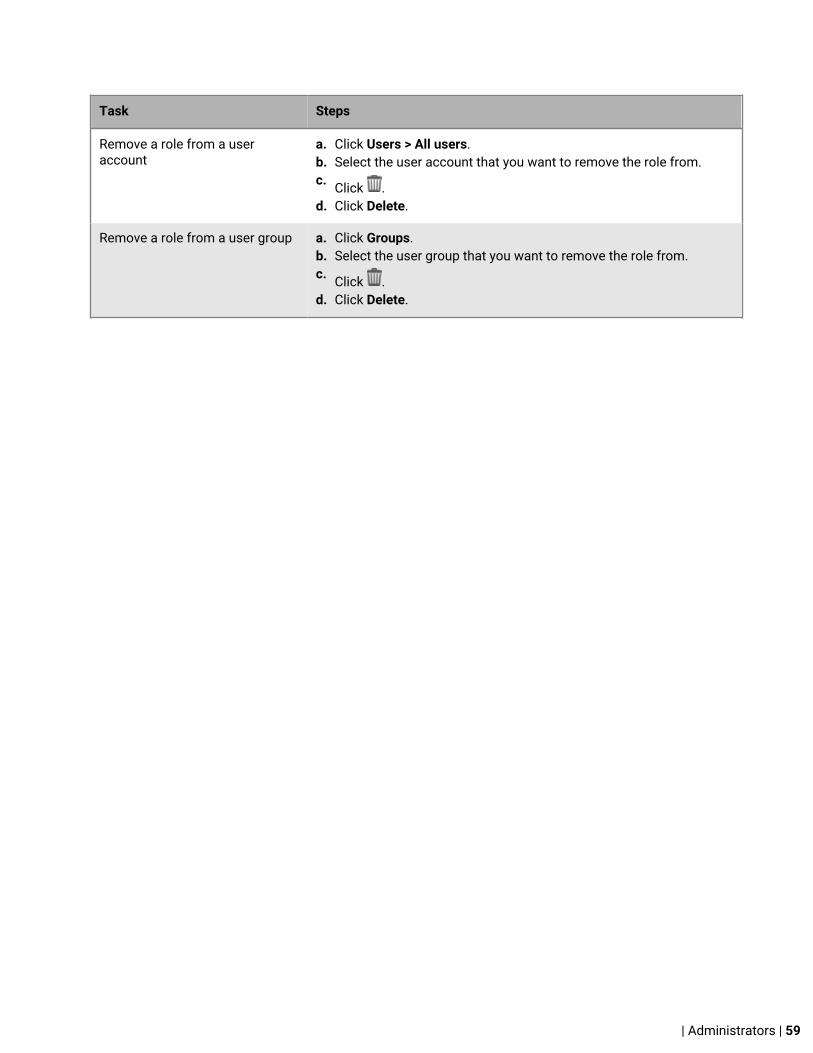
Task Steps
Remove a role from a useraccount
a. Click Users > All users.b. Select the user account that you want to remove the role from.c. Click .d. Click Delete.
Remove a role from a user group a. Click Groups.b. Select the user group that you want to remove the role from.c. Click .d. Click Delete.
| Administrators | 59

Using profiles, variables, and email templatesProfiles, variables, and email templates help you to manage user accounts and communicate with usersefficiently.
Profiles are an efficient way for your organization to configure multiple devices. They allow you to store all thesettings for a specific configuration in one place and quickly deliver the settings to the appropriate devices.
Variables represent standard account attributes (for example, username) and other predefined attributes (forexample, server address used for device activation). You can use variables in profiles, compliance notifications,activation emails, and event notifications.
Email templates allow you to customize and personalize email messages that BlackBerry UEM sends to users andadministrators.
ProfilesA profile contains configuration information for devices and each profile type supports a particular configuration,such as certificates, work connection settings, or settings that enforce certain standards for devices. You canspecify settings for BlackBerry 10, iOS, macOS, Android, and Windows devices in the same profile and thendistribute the configuration information to devices by assigning the profile to user accounts, user groups, ordevice groups.
Assigning profilesYou can assign profiles to user accounts, user groups, and device groups. Some profile types may use ranking todetermine which profile is sent to a device.
• Ranked profile type: You can assign one profile to a user and one profile to each group they belong to, andBlackBerry UEM sends only one of the assigned profiles to the user's device.
• Non-ranked profile type: You can assign multiple profiles to a user and multiple profiles to each group theybelong to, and BlackBerry UEM sends all the assigned profiles to the user's device.
Note: You cannot assign an activation profile to a device group.
For a complete list of profiles, see the Profiles reference.
Related concepts
How BlackBerry UEM chooses which profiles to assign
Related tasks
Assign a profile or IT policy to a user groupAssign a profile or IT policy to a user accountRank profiles
How BlackBerry UEM chooses which profiles to assignFor ranked profile types, BlackBerry UEM sends only one profile of each type to a device and uses predefined rulesto determine which profile to assign to a user and the devices that the user activates.
| Using profiles, variables, and email templates | 60
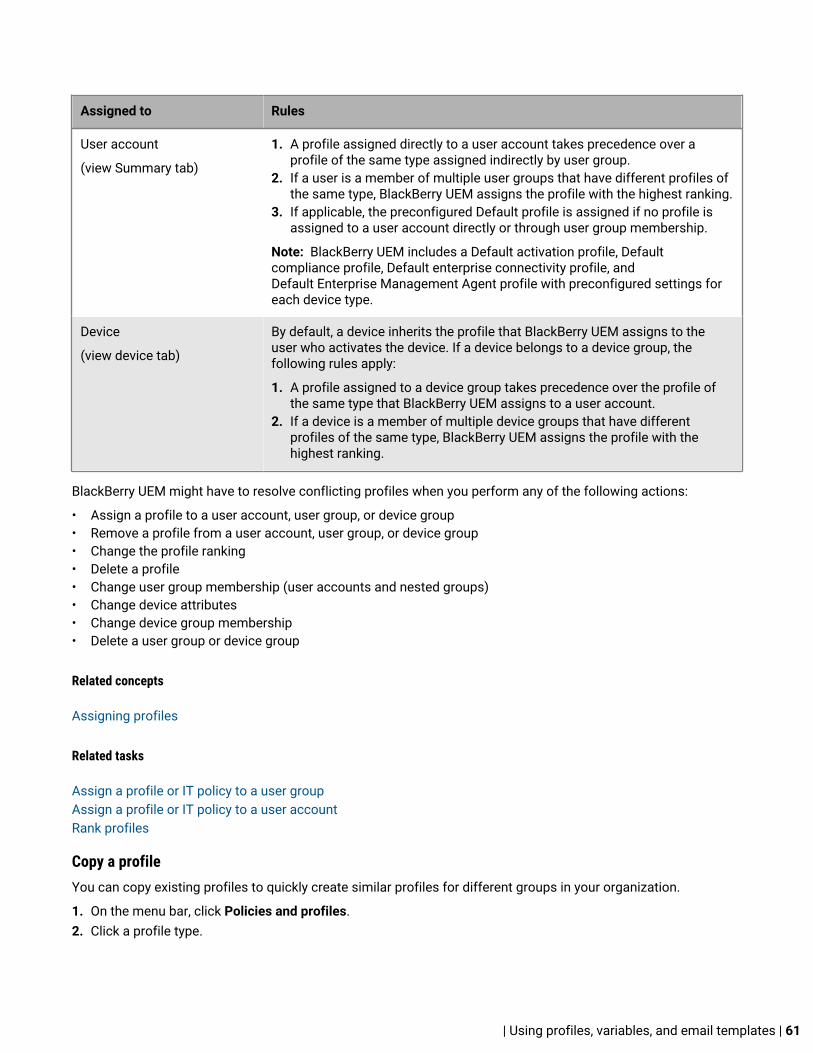
Assigned to Rules
User account
(view Summary tab)
1. A profile assigned directly to a user account takes precedence over aprofile of the same type assigned indirectly by user group.
2. If a user is a member of multiple user groups that have different profiles ofthe same type, BlackBerry UEM assigns the profile with the highest ranking.
3. If applicable, the preconfigured Default profile is assigned if no profile isassigned to a user account directly or through user group membership.
Note: BlackBerry UEM includes a Default activation profile, Defaultcompliance profile, Default enterprise connectivity profile, andDefault Enterprise Management Agent profile with preconfigured settings foreach device type.
Device
(view device tab)
By default, a device inherits the profile that BlackBerry UEM assigns to theuser who activates the device. If a device belongs to a device group, thefollowing rules apply:
1. A profile assigned to a device group takes precedence over the profile ofthe same type that BlackBerry UEM assigns to a user account.
2. If a device is a member of multiple device groups that have differentprofiles of the same type, BlackBerry UEM assigns the profile with thehighest ranking.
BlackBerry UEM might have to resolve conflicting profiles when you perform any of the following actions:
• Assign a profile to a user account, user group, or device group• Remove a profile from a user account, user group, or device group• Change the profile ranking• Delete a profile• Change user group membership (user accounts and nested groups)• Change device attributes• Change device group membership• Delete a user group or device group
Related concepts
Assigning profiles
Related tasks
Assign a profile or IT policy to a user groupAssign a profile or IT policy to a user accountRank profiles
Copy a profileYou can copy existing profiles to quickly create similar profiles for different groups in your organization.
1. On the menu bar, click Policies and profiles.2. Click a profile type.
| Using profiles, variables, and email templates | 61
3. Click the name of the profile that you want to copy.4.
Click .5. Type a name and description for the new profile.6. Make changes on the appropriate tab for each device type.7. Click Save.
After you finish: If necessary, rank profiles.
View a profileYou can view the following information about a profile:
• Settings common to all device types and specific to each device type• List and number of user accounts that the profile is assigned to (directly and indirectly)• List and number of user groups that the profile is assigned to (directly)
1. On the menu bar, click Policies and profiles.2. Expand a profile type.3. Click the name of the profile that you want to view.
Change profile settingsIf you update an activation profile, the new profile settings apply only to additional devices that a user activates.Activated devices do not use the new profile settings until the user reactivates them.
1. On the menu bar, click Policies and profiles.2. Click a profile type.3. Click the name of the profile that you want to change.4. Click .5. Make changes to any common settings.6. Make changes on the appropriate tab for each device type.7. Click Save.
After you finish: If necessary, rank profiles.
Remove a profile from user accounts or user groupsIf a profile is assigned directly to user accounts or user groups, you can remove it from users or groups. If aprofile is assigned indirectly by user group, you can remove the profile from the group or remove user accountsfrom the group. When you remove a profile from user groups, the profile is removed from every user that belongsto the selected groups.
Note: The Default activation profile, Default compliance profile, Default enterprise connectivity profile, and DefaultEnterprise Management Agent profile can only be removed from a user account if you assigned them directly tothe user.
1. On the menu bar, click Policies and profiles.2. Select a profile type.3. Click the name of the profile that you want to remove from user accounts or user groups.4. Perform one of the following tasks:
| Using profiles, variables, and email templates | 62
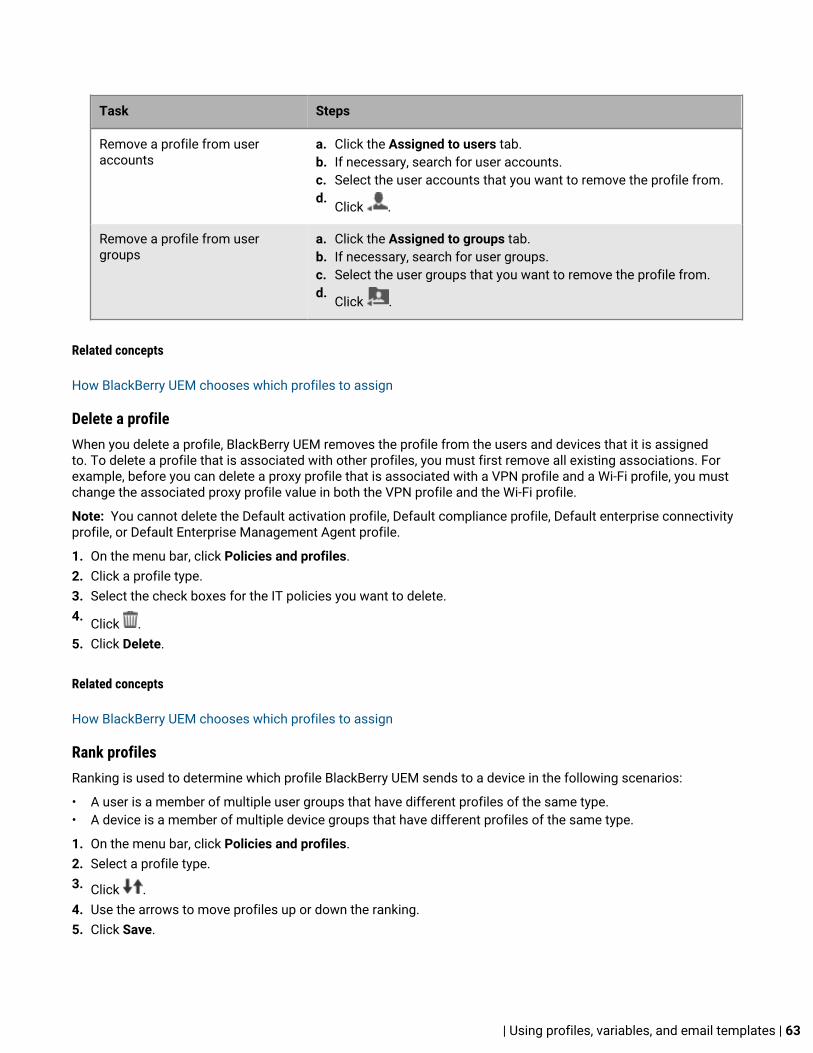
Task Steps
Remove a profile from useraccounts
a. Click the Assigned to users tab.b. If necessary, search for user accounts.c. Select the user accounts that you want to remove the profile from.d.
Click .
Remove a profile from usergroups
a. Click the Assigned to groups tab.b. If necessary, search for user groups.c. Select the user groups that you want to remove the profile from.d.
Click .
Related concepts
How BlackBerry UEM chooses which profiles to assign
Delete a profileWhen you delete a profile, BlackBerry UEM removes the profile from the users and devices that it is assignedto. To delete a profile that is associated with other profiles, you must first remove all existing associations. Forexample, before you can delete a proxy profile that is associated with a VPN profile and a Wi-Fi profile, you mustchange the associated proxy profile value in both the VPN profile and the Wi-Fi profile.
Note: You cannot delete the Default activation profile, Default compliance profile, Default enterprise connectivityprofile, or Default Enterprise Management Agent profile.
1. On the menu bar, click Policies and profiles.2. Click a profile type.3. Select the check boxes for the IT policies you want to delete.4. Click .5. Click Delete.
Related concepts
How BlackBerry UEM chooses which profiles to assign
Rank profilesRanking is used to determine which profile BlackBerry UEM sends to a device in the following scenarios:
• A user is a member of multiple user groups that have different profiles of the same type.• A device is a member of multiple device groups that have different profiles of the same type.
1. On the menu bar, click Policies and profiles.2. Select a profile type.3. Click .4. Use the arrows to move profiles up or down the ranking.5. Click Save.
| Using profiles, variables, and email templates | 63

Related concepts
Assigning profilesHow BlackBerry UEM chooses which profiles to assign
Profiles referenceThe following table lists all BlackBerry UEM profiles:
Profile name Description Supported devicetypes
Rankedor notranked1
Configure
Policy
Activation Specifies the device activationsettings for users, such as theactivation type and the numberand types of devices.
All devices Ranked Create anactivation profile
BlackBerryDynamics
Allows devices toaccess BlackBerryDynamics apps suchas BlackBerry Work, BlackBerryAccess, and BlackBerryConnect.
iOS
macOS
Android
Windows
Ranked Createa BlackBerryDynamics profile
App lock mode Specify a single app to run ondevices.
Supervised iOS devices
SamsungKNOX devicesactivated with MDM
Windows10 Educationand Windows10 Enterprisedevices
Ranked Create an app lockmode profile
EnterpriseManagementAgent
Specifies when devices connectto BlackBerry UEM for app orconfiguration updates whena push notification is notavailable.
iOS
Android
Windows
BlackBerry 10
Ranked Create anEnterpriseManagementAgent profile
Compliance
Compliance Defines the device conditionsthat are not acceptable inyour organization and setsenforcement actions. BlackBerryUEM includes a Defaultcompliance profile.
All devices Ranked Create acompliance profile
| Using profiles, variables, and email templates | 64
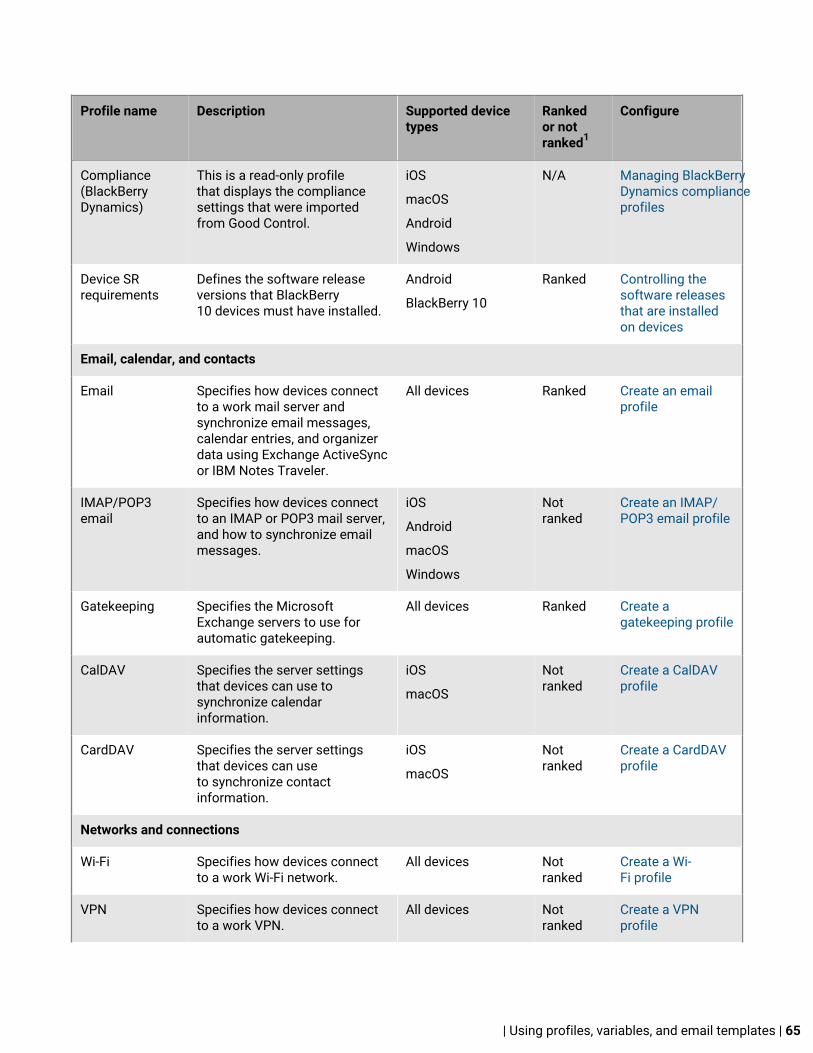
Profile name Description Supported devicetypes
Rankedor notranked1
Configure
Compliance(BlackBerryDynamics)
This is a read-only profilethat displays the compliancesettings that were importedfrom Good Control.
iOS
macOS
Android
Windows
N/A Managing BlackBerryDynamics complianceprofiles
Device SRrequirements
Defines the software releaseversions that BlackBerry10 devices must have installed.
Android
BlackBerry 10
Ranked Controlling thesoftware releasesthat are installedon devices
Email, calendar, and contacts
Email Specifies how devices connectto a work mail server andsynchronize email messages,calendar entries, and organizerdata using Exchange ActiveSyncor IBM Notes Traveler.
All devices Ranked Create an emailprofile
IMAP/POP3email
Specifies how devices connectto an IMAP or POP3 mail server,and how to synchronize emailmessages.
iOS
Android
macOS
Windows
Notranked
Create an IMAP/POP3 email profile
Gatekeeping Specifies the MicrosoftExchange servers to use forautomatic gatekeeping.
All devices Ranked Create agatekeeping profile
CalDAV Specifies the server settingsthat devices can use tosynchronize calendarinformation.
iOS
macOS
Notranked
Create a CalDAVprofile
CardDAV Specifies the server settingsthat devices can useto synchronize contactinformation.
iOS
macOS
Notranked
Create a CardDAVprofile
Networks and connections
Wi-Fi Specifies how devices connectto a work Wi-Fi network.
All devices Notranked
Create a Wi-Fi profile
VPN Specifies how devices connectto a work VPN.
All devices Notranked
Create a VPNprofile
| Using profiles, variables, and email templates | 65

Profile name Description Supported devicetypes
Rankedor notranked1
Configure
Proxy Specifies how devices use aproxy server to access webservices on the Internet or awork network.
iOS
macOS
Android
BlackBerry 10
Ranked Create a proxyprofile
Enterpriseconnectivity
Specifies how devices canconnect to your organization’sresources using enterpriseconnectivity. Enterpriseconnectivity is alwaysenabled for BlackBerry10 devices. For BlackBerry10, Samsung KNOX Workspace,devices, and for iOS deviceswith MDM controls, theenterprise connectivity profilespecifies whether devices canuse BlackBerry Secure ConnectPlus. BlackBerry UEM includes aDefault enterprise connectivityprofile.
iOS
Android
BlackBerry 10
Ranked Create anenterpriseconnectivity profile
BlackBerryDynamics connectivity
Defines the networkconnections, Internetdomains, IP addressranges, and app serversthat devices can connectto when using BlackBerryDynamics apps.
iOS
macOS
Android
Windows
Ranked Createa BlackBerryDynamics connectivityprofile
BlackBerry 2FA Enables two-factorauthentication for users andspecifies the configuration ofthe preauthentication and self-rescue features.
iOS
Android
BlackBerry 10
Ranked Create aBlackBerry 2FAprofile
Network usage Allows you to control whetherwork apps on devices that runiOS 9 or later can use the mobilenetwork or data roaming.
iOS devicesrunning iOS 9 orlater
Ranked Create a networkusage profile
Web contentfilter
Limits the websites that a usercan view on supervised iOSdevices.
Supervised iOS devicesNotranked
Create a webcontent filterprofile
| Using profiles, variables, and email templates | 66

Profile name Description Supported devicetypes
Rankedor notranked1
Configure
Single sign-on Specifies how devicesauthenticate with securedomains automatically afterusers type their username andpassword for the first time.
iOS
BlackBerry 10
Ranked Create a singlesign-on profile
Manageddomains
Configures iOS devices to notifyusers about sending emailoutside of trusted domains andrestricts the apps that can viewdocuments downloaded frominternal domains.
iOS Notranked
Create a manageddomains profile
AirPrint Allows you to add printers tousers' AirPrint printer lists.
iOS Notranked
Createan AirPrint profile
AirPlay Allows you to add devices tousers' AirPlay device lists.
iOS Notranked
Create an AirPlayprofile
Protection
Windows InformationProtection
Specifiesthe Windows InformationProtection setting in Windows10.
Windows 10 Ranked Create a WindowsInformationProtection profile
MicrosoftIntune appprotection
Allows you to manage appsprotected by Microsoft Intune.
iOS
Android
Notranked
Create a MicrosoftIntune appprotection profile
Location service Allows you to request thelocation of devices and viewthe approximate locations on amap.
iOS
Android
Windows
Ranked Create a locationservice profile
Do not disturb Allows you to block BlackBerryWork for Android and BlackBerryWork for iOS notifications duringoff-work days and hours thatyou define.
iOS
Android
Ranked Create a Do notdisturb profile
Custom
Device Allows you to configure theinformation that displays ondevices.
iOS
Android
BlackBerry 10
Windows
Ranked Create a deviceprofile
| Using profiles, variables, and email templates | 67

Profile name Description Supported devicetypes
Rankedor notranked1
Configure
Custom payload Specifies custom configurationinformation using payload codefor devices.
iOS Notranked
Create a custompayload profile
Per-appnotification
Allows you to configure thenotification settings for systemapps and apps that you manageusing BlackBerry UEM.
Supervised devicesrunning iOS 9.3 orlater
Ranked Create a per-appnotification profile
Certificates
CA certificate Specifies a CA certificate thatdevices can use to establishtrust with a work network orserver.
All devices Notranked
Create a CAcertificate profile
Sharedcertificate
Specifies a client certificate thatdevices can use to authenticateusers with a work network orserver.
iOS
macOS
Android
Notranked
Create a sharedcertificate profile
User credential Specifies the CA connectionthat devices use to obtain aclient certificate that is usedto authenticate with a worknetwork or server.
iOS
macOS
Android
BlackBerry 10
Notranked
Using usercredentialprofiles to sendcertificates todevices
SCEP Specifies the SCEP serverthat devices use to obtain aclient certficate that is usedto authenticate with a worknetwork or server.
All devices Notranked
Create a SCEPprofile
Certificateretrieval
Specifies how devices retrievecertificates from LDAP servers.
BlackBerry 10 Ranked Create a certificateretrieval profile
OCSP Specifies the OCSP respondersthat BlackBerry 10 devicescan use to check the status ofcertificates.
BlackBerry 10 Ranked Create an OCSPprofile
CRL Specifies the CRL configurationsthat BlackBerry UEM can use tocheck the status of certificates.
BlackBerry devicespowered by Android
BlackBerry 10
Ranked Create a CRLprofile
Certificatemapping profile
Specifies which clientcertificates apps must use
Android Ranked Create a certificatemapping profile
| Using profiles, variables, and email templates | 68

1For definitions of ranked or non-ranked profiles, see Assigning profiles.
VariablesBlackBerry UEM supports default and custom variables. Default variables represent standard account attributes(for example, username) and other predefined attributes (for example, server address used for device activation).You can use custom variables to define additional attributes.
You can use variables in profiles,compliance notifications, activation emails, and event notifications. Usevariables to reference values instead of specifying the actual values. When the profile, compliance notification,activation email, or event notification is sent to devices, the variables are replaced with the values that theyrepresent.
Note: IT policies and BlackBerry Dynamics app configurations do not support variables.
Using variables in profilesVariables in profiles help you to efficiently manage profiles for the users in your organization. Variables providemore flexibility for profiles and can help limit the number of profiles that you require for each profile type. Forexample, you can create a single VPN profile for multiple users that specifies the %UserName% variable insteadof creating a separate VPN profile for each user that specifies the actual username value.
You can use a variable in any text field in a profile except the Name and Description fields. For example, you canspecify "%UserName%@example.com" in the Email address field in an email profile.
In compliance profiles, you can use variables to customize the compliance notifications that BlackBerry UEMsends to users.
Default variablesThe following default variables are available in BlackBerry UEM:
Variable name Description Primary use
%AccessKeyExpiry% Date and time that an access key expires Activation emailmessages
%AccessKeys% Access keys that are automatically generatedand used to activate BlackBerry Dynamics apps
Activation emailmessages
%ActivationPassword% Activation password that is automaticallygenerated or that you set for a user
Activation emailmessages
%ActivationPasswordExpiry% Date and time that an activation passwordexpires
Activation emailmessages
%ActivationQRCode% QR Code for device activation Activation emailmessages
%ActivationURL% Web address of the server that receivesactivation requests
Activation emailmessages
| Using profiles, variables, and email templates | 69
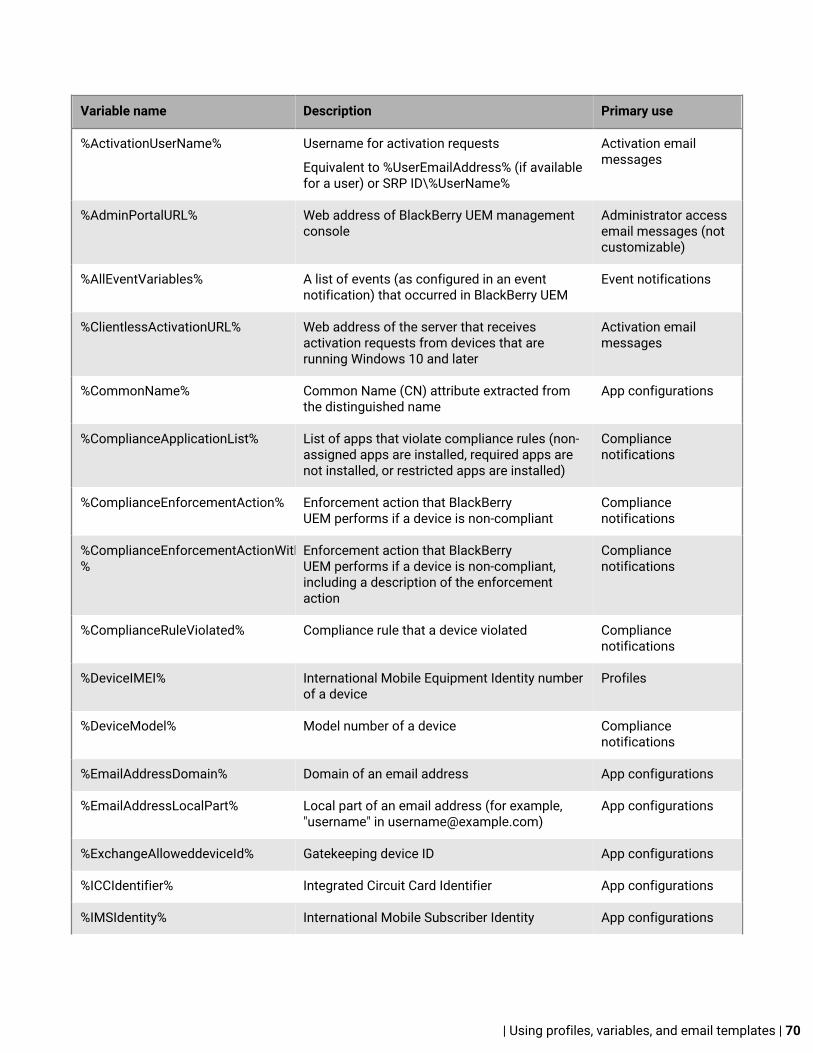
Variable name Description Primary use
%ActivationUserName% Username for activation requests
Equivalent to %UserEmailAddress% (if availablefor a user) or SRP ID\%UserName%
Activation emailmessages
%AdminPortalURL% Web address of BlackBerry UEM managementconsole
Administrator accessemail messages (notcustomizable)
%AllEventVariables% A list of events (as configured in an eventnotification) that occurred in BlackBerry UEM
Event notifications
%ClientlessActivationURL% Web address of the server that receivesactivation requests from devices that arerunning Windows 10 and later
Activation emailmessages
%CommonName% Common Name (CN) attribute extracted fromthe distinguished name
App configurations
%ComplianceApplicationList% List of apps that violate compliance rules (non-assigned apps are installed, required apps arenot installed, or restricted apps are installed)
Compliancenotifications
%ComplianceEnforcementAction% Enforcement action that BlackBerryUEM performs if a device is non-compliant
Compliancenotifications
%ComplianceEnforcementActionWithDescription%
Enforcement action that BlackBerryUEM performs if a device is non-compliant,including a description of the enforcementaction
Compliancenotifications
%ComplianceRuleViolated% Compliance rule that a device violated Compliancenotifications
%DeviceIMEI% International Mobile Equipment Identity numberof a device
Profiles
%DeviceModel% Model number of a device Compliancenotifications
%EmailAddressDomain% Domain of an email address App configurations
%EmailAddressLocalPart% Local part of an email address (for example,"username" in [email protected])
App configurations
%ExchangeAlloweddeviceId% Gatekeeping device ID App configurations
%ICCIdentifier% Integrated Circuit Card Identifier App configurations
%IMSIdentity% International Mobile Subscriber Identity App configurations
| Using profiles, variables, and email templates | 70
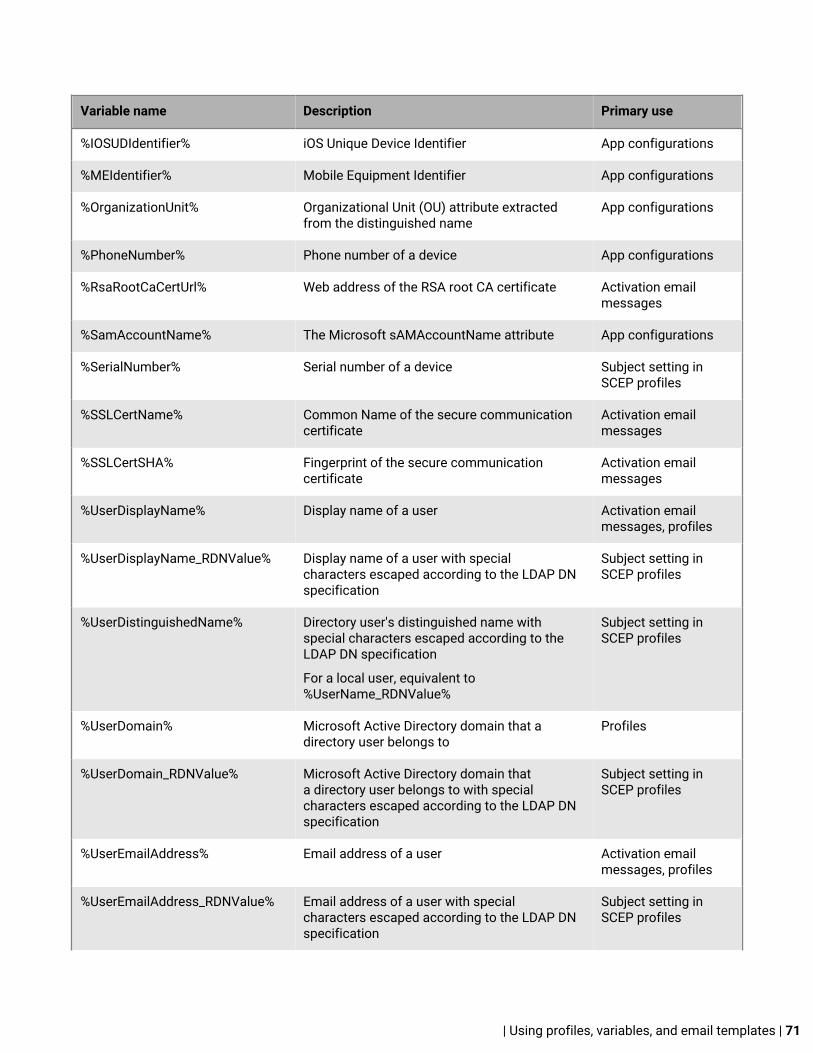
Variable name Description Primary use
%IOSUDIdentifier% iOS Unique Device Identifier App configurations
%MEIdentifier% Mobile Equipment Identifier App configurations
%OrganizationUnit% Organizational Unit (OU) attribute extractedfrom the distinguished name
App configurations
%PhoneNumber% Phone number of a device App configurations
%RsaRootCaCertUrl% Web address of the RSA root CA certificate Activation emailmessages
%SamAccountName% The Microsoft sAMAccountName attribute App configurations
%SerialNumber% Serial number of a device Subject setting inSCEP profiles
%SSLCertName% Common Name of the secure communicationcertificate
Activation emailmessages
%SSLCertSHA% Fingerprint of the secure communicationcertificate
Activation emailmessages
%UserDisplayName% Display name of a user Activation emailmessages, profiles
%UserDisplayName_RDNValue% Display name of a user with specialcharacters escaped according to the LDAP DNspecification
Subject setting inSCEP profiles
%UserDistinguishedName% Directory user's distinguished name withspecial characters escaped according to theLDAP DN specification
For a local user, equivalent to%UserName_RDNValue%
Subject setting inSCEP profiles
%UserDomain% Microsoft Active Directory domain that adirectory user belongs to
Profiles
%UserDomain_RDNValue% Microsoft Active Directory domain thata directory user belongs to with specialcharacters escaped according to the LDAP DNspecification
Subject setting inSCEP profiles
%UserEmailAddress% Email address of a user Activation emailmessages, profiles
%UserEmailAddress_RDNValue% Email address of a user with specialcharacters escaped according to the LDAP DNspecification
Subject setting inSCEP profiles
| Using profiles, variables, and email templates | 71
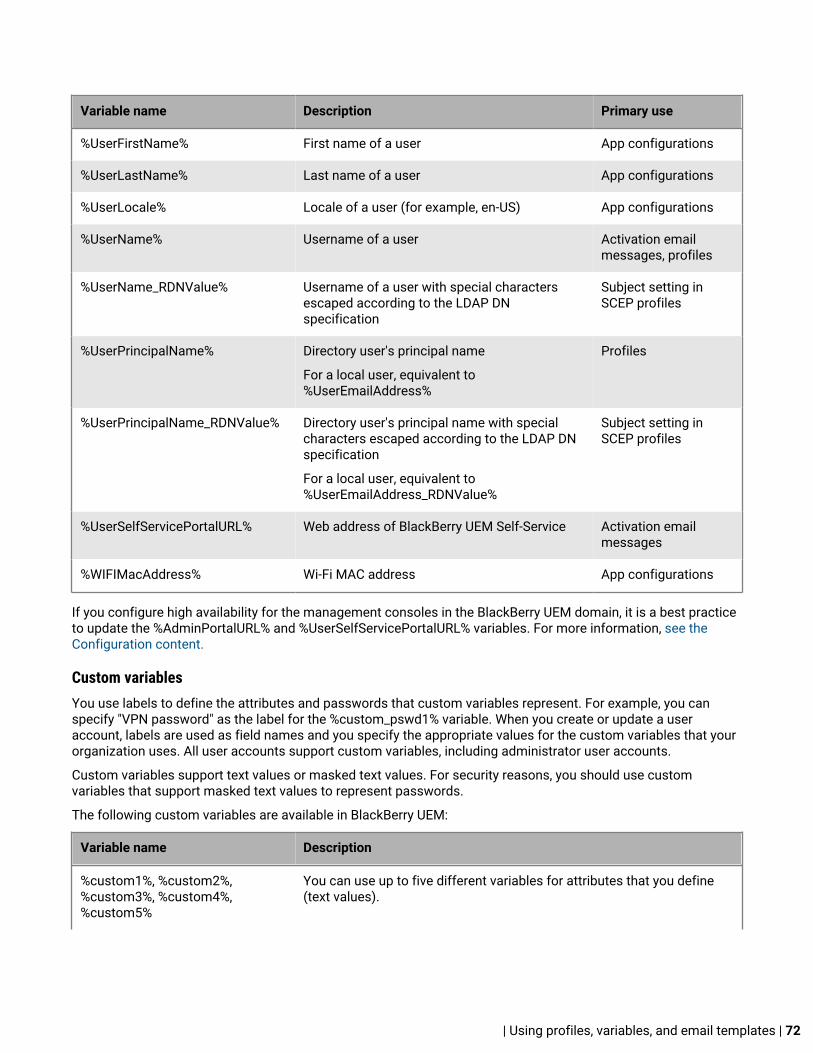
Variable name Description Primary use
%UserFirstName% First name of a user App configurations
%UserLastName% Last name of a user App configurations
%UserLocale% Locale of a user (for example, en-US) App configurations
%UserName% Username of a user Activation emailmessages, profiles
%UserName_RDNValue% Username of a user with special charactersescaped according to the LDAP DNspecification
Subject setting inSCEP profiles
%UserPrincipalName% Directory user's principal name
For a local user, equivalent to%UserEmailAddress%
Profiles
%UserPrincipalName_RDNValue% Directory user's principal name with specialcharacters escaped according to the LDAP DNspecification
For a local user, equivalent to%UserEmailAddress_RDNValue%
Subject setting inSCEP profiles
%UserSelfServicePortalURL% Web address of BlackBerry UEM Self-Service Activation emailmessages
%WIFIMacAddress% Wi-Fi MAC address App configurations
If you configure high availability for the management consoles in the BlackBerry UEM domain, it is a best practiceto update the %AdminPortalURL% and %UserSelfServicePortalURL% variables. For more information, see theConfiguration content.
Custom variablesYou use labels to define the attributes and passwords that custom variables represent. For example, you canspecify "VPN password" as the label for the %custom_pswd1% variable. When you create or update a useraccount, labels are used as field names and you specify the appropriate values for the custom variables that yourorganization uses. All user accounts support custom variables, including administrator user accounts.
Custom variables support text values or masked text values. For security reasons, you should use customvariables that support masked text values to represent passwords.
The following custom variables are available in BlackBerry UEM:
Variable name Description
%custom1%, %custom2%,%custom3%, %custom4%,%custom5%
You can use up to five different variables for attributes that you define(text values).
| Using profiles, variables, and email templates | 72

Variable name Description
%custom_pswd1%,%custom_pswd2%,%custom_pswd3%,%custom_pswd4%,%custom_pswd5%
You can use up to five different variables for passwords that you define(masked text values).
Define custom variables
You must define custom variables before you can use them. Only custom variables that have a label are displayedwhen you create or update a user account.
1. On the menu bar, click Settings.2. In the left pane, expand General settings.3. Click Custom variables.4. Select the Show custom variables when adding or editing a user check box.5. Specify a label for each custom variable that you plan to use. The labels are used as field names in the Custom
variables section when you create or update a user account.6. Click Save.
Using custom variables
After you define custom variables, you must specify the appropriate values when you create or update a useraccount. You can then use custom variables in the same way as default variables. You specify the variable namewhen you create profiles or customize compliance notifications and activation email messages.
Example: Using the same VPN profile for several users who have their own VPN passwords
In the following example, "VPN password" is the label that you specified for the %custom_pswd1% variable and itis used as a field name in the Custom variables section when you update a user account.
1. On the menu bar, click Users > Managed devices.2. Search for a user account.3. In the search results, click the name of the user account.4. Click .5. Expand Custom variables.6. In the VPN password field, type a user's VPN password.7. Click Save.8. Repeat steps 2 to 7 for each user that will use the VPN profile.9. When you create the VPN profile, in the Password field, type %custom_pswd1%.
Email templatesUsing email templates allows you to customize and personalize email messages that are sent to users for any ofthe following reasons:
• Device activation - send emails to users with instructions for activating their device and send separate emailscontaining their activation passwords
• Compliance - send email notifications to users when their device is out of compliance
| Using profiles, variables, and email templates | 73

• BlackBerry Dynamics apps activation - send emails to users containing access keys• Event notifications - send emails to notify administrators about particular events in BlackBerry UEM
You can personalize emails by using variables in the email templates for items like the user's name, emailaddress, or activation password. Using the HTML editor, you can customize the appearance of emails by usingdifferent fonts, colours, and images. You can create multiple templates to use for different device types oractivation types. You can edit the default email templates or create new ones.
When you add a user to BlackBerry UEM, create a compliance profile, or generate passwords, you can select theemail template to use. BlackBerry UEM sends the personalized email message to the user based on the templatethat you select.
Default email templatesBlackBerry UEM includes some default email templates. Depending on your BlackBerry UEM configuration, youwill see some or all of the following default email templates in Settings > Email templates:
Type Default emailtemplate
Description
Device activation Default activationemail
This template contains the instructions that a user needs toactivate their device. You can choose to send two separateemails to the user: one containing the activation instructionsand a second that contains only the activation password.
If you don't select a different template, BlackBerry UEM usesthis template when it sends an activation email to a user.
You can edit this template, but you cannot delete it.
Default managedGoogle accountcredentials
Default managedGoogle accountcredentials
This template is used in environments that have a managedGoogle domain. It provides the user's Google accountpassword.
Users with Android 6.0 and later devices automaticallyreceive this email if they are assigned an Android workprofile activation type.
You can edit this template, but you cannot delete it.
You should also send the Default activation email templateto provide users with the instructions to activate theirdevices in BlackBerry UEM.
Default Android workprofile activation code
Default Android workprofile activation code
This template is used in environments that have a managedGoogle domain. It provides a Google activation code.
Users with Android 5.1 and earlier devices automaticallyreceive this email if they are assigned a Work space onlyactivation type.
You can edit this template, but you cannot delete it.
You should also send the Default activation email templateto provide users with the instructions to activate theirdevices in BlackBerry UEM.
| Using profiles, variables, and email templates | 74

Type Default emailtemplate
Description
Apple DEP deviceactivation
Apple DEP activationemail
This template contains the instructions that a user needs toactivate an Apple DEP device. You can choose to send twoseparate email messages to the user: one containing theactivation instructions and a second that contains only theactivation password.
You can edit or delete this template.
BlackBerry Dynamicsaccess key
BlackBerry Dynamicsaccess key email
This template contains the instructions that a user needs toactivate a BlackBerry Dynamics app using an access key.
You can edit or delete this template.
Default Work spaceonly (Android workprofiles) activationemail
Default Work spaceonly (Android workprofiles) activation
This template is used in environments that do not havea managed Google domain and that use Android workprofiles.
This template contains the instructions that a user needs toactivate their device. You can choose to send two separateemails to the user: one containing the activation instructionsand a second that contains only the activation password.
You can edit or delete this template.
Compliance violation Default complianceemail
This template contains information about a user's devicecompliance. You can associate this template with acompliance profile.
You can edit this template, but you cannot delete it.
Event notification BlackBerry UEM eventnotification email
This template contains information for administrators aboutan event that has occurred in BlackBerry UEM. You canassociate this template with an event notification.
You can edit this template, but you cannot delete it.
Device activatednotification
Device activatednotification email
This template contains information about the device thata user activated. A device activated notification emailis sent when the user activates their device using theBlackBerry UEM Client. A BlackBerry Dynamics deviceactivated notification email is sent when the user activates aBlackBerry Dynamics app on their device.
You can edit this template, but you cannot delete it.
Self-service loginnotification
Self-service loginnotification email
This template contains information about the user thatlogged into the BlackBerry UEM Self-Service portal (forexample, the IP address and the date and time).
You can edit this template, but you cannot delete it.
| Using profiles, variables, and email templates | 75

Suggested textThe suggested text is used in the default email templates. If you edit the default email templates and later wantto use the default text, you can copy and paste it from here. If the default text is updated between releasesof BlackBerry UEM, you can see the updated text here. For a list of variables that you can use in email templates,see Default variables.
Name Suggested text
Android workprofile activationcode
Subject: An Android work profile activation code has been created for you
%UserDisplayName%,
To activate an Android device with a work profile only, your administrator has createdan Android work profile activation code for you. You will receive your BlackBerryUEM activation password in a separate email message.
Your Android work profile activation code: %GoogleActivationCode%
Your Android work profile activation code will expire on %ActivationPasswordExpiry%.
If you have any questions, contact your administrator.
Defaultmanaged Google accountcredentials
Subject: A Google account has been created for you
%UserDisplayName%,
To enable the work profile on your device, your administrator has createda Google account for you. You will need your Google account password when youactivate the work profile. The Google account password displayed here is not thepassword that you use when you activate your device on BlackBerry UEM. You willreceive your BlackBerry UEM activation password in a separate email message, or youcan set your BlackBerry UEM activation password in BlackBerry UEM Self-Service.
You will need the following information when you activate the work profile:
• Your work email address: %UserEmailAddress%• Your Google account password: %Password%
You can manage your Google Account at https://myaccount.google.com. If you changethe password for your Google Account, the password included in this email will nolonger apply, and you must use the new password instead.
Please keep this information for your records.
If you have any questions, contact your administrator.
| Using profiles, variables, and email templates | 76

Name Suggested text
Apple DEP deviceactivation email
First email
Subject: Activating your device on BlackBerry UEM
%UserDisplayName%,
Your administrator has enabled your iOS device for BlackBerry UEM. To activate yourdevice you need the following information:
• Your work email address: %UserEmailAddress%• Your device activation password: Your activation password will be delivered in a
separate email.
You can manage your own device with BlackBerry UEM Self-Service at%UserSelfServicePortalURL%. To log in, use the following username:
• BlackBerry UEM Self-Service username: %UserName%
Your BlackBerry UEM Self-Service password may have been delivered in a separateemail.
If you have not received it, contact your administrator.
Please keep this information for your records.
If you have any questions, contact your administrator.
Apple DEP deviceactivation email
Second email
Subject: Password to activate your device on BlackBerry UEM
%UserDisplayName%,
Your administrator has enabled your mobile device for BlackBerry UEM. To activate yourdevice you need the following information:
Your device activation password: %ActivationPassword%
Your password will expire on %ActivationPasswordExpiry%.
Please follow the instructions in the "Activating your device on BlackBerry UEM" email toactivate your iOS device on BlackBerry UEM.
If you have any questions, contact your administrator.
Welcome to BlackBerry UEM!
| Using profiles, variables, and email templates | 77

Name Suggested text
BlackBerryDynamics accesskey email
Subject: An access key for a BlackBerry Dynamics app has been created for you
%UserDisplayName%,
Your administrator has created an access key for a BlackBerry Dynamics app. Thisemail contains the access key and instructions to set up the app.
If you have been given permission to use more than one app, you will receive more thanone email. Each email has an access key that can be used to set up an app. You can useany of your access keys to set up any app, but you can only use each access key once.
Before you begin, make sure you have mobile data or Wi-Fi coverage.
1. Open the BlackBerry Dynamics app.2. When you are prompted, enter the following information.
• Email address: %UserEmailAddress%• Access key: %AccessKeys%
Your access key will expire on %AccessKeyExpiry%.3. You may be prompted to create a password. You will need to enter this password
when you open the app.
If you have any questions, contact your administrator.
| Using profiles, variables, and email templates | 78

Name Suggested text
Default activationemail
First email
Subject: Activating your device on BlackBerry UEM
%UserDisplayName%,
Your administrator has enabled your mobile device for BlackBerry UEM. To activate yourdevice you need some or all of the following information:
• Your work email address: %UserEmailAddress%• Server name: %ActivationURL%• Activation username: %ActivationUserName%• Your device activation password: Your activation password will be delivered in a
separate email.
You can watch a video on how to activate your device here: http://help.blackberry.com/en/activation-videos/current/
For Android devices:
If you are using an Android device, you must install the BlackBerry UEMClient from Google Play.
For iOS devices:
If you are using an iOS device, you must install the BlackBerry UEM Client from the AppStore.
For iOS devices, open Safari and go to workspace://apps to install apps that youradministrator has assigned to you. If available, you can also tap Work Apps on yourdevice.
For macOS devices:
If you are using a macOS device, you must activate your device using BlackBerry UEMSelf-Service.
For Windows Phone 8.1 devices:
If you are using a device running Windows Phone 8.1 or earlier, you must installthe BlackBerry UEM Client from the Windows Store.
For devices running Windows 10 or later:
You will need the following information to activate your device:
• Server name: %ClientlessActivationURL%• Certificate server URL: %RsaRootCaCertUrl%• You must install the RSA certificate. Type the Certificate server URL in the address
bar of the browser on your device. Follow the instructions and install the certificateinto the Trusted Root Certification Authorities folder.
• On your device, go to Settings > Accounts > Access work or school and tap Enrollonly in device management.
To manage your devices
You can manage your own device with BlackBerry UEM Self-Service at%UserSelfServicePortalURL%. To log in, use the following username:
BlackBerry UEM Self-Service username: %UserName%
Your BlackBerry UEM Self-Service password may have been delivered in a separateemail.
Welcome to BlackBerry UEM!
| Using profiles, variables, and email templates | 79

Name Suggested text
Default activationemail
Second email
Subject: Password to activate your device on BlackBerry UEM
%UserDisplayName%,
Your administrator has enabled your mobile device for BlackBerry UEM. To activate yourdevice you need the following information:
• Your device activation password: %ActivationPassword%• Your password will expire on %ActivationPasswordExpiry%
Please follow the instructions in the "Activating your device on BlackBerry UEM" email toactivate your BlackBerry 10, iOS, Android, or Windows device on BlackBerry UEM.
If you have any questions, contact your administrator.
Welcome to BlackBerry UEM!
Default complianceemail
Subject: Notification of noncompliant device
Your device is not compliant with your organization's policies. If this condition persistsyour administrator might limit access to the organization's data from your device, deletethe organization's data on your device, or delete all content and settings from yourdevice.
| Using profiles, variables, and email templates | 80

Name Suggested text
Default Work spaceonly (Android workprofiles) activationemail
First email
Subject: Activating your device on BlackBerry UEM
%UserDisplayName%,
Your administrator has enabled your Android device (6.0 and later) for BlackBerry UEM.To activate your device, you need the following information:
• Activation username: %ActivationUserName%• Your device activation password: Your activation password will be delivered in a
separate email.
To activate your device, perform the following actions:
1. If you do not see the device setup Welcome screen, reset your device to the factorydefault settings.
2. During the device setup, in the Add your account screen enter afw#blackberry.Wait while the device updates some important system applications and downloadsthe UEM Client.
3. In the BlackBerry UEM Client, follow the instructions on the screen to activate yourdevice.
You can manage your own device with BlackBerry UEM Self-Service at%UserSelfServicePortalURL%. To log in, use the following username:
BlackBerry UEM Self-Service username: %UserName%
Your BlackBerry UEM Self-Service password may have been delivered in a separateemail.
If you have not received it, contact your administrator.
Please keep this information for your records.
If you have any questions, contact your administrator.
Welcome to BlackBerry UEM!
Default Work spaceonly (Android workprofiles) activationemail
Second email
Subject: Password to activate your device on BlackBerry UEM
%UserDisplayName%,
Your administrator has enabled your Android device for BlackBerry UEM. To activateyour device you need the following information:
• Your device activation password: %ActivationPassword%• Your password will expire on %ActivationPasswordExpiry%
Please follow the instructions in the "Activating your device on BlackBerry UEM" email toactivate your device on BlackBerry UEM.
If you have any questions, contact your administrator.
Welcome toBlackBerry UEM!
BlackBerryUEM eventnotification email
Subject: BlackBerry UEM event notification
The following event occurred:
%AllEventVariables%
| Using profiles, variables, and email templates | 81

Name Suggested text
Device activatednotification
Subject: Device activated on BlackBerry UEM
%UserDisplayName%,
Your device has been activated on BlackBerry UEM.
Device information
Model: %DeviceModel%
Serial Number: %SerialNumber%
IMEI: %DeviceIMEI%
If you did not activate this device, contact your administrator.
Subject: BlackBerry Dynamics device activated on BlackBerry UEM
%UserDisplayName%,
Your BlackBerry Dynamics device has been activated on BlackBerry UEM.
If you did not activate this device, contact your administrator.
Self-service loginnotification
Subject: Self-service login notification
%UserDisplayName%,
You have logged in to BlackBerry UEM Self-Service.
IP address: %IPAddress%
Time: %Timestamp%
If you did not log in, contact your administrator.
Create an activation email template1. On the menu bar, click Settings > General settings.2. Click Email templates.3. Click . Select Device activation.4. In the Name field, type a name to identify this template.5. In the Subject field, edit the text to customize the subject line of the first activation email.6. In the Message field, type the body text of the activation email.
• Use the HTML editor to select the font format and to insert images (for example, a corporate logo).• Insert variables in the text to personalize the message (for example, you can use the variable
%UserDisplayName% to insert the recipient's name). For a list of available variables, see Default variables.• To see sample text, click Suggested text.
7. If you want users to activate their device using a QR Code instead of an activation password, select theAppend a QR code to email message check box.
8. To send the activation password or QR Code separately from the activation instructions, select Send twoseparate activation emails - first for complete instructions, second for password. If you decide to send onlyone activation email, make sure that you include the activation password, the activation password variable, orthe QR Code in the first email.
9. In the Subject field, type a subject line for the second activation email.
| Using profiles, variables, and email templates | 82

10.Customize the body text of the second activation email template and include the activation password, theactivation password variable, or select the Append a QR code to email message check box.
11.Click Save.
Create a template for compliance email notificationsYou can create multiple email templates, customize them to apply to specific device types or groups of users, andassign an appropriate template to each user account. When a user's device does not comply with a complianceprofile, BlackBerry UEM can send a personalized email message based on the assigned template. BlackBerry UEMincludes a default compliance violation email template that can be edited, but not deleted. If you don't assign adifferent template to a user account, BlackBerry UEM uses the default template.
1. On the menu bar, click Settings > General settings.2. Click Email templates.3. Click . Select Compliance violation.4. In the Name field, type a name to identify this template.5. In the Subject field, type a subject for the email message.6. In the Message field, type the body text of the compliance email message. Use the HTML editor to select the
font format and to insert images, for example a corporate logo. Insert variables in the text to personalize themessage, for example you can use the variable %UserDisplayName% to insert the recipient's name. For a list ofavailable variables, see Default variables.
7. Click Save.
Create an event notification email templateYou can create event notification email templates to associate with event notifications.
1. On the menu bar, click Settings > General settings.2. Click Email templates. 3. Click and select Event notification.4. In the Name field, type a name to identify this template.5. In the Subject field, complete one of the following tasks:
• Clear the Append event type to the email subject check box and type a subject.• Leave the Append event type to the email subject check box selected, and type additional text in the
subject field.• Leave the Append event type to the email subject check box selected.
6. In the Message field, type the body text of the event notification email.
• Use the HTML editor to select the font format and to insert images (for example, your organization's logo).• To see sample text, click Suggested text.
7. Click Save.
Related concepts
Creating event notifications
Edit an email template1. On the menu bar, click Settings > General settings.2. Click Email templates.
| Using profiles, variables, and email templates | 83

3. Click Default activation email or any existing template that you want to edit.4. Edit the Name, Subject, or Message fields. If you make a mistake and want to start over, click Cancel to return
to the Email templates page.5. When you have completed your changes, click Save.
| Using profiles, variables, and email templates | 84

Wi-Fi, VPN, BlackBerry Secure Connect Plus, and otherwork connectionsYou can use profiles to set up and manage work connections for devices in your organization. Work connectionsdefine how devices connect to work resources in your organization's environment, such as mail servers, proxyservers, Wi-Fi networks, and VPNs. You can specify settings for BlackBerry 10, iOS, macOS, Android, and Windowsdevices in the same profile and then assign the profile to user accounts, user groups, or device groups.
Steps to set up work connections for devicesWhen you set up work connections for devices, you perform the following actions:
Step Action
Create profiles to configure how devices connect to work resources. For example, createan email profile, Wi-Fi profile, VPN profile, enterprise connectivity profile, and BlackBerryDynamics connectivity profile.
If necessary, rank profiles.
Assign profiles to user accounts, user groups, or device groups.
Best practice: Creating work connection profilesSome work connection profiles can include one or more associated profiles. When you specify an associatedprofile, you link an existing profile to a work connection profile, and devices must use the associated profile whenthey use the work connection profile.
Consider the following guidelines:
• Determine which work connections are required for devices in your organization.• Create profiles that you can associate with other profiles before you create the work connection profiles that
use them.• Use variables where appropriate.
You can associate certificate profiles and proxy profiles with various work connection profiles. You should createprofiles in the following order:
1. Certificate profiles2. Proxy profiles3. Work connection profiles such as email, VPN, and Wi-Fi
For example, if you create a Wi-Fi profile first, you cannot associate a proxy profile with the Wi-Fi profile when youcreate it. After you create a proxy profile, you must change the Wi-Fi profile to associate the proxy profile with it.
| Wi-Fi, VPN, BlackBerry Secure Connect Plus, and other work connections | 85

Related concepts
Sending certificates to devices using profiles
Related reference
Using variables in profiles
Setting up work Wi-Fi networks for devicesYou can use a Wi-Fi profile to specify how devices connect to a work Wi-Fi network behind the firewall. You canassign a Wi-Fi profile to user accounts, user groups, or device groups.
Device Apps and network connections
BlackBerry 10 By default, both work and personal apps can use the Wi-Fi profiles stored onthe device to connect to your organization's network. Work apps can also usethe BlackBerry Infrastructure to connect to your organization's network. If yourorganization's security standards do not allow personal apps to access yourorganization's network, or you want to limit connectivity options for work apps, youcan restrict connection options.
iOS, macOS, Android,and Windows
Work and personal apps can use the Wi-Fi profiles stored on the device to connectto your organization's network:
Create a Wi-Fi profileThe required profile settings vary for each device type and depend on the Wi-Fi security type and authenticationprotocol that you select.
Before you begin:
• If devices use certificate-based authentication for work Wi-Fi connections, create a CA certificate profile andassign it to user accounts, user groups, or device groups. To send client certificates to devices, create a SCEP,shared certificate, or user credential profile to associate with the Wi-Fi profile.Note: Samsung KNOX Workspace devices don’t support using certificates sent to devices by BlackBerryUEM for Wi-Fi authentication. Users must set up certificate-based authentication manually on Samsung KNOXWorkspace devices.
• For BlackBerry 10, iOS, macOS, Android Enterprise, and Samsung KNOX devices that use a proxy server forwork Wi-Fi connections, create a proxy profile to associate with the Wi-Fi profile.
• If BlackBerry 10 devices use a VPN for work Wi-Fi connections, create a VPN profile to associate with the Wi-Fi profile.
1. On the menu bar, click Policies and Profiles.2. Click Networks and connections > Wi-Fi.3. Click .4. Type a name and description for the Wi-Fi profile. This information is displayed on devices.5. In the SSID field, type the network name of a Wi-Fi network.6. If the Wi-Fi network does not broadcast the SSID, select the Hidden network check box.7. Optionally, clear the check box for any device type that you do not want to configure the profile for.
| Wi-Fi, VPN, BlackBerry Secure Connect Plus, and other work connections | 86
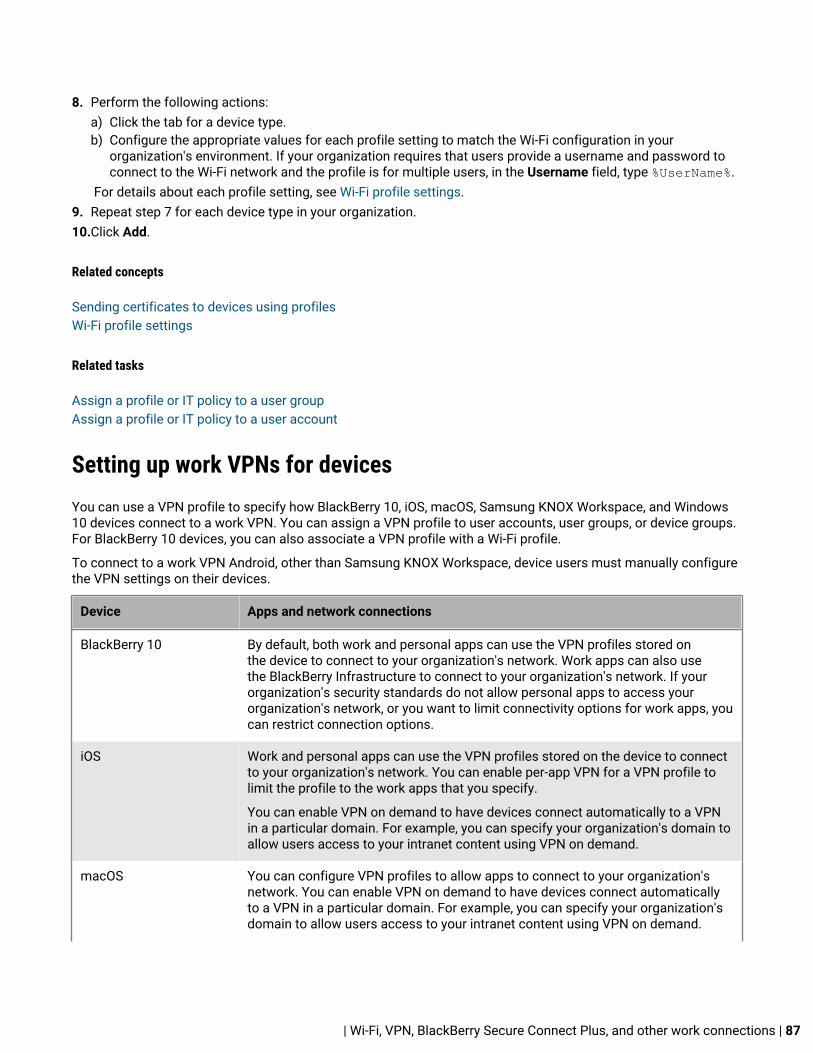
8. Perform the following actions:a) Click the tab for a device type.b) Configure the appropriate values for each profile setting to match the Wi-Fi configuration in your
organization's environment. If your organization requires that users provide a username and password toconnect to the Wi-Fi network and the profile is for multiple users, in the Username field, type %UserName%.
For details about each profile setting, see Wi-Fi profile settings.9. Repeat step 7 for each device type in your organization.10.Click Add.
Related concepts
Sending certificates to devices using profilesWi-Fi profile settings
Related tasks
Assign a profile or IT policy to a user groupAssign a profile or IT policy to a user account
Setting up work VPNs for devicesYou can use a VPN profile to specify how BlackBerry 10, iOS, macOS, Samsung KNOX Workspace, and Windows10 devices connect to a work VPN. You can assign a VPN profile to user accounts, user groups, or device groups.For BlackBerry 10 devices, you can also associate a VPN profile with a Wi-Fi profile.
To connect to a work VPN Android, other than Samsung KNOX Workspace, device users must manually configurethe VPN settings on their devices.
Device Apps and network connections
BlackBerry 10 By default, both work and personal apps can use the VPN profiles stored onthe device to connect to your organization's network. Work apps can also usethe BlackBerry Infrastructure to connect to your organization's network. If yourorganization's security standards do not allow personal apps to access yourorganization's network, or you want to limit connectivity options for work apps, youcan restrict connection options.
iOS Work and personal apps can use the VPN profiles stored on the device to connectto your organization's network. You can enable per-app VPN for a VPN profile tolimit the profile to the work apps that you specify.
You can enable VPN on demand to have devices connect automatically to a VPNin a particular domain. For example, you can specify your organization's domain toallow users access to your intranet content using VPN on demand.
macOS You can configure VPN profiles to allow apps to connect to your organization'snetwork. You can enable VPN on demand to have devices connect automaticallyto a VPN in a particular domain. For example, you can specify your organization'sdomain to allow users access to your intranet content using VPN on demand.
| Wi-Fi, VPN, BlackBerry Secure Connect Plus, and other work connections | 87

Device Apps and network connections
KNOX Workspace Work apps can use the VPN profiles stored on the device to connect to yourorganization's network.
You can enable per-app VPN to limit the profile to the work apps that you specify.
A supported VPN client app must be installed on the device. CiscoAnyConnect and Juniper are supported.
Note: The Juniper app supports only SSL VPN.
Windows 10 You can configure VPN profiles to allow apps to connect to your organization'snetwork. In the VPN profile, you can specify a list of apps that must use the VPN.
Create a VPN profileThe required profile settings vary for each device type and depend on the VPN connection type and authenticationtype that you select.
Note: Some devices may be unable to store the xAuth password. For more information, visitsupport.blackberry.com/kb to read KB30353.
Before you begin:
• If devices use certificate-based authentication for work VPN connections, create a CA certificate profile andassign it to user accounts, user groups, or device groups. To send client certificates to devices, create a usercredential, SCEP, or shared certificate profile to associate with the VPN profile.
• For BlackBerry 10, iOS, macOS, and Samsung KNOX Workspace devices that use a proxy server, create a proxyprofile to associate with the VPN profile. (The proxy server for Windows 10 devices is configured in the VPNprofile.)
• For KNOX Workspace devices, add the appropriate VPN client app to the app list and assign it to useraccounts, user groups, or device groups. The supported VPN client apps are Cisco AnyConnect and Juniper.
1. On the menu bar, click Policies and Profiles.2. Click Networks and connections > VPN.3. Click .4. Type a name and description for the VPN profile. This information is displayed on devices.5. Optionally, clear the check box for any device type that you do not want to configure the profile for.6. Perform the following actions:
a) Click the tab for a device type.b) Configure the appropriate values for each profile setting to match the VPN configuration in your
organization's environment. If your organization requires that users provide a username and password toconnect to the VPN and the profile is for multiple users, in the Username field, type %UserName%.
For details about each profile setting, see VPN profile settings.7. Repeat step 5 for each device type in your organization.8. Click Add.
Related concepts
Sending certificates to devices using profilesVPN profile settings
| Wi-Fi, VPN, BlackBerry Secure Connect Plus, and other work connections | 88
Related tasks
Assign a profile or IT policy to a user groupAssign a profile or IT policy to a user account
Enabling VPN on demand for iOS or macOS devicesVPN on demand allows you to specify whether an iOS or macOS device connects automatically to a VPN in aparticular domain. Client certificates provide authentication for the user's device when accessing the particulardomain. For example, you can specify your organization's domain to allow users access to your intranet contentusing VPN on demand.
Related reference
iOS and macOS: VPN profile settings
Enabling per-app VPNYou can set up per-app VPN for iOS, Samsung KNOX Workspace, and Windows 10 devices to specify which appson devices must use a VPN for their data in transit. Per-app VPN helps decrease the load on your organization’sVPN by enabling only certain work traffic to use the VPN (for example, accessing application servers or webpagesbehind the firewall). This feature also supports user privacy and increases connection speed for personal apps bynot sending the personal traffic through the VPN.
For iOS devices, apps are associated with a VPN profile when you assign the app or app group to a user, usergroup, or device group.
For Samsung KNOX Workspace devices, apps are added to the "Apps allowed to use the VPN connection" settingin the VPN profile.
For Windows 10 devices, apps are added to the "App trigger list" setting in the VPN profile.
Related reference
iOS and macOS: VPN profile settingsAndroid: VPN profile settingsWindows 10: VPN profile settings
How BlackBerry UEM chooses which per-app VPN settings to assign to iOS devices
Only one VPN profile can be assigned to an app or app group. BlackBerry UEM uses the following rules todetermine which per-app VPN settings to assign to an app on iOS devices:
• Per-app VPN settings that are associated with an app directly take precedence over per-app VPN settingsassociated indirectly by an app group.
• Per-app VPN settings that are associated with a user directly take precedence over per-app VPN settingsassociated indirectly by a user group.
• Per-app VPN settings that are assigned to a required app take precedence over per-app VPN settings assignedto an optional instance of the same app.
• Per-app VPN settings that are associated with the user group name that appears earlier in the alphabetical listtakes precedence if the following conditions are met:
• An app is assigned to multiple user groups• The same app appears in the user groups
| Wi-Fi, VPN, BlackBerry Secure Connect Plus, and other work connections | 89

• The app is assigned in the same way, either as a single app or an app group• The app has the same disposition in all assignments, either required or optional
For example, you assign Cisco WebEx Meetings as an optional app to the user groups Development andMarketing. When a user is in both groups, the per-app VPN settings for the Development group is applied to theWebEx Meetings app for that user.
If a per-app VPN profile is assigned to a device group, it takes precedence over the per-app VPN profile that isassigned to the user account for any devices that belong to the device group.
Setting up proxy profiles for devicesYou can specify how devices use a proxy server to access web services on the Internet or a work network.For BlackBerry 10, iOS, macOS, and Android devices, you create a proxy profile. For Windows 10 devices, you addthe proxy settings in the Wi-Fi or VPN profile.
Unless noted otherwise, proxy profiles support proxy servers that use basic or no authentication.
Device Proxy configuration
BlackBerry 10 Create a proxy profile and associate it with the profiles that your organizationuses, which can include any of the following:
• Wi-Fi• VPN• Enterprise connectivity
iOS Create a proxy profile and associate it with the profiles that your organizationuses, which can include any of the following:
• Wi-Fi• VPN
You can also assign a proxy profile to user accounts, user groups, or devicegroups.
Note: A proxy profile that is assigned to user accounts, user groups, or devicegroups is a global proxy for supervised devices only and takes precedence over aproxy profile that is associated with a Wi-Fi or VPN profile. Supervised devices usethe global proxy settings for all HTTP connections.
macOS Create a proxy profile and associate it with a Wi-Fi or VPN profile.
macOS applies profiles to user accounts or devices. Proxy profiles are applied todevices.
Android For Android Enterprise devices, create a proxy profile and associate it with a Wi-Fi profile.
Android 8.0 and later devices with MDM controls or User privacy activations don'tsupport Wi-Fi profiles with proxy settings. If a device with one of these activationtypes is upgraded to Android 8.0, Wi-Fi profiles that have an associated proxyprofile will be removed from the device.
| Wi-Fi, VPN, BlackBerry Secure Connect Plus, and other work connections | 90

Device Proxy configuration
Samsung KNOX Create a proxy profile and associate it with the profiles that your organizationuses. The following conditions apply:
• For Wi-Fi profiles, only proxy profiles with manual configuration are supportedon KNOX devices. Proxy profiles that you associate with Wi-Fi profiles supportproxy servers that use basic, NTLM, or no authentication.
• For VPN and enterprise connectivity profiles, proxy profiles with manualconfiguration are supported on Samsung KNOX Workspace devices thatuse KNOX 2.5 and later. Proxy profiles with PAC configuration are supportedon KNOX Workspace devices that use a version of KNOX that is later than 2.5.
Note: To use a proxy profile with an enterprise connectivity profile, BlackBerrySecure Connect Plus must be enabled.
You can also assign a proxy profile to user accounts, user groups, or devicegroups. The following conditions apply:
• On KNOX Workspace devices, the profile configures the browser proxy settingsin the work space.
• On Samsung KNOX MDM devices, the profile configures the browser proxysettings on the device.
Note: PAC configuration is not supported on KNOX Workspace devices thatuse KNOX 2.5 and earlier and KNOX MDM devices.
Windows 10 Create a Wi-Fi or VPN profile and specify the proxy server information in the profilesettings. The following conditions apply:
• Wi-Fi proxy supports only manual configuration and is supported onlyon Windows 10 Mobile devices.
• VPN proxy supports PAC or manual configuration.
Create a proxy profileIf your organization uses a PAC file to define proxy rules, you can select PAC configuration to use the proxy serversettings from the PAC file that you specify. Otherwise, you can select manual configuration and specify the proxyserver settings directly in the profile.
1. On the menu bar, click Policies and profiles.2. Click Networks and connections > Proxy.3. Click .4. Type a name and description for the proxy profile.5. Click the tab for a device type.6. Perform one of the following tasks:
| Wi-Fi, VPN, BlackBerry Secure Connect Plus, and other work connections | 91

Task Steps
Specify PAC configurationsettings
a. In the Type drop-down list, verify that PAC configuration is selected.b. In the PAC URL field, type the URL for the web server that hosts
the PAC file and include the PAC file name (for example, http://www.example.com/PACfile.pac). The PAC file should not be hosted on aserver that hosts BlackBerry UEM or any of its components.
c. On the BlackBerry tab, perform the following actions:
1. If your organization requires that users provide a username andpassword to connect to the proxy server and the profile is formultiple users, in the Username field, type %UserName%. If theproxy server requires the domain name for authentication, use theformat <domain>\<username>.
2. In the User can edit drop-down list, click the proxy settingsthat BlackBerry 10 device users can change. The default settingis Read only.
Specify manualconfiguration settings
a. In the Type drop-down list, click Manual configuration.b. In the Host field, type the FQDN or IP address of the proxy server.c. In the Port field, type the port number of the proxy server.d. If your organization requires that users provide a username and
password to connect to the proxy server and the profile is formultiple users, in the Username field, type %UserName%. If theproxy server requires the domain name for authentication, use theformat <domain>\<username>.
e. On the BlackBerry tab, perform the following actions:
1. In the User can edit drop-down list, click the proxy settingsthat BlackBerry 10 device users can change. The default settingis Read only.
2. Optionally, you can specify a list of addresses that users can accessdirectly from their BlackBerry 10 devices without using the proxyserver. In the Exclusion list field, type the addresses (FQDN or IP) anduse a semicolon (;) to separate the values in the list. You can use thewildcard character (*) in an FQDN or IP (for example, *.example.comor 192.0.2.*).
7. Repeat steps 4 and 5 for each device type in your organization.8. Click Add.
After you finish:
• Associate the proxy profile with a Wi-Fi, VPN, or enterprise connectivity profile.• If necessary, rank profiles. The ranking that you specify applies only if you assign a proxy profile to user groups
or device groups.
Related tasks
Assign a profile or IT policy to a user groupAssign a profile or IT policy to a user account
| Wi-Fi, VPN, BlackBerry Secure Connect Plus, and other work connections | 92
Using enterprise connectivity and BlackBerry Secure Connect Plus forconnections to work resourcesYou can use an enterprise connectivity profile to enable enterprise connectivity and BlackBerry Secure ConnectPlus for supported devices.
Enterprise connectivity
Enterprise connectivity sends all work data sent between BlackBerry 10 devices and your organization's networkthrough the BlackBerry Infrastructure to BlackBerry UEM. This feature allows you to avoid opening a directconnection through your organization's firewall to the Internet for BlackBerry 10 device management and appsthat connect to your mail server, internal CA, and other web or content servers. Enterprise connectivity is alwaysenabled for BlackBerry 10 devices, even if you don't use BlackBerry Secure Connect Plus. These devices choosethe most efficient path based on network availability.
BlackBerry Secure Connect Plus
BlackBerry Secure Connect Plus is a BlackBerry UEM component that provides a secure IP tunnel between appsand your organization's network:
• For BlackBerry 10 and Android devices with a work profile, all work apps use the secure tunnel.• For Samsung KNOX Workspace devices, you can allow all work space apps to use the tunnel or specify apps
using per-app VPN• For iOS devices, you can allow all apps to use the tunnel or specify apps using per-app VPN.
Note: If BlackBerry Secure Connect Plus is not available in your region, you must manually disable itfor Android devices in the Enterprise connectivity profile.
The secure IP tunnel gives users access to work resources behind your organization’s firewall while ensuring thesecurity of data using standard protocols and end-to-end encryption.
BlackBerry Secure Connect Plus and a supported device establish a secure IP tunnel when it is the best availableoption for connecting to the organization’s network. If a device is assigned a Wi-Fi profile or VPN profile, and thedevice can access the work Wi-Fi network or VPN, the device uses those methods to connect to the network. Ifthose options are not available (for example, if the user is not in range of the work Wi-Fi network), then BlackBerrySecure Connect Plus and the device establish a secure IP tunnel.
For iOS devices, if you configure per-app VPN for BlackBerry Secure Connect Plus, the configured apps alwaysuse a secure tunnel connection through BlackBerry Secure Connect Plus, even if the app can connect to thework Wi-Fi network or VPN specified in a Wi-Fi or VPN profile.
Supported devices communicate with BlackBerry UEM to establish the secure tunnel through the BlackBerryInfrastructure. One tunnel is established for each device. The tunnel supports standard IPv4 protocols (TCP andUDP). As long as the tunnel is open, apps can access network resources. When the tunnel is no longer required(for example, the user is in range of the work Wi-Fi network), it is terminated.
BlackBerry Secure Connect Plus offers the following advantages:
• The IP traffic that is sent between devices and BlackBerry UEM is encrypted end-to-end using AES256,ensuring the security of work data.
• BlackBerry Secure Connect Plus provides a secure, reliable connection to work resources when a device usercannot access the work Wi-Fi network or VPN.
• BlackBerry Secure Connect Plus is installed behind your organization’s firewall, so data travels through atrusted zone that follows your organization’s security standards.
For more information about how enterprise connectivity and BlackBerry Secure Connect Plus transfer data to andfrom devices, see the Architecture content.
| Wi-Fi, VPN, BlackBerry Secure Connect Plus, and other work connections | 93

Steps to enable BlackBerry Secure Connect PlusWhen you enable BlackBerry Secure Connect Plus, you perform the following actions:
Step Action
Verify that your organization's BlackBerry UEM domain meets the requirements to useBlackBerry Secure Connect Plus.
Verify that BlackBerry Secure Connect Plus is enabled in the Default enterprise connectivityprofile or in a custom enterprise connectivity profile that you create.
Optionally, specify the DNS settings for the BlackBerry Connectivity app.
If your environment includes Android devices with a work profile and Samsung KNOXWorkspace devices that are BlackBerry Dynamics enabled, optimize secure tunnelconnections.
Assign the enterprise connectivity profile to users and groups.
Server and device requirementsTo use BlackBerry Secure Connect Plus, your organization's environment must meet the following requirements.
For the BlackBerry UEM domain:
• Your organization's firewall must allow outbound connections over port 3101 to <region>.turnb.bbsecure.comand <region>.bbsecure.com. If you configure BlackBerry UEM to use a proxy server, verify that the proxyserver allows connections over port 3101 to these subdomains. For more information about domains and IPaddresses to use in your firewall configuration, visit http://support.blackberry.com/kb to read article KB36470.
• In each BlackBerry UEM instance, the BlackBerry Secure Connect Plus component must be running.• By default, Android devices that have a work profile are restricted from using BlackBerry Secure Connect
Plus to connect to Google Play and underlying services (com.android.providers.media, com.android.vending,and com.google.android.apps.gcs). Google Play does not have proxy support. Android devices that have awork profile use a direct connection over the Internet to Google Play.
These restrictions are configured in the Default enterprise connectivity profile and in any new enterpriseconnectivity profiles that you create. It is recommended to keep these restrictions in place. If you removethese restrictions, you must contact Google Play support for the firewall configuration required to allowconnections to Google Play using BlackBerry Secure Connect Plus.
Note: If your environment includes KNOX Workspace and Android work profile devices that with BlackBerryDynamics apps, see Optimize secure tunnel connections for Android devices that use BlackBerry Dynamics apps.
For supported devices:
| Wi-Fi, VPN, BlackBerry Secure Connect Plus, and other work connections | 94

Device Requirements
BlackBerry 10 • BlackBerry 10 OS version 10.3.2 or later• Any of the following activation types:
• Work and personal - Corporate• Work space only• Work and personal - Regulated
Samsung KNOX Workspace • Android 5.0 or later• Samsung KNOX MDM 5.0 or later• Samsung KNOX 2.3 or later• Any of the following activation types:
• Work space only (Samsung KNOX)• Work and personal - full control (Samsung KNOX)• Work and personal - user privacy (Samsung KNOX)
Android Enterprise devices • Android 5.1 or later• Any of the following activation types:
• Work space only (Premium)• Work and personal - user privacy (Premium)
iOS • iOS 9 or later• Devices must be activated using the BlackBerry UEM Client, available from
the App Store• MDM controls activation type
For more information about the licenses that are required to use BlackBerry Secure Connect Plus, see theLicensing content.
Load balancing and high availability for BlackBerry Secure Connect PlusIf a domain includes more than one BlackBerry UEM instance, the BlackBerry Secure Connect Plus componentin each instance runs and processes data. Data is load-balanced across all BlackBerry Secure Connect Pluscomponents in the domain.
High availability failover is available for BlackBerry 10, Samsung KNOX Workspace, Android devices that havea work profile, and iOS devices. If a device is using a secure tunnel and the current BlackBerry Secure ConnectPlus component becomes unavailable, the BlackBerry Infrastructure assigns the device to a BlackBerry SecureConnect Plus component on another BlackBerry UEM instance. The device resumes use of the secure tunnel withminimal disruption.
BlackBerry Secure Connect Plus and the BlackBerry Connectivity NodeYou can install one or more instances of the BlackBerry Connectivity Node to add additional instances of thedevice connectivity components to your organization’s domain. Each BlackBerry Connectivity Node containsan active instance of BlackBerry Secure Connect Plus that can process device data and establish secureconnections.
You can also create server groups. A server group contains one or more instances of the BlackBerry ConnectivityNode. When you create a server group, you specify the regional data path that you want the components to use toconnect to the BlackBerry Infrastructure. For example, you can create a server group to direct device connections
| Wi-Fi, VPN, BlackBerry Secure Connect Plus, and other work connections | 95

for BlackBerry Secure Connect Plus and the BlackBerry Secure Gateway to use the path for the United Statesto the BlackBerry Infrastructure. You can associate email and enterprise connectivity profiles with a servergroup. Any device that is assigned those profiles uses that server group’s regional connection to the BlackBerryInfrastructure when it uses any of the components of the BlackBerry Connectivity Node.
If a server group contains multiple instances of the BlackBerry Connectivity Node, devices can use any instancethat is running. Device connections are load balanced across the available instances in the group. If no instancesare available, devices cannot use those components for secure connections. At least one of the instances mustbe available.
For more information about planning for and installing a BlackBerry Connectivity Node, see the Planningcontent and the Installation and upgrade content.
Enabling and configuring enterprise connectivity and BlackBerry Secure Connect PlusYou use an enterprise connectivity profile to enable enterprise connectivity and BlackBerry Secure Connect Plus.
• BlackBerry 10 devices support enterprise connectivity both with and without BlackBerry Secure Connect Plus.You cannot disable enterprise connectivity for BlackBerry 10 devices.
• Android devices with a work profile, Samsung KNOX Workspace devices, and iOS devices, support enterpriseconnectivity through BlackBerry Secure Connect Plus.
Note: If you use an email profile to enable the BlackBerry Secure Gateway for iOS devices, it is a best practice toconfigure per-app VPN for BlackBerry Secure Connect Plus. For more information about the BlackBerry SecureGateway, see Protecting email data using the BlackBerry Secure Gateway.
Note: If your environment includes Android devices with a work profile and Samsung KNOX Workspace deviceswith BlackBerry Dynamics apps, see Optimize secure tunnel connections for Android devices that use BlackBerryDynamics apps.
Create an enterprise connectivity profile
If you want to use an enterprise connectivity profile to configure BlackBerry Secure Connect Plus, see EnableBlackBerry Secure Connect Plus instead of this task.
By default, BlackBerry UEM assigns the Default enterprise connectivity profile to all users. You can edit the defaultprofile or you can create new enterprise connectivity profiles.
Before you begin: If necessary, create a proxy profile.
1. On the menu bar, click Policies and Profiles.2. Click Networks and connections > Enterprise connectivity.3. Click .4. Type a name and description for the profile. Each enterprise connectivity profile must have a unique name.5. Perform the following actions:
a) Click the tab for a device type.b) If enterprise connectivity is enabled and you use a proxy, select a proxy profile.
6. Repeat step 4 for each supported device type in your organization.7. Click Add.
After you finish: If necessary, rank profiles.
Related concepts
Enterprise connectivity profile settings
| Wi-Fi, VPN, BlackBerry Secure Connect Plus, and other work connections | 96

Related tasks
Assign a profile or IT policy to a user groupAssign a profile or IT policy to a user account
Enable BlackBerry Secure Connect Plus
If you want to allow devices to use BlackBerry Secure Connect Plus, you must enable BlackBerry Secure ConnectPlus in an enterprise connectivity profile and assign the profile to users and groups. By default, BlackBerry SecureConnect Plus is enabled for BlackBerry 10 and supported Android devices. For iOS devices, BlackBerry SecureConnect Plus is not enabled by default.
You can do one of the following:
• Verify that BlackBerry Secure Connect Plus is enabled in the Default enterprise connectivity profile for theappropriate device types. If a user account is not assigned a custom enterprise connectivity profile directly orthrough group membership, BlackBerry UEM assigns the Default profile.
• Create a custom enterprise connectivity profile using the following instructions and assign it to users andgroups.
When the enterprise connectivity profile is applied to the device after activation, BlackBerry UEM installs theBlackBerry Connectivity app on the device (for Android devices that have a work profile, the app is installedautomatically from Google Play; for iOS devices, the app is installed automatically from the App Store). OnBlackBerry 10 devices, the app is hidden and does not require user interaction.
BlackBerry releases new versions of the app to support new features and enhancements. For instructions onupgrading the app, and to learn about the latest known and fixed issues, see the BlackBerry Connectivity appRelease Notes.
1. In the management console, on the menu bar, click Policies and Profiles.2. Click Networks and connections > Enterprise connectivity.3. Click .4. If you created and configured one or more server groups to direct BlackBerry Secure Connect Plus traffic to
a specific regional path to the BlackBerry Infrastructure, in the BlackBerry Secure Connect Plus server groupdrop-down list, click the appropriate server group.
5. Configure the appropriate values for the profile settings for each device type. For more information about eachprofile setting, see Enterprise connectivity profile settings.
6. Click Add.7. Assign the profile to groups or user accounts.8. If you configured per-app VPN for iOS devices, when you assign an app or app group, associate it with the
appropriate enterprise connectivity profile.
After you finish:
• On Samsung KNOX Workspace and Android devices that have a work profile, the BlackBerry Connectivity appprompts users to allow it to run as a VPN and to allow access to private keys on the device. Instruct users toaccept the requests. Samsung KNOX Workspace, Android devices that have a work profile, and iOS deviceusers can open the app to view the status of the connection. No further action is required from users.
• If you created more than one enterprise connectivity profile, rank the profiles.• If you want to implement custom encryption for BlackBerry Secure Connect Plus, you must complete extra
configuration tasks before users activate BlackBerry 10 devices. See "Implementing custom encryption."• If you are troubleshooting a connection issue with a KNOX Workspace, Android device that has a work
profile, or iOS device, the app allows the user to send the device logs to an administrator's email address (the
| Wi-Fi, VPN, BlackBerry Secure Connect Plus, and other work connections | 97

user enters an email address that you must provide). Note that the logs are not viewable with Winzip. It isrecommended to use another utility such as 7-Zip.
Related concepts
Enterprise connectivity profile settings
Related tasks
Assign a profile or IT policy to a user groupAssign a profile or IT policy to a user accountRank profiles
Specify the DNS settings for the BlackBerry Connectivity app
You can specify the DNS servers that you want the BlackBerry Connectivity app to use for secure tunnelconnections. You can also specify DNS search suffixes. If you do not specify DNS settings, the app obtains DNSaddresses from the computer that hosts the BlackBerry Secure Connect Plus component, and the default searchsuffix is the DNS domain of that computer.
If you create and configure one or more server groups to direct BlackBerry Secure Connect Plus connections to aspecific regional path to the BlackBerry Infrastructure, you can specify DNS settings specific to each server group.If you do, the DNS settings for a server group take precedence over the global DNS settings that you specify usingthe following steps. For more information about creating and configuring server groups, see the Installation andupgrade content.
1. On the menu bar, click Settings.2. Click Infrastructure > BlackBerry Secure Connect Plus.3. Select the Manually configure DNS servers check box and click .4. Type the DNS server address in dot-decimal notation (for example, 192.0.2.0). Click Add.5. If necessary, repeat steps 3 and 4 to add more DNS servers. In the DNS servers table, click the arrows in
the Ranking column to set the priority for the DNS servers.6. If you want to specify DNS search suffixes, complete the following steps:
a) Select the Manage DNS search suffixes manually check box and click .b) Type the DNS search suffix (for example, domain.com). Click Add.
7. If necessary, repeat step 6 to add more DNS search suffixes. In the DNS search suffix table, click the arrows inthe Ranking column to set the priority for the DNS servers.
8. Click Save.
Optimize secure tunnel connections for Android devices that use BlackBerry Dynamics apps
If you enable BlackBerry Secure Connect Plus and your environment includes BlackBerry Dynamics apps installedon Android devices that have a work profile or Samsung KNOX Workspace devices, it is recommended that youconfigure the BlackBerry Dynamics connectivity profile assigned to these devices to disable BlackBerry Proxy.Using both BlackBerry Proxy and BlackBerry Secure Connect Plus might delay network activity from the appsbecause the data is routed to both network components.
1. On the menu bar, click Policies and Profiles.2. Click Networks and connections > BlackBerrry Dynamics connectivity.
| Wi-Fi, VPN, BlackBerry Secure Connect Plus, and other work connections | 98

3. Select the profile that is assigned to Android devices that have a work profile and Samsung KNOX Workspacedevices.
4. Click 5. Clear the Route all traffic check box.6. Click Save.
Related reference
BlackBerry Dynamics connectivity profile settings
Direct BlackBerry 10 work space traffic through BlackBerry Secure Connect Plus when a Wi-Fi network is available
If you use BlackBerry UEM to configure a Wi-Fi profile and assign it to BlackBerry 10 devices, the devices prioritizethe work Wi-Fi network above BlackBerry Secure Connect Plus. If the work Wi-Fi network is not available, anddevices are not assigned a VPN profile or cannot access the VPN, devices use BlackBerry Secure Connect Plus.You have the option of directing all work space traffic through BlackBerry Secure Connect Plus even when devicescan access the work Wi-Fi network. You may choose to use this option if your organization’s security standardsprevent device connections to work resources over the Wi-Fi network.
Note: Enabling this feature directs all work space traffic that would typically use the work Wi-Fi network througha secure connection to the BlackBerry Infrastructure. This feature may have an impact on your organization’s datausage and network costs. Verify that this is your organization’s preferred configuration before you enable thisfeature.
Before you begin: In the IT policy that is assigned to BlackBerry 10 device users, verify that the "Force networkaccess control for work apps" IT policy rule is not selected.
1. On the menu bar, click Policies and Profiles.2. Click Networks and connections > Wi-Fi.3. Click a Wi-Fi profile that is assigned to BlackBerry 10 device users.4. Click .5. On the BlackBerry tab, in the Associated profiles section, select the Use an enterprise connectivity profile
with a BlackBerry Secure Connect Plus connection for work data check box.6. Click Save.
After you finish: If you created and assigned multiple Wi-Fi profiles, repeat this task as necessary.
Related reference
BlackBerry 10: Wi-Fi profile settings
Troubleshooting BlackBerry Secure Connect PlusConsider the following issues if you are having trouble setting up BlackBerry Secure Connect Plus.
The BlackBerry Secure Connect Plus Adapter goes into an “Unidentified network” state and stops working
Cause
This issue might occur if you restart the computer that hosts BlackBerry Secure Connect Plus.
| Wi-Fi, VPN, BlackBerry Secure Connect Plus, and other work connections | 99

Solution - Windows Server 2008 R2 and Windows Server 2008 R2 SP1
1. In Server Manager, expand Roles > Network Policy and Access Services. Right-click Routing and RemoteAccess and click Disable Routing and Remote Access.
2. Right-click Routing and Remote Access and click Configure and Enable Routing and Remote Access.3. Complete the setup wizard, selecting these options:
a. On the Configuration screen, select Network address translation (NAT).b. On the NAT Internet Connection screen, select Use this public interface to connect to the Internet. Verify
that BlackBerry Secure Connect Plus is displayed in the list of network interfaces.4. Expand Roles > Network Policy and Access Services > Routing and Remote Access > IPv4 and click NAT.
Open the Local Area Connection properties and select Public interface connected to the Internet and EnableNAT on this interface. Click OK.
5. Open the BlackBerry Secure Connect Plus properties and select Private interface connected to privatenetwork. Click OK.
6. Right-click Routing and Remote Access and click All Tasks > Restart.7. In the Windows Services, restart the BlackBerry UEM – BlackBerry Secure Connect Plus service.
In Network Connections, it may take a few minutes before the BlackBerry Secure Connect Plus Adapter displays asuccessful connection.
Download and install the hotfix in the Windows KB article NAT functionality fails on a Windows Server 2008 R2SP1-based RRAS server.
Solution - Windows Server 2012
1. In Server Manager, click Manage > Add Roles and Features. Click Next until you get to the Features screen.Expand Remote Server Administration Tools > Role Administration Tools and select Remote AccessManagement Tools. Complete the wizard to install the tools.
2. Click Tools > Remote Access Management.3. Under Configuration, click DirectAccess and VPN.4. Under VPN, click Open RRAS Management.5. Right-click the Routing and Remote Access Server and click Disable Routing and Remote Access.6. Right-click the Routing and Remote Access server and click Configure and Enable Routing and Remote
Access.7. Complete the setup wizard, selecting these options:
a. On the Configuration screen, select Network address translation (NAT).b. On the NAT Internet Connection screen, select Use this public interface to connect to the Internet. Verify
that BlackBerry Secure Connect Plus is displayed in the list of network interfaces.8. Open Routing and Remote Access > <server_name> > IPv4 and click NAT. Open the Local Area Connection
properties and select Public interface connected to the Internet and Enable NAT on this interface. Click OK.9. Open the BlackBerry Secure Connect Plus properties and select Private interface connected to private
network. Click OK.10.Right-click the Routing and Remote Access Server and click All Tasks > Restart.11.In the Windows Services, restart the BlackBerry UEM – BlackBerry Secure Connect Plus service.
Download and install the hotfix in the Windows KB article NAT functionality fails on a Windows Server 2012-basedRRAS server.
| Wi-Fi, VPN, BlackBerry Secure Connect Plus, and other work connections | 100

BlackBerry Secure Connect Plus does not start
Possible cause
The TCP/IPv4 settings for the BlackBerry Secure Connect Plus Adapter might not be correct.
Possible solution
In Network Connections > BlackBerry Secure Connect Plus Adapter > Properties > Internet Protocol Version 4(TCP/IPv4) > Properties, verify that Use the following IP address is selected, with the following default values:
• IP address: 172.16.0.1• Subnet mask: 255.255.0.0
If necessary, correct these settings and restart the server.
BlackBerry Secure Connect Plus stops working after a BlackBerry UEM upgrade
Cause
This issue might occur if the server wasn't restarted during an RRAS update before BlackBerry UEM is upgraded toversion 12.7, which causes NAT/routing setup to fail during the upgrade.
Solution
1. Restart the server.2. In the Windows Services, stop the BlackBerry UEM – BlackBerry Secure Connect Plus service.3. As an administrator, start Windows PowerShell (64-bit) or open a command prompt.4. Navigate to <drive>:\Program Files\BlackBerry\UEMSecureConnectPlus\config\blackberry
\ and Run configureRRAS.bat5. Navigate to <drive>:\Program Files\BlackBerry\UEMSecureConnectPlus\config\ and Run
configure-network-interface.cmd6. In the Windows Services, start the BlackBerry UEM – BlackBerry Secure Connect Plus service.
View the log files for BlackBerry Secure Connect Plus
Two log files, located by default at <drive>:\Program Files\BlackBerry\UEM\Logs\<yyyymmdd>, record data aboutBlackBerry Secure Connect Plus:
• BSCP: log data about the BlackBerry Secure Connect Plus server component• BSCP-TS: log data for connections with the BlackBerry Connectivity app
On each computer that hosts a BlackBerry Connectivity Node instance, the log files for BlackBerry Secure ConnectPlus are located at <drive>:\Program Files\BlackBerry\BlackBerry Connectivity Node\Logs\<yyyymmdd>.
| Wi-Fi, VPN, BlackBerry Secure Connect Plus, and other work connections | 101

Purpose Log file Example
Verify that BlackBerrySecure Connect Plusis connected to theBlackBerry Infrastructure
BSCP 2015-01-19T13:17:47.540-0500 - BSCP {TcpClientConnectorNio#2}logging.feature.bscp.service|logging.component.bscp.pss.bcp [{}] -DEBUG Received Ping from [id: 0x60bce5a3, /10.90.84.22:28231 =>stratos.bcp.bblabs.rim.net/206.53.155.152:3101], responding withPong.2015-01-19T13:18:22.989-0500 - BSCP {ChannelPinger#1}logging.feature.bscp.service|logging.component.bscp.pss.bcp [{}]- DEBUG Sending Ping to [id: 0xb4a1677a, /10.90.84.22:28232 =>stratos.bcp.bblabs.rim.net/206.53.155.152:3101]
Verify that BlackBerrySecure Connect Plus isready to receive callsfrom the BlackBerryConnectivity app ondevices
BSCP-TS 47: [14:13:21.231312][][3][AsioTurnSocket-1] Connected,host=68-171-243-141.rdns.blackberry.net
48: [14:13:21.239312][][3][AsioTurnSocket-1] Creating TURNallocation
49: [14:13:21.405121][][3][AsioTurnSocket-1] TURN allocationcreated
Verify that devices areusing the secure tunnel
BSCP-TS 74: [10:39:45.746926][][3][Tunnel-2FFEC51E] Sent: 2130.6 KB(1733), Received: 201.9 KB (1370), Running: 00:07:00.139249
Verify that BlackBerrySecure Connect Plus isusing custom transcodersettings
BSCP "configuration_def" : "com.rim.p2e.vpn.server.cipherSuite" } ],"TRANSCODER", [ "provider", { "configuration_def" :"com.rim.p2e.vpn.transcoder.provider" }, "server_library",{ "configuration_def" : "com.rim.p2e.vpn.transcoder.server.library" },"server_config_blob", { "configuration_def" :"com.rim.p2e.vpn.transcoder.server.configBlob" } ] ]
Verify that devicesare using a customtranscoder
BSCP-TS 37: [13:41:39.800371][][3][BlackBerry_1.0.0.1-25B212A5] Connected
Related concepts
Using log files
Setting up network connections for BlackBerry Dynamics appsBlackBerry Dynamics connectivity profiles define the network connections, Internet domains, IP address ranges,and app servers that devices can connect to when using BlackBerry Dynamics apps.
BlackBerry UEM includes a Default BlackBerry Dynamics connectivity profile with preconfigured settings. Ifno BlackBerry Dynamics connectivity profile is assigned to a user account or a user group that a user belongsto, BlackBerry UEM sends the Default BlackBerry Dynamics connectivity profile to a user's devices. BlackBerryUEM automatically sends a BlackBerry Dynamics connectivity profile to a device when a user activatesit, when you update an assigned BlackBerry Dynamics connectivity profile, or when a different BlackBerryDynamics connectivity profile is assigned to a user account or device.
| Wi-Fi, VPN, BlackBerry Secure Connect Plus, and other work connections | 102

Create a BlackBerry Dynamics connectivity profile1. On the menu bar, click Policies and Profiles.2. Click Networks and connections > BlackBerrry Dynamics connectivity3. Click .4. Type a name and description for the profile.5. Configure the appropriate values for the profile settings. For more information about each profile setting,
see BlackBerry Dynamics connectivity profile settings.6. To add an app server for a BlackBerry Dynamics app, see Add an app server to a BlackBerry Dynamics
connectivity profile.7. Click Add.
After you finish: If necessary, rank profiles.
Related tasks
Assign a profile or IT policy to a user groupAssign a profile or IT policy to a user account
Related reference
BlackBerry Dynamics connectivity profile settings
Routing all BlackBerry Dynamics app data through BlackBerry ProxyIn the BlackBerry Dynamics connectivity profile, you can specify the servers that your users' BlackBerryDynamics apps are allowed to access through the firewall using BlackBerry Proxy.
If you select the Route all traffic option, all BlackBerry Dynamics app data, regardless of domain or subnet, isrouted through BlackBerry Proxy.
Routing all traffic through BlackBerry Proxy has the following benefits:
• Web browsers and BlackBerry Dynamics apps on devices can connect to any server behind the firewall that isreachable by BlackBerry Proxy.
• You can easily monitor data traffic between BlackBerry Dynamics apps and your resources.
You should be aware of the following considerations if you select the Route all traffic option:
• Establishing connections to servers on the Internet can take longer.• If you are using a web proxy to allow access to external sites and have settings configured in your proxy to
restrict certain sites, when you select the Route all traffic option, you also need to set the proxy propertiesin BlackBerry Proxy. Otherwise, apps will not be able to access external sites. For more information onconfiguring BlackBerry Proxy settings, see the Configuration content.
• BlackBerry Access can be configured with a PAC file that determines allowable sites. In this case, the PACfile determines the proxy settings and the Route all traffic option has no effect. For more information, see theBlackBerry Access Administration Guide.
Add an app server to a BlackBerry Dynamics connectivity profileIf you have a BlackBerry Dynamics app that is served from an app server or web server, you can specify the nameof that server and the priority of the BlackBerry Proxy clusters used for communication with it.
1. On the menu bar, click Policies and Profiles.
| Wi-Fi, VPN, BlackBerry Secure Connect Plus, and other work connections | 103

2. Click Networks and connections > BlackBerrry Dynamics connectivity.3. Click the BlackBerry Dynamics connectivity profile that you want to add an app server to.4. Click .5. Under App servers, click Add.6. Select the BlackBerry Dynamics app that you want to add an app server for.7. Click Save.8. In the table for the app, click .9. In the Server field, specify the FQDN of the app server.10.In the Port field, specify the port of the BlackBerry Proxy cluster that is used to access the server.11.In the Priority drop-down list, specify the priority of the BlackBerry Proxy cluster that must be used to reach the
domain.12.In the Primary BlackBerry Proxy cluster drop-down list, specify the name of the BlackBerry Proxy cluster that
you want to set as the primary cluster.13.In the Secondary BlackBerry Proxy cluster drop-down list, specify the name of the BlackBerry Proxy cluster
that you want to set as the secondary cluster.14.Click Save.
Using BlackBerry 2FA for secure connections to critical resourcesBlackBerry 2FA protects access to your organization’s critical resources using two-factorauthentication. BlackBerry 2FA uses a password that users enter and a secure prompt on their mobile device eachtime they attempt to access resources.
You manage BlackBerry 2FA from the BlackBerry UEM management console, where you use a BlackBerry2FA profile to enable two-factor authentication for your users. To use the latest version of BlackBerry 2FA and itsassociated features, such as preauthentication and self-rescue, your users must have the BlackBerry 2FA profileassigned to them. For more information, see the BlackBerry 2FA content.
Setting up single sign-on authentication for devicesUsing a single sign-on profile, you can enable BlackBerry 10 devices and certain iOS devices to authenticateautomatically with domains and web services in your organization’s network. After you assign a single sign-onprofile, the user is prompted for a username and password the first time they try to access a secure domain thatyou specified. The login information is saved on the user’s device and used automatically when the user triesto access any of the secure domains specified in the profile. When the user changes the password, the user isprompted the next time they try to access a secure domain.
You can also use a single sign-on profile to specify trusted domains for certificates that you send to BlackBerry10 devices using a SCEP profile. Once you specify trusted domains, BlackBerry 10 users can select the requiredcertificates when they access a trusted domain.
Single sign-on profiles support the following authentication types:
Authentication type Device OS Applies to
• Kerberos iOS • Browser and apps• Can restrict which apps can use the profile
| Wi-Fi, VPN, BlackBerry Secure Connect Plus, and other work connections | 104
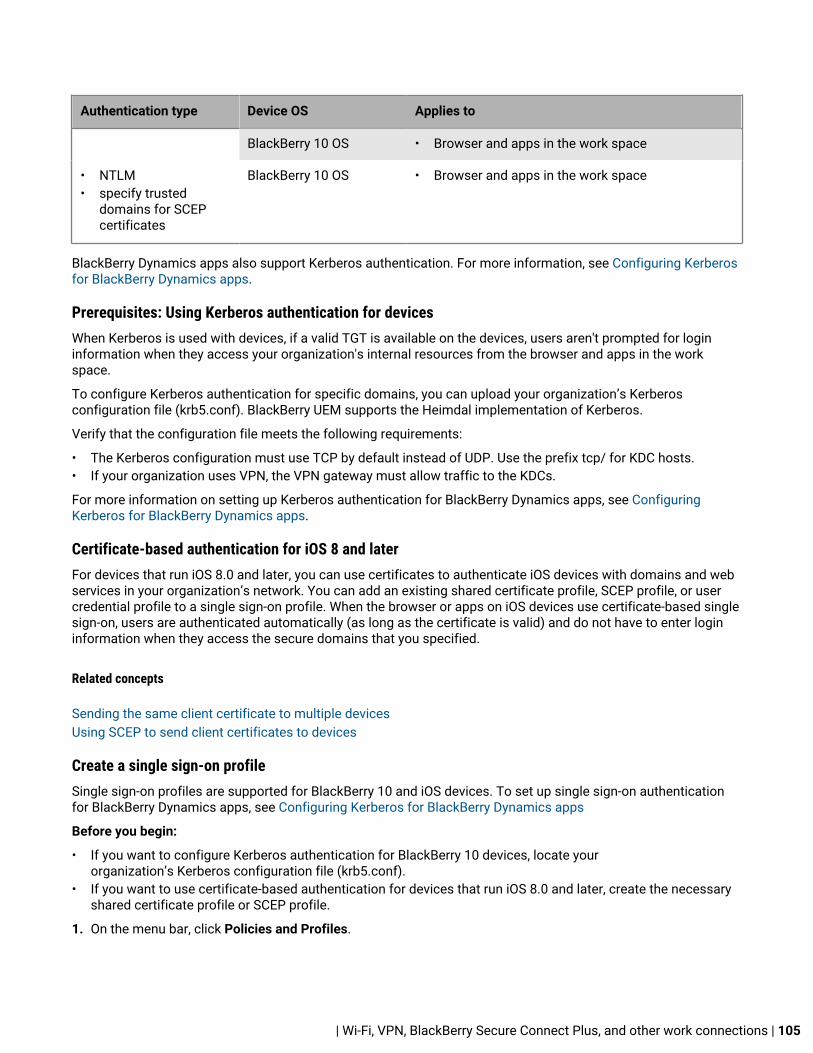
Authentication type Device OS Applies to
BlackBerry 10 OS • Browser and apps in the work space
• NTLM• specify trusted
domains for SCEPcertificates
BlackBerry 10 OS • Browser and apps in the work space
BlackBerry Dynamics apps also support Kerberos authentication. For more information, see Configuring Kerberosfor BlackBerry Dynamics apps.
Prerequisites: Using Kerberos authentication for devicesWhen Kerberos is used with devices, if a valid TGT is available on the devices, users aren't prompted for logininformation when they access your organization's internal resources from the browser and apps in the workspace.
To configure Kerberos authentication for specific domains, you can upload your organization’s Kerberosconfiguration file (krb5.conf). BlackBerry UEM supports the Heimdal implementation of Kerberos.
Verify that the configuration file meets the following requirements:
• The Kerberos configuration must use TCP by default instead of UDP. Use the prefix tcp/ for KDC hosts.• If your organization uses VPN, the VPN gateway must allow traffic to the KDCs.
For more information on setting up Kerberos authentication for BlackBerry Dynamics apps, see ConfiguringKerberos for BlackBerry Dynamics apps.
Certificate-based authentication for iOS 8 and laterFor devices that run iOS 8.0 and later, you can use certificates to authenticate iOS devices with domains and webservices in your organization’s network. You can add an existing shared certificate profile, SCEP profile, or usercredential profile to a single sign-on profile. When the browser or apps on iOS devices use certificate-based singlesign-on, users are authenticated automatically (as long as the certificate is valid) and do not have to enter logininformation when they access the secure domains that you specified.
Related concepts
Sending the same client certificate to multiple devicesUsing SCEP to send client certificates to devices
Create a single sign-on profileSingle sign-on profiles are supported for BlackBerry 10 and iOS devices. To set up single sign-on authenticationfor BlackBerry Dynamics apps, see Configuring Kerberos for BlackBerry Dynamics apps
Before you begin:
• If you want to configure Kerberos authentication for BlackBerry 10 devices, locate yourorganization’s Kerberos configuration file (krb5.conf).
• If you want to use certificate-based authentication for devices that run iOS 8.0 and later, create the necessaryshared certificate profile or SCEP profile.
1. On the menu bar, click Policies and Profiles.
| Wi-Fi, VPN, BlackBerry Secure Connect Plus, and other work connections | 105

2. Click Networks and connections > Single sign-on.3. Click .4. Type a name and description for the profile.5. Perform any of the following tasks:
Task Steps
Configure Kerberos authenticationfor iOS devices
a. Click the iOS tab.b. Under Kerberos, click .c. In the Name field, type a name for the configuration.d. In the Principal name field, type the name of the Kerberos Principal,
using the format <primary>/<instance>@<realm> (for example, user/[email protected]).
e. In the Realm field, type the Kerberos realm in uppercase letters (forexample, EXAMPLE.COM).
f. In the URL prefixes field, type the URL prefix for the sites that youwant devices to authenticate with. The prefix must begin with http://or https://, and can include wildcard values (*) (for example, https://www.blackberry.example.com/*).
g. To specify more URL prefixes, click to add more fields.h. If you want to limit the configuration to specific apps, click beside App
identifiers. Type the app bundle ID. You can use a wildcard value (*) tomatch the ID to multiple apps. (for example, com.company.*).
i. To specify more app identifiers, click to add more fields.j. If you want devices that run iOS 8.0 and later to use certificate-based
authentication, in the Credentials drop-down list, click Certificate, SCEP,or User credential. In the certificate drop-down list, click the certificateprofile that you want to use.
k. Click Add.l. If necessary, repeat steps 2 to 11 to add another Kerberos configuration.
Configure Kerberos authenticationfor BlackBerry 10 devices
a. Click the BlackBerry tab.b. Click Browse. Navigate to and select your
organization’s Kerberos configuration file (krb5.conf).
Configure NTLMauthentication or trusteddomains for SCEPcertificates for BlackBerry10 devices
a. Click the BlackBerry tab.b. Under Trusted domains, click .c. In the Name field, type a name for the configuration.d. In the Domain field, type a trusted subdomain or individual host where
the domain credentials can be used to authenticate automatically. Typethe server name as an FQDN, hostname, alias, or IP address. DNS namescan contain wildcards (*).
e. To specify more subdomains, click to add more fields.f. Click Add.g. If necessary, repeat steps 2 to 6 to add another trusted domain.
6. Click Add.
After you finish: If necessary, rank profiles.
| Wi-Fi, VPN, BlackBerry Secure Connect Plus, and other work connections | 106

Related concepts
Sending the same client certificate to multiple devicesUsing SCEP to send client certificates to devices
Related tasks
Assign a profile or IT policy to a user groupAssign a profile or IT policy to a user account
Filtering web content on iOS devicesYou can use web content filter profiles to limit the websites that a user can view in Safari or other browser appson a supervised iOS device. You can assign web content filter profiles to user accounts, user groups, or devicegroups.
When you create a web content filter profile, you can choose the allowed websites option that supports yourorganization's standards for the use of mobile devices.
Note: This profile applies to supervised iOS devices only.
Allowed websites Description
Specific websites only This option allows access to only the websites that you specify. A bookmark iscreated in Safari for each allowed website.
Limit adult content This option enables automatic filtering to identify and block inappropriate content.You can also include specific websites using the following settings:
• Permitted URLs: You can add one or more URLs to allow access to specificwebsites. Users can view websites in this list regardless of whether automaticfiltering blocks access.
• Blacklisted URLs: You can add one or more URLs to deny access to specificwebsites. Users cannot view websites in this list regardless of whetherautomatic filtering allows access.
Create a web content filter profileWhen you create a web content filter profile, each URL that you specify must begin with http:// or https://. Ifnecessary, you should add separate entries for http:// and https:// versions of the same URL. DNS resolution doesnot occur, so restricted websites could still be accessible (for example, if you specify http://www.example.com,users might be able to access the website using the IP address).
1. On the menu bar, click Policies and Profiles.2. Click Networks and connections > Web content filter.3. Click .4. Type a name and description for the web content filter profile.5. Perform one of the following tasks:
| Wi-Fi, VPN, BlackBerry Secure Connect Plus, and other work connections | 107

Task Steps
Allow access to specific websitesonly
a. In the Allowed websites drop-down list, verify that Specificwebsites only is selected.
b. In the Specific website bookmarks section, click .c. Perform the following actions:
1. In the URL field, type a web address that you want to allowaccess to.
2. Optionally, in the Bookmark path field, type the name of abookmark folder (for example, /Work/).
3. In the Title field, type a name for the website.4. Click Add.
d. Repeat steps 2 and 3 for each allowed website.
Limit adult content a. In the Allowed websites drop-down list, click Limit adult content toenable automatic filtering.
b. Optionally, perform the following actions:
1. Click beside Permitted URLs.2. Type a web address that you want to allow access to.3. Repeat steps 2.a and 2.b for each allowed website.
c. Optionally, perform the following actions:
1. Click beside Blacklisted URLs.2. Type a web address that you want to deny access to.3. Repeat steps 3.a and 3.b for each restricted website.
6. Click Add.
Related tasks
Assign a profile or IT policy to a user groupAssign a profile or IT policy to a user account
Managing email and web domains for iOS devicesYou can use a managed domains profile to define certain email domains and web domains as "manageddomains" that are internal to your organization. Managed domains profiles apply only to devices running iOS 8 orlater with the MDM controls activation type.
After you assign a managed domains profile:
• When a user creates an email message and adds a recipient email address with a domain that is not specifiedin the managed domains profile, the device displays the address in red to warn the user that the recipient isexternal to the organization. The device does not prevent the user from sending email to external recipients.
• A user must use an app that is managed by BlackBerry UEM to view documents from a managed web domainor documents downloaded from a managed web domain. The device does not prevent the user from visiting orviewing documents from other web domains. The managed domains profile applies to the Safari browser only.
| Wi-Fi, VPN, BlackBerry Secure Connect Plus, and other work connections | 108

Create a managed domains profileManaged domains profiles apply only to devices running iOS 8 or later with the MDM controls activation type.
1. On the menu bar, click Policies and profiles.2. Click Networks and connections > Managed domains.3. Click .4. Type a name and description for the profile.5. Optionally, in the Description field, type a description for the profile.6. In the Managed email domains section, click .7. In the Email domains field, type a top-level domain name (for example, example.com instead of
example.com/canada).8. Click Add.9. In the Managed web domains section, click . For examples of web domain formats, see Managed Safari
Web Domains in the iOS Developer Library.10.In the Web domains field, type a domain name.11.If you want to allow password autofill for the web domains that you specified, select the Allow password
autofill check box. This option is supported only for supervised iOS devices running iOS 9.3 or later.12.Click Add.13.Click Add.
Related tasks
Assign a profile or IT policy to a user groupAssign a profile or IT policy to a user account
Create an AirPrint profileYou can configure AirPrint profiles and assign them to devices that run iOS 7 or later so that users don’t have toconfigure printers manually. AirPrint profiles can help users find printers that support AirPrint, are accessible tothem, and for which they have the required permissions.
1. On the menu bar, click Policies and Profiles.2. Click Networks and connections > AirPrint.3. Click .4. Type a name and description for the AirPrint profile.5. In the AirPrint configuration section, click .6. In the IP Address field, type the IP address of the printer or AirPrint server.7. Optionally, in the Resource Path field, type the resource path of the printer.
The printer's resource path corresponds to the rp parameter of the _ipps.tcp Bonjour record. For example:
• printers/<printer series>• printers/<printer model>• ipp/print• IPP_Printer
8. Click Add.
| Wi-Fi, VPN, BlackBerry Secure Connect Plus, and other work connections | 109

9. Click Add.
Related tasks
Assign a profile or IT policy to a user groupAssign a profile or IT policy to a user account
Configuring AirPlay profiles for iOS devicesYou can configure AirPlay profiles and assign them to devices that run iOS 7 or later. AirPlay is an iOS featurethat lets you display photos or stream music and video to compatible AirPlay devices such as AppleTV, AirPortExpress, or AirPlay enabled speakers.
With an AirPlay profile you can set passwords for specific AirPlay devices to make sure that only authorizedusers can access them. You can also create an allowed list of destination devices to make sure thatsupervised iOS devices can only connect to the AirPlay devices that you specify. You can assign AirPlay profilesto user accounts, user groups, or device groups.
Example: Set a password for an AirPlay device
If you want to restrict access to a specific AirPlay device, add the name of the device and set apassword. iOS device users with that AirPlay profile will have to type the password to access that AirPlay device.Note that the password is required by the AirPlay profile, not by the AirPlay device itself. iOS device users whodon't have that AirPlay profile can still access the AirPlay device without the password.
Example: Create a list of AirPlay devices for supervised iOS devices
If you want to allow supervised iOS devices to stream content only to specific devices, you can add the deviceID. Supervised devices will only be able to stream content to the devices that you specify. Devices that are notsupervised will not be affected by this list.
Create an AirPlay profile1. On the menu bar, click Policies and Profiles.2. Click Networks and connections > AirPlay.3. Click .4. Type a name and description for the AirPlay profile.5. Click in the Allowed destination devices section.6. In the Device name field, type the name of the AirPlay device you want to add. You can find the name of
the AirPlay device in the device settings or you can look up the name of the device by tapping AirPlay in theControl Center of an iOS device to see a list of available AirPlay devices near you.
7. In the Password field, type a password.8. Click Add.9. Click in the Allowed destination devices for supervised devices section.10.In the Device ID field, type the device ID of the AirPlay device you want to add. You can find the device ID of the
AirPlay device in the device settings. For more information about finding the device ID, see the documentationfor your Apple product.
11.Click Add.
| Wi-Fi, VPN, BlackBerry Secure Connect Plus, and other work connections | 110

Related tasks
Assign a profile or IT policy to a user groupAssign a profile or IT policy to a user account
Controlling network usage for work apps on iOS devicesYou can use a network usage profile to control how work apps on devices that run iOS 9 or later use the mobilenetwork.
To help manage network usage, you can prevent apps from transferring data when devices are connected to themobile network or when devices are roaming. You can specify the same network usage rules for all work apps,or you can specify rules for certain work apps. A network usage profile can contain rules for one app or multipleapps. If you don't specify any apps in the profile, the rules are applied to all work apps.
Create a network usage profileThe rules in a network usage profile apply to work apps only. If you have not assigned apps to users or groups, thenetwork usage profile does not have any effect.
Before you begin: Add apps to the app list and assign them to user groups or user accounts.
1. On the menu bar, click Policies and Profiles.2. Click Networks and connections > Network usage.3. Click .4. Type a name and description for the profile.5. Click .6. Perform one of the following actions:
• Tap Add an app and click on an app in the list.• Select Specify the app package ID and type the ID. The app package ID is also known as the bundle ID. You
can find the App package ID by clicking the app in the app list. Use a wildcard value (*) to match the ID tomultiple apps. (For example, com.company.*).
7. To prevent the app or apps from using data when the device is roaming, clear the Allow data roaming checkbox.
8. To prevent the app or apps from using data when the device is connected to the mobile network, clear theAllow cellular data check box.
9. Click Add.10.Repeat steps 5 to 8 for each app that you want to add to the list.
After you finish: If necessary, rank profiles.
Related tasks
Assign a profile or IT policy to a user groupAssign a profile or IT policy to a user account
| Wi-Fi, VPN, BlackBerry Secure Connect Plus, and other work connections | 111

Email, calendar, and contactsYou can use profiles to manage how devices receive work email messages, calendar data, and contactinformation. You can specify settings for BlackBerry 10, iOS, macOS, Android, and Windows devices in the sameprofile and then assign the profile to user accounts, user groups, or device groups.
If your organization uses BlackBerry Work for to manage email, calendar, and contacts for users devices, youconfigure the BlackBerry Work app instead of the email profile. For more information about managing BlackBerryWork, see Managing BlackBerry Dynamics apps and the BlackBerry Work Administration Guide.
Setting up work email for devicesYou can use email profiles to specify how devices connect to your organization's mail server and synchronizeemail messages, calendar entries, and organizer data using Exchange ActiveSync or IBM Notes Traveler.
If you want to use Exchange ActiveSync, you should note the following:
• For extended email security, you can enable S/MIME for iOS devices and Android devices. You can enable S/MIME or PGP for BlackBerry 10 devices. PGP is supported by BlackBerry 10 OS version 10.3.1 and later.
• If you enable S/MIME, you can use other profiles to allow devices to automatically retrieve S/MIME certificatesand check certificate status.
If you want to use Notes Traveler, you should note the following:
• To use Notes Traveler with iOS devices, you must enable the BlackBerry Secure Gateway.• To Do data synchronization is only supported on BlackBerry 10 devices. It uses the SyncML communication
protocol on the Notes Traveler server.• For extended email security on BlackBerry 10 devices, only IBM Notes encryption is supported (S/MIME is not
supported).• To use Notes Traveler with the IBM Verse client app:
• for Samsung KNOX devices, you configure the settings for IBM Verse in the email profile• for Android devices that have a work profile, you configure the settings for IBM Verse using app
configuration
You can also use IMAP/POP3 email profiles to specify how iOS, macOS, Android, and Windows devices connectto IMAP or POP3 mail servers and synchronize email messages. Devices activated to use KNOX MDM do notsupport IMAP or POP3.
You can use BlackBerry Work instead of an email profile for managing email, calendar, and contacts for usersdevices. For more information about managing BlackBerry Work, see Managing BlackBerry Dynamics apps andthe BlackBerry Work Administration Guide.
Create an email profileThe required profile settings vary for each device type and depend on the mail server used in your organization'senvironment.
Before you begin:
• If you use certificate-based authentication between devices and your mail server, you must create a CAcertificate profile and assign it to users. You must also make sure that devices have a trusted client certificate.
• To automatically apply an email profile to Android devices, the device must meet one of the followingcriteria. If the device does not meet any of these criteria, BlackBerry UEM still sends the email profileto Android devices, but the user must manually configure the connection to the mail server:
| Email, calendar, and contacts | 112

• Android Enterprise devices• Samsung KNOX and Samsung KNOX Workspace devices• Motorola devices
• If you plan to use the BlackBerry Secure Gateway to provide a secure connection to your organization's mailserver through the BlackBerry Infrastructure and BlackBerry UEM for iOS devices, verify that your organizationhas the appropriate BlackBerry UEM licenses. For more information, see the Licensing content.
1. On the menu bar, click Policies and Profiles.2. Click Email, calendar and contacts > Email.3. Click .4. Type a name and description for the profile.5. If necessary, type the domain name of the mail server. If the profile is for multiple users who may be in
different Microsoft Active Directory domains, you can use the %UserDomain% variable.6. In the Email address field, perform one of the following actions:
• If the profile is for one user, type the email address of the user.• If the profile is for multiple users, type %UserEmailAddress%.
7. Type the host name or IP address of the mail server.8. In the Username field, perform one of the following actions:
• If the profile is for one user, type the username.• If the profile is for multiple users, type %UserName%.• If the profile is for multiple users in an IBM Notes Traveler environment, type %UserDisplayName%.
9. If you configured server groups to direct BlackBerry Secure Gateway traffic to a specific regional connection tothe BlackBerry Infrastructure, in the BlackBerry Secure Gateway Service server group drop-down list, click theappropriate server group.For more information about the BlackBerry Connectivity Node and server groups, see the Planningcontent and the Installation and upgrade content.
10.Click the tab for each device type in your organization and configure the appropriate values for each profilesetting. For details about each profile setting, see Email profile settings.
11.Click Add.
After you finish: If necessary, rank profiles.
Related concepts
Email profile settingsSending certificates to devices using profiles
Related tasks
Assign a profile or IT policy to a user groupAssign a profile or IT policy to a user account
Create an IMAP/POP3 email profileThe required profile settings vary for each device type and depend on the settings that you select.
Note: BlackBerry UEM sends the email profile to Android devices, but the user must manually configure theconnection to the mail server.
| Email, calendar, and contacts | 113

1. On the menu bar, click Policies and Profiles.2. Click Email, calendar and contacts > IMAP/POP3 email.3. Click .4. Type a name and description for the profile.5. In the Email type field, select the type of email protocol. 6. In the Email address field, perform one of the following actions:
• If the profile is for one user, type the email address of the user.• If the profile is for multiple users, type %UserEmailAddress%.
7. In the Incoming mail settings section, type the host name or IP address of the mail server for receiving mail.8. If necessary, type the port for receiving mail.9. In the Username field, perform one of the following actions:
• If the profile is for one user, type the username.• If the profile is for multiple users, type %UserName%.
10.In the Outgoing mail settings section, type the host name or IP address of the mail server for sending mail.11.If necessary, type the port for sending mail.12.If necessary, select Authentication required for outgoing mail and specify the credentials used for sending
mail.13.Click the tab for each device type in your organization and configure the appropriate values for each profile
setting. For details about each profile setting, see IMAP/POP3 email profile settings.14.Click Add.
Related concepts
IMAP/POP3 email profile settings
Related tasks
Assign a profile or IT policy to a user groupAssign a profile or IT policy to a user account
Protecting email data using the BlackBerry Secure GatewayThe BlackBerry Secure Gateway provides a secure connection through the BlackBerryInfrastructure and BlackBerry UEM to your organization's mail server for iOS devices that are activated with MDMcontrols.
Enabling the BlackBerry Secure Gateway allows devices that are activated with MDM controls to send and receivework email without requiring you to expose your mail server outside the firewall or locate your mail server in aDMZ.
If you plan to use the BlackBerry Secure Gateway, you must verify that your organization has theappropriate BlackBerry UEM licenses. For more information, see the Licensing content.
To enable the BlackBerry Secure Gateway, select the "Enable BlackBerry Secure Gateway" setting in the emailprofile.
If you configured server groups to support regional connections to the BlackBerry Infrastructure, you candirect BlackBerry Secure Gateway traffic to a specific regional connection by associating the email profile with theappropriate server group.
| Email, calendar, and contacts | 114

Extending email security using S/MIMEYou can extend email security for BlackBerry 10, iOS, and Android device users by enabling S/MIME. S/MIMEprovides a standard method of encrypting and signing email messages. Users can encrypt, sign, or encrypt andsign email messages using S/MIME protection when they use a work email account that supports S/MIME-protected messages on devices. S/MIME cannot be enabled for personal email addresses.
Users can store recipients' S/MIME certificates on their devices. Users can store their private keys on theirdevices or a smart card.
You enable S/MIME for users in an email profile. You can force BlackBerry 10 device users to use S/MIME, but notiOS or Android device users. When S/MIME use is optional, a user can enable S/MIME on the device and specifywhether to encrypt, sign, or encrypt and sign email messages.
S/MIME settings take precedence over PGP settings. When S/MIME support is set to "Required," PGP settings areignored.
Retrieving S/MIME certificates
You can use certificate retrieval profiles to allow BlackBerry 10 devices to search for and retrieve recipients'S/MIME certificates from LDAP certificate servers. If a required S/MIME certificate is not already in a device'scertificate store, the device retrieves it from the server and imports it into the certificate store automatically.
BlackBerry 10 devices search each LDAP certificate server that you specify in the profile and retrieve the S/MIMEcertificate. If there is more than one S/MIME certificate and a device is unable to determine the preferred one, thedevice displays all the S/MIME certificates so that the user can choose which one to use.
You can require that devices use either simple authentication or Kerberos authentication to authenticate withLDAP certificate servers. If you require that devices use simple authentication, you can include the requiredauthentication credentials in certificate retrieval profiles so that devices can automatically authenticate withLDAP certificate servers. If you require that devices use Kerberos authentication, you can include the requiredauthentication credentials in certificate retrieval profiles so that devices that are running BlackBerry 10 OS version10.3.1 and later can automatically authenticate with LDAP certificate servers. Otherwise, the device prompts theuser for the required authentication credentials the first time that the device attempts to authenticate with anLDAP certificate server. For devices that are running BlackBerry 10 OS version 10.2.1 to 10.3, the device promptsthe user for the required authentication credentials the first time that the device attempts to authenticate with anLDAP certificate server.
If you implement Kerberos authentication for S/MIME certificate retrieval, you must assign a single sign-on profileto the applicable users or user groups. For more information about creating and assigning a single sign-on profile,see Setting up single sign-on authentication for devices.
If you do not create a certificate retrieval profile and assign it to user accounts, user groups, or device groups,users must manually import S/MIME certificates from a work email attachment or a computer.
Create a certificate retrieval profile
Before you begin:
• To allow devices to trust LDAP certificate servers when they make secure connections, you might needto distribute CA certificates to devices. If necessary, create CA certificate profiles and assign them touser accounts, user groups, or device groups. For more information about CA certificates, see Sending CAcertificates to devices.
• If you implement Kerberos authentication for S/MIME certificate retrieval, you must assign a single sign-onprofile to the applicable users or user groups. For more information about single sign-on profiles, see Settingup single sign-on authentication for devices.
| Email, calendar, and contacts | 115

1. On the menu bar, click Policies and Profiles.2. Click Certificates > Certificate retrieval.3. Click .4. Type a name and description for the certificate retrieval profile.5. In the table, click .6. In the Service URL field, type the FQDN of an LDAP certificate server using the format ldap://<fqdn>:<port>.
(For example, ldap://server01.example.com:389).7. In the Search base field, type the base DN that is the starting point for LDAP certificate server searches.8. In the Search scope drop-down list, perform one of the following actions:
• To search the base object only (base DN), click Base. This option is the default value.• To search one level below the base object, but not the base object itself, click One level.• To search the base object and all levels below it, click Subtree.• To search all levels below the base object, but not the base object itself, click Children.
9. If authentication is required, perform the following actions:a) In the Authentication type drop-down list, click Simple or Kerberos.b) In the LDAP user ID field, type the DN of an account that has search permissions on the LDAP certificate
server (for example, cn=admin,dc=example,dc=com).c) In the LDAP password field, type the password for the account that has search permissions on the LDAP
certificate server.10.If necessary, select the Use secure connection check box.11.In the Connection timeout field, type the amount of time, in seconds, that the device waits for the LDAP
certificate server to respond.12.Click Add.13.Repeat steps 5 to 11 for each LDAP certificate server.14.Click Add.
After you finish:
• To allow BlackBerry 10 devices to check certificate status, create an OCSP or CRL profile.• If necessary, rank profiles.
Related tasks
Create an OCSP profileCreate a CRL profileAssign a profile or IT policy to a user groupAssign a profile or IT policy to a user account
Determining the status of S/MIME certificates on devices
You can use OCSP and CRL profiles to allow BlackBerry 10 devices to check the status of S/MIME certificates.You can assign an OCSP profile and a CRL profile to user accounts, user groups, or device groups.
BlackBerry 10 devices search each OCSP responder that you specify in an OCSP profile and retrieves the S/MIMEcertificate status. Devices that are running BlackBerry 10 OS version 10.3.1 and later can send certificate statusrequests to BlackBerry UEM, and you can use CRL profiles to configure BlackBerry UEM to search for the status ofS/MIME certificates using HTTP, HTTPS, or LDAP.
| Email, calendar, and contacts | 116

If you use Exchange ActiveSync for certificate retrieval, iOS and Android devices use Exchange ActiveSync tocheck the status of S/MIME certificates. If you use LDAP for certificate retrieval, iOS and Android devices useOCSP to check the status of certificates. iOS and Android devices do not use OCSP profiles. Devices check theOCSP responder within the certificate.
For more information about certificate status indicators, see the user guide for the device to read about secureemail icons.
Create an OCSP profile
OCSP profiles are supported for BlackBerry 10 devices.
1. On the menu bar, click Policies and Profiles.2. Click Certificates > OCSP.3. Click .4. Type a name and description for the OCSP profile.5. Perform the following actions:
a) In the table, click .b) In the Service URL field, type the web address of an OCSP responder.c) In the Connection timeout field, type the amount of time, in seconds, that the device waits for the OCSP
response.d) Click Add.
6. Repeat step 4 for each OCSP responder.7. Click Add.
After you finish: If necessary, rank profiles.
Related tasks
Assign a profile or IT policy to a user groupAssign a profile or IT policy to a user account
Create a CRL profile
CRL profiles are supported for BlackBerry 10 devices and BlackBerry devices powered by Android with Android 7.0and later.
1. On the menu bar, click Policies and Profiles.2. Click Certificates > CRL.3. Click .4. Type a name and description for the CRL profile.5. To allow devices to use responder URLs defined in the certificate, select the Use certificate extension
responders check box.6. Perform any of the following tasks:
| Email, calendar, and contacts | 117

Task Steps
Specify an HTTP CRLconfiguration
a. In the HTTP for CRL section, click .b. Type a name and description for the HTTP CRL configuration.c. In the Service URL field, type the web address of an HTTP or
HTTPS server.d. Click Add.e. Repeat steps 1 to 4 for each HTTP or HTTPS server.
Specify an LDAP CRLconfiguration
a. In the LDAP for CRL section, click .b. Type a name and description for the LDAP CRL configuration.c. In the Service URL field, type the FQDN of an LDAP server
using the format ldap://<fqdn>:<port> (for example, ldap://server01.example.com:389). For secure connections, use theformat ldaps://<fqdn>:<port>.
d. In the Search base field, type the base DN that is the starting pointfor LDAP server searches.
e. If necessary, select the Use secure connection check box.f. In the LDAP user ID field, type the DN of an account that
has search permissions on the LDAP server (for example,cn=admin,dc=example,dc=com).
g. In the LDAP password field, type the password for the account thathas search permissions on the LDAP server.
h. Click Add.i. Repeat steps 1 to 8 for each LDAP server.
7. Click Add.
After you finish: If necessary, rank profiles.
Related tasks
Assign a profile or IT policy to a user groupAssign a profile or IT policy to a user account
Extending email security using PGPFor devices that are running BlackBerry 10 OS version 10.3.1 and later, you can extend email security for deviceusers by enabling PGP. PGP protects email messages on devices using OpenPGP format. Users can sign, encrypt,or sign and encrypt email messages using PGP protection when they use a work email address. PGP cannot beenabled for personal email addresses.
You enable PGP for users in an email profile. You can force BlackBerry 10 device users to use PGP, disallow theuse of PGP, or make it optional. When PGP use is optional (the default setting), a user can enable PGP on thedevice and specify whether to encrypt, sign, or encrypt and sign email messages.
To sign and encrypt email messages, users must store PGP keys for each recipient on their devices. Users canstore PGP keys by importing the files from a work email message.
You can configure PGP using the appropriate email profile settings.
| Email, calendar, and contacts | 118

Related reference
BlackBerry 10: Email profile settings
Enforcing secure email using message classificationMessage classification allows your organization to specify and enforce secure email policies and add visualmarkings to email messages on BlackBerry 10 devices. You can use BlackBerry UEM to provide BlackBerry10 device users with similar options for message classification that you make available on their computeremail applications. You can define the following rules to apply to outgoing messages, based on the messages'classifications:
• Add a label to identify the message classification (for example, Confidential)• Add a visual marker to the end of the subject line (for example, [C])• Add text to the beginning or end of the body of an email (for example, This message has been classified as
Confidential)• Set S/MIME or PGP options (for example, sign and encrypt)• Set a default classification
For devices that are running BlackBerry 10 OS version 10.3.1 and later, you can use message classification torequire users to sign, encrypt, or sign and encrypt email messages, or add visual markings to email messagesthat they send from their devices. You can use email profiles to specify message classification configurationfiles (with .json file name extensions) to send to users’ devices. When users either reply to email messages thathave message classification set or compose secure email messages, the message classification configurationdetermines the classification rules that devices must enforce on outgoing messages.
The message protection options on a device are limited to the types of encryption and digital signing that arepermitted on the device. When a user applies a message classification to an email message on a device, the usermust select one type of message protection that the message classification permits, or accept the default typeof message protection. If a user selects a message classification that requires signing, encrypting, or signing andencrypting of the email message, and the device does not have S/MIME or PGP configured, the user cannot sendthe email message.
S/MIME and PGP settings take precedence over message classification. Users can raise, but not lower, themessage classification levels on their devices. The message classification levels are determined by the secureemail rules of each classification.
When message classification is enabled, users cannot use the BlackBerry Assistant to send email messages fromtheir devices.
You can configure message classification using the appropriate email profile settings.
For more information about how to create message classification configuration files, visitsupport.blackberry.com/kb to read article KB36736.
Related reference
BlackBerry 10: Email profile settings
Using Exchange GatekeepingYour organization can use the BlackBerry Gatekeeping Service to control which devices can access ExchangeActiveSync.
To use gatekeeping in BlackBerry UEM, you must complete the following tasks:
| Email, calendar, and contacts | 119
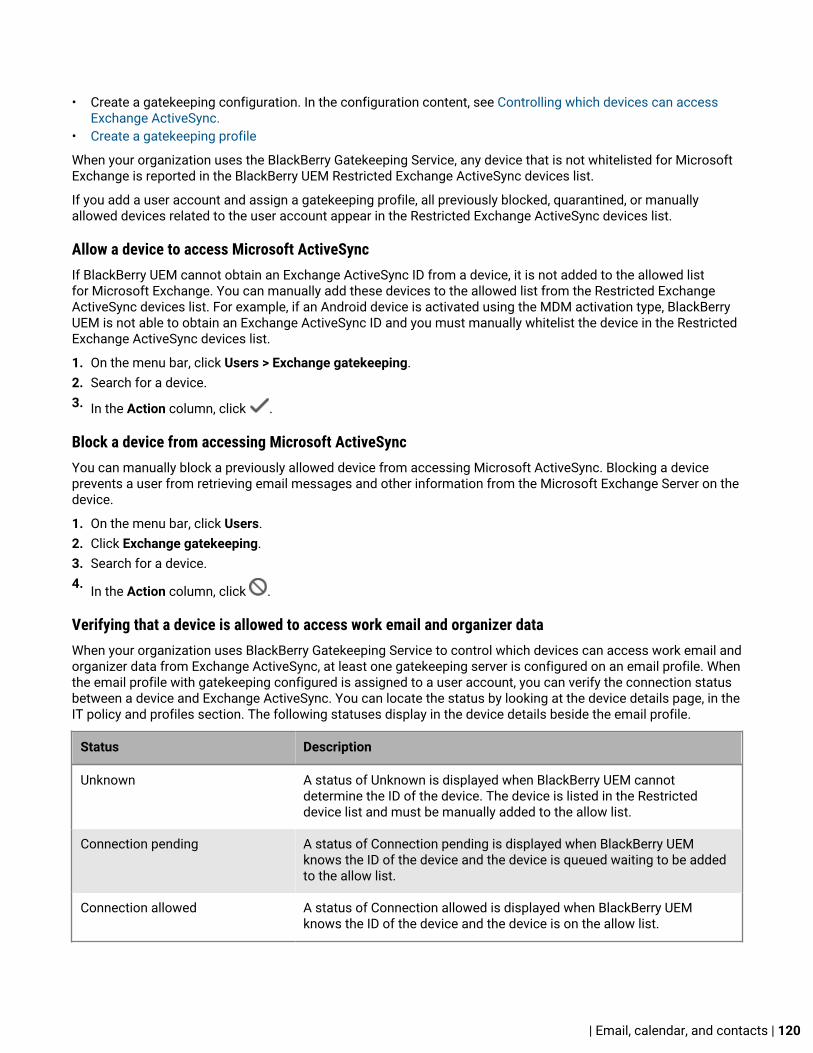
• Create a gatekeeping configuration. In the configuration content, see Controlling which devices can accessExchange ActiveSync.
• Create a gatekeeping profile
When your organization uses the BlackBerry Gatekeeping Service, any device that is not whitelisted for MicrosoftExchange is reported in the BlackBerry UEM Restricted Exchange ActiveSync devices list.
If you add a user account and assign a gatekeeping profile, all previously blocked, quarantined, or manuallyallowed devices related to the user account appear in the Restricted Exchange ActiveSync devices list.
Allow a device to access Microsoft ActiveSyncIf BlackBerry UEM cannot obtain an Exchange ActiveSync ID from a device, it is not added to the allowed listfor Microsoft Exchange. You can manually add these devices to the allowed list from the Restricted ExchangeActiveSync devices list. For example, if an Android device is activated using the MDM activation type, BlackBerryUEM is not able to obtain an Exchange ActiveSync ID and you must manually whitelist the device in the RestrictedExchange ActiveSync devices list.
1. On the menu bar, click Users > Exchange gatekeeping.2. Search for a device.3. In the Action column, click .
Block a device from accessing Microsoft ActiveSyncYou can manually block a previously allowed device from accessing Microsoft ActiveSync. Blocking a deviceprevents a user from retrieving email messages and other information from the Microsoft Exchange Server on thedevice.
1. On the menu bar, click Users.2. Click Exchange gatekeeping.3. Search for a device.4. In the Action column, click .
Verifying that a device is allowed to access work email and organizer dataWhen your organization uses BlackBerry Gatekeeping Service to control which devices can access work email andorganizer data from Exchange ActiveSync, at least one gatekeeping server is configured on an email profile. Whenthe email profile with gatekeeping configured is assigned to a user account, you can verify the connection statusbetween a device and Exchange ActiveSync. You can locate the status by looking at the device details page, in theIT policy and profiles section. The following statuses display in the device details beside the email profile.
Status Description
Unknown A status of Unknown is displayed when BlackBerry UEM cannotdetermine the ID of the device. The device is listed in the Restricteddevice list and must be manually added to the allow list.
Connection pending A status of Connection pending is displayed when BlackBerry UEMknows the ID of the device and the device is queued waiting to be addedto the allow list.
Connection allowed A status of Connection allowed is displayed when BlackBerry UEMknows the ID of the device and the device is on the allow list.
| Email, calendar, and contacts | 120

Verify that a device is allowed
1. On the menu bar, click Users > Managed devices.2. Search for a user account.3. In the search results, click the name of a user account.4. Select the tab for the device that you want to verify.5. In the IT policy and profiles section, if the device is allowed, Connection allowed is displayed beside the email
profile.
Creating a gatekeeping profileIf you configured the BlackBerry Gatekeeping Service, you need to create a gatekeeping profile and assign itto user accounts, user groups, or device groups. The gatekeeping profile allows you to select the MicrosoftExchange servers for automatic gatekeeping.
Create a gatekeeping profile
If you use automatic gatekeeping, create a gatekeeping profile.
1. On the menu bar, click Policies and Profiles.2. Click Email, calendar and contacts > Gatekeeping.3. Click .4. Type a name and description for the profile.5. Click Select servers.6. Select one or more servers and click .7. Click Save.
Setting up CardDAV and CalDAV profiles for iOS and macOS devicesYou can use CardDAV and CalDAV profiles to allow iOS and macOS devices to access contact and calendarinformation on a remote server. You can assign CardDAV and CalDAV profiles to user accounts, user groups, ordevice groups. Multiple devices can access the same information.
macOS applies profiles to user accounts or devices. CardDAV and CalDAV profiles are applied to user accounts.
Create a CardDAV profileBefore you begin:
• Verify that the device can access an active CardDAV server.
1. On the menu bar, click Policies and Profiles.2. Click Email, calendar and contacts > CardDAV.3. Click .4. Type a name and description for the profile.5. Type the server address for the profile. This is the FQDN of the computer that hosts the calendar application.6. In the Username field, perform one of the following actions:
• If the profile is for one user, type the username.• If the profile is for multiple users, type %UserName%.
| Email, calendar, and contacts | 121

7. If required, enter the port for the CardDAV server.8. If required, select the Use SSL check box and enter the URL for the SSL server.9. Click Add.
After you finish: Assign the profile to users, user groups or device groups.
Related tasks
Assign a profile or IT policy to a user groupAssign a profile or IT policy to a user account
Create a CalDAV profileBefore you begin:
• Verify that the device can access an active CalDAV server.
1. On the menu bar, click Policies and Profiles.2. Click Email, calendar and contacts > CalDAV.3. Click .4. Type a name and description for the profile.5. Type the server address for the profile. This is the FQDN of the computer that hosts the calendar application.6. In the Username field, perform one of the following actions:
• If the profile is for one user, type the username.• If the profile is for multiple users, type %UserName%.
7. If required, enter the port for the CalDAV server.8. If required, select the Use SSL check box and enter the URL for the SSL server.9. Click Add.
After you finish: Assign the profile to users, user groups or device groups.
Related tasks
Assign a profile or IT policy to a user groupAssign a profile or IT policy to a user account
| Email, calendar, and contacts | 122

CertificatesA certificate is a digital document issued by a CA that verifies the identity of a certificate subject and binds theidentity to a public key. Each certificate has a corresponding private key that is stored separately. The public keyand private key form an asymmetric key pair that can be used for data encryption and identity authentication. ACA signs the certificate to verify that entities that trust the CA can also trust the certificate.
Depending on the device capabilities and activation type, devices and apps can use certificates to:
• Authenticate using SSL/TLS when connecting to webpages that use HTTPS• Authenticate with a work mail server• Authenticate with a work Wi-Fi network or VPN• Encrypt and sign email messages using S/MIME protection
Multiple certificates used for different purposes can be stored on a device.
Steps to use certificatesWhen you use certificates with devices or apps, you perform the following actions:
Step Action
If necessary, connect BlackBerry UEM to your organization’s PKI software.
Create one or more CA certificate profiles to send CA certificates to devices.
Create SCEP, user credential, or shared certificate profiles or upload certificates for aspecific user to send client certificates to devices.
If necessary, associate certificate profiles with Wi-Fi, VPN, or email profiles.
If necessary, assign certificate profiles to user accounts, user groups, or device groups.
Integrating BlackBerry UEM with your organization's PKI softwareIf your organization uses a PKI solution to issue certificates, you can extend the certificate-based authenticationprovided by those PKI services to the devices and apps that you manage with BlackBerry UEM.
Entrust products (for example, Entrust IdentityGuard and Entrust Authority Administration Services)and OpenTrust products (for example, OpenTrust PKI and OpenTrust CMS) provide CAs that issue clientcertificates. You can configure a connection with your organization’s PKI software and use profiles to send the CAcertificate and client certificates to devices.
| Certificates | 123
For BlackBerry Dynamics enabled devices, you can also set up a PKI connector that creates a connectionbetween BlackBerry UEM and a CA server to enroll certificates for BlackBerry Dynamics apps or use an app thatsupports app-based certificate enrollment such as Purebred.
Connect BlackBerry UEM to your organization’s Entrust softwareTo allow BlackBerry UEM to send certificates issued by your organization's Entrust software (for example, EntrustIdentityGuard or Entrust Authority Administration Services) to devices, you can add a connection toyour organization's Entrust software to BlackBerry UEM. This connection is not supported by BlackBerryDynamics apps.
Before you begin: Contact your organization’s Entrust administrator to obtain:
• the URL of the Entrust MDM Web Service• the login information for an Entrust administrator account that you can use to connect BlackBerry UEM to
the Entrust software• the Entrust CA certificate that contains the public key (.der, .pem, or .cert); BlackBerry UEM uses this certificate
to establish SSL connections to the Entrust server
1. On the menu bar, click Settings.2. Click External integration > Certification authority.3. Click Add an Entrust connection.4. In the Connection name field, type a name for the connection.5. In the URL field, type the URL of the Entrust MDM Web Service.6. In the Username field, type the username of the Entrust administrator account.7. In the Password field, type the password of the Entrust administrator account.8. To upload a CA certificate to allow BlackBerry UEM to establish SSL connections to the Entrust server,
click Browse. Navigate to and select the CA certificate.9. To test the connection, click Test connection.10.Click Save.
After you finish:
• Create a user credential profile to send certificates from your PKI software to devices.
Connect BlackBerry UEM to your organization’s Entrust IdentityGuard server to use smart credentialsIf your organization uses derived smart credentials managed by Entrust IdentityGuard, you can use derived smartcredentials with Android devices and BlackBerry Dynamics apps.
Before you begin:
Contact your organization’s Entrust administrator to obtain the following information:
• URL of the Entrust IdentityGuard server• Name of the smart credential to be activated on devices as specified in Entrust IdentityGuard• Entrust CA certificate to send the certificate to devices
1. On the menu bar, click Settings.2. Click External integration > Certification authority.3. Click Add a connection for Entrust smart credentials.4. In the Smart credential name field, type the name of the smart credential specified in Entrust IdentityGuard.5. In the Entrust URL field, type the URL of the Entrust IdentityGuard server.6. Click Add.
| Certificates | 124

After you finish:
• Create a CA certificate profile to send the Entrust CA certificate to devices and assign the profile to the sameusers or groups that the user credential profile will be assigned to.
• Create a user credential profile to use Entrust smart credentials on devices.
Connect BlackBerry UEM to your organization's OpenTrust softwareTo extend OpenTrust certificate-based authentication to devices, you must add a connection to yourorganization's OpenTrust software. BlackBerry UEM supports integration with OpenTrust PKI 4.8.0 and laterand OpenTrust CMS 2.0.4 and later. This connection is not supported by BlackBerry Dynamics apps.
Before you begin: Contact your organization’s OpenTrust administrator to obtain the URL of the OpenTrust server,the client-side certificate that contains the private key (.pfx or .p12 format), and the certificate password.
1. On the menu bar, click Settings.2. Click External integration > Certification authority.3. Click Add an OpenTrust connection.4. In the Connection name field, type a name for the connection.5. In the URL field, type the URL of the OpenTrust software.6. Click Browse. Navigate to and select the client-side certificate that BlackBerry UEM can use to authenticate the
connection to the OpenTrust server.7. In the Certificate password field, type the password for the OpenTrust server certificate.8. To test the connection, click Test connection.9. Click Save.
After you finish:
• Create a user credential profile to send certificates from your PKI software to devices.• When you use the BlackBerry UEM connection with OpenTrust software to distribute certificates to devices,
there may be a short delay before the certificates are valid. This delay might cause issues with emailauthentication during the device activation process. To resolve this issue, in the OpenTrust software, configurethe OpenTrust CA and set "Backdate Certificates (seconds)" to 180.
Connect BlackBerry UEM to your organization’s BlackBerry Dynamics PKI ConnectorTo use your organization's PKI software to enroll certificates for BlackBerry Dynamics apps, you can setup a BlackBerry Dynamics PKI connector to communicate with your CA and link BlackBerry UEM to the PKIconnector.
Before you begin: Set up a BlackBerry Dynamics PKI connector. For more information, see Configuring PKIconnections for BlackBerry Dynamics apps in the Configuration content.
1. On the menu bar, click Settings > External integration > Certification authority.2. Click Add a BlackBerry Dynamics PKI connection.3. In the Connection name field, type a name for the connection.4. In the URL field, type the URL of the PKI connector.5. Select one of the following options:
• Authenticate with username and password: Choose this option if BlackBerry UEM authenticates withthe BlackBerry Dynamics PKI Connector using password-based authentication.
• Authenticate with client certificate: Choose this option if BlackBerry UEM authenticates with the BlackBerryDynamics PKI Connector using certificate-based authentication.
| Certificates | 125

6. If you selected Authenticate with username and password, in the Username and Password fields, type theusername and password for the BlackBerry Dynamics PKI connector.
7. If you selected Authenticate with client certificate, click Browse to select and upload a certificate that istrusted by the BlackBerry Dynamics PKI Connector. In the Client certificate password field, type the passwordfor the certificate.
8. In the Trusted certificate for the PKI connector section you can specify the certificate that BlackBerryUEM uses to trust connections to the PKI connector, select one of the following options:
• CA certificate from BlackBerry Control TrustStore • CA certificate: If you select this option you must click Browse to navigate to and select your
organization's CA certificate.• PKI connector server certificate: If you select this option you must click Browse to navigate to and select
your organization's PKI connector server certificate.9. To test the connection, click Test connection.10.Click Save.
After you finish:
• Create a user credential profile to send certificates from your PKI software to devices.
Connect BlackBerry UEM to your organization’s app-based PKI solutionApp-based PKI solutions such as Purebred include an app installed on a device that communicates with a CA toenroll certificates and add them to the device. You can use an app-based PKI solution to provide certificates foruse by BlackBerry Dynamics apps.
To use an app-based PKI solution with iOS devices, you must add a connection between BlackBerry UEM and thePKI provider. This task is not required to use an app-based PKI solution with only Android devices.
If the PKI app that retrieves certificates from the CA is not a BlackBerry Dynamics app, the BlackBerry UEMClient communicates with the PKI app to get the certificates and provide them to BlackBerry Dynamics apps.
Before you begin: Verify that the app that retrieves certificates for use by BlackBerry Dynamics apps is in the applist in BlackBerry UEM.
1. On the menu bar, click Settings > External integration > Certification authority.2. Click Add a connection for device based certificates.3. Select the app that retrieves certificates from the PKI app for use by BlackBerry Dynamics apps. To
use Purebred, select the BlackBerry UEM Client.4. Click Add.
After you finish:
• Creating user credential profiles for app-based certificates.• Create a user credential profile to use app-based certificates on iOS devices.• Create a user credential profile to use certificates from the native keystore on Android devices
Providing client certificates to devicesMany certificates used for different purposes can be stored on a device. You and users can add client certificatesto devices in several ways.
| Certificates | 126
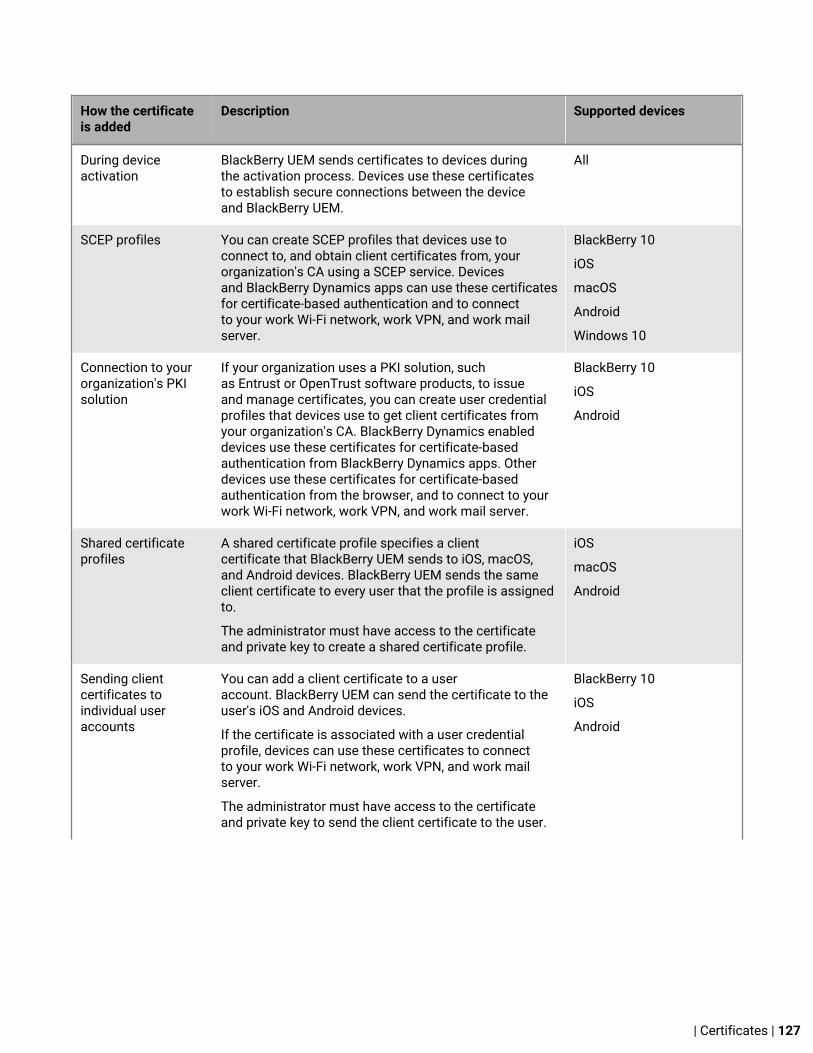
How the certificateis added
Description Supported devices
During deviceactivation
BlackBerry UEM sends certificates to devices duringthe activation process. Devices use these certificatesto establish secure connections between the deviceand BlackBerry UEM.
All
SCEP profiles You can create SCEP profiles that devices use toconnect to, and obtain client certificates from, yourorganization's CA using a SCEP service. Devicesand BlackBerry Dynamics apps can use these certificatesfor certificate-based authentication and to connectto your work Wi-Fi network, work VPN, and work mailserver.
BlackBerry 10
iOS
macOS
Android
Windows 10
Connection to yourorganization's PKIsolution
If your organization uses a PKI solution, suchas Entrust or OpenTrust software products, to issueand manage certificates, you can create user credentialprofiles that devices use to get client certificates fromyour organization's CA. BlackBerry Dynamics enableddevices use these certificates for certificate-basedauthentication from BlackBerry Dynamics apps. Otherdevices use these certificates for certificate-basedauthentication from the browser, and to connect to yourwork Wi-Fi network, work VPN, and work mail server.
BlackBerry 10
iOS
Android
Shared certificateprofiles
A shared certificate profile specifies a clientcertificate that BlackBerry UEM sends to iOS, macOS,and Android devices. BlackBerry UEM sends the sameclient certificate to every user that the profile is assignedto.
The administrator must have access to the certificateand private key to create a shared certificate profile.
iOS
macOS
Android
Sending clientcertificates toindividual useraccounts
You can add a client certificate to a useraccount. BlackBerry UEM can send the certificate to theuser's iOS and Android devices.
If the certificate is associated with a user credentialprofile, devices can use these certificates to connectto your work Wi-Fi network, work VPN, and work mailserver.
The administrator must have access to the certificateand private key to send the client certificate to the user.
BlackBerry 10
iOS
Android
| Certificates | 127

How the certificateis added
Description Supported devices
User upload to UEMSelf-Service
Users can upload certificates to BlackBerry UEM Self-Service. BlackBerry UEM then pushes the certificate tothe users devices.
If the certificate is associated with a user credentialprofile, devices and BlackBerry Dynamics apps can usethese certificates for certificate-based authenticationand to connect to your work Wi-Fi network, work VPN,and work mail server.
BlackBerry 10
iOS
Android
User import On BlackBerry 10 devices, users can import clientcertificates into the device's certificate store in the"Security and Privacy" section of the "System Settings".Certificates intended for use by the work browser or forsending S/MIME-protected messages from the workemail account can be imported from the file system onthe device or from a network location that is accessiblefrom the work space.
On Android devices, users can add certificates tothe device native keystore for use with BlackBerryDynamics apps.
BlackBerry 10
Android
Smart cards Users can import S/MIME and SSL certificates to theirdevices from a smart card.
BlackBerry 10
Sending certificates to devices using profilesYou can send certificates to devices using the following profiles available in the Policies and Profiles library:
Profile Description
CA certificate CA certificate profiles specify a CA certificate that devices can use to trust theidentity associated with any client or server certificate that has been signed bythat CA.
User credential User credential profiles send certificates to devices in the following ways:
• They can specify a connection to your organization's PKI software to sendclient certificates to devices.
• They can allow you to manually upload certificates in BlackBerry UEM andallow users to upload certificates using BlackBerry UEM Self-Service.
• They can allow BlackBerry Dynamics apps on Android devices to usecertificates from the device native keystore.
SCEP SCEP profiles specify how devices connect to, and obtain client certificatesfrom, your organization's CA using a SCEP service.
| Certificates | 128

Profile Description
Shared certificate Shared certificate profiles specify a client certificate that BlackBerryUEM sends to iOS and Android devices. BlackBerry UEM sends the same clientcertificate to every user that the profile is assigned to.
For iOS and Android devices, you can also send a client certificate to a device by adding the certificate directly toa user account. For more information, see Add a client certificate to a user account.
For BlackBerry 10, iOS, and Android devices, if your organization uses certificates for S/MIME, you can alsouse profiles to allow devices to get recipient public keys and check certificate status. For more information,see Extending email security using S/MIME.
For BlackBerry Dynamics apps to use certificates sent by profiles, you must select "Allow BlackBerryDynamics apps to use user certificates, SCEP profiles, and user credential profiles" in the settings for the app.
Related concepts
Extending email security using S/MIME
Related tasks
Add a client certificate to a user account
Choosing profiles to send client certificates to devicesYou can use different types of profiles to send client certificates to devices. The type of profile that you choosedepends on how your organization uses certificates and the types of devices that your organization supports.Consider the following guidelines:
• To use SCEP profiles, you must have a CA that supports SCEP.• If you have set up a connection between BlackBerry UEM and your organization's PKI solution, use user
credential profiles to send certificates to devices. You can connect directly to an Entrust CA or OpenTrust CA.You can also use a BlackBerry Dynamics PKI connector to connect to a CA server to enroll certificatesfor BlackBerry Dynamics enabled devices.
• To allow users to upload certificates that they can use to connect to your work Wi-Fi network, work VPN, andwork mail server, use a user credential profile.
• To use certificates with BlackBerry Dynamics apps, you must use a user credential profile or add thecertificates to individual user accounts.
• To use client certificates for Wi-Fi, VPN, and mail server authentication, you must associate the certificateprofile with a Wi-Fi, VPN, or email profile.
Note: Android Enterprise devices don't support using certificates sent to devices by BlackBerry UEM for Wi-Fi authentication.
• Shared certificate profiles and certificates that you add to user accounts do not keep the private key privatebecause you must have access to the private key. Connecting to a CA using SCEP or user credential profiles ismore secure because the private key is sent only to the device that the certificate was issued to.
Sending CA certificates to devicesYou might need to send CA certificates to devices if your organization uses S/MIME or if devices or BlackBerryDynamics apps use certificate-based authentication to connect to a network or server in your organization’senvironment.
| Certificates | 129

When a CA certificate is stored on a device, the device and apps trust the identity associated with any client orserver certificate signed by the CA. When the certificate for the CA that signed your organization's network andserver certificates is stored on devices, device and apps can trust your networks and servers when they makesecure connections. When the CA certificate that signed your organization's S/MIME certificates is stored ondevices, the email client can trust the sender's certificate when a secure email message is received.
Multiple CA certificates that are used for different purposes can be stored on a device. You can use CA certificateprofiles to send CA certificates to devices.
Create a CA certificate profile
Before you begin: You must obtain the CA certificate file that you want to send to devices.
1. On the menu bar, click Policies and Profiles.2. Click Certificates > CA certificate.3. Click .4. Type a name and description for the profile. Each CA certificate profile must have a unique name. Some
names (for example, ca_1) are reserved.5. In the Certificate file field, click Browse to locate the certificate file.6. If the CA certificate is sent to BlackBerry 10 devices, on the BlackBerry tab, specify one or more of the
following certificate stores to send the certificate to on the device:
• Browser certificate store• VPN certificate store• Wi-Fi certificate store• Enterprise certificate store
7. If the CA certificate is sent to macOS devices, on the macOS tab, in the Apply profile to drop-down list,select User or Device.
8. Click Add.
Related tasks
Assign a profile or IT policy to a user accountAssign a profile or IT policy to a user group
CA certificate stores on BlackBerry 10 devices
CA certificates that are sent to BlackBerry 10 devices are saved to different certificate stores, depending on thepurpose of the certificate.
Store Description
Browser certificatestore
The work browser on BlackBerry 10 devices uses the certificates in this store toestablish SSL connections with servers in your organization's environment.
VPN certificate store BlackBerry 10 devices use certificates in this store for VPN connections. You mustset the "Trusted certificate source" setting in the VPN profile to "Trusted certificatestore" to use the certificates in this store for work VPN connections.
| Certificates | 130

Store Description
Wi-Fi certificate store BlackBerry 10 devices use certificates in this store for Wi-Fi connections. You mustset the "Trusted certificate source" setting in the Wi-Fi profile to "Trusted certificatestore" to use certificates in this store for work Wi-Fi connections.
Enterprise certificatestore
BlackBerry 10 devices use certificates in this store to authenticate S/MIME-protectedemail messages that are received.
Using user credential profiles to send certificates to devicesUser credential profiles allow devices to use client certificates obtained by the following methods:
• An established connection between BlackBerry UEM and your organization’s Entrust CA or OpenTrust CA• Manually uploading certificates to the BlackBerry UEM management console or BlackBerry UEM Self-Service• For Android devices, certificates stored in the device native keystore• For BlackBerry Dynamics apps, through an established PKI connector connection• For BlackBerry Dynamics apps, using an app-based PKI solution such as Purebred.
If users manually upload certificates in UEM Self-Service, you can see the certificate on the user page in themanagement console. You can also delete or replace the certificate.
User credential profiles are supported on iOS and Android devices, and on devices running BlackBerry10 OS version 10.3.1 and later. App-based PKI solutions are supported for BlackBerry Dynamics appson iOS and Android devices. Manually uploading certificates is supported for BlackBerry 10, iOS, AndroidEnterprise, and Samsung KNOX Workspace devices.
For more information about connecting BlackBerry UEM to your organization's PKI software,see Integrating BlackBerry UEM with your organization's PKI software.
Alternatively, you can use SCEP profiles to enroll client certificates to devices. You can also upload certificatesdirectly to a user account. The type of profile you choose depends on how your organization uses the PKIsoftware, the types of devices your organization supports, and how you want to manage certificates.
Create a user credential profile to manually upload certificates
User credential profiles can allow you or users to manually upload a certificate to be sent to the user's devices.
1. On the menu bar, click Policies and Profiles.2. Click Certificates > User credential.3. Click .4. Type a name and description for the profile. Each certificate profile must have a unique name.5. In the Certification authority connection drop-down list, select Manually uploaded certificate.6. Click Add.
After you finish:
• If devices use client certificates to authenticate with a Wi-Fi network, VPN, or mail server, associate the usercredential profile with a Wi-Fi, VPN, or email profile.
• Assign the profile to user accounts and user groups.• Add a client certificate to a user credential profile or instruct users to use BlackBerry UEM Self-Service to
upload their own certificate.
| Certificates | 131
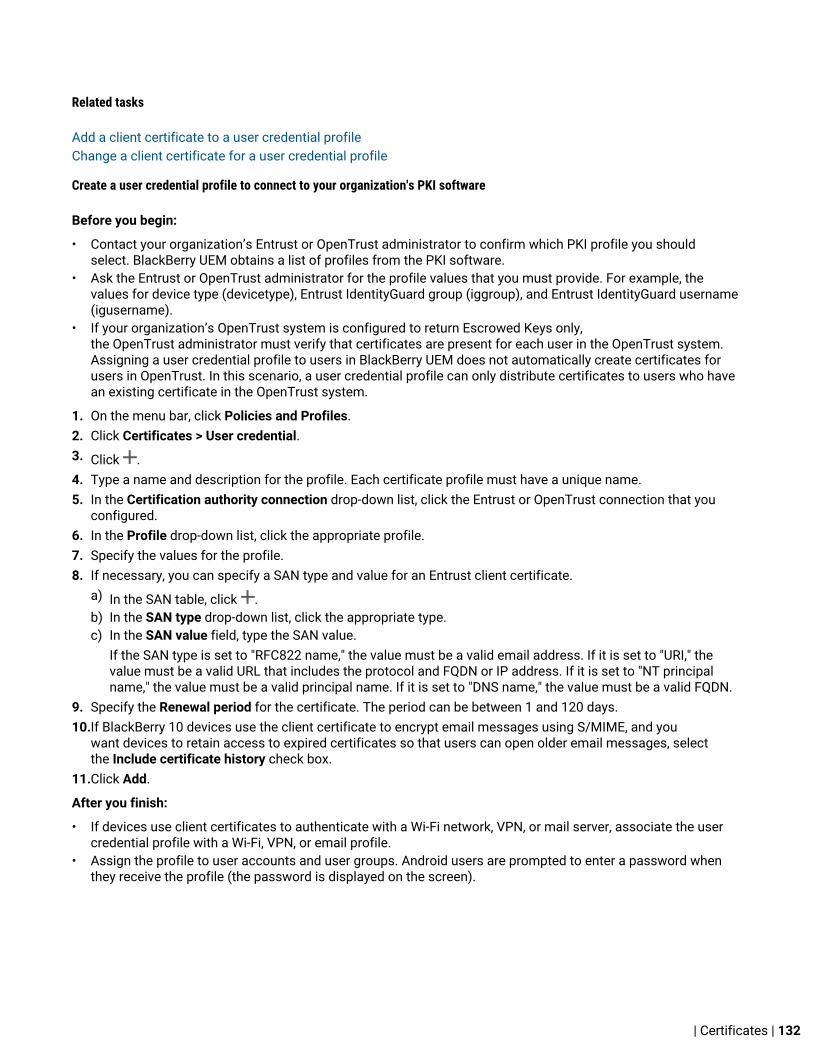
Related tasks
Add a client certificate to a user credential profileChange a client certificate for a user credential profile
Create a user credential profile to connect to your organization's PKI software
Before you begin:
• Contact your organization’s Entrust or OpenTrust administrator to confirm which PKI profile you shouldselect. BlackBerry UEM obtains a list of profiles from the PKI software.
• Ask the Entrust or OpenTrust administrator for the profile values that you must provide. For example, thevalues for device type (devicetype), Entrust IdentityGuard group (iggroup), and Entrust IdentityGuard username(igusername).
• If your organization’s OpenTrust system is configured to return Escrowed Keys only,the OpenTrust administrator must verify that certificates are present for each user in the OpenTrust system.Assigning a user credential profile to users in BlackBerry UEM does not automatically create certificates forusers in OpenTrust. In this scenario, a user credential profile can only distribute certificates to users who havean existing certificate in the OpenTrust system.
1. On the menu bar, click Policies and Profiles.2. Click Certificates > User credential.3. Click .4. Type a name and description for the profile. Each certificate profile must have a unique name.5. In the Certification authority connection drop-down list, click the Entrust or OpenTrust connection that you
configured.6. In the Profile drop-down list, click the appropriate profile.7. Specify the values for the profile.8. If necessary, you can specify a SAN type and value for an Entrust client certificate.
a) In the SAN table, click .b) In the SAN type drop-down list, click the appropriate type.c) In the SAN value field, type the SAN value.
If the SAN type is set to "RFC822 name," the value must be a valid email address. If it is set to "URI," thevalue must be a valid URL that includes the protocol and FQDN or IP address. If it is set to "NT principalname," the value must be a valid principal name. If it is set to "DNS name," the value must be a valid FQDN.
9. Specify the Renewal period for the certificate. The period can be between 1 and 120 days.10.If BlackBerry 10 devices use the client certificate to encrypt email messages using S/MIME, and you
want devices to retain access to expired certificates so that users can open older email messages, selectthe Include certificate history check box.
11.Click Add.
After you finish:
• If devices use client certificates to authenticate with a Wi-Fi network, VPN, or mail server, associate the usercredential profile with a Wi-Fi, VPN, or email profile.
• Assign the profile to user accounts and user groups. Android users are prompted to enter a password whenthey receive the profile (the password is displayed on the screen).
| Certificates | 132
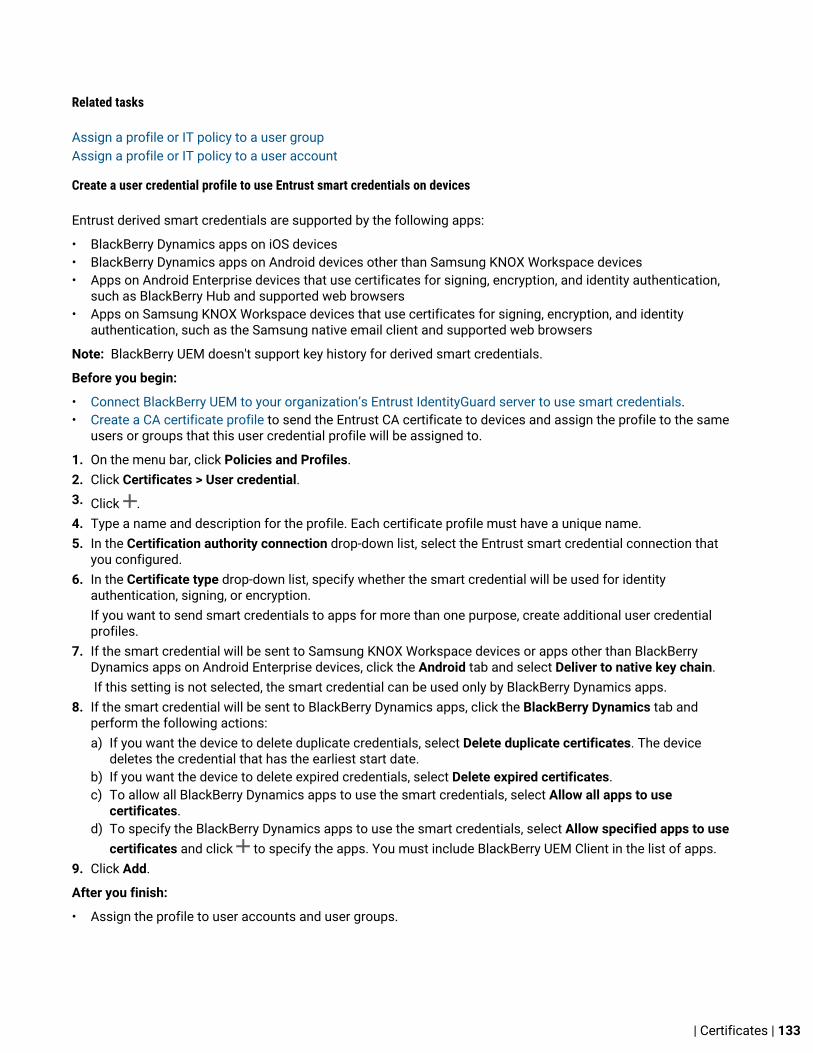
Related tasks
Assign a profile or IT policy to a user groupAssign a profile or IT policy to a user account
Create a user credential profile to use Entrust smart credentials on devices
Entrust derived smart credentials are supported by the following apps:
• BlackBerry Dynamics apps on iOS devices• BlackBerry Dynamics apps on Android devices other than Samsung KNOX Workspace devices• Apps on Android Enterprise devices that use certificates for signing, encryption, and identity authentication,
such as BlackBerry Hub and supported web browsers• Apps on Samsung KNOX Workspace devices that use certificates for signing, encryption, and identity
authentication, such as the Samsung native email client and supported web browsers
Note: BlackBerry UEM doesn't support key history for derived smart credentials.
Before you begin:
• Connect BlackBerry UEM to your organization’s Entrust IdentityGuard server to use smart credentials.• Create a CA certificate profile to send the Entrust CA certificate to devices and assign the profile to the same
users or groups that this user credential profile will be assigned to.
1. On the menu bar, click Policies and Profiles.2. Click Certificates > User credential.3. Click .4. Type a name and description for the profile. Each certificate profile must have a unique name.5. In the Certification authority connection drop-down list, select the Entrust smart credential connection that
you configured.6. In the Certificate type drop-down list, specify whether the smart credential will be used for identity
authentication, signing, or encryption.If you want to send smart credentials to apps for more than one purpose, create additional user credentialprofiles.
7. If the smart credential will be sent to Samsung KNOX Workspace devices or apps other than BlackBerryDynamics apps on Android Enterprise devices, click the Android tab and select Deliver to native key chain. If this setting is not selected, the smart credential can be used only by BlackBerry Dynamics apps.
8. If the smart credential will be sent to BlackBerry Dynamics apps, click the BlackBerry Dynamics tab andperform the following actions:a) If you want the device to delete duplicate credentials, select Delete duplicate certificates. The device
deletes the credential that has the earliest start date.b) If you want the device to delete expired credentials, select Delete expired certificates.c) To allow all BlackBerry Dynamics apps to use the smart credentials, select Allow all apps to use
certificates.d) To specify the BlackBerry Dynamics apps to use the smart credentials, select Allow specified apps to use
certificates and click to specify the apps. You must include BlackBerry UEM Client in the list of apps.9. Click Add.
After you finish:
• Assign the profile to user accounts and user groups.
| Certificates | 133

• After a device receives the profile, users must log in to the Entrust IdentityGuard Self-Service Module toactivate their smart credential and use the BlackBerry UEM Client to scan the QR code presented by the EntrustIdentityGuard Self-Service Module to add the smart credential to the device.
• To remove an Entrust smart credential from a device, the user should deactivate the smart credential inthe BlackBerry UEM Client before you unassign the profile or remove the certificate.
Create a user credential profile to connect to your BlackBerry Dynamics PKI connector
1. On the menu bar, click Policies and Profiles.2. Click Certificates > User credential.3. Click .4. Type a name and description for the profile. Each certificate profile must have a unique name.5. In the Certification authority connection drop-down list, select the BlackBerry Dynamics PKI connection that
you configured.6. If the user must provide a password to request a certificate, select Require user-entered password or OTP.7. If you want to allow the device to automatically request a new certificate before the current certificate expires,
select Enable certificate renewal and specify the number of days prior to expiry that devices request a newcertificate.
8. If you want the device to delete expired certificates, select Delete expired certificates.9. If you want the device to delete duplicate certificates, select Remove duplicate certificates. The device deletes
the certificate that has the earliest start date.10.Click Add.
After you finish:
• Allow BlackBerry Dynamics apps to use certificates.• Assign the profile to user accounts and user groups.• If you update the PKI connector, click Refresh PKI capabilities to update the supported PKI features for the
profile.
Renew certificates that are enrolled through the BlackBerry Dynamics PKI connector
If you need to update user certificates for all BlackBerry Dynamics users, you can send a command to requestcertificate renewal to all devices that are assigned the user credential profile.
1. On the menu bar, click Policies and Profiles.2. Click Certificates > User credential.3. Click the name of the profile that you want to change.4. Click Refresh PKI capabilities to ensure that BlackBerry UEM has the most recent details for the PKI
connector.5. Click Renew to command all BlackBerry Dynamics enabled devices that are assigned the profile to request
certificate renewal.
Related tasks
Renew or remove a BlackBerry Dynamics certificate for a user account
| Certificates | 134

Creating user credential profiles for app-based certificates
App-based PKI solutions such as Purebred include an app installed on a device that communicates with a CA toenroll certificates and add them to the device. You can use an app-based PKI solution to provide certificates foruse by BlackBerry Dynamics apps.
To use an app-based PKI solution with iOS devices, you must add a connection between BlackBerry UEM and thePKI provider. This task is not required to use an app-based PKI solution with only Android devices.
If the PKI app that retrieves certificates from the CA is not a BlackBerry Dynamics app, the BlackBerry UEMClient communicates with the PKI app to get the certificates and provide them to BlackBerry Dynamics apps.
If you send more than one certificate to devices using this method, it is recommended that you set up multipleuser credential profiles with each profile using a different type of certificate. If you use a single profile instancefor multiple certificates, there is no indication if any certificates are missing. For example, if a profile includesseparate encryption, signing, and authentication certificates and only the signing and authentication certificatesare imported, it appears on the device that the that the import was successful even though the encryptioncertificate is missing. However, if you set up three separate user credential profiles and the encryption certificateis missing, the issue is apparent.
Steps to use app-based certificates
Some of the steps required to use your organization's app-based PKI solution are necessary only if you use thesolution with iOS devices.
Step Action
To use an app-based PKI solution with iOS devices, in the BlackBerry Dynamics profile,select, Enable UEM Client to enroll in BlackBerry Dynamics and designate BlackBerry UEMClient for App authentication delegation.
To use an app-based PKI solution with iOS devices, connect BlackBerry UEM to yourorganization’s app-based PKI solution.
To use an app-based PKI solution with iOS devices, if the PKI app is not a BlackBerryDynamics app, configure the BlackBerry UEM Client to support app-based certificates.
Configure BlackBerry Dynamics apps to use app-based certificates.
Ensure that the PKI app (for example, Purebred) is installed on users' devices.
To use the app-based PKI solution with iOS devices, create a user credential profile to useapp-based certificates.
To use the app-based PKI solution with Android devices, create a user credential profile touse certificates from the native keystore.
| Certificates | 135

Configure the BlackBerry UEM Client to support app-based certificates
This task is required only if you use your organization's app-based PKI solution with iOS devices and the PKI appis not a BlackBerry Dynamics app.
1. In the BlackBerry UEM management console, on the menu bar click Apps. 2. In the app list, select BlackBerry UEM Client.3. In the App configuration section, click +.4. In the App name field, type a name for the app.5. In the UTI schemes field, specify the UTI schemes for your organization's app-based PKI solution. For example,
if you are using the Purebred app use the following schemes: purebred.zip.all, purebred.zip.no_filter.6. Click Save.7. Select Allow BlackBerry Dynamics apps to use user certificates and user credential profiles.8. Assign the BlackBerry UEM Client with the app configuration that you created to the users and devices you
want to use the app-based PKI solution.
Configure BlackBerry Dynamics apps to use app-based certificates
BlackBerry Dynamics apps automatically select which certificate to use for S/MIME and for authenticationover TLS connections based on the key usage and extended key usage properties in the certificates. If two ormore certificates have same set of properties, apps may not be able to resolve which certificate to use for TLSauthentication. You can help apps determine which certificate to use by following the steps below.
1. In the BlackBerry UEM management console, on the menu bar, click Apps. 2. In the app list, select the app (for example, BlackBerry Work or BlackBerry Access).3. Select the Allow BlackBerry Dynamics apps to use user certificates and user credential profiles option.4. If you are configuring BlackBerry Work, in the App configuration section, click + and perform one of the
following tasks:
Task Steps
Configure BlackBerryWork when yourorganization isusing BEMS
a. On the Configuration Settings tab, select Clients must have individual logincertificates (SSL) uploaded in the GC.
b. To enable automatic discovery of the Microsoft Exchange server that theusers are on, select Use BEMS to perform Autodiscover of the EAS/EWSendpoint for the user.
c. On the Exchange Settings tab, in the User Credential Profile Name field, typethe name of the user credential profile.
| Certificates | 136

Task Steps
Configure BlackBerryWork when yourorganization is notusing BEMS
a. Select the Exchange Settings tab.b. If your server uses the domain name\user login format, in the Default
Domain field, specify the default Windows NT Domain that BlackBerryWork connects to when users log in.
c. In the Active Sync Server field, specify the default ExchangeActiveSync server that BlackBerry Work connects to when users log into BlackBerry Work (for example, cas.mydomain.com).
d. In the Auto Discover URL field, specify the auto discover URL if known.This speeds up the autodiscover setup process (for example, https://autodiscover.mydomain.com).
e. In the Auto Discover Connection Timeout in Seconds (iOS only) field, specifythe autodiscover connection timeout in seconds.
f. In the User Credential Profile Name field, type the name of the usercredential profile.
5. Click Save.
Create a user credential profile to use app-based certificates on iOS devices
1. On the menu bar, click Policies and Profiles.2. Click Certificates > User credential.3. Click .4. Type a name and description for the profile. Each certificate profile must have a unique name.5. In the Certification authority connection drop-down list, select the name of the app you specified when you
connected BlackBerry UEM to your PKI solution. If you are using Purebred, select the BlackBerry UEM Client6. To specify which certificate the BlackBerry Dynamics app will use, perform the following actions:
a) In the Key usage section, select the operations that the certificate supports.BlackBerry Dynamics apps will only use certificates that have at least the specified key usage value set. Forexample, an encryption certificate may have a key usage value of Key encipherment. An authenticationcertificate may have a key usage value of Digital signature. A signing certificate may have a key usagevalue of both Digital signature and Nonrepudiation.
b) In the Extended key usage section, select the functions that the certificate was issued for. BlackBerry Dynamics apps will only use certificates if all selected extended key usage values are present inthe certificate. Certificates can have additional extended key usage values.
c) If the certificate was issued for purposes other than email, client authentication, or smart card login,select Additional Object ID usage, click and specify the OID for the key usage. For example, if thecertificate will be used for server authentication, it may have the OID 1.3.6.1.5.5.7.3.1
d) Beside Issuers, click and type the issuer name.BlackBerry Dynamics apps will only use a certificate if the specified issuer matches the OpenSSL short-form OID in the certificate. You can copy this value from the issuer's certificate. Do not put spaces before orafter the equal sign (=). For example:
CN=Acme_cert SMIME,OU=Acme_Legal,O=Acme,C=Can CN=Acme_cert SMIME,OU=Acme_Legal,O=Acme CN=Acme_cert TLS
7. If you want the device to delete expired certificates, select Delete expired certificates.
| Certificates | 137

Expired encryption certificates used for S/MIME should be retained on the device to allow users to readmessages that were encrypted before the certificate expired.
8. If you want the device to delete duplicate certificates, select Remove duplicate certificates. The device deletesthe certificate that has the earliest start date.
9. Click Add.
After you finish:
• Allow BlackBerry Dynamics apps to use certificates.• Assign the profile to user accounts and user groups.
Create a user credential profile to use certificates from the native keystore on Android devices
You can configure the user certificate profile to allow BlackBerry Dynamics apps to use a certificate from thenative keystore on Android devices. You can allow BlackBerry Dynamics apps to use any certificate that had beenadded to the keystore or you can define restrictions on which certificate the app can choose. For example, if youare using an app-based PKI solution such as Purebred that adds certificates to the native keystore, you can forcethe app to select a certificate issued by your Purebred PKI solution and require that the app use certificates withspecified capabilities.
1. On the menu bar, click Policies and Profiles.2. Click Certificates > User credential.3. Click .4. Type a name and description for the profile. Each certificate profile must have a unique name.5. In the Certification authority connection drop-down list, select Native keystore.6. To specify which certificate the BlackBerry Dynamics app will use, perform the following actions:
a) Beside Issuers, click and type the issuer name.BlackBerry Dynamics apps will only use a certificate if the specified issuer matches the OpenSSL short-form OID in the certificate. You can copy this value from the issuer's certificate. Do not put spaces before orafter equal sign (=). For example:
CN=Acme_cert SMIME,OU=Acme_Legal,O=Acme,C=Can CN=Acme_cert SMIME,OU=Acme_Legal,O=Acme CN=Acme_cert TLS
b) In the Key usage section, select the operations that the certificate supports.BlackBerry Dynamics apps will only use certificates that have at least the specified key usage value set. Forexample, an encryption certificate may have a key usage value of Key encipherment. An authenticationcertificate may have a key usage value of Digital signature. A signing certificate may have a key usagevalue of both Digital signature and Nonrepudiation.
c) In the Extended key usage section, select the functions that the certificate was issued for. BlackBerry Dynamics apps will only use certificates if all selected extended key usage values are present inthe certificate. Certificates can have additional extended key usage values.
d) If the certificate was issued for purposes other than email, client authentication, or smart card login,select Additional Object ID usage, click and specify the OID for the key usage. For example, if thecertificate will be used for server authentication, it may have the OID 1.3.6.1.5.5.7.3.1
7. If you want the device to delete expired certificates, select Delete expired certificates.Expired encryption certificates used for S/MIME should be retained on the device to allow users to readmessages that were encrypted before the certificate expired.
8. If you want the device to delete duplicate certificates, select Remove duplicate certificates. The device deletesthe certificate that has the earliest start date.
| Certificates | 138

9. Click Add.
After you finish:
• Allow BlackBerry Dynamics apps to use certificates.• Assign the profile to user accounts and user groups.
Using SCEP to send client certificates to devicesYou can use SCEP profiles to specify how devices and BlackBerry Dynamics apps obtain client certificates fromyour organization's CA through a SCEP service. SCEP is an IETF protocol that simplifies the process of enrollingclient certificates to a large number of devices or apps without any administrator input or approval requiredto issue each certificate. Devices and BlackBerry Dynamics apps can use SCEP to request and obtain clientcertificates from a SCEP-compliant CA that is used by your organization.
The CA that you use must support challenge passwords. The CA uses challenge passwords to verify that thedevice or app is authorized to submit a certificate request.
If your organization uses an Entrust CA or OpenTrust CA, SCEP profiles are not supported for Windows10 devices.
Create a SCEP profile
The required profile settings depend on the SCEP service configuration in your organization's environment andvary depending on whether the certificate is used by a BlackBerry Dynamics app or by a specified device type.
Note: If you want to use a SCEP profile to distribute OpenTrust client certificates to devices, you must apply ahotfix to your OpenTrust software. For more information, contact your OpenTrust support representative andreference support case SUPPORT-798.
1. On the menu bar, click Policies and Profiles.2. Click Certificates > SCEP.3. Click .4. Type a name and description for the profile. Each certificate profile must have a unique name.5. In the URL field, type the URL for the SCEP service. The URL should include the protocol, FQDN, port number,
and SCEP path.6. In the Instance name field, type the instance name for the CA.7. In the Certification authority connection drop-down list, perform one of the following actions:
• To use an Entrust connection that you configured, click the appropriate connection. In the Profile drop-down list, click a profile. Specify the values for the profile.
• To use an OpenTrust connection that you configured, click the appropriate connection. In the Profile drop-down list, click a profile. Specify the values for the profile.
• The following settings in the SCEP profile do not apply to OpenTrust client certificates: Key usage,Extended key usage, Subject, and SAN.
• To use another CA, click Generic. In the SCEP challenge type drop-down list, select Static or Dynamic andspecify the required settings for the challenge type.
Note: For Windows devices, only static passwords are supported.8. Optionally, clear the check box for any device type that you do not want to configure the profile for.9. Perform the following actions:
a) Click the tab for a device type.b) Configure the appropriate values for each profile setting to match the SCEP service configuration in your
organization's environment.
| Certificates | 139

10.Repeat step 8 for each device type in your organization.11.Click Add.
After you finish: If devices use the client certificate to authenticate with a work Wi-Fi network, work VPN, or workmail server, associate the SCEP profile with a Wi-Fi, VPN, or email profile.
Related concepts
SCEP profile settings
Sending the same client certificate to multiple devicesYou can use shared certificate profiles to send client certificates to iOS, macOS, and Android devices.
Shared certificate profiles send the same key pair to every user who is assigned the profile. You should useshared certificate profiles only if you want to allow more than one user to share a client certificate.
macOS applies profiles to user accounts or devices. You can configure a shared certificate profile to apply to oneor the other.
Related tasks
Add a client certificate to a user account
Create a shared certificate profile
Before you begin: You must obtain the client certificate file that you want to send to devices. The certificate filemust have a .pfx or .p12 file name extension.
1. On the menu bar, click Policies and Profiles.2. Click Certificates > Shared certificate.3. Click .4. Type a name and description for the profile. Each certificate profile must have a unique name. Some names
(for example, ca_1) are reserved.5. In the Password field, type a password for the shared certificate profile.6. In the Certificate file field, click Browse to locate the certificate file.7. On the macOS tab, in the Apply profile to drop-down list, select User or Device.8. Click Add.
Related tasks
Assign a profile or IT policy to a user groupAssign a profile or IT policy to a user account
Specify the certificate used by an appFor devices that use Android 7.0 and later, you can use a certificate mapping profile to specify the clientcertificates that apps use. The certificate mapping profile is not supported for BlackBerry Dynamics apps.
Certificate mapping profiles allow you to specify the certificates that Android apps use. You can require an appto use a certificate sent to the device by a SCEP, user credential, or shared certificate profile. You can use a
| Certificates | 140

certificate with one or more specified apps or all managed apps. You can also specify whether an app uses acertificate any time that one is required, or only for connections to a specific URI.
Multiple certificate mappings can be specified in a single profile. Only one certificate mapping profile can beassigned to a user.
Create a certificate mapping profile
Before you begin: Create any SCEP, user credential, or shared certificate profiles required to send certificates todevices and assign the profiles to users or groups.
1. On the menu bar, click Policies and Profiles.2. Click Certificates > Certificate mapping.3. Click .4. Type a name and description for the profile. Each certificate profile must have a unique name.5. In the mapping table, click .6. Under Destination URI, select one of the following options:
• Select None if the app won’t use the certificate to authenticate a connection with a resource.• Select Any if the app can use the certificate to authenticate a connection with any resource.• Select Specified host:port and type the host and port if the app can use the certificate to authenticate with
a specific resource.7. Under App certificate, perform one of the following actions:
• To specify that the app must use a certificate sent to the device by another profile, select Selectedcertificate and select the profile name from the drop-down list.
• To specify that the app must use a certificate sent to the device by a third-party source, select Certificatealias and type the alias for the certificate. If you do not know the alias, consult the documentation oradministrator for the certificate provider.
• To specify that the app must use a certificate sent to the device by another profile, select Selectedcertificate and select the profile name from the drop-down list.
8. Under Allowed apps for destination URI, perform one of the following actions:
• To allow any managed app to request the specified certificate, select Any apps in workspace.• To allow only specified apps to request the certificate, select Specified apps and click to specify one or
more apps.9. If necessary, repeat steps 5 to 8 to add to additional mappings to the profile.10.Click Add.
After you finish:
• Assign the profile to user accounts and user groups.• If necessary, rank profiles.
| Certificates | 141

Device policies, standards, and complianceYou can use IT policies and profiles to enforce certain standards for devices in your organization. An IT policy is aset of rules that control features and functionality on devices. Different profiles support particular configurationssuch as BlackBerry Dynamics app behavior, compliance rules, web content restrictions, or app restrictions. Youcan specify settings for BlackBerry 10, iOS, Android, and Windows devices in the same IT policy or profile and thenassign the IT policy or profile to user accounts, user groups, or device groups.
Steps to set up your organization's policies and standards for devicesWhen you set up your organization's policies and standards for devices, you perform the following actions:
Step Action
Review the Default IT policy and, if necessary, make updates.
Optionally, create custom IT policies.
Create profiles to enforce certain standards on devices. For example, create a complianceprofile, a web content profile, or organization notice profile.
If necessary, rank IT policies and rank profiles.
Assign IT policies and profiles to user accounts, user groups, or device groups.
Managing devices with IT policiesYou can use IT policies to manage the security and behavior of devices in your organization. An IT policyis a set of rules that control features and functionality on devices. You can configure rules for BlackBerry10, iOS, macOS, Android, and Windows devices in the same IT policy. The device OS determines the list offeatures that can be controlled using IT policies and the device activation type determines which rules in an ITpolicy apply to a specific device. Devices ignore rules in an IT policy that to not apply to them.
BlackBerry UEM includes a Default IT policy with preconfigured rules for each device type. If no IT policy isassigned to a user account, a user group that a user belongs to, or a device group that a user's devices belongto, BlackBerry UEM sends the Default IT policy to a user's devices. BlackBerry UEM automatically sends an ITpolicy to a device when a user activates it, when you update an assigned IT policy, or when a different IT policy isassigned to a user account or device.
BlackBerry UEM synchronizes daily with the BlackBerry Infrastructure over port 3101 to determine whether anyupdated IT policy information is available. If updated IT policy information is available, BlackBerry UEM retrievesit, and stores the updates in the BlackBerry UEM database. Administrators with the "View IT policies" and "Createand edit IT policies" permissions are notified about the update when they log in.
For more information about the IT policy rules for each device type, download the Policy Reference Spreadsheet.
| Device policies, standards, and compliance | 142

Restricting or allowing device capabilitiesWhen you configure IT policy rules, you can restrict or allow device capabilities. The IT policy rules available foreach device type are determined by the device OS and version and by the device activation type. For example,depending on the device and activation type, you can use IT policy rules to:
• Enforce password requirements for the device or the work space on a device• Prevent users from using device features, such as the camera• Control connections that use Bluetooth wireless technology• Control the availability of certain apps• Require encryption and other security features
Depending on the device activation type, you can use IT policy rules to control the entire device, only the workspace on a device, or both.
For Android 8.0 and later devices, you can create a device support message that displays on the device for somefeatures when they are disabled by IT policy rules.
For more information about the IT policy rules for each device type, download the Policy Reference Spreadsheet.
Setting device password requirementsYou use IT policy rules to set the password requirements for devices. You can set requirements for passwordlength and complexity, password expiration, and the result of incorrect password attempts. The following topicsexplain the password rules that apply to the various device and activation types.
For more information about the IT policy rules, download the Policy Reference Spreadsheet.
Setting BlackBerry 10 password requirements
On BlackBerry 10 devices, the password rules affect the password for the work space. "Work space only" devicesmust have a password and you can set the requirements for the password.
You can choose whether "Work and personal - Corporate" and "Work and personal - Regulated" devices must havea work space password. If you require work space passwords, you can set the minimum requirements for thepassword, specify whether the device must also have a password, and specify whether the work space and devicepasswords can or must be the same.
Rule Details
Password required forwork space
Specify whether "Work and personal - Corporate" and "Work and personal -Regulated" devices require a password for the work space. "Work space only"devices must have a password.
Minimum passwordlength
Specify the minimum length of the work space password. The password must beat least 4 characters.
Minimum passwordcomplexity
Specify the minimum complexity of the work space password. You can chooseone of the following options:
• No restriction• Minimum 1 letter and 1 number• Minimum 1 letter, 1 number, and 1 special character• Minimum 1 upper case, 1 lower case, 1 number, and 1 special character• Minimum 1 uppercase, 1 lowercase, and 1 number
| Device policies, standards, and compliance | 143

Rule Details
Security timeout Specify the period of user inactivity before the work space locks.
Maximum passwordattempts
Specify the number of times that a user can enter an incorrect password beforethe work space is wiped. On "Work and personal - Corporate" and "Work andpersonal - Regulated" devices, if the work space and device have the samepassword, the device is wiped.
Maximum passwordhistory
Specify the number of previous passwords that a device checks to prevent a userfrom reusing a recent work space password. If set to 0, the device does not checkprevious passwords.
Maximum password age Specify the maximum number of days that the work space password can be used.If set to 0, the password does not expire.
Require full devicepassword
Specify whether "Work and personal - Corporate" and "Work and personal -Regulated" devices require a password for the device as well as the work space.
Define work spaceand device passwordbehavior
Specify whether the work space password and device password must be different,must be the same, or whether the user can choose if the passwords are the same.
For more information about the IT policy rules password rules, download the Policy Reference Spreadsheet.
Setting iOS password requirements
You can choose whether iOS devices must have a password. If you require a password, you can set therequirements for the password.
Note: iOS devices and some of the device password rules use the term "passcode." Both "password" and"passcode" have the same meaning.
Rule Description
Password required fordevice
Specify whether the user must set a device password.
Allow simple value Specify whether the password can contain repeated or sequential characters, suchas DEFG or 3333.
Require alphanumericvalue
Specify whether the password must contain both letters and numbers.
Minimum passcodelength
Specify the minimum length of the password. If you enter a value that is less thanthe minimum required by the iOS device, the device minimum is used.
Minimum number ofcomplex characters
Specify the minimum number of non-alphanumeric characters that the passwordmust contain.
Maximum passcode age Specify the maximum number of days that the password can be used.
| Device policies, standards, and compliance | 144

Rule Description
Maximum auto-lock Specify the maximum value that a user can set for the auto-lock time, which is thenumber of minutes of user inactivity that must elapse before a device locks. If setto "None," all supported values are available on the device. If the selected value isoutside of the range supported by the device, the device will use the closest valueit supports.
Passcode history Specify the number of previous passwords that a device checks to prevent a userfrom reusing a recent password.
Maximum grace periodfor device lock
Specify the maximum value that a user can set for the grace period for devicelock, which is the amount of time that a device can be locked before a password isrequired to unlock it. If set to "None," all values are available on the device. If set to"Immediately," the password is required immediately after the device locks.
Maximum failedpassword attempts
Specify the number of times that a user can enter an incorrect password beforethe device is wiped.
Allow password changes(supervised only)
Specify if a user can add, change, or remove the password.
For more information about the IT policy rules password rules, download the Policy Reference Spreadsheet.
Setting macOS password requirements
You can choose whether password rules for macOS devices apply to the device or the user and whether apassword is required. If you require a password, you can set the requirements for the password.
Rule Description
IT policy rules target This rule specifies whether the IT policy rules for the password apply only to theassigned user's account or to the entire device.
Password required fordevice
Specify whether the user must set a device password.
Allow simple password Specify whether the password can contain repeated or sequential characters, suchas DEFG or 3333.
Require alphanumericvalue
Specify whether the password must contain both letters and numbers.
Minimum passwordlength
Specify the minimum length of the password.
Minimum number ofcomplex characters
Specify the minimum number of non-alphanumeric characters that the passwordmust contain.
Maximum password age Specify the maximum number of days that the password can be used before itexpires and the user must set a new password.
| Device policies, standards, and compliance | 145

Rule Description
Maximum auto-lock Specify the maximum number of minutes of user inactivity that must elapsebefore a device locks. If set to "None," the user can select any value.
Password history Specify the maximum number of previous passwords that a device checks toprevent a user from reusing a password.
Maximum grace periodfor device lock
Specify the maximum value that a user can set for the grace period for devicelock, which is the amount of time that a device can be locked before a password isrequired to unlock it.
Maximum failedpassword attempts
Specify the number of times that a user can enter an incorrect password before adevice is wiped.
For more information about the IT policy rules password rules, download the Policy Reference Spreadsheet.
Setting Android password requirements
There are four groups of IT policy rules for Android passwords. The group of rules that you use depends on thedevice activation type and whether you are setting requirements for the device password or the work spacepassword.
Activation type Supported password rules
MDM controls Use the global password rules to set device password requirements.
All other password rules are ignored by the device.
Use a compliance profile to enforce the password requirements.
Work space only
Work space only ( Premium)
Use the global password rules to set password requirements for thedevice. Because the device only has a work space, the password is alsothe work space password.
All other password rules are ignored by the device.
Use a compliance profile to enforce the password requirements.
Work and personal - user privacy
Work and personal - userprivacy (Premium)
Use the global password rules to set device password requirements.
Use the work profile password rules to set the password requirementsfor the work profile.
For BlackBerry devices powered by Android, you can force the workprofile and device passwords to be different.
All other password rules are ignored by the device.
Use a compliance profile to enforce the password requirements.
MDM controls (KNOX MDM) Use the KNOX MDM password rules to set device passwordrequirements.
All other password rules are ignored by the device.
Use a compliance profile to enforce the password requirements.
| Device policies, standards, and compliance | 146

Activation type Supported password rules
Work space only (SamsungKNOX)
Use the KNOX Premium - Workspace password rules to set passwordrequirements for the work space.
All other password rules are ignored by the device.
Use a compliance profile to enforce the password requirements.
Work and personal - fullcontrol (Samsung KNOX)
Use the KNOX MDM password rules to set device passwordrequirements.
Use the KNOX Premium - Workspace password rules to set passwordrequirements for the work space.
All other password rules are ignored by the device.
Use a compliance profile to enforce the password requirements.
Work and personal - userprivacy (Samsung KNOX)
You have no control over the device password.
Use the KNOX Premium - Workspace password rules to set passwordrequirements for the work space.
All other password rules are ignored by the device.
Use a compliance profile to enforce the password requirements.
Android: Global password rules
The global password rules set the device password requirements for devices with the following activation types:
• MDM controls (without Samsung KNOX)• Work space only• Work space only (Premium)• Work and personal - user privacy • Work and personal - user privacy (Premium)
Rule Description
Password requirements Specify the minimum requirements for the password. You can choose one of thefollowing options:
• Unspecified - no password required• Something - the user must set a password but there are no requirements for
length or quality• Numeric - the password must include at least one number• Alphabetic - the password must include at least one letter• Alphanumeric - the password must include at least one letter and one number• Complex - allows you to set specific requirements for different character types
| Device policies, standards, and compliance | 147

Rule Description
Maximum failedpassword attempts
Specify the number of times that a user can enter an incorrect password before adevice is wiped or deactivated.
Devices with the "MDM controls" activation type are wiped.
Devices with the "Work and personal - user privacy " and the "Work and personal- user privacy (Premium)" activation types are deactivated and the work profileremoved.
Maximum inactivity timelock
Specify the number of minutes of user inactivity that must elapse before thedevice or work space locks. This rule is ignored if no password is required.
Password expirationtimeout
Specify the maximum amount of time that the password can be used. After thespecified amount of time elapses, the user must set a new password. If set to 0,the password does not expire.
Password historyrestriction
Specify the maximum number of previous passwords that a device checksto prevent a user from reusing a recent numeric, alphabetic, alphanumeric, orcomplex password. If set to 0, the device does not check previous passwords.
Minimum passwordlength
Specify the minimum number of characters for a numeric, alphabetic,alphanumeric, or complex password.
Minimum uppercaseletters required inpassword
Specify the minimum number of uppercase letters that a complex password mustcontain.
Minimum lowercaseletters required inpassword
Specify the minimum number of lowercase letters that a complex password mustcontain.
Minimum letters requiredin password
Specify the minimum number of letters that a complex password must contain.
Minimum non-letters inpassword
Specify the minimum number of non-letter characters (numbers or symbols) that acomplex password must contain.
Minimum numericaldigits required inpassword
Specify the minimum number of numerals that a complex password must contain.
Minimum symbolsrequired in password
Specify the minimum number of non-alphanumeric characters that a complexpassword must contain.
For more information about the IT policy rules password rules, download the Policy Reference Spreadsheet.
Android: Work profile password rules
The work profile password rules set the work space password requirements for devices with the followingactivation types:
| Device policies, standards, and compliance | 148
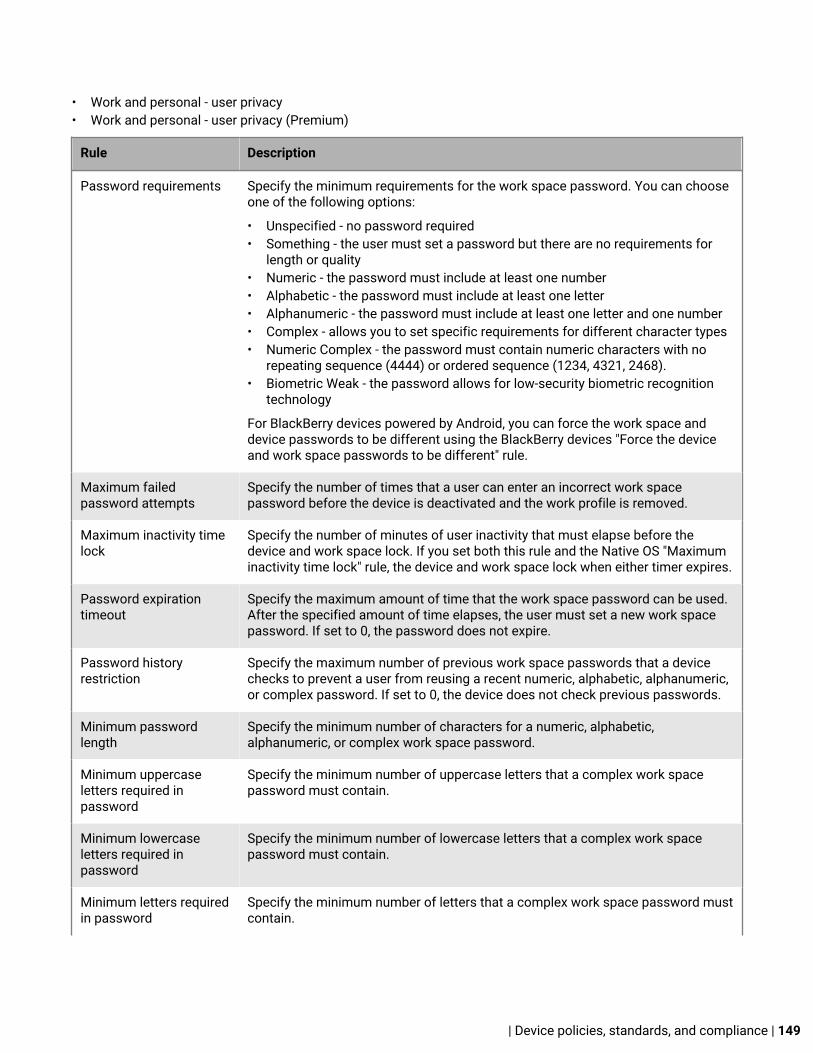
• Work and personal - user privacy• Work and personal - user privacy (Premium)
Rule Description
Password requirements Specify the minimum requirements for the work space password. You can chooseone of the following options:
• Unspecified - no password required• Something - the user must set a password but there are no requirements for
length or quality• Numeric - the password must include at least one number• Alphabetic - the password must include at least one letter• Alphanumeric - the password must include at least one letter and one number• Complex - allows you to set specific requirements for different character types• Numeric Complex - the password must contain numeric characters with no
repeating sequence (4444) or ordered sequence (1234, 4321, 2468).• Biometric Weak - the password allows for low-security biometric recognition
technology
For BlackBerry devices powered by Android, you can force the work space anddevice passwords to be different using the BlackBerry devices "Force the deviceand work space passwords to be different" rule.
Maximum failedpassword attempts
Specify the number of times that a user can enter an incorrect work spacepassword before the device is deactivated and the work profile is removed.
Maximum inactivity timelock
Specify the number of minutes of user inactivity that must elapse before thedevice and work space lock. If you set both this rule and the Native OS "Maximuminactivity time lock" rule, the device and work space lock when either timer expires.
Password expirationtimeout
Specify the maximum amount of time that the work space password can be used.After the specified amount of time elapses, the user must set a new work spacepassword. If set to 0, the password does not expire.
Password historyrestriction
Specify the maximum number of previous work space passwords that a devicechecks to prevent a user from reusing a recent numeric, alphabetic, alphanumeric,or complex password. If set to 0, the device does not check previous passwords.
Minimum passwordlength
Specify the minimum number of characters for a numeric, alphabetic,alphanumeric, or complex work space password.
Minimum uppercaseletters required inpassword
Specify the minimum number of uppercase letters that a complex work spacepassword must contain.
Minimum lowercaseletters required inpassword
Specify the minimum number of lowercase letters that a complex work spacepassword must contain.
Minimum letters requiredin password
Specify the minimum number of letters that a complex work space password mustcontain.
| Device policies, standards, and compliance | 149

Rule Description
Minimum non-letters inpassword
Specify the minimum number of non-letter characters (numbers or symbols) that acomplex work space password must contain.
Minimum numericaldigits required inpassword
Specify the minimum number of numerals that a complex work space passwordmust contain.
Minimum symbolsrequired in password
Specify the minimum number of non-alphanumeric characters that a complexwork space password must contain.
For more information about the IT policy rules password rules, download the Policy Reference Spreadsheet.
Android: KNOX MDM password rules
The KNOX MDM password rules set the device password requirements for devices with the following activationtypes:
• MDM controls (KNOX MDM)• Work and personal - full control (Samsung KNOX)
Devices with these activation types must have a device password.
Rule Description
Password requirements Specify the minimum requirements for the password. You can choose one of thefollowing options:
• Numeric - the password must include at least one number• Alphabetic - the password must include at least one letter• Alphanumeric - the password must include at least one letter and one number• Complex - allows you to set specific requirements for different character types
Minimum passwordlength
Specify the minimum length of the password. The password must be at least 4characters.
Minimum lowercaseletters required inpassword
Specify the minimum number of lowercase letters that a complex password mustcontain.
Minimum uppercaseletters required inpassword
Specify the minimum number of uppercase letters that a complex password mustcontain.
Minimum complexcharacters required inpassword
Specify the minimum number of complex characters (for example, numbers orsymbols) that a complex password must contain. If you set this value to 1, thenat least one number is required. If you set a value greater than 1, then at least onenumber and one symbol are required.
| Device policies, standards, and compliance | 150
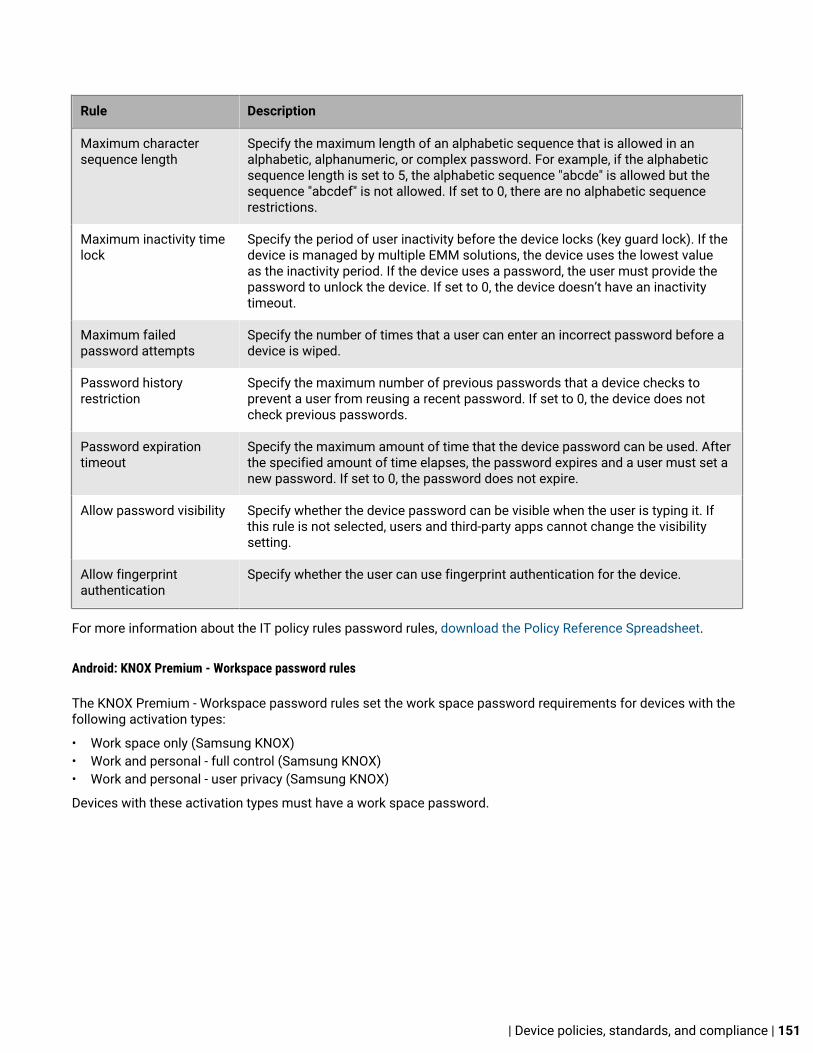
Rule Description
Maximum charactersequence length
Specify the maximum length of an alphabetic sequence that is allowed in analphabetic, alphanumeric, or complex password. For example, if the alphabeticsequence length is set to 5, the alphabetic sequence "abcde" is allowed but thesequence "abcdef" is not allowed. If set to 0, there are no alphabetic sequencerestrictions.
Maximum inactivity timelock
Specify the period of user inactivity before the device locks (key guard lock). If thedevice is managed by multiple EMM solutions, the device uses the lowest valueas the inactivity period. If the device uses a password, the user must provide thepassword to unlock the device. If set to 0, the device doesn’t have an inactivitytimeout.
Maximum failedpassword attempts
Specify the number of times that a user can enter an incorrect password before adevice is wiped.
Password historyrestriction
Specify the maximum number of previous passwords that a device checks toprevent a user from reusing a recent password. If set to 0, the device does notcheck previous passwords.
Password expirationtimeout
Specify the maximum amount of time that the device password can be used. Afterthe specified amount of time elapses, the password expires and a user must set anew password. If set to 0, the password does not expire.
Allow password visibility Specify whether the device password can be visible when the user is typing it. Ifthis rule is not selected, users and third-party apps cannot change the visibilitysetting.
Allow fingerprintauthentication
Specify whether the user can use fingerprint authentication for the device.
For more information about the IT policy rules password rules, download the Policy Reference Spreadsheet.
Android: KNOX Premium - Workspace password rules
The KNOX Premium - Workspace password rules set the work space password requirements for devices with thefollowing activation types:
• Work space only (Samsung KNOX) • Work and personal - full control (Samsung KNOX)• Work and personal - user privacy (Samsung KNOX)
Devices with these activation types must have a work space password.
| Device policies, standards, and compliance | 151
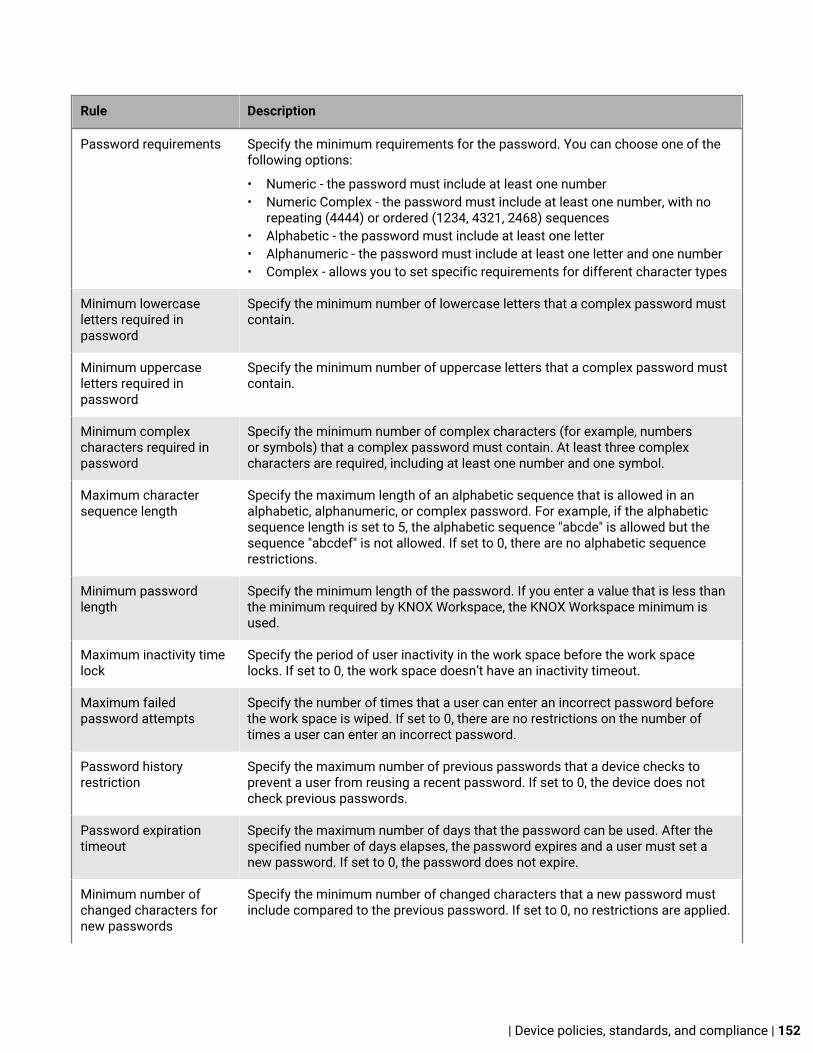
Rule Description
Password requirements Specify the minimum requirements for the password. You can choose one of thefollowing options:
• Numeric - the password must include at least one number• Numeric Complex - the password must include at least one number, with no
repeating (4444) or ordered (1234, 4321, 2468) sequences• Alphabetic - the password must include at least one letter• Alphanumeric - the password must include at least one letter and one number• Complex - allows you to set specific requirements for different character types
Minimum lowercaseletters required inpassword
Specify the minimum number of lowercase letters that a complex password mustcontain.
Minimum uppercaseletters required inpassword
Specify the minimum number of uppercase letters that a complex password mustcontain.
Minimum complexcharacters required inpassword
Specify the minimum number of complex characters (for example, numbersor symbols) that a complex password must contain. At least three complexcharacters are required, including at least one number and one symbol.
Maximum charactersequence length
Specify the maximum length of an alphabetic sequence that is allowed in analphabetic, alphanumeric, or complex password. For example, if the alphabeticsequence length is set to 5, the alphabetic sequence "abcde" is allowed but thesequence "abcdef" is not allowed. If set to 0, there are no alphabetic sequencerestrictions.
Minimum passwordlength
Specify the minimum length of the password. If you enter a value that is less thanthe minimum required by KNOX Workspace, the KNOX Workspace minimum isused.
Maximum inactivity timelock
Specify the period of user inactivity in the work space before the work spacelocks. If set to 0, the work space doesn’t have an inactivity timeout.
Maximum failedpassword attempts
Specify the number of times that a user can enter an incorrect password beforethe work space is wiped. If set to 0, there are no restrictions on the number oftimes a user can enter an incorrect password.
Password historyrestriction
Specify the maximum number of previous passwords that a device checks toprevent a user from reusing a recent password. If set to 0, the device does notcheck previous passwords.
Password expirationtimeout
Specify the maximum number of days that the password can be used. After thespecified number of days elapses, the password expires and a user must set anew password. If set to 0, the password does not expire.
Minimum number ofchanged characters fornew passwords
Specify the minimum number of changed characters that a new password mustinclude compared to the previous password. If set to 0, no restrictions are applied.
| Device policies, standards, and compliance | 152

Rule Description
Allow keyguardcustomizations
Specify whether a device can use keyguard customizations, such as trust agents.If this rule is not selected, keyguard customizations are turned off.
Allow keyguard trustagents
Specify whether a user can keep the work space unlocked for 2 hours after themaximum inactivity timeout value. If you do not set an inactivity timeout value, theuser can perform this action by default.
Allow password visibility Specify whether the device password can be visible when the user is typing it. Ifthis rule is not selected, users and third-party apps cannot change the visibilitysetting.
Enforce two-factorauthentication
Specify whether a user must use two-factor authentication to access the workspace. For example, you can use this rule if you want the user to authenticateusing a fingerprint and a password.
Allow fingerprintauthentication
Specify whether the user can use fingerprint authentication to access the workspace.
For more information about the IT policy rules password rules, download the Policy Reference Spreadsheet.
Setting Windows password requirements
You can choose whether Windows devices must have a password. If you require a password, you can set therequirements for the password.
Rule Description
Password required fordevice
Specify whether the user must set a device password.
Allow simple password Specify whether the password can contain repeated or sequential characters, suchas DEFG or 3333.
Minimum passwordlength
Specify the minimum length of the password. The password must be at least 4characters.
Password complexity Specify the complexity of the password. You can choose the following options:
• Alphanumeric - the password must contain letters and numbers• Numeric - the password must contain only numbers
Minimum number ofcharacter types
Specify the minimum number of character types that an alphanumeric passwordmust contain. Select from the following options:
1. numbers required2. numbers and lowercase letters required3. numbers, lowercase letters, and uppercase letters required4. numbers, lowercase letters, uppercase letters, and special characters required
Password character requirements for Windows 10 computers and tablets aredetermined by the user account type, not this setting.
| Device policies, standards, and compliance | 153

Rule Description
Password expiration Specify the maximum number of days that the password can be used. If set to 0,the password does not expire.
Password history Specify the number of previous passwords that a device checks to prevent a userfrom reusing a recent password. If set to 0, the device does not check previouspasswords.
Maximum failedpassword attempts
Specify the number of times that a user can enter an incorrect password beforethe device is wiped. If set to 0, the device is not wiped regardless of how manytimes the user enters an incorrect password.
This rule does not apply to devices that allow multiple user accounts, includingWindows 10 computers and tablets.
Maximum inactivity timelock
Specify the period of user inactivity that must elapse before the device locks. If setto 0, the device does not lock automatically.
Allow idle return withoutpassword
Specify whether a user must type the password when the idle grace period ends.If this rule is selected, the user can set the password grace period timer on thedevice. This rule does not apply to Windows 10 computers and tablets.
For more information about the IT policy rules password rules, download the Policy Reference Spreadsheet.
How BlackBerry UEM chooses which IT policy to assignBlackBerry UEM sends only one IT policy to a device and uses predefined rules to determine which IT policy toassign to a user and the devices that the user activates.
Assigned to Rules
User account
(view Summary tab)
1. An IT policy assigned directly to a user account takes precedence over an ITpolicy assigned indirectly by user group.
2. If a user is a member of multiple user groups that have different IT policies,BlackBerry UEM assigns the IT policy with the highest ranking.
3. The Default IT policy is assigned if no IT policy is assigned to a user accountdirectly or through user group membership.
Device
(view device tab)
By default, a device inherits the IT policy that BlackBerry UEM assigns to the userwho activates the device. If a device belongs to a device group, the following rulesapply:
1. An IT policy assigned to a device group takes precedence over the IT policythat BlackBerry UEM assigns to a user account.
2. If a device is a member of multiple device groups that have different IT policies,BlackBerry UEM assigns the IT policy with the highest ranking.
BlackBerry UEM might have to resolve conflicting IT policies when you perform any of the following actions:
• Assign an IT policy to a user account, user group, or device group• Remove an IT policy from a user account, user group, or device group• Change the IT policy ranking
| Device policies, standards, and compliance | 154

• Delete an IT policy• Change user group membership (user accounts and nested groups)• Change device attributes• Change device group membership• Delete a user group or device group
Related tasks
Rank IT policies
Creating and managing IT policiesYou can use the Default IT policy or create custom IT policies (for example, to specify IT policy rules for differentuser groups or device groups in your organization). If you plan to use the Default IT policy, you should review itand, if necessary, update it to make sure that the rules meet your organization's security standards.
Create an IT policy
1. On the menu bar, click Policies and Profiles.2. Click Policy > IT policies.3. Click .4. Type a name and description for the IT policy.5. Click the tab for each device type in your organization and configure the appropriate values for the IT policy
rules.Hold the mouse over the name of a rule to display help tips.
6. Click Add.
After you finish: Rank IT policies
Related tasks
Assign a profile or IT policy to a user accountAssign a profile or IT policy to a user group
Copy an IT policy
You can copy existing IT policies to quickly create custom IT policies for different groups in your organization.
1. On the menu bar, click Policies and Profiles.2. Click Policy > IT policies.3. Click the name of the IT policy that you want to copy.4.
Click .5. Type a name and description for the new IT policy.6. Make changes on the appropriate tab for each device type.7. Click Add.
After you finish: Rank IT policies
| Device policies, standards, and compliance | 155

Related tasks
Assign a profile or IT policy to a user accountAssign a profile or IT policy to a user group
Rank IT policies
Ranking is used to determine which IT policy BlackBerry UEM sends to a device in the following scenarios:
• A user is a member of multiple user groups that have different IT policies.• A device is a member of multiple device groups that have different IT policies.
1. On the menu bar, click Policies and Profiles.2. Click Policy > IT policies.3. Click .4. Use the arrows to move IT policies up or down the ranking.5. Click Save.
Related concepts
How BlackBerry UEM chooses which IT policy to assign
View an IT policy
You can view the following information about an IT policy:
• IT policy rules specific to each device type• List and number of user accounts that the IT policy is assigned to (directly and indirectly)• List and number of user groups that the IT policy is assigned to (directly)
1. On the menu bar, click Policies and Profiles.2. Click Policy > IT policies.3. Click the name of the IT policy that you want to view.
Change an IT policy
1. On the menu bar, click Policies and Profiles.2. Click Policy > IT policies.3. Click the name of the IT policy that you want to change.4. Click .5. Make changes on the appropriate tab for each device type.6. Click Save.
After you finish: If necessary, change the IT policy ranking.
Related tasks
Rank IT policies
| Device policies, standards, and compliance | 156

Remove an IT policy from user accounts or user groups
If an IT policy is assigned directly to user accounts or user groups, you can remove it from users or groups. Ifan IT policy is assigned indirectly by user group, you can remove the IT policy from the group or remove useraccounts from the group. When you remove an IT policy from user groups, the IT policy is removed from everyuser that belongs to the selected groups.
Note: The Default IT policy can only be removed from a user account if you assigned it directly to the user.
1. On the menu bar, click Policies and Profiles.2. Click Policy > IT policies.3. Click the name of the IT policy that you want to remove from user accounts or user groups.4. Perform one of the following tasks:
Task Steps
Remove an IT policy from useraccounts
a. Click the Assigned to users tab.b. If necessary, search for user accounts.c. Select the user accounts that you want to remove the IT policy
from.d.
Click .
Remove an IT policy from usergroups
a. Click the Assigned to groups tab.b. If necessary, search for user groups.c. Select the user groups that you want to remove the IT policy from.d.
Click .
Related concepts
How BlackBerry UEM chooses which IT policy to assign
Delete an IT policy
You cannot delete the Default IT policy. When you delete a custom IT policy, BlackBerry UEM removes the ITpolicy from the users and devices that it is assigned to.
1. On the menu bar, click Policies and Profiles.2. Click Policy > IT policies.3. Select the check boxes for the IT policies you want to delete.4. Click .5. Click Delete.
Related concepts
How BlackBerry UEM chooses which IT policy to assign
Export IT policies
You can export IT policies to an .xml file for auditing purposes.
| Device policies, standards, and compliance | 157
Note:
Profiles that are associated with IT policies are not exported.
1. On the menu bar, click Policies and Profiles.2. Click Policy > IT policies.3. Select the check boxes for the IT policies you want to export.4. Click .5. Click Next.6. Click Export.
Controlling BlackBerry OS device capabilities using IT policiesIf the BlackBerry UEM domain supports BlackBerry OS (version 5.0 to 7.1) devices, you can use BlackBerry OS ITpolicies to control and manage BlackBerry OS devices, the BlackBerry Desktop Software, and the BlackBerry WebDesktop Manager in your organization's environment.
For more information on creating or updating IT policies for BlackBerry OS devices, download the AdministrationGuide at help.blackberry.com/detectLang/bes5-for-exchange/.
Related tasks
Assign a BlackBerry OS IT policy, profile, or software configuration to a user groupAssign a BlackBerry OS IT policy, profile, or software configuration to a user account
Controlling BlackBerry Dynamics on users devicesThe BlackBerry Dynamics profile enables BlackBerry Dynamics for users and sets standards for BlackBerryDynamics app access, data protection, and logging.
BlackBerry UEM includes a Default BlackBerry Dynamics profile with preconfigured settings. If no BlackBerryDynamics profile is assigned to a user account, a user group that a user belongs to, or a device group that a user'sdevices belong to, BlackBerry UEM sends the Default BlackBerry Dynamics profile to a user's devices. BlackBerryUEM automatically sends a BlackBerry Dynamics profile to a device when a user activates it, when you updatean assigned BlackBerry Dynamics profile, or when a different BlackBerry Dynamics profile is assigned to a useraccount or device.
You can assign the BlackBerry Dynamics profile to user accounts, user groups, or device groups.
Related reference
Managing BlackBerry Dynamics compliance profiles
Create a BlackBerry Dynamics profile1. On the menu bar, click Policies and Profiles.2. Click Policy > BlackBerrry Dynamics3. Click .4. Type a name and description for the profile.5. Configure the appropriate values for the profile settings. For more information about each profile setting,
see BlackBerry Dynamics profile settings.
| Device policies, standards, and compliance | 158

6. Click Add.
After you finish: If necessary, rank profiles.
Related tasks
Assign a profile or IT policy to a user groupAssign a profile or IT policy to a user account
Related reference
BlackBerry Dynamics profile settings
Enforcing compliance rules for devicesYou can use compliance profiles to encourage users to follow your organization’s standards for the use ofdevices. A compliance profile defines the device conditions that are not acceptable in your organization.For example, you can choose to disallow devices that are jailbroken, rooted, or have an integrity alert due tounauthorized access to the operating system.
A compliance profile specifies the following information:
• Conditions that would make a device non-compliant• Email messages and device notifications that users receive if they violate the compliance conditions• Actions that are taken if users do not correct the issue, including limiting a user’s access to the organization's
resources, deleting work data from the device, or deleting all data from the device
For Samsung KNOX devices, you can add a list of restricted apps to a compliance profile. However, BlackBerryUEM does not enforce the compliance rules. Instead, the restricted app list is sent to devices and the deviceenforces compliance. Any restricted apps cannot be installed, or if they are already installed, they are disabled.When you remove an app from the restricted list, the app is re-enabled if it is already installed.
BlackBerry UEM includes a Default compliance profile. The Default compliance profile does not enforce anycompliance conditions. To enforce compliance rules, you can change the settings of the Default complianceprofile or you can create and assign custom compliance profiles. Any user accounts that are not assigned acustom compliance profile are assigned the Default compliance profile.
Create a compliance profileBefore you begin:
• If you are defining rules to restrict or allow specific apps, add those apps to the restricted apps list. Formore information, see Add an app to the restricted app list. Note that this does not apply to built-in apps forsupervised iOS 9.3.2 and later devices. To restrict built-in apps you must create a compliance profile and addthe apps to the restricted app list in the profile. For more information, see iOS: Compliance profile settings.
• To monitor apps in compliance profiles for Windows Phone devices, you must upload an AET. For moreinformation, see Upload an application enrollment token for Windows Phone devices.
• If you want to send an email notification to users when their devices are not compliant, edit the defaultcompliance email, or create a new email template. For more information, see Create a template for complianceemail notifications.
1. On the menu bar, click Policies and Profiles.2. Click Compliance > Compliance.
| Device policies, standards, and compliance | 159

3. Click .4. Type a name and description for the compliance profile.5. If you want to send a notification message to users when their devices become non-compliant, perform any of
the following actions:
• In the Email sent when violation is detected drop-down list, select an email template. To see the defaultcompliance email, click Settings > General settings > Email templates.
• In the Enforcement interval drop-down list, select how often BlackBerry UEM checks for compliance.• Expand Device notification sent out when violation is detected. Edit the message if necessary.
If you want to use variables to populate notifications with user, device, and compliance information, seeVariables. You can also define and use your own custom variables using the management console. For moreinformation, see Custom variables.
6. Click the tab for each device type in your organization and configure the appropriate values for each profilesetting. For details about each profile setting, see Compliance profile settings.
7. Click Add.
After you finish: If necessary, rank profiles.
Related tasks
Assign a profile or IT policy to a user groupAssign a profile or IT policy to a user account
Create a template for compliance email notificationsYou can create multiple email templates, customize them to apply to specific device types or groups of users, andassign an appropriate template to each user account. When a user's device does not comply with a complianceprofile, BlackBerry UEM can send a personalized email message based on the assigned template. BlackBerry UEMincludes a default compliance violation email template that can be edited, but not deleted. If you don't assign adifferent template to a user account, BlackBerry UEM uses the default template.
1. On the menu bar, click Settings > General settings.2. Click Email templates.3. Click . Select Compliance violation.4. In the Name field, type a name to identify this template.5. In the Subject field, type a subject for the email message.6. In the Message field, type the body text of the compliance email message. Use the HTML editor to select the
font format and to insert images, for example a corporate logo. Insert variables in the text to personalize themessage, for example you can use the variable %UserDisplayName% to insert the recipient's name. For a list ofavailable variables, see Default variables.
7. Click Save.
Managing BlackBerry Dynamics compliance profilesBlackBerry Dynamics compliance profiles are imported from Good Control when you synchronize GoodControl with BlackBerry UEM. You cannot edit BlackBerry Dynamics compliance profiles, but they can be usedas a reference when you are creating new compliance profiles in BlackBerry UEM. Users that were assignedto a compliance profile in Good Control remain assigned to the same profile after they are synchronizedwith BlackBerry UEM. When a user is assigned to a BlackBerry Dynamics compliance profile, the BlackBerryDynamics compliance profile takes precedence over any BlackBerry Dynamics rules in the BlackBerryUEM compliance profiles that a user may also be assigned to.
| Device policies, standards, and compliance | 160

For information on how to create compliance profiles in BlackBerry UEM, see Create a compliance profile.
Setting Description
Jailbroken OS This setting specifies the actions that occur if a user or attackerbypasses various restrictions on a device to modify the OS, installsunapproved apps, or obtains elevated permissions and the actions thatoccur for BlackBerry Dynamics apps if a jailbroken OS is used.
OS version verification This setting specifies the versions of the OS that are allowed andrestricted and the actions that occur for BlackBerry Dynamics apps if arestricted OS is installed on a device.
Hardware model verification This setting specifies the hardware models that are allowed andrestricted and the actions that occur for BlackBerry Dynamics apps if arestricted hardware model is being used.
BlackBerry Dynamics libraryversion verification
This setting specifies the BlackBerry Dynamics libraries that can be usedand the actions that occur for BlackBerry Dynamics apps if a device isusing a disallowed version of the library.
Connectivity verification This setting specifies whether a device must connect to BlackBerryUEM within a specified number of days and the actions that occurfor BlackBerry Dynamics apps if a device does not connect to BlackBerryUEM.
The "Base connectivity interval on auth delegate app" subsettingspecifies whether the app that is set as the authentication delegatemanages the connectivity interval. If you use the authentication delegateto manage the connectivity interval, less frequently used apps will not beblocked or wiped if they do not connect to. BlackBerry UEM.
Related concepts
Controlling BlackBerry Dynamics on users devices
Configuring the Enterprise Management AgentThe Enterprise Management Agent profile ensures that devices contact BlackBerry UEM regularly for appor configuration updates. When there is an update for a device, BlackBerry UEM prompts the device tocontact BlackBerry UEM to receive the updates. If for any reason the device doesn't receive the prompt,the Enterprise Management Agent profile is used to make sure that the device contacts BlackBerry UEM atintervals that you specify.
You also use the Enterprise Management Agent profile to allow BlackBerry UEM to collect a list of personalapps on users' devices. To turn off the collection of personal apps, you must deselect the "Allow personal appcollection" setting. For more information, see Turn off personal apps collection.
For BlackBerry 10 devices, the Enterprise Management Agent profile allows you to restrict which cipher suitesfrom the SSL library are supported by the device. Restricting the supported cipher suites does not affect devicecommunication with BlackBerry UEM, but it could affect communication with other servers in your organization,depending on the requirements of those servers.
| Device policies, standards, and compliance | 161

You can assign an Enterprise Management Agent profile to users, user groups, and device groups.
Create an Enterprise Management Agent profile1. On the menu bar, click Policies and Profiles.2. Click Policy > Enterprise Management Agent.3. Click .4. Type a name and description for the profile.5. Set the values for each device type as required by your organization. For details about the profile settings, see
Enterprise Management Agent profile settings.6. Click Add.
After you finish: If necessary, rank profiles.
Related concepts
Enterprise Management Agent profile settings
Related tasks
Assign a profile or IT policy to a user groupAssign a profile or IT policy to a user account
Limiting devices to a single appOn supervised iOS devices, Android devices managed using Samsung KNOX MDM, or Windows 10 Enterpriseand Windows 10 Education devices managed using MDM, you can use an app lock mode profile to limit devicesto run only one app. For example, you can limit access to a single app for training purposes or for point-of-salesdemonstrations. On iOS devices, the home button on a device is disabled and the device automatically opens theapp when the user wakes up the device or restarts it.
Create an app lock mode profileSpecify a single app to run on devices and select the device settings that you want to enable for the user. Forsupervised iOS devices, you can select an app in the app list, specify the bundle ID of the app, or select a built-inapp. For Android devices that are managed using Samsung KNOX MDM, specify the app package identifier thatyou want to set as the home screen. For Windows 10 devices managed using MDM, specify the account and theApplication User Model ID (AUMID) of the app. Visit docs.microsoft.com to find the AUMID.
Note: If the user does not install the app on a device, when you assign the profile to a user or user group thedevice is not restricted to the app.
Before you begin: For iOS devices, if you plan to use the app list to select an app, make sure that the app isavailable in the app list.
1. On the menu bar, click Policies and Profiles.2. Click Policy > App lock mode.3. Click .4. Type a name and description for the profile.5. Specify the device types the profile applies to.
| Device policies, standards, and compliance | 162

6. Perform one of the following tasks:
Task Steps
Specify the app to runon iOS devices
In the Specify the app to run on the device section, perform one of thefollowing actions:
• Click Add an app, and click an app in the list. • Click Specify the bundle ID of an app and type the bundle ID (for
example, <com.company.appname>). Valid characters are uppercaseand lowercase letters, 0 to 9, hyphen (-), and period (.).
• Click Select a built-in iOS app and select an app from the drop-down list.
Specify the app to runon Android devices
In the Specify the app to run on the device field, type the app packageidentifier of the app that you want to set as the home screen.
Specify the app to runon Windows 10 devices
• In the Account field, type a user account name that includes thedomain name and user name. For a local user, use the device namein place of the domain name.
• In the Application User Model ID field, type the AUMID ofthe app (for example, the AUMID for the Calculator appis Microsoft.WindowsCalculator_8wekyb3d8bbwe!App.
7. For iOS and Android devices, in the Administrator-enabled settings, select the options that you want to enablefor the user when using the app.
8. For iOS devices, in the User-enabled settings, select the options that the user can enable.9. Click Add.
After you finish: If necessary, rank profiles.
Related tasks
Add an Android app to the app list if BlackBerry UEM is not configured for Android Enterprise devicesAdd an Android app to the app list if BlackBerry UEM is configured for Android Enterprise devicesAdd an iOS app to the app listAssign a profile or IT policy to a user groupAssign a profile or IT policy to a user account
Controlling the software releases that are installed on devicesYou can control the device software releases that are installed on Android Enterprise devices with Work spaceonly activations, Samsung KNOX devices, and BlackBerry 10 devices.
On devices with Android 6.0 and later that are activated with Android Enterprise, you can specify whether the usercan choose when to install available software updates or whether software updates are automatically installed.You can specify different rules depending on the device model and currently installed OS version.
On devices that are activated with Android Enterprise, you can set an update period for apps that are running inthe foreground because by default, when an Android app is running in the foreground, Google Play cannot updateit. You can also control how Google Play applies the changes to the device such as the user can allow the change,or the change occurs only when the device is connected to a Wi-Fi network.
| Device policies, standards, and compliance | 163

On Samsung KNOX devices, you can use Enterprise Firmware Over the Air (E-FOTA) to control when firmwareupdates from Samsung are installed. Controlling firmware versions ensures that users’ devices are usingfirmware versions that their apps support and comply with your organization’s policies. You can use a deviceSR requirements profile to create firmware rules for the Samsung KNOX devices that are activated on UEM. Youcan schedule when firmware updates are installed and specify when forced updates must be installed. For moreinformation about E-FOTA, visit https://seap.samsung.com/sdk/enterprise-fota.
On devices running BlackBerry 10 OS version 10.3.1 or later that are activated with Work and personal -Regulated or Work space only, you can limit which software release versions that BlackBerry 10 devices canhave installed using a device SR requirements profile. You can also add exceptions to the global settings forspecific device models. For example, you may want to test a software release before making it available to yourorganization.
To enforce a particular action if a restricted software release version is installed on a device, you must create acompliance profile and assign the compliance profile to users, user groups, or device groups. The complianceprofile specifies the actions that occur if the user does not remove the restricted software release from thedevice.
Create a device SR requirements profile for Android Enterprise devices with Work space only activations1. On the menu bar, click Policies and Profiles.2. Click Compliance > Device SR requirements3. Click .4. Type a name and description for the profile.5. Click the Android tab.6. In the Work space only OS update rule table, click .7. In the Device model drop-down list, select a device model.8. In the OS version drop-down list, select the installed OS version.9. In the Update rule list, select one of the following options.
• Select Default to allow the user to choose when to install updates.• Select Update automatically to install updates without prompting the user.• Select Update automatically between to install updates between the times you specify without prompting
the user. The user can choose to install updates outside of this window.• Select Postpone up to 30 days to block installation of updates for 30 days. After 30 days, the user can
choose when to install an update. Depending on the device manufacturer and wireless service provider,security updates might not be postponed.
10.When you are done, click Add.11.Repeat steps 6 to 10 for each rule that you want to add.12.To specify an update period for apps that are running in the foreground, select Enable update period for apps
that are running in the foreground, and set the following options:
• Start time (local device time): Specifies the time when apps will start to update.• Duration: Specifies the number of hours that you will allow apps to be updated.
13.To specify how Google Play applies the changes to apps running in the foreground, select App auto updatepolicy. Select one of the following options:
• User can allow: The user is prompted to allow the apps to update on the device. Note that this is the defaultsetting if you don't select the App auto update policy option
• Always: The apps will always update. Note that for an app that is always running, such as BlackBerry UEMClient, BlackBerry Work, or BlackBerry Connectivity, if you don't select the Enable update period for apps
| Device policies, standards, and compliance | 164

that are running in the foreground option, the app will not update until the user manually updates the app onthe device.
• Wi-Fi only: The apps will update only when the device is connected to a Wi-Fi network. Note that for an appthat is always running, such as BlackBerry UEM Client, BlackBerry Work, or BlackBerry Connectivity, if youdon't select the Enable update period for apps that are running in the foreground option, the app will notupdate until the user manually updates the app on the device.
• Disable: The apps will never update.
Note:
Note that if you select Always, Wi-Fi only, or Disable, the user cannot select a different option on the device.For example, if you select Disable in the profile, the user cannot enable an app to update on the device.
14.Click Add.
After you finish: If necessary, rank profiles.
Create a device SR requirements profile for Samsung KNOX devices1. On the menu bar, click Policies and Profiles.2. Click Compliance > Device SR requirements3. Click .4. Type a name and description for the profile.5. Click the Android tab.6. In the Samsung device firmware rule table, click .7. In the Device model field, enter the device model or select one from the drop-down list.8. In the Language drop-down list, select a language.9. In the Carrier code field, enter the CSC code for the wireless service provider for the device. 10.Click Get firmware version. 11.Repeat steps 5 to 8 for each firmware rule that you want to add.12.When you are done, click Add.13.In the Samsung device firmware rules table, click Schedule beside the firmware version you added.14.In the Schedule forced update dialog box, do the following:
a) In the Schedule forced update between fields, select a date range when the update must be installed. Thedate range must be 3 and 7 days. The default value is 7 days.
b) In the Schedule forced update during the hours of drop-down lists, specify when the forced update must beinstalled and the time zone for the user. The time range must be between 1 and 12 hours.
15.Click Save.
After you finish: If necessary, rank profiles.
Create a device SR requirements profile for BlackBerry 10 devicesBefore you begin: Create or edit a compliance profile that specifies the actions that occur if a restricted softwarerelease is installed on a device.
1. On the menu bar, click Policies and Profiles.2. Click Compliance > Device SR requirements.3. Click .4. Type a name and description for the profile.5. Click the BlackBerry tab.
| Device policies, standards, and compliance | 165

6. To view a list of all of the BlackBerry 10 device software releases and corresponding service provider, devicemodel, hardware ID, software release version, and revocation status information, click View a list of devicesoftware releases.
7. Select the Make update required check box to force users to update their devices to a software releasedefined in the profile.
8. In the Grace period field, type a value, in hours, can elapse before users must update their devices. If usersdo not update their devices within the grace period, or if you set the grace period to 0, the software update isautomatically installed on devices.
9. In the Minimum software release version drop-down list, select the minimum software version thata BlackBerry 10 device must be running.
10.In the Maximum software release version drop-down list, select the maximum software version thata BlackBerry 10 device must be running.
11.To override the global setting for a device model, perform the following tasks:a) In the Exceptions table, click .b) In the Disposition drop-down list, select whether you want to allow or disallow software release versions. If
you specify a disallowed range, and you have not specified an allowed range for a device model, a secondcolumn appears where you are required to specify an allowed range. If an allowed range is not specifiedthe global settings no longer apply to the device model, and all software release versions, other than theexception, are allowed automatically.
c) In the Device model drop-down list, select the device model that you want to set the exception for.d) In the Minimum drop-down list, select the minimum software version that you want to allow or disallow.e) In the Maximum drop-down list, select the maximum software version that you want to allow or disallow.f) If you disallowed a software release version, select the minimum software version that you want to allow.g) If you disallowed a software release version, select the maximum software version that you want to allow.
12.Click Save.13.Click Add.
After you finish: If necessary, rank profiles.
Related tasks
Assign a profile or IT policy to a user groupAssign a profile or IT policy to a user account
View users who are running a revoked software releaseYou can view a list of users who are running a revoked software release. A revoked software release is a softwarerelease that is no longer accepted by a service provider but might still be installed on a user’s device.
1. On the menu bar, click Policies and Profiles.2. Click Compliance > Device SR requirements.3. Click the name of the profile that you want to view.4. Click the x users running revoked SR tab to see the list of users who are running a revoked software release.
Displaying organization information on devicesYou can configure BlackBerry UEM to display organization information and custom organization notices ondevices.
| Device policies, standards, and compliance | 166

For BlackBerry 10, iOS, macOS, Android, and Windows 10 devices, you can create custom organization noticesand have them display during activation. For example, a notice could include the conditions that a user mustfollow to comply with your organization’s security requirements. The user must accept the notice to continue theactivation process. You can create multiple notices to cover different requirements and you can create separateversions of each notice to support different languages.
You can create device profiles to display information about your organization on devices.For iOSand Android devices, organization information is displayed in the BlackBerry UEM Client on thedevice. For Windows 10, the phone number and email address are displayed in the support information on thedevice. For BlackBerry 10 and Samsung KNOX devices, you can use the device profile to display the customorganization notice when the user restarts the device.
For BlackBerry 10, Samsung KNOX, and supervised iOS devices, you can also use the device profile to adda custom wallpaper image to display information for your users. For example, you can create an image thathas your support contact information, internal website information, or your organization's logo. On BlackBerry10 and Samsung KNOX devices, the wallpaper displays in the work space.
Where organization information isdisplayed
How to configure the organization information
Display an organization noticeon activation for BlackBerry10, iOS, macOS, Android, and Windows10 devices
Create an organization notice and assign it to an activationprofile.
Display an organization notice on restartfor Samsung KNOX devices
Create an organization notice and assign it in the Android tab ofthe device profile. To change the notice that displays on devicerestart, you must update the device profile.
Display an organization notice on restartfor BlackBerry 10 devices
Create an organization notice and assign it in the BlackBerry tabof a device profile. Verify that the "Display organization noticeafter device restart" IT policy rule is selected. To change thenotice that displays on device restart, you must update the deviceprofile.
Note: The IT Policy rule applies only to the "Work space only" and"Work and personal - Regulated" activation types on devices thatare running BlackBerry 10 OS version 10.3.1 and later.
Display organization informationin the BlackBerry UEMClient on iOS and Android devices, orin the support information on Windows10 devices
Type the information you want to display in the appropriate tab ofthe device profile.
In a wallpaper image on BlackBerry10, Samsung KNOX, orsupervised iOS devices
Select an image file in the appropriate tab of the device profile.
Create organization noticesYou can create custom organization notices to display during activation of BlackBerry 10, iOS, macOS, Android,and Windows 10 devices.
| Device policies, standards, and compliance | 167

BlackBerry 10 and Samsung KNOX devices can also display the organization notice when a user restarts thedevice.
1. On the menu bar, click Settings.2. In the left pane, expand General settings.3. Click Organization notices.4. Click at the right side of the screen. 5. In the Name field, type a name for the organization notice.6. Optionally, you can reuse text from an existing organization notice by selecting it in the Text copied from
organization notice drop-down list.7. In the Device language drop-down list, select the language to use as the default language for the organization
notice.8. In the Organization notice field, type the text of the organization notice.9. Optionally, you can click Add an additional language multiple times to post the organization notice in more
languages.10.If you post the organization notice in more than one language, select the Default language option below one of
the messages to make it the default language.11.Click Save.
After you finish:
• To display the organization notice during activation, assign the organization notice to an activation profile.• To display the organization notice when a Samsung KNOX device restarts, assign the organization notice to a
device profile. • To display the organization notice when a BlackBerry 10 device restarts, assign the organization notice to a
device profile and select the "Display organization notice after device restart" IT policy rule.
Create a device profileBefore you begin: For BlackBerry 10 and Samsung KNOX devices, create organization notices.
1. On the menu bar, click Policies and Profiles.2. Click Custom > Device.3. Click .4. Type a name and description for the profile. Each device profile must have a unique name.5. Perform one of the following tasks:
Task Steps
Assign an organization notice to displayon BlackBerry 10 or Samsung KNOX devices duringdevice restart
a. Click BlackBerry or Android.b. In the Assign organization notice drop-down list,
select the organization notice that you want todisplay on devices.
For iOSand Androiddevices, define the organizationinformation to display in the BlackBerry UEMClient app.
For Windows 10, define the phone number andemail address to display in the support informationon devices.
a. Click iOS, Android, or Windows.b. Type the name, address, phone number, and
email address for your organization.
| Device policies, standards, and compliance | 168

6. If necessary, perform the following tasks:
Task Steps
Add a wallpaper image to thework space on BlackBerry10 or Samsung KNOX devices
a. Click BlackBerry or Android.b. In the Work space wallpaper section, click Browse.c. Select the image that you want to use for the wallpaper.d. Click Open.
Add a wallpaper image tosupervised iOS devices
a. Click iOS.b. In the Device wallpaper section, select whether the wall paper
displays on the Home screen, Lock screen, or Both.c. Click Browse and select the image that you want to use for the
wallpaper.d. Click Open.e. In the Set wallpaper for field, select where you want the wallpaper
to display.
7. Click Add.
After you finish:
• To display the organization notice when a BlackBerry 10 device restarts, select the "Display organization noticeafter device restart" IT policy rule.
• If necessary, rank profiles.
Related tasks
Assign a profile or IT policy to a user groupAssign a profile or IT policy to a user account
Using location services on devicesYou can use a location service profile to request the location of devices and view their approximate locations ona map. You can also allow users to locate their devices using BlackBerry UEM Self-Service. If you enable locationhistory for iOS and Android devices, the devices must report location information periodically and administratorscan view the location history.
Location service profiles use the location services on iOS, Android, and Windows 10 Mobile devices. Dependingon the device and available services, location services may use information from GPS, cellular, and Wi-Fi networksto determine the location of the device.
Configure location service settingsYou can configure the settings for location service profiles, such as the unit of speed that is displayed for a devicewhen you view its location on a map. If you enable location history for iOS and Android devices, BlackBerry UEMstores the location history for 1 month by default.
1. On the menu bar, click Settings > General settings > Location service.2. In the Location history age field, specify the number of days, weeks, or months that BlackBerry UEM stores the
location history for devices.3. In the Displayed unit of speed drop-down list, click km/h or mph.
| Device policies, standards, and compliance | 169

4. Click Save.
Create a location service profileYou can assign a location service profile to user accounts, user groups, or device groups. Users must acceptthe profile before the management console or BlackBerry UEM Self-Service can display iOS and Android devicelocations on a map. Windows 10 Mobile devices automatically accept the profile.
Before you begin: Configure location service settings
1. On the menu bar, click Policies and profiles.2. Click Protection > Location service.3. Click .4. Type a name and description for the location service profile.5. Optionally, clear the check box for any device type that you do not want to configure the profile for.6. Perform any of the following tasks:
Task Steps
Enable location history for iOSdevices
a. On the iOS tab, verify that the Log device location history check boxis selected.
Note: BlackBerry UEM collects a device's location hourly and, ifpossible, when there has been a significant change in the device'slocation (for example, 500 meters or more).
Enable location history forAndroid devices
a. On the Android tab, verify that the Log device location historycheck box is selected.
b. In the Device location check distance field, specify the minimumdistance that a device must travel before the device location isupdated.
c. In the Location update frequency field, specify how often the devicelocation is updated.
Note: Both the distance and frequency conditions must be met beforethe device location is updated.
7. Click Add.
After you finish: If necessary, rank profiles.
Related tasks
Assign a profile or IT policy to a user groupAssign a profile or IT policy to a user accountLocate a device
Turning off notifications outside of work hoursYou can use Do not disturb profiles to block device notifications outside of work hours in BlackBerry Work forAndroid and BlackBerry Work for iOS. This feature requires BEMS 2.8 or later.
| Device policies, standards, and compliance | 170

Create a Do not disturb profileBefore you begin:
• BEMS 2.8 or later is installed and configured in your environment. For instructions, see the BEMS installationand configuration guides.
• BlackBerry Work is added to the BlackBerry Dynamics connectivity profile. See Configure BlackBerryWork connection settings in the BlackBerry Work admininstration content.
1. On the menu bar, click Policies and Profiles.2. Click Protection > Do not disturb3. Click .4. Type a name and description for the profile.5. Enter a message to display on devices when BlackBerry Work notifications are blocked . If you leave this field
blank, a default message is displayed.6. Do one of the following:
Task Steps
Specify common work days andhours.
a. Click the Select common work days and hours option.b. In the From drop-down lists, specify the time that work days start.c. In the To drop-down lists, specify the time that work days end.d. In the Work days list, select the days of the week that are work
days.
Specify custom work hours forspecific days.
a. Click the Select custom work days and hours option. b. Select a day of the week.c. In the From drop-down lists, specify the time that the work day
starts.d. In the To drop-down lists, specify the time that the work day ends.e. Repeat steps 2 to 4 for each day of the week that is a work day.
7. Click Add.
Managing iOS features using custom payload profilesYou can use custom payload profiles to control features on iOS devices that aren’t controlled byexisting BlackBerry UEM policies or profiles.
Note: If a feature is controlled by an existing BlackBerry UEM policy or profile, a custom payload profile may notwork as expected. You should use existing policies or profiles whenever possible.
You can create Apple configuration profiles using the Apple Configurator and add them to BlackBerryUEM custom payload profiles. You can assign custom payload profiles to users, user groups, and device groups.
• Control an existing iOS feature that isn’t included in the BlackBerry UEM policies and profiles. For example,with BES10, your CEO’s assistant was able to access both her own email account and the CEO’s on an iPhone.In BlackBerry UEM, you can assign only one email profile to a device, so the assistant can only access hisown email account. To solve this, you can assign an email profile to let the assistant’s iPhone access theassistant’s email account and a custom payload profile that lets the assistant’s iPhone access your CEO’semail account.
| Device policies, standards, and compliance | 171

• Control a new iOS feature that was released after the latest BlackBerry UEM software release. For example,you want to control a new feature that will be available to devices when they upgrade to iOS 9, but BlackBerryUEM won’t have a profile for the new feature until the next BlackBerry UEM software release. To solve this, youcan create a custom payload profile that controls that feature until the next BlackBerry UEM software release.
Create a custom payload profileBefore you begin: Download and install the latest version of the Apple Configurator from Apple.
1. In the Apple Configurator, create an Apple configuration profile.2. In the BlackBerry UEM management console, click Policies and Profiles.3. Click Custom > Custom payload.4. Click .5. Type a name and description for the profile.6. In the Apple Configurator, copy the XML code for the Apple configuration profile. When you copy the text, copy
only the elements in bold text as shown in the following code sample.
<?xml version="1.0" encoding="UTF-8"?><!DOCTYPE plist PUBLIC "-//Apple//DTD PLIST 1.0//EN""http://www.apple.com/DTDs/PropertyList-1.0.dtd"><plist version="1.0"><dict> <key>PayloadContent</key> <array> <dict> <key>CalDAVAccountDescription</key> <string>CalDAV Account Description</string> <key>CalDAVHostName</key> <string>caldav.server.example</string> <key>CalDAVPort</key> <integer>8443</integer> <key>CalDAVPrincipalURL</key> <string>Principal URL for the CalDAV account</string> <key>CalDAVUseSSL</key> </true> <key>CalDAVUsername</key> <string>Username</string> <key>PayloadDescription</key> <string>Configures CalDAV account.</string> <key>PayloadDisplayName</key> <string>CalDAV (CalDAV Account Description)</string> <key>PayloadIdentifier</key> <string>.caldav1</string> <key>PayloadOrganization</key> <string></string> <key>PayloadType</key> <string>com.apple.caldav.account</string> <key>PayloadUUID</key> <string>9ADCF5D6-397C-4E14-848D-FA04643610A3</string> <key>PayloadVersion</key> <integer>1</integer> </dict> </array> <key>PayloadDescription</key> <string>Profile description.</string> <key>PayloadDisplayName</key> <string>Profile Name</string> <key>PayloadOrganization</key>
| Device policies, standards, and compliance | 172

<string></string> <key>PayloadRemovalDisallowed</key> <false/> <key>PayloadType</key> <string>Configuration</string> <key>PayloadUUID</key> <string>7A5F8391-5A98-46EA-A3CF-C0D6EDC74632</string> <key>PayloadVersion</key> <integer>1</integer></dict></plist>
7. In the Custom payload field, paste the XML code from the Apple Configurator.8. Click Add.
Related tasks
Assign a profile or IT policy to a user groupAssign a profile or IT policy to a user account
Configure the layout of apps on supervised iOS devicesYou can control the order of apps that display a user’s iOS device. This profile can be used only withsupervised iOS 9.3 and later devices.
1. On the menu bar, click Policies and profiles.2. Click Custom > Home screen layout.3. Click .4. In the Type of app list, select the type of app that you want to drag and drop onto the screen (for example,
Built-in apps).5. Drag and drop the icons from the App list to the home screen.6. Click Add.
Setting up Windows Information Protection for Windows 10 devicesYou can set up Windows Information Protection (WIP) for Windows 10 devices when you want to:
• Separate personal and work data on devices and be able to wipe only work data• Prevent users from sharing work data outside of protected work apps or with people outside of your
organization• Protect data even if it is moved to or shared on other devices, such as a USB key• Audit user behavior and take appropriate actions to prevent data leaks
When you set up WIP for devices, you specify the apps that you want to protect with WIP. Protected apps aretrusted to create and access work files, while unprotected apps can be blocked from accessing work files.You can choose the level of protection for protected apps based on how you want users to behave when theyshare work data. When WIP is enabled, all data sharing practices are audited. For more information about WIP,visit https://technet.microsoft.com/itpro/windows/keep-secure/protect-enterprise-data-using-wip.
The apps that you specify can be enlightened or unenlightened for enterprise. Enlightened apps can createand access work and personal data. Unenlightened apps can only create and access work data. For more
| Device policies, standards, and compliance | 173

information about enlightened and unenlightened apps, visit https://docs.microsoft.com/en-us/windows/security/information-protection/windows-information-protection/enlightened-microsoft-apps-and-wip.
Create a Windows Information Protection profile1. On the menu bar, click Policies and Profiles.2. Click Protection > Windows Information Protection.3. Click .4. Type a name and description for the profile.5. Configure the appropriate values for each profile setting. For details about each profile setting, see Windows
10: Windows Information Protection profile settings.6. Click Add.
Related concepts
Windows Information Protection profile settings
Related tasks
Assign a profile or IT policy to a user groupAssign a profile or IT policy to a user account
| Device policies, standards, and compliance | 174

AppsYou can create a library of apps that you want to manage and monitor on BlackBerry 10, iOS, Android,and Windows devices. To manage apps, you can add the apps to the app list and assign them to user accounts,user groups, or device groups.
When you manage apps, you perform the following actions:
Step Action
Add the public and internal apps that you want to manage to the app list.
Create app groups to manage multiple apps at the same time.
Assign apps or app groups to user accounts, user groups, or device groups so that userscan install them.
Adding apps to the app listThe app list contains apps that you can assign to users, user groups, and device groups. Apps listed with a lockicon are BlackBerry Dynamics apps.
Note: If your organization uses Microsoft Intune for MAM of apps such as Office 365 apps, instead of adding theapps to the app list, create a Microsoft Intune app protection profile to assign apps protected by Intune to users.
Adding public apps to the app listA public app is an app that is available from the BlackBerry World storefront, the App Store online store,the Google Play store, or the Windows Store.
Add a BlackBerry 10 app to the app list
1. On the menu bar, click Apps. 2.
Click .3. Click BlackBerry World.4. In the search field, search for the app that you want to add. You can search by app name, vendor, or BlackBerry
World URL.5. In the drop-down list, select the country of the store that you want to search in.6. Click Search.7. In the search results, click Add to add an app.8. To filter BlackBerry 10 apps in the app list by category, you can select a category for the app. In
the Category drop-down list, do one of the following:
Task Steps
Select a category for the app a. In the drop-down list, select a category.
| Apps | 175

Task Steps
Create a category for the app a. Type a name for the category. The new category will appear in thedrop-down list with the "new category" label beside it
b. Press Enter.c. Press Enter.
9. On the app information screen, click Add.
Related tasks
Assign an app to a user groupAssign an app to a user account
Add an iOS app to the app list
When you add public iOS apps to the app list, the connection to the App Store is made directly from the computerthat is running the BlackBerry UEM console. If your organization is using a proxy server, you must ensure thatno SSL interception occurs. For more information on ports that must be open, visit support.blackberry.com/community to read article 52777.
1. On the menu bar, click Apps. 2.
Click .3. Click App Store.4. In the search field, search for the app that you want to add. You can search by app name, vendor, or App
Store URL.5. In the drop-down list, select the country of the store that you want to search in.6. Click Search.7. In the search results, click Add to add an app.8. To filter apps in the app list by category and to organize the apps into categories in the work apps list on users'
devices, you can select a category for the app. In the Category drop-down list, do one of the following:
Task Steps
Select a category for the app a. In the drop-down list, select a category.
Create a category for the app a. Type a name for the category. The new category will appear in thedrop-down list with the "new category" label beside it
b. Press Enter.c. Press Enter.
9. In the App rating and review drop-down list, perform one of the following actions. When multiple versions ofthe app exist, the setting specified applies to all versions of the app.
• If you want users to rate and provide reviews of apps and see all reviews submitted by other users in yourenvironment, select Public mode.
• If you want users to only rate and provide reviews of apps, select Private mode. Users cannot see reviewsprovided by other users. You can see reviews in the BlackBerry UEM management console.
• If you don't want users to rate or provide reviews of apps or see reviews provided by other users,select Disabled.
| Apps | 176

10.In the Supported device form factor drop-down list, select the form factors that the app can be installed on.For example, you can prevent the app from being available in the Work Apps app for iPad.
11.If you want the app to be deleted from the device when the device is removed from BlackBerry UEM,select Remove the app from the device when the device is removed from BlackBerry UEM. This option appliesonly to apps with a disposition marked as required and the default installation for required apps is set toprompt once.
12.If you want to prevent apps on iOS devices from being backed up to the iCloud online service, select DisableiCloud backup for the app. This option applies only to apps with a disposition marked as required. You set thedisposition of the app when you assign the app to a user or group.
13.In the Default installation for required apps drop-down list, perform one of the following actions:
• If you want users to receive one prompt to install the app on their iOS devices, select Prompt once. Ifusers dismiss the prompt, they can install the app later using the Work Apps screen in the BlackBerry UEMClient app or the Work Apps icon on the device.
• If you don't want users to receive a prompt, select No prompt.
The default installation method applies only to apps with a disposition marked as required. You set thedisposition of the app when you assign the app to a user or group.
14.In the Convert installed personal app to work app drop-down list, select one of the following:
• To convert the app to a work app if it is already installed on iOS 9 or later devices, select Convert. After youassign the app to a user, the app is converted to a work app and can be managed by BlackBerry UEM.
• If you don't want to convert the app to a work app if it is already installed on iOS 9 or later devices, select Donot convert. After you assign the app to a user, the app cannot be managed by BlackBerry UEM.
15.If the app settings can be preconfigured (for example, connection information), and you want to do so, obtainthe configuration details from the app vendor and perform the following actions:a) In the App configuration table, complete one of the following tasks:
Task Steps
Create an app configurationfrom an XML template
1. Click > Create from a template.2. Click Browse and select the template that you want to add.3. Click Upload.4. For each setting, enter the value that you want to set.
For more information about app configuration .xml templates,visit http://www.appconfig.org/ios/.
Copy another app configuration 1. Click > Copy from an app configuration.2. In the Copy from drop-down list, select the app configuration that
you want to copy. 3. For each setting, edit the key name or value.
Create an app configurationmanually
1. Click > Configure manually.2. For each setting that you want to add, click and select a value
type for the setting.3. For each setting, enter the key name and the value that you want
to set.
b) Type a name in the App configuration name field.c) Click Save.
| Apps | 177

d) If necessary, use the arrows to move the profiles up or down the ranking. When an app is assigned morethan once with different app configurations, the app configuration with the higher rank applies.
16.Click Add.
Related tasks
Assign an app to a user groupAssign an app to a user account
Add an Android app to the app list if BlackBerry UEM is not configured for Android Enterprise devices
Add only apps to the available app list. Movies, music, and newsstand media cannot be delivered to devices.If you assign media to a user and set the disposition of the media as required, the device is subject to theenforcement action defined in the compliance profile that is assigned to it.
If BlackBerry UEM is configured to support Android Enterprise devices, see Add an Android app to the app listif BlackBerry UEM is configured for Android Enterprise devices.
1. On the menu bar, click Apps. 2.
Click .3. Click Google Play.4. Click Open Google Play and search for the app that you want to add. You can then copy and paste information
from Google Play in the following steps and also download icons and screen shots.5. In the App name field, type the app name.6. In the App description field, type a description for the app.7. To filter apps in the app list by category and to organize the apps into categories in the work apps list on users'
devices, you can select a category for the app. In the Category drop-down list, do one of the following:
Task Steps
Select a category for the app a. In the drop-down list, select a category.
Create a category for the app a. Type a name for the category. The new category will appear in thedrop-down list with the "new category" label beside it
b. Press Enter.c. Press Enter.
8. In the App rating and review drop-down list, perform one of the following actions. When multiple versions ofthe app exist, the setting specified applies to all versions of the app.
• If you want users to rate and provide reviews of apps and see all reviews submitted by other users in yourenvironment, select Public mode.
• If you want users to rate and provide reviews of apps only, select Private mode. Users cannot see reviewsprovided by other users. You can see reviews in the BlackBerry UEM management console.
• If you don't want users to rate or provide reviews of apps or see reviews provided by other users,select Disabled.
9. In the Vendor field, type the name of the app vendor.10.In the App icon field, click Browse. Locate and select an icon for the app. The supported formats
are .png, .jpg, .jpeg, or .gif. Do not use Google Chrome to download the icon because an incompatible .webpimage is downloaded.
11.In the App web address from Google Play field, type the web address of the app in Google Play.
| Apps | 178

12.To add screen shots of the app, click Add and browse to the screen shots. The supported image typesare .jpg, .jpeg, .png, or .gif.
13.In the Send to drop-down list, perform one of the following actions:
• If you want the app to be sent to all Android devices, select All Android devices. • If you want the app to be sent to only Android devices that use Samsung KNOX Workspace, select Only
KNOX Workspace devices.14.Click Add.
Related tasks
Assign an app to a user groupAssign an app to a user account
Add an Android app to the app list if BlackBerry UEM is configured for Android Enterprise devices
If you have configured support for Android Enterprise devices, the connection to Google allows BlackBerryUEM to get app information from Google Play. The connection to Google Play is made directly from the computerthat is running the BlackBerry UEM console. If your organization is using a proxy server, you must ensure thatno SSL interception occurs. For more information on ports that must be open, visit support.blackberry.com/community to read article 52777. For more information about configuring BlackBerry UEM to support AndroidEnterprise devices, see the Configuration content.
If BlackBerry UEM is not configured to support Android Enterprise devices, see Add an Android app to the app listif BlackBerry UEM is not configured for Android Enterprise devices.
To use Google Play to manage apps in the Samsung KNOX Workspace, devices must have Samsung KNOX 2.7.1or later installed and you must allow Google Play app management for Samsung KNOX Workspace devices in theactivation profile.
Note: In an upcoming release of BlackBerry UEM, the settings applicable to BlackBerry Hub+ and DivideProductivity will be removed from the email profile and will be available only in an app configuration in the appsettings. In this release, if you configure app settings in the email profile and in an app configuration, the appconfiguration takes precedence if both are assigned.
1. On the menu bar, click Apps. 2.
Click .3. Click Google Play.4. Search for the app that you want to add or pick an app on the store home page.5. Select the app.6. Click Approve.7. To accept app permissions on behalf of users, click Approve. You must accept the app permissions to allow
required apps to be automatically installed on Android Enterprise devices or in KNOX Workspace. If you don'taccept the app permissions on behalf of users, the app can't be managed in BlackBerry UEM.
8. On the Approval Settings tab, choose how you would like to handle new app permission requests when thereis an updated app.
• To automatically accept the new permissions added by the app vendor, select Keep approved when apprequests new permissions.
• To manually re-accept the new app permissions added by the app vendor before the app can be sent tonew devices, select Revoke app approval when this app requests new permissions.. For more informationabout updating app permissions, see Update app permissions for Android Enterprise apps.
| Apps | 179

9. If you selected the Revoke app approval when this app requests new permissions option on the Notificationstab, add a subscriber to be notified when the app permission changes. The administrator will have to re-approve the app before users can access it.
10.Click Save.11.In the App description field, type a description for the app.12.To add screen shots of the app, click Add and browse to the screen shots. The supported image types
are .jpg, .jpeg, .png, or .gif.13.In the Send to drop-down list, perform one of the following actions:
• If you want the app to be sent to all Android devices, select All Android devices. • If you want the app to be sent to only Android devices that use Samsung KNOX Workspace,
select Samsung KNOX Workspace devices.• If you want the app to be sent only to Android Enterprise devices, select Android devices with a work
profile.14.For apps that support configuration settings, an App configuration table is displayed. If you want to create an
app configuration, complete the following steps:a) Click to add an app configuration.b) Type a name for the app configuration and specify the configuration settings to use.c) Click Save.d) If necessary, use the arrows to move the profiles up or down the ranking. When an app is assigned more
than once with different app configurations, the app configuration with the higher rank applies.15.To filter apps in the app list by category and to organize the apps into categories in the work apps list on users'
devices, you can select a category for the app. In the Category drop-down list, do one of the following:
Task Steps
Select a category for the app a. In the drop-down list, select a category.
Create a category for the app a. Type a name for the category. The new category will appear in thedrop-down list with the "new category" label beside it
b. Press Enter.c. Press Enter.
16.In the App rating and review drop-down list, perform one of the following actions. When multiple versions ofthe app exist, the setting specified applies to all versions of the app.
• If you want users to rate and provide reviews of apps and see all reviews submitted by other users in yourenvironment, select Public mode.
• If you want users to only rate and provide reviews of apps, select Private mode. Users cannot see reviewsprovided by other users. You can see reviews in the BlackBerry UEM management console.
• If you don't want users to rate or provide reviews of apps or see reviews provided by other users,select Disabled.
17.Click Add.
Related tasks
Assign an app to a user groupAssign an app to a user account
| Apps | 180

Add a Windows 10 app to the app list
To add Windows 10 apps to the app list, you must manage your app catalog in the Windows Store forBusiness and then synchronize the apps to BlackBerry UEM. When new apps are added to your app catalog,you can synchronize the apps with BlackBerry UEM right away or wait until BlackBerry UEM synchronizesautomatically. BlackBerry UEM synchronizes the app catalog every 24 hours.
You can allow users to install offline or online apps from the Windows Store for Business app catalog. Offlineapps are downloaded by BlackBerry UEM when you synchronize with the app catalog. Using offline apps isrecommended because all management of these apps can be performed from BlackBerry UEM, and users caninstall them without connecting to the Windows Store for Business. After the apps are installed, devices receiveupdates to the apps from the Windows Store.
Online apps are downloaded directly from the Windows Store for Business. To be able to send required onlineapps to devices, instruct your users to add their work accounts to Accounts used by other apps in Windows 10.
Before you begin:
• Specify the shared network location for storing internal apps to store offline apps. • Configure BlackBerry UEM to synchronize with the Windows Store for Business. For instructions, see the
Configuration content.
1. On the menu bar, click Apps.2.
Click .3. Click Windows Store > 10.4. Click Synchronize apps.
Allowing users to install online Windows 10 apps
To allow users to install online Windows 10 apps, the user must exist in your Microsoft Azure directory, andthe user’s email address in BlackBerry UEM must match the user’s email address in Microsoft Azure AD. Youcan synchronize your directory to Microsoft Azure using Microsoft Azure AD Connect. For instructions, see theConfiguration content.
Note: To be able to send required online apps to devices, instruct your users to add their work accountsto Accounts used by other apps in Windows 10.
Add an app category for a Windows 10 app
After you set a category for an app, you can filter apps in the app list by category and organize the apps in thework apps list on users' devices into categories. After a Windows 10 app has been synchronized to BlackBerryUEM, you can assign an app category to it.
Before you begin: Add a Windows 10 app to the app list.
1. On the menu bar, click Apps. 2. Click the app that you want to assign an app category to.3. In the Category drop-down list, do one of the following:
Step Description
Select a category for theapp
a. In the drop-down list, select a category.
| Apps | 181

Step Description
Create a category forthe app
a. Type a name for the category. A "new category" message will appear in thedrop-down list with the new category label beside it
b. Press Enter.c. Press Enter.
4. Click Save.
Add public BlackBerry Dynamics apps to the app list
To add public BlackBerry Dynamics apps to the app list in BlackBerry UEM, your organization must be entitledto use apps in the BlackBerry Marketplace for Enterprise Software. The BlackBerry Marketplace for EnterpriseSoftware contains a catalog of BlackBerry Dynamics apps. After your organization is entitled to use the app,you can update the app list to synchronize the apps with BlackBerry UEM right away or wait until BlackBerryUEM synchronizes automatically. BlackBerry UEM synchronizes BlackBerry Dynamics apps every 24 hours.
Note: Users should activate the dynamics applications on the same BlackBerry UEM environment thatthe applications are assigned from. Activating BlackBerry Dynamics apps with access keys from anexternal BlackBerry Dynamics environment is not supported.
1. Log in to your account at https://marketplace.blackberry.com/apps.2. Locate the app in the BlackBerry Marketplace for Enterprise Software and request a trial. The app will be made
available to your organization and can be assigned to users after the app has been synchronized to BlackBerryUEM.
3. To purchase the app, follow the instructions provided by the app developer.
After you finish:
• Update the app list to synchronize apps to BlackBerry UEM.
View public BlackBerry Dynamics app entitlements
1. Log in to https://account.good.com/pce/#/a/organization//servers.2. Expand Entitlements.
Adding internal apps to the app listInternal apps include proprietary apps developed by your organization, or apps made available for yourorganization's exclusive use. Internal apps are not added from public app storefronts.
BlackBerry apps must be .bar files, iOS apps must be .ipa files, and Android apps must be .apk files. Internal appsmust also be signed and unaltered.
Users can find internal apps on their devices as follows:
• For BlackBerry 10 devices, in the Company Apps tab in BlackBerry World for Work• For iOS and Android devices, in the Assigned work apps list in the BlackBerry UEM Client app
Steps to add internal apps to the app list
When you add internal apps, you perform the following actions:
| Apps | 182

Step Action
Specify the shared network location for storing internal apps.
If the app is not a BlackBerry Dynamics app, add an internal app to the app list.
If the app is a BlackBerry Dynamics app, add an internal BlackBerry Dynamics appentitlement and then upload the BlackBerry Dynamics app source files.
If you are adding an internal app that you want to make available on Android devices thathave a work profile, perform the steps to host the app in Google Play or in BlackBerryUEM.
Specify the shared network location for storing internal apps
Before you add internal apps to the available app list, you must specify a shared network location to store theapp source files. To make sure that internal apps remain available, this network location should have a highavailability solution and be backed up regularly. Also, do not create the shared network folder in the BlackBerryUEM installation folder because it will be deleted if you upgrade BlackBerry UEM.
Before you begin:
• Create a shared network folder to store the source files for internal apps on the network that hosts BlackBerryUEM.
• Verify that the service account for the computer that hosts BlackBerry UEM has read and write access to theshared network folder.
1. On the menu bar, click Settings.2. In the left pane, expand App management.3. Click Internal app storage.4. In Network location field, type the path of the shared network folder using the following format:
\\<computer_name>\<shared_network_folder>
The shared network path must be typed in UNC format (for example, \\ComputerName\Applications\InternalApps).
5. Click Save.
Add an internal app to the app list
Before you begin: Specify the shared network location for storing internal apps.
1. On the menu bar, click Apps. 2.
Click .3. Click Internal apps.4. Click Browse. Navigate to the app that you want to add or update.5. Click Open.6. Click Add.7. Optionally, add a vendor name and an app description.
| Apps | 183

8. To add screen shots of the app, click Add. Browse to the screen shots. The supported image typesare .jpg, .jpeg, .png, or .gif.
9. To filter apps in the app list by category and to organize the apps into categories in the work apps list on users'devices, you can select a category for the app. In the Category drop-down list, do one of the following:
Task Steps
Select a category for the app a. In the drop-down list, select a category.
Create a category for theapp
a. Type a name for the category. The "new category" will appear in thedrop-down list with the new category label beside it
b. Press Enter.c. Press Enter.
10.In the App rating and review drop-down list, perform one of the following actions. When multiple versions ofthe app exist, the setting specified applies to all versions of the app.
• If you want users to rate and provide reviews of apps and see all reviews submitted by other users in yourenvironment, select Public mode.
• If you want users to only rate and provide reviews of apps, select Private mode. Users cannot see reviewsprovided by other users. You can see reviews in the BlackBerry UEM management console.
• If you don't want users to rate or provide reviews of apps or see reviews provided by other users,select Disabled.
11.If you are adding an iOS app, perform the following actions:a) In the Supported device form factor drop-down list, select the form factors that the app can be installed on.
For example, you can prevent the app from being available in the Work Apps app for iPad.b) If you want the app to be deleted from the device when the device is removed from BlackBerry UEM,
select Remove the app from the device when the device is removed from BlackBerry UEM. This optionapplies only to apps with a disposition marked as required and the default installation for required apps isset to prompt once.
c) If you want to prevent apps on iOS devices from being backed up to the iCloud online service, select DisableiCloud backup for the app. This option applies only to apps with a disposition marked as required. You setthe disposition of the app when you assign the app to a user or group.
d) In the Default installation method for required apps drop-down list, if you want users to receive one promptto install the app on their iOS devices, select Prompt once. If users dismiss the prompt, they can install theapp later from the Work Apps list in the BlackBerry UEM Client app or the Work Apps icon on the device.
12.If you are adding an Android app, in the Send to drop-down list, perform one of the following actions:
• If you want the app to be sent to all Android devices, select All Android devices.• If you want the app to be sent to only Android devices that use Samsung KNOX Workspace,
select Samsung KNOX Workspace devices.• If you want the app to be sent only to Android devices with a work profile, select Android devices with a
work profile.13.To allow the app to be installed on Android devices with a work profile, select Enable the app for work profiles.14.For apps that support configuration settings, an App configuration table is displayed. Click to add an app
configuration. For more information, see Adding or changing an app configuration.15.Click Add. If you plan to host the app in BlackBerry UEM using a .json file, copy and save the URL that is
displayed.
After you finish: If you selected the Enable the app for Android work profiles option, complete one of thefollowing tasks:
• Host an internal app for devices with an Android work profile in Google Play using the .apk file
| Apps | 184
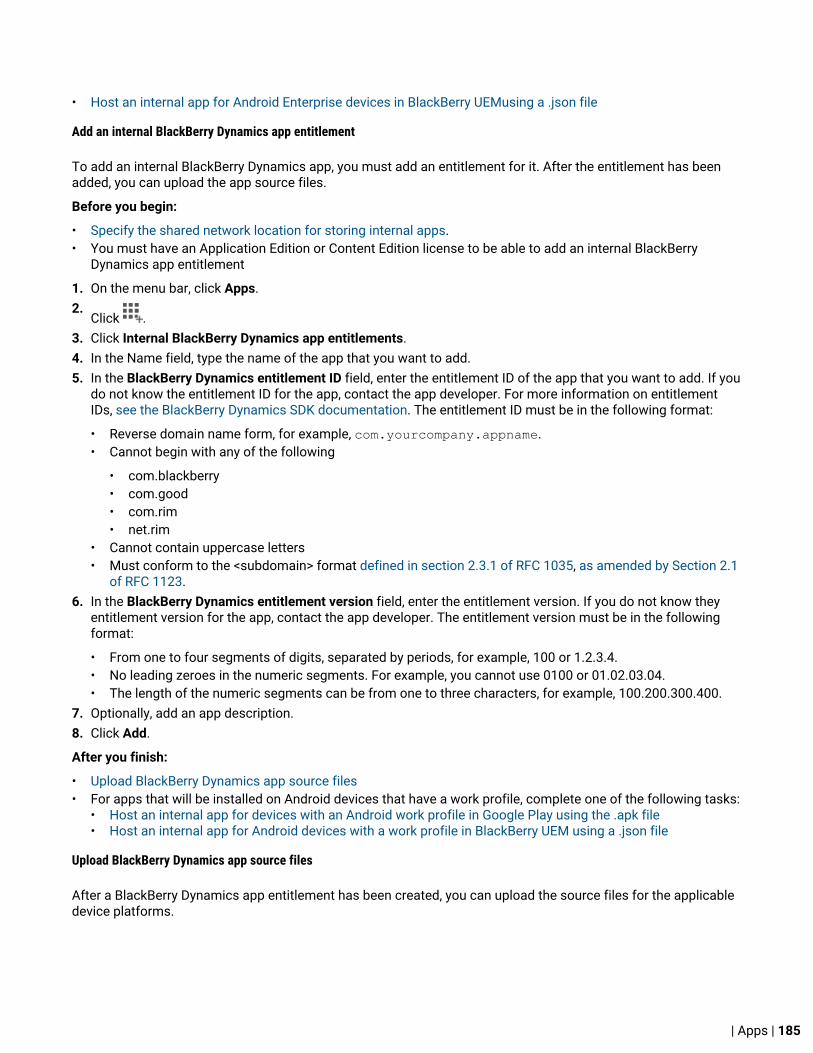
• Host an internal app for Android Enterprise devices in BlackBerry UEMusing a .json file
Add an internal BlackBerry Dynamics app entitlement
To add an internal BlackBerry Dynamics app, you must add an entitlement for it. After the entitlement has beenadded, you can upload the app source files.
Before you begin:
• Specify the shared network location for storing internal apps.• You must have an Application Edition or Content Edition license to be able to add an internal BlackBerry
Dynamics app entitlement
1. On the menu bar, click Apps. 2.
Click .3. Click Internal BlackBerry Dynamics app entitlements.4. In the Name field, type the name of the app that you want to add.5. In the BlackBerry Dynamics entitlement ID field, enter the entitlement ID of the app that you want to add. If you
do not know the entitlement ID for the app, contact the app developer. For more information on entitlementIDs, see the BlackBerry Dynamics SDK documentation. The entitlement ID must be in the following format:
• Reverse domain name form, for example, com.yourcompany.appname.• Cannot begin with any of the following
• com.blackberry• com.good• com.rim• net.rim
• Cannot contain uppercase letters• Must conform to the <subdomain> format defined in section 2.3.1 of RFC 1035, as amended by Section 2.1
of RFC 1123.6. In the BlackBerry Dynamics entitlement version field, enter the entitlement version. If you do not know they
entitlement version for the app, contact the app developer. The entitlement version must be in the followingformat:
• From one to four segments of digits, separated by periods, for example, 100 or 1.2.3.4.• No leading zeroes in the numeric segments. For example, you cannot use 0100 or 01.02.03.04.• The length of the numeric segments can be from one to three characters, for example, 100.200.300.400.
7. Optionally, add an app description.8. Click Add.
After you finish:
• Upload BlackBerry Dynamics app source files• For apps that will be installed on Android devices that have a work profile, complete one of the following tasks:
• Host an internal app for devices with an Android work profile in Google Play using the .apk file• Host an internal app for Android devices with a work profile in BlackBerry UEM using a .json file
Upload BlackBerry Dynamics app source files
After a BlackBerry Dynamics app entitlement has been created, you can upload the source files for the applicabledevice platforms.
| Apps | 185

Note: Users should activate the dynamics applications on the same BlackBerry UEM environment that theapplications are assigned from. Activating BlackBerry Dynamics apps with access keys from an externalBlackBerry Dynamics environment is not supported.
Before you begin:
• Add an internal BlackBerry Dynamics app entitlement
1. On the menu bar, click Apps.2. Click the app that you want to upload source files for.3. Click the tab for the device platform that you want to upload a source file for.4. In the App source file section, click Add.5. Click Browse. Navigate to the app that you want to add or update.6. Click Add.7. If necessary, update the app settings. For more information, see Manage settings for a BlackBerry
Dynamics app.
Host an internal app for devices with an Android work profile in Google Play using the .apk file
When you host an app in Google Play, you can use configuration settings to modify app behaviors and set the appas required or optional. To host an app in Google Play, you must publish the app in Google Play so that users caninstall the internal app on their devices.
Before you begin:
• In BlackBerry UEM, add the internal .apk file to the app list. Select the Enable the app for Android work profilesoption, and in the App will be hosted by drop-down list, click Google Play.Note: You need to select Enable the app for Android work profiles even if you are hosting the app for allAndroid devices.
• You need an account to log in to the Google Developers Console. If an Android work profile is configured,use the same email address for the developer account that you used to set up the work profile. For eachBlackBerry UEM domain you need a different developer account.
Visit https://support.blackberry.com/kb to read article 47873 for instructions on hosting an internal app forAndroid devices with a work profile in BlackBerry UEM using a .apk file.
Related tasks
Add an internal app to the app list
Host an internal app for Android Enterprise devices in BlackBerry UEMusing a .json file
To host an internal app for Android Enterprise devices in BlackBerry UEM, you must generate a .json file forthe app, upload the file to Google Play, and get the license key for the published app. Apps that are hostedin BlackBerry UEM can be set only as optional, and you cannot use configuration settings to modify app featuresand behaviors.
Before you begin:
• Verify that you have OpenSSL, JDK, Python 2.x, and Android Asset Packaging Tool (aapt) installed in a Pathlocation on the computer.
• You need an account to log in to the Google Developers Console. If you configured support for AndroidEnterprise, use the same email address for the developer account that you used to set up Android Enterprise.For each BlackBerry UEM domain you need a different developer account.
| Apps | 186

• In BlackBerry UEM, add an internal app to the app list. Select the Enable the app for Android Enterprise option,and in the App will be hosted by drop-down list, click BlackBerry UEM. Copy and save the URL that is displayedin BlackBerry UEM.Note: You need to select Enable the app for Android Enterprise even if you are hosting the app forall Android devices.
Visit https://support.blackberry.com/community to read article 47768 for instructions on hosting and updating aninternal app for Android Enterprise devices in BlackBerry UEM using a .json file.
Related tasks
Add an internal app to the app list
Update an internal app
When you update an internal app, the updated app will replace the app currently assigned to users and groups.BlackBerry devices update the app version automatically. Other devices may prompt the user to install the newapp version.
Before you begin: If you are updating an app that is hosted in Google Play for Android devices with a work profile,add the updated version of the app to Google Play and wait for Google to publish the app before you update theapp in BlackBerry UEM.
1. On the menu bar, click Apps.2. Click on the internal app that you want to update.3.
In the top-right corner, click .4. In the Update internal app dialog box, click Browse and navigate to the app that you want to update.5. Click Add until the Save button appears.6. Click Save.
Update an internal app for Android devices with a work profile in BlackBerry UEM using a .json file
Visit http://support.blackberry.com/kb to read article 47768 for instructions on updating an internal appfor Android devices with a work profile in BlackBerry UEM using a .json file.
Adding or changing an app configurationApp configurations allow you to preconfigure certain app settings before you assign apps to users. Bypreconfiguring app settings, you can make it easier for users to download, set up, and use the apps. For example,many apps require users to type a URL, an email address, or other information before they can use the app. Byadding an app configuration, you can configure some of these settings in advance. You can create multiple appconfigurations for an app with different settings for different purposes, and rank the configurations. If an app isassigned to a user more than once with different app configurations, the app with the highest rank is applied.
In BlackBerry UEM, you can create an app configuration for the following apps:
• iOS apps (public or internal) that are developed with Managed Configuration capabilities. See Add an iOS appto the app list.
• Android apps (public or internal) that are developed with Android App Restrictions cababilities. BlackBerryUEM must be configured to support Android work profiles. See Add an Android app to the app list if BlackBerryUEM is configured for Android Enterprise devices.
For information about app settings, contact the app vendor.
| Apps | 187

For more information about app configuration, visit http://www.appconfig.org/.
Adding app shortcutsYou can use app shortcuts to add a customized shortcut to the device or BlackBerry Dynamics Launcher. Forexample, you can add a shortcut to your organization’s internal website. For each app shortcut, you can configurethe following attributes:
• Web address that opens when users tap the icon• Icon and label of the shortcut• Location to add the app shortcut (for example, the BlackBerry Dynamics Launcher)• If the web address opens in the secure BlackBerry Access browser
Create an app shortcut
You must create an app shortcut for each shortcut that you want to display on users’ devices. For devicesactivated with BlackBerry Dynamics, you have the option to add the shortcut to the BlackBerry DynamicsLauncher.
Before you begin:
• Verify that users are assigned an app entitlement for “Feature – BlackBerry AppStore” (com.blackberry.feature.appstore).
• Verify that the image that you plan to use as the icon for the shortcut meets the following requirements:• The image format is .png, .jpg, or .jpeg.• The image does not have transparent elements. Any transparent elements will display as black on the
device.• The maximum image size is 120x120.
1. On the menu bar, click Apps.2.
Click .3. Click App shortcut.4. Type a name and description for the app shortcut. The name is used as the label for the app shortcut.5. Beside the Shortcut icon field, click Browse. Locate and select an image for the app shortcut icon. The
supported image formats are .png, .jpg, or .jpeg.6. Select the device types that you want to configure this app shortcut for.7. In each of the device type tabs that you selected, do any of the following:
• To add a shortcut to a website, in the URL field, type the web address of the shortcut. The web addressmust begin with http:// or https://.
8. Select the location where you want the shortcut to be added. For devices with BlackBerry Dynamics, specifywhether you want the shortcut to open in the BlackBerry Access browser.
9. Click Add.
Related tasks
Assign an app to a user groupAssign an app to a user account
| Apps | 188

Preventing users from installing specific appsTo help prevent users from installing specific apps, you can create a list of restricted apps and use complianceprofiles to enforce the restrictions. For example, you might want to prevent users from installing malicious appsor apps that require a lot of resources.
Restrict specific apps
For iOSand Android devices, you can create a compliance profile to select apps from the restricted app list andset an enforcement action such as prompting the user or deleting work data if one of these apps is installed.
For the following devices, you don't need to specify an enforcement action because users are automaticallyprevented from installing apps that you specify in a compliance profile:
• For Samsung KNOX devices, if a user tries to install a restricted app, the device displays a message that theapp is restricted and cannot be installed. If a restricted app is already installed, it is disabled. For SamsungKNOX devices you can select an option in the compliance profile to prevent apps being installed in thepersonal space as well as the work space.
• For supervised iOS 9.3.2 and later devices, if a user tries to install a restricted app, the app is hidden. If arestricted app is already installed, it is hidden from the user without any notification. To restrict built-in appsyou must create a compliance profile and add the apps to the restricted app list in the profile. For moreinformation, see iOS: Compliance profile settings.
• For Android Enterprise devices, you don't need to create a compliance profile to restrict apps, other thansystem apps, because users can only install apps in the work space that you have assigned. If a restrictedapp is already installed on a device, it is not disabled. If you want to restrict a system app (such as calculator,clock, or camera), you must add the system app to a compliance profile to enforce the restriction.
• For BlackBerry 10 devices, you don't need to create a compliance profile to restrict apps because users canonly install apps in the work space that you have assigned. If a restricted app is already installed on a device, itis not disabled.
Allow specific apps
For supervised iOS 9.3.2 and later devices, you can create a compliance profile that specifies a list of allowedapps. All other apps, with the exception of the Phone and Preferences apps, are automatically disallowed andcannot be seen on the device. Apps that are already installed that are not on the allowed list are hidden from theuser without any notification. The following apps are included on the allowed list by default to ensure that devicescan be managed in BlackBerry UEM:
• BlackBerry UEM Client• Web Clip icons• BlackBerry Secure Connect Plus
Note: If the same iOS app is assigned to both the restricted list and allowed list in a compliance profile, the appis restricted.
For more information about creating compliance profiles, see Create a compliance profile.
Steps to prevent users from installing specific appsWhen you prevent users from installing apps, you perform the following actions:
| Apps | 189
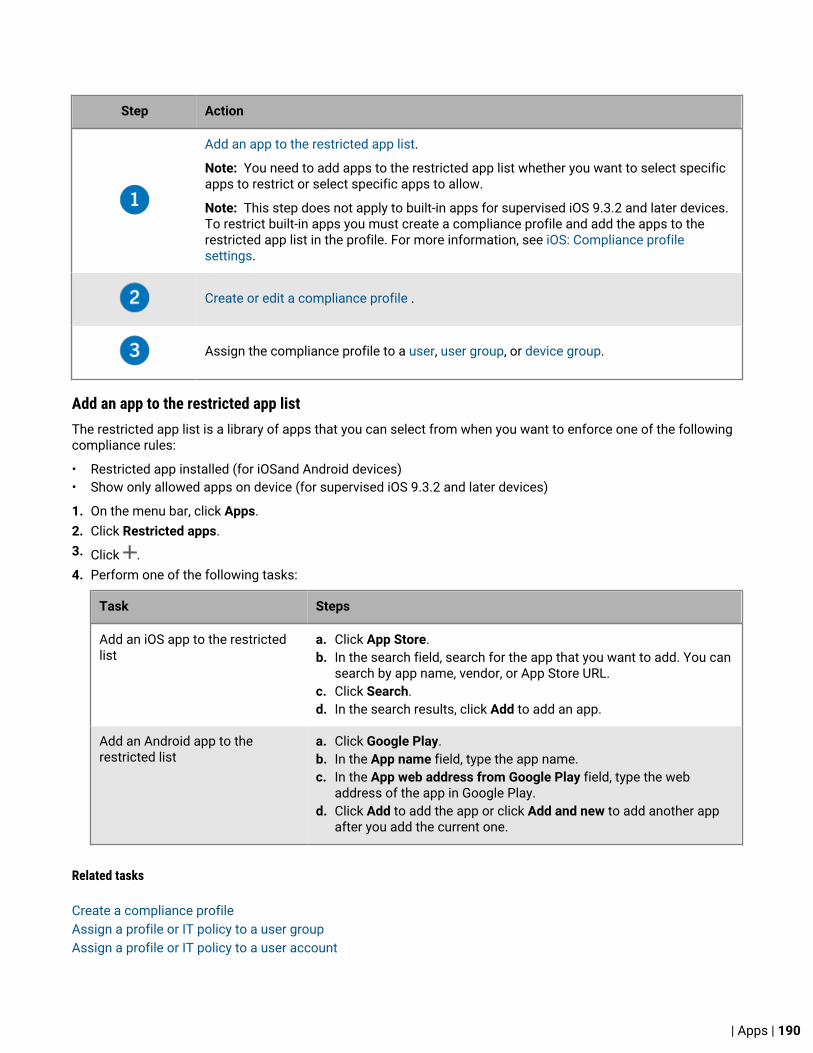
Step Action
Add an app to the restricted app list.
Note: You need to add apps to the restricted app list whether you want to select specificapps to restrict or select specific apps to allow.
Note: This step does not apply to built-in apps for supervised iOS 9.3.2 and later devices.To restrict built-in apps you must create a compliance profile and add the apps to therestricted app list in the profile. For more information, see iOS: Compliance profilesettings.
Create or edit a compliance profile .
Assign the compliance profile to a user, user group, or device group.
Add an app to the restricted app listThe restricted app list is a library of apps that you can select from when you want to enforce one of the followingcompliance rules:
• Restricted app installed (for iOSand Android devices)• Show only allowed apps on device (for supervised iOS 9.3.2 and later devices)
1. On the menu bar, click Apps. 2. Click Restricted apps. 3. Click .4. Perform one of the following tasks:
Task Steps
Add an iOS app to the restrictedlist
a. Click App Store.b. In the search field, search for the app that you want to add. You can
search by app name, vendor, or App Store URL.c. Click Search.d. In the search results, click Add to add an app.
Add an Android app to therestricted list
a. Click Google Play.b. In the App name field, type the app name.c. In the App web address from Google Play field, type the web
address of the app in Google Play.d. Click Add to add the app or click Add and new to add another app
after you add the current one.
Related tasks
Create a compliance profileAssign a profile or IT policy to a user groupAssign a profile or IT policy to a user account
| Apps | 190

Create a device group
Managing apps on the app listThe app list contains apps that you can assign to users, user groups, and device groups. The app list includes thefollowing information:
• App name and icon• App vendor• Supported device OS• Number of applied users• Number of devices the app is installed on• App rating• App source
You can click the number of applied users to display information about the installation status for the app.
You can click the number of devices the app is installed on to see a count of confirmed and unconfirmedinstallations. Unconfirmed installations include installations on iOS devices with the User privacy activation typebecause UEM can't confirm if the app is still installed on the device.
Apps listed with a lock icon are BlackBerry Dynamics apps. For more information, see Managing BlackBerryDynamics apps.
Note: Apps assigned to users by a Microsoft Intune app protection profile don't appear in the app list.
Delete an app from the app listWhen you delete an app from the app list, the app is unassigned from any users or groups that it is assigned toand it no longer appears in a device's work app catalog.
1. On the menu bar, click Apps.2. Select the check box beside the apps that you want to delete from the app list.3. Click .4. Click Delete.
Change whether an app is required or optionalYou can change whether an app is required or optional. The actions that occur when an app is set to required oroptional depend on the type of app, the device, and the activation type.
1. On the menu bar, click User and Devices.2. If the app that you want to change is assigned to a user account, in the search results, click the name of a user
account.3. If the app that you want to change is assigned to a group, in the left pane, click Groups to expand the list of
user groups and click the name of the group.4. In the Groups assigned and user assigned apps section, click the disposition for the app that you want to
change.5. In the Disposition drop-down list for the app, select Optional or Required.6. Click Assign.
| Apps | 191

Related reference
App behavior on Android devicesApp behavior on iOS devicesApp behavior on BlackBerry devices
Device notifications for new and updated appsIn most cases, users receive notifications on their devices when you assign new apps, or when updates areavailable for installed apps. In addition to device notifications, any new or updated apps appear in the "New/Updated" list of the app catalog in the BlackBerry UEM Client or the Work Apps app.
Apps (both required and optional) appear in the "New/Updated" list in the following situations:
• An app is assigned to a user and the app is not already installed on their device• An app is assigned to a user and is automatically installed• An upgrade for an installed app is available
BlackBerry UEM will periodically resend notifications to devices if apps remain in the "New/Updated" list.
In the "New/Updated" list of apps, if a user clicks on a new app to see the app details, the app is removed from the"New/Updated" list whether or not the user installs the app. If a user clicks on an updated app, the app remains inthe list until the update is installed.
For more information about app notifications, see:
• App behavior on iOS devices• App behavior on Android devices• App behavior on Android Enterprise devices• App behavior on Samsung KNOX devices
App behavior on iOS devicesFor devices enabled for BlackBerry Dynamics, the work app catalog appears in the BlackBerry DynamicsLauncher if you have added it to the BlackBerry Dynamics Launcher.
For iOS devices activated with MDM controls and User privacy, the following behavior occurs:
| Apps | 192

App type When apps areassigned to a user
When apps areupdated
When apps areunassigned from auser
When the deviceis removedfrom BlackBerryUEM
Public appswith a requireddisposition
If apps are alreadyinstalled, useris prompted toallow BlackBerryUEM to manage theapps.
On superviseddevices, appsare installedautomatically.
On non-superviseddevices, users arenot prompted toinstall apps. Usersmust go to the appcatalog to install therequired apps.
Apps are removedfrom the "New/Updated" list whenthe user views thedetails (even if theapp is not installed),or when the userinstalls the apps.
You can use acompliance profileto define theactions that occurif required apps arenot installed.
iTunes notifies usersof available updates.
Apps are removedfrom the "New/Updated" list whenthe user updates theapp. (can take up toone hour)
For devices that donot have accessto iTunes, usersare not notified butcan download theupdate from the appcatalog.
Apps areautomaticallyremoved from thedevice withoutnotification.
Apps no longerappear in the appcatalog.
For devicesactivated with MDMcontrols, appsare removedautomatically.
For devicesactivated with Userprivacy, users areprompted to removethe apps.
| Apps | 193
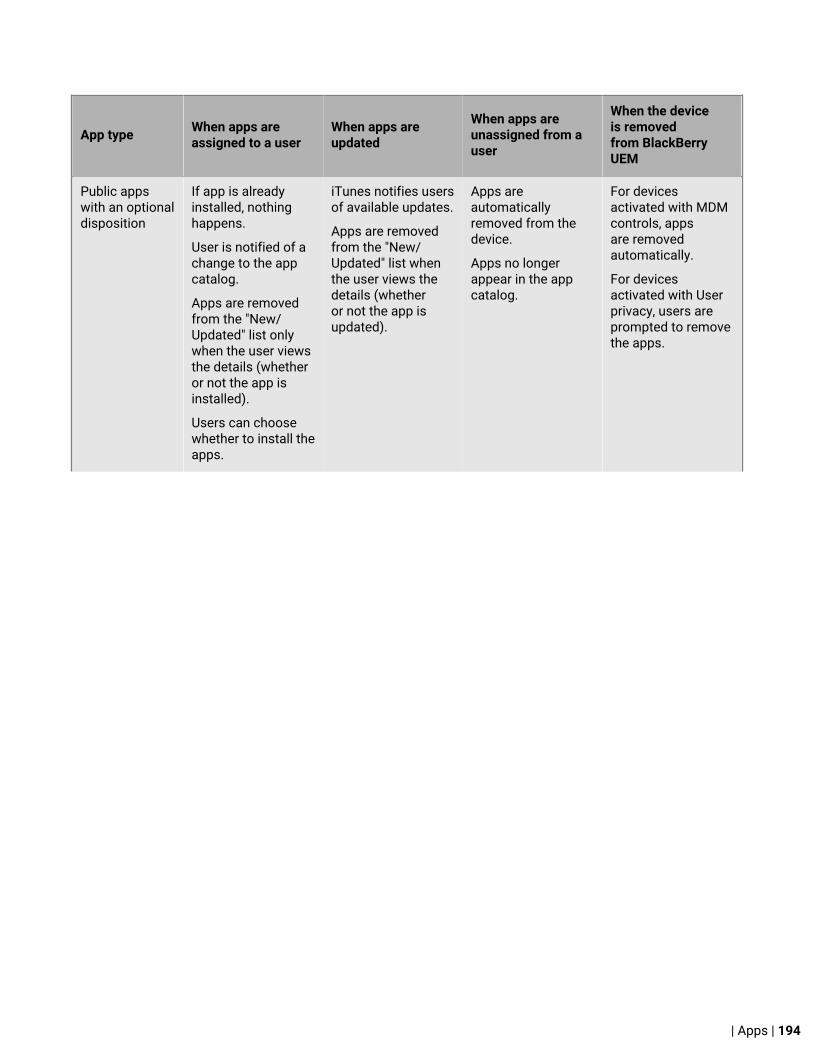
App type When apps areassigned to a user
When apps areupdated
When apps areunassigned from auser
When the deviceis removedfrom BlackBerryUEM
Public appswith an optionaldisposition
If app is alreadyinstalled, nothinghappens.
User is notified of achange to the appcatalog.
Apps are removedfrom the "New/Updated" list onlywhen the user viewsthe details (whetheror not the app isinstalled).
Users can choosewhether to install theapps.
iTunes notifies usersof available updates.
Apps are removedfrom the "New/Updated" list whenthe user views thedetails (whetheror not the app isupdated).
Apps areautomaticallyremoved from thedevice.
Apps no longerappear in the appcatalog.
For devicesactivated with MDMcontrols, appsare removedautomatically.
For devicesactivated with Userprivacy, users areprompted to removethe apps.
| Apps | 194

App type When apps areassigned to a user
When apps areupdated
When apps areunassigned from auser
When the deviceis removedfrom BlackBerryUEM
Internal appswith a requireddisposition
If apps are alreadyinstalled, useris prompted toallow BlackBerryUEM to manage theapps.
On superviseddevices, appsare installedautomatically.
On non-superviseddevices, usersare prompted toinstall apps. If theuser cancels theinstallation, they caninstall apps from theapp catalog.
Apps are removedfrom the "New/Updated" list whenthe user views thedetails (even if theapp is not installed),or when the userinstalls the apps.
You can use acompliance profileto define theactions that occurif required apps arenot installed.
Apps are removedfrom the "New/Updated" list whenthe user updates theapp.
Apps areautomaticallyremoved from thedevice withoutnotification.
Apps no longerappear in the appcatalog.
For devicesactivated with MDMcontrols, appsare removedautomatically.
For devicesactivated with Userprivacy, users areprompted to removethe apps.
Internal appswith an optionaldisposition
If apps are alreadyinstalled, nothinghappens.
Apps are removedfrom the "New/Updated" list whenthe user views thedetails (even if theapp is not installed),or when the userinstalls the apps.
Apps are removedfrom the "New/Updated" list whenthe user updates theapp.
Apps areautomaticallyremoved from thedevice withoutnotification.
Apps no longerappear in the appcatalog.
For devicesactivated with MDMcontrols, appsare removedautomatically.
For devicesactivated with Userprivacy, users areprompted to removethe apps.
| Apps | 195

App behavior on Android devices
For devices enabled for BlackBerry Dynamics, the work app catalog appears in the BlackBerry DynamicsLauncher if you have added it to the BlackBerry Dynamics Launcher.
For Android devices activated with MDM controls and User privacy, the following behavior occurs:
App type When apps areassigned to a user
When apps areupdated
When apps areunassigned from auser
When the deviceis removedfrom BlackBerryUEM
Public appswith a requireddisposition
User is notified of achange to the appcatalog.
Apps are removedfrom the "New/Updated" list whenthe user views thedetails (even if theapp is not installed),or when the userinstalls the apps.
You can use acompliance profileto define theactions that occurif required apps arenot installed.
User is notifiedby Google Play.
The user isprompted to removethe apps.
Apps no longerappear in the appcatalog.
The user isprompted to removethe apps.
Public appswith an optionaldisposition
The user can choosewhether to install theapps.
User is notifiedby Google Play.
The user isprompted to removethe apps.
Apps no longerappear in the appcatalog.
The user isprompted to removethe apps.
| Apps | 196
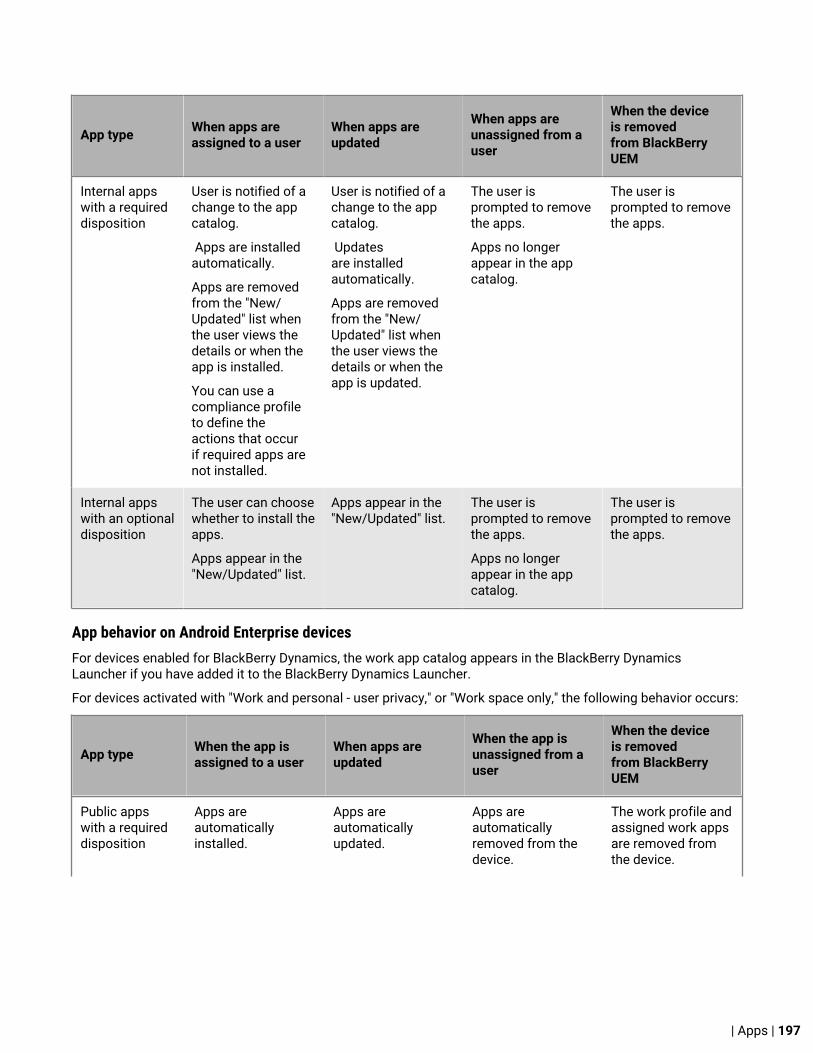
App type When apps areassigned to a user
When apps areupdated
When apps areunassigned from auser
When the deviceis removedfrom BlackBerryUEM
Internal appswith a requireddisposition
User is notified of achange to the appcatalog.
Apps are installedautomatically.
Apps are removedfrom the "New/Updated" list whenthe user views thedetails or when theapp is installed.
You can use acompliance profileto define theactions that occurif required apps arenot installed.
User is notified of achange to the appcatalog.
Updatesare installedautomatically.
Apps are removedfrom the "New/Updated" list whenthe user views thedetails or when theapp is updated.
The user isprompted to removethe apps.
Apps no longerappear in the appcatalog.
The user isprompted to removethe apps.
Internal appswith an optionaldisposition
The user can choosewhether to install theapps.
Apps appear in the"New/Updated" list.
Apps appear in the"New/Updated" list.
The user isprompted to removethe apps.
Apps no longerappear in the appcatalog.
The user isprompted to removethe apps.
App behavior on Android Enterprise devicesFor devices enabled for BlackBerry Dynamics, the work app catalog appears in the BlackBerry DynamicsLauncher if you have added it to the BlackBerry Dynamics Launcher.
For devices activated with "Work and personal - user privacy," or "Work space only," the following behavior occurs:
App type When the app isassigned to a user
When apps areupdated
When the app isunassigned from auser
When the deviceis removedfrom BlackBerryUEM
Public appswith a requireddisposition
Apps areautomaticallyinstalled.
Apps areautomaticallyupdated.
Apps areautomaticallyremoved from thedevice.
The work profile andassigned work appsare removed fromthe device.
| Apps | 197
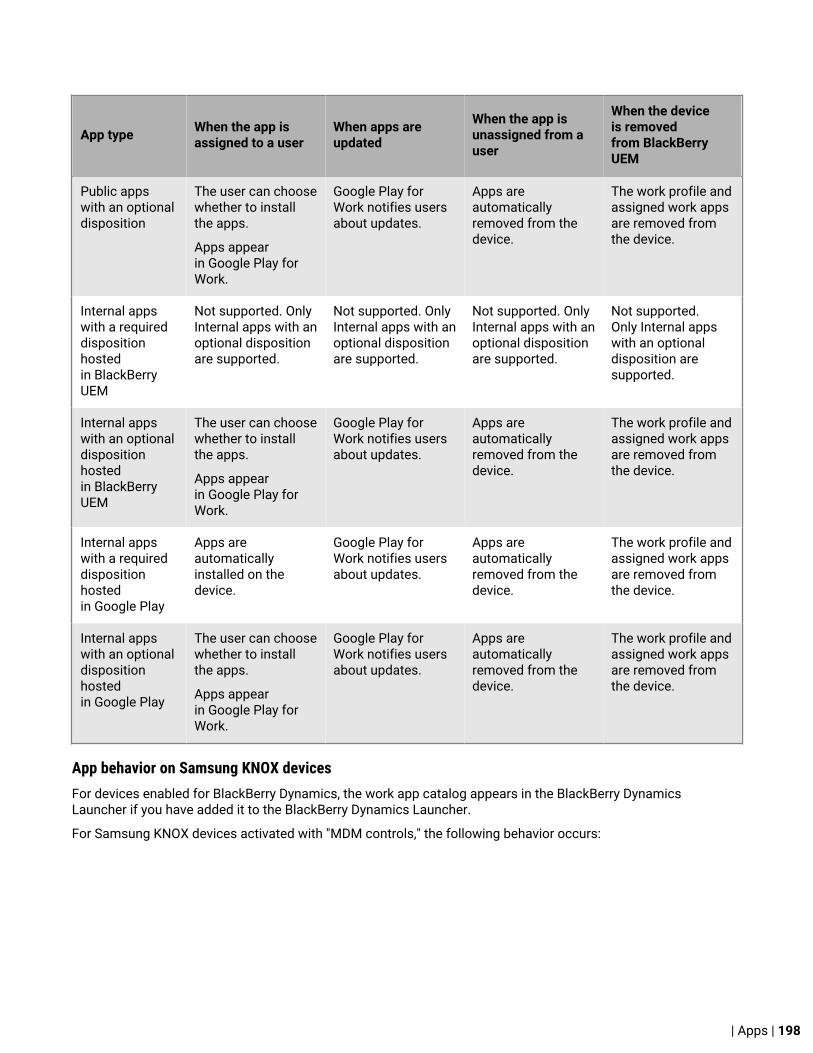
App type When the app isassigned to a user
When apps areupdated
When the app isunassigned from auser
When the deviceis removedfrom BlackBerryUEM
Public appswith an optionaldisposition
The user can choosewhether to installthe apps.
Apps appearin Google Play forWork.
Google Play forWork notifies usersabout updates.
Apps areautomaticallyremoved from thedevice.
The work profile andassigned work appsare removed fromthe device.
Internal appswith a requireddispositionhostedin BlackBerryUEM
Not supported. OnlyInternal apps with anoptional dispositionare supported.
Not supported. OnlyInternal apps with anoptional dispositionare supported.
Not supported. OnlyInternal apps with anoptional dispositionare supported.
Not supported.Only Internal appswith an optionaldisposition aresupported.
Internal appswith an optionaldispositionhostedin BlackBerryUEM
The user can choosewhether to installthe apps.
Apps appearin Google Play forWork.
Google Play forWork notifies usersabout updates.
Apps areautomaticallyremoved from thedevice.
The work profile andassigned work appsare removed fromthe device.
Internal appswith a requireddispositionhostedin Google Play
Apps areautomaticallyinstalled on thedevice.
Google Play forWork notifies usersabout updates.
Apps areautomaticallyremoved from thedevice.
The work profile andassigned work appsare removed fromthe device.
Internal appswith an optionaldispositionhostedin Google Play
The user can choosewhether to installthe apps.
Apps appearin Google Play forWork.
Google Play forWork notifies usersabout updates.
Apps areautomaticallyremoved from thedevice.
The work profile andassigned work appsare removed fromthe device.
App behavior on Samsung KNOX devicesFor devices enabled for BlackBerry Dynamics, the work app catalog appears in the BlackBerry DynamicsLauncher if you have added it to the BlackBerry Dynamics Launcher.
For Samsung KNOX devices activated with "MDM controls," the following behavior occurs:
| Apps | 198

App type When the app isassigned to a user
When apps areupdated
When the app isunassigned from auser
When the deviceis removedfrom BlackBerryUEM
Public appswith a requireddisposition
The user isprompted to installthe apps.
Assigned appsare shown inthe BlackBerry UEMClient. When theuser clicks the installbutton, GooglePlay opens and theapp is installed fromthere.
You can use acompliance profileto define theactions that occurif required apps arenot installed.
Google Play notifiesusers of updates.
App appears in the"New/Updates" list.
The user isprompted touninstall the apps.
The user isprompted touninstall assignedwork apps
Public appswith an optionaldisposition
The user can choosewhether to install theapps.
Assigned appsare shown inthe BlackBerry UEMClient. When theuser clicks the installbutton, GooglePlay opens and appsare installed fromthere.
Google Play notifiesusers of updates.
App appears in the"New/Updates" list.
The user isprompted touninstall the apps.
The user isprompted touninstall assignedwork apps
Internal appswith a requireddisposition
Apps areautomaticallyinstalled on devices.The user cannotuninstall the apps.
Apps are updatedautomatically.
Apps areautomaticallyremoved from thedevice.
Apps areautomaticallyremoved from thedevice.
Internal appswith an optionaldisposition
User can choosewhether to install theapps.
User installs appsfrom the BlackBerryUEM Client.
User can choosewhether to updatethe apps.
User updates appsfrom the BlackBerryUEM Client.
Apps areautomaticallyremoved from thedevice.
Apps areautomaticallyremoved from thedevice.
For devices activated with Work space only (Samsung KNOX), the following behavior occurs:
| Apps | 199

App type When the app isassigned to a user
When apps areupdated
When the app isunassigned from auser
When the deviceis removedfrom BlackBerryUEM
Public appswith a requireddisposition
All public apps arerestricted by defaultin the work space.
Assigned appsare shown in the"New/Updated"list, but theymust be installedfrom Google Play.
Apps are removedfrom the "New/Updated" list whenthe user views thedetails or when theapp is updated.
Google Play mustbe enabled in theIT policy that isassigned to the user.
You can use acompliance profileto define the actionsthat occur if arequired app is notinstalled.
Google Play notifiesusers of updates.
Apps appear in the"New/Updates" list.
Apps are removedfrom the "New/Updated" list whenthe user views thedetails or when theapp is updated.
Apps are removedfrom the device,and can no longerbe installedfrom Google Play.
The work spaceand all work appsare removedautomatically.
Apps are no longerautomaticallyrestricted in GooglePlay.
| Apps | 200

App type When the app isassigned to a user
When apps areupdated
When the app isunassigned from auser
When the deviceis removedfrom BlackBerryUEM
Public appswith an optionaldisposition
All public apps arerestricted by defaultin the work space.
Assigned appsare shown in the"New/Updated"list, but theymust be installedfrom Google Play.
Apps are removedfrom the "New/Updated" list whenthe user views thedetails or when theapp is updated.
Google Play mustbe enabled in theIT policy that isassigned to the user.
Google Play notifiesusers of updates.
Apps appear in the"New/Updates" list.
Apps are removedfrom the "New/Updated" list whenthe user views thedetails or when theapp is updated.
Apps are removedfrom the device,and can no longerbe installedfrom Google Play.
Apps are removedautomatically.
Apps are no longerautomaticallyrestricted in GooglePlay.
Internal appswith a requireddisposition
Apps areautomaticallyinstalled on devices.The user cannotuninstall the apps.
Apps areautomaticallyupdated on thedevice.
Apps areautomaticallyremoved from thedevice.
Apps areautomaticallyremoved from thedevice.
Internal appswith an optionaldisposition
Users can choosewhether to install theapps.
Users installthe apps fromthe BlackBerry UEMClient.
Users can choosewhether to install theapps.
Users installthe apps fromthe BlackBerry UEMClient.
Apps areautomaticallyremoved from thedevice.
Apps areautomaticallyremoved from thedevice.
For devices activated with "Work and personal - full control (Samsung KNOX)" and "User privacy (SamsungKNOX)", the following behavior occurs:
| Apps | 201
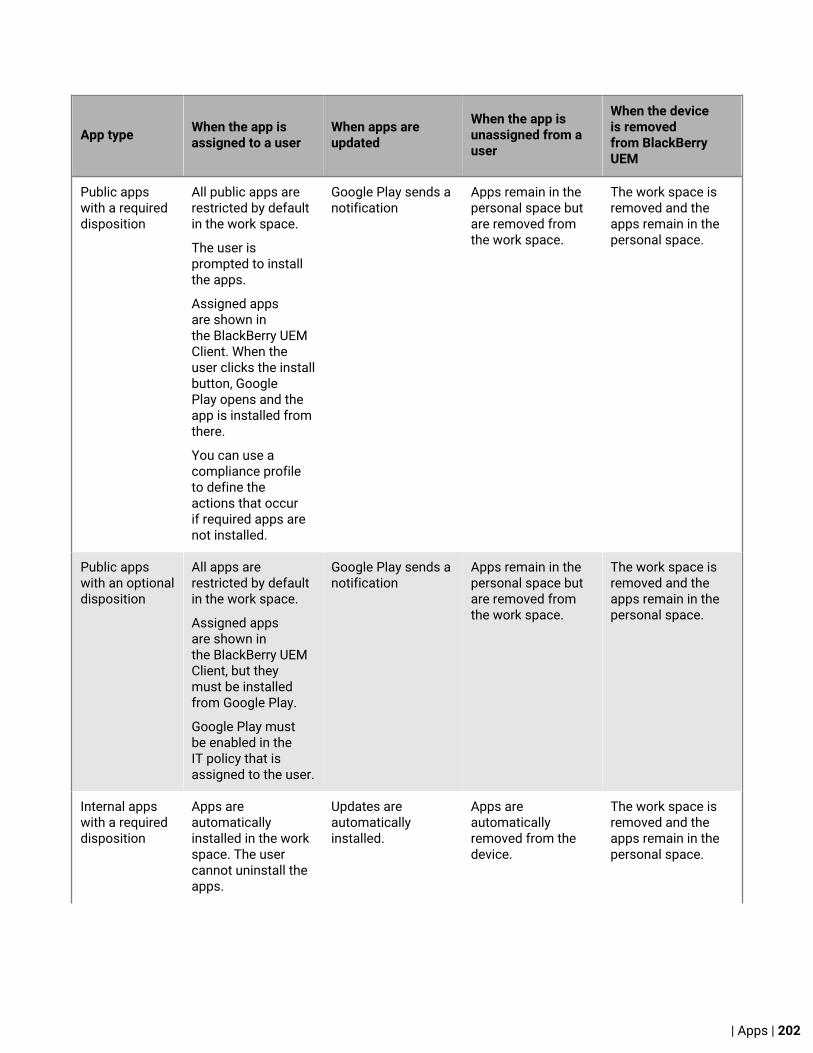
App type When the app isassigned to a user
When apps areupdated
When the app isunassigned from auser
When the deviceis removedfrom BlackBerryUEM
Public appswith a requireddisposition
All public apps arerestricted by defaultin the work space.
The user isprompted to installthe apps.
Assigned appsare shown inthe BlackBerry UEMClient. When theuser clicks the installbutton, GooglePlay opens and theapp is installed fromthere.
You can use acompliance profileto define theactions that occurif required apps arenot installed.
Google Play sends anotification
Apps remain in thepersonal space butare removed fromthe work space.
The work space isremoved and theapps remain in thepersonal space.
Public appswith an optionaldisposition
All apps arerestricted by defaultin the work space.
Assigned appsare shown inthe BlackBerry UEMClient, but theymust be installedfrom Google Play.
Google Play mustbe enabled in theIT policy that isassigned to the user.
Google Play sends anotification
Apps remain in thepersonal space butare removed fromthe work space.
The work space isremoved and theapps remain in thepersonal space.
Internal appswith a requireddisposition
Apps areautomaticallyinstalled in the workspace. The usercannot uninstall theapps.
Updates areautomaticallyinstalled.
Apps areautomaticallyremoved from thedevice.
The work space isremoved and theapps remain in thepersonal space.
| Apps | 202

App type When the app isassigned to a user
When apps areupdated
When the app isunassigned from auser
When the deviceis removedfrom BlackBerryUEM
Internal appswith an optionaldisposition
Users can choosewhether to install theapps.
Users install appsfrom the BlackBerryUEM Client and appsare installed in thework space.
Users can choosewhether to updatethe apps.
Users update appfrom the BlackBerryUEM Client.
Apps areautomaticallyremoved from thedevice.
The work space isremoved and theapps remain in thepersonal space.
App behavior on BlackBerry devicesFor BlackBerry devices activated with Work and personal - Corporate (Work space only) or Work and personal -Regulated, the following occurs:
App type Behavior when apps areassigned to a user
Behavior when apps areunassigned from a user
Behavior when thedevice is removedfrom BlackBerry UEM
Public apps with arequired disposition
Not supported. Not supported. Not supported.
Public apps with anoptional disposition
The user can choosewhether to install theapps.
The apps appear inthe Public Apps tabin BlackBerry World forWork.
The user is prompted touninstall the apps.
The work space and allwork apps are removedautomatically.
Internal apps with arequired disposition
The apps areautomatically installed ondevices.
The user cannot uninstallthe apps.
The apps areautomatically removedfrom the device.
The work space and allwork apps are removedautomatically.
Internal apps with anoptional disposition
The apps areautomatically installed ondevices.
The user cannot uninstallthe apps.
The apps areautomatically removedfrom the device.
The work space and allwork apps are removedautomatically.
| Apps | 203

App behavior on Windows 10 devices
App type Behavior when apps areassigned to a user
Behavior when apps areunassigned from a user
Behavior whendevices are removedfrom BlackBerry UEM
Offline WindowsStore apps with arequired disposition
The apps areautomatically installedon devices. Users cannotuninstall the apps.
The apps areautomatically removedfrom devices.
The apps areautomatically removedfrom devices.
Online WindowsStore apps with arequired disposition
The apps areautomatically installedon devices. Users cannotuninstall the apps.
The apps areautomatically removedfrom devices.
The apps areautomatically removedfrom devices.
Offline WindowsStore apps with anoptional disposition
Users can choosewhether to install theapps.
For offline apps, usersinstall the app fromthe BlackBerry UEM AppCatalog.
Not supportedon Windows 10Mobile devices.
Users are not promptedto uninstall the apps.
Users are not promptedto uninstall assignedapps.
Online WindowsStore apps with anoptional disposition
Users can choosewhether to install theapps.
For online apps, usersinstall the app fromthe Windows Store appon their devices.
Not supportedon Windows 10Mobile devices.
Users are not promptedto uninstall the apps.
Users are not promptedto uninstall the apps.
Internal apps with arequired disposition
Not supported Not supported Not supported
Internal apps with anoptional disposition
Not supported Not supported Not supported
Managing app groupsApp groups allow you to create a collection of apps that can be assigned to users, user groups, or device groups.Grouping apps helps to increase efficiency and consistency when managing apps. For example, you can use appgroups to group the same app for multiple device types, or to group apps for users with the same role in yourorganization.
| Apps | 204

BlackBerry UEM provides a preconfigured app groups called "Recommended apps for Android devices with a workprofile" and "BlackBerry Productivity Suite".
Create an app group
Before you begin: Add the apps to the app list.
1. On the menu bar, click Apps > App groups. 2.
Click . 3. Type a name and description for the app group.4. Click .5. Search for and select the apps that you want to add.6. For iOS and Android apps, if there is an available app configuration, select the app configuration to assign to
the app. 7. If you are adding iOS apps, perform one of the following tasks:
Task Steps
If you have not added a VPPaccount
a. Click Add.
If you have added at least oneVPP account
a. Click Add.b. Select Yes if you want to assign a license to the iOS app. Select No,
if you do not want to assign a license or you do not have a licenseto assign to the app.
c. If you assign a license to the app, in the App licenses drop-downlist, select the VPP account to associate with the app.
d. In the Assign license to drop-down list, assign the license tothe User or Device. If the App license drop-down list is notspecified, the App license to drop-down list is not available.
e. Click Add, then click Add again.
Users must follow the instructions on their devices to enroll in yourorganization's VPP before they can install prepaid apps. Users have tocomplete this task once.
Note: If you grant access to more licenses than you have available, thefirst users who access the available licenses can install the app.
8. Click Add, then click Add again.
Related tasks
Assign an app to a user groupAssign an app to a user account
Edit an app group
1. On the menu bar, click Apps > App groups.2. Click the app group that you want to edit.3. Make the necessary edits.
| Apps | 205

4. Click Save.
View the status of apps and app groups assigned to user accounts1. On the menu bar, click Apps.2. Under Applied users for the app or app group that you want to view, click the number.3. Click Assigned to x users to view the user accounts that this app is assigned to.4. View the Assignment column to verify whether the app or app group was assigned directly to the user account
or to a group.5. View the Status column to verify whether an app is installed on a device. The following are the possible
statuses:
• Installed: The app is installed on the user's device. For iOS devices with the User privacy activation type,this status indicates only that installation was initiated. BlackBerry UEM can't confirm if the app remainsinstalled on the device.
• Not installed: The app has not been installed on the user's device or has been removed from the user'sdevice.
• Cannot be installed: The app is not supported on the user's device.• Not supported: The device's OS does not support this app.
View which apps are assigned to user groups1. On the menu bar, click Apps.2. Under Assigned to users for the app that you want to view, click the number.3. Click the Assigned to x groups to view the user groups that this app is assigned to.
Viewing and customizing the apps listYou can customize the apps list and select the information to display. You can use filters to view only theinformation that is relevant to your task. You can select and reorder the columns in the apps list. You can add andremove columns in the apps list. You can use one or multiple filters to control the apps that are displayed. Forexample, you can filter the app list by app type, OS, category, secured type, and app rating.
Select the information to display in the apps list
1. On the menu bar, click Apps > All apps.2. Click at the top of the apps list and perform any of the following actions:
• Click Select all or select the check box for each column that you want to display.• Clear the check box for each column that you want to remove.• Click Reset to return to the default selections.
3. To reorder the columns, click a column header and drag it to the left or right.
Filter the app list
When you turn on multiple selection, you can select multiple filters before you apply them, and you can selectmultiple filters in each category. When you turn off multiple selection, each filter is applied when you select it, andyou can select only one filter in each category.
1. On the menu bar, click Apps > All apps.2. Click to turn multiple selection on or off.3. Under Filters, expand one or more categories.
| Apps | 206
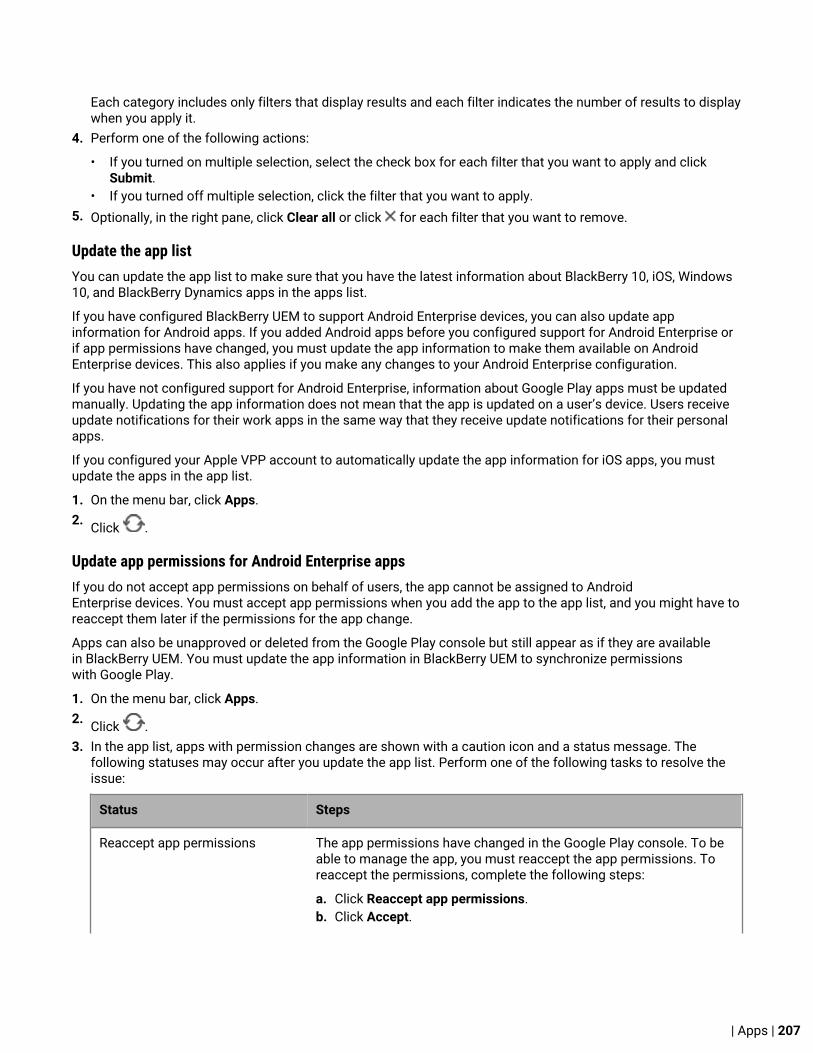
Each category includes only filters that display results and each filter indicates the number of results to displaywhen you apply it.
4. Perform one of the following actions:
• If you turned on multiple selection, select the check box for each filter that you want to apply and clickSubmit.
• If you turned off multiple selection, click the filter that you want to apply.5. Optionally, in the right pane, click Clear all or click for each filter that you want to remove.
Update the app listYou can update the app list to make sure that you have the latest information about BlackBerry 10, iOS, Windows10, and BlackBerry Dynamics apps in the apps list.
If you have configured BlackBerry UEM to support Android Enterprise devices, you can also update appinformation for Android apps. If you added Android apps before you configured support for Android Enterprise orif app permissions have changed, you must update the app information to make them available on AndroidEnterprise devices. This also applies if you make any changes to your Android Enterprise configuration.
If you have not configured support for Android Enterprise, information about Google Play apps must be updatedmanually. Updating the app information does not mean that the app is updated on a user’s device. Users receiveupdate notifications for their work apps in the same way that they receive update notifications for their personalapps.
If you configured your Apple VPP account to automatically update the app information for iOS apps, you mustupdate the apps in the app list.
1. On the menu bar, click Apps. 2. Click .
Update app permissions for Android Enterprise appsIf you do not accept app permissions on behalf of users, the app cannot be assigned to AndroidEnterprise devices. You must accept app permissions when you add the app to the app list, and you might have toreaccept them later if the permissions for the app change.
Apps can also be unapproved or deleted from the Google Play console but still appear as if they are availablein BlackBerry UEM. You must update the app information in BlackBerry UEM to synchronize permissionswith Google Play.
1. On the menu bar, click Apps.2. Click .3. In the app list, apps with permission changes are shown with a caution icon and a status message. The
following statuses may occur after you update the app list. Perform one of the following tasks to resolve theissue:
Status Steps
Reaccept app permissions The app permissions have changed in the Google Play console. To beable to manage the app, you must reaccept the app permissions. Toreaccept the permissions, complete the following steps:
a. Click Reaccept app permissions.b. Click Accept.
| Apps | 207
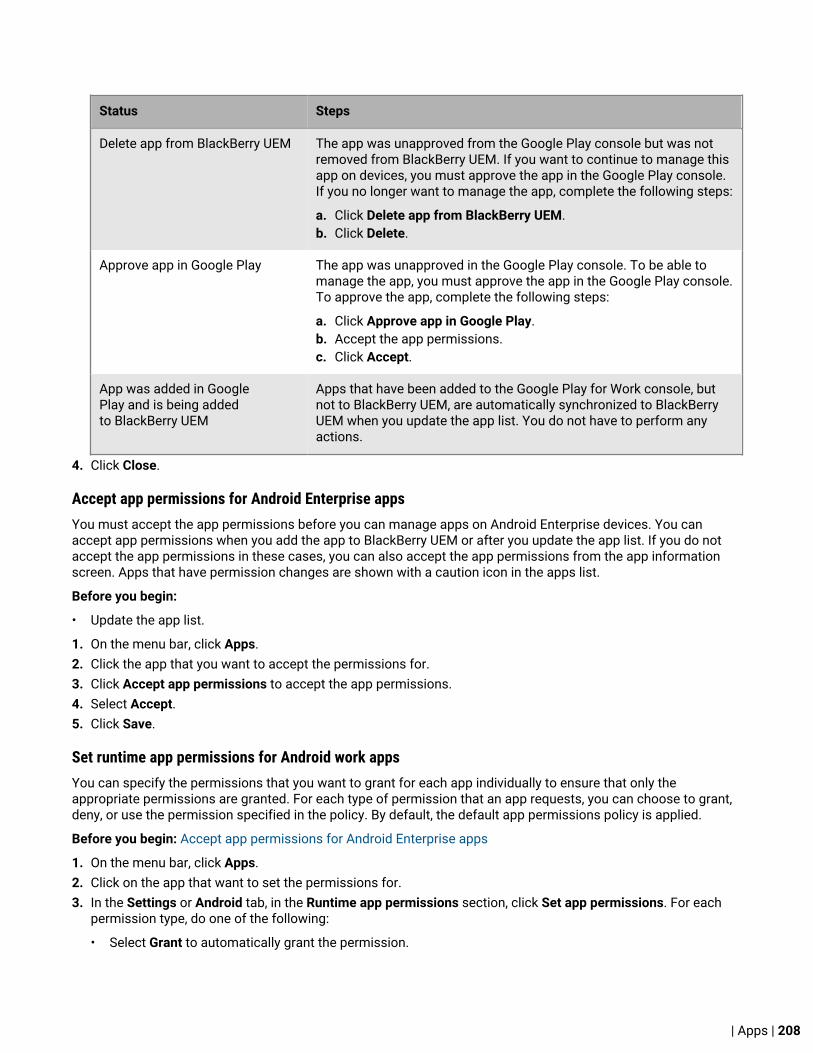
Status Steps
Delete app from BlackBerry UEM The app was unapproved from the Google Play console but was notremoved from BlackBerry UEM. If you want to continue to manage thisapp on devices, you must approve the app in the Google Play console.If you no longer want to manage the app, complete the following steps:
a. Click Delete app from BlackBerry UEM.b. Click Delete.
Approve app in Google Play The app was unapproved in the Google Play console. To be able tomanage the app, you must approve the app in the Google Play console.To approve the app, complete the following steps:
a. Click Approve app in Google Play.b. Accept the app permissions.c. Click Accept.
App was added in GooglePlay and is being addedto BlackBerry UEM
Apps that have been added to the Google Play for Work console, butnot to BlackBerry UEM, are automatically synchronized to BlackBerryUEM when you update the app list. You do not have to perform anyactions.
4. Click Close.
Accept app permissions for Android Enterprise appsYou must accept the app permissions before you can manage apps on Android Enterprise devices. You canaccept app permissions when you add the app to BlackBerry UEM or after you update the app list. If you do notaccept the app permissions in these cases, you can also accept the app permissions from the app informationscreen. Apps that have permission changes are shown with a caution icon in the apps list.
Before you begin:
• Update the app list.
1. On the menu bar, click Apps.2. Click the app that you want to accept the permissions for.3. Click Accept app permissions to accept the app permissions.4. Select Accept.5. Click Save.
Set runtime app permissions for Android work appsYou can specify the permissions that you want to grant for each app individually to ensure that only theappropriate permissions are granted. For each type of permission that an app requests, you can choose to grant,deny, or use the permission specified in the policy. By default, the default app permissions policy is applied.
Before you begin: Accept app permissions for Android Enterprise apps
1. On the menu bar, click Apps.2. Click on the app that want to set the permissions for.3. In the Settings or Android tab, in the Runtime app permissions section, click Set app permissions. For each
permission type, do one of the following:
• Select Grant to automatically grant the permission.
| Apps | 208

• Select Deny to automatically deny the permission.• Select Use app permission policy to use the policy setting.
4. Click Save.
Managing BlackBerry Dynamics appsIf your organization uses BlackBerry Dynamics apps, you may have to configure additional app settings. Forexample, if your organization uses BlackBerry Work, you configure settings for the app to send email to devicesrather than using the email profile. You must also configure connectivity settings and other options that apply onlyto BlackBerry Dynamics apps.
For more information on the features and settings supported by individual BlackBerry Dynamics apps, seethe ocumentation for the app.
To use BlackBerry Dynamics apps in your organization, you perform the following actions:
Step Action
Check BlackBerry Dynamics connectivity settings and change them if necessary.
Create a BlackBerry Dynamics profile or update the Default BlackBerry Dynamics profile.
Add BlackBerry Dynamics apps to BlackBerry UEM.
If required, change BlackBerry Dynamics apps settings.
Add the work app catalog to the BlackBerry Dynamics Launcher.
Assign the BlackBerry Dynamics profile and BlackBerry Dynamics connectivity profile toa user group or user account.
Assign BlackBerry Dynamics apps to user groups or user accounts.
For users who want to activate BlackBerry Dynamics apps on devices without the UEMClient, generate access keys for the apps.
Manage settings for a BlackBerry Dynamics appYou can manage app configurations, server configurations, and app settings.
1. On the menu bar, click Apps.2. Click the BlackBerry Dynamics app that you want to change.3. On the Settings > BlackBerry Dynamics tab, perform any of the following tasks:
| Apps | 209

Task Steps
Specify a BlackBerryDynamics profile for theapp.
If you want the app to use a specific BlackBerry Dynamics profile instead ofthe BlackBerry Dynamics profile that is assigned to the user, select the profilefrom the Override BlackBerry Dynamics profile drop-down list.
Specify a complianceprofile for the app.
If you want the app to use a specific compliance profile rather than thecompliance profile that is assigned to the user, select the profile fromthe Override compliance profile profile drop-down list.
Add or change the appconfiguration for aninternal app.
a. Beside App configuration, click Upload a template to add a new appconfiguration template.
b. Browse to the location of the template.c. Click Save.
Add or change the appconfiguration for apublic app
a. In the App configuration table, click .b. Type a name for the app configuration.c. Edit the configuration settings.d. Click Save.e. If required, use the arrows to move the app configuration up or down to
change the priority.
For more information see BlackBerry UEM Client app configuration settings .
For more information about BlackBerry Work, BlackBerry Notes and BlackBerryTasks app configuration settings, see Configure BlackBerry Work appsettings and Configure BlackBerry Notes and BlackBerry Tasks app settings inthe BlackBerry Work, Notes, and Tasks Administration content.
Add or change theserver configurationpayload to specify thekeys and values used toconfigure settings forthe app.
If the app has custom app policies, the custom policies are added to the Serverconfiguration payload area.
a. In the Server configuration payload section, click Add.b. In the text box, enter the XML or JSON code for the configuration payload.
Allow BlackBerryDynamics apps touse user certificates,SCEP profiles, and usercredential profiles
Select whether the app can use user certificates as an authentication option.For more information about configuring your environment to using certificateswith BlackBerry Dynamics apps, see Sending certificates to devices usingprofiles.
4. Click the tab for the device platform that you want to manage and set the appropriate options.5. Click Save.
iOS and macOS: BlackBerry Dynamics app settings
Most of the following settings are supported only for iOS devices and don't appear on the macOS tab.
| Apps | 210
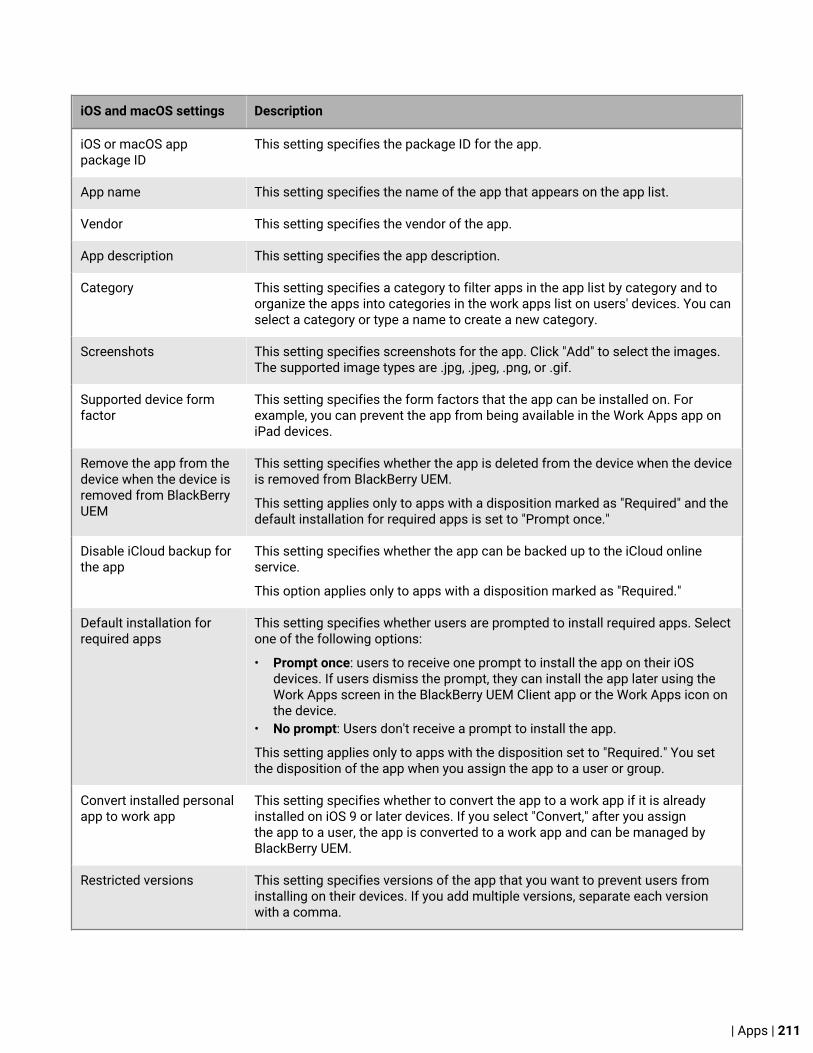
iOS and macOS settings Description
iOS or macOS apppackage ID
This setting specifies the package ID for the app.
App name This setting specifies the name of the app that appears on the app list.
Vendor This setting specifies the vendor of the app.
App description This setting specifies the app description.
Category This setting specifies a category to filter apps in the app list by category and toorganize the apps into categories in the work apps list on users' devices. You canselect a category or type a name to create a new category.
Screenshots This setting specifies screenshots for the app. Click "Add" to select the images.The supported image types are .jpg, .jpeg, .png, or .gif.
Supported device formfactor
This setting specifies the form factors that the app can be installed on. Forexample, you can prevent the app from being available in the Work Apps app oniPad devices.
Remove the app from thedevice when the device isremoved from BlackBerryUEM
This setting specifies whether the app is deleted from the device when the deviceis removed from BlackBerry UEM.
This setting applies only to apps with a disposition marked as "Required" and thedefault installation for required apps is set to "Prompt once."
Disable iCloud backup forthe app
This setting specifies whether the app can be backed up to the iCloud onlineservice.
This option applies only to apps with a disposition marked as "Required."
Default installation forrequired apps
This setting specifies whether users are prompted to install required apps. Selectone of the following options:
• Prompt once: users to receive one prompt to install the app on their iOSdevices. If users dismiss the prompt, they can install the app later using theWork Apps screen in the BlackBerry UEM Client app or the Work Apps icon onthe device.
• No prompt: Users don't receive a prompt to install the app.
This setting applies only to apps with the disposition set to "Required." You setthe disposition of the app when you assign the app to a user or group.
Convert installed personalapp to work app
This setting specifies whether to convert the app to a work app if it is alreadyinstalled on iOS 9 or later devices. If you select "Convert," after you assignthe app to a user, the app is converted to a work app and can be managed byBlackBerry UEM.
Restricted versions This setting specifies versions of the app that you want to prevent users frominstalling on their devices. If you add multiple versions, separate each versionwith a comma.
| Apps | 211

Android: BlackBerry Dynamics app settings
Android settings Description
Android app package ID This setting specifies the package ID for the app.
App name This setting specifies the name of the app that appears on the app list.
Vendor This setting specifies the vendor of the app.
App description This setting specifies the app description.
Category This setting specifies a category to filter apps in the app list by category and toorganize the apps into categories in the work apps list on users' devices. You canselect a category or type a name to create a new category.
Send to This setting specifies whether the app is sent to all android devices, only Androiddevices with a work profile, or only Samsung KNOX Workspace devices.
Restricted versions This setting specifies versions of the app that you want to prevent users frominstalling on their devices. If you add multiple versions, separate each versionwith a comma.
Windows: BlackBerry Dynamics app settings
Windows settings Description
Windows 10 (UWP)package family nme
This setting specifies the package family name for a Windows 10 app.
App name This setting specifies the name of the app that appears on the app list.
Vendor This setting specifies the vendor of the app.
App description This setting specifies the app description.
Category This setting specifies a category to filter apps in the app list by category and toorganize the apps into categories in the work apps list on users' devices. You canselect a category or type a name to create a new category.
Screenshots This setting specifies screenshots for the app. Click "Add" to select the images.The supported image types are .jpg, .jpeg, .png, or .gif.
Remove the app from thedevice when the device isremoved from BlackBerryUEM
This setting specifies whether the app is deleted from the device when the deviceis removed from BlackBerry UEM.
This setting applies only to apps with a disposition marked as "Required" and thedefault installation for required apps is set to "Prompt once."
| Apps | 212

Windows settings Description
Restricted versions This setting specifies versions of the app that you want to prevent users frominstalling on their devices. If you add multiple versions, separate each versionwith a comma.
BlackBerry UEM Client app configuration settings
Option Description
Allow use of BypassUnlock in the UEM Client
If you select this option, the UEM Client will bypass the BlackBerry Dynamics userauthentication/lock screen and the user can open the UEM Client withoutneeding to unlock the UEM Client app. If you have BlackBerry 2FA configured,the BlackBerry 2FA accept/decline screen will display and the user must clickAccept. Then user is then logged in to the app or service through BlackBerry 2FA.
App name Type a name for the app. You select this option when you want to use yourorganization's app-based PKI solution, such as Purebred, to enroll certificatesfor BlackBerry Dynamics apps. You can install the app on devices andallow BlackBerry Dynamics apps to use certificates enrolled through the PKI app.This option is supported only for iOS devices
UTI schemes Specify the UTI schemes for your organization's app-based PKI solution.For example, if you are using the Purebred app, use the following schemes:purebred.zip.all, purebred.zip.no_filter.
Manage BlackBerry Dynamics app servicesApp services are shared functions that are offered by a mobile or server-based app. Using the BlackBerryDynamics SDKs, an app developer can expose a function of an app that other developers can use in theirown BlackBerry Dynamics apps. Using the management console, you can register app services for yourorganization and supply the service definition from the developer. Your organization’s developers can review theregistered app services and can leverage the available service definitions in the BlackBerry Dynamics apps thatthey create.
App services for select BlackBerry Dynamics apps and partner apps are also available for use, and you canview the associated service definitions in the management console. For more information about app servicedevelopment, visit the BlackBerry Dynamics Developer Community.
Before you begin: If you want to register an app service for your organization, verify that you have the app serviceID, version number, and service definition.
1. In the management console, on the menu bar, click Settings > BlackBerry Dynamics.2. Click App services.3. Perform any of the following tasks:
| Apps | 213

Task Steps
Register an app servicefor your organization
a. Click .b. In the Service type drop-down list, perform one of the following actions:
• If the app service is offered by a mobile app, click Application.• If the app service is offered by a server-based app, click Server.
c. In the ID field, type the app service ID. The ID must be a uniquestring (all lowercase) in reverse DNS notation (for example,com.example.service.print).
d. Type a name and description for the app service.e. In the Version field, type the version. The version number must include digits
only. If you want to add one or more sub-version numbers (for example, thebuild version), use periods to separate the segments. Each segment cannotbegin with 0 (for example, 1.1.5 is valid, 1.1.05 is not).
f. Optionally, type a description for the version.g. In the Service definition field, type the service definition in JSON format.h. Click Save.
Edit an app service Use the following steps to edit an app service that was registered for yourorganization (for example, to add a new version). You cannot change the appservice type or ID. You cannot edit a BlackBerry Dynamics app service or partnerapp service.
a. Search for the app service that you want to edit.b. Click the app service name.c. Edit the app service details as necessary. To add a new version, click and
specify the version number, description, and service definition.
Note: Deleting an app service version does not have any impact on the appsthat offer or use the service, it simply removes the service definition from themanagement console so that your organization’s developers cannot refer toit.
d. Click Save.
Delete an app service You cannot delete a BlackBerry Dynamics app service or partner app service.Deleting an app service from the management console does not have anyimpact on the apps that offer or use the service, it simply removes the servicedefinition from the management console so that your organization’s developerscannot refer to it.
a. Search for the app service that you want to remove.b. Click next to the service.c. Click Delete.
After you finish: Optionally, you can bind an app service version to a managed app so that the managementconsole can indicate that the app provides the service. For more information, see Manage settings fora BlackBerry Dynamics app.
| Apps | 214

Configuring Kerberos for BlackBerry Dynamics appsBlackBerry Dynamics apps support both Kerberos Constrained Delegation and Kerberos PKINIT. KerberosConstrained Delegation (KCD) and Kerberos PKINIT are distinct implementations of Kerberos. You can supportone or the other for BlackBerry Dynamics apps, but not both.
Kerberos Constrained Delegation uses a previously established trust relationship between BlackBerry UEM andthe Windows Key Distribution Center (KDC). BlackBerry UEM communicates with KDC on behalf of the app.Kerberos Constrained Delegation takes precedence over Kerberos PKINIT, even if the user has a valid certificate.For general information on how Kerberos Constrained Delegation works with BlackBerry Dynamics apps, seeKerberos Constrained Delegation with Good Control.
Kerberos PKINIT authentication establishes trust directly between the BlackBerry Dynamics app and the WindowsKDC. User authentication is based on certificates issued by Microsoft Active Directory Certificate Services. To usePKINIT, Kerberos Constrained Delegation must not be enabled in the app settings in BlackBerry UEM.
Configuring Kerberos Constrained Delegation
Kerberos Constrained Delegation allows users to access enterprise resources without having to enter theirnetwork credentials. Kerberos Constrained Delegation uses service tickets that are encrypted and decrypted bykeys that don't contain the user’s credentials.
When Kerberos Constrained Delegation is configured, the app delegates authentication to BlackBerry UEM to acton its behalf to request access to an enterprise resource.
Set up Kerberos Constrained Delegation using the following guidelines:
• Enable Kerberos authentication (under Windows authentication) for the Microsoft Exchange Web Services webserver in Microsoft Internet Information Services (IIS).
• In the "Active Directory Users and Computers" Microsoft Management Console (MMC), on the Delegation tab,add the Microsoft Exchange Web Services web server’s HTTP service for the Good Admin account.
• If Kerberos Constrained Delegation is enabled, users can’t enter their authentication credentials (usernamesand passwords). Authentication is delegated to BlackBerry UEM.
To enable Kerberos Constrained Delegation for a BlackBerry Dynamics app, select the Permit the use ofKerberos Constrained Delegation setting in the configuration settings for the app. For detailed instructions, seethe administration content for the app.
Configuring Kerberos PKINIT
BlackBerry UEM supports Kerberos PKINIT for BlackBerry Dynamics user authentication using PKI certificates.
If you want to use Kerberos PKINIT for BlackBerry Dynamics apps, your organization must meet the followingrequirements:
Key points
• Kerberos Constrained Delegation must not be enabled.• The KDC host must be added to the Allowed Domains list in the BlackBerry Dynamics Connectivity Profile.• The KDC host must be listening on TCP port 88 (the Kerberos default port).• BlackBerry Dynamics doesn't support KDC over UDP.• The KDC must have an A record (IPv4) or AAAA record (IPv6) in your DNS.• BlackBerry Dynamics doesn't use Kerberos configuration files (such as krb5.conf) to locate the correct KDC.• The KDC can refer the client to another KDC host. BlackBerry Dynamics will follow the referral, as long as the
KDC host that is referred to is added to the Allowed Domains list in the BlackBerry Dynamics ConnectivityProfile.
| Apps | 215

• The KDC can obtain the TGT transparently to BlackBerry Dynamics from another KDC host.
Server certificates
• Windows KDC server certificates issued via the Active Directory Certificate Services must come only from thefollowing Windows Server versions. No other server versions are supported.
• Internet Information Server with Windows Server 2008 R2• Internet Information Server with Windows Server 2012 R2
• Valid KDC service certificates must be located either in the BlackBerry Dynamics Certificate Store or the DeviceCertificate Store.
Client certificates
• The minimum keylength for the certificates must be 2,048 bytes.• Client certificates must include the User Principal Name (for example, [email protected]) in the Subject
Alternative Name of object ID szOID_NT_PRINCIPAL_NAME 1.3.6.1.4.1.311.20.2.3, as specified by Microsoft athttps://support.microsoft.com/en-us/kb/287547.
• The domain of the User Principal Name must match the name of the realm of the Windows KDC service.• The Extended Key Usage property of the certificate must be Microsoft Smart Card logon
(1.3.6.1.4.1.311.20.2.2).• Certificates must be valid. Validate them against the servers listed above.
Add the work app catalog to the BlackBerry Dynamics LauncherFor devices that are enabled for BlackBerry Dynamics, you can add the work app catalog to the BlackBerryDynamics Launcher so that users have quick acces to a list of their assigned work apps.
1. On the menu bar, click Groups.2. Select the All users group.3. In the Assigned apps section, click .4. In the search field, search for Feature – BlackBerry App Store.5. Select Feature – BlackBerry App Store.6. In the Disposition drop-down list for the app, select Required.7. Click Assign.
Generate access keys for BlackBerry Dynamics appsBlackBerry Dynamics apps require an access key to be activated on a device. BlackBerry UEM Client can requestaccess keys automatically from BlackBerry UEM after users install an app. You or a user must manually generateaccess keys and send them to activate BlackBerry Dynamics apps in the following situations:
• For Samsung KNOX Workspace devices• For iOS and Android devices that don't need MDM and do not have the UEM Client installed• For users who want to activate BlackBerry Dynamics apps on devices that don't require the BlackBerry UEM
Client.
You can generate access keys when you create a new user, or anytime afterwards. Users do not need to activatetheir devices in BlackBerry UEM to receive access keys. Users can also generate access keys in BlackBerry UEMSelf-Service.
1. On the menu bar, click Users > Managed devices.2. Search for a user account.
| Apps | 216
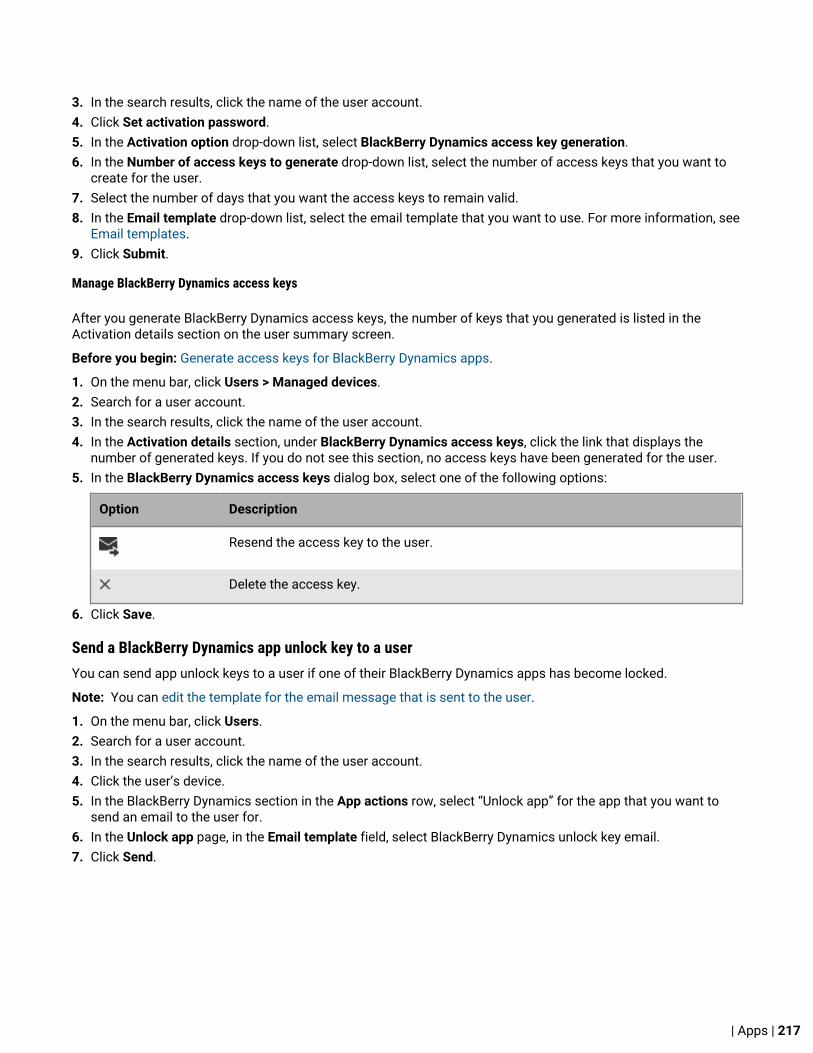
3. In the search results, click the name of the user account.4. Click Set activation password.5. In the Activation option drop-down list, select BlackBerry Dynamics access key generation.6. In the Number of access keys to generate drop-down list, select the number of access keys that you want to
create for the user.7. Select the number of days that you want the access keys to remain valid.8. In the Email template drop-down list, select the email template that you want to use. For more information, see
Email templates.9. Click Submit.
Manage BlackBerry Dynamics access keys
After you generate BlackBerry Dynamics access keys, the number of keys that you generated is listed in theActivation details section on the user summary screen.
Before you begin: Generate access keys for BlackBerry Dynamics apps.
1. On the menu bar, click Users > Managed devices.2. Search for a user account.3. In the search results, click the name of the user account.4. In the Activation details section, under BlackBerry Dynamics access keys, click the link that displays the
number of generated keys. If you do not see this section, no access keys have been generated for the user.5. In the BlackBerry Dynamics access keys dialog box, select one of the following options:
Option Description
Resend the access key to the user.
Delete the access key.
6. Click Save.
Send a BlackBerry Dynamics app unlock key to a userYou can send app unlock keys to a user if one of their BlackBerry Dynamics apps has become locked.
Note: You can edit the template for the email message that is sent to the user.
1. On the menu bar, click Users.2. Search for a user account.3. In the search results, click the name of the user account.4. Click the user’s device.5. In the BlackBerry Dynamics section in the App actions row, select “Unlock app” for the app that you want to
send an email to the user for.6. In the Unlock app page, in the Email template field, select BlackBerry Dynamics unlock key email.7. Click Send.
| Apps | 217

Managing apps protected by Microsoft IntuneMicrosoft Intune is a cloud-based EMM service that provides both MDM and MAM features. Intune MAM providessecurity features for apps, including Office 365 apps, that protect data within apps. For example, Intune canrequire that data within apps be encrypted and prevent copying and pasting, printing, and using the Save ascommand.
For iOS and Android devices, if you want to use Intune app protection policies to protect data in Office 365 apps,you can do so while using BlackBerry UEM to manage the devices. You can connect UEM to Intune, allowing youto set Intune app protection policies from within the UEM management console.
To deploy apps protected by Intune, you must first configure the connection between UEM and Intune. For moreinformation, see Connecting BlackBerry UEM to Microsoft Azure in the Configuration content.
Intune uses app protection policies to protect apps. To protect apps from the UEM management console, youcreate an Intune app protection profile. When you create or update an app protection profile in UEM, the settingsare sent to Intune and update the settings in the corresponding app protection policy.
Note: If you update the app protection policy in Intune, the changes are not synchronized with BlackBerry UEM.After you create an app protection profile in UEM, do not update the corresponding policy from within Intune.
Create a Microsoft Intune app protection profileWhen you create or update a Microsoft Intune app protection profile in BlackBerry UEM, the profile settings aresent to Intune to update the corresponding app protection policy. Microsoft Intune app protection profiles can beassigned only to directory-linked groups.
Before you begin:
• Configure the connection between BlackBerry UEM and Microsoft Intune. The Microsoft Intune app protectionprofile does not appear on the Policies and Profiles page if the connection isn't configured.
• For Android devices, ensure the Microsoft Company Portal app is installed on devices. For more information,see https://docs.microsoft.com/intune/app-protection-enabled-apps-android.
1. On the menu bar, click Policies and Profiles.2. Click Protection > Microsoft Intune app protection profile.3. Click .4. Type a name and description for the profile.5. Configure the appropriate values for each device type.6. Click Add.
After you finish: Assign the Intune app protection profile to a directory-linked group.
Related concepts
Microsoft Intune app protection profile settings
Related tasks
Assign a profile or IT policy to a user group
| Apps | 218

Wipe apps managed by Microsoft IntuneYou can use the Wipe apps command to delete the data from apps that are managed by Intune on iOS andAndroid devices. The apps are not uninstalled when this command is sent.
1. On the menu bar, click Users.2. Search for and click the user that you want to wipe the data from.3. Click the <device model> (Intune) tab.4. Click Wipe apps.
Managing Apple VPP accountsThe Apple Volume Purchase Program (VPP) allows you to buy, distribute, and update installed iOS apps in bulk.You can link Apple VPP accounts to BlackBerry UEM so that you can distribute purchased licenses for iOS appsassociated with the VPP accounts.
Add an Apple VPP accountTo see how to add an Apple VPP account, visit our YouTube channel.
1. On the menu bar, click Apps > iOS app licenses. 2. Click Add an Apple VPP account.3. Type a name and the account holder information for the VPP account. 4. In the VPP service token field, copy and paste the 64-bit code from the .vpp token file. This is the file that the
VPP account holder downloaded from the VPP store.5. Click Next.6. Select the apps that you want to add to the app list. If an app has already been added to the app list, you
cannot select it.7. If you want the apps to be updated automatically when an updated version is available on BlackBerry UEM,
select Automatically update the app when a new version is available. This setting applies to all VPP apps forthis VPP account. You can edit this setting later.
8. If you want the apps to be removed from devices when the apps are deleted from BlackBerry UEM,select Remove the app from the device when the device is removed from the system.
9. To prevent apps on iOS devices from being backed up to the iCloud online service, select Disable iCloudbackup for the app. This option applies only to apps with a disposition marked as required. You set thedisposition of the app when you assign the app to a user or group.
10.In the Default installation method drop-down list, perform one of the following actions:
• Select Prompt once if you want users to receive one prompt to install the apps on their iOS devices. If usersdismiss the prompt, they can install the apps later from the Work Apps list in the BlackBerry UEM Client appor the Work Apps icon on the device.
• Select No prompt. Users are not notified. They can install the apps from the Work Apps list inthe BlackBerry UEM Client app or the Work Apps icon on the device.
11.Click Add.
Related tasks
Assign an app to a user groupAssign an app to a user account
| Apps | 219

Edit an Apple VPP account
1. On the menu bar, click Apps > iOS app licenses. 2. Click .3. Edit any of the following VPP account information settings:
• VPP account name• VPP account holder information• VPP service token• Automatically update the app when a new version is available.
4. Click Save.
Update Apple VPP account informationWhen the App Licenses page is opened, the most current licensing information is synced automatically fromthe Apple VPP servers. If necessary, you can also manually update the licensing information that you have addedto BlackBerry UEM.
1. On the menu bar, click Apps. 2. Click iOS app licenses. 3.
Click .
Delete an Apple VPP accountBefore you begin: Remove apps that have associated licenses from users before deleting the VPP account.
1. On the menu bar, click Apps. 2. Click iOS app licenses. 3. Click .4. Click Delete.
Assigning Apple VPP licenses to devicesYou can assign Apple Volume Purchase Program (VPP) licenses to devices that run iOS 9 and later. AssigningVPP licenses to devices instead of to users simplifies the process for users because they no longer requirean Apple ID to install apps. Additionally, apps do not appear in users' purchase history and app installs. When youchange the existing assignment type for an app from user assigned to device assigned, the user must re-installthe app before the new assignment is applied and displayed in the BlackBerry UEM management console.
Assigning VPP licenses to devices is supported only on iOS devices that are activated with MDM controls.
You can assign VPP licenses to devices when apps are added to any of the following groups and accounts:
• User accounts • App groups• User groups
Assigning VPP licenses to device groups is not supported.
View Apple VPP license assignment
You can view the status of the Apple VPP license assignment in your domain.
1. On the menu bar, click Apps > iOS app licenses.
| Apps | 220

2. If you have more than one Apple VPP account, click the VPP account that you want to view the VPP licenseassignment for.For each iOS app in the domain, you can view the following VPP license information:
• The number of available VPP licenses• The number of used VPP licenses
3. In the Used licenses column for the app, click the used licenses link.For the specified app, you can view the following app license assignment information:
• The usernames that the app is licensed to• If the app license is assigned to a user account or a device• If a VPP license is used or not used• If the app is installed or not installed
4. Click Close.
Rank app installationYou can rank apps to control the order that the apps are installed when you assign them to devices. Settingthe rank ensures that any authentication delegate apps are pushed to the device first. The ranking applies onlyto iOS and Android apps.
1. On the menu bar click, Apps > App installation ranking.2. Click .3. Click . 4. Click the checkbox beside the apps that you want to rank.5. Click Add.6. On the App installation ranking page, click in the Rank column to place the apps in the order that you want
them to be installed on the devices.7. Click Save.
Edit the app installation ranking listYou can edit the installation sequence for the apps that will be installed on your organization's devices. Theranking applies only to iOS apps.
1. On the menu bar click, Apps > App installation ranking.2. Click .3. Click in the Rank column to place the apps in the order that you want them to be installed on the devices.4. Click Save.
Remove an app from the app installation ranking listYou can remove an app from the app installation ranking list. The ranking applies only to iOS apps.
1. On the menu bar click, Apps > App installation ranking.2. Click .3. In the list, click beside the app that you want to remove.4. Click Remove.5. Click Save.
| Apps | 221

Viewing personal app listsBy default, BlackBerry UEM receives a list of the personal apps that are installed on devices activated with asupported activation type.
In the BlackBerry UEM management console you can view the list of personal apps on the device details page fora specific user account, or on the Personal apps page for all user accounts. See View the personal apps list in themanagement console.
Note: You can also view apps that were installed on devices before they were activated as KNOX Workspace onlydevices.
Viewing a list of personal apps is not supported for devices that are activated with the following activation types:
• iOS and Android: User privacy• Android: Work and personal - user privacy• Samsung KNOX: Work and personal - user privacy - (Samsung KNOX)• BlackBerry 10: Work and personal - Corporate• iOS and Android: Device registration for BlackBerry 2FA only
To turn off the collection of personal apps for all activation types, you must deselect the "Allow personal appcollection" setting in the Enterprise Management Agent profile. For more information, see Turn off personal appscollection.
View the personal apps list in the management console
You can view the following information about apps that are installed in the user's personal space:
• App name• App version• OS the app supports• Number of user accounts that have the app installed
Before you begin: Create an activation profile with an activation type that supports BlackBerry UEM receiving a listof apps that are installed in the user's personal space and assign it to users or groups.
1. On the menu bar, click Apps > Personal apps.2. In the App name column for the app, click the app name.
For the specified app, you can view the corresponding app details on the public app storefront, whenapplicable.
3. In the Installed # column for the app, click the installed number.For the specified app, you can view the user account and the device that the app is installed on.
Turn off personal apps collectionBy default, BlackBerry UEM receives a list of the personal apps that are installed on devices activated with asupported activation type. You can turn off personal apps collection for all activation types.
1. On the menu bar, click Polices and Profiles.2. Expand Enterprise Management Agent.3. Click the name of the profile that you want to change.4. Click .5. Clear the Allow personal app collection check box for each device type.6. Click Save.
| Apps | 222

Rating and reviewing appsYou can specify whether users in your organization can rate and provide reviews of iOS, Android, and Windows 10apps and see reviews provided by other users for internal custom apps or apps that are downloaded from publicapp storefronts. Ratings and reviews submitted for apps cannot be seen by users outside your environment.Reviews can contain a maximum of 1000 characters.
Users can rate an app without providing a review, but they must rate the app when they provide a review. Ratingsand reviews that are submitted by users are saved to and viewable in the BlackBerry UEM console in near real-time. You can view the average rating of an app, the number of reviews submitted, and read the individual reviewsfor the app. You can also delete ratings and reviews as required.
When you add multiple versions of a custom app to BlackBerry UEM and enable app rating and review forone version of the app, the setting specified applies to all versions of the custom app. The average rating andreview count and app rating and reviews submitted for different versions of the custom app display the sameinformation for each version.
By default, new apps added to the app list in the BlackBerry UEM management console allow users to rate theapp, provide reviews of the app, and see reviews provided by other users in your organization. By default, apprating and review is disabled for existing apps, but you can enable this feature as required. When app rating andreview is enabled for an app, the permission applies to any version of the app that is added to BlackBerry UEM.
Rating and reviewing apps is not supported on the following devices:
• BlackBerry 10 devices• BlackBerry Dynamics enabled devices• Android Enterprise devices
Enable or disable app ratings and reviews for all appsYou can enable or disable app ratings and reviews for all apps that you have added to BlackBerry UEM andconfigure the level of interaction that a user can have with the reviews and ratings.
Note: App rating and review settings are applied only to apps that you add after the settings are saved.
1. On the menu bar, click Settings > App management.2. Click Ratings and reviews.3. To enable app ratings and reviews, select Enable app ratings and reviews.
• If you want users to rate and provide reviews for the app, as well as read reviews submitted by other usersin your environment, select Public mode.
• If you want users to only rate and provide reviews of apps, select Private mode. Users cannot see reviewsprovided by other users. You can see reviews in the BlackBerry UEM management console.
• If you don't want users to rate or provide reviews of apps or see reviews provided by other users, selectDisabled.
4. To disable app ratings and reviews, clear Enable app ratings and reviews.5. Click Save.
Enable app ratings and reviews for existing appsWhen you specify whether users can rate an app, provide reviews of an app, and see reviews provided by otherusers, the permission specified applies to all version of the app.
1. On the menu bar, click Apps.2. Click an app.3. On the Settings tab, in the App rating and review drop-down list, perform one of the following actions:
| Apps | 223

• If you want users to rate and provide reviews for the app, as well as read reviews submitted by other usersin your environment, select Public mode.
• If you want users to only rate and provide reviews of apps, select Private mode. Users cannot see reviewsprovided by other users. You can see reviews in the BlackBerry UEM management console.
• If you don't want users to rate or provide reviews of apps or see reviews provided by other users, selectDisabled.
4. Click Save.
View app reviews in the management consoleYou can view the overall average rating for an app and individual ratings and reviews provided by users of an app.
1. On the menu, click Apps.2. Optional, click the App rating column to order apps enabled for rating and reviewing.
Apps enabled for rating and review appear in the following order:
a. Apps with ratings and reviewsb. Apps without ratings and reviewsc. App rating is disabledd. Apps that don't support ratings and reviews
3. Click an app.4. Click the <review number> reviews tab.
Specify app rating and review settings for multiple appsWhen you specify whether users can rate an app, provide reviews of an app, and see reviews provided by otherusers, the permission specified applies to all version of the app.
1. On the menu, click Apps.2. Perform one of the following actions:
• Select the check box at the top of the apps list to select all apps.• Select the check box for each app that you want to enable the app and rating review for.
3. Click the .4. Select one of the following permissions:
• If you want users to rate and provide a review for the app, as well as read reviews submitted by other usersin your environment, select Public mode.
• If you want users to only rate and provide reviews of apps, select Private mode, Users cannot see reviewsprovided by other users. You can see reviews in the BlackBerry UEM management console.
• If you don't want users to rate or provide reviews of apps, or see reviews provided by other users, selectDisabled.
5. Click Save.
Delete app ratings and reviewsYou can delete app ratings and reviews as required.
1. On the menu, click Apps.2. Optional, click the App rating column to order apps enabled for rating and reviewing.3. Click an app enabled for rating and review.4. In the App details screen, click the <review number> reviews tab.
| Apps | 224

5. Click Select all or select the check box beside each review that you want to delete.6. Click .7. Click Remove.8. Click Save.
Managing the Work Apps icon for iOS devicesWhen users activate iOS devices with either "MDM controls" or "Work and personal - full control" activation types,a Work Apps icon is displayed on the device. Users can tap the icon to see work apps that have been assigned tothem, and they can install or update the apps as required.
You can customize the appearance of the Work Apps icon by selecting an image and name for the icon. Thedefault name for the Work Apps icon is "Work Apps" and the default icon displays a BlackBerry logo.
Customize the Work Apps iconWhen you customize the Work Apps icon, the icon is updated on all activated iOS devices.
Note: This feature is not supported on devices activated with user privacy.
Before you begin: Verify that the image you plan to use for the Work Apps icon meets the following requirements:
• Image format must be .png, .jpg, or .jpeg.• Avoid using .png images that have transparent elements. The transparent elements display as black on the
device.• For suggested image sizes, visit developer.apple.com to see Icon and Image Sizes.
1. On the menu bar, click Settings.2. In the left pane, expand App management.3. Click Work Apps app for iOS.4. In the Name field, type a name for the custom icon. The name appears on the device just under the icon.5. Click Browse. Locate and select an image for the Work Apps icon. The supported image formats are .png, .jpg,
or .jpeg.6. Select Display the Work Apps app in full screen mode to let users toggle the Work Apps icon from regular to
full screen mode.7. Click Save.
Disable the Work Apps app for iOSIf users are accessing their work apps catalog from the BlackBerry Dynamics Launcher, you can disable the WorkApps app.
1. On the menu bar, click Settings.2. In the left pane, expand App management.3. Click Work Apps for iOS.4. Click Disable Work Apps app.
| Apps | 225

Managing notifications for apps on supervised iOS devicesYou can use per-app notification profiles to configure the notification settings for system apps and apps thatyou manage using BlackBerry UEM. Per-app notification profiles are supported for supervised iOS devicesrunning iOS 9.3 or later.
Note: You must assign a per-app notification profile to user accounts after the affected apps have already beeninstalled on users' devices. If the profile is applied before the affected apps are installed, users may not be able toturn on notifications for the apps.
Create a per-app notification profileBefore you begin: Verify that the apps that you want to configure notification settings for are already installedon users' devices before you assign the per-app notification profile. If the profile is applied to devices before theaffected apps are installed, users may not be able to turn on notifications for the apps.
1. On the menu bar, click Policies and profiles.2. Click Custom > Per-app notification.3. Click .4. Type a name and description for the profile.5. In the Per-app notification settings section, click . Perform one of the following actions to specify the app
that you want to configure notification settings for:
• To select the app from the managed app list, click Select apps from the app list. Search for and select theapp.
• To specify the app by its package ID, click Add an app package ID. Type the app name and package ID.6. Click Next.7. Click Enable critical alert if you want critical alerts to override your organization's do not disturb profile and
notification settings. This setting applies only to iOS 12.0 and later devices.8. In the Notification drop-down list, click Enabled.9. Select any of the following notification options:
• Show in notification center• Show in lock screen
10.In the Notification alert type drop-down list, select one of the following options:
• None: Device users do not receive notification alerts.• Banner: Device users receive notification alerts in the banner.• Modal alert: Device users receive modal notification alerts.
11.Select any of the following notification alert options:
• Enable badges: Specify whether the app displays a badge.• Enable sounds: Specify whether the app makes a sound.• Show in CarPlay: Specify whether notifications are displayed in CarPlay. This setting applies only
to iOS 12.0 and later devices.12.Click Save.13.Repeat steps 4 to 9 to add additional per-app notifications.14.Click Add.
After you finish:
| Apps | 226

• To edit the notification settings for an app, in the Per-app notification settings section, click the notificationsetting for the app and change the settings as necessary.
• If you created more than one per-app notification profile, rank the profiles.
Related tasks
Assign a profile or IT policy to a user groupAssign a profile or IT policy to a user account
Set the organization name for BlackBerry WorldYou can add your organization's name to the BlackBerry World for Work corporate app storefront.
1. On the menu bar, click Settings.2. Expand App management and click BlackBerry World for Work.3. In Organization name, type the name of your organization.4. Click Save.
Managing apps on BlackBerry OS devicesIf the BlackBerry UEM domain supports BlackBerry OS (version 5.0 to 7.1) devices, you can use the managementconsole to install and manage the BlackBerry Device Software and BlackBerry Java Applications on BlackBerry OSdevices.
To send BlackBerry Java Applications to BlackBerry OS devices, you must first add the apps to theshared network folder. You can use the shared network folder to store and manage all versions ofthe BlackBerry Java Applications that you want to install on, update on, or remove from devices.
In the management console, you create software configurations to specify the versions of the BlackBerry DeviceSoftware and BlackBerry Java Applications that you want to install on, update on, or remove from BlackBerry OSdevices. You also use software configurations to specify which apps are required, optional, or not permitted.When you create a software configuration, you must also specify whether users can install apps that are not listedin the software configuration.
When you add a BlackBerry Java Application to a software configuration, you must assign an applicationcontrol policy to the app to specify what resources the app can access. You can use default application controlpolicies or you can create and use custom application control policies. If you permit users to install unlistedapplications, you must create an application control policy for unlisted applications that specifies what resourcesthe applications can access.
When you assign a software configuration to a user group or individual user accounts, the management consolecreates a deployment job to install the BlackBerry Device Software and BlackBerry Java Applications on devicesand to apply application control policies to the devices.
For more information about installing and managing the BlackBerry Device Software on BlackBerry OSdevices, download the BlackBerry Device Software Update Guide.
Preparing to distribute BlackBerry Java Applications To send a BlackBerry Java Application to BlackBerry OS (version 5.0 to 7.1) devices, the application developermust create a .zip file that contains the necessary application files and an .alx file that contains information about
| Apps | 227

the app. If a directory structure is described in the .alx file, that directory structure must be represented in the .zipfile.
Before you distribute BlackBerry Java Applications, you must specify a shared network folderfor BlackBerry Java Applications using the management console. For more information, refer to Specify theshared network location for storing internal apps.
After you add an app to the shared network folder, you can add the app to a software configuration,specify whether the app is required, optional, or not permitted on BlackBerry OS devices, and assign anapplication control policy to the app to control the access permissions for the app. You assign softwareconfigurations to user accounts to install or upgrade BlackBerry Java Applications on BlackBerry devices, or toremove BlackBerry Java Applications from BlackBerry OS devices.
Add a BlackBerry Java Application to the shared network folder
To send a BlackBerry Java Application to BlackBerry OS (version 5.0 to 7.1) devices, you must first addthe BlackBerry Java Application bundle to the shared network location. To send an updated version ofa BlackBerry Java Application to BlackBerry OS devices, you must first add the updated bundle to the applicationrepository. For more information on setting up a shared network folder, see Specify the shared network locationfor storing internal apps.
1. On the menu bar, click BlackBerry OS Settings.2. Click Add or update applications.3. In the Application location section, click Browse. Navigate to the BlackBerry Java Application bundle that you
want to add to, or update in, the application repository.4. Click Next.5. Click Add application.
Specify keywords for a BlackBerry Java Application
You can specify keywords for a BlackBerry Java Application. You can use the keywords to search for theapplication in the application repository.
1. On the menu bar, click BlackBerry OS Settings. 2. Click Manage applications.3. Search for an application.4. In the search results, click the name of an application.5. Click Edit application.6. In the Application keywords field, type a keyword.7. Click the Add icon.8. Repeat steps 6 and 7 for each keyword that you want to add.9. Click Save all.
Configuring application control policiesWhen you add a BlackBerry Java Application to a software configuration so that you can install the appon BlackBerry OS (version 5.0 to 7.1) devices, you must specify an application control policy that youwant to apply to the BlackBerry Java Application. Application control policies control the data and APIsthat BlackBerry Java Applications can access on BlackBerry OS devices, and the external data sources andnetwork connections that BlackBerry Java Applications can access.
| Apps | 228

BlackBerry UEM includes a standard application control policy for BlackBerry Java Applications that you classifyas required, optional, or not permitted. You can change the default settings of the standard application controlpolicies or create custom application control policies for a BlackBerry Java Application.
For more information about configuring settings for application control policy rules, download the BES5 PolicyReference Guide.
Standard application control policies
BlackBerry UEM includes the following standard application control policies for BlackBerry OS (version 5.0 to 7.1)devices.
Application control policy Description
Standard Required When you apply the application control policy to a BlackBerry JavaApplication, rule settings require that the BlackBerry Java Application beinstalled and permitted to run on BlackBerry OS devices. BlackBerry OSdevices install the app automatically.
Standard Optional When you apply the application control policy to a BlackBerry JavaApplication, rule settings make the BlackBerry Java Application optionalon the BlackBerry OS device. Users can install and run the BlackBerryJava Application on their BlackBerry OS devices.
Standard Disallowed When you apply the application control policy to a BlackBerry JavaApplication, rule settings prevent users from installing the BlackBerryJava Application on BlackBerry OS devices. Users cannot install and runthe BlackBerry Java Application on their BlackBerry OS devices.
Change a standard application control policy
When you add a BlackBerry Java Application to a software configuration, you must assign an application controlpolicy to the BlackBerry Java Application. Based on the requirements of your organization's environment, you canchange the default settings for the standard application control policies.
1. On the menu bar, click BlackBerry OS Settings.2. Click Manage default application control policies.3. Click the standard application control policy that you want to change.4. Click Edit application control policy.5. On the Access settings tab, in the Settings section, change the settings for the standard application control
policy.6. Click Save all.
Create custom application control policies for a BlackBerry Java Application
After you add a BlackBerry Java Application to the shared network folder, you can configure the app to use thestandard application control policies, or you can create custom application control policies for the app. If youwant a BlackBerry Java Application to use custom application control policies, you must create the customapplication control policies before you add the app to a software configuration. When you add the app to asoftware configuration, you can select which custom application control policy you want to apply to the app.
If you add the BlackBerry Java Application to multiple software configurations and you assign different customapplication control policies to the BlackBerry Java Application in the different software configurations, you must
| Apps | 229

set the priority for the custom application control policies. This priority determines which custom applicationcontrol policy the BlackBerry Policy Service applies if you assign multiple software configurations to a useraccount.
1. On the menu bar, click BlackBerry OS Settings.2. Click Manage applications.3. Search for a BlackBerry Java Application.4. In the search results, click a BlackBerry Java Application.5. In the Application versions section, click the version of the application that you want to create a custom
application control policy for.6. Click Edit application.7. On the Application control policies tab, in the Settings section, select the Use custom application control
policies option.8. Perform any of the following tasks:
Task Steps
Create an applicationcontrol policy forrequired BlackBerry Java Applications.
a. In the Required application name field, type a name for theapplication control policy.
b. In the Settings section, configure the settings for the applicationcontrol policy.
c. Click the Add icon.d. Repeat steps a to c for each application control policy that you
want to create.
Create an applicationcontrol policy foroptional BlackBerry Java Applications.
a. In the Optional application name field, type a name for theapplication control policy.
b. In the Settings section, configure the settings for the applicationcontrol policy.
c. Click the Add icon.d. Repeat steps 1 to 3 for each application control policy that you
want to create.
Create an applicationcontrol policyfor BlackBerry Java Applicationsthat are not permitted.
a. In the Disallowed application name field, type a name for theapplication control policy.
b. Click the Add icon.
9. If necessary, in each section, click the up and down arrows to set the priority for the application controlpolicies.
10.Click Save all.
IT policy rules ranking on BlackBerry OS devices
IT policy rule settings override application control policy rule settings. For example, if you change the AllowInternal Connections IT policy rule to No for BlackBerry OS (version 5.0 to 7.1) devices, and if the devices havean application control policy set that allows a specific app to make internal connections, the app cannot makeinternal connections.
The device revokes an application control policy and resets if the permissions of the app it is applied to becomemore restrictive. Devices permit users to make app permissions more restrictive, but not less restrictive, than thepermissions that you specify.
| Apps | 230

Application control policies for unlisted applicationsWhen you create a software configuration and assign it to user accounts so that you can send BlackBerry DeviceSoftware, BlackBerry Java Applications, and standard application settings to BlackBerry OS (version 5.0 to 7.1)devices, you must configure whether the software configuration permits users to install and use apps that arenot included in the software configuration (also known as unlisted applications). When you configure whetherunlisted applications are permitted and optional or not permitted on BlackBerry OS devices, you must assign anapplication control policy for unlisted applications to the software configuration.
An application control policy for unlisted applications determines what unlisted applications are permittedon BlackBerry OS devices and what data the unlisted applications can access on BlackBerry OS devices. There aretwo standard application control policies for unlisted applications: one for unlisted applications that are optional,and one for unlisted applications that are not permitted. You can change the default settings of the standardapplication control policy for unlisted applications that are optional, or you can create custom application controlpolicies for unlisted applications that are optional.
Change the standard application control policy for unlisted applications that are optional
1. On the menu bar, click BlackBerry OS Settings.2. Expand Software.3. Click Manage application control policies for unlisted applications.4. Click the Standard Unlisted Optional application control policy.5. Click Edit application control policy.6. On the Access settings tab, in the Settings section, configure the settings for the application control policy.7. Click Save all.
Create an application control policy for unlisted applications
There are two default application control policies for unlisted applications: one for unlisted applications that youpermit on BlackBerry OS (version 5.0 to 7.1) devices, and one for unlisted applications that you do not permiton BlackBerry OS devices. You can also create custom application control policies for unlisted applications thatare optional.
1. On the menu bar, click BlackBerry OS Settings.2. Expand Software.3. Click Create an application control policy for unlisted applications.4. In the Application control policy information section, in the Name field, type a name for the application control
policy for unlisted applications.5. Click Save.6. On the BlackBerry solution management menu, click Manage application control policies for unlisted
applications.7. Click the application control policy that you created.8. Click Edit application control policy.9. On the Access settings tab, in the Settings section, configure the settings for the application control policy.10.Click Save all.
Configure the priority of application control policies for unlisted applications
You can assign multiple software configurations to user accounts. You can assign different application controlpolicies for unlisted applications to different software configurations. You must configure the priority of thedifferent application control policies for unlisted applications so that the BlackBerry Policy Service can determine
| Apps | 231
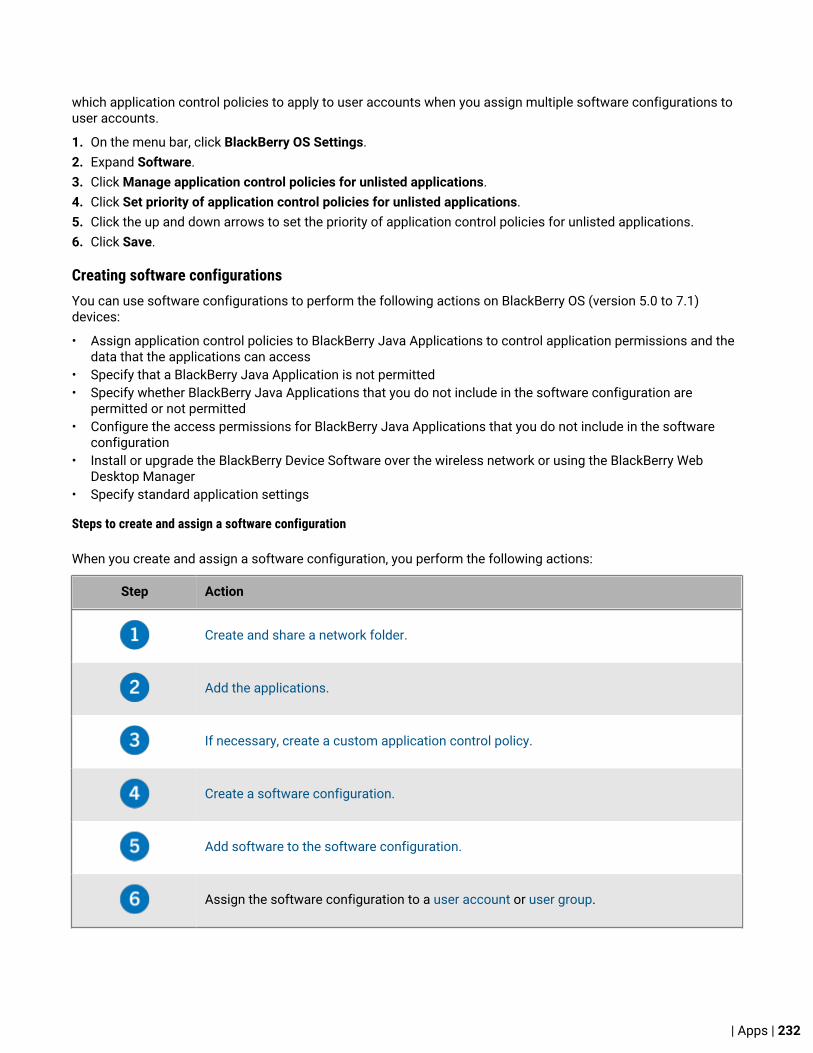
which application control policies to apply to user accounts when you assign multiple software configurations touser accounts.
1. On the menu bar, click BlackBerry OS Settings.2. Expand Software.3. Click Manage application control policies for unlisted applications.4. Click Set priority of application control policies for unlisted applications.5. Click the up and down arrows to set the priority of application control policies for unlisted applications.6. Click Save.
Creating software configurationsYou can use software configurations to perform the following actions on BlackBerry OS (version 5.0 to 7.1)devices:
• Assign application control policies to BlackBerry Java Applications to control application permissions and thedata that the applications can access
• Specify that a BlackBerry Java Application is not permitted• Specify whether BlackBerry Java Applications that you do not include in the software configuration are
permitted or not permitted• Configure the access permissions for BlackBerry Java Applications that you do not include in the software
configuration• Install or upgrade the BlackBerry Device Software over the wireless network or using the BlackBerry Web
Desktop Manager• Specify standard application settings
Steps to create and assign a software configuration
When you create and assign a software configuration, you perform the following actions:
Step Action
Create and share a network folder.
Add the applications.
If necessary, create a custom application control policy.
Create a software configuration.
Add software to the software configuration.
Assign the software configuration to a user account or user group.
| Apps | 232
Create a software configuration
1. On the menu bar, click BlackBerry OS Settings.2. Expand Software. 3. Click Create a software configuration.4. In the Configuration information section, in the Name field, type a name for the software configuration.5. In the Disposition for unlisted applications drop-down list, perform one of the following actions:
• To permit users to install applications that are not included in the software configuration ontheir BlackBerry OS devices, click Optional.
• To prevent users from installing applications that are not included in the software configuration ontheir BlackBerry OS devices, click Disallowed.
6. In the Application control policy for unlisted applications drop-down list, click the application control policy forunlisted applications that you want to assign to the software configuration.
7. Click Save.
After you finish: Add BlackBerry Device Software configurations and BlackBerry Java Applications to the softwareconfiguration.
Add a BlackBerry Java Application to a software configuration
You must add a BlackBerry Java Application to a software configuration and assign the software configurationto user accounts to install the BlackBerry Java Application on BlackBerry OS (version 5.0 to 7.1) devices overthe wireless network. To upgrade an app, you must add the new version of the app to the appropriate softwareconfiguration. BlackBerry UEM upgrades the app that is on BlackBerry OS devices to the new version.
1. On the menu bar. click BlackBerry OS Settings.2. Expand Software. 3. Click Manage software configurations.4. Click the software configuration that you want to add a BlackBerry Java Application to.5. Click Edit software configuration.6. On the Applications tab, click Add applications to software configuration.7. Search for the BlackBerry Java Applications that you want to add to the software configuration.8. In the search results, select a BlackBerry Java Application that you want to add to the software configuration.9. In the Disposition drop-down list for the BlackBerry Java Application, perform one of the following actions:
• To install the BlackBerry Java Application automatically on BlackBerry OS devices, and to prevent usersfrom removing the application, click Required.
• To permit users to install and remove the BlackBerry Java Application, click Optional.• To prevent users from installing a BlackBerry Java Application on BlackBerry OS devices, click Disallowed.
10.In the Application data section, in the Application control policy drop-down list, click an application controlpolicy to apply to the BlackBerry Java Application.
11.If necessary, in the Deployment drop-down list, perform one of the following actions:
• To install the application on BlackBerry OS devices over the wireless network, click Wireless.• To install the application on BlackBerry OS devices using a USB connection to the user's computer and
the BlackBerry Web Desktop Manager, click Wired.12.Repeat steps 6 to 10 for each BlackBerry Java Application that you want to add to the software configuration.13.Click Add to software configuration.14.Click Save all.
| Apps | 233

Install BlackBerry Java Applications on a BlackBerry OS device at a central computerIf you do not want to install BlackBerry Java Applications on a BlackBerry OS (version 5.0 to 7.1) device over thewireless network, and you do not want the user to install the BlackBerry Java Applications using the BlackBerryWeb Desktop Manager or BlackBerry Desktop Software, you can install the BlackBerry Java Applications ona BlackBerry OS device by connecting the BlackBerry OS device to a central computer that can access BlackBerryUEM.
Before you begin:
• Assign a software configuration with the necessary BlackBerry Java Applications to the appropriate useraccount.
• To permit the management console to connect to a BlackBerry OS device that is attached to the computerthat hosts the BlackBerry UEM management console by a USB connection, add the web address of themanagement console to the list of trusted web sites in the web browser. Log in to the management consoleagain.
• Verify that the central computer can access the management console.• Connect the BlackBerry OS device that is associated with the user account to the central computer.
1. On the menu bar, click BlackBerry OS Settings.2. Expand Attached devices.3. Click Device software.4. Click Automatic installation of applications on the BlackBerry device.5. Complete the instructions on the screen.
View the users that have a BlackBerry Java Application installed on their BlackBerry OS devices1. On the menu bar, click BlackBerry OS Settings.2. Expand Software > Applications.3. Click Manage applications.4. Search for an app.5. In the search results, click the name of an app.6. In the Application versions section, click a version of the app.7. Click View users with application.8. Search for users that are associated with BlackBerry OS devices that you installed
the BlackBerry Java Application on.
Reconciliation rules for conflicting settings in software configurationsIf you assign multiple software configurations to user accounts or user groups, the multiple softwareconfigurations might contain conflicting settings. For example, you might specify that a BlackBerry JavaApplication is required in a software configuration that you assign to a user account, but you might also specifythat the same application is not permitted in a software configuration that you assign to a user group that theuser account belongs to. Conflicts can occur when you assign multiple BlackBerry Java Applications, applicationcontrol policies, application control policies for unlisted applications, BlackBerry Device Software, and thestandard application settings in BlackBerry Device Software configurations.
BlackBerry UEM uses predefined reconciliation rules to resolve conflicting settings in multiple softwareconfigurations, and to determine which applications, software, and settings are installed on or applied toa BlackBerry OS (version 5.0 to 7.1) device. BlackBerry UEM resolves conflicting settings as an asynchronousbackground activity. You can view the outcome of the reconciliation activities, reconciliation errors, and theapplications, software, and settings that BlackBerry UEM installed on or applied to a BlackBerry OS device.
| Apps | 234

BlackBerry UEM might have to reconcile software configuration settings that conflict if you perform any of thefollowing actions:
• Activate a device• Assign a new BlackBerry OS device or PIN to a user• Add a user account to or remove a user account from a group• Add a group to or remove a group from another group• Add an app to or remove an app from a software configuration• Change the settings for an app in a software configuration• Change the settings for an application control policy• Change the ranking for application control policies• Install a new version of the BlackBerry Device Software on a BlackBerry OS device• Add a BlackBerry Device Software configuration to or remove a BlackBerry Device Software configuration from
a software configuration• Change a BlackBerry Device Software configuration• Change the standard application settings in a BlackBerry Device Software configuration
Reconciliation rules: BlackBerry Java Applications
Scenario Rule
Multiple software configurations are assigned toa user account or the groups the user belongs to.Multiple BlackBerry Java Applications are containedin each software configuration.
The BlackBerry Java Applications in each softwareconfiguration are installed on the BlackBerry OS(version 5.0 to 7.1) device. If the BlackBerry DeviceSoftware does not support a specific BlackBerryJava Application, the application is not installed onthe BlackBerry OS device.
Multiple software configurations that containdifferent versions of the same BlackBerry JavaApplication are assigned to a user account or thegroups the user belongs to.
When different versions of an app exist in thesoftware configurations that are assigned to a useraccount, the latest version of the application thatis supported by the BlackBerry Device Software isinstalled on the BlackBerry OS device. For example,if a software configuration with version 1.0 of anapplication is assigned to a user account, andanother software configuration with version 2.0 of theapplication is assigned to a user account, version 2.0of the application is installed on the BlackBerry OSdevice.
The version of a BlackBerry Java Application thatis in a software configuration that is assigned to auser account takes precedence over the version ofa BlackBerry Java Application that is in a softwareconfiguration that is assigned to a group. Forexample, if version 1.0 of an application is in asoftware configuration that is assigned to a useraccount, and version 2.0 of an application is in asoftware configuration that is assigned to a groupthat the user belongs to, version 1.0 of the applicationis installed on the BlackBerry OS device.
| Apps | 235
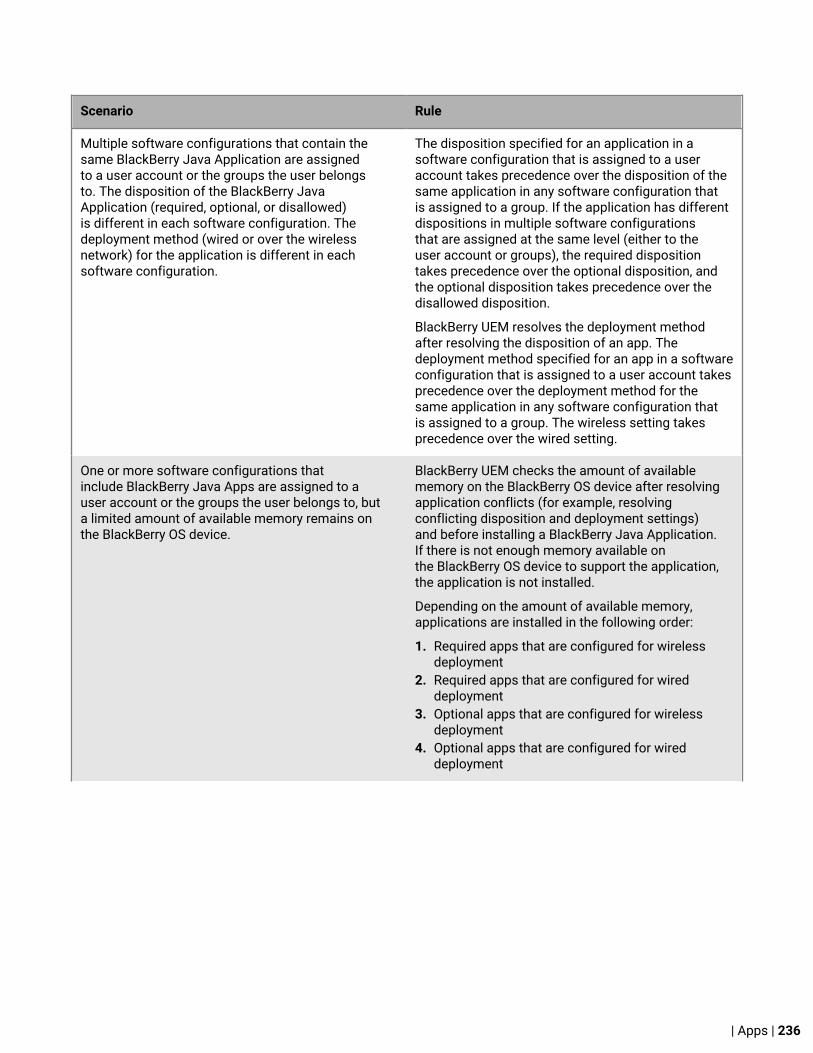
Scenario Rule
Multiple software configurations that contain thesame BlackBerry Java Application are assignedto a user account or the groups the user belongsto. The disposition of the BlackBerry JavaApplication (required, optional, or disallowed)is different in each software configuration. Thedeployment method (wired or over the wirelessnetwork) for the application is different in eachsoftware configuration.
The disposition specified for an application in asoftware configuration that is assigned to a useraccount takes precedence over the disposition of thesame application in any software configuration thatis assigned to a group. If the application has differentdispositions in multiple software configurationsthat are assigned at the same level (either to theuser account or groups), the required dispositiontakes precedence over the optional disposition, andthe optional disposition takes precedence over thedisallowed disposition.
BlackBerry UEM resolves the deployment methodafter resolving the disposition of an app. Thedeployment method specified for an app in a softwareconfiguration that is assigned to a user account takesprecedence over the deployment method for thesame application in any software configuration thatis assigned to a group. The wireless setting takesprecedence over the wired setting.
One or more software configurations thatinclude BlackBerry Java Apps are assigned to auser account or the groups the user belongs to, buta limited amount of available memory remains onthe BlackBerry OS device.
BlackBerry UEM checks the amount of availablememory on the BlackBerry OS device after resolvingapplication conflicts (for example, resolvingconflicting disposition and deployment settings)and before installing a BlackBerry Java Application.If there is not enough memory available onthe BlackBerry OS device to support the application,the application is not installed.
Depending on the amount of available memory,applications are installed in the following order:
1. Required apps that are configured for wirelessdeployment
2. Required apps that are configured for wireddeployment
3. Optional apps that are configured for wirelessdeployment
4. Optional apps that are configured for wireddeployment
| Apps | 236

Scenario Rule
A software configuration is assigned to auser account and it contains a BlackBerryJava Application that has a dependency onanother BlackBerry Java Application.
If a BlackBerry Java Application in a softwareconfiguration has a dependency on anotherapplication, and the other application is not includedin a software configuration that is assigned to theuser account or a group that the user belongs to,the application is not installed on the BlackBerry OSdevice.
If a BlackBerry Java Application in a softwareconfiguration has a dependency on another app,and the dependent app is included in a softwareconfiguration that is assigned to the user accountor a group the user belongs to, the dependent appis installed first. If the dependent app is installedsuccessfully, the app with the dependency is theninstalled.
A software configuration is assigned to auser account and it contains a BlackBerryJava Application that has a dependency onanother BlackBerry Java Application. The dependentapplication is not supported on the BlackBerry OSdevice.
If a dependent application is not supported bythe BlackBerry OS device or was not installedsuccessfully on the BlackBerry OS device, theapplication with the dependency is not installed onthe user's BlackBerry OS device.
Multiple BlackBerry Java Applications have a circulardependency (for example, application A is dependenton application B, application B is dependent onapplication C, and application C is dependenton application A) and are included in the sameapplication bundle. The application bundle is addedto the application repository. The apps are addedto a software configuration and assigned to a useraccount or a group the user belongs to.
If multiple BlackBerry Java Apps are included inthe same application bundle and have a circulardependency, the applications are not installed onthe BlackBerry OS device. If multiple apps have acircular dependency, they can only be installed if theyexist in separate application bundles and are installedusing wired deployment.
Reconciliation rules: BlackBerry Device Software
Scenario Rule
A software configuration that contains BlackBerryDevice Software is assigned to a user account. Asoftware configuration that contains a differentversion of BlackBerry Device Software is assigned toa group that the user account belongs to.
The BlackBerry Device Software in a softwareconfiguration that is assigned to a user account takesprecedence over the BlackBerry Device Software in asoftware configuration that is assigned to a group.
| Apps | 237

Scenario Rule
Multiple software configurations that containdifferent versions of BlackBerry Device Software areassigned to a user account.
The version of the BlackBerry Device Software thatis supported by the BlackBerry OS (version 5.0 to7.1) device and by the wireless service provider,and that you ranked highest in the BlackBerryUEM management console, is installed onthe BlackBerry OS device. BlackBerry UEM does notinstall a version of the BlackBerry Device Software ifthat version is ranked lower than the version ofthe BlackBerry Device Software that is currentlyinstalled on the BlackBerry OS device.
Reconciliation rules: Standard application settings
Scenario Rule
A software configuration with standard applicationsettings is assigned to a user account. A softwareconfiguration with different standard applicationsettings is assigned to a group that the user accountbelongs to.
The standard application settings in a softwareconfiguration that is assigned to a user account takeprecedence over the standard application settings ina software configuration that is assigned to a group.
A user account belongs to multiple groups. Thecalendar initial view setting is configured differently ineach of the software configurations that are assignedto the groups.
The calendar initial view setting that is applied to theuser's BlackBerry OS (version 5.0 to 7.1) device isthe lowest value that was specified in the multiplesoftware configurations.
A user account belongs to multiple groups. Thecalendar keep appointments setting is configureddifferently in each of the software configurations thatare assigned to the groups.
The calendar keep appointments setting that isapplied to the user's BlackBerry OS device is thehighest value that was specified in the multiplesoftware configurations.
A user account belongs to multiple groups. The emailconfirm delete setting is set to Yes in one or moreof the software configurations that are assigned tothe groups. The setting is set to No in the remainingsoftware configurations.
If the email confirm delete setting is set to Yes in asoftware configuration that is assigned to a groupthat the user account belongs to, the Yes setting isapplied to the BlackBerry OS device.
A user account belongs to multiple groups. Theemail hide sent messages setting is set to Yes inone or more of the software configurations that areassigned to the groups. The setting is set to No in theremaining software configurations.
If the email hide sent messages setting is set to No ina software configuration that is assigned to a groupthat the user account belongs to, the No setting isapplied to the BlackBerry OS device.
A user account belongs to multiple groups. Theemail save copy in sent folder setting is set to Yes inone or more of the software configurations that areassigned to the groups. The setting is set to No in theremaining software configurations.
If the email save copy in sent folder setting is set toYes in a software configuration that is assigned toa group that the user account belongs to, the Yessetting is applied to the BlackBerry OS device.
| Apps | 238

Scenario Rule
A user account belongs to multiple groups. Theaddress book sort by setting is configured differentlyin each of the software configurations that areassigned to the groups.
If the address book sort by setting is configureddifferently in the software configurations that areassigned to the groups that the user account belongsto, the first name setting takes precedence over thelast name setting, and the last name setting takesprecedence over the company name setting.
A user account belongs to multiple groups.The attributes settings for the various standardapplication settings are configured differently in thesoftware configurations that are assigned to thegroups.
The Locked and visible setting takes precedence overthe Unlocked and visible setting. The Unlocked andvisible setting takes precedence over the Unlockedand hidden setting.
Standard application settings are configured ina software configuration and assigned to useraccounts with BlackBerry OS devices that are runninga BlackBerry Device Software version earlier than 5.0.
Standard application settings apply onlyto BlackBerry OS devices that are running BlackBerryDevice Software version 5.0 or later.
Reconciliation rules: Application control policies
Scenario Rule
A user is assigned multiple software configurationsthat each contain the same application. A differentapplication control policy is assigned to theapplication in each software configuration.
An application control policy for an applicationin a software configuration that is assigned to auser account takes precedence over an applicationcontrol policy for the same application in a softwareconfiguration that is assigned to a group. Therequired setting takes precedence over the optionalsetting. The optional setting takes precedence overthe disallowed setting.
If multiple software configurations contain thesame application, and each software configurationis assigned a different custom application controlpolicy with the same disposition (for example, twocustom required application control policies), theapplication control policy that you ranked highest inthe BlackBerry UEM management console is appliedto the user's BlackBerry OS (version 5.0 to 7.1) device.
| Apps | 239

Reconciliation rules: Application control policies for unlisted applications
Scenario Rule
A software configuration with a default or customapplication control policy for unlisted applications isassigned to a user account. A software configurationwith a different application control policy for unlistedapplications is assigned to a group that the useraccount belongs to.
The application control policy for unlistedapplications in a software configuration that isassigned to a user account takes precedence over theapplication control policy for unlisted applications in asoftware configuration that is assigned to a group.
A software configuration that defines unlistedapplications as disallowed is assigned to a useraccount. A software configuration that definesunlisted applications as optional is also assigned tothe user account.
If unlisted applications are defined as disallowed ina software configuration that is assigned to a useraccount, unlisted applications are not permitted onthe BlackBerry OS (version 5.0 to 7.1) device.
Multiple software configurations with differentapplication control policies for unlisted applicationsare assigned to a user account.
The application control policy for unlistedapplications that you ranked highest in the BlackBerryUEM management console is applied tothe BlackBerry OS device.
| Apps | 240

Users and groupsYou can create user accounts and then create groups of users to help manage users and devices efficiently.
Steps to create groups and user accountsWhen you manage your organization's users and devices, you perform the following actions:
Step Action
Create user roles.
Create user groups.
Create user accounts.
Optionally, create device groups.
Creating user rolesUser roles allow you to specify the capabilities that are available to users in BlackBerry UEM Self-Service.
BlackBerry UEM includes one preconfigured Default user role. The Default user role is set up to allow allBlackBerry UEM Self-Service capabilities, and it is assigned to the "All users" group. You can edit the capabilitiesof the Default user role.
Note: Renaming, deleting, or removing the Default user role from the "All users" group can cause issues with theWork Apps app on iOS devices.
If you want to restrict certain BlackBerry UEM Self-Service capabilities for users, you can create new user roles oredit an existing user role. You can assign user roles to groups or directly to users.
BlackBerry UEM Self-Service capabilitiesThe following table lists the BlackBerry UEM Self-Service capabilities:
Capability Description
Specify an activationpassword
This capability allows users to create activation passwords that they can use toactivate their devices in BlackBerry UEM. You can configure the default passwordexpiration period and the required password complexity at Settings > Self-Service> Self-Service settings.
Specify access key This capability allows users to create access keys that they can use toactivate BlackBerry Dynamics apps.
| Users and groups | 241

Capability Description
Delete only work data This capability allows users to send the "Delete only work data" command to adevice. The command deletes work data including the IT policy, profiles, apps, andcertificates.
Delete all device data This capability allows users to send the "Delete all device data" command to adevice. The command deletes all user information and app data that the devicestores, including information in the work space. It returns the device to factorydefault settings and deletes the device from BlackBerry UEM.
Locate device This capability allows users to view the location of their iOS, Android, or Windows10 Mobile devices on a map. This capability requires that a location service profileis assigned to the user. For more information, see Create a location service profile.
Manage user certificates This capability allows users to upload user certificates for their devices. You canprovide instructions to users about the certificates they need, and where to uploadthe certificates from.
Lock andunlock BlackBerryDynamics apps
If users' devices are enabled for BlackBerry Dynamics, this capability allowsusers to lock BlackBerry Dynamics apps that are installed on their devices and togenerate unlock keys to unlock the apps. When a user locks an app, it preventsanyone from opening it.
Delete BlackBerryDynamics app data
If users' devices are enabled for BlackBerry Dynamics, this capability allows usersto delete all data from a BlackBerry Dynamics app that is installed on a device. Thecommand removes all data stored by the app but the app is not deleted.
Create a user roleYou can create a custom user role and assign it to users or groups to specify the capabilities that users have inBlackBerry UEM Self-Service.
1. On the menu bar, click Settings > Self-Service.2. Click User roles.3.
Click 4. Type a name and description for the user role.5. To copy permissions from another role, click a role in the Permissions copied from role drop-down list.6. Select the capabilities that you want a user to have.7. Click Save.
How BlackBerry UEM chooses which user role to assignOnly one role is assigned to a user. BlackBerry UEM uses the following rules to determine which role to assign toa user:
• A role assigned directly to a user account takes precedence over a role assigned indirectly by user group.• If a user is a member of multiple user groups that have different user roles, BlackBerry UEM assigns the role
with the highest ranking.
| Users and groups | 242
Rank user rolesRanking is used to determine which role BlackBerry UEM assigns to a user when they are a member of multipleuser groups that have different roles.
1. On the menu bar, click Settings > Self-Service.2. Click User roles.3. Use the arrows to move roles up or down the ranking.4. Click Save.
Assign a user role to a groupA user role specifies the capabilities available to users in BlackBerry UEM Self-Service.
Before you begin: Create a user role.
1. On the menu bar, click Groups.2. Search for a user group.3. In the search results, click the name of the user group.4. Click the Managed devices tab.5. In the User role section, click .6. In the drop-down list, click the name of the role that you want to assign to the group.7. Click Add or Replace.
Assign a user role to a userA user role specifies the capabilities available to users in BlackBerry UEM Self-Service.
Before you begin: Create a user role.
1. On the menu bar, click Users.2. Select the All users or Managed devices tab.3. Search for a user account.4. In the search results, click the name of the user account.5. Click .6. In the Direct role assignment drop-down list, select the role that you want to assign. If you select None, the
user's role will be assigned by a group. If there is no group assignment, the user will not have access toBlackBerry UEM Self-Service.
7. Click Save.
Creating and managing user accountsYou can add user accounts directly to BlackBerry UEM or, if you connected BlackBerry UEM to your companydirectory, you can add user accounts from your company directory. For information about connecting BlackBerryUEM to a company directory and enabling directory-linked groups, see the Configuration content.
You can also use a .csv file to add multiple user accounts to BlackBerry UEM at the same time.
Create a user accountBefore you begin:
| Users and groups | 243

• If you want to add a directory user, verify that BlackBerry UEM is connected to your company directory.For information about connecting BlackBerry UEM to a company directory and enabling directory-linkedgroups, see the Configuration content.
• If you want to enable the BlackBerry Workspaces service for your users, verify that the Workspaces plug-infor BlackBerry UEM is installed on each instance of BlackBerry UEM in your environment. For more informationabout installing the Workspaces service, contact your Workspaces account representative.
1. On the menu bar, click Users > Managed devices.2. Click Add user.3. Perform one of the following tasks:
Task Steps
Add a directory user a. On the Company directory tab, in the search field, specify thesearch criteria for the directory user that you want to add. You cansearch by first name, last name, display name, username, or emailaddress.
b. In the search results, select the user account.
Add a local user a. Click the Local tab.b. Type the First name and Last name for the user account.c. In the Display name field, make changes if necessary. The display
name is automatically configured with the first and last name thatyou specified.
d. In the Username field, enter a unique username for the useraccount.
e. In the Email address field, enter a contact email address forthe user account. An email address for the user account isrequired when you enable a service such as Workspaces or devicemanagement.
f. Optionally, click Additional user details and fill in the fields asneeded.
4. If local groups exist in BlackBerry UEM and you want to add the user account to groups, in the Availablegroups list, select one or more groups and click .When you create a user account, you can add it only to local groups in BlackBerry UEM. If the user account isa member of a directory-linked group, it is automatically associated with that group when the synchronizationbetween BlackBerry UEM and your company directory occurs.To add a user account to groups that are assigned an administrative role, you must be a SecurityAdministrator.
5. If you add a local user, in the Account password field, create a password for BlackBerry UEM Self-Service.If the user is assigned an administrative role, they can also use the password to access the managementconsole.
6. In the Enabled services section, select the Enable user for device management option. 7. If the Workspaces plug-in for BlackBerry UEM is installed in the domain, to enable the Workspaces service,
perform the following actions: a) In the BlackBerry Workspaces section, select the Enable BlackBerry Workspaces check box. By default,
users enabled with the Workspaces service receive the Visitor role.b) Select one or more user roles. Click .
8. Perform one of the following tasks:
| Users and groups | 244

Task Steps
Have users activate deviceswith the activation profile that iscurrently assigned to them.
a. In the Activation option drop-down list, select Default deviceactivation.
b. In the Activation password drop-down list, select whether you wantto set the password or autogenerate a password.
c. Optionally, change the activation period expiration. The activationperiod expiration specifies how long the activation passwordremains valid.
d. If you want the activation password to be valid only for one deviceactivation, select Activation period expires after the first device isactivated.
e. In the Activation email template drop-down list, select a templateto use for the activation email.
Pair an activation password witha specific activation profile.
a. In the Activation option drop-down list, select Device activationwith specified activation profile.
b. In the Activation profile drop-down list, select the activation profilethat you want to pair with a password.
c. In the Activation password drop-down list, select whether you wantto set the password or autogenerate a password.
d. Optionally, change the activation period expiration. The activationperiod expiration specifies how long the activation passwordremains valid.
e. If you want the activation password to be valid only for one deviceactivation, select Activation period expires after the first device isactivated.
f. In the Activation email template drop-down list, click a template touse for the activation email.
Allow users to activateonly BlackBerry Dynamics apps
a. In the Activation option drop-down list, select BlackBerry Dynamicsaccess key generation.
b. In the Number of access keys to generate drop-down list, selectthe number of keys. Each key can be used only once to activatea BlackBerry Dynamics app.
c. Select the number of days that you want the access key to remainvalid.
d. In the Activation email template drop-down list, click a template touse for the activation email.
Add user to BlackBerry UEM only. a. In the Activation option drop-down list, select Do not set.
9. If the BlackBerry UEM domain supports BlackBerry OS (version 5.0 to 7.1) devices, to enable BlackBerry OSdevice activation for a directory user, perform the following actions:a) Select the Allow user to activate a BlackBerry OS device check box.b) In the BlackBerry OS mail server drop-down list, click the name of a server.
Note: The directory user must exist on the work mail server that the BlackBerry OS mail server connects to.10.If you use custom variables, expand Custom variables and specify the appropriate values for the variables that
you defined.11.Perform one of the following actions:
| Users and groups | 245

• To save the user account, click Save.• To save the user account and create another user account, click Save and new.
Related concepts
Allowing users to activate multiple devices with different activation typesEmail templates
Related reference
Custom variables
Creating user accounts from a .csv file
You can create the .csv file manually using the BlackBerry UEM sample .csv file, which is available for downloadfrom the Import tab in the Add a user window.
About the user accounts .csv file
You can import user accounts in a .csv file into BlackBerry UEM to create many user accounts at the same time.Depending on your requirements, you can also specify group membership and activation settings for the useraccounts by including the following columns in the .csv file:
Column Header Description
Group membership Assign one or more user groups to each user account.
Use a semicolon (;) to separate multiple user groups.
If you do not include the “Group membership” column, when you importthe file, you are given the option to select the group that you want all of theimported user accounts added to. If you want to assign each user account to aspecific user group, you use this column before you import the file.
MDM (BlackBerry UEM) Specify whether the user is enabled for MDM. To enable a user for MDM, type"Enabled".
Activation password Enter the activation password.
This value is required if the “Activation password generation” value is set to“manual.”
Activation template Enter the name of the activation email template that you want to send to theuser. If you do not specify a name, the default email activation template isused.
Activation passwordexpiration
Enter the number of seconds the activation password exists before it expires.
| Users and groups | 246

Column Header Description
Activation passwordgeneration
Enter one of the following:
• Auto. The activation password is automatically created and sent to theuser.
• Manual. The activation password is set in the "Activation password"column.
If the value is left blank, the default is Auto.
Send activation email Enter one of the following:
• True. The activation email is sent to the user. • False. The activation email is not sent to the user.
If the “Activation password generation” is set to “Auto,” the activation emailis sent to the user regardless of the value in this column. If the “Activationpassword generation” value is "Manual" and this value is empty, then thedefault is True.
User type This column is required whenever the .csv file includes both local anddirectory user accounts. Enter one of the following:
• L for local user accounts• D for directory user accounts
The entries are not case-sensitive.
Directory UID (Optional) An alternative to entering the email address for directory useraccounts. By default, the email address is used to validate the directory useraccounts; however, you can specify that the directory UID be used instead.If the user account cannot be validated against the directory UID, an error isreported.
If you include a Directory UID value for one of your users, the column headermust include Directory UID and all of the rows in the .csv file must includeeither a Directory UID or have an empty placeholder (,) for the Directory UIDcolumn.
To see an example of the .csv file, click Users > All users > Add user > Import > Download sample .csv file.
How BlackBerry UEM validates the user accounts .csv file
BlackBerry UEM validates the user accounts .csv file before, during, and immediately after it loads the .csv file andreports any errors that it encounters.
The following are some of the errors that will prevent BlackBerry UEM from loading the .csv file:
• An invalid file format or file extension• No data in the file• The number of columns does not match the number of headers in the file
When BlackBerry UEM encounters an error, it stops loading the file and displays an error message. You mustcorrect the error and then reload the .csv file.
| Users and groups | 247

After the .csv file is loaded, BlackBerry UEM displays a list of user accounts that will be imported and, ifapplicable, any directory user accounts that will not be imported as a result of an error (for example, a duplicateentry or invalid email address). You can do one of the following:
• Cancel the operation, correct the errors, and then reload the .csv file.• Continue and load the valid user accounts. The directory user accounts with errors are not loaded. You must
copy and correct the directory user accounts that were not loaded in a separate .csv file. Otherwise, reloadingthe same .csv file will result in duplication errors for the user accounts that were successfully loaded.
BlackBerry UEM performs a final validation on the imported user accounts just before it creates the user accountsto ensure that no errors have been introduced as the file was being imported (for example, another administratorcreated a user account just as a .csv file containing that same user account was being imported).
Add user accounts using a .csv file
For an example of a .csv file, refer to About the user accounts .csv file.
Before you begin:
• If the .csv file contains directory user accounts, verify that BlackBerry UEM is connected to your companydirectory.
• Verify that the number of columns match the number of headers in the .csv file.• Verify that the required columns are included.• Verify that the information in the columns is correct.
1. On the menu bar, click Users.2. Select the All users or Managed devices tab.3. Click Add user.4. Click the Import tab.5. Click Browse and navigate to the .csv file that contains the user accounts that you want to add.6. Click Load.7. If errors are reported, perform the following actions:
a) Correct the errors in the .csv file.b) Click Browse and navigate to the .csv file.c) Click Load.d) Repeat step 6 until all errors are corrected.
8. If the .csv file does not use the "Group membership" column and local groups exist in BlackBerry UEM, performthe following actions if you want to add user accounts to groups:a) In the Available groups list, select one or more groups and click .b) Click Next.When you import the .csv file, all user accounts are added to the local groups that you select. If a useraccount is a member of a directory-linked group, it is automatically associated with that group when thesynchronization between BlackBerry UEM and your company directory occurs.To add user accounts to groups that are assigned an administrative role, you must be a Security Administrator.
9. Review the list of user accounts and perform one of the following actions:
• To correct the errors for any invalid directory user accounts, click Cancel and go to step 6.• To add the valid user accounts, click Import. Any invalid directory user accounts are ignored.
After you finish: If the BlackBerry UEM domain supports BlackBerry OS (version 5.0 to 7.1) devices, to enableBlackBerry OS device activation for directory user accounts, edit user account information.
| Users and groups | 248

Related tasks
Edit user account information
View a user accountYou can view information about a user account on the Summary tab. For example, you can view the followinginformation:
• Activated devices• User groups that a user account belongs to• Assigned IT policy, profiles, and apps
1. On the menu bar, click Users.2. Search for a user account using one of the following options:
• Click All users, and type in the Search field.• Click Managed devices > User search and type in the search field.
3. In the search results, click the name of the user account.
Add notes to a user accountYou can add notes to keep track of any information related to a specific user account. The note information isstored with the user account and not with an individual device. If the user is removed, the information in the notesfield is also removed. Using the notes feature is controlled by the "Edit users" permission for administrators.
1. On the menu bar, click Users.2. Search for a user account.3. In the search results, click the name of a user account.4. Click the Add note icon in the upper right hand corner.5. Type notes in the dialog box that opens. The notes that you type are automatically saved and the icon changes
to indicate that there are notes saved.
Manage multiple user accounts at one timeYou can complete certain actions for multiple users at one time. For example, you can send an email to a selectedgroup of users.
Before you begin: Set the default or advanced view.
1. On the menu bar, click Users > Managed devices.2. If necessary, Filter the user list.3. Perform one of the following actions:
• Select the check box at the top of the user list to select all users.• Select the check box for each user that you want to include in the file. You can use Shift+click to select
multiple users.4. From the menu, click one of the following icons:
Icon Description
Send an email to users
| Users and groups | 249
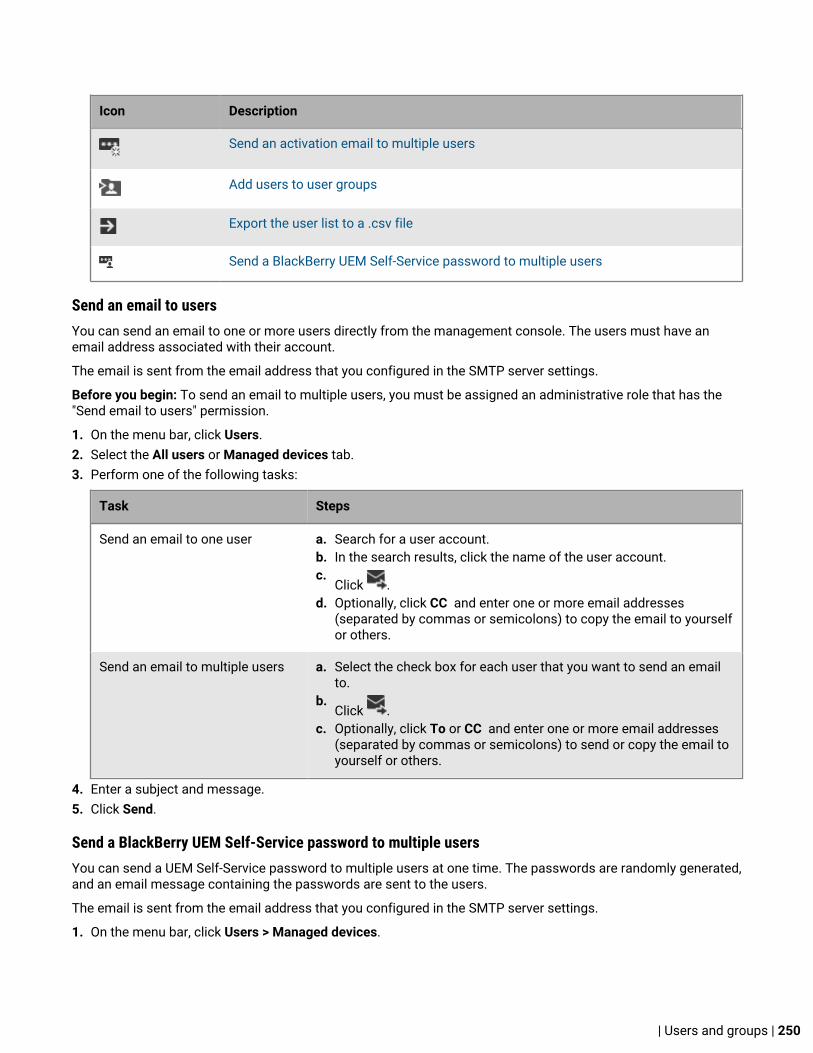
Icon Description
Send an activation email to multiple users
Add users to user groups
Export the user list to a .csv file
Send a BlackBerry UEM Self-Service password to multiple users
Send an email to usersYou can send an email to one or more users directly from the management console. The users must have anemail address associated with their account.
The email is sent from the email address that you configured in the SMTP server settings.
Before you begin: To send an email to multiple users, you must be assigned an administrative role that has the"Send email to users" permission.
1. On the menu bar, click Users.2. Select the All users or Managed devices tab.3. Perform one of the following tasks:
Task Steps
Send an email to one user a. Search for a user account.b. In the search results, click the name of the user account.c.
Click .d. Optionally, click CC and enter one or more email addresses
(separated by commas or semicolons) to copy the email to yourselfor others.
Send an email to multiple users a. Select the check box for each user that you want to send an emailto.
b.Click .
c. Optionally, click To or CC and enter one or more email addresses(separated by commas or semicolons) to send or copy the email toyourself or others.
4. Enter a subject and message.5. Click Send.
Send a BlackBerry UEM Self-Service password to multiple usersYou can send a UEM Self-Service password to multiple users at one time. The passwords are randomly generated,and an email message containing the passwords are sent to the users.
The email is sent from the email address that you configured in the SMTP server settings.
1. On the menu bar, click Users > Managed devices.
| Users and groups | 250

2. Select the users that you want to send the UEM Self-Service password to. Note that users must have an emailaddress associated with their accounts.
3. Click .4. Click Continue.
Edit user account informationYou can edit the following user information:
• Name, username, display name, and email address• Group membership (membership to directory-linked groups cannot be changed)• Account password for local user accounts• User role• If you defined custom variables, you can edit the variable information• If the BlackBerry UEM domain supports BlackBerry OS (version 5.0 to 7.1) devices, you can enable or disable
BlackBerry OS device activation for directory user accounts. You can disable BlackBerry OS device activationonly if the user did not activate a BlackBerry OS device.
Note: You cannot edit the user details for the default administrative user or for users that use their BlackBerryOnline account credentials.
1. On the menu bar, click Users > Managed devices.2. Search for a user account.3. In the search results, click the name of the user account.4. Click .5. Edit the user account information.6. Click Save.
Synchronize information for a directory userIf you have added a user account from your company directory, you can manually synchronize that user'sinformation with your company directory at any time instead of waiting for the automatic synchronization time.
1. On the menu bar, click Users.2. Select the All users or Managed devices tab.3. Search for a user account.4. In the search results, click the name of the user account.5.
Click .
Change organizer data synchronization and mail configuration for a BlackBerry OS device user
In the Advanced settings on the Summary tab, you can change organizer data synchronization settings for a useraccount. You can also manage message forwarding, control which folders a user can synchronize to a BlackBerryOS device, and manage signatures and disclaimers in email messages.
1. On the menu bar, click Users.2. Search for a user account.3. In the search results, click the name of the user account.4. In the IT policy, profiles, and software configurations section, click Advanced settings.5. Click Edit user.6. In the Messaging configuration section, click Default configuration.
| Users and groups | 251

7. Make changes on the appropriate tabs.8. Click Continue to user information edit.9. Click Save all.
Remove services from a userIf BlackBerry UEM is enabled for one or more value-added services, and a user is enabled for a service, you canremove the service from a user. You can also remove MDM controls, without deleting the user account fromBlackBerry UEM.
Before you begin:
• Before you can remove MDM controls, you must remove activated devices from a user.• Before you can remove the Enterprise Identity service, you must remove all Enterprise Identity assignments.
1. On the menu bar, click Users > All users.2. Search for a user account.3. In the search results, click the name of the user account.4. Click .5. Perform any of the following tasks:
Task Steps
Remove MDM services a. Click on Managed devices.b. Click Save.
Remove Workspaces service a. Click on Workspaces.b. In the Remove WatchDox by BlackBerry dialog screen, select one
of the following options:
• Delete all files owned by this user and revoke membershipsfrom all workspace groups and distribution lists
• Transfer this user's files and membership in workspace groupsand distribution lists to a different email address.
In the Email address field, type a contact email address. A newuser account is created if the email address is not associatedwith an existing user account.
c. Click Remove.
Remove Enterprise Identityservice
a. Click on Enterprise Identity.b. Click Save.
After you finish: To enable a service, see Enable services for a user.
Enable services for a userIf BlackBerry UEM is enabled for one or more value-added services, you can enable a service for a user.
1. On the menu bar, click Users > All users.2. Search for a user account.3. In the search results, click the name of the user account.4. Perform any of the following tasks:
| Users and groups | 252

Task Steps
Enable MDM services a. Click on Managed devices.b. If local groups exist in BlackBerry UEM and you want to add the
user account to groups, in the Available groups list, select one ormore groups and click .
c. Choose an option for the device activation password.d. Click Save.
Enable the Workspaces service a. Click on Workspaces.b. Assign Workspaces roles.c. Click Save.
Enable the Enterprise Identityservice
a. Click on Enterprise Identity.b. Select app groups.c. Click Assign.
Delete a user accountWhen you delete a user account, the work data is also deleted from all of the user's devices.
Before you begin:
• Deactivate any devices that are associated with the user account that you want to delete.• Remove any services that are associated with the user account that you want to delete. For more information,
see Remove services from a user.
1. On the menu bar, click Users > Managed devices.2. Search for a user account.3. In the search results, select the name of a user account.4. Click .5. Click Delete.
Related concepts
Deactivating devices
Add users to user groupsNote: To add a user that is assigned an administrative role to a user group, you must be a Security Administrator.
1. On the menu bar, click Users > Managed devices.2. Select the check box beside the users that you want to add to user groups.3. Click .4. In the Available groups list, select one or more groups and click .
Note: Membership to directory-linked groups cannot be changed.5. Click Save.
| Users and groups | 253

Remove a user from a user groupYou cannot remove a user from a directory-linked group.
Note: To remove a user that is assigned an administrative role from a user group, you must be a SecurityAdministrator.
1. On the menu bar, click Groups.2. Search for the user group you want to edit.3. Click the user group.4. Search for the user you want to remove.5. Select the user.6.
Click .
Change which user groups a user belongs toNote: To change which user groups a user that is assigned an administrative role belongs to, you must be aSecurity Administrator.
1. On the menu bar, click Users > Managed devices.2. Search for a user account.3. In the search results, click the name of the user account.4. In the Group membership section, click .5. Perform any of the following actions:
• To add the user to user groups, in the Available groups list, select one or more groups and click .• To remove the user from user groups, in the Member of groups list, select one or more groups and click .
Note: Membership to directory-linked groups cannot be changed.6. Click Save.
Assign a profile or IT policy to a user account1. On the menu bar, click Users > Managed devices.2. Search for a user account.3. In the search results, click the name of the user account.4. In the IT policy and profiles section, click .5. Click IT policy or a profile type.6. In the drop-down list, click the name of the profile or IT policy that you want to assign to the user.7. For IT policies and ranked profile types, if the profile type that you selected in step 5 is already assigned
directly to the user, click Replace. Otherwise, click Assign.
Related concepts
How BlackBerry UEM chooses which IT policy to assignAssigning profilesHow BlackBerry UEM chooses which profiles to assign
| Users and groups | 254

Related tasks
Create an IT policyCreate a device SR requirements profile for BlackBerry 10 devicesAssign a profile or IT policy to a user group
Add a client certificate to a user accountYou can add a client certificate to an individual user account and send the certificate to BlackBerryDynamics enabled devices or other managed iOS and Android devices.
Add client certificates to user accounts when users devices need certificates for S/MIME or client authenticationand the certificate can't be sent to devices via a user credential profile or SCEP profile.
The client certificate must have a .pfx or .p12 file name extension. You can send more than one client certificateto devices.
You can also use user credential profiles to upload certificates for individual users. User credential profiles can beassociated with a Wi-Fi, VPN, or email profile.
1. On the menu bar, click Users > Managed devices.2. Search for a user account.3. In the search results, click the name of a user account.4. In the IT policy and profiles section, click . 5. Click User certificate. 6. Type a description for the certificate.7. In the Apply certificate to section, select one of the following:
• Other managed devices: Choose this option to send the certificate to iOS and Android devices for allsupported uses other than for BlackBerry Dynamics apps.
• BlackBerry Dynamics enabled devices: Choose this option to send the certificate to devices to usewith BlackBerry Dynamics apps.
8. In the Certificate file field, click Browse to locate the certificate file.9. If you selected Other managed devices, in the Password field, type a password for the certificate.
For iOS devices, a password is required. For Android devices, you do not have to provide a passwordin BlackBerry UEM if the device is running the latest version of BlackBerry UEM Client. If you don't set apassword, the user must enter the device password.
10.Click Add.The certificate is listed in the User certificates table on the user summary page.
After you finish:
• For BlackBerry Dynamics enabled devices, configure the length of time uploaded certificates remain onthe BlackBerry UEM server before they are automatically deleted from the server. The default setting is 24hours.
Related concepts
Sending certificates to devices using profiles
Change a client certificate for a user account1. On the menu bar, click Users > Managed devices.
| Users and groups | 255

2. Search for a user account.3. In the search results, click the name of a user account.4. In the IT policy and profiles section, click the user certificate that you want to change.5. Click .6. Make the necessary changes. You can't change which devices the certificate applies to.7. Click Save.
After you finish: If you change a BlackBerry Dynamics user certificate that you or a user has removed from adevice, the certificate is resent to the device.
Renew or remove a BlackBerry Dynamics certificate for a user accountYou can send a command to a user's device to request certificate renewal from the CA. You can also removea BlackBerry Dynamics certificate from a user's device. If you remove a certificate, the BlackBerry DynamicsPKI connector sends a notification to the CA that the certificate is no longer in use, but the certificate is notautomatically revoked.
1. On the menu bar, click Users > Managed devices.2. Search for a user account.3. In the search results, click the name of a user account.4. In the User certificates section, perform one of the following actions:
•Click to request certificate renewal from the CA.
• Click to remove the certificate from the user's devices.
Note: To remove an Entrust smart credential from a device, the user must also deactivate the smart credentialin the BlackBerry UEM Client.
Related tasks
Renew certificates that are enrolled through the BlackBerry Dynamics PKI connector
Add a client certificate to a user credential profileYou can upload certificates for individual users to a user credential profile. Users can also upload their certificateto the user credential profile using BlackBerry UEM Self-Service. Uploading certificates to user credential profilesis supported for devices running BlackBerry 10 OS version 10.3.1 and later, iOS devices, and for Android deviceswith a work space.
The client certificate must have a .pfx or .p12 file name extension. If you or a user uploads a new certificate to theuser credential profile, it replaces the exisiting certificate on the users devices.
Before you begin:
• Create a user credential profile to manually upload certificates.• Assign the user credential profile to users.
1. On the menu bar, click Users > Managed devices.2. Search for a user account.3. In the search results, click the name of a user account.4. In the IT policy and profiles section, beside the user credential profile, click Add a certificate.5. Click Browse to locate the certificate file.
| Users and groups | 256

6. Type the password for the certificate. For iOS devices, the password is required. For Android devices, you donot have to provide the password in BlackBerry UEM if the device is running the latest version of BlackBerryUEM Client. If you don't specify the password, the user must enter the device password.
7. Click Add.
Related tasks
Create a user credential profile to manually upload certificates
Change a client certificate for a user credential profileYou can change the certificate that you or a user has added to a user credential profile. The new certificatereplaces the existing certificate on the device.
1. On the menu bar, click Users > Managed devices.2. Search for a user account.3. In the search results, click the name of a user account.4. In the IT policy and profiles section, in the row for the user credential profile, click Update.5. Click Browse to locate the certificate file.6. Type a password for the certificate. For iOS devices, a password is required. For Android devices, you do not
have to provide the password in BlackBerry UEM if the device is running the latest version of BlackBerry UEMClient. If you don't specify the password, the user must enter the device password.
7. Click Save.
Related tasks
Create a user credential profile to manually upload certificates
Assign an app to a user account
If you need to control apps at the user level, you can assign apps or app groups to user accounts. When youassign an app to a user, the app is made available to any devices that the user has activated for that device type,and the app is listed in the work app catalog on the device.
You can also assign apps to users for device types that the user has not activated yet. If the user activates adifferent device type in the future, the proper apps are made available to that user's new device.
The same app can be assigned directly to the user account, or inherited from user groups or device groups. Thesettings for the app (for example, whether the app is required) are assigned based on priority: device groups havethe highest priority, then user accounts, then user groups.
Before you begin:
• Add the app to the available app list• Optionally, add the apps to an app group
1. On the menu bar, click Users > Managed devices. 2. Search for a user account.3. In the search results, click the name of a user account.4. In the Apps section, click .5. Select the check box beside the apps or app group that you want to assign to the user account.
| Users and groups | 257

6. Click Next.7. In the Disposition drop-down list for the app, perform one of the following actions:
• To require users to install the app, select Required.• To permit users to install and remove the app, select Optional.
Note: If the same app is assigned to a user account, a user group that the user belongs to, and the devicegroup the device belongs to, the disposition of the app assigned in the device group takes precedence.
8. For iOS devices, to assign per-app VPN settings to an app or app group, in the Per app VPN drop-down list forthe app or app group, select the settings to associate with the app or app group.
9. For iOS and Android devices, if there is an available app configuration, select the app configuration to assign tothe app.
10.If you are adding an iOS app, perform one of the following tasks:
Task Steps
If you have not added aVPP account or you arenot adding an iOS app
a. Click Assign.
If you are addingan iOS app and you haveadded at least one VPPaccount
a. Click Next.b. Select Yes if you want to assign a license to the iOS app. Select No, if you
do not want to assign a license or you do not have a license to assign to theapp.
c. If you have assigned a license to the app, in the App license drop-down list,select the VPP account to associate with the app.
d. In the Assign license to drop-down list, assign the license tothe User or Device. If no value is specified in the App license drop-down list,the Assign license to drop-down list is not available.
e. Click Assign.
Users must follow the instructions to enroll in your organization's VPP ontheir devices before they can install prepaid apps. Users have to completethis task once.
Note: If you grant access to more licenses than you have available, the firstusers who access the available licenses can install the app. If the app is arequired app that does not have an available license, you must obtain thelicense before the user can install the app or the user will be subject to anycompliance rules that you have assigned to the user.
Related reference
App behavior on Android devicesApp behavior on iOS devicesApp behavior on BlackBerry devices
Assign an app group to a user accountIf you need to control apps at the user level, you can assign apps or app groups to user accounts. When youassign an app to a user, the app is made available to any devices that the user has activated for that device type,and the app is listed in the work app catalog on the device.
| Users and groups | 258

You can also assign apps to users for device types that the user has not activated yet. If the user activates adifferent device type in the future, the proper apps are made available to that user's new device.
The same app can be assigned directly to the user account, or inherited from user groups or device groups. Thesettings for the app (for example, whether the app is required) are assigned based on priority: device groups havethe highest priority, then user accounts, then user groups.
Before you begin: Add the apps to an app group.
1. On the menu bar, click Users > Managed devices. 2. Search for a user account.3. In the search results, click the name of a user account.4. In the Apps section, click .5. Select the check box beside the apps or app group that you want to assign to the user account.6. Click Next.7. In the Disposition drop-down list for the app, perform one of the following actions:
• To require users to install the app, select Required.• To permit users to install and remove the app, select Optional.
Note: If the same app is assigned to a user account, a user group that the user belongs to, and the devicegroup the device belongs to, the disposition of the app assigned in the device group takes precedence.
8. For iOS devices, to assign per-app VPN settings to an app or app group, in the Per app VPN drop-down list forthe app or app group, select the settings to associate with the app or app group.
9. If you are adding an iOS app, perform one of the following tasks:
Task Steps
If you have not added aVPP account or you arenot adding an iOS app
a. Click Assign.
If you are addingan iOS app and you haveadded at least one VPPaccount
a. Click Next.b. Select Yes if you want to assign a license to the iOS app. Select No, if you
do not want to assign a license or you do not have a license to assign to theapp.
c. If you have assigned a license to the app, in the App license drop-down list,select the VPP account to associate with the app.
d. In the Assign license to drop-down list, assign the license tothe User or Device. If no value is specified in the App license drop-down list,the Assign license to drop-down list is not available.
e. Click Assign.
Users must follow the instructions to enroll in your organization's VPP ontheir devices before they can install prepaid apps. Users have to completethis task once
Note: If you grant access to more licenses than you have available, the firstusers who access the available licenses can install the app. If the app is arequired app that does not have an available license, you must obtain thelicense before the user can install the app or be subject to any compliance rulesthat you have assigned to the user.
| Users and groups | 259

Related reference
App behavior on Android devicesApp behavior on iOS devicesApp behavior on BlackBerry devices
Assign a BlackBerry OS IT policy, profile, or software configuration to a user accountBefore you begin:
• Verify that you enabled BlackBerry OS device activation for the user account. For more information, downloadthe Administration Guide at help.blackberry.com/detectLang/bes5-for-exchange/.
• Create a BlackBerry OS IT policy.• Create a software configuration.• Create a Wi-Fi or VPN profile for BlackBerry OS devices. For more information, download the Administration
Guide at help.blackberry.com/detectLang/bes5-for-exchange/.• Create a push or pull access control rule for BlackBerry OS devices. For more information, download the
Administration Guide at help.blackberry.com/detectLang/bes5-for-exchange/.
1. On the menu bar, click Users.2. Search for a user account.3. In the search results, click the name of the user account.4. In the IT policy, profiles, and software configurations section, click .5. Click IT policy, Wi-Fi, VPN, Push access control rule, Pull access control rule, or Software configuration.6. In the drop-down list, click the name of the IT policy, profile, access control rule, or software configuration that
you want to assign to the user.7. Click Assign.
Related concepts
Controlling BlackBerry OS device capabilities using IT policies
Related tasks
Assign a BlackBerry OS IT policy, profile, or software configuration to a user group
View the resolved BlackBerry OS IT policy rules that are assigned to a user accountIf a user is a member of multiple user groups that have different BlackBerry OS IT policies, BlackBerry UEMresolves conflicting IT policies or IT policy rule settings using the reconciliation method that you specified in theBlackBerry OS Settings. You can view the results of the BlackBerry OS IT policy reconciliation and the settingsresolved for each rule in the Advanced settings on the Summary tab. If an IT policy rule is the same in the multipleBlackBerry OS IT policies that are applied to the user account, the results do not display the IT policy rule.
1. On the menu bar, click Users.2. Search for a user account.3. In the search results, click the name of the user account.4. In the IT policy, profiles, and software configurations section, click Advanced settings.5. Click the Policies tab.6. In the Resolved IT policy name section, click the name of the BlackBerry OS IT policy.
| Users and groups | 260

Creating and managing user groupsA user group is a collection of related users who share common properties. Administering users as a group ismore efficient than administering individual users because properties can be added, changed, or removed for allmembers of the group at the same time.
Users can belong to more than one group at a time. You can assign an IT policy, profiles, and apps in themanagement console when you create or update the settings for a user group. If the BlackBerry UEM domainsupports BlackBerry OS (version 5.0 to 7.1) devices, you can also assign a BlackBerry OS IT policy, profiles, andsoftware configurations.
You can create two types of user groups:
• Directory-linked groups link to groups in your company directory. Only directory user accounts can bemembers of a directory-linked group.
• Local groups are created and maintained in BlackBerry UEM and can have local user accounts and directoryuser accounts assigned to them.
After you create user groups, you can define a group as a member of another group. When you nest a group withina user group, members of the nested group inherit the properties of the user group. You create and maintain thenesting structure in BlackBerry UEM and you can nest both directory-linked groups and local groups within eachtype of user group.
Creating directory-linked groupsYou can create groups in BlackBerry UEM that are linked to one or more groups in your company directory.These BlackBerry UEM groups are called "directory-linked groups." Only directory user accounts can be membersof a directory-linked group.
At a scheduled interval, BlackBerry UEM automatically synchronizes the membership of a directory-linked groupwith its associated company directory group (or groups). Users that were added or removed from the companydirectory group are added or removed from the directory-linked group.
Note: When users are moved into a company directory group that is linked to a directory-linked group, they areassigned the policies, profiles, and apps that are assigned to the group. When users are removed from a companydirectory group that is linked to a directory-linked group, the policies, profiles, and app are removed from the user.
Each directory-linked group can link to only a single company directory. For example, if BlackBerry UEM hastwo Microsoft Active Directory connections (A and B), and you create a directory-linked group that is linked toconnection A, you can link only to directory groups from connection A. You must create new directory linkedgroups for any other directory connections.
To enable this feature, see "Enable directory-linked groups" in the Configuration content.
Synchronizing directory-linked groups does not add or delete users in BlackBerry UEM. To allow BlackBerryUEM to create user accounts when new company directory users are created, you must enable and configureonboarding. For more information, see "Enabling onboarding" in the Configuration content.
Create a directory-linked group
Before you begin: Enable directory-linked groups. For instructions, see the Configuration content.
1. On the menu bar, click Groups.2.
Click .3. Type the group name.4. In the Linked directory groups section, perform the following actions:
| Users and groups | 261
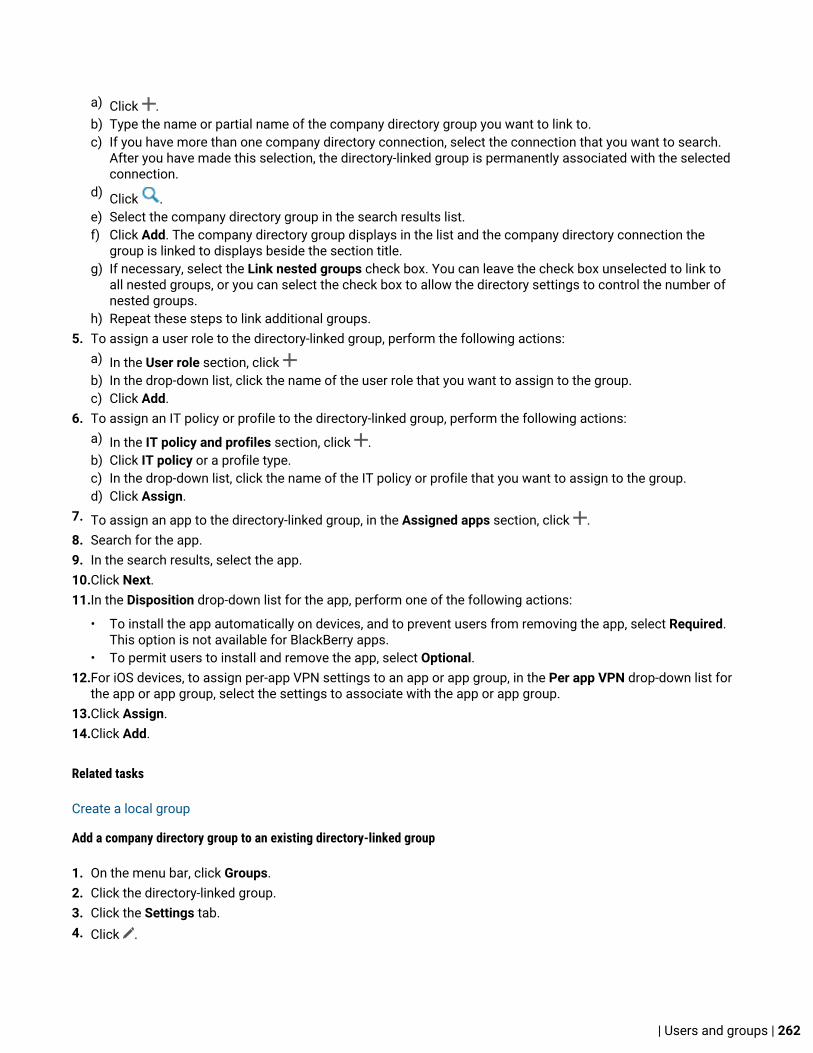
a) Click .b) Type the name or partial name of the company directory group you want to link to.c) If you have more than one company directory connection, select the connection that you want to search.
After you have made this selection, the directory-linked group is permanently associated with the selectedconnection.
d) Click .e) Select the company directory group in the search results list.f) Click Add. The company directory group displays in the list and the company directory connection the
group is linked to displays beside the section title.g) If necessary, select the Link nested groups check box. You can leave the check box unselected to link to
all nested groups, or you can select the check box to allow the directory settings to control the number ofnested groups.
h) Repeat these steps to link additional groups.5. To assign a user role to the directory-linked group, perform the following actions:
a) In the User role section, click b) In the drop-down list, click the name of the user role that you want to assign to the group.c) Click Add.
6. To assign an IT policy or profile to the directory-linked group, perform the following actions:a) In the IT policy and profiles section, click .b) Click IT policy or a profile type.c) In the drop-down list, click the name of the IT policy or profile that you want to assign to the group.d) Click Assign.
7. To assign an app to the directory-linked group, in the Assigned apps section, click .8. Search for the app.9. In the search results, select the app.10.Click Next.11.In the Disposition drop-down list for the app, perform one of the following actions:
• To install the app automatically on devices, and to prevent users from removing the app, select Required.This option is not available for BlackBerry apps.
• To permit users to install and remove the app, select Optional. 12.For iOS devices, to assign per-app VPN settings to an app or app group, in the Per app VPN drop-down list for
the app or app group, select the settings to associate with the app or app group. 13.Click Assign.14.Click Add.
Related tasks
Create a local group
Add a company directory group to an existing directory-linked group
1. On the menu bar, click Groups.2. Click the directory-linked group.3. Click the Settings tab.4. Click .
| Users and groups | 262
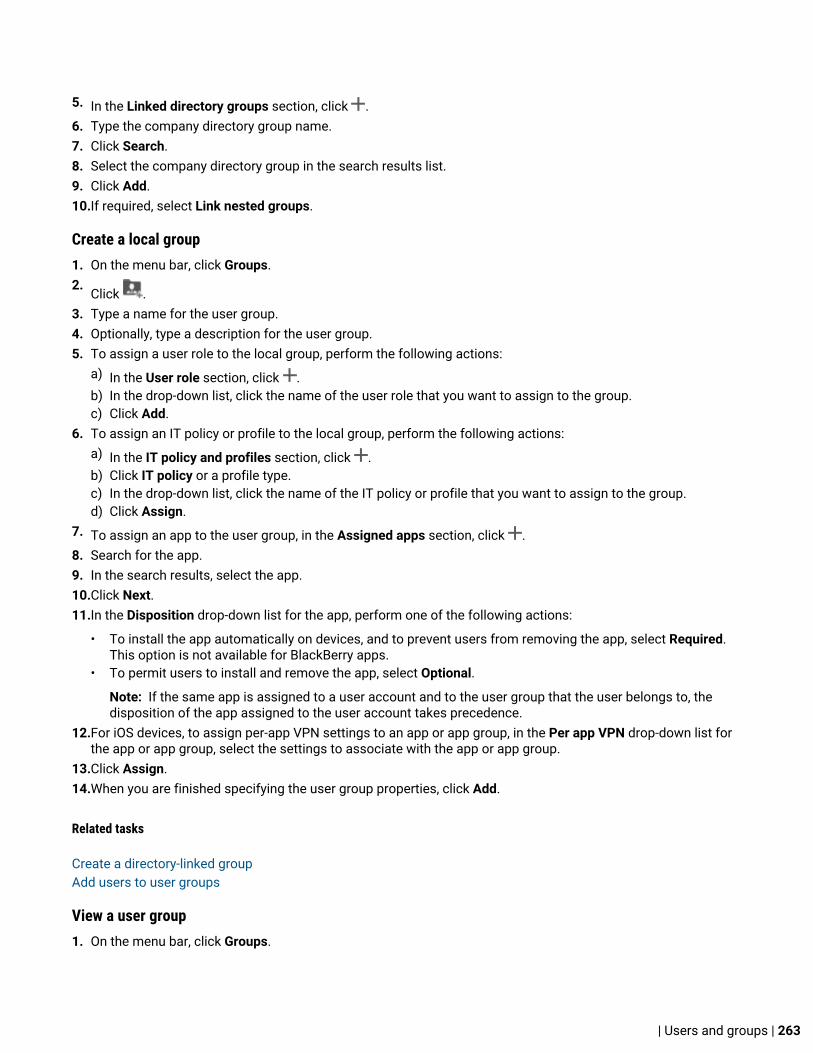
5. In the Linked directory groups section, click .6. Type the company directory group name.7. Click Search.8. Select the company directory group in the search results list.9. Click Add.10.If required, select Link nested groups.
Create a local group1. On the menu bar, click Groups.2.
Click .3. Type a name for the user group.4. Optionally, type a description for the user group.5. To assign a user role to the local group, perform the following actions:
a) In the User role section, click .b) In the drop-down list, click the name of the user role that you want to assign to the group.c) Click Add.
6. To assign an IT policy or profile to the local group, perform the following actions:a) In the IT policy and profiles section, click .b) Click IT policy or a profile type.c) In the drop-down list, click the name of the IT policy or profile that you want to assign to the group.d) Click Assign.
7. To assign an app to the user group, in the Assigned apps section, click .8. Search for the app.9. In the search results, select the app.10.Click Next.11.In the Disposition drop-down list for the app, perform one of the following actions:
• To install the app automatically on devices, and to prevent users from removing the app, select Required.This option is not available for BlackBerry apps.
• To permit users to install and remove the app, select Optional.
Note: If the same app is assigned to a user account and to the user group that the user belongs to, thedisposition of the app assigned to the user account takes precedence.
12.For iOS devices, to assign per-app VPN settings to an app or app group, in the Per app VPN drop-down list forthe app or app group, select the settings to associate with the app or app group.
13.Click Assign.14.When you are finished specifying the user group properties, click Add.
Related tasks
Create a directory-linked groupAdd users to user groups
View a user group1. On the menu bar, click Groups.
| Users and groups | 263

2. Search for a user group.3. In the search results, click the name of the user group.4. To view the members of a user group, perform the following actions:
a) Click Users to view the assigned user accounts.b) Click Nested groups to view the assigned nested groups.
5. Click Settings to view the following information about a user group:
• Linked directory groups (available for a directory-linked group)• Assigned BlackBerry OS IT policy, profiles, and software configurations (available if the BlackBerry UEM
domain supports BlackBerry OS devices)• Assigned IT policy, profiles, and apps
Change the name of a user group
1. On the menu bar, click Groups.2. Search for the user group you want to view.3. Click the user group.4. Click .5. Change the name of the user group.6. Optionally, change the description of the user group.7. Click Save.
Delete a user groupWhen you delete a user group, the users in the group are not deleted. The group properties that are assigned tothe user are removed or changed.
1. On the menu bar, click Groups.2. Search for the user group that you want to delete.3. Click the user group.4. Click .5. Click Delete.
Add nested groups to a user groupWhen you add a nested group to a user group, any groups that belong to the nested group are also added.
Before you begin: Create user groups. You can create directory-linked groups or local groups.
1. On the menu bar, click Groups.2. Search for a user group.3. In the search results, click the name of the user group.4. Click the Nested groups tab.5. Click .6. Select one or more available groups.7. Click Add.
Remove nested groups from a user groupYou can remove nested groups that are assigned directly to a user group.
| Users and groups | 264

1. On the menu bar, click Groups.2. Search for a user group.3. In the search results, click the name of the user group.4. Click the Nested groups tab.5. Click beside each nested group that you want to remove.
Assign a profile or IT policy to a user group1. On the menu bar, click Groups > User.2. In the group list, click the name of the user group.3. In the Assigned profile section, click .4. Click IT policy or a profile type.5. In the drop-down list, click the name of the profile or IT policy that you want to assign to the group.6. For IT policies and ranked profile types, if the profile type that you selected in step 6 is already assigned
directly to the group, click Replace. Otherwise, click Assign.
Related concepts
How BlackBerry UEM chooses which IT policy to assignAssigning profilesHow BlackBerry UEM chooses which profiles to assign
Related tasks
Create an IT policyCreate a device SR requirements profile for BlackBerry 10 devicesAssign a profile or IT policy to a user account
Assign an app to a user group
When you assign apps to a user group, the apps are made available to any applicable devices that the membersof the user group have activated. You can also assign apps to user groups for device types that the membersof the user group have not activated yet. This makes sure that if any member of the group activates a differentdevice type in the future, the proper apps are made available to new devices.
If a user account is a member of multiple user groups that have the same apps or app groups assigned to them,only one instance of the app or app group appears in the list of assigned apps for that user account. The sameapp can be assigned directly to the user account, or inherited from user groups or device groups. The settings forthe app (for example, whether the app is required) are assigned based on priority. Device groups have the highestpriority, then user accounts, then user groups.
Before you begin:
• Add the app to the available app list.• Optionally, add the apps to an app group.
1. On the menu bar, click Groups > User.2. In the group list, click the name of the user group.3. In the Assigned apps section, click .
| Users and groups | 265

4. In the search field, type the app name, vendor, or URL of the app that you want to add.5. Select the check box beside the apps or app group that you want to assign to the user group.6. Click Next.7. In the Disposition drop-down list for the app, perform one of the following actions:
• To require users to install the app, select Required.• To permit users to install and remove the app, select Optional.
Note: If the same app is assigned to a user account, a user group that the user belongs to, and the devicegroup the device belongs to, the disposition of the app assigned in the device group takes precedence.
8. For iOS devices, to assign per-app VPN settings to an app or app group, in the Per app VPN drop-down list forthe app or app group, select the settings to associate with the app or app group.
9. For iOS and Android devices, if there is an available app configuration, select the app configuration to assign tothe app.
10.Perform one of the following tasks:
Task Steps
If you have not added aVPP account or you arenot adding an iOS app
a. Click Assign.
If you are addingan iOS app and you haveadded at least one VPPaccount
a. Click Next.b. Select Yes if you want to assign a license to the iOS app. Select No, if you
do not want to assign a license or you do not have a license to assign to theapp.
c. If you have assigned a license to the app, in the App license drop-down list,select the VPP account to associate with the app.
d. In the Assign license to drop-down list, assign the license tothe User or Device. If no value is specified in the App license drop-down list,the Assign license to drop-down list is not available.
e. Click Assign.
Users must follow the instructions to enroll in your organization's VPP on theirdevices before they can install prepaid apps. Users have to complete this taskonce.
Note: If you grant access to more licenses than you have available, the firstusers who access the available licenses can install the app. If the app is arequired app that does not have an available license, you must obtain thelicense before the user can install the app or the user will be subject to anycompliance rules that you have assigned to the user.
Related reference
App behavior on Android devicesApp behavior on iOS devicesApp behavior on BlackBerry devices
Assign an app group to a user group
| Users and groups | 266

When you assign an app group to a user group, the apps in the app group are made available to any applicabledevices that the members of the user group have activated. You can also assign apps to user groups for devicetypes that the members of the user group have not activated yet. This makes sure that if any member of the groupactivates a different device type in the future, the proper apps are made available to new devices.
If a user account is a member of multiple user groups that have the same apps or app groups assigned to them,only one instance of the app group appears in the list of assigned apps for that user account. The same app canbe assigned directly to the user account, or inherited from user groups or device groups. The settings for the app(for example, whether the app is required) are assigned based on priority: device groups have the highest priority,then user accounts, then user groups.
Before you begin:
• Add the apps to an app group.
1. On the menu bar, click Groups. 2. On the User groups tab, click the name of a group.3. In the Assigned apps section, click .4. In the search field, type the name of the app group that you want to add.5. Select the check box beside the apps or app group that you want to assign to the user group.6. Click Next.7. In the Disposition drop-down list for the app, perform one of the following actions:
• To require users to install the app, select Required.• To permit users to install and remove the app, select Optional.
Note: If the same app is assigned to a user account, a user group that the user belongs to, and the devicegroup the device belongs to, the disposition of the app assigned in the device group takes precedence.
8. For iOS devices, to assign per-app VPN settings to an app or app group, in the Per app VPN drop-down list forthe app or app group, select the settings to associate with the app or app group.
9. Perform one of the following tasks:
Task Steps
If you have not added aVPP account or you arenot adding an iOS app
a. Click Assign.
| Users and groups | 267

Task Steps
If you are addingan iOS app and you haveadded at least one VPPaccount
a. Click Next.b. Select Yes if you want to assign a license to the iOS app. Select No, if you
do not want to assign a license or you do not have a license to assign to theapp.
c. If you have assigned a license to the app, in the App license drop-down list,select the VPP account to associate with the app.
d. In the Assign license to drop-down list, assign the license tothe User or Device. If no value is specified in the App license drop-down list,the Assign license to drop-down list is not available.
e. Click Assign.
Users must follow the instructions to enroll in your organization's VPP on theirdevices before they can install prepaid apps. Users have to complete this taskonce.
Note: If you grant access to more licenses than you have available, the firstusers who access the available licenses can install the app. If the app is arequired app that does not have an available license, you must obtain thelicense before the user can install the app or the user will be subject to anycompliance rules that you have assigned to the user.
Related reference
App behavior on Android devicesApp behavior on iOS devicesApp behavior on BlackBerry devices
Assign a BlackBerry OS IT policy, profile, or software configuration to a user groupBefore you begin:
• Create a BlackBerry OS IT policy. For more information, download the Administration Guide athelp.blackberry.com/detectLang/bes5-for-exchange/.
• Create a software configuration.• Create a Wi-Fi or VPN profile for BlackBerry OS devices. For more information, download the Administration
Guide at help.blackberry.com/detectLang/bes5-for-exchange/.• Create a push or pull access control rule for BlackBerry OS devices. For more information, download the
Administration Guide at help.blackberry.com/detectLang/bes5-for-exchange/.
1. On the menu bar, click Groups.2. Search for a user group.3. In the search results, click the name of the user group.4. Click the Managed devices tab.5. In the IT policy, profiles, and software configurations section, click .6. Click IT policy, Wi-Fi, VPN, Push access control rule, Pull access control rule, or Software configuration.7. In the drop-down list, click the name of the IT policy, profile, access control rule, or software configuration that
you want to assign to the group.8. Click Assign.
| Users and groups | 268

Related concepts
Controlling BlackBerry OS device capabilities using IT policies
Related tasks
Assign a BlackBerry OS IT policy, profile, or software configuration to a user account
| Users and groups | 269

Creating and managing shared device groupsYou can allow multiple users to share an iOS device and configure settings that are specific to each user or thesame for all users. You can customize terms of use that users must accept to check out shared devices. A usercan check out a device using local or Microsoft Active Directory authentication. When they are done using it, theycan check it in and the device is available for the next user. Shared devices remain managed by BlackBerry UEMduring the check-out and check-in process.
This feature was designed for supervised devices with the following configuration:
• App lock mode enabled• VPP apps assigned
Note: This feature does not support BlackBerry Dynamics apps. The same BlackBerry Dynamics profile must beassigned to the user account that owns the shared device group and also to the shared device group. You mustverify that the "Enable UEM Client to enroll in BlackBerry Dynamics" option is not selected in the profile.
Related concepts
Limiting devices to a single appManaging Apple VPP accounts
Create a shared device groupWhen you create a shared device group, a local user account is created. This local user account owns the shareddevice group.
1. On the menu bar, click Users > Shared device groups.2. Click beside the search bar.3. Type a name for the shared device group.4. Optionally, type a description for the shared device group.5. Type the username for device activation.6. To require users to accept terms of service when they check out a shared device, perform the following
actions:a) Select Enable terms of service.b) Type the terms of service text.
7. In the Granted users section, search for a user and click their name in the list of search results.8. Repeat step 7 for each user that you want to add.9. Click Save.
After you finish: To enable UEM Client app lock, edit the shared device group information.
Activate a shared deviceBefore users can check out shared devices, you must activate them.
Before you begin: Verify that the BlackBerry Dynamics profile that is assigned to the shared device group doesnot have the Enable UEM Client to enroll in BlackBerry Dynamics option selected. Verify that the same profile isalso assigned to the user account that owns the shared device group.
1. On the menu bar, click Users > Shared devices.2. Search for a shared device group.
| Users and groups | 270

3. In the search results, click the name of the shared device group.4. Click Device activation to view the server address and activation username and password.5. Use the device activation information to activate the device. For help with activation, see Activate an iOS
device.
After you finish: Verify that the activated device is displayed in the Shared devices section. BlackBerry UEM usesthe group name to generate the device name and adds a number. For example, if the group name is Example, thefirst device that you activate is named Example 01.
View the check-out history for a userYou can view the list of shared devices that a user has used. Each record indicates the time a device was checkedout and checked in and the list displays the last 50 records for a user. The check-out history for a user is updatedwhen they check in a device.
1. On the menu bar, click Users > Shared devices.2. Search for a shared device group.3. In the search results, click the name of the shared device group.4. In the Granted users section, click View in the Checkout history column for the user.
Edit the user membership for a shared device groupUser membership for a shared device group specifies the list of users granted access to the shared devicesactivated for the group. Users can belong to one or more shared device groups.
1. On the menu bar, click Users > Shared devices.2. Search for a shared device group.3. In the search results, click the name of the shared device group.4. In the Granted users section, perform any of the following actions:
• To add a user to the group, search for the user and click their name in the list of search results.• To remove a user from the group, click in the Action column for the user and click Submit.
5. Repeat step 4 for each user that you want to add or remove.
Remove a device from a shared device groupWhen you remove a device from a shared device group, BlackBerry UEM sends the Delete only work datacommand to the device.
1. On the menu bar, click Users > Shared devices.2. Search for a shared device group.3. In the search results, click the name of the shared device group.4. In the Shared devices section, perform the following actions:
a) Click in the Action column for the device.b) Click Delete only work data.
5. Repeat step 4 for each device that you want to remove.
Delete a shared device groupBefore you begin: Remove all devices in the shared device group.
1. On the menu bar, click Users > Shared devices.2. Search for a shared device group.
| Users and groups | 271

3. In the search results, click the name of the shared device group.4. Click .5. Click Delete.
Assign an app to a shared device groupWhen you assign apps or app groups to a shared device group, the apps are made available when a user checksout a device that is activated for the group, and the apps are removed when the user checks in the device. If youwant any apps to remain on devices when they are checked in, you must also assign the apps to the user accountthat owns the shared device group.
Before you begin:
• Add the app to the available app list.• Optionally, add the apps to an app group.
1. On the menu bar, click Users > Shared devices.2. Search for a shared device group.3. In the search results, click the name of the shared device group.4. In the Assigned apps section, click .5. In the search field, type the app name, vendor, or URL of the app that you want to add.6. Select the check box beside the apps or app group that you want to assign to the user group.7. Click Next.8. In the Disposition drop-down list for the app, perform one of the following actions:
• To require users to install the app, select Required.• To permit users to install and remove the app, select Optional.
9. To assign per-app VPN settings to an app or app group, in the Per-app VPN drop-down list for the app or appgroup, select the settings to associate with the app or app group.
10.If there is an available app configuration, select the app configuration to assign to the app.11.Click Next.12.Select Yes if you want to assign a license to the app. Select No if you do not want to assign a license or you do
not have a license to assign to the app.13.If you have assigned a license to the app, in the App license drop-down list, select the VPP account to
associate with the app.14.In the Assign license to drop-down list, assign the license to the User or Device. If no value is specified in the
App license drop-down list, the Assign license to drop-down list is not available.15.Click Assign.
Users must follow the instructions to enroll in your organization's VPP on their devices before they can installprepaid apps. Users have to complete this task once.
Note: If you grant access to more licenses than you have available, the first users who access the availablelicenses can install the app. If the app is a required app that does not have an available license, you mustobtain the license before the user can install the app or the user will be subject to any compliance rules thatyou have assigned to the user.
Assign an IT policy or a profile to a shared device groupWhen you assign an IT policy or a profile to a shared device group, they are sent when a user checks out a devicethat is activated for the group and removed when the user checks in the device. If you want an IT policy or profile
| Users and groups | 272

to remain on devices when they are checked in, you must also assign them to the user account that owns theshared device group.
Before you begin:
• If necessary, Create an IT policy.• If necessary, create profiles. For more information, see Profiles reference and Using variables in profiles.
1. On the menu bar, click Users > Shared devices.2. Search for a shared device group.3. In the search results, click the name of the shared device group.4. In the Assigned IT policy and profiles section, click .5. Click IT policy or a profile type.6. In the drop-down list, click the name of the IT policy or profile that you want to assign to the group.7. Perform any of the following tasks:
Task Steps
Assign an IT policy a. If an IT policy is already assigned directly to the group, clickReplace. Otherwise, click Assign.
Assign a ranked profile type a. If the profile type that you selected in step 5 is already assigneddirectly to the group, click Replace. Otherwise, click Assign.
Assign a non-ranked profile type a. Click Assign.
Creating device groupsA device group is a group of devices that have common attributes, such as device model and manufacturer,OS type and version, service provider, and whether the device is owned by your organization or by theuser. BlackBerry UEM automatically moves devices into or out of the device group based on the device attributesthat you define.
You can use device groups to apply different sets of policies, profiles, and apps to devices assigned to a singleuser. For example, you can use a device group to apply a specific IT policy to all devices running BlackBerry 10 OS,or to all HTC EVO devices running Android OS 4.0 or later on the T-Mobile network.
Policies, profiles, and apps assigned to a device group take priority over those assigned to a user or a user group.However, you cannot assign activation profiles or user certificates to device groups.
Device groups do not include BlackBerry OS (version 5.0 to 7.1) devices. Even if you create a device group querythat would logically include your BlackBerry OS devices, they are not included in the device group.
Create a device group1. On the menu bar, click Groups > Device.2.
Click .3. Type a name for the device group.4. In the Scope to user groups section, you can select one or more user groups to apply the device group to. If
you don't select any user groups, the device group applies to all activated devices.5. In the Device query section, in the first drop-down list, click Any or All.
| Users and groups | 273

If you select All, devices must match all the attributes you define to be included in the device group. If youselect Any, devices need to match only one of the attributes you define to be included in the device group.
6. In the Device query section, perform the following actions:
• In the Attribute drop-down list, click an attribute.• In the Operator drop-down list, click an operator.• In the Value drop-down list, click or type a value.
You can add or remove rows to focus your query.7. Click Next.8. To assign an IT policy or profile to the device group, perform the following actions:
a) In the IT policy and profiles section, click .b) Click IT policy or a profile type.c) In the drop-down list, click the name of the IT policy or profile that you want to assign to the group.d) Click Assign.
9. To assign an app or app group to the device group, in the Assigned apps section, click .
Note: You cannot add BlackBerry Dynamics apps to device groups because entitlements can only be grantedto users. Any BlackBerry Dynamics included in app groups that you add to device groups will not be assignedto users.
Note: You cannot add Android apps that have an optional disposition to device groups in a BlackBerry UEMenvironment that supports Android work profiles. Google Play for Work cannot assign apps to device IDs.Google Play for Work can assign apps only to Google User IDs. If you add Android apps that have a requireddisposition to a device group, the apps will be installed, but the apps will not be listed in Google Play for Work.
10.Search for the app.11.In the search results, select the app.12.Click Next.13.In the Disposition drop-down list for the app or app group, perform one of the following actions:
• If the app is an iOS or Android app: To require users to follow the actions defined for apps in thecompliance profile assigned to them, select Required.
• If the app is a Windows Phone app: To automatically install an internal app on assigned devices, selectRequired. If users uninstall the required internal app, they must follow the actions defined in the complianceprofile assigned to them. For apps added from the Windows Store, select Required so that users mustfollow the actions defined for apps in the compliance profile assigned to them. This applies only to devicesrunning Windows Phone 8.1 or later.
• If the app is an internal BlackBerry 10 app: To automatically install an internal app on assigned devices,select Required. This option is only available for internal BlackBerry 10 apps. Apps added from theBlackBerry World storefront can only be optional.
• If the app group supports Android work profiles, the disposition can only be set as required.• To permit users to install and remove the app, select Optional.
Note: The same app can be assigned directly to the user account, or inherited from user groups or devicegroups. The settings for the app (for example, whether the app is required) are assigned based on priority:device groups take precedence over user accounts and user groups.
14.For iOS devices, to assign per-app VPN settings to an app or app group, in the Per app VPN drop-down list forthe app or app group, select the settings to associate with the app or app group.
15.For iOS and Android devices, if there is an available app configuration, select the app configuration to assign tothe app.
16.Click Assign.
| Users and groups | 274

17.When you are finished specifying the device group properties, click Save.
Edit a device group1. On the menu bar, click Groups > Device.2. Click the name of a device group that you want to edit.3. Click .4. Make the necessary edits.5. Click Save.
Defining parameters for device groupsWhen you create a device group, you configure a device query that includes one or more attribute statements.You can specify whether a device belongs to the device group if it matches any attribute statement or only if itmatches all the attribute statements. Each attribute statement contains an attribute, an operator, and a value.
Attribute Operators Values
Carrier • =• !=• Starts with
In the text field, type the name of a service provider,such as T-Mobile or Bell.
BlackBerry Dynamicsenabled
• =• !=
In the drop-down list, choose one of the followingoptions:
• Disabled• Enabled
Manufacturer • =• !=• Starts with
In the text field, type the name of a devicemanufacturer, such as Apple or BlackBerry.
Model • =• !=• Starts with
In the text field, type the name of a device model,such as iPhone 5S or BlackBerry Classic.
OS • =• !=
In the drop-down list, choose one of the followingoptions:
• Android• BlackBerry 10• iOS• Windows
OS version • =• !=• >=• <=
In the text field, type an OS version, such as 7.1.1 or10.3. If you use this attribute, you should also specifythe OS attribute.
| Users and groups | 275

Attribute Operators Values
Ownership • =• !=
In the drop-down list, choose one of the followingoptions:
• Work• Personal• Not specified
Activation type • =• !=
In the drop-down list, choose an activation type.The list contains the same activation types that areavailable for assignment in your activation profiles.
KNOX Workspace • =• !=• Starts with
In the text-field, type a Samsung KNOX Workspaceversion, such as 2.2.
View a device group
1. On the menu bar, click Groups > Devices.2. Search for the device group you want to view.3. Click the device group.4. Perform one of the following actions:
• To view the devices assigned to the device group, click the Devices tab.• To view the user groups, device queries, IT policies, profiles, or apps assigned to the device group, select
the Settings tab.
Change the name of a device group
1. On the menu bar, click Groups > Device.2. Search for the device group that you want to view.3. Click the device group.4. Click .5. Change the name of the device group.6. Click Next.7. Click Save.
Delete a device groupTo be able to delete a device group, you must have permission to manage all of the user groups that the devicegroup has been applied to.
1. On the menu bar, click Groups > Device.2. Search for the device group that you want to view.3. Click the device group.4. Click .5. Click Delete.
| Users and groups | 276
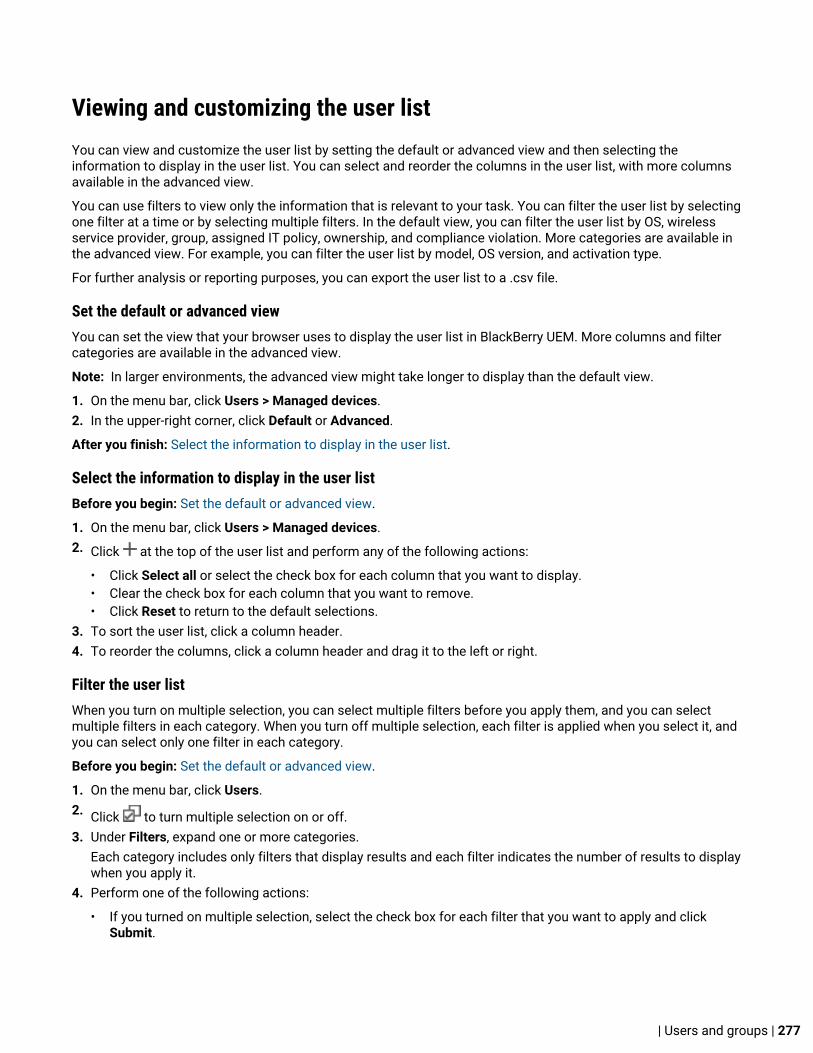
Viewing and customizing the user listYou can view and customize the user list by setting the default or advanced view and then selecting theinformation to display in the user list. You can select and reorder the columns in the user list, with more columnsavailable in the advanced view.
You can use filters to view only the information that is relevant to your task. You can filter the user list by selectingone filter at a time or by selecting multiple filters. In the default view, you can filter the user list by OS, wirelessservice provider, group, assigned IT policy, ownership, and compliance violation. More categories are available inthe advanced view. For example, you can filter the user list by model, OS version, and activation type.
For further analysis or reporting purposes, you can export the user list to a .csv file.
Set the default or advanced viewYou can set the view that your browser uses to display the user list in BlackBerry UEM. More columns and filtercategories are available in the advanced view.
Note: In larger environments, the advanced view might take longer to display than the default view.
1. On the menu bar, click Users > Managed devices.2. In the upper-right corner, click Default or Advanced.
After you finish: Select the information to display in the user list.
Select the information to display in the user listBefore you begin: Set the default or advanced view.
1. On the menu bar, click Users > Managed devices.2. Click at the top of the user list and perform any of the following actions:
• Click Select all or select the check box for each column that you want to display.• Clear the check box for each column that you want to remove.• Click Reset to return to the default selections.
3. To sort the user list, click a column header.4. To reorder the columns, click a column header and drag it to the left or right.
Filter the user listWhen you turn on multiple selection, you can select multiple filters before you apply them, and you can selectmultiple filters in each category. When you turn off multiple selection, each filter is applied when you select it, andyou can select only one filter in each category.
Before you begin: Set the default or advanced view.
1. On the menu bar, click Users.2. Click to turn multiple selection on or off.3. Under Filters, expand one or more categories.
Each category includes only filters that display results and each filter indicates the number of results to displaywhen you apply it.
4. Perform one of the following actions:
• If you turned on multiple selection, select the check box for each filter that you want to apply and clickSubmit.
| Users and groups | 277

• If you turned off multiple selection, click the filter that you want to apply.5. Optionally, in the right pane, click Clear all or click for each filter that you want to remove.
Sort the user listYou can sort the user list alphabetically by any of the categories displayed in the column headers.
Before you begin: Set the default or advanced view.
1. On the menu bar, click Users and select the tab you want to view.2. If necessary, filter the user list.3. Click a column header. Click the column header again to sort in reverse order.
Export the user list to a .csv fileWhen you export the user list to a .csv file, the file includes all columns available in the default or advanced view.
Before you begin: Set the default or advanced view.
1. On the menu bar, click Users > Managed devices.2. If necessary, filter the user list.3. Perform one of the following actions:
• Select the check box at the top of the user list to select all users.• Select the check box for each user that you want to include in the file. You can use Shift+click to select
multiple users.4. Click and save the file.
Related tasks
Filter the user list
Change the device ownership labelEach activated device in BlackBerry UEM has a label that indicates whether the device is owned by yourorganization, the user, or not specified. The default value for this label comes from the device ownership setting inthe activation profile. You can edit the ownership label at any time. To change this setting for multiple devices at atime, see Send a bulk command.
The device ownership label is useful if you want to filter the user list using the device ownership setting. For moreinformation, see Filter the user list.
1. On the menu bar, click Users > Managed devices.2. Search for a user account.3. In the search results, click the name of the user account.4. Click the device tab.5. In the activated device section, beside the ownership setting, click Edit.6. From the drop-down list, select one of the following options:
• Work• Personal• Not specified
7. Click Save.
| Users and groups | 278

Device activationWhen you activate a device, you associate the device with BlackBerry UEM so that you can manage devices andusers can access work data on their devices.
When a device is activated, you can send IT policies and profiles to control the available features and managethe security of work data. You can also assign apps for the user to install. Depending on how much control theselected activation type allows, you may also be able to protect the device by restricting access to certain data,remotely setting passwords, locking the device, or deleting data.
You can assign activation types to accommodate the requirements of devices owned by your organizationand devices owned by users. Different activation types give you different degrees of control over the work andpersonal data on devices, ranging from full control over all data to specific control over work data only.
Steps to activate devicesWhen you activate devices, you perform the following actions.
Step Action
Verify that all activation requirements are met.
Configure the default activation settings.
If applicable, review the following information:
• If you plan to support Android Enterprise devices, see Supporting AndroidEnterprise activations.
• If you plan to support Windows 10 devices, see Supporting Windows 10 activations.
Update the template for the activation email.
Create an activation profile and assign it to a user account or to a group that the userbelongs to.
Set an activation password for the user.
Requirements: ActivationFor all devices:
• An available license in BlackBerry UEM for the device that you want to activate. For more information aboutlicenses, see the Licensing content.
• A working wireless connection
| Device activation | 279

For iOS and Android devices:
• The latest version of the BlackBerry UEM Client app installed on the device
For Windows 10 and Windows 10 Mobile devices:
• A BlackBerry Enterprise Server Root RSA certificate installed on the device• For devices that use a proxy configuration, a proxy that does not require authentication. For more information,
see https://docs.microsoft.com/en-us/windows/client-management/mdm/new-in-windows-mdm-enrollment-management
• For computers, Windows 10 Home has only limited support.
For "work space only" on Android Enterprise devices:
• A Google activation code
For BlackBerry OS (version 5.0 to 7.1) devices:
• A user account in a directory on the work mail server that the BlackBerry OS mail server connects to • BlackBerry OS device activation enabled for the user account
Note: Users can watch a video on how to activate their devices.
Managing activation passwordsYou can have some control over the number of devices that users can activate by managing the activationpasswords that are sent to users.
The following are examples of how you can manage activation passwords:
• When you set activation passwords for users, you can do the following:
• Have BlackBerry UEM autogenerate an activation password or you can specify an activation password.• Specify how long the activation password is valid (in minutes or days).• Specify that the activation period expires as soon as the user activates a device, effectively limiting the
number of devices that a user can activate with that password to one.
For more information, see Set an activation password and send an activation email message.• You can create multiple passwords for a user and pair the passwords with specific activation profiles. For
more information, see Allowing users to activate multiple devices with different activation types.• If you allow users to set activation passwords in BlackBerry UEM Self-Service, users can create activation
passwords whenever needed, but they can activate only the number of devices that are specified in the theactivation profile. For more information, see Allow users to set activation passwords in BlackBerry UEM Self-Service.
• You can expire activation passwords for a user at any time. For more information, see Manually expire anactivation password.
• If you are deploying devices using Samsung KNOX Mobile Enrollment, you can allow users of those devicesto use their Microsoft Active Directory credentials to activate their devices. Instead of managing activationpasswords for each user, you can can instruct users to use their Active Directory credentials. This optionapplies only to devices that are enrolled in your organization's KNOX Mobile Enrollment account. For moreinformation, see Specify the default settings for activation passwords.
Specify the default settings for activation passwordsYou can specify the default time an activation password remains valid before it expires. You can also specify thelength of automatically generated passwords that are sent to users in one of the activation email messages andyou can specify whether or not the activation period expires after the first device is activated.
| Device activation | 280

The value that you enter for the activation password expiration appears as the default setting in the Activationpassword expiration field in the Set device activation password and Add a user windows.
For devices that are activated using Samsung KNOX Mobile Enrollment, you can also specify whether to allowusers to use their Microsoft Active Directory credentials to activate their devices.
1. On the menu bar, click Settings.2. In the left pane, expand General settings.3. Click Activation defaults.4. In the Activation period expiration field, enter the default time that an activation password (or QR Code)
remains valid before it expires. The time can be from 1 minute to 30 days.5. If necessary, select the Activation period expires after the first device is activated check box.6. Select or clear the Allow QR codes for device activation check box. If selected, you can choose to send
a QR Code to users instead of an activation password. If you don't select this option, the option to send a QRCode is not available in the activation email template.
7. If necessary, for devices that are activated using KNOX Mobile Enrollment, select Allow use of MicrosoftActive Directory username and password.
8. Select or clear the Send device activated notification check box. If selected, the user receives an emailmessage when a device is activated.
9. In the Autogenerated activation password length field, specify the length of the automatically generatedactivation password. The value can be from 4 to 16.
10.In the Autogenerated password complexity section, select one or more of the following options:
• Lowercase letters• Uppercase letters• Numbers• Special characters or symbols
11.Select or clear the Turn on registration with the BlackBerry Infrastructure check box to modify how usersactivate their mobile devices. If you don't select this option, users will be asked to provide the server addressfor BlackBerry UEM when they activate devices. For more information, see Turn on user registration withthe BlackBerry Infrastructure.
12.Click Save.
Allowing users to activate multiple devices with different activation typesYou can create multiple activation passwords for a user and pair the activation passwords with specific activationprofiles so that users can activate devices with different activation types.
For example, you might want users to activate work devices with an activation type that allows you to havefull control of devices, but activate their personal devices with an activation type that allows user privacy. Bypairing one activation password with an activation profile that allows full device control and a second activationpassword with the user privacy activation profile, users can activate each device with different results. You cancreate email templates that describe the intended use for each password.
Select the "Device activation with specified activation profile" option when you complete any of the followingtasks:
• Create a user account• Set an activation password and send an activation email message• Send an activation email to multiple users
At a given time, you can have a maximum of two activation passwords that are paired with specific activationprofiles. Each password can be used to activate multiple devices.
| Device activation | 281

Note: For activation passwords that are paired with specific activation profiles, the "Number of devices that auser can activate" setting in the activation profile is not enforced.
If you delete an activation profile that an activation password is paired with, the activation password isautomatically expired.
If necessary, you can expire activation passwords for a particular user at any time. For more information,see Manually expire an activation password.
Unlike regular activation passwords, users cannot create activation passwords that are paired with specificactivation profiles in BlackBerry UEM Self-Service.
This option is not supported by iOS devices that are enrolled in DEP.
Manually expire an activation passwordYou can manually expire an activation password that was generated for a user.
1. On the menu bar, click Users > Managed devices.2. Search for a user account.3. In the search results, click the name of the user account.4. In the Activation details section, locate the activation password that you want to expire. Click Expire. The
activation password is expired immediately.If you expire a regular activation password, the date and time that you expire the password is displayed.If you expire an activation password that was paired with a specific activation profile, the details of the deviceactivation password are no longer displayed.
Set an activation password and send an activation email messageYou can set an activation password and send a user an activation email with the information required to activateone or more devices.
The email is sent from the email address that you configured in the SMTP server settings.
Before you begin: Create an activation email template.
1. On the menu bar, click Users > Managed devices.2. Search for a user account.3. In the search results, click the name of the user account.4. In the Activation details pane, click Set activation password.5. In the Activation option drop-down list, perform one of the following tasks:
• If you want the user to activate their device with the activation profile that is currently assigned to them,select Default device activation. You can see the activation profile that is assigned to the user in the ITpolicy and profiles section on the Summary tab.
• If you want to pair an activation password with a specific activation profile, select Device activation withspecified activation profile. For more information, see Allowing users to activate multiple devices withdifferent activation types.
6. In the Activation password drop-down list, perform one of the following tasks:
• If you want to automatically generate a password, select Autogenerate device activation password andsend email with activation instructions. When you select this option, you must select an email template tosend the information to the user.
• If you want to set an activation password for the user and, optionally, send an activation email, select Setdevice activation password.
| Device activation | 282

7. Optionally, change the activation period expiration. The activation period expiration specifies how long theactivation password remains valid.
8. If you want the activation password to be valid only for one device activation, select Activation period expiresafter the first device is activated.
9. In the Activation email template drop-down list, select the email template that you want to use. For moreinformation, see Email templates.
10.Click Submit.
Send an activation email to multiple usersYou can send activation email messages to multiple users at one time. When you send an activation email tomultiple users, the activation password is autogenerated. If you want to set the activation password, see Set anactivation password and send an activation email message.
The email is sent from the email address that you configured in the SMTP server settings.
Before you begin: Create an activation email template.
1. On the menu bar, click Users > Managed devices.2. Select the check box for each user that you want to send an activation email to.3.
Click .4. In the Activation option drop-down list, perform one of the following tasks:
• If you want users to activate their devices with the activation profile that is currently assigned to them,select Default device activation.
• If you want to pair an activation password with a specific activation profile, select Device activation withspecified activation profile. For more information about pairing activation passwords with activationprofiles, see Allowing users to activate multiple devices with different activation types.
5. In the Activation password drop-down list, select Autogenerate device activation password and send emailwith activation instructions.
6. Optionally, change the activation period expiration. The activation period expiration specifies how long theactivation password remains valid.
7. If you want the activation password to be valid only for one device activation, select Activation period expiresafter the first device is activated.
8. In the Activation email template drop-down list, select the email template that you want to use. For moreinformation, see Email templates.
9. Click Send.
Allow users to set activation passwords in BlackBerry UEM Self-ServiceYou can allow users with BlackBerry 10, iOS, Android, and Windows devices to create their own activationpasswords using BlackBerry UEM Self-Service.
Note: BlackBerry OS (version 5.0 to 7.1) device users can create activation passwords using BlackBerry WebDesktop Manager.
1. On the menu bar, click Settings > General settings > Self-Service.2. Verify that Allow users to access the self-service console is selected.3. Select Allow users to activate devices in the self-service console and complete the following tasks:
a) Specify the number of minutes, hours, or days that a user can activate a device before the activationpassword expires.
b) Specify the minimum number of characters required in an activation password.
| Device activation | 283

c) In the Minimum password complexity drop-down list, select the level of complexity required for activationpasswords.
4. Click Save.
Turn on user registration with the BlackBerry InfrastructureRegistration with the BlackBerry Infrastructure simplifies the way users activate their mobile devices. Withregistration turned on, users do not need to enter the server address when they activate devices. Registration isenabled by default. If you change this setting, you might need to update the activation email with the steps thatusers must take to activate their devices.
Devices running Windows 10 and Windows 10 Mobile do not use the same method for contacting the BlackBerryInfrastructure, so turning user registration on or off does not change the activation process for these devices.
Devices running BlackBerry OS (version 5.0 to 7.1) do not contact the BlackBerry Infrastructure, so turning userregistration on or off does not change the activation process for these devices.
1. On the menu bar, click Settings.2. In the left pane, expand General settings.3. Click Activation defaults.4. Make sure the Turn on registration with the BlackBerry Infrastructure check box is selected.5. Click Save.
Enable user notification when a device has been activatedYou can enable UEM to notify a user each time a device is activated on their account. The email notification issent to the email address of the user account that was used to activate the device. By default, the email includesthe device model, serial number, and IMEI. If the user receives a notification that they were not expecting, theyshould contact an administrator.
1. On the menu bar, click Settings > General settings.2. Click Activation Defaults.3. Select Send device activated notification.4. Click Save.
Related tasks
Edit an email template
Related reference
Default email templatesSuggested text
Supporting Android Enterprise activationsTo support activating Android Enterprise devices , complete the following tasks as required:
| Device activation | 284

• If you have a G Suite domain, see Support Android Enterprise activations with a G Suite domain.• If you have a Google Cloud domain, see Support Android Enterprise activations with a Google Cloud domain.• Verify that BlackBerry Hub will work properly on Android Enterprise devices. See Enable a unified BlackBerry
Hub.
Support Android Enterprise activations with a G Suite domainIf you have configured BlackBerry UEM to connect to a G Suite domain, you must perform the following tasksbefore users can activate Android Enterprise devices.
Before you begin: Configure BlackBerry UEM to support Android Enterprise devices. For information aboutconfiguring BlackBerry UEM to support Android Enterprise devices, see the Configuration content.
1. In your G Suite domain, create user accounts for your Android users.2. If users have devices with Android 6.0 or later, select the Enforce EMM Policy setting in the G Suite domain.
This setting is required for devices with the Work space only activation type and strongly recommended fordevices with other activation types. If this setting is not selected, users can add a managed Google account tothe device that can access work apps outside of the work profile.
3. If you intend to assign the Work space only activation type and some users have devices with Android 6.0 orlater, select the Enforce EMM Policy setting in the G Suite domain.
4. In BlackBerry UEM, create local user accounts for your Android users. Each account's email address mustmatch the email address in the corresponding G Suite account.
5. Make sure that your users know the passwords for their G Suite accounts.6. In BlackBerry UEM, assign an email profile and productivity apps to users, user groups or device groups.
Support Android Enterprise activations with a Google Cloud domainIf you have configured BlackBerry UEM to connect to a Google Cloud domain, you must perform the followingtasks before users can activate devices using Android Enterprise.
Before you begin: Configure BlackBerry UEM to support Android Enterprise. When you configure BlackBerryUEM to connect to a Google Cloud domain, you must select whether BlackBerry UEM can create user accounts inthe domain. This selection affects the tasks that you must perform before users can activate Android devices thathave a work profile. For information about configuring BlackBerry UEM to support Android Enterprise devices, seethe Configuration content.
1. In BlackBerry UEM, add directory user accounts for your Android Enterprise users.2. If you choose not to allow BlackBerry UEM to create user accounts in your Google Cloud domain, you must
create user accounts in your Google Cloud domain and in BlackBerry UEM. Perform one of the followingactions:
• In your Google Cloud domain, create user accounts for your Android Enterprise users. Each email addressmust match the email address in the corresponding BlackBerry UEM user account. Make sure thatyour Android Enterprise users know the password for their Google Cloud accounts.
• Use the Google Apps Directory Sync tool to synchronize your Google Cloud domain with your companydirectory. If you do this, you don't need to create user accounts manually in your Google Cloud domain.
3. If you intend to assign the Work space only (Android Enterprise) activation type and some users have deviceswith Android 6.0 or later, select the Enforce EMM Policy setting in the Google Cloud domain.
4. In BlackBerry UEM, assign an email profile and productivity apps to users, user groups or device groups.
Enable a unified BlackBerry HubBlackBerry Hub is an app that allows users to view messages, notifications, and events in one spot.
| Device activation | 285

To allow users with Android Enterprise devices to view both work and personal messages in BlackBerry Hub, youneed to verify some settings in BlackBerry UEM.
1. For the IT policy that is assigned to users, in the BlackBerry Productivity Suite section, verify that the "Allowunified account view in BlackBerry Hub" IT policy rule is selected.
2. Perform one of the following tasks:
• If you configure the settings for BlackBerry Hub in an email profile, on the Android tab of the email profile,verify that the following items are selected:
• Allow data to be shared between work and personal profiles• Allow personal app access to the work data
• If you configure the settings for BlackBerry Hub in an app configuration, verify that the following items areselected:
• IPC across profiles• Access work content
After you finish:
For information about using the BlackBerry Hub on devices, such as adding an email account or customizingthe BlackBerry Hub settings, see the BlackBerry Hub content.
For troubleshooting information, visit http://support.blackberry.com/kb to read article 37721.
Supporting Windows 10 activationsYou can help users activate Windows 10 devices in two ways:
• Deploy a discovery service to simplify Windows 10 activations. For more information, see the Configurationcontent.
• Create or edit an activation email template to provide Windows 10 activation information. For moreinformation, see "Create an activation email template."
Creating activation profilesYou can control how devices are activated and managed using activation profiles. An activation profile specifieshow many and what types of devices a user can activate and the type of activation to use for each device type.
The activation type allows you to configure how much control you have over activated devices. You might wantcomplete control over a device that you issue to a user. You might want to make sure that you have no controlover the personal data on a device that a user owns and brings to work.
The assigned activation profile applies only to devices the user activates after you assign the profile. Devices thatare already activated are not automatically updated to match the new or updated activation profile.
When you add a user to BlackBerry UEM, the Default activation profile is assigned to the user account. You canchange the Default activation profile to suit your requirements, or you can create a custom activation profile andassign it to users or user groups.
Activation profiles do not apply to BlackBerry OS (version 5.0 to 7.1) devices.
Create an activation profile1. On the menu bar, click Policies and Profiles.2. Click Policy > Activation.
| Device activation | 286

3. Click .4. Type a name and description for the profile.5. In the Number of devices that a user can activate field, specify the maximum number of devices the user can
activate. 6. In the Device ownership drop-down list, select the default setting for device ownership. Perform one of the
following actions:
• If some users activate personal devices and some users activate work devices, select Not specified.• If users typically activate work devices, select Work.• If users typically activate personal devices, select Personal.
7. Optionally, select an organization notice in the Assign organization notice drop-down list. If you assign anorganization notice, users activating BlackBerry 10, Windows 10, iOS, or macOS devices must accept thenotice to complete the activation process.
8. In the Device types that users can activate section, select the device types as required. Device types that youdon't select are not included in the activation profile and users can't activate those devices.
9. Perform the following actions for each device type included in the activation profile:
• Click the tab for the device type.• In the Device model restrictions drop-down list, select whether to allow or restrict specified devices or to
have no restrictions. Click Edit to select the devices you want to restrict or allow, and click Save.• In the Allowed version drop-down list, select the minimum allowed version.• On the Windows tab, you can select one or both form factor options and choose whether to allow or
disallow those form factors in the Device model restrictions drop-down list.• In the Activation type section, select an activation type.
• For Android devices, you can select multiple activation types and rank them to meet your organization'srequirements.
• For Android devices, if you select an Android Enterprise activation type, you can select the Whenactivating Android Enterprise devices, enable premium UEM functionality such as BlackBerry SecureConnect Plus. option to enable BlackBerry Secure Connect Plus and KNOX Platform for Enterprisefeatures (for devices that support Samsung KNOX).
• For Android devices, if you select the "MDM controls" activation type and you do not want KNOX MDMpolicy rules to be applied to the devices, clear the Activate Samsung KNOX APIs on MDM Controlsactivations check box. This setting applies only to devices that support KNOX MDM.
• For Android devices, if you select one of the Samsung KNOX activation types and want to use GooglePlay to manage work apps, select Google Play app management for Samsung Knox Workspacedevices. This option is available only if you have configured a connection to a Google domain. For moreinformation, see the Configuration content.
• For iOS devices, if you select the "User privacy" activation type and you want to enable SIM-basedlicensing, you must select the Allow access to SIM card and device hardware information to enableSIM-based licensing option.
• For iOS devices, if you select the "MDM controls" or User privacy (with SIM-based licensing) activationtypes, you can restrict unsupervised devices by selecting "Do not allow unsupervised devices toactivate."
10.Click Add.
After you finish: If necessary, rank profiles.
Related tasks
Assign a profile or IT policy to a user group
| Device activation | 287

Assign a profile or IT policy to a user accountCreate organization notices
Activation types: BlackBerry 10 devices
Activation type Description
Work and personal -Corporate
This activation type provides control of work data on devices, while making surethat there is privacy for personal data. When a device is activated, a separatework space is created on the device and the user must create a password toaccess the work space. Work data is protected using encryption and passwordauthentication. All work data from any previous activations is deleted.
You can control the work space on the device using commands and IT policies,but you cannot control any aspects of the personal space on the device.
Work space only This activation type provides full control of the device and does not providea separate space for personal data. When a device is activated, the personalspace and all work data from any previous activation is removed, a work space isinstalled, and the user must create a password to access the device. Work data isprotected using encryption and password authentication.
You can control the device using commands and IT policies.
Work and personal -Regulated
This activation type provides control of both work and personal data. Whena device is activated, a separate work space is created on the device and theuser must create a password to access the work space. Work data is protectedusing encryption and password authentication. All work data from any previousactivations is deleted.
You can control both the work space and the personal space on the device usingcommands and IT policies.
Activation types: iOS devices
Activation type Description
MDM controls This activation type provides basic device management using device controlsmade available by iOS. A separate work space is not installed on the device, andthere is no added security for work data.
You can control the device using commands and IT policies. During activation,users must install a mobile device management profile on the device.
| Device activation | 288

Activation type Description
User privacy You can use the User privacy activation type to provide basic control of deviceswhile making sure that users' personal data remains private. With this activationtype, no separate container is installed on the device, and no added securityfor work data is provided. Devices activated with User privacy are activatedon BlackBerry UEM and can use services such as Find my Phone and RootDetection, but administrators cannot control device policies.
Note: For SIM-based licensing, you must select "Allow access to SIM card anddevice hardware information to enable SIM-based licensing" in the activationprofile. Users must install an MDM profile that can access only the SIM card anddevice hardware information that is required to check if an appropriate SIM licenseis available (for example, ICCID and IMEI).
This activation type is not supported for Apple TV devices.
When you allow User privacy activations in the iOS activation profile, you selectthe profiles that you want manage on the device based on the needs of yourorganization. You can choose any of the following:
• Allow App management: This option specifies whether you want to install orremove work apps on the device, and display a list of installed work apps in theuser details screen.You can also specify whether to allow app shortcuts.
• Allow IT Policy management: This option specifies whether you want toapply a limited set of IT policy rules to the device (password policies, allowscreenshots, allow documents from managed sources in unmanageddestinations, and allow documents from unmanaged sources in manageddestinations).
• Allow Email profile management: This option specifies whether to apply theEmail profile settings that are assigned to the user to the device.
• Allow Wi-Fi profile management: This option specifies whether to apply the Wi-Fi profile settings that are assigned to the user to the device.
• Allow VPN profile management: This option specifies whether to apply theVPN profile settings that are assigned to the user to the device.
Device registrationfor BlackBerry 2FA only
This activation type supports the BlackBerry 2FA solution for devicesthat BlackBerry UEM does not manage. This activation type does not provideany device management or controls, but allows devices to use the BlackBerry2FA feature. To use this activation type, you must also assign the BlackBerry2FA profile to users.
When a device is activated, you can view limited device information in themanagement console, and you can deactivate the device using a command.
This activation type is supported only for Microsoft Active Directory users.
This activation type is not supported for Apple TV devices.
For more information, see the BlackBerry 2FA content.
| Device activation | 289

Activation types: macOS devices
Activation type Description
MDM controls This activation type provides basic device management using device controlsthat macOS makes available.
When a user activates a macOS device, the device and the user are set up asseparate entities on BlackBerry UEM. Separate communication channels areestablished between BlackBerry UEM and the device and BlackBerry UEM andthe user account, allowing you to manage the device and the user separately.Some profiles are assigned to the user only, for example email profiles. Someprofiles are assigned to the device only, for example proxy profiles. Some profilesallow you to choose whether to apply the profile to the device or the user, forexample Wi-Fi profiles. For more information, see Profile settings.
You can control the device using commands and IT policies. Usersactivate macOS devices using BlackBerry UEM Self-Service.
Activation types: Android devicesFor Android devices, you can select multiple activation types and rank them to make sure that BlackBerryUEM assigns the most appropriate activation type for the device. For example, if you rank "Work spaceonly (Samsung KNOX)" first and "MDM controls" second, devices that support Samsung KNOX Workspace receivethe first activation type.
Note: KNOX MDM allows the device to use the KNOX MDM IT policy rules in BlackBerry UEM instead of the basicrules available for all Android devices. KNOX Workspace creates a separate work space on the device that keepswork data and apps separate from personal data and apps.
The Android activation types are organized in the following tables:
• Android devices• Android Enterprise devices• Samsung KNOX Workspace
Note: If you enable attestation for your organization’s BlackBerry UEM instance, during Android deviceactivation, the authenticity and integrity of the device is checked. Ensure that users have BlackBerry UEMClient for Android version 12.9 MR1 or later installed on their devices before you enable this feature.
Note: The MDM activation type does not support app configurations for BlackBerry Hub+ Services.Also, Samsung KNOX devices will only receive a BlackBerry Hub+ Services app configuration if you use GooglePlay to manage work apps.
Android devices
The following activation types apply to all Android devices.
| Device activation | 290

Activation type Description
MDM controls This activation type lets you manage the device using commands and ITpolicy rules. If the device supports KNOX MDM, this activation type appliesthe KNOX MDM IT policy rules. A separate work space is not created on thedevice, and there is no added security for work data.
If you do not want to apply KNOX MDM policy rules, clear the Activate SamsungKNOX on Samsung devices that have the MDM controls activation typeassigned check box. This setting applies only to devices that support KNOX MDM.
During activation, users must grant Administrator permissions to the BlackBerryUEM Client.
This activation type will be deprecated in a future release. For moreinformation, visit https://support.blackberry.com/community to read article48386.
User privacy You can use the User privacy activation type to provide basic control of deviceswhile making sure that users' personal data remains private. With this activationtype, no separate container is installed on the device, and no added securityfor work data is provided. Devices activated with User privacy are activatedon BlackBerry UEM and can use services such as Find my Phone and RootDetection, but administrators cannot control device policies.
Device registrationfor BlackBerry 2FA only
This activation type supports the BlackBerry 2FA solution for devicesthat BlackBerry UEM does not manage. This activation type does not provideany device management or controls, but allows devices to use the BlackBerry2FA feature. To use this activation type, you must also assign the BlackBerry2FA profile to users.
When a device is activated, you can view limited device information in themanagement console, and you can deactivate the device using a command.
This activation type is supported only for Microsoft Active Directory users.
For more information, see the BlackBerry 2FA content.
Android Enterprise devices
The following activation types apply only to Android Enterprise devices.
| Device activation | 291

Activation type Description
Work and personal -user privacy (AndroidEnterprise)
This activation type maintains privacy for personal data but lets you manage workdata using commands and IT policy rules. This activation type creates a workprofile on the device that separates work and personal data. Work and personaldata are both protected using encryption and password authentication.
To enable BlackBerry Secure Connect Plus and KNOX policies (for devices thatsupport Knox Platform for Enterprise), you must select the When activatingAndroid Enterprise devices, enable premium UEM functionality such asBlackBerry Secure Connect Plus. option.
Users do not have to grant Administrator permissions to the BlackBerry UEMClient.
Work spaceonly (Android Enterprise)
If you assign this activation type to a user, you must also assign the Work spaceonly activation email template to that user. Assigning that template makes surethat the user receives the Google activation code required during the activationprocess.
This activation type lets you manage the entire device using commands and ITpolicy rules. This activation type requires the user to reset the device to factorysettings before activating. The activation process installs a work profile and nopersonal profile. The user must create a password to access the device. All dataon the device is protected using encryption and a method of authentication suchas a password.
This activation type does not support BlackBerry Secure Connect Plus.
During activation, the device installs the BlackBerry UEM Client automaticallyand grants it Administrator permissions. Users cannot revoke the Administratorpermissions or uninstall the app.
This activation type applies KNOX policies to devices that support KNOX Platformfor Enterprise.
To enable BlackBerry Secure Connect Plus or KNOX Premium policies, you mustselect the When activating Android Enterprise devices, enable premium UEMfunctionality such as BlackBerry Secure Connect Plus. option.
Samsung KNOX Workspace devices
The following activation types apply only to Samsung devices that support KNOX Workspace.
| Device activation | 292

Activation type Description
Work and personal - fullcontrol (Samsung KNOX)
This activation type lets you manage the entire device using commands andthe KNOX MDM and KNOX Workspace IT policy rules. This activation type createsa separate work space on the device and the user must create a password toaccess the work space. Data in the work space is protected using encryption anda method of authentication such as a password, PIN, pattern, or fingerprint. Thisactivation type supports the logging of device activity (SMS, MMS, and phonecalls) in BlackBerry UEM log files.
During activation users must grant Administrator permissions to the BlackBerryUEM Client.
Work and personal -user privacy - (SamsungKNOX)
This activation type maintains privacy for personal data, but lets you managework data using commands and IT policy rules. This activation type does notsupport the KNOX MDM IT policy rules. This activation type creates a separatework space on the device and the user must create a password to access thework space. Data in the work space is protected using encryption and a method ofauthentication such as a password, PIN, pattern, or fingerprint. The user must alsocreate a Screen lock password to protect the entire device and will not be able touse USB debugging mode.
During activation, users must grant Administrator permissions to the BlackBerryUEM Client.
Work space only -(Samsung KNOX)
This activation type lets you manage the entire device using commands andthe KNOX MDM and KNOX Workspace IT policy rules. This activation typeremoves the personal space and installs a work space. The user must createa password to access the device. All data on the device is protected usingencryption and a method of authentication such as a password, PIN, pattern, orfingerprint. This activation type supports the logging of device activity (SMS, MMS,and phone calls) in BlackBerry UEM log files.
During activation, users must grant Administrator permissions to the BlackBerryUEM Client.
Activation types: Windows devices
Activation type Description
MDM controls This activation type provides basic device management using device controlsmade available by Windows 10, Windows 10 Mobile, and Windows Phone. Aseparate work space is not installed on the device, and there is no added securityfor work data.
You can control the device using commands and IT policies. WindowsPhone users must install BlackBerry UEM Client to activate a device. Windows10 and Windows 10 Mobile users activate devices through the Windows 10 Workaccess app.
| Device activation | 293

Activation step-by-step for usersIf necessary, you can provide users with step-by-step instructions to activate devices.
Activating Android devicesThe information that users must enter and the steps to activate an Android device are different depending on theactivation type that is assigned to them. The activation email templates contain the information that users need.For more information, see Email templates.
For QR Code activations, see Activate a device using a QR Code.
Activate an Android device
Note: These steps apply to a device that is assigned the MDM controls activation type. Activation types thatinstall or activate a work space on the device may require additional steps.
Send the following activation instructions to the device user.
1. On the device, install the BlackBerry UEM Client. You can download the BlackBerry UEM Client from GooglePlay.
2. On the device, tap UEM Client.3. Read the license agreement. Tap I Agree.4. Type your work email address. Tap Next.5. If necessary, type the server address. Tap Next. You can find the server address in the activation email
message you received or in BlackBerry UEM Self-Service.6. Type your activation password. Tap Activate My Device.7. Tap Next.8. Tap Activate.
After you finish: To verify that the activation process completed successfully, perform one of the followingactions:
• On the device, open BlackBerry UEM Client. Tap About. In the Activated Device section, verify that the deviceinformation and the activation time stamp are present.
• In BlackBerry UEM Self-Service, verify that your device is listed as an activated device. It can take up to twominutes for the status to update after you activate the device.
Activate an Android Enterprise device
These steps apply to devices that are assigned the Work and personal - user privacy (AndroidEnterprise) activation type.
Send the following activation instructions to the device user.
Before you begin:
• You need the following information:• BlackBerry UEM activation password• Your work email and password
• You might need the following information:• BlackBerry UEM server address• Google account password
| Device activation | 294

1. On the device, install the BlackBerry UEM Client. You can download the BlackBerry UEM Client from GooglePlay.
2. On the device, tap UEM Client.3. Read the license agreement. Tap I Agree. 4. Type your work email address. Tap Next.5. If necessary, type the server address. Tap Next. You can find the server address in the activation email
message you received or in BlackBerry UEM Self-Service.6. Type your activation password. Tap Activate My Device.7. Wait while the profiles and settings are pushed to your device. 8. Tap Set up.9. Tap OK and wait while the work profile is set up.10.If necessary, type your Google password. Tap Next.11.If prompted, you can set up a device password and select notification options.12.If you are prompted, tap OK to allow the connection to BlackBerry Secure Connect Plus and wait while the
connection is turned on.
Activate an Android Enterprise device with work space only
These steps apply to devices that are assigned the Work space only (Android Enterprise) activation type.
Send the following activation instructions to the device user.
Before you begin: Make sure you have the following information that was sent by your administrator in one ormore email messages:
• BlackBerry UEM activation password• Android work profile activation code• Your work email and password• BlackBerry UEM server address (you might not need this)
1. If you do not see the device setup Welcome screen, reset your device to the factory default setting.2. During the device setup, in the Add your account screen, tap Menu > Setup work device.3. If you are prompted, encrypt the device.4. On the device, tap UEM Client.5. Read the license agreement. Tap I Agree. 6. Type your work email address. Tap Next.7. If necessary, type the server address. Tap Next. You can find the server address in the activation email
message you received or in BlackBerry UEM Self-Service.8. Type your activation password. Tap Activate My Device.9. Wait while the profiles and settings are pushed to your device. 10.Tap Set up.11.Tap OK and wait while the work profile is set up.12.Type your Google password.13.Tap Next.14.On the Unlock selection screen, tap Password.15.Make sure that Require password to start device is selected. Tap Continue.16.Type a device password, type it again to confirm it. Tap OK.17.Select one of the options for how you want your notifications to show. Tap Done.
| Device activation | 295

18.If prompted, tap OK to allow the connection to BlackBerry Secure Connect Plus and wait while the connectionis turned on.
19.From the home screen, open the app list. Tap the BlackBerry Hub app to complete the set up.a) Tap Next to give BlackBerry Services permissions on your device and if prompted, tap Allow for each of the
next screens.b) Tap the arrow to continue.c) Tap Grant Permissions to give BlackBerry Hub permissions on your device. If you are prompted,
tap Allow for each of the next screens.d) Tap your email address.e) Type your work email password. Tap Next.f) Tap OK.g) In the Remote security administration screen, tap OK.h) In the Account setup screen, tap Next.i) In the Security update screen, tap OK.j) Tap Activate to activate the device administrator.k) Tap Done.
20.Take a tour of the BlackBerry Hub and wait for your email messages to sync.
Activate an Android device with work space only - and no Google domain
These steps apply to devices that are assigned the Work space only (Android Enterprise) activation type.
Send the following activation instructions to the device user.
Before you begin: Make sure you have the following information that was sent by your administrator in one ormore email messages:
• Activation username• BlackBerry UEM activation password
1. If you do not see the device setup Welcome screen, reset your device to the factory default setting.2. During the device setup, in the Add your account screen, type afw#blackberry.3. Wait while the device updates system applications and downloads the BlackBerry UEM Client.4. Read the license agreement. Tap I Agree. 5. Type your work email address. Tap Next.6. If necessary, type the server address. Tap Next. You can find the server address in the activation email
message you received or in BlackBerry UEM Self-Service.7. Type your activation password. Tap Activate My Device.8. Wait while the profiles and settings are pushed to your device. 9. Tap Set up.10.Tap OK and wait while the work profile is set up.11.Type your Google password.12.Tap Next.13.On the Unlock selection screen, tap Password.14.Make sure that Require password to start device is selected. Tap Continue.15.Type a device password and type it again to confirm it. Tap OK.16.Select one of the options for how you want your notifications to show. Tap Done.17.If you are prompted, tap OK to allow the connection to BlackBerry Secure Connect Plus and wait while the
connection is turned on.
| Device activation | 296

18.From the home screen, open the app list. Tap the BlackBerry Hub app to complete the set up.a) Tap Next to give BlackBerry Services permissions on your device and if prompted, tap Allow for each of the
next screens.b) Tap the arrow to continue.c) Tap Grant Permissions to give BlackBerry Hub permissions on your deviceIf you are prompted,
tap Allow for each of the next screens.d) Tap your email address.e) Type your work email password. Tap Next.f) Tap OK.g) In the Remote security administration screen, tap OK.h) In the Account setup screen, tap Next.i) In the Security update screen, tap OK.j) Tap Activate to activate the device administrator.k) Tap Done.
19.Take a tour of the BlackBerry Hub and wait for your email messages to sync.
Activate an iOS deviceFor QR Code activations, see Activate a device using a QR Code.
To activate devices using an activation password, send the following instructions to the device user.
1. On the device, install the BlackBerry UEM Client app. You can download the BlackBerry UEM Client app fromthe App Store.
2. On the device, tap UEM Client.3. Read the license agreement and tap I Agree.4. Type your work email address and tap Go.5. If necessary, type the server address and tap Go. You can find the server address in the activation email
message you received or in BlackBerry UEM Self-Service.6. Type your activation password and tap Activate My Device.7. Tap OK to install the required certificate.8. Follow the instructions on the screen to complete the activation.9. If you are prompted to enter the password for your email account or the passcode for your device, follow the
instructions on the screen.
After you finish: To verify that the activation process completed successfully, perform one of the followingactions:
• On the device, open the BlackBerry UEM Client app and tap About. In the Activated Device and ComplianceStatus sections, verify that the device information and the activation time stamp are present.
• In BlackBerry UEM Self-Service, verify that your device is listed as an activated device. It can take up to twominutes for the status to update after you activate the device.
Activate a BlackBerry 10 deviceSend the following activation instructions to the device user.
1. On the device, navigate to Settings.2. Tap Accounts.3. If you have existing accounts on this device, tap Add Account. Otherwise, continue to Step 4.4. Tap Email, Calendar and Contacts.5. Type your work email address and tap Next.
| Device activation | 297
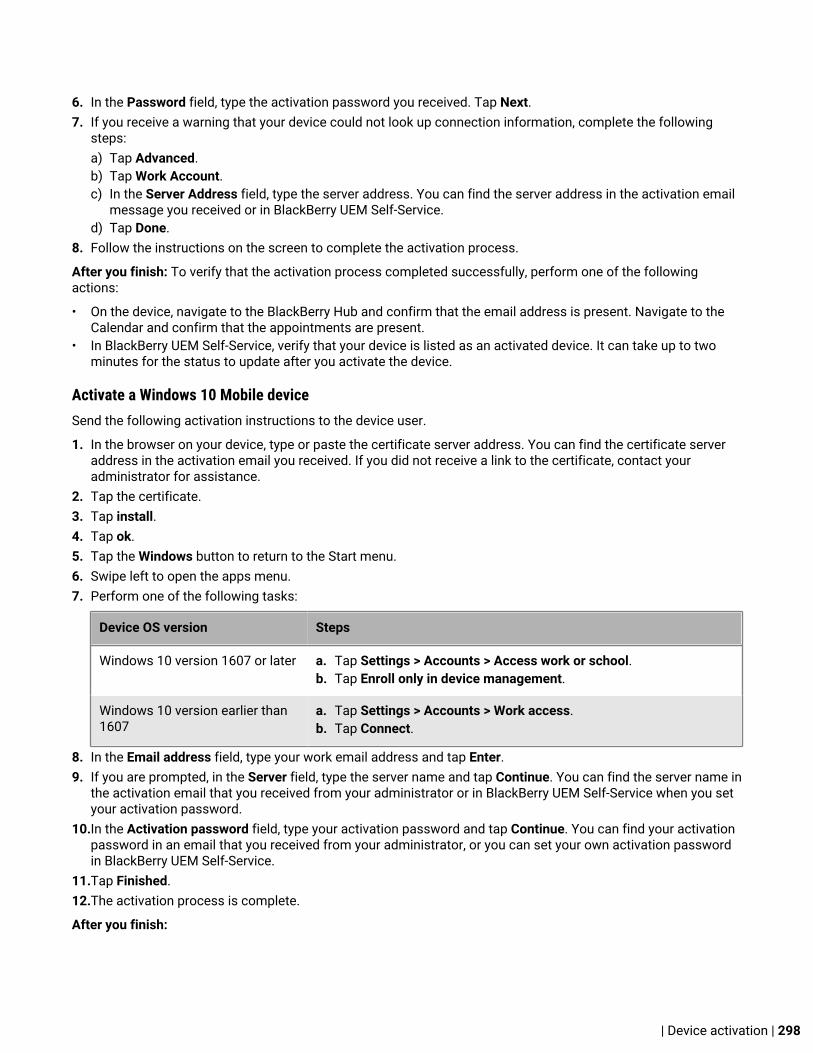
6. In the Password field, type the activation password you received. Tap Next.7. If you receive a warning that your device could not look up connection information, complete the following
steps:a) Tap Advanced.b) Tap Work Account.c) In the Server Address field, type the server address. You can find the server address in the activation email
message you received or in BlackBerry UEM Self-Service.d) Tap Done.
8. Follow the instructions on the screen to complete the activation process.
After you finish: To verify that the activation process completed successfully, perform one of the followingactions:
• On the device, navigate to the BlackBerry Hub and confirm that the email address is present. Navigate to theCalendar and confirm that the appointments are present.
• In BlackBerry UEM Self-Service, verify that your device is listed as an activated device. It can take up to twominutes for the status to update after you activate the device.
Activate a Windows 10 Mobile deviceSend the following activation instructions to the device user.
1. In the browser on your device, type or paste the certificate server address. You can find the certificate serveraddress in the activation email you received. If you did not receive a link to the certificate, contact youradministrator for assistance.
2. Tap the certificate.3. Tap install.4. Tap ok.5. Tap the Windows button to return to the Start menu.6. Swipe left to open the apps menu.7. Perform one of the following tasks:
Device OS version Steps
Windows 10 version 1607 or later a. Tap Settings > Accounts > Access work or school.b. Tap Enroll only in device management.
Windows 10 version earlier than1607
a. Tap Settings > Accounts > Work access.b. Tap Connect.
8. In the Email address field, type your work email address and tap Enter.9. If you are prompted, in the Server field, type the server name and tap Continue. You can find the server name in
the activation email that you received from your administrator or in BlackBerry UEM Self-Service when you setyour activation password.
10.In the Activation password field, type your activation password and tap Continue. You can find your activationpassword in an email that you received from your administrator, or you can set your own activation passwordin BlackBerry UEM Self-Service.
11.Tap Finished.12.The activation process is complete.
After you finish:
| Device activation | 298

• To verify that the activation process completed successfully, you can perform the following actions:• On the device, click Settings > Accounts > Access work or school (or Work access) to confirm that your
device is connected to BlackBerry UEM. Click the briefcase icon > Info to check the sync status information.• In BlackBerry UEM Self-Service, verify that your device is listed as an activated device. It can take up to two
minutes for the status to update after you activate the device.• If requested by your administrator, add your work account to Accounts used by other apps so that you can
access required online apps.• For Windows 10 version 1607 or later, click Settings > Accounts > Access work and school > Connect. Type
your work email address and password.• For Windows 10 version earlier than 1607, click Settings > Accounts > Your email and accounts. Under
Accounts used by other apps, click Add a work or school account, and type your work email address andpassword.
Activate a macOS deviceSend the following activation instructions to the device user.
Before you begin: You need the following BlackBerry UEM Self-Service login information:
• Web address for BlackBerry UEM Self-Service• Username and password• Domain name
1. Using the device that you want to activate, and the login information that you received from your administrator,log in to BlackBerry UEM Self-Service.
2. If there are already devices displayed, click Activate a device.3. In the Device drop-down menu, click macOS.4. Watch the activation tutorial.5. Click Submit.6. Follow the instructions to install the required profiles and to complete the activation of the device. When the
activation completes, you can see your device displayed in BlackBerry UEM Self-Service.
Activate an Apple TV deviceSend the following activation instructions to the device user.
Before you begin:
• You need the web address and your login credentials for BlackBerry UEM Self-Service.• You need a macOS computer with Apple Configurator 2 installed.• You need a USB-C or Micro-USB cable (depending on the version of Apple TV).• Verify that the Apple TV device is in supervised mode.• Disconnect the HDMI cable and power cord from the Apple TV device.
1. Connect the Apple TV device to your macOS computer using a USB-C or Micro-USB cable.2. For third and fourth generation versions of Apple TV, connect the power cord.3. On your macOS computer, log in to BlackBerry UEM Self-Service.4.
Depending on whether you are activating your first device, or you already have an activated device, click or
click > Activate a device.5. In the Device drop-down menu, click Apple TV.6. Click Submit.
| Device activation | 299

7. Click Download profile.8. Click Close.9. Open Apple Configurator 2.10.Select Apple TV and click Add > Profiles.11.Select the configuration file that you downloaded in Step 7 and click Add.12.When the activation completes, you can see your device displayed in BlackBerry UEM Self-Service.
Activate a Windows 10 tablet or computerNote: If you want to manage Windows 10 devices using MDM, the devices cannot be managed by MicrosoftSystem Center Configuration Manager.
Send the following activation instructions to the device user.
1. In the browser on your device, type or paste the certificate server address. You can find the certificate serveraddress in the activation email you received. If you did not receive a link to the certificate, contact youradministrator for assistance.
2. Click Save.3. In the certificate download notification, tap Open.4. Click Open.5. Click Install Certificate.6. Select the Current User option. Click Next.7. Select the Place all certificates in the following store option. Click Browse.8. Select Trusted Root Certification Authorities. Click OK.9. Click Next.10.Click Finish.11.Click OK.12.Click OK.13.Click the Start button.14.Perform one of the following tasks:
Device OS version Steps
Windows 10 version 1607 or later a. Tap Settings > Accounts > Access work or school.b. Tap Enroll only in device management.
Windows 10 version earlier than1607
a. Tap Settings > Accounts > Work access.b. Tap Connect.
15.In the Email address field, type your email address. Tap Continue.16.If you are prompted, in the Server field, type the server name and tap Continue. You can find the server name in
the activation email that you received from your administrator or in BlackBerry UEM Self-Service when you setyour activation password.
17.In the Activation password field, type your activation password and tap Continue. You can find your activationpassword in the activation email that you received from your administrator, or you can set your own activationpassword in BlackBerry UEM Self-Service.
18.Tap Done.19.The activation process is complete.
After you finish:
| Device activation | 300

• To verify that the activation process completed successfully, you can perform the following actions:• On the device, click Settings > Accounts > Access work or school (or Work access) to confirm that your
device is connected to BlackBerry UEM. Click the briefcase icon > Info to check the sync status information.• In BlackBerry UEM Self-Service, verify that your device is listed as an activated device. It can take up to two
minutes for the status to update after you activate the device.• If requested by your administrator, add your work account to Accounts used by other apps so that you can
access required online apps.• For Windows 10 version 1607 or later, click Settings > Accounts > Access work and school > Connect. Type
your work email address and password.• For Windows 10 version earlier than 1607, click Settings > Accounts > Your email and accounts. Under
Accounts used by other apps, click Add a work or school account, and type your work email address andpassword.
Activate a device using a QR CodeQR Code activation is supported on iOS and Android devices.
To activate devices using a QR Code, send the following instructions to the device user.
Before you begin: You need a QR Code. You can find it in the activation email that you received from youradministrator, or you can generate one in BlackBerry UEM Self-Service.
1. On the device, install the BlackBerry UEM Client app. For iOS devices, download the app from the App Store.For Android devices, download the app from Google Play.
2. On the device, tap UEM Client.3. Read the license agreement and tap I Agree.4. Scan the QR Code that you received in the activation email or that you generated in BlackBerry UEM Self-
Service.5. If you are prompted to enter the password for your email account or the passcode for your device, follow the
instructions on the screen.
After you finish: To verify that the activation process completed successfully, you can perform one of thefollowing actions:
• On the device, open the BlackBerry UEM Client app and tap About. In the Activated Device and ComplianceStatus sections, verify that the device information and the activation time stamp are present.
• In BlackBerry UEM Self-Service, verify that your device is listed as an activated device. It can take up to twominutes for the status to update after you activate the device.
Activate a BlackBerry OS deviceSend the following activation instructions to the device user.
1. On the device, navigate to Setup.2. Click Email Accounts.3. Click Enterprise Account.4. In the Email field, type your work email address.5. In the Password field, type the activation password you received.6. Click Activate.7. Click OK.
After you finish: To verify that the activation process completed successfully, perform one of the followingactions:
| Device activation | 301

• On the device, navigate to the Setup app and click Email Accounts. Confirm that the email address is present.• In BlackBerry Web Desktop Manager, verify that your device is listed as an activated device. It can take up to
two minutes for the status to update after you activate the device.
Activate multiple devices using KNOX Mobile EnrollmentSamsung KNOX Mobile Enrollment allows you to activate large numbers of devices in BlackBerry UEM at onetime. For more information, visit https://www.samsungknox.com/en/products/knox-mobile-enrollment.
Before you begin: You need to purchase devices from one of the following:
• An approved reseller• A reseller that is willing to share the device IMEIs directly with Samsung
1. On the menu bar, click Settings > External integration.2. Click KNOX Mobile Enrollment.3. Complete the steps on the screen.
After you finish: After you have completed the activation, click Download to download the configuration.jsonfile. In the file, compare the entry in the CFPrint section with the entry that you added when you configured KNOXMobile Enrollment. If the entries are different, copy the entire text from the .json file into the Custom JSON Datafield on the KNOX Mobile Enrollment page.
Activate multiple devices using zero-touch enrollment for AndroidEnterprise devicesZero-touch enrollment allows you to deploy a large number of Android Enterprise devices at one time.
Your organization purchases these devices from an authorized enterprise reseller, who sets up a zero-touchenrollment account and adds the devices to the account to provision them for device management. When usersset up these devices for the first time, the devices will automatically download the BlackBerry UEM Client andstart the activation process with BlackBerry UEM. The user must complete the activation process to use thedevice.
For more information about zero-touch enrollment and how to configure it, see https://www.android.com/intl/en_ca/enterprise/management/zero-touch/ and https://support.google.com/work/android/answer/7514005.
To use zero-touch enrollment in BlackBerry UEM, devices must be running Android 8.0 or later and have beenenabled for zero-touch enrollment.
1. Purchase supported devices from an approved enterprise reseller. The reseller sets up a zero-touch enrollmentaccount for your organization.
2. In the zero-touch platform, the reseller adds the devices that you purchased.3. In the BlackBerry UEM management console, on the menu bar, click Settings > External integration.4. Click Android enterprise.5. At the bottom of the screen, click Learn more.6. Copy the string generated by this BlackBerry UEM instance for use when configuring devices in the zero-touch
enrollment portal.You can either leave the username field blank or edit it to include a username so that only that username canbe used to log in to the device that uses the configuration.
7. In the zero-touch platform, create configurations and assign them to the devices that you purchased.
| Device activation | 302

8. In BlackBerry UEM, verify that the appropriate profiles and IT policies are assigned to users. To use zero-touchenrollment, you must assign an activation profile with the "Work space only (Android Enterprise )" activationtype enabled.
9. Distribute the devices to users.
Activating iOS devices that are enrolled in DEPYou can enroll iOS devices in Apple's Device Enrollment Program and assign enrollment configurations to devicesusing the BlackBerry UEM management console. The enrollment configurations include extra rules, such as"Enable supervised mode," that are assigned to the devices during MDM enrollment.
You can use an Apple Business Manager account to synchronize BlackBerry UEM with DEP. Apple BusinessManager is a web-based portal in which you can enroll and manage iOS devices in DEP, and manage Apple VPPaccounts. If your organization uses DEP or VPP, you can upgrade to Apple Business Manager.
When the devices are activated, BlackBerry UEM sends IT policies and profiles that you assigned to users.
Note: For certain features to work, you must assign the BlackBerry UEM Client app to the users. Users muststart the BlackBerry UEM Client after they activate the device. For information about when you need to assign theBlackBerry UEM Client app to users, visit support.blackberry.com/kb/ to read article KB39313.
Steps to activate devices that are enrolled in DEPWhen you activate iOS devices that are enrolled in Apple's Device Enrollment Program, you perform the followingactions:
Step Action
Register iOS devices in DEP and assign them to the BlackBerry UEM server.
If you did not select "Automatically assign new devices to this configuration" when youcreated the enrollment configuration, or you want to assign a different configuration, assignan enrollment configuration.
Optionally, add the BlackBerry UEM Client app to the app list and assign it to user accountsor user groups. See Add an iOS app to the app list.
If you do not want to use the default activation profile, see Create an activation profile andassign it to a user account or to a group that the user belongs to.
Set an activation password for the user and send an activation email to users usingthe Apple DEP email template.
When you set the activation password, you must select the "Default device activation"option.
Company directory users can use their company directory username and password so youdon't need to create an activation password. Users must enter their username in the formatdomain\username.
Distribute the devices to users and have them complete the setup. After the setupcompletes, users must install and open the BlackBerry UEM Client app.
| Device activation | 303

Register iOS devices in DEP and assign them to the BlackBerry UEM serverTo register the devices, you must enter the device serial numbers in the Apple Business Manager or DEPPortal and assign the devices to the BlackBerry UEM server. You can enter the serial numbers in the followingways:
• Type in each number• Select the order number that Apple assigned to the devices when you purchased them• Upload a .csv file containing the serial numbers
Before you begin: Configure BlackBerry UEM to use DEP. For more information, see the Configuration content.
1. In a browser, type business.apple.com or deploy.apple.com.2. Sign in to your Apple Business Manager or DEP account.3. In the Device Enrollment Program section, click Manage Devices.4. Follow the steps to enter the serial numbers for the devices.5. Assign the serial numbers to the BlackBerry UEM server.
After you finish: Assign an enrollment configuration to iOS devices.
Assign an enrollment configuration to iOS devicesIf you created an enrollment configuration and selected "Automatically assign all new devices to thisconfiguration," BlackBerry UEM automatically assigns the configuration when DEP devices synchronizewith BlackBerry UEM. Otherwise, you must assign an enrollment configuration to devices. BlackBerryUEM synchronizes with DEP on a daily schedule and whenever you view the Apple DEP devices page.
If the activation status for a device is still pending, you can remove an existing enrollment configuration andassign a new one.
Before you begin: Register iOS devices in DEP and assign them to the BlackBerry UEM server.
1. On the menu bar, click Users > Apple DEP devices.2. Select the check boxes beside the devices that you want to assign an enrollment configuration to. You must
select devices that are registered to the same DEP account.3. Click .4. In the Enrollment configuration drop-down list, select the enrollment configuration that you want to assign.5. Click Assign.
After you finish: Distribute the iOS devices to users. As part of the device setup, devices are activatedwith BlackBerry UEM. Users are prompted for a username and password. Company directory users can usetheir company directory username (in the format domain\username) and password. Local users need to use anactivation password. See Set an activation password for the user.
Add an enrollment configurationAn enrollment configuration allows you to define how devices that are enrolled in DEP are set up when they areactivated in BlackBerry UEM. You can create as many enrollment configurations as your organization needs.
1. On the menu bar, click Settings.2. In the left pane, click External integration > Apple Device Enrollment Program.3. Click the name of a DEP account.4. In the DEP enrollment configurations section, click .5. Type a name for the configuration.6. Complete one of the following tasks:
| Device activation | 304

• If you want BlackBerry UEM to automatically assign the enrollment configuration when DEP devicessynchronize to BlackBerry UEM, select the "Automatically assign all new devices to this configuration"checkbox. BlackBerry UEM synchronizes with Apple DEP on a daily schedule and whenever you view theApple DEP devices page.
Note: If you previously created an enrollment configuration with this setting and the configuration wasapplied to devices, BlackBerry UEM does not assign the new enrollment configuration.
Note: You can select only one enrollment configuration to be automatically assigned to new DEP devices.If you previously created an enrollment configuration with this setting, the setting is removed from theprevious configuration and added to the new one.
• If you want to manually assign the enrollment configuration to specific devices, leave the "Automaticallyassign all new devices to this configuration" box unchecked.
7. Optionally, type a department name and support phone number to be displayed on devices during setup.8. In the Device configuration section, select from the following options:
• Allow pairing - if selected, users can pair the device with a computer• Enable supervised mode - if selected, devices are activated in supervised mode. You must select at least
one of "Enable supervised mode" or "Allow removal of MDM profile."• Mandatory - if selected, users are not prompted to accept the enrollment configuration• Allow removal of MDM profile - if selected, users can deactivate devices. You must select at least one of
"Enable supervised mode" or "Allow removal of MDM profile."• Wait until device is configured - if selected, users cannot cancel the device setup until activation with
BlackBerry UEM is completed. This setting is valid only if you select "Enable supervised mode."9. In the Skip during setup section, select the items that you do not want to include in the device setup:
• Passcode - if selected, users are not prompted to create a device passcode• Location services - if selected, location services are disabled on the device• Restore - if selected, users cannot restore data from a backup file• Move from Android - if selected, users cannot restore data from an Android device• Apple ID - if selected users are prevented from signing in to Apple ID and iCloud• Terms and conditions - if selected, users do not see the iOS terms and conditions• Siri - if selected, Siri is disabled on devices• Diagnostics - if selected, diagnostic information is not automatically sent from the device during setup• Biometric - if selected, users cannot set up Touch ID• Payment - if selected, users cannot set up Apple pay• Zoom - if selected, users cannot set up Zoom• Home button setup - if selected, users cannot adjust the Home button's click
10.Click Save.11.If you selected "Automatically assign new devices to this configuration," click Yes.
After you finish: If you did not select "Automatically assign new devices to this configuration", see Assign anenrollment configuration to iOS devices.
Remove an enrollment configuration that is assigned to iOS devicesIf you assigned an enrollment configuration to devices and the configuration is not yet applied to the devices, youcan remove the enrollment configuration from the devices.
1. On the menu bar, click Users > Apple DEP devices.2. Select the check boxes beside the devices that you want to remove an enrollment configuration from. You
must select devices that are registered to the same DEP account.
| Device activation | 305

3. Click .4. Click Remove.
After you finish: Assign an enrollment configuration to iOS devices.
Delete an enrollment configurationIf you delete an enrollment configuration that is assigned to devices before the configuration is applied to thedevices, BlackBerry UEM removes the enrollment configuration assigned to the device records.
1. On the menu bar, click Settings.2. In the left pane, click External integration > Apple Device Enrollment Program.3. Click the name of a DEP account.4. In the DEP enrollment configurations section, click .5. Click Delete.
After you finish: If BlackBerry UEM removes the enrollment configuration from devices, assign an enrollmentconfiguration to the devices.
Change the settings for an enrollment configurationIf you assigned an enrollment configuration to devices and the configuration is not applied to the devices,BlackBerry UEM updates the enrollment configuration assigned to the devices when you save the changes to theconfiguration.
1. On the menu bar, click Settings.2. In the left pane, click External integration > Apple Device Enrollment Program.3. Click the name of a DEP account.4. In the DEP enrollment configurations section, click the name of the configuration you want to change.5. Change the settings.6. Click Save.
View the settings for an enrollment configuration that is assigned to a deviceIf an enrollment configuration is assigned to an iOS device and the configuration is pending, you can view thesettings for the enrollment configuration.
1. On the menu bar, click Users > Apple DEP devices.2. In the Enrollment configuration column, click the name of an enrollment configuration.
View user details for an activated deviceAfter a device is successfully activated, you can view details associated with the user, such as the groups that theuser is assigned to.
1. On the menu bar, click Users > Apple DEP devices.2. In the Display name column, click the name of a user.
Activating iOS devices using Apple Configurator 2You can use Apple Configurator 2 to prepare iOS devices for activation in BlackBerry UEM. Users can activatethe prepared devices without using the BlackBerry UEM Client app. They need only their username and activationpassword.
| Device activation | 306
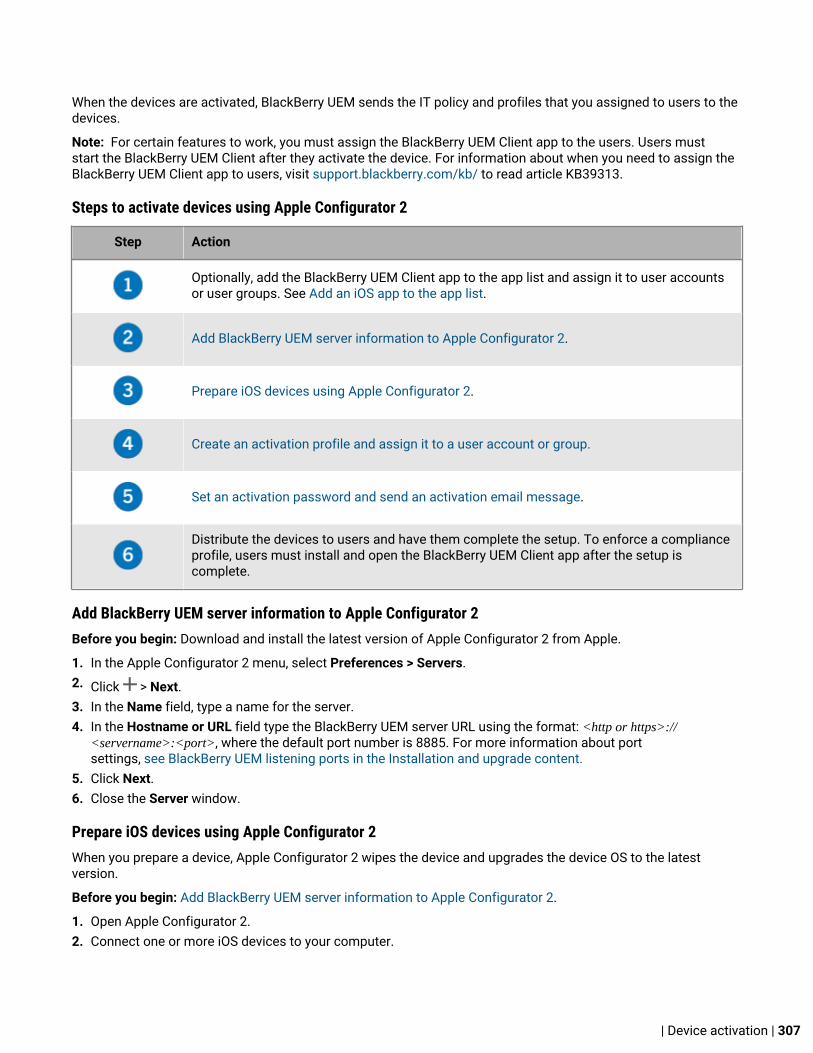
When the devices are activated, BlackBerry UEM sends the IT policy and profiles that you assigned to users to thedevices.
Note: For certain features to work, you must assign the BlackBerry UEM Client app to the users. Users muststart the BlackBerry UEM Client after they activate the device. For information about when you need to assign theBlackBerry UEM Client app to users, visit support.blackberry.com/kb/ to read article KB39313.
Steps to activate devices using Apple Configurator 2
Step Action
Optionally, add the BlackBerry UEM Client app to the app list and assign it to user accountsor user groups. See Add an iOS app to the app list.
Add BlackBerry UEM server information to Apple Configurator 2.
Prepare iOS devices using Apple Configurator 2.
Create an activation profile and assign it to a user account or group.
Set an activation password and send an activation email message.
Distribute the devices to users and have them complete the setup. To enforce a complianceprofile, users must install and open the BlackBerry UEM Client app after the setup iscomplete.
Add BlackBerry UEM server information to Apple Configurator 2Before you begin: Download and install the latest version of Apple Configurator 2 from Apple.
1. In the Apple Configurator 2 menu, select Preferences > Servers.2. Click > Next.3. In the Name field, type a name for the server.4. In the Hostname or URL field type the BlackBerry UEM server URL using the format: <http or https>://
<servername>:<port>, where the default port number is 8885. For more information about portsettings, see BlackBerry UEM listening ports in the Installation and upgrade content.
5. Click Next.6. Close the Server window.
Prepare iOS devices using Apple Configurator 2When you prepare a device, Apple Configurator 2 wipes the device and upgrades the device OS to the latestversion.
Before you begin: Add BlackBerry UEM server information to Apple Configurator 2.
1. Open Apple Configurator 2.2. Connect one or more iOS devices to your computer.
| Device activation | 307

3. Click Prepare.4. In the Configuration drop-down list, select Manual. Click Next.5. In the Server drop-down list, select the BlackBerry UEM server. Click Next.6. Optionally, select the Supervise devices checkbox. Click Next.7. If you selected Supervise devices, complete the organization information.8. Click Prepare and wait while the device is prepared. The process can take up to 15 minutes.
After you finish: Distribute the devices to users for activation.
Using Activation Lock on iOS devicesThe Activation Lock feature on iOS devices allows users to protect their devices if they are lost or stolen. Whenthe feature is enabled, the user must confirm the Apple ID and password to disable Find My iPhone, erase thedevice, or reactivate and use the device.
To manage the Activation Lock feature in BlackBerry UEM:
• The device must be a supervised device running iOS 7.1 or later.• The device must have an iCloud account configured.• The device must have Find My iPhone or Find My iPad enabled.
When a device is activated on BlackBerry UEM, Activation Lock is disabled by default. You can enable it for eachdevice individually, or you can enforce it using the IT policy. When you enable Activation Lock, BlackBerry UEMstores a bypass code that you can use to clear the lock so that the device can be erased and reactivated withoutthe user's Apple ID and password.
Related concepts
Activating iOS devices that are enrolled in DEP
Enable Activation LockComplete the following steps to enable Activation Lock for each device individually. If Activation Lock is enforcedusing the IT policy rule, it is already enabled.
Note: When enabling the Activation Lock feature, a short delay may occur between BlackBerry UEM and Apple.
Before you begin:
• The device must be a supervised device running iOS 7.1 or later.• The device must have an iCloud account configured.• The device must have Find My iPhone or Find My iPad enabled.
1. On the menu bar, click Users.2. Search for a user account.3. In the search results, click the name of the user account.4. Click the device tab.5. In the Manage device window, click Enable Activation Lock.
After you finish: To view the list of bypass codes for devices, see View the Activation Lock bypass code
| Device activation | 308

Disable Activation LockComplete the following steps to disable Activation Lock for each device individually. If Activation Lock is enforcedusing an IT policy rule, you cannot disable it.
Note: When you enable the Activation Lock feature, a short delay may occur between BlackBerry UEM and Apple.
1. On the menu bar, click Users.2. Search for a user account.3. In the search results, click the name of the user account.4. Click the device tab.5. In the Manage device window, select Disable Activation Lock.
View the Activation Lock bypass codeYou can view the Activation Lock bypass code and the date that the bypass code was generated.
1. On the menu bar, click Users > Apple Activation Lock.2. Search for a device.3. In the search results, click the device.4. If necessary, scroll to the right of the main screen to view the bypass code.
Restricting unsupervised iOS devicesThere are two ways to restrict unsupervised iOS devices in BlackBerry UEM:
• For devices that are enrolled in DEP, you can assign an enrollment configuration to devices that has the"Enable supervised mode" setting selected. When devices are activated, they are automatically activated insupervised mode. For more information, see Assign an enrollment configuration to iOS devices.
• You can assign an activation profile that has the "Do not allow unsupervised devices to activate" settingselected to user accounts. This setting is supported for the "MDM controls" and "User privacy" (with SIM-based licensing enabled) activation types. BlackBerry UEM prevents unsupervised devices from activatingand automatically removes devices if they become unsupervised, whether the devices are activated with theBlackBerry UEM Client or using DEP. For more information, see Create an activation profile.
Activating BlackBerry 10 devices using the BlackBerry WiredActivation ToolThe BlackBerry Wired Activation Tool allows you to activate multiple BlackBerry 10 devices at the same timeusing USB connections instead of wireless connections. Your organization may want to use this method fordifferent reasons:
• To make it quick and easy to activate multiple devices at once• To keep the activation process in the hands of administrators• To activate devices and configure their security features, such as content encryption requirements and VPN
profiles, before giving them to users or connecting them to your organization's network
You can't assign profiles and policies using the BlackBerry Wired Activation Tool. You must assign any profilesand policies to your users in the BlackBerry UEM management console before assigning and activating devicesusing the BlackBerry Wired Activation Tool. However, you don't need to set any activation passwords to assignand activate devices using the BlackBerry Wired Activation Tool.
| Device activation | 309

To activate devices using the BlackBerry Wired Activation Tool, the devices must be running BlackBerry 10OS version 10.3 or later.
To obtain the BlackBerry Wired Activation Tool contact your Customer Support representative.
Configure the BlackBerry Wired Activation Tool and log in to a BlackBerry UEM instanceBefore you can activate devices with the BlackBerry Wired Activation Tool, you must create a configurationfor each BlackBerry UEM instance you need to access. After you create a configuration, you must also use anadministrator account to allow the BlackBerry Wired Activation Tool to access BlackBerry Web Services.
1. In the BlackBerry Wired Activation Tool installation folder, double-click the BWAT.exe file.2. In the Add a BES12 server screen, in the Name field, type a name to identify the configuration you're creating.
For example, if you have two BlackBerry UEM instances, you might create a configuration for each one andname them Server 1 and Server 2.
3. In the BlackBerry Web Services URL field, type the address for the BlackBerry Web Services component. Thedefault address is https://<BlackBerry UEM web address>:18084.
You can change the port by modifying the tomcat.bws.port setting in the BlackBerry UEM database.4. In the BCP Endpoint URL field, type the address to use for device activations. This is also known as the
Activation URL or Server name. The default address is: http://server.name:8882/SRP_ID/mdm.
You can find the address by making sure the %ActivationURL% variable is in the Activation email template andclicking View activation email from any User summary screen.
If necessary, you can also look up the host address and port in the BlackBerry UEM database. In thedef_cfg_setting_dfn table, find the id_setting_definition values for bdmi.enroll.bcp.hostand bdmi.enroll.bcp.port. Then use the id_setting_definition values to look up the values ofthose settings in the obj_global_cfg_setting.
5. Click Submit.6. In the Log in screen, select a BlackBerry UEM configuration from the drop-down list.7. In the Username field, type the username of a BlackBerry UEM user account with administrator permissions.8. In the Password field, type the password for the account.9. In the Directory drop-down list, select an authentication method.10.If required, in the Domain field, type the Microsoft Active Directory domain.11.Click Log in.
Activate BlackBerry 10 devices using the BlackBerry Wired Activation ToolBefore you begin:
• Configure the BlackBerry Wired Activation Tool and log in to a BlackBerry UEM instance.• Turn on all connected devices and make sure that all devices have either completed the initial setup process,
or that they haven't started it. You can't activate devices if the initial setup process is in progress.
1. Connect one or more BlackBerry 10 devices to your computer using USB cables.2. Check the Status column for each device. Perform one of the following actions:
• If the Status column displays Requires password, click Requires password to enter the password for thedevice
• If the Status column displays Unsupported device, upgrade the device software to BlackBerry 10 OSversion 10.3 or later
• If the Status column displays Ready, assign the device to a user3. In the Search field, search for a user account that you want to assign a device to.
| Device activation | 310
4. In the list of search results, click the user account.5. In the main section of the screen, click a user account name and drag the name to a device to assign the
device to that user. Repeat this step to assign devices to multiple users.6. Select the checkbox next to the user and device pairs that you want to activate.7. Click Activate devices.
The BlackBerry Wired Activation Tool activates all the devices you selected. Check the Status column for theprogress and results for each device. If an activation doesn't complete, click the message in the Status column formore information about errors.
Tips for troubleshooting device activationWhen you troubleshoot activation of any device type, always check the following:
• Make sure that BlackBerry UEM supports the device type. For more information about supported devicetypes, see the Compatibility matrix.
• Make sure that there are licenses available for the device type the user activates and the activation type that isassigned to the user. For more information, see the Licensing content.
• Check network connectivity on the device.
• Verify that the mobile or Wi-Fi network is active and has sufficient coverage.• If the user must manually configure a VPN or work Wi-Fi profile to access content behind your
organization's firewall, make sure that the user's profiles are configured correctly on the device.• If on work Wi-Fi, make sure that the device network path is available. For more information on configuring
network firewalls to work with BlackBerry UEM, visit support.blackberry.com/community to read article36470.
• Make sure that the activation profile assigned to the supports the device type being activated.• If the device is trying to connect with BlackBerry UEM or the BlackBerry Infrastructure through your
organization's firewall, verify that the proper firewall ports are open. For more information about requiredports, see the Installation and upgrade content.
• Gather device logs:
• For more information on retrieving BlackBerry 10 device log files, visit support.blackberry.com/community to read article 26038.
Note: BlackBerry 10 device log files are encrypted. To use BlackBerry 10 device log files fortroubleshooting purposes, you must have an open ticket with BlackBerry Technical Support Services. Onlysupport agents can decrypt the log files.
• For more information on retrieving iOS device log files, visit support.blackberry.com/community to readarticle 36986.
• For more information on retrieving Android device log files, visit support.blackberry.com/community to readarticle 32516.
KNOX Workspace and Android Enterprise devices
When you troubleshoot activation of Samsung devices that use Samsung KNOX Workspace, check the following:
• Make sure the device supports KNOX Workspace. See the information from Samsung.• Make sure that the Warranty Bit has not been triggered. See the information from Samsung. • Make sure that the KNOX container version is supported. KNOX Workspace requires KNOX Container 2.0 or
later. For more information about supported Samsung KNOX versions, see the list from Samsung.
When you troubleshoot activation of Android Enterprise devices, check the following:
| Device activation | 311
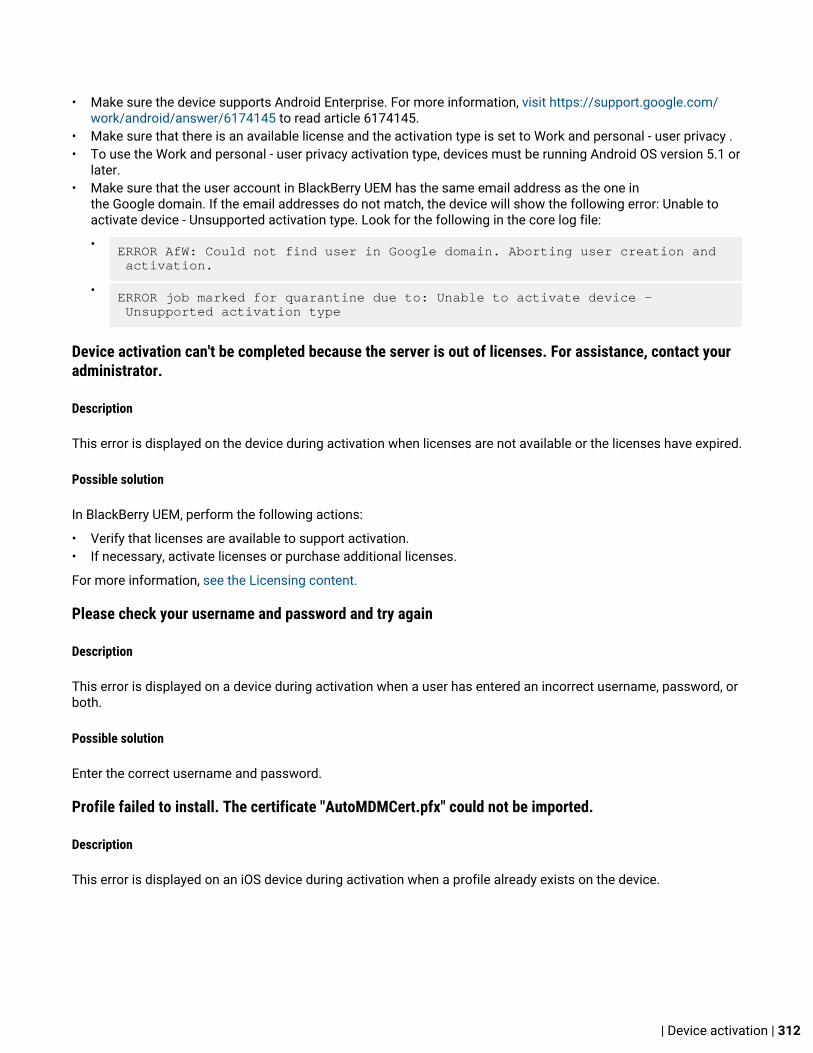
• Make sure the device supports Android Enterprise. For more information, visit https://support.google.com/work/android/answer/6174145 to read article 6174145.
• Make sure that there is an available license and the activation type is set to Work and personal - user privacy .• To use the Work and personal - user privacy activation type, devices must be running Android OS version 5.1 or
later. • Make sure that the user account in BlackBerry UEM has the same email address as the one in
the Google domain. If the email addresses do not match, the device will show the following error: Unable toactivate device - Unsupported activation type. Look for the following in the core log file:
• ERROR AfW: Could not find user in Google domain. Aborting user creation and activation.
• ERROR job marked for quarantine due to: Unable to activate device - Unsupported activation type
Device activation can't be completed because the server is out of licenses. For assistance, contact youradministrator.
Description
This error is displayed on the device during activation when licenses are not available or the licenses have expired.
Possible solution
In BlackBerry UEM, perform the following actions:
• Verify that licenses are available to support activation.• If necessary, activate licenses or purchase additional licenses.
For more information, see the Licensing content.
Please check your username and password and try again
Description
This error is displayed on a device during activation when a user has entered an incorrect username, password, orboth.
Possible solution
Enter the correct username and password.
Profile failed to install. The certificate "AutoMDMCert.pfx" could not be imported.
Description
This error is displayed on an iOS device during activation when a profile already exists on the device.
| Device activation | 312

Possible solution
Go to Settings > General > Profiles on the device and verify that a profile already exists. Remove the profile andreactivate. If the issue persists, you might have to reset the device because data might be cached.
Error 3007: Server is not available
Description
This error can appear on the device during activation because of the following:
• The certificate that BlackBerry UEM uses to sign the MDM profile that it sends to iOS devices is not trusted bythe device. The user is asked to trust this certificate when they activate the device.
• If you configure a transparent proxy such as Blue Coat and it monitors port 443 for non-standard traffic, theBlackBerry UEM Client cannot make the required HTTP CONNECT and HTTP OPTIONS calls to BlackBerryUEM.
Possible solutions
Possible solutions include:
• Install the root certificate for the CA that issued the certificate that BlackBerry UEM uses to sign the MDMprofile to the iOS device. For more information about this certificate, see the Configuration content.
• Verify that your proxy configuration is not blocking the BlackBerry UEM Client from making HTTP CONNECTand HTTP OPTIONS calls to BlackBerry UEM. For more information, visit http://support.blackberry.com/kb toread article 38644.
Unable to contact server, please check connectivity or server address
Description
This error can appear on the device during activation because of the following:
• The username was entered incorrectly on the device.• The customer address for device activation was entered incorrectly on the device.
Note: This is only required when registration with the BlackBerry Infrastructure has been disabled.• No activation password has been set, or the password has expired.
Possible solutions
Possible solutions include:
• Verify the username and password.• Verify the customer address for device activation.• Set a new activation password using BlackBerry UEM Self-Service.
iOS or macOS device activations fail with an invalid APNs certificate
Possible cause
If you are unable to activate iOS or macOS devices, the APNs certificate may not be registered correctly.
| Device activation | 313

Possible solution
Perform one or more of the following actions:
• In the management console, on the menu bar, click Settings > External integration > Apple Push Notification.Verify that the APNs certificate status is "Installed." If the status is not correct, try to register the APNscertificate again.
• To test the connection between BlackBerry UEM and the APNs server, click Test APNS certificate.• If necessary, obtain a new signed CSR from BlackBerry, and request and register a new APNs certificate.
Users are not receiving the activation email
Description
Users are not receiving their activation email, even though all of the settings in BlackBerry UEM are correct.
Possible solution
If users are using a third-party mail server, email messages from BlackBerry UEM can be marked as spam and endup in the spam email folder or the junk mail folder.
Make sure that users have checked their spam email folder or junk mail folder for the activation email.
| Device activation | 314

Device commands and controlsBlackBerry UEM lets you send commands to devices over the wireless network to protect device data. You canalso locate devices on a map and control which devices can access Exchange ActiveSync.
Sending commands to users and devicesYou can send various commands over the wireless network to manage user accounts and devices. The list ofcommands that are available depends on the device type and activation type. You can send commands to aspecific user or device, or you can send commands to multiple users and devices using bulk commands.
For example, you can use commands in the following circumstances:
• If a device is temporarily misplaced, you can send a command to lock the device or delete work data from thedevice.
• If you want to redistribute a device to another user in your organization, or if a device is lost or stolen, you cansend a command to delete all data from the device.
• When an employee leaves your organization, you can send a command to the user's personal device to deleteonly the work data.
• If a user forgets the work space password, you can send a command to reset the work space password.• For users with supervised DEP devices, you can send a command to trigger an OS upgrade.
Send a command to a deviceBefore you begin:
If you want to set an expiry period for commands that delete data from devices in BlackBerry UEM, see Set anexpiry time for commands.
1. On the menu bar, click Users > Managed devices.2. Search for a user account.3. In the search results, click the name of the user account.4. Click the device tab.5. In the Manage device window, select the command that you want to send to the device.
Send a bulk commandYou can send a command to multiple user accounts or devices at the same time by selecting the users or devicesfrom the user list and sending a bulk command.
Before you begin: If you want to set an expiry period for commands that delete data from devices, see Set anexpiry time for commands.
1. On the menu bar, click Users > Managed devices.2. If necessary, filter the user list.3. Perform one of the following actions:
• Select the check box at the top of the user list to select all users and devices in the list.• Select the check box for each user and device that you want to include. You can use Shift+click to select
multiple users.4. From the menu, click one of the following icons:
| Device commands and controls | 315

Icon Description
Locate devices
You can select a maximum of 100 devices at a time.
For more information, see Locate a device.
Send email
For more information, see Send an email to users.
Send activation email
For more information, see Send an activation email to multiple users.
Add to user groups
You can select a maximum of 200 devices at a time.
For more information, see Add users to user groups.
Export
For more information, see Export the user list to a .csv file .
Remove devices
To use this bulk command, you must be a Security Administrator. You can select amaximum of 200 devices at a time.
For more information, see Commands for all device types.
Update device information.
For more information, see Commands for all device types.
Delete all device data
To use this command, you must be a Security Administrator. You can select amaximum of 200 devices at a time. This bulk command is not supported for macOSdevices.
For more information, see Commands reference.
Delete only work data
To use this command, you must be a Security Administrator. You can select amaximum of 200 devices at a time.
For more information, see Commands reference.
Edit device ownership
You can select a maximum of 100 devices at a time.
For more information, see Change the device ownership label.
| Device commands and controls | 316

Icon Description
Update OS
You can force supervised iOS devices to install an available OS update. To use thiscommand, you must be a Security Administrator. You can select a maximum of 200devices at a time.
For more information, see Update the OS on supervised iOS devices.
Change console passwords
You can send a BlackBerry UEM Self-Service password to multiple users at one time.
For more information, see Send a BlackBerry UEM Self-Service password to multipleusers.
Set an expiry time for commandsWhen you send the "Delete all device data" or "Delete only work data" command to a device, the device mustconnect to BlackBerry UEM for the command to complete. If the device is unable to connect to BlackBerry UEM,the command remains in pending status and the device is not removed from BlackBerry UEM unless you manuallyremove it. Alternatively, you can configure BlackBerry UEM to automatically remove devices when the commandsdo not complete after a specified amount of time.
1. On the menu bar, click Settings > General settings > Delete command expiry.2. For one or both of Delete all device data and Delete only work data , select Automatically remove the device if
the command has not completed.3. In the Command expiration field, type the number of days after which the command expires and the device is
automatically removed from BlackBerry UEM.4. Click Save.
Commands referenceThe commands you can send to devices depends on the device type and activation type. Some commands can besent to multiple devices at a time.
Commands for all device types
Command Description
Update deviceinformation
This command sends and receives updated device information. For example, youcan send newly updated IT policy rules or profiles to a device, and receive updatedinformation about a device such as OS version or battery level.
For macOS devices, the command is "Update desktop data".
For Windows 10 devices, the command sends a request to the device to create a healthcertificate validation request. The device sends the request to the Microsoft HealthAttestation Service to check for compliance.
To send this command to multiple devices, see Send a bulk command.
View deviceactions
This command displays any actions that are in progress on a device. For moreinformation, see Viewing device actions.
| Device commands and controls | 317
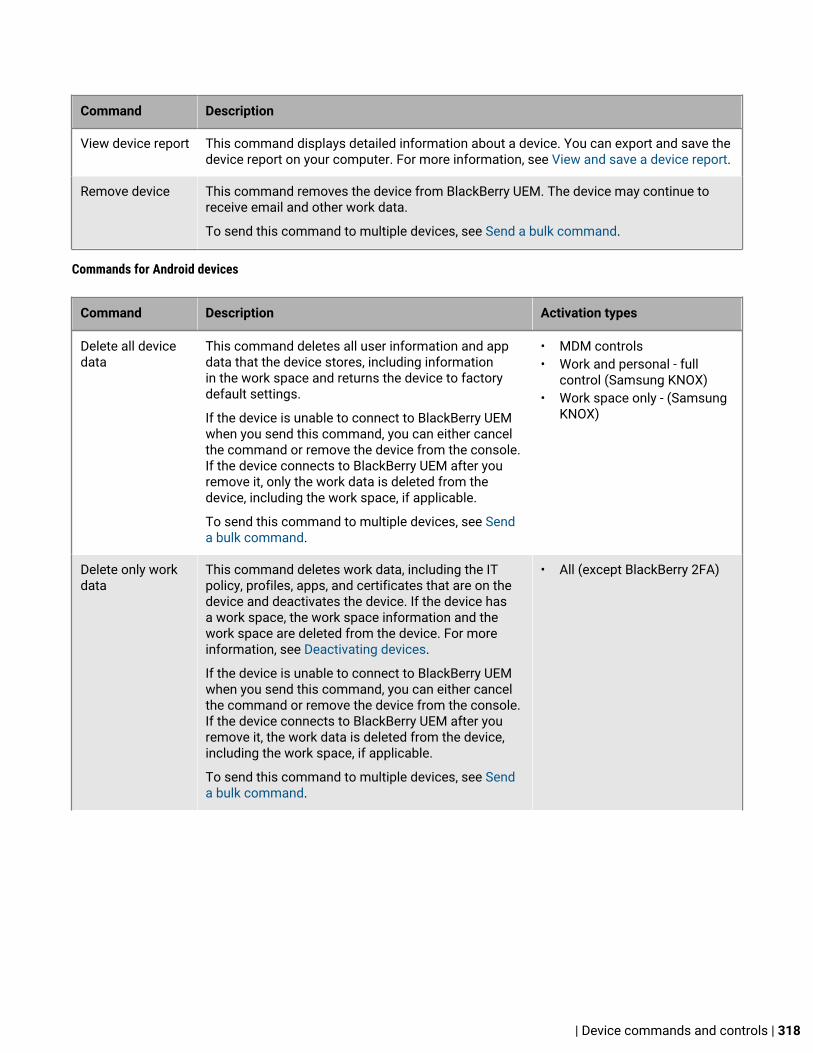
Command Description
View device report This command displays detailed information about a device. You can export and save thedevice report on your computer. For more information, see View and save a device report.
Remove device This command removes the device from BlackBerry UEM. The device may continue toreceive email and other work data.
To send this command to multiple devices, see Send a bulk command.
Commands for Android devices
Command Description Activation types
Delete all devicedata
This command deletes all user information and appdata that the device stores, including informationin the work space and returns the device to factorydefault settings.
If the device is unable to connect to BlackBerry UEMwhen you send this command, you can either cancelthe command or remove the device from the console.If the device connects to BlackBerry UEM after youremove it, only the work data is deleted from thedevice, including the work space, if applicable.
To send this command to multiple devices, see Senda bulk command.
• MDM controls• Work and personal - full
control (Samsung KNOX)• Work space only - (Samsung
KNOX)
Delete only workdata
This command deletes work data, including the ITpolicy, profiles, apps, and certificates that are on thedevice and deactivates the device. If the device hasa work space, the work space information and thework space are deleted from the device. For moreinformation, see Deactivating devices.
If the device is unable to connect to BlackBerry UEMwhen you send this command, you can either cancelthe command or remove the device from the console.If the device connects to BlackBerry UEM after youremove it, the work data is deleted from the device,including the work space, if applicable.
To send this command to multiple devices, see Senda bulk command.
• All (except BlackBerry 2FA)
| Device commands and controls | 318

Command Description Activation types
Lock device This command locks the device. The user must typethe existing device password to unlock the device.If a device is temporarily lost, you might use thiscommand.
When you send this command, the device locks onlyif there is an existing device password. Otherwise, noaction is taken on the device.
• MDM controls• Work and personal - full
control (Samsung KNOX)• Work and personal - user
privacy• Work and personal - user
privacy (Premium)• Work space only• Work space only (Premium)
Unlock device andclear password
This command unlocks the device and promptsthe user to create a new device password. If theuser skips the "Create device password" screen,the previous password is retained. You can use thiscommand if a user forgets the device password.
Note: This command is not supported onnon-Samsung devices running Android 7.0 and laterthat are activated with MDM controls.
• MDM controls• Work and personal - full
control (Samsung KNOX)• Work and personal - user
privacy (Samsung KNOX)
Specify devicepassword andlock
This command lets you create a device password andthen lock the device. You must create a password thatcomplies with existing password rules. To unlock thedevice, the user must type the new password.
Note: This command is not supported on non-Samsung devices running Android 7.0 and later thatare activated with MDM controls.
Note: For the Work and personal - user privacyactivation types, only BlackBerry devices powered byAndroid 8.x and later support this command.
• MDM controls• Work and personal - full
control (Samsung KNOX)• Work space only• Work space only (Premium)• Work and personal - user
privacy• Work and personal - user
privacy (Premium)
Reset work spacepassword
This command deletes the current work spacepassword from the device. When the user opens thework space, the device prompts the user to set a newwork space password.
• Work and personal - fullcontrol (Samsung KNOX)
• Work and personal - userprivacy - (Samsung KNOX)
• Work space only - (SamsungKNOX)
Specify workspace passwordand lock
For devices running Android 7.0 or later, you canspecify a work space password and lock the device.When the user opens an Android work profile app,they must type the password that you specified.
• Work and personal - userprivacy
• Work and personal - userprivacy (Premium)
Disable/enablework space
This command disables or enables access to thework space apps on the device.
• Work and personal - fullcontrol (Samsung KNOX)
• Work and personal - userprivacy - (Samsung KNOX)
• Work space only - (SamsungKNOX)
| Device commands and controls | 319

Command Description Activation types
DeactivateBlackBerry 2FA
This command deactivates devices that are activatedwith the BlackBerry 2FA activation type. The device isremoved from BlackBerry UEM and the user can't usethe BlackBerry 2FA feature.
• BlackBerry 2FA
Wipe apps This command wipes data from all Microsoft Intune-managed apps on the device. The apps are notremoved from the device.
For more information, see Wipe apps managed byMicrosoft Intune
• All (except BlackBerry 2FA)
Commands for iOS devices
Command Description Activation types
Delete all devicedata
This command deletes all user information and appdata that the device stores and returns the device tofactory default settings.
If the device is unable to connect to BlackBerry UEMwhen you send this command, you can either cancelthe command or remove the device from the console.If the device connects to BlackBerry UEM after youremove it, only the work data is deleted from thedevice.
To send this command to multiple devices, see Senda bulk command.
• MDM controls
Delete only workdata
This command deletes work data, including the ITpolicy, profiles, apps, and certificates that are on thedevice.
If the device is unable to connect to BlackBerry UEMwhen you send this command, you can either cancelthe command or remove the device from the console.If the device connects to BlackBerry UEM after youremove it, the work data is deleted from the device.
To send this command to multiple devices, see Senda bulk command.
• MDM controls• User privacy
Lock device This command locks a device. The user must typethe existing device password to unlock the device.If a device is temporarily lost, you might use thiscommand.
When you send this command, the device locks onlyif there is an existing device password. Otherwise, noaction is taken on the device.
This command is not supported for Apple TV devices.
• MDM controls
| Device commands and controls | 320

Command Description Activation types
Unlock and clearpassword
This command unlocks a device and deletes theexisting password. The user is prompted to create adevice password. You can use this command if theuser forgets the device password.
This command is not supported for Apple TV devices.
• MDM controls
Turn on LostMode
This command locks the device and lets you set aphone number and message to display on the device.For example, you can display contact information forwhen the device is found.
After you send this command, you can view thelocation of the device from BlackBerry UEM.
This command is supported for supervised iOSdevices running iOS 9.3 or later.
This command is not supported for Apple TV devices.
• MDM controls
DeactivateBlackBerry 2FA
This command deactivates devices that are activatedwith the "BlackBerry 2FA" activation type. The deviceis removed from BlackBerry UEM and the user can'tuse the BlackBerry 2FA feature.
This command is not supported for Apple TV devices.
• BlackBerry 2FA
Update OS This command forces devices to install an availableOS update. Supported on the following devices:
• supervised devices running iOS 10.3 and later• supervised DEP devices running iOS 9.0 and later
For more information, see Update the OS onsupervised iOS devices.
To send this command to multiple devices, see Senda bulk command.
This command is not supported for Apple TV devices.
• MDM controls
Restart device This command forces devices to restart. Supportedon supervised iOS devices that are running 10.3 andlater.
This command is not supported for Apple TV devices.
• MDM controls
Turn off device This command forces devices to turn off. Supportedon supervised iOS devices that are running 10.3 andlater.
This command is not supported for Apple TV devices.
• MDM controls
| Device commands and controls | 321

Command Description Activation types
Wipe apps This command wipes data from all Microsoft Intune-managed apps on the device. The apps are notremoved from the device.
For more information, see Wipe apps managed byMicrosoft Intune
• MDM controls
Commands for macOS devices
Command Description Activation types
Lock desktop This command allows you to set a PIN and lock thedevice.
• MDM controls
Delete only workdata
This command deletes work data, including the ITpolicy, profiles, apps, and certificates that are onthe device, and optionally, deletes the device fromBlackBerry UEM.
To send this command to multiple devices, see Senda bulk command.
• MDM controls
Delete all devicedata
This command deletes all user information and appdata from the device. It returns the device to factorydefaults, locks the device with a PIN that you set, andoptionally, deletes the device from BlackBerry UEM.
Not supported as a bulk command.
• MDM controls
Commands for BlackBerry 10 devices
Command Description Activation types
Specify devicepassword, lockdevice and setmessage
This command lets you create a device password andset a home screen message, then locks the device.You must create a password that complies withexisting password rules. When the user unlocks thedevice, the device prompts the user to accept or rejectthe new password.
If an IT policy requires the device to have the samepassword for the device and the work space, thiscommand also changes the work space password.
• Work and personal -Corporate
• Work space only• Work and personal -
Regulated
| Device commands and controls | 322

Command Description Activation types
Delete all devicedata
This command deletes all user information and appdata that the device stores, including informationin the work space. It returns the device to factorydefault settings, and optionally, deletes the devicefrom BlackBerry UEM.
If the device is unable to connect to BlackBerry UEMwhen you send this command, you can either cancelthe command or remove the device from the console.If the device connects to BlackBerry UEM after youremove it, only the work data is deleted from thedevice.
To send this command to multiple devices, see Senda bulk command.
• Work and personal -Corporate
• Work space only• Work and personal -
Regulated
Specify workspace passwordand lock
This command lets you create a work spacepassword on the device and lock the work space. Youmust create a password that complies with existingpassword rules. To unlock the work space, the usermust type the new password you create.
If an IT policy requires the device to have the samepassword for the device and the work space, thiscommand also changes the device password.
• Work and personal -Corporate
• Work and personal -Regulated
Delete only workdata
This command deletes work data, including the ITpolicy, profiles, apps, and certificates that are onthe device, and optionally, deletes the device fromBlackBerry UEM.
If the device has a work space, the work spaceinformation is deleted and the work space is deletedfrom the device.
If the device is unable to connect to BlackBerry UEMwhen you send this command, you can either cancelthe command or remove the device from the console.If the device connects to BlackBerry UEM after youremove it, the work data is deleted from the device.
To send this command to multiple devices, see Senda bulk command.
• Work and personal -Corporate
• Work and personal -Regulated
| Device commands and controls | 323

Commands for Windows devices
Command Description Activation types
Lock device This command locks a device. The user must typethe existing device password to unlock the device.If a device is temporarily lost, you might use thiscommand.
When you send this command, the device locks onlyif there is an existing device password. Otherwise, noaction is taken on the device.
This command is supported only on devices runningWindows 10 Mobile and Windows Phone 8.1 or later.
MDM controls
Generate devicepassword andlock
This command generates a device password andlocks the device. The generated password is sent tothe user by email. You can use the preselected emailaddress, or specify an email address. The generatedpassword complies with any existing password rules.
This command is supported only on devices runningWindows 10 Mobile and Windows Phone OS version8.10.14176 or later.
MDM controls
Delete only workdata
This command deletes work data, including the ITpolicy, profiles, apps, and certificates that are onthe device, and optionally, deletes the device fromBlackBerry UEM.
The user account is not deleted when you send thiscommand.
After you send this command, you are given theoption of deleting the device from BlackBerry UEM.If the device is unable to connect to BlackBerry UEM,you can remove the device from BlackBerry UEM.If the device connects to BlackBerry UEM after youremoved it, only the work data is deleted from thedevice, including the work space, if applicable.
To send this command to multiple devices, see Senda bulk command.
MDM controls
| Device commands and controls | 324

Command Description Activation types
Delete all devicedata
This command deletes all user information and appdata that the device stores. It returns the device tofactory defaults and optionally, deletes the devicefrom BlackBerry UEM.
After you send this command, you are given theoption of deleting the device from BlackBerry UEM.If the device is unable to connect to BlackBerry UEM,you can remove the device from BlackBerry UEM.If the device connects to BlackBerry UEM after youremoved it, only the work data is deleted from thedevice, including the work space, if applicable.
To send this command to multiple devices, see Senda bulk command.
MDM controls
Restart desktop/device
This command forces devices to restart.
This command is supported only on Windows 10devices.
MDM controls
Commands for BlackBerry OS (version 5.0 to 7.1) devices
BlackBerry OS (version 5.0 to 7.1)
Command Description
Specify devicepassword andlock
This command lets you create a device password, then locks the device. You must createa password that complies with existing password rules. If you or a user turned on two-factor content protection, you cannot use this command.
Delete only workdata
This command deletes work data, including the IT policy, email messages, contacts, andwork service books that are on the device. All personal data remains on the device.
Delete all devicedata
This command permanently deletes all user information and application data that thedevice stores, and returns the device to factory defaults.
You can send this command to a device that you want to distribute to another user, or toa device that is lost and that the user might not recover.
Resend servicebooks
This command resends service books to a device. Service books specify which servicesare available on a BlackBerry OS device.
Resend IT policy This command resends the assigned BlackBerry OS IT policy to a device.
| Device commands and controls | 325
Deactivating devicesWhen you or a user deactivates a device, the connection between the device and the user account in BlackBerryUEM is removed. You can't manage the device and the device is no longer displayed in the management console.The user can't access work data on the device.
You can deactivate a device using the "Delete only work data" command. Users can deactivate their devices usingthe following methods:
• For iOS, Android, or Windows Phone devices, users can select Deactivate My Device on the About screen inthe BlackBerry UEM Client app.
• For Windows 10 devices, users can select Settings > Accounts > Work access > Delete. • For BlackBerry 10 devices, users can select Settings > BlackBerry Balance > Delete work space.
For devices that use KNOX MDM, when the device is deactivated, internal apps are uninstalled, and the uninstalloption becomes available for any public apps that were installed from the app list as required.
For Android Enterprise devices that only have a work space, if you deactivate a device you have the option todelete all data from the SD card and remove factory reset protection.
For Samsung KNOX Workspace devices that have been activated using the Work and personal - fullcontrol or Work space only activation types, deactivating the device deletes all data from the device or from thework space only. You can specify which data is wiped using the "Data wipe on deactivation" IT policy rule.
Locate a deviceYou can locate iOS, Android, and Windows 10 Mobile devices (for example, if a device is lost or stolen). Usersmust accept the location service profile before the management console can display iOS and Android devicelocations on a map. Windows 10 Mobile devices automatically accept the profile. Location history is available foriOS and Android devices if you enabled it in the profile.
Before you begin: Create and assign a location service profile.
1. On the menu bar, click Users > Managed devices.2. Select the check box for each device that you want to locate.3.
Click .4. Find the devices on the map using the following icons. If an iOS or Android device does not respond with
the latest location information and location history is enabled in the profile, the map displays the last knownlocation of the device.
•Current location:
•Last known location:
You can click or hover over an icon to display location information, such as latitude and longitude and whenthe location was reported (for example, 1 minute ago or 2 hours ago).
5. To view the location history for an iOS or Android device, perform the following actions:a) Click View location history.b) Select a date and time range.c) Click Submit.
| Device commands and controls | 326

Related tasks
Create a location service profile
Using Lost Mode for supervised iOS devicesYou can enable and manage Lost Mode for supervised iOS devices running iOS 9.3 or later. When a device is lost,enabling Lost Mode allows you to:
• Lock the device and set the message you want to display (for example, you can display contact information forwhen the device is found).
• View the current location of the device without using a Location service profile.• Track all devices that are in Lost Mode from the management console.
Turn on Lost Mode
Lost Mode is supported on supervised iOS devices running iOS 9.3 or later.
1. On the menu bar, click Users > Managed devices.2. Click on a device that you want to turn on Lost Mode for.3. In the device tab, click Turn on Lost Mode.4. In the Contact phone number and Message fields, enter the appropriate information.5. Optionally, select Replace slide to unlock text and enter the text to display.6. Click Enable.
Locate a device in Lost Mode
Before you begin: Turn on Lost Mode
1. On the menu bar, click Users > Managed devices.2. Click on a device that has Lost Mode turned on.3. In the device tab, click Get device location.
Turn off Lost Mode
Before you begin: Turn on Lost Mode
1. On the menu bar, click Users > Managed devices.2. Click on a device that has Lost Mode turned on.3. In the device tab, click Turn off Lost Mode.
View available updates for iOS devicesYou can see if a software update is available for your users' iOS devices so that you can have them upgrade thesoftware to the latest version.
1. On the menu bar, click Users > Managed devices.2. Search for a user account.3. In the search results, click the name of the user account.4. Select the device tab.5. In the Activated device section, see if an update is available.
| Device commands and controls | 327
Related tasks
Send an email to users
Update the OS on supervised iOS devicesYou can force the following devices to install an available OS update:
• supervised devices running iOS 10.3 and later• supervised DEP devices running iOS 9.0 and later
To update the OS on multiple devices, see Send a bulk command.
1. On the menu bar, click Users > Managed devices.2. Search for a user account.3. In the search results, click the name of the user account.4. Click the device tab.5. In the left pane, if a software update is available, click Update now.6. In the drop-down list, select one of the following options:
• Download and install: The update is automatically downloaded and installed on the device.• Download only: The update is automatically downloaded on the device and the user is prompted to install
it.• Install downloaded update: If the update is already downloaded on a device, it is automatically installed.
7. Click Submit.
Creating device support messagesFor Android 8.0 and later devices, you can create a support message that displays on the device when a feature isdisabled by an IT policy. The message displays in the settings screen for the feature that is disabled. If you don'tcreate a support message, the device displays the default message for the OS.
You can also specify an administrator support message that displays on the Device administrators settingsscreen. For example, you may want to display a disclaimer that your organization can monitor and manage appsand data in the work profile.
If your organization has users who work in more than one language, you can add support messages in additionallanguages and specify the default language that displays on devices that don’t use one of the availablelanguages.
Create device support messagesDevice support messages are supported by Android 8.0 and later devices.
1. On the menu bar, click Settings > General settings.2. Click Custom device support messages.3. On the Custom device support messages tab, click Add.4. Select the language that you want the notification to appear in.5. In the Disabled feature notice field, type the notice that you want to display on the device when a feature is
disabled. The message can be up to 200 characters.
| Device commands and controls | 328

6. Optionally, in the Administrator support message field, type a notice that displays on the Device administratorssettings screen.
7. If you want to create a message in more than one language, click Add an additional language and repeat steps4 to 6 for each language.
8. If you added messages in more than one language, select Default language beside the language that you wantto appear on devices that don’t use one of the available languages. For example, if English and French are theavailable languages, and English is the default language, the English message appears on devices that useGerman.
9. Click Save.
Allowing BlackBerry 10 users to back up device dataYou can control whether BlackBerry 10 users can back up and restore device data. You can permit users to backup only data from the personal space or to back up data from both the personal and work spaces. In the IT policythat you assign to users, you can select one or both of the following IT policy rules:
IT policy rule Applicable activation types
Allow backup and restore ofdevice
• Work and personal - Regulated• Work space only
Allow backup and restore of workspace
• Work and personal - Corporate• Work and personal - Regulated
Note: For devices activated with "Work and personal - Regulated," thisrule is applied only if the "Allow backup and restore of device" rule isselected.
If the IT policy that is assigned to users permits device backups, users can log in to BlackBerry Link to create orrestore back up files.
When users create backup files using BlackBerry Link, the files are encrypted using encryption keys thatBlackBerry UEM sends to BlackBerry 10 devices. The initial encryption keys are generated when you install orupgrade to BlackBerry UEM version 12.4. If necessary, you can generate new encryption keys, import encryptionkeys from another BlackBerry UEM instance, or export encryption keys.
Generate encryption keysYou can generate the encryption keys that are used to encrypt the backup files when users back up data fromtheir BlackBerry 10 devices.
1. On the menu bar, click Settings > General settings > BB10 backup and restore.2. Click Generate new key.3. Click Generate.
After you finish: The encryption keys are sent to all BlackBerry 10 devices that are activated in BlackBerry UEM.
Export encryption keysYou can export encryption keys from BlackBerry UEM so that you can import the keys to another BlackBerry UEMinstance.
1. On the menu bar, click Settings > General settings > BB10 backup and restore.
| Device commands and controls | 329

2. Click Export keys.3. Type and confirm a password for the file.4. Click Export.5. Save the file.
Import encryption keysYou can import encryption keys to BlackBerry UEM that were generated and exported from a different BlackBerryUEM instance.
Before you begin: Verify that you have the password for the encryption keys file that you will import.
1. On the menu bar, click Settings > General settings > BB10 backup and restore.2. Click Import keys.3. Click Browse and navigate to the encryption keys file. Click Open.4. Type the password for the file.5. Click Import.
Remove encryption keysWhen you generate a new encryption key, any previously generated keys become useful for decryption purposesonly. If you no longer need previously generated keys, you can remove them from BlackBerry UEM. The mostrecently generated encryption key cannot be removed.
1. On the menu bar, click Settings > General settings > BB10 backup and restore.2. To remove a decryption key, beside the key, click .3. To confirm that you want to permanently remove the key, type "blackberry." Click Remove.
| Device commands and controls | 330

Maintenance, monitoring, and reportingYou can monitor the status of BlackBerry UEM using log files, audit log files, and SNMP tools, and you cangenerate reports from the dashboard and the user list.
Using log filesYou can use log files to identify and troubleshoot issues with the BlackBerry UEM components or devices in yourorganization's environment. The BlackBerry UEM logging capabilities allow you to:
• Track the activity of the BlackBerry UEM components using the server logs• Send BlackBerry UEM log file data to a syslog server or to a text file• Retrieve log files from Android and BlackBerry 10 devices• Audit app activity on BlackBerry 10 devices
Managing BlackBerry UEM log filesThe size of the log files varies depending on the number of users and devices in your BlackBerry UEMenvironment and their level of activity. It is a best practice to monitor and control the amount of disk space usedby the log files. To prevent them from taking up too much disk space, you can specify a maximum file size anddebug level for the log files.
You can configure logging settings at the following levels:
• Global logging settings: These settings apply to all the BlackBerry UEM instances in your organization thatshare the same database. These settings include the location of the syslog file and the maximum size for thelog files.
• Instance logging settings: These settings apply only to the BlackBerry UEM instance you select and overrideglobal settings. These settings include enabling the option of a local location for log files and the log filelogging level.
Configure global logging settings
1. On the menu bar, click Settings > Infrastructure > Logging.2. Configure the following global settings as required for your organization's environment:
Note: Changes to these settings require a system restart.
Setting Steps
To route system events to asyslog server
Select the SysLog checkbox and specify the host name and port forthe syslog server where you want to route the BlackBerry UEM logevents.
To be able to specify a locationon the server instance wherethe BlackBerry UEM componentlog files are stored
Select the Enable local file destination checkbox.
To enable advanced logging ofserver-to-device communicationsfor troubleshooting
Select the Enable MDM payload logging checkbox.
| Maintenance, monitoring, and reporting | 331

Setting Steps
To set a maximum size limit forthe BlackBerry UEM componentlog files
In the Maximum log file size field, specify the maximum size, in MB,that each log file can reach.
When a log file reaches the maximum size, BlackBerry UEM starts anew instance of the log file.
To set the maximum serverlog file age for the BlackBerryUEM component log files
In the Maximum server log file age field, specify the maximum numberof days to keep the server log files before they are deleted.
If you do not specify a value, the log files are not deleted.
To specify a network destinationpath for Android and BlackBerry10 device log files
In the Device log network location field, specify the UNC path whereyou want to store activity log files that you retrieve from devices usingthe management console.
Maximum device app audit logfile age
In the Maximum device app audit log file age field, specify themaximum number of days to keep the device app audit log files beforethey are deleted.
If you do not specify a value, the log files are not deleted.
3. Click Save.
Set a log level for individual BlackBerry UEM components
To help aid in troubleshooting and to prevent performance impact due to excess log file generation, you canenable individual BlackBerry UEM components to write to log files at different information levels. For example,you can configure the BlackBerry UEM Core to generate log files at the Debug level, and leave the rest of thecomponents to generate log files at the Info level.
1. On the menu bar, click Settings > Infrastructure > Logging.2. Expand Global logging settings.3. In the Service logging override section, click .4. Select a UEM component.5. In the Logging level drop-down lost, select a logging level.6. Click Save.
After you finish: If necessary, you can override these settings. For more information, see Change the defaultsettings for BlackBerry Connectivity Node instances, and Create a server group.
Configure instance logging settings
1. On the menu bar, click Settings > Infrastructure > Logging.2. Expand the server instance that you want to configure.3. Configure the following settings as required for your organization's environment:
| Maintenance, monitoring, and reporting | 332
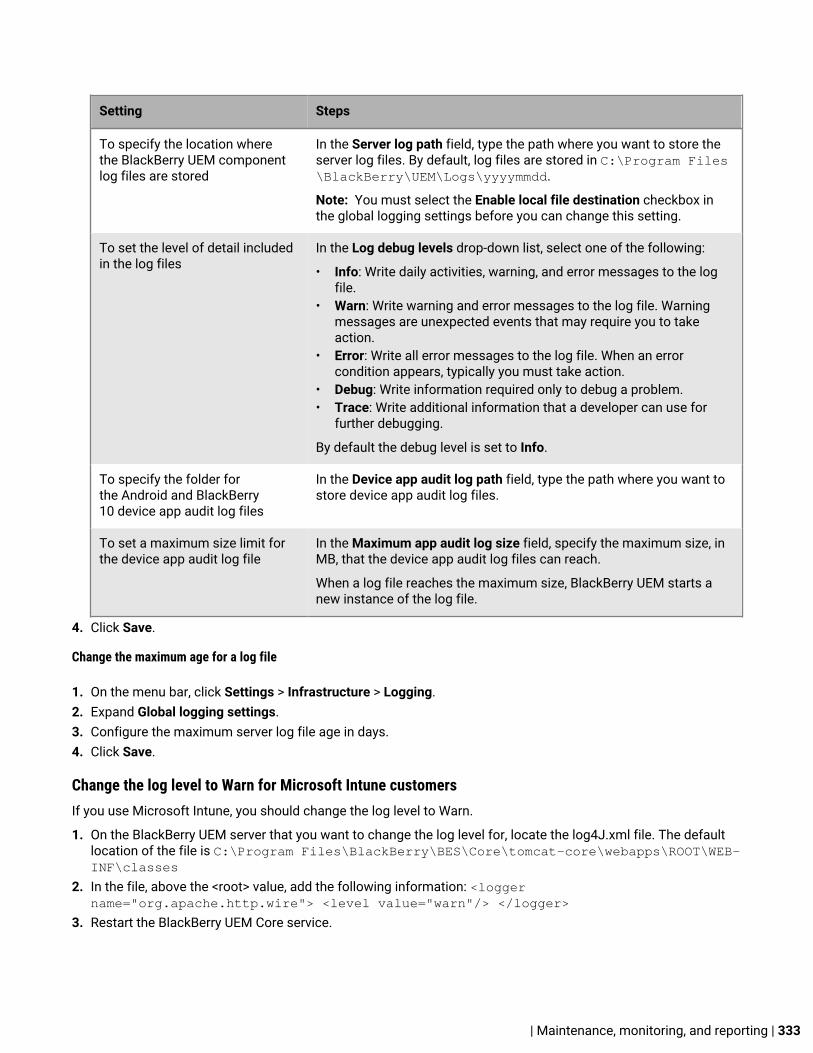
Setting Steps
To specify the location wherethe BlackBerry UEM componentlog files are stored
In the Server log path field, type the path where you want to store theserver log files. By default, log files are stored in C:\Program Files\BlackBerry\UEM\Logs\yyyymmdd.
Note: You must select the Enable local file destination checkbox inthe global logging settings before you can change this setting.
To set the level of detail includedin the log files
In the Log debug levels drop-down list, select one of the following:
• Info: Write daily activities, warning, and error messages to the logfile.
• Warn: Write warning and error messages to the log file. Warningmessages are unexpected events that may require you to takeaction.
• Error: Write all error messages to the log file. When an errorcondition appears, typically you must take action.
• Debug: Write information required only to debug a problem. • Trace: Write additional information that a developer can use for
further debugging.
By default the debug level is set to Info.
To specify the folder forthe Android and BlackBerry10 device app audit log files
In the Device app audit log path field, type the path where you want tostore device app audit log files.
To set a maximum size limit forthe device app audit log file
In the Maximum app audit log size field, specify the maximum size, inMB, that the device app audit log files can reach.
When a log file reaches the maximum size, BlackBerry UEM starts anew instance of the log file.
4. Click Save.
Change the maximum age for a log file
1. On the menu bar, click Settings > Infrastructure > Logging.2. Expand Global logging settings.3. Configure the maximum server log file age in days.4. Click Save.
Change the log level to Warn for Microsoft Intune customersIf you use Microsoft Intune, you should change the log level to Warn.
1. On the BlackBerry UEM server that you want to change the log level for, locate the log4J.xml file. The defaultlocation of the file is C:\Program Files\BlackBerry\BES\Core\tomcat-core\webapps\ROOT\WEB-INF\classes
2. In the file, above the <root> value, add the following information: <loggername="org.apache.http.wire"> <level value="warn"/> </logger>
3. Restart the BlackBerry UEM Core service.
| Maintenance, monitoring, and reporting | 333

Finding log filesBy default, a server log file is created for each BlackBerry UEM component and is storeddaily on the computer where the component is installed. If you install multiple BlackBerryUEM instances, each computer creates its own log files. BlackBerry UEM names the log files<server_name>_<component_identifier>_<yyyymmdd>_<log_number>.<file extension> (for example,BBServer01_MDAT_20140730_0001.txt).
The following log files are available in a BlackBerry UEM solution:
• Log files for components used to manage BlackBerry 10, iOS, Android, and Windows devices.
Log files are:
• ACCS - Tomcat access log files• AFMGR - BlackBerry Affinity Manager log files• BGS - BlackBerry Gatekeeping Service log files• BSG - BlackBerry Secure Gateway log files• CORE - BlackBerry UEM Core log files• DISP - BlackBerry Dispatcher log files• EVNT - BlackBerry UEM Core event log files• MDAT - BlackBerry MDS Connection Service log files• TMCT - Tomcat server log files• UI - BlackBerry UEM management console log files• <Server_FQDN>_yyyymmdd.csv<Computer_FQDN>_yyyymmdd.csv file used for logging the BlackBerry MDS
Connection Service for BlackBerry UEM.
Note: For more details on the BlackBerry MDS Connection Service .csv log file, visitsupport.blackberry.com/kb to read article 36936.
Additional log files are created when you first install BlackBerry UEM.
By default these log files are stored in <drive>:\Program Files\BlackBerry\UEM\Logs\<date orfolder name>
• Log files used for BlackBerry Secure Connect Plus are:
• BSCP - BlackBerry Secure Connect Plus log files which log data for connections with the BlackBerry SecureConnect Plus app
• BSCP-TS - BlackBerry Secure Connect Plus core log files which log data about the BlackBerry SecureConnect Plus component
The BlackBerry Secure Connect Plus log files are stored in <drive>:\Program Files\BlackBerry\UEM\Logs\.• Log files used for the BlackBerry Work Connect Notification Service are:
• BWCN - BlackBerry Work Connect Notification Service log files
The BlackBerry Work Connect Notification Service log files are stored in <drive>:\Program Files\BlackBerry\UEM\Logs\BWCN\<filename>
• Log files for components used to manage BlackBerry OS (version 5.0 to 7.1) devices (if applicable)
By default these log files are stored daily in C:\Program Files\Research In Motion\BlackBerryEnterprise Server\Logs\<date or folder name>.
For more information about log files for BES5, see the BES5 Administration Guide.• Log files for BBM logs, phone logs, PIN to PIN logs, SMS/MMS logs, and video chat logs are stored in .csv
format and are used to audit app activity.
| Maintenance, monitoring, and reporting | 334

By default, app audit log files for BlackBerry 10 devices are stored in C:\Program Files\BlackBerry\UEM\Logs\ and app audit log files for BlackBerry OS devices are stored in C:\Program Files (x86)\Research in Motion\BlackBerry Enterprise Server\Logs\.
• Log files for Good Control are stored in: C:\Program Files\BlackBerry\UEM\Logs\gclogs• Log files for Good Proxy are stored in: C:\Program Files\BlackBerry\UEM\Logs\gpslogs
Reading log filesBlackBerry UEM log files are saved in two formats, comma-separated value and text files.
BlackBerry Gatekeeping Service logs, BlackBerry UEM packet logs, BlackBerry Messenger contact and message,phone call, PIN , SMS, and video chat logs are stored in CSV format.
All other log files are stored in TXT format.
Reading .csv log files
Comma-separated log files contain different information depending what component, what device, or what deviceapp, they log information for. Some examples of log files in .csv format include the BlackBerry GatekeepingService log file, and the device app audit files, such as the BBM or Phone call log.
You can identify information contained in .csv log files because each log line presents information in a simple andconsistent manner, for example, each line in the SMS log file will present information in the following format:
Name.ID,"Email Address","Type of Message","To","From","Callback Phone Number","Body","Send/Received Date","Server Log Date","Overall Message Status","Command","UID"
Each line in a Phone log file, would present in the following format:
Name.ID,"Type of Call","Name","Phone Number","Start Date","Server Log Date","Elapsed Time","Memo","Command","UID","Phone Line"
Reading .txt log files
Log files stored as .txt files have two basic formats:
• The first format is the most common and usually starts with the date and time, providing information in thefollowing manner:
TimeStamp Hostname AppName ProcessId MessageID [StructuredData] Message
For example:
2015-06-12T12:07:17.634-0400 computer.example.com MDM localhost-startStop-1 logging.feature.admin.application.management|logging.component.appmgmt [{{requestId,543ade23}{myContextInfo,runningContext}}] INFO Total 2 routes, of which 2 is started.
• The second format, starting with a numerical level indicator, provides information in the following manner:
Level Date Thread CID Message
| Maintenance, monitoring, and reporting | 335

For example:
<#03>[30000] (09/10 00:00:00.122):{0x520} [DIAG] EVENT=Thread_report, THREADID=0x1390, THREADNAME="SRPReceiverHandler"
There may be some variation, based on the component or function that is being logged, but all log files stored as.txt files contain the following basic information.
Item Description
Date or Timestamp A timestamp in of the form <Date><Time><difference from UTC>.
The Date/Time indicates the date and time of a particular event.
Note: The date and time stamp are in the local server time.
Hostname or componentidentification
Component identification, or hostname, tells you which component thatthe log file is for. In some cases, this is clear, such as CORE or MDS-CS,in others it is less clear, using a numerical identifier
Appname The Appname is the same for all log files and is shown as MDM.
ProcessID or Thread Represents the Java Thread Id of the thread which is currently logging amessage. For example:
localhost-startStop-1
MessageID The MessageId identifies the type of message being sent to the log file.It is a combination of the feature and component being logged using theformat <feature>|<component>. For example:
admin.application.management|appmgmt
StructuredData Zero or more name value pairs which represent structured data. Forexample:
[{{requestId,543ade23}{myContextInfo,runningContext}}]
Message The message indicates the activity and describes the nature of the event.A message could include information about the hardware or softwarerunning, or the problem that is occurring. For example:
INFO Total 2 routes, of which 2 is started.
| Maintenance, monitoring, and reporting | 336

Item Description
Level The event level indicates the type of log entry. Commonly, events will fitinto one of the following categories:
• ERROR = Error• WARN = Warning• INFO = Informational
ENV = Environmental• DEBUG = Debug• Other
• DIAG = Diagnostic• TRAC = Trace
In some log files, the level is shown with a numerical value, in thefollowing format:
• [10000] = Error• [20000] = Warning• [30000] = Informational• [40000] = Debug• [50000] = Other
Log file levels
Level Description
DEBUG This level specifies information that is valuable for debugging codingissues. Events can include the following:
• States of suspect resources in error conditions• Transitions between internal and external components• REST requests to the BlackBerry UEM Core• Requests to Microsoft Active Directory
ERROR This level specifies an error condition that requires you or a supportspecialist to take action. Events can include the following:
• Encoding exceptions• Data level exceptions• Recoverable coding exceptions
INFO This level specifies normal system events that administrators or supportspecialists might want to see.
This level is the default log level for BlackBerry UEM.
TRACE This level specifies information that is useful to those with developerknowledge, including information used for classes and method tracing,method parameters and so on.
| Maintenance, monitoring, and reporting | 337
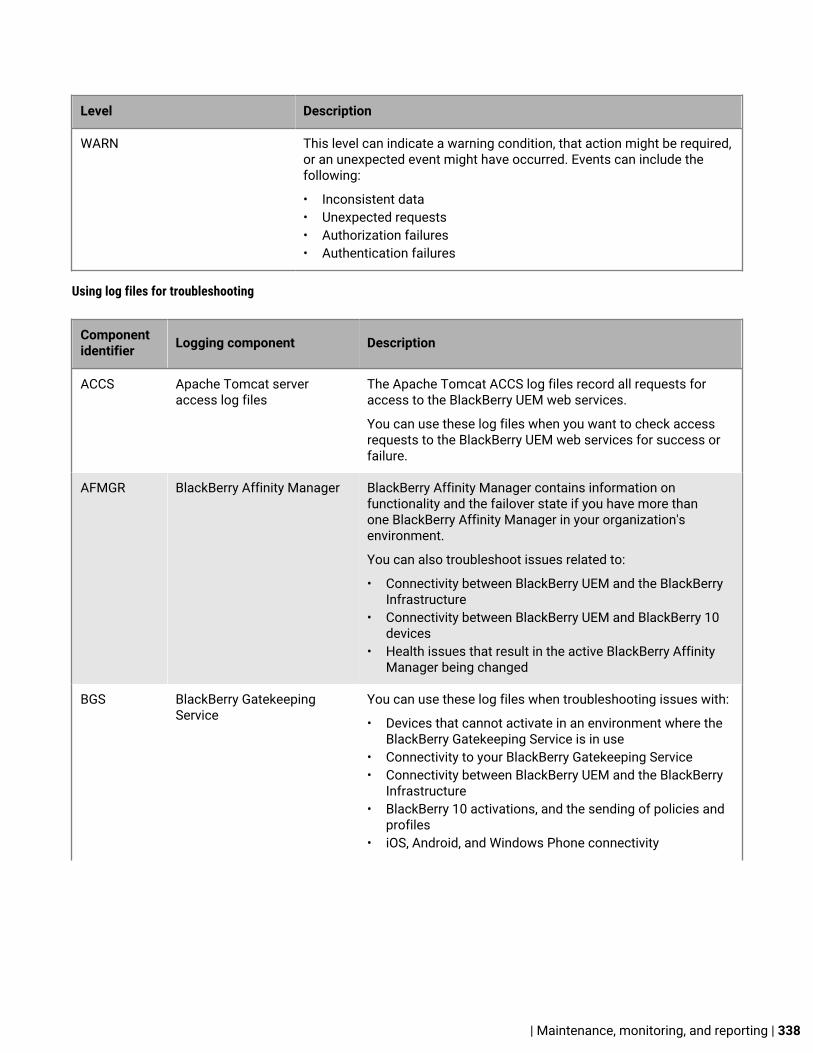
Level Description
WARN This level can indicate a warning condition, that action might be required,or an unexpected event might have occurred. Events can include thefollowing:
• Inconsistent data• Unexpected requests• Authorization failures• Authentication failures
Using log files for troubleshooting
Componentidentifier Logging component Description
ACCS Apache Tomcat serveraccess log files
The Apache Tomcat ACCS log files record all requests foraccess to the BlackBerry UEM web services.
You can use these log files when you want to check accessrequests to the BlackBerry UEM web services for success orfailure.
AFMGR BlackBerry Affinity Manager BlackBerry Affinity Manager contains information onfunctionality and the failover state if you have more thanone BlackBerry Affinity Manager in your organization'senvironment.
You can also troubleshoot issues related to:
• Connectivity between BlackBerry UEM and the BlackBerryInfrastructure
• Connectivity between BlackBerry UEM and BlackBerry 10devices
• Health issues that result in the active BlackBerry AffinityManager being changed
BGS BlackBerry GatekeepingService
You can use these log files when troubleshooting issues with:
• Devices that cannot activate in an environment where theBlackBerry Gatekeeping Service is in use
• Connectivity to your BlackBerry Gatekeeping Service• Connectivity between BlackBerry UEM and the BlackBerry
Infrastructure• BlackBerry 10 activations, and the sending of policies and
profiles• iOS, Android, and Windows Phone connectivity
| Maintenance, monitoring, and reporting | 338

Componentidentifier Logging component Description
BSCP BlackBerry Secure ConnectPlus
Logs data about the BlackBerry Secure Connect Pluscomponent.
You can use these log files to verify that BlackBerry SecureConnect Plus is connected to the BlackBerry Infrastructure.For example:
2015-01-19T13:17:47.540-0500 - BSCP{TcpClientConnectorNio#2} logging.feature.bscp.service|logging.component.bscp.pss.bcp [{}] - DEBUG ReceivedPing from [id: 0x60bce5a3, /192.0.2.0:28231 =>bcp.example.com/192.0.2.124:3101], respondingwith Pong. 2015-01-19T13:18:22.989-0500 - BSCP{ChannelPinger#1} logging.feature.bscp.service|logging.component.bscp.pss.bcp [{}] - DEBUGSending Ping to [id: 0xb4a1677a, /192.0.2.0:28232 =>bcp.example.com/192.0.2.124:3101]
BSCP-TS BlackBerry Secure ConnectPlus core
Logs data for connections with the BlackBerry SecureConnect Plus client.
You can use these log files to verify that BlackBerry SecureConnect Plus is ready to receive calls from the BlackBerrySecure Connect Plus client on devices. For example:
47: [14:13:21.231312][][3][AsioTurnSocket-1] Connected,host=68-171-243-141.rdns.blackberry.net 48:[14:13:21.239312][][3][AsioTurnSocket-1] Creating TURNallocation 49: [14:13:21.405121][][3][AsioTurnSocket-1] TURNallocation created
Use to verify that devices are using the secure tunnel. Forexample:
74: [10:39:45.746926][][3][Tunnel-2FFEC51E] Sent: 2130.6 KB(1733), Received: 201.9 KB (1370), Running: 00:07:00.139249
BSG BlackBerry Secure Gateway You can use these log files when troubleshooting issues with:
• iOS devices that can't send or receive email messages• Connectivity between BlackBerry UEM and the BlackBerry
Infrastructure• Connectivity between the BlackBerry Infrastructure and the
Microsoft Exchange or Microsoft Office 365 mail server
BWCN BlackBerry Work ConnectNotification Service
You can use these log files when troubleshooting issues withiOS devices that are not receiving notifications of new orchanged items.
| Maintenance, monitoring, and reporting | 339
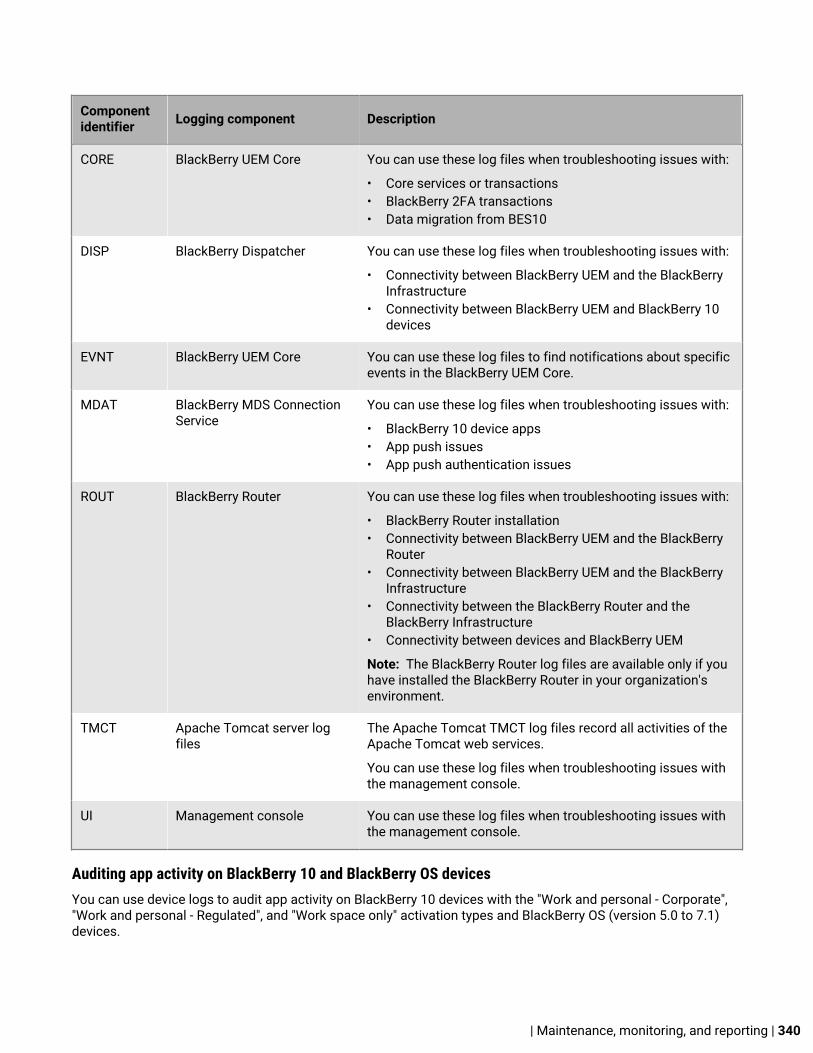
Componentidentifier Logging component Description
CORE BlackBerry UEM Core You can use these log files when troubleshooting issues with:
• Core services or transactions• BlackBerry 2FA transactions• Data migration from BES10
DISP BlackBerry Dispatcher You can use these log files when troubleshooting issues with:
• Connectivity between BlackBerry UEM and the BlackBerryInfrastructure
• Connectivity between BlackBerry UEM and BlackBerry 10devices
EVNT BlackBerry UEM Core You can use these log files to find notifications about specificevents in the BlackBerry UEM Core.
MDAT BlackBerry MDS ConnectionService
You can use these log files when troubleshooting issues with:
• BlackBerry 10 device apps• App push issues• App push authentication issues
ROUT BlackBerry Router You can use these log files when troubleshooting issues with:
• BlackBerry Router installation• Connectivity between BlackBerry UEM and the BlackBerry
Router• Connectivity between BlackBerry UEM and the BlackBerry
Infrastructure• Connectivity between the BlackBerry Router and the
BlackBerry Infrastructure• Connectivity between devices and BlackBerry UEM
Note: The BlackBerry Router log files are available only if youhave installed the BlackBerry Router in your organization'senvironment.
TMCT Apache Tomcat server logfiles
The Apache Tomcat TMCT log files record all activities of theApache Tomcat web services.
You can use these log files when troubleshooting issues withthe management console.
UI Management console You can use these log files when troubleshooting issues withthe management console.
Auditing app activity on BlackBerry 10 and BlackBerry OS devicesYou can use device logs to audit app activity on BlackBerry 10 devices with the "Work and personal - Corporate","Work and personal - Regulated", and "Work space only" activation types and BlackBerry OS (version 5.0 to 7.1)devices.
| Maintenance, monitoring, and reporting | 340

You must configure the following IT policy rules to generate these log files:
IT policy rulefor BlackBerry 10
IT policy rulefor BlackBerry OSdevices
Description
Synchronize BBM logs Disable BlackBerryMessenger WirelessSynchronization
This rule specifies whether a device synchronizeslogs from BlackBerry Messenger with BlackBerryUEM.
Synchronize phone logs Disable Phone Call LogWireless Synchronization
This rule specifies whether a device synchronizes thecall log for the Phone app with BlackBerry UEM.
Synchronize PIN to PINlogs
Disable PIN MessagesWireless Synchronization
This rule specifies whether a device synchronizeslogs for PIN messages with BlackBerry UEM.
Synchronize SMS/MMSlogs
Disable SMS MessagesWireless Synchronization
This rule specifies whether a device synchronizeslogs for SMS text messages and MMS messageswith BlackBerry UEM.
Synchronize video chatlogs
Not applicableto BlackBerry OS devices
This rule specifies whether a BlackBerry 10 devicesynchronizes logs for the BBM Video featurewith BlackBerry UEM.
By default, app audit log files for BlackBerry 10 devices are stored in C:\Program Files\BlackBerry\UEM\Logs\<yyyymmdd> and app audit log files for BlackBerry OS devices are stored in C:\Program Files (x86)\Research inMotion\BlackBerry Enterprise Server\Logs\<yyyymmdd>.
Viewing device actionsActions that were taken or are in progress on a device as a result of commands that you sent from the BlackBerryUEM management console, such as locking a device, disabling the work space, or deleting device data.
Availability of these commands depends on the device and activation type.
The status of a device command can be:
• Command canceled• Command completed by device• Command delivered to device• Command delivery acknowledged by device• Command failed• Command in progress• Notification acknowledged by device• Notification sent to device• Queued
View device actions
1. On the menu bar, click Users > Managed devices.2. Search for a user account.3. In the search results, click the name of a user account.4. Click the tab for the device that you want to view the device actions for.
| Maintenance, monitoring, and reporting | 341
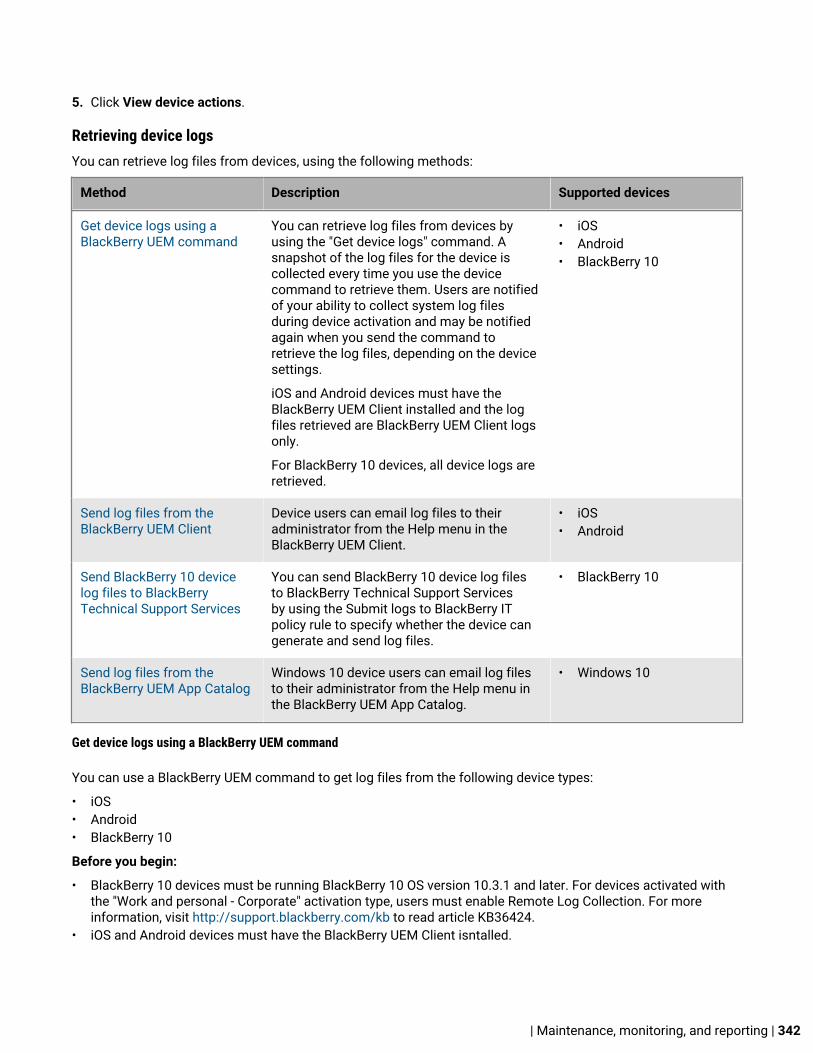
5. Click View device actions.
Retrieving device logsYou can retrieve log files from devices, using the following methods:
Method Description Supported devices
Get device logs using aBlackBerry UEM command
You can retrieve log files from devices byusing the "Get device logs" command. Asnapshot of the log files for the device iscollected every time you use the devicecommand to retrieve them. Users are notifiedof your ability to collect system log filesduring device activation and may be notifiedagain when you send the command toretrieve the log files, depending on the devicesettings.
iOS and Android devices must have theBlackBerry UEM Client installed and the logfiles retrieved are BlackBerry UEM Client logsonly.
For BlackBerry 10 devices, all device logs areretrieved.
• iOS• Android• BlackBerry 10
Send log files from theBlackBerry UEM Client
Device users can email log files to theiradministrator from the Help menu in theBlackBerry UEM Client.
• iOS• Android
Send BlackBerry 10 devicelog files to BlackBerryTechnical Support Services
You can send BlackBerry 10 device log filesto BlackBerry Technical Support Servicesby using the Submit logs to BlackBerry ITpolicy rule to specify whether the device cangenerate and send log files.
• BlackBerry 10
Send log files from theBlackBerry UEM App Catalog
Windows 10 device users can email log filesto their administrator from the Help menu inthe BlackBerry UEM App Catalog.
• Windows 10
Get device logs using a BlackBerry UEM command
You can use a BlackBerry UEM command to get log files from the following device types:
• iOS• Android• BlackBerry 10
Before you begin:
• BlackBerry 10 devices must be running BlackBerry 10 OS version 10.3.1 and later. For devices activated withthe "Work and personal - Corporate" activation type, users must enable Remote Log Collection. For moreinformation, visit http://support.blackberry.com/kb to read article KB36424.
• iOS and Android devices must have the BlackBerry UEM Client isntalled.
| Maintenance, monitoring, and reporting | 342

• By default, the Junior HelpDesk role cannot retrieve log files.
1. On the menu bar, click Users > Managed devices.2. Search for a user account.3. In the search results, click the name of the user account.4. Click the device tab.5. In the Manage devices window, click Get device logs.6. Click Request.
After you finish:
Retrieve the device log files. By default, the log files are stored in C:\Program Files\BlackBerry\UEM\Logs\device_logs.
Send BlackBerry 10 device log files to BlackBerry Technical Support Services
You can configure a BlackBerry 10 device to allow it to submit log files to BlackBerry Technical Support Services.You can use the Submit logs to BlackBerry IT policy rule to specify whether the device can generate and send logfiles.
The user must have an open ticket with BlackBerry Technical Support Services and must provide the ticketnumber when submitting the device log files. If the user does not provide a valid support ticket number or thecorrect email address or PIN number associated to the support ticket, the device will display an error when tryingto submit the device log files.
Send log files from the BlackBerry UEM Client
Users can send you log files from the BlackBerry UEM Client for the following devices:
• iOS• Android• Windows Phone 8
1. On the device, tap the UEM Client icon.2. Tap Help.3. Tap Send Logs or Bug report.4. Select the email account on the device to send the log file.5. Tap Send.
• iOS and Android log files will be attached to the email as a .zip file• Windows Phone 8 device log files will be placed in the body of the email
Send log files from the BlackBerry UEM App Catalog
For Windows 10 devices, users can send you log files from the BlackBerry UEM App Catalog.
1. On the device, tap the App Catalog icon.2. Tap Help.3. Tap Bug report.4. Select the email account on the device to send the log file.5. Tap Send. The log files are attached to the email as a .zip file.
| Maintenance, monitoring, and reporting | 343
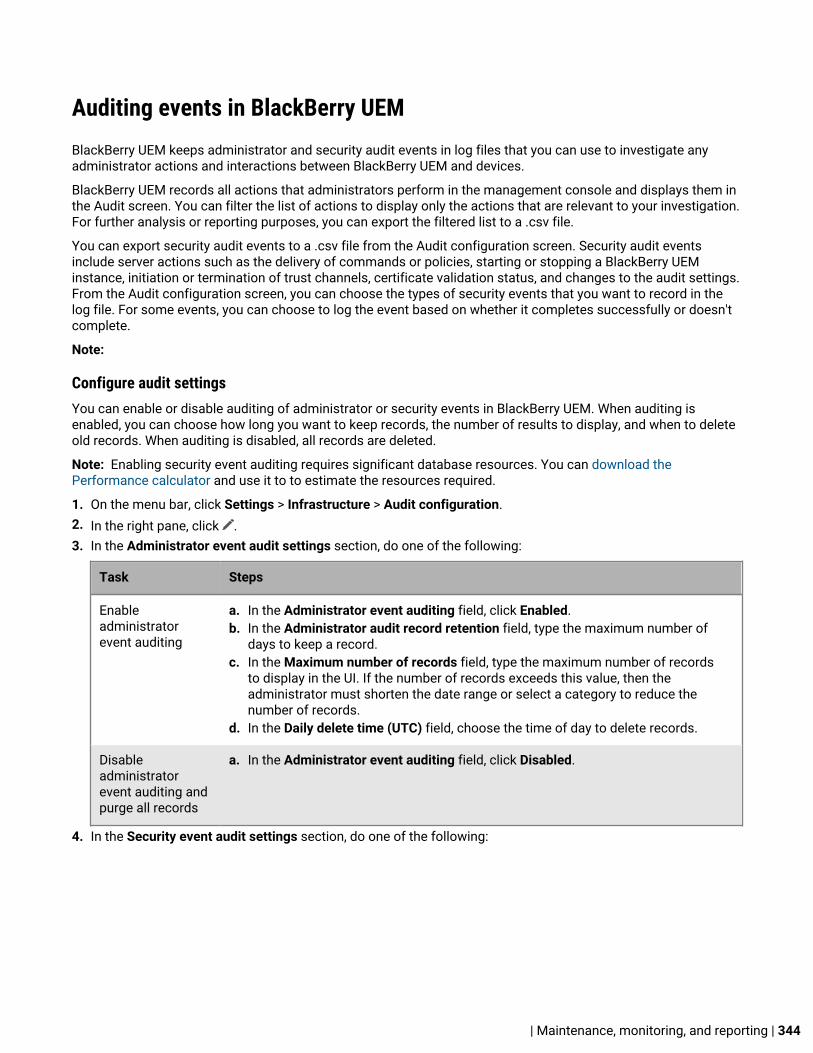
Auditing events in BlackBerry UEMBlackBerry UEM keeps administrator and security audit events in log files that you can use to investigate anyadministrator actions and interactions between BlackBerry UEM and devices.
BlackBerry UEM records all actions that administrators perform in the management console and displays them inthe Audit screen. You can filter the list of actions to display only the actions that are relevant to your investigation.For further analysis or reporting purposes, you can export the filtered list to a .csv file.
You can export security audit events to a .csv file from the Audit configuration screen. Security audit eventsinclude server actions such as the delivery of commands or policies, starting or stopping a BlackBerry UEMinstance, initiation or termination of trust channels, certificate validation status, and changes to the audit settings.From the Audit configuration screen, you can choose the types of security events that you want to record in thelog file. For some events, you can choose to log the event based on whether it completes successfully or doesn'tcomplete.
Note:
Configure audit settingsYou can enable or disable auditing of administrator or security events in BlackBerry UEM. When auditing isenabled, you can choose how long you want to keep records, the number of results to display, and when to deleteold records. When auditing is disabled, all records are deleted.
Note: Enabling security event auditing requires significant database resources. You can download thePerformance calculator and use it to to estimate the resources required.
1. On the menu bar, click Settings > Infrastructure > Audit configuration.2. In the right pane, click .3. In the Administrator event audit settings section, do one of the following:
Task Steps
Enableadministratorevent auditing
a. In the Administrator event auditing field, click Enabled.b. In the Administrator audit record retention field, type the maximum number of
days to keep a record.c. In the Maximum number of records field, type the maximum number of records
to display in the UI. If the number of records exceeds this value, then theadministrator must shorten the date range or select a category to reduce thenumber of records.
d. In the Daily delete time (UTC) field, choose the time of day to delete records.
Disableadministratorevent auditing andpurge all records
a. In the Administrator event auditing field, click Disabled.
4. In the Security event audit settings section, do one of the following:
| Maintenance, monitoring, and reporting | 344

Task Steps
Enable securityevent auditing
a. In the Security event auditing field, click Enabled.b. In the Security audit record retention field, type the maximum number of days to
keep a record.c. In the Daily delete time (UTC) field, choose the time of day to delete old records.d. To stop auditing a security event, click beside the event type.e. To add security events to audit, click . Select the events and click Add.f. Optionally, if a drop-down list is available in the Setting column beside an event
type, choose the condition to log the event.
Disable securityevent auditing andpurge all records
a. In the Security event auditing field, click Disabled.
5. Click Save.
After you finish:
• Restart the BlackBerry UEM Core service on every computer that hosts a BlackBerry UEM instance.• Log in to the management console again.
View and filter the administrator audit eventsThe following task is for viewing and filtering the administrator event audit log only. To view the security auditevent log, see Export security audit events to a .csv file.
1. On the menu bar, click Audit and Logging > System audit.2. Click Edit.3. Choose a category and date range. Click Submit.4. Under Filters, click a category to expand it. Note: Under the Roles category, a role named Work Apps is
displayed if a user is accessing work apps from their device. Work Apps is not an existing role; it is assigneddynamically to add the minimum set of permissions to access the user's work apps.
5. Select the filters that you want to apply and click Submit.6. Optionally, in the right pane, click . Select the columns that you want to view.7. If necessary, do one of the following:
• To remove a filter, click beside the filter that you want to remove.• To clear all filters, click Clear all.
After you finish: If necessary, Export administrator audit events to a .csv file.
Export administrator audit events to a .csv fileWhen you export the administrator audit events to a .csv file, the .csv file includes the data that you filter.
1. On the menu bar, click Audit and Logging > System audit.2. If necessary, in the left pane, filter the audit log to view only the data that you want to include in the .csv file.3. Click and save the file.
| Maintenance, monitoring, and reporting | 345

Export security audit events to a .csv fileWhen you export the security audit events to a .csv file, the .csv file includes the all security events that werelogged.
1. On the menu bar, click Settings > Infrastructure > Audit configuration.2. In the Security event audit settings section, click Export and save the file.
Delete audit recordsYou can delete audit records before the next daily delete time.
1. On the menu bar, click Settings > Infrastructure > Audit configuration .2. In the Administrator event audit settings or Security event audit settings section, click Delete.3. Click Delete.
Creating event notificationsYou can set up event notifications to alert administrators by email about certain BlackBerry UEM events. Someexamples of events include:
• A user account is added• A device becomes non-compliant• A device is deactivated• An IT policy is assigned to a group• The APNs certificate is 30 days from expiry
For a complete list of events, see Event types.
Each event notification is associated with an email distribution list, a schedule, and an email template. You cancreate distribution lists that include individual email addresses, recipients with certain administrator roles, orrecipients that belong to certain groups. Schedules define the days of the week and times of day that notificationsare sent. Email templates define the content of email notifications.
Related tasks
Create an event notification email templateYou can create event notification email templates to associate with event notifications.
Create an event notification Create an event notification to alert administrators about events in BlackBerry UEM.
Before you begin:
• If you don't want to use the default event notification email, create an event notification email template.• Create a schedule for an event notification.• Create a distribution list for an event notification.
1. On the menu bar, click Settings > General settings.2. Click Event notifications.3. On the Event notifications tab, click .4. Select one event type.
| Maintenance, monitoring, and reporting | 346

5. Click Next.6. In the Date/time to send email notification drop-down list, select one of the following options:
• Always after an event: Email notifications are sent whenever the event occurs.• Any preconfigured schedule in the list.• Add new scheduler: Create a schedule and click Save.
7. In the Recipients field, select one of the following options:.
• Add new distribution list: Create a distribution list and click Save.• Any preconfigured distribution list.
8. In the Email template drop-down list, select the email template that you want to use for the event notification.9. In the Status drop-down list, select On to enable the event notification or Off to disable the event notification.10.Click Preview email to see the event notification email and the list of email addresses for the recipients.11.Click Save.
Create a schedule for an event notificationYou can preconfigure schedules to associate with event notifications. Event notifications are sent only for eventsthat occur during the days and hours defined in the schedule.
1. On the menu bar, click Settings > General settings.2. Click Event notifications.3. On the Schedule components tab, click .4. Type a name for the schedule.5. Select the days of the week to send notifications. Notifications are sent only for events that occur on the
selected days.6. Select one of the following options:
• Select the All day event check box: Notifications are sent anytime.• Deselect the All day event check box: Select the hours each day that notifications are sent. Notifications
are sent only for events that occur within these hours.7. Click Save.
Create a distribution list for an event notificationYou can create distribution lists to associate with event notifications. Distribution lists can include user groups,administrator roles, and individual email addresses.
1. On the menu bar, click Settings > General settings.2. Click Event notifications.3. On the Distribution list tab, click .4. Type a name for the distribution list.5. If you want to include individual email addresses, click in the Email recipients section, type an email
address and click Save.6. If you want to include administrators that belong to a group, select one or more groups in the Available user
groups list and click .7. If you want to include administrators that have a particular role, select one or more roles from the Available
user roles list and click .8. Click Add.
| Maintenance, monitoring, and reporting | 347
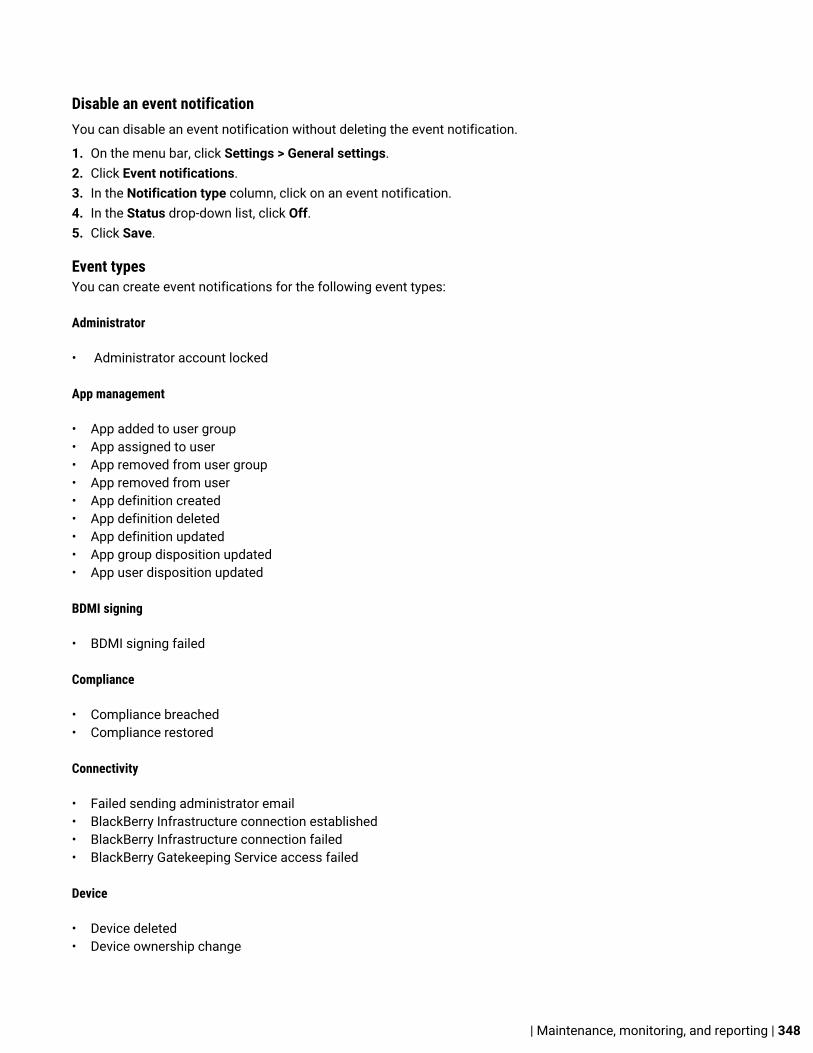
Disable an event notificationYou can disable an event notification without deleting the event notification.
1. On the menu bar, click Settings > General settings.2. Click Event notifications.3. In the Notification type column, click on an event notification.4. In the Status drop-down list, click Off.5. Click Save.
Event typesYou can create event notifications for the following event types:
Administrator
• Administrator account locked
App management
• App added to user group• App assigned to user• App removed from user group• App removed from user• App definition created• App definition deleted• App definition updated• App group disposition updated• App user disposition updated
BDMI signing
• BDMI signing failed
Compliance
• Compliance breached• Compliance restored
Connectivity
• Failed sending administrator email• BlackBerry Infrastructure connection established• BlackBerry Infrastructure connection failed• BlackBerry Gatekeeping Service access failed
Device
• Device deleted• Device ownership change
| Maintenance, monitoring, and reporting | 348

• Command sent• Command delivered• Allow BlackBerry Gatekeeping Service• SIM swap• User device state changed
Enrollment
• Activation completed• Activation failed • Deactivated
Group
• Group created• Group deleted• Group added to user group• Group added to user• Group removed from user group• User removed from group
Policies and profiles
• Policy or profile created• Policy or profile deleted• Policy or profile sent• Policy or profile delivered• Policy or profile assigned to group• Policy or profile assigned to user• Policy or profile unassigned from group• Policy or profile unassigned from user• Policy or profile signature storing• Policy or profile signature validation
Performance
• Device performance alert
User
• User created• User deleted
Apple Push Notification
• APNs certificate expiry (30 days before expiry)
| Maintenance, monitoring, and reporting | 349
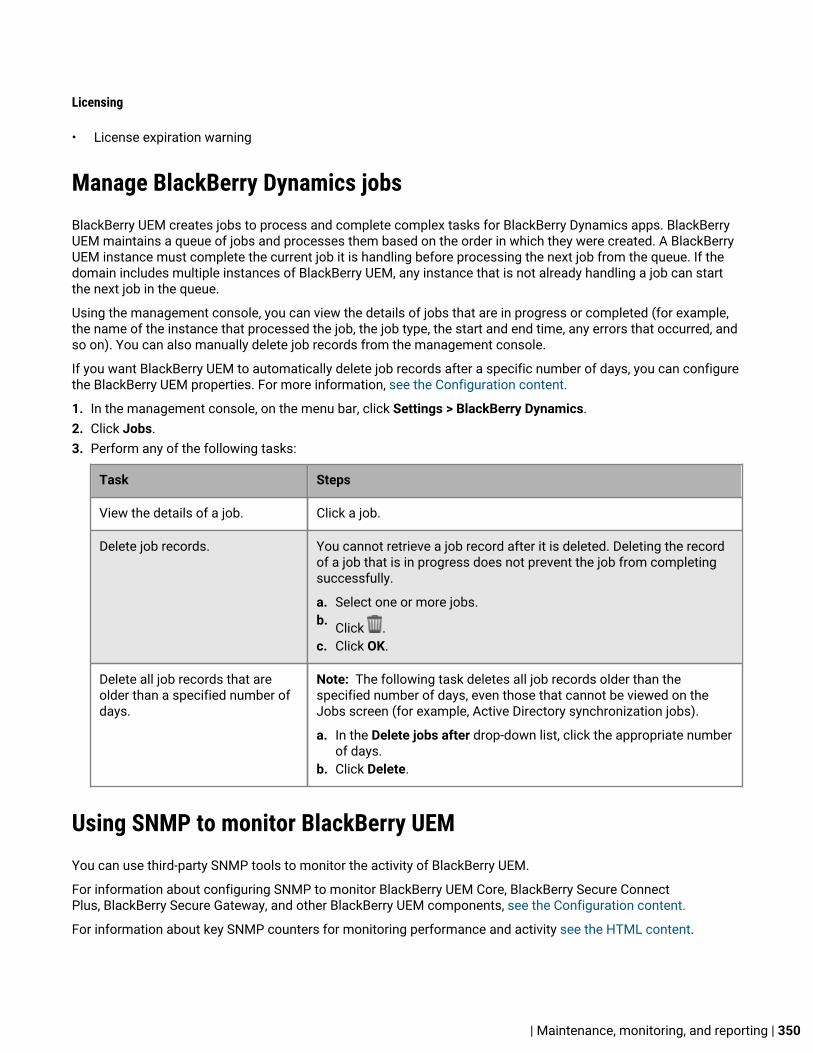
Licensing
• License expiration warning
Manage BlackBerry Dynamics jobsBlackBerry UEM creates jobs to process and complete complex tasks for BlackBerry Dynamics apps. BlackBerryUEM maintains a queue of jobs and processes them based on the order in which they were created. A BlackBerryUEM instance must complete the current job it is handling before processing the next job from the queue. If thedomain includes multiple instances of BlackBerry UEM, any instance that is not already handling a job can startthe next job in the queue.
Using the management console, you can view the details of jobs that are in progress or completed (for example,the name of the instance that processed the job, the job type, the start and end time, any errors that occurred, andso on). You can also manually delete job records from the management console.
If you want BlackBerry UEM to automatically delete job records after a specific number of days, you can configurethe BlackBerry UEM properties. For more information, see the Configuration content.
1. In the management console, on the menu bar, click Settings > BlackBerry Dynamics.2. Click Jobs.3. Perform any of the following tasks:
Task Steps
View the details of a job. Click a job.
Delete job records. You cannot retrieve a job record after it is deleted. Deleting the recordof a job that is in progress does not prevent the job from completingsuccessfully.
a. Select one or more jobs.b. Click .c. Click OK.
Delete all job records that areolder than a specified number ofdays.
Note: The following task deletes all job records older than thespecified number of days, even those that cannot be viewed on theJobs screen (for example, Active Directory synchronization jobs).
a. In the Delete jobs after drop-down list, click the appropriate numberof days.
b. Click Delete.
Using SNMP to monitor BlackBerry UEMYou can use third-party SNMP tools to monitor the activity of BlackBerry UEM.
For information about configuring SNMP to monitor BlackBerry UEM Core, BlackBerry Secure ConnectPlus, BlackBerry Secure Gateway, and other BlackBerry UEM components, see the Configuration content.
For information about key SNMP counters for monitoring performance and activity see the HTML content.
| Maintenance, monitoring, and reporting | 350

Using dashboard reportsThe dashboard uses graphs to present information from the BlackBerry UEM services about users and deviceson your system. You can use the cursor to hover over a data point (for example, a slice in a pie chart) to seeinformation about the users or devices.
If you need more information, you can display a report from the graph to see detailed information about usersor devices. The maximum number of records in a report is 2000. You can generate a .csv file from a report andexport the file for further analysis or reporting purposes.
To open and manage a user account, you can click the user or device in a report. When you are finished with anaccount, you can click Back on the page (not the browser) to return to the report.
The following table describes the information each dashboard report displays.
Dashboard report Description
Devices roaming and notroaming
A list of users with devices that are currently in a roaming state
Device activations A dynamic representation of the devices activated each month in yourorganization over a 12-month period, based on when the devices were initiallyactivated. The numbers change to reflect currently activated devices. Forexample, if a device that you activated in August is deactivated, the number ofdevices shown in August is reduced by one.
Top 5 assigned appsinstalled
The five most common apps assigned by your organization and installed ondevices
Devices by platform A list of the devices in your organization, by platform
Device compliance A list of issues detected on BlackBerry 10, iOS, Android, and WindowsPhone devices in your organization
Devices by last contacttime
The number of days that have passed since devices last contacted the server
Devices by carriers A list of the devices in your organization, by service provider
Top 5 device models The five most common mobile device models in your organization
Change the type of graphTo see how use the dashboard, visit our YouTube channel.
You can change the type of graph used to graph information.
Click beside a graph and select a type of graph from the drop-down list.
Export a dashboard report to a .csv file1. To open a report, click a graph.2. To sort the records based on the column selected, click a column header.3. Click Export and save the file.
| Maintenance, monitoring, and reporting | 351

Logging phone call and SMS/MMS activity for AndroidEnterprise and Samsung KNOX Workspace devicesYou can log and review phone call and SMS/MMS activity for Android Enterprise and Samsung KNOXWorkspace devices. BlackBerry UEM can log this activity for devices that are activated with "Work spaceonly (Premium)", "Work and personal - full control (Samsung KNOX)" and "Work space only (Samsung KNOX)"activation types.
To turn on logging for SMS/MMS and phone calls, you must select the following rules in the IT policy for thedevice:
• Send SMS/MMS logs to UEM• Send phone logs to UEM
BlackBerry UEM stores separate .csv log files for both phone calls and SMS/MMS.By default, these log files are stored in <drive>:\Program Files\BlackBerry\UEM\Logs\<date or folder name>. BlackBerry UEM names the logfiles <server_name>_<component_identifier>_<event_definition_version>_<yyyymmdd>_<log_number>.<fileextension> (for example, BBServer01_phone_1.0_20160730_0001.csv).
See Using log files for information about finding and reading log files.
View and save a device reportYou can generate a device report to view detailed information about each device that is associated withBlackBerry UEM.
1. On the menu bar, click Users > Managed devices.2. Search for a user account.3. In the search results, click the name of the user account.4. Select the device tab.5. Click View device report.6. Click Export to save the device report to a file on the computer, if necessary.
Exporting app deployment reportsYou can export app deployment reports for apps, including BlackBerry Dynamics apps, to an .html file from theApps screen in the management console. The report includes information about apps deployed by BlackBerryUEM and the users that currently have the apps installed on their devices. For example, you can find deviceinformation about all users that have a specific app, including the device ID, model, OS version, and installationstatus.
You can choose the apps that you want to include in a report. Each app that you choose to include in the report isgiven a separate section listing its app version information and the device information for each user that has theapp installed.
Note: For iOS devices with the User privacy activation type, the report lists all devices that the app has beenassigned to. BlackBerry UEM can't confirm if the app is still installed on the device when the report is generated.
You can also open the .html file using Microsoft Excel for further analysis.
| Maintenance, monitoring, and reporting | 352
Export an app deployment report to an .html file1. On the menu bar, click Apps > Apps.2. For each app that you want to include in the report, select the check box beside the app. You can select the
checkbox at the top of the apps list to select all apps.3. Click and save the file.
Activity and compliance violation reports for BlackBerry DynamicsappsWhen BlackBerry UEM and BlackBerry Dynamics are integrated, you can export BlackBerry Dynamics app activityor compliance violation data from the management console. You can use this information to take action oninappropriate or suspicious activity. App activity reports include app activity data for each BlackBerry Dynamicsapp (for example, app version information, activation date, and the last contact with the server). Complianceviolation reports include compliance violation data for each app (for example, the policy rules that were violatedand when the violation occurred).
Export BlackBerry Dynamics app reports to a .csv fileEach report has a limit of 5000 records.
1. On the menu bar, click Settings > BlackBerry Dynamics > Reporting.2. In the Export data to .csv section, select the type of report that you want to export:
• BlackBerry Dynamics app activity• BlackBerry Dynamics app compliance violations
3. Click Export and save the file.
Monitoring the performance of the BlackBerry Work appYou can monitor the performance of the BlackBerry Work app and choose the issues that you want to be reported.
Enable BlackBerry Work monitoringTo enable BlackBerry Work monitoring, you must configure the app configuration that is assigned to it.
1. On the menu bar, click Apps.2. Click the BlackBerry Work app that you want to monitor.3. On the BlackBerry Dynamics tab, in the App configuration table, click the name of the app configuration that
you want to edit.4. On the Performance Reporting tab, configure any of the following:
• Enable Performance Reporting: Specify whether to monitor performance of the BlackBerry Work app.• HTTP Connection Error: Specify whether to report HTTP connection errors between BlackBerry Work and
the specified application servers.• HTTP Response Time: Specify whether to report HTTP responses that are taking longer than the specified
time. Enter the application server addresses to monitor.• HTTP Status Code: Specify whether to report a specified HTTP status code. Enter the application server
addresses to monitor.
| Maintenance, monitoring, and reporting | 353

• Don't send reports for duration (in seconds): Specify the amount of time to wait before sending anotherreport.
5. Click Save.
View device performance alert notificationsBefore you begin: Enable BlackBerry Work monitoring
1. On the menu bar, click Audit and logging > Device performance.2. Choose a category and date range. Click Submit.3. Under Filters, click a category to expand it.4. Select the filters that you want to apply and click Submit.5. If necessary, do one of the following:
• To remove a filter, click beside the filter that you want to remove.• To clear all filters, click Clear all.
6. To export the results to a .csv file, click .
View a performance alert for a single deviceInstead of viewing a list of performance alerts based on date and alert type, you can also view all of theperformance alerts for a single device in the last 24 hours. If there are performance alerts for a device, a cautionicon appears on the device tab and a message is displayed that tells you how many alerts have been detected onthe device.
Before you begin: Enable BlackBerry Work monitoring
1. On the menu bar, click Users > Managed devices.2. Search for a user account.3. In the search results, click the name of the user account.4. Select the device tab for the device that you want to view alerts for. A device with performance alerts or
compliance violations is flagged with a caution icon.5. If there are performance alerts for the device, click View all beside the performance alert message to view the
list of performance alerts for that device.
| Maintenance, monitoring, and reporting | 354

Profile settingsThis section provides detailed descriptions of the options in profiles that have a large number of settings to helpyou configure email, network connections, and other functionality.
For profiles with only a small number of settings, see the topic on creating the profile for setting descriptions.
Email profile settingsYou can use a variable in any profile setting that is a text field to reference a value instead of specifying the actualvalue. BlackBerry UEM supports default variables that are predefined and custom variables that you define. Emailprofiles are supported on the following device types:
• BlackBerry 10• iOS• macOS• Android• Windows
In some cases, the minimum version of the device OS required to support a setting is a version not supportedby BlackBerry UEM. For more information about supported versions, see the Compatibility matrix.
Common: Email profile settings
Common: Email profilesetting Description
Domain name This setting specifies the domain name of the mail server.
Email address This setting specifies the user's email address. If the profile is for multiple users,you can use the %UserEmailAddress% variable.
Host name or IP address This setting specifies the host name or IP address of the mail server.
Username This setting specifies the user's username. If the profile is for multiple users, youcan use the %UserName% variable.
Automatic gatekeepingservers
If you configured server groups to direct BlackBerry Secure Gateway trafficor BlackBerry Gatekeeping Service traffic to a specific regional connection tothe BlackBerry Infrastructure, this setting specifies the appropriate server group.
For more information about the BlackBerry Connectivity Node and servergroups, see the Planning content and the Installation and upgrade content.
| Profile settings | 355

BlackBerry 10: Email profile settings
BlackBerry 10: Emailprofile setting Description
Account name This setting specifies the work email account name that appears in theBlackBerry Hub and in the device settings. You can use a variable, such as%UserEmailAddress%.
Port This setting specifies the port that is used to connect to the mail server.
Delivery settings
Profile type This setting specifies whether you want this profile to support ExchangeActiveSync or IBM Notes Traveler.
Possible values:
• Exchange ActiveSync• IBM Notes Traveler
The default value is "Exchange ActiveSync."
SyncML server This setting specifies the FQDN of the IBM Notes Traveler server that a BlackBerry10 device can use to synchronize To Do data.
This setting is valid only if the "Profile type" setting is set to "IBM Notes Traveler."
SyncML port This setting specifies the port of the Notes Traveler server that a BlackBerry 10device can use to synchronize To Do data.
This setting is valid only if the "Profile type" setting is set to "IBM Notes Traveler."
Use SSL for SyncML This setting specifies whether a BlackBerry 10 device needs to make an SSLconnection to the Notes Traveler server.
This setting is valid only if the "Profile type" setting is set to "IBM Notes Traveler."
Push enabled This setting specifies whether the mail server can push email messages to aBlackBerry 10 device.
| Profile settings | 356

BlackBerry 10: Emailprofile setting Description
Interval betweensynchronizations
This setting specifies how often a BlackBerry 10 device checks the mail server fornew email messages.
This setting is valid only if the "Push enabled" setting is not selected.
Possible values:
• Manual• 5 minutes• 15 minutes• 30 minutes• 1 hour• 2 hours• 4 hours• 24 hours
The default value is "15 minutes."
Days to synchronize This setting specifies the number of days in the past to synchronize emailmessages and organizer data to a BlackBerry 10 device.
Possible values:
• 1 day• 3 days• 7 days• 14 days• 1 month• Forever
The default value is "1 month."
Require manualsynchronization whenroaming
This setting specifies whether a user must start synchronization between aBlackBerry 10 device and the mail server when the user is roaming.
Use SSL This setting specifies whether a device must use SSL to connect to the mailserver.
Calendar synchronization This setting specifies whether a BlackBerry 10 device synchronizes calendarentries with the mail server.
Contacts synchronization This setting specifies whether a BlackBerry 10 device synchronizes contacts withthe mail server.
Email synchronization This setting specifies whether a BlackBerry 10 device synchronizes emailmessages with the mail server.
| Profile settings | 357
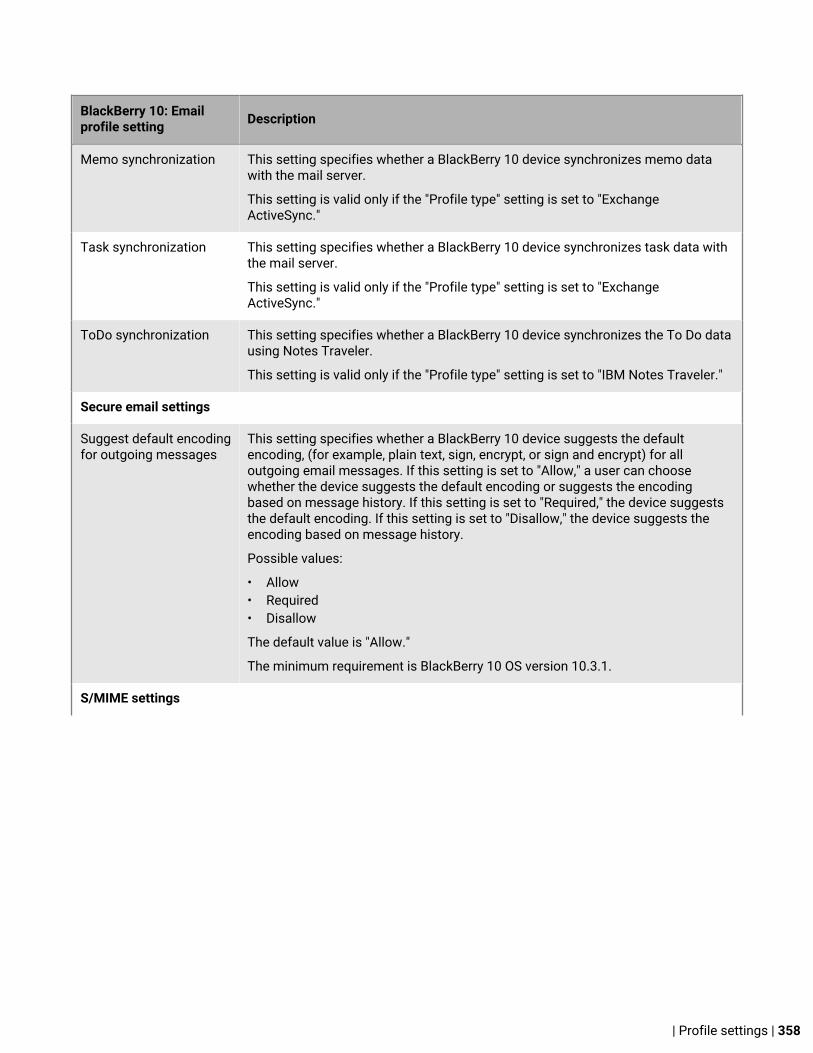
BlackBerry 10: Emailprofile setting Description
Memo synchronization This setting specifies whether a BlackBerry 10 device synchronizes memo datawith the mail server.
This setting is valid only if the "Profile type" setting is set to "ExchangeActiveSync."
Task synchronization This setting specifies whether a BlackBerry 10 device synchronizes task data withthe mail server.
This setting is valid only if the "Profile type" setting is set to "ExchangeActiveSync."
ToDo synchronization This setting specifies whether a BlackBerry 10 device synchronizes the To Do datausing Notes Traveler.
This setting is valid only if the "Profile type" setting is set to "IBM Notes Traveler."
Secure email settings
Suggest default encodingfor outgoing messages
This setting specifies whether a BlackBerry 10 device suggests the defaultencoding, (for example, plain text, sign, encrypt, or sign and encrypt) for alloutgoing email messages. If this setting is set to "Allow," a user can choosewhether the device suggests the default encoding or suggests the encodingbased on message history. If this setting is set to "Required," the device suggeststhe default encoding. If this setting is set to "Disallow," the device suggests theencoding based on message history.
Possible values:
• Allow• Required• Disallow
The default value is "Allow."
The minimum requirement is BlackBerry 10 OS version 10.3.1.
S/MIME settings
| Profile settings | 358

BlackBerry 10: Emailprofile setting Description
S/MIME support This setting specifies whether S/MIME is enabled on a BlackBerry 10 device. Ifthis setting is set to "Allow," a user can choose whether or not to enable S/MIMEprotection on the device. If this setting is set to "Required," S/MIME protectionis enabled on the device and the user can't disable it. If this setting is set to"Disallow," S/MIME protection is disabled on the device and the user can't enableit.
To send encrypted email messages, a user must have the recipient's public keyon the device or smart card. To send digitally signed email messages, the user'sprivate key must be on the device or smart card.
This setting takes precedence over the "Digitally signed S/MIME messages"setting and the "Encrypted S/MIME messages" setting.
This setting affects the "PGP support" setting. If this setting is set to "Required,"the "PGP support" setting must be set to "Disallow."
Possible values:
• Allow• Required• Disallow
The default value is "Allow."
Digitally signed S/MIMEmessages
This setting specifies whether a BlackBerry 10 device sends outgoing emailmessages with a digital signature. If this setting is set to "Allow," a user canchoose whether to digitally sign outgoing email messages. If this setting is set to"Required," a user must digitally sign outgoing email messages. If this setting isset to "Disallow," a user can't digitally sign outgoing email messages
To send digitally signed email messages, the user's private key must be on thedevice or smart card.
This setting is valid only if the "S/MIME support" setting is set to "Allow" or"Required."
If the "S/MIME support" setting is set to "Required," and both this setting and the"Encrypted S/MIME messages" setting are set to "Disallow," the "Encrypted S/MIME messages" setting and this setting are ignored and the default setting of"Allow" is used for both settings.
Possible values:
• Allow• Required• Disallow
The default value is "Allow."
| Profile settings | 359
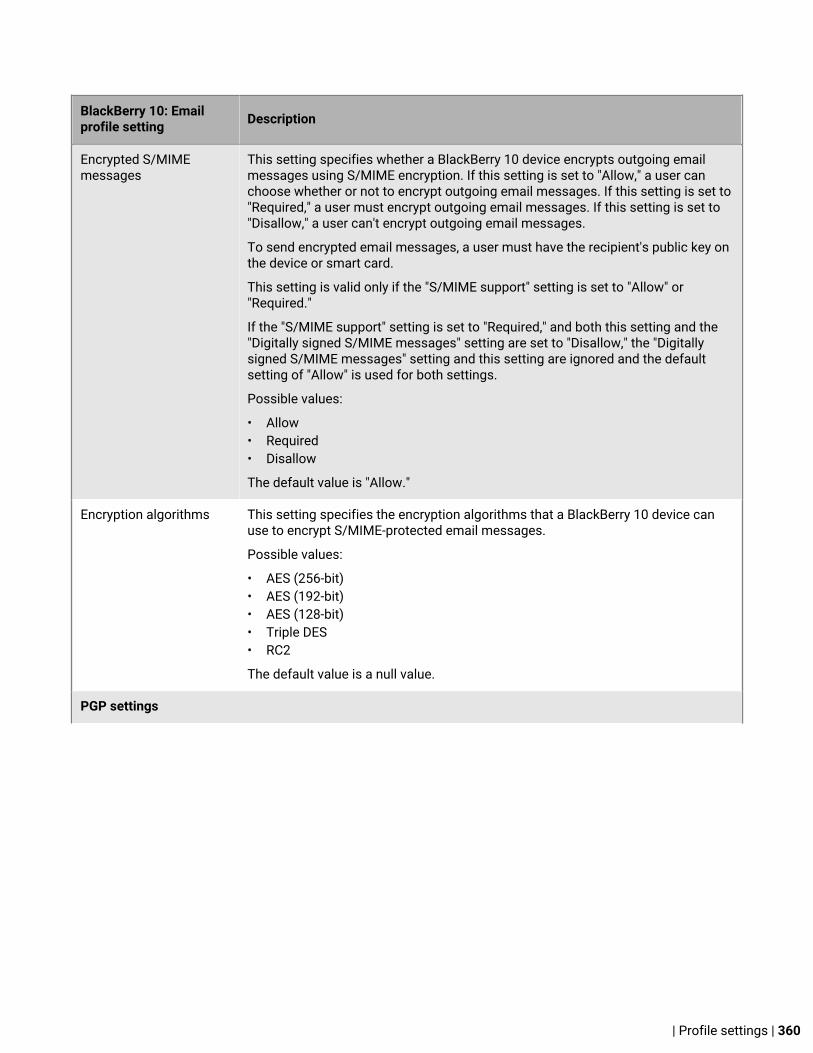
BlackBerry 10: Emailprofile setting Description
Encrypted S/MIMEmessages
This setting specifies whether a BlackBerry 10 device encrypts outgoing emailmessages using S/MIME encryption. If this setting is set to "Allow," a user canchoose whether or not to encrypt outgoing email messages. If this setting is set to"Required," a user must encrypt outgoing email messages. If this setting is set to"Disallow," a user can't encrypt outgoing email messages.
To send encrypted email messages, a user must have the recipient's public key onthe device or smart card.
This setting is valid only if the "S/MIME support" setting is set to "Allow" or"Required."
If the "S/MIME support" setting is set to "Required," and both this setting and the"Digitally signed S/MIME messages" setting are set to "Disallow," the "Digitallysigned S/MIME messages" setting and this setting are ignored and the defaultsetting of "Allow" is used for both settings.
Possible values:
• Allow• Required• Disallow
The default value is "Allow."
Encryption algorithms This setting specifies the encryption algorithms that a BlackBerry 10 device canuse to encrypt S/MIME-protected email messages.
Possible values:
• AES (256-bit)• AES (192-bit)• AES (128-bit)• Triple DES• RC2
The default value is a null value.
PGP settings
| Profile settings | 360

BlackBerry 10: Emailprofile setting Description
PGP support This setting specifies whether PGP protection is enabled on a BlackBerry 10device. If this setting is set to "Allow," a user can choose whether or not to enablePGP protection on the device. If this setting is set to "Required," PGP protectionis enabled on the device and the user can't disable it. If this setting is set to"Disallow," PGP protection is disabled on the device and the user can't enable it.
To send encrypted email messages, a user must have the recipient's public key onthe device. To send digitally signed email messages, the user's private key mustbe on the device.
The "S/MIME support" setting affects this setting. If the "S/MIME support" settingis set to "Required," or if the "S/MIME support" setting is set to "Allow" and the"Digitally signed S/MIME messages" setting or the "Encrypted S/MIME messages"setting is set to "Required," this setting must be set to "Disallow."
Possible values:
• Allow• Required• Disallow
The default value is "Allow."
The minimum requirement is BlackBerry 10 OS version 10.3.1.
Symantec EncryptionManagement Serveraddress
This setting specifies the FQDN or IP address of your organization’s SymantecEncryption Management Server to require a BlackBerry 10 device user to enroll thedevice with this server to send PGP messages.
The "PGP support" setting affects this setting. The device uses this setting if the"PGP support" setting is set to "Allow" or "Required."
The minimum requirement is BlackBerry 10 OS version 10.3.1.
Symantec EncryptionManagement Serverenrollment method
This setting specifies the method that a BlackBerry 10 device user must use toenroll the device with your organization’s Symantec Encryption ManagementServer. If this setting is set to "Email authentication", the device prompts the userto type their email address. If this setting is set to "Microsoft Active Directoryauthentication", the device prompts the user to type their domain username andpassword.
The "PGP support" setting affects this setting. The device uses this setting if the"PGP support" setting is set to "Allow" or "Required."
Possible values:
• Email authentication• Microsoft Active Directory authentication
The default value is "Email authentication."
The minimum requirement is BlackBerry 10 OS version 10.3.1.
Associated profiles
| Profile settings | 361
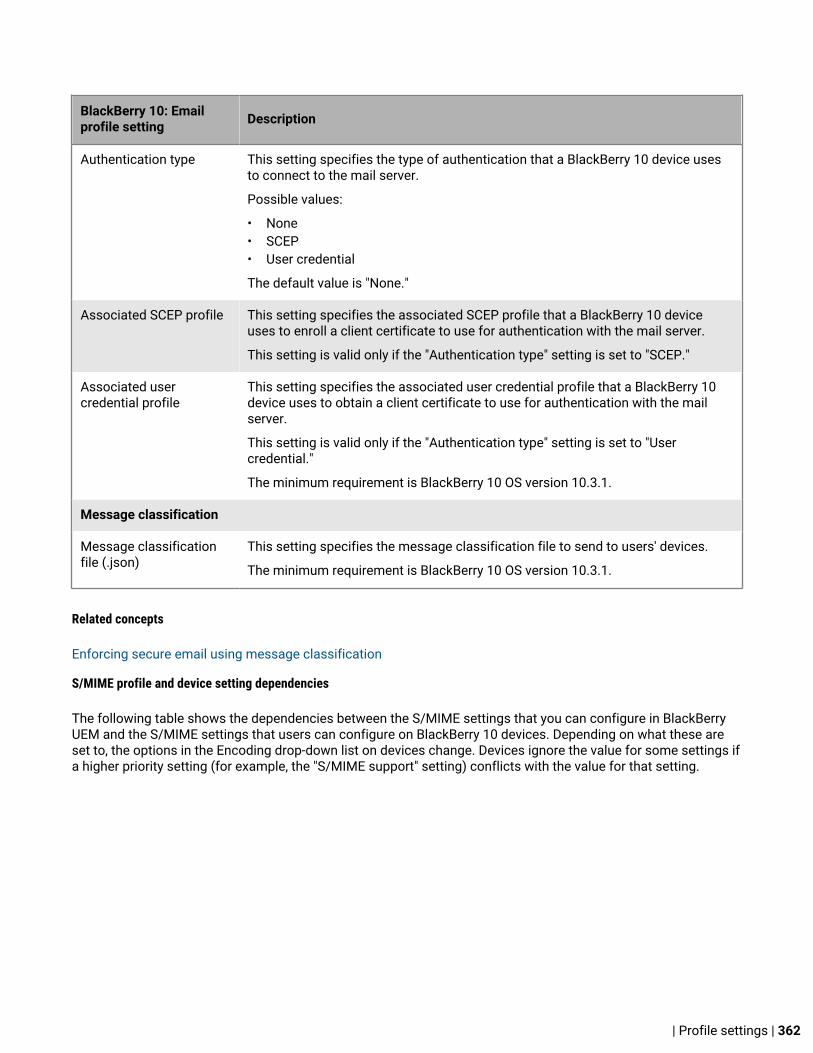
BlackBerry 10: Emailprofile setting Description
Authentication type This setting specifies the type of authentication that a BlackBerry 10 device usesto connect to the mail server.
Possible values:
• None• SCEP• User credential
The default value is "None."
Associated SCEP profile This setting specifies the associated SCEP profile that a BlackBerry 10 deviceuses to enroll a client certificate to use for authentication with the mail server.
This setting is valid only if the "Authentication type" setting is set to "SCEP."
Associated usercredential profile
This setting specifies the associated user credential profile that a BlackBerry 10device uses to obtain a client certificate to use for authentication with the mailserver.
This setting is valid only if the "Authentication type" setting is set to "Usercredential."
The minimum requirement is BlackBerry 10 OS version 10.3.1.
Message classification
Message classificationfile (.json)
This setting specifies the message classification file to send to users' devices.
The minimum requirement is BlackBerry 10 OS version 10.3.1.
Related concepts
Enforcing secure email using message classification
S/MIME profile and device setting dependencies
The following table shows the dependencies between the S/MIME settings that you can configure in BlackBerryUEM and the S/MIME settings that users can configure on BlackBerry 10 devices. Depending on what these areset to, the options in the Encoding drop-down list on devices change. Devices ignore the value for some settings ifa higher priority setting (for example, the "S/MIME support" setting) conflicts with the value for that setting.
| Profile settings | 362

S/MIMEsupportsetting
DigitallysignedS/MIMEmessagessetting
EncryptedS/MIMEmessagessetting
S/MIME settings on device Encoding drop-downon device
Allowed Allowed User can turn S/MIMEprotection on or off.
Plain text
Sign (S/MIME)
Encrypt (S/MIME)
Sign and Encrypt (S/MIME)
Allowed Required S/MIME protection is on. Usercan't turn it off.
Encrypt (S/MIME)
Sign and Encrypt (S/MIME)
Allowed Disallowed User can turn S/MIMEprotection on or off.
Plain text
Sign (S/MIME)
Required Allowed S/MIME protection is on. Usercan't turn it off.
Sign (S/MIME)
Sign and Encrypt (S/MIME)
Required Required S/MIME protection is on. Usercan't turn it off.
Sign and Encrypt (S/MIME)
Required Disallowed S/MIME protection is on. Usercan't turn it off.
Sign (S/MIME)
Disallowed Allowed User can turn S/MIMEprotection on or off.
Plain text
Encrypt (S/MIME)
Disallowed Required S/MIME protection is on. Usercan't turn it off.
Encrypt (S/MIME)
Allowed
Disallowed Disallowed User can turn S/MIMEprotection on or off but can'tencrypt or sign messagesbecause the necessary profilesare set to Disallowed.
Plain text
Required Allowed Allowed S/MIME protection is on. Usercan't turn it off.
Sign (S/MIME)
Encrypt (S/MIME)
Sign and Encrypt (S/MIME)
| Profile settings | 363

S/MIMEsupportsetting
DigitallysignedS/MIMEmessagessetting
EncryptedS/MIMEmessagessetting
S/MIME settings on device Encoding drop-downon device
Allowed Required S/MIME protection is on. Usercan't turn it off.
Encrypt (S/MIME)
Sign and Encrypt (S/MIME)
Allowed Disallowed S/MIME protection is on. Usercan't turn it off.
Sign (S/MIME)
Required Allowed S/MIME protection is on. Usercan't turn it off.
Sign (S/MIME)
Sign and Encrypt (S/MIME)
Required Required S/MIME protection is on. Usercan't turn it off.
Sign and Encrypt (S/MIME)
Required Disallowed S/MIME protection is on. Usercan't turn it off.
Sign (S/MIME)
Disallowed Allowed S/MIME protection is on. Usercan't turn it off.
Encrypt (S/MIME)
Disallowed Required S/MIME protection is on. Usercan't turn it off.
Encrypt (S/MIME)
Disallowed
(This setting isignored)
Disallowed
(This setting isignored)
S/MIME protection is on. Usercan't turn it off.
Sign (S/MIME)
Encrypt (S/MIME)
Sign and Encrypt (S/MIME)
Disallowed Any setting isignored
Any setting isignored
S/MIME protection is off. Usercan't turn it on.
Plain text
PGP profile and device setting dependencies
The following table shows the dependencies between the "PGP support" setting that you can configurein BlackBerry UEM and the PGP settings that users can configure on BlackBerry 10 devices. Depending on whatthe "PGP support" setting is set to, the options in the Encoding drop-down list on devices change. Devices ignorethe value of this setting if a higher priority setting (for example, the S/MIME support" setting) conflicts with thevalue for that setting.
| Profile settings | 364

"PGP support"setting
PGP settings on device Encoding drop-down on device
Allow Users can turn PGP protection on or off. • Plain text• Sign (PGP)• Encrypt (PGP)• Sign and Encrypt (PGP)
Required PGP protection is on. User can't turn it off. • Sign (PGP)• Encrypt (PGP)• Sign and Encrypt (PGP)
Disallow PGP protection is off. User can't turn it on. No drop-down. Plain text is used.
iOS: Email profile settings
iOS: Email profile setting Description
Delivery settings
Allow messages to bemoved
This setting specifies whether users can move email messages from this accountto another existing email account on an iOS device.
Allow recent addressesto be synced
This setting specifies whether an iOS device user can sync recently usedaddresses across devices.
Use only in Mail This setting specifies whether apps other than the Mail app on an iOS device canuse this account to send email messages.
Enable S/MIME This setting specifies whether an iOS device user can send S/MIME protectedemail messages.
Enable digitally signed S/MIME messages
This setting specifies whether a device sends outgoing messages with a digitalsignature.
This setting applies only to iOS 10.3 and later devices
Signing credentials This setting specifies how devices find the certificates required to sign messages.
This setting is valid only if the "Enable S/MIME" setting is selected.
Possible values:
• Shared certificate• SCEP• User credential
After you choose the profile type you want to use, you specify the sharedcertificate, SCEP, or user credential profile.
Signing shared certificate This setting specifies the shared certificate profile for a client certificate thatan iOS device uses to sign email messages.
This setting is valid only if the "Enable S/MIME" setting is selected.
| Profile settings | 365

iOS: Email profile setting Description
Signing SCEP This setting specifies the SCEP profile that devices can use to retrieve thecertificates required to sign email messages using S/MIME.
This setting is valid only if the "Enable S/MIME" setting is selected.
Signing user credential This setting specifies the user credential profile that devices can use to obtain theclient certificates required to sign email messages using S/MIME.
This setting is valid only if the "Enable S/MIME" setting is selected.
User can turn on or turnoff S/MIME signing
This setting specifies whether a user is allowed to turn on or turn off S/MIMEsigning. This setting applies only to iOS 12.0 and later devices.
User can change signingcredentials
This setting specifies whether a user can override signing credentials. This settingapplies only to iOS 12.0 and later devices.
Enable S/MIME messageencryption
This setting specifies whether a device encrypts outgoing email messages with S/MIME encryption.
This setting applies only to iOS 10.3 and later devices
Encryption credentials This setting specifies how devices find the certificates required to encryptmessages.
Possible values:
• Shared certificate• SCEP• User credential
After you select the profile type, you select the shared certificate, SCEP, or usercredential profile that you want to use.
This setting is valid only if the "Enable S/MIME" setting is selected.
Encryption sharedcertificate
This setting specifies the shared certificate profile for a client certificate thatan iOS device can use to encrypt email messages.
Devices choose the appropriate certificate for the recipient to encrypt messagesusing S/MIME.
This setting is valid only if the "Enable S/MIME" setting is selected.
Encryption SCEP This setting specifies the SCEP profile that devices can use to retrieve thecertificates required to encrypt email messages using S/MIME.
This setting takes effect only if the "Enable S/MIME" setting is selected.
Encryption usercredential
This setting specifies the user credential profile that devices can use to retrievethe client certificates required to encrypt email messages using S/MIME.
This setting takes effect only if the "Enable S/MIME" setting is selected.
User can override S/MIME encryption
This setting specifies whether a user can turn on or turn off the encryptionsetting. This setting applies only to iOS 12.0 and later devices.
| Profile settings | 366
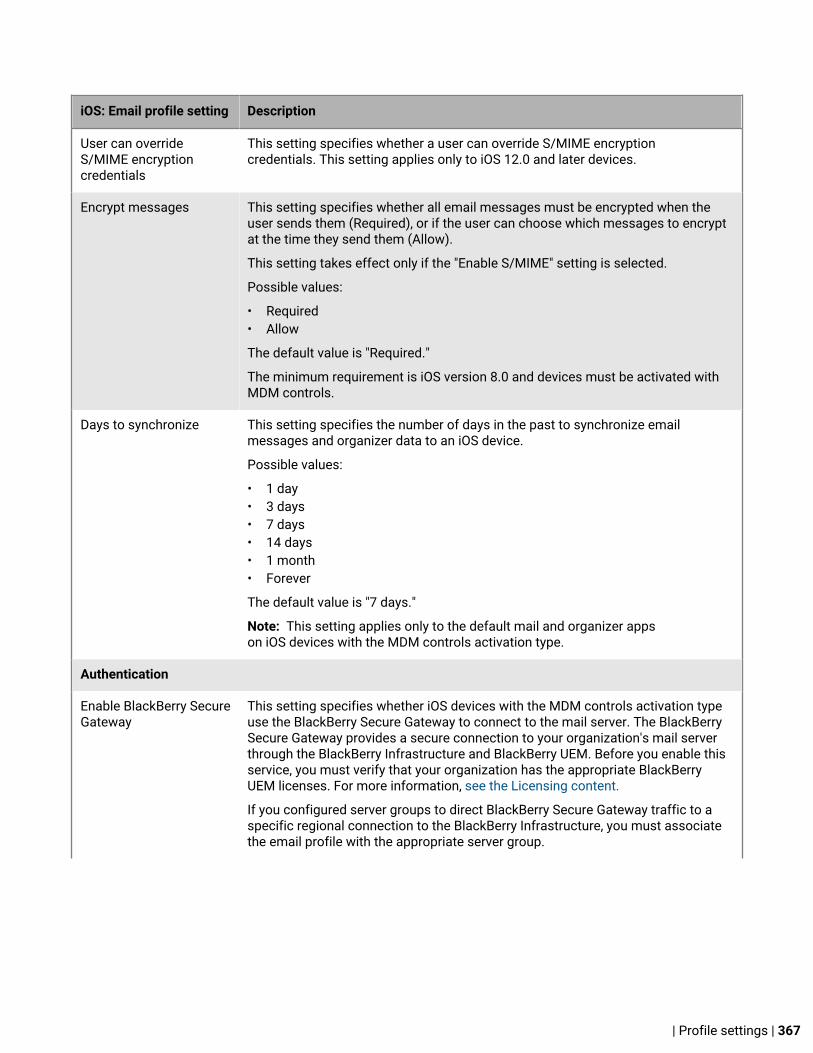
iOS: Email profile setting Description
User can overrideS/MIME encryptioncredentials
This setting specifies whether a user can override S/MIME encryptioncredentials. This setting applies only to iOS 12.0 and later devices.
Encrypt messages This setting specifies whether all email messages must be encrypted when theuser sends them (Required), or if the user can choose which messages to encryptat the time they send them (Allow).
This setting takes effect only if the "Enable S/MIME" setting is selected.
Possible values:
• Required• Allow
The default value is "Required."
The minimum requirement is iOS version 8.0 and devices must be activated withMDM controls.
Days to synchronize This setting specifies the number of days in the past to synchronize emailmessages and organizer data to an iOS device.
Possible values:
• 1 day• 3 days• 7 days• 14 days• 1 month• Forever
The default value is "7 days."
Note: This setting applies only to the default mail and organizer appson iOS devices with the MDM controls activation type.
Authentication
Enable BlackBerry SecureGateway
This setting specifies whether iOS devices with the MDM controls activation typeuse the BlackBerry Secure Gateway to connect to the mail server. The BlackBerrySecure Gateway provides a secure connection to your organization's mail serverthrough the BlackBerry Infrastructure and BlackBerry UEM. Before you enable thisservice, you must verify that your organization has the appropriate BlackBerryUEM licenses. For more information, see the Licensing content.
If you configured server groups to direct BlackBerry Secure Gateway traffic to aspecific regional connection to the BlackBerry Infrastructure, you must associatethe email profile with the appropriate server group.
| Profile settings | 367

iOS: Email profile setting Description
Authentication type This setting specifies the type of authentication an iOS device uses to connect tothe mail server.
This setting is valid only if the "Enable BlackBerry Secure Gateway" setting is notselected.
Possible values:
• None• Shared certificate• SCEP• User credential
The default value is "None."
Shared certificate profile This setting specifies the shared certificate profile for the client certificate thatan iOS device uses to connect to the mail server.
This setting is valid only if the "Enable BlackBerry Secure Gateway" setting is notselected and the "Authentication type" setting is set to "Shared certificate."
Associated SCEP profile This setting specifies the associated SCEP profile that an iOS device uses to enrolla client certificate to use for authentication with the mail server.
This setting is valid only if the "Enable BlackBerry Secure Gateway" setting is notselected and the "Authentication type" setting is set to "SCEP."
Associated usercredential profile
This setting specifies the associated user credential profile that an iOS deviceuses to enroll a client certificate to use for authentication with the mail server.
This setting is valid only if the "Enable BlackBerry Secure Gateway" setting is notselected and the "Authentication type" setting is set to "User credential."
Use credentials andcertificate
This setting specifies whether a device uses credentials and a client certificateobtained using the associated SCEP profile to authenticate with the mail server.
This setting is valid only if the "Enable BlackBerry Secure Gateway" setting is notselected and the "Authentication type" setting is set to "SCEP."
Use SSL This setting specifies whether a device must use SSL to connect to the mailserver.
Accept all SSLcertificates
This setting specifies whether all SSL certificates are accepted.
External email domains
External email domainallowed list
This setting specifies the list of domains that a user can send work email orcalendar entries to. For example, when a user adds a recipient who has an emailaddress in the allowed domain to an email message or calendar entry, no warningmessage is displayed. This setting applies to the work space only.
If you list multiple domain names, separate the domain names with a comma (,),semicolon (;), or space.
| Profile settings | 368

iOS: Email profile setting Description
External email domainrestricted list
This setting specifies the list of domains that users cannot send work email orcalendar entries to. For example, if a user tries to add a recipient with an emailaddress from the restricted domain to an email message or calendar invitation,the Work Connect app prevents the user from completing the task. This settingapplies to the work space only.
If you list multiple domain names, separate the domain names with a comma (,),semicolon (;), or space.
Allow Mail Drop This setting specifies whether users can send files from this account using MailDrop.
The minimum requirement is iOS version 9.0 and devices must be activated withMDM controls.
macOS: Email profile settingsmacOS applies profiles to user accounts or devices. Email profiles are applied to user accounts.
macOS: Email profilesetting Description
Path This setting specifies the network path of the mail server.
Port This setting specifies the port that is used to connect to the mail server.
Use SSL This setting specifies whether a device must use SSL to connect to the mailserver.
External host name or IPaddress
This setting specifies the external host name or IP address of the mail server.
Use external SSL This setting specifies whether a device must use SSL to connect to the externalmail server.
External path This setting specifies the network path of the external mail server.
External server port This setting specifies the port that is used to connect to the external mail server.
Android: Email profile settingsNote: In an upcoming release of BlackBerry UEM, the settings applicable to BlackBerry Hub+ and DivideProductivity will be removed from the email profile and will be available only in an app configuration in the appsettings. In this release, if you configure app settings here and in an app configuration, the app configurationtakes precedence if both are assigned.
Android: Email profilesetting Description
Delivery settings
| Profile settings | 369

Android: Email profilesetting Description
Profile type This setting specifies whether you want this profile to support ExchangeActiveSync or IBM Notes Traveler.
Possible values:
• Exchange ActiveSync• IBM Notes Traveler
The default value is "Exchange ActiveSync."
Days to synchronize This setting specifies the number of days in the past to synchronize emailmessages and organizer data to an Android device.
Possible values:
• Unlimited• 1 day• 3 days• 7 days• 14 days• 1 month
The default value is "1 month."
For Android devices that use Samsung KNOX MDM, if you set the value toUnlimited, only one month is synchronized.
Note: This setting applies only to the default mail and organizer appson Android devices with the MDM controls activation type. If the device isassigned the Work and personal - user privacy or Work and personal - fullcontrol activation type, this setting does not affect the synchronization settings forthe default mail and organizer apps or the Work Space Manager app.
Authentication type This setting specifies the type of authentication an Android device uses to connectto the mail server.
Possible values:
• None• Shared certificate• SCEP• User credential
The default value is "None."
Associated SCEP profile This setting specifies the associated SCEP profile that an Android device uses toobtain a client certificate to authenticate with the mail server.
This setting is valid only if the "Authentication type" setting is set to "SCEP."
Use credentials andcertificate
This setting specifies whether a device uses credentials and a client certificateobtained using the associated SCEP profile to authenticate with the mail server.
This setting is valid only if the "Authentication type" setting is set to "SCEP."
| Profile settings | 370

Android: Email profilesetting Description
Shared certificate profile This setting specifies the shared certificate profile for the client certificate thatan Android device uses to connect to the mail server.
This setting is valid only if the "Authentication type" setting is set to "Sharedcertificate."
Associated usercredential profile
This setting specifies the user credential profile for the client certificate thatan Android device uses to connect to the mail server.
This setting is valid only if the "Authentication type" setting is set to "Usercredential."
Use SSL This setting specifies whether a device must use SSL to connect to the mailserver.
Accept all SSLcertificates
This setting specifies whether a device automatically accepts untrusted SSLcertificates from the mail server. If this setting is not selected, devices canconnect only to mail servers that use a trusted SSL certificate.
Maximum emailattachment size
This setting specifies the maximum size allowed for email attachments (in MB).
The possible values are 1 to 365. The default setting is 25.
This setting applies only to Android Enterprise devices.
Default email signaturefor new messages
This setting specifies an email signature that is automatically appended to newemail messages.
This setting applies only to Android Enterprise devices.
Enable S/MIME This setting specifies whether devices can send S/MIME-protected emailmessages.
For devices that use the BlackBerry Productivity Suite, you must set a value for the"S/MIME support" setting instead.
Sign messages This setting specifies whether devices send all outgoing email messages with adigital signature.
This setting is valid only if the "Enable S/MIME" setting is selected.
For Android Enterprise devices, this setting applies only to devices that use DivideProductivity.
For devices that use the BlackBerry Productivity Suite, you must set a value for the"Digitally signed S/MIME messages" setting instead.
| Profile settings | 371

Android: Email profilesetting Description
Signing credentials This setting specifies the credentials that a device uses to sign email messages.
This setting is valid only if the "Sign messages" setting is selected.
Possible values:
• Shared certificate• SCEP• User credential
The default setting is "Shared certificate."
Signing shared certificate This setting specifies the shared certificate profile for a client certificate that adevice uses to sign email messages.
This setting is valid only if the "Signing credentials" setting is set to "Sharedcertificate."
Signing SCEP This setting specifies the SCEP profile for a client certificate that a device uses tosign email messages.
This setting is valid only if the "Signing credentials" setting is set to "SCEP."
Signing user credential This setting specifies the user credential profile for a client certificate that adevice uses to sign email messages.
This setting is valid only if the "Signing credentials" setting is set to "Usercredential."
Encrypt messages This setting specifies whether devices encrypt outgoing email messages using S/MIME encryption.
This setting is valid only if the "Enable S/MIME" setting is selected.
For Android Enterprise devices, this setting applies only to devices that use DivideProductivity.
For devices that use the BlackBerry Productivity Suite, you must set a value for the"Digitally signed S/MIME messages" setting instead.
Encryption credentials This setting specifies the credentials that a device uses to encrypt emailmessages.
This setting is valid only if the "Encrypt messages" setting is selected.
Possible values:
• Shared certificate• SCEP• User credential
The default setting is "Shared certificate."
| Profile settings | 372

Android: Email profilesetting Description
Encryption sharedcertificate
This setting specifies the shared certificate profile for a client certificate that adevice uses to encrypt email messages.
This setting is valid only if the "Encryption credentials" setting is set to "Sharedcertificate."
Encryption SCEP This setting specifies the SCEP profile for a client certificate that a device uses toencrypt email messages.
This setting is valid only if the "Signing credentials" setting is set to "SCEP."
Encryption usercredential
This setting specifies the user credential profile for a client certificate that adevice uses to encrypt email messages.
This setting is valid only if the "Signing credentials" setting is set to "Usercredential."
Require smart cardauthentication for email
This setting specifies whether a smart card is required for Samsung KNOX devicesto authenticate with the mail server.
Allow user to editsettings
Specify whether the user can edit delivery settings.
This setting applies only to Samsung KNOX devices.
External email domains
External email domainallowed list
This setting specifies the list of domains that a user can send work email orcalendar entries to. For example, when a user adds a recipient who has an emailaddress in the allowed domain to an email message or calendar entry, no warningmessage is displayed. This setting applies to the work space only.
If you list multiple domain names, separate the domain names with a comma (,),semicolon (;), or space.
External email domainrestricted list
This setting specifies the list of domains that users cannot send work email orcalendar entries to. For example, if a user tries to add a recipient with an emailaddress from the restricted domain to an email message or calendar invitation,the Email app or Calendar app prevents the user from completing the task. Thissetting applies to the work space only.
If you list multiple domain names, separate the domain names with a comma (,),semicolon (;), or space.
BlackBerry Productivity Suite
These settings apply only to Android Enterprise devices.
Perform OCSP checking This setting specifies whether devices use OCSP to check the status of S/MIMEcertificates.
Allow users to acceptuntrusted certificates
This setting specifies whether users can allow the device to accept untrustedcertificates.
| Profile settings | 373

Android: Email profilesetting Description
Allow telemetry eventsto be sent from the workprofile
This setting specifies whether the BlackBerry Productivity Suite allows thecollection of usage data.
Security type This setting specifies the security type used by the BlackBerry Productivity Suite.
Possible values:
• SSL• SSL-Trust All
The default value is "SSL."
Allow data to be sharedbetween work andpersonal profiles
This setting specifies whether the personal profile can access data in the workprofile.
Select this setting and the "Allow personal app access to work data" setting toenable the following features:
• A unified BlackBerry Hub that contains both work and personal accounts. Formore information, see Enable a unified BlackBerry Hub.
• A unified keyboard dictionary that allows learned words to be shared in workand personal profiles. Users can decide whether to use the unified keyboarddictionary for predictions and corrections.
.
Allow personal appaccess to work data
This setting specifies whether personal apps can access work data.
Select this setting and the "Allow data to be shared between work and personalprofiles" setting to enable the following features:
• A unified BlackBerry Hub that contains both work and personal accounts. Formore information, see Enable a unified BlackBerry Hub.
• A unified keyboard dictionary that allows learned words to be shared in workand personal profiles. Users can decide whether to use the unified keyboarddictionary for predictions and corrections.
S/MIME settings
These settings apply only to Android Enterprise devices.
S/MIME support This setting specifies whether an Android device that uses the BlackBerryProductivity Suite can send S/MIME-protected email messages.
Possible values:
• Allow• Required• Disallow
The default value is "Allow."
| Profile settings | 374

Android: Email profilesetting Description
Digitally signed S/MIMEmessages
This setting specifies whether an Android device that uses the BlackBerryProductivity Suite sends outgoing email messages with a digital signature.
Possible values:
• Allow• Required• Disallow
The default value is "Allow."
Encrypted S/MIMEmessages
This setting specifies whether an Android device that uses the BlackBerryProductivity Suite encrypts outgoing email messages using S/MIME encryption.
Possible values:
• Allow• Required• Disallow
The default value is "Allow."
S/MIME encryptionalgorithms
This setting specifies the encryption algorithms that an Android device that usesthe BlackBerry Productivity Suite can use to encrypt S/MIME-protected emailmessages.
Possible values:
• AES (256-bit)• AES (192-bit)• AES (128-bit)• Triple DES• ARC2
Windows: Email profile settings
Windows: Email profilesetting Description
Delivery settings
Profile type This setting specifies whether you want this profile to support ExchangeActiveSync or IBM Notes Traveler.
Possible values:
• Exchange ActiveSync• IBM Notes Traveler
The default value is "Exchange ActiveSync."
Account name This setting specifies the work email account name that appears on the Windowsdevice. You can use a variable, such as %UserEmailAddress%.
| Profile settings | 375

Windows: Email profilesetting Description
Synchronization interval This setting specifies how often a Windows device downloads new emailmessages from the mail server.
Possible values:
• As items are received• Manual• 15 minutes• 30 minutes• 60 minutes
The default value is "As items are received."
Days to synchronize This setting specifies the number of days in the past to synchronize emailmessages and organizer data to a Windows device.
Possible values:
• Forever• 3 days• 7 days• 14 days• 1 month
The default value is "7 days."
Use SSL This setting specifies whether a Windows device must use SSL to connect to themail server.
Content to synchronize
Email This setting specifies whether a Windows device synchronizes email messageswith the mail server.
Contacts This setting specifies whether a Windows device synchronizes contacts with themail server.
Calendar This setting specifies whether a Windows device synchronizes calendar entrieswith the mail server.
Task This setting specifies whether a Windows device synchronizes task data with themail server.
This setting is valid only if the "Profile type" setting is set to "ExchangeActiveSync."
| Profile settings | 376

IMAP/POP3 email profile settingsYou can use a variable in any profile setting that is a text field to reference a value instead of specifying the actualvalue. BlackBerry UEM supports default variables that are predefined and custom variables that you define. IMAP/POP3 email profiles are supported on the following device types:
• iOS• macOS• Android• Windows
In some cases, the minimum version of the device OS required to support a setting is a version not supportedby BlackBerry UEM. For more information about supported versions, see the Compatibility matrix.
Common: IMAP/POP3 email profile settings
Common: IMAP/POP3email profile setting Description
Email type This setting specifies the type of mail server.
Possible values:
• IMAP• POP3
The default value is "IMAP."
Display name This setting specifies the display name of the account. If the profile is for multipleusers, you can use the %UserDisplayName% variable.
Email address This setting specifies the user's email address. If the profile is for multiple users,you can use the %UserEmailAddress% variable.
Incoming mail settings
Host name or IP address This setting specifies the host name or IP address of the mail server for incomingmail.
Port This setting specifies the port that is used to connect to the mail server forincoming mail.
Username This setting specifies the user's username. If the profile is for multiple users, youcan use the %UserName% variable.
Use SSL for incomingmail
This setting specifies whether an iOS, Android, or Windows device must use SSLto connect to the mail server to get received mail.
Outgoing mail settings
Host name or IP address This setting specifies the host name or IP address of the mail server for outgoingmail.
| Profile settings | 377
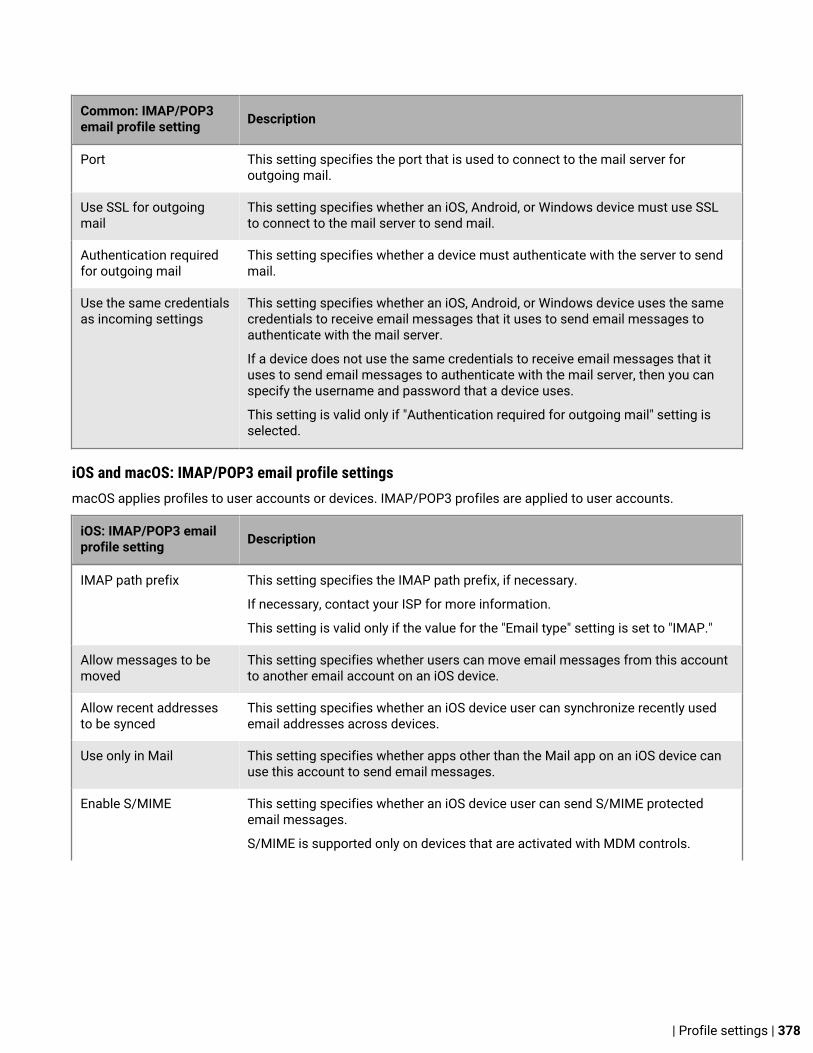
Common: IMAP/POP3email profile setting Description
Port This setting specifies the port that is used to connect to the mail server foroutgoing mail.
Use SSL for outgoingmail
This setting specifies whether an iOS, Android, or Windows device must use SSLto connect to the mail server to send mail.
Authentication requiredfor outgoing mail
This setting specifies whether a device must authenticate with the server to sendmail.
Use the same credentialsas incoming settings
This setting specifies whether an iOS, Android, or Windows device uses the samecredentials to receive email messages that it uses to send email messages toauthenticate with the mail server.
If a device does not use the same credentials to receive email messages that ituses to send email messages to authenticate with the mail server, then you canspecify the username and password that a device uses.
This setting is valid only if "Authentication required for outgoing mail" setting isselected.
iOS and macOS: IMAP/POP3 email profile settingsmacOS applies profiles to user accounts or devices. IMAP/POP3 profiles are applied to user accounts.
iOS: IMAP/POP3 emailprofile setting Description
IMAP path prefix This setting specifies the IMAP path prefix, if necessary.
If necessary, contact your ISP for more information.
This setting is valid only if the value for the "Email type" setting is set to "IMAP."
Allow messages to bemoved
This setting specifies whether users can move email messages from this accountto another email account on an iOS device.
Allow recent addressesto be synced
This setting specifies whether an iOS device user can synchronize recently usedemail addresses across devices.
Use only in Mail This setting specifies whether apps other than the Mail app on an iOS device canuse this account to send email messages.
Enable S/MIME This setting specifies whether an iOS device user can send S/MIME protectedemail messages.
S/MIME is supported only on devices that are activated with MDM controls.
| Profile settings | 378

iOS: IMAP/POP3 emailprofile setting Description
Signing credentials This setting specifies the credentials that a device uses to sign email messages.
This setting is valid only if the "Enable S/MIME" setting is selected.
Possible values:
• Shared certificate• SCEP• User credential
The default setting is "Shared certificate."
Signing shared certificate This setting specifies the shared certificate profile for a client certificate that adevice uses to sign email messages.
This setting is valid only if the "Signing credentials" setting is set to "Sharedcertificate."
Signing SCEP This setting specifies the SCEP profile that devices can use to retrieve thecertificates required to sign email messages using S/MIME.
This setting is valid only if the "Signing credentials" setting is set to "SCEP."
Signing user credential This setting specifies the user credential profile that devices can use to obtain theclient certificates required to sign email messages using S/MIME.
This setting is valid only if the "Signing credentials" setting is set to "Usercredential."
Encryption credentials This setting specifies how devices find the certificates required to encryptmessages.
This setting is valid only if the "Enable S/MIME" setting is selected.
Possible values:
• Shared certificate• SCEP• User credential
After you select the profile type, you select the shared certificate, SCEP, or usercredential profile that you want to use.
Encryption sharedcertificate
This setting specifies the shared certificate profile for a client certificate that adevice uses to encrypt email messages.
Devices choose the appropriate certificate for the recipient to encrypt messagesusing S/MIME.
This setting is valid only if the "Encryption credentials" setting is set to "Sharedcertificate."
Encryption SCEP This setting specifies the SCEP profile that devices can use to retrieve thecertificates required to encrypt email messages using S/MIME.
This setting is valid only if the "Encryption credentials" setting is set to "SCEP."
| Profile settings | 379
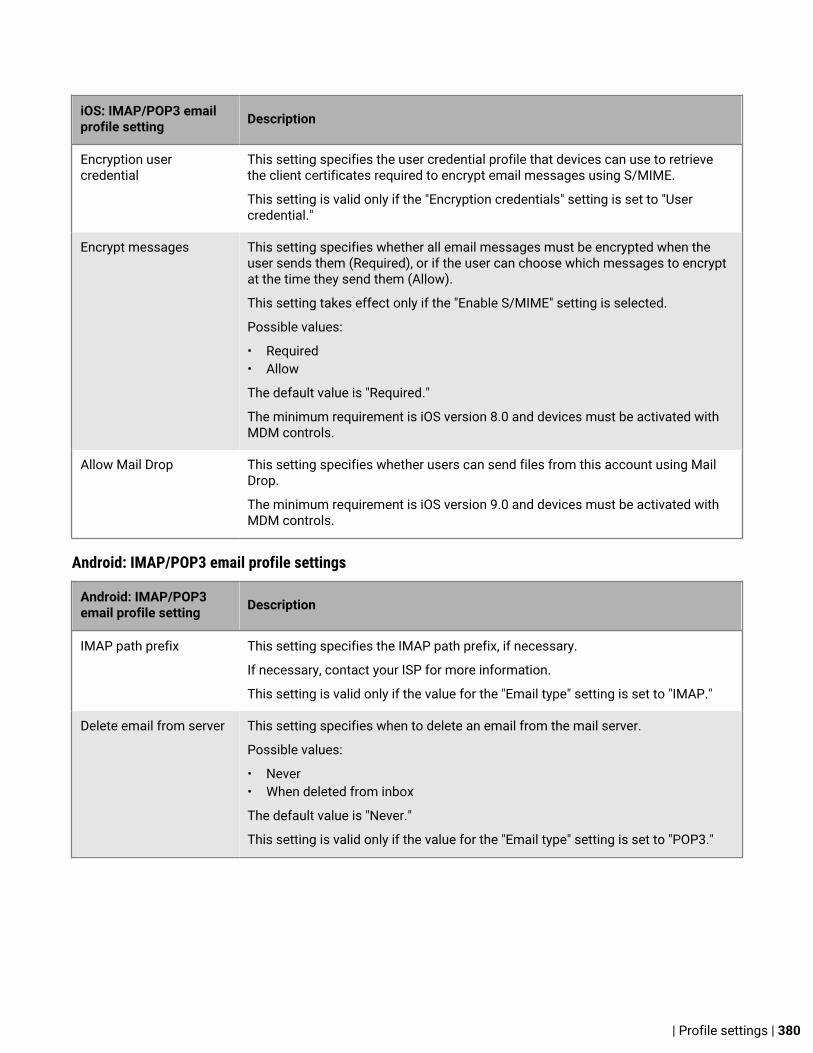
iOS: IMAP/POP3 emailprofile setting Description
Encryption usercredential
This setting specifies the user credential profile that devices can use to retrievethe client certificates required to encrypt email messages using S/MIME.
This setting is valid only if the "Encryption credentials" setting is set to "Usercredential."
Encrypt messages This setting specifies whether all email messages must be encrypted when theuser sends them (Required), or if the user can choose which messages to encryptat the time they send them (Allow).
This setting takes effect only if the "Enable S/MIME" setting is selected.
Possible values:
• Required• Allow
The default value is "Required."
The minimum requirement is iOS version 8.0 and devices must be activated withMDM controls.
Allow Mail Drop This setting specifies whether users can send files from this account using MailDrop.
The minimum requirement is iOS version 9.0 and devices must be activated withMDM controls.
Android: IMAP/POP3 email profile settings
Android: IMAP/POP3email profile setting Description
IMAP path prefix This setting specifies the IMAP path prefix, if necessary.
If necessary, contact your ISP for more information.
This setting is valid only if the value for the "Email type" setting is set to "IMAP."
Delete email from server This setting specifies when to delete an email from the mail server.
Possible values:
• Never• When deleted from inbox
The default value is "Never."
This setting is valid only if the value for the "Email type" setting is set to "POP3."
| Profile settings | 380

Windows: IMAP/POP3 email profile settings
Windows: IMAP/POP3email profile setting Description
Delete email from server This setting specifies how email messages are treated when a user deletes them.Email messages can be deleted from the server (hard delete) or removed from theinbox but kept in the Trash folder (soft delete).
Possible values:
• Hard delete• Soft delete
The default value is "Soft delete."
This setting is valid only if the value for the "Email type" is set to "IMAP."
Domain This setting specifies the domain of the mail server.
Synchronization interval This setting specifies how often a Windows device downloads new content fromthe mail server.
Possible values:
• Manual• 15 minutes• 30 minutes• 60 minutes• 2 hours
The default value is "15 minutes."
Initial retrieval amount This setting specifies the number of days in the past to synchronize emailmessages and organizer data to a Windows device.
Possible values:
• All• 7 days• 14 days• 30 days
The default value is "7 days."
Only use the cellularnetwork and not Wi-Fi
This setting specifies whether email messages are sent and received only over thewireless network.
Wi-Fi profile settingsYou can use a variable in any profile setting that is a text field to reference a value instead of specifying the actualvalue. BlackBerry UEM supports default variables that are predefined and custom variables that you define. Wi-Fi profiles are supported on the following device types:
• BlackBerry 10• iOS
| Profile settings | 381

• macOS• Android• Windows
In some cases, the minimum version of the device OS required to support a setting is a version not supportedby BlackBerry UEM. For more information about supported OS versions, see the Compatibility matrix.
Common: Wi-Fi profile settings
Common: Wi-Fi profilesetting Description
SSID This setting specifies the network name of a Wi-Fi network and its wireless accesspoints. The SSID is case-sensitive and must contain alphanumeric characters.
Possible values are limited to 32 characters.
Hidden network This setting specifies whether the Wi-Fi network hides the SSID.
BlackBerry 10: Wi-Fi profile settings
BlackBerry 10: Wi-Fiprofile setting Description
Security type This setting specifies the type of security that the Wi-Fi network uses.
Possible values:
• None• WEP personal• WPA-Personal• WPA-Enterprise• WPA2-Personal• WPA2-Enterprise
The default value is "None."
WEP key This setting specifies the WEP key for the Wi-Fi network. The WEP key must be 10or 26 hexadecimal characters (0-9, A-F) or 5 or 13 alphanumeric characters (0-9, A-Z).
Examples of hexadecimal key values are ABCDEF0123 orABCDEF0123456789ABCDEF0123. Examples of alphanumeric key values areabCD5 or abCDefGHijKL1.
This setting is valid only if the "Security type" setting is set to "WEP personal."
| Profile settings | 382

BlackBerry 10: Wi-Fiprofile setting Description
Preshared key type This setting specifies the type of preshared key for the Wi-Fi network.
This setting is valid only if the "Security type" setting is set to "WPA-Personal" or"WPA2-Personal."
Possible values:
• ASCII• HEX
The default value is "ASCII."
Preshared key This setting specifies the preshared key for the Wi-Fi network.
This setting is valid only if the "Security type" setting is set to "WPA-Personal" or"WPA2-Personal."
Possible values are limited to 64 characters.
Authentication protocol This setting specifies the EAP method that the Wi-Fi network uses.
This setting is valid only if the "Security type" setting is set to "WPA-Enterprise" or"WPA2-Enterprise."
Possible values:
• PEAP• TTLS• EAP-FAST• TLS
The default value is "PEAP."
Inner authentication This setting specifies the inner authentication method used with a TLS tunnel.
If you want to use PAP for inner authentication, set this setting to "Auto."
This setting is valid only if the "Authentication protocol" setting is set to "PEAP" or"TTLS."
Possible values:
• Auto• MS-CHAPv2• GTC
The default value is "Auto."
| Profile settings | 383

BlackBerry 10: Wi-Fiprofile setting Description
EAP-FAST provisioningmethod
This setting specifies the provisioning method for EAP-FAST authentication.
This setting is valid only if the "Authentication protocol" setting is set to "EAP-FAST."
Possible values:
• Anonymous• Authenticated
The default value is "Anonymous."
Username This setting specifies the username that a BlackBerry 10 device uses toauthenticate with the Wi-Fi network. If the profile is for multiple users, you canspecify the %UserName% variable.
This setting is valid only if the "Authentication protocol" setting is set to "PEAP,""TTLS," "EAP-FAST," or "TLS."
Password This setting specifies the password that a BlackBerry 10 device uses toauthenticate with the Wi-Fi network.
This setting is valid only if the "Authentication protocol" setting is set to "PEAP,""TTLS," or "EAP-FAST."
Band type This setting specifies the frequency band that the Wi-Fi network uses.
Possible values:
• Dual• 2.4 GHz• 5.0 GHz
The default value is "Dual."
Enable DHCP This setting specifies whether the Wi-Fi network uses DHCP.
IP address This setting specifies the IP address of the host for the Wi-Fi network.
This setting is valid only if the "Enable DHCP" setting is not selected.
Subnet mask This setting specifies the subnet mask in dot-decimal notation (for example,192.0.2.0).
This setting is valid only if the "Enable DHCP" setting is not selected.
Primary DNS This setting specifies the primary DNS server in dot-decimal notation (for example,192.0.2.0).
This setting is valid only if the "Enable DHCP" setting is not selected.
Secondary DNS This setting specifies the secondary DNS server in dot-decimal notation (forexample, 192.0.2.0).
This setting is valid only if the "Enable DHCP" setting is not selected.
| Profile settings | 384

BlackBerry 10: Wi-Fiprofile setting Description
Default gateway This setting specifies the default gateway in dot-decimal notation (for example,192.0.2.0).
This setting is valid only if the "Enable DHCP" setting is not selected.
Domain suffix This setting specifies the FQDN of the DNS suffix.
This setting is valid only if the "Enable DHCP" setting is not selected.
Enable IPv6 This setting specifies whether the Wi-Fi network supports IPv6.
Enable access pointhandover
This setting specifies whether a BlackBerry 10 device can perform Wi-Fi handoversbetween wireless access points.
User can edit This setting specifies the Wi-Fi settings that a BlackBerry 10 device user canchange. If this setting is set to "Read only," the user can't change any settings.If this setting is set to "Credentials only," the user can change the username andpassword.
Possible values:
• Read only• Credentials only
The default value is "Read only."
Data security level This setting specifies the domain in the work space where the Wi-Fi profile isstored when the work space uses advanced data at rest protection. This setting isvalid only if the "Force advanced data at rest protection" IT policy rule is selected.If this setting is set to "Always available," the profile is stored in the Startupdomain and is available when the work space is locked. If this setting is set to"Available after authentication," the profile is stored in the Operational domain andis available after the work space is unlocked once until the device restarts. If thissetting is set to "Available only when work space unlocked," the profile is stored inthe Lock domain and can be used for Wi-Fi connections only when the work spaceis unlocked.
Possible values:
• Always available• Available after authentication• Available only when work space unlocked
The default value is "Always available."
The minimum requirement is BlackBerry 10 OS version 10.3.1.
| Profile settings | 385

BlackBerry 10: Wi-Fiprofile setting Description
Force TLS 1.2 This setting specifies whether BlackBerry 10 devices must use TLS 1.2 forcommunication over the Wi-Fi network.
Possible values:
• Off• On
The default value is "Off."
The minimum requirement is BlackBerry 10 OS version 10.3.3.
Trust
Client certificate source This setting specifies how BlackBerry 10 devices can obtain the client certificate.There are four options for devices to obtain client certificates:
• If you choose "SCEP", you must also specify the associated SCEP profile thatthe device can use to download the client certificate.
• If you choose "User credential", you must also specify the user credentialprofile that the device can use to download the client certificate.
• If you choose "Smart card", the user must pair the device with a smart card thatincludes the client certificate.
• If you choose "Other", the user must add the client certificate to the devicemanually.
Smart card support is available for devices that are running BlackBerry 10 OSversion 10.3.1 and later.
Possible values:
• Smart card• SCEP• User credential• Other
The default value is "Other."
Associated SCEP profile This setting specifies the associated SCEP profile that a BlackBerry 10 deviceuses to enroll a client certificate to use for authentication with the Wi-Fi network.
This setting is valid only if the "Client certificate source" setting is set to "SCEP."
Associated usercredential profile
This setting specifies the associated user credential profile that a BlackBerry 10device uses to enroll a client certificate to use for authentication with the Wi-Finetwork.
This setting is valid only if the "Client certificate source" setting is set to "Usercredential."
The minimum requirement for using a user credential profile is BlackBerry 10 OSversion 10.3.1.
| Profile settings | 386

BlackBerry 10: Wi-Fiprofile setting Description
Trusted certificatesource
This setting specifies the source of the trusted certificate. If this setting is set to"Trusted certificate store," a BlackBerry 10 device can connect to a Wi-Fi networkthat uses any certificate in the Wi-Fi certificate store.
Possible values:
• None• Trusted certificate store
The default value is "None."
Associated profiles
Use an enterpriseconnectivity profile witha BlackBerry SecureConnect Plus connectionfor work data
This setting specifies whether all work space traffic is directed through BlackBerrySecure Connect Plus, including when BlackBerry 10 devices can access the workWi-Fi network. If this setting is not selected, when you configure a Wi-Fi profile andassign it to BlackBerry 10 devices, the devices prioritize the work Wi-Fi networkabove BlackBerry Secure Connect Plus for work space traffic.
If you want to use this feature, in the IT policy that is assigned to BlackBerry 10device users, verify that the Force network access control for work apps IT policyrule is not selected.
This setting may affect your organization’s data usage and network costs. Verifythat this is your organization’s preferred configuration before you use this feature.
The minimum requirement is BlackBerry 10 OS version 10.3.2.
Associated VPN profile This setting specifies the associated VPN profile that a BlackBerry 10 device usesto connect to a VPN when the device is connected to the Wi-Fi network.
Associated proxy profile This setting specifies the associated proxy profile that a BlackBerry 10 deviceuses to connect to a proxy server when the device is connected to the Wi-Finetwork.
iOS and macOS: Wi-Fi profile settingsmacOS applies profiles to user accounts or devices. You can configure a Wi-Fi profile to apply to one or the other.
iOS and macOS: Wi-Fi profile setting Description
Automatically joinnetwork
This setting specifies whether a device can automatically join the Wi-Fi network.
| Profile settings | 387
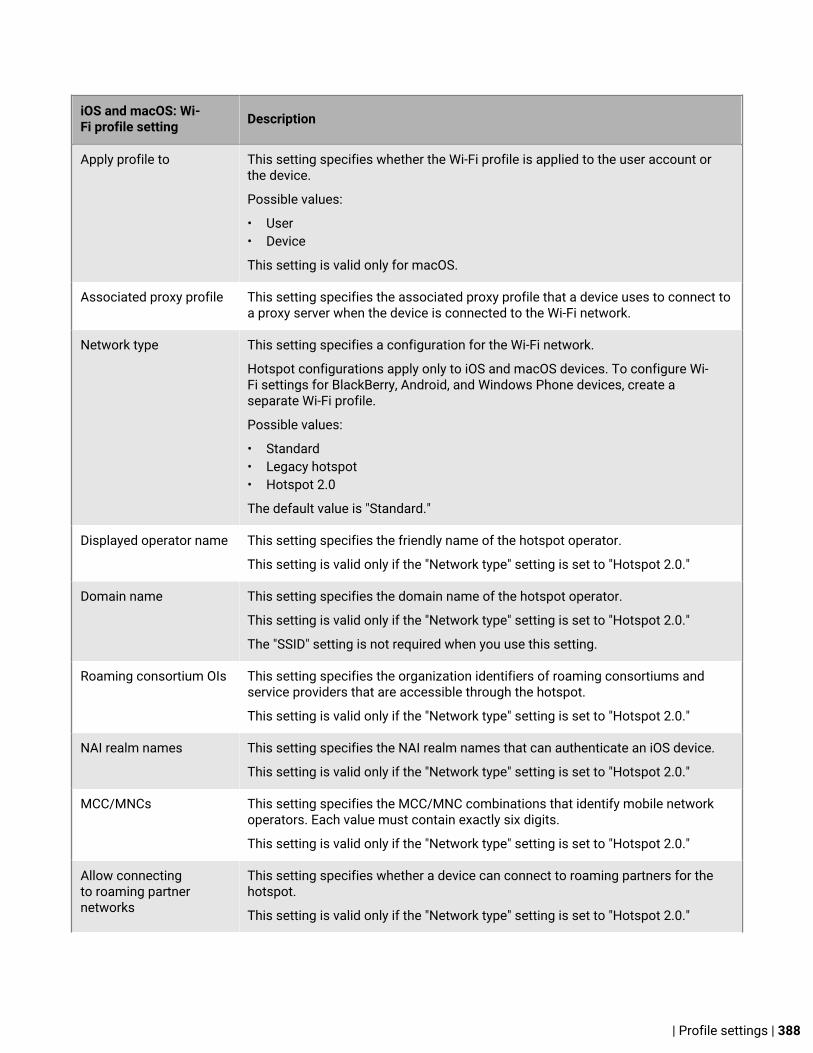
iOS and macOS: Wi-Fi profile setting Description
Apply profile to This setting specifies whether the Wi-Fi profile is applied to the user account orthe device.
Possible values:
• User• Device
This setting is valid only for macOS.
Associated proxy profile This setting specifies the associated proxy profile that a device uses to connect toa proxy server when the device is connected to the Wi-Fi network.
Network type This setting specifies a configuration for the Wi-Fi network.
Hotspot configurations apply only to iOS and macOS devices. To configure Wi-Fi settings for BlackBerry, Android, and Windows Phone devices, create aseparate Wi-Fi profile.
Possible values:
• Standard• Legacy hotspot• Hotspot 2.0
The default value is "Standard."
Displayed operator name This setting specifies the friendly name of the hotspot operator.
This setting is valid only if the "Network type" setting is set to "Hotspot 2.0."
Domain name This setting specifies the domain name of the hotspot operator.
This setting is valid only if the "Network type" setting is set to "Hotspot 2.0."
The "SSID" setting is not required when you use this setting.
Roaming consortium OIs This setting specifies the organization identifiers of roaming consortiums andservice providers that are accessible through the hotspot.
This setting is valid only if the "Network type" setting is set to "Hotspot 2.0."
NAI realm names This setting specifies the NAI realm names that can authenticate an iOS device.
This setting is valid only if the "Network type" setting is set to "Hotspot 2.0."
MCC/MNCs This setting specifies the MCC/MNC combinations that identify mobile networkoperators. Each value must contain exactly six digits.
This setting is valid only if the "Network type" setting is set to "Hotspot 2.0."
Allow connectingto roaming partnernetworks
This setting specifies whether a device can connect to roaming partners for thehotspot.
This setting is valid only if the "Network type" setting is set to "Hotspot 2.0."
| Profile settings | 388

iOS and macOS: Wi-Fi profile setting Description
Security type This setting specifies the type of security that the Wi-Fi network uses.
If the "Network type" setting is set to "Hotspot 2.0," this setting is set to "WPA2-Enterprise."
Possible values:
• None• WEP personal• WEP enterprise• WPA-Personal• WPA-Enterprise• WPA2-Personal• WPA2-Enterprise
The default value is "None."
WEP key This setting specifies the WEP key for the Wi-Fi network. The WEP key must be 10or 26 hexadecimal characters (0-9, A-F) or 5 or 13 alphanumeric characters (0-9, A-Z).
Examples of hexadecimal key values are ABCDEF0123 orABCDEF0123456789ABCDEF0123. Examples of alphanumeric key values areabCD5 or abCDefGHijKL1.
This setting is valid only if the "Security type" setting is set to "WEP personal."
Preshared key This setting specifies the preshared key for the Wi-Fi network.
This setting is valid only if the "Security type" setting is set to "WPA-Personal" or"WPA2-Personal."
Protocols
Authentication protocol This setting specifies the EAP methods that the Wi-Fi network supports. You canselect multiple EAP methods.
This setting is valid only if the "Security type" setting is set to "WEP enterprise,""WPA-Enterprise," or "WPA2-Enterprise."
Possible selections:
• TLS• TTLS• LEAP• PEAP• EAP-FAST• EAP-SIM
| Profile settings | 389

iOS and macOS: Wi-Fi profile setting Description
Inner authentication This setting specifies the inner authentication method for use with TTLS.
This setting is valid only if the "Authentication protocol" setting is set to "TTLS."
Possible values:
• None• PAP• CHAP• MS-CHAP• MS-CHAPv2• EAP
The default value is "MS-CHAPv2."
Use PAC This setting specifies whether the EAP-FAST method uses a Protected AccessCredential.
This setting is valid only if the "Authentication protocol" setting is set to "EAP-FAST."
Provision PAC This setting specifies whether the EAP-FAST method allows PAC provisioning.
This setting is valid only if the "Authentication protocol" setting is set to "EAP-FAST" and the "Use PAC" setting is selected.
Provision PACanonymously
This setting specifies whether the EAP-FAST method allows anonymous PACprovisioning.
This setting is valid only if the "Authentication protocol" setting is set to "EAP-FAST," the "Use PAC" setting is selected, and the "Provision PAC" setting isselected.
Authentication
Outer identity for TTLS,PEAP, and EAP-FAST
This setting specifies the outer identity for a user that is sent in clear text.You can specify an anonymous username to hide the user's real identity (forexample, anonymous). The encrypted tunnel is used to send the real usernameto authenticate with the Wi-Fi network. If the outer identity includes the realmname to route the request, it must be the user's actual realm (for example,[email protected]).
This setting is valid only if the "Authentication protocol" setting is set to "TTLS,""PEAP," or "EAP-FAST."
Use password includedin Wi-Fi profile
This setting specifies whether the Wi-Fi profile includes the password forauthentication.
This setting is valid only if the "Security type" setting is set to "WEP enterprise,""WPA-Enterprise," or "WPA2-Enterprise."
| Profile settings | 390

iOS and macOS: Wi-Fi profile setting Description
Password This setting specifies the password that an iOS device uses to authenticate withthe Wi-Fi network.
This setting is valid only if the "Use password included in Wi-Fi profile" setting isselected.
Username This setting specifies the username that an iOS device uses to authenticatewith the Wi-Fi network. If the profile is for multiple users, you can specify the%UserName% variable.
This setting is valid only if the "Security type" setting is set to "WEP enterprise,""WPA-Enterprise," or "WPA2-Enterprise."
Authentication type This setting specifies the type of authentication that a device uses to connect tothe Wi-Fi network.
This setting is valid only if the "Security type" setting is set to "WEP enterprise,""WPA-Enterprise," or "WPA2-Enterprise."
Possible values:
• None• Shared certificate• SCEP• User credential
The default value is "None."
Type of certificate linking This setting specifies the type of linking for the client certificate associated withthe Wi-Fi profile.
This setting is valid only if the "Authentication type" setting is set to "Sharedcertificate."
Possible values:
• Single reference• Variable injection
The default value is "Single reference."
Shared certificate profile This setting specifies the shared certificate profile with the client certificate that adevice uses to authenticate with the Wi-Fi network.
This setting is valid only if the "Type of certificate linking" setting is set to "Singlereference."
Client certificate name This setting specifies the name of the client certificate that a device uses toauthenticate with the Wi-Fi network.
This setting is valid only if the "Type of certificate linking" setting is set to "Variableinjection."
| Profile settings | 391

iOS and macOS: Wi-Fi profile setting Description
Associated SCEP profile This setting specifies the associated SCEP profile that a device uses to obtain aclient certificate to authenticate with the Wi-Fi network.
This setting is valid only if the "Authentication type" setting is set to "SCEP."
Associated usercredential profile
This setting specifies the associated user credential profile that a device uses toobtain a client certificate to authenticate with the Wi-Fi network.
This setting is valid only if the "Authentication type" setting is set to "Usercredential."
Trust
Certificate commonnames expected fromauthentication server
This setting specifies the common names in the certificate that the authenticationserver sends to the device (for example, *.example.com).
This setting is valid only if the "Security type" setting is set to "WEP enterprise,""WPA-Enterprise," or "WPA2-Enterprise."
Type of certificate linking This setting specifies the type of linking for the trusted certificates associatedwith the Wi-Fi profile.
This setting is valid only if the "Security type" setting is set to "WEP enterprise,""WPA-Enterprise," or "WPA2-Enterprise."
Possible values:
• Single reference• Variable injection
The default value is "Single reference."
CA certificate profiles This setting specifies the CA certificate profiles with the trusted certificates that adevice uses to establish trust with the Wi-Fi network.
This setting is valid only if the "Type of certificate linking" setting is set to "Singlereference."
Trusted certificatenames
This setting specifies the names of the trusted certificates that a device uses toestablish trust with the Wi-Fi network.
This setting is valid only if the "Type of certificate linking" setting is set to "Variableinjection."
Trust user decisions This setting specifies whether a device prompts the user to trust a server when thechain of trust can't be established. If this setting is not selected, only connectionsto trusted servers that you specify are allowed.
This setting is valid only if the "Security type" setting is set to "WEP enterprise,""WPA-Enterprise," or "WPA2-Enterprise."
Enable QoS markingprofile
This setting specifies whether you can enable L2 and L3 marking for traffic sentthrough the Wi-Fi network.
This setting is valid only for devices running iOS 10 and later.
| Profile settings | 392

iOS and macOS: Wi-Fi profile setting Description
Use QoSfor FaceTime calls
This setting specifies whether audio and video traffic for FaceTime calls can useL2 and L3 marking.
This setting is valid only for devices running iOS 10 and later.
Use only L2 marking forQoS traffic
This setting specifies whether traffic sent through the Wi-Fi network uses only L2marking.
This setting is valid only for devices running iOS 10 and later.
Apply QoS marking toselected apps
This setting specifies the bundle IDs for apps that can use L2 and L3 marking.
This setting is valid only for devices running iOS 10 and later.
Android: Wi-Fi profile settings
Android: Wi-Fi profilesetting Description
Associated proxy profile This setting specifies the associated proxy profile that an Android devices use toconnect to a proxy server when the device is connected to the Wi-Fi network.
Android 8.0 and later devices with MDM controls or User privacy activations don'tsupport Wi-Fi profiles with proxy settings. If a device with one of these activationtypes is upgraded to Android 8.0, Wi-Fi profiles that have an associated proxyprofile will be removed from the device.
BSSID This setting specifies the MAC address of a wireless access point in the Wi-Finetwork.
Primary DNS This setting specifies the primary DNS server in dot-decimal notation (for example,192.0.2.0).
This setting applies only to devices that use Samsung KNOX when the IP addressis statically assigned by the organization's network.
Secondary DNS This setting specifies the secondary DNS server in dot-decimal notation (forexample, 192.0.2.0).
This setting applies only to devices that use Samsung KNOX when the IP addressis statically assigned by the organization's network.
Security type This setting specifies the type of security that the Wi-Fi network uses.
Possible values:
• None• Personal• Enterprise
The default value is "None."
| Profile settings | 393
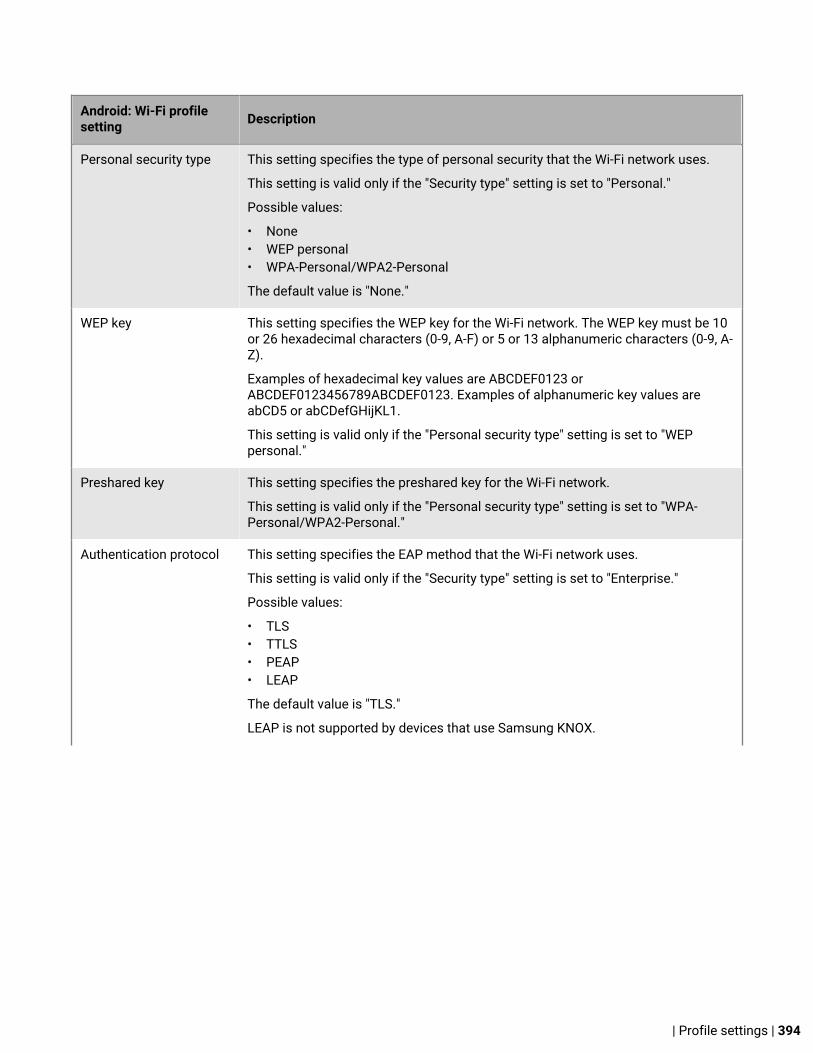
Android: Wi-Fi profilesetting Description
Personal security type This setting specifies the type of personal security that the Wi-Fi network uses.
This setting is valid only if the "Security type" setting is set to "Personal."
Possible values:
• None• WEP personal• WPA-Personal/WPA2-Personal
The default value is "None."
WEP key This setting specifies the WEP key for the Wi-Fi network. The WEP key must be 10or 26 hexadecimal characters (0-9, A-F) or 5 or 13 alphanumeric characters (0-9, A-Z).
Examples of hexadecimal key values are ABCDEF0123 orABCDEF0123456789ABCDEF0123. Examples of alphanumeric key values areabCD5 or abCDefGHijKL1.
This setting is valid only if the "Personal security type" setting is set to "WEPpersonal."
Preshared key This setting specifies the preshared key for the Wi-Fi network.
This setting is valid only if the "Personal security type" setting is set to "WPA-Personal/WPA2-Personal."
Authentication protocol This setting specifies the EAP method that the Wi-Fi network uses.
This setting is valid only if the "Security type" setting is set to "Enterprise."
Possible values:
• TLS• TTLS• PEAP• LEAP
The default value is "TLS."
LEAP is not supported by devices that use Samsung KNOX.
| Profile settings | 394

Android: Wi-Fi profilesetting Description
Inner authentication This setting specifies the inner authentication method for use with TTLS.
This setting is valid only if the "Authentication protocol" setting is set to "TTLS."
Possible values:
• None• PAP• CHAP• MS-CHAP• MS-CHAPv2• GTC
The default value is "MS-CHAPv2."
CHAP is not supported by devices that use Samsung KNOX.
Outer identity for TTLS This setting specifies the outer identity for a user that is sent in clear text.You can specify an anonymous username to hide the user's real identity (forexample, anonymous). The encrypted tunnel is used to send the real usernameto authenticate with the Wi-Fi network. If the outer identity includes the realmname to route the request, it must be the user's actual realm (for example,[email protected]).
This setting is valid only if the "Authentication protocol" setting is set to "TTLS."
Outer identity for PEAP This setting specifies the outer identity for a user that is sent in clear text.You can specify an anonymous username to hide the user's real identity (forexample, anonymous). The encrypted tunnel is used to send the real usernameto authenticate with the Wi-Fi network. If the outer identity includes the realmname to route the request, it must be the user's actual realm (for example,[email protected]).
This setting is valid only if the "Authentication protocol" setting is set to "PEAP."
Username This setting specifies the username that an Android device uses to authenticatewith the Wi-Fi network. If the profile is for multiple users, you can specify the%UserName% variable.
This setting is valid only if the "Security type" setting is set to "Enterprise."
Use password included inWi-Fi profile
This setting specifies whether the Wi-Fi profile includes the password forauthentication.
This setting is valid only if the "Security type" setting is set to "Enterprise."
Password This setting specifies the password that an Android device uses to authenticatewith the Wi-Fi network.
This setting is valid only if the "Use password included in Wi-Fi profile" setting isselected.
| Profile settings | 395

Android: Wi-Fi profilesetting Description
Authentication type This setting specifies the type of authentication that an Android device uses toconnect to the Wi-Fi network.
This setting is valid only if the "Security type" setting is set to "Enterprise."
Possible values:
• None• Shared certificate• SCEP• User credential
The default value is "None."
Type of certificate linking This setting specifies the type of linking for the client certificate associated withthe Wi-Fi profile.
This setting is valid only if the "Authentication type" setting is set to "Sharedcertificate."
Possible values:
• Single reference• Variable injection
The default value is "Single reference."
Shared certificate profile This setting specifies the shared certificate profile with the client certificate thatan Android device uses to authenticate with the Wi-Fi network.
This setting is valid only if the "Type of certificate linking" setting is set to "Singlereference."
The shared certificate profile name must be less than 36 characters for devicesthat use a KNOX Workspace.
Associated SCEP profile This setting specifies the associated SCEP profile that an Android device uses toobtain a client certificate to authenticate with the Wi-Fi network.
This setting is valid only if the "Authentication type" setting is set to "SCEP."
The SCEP profile name must be less than 36 characters for devices that use aKNOX Workspace.
Associated usercredential profile
This setting specifies the associated user credential profile that an Android deviceuses to obtain a client certificate to authenticate with the Wi-Fi network.
This setting is valid only if the "Authentication type" setting is set to "Usercredential."
The user credential profile name must be less than 36 characters for devices thatuse a KNOX Workspace.
| Profile settings | 396

Android: Wi-Fi profilesetting Description
Client certificate name This setting specifies the name of the client certificate that an Android deviceuses to authenticate with the Wi-Fi network.
This setting is valid only if the "Type of certificate linking" setting is set to "Variableinjection."
Certificate commonnames expected fromauthentication server
This setting specifies the common names in the certificate that the authenticationserver sends to the device (for example, *.example.com).
This setting is valid only if the "Security type" setting is set to "Enterprise."
Type of certificate linking This setting specifies the type of linking for the trusted certificates associatedwith the Wi-Fi profile.
This setting is valid only if the "Security type" setting is set to "Enterprise."
Possible values:
• Single reference• Variable injection
The default value is "Single reference."
CA certificate profile This setting specifies the CA certificate profile with the trusted certificate that anAndroid device uses to establish trust with the Wi-Fi network.
This setting is valid only if the "Type of certificate linking" setting is set to "Singlereference."
Trusted certificatenames
This setting specifies the names of the trusted certificates that an Android deviceuses to establish trust with the Wi-Fi network.
This setting is valid only if the "Type of certificate linking" setting is set to "Variableinjection."
Windows: Wi-Fi profile settings
Windows: Wi-Fi profilesetting Description
Connect automaticallywhen this network is inrange
This setting specifies whether devices can connect automatically to the Wi-Fi network.
| Profile settings | 397

Windows: Wi-Fi profilesetting Description
Security type This setting specifies the type of security that the Wi-Fi network uses.
Possible values:
• Open• WPA-Enterprise• WPA-Personal• WPA2-Enterprise• WPA2-Personal
The default value is "Open."
Encryption type This setting specifies the encryption method that the Wi-Fi network uses.
The "Security type" setting determines which encryption types are supported andthe default value for this setting.
Possible values:
• None• WEP• TKIP• AES
WEP key This setting specifies the WEP key for the Wi-Fi network. The WEP key must be 10or 26 hexadecimal characters (0-9, A-F) or 5 or 13 alphanumeric characters (0-9, A-Z).
Examples of hexadecimal key values are ABCDEF0123 orABCDEF0123456789ABCDEF0123. Examples of alphanumeric key values areabCD5 or abCDefGHijKL1.
This setting is valid only if the "Security type" setting is set to "Open" and the"Encryption type" is set to "WEP."
Key index This setting specifies the position of the matching key stored on the wirelessaccess point.
This setting is valid only if the "Security type" setting is set to "Open" and the"Encryption type" is set to "WEP."
The possible values are from 1 to 4.
The default value is 2.
Preshared key This setting specifies the preshared key for the Wi-Fi network.
This setting is valid only if the "Security type" setting is set to "WPA-Personal."
Enable single sign-on This setting specifies whether the Wi-Fi network supports single sign-onauthentication.
This setting is valid only if the "Security type" setting is set to "WPA-Enterprise" or"WPA2-Enterprise."
| Profile settings | 398

Windows: Wi-Fi profilesetting Description
Single sign-on type This setting specifies when single sign-on authentication is performed. When setto “Perform immediately before user login”, single sign-on is performed beforethe user logs in to your organization’s Active Directory. When set to “Performimmediately after user login”, single sign-on is performed immediately after theuser logs in to your organization’s Active Directory.
This setting is valid only if the “Enable single sign-on" setting is selected.
Possible values:
• Perform immediately before user login• Perform immediately after user login
The default value is “Perform immediately before user login.”
Maximum delay forconnectivity
This setting specifies, in seconds, the maximum delay before the single sign-onconnection attempt fails.
This setting is valid only if the “Enable single sign-on" setting is selected.
The possible values are from 0 to 120 seconds.
The default value is "10 seconds."
Allow additional dialogsto be displayed duringsingle sign-on
This setting specifies whether a device can display dialog boxes beyond the loginscreen. For example, if an EAP authentication type requires a user to confirm thecertificate sent from server during authentication, the device can display the dialogbox.
This setting is valid only if the “Enable single sign-on" setting is selected.
This network usesseparate virtual LANsfor machine and userauthentication
This setting specifies whether the VLAN used by a device changes based on theuser's login information. For example, if the device is placed on one VLAN whenit starts, and then — based on user permissions — transitions to a different VLANnetwork after the user logs in.
This setting is valid only if the “Enable single sign-on" setting is selected.
Validate server certificate This setting specifies whether a device must validate the server certificate thatverifies the identity of the wireless access point.
This setting is valid only if the "Security type" setting is set to "WPA-Enterprise" or"WPA2-Enterprise."
Do not prompt user toauthorize new serversor trusted certificationauthorities
This setting specifies whether a user is prompted to trust the server certificate.
This setting is valid only if the “Validate server certificate" setting is selected.
| Profile settings | 399

Windows: Wi-Fi profilesetting Description
CA certificate profiles This setting specifies the CA certificate profile that provides the root of trust forthe server certificate that the wireless access point uses.
This setting limits the root CAs that devices trust to the selected CAs. If you do notselect any trusted root CAs, devices trust all root CAs listed in their trusted rootcertification authority store.
This setting is valid only if the “Validate server certificate" setting is selected.
Enable fast reconnect This setting specifies whether the Wi-Fi network supports fast reconnect for PEAPauthentication across multiple wireless access points.
This setting is valid only if the "Security type" setting is set to "WPA-Enterprise" or"WPA2-Enterprise."
Enforce NAP This setting specifies whether the Wi-Fi network uses NAP to perform systemhealth checks on devices to verify that they meet health requirements, beforeconnections to the network are permitted.
This setting is valid only if the "Security type" setting is set to "WPA-Enterprise" or"WPA2-Enterprise."
Enable FIPS mode This setting specifies whether the Wi-Fi network supports compliance with theFIPS 140-2 standard.
This setting is valid only if the "Security type" setting is set to "WPA2-Enterprise" or"WPA2-Personal" and the "Encryption type" is set to "AES."
This setting is valid for devices running Windows Phone 8.1 and later.
Enable PMK caching This setting specifies whether a device can cache the PMK to turn on WPA2 fastroaming. Fast roaming skips 802.1X settings with a wireless access point that thedevice authenticated with previously.
This setting is valid only if the "Security type" setting is set to "WPA2-Enterprise."
PMK time to live This setting specifies the duration, in minutes, that a device can store the PMK incache.
This setting is valid only if the “Enable PMK caching" setting is selected.
The possible values are from 5 to 1440 minutes.
The default value is 720 minutes.
Number of entries inPMK cache
This setting specifies the maximum number of PMK entries that a device canstore in cache.
This setting is valid only if the “Enable PMK caching" setting is selected.
The possible values are from 1 to 255.
The default value is 128.
| Profile settings | 400

Windows: Wi-Fi profilesetting Description
This network usespreauthentication
This setting specifies whether the access point supports preauthenticationfor WPA2 fast roaming.
Preauthentication allows devices that connect to one wireless access pointto perform 802.1X settings with other wireless access points within its range.Preauthentication stores the PMK and its associated information in the PMKcache. When the device connects to a wireless access point with which it haspreauthenticated, it uses the cached PMK information to reduce the time requiredto authenticate and connect.
This setting is valid only if the “Enable PMK caching" setting is selected.
Maximumpreauthenticationattempts
This setting specifies the maximum number of allowed preauthenticationattempts.
This setting is valid only if the “This network uses preauthentication" setting isselected.
The possible values are from 1 to 16.
The default value is 3.
Proxy type This setting specifies the type of proxy configuration for the Wi-Fi profile.
Possible settings:
• None• PAC configuration• Manual configuration• Web Proxy Autodiscovery
The default setting is "Manual configuration."
This setting applies only to Windows 10 Mobile devices.
PAC URL This setting specifies the URL for the web server that hosts the PAC file and thePAC file name in the format http://<web_server_URL>/<filename>.pac.
This setting is valid only if the "Proxy type" setting is set to "PAC configuration."
Address This setting specifies the server name and port for the network proxy. Use theformat host:port (for example, server01.example.com:123). The host must be oneof the following:
• A registered name, such as a server name, FQDN, or Single Label Name (forexample, server01 instead of server01.example.com)
• An IPv4 or IPv6 address
This setting is valid only if the "Proxy type" setting is set to "Manual configuration."
| Profile settings | 401
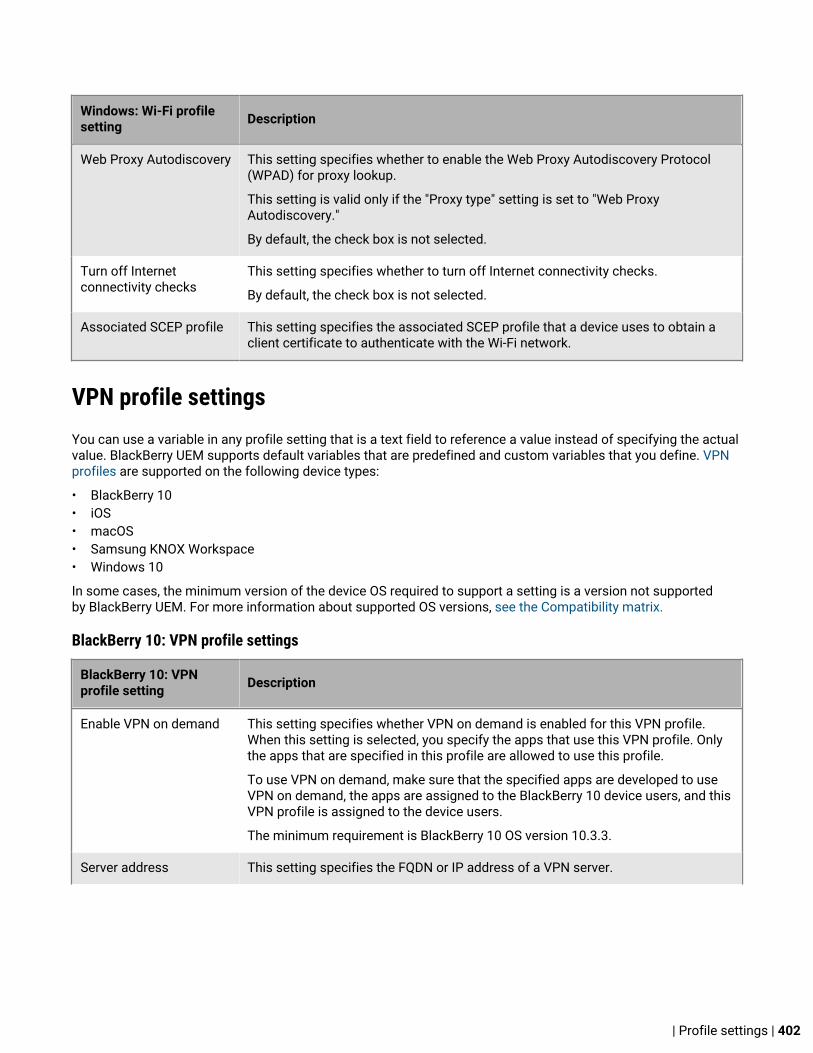
Windows: Wi-Fi profilesetting Description
Web Proxy Autodiscovery This setting specifies whether to enable the Web Proxy Autodiscovery Protocol(WPAD) for proxy lookup.
This setting is valid only if the "Proxy type" setting is set to "Web ProxyAutodiscovery."
By default, the check box is not selected.
Turn off Internetconnectivity checks
This setting specifies whether to turn off Internet connectivity checks.
By default, the check box is not selected.
Associated SCEP profile This setting specifies the associated SCEP profile that a device uses to obtain aclient certificate to authenticate with the Wi-Fi network.
VPN profile settingsYou can use a variable in any profile setting that is a text field to reference a value instead of specifying the actualvalue. BlackBerry UEM supports default variables that are predefined and custom variables that you define. VPNprofiles are supported on the following device types:
• BlackBerry 10• iOS• macOS• Samsung KNOX Workspace• Windows 10
In some cases, the minimum version of the device OS required to support a setting is a version not supportedby BlackBerry UEM. For more information about supported OS versions, see the Compatibility matrix.
BlackBerry 10: VPN profile settings
BlackBerry 10: VPNprofile setting Description
Enable VPN on demand This setting specifies whether VPN on demand is enabled for this VPN profile.When this setting is selected, you specify the apps that use this VPN profile. Onlythe apps that are specified in this profile are allowed to use this profile.
To use VPN on demand, make sure that the specified apps are developed to useVPN on demand, the apps are assigned to the BlackBerry 10 device users, and thisVPN profile is assigned to the device users.
The minimum requirement is BlackBerry 10 OS version 10.3.3.
Server address This setting specifies the FQDN or IP address of a VPN server.
| Profile settings | 402

BlackBerry 10: VPNprofile setting Description
Gateway type This setting specifies the type of VPN client that the VPN client on a BlackBerry 10device emulates.
Possible values:
• Check Point VPN-1• Cisco VPN 3000 Series Concentrator• Cisco Secure PIX Firewall• Cisco IOS Easy VPN• Cisco ASA Series• Cisco AnyConnect• Juniper SRX Series (IPsec VPN)• Juniper MAG Series or Juniper SA Series (SSL VPN)• Microsoft IKEv2 VPN server• Generic IKEv2 VPN server• NIAP-compliant IKEv2 VPN server
The default value is "Check Point VPN-1."
Authentication type This setting specifies the authentication type for the VPN gateway.
The "Gateway type" setting determines which authentication types are supportedand the default value for this setting.
Possible values:
• PSK• PKI• XAUTH-PSK• XAUTH-PKI• EAP-TLS• EAP-MS-CHAPv2
Preshared key or Grouppassword
This setting specifies the preshared key or group password for the VPN gateway.
This setting is valid only if the "Authentication type" setting is set to "PSK" or"XAUTH-PSK."
Username This setting specifies the username that a BlackBerry 10 device uses toauthenticate with the VPN gateway. If the profile is for multiple users, you can usethe %UserName% variable.
This setting is valid only if the "Gateway type" setting is set to "Cisco AnyConnect"or if the "Authentication type" setting is set to "XAUTH-PSK" or "XAUTH-PKI."
Hardware token This setting specifies whether a user must use a hardware token to authenticatewith the VPN gateway.
This setting is valid only if the "Authentication type" setting is set to "XAUTH-PSK"or "XAUTH-PKI."
| Profile settings | 403

BlackBerry 10: VPNprofile setting Description
Password This setting specifies the password that a BlackBerry 10 device uses toauthenticate with the VPN gateway.
This setting is valid only if the "Gateway type" setting is set to "Cisco AnyConnect"or if the "Authentication type" setting is set to "XAUTH-PSK" or "XAUTH-PKI" andthe "Hardware token" setting is not selected.
EAP identity This setting specifies the EAP identity that a BlackBerry 10 device uses toauthenticate with the VPN gateway.
This setting is valid only if the "Authentication type" setting is set to "EAP-TLS."
EAP-TLS Gateway ID This setting is valid only if the "Gateway type" setting is set to "NIAP-compliantIKEv2 VPN server" and the "Authentication type" is set to "EAP-TLS."
The minimum requirement is BlackBerry 10 OS version 10.3.3.
MS-CHAPv2 EAP identity This setting specifies the MS-CHAPv2 EAP identity that a BlackBerry 10 deviceuses to authenticate with the VPN gateway.
This setting is valid only if the "Authentication type" setting is set to "EAP-MS-CHAPv2."
MS-CHAPv2 username This setting specifies the MS-CHAPv2 username that a BlackBerry 10 device usesto authenticate with the VPN gateway.
This setting is valid only if the "Authentication type" setting is set to "EAP-MS-CHAPv2."
MS-CHAPv2 password This setting specifies the MS-CHAPv2 password that a BlackBerry 10 device usesto authenticate with the VPN gateway.
This setting is valid only if the "Authentication type" setting is set to "EAP-MS-CHAPv2."
Authentication ID type This setting specifies the authentication ID type for the VPN gateway.
This setting is valid only if the "Gateway type" setting is set to "Juniper MAG Seriesor Juniper SA Series (SSL VPN)," "Microsoft IKEv2 VPN server," "Generic IKEv2VPN server," or "NIAP-compliant IKEv2 VPN server."
The "Gateway type" setting determines which authentication ID types aresupported and the default value for this setting.
Possible values:
• IPv4• Fully qualified domain name• Email address• Identity certificate distinguished name• Identity certificate general name• Key ID
| Profile settings | 404

BlackBerry 10: VPNprofile setting Description
Authentication ID orGroup username
This setting specifies the authentication ID or group username for the VPNgateway.
This setting is valid only if the "Gateway type" setting is set to "Juniper MAG Seriesor Juniper SA Series (SSL VPN)," "Microsoft IKEv2 VPN server," or "Generic IKEv2VPN server," or if the "Authentication type" setting is set to "PSK" or "XAUTH-PSK."
Gateway authenticationtype
This setting specifies the gateway authentication type for the VPN gateway.
This setting is valid only if the "Gateway type" setting is set to "Juniper MAG Seriesor Juniper SA Series (SSL VPN)," "Microsoft IKEv2 VPN server," or "Generic IKEv2VPN server."
Possible values:
• None• PSK• PKI
The default value is "None."
Enable OCSP/CRL checkon the certificates fromthe VPN
This setting enables certificate revocation checking for the certificates usedduring authentication.
This setting is valid only if the "Gateway type" setting is set to "NIAP-compliantIKEv2 VPN server" and the "Authentication type" setting is set to "PKI" or "EAP-TLS."
The minimum requirement is BlackBerry 10 OS version 10.3.3.
Gateway preshared key This setting specifies the gateway preshared key for the VPN gateway.
This setting is valid only if the "Gateway authentication type" setting is set to"PSK."
Gateway authenticationID type
This setting specifies the gateway authentication ID type for the VPN gateway.
This setting is valid only if the "Gateway type" setting is set to "Juniper MAG Seriesor Juniper SA Series (SSL VPN)," "Microsoft IKEv2 VPN server," or "Generic IKEv2VPN server."
Possible values:
• IPv4• Fully qualified domain name• Email address• Identity certificate distinguished name• Identity certificate general name• Key ID
The default value is "IPv4."
| Profile settings | 405

BlackBerry 10: VPNprofile setting Description
Gateway authenticationID
This setting specifies the gateway authentication ID for the VPN gateway.
This setting is valid only if the "Gateway authentication ID type" setting is set to"Fully qualified domain name" or "Email address."
Send additional Gatewayrequest ID in message 1of IKEv2 protocol
The default value is disabled.
This setting is valid only if the "Gateway type" setting is set to "NIAP-compliantIKEv2 VPN server."
The minimum requirement is BlackBerry 10 OS version 10.3.3.
Requested gateway IDtype
This setting specifies the requested gateway ID type for the VPN.
This setting is valid only if the "Gateway type" setting is set to "NIAP-compliantIKEv2 VPN server" and the "Send requested gateway ID in message 1 of IKEv2protocol" setting is selected.
Possible values:
• IPv4• Fully qualified domain name• Email address• Identity certificate distinguished name• Identity certificate general name• Key ID
The default value is "IPv4."
The minimum requirement is BlackBerry 10 OS version 10.3.3.
Requested gateway ID This setting requests a specific gateway ID in the first IKE message during login, ifthe VPN server supports multiple IDs. May be different than the gateway ID usedfor authentication.
This setting is valid only if the "Gateway type" setting is set to "NIAP-compliantIKEv2 VPN server" and the "Send requested gateway ID in message 1 of IKEv2protocol" setting is selected.
The minimum requirement is BlackBerry 10 OS version 10.3.3.
Secondary username This setting specifies the username that a BlackBerry 10 device uses forsecondary authentication with the VPN gateway. If the profile is for multiple users,you can use the %UserName% variable.
This setting is valid only if the "Gateway type" setting is set to "Cisco AnyConnect."
The minimum requirement is BlackBerry 10 OS version 10.3.1.
Secondary password This setting specifies the password that a BlackBerry 10 device uses forsecondary authentication with the VPN gateway.
This setting is valid only if the "Gateway type" setting is set to "Cisco AnyConnect."
The minimum requirement is BlackBerry 10 OS version 10.3.1.
| Profile settings | 406

BlackBerry 10: VPNprofile setting Description
Group name This setting specifies the group name for the VPN gateway.
This setting is valid only if the "Gateway type" setting is set to "Cisco AnyConnect."
The minimum requirement is BlackBerry 10 OS version 10.3.1.
Enable automatic clientcertificate processing
This setting specifies whether a client certificate is automatically selected when aVPN connection is made.
This setting is valid only if the "Gateway type" setting is set to "Cisco AnyConnect."
The minimum requirement is BlackBerry 10 OS version 10.3.1.
Enable IPsecauthentication
This setting specifies whether the VPN gateway uses IPsec authentication.
This setting is valid only if the "Gateway type" setting is set to "Cisco AnyConnect."
The minimum requirement is BlackBerry 10 OS version 10.3.1.
IPsec authentication type This setting specifies the authentication type for an IPsec VPN connection.
This setting is valid only if the "Enable IPsec authentication" setting is selected.
Possible values:
• EAP-MS-CHAPv2• EAP-MD5• EAP-GTC• EAP-AnyConnect• IKE-RSA
The default value is "EAP-MS-CHAPv2."
The minimum requirement is BlackBerry 10 OS version 10.3.1.
EAP authentication ID This setting specifies the EAP identity that a BlackBerry 10 device uses toauthenticate with the VPN gateway.
This setting is valid only if the "IPSec authentication type" setting is set to "EAPMSCHAPv2," "EAP MD5," or "EAP GTC."
Exclude subnets This setting specifies whether to exclude specified subnets from using the VPNconnection.
This setting is valid only if the "Gateway type" setting is set to "Cisco AnyConnect."
The minimum requirement is BlackBerry 10 OS version 10.3.1.
Exclusion subnets This setting specifies the subnets and subnet masks that are not sent through theVPN connection.
This setting is valid only if the "Exclude subnets flag" setting is selected.
| Profile settings | 407

BlackBerry 10: VPNprofile setting Description
Cisco AnyConnectconfiguration file (.xml)
This setting specifies the location of the Cisco AnyConnect configuration file tosend to BlackBerry 10 devices.
This setting is valid only if the "Gateway type" setting is set to "Cisco AnyConnect."
The minimum requirement is BlackBerry 10 OS version 10.3.1.
Allow personal apps onwork networks
This setting specifies whether personal apps on a BlackBerry 10 device can usethe VPN connection.
This setting is valid only if the "Allow personal apps to use work networks" ITpolicy rule is selected.
The minimum requirement is BlackBerry 10 OS version 10.3.1.
Untrusted certificateaction
This setting specifies whether a BlackBerry 10 device accepts untrustedcertificates. If this setting is set to "Allow," the device accepts untrustedcertificates automatically. If this setting is set to "Prompt," the user can choosewhether to accept untrusted certificates. If this setting is set to "Disallow," thedevice does not accept untrusted certificates.
The "Gateway type" setting determines which untrusted certificate actions aresupported and the default value for this setting.
Possible values:
• Allow• Prompt• Disallow
The minimum requirement is BlackBerry 10 OS version 10.3.2.
| Profile settings | 408

BlackBerry 10: VPNprofile setting Description
Client certificate source This setting specifies how BlackBerry 10 devices can obtain the client certificate.There are four options for devices to obtain client certificates:
• If you choose "Smart card," the user must pair the device with a smart card thatincludes the client certificate.
• If you choose "SCEP," you must also specify the associated SCEP profile thatthe device can use to download the client certificate.
• If you choose “User credential," you must also specify the user credentialprofile that the device can use to download the client certificate.
• If you choose "Other," the user must add the client certificate to the devicemanually.
Smart card support is available for devices that are running BlackBerry 10 OSversion 10.3.1 and later.
This setting is valid only if the "Authentication type" setting is set to "PKI" or"XAUTH-PKI."
Possible values:
• Smart card• SCEP• User credential• Other
The default value is "Other."
Associated SCEP profile This setting specifies the associated SCEP profile that a BlackBerry 10 deviceuses to obtain a client certificate to authenticate with the VPN.
This setting is valid only if the "Client certificate source" setting is set to "SCEP."
Associated usercredential profile
This setting specifies the associated user credential profile that a BlackBerry 10device uses to obtain a client certificate to use for authentication with the VPN.
This setting is valid only if the "Client certificate source" setting is set to "Usercredential."
The minimum requirement for using a user credential profile is BlackBerry 10 OSversion 10.3.1.
IKE lifetime This setting specifies the lifetime, in seconds, of the IKE connection. If you set anunsupported value or a null value, the BlackBerry 10 device default value is used.
The possible values are from 1 to 2,147,483,647.
| Profile settings | 409

BlackBerry 10: VPNprofile setting Description
IKE threshold This setting specifies the percentage of the IKE lifetime at which the VPN clientwill initiate a new key exchange.
Possible values: 0-100%
The default value is "90".
This setting is valid only if the "Gateway type" setting is set to "NIAP-compliantIKEv2 VPN server."
The minimum requirement is BlackBerry 10 OS version 10.3.3.
IPsec lifetime This setting specifies the lifetime, in seconds, of the IPsec connection. If you setan unsupported value or a null value, the BlackBerry 10 device default value isused.
The possible values are from 1 to 2,147,483,647.
IPsec threshold This setting specifies the percentage of the IPsec threshold at which the VPNclient will initiate a new key exchange.
Possible values: 0-100%
The default value is "90".
This setting is valid only if the "Gateway type" setting is set to "NIAP-compliantIKEv2 VPN server."
The minimum requirement is BlackBerry 10 OS version 10.3.3.
Allow VPN extensions This setting allows you to enable or disable extensions.
This setting is valid only if the "Gateway type" setting is set to "NIAP-compliantIKEv2 VPN server."
The minimum requirement is BlackBerry 10 OS version 10.3.3.
VPN Extensions list This setting allows you to enter a list of extensions that are used to generateVendor ID payloads and perform additional certificate validation.
This setting is valid only if the "Gateway type" setting is set to "NIAP-compliantIKEv2 VPN server" and the "Allow VPN extensions" setting is selected.
The minimum requirement is BlackBerry 10 OS version 10.3.3.
Require vendor IDextension
This setting indicates that the administrator wants to use one of the extensions inthe VPN extension list to generate a Vendor ID payload during the login.
This setting is valid only if the "Gateway type" setting is set to "NIAP-compliantIKEv2 VPN server" and the "Allow VPN extensions" setting is selected.
The minimum requirement is BlackBerry 10 OS version 10.3.3.
| Profile settings | 410

BlackBerry 10: VPNprofile setting Description
Require certificatevalidation extension
This setting indicates that the administrator wants to use one of the extensions toperform additional certificate validation.
This setting is valid only if the "Gateway type" setting is set to "NIAP-compliantIKEv2 VPN server" and the "Allow VPN extensions" setting is selected.
The minimum requirement is BlackBerry 10 OS version 10.3.3.
Enable sessionresumption
This setting enables IKEv2 session resumption settings. If the VPN serversupports this feature, the VPN client will suspend and resume a session insteadof completely disconnecting and reconnecting whenever VPN auto-connect isenabled.
This setting is valid only if the "Gateway type" setting is set to "NIAP-compliantIKEv2 VPN server."
The minimum requirement is BlackBerry 10 OS version 10.3.3.
Ticket threshold This setting specifies at what percentage of the ticket threshold sessionresumption will occur.
Possible values: 0-100%
The default value is "90".
This setting is valid only if the "Gateway type" setting is set to "NIAP-compliantIKEv2 VPN server" and the "Enable session resumption" setting is selected.
The minimum requirement is BlackBerry 10 OS version 10.3.3.
Enable hash-and-URLformat certificatepayloads during IKE
This setting specifies whether the VPN client advertises to the VPN server that itsupports using IKEv2 to exchange certificates using URLs and fetches certificates,if available, from a provided HTTP URL.
This setting is valid only if the "Gateway type"setting is set to "NIAP-compliantIKEv2 VPN server."
The minimum requirement is BlackBerry 10 OS version 10.3.3.
Enable strictenforcement of approvedalgorithms
This setting specifies whether the use of NIAP-approved algorithms is strictlyenforced.
This setting is valid only if the "Gateway type" setting is set to "NIAP-compliantIKEv2 VPN server."
The minimum requirement is BlackBerry 10 OS version 10.3.3.
Split tunneling This setting specifies whether a BlackBerry 10 device can use split tunneling tobypass the VPN gateway, if the VPN gateway supports it.
This setting is not valid if the "Gateway type" setting is set to "NIAP-compliantIKEv2 VPN server."
| Profile settings | 411

BlackBerry 10: VPNprofile setting Description
Disable banner This setting specifies whether a BlackBerry 10 device blocks the VPN banner.
This setting is not valid if the "Gateway type" setting is set to "NIAP-compliantIKEv2 VPN server."
Trusted certificatesource
This setting specifies the source of the trusted certificate. If this setting is set to"Trusted certificate store," a BlackBerry 10 device can connect to a VPN that usesany certificate in the VPN certificate store.
This setting is valid only if the "Authentication type" setting is set to "PKI" or"XAUTH-PKI."
Possible values:
• None• Trusted certificate store
The default value is "None."
Automatically determineIP
This setting specifies whether a BlackBerry 10 device automatically determinesthe IP configuration of the VPN gateway.
Private IP This setting specifies the private IP of the VPN gateway.
This setting is valid only if the "Automatically determine IP" setting is not selected.
Private IP mask This setting specifies the private IP mask of the VPN gateway.
This setting is valid only if the "Automatically determine IP" setting is not selected.
Subnet This setting specifies the subnet of the VPN gateway.
This setting is valid only if the "Automatically determine IP" setting is not selected.
Subnet mask This setting specifies the subnet mask of the VPN gateway.
This setting is valid only if the "Automatically determine IP" setting is not selected.
Automatically determineDNS
This setting specifies whether a BlackBerry 10 device automatically determinesthe DNS configuration of the VPN gateway.
Primary DNS This setting specifies the primary DNS server in dot-decimal notation (for example,192.0.2.0).
This setting is valid only if the "Automatically determine DNS" setting is notselected.
Secondary DNS This setting specifies the secondary DNS server in dot-decimal notation (forexample, 192.0.2.0).
This setting is valid only if the "Automatically determine DNS" setting is notselected.
| Profile settings | 412

BlackBerry 10: VPNprofile setting Description
Domain suffix This setting specifies the FQDN of the DNS suffix.
This setting is valid only if the "Automatically determine DNS" setting is notselected.
Perfect forward secrecy This setting specifies whether the VPN gateway supports PFS.
If this setting is selected, the "IPsec DH group" setting must not be set to 0.
Manual algorithmselection
This setting specifies whether you must set the cryptographic algorithms for theVPN gateway.
IKE DH group This setting specifies the DH group that a BlackBerry 10 device uses to generatekey material.
This setting is valid only if the "Manual algorithm selection" setting is selected.
Possible values:
• 1 to 26, except 3, 4, and 6• Custom 1 to Custom 5
The default value is "1."
Custom IKE DH provider This setting specifies the name of the provider for custom IKE DH.
This setting is valid only if the "IKE DH group" setting is set to one of the Customvalues.
Enable MOBIKE This setting specifies whether the VPN gateway supports MOBIKE.
This setting is valid only if the "Gateway type" setting is set to "Microsoft IKEv2VPN server," or "Generic IKEv2 VPN server," the "Authentication type" setting is setto "PKI," and the "IKE DH group" setting is set to one of the Custom values.
The minimum requirement is BlackBerry 10 OS version 10.3.1.
IKE cipher This setting specifies the algorithm that a BlackBerry 10 device uses to generate ashared secret key.
This setting is valid only if the "Manual algorithm selection" setting is selected.
Possible values:
• None• DES (56-bit key)• Triple DES (168-bit key)• AES (128-bit key)• AES (192-bit key)• AES (256-bit key)
The default value is "None."
| Profile settings | 413

BlackBerry 10: VPNprofile setting Description
IKE hash This setting specifies the hash function that a BlackBerry 10 device uses with IKE.
This setting is valid only if the "Manual algorithm selection" setting is selected.
Possible values:
• None• MD5• AES-XCBC• SHA-1• SHA-256• SHA-384• SHA-512
The default value is "None."
IKE PRF This setting specifies the PRF that a BlackBerry 10 device uses with IKE.
This setting is valid only if the "Manual algorithm selection" setting is selected.
Possible values:
• None• HMAC• HMAC-MD5• AES-XCBC• HMAC-SHA-1• HMAC-SHA-256• HMAC-SHA-384• HMAC-SHA-512
The default value is "None."
IPsec DH group This setting specifies the DH group that a BlackBerry 10 device uses with IPsec.
This setting is valid only if the "Manual algorithm selection" setting is selected.
The possible values are from 0 to 26, except 3, 4, and 6.
The default value is "0."
IPsec cipher This setting specifies the algorithm that a BlackBerry 10 device uses with IPsec.
This setting is valid only if the "Manual algorithm selection" setting is selected.
Possible values:
• None• DES (56-bit key)• Triple DES (168-bit key)• AES (128-bit key)• AES (192-bit key)• AES (256-bit key)
The default value is "None."
| Profile settings | 414

BlackBerry 10: VPNprofile setting Description
IPsec hash This setting specifies the hash function that a BlackBerry 10 device uses withIPsec.
This setting is valid only if the "Manual algorithm selection" setting is selected.
Possible values:
• None• MD5• AES-XCBC• SHA-1• SHA-256• SHA-384• SHA-512
The default value is "None."
NAT keepalive This setting specifies how often a device sends a NAT keepalive packet. If youset an unsupported value or a null value, the BlackBerry 10 device default value isused.
The possible values are from 1 to 2,147,483,647.
DPD frequency This setting specifies the DPD frequency, in seconds. A BlackBerry 10 devicesupports a minimum setting of 10 seconds. If you set an unsupported value or anull value, the device default value is used.
The possible values are from 1 to 2,147,483,647.
User can edit This setting specifies the VPN settings that a BlackBerry 10 device user canchange. If this setting is set to "Read only," the user can't change any settings.If this setting is set to "Credentials only," the user can change the username andpassword.
Possible values:
• Read only• Credentials only
The default value is "Read only."
Display VPN informationon device
This setting specifies whether VPN information is displayed on a BlackBerry10 device. If this setting is set to "Visible," most of the VPN profile informationappears on the device. If this setting is set to "Invisible," only the profile nameappears on the device. If this setting is set to "Credentials only," the profile nameand the credential fields appear on the device.
Possible values:
• Visible• Invisible• Credentials only
The default value is "Visible."
| Profile settings | 415

BlackBerry 10: VPNprofile setting Description
Data security level This setting specifies the domain in the work space where the VPN profile isstored when the work space uses advanced data at rest protection. This setting isvalid only if the "Force advanced data at rest protection" IT policy rule is selected.If this setting is set to "Always available," the profile is stored in the Startupdomain and is available when the work space is locked. If this setting is set to"Available after authentication," the profile is stored in the Operational domain andis available after the work space is unlocked once until the device restarts. If thissetting is set to "Available only when work space unlocked," the profile is stored inthe Lock domain and can be used for VPN connections only when the work spaceis unlocked.
Possible values:
• Always available• Available after authentication• Available only when work space unlocked
The default value is "Always available."
The minimum requirement is BlackBerry 10 OS version 10.3.1.
Associated proxy profile This setting specifies the associated proxy profile that a BlackBerry 10 deviceuses to connect to a proxy server when the device is connected to the VPN.
iOS and macOS: VPN profile settingsmacOS applies profiles to user accounts or devices. You can configure a VPN profile to apply to one or the other.
iOS and macOS: VPNprofile setting Description
Apply profile to This setting specifies whether the VPN profile is applied to the user account orthe device.
Possible values:
• User• Device
This setting is valid only for macOS devices.
| Profile settings | 416

iOS and macOS: VPNprofile setting Description
Connection type This setting specifies the connection type that a device uses for a VPN gateway.Some connection types also require users to install the appropriate VPN app onthe device.
Possible values:
• L2TP• PPTP• IPsec• Cisco AnyConnect• Juniper• Pulse Secure• F5• SonicWALL Mobile Connect• Aruba VIA• Check Point Mobile• OpenVPN• Custom• IKEv2
The default value is "L2TP."
Some values are not valid for macOS devices.
VPN bundle ID This setting specifies the bundle ID of the VPN app for a custom SSL VPN. Thebundle ID is in reverse-DNS format (for example, com.example.VPNapp).
This setting is valid only if the "Connection type" setting is set to "Custom."
Server This setting specifies the FQDN or IP address of a VPN server.
Username This setting specifies the username that a device uses to authenticate with theVPN gateway. If the profile is for multiple users, you can specify the %UserName% variable.
Custom key-value pairs This setting specifies the keys and associated values for the custom SSL VPN.The configuration information is specific to the vendor's VPN app.
This setting is valid only if the "Connection type" setting is set to "Custom."
Login group or Domain This setting specifies the login group or domain that the VPN gateway uses toauthenticate an iOS device.
This setting is valid only if the "Connection type" setting is set to "SonicWALLMobile Connect."
Realm This setting specifies the name of the authentication realm that the VPN gatewayuses to authenticate an iOS device.
This setting is valid only if the "Connection type" setting is set to "Juniper" or"Pulse Secure."
| Profile settings | 417

iOS and macOS: VPNprofile setting Description
Role This setting specifies the name of the user role that the VPN gateway uses toverify the network resources that an iOS device can access.
This setting is valid only if the "Connection type" setting is set to "Juniper"or Pulse Secure."
Authentication type This setting specifies the authentication type for the VPN gateway.
The "Connection type" setting determines which authentication types aresupported and the default value for this setting.
Possible values:
• Password• RSA SecurID• Shared secret/Group name• Shared certificate• SCEP• User credential
Password This setting specifies the password that a device uses to authenticate with theVPN gateway.
This setting is valid only if the "Authentication type" setting is set to "Password."
Group name This setting specifies the group name for the VPN gateway.
This setting is valid only in the following conditions:
• The "Connection type" setting is set to "Cisco AnyConnect."• The "Connection type" setting is set to "IPsec" and the "Authentication type"
setting is set to "Shared secret/Group name."
Shared secret This setting specifies the shared secret to use for VPN authentication.
This setting is valid only in the following conditions:
• The "Connection type" setting is set to "L2TP."• The "Connection type" setting is set to "IPsec" and the "Authentication type"
setting is set to "Shared secret/Group name."• The "Connection type" setting is set to "IKEv2" and the "Authentication
method" setting is set to "Shared secret."
Shared certificate profile This setting specifies the shared certificate profile with the client certificate thata device uses to authenticate with the VPN gateway.
This setting is valid only if the "Authentication type" or the "Authenticationmethod" setting is set to "Shared certificate."
Associated SCEP profile This setting specifies the associated SCEP profile that an iOS device uses toobtain a client certificate to authenticate with the VPN.
This setting is valid only if the "Authentication type" or the "Authenticationmethod" setting is set to "SCEP."
| Profile settings | 418

iOS and macOS: VPNprofile setting Description
Associated user credentialprofile
This setting specifies the associated user credential profile that a device uses toobtain a client certificate to authenticate with the VPN.
This setting is valid only if the "Authentication type" or the "Authenticationmethod" setting is set to "User credential."
Encryption level This setting specifies the level of data encryption for the VPN connection. If thissetting is set to "Automatic," all available encryption strengths are allowed. If thissetting is set to "Maximum," only the maximum encryption strength is allowed.
This setting is valid only if the "Connection type" setting is set to "PPTP."
Possible values:
• None• Automatic• Maximum
The default value is "None."
Route network trafficthrough VPN
This setting specifies whether to send all network traffic through the VPNconnection.
This setting is valid only if the "Connection type" setting is set to "L2TP" or"PPTP."
Use hybrid authentication This setting specifies whether to use a server-side certificate for authentication.
This setting is valid only if the "Connection type" setting is set to "IPsec" and"Authentication type" is set to "Shared secret/Group name"
Prompt for password This setting specifies whether a device prompts the user for a password.
This setting is valid only if the "Connection type" setting is set to "IPsec" and"Authentication type" is set to "Shared secret/Group name"
Prompt for user PIN This setting specifies whether the device prompts the user for a PIN.
This setting is valid only if the "Connection type" setting is set to "IPsec" andthe "Authentication type" setting is set to "Shared Certificate," "SCEP," or "Usercredential."
Remote address This setting specifies the IP address or hostname of the VPN server.
This setting is valid only if the "Connection type" setting is set to "IKEv2."
Local ID This setting specifies the identity of the IKEv2 client in one of the followingformats: FQDN, UserFQDN, Address, and ASN1DN.
This setting is valid only if the "Connection type" setting is set to "IKEv2."
Remote ID This setting specifies the remote identifier of the IKEv2 client using one of thefollowing formats: FQDN, user FQND, Address, or ASN1DN.
This setting is valid only if the "Connection type" setting is set to "IKEv2."
| Profile settings | 419

iOS and macOS: VPNprofile setting Description
Authentication method This setting specifies the authentication method for the VPN.
This setting is valid only if the "Connection type" setting is set to "IKEv2."
Possible values:
• Shared secret• Shared certificate• SCEP• User credential
Enable VPN on demand This setting specifies whether a device can start a VPN connection automaticallywhen it accesses certain domains.
For iOS devices, this setting applies to work apps.
This setting is valid only in the following conditions:
• The "Connection type" setting is set to "IPsec," "Cisco AnyConnect," "Juniper,""Pulse Secure," "F5," "SonicWALL Mobile Connect," "Aruba VIA," "Check PointMobile," "OpenVPN," or "Custom" and the "Authentication type" is set to"Shared certificate," "SCEP," or "User credential."
• The "Connection type" setting is set to "IKEv2" and the "Authenticationmethod" is set to "Shared certificate."
Domain or host namesthat can use VPN ondemand
This setting specifies the domains and the associated actions for VPN ondemand.
This setting is valid only if the "Enable VPN on demand" setting is selected.
Possible values for "On demand action":
• Always establish• Establish if needed• Never establish
VPN on demand rulesfor iOS 7.0 and later
This setting specifies the connection requirements for VPN on demand. Youmust use one or more keys from the payload format example.
This setting overrides the "Domain or host names that can use VPN on demand"setting.
This setting is valid only if the "Enable VPN on demand" setting is selected.
Enable extendedauthentication
This setting specifies whether the VPN supports xAuth.
This setting is valid only if the "Connection type" setting is set to "IKEv2" or "IKEv2Always On."
| Profile settings | 420

iOS and macOS: VPNprofile setting Description
Minimum TLS version This setting specifies the minimum TLS version that devices running iOS 11 andlater use for EAP-TLS authentication.
This setting is valid only if the Enable xAuth setting is selected and theAuthentication type is “Certificate.”
Possible values:
• 1.0• 1.1• 1.2
The default setting is “1.0.”
Maximum TLS version This setting specifies the maximum TLS version that devices running iOS 11 andlater use for EAP-TLS authentication.
This setting is valid only if the Enable xAuth setting is selected and theAuthentication type is “Certificate.”
Possible values:
• 1.0• 1.1• 1.2
The default setting is “1.2.”
Keepalive interval This setting specifies how often a device sends a keepalive packet.
This setting is valid only if the "Connection type" setting is set to "IKEv2."
Possible values:
• Disabled• 30 minutes• 10 minutes• 1 minute
The default setting is "10 minutes."
Disable MOBIKE This setting specifies whether MOBIKE is disabled.
This setting is valid only if the "Connection type" setting is set to "IKEv2."
The minimum requirement for iOS devices is iOS 9.
Disable IKEv2 redirect This setting specifies whether IKEv2 redirect is disabled. If this setting is notselected, the IKEv2 connection is redirected if a redirect request is received fromthe server.
This setting is valid only if the "Connection type" setting is set to "IKEv2."
The minimum requirement for iOS devices is iOS 9.
| Profile settings | 421

iOS and macOS: VPNprofile setting Description
Enable perfect forwardsecrecy
This setting specifies whether the VPN supports PFS.
This setting is valid only if the "Connection type" setting is set to "IKEv2."
The minimum requirement for iOS devices is iOS 9.
Enable NAT keepalive This setting specifies whether the VPN supports NAT keepalive packets.Keepalive packets are used to maintain NAT mappings for IKEv2 connections.
This setting is valid only if the "Connection type" setting is set to "IKEv2."
The minimum requirement for iOS devices is iOS 9.
NAT keepalive interval This setting specifies how often a device sends a NAT keepalive packet (inseconds).
This setting is valid only if the "Connection type" setting is set to "IKEv2" and the"Enable NAT keepalive" setting is selected.
The minimum value and the default value is 20.
The minimum requirement for iOS devices is iOS 9.
Use IPv4 and IPv6 IKEv2internal subnets
This setting specifies whether the VPN can use the IKEv2 configuration attributeINTERNAL_IP4_SUBNET and INTERNAL_IP6_SUBNET.
This setting is valid only if the "Connection type" setting is set to "IKEv2."
The minimum requirement for iOS devices is iOS 9.
Common name of theserver certificate
This setting specifies the common name in the certificate that the IKE serversends to the device.
This setting is valid only if the "Connection type" setting is set to "IKEv2."
Common name of theserver certificate issuer
This setting specifies the common name of the certificate issuer in the certificatethat the IKE server sends to the device.
This setting is valid only if the "Connection type" setting is set to "IKEv2."
Apply Child SecurityAssociation parameters
This setting specifies whether to apply child security association parameters.
This setting is valid only if the "Connection type" setting is set to "IKEv2."
Apply IKE SecurityAssociation parameters
This setting specifies whether to apply IKE security association parameters.
This setting is valid only if the "Connection type" setting is set to "IKEv2."
| Profile settings | 422

iOS and macOS: VPNprofile setting Description
DH group This setting specifies the DH group that a device uses to generate key material.
This setting is valid only if the "Apply Child Security Association parameters" or"Apply IKE Security Association parameters" setting is selected.
Possible values:
• 0• 1• 2• 5• 14• 15• 16• 17• 18
The default setting is "2."
Encryption algorithm This setting specifies the IKE encryption algorithm.
This setting is valid only if the "Apply Child Security Association parameters" or"Apply IKE Security Association parameters" setting is selected.
Possible values:
• DES• 3DES• AES 128• AES 256
The default setting is "3DES."
Integrity algorithm This setting specifies the IKE integrity algorithm.
This setting is valid only if the "Apply Child Security Association parameters" or"Apply IKE Security Association parameters" setting is selected.
Possible values:
• SHA1 96• SHA1 160• SHA1 256• SHA2 384• SHA2 512
The default value is "SHA1-96."
| Profile settings | 423

iOS and macOS: VPNprofile setting Description
Rekey interval This setting specifies the lifetime of the IKE connection.
This setting is valid only if the "Apply Child Security Association parameters" or"Apply IKE Security Association parameters" setting is selected.
The possible values are from 10 to 1440 minutes.
The default value is 1440.
Enable per-app VPN This setting specifies whether the VPN gateway supports per-app VPN. Thisfeature helps decrease the load on an organization’s VPN. For example, you canenable only certain work traffic to use the VPN, such as accessing applicationservers or webpages behind the firewall.
This setting is valid only if the "Connection type" setting is set to "CiscoAnyConnect," "Juniper," "Pulse Secure," "F5," "SonicWALL Mobile Connect," "ArubaVIA," "Check Point Mobile," "OpenVPN," "Custom," or "IKEv2."
Allow apps to connectautomatically
This setting whether apps associated with per-app VPN can start the VPNconnection automatically.
This setting is valid only if the "Enable per-app VPN" setting is selected.
Safari domains This setting specifies the domains that can start the VPN connection in Safari.
This setting is valid only if the "Enable per-app VPN" setting is selected.
Traffic tunneling This setting specifies whether the VPN tunnels traffic at the application layer orthe IP layer.
This setting is valid only if the "Enable per-app VPN" setting is selected.
Possible values:
• Application layer• IP layer
The default setting is "Application layer."
Associated proxy profile This setting specifies the associated proxy profile that an iOS device uses toconnect to a proxy server when the device is connected to the VPN.
Android: VPN profile settingsThe following VPN profile settings are supported only on Samsung KNOX Workspace devices.
For more information about the VPN profile settings supported by Samsung KNOX Workspace devices,see Samsung KNOX VPN JSON Parameters.
Android: VPN profilesetting Description
Server address This setting specifies the FQDN or IP address of a VPN server.
| Profile settings | 424

Android: VPN profilesetting Description
VPN type This setting specifies whether a device uses IPsec or SSL to connect to the VPNserver.
Possible values:
• IPsec• SSL
The default value is "IPsec."
The Juniper VPN app supports "SSL" only.
User authenticationrequired
This setting specifies whether a device user must provide a username andpassword to connect to the VPN server.
Username This setting specifies the username that a device uses to authenticate with theVPN gateway. If the profile is for multiple users, you can use the %UserName%variable.
This setting is valid only if the “User authentication required” setting is selected.
Password This setting specifies the password that a device uses to authenticate with theVPN gateway.
This setting is valid only if the “User authentication required” setting is selected.
Split tunnel type This setting specifies whether a device can use split tunneling to bypass the VPNgateway, if the VPN gateway supports it.
Possible values:
• Disabled• Manual• Auto
If the "VPN type" setting is set to "IPsec," this setting must be set to “Disabled."
The default value is "Disabled."
Forward routes This setting specifies the route or routes that bypass the VPN gateway. You canspecify one or more IP addresses.
This setting is valid only if the "VPN type" setting is set to "SSL" and the “Splittunnel type” setting is set to “Manual.”
DPD This setting specifies whether DPD is enabled.
This setting is valid only if the "VPN type" setting is set to "IPsec."
| Profile settings | 425

Android: VPN profilesetting Description
IKE version This setting specifies the version of IKE protocol to use with the VPN connection.
Possible values:
• IKEv1• IKEv2
The default value is "IKEv1."
This setting is valid only if the "VPN type" setting is set to "IPsec."
IPsec authentication type This setting specifies the authentication type for the IPsec VPN connection. The"IKE version" setting determines which IPsec authentication types are supportedand the default value for this setting.
Possible values:
• Certificate• Preshared key• EAP MD5• EAP MSCHAPv2• Hybrid RSA• CAC-based authentication
This setting is valid only if the "VPN type" setting is set to "IPsec."
IPsec group ID type This setting specifies the IPsec group ID type for the VPN connection. The "IPsecauthentication type" setting determines which IPsec group ID types are supportedand the default value for this setting.
Possible values:
• Default• IPv4 address• Fully qualified domain name• User FQDN• IKE key ID
If the setting for “IPsec authentication type” is “Certificate," then this setting isautomatically set to “Default."
This setting is valid only if the "VPN type" setting is set to "IPsec."
IPsec group ID This setting specifies the IPsec group ID for the VPN connection.
This setting is valid only if the "VPN type" setting is set to "IPsec."
| Profile settings | 426

Android: VPN profilesetting Description
IKE phase 1 key exchangemode
This setting specifies the exchange mode for the VPN connection.
Possible values:
• Main mode• Aggressive mode
The default value is "Main mode."
This setting is valid only if the "VPN type" setting is set to "IPsec."
IKE lifetime This setting specifies the lifetime, in seconds, of the IKE connection. If you set anunsupported value or a null value, the device default value is used.
This setting is valid only if the "VPN type" setting is set to "IPsec."
IKE encryption algorithm This setting specifies the encryption algorithm used for the IKE connection.
This setting is valid only if the "VPN type" setting is set to "IPsec."
IKE integrity algorithm This setting specifies the integrity algorithm used for the IKE connection.
This setting is valid only if the "VPN type" setting is set to "IPsec and the "IKEversion" is set to "IKEv2."
IPsec DH group This setting specifies the DH group that a device uses to generate key material.
The possible values are 0, 1, 2, 5, and from 14 to 26.
The default value is 0.
This setting is valid only if the "VPN type" setting is set to "IPsec."
IPsec parameter This setting specifies the IPsec parameter used for the VPN connection.
This setting is valid only if the "VPN type" setting is set to "IPsec."
Perfect forward secrecy This setting specifies whether the VPN gateway supports PFS.
This setting is valid only if the "VPN type" setting is set to "IPsec."
Enable MOBIKE This setting specifies whether the VPN gateway supports MOBIKE.
This setting is valid only if the "VPN type" setting is set to "IPsec."
IPsec lifetime This setting specifies the lifetime, in seconds, of the IPsec connection. If you setan unsupported value or a null value, the device default value is used.
This setting is valid only if the "VPN type" setting is set to "IPsec."
IPsec encryption algorithm This setting specifies the IPsec encryption algorithm used for the VPNconnection.
This setting is valid only if the "VPN type" setting is set to "IPsec."
| Profile settings | 427

Android: VPN profilesetting Description
IPsec integrity algorithm This setting specifies the IPsec integrity algorithm used for the VPN connection.
This setting is valid only if the "VPN type" setting is set to "IPsec" and the and the"IKE version" is set to "IKEv2."
Authentication type This setting specifies the authentication type for the VPN gateway.
Possible values:
• None• Certificate-based authentication• CAC-based authentication
The default value is "None."
This setting is valid only if the "VPN type" setting is set to "SSL."
SSL algorithm This setting specifies the encryption algorithm required for an SSL VPNconnection.
This setting is valid only if the "VPN type" setting is set to "SSL."
Append UID/PIDinformation
This setting specifies whether UID and PID information is appended to packetsthat are sent to the VPN client app.
This setting must be selected for the Cisco AnyConnect VPN app.
Support chaining This setting specifies how VPN chaining is supported.
Possible values:
• Support chaining• Outer tunnel• Inner tunnel
The default value is "Support chaining."
Vendor string input type This setting specifies the key-value pairs or JSON string for the VPN. Theconfiguration information is specific to the vendor's VPN app.
Possible values:
• Vendor key-value pairs• Vendor JSON value
The default value is "Vendor key-value pairs."
Vendor key-value pairs This setting specifies the keys and associated values for the VPN. Theconfiguration information is specific to the vendor's VPN app.
This setting is valid only if the "Vendor string input type" setting is set to "Vendorkey-value pairs."
| Profile settings | 428

Android: VPN profilesetting Description
Vendor JSON value This setting specifies the configuration information specific to the vendor's VPNapp, in .json format.
This setting is valid only if the "Vendor string input type" setting is set to "VendorJSON value."
VPN client package ID This setting specifies the package ID of the VPN app.
Automatically retryconnection after error
This setting specifies whether the VPN connection should be automaticallyrestarted after the connection is lost.
Enable FIPS mode This setting specifies whether FIPS mode is enabled. Enabling FIPS mode makessure that only FIPS-validated cryptographic algorithms are used for the VPNconnection.
Enterprise connectivityfor Android devices with awork space
This setting specifies whether Samsung KNOX Workspace devices use a VPNconnection for all apps in the work space or only for specified apps.
• "Container wide VPN" uses a VPN connection for all apps in the work spaceon the device.
• "Per-app VPN" uses a VPN connection only for specified apps.
Apps allowed to use theVPN connection
This setting specifies the apps in the work space that can use a VPN connection.You can select apps from a list of available apps or specify the app package ID.
This setting is valid only if the "Enterprise connectivity for Android devices with awork space" setting is set to "Per-app VPN."
Associated proxy profile This setting specifies the associated proxy profile that a device uses to connectto a proxy server when the device is connected to the VPN.
Related reference
iOS and macOS: VPN profile settingsWindows 10: VPN profile settings
| Profile settings | 429

Windows 10: VPN profile settings
Windows: VPN profilesetting Description
Connection type This setting specifies the connection type that a Windows 10 device uses for aVPN.
Possible values:
• Microsoft• Junos Pulse• SonicWALL Mobile Connect• F5• Check Point Mobile• Manual connection definition
The default value is "Microsoft."
Server This setting specifies the public or routable IP address or DNS name for the VPN.This setting can point to the external IP of a VPN, or a virtual IP for a server farm.
This setting is valid only if the "Connection type" is set to "Microsoft."
Server URL list This setting specifies a comma-separated list of servers in URL, host name, or IPformat.
This setting is valid only if the "Connection type" is not set to "Microsoft".
Routing policy type This setting specifies the type of routing policy.
This setting is valid only if the "Connection type" is set to "Microsoft."
Possible values:
• Split tunnel• Force tunnel
The default value is "Force tunnel."
Native protocol type This setting specifies the type of routing policy used by the VPN.
This setting is valid only if the "Connection type" is set to "Microsoft."
Possible values:
• L2TP• PPTP• IKEv2• Automatic
The default value is "Automatic."
| Profile settings | 430

Windows: VPN profilesetting Description
Authentication This setting specifies the method of authentication used for the native VPN.
The "Native protocol type" setting determines which authentication methods aresupported and the default value for this setting:
• If you select L2TP or PPTP, the possible values are MS-CHAPv2 and EAP. Thedefault value is MS-CHAPv2
• If you select IKEv2, the possible values are User method and Machine method.The default value is User method.
• If you select Automatic, the only possible value is EAP.
Possible values:
• EAP• MS-CHAPv2• User method• Machine method
EAP configuration This setting specifies the XML of the EAP configuration.
For information about how to generate the EAP configuration XML, visit https://docs.microsoft.com/en-us/windows/client-management/mdm/eap-configuration
This setting is valid only if the "Authentication " setting is set to "EAP."
User method This setting specifies the type of user method authentication to use.
This setting is valid only if the "Authentication " setting is set to "User method."
Possible values:
• EAP
Machine method This setting specifies the type of machine method authentication to use.
This setting is valid only if the "Authentication " setting is set to "Machinemethod."
Possible value:
• Certificate
Custom configuration This setting specifies the HTML encoded XML blob for an SSL-VPN plug-inspecific configuration, including authentication information, that is sent to thedevice to make it available for SSL-VPN plug-ins.
This setting is valid only if the "Connection type" is not set to "Microsoft."
Plugin package familyname
This setting specifies the package family name of the custom SSL VPN.
This setting is valid only if the "Connection type" is set to "Manual connectiondefinition."
L2TP preshared key This setting specifies the preshared key used for an L2TP connection.
| Profile settings | 431

Windows: VPN profilesetting Description
App trigger list This setting specifies a list of apps that start the VPN connection.
App trigger list > App ID This setting identifies an app for a per-app VPN.
Possible values:
• Package family name. To find the package family name, install the app andrun the Windows PowerShell command, Get-AppxPackage. For moreinformation, visit http://technet.microsoft.com/en-us/library/hh856044.aspx
• Installation location of the app. For example, C:\Windows\System\Notepad.exe.
Route list This setting specifies a list of routes that the VPN can use. If the VPN uses splittunneling, a route list is required.
Subnet address This setting specifies the IP address of the destination prefix using the IPv4 orIPv6 address format.
Subnet prefix This setting specifies the subnet prefix of the destination prefix.
Exclusion This setting specifies whether the route that is added must point to the VPNinterface as the gateway or a physical interface. If you select the check box,traffic is directed over the physical interface. If you leave the box unchecked,traffic is directed over the VPN.
Domain name list This setting specifies the Name Resolution Policy Table (NRPT) rules for theVPN.
Domain name This setting specifies the FQDN or suffix of the domain.
DNS servers This setting specifies the list of IP addresses of the DNS servers, separated bycommas.
Web proxy server This setting specifies the IP address of the web proxy server.
Trigger VPN This setting specifies whether this domain name rule triggers the VPN.
Persistent This setting specifies whether the domain name rule is applied when the VPN isnot connected.
Traffic filter list This setting specifies the rules that allow traffic over the VPN.
| Profile settings | 432

Windows: VPN profilesetting Description
Traffic filter list > App ID This setting identifies an app for an app-based traffic filter.
Possible values:
• Package family name. To find the package family name, install the app andrun the Windows PowerShell command, Get-AppxPackage. For moreinformation, visit http://technet.microsoft.com/en-us/library/hh856044.aspx
• Installation location of the app. For example, C:\Windows\System\Notepad.exe.
• Type "SYSTEM" to enable Kernel Drivers to send traffic through the VPN (forexample, PING or SMB).
Protocol This setting specifies the protocol that the VPN uses.
Possible values:
• All• TCP• UDP
The default value is "All."
Local port ranges This setting specifies the list of allowed local port ranges separated by commas.For example, 100-120, 200, 300-320.
Remote port ranges This setting specifies the list of allowed remote port ranges separated bycommas. For example, 100-120, 200, 300-320.
Local address ranges This setting specifies the list of allowed local IP address ranges, separated bycommas.
Remote address ranges This setting specifies the list of allowed remote IP address ranges, separated bycommas.
Routing policy type This setting specifies the routing policy that the traffic filter uses. If set to "Forcetunnel," all traffic goes through the VPN. If set to "split tunnel," traffic can gothrough the VPN or the Internet.
Possible values:
• Split tunnel• Force tunnel
The default setting is "Force tunnel."
Remember credentials This setting specifies whether the credentials are cached whenever possible.
Always on This setting specifies whether devices automatically connect to the VPN at sign-in and stay connected until the user manually disconnects the VPN.
| Profile settings | 433

Windows: VPN profilesetting Description
Lock down This setting specifies whether this VPN connection must be used when thedevice connects to a network. When this setting is enabled, the following applies:
• The device stays connected to the VPN. It cannot be disconnected.• The device must be connected to this VPN to have any network connection.• The device cannot connect to, or modify, other VPN profiles.
DNS suffix This setting specifies one or more DNS suffixes separated by commas. The firstDNS suffix in the list is also used as the primary connection for the VPN. The listis added to the SuffixSearchList.
Trusted network detection This setting specifies a comma-separated string to identify the trusted network.The VPN does not connect automatically when users are on their organization'swireless network.
IP Security properties
Authentication transformconstants
Possible values:
• MD596• SHA196• SHA256128• GCMAES128• GCMAE192• GCMAES256
The default setting is "MD596."
Cipher transformconstants
Possible values:
• DES• DES3• AES128• AES192• AES256• GCMAES128• GCMAES192• GCMAES256
The default setting is "DES."
Encryption method Possible values:
• DES• DES3• AES128• AES192• AES256
The default setting is "DES."
| Profile settings | 434

Windows: VPN profilesetting Description
Integrity check method Possible values:
• MD5• SHA196• SHA256• SHA384
The default setting is "MD5."
Diffie-Hellman Group Possible values:
• Group1• Group2• Group14• ECP256• ECP384• Group24
The default setting is "Group1."
PFS Group Possible values:
• PFS1• PFS2• PFS2048• ECP256• ECP384• PFSMM• PFS24
The default value is "PFS1."
Proxy type This setting specifies the type of proxy configuration for the VPN.
Possible values:
• None• PAC configuration• Manual configuration
The default value is "None."
PAC URL This setting specifies the URL for the web server that hosts the PAC file, includingthe PAC file name. For example, http://www.example.com/PACfile.pac.
This setting is valid only if the "Proxy type" setting is set to "PAC configuration."
Address This setting specifies the FQDN or IP address for the proxy server.
This setting is valid only if the "Proxy type" setting is set to "Manualconfiguration."
| Profile settings | 435

Windows: VPN profilesetting Description
Associated SCEP profile This setting specifies the associated SCEP profile that a device uses to obtain aclient certificate to authenticate with the VPN.
SCEP profile settingsYou can use a variable in any profile setting that is a text field to reference a value instead of specifying the actualvalue. BlackBerry UEM supports default variables that are predefined and custom variables that you define. SCEPprofiles are supported on the following device types:
• BlackBerry 10• iOS• macOS• Android• Windows 10
In some cases, the minimum version of the device OS required to support a setting is a version not supportedby BlackBerry UEM. For more information about supported OS versions, see the Compatibility matrix.
Common: SCEP profile settings
Common: SCEP profilesetting Description
Certification authorityconnection
This setting specifies whether the CA is Entrust, OpenTrust, or another CA. Ifyou configured one or more connections to your organization’s Entrust softwareor OpenTrust software, you can select one of the connections in the drop-downlist. Select Generic if you are using any other CA.
If you select an Entrust or OpenTrust connection, you must then select theappropriate PKI profile and specify the necessary values. The available profilesvary based on what the Entrust or OpenTrust administrator has configured in thePKI software.
The default value is Generic.
URL This setting specifies the URL of the SCEP service. The URL should include theprotocol, FQDN, port number, and SCEP path (CGI path that is defined in theSCEP specification). You must set a value for this setting to activate a devicesuccessfully.
SCEP HTTPS URLs are supported by iOS devices and BlackBerry 10 OS version10.3.0 and later.
Instance name This setting specifies the name of the CA instance.
The value can be any string that is understood by the SCEP service. For example, itcould be a domain name like example.org. If a CA has multiple CA certificates, thisfield can be used to distinguish which one is required.
| Profile settings | 436

Common: SCEP profilesetting Description
Verify SCEP serverconnection trust chain
This setting specifies whether BlackBerry UEM verifies that the root CA of theSCEP server is stored in the BlackBerry UEM certificate store to allow BlackBerryUEM to trust the SCEP server when testing connections, retrieving challengepasswords, and acting as a proxy for SCEP requests from devices.
SCEP challenge type This setting specifies whether the SCEP challenge password is dynamicallygenerated or provided as a static password. If this setting is set to "Static," everydevice uses the same challenge password. If this setting is set to "Dynamic," everydevice receives a unique challenge password.
Possible values:
• Static• Dynamic
The default value is Dynamic.
For Windows devices, only "Static" passwords are supported.
Challenge passwordgeneration URL
This setting specifies the URL that devices use to obtain a dynamically generatedchallenge password from the SCEP service. The URL should include theprotocol, domain, port, and SCEP path (CGI path that is defined in the SCEPspecification). If you use a dynamic challenge password, you must set a value toactivate BlackBerry 10 devices successfully.
This setting is valid only if the "SCEP challenge type" setting is set to "Dynamic."
Authentication type This setting specifies the authentication type devices use to connect to the SCEPservice and obtain a challenge password.
This setting is valid only if the "SCEP challenge type" setting is set to "Dynamic."
Possible values:
• Basic• NTLM
The default value is Basic.
Domain This setting specifies the domain used for NTLM authentication when devicesconnect to the SCEP service to obtain a challenge password.
This setting is valid only if the "Authentication type" setting is set to "NTLM."
Username This setting specifies the username required to obtain a challenge password fromthe SCEP service.
This setting is valid only if the "SCEP challenge type" setting is set to "Dynamic."
Password This setting specifies the password required to obtain the challenge passwordfrom the SCEP service.
This setting is valid only if the "SCEP challenge type" setting is set to "Dynamic."
| Profile settings | 437

Common: SCEP profilesetting Description
Challenge password This setting specifies the challenge password that a device uses for certificateenrollment. If you use a static challenge password, you must set a value for thissetting to activate BlackBerry 10 devices successfully.
This setting is valid only if the "SCEP challenge type" setting is set to "Static."
BlackBerry 10: SCEP profile settings
BlackBerry 10: SCEPprofile setting Description
Use device defaultsubject and SAN
This setting specifies whether a BlackBerry 10 device generates the subject andsubject alternative name for a certificate request. If this setting is not selected,you must specify the subject and subject alternative name type and value.
Subject This setting specifies the subject for the certificate, if required for yourorganization's SCEP configuration. Type the subject in the format "/CN=<common_name>/O=<domain_name>" If the profile is for multiple users, youcan use a variable, for example: %UserDistinguishedName%.
This setting is valid only if the "Use device default subject and SAN" setting is notselected.
The minimum requirement is BlackBerry 10 OS version 10.3.1.
SAN This setting specifies the subject alternative name type and value for a certificate.
This setting is valid only if the "Use device default subject and SAN" setting is notselected.
The minimum requirement is BlackBerry 10 OS version 10.3.1.
SAN type This setting specifies the subject alternative name type for the certificate, if it isrequired.
Possible values:
• RFC 822 name• URI• NT principal name• DNS name
The default value is "RFC 822 name."
SAN value This setting specifies the subject alternative representation of the certificatesubject. The value must be an email address, the DNS name of the CA server, thefully qualified URL of the server, or principal name.
The "SAN type" setting determines the appropriate value to specify. If set to"RFC822 name," the value must be a valid email address. If set to "URI," the valuemust be a valid URL that includes the protocol and FQDN or IP address. If setto "NT principal name," the value must be a valid principal name. If set to "DNSname," the value must be a valid FQDN.
| Profile settings | 438

BlackBerry 10: SCEPprofile setting Description
Key algorithm This setting specifies the algorithm that a BlackBerry 10 device uses to generatethe client key pair. You must select an algorithm that is supported by your CA.
Possible values:
• None• RSA• ECC
The default value is "RSA."
RSA strength This setting specifies the RSA strength that a BlackBerry 10 device uses togenerate the client key pair. You must enter a key strength that is supported byyour CA.
This setting is valid only if the "Key algorithm" setting is set to "RSA."
Possible values:
• 1024• 2048• 4096• 8192• 16384
The default value is "1024."
ECC strength This setting specifies the elliptic curve that a BlackBerry 10 device uses togenerate a client key pair. The elliptic curve defines the strength of the client keypair. You must select an elliptic curve that is supported by your CA.
This setting is valid only if the "Key algorithm" setting is set to "ECC."
Possible values:
• sect163k1• sect283k1• secp192r1• secp256r1• secp384r1• secp521r1
The default value is "secp521r1."
| Profile settings | 439

BlackBerry 10: SCEPprofile setting Description
Encryption algorithm This setting specifies the encryption algorithm that a BlackBerry 10 device usesfor the certificate enrollment request.
Possible values:
• None• Triple DES• AES (128-bit)• AES (196-bit)• AES (256-bit)
The default value is "Triple DES."
Hash function This setting specifies the hash function that a BlackBerry 10 device uses for thecertificate enrollment request.
Possible values:
• None• SHA-1• SHA-224• SHA-256• SHA-384• SHA-512
The default value is "SHA-1."
Certificate thumbprint This setting specifies the hexadecimal-encoded hash of the root certificate for theCA. You can use the following algorithms to specify the thumbprint: MD5, SHA-1,SHA-224, SHA-256, SHA-384, and SHA-512. You must set a value for this settingto activate a BlackBerry 10 device successfully.
Automatic renewal This setting specifies how many days before a certificate expires that automaticcertificate renewal occurs.
The possible values are from 1 to 999,999,999 days.
The default value is "30."
| Profile settings | 440

BlackBerry 10: SCEPprofile setting Description
Key usage This setting specifies the cryptographic operations that can be performed usingthe public key contained in the certificate.
Possible selections:
• Digital signature• Non-repudiation• Key encipherment• Data encipherment• Key agreement• Key certificate signing• CRL signing• Encipher only• Decipher only
The default selections are "Digital signature," "Key encipherment," and "Keyagreement."
The minimum requirement is BlackBerry 10 OS version 10.3.1.
Extended key usage This setting specifies the purpose of the key contained in the certificate.
Possible selections:
• Server authentication• Client authentication• Code signing• Email protection• Time stamping• OCSP signing• Secure shell client• Secure shell server
The default selection is "Client authentication."
The minimum requirement is BlackBerry 10 OS version 10.3.1.
iOS: SCEP profile settings
iOS: SCEP profile setting Description
Use BlackBerry UEM as aproxy for SCEP requests
This setting specifies whether all SCEP requests from devices are sentthrough BlackBerry UEM. If the CA is behind your firewall, this setting allows you toenroll client certificates to devices without exposing the CA outside of the firewall.
Subject This setting specifies the subject for the certificate, if required for yourorganization's SCEP configuration. Type the subject in the format "/CN=<common_name>/O=<domain_name>" If the profile is for multiple users, youcan use a variable, for example: %UserDistinguishedName%.
| Profile settings | 441

iOS: SCEP profile setting Description
Retries This setting specifies how many times to retry connecting to the SCEP service ifthe connection attempt fails.
The possible values are from 1 to 999.
The default value is "3."
Retry delay This setting specifies the time in seconds to wait before retrying to connect to theSCEP service.
The possible values are from 1 to 999.
The default value is "10" seconds.
Key size This setting specifies the key size for the certificate.
Possible values:
• 1024• 2048
The default value is 1024.
Fingerprint This setting specifies the fingerprint for enrolling a SCEP certificate. If your CAuses HTTP instead of HTTPS, devices use the fingerprint to confirm the identity ofthe CA during the enrollment process. The fingerprint can't contain spaces.
SAN type This setting specifies the subject alternative name type for the certificate, if it isrequired.
Possible values:
• None• RFC822 name• DNS name• Uniform Resource Identifier
The default value is "None."
SAN value This setting specifies the alternative representation of the certificate subject.The value must be an email address, the DNS name of the CA server, or the fullyqualified URL of the server.
The "SAN type" setting determines the appropriate value to specify. If set to"RFC822 name," the value must be a valid email address. If set to "URI," the valuemust be a valid URL that includes the protocol and FQDN or IP address. If setto "NT principal name," the value must be a valid principal name. If set to "DNSname," the value must be a valid FQDN.
NT principal name This setting specifies the NT principal name for certificate generation.
This setting is valid only if the "SAN type" setting is set to something other than"None."
| Profile settings | 442

iOS: SCEP profile setting Description
Profile expiration Specify the number of days after a certificate is issued that the device requests anew certificate from the CA.
The value should be less than the certificate validity period defined by the CA. Themaximum value is 1825 days.
macOS: SCEP profile settingsmacOS applies profiles to user accounts or devices. You can configure SCEP profiles to apply to one or the other.
macOS: SCEP profilesetting Description
Use BlackBerry UEM as aproxy for SCEP requests
This setting specifies whether all SCEP requests from devices are sentthrough BlackBerry UEM. If the CA is behind your firewall, this setting allows you toenroll client certificates to devices without exposing the CA outside of the firewall.
Apply profile to This setting specifies whether the SCEP profile is applied to the user account orthe device.
Possible values:
• User• Device
Subject This setting specifies the subject for the certificate, if required for yourorganization's SCEP configuration. Type the subject in the format "/CN=<common_name>/O=<domain_name>" If the profile is for multiple users, youcan use a variable, for example: %UserDistinguishedName%.
Retries This setting specifies how many times to retry connecting to the SCEP service ifthe connection attempt fails.
The possible values are from 1 to 999.
The default value is "3."
Retry delay This setting specifies the time in seconds to wait before retrying to connect to theSCEP service.
The possible values are from 1 to 999.
The default value is "10" seconds.
Key size This setting specifies the key size for the certificate.
Possible values:
• 1024• 2048
The default value is "1024."
| Profile settings | 443

macOS: SCEP profilesetting Description
Fingerprint This setting specifies the fingerprint for enrolling a SCEP certificate. If your CAuses HTTP instead of HTTPS, devices use the fingerprint to confirm the identity ofthe CA during the enrollment process. The fingerprint can't contain spaces.
SAN type This setting specifies the subject alternative name type for the certificate, if it isrequired.
Possible values:
• None• RFC822 name• DNS name• Uniform Resource Identifier
The default value is "None."
SAN value This setting specifies the alternative representation of the certificate subject.The value must be an email address, the DNS name of the CA server, or the fullyqualified URL of the server.
The "SAN type" setting determines the appropriate value to specify. If set to"RFC822 name," the value must be a valid email address. If set to "URI," the valuemust be a valid URL that includes the protocol and FQDN or IP address. If setto "NT principal name," the value must be a valid principal name. If set to "DNSname," the value must be a valid FQDN.
NT principal name This setting specifies the NT principal name for certificate generation.
This setting is valid only if the "SAN type" setting is set to something other than"None."
Android: SCEP profile settingsTo see an example of a SCEP profile for Android devices, visit http://support.blackberry.com/kb/ to read articleKB38248.
Android: SCEP profilesetting Description
Use BlackBerry UEM as aproxy for SCEP requests
This setting specifies whether all SCEP requests from devices are sentthrough BlackBerry UEM. If the CA is behind your firewall, this setting allows you toenroll client certificates to devices without exposing the CA outside of the firewall.
| Profile settings | 444

Android: SCEP profilesetting Description
Encryption algorithm This setting specifies the encryption algorithm that an Android device uses for thecertificate enrollment request.
Possible values:
• None• Triple DES• AES (128-bit)• AES (196-bit)• AES (256-bit)
The default value is "Triple DES."
Hash function This setting specifies the hash function that an Android device uses for thecertificate enrollment request.
Possible values:
• None• SHA-1• SHA-224• SHA-256• SHA-384• SHA-512
The default value is "SHA-1."
Certificate thumbprint This setting specifies the hexadecimal-encoded hash of the root certificate forthe CA. You can use the following algorithms to specify the thumbprint: SHA-1,SHA-224, SHA-256, SHA-384, and SHA-512. You must set a value for this setting toactivate devices that use Android work profiles or Samsung KNOX.
Automatic renewal This setting specifies how many days before a certificate expires that automaticcertificate renewal occurs.
The possible values are 1 to 365.
The default value is "30."
Android Enterprise / Samsung KNOX
Subject This setting specifies the subject for the certificate, if required for yourorganization's SCEP configuration. Type the subject in the format "/CN=<common_name>/O=<domain_name>" If the profile is for multiple users, youcan use a variable, for example: %UserDistinguishedName%.
| Profile settings | 445

Android: SCEP profilesetting Description
SAN type This setting specifies the subject alternative name type for the certificate, if it isrequired.
Possible values:
• RFC 822 name• Uniform resource identifier• NT principal name• DNS name
The default value is "RFC 822 name."
SAN value This setting specifies the subject alternative representation of the certificatesubject. The value must be an email address, the DNS name of the CA server, thefully qualified URL of the server, or principal name.
The "SAN type" setting determines the appropriate value to specify. If set to"RFC822 name," the value must be a valid email address. If set to "URI," the valuemust be a valid URL that includes the protocol and FQDN or IP address. If setto "NT principal name," the value must be a valid principal name. If set to "DNSname," the value must be a valid FQDN.
Key algorithm This setting specifies the algorithm that devices with Android work profiles,or Samsung KNOX use to generate the client key pair. You must select analgorithm that is supported by your CA.
Possible values:
• None• RSA• ECC
The default value is "RSA."
RSA strength This setting specifies the RSA strength that Android Enterprise and SamsungKNOX devices use to generate the client key pair. You must enter a key strengththat is supported by your CA.
This setting is valid only if the "Key algorithm" setting is set to "RSA.".
Possible values:
• 1024• 2048• 4096• 8192• 16384
The default value is "1024."
| Profile settings | 446
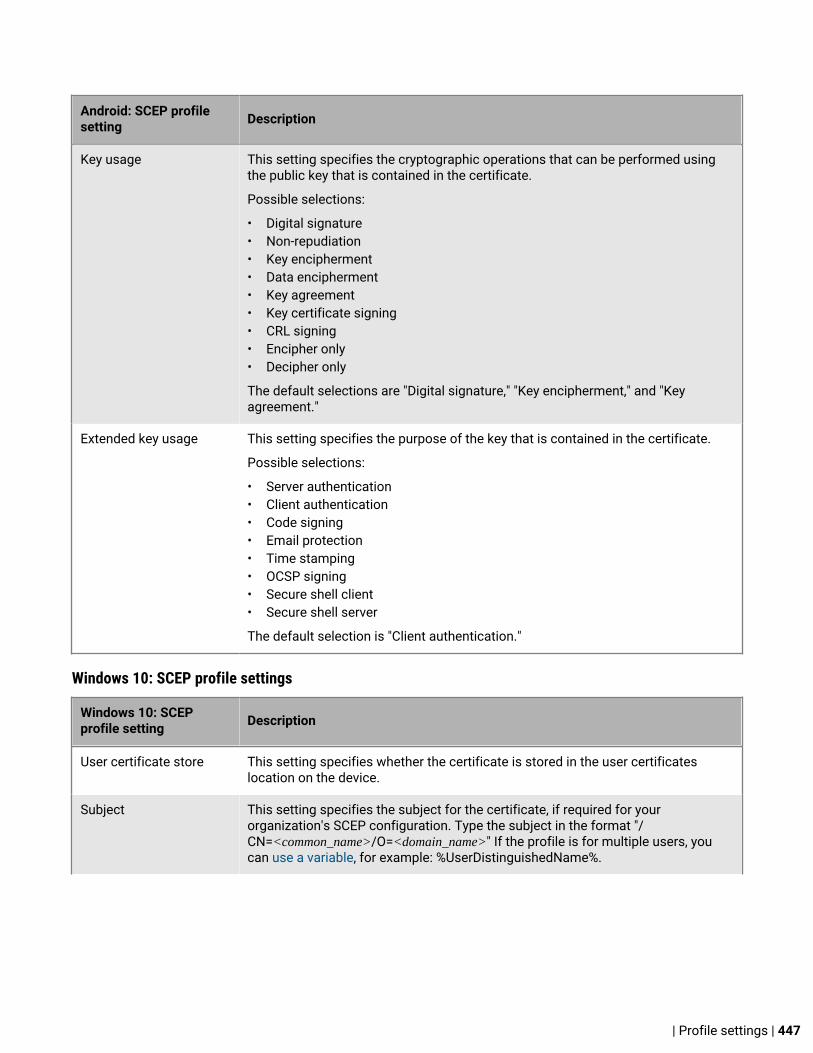
Android: SCEP profilesetting Description
Key usage This setting specifies the cryptographic operations that can be performed usingthe public key that is contained in the certificate.
Possible selections:
• Digital signature• Non-repudiation• Key encipherment• Data encipherment• Key agreement• Key certificate signing• CRL signing• Encipher only• Decipher only
The default selections are "Digital signature," "Key encipherment," and "Keyagreement."
Extended key usage This setting specifies the purpose of the key that is contained in the certificate.
Possible selections:
• Server authentication• Client authentication• Code signing• Email protection• Time stamping• OCSP signing• Secure shell client• Secure shell server
The default selection is "Client authentication."
Windows 10: SCEP profile settings
Windows 10: SCEPprofile setting Description
User certificate store This setting specifies whether the certificate is stored in the user certificateslocation on the device.
Subject This setting specifies the subject for the certificate, if required for yourorganization's SCEP configuration. Type the subject in the format "/CN=<common_name>/O=<domain_name>" If the profile is for multiple users, youcan use a variable, for example: %UserDistinguishedName%.
| Profile settings | 447

Windows 10: SCEPprofile setting Description
SAN type This setting specifies the subject alternative name type for the certificate, if it isrequired.
Possible values:
• None• RFC 822 name• DNS name• Uniform resource identifier
The default value is "None."
SAN value This setting specifies the alternative representation of the certificate subject.The value must be an email address, the DNS name of the CA server, or the fullyqualified URL of the server.
The appropriate value for this setting depends on the value selected for the "SANtype" setting.
Retries This setting specifies how many times to retry connecting to the SCEP service ifthe connection attempt fails.
The possible values are 1 to 999.
The default value is "3."
Retry delay This setting specifies the time in seconds to wait before retrying to connect to theSCEP service.
The possible values are 1 to 999.
The default value is "10" seconds.
Key size This setting specifies the key size for the certificate.
Possible values:
• 1024• 2048• 4096• 8192• 16384
The default value is "1024."
| Profile settings | 448

Windows 10: SCEPprofile setting Description
Key usage This setting specifies the cryptographic operations that can be performed usingthe public key that is contained in the certificate.
• Digital signature• Non-repudiation• Key encipherment• Data encipherment• Key agreement• Key certificate signing• CRL signing• Encipher only
The default selections are "Key certificate signing" and "Encipher only."
Extended key usage This setting specifies the purpose of the key that is contained in the certificate.
• Server authentication• Client authentication• Code signing• Email protection• Time stamping• OCSP signing• Secure shell client• Secure shell server
The default selection is "Client authentication."
SCEP key storage This setting specifies the storage location for the private key.
Possible values:
• TPM• TPM if supported• KSP
The default value is "KSP."
Hash function This setting specifies the hash function that a Windows 10 device uses for thecertificate enrollment request.
Possible values:
• SHA-1• SHA-224• SHA-256• SHA-384• SHA-512
The default value is "SHA-1."
| Profile settings | 449

Windows 10: SCEPprofile setting Description
Certificate thumbprint This setting specifies the hexadecimal-encoded hash of the root certificate forthe CA. You can use the following algorithms to specify the thumbprint: SHA-1,SHA-224, SHA-256, SHA-384, and SHA-512.
Automatic renewal This setting specifies how many days before a certificate expires that automaticcertificate renewal occurs.
The possible values are 1 to 365.
The default value is "30."
BlackBerry Dynamics: SCEP profile settingsThese settings apply to SCEP certificates used with BlackBerry Dynamics apps on iOS and Android devices.
BlackBerry Dynamics:SCEP profile setting Description
Subject This setting specifies the subject for the certificate, if required for yourorganization's SCEP configuration. Type the subject in the format "/CN=<common_name>,O=<domain_name>" If the profile is for multiple users, youcan use a variable, for example: %UserDistinguishedName%.
SAN type This setting specifies the subject alternative name type for the certificate, if it isrequired.
Possible values:
• RFC 822 name• Uniform resource identifier• NT principal name• DNS name
The default value is "RFC 822 name."
SAN value This setting specifies the subject alternative representation of the certificatesubject. The value must be an email address, the DNS name of the CA server, thefully qualified URL of the server, or principal name.
The "SAN type" setting determines the appropriate value to specify. If set to"RFC822 name," the value must be a valid email address. If set to "URI," the valuemust be a valid URL that includes the protocol and FQDN or IP address. If setto "NT principal name," the value must be a valid principal name. If set to "DNSname," the value must be a valid FQDN.
Key algorithm This setting specifies the algorithm used to generate the client key pair. You mustselect an algorithm that is supported by your CA.
Possible values:
• RSA
| Profile settings | 450

BlackBerry Dynamics:SCEP profile setting Description
RSA strength This setting specifies the RSA strength used to generate the client key pair. Youmust enter a key strength that is supported by your CA.
This setting is valid only if the "Key algorithm" setting is set to "RSA.".
Possible values:
• 2048• 4096
The default value is "2048."
Encryption algorithm This setting specifies the encryption algorithm used for the certificate enrollmentrequest.
Possible values:
• Triple DES• AES (128-bit)• AES (196-bit)• AES (256-bit)
The default value is "Triple DES."
Hash function This setting specifies the hash function used for the certificate enrollmentrequest.
Possible values:
• SHA-256• SHA-384• SHA-512
The default value is "SHA-256."
Certificate thumbprint This setting specifies the hexadecimal-encoded hash of the root certificate for theCA. You can use one of the following algorithms to specify the thumbprint: SHA-1,SHA-224, SHA-256, SHA-384, and SHA-512. MD5 is supported only if "Enable FIPS"is not selected in the BlackBerry Dynamics profile.
Automatic renewal This setting specifies how many days before a certificate expires that automaticcertificate renewal occurs.
The possible values are 1 to 365.
The default value is "30."
| Profile settings | 451
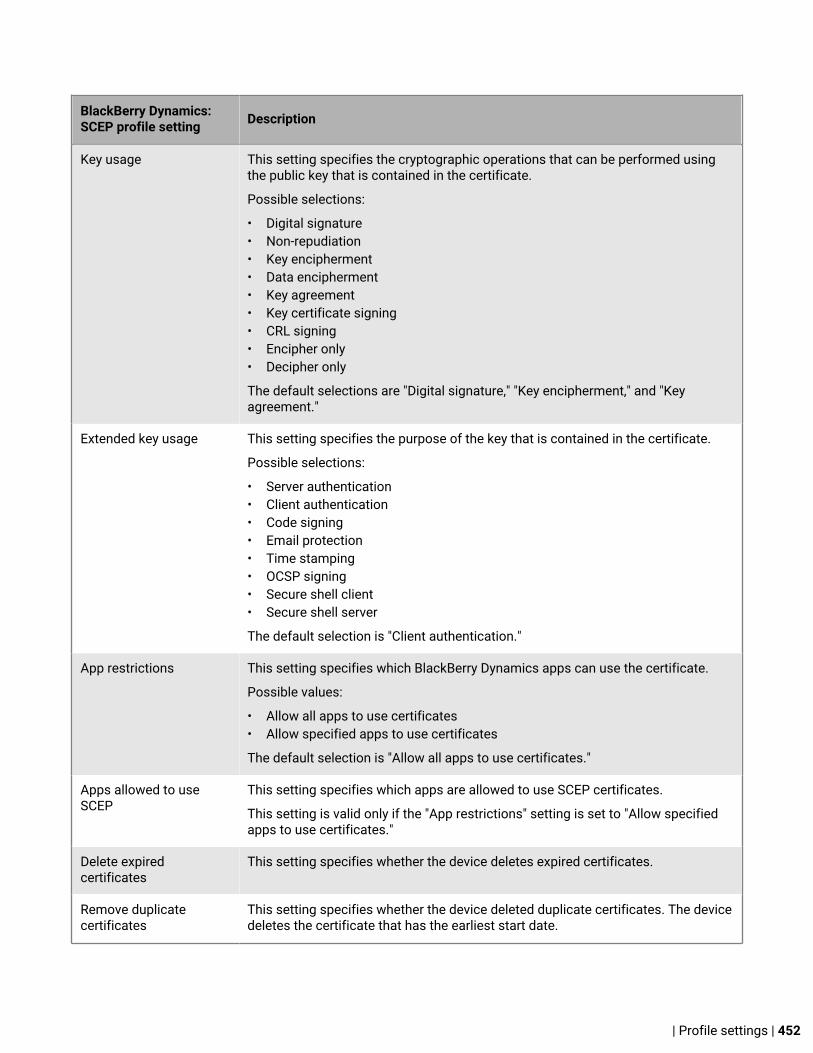
BlackBerry Dynamics:SCEP profile setting Description
Key usage This setting specifies the cryptographic operations that can be performed usingthe public key that is contained in the certificate.
Possible selections:
• Digital signature• Non-repudiation• Key encipherment• Data encipherment• Key agreement• Key certificate signing• CRL signing• Encipher only• Decipher only
The default selections are "Digital signature," "Key encipherment," and "Keyagreement."
Extended key usage This setting specifies the purpose of the key that is contained in the certificate.
Possible selections:
• Server authentication• Client authentication• Code signing• Email protection• Time stamping• OCSP signing• Secure shell client• Secure shell server
The default selection is "Client authentication."
App restrictions This setting specifies which BlackBerry Dynamics apps can use the certificate.
Possible values:
• Allow all apps to use certificates• Allow specified apps to use certificates
The default selection is "Allow all apps to use certificates."
Apps allowed to useSCEP
This setting specifies which apps are allowed to use SCEP certificates.
This setting is valid only if the "App restrictions" setting is set to "Allow specifiedapps to use certificates."
Delete expiredcertificates
This setting specifies whether the device deletes expired certificates.
Remove duplicatecertificates
This setting specifies whether the device deleted duplicate certificates. The devicedeletes the certificate that has the earliest start date.
| Profile settings | 452
Compliance profile settingsCompliance profiles are supported on the following device types:
• BlackBerry 10• iOS• macOS• Android• Windows
Common: Compliance profile settingsFor each compliance rule that you select on the device tabs, choose the action that you want BlackBerry UEM toperform if a user's device is non-compliant.
| Profile settings | 453

Common: Complianceprofile setting Description
Enforcement action This setting specifies the action that BlackBerry UEM takes on devices that are notcompliant.
Possible values:
• Prompt for compliance• Untrust: On iOS, macOS, Android, and Windows devices, this option prevents
the user from accessing work resources and applications from the device. Dataand apps are not deleted from the device.
Note: Untrust is not supported for BlackBerry Dynamics apps.
Note: On iOS devices, the work email account is removed from the native emailapp. Users must restore the email account settings to the app after the devicereturns to compliance.
• Quarantine: On BlackBerry 10 devices, this option prevents the user fromaccessing work resources and applications from the device. Data andapplications are not deleted from the device.
• Delete only work data• Delete all data• Remove from server: On BlackBerry 10, iOS, Android, and Windows devices,
a device can be deactivated from BlackBerry UEM if it violates the "Out ofcontact" rule.
• None: Enables a compliance violation to be identified but no action taken.
The default value is "Prompt for compliance."
On devices activated with "Work and personal - user privacy," you cannot delete alldata on a user's device. If you select, "Delete all data" BlackBerry UEM performsthe same action as "Delete only work data."
For Samsung KNOX Workspace devices that only have a work space, if you select"Delete only work data," "Delete all data," or "Remove from server," all data will bedeleted from the device.
For supervised iOS 9.3.2 and later devices, enforcement actions for the "Restrictedapp is installed" rule are not applicable. Users are automatically prevented frominstalling restricted apps.
Prompt method The possible values are:
• Both• Email notification• Device notification
The default value is "Both."
This setting is valid only if the "Enforcement action" is set to "Prompt forcompliance."
Device notifications are not supported on Windows 10 devices.
| Profile settings | 454
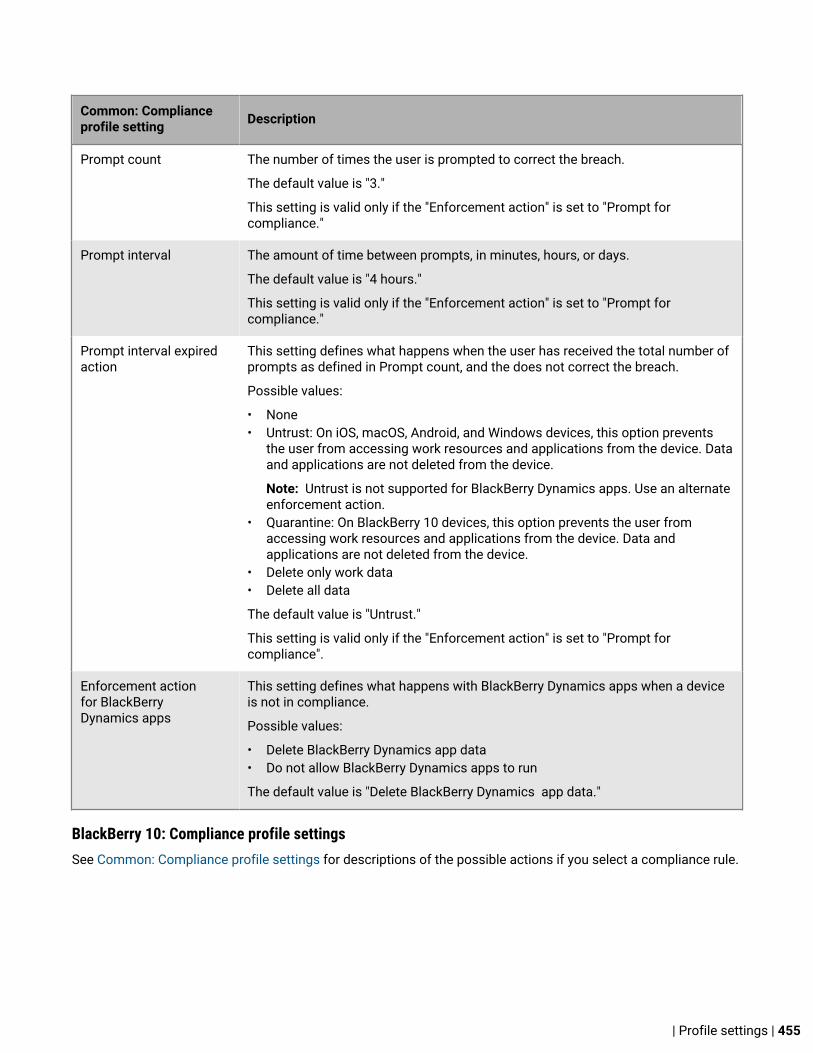
Common: Complianceprofile setting Description
Prompt count The number of times the user is prompted to correct the breach.
The default value is "3."
This setting is valid only if the "Enforcement action" is set to "Prompt forcompliance."
Prompt interval The amount of time between prompts, in minutes, hours, or days.
The default value is "4 hours."
This setting is valid only if the "Enforcement action" is set to "Prompt forcompliance."
Prompt interval expiredaction
This setting defines what happens when the user has received the total number ofprompts as defined in Prompt count, and the does not correct the breach.
Possible values:
• None• Untrust: On iOS, macOS, Android, and Windows devices, this option prevents
the user from accessing work resources and applications from the device. Dataand applications are not deleted from the device.
Note: Untrust is not supported for BlackBerry Dynamics apps. Use an alternateenforcement action.
• Quarantine: On BlackBerry 10 devices, this option prevents the user fromaccessing work resources and applications from the device. Data andapplications are not deleted from the device.
• Delete only work data• Delete all data
The default value is "Untrust."
This setting is valid only if the "Enforcement action" is set to "Prompt forcompliance".
Enforcement actionfor BlackBerryDynamics apps
This setting defines what happens with BlackBerry Dynamics apps when a deviceis not in compliance.
Possible values:
• Delete BlackBerry Dynamics app data• Do not allow BlackBerry Dynamics apps to run
The default value is "Delete BlackBerry Dynamics app data."
BlackBerry 10: Compliance profile settingsSee Common: Compliance profile settings for descriptions of the possible actions if you select a compliance rule.
| Profile settings | 455

BlackBerry 10:Compliance profilesetting
Description
Integrity alert This setting creates a compliance rule if an attacker discovered how to obtain rootaccess or escalated privileges on a BlackBerry 10 device.
Restricted softwarerelease is installed
This setting creates a compliance rule to ensure that devices do not use arestricted software release as specified in a device SR requirements profile. Formore information see, Create a device SR requirements profile for BlackBerry10 devices.
This rule does not apply to devices with the Work and personal - Corporateactivation type.
Restricted OS version isinstalled
This setting creates a compliance rule to ensure that devices do not have arestricted OS version installed as specified in this setting.
You can specify the restricted OS versions.
Restricted device modeldetected
This setting creates a compliance rule to restrict device models as specified inthis setting.
Possible values:
• Allow selected device models• Do not allow selected device models
You can select the the devices models that are allowed or restricted.
Device out of contact This setting creates a compliance rule to ensure that devices are not out ofcontact with BlackBerry UEM for more than a specified amount of time.
Last contact time This setting specifies the number days a device can be out of contact withBlackBerry UEM.
This setting is valid only if the "Device out of contact" setting is selected.
iOS: Compliance profile settingsSee Common: Compliance profile settings for descriptions of the possible actions if you select a compliance rule.
iOS: Compliance profilesetting Description
Jailbroken OS This setting creates a compliance rule to ensure that iOS devices are notjailbroken. A device is jailbroken when a user or attacker bypasses variousrestrictions on a device to modify the OS.
| Profile settings | 456

iOS: Compliance profilesetting Description
Non-assigned app isinstalled
This setting creates a compliance rule to ensure that devices do not have appsinstalled that were not assigned to the user.
When you select this setting and a non-assigned app is installed on an iOS device,a warning message and a link is displayed on the Managed Devices tab. Whenyou click the link, a list of apps that are putting the device out of compliance isdisplayed.
This setting is not valid for devices activated with the User privacy activation type.
Required app is notinstalled
This setting creates a compliance rule to ensure that devices have required appsinstalled.
When you select this setting and a required app is not installed on an iOS device, awarning message and a link is displayed on the Managed Devices tab. When youclick the link, a list of applications that are putting the device out of compliance isdisplayed.
Restricted OS version isinstalled
This setting creates a compliance rule to ensure that devices do not have arestricted OS version installed as specified in this setting.
You can select the restricted OS versions.
Restricted device modeldetected
This setting creates a compliance rule to restrict device models as specified inthis setting.
Possible values:
• Allow selected device models• Do not allow selected device models
You can select the devices models that are allowed or restricted.
Device is out of contact This setting creates a compliance rule to ensure that devices are not out ofcontact with BlackBerry UEM for more than a specified amount of time.
Last contact time This setting specifies the number days a device can be out of contactwith BlackBerry UEM.
This setting is valid only if the "Device out of contact" setting is selected.
BlackBerryDynamics library versionverification
This setting creates a compliance rule that allows you to select the BlackBerryDynamics library versions that cannot be activated.
You can select the blocked library versions.
BlackBerryDynamics connectivityverification
This setting creates a compliance rule to ensure that BlackBerry Dynamics appsare not out of contact with BlackBerry UEM for more than a specified amount oftime. The enforcement action is applied to BlackBerry Dynamics apps.
Base connectivityinterval on authenticationdelegate apps
This setting specifies that the connectivity verification is based on when anauthentication delegate app connects to BlackBerry UEM.
This setting is valid only if the "Connectivity verification" setting is selected.
| Profile settings | 457

iOS: Compliance profilesetting Description
Last contact time This setting specifies the number of days before the device must connectto BlackBerry UEM.
Possible values:
• 8 hours• 16 hours• 1 day• 2 days• 3 days• 7 days• 14 days• 30 days• 60 days• 90 days• 180 days• 365 days
The default value is "2 days."
This setting is valid only if the "Connectivity verification" setting is selected.
Restricted app isinstalled
This setting creates a compliance rule to prevent users from installing specificapps.
To restrict apps, complete any of the following tasks:
• Select an app from the restricted app list. For more information, see Add anapp to the restricted app list.
Do one of the following:
• To select apps using the app name, click the Select apps from the app listoption.
• To select apps using the app package ID, click the Specify the app packageID option. You should not use the package ID to add public apps. Add publicapps to the restricted app list and then use the Select apps from the app listoption to select the apps instead.
• Select a built-in app (supervised iOS 9.3.2 and later devices only)
To remove an app from the list, click .
When you select this setting and a restricted app is installed on an iOS device, awarning message and a link is displayed on the Managed Devices tab. When youclick the link, a list of applications that are putting the device out of compliance isdisplayed.
For supervised iOS 9.3.2 and later devices, enforcement actions for this rule arenot applicable. Users are automatically prevented from installing restricted apps.
| Profile settings | 458

iOS: Compliance profilesetting Description
Show only allowed appson device
This setting creates a compliance rule that specifies a list of apps that are allowedto be installed on users' devices. All other apps are not allowed.
To allow specific apps, complete any of the following tasks:
• Select an app from the restricted app list. For more information, see Add anapp to the restricted app list.
• Select a built-in app (supervised iOS 9.3.2 and later devices only)
Some apps are included in the allowed list by default. To remove an app from thelist, click .
This setting is valid only for supervised devices running iOS 9.3.2 or later.
macOS: Compliance profile settingsSee Common: Compliance profile settings for descriptions of the possible actions if you select a compliance rule.
macOS: Complianceprofile setting Description
Restricted OS version isinstalled
This setting creates a compliance rule to ensure that devices do not have arestricted OS version installed as specified in this setting.
You can select the restricted OS versions.
Restricted device modeldetected
This setting creates a compliance rule to restrict device models as specified inthis setting.
Possible values:
• Allow selected device models• Do not allow selected device models
You can select the the devices models that are allowed or restricted.
BlackBerry Dynamicslibrary versionverification
This setting creates a compliance rule that allows you to select the BlackBerryDynamics library versions that cannot be activated.
You can select the blocked library versions.
BlackBerry Dynamicsconnectivity verification
This setting creates a compliance rule to ensure that BlackBerry Dynamics appsare not out of contact with BlackBerry UEM for more than a specified amount oftime. The enforcement action is applied to BlackBerry Dynamics apps.
Base connectivityinterval on authenticationdelegate apps
This setting specifies that the connectivity verification is based on when anauthentication delegate app connects to BlackBerry UEM.
This setting is valid only if the "Connectivity verification" setting is selected.
| Profile settings | 459

macOS: Complianceprofile setting Description
Last contact time This setting specifies the number of days before the device must connect toBlackBerry UEM.
Possible values:
• 8 hours• 16 hours• 1 day• 2 days• 3 days• 7 days• 14 days• 30 days• 60 days• 90 days• 180 days• 365 days
The default value is "2 days."
This setting is valid only if the "Connectivity verification" setting is selected.
Android: Compliance profile settingsSee Common: Compliance profile settings for descriptions of the possible actions if you select a compliance rule.
Android: Complianceprofile setting Description
Compromised devices(rooted or failedattestation)
This setting creates a compliance rule that specifies the actions that occur if auser or attacker gains access to the root level of an Android device. A device isrooted when a user or attacker gains access to the root level of the Android OS.This rule applies to the rooted state of the device the UEM Client, the BlackBerryDynamics SDK or KNOX Attestation detects it.
Google SafetyNet attestation failure
This setting creates a compliance rule that specifies the actions that occur ifdevices do not pass SafetyNet attestation.
When you use SafetyNet attestation, BlackBerry UEM sends challenges to testthe authenticity and integrity of Android devices and apps in your organization'senvironment.
For these settings to take affect, you must enable the SafetyNet attestationfeature in the management console under Settings > Attestation > SafetyNetattestation frequency.
For more information about configuring SafetyNet attestation, refer to theinformation in the Configuration content.
| Profile settings | 460

Android: Complianceprofile setting Description
Non-assigned app isinstalled
This setting creates a compliance rule to ensure that devices do not have appsinstalled that were not assigned to the user.
When you select this setting and a non-assigned app is installed onan Android device, a warning message and a link is displayed on the ManagedDevices tab. When you click the link, a list of applications that are putting thedevice out of compliance is displayed.
For Android devices that have a work profile and Samsung KNOX devices, userscannot install non-assigned apps in the work space. The enforcement actions donot apply.
This setting is not valid for devices activated with User privacy.
Required app is notinstalled
This setting creates a compliance rule to ensure that devices have required appsinstalled.
When you select this setting and a required app is not installed onan Android device, a warning message and a link is displayed on the ManagedDevices tab. When you click the link, a list of applications that are putting thedevice out of compliance is displayed.
For Android devices that have a work profile devices, the enforcement actions donot apply.
For Samsung KNOX devices, required internal apps are automatically installed.The enforcement actions apply only to required public apps.
Restricted OS version isinstalled
This setting creates a compliance rule to ensure that devices do not have arestricted OS version installed as specified in this setting.
You can select the restricted OS versions.
Restricted device modeldetected
This setting creates a compliance rule to restrict device models as specified inthis setting.
Possible values:
• Allow selected device models• Do not allow selected device models
You can select the devices models that are allowed or restricted.
Device is out of contact This setting creates a compliance rule to ensure that devices are not out ofcontact with BlackBerry UEM for more than a specified amount of time.
The device verifies compliance with this rule and can delete work data, delete alldata, or deactivate itself from BlackBerry UEM if it's out of compliance.
Last contact time This setting specifies the number days a device can be out of contactwith BlackBerry UEM.
This setting is valid only if the "Device out of contact" setting is selected.
| Profile settings | 461

Android: Complianceprofile setting Description
Required security patchlevel is not installed.
This setting creates a compliance rule to ensure that devices have requiredsecurity patches installed as specified in this setting.
You can specify the device models and security patch dates. Devices runninga security patch equal to or later than the specified security patch dates areconsidered compliant.
This setting is valid only for devices running Android 6.0 and laterand PRIV devices running Android 5.1.1 and later.
BlackBerryDynamics library versionverification
This setting creates a compliance rule that allows you to select the BlackBerryDynamics library versions that cannot be activated.
You can select the blocked library versions.
BlackBerryDynamics connectivityverification
This setting creates a compliance rule to ensure that BlackBerry Dynamics appsare not out of contact with BlackBerry UEM for more than a specified amount oftime. The enforcement action is applied to BlackBerry Dynamics apps.
Base connectivityinterval on authenticationdelegate apps
This setting specifies that the connectivity verification is based on when anauthentication delegate app connects to BlackBerry UEM.
This setting is valid only if the "Connectivity verification" setting is selected.
Last contact time This setting specifies the number of days before the device must connectto BlackBerry UEM.
Possible values:
• 8 hours• 16 hours• 1 day• 2 days• 3 days• 7 days• 14 days• 30 days• 60 days• 90 days• 180 days• 365 days
The default value is "2 days."
| Profile settings | 462
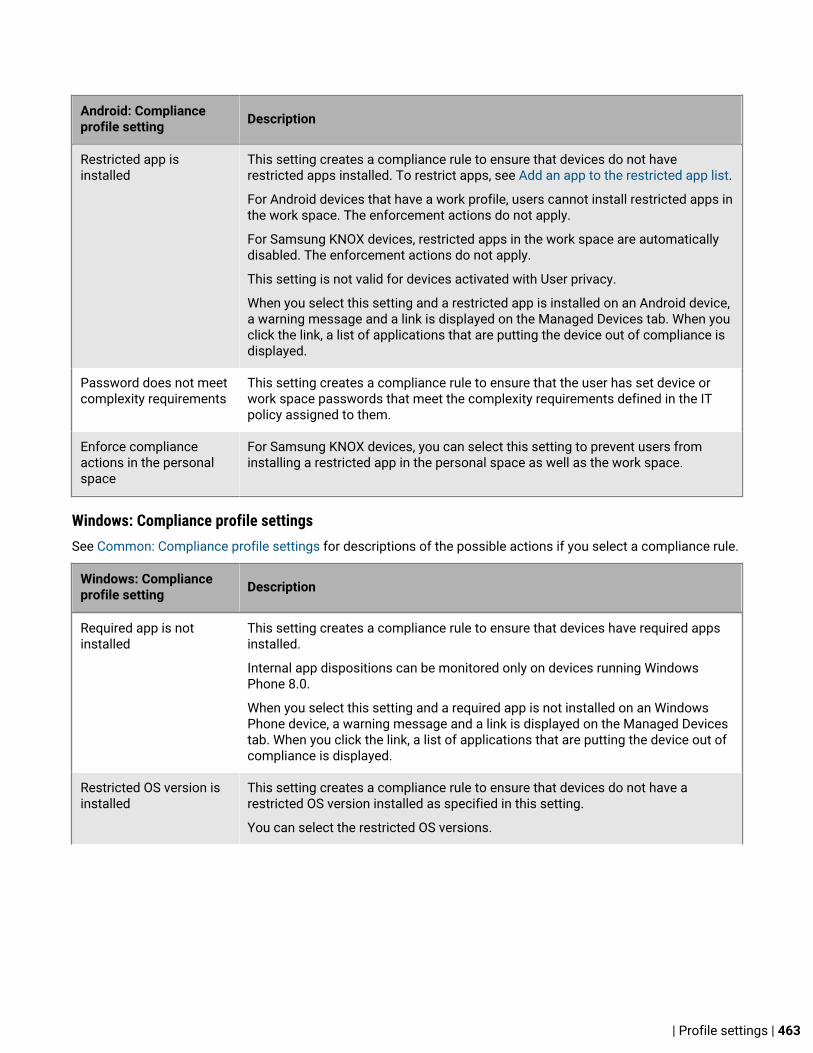
Android: Complianceprofile setting Description
Restricted app isinstalled
This setting creates a compliance rule to ensure that devices do not haverestricted apps installed. To restrict apps, see Add an app to the restricted app list.
For Android devices that have a work profile, users cannot install restricted apps inthe work space. The enforcement actions do not apply.
For Samsung KNOX devices, restricted apps in the work space are automaticallydisabled. The enforcement actions do not apply.
This setting is not valid for devices activated with User privacy.
When you select this setting and a restricted app is installed on an Android device,a warning message and a link is displayed on the Managed Devices tab. When youclick the link, a list of applications that are putting the device out of compliance isdisplayed.
Password does not meetcomplexity requirements
This setting creates a compliance rule to ensure that the user has set device orwork space passwords that meet the complexity requirements defined in the ITpolicy assigned to them.
Enforce complianceactions in the personalspace
For Samsung KNOX devices, you can select this setting to prevent users frominstalling a restricted app in the personal space as well as the work space.
Windows: Compliance profile settingsSee Common: Compliance profile settings for descriptions of the possible actions if you select a compliance rule.
Windows: Complianceprofile setting Description
Required app is notinstalled
This setting creates a compliance rule to ensure that devices have required appsinstalled.
Internal app dispositions can be monitored only on devices running WindowsPhone 8.0.
When you select this setting and a required app is not installed on an WindowsPhone device, a warning message and a link is displayed on the Managed Devicestab. When you click the link, a list of applications that are putting the device out ofcompliance is displayed.
Restricted OS version isinstalled
This setting creates a compliance rule to ensure that devices do not have arestricted OS version installed as specified in this setting.
You can select the restricted OS versions.
| Profile settings | 463

Windows: Complianceprofile setting Description
Restricted device modeldetected
This setting creates a compliance rule to restrict device models as specified inthis setting.
Possible values:
• Allow selected device models• Do not allow selected device models
You can select the devices models that are allowed or restricted.
Device out of contact This setting creates a compliance rule to ensure that devices are not out ofcontact with BlackBerry UEM for more than a specified amount of time.
BlackBerryDynamics library versionverification
This setting creates a compliance rule that allows you to select the BlackBerryDynamics library versions that cannot be activated.
You can select the blocked library versions.
BlackBerryDynamics connectivityverification
This setting creates a compliance rule to ensure that BlackBerry Dynamics appsare not out of contact with BlackBerry UEM for more than a specified amount oftime. The enforcement action is applied to BlackBerry Dynamics apps.
Antivirus signature This setting creates a compliance rule to ensure that devices have an antivirussignature enabled.
Antivirus status This setting creates a compliance rule to ensure that devices have antivirussoftware enabled.
Firewall status This setting creates a compliance rule to ensure that devices have a firewallenabled.
Encryption status This setting creates a compliance rule to ensure that devices require encryption.
Windows update status This setting creates a compliance rule to ensure that devices allow BlackBerryUEM to install Windows OS updates or notify users of required updates.
Restricted app isinstalled
This setting creates a compliance rule to ensure that devices do not haverestricted apps installed. To restrict apps, see Add an app to the restricted app list.
This setting is valid for devices running Windows Phone 8.1 and later.
Grace period expired This setting creates a compliance rule to specify actions that occur if theattestation grace period has expired.
Attestation Identity Keynot present
This setting creates a compliance rule to specify actions that occur if an AIK is notpresent on the device.
Data ExecutionPrevention Policy isdisabled
This setting creates a compliance rule to specify actions that occur if the DEPpolicy is disabled on the device.
| Profile settings | 464

Windows: Complianceprofile setting Description
BitLocker is disabled This setting creates a compliance rule to specify actions that occur if BitLocker isdisabled on the device.
Secure Boot is disabled This setting creates a compliance rule to specify actions that occur if Secure Bootis disabled on the device.
Code integrity is disabled This setting creates a compliance rule to specify actions that occur if the CodeIntegrity feature is disabled on the device.
Device is in safe mode This setting creates a compliance rule to specify actions that occur if the device isin safe mode.
Device is in Windowspreinstallationenvironment
This setting creates a compliance rule to specify actions that occur if the device isin the Windows preinstallation environment.
Early launch antimalwaredriver is not loaded
This setting creates a compliance rule to specify actions that occur if the earlylaunch antimalware driver is not loaded.
Virtual Secure Mode isdisabled
This setting creates a compliance rule to specify actions that occur if VirtualSecure Mode is disabled.
Boot debugging isenabled
This setting creates a compliance rule to specify actions that occur if bootdebugging is enabled.
OS kernel debugging isenabled
This setting creates a compliance rule to specify actions that occur if OS kerneldebugging is enabled.
Test signing is enabled This setting creates a compliance rule to specify actions that occur if test signingis enabled.
Boot manager revisionlist is not the expectedversion
This setting creates a compliance rule to specify actions that occur if the bootmanager revision list is not the expected version.
Code Integrity revisionlist is not the expectedversion
This setting creates a compliance rule to specify actions that occur if the codeintegrity revision list is not the expected version.
Code Integrity policyhash is present and isnot an allowed value
This setting creates a compliance rule to specify actions that occur if the codeintegrity policy hash is present and is not an allowed value.
Custom Secure Bootconfiguration policy hashis present and is not anallowed value
This setting creates a compliance rule to specify actions that occur if the CustomSecure Boot configuration policy hash is present and is not an allowed value.
| Profile settings | 465
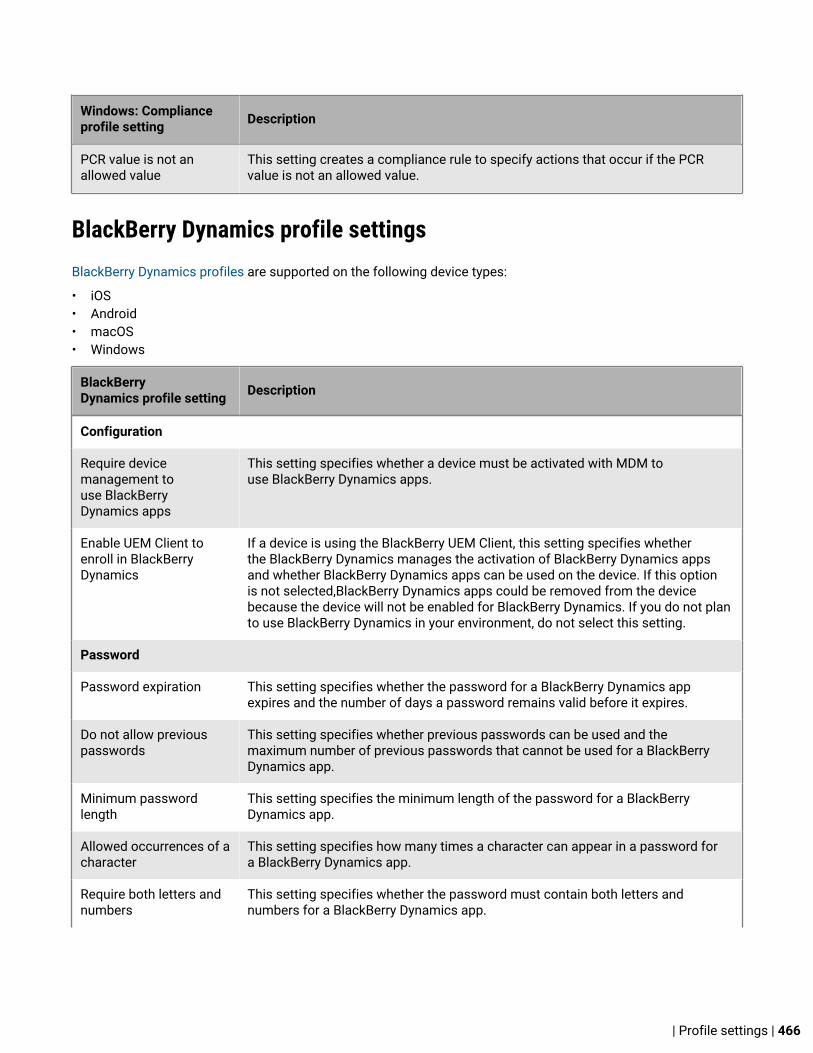
Windows: Complianceprofile setting Description
PCR value is not anallowed value
This setting creates a compliance rule to specify actions that occur if the PCRvalue is not an allowed value.
BlackBerry Dynamics profile settingsBlackBerry Dynamics profiles are supported on the following device types:
• iOS• Android• macOS• Windows
BlackBerryDynamics profile setting Description
Configuration
Require devicemanagement touse BlackBerryDynamics apps
This setting specifies whether a device must be activated with MDM touse BlackBerry Dynamics apps.
Enable UEM Client toenroll in BlackBerryDynamics
If a device is using the BlackBerry UEM Client, this setting specifies whetherthe BlackBerry Dynamics manages the activation of BlackBerry Dynamics appsand whether BlackBerry Dynamics apps can be used on the device. If this optionis not selected,BlackBerry Dynamics apps could be removed from the devicebecause the device will not be enabled for BlackBerry Dynamics. If you do not planto use BlackBerry Dynamics in your environment, do not select this setting.
Password
Password expiration This setting specifies whether the password for a BlackBerry Dynamics appexpires and the number of days a password remains valid before it expires.
Do not allow previouspasswords
This setting specifies whether previous passwords can be used and themaximum number of previous passwords that cannot be used for a BlackBerryDynamics app.
Minimum passwordlength
This setting specifies the minimum length of the password for a BlackBerryDynamics app.
Allowed occurrences of acharacter
This setting specifies how many times a character can appear in a password fora BlackBerry Dynamics app.
Require both letters andnumbers
This setting specifies whether the password must contain both letters andnumbers for a BlackBerry Dynamics app.
| Profile settings | 466

BlackBerryDynamics profile setting Description
Require both uppercaseand lowercase
This setting specifies whether the password must contain both uppercase andlowercase letters for a BlackBerry Dynamics app.
Require at least onespecial character
This setting specifies whether the password must contain at least one specialcharacter for a BlackBerry Dynamics app.
Do not allow sequencesof more than twonumbers
This setting specifies whether the password can contain more than two sequentialnumbers (for example,1, 2, 3) for a BlackBerry Dynamics app.
Do not allow more thanone password changeper day
This setting specifies whether a password can be changed more than once every24 hours for a BlackBerry Dynamics app.
Do not allow personalinformation
This setting specifies whether the following personal information can be used in apassword for a BlackBerry Dynamics app:
• The user's first and last names (excluding initials) as recorded in ActiveDirectory
• The part of an email address before the @ sign.
Allow Biometrics This setting specifies whether BlackBerry Dynamics apps can be unlocked usingbiometric input when they are already open in the app switcher on iOS devices.You can allow the following options:
• None• Allow Touch ID• Allow Face ID• Allow Touch ID and Face ID
Enable Touch ID andFace ID from cold start
This setting specifies whether BlackBerry Dynamics apps can be unlocked usingthe selected biometric input methods when they are opened for the first time aftera device restarts.
Require password to bere-entered and disableTouch ID and Face ID
This setting specifies a period of time after which users must enter a password tounlock a BlackBerry Dynamics app and re-enable Touch ID, Face ID, or both.
Allow Android fingerprintauthentication
This setting specifies whether BlackBerry Dynamics apps can be unlockedusing Android fingerprint authentication.
Do not require password These settings specify whether a user can access a BlackBerry Dynamics appwithout entering a password. The choices are:
• iOS• macOS• Android• Windows
Blocked password list
| Profile settings | 467

BlackBerryDynamics profile setting Description
Blocked password file(.txt)
This setting specifies a list of banned passwords. You can download thepreviously uploaded list of banned passwords. Passwords in the list must meetthe following requirements: each password must be separated by a hard return,only UTF-8 characters are supported, and passwords must be 14 characters orless.
Lock screen
Require passwordwhen BlackBerryDynamics apps start
This setting specifies whether a password is required each time a BlackBerryDynamics app is started.
Note: If you are using authentication delegation, do not select this option.
Require password afterperiod of inactivity
This setting specifies the period of inactivity that must elapse before a passwordis required.
Take action after invalidpassword attempts
This setting specifies whether there is a limit to the number of times that a usercan enter an incorrect password. If you select this rule, specify the number oftimes that a user can enter an incorrect password and the action that occurs afterthe limit has been reached. Choose one of the following actions:
• Lock out user• Wipe Data
Wearables
Allow wearables This setting specifies whether BlackBerry Dynamics apps can be used on awearable device. If you select this rule, specify the how much time must elapsebefore the wearable device is disconnected and whether the wearable canreconnect automatically.
App authentication delegation
| Profile settings | 468

BlackBerryDynamics profile setting Description
You can designate a BlackBerry Dynamics app to act as the authenticationdelegate on behalf of other other BlackBerry Dynamics apps so that users donot have to create a password for each BlackBerry Dynamics app that theyinstall. After an authentication delegate is configured, each time a user opensa BlackBerry Dynamics app, the device displays the password screen for theauthentication delegate instead of the app that they are attempting to open. Afterthe user enters the password for the authentication delegate, the user can openthe BlackBerry Dynamics app.
You can choose any app to be the authentication delegate for other apps, but it isrecommended that you choose your most commonly used app to be the primaryauthentication delegate to provide the most seamless experience for the user.
As a best practice, it is recommended that you set only one authenticationdelegate. This prevents unnecessarily complex and undesirable authenticationdelegate switching and simplifies administrative management. If a useraccidentally deletes the authentication delegate, they must reinstall it. If more thanone authentication delegate is required, for example, the primary authenticationdelegate does not exist for a given platform and an alternate delegate isconfigured, refer to the following recommendations to make sure that BlackBerryDynamics apps are successfully installed and activated:
• Users should always install the primary authentication delegate first andthey should not activate it using an already installed, alternate authenticationdelegate app.
• If the user already has an alternate authentication delegate installed and in use,and then later installs the primary authentication delegate, they need to makesure that the existing, installed authentication delegate is in an unlocked stateto successfully complete the authentication. If the alternate authenticationdelegate has been force closed, the user will encounter various errors and maybe blocked.
• Users must not delete the currently installed authentication delegate afterthey install their primary authentication delegate. Apps that are currentlyusing that authentication delegate will need to automatically switch to the newauthentication delegate when the app is next launched in online mode.
• If the primary authentication delegate is deleted, users should reactivate theauthentication delegate using an access key. If they attempt to activate theauthentication delegate with any other app, it may cause various errors.
• Even if the option to 'allow self authentication' is selected, or if an app that isdesignated as a secondary or tertiary authentication delegate is installed, thereis no fallback mechanism to allow apps to change the authentication delegatewithout the original authentication delegate being installed and unlocked.
Data leakage prevention
| Profile settings | 469

BlackBerryDynamics profile setting Description
Do not allow copyingdata from non BlackBerryDynamics appsinto BlackBerryDynamics apps
This setting specifies whether users can copy data from non BlackBerryDynamics apps to BlackBerry Dynamics apps.
Note: If you are using an app-based PKI solution such as Purebred, do not selectthis option.
Do not allow Androiddictation
This setting specifies whether Android device users can use voice dictationwith BlackBerry Dynamics apps.
Do not allowscreen captureson Android devices
This setting specifies whether Android device users can take screen capturesin BlackBerry Dynamics apps.
Do not allow screenrecording and sharingon iOS devices
This setting specifies whether iOS device users can share and record screensin BlackBerry Dynamics apps.
This setting applies to devices running iOS 11 and later.
Do notallow iOS dictation
This setting specifies whether iOS device users can use voice dictationwith BlackBerry Dynamics apps.
Do not allowcustom keyboardson iOS devices
This setting specifies whether iOS device users can use custom keyboardswith BlackBerry Dynamics apps.
Enable FIPS This setting specifies whether compliance with U.S. Federal InformationProcessing standard 140-2 is enforced.
Certificates
Enable device certificatestore
This setting specifies whether BlackBerry Dynamics apps can get certificates fromthe device certificate store.
Detailed logging
Enable detailedlogging for BlackBerryDynamics apps
This setting specifies whether log files can be generated and uploadedfrom BlackBerry Dynamics apps.
Prevent users fromturning on detailedlogging in BlackBerryDynamics apps
This setting specifies whether users can turn on the ability to generate and sharedetailed log files from BlackBerry Dynamics apps.
Agreement
| Profile settings | 470

BlackBerryDynamics profile setting Description
Enable an agreementmessage for BlackBerryDynamics apps
This setting specifies whether to display a message in BlackBerry Dynamics appsthat the user must acknowledge. If authentication delegation is enabled, themessage is displayed only in the authenticator app. If you select this rule,complete the following actions:
• Specify if the message is displayed each time the app is unlocked, otherwisethe message is only displayed the first time the user opens the app.
• In the Message field, create the message that you want to display.
Note: On Android devices, only the first 4000 characters are displayed.
BlackBerry Dynamics connectivity profile settingsBlackBerry Dynamics connectivity profiles are supported on the following device types:
• iOS• Android• macOS• Windows
BlackBerryDynamics connectivityprofile setting
Description
Import BlackBerryDynamics connectivityprofile
Click the icon to import connectivity settings from a .csv file. When you importa .csv file it replaces the contents of the connectivity profile. This makes it easier ifyou need to manually edit values, or if several URLs or servers need modification.
Export BlackBerryDynamics connectivityprofile
Click the icon to export connectivity settings to a .csv file.
Infrastructure
Route all traffic Specify whether all BlackBerry Dynamics app data is routed through BlackBerryProxy. For more information, see Routing all BlackBerry Dynamics app datathrough BlackBerry Proxy.
Domain Specify the Internet domains that you want to allow access to. Forexample, blackberry.com allows access to any server in the blackberry.comdomain. BlackBerry Dynamics apps are allowed to connect through yourorganization's firewall to any server in the listed domains and their subdomains.
Primary andSecondary BlackBerryProxy Clusters
Specify the fully qualified domain name, port and priority of the BlackBerryProxy clusters that must be used to reach the domain.
Default domains
| Profile settings | 471

BlackBerryDynamics connectivityprofile setting
Description
Domain Specify the default allowed domains (for example, qa.blackberry.com). BlackBerryDynamics apps may try to connect to an unqualified hostname like "portal" insteadof using a fully qualified name like "portal.sales.xyzcorp.com". The domains in thislist will be appended to unqualified hostnames to construct fully qualified names.
Additional servers
Server Specify the fully qualified domain name of any additional servers that BlackBerryDynamics apps can connect to. Add servers to this list instead of using the"Allowed Domains" list if you want BlackBerry Dynamics apps to connect only tocertain servers and not to every server in a domain.
IP address ranges
Range Specify a range of IP addresses that BlackBerry Dynamics apps can access.Address ranges must be entered with a lower and upper bound address (forexample, 192.168.2.0-192.168.2.255) or in IPv4 CIDR notation (for example,192.168.2.0/24). For example:
• Discrete addresses:
Example: 192.168.2.0-192.168.2.255• An entire subnet:
Example: 192.168.2.0/24
App servers If you have a BlackBerry Dynamics app that is served from an app server or webserver, you can specify the name of the server and the priority of the BlackBerryProxy clusters used for communication with it.
For more information, see Add an app server to a BlackBerry Dynamicsconnectivity profile.
Enterprise connectivity profile settingsEnterprise connectivity profiles are supported on the following device types:
• BlackBerry 10• iOS• Android
| Profile settings | 472

Common: Enterprise connectivity profile settings
Common: Complianceprofile setting Description
BlackBerry SecureConnect Plus servergroup
This setting specifies the server group that BlackBerry Secure Connect Plus usesto direct traffic to a specific regional path.
This setting is valid only if you have installed one or more instances ofthe BlackBerry Connectivity Node and set up server groups.
BlackBerry 10: Enterprise connectivity profile settings
Setting Description
Enterprise connectivity Enterprise connectivity is always enabled for BlackBerry 10 devices. You can'tchange this setting.
Proxy profile This setting specifies the associated proxy profile if you want to route securetunnel traffic from devices to the work network through a proxy server.
Enable BlackBerry SecureConnect Plus
This setting specifies whether work apps use BlackBerry Secure Connect Plus forsending work data between devices and your network.
iOS: Enterprise connectivity profile settings
Setting Description
Enable BlackBerry SecureConnect Plus
This setting specifies whether work apps use BlackBerry Secure Connect Plus forsending work data between devices and your network.
Enable VPN on demand This setting specifies whether a work apps can automatically start a VPNconnection using BlackBerry Secure Connect Plus when it accesses workresources.
Select this setting to specify rules for BlackBerry Secure Connect Plus connections
VPN on demand rules foriOS 9 and later
This setting specifies the connection requirements for VPN on demand usingBlackBerry Secure Connect Plus. You must use one or more keys from the payloadformat example.
This setting is valid only if the "Enable VPN on demand" setting is selected.
Enable per-app VPN Select this setting to allow only specific apps to use BlackBerry Secure ConnectPlus.
Note: If you select this option, users must manually turn on the VPN connectionon their device to use BlackBerry Secure Connect Plus. As long as the VPNconnection is on, the device uses BlackBerry Secure Connect Plus to connectto the work network. The user must turn the VPN connection off to use anotherconnection, such as the work Wi-Fi network. Instruct users when it is appropriateto turn on and turn off the VPN connection (for example, you can instruct users toturn on the VPN connection when they are not in range of the work Wi-Fi network).
| Profile settings | 473

Setting Description
Safari domains Click to specify the domains that are allowed to start a VPN connection inSafari.
Allow apps to connectautomatically
Specify whether apps can start the VPN connection automatically.
Proxy profile This setting specifies the associated proxy profile if you want to route securetunnel traffic from devices to the work network through a proxy server.
The proxy profile must use a manual configuration with an IP address. PACconfiguration is not supported. For more information, see Setting up proxy profilesfor devices.
Android: Enterprise connectivity profile settings
Setting Description
Enable BlackBerry SecureConnect Plus
This setting specifies whether work apps use BlackBerry Secure Connect Plus forsending work data between devices and your network.
Enterprise connectivityfor Android devices witha work space
This setting specifies whether Android work profile and Samsung KNOXWorkspace devices use BlackBerry Secure Connect Plus for all apps in the workspace, or only for specified apps.
• "Container wide VPN" uses a VPN connection for all apps in the work space onthe device.
• "Per-app VPN" uses a VPN connection only for specified apps.
| Profile settings | 474

Setting Description
Apps restricted fromusing BlackBerry SecureConnect Plus
This setting specifies apps in the work space on Android work profile devices thatare not allowed to use BlackBerry Secure Connect Plus.
Click and type the app package ID. Repeat as necessary to restrict additionalapps.
By default, Google Play and underlying services (com.android.providers.media,com.android.vending, com.google.android.gms, andcom.google.android.apps.gcs) are restricted because Google Play does nothave proxy support. It is recommended to keep these restrictions in place. Ifyou remove any of these restrictions, you must contact Google Play support forthe firewall configuration required to allow connections to Google Play usingBlackBerry Secure Connect Plus.
If the “Force work apps to only use VPN” IT policy rule is applied to the device,this setting is ignored and no work apps, including the BlackBerry UEM Clientand Google Play are restricted from using BlackBerry Secure Connect Plus. Inthis case you will have to open ports in the firewall to allow the BlackBerry UEMClient to communicate with the BlackBerry Infrastructure through BlackBerryUEM. For more information about opening ports in the firewall when work appsuseBlackBerry Secure Connect Plus, visit http://support.blackberry.com/kb to readarticle KB48330.
If your organization uses BlackBerry Dynamics apps, it is recommended that yourestrict the apps from using BlackBerry Secure Connect Plus. If you don't, youmust open additional ports in your organization’s firewall to allow the apps tosend data to the BlackBerry Dynamics NOC, and network activity from the appsmight be delayed because data is routed to both the BlackBerry Infrastructure andBlackBerry Dynamics NOC.
This setting is valid only if the "Enterprise connectivity for Android devices with awork space" setting is set to "Container wide VPN."
Apps allowed to useEnterprise Connectivity
This setting specifies apps in the work space on Android work profile andSamsung KNOX Workspace devices that are allowed to use BlackBerry SecureConnect Plus. You can select apps from a list of available apps or specify the apppackage ID.
This setting is valid only if the "Enterprise connectivity for Android devices with awork space" setting is set to "Per-app VPN."
Proxy profile If you want to route secure tunnel traffic from Samsung KNOX Workspace 2.5 andlater devices to the work network through a proxy server, select the appropriateproxy profile.
This setting does not apply to Android devices that have a work profile or deviceswith Samsung KNOX Workspace version 2.4 and earlier.
Enterprise Management Agent profile settingsEnterprise Management Agent profiles are supported on the following device types:
• BlackBerry 10
| Profile settings | 475

• iOS• Android• Windows
BlackBerry 10: Enterprise Management Agent profile settings
Setting Description
Enterprise ManagementWeb Service pollinginterval
Specify how often, in seconds, the Enterprise Management Web Service on thedevice polls for configuration updates.
Possible values:
• 3600 to 86400
The default value is 3600.
Fast polling interval Specify how often, in seconds, the device polls for configuration updates whenpush notification is not available for fast polling (BPDS is not registered).
• Minimum: 900
The default value is 900.
Slow polling interval Specify how often, in seconds, the device polls for configuration updates whenpush notification is available for slow polling (BPDS is registered).
• Minimum: 900
The default value is 900.
Allow personal appcollection
This setting specifies whether BlackBerry UEM receives a list of personal appsthat are installed on users' devices.
This setting is not supported on devices with Work and personal - Corporateactivations.
| Profile settings | 476

Setting Description
Configuration file (.json) This setting allows you to specify a configuration file to restrict which ciphersuites from the SSL library are supported by the device.
Specify a configuration file only if you want to remove support for a cipher suitethat has a security vulnerability and your organization’s resources do not requirethat cipher suite for communication.
Specifying a configuration file does not affect device communication withBlackBerry UEM but could impact communication with other servers in yourorganization, depending on the requirements of those servers.
The configuration file must be in .json format.
Example:
{"tls": {"tls_protocols": ["TLSv1"], "tls_ciphersuites":[49200, 49196, 49192, 49188, 49172, 49162, 163, 159, 107,106, 57, 56, 136, 135, 49202, 49198, 49194, 49190, 49167,49157, 157, 61, 53, 132, 141, 49199, 49195, 49191, 49187,49171, 49161, 162, 158, 103, 64, 51, 50, 154, 153, 69,68, 49201, 49197, 49193, 49189, 49166, 49156, 156, 60,47, 150, 65, 140, 49169, 49159, 49164, 49154, 5, 4, 138,49170, 49160, 22, 19, 49165, 49155, 10, 139, 21, 18, 9,20, 17, 8, 6, 3], "tls_curves": ["secp256r1", "secp521r1","brainpoolP512r1", "brainpoolP384r1", "secp384r1","brainpoolP256r1", "secp256k1", "sect571r1", "sect571k1","sect409k1", "sect409r1", "sect283k1", "sect283r1","secp224k1", "secp224r1", "secp192k1", "secp192r1","secp160k1", "secp160r1", "secp160r2", "sect239k1","sect233k1", "sect233r1", "sect193r1", "sect193r2","sect163k1", "sect163r1", "sect163r2"], "tls_sigalgs":["ECDSA+SHA512", "DSA+SHA512", "RSA+SHA512", "ECDSA+SHA384", "DSA+SHA384", "RSA+SHA384", "ECDSA+SHA256", "DSA+SHA256", "RSA+SHA256", "ECDSA+SHA224", "DSA+SHA224","RSA+SHA224", "ECDSA+SHA1", "DSA+SHA1", "RSA+SHA1"],"tls_dh_min_key_bits":768, "tls_suiteb_mode": "SUITEB_OFF"},"vpn": {"vpn_encr": ["aes128", "aes256", "aes128_icv16_gcm","aes256_icv16_gcm", "3des", "aes192"], "vpn_dh": ["dh2","dh5", "dh7", "dh8", "dh9", "dh10", "dh11", "dh12","dh13", "dh14", "dh15", "dh16", "dh17", "dh18", "dh19","dh20", "dh21", "dh22", "dh23", "dh24", "dh25", "dh26"],"vpn_integ": ["sha1", "sha384", "sha512", "aes", "sha256"],"vpn_prf": ["sha1", "sha384", "sha512", "aes", "hmac","sha256"]}}
| Profile settings | 477

iOS: Enterprise Management Agent profile settings
Setting Description
Enterprise ManagementAgent poll rate
Specify how often, in seconds, the device polls for Enterprise ManagementAgent server commands. The device polls only when the UEM Client is open on thedevice.
Possible values:
• 900 to 86400
The default value is 3600.
Allow personal appcollection
This setting specifies whether BlackBerry UEM receives a list of personal appsthat are installed on users' devices.
This setting is not supported on devices with user privacy activations.
Android: Enterprise Management Agent profile settings
Setting Description
App changes Specify how often, in seconds, the device checks for changes in installed apps.
Possible values:
• 3600 to 86400 seconds
The default value is 3600.
Battery level threshold Specify the percent battery level change (from 5 to 100) required before the devicesends information back to BlackBerry UEM.
Possible values:
• 5 to 100 percent
The default value is 20.
RAM free spacethreshold
Specify the required change in the amount of free memory in megabytes beforethe device sends information back to BlackBerry UEM.
By default, the device does not send this information back to BlackBerry UEM.
Internal storagethreshold
Specify the required change in the amount of internal free storage space inmegabytes before the device sends information back to BlackBerry UEM.
The default value is 250.
Memory card threshold Specify the required change in the amount of external free space in megabytesbefore the device sends information back to BlackBerry UEM
The default value is 500.
| Profile settings | 478

Setting Description
Enterprise ManagementAgent poll rate
Specify how often, in seconds, the device polls for Enterprise ManagementAgent server commands.
Possible values:
• Minimum: 900
The default value is 900.
Allow personal appcollection
This setting specifies whether BlackBerry UEM receives a list of personal appsthat are installed on users' devices.
This setting is not supported on devices with user privacy activations.
Windows: Enterprise Management Agent profile settings
Setting Description
Poll interval for deviceconfiguration updates
Specify, in minutes, how often the device polls for configuration updates whenpush notification is not available.
Poll interval for the firstset of retries
Specify, in minutes, the waiting time between attempts in the first set of retries ifpolling for device configuration updates fails.
Number of first retries Specify the number of attempts in the first set of retries.
Poll interval for thesecond set of retries
Specify, in minutes, the waiting time between attempts in the second set of retriesif polling for device configuration updates fails.
Number of second retries Specify the number of attempts in the second set of retries.
Poll interval for theremaining scheduledretries
Specify, in minutes, the waiting time between subsequent attempts after thesecond set of retries if polling for device configuration updates fails.
Number of remainingscheduled retries
Specify the number of subsequent attempts after the second set of retries ifpolling for device configuration updates fails. If set to “0”, the device continues topoll until a connection is successful or the device is deactivated.
Poll on user login Specify whether the device starts a management session on any user login.
All users poll on firstlogin
Specify whether the device starts a management session on first user login for allusers.
Allow personal appcollection
This setting specifies whether BlackBerry UEM receives a list of personal appsthat are installed on users' devices.
Windows Information Protection profile settingsWindows Information Protection profiles are supported on the following device types:
| Profile settings | 479

• Windows 10
Windows 10: Windows Information Protection profile settings
Windows10: Windows InformationProtection profile setting
Description
Windows InformationProtection settings
This setting specifies whether Windows Information Protection is enabled and thelevel of enforcement. When this setting is set to "Off," data is not encrypted andaudit logging is turned off. When this setting is set to "Silent," data is encryptedand any attempts to share protected data are logged. When this setting is set to"Override," data is encrypted, the user is prompted when they attempt to shareprotected data, and any attempts to share protected data are logged. When thissetting is set to "Block," data is encrypted, users cannot share protected data, andany attempts to share protected data are logged.
Possible values:
• Off• Silent• Override• Block
The default value is "Off."
Enterprise protecteddomain names
This setting specifies the work network domain names that your organization usesfor its user identities. You can separate multiple domains with pipes (|). The firstdomain is used as a string to tag files that are protected by apps that use WIP.
For example, example.com|example.net.
Data recovery certificatefile (.der, .cer)
This setting specifies the data recovery certificate file. The file that you specifymust be a PEM encoded or DER encoded certificate with a .der or .cer fileextension.
You use the data recovery certificate file to recover files that were locallyprotected on a device. For example, if your organization wants to recover dataprotected by WIP from a device.
For information on creating a data recovery certificate, see the MicrosoftWindows Information Protection documentation.
Removethe Windows InformationProtection settings whena device is removedfrom BlackBerry UEM
This setting specifies whether to revoke WIP settings when a device isdeactivated. When WIP settings are revoked, the user can no longer accessprotected files.
Show Windows InformationProtection overlays onprotected files and appsthat can create enterprisecontent
This setting specifies whether an overlay icon is shown on file and app icons toindicate whether a file or app is protected by WIP.
| Profile settings | 480

Windows10: Windows InformationProtection profile setting
Description
Work network IP range This setting specifies the range of IP addresses at work to which an app protectedwith WIP can share data.
Use a dash to denote a range of addresses. Use a comma to separate addresses.
Work network IP rangesare authoritative
This setting specifies if only the work network IP ranges are accepted as part ofthe work network. When this setting is enabled, no attempts are made to discoverother work networks.
By default, the option is not selected.
Enterprise internal proxyservers
This setting specifies the internal proxy servers that are used when connecting towork network locations. These proxy servers are only used when connecting to thedomain listed in the Enterprise cloud resources setting.
Enterprise cloudresources
This setting specifies the list of enterprise resource domains hosted in the cloudthat need to be protected. Data from these resources are considered enterprisedata and protected.
Cloud resources domain This setting specifies the domain name.
Paired proxy This setting specifies a proxy that is paired with a cloud resource. Traffic to thecloud resource will be routed through the enterprise network via the denoted proxyserver (on port 80).
A proxy server used for this purpose must also be configured in the Enterpriseinternal proxy servers field.
Enterprise proxy servers This setting specifies the list of internet proxy servers.
Enterprise proxy serversare authoritative
This setting specifies whether the client should accept the configured list ofproxies and not try to detect other enterprise proxies.
Neutral resources This setting specifies the domains that can be used for work or personalresources.
Enterprise networkdomain names
This setting specifies a comma-separated list of domains that comprise theboundaries of the enterprise. Data from one of these domains that is sent to adevice will be considered enterprise data and protected. These locations will beconsidered a safe destination for enterprise data to be shared to.
For example, example.com,example.net.
| Profile settings | 481

Windows10: Windows InformationProtection profile setting
Description
Desktop app payloadcode
Specify the desktop app keys and values used to configure applicationlaunch restrictions on Windows 10 devices. You must use the keys definedby Microsoft for the payload type that you want to configure.
To specify the apps, copy the XML code from the AppLocker policy .xml file andpaste it in this field. When you copy the text, copy only the elements as shown inthe following code sample:
<RuleCollection Type="Appx" EnforcementMode="Enabled"> <FilePublisherRule Id="0c9781aa-bf9f-4352 -b4ba-64c25f36f558" Name="WordMobile" Description="" UserOrGroupSid="S-1-1-0" Action="Allow"> <Conditions> <FilePublisherCondition PublisherName="CN=Microsoft Corporation, O=Microsoft Corporation, L=Redmond, S=Washington, C=US" ProductName="Microsoft.Office.Word" BinaryName="*"> <BinaryVersionRange LowSection="*" HighSection="*" /> </FilePublisherCondition> </Conditions> </FilePublisherRule> </RuleCollection>
For more information about using AppLocker, see the Microsoft AppLockerdocumentation.
| Profile settings | 482

Windows10: Windows InformationProtection profile setting
Description
Universal Windows Platformapp payload code
Specify the Universal Windows Platform app keys and values used to configureWIP on Windows 10 devices. You must use the keys defined by Microsoft for thepayload type that you want to configure.
To specify the apps, copy the XML code from the AppLocker policy .xml file andpaste it in this field. When you copy the text, copy only the elements as shown inthe following code sample:
<RuleCollection Type="Exe" EnforcementMode="Enabled"> <FilePathRule Id="921cc481-6e17-4653-8f75-050b80acca20" Name="(Default Rule) All files" Description="" UserOrGroupSid="S-1-1-0" Action="Allow"> <Conditions> <FilePathCondition Path="*" /> </Conditions> </FilePathRule> <FilePublisherRule Id="ddd0bc90-dada-4002-9e2f-0fc68e1f6af0" Name="WORDPAD.EXE, from O=MICROSOFT CORPORATION, L=REDMOND, S=WASHINGTON, C=US" Description="" UserOrGroupSid="S-1-1-0" Action="Deny"> <Conditions> <FilePublisherCondition PublisherName="O=MICROSOFT CORPORATION, L=REDMOND, S=WASHINGTON, C=US" ProductName="*" BinaryName="WORDPAD.EXE"> <BinaryVersionRange LowSection="*" HighSection="*" /> </FilePublisherCondition> </Conditions> </FilePublisherRule> <FilePublisherRule Id="c8360d06-f651-4883-abdd-9c3a95a415ff" Name="NOTEPAD.EXE, from O=MICROSOFT CORPORATION, L=REDMOND, S=WASHINGTON, C=US" Description="" UserOrGroupSid="S-1-1-0" Action="Allow"> <Conditions> <FilePublisherCondition PublisherName="O=MICROSOFT CORPORATION, L=REDMOND, S=WASHINGTON, C=US" ProductName="*" BinaryName="NOTEPAD.EXE"> <BinaryVersionRange LowSection="*" HighSection="*" /> </FilePublisherCondition> </Conditions> </FilePublisherRule> </RuleCollection>
For more information about using AppLocker, see the Microsoft AppLockerdocumentation.
| Profile settings | 483

Windows10: Windows InformationProtection profile setting
Description
Associated VPN profile This setting specifies the VPN profile that a device uses to connect to a VPN whenusing an app protected by WIP.
This setting is valid only if "Use a VPN profile" is selected for the "Secureconnection used with WIP."
Collect device audit logs This setting specifies whether to collect device audit logs.
Microsoft Intune app protection profile settingsMicrosoft Intune app protection profiles are supported on the following device types:
• iOS• Android
Common: Microsoft Intune app protection profile settings
Intune app protectionprofile setting Description
Interoperability
Enable interoperabilitybetween Intune andDynamics apps
This setting specifies whether BlackBerry Dynamics apps can interact with Intune-managed apps, such as Microsoft Office 365 apps, on the device.
To allow interoperability between BlackBerry Dynamics apps and Intune-managedapps, BlackBerry Enterprise BRIDGE must be installed on users' devices.
For more information see the BlackBerry Enterprise BRIDGE Administration Guide
Data relocation
Allow app to transferdata to other apps
This setting specifies the apps Intune-managed apps can send data to.
Possible values:
• Policy managed apps: This option allows data to be transferred only to otherapps that are managed by Intune.
• All apps• None
| Profile settings | 484

Intune app protectionprofile setting Description
Interoperability
Allow app to receive datafrom other apps
This setting specifies the apps that apps managed by the app protection policycan receive data from.
Possible values:
• Policy managed apps: This option allows data to be transferred only from otherapps that are managed by Intune.
• All apps• None
Prevent "Save as" This setting specifies whether the "Save As" option is enabled for apps.
If you select this setting, you can allow using the "Save As" option to save workdata only to one or more of the following locations:
• Local storage• OneDrive for Business• SharePoint
Restrict cut, copy, andpaste with other apps
This setting specifies how cut, copy, and paste operations can be used with theapp.
Possible values:
• Blocked: This option prevents cut, copy, and paste operations between this appand other apps.
• Policy managed apps: This option allows cut, copy, and paste operationsbetween the app and other apps that are managed by Intune.
• Policy managed apps with paste in: This option allows pasting data from anyapp, but data cut or copied from a policy-managed app can be pasted only toother apps that are managed by Intune.
• Any app: This option allows cut, copy, and paste operations between all appson the device.
Restrict web content todisplay in the managedbrowser
This setting specifies whether web links in apps must be opened in a browsermanaged by Intune.
Disable contact sync This setting specifies whether the app can save contacts to the native Contactsapp on the device.
Disable printing This setting specifies whether the app can print data.
Access
Require corporatecredentials for access
This setting specifies whether users must use their organization credentials toaccess the app.
If this rule is selected, it takes precedence over requirements for a PIN orfingerprint.
| Profile settings | 485

Intune app protectionprofile setting Description
Interoperability
Block managed appsfrom running onjailbroken or rooteddevices
This setting specifies whether apps can run on jailbroken or rooted devices.
Recheck accessrequirements timeoutperiod
This setting specifies, in minutes, how often the access requirements for the appare rechecked when the app is open.
Offline grace period This setting specifies, in minutes, how often the access requirements for the appare rechecked when the device is offline.
Offline interval beforeapp data is wiped
This setting specifies, in days, how long a device can be offline before app data iswiped from the device.
Require PIN for access This setting specifies whether users must enter a PIN to access the app. If thisoption is selected, the user is prompted to provide a PIN the first time they run theapp.
If the "Require corporate credentials for access" setting is selected, it takesprecedence over this rule.
Number of attemptsbefore PIN reset
This setting specifies the number of PIN entry attempts that can be made beforethe user must reset the PIN.
Allow simple PIN This setting specifies whether users can use simple PIN sequences such as 1234or 1111.
PIN length This setting specifies the minimum number of digits in the PIN.
Allow fingerprint insteadof PIN
This setting specifies whether users can use a fingerprint instead of a PIN toaccess the app.
This setting is supported by iOS 8.0 and later and Android 6.0 and later.
Disable app PIN whendevice PIN is managed
This setting specifies whether the app prompts for the PIN when the device isrequired to have a password.
If this setting is selected, the app PIN is not requested on Android devices ifthe UEM IT policy for the device requires a password. To disable the app PINon iOS devices, the device PIN must be required by Intune.
| Profile settings | 486
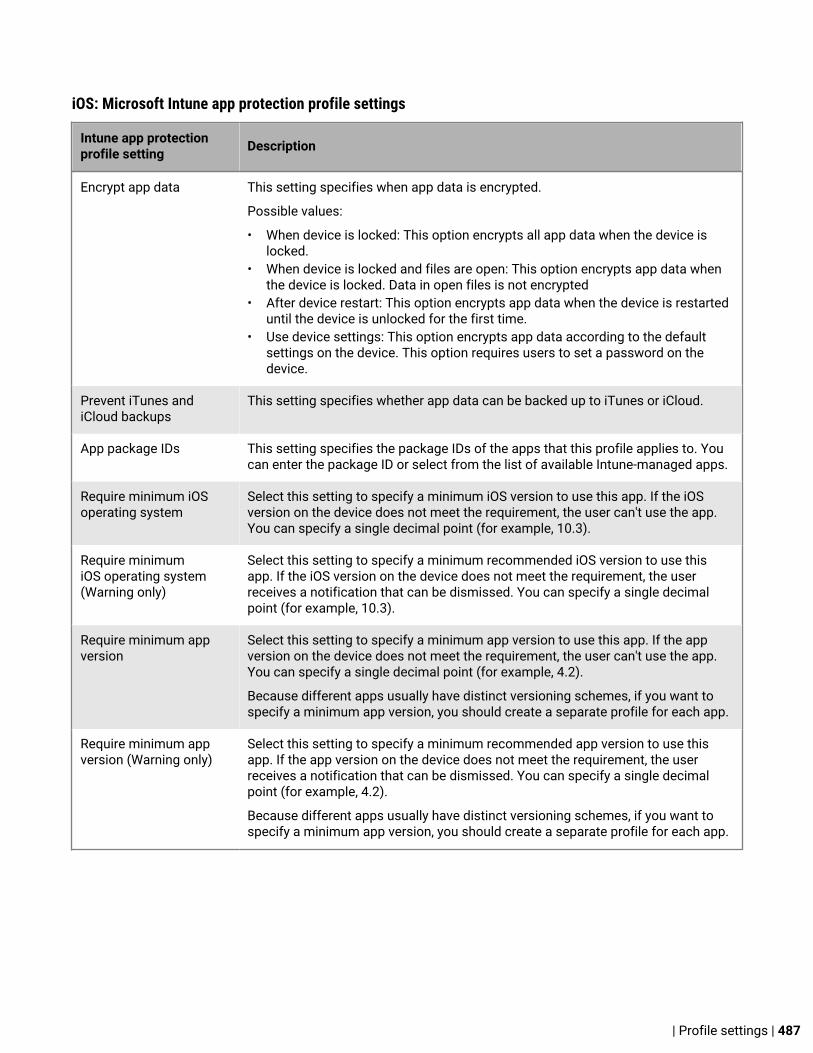
iOS: Microsoft Intune app protection profile settings
Intune app protectionprofile setting Description
Encrypt app data This setting specifies when app data is encrypted.
Possible values:
• When device is locked: This option encrypts all app data when the device islocked.
• When device is locked and files are open: This option encrypts app data whenthe device is locked. Data in open files is not encrypted
• After device restart: This option encrypts app data when the device is restarteduntil the device is unlocked for the first time.
• Use device settings: This option encrypts app data according to the defaultsettings on the device. This option requires users to set a password on thedevice.
Prevent iTunes andiCloud backups
This setting specifies whether app data can be backed up to iTunes or iCloud.
App package IDs This setting specifies the package IDs of the apps that this profile applies to. Youcan enter the package ID or select from the list of available Intune-managed apps.
Require minimum iOSoperating system
Select this setting to specify a minimum iOS version to use this app. If the iOSversion on the device does not meet the requirement, the user can't use the app.You can specify a single decimal point (for example, 10.3).
Require minimumiOS operating system(Warning only)
Select this setting to specify a minimum recommended iOS version to use thisapp. If the iOS version on the device does not meet the requirement, the userreceives a notification that can be dismissed. You can specify a single decimalpoint (for example, 10.3).
Require minimum appversion
Select this setting to specify a minimum app version to use this app. If the appversion on the device does not meet the requirement, the user can't use the app.You can specify a single decimal point (for example, 4.2).
Because different apps usually have distinct versioning schemes, if you want tospecify a minimum app version, you should create a separate profile for each app.
Require minimum appversion (Warning only)
Select this setting to specify a minimum recommended app version to use thisapp. If the app version on the device does not meet the requirement, the userreceives a notification that can be dismissed. You can specify a single decimalpoint (for example, 4.2).
Because different apps usually have distinct versioning schemes, if you want tospecify a minimum app version, you should create a separate profile for each app.
| Profile settings | 487

Android: Microsoft Intune app protection profile settings
Intune app protectionprofile setting Description
Encrypt app data This setting specifies whether app data is encrypted. If you select this rule, appdata is encrypted synchronously during all file input and output tasks.
Prevent Android backups This setting specifies whether app data can be backed up to the Android BackupService.
Block screen captureand Android Assistant
This setting specifies whether screen capture and Android Assistant app scanningcapabilities are allowed when using a protected app. This setting is supported byAndroid 6.0 and later.
App package IDs This setting specifies the package IDs of the apps that this profile applies to. Youcan enter the package ID or select from the list of available Intune-managed apps.
Requireminimum Android version
Select this setting to specify a minimum Android version to use this app. Ifthe Android version on the device does not meet the requirement, the user can'tuse the app.
You can specify up to four release identifiers. Separate release identifiers withperiods (for example, 10.3 or 10.3.14.2).
Requireminimum Android version(Warning only)
Select this setting to specify a minimum recommended Android version to use thisapp. If the Android version on the device does not meet the requirement, the userreceives a notification that can be dismissed.
You can specify up to four release identifiers. Separate release identifiers withperiods (for example, 10.3 or 10.3.14.2).
Requireminimum Android patchversion
Select this setting to specify a minimum Android patch version to use this app. Ifthe Android patch version on the device does not meet the requirement, the usercan't use the app.
Specify the version using the date format YYYY-MM-DD.
Requireminimum Android patchversion (Warning only)
Select this setting to specify a minimum recommended Android patch versionto use this app. If the Android patch version on the device does not meet therequirement, the user receives a notification that can be dismissed.
Specify the version using the date format YYYY-MM-DD.
Require minimum appversion
Select this setting to specify a minimum app version to use this app. If the appversion on the device does not meet the requirement, the user can't use the app.
You can specify up to four release identifiers. Separate release identifiers withperiods (for example, 10.3 or 10.3.14.2).
Because different apps usually have distinct versioning schemes, if you want tospecify a minimum app version, you should create a separate profile for each app.
| Profile settings | 488

Intune app protectionprofile setting Description
Require minimum appversion (Warning only)
Select this setting to specify a minimum recommended app version to use thisapp. If the app version on the device does not meet the requirement, the userreceives a notification that can be dismissed.
You can specify up to four release identifiers. Separate release identifiers withperiods (for example, 10.3 or 10.3.14.2).
Because different apps usually have distinct versioning schemes, if you want tospecify a minimum app version, you should create a separate profile for each app.
| Profile settings | 489

Policy reference spreadsheetFor more information about IT policies and descriptions of IT policy rules, download the Policy ReferenceSpreadsheet.
| Policy reference spreadsheet | 490

GlossaryAES Advanced Encryption Standard
AET application enrollment token
APNs Apple Push Notification service
BES5 BlackBerry Enterprise Server 5
BES10 BlackBerry Enterprise Service 10
BES12 BlackBerry Enterprise Service 12
BES12 instance BES12 instance refers to all BES12 componentsinstalled on one computer except the BlackBerryRouter, which is an optional component that isinstalled separately. A BES12 instance is sometimesreferred to as a "unit of scale."
BlackBerry inter-process protocol The BlackBerry inter-process protocol is a BlackBerryproprietary protocol that generates the session keythat BlackBerry Enterprise Solution components, suchas the BlackBerry Enterprise Server and BlackBerryMobile Voice System, can use to communicatein a highly securely manner with each other. TheBlackBerry inter-process protocol generates thesession key based on the communication password.
BlackBerry UEM domain A BlackBerry UEM domain consists of a BlackBerryUEM database and a BlackBerry Control database andany BlackBerry UEM instances that connect to them.
BlackBerry UEM instance A BlackBerry UEM instance refers to one installationof the BlackBerry UEM Core and all associatedBlackBerry UEM components that communicate withit. The components can be installed on the sameserver or multiple servers. There can be more thanone BlackBerry UEM instance in a BlackBerry UEMdomain.
CA certification authority
certificate A certificate is a digital document that binds theidentity and public key of a certificate subject. Eachcertificate has a corresponding private key that isstored separately. A certificate authority signs thecertificate to indicate that it is authentic and can betrusted.
CRL certificate revocation list
| Glossary | 491

DEP Device Enrollment Program
DNS Domain Name System
DPD Dead Peer Detection
EAP Extensible Authentication Protocol
EAP-FAST Extensible Authentication Protocol FlexibleAuthentication via Secure Tunneling
EAP-MS-CHAP Extensible Authentication Protocol MicrosoftChallenge Handshake Authentication Protocol
EAP-TLS Extensible Authentication Protocol Transport LayerSecurity
EDP enterprise data protection
EMM Enterprise Mobility Management
FQDN fully qualified domain name
GTC Generic Token Card
HMAC keyed-hash message authentication code
HTTP Hypertext Transfer Protocol
HTTPS Hypertext Transfer Protocol over Secure SocketsLayer
ICCID Integrated Circuit Card Identifier
IKE Internet Key Exchange
IMAP Internet Message Access Protocol
IMEI International Mobile Equipment Identity
IP Internet Protocol
IPsec Internet Protocol Security
IT policy An IT policy consists of various rules that control thesecurity features and behavior of devices.
LAN local area network
LDAP Lightweight Directory Access Protocol
MD5 Message-Digest Algorithm, version 5
| Glossary | 492
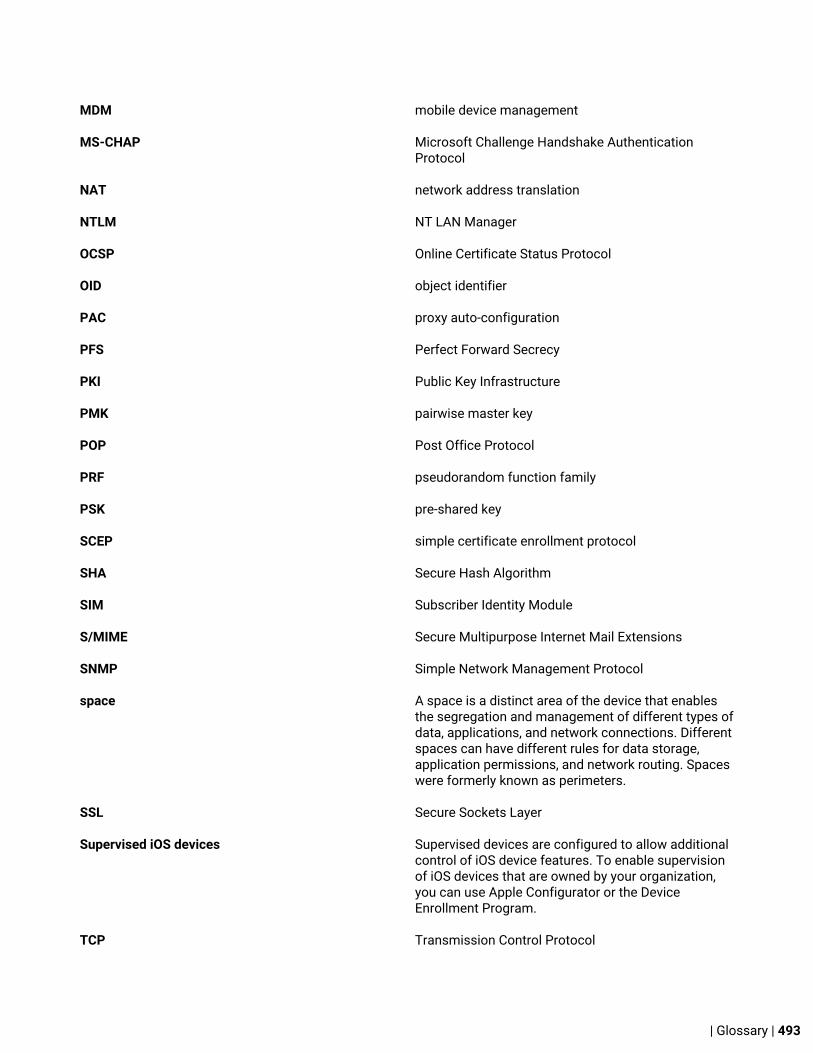
MDM mobile device management
MS-CHAP Microsoft Challenge Handshake AuthenticationProtocol
NAT network address translation
NTLM NT LAN Manager
OCSP Online Certificate Status Protocol
OID object identifier
PAC proxy auto-configuration
PFS Perfect Forward Secrecy
PKI Public Key Infrastructure
PMK pairwise master key
POP Post Office Protocol
PRF pseudorandom function family
PSK pre-shared key
SCEP simple certificate enrollment protocol
SHA Secure Hash Algorithm
SIM Subscriber Identity Module
S/MIME Secure Multipurpose Internet Mail Extensions
SNMP Simple Network Management Protocol
space A space is a distinct area of the device that enablesthe segregation and management of different types ofdata, applications, and network connections. Differentspaces can have different rules for data storage,application permissions, and network routing. Spaceswere formerly known as perimeters.
SSL Secure Sockets Layer
Supervised iOS devices Supervised devices are configured to allow additionalcontrol of iOS device features. To enable supervisionof iOS devices that are owned by your organization,you can use Apple Configurator or the DeviceEnrollment Program.
TCP Transmission Control Protocol
| Glossary | 493

TGT The Ticket Granting Ticket (TGT) is a service ticketthat a client of a Kerberos enabled service sends tothe TGS to request the service ticket for the Kerberosenabled service.
TLS Transport Layer Security
UEM Unified Endpoint Manager
USB Universal Serial Bus
VPN virtual private network
xAuth Extended Authentication
| Glossary | 494

Legal notice©2019 BlackBerry Limited. Trademarks, including but not limited to BLACKBERRY, BBM, BES, EMBLEM Design,ATHOC, MOVIRTU and SECUSMART are the trademarks or registered trademarks of BlackBerry Limited, itssubsidiaries and/or affiliates, used under license, and the exclusive rights to such trademarks are expresslyreserved. All other trademarks are the property of their respective owners.
GOOD and EMBLEM Design are the trademarks or registered trademarks of BlackBerry Limited, its subsidiariesand/or affiliates, used under license, and the exclusive rights to such trademarks are expressly reserved.
Android, Google Chrome, and Google Play are trademarks of Google Inc. Apple, App Store, Apple Configurator,iCloud, macOS, and Safari are trademarks of Apple Inc. Aruba and VIA are trademarks of Aruba Networks, Inc.Bell is a trademark of Bell Canada. Blue Coat is a trademark of Blue Coat Systems, Inc. Bluetooth is a trademarkof Bluetooth SIG. Check Point and VPN-1 are trademarks of Check Point Software Technologies Ltd. Cisco, CiscoAnyConnect, Cisco IOS, and PIX are trademarks of Cisco Systems, Inc. and/or its affiliates in the United Statesand certain other countries. F5 is a trademark of F5 Networks, Inc. HTC EVO is a trademark of HTC Corporation.IBM, Domino, IBM Verse, and Notes are trademarks of International Business Machines Corporation, registeredin many jurisdictions worldwide. iOS is a trademark of Cisco Systems, Inc. and/or its affiliates in the U.S. andcertain other countries. iOS® is used under license by Apple Inc. Juniper is a trademark of Juniper Networks, Inc.Kerberos is a trademark of the Massachusetts Institute of Technology. Microsoft, Active Directory, ActiveSync,Azure, Windows, and Windows Phone are either registered trademarks or trademarks of Microsoft Corporationin the United States and/or other countries. OpenSSL is a trademark of the The OpenSSL Software Foundation,Inc. OpenVPN is a trademark of OpenVPN Technologies, Inc. OpenTrust and OpenTrust CMS are trademarksof Docusign France société par actions simplifiée (sas). PGP is a trademark of PGP Corporation. Pulse Secureis a trademark of Pulse Secure LLC. QR Code is a trademark of DENSO WAVE1 INCORPORATED in Japan andother countries. RSA is a trademark of RSA Security. SonicWALL and Mobile Connect are trademarks of Dell, Inc.Symantec is a trademark or registered trademark of Symantec Corporation or its affiliates in the U.S. and othercountries. T-Mobile is a trademark of Deutsche Telekom AG. Wi-Fi, WPA, and WPA2 are trademarks of the Wi-FiAlliance. Entrust, Entrust IdentityGuard, and Entrust Authority Administration Services are trademarks of Entrust,Inc. KNOX and Samsung KNOX are trademarks of Samsung Electronics Co., Ltd. Vuzix M300 Smart Glasses is atrademark of Vuzix Corporation. All other trademarks are the property of their respective owners.
This documentation including all documentation incorporated by reference herein such as documentationprovided or made available on the BlackBerry website provided or made accessible "AS IS" and "AS AVAILABLE"and without condition, endorsement, guarantee, representation, or warranty of any kind by BlackBerry Limited andits affiliated companies ("BlackBerry") and BlackBerry assumes no responsibility for any typographical, technical,or other inaccuracies, errors, or omissions in this documentation. In order to protect BlackBerry proprietary andconfidential information and/or trade secrets, this documentation may describe some aspects of BlackBerrytechnology in generalized terms. BlackBerry reserves the right to periodically change information that is containedin this documentation; however, BlackBerry makes no commitment to provide any such changes, updates,enhancements, or other additions to this documentation to you in a timely manner or at all.
This documentation might contain references to third-party sources of information, hardware or software,products or services including components and content such as content protected by copyright and/or third-party websites (collectively the "Third Party Products and Services"). BlackBerry does not control, and is notresponsible for, any Third Party Products and Services including, without limitation the content, accuracy,copyright compliance, compatibility, performance, trustworthiness, legality, decency, links, or any other aspectof Third Party Products and Services. The inclusion of a reference to Third Party Products and Services in thisdocumentation does not imply endorsement by BlackBerry of the Third Party Products and Services or the thirdparty in any way.
EXCEPT TO THE EXTENT SPECIFICALLY PROHIBITED BY APPLICABLE LAW IN YOUR JURISDICTION, ALLCONDITIONS, ENDORSEMENTS, GUARANTEES, REPRESENTATIONS, OR WARRANTIES OF ANY KIND, EXPRESSOR IMPLIED, INCLUDING WITHOUT LIMITATION, ANY CONDITIONS, ENDORSEMENTS, GUARANTEES,REPRESENTATIONS OR WARRANTIES OF DURABILITY, FITNESS FOR A PARTICULAR PURPOSE OR USE,
| Legal notice | 495

MERCHANTABILITY, MERCHANTABLE QUALITY, NON-INFRINGEMENT, SATISFACTORY QUALITY, OR TITLE, ORARISING FROM A STATUTE OR CUSTOM OR A COURSE OF DEALING OR USAGE OF TRADE, OR RELATED TO THEDOCUMENTATION OR ITS USE, OR PERFORMANCE OR NON-PERFORMANCE OF ANY SOFTWARE, HARDWARE,SERVICE, OR ANY THIRD PARTY PRODUCTS AND SERVICES REFERENCED HEREIN, ARE HEREBY EXCLUDED.YOU MAY ALSO HAVE OTHER RIGHTS THAT VARY BY STATE OR PROVINCE. SOME JURISDICTIONS MAYNOT ALLOW THE EXCLUSION OR LIMITATION OF IMPLIED WARRANTIES AND CONDITIONS. TO THE EXTENTPERMITTED BY LAW, ANY IMPLIED WARRANTIES OR CONDITIONS RELATING TO THE DOCUMENTATION TOTHE EXTENT THEY CANNOT BE EXCLUDED AS SET OUT ABOVE, BUT CAN BE LIMITED, ARE HEREBY LIMITED TONINETY (90) DAYS FROM THE DATE YOU FIRST ACQUIRED THE DOCUMENTATION OR THE ITEM THAT IS THESUBJECT OF THE CLAIM.
TO THE MAXIMUM EXTENT PERMITTED BY APPLICABLE LAW IN YOUR JURISDICTION, IN NO EVENT SHALLBLACKBERRY BE LIABLE FOR ANY TYPE OF DAMAGES RELATED TO THIS DOCUMENTATION OR ITS USE,OR PERFORMANCE OR NON-PERFORMANCE OF ANY SOFTWARE, HARDWARE, SERVICE, OR ANY THIRDPARTY PRODUCTS AND SERVICES REFERENCED HEREIN INCLUDING WITHOUT LIMITATION ANY OF THEFOLLOWING DAMAGES: DIRECT, CONSEQUENTIAL, EXEMPLARY, INCIDENTAL, INDIRECT, SPECIAL, PUNITIVE,OR AGGRAVATED DAMAGES, DAMAGES FOR LOSS OF PROFITS OR REVENUES, FAILURE TO REALIZE ANYEXPECTED SAVINGS, BUSINESS INTERRUPTION, LOSS OF BUSINESS INFORMATION, LOSS OF BUSINESSOPPORTUNITY, OR CORRUPTION OR LOSS OF DATA, FAILURES TO TRANSMIT OR RECEIVE ANY DATA,PROBLEMS ASSOCIATED WITH ANY APPLICATIONS USED IN CONJUNCTION WITH BLACKBERRY PRODUCTS ORSERVICES, DOWNTIME COSTS, LOSS OF THE USE OF BLACKBERRY PRODUCTS OR SERVICES OR ANY PORTIONTHEREOF OR OF ANY AIRTIME SERVICES, COST OF SUBSTITUTE GOODS, COSTS OF COVER, FACILITIES ORSERVICES, COST OF CAPITAL, OR OTHER SIMILAR PECUNIARY LOSSES, WHETHER OR NOT SUCH DAMAGESWERE FORESEEN OR UNFORESEEN, AND EVEN IF BLACKBERRY HAS BEEN ADVISED OF THE POSSIBILITY OFSUCH DAMAGES.
TO THE MAXIMUM EXTENT PERMITTED BY APPLICABLE LAW IN YOUR JURISDICTION, BLACKBERRY SHALLHAVE NO OTHER OBLIGATION, DUTY, OR LIABILITY WHATSOEVER IN CONTRACT, TORT, OR OTHERWISE TOYOU INCLUDING ANY LIABILITY FOR NEGLIGENCE OR STRICT LIABILITY.
THE LIMITATIONS, EXCLUSIONS, AND DISCLAIMERS HEREIN SHALL APPLY: (A) IRRESPECTIVE OF THE NATUREOF THE CAUSE OF ACTION, DEMAND, OR ACTION BY YOU INCLUDING BUT NOT LIMITED TO BREACH OFCONTRACT, NEGLIGENCE, TORT, STRICT LIABILITY OR ANY OTHER LEGAL THEORY AND SHALL SURVIVE AFUNDAMENTAL BREACH OR BREACHES OR THE FAILURE OF THE ESSENTIAL PURPOSE OF THIS AGREEMENTOR OF ANY REMEDY CONTAINED HEREIN; AND (B) TO BLACKBERRY AND ITS AFFILIATED COMPANIES, THEIRSUCCESSORS, ASSIGNS, AGENTS, SUPPLIERS (INCLUDING AIRTIME SERVICE PROVIDERS), AUTHORIZEDBLACKBERRY DISTRIBUTORS (ALSO INCLUDING AIRTIME SERVICE PROVIDERS) AND THEIR RESPECTIVEDIRECTORS, EMPLOYEES, AND INDEPENDENT CONTRACTORS.
IN ADDITION TO THE LIMITATIONS AND EXCLUSIONS SET OUT ABOVE, IN NO EVENT SHALL ANY DIRECTOR,EMPLOYEE, AGENT, DISTRIBUTOR, SUPPLIER, INDEPENDENT CONTRACTOR OF BLACKBERRY OR ANYAFFILIATES OF BLACKBERRY HAVE ANY LIABILITY ARISING FROM OR RELATED TO THE DOCUMENTATION.
Prior to subscribing for, installing, or using any Third Party Products and Services, it is your responsibility toensure that your airtime service provider has agreed to support all of their features. Some airtime serviceproviders might not offer Internet browsing functionality with a subscription to the BlackBerry® Internet Service.Check with your service provider for availability, roaming arrangements, service plans and features. Installationor use of Third Party Products and Services with BlackBerry's products and services may require one or morepatent, trademark, copyright, or other licenses in order to avoid infringement or violation of third party rights. Youare solely responsible for determining whether to use Third Party Products and Services and if any third partylicenses are required to do so. If required you are responsible for acquiring them. You should not install or useThird Party Products and Services until all necessary licenses have been acquired. Any Third Party Products andServices that are provided with BlackBerry's products and services are provided as a convenience to you and areprovided "AS IS" with no express or implied conditions, endorsements, guarantees, representations, or warrantiesof any kind by BlackBerry and BlackBerry assumes no liability whatsoever, in relation thereto. Your use of ThirdParty Products and Services shall be governed by and subject to you agreeing to the terms of separate licenses
| Legal notice | 496

and other agreements applicable thereto with third parties, except to the extent expressly covered by a license orother agreement with BlackBerry.
The terms of use of any BlackBerry product or service are set out in a separate license or other agreement withBlackBerry applicable thereto. NOTHING IN THIS DOCUMENTATION IS INTENDED TO SUPERSEDE ANY EXPRESSWRITTEN AGREEMENTS OR WARRANTIES PROVIDED BY BLACKBERRY FOR PORTIONS OF ANY BLACKBERRYPRODUCT OR SERVICE OTHER THAN THIS DOCUMENTATION.
BlackBerry Enterprise Software incorporates certain third-party software. The license and copyright informationassociated with this software is available at http://worldwide.blackberry.com/legal/thirdpartysoftware.jsp.
BlackBerry Limited2200 University Avenue EastWaterloo, OntarioCanada N2K 0A7
BlackBerry UK Limited200 Bath RoadSlough, Berkshire SL1 3XEUnited Kingdom
Published in Canada
| Legal notice | 497


