Bacterial Genetics. Mutation. Gene Transfer. Lysogenic Conversion. Plasmids. Transposons.

BigIdea
Investigation 8 T143
3Genetics and Information Transfer
INVESTIGATION 8
BIOTECHNOLOGY: BACTERIAL TRANSFORMATION*How can we use genetic engineering techniques to manipulate heritable information?
■ BACKGROUNDAre genetically modi!ed foods safe? "ere is ongoing debate about whether it is safe to eat fruit and vegetables that are genetically modi!ed to contain toxins that ward o# pests. For instance, biotechnologists have succeeded in inserting a gene (Bt) from the bacterium Bacillus thuringiensis into the corn genome. When expressed, the Bt gene produces a toxin that kills caterpillars and controls earworms that damage corn — but is the corn safe for human consumption?
Genetic information passed from parent to o#spring via DNA provides for continuity of life. In order for information in DNA to direct cellular activities, it must be transcribed into RNA. Some of the RNAs are used immediately for ribosomes or to control other cellular processes. Other RNAs are translated into proteins that have important roles in determining metabolism and development, i.e., cellular activities and phenotypes (traits). When the DNA of a cell changes, the RNAs and proteins they produce o$en change, which in turn changes how that cell functions.
DNA inside a cell can change several ways. It can be mutated, either spontaneously or a$er the DNA replication machinery makes an error. Biotechnologists may cause an intentional mutation in a cell’s own DNA as a way to change how that cell behaves. "e most powerful tool biotechnologists have, though, is the ability to transfer DNA from one organism into another and make it function there. With this tool, they can make cells produce novel protein products that the cells did not make previously.
Stimulate student interest in the investigation by describing applications of genetic engineering. For example, insulin that people take to control their blood sugar levels is o$en made from engineered bacteria. Some vaccines, as well as enzymes used for manufacturing denim jeans, are also made using engineered cells. In the near future, engineered bacteria and other cells being developed could help clean up spilled oil or chemicals, produce fuel for cars and trucks, and even store excess carbon dioxide to help slow global climate change. Ask students to think of other possible applications of biotechnology. Remind students, however, that human manipulation of DNA raises several ethical, social, and medical issues, such as the safety of genetically modi!ed foods.
"e techniques required for gene transfer in higher plants and animals are complex, costly, and di%cult even in the research laboratory. However, the techniques of gene transfer in Escherichia coli (E. coli) bacteria are simple and appropriate for the teaching and learning laboratory (Rapoza and Kreuzer 2004). One common technology,
* Transitioned from the AP Biology Lab Manual (2001)

T144 Investigation 8
bacterial plasmid-based genetic transformation, enables students to manipulate genetic information in a laboratory setting to understand more fully how DNA operates.
In this investigation, students will !rst acquire the tools to transform E. coli bacteria to express new genetic information using a plasmid system and apply mathematical routines to determine transformation e%ciency. (Competent bacterial cells are able to take up exogenous genetic material and are capable of being transformed, and the procedure provided is designed to promote competence. An excellent preparation of competent cells will yield approximately 108 transformed colonies per microgram of plasmid; a poor preparation will yield approximately 104 or less transformed colonies per microgram of plasmid.) Students then have the opportunity to design and conduct individual experiments to explore transformation in more depth. For example, students can select a factor of their choice and explore its ability to induce mutations with observable phenotypes, or they can investigate if bacteria take up more plasmid in some environmental conditions and less in others. "ey also can explore answers to questions about plasmids and transformation that might have been raised during the initial investigation.
"is investigation also provides students with the opportunity to review, connect, and apply concepts that they have studied previously, including cell structure of bacteria; structure and function of cell membranes, enzymes, and DNA and RNA; transcription and translation; the operon model of the regulation of gene expression; evolution and natural selection; and interactions between organisms and their environment.
Interspersed within each investigation are supplemental activities designed to keep students on track and to provide opportunities for them to take a deeper dive into the concepts. You may assign these activities for homework or ask students to do them as they work through the investigation.
■ PREPARATION
Materials and EquipmentSupplies for plasmid transformation systems may be purchased in kits from commercial vendors or purchased individually, depending on your current inventory. A partial list of suppliers is provided in the Supplemental Resources section. At minimum, plasmids should contain the gene for ampicillin resistance (pAMP), as experimental procedures typically use ampicillin to select transformed cells. In addition, plasmids with colored marker genes like beta-GAL and &uorescence markers like green &uorescent protein (GFP) and its cousins make it possible to measure gene expression directly, to follow cell populations as they grow or move, and to !nd cells that have taken up a second plasmid that we cannot see easily. "us, you have freedom in choosing a plasmid transformation system.
"e following materials are included in a typical eight-station ampicillin-resistant plasmid system. "e list will vary depending on the system used. Materials and supplies needed for each student workstation are provided in the student version of this investigation. Students are encouraged to set up their own workstations. Note that you might need additional materials such as agar plates and nutrient agar for the student inquiry investigations.

Investigation 8 T145
BIG IDEA 3: GENETICS AND INFORMATION TRANSFER
Materials Included in Eight-Station Kit
• E. coli (1 vial or slant)• Plasmid (pAMP), hydrated (20 μg)• Ampicillin, lyophilized (30 μg)• Transformation solution
(50mM CaCl2, pH 6), sterile (15 mL)• LB nutrient agar powder, sterile (to
make 500 mL) (20 g) or prepared agar
• LB nutrient broth, sterile (10 mL) • Pipettes, sterile (50)• Inoculation loops, sterile
(10 μL, packs of 10 loops)• Petri dishes, sterile, 60 mm
(packs of 20)• Multicolor 2.0 mL microcentrifuge
tubes (60)
Accessories Required but Not Included in Kit
• Microcentrifuge tube holders• Clock or watch to time 50 seconds• Microwave oven/water bath• "ermometer that reads 42°C• 1 L &ask• 500 mL graduated cylinder• Distilled water
• Crushed ice and containers• 10% solution household bleach• Permanent marker pens• Masking tape• Biohazardous waste disposal bags or
plastic trash bags
Optional Accessories
• Micropipettes, adjustable volume, 2–20 μL (and pipette tips)
• Para!lm laboratory sealing !lm• 37°C incubator oven*
*If an incubator is not available, try using an electric blanket or construct a homemade incubator with a cardboard box and a low voltage lightbulb inside.
Otherwise, incubate agar plates with bacteria 48–72 hours at ambient room temperature. Another option is to use a seedling heating mat with thermostat available from garden supply catalogs; the advantage is that they are sealed against water damage and can be repur-posed for other lab activities, including their original purpose, germinating seeds.
Student Workstation
• E. coli starter plate • Poured agar plates 2 LB and 2 LB/amp• Transformation solution (CaCl2, pH 6.1)
kept ice cold• LB nutrient broth• Sterile inoculation loops
• 100–1000 μL sterile bulb pipettes• 1–10 μL micropipettes with sterile tips• Microcentrifuge tubes• Microcentrifuge tube holder/&oat• Container full of crushed ice• Marking pen

T146 Investigation 8
Common Workstation
• Plasmid (pAMP), hydrated (20 μg)• 42°C water bath and thermometer• 37°C incubator or equivalent• 20 μL adjustable volume micropipettes
and tips (optional)
• 10% household bleach• Biohazardous waste disposal bags• Masking or lab tape
■ PREPARATIONAdvance Preparation Quick Guide for Teachers
Step Objective Time Required WhenStep 1 Prepare agar
plates.1 hr. 3–7 days prior
Step 2 Rehydrate E. coli.Streak starter plates. Rehydrate plasmid DNA, if necessary.
2 min.15 min.2 min.
24–36 hours prior
Step 3 Aliquot solutions.Set up workstations.
10 min. Immediately prior
■ Advance Preparation for Step 1: 3–7 Days Before the Transformation 1. Prepare nutrient agar (autoclave-free).
"e agar plates should be prepared at least three days before the investigation(s) are performed. Plates should be le$ out at room temperature for two days and then refrigerated until use. (Two days at room temperature allows the agar to cure, or dry, su%ciently to readily take up the liquid transformation solution.) Hint: If time is short, incubate the plates at 37°C overnight. "is will dry them out as well, but it shortens their shelf life. Refrigerated plates are good for up to 30 days. To prepare the agar, add 500 mL of distilled water to a one liter or larger Erlenmeyer &ask. Add the entire content of the LB nutrient agar packet. Swirl the &ask to dissolve the agar and heat to boiling in a microwave or water bath or by using a hot plate with stir bar. Heat and swirl until all the agar is dissolved. CAUTION: Be careful to allow the !ask to cool a little before swirling so that the hot medium does not boil over onto your hand. When all the agar is dissolved, allow the LB nutrient agar to cool so that the outside of the &ask is just comfortable to hold (approximately 50°C.). While the agar is cooling, you can label the plates and prepare the ampicillin as outlined below in

Investigation 8 T147
BIG IDEA 3: GENETICS AND INFORMATION TRANSFER
Step 3. CAUTION: Do not let the agar cool so much that is begins to solidify. Keeping the !ask with liquid agar in a water bath at 45–50°C can help prevent the agar from cooling too quickly. Preprepared nutrient agar also can be purchased. However, it will have to be melted before it can be poured into plates. To do this, the plastic bottles containing solid agar can be microwaved at a low temperature (such as using the “poultry defrost” option) for several minutes. Be sure to loosen the cap slightly to expel any air. At high microwave temperatures, the agar can boil over. Another option is to place the bottles in a hot water bath; however, this will take up to 45 minutes or so to melt the agar. CAUTION: Be careful when handling the bottle(s). "ey will get hot!
2. Prepare ampicillin.Ampicillin is either shipped dry in a small vial or already hydrated. If shipped dry, you need to hydrate the ampicillin. Do this by adding 3 mL of transformation solution to the vial to rehydrate the antibiotic. Use a sterile pipette. Note: Excessive heat (≥60°C) will destroy ampicillin. With this in mind, here’s the tricky part: the nutrient agar solidi!es at 27°C, so you must be careful to monitor the cooling of the agar and then pour the plates from start to !nish without interruption. Keeping the &ask with liquid agar in a water bath set to 45–50°C can help prevent the agar from cooling too quickly. Before adding ampicillin to the &ask of agar, make sure you can hold the &ask in your bare hand (approximately 50°C). If your hand tolerates the temperature of the &ask, so will the antibiotic!
3. Label plates.While the agar is cooling, reduce preparation time by labeling the plates. Label with a permanent marker on the bottom of each plate close to the edge. For each class using an eight-station kit, label 16 plates LB and 16 plates LB/amp.
4. Pour nutrient agar plates.First, pour LB nutrient agar into the 16 plates that are labeled LB. If you do not do this and add ampicillin to the !ask with agar, you will not be able to make control plates containing just nutrient agar. Fill each plate to about one-third to one-half (approximately 12 mL) with agar and replace the lid. You may want to stack the plates and let them cool in the stacked con!guration. Second, add the hydrated ampicillin to the remaining LB nutrient agar. Swirl brie&y to mix. Pour into the 16 plates labeled LB/amp using the same technique.Plates should set within 30 minutes.
5. Store the plates.A$er the plates have cured for two days at room temperature, they may be either used or stored by stacking them in a plastic sleeve bag slipped back down over them. "e stack is then inverted, the bag taped closed, and the plates stored upside down at 4°C until used. ("e plates are inverted to prevent condensation on the lid, which may drip onto the agar.)
T148 Investigation 8
■ Advance Preparation for Step 2: 24–36 Hours Before the Transformation 1. Rehydrate bacteria.
Some E. coli cultures come prepared (or can be purchased) in a slant and will not have to be rehydrated. For bacteria that must be rehydrated, use a sterile pipette to add 250 μL of transformation solution directly to the vial. Recap the vial and allow the cell suspension to stand at room temperature for 5 minutes. "en shake the mix before streaking on the LB starter plates. Store the rehydrated bacteria in the refrigerator until used (within 24 hours for best results and no longer than three days).
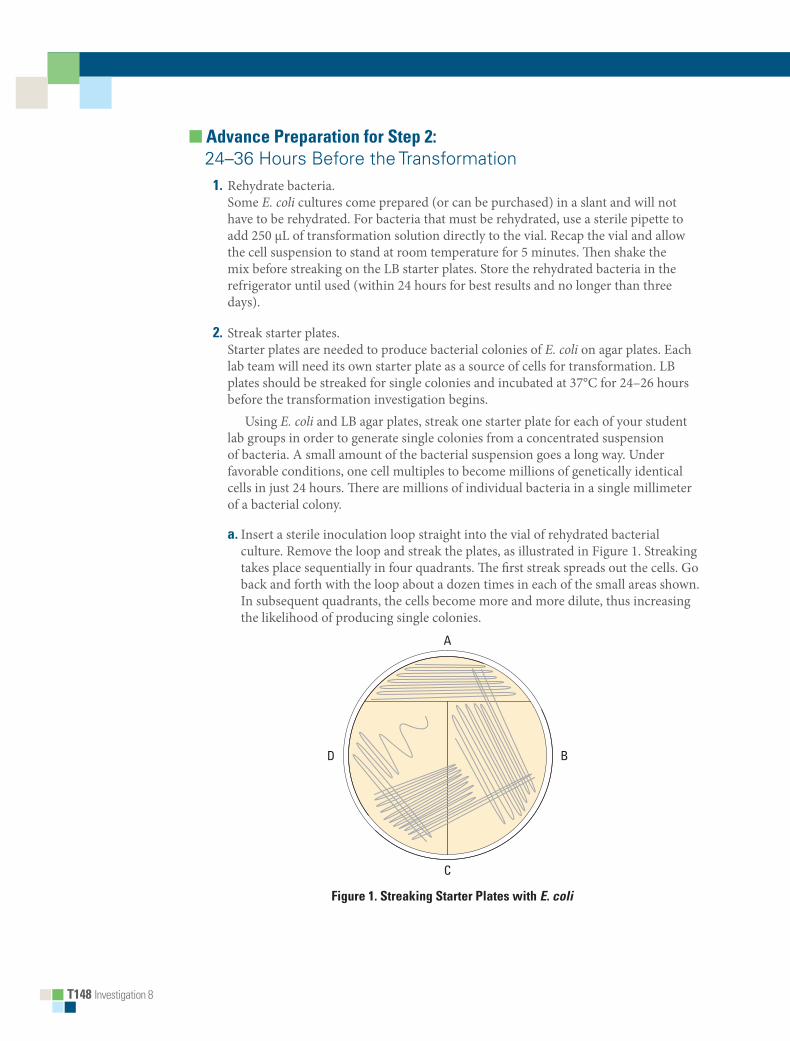
2. Streak starter plates.Starter plates are needed to produce bacterial colonies of E. coli on agar plates. Each lab team will need its own starter plate as a source of cells for transformation. LB plates should be streaked for single colonies and incubated at 37°C for 24–26 hours before the transformation investigation begins. Using E. coli and LB agar plates, streak one starter plate for each of your student lab groups in order to generate single colonies from a concentrated suspension of bacteria. A small amount of the bacterial suspension goes a long way. Under favorable conditions, one cell multiples to become millions of genetically identical cells in just 24 hours. "ere are millions of individual bacteria in a single millimeter of a bacterial colony.
a. Insert a sterile inoculation loop straight into the vial of rehydrated bacterial culture. Remove the loop and streak the plates, as illustrated in Figure 1. Streaking takes place sequentially in four quadrants. "e !rst streak spreads out the cells. Go back and forth with the loop about a dozen times in each of the small areas shown. In subsequent quadrants, the cells become more and more dilute, thus increasing the likelihood of producing single colonies.
Bio_T_Lab08_01 (per specs)
Bio_S_Lab08_03 (mis-labeled in pages?)
A
C
BD
Figure 1. Streaking Starter Plates with E. coli

Investigation 8 T149
BIG IDEA 3: GENETICS AND INFORMATION TRANSFER
b. For subsequent streaks, use as much of the surface area of the plate as possible. A$er the initial streak, rotate the plate approximately 45 degrees and start the second streak. Do not dip into the rehydrated bacteria a second time! Go into the previous streak about two times and then back and forth as shown for a total of about 10 times.
c. Rotate the plate again and repeat streaking.
d. Rotate the plate for the !nal time and make the !nal streak. Repeat steps a–c with the remaining LB plates for each student workstation. Although you can use the same inoculation loop for all starter plates, it is recommended that you use a new, sterile loop for each plate if you have enough. When you are !nished with each plate, cover it immediately to avoid contamination.
e. Place the plates upside down inside the incubator overnight at 37°C or at room temperature for 2–3 days if an incubator is unavailable. Use for transformation within 24–36 hours because bacteria must be actively growing to achieve high transformation e%ciency. (Remember, bacterial growth is exponential.) Do not refrigerate before use. "is will slow bacterial growth.
f. E. coli forms o#-white colonies that are uniformly circular with smooth edges. Avoid using plates with contaminant colonies such as mold.
3. Prepare plasmid."e quantity of DNA is so small that the vial may appear empty. Tap the vial or spin it in a microcentrifuge to ensure that the DNA is not sticking to the cap. If the plasmid is not hydrated, refer to instructions that come with the sample. Store the vial of hydrated DNA in a refrigerator. Rehydrated plasmid should be used within 24 hours.
■ Advance Preparation for Step 3: Immediately Before Transformation Investigation 1. Aliquot solutions.
Each student workstation will need 1 mL of transformation solution and 1 mL of LB nutrient broth. You might have to aliquot these solutions into separate color-coded 2 mL microtubes. If the LB nutrient broth is aliquoted one day prior to the lab, it should be refrigerated. Make sure to label the tubes with permanent marker.
2. Set up student and common workstations.See the list of materials to be supplied at each workstation.
Some le$over materials can be combined and stored for future use. For example, extra salt solutions (CaCl2 in the case of this lab), solutions of DNA, and bu#ers can be stored in a refrigerator freezer. Where possible, standardize materials for use in multiple labs. "is allows you to keep fewer items but larger quantities, giving some leeway for making extra as needed. However, if the plasmid goes through multiple freeze-thaw cycles in a frost-free freezer, the DNA in the plasmid can degrade. It is recommended that you check the shelf life of materials with the commercial vendor.

T150 Investigation 8
Another tip is to keep a running list of students’ experiments. A$er a couple of lab cycles, you should know what students are likely to want to use for their independent investigations, so you can have the materials on hand in advance. Although this seems counterintuitive because you want students to follow their curiosity, having certain materials available will cut down on time and costs.
■ Timing and Length of LabConsider this investigation to be a learning module, not a typical teacher-directed “cookbook lab.” "e investigation provides students myriad opportunities to develop biotech laboratory skills; as they work through the background information and answer questions, they are exploring concepts more deeply.
Day 1Allow approximately one class period (45–60 minutes) to preview the lab and let students work through the background information and prelab questions interspersed in the Getting Started section of the investigation. Alternatively, you can assign this material for homework.
Day 2Allow one class period (45–60 minutes) for students to transform cells and spread plates.
Day 3 It may take longer than 24 hours for students to be able to observe transformed cells. You will have to monitor the incubation conditions and bacterial growth/transformation.
Allow approximately one class period (45–60 minutes) for students to observe transformants and controls, analyze and interpret results, and calculate transformation e%ciency. One option is to assign postlab assessment questions for homework, although student collaboration is recommended.
Day 4+Allow one or two class periods for students to design and conduct an independent investigation. Time will be needed for post experimental observation and data analysis. In addition, students should be given time to present their results to peers.
If students have performed colony transformation experiments before, they may review Procedure and proceed to the independent investigation(s). However, it is recommended that all students read the background information and work through Getting Started.
■ Safety and Houskeeping• Students must apply basic sterile technique when working with and culturing
bacteria. Although the strain of E. coli and the DNA plasmid used in this investigation are not pathogenic, their handling requires appropriate microbiological procedures.
• Remind students to wash their hands when entering or leaving the lab area. "ey should not eat, drink, apply cosmetics, or use personal electronic devices in the work area.

Investigation 8 T151
BIG IDEA 3: GENETICS AND INFORMATION TRANSFER
• Work surfaces should be decontaminated with a 10% household bleach solution at least once a day and a$er any spill of viable material.
• All contaminated liquid or solid wastes are decontaminated before disposal. "is can be done in an autoclave (20 minutes at 121°C) or in a 10% bleach solution (soaked for 20 minutes).
• Ampicillin may cause allergic reactions or irritation to the eyes, respiratory system, and skin. In case of contact with eyes, rinse immediately with plenty of water and seek medical advice. Wear suitable protective clothing. Since ampicillin is a member of the penicillin family of antibiotics, students (or teachers) with allergies to penicillin or to any other member of the penicillin family of antibiotics should avoid contact with ampicillin.
■ ALIGNMENT TO THE AP BIOLOGY CURRICULUM FRAMEWORK"is investigation can be conducted during the study of concepts pertaining to the storage, retrieval, and transmission of genetic information (big idea 3), with a connection to evolution and natural selection (big idea 1). As always, it is important to make connections between big ideas and enduring understandings, regardless of where in the curriculum the lab is taught. "e concepts align with the enduring understandings and learning objectives from the AP Biology Curriculum Framework, as indicated below.
■ Enduring Understandings• 1A2: Natural selection acts on phenotypic variations in populations.• 1C3: Populations of organisms continue to evolve.• 3A1: DNA, and in some cases RNA, is the primary source of heritable information.• 3B1: Gene regulation results in di#erential gene expression.• 3C1: Changes in genotype can result in changes in phenotype.• 3C2: Biological systems have multiple processes that increase genetic variation.
■ Learning Objectives• "e student is able to connect evolutionary changes in a population over time to a
change in the environment (1A2 & SP 7.1).• "e student is able to evaluate given data sets that illustrate evolution as an ongoing
process (1C3 & SP 5.3).• "e student can justify the claim that humans can manipulate heritable information
by identifying at least two commonly used technologies (3A1 & SP 6.4).• "e student can predict how a change in a speci!c DNA or RNA sequence can result
in changes in gene expression (3A1 & SP 6.4).• "e student is able to pose questions about ethical, social, or medical issues
surrounding human genetic disorders [an application of genetic engineering] (3A3 & SP 3.1).

T152 Investigation 8
• "e student can use representations to describe how gene regulation in&uences cell products and function (3B1 & SP 1.4).
• "e student is able to predict how a change in genotype, when expressed as a phenotype, provides a variation that can be subject to natural selection (3C1 & SP 6.4, SP 7.2).
• "e student is able to construct an explanation of the multiple processes that increase variation within a population (3C2 & SP 6.2).
■ ARE STUDENTS READY TO COMPLETE A SUCCESSFUL INQUIRY-BASED, STUDENT-DIRECTED INVESTIGATION?"is investigation reinforces the following skills:• Using pipettes (plastic bulb-type or other volumetric measuring devices)• Measuring temperature (°C)• Applying metric system • Applying quantitative skills
■ Skills DevelopmentStudents will develop the following skills:• Using sterile technique• Disposing properly of materials and solutions that come in contact with bacteria• Transferring bacterial colonies from agar plates to microtubes• Transforming bacterial cells with plasmid DNA• Delivering transformed cultures to agar plates• Applying mathematics to quantify transformation e%ciency
■ Potential ChallengesWith any type of microbiology technique, including working with and culturing bacteria, it is important not to introduce contaminating microorganisms into the experiment. When students are working with the inoculation loops, pipettes, and agar plates, you should stress that the round circle at the end of the loop, the tip of the pipette, and the surface of the agar plate should not be touched or placed onto contaminating surfaces, such as bench tops. While some contamination will likely not ruin the investigation, students should practice sterile technique. You might consider having students do a dry run of the procedures to practice sterile technique before working with bacteria.
Best results are obtained if starter plates are fresh (24–36 hr growth), with bacterial colonies measuring about 1–1.5 mm in diameter. Refrigeration of cultured plates will signi$cantly lower transformation e%ciency. "e optimum temperature for growing E. coli is 37°C.

Investigation 8 T153
BIG IDEA 3: GENETICS AND INFORMATION TRANSFER
Students o$en have di%culty reading the graduations (markings) on the plastic pipette. (If students are using automatic pipetting devices, you should provide instruction on how to load and dispel minute samples.) "e 100 μL, 250 μL, and 1 mL marks will be used as units of measurement. (You might need to remind students that “μl” and “μL” are alternative symbols for the same volumetric measurement.)
Bio_T_Lab08_02
750!l
500!l
250!l
100!l
1ml
Figure 2. Measuring Volume with a Pipette
Another challenge area for students is transferring bacterial colonies from agar plates to microtubes. Students are tempted to scrape more bacterial colonies o# the starter plate than are necessary. A single colony that is 1 mm in diameter contains millions of bacterial cells. To increase transformation e%ciency, students should select 2–4 “fat” colonies that are 1–1.5 mm in diameter. Students should select individual colonies rather than a swab of bacteria from the dense portion of the plate. Remind students that “less is more.”
"e transfer of plasmid DNA from its stock tube to the transformation suspension is crucial. Unless you are con!dent that students can make this transfer successfully, consider adding the plasmid to the transformation suspensions yourself. Look carefully at the loop to see if there is a !lm of plasmid solution across the ring, similar to seeing a soapy !lm across a ring for blowing soap bubbles. Do not add more plasmid than is recommended in the procedure — unless students want to do a little independent investigating about the relationship between the amount of plasmid and the e%ciency of transformation of E. coli. Over-saturating the cell solution with DNA decreases the transformation e%ciency.
Impatient students o$en skip steps in the procedure or fail to read instructions carefully. In this investigation, they must adhere to the instructions unless they are conducting an independent experiment on the e#ect(s) of varying the transformation procedure. "e “heat shock” procedure increases the bacterial uptake of foreign DNA, and the rapid temperature change and the duration of the heat shock are critical. For optimal results, the tubes containing the cell suspensions must be taken directly from ice, placed into the water bath at 42°C (have a student monitor the temperature) for 50 seconds, and returned immediately to the ice. "e absence of the heat shock will result in a 10-fold decrease in transformants; 90 seconds of heat shock will give about half as many transformants as will 50 seconds of heat shock.
About one percent of bacterial cells can be transformed under laboratory conditions. Factors a#ecting transformation e%ciency include the size of the bacterial colony used, the amount of plasmid used, technique, and incubation times. Some E. coli strains are more susceptible to transformation than others due to the composition of the cell wall.

T154 Investigation 8
To improve transformation e%ciency, one recommendation is to have students plate 10 percent of the !nal mix of transformed cells onto one plate, then spin down and plate the remaining 90 percent of cells onto a second plate. If transformation e%ciency is low, and only a few cells take up DNA, this extra plate with more bacteria may have a few transformants. "is extra step is helpful in demonstrating the e#ects of dilution on plating e%ciency, too.
Despite all e#orts, sometimes transformation is unsuccessful. If this happens, one suggestion is to use a random number generator to come up with imaginary colony counts for the purpose of working through the transformation e%ciency calculations.
"e last area of challenge for students is spreading transformants and controls to the agar plates. Delivering an excess of transformed culture to the plates is counterproductive because the plates may not absorb the additional liquid and spreading will be uneven. Transferring bacterial suspensions from the microtubes is tricky; the bacteria will settle at the bottom, but students can hold the top of a closed tube between the index !nger and thumb of one hand and gently &ick the bottom of the tube with the index !nger of the other hand. (You should demonstrate this technique.) A$er transferring bacteria to an agar plate, the students should cover the plates with lids immediately a$er pipetting in the transformation culture and spreading the cells. "ey should spread the suspension evenly around the surface of the agar by quickly skating the &at surface of a new sterile loop back and forth across the plate surface. An alternative method is to use small sterile glass beads to spread the suspensions by gently rocking the beads across the surface of the agar.
Remind students to store their plates in the incubator upside down to prevent any condensation from dripping onto the agar.
■ THE INVESTIGATIONS
■ Getting Started: Prelab Assessment"e Getting Started section of the investigation contains two sets of questions for preparing students and encourages them to ask their own questions about transformation and explore answers. You may assign the background material and prelab questions for homework; as a think, pair/group, share activity, in which pairs or small groups of students brainstorm ideas and then share them with other groups; or as a whole-class discussion.
Before beginning this investigation, students should have a solid understanding of the structure and function of DNA. You might want to take them through the discovery of transformation in 1928 by Frederick Gri%th. Gri%th was studying the bacterium Streptococcus pneumoniae, which causes pneumonia, the leading cause of death in the Western Hemisphere at the time of his research. Ask students to investigate Gri%th’s experiments and their signi!cance in identifying the “transforming principle,” later identi!ed as DNA. Students can present their !ndings in the form of a poster or diagram with annotation.

Investigation 8 T155
BIG IDEA 3: GENETICS AND INFORMATION TRANSFER
As students work through the introductory material, several questions will emerge about transformation and the use of plasmids to transfer genetic information. One strategy for prelab assessment is to join student groups, encourage them to ask questions beyond those listed in the investigation, listen to their answers, and then ask more probing questions.
Using Plasmids with Colored Marker GenesIf you choose a plasmid system that includes colored marker genes like beta-GAL and &uorescent markers like GFP and its cousins, you might want to consider taking students through a more in-depth prelab activity. "is activity is also appropriate for students who are familiar with transformation experiments performed in a previous biology class. Using pGLO plasmid to transform bacteria, students observe the expression of green &uorescent protein (GFP). Students can work through the activity for homework or as a group.
Spark students’ interest in GFP by having them do a little online investigation about jelly!sh that glow in the dark. What makes bioluminescent jelly!sh, Aequorea victoria, easy to spot in deep, dark water is the expression of green &uorescent protein (GFP). "e GFP gene can be transferred into bacteria, and if transformation is successful, the bacteria will express their newly acquired jelly!sh gene and glow brilliant green under ultraviolet (UV) light.
Ask students to discuss the following question:Suppose you have a plasmid that contains both the gene for GFP (pGLO) and a gene
for resistance to ampicillin (pAMP). How will you be able to tell if bacterial cells have been transformed using the plasmid containing genes for GFP and ampicillin resistance?
Take this a step further by having students examine the plasmid in Figure 3 and the corresponding caption.
GFP (the Aequorea victoria jelly!sh gene) codes for green "uorescent protein, and araC is the gene that codes for the protein that regulates transcription of GFP. Bla is the gene that codes for beta-lactamase, an enzyme that confers resistance to ampicillin by disabling ampicillin molecules. “Ori” is the plasmid’s origin of replication, and the arrows indicate the direction of transcription and translation.
Bio_T_Lab08_03
araC
GFP
bla
oripGLO
Figure 3. pGLO Plasmid
In addition to genes for green &uorescent protein and resistance to ampicillin, the pGLO plasmid has a special gene regulation system that switches on GFP production if the sugar arabinose is present in the nutrient medium, and the bacteria glow when exposed to UV light. "is system is an example of an inducible operon.

T156 Investigation 8
Using the information above, ask students to construct a diagram of the arabinose operon, showing the activity of the various components described in the presence of arabinose, and then in the absence of the sugar. "e following questions can guide their thinking:• What evidence will indicate whether your attempts at performing a genetic
transformation are successful?• What will agar plates containing arabinose look like if they contain transformed cells?
Without arabinose?
■ Designing and Conducting Independent Investigations"ere are several directions in which students can go with their own investigations. 1. Students can determine whether any satellite colonies have been transformed.
Do not tell them this in advance, but the majority of satellite colonies form when transformed cells release beta-lactamase (the enzyme encoded by the plasmid that degrades ampicillin) into the surrounding medium. Nontransformed bacteria can then survive and grow.
2. Students can vary the transformation process by altering the amount of DNA, ratio of transformation solutions, time for heat shock, or growth stage of bacteria.
3. Students can investigate the e#ects of mutations on gene expression and whether mutations a#ect plasmids. However, you must make sure that any mutagens students choose to explore are safe. "ere are several postulated or proven mutagens that students likely could handle safely, including the following:• Dilute hydrogen peroxide• Ca#eine• UV light source ("e bacteria must be kept in the dark to prevent DNA repair, and
students must wear UV goggles.)• Potassium nitrate (used in food preservation)
4. Can bacteria take up two di#erent plasmids? "is is an advanced investigation that requires two di#erent plasmids. However, it can lead to very interesting outcomes because some pairs of plasmids are compatible, while others are not.
5. Does having this plasmid give the bacteria an advantage other than antibiotic resistance? Mix equal amounts of transformed bacteria with untransformed bacteria, and plate them together on one plate. Which colonies are bigger a$er 24 hours? Which colonies are more numerous? "is investigation would tie nicely into labs on interspeci!c competition or natural selection.

Investigation 8 T157
BIG IDEA 3: GENETICS AND INFORMATION TRANSFER
■ Summative AssessmentStudents observe the results they obtained and record their observations in their lab notebook. "e Analyzing Results section of the lab in the Student Manual provides several questions for consideration, but encourage students to come up with some of their own questions.
"e following are suggested guidelines to assess students’ understanding of the concepts presented in the investigation, but you are encouraged to develop your own methods of postlab assessment. Some of the tasks can be assigned for homework following the completion of the investigation.
1. Have students record all their data, results, and conclusions in a lab notebook, formal paper, or mini-posters. Based on the students’ product, do you think students have met the learning objectives of the investigation?
2. As you visited the di#erent lab groups, were they able to work through the various activities interspersed throughout the investigation without di%culty? What additional questions did students raise? Did they have ideas for how they could explore answers to their questions?
3. Did students have su%cient mathematical skills to calculate transformation e%ciency?
4. What technical challenges did students have using the equipment required for the investigation? Have students list their challenge areas and discuss solutions.
■ Where Can Students Go from Here?"e background to this investigation asks students to think about several applications of genetic transformation, including genetically modi!ed food and possible ethical, social, or medical issues raised by the manipulation of DNA by biotechnology. Ask students to discuss why these issues are “issues.” What questions are posed by genetic engineering? Students also can respond to the quote from Michael Crichton’s novel and !lm Jurassic Park: “Just because science can do something doesn’t mean that it should.”

T158 Investigation 8
■ SUPPLEMENTAL RESOURCES
■ Background Information/Prelab Activities
"e University of Arizona Biology Project is an online interactive resource for learning biology, with an extensive molecular biology/biotechnology module.
Curriculum Module (Professional Development), AP Biology: From Gene to Protein—A Historical Perspective, College Board, 2010."is set of instructional strategies developed by AP Biology teachers takes students on an inquiry-based journey as they explore key discoveries that allowed scientists to identify DNA as the molecule of heredity and how it is able to store, retrieve, and transmit information necessary for living systems. Drawing their own conclusions, students explore the contributions of notable scientists, including Frederick Gri%th, Hershey and Chase, Watson and Crick, and Meselson and Stahl. "e instructional activities are examples of how teachers can engage students by accommodating their di#erent learning styles, knowledge bases, and abilities and, at the same time, provide depth of content and skills.
. Dolan DNA Learning Center, Cold Spring Harbor."is resource provides myriad interactive activities for students to prepare students for conducting investigations using biotechnology practices, including DNA Subway and iPlant Collaborative.
Gri%th, AJ, Natural plasmids of !lamentous fungi, Microbiol. Rev. 1995 December 59(4), nlm.nih.gov / pubmed/8531891
Johnson, A. Daniel, 40 Inquiry Exercises for the College Biology Lab, NSTA Press, Arlington, VA, 2009. "is information provides great insight into developing student-directed, inquiry-based laboratory investigations for advanced students, while also providing strategies on how teachers can adapt their more teacher-directed labs into opportunities for independent exploration. Unit 3 in the manual, “DNA Isolation and Analysis,” provides exercises for more advanced students to use bioinformatics programs to study and manipulate DNA sequences.
Developed by Pearson Education, this interactive and informative resource allows students to visualize and apply their understanding of biological concepts. Designed for AP Biology students, Lab Bench connects laboratory procedures to key concepts.

Investigation 8 T159
BIG IDEA 3: GENETICS AND INFORMATION TRANSFER
■ Procedural ResourcesBio-Rad Biotechnology Explorer™ pGLO Bacterial Transformation Kit,
Catalog #166-003EDU, "is guided inquiry-based curriculum module developed by Bio-Rad Laboratories is a source from which this investigation can be modi!ed. Using pGLO plasmid to transform bacteria, students observe the expression of green &uorescent protein.
Rapoza, M., and H. Kruezer, Transformations: A Teacher’s Manual, publication from Carolina Biological Supply Company, Burlington, NC, 2004.
"is resource, developed in cooperation with the Dolan DNA Learning Center of Cold Spring Harbor Laboratory, provides extensive background and procedural information for multiple transformation laboratory exercises. All of the plasmids described in the resource contain the gene for ampicillin resistance, and all of the experimental procedures use ampicillin to select transformed cells. Several of the plasmids contain an additional marker gene that causes the transformed cell to be colored, including pVIB, pGREEN, and pBLU.
■ Resources for Extensions of InvestigationPlasmid isolation and puri!cation are fairly simple processes that students might want to try. Chemicals, bacterial strains, culture media, and other supplies can be purchased from several commercial companies, including Carolina Biological (
) and Bio-Rad ( ). Students can isolate speci!c plasmids of your choice and use them to transform bacteria that do not naturally contain the plasmid(s). Using the skills and knowledge obtained from this investigation, students can design an experiment to investigate whether or not their transformation was successful.