Big Data: Querying complex JSON data with BigInsights and Hadoop
28
IBM Querying complex JSON data with BigInsights 4.1 Cynthia M. Saracco, IBM Solution Architect May 2016
-
Upload
cynthia-saracco -
Category
Technology
-
view
5.291 -
download
2
Transcript of Big Data: Querying complex JSON data with BigInsights and Hadoop

IBM
Querying complex JSON data with BigInsights 4.1
Cynthia M. Saracco, IBM Solution Architect
May 2016


Contents Page 1
Contents OVERVIEW 2ACQUIRING SAMPLE JSON WEATHER DATA FROM BLUEMIX ........................................................................................ 3TRANSFERRING THE DATA TO HDFS ................................................................................................................................ 12USING A SQL FUNCTION TO QUERY JSON DATA ............................................................................................................ 14
STEP 1: CREATE A BIG SQL TABLE ............................................................................................................. 14STEP 2: INSTALL HIVE UDF PACKAGE .......................................................................................................... 15STEP 3: EXECUTE QUERIES ........................................................................................................................ 15STEP 4: CREATE NEW TABLES BASED ON TRANSFORMATIVE OPERATIONS ....................................................... 17
USING A SERDE TO QUERY JSON DATA ........................................................................................................................... 19STEP 1: ACQUIRE THE SERDE AND ADD THE JAR FILE TO THE PATH ............................................................... 19STEP 2: CREATE A HIVE TABLE AND EXECUTE SIMPLE QUERIES ...................................................................... 20STEP 3: EXPLORE MORE COMPLEX SCENARIOS ............................................................................................. 22
SUMMARY 25

Page 2 of 28
Overview
Given the popularity of JSON (JavaScript Object Notation), I wanted to explore how someone could query complex JSON structures using BigInsights, IBM’s analytical platform based on Apache Hadoop. I experimented with a few options using JSON-based weather data produced by The Weather Company.
This document summarizes the approach I took to:
• acquire free weather data from the Insights for Weather service on Bluemix, IBM’s cloud environment.
• copy the data to an HDFS subdirectory of a BigInsights 4.1 cluster. For certain exercises, I used the free Big SQL Technology Sandbox publicly available on IM Demo Cloud at https://my.imdemocloud.com. In other cases, I used a different BigInsights 4.1 cluster available internally, as I needed certain permissions not available to me on the IM Demo Cloud.
• create external Big SQL tables for the data and query these tables using standard SQL and Hive JSON functions. In addition, I also explored how to transform the external tables to an alternate format that offers greater ease of use and better runtime efficiency for queries.
• create external Hive tables for the data using a publicly available JSON SerDe (serializer / deserializer) and query these tables using Hive’s query language (HQL), which is based on SQL.
Please note that the steps I describe here are simply intended to help you get started quickly. Production use may require a different approach. Feel free to experiment with other alternatives.
Before beginning, you will need access to a BigInsights 4.1 cluster that has Big SQL, a Big SQL query execution environment (e.g., JSqsh), Hive, and the Hive shell running. A free version of the BigInsights Quick Start Edition is available at http://www.ibm.com/analytics/us/en/technology/hadoop/hadoop-trials.html. Alternately, you can use the free Big SQL Technology Sandbox publicly available on IM Demo Cloud for some scenarios.
You will also need prior knowledge of basic Big SQL operations – e.g., how to connect to Big SQL, how to create external Big SQL tables, how to query Big SQL tables, etc. If necessary, consult the Big SQL hands-on labs available on Hadoop Dev (such as https://developer.ibm.com/hadoop/docs/getting-started/tutorials/big-sql-hadoop-tutorial/) or the product documentation (http://www.ibm.com/support/knowledgecenter/SSPT3X_4.1.0/com.ibm.swg.im.infosphere.biginsights.welcome.doc/doc/welcome.html). Finally, for those exercises that use Hive directly, you will need to be familiar with basic Hive capabilities, including how to launch the Hive shell, register JAR files, and execute Hive queries. If necessary, see the Apache Hive documentation at https://cwiki.apache.org/confluence/display/Hive/LanguageManual.
Special thanks to Dan Kikuchi (IBM) for reviewing this material and suggesting improvements.

Page 3 of 28
Acquiring sample JSON weather data from Bluemix
To get started, you’ll need some data. This section describes how you can obtain weather forecast data from a service available through Bluemix. This data is in JSON format and contains a somewhat complex structure consisting of an array and various nested objects. You will have a chance to explore the structure of this data later as well as experiment with ways of representing this data in tables in a Hadoop-based environment.
As of this writing, a free version of the weather service that I used for my test scenarios is publicly available.
__1. If necessary, register for a free Bluemix account at http://bluemix.net.
__2. Log into Bluemix and display the dashboard (click on the Dashboard tab at top).
__3. Select the Use Services or APIs link.
__4. Filter for services related to Data and Analytics (check the appropriate box in the pane at left), and then select the Insights for Weather service from the menu at right. Use your browser’s scroll bar, if needed, to expose the full list of available services.

Page 4 of 28
__5. Review the information about this service, noting that different types of weather data are available. Subsequent exercises use the Standard 10-Day Daily weather data.
__6. In the pane at right, verify that the Selected Plan is the Free Plan to avoid charges. Click the CREATE button to create an instance of the service for your use.
__7. Review the displayed information to become familiar with the overall service. In a moment, you’ll explore it in greater detail.

Page 5 of 28
__8. As with many Bluemix services, the Insights for Weather service issues credentials that you need to invoke the service. In the pane at left, click the Service Credentials link to expose your credentials.
Your credentials will look something like this:
{ "credentials": { "username": "11111X111-2x3x-4x44-a689-999d09bfdxx9", "password": "z1XIlEZZZZ", "host": "twcservice.mybluemix.net", "port": 443, "url": "https://11111X111-2x3x-4x44-a689-999d09bfdxx9:[email protected]" } }

Page 6 of 28
Note your service’s username and password values, as you will need to supply this information to the service at invocation. (You may wish to copy and paste the username and password supplied for your service into a temporary file so it will be easy to retrieve.)
__9. Return to the pane at left and click on the Manage link.
__10. Click the Learn button.
__11. Note that tutorials, samples, and other information about this service are available. If you plan to use this service in a production environment, you should review these materials.
__12. In the API Reference section, click the REST API link appropriate for your geography. I used the REST API (US South) link.
__13. Review the services available to you.

Page 7 of 28
__14. Expose information about the standard 10-day forecast service. In the previous screen capture, this is the first service listed. Click on twc_forecast_daily link and click again on the API link that is subsequently exposed.
__15. Scroll through the displayed pages to become familiar with the details of this forecast service. Note that you can customize input parameters to control the location of the forecast, the units of measure for the data (e.g., metric) and the language of text data (e.g., English). Accept all default values and proceed to the bottom of the page. Locate and click the Try it out! button.
__16. When prompted for a username and password, enter the information supplied for your service’s credentials.

Page 8 of 28
Note: do not enter your Bluemix ID and password; these will be rejected. You must enter the username and password that were generated for your service when it was created. If necessary, return to the main menu for your service and click on the Services Credentials link to expose this information.
__17. Click OK to execute the service.
__18. Inspect the results; a subset is shown here:

Page 9 of 28
__19. Review the structure of the JSON data returned by this service, noting that it contains multiple levels of nesting. Top-level objects represent metadata (such as the language used in subsequent forecasts, the longitude and latitude of where the forecast apply, etc.) and weather forecasts. Forecasts contain an array of JSON objects that detail the minimum and maximum temperatures, the local time for which the forecast is valid, etc. Also included in each forecast array element are separate night and day forecasts, which contain further details. Keep the structure of this JSON data in mind, as it dictates the schemas of your tables and the syntax of your queries in subsequent exercises.
To make it a bit easier for you to reference your weather data’s structure, here’s a subset of sample data I collected:
{ "metadata": { "language": "en-US", "transaction_id": "1460559287953:645351413", "version": "1", "latitude": 34.53, "longitude": 84.5, "units": "m", "expire_time_gmt": 1460561087, "status_code": 200 }, "forecasts": [ { "class": "fod_long_range_daily", "expire_time_gmt": 1460561087, "fcst_valid": 1460509200, "fcst_valid_local": "2016-04-13T07:00:00+0600", "num": 1, "max_temp": null, "min_temp": -17, . . . "narrative": "Chance of snow showers early. Low -17C.", "qpf": 0.02, "snow_qpf": 0, "snow_range": "", "snow_phrase": "", "snow_code": "", "night": { "fcst_valid": 1460552400, "fcst_valid_local": "2016-04-13T19:00:00+0600", "day_ind": "N", "thunder_enum": 0, "daypart_name": "Tonight", "long_daypart_name": "Wednesday night", . . . }, "day": { "fcst_valid": 1460595600, "fcst_valid_local": "2016-04-14T07:00:00+0600", "day_ind": "D", "thunder_enum": 0, "daypart_name": "Tomorrow", "long_daypart_name": "Thursday", . . . } . . . } ] }
Page 10 of 28
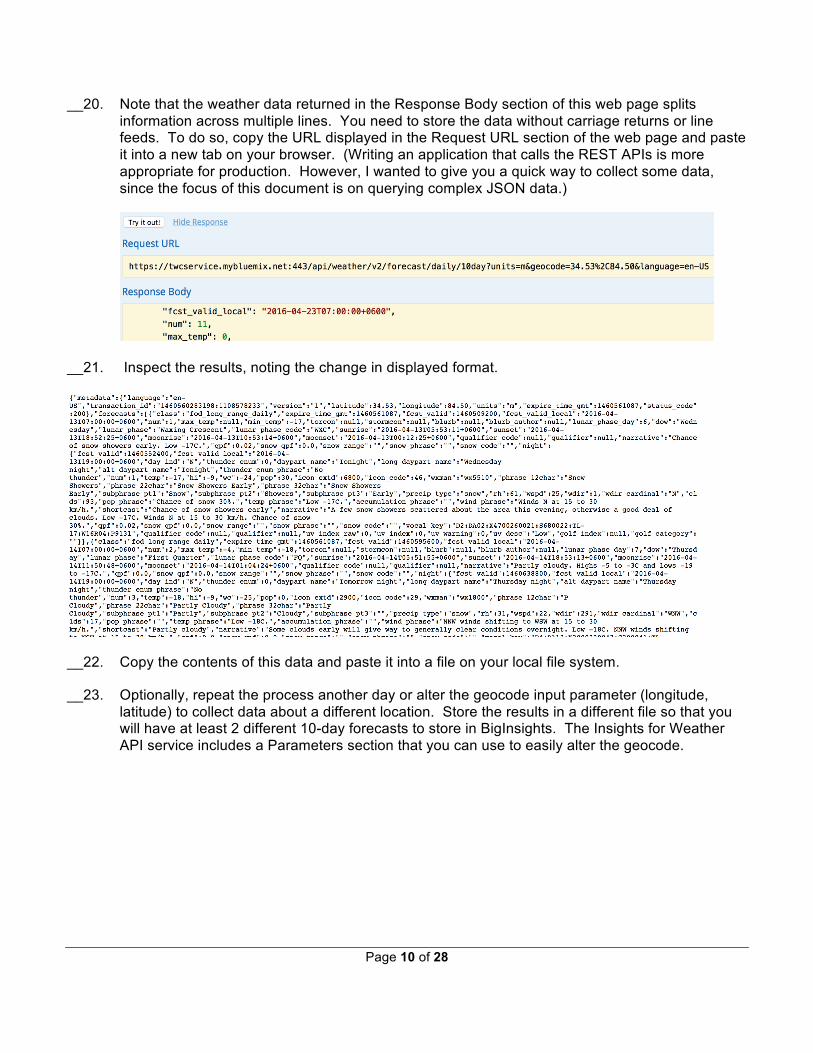
__20. Note that the weather data returned in the Response Body section of this web page splits information across multiple lines. You need to store the data without carriage returns or line feeds. To do so, copy the URL displayed in the Request URL section of the web page and paste it into a new tab on your browser. (Writing an application that calls the REST APIs is more appropriate for production. However, I wanted to give you a quick way to collect some data, since the focus of this document is on querying complex JSON data.)
__21. Inspect the results, noting the change in displayed format.
__22. Copy the contents of this data and paste it into a file on your local file system.
__23. Optionally, repeat the process another day or alter the geocode input parameter (longitude, latitude) to collect data about a different location. Store the results in a different file so that you will have at least 2 different 10-day forecasts to store in BigInsights. The Insights for Weather API service includes a Parameters section that you can use to easily alter the geocode.

Page 11 of 28
The example here overrides the default geocode with one for IBM’s Silicon Valley Laboratory in San Jose, CA (37.195647,-121.748087). The resulting URL is:
https://twcservice.mybluemix.net:443/api/weather/v2/forecast/daily/10day?units=m&geocode=37.195647%2C-121.748087&language=en-US

Page 12 of 28
Transferring the data to HDFS
Once you have at least one file containing a 10-day weather forecast, you need to upload it to your Hadoop / BigInsights cluster. This section summarizes how I did that. Note that my approach requires SSH access. If your environment does not support this, ask your administrator for the recommended approach for uploading files to HDFS. Examples in this section were tested on the public IM Demo Cloud environment (BigInsights 4.1.0.2) available at the time of this writing.
To allow for a little more flexibility and more interesting query results, I collected two 10-day forecasts into separate files (weather10dayApr4.txt and weather10dayFeb17.txt) and uploaded these.
__1. Use FTP or SFTP to transfer your weather data file(s) to a local file system for your BigInsights cluster. On Windows, I use FileZilla. On Mac, I use CyberDuck or SFTP from a command window.
__2. Open a terminal window for your BigInsights cluster. On Windows, I use PUTTY to open a remote terminal session. On Mac, I open a local command window and issue an SSH command such as ssh [email protected].
__3. Verify the presence of the file(s) you transferred in the first step. Within your target directory, issue a command such as
ls weather*.*
Adjust the command as needed to match your file name(s).
__4. Issue an HDFS shell command to create a subdirectory within HDFS for test purposes. In my environment, I had access to the /user/saracco HDFS directory, so I issued the following command to create a /weather subdirectory:
hdfs dfs -mkdir /user/saracco/weather
Modify the command as needed for your environment.
__5. Copy the file(s) from your local directory to your new HDFS subdirectory. Adjust this command as needed for your environment:
hdfs dfs -copyFromLocal weather*.* /user/saracco/weather
__6. Change permissions on your subdirectory and its contents. For example:
hdfs dfs -chmod -R 777 /user/saracco/weather
__7. List the contents of your HDFS subdirectory to validate your work.
hdfs dfs -ls /user/saracco/weather
hdfs dfs -ls /user/saracco/weather Found 2 items

Page 13 of 28
-rwxrwxrwx+ 3 saracco saracco 30677 2016-04-05 16:37 /user/saracco/weather/weather10dayApr4.txt -rwxrwxrwx+ 3 saracco saracco 29655 2016-04-13 14:41 /user/saracco/weather/weather10dayFeb17.txt

Page 14 of 28
Using a SQL function to query JSON data
After you store the sample JSON data in HDFS, you’re ready to analyze it. This section shows you how can use Big SQL to query your data with a Hive user-defined function (hive.get_json_object). This function enables you to extract a JSON object from a JSON string and return the result as a column in your query’s result set.
Although this function is straightforward to use, it parses the target JSON document each time it’s invoked. This means that extracting multiple JSON objects in a single query will cause the same document to be parsed multiple times. As you might imagine, this is inefficient, so you may want to limit your use of this function in production environments to seldom-executed queries or to transformative operations for populating new tables with the necessary information (e.g., CREATE TABLE AS . . . SELECT FROM . . . or INSERT INTO . . . SELECT FROM . . . statements). You’ll have a chance to explore the latter scenario at the end of this section.
Let’s start with the basics first. To begin, you’ll create a table for the JSON weather data that you collected. Specifically, you’ll create an externally managed Big SQL table, which layers a SQL schema over the directory containing your weather data file(s). Next, you’ll create the Hive user-defined functions package provided by Big SQL so that you can use these in your queries. Once that’s done, you’ll query the table.
In case you’re wondering, you can also use Hive natively and execute the get_json_object function against Hive tables. However, I chose to implement this approach using Big SQL because Big SQL offers certain performance and functional advantages that I’ve found useful outside of the scope of this exercise.
Finally, you’ll explore how to create more efficient Big SQL tables for your weather data through transformative queries that populate new tables that employ a Parquet storage format. In effect, you will unravel or flatten select portions of the JSON-based weather data and use Big SQL to convert it to a different format that will simplify your queries and provide better runtime performance.
Examples in this section were tested on the public IM Demo Cloud environment (BigInsights 4.1.0.2) available at the time of this writing.
Step 1: Create a Big SQL table
__1. Launch your preferred Big SQL execution environment (e.g., JSqsh) and connect to your Big SQL database. If you don’t know how to do this, consult the resources mentioned earlier in the Overview section.
__2. Create a Big SQL external table (“weather”) over the HDFS directory into which you copied your JSON file(s) earlier. Adjust the statement below as needed to match your environment:
create external hadoop table if not exists weather (json varchar(32000)) LOCATION '/user/ saracco/weather';
Note that the weather data is being stored in a single varying-length character string column named JSON.

Page 15 of 28
Step 2: Install Hive UDF package
If you’re working with the IM Demo Cloud environment, skip to the next section; an administrator has already installed the Hive UDF package and made if available for your use.
Big SQL includes an optional package that you can install to use some of the Hive user-defined functions (UDFs) in your Big SQL queries. For convenience, I’ve summarized the installation steps here. They require Big SQL administrative authority. Please consult the product documentation at http://www.ibm.com/support/knowledgecenter/#!/SSPT3X_4.1.0/com.ibm.swg.im.infosphere.biginsights.db2biga.doc/doc/biga_hiveUDF.html for further details. Note that after installation, these UDFs will be part of the HIVE schema.
__1. From a terminal window, switch to the Big SQL administrator ID (bigsql) and change to the directory containing the Hive UDFs.
sudo -u bigsql bash
cd $BIGSQL_HOME/hive-compat
__2. Extract the bigsql-hiveudf-*.tar.gz file.
tar -zxvf $BIGSQL_HOME/hive-compat/bigsql-hiveudf-*.tar.gz
__3. Change to the bigsql-hiveudf directory.
cd bigsql-hiveudf
__4. Run this script:
sh ./install-hiveudfs.sh
__5. Optionally, consult the product documentation to see the full list of functions created and to learn more about them. See the link provided earlier.
Step 3: Execute queries
Now you’re ready to query your data. You need to keep the structure of your JSON data in mind because you must specify the path to the JSON object(s) of interest in your queries. If needed, refer to the sample JSON weather data presented in an earlier section.
Query results shown here reflect the sample data that I collected. In at least some cases, the content of your data will differ.
__1. Execute a simple query to extract one JSON object into a single column of a result set. This query extracts the “language” data contained in the “metadata” object of each row in the table.
select hive.get_json_object(json, '$.metadata.language') from weather;

Page 16 of 28
+-------+ | 1 | +-------+ | en-US | | en-US | +-------+
Note that the hive.get_json_object function requires two input parameters: the first is the JSON field to be parsed (in this case, the JSON column of the WEATHER table) and the second is the path to the JSON object of interest. The “$” represents the root of the document. This function invocation indicates that data in the WEATHER.JSON column should be parsed from the document root and the value for the metadata.language object should be retrieved.
__2. Execute a more complex query, extracting multiple JSON objects from each row and casting the value of two objects (in this example, the latitude and longitude) to a data type other than VARCHAR / String.
select hive.get_json_object(json, '$.metadata.transaction_id') as id, cast( hive.get_json_object(json, '$.metadata.latitude') as decimal(20,10) ) as latitude, cast( hive.get_json_object(json, '$.metadata.longitude') as decimal(20,10) ) as longitude, hive.get_json_object(json, '$.forecasts[0].narrative') as nextforecast, hive.get_json_object(json, '$.forecasts[0].fcst_valid_local') as validitydate from weather; +------------+---------------+-----------------+---------------+--------------+ | ID | LATITUDE | LONGITUDE | NEXTFORECAST | VALIDITYDATE | +------------+---------------+-----------------+---------------+--------------+ | 1459805077 | 37.1700000000 | -121.7500000000 | Abundant | 2016-04-04T0 | | 803:134009 | | | sunshine. | 7:00:00-0700 | | 2112 | | | Highs 21 to | | | | | | 23C and lows | | | | | | 8 to 10C. | | | 1455739258 | 37.1700000000 | 84.5000000000 | Partly | 2016-02-17T0 | | 736:810296 | | | cloudy. Low | 7:00:00+0600 | | 662 | | | -4C. | | +------------+---------------+-----------------+---------------+--------------+ 2 rows in results(first row: 0.26s; total: 0.26s)
Note that the final two columns extract JSON objects from a specific element (the first element or element 0) of the “forecasts” array.
__3. Extract the descriptive daytime forecast for the next day. This requires accessing a deeper level of nesting in the JSON data.
select hive.get_json_object(json, '$.forecasts[1].day.narrative') as day2 from weather; +------------------------------------------------------------------+ | DAY2 | +------------------------------------------------------------------+ | Sunshine and clouds mixed. High 4C. Winds NNE at 15 to 25 km\/h. | | Sunny. High 27C. Winds NNW at 15 to 25 km\/h. | +------------------------------------------------------------------+
Page 17 of 28
2 rows in results(first row: 0.25s; total: 0.25s)
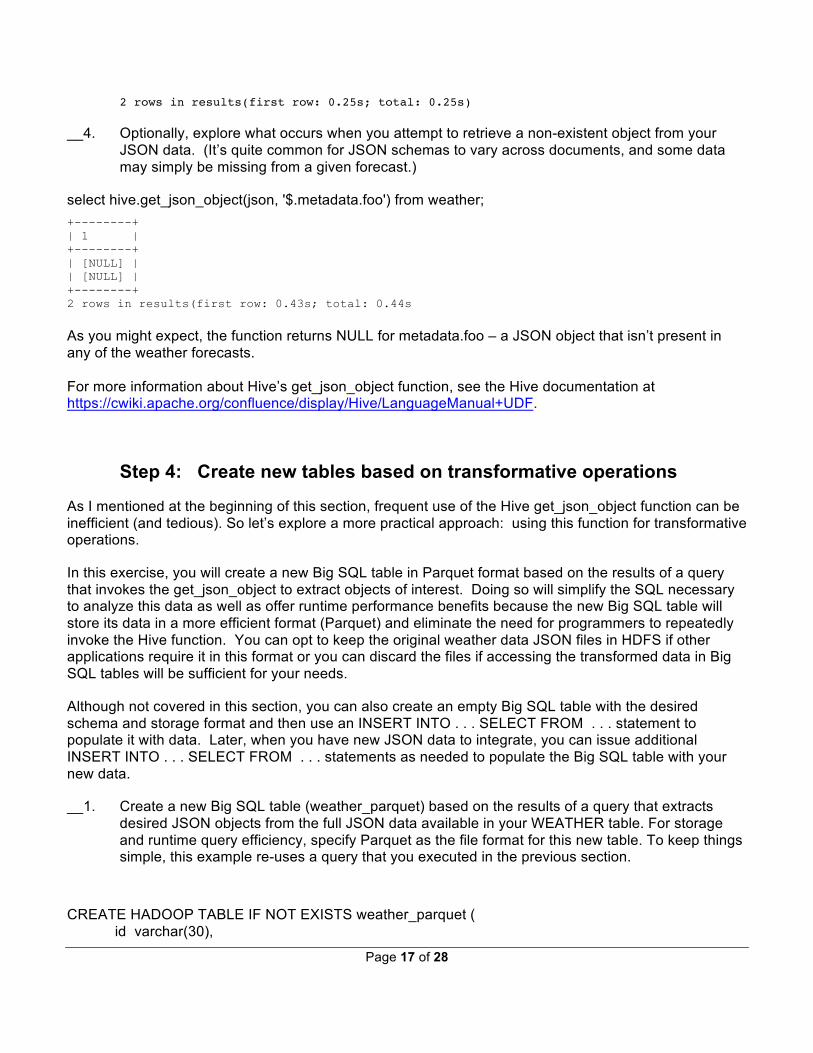
__4. Optionally, explore what occurs when you attempt to retrieve a non-existent object from your JSON data. (It’s quite common for JSON schemas to vary across documents, and some data may simply be missing from a given forecast.)
select hive.get_json_object(json, '$.metadata.foo') from weather; +--------+ | 1 | +--------+ | [NULL] | | [NULL] | +--------+ 2 rows in results(first row: 0.43s; total: 0.44s As you might expect, the function returns NULL for metadata.foo – a JSON object that isn’t present in any of the weather forecasts. For more information about Hive’s get_json_object function, see the Hive documentation at https://cwiki.apache.org/confluence/display/Hive/LanguageManual+UDF.
Step 4: Create new tables based on transformative operations
As I mentioned at the beginning of this section, frequent use of the Hive get_json_object function can be inefficient (and tedious). So let’s explore a more practical approach: using this function for transformative operations.
In this exercise, you will create a new Big SQL table in Parquet format based on the results of a query that invokes the get_json_object to extract objects of interest. Doing so will simplify the SQL necessary to analyze this data as well as offer runtime performance benefits because the new Big SQL table will store its data in a more efficient format (Parquet) and eliminate the need for programmers to repeatedly invoke the Hive function. You can opt to keep the original weather data JSON files in HDFS if other applications require it in this format or you can discard the files if accessing the transformed data in Big SQL tables will be sufficient for your needs.
Although not covered in this section, you can also create an empty Big SQL table with the desired schema and storage format and then use an INSERT INTO . . . SELECT FROM . . . statement to populate it with data. Later, when you have new JSON data to integrate, you can issue additional INSERT INTO . . . SELECT FROM . . . statements as needed to populate the Big SQL table with your new data.
__1. Create a new Big SQL table (weather_parquet) based on the results of a query that extracts desired JSON objects from the full JSON data available in your WEATHER table. For storage and runtime query efficiency, specify Parquet as the file format for this new table. To keep things simple, this example re-uses a query that you executed in the previous section.
CREATE HADOOP TABLE IF NOT EXISTS weather_parquet ( id varchar(30),

Page 18 of 28
latitude varchar(20), longitude decimal(20,10), narrative varchar(1000), validitydate varchar(50) )
STORED AS parquetfile as
select hive.get_json_object(json, '$.metadata.transaction_id') as id, cast(hive.get_json_object(json, '$.metadata.latitude') as decimal(20,10) ) as latitude, cast(hive.get_json_object(json, '$.metadata.longitude') as decimal(20,10) ) as longitude, hive.get_json_object(json, '$.forecasts[0].narrative') as nextforecast, hive.get_json_object(json, '$.forecasts[0].fcst_valid_local') as validitydate from weather;
__2. Count the number of rows in the new table to verify that the expected number are present. Given my test data, I expected a count of 2.
select count(*) from weather_parquet; +---+ | 1 | +---+ | 2 | +---+
__3. Query the new table.
select longitude, latitude, validitydate, narrative from weather_parquet;
Note how much easier it is to express this query than the approach shown in the previous examples, which required repeatedly invoking a Hive UDF and providing JSON path information.
+-----------------+------------+---------------+---------------------------------------------+ | LONGITUDE | LATITUDE | VALIDITYDATE | NARRATIVE | +-----------------+------------+---------------+---------------------------------------------+ | -121.7500000000 | 37.1700000 | 2016-04-04T07 | Abundant sunshine. Highs 21 to 23C and lows | | | 000 | :00:00-0700 | 8 to 10C. | | 84.5000000000 | 37.1700000 | 2016-02-17T07 | Partly cloudy. Low -4C. | | | 000 | :00:00+0600 | | +-----------------+------------+---------------+---------------------------------------------+ 2 rows in results(first row: 0.25s; total: 0.25s)

Page 19 of 28
Using a SerDe to query JSON data
This section introduces another option for querying the JSON data in its native format. Specifically, it explores how you can use a SerDe (serializer / deserializer) built to handle complex JSON structures. SerDes are common in Hadoop environments. You’ll find a number of SerDes available in the public domain, or you can write your own following typical Hadoop practices.
Although Big SQL supports SerDes, the current version has some restrictions that inhibit its use for certain forms of complex JSON structures. Therefore, I chose to use a publicly available JSON SerDe (https://github.com/rcongiu/Hive-JSON-Serde) with Hive to model and query the weather forecast data. General information about this SerDe is available on GitHub and in a blog post at http://thornydev.blogspot.com/2013/07/querying-json-records-via-hive.html. As with any publicly available SerDe, you should evaluate its applicability to your needs in a test environment before considering its use in production applications.
In this section, you will acquire the SerDe and make it available to Hive. Then you will create externally managed Hive tables for your JSON data using this SerDe and explore various ways of querying the data. You should be familiar with Hive before beginning this section.
Examples in this section were tested on a private BigInsights 4.1.0.1 installation. However, this approach should work with any BigInsights 4.1.x installation or any compatible installation of the IBM Open Platform for Apache Hadoop. (As of this writing, the public IM Demo Cloud imposes certain access restrictions on user accounts that preclude its use for this exercise.)
Step 1: Acquire the SerDe and add the JAR file to the path
This section discusses how you can acquire the SerDe I used and how you can make it available to Hive.
__1. Download the SerDe from GitHub at https://github.com/rcongiu/Hive-JSON-Serde and follow the instructions on that site for creating the binary file appropriate for your environment. Make sure this .jar file is present in the local file system for your Hive client.
If you don’t want to create your own binary, you can use one of the binaries that the creator of the SerDe posted at http://www.congiu.net/hive-json-serde/1.3.7/. I used the HDP binary of the SerDe (http://www.congiu.net/hive-json-serde/1.3.7/hdp23/) named json-serde-1.3.7-jar-with-dependencies.jar. I placed this .jar file in the /home/biadmin/sampleData directory of my local file system for my BigInsights cluster.
__2. Launch the Hive shell. Adjust the command below as needed for your environment.
/usr/iop/current/hive-client/bin/hive
Ignore informational log data that may appear (see below) and continue to the next step. SLF4J: Class path contains multiple SLF4J bindings. SLF4J: Found binding in [jar:file:/usr/iop/4.1.0.0/hadoop/lib/slf4j-log4j12-1.7.10.jar!/org/slf4j/impl/StaticLoggerBinder.class] SLF4J: Found binding in [jar:file:/usr/iop/4.1.0.0/spark/lib/spark-assembly-1.4.1_IBM_2-hadoop2.7.1-IBM-8.jar!/org/slf4j/impl/StaticLoggerBinder.class] SLF4J: See http://www.slf4j.org/codes.html#multiple_bindings for an explanation. SLF4J: Actual binding is of type [org.slf4j.impl.Log4jLoggerFactory]

Page 20 of 28
WARNING: Use "yarn jar" to launch YARN applications. SLF4J: Class path contains multiple SLF4J bindings. SLF4J: Found binding in [jar:file:/usr/iop/4.1.0.0/hadoop/lib/slf4j-log4j12-1.7.10.jar!/org/slf4j/impl/StaticLoggerBinder.class] SLF4J: Found binding in [jar:file:/usr/iop/4.1.0.0/spark/lib/spark-assembly-1.4.1_IBM_2-hadoop2.7.1-IBM-8.jar!/org/slf4j/impl/StaticLoggerBinder.class] SLF4J: See http://www.slf4j.org/codes.html#multiple_bindings for an explanation. SLF4J: Actual binding is of type [org.slf4j.impl.Log4jLoggerFactory]
__3. Add the SerDe .jar file to the Hive path. To do so, use the Hive ADD JAR command and specify the location of the .jar file on your local file system. Adjust the code below to match your environment:
add jar /home/biadmin/sampleData/json-serde-1.3.7-jar-with-dependencies.jar; hive> add jar /home/biadmin/sampleData/json-serde-1.3.7-jar-with-dependencies.jar > ; Added [/home/biadmin/sampleData/json-serde-1.3.7-jar-with-dependencies.jar] to class path Added resources: [/home/biadmin/sampleData/json-serde-1.3.7-jar-with-dependencies.jar] If you exit the Hive shell before completing subsequent steps in this exercise, you will need to execute this ADD JAR command again the next time you launch the Hive shell.
Step 2: Create a Hive table and execute simple queries
Before following the instructions below, you should have acquired sample weather data and uploaded it to a directory in HDFS, as described in a previous section. For my tests on an internal BigInsights cluster, I uploaded two weather forecast files to the /user/bigsql_lab/weather directory.
__1. From the Hive shell, create an externally managed Hive table over the HDFS directory that contains your weather data. Adjust the statement below as needed to match your environment:
create external table weather2 (metadata struct<language:string, latitude:string, longitude:string>, forecasts array<struct<class:string, narrative:string>>) row format serde 'org.openx.data.jsonserde.JsonSerDe' location '/user/bigsql_lab/weather';
I presented the CREATE TABLE statement above in a manner that makes it easy for you to cut and paste it into the Hive shell for execution. However, if you find it difficult to read, here’s a version with tabs and new lines for viewing only:
create external table weather2 ( metadata struct<
language:string, latitude:string, longitude:string >,
forecasts array<struct <class:string, narrative:string> >
) row format serde 'org.openx.data.jsonserde.JsonSerDe' location '/user/bigsql_lab/weather';

Page 21 of 28
Let’s explore this table definition a bit. It captures key information about weather metadata and forecasts. Because the sample weather data contains an array of forecasts for a 10-day period, I defined an array of structures, each consisting of class and narrative objects. As you know, the sample weather data contains more metadata and forecast data than what is reflected here. I streamlined this example to make it easy to follow.
Also worth noting is the use of the ROW FORMAT SERDE clause, which references the Java class contained within the registered .jar file that will handle the serialization and deserialization of data for this table.
__2. Execute a simple query that counts the number of rows in the table.
select count(*) from weather2;
You may see informational data about your job before the final query results appear. Note that the final line of the output below is “2.” This is correct for my sample scenario because my table contains 2 rows.
Query ID = biadmin_20160426135723_a9980143-93fa-4e4b-9f52-f90dc8a25cc6 Total jobs = 1 Launching Job 1 out of 1 Number of reduce tasks determined at compile time: 1 In order to change the average load for a reducer (in bytes): set hive.exec.reducers.bytes.per.reducer=<number> In order to limit the maximum number of reducers: set hive.exec.reducers.max=<number> In order to set a constant number of reducers: set mapreduce.job.reduces=<number> Starting Job = job_1461604735460_0006, Tracking URL = http://bigdata.ibm.com:8088/proxy/application_1461604735460_0006/ Kill Command = /mnt/BigInsights/usr/iop/4.1.0.0/hadoop/bin/hadoop job -kill job_1461604735460_0006 Hadoop job information for Stage-1: number of mappers: 1; number of reducers: 1 2016-04-26 13:57:36,480 Stage-1 map = 0%, reduce = 0% 2016-04-26 13:57:43,109 Stage-1 map = 100%, reduce = 0%, Cumulative CPU 3.17 sec 2016-04-26 13:57:50,554 Stage-1 map = 100%, reduce = 100%, Cumulative CPU 6.41 sec MapReduce Total cumulative CPU time: 6 seconds 410 msec Ended Job = job_1461604735460_0006 MapReduce Jobs Launched: Stage-Stage-1: Map: 1 Reduce: 1 Cumulative CPU: 6.41 sec HDFS Read: 67798 HDFS Write: 2 SUCCESS Total MapReduce CPU Time Spent: 6 seconds 410 msec OK 2
__3. Retrieve the metadata for each forecast.
select metadata from weather2; {"language":"en-US","latitude":"37.17","longitude":"-121.75"} {"language":"en-US","latitude":"37.17","longitude":"84.50"}

Page 22 of 28
A few aspects of this query and its output are worth noting. First, the query simply references the column name of METADATA to retrieve its contents. There is no need to reference a document root (as you did when invoking the Hive get_json_object function). Second, although the metadata object within your sample weather data contains a number of objects, only 3 are returned here. That’s because we didn’t model the full metadata object when creating the table. Only the language, latitude, and longitude child objects were included in the table’s schema definition, so that’s all you can query or retrieve.
__4. Retrieve longitude and latitude data for English-language forecasts (en-US).
select metadata.longitude, metadata.latitude from weather2 where metadata.language='en-US'; hive> select metadata.longitude, metadata.latitude from weather2 where metadata.language='en-US'; OK -121.75 37.17 84.50 37.17 Time taken: 0.406 seconds, Fetched: 2 row(s)
__5. Explore what happens when you attempt to retrieve a JSON object that’s in your underlying data file(s) but not defined as part of your table. In this case, try to retrieve the transaction_id from the metadata object in each row of your table:
select metadata.transaction_id from weather2;
Note that the query returns an error, which is what you should expect when you try to query a column that wasn’t defined as part of your table.
FAILED: RuntimeException cannot find field transaction_id(lowercase form: transaction_id) in [language, latitude, longitude]
__6. Now that you understand how to retrieve a JSON object nested within another object, experiment with retrieving part of an array. For each row in your table, retrieve the first forecast narrative as well as its associated longitude and latitude.
select metadata.longitude, metadata.latitude, forecasts[0].narrative from weather2;
hive> select metadata.longitude, metadata.latitude, forecasts[0].narrative from weather2; OK -121.75 37.17 Abundant sunshine. Highs 21 to 23C and lows 8 to 10C. 84.50 37.17 Partly cloudy. Low -4C. Time taken: 0.094 seconds, Fetched: 2 row(s)
Step 3: Explore more complex scenarios
At this point, you’re read to explore more complex scenarios that analyze the JSON weather data in a bit more detail. As you may recall, each element of the forecasts array consists of a structure that includes a number of objects. Among these objects are additional structures for night and day forecasts. This section illustrates how you can model and query nested structures such as these.

Page 23 of 28
__1. Create an externally managed Hive table that captures a deeper level of JSON nesting in its schema. In this case, include portions of the nightly forecasts nested within each element of the forecasts array. Adjust the path specification as needed for your environment.
create external table weather3 (metadata struct<language:string, latitude:string, longitude:string>, forecasts array<struct<class:string, narrative:string, night:struct<shortcast:string, fcst_valid_local:string>>>) row format serde 'org.openx.data.jsonserde.JsonSerDe' location '/user/bigsql_lab/weather';
Again, the previous code contains no extraneous characters, making it suitable for copying into the Hive shell. Here’s a format that’s easier to read:
create external table weather3 ( metadata struct<
language:string, latitude:string, longitude:string
>, forecasts array<
struct< class:string, narrative:string, night:struct<
shortcast:string, fcst_valid_local:string
> >
> ) row format serde 'org.openx.data.jsonserde.JsonSerDe' location '/user/bigsql_lab/weather';
__2. Query the table, accessing JSON objects that are deeply nested. This example retrieves the longitude and latitude, first overall forecast narrative (forecasts[0].narrative), the valid date/time for the night’s forecast for the first element in the forecast array (forecasts[0].night.fcst_valid_local), and the short description of that night’s forecast (forecasts[0].night.shortcast).
select metadata.longitude, metadata.latitude, forecasts[0].narrative, forecasts[0].night.fcst_valid_local, forecasts[0].night.shortcast from weather3; hive> select metadata.longitude, metadata.latitude, forecasts[0].narrative, forecasts[0].night.fcst_valid_local, forecasts[0].night.shortcast from weather3; OK -121.75 37.17 Abundant sunshine. Highs 21 to 23C and lows 8 to 10C. 2016-04-04T19:00:00-0700 Mainly clear 84.50 37.17 Partly cloudy. Low -4C. 2016-02-17T19:00:00+0600 Partly cloudy Time taken: 0.098 seconds, Fetched: 2 row(s)
__3. Retrieve all the nightly short descriptive forecasts (shortcast objects) in each row.
select metadata.longitude, metadata.latitude, forecasts.night.shortcast from weather3;

Page 24 of 28
hive> select metadata.longitude, metadata.latitude, forecasts.night.shortcast from weather3; OK -121.75 37.17 ["Mainly clear","Mainly clear","Mostly cloudy","Cloudy","Chance of showers","Areas of fog developing late","A few clouds","Mainly clear","Partly cloudy","Showers possible","Chance of showers"] 84.50 37.17 ["Partly cloudy","Clear","Partly cloudy","Cloudy","Partly cloudy","Partly cloudy","Partly cloudy","Mostly clear","Partly cloudy","Partly cloudy","Partly cloudy"] Time taken: 0.096 seconds, Fetched: 2 row(s)
Note that the final column in the result set is an array of short nightly forecasts (shortcast objects).
__4. Represent the short nightly forecasts in a “flat” format, extracting each of the first 3 short nightly forecasts into separate columns.
select metadata.longitude, metadata.latitude, forecasts[0].night.shortcast, forecasts[1].night.shortcast, forecasts[2].night.shortcast from weather3; hive> select metadata.longitude, metadata.latitude, forecasts[0].night.shortcast, forecasts[1].night.shortcast, forecasts[2].night.shortcast from weather3; OK -121.75 37.17 Mainly clear Mainly clear Mostly cloudy 84.50 37.17 Partly cloudy Clear Partly cloudy Time taken: 0.09 seconds, Fetched: 2 row(s)
Page 25 of 28
Summary
Now you have some ideas for how to use Big SQL or Hive to model and query complex JSON data, such as weather forecasts returned by the Insights for Weather service on Bluemix (created by IBM’s The Weather Company).
To expand your Big Data skills and learn more, enroll in free online courses offered by Big Data University (http://www.bigdatauniversity.com/) or work through free tutorials included in the BigInsights product documentation. The HadoopDev web site (https://developer.ibm.com/hadoop/) contains links to these and other resources.

Page 26 of 28
© Copyright IBM Corporation 2016. Written by C. M. Saracco.
The information contained in these materials is provided for
informational purposes only, and is provided AS IS without warranty
of any kind, express or implied. IBM shall not be responsible for any
damages arising out of the use of, or otherwise related to, these
materials. Nothing contained in these materials is intended to, nor
shall have the effect of, creating any warranties or representations
from IBM or its suppliers or licensors, or altering the terms and
conditions of the applicable license agreement governing the use of
IBM software. References in these materials to IBM products,
programs, or services do not imply that they will be available in all
countries in which IBM operates. This information is based on
current IBM product plans and strategy, which are subject to change
by IBM without notice. Product release dates and/or capabilities
referenced in these materials may change at any time at IBM’s sole
discretion based on market opportunities or other factors, and are not
intended to be a commitment to future product or feature availability
in any way.
IBM, the IBM logo and ibm.com are trademarks of International
Business Machines Corp., registered in many jurisdictions
worldwide. Other product and service names might be trademarks of
IBM or other companies. A current list of IBM trademarks is
available on the Web at “Copyright and trademark information” at
www.ibm.com/legal/copytrade.shtml.