Bicycling to School Together€¦ · way to instill a love of bicycling while developing life-long...
14
Bicycling to School Together A Bike Train Planning Guide
Transcript of Bicycling to School Together€¦ · way to instill a love of bicycling while developing life-long...

Bicycling to School Together
A Bike Train Planning Guide


National Center for Safe Routes to School | www.saferoutesinfo.org
All aboard the bike train! Mia got a new bike for her birthday and is begging her parents to let her ride it to school. She says a couple of her friends want to ride too. Mom mentioned it in passing to other parents and they like the idea but aren’t sure the kids should be riding alone. Welcome to the bike train…
Bike trains enable students to get to school while enjoying the outdoors and the company of other bicyclists. Best suited for children in upper elementary and middle school grades, bike trains are led by adults - one at the front and one at the rear of the train - that accompany students as they bike to and from school. From one or two neighbors biking together, to a route with multiple “stations” where more riders join in, bike trains can be a great way to instill a love of bicycling while developing life-long safety skills.
Planning a bike train
Whether you’re planning a bike train for a special event or an ordinary school day, this bike train guide can help you get started. Drawing on the experience of existing bike trains, this guide provides how-to information and tips for planning a safe and efficient route and schedule, and details key skills and equipment needed to support safe riding.
Step 1: Plan the route and schedule • Pick the route• Set the schedule• Plan for the unexpected
Step 2: Getting ready for the ride: Safe equipment, safe riders, prepared leaders
• Equipment• Safety skills for student bicyclists• Role of the bike train leaders
Step 3: Final preparations and the first ride • Practice ride and information review• Enjoy the ride
Keeping your train going
Why ride the bike train?Many families get the idea that active transportation is a good thing for many reasons:
• It’s fun!• It’s great physical activity.• Student riders arrive at school
alert and ready to learn. • It instills safe bicycling skills.

Step 1: Plan the route and schedule Bike trains can be as simple as parents and students who live on the same street riding to school together, or may involve “picking up” students along the way. Regardless, a bike train should follow a well-planned route to ensure participants’ safety and provide the best riding experience for the group.
Pick the route
A bike train route should be determined by considering where student riders live, students’ riding abilities and the safety of the bicycling environment.
If you haven’t yet identified your bike train participants, reach out to students and parents in your neighborhood or to those who currently bike to school to see if they would be interested in forming a bike train. Once you know who will be participating in the bike train, you can begin thinking about potential routes.
Things to consider when picking the route:
1. Where do the student riders live? Depending on where the student riders live, your bike train may meet in one location central to everyone, or you may develop a schedule that allows the bike train to “pick up” student riders at different stops along the way. In some communities, it may make sense for a bike train to start from a “park-n-ride” location near a trail, rather than ride on the city streets. NOTE: Both centrally located starting points and pick up spots need to have enough space for cyclists to gather as a group and provide safe places to enter the roadway or path.
2. Is there bicycle infrastructure such as paths or bike lanes that would enhance the ride? If possible, take advantage of shared-use paths, protected bike lanes and other routes that are physically separated from motor vehicles. If none of the above are available to you, then be sure to use routes that have a low-speed limit and have minimal traffic.
National Center for Safe Routes to School | www.saferoutesinfo.org

3. Where are the best places to cross the street? Select bicycle-friendly crossing locations where vehicle traffic is stop controlled (stop sign or traffic light) and there is good visibility for both drivers and bicyclists. When approaching the school campus, consider crossing locations that have a school crossing guard. At such locations, it may be best for riders to dismount and walk their bikes across the crosswalk.
4. How long will it take to ride the route? Consider the age and skill level of your riders and try to plan routes that allow for a relatively leisurely pace while keeping the total commute time at an acceptable level for your group.
5. What happens when you get to the school campus? Consider how the bicycle train will enter and exit school grounds. Pick a route that avoids traffic as much as possible, and consider that this may be different at morning arrival and afternoon dismissal. Check with your school about policies related to riding bikes on the school campus and through intersections with posted crossing guards. If necessary, have riders dismount and walk their bikes onto and across school grounds.
6. What do you do with the bikes at the end of the ride? Student riders will need a secure location, like a bicycle rack, to store their bicycles while they are at school. Check to see that your school has a sufficient number of bicycle racks in an easily accessible location. Riders must bring their own locks to secure their bikes.
After identifying a potential route, ride it at least once without the student riders, but under the same conditions you expect when the bike train is in operation (i.e., weekday school arrival and dismissal times when school is in session), making note of any challenging areas as well as locations where the group could pull over to make an unexpected stop. If needed, make adjustments and ride the route again.
National Center for Safe Routes to School | www.saferoutesinfo.org
Tip: Create a route mapOnce the route is confirmed, create a map showing the bike train route and distribute it to all bike train participants. A bike train route map could include:
• Starting location, school location, and pick up locations as appropriate
• Surrounding streets and pathways• Street names• Local landmarks• Crosswalk and crossing
guard locations
Online mapping tools like Google Maps provide most of this information. To learn more about making a bicycle train route map, check out the Creating Walking and Bicycling Route Maps Tip Sheet: http://bit.ly/routetips.
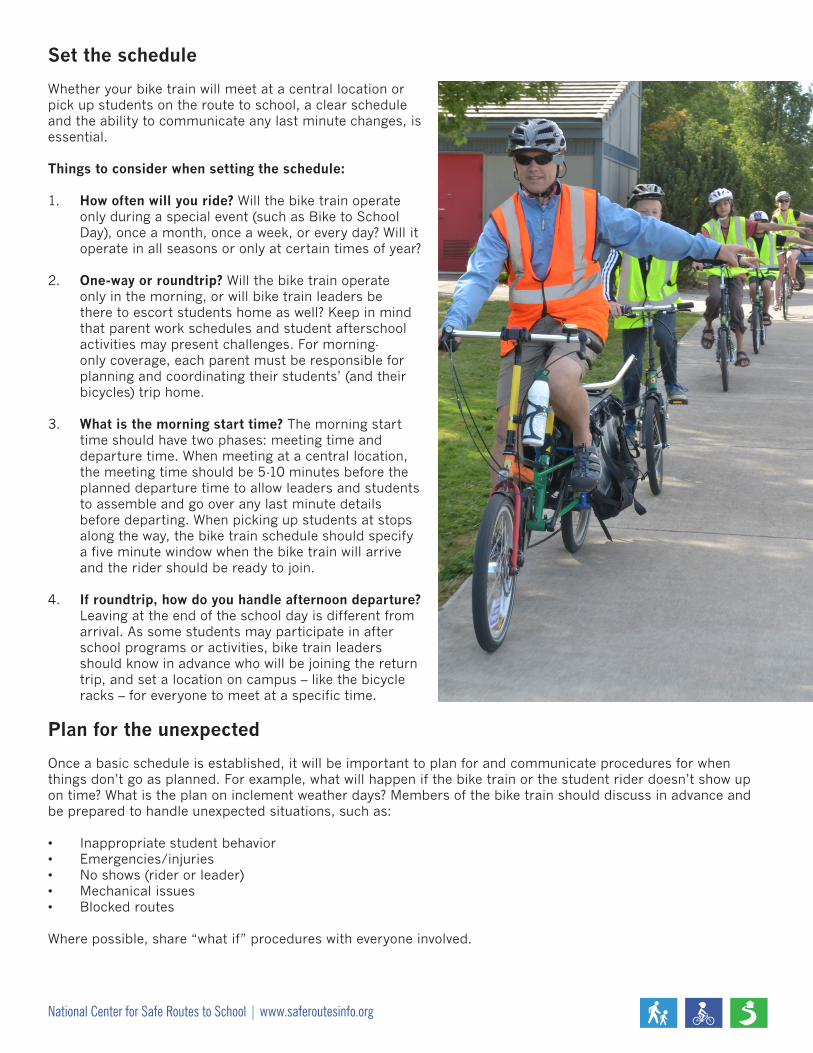
Set the schedule
Whether your bike train will meet at a central location or pick up students on the route to school, a clear schedule and the ability to communicate any last minute changes, is essential.
Things to consider when setting the schedule:
1. How often will you ride? Will the bike train operate only during a special event (such as Bike to School Day), once a month, once a week, or every day? Will it operate in all seasons or only at certain times of year?
2. One-way or roundtrip? Will the bike train operate only in the morning, or will bike train leaders be there to escort students home as well? Keep in mind that parent work schedules and student afterschool activities may present challenges. For morning-only coverage, each parent must be responsible for planning and coordinating their students’ (and their bicycles) trip home.
3. What is the morning start time? The morning start time should have two phases: meeting time and departure time. When meeting at a central location, the meeting time should be 5-10 minutes before the planned departure time to allow leaders and students to assemble and go over any last minute details before departing. When picking up students at stops along the way, the bike train schedule should specify a five minute window when the bike train will arrive and the rider should be ready to join.
4. If roundtrip, how do you handle afternoon departure? Leaving at the end of the school day is different from arrival. As some students may participate in after school programs or activities, bike train leaders should know in advance who will be joining the return trip, and set a location on campus – like the bicycle racks – for everyone to meet at a specific time.
Plan for the unexpected
Once a basic schedule is established, it will be important to plan for and communicate procedures for when things don’t go as planned. For example, what will happen if the bike train or the student rider doesn’t show up on time? What is the plan on inclement weather days? Members of the bike train should discuss in advance and be prepared to handle unexpected situations, such as:
• Inappropriate student behavior• Emergencies/injuries• No shows (rider or leader)• Mechanical issues• Blocked routes
Where possible, share “what if” procedures with everyone involved.
National Center for Safe Routes to School | www.saferoutesinfo.org

National Center for Safe Routes to School | www.saferoutesinfo.org
Step 2: Getting ready for the ride: Safe equipment, safe riders, prepared leadersWhile the route and schedule are important foundations for a bike train, all participants need to be prepared to ride safely.
Equipment
Proper bicycling equipment can support a safe and comfortable ride to school. Everyone must have a bicycle that fits, is in good mechanical condition, and is equipped with features to support safe commuting. Every rider must have a properly fitted helmet and wear it correctly. The handout included in this guide provides details how to assess bicycle and helmet fit, and how to check that bike components are operating safely. It can be provided to both the bike train leaders and to the caregivers of student riders. Encourage riders and leaders to review the handout and gather all of the necessary supplies before the first ride so everyone is ready to go.
Leaders can reinforce proper helmet fit and use by having participants sign a helmet pledge stating that they will wear a helmet every time they ride their bike. For more information, see the Helmets on Heads pledge: http://www.helmetsonheads.org/pledge/.
Safety skills for student bicyclists
Safety is the most important consideration in operating a bike train, and should be reinforced at every opportunity. Students will be expected to follow the rules of the bike train, practice safe riding behaviors and listen to the bike train leaders at all times. It is important to communicate to all riders that riding with a bike train is a privilege that can be revoked, particularly if a student’s actions put the group at risk.
Bike trains are best suited for children in upper elementary and middle school grades when they are better able to judge and react to the speed, distance and sounds of traffic than younger students. Because children develop these skills at different ages, parents/caregivers must assess their child’s bicycling ability and give permission for student participation in a bike train. While parents/caregivers are ultimately responsible for preparing their children to ride with a bike train, bike train leaders can help by providing parents with bicycle safety resources and specific details about the bike train operations. The handout included in this guide provides information on basic safety skills and bicycling rules of the road.

National Center for Safe Routes to School | www.saferoutesinfo.org
Before giving permission to participate in a bike train, caregivers should observe that students can:
• Start and stop smoothly.• Ride in a straight line without weaving.• Use hand signals and check their surroundings while
maintaining their balance.
With the students and their caregivers, create a set of ground rules for your bike train, including consequences for not following the rules. Example ground rules include:
• No helmet, no ride. All riders must wear helmets that are properly fitted.
• Be on time.• Listen for and obey directions from the bike train leader at
all times.• Stay in formation with an adult leader in front and back,
and do not pass other members of the bike train.• Follow the rules of the road.• Stick together while keeping a safe distance from other riders. • Communicate, communicate, communicate. If a rider needs
to slow down or stop for any reason, communicate with all bike train participants so everyone knows what’s about to happen.
Role of the bike train leaders
Bike train leaders need to model and be able to teach safe bicycling skills. Review the safety skills checklist in the handout included with this guide. Other materials may be found at WalkBiketoSchool (http://www.walkbiketoschool.org) and at League of American Bicyclists (http://www.bikeleague.org/ridesmart). Note: Leaders may want to look for bicycle skills classes available in your community. Courses on group riding, family riding or riding with children are a plus.
At minimum, bike trains require two leaders, one in the front and one at the back. For larger bike trains, a good rule of thumb is one adult for every 3 to 4 students. Bike train leaders serve several roles:
• The leader in the front is responsible for leading the train by modeling safe bicycling behavior, keeping track of time, and stopping at designated stops. This leader also provides instructions or alerts when the group should pay extra attention, such as approaching an intersection or a hill.
• The leader in the back makes sure that no students fall behind and monitors the behavior of the students in front of him/her. This leader also communicates instructions as needed (i.e. if a car is approaching from the back).
• For larger groups, additional leaders should be evenly spaced between the students in the bike train to watch, instruct and assist students as needed.
• During the ride, all bike train leaders should be scanning the roadway and communicating about upcoming stops and turns, potential hazards, the bike train’s pace (too fast or too slow), and other issues. They should be attentive to student bicycling behaviors and provide students with verbal guidance and encouragement.
Once the group of committed leaders is established, prepare a detailed schedule and contact list for each leader, including emergency contact information and multiple phone numbers for all riders if possible. When heading out for a ride, bike train leaders should have (in addition to bikes and helmets):
q Brightly colored or reflective clothing that makes them visible to drivers and the students following themq Cell phones and emergency contact information for each student riderq Waterq Bicycle bellq A bicycle pump and repair kit with everything needed for fixing a flat tire, adjusting seat height,
and making minor repairsq A first aid kit

National Center for Safe Routes to School | www.saferoutesinfo.org
Step 3: Final preparations and the first ride With the advance planning completed, you know where and when the ride will happen and all the safety steps are in place. Before enjoying your first ride, assemble your leaders and riders to review the details and take a fun practice ride.
Practice ride and information review
Some groups have a bike rally the weekend before the event. Others just choose a time before the first official ride to gather the bike train leaders and the student riders with their parents/caregivers to practice riding the route. When assembled, review required equipment and rules of the road, discuss the ground rules, and practice group riding skills along the route. As a group, discuss contingency plans and procedures, and determine strategies for situations like inclement weather, difficult segments of the route, or mechanical issues (see Plan for the unexpected in Step 1).
Consider assembling a packet of information for all bike train participants that includes:
• Map of the route, including designated stops where students will be picked-up, if applicable.• Schedule, including information about inclement weather plans and procedures for reporting absences.• Contact information for bike train leaders and riders, including emergency contact information. • Bike train ground rules. • Bike Train Equipment and Safety checklists (included with this guide).
TIP: Create a combined parent permission slip and student rider agreement form that includes the information above. Have both the parent/caregiver and student rider sign the form stating they have inspected the student’s bike and helmet and reviewed the contents of the packet together.
Enjoy the ride
You put a lot of effort into making this a great first ride - Enjoy it! As with all new things, there may be some kinks to work out so be prepared to be flexible. While riding, listen to what the leaders and student riders are saying. You will learn a lot from your group, and you may be surprised by what a rewarding thing you have started.

Keeping your bike train goingOnce your bike train is up and running, don’t be surprised if it grows! Riding a bike is naturally fun, but below are a few ideas to keep your bike train leaders and student riders excited and engaged year-round.
Keep it fresh
Be creative when thinking about ways to keep riders interested or address a challenge. One bike train leader operating an elementary school bike train in Washington, DC had a hard time getting student riders to ride single file and not pass each other until she realized that the students were all trying to be the first in line. She implemented a rotating schedule that allowed each student to take the front spot at least once a week by going in alphabetical order by last name.
Reward student riders Find ways to frequently celebrate and reward student riders. Students who participate in a middle school “bike brigade” in Columbia, MO get special stickers for extra efforts, such as riding in below-freezing temperatures, or helping other riders carry heavy items.
Foster a supportive bike culture
The bike train is likely to be more sustainable if it is supported by a strong bike culture. Does your school celebrate Bike to School Day? Does it host a bike rodeo or teach a bicycle safety curriculum? Would it support the Helmets on Heads pledge? Consider supporting initiatives like these to expand the bike culture at your school and in your community.
Check your progress
It’s a good idea to regularly assess how well the bike train is functioning. Ask students and leaders - Are there things that could be done better? Are there ways to make it more fun? Is the schedule working or would they like to ride more frequently?
Share your bike train story!We’d love to hear how your bike train is going, along with any insights you may have for others. Send your bike train story and photos to [email protected].
Questions?If you have any questions about this series or about setting up a bike train, email us at [email protected] or call us toll free at 1-866-610-SRTS.
National Center for Safe Routes to School | www.saferoutesinfo.org
Prepare riders for the change of seasonsIn the Fall/Winter when daylight hours are shorter and temperatures may be chilly, help student riders stay safe and comfortable through increased visibility and extra layers of clothing.
• Reflective clothing – Encourage reflective vests or materials for all members of the bike train to improve visibility during dark morning and evening rides.
• Lights – Be sure all bikes have white headlights in the front and red rear taillights for traveling after dark. Reflectors in the wheel spokes provide visibility from the side.
• Layers – Student riders should dress for colder temperatures and wind chill by layering their clothing, wearing gloves, and scarves or other face covers.
In warmer months the longer days are perfect for more riding, but higher temperatures and sun exposure can make things unpleasant if riders aren’t prepared.
• Hydrate – Encourage student riders to carry water and take breaks as necessary. Bike train leaders should carry an extra bottle or two just in case a rider forgets.
• Sun safety – Encourage sunscreen, and wear sunglasses to reduce glare.
• Stay cool – Wear breathable clothing in light colors, which will reflect the sun and help to keep them cool.

National Center for Safe Routes to School | www.saferoutesinfo.org
Bike train equipment checklist Proper bicycling equipment can support a safe and comfortable ride to school. Everyone must have a bicycle that fits, is in good mechanical condition, and is equipped with features to support safe commuting.
Check bike fit
Students will be safest and most comfortable on bikes that fit them at their current size, not ones that they will “grow into.”
q When standing over the bicycle, there should be 1 to 2 inches between the rider and the top tube (bar) if using a road bike and 3 to 4 inches if using a mountain bike.
q When sitting on the bike, the rider should be able to touch the ground with both feet.
Check bike condition using the ABC quick check
It is important to make sure that bicycles are in good operating condition before any ride. The ABC Quick Check is an inspection approach that encourages review of Air, Brakes, Chain, and Quick release parts, all of which should be inspected and in good working condition before each ride:
q Air - Check the air pressure, spin the wheels and make sure the tires are not worn out.q Brakes - Check to make sure coaster brakes will stop the bike by spinning the back wheel and applying the
brake. If the bike has hand brakes check to see that the levers don’t hit the handlebars when squeezed. Lift one tire up at a time and spin it; squeeze the levers to see if the tire stops. The brake pads should be clean, straight and contact the rims properly.
q Cranks, Chains and Cogs - Grab the crank arms and try to wiggle side to side. There should be no movement. Spin the pedals and cranks to see if the chain drives the rear wheel. The chain should look like metal not rust or black gunk. If the bike has gears check to make sure the gear levers and derailleurs (gear-changing mechanism) work to shift the chain between gears.
q Quick Release - Some bikes have quick releases on the wheels or the seat post. Check to make sure they are tight and closed properly.
q Check - After making sure the seat and handlebars are tight and the proper height, ride your bicycle around the driveway or parking lot and check that everything works well.
In addition to the ABC Quick Check:
q Check that bicycles have reflectors on the front, back and both wheels. If riding when it’s dark or nearly dark, there should also be white headlights and red taillights.
q Riders should have a bike lock to secure their bicycle once arriving at the school. U-locks are preferred over cable locks, which can be easily cut. Attach the frame and front wheel of the bike to the bike rack.
q Finally, to help transport backpacks and other school supplies, bicyclists may want to consider a bike basket, saddle bag, or other way to safely transport school items.

National Center for Safe Routes to School | www.saferoutesinfo.org
Bike train safety checklistSafety is the most important consideration in operating a bike train, and should be reinforced at every opportunity. Everyone must have a properly fitted helmet and wear it correctly. Students are expected to follow the rules of the bike train, practice safe riding behaviors and listen to the bike train leaders at all times.
Check basic rider skills
Bike trains are best suited for children in upper elementary and middle school grades when they are better able to judge and react to the speed, distance, and sounds of traffic than younger students. Because children develop these skills at different ages, parents/caregivers must assess their child’s bicycling ability and give permission for student participation in a bike train. At a minimum, bike train leaders and parents/caregivers should observe that students can:
• Start and stop smoothly.• Ride in a straight line without weaving.• Use hand signals and check their surroundings while
maintaining their balance.
Check knowledge of rules of the road
All bike train participants must know and follow the basic bicycling Rules of the Road, including:
• Ride on the street in the same direction as traffic, not on the sidewalk.
• Ride on the right side of the road a safe distance from the curb or parked cars
• Ride single file, leaving space between bicycles in case of a sudden stop.
• Stop at all stop signs and red lights.• Use hand signals to indicate turns, slowing, and stopping.
Calling out “slowing,” “turning,” or “stopping” can also be helpful when riding in a group.
For additional safety resources, see http://www.walkbiketoschool.org/keep-going/bike-safety.
Check helmet fitPut your helmet flat on your head. If it moves when you shake your head, you need to tighten your helmet or get a smaller one. Check:
Eyes: The helmet should sit low on your forehead – two finger widths above your eyebrows.
Ears: With the helmet buckled, the straps should meet just below the ears.
Mouth: When buckled, you should be able to fit no more than two fingers between the buckle and chin.
For more information, see the Helmets on Heads Fit Guide: http://www.helmetsonheads.org/fit/.

Photo credits:
Alliance for Biking and Walking
North Carolina Department of Transportation, North Carolina
Billinghurst Middle School, Nevada
Oregon Safe Routes to School Program, Oregon
PedNet Coalition, Missouri
Jane Healy and Active Transportation Alliance, Illinois
Mike Cynecki, Arizona
All other photos from the National Center for Safe Routes to School.

730 Martin Luther King Jr. Blvd., Suite 300 Chapel Hill, North Carolina 27599-3430


![Bike train system [eindhoven]](https://static.fdocuments.in/doc/165x107/55a51e7b1a28ab565a8b4902/bike-train-system-eindhoven.jpg)