SRM Supplementary Information SRM_SHO_303 SRM Supplementary Information.

Copyright 2006-2021 SRM Enterprises, Inc. Updated 1/4/21 1
Thank you for purchasing the BestTrack® Space Derby® Track. Please check out our web site at www.besttrack.com for the latest information on new products.
Your BestTrack® Space Derby® Track is designed to give you years of trouble free service and is covered by our lifetime warranty. Please read though all of the instructions before starting to assemble your track.
Lifetime Warranty
Your BestTrack® Space Derby Track is covered by a lifetime warranty against manufacturing defects. This
covers all parts of the track against warping or wearing out. This warranty does not cover damage due to misuse or abuse whether accidental or intentional. Discoloration or spotting on the track due to moisture is not covered.
Additional items you will need: 1. You will need to purchase a Space Derby Accessory Kit, which includes 300 feet of spooled
monofilament line for the track, four space derby carriers, and a swivel snap to prevent the line from coiling. You will also need Space Derby rocket kits. These items are available from your local Scout supplier or the BSA website at: scoutstuff.org.
2. Four 10 lb Olympic style barbell plate weights and two 5 lb Olympic style barbell plate weights. Be sure that they have the large 2 inch “Olympic” style hole through the middle. These are used to hold the stands in place and to also add tension to the racing lines.
Start Tower
Finish Tower
BestTrack® Space Derby® Tracks
By: SRM Enterprises, Inc. P.O. Box 53 Forest City, IA 50436 641-585-2299

Copyright 2006-2021 SRM Enterprises, Inc. Updated 1/4/21 2
Step 1 Check all parts against the diagram on sheet 2 for identification. Please refer to this page during assembly to help you in selecting the parts for each step. The lengths of the aluminum parts are shown in inches to help you identify them.
Four ¼-20 Wing Nuts (Part #21) and Two Nylon Weight Straps (not shown) are also included.
Parts Diagram – Please refer to this page to identify your parts.
Copyright 2006-2021 SRM Enterprises, Inc. Updated 1/4/21 3
Step 2 Please refer to diagram below for this step. You will need the following parts: (8) Black Plastic Angle Caps – Part #17 (4) Bases – Part #2 Push on the Black Plastic Angle Caps (Part #17) onto both ends of all four Bases (Part #2) leaving the bolt holes open for assembly. (You may need to lightly tap these on with a hammer.) Then bolt together all four of the Stand Assemblys using the following for each assembly: Using the following additional parts: (8) Gussets – Part #1 (8) Verticals – Part #4 (24) ¼-20 X .50 long Hex Head Bolts – Part #9 (24) ¼-20 Hex Nuts – Part #11 Take one base (with end caps) (Part #2), two verticals (Part #4) and two gussets (Part #1) and assemble as shown using 6 nuts and bolts (Parts #9 & #11). Repeat to make three more assemblies. IMPORTANT! Only tighten these nuts & bolts finger tight at this time.

Copyright 2006-2021 SRM Enterprises, Inc. Updated 1/4/21 4
Step 3 Please refer to diagram below for this step. You will need the following parts: (4) Cross Angles – Part #3 (12) ¼-20 X .50 long Hex Head Bolts – Part #9 (4) ¼-20 Hex Nuts – Part #11 (8) ¼-20 Nyloc Nuts – Part #19 (4) ¼-20 Wing Nuts – Part #21 (4) Stand Assemblies from step 2 Bolt together two stand assemblies at the top using the side holes as shown. Add two Cross Angles (Part #3). Repeat this step to build one more tower assembly. Note that Wing Nuts are use on one end of the cross angles to aid in disassembling for storage and adding and removing weights. Lock nuts should be tightened, then backed off ¼ to ½ turn to allow parts to pivot.
Copyright 2006-2021 SRM Enterprises, Inc. Updated 1/4/21 5
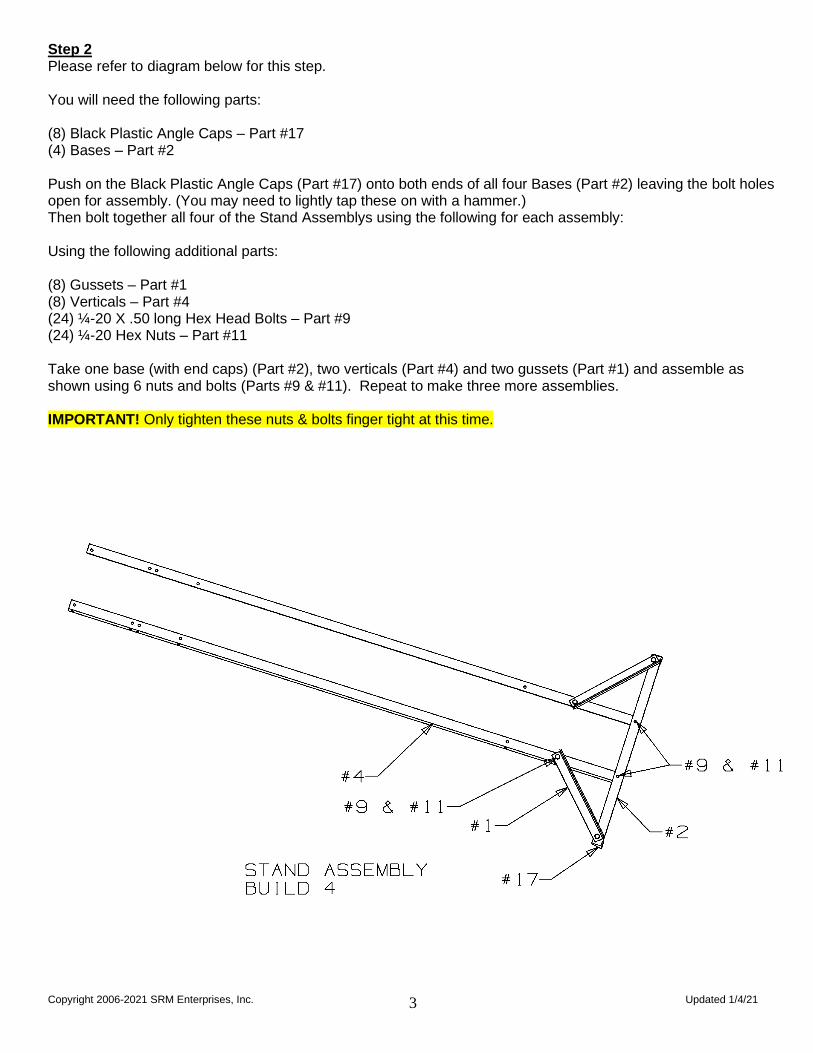
Step 4 –Tower Assembly - continued Refer to the diagram below for these steps. You will need the following parts: (4) Black Plastic Angle Caps – Part #17 (2) Top Angles – Part #8 (8) Eye Bolts – Part #10 (20) ¼-20 Hex Nuts – Part #11 (4) ¼-20 X .50 long Hex Head Bolts – Part #9 Push on the Black Plastic Angle Caps (Part #17) onto both ends of both Top Angles (Part #8) leaving the bolt holes open for assembly. (You may need to lightly tap these on with a hammer.) Attach a Top Angle (Part #8) referring to the diagram below. Tighten all bolts at this time. Thread a nut (Part #11) onto an Eye Bolt (Part #10) before inserting it into the hole on the Top Angle. Fasten the Eye Bolt with another nut on the back side of the Top Angle. Repeat for the other three Eye Bolts. Be sure to position the Eye Bolts with the open side of the curved hook up. The Finish Tower is now complete. Repeat this step for the Start Tower.

Copyright 2006-2021 SRM Enterprises, Inc. Updated 1/4/21 6
Step 5 – Start Gate Assembly Refer to the diagram below for these steps. You will need the following parts: (2) Black Plastic Angle Caps – Part #17 (4) ¼-20 X .50 long Hex Head Bolts – Part #9 (4) ¼-20 Hex Nuts – Part #11 (2) Start Gate Sides – Part #6 (1) Start Gate Back – Part #5 (1) Start Gate Front – Part #7 (8) #10-24 X 2.50 Machine Screws – Part #13 (8) #10-24 Hex Nuts – Part #12 (8) Black Vinyl Bolt Covers – Part #16 Push on the Black Plastic Angle Caps (Part #17) onto both ends of the Start Gate Front (Part #7) leaving the bolt holes open for assembly. (You may need to lightly tap these on with a hammer.) Bolt together the Start Gate Sides, Front, and Back as shown below using the Four ¼-20 Hex Nuts and Bolts. Tighten all bolts. Insert the #10-24 Machine Screws (Part #13) through the holes in the Start Gate Front as shown and fasten using the #10-24 Hex Nuts (Part #12). Also see the diagram on page 7. Tighten all nuts. Slide the Black Vinyl Bolt Covers (Part #16) over the #10-24 Machine Screws.

Copyright 2006-2021 SRM Enterprises, Inc. Updated 1/4/21 7
Step 6 – Start Tower Final Assembly Refer to the following two diagrams for these next steps. Place the Start Gate Assembly over the Start Tower aligning the front pivot holes in the Start Gate with the top holes on the side of the tower. (NOTE: You will need to temporarily remove the Top Angle (Part #8) to slide the Start Gate Assembly over the tower. Replace Part #8 after mounting the assembly). Insert a ¼-20 X 1” long Hex Bolt (Part #18) through the Start Gate pivot hole, then through three Flat Washers (part #15), and then through the hole in the Tower. Repeat for other side pivot hole. Fasten the Hex Bolts using a ¼-20 Nyloc Nut (Part #19). Tighten the Nyloc Nuts to the point where the Start Gate will still pivot freely. Insert a ¼-20 X .5” long Hex Bolt and Nut (Parts #9 & #11) into the lower side hole on the rear leg that has the Spring to act as a stop bolt (as shown below) for the Start Gate. Attach the Spring (Part #14) as shown. A spare Spring is included.
Start Gate Assembly Detail
Copyright 2006-2021 SRM Enterprises, Inc. Updated 1/4/21 8
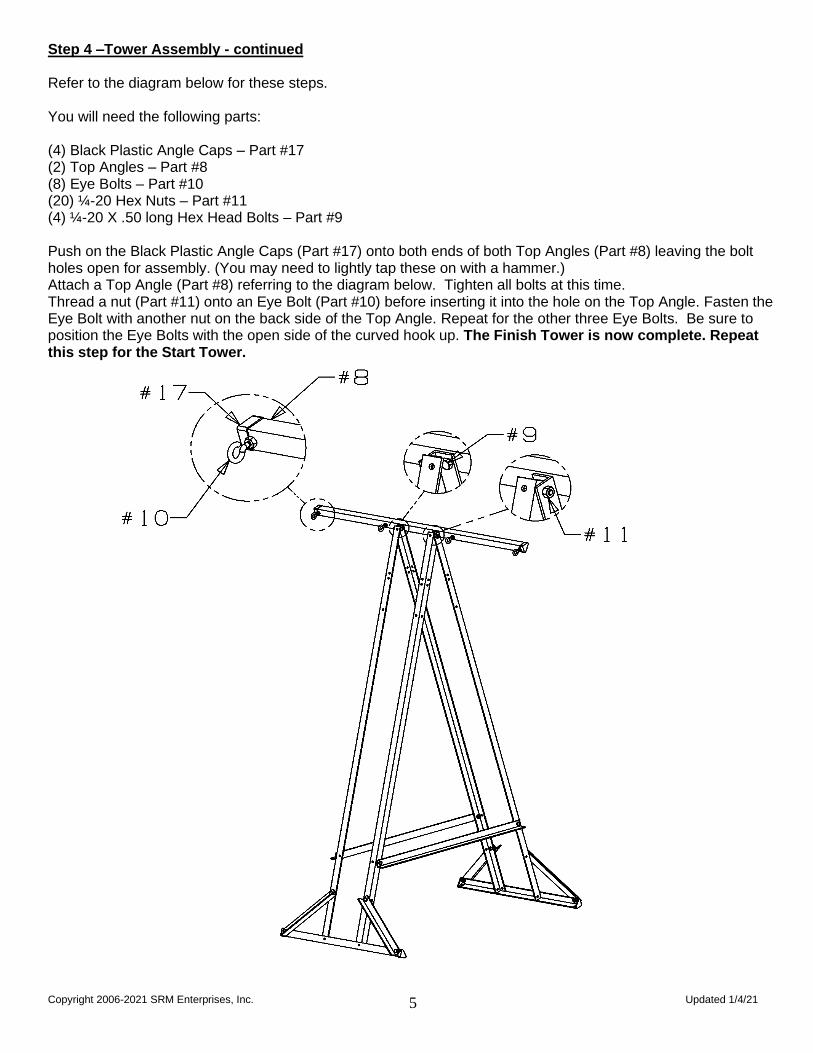
Start Tower Assembly Rear View
Copyright 2006-2021 SRM Enterprises, Inc. Updated 1/4/21 9
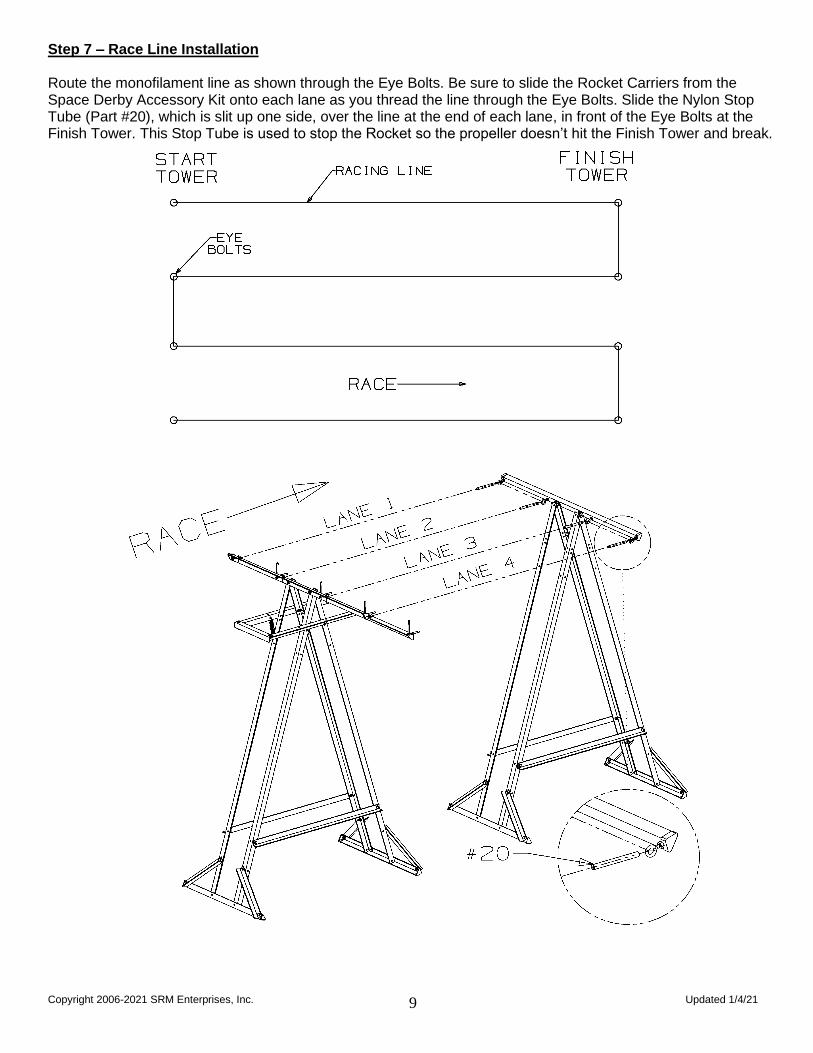
Step 7 – Race Line Installation Route the monofilament line as shown through the Eye Bolts. Be sure to slide the Rocket Carriers from the Space Derby Accessory Kit onto each lane as you thread the line through the Eye Bolts. Slide the Nylon Stop Tube (Part #20), which is slit up one side, over the line at the end of each lane, in front of the Eye Bolts at the Finish Tower. This Stop Tube is used to stop the Rocket so the propeller doesn’t hit the Finish Tower and break.
Copyright 2006-2021 SRM Enterprises, Inc. Updated 1/4/21 10
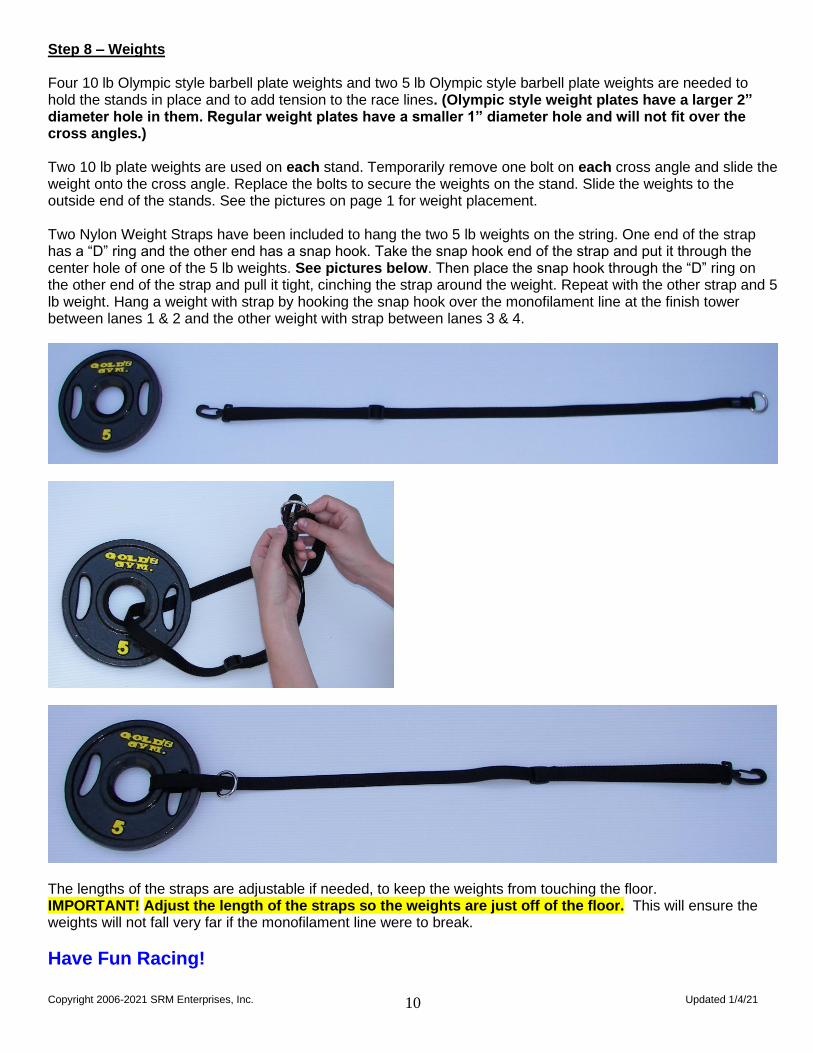
Step 8 – Weights Four 10 lb Olympic style barbell plate weights and two 5 lb Olympic style barbell plate weights are needed to hold the stands in place and to add tension to the race lines. (Olympic style weight plates have a larger 2” diameter hole in them. Regular weight plates have a smaller 1” diameter hole and will not fit over the cross angles.) Two 10 lb plate weights are used on each stand. Temporarily remove one bolt on each cross angle and slide the weight onto the cross angle. Replace the bolts to secure the weights on the stand. Slide the weights to the outside end of the stands. See the pictures on page 1 for weight placement. Two Nylon Weight Straps have been included to hang the two 5 lb weights on the string. One end of the strap has a “D” ring and the other end has a snap hook. Take the snap hook end of the strap and put it through the center hole of one of the 5 lb weights. See pictures below. Then place the snap hook through the “D” ring on the other end of the strap and pull it tight, cinching the strap around the weight. Repeat with the other strap and 5 lb weight. Hang a weight with strap by hooking the snap hook over the monofilament line at the finish tower between lanes 1 & 2 and the other weight with strap between lanes 3 & 4.
The lengths of the straps are adjustable if needed, to keep the weights from touching the floor. IMPORTANT! Adjust the length of the straps so the weights are just off of the floor. This will ensure the weights will not fall very far if the monofilament line were to break.
Have Fun Racing!

Copyright 2006-2021 SRM Enterprises, Inc. Updated 1/4/21 11
Other Products Available From BestTrack®
BestTrack® Pinewood Derby® Tracks Shown with optional Lift Kit.
Available in 1, 2, 3, 4, 6, & 8 lanes wide and 35, 42, or 49 ft. long.
The BestTrack® Lift Kit elevates your track about 18" off the floor allowing better viewing of the race from all angles. Our Lift Kit consists of easily attached aluminum legs that spin on or off in seconds. Also included is a stand extension, curve leg extensions, and vinyl feet to protect your floor. Each straight section has four legs to stand independently. Legs can be positioned anywhere along the length of the straight sections.
BestTrack® BestTrack® Car Carriers
Trophy Display Stands Track Extensions and Track Conversions – Make your track longer and/or wider!
Your BestTrack® Pinewood Derby® Track can grow with your organization. Add length in 7ft. increments and/or add lanes to race more cars.
Copyright 2006-2021 SRM Enterprises, Inc. Updated 1/4/21 12
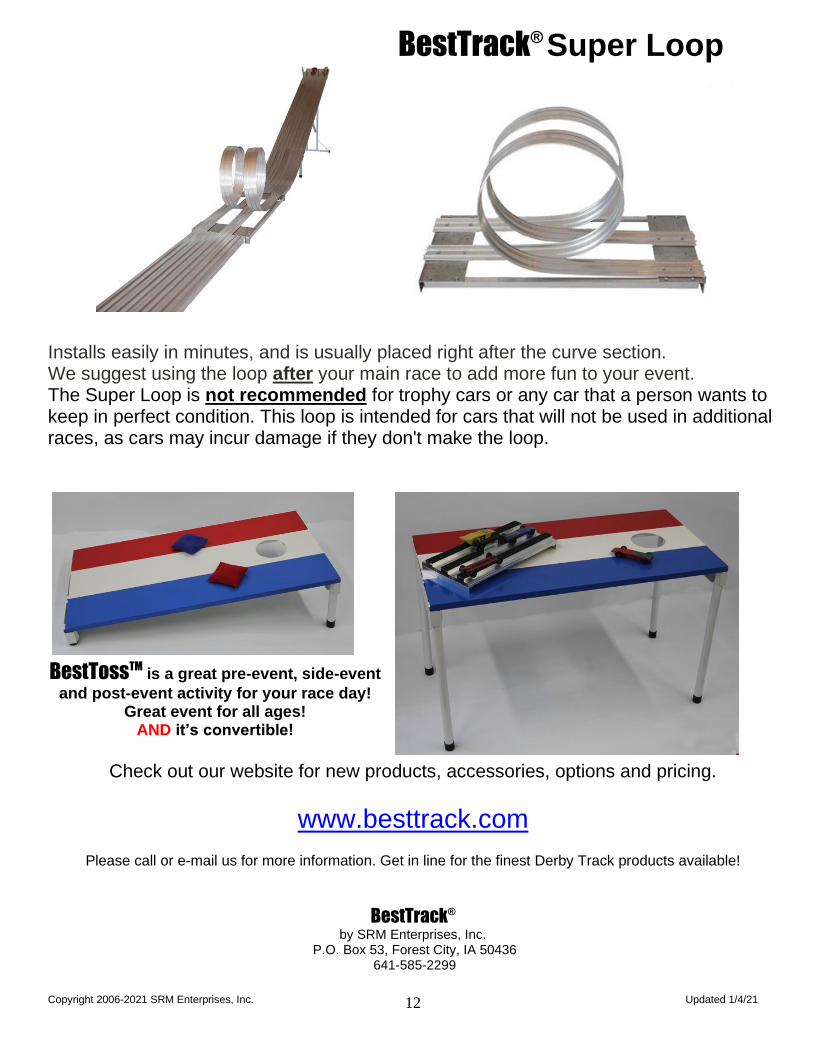
BestTrack® Super Loop
Installs easily in minutes, and is usually placed right after the curve section. We suggest using the loop after your main race to add more fun to your event. The Super Loop is not recommended for trophy cars or any car that a person wants to keep in perfect condition. This loop is intended for cars that will not be used in additional races, as cars may incur damage if they don't make the loop.
BestTossTM is a great pre-event, side-event
and post-event activity for your race day! Great event for all ages!
AND it’s convertible!
Check out our website for new products, accessories, options and pricing.
www.besttrack.com
Please call or e-mail us for more information. Get in line for the finest Derby Track products available!
BestTrack®
by SRM Enterprises, Inc. P.O. Box 53, Forest City, IA 50436
641-585-2299