Best_IPv6 Routing Operation
88
Operation Manual - IPv6 Routing Quidway S3500-EA Series Ethernet Switches Table of Contents Huawei Technologies Proprietary i Table of Contents Chapter 1 IP v6 Static R outing Conf iguration ............................................................................. 1-1 1.1 Introduction to IPv6 Static Routing .................................................................................... 1-1 1.1.1 Features and Functionalities of IPv6 Static Routes ................................................ 1-1 1.1.2 Default IPv6 Route .................................................................................................. 1-1 1.2 Configuring IPv 6 Static Routes.......................................................................................... 1-2 1.2.1 Configuration prerequisites ..................................................................................... 1-2 1.2.2 Configuring IPv6 Static Routes ............................................................................... 1-2 1.3 Displaying and Maintaining IP v6 Static Routes ................................................................. 1-2 1.4 IPv6 Static Routing Configuration Example........................................................... ............ 1-3 Chapter 2 IP v6-RIPng Co nfiguration ........................................................................................... 2-1 2.1 Introduction to RIPng ......................................................................................................... 2-1 2.1.1 RIPng Working Mechanism.................................................... ................................. 2-1 2.1.2 RIPng Packet Format .............................................................................................. 2-2 2.1.3 RIPng Packet Processing Procedure...................................................................... 2-3 2.1.4 Protocol Specification.............................................................................................. 2-4 2.2 RIPng Basic Configuration................................................................................................. 2-4 2.2.1 Configuration Prerequisites ..................................................................................... 2-4 2.2.2 Configuring the Basic RIPng Function .................................................................... 2-4 2.3 RIPng Configuration .......................................................................................................... 2-5 2.3.1 Configuring an Additional Routing Metric................................................................ 2-5 2.3.2 Configuring RIPng Route Summarization ............................................................... 2-5 2.3.3 Configuring RIPng to Advertise a Default Route..................................................... 2-6 2.3.4 Configuring a RIPng Route Filtering Policy................................................. ............ 2-6 2.3.5 Configuring a RIPng Priority.................................................................................... 2-7 2.3.6 Configuring RIPng Route Redistribution ................................................................. 2-7 2.4 RIPng Network Adjustment and Optimization ................................................................... 2-8 2.4.1 Configuring RIPng Timers ....................................................................................... 2-8 2.4.2 Configuring the Split Horizon and Poison Reverse Functions ................................ 2-8 2.4.3 Configuring Zero Field Check for RIPng Packet Headers ...................................... 2-9 2.4.4 Configuring the Maximum Number of Equivalent Routes..................................... 2-10 2.5 Displaying and Maintaining RIPng................................................................................... 2-10 2.6 RIPng Configuration Example ......................................................................................... 2-10 Chapter 3 IPv6-OSPFv 3 Configuration........................................................................................ 3-1 3.1 Introduction to OSPFv3 ..................................................................................................... 3-1 3.1.1 OSP Fv3 Overview............................................................. ...................................... 3-1 3.1.2 OSPFv3 Packets ..................................................................................................... 3-1 3.1.3 OSPFv3 LSA Types ................................................................................................ 3-2
-
Upload
duk-yell-yoo -
Category
Documents
-
view
222 -
download
0
Transcript of Best_IPv6 Routing Operation

8/3/2019 Best_IPv6 Routing Operation
http://slidepdf.com/reader/full/bestipv6-routing-operation 1/88
Operation Manual - IPv6 RoutingQuidway S3500-EA Series Ethernet Switches Table of Contents
Huawei Technologies Proprietary
i
Table of Contents
Chapter 1 IPv6 Static Routing Configuration ............................................................................. 1-1 1.1 Introduction to IPv6 Static Routing .................................................................................... 1-1
1.1.1 Features and Functionalities of IPv6 Static Routes ................................................ 1-1 1.1.2 Default IPv6 Route .................................................................................................. 1-1
1.2 Configuring IPv6 Static Routes.......................................................................................... 1-2 1.2.1 Configuration prerequisites ..................................................................................... 1-2 1.2.2 Configuring IPv6 Static Routes............................................................................... 1-2
1.3 Displaying and Maintaining IPv6 Static Routes ................................................................. 1-2 1.4 IPv6 Static Routing Configuration Example....................................................................... 1-3
Chapter 2 IPv6-RIPng Configuration........................................................................................... 2-1 2.1 Introduction to RIPng ......................................................................................................... 2-1
2.1.1 RIPng Working Mechanism..................................................................................... 2-1 2.1.2 RIPng Packet Format.............................................................................................. 2-2 2.1.3 RIPng Packet Processing Procedure...................................................................... 2-3 2.1.4 Protocol Specification.............................................................................................. 2-4
2.2 RIPng Basic Configuration................................................................................................. 2-4 2.2.1 Configuration Prerequisites..................................................................................... 2-4 2.2.2 Configuring the Basic RIPng Function.................................................................... 2-4
2.3 RIPng Configuration .......................................................................................................... 2-5 2.3.1 Configuring an Additional Routing Metric................................................................ 2-5 2.3.2 Configuring RIPng Route Summarization............................................................... 2-5 2.3.3 Configuring RIPng to Advertise a Default Route..................................................... 2-6 2.3.4 Configuring a RIPng Route Filtering Policy............................................................. 2-6 2.3.5 Configuring a RIPng Priority.................................................................................... 2-7 2.3.6 Configuring RIPng Route Redistribution................................................................. 2-7
2.4 RIPng Network Adjustment and Optimization ................................................................... 2-8 2.4.1 Configuring RIPng Timers....................................................................................... 2-8 2.4.2 Configuring the Split Horizon and Poison Reverse Functions................................ 2-8 2.4.3 Configuring Zero Field Check for RIPng Packet Headers ...................................... 2-9 2.4.4 Configuring the Maximum Number of Equivalent Routes..................................... 2-10
2.5 Displaying and Maintaining RIPng................................................................................... 2-10 2.6 RIPng Configuration Example ......................................................................................... 2-10
Chapter 3 IPv6-OSPFv3 Configuration........................................................................................ 3-1 3.1 Introduction to OSPFv3 ..................................................................................................... 3-1
3.1.1 OSPFv3 Overview................................................................................................... 3-1 3.1.2 OSPFv3 Packets..................................................................................................... 3-1 3.1.3 OSPFv3 LSA Types ................................................................................................ 3-2

8/3/2019 Best_IPv6 Routing Operation
http://slidepdf.com/reader/full/bestipv6-routing-operation 2/88
Operation Manual - IPv6 RoutingQuidway S3500-EA Series Ethernet Switches Table of Contents
Huawei Technologies Proprietary
ii
3.1.4 Timers of OSPFv3................................................................................................... 3-3 3.1.5 OSPFv3 Features Supported.................................................................................. 3-3 3.1.6 Related RFCs.......................................................................................................... 3-3
3.2 IPv6-OSPFv3 Configuration Task List ............................................................................... 3-4
3.3 Configuring OSPFv3 Basic Functions ............................................................................... 3-4 3.3.1 Prerequisites ........................................................................................................... 3-4 3.3.2 Configuring OSPFv3 Basic Functions..................................................................... 3-4
3.4 Configuring OSPFv3 Area Parameters ............................................................................. 3-5 3.4.1 Prerequisites ........................................................................................................... 3-5 3.4.2 Configuring an OSPFv3 Stub Area......................................................................... 3-5 3.4.3 Configuring OSPFv3 Virtual Links........................................................................... 3-6
3.5 Configuring OSPFv3 Routing Information Management ................................................... 3-7 3.5.1 Prerequisites ........................................................................................................... 3-7 3.5.2 Configuring OSPFv3 Route Summarization ........................................................... 3-7 3.5.3 Configuring OSPFv3 Inbound Route Filtering......................................................... 3-7 3.5.4 Configuring Link Costs for OSPFv3 Interfaces ....................................................... 3-8 3.5.5 Configuring the Maximum Number of OSPFv3 Load-balancing Routes ................ 3-8 3.5.6 Configuring OSPFv3 Route Redistribution ............................................................. 3-9
3.6 Configuring OSPFv3 Network Optimization ...................................................................... 3-9 3.6.1 Prerequisites ......................................................................................................... 3-10 3.6.2 Configuring OSPFv3 Timers ................................................................................. 3-10 3.6.3 Configuring the DR Priority for an Interface .......................................................... 3-11 3.6.4 Ignoring MTU Check for DD Packets.................................................................... 3-11 3.6.5 Disable Interfaces from Sending OSPFv3 Packets .............................................. 3-12
3.7 Displaying and Maintaining OSPFv3 ............................................................................... 3-13 3.8 OSPFv3 Configuration Examples.................................................................................... 3-14
3.8.1 Configuring OSPFv3 Areas................................................................................... 3-14 3.8.2 Configuring OSPFv3 DR Election ......................................................................... 3-18
3.9 Troubleshooting OSPFv3 Configuration.......................................................................... 3-21 3.9.1 No OSPFv3 Neighbor Relationship Established................................................... 3-21 3.9.2 Incorrect Routing Information................................................................................ 3-22
Chapter 4 IPv6-IS-IS Configuration.............................................................................................. 4-1 4.1 Introduction to IPv6-IS-IS................................................................................................... 4-1 4.2 IPv6-IS-IS Basic Configuration .......................................................................................... 4-1
4.2.1 Configuration Prerequisites..................................................................................... 4-2 4.2.2 Configuring IPv6-IS-IS Basic Functions.................................................................. 4-2
4.3 Configuring IPv6-IS-IS Routing Information Control.......................................................... 4-2 4.3.1 Configuration Prerequisites..................................................................................... 4-2 4.3.2 Configuration Procedure ......................................................................................... 4-2
4.4 Displaying and Maintaining IPv6-IS-IS .............................................................................. 4-4 4.5 IPv6-IS-IS Configuration Example ..................................................................................... 4-4

8/3/2019 Best_IPv6 Routing Operation
http://slidepdf.com/reader/full/bestipv6-routing-operation 3/88
Operation Manual - IPv6 RoutingQuidway S3500-EA Series Ethernet Switches Table of Contents
Huawei Technologies Proprietary
iii
Chapter 5 IPv6-BGP4+ Configuration.......................................................................................... 5-1 5.1 BGP4+ Overview ............................................................................................................... 5-1 5.2 Configuration Task List ...................................................................................................... 5-2 5.3 Configuring BGP4+ Basic Functions ................................................................................. 5-3
5.3.1 Prerequisites ........................................................................................................... 5-3 5.3.2 Configuring an IPv6 Peer........................................................................................ 5-3 5.3.3 Advertising a Local IPv6 Route ............................................................................... 5-3 5.3.4 Configuring a Preferred Value for Routes Received from a Peer/Peer Group ....... 5-4 5.3.5 Specifying a Local Update Source Interface to a Peer/Peer Group ....................... 5-4 5.3.6 Configuring a Non Direct EBGP Connection to a Peer/Peer Group....................... 5-5 5.3.7 Configuring Description for a Peer/Peer Group ...................................................... 5-5 5.3.8 Establishing No Session to a Peer/Peer Group...................................................... 5-6 5.3.9 Logging Session State and Event Information of a Peer/Peer Group .................... 5-6
5.4 Controlling Route Distribution and Reception.................................................................... 5-7 5.4.1 Prerequisites ........................................................................................................... 5-7 5.4.2 Configuring BGP4+ Route Redistribution ............................................................... 5-7 5.4.3 Advertising Default Route to a Peer/Peer Group.................................................... 5-8 5.4.4 Configuring Route Distribution Policy...................................................................... 5-8 5.4.5 Configuring Route Reception Policy ....................................................................... 5-9 5.4.6 Configuring BGP4+ and IGP Route Synchronization ........................................... 5-10 5.4.7 Configuring Route Dampening.............................................................................. 5-11
5.5 Configuring BGP4+ Route Attributes............................................................................... 5-11 5.5.1 Prerequisites ......................................................................................................... 5-11 5.5.2 Configuring BGP4+ Preference and Default LOCAL_PREF and NEXT_HOP
Attributes ........................................................................................................................ 5-11 5.5.3 Configuring the MED Attribute .............................................................................. 5-12 5.5.4 Configuring the AS_PATH Attribute...................................................................... 5-13
5.6 Adjusting and Optimizing BGP4+ Networks.................................................................... 5-13 5.6.1 Prerequisites ......................................................................................................... 5-14 5.6.2 Configuring BGP4+ Timers ................................................................................... 5-14 5.6.3 Configuring BGP4+ Soft Reset ............................................................................. 5-15 5.6.4 Configuring the Maximum Number of Load-Balancing Routes............................. 5-16
5.7 Configuring a Large Scale BGP4+ Network .................................................................... 5-17 5.7.1 Prerequisites ......................................................................................................... 5-17 5.7.2 Configuring BGP4+ Peer Group ........................................................................... 5-17 5.7.3 Configuring BGP4+ Community............................................................................5-19 5.7.4 Configuring a BGP4+ Router Reflector................................................................. 5-20
5.8 Displaying and Maintaining BGP4+ Configuration .......................................................... 5-21 5.8.1 Displaying BGP ..................................................................................................... 5-21 5.8.2 Resetting BGP4+ Connections ............................................................................. 5-22 5.8.3 Clearing BGP4+ Information ................................................................................. 5-22
5.9 BGP4+ Configuration Examples...................................................................................... 5-23

8/3/2019 Best_IPv6 Routing Operation
http://slidepdf.com/reader/full/bestipv6-routing-operation 4/88
Operation Manual - IPv6 RoutingQuidway S3500-EA Series Ethernet Switches Table of Contents
Huawei Technologies Proprietary
iv
5.9.1 BGP4+ Basic Configuration .................................................................................. 5-23 5.9.2 BGP4+ Router Reflector Configuration................................................................. 5-25
5.10 Troubleshooting BGP4+ Configuration.......................................................................... 5-27 5.10.1 No BGP4+ Peer Relationship Established.......................................................... 5-27
Chapter 6 Routing Policy Configuration..................................................................................... 6-1
6.1 Introduction to Routing Policy ............................................................................................ 6-1 6.1.1 Routing Policy and Policy Routing.......................................................................... 6-1 6.1.2 Filters....................................................................................................................... 6-1 6.1.3 Routing Policy Application....................................................................................... 6-3
6.2 Defining Filtering Lists ....................................................................................................... 6-3 6.2.1 Prerequisites ........................................................................................................... 6-3 6.2.2 Defining an IPv6-prefix List ..................................................................................... 6-3 6.2.3 Defining an AS Path ACL........................................................................................ 6-4 6.2.4 Defining a Community List ...................................................................................... 6-4
6.3 Configuring a Routing Policy ............................................................................................. 6-4 6.3.1 Prerequisites ........................................................................................................... 6-5 6.3.2 Creating a Routing Policy........................................................................................ 6-5 6.3.3 Defining if-match Clauses for the Routing Policy.................................................... 6-6 6.3.4 Defining apply Clauses for the Routing Policy ........................................................ 6-7
6.4 Displaying and Maintaining the Routing Policy.................................................................. 6-8 6.5 Routing Policy Configuration Example .............................................................................. 6-9
6.5.1 Applying Routing Policy When Redistributing IPv6 Routes.................................... 6-9 6.6 Troubleshooting Routing Policy Configuration ................................................................ 6-10
6.6.1 IPv6 Routing Information Filtering Failed.............................................................. 6-10

8/3/2019 Best_IPv6 Routing Operation
http://slidepdf.com/reader/full/bestipv6-routing-operation 5/88
Operation Manual - IPv6 RoutingQuidway S3500-EA Series Ethernet Switches Chapter 1 IPv6 Static Routing Configuration
Huawei Technologies Proprietary
1-1
Chapter 1 IPv6 Static Routing Configuration
Note:
The term “router” and router icon in this document refer to either a router in a generic
sense or a Layer 3 switch running routing protocols.
Verify that the system already operates in IPv4/IPv6 dual-stack mode before
configuring IPv6 routing.
All the IPv6 routing related configuration mentioned in this manual assumes that the
system already operates in IPv4/IPv6 dual-stack mode. For dual stack mode
configuration, see the part covering dual stack in the IPv6 Configuration module.
For a manually established tunnel, routing protocols can be employed on the tunnel
interfaces successfully if the tunnel is configured to support expedite termination
subnet addresses. While for tunnels of other types, routing protocols cannot be
employed on the tunnel interfaces successfully.
1.1 Introduction to IPv6 Static Routing
Static routes are special routes that are manually configured by network administrators.
These manually configured static routes work well in simple networks. Configuring and
using them properly can improve the performance of networks and can guarantee
enough bandwidth reserved for important applications.
However, static routes also have their downside: network failure or topology changes
could introduce unreachable routes that lead to network disconnection. Such scenarios
require the network administrators to manually configure and modify the static routes.
1.1.1 Features and Functionalities of IPv6 Static Routes
Similar to IPv4 static routes, IPv6 static routes work well in simple IPv6 network
environments.
Their major difference lies in the destination and the next hop addresses. IPv6 static
routes use IPv6 addresses whereas IPv4 static routes use IPv4 addresses.
1.1.2 Default IPv6 Route
An IPv6 static route that has the destination address configured as “::/0” (indicating a
prefix length of 0) is the default IPv6 route. If the destination address of an IPv6 packet

8/3/2019 Best_IPv6 Routing Operation
http://slidepdf.com/reader/full/bestipv6-routing-operation 6/88
Operation Manual - IPv6 RoutingQuidway S3500-EA Series Ethernet Switches Chapter 1 IPv6 Static Routing Configuration
Huawei Technologies Proprietary
1-2
does not match any entries in the routing table, this default route will be used to forward
the packet.
1.2 Configuring IPv6 Static RoutesIn small IPv6 network environments, IPv6 static routes can be used to achieve network
connectivity. In comparison to dynamic routes, it helps to save network bandwidth.
1.2.1 Configuration prerequisites
Enabling IPv6 packet forwarding
Ensuring that the neighboring nodes are IPv6 reachable
1.2.2 Configuring IPv6 Static Routes
To do… Use the commands… Remarks
Enter system view system-view —
Configure an IPv6static route
ipv6 route-static ipv6-address prefix-length [ interface-type interface-number ]nexthop-address [ preference preference-value ]
Required;
The default preference ofIPv6 static routes is 60..
1.3 Displaying and Maintaining IPv6 Static Routes
To do… Use the command… Remarks
Display IPv6 staticroute information
display ipv6 routing-table protocol static [ inactive |verbose ]
Available in any view
Remove all IPv6static routes
delete ipv6 static-routes all Available in system view
Note:
Using the undo ipv6 route-static command deletes a single IPv6 static route, while
using the delete ipv6 static-routes all command deletes all IPv6 static routes
including the default route.

8/3/2019 Best_IPv6 Routing Operation
http://slidepdf.com/reader/full/bestipv6-routing-operation 7/88
Operation Manual - IPv6 RoutingQuidway S3500-EA Series Ethernet Switches Chapter 1 IPv6 Static Routing Configuration
Huawei Technologies Proprietary
1-3
1.4 IPv6 Static Routing Configuration Example
I. Network requirements
With IPv6 static routes configured, all hosts and switches can interact with each other.
II. Network diagram
PC11::2/64
SwitchA
SwitchB
SwitchC
Vlan-interface1001::1/64
Vlan-interface2004::1/64
Vlan-interface4002::1/64
Vlan-interface5003::1/64
PC22::2/64
PC33::2/64
Vlan-interface2004::2/64
Vlan-interface3005::1/64
Vlan-interface3005::2/64
Figure 1-1 Network diagram for static routes
III. Configuration procedure
1) Configure the IPv6 addresses of all VLAN interfaces (Omitted here)
2) Configure IPv6 static routes.
# Configure on SwitchA the default IPv6 static route.
<SwitchA> system-view
[SwitchA] ipv6
[SwitchA] ipv6 route-static :: 0 4::2
# Configure two IPv6 static routes on SwitchB.
<SwitchB> system-view
[SwitchB] ipv6
[SwitchB] ipv6 route-static 1:: 64 4::1
[SwitchB] ipv6 route-static 3:: 64 5::1
# Configure on SwitchC the default IPv6 static route.
<SwitchC> system-view
[SwitchC] ipv6
[SwitchC] ipv6 route-static :: 0 5::2
3) Configure the IPv6 addresses of hosts and gateways.
Configure the IPv6 addresses of all the hosts based upon the network diagram,
configure the default gateway of PC1 as 1::1, PC2 as 2::1, and PC3 as 3::1.
4) Display configuration information

8/3/2019 Best_IPv6 Routing Operation
http://slidepdf.com/reader/full/bestipv6-routing-operation 8/88
Operation Manual - IPv6 RoutingQuidway S3500-EA Series Ethernet Switches Chapter 1 IPv6 Static Routing Configuration
Huawei Technologies Proprietary
1-4
# Display the IPv6 routing table of SwitchA.
[SwitchA] display ipv6 routing-table
Routing Table :
Destinations : 7 Routes : 7
Destination: ::/0 Protocol : Static
NextHop : 4::2 Preference: 60
Interface : Vlan200 Cost : 0
Destination: ::1/128 Protocol : Direct
NextHop : ::1 Preference: 0
Interface : InLoop0 Cost : 0
Destination: 1::/64 Protocol : Direct
NextHop : 1::1 Preference: 0
Interface : Vlan100 Cost : 0
Destination: 1::1/128 Protocol : Direct
NextHop : ::1 Preference: 0
Interface : InLoop0 Cost : 0
Destination: 4::/64 Protocol : Direct
NextHop : 4::1 Preference: 0Interface : Vlan200 Cost : 0
Destination: 4::1/128 Protocol : Direct
NextHop : ::1 Preference: 0
Interface : InLoop0 Cost : 0
Destination: FE80::/10 Protocol : Direct
NextHop : :: Preference: 0
Interface : NULL0 Cost : 0
# Verify with the ping command.
[SwitchA] ping ipv6 3::1
PING 3::1 : 56 data bytes, press CTRL_C to break
Reply from 3::1
bytes=56 Sequence=1 hop limit=63 time = 5 ms
Reply from 3::1
bytes=56 Sequence=2 hop limit=63 time = 4 ms
Reply from 3::1
bytes=56 Sequence=3 hop limit=63 time = 4 ms
Reply from 3::1

8/3/2019 Best_IPv6 Routing Operation
http://slidepdf.com/reader/full/bestipv6-routing-operation 9/88
Operation Manual - IPv6 RoutingQuidway S3500-EA Series Ethernet Switches Chapter 1 IPv6 Static Routing Configuration
Huawei Technologies Proprietary
1-5
bytes=56 Sequence=4 hop limit=63 time = 4 ms
Reply from 3::1
bytes=56 Sequence=5 hop limit=63 time = 4 ms
--- 3::1 ping statistics ---
5 packet(s) transmitted
5 packet(s) received
0.00% packet loss
round-trip min/avg/max = 4/4/5 ms

8/3/2019 Best_IPv6 Routing Operation
http://slidepdf.com/reader/full/bestipv6-routing-operation 10/88
Operation Manual - IPv6 RoutingQuidway S3500-EA Series Ethernet Switches Chapter 2 IPv6-RIPng Configuration
Huawei Technologies Proprietary
2-1
Chapter 2 IPv6-RIPng Configuration
Note:
The term “router” and router icon in this document refer to either a router in a generic
sense or a Layer 3 switch running routing protocols.
Verify that the system already operates in IPv4/IPv6 dual-stack mode before
configuring IPv6 routing.
All the IPv6 routing related configuration mentioned in this manual assumes that the
system already operates in IPv4/IPv6 dual-stack mode. For dual stack mode
configuration, see the part covering dual stack in the IPv6 Configuration module.
2.1 Introduction to RIPng
RIP next generation (RIPng) is an extension of RIP-2 for IPv4. Most RIP concepts are
applicable in RIPng.
To adopt RIPng for IPv6 network, the following modifications have been made on basis
of RIP:
UDP port number: RIPng uses UDP port 521 for sending and receiving routing
information.
Multicast address: RIPng uses FF02:9 as the link-local multicast address.
Destination Prefix: 128-bit destination address prefix.
Next hop: IPv6 address in 128-bit.
Source address: RIPng uses FE80::/10 as the link-local source address
2.1.1 RIPng Working Mechanism
RIPng is a routing protocol based on the distance vector (D-V) algorithm. RIPng uses
UDP packets to exchange routing information through port 521.
RIPng uses a hop count to measure the distance to the destination. The hop count is
referred to as metric or cost. The hop count from a router to the network that the router
is directly connected is 0. The hop count from one router to another router is 1, and so
on. When the hop count is greater than or equal to 16, the destination network or host is
unreachable.
By default, the routing update is sent every 30 seconds. If the router cannot receive
routing updates within 180 seconds, the routes learnt from neighbors are considered as
8/3/2019 Best_IPv6 Routing Operation
http://slidepdf.com/reader/full/bestipv6-routing-operation 11/88
Operation Manual - IPv6 RoutingQuidway S3500-EA Series Ethernet Switches Chapter 2 IPv6-RIPng Configuration
Huawei Technologies Proprietary
2-2
fail. After another 240 seconds, if no routing updates are received, the router will
remove those routes from the routing table.
RIPng supports Split Horizon and Poison Reverse to prevent routing loops, and route
redistribution.
Each RIPng router maintains a routing database, including route entries to all
reachable destinations. These route entries contain the following information:
Destination address: IPv6 address of a host or a network.
Next hop address: IP address of a neighbor router along the path to the
destination.
Egress interface: Interface that forwards IPv6 packets.
Metric: Cost from the local router to the destination.
Routing time: Time elapsed since the routing entry is updated last time. Routing
time is reset to 0 each time the routing entry is updated. Route tag: It is used for tagging external routes so that the routes can be controlled
flexibly in routing policy based on the tags.
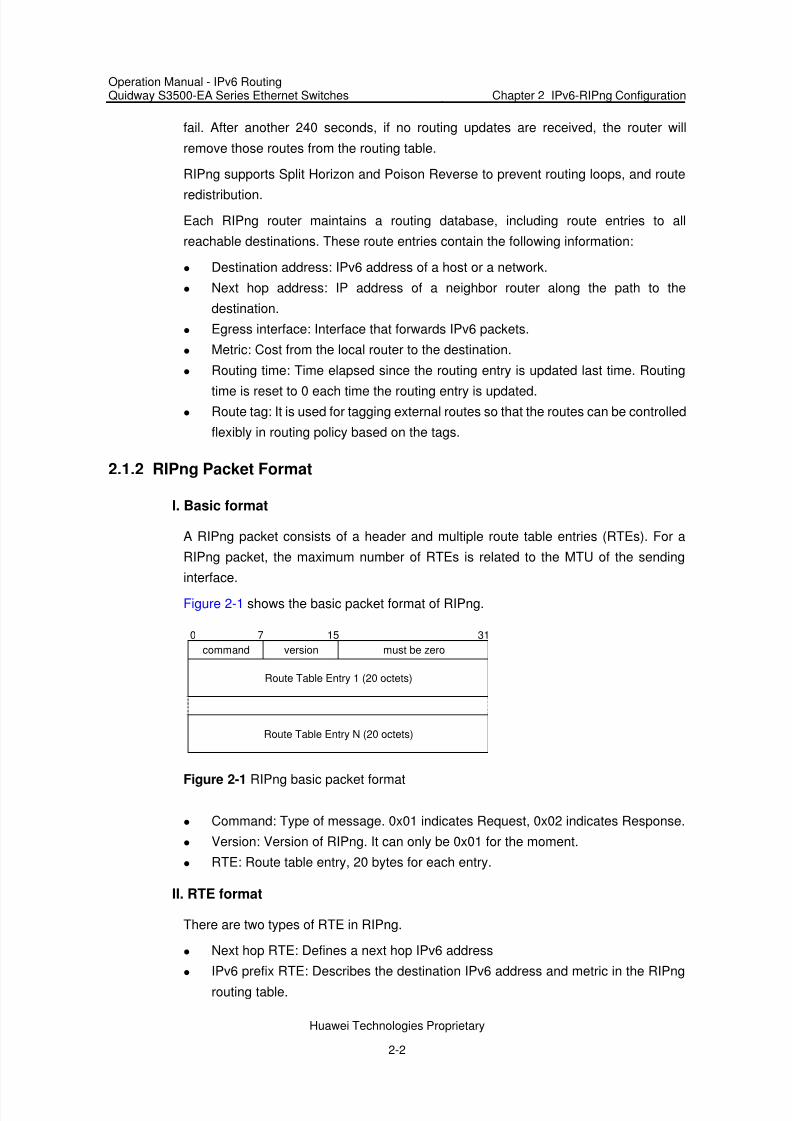
2.1.2 RIPng Packet Format
I. Basic format
A RIPng packet consists of a header and multiple route table entries (RTEs). For a
RIPng packet, the maximum number of RTEs is related to the MTU of the sending
interface.
Figure 2-1 shows the basic packet format of RIPng.
0 7 15 31
command must be zeroversion
Route Table Entry N (20 octets)
Route Table Entry 1 (20 octets)
Figure 2-1 RIPng basic packet format
Command: Type of message. 0x01 indicates Request, 0x02 indicates Response.
Version: Version of RIPng. It can only be 0x01 for the moment.
RTE: Route table entry, 20 bytes for each entry.
II. RTE format
There are two types of RTE in RIPng.
Next hop RTE: Defines a next hop IPv6 address
IPv6 prefix RTE: Describes the destination IPv6 address and metric in the RIPng
routing table.

8/3/2019 Best_IPv6 Routing Operation
http://slidepdf.com/reader/full/bestipv6-routing-operation 12/88
Operation Manual - IPv6 RoutingQuidway S3500-EA Series Ethernet Switches Chapter 2 IPv6-RIPng Configuration
Huawei Technologies Proprietary
2-3
Figure 2-2 shows format of the next hop RTE
0 7 15 31
must be zero must be zero 0xFF
IPv6 next hop address (16 octets)
Figure 2-2 Next hop RTE format
IPv6 next hop address is the IPv6 address of the next hop.
Figure 2-3 shows the format of the IPv6 prefix RTE.
0 7 15 31
IPv6 prefix (16 octets)
route tag prefix len metric
Figure 2-3 IPv6 prefix RTE format
IPv6 prefix: Destination IPv6 address prefix.
Route tag: Intended to differentiate internal RIP routes from external RIP routes.
Prefix len: Length of the IPv6 address prefix. Metric: Cost of a route.
2.1.3 RIPng Packet Processing Procedure
I. Request packet
When a RIPng router first starts or needs to update part entries in its routing table, the
request packet is sent as multicast to ask for routing information from neighbors.
The requested RIPng router processes the received request based on the RTE. If there
is only one RTE, and IPv6 prefix and the prefix length is 0 with a metric value of 16, therequested RIPng router will response with the entire routing table. If there are multiple
RTEs in a Request message, the requested RIPng router will examine each RTE,
update its metric, and send the requested routing information to the requesting router in
the response packet.
II. Response packet
The response packet containing the local routing table information is generated under
the following conditions:
Response to a specific request
Update sent periodically

8/3/2019 Best_IPv6 Routing Operation
http://slidepdf.com/reader/full/bestipv6-routing-operation 13/88
Operation Manual - IPv6 RoutingQuidway S3500-EA Series Ethernet Switches Chapter 2 IPv6-RIPng Configuration
Huawei Technologies Proprietary
2-4
Trigged update caused by route changes
Before the router updates its RIPng routing table based on the received response, it
must check the validation of the response packet, such as whether the IPv6 address is
the link-local address, whether the port number is correct. The response packet failedthe check will be discarded.
2.1.4 Protocol Specification
RIPng related specifications are:
RFC2080: RIPng for IPv6
RFC2081: RIPng Protocol Applicability Statement
RFC2453: RIP Version 2
2.2 RIPng Basic Configuration
In this section, you are presented with the information to configure the basic RIPng
features.
In the configurations, RIPng should be enabled first. But it is not necessary for RIPng
related interface configurations, such as assigning an IPv6 address.
2.2.1 Configuration Prerequisites
Before the configuration, accomplish the following tasks first:
Enable IPv6 packet forwarding.
Configure IP address on each interface, and make sure all nodes are reachable.
2.2.2 Configuring the Basic RIPng Function
Follow these steps to configure the basic RIPng function:
To do… Use the command… Remarks
Enter system view system-view ––
Create a RIPng process
and enter RIPng view ripng [ process-id ] Required
Not created by default
Return to system view quit —
Enter interface viewinterface interface-type interface-number
––
Enable RIPng on aspecified interface ripng process-id enable
Required
Disabled by default

8/3/2019 Best_IPv6 Routing Operation
http://slidepdf.com/reader/full/bestipv6-routing-operation 14/88
Operation Manual - IPv6 RoutingQuidway S3500-EA Series Ethernet Switches Chapter 2 IPv6-RIPng Configuration
Huawei Technologies Proprietary
2-5
Note:
If RIPng is not enabled on an interface, the interface will not send and receive any
RIPng route.
2.3 RIPng Configuration
Before the configuration, accomplish the following tasks first:
Configure IP address on each interface, and make sure all nodes are reachable.
Configure RIPng basic functions
Define an IPv6 ACL before using it for route filtering. Refer to ACL configuration for
related information.
Define the IPv6 address prefix list before using it for route filtering. Refer to 6.2
Defining Filtering Lists
2.3.1 Configuring an Additional Routing Metric
Additional routing metric is an input/output metric added to a RIPng route, including
additional metric of sent routes and additional metric of received routes.
The additional metric of a sent route will not change the routing metric in the routing
table and will be added only when an interface sends RIPng routing information.
The additional metric of a received route will change the routing metric in the routing
table. When an interface receives a valid RIP route, the additional metric will be added
to the route before the route is added to the routing table
Follow these steps to configure the RIPng priority and additional routing metric:
To do… Use the command… Remarks
Enter system view system-view ––
Enter interface viewinterface interface-type interface-number
––
Define an additionalrouting metric forreceived routes
ripng metricin value Optional
0 by default
Define an additionalrouting metric foradvertised routes ripng metricout value Optional
1 by default
2.3.2 Configuring RIPng Route Summarization
Follow these steps to configure RIPng route summarization

8/3/2019 Best_IPv6 Routing Operation
http://slidepdf.com/reader/full/bestipv6-routing-operation 15/88
Operation Manual - IPv6 RoutingQuidway S3500-EA Series Ethernet Switches Chapter 2 IPv6-RIPng Configuration
Huawei Technologies Proprietary
2-6
To do… Use the command… Remarks
Enter system view system-view ––
Enter interface view interface interface-type interface-number ––
Advertise a summaryIPv6 prefix ripng summary-address ipv6-address
prefix-length Required
2.3.3 Configuring RIPng to Advertise a Default Route
Follow these steps to configure RIPng default route:
To do… Use the command… Remarks
Enter system view system-view ––
Enter interface viewinterface interface-type interface-number
––
Configure RIPng toadvertise a defaultroute
ripng default-route { only | originate } [ cost value ]
Required
By default, RIPng does notadvertise any default route.
Note:
The RIPng default route is forced to send in the update message of the designated
interface regardless of whether it exists in the IPv6 routing table.
2.3.4 Configuring a RIPng Route Filtering Policy
You can filter received routing information based on IPv6 ACL or IPv6 prefix list. Only
those routes that are not filtered will be added to the RIPng routing table. In addition,
you can filter routes to be advertised by the local host, including RIPng routes
redistributed from other routing protocols or learned from neighbors. Only routes that
satisfy the conditions will be advertised to RIPng neighbors.
Follow these steps to configure a RIPng route filtering policy:
To do… Use the command… Remarks
Enter system view system-view ––
Enter RIPng view ripng [ process-id ] ––
Define a filtering policy forreceived routinginformation
filter-policy { acl6-number |ipv6-prefix ipv6-prefix-name }
import
Required
By default, RIPng doesnot filter received routing
information.

8/3/2019 Best_IPv6 Routing Operation
http://slidepdf.com/reader/full/bestipv6-routing-operation 16/88
Operation Manual - IPv6 RoutingQuidway S3500-EA Series Ethernet Switches Chapter 2 IPv6-RIPng Configuration
Huawei Technologies Proprietary
2-7
To do… Use the command… Remarks
Define a filtering policy for
routing information to beadvertised
filter-policy{ acl6-number |
ipv6-prefix ipv6-prefix-name } export [ protocol [ process-id ] ]
Required
By default, RIPng does
not filter routinginformation to beadvertised.
2.3.5 Configuring a RIPng Priority
Any routing protocol has its own specific protocol priority. The device can select an
optimal route from different protocol routes. You can set a priority for RIPng manually.
The smaller the value is, the higher the priority is.
Follow these steps to configure a RIPng priority:
To do… Use the command… Remarks
Enter system view system-view —
Enter RIPng view ripng [ process-id ] —
Configure a RIPng prioritypreference [ route-policy route-policy-name ] value
Optional
By default, the value ofthe RIPng priority is 100.
2.3.6 Configuring RIPng Route Redistribution
Follow these steps to configure RIPng redistributed route:
To do… Use the command… Remarks
Enter system view system-view ––
Enter RIPng view ripng [ process-id ] ––
Configure a defaultrouting metric for a
redistributed route
default cost value
Optional
By default, the default
metric of a redistributeroute is 0.
Redistribute a route
import-route protocol [ process-id ][ allow-ibgp ] [ cost cost-value | route-policyroute-policy-name ] *
Required
By default, RIPng doesnot redistribute any otherprotocol route.

8/3/2019 Best_IPv6 Routing Operation
http://slidepdf.com/reader/full/bestipv6-routing-operation 17/88
Operation Manual - IPv6 RoutingQuidway S3500-EA Series Ethernet Switches Chapter 2 IPv6-RIPng Configuration
Huawei Technologies Proprietary
2-8
2.4 RIPng Network Adjustment and Optimization
This section describes how to adjust and optimize the performance of the RIPng
network as well as applications under special network environments. Before adjusting
and optimizing the RIPng network, complete the following tasks:
Configure a network layer address for an interface
Configure the basic RIPng function
2.4.1 Configuring RIPng Timers
You can adjust RIPng timers to optimize the performance of the RIPng network.
Follow these steps to configure RIPng timers:
To do… Use the command… Remarks
Enter system view system-view —
Enter RIPng view ripng [ process-id ] —
Configure RIPngtimers
timers{ garbage-collectgarbage-collect-value | suppress suppress-value | timeout timeout-value | update update-value }
*
Optional.
The RIPng timers have thefollowing defaults:
30 seconds for the update timer
180 seconds for the timeouttimer
120 seconds for the suppress
timer 240 seconds for the
garbage-collect timer
Note:
When adjusting RIPng timers, you should consider the network performance and
perform unified configurations on routers running RIPng to avoid unnecessary network
traffic increase or route oscillation.
2.4.2 Configuring the Split Horizon and Poison Reverse Functions
Note:
If both the split horizon and poison reverse functions are configured, only the poison
reverse function takes effect.

8/3/2019 Best_IPv6 Routing Operation
http://slidepdf.com/reader/full/bestipv6-routing-operation 18/88
Operation Manual - IPv6 RoutingQuidway S3500-EA Series Ethernet Switches Chapter 2 IPv6-RIPng Configuration
Huawei Technologies Proprietary
2-9
I. Configure the split horizon function
The split horizon function disables a route learned from an interface from being
advertised so as to prevent a routing loop between neighbor routers.
Follow these steps to configure the split horizon function:
To do… Use the command… Remarks
Enter system view system-view ––
Enter interface viewinterface interface-type interface-number
––
Enable the split horizonfunction ripng split-horizon Optional
Enabled by default
Note:
Normally you are recommended to enable the split horizon to prevent routing loops.
II. Configuring the poison reverse function
The poison reverse function enables a route learned from an interface to be advertised.
However, the metric of the route is set to 16. That is to say, the route is unreachable
Follow these steps to configure poison reverse:
To do… Use the command… Remarks
Enter system view system-view ––
Enter interface viewinterface interface-type interface-number
––
Enable the poison reversefunction ripng poison-reverse Required
Disabled by default
2.4.3 Configuring Zero Field Check for RIPng Packet Headers
Some fields in RIPng packet headers must be zero. These fields are called zero fields.
You can enable the zero field check for RIPng packet headers. If any such field contains
a non-zero value, the entire RIPng packet will not be processed. If you are sure that all
packets are trusty, you can disable the zero field check to save the CPU processing
time.
Follow these steps to configure RIPng zero field check:

8/3/2019 Best_IPv6 Routing Operation
http://slidepdf.com/reader/full/bestipv6-routing-operation 19/88
Operation Manual - IPv6 RoutingQuidway S3500-EA Series Ethernet Switches Chapter 2 IPv6-RIPng Configuration
Huawei Technologies Proprietary
2-10
To do… Use the command… Remarks
Enter system view system-view ––
Enter RIPng view ripng [ process-id ] ––
Enable the zero fieldcheck for RIPng packerheaders checkzero Optional
Enabled by default
2.4.4 Configuring the Maximum Number of Equivalent Routes
Follow these steps to configure the maximum number of RIPng equivalent routes in
load sharing mode:
To do… Use the command… Remarks
Enter system view system-view ––
Enter RIPng view ripng [ process-id ] ––
Configure the maximumnumber of equivalentroutes in load sharingmode
maximumload-balancing number
Optional
By default, the maximumload-balancing is 4.
2.5 Displaying and Maintaining RIPng
To do… Use the command… Remarks
Display configurationinformation of a RIPng process display ripng
[ process-id ] Available in anyview
Display routes in the databaseadvertised by RIPng
display ripng process-id database
Available in anyview
Display routing information ofthe specified RIPng process
display ripng process-id route
Available in anyview
Display information of a RIPnginterface
display ripng process-id interface [ interface-type interface-number ]
Available in anyview
2.6 RIPng Configuration Example
I. Network requirements
As shown in Figure 2-4, all switches run RIPng. Configure Switch B to filter the route
(3::/64) learnt from Switch C, which means the route will not be added to the routing
table of Switch B, and Switch B will not forward it to Switch A.

8/3/2019 Best_IPv6 Routing Operation
http://slidepdf.com/reader/full/bestipv6-routing-operation 20/88
Operation Manual - IPv6 RoutingQuidway S3500-EA Series Ethernet Switches Chapter 2 IPv6-RIPng Configuration
Huawei Technologies Proprietary
2-11
II. Network diagram
SwitchA SwitchB SwitchC
RIPng
1::2/64
1::1/64
3::1/64 3::2/64
Vlan-interface6004::1/64
5::1/64
2::1/64 Vlan-interface100
Vlan-interface100 Vlan-interface200
Vlan-interface200
Vlan-interface400
Vlan-interface500
SwitchA SwitchB SwitchC
RIPng
1::2/64
1::1/64
3::1/64 3::2/64
Vlan-interface6004::1/64
5::1/64
2::1/64 Vlan-interface100
Vlan-interface100 Vlan-interface200
Vlan-interface200
Vlan-interface400
Vlan-interface500
Figure 2-4 Network diagram for RIPng configuration
III. Configuration procedure
1) Configure the IPv6 address for each interface
Omitted
2) Configure basic RIPng function
# Configure Switch A.
<SwitchA> system-view
[SwitchA] ipv6
[SwitchA] ripng 1
[SwitchA-ripng-1] quit
[SwitchA] interface vlan-interface 100
[SwitchA-Vlan-interface100] ripng 1 enable
[SwitchA-Vlan-interface100] quit
[SwitchA] interface vlan-interface 400
[SwitchA-Vlan-interface400] ripng 1 enable
[SwitchA-Vlan-interface400] quit
# Configure Switch B.
<SwitchB> system-view
[SwitchB] ipv6
[SwitchB] ripng 1
[SwitchB-ripng-1] quit
[SwitchB] interface vlan-interface 200
[SwitchB-Vlan-interface200] ripng 1 enable
[SwitchB-Vlan-interface200] quit
[SwitchB] interface vlan-interface 100
[SwitchB-Vlan-interface100] ripng 1 enable
[SwitchB-Vlan-interface100] quit
# Configure Switch C.

8/3/2019 Best_IPv6 Routing Operation
http://slidepdf.com/reader/full/bestipv6-routing-operation 21/88
Operation Manual - IPv6 RoutingQuidway S3500-EA Series Ethernet Switches Chapter 2 IPv6-RIPng Configuration
Huawei Technologies Proprietary
2-12
<SwitchC> system-view
[SwitchC] ipv6
[SwitchC] ripng 1
[SwitchC-ripng-1] quit
[SwitchC] interface vlan-interface 200
[SwitchC-Vlan-interface200] ripng 1 enable
[SwitchC-Vlan-interface200] quit
[SwitchC] interface vlan-interface 500
[SwitchC-Vlan-interface500] ripng 1 enable
[SwitchC-Vlan-interface500] quit
[SwitchC] interface vlan-interface 600
[SwitchC-Vlan-interface600] ripng 1 enable
[SwitchC-Vlan-interface600] quit
# Display routing table of Switch B.
<SwitchB> display ripng 1 route
Route Flags: A - Aging, S - Suppressed, G - Garbage-collect
----------------------------------------------------------------
Peer FE80::20F:E2FF:FE23:82F5 on Vlan-interface100
Dest 1::/64,
via FE80::20F:E2FF:FE23:82F5, cost 1, tag 0, A, 6 Sec
Dest 2::/64,
via FE80::20F:E2FF:FE23:82F5, cost 1, tag 0, A, 6 Sec
Peer FE80::20F:E2FF:FE00:100 on Vlan-interface200
Dest 3::/64,
via FE80::20F:E2FF:FE00:100, cost 1, tag 0, A, 11 Sec
Dest 4::/64,
via FE80::20F:E2FF:FE00:100, cost 1, tag 0, A, 11 Sec
Dest 5::/64,
via FE80::20F:E2FF:FE00:100, cost 1, tag 0, A, 11 Sec
# Display the routing table of Switch A.
[SwitchA] display ripng 1 route
Route Flags: A - Aging, S - Suppressed, G - Garbage-collect
----------------------------------------------------------------
Peer FE80::200:2FF:FE64:8904 on Vlan-interface100
Dest 1::/64,
via FE80::200:2FF:FE64:8904, cost 1, tag 0, A, 31 Sec
Dest 4::/64,
via FE80::200:2FF:FE64:8904, cost 2, tag 0, A, 31 Sec

8/3/2019 Best_IPv6 Routing Operation
http://slidepdf.com/reader/full/bestipv6-routing-operation 22/88
Operation Manual - IPv6 RoutingQuidway S3500-EA Series Ethernet Switches Chapter 2 IPv6-RIPng Configuration
Huawei Technologies Proprietary
2-13
Dest 5::/64,
via FE80::200:2FF:FE64:8904, cost 2, tag 0, A, 31 Sec
Dest 3::/64,
via FE80::200:2FF:FE64:8904, cost 1, tag 0, A, 31 Sec
3) Configure Switch B to filter received routes
[SwitchB] acl ipv6 number 2000
[SwitchB-acl6-basic-2000] rule deny source 3::/64
[SwitchB-acl6-basic-2000] rule permit
[SwitchB-acl6-basic-2000] quit
[SwitchB] ripng 1
[SwitchB-ripng-1] filter-policy 2000 import
[SwitchB-ripng-1] filter-policy 2000 export
[SwitchB-ripng-1] quit
# Display routing tables of Switch B and Switch A.
[SwitchB] display ripng 1 route
Route Flags: A - Aging, S - Suppressed, G - Garbage-collect
----------------------------------------------------------------
Peer FE80::20F:E2FF:FE23:82F5 on Vlan-interface100
Dest 1::/64,
via FE80::20F:E2FF:FE23:82F5, cost 1, tag 0, A, 2 Sec
Dest 2::/64,
via FE80::20F:E2FF:FE23:82F5, cost 1, tag 0, A, 2 Sec
Peer FE80::20F:E2FF:FE00:100 on Vlan-interface200
Dest 4::/64,
via FE80::20F:E2FF:FE00:100, cost 1, tag 0, A, 5 Sec
Dest 5::/64,
via FE80::20F:E2FF:FE00:100, cost 1, tag 0, A, 5 Sec
[SwitchA] display ripng 1 route
Route Flags: A - Aging, S - Suppressed, G - Garbage-collect
----------------------------------------------------------------
Peer FE80::20F:E2FF:FE00:1235 on Vlan-interface100
Dest 1::/64,
via FE80::20F:E2FF:FE00:1235, cost 1, tag 0, A, 2 Sec
Dest 4::/64,
via FE80::20F:E2FF:FE00:1235, cost 2, tag 0, A, 2 Sec
Dest 5::/64,
via FE80::20F:E2FF:FE00:1235, cost 2, tag 0, A, 2 Sec

8/3/2019 Best_IPv6 Routing Operation
http://slidepdf.com/reader/full/bestipv6-routing-operation 23/88
Operation Manual - IPv6 RoutingQuidway S3500-EA Series Ethernet Switches Chapter 3 IPv6-OSPFv3 Configuration
Huawei Technologies Proprietary
3-1
Chapter 3 IPv6-OSPFv3 Configuration
Note:
The term “router” and router icon in this document refer to either a router in a generic
sense or a Layer 3 switch running routing protocols.
Verify that the system already operates in IPv4/IPv6 dual-stack mode before
configuring IPv6 routing.
All the IPv6 routing related configuration mentioned in this manual assumes that the
system already operates in IPv4/IPv6 dual-stack mode. For dual stack mode
configuration, see the part covering dual stack in the IPv6 Configuration module.
3.1 Introduction to OSPFv3
3.1.1 OSPFv3 Overview
OSPFv3 is OSPF (Open Shortest Path First) version 3 for short, supporting IPv6 and
compliant with RFC2740 (OSPF for IPv6).
Unchanged parts between OSPFv3 and OSPFv2:
32 bits router ID and area ID
Packets: Hello, DD (Data Description), LSR (Link State Request), LSU (Link State
Update), LSAck (Link State Acknowledgment)
Mechanisms for finding neighbors and establishing adjacencies
Mechanisms for LSA flooding and aging
Differences between OSPFv3 and OSPFv2:
OSPFv3 now runs on a per-link basis, instead of on a per-IP-subnet basis.
OSPFv3 supports multiple instances per link. OSPFv3 identifies neighbors by Router IDs, while OSPFv2 by IP addresses.
3.1.2 OSPFv3 Packets
OSPFv3 has also five types of packets: hello, DD, LSR, LSU, and LSAck.
The five packets have the same packet header, which different from the OSPFv2
packet header is only 16 bytes in length, has no authentication field, but added with an
Instance ID field to support multi-instance per link.
Figure 3-1 gives the OSPFv3 packet header.

8/3/2019 Best_IPv6 Routing Operation
http://slidepdf.com/reader/full/bestipv6-routing-operation 24/88
Operation Manual - IPv6 RoutingQuidway S3500-EA Series Ethernet Switches Chapter 3 IPv6-OSPFv3 Configuration
Huawei Technologies Proprietary
3-2
Version # Type Packet Length
Router ID
Area ID
Checksum
0
Instance ID 0
3115
Figure 3-1 OSPFv3 packet header
Major fields:
Version #: Version of OSPF, which is 3 for OSPFv3.
Type: Type of OSPF packet, from 1 to 5 are hello, DD, LSR, LSU, and LSAckrespectively.
Packet Length: Packet length in bytes, including header.
Instance ID: Instance ID for a link.
0: Reserved, which must be 0.
3.1.3 OSPFv3 LSA Types
OSPFv3 sends routing information in LSAs, which as defined in RFC2740 have the
following types:
Router-LSAs: Originated by all routers. This LSA describes the collected states ofthe router's interfaces to an area. Flooded throughout a single area only.
Network-LSAs: Originated for broadcast and NBMA networks by the Designated
Router. This LSA contains the list of routers connected to the network. Flooded
throughout a single area only.
Inter-Area-Prefix-LSAs: Similar to Type 3 LSA of OSPFv2, originated by ABRs
(Area Border Routers), and flooded throughout the LSA's associated area. Each
Inter-Area-Prefix-LSA describes a route with IPv6 address prefix to a destination
outside the area, yet still inside the AS (an inter-area route).
Inter-Area-Router-LSAs: Similar to Type 4 LSA of OSPFv2, originated by ABRs
and flooded throughout the LSA's associated area. Each Inter-Area-Router-LSA
describes a route to ASBR (Autonomous System Boundary Router).
AS-external-LSAs: Originated by ASBRs, and flooded throughout the AS (except
Stub and NSSA areas). Each AS-external-LSA describes a route to another
Autonomous System. A default route can be described by an AS external LSA.
Link-LSAs: A router originates a separate Link-LSA for each attached link.
Link-LSAs have link-local flooding scope. Each Link-LSA describes the IPv6
address prefix of the link and Link-local address of the router,
Intra-Area-Prefix-LSAs: Each Intra-Area-Prefix-LSA contains IPv6 prefix
information on a router, stub area or transit area information, and has area

8/3/2019 Best_IPv6 Routing Operation
http://slidepdf.com/reader/full/bestipv6-routing-operation 25/88
Operation Manual - IPv6 RoutingQuidway S3500-EA Series Ethernet Switches Chapter 3 IPv6-OSPFv3 Configuration
Huawei Technologies Proprietary
3-3
flooding scope. It was introduced because Router-LSAs and Network-LSAs
contain no address information now.
3.1.4 Timers of OSPFv3
Timers in OSPFv3 include:
OSPFv3 packet timer
LSA delay timer
SPF timer
I. OSPFv3 packet timer
Hello packets are sent periodically between neighboring routers for finding and
maintaining neighbor relationships, or for DR/BDR election. The hello interval must be
identical on neighboring interfaces. The smaller the hello interval, the faster thenetwork convergence speed and the bigger the network load.
If a router receives no hello packet from a neighbor after a period, it will declare the peer
is down. The period is called dead interval.
After sending an LSA to its adjacency, a router waits for an acknowledgment from the
adjacency. If no response received after retransmission interval elapses, the router will
send again the LSA. The retransmission interval must be longer than the round-trip
time in between.
II. LSA delay time
Each LSA has an age in the local LSDB (incremented by 1 per second), but an LSA is
not aged on transmission. You need to add an LSA delay time into the age time before
transmission, which is important for low speed networks.
III. SPF timer
Whenever LSDB changes, SPF recalculation happens. If recalculations become so
frequent, a large amount of resources will be occupied, reducing operation efficiency of
routers. You can adjust SPF calculation interval and delay time to protect networks from
being overloaded due to frequent changes.
3.1.5 OSPFv3 Features Supported
Basic features defined in RFC2740
OSPFv3 stub area
OSPFv3 multi-process, which enable a router to run multiple OSPFv3 processes
3.1.6 Related RFCs
RFC2740: OSPF for IPv6
RFC2328: OSPF Version 2

8/3/2019 Best_IPv6 Routing Operation
http://slidepdf.com/reader/full/bestipv6-routing-operation 26/88
Operation Manual - IPv6 RoutingQuidway S3500-EA Series Ethernet Switches Chapter 3 IPv6-OSPFv3 Configuration
Huawei Technologies Proprietary
3-4
3.2 IPv6-OSPFv3 Configuration Task List
To configure OSPFv3, perform the tasks described in the following sections:
Task Description
Configuring OSPFv3 Basic Functions Required
Configuring an OSPFv3 Stub Area OptionalConfiguring OSPFv3 Area Parameters Configuring OSPFv3 Virtual Links Optional
Configuring OSPFv3 Route Summarization
Optional
Configuring OSPFv3 Inbound RouteFiltering
Optional
Configuring Link Costs for OSPFv3Interfaces Optional
Configuring the Maximum Number ofOSPFv3 Load-balancing Routes
Optional
Configuring OSPFv3
Routing Information Management
Configuring OSPFv3 Route Redistribution
Optional
Configuring OSPFv3 Timers Optional
Configuring the DR Priority for anInterface
Optional
Ignoring MTU Check for DD Packets Optional
Configuring OSPFv3 Network Optimization
Disable Interfaces from Sending OSPFv3 Packets
Optional
3.3 Configuring OSPFv3 Basic Functions
3.3.1 Prerequisites
Make neighboring nodes accessible with each other at network layer.
Enable IPv6 packet forwarding
3.3.2 Configuring OSPFv3 Basic Functions
To configure OSPFv3 basic functions, use the following commands:
To do… Use the command… Remarks
Enter system view system-view —
Enable OSPFv3 andenter its view
ospfv3 [ process-id ] Required
Specify a router ID router-id router-id Required

8/3/2019 Best_IPv6 Routing Operation
http://slidepdf.com/reader/full/bestipv6-routing-operation 27/88
Operation Manual - IPv6 RoutingQuidway S3500-EA Series Ethernet Switches Chapter 3 IPv6-OSPFv3 Configuration
Huawei Technologies Proprietary
3-5
To do… Use the command… Remarks
Enter interface viewinterface interface-type interface-number
—
Enable OSPFv3 on theinterface
ospfv3 process-id areaarea-id [ instanceinstance-id ]
Required
Not enabled by default
Note:
Configure an OSPFv3 process ID when enabling OSPFv3. The process ID takes
effect locally, without affecting packet exchange between routers.
When configuring a router ID, make sure each router has a unique ID. If a router
runs multiple OSPFv3 processes, you need to specify a router ID for each process.
You need to specify a router ID manually, which is necessary to make OSPFv3
work.
3.4 Configuring OSPFv3 Area Parameters
The stub area and virtual link support of OSPFv3 has the same principle and
application environments with OSPFv2.
Splitting an OSPFv3 AS into multiple areas reduces the number of LSAs on networksand extends OSPFv3 application. For those non-backbone areas residing on the AS
boundary, you can configure them as Stub areas to further reduce the size of routing
tables on routers in these areas and the number of LSAs.
Non-backbone areas exchange routing information via the backbone area. Therefore,
the backbone and non-backbone areas, including the backbone itself must maintain
connectivity. In practice, necessary physical links may not be available for connectivity.
You can configure virtual links to address it.
3.4.1 Prerequisites
Enable IPv6 packet forwarding
Configure OSPFv3 basic functions
3.4.2 Configuring an OSPFv3 Stub Area
To configure an OSPFv3 stub area, use the following commands:
To do… Use the command… Remarks
Enter system view system-view —
Enter OSPFv3 view ospfv3 [ process-id ] Required
8/3/2019 Best_IPv6 Routing Operation
http://slidepdf.com/reader/full/bestipv6-routing-operation 28/88
Operation Manual - IPv6 RoutingQuidway S3500-EA Series Ethernet Switches Chapter 3 IPv6-OSPFv3 Configuration
Huawei Technologies Proprietary
3-6
To do… Use the command… Remarks
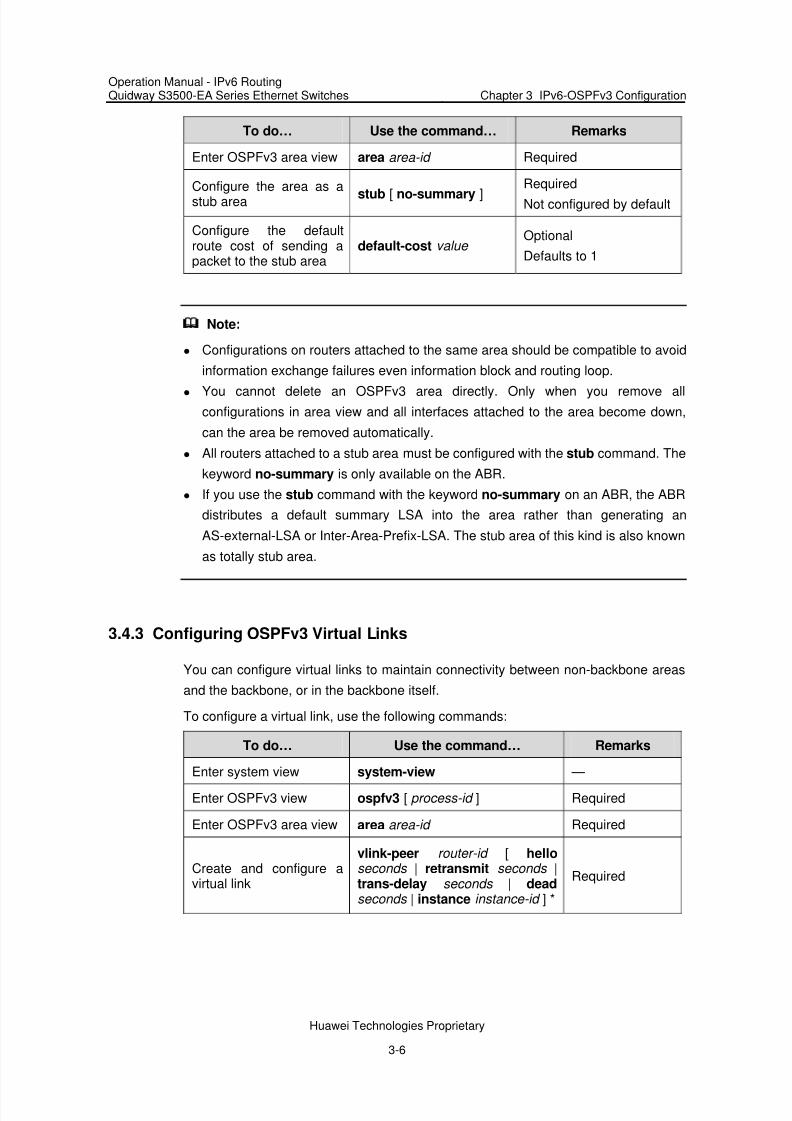
Enter OSPFv3 area view area area-id Required
Configure the area as astub area stub [ no-summary ]
Required
Not configured by default
Configure the defaultroute cost of sending apacket to the stub area
default-cost value Optional
Defaults to 1
Note:
Configurations on routers attached to the same area should be compatible to avoid
information exchange failures even information block and routing loop.
You cannot delete an OSPFv3 area directly. Only when you remove allconfigurations in area view and all interfaces attached to the area become down,
can the area be removed automatically.
All routers attached to a stub area must be configured with the stub command. The
keyword no-summary is only available on the ABR.
If you use the stub command with the keyword no-summary on an ABR, the ABR
distributes a default summary LSA into the area rather than generating an
AS-external-LSA or Inter-Area-Prefix-LSA. The stub area of this kind is also known
as totally stub area.
3.4.3 Configuring OSPFv3 Virtual Links
You can configure virtual links to maintain connectivity between non-backbone areas
and the backbone, or in the backbone itself.
To configure a virtual link, use the following commands:
To do… Use the command… Remarks
Enter system view system-view —
Enter OSPFv3 view ospfv3 [ process-id ] Required
Enter OSPFv3 area view area area-id Required
Create and configure avirtual link
vlink-peer router-id [ hello seconds | retransmit seconds |trans-delay seconds | dead seconds | instance instance-id ] *
Required

8/3/2019 Best_IPv6 Routing Operation
http://slidepdf.com/reader/full/bestipv6-routing-operation 29/88
Operation Manual - IPv6 RoutingQuidway S3500-EA Series Ethernet Switches Chapter 3 IPv6-OSPFv3 Configuration
Huawei Technologies Proprietary
3-7
Note:
Both ends of a virtual link are ABRs that are configured with the vlink-peer command.
3.5 Configuring OSPFv3 Routing Information Management
This section is to configure management of OSPF routing information advertisement
and reception, and route redistribution from other protocols.
3.5.1 Prerequisites
Enable IPv6 packet forwarding
Configure OSPFv3 basic functions
3.5.2 Configuring OSPFv3 Route Summarization
To configure route summarization between areas, use the following command on a
ABR:
To do… Use the command… Remarks
Enter system view system-view —
Enter OSPFv3 view ospfv3 [ process-id ] Required
Enter OSPFv3 area view area area-id Required
Configure a summaryroute
abr-summary ipv6-address prefix-length [ not-advertise ]
Required
Not configured by default
Note:
The abr-summary command is available on ABRs only. If contiguous network
segments are available in an area, you can use the command to summarize them into
one network segment on the ABR. The ABR will advertise only the summary route. AnyLSA falling into the specified network segment will not be advertised, reducing the
LSDB size in other areas.
3.5.3 Configuring OSPFv3 Inbound Route Filtering
You can configure OSPFv3 to filter routes that are computed from received LSAs
according to some rules.
To configure inbound route filtering, use the following commands:

8/3/2019 Best_IPv6 Routing Operation
http://slidepdf.com/reader/full/bestipv6-routing-operation 30/88
Operation Manual - IPv6 RoutingQuidway S3500-EA Series Ethernet Switches Chapter 3 IPv6-OSPFv3 Configuration
Huawei Technologies Proprietary
3-8
To do… Use the command… Remarks
Enter system view system-view —
Enter OSPFv3 view ospfv3 [ process-id ] Required
Configure inbound routefiltering
filter-policy { acl6-number |ipv6-prefix ipv6-prefix-name } import
Required
Not configured by default
Note:
Use of the filter-policy import command can only filter routes computed by OSPFv3.
Only routes not filtered can be added into the local routing table.
3.5.4 Configuring Link Costs for OSPFv3 Interfaces
You can configure OSPFv3 link costs for interfaces to adjust routing calculation.
To configure the link cost for an OSPFv3 interface, use the following commands:
To do… Use the command… Remarks
Enter system view system-view —
Enter interface view interface interface-type interface-number —
Configure the cost for theinterface
ospfv3 cost value [ instance instance-id ]
Optional
By default, The costvalue defaults to 1.
3.5.5 Configuring the Maximum Number of OSPFv3 Load-balancing Routes
If multiple routes to a destination are available, using load balancing to send IPv6
packets on these routes in turn can improve link utility. To configure the maximum
number of load-balancing routes, use the following commands:
To do… Use the command… Remarks
Enter system view system-view —
Enter OSPFv3 view ospfv3 [ process-id ] Required
Specify the maximumnumber of load-balancingroutes
maximumload-balancing maximum
Optional
By default, the maximumnumber of load-balancingroutes supported by
OSPFv3 is four

8/3/2019 Best_IPv6 Routing Operation
http://slidepdf.com/reader/full/bestipv6-routing-operation 31/88
Operation Manual - IPv6 RoutingQuidway S3500-EA Series Ethernet Switches Chapter 3 IPv6-OSPFv3 Configuration
Huawei Technologies Proprietary
3-9
3.5.6 Configuring OSPFv3 Route Redistribution
To configure OSPFv3 route redistribution, use the following commands:
To do… Use the command… Remarks
Enter system view system-view —
Enter OSPFv3 view ospfv3 [ process-id ] Required
Specify a default cost forredistributed routes
default cost value Optional
Defaults to 1
Redistribute routes fromother protocols, includingfrom other OSPFv3
processes
import-route { isisv6process-id | ospfv3 process-id | ripng process-id | bgp4+[ allow-ibgp ] | direct | static }[ cost value | type type |
route-policyroute-policy-name ] *
Required
Not configured bydefault
Configure to filterredistributed routes
filter-policy { acl6-number |ipv6-prefix ipv6-prefix-name }export [ isisv6 process-id | ospfv3 process-id | ripng process-id | bgp4+ | direct | static]
Optional
Not configured bydefault
Note:
Using the import-route command on a router makes the router become an ASBR.
Since OSPFv3 is a link state based routing protocol, it cannot directly filter LSAs to
be advertised. Therefore, you need to configure filtering redistributed routes before
advertising routes that are not filtered in LSAs into the routing domain.
Use of the filter-policy export command takes effect only on the local router.
However, if the import-route command is not configured, executing the
filter-policy export command does not take effect.
3.6 Configuring OSPFv3 Network Optimization
This section describes configurations of OSPFv3 timers, interface DR priority, MTU
check ignorance for DD packets, disabling interfaces from sending OSPFv3 packets.
OSPFv3 timers:
Packet timer: Specified to adjust topology convergence speed and network load
LSA delay timer: Specified especially for low speed links
SPF timer: Specified to protect networks from being over consumed due to
frequent network changes.

8/3/2019 Best_IPv6 Routing Operation
http://slidepdf.com/reader/full/bestipv6-routing-operation 32/88
Operation Manual - IPv6 RoutingQuidway S3500-EA Series Ethernet Switches Chapter 3 IPv6-OSPFv3 Configuration
Huawei Technologies Proprietary
3-10
For a broadcast network, you can configure DR priorities for interfaces to affect
DR/BDR election.
By disabling an interface from sending OSPFv3 packets, you can make other routers
on the network obtain no information from the interface.
3.6.1 Prerequisites
Enable IPv6 packet forwarding
Configure OSPFv3 basic functions
3.6.2 Configuring OSPFv3 Timers
To configure OSPFv3 timers, use the following commands:
To do… Use the command… Remarks
Enter system view system-view —
Enter interface view interface interface-type interface-number —
Configure hello intervalospfv3 timer hello seconds [ instanceinstance-id ]
Optional
Defaults to 10 seconds.
Configure dead intervalospfv3 timer dead seconds [ instanceinstance-id ]
Optional
Defaults to 40 seconds.
Configure LSAretransmission interval
ospfv3 timer retransmitinterval [ instanceinstance-id ]
Optional
Defaults to 5 seconds
Configure LSAtransmission delay
ospfv3 trans-delay seconds [ instanceinstance-id ]
Optional
Defaults to 1 second
Exit to system view quit —
Enter OSPFv3 view ospfv3 [ process-id ] Required
Configure SPF timerspf timers delay-interval hold-interval
Optional
delay-interval defaults to5 seconds;
hold-interval defaults to10 seconds

8/3/2019 Best_IPv6 Routing Operation
http://slidepdf.com/reader/full/bestipv6-routing-operation 33/88
Operation Manual - IPv6 RoutingQuidway S3500-EA Series Ethernet Switches Chapter 3 IPv6-OSPFv3 Configuration
Huawei Technologies Proprietary
3-11
Note:
The dead interval set on neighboring interfaces cannot be so small. Otherwise, a
neighbor is so easy to be considered as down.
The LSA retransmission interval cannot be so small to avoid unnecessary
retransmissions.
3.6.3 Configuring the DR Priority for an Interface
To configure the DR priority for an interface, use the following commands:
To do… Use the command… Remarks
Enter system view system-view —
Enter interface view interface interface-type interface-number —
Configure the DR priorityospfv3 dr-priority priority [ instance instance-id ]
Optional
Defaults to 1
Note:
The DR priority of an interface determines the interface’s qualification in DR election.
Interfaces having the priority 0 cannot become a DR or BDR.
3.6.4 Ignoring MTU Check for DD Packets
When LSAs are few, it is unnecessary to check MTU in DD packets in order to improve
efficiency.
To ignore MTU check for DD packets, use the following commands:
To do… Use the command… RemarksEnter system view system-view —
Enter interface view interface interface-type interface-number —
Ignore MTU check for DDpackets ospfv3 mtu-ignore
[ instance instance-id ] Required
Not ignored by default

8/3/2019 Best_IPv6 Routing Operation
http://slidepdf.com/reader/full/bestipv6-routing-operation 34/88
Operation Manual - IPv6 RoutingQuidway S3500-EA Series Ethernet Switches Chapter 3 IPv6-OSPFv3 Configuration
Huawei Technologies Proprietary
3-12
3.6.5 Disable Interfaces from Sending OSPFv3 Packets
To disable interfaces from sending any OSPFv3 packet, use the following commands:
To do… Use the command… Remarks
Enter system view system-view -
Enter OSPFv3 view ospfv3 [ process-id ] Required
Disable interfaces fromsending any OSPFv3packet
silent-interface { interface-type interface-number | all }
Required
Not disabled by default
Note:
Multiple processes can disable the same interface from sending OSPFv3 packets.Use of the silent-interface command disables only the interfaces associated with
the current process rather than interfaces associated with other processes.
After an OSPF interface is set to silent, direct routes of the interface can still be
advertised in Intra-Area-Prefix-LSAs via other interfaces, but hello packets for
finding neighbors cannot be advertised, so no neighboring relationship can be
established on the interface, enhancing adaptability of OSPFv3 networking.

8/3/2019 Best_IPv6 Routing Operation
http://slidepdf.com/reader/full/bestipv6-routing-operation 35/88
Operation Manual - IPv6 RoutingQuidway S3500-EA Series Ethernet Switches Chapter 3 IPv6-OSPFv3 Configuration
Huawei Technologies Proprietary
3-13
3.7 Displaying and Maintaining OSPFv3
To do… Use the command… Remarks
Display OSPFv3debugging stateinformation
display debugging ospfv3
Display OSPFv3 processbrief information
display ospfv3 [ process-id ]
Display OSPFv3 interfaceinformation
display ospfv3 interface [ interface-type interface-number |statistic ]
Display OSPFv3 LSDB
information
display ospfv3 [ process-id ] lsdb[ [ external | inter-prefix | inter-router | intra-prefix | link |
network | router ] [ link-state-id ][ originate-router router-id ] | total ]
Display LSA statistics inOSPFv3 LSDB
display ospfv3 lsdb statistic
Display OSPFv3 neighborinformation
display ospfv3 [ process-id ] [ area area-id ] peer [ [ interface-type interface-number ] [ verbose ] | peer-router-id ]
Display OSPFv3 neighborstatistics
display ospfv3 peer statistic
Display OSPFv3 routingtable information
display ospfv3 [ process-id ]routing [ ipv6-address prefix-length | ipv6-address /prefix-length | abr-routes | asbr-routes | all | statistics ]
Display OSPFv3 areatopology information
display ospfv3 [ process-id ] topology [ area area-id ]
Display OSPFv3 virtuallink information
display ospfv3 [ process-id ] vlink
Display OSPFv3 next hop
information
display ospfv3 [ process-id ]
next-hop
Display OSPFv3 link staterequest list information
display ospfv3 [ process-id ]request-list [ statistics ]
Display OSPFv3 link stateretransmission listinformation
display ospfv3 [ process-id ]retrans-list [ statistics ]
Display OSPFv3 statistics display ospfv3 statistic
Available inany view

8/3/2019 Best_IPv6 Routing Operation
http://slidepdf.com/reader/full/bestipv6-routing-operation 36/88
Operation Manual - IPv6 RoutingQuidway S3500-EA Series Ethernet Switches Chapter 3 IPv6-OSPFv3 Configuration
Huawei Technologies Proprietary
3-14
3.8 OSPFv3 Configuration Examples
3.8.1 Configuring OSPFv3 Areas
I. Network requirements
In Figure 3-2, all switches run OSPFv3. The AS is split into three areas, in which,
Switch B and Switch C act as ABRs to forward routing information between areas.
It is required to configure Area 2 as a stub area, reducing LSAs into the area without
affecting route reachability.
II. Network diagram
SwitchB SwitchC
SwitchD
Vlan-interface1002001::1/64
Vlan-interface1002001::2/64 Vlan-interface400
2001:2::1/64
Vlan-interface4002001:2::2/64
OSPFv3
Area0
Vlan-interface2002001:1::1/64
SwitchA
Vlan-interface2002001:1::2/64
OSPFv3Area1
Vlan-interface3002001:3::1/64
OSPFv3Area2 Stub
Figure 3-2 Network diagram for OSPFv3 area configuration
III. Configuration procedure
1) Configure IPv6 addresses for interfaces (omitted)
2) Configure OSPFv3 basic functions
# Configure Switch A.
<SwitchA> system-view
[SwitchA] ipv6[SwitchA] ospfv3
[SwitchA-ospfv3-1] router-id 1.1.1.1
[SwitchA-ospfv3-1] quit
[SwitchA] interface vlan-interface 300
[SwitchA-Vlan-interface300] ospfv3 1 area 1
[SwitchA-Vlan-interface300] quit
[SwitchA] interface vlan-interface 200
[SwitchA-Vlan-interface200] ospfv3 1 area 1
[SwitchA-Vlan-interface200] quit

8/3/2019 Best_IPv6 Routing Operation
http://slidepdf.com/reader/full/bestipv6-routing-operation 37/88
Operation Manual - IPv6 RoutingQuidway S3500-EA Series Ethernet Switches Chapter 3 IPv6-OSPFv3 Configuration
Huawei Technologies Proprietary
3-15
# Configure Switch B
<SwitchB> system-view
[SwitchB] ipv6
[SwitchB] ospfv3
[SwitchB-ospf-1] router-id 2.2.2.2
[SwitchB-ospf-1] quit
[SwitchB] interface vlan-interface 100
[SwitchB-Vlan-interface100] ospfv3 1 area 0
[SwitchB-Vlan-interface100] quit
[SwitchB] interface vlan-interface 200
[SwitchB-Vlan-interface200] ospfv3 1 area 1
[SwitchB-Vlan-interface200] quit
# Configure Switch C<SwitchC> system-view
[SwitchC] ipv6
[SwitchC] ospfv3
[SwitchC-ospfv3-1] router-id 3.3.3.3
[SwitchC-ospfv3-1] quit
[SwitchC] interface vlan-interface 100
[SwitchC-Vlan-interface100] ospfv3 1 area 0
[SwitchC-Vlan-interface100] quit
[SwitchC] interface vlan-interface 400
[SwitchC-Vlan-interface400] ospfv3 1 area 2
[SwitchC-Vlan-interface400] quit
# Configure Switch D
<SwitchD> system-view
[SwitchD] ipv6
[SwitchD] ospfv3
[SwitchD-ospfv3-1] router-id 4.4.4.4
[SwitchD-ospfv3-1] quit
[SwitchD] interface Vlan-interface 400
[SwitchD-Vlan-interface400] ospfv3 1 area 2
[SwitchD-Vlan-interface400] quit
# Display OSPFv3 neighbor information on Switch B.
[SwitchB] display ospfv3 peer
OSPFv3 Area ID 0.0.0.0 (Process 1)
----------------------------------------------------------------------
Neighbor ID Pri State Dead Time Interface Instance ID
3.3.3.3 1 Full/DR 00:00:39 Vlan100 0

8/3/2019 Best_IPv6 Routing Operation
http://slidepdf.com/reader/full/bestipv6-routing-operation 38/88
Operation Manual - IPv6 RoutingQuidway S3500-EA Series Ethernet Switches Chapter 3 IPv6-OSPFv3 Configuration
Huawei Technologies Proprietary
3-16
OSPFv3 Area ID 0.0.0.1 (Process 1)
----------------------------------------------------------------------
Neighbor ID Pri State Dead Time Interface Instance ID
1.1.1.1 1 Full/Backup 00:00:38 Vlan200 0
# Display OSPFv3 neighbor information on Switch C.
[SwitchC] display ospfv3 peer
OSPFv3 Area ID 0.0.0.0 (Process 1)
----------------------------------------------------------------------
Neighbor ID Pri State Dead Time Interface Instance ID
2.2.2.2 1 Full/Backup 00:00:39 Vlan100 0
OSPFv3 Area ID 0.0.0.2 (Process 1)
----------------------------------------------------------------------
Neighbor ID Pri State Dead Time Interface Instance ID
4.4.4.4 1 Full/DR 00:00:38 Vlan400 0
# Display OSPFv3 routing table information on Switch D.
[SwitchD] display ospfv3 routing
E1 - Type 1 external route, IA - Inter area route, I - Intra area route
E2 - Type 2 external route, * - Selected route
OSPFv3 Router with ID (4.4.4.4) (Process 1)
------------------------------------------------------------------------
*Destination: 2001::/64
Type : IA Cost : 2
NextHop : FE80::F40D:0:93D0:1 Interface: Vlan400
*Destination: 2001:1::/64
Type : IA Cost : 3
NextHop : FE80::F40D:0:93D0:1 Interface: Vlan400
*Destination: 2001:2::/64
Type : I Cost : 1
NextHop : directly-connected Interface: Vlan400
*Destination: 2001:3::/64
Type : IA Cost : 4
NextHop : FE80::F40D:0:93D0:1 Interface: Vlan400
3) Configure Area 2 as a stub area
# Configure Switch D
[SwitchD] ospfv3
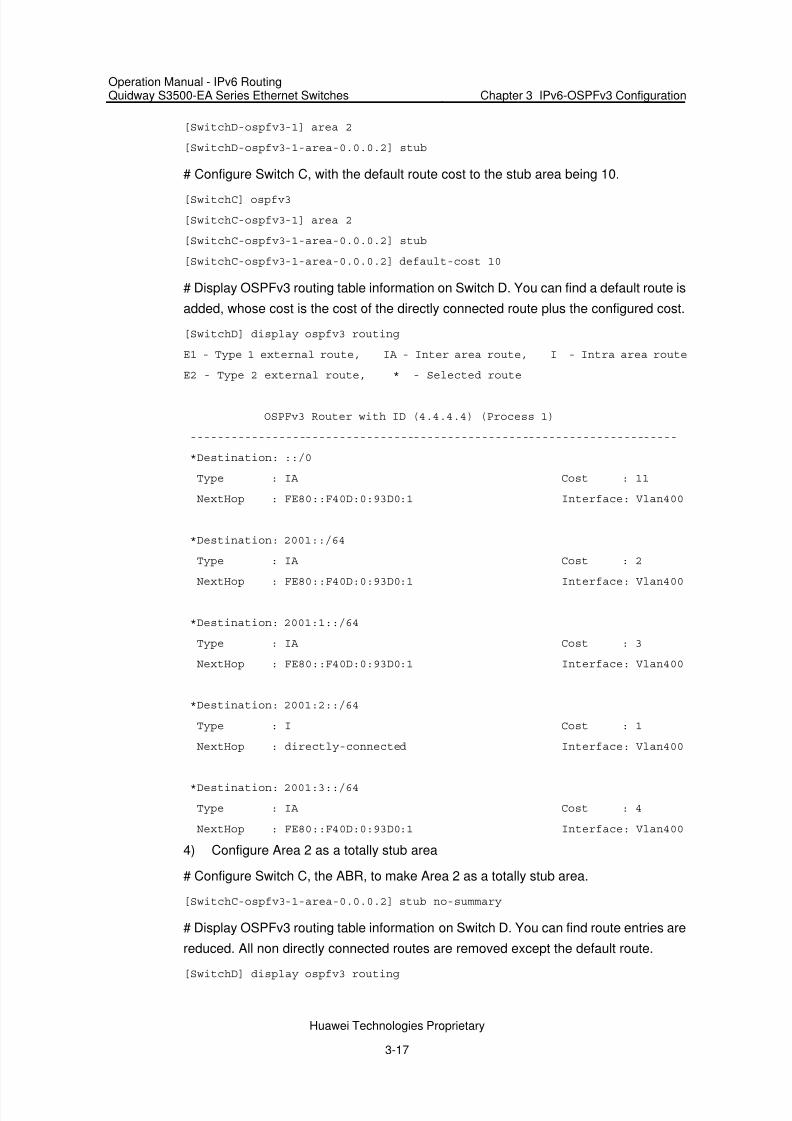
8/3/2019 Best_IPv6 Routing Operation
http://slidepdf.com/reader/full/bestipv6-routing-operation 39/88
Operation Manual - IPv6 RoutingQuidway S3500-EA Series Ethernet Switches Chapter 3 IPv6-OSPFv3 Configuration
Huawei Technologies Proprietary
3-17
[SwitchD-ospfv3-1] area 2
[SwitchD-ospfv3-1-area-0.0.0.2] stub
# Configure Switch C, with the default route cost to the stub area being 10.
[SwitchC] ospfv3
[SwitchC-ospfv3-1] area 2
[SwitchC-ospfv3-1-area-0.0.0.2] stub
[SwitchC-ospfv3-1-area-0.0.0.2] default-cost 10
# Display OSPFv3 routing table information on Switch D. You can find a default route is
added, whose cost is the cost of the directly connected route plus the configured cost.
[SwitchD] display ospfv3 routing
E1 - Type 1 external route, IA - Inter area route, I - Intra area route
E2 - Type 2 external route, * - Selected route
OSPFv3 Router with ID (4.4.4.4) (Process 1)
------------------------------------------------------------------------
*Destination: ::/0
Type : IA Cost : 11
NextHop : FE80::F40D:0:93D0:1 Interface: Vlan400
*Destination: 2001::/64
Type : IA Cost : 2
NextHop : FE80::F40D:0:93D0:1 Interface: Vlan400
*Destination: 2001:1::/64
Type : IA Cost : 3
NextHop : FE80::F40D:0:93D0:1 Interface: Vlan400
*Destination: 2001:2::/64
Type : I Cost : 1
NextHop : directly-connected Interface: Vlan400
*Destination: 2001:3::/64
Type : IA Cost : 4
NextHop : FE80::F40D:0:93D0:1 Interface: Vlan400
4) Configure Area 2 as a totally stub area
# Configure Switch C, the ABR, to make Area 2 as a totally stub area.
[SwitchC-ospfv3-1-area-0.0.0.2] stub no-summary
# Display OSPFv3 routing table information on Switch D. You can find route entries are
reduced. All non directly connected routes are removed except the default route.
[SwitchD] display ospfv3 routing

8/3/2019 Best_IPv6 Routing Operation
http://slidepdf.com/reader/full/bestipv6-routing-operation 40/88
Operation Manual - IPv6 RoutingQuidway S3500-EA Series Ethernet Switches Chapter 3 IPv6-OSPFv3 Configuration
Huawei Technologies Proprietary
3-18
E1 - Type 1 external route, IA - Inter area route, I - Intra area route
E2 - Type 2 external route, * - Selected route
OSPFv3 Router with ID (4.4.4.4) (Process 1)
------------------------------------------------------------------------
*Destination: ::/0
Type : IA Cost : 11
NextHop : FE80::F40D:0:93D0:1 Interface: Vlan400
*Destination: 2001:2::/64
Type : I Cost : 1
NextHop : directly-connected Interface: Vlan400
3.8.2 Configuring OSPFv3 DR Election
I. Network requirements
In Figure 3-3:
The priority of Switch A is 100, the highest priority on the network, so it will be the
DR.
The priority of Switch C is 2, the second highest priority on the network, so it will be
the BDR.
The priority of Switch B is 0, so it cannot become the DR.
RouterD has the default priority 1.
II. Network diagram
SwitchBSwitchA
SwitchD
Vlan-interface2002001::2/64
Vlan-interface1002001::1/64
Vlan-interface2002001::4/64
SwitchC
Vlan-interface1002001::3/64
Figure 3-3 Network diagram for OSPFv3 DR election configuration
III. Configuration procedure
1) Configure IPv6 addresses for interfaces (omitted)
2) Configure OSPFv3 basic functions
# Configure Switch A
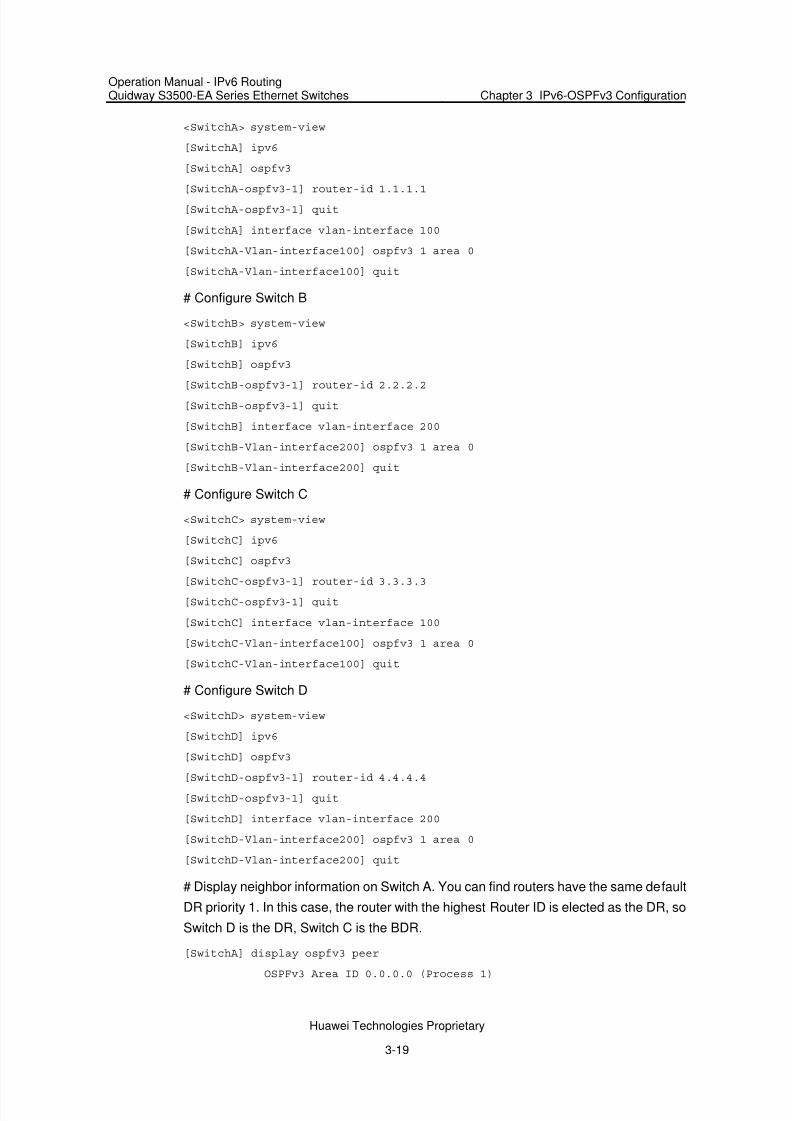
8/3/2019 Best_IPv6 Routing Operation
http://slidepdf.com/reader/full/bestipv6-routing-operation 41/88
Operation Manual - IPv6 RoutingQuidway S3500-EA Series Ethernet Switches Chapter 3 IPv6-OSPFv3 Configuration
Huawei Technologies Proprietary
3-19
<SwitchA> system-view
[SwitchA] ipv6
[SwitchA] ospfv3
[SwitchA-ospfv3-1] router-id 1.1.1.1
[SwitchA-ospfv3-1] quit
[SwitchA] interface vlan-interface 100
[SwitchA-Vlan-interface100] ospfv3 1 area 0
[SwitchA-Vlan-interface100] quit
# Configure Switch B
<SwitchB> system-view
[SwitchB] ipv6
[SwitchB] ospfv3
[SwitchB-ospfv3-1] router-id 2.2.2.2
[SwitchB-ospfv3-1] quit
[SwitchB] interface vlan-interface 200
[SwitchB-Vlan-interface200] ospfv3 1 area 0
[SwitchB-Vlan-interface200] quit
# Configure Switch C
<SwitchC> system-view
[SwitchC] ipv6
[SwitchC] ospfv3
[SwitchC-ospfv3-1] router-id 3.3.3.3
[SwitchC-ospfv3-1] quit
[SwitchC] interface vlan-interface 100
[SwitchC-Vlan-interface100] ospfv3 1 area 0
[SwitchC-Vlan-interface100] quit
# Configure Switch D
<SwitchD> system-view
[SwitchD] ipv6
[SwitchD] ospfv3
[SwitchD-ospfv3-1] router-id 4.4.4.4
[SwitchD-ospfv3-1] quit
[SwitchD] interface vlan-interface 200
[SwitchD-Vlan-interface200] ospfv3 1 area 0
[SwitchD-Vlan-interface200] quit
# Display neighbor information on Switch A. You can find routers have the same default
DR priority 1. In this case, the router with the highest Router ID is elected as the DR, so
Switch D is the DR, Switch C is the BDR.
[SwitchA] display ospfv3 peer
OSPFv3 Area ID 0.0.0.0 (Process 1)

8/3/2019 Best_IPv6 Routing Operation
http://slidepdf.com/reader/full/bestipv6-routing-operation 42/88
Operation Manual - IPv6 RoutingQuidway S3500-EA Series Ethernet Switches Chapter 3 IPv6-OSPFv3 Configuration
Huawei Technologies Proprietary
3-20
----------------------------------------------------------------------
Neighbor ID Pri State Dead Time Interface Instance ID
2.2.2.2 1 2-Way/DROther 00:00:36 Vlan200 0
3.3.3.3 1 Full/Backup 00:00:35 Vlan100 0
4.4.4.4 1 Full/DR 00:00:33 Vlan200 0
# Display neighbor information on Switch D. You can find neighbor states between
Router D and other routers are all full.
[SwitchD] display ospfv3 peer
OSPFv3 Area ID 0.0.0.0 (Process 1)
----------------------------------------------------------------------
Neighbor ID Pri State Dead Time Interface Instance ID
1.1.1.1 1 Full/DROther 00:00:30 Vlan100 0
2.2.2.2 1 Full/DROther 00:00:37 Vlan200 0
3.3.3.3 1 Full/Backup 00:00:31 Vlan100 0
3) Configure DR priorities for interfaces.
# Configure the DR priority of Vlan-interface100 as 100 on Switch A.
[SwitchA] interface Vlan-interface 100
[SwitchA-Vlan-interface100] ospfv3 dr-priority 100
[SwitchA-Vlan-interface100] quit
# Configure the DR priority of Vlan-interface 200 as 0 on Switch B.
[SwitchB] interface vlan-interface 200
[SwitchB-Vlan-interface200] ospfv3 dr-priority 0
[SwitchB-Vlan-interface200] quit
#Configure the DR priority of Switch C as 2.
[SwitchC] interface Vlan-interface 100
[SwitchC-Vlan-interface100] ospfv3 dr-priority 2
[SwitchC-Vlan-interface100] quit
# Display neighbor information on Switch A. You can find DR priorities have been
updated, but DR and BDR are not changed.
[SwitchA] display ospfv3 peer
OSPFv3 Area ID 0.0.0.0 (Process 1)
----------------------------------------------------------------------
Neighbor ID Pri State Dead Time Interface Instance ID
2.2.2.2 0 2-Way/DROther 00:00:38 Vlan200 0
3.3.3.3 2 Full/Backup 00:00:32 Vlan100 0
4.4.4.4 1 Full/DR 00:00:36 Vlan200 0
#Display neighbor information on Switch D. You can find Switch D is still the DR.
[SwitchD] display ospfv3 peer
OSPFv3 Area ID 0.0.0.0 (Process 1)

8/3/2019 Best_IPv6 Routing Operation
http://slidepdf.com/reader/full/bestipv6-routing-operation 43/88
Operation Manual - IPv6 RoutingQuidway S3500-EA Series Ethernet Switches Chapter 3 IPv6-OSPFv3 Configuration
Huawei Technologies Proprietary
3-21
----------------------------------------------------------------------
Neighbor ID Pri State Dead Time Interface Instance ID
1.1.1.1 100 Full/DROther 00:00:33 Vlan100 0
2.2.2.2 0 Full/DROther 00:00:36 Vlan200 0
3.3.3.3 2 Full/Backup 00:00:40 Vlan100 0
4) Restart DR/BDR election
# Use the shutdown and undo shutdown commands on interfaces to restart DR/BDR
election (omitted).
# Display neighbor information on Switch A. You can find Switch C becomes the BDR.
[SwitchA] display ospfv3 peer
OSPFv3 Area ID 0.0.0.0 (Process 1)
----------------------------------------------------------------------
Neighbor ID Pri State Dead Time Interface Instance ID
2.2.2.2 0 Full/DROther 00:00:31 Vlan200 0
3.3.3.3 2 Full/Backup 00:00:39 Vlan100 0
4.4.4.4 1 Full/DROther 00:00:37 Vlan200 0
# Display neighbor information on Switch D. You can find Switch A becomes the DR.
[SwitchD] display ospfv3 peer
OSPFv3 Area ID 0.0.0.0 (Process 1)
----------------------------------------------------------------------
Neighbor ID Pri State Dead Time Interface Instance ID
1.1.1.1 100 Full/DR 00:00:34 Vlan100 02.2.2.2 0 2-Way/DROther 00:00:34 Vlan200 0
3.3.3.3 2 Full/Backup 00:00:32 Vlan100 0
3.9 Troubleshooting OSPFv3 Configuration
3.9.1 No OSPFv3 Neighbor Relationship Established
I. Symptom
No OSPF neighbor relationship can be established.
II. Analysis
If the physical link and lower protocol work well, check OSPF parameters configured on
interfaces. The two neighboring interfaces must have the same parameters, such as
the area ID, network segment and mask, network type. If the network type is broadcast,
at least one interface must have a DR priority higher than 0.
III. Process steps
1) Display neighbor information using the display ospfv3 peer command.

8/3/2019 Best_IPv6 Routing Operation
http://slidepdf.com/reader/full/bestipv6-routing-operation 44/88
Operation Manual - IPv6 RoutingQuidway S3500-EA Series Ethernet Switches Chapter 3 IPv6-OSPFv3 Configuration
Huawei Technologies Proprietary
3-22
2) Display OSPFv3 interface information using the display ospfv3 interface
command.
3) Ping the neighbor router’s IP address to check connectivity.
4) Check OSPF timers. The dead interval on an interface must be at least four timesthe hello interval.
5) On a broadcast network, at least one interface must have a DR priority higher than
0.
3.9.2 Incorrect Routing Information
I. Symptom
OSPFv3 cannot find routes to other areas.
II. Analysis
The backbone area must maintain connectivity to all other areas. If a router connects to
more than one area, at least one area must be connected to the backbone. The
backbone cannot be configured as a Stub area.
In a Stub area, all routers cannot receive external routes, and all interfaces connected
to the Stub area must be associated with the Stub area.
III. Process steps
1) Use the display ospfv3 peer command to display OSPFv3 neighbors.
2) Use the display ospfv3 interface command to display OSPFv3 interfaceinformation.
3) Use the display ospfv3 lsdb command to display Link State Database
information to check integrity.
4) Display information about area configuration using the display
current-configuration configuration command. If more than two areas are
configured, at least one area is connected to the backbone.
5) In a Stub area, all routers are configured with the stub command.
6) If a virtual link is configured, use the display ospf vlink command to check the
neighbor state.

8/3/2019 Best_IPv6 Routing Operation
http://slidepdf.com/reader/full/bestipv6-routing-operation 45/88
Operation Manual - IPv6 RoutingQuidway S3500-EA Series Ethernet Switches Chapter 4 IPv6-IS-IS Configuration
Huawei Technologies Proprietary
4-1
Chapter 4 IPv6-IS-IS Configuration
Note:
The term “router” and router icon in this document refer to either a router in a generic
sense or a Layer 3 switch running routing protocols.
Verify that the system already operates in IPv4/IPv6 dual-stack mode before
configuring IPv6 routing.
All the IPv6 routing related configuration mentioned in this manual assumes that the
system already operates in IPv4/IPv6 dual-stack mode. For dual stack mode
configuration, see the part covering dual stack in the IPv6 Configuration module.
4.1 Introduction to IPv6-IS-IS
The IS-IS routing protocol (Intermediate System-to-Intermediate System intra-domain
routing information exchange protocol) supports multiple network protocols, including
IPv6. The IS-IS with IPv6 support is called IPv6-IS-IS dynamic routing protocol. The
International Engineer Task Force (IETF) defines the IPv6 protocol for IS-IS in the file
draft-ietf-isis-ipv6-05. Two type-length-values (TLVs) and a new network layer protocol
identifier (NLPID) are added to support IPv6 protocol.
The TLV is a variable field in the link state PDUs (LSP). The two TLVs are:
IPv6 Reachability: Defines the prefix, metric and other information to indicate the
network reachability, with type 236 (0xEC).
IPv6 Interface Address: A corresponding TLV as the IP Interface Address in IPv4,
which transforms the 32 bits IPv4 address to 128 bits IPv6 address.
NLPID is an 8-bit field with a value of 142 (0x8E). If the IS-IS router supports IPv6, the
routing information is advertised with the NLPID.
4.2 IPv6-IS-IS Basic Configuration
Note:
You can implement IPv6 networking through IPv6-IS-IS in IPv6 network environment.

8/3/2019 Best_IPv6 Routing Operation
http://slidepdf.com/reader/full/bestipv6-routing-operation 46/88
Operation Manual - IPv6 RoutingQuidway S3500-EA Series Ethernet Switches Chapter 4 IPv6-IS-IS Configuration
Huawei Technologies Proprietary
4-2
4.2.1 Configuration Prerequisites
Before the configuration, accomplish the following tasks first:
Enable IPv6 globally Configure IP address on each interface, and make sure all nodes are reachable.
Enable IS-IS
4.2.2 Configuring IPv6-IS-IS Basic Functions
Follow these steps to configure the basic functions of IPv6-IS-IS
To do… Use command to… Remarks
Enter system view system-view ––
Create an IS-IS processand enter IS-IS view isis [ process-id ] RequiredNot enabled by default
Set the network entityname of the IS-IS process
network-entity net Required
Not configured by default
Enable IPv6 in the IS-ISprocess
ipv6 enable Required
Disabled by default Go back to system view quit ––
Enter interface view interface interface-type interface-number ––
Enable IPv6-IS-IS on aspecified interface isis ipv6 enable
[ process-id ] [ silent ] Required
Disabled by default
4.3 Configuring IPv6-IS-IS Routing Information Control
4.3.1 Configuration Prerequisites
Note:
You need finish basic IPv6-IS-IS configuration before configuring IPv6-IS-IS routing
features.
4.3.2 Configuration Procedure
Follow these steps to configure IPv6-IS-IS routing information control:

8/3/2019 Best_IPv6 Routing Operation
http://slidepdf.com/reader/full/bestipv6-routing-operation 47/88
Operation Manual - IPv6 RoutingQuidway S3500-EA Series Ethernet Switches Chapter 4 IPv6-IS-IS Configuration
Huawei Technologies Proprietary
4-3
To do… Use command to… Remarks
Enter system view system-view ––
Enter IS-IS view isis [ process-id ] ––
Define the routingpriority of IPv6-IS-IS
ipv6 preference { route-policyroute-policy-name | preference-value }*
Optional
15 by default
Configure routesummarization ofIPv6-IS-IS
ipv6 summary ipv6-prefix prefix-length [ avoid-feedback |generate_null0_route | [ level-1 | level-1-2 | level-2 ] | tagtag-value ] *
Optional
Disabled by default
Define an IPv6-IS-IS
default route
ipv6 default-route-advertise [ [ level-1 | level-2 | level-1-2 ] |
route-policy route-policy-name ]*
Optional
No IPv6-IS-IS default
route is defined bydefault.
Configure IPv6 IS-ISto filter receivedroutes
ipv6 filter-policy { acl6-number |ipv6-prefix ipv6-prefix-name |route-policy route-policy-name }import
Optional
No filtering policy isdefined by default
Configure IPv6 IS-ISto redistribute routesfrom another routingprotocol
ipv6 import-route protocol [ process-id | allow-ibgp ] [ cost cost-value | [ level-1 | level-2 | level-1-2 ] | route-policyroute-policy-name | tagtag-value ]*
Optional
Not configured bydefault
Define the filteringpolicy forredistributed route
ipv6 filter-policy { acl6-number |ipv6-prefix ipv6-prefix-name |route-policy route-policy-name }export [ protocol process-id ]
Optional
Do not filter theredistributed route bydefault.
Enable route leaking ipv6 import-route isisv6 level-2into level-1 [ filter-policy{ acl6-number | ipv6-prefixipv6-prefix-name | route-policyroute-policy-name } | tagtag-value ]*
Optional
Not enabled bydefault.
Define the maximumnumber of the loadbalance
ipv6 maximum load-balancingnumber
Optional
4 by default
Note:
The ipv6 filter-policy export command, usually used in combination with the ipv6
import-route command, filters the distributed route when advertising it to other routers.
If no protocol parameter is specified, all distributed protocols will be filtered.

8/3/2019 Best_IPv6 Routing Operation
http://slidepdf.com/reader/full/bestipv6-routing-operation 48/88
Operation Manual - IPv6 RoutingQuidway S3500-EA Series Ethernet Switches Chapter 4 IPv6-IS-IS Configuration
Huawei Technologies Proprietary
4-4
4.4 Displaying and Maintaining IPv6-IS-IS
To do… Use the command… Remarks
Display brief informationof IS-IS
display isis brief Available in any view
Display the status of thedebug switch
display isis debug-switchesprocess-id
Available in any view
Display information of theIS-IS enabled interface
display isis interface[ verbose ] [ process-id ]
Available in any view
Display information of theIS-IS license
display isis license Available in any view
Display the LSDB
information
display isis lsdb [ [ l1 | l2 |level-1 | level-2 ] | [ [ lsp-id
lsp-id | lsp-name lspname ] | local | verbose ]* [ process-id ]
Available in any view
Display the IS-IS meshgroup
display isis mesh-group[ process-id ]
Available in any view
Display the mapping tablebetween the host nameand system ID
display isis name-table[ process-id ]
Available in any view
Display information of theIS-IS peer
display isis peer [ verbose ][ process-id ]
Available in any view
Display the IS-IS routinginformation
display isis route ipv6
[ [ level-1 | level-2 ] |verbose ]* [ process-id ]
Available in any view
Display information of theSPF log
display isis spf-log[ process-id ]
Available in any view
Display statisticinformation of the IS-ISprocess
display isis statistics [ level-1 | level-2 | level-1-2 ][ process-id ]
Available in any view
Clear IS-IS configurationdata
reset isis all [ process-id ]Available in userview
Clear the IS-IS data
information of a neighbor
reset isis peer system-id
[ process-id ]
Available in user
view
4.5 IPv6-IS-IS Configuration Example
I. Network requirements
As shown in Figure 4-1, connect and enable IS-IS over IPv6 on Switch A, Switch B,
Switch C and Switch D within an autonomous system.

8/3/2019 Best_IPv6 Routing Operation
http://slidepdf.com/reader/full/bestipv6-routing-operation 49/88
Operation Manual - IPv6 RoutingQuidway S3500-EA Series Ethernet Switches Chapter 4 IPv6-IS-IS Configuration
Huawei Technologies Proprietary
4-5
Switch A and Switch B are Level-1 switches, Switch D is Level-2 switch, and Switch C is
a Level-1-2 switch connecting two areas. Switch A, Switch B, Switch C are in area 10,
while Switch D is in area 20.
II. Network diagram
SwitchBL1
SwitchCL1/2
SwitchDL2
Vlan-interfac e3002001:3::1/64
Vlan-interfac e300
2001:3::2/64
Vlan-interface1002001:1::2/64
Vlan-interfac e2002001:2::1/64
SwitchAL1
IS-ISArea10
Vlan-interface2002001:2::2/64
IS-ISArea20
Vlan-interfac e1002001:1::1/64
Vlan-interface3012001:4::1/64
SwitchBL1
SwitchCL1/2
SwitchDL2
Vlan-interfac e3002001:3::1/64
Vlan-interfac e300
2001:3::2/64
Vlan-interface1002001:1::2/64
Vlan-interfac e2002001:2::1/64
SwitchAL1
IS-ISArea10
Vlan-interface2002001:2::2/64
IS-ISArea20
Vlan-interfac e1002001:1::1/64
Vlan-interface3012001:4::1/64
Figure 4-1 Network diagram for IPv6-IS-IS basic configuration
III. Configuration procedure
1) Configure IPv6 address for each interface
Omitted
2) Configure basic IPv6-IS-IS functions
# Configure Switch A.
<SwitchA> system-view
[SwitchA] isis 1
[SwitchA-isis-1] is-level level-1
[SwitchA-isis-1] network-entity 10.0000.0000.0001.00
[SwitchA-isis-1] ipv6 enable
[SwitchA-isis-1] quit
[SwitchA] interface vlan-interface 100
[SwitchA-Vlan-interface100] isis ipv6 enable 1
[SwitchA-Vlan-interface100] quit
# Configure Switch B.
<SwitchB> system-view
[SwitchB] isis 1
[SwitchB-isis-1] is-level level-1
[SwitchB-isis-1] network-entity 10.0000.0000.0002.00
[SwitchB-isis-1] ipv6 enable
[SwitchB-isis-1] quit
[SwitchB] interface vlan-interface 200

8/3/2019 Best_IPv6 Routing Operation
http://slidepdf.com/reader/full/bestipv6-routing-operation 50/88
Operation Manual - IPv6 RoutingQuidway S3500-EA Series Ethernet Switches Chapter 4 IPv6-IS-IS Configuration
Huawei Technologies Proprietary
4-6
[SwitchB-Vlan-interface200] isis ipv6 enable 1
[SwitchB-Vlan-interface200] quit
# Configure Switch C.
<SwitchC> system-view
[SwitchC] isis 1
[SwitchC-isis-1] network-entity 10.0000.0000.0003.00
[SwitchC-isis-1] ipv6 enable
[SwitchC-isis-1] quit
[SwitchC] interface vlan-interface 100
[SwitchC-Vlan-interface100] isis ipv6 enable 1
[SwitchC-Vlan-interface100] quit
[SwitchC] interface vlan-interface 200
[SwitchC-Vlan-interface200] isis ipv6 enable 1
[SwitchC-Vlan-interface200] quit
[SwitchC] interface vlan-interface 300
[SwitchC-Vlan-interface300] isis ipv6 enable 1
[SwitchC-Vlan-interface300] quit
# Configure Switch D.
<SwitchD> system-view
[SwitchD] isis 1
[SwitchD-isis-1] is-level level-2
[SwitchD-isis-1] network-entity 20.0000.0000.0004.00
[SwitchD-isis-1] ipv6 enable
[SwitchD-isis-1] quit
[SwitchD] interface vlan-interface 300
[SwitchD-Vlan-interface300] isis ipv6 enable 1
[SwitchD-Vlan-interface300] quit
[SwitchD] interface vlan-interface 301
[SwitchD-Vlan-interface301] isis ipv6 enable 1
[SwitchD-Vlan-interface301] quit

8/3/2019 Best_IPv6 Routing Operation
http://slidepdf.com/reader/full/bestipv6-routing-operation 51/88
Operation Manual - IPv6 RoutingQuidway S3500-EA Series Ethernet Switches Chapter 5 IPv6-BGP4+ Configuration
Huawei Technologies Proprietary
5-1
Chapter 5 IPv6-BGP4+ Configuration
Note:
This chapter describes only configuration for BGP4+. For BGP-related information,
refer to the part covering BGP configuration in the IPv4 Routing module.
Verify that the system already operates in IPv4/IPv6 dual-stack mode before
configuring IPv6 routing.
All the IPv6 routing related configuration mentioned in this manual assumes that the
system already operates in IPv4/IPv6 dual-stack mode. For dual stack mode
configuration, see the part covering dual stack in the IPv6 Configuration module.
5.1 BGP4+ Overview
The traditional BGP-4 manages only IPv4 routing information, thus other network layer
protocols such as IPv6 are limited when traveling across ASs.
To support multiple network layer protocols, IETF extended BGP-4 by introducing
BGP4+ that is defined in RFC 2858 (Multiprotocol Extensions for BGP-4).
To implement IPv6 support, BGP4+ reflects IPv6 network layer information into
attributes of Network Layer Reachable Information (NLRI) and NEXT_HOP.
NLRI attribute of BGP4+ involves:
MP_REACH_NLRI: Multiprotocol Reachable NLRI, for advertisement of next hop
information of reachable routes.
MP_UNREACH_NLRI: Multiprotocol Unreachable NLRI, for withdrawal of
unreachable routes.
NEXT_HOP attribute of BGP4+ is identified by IPv6 address, which is an IPv6 unicast
address or local link address.
BGP4+ utilizes BGP multiprotocol extensions for application in IPv6 networks. The
original message and routing mechanism of BGP is not changed.

8/3/2019 Best_IPv6 Routing Operation
http://slidepdf.com/reader/full/bestipv6-routing-operation 52/88
Operation Manual - IPv6 RoutingQuidway S3500-EA Series Ethernet Switches Chapter 5 IPv6-BGP4+ Configuration
Huawei Technologies Proprietary
5-2
5.2 Configuration Task List
Task Description
Configuring an IPv6 Peer Required
Advertising a Local IPv6 Route Optional
Configuring a Preferred Value for RoutesReceived from a Peer/Peer Group
Optional
Specifying a Local Update Source Interface to a Peer/Peer Group
Optional
Configuring a Non Direct EBGP Connection to a Peer/Peer Group
Optional
Configuring Description for a Peer/Peer
Group
Optional
Establishing No Session to a Peer/PeerGroup
Optional
Configuring BGP4+ Basic Functions
Logging Session State and Event Information of a Peer/Peer Group
Optional
Configuring BGP4+ Route Redistribution Optional
Advertising Default Route to a Peer/PeerGroup
Optional
Configuring Route Distribution Policy Optional
Configuring Route Reception Policy Optional
Configuring BGP4+ and IGP RouteSynchronization
Optional
Controlling Route Distribution and Reception
Configuring Route Dampening Optional
Configuring BGP4+ Preference and Default LOCAL_PREF and NEXT_HOPAttributes
Optional
Configuring the MED Attribute Optional
Configuring BGP4+ Route Attributes
Configuring the AS_PATH Attribute Optional
Configuring BGP4+ Timers Optional
Configuring BGP4+ Soft Reset OptionalAdjusting and Optimizing BGP4+ Networks Configuring the Maximum Number of
Load-Balancing Routes Optional
Configuring BGP4+ Peer Group Optional
Configuring BGP4+ Community OptionalConfiguring a LargeScale BGP4+ Network
Configuring a BGP4+ Router Reflector Optional

8/3/2019 Best_IPv6 Routing Operation
http://slidepdf.com/reader/full/bestipv6-routing-operation 53/88
Operation Manual - IPv6 RoutingQuidway S3500-EA Series Ethernet Switches Chapter 5 IPv6-BGP4+ Configuration
Huawei Technologies Proprietary
5-3
5.3 Configuring BGP4+ Basic Functions
5.3.1 Prerequisites
Before configuring this task, you have
Specified IP addresses for interfaces.
Enabled IPv6 function.
You need to decide on:
Local AS number and Router ID
Peer IPv6 address and AS number
Source interface of updates
5.3.2 Configuring an IPv6 Peer
To configure an IPv6 peer, use the following commands:
To do… Use the command… Remarks
Enter system view system-view —
Enter BGP view bgp as-number Required
Not enabled by default
Specify a router ID router-id router-id
Optional
Required if no IPaddresses configured forLoopback interface andother interfaces
Enter IPv6 address familyview ipv6-family —
Specify an IPv6 peer andits AS number peer ipv6-address
as-number as-number Required
Not configured by default
5.3.3 Advertising a Local IPv6 Route
To advertise a local route into the routing table, use the following commands:
To do… Use the command… Remarks
Enter system view system-view —
Enter BGP view bgp as-number Required
Enter IPv6 address familyview ipv6-family —

8/3/2019 Best_IPv6 Routing Operation
http://slidepdf.com/reader/full/bestipv6-routing-operation 54/88
Operation Manual - IPv6 RoutingQuidway S3500-EA Series Ethernet Switches Chapter 5 IPv6-BGP4+ Configuration
Huawei Technologies Proprietary
5-4
To do… Use the command… Remarks
Advertise a local routeinto BGP4+ routing table
network ipv6-address prefix-length [ short-cut |route-policy route-policy-name ]
Required
Not advertised by default
5.3.4 Configuring a Preferred Value for Routes Received from a Peer/Peer
Group
To configure a preferred value for routes received from a peer/peer group, use the
following commands:
To do… Use the command… Remarks
Enter system view system-view —
Enter BGP view bgp as-number Required
Enter IPv6 address familyview ipv6-family —
Configure a preferredvalue for routes receivedfrom a peer/peer group
peer { ipv6-group-name | ipv6-address }preferred-value value
Optional
By default, the preferredvalue is 0.
5.3.5 Specifying a Local Update Source Interface to a Peer/Peer Group
To specify a local update source interface connected to a peer, use the following
commands:
To do… Use the command… Remarks
Enter system view system-view —
Enter BGP view bgp as-number Required
Enter IPv6 address family
view
ipv6-family —
Specify a local updatesource interfaceconnected to a peer
peer { ipv6-group-name | ipv6-address }connect-interface interface-type interface-number
Required
By default, the sourceinterface of the optimalupdates is used.

8/3/2019 Best_IPv6 Routing Operation
http://slidepdf.com/reader/full/bestipv6-routing-operation 55/88
Operation Manual - IPv6 RoutingQuidway S3500-EA Series Ethernet Switches Chapter 5 IPv6-BGP4+ Configuration
Huawei Technologies Proprietary
5-5
Note:
To improve stability and reliability, you can specify the local interface of a BGP4+
connection as loopback interface. By doing so, a connection failure upon redundancy
available will not affect BGP4+ connection.
5.3.6 Configuring a Non Direct EBGP Connection to a Peer/Peer Group
To configure an EBGP connection to a peer not directly connected, use the following
commands:
To do… Use the command… Remarks
Enter system view system-view —
Enter BGP view bgp as-number Required
Enter IPv6 address familyview
ipv6-family —
Configure a non directEBGP connection to apeer/peer group
peer { ipv6-group-name | ipv6-address }ebgp-max-hop [ hop-count ]
Required
Not configured bydefault
Caution:
In general, direct links should be available between EBGP peers. If not available, you
can use the peer ebgp-max-hop command to establish a multi-hop TCP connection in
between. However, you need not use this command for direct EBGP connection using
loopback interfaces.
5.3.7 Configuring Description for a Peer/Peer Group
To configure description for a peer/peer group, use the following commands:
To do… Use the command… Remarks
Enter system view system-view —
Enter BGP view bgp as-number Required
Enter IPv6 addressfamily view
ipv6-family —

8/3/2019 Best_IPv6 Routing Operation
http://slidepdf.com/reader/full/bestipv6-routing-operation 56/88
Operation Manual - IPv6 RoutingQuidway S3500-EA Series Ethernet Switches Chapter 5 IPv6-BGP4+ Configuration
Huawei Technologies Proprietary
5-6
To do… Use the command… Remarks
Configure description fora peer/peer group
peer { ipv6-group-name | ipv6-address } description description-text
Optional
Not configured by default
Note:
The peer group for which to configure description must have been created.
5.3.8 Establishing No Session to a Peer/Peer Group
To disable session establishment to a peer/peer group, use the following commands:
To do… Use the command… Remarks
Enter system view system-view —
Enter BGP view bgp as-number Required
Enter IPv6 address familyview
ipv6-family —
Disable sessionestablishment to apeer/peer group
peer { ipv6-group-name | ipv6-address } ignore
Optional
Not disabled by default
5.3.9 Logging Session State and Event Information of a Peer/Peer Group
To log on the session and event information of a peer/peer group, use the following
commands:
To do… Use the command… Remarks
Enter system view system-view —
Enter BGP view bgp as-number Required
Enable global logging log-peer-changeOptional
Enabled by default
Enter IPv6 address familyview
ipv6-family —
Enable to log session andevent information of apeer/peer group
peer { ipv6-group-name | ipv6-address }log-change
Optional
Enabled by default

8/3/2019 Best_IPv6 Routing Operation
http://slidepdf.com/reader/full/bestipv6-routing-operation 57/88
Operation Manual - IPv6 RoutingQuidway S3500-EA Series Ethernet Switches Chapter 5 IPv6-BGP4+ Configuration
Huawei Technologies Proprietary
5-7
Note:
Refer to BGP Commands in IPv4 Routing for information about the log-peer-change
command.
5.4 Controlling Route Distribution and Reception
The task includes routing information filtering, routing policy application and route
dampening.
5.4.1 Prerequisites
Before configuring this task, you have:
Enabled IPv6 function
Configured BGP4+ basic functions
You need to decide on:
ACL number
Routing policy names on both distribution and reception directions
Route dampening parameters: half-life, threshold values
5.4.2 Configuring BGP4+ Route Redistribution
To configure BGP4+ route redistribution and filtering, use the following commands:
To do… Use the command… Remarks
Enter system view system-view —
Enter BGP view bgp as-number Required
Enter IPv6 address familyview ipv6-family —
Enable to redistributedefault route into the
BGP4+ routing table
default-route imported Optional
Not enabled by default
Enable to redistributeroutes from other routingprotocols
import-route protocol [ process-id ] [ medmed-value | route-policy route-policy-name ]*
Required
Not enabled by default

8/3/2019 Best_IPv6 Routing Operation
http://slidepdf.com/reader/full/bestipv6-routing-operation 58/88
Operation Manual - IPv6 RoutingQuidway S3500-EA Series Ethernet Switches Chapter 5 IPv6-BGP4+ Configuration
Huawei Technologies Proprietary
5-8
Note:
If the default-route imported command is not configured, using the import-route
command cannot redistribute any IGP default route.
5.4.3 Advertising Default Route to a Peer/Peer Group
To advertise default route to a peer/peer group, use the following commands:
To do… Use the command… Remarks
Enter system view system-view —
Enter BGP view bgp as-number Required
Enter IPv6 address familyview ipv6-family —
Advertise a default routeto a peer/peer group
peer { ipv6-group-name | ipv6-address }default-route-advertise[ route-policy route-policy-name ]
Required
Not advertisedby default
Note:
With the peer default-route-advertise command used, the local router advertises a
default route with itself as the next hop to the specified peer/peer group, regardless of
whether the default route is available in the routing table.
5.4.4 Configuring Route Distribution Policy
To configure policies for route distribution, use the following commands:
To do… Use the command… Remarks
Enter system view system-view —
Enter BGP view bgp as-number Required
Enter IPv6 address familyview ipv6-family —
Filter advertised routes
filter-policy { acl6-number | ipv6-prefix ipv6-prefix-name } export [ protocol process-id ]
Required
Not filtered by default
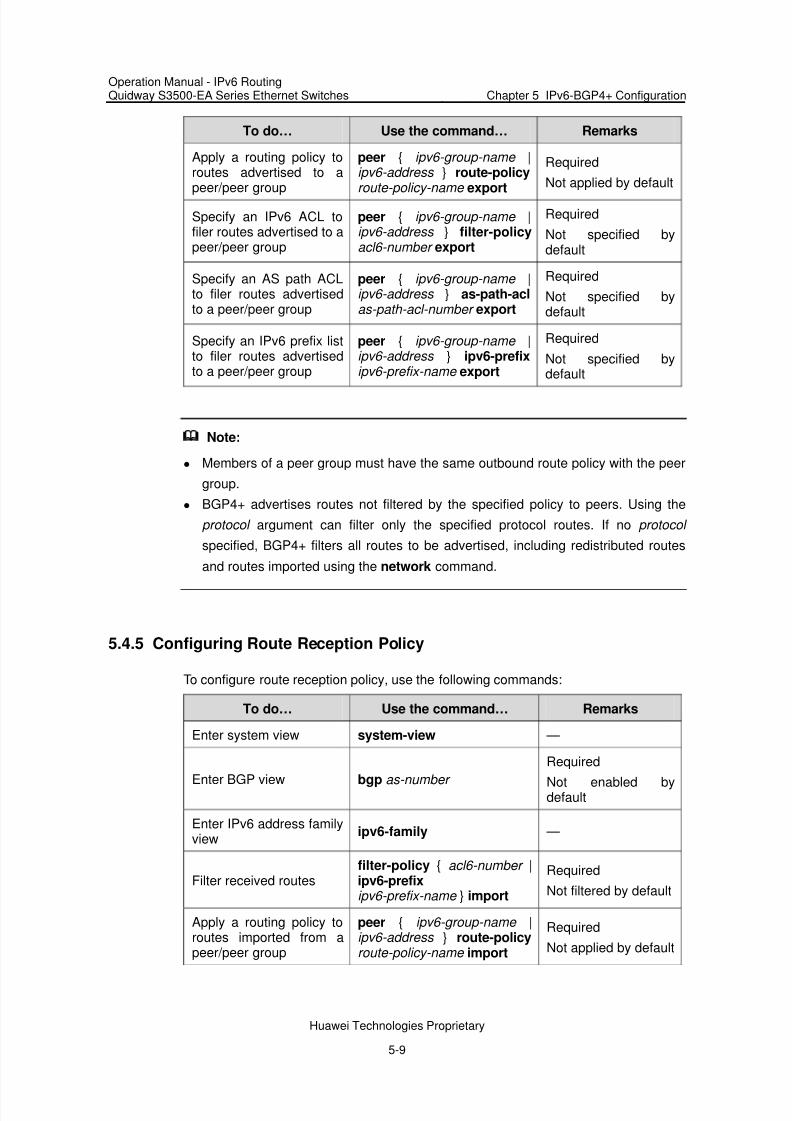
8/3/2019 Best_IPv6 Routing Operation
http://slidepdf.com/reader/full/bestipv6-routing-operation 59/88
Operation Manual - IPv6 RoutingQuidway S3500-EA Series Ethernet Switches Chapter 5 IPv6-BGP4+ Configuration
Huawei Technologies Proprietary
5-9
To do… Use the command… Remarks
Apply a routing policy toroutes advertised to apeer/peer group
peer { ipv6-group-name |ipv6-address } route-policy route-policy-name export
Required
Not applied by default
Specify an IPv6 ACL tofiler routes advertised to apeer/peer group
peer { ipv6-group-name |ipv6-address } filter-policy acl6-number export
Required
Not specified bydefault
Specify an AS path ACLto filer routes advertisedto a peer/peer group
peer { ipv6-group-name |ipv6-address } as-path-acl as-path-acl-number export
Required
Not specified bydefault
Specify an IPv6 prefix listto filer routes advertisedto a peer/peer group
peer { ipv6-group-name |ipv6-address } ipv6-prefix ipv6-prefix-name export
Required
Not specified bydefault
Note:
Members of a peer group must have the same outbound route policy with the peer
group.
BGP4+ advertises routes not filtered by the specified policy to peers. Using the
protocol argument can filter only the specified protocol routes. If no protocol
specified, BGP4+ filters all routes to be advertised, including redistributed routes
and routes imported using the network command.
5.4.5 Configuring Route Reception Policy
To configure route reception policy, use the following commands:
To do… Use the command… Remarks
Enter system view system-view —
Enter BGP view bgp as-number
Required
Not enabled bydefault
Enter IPv6 address familyview ipv6-family —
Filter received routesfilter-policy { acl6-number |ipv6-prefix ipv6-prefix-name } import
Required
Not filtered by default
Apply a routing policy toroutes imported from apeer/peer group
peer { ipv6-group-name |ipv6-address } route-policy route-policy-name import
Required
Not applied by default

8/3/2019 Best_IPv6 Routing Operation
http://slidepdf.com/reader/full/bestipv6-routing-operation 60/88
Operation Manual - IPv6 RoutingQuidway S3500-EA Series Ethernet Switches Chapter 5 IPv6-BGP4+ Configuration
Huawei Technologies Proprietary
5-10
To do… Use the command… Remarks
Specify an ACL to filterroutes imported from a
peer/peer group
peer { ipv6-group-name |ipv6-address } filter-policy
acl6-number import
Required
Not specified by
default
Specify an AS path ACLto filter routing informationimported from a peer/peergroup
peer { ipv6-group-name |ipv6-address } as-path-acl as-path-acl-number import
Required
Not specified bydefault
Specify an IPv6 prefix listto filter routing informationimported from a peer/peergroup
peer { ipv6-group-name |ipv6-address } ipv6-prefix ipv6-prefix-name import
Required
Not specified bydefault
Specify the upper limit ofaddress prefixes imported
from a peer/peer group
peer { ipv6-group-name | ipv6-address } route-limit
limit [ percentage ]
Optional
By default, no limit onprefixes
Note:
Only routes not filtered by the specified policy can be added into the local BGP4+
routing table.
Members of a peer group can have different inbound route policies.
5.4.6 Configuring BGP4+ and IGP Route Synchronization
With this feature enabled and when a non-BGP4+ router is responsible for forwarding
packets in an AS, BGP4+ speakers in the AS cannot advertise routing information to
outside ASs unless all routers in the AS know the latest routing information.
By default, when a BGP4+ router receives an IBGP route, it only checks the
reachability of the route’s next hop before advertisement. If the synchronization feature
is configured, only the IBGP route is advertised by IGP can the route be advertised to
EBGP peers.
To configure BGP4+ and IGP route synchronization, use the following commands:
To do… Use the command… Remarks
Enter system view system-view —
Enter BGP view bgp as-number Required
Enter IPv6 address familyview ipv6-family —
Enable routesynchronization between
BGP4+ and IGP
synchronizationRequired
Not enabled by default

8/3/2019 Best_IPv6 Routing Operation
http://slidepdf.com/reader/full/bestipv6-routing-operation 61/88
Operation Manual - IPv6 RoutingQuidway S3500-EA Series Ethernet Switches Chapter 5 IPv6-BGP4+ Configuration
Huawei Technologies Proprietary
5-11
5.4.7 Configuring Route Dampening
To configure BGP route dampening, use the following commands:
To do… Use the command… Remarks
Enter system view system-view —
Enter BGP view bgp as-number Required
Enter IPv6 address familyview ipv6-family —
Configure BGP4+ routedampening parameters
dampening [ half-life-reachable half-life-unreachable reuse suppress ceiling | route-policy route-policy-name ]*
Optional
Not configured bydefault
5.5 Configuring BGP4+ Route Attributes
This section describes how to use BGP4+ route attributes to modify BGP4+ routing
policy. These attributes are:
BGP4+ protocol preference
Default LOCAL_PREF attribute
MED attribute
NEXT_HOP attribute
AS_PATH attribute
5.5.1 Prerequisites
Before configuring this task, you have:
Enabled IPv6 function
Configured BGP4+ basic functions
5.5.2 Configuring BGP4+ Preference and Default LOCAL_PREF and
NEXT_HOP Attributes
To do so, use the following commands:
To do… Use the command… Remarks
Enter system view system-view —
Enter BGP view bgp as-number Required
Enter IPv6 address familyview
ipv6-family —

8/3/2019 Best_IPv6 Routing Operation
http://slidepdf.com/reader/full/bestipv6-routing-operation 62/88
Operation Manual - IPv6 RoutingQuidway S3500-EA Series Ethernet Switches Chapter 5 IPv6-BGP4+ Configuration
Huawei Technologies Proprietary
5-12
To do… Use the command… Remarks
Configure preferencevalues for BGP4+external, internal, localroutes
preference { external-preference internal-preference local-preference |route-policy route-policy-name }
Optional
The default preference
values of external, internaland local routes are 255,255, 130 respectively
Configure the defaultvalue for local preference
defaultlocal-preference value
Optional
The value defaults to 100
Advertise routes to apeer/peer group with thelocal router as the nexthop
peer { ipv6-group-name | ipv6-address }next-hop-local
Optional
By default, the feature isavailable for routesadvertised to the EBGPpeer/peer group, but not
available to the IBGPpeer/peer group
Note:
To make sure an IBGP peer can find the correct next hop, you can configure routes
advertised to the peer to use the local router as the next hop. If BGP load balancing
is configured, the local router sets the next hop of outbound routes for a peer/peer
group to itself regardless of whether the peer next-hop-local command is
configured.
In a special networking environment of third-party next hop (that is, a broadcast
network with two BGP4+ peers connected to the same network segment), by default,
the router does not use its own address as the next hop when advertising routes to
EBGP peers/peer groups; the router uses its own address as the next hop only after
the peer next-hop-local command is used.
5.5.3 Configuring the MED Attribute
To configure the MED attribute, use the following commands:
To do… Use the command… Remarks
Enter system view system-view —
Enter BGP view bgp as-number Required
Enter IPv6 address familyview
ipv6-family —
Configure a default MEDvalue
default med med-value Optional
Defaults to 0

8/3/2019 Best_IPv6 Routing Operation
http://slidepdf.com/reader/full/bestipv6-routing-operation 63/88
Operation Manual - IPv6 RoutingQuidway S3500-EA Series Ethernet Switches Chapter 5 IPv6-BGP4+ Configuration
Huawei Technologies Proprietary
5-13
To do… Use the command… Remarks
Enable to compare MEDvalues of routes fromdifferent EBGP peers
compare-different-as-med
Optional
Not enabled by default
Prioritize MED values ofroutes from each AS
bestroute compare-medOptional
Not configured by default
Prioritize MED values ofroutes from confederationpeers
bestroutemed-confederation
Optional
Not configured by default
5.5.4 Configuring the AS_PATH Attribute
To do so, use the following commands:
To do… Use the command… Remarks
Enter system view system-view —
Enter BGP view bgp as-number Required
Enter IPv6 address familyview
ipv6-family —
Allow local AS number inAS_PATH of routes froma peer/peer group
peer { ipv6-group-name |ipv6-address }allow-as-loop [ number ]
Optional
Not allowed by default
Specify a fake AS numberfor a peer/peer group
peer { ipv6-group-name |ipv6-address } fake-as as-number
Optional
Not specified by default
Neglect the AS_PATHattribute for best routeselection
bestrouteas-path-neglect
Optional
Not neglected by default
Configure to carry onlythe public AS number inupdates sent to apeer/peer group
peer { ipv6-group-name |ipv6-address }public-as-only
Optional
By default, BGP updatescarry private AS number
Substitute local ASnumber for the ASnumber of a peer/peergroup indicated in theAS_PATH attribute
peer { ipv6-group-name |ipv6-address }substitute-as
Optional
Not substituted by default
5.6 Adjusting and Optimizing BGP4+ Networks
This section describes configurations of BGP4+ timers, BGP4+ connection soft reset
and the maximum number of load balancing routes.

8/3/2019 Best_IPv6 Routing Operation
http://slidepdf.com/reader/full/bestipv6-routing-operation 64/88
Operation Manual - IPv6 RoutingQuidway S3500-EA Series Ethernet Switches Chapter 5 IPv6-BGP4+ Configuration
Huawei Technologies Proprietary
5-14
1) BGP4+ timers
After establishing a BGP4+ connection, two routers send keepalive messages
periodically to each other to keep the connection. If a router receives no keepalive
message from the peer after the holdtime elapses, it tears down the connection.
When establishing a BGP4+ connection, the two parties compare their holdtime values,
taking the shorter one as the common holdtime. If the holdtime is 0, neither keepalive
massage is sent, nor holdtime is checked.
2) BGP4+ connection soft reset
After modifying a route selection policy, you have to reset BGP4+ connections to make
the new one take effect, causing a short time disconnection. The current BGP4+
implementation supports the route-refresh feature that enables dynamic BGP4+
routing table refresh without needing to disconnect BGP4+ links.
With this feature enabled on all BGP4+ routers in a network, when a routing policy
modified on a router, the router advertises a route-refresh message to its peers, which
then send their routing information back to the router. Therefore, the local router can
perform dynamic routing information update and apply the new policy without tearing
down connections.
If a router not supporting route-refresh exists in the network, you need to configure the
peer keep-all-routes command on the router to save all route updates, and then use
the refresh bgp ipv6 command to soft-reset BGP4+ connections.
5.6.1 Prerequisites
Before configuring BGP4+ timers, you have:
Enabled IPv6 function
Configured BGP4+ basic functions
5.6.2 Configuring BGP4+ Timers
To do so, use the following commands:
To do… Use the command… Remarks
Enter system view system-view —
Enter BGP view bgp as-number Required
Enter IPv6 address familyview
ipv6-family —
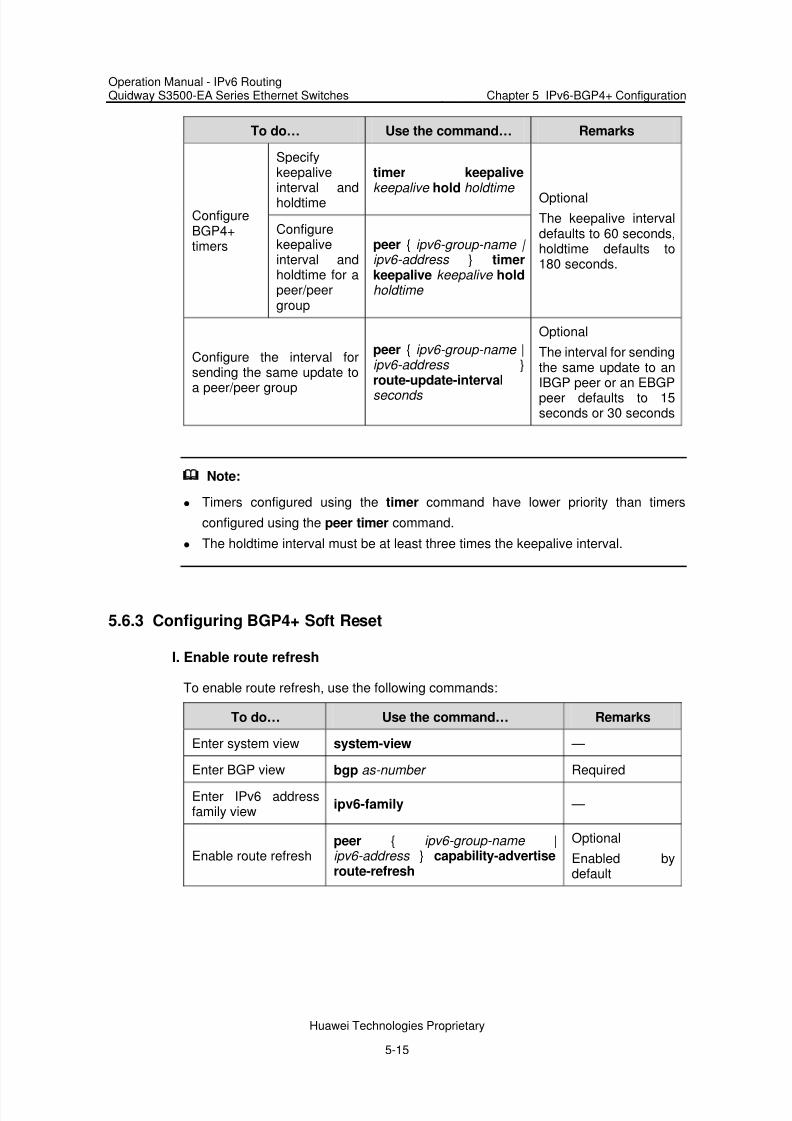
8/3/2019 Best_IPv6 Routing Operation
http://slidepdf.com/reader/full/bestipv6-routing-operation 65/88
Operation Manual - IPv6 RoutingQuidway S3500-EA Series Ethernet Switches Chapter 5 IPv6-BGP4+ Configuration
Huawei Technologies Proprietary
5-15
To do… Use the command… Remarks
Specifykeepaliveinterval andholdtime
timer keepalive keepalive hold holdtime
ConfigureBGP4+timers
Configurekeepaliveinterval andholdtime for apeer/peergroup
peer { ipv6-group-name | ipv6-address } timer keepalive keepalive holdholdtime
Optional
The keepalive intervaldefaults to 60 seconds,holdtime defaults to180 seconds.
Configure the interval forsending the same update to
a peer/peer group
peer { ipv6-group-name | ipv6-address }route-update-interval
seconds
Optional
The interval for sendingthe same update to anIBGP peer or an EBGPpeer defaults to 15seconds or 30 seconds
Note:
Timers configured using the timer command have lower priority than timers
configured using the peer timer command.
The holdtime interval must be at least three times the keepalive interval.
5.6.3 Configuring BGP4+ Soft Reset
I. Enable route refresh
To enable route refresh, use the following commands:
To do… Use the command… Remarks
Enter system view system-view —
Enter BGP view bgp as-number Required
Enter IPv6 addressfamily view
ipv6-family —
Enable route refreshpeer { ipv6-group-name |ipv6-address } capability-advertise route-refresh
Optional
Enabled bydefault

8/3/2019 Best_IPv6 Routing Operation
http://slidepdf.com/reader/full/bestipv6-routing-operation 66/88
Operation Manual - IPv6 RoutingQuidway S3500-EA Series Ethernet Switches Chapter 5 IPv6-BGP4+ Configuration
Huawei Technologies Proprietary
5-16
II. Perform manual soft-reset
To perform manual soft reset, use the following commands:
To do… Use the command… Remarks
Enter system view system-view —
Enter BGP view bgp as-number Required
Enter IPv6 address familyview
ipv6-family —
Save all routes from apeer/peer group, notletting them go throughthe inbound policy
peer { ipv6-group-name | ipv6-address }keep-all-routes
Optional
Not saved by default.
Return to user view return —
Soft-reset BGP4+connections manually
refresh bgp ipv6 { all |ipv6-address | group ipv6-group-name | external |internal } { export | import }
Required
Note:
If the peer keep-all-routes command is used, all routes from the peer/peer group will
be saved regardless of whether filtering policy available. These routes will be used to
generate BGP4+ routes after soft-reset is performed.
5.6.4 Configuring the Maximum Number of Load-Balancing Routes
To configure the maximum number of load balancing routes, use the following
commands:
To do… Use the command… Remarks
Enter system view system-view —
Enter BGP view bgp as-number Required
Enter IPv6 address familyview
ipv6-family —
Configure the maximumnumber of load balancingroutes
balance number
Required
By default, no loadbalancing is enabled.
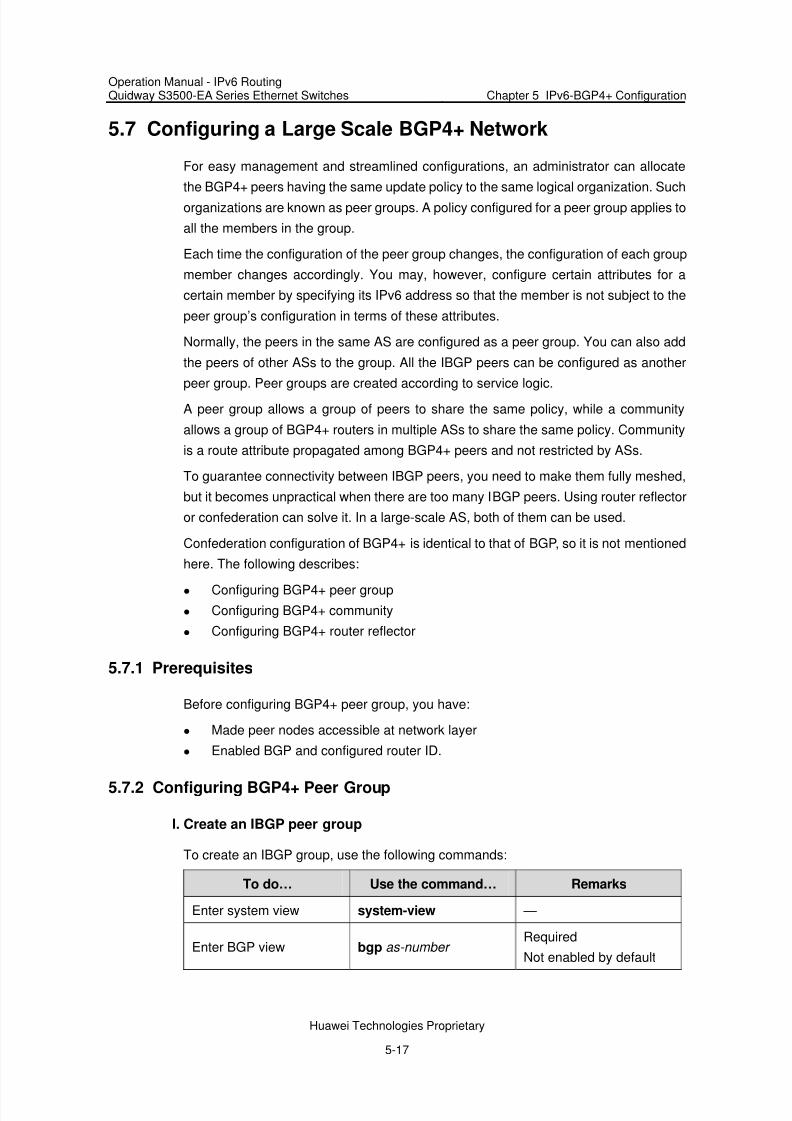
8/3/2019 Best_IPv6 Routing Operation
http://slidepdf.com/reader/full/bestipv6-routing-operation 67/88
Operation Manual - IPv6 RoutingQuidway S3500-EA Series Ethernet Switches Chapter 5 IPv6-BGP4+ Configuration
Huawei Technologies Proprietary
5-17
5.7 Configuring a Large Scale BGP4+ Network
For easy management and streamlined configurations, an administrator can allocate
the BGP4+ peers having the same update policy to the same logical organization. Such
organizations are known as peer groups. A policy configured for a peer group applies to
all the members in the group.
Each time the configuration of the peer group changes, the configuration of each group
member changes accordingly. You may, however, configure certain attributes for a
certain member by specifying its IPv6 address so that the member is not subject to the
peer group’s configuration in terms of these attributes.
Normally, the peers in the same AS are configured as a peer group. You can also add
the peers of other ASs to the group. All the IBGP peers can be configured as another
peer group. Peer groups are created according to service logic.
A peer group allows a group of peers to share the same policy, while a community
allows a group of BGP4+ routers in multiple ASs to share the same policy. Community
is a route attribute propagated among BGP4+ peers and not restricted by ASs.
To guarantee connectivity between IBGP peers, you need to make them fully meshed,
but it becomes unpractical when there are too many IBGP peers. Using router reflector
or confederation can solve it. In a large-scale AS, both of them can be used.
Confederation configuration of BGP4+ is identical to that of BGP, so it is not mentioned
here. The following describes:
Configuring BGP4+ peer group
Configuring BGP4+ community
Configuring BGP4+ router reflector
5.7.1 Prerequisites
Before configuring BGP4+ peer group, you have:
Made peer nodes accessible at network layer
Enabled BGP and configured router ID.
5.7.2 Configuring BGP4+ Peer Group
I. Create an IBGP peer group
To create an IBGP group, use the following commands:
To do… Use the command… Remarks
Enter system view system-view —
Enter BGP view bgp as-number Required
Not enabled by default

8/3/2019 Best_IPv6 Routing Operation
http://slidepdf.com/reader/full/bestipv6-routing-operation 68/88
Operation Manual - IPv6 RoutingQuidway S3500-EA Series Ethernet Switches Chapter 5 IPv6-BGP4+ Configuration
Huawei Technologies Proprietary
5-18
To do… Use the command… Remarks
Enter IPv6 address familyview ipv6-family —
Create an IBGP peergroup
group ipv6-group-name [ internal ]
Required
Add a peer into the grouppeer ipv6-address group ipv6-group-name [ as-number as-number ]
Required
Not added by default
II. Create a pure EBGP peer group
To configure a pure EBGP group, use the following commands:
To do… Use the command… Remarks
Enter system view system-view —
Enter BGP view bgp as-number Required
Not enabled by default
Enter IPv6 address familyview
ipv6-family —
Create an EBGP peergroup
group ipv6-group-name external
Required
Configure the AS number
for the peer group
peer ipv6-group-name
as-number as-number
Required
Not configured by default
Add an IPv6 peer into thepeer group
peer ipv6-address group ipv6-group-name
Required
Not added by default
Note:
To create a pure EBGP peer group, you need to specify the AS number for the peer
group.
If a peer was added into an EBGP peer group, you cannot specify any AS number
for the peer group.

8/3/2019 Best_IPv6 Routing Operation
http://slidepdf.com/reader/full/bestipv6-routing-operation 69/88
Operation Manual - IPv6 RoutingQuidway S3500-EA Series Ethernet Switches Chapter 5 IPv6-BGP4+ Configuration
Huawei Technologies Proprietary
5-19
III. Create a mixed EBGP peer group
To do so, use the following commands:
To do… Use the command… Remarks
Enter system view system-view —
Enter BGP view bgp as-number Required
Not enabled by default
Enter IPv6 address familyview
ipv6-family —
Create an EBGP peergroup
group ipv6-group-name external
Required
Specify the AS number of
an IPv6 peer
peer ipv6-address
as-number as-number
Required
Not specified by default
Add the IPv6 peer into thepeer group
peer ipv6-address group ipv6-group-name
Required
Not added by default
Note:
When creating a mixed EBGP peer group, you need to create a peer and specify its AS
number that can be different from AS numbers of other peers, but you cannot specify
any AS number for the EBGP peer group.
5.7.3 Configuring BGP4+ Community
I. Advertise community attribute to a peer/peer group
To do so, use the following commands:
To do… Use the command… Remarks
Enter system view system-view —
Enter BGP view bgp as-number Required
Not enabled by default
Enter IPv6 address familyview
ipv6-family —
Advertise communityattribute to a peer/peergroup
peer { ipv6-group-name | ipv6-address }advertise-community
Required
Not advertised by default

8/3/2019 Best_IPv6 Routing Operation
http://slidepdf.com/reader/full/bestipv6-routing-operation 70/88
Operation Manual - IPv6 RoutingQuidway S3500-EA Series Ethernet Switches Chapter 5 IPv6-BGP4+ Configuration
Huawei Technologies Proprietary
5-20
II. Apply a routing policy to routes advertised to a peer/peer group
To do so, use the following commands:
To do… Use the command… Remarks
Enter system view system-view —
Enter BGP view bgp as-number Required
Enter IPv6 address familyview
ipv6-family —
Apply a routing policy toroutes advertised to apeer/peer group
peer { ipv6-group-name |ipv6-address }route-policy route-policy-name export
Required
Not applied by default
Note:
When configuring BGP4+ community, you need to configure a routing policy to
define the community attribute, and apply the routing policy to route advertisement.
For routing policy configuration, refer to Chapter 6 Routing Policy Configuration .
5.7.4 Configuring a BGP4+ Router Reflector
To configure a BGP4+ router reflector, use the following commands:
To do… Use the command… Remarks
Enter system view system-view —
Enter BGP view bgp as-number Required
Enter IPv6 address familyview
ipv6-family —
Configure the router as arouter reflector and
specify a peer/peer groupas a client
peer { ipv6-group-name | ipv6-address }
reflect-client
Required
Not configured by default
Enable route reflectionbetween clients
reflect between-clients Optional
Enabled by default
Configure the cluster IDof the router reflector
reflector cluster-id cluster-id
Optional
By default, a routerreflector uses its router IDas the cluster ID

8/3/2019 Best_IPv6 Routing Operation
http://slidepdf.com/reader/full/bestipv6-routing-operation 71/88
Operation Manual - IPv6 RoutingQuidway S3500-EA Series Ethernet Switches Chapter 5 IPv6-BGP4+ Configuration
Huawei Technologies Proprietary
5-21
Note:
In general, it is not required to make clients of a router reflector fully meshed. The
router reflector forwards routing information between clients. If clients are fully
meshed, you can disable route reflection between clients to reduce metrics.
If a cluster has multiple router reflectors, you need to specify the same cluster ID for
these router reflectors to avoid routing loops.
5.8 Displaying and Maintaining BGP4+ Configuration
5.8.1 Displaying BGP
To do… Use the command… Remarks
Display peer groupinformation
display bgp ipv6 group[ ipv6-group-name ]
Display BGP4+advertised routinginformation
display bgp ipv6 network
Display AS pathinformation
display bgp ipv6 paths[ as-regular-expression ]
Display BGP peer
information
display bgp ipv6 peer [ ipv6-address { log-info | verbose } | ipv6-group-name log-info | verbose ]
Display BGP4+ routingtable information
display bgp ipv6 routing-table[ ipv6-address prefix-length ]
Display routinginformation matchedby a AS path ACL
display bgp ipv6 routing-tableas-path-acl as-path-acl-number
Display BGP4+community routinginformation
display bgp ipv6 routing-tablecommunity [ aa:nn <1-13> ][ no-advertise | no-export | no-export-subconfed ]*
[ whole-match ]
Display routinginformation matchedby a BGP4+community list
display bgp ipv6 routing-table community-list { basic-community-list-number [ whole-match ] |adv-community-list-number }&<1-16>
Display BGP4+dampened routinginformation
display bgp ipv6 routing-tabledampened
Display BGP4+dampening parameter
information
display bgp ipv6 routing-table
dampening parameter
Available inany view

8/3/2019 Best_IPv6 Routing Operation
http://slidepdf.com/reader/full/bestipv6-routing-operation 72/88
Operation Manual - IPv6 RoutingQuidway S3500-EA Series Ethernet Switches Chapter 5 IPv6-BGP4+ Configuration
Huawei Technologies Proprietary
5-22
To do… Use the command… Remarks
Display routinginformation originatedfrom different ASs
display bgp ipv6 routing-tabledifferent-origin-as
Display routing flapstatistics
display bgp ipv6 routing-tableflap-info [ regular-expression as-regular-expression | as-path-aclas-path-acl-number | network-address [ prefix-length [ longer-match ] ] ]
Display routinginformation sentto/received from a peer
display bgp ipv6 routing-table peeripv6-address { advertised-routes | received-routes } [ network-address prefix-length | statistic ]
Display routing
information matchedby a regularexpression
display bgp ipv6 routing-table
regular-expression as-regular-expression
Display BGP4+ routingstatistics
display bgp ipv6 routing-table statistic
5.8.2 Resetting BGP4+ Connections
To do… Use the command… Remarks
Reset all BGP4+ connections reset bgp ipv6 all
Reset the BGP4+ connectionto an AS
reset bgp ipv6 as-number
Reset the BGP4+ connectionto a peer
reset bgp ipv6 ipv6-address [ flap-info ]
Reset all EBGP connections reset bgp ipv6 external
Reset the BGP4+ connectionto a peer group
reset bgp ipv6 group ipv6-group-name
Reset all IBGP connections reset bgp ipv6 internal
Available in userview
5.8.3 Clearing BGP4+ Information
To do… Use the command… Remarks
Clear dampeningrouting informationand releasesuppressed routes
reset bgp ipv6 dampening[ ipv6-address prefix-length ]
Available in userview

8/3/2019 Best_IPv6 Routing Operation
http://slidepdf.com/reader/full/bestipv6-routing-operation 73/88
Operation Manual - IPv6 RoutingQuidway S3500-EA Series Ethernet Switches Chapter 5 IPv6-BGP4+ Configuration
Huawei Technologies Proprietary
5-23
To do… Use the command… Remarks
Clear route flapinformation
reset bgp ipv6 flap-info [ ipv6-address/prefix-length | regexpas-path-regexp | as-path-aclas-path-acl-number ]
5.9 BGP4+ Configuration Examples
Note:
Some BGP4+ configuration examples are similar to those of BGP4, so refer to BGP
Configuration in IPv4 Routing for related information.
5.9.1 BGP4+ Basic Configuration
I. Network requirements
In Figure 5-1 are all BGP4+ switches. Between Switch A and Switch B is an EBGP
connection. Switch B, Switch C and Switch D are IBGP fully meshed.
II. Network diagram
SwitchC
SwitchD
Vlan-interface100
9:1::1/64
Vlan-interface1009:1::2/64
Vlan-interface3009:3::2/64
AS 65009
Vlan-interface2009:2::1/64
SwitchB
SwitchA
Vlan-interface40010::2/64
Vlan-interface40010::1/64
AS 65008
Vlan-interface2009:2::2/64Vlan-interface300
9:3::1/64
Vlan-interface4018::1/64
Figure 5-1 BGP4+ basic configuration network diagram
III. Configuration procedure
1) Configure IPv6 addresses for interfaces (omitted)
2) Configure IBGP connections
# Configure Switch B.
<SwitchB> system-view

8/3/2019 Best_IPv6 Routing Operation
http://slidepdf.com/reader/full/bestipv6-routing-operation 74/88
Operation Manual - IPv6 RoutingQuidway S3500-EA Series Ethernet Switches Chapter 5 IPv6-BGP4+ Configuration
Huawei Technologies Proprietary
5-24
[SwitchB] ipv6
[SwitchB] bgp 65009
[SwitchB-bgp] router-id 2.2.2.2
[SwitchB-bgp] ipv6-family
[SwitchB-bgp-af-ipv6] peer 9:1::2 as-number 65009
[SwitchB-bgp-af-ipv6] peer 9:3::2 as-number 65009
[SwitchB-bgp-af-ipv6] quit
[SwitchB-bgp] quit
# Configure Switch C.
<SwitchC> system-view
[SwitchC] ipv6
[SwitchC] bgp 65009
[SwitchC-bgp] router-id 3.3.3.3
[SwitchC-bgp] ipv6-family
[SwitchC-bgp-af-ipv6] peer 9:3::1 as-number 65009
[SwitchC-bgp-af-ipv6] peer 9:2::2 as-number 65009
[SwitchC-bgp-af-ipv6] quit
[SwitchC-bgp] quit
# Configure Switch D.
<SwitchD> system-view
[SwitchD] ipv6
[SwitchD] bgp 65009
[SwitchD-bgp] router-id 4.4.4.4
[SwitchD-bgp] ipv6-family
[SwitchD-bgp-af-ipv6] peer 9:1::1 as-number 65009
[SwitchD-bgp-af-ipv6] peer 9:2::1 as-number 65009
[SwitchD-bgp-af-ipv6] quit
[SwitchD-bgp] quit
3) Configure the EBGP connection
# Configure Switch A.
<SwitchA> system-view
[SwitchA] ipv6
[SwitchA] bgp 65008
[SwitchA-bgp] router-id 1.1.1.1
[SwitchA-bgp] ipv6-family
[SwitchA-bgp-af-ipv6] peer 10::1 as-number 65009
[SwitchA-bgp-af-ipv6] quit
[SwitchA-bgp] quit
# Configure Switch B.
[SwitchB] bgp 65009

8/3/2019 Best_IPv6 Routing Operation
http://slidepdf.com/reader/full/bestipv6-routing-operation 75/88
Operation Manual - IPv6 RoutingQuidway S3500-EA Series Ethernet Switches Chapter 5 IPv6-BGP4+ Configuration
Huawei Technologies Proprietary
5-25
[SwitchB-bgp] ipv6-family
[SwitchB-bgp-af-ipv6] peer 10::2 as-number 65008
# Display IPv6 peer information on Switch B.
[SwitchB] display bgp ipv6 peer
BGP local router ID : 2.2.2.2
Local AS number : 65009
Total number of peers : 3 Peers in established state : 3
Peer V AS MsgRcvd MsgSent OutQ PrefRcv Up/Down State
10::2 4 65008 3 3 0 0 00:01:16 Established
9:3::2 4 65009 2 3 0 0 00:00:40 Established
9:1::2 4 65009 2 4 0 0 00:00:19 Established
# Display IPv6 peer information on Switch C.
[SwitchC] display bgp ipv6 peer
BGP local router ID : 3.3.3.3
Local AS number : 65009
Total number of peers : 2 Peers in established state : 2
Peer V AS MsgRcvd MsgSent OutQ PrefRcv Up/Down State
9:3::1 4 65009 4 4 0 0 00:02:18 Established
9:2::2 4 65009 4 5 0 0 00:01:52 Established
Switch A and B established an EBGP connection; Switch B, C and D established IBGP
connections with each other.
5.9.2 BGP4+ Router Reflector Configuration
I. Network requirements
Switch B receives an EBGP update and sends it to Switch C, which is configured as a
router reflector with two clients: Switch B and Switch D.
Switch B and Switch D need not establish an IBGP connection because Switch C
reflects updates between them.

8/3/2019 Best_IPv6 Routing Operation
http://slidepdf.com/reader/full/bestipv6-routing-operation 76/88
Operation Manual - IPv6 RoutingQuidway S3500-EA Series Ethernet Switches Chapter 5 IPv6-BGP4+ Configuration
Huawei Technologies Proprietary
5-26
II. Network diagram
RouteReflector
IBGPIBGP
AS200
SwitchC
Vlan-interface200100::1/96
Vlan-interface200100::2/96
Vlan-interface300101::2/96
Vlan-interface100102::2/96
Vlan-interface300101::1/96
Vlan-interface100102::1/96
Vlan-interface2011::1/64
SwitchA
AS100 SwitchB SwitchD
Figure 5-2 BGP4+ router reflector configuration network diagram
III. Configuration procedure
1) Configure IPv6 addresses for VLAN interfaces (omitted)
2) Configure BGP4+ basic functions
# Configure Switch A.
<SwitchA> system-view
[SwitchA] ipv6
[SwitchA] bgp 100
[SwitchA-bgp] router-id 1.1.1.1
[SwitchA-bgp] ipv6-family
[SwitchA-bgp-af-ipv6] peer 100::2 as-number 200
[SwitchA-bgp-af-ipv6] network 1:: 64
[SwitchA-bgp-af-ipv6] quit
#Configure Switch B.
<SwitchB> system-view
[SwitchB] ipv6
[SwitchB] bgp 200
[SwitchB-bgp] router-id 2.2.2.2
[SwitchB-bgp] ipv6-family
[SwitchB-bgp-af-ipv6] peer 100::1 as-number 100
[SwitchB-bgp-af-ipv6] peer 101::1 as-number 200
# Configure Switch C.
<SwitchC> system-view
[SwitchC] ipv6
[SwitchC] bgp 200
[SwitchC-bgp] router-id 3.3.3.3
[SwitchC-bgp] ipv6-family
[SwitchC-bgp-af-ipv6] peer 101::2 as-number 200
[SwitchC-bgp-af-ipv6] peer 102::2 as-number 200

8/3/2019 Best_IPv6 Routing Operation
http://slidepdf.com/reader/full/bestipv6-routing-operation 77/88
Operation Manual - IPv6 RoutingQuidway S3500-EA Series Ethernet Switches Chapter 5 IPv6-BGP4+ Configuration
Huawei Technologies Proprietary
5-27
# Configure Switch D.
<SwitchD> system-view
[SwitchD] ipv6
[SwitchD] bgp 200
[SwitchD-bgp] router-id 4.4.4.4
[SwitchD-bgp] ipv6-family
[SwitchD-bgp-af-ipv6] peer 102::1 as-number 200
3) Configure router reflector
# Configure Switch C as a router reflector, Switch B and Switch D as its clients.
[SwitchC-bgp-af-ipv6] peer 101::2 reflect-client
[SwitchC-bgp-af-ipv6] peer 102::2 reflect-client
Use the display bgp ipv6 routing-table command on Switch B and Switch D
respectively, you can find both of them have learned the network 1::/64.
5.10 Troubleshooting BGP4+ Configuration
5.10.1 No BGP4+ Peer Relationship Established
I. Symptom
Display BGP4+ peer information using the display bgp ipv6 peer command. The state
of the connection to the peer cannot become established.
II. Analysis
To become BGP4+ peers, any two routers need to establish a TCP session using port
179 and exchange open messages successfully.
III. Processing steps
1) Use the display current-configuration command to verify the peer’s AS number.
2) Use the display bgp ipv6 peer command to verify the peer’s IPv6 address.
3) If the loopback interface is used, check whether the peer connect-interface
command is configured.
4) If the peer is not directly connected, check whether the peer ebgp-max-hop
command is configured.
5) Check whether a route to the peer is available in the routing table.
6) Use the ping command to check connectivity.
7) Use the display tcp status command to check the TCP connection.
8) Check whether an ACL for disabling TCP port 179 is configured.

8/3/2019 Best_IPv6 Routing Operation
http://slidepdf.com/reader/full/bestipv6-routing-operation 78/88
Operation Manual - IPv6 RoutingQuidway S3500-EA Series Ethernet Switches Chapter 6 Routing Policy Configuration
Huawei Technologies Proprietary
6-1
Chapter 6 Routing Policy Configuration
Note:
Verify that the system already operates in IPv4/IPv6 dual-stack mode before
configuring IPv6 routing policy.
All the IPv6 routing policy related configuration mentioned in this manual assumes
that the system already operates in IPv4/IPv6 dual-stack mode. For dual stack
mode configuration, see the part covering dual stack in the IPv6 Configuration
module.
A routing policy is used on the router for route inspection, filtering, attributes modifying
when routes are received, advertised, or redistributed.
6.1 Introduction to Routing Policy
6.1.1 Routing Policy and Policy Routing
By modifying route attributes (including reachability), routing policy is adopted to
change routing path for network traffic.
When distributing or receiving routing information, a router can apply some policy to
filter routing information, for example, a router handles only routing information that
matches some rules, or a routing protocol redistributes from other protocols only routes
matching some rules and modifies some attributes of these routes to satisfy its needs.
To implement routing policy, first define the features of routing information, namely, a
set of matching rules. You can make definitions according to attributes in routing
information, such as destination address, advertising router’s address. The matching
rules can be set beforehand and then apply them to a routing policy for route
distribution, reception and redistribution.
6.1.2 Filters
Routing protocols can use five filters: ACL, IP prefix list, AS path, community-list and
route policy.
I. ACL
When defining an ACL, you can specify IP addresses and prefixes for matching
destinations or next hops of routing information.

8/3/2019 Best_IPv6 Routing Operation
http://slidepdf.com/reader/full/bestipv6-routing-operation 79/88
Operation Manual - IPv6 RoutingQuidway S3500-EA Series Ethernet Switches Chapter 6 Routing Policy Configuration
Huawei Technologies Proprietary
6-2
For ACL configuration, refer to ACL Operation manual .
II. IP prefix list
IP-prefix list plays a role similar to ACL, but it is more flexible than ACL and easier tounderstand. When IP-prefix list is applied for routing information filtering, its matching
object is the destination address information field of routing information.
An IP-prefix list is identified by the IP-prefix list name. Each IP-prefix list can comprise
multiple items, and each item, which is identified by an index number, can specify a
matching range in network prefix format. The index number indicates the matching
sequence in the IP-prefix list.
During matching, a router checks list items identified by index number in the ascending
order. If one item matched, the IP-prefix list filtering is passed, without needing to match
the next item.
III. AS-path ACL
AS-path ACL only applies to BGP4+. There is an AS-path field in the BGP4+ routing
information packets. As-path-acl specifies matching conditions according to the
AS-path field.
IV. Community list
The community list only applies to BGP4+. The BGP4+ routing information packet
contains a community attribute field to identify a community. Based on the community
attribute, the community-list specifies matching conditions.
V. Routing policy
A routing policy is used for matching some attributes in given routing information and
modifying the attributes of the information if matching conditions are satisfied. A routing
policy can utilize the above filters to define its own matching rules.
A routing policy can comprise multiple nodes, which are in logic OR relationship. Each
node is a matching unit, and the system checks nodes in the order of node sequence
number. Once the matching test of a node is passed, the route-policy is passed without
needing to match other nodes.
Each node comprises a set of if-match and apply clauses. The if-match clauses
define the matching rules. The matching objects are some attributes of routing
information. The different if-match clauses on the same node is in logic AND
relationship. Only when the matching conditions specified by all the if-match clauses
on a node are satisfied, can routing information passes the matching test of the node.
The apply clauses specify the actions performed after the node matching test passed,
concerning the attribute settings for the routing information.

8/3/2019 Best_IPv6 Routing Operation
http://slidepdf.com/reader/full/bestipv6-routing-operation 80/88
Operation Manual - IPv6 RoutingQuidway S3500-EA Series Ethernet Switches Chapter 6 Routing Policy Configuration
Huawei Technologies Proprietary
6-3
6.1.3 Routing Policy Application
Routing policy applies in two ways:
When redistributing routes from other routing protocols, a routing protocolredistributes only routes matching rules defined in a routing policy.
When receiving or advertising routing information, a routing protocol uses a
routing policy to filter routing information.
6.2 Defining Filtering Lists
6.2.1 Prerequisites
Before configuring this task, prepare the following data:
IP-prefix list name Matching address range
6.2.2 Defining an IPv6-prefix List
Identified by name, each IPv6 prefix list can comprise multiple items. Each item
specifies a matching address range in the form of network prefix, which is identified by
index number.
During matching, the system checks list items identified by index number in the
ascending order. If one item is matched, IP-prefix list filtering is passed, without
needing to match other items.
To define an IPv6 prefix list, use the following commands:
To do… Use the command… Remarks
Enter system view system-view —
Define an IPv6prefix list
ip ipv6-prefix ipv6-prefix-name [ indexindex-number ] { deny | permit } ipv6-address prefix-length [ greater-equal min-prefix-length ][ less-equal max-prefix-length ]
Required
Not defined bydefault
Note:
If all items are set to the deny mode, no route can pass the IPv6 prefix list. It is
recommended to define the permit :: 0 less-equal 128 item following multiple deny
mode items to allow other IPv6 routing information to pass.
For example, the following configuration filters routes 2000:1::/48, 2000:2::/48 and
2000:3::/48, but allows other routes to pass.

8/3/2019 Best_IPv6 Routing Operation
http://slidepdf.com/reader/full/bestipv6-routing-operation 81/88
Operation Manual - IPv6 RoutingQuidway S3500-EA Series Ethernet Switches Chapter 6 Routing Policy Configuration
Huawei Technologies Proprietary
6-4
<Sysname> system-view
[Sysname] ip ipv6-prefix abc index 10 deny 2000:1:: 48
[Sysname] ip ipv6-prefix abc index 20 deny 2000:2:: 48
[Sysname] ip ipv6-prefix abc index 30 deny 2000:3:: 48
[Sysname] ip ipv6-prefix abc index 40 permit :: 0 less-equal 128
6.2.3 Defining an AS Path ACL
You can define multiple items for an AS path ACL that is identified by its number. During
matching, the relation between items is logic OR, that is, if routing information matches
one of these items, it passes the AS path ACL.
To define an AS path ACL, use the following commands:
To do… Use the command… Remarks
Enter system view system-view —
Define an AS pathACL
ip as-path-aclas-path-acl-number { deny |permit } regular-expression
Required
Not defined by default
6.2.4 Defining a Community List
You can define multiple items for a community list that is identified by its number. During
matching, the relation between items is logic OR, that is, if routing information matchesone of these items, it passes the community list.
To define a community list, use the following commands:
To do… Use the command… Remarks
Enter system view system-view —
Define abasiccommunitylist
ip community-list basic-comm-list-num { deny |permit } [ community-number-list ][ internet | no-advertise | no-export| no-export-subconfed ]*
Define a
communitylist Define anadvancedcommunitylist
ip community-list adv-comm-filter-num { deny |permit } regular-expression
Required todefine either
Not defined bydefault
6.3 Configuring a Routing Policy
A routing policy is used to filter routing information according to some attributes, and
modify some attributes of the routing information that matches the routing policy.
Matching rules can be configured using filters above mentioned.

8/3/2019 Best_IPv6 Routing Operation
http://slidepdf.com/reader/full/bestipv6-routing-operation 82/88
Operation Manual - IPv6 RoutingQuidway S3500-EA Series Ethernet Switches Chapter 6 Routing Policy Configuration
Huawei Technologies Proprietary
6-5
A routing policy can comprise multiple nodes, each node contains:
if-match clauses: define the matching rules routing information must satisfy. The
matching objects are some attributes of routing information.
apply clauses: specifies the actions performed after specified matching rulessatisfied, concerning attribute settings for passed routing information.
6.3.1 Prerequisites
Before configuring this task, you have completed:
Filtering list configuration
Routing protocol configuration
You also need to decide on:
Name of routing policy, node sequence numbers Matching rules
Attributes to be modified
6.3.2 Creating a Routing Policy
To create a routing policy, use the following commands:
To do… Use the command… Remarks
Enter system view system-view —
Create a routingpolicy and enter itsview
route-policy route-policy-name { permit |deny } node node-number
RequiredNot created by default
Note:
If a node is specified as permit, routing information meeting the node’s conditions
will be handled using the apply clauses of this node, without needing to match the
next node. If routing information does not meet the node’s conditions, it will go to the
next node for matching.
If a node is specified as deny, the apply clauses of the node will not be executed.When routing information meets all if-match clauses, it cannot pass the node, nor
can it go to the next node. If route information cannot meet any if-match clause of
the node, it will go to the next node for matching.
When a routing policy is defined with more than one node, at least one node should
be configured using the permit keyword. If the routing policy is used to filter routing
information, routing information that does not meet any node’s conditions cannot
pass the routing policy. If all nodes of the routing policy are set using the deny
keyword, no routing information can pass it.

8/3/2019 Best_IPv6 Routing Operation
http://slidepdf.com/reader/full/bestipv6-routing-operation 83/88
Operation Manual - IPv6 RoutingQuidway S3500-EA Series Ethernet Switches Chapter 6 Routing Policy Configuration
Huawei Technologies Proprietary
6-6
6.3.3 Defining if-match Clauses for the Routing Policy
To define if-match clauses for a route-policy, use the following command:
To do… Use the command… Remarks
Enter system view system-view —
Enter routing policy view route-policy route-policy-name { permit |deny } node node-number
Required
Set conditions to matchIPv6 routing information
if-match ipv6 { address |next-hop | route-source }{ acl acl-number | prefix-list ipv6-prefix-name }
Optional
Not configured bydefault
Set conditions to match
AS path field of BGP4+routing information
if-match as-path as-path-acl-number &<1-16>
Optional
Not configured bydefault
Match communityattribute of BGP4+ routinginformation
if-match community { basic-community-list-number [ whole-match ] |adv-community-list-number }&<1-16>
Optional
Not configured bydefault
Match route cost ofrouting information
if-match cost value
Optional
Not configured bydefault
Match outbound interfaceof routing information
if-match interface{ interface-type interface-number }&<1-16>
OptionalNot configured bydefault
Match types of routes
if-match route-type { internal | external-type1 |external-type2 |external-type1or2 |is-is-level-1 | is-is-level-2 |nssa-external-type1 |nssa-external-type2 |nssa-external-type1or2 }*
Optional
Not configured bydefault
Configure the matchingcondition for the tag fieldof the routing information
if-match tag value OptionalNot configured bydefault

8/3/2019 Best_IPv6 Routing Operation
http://slidepdf.com/reader/full/bestipv6-routing-operation 84/88
Operation Manual - IPv6 RoutingQuidway S3500-EA Series Ethernet Switches Chapter 6 Routing Policy Configuration
Huawei Technologies Proprietary
6-7
Note:
The if-match clauses of a route-policy are in logic AND relationship, namely, routing
information has to satisfy all if-match clauses before executed with apply clauses.
You can specify no or multiple if-match clauses for a routing policy. If no if-match
clause is specified, and the routing policy is in permit mode, all routing information
can pass the node, or in deny mode, no routing information can pass.
6.3.4 Defining apply Clauses for the Routing Policy
To define apply clauses for a route-policy, use the following command:
To do… Use the command… RemarksEnter system view system-view —
Create a routingpolicy and enter itsview
route-policy route-policy-name { permit | deny } node node-number
Required
Not created by default
Set AS_PATH ofBGP4+ routinginformation
apply as-pathas-number &<1-10> [ replace ]
Optional
Not set by default
Specify acommunity list
according to whichto delete communityattributes of BGP4+routing information
apply comm-list comm-list-number delete
Optional
Not configured by default
Set communityattribute of BGP4+routing information
apply community { none |additive | { community-number &<1-16> |aa:nn &<1-16> |no-export-subconfed | no-export | no-advertise }*[ additive ] }
Optional
Not set by default
Set the cost ofrouting information apply cost [ + | - ] value
Optional
Not set by default
Set the cost type ofrouting information
apply cost-type { external |internal | type-1 | type-2 }
Optional
Not set by default
Set the next hop
for IPv6 routinginformation
apply ipv6 next-hop ipv6-address
Optional
Not set by default
Redistribute routesto a specified ISISlevel
apply isis { level-1 | level-1-2 |level-2 }
Optional
Not configured by default
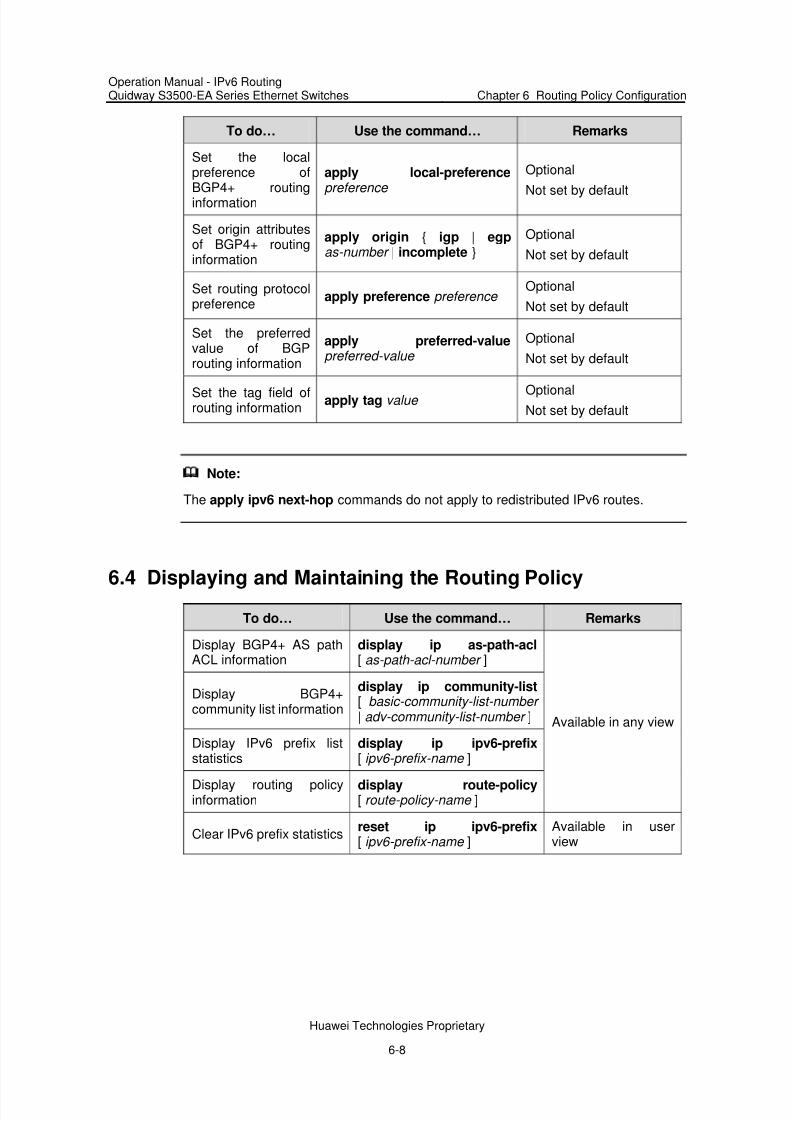
8/3/2019 Best_IPv6 Routing Operation
http://slidepdf.com/reader/full/bestipv6-routing-operation 85/88
Operation Manual - IPv6 RoutingQuidway S3500-EA Series Ethernet Switches Chapter 6 Routing Policy Configuration
Huawei Technologies Proprietary
6-8
To do… Use the command… Remarks
Set the localpreference ofBGP4+ routinginformation
apply local-preference preference
Optional
Not set by default
Set origin attributesof BGP4+ routinginformation
apply origin { igp | egp as-number | incomplete }
Optional
Not set by default
Set routing protocolpreference
apply preference preference Optional
Not set by default
Set the preferredvalue of BGProuting information
apply preferred-value preferred-value
Optional
Not set by default
Set the tag field ofrouting information
apply tag value OptionalNot set by default
Note:
The apply ipv6 next-hop commands do not apply to redistributed IPv6 routes.
6.4 Displaying and Maintaining the Routing Policy
To do… Use the command… Remarks
Display BGP4+ AS pathACL information
display ip as-path-acl [ as-path-acl-number ]
Display BGP4+community list information
display ip community-list [ basic-community-list-number | adv-community-list-number ]
Display IPv6 prefix liststatistics
display ip ipv6-prefix [ ipv6-prefix-name ]
Display routing policyinformation
display route-policy [ route-policy-name ]
Available in any view
Clear IPv6 prefix statisticsreset ip ipv6-prefix[ ipv6-prefix-name ]
Available in userview

8/3/2019 Best_IPv6 Routing Operation
http://slidepdf.com/reader/full/bestipv6-routing-operation 86/88
Operation Manual - IPv6 RoutingQuidway S3500-EA Series Ethernet Switches Chapter 6 Routing Policy Configuration
Huawei Technologies Proprietary
6-9
6.5 Routing Policy Configuration Example
6.5.1 Applying Routing Policy When Redistributing IPv6 Routes
I. Network requirements
Enable RIPng and configure three static routes on Switch A.
Apply a routing policy when redistributing static routes, making routes in 20::0/32
and 40::0/32 pass, routes in 30::0/32 filtered.
Display RIPng routing table information on Switch B to verify the configuration.
II. Network diagram
20::/3230::/32
SwitchA
Vlan-interface10010::2/32
SwitchB
40::/32 Vlan-interface10010::1/32
Vlan-interface200
11::1/32
Figure 6-1 Network diagram for routing policy application to route redistribution
III. Configuration procedure
1) Configure Switch A.
# Configure IPv6 addresses for Vlan-interface 100 and Vlan-interface 200.
<SwitchA> system-view
[SwitchA] ipv6
[SwitchA] interface vlan-interface 100
[SwitchA-Vlan-interface100] ipv6 address 10::1 32
[SwitchA-Vlan-interface100] quit
[SwitchA] interface vlan-interface 200
[SwitchA-Vlan-interface200] ipv6 address 11::1 32
[SwitchA-Vlan-interface200] quit
# Enable RIPng on Vlan-interface 100.
[SwitchA] interface vlan-interface 100
[SwitchA-Vlan-interface100] ripng 1 enable
[SwitchA-Vlan-interface100] quit
# Configure three static routes.
[SwitchA] ipv6 route-static 20:: 32 11::2
[SwitchA] ipv6 route-static 30:: 32 11::2
[SwitchA] ipv6 route-static 40:: 32 11::2
# Configure routing policy.
[SwitchA] ip ipv6-prefix a index 10 permit 30:: 32
[SwitchA] route-policy static2ripng deny node 0

8/3/2019 Best_IPv6 Routing Operation
http://slidepdf.com/reader/full/bestipv6-routing-operation 87/88
Operation Manual - IPv6 RoutingQuidway S3500-EA Series Ethernet Switches Chapter 6 Routing Policy Configuration
Huawei Technologies Proprietary
6-10
[SwitchA-route-policy] if-match ipv6 address prefix-list a
[SwitchA-route-policy] quit
[SwitchA] route-policy static2ripng permit node 10
[SwitchA-route-policy] quit
# Enable RIPng and redistribute static routes.
[SwitchA] ripng
[SwitchA-ripng-1] import-route static route-policy static2ripng
2) Configure Switch B.
# Configure the IPv6 address for Vlan-interface 100.
[SwitchB] ipv6
[SwitchB] interface vlan-interface 100
[SwitchB-Vlan-interface100] ipv6 address 10::2 32
# Enable RIPng on Vlan-interface 100.
[SwitchB-Vlan-interface100] ripng 1 enable
[SwitchB-Vlan-interface100] quit
# Enable RIPng.
[SwitchB] ripng
# Display RIPng routing table information.
[SwitchB-ripng-1] display ripng 1 route
Route Flags: A - Aging, S - Suppressed, G - Garbage-collect
----------------------------------------------------------------
Peer FE80::7D58:0:CA03:1 on Vlan-interface 100
Dest 10::/32,
via FE80::7D58:0:CA03:1, cost 1, tag 0, A, 18 Sec
Dest 20::/32,
via FE80::7D58:0:CA03:1, cost 1, tag 0, A, 8 Sec
Dest 40::/32,
via FE80::7D58:0:CA03:1, cost 1, tag 0, A, 3 Sec
6.6 Troubleshooting Routing Policy Configuration
6.6.1 IPv6 Routing Information Filtering Failed
I. Symptom
Filtering routing information failed, while routing protocol runs normally.
II. Analysis
At least one item of the IPv6 prefix list should be configured as permit mode, and at
least one node of the Route-policy should be configured as permit mode.

8/3/2019 Best_IPv6 Routing Operation
http://slidepdf.com/reader/full/bestipv6-routing-operation 88/88
Operation Manual - IPv6 RoutingQuidway S3500-EA Series Ethernet Switches Chapter 6 Routing Policy Configuration
III. Processing procedure
1) Use the display ip ipv6-prefix command to display IP prefix list.
2) Use the display route-policy command to display route policy information.