Best Barns USA Assembly Book - kitsuperstore.com
20
This manual is copyrighted. Under the copyright laws, this manual may not be copied, in whole or in part, without consent from Reynolds Building Systems, Inc. © Copyright 2011 the Denver 12' x 20' Revised July 15, 2021 Assembly Book Best Barns USA Manufactured by Reynolds Building Systems, Inc. 205 Arlington Drive Greenville, PA 16125
Transcript of Best Barns USA Assembly Book - kitsuperstore.com

This manual is copyrighted. Under the copyright laws, this manualmay not be copied, in whole or in part, without consent from ReynoldsBuilding Systems, Inc. © Copyright 2011
the Denver 12' x 20'
Revised July 15, 2021Assembly Book
Best Barns USA
Manufactured by Reynolds Building Systems, Inc.205 Arlington Drive Greenville, PA 16125

When measurements are given for a boardlength or width, it is from the longest side.
measure from here
Tool List Hammer & Hand SawFraming Square & LevelPower Circular Saw
Power Drill/screwdriverMeasuring Tape2-8' Step Ladders
Always wear safety glasses when cutting or nailing!
IMPORTANT INFORMATION ABOUT YOUR SHED KIT
To identify which edge we want you to use,we will refer to the edge as either the 'LAP'Edge or the Tongue Edge.
Tongue Edge
LAP Edge
Download the most current instruction book at www.barnkits.com; use the "manuals"link on the menu bar and then select your building kit and size.
Thank you for purchasing our shed kit. Read the instructions before starting the assemblyof the building. If you have any questions about assembling the kit, call 800-245-1577.Business hours (8:00-5:00 ET) Monday thru Friday. After business hours call 724-866- 4357.or email to [email protected].
The material that is included in our kit is listed on the back page. The optional floor package,if purchased, will be supplied by a local lumber supplier.
Our kit does not include the shingles, the quantity needed is listed on the back page. Thesiding is primed. You will need to apply a finish coat using latex acrylic paint.
Some of the framing lumber was used in the shipping pallet. Unpack the material from thepallets. Unscrew the OSB panels and the 2x4s from the shipping pallet. The 2x4s will beused for wall bracing and to support the loft beams. The bit for the screws is packed in thehardware bag.
Most buildings are installed on a wood floor and the siding was designed to extend over thewood flooring. If the foundation is a concrete floor cut the siding flush with the bottom ofthe wall plate to prevent the concrete from contacting the siding.
Stacking the boards, according to size, will make them easier to find when needed. Do Notdiscard any material until your building is complete.
Before you begin construction, be sure to study this assembly manual. Also, obtain a buildingpermit and check all pertinent building code regulations for your area.
Thank you for your purchase.

1. Stagger the 4x4 timbers as shown below. Cut (2) two 2x4- 8' boards into 2' long blocksto secure the 4x4s where they butt together.
Assembly Instructions forRear Floor Section
4. Install the floor joists cut above between the 8' joist headers. Secure with 16d galv. deck nails.5. Place floor assembly over the 4x4s. Square floor assembly. Measure the floor diagonally
(corner to corner) and then the opposite corners; these measurements will be the same whenthe floor is square. Toenail frame (headers & joists) to the 4x4 runners.
2. Cut (2) two 2x4-8' to a length of 8' -0". Theywill be used for the joist headers. Layout, fromleft, for 16" on center joist spacing. 'X' markswhere floor joist will be placed.
6. Cut (2) two 2x4-12' to a length of 12' -0". Layoutfor 16" joist spacing, See above.
7. Install floor joists between the joist headers. Squarethe floor section and install against the sectionassembled above. Toenail to the 4x4s runners.
8. Install 4x8 flooring over the 2x4s. Use 8d galv.spiral nails spaced 8" apart.
Material Description 12' x 20'2x4 Treated Blocking 2 pcs. 8'2x4 PT Joist Headers 2 pcs. 8'2x4 PT Joist Headers 2 pcs. 12'2x4 PT Floor Joist 17 pcs. 12'4x4 Treated Runners 4 pcs. 8'4x4 Treated Runners 4 pcs. 12'Flooring 5/8" or 3/4" 8 pcs. 4x8Galv Spiral Floor Nails 3 lb. 8dGalvanized Deck Nails 5 lb. 16d
Foundation size is 12'-0" x 20'-0". Check local building codes in your area, the construction mayhave to change. For a concrete slab, install sill sealer as a moisture barrier between the concreteand the wall plates. Foam sill sealer can be purchased at home centers in rolls 3-1/2" or wider.
Constructing Details for Deluxe Floor SystemDeluxe floors include 4x4 runners, standard floors do not.
3. Cut (17) seventeen 2x4-12' treated boards to 11' -9". These will be the floor joists. Treatedlumber may be thicker than 1-1/2". Take this into account when cutting the length of floorjoists. Shorten joist measurements if necessary to obtain 12'-0" building width.
X X X XX X X X
XX
15-1/4" 16" 16"
4x4-8' TreatedRunner
4x8 Flooring
2x4-8' Joist Header
4x4-12' TreatedRunner
4x4-8' Runner
4x4-12' Runner
4x4-12' Runner
Front Floor Section
: :: : ::
::
::
::
:

72" long 2x4
3/4" Plywood Gusset
Set these trusses aside. DO NOT use trusses for assembling the roof gables.
Step 1 Assemble Trusses
32" Top Gusset
3. Position a Gable Plate on the floor. Use 2x4 blocks to hold the 2x4 plate straight.4. Position (2) two truss halves (2x4s connected with a metal plate) with the short legs against
the 2x4 Gable Plate. DO NOT attach the Gable Plate Assembly to the truss. It is temporarilyused to help hold the 2x4 truss parts in place and will be used in a later step.
5. Secure 2x4 blocks around the perimeter of truss to hold truss parts in place.
Truss Half
Metal Plate
1. Butt (2) two 72" long 2x4s together and secure them by nailing a 3-1/2" x 42-3/4" longplywood gusset across the top where they butt together. Use glue and 6d common nails.Install the gusset with the center line lined up where the 2x4 meet.
Temporarily screw 2x4 blocks to the floor to insure that all the trusses are assembledthe same. Short 2x4s, that may have an angle on one end, are supplied in the kit.
6. Secure the 2x4s at the peak with a 12" x 32" wood gusset. Apply wood glue betweenthe gusset and truss and nail with (25) twenty-five 6d common nails.
7. Turn the truss over and install a gusset to the other side of the truss.8. Repeat this process to assemble (8) eight more trusses.
2. Repeat to assemble another Gable Plate.
2x4 Block
Gable Plate
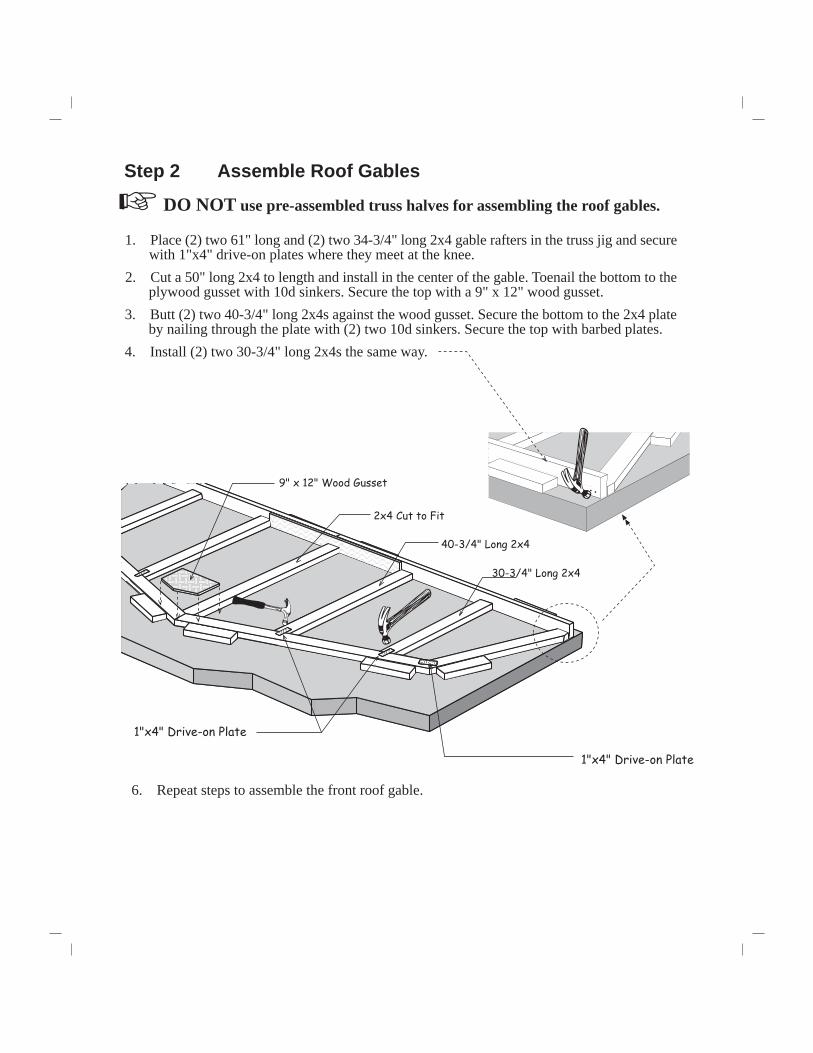
6. Repeat steps to assemble the front roof gable.
:
DO NOT use pre-assembled truss halves for assembling the roof gables.
1. Place (2) two 61" long and (2) two 34-3/4" long 2x4 gable rafters in the truss jig and securewith 1"x4" drive-on plates where they meet at the knee.
2. Cut a 50" long 2x4 to length and install in the center of the gable. Toenail the bottom to theplywood gusset with 10d sinkers. Secure the top with a 9" x 12" wood gusset.
3. Butt (2) two 40-3/4" long 2x4s against the wood gusset. Secure the bottom to the 2x4 plateby nailing through the plate with (2) two 10d sinkers. Secure the top with barbed plates.
4. Install (2) two 30-3/4" long 2x4s the same way.
1"x4" Drive-on Plate
Step 2 Assemble Roof Gables
30-3/4" Long 2x4
2x4 Cut to Fit
40-3/4" Long 2x4
9" x 12" Wood Gusset
1"x4" Drive-on Plate

X X XX
Butt (2) two 68-1/2" boards together. Center a 2x4-6' board (used as door spacer) on top and screwthe boards together using (4) four 2-1/2" wood screws. Mark stud spacing as shown below.
19-3/4"
32-1/2"
2x4 - 68-1/2" Boards
2x4 - 6' Board (Door Spacer)
19-3/4"
Step 4 Assemble Door Header & Bottom Wall Plate
75" Long 2x6
OSB Filler
Assemble door header using (2) two 75" long 2x6 boards and a 75" OSB fillerpanel. Apply wood glue between OSB and boards. Nail header together with10d sinkers. Use (12) twelve nails on each side.
Step 3 Apply Siding and Trim to Roof Gables1. Remove 2x4 blocks and turn the gable frame over.2. Install pre-cut siding on rear gable. Bottom of siding extends 3/4" below the gable plate.
Use 6d galv. nails spaced 12" apart.
Blue Marks on End
Siding Extends3/4" Below Plate
3. Install (2) two 61" long 1x4 gable trim flush with the top edge of the gable. Install theends with blue marks together. Install trim with 6d galv. nails.
5. Install trim on the front gable.
4. Install (2) two 42-1/2" long1x4 gable trim flush with theside edge of the gable.
Note: Gable siding may need to be appliedfrom right to left on one of the gables so the'LAP' edge will lap over the 'Tongue' edgeon the adjoining siding panel.
2x4-6' Door Spacer
!
!Check measurements. Theyshould be the same or thedoor opening will not be square!
!
!
Siding Extends 3/4" Below Plate
Cut the siding flush with the bottom plate if installing on a cement slab.
Step 5 Assemble Front Wall
2x6 Door Header
Siding 3/4"Below Header
Cut Edge
Tongue Edge
Cut Edge
Butt Square EdgesTogether
5. Locate a 12" siding panel that has a 'LAP' edge. Position the 'cut' edge flush with the left sideof the door opening. Do not nail the 'LAP' edge until the other siding is applied. Siding shouldextend 3/4" below the bottom plate. Use 6d galv. nails spaced 8" apart.
6. Select the 24" wide siding panel, with the 'tongue edge', and install this siding panel at the leftend of the wall frame as shown below.
7. Install (2) two 7-3/4" pre-cut siding panels over the door opening, flush with the top plate.8. Install a 12-34" siding panel with the 'cut' edge flush with the side of the door opening.9. Install the last siding panel. It will extend 3-1/2" beyond the 2x4 wall frame.
LAP Edge
LAP Edge
12" Siding Panel 12-3/4"Siding PanelSiding Extends 3-1/2"
Past 2x4 Frame
Wall Studs with DoorJacks Attached
68-1/2" Top Plate
2x4 Bottom Plate w/ Door Spacer
2 68-1/2" Wall Plates4 80-1/4' Wall Studs2 80-1/4' Wall Studs
w/ door jacks attached1 Door Header from Step 41 Bottom Plate from Step 4
Material List
1. Gather the material listed below to assemble the door wall.2. Install (4) four 80-1/4" wall studs over the 'X' marks.3. Install the wall studs with
the door jacks on each sideof the door spacer.
4. Install door header on thedoor jacks.
!

Cut the siding flush with thebottom plate if installing thebuilding on a concrete slab.
A BXX
XX
X XX X
XXC
72" Wall Plate
48" Wall Plate
::
: :: : :
.
.
.
Step 6A Assemble 10' Side Walls
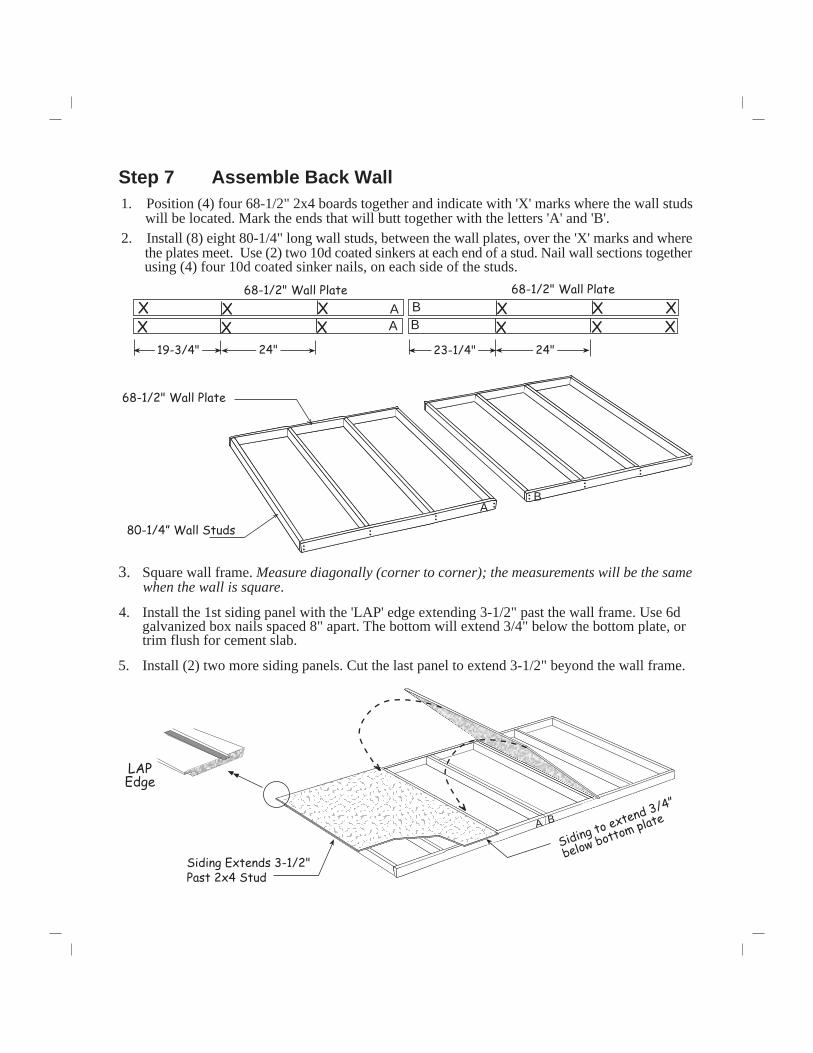
4. Square wall frame. Measure diagonally (corner to corner); the measurements will be the samewhen the wall is square.
5. Cut one of the 48" wide siding panels in half lengthways. Select the half, with the 'tongue'edge, and install this panel with the 'cut' edge flush with the end of the wall and extending 3/4"below the bottom plate. Use 6d galvanized nails spaced 8" apart. LAP edge panel will be usedin next step.
6. Install (2) two more siding panels.
Siding Extends 3/4" Below Plate
LAP Edge
1. Position (2) two 2x4-48" boards and (2) two 2x4-72" boards together and indicate with 'X'marks where the wall studs will be located. Mark the ends that will butt together with the letters'A' and 'B'. Mark right side end with a 'C'. This will be referenced in a latter step.
2. Install (7) seven 80-1/4" long wall studs between the wall plates. Use (2) two 10d sinkersat each end of stud. Nail the frames together with (4) four 10d sinkers on each side.
3. Repeat to assemble (3) three more 10' long side wall frames. You will need to cut (2) two64" long 2x4s to a length of 48" to assemble the last 48" wall frame.
7. Select (1) one of the 10' wall frames and repeat steps 4-6 to apply siding.
24"23-1/4"
72" Wall Plate48" Wall Plate
23-1/4"
Cut Edge
Tongue Edge
C
A B
BA
C
BA

4. Repeat to apply siding to the other 10' wall frame.
Step 6B Assemble Side Walls for 20' Building Length
1. Select one of the 10' side walls with siding. Butt a 10' wall frame against this wall withthe 'C' marks together. Do Not nail these frames together so they can be separated later.
10' Wall Panel from Step 5
72" Wall Plate
2. Square the wall frame. Install a full width siding panel using 6d galvanized box nails spaced8" apart. Do Not nail along the long edge that overlaps the sided wall frame. You can nailthis edge after the wall panels are installed. This will enable you to separate the wall panelsmaking them easier to handle.
Do Not Nail Along This Edge
LAP Edge
48" Wall Plate3. Install another full width siding panel and
a 2' wide siding panel with 'LAP' edge.
CC
LAP Edge
3. Square wall frame. Measure diagonally (corner to corner); the measurements will be the samewhen the wall is square.
4. Install the 1st siding panel with the 'LAP' edge extending 3-1/2" past the wall frame. Use 6dgalvanized box nails spaced 8" apart. The bottom will extend 3/4" below the bottom plate, ortrim flush for cement slab.
5. Install (2) two more siding panels. Cut the last panel to extend 3-1/2" beyond the wall frame.
AA
BB
X XX X
XX
XX
XX
XX
Step 7 Assemble Back Wall1. Position (4) four 68-1/2" 2x4 boards together and indicate with 'X' marks where the wall studs
will be located. Mark the ends that will butt together with the letters 'A' and 'B'.2. Install (8) eight 80-1/4" long wall studs, between the wall plates, over the 'X' marks and where
the plates meet. Use (2) two 10d coated sinkers at each end of a stud. Nail wall sections togetherusing (4) four 10d coated sinker nails, on each side of the studs.
Siding to extend 3/4”
below bottom plate
LAPEdge
A B
Siding Extends 3-1/2"Past 2x4 Stud
:
80-1/4” Wall Studs
68-1/2" Wall Plate
::
::
::
:
AB
68-1/2" Wall Plate
23-1/4"
68-1/2" Wall Plate
19-3/4" 24" 24"

Step 8A Build Center Wall Brace & Set Walls
10. Remove the 2x4 door spacer and install it in the door opening to brace the front wall.11. Cut and remove the bottom 2x4 in the door opening.
Nail Along Siding Edge
2x4 WallBrace
12' Long RearWall Panel
8. Install the center Wall Bracebetween the side walls to holdthem straight. See Detail 'D' topon next page.
Wall Brace
1. Remove (2) two 7' long 2x4s from one of the shipping pallets.2. Cut one of the 2x4s to a length of 53". Cut the other board to a length of 60". Save cut-offs.3. Butt together a 7' long and a 60" long 2x4 on a flat level surface.
2x4- 7'
2x4- 60"
2x4- 7'
2x4- 53"
3-1/2" Space oneach end
4. Lay a 7' long 2x4 on top of the 60" long board 3-1/2" from end. Nextto this butt a 53" long 2x4. Secure all boards together with a double rowof 2-1/2" long wood screws spaced 18" apart.
5. Set the back wall panel between (2) two 10' long side walls. Position the 'C' mark toward frontof building. Secure wall panels together at the corners using (4) four 10d sinkers per corner.
6. Install the next (2) two side walls with the 'C' mark towards back of building.Nail with 10dsinkers. Nail siding edge where panels overlap.
7. Install front wall between the side walls. Nail along the siding edge where the side wall sidingpanels overlap.
Step 8B Build Center Wall Brace & Set Walls
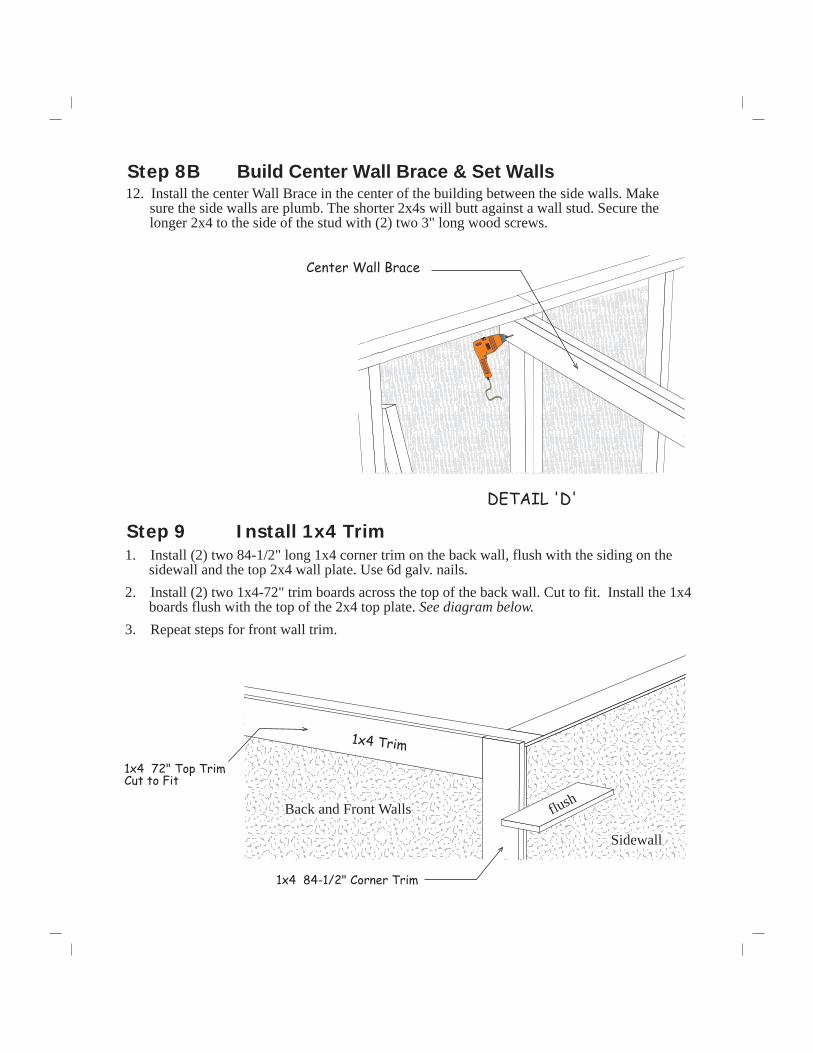
Center Wall Brace
DETAIL 'D'
Step 9 Install 1x4 Trim
1x4 Trim
flush
1. Install (2) two 84-1/2" long 1x4 corner trim on the back wall, flush with the siding on thesidewall and the top 2x4 wall plate. Use 6d galv. nails.
2. Install (2) two 1x4-72" trim boards across the top of the back wall. Cut to fit. Install the 1x4boards flush with the top of the 2x4 top plate. See diagram below.
3. Repeat steps for front wall trim.
Back and Front Walls
1x4 72" Top TrimCut to Fit
1x4 84-1/2" Corner Trim
Sidewall
12. Install the center Wall Brace in the center of the building between the side walls. Makesure the side walls are plumb. The shorter 2x4s will butt against a wall stud. Secure thelonger 2x4 to the side of the stud with (2) two 3" long wood screws.

1. Install a 6' long 2x4 board as a tie plate over the side wall plate. Use 10d sinkers.2. Install a 7' long 2x4 and cut another 7' long 2x4 to finish.3. Repeat to install tie plates on the opposite side wall.
Rear Gable2x4 -6' Tie Plate
2x4 -7' Tie Plate
1x4 Trim
Bottom Edge ofGable Siding
1. Install the rear gable on the rear wall. Thesiding on the gable must extend over the1x4 trim board. See detail. Nail the gable tothe 2x4 wall plate with 10d sinkers.
2. Install gable on front wall.
Step 10 Install Roof Gables
WARNING: The roof gables areheavy and awkward. You'll needhelpers to lift and set gables in place.
Step 11 Install 2x4 Tie Plates on Side Walls
Step 12 Install Gable Support Shelf
4. From cut-offs from Step 8 cut (2) two 2x4s to a length of 10-1/4".5. Nail the 2x4 blocks to the rear corners, flush with the top of the 2x4 tie plate and against rear
wall. Use (4) four 10d sinkers.6. Nail one of the boards you assembled in previous step to blocks. Use 10d sinkers.7. Make sure the walls are square to each other. Nail (2) two 15" x 72" OSB panels across
the 2x4 gable plate (notch around plywood gusset) and the 2x4s. Use 6d common nails.8. Repeat steps 4-7 to install support shelf at the front wall.
2x4- 68-1/2"
2x4- 68-1/2"
2x4- 7'
10-1/4" Block
137" Long 2x4
1. Remove the 7' long wall braces.2. Butt (2) two 68-1/2" long 2x4s together. Center one 2x4-7' over the 2x4s and
secure them with 2-1/2" wood screws spaced 18" apart.3. Repeat to assemble another gable shelf board.

Step 13 Layout Roof Trusses
Rear Gable
24"
23-1/4"
Gable Trim
Starting at the back of the building, layout the truss spacing. Measure from the face of thegable trim to mark the location of the first truss. The last truss space will be more than 24".Important: When marking the opposite wall, place the 'X' mark on the same side of the lineso your trusses are parallel when they are installed.

Metal Truss Hanger
Soffit BoardFlush With Siding
Step 14 Install Trusses & Soffit Boards
Note: Truss To BeFlush with 2x4 Plate
10d Nail
DETAIL 'E'
1. Place trusses over the 'X' marks and secure trusses to2x4 truss plate using 2x4 hangers secured with 10dcoated sinker nails. See Detail 'E'.
2. Locate (3) three 65-1/4" long soffit boards thathave a beveled edge. Install one of these boardsflush with the top of the siding and butting againstthe rear gable trim. Secure soffit board to the topwall plate with 3" long screws in each 2x3 block.
3. Install (2) two more soffit boards.4. Install a 4' soffit board behind 1x4 trim on the
front gable. Cut to fit.5. Repeat to install soffit boards on opposite side
wall.

Insert (2) two plyclips into the roof sheathingbetween each truss at the top row.
3. Apply roof sheathing across the top of the roof. There will be an air space at thepeak of the trusses to allow for ventilation.
Straight Edge
To prevent the nails from protrudingthought the bottom of the soffit board,do not nail at an angle when nailing roof sheathing to the soffit boards.
28-1/2” x 48”
Plyclip
42” x 48”
42” x 72”42” x 76-1/2”
13” x 72”
Install This Row First
13” x 48”
48” x 72”48” x 72”
13” x 76-1/2”
42” x 48”
48” x 72”13” x 48”
1. Install a 42" x 72" OSB roof panel flush withthe face of the rear gable trim. Use a straightedge to align the top of the sheathing with thetop of the truss. Continue adding sheathingfollowing the layout below. Use 6d commonnails, spaced 12" apart.
2. Repeat step for opposite side.
Step 15 Install Roof Sheathing

1. Install loft door trim panel on the front gable by screwing through the back of the sidingwith 1" galv. screws.
Building Tip: Install ridge vent in lieu of shingles caps. Ridge vent provides ideal ventilation,preventing heat and moisture from damaging your building or its contents.
Optional ridge vent providesideal ventilation.
AirSpace
2. Install 80" long 1x4 trim boards on the corners of the side walls.
Step 16 Install Front Trim
Step 17 Install Roofing — Not Supplied in Kit
Install metal roof edging perimeter of the roof area.If you are not installing shingles at this time, you canpurchase felt paper to protect the sheathing. Installthe felt paper before you install the metal roof edge.Install shingles according to the instructions on thewrapper. If you need more detailed instructions oninstalling shingles, there are good publications at bookstores or newsstands.
Truss
3. Install lx4x76-3/4" trim boards along each side of the door opening. Tack these boardswith a couple nails; you may want to move the trim later when you install the doors.
4. Install a 1x4x81-3/4" board, that has angle cuts on both ends, over the door opening.

Step 18 Install Doors
Before you fasten the hinges to the doortrim, temporarily prop the doors in theopening. Tip; set the door stop on a pieceof siding to help hold the door in place.Leave a space between the doors and theside trim to allow room for the doors toexpand when they absorb moisture.If your door opening is out of square, thespace around the doors will not be even.You can reposition the side trim to makeallowances for this. The side trim doesnot have to be flush with the frame of thedoor opening. You can move the trim inor out to make the door spacing equal.Secure hinges to trim with 1-3/4" screws.
Front ofLeft Door
Siding Extends Past Trim
6. Install a barrel bolt, on the lower back ofthe door to secure this door in place whenclosed. Drill a hole for the round shaft todrop into.
7. Install another bolt at the top of the door.8. Install door latch. Siding Shim
Back ofLeft Door
1. Lay the left door with the trim facing up. Thesiding on the left door extends past the door trim.See detail below.
2. Install 5" hinges to the left side of the door frame.To position the hinge properly, hold the rectangularplate against the frame. Use 1-3/4" black screws.
3. Install hinges to the right side of the other door.
Shingles by Owner 14 Bundles Shingles 9 pcs. Roof 'drip' Edge
Qty. Qty.
4 Wall Tie Plates 84 "
40 Wall Studs black ends 80 1/4" 4 1x4 Gable Trim 61 "
2 Wall Studs wuth Door Jacks 80 1/4" 4 1x4 Gable Trim 42 1/2"
15 Wall Plates 72 " 4 1x4 Lower Wall Trim 72 "
12 Wall Plates 68 1/2" 4 1x4 Corner Trim 84 1/2"
4 Gable Top Rafter 61 " 4 1x4 Corner Trim 80 "
4 Gable Side Rafter 34 3/4" 1 1x4 Door Trim 81 3/4"
8 Wall & Tie Plate Material 48 " 2 1x4 Door Trim 76 5/8"2 Gable Studs 50 "
4 Gable Studs 40 3/4 7 lb. 10d Sinkers 40 7/16" Plyclips
4 Gable Studs 30 3/4 5 lb. 6d Galv. 1 Bottle Glue50 Black Screws
2 Door Header 75 "
10 lb. 6d Common
18 Truss Hangers1 Door Hasp
10 2 4 Blocks for Truss Jig 10" to 12"
6 5" Door Himges
2 Barrel Bolts
1 OSB Door Header Filler 5-1/4" x 75"
12 1x4 Drive-on Plate
36 2-1/2" Screws
18 Wood Gussets for Trusses
2 2" Screw Bit
50 3" Screws
2 Wood Gussets for Gables
11 48" x 84" 4 48" x 56" 6 48" x 72" Roof Sheathing
2 12" x 84" 4 24" x 39-3/4" 2 42" x 72" Roof Sheathing
6 24" x 84" 2 42" x 76-1/2" Roof Sheathing
2 7-3/4" x 36" - over door opening 4 42" x 48" Roof Sheathing
2 28-1/2" x 48" Roof Sheathing
18 Pre-built Truss Halves 2 13" x 72" Roof Sheathing
2 36" x 76" Pre-built Barn Doors 2 13" x 76-1/2" Roof Sheathing
1 36" x 31" Pre-built Loft Door Frame 4 13" x 48" Roof Sheathing
6 4 15" x 72" Gable Shelf
2
White Pine Trim
Size2x4 Framing DescriptionSize
7/16" OSB Sheathing
Hardware
Gable Siding
2x6 Framing
Miscellaneous Lumber
12" x 32"
9" x 12"
3-1/2" x 48" Pre-built Soffit Boards
Pre-built Components
Lower Wall Siding
3-1/2" x 65-1/4" Pre-built Soffit Boards