Beschreibung der Komponente -...
22
GEO-Laser Remote App V. 2.0 Operating Instructions WWW.GEO-LASER.DE – INFO@GEO- LASER.DE
Transcript of Beschreibung der Komponente -...

Contents
1 GEO-Laser Remote App...........................................................................................3
1.1 Functions.......................................................................................................................3
1.2 Compatible Devices.......................................................................................................3
2 Start Screen (Device Selection)................................................................................4
3 Connect to a Laser...................................................................................................5
3.1 Switch On Wireless Connection to Laser Device...........................................................5
3.2 Show MAC Address of Laser Device..............................................................................5
3.3 Connect App and Laser Device......................................................................................6
3.4 Save Laser with Name...................................................................................................6
3.5 Saved Devices................................................................................................................6
4 Set Up Connection to a Receiver..............................................................................7
4.1 Switch On Bluetooth at the Receiver............................................................................7
4.2 Find Receiver.................................................................................................................7
4.3 Connect to Linked Receiver...........................................................................................8
4.4 Refresh Connection.......................................................................................................8
5 Measurements with a Laser Receiver......................................................................9
5.1 Remote Display..........................................................................................................9
5.2 Single Measurement.....................................................................................................9
5.3 Continuous Measurement............................................................................................9
5.4 Measured Values...........................................................................................................9
6 User Input Panel....................................................................................................10
6.1 Explanation of Buttons................................................................................................11
6.2 Settings Menu.............................................................................................................12
6.2.1 Receiver......................................................................................................................12
6.2.2 Bar Chart Settings........................................................................................................14
6.2.3 Other...........................................................................................................................14
Operating Instructions GEO-Laser Remote App 08.03.2017© GEO-Laser GmbH Page 2 of 14

1 GEO-Laser Remote AppThis manual describes the functions of the “GEO-Laser Remote App”. The app serves firstly as remote control for our lasers and secondly as remote display and data logger for selected laser receivers with Bluetooth function.
1.1 FunctionsThe “GEO-Laser Remote App” offers mirroring of both the display and function keys for remote con -trol of our lasers. The laser is therefore fully remote-controllable and operable. Changes in the laser are shown in the app immediately.Used in conjunction with our laser receivers LE-71 and LE-72, the app can be used for the following functionalities:
Trigger and display in the mode “Single Measurement” Trigger, termination and definition of the boundary conditions in the mode “Continu-
ous Measurement” Clear bar chart display of the measured values Monitoring of limit values Export and storage function for logged measured values Change between mm/inch units of measurement Zero offset Set factory zero Read out and save internal memory of the receiver Synchronise time of the smart phone/tablet with the receiver
The app is available in German and English.
1.2 Compatible DevicesThe “GEO-Laser Remote App” is compatible with the following devices:
Lasers: RL-78L/-79L, RL-87L, NL-8/-9/-9V, IL-9xL, PL-95L, UL-89L
Laser receivers: LE-71/-72
Operating Instructions GEO-Laser Remote App 08.03.2017© GEO-Laser GmbH Page 3 of 14

2 Start Screen (Device Selection)Before you start the app, you should make sure that your smart phone has a Bluetooth function and that it is enabled. When launching the app, you can choose between connection to a laser or to a receiver. To do so, simply press the corresponding symbol.
Operating Instructions GEO-Laser Remote App 08.03.2017© GEO-Laser GmbH Page 4 of 14

3 Connect to a LaserTo set up a connection between the app and a laser, you first need to enter the so-called MAC ad-dress of the laser in the app. Please make sure that your laser has the necessary functionality (see chapter 1.2). If the laser has already been programmed into the app, the connection can be estab-lished again directly (see chapter 3.5).
3.1 Switch On Wireless Connection to Laser DeviceTo connect to a laser device, you first need to switch on the wireless connection at the laser. To do
so, press the Menu button for about 6 seconds. Then
navigate in the menu with the arrow button to the item “K”. Then activate the wireless connection by press-
ing the arrow down button .
3.2 Show MAC Address of Laser DeviceTo find out the MAC address of your laser device, press the Menu button for about 6 seconds.
Then navigate to “S” and press the arrow up button . Then enter the service code 22; to do so,
press the arrow up button until “22” appears in the
display and confirm this with OK .
The MAC address of the laser device is then shown:
Operating Instructions GEO-Laser Remote App 08.03.2017© GEO-Laser GmbH Page 5 of 14

3.3 Connect App and Laser Device
In the start screen of the app, select the laser.Then open the item “Mac address input” in the context menu at the top right corner of the screen and enter the MAC address of your laser. The app then connects auto-matically to the laser.
3.4 Save Laser with NameYou can enter a name for the laser under the item “Save a device in List” in the app’s context menu. This name then appears under the item “Devices” and serves quick selection of the device. This function is particularly prac-tical when you want to control various devices remotely.
3.5 Saved DevicesTo connect to a device that has already been saved, select the item “Devices” in the context menu. A list of all devices previously saved by you then appears. Select the required laser and confirm with “OK”. Laser devices can also be removed from the list again in this menu.
Operating Instructions GEO-Laser Remote App 08.03.2017© GEO-Laser GmbH Page 6 of 14

4 Set Up Connection to a ReceiverIf you have a receiver with active Bluetooth connection, the “GEO-Laser Remote App” links to it auto -matically when launched. Prerequisite for this is that there was at least one connection between the receiver and app before. The app saves this connection. Follow the following steps to establish a link for the first time.
4.1 Switch On Bluetooth at the ReceiverTo establish a connection, the receiver must be in a Bluetooth mode. To do so, switch on the receiver as normal and navigate in the main menu to the item “Continuous Measurement + BT”. Confirm by pressing the button “OK” .
4.2 Find ReceiverTo connect the app to a receiver, press the button Receiver in the start screen. Then open the context menu in the top right corner of the screen. There press Receiver selection. An empty list appears when the app is started for the first time. Press “Add Device”.
You are then moved to the Bluetooth settings of your smart phone or tablet. They can vary slightly from device to device. The example here shows the situation for a Samsung smart phone.Press Scan to find receivers in your vicinity. Note: The receiver must already be in the correct mode at this point (see chapter 4.1). Select the required receiver by tap-ping. The receiver sends you a connect request.
Operating Instructions GEO-Laser Remote App 08.03.2017© GEO-Laser GmbH Page 7 of 14

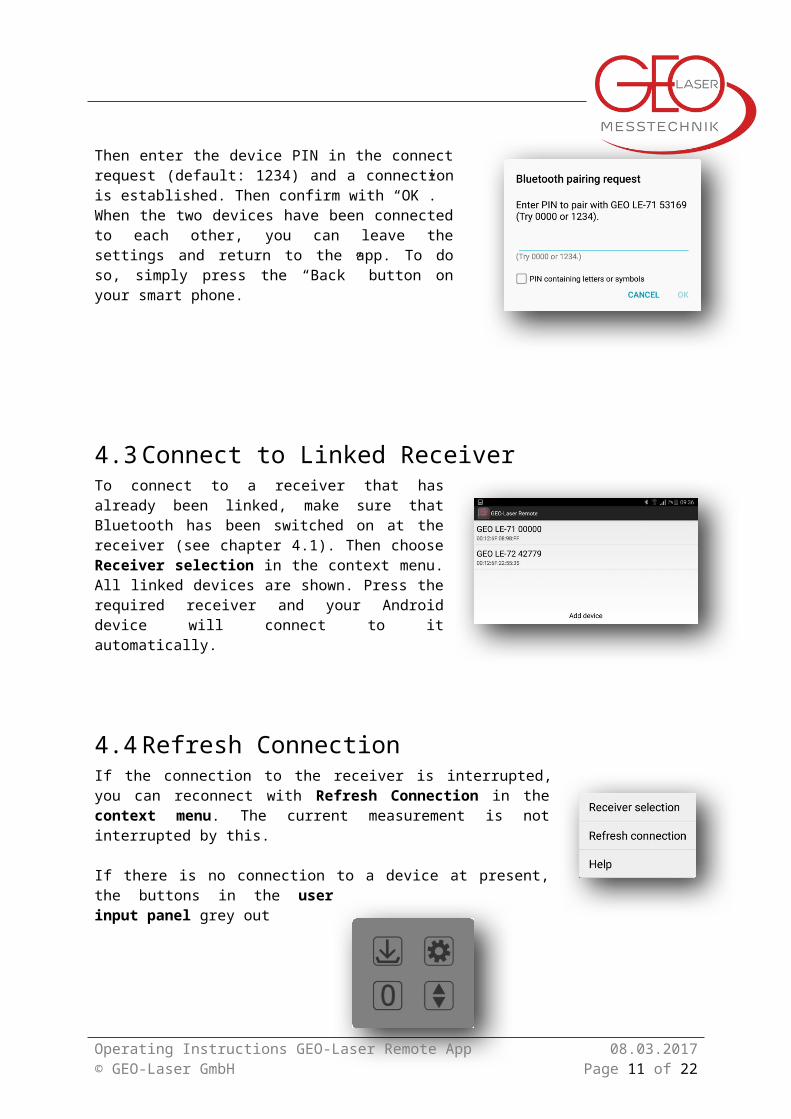
Then enter the device PIN in the connect request (default: 1234) and a connection is established. Then confirm with “OK”.When the two devices have been connected to each other, you can leave the settings and return to the app. To do so, simply press the “Back” button on your smart phone.
4.3 Connect to Linked Receiver To connect to a receiver that has already been linked, make sure that Bluetooth has been switched on at the receiver (see chapter 4.1). Then choose Receiver selection in the context menu. All linked devices are shown. Press the required receiver and your Android device will connect to it automatically.
4.4 Refresh ConnectionIf the connection to the receiver is interrupted, you can reconnect with Re-fresh Connection in the context menu. The current measurement is not interrupted by this.
If there is no connection to a device at present, the buttons in the user input panel grey out
Operating Instructions GEO-Laser Remote App 08.03.2017© GEO-Laser GmbH Page 8 of 14

5 Measurements with a Laser ReceiverThe app offers three different measurement modes when in receiver mode. The functions of the
different modes are explained below. You change the mode in the Settings Menu with the first item Measurement Mode.
5.1 Remote DisplayThe mode Remote Display delivers the current measured values of the receiver. They are shown both as numerical values with unit and in a bar chart with the respective limits defined. You can
check whether a wireless connection to the receiver exists by pressing the button , make settings
, set the zero point manually or search for the laser beam .
5.2 Single MeasurementLike Remote Display, Single Measurement delivers the current measured values.
To start this measurement mode, select “Single Measurement” in the Settings Menu .
You can save the current measured value by pressing the button Save Measured Value . The last measured value is then shown directly underneath the current measured value. It can be deleted again by tapping it. If you want to end measurement and export the measured values taken, press
the button Save Measurement Series . If you want to cancel the measurement series, you merely need to change to another measurement mode. Note: Logged values are only saved if Save Meas-
urement Series was pressed.
5.3 Continuous MeasurementLike Remote Display, Continuous Measurement delivers the current measured values.
To start this measurement, first select a measurement interval in the Settings Menu . Then
change to “Continuous Measurement” in the Settings Menu .The app then records the values measured by the receiver automatically in the interval defined. To
save the measurement series, press Save Measurement Series . To cancel the measurement
series, press Cancel Measurement .
Note: Logged values are only saved if Save Measurement Series was pressed.
5.4 Measured ValuesAfter saving, the measured values are to be found in the Download folder of your device. The meas-ured values are saved in the format “.csv”. The comma is used as separator. They can be edited in spreadsheet programs (e.g. Excel). The following information is saved: status, position, unit, time and date. If the laser beam leaves the limit range during measurement, this is shown to you in the table. Note: The date relates to the time set in the receiver. It is therefore advisable to synchronise it with the smart phone beforehand (see chapter 4.6).
Operating Instructions GEO-Laser Remote App 08.03.2017© GEO-Laser GmbH Page 9 of 14

6 User Input PanelThe user input panel has four buttons. These and their functions change depending on the measure-ment mode selected. They are described here from top left to bottom right.The following four functions are available in the measurement mode Remote Display:
Check Settings Menu Set Zero Point Find Laser
The following four functions are available in the measurement mode Single Measurement:
Save Measured Value Settings Menu Save Measurement Series Find Laser
The following four functions are available in the measurement mode Con-tinuous Measurement:
Save Measurement Series Settings Menu Cancel Measurement Find Laser
Operating Instructions GEO-Laser Remote App 08.03.2017© GEO-Laser GmbH Page 10 of 14
6.1 Explanation of Buttons
I. Check To check whether a wireless connection exists, you can have a short beep emitted by the receiver in the measurement mode Remote Dis-play.
II. Settings MenuVarious settings can be made here; see chapter 5.2.
III. Set Zero PointThe current measured value is set as new manual zero point. (can be cancelled in the Settings Menu; see Set Factory Zero).
IV. Find LaserActivates the receiver search for the laser. This function is only pos-sible if the laser beam is currently not being detected.
V. Save Measured ValueValues are logged during single measurement by pressing this button. Note: Use Save Measurement Series to save values permanently.
VI. Save Measurement SeriesSaves and ends the current measurement. The logged measured val-ues are saved in a “.csv” file and placed in the standard Download folder of your device.
VII. Cancel MeasurementCancels the measurement. Note: Values logged during the measure-ment are not saved and will be lost!
Operating Instructions GEO-Laser Remote App 08.03.2017© GEO-Laser GmbH Page 11 of 14

6.2 Settings MenuSelect the Settings Menu in the user input panel.
Here you can make the following settings:
6.2.1 Receiver
Measurement ModeThis setting is used to change the measurement mode of the receiver. The following measurement modes are available for selection:
Remote Display Single Measurement
Continuous Measurement
Please note: If you change from Single Measurement mode or Continuous Measurement mode into another mode, the data recorded so far will be lost as it has not yet been saved. To save the
data, press Save Measurement Series .
Operating Instructions GEO-Laser Remote App 08.03.2017© GEO-Laser GmbH Page 12 of 14

Measurement IntervalThis setting is used to change the measure-ment interval of the app (in seconds). The measurement interval is the refresh rate of the app, i.e. the measured value is only refreshed in this interval.The screen display and chart on the left side are refreshed in dependence on the interval. The setting also changes the measurement interval for continuous measurement. In this mode the setting defines in what intervals of time the app saves the values of continuous measurement. Note: The minimum meas-urement interval is two seconds. If the interval is changed while a measurement is run-ning, this measurement is cancelled. Therefore set the measurement interval before starting a measurement!
Read Internal Receiver MemoryThis setting is used to read out the internal memory of the receiver. The data is saved in the Download folder of your device.
Set Factory ZeroThis setting is used to set the default factory zero point.
Synchronise TimeThis setting is used to synchronise the time of the smart phone or tablet with the receiver. The receiver takes on the time of the Android device.
Unit inch/mmThis setting is used to change the unit of the receiver from “inch” to “mm” and vice versa with the press of a button. The receiver takes on this setting. The unit cannot be changed if you are currently busy with a measurement. To change the unit, simply switch to the measurement mode Remote Display.
Operating Instructions GEO-Laser Remote App 08.03.2017© GEO-Laser GmbH Page 13 of 14

6.2.2 Bar Chart SettingsThese settings are used to define limit values for monitoring of limits. They also relate to the chart on the left side. The chart displays monitoring of the values graphically. Both an upper and a lower limit can be set independently of each other.
The scale of the receiver can display a maximum of 70 mm or ≈ 2.76 inch. The receiver can -not measure limits that are further apart.
Upper LimitSelect the upper limit (tolerance) for your measurement by pressing the number field and entering the limit value in the dialogue that opens.
Lower LimitSelect the lower limit (tolerance) for your measurement by pressing the number field andentering the limit value in the dialogue that opens.
6.2.3 Other
Restore DefaultsDeletes any measured values still in the cache. All settings that have been made are restored to their defaults.
AboutVersion number.
Operating Instructions GEO-Laser Remote App 08.03.2017© GEO-Laser GmbH Page 14 of 14

![Femtosecond laser induced density changes in GeO2 and SiO2 ... · Femtosecond laser induced density changes in GeO 2 and SiO 2 glasses: fictive temperature effect [Invited] Lena](https://static.fdocuments.in/doc/165x107/5f1059ea7e708231d448ae1f/femtosecond-laser-induced-density-changes-in-geo2-and-sio2-femtosecond-laser.jpg)