BENDING LIGHT – REFRACTION - lasertechonline.org · You might also find hollow thin-walled...
10
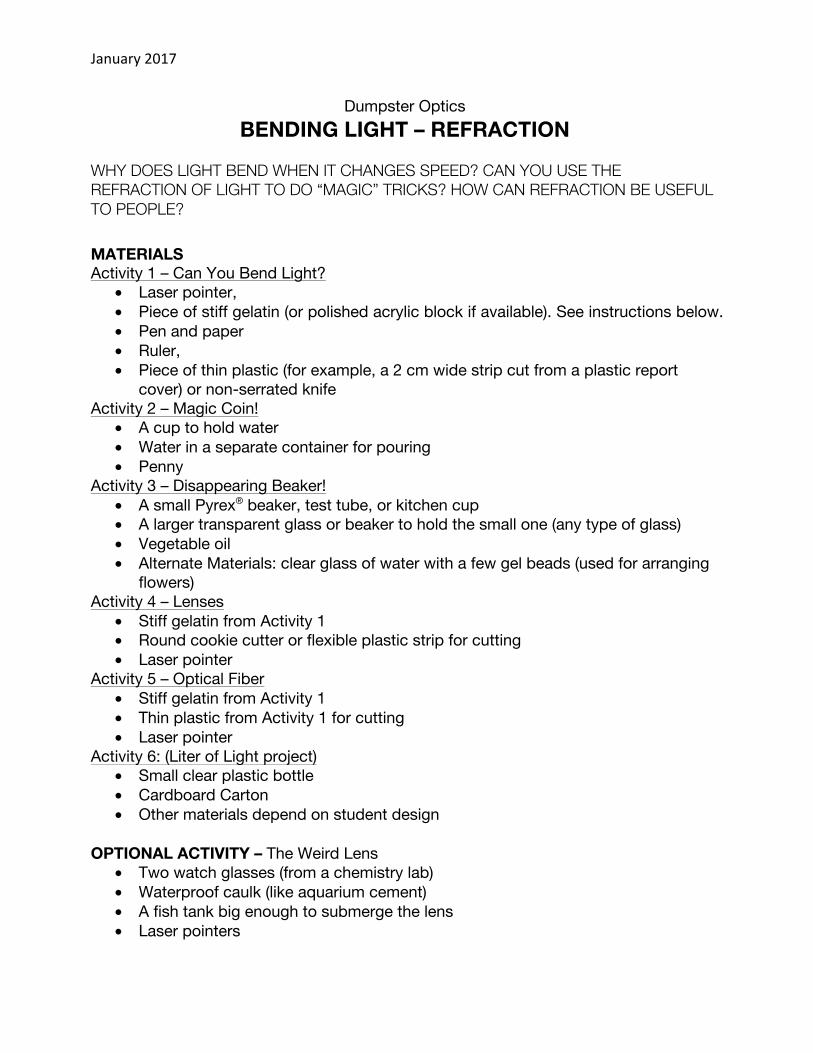
January 2017 Dumpster Optics BENDING LIGHT – REFRACTION WHY DOES LIGHT BEND WHEN IT CHANGES SPEED? CAN YOU USE THE REFRACTION OF LIGHT TO DO “MAGIC” TRICKS? HOW CAN REFRACTION BE USEFUL TO PEOPLE? MATERIALS Activity 1 – Can You Bend Light? • Laser pointer, • Piece of stiff gelatin (or polished acrylic block if available). See instructions below. • Pen and paper • Ruler, • Piece of thin plastic (for example, a 2 cm wide strip cut from a plastic report cover) or non-serrated knife Activity 2 – Magic Coin! • A cup to hold water • Water in a separate container for pouring • Penny Activity 3 – Disappearing Beaker! • A small Pyrex ® beaker, test tube, or kitchen cup • A larger transparent glass or beaker to hold the small one (any type of glass) • Vegetable oil • Alternate Materials: clear glass of water with a few gel beads (used for arranging flowers) Activity 4 – Lenses • Stiff gelatin from Activity 1 • Round cookie cutter or flexible plastic strip for cutting • Laser pointer Activity 5 – Optical Fiber • Stiff gelatin from Activity 1 • Thin plastic from Activity 1 for cutting • Laser pointer Activity 6: (Liter of Light project) • Small clear plastic bottle • Cardboard Carton • Other materials depend on student design OPTIONAL ACTIVITY – The Weird Lens • Two watch glasses (from a chemistry lab) • Waterproof caulk (like aquarium cement) • A fish tank big enough to submerge the lens • Laser pointers
Transcript of BENDING LIGHT – REFRACTION - lasertechonline.org · You might also find hollow thin-walled...
January2017
Dumpster Optics BENDING LIGHT – REFRACTION
WHY DOES LIGHT BEND WHEN IT CHANGES SPEED? CAN YOU USE THE REFRACTION OF LIGHT TO DO “MAGIC” TRICKS? HOW CAN REFRACTION BE USEFUL TO PEOPLE?
MATERIALS Activity 1 – Can You Bend Light?
• Laser pointer, • Piece of stiff gelatin (or polished acrylic block if available). See instructions below. • Pen and paper • Ruler, • Piece of thin plastic (for example, a 2 cm wide strip cut from a plastic report
cover) or non-serrated knife Activity 2 – Magic Coin!
• A cup to hold water • Water in a separate container for pouring • Penny
Activity 3 – Disappearing Beaker! • A small Pyrex® beaker, test tube, or kitchen cup • A larger transparent glass or beaker to hold the small one (any type of glass) • Vegetable oil • Alternate Materials: clear glass of water with a few gel beads (used for arranging
flowers) Activity 4 – Lenses
• Stiff gelatin from Activity 1 • Round cookie cutter or flexible plastic strip for cutting • Laser pointer
Activity 5 – Optical Fiber • Stiff gelatin from Activity 1 • Thin plastic from Activity 1 for cutting • Laser pointer
Activity 6: (Liter of Light project) • Small clear plastic bottle • Cardboard Carton • Other materials depend on student design
OPTIONAL ACTIVITY – The Weird Lens • Two watch glasses (from a chemistry lab) • Waterproof caulk (like aquarium cement) • A fish tank big enough to submerge the lens • Laser pointers
January2017
Where to find materials: In this lesson students will study how light travels when it goes from one transparent material (medium) to another where it travels at a different speed. In science classes this is traditionally done by tracing light rays as they go from air into a block of clear plastic. If the light rays skim the surface of a table you can easily see the paths in air and in plastic. Refraction experiments often use polished acrylic blocks, but these can be quite expensive. You might also find hollow thin-walled plastic boxes that can be filled with water or other liquid. Again, they are expensive when purchased from science supply stores. Sometimes items are sold in plastic boxes that are (or can be made) waterproof, but since you pay for the contents as well these can also be expensive. A perfectly good alternative is very stiff gelatin (also known as “Jello® Jigglers®” in the U.S.). A very stiff gel is needed so that it can be easily handled at room temperature. Use only one-third the usual amount of water for each packet of gelatin. Use boiling water only and stir very well until the gelatin is dissolved. We favor sugarless lemon gelatin because red lasers contrast well with the yellow gelatin. You can use non-flavored gelatin but we have trouble making it so that it is not cloudy. Just be sure not to use any sugar varieties because they make everything very sticky! Lightly oil pans (any flat-bottomed pan will do) filling it 2 – 3 cm deep. You can place the gelatin in the refrigerator to harden, however, it will usually gel at room temperature if the room is not too warm. Cut into blocks to distribute to student teams. A 4 cm x 6 cm rectangle should be enough. Thin, non-serrated knives or narrow strips cut from plastic report covers can be used to cut the gelatin into the shapes you need. The idea is to make a smooth, straight cut at right angles to the gelatin surface. VOCABULARY:
• Refraction • Perpendicular • Parallel • Refractive angle • Incident angle
• Lens • Convex • Concave • Optical Fiber • LASER SAFETY
TEACHER NOTES LASER SAFETY: Review laser safety before handing out any materials. Laser pointers are generally low power and safe (when bought from a reputable source). Legal laser pointers in the U.S. have a 5 milliwatt output limit. As with any bright light there is always a danger if someone tries to stare into the beam. Remind students that it is not safe to stare at ANY bright lights because they might damage the delicate sensors in their eyes. Either provide the students with rules or have them come up with their own such as no high sticking (waving the laser around). Make sure students understand the consequences, for example, they will lose the privilege of using a laser pointer. Other
important rules are • Leave the laser on the table. • Put a book or other block at the far end of the table to keep the beam from
entering other students' space. • Stand when working. Do not bend down when the laser is on so that your eye is
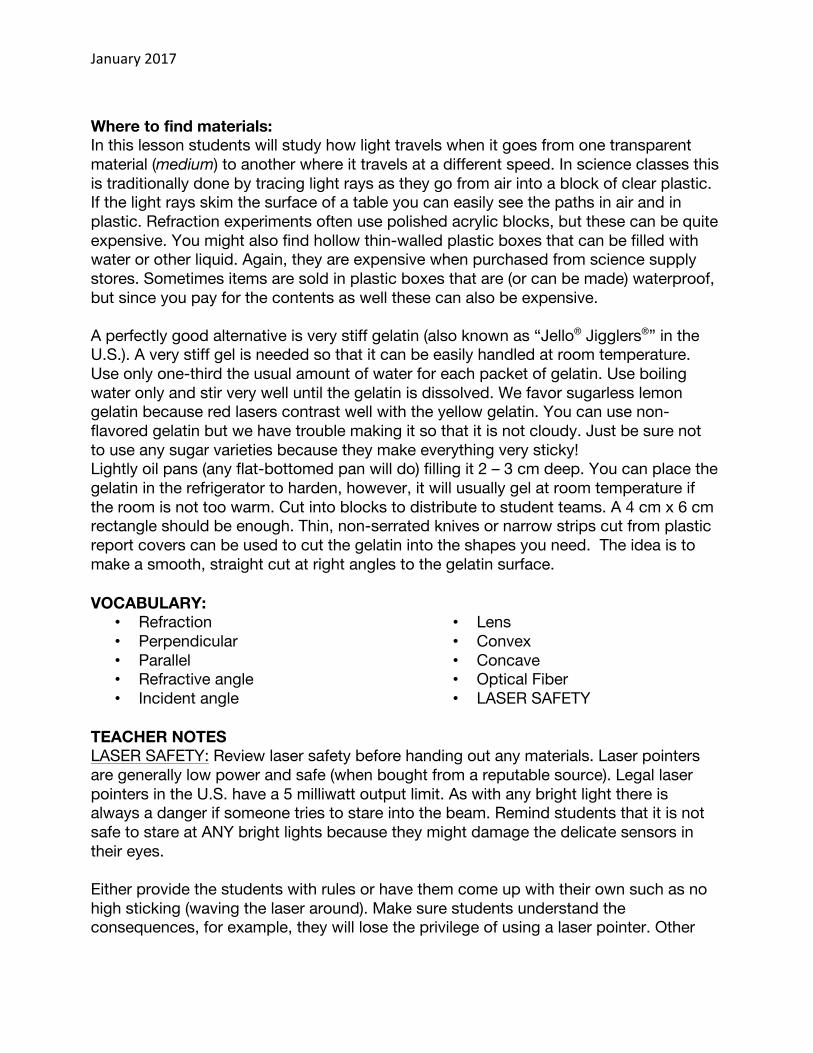
at laser level. REFRACTION– WHY IT HAPPENS: The "warm up" slide shows light rays filtering through trees. Note that light rays are only visible when they are reflected (scattered) into your eyes. In this case, light is reflected from fog (water droplets) in the air. The rays in the photo make straight lines, that is, light travels in a straight line unless something causes it to change directions – reflection, refraction or other interaction with a material. Why does light bend when it encounters a different material where it changes speed? Light travels about 300,000,000 m/s (186 mi/s) in a vacuum, but in every other material it travels more slowly. (The speed of light in air is almost the same as in a vacuum.) When light slows, its wavelength shrinks as shown in Slide #6 and the figure below. The more the light slows, the more the wavelength shortens.
A little wave math: speed = wavelength x frequency. Frequency is the rate the wave vibrates up and down. Light waves of a given color always vibrate up and down at the same rate, that is, the frequency doesn’t change when it enters a new material and changes speed. Wavelength is the distance between crests of the wave. To keep the two sides of the equation equal, the wavelength must get smaller when the wave speed gets smaller since the frequency stays the same.
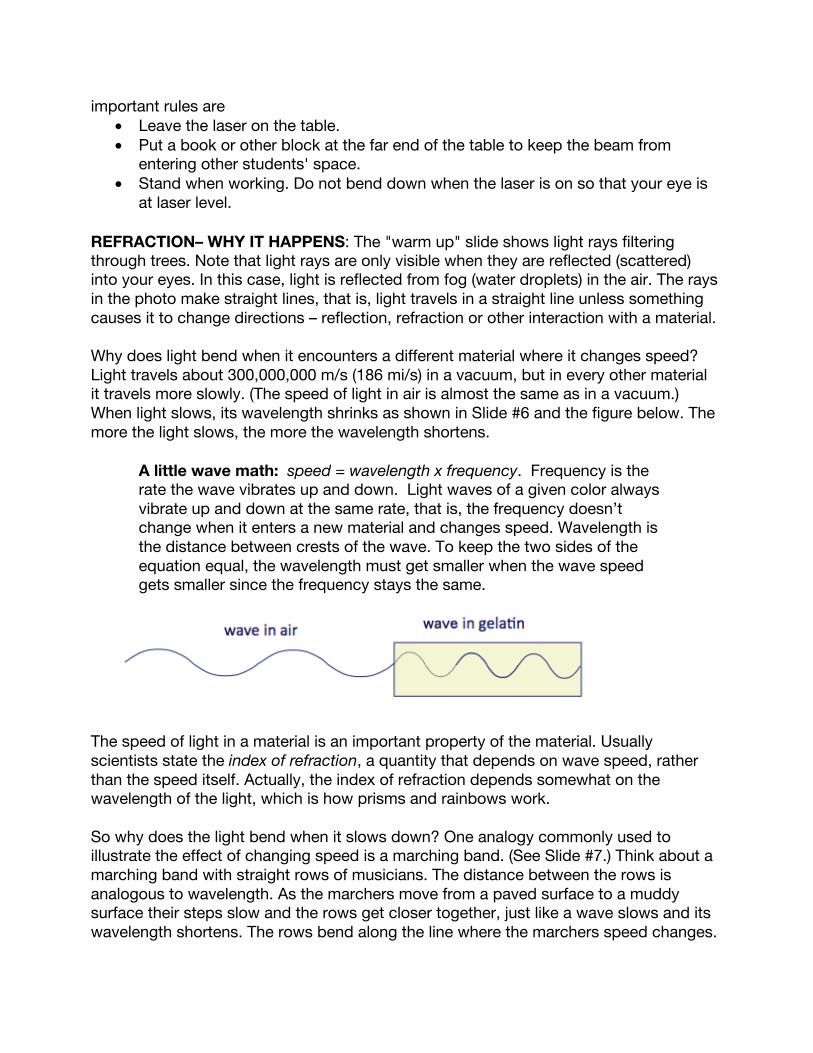
The speed of light in a material is an important property of the material. Usually scientists state the index of refraction, a quantity that depends on wave speed, rather than the speed itself. Actually, the index of refraction depends somewhat on the wavelength of the light, which is how prisms and rainbows work. So why does the light bend when it slows down? One analogy commonly used to illustrate the effect of changing speed is a marching band. (See Slide #7.) Think about a marching band with straight rows of musicians. The distance between the rows is analogous to wavelength. As the marchers move from a paved surface to a muddy surface their steps slow and the rows get closer together, just like a wave slows and its wavelength shortens. The rows bend along the line where the marchers speed changes.
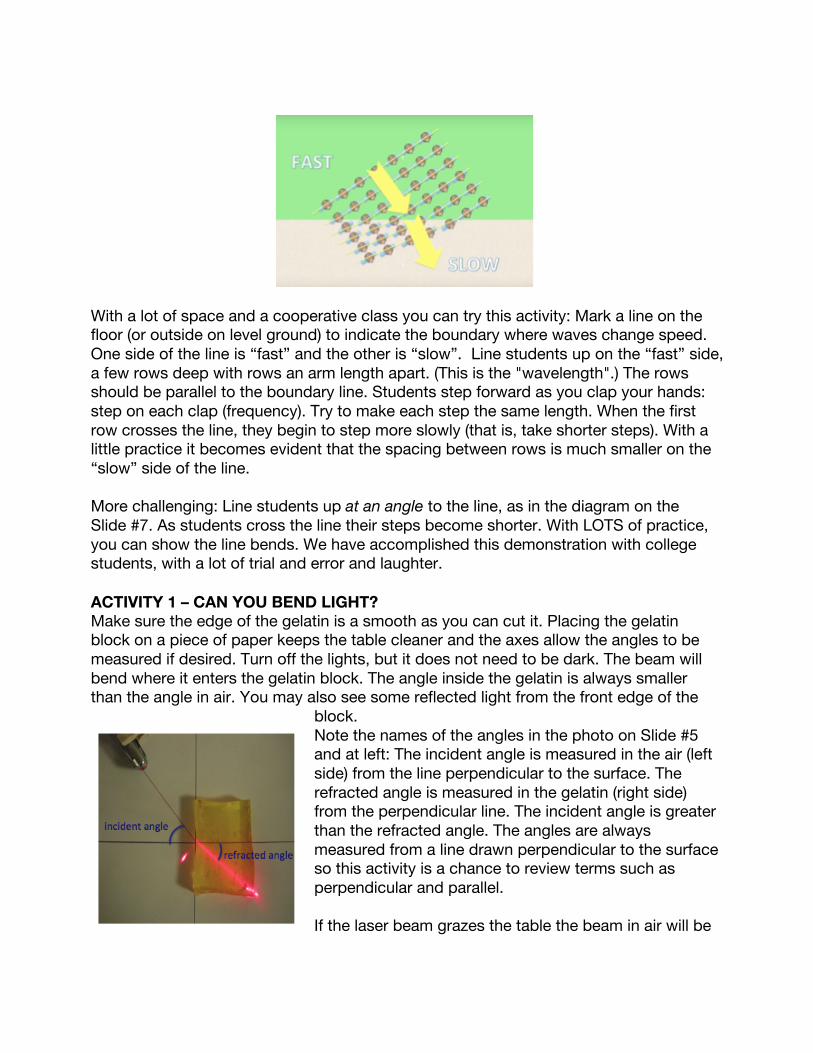
With a lot of space and a cooperative class you can try this activity: Mark a line on the floor (or outside on level ground) to indicate the boundary where waves change speed. One side of the line is “fast” and the other is “slow”. Line students up on the “fast” side, a few rows deep with rows an arm length apart. (This is the "wavelength".) The rows should be parallel to the boundary line. Students step forward as you clap your hands: step on each clap (frequency). Try to make each step the same length. When the first row crosses the line, they begin to step more slowly (that is, take shorter steps). With a little practice it becomes evident that the spacing between rows is much smaller on the “slow” side of the line. More challenging: Line students up at an angle to the line, as in the diagram on the Slide #7. As students cross the line their steps become shorter. With LOTS of practice, you can show the line bends. We have accomplished this demonstration with college students, with a lot of trial and error and laughter. ACTIVITY 1 – CAN YOU BEND LIGHT? Make sure the edge of the gelatin is a smooth as you can cut it. Placing the gelatin block on a piece of paper keeps the table cleaner and the axes allow the angles to be measured if desired. Turn off the lights, but it does not need to be dark. The beam will bend where it enters the gelatin block. The angle inside the gelatin is always smaller than the angle in air. You may also see some reflected light from the front edge of the
block. Note the names of the angles in the photo on Slide #5 and at left: The incident angle is measured in the air (left side) from the line perpendicular to the surface. The refracted angle is measured in the gelatin (right side) from the perpendicular line. The incident angle is greater than the refracted angle. The angles are always measured from a line drawn perpendicular to the surface so this activity is a chance to review terms such as perpendicular and parallel. If the laser beam grazes the table the beam in air will be
visible. Otherwise it is assumed to travel in the same direction the laser is pointing. Remember you can only see the beam if there is something in the path of the beam to reflect it into your eye. It can be made visible with a quick spritz of water from a plant mister, a small puff of talcum powder or chalk dust. It can get messy, so just use a little. Ask students what other materials can be used besides gelatin. How could you test them? The edge needs to be smooth so a polished piece of glass or plastic will work. Empty plastic boxes can be filled with water or other liquids. No matter the material you try, the beam should always bend back toward the perpendicular line when the beam goes from air into the material. It will bend in the opposite direction when exiting the material back into the air. ACTIVITY 2 – MAGIC COIN! The remaining activities show how refraction can be put to use. The Magic Coin is a quick "magic trick" that illustrates how the path of light changes when light goes from water into air. Be sure to move the paper cup along the table until the coin just disappears, or can’t be seen and don't move your head or the cup after that. When water is added to the cup the bending of light at the surface of the water makes the coin visible again. Water must be added slowly. If the water is just dumped in the cup the coin may move and the “trick” may not work. Try it first before doing with students. How does it work? First ask for student ideas! (Slide #9) Room light (not shown in the diagram) illuminates the penny. The light is then reflected toward the surface (only one ray is shown). Without the water in place, the ray continues in a straight line and misses the eye completely unless you move your head. This is why you can't see it before you add the water. With water in the cup, the light is refracted at the surface and directed over the edge of the cup so it can enter the eye and you can see it. Your eye/brain interprets the light you see so the penny appears to be in the direction of the dashed line. ACTIVITY 3 – DISAPPEARING BEAKER This is a well-known activity with many variations. The trick is to find glass and oil that have the same index of refraction (light speed). Pyrex® and canola oil will work for sure but you can try other combinations. Pyrex® is a brand name for borosilicate glass. This experiment is easiest to do with a small and large beaker but any borosilicate glass will do. Kitchen glassware with the Pyrex® brand name will work if placed in a larger glass bowl, for example, a small custard cup placed into a larger one. Inexpensive vegetable oil works so don't bother with expensive oils. Begin by asking students why they can see two beakers, inner and outer. If they have completed the Reflection lesson they will know that they see objects by reflected light. At first, be careful pouring the oil into the inner container so it doesn’t overflow (yet) into
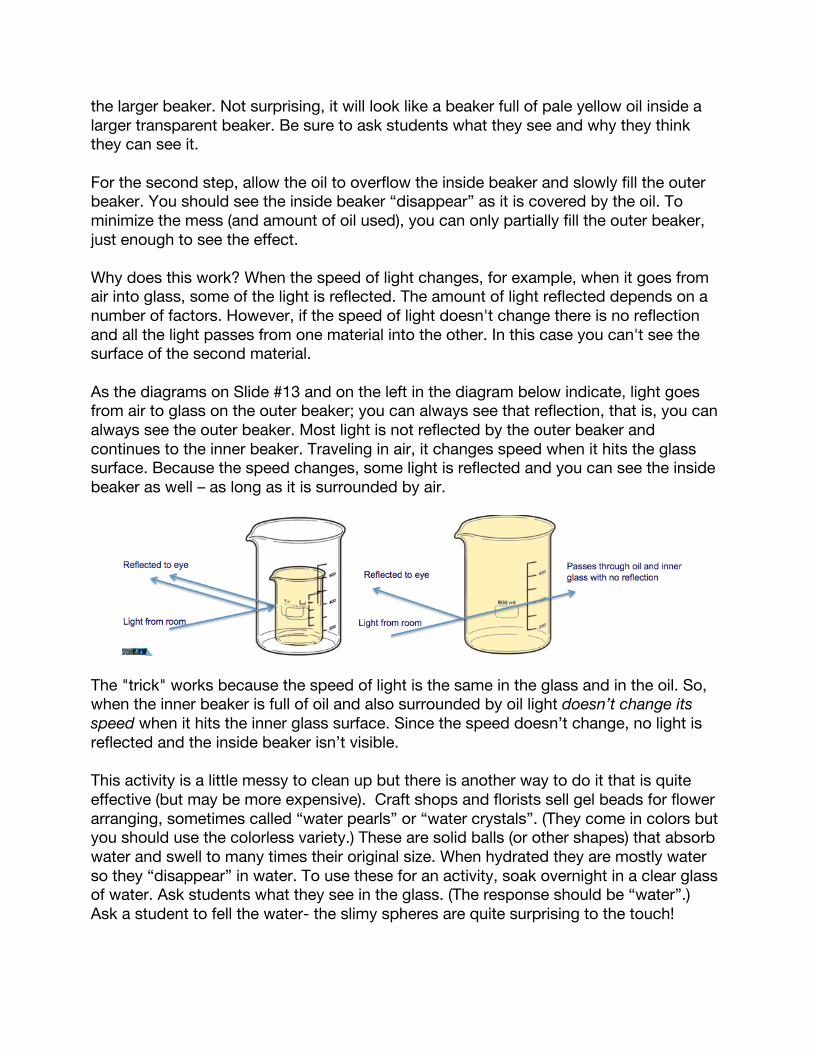
the larger beaker. Not surprising, it will look like a beaker full of pale yellow oil inside a larger transparent beaker. Be sure to ask students what they see and why they think they can see it. For the second step, allow the oil to overflow the inside beaker and slowly fill the outer beaker. You should see the inside beaker “disappear” as it is covered by the oil. To minimize the mess (and amount of oil used), you can only partially fill the outer beaker, just enough to see the effect. Why does this work? When the speed of light changes, for example, when it goes from air into glass, some of the light is reflected. The amount of light reflected depends on a number of factors. However, if the speed of light doesn't change there is no reflection and all the light passes from one material into the other. In this case you can't see the surface of the second material. As the diagrams on Slide #13 and on the left in the diagram below indicate, light goes from air to glass on the outer beaker; you can always see that reflection, that is, you can always see the outer beaker. Most light is not reflected by the outer beaker and continues to the inner beaker. Traveling in air, it changes speed when it hits the glass surface. Because the speed changes, some light is reflected and you can see the inside beaker as well – as long as it is surrounded by air.
The "trick" works because the speed of light is the same in the glass and in the oil. So, when the inner beaker is full of oil and also surrounded by oil light doesn’t change its speed when it hits the inner glass surface. Since the speed doesn’t change, no light is reflected and the inside beaker isn’t visible. This activity is a little messy to clean up but there is another way to do it that is quite effective (but may be more expensive). Craft shops and florists sell gel beads for flower arranging, sometimes called “water pearls” or “water crystals”. (They come in colors but you should use the colorless variety.) These are solid balls (or other shapes) that absorb water and swell to many times their original size. When hydrated they are mostly water so they “disappear” in water. To use these for an activity, soak overnight in a clear glass of water. Ask students what they see in the glass. (The response should be “water”.) Ask a student to fell the water- the slimy spheres are quite surprising to the touch!
ACTIVITY 4 – LENSES Lenses are a familiar application of refraction. Light bends at both surfaces to change the path after passing through the lens. In this activity students look at lenses that cause rays of light to meet on the other side (converging) and lenses that cause light rays to spread (diverge) on the other side. This activity uses a lens cross section to guide light from laser pointers. For the best results, make the cuts in the gelatin as smooth as possible. If two laser pointers aren't available you can use a single laser pointer and move it to different locations parallel to the horizontal axis as shown on Slide #13. Trace the ray with a pencil as it enters and leaves the lens. If cookie cutters aren’t available you can use strips about 2 cm wide cut from a plastic report cover or other stiff plastic. Two intersecting circles make a “lens” as shown on Slide #13. The laser beams will bend twice- when entering and when leaving the lens. The two beams should meet on the other side of the lens. Be careful to align the cut shape as shown and be sure the laser beams are perpendicular to the long axis of the lens shape. This is a converging lens. It causes parallel rays of light to come to a focus. The point where the beams meet is the focal point. It is sometimes called a convex lens in science books, because both sides have a convex shape. However, converging is a more precise term. Eyeglasses used to assist near vision (reading glasses) have converging lenses. The lens shown in Slide #14 is a little trickier to cut. Start with a rectangle and use the cookie cutter to remove half circles on each side. This is a diverging lens. It causes parallel rays of light to spread apart, or diverge, as if they came from a point behind the lens. It can also be called a concave lens, because both sides have a concave shape. However, diverging is a more precise term. Eyeglasses worn for myopia (nearsightedness) are diverging lenses. Combinations of lens shapes have unpredictable results because student-made gelatin lenses have different curvatures. If the sides are reasonably smooth it is usually possible to at least trace the laser beams as they travel from one to the other. Activity 5 – Optical Fiber Optical fiber for telecommunications is made of very thin strands of glass, a little larger than a human hair. Light is trapped in the fiber where it can travel without dimming (attenuating) over very long distances. Since many wavelengths (colors) can carry different information on the same fiber, it can carry a tremendous amount of data. The gelatin fiber will probably lose most of the light along its length because it is difficult to keep the sides smooth. It is possible with care to see some light exiting the end opposite the laser pointer. Shine the light at an angle to the thin rectangle and look for reflections off the inner surface, back into the gelatin.
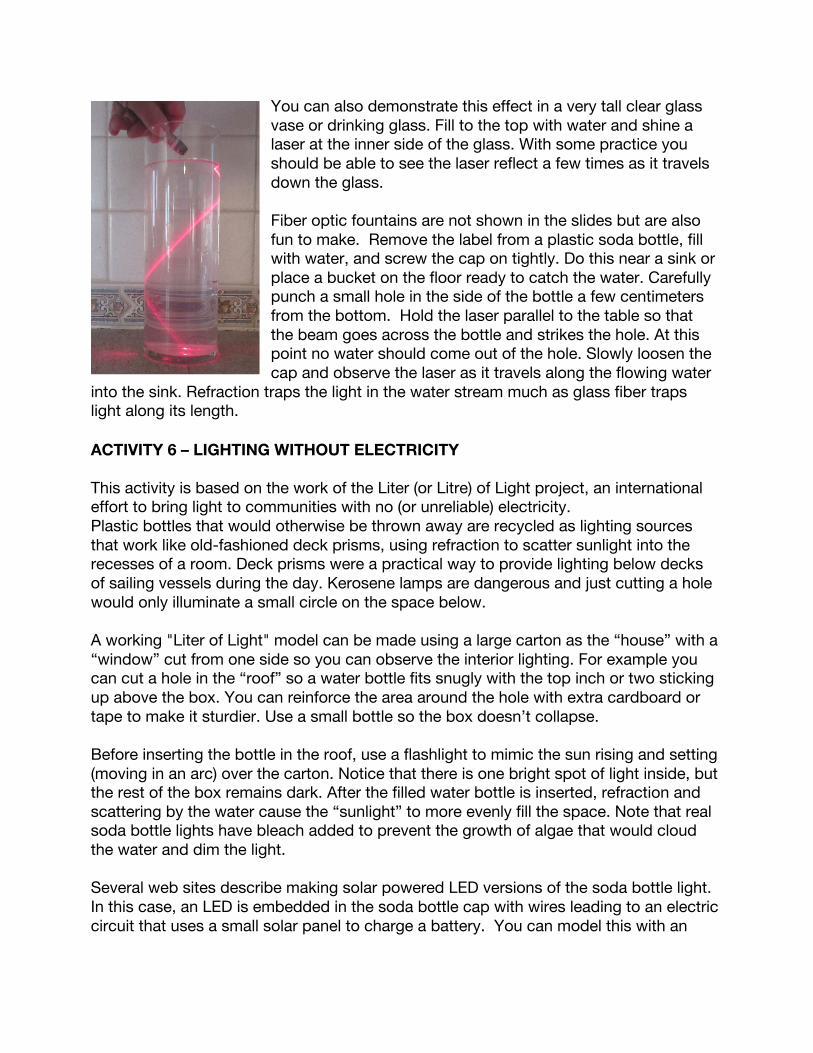
You can also demonstrate this effect in a very tall clear glass vase or drinking glass. Fill to the top with water and shine a laser at the inner side of the glass. With some practice you should be able to see the laser reflect a few times as it travels down the glass. Fiber optic fountains are not shown in the slides but are also fun to make. Remove the label from a plastic soda bottle, fill with water, and screw the cap on tightly. Do this near a sink or place a bucket on the floor ready to catch the water. Carefully punch a small hole in the side of the bottle a few centimeters from the bottom. Hold the laser parallel to the table so that the beam goes across the bottle and strikes the hole. At this point no water should come out of the hole. Slowly loosen the cap and observe the laser as it travels along the flowing water
into the sink. Refraction traps the light in the water stream much as glass fiber traps light along its length.
ACTIVITY 6 – LIGHTING WITHOUT ELECTRICITY
This activity is based on the work of the Liter (or Litre) of Light project, an international effort to bring light to communities with no (or unreliable) electricity. Plastic bottles that would otherwise be thrown away are recycled as lighting sources that work like old-fashioned deck prisms, using refraction to scatter sunlight into the recesses of a room. Deck prisms were a practical way to provide lighting below decks of sailing vessels during the day. Kerosene lamps are dangerous and just cutting a hole would only illuminate a small circle on the space below. A working "Liter of Light" model can be made using a large carton as the “house” with a “window” cut from one side so you can observe the interior lighting. For example you can cut a hole in the “roof” so a water bottle fits snugly with the top inch or two sticking up above the box. You can reinforce the area around the hole with extra cardboard or tape to make it sturdier. Use a small bottle so the box doesn’t collapse. Before inserting the bottle in the roof, use a flashlight to mimic the sun rising and setting (moving in an arc) over the carton. Notice that there is one bright spot of light inside, but the rest of the box remains dark. After the filled water bottle is inserted, refraction and scattering by the water cause the “sunlight” to more evenly fill the space. Note that real soda bottle lights have bleach added to prevent the growth of algae that would cloud the water and dim the light. Several web sites describe making solar powered LED versions of the soda bottle light. In this case, an LED is embedded in the soda bottle cap with wires leading to an electric circuit that uses a small solar panel to charge a battery. You can model this with an
inexpensive solar walkway light. These have small solar panels that charge a battery during the day and an LED that glows at night. Inserted in the bottle, such a solar power light source would provide light after the sunset. OPTIONAL ACTIVITY – THE WEIRD LENS Students, even some college students, often assume that the shape of the lens is the only factor in determining if the lens is converging or diverging. Typically textbooks only show lenses made of glass so that is a reasonable assumption. In this activity, a lens that looks like it should cause light rays to converge actually spreads the rays out. Watch glasses are small rounded glass dishes used in chemistry labs. You will need two of these to make one lens. Clean the watch glasses thoroughly so the caulk will adhere. Run a thick bead of caulk around the edge of one watch glass and carefully place the other on top, edge to edge, to make a hollow shape that is convex on both sides. Be sure to use enough to completely seal the edges. It may take up to 24 hours before this odd lens can be submerged in water. If the caulk has not completely cured it will just make a mess in the water. Submerge the lens into a tank of water large enough to hold it. We found a small plastic box used to transport animals that worked well and was not too expensive. A fish tank works too. Since the hollow lens floats you may need an extra pair of hands to help with the experiment. Submerge a glass lens first and use two laser pointers to show that light passing through the lens is brought to a focus, as expected, on the other side. (You can use a magnifying glass for this lens.) You will notice that the light converges much more slowly in water than in air, so the distance to the focal point is longer. Since light travels slower in water than in air, light bends less at the lens surface when it is submerged. When you submerge the "air lens" that you made, the laser beams will diverge, or spread apart, on the other side. Light travels faster in air than in water so even though this lens is thicker in the center like a converging lens (double convex shape) it causes the rays to diverge. APPLICATION: When you open your eyes under water your eyes can’t focus because they are now surrounded by water, rather than air. Light does not bend as much going from water into your eye as from air into your eye. Swim goggles restore the air space in front of your cornea and allow the eye to focus.
VIDEOS AND WEB SITES A video showing gelatin refraction https://www.youtube.com/watch?v=wjEm45jlFrI A video showing the Disappearing Beaker https://www.youtube.com/watch?v=86Hv5-4qlt0 A video showing the "Air Lens" https://www.youtube.com/watch?v=sY95YVHUp1E Liter of Light web site. The project has educational resources. http://literoflight.org/