BeLight Software Printfolio · ~/Library/Application Support/BeLight Software/Business Card...
48
BeLight Software Printfolio Getting Started Guide Version 1 November 2010
Transcript of BeLight Software Printfolio · ~/Library/Application Support/BeLight Software/Business Card...
BeLight Software
PrintfolioGetting Started Guide
Version 1November 2010
(C) 2010 BeLight Software, Ltd.
All rights reserved.
BeLight Software, Ltd. reserves the right to improve, enhance and revise its products without notice.
The information in this document is furnished for informational use only, is subject to change without notice, and should not be constructed as a commitment by BeLight Software, Ltd. BeLight Software assumes no liability for any errors or inaccuracies that may appear in this document.
All trademarks, product and/or brand names mentioned in this publication, are the sole property of their respective owners.
Written by Nick Shubin. Cover design by Viktoriya Naumova.Thanks to Ray East for help with the creation of this publication.
3Table of Contents
ContentsChapter 1: Introduction .................................. 5
Welcome to Printfolio ............................................................. 5What is Included ................................................................... 5System Requirements ............................................................ 5Installing Printfolio ................................................................ 6Removing Printfolio ............................................................... 6Updating Printfolio ................................................................. 7Licensing ............................................................................. 7Technical Support .................................................................. 7Useful Web Resources ............................................................ 8Conventions Used in this Document ......................................... 8Where to Find More Detailed Documentation ............................. 9
Chapter 2: A Quick Tour ............................... 10The Printfolio Gallery ............................................................10
The Interface of the Printfolio Applications ............................11Disc Cover Main Window .......................................................11
The Inspector .........................................................................13The Design Element Tab .......................................................13The Geometry Tab ................................................................13The Fill and Shadow Tab .......................................................13The Image Tab .....................................................................13The Text Tab .......................................................................13The Alignment Tab ...............................................................13
The Preferences Dialog ...........................................................14
Chapter 3: Quick Start Guide ........................ 15Business Card Composer Quick Start Guide ............................15
Step 1: Choosing a Template in the Assistant ...........................15Step 2: Choosing a Paper Layout ............................................16Step 3: Calibrating Your Printer ..............................................17Step 4: Editing Your Card ......................................................19Step 5: Printing Your Card .....................................................20
Disc Cover Quick Start Guide ..................................................22Step 1: Choosing a Template in the Assistant ...........................22Step 2: Importing Images or a List of Songs, Files or Videos ......23Step 3: Editing Your Document ..............................................26Step 4: Printing Your Document ............................................30
Labels & Addresses Quick Start Guide ....................................32Step 1: Choosing a Template .................................................32Step 2: Selecting Paper Layout ..............................................33Step 3: Adjusting the Document.............................................34Step 4: Printing ...................................................................35
4 Printfolio Getting Started Guide
Swift Publisher Quick Start Guide ...........................................37Choosing Templates ..............................................................37Editing Text .........................................................................37Adding and Modifying Images ................................................37Adding and Deleting Pages ....................................................38
Art Text Quick Start Guide ......................................................39Using Art Text with the Printfolio Software ...............................39Step 1: Adding an Art Text Object ..........................................39Step 2: Changing Text or Choosing an Image ...........................40Step 3: Applying Effects ........................................................41Step 4: Applying Transformation ............................................43Step 5: Adding More Text or Graphic Objects ...........................44Step 6: Organizing Layers in Your Document ............................44Step 7: Adding the Background ..............................................45Step 8: Sending the Image Back to the Main Program ...............47
Image Tricks: Editing Images .................................................48
5Chapter 1: Introduction
Chapter 1: IntroductionWelcome to PrintfolioPrintfolio is a package of programs. Each program lets you work with a particular type of document. On the other hand, Printfolio is an application that lets you choose a document type, like a brochure or address label, and automatically opens the template library of the program that corresponds to your choice.
What is IncludedPrintfolio package applications:
• Business Card Composer is used to design and print business cards. • Disc Cover is used to design and print CD/DVD labels and cover art. • Labels & Addresses is used to design and print labels, envelopes and
postcards. • Swift Publisherisusedtodesignandprintflyers,brochuresandother
types of documents.
Additional applications:• Art Text is used to create textual graphics, logos, icons and web design
elements.• Image Tricks is used to edit and generate images.
System Requirements• AppleMacintoshcomputer• MacOSXv10.5.8orlater• 600MBofavailablediskspace(approx.4GBforthefullclipart
collection included in the retail version)• DVD-ROMdrive(forretailversion)• Internetconnectiontouseonlineservices

6 Printfolio Getting Started Guide
Installing PrintfolioRetail edition on DVD:
1.Double-clickonthePrintfolioicon.2. Follow the installation instructions.
Retail edition via download:1.Double-clickonthePrintfolioicon.2. Follow the installation instructions.3.Double-clicktheAdditionalCliparticon.4. Follow the installation instructions.
Standard edition:1.Double-clickonthePrintfolioicon.2. Follow the installation instructions.
By default, the Printfolio application is installed into the Applications folder. Other programs are installed into the Applications/Printfolio Units folder.
Removing Printfolio
ToremovePrintfolioapplications,deletefilesandfoldersfollowingthesepaths:
/Applications/Printfolio Units/Applications/Printfolio.app
~/Library/Application Support/BeLight Software/Business Card Composer~/Library/Application Support/BeLight Software/Disc Cover~/Library/Application Support/BeLight Software/Image Depot~/Library/Application Support/BeLight Software/Labels & Addresses
~/Library/Preferences/com.belightsoft.PrintFolio.plist~/Library/Preferences/com.belightsoft.BusinessCardComposer5.plist~/Library/Preferences/com.belightsoft.DiscCover2.plist~/Library/Preferences/com.belightsoft.LabelsAddresses.plist~/Library/Preferences/com.belightsoft.SwiftPublisher2.plist
~/Library/Caches/com.belightsoft.BusinessCardComposer5~/Library/Caches/com.belightsoft.DiscCover2~/Library/Caches/com.belightsoft.LabelsAddresses~/Library/Caches/com.belightsoft.SwiftPublisher2
/Library/Application Support/BeLight Software/Business Card Composer/Library/Application Support/BeLight Software/BasicShapes/Library/Application Support/BeLight Software/ClipArt/Library/Application Support/BeLight Software/Disc Cover/Library/Application Support/BeLight Software/Labels & Addresses
7Chapter 1: Introduction
/Library/Application Support/BeLight Software/Swift Publisher/Library/Application Support/BeLight Software/Masks
On Mac OS 10.5, delete also:/Library/Receipts/PrintfolioCommon.pkg/Library/Receipts/Additional Clipart.pkg/Library/Receipts/Additional Fonts.pkg
“~“ means user’s Home.
Updating Printfolio
To update the Printfolio application, select Printfolio > Check for Updates… in the main menu. To update other included programs individually, select Check for Updates… in their menu.
You can also download updates from the developer’s web site:http://www.belightsoft.com/
Licensing1. Start the Printfolio application. The program will display a message box
informing you that the program is unlicensed.2. Click the License… button.3. Enter your name and license code.
Notes:1. Use a Printfolio license key with the Printfolio.app application. Business Card Composer, Disc Cover, Labels & Addresses and Swift Publisher will become licensed too.
2.APrintfoliolicensekeydoesnotlicenseArtTexttouseitasastand-aloneapplication. To use Art Text apart from Printfolio, a separate license code must be purchased.
3.LicensingPrintfolioletsyouuseArtTextintheplug-inmode.See Chapter 3, “Using Art Text with the Printfolio Software”.
Technical SupportThe developer of Printfolio offers free technical support.
ByE-mail:[email protected]
8 Printfolio Getting Started Guide
Technical support form on BeLight’s website: http://www.belightsoft.com/support/
Forum on BeLight’s website: http://www.belightsoft.com/forum/
When reporting a problem, please make sure to specify: •Theversionoftheprogramyouareusing.•TheversionofMacOSXinstalledonyourcomputer.•Yourpreviousactionsthatcouldhaveleadtotheproblem.•Iftheproblempersists,describehowtoreproduceit.•Whennecessary,illustrateyourreportwithscreenshots(pressCmd-Shift-3 to save a screenshot on your Desktop).
Useful Web ResourcesPrintfolio page:http://www.belightsoft.com/products/printfolio/overview.php
BeLight Software web site:http://www.belightsoft.com
Buy Printfolio:http://www.belightsoft.com/buy/
Conventions Used in this Document• Bold Text is used for the names of menu items, shortcuts, buttons,
radio buttons, edit boxes, check boxes and other controls.
• Text in Italics is used for the names of windows, dialog boxes, panels, tabs and other elements of the program interface. Suchtextformattingisusedfornamesofprograms,files,foldersandweb links.
It is also used for chapter and section references, and to introduce important remarks.
• Formenuitems,the“>”symbolisused.Forexample,File > Open is equivalentto“theOpenitemundertheFilemenu”.
• Ashortcut(shortkey)isoneorseveralkeyswhicharepressedtogether.Cmd-S means you should hold down the Command(Apple) key while pressing the S key, then release them.
9Chapter 1: Introduction
• Ctrl-clickisaclickwhileholdingtheCtrlkeydown.Right-clickisaclickbytherightbuttonofatwo-buttonmouse.Bothactionsareequivalent.
• Thecontext(contextualorshortcut)menuisapop-upmenuthatappearswhenyouright-clickorCtrl-clickonanobject.Thismenucontainsoptionsthatvarydependingontheobject(image,text,etc.).
Where to Find More Detailed DocumentationApplications included in Printfolio have embedded Help and other documentation on the developer’s web site. To open Help in the program, use the Help menu.
10 Printfolio Getting Started Guide
Chapter 2: A Quick TourThe Printfolio Gallery
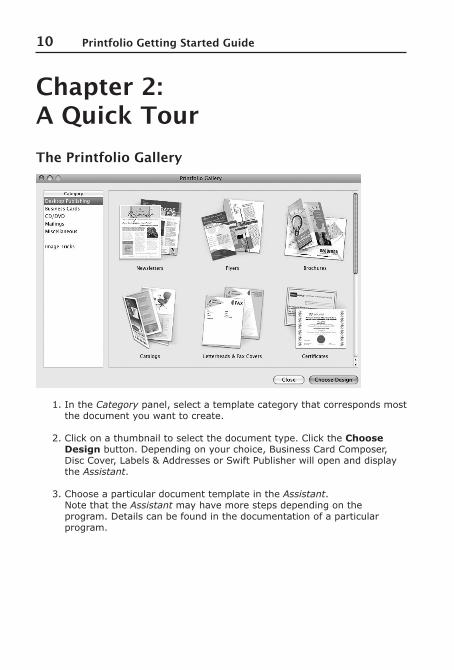
1. In the Category panel, select a template category that corresponds most the document you want to create.
2. Click on a thumbnail to select the document type. Click the Choose Design button. Depending on your choice, Business Card Composer, Disc Cover, Labels & Addresses or Swift Publisher will open and display the Assistant.
3. Choose a particular document template in the Assistant. Note that the Assistant may have more steps depending on the program. Details can be found in the documentation of a particular program.
11Chapter 2: A Quick Tour
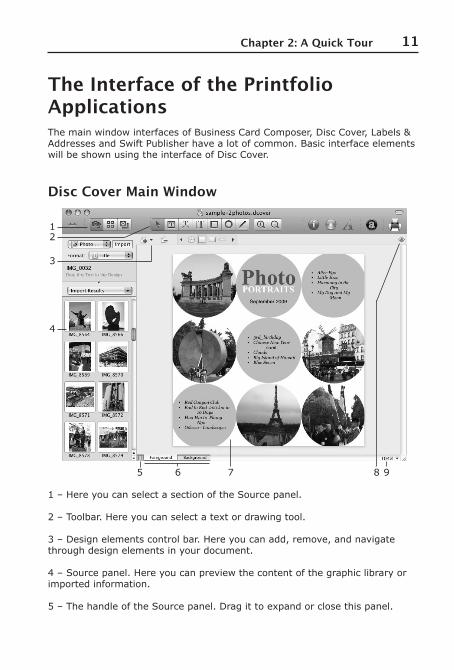
The Interface of the Printfolio ApplicationsThe main window interfaces of Business Card Composer, Disc Cover, Labels & Addresses and Swift Publisher have a lot of common. Basic interface elements will be shown using the interface of Disc Cover.
Disc Cover Main Window
1 – Here you can select a section of the Source panel.
2 – Toolbar. Here you can select a text or drawing tool.
3 – Design elements control bar. Here you can add, remove, and navigate through design elements in your document.
4 – Source panel. Here you can preview the content of the graphic library or imported information.
5 – The handle of the Source panel. Drag it to expand or close this panel.
1
9765
4
2
3
8
12 Printfolio Getting Started Guide
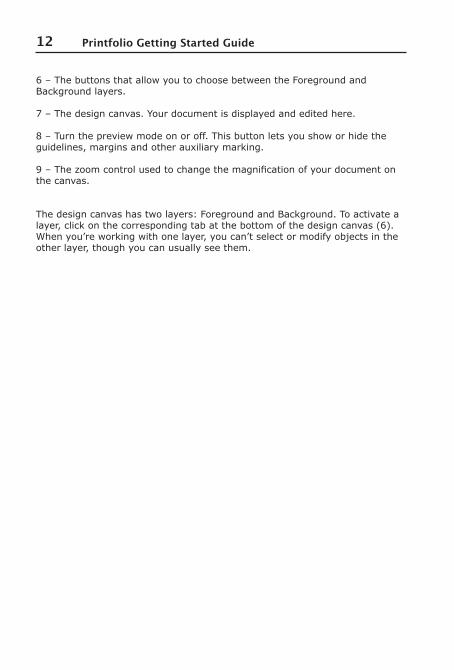
6 – The buttons that allow you to choose between the Foreground and Background layers.
7 – The design canvas. Your document is displayed and edited here.
8 – Turn the preview mode on or off. This button lets you show or hide the guidelines, margins and other auxiliary marking.
9–Thezoomcontrolusedtochangethemagnificationofyourdocumentonthe canvas.
The design canvas has two layers: Foreground and Background. To activate a layer,clickonthecorrespondingtabatthebottomofthedesigncanvas(6).When you’re working with one layer, you can’t select or modify objects in the other layer, though you can usually see them.
13Chapter 2: A Quick Tour
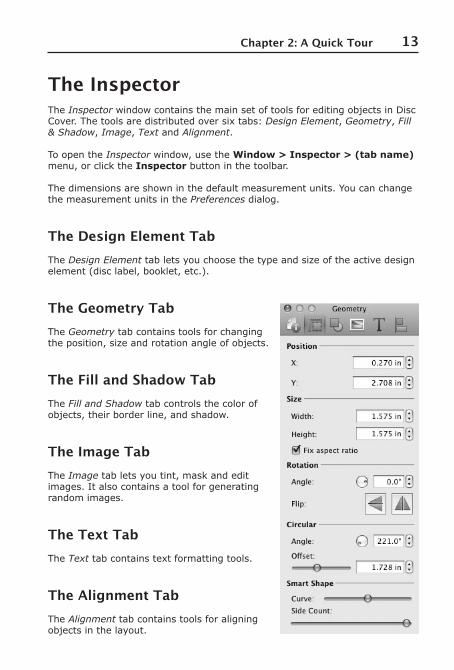
The InspectorThe Inspector window contains the main set of tools for editing objects in Disc Cover. The tools are distributed over six tabs: Design Element, Geometry, Fill & Shadow, Image, Text and Alignment.
To open the Inspector window, use the Window > Inspector > (tab name) menu, or click the Inspector button in the toolbar.
The dimensions are shown in the default measurement units. You can change the measurement units in the Preferences dialog.
The Design Element Tab The Design Element tab lets you choose the type and size of the active design element(disclabel,booklet,etc.).
The Geometry TabThe Geometry tab contains tools for changing the position, size and rotation angle of objects.
The Fill and Shadow Tab The Fill and Shadow tab controls the color of objects, their border line, and shadow.
The Image Tab The Image tab lets you tint, mask and edit images. It also contains a tool for generating random images.
The Text Tab The Text tab contains text formatting tools.
The Alignment Tab The Alignment tab contains tools for aligning objects in the layout.
14 Printfolio Getting Started Guide
The Preferences DialogThe Preferences dialog contains settings that are applied by default every time you run the application. You can control the program behavior by changing them.
To open the Preferences dialog, choose [Program name] > Preferences in the main menu or press “Cmd-,”.
The detailed description of the Preferences can be found in the documentation of the corresponding program.
15Chapter 3: Quick Start Guide
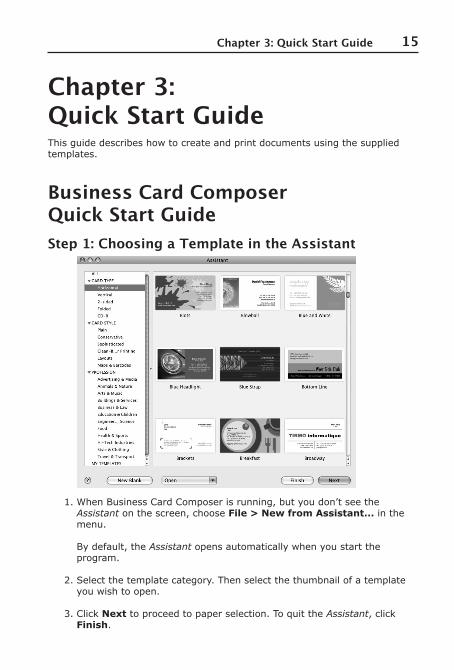
Business Card Composer Quick Start GuideStep 1: Choosing a Template in the Assistant
1. When Business Card Composer is running, but you don’t see the Assistant on the screen, choose File > New from Assistant... in the menu. By default, the Assistant opens automatically when you start the program.
2. Select the template category. Then select the thumbnail of a template you wish to open.
3. Click Next to proceed to paper selection. To quit the Assistant, click Finish.
Chapter 3: Quick Start GuideThis guide describes how to create and print documents using the supplied templates.
16 Printfolio Getting Started Guide
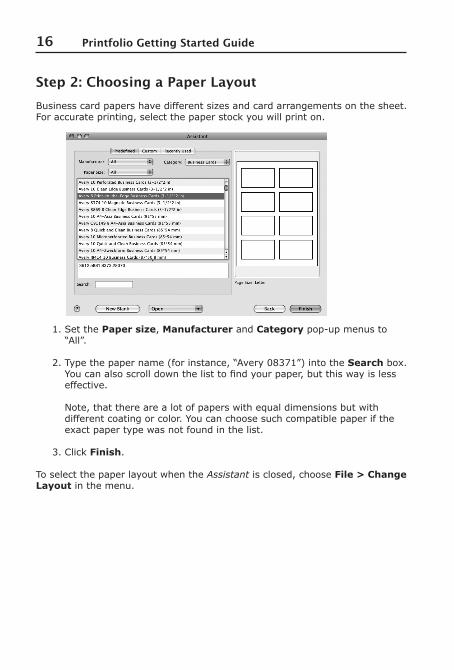
Step 2: Choosing a Paper LayoutBusiness card papers have different sizes and card arrangements on the sheet. For accurate printing, select the paper stock you will print on.
1. Set the Paper size, Manufacturer and Categorypop-upmenusto“All”.
2.Typethepapername(forinstance,“Avery08371”)intotheSearch box. Youcanalsoscrolldownthelisttofindyourpaper,butthiswayislesseffective. Note, that there are a lot of papers with equal dimensions but with different coating or color. You can choose such compatible paper if the exact paper type was not found in the list.
3. Click Finish.
To select the paper layout when the Assistant is closed, choose File > Change Layout in the menu.
17Chapter 3: Quick Start Guide
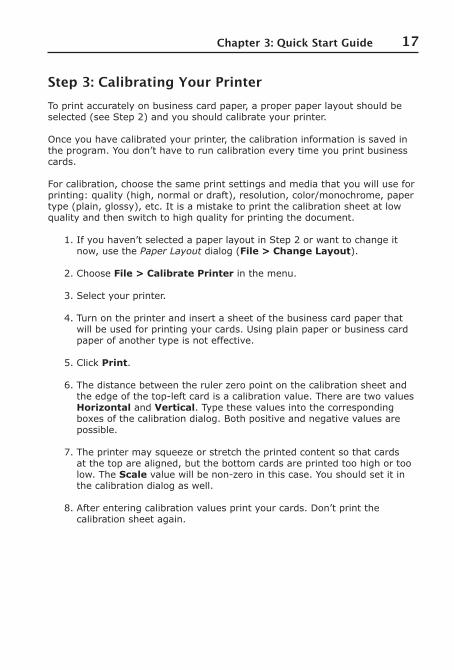
Step 3: Calibrating Your PrinterTo print accurately on business card paper, a proper paper layout should be selected(seeStep2)andyoushouldcalibrateyourprinter.
Once you have calibrated your printer, the calibration information is saved in the program. You don’t have to run calibration every time you print business cards.
For calibration, choose the same print settings and media that you will use for printing:quality(high,normalordraft),resolution,color/monochrome,papertype(plain,glossy),etc.Itisamistaketoprintthecalibrationsheetatlowquality and then switch to high quality for printing the document.
1. If you haven’t selected a paper layout in Step 2 or want to change it now, use the Paper Layoutdialog(File > Change Layout).
2. Choose File > Calibrate Printer in the menu.
3. Select your printer.
4. Turn on the printer and insert a sheet of the business card paper that will be used for printing your cards. Using plain paper or business card paper of another type is not effective.
5. Click Print.
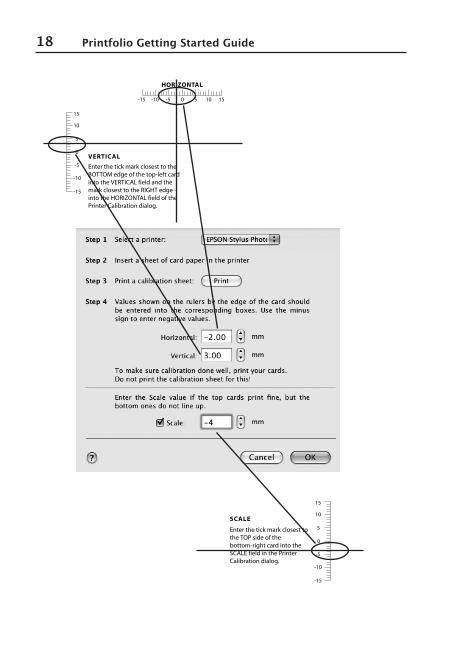
6. The distance between the ruler zero point on the calibration sheet and theedgeofthetop-leftcardisacalibrationvalue.TherearetwovaluesHorizontal and Vertical. Type these values into the corresponding boxes of the calibration dialog. Both positive and negative values are possible.
7. The printer may squeeze or stretch the printed content so that cards at the top are aligned, but the bottom cards are printed too high or too low. The Scalevaluewillbenon-zerointhiscase.Youshouldsetitinthe calibration dialog as well.
8. After entering calibration values print your cards. Don’t print the calibration sheet again.
18 Printfolio Getting Started Guide
19Chapter 3: Quick Start Guide
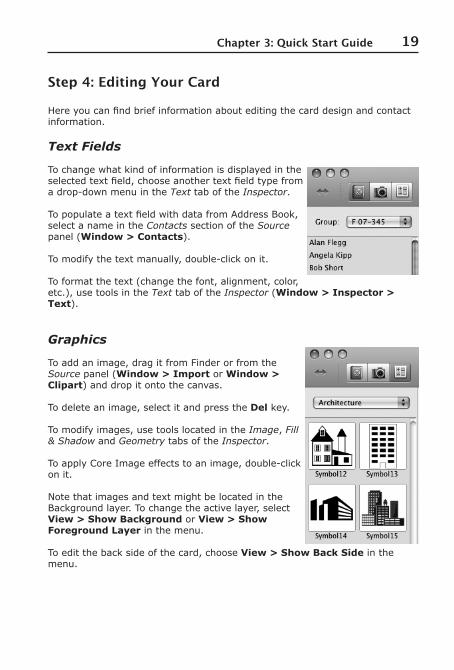
Step 4: Editing Your Card
Hereyoucanfindbriefinformationabouteditingthecarddesignandcontactinformation.
Text Fields
To change what kind of information is displayed in the selectedtextfield,chooseanothertextfieldtypefromadrop-downmenuintheText tab of the Inspector.
TopopulateatextfieldwithdatafromAddressBook,select a name in the Contacts section of the Source panel(Window > Contacts).
Tomodifythetextmanually,double-clickonit.
Toformatthetext(changethefont,alignment,color,etc.), use tools in the Text tab of the Inspector(Window > Inspector > Text).
Graphics
To add an image, drag it from Finder or from the Sourcepanel(Window > Import or Window > Clipart) and drop it onto the canvas.
To delete an image, select it and press the Del key.
To modify images, use tools located in the Image, Fill & Shadow and Geometry tabs of the Inspector.
ToapplyCoreImageeffectstoanimage,double-clickon it. Note that images and text might be located in the Background layer. To change the active layer, select View > Show Background or View > Show Foreground Layer in the menu.
To edit the back side of the card, choose View > Show Back Side in the menu.
20 Printfolio Getting Started Guide
Step 5: Printing Your CardThese short instructions cover printing one business card design with one person’s information. In more detailed documentation, you will be instructed on how to print different designs on the same page, and how to activate the automatic substitution of information on the card design to print cards for different persons.
Successful card printing depends on Steps 2 and 3.
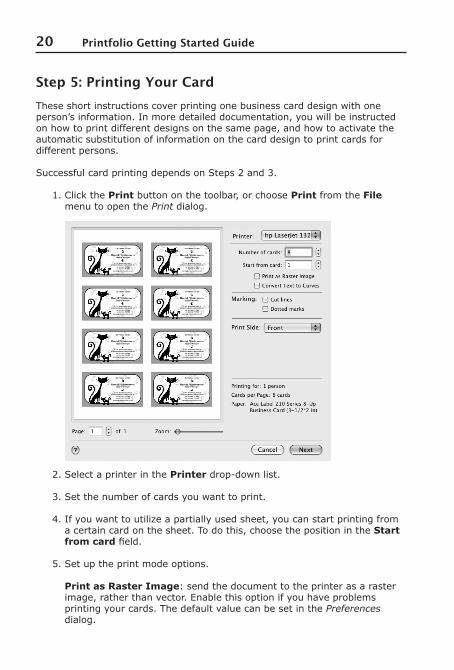
1. Click the Print button on the toolbar, or choose Print from the File menu to open the Print dialog.
2. Select a printer in the Printerdrop-downlist. 3. Set the number of cards you want to print. 4. If you want to utilize a partially used sheet, you can start printing from
a certain card on the sheet. To do this, choose the position in the Start from cardfield.
5. Set up the print mode options. Print as Raster Image: send the document to the printer as a raster image, rather than vector. Enable this option if you have problems printing your cards. The default value can be set in the Preferences dialog.

21Chapter 3: Quick Start Guide
Convert Text to Curves: converts text to vector images before sending the design to the printer. The option lets you avoid some problems with printers.
6. Set up Marking options if you want to print cards on plain paper and cut them out by yourself.
7.Fordouble-sidedcards,choosewhichsidetoprinttointhePrint Side pop-upmenu.
8. Click the Next button. In the system print dialog check the standard
print options. 9. Click the Print button.
22 Printfolio Getting Started Guide
Disc Cover Quick Start GuideStep 1: Choosing a Template in the Assistant
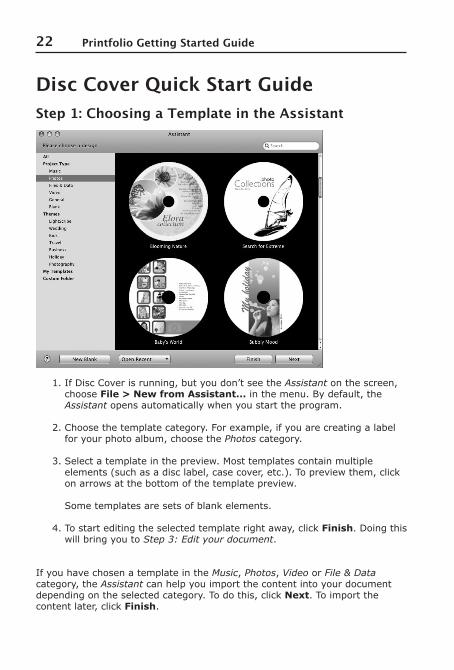
1. If Disc Cover is running, but you don’t see the Assistant on the screen, choose File > New from Assistant... in the menu. By default, the Assistant opens automatically when you start the program.
2. Choose the template category. For example, if you are creating a label for your photo album, choose the Photos category.
3. Select a template in the preview. Most templates contain multiple elements(suchasadisclabel,casecover,etc.).Topreviewthem,clickon arrows at the bottom of the template preview. Some templates are sets of blank elements.
4. To start editing the selected template right away, click Finish. Doing this will bring you to Step 3: Edit your document.
If you have chosen a template in the Music, Photos, Video or File & Data category, the Assistant can help you import the content into your document depending on the selected category. To do this, click Next. To import the content later, click Finish.
23Chapter 3: Quick Start Guide
Step 2: Importing Images or a List of Songs, Files or VideosThe type of data that you can import in the second step depends on which templatecategoryhasbeenselected(seeStep1,items3and4).
If the Photos category has been selected, the Assistant will offer you to import datafromyouriPhotolibrary(Step2,sectionPhotos).
If the Music category has been selected, the Assistant will offer you to import datafromyouriTuneslibrary(Step2,sectionMusic).
If you select the File & Data category, the Assistant lets you choose a folder to createalistofitscontent(Step2,sectionFiles & Data).
If you select the Video category, the Assistant lets you choose a folder to createalistofitscontent(Step2,sectionVideo).
Note: After the Assistant has been closed, you can import data using the Source panel.
Photos
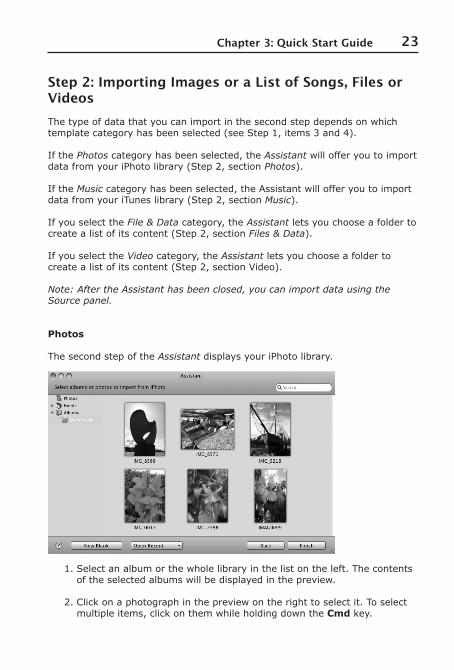
The second step of the Assistant displays your iPhoto library.
1. Select an album or the whole library in the list on the left. The contents of the selected albums will be displayed in the preview.
2. Click on a photograph in the preview on the right to select it. To select multiple items, click on them while holding down the Cmd key.

24 Printfolio Getting Started Guide
3. Click Finishtoproceedtoeditingorprinting(Step 3: Editing your label).
Music
The second step of the Assistant displays your iTunes library.
1. Select an album, playlist, or the whole library in the list on the left. The contents will be displayed on the right.
2. Select tracks you want to import. To select an individual track, click on it. To select multiple items, click on them while holding down the Cmd key. To select a range of items, use the Shift key. To select all items, press Cmd-A.
3. Click Finishtoproceedtoeditingorprinting(Step 3: Editing Your Document).
Files & Data
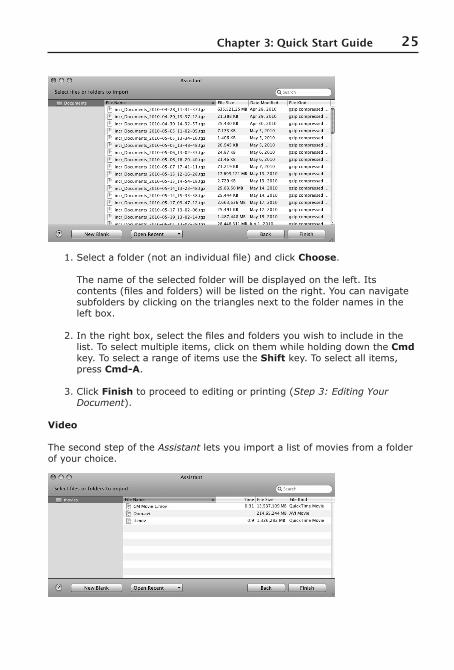
The second step of the Assistantletsyouimportalistoffilesfromafolderofyour choice.
25Chapter 3: Quick Start Guide
1.Selectafolder(notanindividualfile)andclickChoose. The name of the selected folder will be displayed on the left. Its contents(filesandfolders)willbelistedontheright.Youcannavigatesubfolders by clicking on the triangles next to the folder names in the left box.
2.Intherightbox,selectthefilesandfoldersyouwishtoincludeinthelist. To select multiple items, click on them while holding down the Cmd key. To select a range of items use the Shift key. To select all items, press Cmd-A.
3. Click Finishtoproceedtoeditingorprinting(Step 3: Editing Your Document).
Video
The second step of the Assistant lets you import a list of movies from a folder of your choice.
26 Printfolio Getting Started Guide
1. Selectafolder(notanindividualfile)andclickChoose. The name of the selected folder will be displayed on the left. Its contents(filesandfolders)willbelistedontheright.Youcannavigate subfolders by clicking on the triangles next to the folder names in the left box.
2. Intherightbox,selectthefilesyouwishtoincludeinthelist.Toselect multiple items, click on them while holding down the Cmd key. To select a range of items use the Shift key. To select all items, press Cmd-A.
3. Click Finishtoproceedtoeditingorprinting(Step 3: Editing Your Document).
Step 3: Editing Your DocumentHereyoucanfindbriefinformationabouteditingthecontentofyourdocument. Some or all the steps below may be omitted.
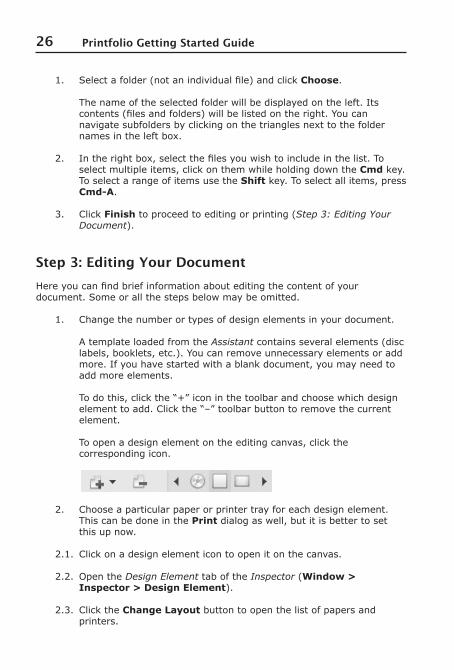
1. Change the number or types of design elements in your document. A template loaded from the Assistantcontainsseveralelements(disclabels, booklets, etc.). You can remove unnecessary elements or add more. If you have started with a blank document, you may need to add more elements. Todothis,clickthe“+”iconinthetoolbarandchoosewhichdesignelementtoadd.Clickthe“–”toolbarbuttontoremovethecurrentelement. To open a design element on the editing canvas, click the corresponding icon.
2. Choose a particular paper or printer tray for each design element. This can be done in the Print dialog as well, but it is better to set this up now.
2.1. Click on a design element icon to open it on the canvas.
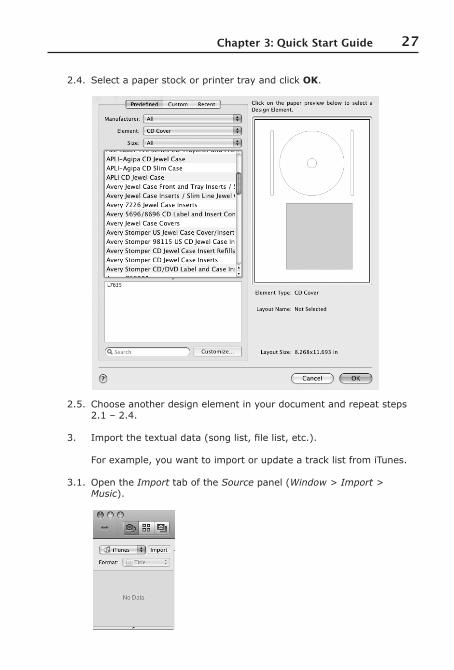
2.2. Open the Design Element tab of the Inspector(Window > Inspector > Design Element).
2.3. Click the Change Layout button to open the list of papers and printers.
27Chapter 3: Quick Start Guide
2.4. Select a paper stock or printer tray and click OK.
2.5. Choose another design element in your document and repeat steps 2.1 – 2.4.
3. Importthetextualdata(songlist,filelist,etc.). For example, you want to import or update a track list from iTunes.
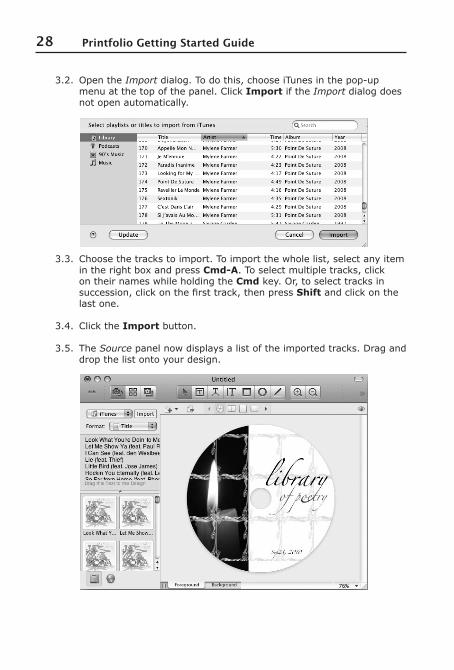
3.1. Open the Import tab of the Sourcepanel(Window > Import > Music).
28 Printfolio Getting Started Guide
3.2. Open the Importdialog.Todothis,chooseiTunesinthepop-upmenu at the top of the panel. Click Import if the Import dialog does not open automatically.
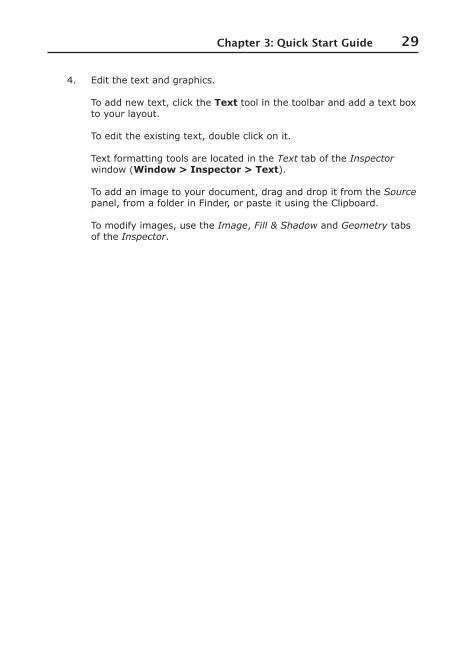
3.3. Choose the tracks to import. To import the whole list, select any item in the right box and press Cmd-A. To select multiple tracks, click on their names while holding the Cmd key. Or, to select tracks in succession,clickonthefirsttrack,thenpressShift and click on the last one.
3.4. Click the Import button.
3.5. The Source panel now displays a list of the imported tracks. Drag and drop the list onto your design.
29Chapter 3: Quick Start Guide
4. Edit the text and graphics. To add new text, click the Text tool in the toolbar and add a text box to your layout. To edit the existing text, double click on it. Text formatting tools are located in the Text tab of the Inspector window(Window > Inspector > Text). To add an image to your document, drag and drop it from the Source panel, from a folder in Finder, or paste it using the Clipboard. To modify images, use the Image, Fill & Shadow and Geometry tabs of the Inspector.
30 Printfolio Getting Started Guide
Step 4: Printing Your Document 1. If you have several design elements, activate the one you are going
to print. By doing this, you will help the program set up the paper in the print dialog correctly.
2. (Optional)Calibrateyourprinter.Thisisstronglyrecommendedasasolution to avoid offset at printing.
2.1. Choose File > Calibrate Printer… in the menu.
2.2. Check if the paper and printer are selected correctly in the calibration dialog. For calibration, use the paper that will be used for printing.
2.3. Click the Print Calibration Sheet… button.
2.4. If the artwork is printed with offset, you should enter the offset values into the Horizontal and Verticalfields.Thevalueisthepoint on the calibration sheet where the corresponding ruler crosses the edge of the actual label or disc. After inputting the values, the calibration preview should display the artwork shifted in the same direction as the printed artwork.
3. The actual printing process begins here.
3.1. Click the Print toolbar button, or choose File > Print… in the menu to open the Print dialog.
3.2. Make sure that the correct media type is set in the Output and Paper Typepop-upmenus.
3.3. Choose a printer if there are several printers installed.
3.4. Keep other settings unchanged.
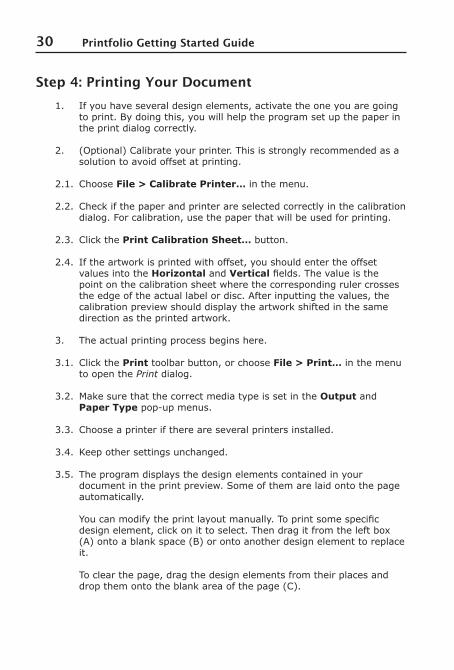
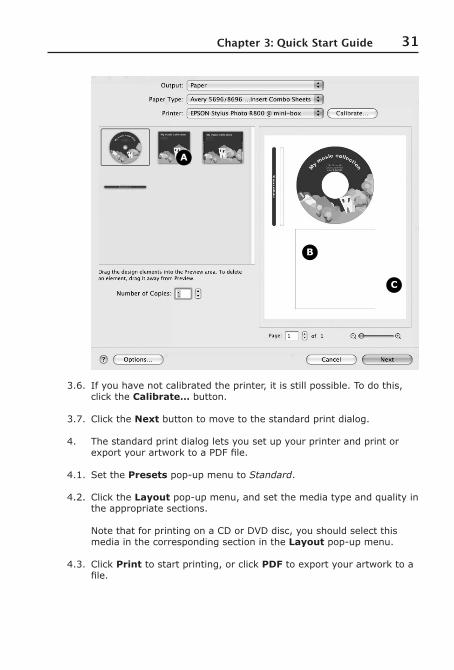
3.5. The program displays the design elements contained in your document in the print preview. Some of them are laid onto the page automatically. Youcanmodifytheprintlayoutmanually.Toprintsomespecificdesign element, click on it to select. Then drag it from the left box (A)ontoablankspace(B)orontoanotherdesignelementtoreplaceit. To clear the page, drag the design elements from their places and dropthemontotheblankareaofthepage(C).
31Chapter 3: Quick Start Guide
3.6. If you have not calibrated the printer, it is still possible. To do this, click the Calibrate… button.
3.7. Click the Next button to move to the standard print dialog.
4. The standard print dialog lets you set up your printer and print or exportyourartworktoaPDFfile.
4.1. Set the Presetspop-upmenutoStandard.
4.2. Click the Layoutpop-upmenu,andsetthemediatypeandqualityinthe appropriate sections. Note that for printing on a CD or DVD disc, you should select this media in the corresponding section in the Layoutpop-upmenu.
4.3. Click Print to start printing, or click PDF to export your artwork to a file.
A
B
C
32 Printfolio Getting Started Guide
Labels & Addresses Quick Start Guide
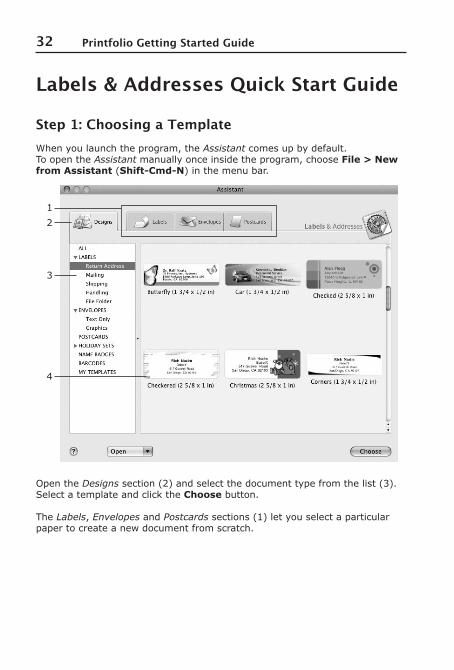
Step 1: Choosing a TemplateWhen you launch the program, the Assistant comes up by default. To open the Assistant manually once inside the program, choose File > New from Assistant(Shift-Cmd-N) in the menu bar.
Open the Designssection(2)andselectthedocumenttypefromthelist(3).Select a template and click the Choose button.
The Labels, Envelopes and Postcardssections(1)letyouselectaparticularpaper to create a new document from scratch.
1
4
3
2
33Chapter 3: Quick Start Guide
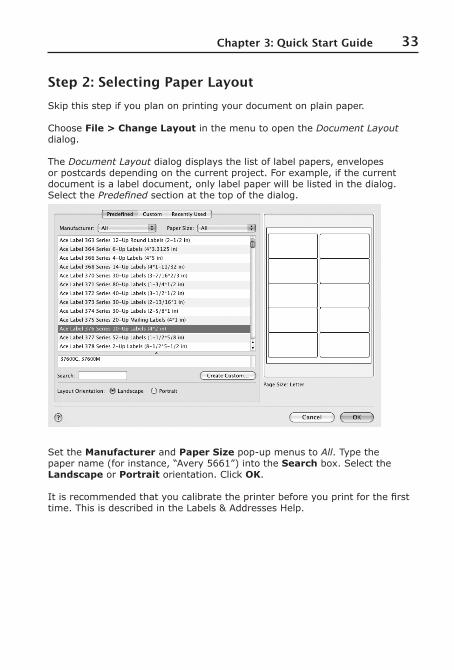
Step 2: Selecting Paper LayoutSkip this step if you plan on printing your document on plain paper.
Choose File > Change Layout in the menu to open the Document Layout dialog.
The Document Layout dialog displays the list of label papers, envelopes or postcards depending on the current project. For example, if the current document is a label document, only label paper will be listed in the dialog.Select the Predefined section at the top of the dialog.
Set the Manufacturer and Paper Sizepop-upmenustoAll. Type the papername(forinstance,“Avery5661”)intotheSearch box. Select the Landscape or Portrait orientation. Click OK.
Itisrecommendedthatyoucalibratetheprinterbeforeyouprintforthefirsttime. This is described in the Labels & Addresses Help.
34 Printfolio Getting Started Guide
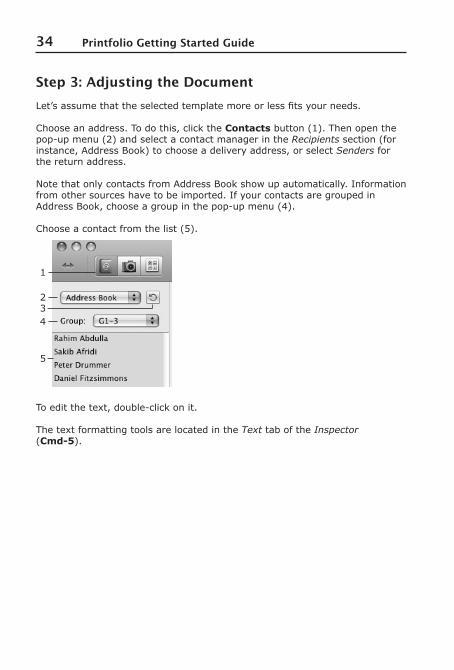
Step 3: Adjusting the DocumentLet’sassumethattheselectedtemplatemoreorlessfitsyourneeds.
Choose an address. To do this, click the Contactsbutton(1).Thenopenthepop-upmenu(2)andselectacontactmanagerintheRecipientssection(forinstance, Address Book) to choose a delivery address, or select Senders for the return address.
Note that only contacts from Address Book show up automatically. Information from other sources have to be imported. If your contacts are grouped in AddressBook,chooseagroupinthepop-upmenu(4).
Chooseacontactfromthelist(5).
Toeditthetext,double-clickonit.
The text formatting tools are located in the Text tab of the Inspector (Cmd-5).
1
2
4
5
3
35Chapter 3: Quick Start Guide
Step 4: PrintingPrinting is described using a label document. Printing envelopes and postcards have common settings. Find details in the embedded Help of Labels & Addresses.
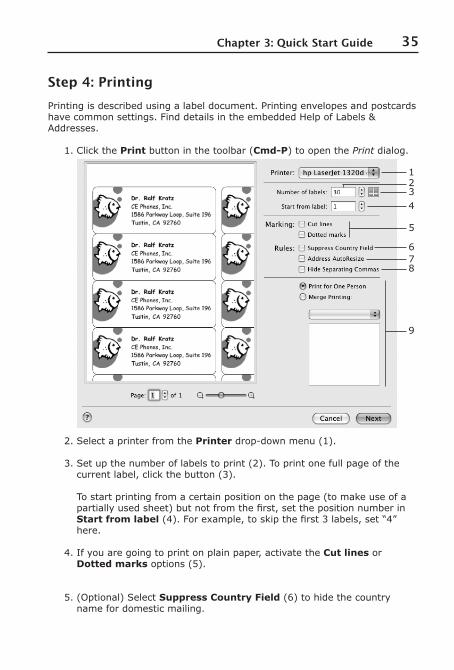
1. Click the Printbuttoninthetoolbar(Cmd-P) to open the Print dialog.
2. Select a printer from the Printerdrop-downmenu(1).
3.Setupthenumberoflabelstoprint(2).Toprintonefullpageofthecurrentlabel,clickthebutton(3). Tostartprintingfromacertainpositiononthepage(tomakeuseofapartiallyusedsheet)butnotfromthefirst,setthepositionnumberinStart from label(4).Forexample,toskipthefirst3labels,set“4”here.
4. If you are going to print on plain paper, activate the Cut lines or Dotted marksoptions(5).
5.(Optional)SelectSuppress Country Field(6)tohidethecountryname for domestic mailing.
1
6
5
432
9
87
36 Printfolio Getting Started Guide
6.(Optional)SelectAddress Autoresize(7)todecreasethefontsizeautomaticallywhentheaddressdoesn’tfitthelabel.Notethatthisfeature can modify only the text in address panels.
7.(Optional)SelectHide Separating Commas(8)toremoveautomaticallyaddedcommasthatseparateaddressfields.
8. Click Next to proceed to the standard print dialog. Here you can set up the print quality, color settings, etc. The settings may vary depending on the printer driver.
9. Click Print to send your labels to the printer. Or, click the PDF button to savethepage(s)toaPDFfile.
37Chapter 3: Quick Start Guide
Swift Publisher Quick Start Guide
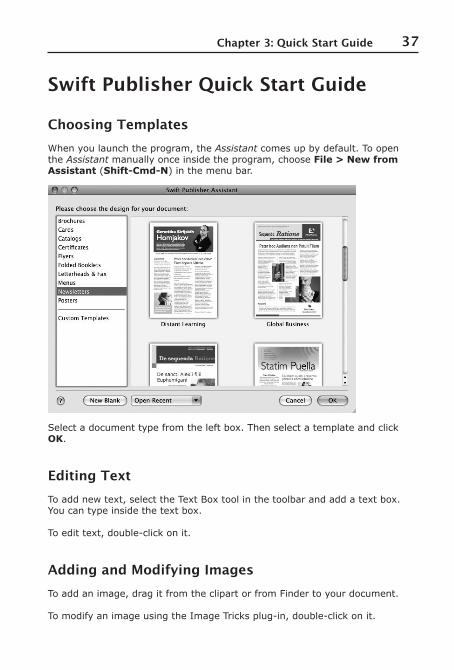
Choosing TemplatesWhen you launch the program, the Assistant comes up by default. To open the Assistant manually once inside the program, choose File > New from Assistant(Shift-Cmd-N) in the menu bar.
Select a document type from the left box. Then select a template and click OK.
Editing TextTo add new text, select the Text Box tool in the toolbar and add a text box. You can type inside the text box.
Toedittext,double-clickonit.
Adding and Modifying ImagesTo add an image, drag it from the clipart or from Finder to your document.
TomodifyanimageusingtheImageTricksplug-in,double-clickonit.
38 Printfolio Getting Started Guide
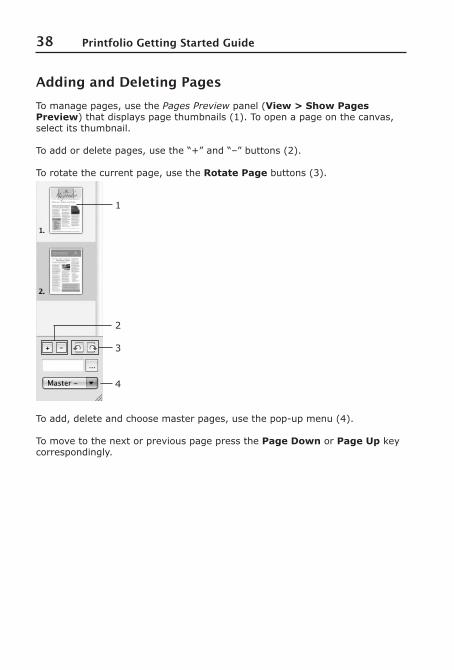
Adding and Deleting PagesTo manage pages, use the Pages Previewpanel(View > Show Pages Preview)thatdisplayspagethumbnails(1).Toopenapageonthecanvas,select its thumbnail.
Toaddordeletepages,usethe“+”and“–”buttons(2).
To rotate the current page, use the Rotate Pagebuttons(3).
Toadd,deleteandchoosemasterpages,usethepop-upmenu(4).
To move to the next or previous page press the Page Down or Page Up key correspondingly.
1
4
3
2
39Chapter 3: Quick Start Guide
Art Text Quick Start GuideThis guide describes possible steps of using Art Text. They are not obligatory.
Using Art Text with the Printfolio SoftwareThePrintfiliolicenseletsyouuseArtTextinsocalledplug-inmodeinsideBusiness Card Composer, Disc Cover, Labels & Addresses and Swift Publisher (named“mainprogram”inthissection).Forsuchuse,Printfoliomustberegistered. Registration of Art Text is not necessary. However, to use Art Text asastand-aloneapplication,youmustpurchasealicensecode.
Step 1: Adding an Art Text ObjectIn the main program, click the Art Text button in the toolbar or select Insert > Art Textinthemainmenu.TheArtTextapplicationwillpop-up.
40 Printfolio Getting Started Guide
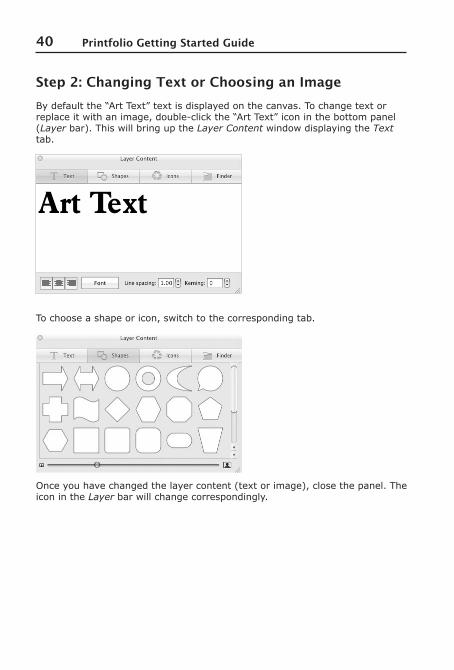
Step 2: Changing Text or Choosing an ImageBydefaultthe“ArtText”textisdisplayedonthecanvas.Tochangetextorreplaceitwithanimage,double-clickthe“ArtText”iconinthebottompanel(Layer bar). This will bring up the Layer Content window displaying the Text tab.
To choose a shape or icon, switch to the corresponding tab.
Onceyouhavechangedthelayercontent(textorimage),closethepanel.Theicon in the Layer bar will change correspondingly.
41Chapter 3: Quick Start Guide
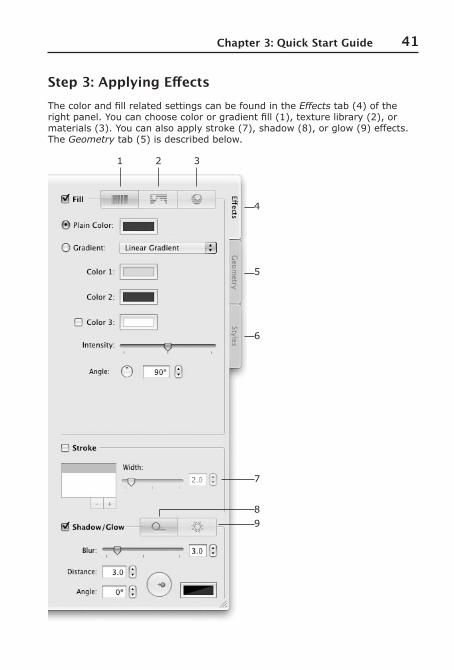
Step 3: Applying EffectsThecolorandfillrelatedsettingscanbefoundintheEffectstab(4)oftherightpanel.Youcanchoosecolororgradientfill(1),texturelibrary(2),ormaterials(3).Youcanalsoapplystroke(7),shadow(8),orglow(9)effects.The Geometrytab(5)isdescribedbelow.
1
4
32
5
6
7
89
42 Printfolio Getting Started Guide
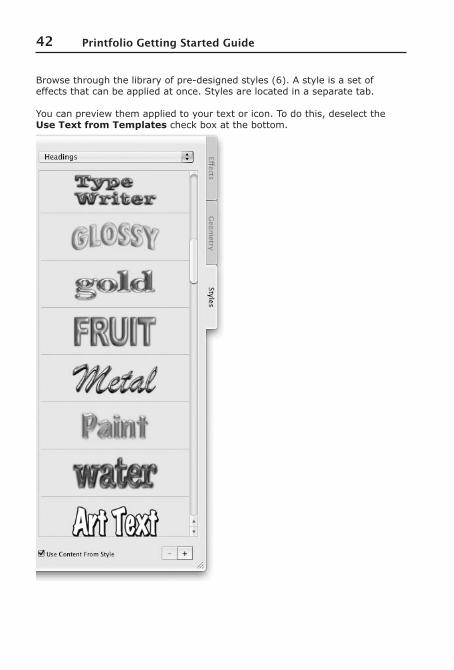
Browsethroughthelibraryofpre-designedstyles(6).Astyleisasetofeffects that can be applied at once. Styles are located in a separate tab.
You can preview them applied to your text or icon. To do this, deselect the Use Text from Templates check box at the bottom.
43Chapter 3: Quick Start Guide
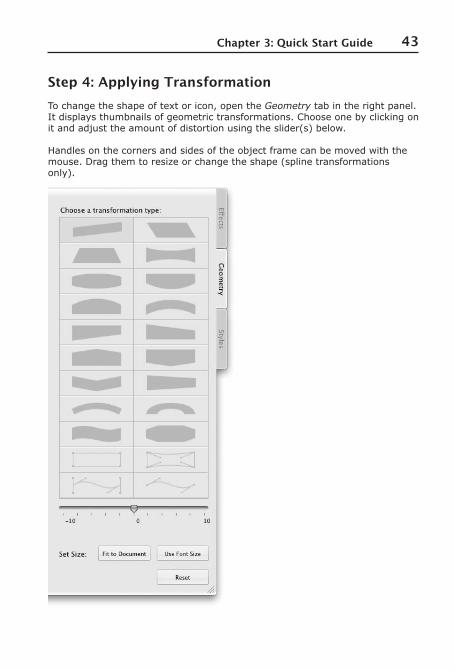
Step 4: Applying TransformationTo change the shape of text or icon, open the Geometry tab in the right panel. It displays thumbnails of geometric transformations. Choose one by clicking on itandadjusttheamountofdistortionusingtheslider(s)below.
Handles on the corners and sides of the object frame can be moved with the mouse.Dragthemtoresizeorchangetheshape(splinetransformationsonly).
44 Printfolio Getting Started Guide
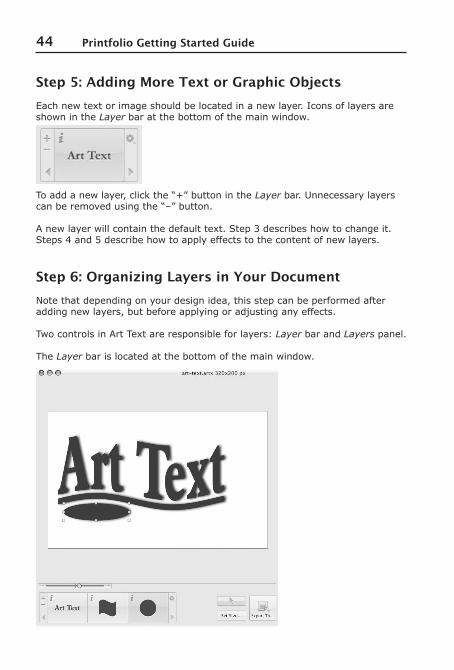
Step 5: Adding More Text or Graphic ObjectsEach new text or image should be located in a new layer. Icons of layers are shown in the Layer bar at the bottom of the main window.
Toaddanewlayer,clickthe“+”buttonintheLayer bar. Unnecessary layers canberemovedusingthe“–”button.
A new layer will contain the default text. Step 3 describes how to change it. Steps 4 and 5 describe how to apply effects to the content of new layers.
Step 6: Organizing Layers in Your DocumentNote that depending on your design idea, this step can be performed after adding new layers, but before applying or adjusting any effects.
Two controls in Art Text are responsible for layers: Layer bar and Layers panel.
The Layer bar is located at the bottom of the main window.
45Chapter 3: Quick Start Guide
The Layer bar displays icons of layers with layer content. When a layer is active, the icon is highlighted. When you apply effects or change their settings, the active layer is affected.
Toaddanewlayer,clickthe“+”button.Toremovetheactivelayer,clickthe“-”button.
Layers overlap each other. The icon of the top layer is to the right in the Layer bar. The bottom layer is to the left. Drag an icon left of right in the bar to change the layer order.
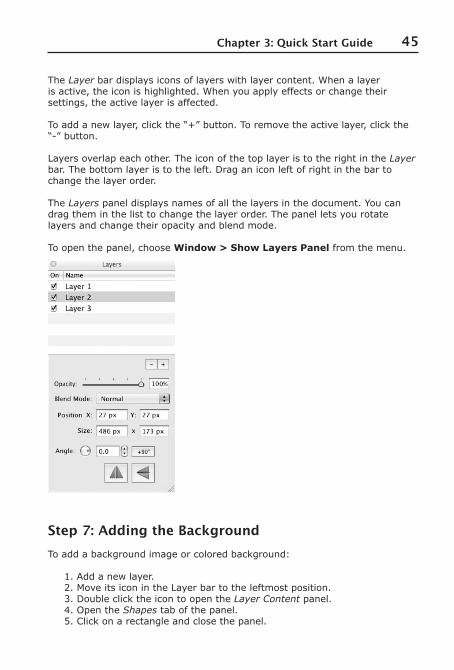
The Layers panel displays names of all the layers in the document. You can drag them in the list to change the layer order. The panel lets you rotate layers and change their opacity and blend mode.
To open the panel, choose Window > Show Layers Panel from the menu.
Step 7: Adding the BackgroundTo add a background image or colored background:
1. Add a new layer.2. Move its icon in the Layer bar to the leftmost position.3. Double click the icon to open the Layer Content panel.4. Open the Shapes tab of the panel.5. Click on a rectangle and close the panel.
46 Printfolio Getting Started Guide
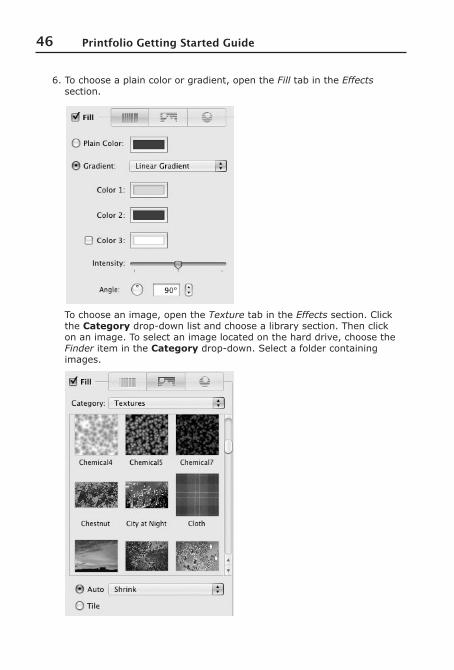
6. To choose a plain color or gradient, open the Fill tab in the Effects section.
To choose an image, open the Texture tab in the Effects section. Click the Categorydrop-downlistandchoosealibrarysection.Thenclickon an image. To select an image located on the hard drive, choose the Finder item in the Categorydrop-down.Selectafoldercontainingimages.
47Chapter 3: Quick Start Guide
Step 8: Sending the Image Back to the Main ProgramClick the Link Back button in Art Text to send the object back to the document in the main program.
Graphics created in Art Text are not ordinary images when they are inserted inthemainprogrambutArtTextobjects.Youcandouble-clickonittoedititsproperties in Art Text.
48 Printfolio Getting Started Guide
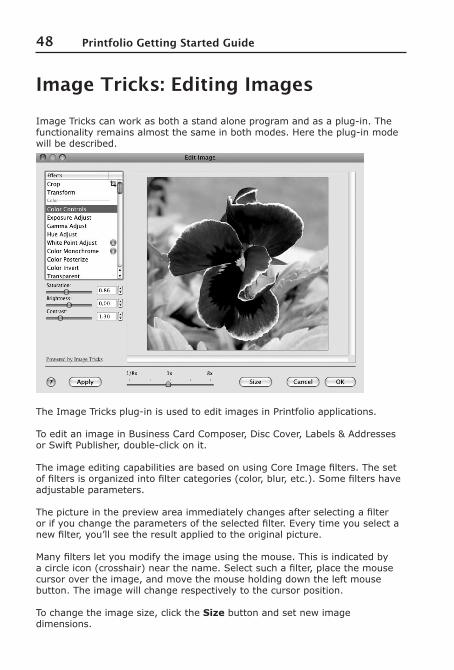
Image Tricks: Editing ImagesImageTrickscanworkasbothastandaloneprogramandasaplug-in.Thefunctionalityremainsalmostthesameinbothmodes.Heretheplug-inmodewill be described.
TheImageTricksplug-inisusedtoeditimagesinPrintfolioapplications.
To edit an image in Business Card Composer, Disc Cover, Labels & Addresses orSwiftPublisher,double-clickonit.
TheimageeditingcapabilitiesarebasedonusingCoreImagefilters.Thesetoffiltersisorganizedintofiltercategories(color,blur,etc.).Somefiltershaveadjustable parameters.
Thepictureinthepreviewareaimmediatelychangesafterselectingafilterorifyouchangetheparametersoftheselectedfilter.Everytimeyouselectanewfilter,you’llseetheresultappliedtotheoriginalpicture.
Manyfiltersletyoumodifytheimageusingthemouse.Thisisindicatedbyacircleicon(crosshair)nearthename.Selectsuchafilter,placethemousecursor over the image, and move the mouse holding down the left mouse button. The image will change respectively to the cursor position.
To change the image size, click the Size button and set new image dimensions.