BEGINNER EV3 PROGRAMMING LESSON 1
28
BEGINNER EV3 PROGRAMMING LESSON 1 By: Droids Robotics www.ev3lessons.com Intro to Brick and Software, Moving Straight, Turning
Transcript of BEGINNER EV3 PROGRAMMING LESSON 1
BEGINNER EV3 PROGRAMMING
LESSON 1
By: Droids Robotics www.ev3lessons.com
Intro to Brick and Software, Moving Straight, Turning

SECTION 1: EV3 BASICS
© Droids Robotics, 2014, v.1.1 (Last edit: 9/22/2014)

THE “BRICK” BUTTONS
1 = Back Undo Stop Program Shut Down EV3
2 = Center Button Select options Run Program
3 = L, R, Up, Down Navigate menus
© Droids Robotics, 2014, v.1.1 (Last edit: 9/22/2014)
1
2 3
3
3
3
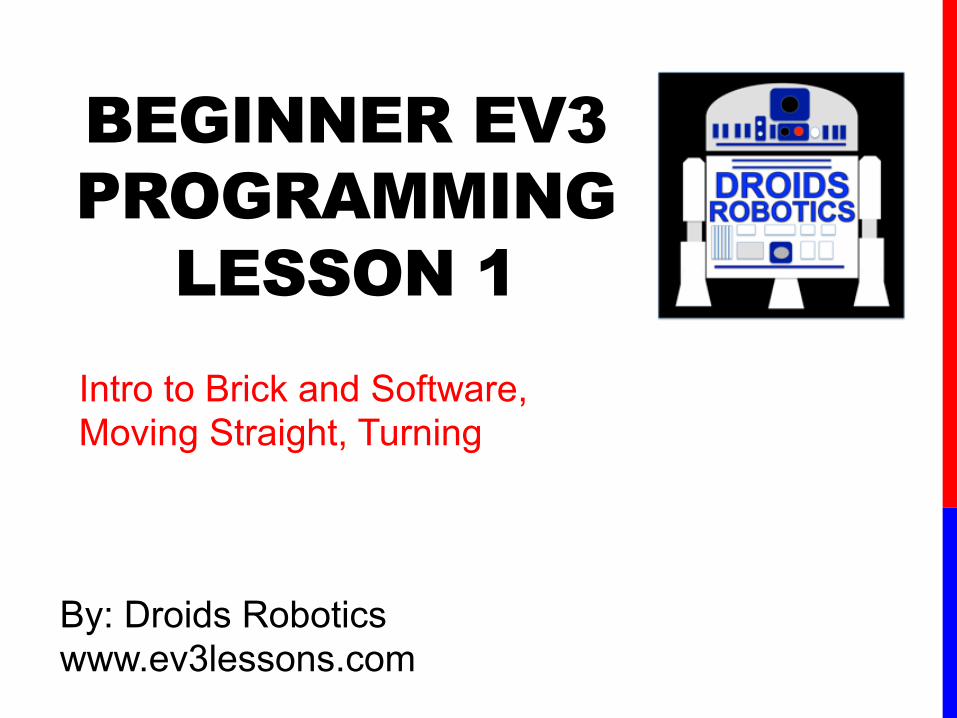
THE “BRICK” SCREEN Tabs on Screen 1. Run Recent
Find programs you ran recently
2. File Navigation
Find all programs by project 3. Brick Apps
Port views 4. Settings
Bluetooth, Wifi, Volume
© Droids Robotics, 2014, v.1.1 (Last edit: 9/22/2014)
1 2 3 4

PORTS, SENSORS, MOTORS
© Droids Robotics, 2014, v.1.1 (Last edit: 9/22/2014) Ports 1, 2, 3, 4 = Sensors
Ports A, B, C, D = Motors Default setup assumes Right Motor in C, Left Motor in B
B
C
Default setup

EV3 SOFTWARE
© Droids Robotics, 2014, v.1.1 (Last edit: 9/22/2014)
Open New Project
Open Saved Project

EV3 SOFTWARE: STARTING A NEW PROGRAM
Opened Projects Opened Programs
Create a Project
Create a Program Project Properties
List of programs
© Droids Robotics, 2014, v.1.1 (Last edit: 9/22/2014)
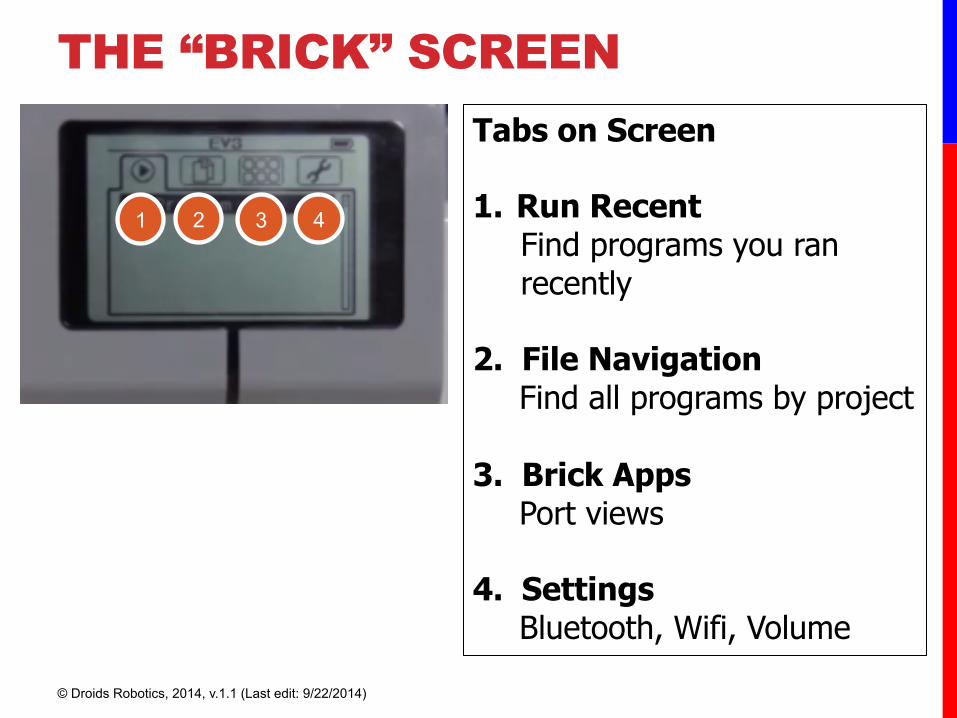
EV3 SOFTWARE: PROGRAMMING SCREEN
� Connection status � Download programs ready to be run � Download/play programs instantly � Download a section of a program to
run � Intelligent EV3 Brick status: name and
battery level, etc. � Port status and sensor readings � Type of connection between the EV3
Brick and the computer (BT, Wi-Fi, or USB)
The Communication Pane
Programming Blocks in 6 Colored Tabs
Programming Area or Canvas
Brick Status & Downloading
© Droids Robotics, 2014, v.1.1 (Last edit: 9/22/2014)

EV3 BLOCKS: COLORED TABS
© Droids Robotics, 2014, v.1.1 (Last edit: 9/22/2014)
ACTION BLOCKS Move, Large & Medium
Motor, Display…
FLOW BLOCKS Start, Wait, Loop,
Switch, Loop Interrupt
SENSOR BLOCKS Brick Buttons, Gyro,
Color, Ultrasonic
DATA OPERATIONS Variables, Array, Logic,
Math, Compare…
ADVANCED BLOCKS Data Logging,
Unregulated Motor…
MY BLOCKS Custom Blocks you
create

SECTION 2: MOVING STRAIGHT
© Droids Robotics, 2014, v.1.1 (Last edit: 9/22/2014)

CHALLENGE: MOVE STRAIGHT Steps to create a program
1. Click and hold block with left mouse button to drag it
2. Drop the programming block when grey box appears
3. Select / enter options
4. Click download to compile and load the program in the EV3 controller
25
STEP 1: Green Block Tab, Click and hold Move Steering and drag to programming area STEP 2: Drop next to the Start Block (green arrow)
© Droids Robotics, 2014, v.1.1 (Last edit: 9/22/2014)

MOVE STEERING BLOCK
Move Steering Block Move Steering • Controls and regulates two motors. • Both motors move either forward (positive
power) or backward (negative power) • Allows steering by applying more power to
one of the two motors
Steering Control from (-100- 100) where 0 = move straight; Positive# = C more power than B negative# = B more power than C
Power (100 to -100); positive number is move forward; negative, moves backward. Note: small amount of power may cause the robot to stall.
Number of motor degrees, rotations or seconds
Brake or Coast
21
Steering: Straight or turn Power/Speed Duration/Distance
Mode of operation Brake/
Coast
© Droids Robotics, 2014, v.1.1 (Last edit: 9/22/2014)
B
C

NEGATIVE & POSITIVE POWER: BACKWARD & FORWARD
© Droids Robotics, 2014, v.1.1 (Last edit: 9/22/2014)
Negative Power = Backwards
Positive Power = Forward
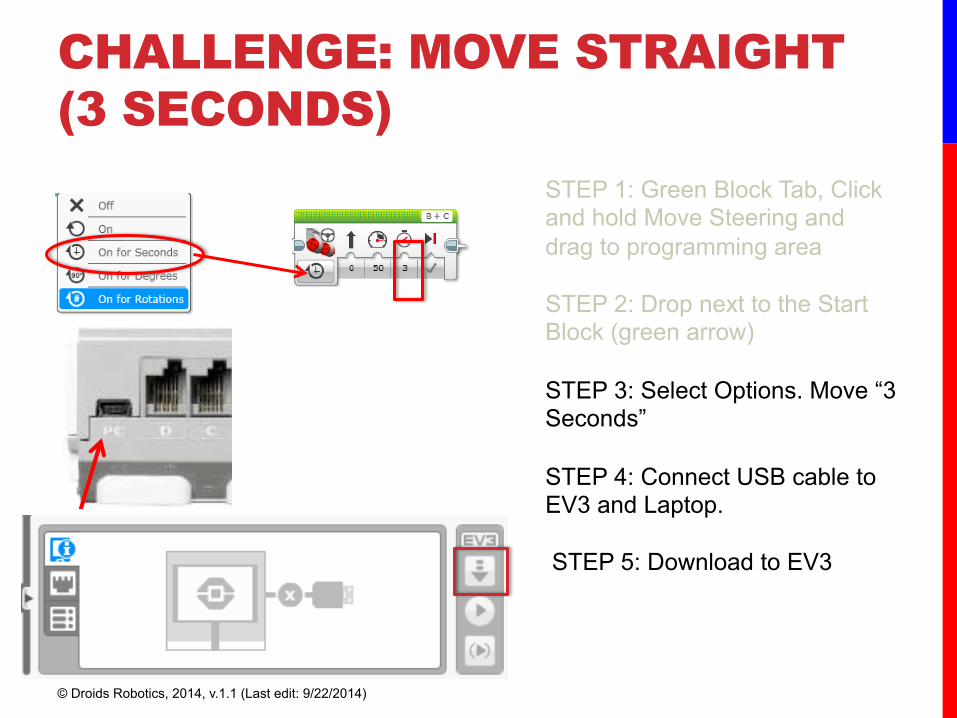
CHALLENGE: MOVE STRAIGHT (3 SECONDS)
STEP 1: Green Block Tab, Click and hold Move Steering and drag to programming area STEP 2: Drop next to the Start Block (green arrow) STEP 3: Select Options. Move “3 Seconds” STEP 4: Connect USB cable to EV3 and Laptop. STEP 5: Download to EV3
Ports, Sensors and Motors
Large Motor
1, 2, 3, 4 = Input ports used for sensors.
Medium Motor
A, B, C, D = Output ports used for motors.
The PC USB port is used to connect to The PC so you can download the
Programs into EV3 Controller
6
© Droids Robotics, 2014, v.1.1 (Last edit: 9/22/2014)

MOVE STRAIGHT: SECONDS VS. DEGREES VS. ROTATIONS CHALLENGE: Move your robot forward from the start line to the finish line (1) and back to the start (2). Try: Select SECONDS, DEGREES or ROTATIONS
Try: Different speeds What are some advantages or disadvantages of using
each one? Did you have to do a lot of guess and check to reach
the line?
1 2
FINISH
START
© Droids Robotics, 2014, v.1.1 (Last edit: 9/22/2014)
B C
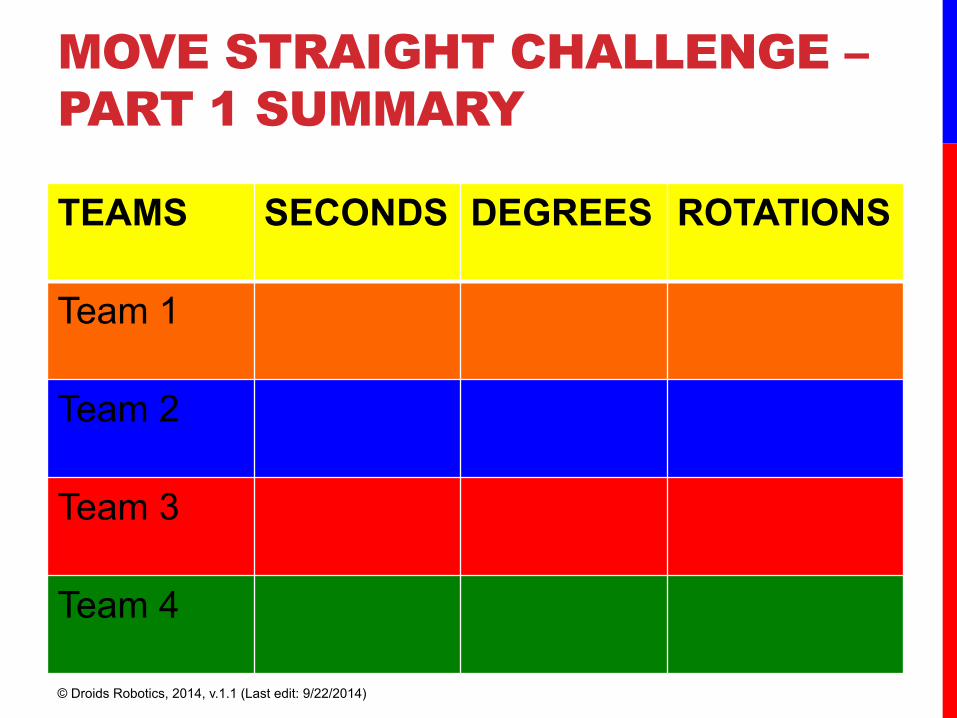
MOVE STRAIGHT CHALLENGE – PART 1 SUMMARY
TEAMS SECONDS DEGREES ROTATIONS
Team 1
Team 2
Team 3
Team 4
© Droids Robotics, 2014, v.1.1 (Last edit: 9/22/2014)

MOVE STRAIGHT DISCUSSION
Teams Did you guess and check a lot?
Did changing the speed matter?
What was more accurate? Seconds? Degrees?
Do you think wheel size will matter?
Do you think battery level matters?
Team 1
Team 2 Team 3 Team 4
© Droids Robotics, 2014, v.1.1 (Last edit: 9/22/2014)

MOVING STRAIGHT MORE ACCURATELY: USE PORT VIEW Try “port view” on brick (on Brick Apps tab)
• Move your robot with your hand from your start line to your end line • Read how many degrees your robot moved • Use this number in the Move Steering Block to move the correct
distance.
© Droids Robotics, 2014, v.1.1 (Last edit: 9/22/2014)

SECTION 3: TURNING
© Droids Robotics, 2014, v.1.1 (Last edit: 9/22/2014)

PIVOT VS. SPIN TURNS 180 Degree Pivot Turn
180 Degree Spin Turn
Notice where the robot ends in both pictures after a 180 degree turn. In the Spin Turn, the robot moves a lot less and that makes Spin Turns are great for tight positions. Spin turns tend to be a bit faster but also a little less accurate. So when you need to make turns on the FLL board, you should decide which turn is best for you!
© Droids Robotics, 2014, v.1.1 (Last edit: 9/22/2014)
B
C Start Position End Position
Motors B and C
Move
B
C Motor
B Moves Start Position
End Position B
C
B
C
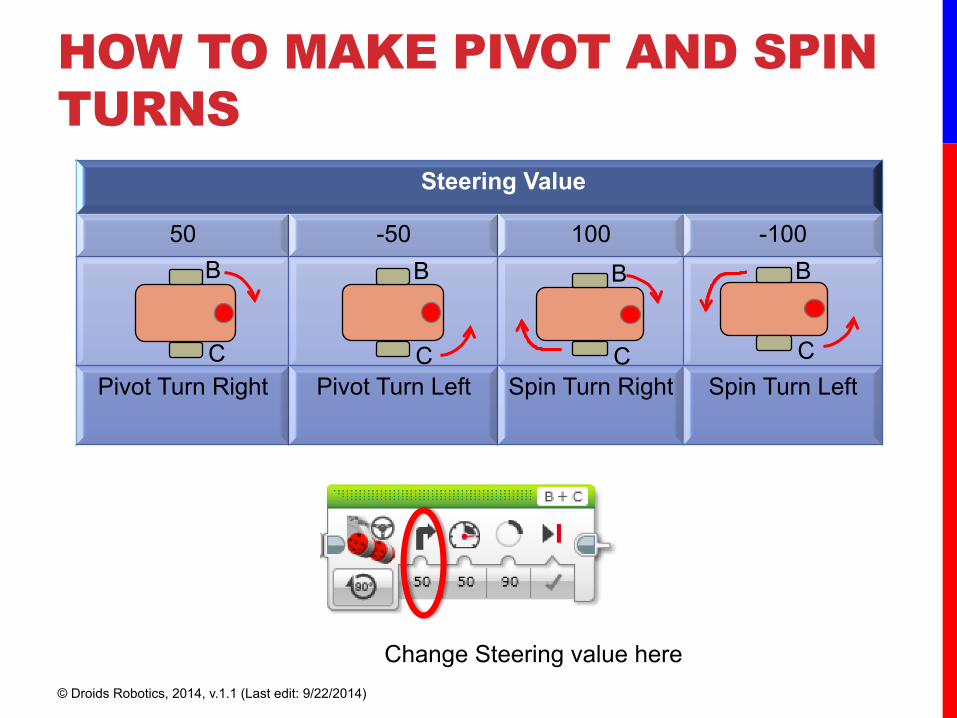
HOW TO MAKE PIVOT AND SPIN TURNS
Steering Value
50 -50 100 -100
Pivot Turn Right Pivot Turn Left Spin Turn Right Spin Turn Left
Change Steering value here © Droids Robotics, 2014, v.1.1 (Last edit: 9/22/2014)
B
C
B
C
B
C
B
C

MAKING A PIVOT TURN FOR 90 DEGREES
Program your robot to turn 90 degrees....Does the robot actually turn 90 degrees if you just pick 90 degrees for distance?
© Droids Robotics, 2014, v.1.1 (Last edit: 9/22/2014)
B
C
B C
?

HOW DO YOU MAKE THE ROBOT TURN 90 DEGREES?
Ans. Try using the port view again to measure the turn and then input the correct number of degrees.
© Droids Robotics, 2014, v.1.1 (Last edit: 9/22/2014)
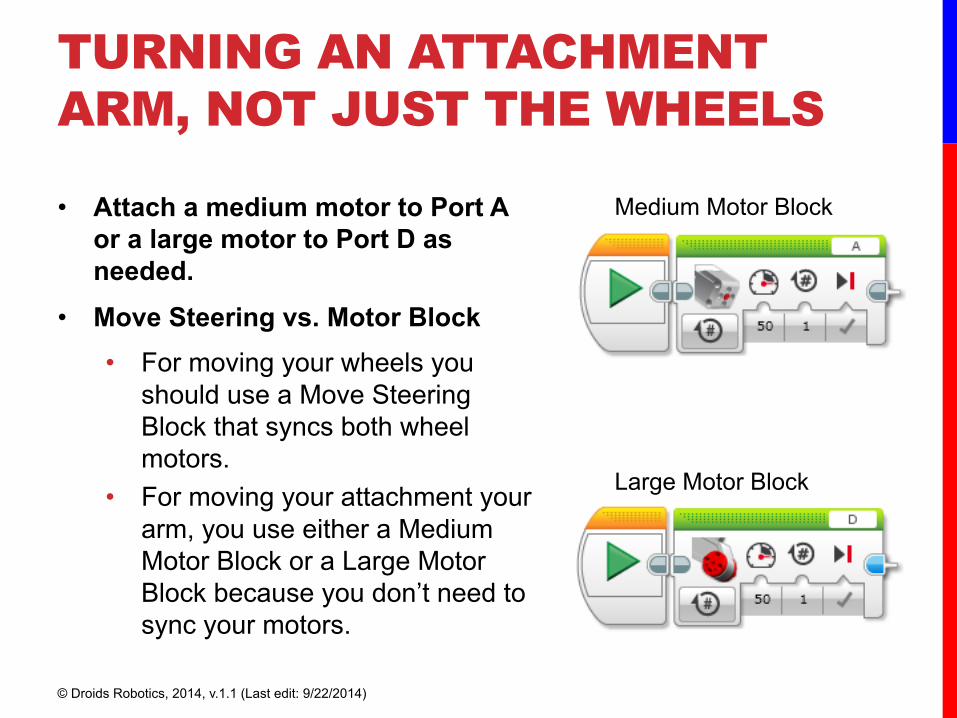
TURNING AN ATTACHMENT ARM, NOT JUST THE WHEELS
• Attach a medium motor to Port A or a large motor to Port D as needed.
• Move Steering vs. Motor Block • For moving your wheels you
should use a Move Steering Block that syncs both wheel motors.
• For moving your attachment your arm, you use either a Medium Motor Block or a Large Motor Block because you don’t need to sync your motors.
Medium Motor Block
Large Motor Block
© Droids Robotics, 2014, v.1.1 (Last edit: 9/22/2014)
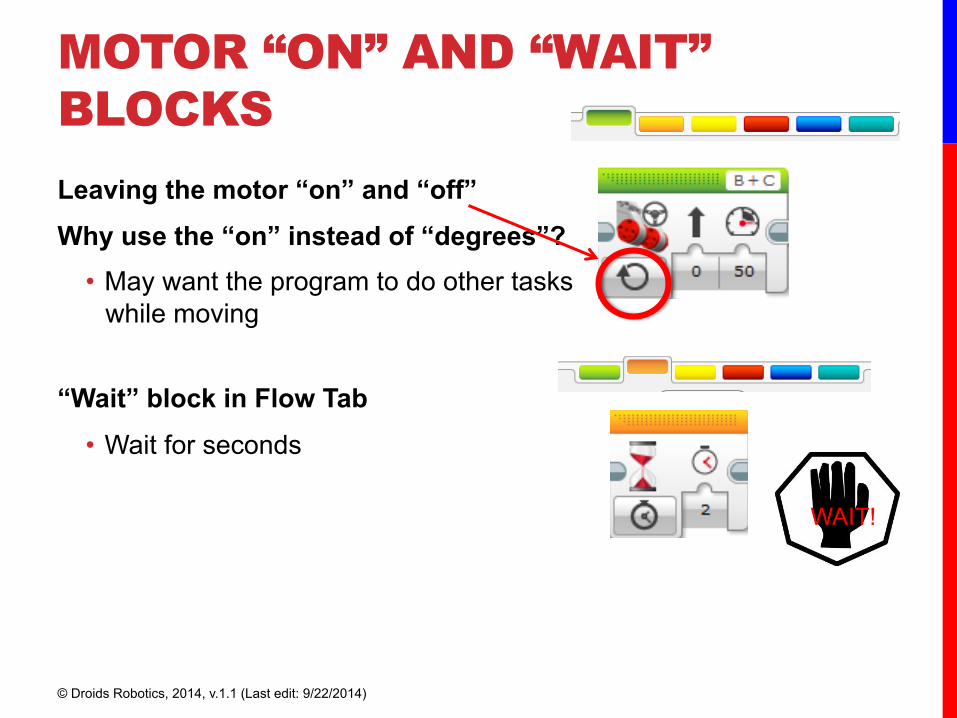
MOTOR “ON” AND “WAIT” BLOCKS Leaving the motor “on” and “off” Why use the “on” instead of “degrees”?
• May want the program to do other tasks while moving
“Wait” block in Flow Tab
• Wait for seconds
Wait Block – Examples
Example 1: Move until the robot detects a (black) dark line and stop
Example 2: Move to detect a black line, using a LOOP block instead of WAIT. Simultaneously use the WAIT for time block and if two seconds elapsed, end the loop using LOOP INTERRUPT and stop the motors.
43
Wait Block – Examples
Example 1: Move until the robot detects a (black) dark line and stop
Example 2: Move to detect a black line, using a LOOP block instead of WAIT. Simultaneously use the WAIT for time block and if two seconds elapsed, end the loop using LOOP INTERRUPT and stop the motors.
43
WAIT!
© Droids Robotics, 2014, v.1.1 (Last edit: 9/22/2014)

SOMETHING FUN: DISPLAY BLOCK • Use the Display Block to
display information and pictures on the screen
• You can control the location and size of text
• You can use this same block to display sensor readings and instructions.
• Challenge: Can you display eyes on the screen while moving? Alternate eyeballs that look left and right. • Use the Display Block,
Motor On and Wait Block
How to write a program to calibrate the light sensor
41 © Droids Robotics, 2014, v.1.1 (Last edit: 9/22/2014)

CHALLENGE SOLUTION
Display Block Motor On Wait
Block Motor Off
© Droids Robotics, 2014, v.1.1 (Last edit: 9/22/2014)
CREDITS • This tutorial was created by Sanjay Seshan and Arvind Seshan from
FLL Team Not the Droids You Are Looking For (Droids Robotics)
• We have additional material for more advanced lessons available on request.
• Useful tools for FLL teams and robot programmers are available at www.ev3lessons.com
• The material is made available to you free of charge. However, we would greatly appreciate a letter indicating that you are using the materials and what you think of them.
• Feedback and suggestions are encouraged.
• Email: [email protected]
© Droids Robotics, 2014, v.1.1 (Last edit: 9/22/2014)