Getting Organized Teamwork is Required!. Planning Your Work before You Implement.

Microsoft PlannerDemo Guide

This document is provided “as-is”. Information and views expressed in this document, including URL and other Internet Web site references, may change without notice. You bear the risk of using it. This document does not provide you with any legal rights to any intellectual property in any Microsoft product. You may copy and use this document for your internal, reference purposes.
© 2016 Microsoft. All rights reserved.
2

Demo Guide Microsoft Planner
Contents
Before You Begin........................................................................................................................................................... 4Prerequisites............................................................................................................................................................... 4Planner Home Page and Logins.................................................................................................................................. 4First-time Post-Install Steps........................................................................................................................................ 4Pre-demo Setup Steps................................................................................................................................................ 4
Microsoft Planner........................................................................................................................................................... 6Introduction................................................................................................................................................................ 6Length........................................................................................................................................................................ 6
Microsoft Planner Demo Steps....................................................................................................................................... 6Introduction to Microsoft Planner................................................................................................................................ 6Managing Work with Planner...................................................................................................................................... 7Planner Views........................................................................................................................................................... 10The Charts Dashboard.............................................................................................................................................. 12Office 365 Integration............................................................................................................................................... 14Optional: File sharing and collaboration...................................................................................................................17Optional: Create a New Plan..................................................................................................................................... 20
Reset Instructions........................................................................................................................................................ 23Post-Install Steps......................................................................................................................................................... 24
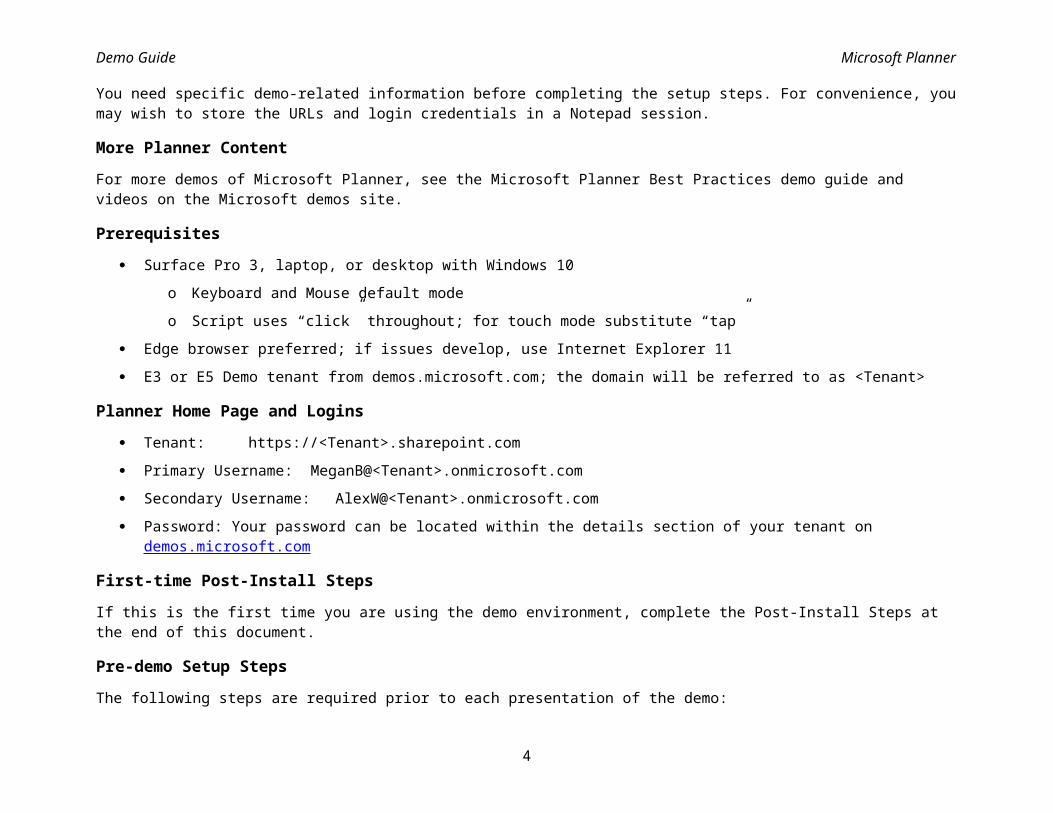
Before You BeginYou need specific demo-related information before completing the setup steps. For convenience, you may wish to store the URLs and login credentials in a Notepad session.
3
Demo Guide Microsoft Planner
More Planner ContentFor more demos of Microsoft Planner, see the Microsoft Planner Best Practices demo guide and videos on the Microsoft demos site.
Prerequisites Surface Pro 3, laptop, or desktop with Windows 10
o Keyboard and Mouse default modeo Script uses “click” throughout; for touch mode substitute “tap”
Edge browser preferred; if issues develop, use Internet Explorer 11 E3 or E5 Demo tenant from demos.microsoft.com; the domain will be referred to as <Tenant>
Planner Home Page and Logins Tenant: https://<Tenant>.sharepoint.com
Primary Username: MeganB@<Tenant>.onmicrosoft.com Secondary Username: AlexW@<Tenant>.onmicrosoft.com Password: Your password can be located within the details section of your tenant on demos.microsoft.com
First-time Post-Install StepsIf this is the first time you are using the demo environment, complete the Post-Install Steps at the end of this document.
Pre-demo Setup StepsThe following steps are required prior to each presentation of the demo:1. Start a browser session and log onto the demo home page with the URL and MeganB credentials given above.2. Click App Launcher , and then click Planner.3. If you are not already in the Planner hub, in the left navigation, click Planner hub.4. If you are planning to show co-authoring:
a. In a separate or InPrivate browser session, either (1) log into the Planner site with Alex Wilber’s (alias AlexW) credentials (see above) OR (2) have a second person (“demo buddy”) log into the site as Alex Wilber using a different machine.
4

Demo Guide Microsoft Planner
b. Select the Online Marketing plan.c. In the top navigation, click more items (…) and then click Files.d. Select the file Product Launch Marketing, and then at the top, click Open, Open in PowerPoint
Online.e. Click Edit Presentation, and then select Edit in Browser.f. Click into the subtitle of the first slide and place the cursor at the end of the text.g. Minimize the Alex Wilber browser session.
5

Demo Guide Microsoft Planner
Microsoft PlannerIntroductionMicrosoft Planner offers people a simple and visual way to manage teamwork. Planner is highly versatile, making it easy for you and your team to create new plans, organize and assign tasks, share files, chat about what you’re working on, and get updates on progress. Intuitive and very easy to use, Planner enables anyone to manage a marketing event, brainstorm new product ideas, track a school assignment, prepare for a customer visit, or just organize your team more effectively.
LengthThis demo requires 25 minutes.
Microsoft Planner Demo StepsIntroduction to Microsoft Planner
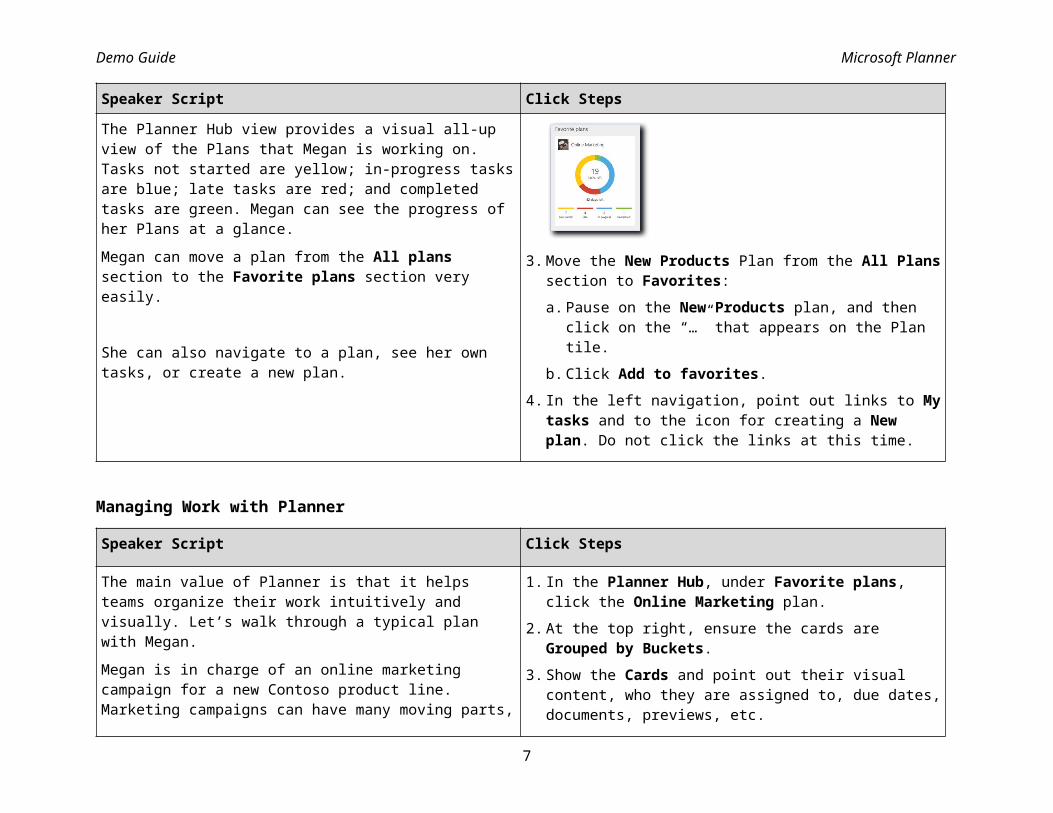
Speaker Script Click StepsMegan Bowen is a marketing manager for Contoso, a large multinational corporation. With many activities in play, she needs to manage numerous tasks, documents, notes, and other assets throughout the day. Microsoft Planner is the perfect solution, providing Megan and her team with a flexible, visually rich, and interactive view of their work.Planner Hub The Planner Hub view provides a visual all-up view of the Plans that Megan is working on. Tasks not started are yellow; in-progress tasks are blue; late tasks are red; and completed tasks are green. Megan can see the progress of her Plans at a glance.Megan can move a plan from the All plans section to
1. Start in the browser, in the Hub - Planner tab.2. Point out the plan(s) in the Favorite plans section,
and the other plans under All plans.Note: Throughout the demo, your views may not match the screen shots exactly.
3. Move the New Products Plan from the All Plans
6
Demo Guide Microsoft Planner
Speaker Script Click Stepsthe Favorite plans section very easily.
She can also navigate to a plan, see her own tasks, or create a new plan.
section to Favorites:a. Pause on the New Products plan, and then click
on the “…” that appears on the Plan tile.b. Click Add to favorites.
4. In the left navigation, point out links to My tasks and to the icon for creating a New plan. Do not click the links at this time.
Managing Work with Planner
Speaker Script Click Steps
The main value of Planner is that it helps teams organize their work intuitively and visually. Let’s walk through a typical plan with Megan.Megan is in charge of an online marketing campaign for a new Contoso product line. Marketing campaigns can have many moving parts, including numerous tasks, deadlines, assets, and deliverables. Planner helps keep everything organized and up to date.Megan opens Online Marketing to review status and to plan any action needed to keep the Plan on track.Boards and CardsEach plan has its own Board, where Megan sees a detailed view of tasks and team members.Within the Board, a card containing due dates, documents, categories, and conversations represents each work item or task. Documents or pictures get rich image previews, so it is easy to understand what the Card is about at a glance.
1. In the Planner Hub, under Favorite plans, click the Online Marketing plan.
2. At the top right, ensure the cards are Grouped by Buckets.
3. Show the Cards and point out their visual content, who they are assigned to, due dates, documents, previews, etc.
7

Demo Guide Microsoft Planner
Speaker Script Click Steps
Add and Remove Team MembersAdding a new team member (or removing an existing one) is easy. Megan just goes to the pull-down menu at the top right, types the name of the person she wishes to add, and that’s it!
Megan adds Lee Gu to the marketing campaign team.
4. At the upper right, click the down-arrow next to Members and in the name field, type Lee.
5. Wait for the name Lee Gu to resolve, and then click it.
6. In the Members window, pause on a name, click the context menu (…) and show the option to remove the person from the plan. Note Do not remove the person at this time, instead, close the Member list.
Attach DocumentsMegan opens a Card and attaches a document to it. She assigns the document to be the preview image, providing a quick visual reminder of the task.Team members can easily find and edit or co-author the
7. In the To do bucket, click the Media Outlets card. 8. Click Attach, and then click Browse OneDrive.9. In the list, click the PowerPoint file Media Sources,
and then click OK.10. Under Attachments, click the context menu (…)
8

Demo Guide Microsoft Planner
Speaker Script Click Steps
document. Comments and tagsEvery Card has its own conversation thread, enabling team members to focus on task-related issues and questions. Optional: Megan posts a comment to the current task.Note: A post is permanent and cannot be removed.
Megan adds a colored tag to the card to make it more visible.
When she closes the card, the colored tab helps draw attention to it.
of the preview image, and confirm Set as preview is selected.
11. Optional – post a comment:a. Scroll down to the Comments section.b. In the text box, type Is anything blocking this
task? and then click Post.12. At the upper right of the card, pause on the set of
colored tabs and click into the Set Label field of the red tab.
13. In the Set Label field, if not already assigned, type Urgent.
14. Click the x at the upper right of the card to close it. You should see the red tag.
9

Demo Guide Microsoft Planner
Planner Views
Buckets ViewNote to presenter: In order to reset the environment at the end of the demo, it is important to keep track of any new buckets, task reassignments, or other changes made in this section. During reset, do not delete any newly-created buckets without first reassigning tasks to their original buckets.As we see here, teams can organize cards on the Board into customizable columns called Buckets. Teams can use Buckets to reflect various work streams or logical categories of work within each Plan. The ability to group tasks this way gives Planner a great deal of flexibility.Megan creates a new bucket for social media-related tasks, and adds a few tasks to the bucket by simply dragging and dropping them from To do or any other bucket.
She can also assign or re-assign tasks by dragging and dropping. Here, Megan assigns some tasks to the new team member Lee Gu. Lee will replace any existing assignments. If a task is initially unassigned, he will be assigned.Megan can delete buckets if they are no longer useful. However, any tasks associated with the bucket are also
1. Click +Add new bucket.2. In the Bucket name field, type Social Media and
press Enter.3. Drag several items from the To do list to the new
Social Media bucket. Examples:a. Twitter Contentb. YouTube Strategiesc. Social Media Conceptsd. Facebook Campaign
4. Optional: Drag one or more cards from their current bucket to the new Social Media bucket.
5. In the top right Members gallery, drag and drop Lee Gu’s picture to one or more tasks in the Social Media bucket.Note: Lee can be added to unassigned tasks, or tasks previously assigned to another person.
6. Beside the Social Media bucket, click the context menu (…) and show the Delete option. Note: Do not click it at this time. Click out to come back to the main view.
10

Demo Guide Microsoft Planner
deleted, so move them to another bucket first, if necessary.
Progress ViewAnother useful view is Progress, in which Megan can see cards grouped by task status (Not started, In progress, and Completed).She quickly sees that the majority of tasks are not started or are in progress, with just one or two completed.
7. In the top navigation, ensure Board is selected.8. At the upper right, click the down-arrow next to
Group by and click Progress.
Assigned to ViewMegan can also group cards by task assignment. This gives a quick view of how many tasks each team member is responsible for, and enables Megan to spot potential imbalances in work assignments.In this Plan, Alex Wilber has more tasks assigned to him than any other team members do, and several of his tasks are overdue. He may need some relief in the form of reassigning some of his tasks to other team members. Megan will address this issue in a few minutes.
9. At the upper right, click the down-arrow next to Group by and click Assigned to.
10. Scroll left and right to review the team members and their tasks.
11. Scroll up and down and show that Alex Wilber has more tasks than other team members do, with several late tasks (shown by red date symbols).
My Tasks ViewThe My Tasks view makes it easy for Megan to manage her own tasks.She can group her tasks either by Progress or by Plan. She starts in the Progress view.In this view, she will just change the status of some tasks, which she can do quickly. She recently started one of her tasks, so she drags it from the Not started column to the In progress column.
12. In the left navigation, click My tasks. Start the view as Group by Progress.
13. Drag one of the tasks from the Not started column to the In progress column.
14. Pause on the upper right corner of any In progress task and click the check box.
11

Demo Guide Microsoft Planner
Megan marks a task complete by clicking the check box.That’s all she needs to do for now.If Megan needs to edit a task extensively, for example to change the due date, reassign it, add a document, or place it in a different Bucket, she could do so by clicking the task and making the needed updates.She returns to the Online Marketing Plan.
15. In the left navigation, under All plans or under Favorite plans, click Online Marketing.
12

Demo Guide Microsoft Planner
The Charts Dashboard
Speaker Script Click StepsPlans have two basic views: Board and Charts. Megan just completed some Plan operations in the Board view.The Charts view gives Megan a rich visual representation of the overall progress and the workload distribution between the team members. This helps her identify and resolve key issues in order to keep the team on track.In order to highlight the status that Megan wants to focus on, she clicks the various states below the graphic. This in turn refreshes the Tasks list at the right,As seen previously, most of the tasks are either not started or in progress, as expected for a relatively new initiative. However, the project has some late tasks, which Megan needs to address.
In the Members section (middle of the page), Megan can see how many tasks are assigned to each team member, and the distribution of task status for each.As previously discovered in the Board view, Megan sees that Alex has more late tasks, and more tasks assigned
1. In the upper navigation, click Charts.
2. In turn, below the Status “doughnut”, click through
the status bars Not started, In progress, and Late. As the different states are selected, point to the Tasks list updates.
3. Leave the Late status in view.
4. In the Members section, beside Alex Wilber, click the red bar. The Tasks list will update.Note: Your view may not match the screen shots exactly.
13

Demo Guide Microsoft Planner
Speaker Script Click Stepsto him, than other team members do.
Rebalance the workloadMegan will do some workload rebalancing to ease the pressure on Alex.Reassigning Alex’s late tasks is easily done.
5. In the Tasks list at the right, click one of the late tasks (marked with a red due date). The task window will appear.
6. At the upper right, click the photo next to Alex Wilber.
7. In the drop-down, scroll down if needed and click Pradeep Gupta.
8. Close the task window.9. Optional: In the same way, reassign another one of
Alex’s late tasks to Johanna Lorenz.10. Show that Alex now has fewer late tasks.
14

Demo Guide Microsoft Planner
Office 365 Integration
Speaker Script Click StepsOffice 365 Groups and conversationsPlanner is part of Office 365, so all infrastructure for emailing, conversations, and notification handling is already in place.An Office 365 Group is automatically created when someone creates a new Plan. Conversely, a Plan is also created when someone creates a new Group.Because each Plan is associated with a Group, all conversations in Planner are also available in Outlook 2016, Outlook on the Web, and the Outlook Groups Mobile Apps. Team members can stay on top of their Plans and tasks, wherever and whenever they work.When Megan opens Conversations in the Online Marketing Plan, the Group conversation opens in Outlook on the Web.
Being a relatively new Plan, most of the conversations have to do with assigning or reassigning tasks.Subscribing to Group conversations is an option that
1. In the top navigation, click more items (…), and then click Conversations.
2. In the left navigation, point out that Plans appear as Office 365 Groups.
3. Scroll through messages relating to the Online Marketing plan.
4. At the top right of the conversations list, click the down-arrow next to Joined and point to the Unsubscribe option.
15

Demo Guide Microsoft Planner
Speaker Script Click Stepseach team member can set independently. Once subscribed, they will receive notifications in their Outlook inbox whenever they are assigned a new task, added to a conversation, or if events are scheduled.Megan already subscribes to the conversation, but she could unsubscribe if she wished.
Conversation HistoryUnlike joining a distribution list (DL), any Group member—regardless of when they join—immediately sees the entire conversation history. They can quickly get up to speed on the status of the Plan, see answers to previously asked questions, share documents, and more.Megan sees a help request from recently added team member Alex Wilber. When he joined the team, Alex was immediately able to see the entire conversation history, but did not spot an answer to some issues he is facing with a launch event planning task. Thus, Alex posted a help request to the entire team.Megan was involved in launch planning previously, so she drafts a reply with an offer to help.Note to presenter: If you Send the message, it will be added permanently to the conversation. If you plan to use the tenant for additional demos, it is recommended that you Discard the reply.
5. Scroll down if needed and select the conversation started by Alex Wilber titled Hi all, I could use some help pulling together…Note: The conversation could be anywhere in the list.
6. Click Reply all.7. In the text box, type I think I can help you with
this, Alex.8. To prevent adding the reply permanently to the
conversation, click Discard. If you see a confirmation, click Discard again to confirm.
OneNote integrationAnother powerful feature of Planner is OneNote integration. Every plan has a OneNote notebook
9. At the top of the conversation list, click Notebook.10. Navigate to the Marketing Brainstorms
section.
16

Demo Guide Microsoft Planner
Speaker Script Click Stepsattached, making it easy for team members to share, record, and express ideas with each other in a central location.
11. Optional: Add an idea to the Swag ideas page.
12. Close the OneNote tab. You should be back in the Group conversations for the Online Marketing Plan.
CalendarEvery Plan comes with a shared calendar that all team members can access and to which they can contribute. Working with a Planner calendar is the same experience as working with a Group calendar. Every user can select which calendar(s) to display in his or her own view.Her personal calendar is quite full, so Megan temporarily hides it to better show the Online Marketing group calendar.Megan temporarily opens another Plan calendar to show events and meetings for that group. As she does so, events for that group display in a different color.
Megan closes the Engineering calendar and re-opens her personal calendar.
13. At the top of the conversation list, click Calendar.
14. In the left navigation, under Groups, point to the Group calendars that Megan can access.
15. Under My calendars, click Calendar to deselect Megan’s personal calendar.
16. Under Groups, click to select Engineering.
17. In the left navigation, click Engineering again to deselect that calendar.
18. Under My calendars, click Calendar to show Megan’s personal calendar again.
19. Close the Calendar tab.
17

Demo Guide Microsoft Planner
Note to presenter: If you do not plan to show the Optional sections, go to the Reset Instructions now to reset the environment.
Optional: File sharing and collaboration
Note to presenter: This section assumes that you followed the Pre-demo setup steps relating to co-authoring.Continuing the theme of collaboration in Office 2016, Planner is an ideal way to organize and work with Office files. Attach Word, Excel, and PowerPoint documents to a Card and start editing them right away. When a document is attached to a Card, it is stored in the Files area of the Plan, allowing members to edit them collaboratively (co-authoring) or to work on them offline.Here, Megan opens the PowerPoint presentation that Alex referred to in his request for help. She can do so right from the group conversation.
1. Start in the Online Marketing Plan (either the Charts or the Board view).
2. If you do not have the GroupMail tab open, in the top navigation, click more items (…), and then click Conversations.
3. In the conversations list, select the Alex Wilber conversation Hi all, I could use some help...
4. Click the PowerPoint icon in the message.
5. Click Edit and reply.
6. At the top right, show that Alex Wilber is also editing the presentation.
18

Demo Guide Microsoft Planner
Megan notices Alex is already editing the document.
She makes some edits to the title slide.
Updates to each person’s view of the presentation are made in near real time. Back in Alex’s session, he notes Megan’s edits.
Alex makes some edits of his own.
7. On slide 1, select the text within the title and change the font color to blue (any shade).
8. Resize the title box to make it smaller and force the title to two rows.
9. Switch to Alex Wilber’s browser session.10. Note that Megan Bowen is also editing, and that
the title has changed color to blue.11. Pause on the person icon at the top right of the
title box and show the change was made by Megan.
12. Change the subtitle to How do we make connections?
13. Click out of the subtitle box.14. Switch back to the Megan Bowen session.15. Show the edit just made by Alex.16. At the top right of the PowerPoint Online
window, click X to close the PowerPoint Web App. 17. Return to the Alex Wilber session and close the
19

Demo Guide Microsoft Planner
Megan sees his edits also. Product Launch Marketing (PowerPoint Online) tab.
Optional: Create a New PlanNote: As of this writing, you can only delete a Plan by deleting the associated Group in Outlook on the web. If you plan to re-use the demo environment, follow the steps in the Reset Instructions section to delete the Group and Plan.
Speaker Script Click StepsMegan is heading up a new initiative soon for an office move, so she creates a Plan for it.In a few clicks, the new plan is on the board.
1. Navigate to the Planner Hub.2. In the left navigation, click New plan.3. In the Plan name text box, type Office Move.4. Leave the Make this plan public option as Yes.5. Optionally, add a Plan description.6. Click Create Plan. Wait for the plan to appear.
Add membersMegan adds some team members to the plan.
7. At the upper right, click Add Members.8. In the name box, type IsaiahL, wait for Isaiah
Langer’s name to resolve, and then click Isaiah Langer.
9. Repeat step 2 for JoniS (Joni Sherman) and LidiaH (Lidia Holloway).
10. Close the Members window.
20

Demo Guide Microsoft Planner
Speaker Script Click StepsCreate BucketsAs we saw before, Buckets can hold collections of cards organized in any way Megan wishes.If Megan changes her mind, she can always delete a Bucket, remembering to reassign any remaining tasks to another Bucket.
11. At the upper right, ensure Group by Buckets is selected.
12. Create a new bucket:a. Click +Add new bucket.b. Give the bucket a name, e.g. Logistics.c. Press Enter.
13. Optional: Repeat step 2 for one or more buckets; assign the names as you wish.
Create and assign tasksMegan creates and assigns some tasks to the plan.
The first task is to create a timeline for the move.
Megan assigns the task to Joni.
14. In the Board view, at the upper right, click Group by, and then click Assigned to.
15. Under Unassigned, click the + sign.16. In the Type a task name field, type Office
Move Timeline.17. Click Set bucket and select Logistics.18. Click Set due date.19. Enter a date one week from today.20. Click Add task.21. When the Office Move Timeline card appears
on the board, click it to open a details window.22. On the right, click Assign.23. Select Joni Sherman.24. In the Description box, type Create detailed
timeline for office move.25. To the right of Description, select Set as
preview.26. In the Start date pull-down, select today’s date.27. In the Comments section, type Urgent,
complete this first!
21

Demo Guide Microsoft Planner
Speaker Script Click Steps28. Click Post.29. At the top, click Not started, and then click In
progress.30. Close the task details window.31. Show the task appears on the board, assigned to
Joni Sherman.32. Optional: Add some additional tasks,
assignments, descriptions, and comments.
Task labelsMegan can define a set of pre-provisioned colored labels to use as tags for specific tasks. For example, she sets the red label to Urgent and tags the Office Move Timeline task with that label.
33. In the upper right, ensure Group by is set to Assigned to.
34. Click the Office Move Timeline task.35. At the upper right, pause on the red tab and in
the Set label field, type Urgent.36. Close the task details window.37. Back in the Board view, pause on the label for the
task, and show the Urgent designation.
38. Optional: Define some additional tags and assign them to other tasks.
39. In the left navigation, click Planner hub and show the new plan in the All plans list.
22

Demo Guide Microsoft Planner
Reset InstructionsFollow these steps to reset the demo at the conclusion of each presentation. Note, depending on the presentation, some of the steps may not apply.As an option, if resetting the demo would be inconvenient, we recommend that you provision a new Planner demo tenant from https://demos.microsoft.com.
1. In the Planner Hub, remove the New Products plan from the Favorites list.a. Pause on the New Products plan tile, and then click the context menu (…) that appears at the upper
right of the tile.b. Click the Remove from favorites pop-up.
2. Remove Lee Gu from the Online Marketing Plan team.3. Remove the attachment from the Media Outlets card.4. Remove the colored tag from the Media Outlets card.5. Revert any task assignments you changed during the demo, for example those reassigned from Alex Wilber to
another team member.6. Revert any task deadlines you changed during the demo.7. Revert any changes you made to Buckets, and delete any new Buckets you created. Before deleting a Bucket,
be sure to remove the tasks from it first, placing them in their original Buckets or in the To do list.8. In My Tasks, revert any task marked Complete and return it to Not started or In progress.9. In My Tasks, revert any other tasks where the state changed, i.e. from In Progress back to Not Started.10.Revert any changes you made to documents by changing them back to their original versions in OneDrive for
Business (e.g. PowerPoint presentations such as Product Launch Marketing).a. Navigate to the Online Marketing files list (the group OneDrive).b. Next to the file, click the context menu (…), and then click Version History.c. Pause on Version 1.0 (or the earliest version), click the down-arrow, and then click Restore. d. If you see a confirmation window, confirm the restore.
11.Delete any new Plan that you created during the demo.a. Use App Launcher to open Mail.b. Under Groups, click the group (Plan) you created and wait for the conversation list to appear.
23

Demo Guide Microsoft Planner
c. In the left navigation, right-click the plan and select View details.d. In the pop-up, click more items (…) and select Edit group.e. At the bottom of the pane, click Delete group.f. Check the “I understand” box, and then click Delete.
Post-Install StepsComplete the following post-install steps once for your demo environment:Remove Members
1. Open a browser and log onto the demo environment using the URL and credentials for Megan Bowen. Username: MeganB@<Tenant>.onmicrosoft.com Password: Your password can be located within the details section of your tenant on
demos.microsoft.com2. Click App Launcher , and then click Planner.3. Click the tile to open the Online Marketing Plan.4. At the upper right, click the drop-down next to Members.5. If you see any of the following members, remove them from the Plan by pausing on their names, clicking the
ellipsis, and then clicking Remove from plan:a. MOD Administrator or System Administratorb. Emily Braunc. Henrietta Muellerd. Miriam Graham
6. Close the Members pane.7. Close the browser.
Download files from https://demos.microsoft.com site1. In a separate browser session, navigate to https://<tenant>.sharepoint.com.2. If prompted, login as Megan Bowen
Username: MeganB@<tenant>.onmicrosoft.com
24

Demo Guide Microsoft Planner
Password: Your password can be located within the details section of your tenant on demos.microsoft.com
3. Click on the Demo Assets tile.4. In the Office 365 Demos document library, double-click to open Microsoft Planner Demo.5. Download the Product Launch Marketing.pptx file and place it on your local machine. 6. Repeat steps 3 and 4 for the file Media Sources.pptx7. Click App Launcher , and then click Planner.8. If not already there, in the left navigation, click Planner hub.9. If Online Marketing is not yet included in Favorite plans:
a. Pause on the Online Marketing plan and click the ellipsis (…).b. Click Add to favorites.
10.Click the tile to open the Online Marketing Plan.11.In the top navigation, click the ellipsis (…), and then click Files.12.At the top of the page, click Upload, then click Files.13.Navigate to where you downloaded Product Launch Marketing.pptx and Media Sources.pptx, select the
files, and then click Open.14.Wait a minute or so and confirm you have successfully uploaded the files to the group OneDrive.15.Close the Online Marketing Files tab.
Add OneNote Content1. If not already there, return to the Online Marketing – Planner tab.2. In the top navigation, click Notebook.3. In the left navigation, click + Section.4. Name the new section Marketing Brainstorms and click OK.5. In the Untitled page, click into the blank title at the top, and type Swag Ideas.6. Click into the body of the note.7. Pin the Ribbon by clicking the Home tab, and then clicking the Pin icon at the far right.8. Add the following items as bullet points:
Mug and coffee beans
25
Demo Guide Microsoft Planner
Keychain with logo Water bottle Safety whistle Windbreaker
16.Close the Online Marketing Notebook tab.17.On the Online Marketing Planner tab, if the To Do bucket is not already at the far left of the page, click
and hold the title and drag the bucket to the far left of the page.18.Sign out of the Planner environment.
Start a Conversation as Alex Wilber1. Log onto the demo environment again, using the URL and credentials for Alex Wilber (alias AlexW) given in
the Planner Home Page and Logins section.2. Click App Launcher , and then click Planner.3. In the Planner Hub, click the Online Marketing Plan.
Note: It may not be listed under Favorites, but it should be under All plans.4. In the top navigation, click more items (…), and then click Conversations.5. Click New conversation.6. In the text field, type Hi all, I could use some help pulling together content for the European launch
events marketing campaign. Can anyone help?7. Click the attachment icon (paper clip).8. In the left navigation, click Online Marketing.9. Select the file Product Launch Marketing.pptx.10.Click Next.11.Click Attach as a OneDrive file.12.Back in the message pane, click Send.13.Close the GroupMail tab.14.Log out of the Planner environment.
26