Becoming a Supple Leopard - · PDF fileCategory 2 Movements ... becoming a supple leopard...
44
Becoming a Supple Leopard The Ultimate Guide to Resolving Pain, Preventing Injury, and Optimizing Athletic Performance Kelly Starrett with Glen Cordoza Victory Belt Publishing Inc. Las Vegas
Transcript of Becoming a Supple Leopard - · PDF fileCategory 2 Movements ... becoming a supple leopard...
Becoming a
SuppleLeopard
The Ultimate Guide to Resolving Pain, Preventing Injury, and Optimizing Athletic Performance
Kelly Starrettwith Glen Cordoza
Victory Belt Publishing Inc.Las Vegas

First Published in 2013 by Victory Belt Publishing Inc.
Copyright © 2013 Kelly Starrett and Glen CordozaAll rights reserved
No part of this publication may be reproduced or distributed in any form or by any means, electronic or mechanical, or stored in a database or retrieval system, without prior written permission from the publisher.
ISBN 13: 978-1-936608-58-4
This book is for educational purposes. The publisher and authors of this instructional book are not responsible in any manner whatsoever for any adverse e!ects arising direct-ly or indirectly as a result of the information provided in this book. If not practiced safely and with caution, working out can be dangerous to you and to others. It is important to consult with a professional "tness instructor before beginning training. It is also very important to consult with a physician prior to training due to the intense and strenuous nature of the techniques in this book.
Printed in The USA
RRD 02-13
TABLE OF CONTENTS
ACKNOWLEDGMENTS ......................................................................................................................................... 7
INTRODUCTION ...................................................................................................................................................... 10
A New Human-Performance Epoch ........................................................................................................................... 11
How to Use This Book..................................................................................................................................................... 15
CHAPTER 1 THE MOVEMENT AND MOBILITY SYSTEM .................................................... 16
It’s About Performance .................................................................................................................................................. 18
The Gym Is Your Lab ....................................................................................................................................................... 20
You Are an Amazing, Adaptable, Healing Machine ............................................................................................. 22
You Cannot Make Basic Adaptation Errors .............................................................................................................. 25
CHAPTER 2 MIDLINE STABILIZATION AND ORGANIZATION ........................................ 26
Three Reasons for Bracing Your Spine ...................................................................................................................... 28
The Bracing Sequence ................................................................................................................................................... 29
The Two-Hand Rule ......................................................................................................................................................... 31
Braced-Neutral Standing Position .............................................................................................................................. 34
Braced-Neutral Sitting Position ................................................................................................................................... 36
Abdominal Tension ......................................................................................................................................................... 38
Breathing Mechanics ...................................................................................................................................................... 39
CHAPTER 3 ONE-JOINT RULE .................................................................................................................... 43
Braced Spinal Extension and Flexion ........................................................................................................................ 46
Global Spinal Extension and Flexion ......................................................................................................................... 47
CHAPTER 4 LAWS OF TORQUE ............................................................................................................... 49
The Two Laws of Torque ................................................................................................................................................ 53
Torque Tests ....................................................................................................................................................................... 55
Shoulder-Stability Torque Tests................................................................................................................................... 55
Hip-Stability Torque Tests ............................................................................................................................................. 59
CHAPTER 5 MOVEMENT HIERARCHY ............................................................................................... 70
Skill Progressions and Movement Complexity ...................................................................................................... 71
Category 1 Movements ................................................................................................................................................. 73
Category 2 Movements ................................................................................................................................................. 74
Category 3 Movements ................................................................................................................................................. 75
Upright-Torso Demands ................................................................................................................................................ 76
CATEGORY 1 MOVEMENTS .............................................................................................................. 80
Air Squat ...................................................................................................................................................................... 82
Box Squat .................................................................................................................................................................... 94
Back Squat .................................................................................................................................................................. 96
Front Squat ............................................................................................................................................................... 106
Overhead Squat ....................................................................................................................................................... 111
Deadlift ...................................................................................................................................................................... 116
Pushup ....................................................................................................................................................................... 124
Ring Pushup ............................................................................................................................................................. 129
Bench Press ............................................................................................................................................................... 130
Floor Press ................................................................................................................................................................. 135
Dip ............................................................................................................................................................................... 136
Ring Dip ..................................................................................................................................................................... 139
Strict-Press ................................................................................................................................................................ 140
Handstand Pushup ................................................................................................................................................ 146
Pull-Up........................................................................................................................................................................ 149
Chin-Up ...................................................................................................................................................................... 153
CATEGORY 2 MOVEMENTS ............................................................................................................ 154
Wall Ball ...................................................................................................................................................................... 156
Push-Press ................................................................................................................................................................. 158
Jumping and Landing ........................................................................................................................................... 161
Kettlebell Swing ...................................................................................................................................................... 162
One-Arm Swing....................................................................................................................................................... 166
Rowing ....................................................................................................................................................................... 168
Kipping Pull-Up ....................................................................................................................................................... 171
Snatch Balance Progression ................................................................................................................................ 172
CATEGORY 3 MOVEMENTS ............................................................................................................ 176
Burpee ........................................................................................................................................................................ 178
Turkish Getup ........................................................................................................................................................... 180
Clean ........................................................................................................................................................................... 183
Power Clean.............................................................................................................................................................. 186
Hang Clean ............................................................................................................................................................... 187
Push-Jerk ................................................................................................................................................................... 190
Snatch ......................................................................................................................................................................... 195
Muscle-Up ................................................................................................................................................................. 198
CHAPTER 6 THE TUNNEL ............................................................................................................................. 201
Identifying the Problem .............................................................................................................................................. 202
CHAPTER 7 THE SYSTEMS ........................................................................................................................ 204
A Movement-Based Approach .................................................................................................................................. 205
The Mobility Systems ................................................................................................................................................... 207
Joint Mechanics ......................................................................................................................................................... 208
Sliding Surface ............................................................................................................................................................ 211
Muscle Dynamics ....................................................................................................................................................... 212
Mobilization Methods .................................................................................................................................................. 213
Pressure Wave ............................................................................................................................................................. 213
Contract and Relax ................................................................................................................................................... 214
Banded Flossing ......................................................................................................................................................... 215
Smash and Floss ........................................................................................................................................................ 216
Paper Clipping (Oscillation) .................................................................................................................................... 216
Voodoo Flossing (Compression) ............................................................................................................................. 217
Flexion Gapping ........................................................................................................................................................ 221
Upstream/Downstream Approach .......................................................................................................................... 222
Programming for Mobility .......................................................................................................................................... 222
Rules of Mobility ............................................................................................................................................................ 223
Mobility Tools .................................................................................................................................................................. 226
AREA 1: THORACIC SPINE (UPPER BACK, NECK, SCAPULA) ...................................... 230
AREA 2: POSTERIOR SHOULDER (LAT, POSTERIOR DELTOID) .................................. 248
AREA 3: ANTERIOR SHOULDER (PEC, ANTERIOR DELTOID) ........................................ 262
AREA 4: DOWNSTREAM ARM (TRICEPS, ELBOWS, FOREARM, WRIST) ............. 274
AREA 5: TRUNK (PSOAS, LOW BACK, OBLIQUE) .................................................................. 286
AREA 6: POSTERIOR HIGH CHAIN (GLUTES, HIP CAPSULE) ....................................... 298
AREA 7: ANTERIOR HIGH CHAIN (HIP FLEXOR, QUADRICEPS) ................................ 322
AREA 8: MEDIAL CHAIN (ADDUCTOR) ........................................................................................... 338
AREA 9: POSTERIOR CHAIN (HAMSTRING) .............................................................................. 346
AREA 10: KNEE ................................................................................................................................................ 358
AREA 11: MEDIAL/ANTERIOR SHIN ................................................................................................. 366
AREA 12: CALF ................................................................................................................................................. 374
AREA 13: ANKLE/PLANTAR SURFACE ........................................................................................... 386
GLOSSARY ................................................................................................................................................................ 398
ABOUT THE AUTHORS .................................................................................................................................. 400
10
Often these days, I find myself crammed into an airplane seat on my way across the country to work with athletes, coaches, professional sports teams, CrossFit gyms, corporations, and elite mili-tary forces. Inevitably I end up making small talk with the poor soul imprisoned next to me. Soon enough I get the question: “What do you do for work?”
Dozens of answers run through my head.“I make the best athletes in the world better.”“I work with the government to improve our
military’s force protection and force resiliency.”“I work with athletes and coaches to help them
understand and resolve common and preventable losses of torque, force, wattage, and output.”
“I’m trying to change the world’s movement-based economy from subsistence tension-hunt-ing to sustainable, high-yield torque farming.”
“I’m fomenting revolution. I’m trying to em-power people to live more integrated, pain-free, self-actualized lives.”
No, I don’t mention anything about farm-ing torque or self-actualization, which I’ll spend plenty of time on in the pages to come. I keep it simple. “I’m a teacher,” I say.
Typically eyes glaze over, and the conversation sputters to a halt. But once in a while, my seatmate is curious enough to ask the obvious follow-up—“What do you teach?”—unaware of the depths of my obsession with human movement and perfor-mance, but he soon finds out.
What I teach—and what you will learn in this book—is a multi-function, extraordinarily effec-tive movement and mobility system. Learn, prac-tice, and apply it and you will understand how to move correctly in all situations. And I mean all. It will serve you at rest and when you are executing a demanding physical feat, say, in the midst of an Olympic competition, or in a strenuous combat or rescue operation.
This is a strength-and-conditioning system that is also diagnostic in nature: it can help you—or your coach—detect movement and position-ing errors even as it improves your performance and brings you to the top of your game. My sys-tem gives you the tools to dissolve the physical restrictions that prevent you from fully actualiz-ing your potential. With enough practice, you can develop yourself to the point at which your full physical capabilities will be available to you in-stantaneously. You will develop the motor-control and range-of-motion to do anything at any time.
You could ultimately become the human equivalent of a supple leopard, always poised and ready for action.
You might ask, “What does it mean to become a supple leopard?” It’s a good question, one that warrants an explanation.
I’ve long been fascinated with this idea of a leopard: powerful, fast, adaptable, stealthy… ba-dass.
When I was fourteen I watched Gallipoli, a World War I movie about two Australian sprinters going off to war, with my dad. There’s a memora-ble scene in the beginning of the movie in which Archy, a rising track star, is being trained by his uncle Jack. The pep talk goes something like this:
Jack: What are your legs?
Archy: Springs. Steel Springs.
Jack: What are they going to do?
Archy: Hurl me down the track.
Jack: How fast can you run?
Archy: As fast as a leopard.
Jack: How fast are you going to run?
Archy: As fast as a leopard!
Jack: Then let’s see you do it!
INTRODUCTION

INTRODUCTION
11
For whatever reason, the “fast as a leopard” mantra stuck with me. But it wasn’t until a Navy SEAL buddy of mine said to me, “You know, Kel-ly, a leopard never stretches” that this notion of becoming a supple leopard drifted into my con-sciousness.
Of course a leopard doesn’t stretch. A leopard has full physical capacity available at all times. It can attack and defend with full power at any mo-ment. Unlike humans, it doesn’t need to prep for movement. It doesn’t need to activate its glutes; it doesn’t have to foam-roll; it doesn’t have to raise its core temperature—it’s just ready.
Obviously, we do not share the same physical playing field with leopards. We have to warm-up for strenuous activities and practice and ingrain good movement patterning. But that doesn’t mean we all can’t be working toward the goal of having full physical capabilities available to us in-stantaneously, or having the motor-control and range-of-motion to perform any physical feat at any time. Leopards don’t have to work at being supple; they naturally are. But people are brutally tight and missing key ranges of motion that pre-vent them from moving as supplely and power-fully as a leopard.
Metaphorically speaking, if you want to become a supple leopard, you need to understand how to move correctly in all situations. You also need the tools to deal with stiff and adaptively short tissues that restrict range-of-motion. This is the basis of my Movement and Mobility System.
A New Human-Performance Epoch
Is what I teach radically new? Yes, and then again, no.
I see myself as one of the latest in a long line of teachers concerned with organizing and opti-mizing movement to maximize physical perfor-mance—consistently and without injury.
Certainly, human beings have explored this for eons. In fact, I’ve seen a thousand-year-old image on a coin that shows a man sitting in full lotus—a
posture that creates more stability for the spinal system. More recently, some three hundred and fifty years ago, a famous Japanese swordsman, Miyamoto Musashi, wrote about the importance of keeping your belly firm and your knees and feet in a good position: “Make your combat stance your everyday stance.” Strange yet perfect advice from Musashi’s famous text, The Book of Five Rings.
What’s exciting about being alive today is that we’re in the midst of a human-performance ep-och. Physical mastery is not limited to the few. As I see it, we are experiencing a quantum leap in the quality, reproducibility, and ubiquity of absolute human physical potential. In fact, if we imagine the peak expression of human potential to be some kind of golden ratio, then the current generation of coaches, athletes, and thinkers have made the equivalent of a Fibonacci jump to light speed.
It’s crazy. I mean, even my mother is gluten-free and casually brags about her latest deadlift personal record.
What’s going on? What’s so different about the time in which we live?
What’s different is that we’ve seen a conver-gence of factors create a new golden age in hu-man physical performance. Four key factors are responsible.
First, the advent of the Internet and modern media has enabled a global sharing of ideas. Isolat-ed pockets of embodied knowledge are more eas-ily transferred and shared. Ten years ago, finding an Olympic-lifting coach required bloodhound-like determination or luck. Most likely both. Now the clean and snatch—the two core Olympic-lift-ing movements—are widespread practices.
Second, for the first time in the modern train-ing era, there is an unparalleled cross-discipline exchange among training practices and theories of human movement. For example, our gym, San Francisco CrossFit, is an interdisciplinary melting pot: physiotherapists hang out with elite pow-erlifters, Olympic-lifting medalists talk to cham-pion gymnasts, and ballet dancers train with elite endurance coaches. This phenomenon is the strength-and-conditioning equivalent of the
12
great systems theorist Buckminster Fuller’s con-cept of mutual accommodation: that correctly or-ganized, functionally sound systems are never in opposition. They mutually support one another.
We all have the same basic design and body structure. People’s shoulders all work the same way: the principles that govern a stable shoul-der position while vaulting in gymnastics are the same in the bench press; how you organize your shoulders to sit in lotus posture while meditating is the same way you organize them when work-ing at your computer. It’s just that the same set of problems have been solved from radically differ-ent angles and approaches. Until now.
Third, we appear to be living in a time in which there is a growing interest in the body. While this topic probably merits its own book, there can be no doubt that the accessibility of online and mo-bile tools that make it possible to measure our behavior, along with our lifestyle, nutrition, and exercise habits, has shifted the responsibility for keeping our bodies in the best shape possible back where it belongs—on the individual.
Elite and recreational athletes alike can track
and measure nearly any aspect of their perfor-mance and biology with little effort and cost. Want to know how that afternoon coffee affects your sleep quality? No problem. Want to fraction-ate your cholesterol and find out if you are eat-ing too much bacon? No problem (although I’m pretty sure that it’s impossible to eat too much bacon). Whether people are tracking their own blood chemistry or daily step totals, or trying to get to the root of their own knee pain, there has been an enormous shift in consciousness, leading to a greater sense of self-control. Eating, sleeping, and moving correctly are not gimmicks or fads. The dam is burst and the personal biological revo-lution is here.
It’s a brave new world. We don’t have to wait decades or weather multiple knee surgeries and heart attacks to find out that we’re running poor-ly, eating poorly, sleeping poorly, and training poorly. Peter Drucker—world-renowned man-agement consultant, educator, and author—was right, “What gets measured, gets managed.”
The fourth factor contributing to this golden age is the evolution of strength-and-condition-

INTRODUCTION
13
ing. People have been lifting heavy weights, mov-ing quickly, and working very hard to real effect for some time. The difference now is that a good strength-and-conditioning program has all of the elements of human movement covered. That is, an intelligently structured strength-and-condition-ing program gives the athlete full range-of-mo-tion in his joints, limbs, and tissues; the motor-control to express those ranges with movements; and the ability to do so under actual physical load, metabolic demand, cardio-respiratory demand, speed, and stress. Couple this complete physical paradigm (the CrossFit model holds that people should look and train like Olympic-lifting-sprint-er-gymnasts, for example) with the number of people now using a common language of move-ments and movement paradigms, and you have the largest scale model experiment in human movement in the history of the world.
To help put this in perceptive, in the seven years our gym, San Francisco CrossFit, has been open, we estimate that we’ve facilitated nearly seventy thousand athlete training sessions. The sheer volume of pattern recognition this is ca-pable of generating is staggering and could take a clinician or a coach a lifetime to accumulate. Now multiply this by the thousands of locations, across hundreds of sports platforms, and sudden-ly a simple strength-and-conditioning system also becomes the world’s most potent diagnostic tool with unmatched test and retest capabilities. This accumulated wisdom is what has given rise to my system. The gym is suddenly the laboratory.
We are able to eliminate correlates for human movement and performance and replace them with actual human movement. You don’t have to demonstrate an active straight-leg raise (a com-mon physical-therapist tool for assessing ham-string range-of-motion); you just need to dem-onstrate that you can pick something up off the ground while keeping your spine organized and flat (deadlift). This is how you bring it down to the bare essentials.
Realize what a huge shift in thinking this is.Our previous model of strength-and-con-
ditioning was predicated on the fact that if you were just stronger and fitter, you’d be a better ath-
lete and better at your chosen sport. Clearly, that’s not true. In fact, anterior cruciate ligament (ACL) injury rates in children continue to increase. Run-ning injury rates are estimated to be as high as 70 percent in some studies. And therein lies the problem.
In the past, it has been difficult to understand the nuances of poor technique and biomechanics as expressed by athletes. Anecdotally, basketball is the most dangerous sport a middle-aged man can play. Why do middle-aged guys so readily tear their Achilles playing pickup B-ball? Because it’s hard to see the underlying poor movement patterns while they’re playing. They’re changing shapes, transitioning from one position to anoth-er at high speeds.
To prevent these injuries, we need a tool to make the invisible visible. We need to bring athletes into the lab (i.e., gym) to assess their movement patterns before the catastrophe oc-curs—ACL tear, herniated disk, torn rotator cuff. In addition, we need a model that allows us to identify the problem, be it motor-control or bio-mechanical in origin. That’s what my Movement and Mobility System does.
By consistently and systematically exposing athletes to the rigors of full-range movements and optimal human motor-control, we’re able to quickly identify force leaks, torque dumps, bad technique, motor inefficiency, poorly integrated movement patterns; holes in strength, speed, and metabolic conditioning; and restrictions in mobil-ity. Best of all, the tool we use to detect and pre-vent injury is the same tool needed to improve an athlete’s performance. The middle-age “tore my heel cord” syndrome is a lot less likely to happen if that athlete is regularly exposing his ankle to full ranges of motion in movements like pistols or overhead squats (see page 111).
But there is even more to it than that. This complete and modern strength-and-conditioning system has not only become the most complete way to systematically test and retest athletic per-formance, and to diagnose movement inefficien-cies and dysfunction—it has also created a formal, universal language of human movement. In short, if you understand the principles that govern
BECOMING A SUPPLE LEOPARD
14
full-range strength-and-conditioning exercises and can apply them in this low-risk environment (gym), you understand and can apply them to the activities and positions of life, sports, dance, com-bat, and play.
Take the squat for example. Squatting isn’t just a movement performed in the gym; it’s how hu-man beings lower their center of gravity. To per-form a full-range—hips below knee crease—squat with loads overhead, in the front of the torso, on the back, or on one leg pretty much covers the range of squatting activities a human can ever be expected to perform. If you understand the prin-ciples of this formal movement training language, then you are better prepared to express a more informal or applicable form of human movement everywhere else. You can start to connect the dots between the safe, stable positions practiced in the gym to the movements performed outside the gym. For example, if you understand how to organize your spine and stabilize your hips and shoulders in a good position when performing a deadlift or clean, you have a ubiquitous model for picking something off the ground. If you under-stand how to create a braced-neutral trunk and generate torque off of a bar when performing a pull-up, you will not have a problem applying the same principles when climbing a tree.
This is the rub: If you only ever climb trees, it may be impossible to know if you are working in the safest and most efficient positions—a stable shoulder and stable trunk—unless you also do formal pull-ups. In other words, it’s a lot harder to identify whether someone is moving in a safe, sta-ble position when climbing a tree than when per-forming a pull-up in the gym, even though both activities abide by the same fundamental move-ment principles. So in addition to being a lab in which to identify, diagnose, and treat poor move-ment practices, the gym is a safe and controlled environment in which we can teach and layer these ubiquitous concepts with accelerated learn-ing capabilities and reduced potential for injury.
Moreover, the idea of creating a common movement language based on formal strength-and-conditioning principles is why there can be suddenly so much inter-disciplinary movement-
based discussion and collaboration. We are able to move beyond “people should train in gymnastics” to “people should train in gymnastics because the handstand position easily teaches and exposes shoulder stability and organization and has the same finish position and shoulder demands as the jerk.” The commonality and universality of “formal” human movement is easily understood by coach and athlete alike, and it is easy to track and test changes in positional quality by measuring the very thing we are chasing in the gym anyway—performance. This is why we track work output, wattage, poundage, reps, and time in the first place.
Brilliant people have spent their entire lives developing systems that help us understand how and why humans move the way they move and have the ailments they do. Do these systems work? Of course they do. They work to varying degrees and with varying application. Should we discard them? No, of course not. But there is a significant disconnect between our older models of human movement and our current understanding about how best to maximize human physical potential.
I’ll use a real-life example to help illustrate my point. Recently I was on a working vacation to Australia with my wife and two daughters. We booked a few days at a beautiful spa along Austra-lia’s west coast. My wife, Juliet, noticed that there was a free yoga class the following morning at 8 a.m. and thought it would be amusing for me to attend. I showed up ten minutes before the hour as I was instructed but found that I was the last person to arrive. The instructor sighed in resigna-tion when she saw 225-pound me walk into her yoga class “late.” (There were already fifteen or so very “I do yoga”–looking women there; I was the only man.)
In a fake-pleasant voice, she asked me if I’d ever done yoga. I said I had, which was true: I’d done a lot of yoga when I was much younger. Not five minutes into the session she started making very complimentary comments about the abilities of the “bloke” in the back row. “Great job back there!” “Wow!” And the more effusive and surprised the instructor became, the more I became the hated target of all the skinny women in class struggling
INTRODUCTION
15
ments. In chapter 5, “Movement Hierarchy,” you will
learn how to properly execute functional full-range strength-and-conditioning movements—squatting, pulling, and pressing iterations—as well as how to identify and correct common movement errors. Once you understand and can apply the movement principles to function-al movements, you will have no problem using those skills to correct errors and optimize move-ment efficiency for all of your movements.
The key is to prioritize position and movement first. Most of you will probably want to skip right to the mobilization techniques later in the book. And if you have a tight muscle or a painful joint that needs to be dealt with, by all means go there. (See chapter 7, “The Systems.”) But know that you will never get to the bottom of your pain and dys-function if you don’t correct the movement or po-sition that is causing the problem. It’s like treating a symptom without addressing the disease. The problem will still be there.
Note: The evolution of the Movement and Mo-bility System continues to progress at an expo-nential rate. New ways of improving performance and torturing athletes are being developed every-day in the San Francisco CrossFit laboratory. For all the latest and most up-to-date mobilizations go to MobilityWOD.com.
To help you navigate the pages of this book, it’s important that you understand the basic con-struct and function of my Movement and Mobility System.
There are three movement principles: midline stabilization and organization (spinal mechanics), one-joint rule, and laws of torque. Think of the movement principles as the master blueprint for creating safe and stable positions for all human movements. You will learn about these in chapters 2, 3, and 4. If you practice them in the order pre-sented, you will know how to stabilize your spine in a braced, well-organized position; how to main-tain good posture during loaded, dynamic move-ments; and how to create stability in your joints to generate maximize force, power, and speed. Then you will have the necessary foundation to properly execute the strength-and-conditioning exercises in chapter 5.
Realize that you can immediately apply the movement principles to the actions of sports and life. Once you understand position as a skill and the underpinnings of stability, you can start to bring consciousness to your position in all situ-ations, whether you’re trapped behind a desk at work, picking up your child, carrying groceries, or playing volleyball. But mastering the movement principles takes practice. And you need to be able to identify restrictions in range-of-motion and motor-control dysfunction so that you can isolate and solve your unique problems. That’s why the movement principles are practiced in a safe, con-trolled environment (the gym) using fundamental (transferable) strength-and-conditioning move-
HOW TO USE THIS BOOK
with the postures. At the end of class, the instructor rushed right
up to me and apologized for not recognizing that I was obviously an advanced practitioner. (I mean clearly I’m a beginner, but I was loads better than everyone else, and I do lift weights and perform gymnastics.) When she asked me where I prac-ticed, I laughed a little and said that I didn’t. In my
nicest voice I said that I actually hadn’t done yoga in over ten years. She was a little taken aback, in that I clearly understood how to perform the movements in her class, but didn’t actually prac-tice, and so she had to ask, “What do you do?”
I said I was a teacher.
15
BECOMING A SUPPLE LEOPARD
116
DEADLIFTBend over to pick up a toolbox and you’re deadlifting. The deadlift is both common and crucial to the world
of work: A !reman hoisting someone onto a stretcher, a soldier in the !eld bending over to grab an ammo box, or a construction worker picking up an electric saw.
Each time you bend over to pick something up o" the ground, you’re essentially executing a deadlift. Yet few people understand how to do it correctly. The fact that so many people round their back when they bend over to pick something up may explain why millions su"er from lower back pain.
People who understand how to deadlift with good form—meaning they know how to brace, create torque, and never sacri!ce form for range-of-motion—typically have fewer back problems. They have a model for picking something up that is universally applicable: If you know how to set up for a deadlift, you know how to pick something heavy o" the ground without compromising your back.
To protect your back and maximize force production, you need to bring consciousness to this fundamental movement pattern so that you can reproduce a good position in all situations. You need to optimize and in-grain the deadlift setup so you have the same movement outcome every single time. Whether you’re tired, or stressed out, or both, you have a blueprint that will allow you to produce maximum power with minimum risk.
The deadlift shares the same load-order sequence and universal laws as the squat: brace, create torque, load your hips and hamstrings, keep your shins vertical, and distribute your weight in the center of your feet. (For an overview of these principles, review the air squat on page 82.) This makes the deadlift a very easy movement to learn and signi!cantly shortens your learning curve. And as with all category 1 movements, the deadlift serves as a diagnostic tool for assessing range-of-motion restrictions and motor-control errors. (You can really see spinal errors and posterior chain restriction with this movement). But before you start down that path, you need to learn how to optimize the setup.
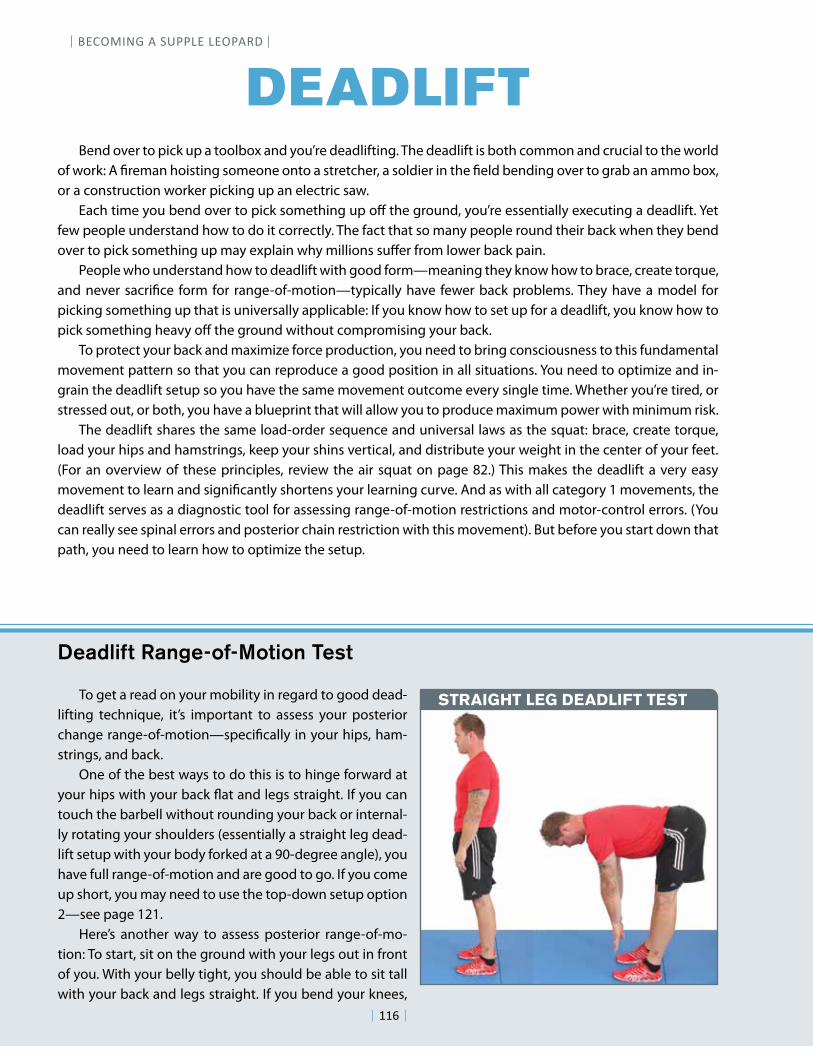
To get a read on your mobility in regard to good dead-lifting technique, it’s important to assess your posterior change range-of-motion—speci!cally in your hips, ham-strings, and back.
One of the best ways to do this is to hinge forward at your hips with your back #at and legs straight. If you can touch the barbell without rounding your back or internal-ly rotating your shoulders (essentially a straight leg dead-lift setup with your body forked at a 90-degree angle), you have full range-of-motion and are good to go. If you come up short, you may need to use the top-down setup option 2—see page 121.
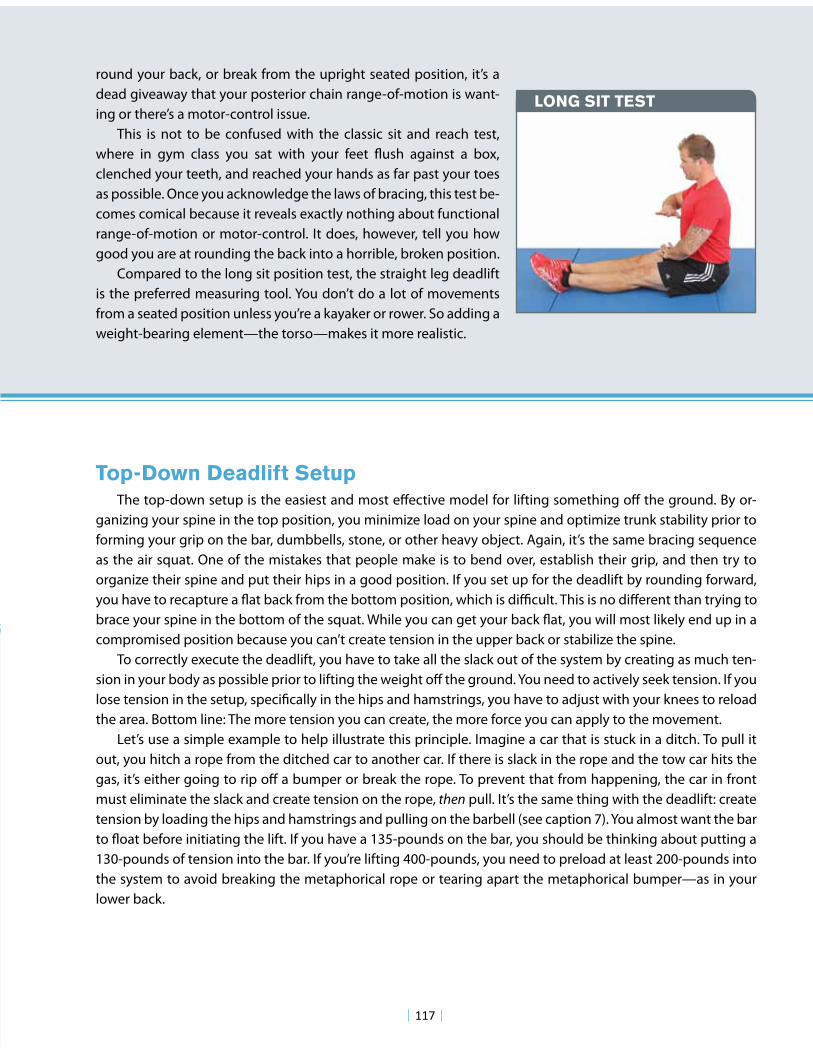
Here’s another way to assess posterior range-of-mo-tion: To start, sit on the ground with your legs out in front of you. With your belly tight, you should be able to sit tall with your back and legs straight. If you bend your knees,
Deadlift Range-of-Motion Test
STRAIGHT LEG DEADLIFT TEST
116
MOVEMENT HIERARCHY: CATEGORY 1 MOVEMENTS
117
The top-down setup is the easiest and most e!ective model for lifting something o! the ground. By or-ganizing your spine in the top position, you minimize load on your spine and optimize trunk stability prior to forming your grip on the bar, dumbbells, stone, or other heavy object. Again, it’s the same bracing sequence as the air squat. One of the mistakes that people make is to bend over, establish their grip, and then try to organize their spine and put their hips in a good position. If you set up for the deadlift by rounding forward, you have to recapture a "at back from the bottom position, which is di#cult. This is no di!erent than trying to brace your spine in the bottom of the squat. While you can get your back "at, you will most likely end up in a compromised position because you can’t create tension in the upper back or stabilize the spine.
To correctly execute the deadlift, you have to take all the slack out of the system by creating as much ten-sion in your body as possible prior to lifting the weight o! the ground. You need to actively seek tension. If you lose tension in the setup, speci$cally in the hips and hamstrings, you have to adjust with your knees to reload the area. Bottom line: The more tension you can create, the more force you can apply to the movement.
Let’s use a simple example to help illustrate this principle. Imagine a car that is stuck in a ditch. To pull it out, you hitch a rope from the ditched car to another car. If there is slack in the rope and the tow car hits the gas, it’s either going to rip o! a bumper or break the rope. To prevent that from happening, the car in front must eliminate the slack and create tension on the rope, then pull. It’s the same thing with the deadlift: create tension by loading the hips and hamstrings and pulling on the barbell (see caption 7). You almost want the bar to "oat before initiating the lift. If you have a 135-pounds on the bar, you should be thinking about putting a 130-pounds of tension into the bar. If you’re lifting 400-pounds, you need to preload at least 200-pounds into the system to avoid breaking the metaphorical rope or tearing apart the metaphorical bumper—as in your lower back.
Top-Down Deadlift Setup
LONG SIT TEST
round your back, or break from the upright seated position, it’s a dead giveaway that your posterior chain range-of-motion is want-ing or there’s a motor-control issue.
This is not to be confused with the classic sit and reach test, where in gym class you sat with your feet "ush against a box, clenched your teeth, and reached your hands as far past your toes as possible. Once you acknowledge the laws of bracing, this test be-comes comical because it reveals exactly nothing about functional range-of-motion or motor-control. It does, however, tell you how good you are at rounding the back into a horrible, broken position.
Compared to the long sit position test, the straight leg deadlift is the preferred measuring tool. You don’t do a lot of movements from a seated position unless you’re a kayaker or rower. So adding a weight-bearing element—the torso—makes it more realistic.
BECOMING A SUPPLE LEOPARD
118
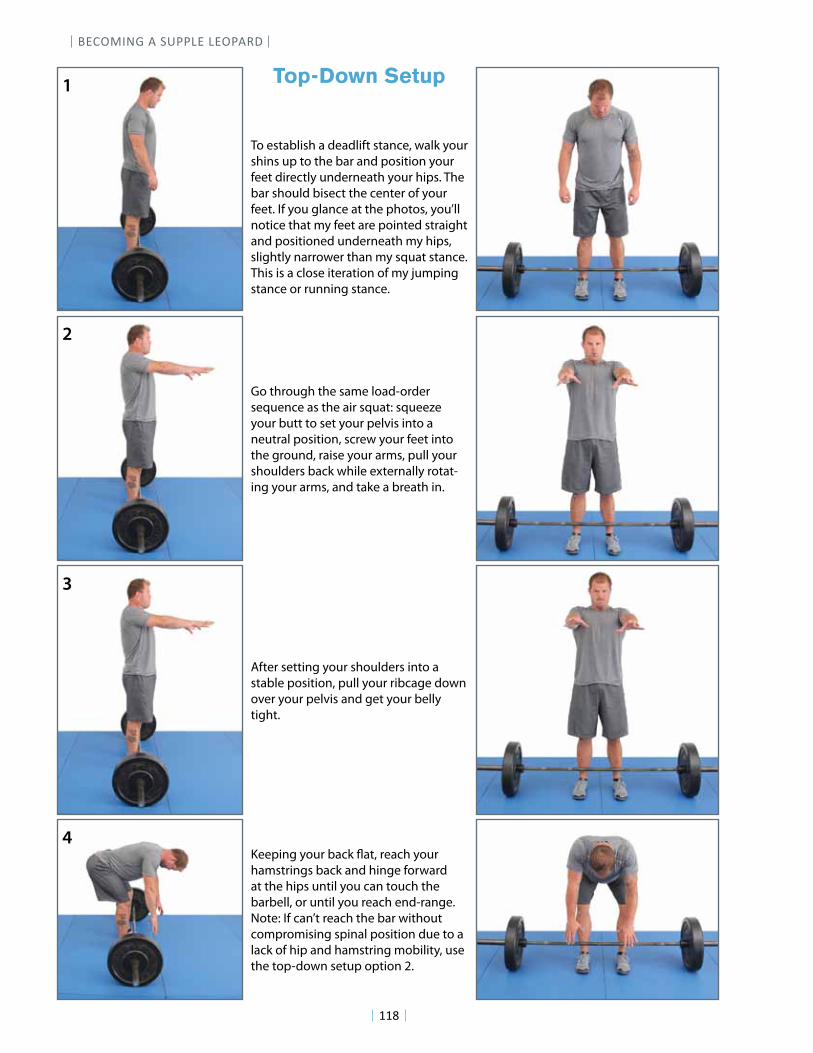
To establish a deadlift stance, walk your shins up to the bar and position your feet directly underneath your hips. The bar should bisect the center of your feet. If you glance at the photos, you’ll notice that my feet are pointed straight and positioned underneath my hips, slightly narrower than my squat stance. This is a close iteration of my jumping stance or running stance.
Go through the same load-order sequence as the air squat: squeeze your butt to set your pelvis into a neutral position, screw your feet into the ground, raise your arms, pull your shoulders back while externally rotat-ing your arms, and take a breath in.
After setting your shoulders into a stable position, pull your ribcage down over your pelvis and get your belly tight.
Keeping your back !at, reach your hamstrings back and hinge forward at the hips until you can touch the barbell, or until you reach end-range. Note: If can’t reach the bar without compromising spinal position due to a lack of hip and hamstring mobility, use the top-down setup option 2.
1
3
2
4
Top-Down Setup

MOVEMENT HIERARCHY: CATEGORY 1 MOVEMENTS
119
Grip the bar one hand at a time, form-ing your grip just to the outside of your shin with your palm facing your body. This allows you to form a hook grip on the bar—see hook grip, page 120—while maintaining tension in the hips, hamstrings, and upper back. For most people, a thumbs distance from your leg is good start. The key is that you have enough room to press your knees out. So before you start your lift, get into position, shove your knees out as far as possible, and make sure that your arms are not in the way.
Form a hook grip with your other hand in the exact same fashion. Note: I prefer the double over-hand grip (pronated grip) as illustrated in the photos. This allows me to maximize torque and tension in my upper back. While the mix grip is certainly a viable option, it does not allow you to create torque and stabilize your shoulders to the same degree—see mix grip, page 122.
As you form your grip, you’ll prob-ably notice that there is not as much tension in the system—meaning your back is not as tight and your hips and hamstrings are not loaded to the same degree. To reclaim tension, screw your hands into the bar as if you were try-ing to break or bend the bar. As you do this, raise your hips and pull your knees back, creating as much tension in your hips, hamstrings, and back as possible. Again, there should be no change in spinal position.
After reloading your hips, hamstrings, and back, lower your butt slightly while pulling on the barbell, keeping your shins as vertical as possible. To help with this step, imagine pulling yourself into position. It’s also impor-tant to notice that the bar is posi-tioned underneath my scapula. If your shoulders are too far over the bar it’s usually an indication that your shins are not vertical. You will lose some capacity to generate force.
Reload Hips and Hamstrings:
5
7
6
8
BECOMING A SUPPLE LEOPARD
120
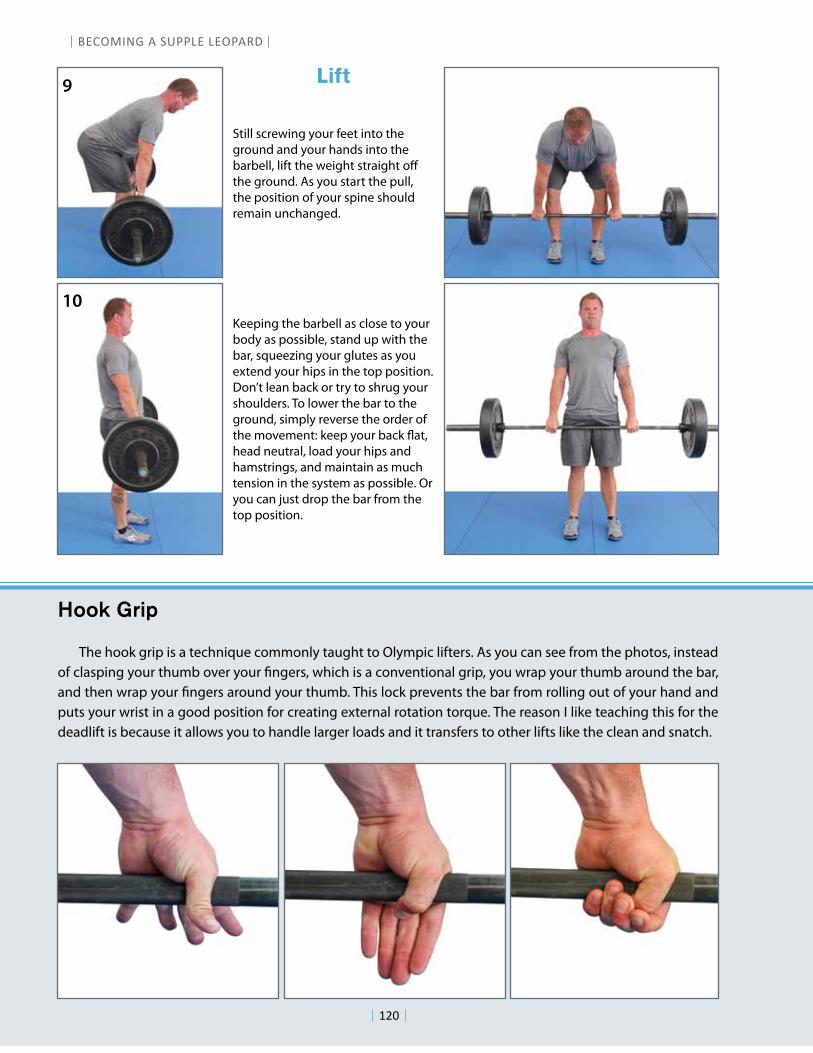
Still screwing your feet into the ground and your hands into the barbell, lift the weight straight o! the ground. As you start the pull, the position of your spine should remain unchanged.
Keeping the barbell as close to your body as possible, stand up with the bar, squeezing your glutes as you extend your hips in the top position. Don’t lean back or try to shrug your shoulders. To lower the bar to the ground, simply reverse the order of the movement: keep your back "at, head neutral, load your hips and hamstrings, and maintain as much tension in the system as possible. Or you can just drop the bar from the top position.
Lift
The hook grip is a technique commonly taught to Olympic lifters. As you can see from the photos, instead of clasping your thumb over your #ngers, which is a conventional grip, you wrap your thumb around the bar, and then wrap your #ngers around your thumb. This lock prevents the bar from rolling out of your hand and puts your wrist in a good position for creating external rotation torque. The reason I like teaching this for the deadlift is because it allows you to handle larger loads and it transfers to other lifts like the clean and snatch.
Hook Grip
9
10
120
MOVEMENT HIERARCHY: CATEGORY 1 MOVEMENTS
121
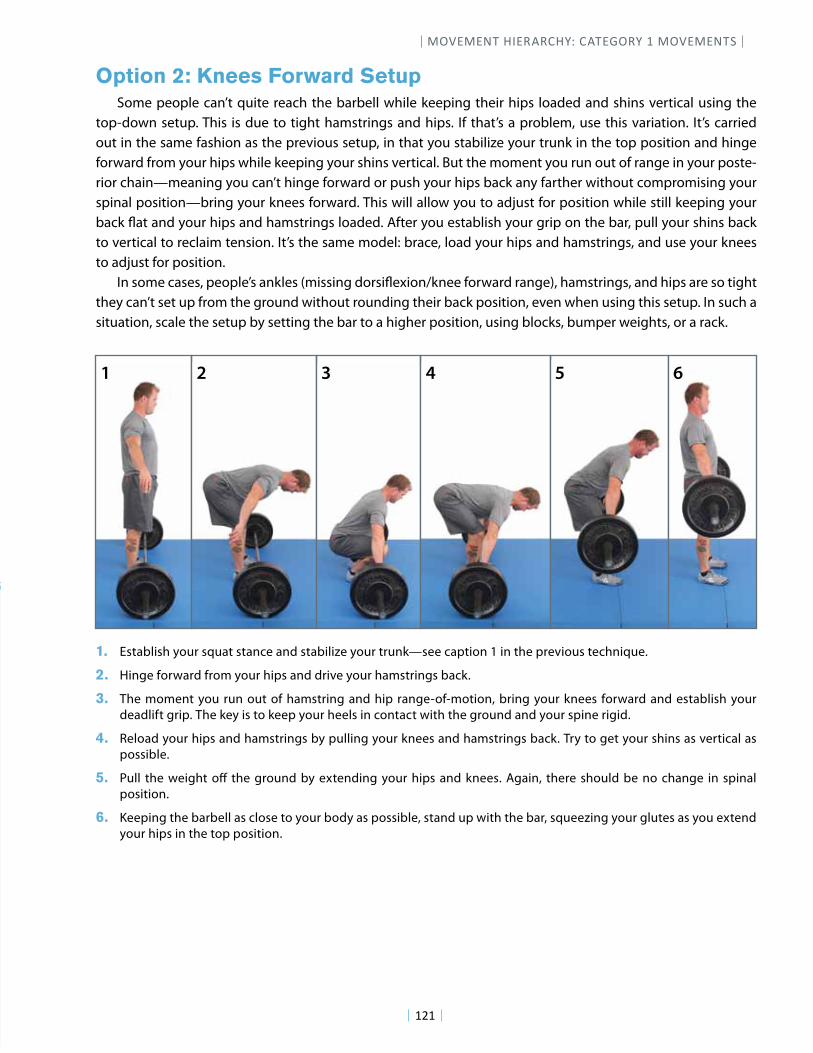
Some people can’t quite reach the barbell while keeping their hips loaded and shins vertical using the top-down setup. This is due to tight hamstrings and hips. If that’s a problem, use this variation. It’s carried out in the same fashion as the previous setup, in that you stabilize your trunk in the top position and hinge forward from your hips while keeping your shins vertical. But the moment you run out of range in your poste-rior chain—meaning you can’t hinge forward or push your hips back any farther without compromising your spinal position—bring your knees forward. This will allow you to adjust for position while still keeping your back !at and your hips and hamstrings loaded. After you establish your grip on the bar, pull your shins back to vertical to reclaim tension. It’s the same model: brace, load your hips and hamstrings, and use your knees to adjust for position.
In some cases, people’s ankles (missing dorsi!exion/knee forward range), hamstrings, and hips are so tight they can’t set up from the ground without rounding their back position, even when using this setup. In such a situation, scale the setup by setting the bar to a higher position, using blocks, bumper weights, or a rack.
Option 2: Knees Forward Setup
1. Establish your squat stance and stabilize your trunk—see caption 1 in the previous technique.
2. Hinge forward from your hips and drive your hamstrings back.
3. The moment you run out of hamstring and hip range-of-motion, bring your knees forward and establish your deadlift grip. The key is to keep your heels in contact with the ground and your spine rigid.
4. Reload your hips and hamstrings by pulling your knees and hamstrings back. Try to get your shins as vertical as possible.
5. Pull the weight o" the ground by extending your hips and knees. Again, there should be no change in spinal position.
6. Keeping the barbell as close to your body as possible, stand up with the bar, squeezing your glutes as you extend your hips in the top position.
1 5 3 2 6 4
BECOMING A SUPPLE LEOPARD
122
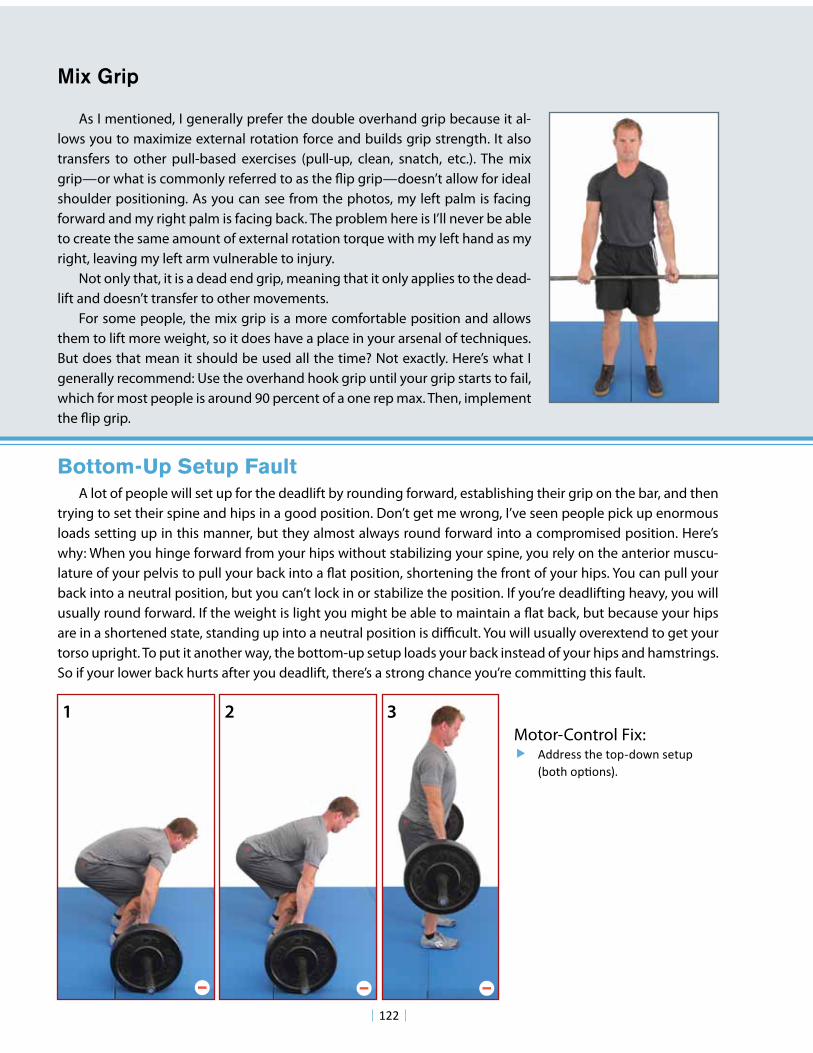
As I mentioned, I generally prefer the double overhand grip because it al-lows you to maximize external rotation force and builds grip strength. It also transfers to other pull-based exercises (pull-up, clean, snatch, etc.). The mix grip—or what is commonly referred to as the !ip grip—doesn’t allow for ideal shoulder positioning. As you can see from the photos, my left palm is facing forward and my right palm is facing back. The problem here is I’ll never be able to create the same amount of external rotation torque with my left hand as my right, leaving my left arm vulnerable to injury.
Not only that, it is a dead end grip, meaning that it only applies to the dead-lift and doesn’t transfer to other movements.
For some people, the mix grip is a more comfortable position and allows them to lift more weight, so it does have a place in your arsenal of techniques. But does that mean it should be used all the time? Not exactly. Here’s what I generally recommend: Use the overhand hook grip until your grip starts to fail, which for most people is around 90 percent of a one rep max. Then, implement the !ip grip.
Mix Grip
A lot of people will set up for the deadlift by rounding forward, establishing their grip on the bar, and then trying to set their spine and hips in a good position. Don’t get me wrong, I’ve seen people pick up enormous loads setting up in this manner, but they almost always round forward into a compromised position. Here’s why: When you hinge forward from your hips without stabilizing your spine, you rely on the anterior muscu-lature of your pelvis to pull your back into a !at position, shortening the front of your hips. You can pull your back into a neutral position, but you can’t lock in or stabilize the position. If you’re deadlifting heavy, you will usually round forward. If the weight is light you might be able to maintain a !at back, but because your hips are in a shortened state, standing up into a neutral position is di"cult. You will usually overextend to get your torso upright. To put it another way, the bottom-up setup loads your back instead of your hips and hamstrings. So if your lower back hurts after you deadlift, there’s a strong chance you’re committing this fault.
Bottom-Up Setup Fault
! !""#$%%&'($&')*+"),-&%$'.*&/0)'(&)*1)-%23
Motor-Control Fix: 1 3 2
— — —
MOVEMENT HIERARCHY: CATEGORY 1 MOVEMENTS
123
A lot of powerlifters will pull with a rounded upper back—while keeping the lower back !at—because it shortens the distance they have to pull the weight to the lockout position of the hips. This is where people get confused. The upper back is in "xed !exion, meaning that they round forward and then create tension and torque in that position.
What people have to remember is that rounding the upper back is a conscious decision that professional powerlifters make. And they understand the consequences. A classic case is Donny Thompson, a professional powerlifter and world record holder. He was practicing de"cit deadlifts with a rounded back and su#ered a disc injury. His reaction was: “I knew better. I was pulling with a rounded back and it got me.” At no point will a professional powerlifter ever round their lower back when performing a deadlift. It would be like a bomb go-ing o#. However, to get a slight edge, sometimes they will sacri"ce the safety of their position if it means being able to lift more weight.
With that said, a beginner or "tness lifter should never round their upper back as a means of lifting more weight. Why? Because it increases susceptibility to injury, ingrains a dysfunctional movement pattern into your daily life, and does not translate to other athletic movements like dynamic pulling and jumping.
I like Jesse Burdick’s general rule for pulling heavy with a rounded upper back. When you can deadlift 600 pounds, then you can start to entertain thoughts of rounding your thoracic spine. In fact, many of the best Olympic lifting coaches in the world, like Mike Burgener and Glenn Pendlay, won’t let their athletes pull heavy deadlift singles for the reason that they don’t want to ingrain a pulling pattern with an upper body (upper back and shoulder position) that won’t translate to Olympic style weightlifting.
Powerlifters Rounding Their Back
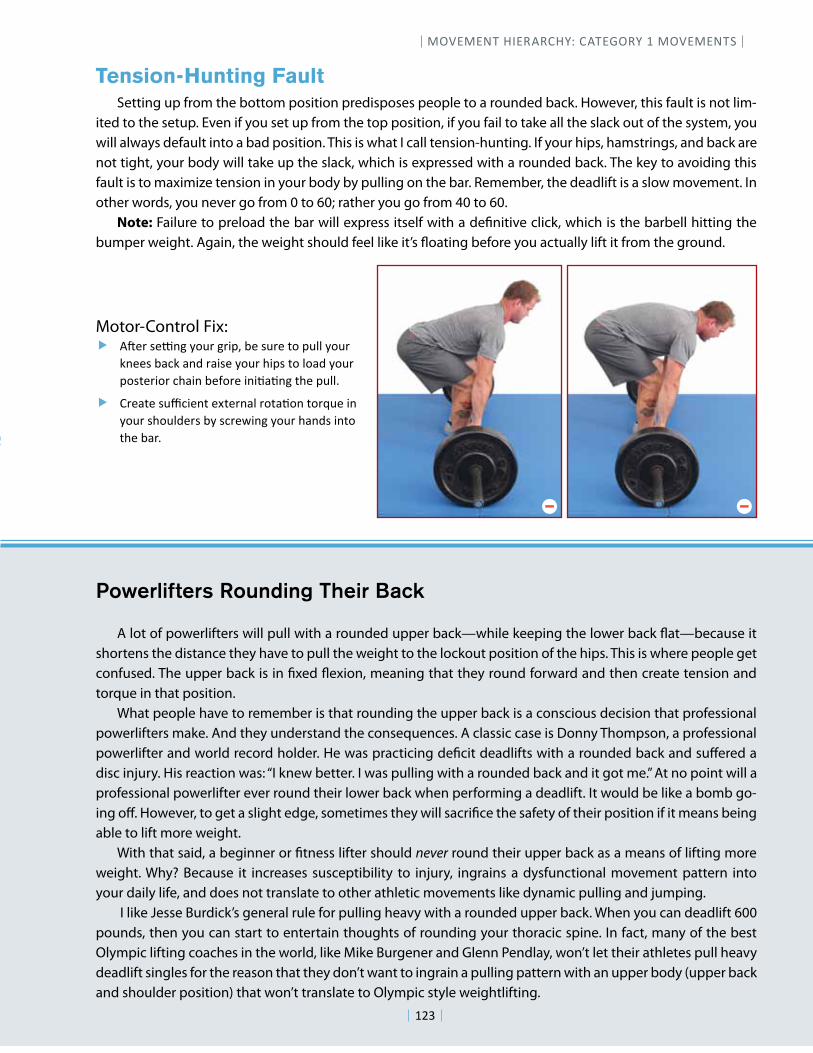
Setting up from the bottom position predisposes people to a rounded back. However, this fault is not lim-ited to the setup. Even if you set up from the top position, if you fail to take all the slack out of the system, you will always default into a bad position. This is what I call tension-hunting. If your hips, hamstrings, and back are not tight, your body will take up the slack, which is expressed with a rounded back. The key to avoiding this fault is to maximize tension in your body by pulling on the bar. Remember, the deadlift is a slow movement. In other words, you never go from 0 to 60; rather you go from 40 to 60.
Note: Failure to preload the bar will express itself with a de"nitive click, which is the barbell hitting the bumper weight. Again, the weight should feel like it’s !oating before you actually lift it from the ground.
Tension-Hunting Fault
! !"#$%&#'()%*+,$%)$-./%0#%&,$#%1+%.,22%*+,$%knees back and raise your hips to load your .+&1#$-+$%345-(%0#6+$#%-(-757()%14#%.,228
! 9$#51#%&,:3-#(1%#;1#$(52%$+157+(%1+$<,#%-(%your shoulders by screwing your hands into the bar.
Motor-Control Fix:
— —
123
BECOMING A SUPPLE LEOPARD
124
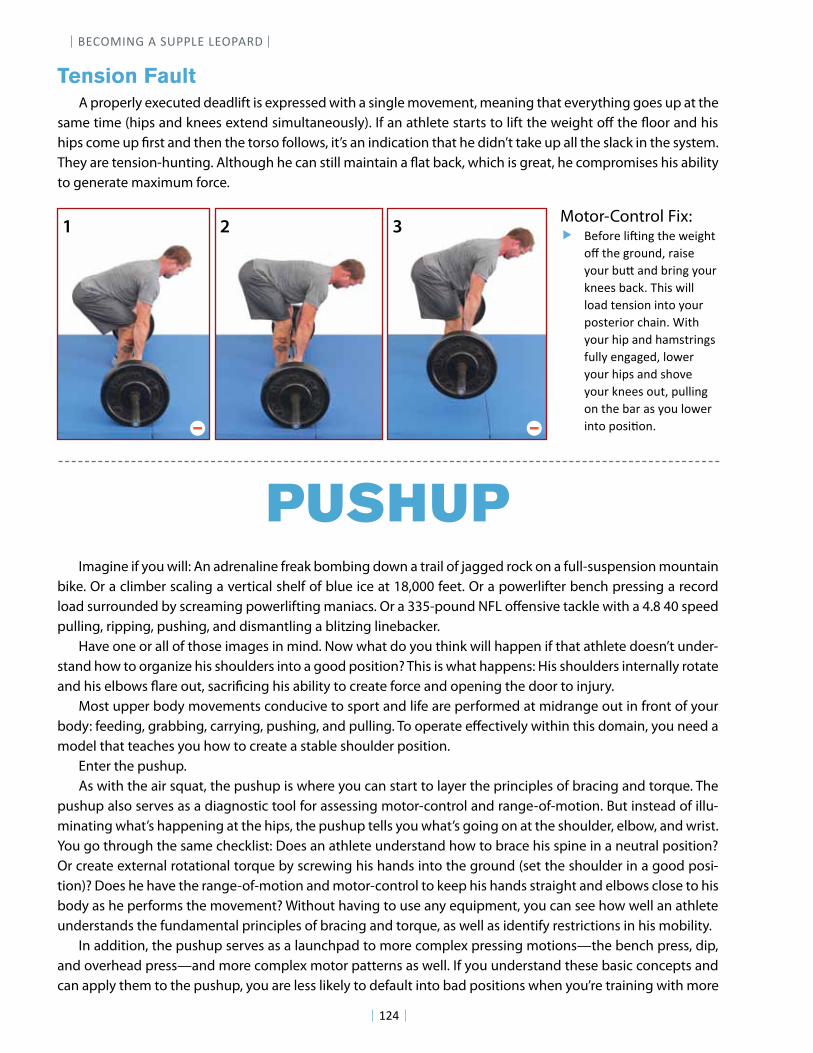
A properly executed deadlift is expressed with a single movement, meaning that everything goes up at the same time (hips and knees extend simultaneously). If an athlete starts to lift the weight o! the "oor and his hips come up #rst and then the torso follows, it’s an indication that he didn’t take up all the slack in the system. They are tension-hunting. Although he can still maintain a "at back, which is great, he compromises his ability to generate maximum force.
Tension Fault
! !"#$%"&'()(*+&,-"&."(+-,&$/&,-"&+%$0*12&%3(4"&5$0%&607&3*1&6%(*+&5$0%&knees back. This will load tension into your posterior chain. With your hip and hamstrings fully engaged, lower your hips and shove your knees out, pulling on the bar as you lower (*,$&8$4(9$*:&
Motor-Control Fix:
PUSHUPImagine if you will: An adrenaline freak bombing down a trail of jagged rock on a full-suspension mountain
bike. Or a climber scaling a vertical shelf of blue ice at 18,000 feet. Or a powerlifter bench pressing a record load surrounded by screaming powerlifting maniacs. Or a 335-pound NFL o!ensive tackle with a 4.8 40 speed pulling, ripping, pushing, and dismantling a blitzing linebacker.
Have one or all of those images in mind. Now what do you think will happen if that athlete doesn’t under-stand how to organize his shoulders into a good position? This is what happens: His shoulders internally rotate and his elbows "are out, sacri#cing his ability to create force and opening the door to injury.
Most upper body movements conducive to sport and life are performed at midrange out in front of your body: feeding, grabbing, carrying, pushing, and pulling. To operate e!ectively within this domain, you need a model that teaches you how to create a stable shoulder position.
Enter the pushup.As with the air squat, the pushup is where you can start to layer the principles of bracing and torque. The
pushup also serves as a diagnostic tool for assessing motor-control and range-of-motion. But instead of illu-minating what’s happening at the hips, the pushup tells you what’s going on at the shoulder, elbow, and wrist. You go through the same checklist: Does an athlete understand how to brace his spine in a neutral position? Or create external rotational torque by screwing his hands into the ground (set the shoulder in a good posi-tion)? Does he have the range-of-motion and motor-control to keep his hands straight and elbows close to his body as he performs the movement? Without having to use any equipment, you can see how well an athlete understands the fundamental principles of bracing and torque, as well as identify restrictions in his mobility.
In addition, the pushup serves as a launchpad to more complex pressing motions—the bench press, dip, and overhead press—and more complex motor patterns as well. If you understand these basic concepts and can apply them to the pushup, you are less likely to default into bad positions when you’re training with more
1 3 2
— —
MOVEMENT HIERARCHY: CATEGORY 1 MOVEMENTS
125
complicated movements.No wonder so many athletes su!er from torn rotator cu!s and dislocated shoulder injuries, and why peo-
ple experience anterior shoulder pain every time they press. They don’t understand the principles that govern good positions as it relates to the shoulder, elbow, and wrist. The pushup teaches and ingrains those funda-mental movement patterns and gives coaches and athletes a template for solving problems at the shoulder, elbow, and wrist.
Coaches, athletes, and physical therapists will often relate shoulder issues to a weak rotator cu! or weak shoulders. Although this is a contributing factor, it’s not necessarily the root cause. It’s about position: If you don’t have a model for creating a stable position, generating spontaneous torque and force is di"cult. Once you understand how to correctly perform a pushup, it doesn’t matter where your hands are, what you are grabbing, pushing, or pulling. Nor does the orientation of your arms matter. You can still create a stable and mechanically powerful position.
Note: The pushup shares a lot of the same principles as the squat and deadlift, but instead of loading your hips and hamstrings, keeping your shins vertical, and distributing your weight over the center of your feet, you load your pecs and triceps, keep your forearms vertical, and distribute your weight over the center of your hands (in front of your wrist). The concept of stance is also transferable. As with your squat and dead-lift stance, you should #nd a comfortable position that transfers to other pressing motions. Positioning your hands shoulder-width apart is a good start. The goal is to establish a position that allows you to perform the movement with good technique. Once you’re pro#cient, start switching up the width of your hands from time to time to create a new stimulus.
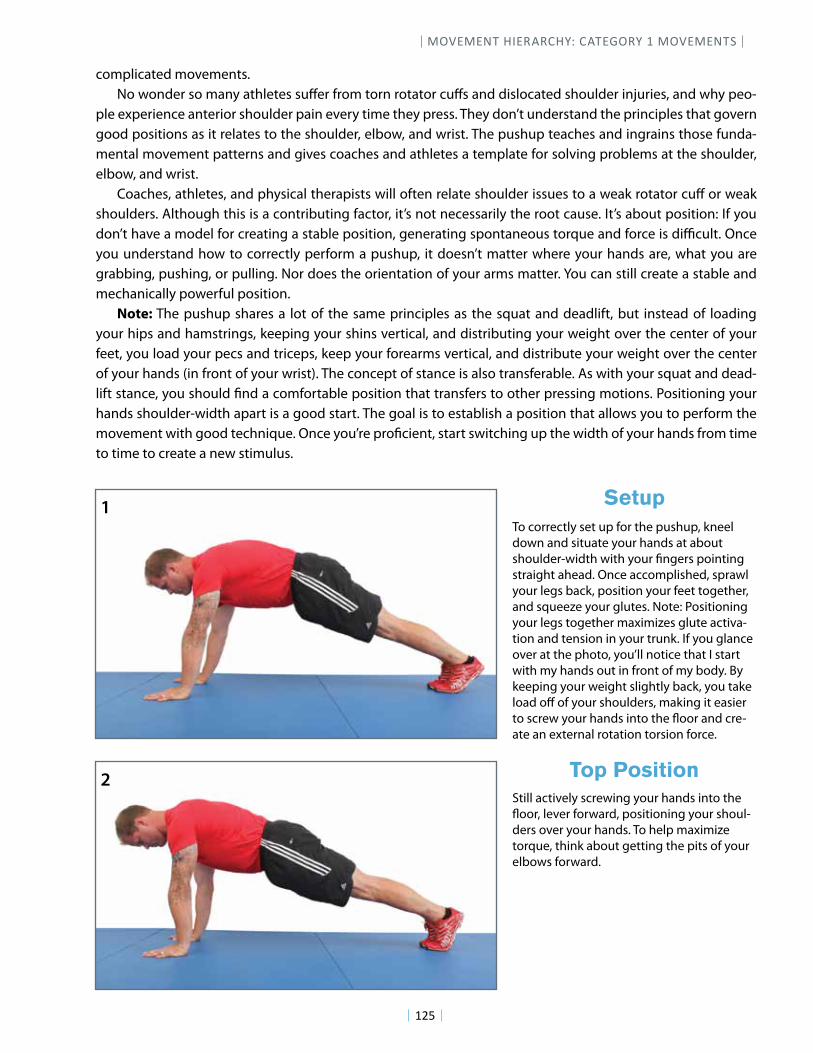
To correctly set up for the pushup, kneel down and situate your hands at about shoulder-width with your #ngers pointing straight ahead. Once accomplished, sprawl your legs back, position your feet together, and squeeze your glutes. Note: Positioning your legs together maximizes glute activa-tion and tension in your trunk. If you glance over at the photo, you’ll notice that I start with my hands out in front of my body. By keeping your weight slightly back, you take load o! of your shoulders, making it easier to screw your hands into the $oor and cre-ate an external rotation torsion force.
Still actively screwing your hands into the $oor, lever forward, positioning your shoul-ders over your hands. To help maximize torque, think about getting the pits of your elbows forward.
Setup
Top Position
1
2
BECOMING A SUPPLE LEOPARD
126
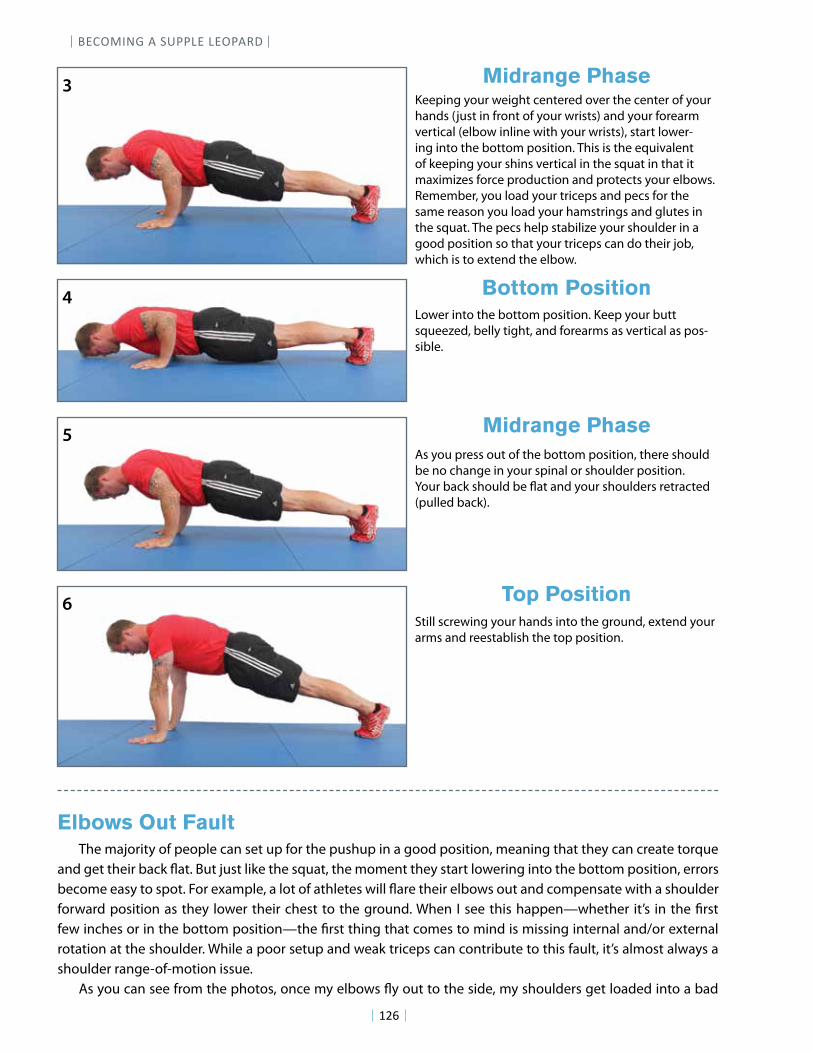
Keeping your weight centered over the center of your hands (just in front of your wrists) and your forearm vertical (elbow inline with your wrists), start lower-ing into the bottom position. This is the equivalent of keeping your shins vertical in the squat in that it maximizes force production and protects your elbows. Remember, you load your triceps and pecs for the same reason you load your hamstrings and glutes in the squat. The pecs help stabilize your shoulder in a good position so that your triceps can do their job, which is to extend the elbow.
Lower into the bottom position. Keep your butt squeezed, belly tight, and forearms as vertical as pos-sible.
As you press out of the bottom position, there should be no change in your spinal or shoulder position. Your back should be !at and your shoulders retracted (pulled back).
Still screwing your hands into the ground, extend your arms and reestablish the top position.
Midrange Phase
Bottom Position
Midrange Phase
Top Position
The majority of people can set up for the pushup in a good position, meaning that they can create torque and get their back !at. But just like the squat, the moment they start lowering into the bottom position, errors become easy to spot. For example, a lot of athletes will !are their elbows out and compensate with a shoulder forward position as they lower their chest to the ground. When I see this happen—whether it’s in the "rst few inches or in the bottom position—the "rst thing that comes to mind is missing internal and/or external rotation at the shoulder. While a poor setup and weak triceps can contribute to this fault, it’s almost always a shoulder range-of-motion issue.
As you can see from the photos, once my elbows !y out to the side, my shoulders get loaded into a bad
Elbows Out Fault
5
3
6
4
MOVEMENT HIERARCHY: CATEGORY 1 MOVEMENTS
127
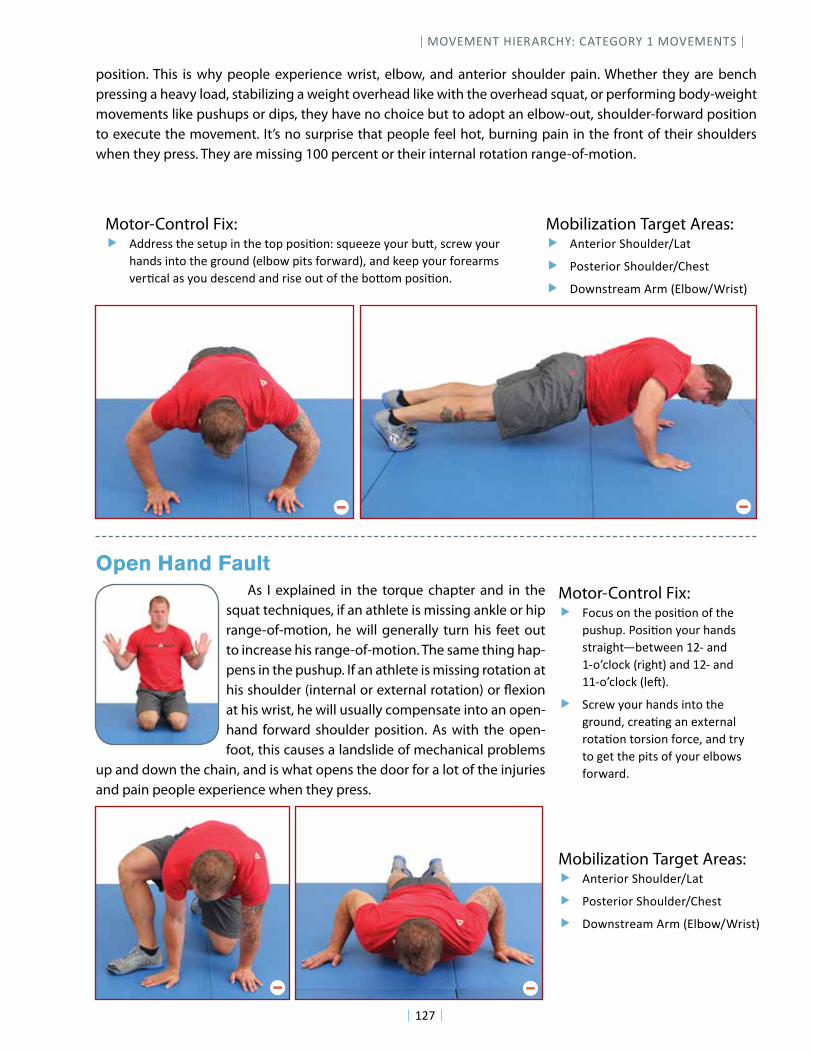
As I explained in the torque chapter and in the squat techniques, if an athlete is missing ankle or hip range-of-motion, he will generally turn his feet out to increase his range-of-motion. The same thing hap-pens in the pushup. If an athlete is missing rotation at his shoulder (internal or external rotation) or !exion at his wrist, he will usually compensate into an open-hand forward shoulder position. As with the open-foot, this causes a landslide of mechanical problems
up and down the chain, and is what opens the door for a lot of the injuries and pain people experience when they press.
Open Hand Fault
position. This is why people experience wrist, elbow, and anterior shoulder pain. Whether they are bench pressing a heavy load, stabilizing a weight overhead like with the overhead squat, or performing body-weight movements like pushups or dips, they have no choice but to adopt an elbow-out, shoulder-forward position to execute the movement. It’s no surprise that people feel hot, burning pain in the front of their shoulders when they press. They are missing 100 percent or their internal rotation range-of-motion.
! !""#$%%&'($&%$')*&+,&'($&'-*&*-%+.-,/&%0)$$1$&2-)#&3)45&%6#$7&2-)#&hands into the ground (elbow pits forward), and keep your forearms 8$#.69:&9%&2-)&"$%6$,"&9,"&#+%$&-)'&-;&'($&3-4-<&*-%+.-,=&
! >-6)%&-,&'($&*-%+.-,&-;&'($&*)%()*=&?-%+.-,&2-)#&(9,"%&%'#9+@('A3$'7$$,&BCD&9,"&BD-E6:-6F&G#+@('H&9,"&BCD&9,"&BBD-E6:-6F&G:$IH=&
! Screw your hands into the @#-),"5&6#$9.,@&9,&$J'$#,9:&#-'9.-,&'-#%+-,&;-#6$5&9,"&'#2&to get the pits of your elbows forward.
Motor-Control Fix:
Motor-Control Fix:
! Anterior Shoulder/Lat
! Posterior Shoulder/Chest
! Downstream Arm (Elbow/Wrist)
! Anterior Shoulder/Lat
! Posterior Shoulder/Chest
! Downstream Arm (Elbow/Wrist)
Mobilization Target Areas:
Mobilization Target Areas:
— —
— —
BECOMING A SUPPLE LEOPARD
128
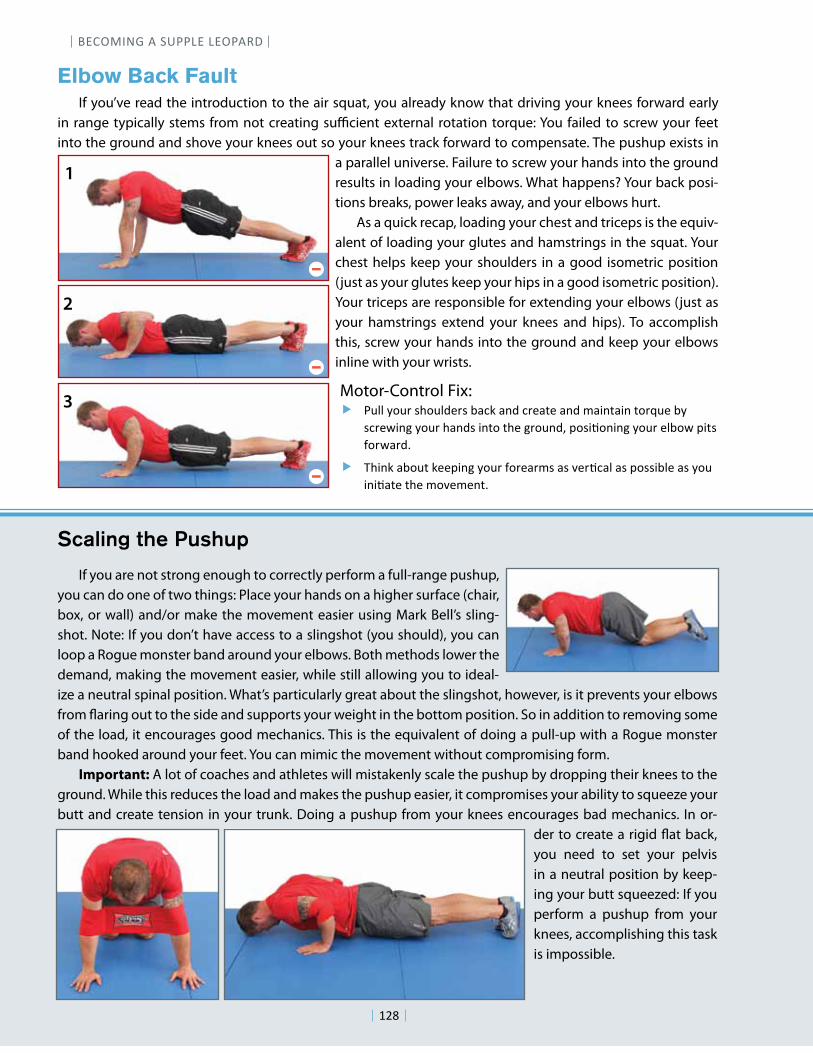
If you’ve read the introduction to the air squat, you already know that driving your knees forward early in range typically stems from not creating su!cient external rotation torque: You failed to screw your feet into the ground and shove your knees out so your knees track forward to compensate. The pushup exists in
a parallel universe. Failure to screw your hands into the ground results in loading your elbows. What happens? Your back posi-tions breaks, power leaks away, and your elbows hurt.
As a quick recap, loading your chest and triceps is the equiv-alent of loading your glutes and hamstrings in the squat. Your chest helps keep your shoulders in a good isometric position (just as your glutes keep your hips in a good isometric position). Your triceps are responsible for extending your elbows (just as your hamstrings extend your knees and hips). To accomplish this, screw your hands into the ground and keep your elbows inline with your wrists.
Elbow Back Fault
! !"##$%&"'$()&"#*+'($,-./$-0*$.'+-1+$-0*$2-301-30$1&'4"+$,%$(.'+5306$%&"'$)-0*($301&$1)+$6'&"0*7$8&(39&0306$%&"'$+#,&5$831($forward.
! :)30/$-,&"1$/++8306$%&"'$;&'+-'2($-($<+'9.-#$-($8&((3,#+$-($%&"$3039-1+$1)+$2&<+2+01=$
Motor-Control Fix:
If you are not strong enough to correctly perform a full-range pushup, you can do one of two things: Place your hands on a higher surface (chair, box, or wall) and/or make the movement easier using Mark Bell’s sling-shot. Note: If you don’t have access to a slingshot (you should), you can loop a Rogue monster band around your elbows. Both methods lower the demand, making the movement easier, while still allowing you to ideal-ize a neutral spinal position. What’s particularly great about the slingshot, however, is it prevents your elbows from "aring out to the side and supports your weight in the bottom position. So in addition to removing some of the load, it encourages good mechanics. This is the equivalent of doing a pull-up with a Rogue monster band hooked around your feet. You can mimic the movement without compromising form.
Important: A lot of coaches and athletes will mistakenly scale the pushup by dropping their knees to the ground. While this reduces the load and makes the pushup easier, it compromises your ability to squeeze your butt and create tension in your trunk. Doing a pushup from your knees encourages bad mechanics. In or-
der to create a rigid "at back, you need to set your pelvis in a neutral position by keep-ing your butt squeezed: If you perform a pushup from your knees, accomplishing this task is impossible.
Scaling the Pushup
1
3
2
—
—
—
128
274
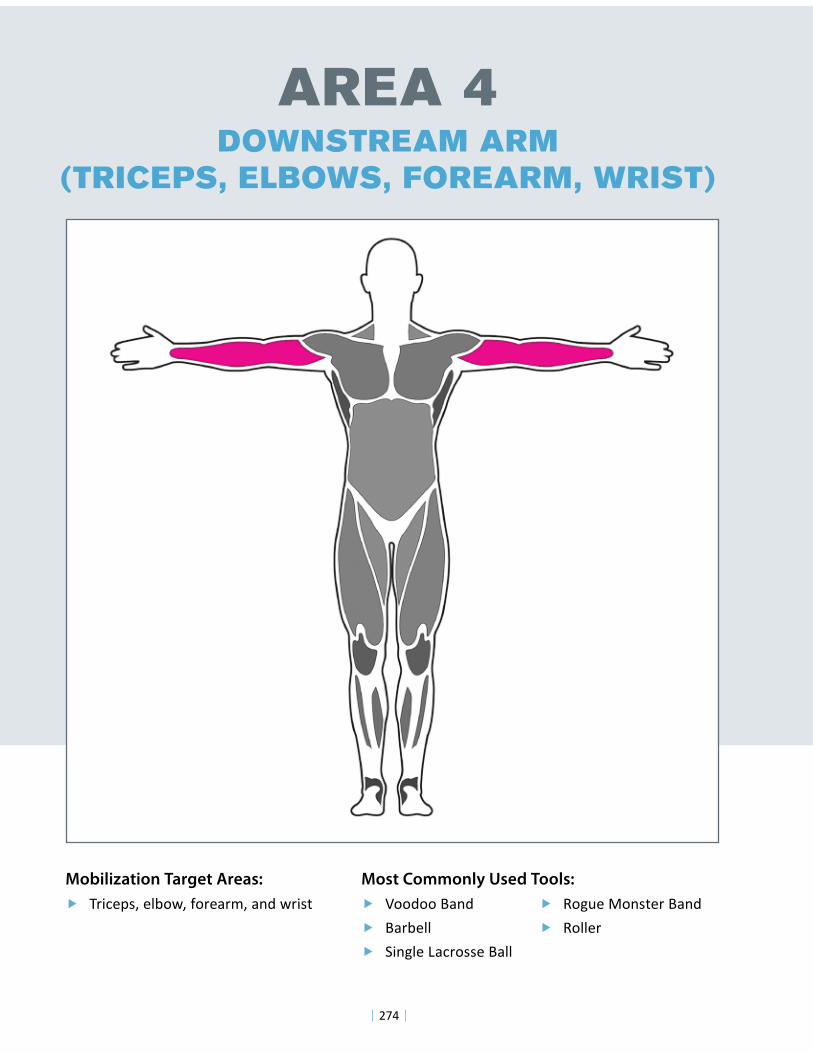
AREA 4DOWNSTREAM ARM
(TRICEPS, ELBOWS, FOREARM, WRIST)
! Triceps, elbow, forearm, and wrist ! Voodoo Band ! Barbell ! Single Lacrosse Ball
Mobilization Target Areas: Most Commonly Used Tools: ! Rogue Monster Band ! Roller
275
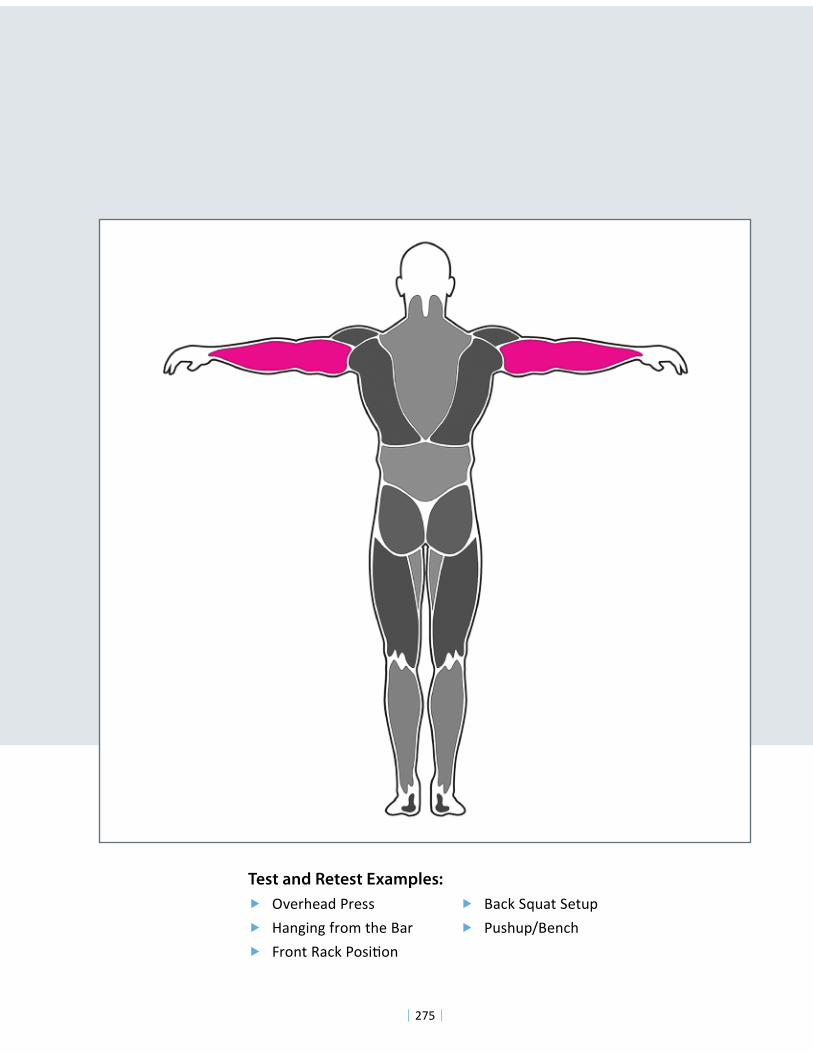
! Overhead Press ! Hanging from the Bar ! !"#$%&'()*&+#,-.#$
Test and Retest Examples: ! /()*&012(%&03%24 ! Pushup/Bench
BECOMING A SUPPLE LEOPARD
276
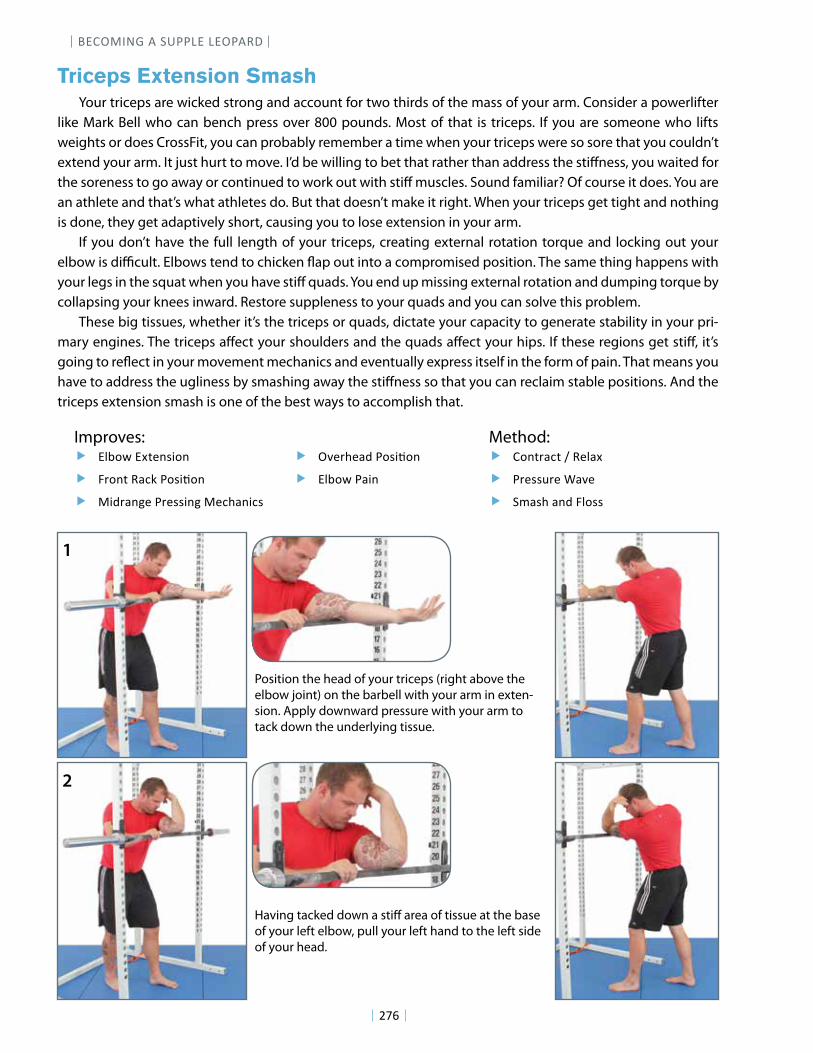
Your triceps are wicked strong and account for two thirds of the mass of your arm. Consider a powerlifter like Mark Bell who can bench press over 800 pounds. Most of that is triceps. If you are someone who lifts weights or does CrossFit, you can probably remember a time when your triceps were so sore that you couldn’t extend your arm. It just hurt to move. I’d be willing to bet that rather than address the sti!ness, you waited for the soreness to go away or continued to work out with sti! muscles. Sound familiar? Of course it does. You are an athlete and that’s what athletes do. But that doesn’t make it right. When your triceps get tight and nothing is done, they get adaptively short, causing you to lose extension in your arm.
If you don’t have the full length of your triceps, creating external rotation torque and locking out your elbow is di"cult. Elbows tend to chicken #ap out into a compromised position. The same thing happens with your legs in the squat when you have sti! quads. You end up missing external rotation and dumping torque by collapsing your knees inward. Restore suppleness to your quads and you can solve this problem.
These big tissues, whether it’s the triceps or quads, dictate your capacity to generate stability in your pri-mary engines. The triceps a!ect your shoulders and the quads a!ect your hips. If these regions get sti!, it’s going to re#ect in your movement mechanics and eventually express itself in the form of pain. That means you have to address the ugliness by smashing away the sti!ness so that you can reclaim stable positions. And the triceps extension smash is one of the best ways to accomplish that.
Triceps Extension Smash
! !"#$%&!'()*+,$*&
! -.$*(&/012&3$+,4$*
! Midrange Pressing Mechanics
! 5$*(.01(&6&/)"0'
! Pressure Wave
! Smash and Floss
Method: ! 78).9)0:&3$+,4$*
! Elbow Pain
Position the head of your triceps (right above the elbow joint) on the barbell with your arm in exten-sion. Apply downward pressure with your arm to tack down the underlying tissue.
Having tacked down a sti! area of tissue at the base of your left elbow, pull your left hand to the left side of your head.
1
2
Improves:

THE SYSTEMS: AREA 4—DOWNSTREAM ARM
277
Staying on the sti! tissue, straighten your arm. The idea here is to "nd a tight spot and push and pull past that spot by bending and straight-ening your arm.
To get full excursion of the tissue, bend your left arm to the opposite side of your body.
Keeping your arm bent, continue to smash the tissue by moving your arm toward your left side. The idea here is to pressure wave back and forth, smashing the tissues laterally.
If you don’t have a rack, don’t panic. You can do this on the ground using a barbell, lacrosse ball, rolling pin, wine bottle, or whatever you have at your disposal. Find something to smash your triceps on and get some work done.
TRICEPS SMASH—ALTERNATE OPTIONS
5
3
4
BECOMING A SUPPLE LEOPARD
278
Wrapping a voodoo band above and below your elbow and then spending a few minutes moving through a full range-of-motion is one of the fastest and most e!ective ways to address elbow pain and restore suppleness to your triceps. If your elbow aches, or you’re missing key corners in your mobility—elbow extension or "exion—this should be one of your #rst stops. In fact, if I have an athlete that is su!ering from epicondylitis (tennis elbow), this is the #rst thing I have them do. Seriously, nothing I’ve seen, experienced, or have been taught solves “hot elbow” problems as quickly and e!ectively as the voodoo elbow mobilization. To learn more about proper wrapping technique, revisit the introduction to this chapter.
Voodoo Elbow Mobilization
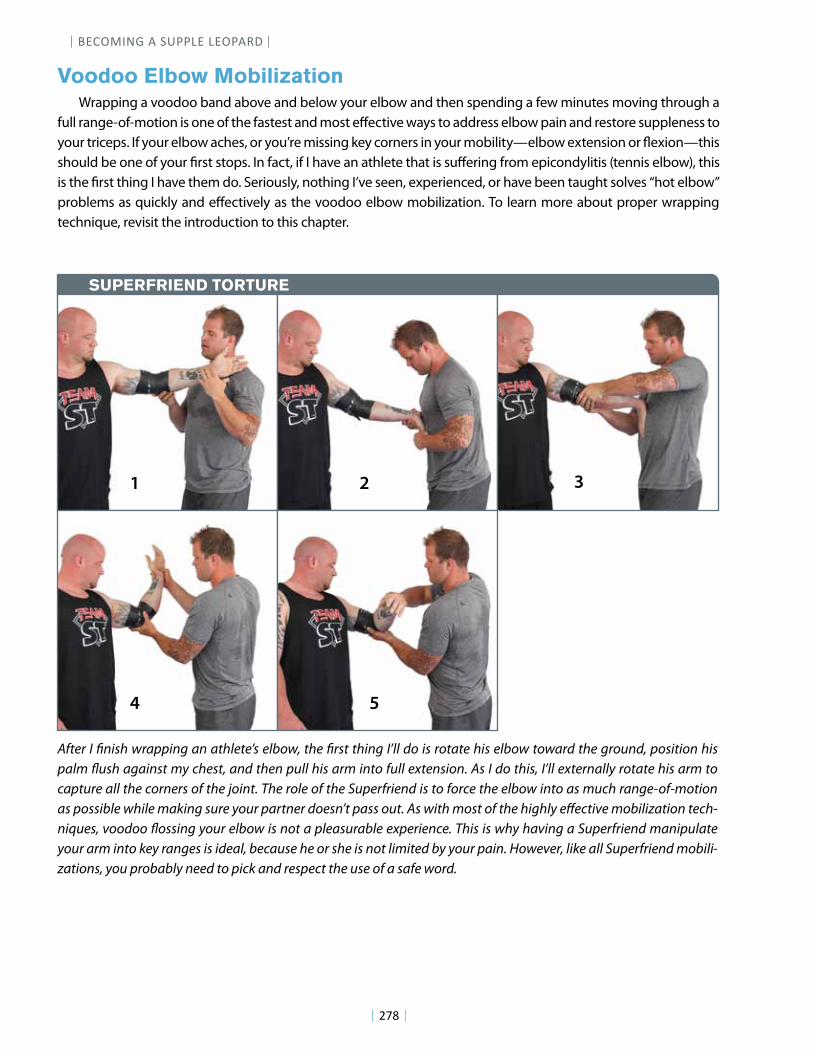
SUPERFRIEND TORTURE
After I !nish wrapping an athlete’s elbow, the !rst thing I’ll do is rotate his elbow toward the ground, position his palm "ush against my chest, and then pull his arm into full extension. As I do this, I’ll externally rotate his arm to capture all the corners of the joint. The role of the Superfriend is to force the elbow into as much range-of-motion as possible while making sure your partner doesn’t pass out. As with most of the highly e#ective mobilization tech-niques, voodoo "ossing your elbow is not a pleasurable experience. This is why having a Superfriend manipulate your arm into key ranges is ideal, because he or she is not limited by your pain. However, like all Superfriend mobili-zations, you probably need to pick and respect the use of a safe word.
1
5
3 2
4
THE SYSTEMS: AREA 4—DOWNSTREAM ARM
279
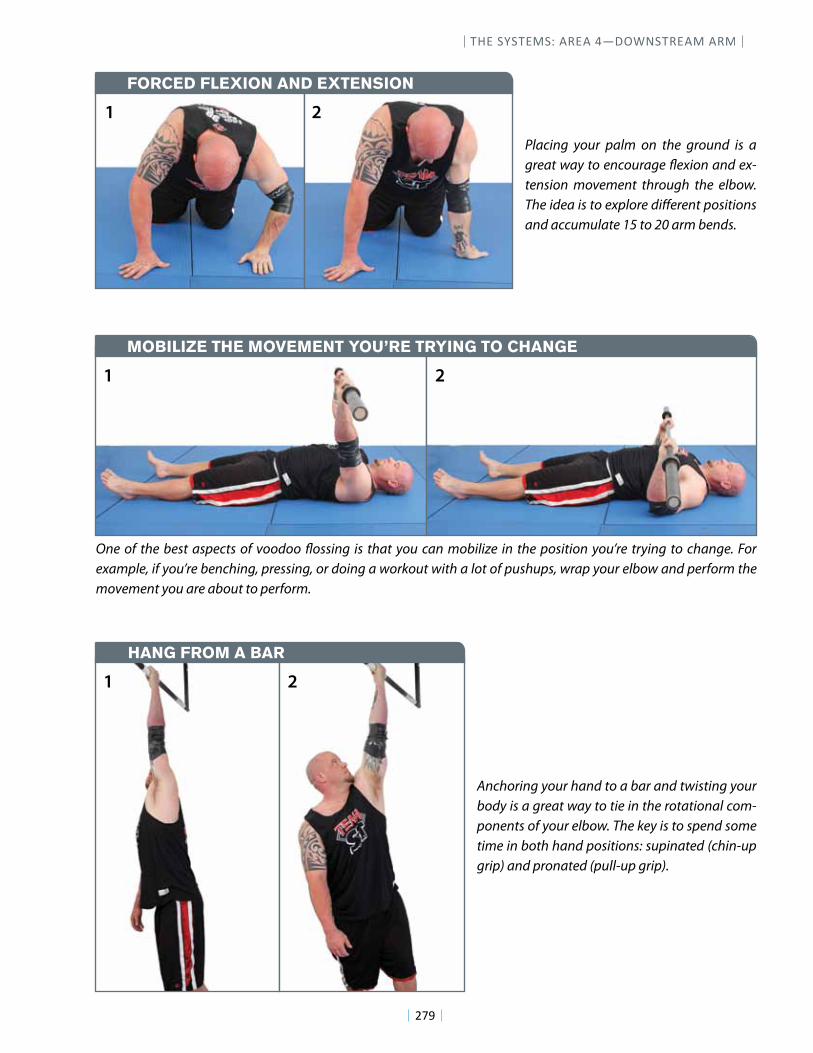
Placing your palm on the ground is a great way to encourage !exion and ex-tension movement through the elbow. The idea is to explore di"erent positions and accumulate 15 to 20 arm bends.
Anchoring your hand to a bar and twisting your body is a great way to tie in the rotational com-ponents of your elbow. The key is to spend some time in both hand positions: supinated (chin-up grip) and pronated (pull-up grip).
One of the best aspects of voodoo !ossing is that you can mobilize in the position you’re trying to change. For example, if you’re benching, pressing, or doing a workout with a lot of pushups, wrap your elbow and perform the movement you are about to perform.
FORCED FLEXION AND EXTENSION
MOBILIZE THE MOVEMENT YOU’RE TRYING TO CHANGE
HANG FROM A BAR
1 2
1 2
1 2
322
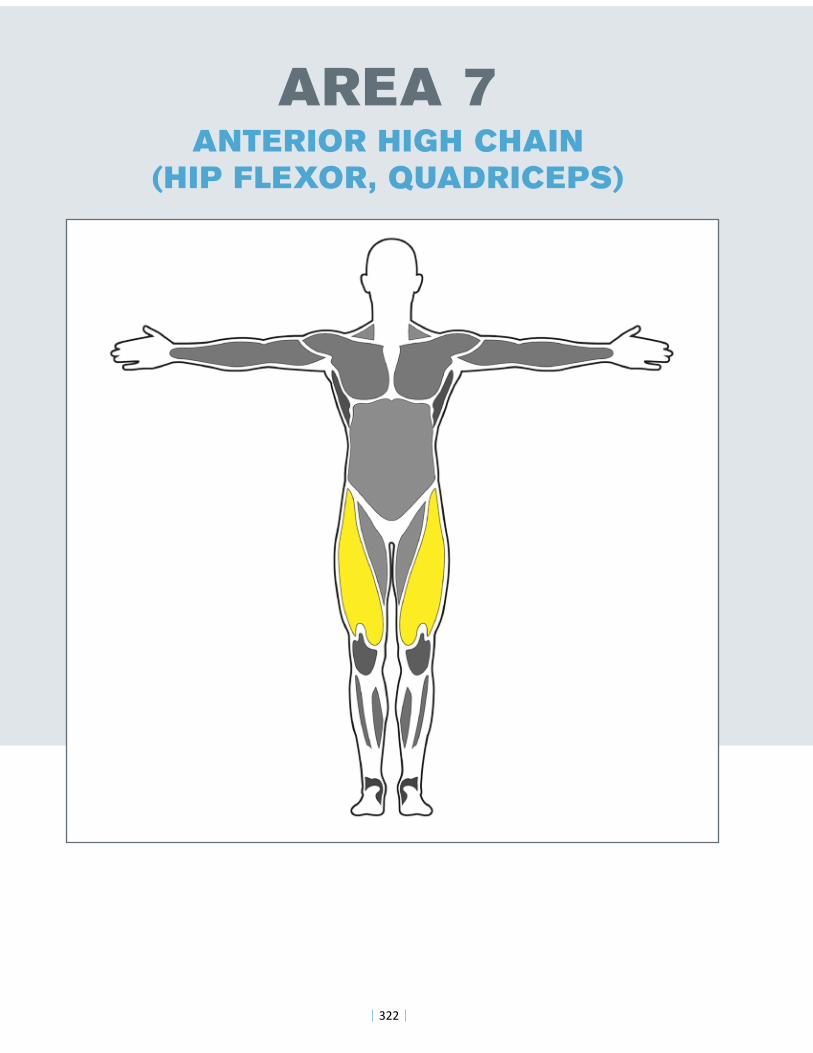
AREA 7ANTERIOR HIGH CHAIN
(HIP FLEXOR, QUADRICEPS)
323
! !"#$%&'%()&*(+)&*(,$-'%./(0"1(2301%&4$*.5((
Mobilization Target Areas:
! Single Lacrosse Ball ! Rogue Monster Band ! Roller
Most Commonly Used Tools:
! 6230#78399&":(8'.&;'"( ! <'*(8'.&;'"(
Test and Retest Examples:
BECOMING A SUPPLE LEOPARD
324
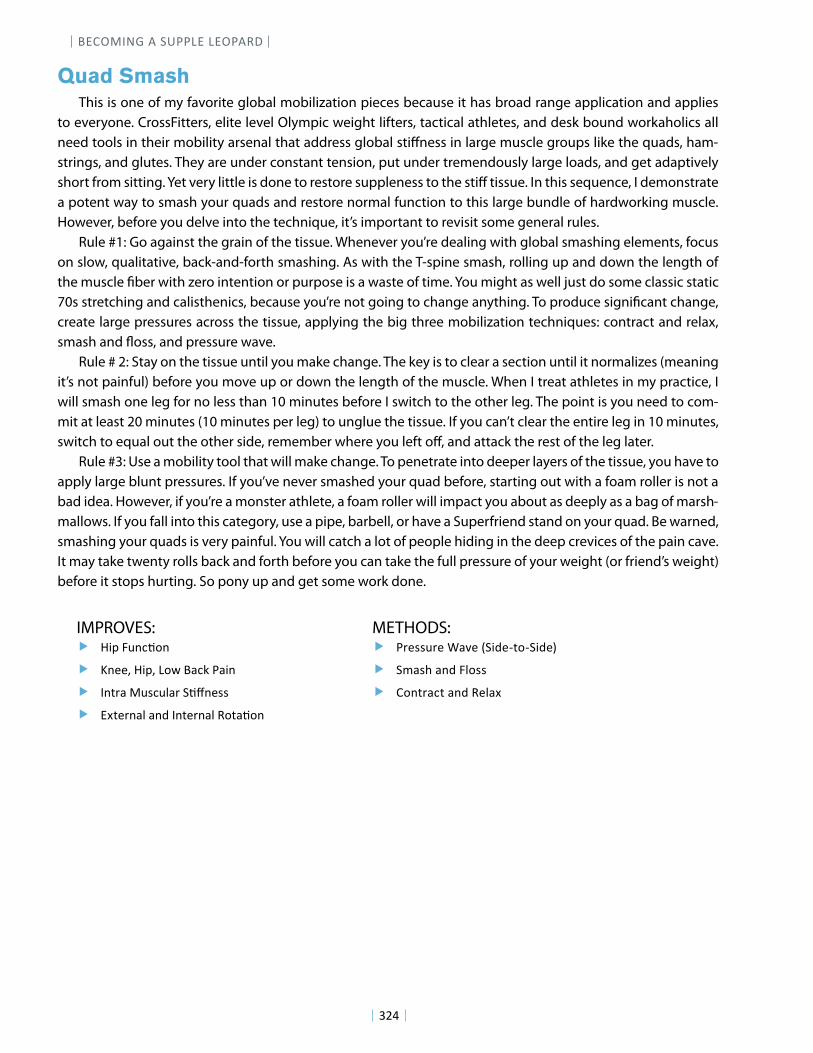
This is one of my favorite global mobilization pieces because it has broad range application and applies to everyone. CrossFitters, elite level Olympic weight lifters, tactical athletes, and desk bound workaholics all need tools in their mobility arsenal that address global sti!ness in large muscle groups like the quads, ham-strings, and glutes. They are under constant tension, put under tremendously large loads, and get adaptively short from sitting. Yet very little is done to restore suppleness to the sti! tissue. In this sequence, I demonstrate a potent way to smash your quads and restore normal function to this large bundle of hardworking muscle. However, before you delve into the technique, it’s important to revisit some general rules.
Rule #1: Go against the grain of the tissue. Whenever you’re dealing with global smashing elements, focus on slow, qualitative, back-and-forth smashing. As with the T-spine smash, rolling up and down the length of the muscle "ber with zero intention or purpose is a waste of time. You might as well just do some classic static 70s stretching and calisthenics, because you’re not going to change anything. To produce signi"cant change, create large pressures across the tissue, applying the big three mobilization techniques: contract and relax, smash and #oss, and pressure wave.
Rule # 2: Stay on the tissue until you make change. The key is to clear a section until it normalizes (meaning it’s not painful) before you move up or down the length of the muscle. When I treat athletes in my practice, I will smash one leg for no less than 10 minutes before I switch to the other leg. The point is you need to com-mit at least 20 minutes (10 minutes per leg) to unglue the tissue. If you can’t clear the entire leg in 10 minutes, switch to equal out the other side, remember where you left o!, and attack the rest of the leg later.
Rule #3: Use a mobility tool that will make change. To penetrate into deeper layers of the tissue, you have to apply large blunt pressures. If you’ve never smashed your quad before, starting out with a foam roller is not a bad idea. However, if you’re a monster athlete, a foam roller will impact you about as deeply as a bag of marsh-mallows. If you fall into this category, use a pipe, barbell, or have a Superfriend stand on your quad. Be warned, smashing your quads is very painful. You will catch a lot of people hiding in the deep crevices of the pain cave. It may take twenty rolls back and forth before you can take the full pressure of your weight (or friend’s weight) before it stops hurting. So pony up and get some work done.
Quad Smash
! !"#$%&'()*'
! Knee, Hip, Low Back Pain
! +',-.$/&0(&1.-$2)3'400
! 56,4-'.1$.'7$+',4-'.1$8*,.)*'$
IMPROVES: ! 9-400&-4$:.;4$<2"74=,*=2"74>
! Smash and Floss
! ?*',-.(,$.'7$841.6
METHODS:
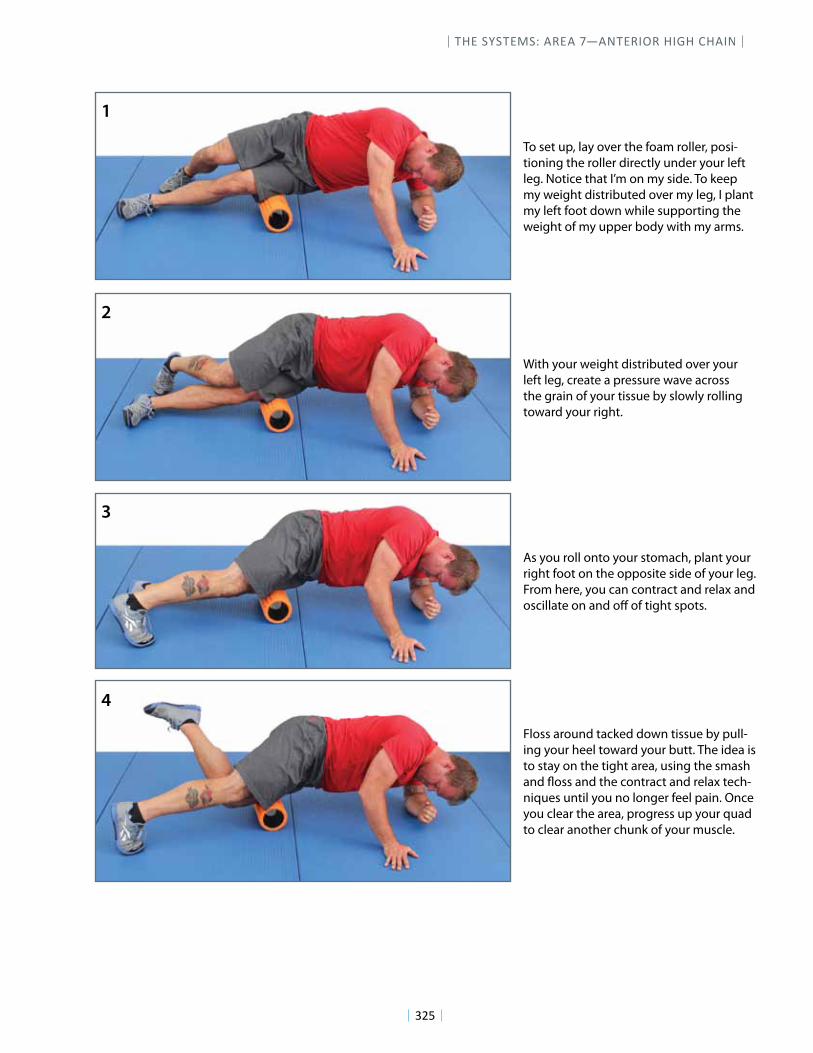
THE SYSTEMS: AREA 7—ANTERIOR HIGH CHAIN
325
1
3
2
4
To set up, lay over the foam roller, posi-tioning the roller directly under your left leg. Notice that I’m on my side. To keep my weight distributed over my leg, I plant my left foot down while supporting the weight of my upper body with my arms.
With your weight distributed over your left leg, create a pressure wave across the grain of your tissue by slowly rolling toward your right.
As you roll onto your stomach, plant your right foot on the opposite side of your leg. From here, you can contract and relax and oscillate on and o! of tight spots.
Floss around tacked down tissue by pull-ing your heel toward your butt. The idea is to stay on the tight area, using the smash and "oss and the contract and relax tech-niques until you no longer feel pain. Once you clear the area, progress up your quad to clear another chunk of your muscle.
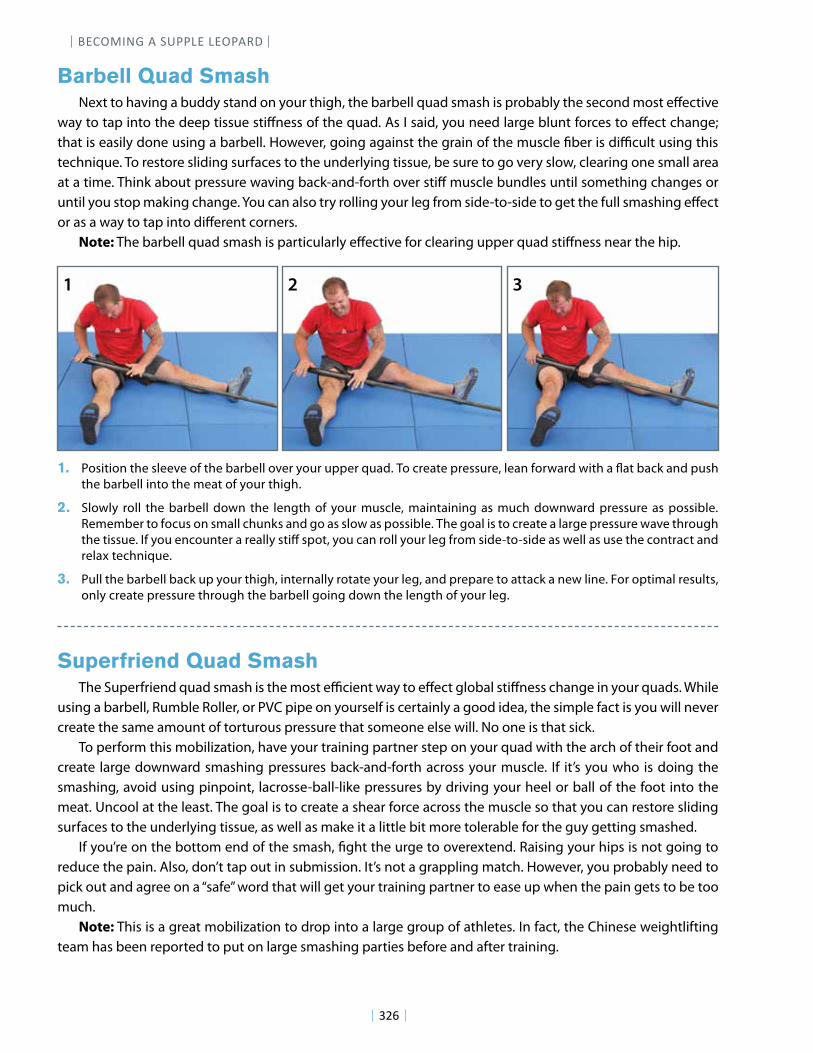
BECOMING A SUPPLE LEOPARD
326
Next to having a buddy stand on your thigh, the barbell quad smash is probably the second most e!ective way to tap into the deep tissue sti!ness of the quad. As I said, you need large blunt forces to e!ect change; that is easily done using a barbell. However, going against the grain of the muscle "ber is di#cult using this technique. To restore sliding surfaces to the underlying tissue, be sure to go very slow, clearing one small area at a time. Think about pressure waving back-and-forth over sti! muscle bundles until something changes or until you stop making change. You can also try rolling your leg from side-to-side to get the full smashing e!ect or as a way to tap into di!erent corners.
Note: The barbell quad smash is particularly e!ective for clearing upper quad sti!ness near the hip.
The Superfriend quad smash is the most e#cient way to e!ect global sti!ness change in your quads. While using a barbell, Rumble Roller, or PVC pipe on yourself is certainly a good idea, the simple fact is you will never create the same amount of torturous pressure that someone else will. No one is that sick.
To perform this mobilization, have your training partner step on your quad with the arch of their foot and create large downward smashing pressures back-and-forth across your muscle. If it’s you who is doing the smashing, avoid using pinpoint, lacrosse-ball-like pressures by driving your heel or ball of the foot into the meat. Uncool at the least. The goal is to create a shear force across the muscle so that you can restore sliding surfaces to the underlying tissue, as well as make it a little bit more tolerable for the guy getting smashed.
If you’re on the bottom end of the smash, "ght the urge to overextend. Raising your hips is not going to reduce the pain. Also, don’t tap out in submission. It’s not a grappling match. However, you probably need to pick out and agree on a “safe” word that will get your training partner to ease up when the pain gets to be too much.
Note: This is a great mobilization to drop into a large group of athletes. In fact, the Chinese weightlifting team has been reported to put on large smashing parties before and after training.
Barbell Quad Smash
Superfriend Quad Smash
1. Position the sleeve of the barbell over your upper quad. To create pressure, lean forward with a $at back and push the barbell into the meat of your thigh.
2. Slowly roll the barbell down the length of your muscle, maintaining as much downward pressure as possible. Remember to focus on small chunks and go as slow as possible. The goal is to create a large pressure wave through the tissue. If you encounter a really sti! spot, you can roll your leg from side-to-side as well as use the contract and relax technique.
3. Pull the barbell back up your thigh, internally rotate your leg, and prepare to attack a new line. For optimal results, only create pressure through the barbell going down the length of your leg.
1 3 2
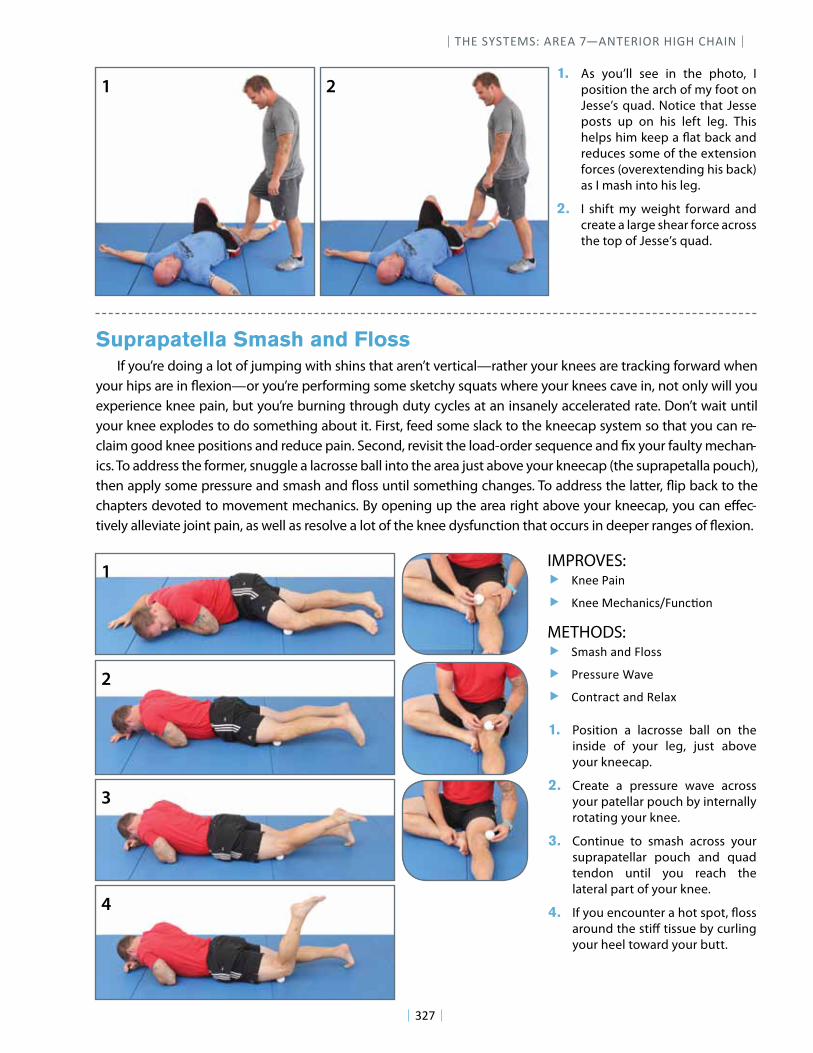
THE SYSTEMS: AREA 7—ANTERIOR HIGH CHAIN
327
If you’re doing a lot of jumping with shins that aren’t vertical—rather your knees are tracking forward when your hips are in !exion—or you’re performing some sketchy squats where your knees cave in, not only will you experience knee pain, but you’re burning through duty cycles at an insanely accelerated rate. Don’t wait until your knee explodes to do something about it. First, feed some slack to the kneecap system so that you can re-claim good knee positions and reduce pain. Second, revisit the load-order sequence and "x your faulty mechan-ics. To address the former, snuggle a lacrosse ball into the area just above your kneecap (the suprapetalla pouch), then apply some pressure and smash and !oss until something changes. To address the latter, !ip back to the chapters devoted to movement mechanics. By opening up the area right above your kneecap, you can e#ec-tively alleviate joint pain, as well as resolve a lot of the knee dysfunction that occurs in deeper ranges of !exion.
Suprapatella Smash and Floss
1. Position a lacrosse ball on the inside of your leg, just above your kneecap.
2. Create a pressure wave across your patellar pouch by internally rotating your knee.
3. Continue to smash across your suprapatellar pouch and quad tendon until you reach the lateral part of your knee.
4. If you encounter a hot spot, !oss around the sti# tissue by curling your heel toward your butt.
1. As you’ll see in the photo, I position the arch of my foot on Jesse’s quad. Notice that Jesse posts up on his left leg. This helps him keep a !at back and reduces some of the extension forces (overextending his back) as I mash into his leg.
2. I shift my weight forward and create a large shear force across the top of Jesse’s quad.
! Knee Pain
! !"##$%#&'(")&*+,-"&./"
IMPROVES:
! Smash and Floss
! Pressure Wave
! 0/"12(&1$("3$4#5(6
METHODS:
1 2
1
3
2
4
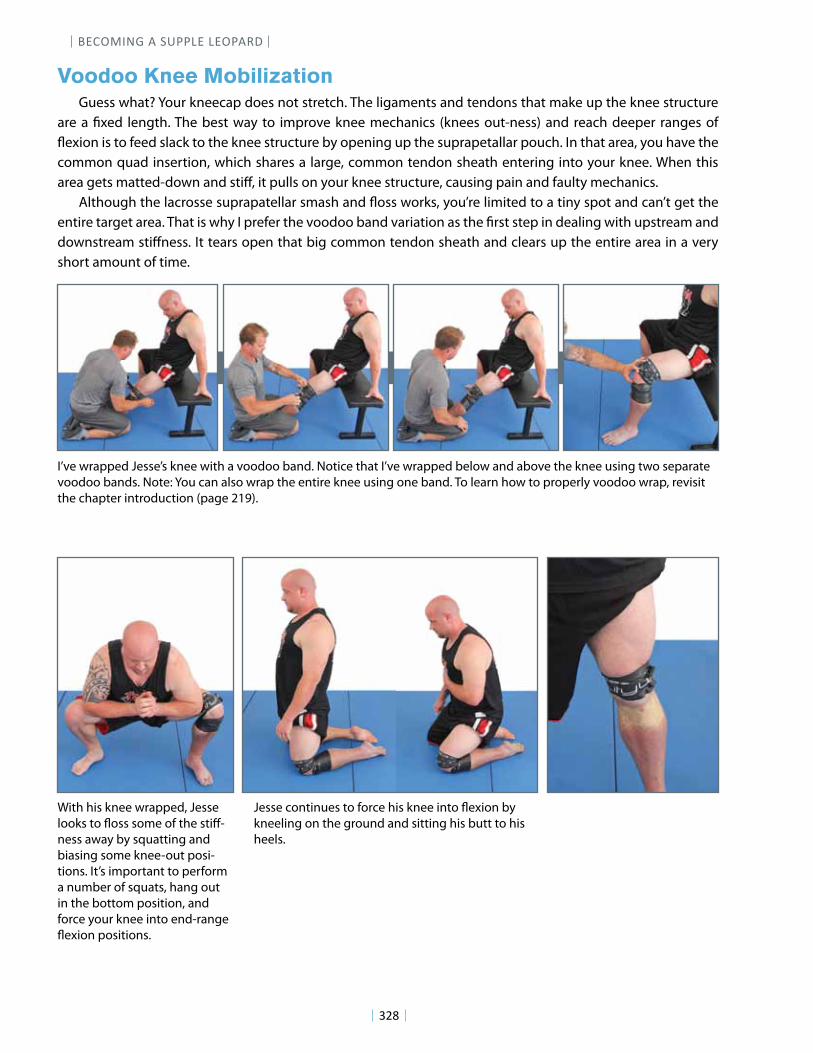
BECOMING A SUPPLE LEOPARD
328
Guess what? Your kneecap does not stretch. The ligaments and tendons that make up the knee structure are a !xed length. The best way to improve knee mechanics (knees out-ness) and reach deeper ranges of "exion is to feed slack to the knee structure by opening up the suprapetallar pouch. In that area, you have the common quad insertion, which shares a large, common tendon sheath entering into your knee. When this area gets matted-down and sti#, it pulls on your knee structure, causing pain and faulty mechanics.
Although the lacrosse suprapatellar smash and "oss works, you’re limited to a tiny spot and can’t get the entire target area. That is why I prefer the voodoo band variation as the !rst step in dealing with upstream and downstream sti#ness. It tears open that big common tendon sheath and clears up the entire area in a very short amount of time.
Voodoo Knee Mobilization
I’ve wrapped Jesse’s knee with a voodoo band. Notice that I’ve wrapped below and above the knee using two separate voodoo bands. Note: You can also wrap the entire knee using one band. To learn how to properly voodoo wrap, revisit the chapter introduction (page 219).
With his knee wrapped, Jesse looks to "oss some of the sti#-ness away by squatting and biasing some knee-out posi-tions. It’s important to perform a number of squats, hang out in the bottom position, and force your knee into end-range "exion positions.
Jesse continues to force his knee into "exion by kneeling on the ground and sitting his butt to his heels.
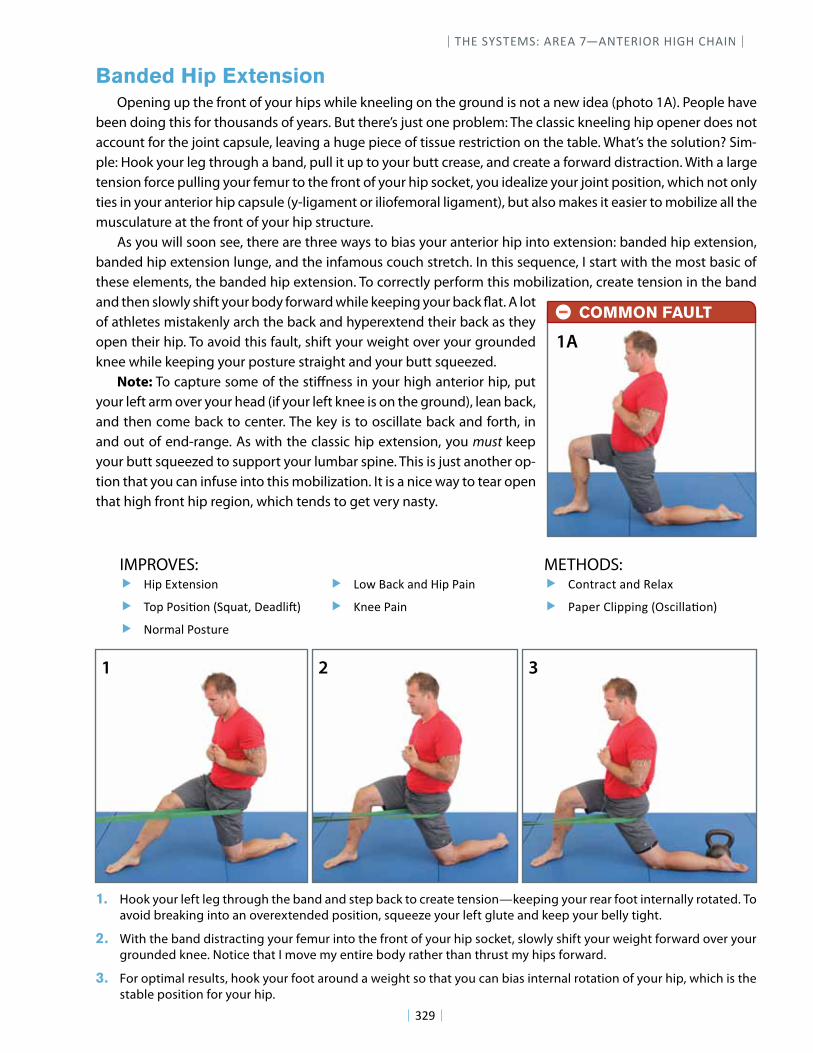
THE SYSTEMS: AREA 7—ANTERIOR HIGH CHAIN
329
Opening up the front of your hips while kneeling on the ground is not a new idea (photo 1A). People have been doing this for thousands of years. But there’s just one problem: The classic kneeling hip opener does not account for the joint capsule, leaving a huge piece of tissue restriction on the table. What’s the solution? Sim-ple: Hook your leg through a band, pull it up to your butt crease, and create a forward distraction. With a large tension force pulling your femur to the front of your hip socket, you idealize your joint position, which not only ties in your anterior hip capsule (y-ligament or iliofemoral ligament), but also makes it easier to mobilize all the musculature at the front of your hip structure.
As you will soon see, there are three ways to bias your anterior hip into extension: banded hip extension, banded hip extension lunge, and the infamous couch stretch. In this sequence, I start with the most basic of these elements, the banded hip extension. To correctly perform this mobilization, create tension in the band and then slowly shift your body forward while keeping your back !at. A lot of athletes mistakenly arch the back and hyperextend their back as they open their hip. To avoid this fault, shift your weight over your grounded knee while keeping your posture straight and your butt squeezed.
Note: To capture some of the sti"ness in your high anterior hip, put your left arm over your head (if your left knee is on the ground), lean back, and then come back to center. The key is to oscillate back and forth, in and out of end-range. As with the classic hip extension, you must keep your butt squeezed to support your lumbar spine. This is just another op-tion that you can infuse into this mobilization. It is a nice way to tear open that high front hip region, which tends to get very nasty.
Banded Hip Extension
! !"#$%&'()*"+)
! ,+#$-+*".+)$/0123'4$5(367"89
! Normal Posture
IMPROVES: ! :+)';3<'$3)6$=(73&
! -3#(;$:7"##")>$/?*<"773.+)9$
METHODS: ! Low Back and Hip Pain
! Knee Pain
1. Hook your left leg through the band and step back to create tension—keeping your rear foot internally rotated. To avoid breaking into an overextended position, squeeze your left glute and keep your belly tight.
2. With the band distracting your femur into the front of your hip socket, slowly shift your weight forward over your grounded knee. Notice that I move my entire body rather than thrust my hips forward.
3. For optimal results, hook your foot around a weight so that you can bias internal rotation of your hip, which is the stable position for your hip.
1 3 2
COMMON FAULT—
1A
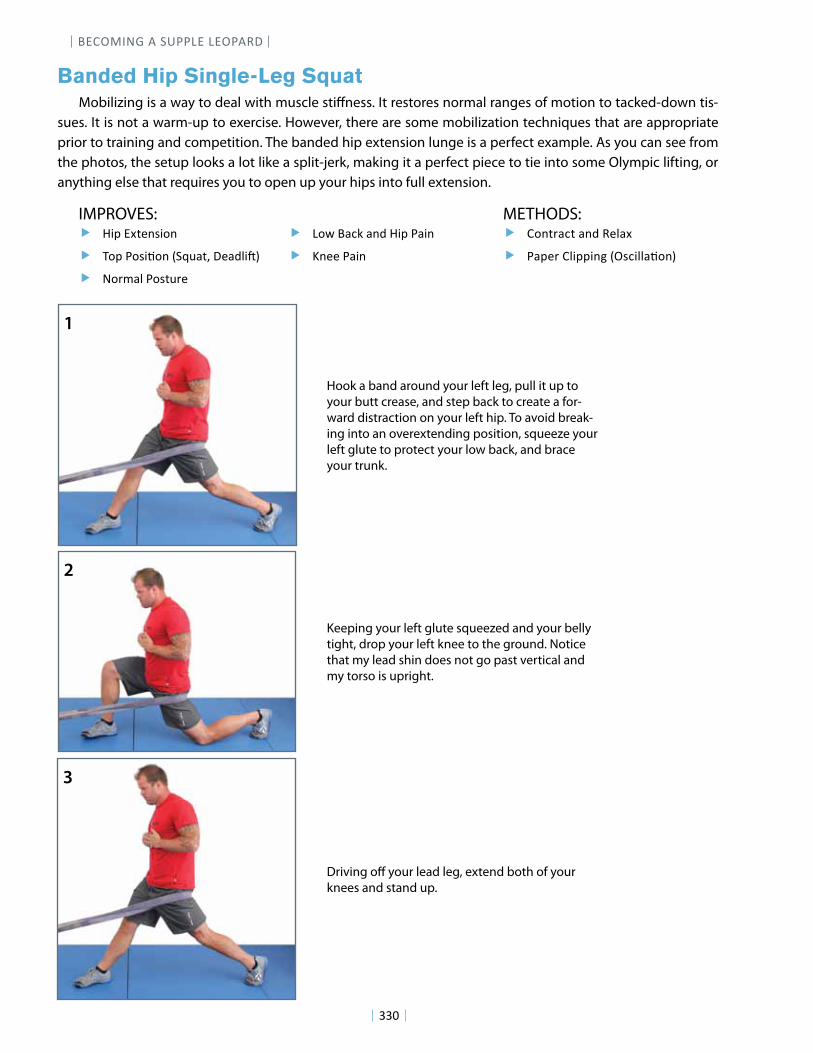
BECOMING A SUPPLE LEOPARD
330
Mobilizing is a way to deal with muscle sti!ness. It restores normal ranges of motion to tacked-down tis-sues. It is not a warm-up to exercise. However, there are some mobilization techniques that are appropriate prior to training and competition. The banded hip extension lunge is a perfect example. As you can see from the photos, the setup looks a lot like a split-jerk, making it a perfect piece to tie into some Olympic lifting, or anything else that requires you to open up your hips into full extension.
Banded Hip Single-Leg Squat
! !"#$%&'()*"+)
! ,+#$-+*".+)$/0123'4$5(367"89
! Normal Posture
IMPROVES: ! :+)';3<'$3)6$=(73&
! -3#(;$:7"##")>$/?*<"773.+)9
METHODS: ! Low Back and Hip Pain
! Knee Pain
1
3
2
Hook a band around your left leg, pull it up to your butt crease, and step back to create a for-ward distraction on your left hip. To avoid break-ing into an overextending position, squeeze your left glute to protect your low back, and brace your trunk.
Keeping your left glute squeezed and your belly tight, drop your left knee to the ground. Notice that my lead shin does not go past vertical and my torso is upright.
Driving o! your lead leg, extend both of your knees and stand up.
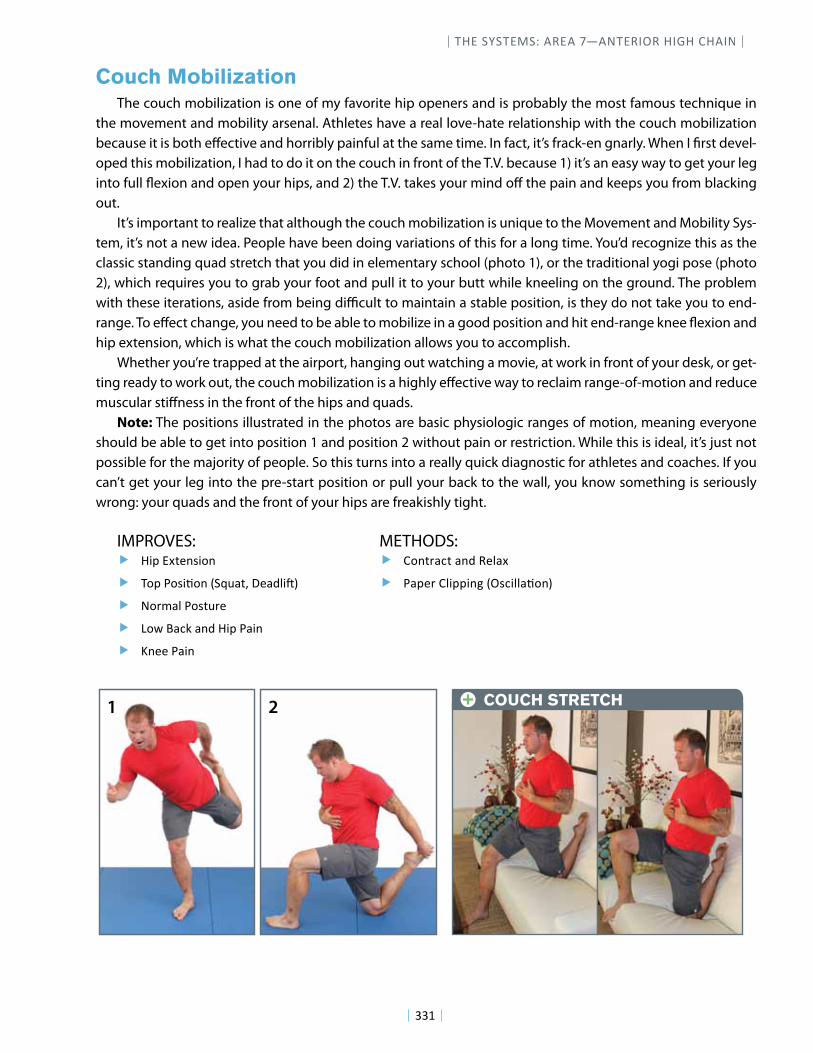
THE SYSTEMS: AREA 7—ANTERIOR HIGH CHAIN
331
The couch mobilization is one of my favorite hip openers and is probably the most famous technique in the movement and mobility arsenal. Athletes have a real love-hate relationship with the couch mobilization because it is both e!ective and horribly painful at the same time. In fact, it’s frack-en gnarly. When I "rst devel-oped this mobilization, I had to do it on the couch in front of the T.V. because 1) it’s an easy way to get your leg into full #exion and open your hips, and 2) the T.V. takes your mind o! the pain and keeps you from blacking out.
It’s important to realize that although the couch mobilization is unique to the Movement and Mobility Sys-tem, it’s not a new idea. People have been doing variations of this for a long time. You’d recognize this as the classic standing quad stretch that you did in elementary school (photo 1), or the traditional yogi pose (photo 2), which requires you to grab your foot and pull it to your butt while kneeling on the ground. The problem with these iterations, aside from being di$cult to maintain a stable position, is they do not take you to end-range. To e!ect change, you need to be able to mobilize in a good position and hit end-range knee #exion and hip extension, which is what the couch mobilization allows you to accomplish.
Whether you’re trapped at the airport, hanging out watching a movie, at work in front of your desk, or get-ting ready to work out, the couch mobilization is a highly e!ective way to reclaim range-of-motion and reduce muscular sti!ness in the front of the hips and quads.
Note: The positions illustrated in the photos are basic physiologic ranges of motion, meaning everyone should be able to get into position 1 and position 2 without pain or restriction. While this is ideal, it’s just not possible for the majority of people. So this turns into a really quick diagnostic for athletes and coaches. If you can’t get your leg into the pre-start position or pull your back to the wall, you know something is seriously wrong: your quads and the front of your hips are freakishly tight.
Couch Mobilization
! !"#$%&'()*"+)
! ,+#$-+*".+)$/0123'4$5(367"89
! Normal Posture
! Low Back and Hip Pain
! Knee Pain
IMPROVES: ! :+)';3<'$3)6$=(73&
! -3#(;$:7"##")>$/?*<"773.+)9
METHODS:
1 2 COUCH STRETCH+
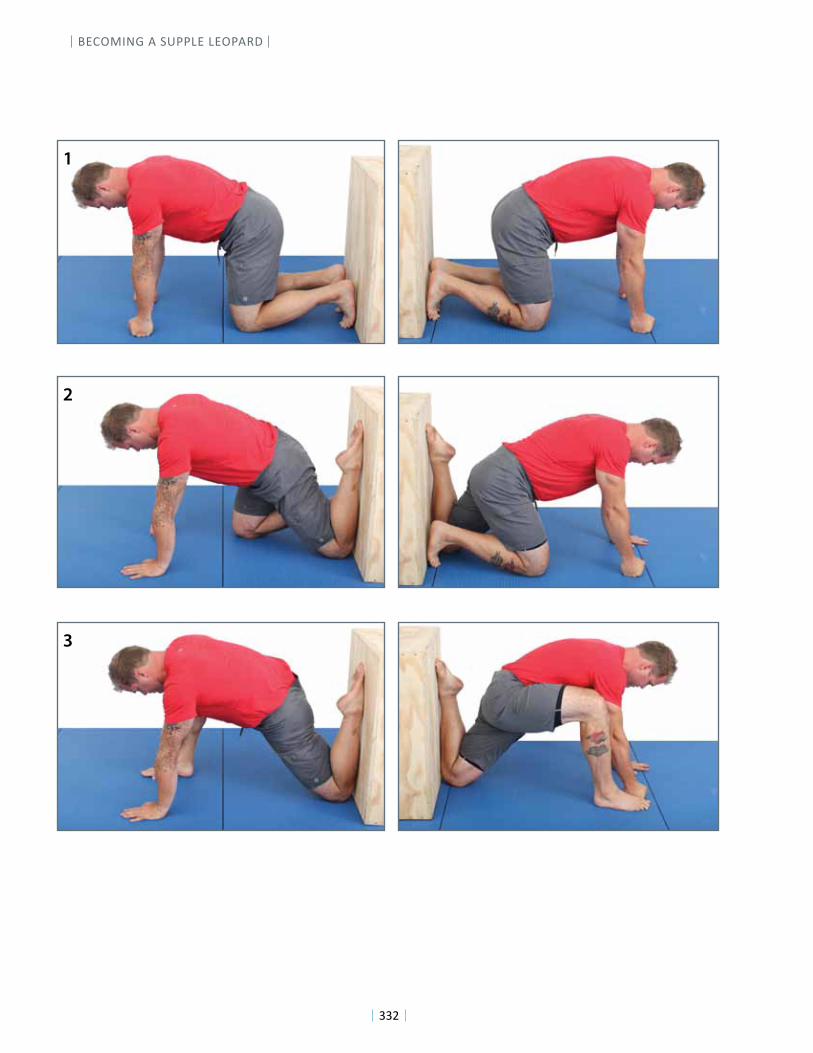
BECOMING A SUPPLE LEOPARD
332
1
3
2
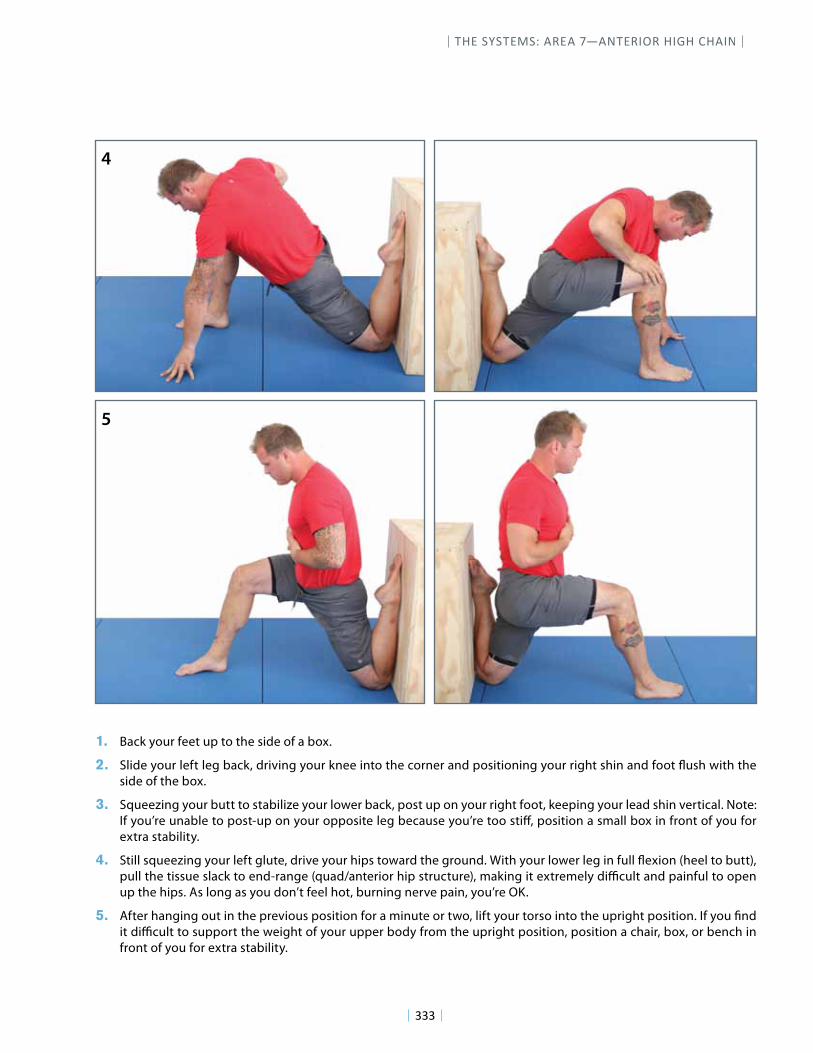
THE SYSTEMS: AREA 7—ANTERIOR HIGH CHAIN
333
1. Back your feet up to the side of a box.
2. Slide your left leg back, driving your knee into the corner and positioning your right shin and foot !ush with the side of the box.
3. Squeezing your butt to stabilize your lower back, post up on your right foot, keeping your lead shin vertical. Note: If you’re unable to post-up on your opposite leg because you’re too sti", position a small box in front of you for extra stability.
4. Still squeezing your left glute, drive your hips toward the ground. With your lower leg in full !exion (heel to butt), pull the tissue slack to end-range (quad/anterior hip structure), making it extremely di#cult and painful to open up the hips. As long as you don’t feel hot, burning nerve pain, you’re OK.
5. After hanging out in the previous position for a minute or two, lift your torso into the upright position. If you $nd it di#cult to support the weight of your upper body from the upright position, position a chair, box, or bench in front of you for extra stability.
5
4
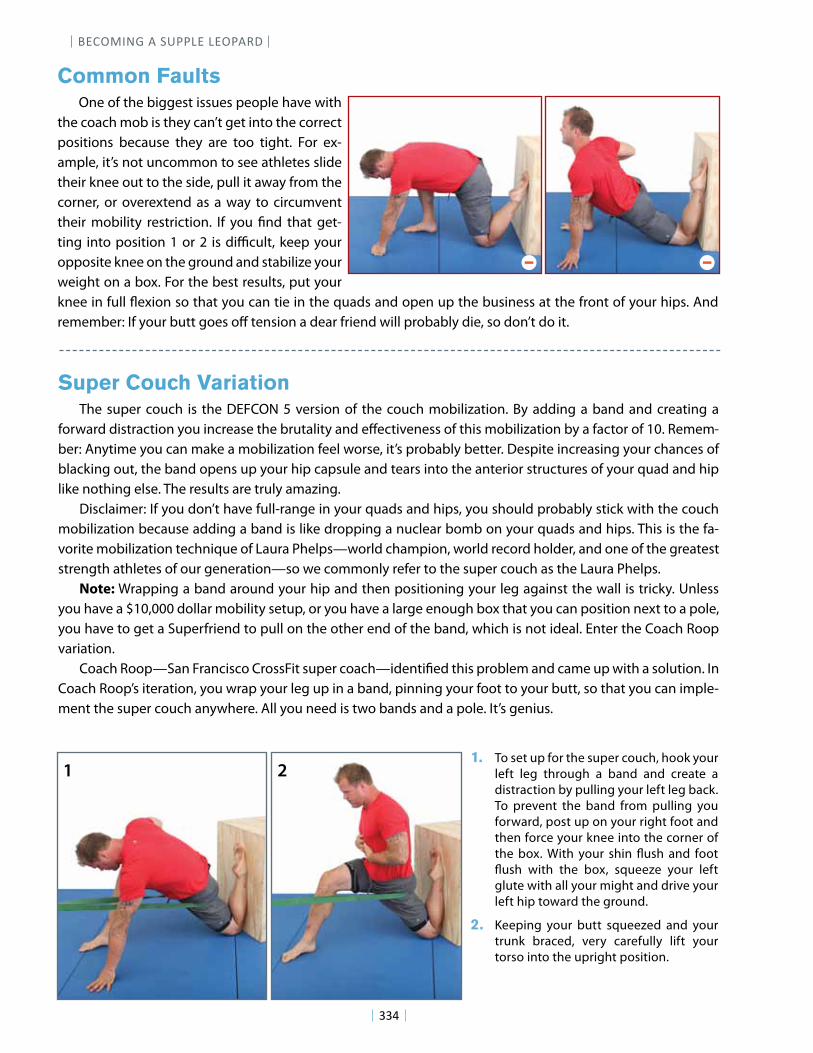
BECOMING A SUPPLE LEOPARD
334
One of the biggest issues people have with the coach mob is they can’t get into the correct positions because they are too tight. For ex-ample, it’s not uncommon to see athletes slide their knee out to the side, pull it away from the corner, or overextend as a way to circumvent their mobility restriction. If you !nd that get-ting into position 1 or 2 is di"cult, keep your opposite knee on the ground and stabilize your weight on a box. For the best results, put your knee in full #exion so that you can tie in the quads and open up the business at the front of your hips. And remember: If your butt goes o$ tension a dear friend will probably die, so don’t do it.
Common Faults
The super couch is the DEFCON 5 version of the couch mobilization. By adding a band and creating a forward distraction you increase the brutality and e$ectiveness of this mobilization by a factor of 10. Remem-ber: Anytime you can make a mobilization feel worse, it’s probably better. Despite increasing your chances of blacking out, the band opens up your hip capsule and tears into the anterior structures of your quad and hip like nothing else. The results are truly amazing.
Disclaimer: If you don’t have full-range in your quads and hips, you should probably stick with the couch mobilization because adding a band is like dropping a nuclear bomb on your quads and hips. This is the fa-vorite mobilization technique of Laura Phelps—world champion, world record holder, and one of the greatest strength athletes of our generation—so we commonly refer to the super couch as the Laura Phelps.
Note: Wrapping a band around your hip and then positioning your leg against the wall is tricky. Unless you have a $10,000 dollar mobility setup, or you have a large enough box that you can position next to a pole, you have to get a Superfriend to pull on the other end of the band, which is not ideal. Enter the Coach Roop variation.
Coach Roop—San Francisco CrossFit super coach—identi!ed this problem and came up with a solution. In Coach Roop’s iteration, you wrap your leg up in a band, pinning your foot to your butt, so that you can imple-ment the super couch anywhere. All you need is two bands and a pole. It’s genius.
Super Couch Variation
1. To set up for the super couch, hook your left leg through a band and create a distraction by pulling your left leg back. To prevent the band from pulling you forward, post up on your right foot and then force your knee into the corner of the box. With your shin #ush and foot #ush with the box, squeeze your left glute with all your might and drive your left hip toward the ground.
2. Keeping your butt squeezed and your trunk braced, very carefully lift your torso into the upright position.
1 2
— —