Begin Project Begin Section 2 End Section 2 Begin Section ...

Beamer v3.0 Guide
Beamer v3.0 Guide
Ki-Joo Kim (a.k.a. Daisyweb)
November 4, 2004

Beamer v3.0 Guide
Why Beamer?
Why Beamer?
Pros:
Both dvips/ps2pdf1 and pdflatex supports2
Rich overlay and transition effects
Navigational bars and symbols
Outputs: screen, transparency, handouts, and notes
Emulation of other PDF presentation tools such as Prosper and FoilTEX
Cons:
Difficult to design a template
1You need this route if you use PSTricks.2No dvipdfm support!

Beamer v3.0 Guide
Beamer Structure
Basic Code
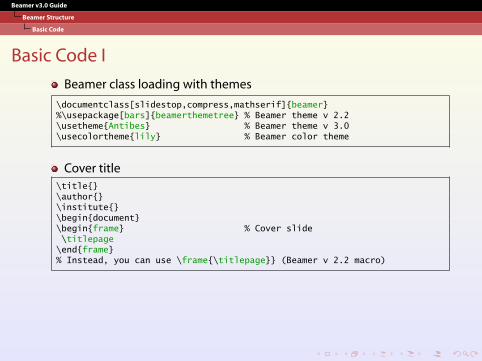
Basic Code I
Beamer class loading with themes
\documentclass[slidestop,compress,mathserif]{beamer}%\usepackage[bars]{beamerthemetree} % Beamer theme v 2.2\usetheme{Antibes} % Beamer theme v 3.0\usecolortheme{lily} % Beamer color theme
Cover title\title{}\author{}\institute{}\begin{document}\begin{frame} % Cover slide\titlepage\end{frame}% Instead, you can use \frame{\titlepage}} (Beamer v 2.2 macro)
Beamer v3.0 Guide
Beamer Structure
Basic Code
Basic Code I
Beamer class loading with themes
\documentclass[slidestop,compress,mathserif]{beamer}%\usepackage[bars]{beamerthemetree} % Beamer theme v 2.2\usetheme{Antibes} % Beamer theme v 3.0\usecolortheme{lily} % Beamer color theme
Cover title\title{}\author{}\institute{}\begin{document}\begin{frame} % Cover slide\titlepage\end{frame}% Instead, you can use \frame{\titlepage}} (Beamer v 2.2 macro)

Beamer v3.0 Guide
Beamer Structure
Basic Code
Basic Code II
Main slide frame\section{Introduction} % Bookmark information\subsection{History} % Bookmark information\begin{frame}[options]\frametitle{History}... slide contents ...\end{frame}
With v 2.2 macro:\frame[options]{\frametitle{History}%... slide contents ...}%

Beamer v3.0 Guide
Beamer Structure
Five Themes
Five Themes
The main difference between v 3.0 and v 2.2 is Beamer themes.
Five theme categories:Presentation Themes – Slide templateColor Themes – Color scheme for slide templateFont ThemesInner ThemesOuter Themes
Example
\documentclass[slidestop,compress,mathserif]{beamer}%\usepackage[bars]{beamerthemetree} % Beamer theme v 2.2\usetheme{Antibes} % Beamer theme v 3.0\usecolortheme{lily} % Beamer color theme
Go to Themes for more information.

Beamer v3.0 Guide
Beamer Structure
Beamer Options for Layout
Beamer Options for Layout
[slidestop] puts frame titles on the top left corner(default=[slidescentered]).
[compress]makes all navigation bars as small as possible(default=[uncompressed]).
[red] changes navigation bars and titles to reddish color.blue: Default color schemered: Used in this presentationbrownblackandwhite: Good for transparencies

Beamer v3.0 Guide
Beamer Structure
Beamer Options for Output
Beamer Options for Output
Default: PDF screen (size 128mm × 96 mm)3.
[handout] for PDF handouts.
[trans] for PDF transparency.
⇒ For handout and trans, you need some extra work to enlarge the size. Clickhere to see an example!
[notes=hide/show/only] for notes. Hide notes (default), addnotes to the PDF screen, or notes only PDF.
3Monitor’s 4:3 aspect ratio.

Beamer v3.0 Guide
Beamer Structure
Additional Beamer Options
Additional Beamer Options
[hyperref={bookmarks=false}] removes bookmarks.
[cjk] for CJK typesetting. ⇒ For hangul, use hfont package.
\usepackage[utf8]{inputenc} for Unicode.

Frame Options\frame[plain]{\frametitle{}..} for plane frame style as usedin this slide!
[containsverbatim] for using verbatim environment and \verbcommand.
[allowframebreaks] for automatic split of frames if the contentsdo not fit in a single slide.
[shrink] for shrinking the contents to fit in a single slide.
[squeeze] for squeezing vertical space.

Beamer v3.0 Guide
Beamer Structure
Transparency Effects
Transparency Effects
All overlayed stuffs are covered (default)
\beamertemplatetransparentcoveredhighmakes all covered texthighly transparent
\beamertemplatetransparentcovereddynamicmediummakes allcovered text quite transparent, but is a dynamic way. The range ofdynamics is smaller.

Beamer v3.0 Guide
Fonts
Text and Math Fonts
Text and Math Fonts I
Excellent support for selecting text and math fonts.
Default text and math fonts: CMSS and CMR MathYou should avoid CMR Math in presentationExample: http://faq.ktug.or.kr/wiki/uploads/MathFonts.pdf
Beamer option [sans] for text font (default)mathsans is default.Equivalent to \usefonttheme{default}
Beamer option [sefif] for text fontmathserif is default.Equivalent to \usefonttheme[options]{serif}
Beamer option [mathsans/mathserif] for math font

Beamer v3.0 Guide
Fonts
Text and Math Fonts
Text and Math Fonts II
Beamer option [professionalfonts] to turn off Beamer’s internalfont rewriting (⇒ Equivalent to \usefonttheme{professionalfonts})
Additional font theme macros\usefonttheme{structurebold} for bold faced structures (titles,headlines, footlines, sidebars, ...)\usefonttheme{structureitalicserif}\usefonttheme{structuresmallcapsserif}
Font settings in this document:
\documentclass[mathserif]{beamer} % sans (text) + mathserif\usepackage{lucidaso} % Lucida Bright (SO Version)\usepackage[small]{eulervm} % Euler VM
Beamer v3.0 Guide
Fonts
Font Size
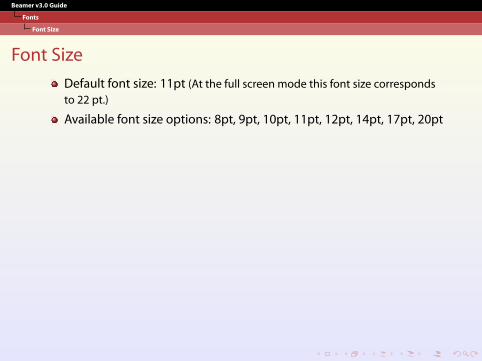
Font Size
Default font size: 11pt (At the full screen mode this font size correspondsto 22 pt.)
Available font size options: 8pt, 9pt, 10pt, 11pt, 12pt, 14pt, 17pt, 20pt

Beamer v3.0 Guide
Colors
Color Definition
Color Definition
Beamer loads xcolor package by Uwe Kern, which also supports colorand pstcol.
‘xcolor’ definition\xdefinecolor{lavendar}{rgb}{0.8,0.6,1}\xdefinecolor{olive}{cmyk}{0.64,0,0.95,0.4}\colorlet{structure}{green!60!black} for color substitutionPredefined colors: red, green, blue, cyan, magenta, yellow, black,darkgray, gray, lightgray, orange, violet, purple, and brown
If you want to use the options of ‘color’ package, pass[color=option] option to Beamer.
If you want to use ‘pstcol’, pass [xcolor=pst,dvips] option toBeamer. Now you should use ‘dvips/ps2pdf’

Beamer v3.0 Guide
Colors
More colors in xcolor package
More colors in ‘xcolor’ package
Color mixing is very easy!
color example meaninggreen!80!gray text 80% green + 20% graygreen!60!gray text 60% green + 40% graygreen!40!gray text 40% green + 60% gray-green text remove green from above
You can use animate (Beamer macro) or multido (PSTricks macro)for fade-in and fade-out!

Beamer v3.0 Guide
Colors
Highlighting Colors
Highlighting Colors
Beamer also has theme-specific highlighting colors:\alert{text}⇒ text\structure{text}⇒ text
To change these colors:\usecolortheme[named=yellow]{structure} to change toyellow.\setbeamercolor{alerted_text}{fg=cyan}4 to change to cyan.
4 ’_’ means space.

Beamer v3.0 Guide
Colors
Background Colors
Background Colors
To set solid background color,\beamersetaveragebackground{color} or\beamertemplatesolidbackgroundcolor{color}
To set gradient background color,\beamertemplateshadingbackground{color1}{color2}. ⇒ Thecolors in this slide is {blue!5}{yellow!10}.
To set grid background,\beamertemplategridbackground[grid_space].

Beamer v3.0 Guide
Colors
Color Example
Color Example
Color changes inNavigational barsBackgroundstructure{..} color
Code:\colorlet{mystruct}{structure} % Save current structure\colorlet{structure}{magenta} % New structure\usestructuretemplate{\color{structure}}{} % \structure{..}\beamertemplateshadingbackground{yellow!50}{magenta!50} % New background\frame{%...}%% Back to the original "structure" and bg color schemes\colorlet{structure}{mystruct}\beamertemplateshadingbackground{blue!10}{yellow!10}
Beamer v3.0 Guide
Verbatim
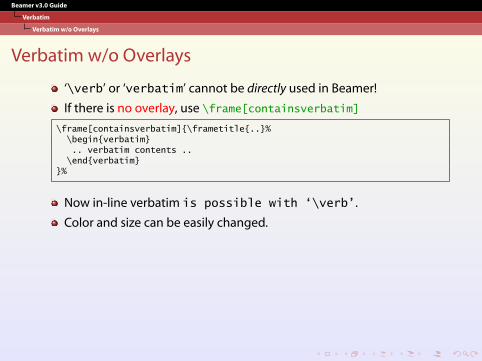
Verbatim w/o Overlays
Verbatim w/o Overlays
‘\verb’ or ‘verbatim’ cannot be directly used in Beamer!
If there is no overlay, use \frame[containsverbatim]
\frame[containsverbatim]{\frametitle{..}%\begin{verbatim}.. verbatim contents ..\end{verbatim}
}%
Now in-line verbatim is possible with ‘\verb’.
Color and size can be easily changed.

Beamer v3.0 Guide
Verbatim
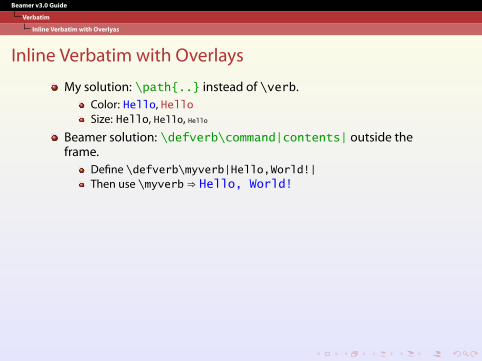
Inline Verbatim with Overlyas
Inline Verbatim with Overlays
My solution: \path{..} instead of \verb.Color: Hello, HelloSize: Hello, Hello, Hello
Beamer solution: \defverb\command|contents| outside theframe.
Define \defverb\myverb|Hello,World!|Then use \myverb⇒ Hello, World!
Beamer v3.0 Guide
Verbatim
Inline Verbatim with Overlyas
Inline Verbatim with Overlays
My solution: \path{..} instead of \verb.Color: Hello, HelloSize: Hello, Hello, Hello
Beamer solution: \defverb\command|contents| outside theframe.
Define \defverb\myverb|Hello,World!|Then use \myverb⇒ Hello, World!

Beamer v3.0 Guide
Verbatim
Verbatim with Overlays
Verbatim with Overlays
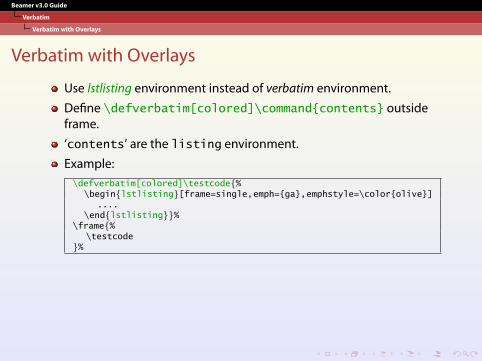
Use lstlisting environment instead of verbatim environment.
Define \defverbatim[colored]\command{contents} outsideframe.
‘contents’ are the listing environment.
Example:
\defverbatim[colored]\testcode{%\begin{lstlisting}[frame=single,emph={ga},emphstyle=\color{olive}]....
\end{lstlisting}}%\frame{%\testcode
}%
Beamer v3.0 Guide
Verbatim
Verbatim with Overlays
Verbatim with Overlays
Use lstlisting environment instead of verbatim environment.
Define \defverbatim[colored]\command{contents} outsideframe.
‘contents’ are the listing environment.
Example:
\defverbatim[colored]\testcode{%\begin{lstlisting}[frame=single,emph={ga},emphstyle=\color{olive}]....
\end{lstlisting}}%\frame{%\testcode
}%

Beamer v3.0 Guide
Figures
Figures Intro
Figures Intro
Standard LATEX figure environmentcan be used.
Beamer also loads pgf package. SoPGF command,\pgfimage[]{file}, is alsopossible.
\includegraphics, \pgfimage,and \pdfuseimage understandoverlays.
Figure: Tiger

Beamer v3.0 Guide
Figures
PGF Macros
PGF Macros
PSTricks and PGF can be used for locating figures exactly .
Grid size of slide: (LL × UR) = (0cm,-7cm) × (11cm,1cm)
PGF macro for locating figures:
\pgfputat{\pgfxy(0,-6.5)}{\pgfbox[left,base]{\pgfimage[width=1cm]{tiger}}}
If you use the same figure several times, use \pgfdecalreimageand \pgfuseimage. Or just use \includegraphics.

Beamer v3.0 Guide
Figures
Figures inside Columns
Figures inside Columns
Figures inside ‘columns’ environment need exact position.
PGF macros (PDF, PNG, and JPEG with pdflatex)
\begin{columns}\begin{column}{0.65\textwidth}A\\B
\end{column}\begin{column}{0.35\textwidth}\pgfputat{\pgfxy(0,0)}{\pgfbox[left,top]{\includegraphics[width=\textwidth]{tiger}}}
\end{column}\end{columns}
PSTricks macros (EPS with dvips)
\begin{columns}\begin{column}{0.65\textwidth}A\\B\end{column}\begin{column}{0.35\textwidth}\rput[lt](0,0){\includegraphics[clip=true,width=\textwidth]{tiger}}\end{column}\end{columns}

Beamer v3.0 Guide
Figures
Zooming Figures
Zooming Figures
Figures can be zoomed5 using\framezoom<button overlay><zoomed overlay>(x,y)(w,h).
(x,y): Upper left coordinate point(w,h): Width and height for zooming
Example:
\frame{\frametitle{Zooming Figures -- Example}\framezoom<1><2>[border](0.5cm,0.5cm)(2cm,1.5cm)\framezoom<1><3>[border](1cm,3cm)(2cm,1.5cm)\framezoom<1><4>[border](3cm,2cm)(2cm,2cm)
\pgfimage[height=6cm]{tiger}%\includegraphics[height=6cm]{tiger} is working, too!}%
5New in Version 2.2

Beamer v3.0 Guide
Figures
Zooming Figures – Example
Zooming Figures – Example
Click the border to zoom-in.

Beamer v3.0 Guide
Figures
Zooming Figures – Example
Zooming Figures – Example
Click the border to zoom-in.

Beamer v3.0 Guide
Figures
Zooming Figures – Example
Zooming Figures – Example
Click the border to zoom-in.

Beamer v3.0 Guide
Figures
Zooming Figures – Example
Zooming Figures – Example
Click the border to zoom-in.

Beamer v3.0 Guide
Figures
Drawing Figures
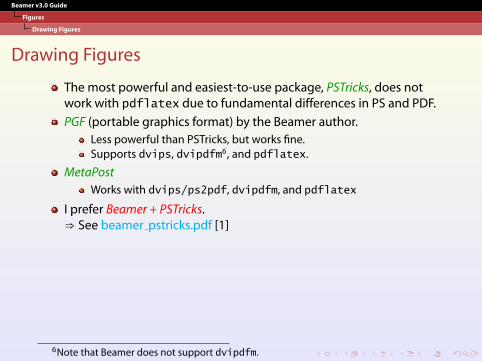
Drawing Figures
The most powerful and easiest-to-use package, PSTricks, does notwork with pdflatex due to fundamental differences in PS and PDF.
PGF (portable graphics format) by the Beamer author.Less powerful than PSTricks, but works fine.Supports dvips, dvipdfm6, and pdflatex.
MetaPostWorks with dvips/ps2pdf, dvipdfm, and pdflatex
I prefer Beamer + PSTricks.⇒ See beamer pstricks.pdf [1]
6Note that Beamer does not support dvipdfm.

Beamer v3.0 Guide
Figures
Drawing Figures
Drawing Figures
The most powerful and easiest-to-use package, PSTricks, does notwork with pdflatex due to fundamental differences in PS and PDF.
PGF (portable graphics format) by the Beamer author.Less powerful than PSTricks, but works fine.Supports dvips, dvipdfm6, and pdflatex.
MetaPostWorks with dvips/ps2pdf, dvipdfm, and pdflatex
I prefer Beamer + PSTricks.⇒ See beamer pstricks.pdf [1]
6Note that Beamer does not support dvipdfm.

Beamer v3.0 Guide
Figures
Masking Figures
Masking Figures
Want to mask white background of your images?
+ =
Make a mask image in 256 Colors and JPEG Compression7
Use \pgfdeclaremask in pdf package. But only works with pdflatex!
Source code:\pgfdeclaremask{mymask}{ppt.mask} % Mask image: ppt.mask.jpg\pgfimage[mask=mymask,interpolate=true]{ppt} % Masking ppt.png
But the mask image masks the whole slide! See the font outlines.
7I do not know the exact requirement.

Beamer v3.0 Guide
Local Structures
Fancy Bullets
Fancy Bullets
1 \beamertemplateballitem in the preamble2 itemize environment ⇒ Fancy ball3 enumerate environment ⇒ Fancy numbered ball (used here).
To use different enumerate templates,
\begin{enumerate}[minitemplate]\item ...
\end{enumerate}
where mini template can be ‘A’, ‘a’, ‘i’, ‘I’, ‘(A)’, . . . . But the indentation may bechanged (bug?)
i Item 1
ii Item 2

Beamer v3.0 Guide
Local Structures
Framed Text
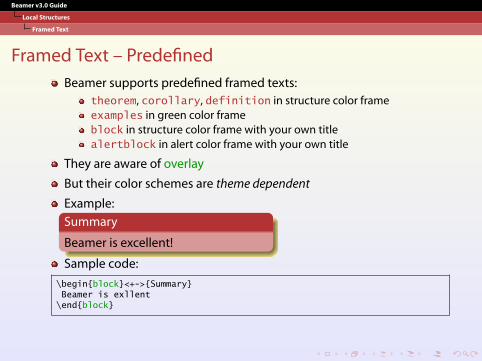
Framed Text – PredefinedBeamer supports predefined framed texts:
theorem, corollary, definition in structure color frameexamples in green color frameblock in structure color frame with your own titlealertblock in alert color frame with your own title
They are aware of overlay
But their color schemes are theme dependent
Example:
Summary
Beamer is excellent!
Sample code:
\begin{block}<+->{Summary}Beamer is exllent\end{block}

Beamer v3.0 Guide
Local Structures
Framed Text
Framed Text – PredefinedBeamer supports predefined framed texts:
theorem, corollary, definition in structure color frameexamples in green color frameblock in structure color frame with your own titlealertblock in alert color frame with your own title
They are aware of overlay
But their color schemes are theme dependent
Example:
Summary
Beamer is excellent!
Sample code:
\begin{block}<+->{Summary}Beamer is exllent\end{block}

Beamer v3.0 Guide
Local Structures
Framed Text
Framed Text – User-defined
beamerboxesrounded environment
Example
Theorem
A = B
B = C
⇒Theorem
A = C?
Source Code:
\setbeamercolor{uppercol}{fg=white,bg=ugreen}%\setbeamercolor{lowercol}{fg=black,bg=lgreen}%\begin{beamerboxesrounded}[upper=uppercol,lower=lowercol,shadow=true]{Theorem}$A = B$.
\end{beamerboxesrounded}}

Beamer v3.0 Guide
Local Structures
Columns
Columns
Use LATEX minipageenvironment or
Use Beamer columnsenvironment\begin{columns}\begin{column}[pos]{width}... contents ...
\end{column}\begin{column}[pos]{width}... contents ...\end{column}\end{columns}

Beamer v3.0 Guide
Local Structures
Tables
Tables
Standard LATEX table environmentcan be used.
\onslide inside ‘overprint’environment for showing overlaysin the right example.
Table Overlays:

Beamer v3.0 Guide
Local Structures
Tables
Tables
Standard LATEX table environmentcan be used.
\onslide inside ‘overprint’environment for showing overlaysin the right example.
Table Overlays:
Cells are growing

Beamer v3.0 Guide
Local Structures
Tables
Tables
Standard LATEX table environmentcan be used.
\onslide inside ‘overprint’environment for showing overlaysin the right example.
Table Overlays:
Cells are growingstep by

Beamer v3.0 Guide
Local Structures
Tables
Tables
Standard LATEX table environmentcan be used.
\onslide inside ‘overprint’environment for showing overlaysin the right example.
Table Overlays:
Cells are growingstep bystep.

Beamer v3.0 Guide
Local Structures
Tables
Tables
Standard LATEX table environmentcan be used.
\onslide inside ‘overprint’environment for showing overlaysin the right example.
Table Overlays:
Cells are growingstep bystep. Finished!

Beamer v3.0 Guide
Transitions
Transitions
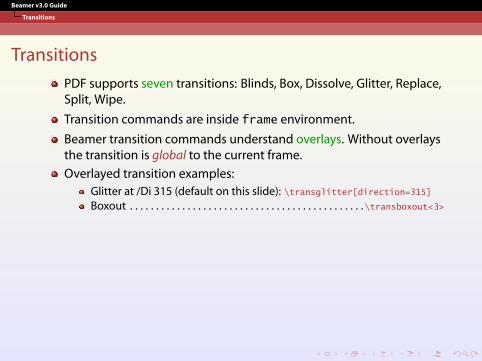
PDF supports seven transitions: Blinds, Box, Dissolve, Glitter, Replace,Split, Wipe.
Transition commands are inside frame environment.
Beamer transition commands understand overlays. Without overlaysthe transition is global to the current frame.
Overlayed transition examples:
Glitter at /Di 315 (default on this slide): \transglitter[direction=315]Boxout . . . . . . . . . . . . . . . . . . . . . . . . . . . . . . . . . . . . . . . . . . . . .\transboxout<3>. . . . . . . . . . . . . . . . . . . . . . . Boxin: \transboxin<4> . . . . . . . . . . . . . . . . . . . . . . .Dissolve transition: \transdissolve<5>Split vertical out: \transsplitverticalout<6>

Beamer v3.0 Guide
Transitions
Transitions
PDF supports seven transitions: Blinds, Box, Dissolve, Glitter, Replace,Split, Wipe.
Transition commands are inside frame environment.
Beamer transition commands understand overlays. Without overlaysthe transition is global to the current frame.
Overlayed transition examples:Glitter at /Di 315 (default on this slide): \transglitter[direction=315]
Boxout . . . . . . . . . . . . . . . . . . . . . . . . . . . . . . . . . . . . . . . . . . . . .\transboxout<3>. . . . . . . . . . . . . . . . . . . . . . . Boxin: \transboxin<4> . . . . . . . . . . . . . . . . . . . . . . .Dissolve transition: \transdissolve<5>Split vertical out: \transsplitverticalout<6>
Beamer v3.0 Guide
Transitions
Transitions
PDF supports seven transitions: Blinds, Box, Dissolve, Glitter, Replace,Split, Wipe.
Transition commands are inside frame environment.
Beamer transition commands understand overlays. Without overlaysthe transition is global to the current frame.
Overlayed transition examples:Glitter at /Di 315 (default on this slide): \transglitter[direction=315]Boxout . . . . . . . . . . . . . . . . . . . . . . . . . . . . . . . . . . . . . . . . . . . . .\transboxout<3>
. . . . . . . . . . . . . . . . . . . . . . . Boxin: \transboxin<4> . . . . . . . . . . . . . . . . . . . . . . .Dissolve transition: \transdissolve<5>Split vertical out: \transsplitverticalout<6>

Beamer v3.0 Guide
Transitions
Transitions
PDF supports seven transitions: Blinds, Box, Dissolve, Glitter, Replace,Split, Wipe.
Transition commands are inside frame environment.
Beamer transition commands understand overlays. Without overlaysthe transition is global to the current frame.
Overlayed transition examples:Glitter at /Di 315 (default on this slide): \transglitter[direction=315]Boxout . . . . . . . . . . . . . . . . . . . . . . . . . . . . . . . . . . . . . . . . . . . . .\transboxout<3>. . . . . . . . . . . . . . . . . . . . . . . Boxin: \transboxin<4> . . . . . . . . . . . . . . . . . . . . . . .
Dissolve transition: \transdissolve<5>Split vertical out: \transsplitverticalout<6>

Beamer v3.0 Guide
Transitions
Transitions
PDF supports seven transitions: Blinds, Box, Dissolve, Glitter, Replace,Split, Wipe.
Transition commands are inside frame environment.
Beamer transition commands understand overlays. Without overlaysthe transition is global to the current frame.
Overlayed transition examples:Glitter at /Di 315 (default on this slide): \transglitter[direction=315]Boxout . . . . . . . . . . . . . . . . . . . . . . . . . . . . . . . . . . . . . . . . . . . . .\transboxout<3>. . . . . . . . . . . . . . . . . . . . . . . Boxin: \transboxin<4> . . . . . . . . . . . . . . . . . . . . . . .Dissolve transition: \transdissolve<5>
Split vertical out: \transsplitverticalout<6>

Beamer v3.0 Guide
Transitions
Transitions
PDF supports seven transitions: Blinds, Box, Dissolve, Glitter, Replace,Split, Wipe.
Transition commands are inside frame environment.
Beamer transition commands understand overlays. Without overlaysthe transition is global to the current frame.
Overlayed transition examples:Glitter at /Di 315 (default on this slide): \transglitter[direction=315]Boxout . . . . . . . . . . . . . . . . . . . . . . . . . . . . . . . . . . . . . . . . . . . . .\transboxout<3>. . . . . . . . . . . . . . . . . . . . . . . Boxin: \transboxin<4> . . . . . . . . . . . . . . . . . . . . . . .Dissolve transition: \transdissolve<5>Split vertical out: \transsplitverticalout<6>

Beamer v3.0 Guide
Overlays
Overview
Overlays - Overview
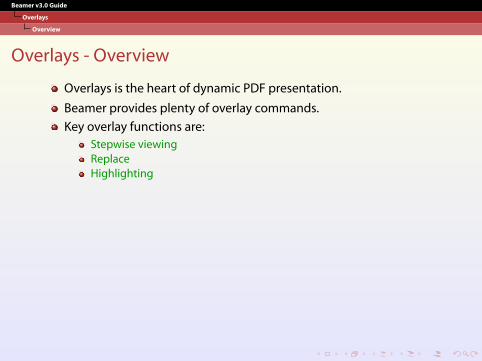
Overlays is the heart of dynamic PDF presentation.
Beamer provides plenty of overlay commands.
Key overlay functions are:Stepwise viewingReplaceHighlighting
Various overlay counters: ‘n’, ‘n-’, ‘-n’, ‘n1-n2’, ‘+-’.
Beamer v3.0 Guide
Overlays
Overview
Overlays - Overview
Overlays is the heart of dynamic PDF presentation.
Beamer provides plenty of overlay commands.
Key overlay functions are:Stepwise viewingReplaceHighlighting
Various overlay counters: ‘n’, ‘n-’, ‘-n’, ‘n1-n2’, ‘+-’.

Beamer v3.0 Guide
Overlays
Overview
Overlays - Overview
Overlays is the heart of dynamic PDF presentation.
Beamer provides plenty of overlay commands.
Key overlay functions are:Stepwise viewingReplaceHighlighting
Various overlay counters: ‘n’, ‘n-’, ‘-n’, ‘n1-n2’, ‘+-’.

Beamer v3.0 Guide
Overlays
Pause
Pause for Stepwise Viewing
pause command8 for easy and simple overlays.
\begin{itemize}\pause \item Every thing\pause \item that has\pause \item beginning\pause \item has end.\end{itemize}
Every thing
that has
beginning
has end.
Note that pause does not know overlay counters.
8There is also \unpause command.

Beamer v3.0 Guide
Overlays
Pause: Table Example
Pause: Table Example
Row increment in a table:
Class A B C DX 1 2 3 4Y 3 4 5 6Z 5 6 7 8
Source code:
\rowcolors[]{1}{blue!20}{blue!10}\begin{tabular}{l!{\vrule}cccc}Class & A & B & C & D \\\hlineX & 1 & 2 & 3 & 4 \pause \\Y & 3 & 4 & 5 & 6 \pause \\Z & 5 & 6 & 7 & 8\end{tabular}

Beamer v3.0 Guide
Overlays
Pause: Table Example
Pause: Table Example
Row increment in a table:
Class A B C DX 1 2 3 4
Y 3 4 5 6Z 5 6 7 8
Source code:
\rowcolors[]{1}{blue!20}{blue!10}\begin{tabular}{l!{\vrule}cccc}Class & A & B & C & D \\\hlineX & 1 & 2 & 3 & 4 \pause \\Y & 3 & 4 & 5 & 6 \pause \\Z & 5 & 6 & 7 & 8\end{tabular}

Beamer v3.0 Guide
Overlays
Pause: Table Example
Pause: Table Example
Row increment in a table:
Class A B C DX 1 2 3 4Y 3 4 5 6
Z 5 6 7 8
Source code:
\rowcolors[]{1}{blue!20}{blue!10}\begin{tabular}{l!{\vrule}cccc}Class & A & B & C & D \\\hlineX & 1 & 2 & 3 & 4 \pause \\Y & 3 & 4 & 5 & 6 \pause \\Z & 5 & 6 & 7 & 8\end{tabular}

Beamer v3.0 Guide
Overlays
Pause: Table Example
Pause: Table Example
Row increment in a table:
Class A B C DX 1 2 3 4Y 3 4 5 6Z 5 6 7 8
Source code:
\rowcolors[]{1}{blue!20}{blue!10}\begin{tabular}{l!{\vrule}cccc}Class & A & B & C & D \\\hlineX & 1 & 2 & 3 & 4 \pause \\Y & 3 & 4 & 5 & 6 \pause \\Z & 5 & 6 & 7 & 8\end{tabular}

Beamer v3.0 Guide
Overlays
Pause: Table Example
Pause: Table Example
Row increment in a table:
Class A B C DX 1 2 3 4Y 3 4 5 6Z 5 6 7 8
Source code:
\rowcolors[]{1}{blue!20}{blue!10}\begin{tabular}{l!{\vrule}cccc}Class & A & B & C & D \\\hlineX & 1 & 2 & 3 & 4 \pause \\Y & 3 & 4 & 5 & 6 \pause \\Z & 5 & 6 & 7 & 8\end{tabular}

Beamer v3.0 Guide
Overlays
Onslide
Onslide for Stepwise Viewing
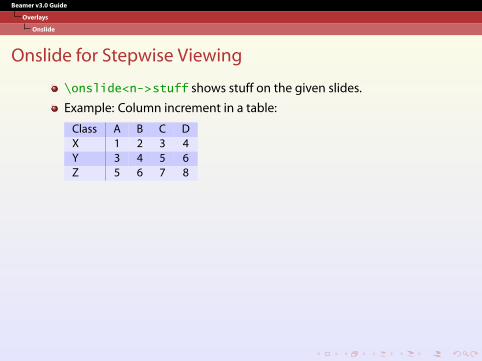
\onslide<n->stuff shows stuff on the given slides.
Example: Column increment in a table:
Class
A B C D
X
1 2 3 4
Y
3 4 5 6
Z
5 6 7 8
Source code:
\rowcolors[]{1}{blue!20}{blue!10}\begin{tabular}{l!{\vrule}c<{\onslide<2->}c<{\onslide<3->} %
c<{\onslide<4->}c<{\onslide}c}Class & A & B & C & D \\X & 1 & 2 & 3 & 4 \\Y & 3 & 4 & 5 & 6 \\Z & 5 & 6 & 7 & 8
\end{tabular}

Beamer v3.0 Guide
Overlays
Onslide
Onslide for Stepwise Viewing
\onslide<n->stuff shows stuff on the given slides.
Example: Column increment in a table:
Class A
B C D
X 1
2 3 4
Y 3
4 5 6
Z 5
6 7 8
Source code:
\rowcolors[]{1}{blue!20}{blue!10}\begin{tabular}{l!{\vrule}c<{\onslide<2->}c<{\onslide<3->} %
c<{\onslide<4->}c<{\onslide}c}Class & A & B & C & D \\X & 1 & 2 & 3 & 4 \\Y & 3 & 4 & 5 & 6 \\Z & 5 & 6 & 7 & 8
\end{tabular}

Beamer v3.0 Guide
Overlays
Onslide
Onslide for Stepwise Viewing
\onslide<n->stuff shows stuff on the given slides.
Example: Column increment in a table:
Class A B
C D
X 1 2
3 4
Y 3 4
5 6
Z 5 6
7 8
Source code:
\rowcolors[]{1}{blue!20}{blue!10}\begin{tabular}{l!{\vrule}c<{\onslide<2->}c<{\onslide<3->} %
c<{\onslide<4->}c<{\onslide}c}Class & A & B & C & D \\X & 1 & 2 & 3 & 4 \\Y & 3 & 4 & 5 & 6 \\Z & 5 & 6 & 7 & 8
\end{tabular}

Beamer v3.0 Guide
Overlays
Onslide
Onslide for Stepwise Viewing
\onslide<n->stuff shows stuff on the given slides.
Example: Column increment in a table:
Class A B C
D
X 1 2 3
4
Y 3 4 5
6
Z 5 6 7
8
Source code:
\rowcolors[]{1}{blue!20}{blue!10}\begin{tabular}{l!{\vrule}c<{\onslide<2->}c<{\onslide<3->} %
c<{\onslide<4->}c<{\onslide}c}Class & A & B & C & D \\X & 1 & 2 & 3 & 4 \\Y & 3 & 4 & 5 & 6 \\Z & 5 & 6 & 7 & 8
\end{tabular}
Beamer v3.0 Guide
Overlays
Onslide
Onslide for Stepwise Viewing
\onslide<n->stuff shows stuff on the given slides.
Example: Column increment in a table:
Class A B C DX 1 2 3 4Y 3 4 5 6Z 5 6 7 8
Source code:
\rowcolors[]{1}{blue!20}{blue!10}\begin{tabular}{l!{\vrule}c<{\onslide<2->}c<{\onslide<3->} %
c<{\onslide<4->}c<{\onslide}c}Class & A & B & C & D \\X & 1 & 2 & 3 & 4 \\Y & 3 & 4 & 5 & 6 \\Z & 5 & 6 & 7 & 8
\end{tabular}

Beamer v3.0 Guide
Overlays
Item I
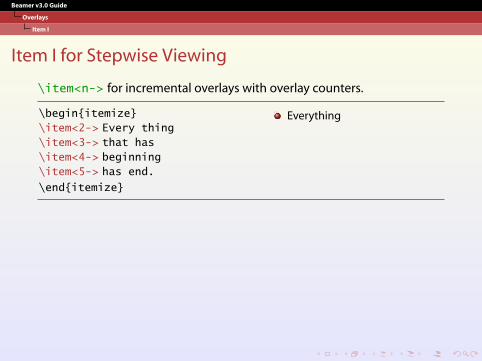
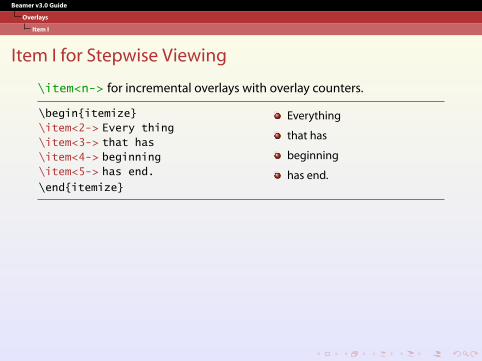
Item I for Stepwise Viewing
\item<n-> for incremental overlays with overlay counters.
\begin{itemize}\item<2-> Every thing\item<3-> that has\item<4-> beginning\item<5-> has end.\end{itemize}
Everything
that has
beginning
has end.
Beamer v3.0 Guide
Overlays
Item I
Item I for Stepwise Viewing
\item<n-> for incremental overlays with overlay counters.
\begin{itemize}\item<2-> Every thing\item<3-> that has\item<4-> beginning\item<5-> has end.\end{itemize}
Everything
that has
beginning
has end.

Beamer v3.0 Guide
Overlays
Item I
Item I for Stepwise Viewing
\item<n-> for incremental overlays with overlay counters.
\begin{itemize}\item<2-> Every thing\item<3-> that has\item<4-> beginning\item<5-> has end.\end{itemize}
Everything
that has
beginning
has end.

Beamer v3.0 Guide
Overlays
Item I
Item I for Stepwise Viewing
\item<n-> for incremental overlays with overlay counters.
\begin{itemize}\item<2-> Every thing\item<3-> that has\item<4-> beginning\item<5-> has end.\end{itemize}
Everything
that has
beginning
has end.
Beamer v3.0 Guide
Overlays
Item I
Item I for Stepwise Viewing
\item<n-> for incremental overlays with overlay counters.
\begin{itemize}\item<2-> Every thing\item<3-> that has\item<4-> beginning\item<5-> has end.\end{itemize}
Everything
that has
beginning
has end.

Beamer v3.0 Guide
Overlays
Item I
Item I for Stepwise Viewing
\item<n-> for incremental overlays with overlay counters.
\begin{itemize}\item<2-> Every thing\item<3-> that has\item<4-> beginning\item<5-> has end.\end{itemize}
Everything
that has
beginning
has end.
What if more items are inserted?

Beamer v3.0 Guide
Overlays
Item II
Item II for Stepwise Viewing
<+-> for incremental overlays w/o overlay counters.
\begin{itemize}[<+->]\item Every thing\item that has\item beginning\item has end.\end{itemize}
Everything
that has
beginning
has end.
Note that \item<+-> can be used instead of global setting of\begin{itemize}[<+->].

Beamer v3.0 Guide
Overlays
Item III
Item III for Stepwise Viewing
\item<n1-n2> for fine control of overlays.
\begin{itemize}\item<1-> Every thing\item<3-4> that has\item<4> beginning\item<2-5> has end.\end{itemize}
Everything
that has
beginning
has end.

Beamer v3.0 Guide
Overlays
Item III
Item III for Stepwise Viewing
\item<n1-n2> for fine control of overlays.
\begin{itemize}\item<1-> Every thing\item<3-4> that has\item<4> beginning\item<2-5> has end.\end{itemize}
Everything
that has
beginning
has end.

Beamer v3.0 Guide
Overlays
Item III
Item III for Stepwise Viewing
\item<n1-n2> for fine control of overlays.
\begin{itemize}\item<1-> Every thing\item<3-4> that has\item<4> beginning\item<2-5> has end.\end{itemize}
Everything
that has
beginning
has end.

Beamer v3.0 Guide
Overlays
Item III
Item III for Stepwise Viewing
\item<n1-n2> for fine control of overlays.
\begin{itemize}\item<1-> Every thing\item<3-4> that has\item<4> beginning\item<2-5> has end.\end{itemize}
Everything
that has
beginning
has end.

Beamer v3.0 Guide
Overlays
Item III
Item III for Stepwise Viewing
\item<n1-n2> for fine control of overlays.
\begin{itemize}\item<1-> Every thing\item<3-4> that has\item<4> beginning\item<2-5> has end.\end{itemize}
Everything
that has
beginning
has end.

Beamer v3.0 Guide
Overlays
Item III
Item III for Stepwise Viewing
\item<n1-n2> for fine control of overlays.
\begin{itemize}\item<1-> Every thing\item<3-4> that has\item<4> beginning\item<2-5> has end.\end{itemize}
Everything
that has
beginning
has end.

Beamer v3.0 Guide
Overlays
Replace
Replace
Successive \only<n>{..}.(Ex) \only<1>{GA}\only<2>{MOGA}\only<3>{pMOGA}⇒ GA
\uncover<n>{..} shows at given n.(Ex) \uncover<5>{I am 5} ⇒
I am 5
\invisible<n>{..} hides at given n.(Ex) \invisible<8>{Invisible at 8} ⇒ Invisible at 8
\alt<n>{at n}{not at n} for two alternatives.(Ex) \alt<11>{I am 11}{I am not 11} ⇒ I am not 11
\temporal<n>{before}{at n}{after} for three alternatives.9
(Ex) \temporal<14>{I am 13}{I am 14}{I am 15} ⇒ I am 13
Slide 1
9See also highlighting section.

Beamer v3.0 Guide
Overlays
Replace
Replace
Successive \only<n>{..}.(Ex) \only<1>{GA}\only<2>{MOGA}\only<3>{pMOGA}⇒ MOGA
\uncover<n>{..} shows at given n.(Ex) \uncover<5>{I am 5} ⇒
I am 5
\invisible<n>{..} hides at given n.(Ex) \invisible<8>{Invisible at 8} ⇒ Invisible at 8
\alt<n>{at n}{not at n} for two alternatives.(Ex) \alt<11>{I am 11}{I am not 11} ⇒ I am not 11
\temporal<n>{before}{at n}{after} for three alternatives.9
(Ex) \temporal<14>{I am 13}{I am 14}{I am 15} ⇒ I am 13
Slide 2
9See also highlighting section.

Beamer v3.0 Guide
Overlays
Replace
Replace
Successive \only<n>{..}.(Ex) \only<1>{GA}\only<2>{MOGA}\only<3>{pMOGA}⇒ pMOGA
\uncover<n>{..} shows at given n.(Ex) \uncover<5>{I am 5} ⇒
I am 5
\invisible<n>{..} hides at given n.(Ex) \invisible<8>{Invisible at 8} ⇒ Invisible at 8
\alt<n>{at n}{not at n} for two alternatives.(Ex) \alt<11>{I am 11}{I am not 11} ⇒ I am not 11
\temporal<n>{before}{at n}{after} for three alternatives.9
(Ex) \temporal<14>{I am 13}{I am 14}{I am 15} ⇒ I am 13
Slide 3
9See also highlighting section.

Beamer v3.0 Guide
Overlays
Replace
Replace
Successive \only<n>{..}.(Ex) \only<1>{GA}\only<2>{MOGA}\only<3>{pMOGA}⇒ pMOGA
\uncover<n>{..} shows at given n.(Ex) \uncover<5>{I am 5} ⇒
I am 5
\invisible<n>{..} hides at given n.(Ex) \invisible<8>{Invisible at 8} ⇒ Invisible at 8
\alt<n>{at n}{not at n} for two alternatives.(Ex) \alt<11>{I am 11}{I am not 11} ⇒ I am not 11
\temporal<n>{before}{at n}{after} for three alternatives.9
(Ex) \temporal<14>{I am 13}{I am 14}{I am 15} ⇒ I am 13
Slide 4
9See also highlighting section.

Beamer v3.0 Guide
Overlays
Replace
Replace
Successive \only<n>{..}.(Ex) \only<1>{GA}\only<2>{MOGA}\only<3>{pMOGA}⇒ pMOGA
\uncover<n>{..} shows at given n.(Ex) \uncover<5>{I am 5} ⇒ I am 5
\invisible<n>{..} hides at given n.(Ex) \invisible<8>{Invisible at 8} ⇒ Invisible at 8
\alt<n>{at n}{not at n} for two alternatives.(Ex) \alt<11>{I am 11}{I am not 11} ⇒ I am not 11
\temporal<n>{before}{at n}{after} for three alternatives.9
(Ex) \temporal<14>{I am 13}{I am 14}{I am 15} ⇒ I am 13
Slide 5
9See also highlighting section.

Beamer v3.0 Guide
Overlays
Replace
Replace
Successive \only<n>{..}.(Ex) \only<1>{GA}\only<2>{MOGA}\only<3>{pMOGA}⇒ pMOGA
\uncover<n>{..} shows at given n.(Ex) \uncover<5>{I am 5} ⇒
I am 5
\invisible<n>{..} hides at given n.(Ex) \invisible<8>{Invisible at 8} ⇒ Invisible at 8
\alt<n>{at n}{not at n} for two alternatives.(Ex) \alt<11>{I am 11}{I am not 11} ⇒ I am not 11
\temporal<n>{before}{at n}{after} for three alternatives.9
(Ex) \temporal<14>{I am 13}{I am 14}{I am 15} ⇒ I am 13
Slide 6
9See also highlighting section.

Beamer v3.0 Guide
Overlays
Replace
Replace
Successive \only<n>{..}.(Ex) \only<1>{GA}\only<2>{MOGA}\only<3>{pMOGA}⇒ pMOGA
\uncover<n>{..} shows at given n.(Ex) \uncover<5>{I am 5} ⇒
I am 5
\invisible<n>{..} hides at given n.(Ex) \invisible<8>{Invisible at 8} ⇒ Invisible at 8
\alt<n>{at n}{not at n} for two alternatives.(Ex) \alt<11>{I am 11}{I am not 11} ⇒ I am not 11
\temporal<n>{before}{at n}{after} for three alternatives.9
(Ex) \temporal<14>{I am 13}{I am 14}{I am 15} ⇒ I am 13
Slide 7
9See also highlighting section.

Beamer v3.0 Guide
Overlays
Replace
Replace
Successive \only<n>{..}.(Ex) \only<1>{GA}\only<2>{MOGA}\only<3>{pMOGA}⇒ pMOGA
\uncover<n>{..} shows at given n.(Ex) \uncover<5>{I am 5} ⇒
I am 5
\invisible<n>{..} hides at given n.(Ex) \invisible<8>{Invisible at 8} ⇒
Invisible at 8
\alt<n>{at n}{not at n} for two alternatives.(Ex) \alt<11>{I am 11}{I am not 11} ⇒ I am not 11
\temporal<n>{before}{at n}{after} for three alternatives.9
(Ex) \temporal<14>{I am 13}{I am 14}{I am 15} ⇒ I am 13
Slide 8
9See also highlighting section.

Beamer v3.0 Guide
Overlays
Replace
Replace
Successive \only<n>{..}.(Ex) \only<1>{GA}\only<2>{MOGA}\only<3>{pMOGA}⇒ pMOGA
\uncover<n>{..} shows at given n.(Ex) \uncover<5>{I am 5} ⇒
I am 5
\invisible<n>{..} hides at given n.(Ex) \invisible<8>{Invisible at 8} ⇒ Invisible at 8
\alt<n>{at n}{not at n} for two alternatives.(Ex) \alt<11>{I am 11}{I am not 11} ⇒ I am not 11
\temporal<n>{before}{at n}{after} for three alternatives.9
(Ex) \temporal<14>{I am 13}{I am 14}{I am 15} ⇒ I am 13
Slide 9
9See also highlighting section.

Beamer v3.0 Guide
Overlays
Replace
Replace
Successive \only<n>{..}.(Ex) \only<1>{GA}\only<2>{MOGA}\only<3>{pMOGA}⇒ pMOGA
\uncover<n>{..} shows at given n.(Ex) \uncover<5>{I am 5} ⇒
I am 5
\invisible<n>{..} hides at given n.(Ex) \invisible<8>{Invisible at 8} ⇒ Invisible at 8
\alt<n>{at n}{not at n} for two alternatives.(Ex) \alt<11>{I am 11}{I am not 11} ⇒ I am not 11
\temporal<n>{before}{at n}{after} for three alternatives.9
(Ex) \temporal<14>{I am 13}{I am 14}{I am 15} ⇒ I am 13
Slide 10
9See also highlighting section.

Beamer v3.0 Guide
Overlays
Replace
Replace
Successive \only<n>{..}.(Ex) \only<1>{GA}\only<2>{MOGA}\only<3>{pMOGA}⇒ pMOGA
\uncover<n>{..} shows at given n.(Ex) \uncover<5>{I am 5} ⇒
I am 5
\invisible<n>{..} hides at given n.(Ex) \invisible<8>{Invisible at 8} ⇒ Invisible at 8
\alt<n>{at n}{not at n} for two alternatives.(Ex) \alt<11>{I am 11}{I am not 11} ⇒ I am 11
\temporal<n>{before}{at n}{after} for three alternatives.9
(Ex) \temporal<14>{I am 13}{I am 14}{I am 15} ⇒ I am 13
Slide 11
9See also highlighting section.

Beamer v3.0 Guide
Overlays
Replace
Replace
Successive \only<n>{..}.(Ex) \only<1>{GA}\only<2>{MOGA}\only<3>{pMOGA}⇒ pMOGA
\uncover<n>{..} shows at given n.(Ex) \uncover<5>{I am 5} ⇒
I am 5
\invisible<n>{..} hides at given n.(Ex) \invisible<8>{Invisible at 8} ⇒ Invisible at 8
\alt<n>{at n}{not at n} for two alternatives.(Ex) \alt<11>{I am 11}{I am not 11} ⇒ I am not 11
\temporal<n>{before}{at n}{after} for three alternatives.9
(Ex) \temporal<14>{I am 13}{I am 14}{I am 15} ⇒ I am 13
Slide 12
9See also highlighting section.

Beamer v3.0 Guide
Overlays
Replace
Replace
Successive \only<n>{..}.(Ex) \only<1>{GA}\only<2>{MOGA}\only<3>{pMOGA}⇒ pMOGA
\uncover<n>{..} shows at given n.(Ex) \uncover<5>{I am 5} ⇒
I am 5
\invisible<n>{..} hides at given n.(Ex) \invisible<8>{Invisible at 8} ⇒ Invisible at 8
\alt<n>{at n}{not at n} for two alternatives.(Ex) \alt<11>{I am 11}{I am not 11} ⇒ I am not 11
\temporal<n>{before}{at n}{after} for three alternatives.9
(Ex) \temporal<14>{I am 13}{I am 14}{I am 15} ⇒ I am 13
Slide 13
9See also highlighting section.

Beamer v3.0 Guide
Overlays
Replace
Replace
Successive \only<n>{..}.(Ex) \only<1>{GA}\only<2>{MOGA}\only<3>{pMOGA}⇒ pMOGA
\uncover<n>{..} shows at given n.(Ex) \uncover<5>{I am 5} ⇒
I am 5
\invisible<n>{..} hides at given n.(Ex) \invisible<8>{Invisible at 8} ⇒ Invisible at 8
\alt<n>{at n}{not at n} for two alternatives.(Ex) \alt<11>{I am 11}{I am not 11} ⇒ I am not 11
\temporal<n>{before}{at n}{after} for three alternatives.9
(Ex) \temporal<14>{I am 13}{I am 14}{I am 15} ⇒ I am 14
Slide 14
9See also highlighting section.

Beamer v3.0 Guide
Overlays
Replace
Replace
Successive \only<n>{..}.(Ex) \only<1>{GA}\only<2>{MOGA}\only<3>{pMOGA}⇒ pMOGA
\uncover<n>{..} shows at given n.(Ex) \uncover<5>{I am 5} ⇒
I am 5
\invisible<n>{..} hides at given n.(Ex) \invisible<8>{Invisible at 8} ⇒ Invisible at 8
\alt<n>{at n}{not at n} for two alternatives.(Ex) \alt<11>{I am 11}{I am not 11} ⇒ I am not 11
\temporal<n>{before}{at n}{after} for three alternatives.9
(Ex) \temporal<14>{I am 13}{I am 14}{I am 15} ⇒ I am 15
Slide 15
9See also highlighting section.

Beamer v3.0 Guide
Overlays
More Replace
More Replaces
In case of subtle differences in the heights of replacements, overlayareaand overprint environments can be used.
\only<n> in overlayarea environment:
\onslide<n> in overprint environment:

Beamer v3.0 Guide
Overlays
More Replace
More Replaces
In case of subtle differences in the heights of replacements, overlayareaand overprint environments can be used.
\only<n> in overlayarea environment:The development of pMSGA is based onNSGA-II and PGAPack.
\onslide<n> in overprint environment:

Beamer v3.0 Guide
Overlays
More Replace
More Replaces
In case of subtle differences in the heights of replacements, overlayareaand overprint environments can be used.
\only<n> in overlayarea environment:The main difference is sharing again and new density function.
\onslide<n> in overprint environment:This is a first line.This is a second, long line.

Beamer v3.0 Guide
Overlays
More Replace
More Replaces
In case of subtle differences in the heights of replacements, overlayareaand overprint environments can be used.
\only<n> in overlayarea environment:The main difference is sharing again and new density function.
\onslide<n> in overprint environment:The previous two lines are replaced by this one.

Beamer v3.0 Guide
Overlays
Simple Highlighting
Simple Highlighting
\item <+-| alert@+> for automatic highlighting.
\begin{itemize}\item <+-| alert@+> Every thing\item <+-| alert@+> that has\item <+-| alert@+> beginning\item <+-| alert@+> has end.\end{itemize}
Everything
that has
beginning
has end.
You can also use \begin{itemize}[<+-|alert@+>] instead ofindividual ’\item <+-| alert@+>’.
You can also use structure instead of alert.

Beamer v3.0 Guide
Overlays
Alert
Alert for Highlighting
\item<n->\alert<n>{stuff} is better than the previous automaticone.
\begin{itemize}\item<2->\alert<2> Every thing\item<2->\alert<3> that has\item<2->\alert<4> beginning\item<2->\alert<5> has end.\end{itemize}
Everything
that has
beginning
has end.
Note that \item<2->\alert<2> is same to \item<2-| alert@2>.

Beamer v3.0 Guide
Overlays
Alternative
Alternative for Highlighting
\alt<n>{\color{col1}..}{\color{col2}..} foractive/inactive highlighting
Example:
Everythingthat hasbeginninghas end.
Source code:
\begin{itemize}\item<2-> \alt<2>{\color{blue} Everything}{\color{gray} Everything}\item<2-> \alt<3>{\color{blue} that has}{\color{gray} that has}\item<2-> \alt<4>{\color{blue} beginning}{\color{gray} beginning}\item<2-> \alt<5>{\color{blue} has end.}{\color{gray} has end.}
\end{itemize}

Beamer v3.0 Guide
Overlays
Alternative
Alternative for Highlighting
\alt<n>{\color{col1}..}{\color{col2}..} foractive/inactive highlighting
Example:Everythingthat hasbeginninghas end.
Source code:
\begin{itemize}\item<2-> \alt<2>{\color{blue} Everything}{\color{gray} Everything}\item<2-> \alt<3>{\color{blue} that has}{\color{gray} that has}\item<2-> \alt<4>{\color{blue} beginning}{\color{gray} beginning}\item<2-> \alt<5>{\color{blue} has end.}{\color{gray} has end.}
\end{itemize}

Beamer v3.0 Guide
Overlays
Temporal
Temporal for Highlighting
\temporal<n>{before}{on}{after} for incrementalhighlighting
Ready?Everythingthat hasbeginninghas end.
Source code:
\def\hilite<#1>{%\temporal<#1>{\color{gray}}{\color{blue}}%
{\color{blue!25}}}...\begin{itemize}\hilite<3> \item Everything\hilite<4> \item that has\hilite<5> \item beginning\hilite<6> \item has end.
\end{itemize}

Beamer v3.0 Guide
Overlays
Other Highlightings
Other Highlightings
\textbf, \textit, \textsl, \textrm, \textsf, and \color alsounderstand overlays.
Example
Everything (\color<3-4>{olive}{Everything})that hasbeginning (\color<5>[rgb]{.9,.5,.5}beginning)has end.

Beamer v3.0 Guide
Overlays
Other Highlightings
Other Highlightings
\textbf, \textit, \textsl, \textrm, \textsf, and \color alsounderstand overlays.
Example
Everything (\color<3-4>{olive}{Everything})that hasbeginning (\color<5>[rgb]{.9,.5,.5}beginning)has end.

Beamer v3.0 Guide
Overlays
Other Highlightings
Other Highlightings
\textbf, \textit, \textsl, \textrm, \textsf, and \color alsounderstand overlays.
ExampleEverything (\color<3-4>{olive}{Everything})
that hasbeginning (\color<5>[rgb]{.9,.5,.5}beginning)has end.

Beamer v3.0 Guide
Overlays
Other Highlightings
Other Highlightings
\textbf, \textit, \textsl, \textrm, \textsf, and \color alsounderstand overlays.
ExampleEverything (\color<3-4>{olive}{Everything})that has
beginning (\color<5>[rgb]{.9,.5,.5}beginning)has end.

Beamer v3.0 Guide
Overlays
Other Highlightings
Other Highlightings
\textbf, \textit, \textsl, \textrm, \textsf, and \color alsounderstand overlays.
ExampleEverything (\color<3-4>{olive}{Everything})that hasbeginning (\color<5>[rgb]{.9,.5,.5}beginning)
has end.

Beamer v3.0 Guide
Overlays
Other Highlightings
Other Highlightings
\textbf, \textit, \textsl, \textrm, \textsf, and \color alsounderstand overlays.
ExampleEverything (\color<3-4>{olive}{Everything})that hasbeginning (\color<5>[rgb]{.9,.5,.5}beginning)has end.

Beamer v3.0 Guide
Animation
Animations
Animation
For dynamic presentation Beamer supports transition, overlay, andanimation.
Animation depends on your imagination and LATEX skill.
Supported animation typesAnimate + OverlayAnimatevalueTimed overlays (auto advancing)
Use with caution as animation needs lots of slides

Beamer v3.0 Guide
Animation
Animate + Overlay
Animate + Overlay
\animate<n>10 for automatic stepwise viewing
Ready?
Everythingthat hasbeginninghas end.
Source code:
\frame{\animate<3-6>\frametitle{Animate + Overlay}%...\begin{itemize}[<+->]\item Everything\item that has\item beginning\item has end.
\end{itemize}
10Remember that n can be n1-n2, n1-, or etc.

Beamer v3.0 Guide
Animation
Animate + Overlay
Animate + Overlay
\animate<n>10 for automatic stepwise viewing
Ready?Everything
that hasbeginninghas end.
Source code:
\frame{\animate<3-6>\frametitle{Animate + Overlay}%...\begin{itemize}[<+->]\item Everything\item that has\item beginning\item has end.
\end{itemize}
10Remember that n can be n1-n2, n1-, or etc.

Beamer v3.0 Guide
Animation
Animate + Overlay
Animate + Overlay
\animate<n>10 for automatic stepwise viewing
Ready?Everythingthat has
beginninghas end.
Source code:
\frame{\animate<3-6>\frametitle{Animate + Overlay}%...\begin{itemize}[<+->]\item Everything\item that has\item beginning\item has end.
\end{itemize}
10Remember that n can be n1-n2, n1-, or etc.

Beamer v3.0 Guide
Animation
Animate + Overlay
Animate + Overlay
\animate<n>10 for automatic stepwise viewing
Ready?Everythingthat hasbeginning
has end.
Source code:
\frame{\animate<3-6>\frametitle{Animate + Overlay}%...\begin{itemize}[<+->]\item Everything\item that has\item beginning\item has end.
\end{itemize}
10Remember that n can be n1-n2, n1-, or etc.

Beamer v3.0 Guide
Animation
Animate + Overlay
Animate + Overlay
\animate<n>10 for automatic stepwise viewing
Ready?Everythingthat hasbeginninghas end.
Source code:
\frame{\animate<3-6>\frametitle{Animate + Overlay}%...\begin{itemize}[<+->]\item Everything\item that has\item beginning\item has end.
\end{itemize}
10Remember that n can be n1-n2, n1-, or etc.

Beamer v3.0 Guide
Animation
Animatevalue
Animatevalue
\animate<n> to animate ‘n’ slides
\animatevalue<n>{name}{start}{end} for specifyinganimation effects
name: counter or dimensionstart and end values of the value

Beamer v3.0 Guide
Animation
Flying Animation
Flying Animation
\animate and \animatevalue are used.
This animation consumes 31 pages!
Ready to explore?Flying in from right!
Flying in from left!

Beamer v3.0 Guide
Animation
Flying Animation
Flying Animation
\animate and \animatevalue are used.
This animation consumes 31 pages!
Ready to explore?Flying in from right!
Flying in from left!

Beamer v3.0 Guide
Animation
Flying Animation
Flying Animation
\animate and \animatevalue are used.
This animation consumes 31 pages!
Ready to explore?Flying in from right!
Flying in from left!

Beamer v3.0 Guide
Animation
Flying Animation
Flying Animation
\animate and \animatevalue are used.
This animation consumes 31 pages!
Ready to explore?Flying in from right!
Flying in from left!

Beamer v3.0 Guide
Animation
Flying Animation
Flying Animation
\animate and \animatevalue are used.
This animation consumes 31 pages!
Ready to explore?Flying in from right!
Flying in from left!

Beamer v3.0 Guide
Animation
Flying Animation
Flying Animation
\animate and \animatevalue are used.
This animation consumes 31 pages!
Ready to explore?Flying in from right!
Flying in from left!

Beamer v3.0 Guide
Animation
Flying Animation
Flying Animation
\animate and \animatevalue are used.
This animation consumes 31 pages!
Ready to explore?Flying in from right!
Flying in from left!

Beamer v3.0 Guide
Animation
Flying Animation
Flying Animation
\animate and \animatevalue are used.
This animation consumes 31 pages!
Ready to explore?Flying in from right!
Flying in from left!

Beamer v3.0 Guide
Animation
Flying Animation
Flying Animation
\animate and \animatevalue are used.
This animation consumes 31 pages!
Ready to explore?Flying in from right!
Flying in from left!

Beamer v3.0 Guide
Animation
Flying Animation
Flying Animation
\animate and \animatevalue are used.
This animation consumes 31 pages!
Ready to explore?Flying in from right!
Flying in from left!

Beamer v3.0 Guide
Animation
Flying Animation
Flying Animation
\animate and \animatevalue are used.
This animation consumes 31 pages!
Ready to explore?Flying in from right!
Flying in from left!

Beamer v3.0 Guide
Animation
Flying Animation
Flying Animation
\animate and \animatevalue are used.
This animation consumes 31 pages!
Ready to explore?Flying in from right!
Flying in from left!

Beamer v3.0 Guide
Animation
Flying Animation
Flying Animation
\animate and \animatevalue are used.
This animation consumes 31 pages!
Ready to explore?Flying in from right!
Flying in from left!

Beamer v3.0 Guide
Animation
Flying Animation
Flying Animation
\animate and \animatevalue are used.
This animation consumes 31 pages!
Ready to explore?Flying in from right!
Flying in from left!

Beamer v3.0 Guide
Animation
Flying Animation
Flying Animation
\animate and \animatevalue are used.
This animation consumes 31 pages!
Ready to explore?Flying in from right!
Flying in from left!

Beamer v3.0 Guide
Animation
Flying Animation
Flying Animation
\animate and \animatevalue are used.
This animation consumes 31 pages!
Ready to explore?Flying in from right!
Flying in from left!

Beamer v3.0 Guide
Animation
Flying Animation
Flying Animation
\animate and \animatevalue are used.
This animation consumes 31 pages!
Ready to explore?Flying in from right!
Flying in from left!

Beamer v3.0 Guide
Animation
Flying Animation
Flying Animation
\animate and \animatevalue are used.
This animation consumes 31 pages!
Ready to explore?Flying in from right!
Flying in from left!

Beamer v3.0 Guide
Animation
Flying Animation
Flying Animation
\animate and \animatevalue are used.
This animation consumes 31 pages!
Ready to explore?Flying in from right!
Flying in from left!

Beamer v3.0 Guide
Animation
Flying Animation
Flying Animation
\animate and \animatevalue are used.
This animation consumes 31 pages!
Ready to explore?Flying in from right!
Flying in from left!

Beamer v3.0 Guide
Animation
Flying Animation
Flying Animation
\animate and \animatevalue are used.
This animation consumes 31 pages!
Ready to explore?Flying in from right!
Flying in from left!

Beamer v3.0 Guide
Animation
Flying Animation
Flying Animation
\animate and \animatevalue are used.
This animation consumes 31 pages!
Ready to explore?Flying in from right!
Flying in from left!

Beamer v3.0 Guide
Animation
Flying Animation
Flying Animation
\animate and \animatevalue are used.
This animation consumes 31 pages!
Ready to explore?Flying in from right!
Flying in from left!

Beamer v3.0 Guide
Animation
Flying Animation
Flying Animation
\animate and \animatevalue are used.
This animation consumes 31 pages!
Ready to explore?Flying in from right!
Flying in from left!

Beamer v3.0 Guide
Animation
Flying Animation
Flying Animation
\animate and \animatevalue are used.
This animation consumes 31 pages!
Ready to explore?Flying in from right!
Flying in from left!

Beamer v3.0 Guide
Animation
Flying Animation
Flying Animation
\animate and \animatevalue are used.
This animation consumes 31 pages!
Ready to explore?Flying in from right!
Flying in from left!

Beamer v3.0 Guide
Animation
Flying Animation
Flying Animation
\animate and \animatevalue are used.
This animation consumes 31 pages!
Ready to explore?Flying in from right!
Flying in from left!

Beamer v3.0 Guide
Animation
Flying Animation
Flying Animation
\animate and \animatevalue are used.
This animation consumes 31 pages!
Ready to explore?Flying in from right!
Flying in from left!

Beamer v3.0 Guide
Animation
Flying Animation
Flying Animation
\animate and \animatevalue are used.
This animation consumes 31 pages!
Ready to explore?Flying in from right!
Flying in from left!

Beamer v3.0 Guide
Animation
Flying Animation
Flying Animation
\animate and \animatevalue are used.
This animation consumes 31 pages!
Ready to explore?Flying in from right!
Flying in from left!
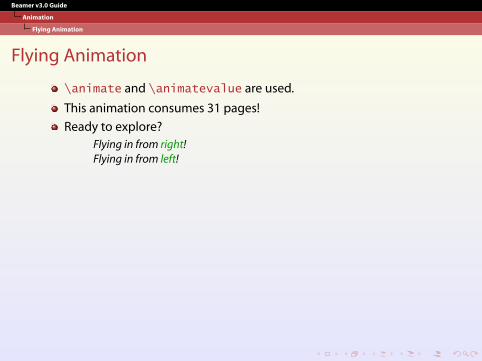
Beamer v3.0 Guide
Animation
Flying Animation
Flying Animation
\animate and \animatevalue are used.
This animation consumes 31 pages!
Ready to explore?Flying in from right!Flying in from left!

Beamer v3.0 Guide
Animation
Flying Animation - Source
Flying Animation - Source
\newcount\opaqueness\newdimen\offset\frame{\frametitle{Flying Animation}%\animate<2-15,17-30> % Actual animation values. Try <1-31>\begin{itemize}\item[]\animatevalue<1-15>{\opaqueness}{0}{100}%\animatevalue<1-15>{\offset}{6cm}{0cm}%\begin{colormixin}{\the\opaqueness!averagebackgroundcolor}\hspace{\offset} Flying in from {\color{olive} right}!\end{colormixin}
\item[]\animatevalue<17-31>{\opaqueness}{0}{100} % Starts at 17, not 16, to give\animatevalue<17-31>{\offset}{-5cm}{0cm} % one pause!\begin{colormixin}{\the\opaqueness!averagebackgroundcolor}\hspace{\offset} Flying in from {\color{olive} left}!\end{colormixin}\end{itemize}

Beamer v3.0 Guide
Animation
Timed Overlays
Timed Overlays
Adobe Reader supports timed overlays, often called auto advancing.
Two approaches\hypersetup{pdfpageduration=time} from hyperref package +overlay macros\transduration<n>{time} from beamer package + overlay macros
See beamer pstricks.pdf to see a fancy example.
Try to do the same thing using PGF. Easy or not?

Beamer v3.0 Guide
Beamer Themes
Presentation Themes
Presentation Themes
\usetheme[option]{name}: Named tobeamertheme<name>.sty.
Old themes: bars, boxes, classic, default, lined, plain, shadow, sidebar,sidebardark, sidebardarktab, sidebartab, split, tree, treebars
New themes (v3.0)W/o navigation bar: default, boxes, Bergen, Madrid, Pittsburgh,RochesterWith a tree-like navigation bar: Antibes, JuanLesPins, Montpellier.With a TOC sidebar: Berkeley, PaloAlto, Goettingen, Marburg, HannoverWith a mini frame navigation: Berlin, Ilmenau, Dresden, Darmstadt,Frankfurt, Singapore, SzegedWith section and subsection titles: Copenhagen, Luebeck, Malmoe,Warsaw
Return to Theme

Beamer v3.0 Guide
Beamer Themes
Color Themes
Color Themes
\usecolortheme[option]{name}: Named tobeamercolortheme<name>.sty.
Four basic color themes:Default and special-purpose themes: default, structure (e.g.,\usecolortheme[named=SeaGreen]{structure}).Complete color themes: albatross, beetle, crane, dove, fly, seagullInner color themes: lily, orchidOuter color themes: whale, seahorse
\setbeamercolor{beamer_element}{color} for color setup ofBeamer elements(Ex) \setbeamercolor{frametitle}{fg=blue,bg=yellow}
Return to Theme

Beamer v3.0 Guide
Beamer Themes
Font Themes
Font Themes
\usecolortheme[option]{name}: Named tobeamerfonttheme<name>.sty.
New themes (v3.0): default, professionalfonts, serif, structurebold,structureitalicserif, structuresmallcapsserif
Return to Theme

Beamer v3.0 Guide
Misc Features
Hyperlinks and Buttons
Hyperlinks and Buttons
Beamer provides additional options for hyperlinks and buttons.
\hyperlink{targetname}{\beamergotobutton{text}} to createlink.
\hypertarget{targetname}{text} to create target.
Some useful buttons are \beamerbutton, \beamergotobutton,and \beamerreturnbutton.
To go to the last slide, click here .

Beamer v3.0 Guide
Misc Features
Notes
Notes
To add notes to PDF screen, \documentclass[notes]{beamer}.
To make only notes, \documentclass[notesonly]{beamer}.
Notes addition by adding \note[options]{...} after\frame{...}.
This slide has notes. Want to see them?

Beamer v3.0 Guide
Misc Features
Notes
Notes
To add notes to PDF screen, \documentclass[notes]{beamer}.
To make only notes, \documentclass[notesonly]{beamer}.
Notes addition by adding \note[options]{...} after\frame{...}.
This slide has notes. Want to see them?

Beamer v3.0 Guide
Misc Features
Notes
Notes
To add notes to PDF screen, \documentclass[notes]{beamer}.
To make only notes, \documentclass[notesonly]{beamer}.
Notes addition by adding \note[options]{...} after\frame{...}.
This slide has notes. Want to see them?

Notes
To add notes to PDF screen, \documentclass[notes]{beamer}.
To make only notes, \documentclass[notesonly]{beamer}.
Notes addition by adding \note[options]{...} after\frame{...}.
This slide has notes. Want to see them?
2004
-11-
04
Beamer v3.0 Guide
Misc Features
Notes
Notes
• Can you see me?• Two note options for note are itemize and enumerate.• \beamertemplatenoteplain for plain note page!

Beamer v3.0 Guide
Misc Features
Merge for “trans” Output
Merge for “trans” Output
Beamer screen size = 128mm x 96mm
Merge transparency output on letter paper for printing!
\documentclass{article} %\usepackage{pdfpages}\begin{document}\includepdf[nup=2x2,landscape,delta=5mm 5mm,%
scale=0.95,pages={1-18}]{trans.pdf}\end{document}
To return, click here .

Beamer v3.0 Guide
Misc Features
Movie
Movie
Beamer provides multimedia package.11
\movie[options]{poster}{file_name}poster: Poster for the movie (empty, text, or image).file name: AVI or MPG.Works with pdflatex and dvips/ps2pdf routes.
Some useful optionsautostart, loop, repeat, palindromeborderwidth, showcontrols, externalviewer
Example: clock.avi
11New in Version 2.2. Can be used independently.
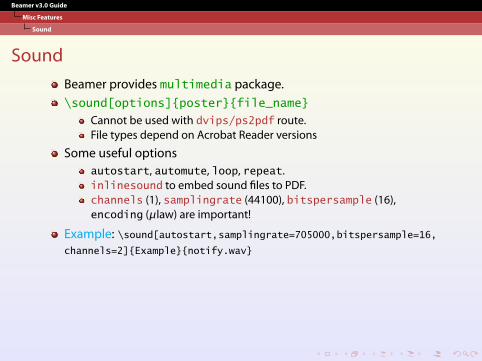
Beamer v3.0 Guide
Misc Features
Sound
Sound
Beamer provides multimedia package.
\sound[options]{poster}{file_name}Cannot be used with dvips/ps2pdf route.File types depend on Acrobat Reader versions
Some useful optionsautostart, automute, loop, repeat.inlinesound to embed sound files to PDF.channels (1), samplingrate (44100), bitspersample (16),encoding (µlaw) are important!
Example: \sound[autostart,samplingrate=705000,bitspersample=16,channels=2]{Example}{notify.wav}

Beamer v3.0 Guide
Misc Features
Logo and Footer
Footer Design
To add logo, \logo{stuff} in the preamble.The logo will place in the right bottom corner.How to change it? – See below!
To redesign the footer, apply the following code:
\usefoottemplate{\vbox{%\tinycolouredline{structure!25}%{\color{white}\textbf{\insertshortauthor\hfill%\insertshortinstitute}}%
\tinycolouredline{structure}%{\color{white}\textbf{\insertshorttitle}\hfill}%
}}

Beamer v3.0 Guide
Misc Features
Emulation
Emulations of Other Packages
You can use FoilTEX, (HA)Prosper, Seminar, or TEXPower slides withinBeamer.
Not perfect, but you can easily import your slides written from theabove four classes.
Prosper example:
\usepackage{beamerprosper} % Required...\overlays{8}{%\begin{slide}{Prosper Emulation Example}\begin{itemize}\item Backward writing is easy and simple:\fromSlide{8}{{\color{green} P}}%\fromSlide{7}{{\color{blue} R}}%\fromSlide{6}{{\color{magenta} O}}%\fromSlide{5}{{\color{cyan} S}}%\fromSlide{4}{{\color{yellow} P}}%\fromSlide{3}{{\color{olive} E}}%\fromSlide{2}{{{\color{red} R}}}
\end{itemize}\end{slide} }%

Beamer v3.0 Guide
Misc Features
Prosper Result
Prosper Result
This slide is written with Prosper syntax!
Backward writing is easy and simple:
PROSPER

Beamer v3.0 Guide
Misc Features
Prosper Result
Prosper Result
This slide is written with Prosper syntax!
Backward writing is easy and simple:
PROSPE
R

Beamer v3.0 Guide
Misc Features
Prosper Result
Prosper Result
This slide is written with Prosper syntax!
Backward writing is easy and simple:
PROSP
ER

Beamer v3.0 Guide
Misc Features
Prosper Result
Prosper Result
This slide is written with Prosper syntax!
Backward writing is easy and simple:
PROS
PER

Beamer v3.0 Guide
Misc Features
Prosper Result
Prosper Result
This slide is written with Prosper syntax!
Backward writing is easy and simple:
PRO
SPER

Beamer v3.0 Guide
Misc Features
Prosper Result
Prosper Result
This slide is written with Prosper syntax!
Backward writing is easy and simple:
PR
OSPER

Beamer v3.0 Guide
Misc Features
Prosper Result
Prosper Result
This slide is written with Prosper syntax!
Backward writing is easy and simple:
P
ROSPER

Beamer v3.0 Guide
Misc Features
Prosper Result
Prosper Result
This slide is written with Prosper syntax!
Backward writing is easy and simple:PROSPER

Beamer v3.0 Guide
Misc Features
Hangul
Hangul
If you installed HLATEX, load \usepackage{hfont}.
\textgs{...}⇒��Qe7��ï 4~×��¬�£���s�4¶¨Click here to return.
Note: Hangul bookmarks and Hangul search in PDF are onlysupported by dvipdfm(x). But Beamer does not supportdvipdfm(x).
Beamer option [cjk] is supported.
\usepackage[utf8]{inputenc} is supported.

Beamer v3.0 Guide
Misc Features
Other Macros
Other Macros
To remove navigation symbols,\usenavigationsymbolstemplate{}.

Beamer v3.0 Guide
Last Slide
Last Slide
This page is directed from the button you clicked.
To go back, click here .

Beamer v3.0 Guide
Reference
Reference
Ki-Joo Kim, Ki-Joo’s LATEX Documents(http://www.geocities.com/kijoo2000/).
Michael Wiedmann, Screen Presentation Tools (http://www.miwie.org/presentations/presentations.html).