BD Stem Cell Enumeration Application Guide for BD ... · 1 Prepare the High process control, press...
42
bdbiosciences.com 23-11206-01 Rev. 01 12/2011 IVD For In Vitro Diagnostic Use Becton, Dickinson and Company BD Biosciences 2350 Qume Dr. San Jose, CA 95131 USA Tel 877.232.8995 Fax 408.954.2347 [email protected] BENEX Limited Rineanna House Shannon Free Zone Shannon, County Clare Ireland Tel 353.61.472920 Fax 353.61.472907 BD Biosciences European Customer Support Tel 32.2.400.98.95 Fax 32.2.401.70.94 [email protected] REP EC BD Stem Cell Enumeration Application Guide for BD FACSCalibur Flow Cytometers
Transcript of BD Stem Cell Enumeration Application Guide for BD ... · 1 Prepare the High process control, press...

bdbiosciences.com23-11206-01 Rev. 0112/2011
IVD For In Vitro Diagnostic Use
Becton, Dickinson and CompanyBD Biosciences2350 Qume Dr.San Jose, CA 95131 USATel 877.232.8995Fax [email protected]
BENEX LimitedRineanna HouseShannon Free ZoneShannon, County ClareIrelandTel 353.61.472920Fax 353.61.472907
BD BiosciencesEuropean Customer SupportTel 32.2.400.98.95Fax [email protected]
REPEC
BD Stem Cell Enumeration
Application Guidefor BD FACSCalibur Flow Cytometers
Copyrights
© 2011, Becton, Dickinson and Company. All rights reserved. No part of this publication may be reproduced, transmitted, transcribed, stored in retrieval systems, or translated into any language or computer language, in any form or by any means: electronic, mechanical, magnetic, optical, chemical, manual, or otherwise, without prior written permission from Becton, Dickinson and Company.
The information in this guide is subject to change without notice. BD Biosciences reserves the right to change its products and services at any time to incorporate the latest technological developments. Although this guide has been prepared with every precaution to ensure accuracy, BD Biosciences assumes no liability for any errors or omissions, nor for any damages resulting from the application or use of this information. BD Biosciences welcomes customer input on corrections and suggestions for improvement.
Trademarks
CONTRAD is a registered trademark of Decon Labs, Inc.
Mac is a trademark of Apple, Inc., registered in the US and other countries.
BD, BD Logo, and all other trademarks are property of Becton, Dickinson and Company. © 2011 BD
Regulatory Information
For In Vitro Diagnostic Use.
Class 1 Laser Product.
Notice
BD Biosciences delivers software and workstations that are intended for running the instruments supplied by BD Biosciences. It is the responsibility of the buyer/user to ensure that all added electronic files including software and transport media are virus free. If the workstation is used for Internet access or purposes other than those specified by BD Biosciences, it is the buyer/user’s responsibility to install and maintain up-to-date virus protection software. BD Biosciences does not make any warranty with respect to the workstation remaining virus free after installation. BD Biosciences is not liable for any claims related to or resulting from buyer/user's failure to install and maintain virus protection.
History
Revision Date Change Made
640784 Rev. A 3/2008 Initial release
23-11206-00 Rev. A 11/2009 Updated to add comments from European clinical trials (performance evaluation studies).
23-11206-01 Rev. 01 12/2011 Updated to add Class 1 laser information and heading for intended use.
iii
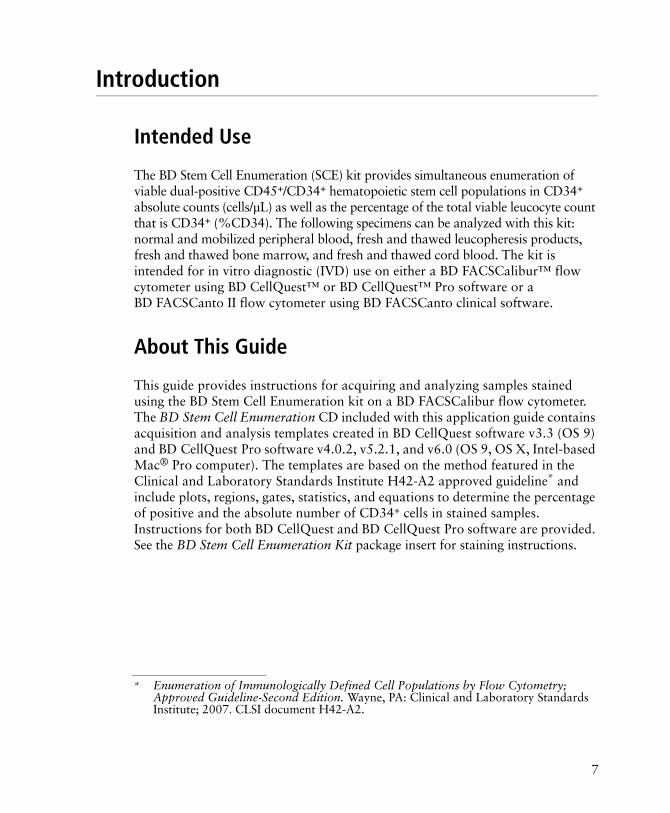
Contents
Conventions . . . . . . . . . . . . . . . . . . . . . . . . . . . . . . . . . . . . . . . . . . . . . . . . . . . . . 5
Technical Assistance . . . . . . . . . . . . . . . . . . . . . . . . . . . . . . . . . . . . . . . . . . . . . . . 6
Introduction . . . . . . . . . . . . . . . . . . . . . . . . . . . . . . . . . . . . . . . . . . . . . . . . . . . . . 7
Intended Use . . . . . . . . . . . . . . . . . . . . . . . . . . . . . . . . . . . . . . . . . . . . . . . . . 7
About This Guide . . . . . . . . . . . . . . . . . . . . . . . . . . . . . . . . . . . . . . . . . . . . . . 7
Running Instrument Setup . . . . . . . . . . . . . . . . . . . . . . . . . . . . . . . . . . . . . . . . . . 8
Setting Up the Instrument . . . . . . . . . . . . . . . . . . . . . . . . . . . . . . . . . . . . . . . . 8
Optimizing and Adjusting Compensation . . . . . . . . . . . . . . . . . . . . . . . . . . . . 9
Setting Acquisition and Storage Criteria . . . . . . . . . . . . . . . . . . . . . . . . . . . . 12
Acquiring and Analyzing Process Controls . . . . . . . . . . . . . . . . . . . . . . . . . . . . . 14
Acquiring Controls . . . . . . . . . . . . . . . . . . . . . . . . . . . . . . . . . . . . . . . . . . . . 14
Analyzing Controls . . . . . . . . . . . . . . . . . . . . . . . . . . . . . . . . . . . . . . . . . . . 15
Acquiring, Reviewing, and Analyzing Samples . . . . . . . . . . . . . . . . . . . . . . . . . . 16
Acquiring Samples . . . . . . . . . . . . . . . . . . . . . . . . . . . . . . . . . . . . . . . . . . . . 16
Reviewing Results . . . . . . . . . . . . . . . . . . . . . . . . . . . . . . . . . . . . . . . . . . . . 17
Analyzing Samples . . . . . . . . . . . . . . . . . . . . . . . . . . . . . . . . . . . . . . . . . . . . 18
Gate Definitions . . . . . . . . . . . . . . . . . . . . . . . . . . . . . . . . . . . . . . . . . . . . . . . . . 21
Gating Strategy . . . . . . . . . . . . . . . . . . . . . . . . . . . . . . . . . . . . . . . . . . . . . . . . . . 22
Template Examples . . . . . . . . . . . . . . . . . . . . . . . . . . . . . . . . . . . . . . . . . . . . . . . 26
Troubleshooting . . . . . . . . . . . . . . . . . . . . . . . . . . . . . . . . . . . . . . . . . . . . . . . . . 30
Performance . . . . . . . . . . . . . . . . . . . . . . . . . . . . . . . . . . . . . . . . . . . . . . . . . . . . 41


5
Conventions
The following tables list conventions in this guide. Table 1 lists the symbols that are used in this application guide or on safety labels to alert you to a potential hazard. Text and keypad conventions are shown in Table 2.
Table 1 Hazard symbols1
1. This symbol appears on the instrument with the mandatory yellow background per requirement of the applicable standard.
Symbol Meaning
CAUTION hazard or unsafe practice that could result in material damage, data loss, minor or severe injury, or death
Table 2 Text and keypad conventions
Convention Use
Tip highlights features or hints that can save time and prevent difficulties
NOTE describes important features or instructions
Italics highlight book titles and new or unfamiliar terms on their first appearance in the text.
[ ] identify screen keys, for example, [Run]
MM/DD/YY indicates the date, in month, day, year; eg, 08/09/06
HH:MM:SS indicates time, in hours, minutes, seconds; eg, 13:23:48

6 BD Stem Cell Enumeration Application Guide
Technical Assistance
For technical questions or assistance in solving a problem:
• See Troubleshooting on page 30.
• Read the section of the BD FACSCalibur Instructions for Use, or the BD CellQuest or BD CellQuest Pro Software Reference Manual specific to the operation you are performing.
If additional assistance is required, contact your local BD Biosciences technical support representative or supplier. Visit our website, bdbiosciences.com, for up-to-date contact information.
When contacting BD Biosciences, have the following information available:
• Product name, part number, and serial number
• Any error messages
• Details of recent system performance
7
Introduction
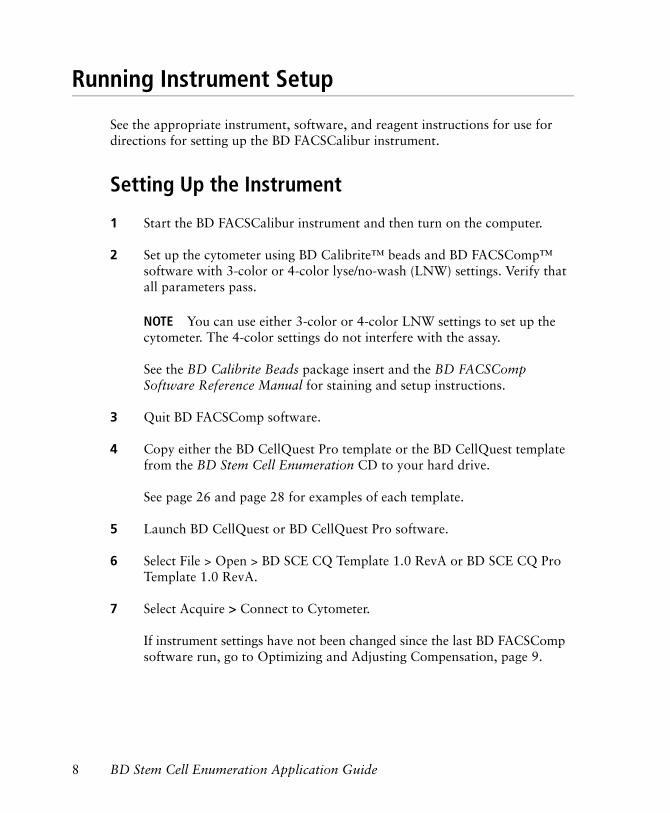
Intended Use
The BD Stem Cell Enumeration (SCE) kit provides simultaneous enumeration of viable dual-positive CD45+/CD34+ hematopoietic stem cell populations in CD34+
absolute counts (cells/µL) as well as the percentage of the total viable leucocyte count that is CD34+ (%CD34). The following specimens can be analyzed with this kit: normal and mobilized peripheral blood, fresh and thawed leucopheresis products, fresh and thawed bone marrow, and fresh and thawed cord blood. The kit is intended for in vitro diagnostic (IVD) use on either a BD FACSCalibur™ flow cytometer using BD CellQuest™ or BD CellQuest™ Pro software or a BD FACSCanto II flow cytometer using BD FACSCanto clinical software.
About This Guide
This guide provides instructions for acquiring and analyzing samples stained using the BD Stem Cell Enumeration kit on a BD FACSCalibur flow cytometer. The BD Stem Cell Enumeration CD included with this application guide contains acquisition and analysis templates created in BD CellQuest software v3.3 (OS 9) and BD CellQuest Pro software v4.0.2, v5.2.1, and v6.0 (OS 9, OS X, Intel-based Mac® Pro computer). The templates are based on the method featured in the Clinical and Laboratory Standards Institute H42-A2 approved guideline* and include plots, regions, gates, statistics, and equations to determine the percentage of positive and the absolute number of CD34+ cells in stained samples. Instructions for both BD CellQuest and BD CellQuest Pro software are provided. See the BD Stem Cell Enumeration Kit package insert for staining instructions.
* Enumeration of Immunologically Defined Cell Populations by Flow Cytometry; Approved Guideline-Second Edition. Wayne, PA: Clinical and Laboratory Standards Institute; 2007. CLSI document H42-A2.
8 BD Stem Cell Enumeration Application Guide
Running Instrument Setup
See the appropriate instrument, software, and reagent instructions for use for directions for setting up the BD FACSCalibur instrument.
Setting Up the Instrument
1 Start the BD FACSCalibur instrument and then turn on the computer.
2 Set up the cytometer using BD Calibrite™ beads and BD FACSComp™ software with 3-color or 4-color lyse/no-wash (LNW) settings. Verify that all parameters pass.
NOTE You can use either 3-color or 4-color LNW settings to set up the cytometer. The 4-color settings do not interfere with the assay.
See the BD Calibrite Beads package insert and the BD FACSComp Software Reference Manual for staining and setup instructions.
3 Quit BD FACSComp software.
4 Copy either the BD CellQuest Pro template or the BD CellQuest template from the BD Stem Cell Enumeration CD to your hard drive.
See page 26 and page 28 for examples of each template.
5 Launch BD CellQuest or BD CellQuest Pro software.
6 Select File > Open > BD SCE CQ Template 1.0 RevA or BD SCE CQ Pro Template 1.0 RevA.
7 Select Acquire > Connect to Cytometer.
If instrument settings have not been changed since the last BD FACSComp software run, go to Optimizing and Adjusting Compensation, page 9.

9
8 Select Cytometer > Instrument Settings.
• Click Open in the Instrument Settings window.
• Select BD Files > Instrument Settings Files. Click Open and navigate to Calib File.LNW. Double-click the file icon.
• Click Set, and then click Done.
Optimizing and Adjusting Compensation
1 Prepare the High process control, press RUN, put the control on the sample injection probe (SIP), and then press HI on the cytometer.
See the BD Stem Cell Control package insert for instructions on preparing the control.
2 In the Acquisition Control window, select the Setup checkbox, and then click Acquire to begin instrument optimization.
3 Select Cytometer > Threshold.
• In the Threshold window, change FL3 to FL1.
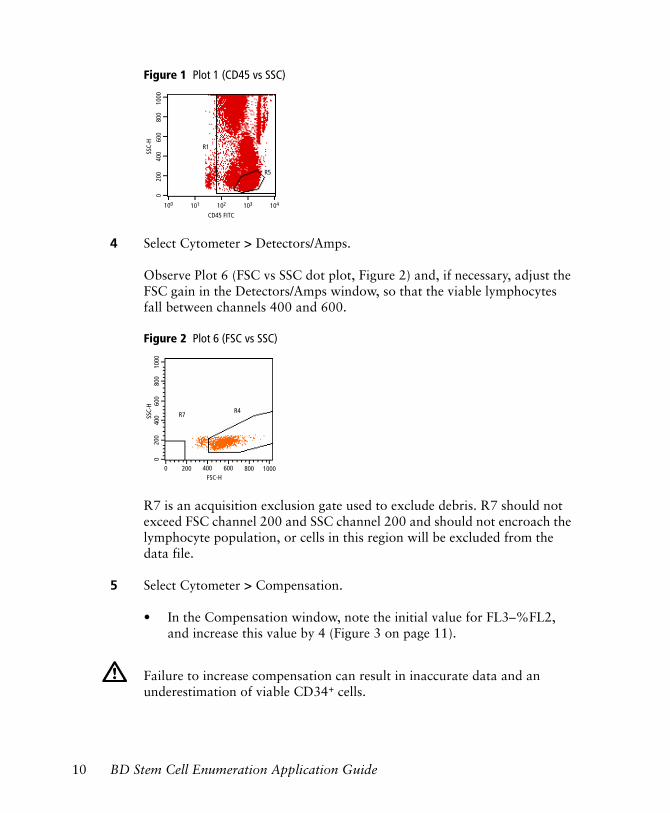
• Monitor Plot 1 (FL1 vs SSC) while adjusting the FL1 threshold as necessary, to exclude debris without excluding any CD45 cells. See Figure 1 on page 10.
Tip Set the FL1 threshold to 300 and adjust as necessary.
10 BD Stem Cell Enumeration Application Guide
Figure 1 Plot 1 (CD45 vs SSC)
4 Select Cytometer > Detectors/Amps.
Observe Plot 6 (FSC vs SSC dot plot, Figure 2) and, if necessary, adjust the FSC gain in the Detectors/Amps window, so that the viable lymphocytes fall between channels 400 and 600.
Figure 2 Plot 6 (FSC vs SSC)
R7 is an acquisition exclusion gate used to exclude debris. R7 should not exceed FSC channel 200 and SSC channel 200 and should not encroach the lymphocyte population, or cells in this region will be excluded from the data file.
5 Select Cytometer > Compensation.
• In the Compensation window, note the initial value for FL3–%FL2, and increase this value by 4 (Figure 3 on page 11).
Failure to increase compensation can result in inaccurate data and an underestimation of viable CD34+ cells.
R5
101 102 103 104
020
040
060
080
010
00
CD45 FITC
SSC-
HR1
100
R4
0 200 400 600 800
020
040
060
080
010
00SS
C-H
1000
R7
FSC-H

11
See Troubleshooting for help with compensation.
Figure 3 Compensation window, initial and adjusted
• Observe the two 7-AAD v SSC plots (Figure 4). One is ungated and one is gated on the CD34 Total gate. Both plots display R8. Because this sample does not have 7-AAD in the tube, all CD34 cells fall in the negative gate (R8).
Figure 4 7-AAD vs SSC dot plots, gated and ungated
• On the ungated plot, adjust R8 to include all the 7-AAD– cells.
• On the gated plot, verify that the CD34 cells are all within R8. Adjust FL3–%FL2 compensation if any CD34+ cells are outside the gate.
6 Observe the remaining plots and adjust according to the description in Gating Strategy on page 22.
7 In the Acquisition control window, select Pause, then Abort. Clear the Setup checkbox.
initial adjusted
gated ungated
100 101 102 103
020
040
060
080
010
00
7-AAD
SSC-
H
R8
020
040
060
080
010
00
7-AAD
SSC-
H
R8
104100 101 102 103 104

12 BD Stem Cell Enumeration Application Guide
8 Remove the High control from the SIP.
Setting Acquisition and Storage Criteria
Samples that complete acquisition in less than 15 minutes must meet the following conditions to be reported:
• At least 100 viable CD34 events
• At least 1,000 beads
• At least 75,000 viable CD45 events
1 To set acquisition and storage criteria, in the Parameter Description or Browser window, specify a file name and storage location for the data files.
2 Verify the following options in the Acquisition & Storage window.
• Confirm the acquisition gate. Select to Reject Debris (R7) events.
• Confirm the Collection Criteria. Select Event Count or Time. Enter 75,000 in the Acquisition will stop when field, and set the menu to
Debris (R7)
Viable CD45
Debris (R7)
13
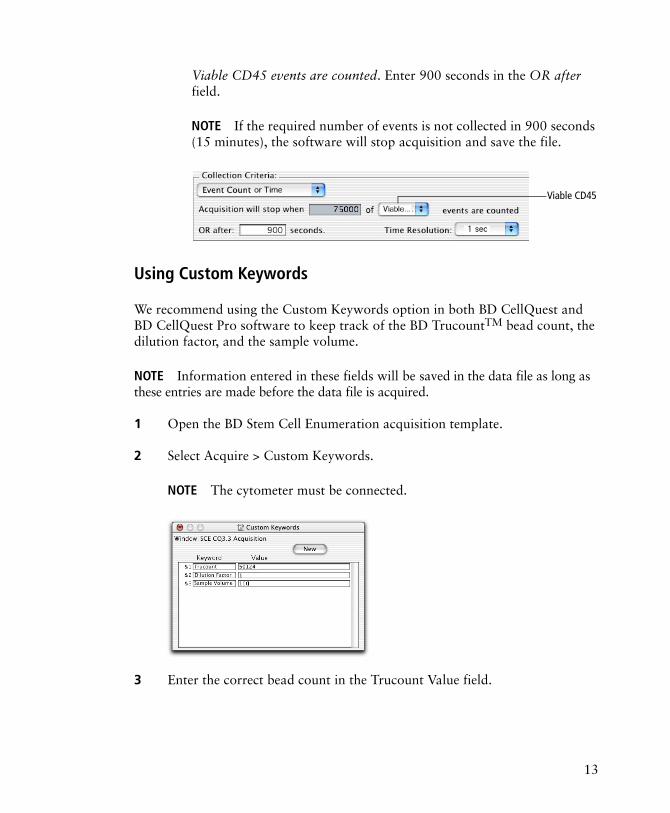
Viable CD45 events are counted. Enter 900 seconds in the OR after field.
NOTE If the required number of events is not collected in 900 seconds (15 minutes), the software will stop acquisition and save the file.
Using Custom Keywords
We recommend using the Custom Keywords option in both BD CellQuest and BD CellQuest Pro software to keep track of the BD TrucountTM bead count, the dilution factor, and the sample volume.
NOTE Information entered in these fields will be saved in the data file as long as these entries are made before the data file is acquired.
1 Open the BD Stem Cell Enumeration acquisition template.
2 Select Acquire > Custom Keywords.
NOTE The cytometer must be connected.
3 Enter the correct bead count in the Trucount Value field.
Viable CD45

14 BD Stem Cell Enumeration Application Guide
4 If the specimen was diluted, enter the dilution factor in the Dilution Factor Value field.
NOTE The Sample Volume value should be 100 at all times for this assay.
5 Close the Custom Keywords window.
NOTE Do not click the New button in the window.
The BD Trucount bead count will be shown in the Gate Stats view header if you are working in OS 9. In OS X, the bead count will be shown after the document has been saved and then reopened.
Tip These values will be exported with the statistics for future calculations in your spreadsheet, but only if they are displayed in the Stats view.
Acquiring and Analyzing Process Controls
See the BD Stem Cell Enumeration Kit package insert for instructions on staining process controls.
Acquiring Controls
1 Gently vortex the control and place it on the SIP.
2 Click Acquire.
• For both the High and Low BD Stem Cell controls, acquire and save 75,000 CD45 events each.
• For the BD Stem Cell control tube stained to test the 7-AAD reagent performance, acquire approximately 10,000 total events, click Pause,
Due to the temperature requirements of this assay, the BD FACS™ Loader cannot be used to acquire samples.
15
and then click Save. (See the 7-AAD Reagent Performance section in the package insert.)
Analyzing Controls
1 Read the data file for the first control into the template.
2 For both the High and Low BD Stem Cell controls, move the right border of R8 against the lymphocytes, monocytes, and granulocytes.
3 Check each plot and verify that the gates enclose the appropriate populations.
4 Verify that results are within the established range for the process controls you are using.
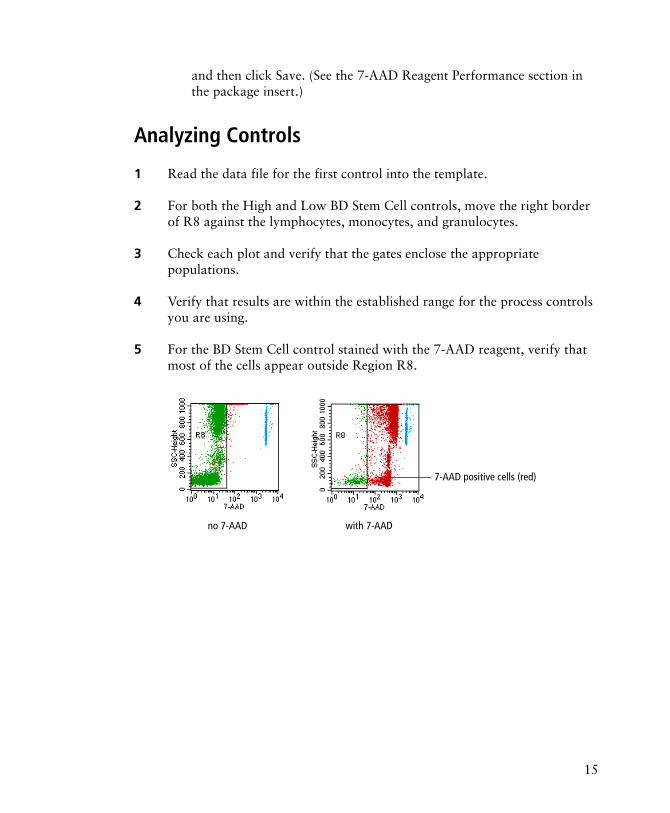
5 For the BD Stem Cell control stained with the 7-AAD reagent, verify that most of the cells appear outside Region R8.
no 7-AAD with 7-AAD
7-AAD positive cells (red)
16 BD Stem Cell Enumeration Application Guide
Acquiring, Reviewing, and Analyzing Samples
See the BD Stem Cell Enumeration kit package insert for instructions on staining cells.
Acquiring Samples
Tip For each sample, review the results and verify that the acquisition criteria have been met before acquiring the next sample, especially if sample volume is limited.
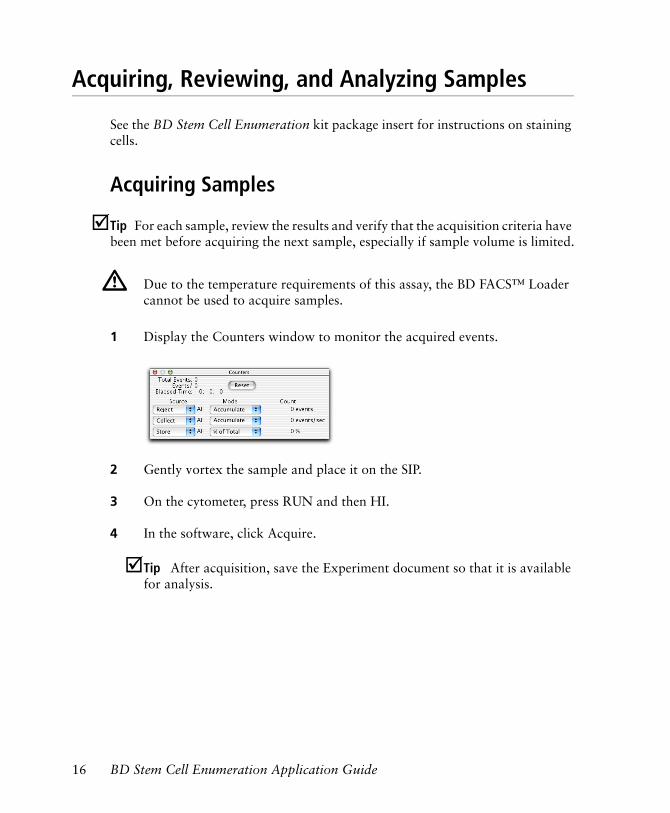
1 Display the Counters window to monitor the acquired events.
2 Gently vortex the sample and place it on the SIP.
3 On the cytometer, press RUN and then HI.
4 In the software, click Acquire.
Tip After acquisition, save the Experiment document so that it is available for analysis.
Due to the temperature requirements of this assay, the BD FACS™ Loader cannot be used to acquire samples.
17
Reviewing Results
1 Verify that the following conditions have been met.
• At least 100 viable CD34 events
• At least 1,000 beads
• At least 75,000 viable CD45 events
2 If less than 100 viable CD34 events were acquired, but the other acquisition criteria were met, do the following:
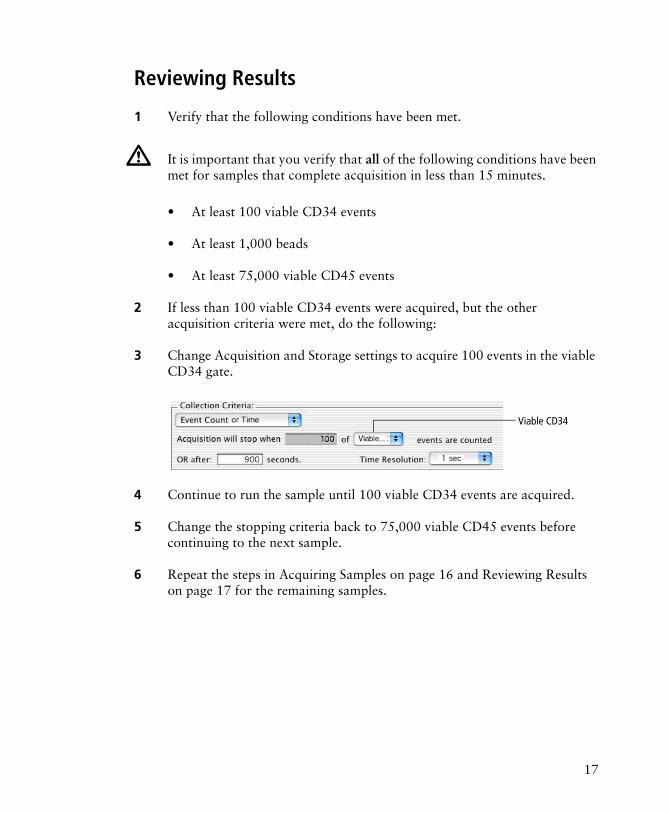
3 Change Acquisition and Storage settings to acquire 100 events in the viable CD34 gate.
4 Continue to run the sample until 100 viable CD34 events are acquired.
5 Change the stopping criteria back to 75,000 viable CD45 events before continuing to the next sample.
6 Repeat the steps in Acquiring Samples on page 16 and Reviewing Results on page 17 for the remaining samples.
It is important that you verify that all of the following conditions have been met for samples that complete acquisition in less than 15 minutes.
Viable CD34

18 BD Stem Cell Enumeration Application Guide
Analyzing Samples
Use this procedure if you are analyzing data with either BD CellQuest or BD CellQuest Pro software.
1 Read the data file for the first sample into the template.
2 Check each plot and verify that the gates enclose the appropriate populations.
3 Follow the appropriate steps based on the software you are using (page 18 for BD CellQuest Pro software or page 19 for BD CellQuest software).
Analyzing Using BD CellQuest Pro Software
1 Select the Trucount= text box by clicking the border (handles appear).
2 From the menu bar, select Statistics.
3 From the menu, select Edit Expression.
Alternatively, click the Expression Editor button in the tool palette.
4 In the Expression Editor, enter the numbers for the bead count (beads/pellet).
Do not delete regions from the plots by selecting them and then pressing the Backspace key. This will delete the regions from the document. The gates will become inactive and the Expression Editor calculations will disappear. If this does occur, reload the template.
handles

19
5 To change the dilution factor, follow steps 1 through 4 for the dilution factor text box.
NOTE The default value for no dilution is 1.
6 View the calculated results.
7 Print the analysis for your records.
Analyzing Using BD CellQuest Software
If you are using BD CellQuest software with the BD CellQuest template, you must calculate results manually or export the statistics and calculate them using a spreadsheet validated by your laboratory. Follow this procedure to calculate statistics.
1 Enter the appropriate values from the Gate statistics into each of the following equations.
If the numbers for the sample dilution factor or BD Trucount beads/pellet are not entered exactly, results will be incorrect.
20 BD Stem Cell Enumeration Application Guide
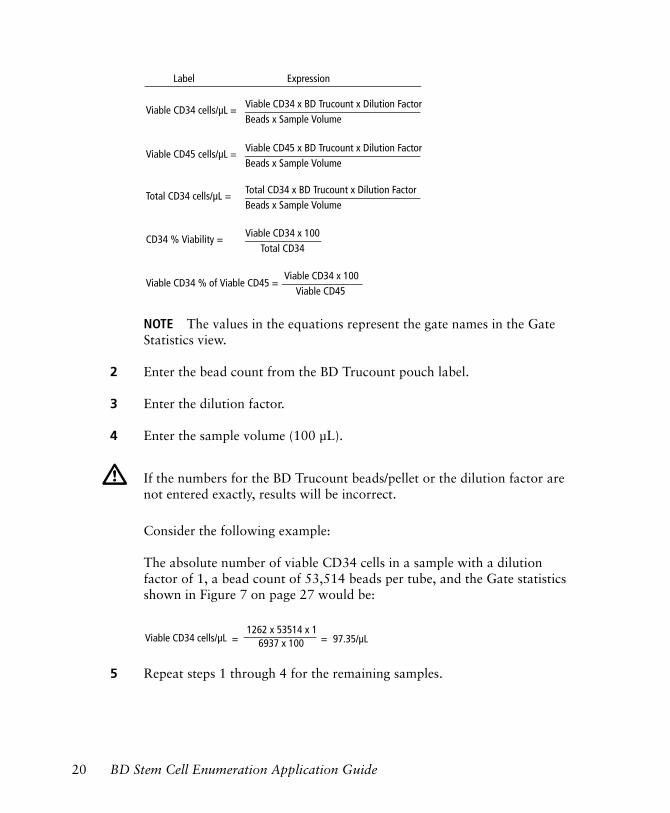
NOTE The values in the equations represent the gate names in the Gate Statistics view.
2 Enter the bead count from the BD Trucount pouch label.
3 Enter the dilution factor.
4 Enter the sample volume (100 µL).
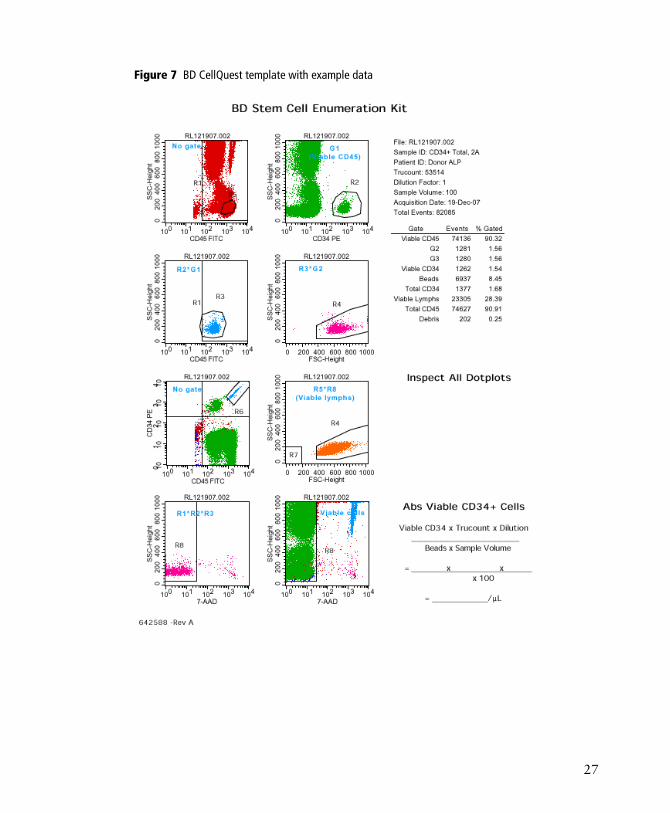
Consider the following example:
The absolute number of viable CD34 cells in a sample with a dilution factor of 1, a bead count of 53,514 beads per tube, and the Gate statistics shown in Figure 7 on page 27 would be:
5 Repeat steps 1 through 4 for the remaining samples.
If the numbers for the BD Trucount beads/pellet or the dilution factor are not entered exactly, results will be incorrect.
Viable CD34 x BD Trucount x Dilution FactorBeads x Sample Volume
Viable CD34 cells/µL =
Viable CD45 x BD Trucount x Dilution FactorBeads x Sample Volume
Viable CD45 cells/µL =
Total CD34 x BD Trucount x Dilution FactorBeads x Sample Volume
Total CD34 cells/µL =
Viable CD34 x 100Total CD34
CD34 % Viability =
Viable CD34 x 100Viable CD45
Viable CD34 % of Viable CD45 =
Label Expression
Viable CD34 cells/µL1262 x 53514 x 1
6937 x 100 = = 97.35/µL
21
Gate Definitions
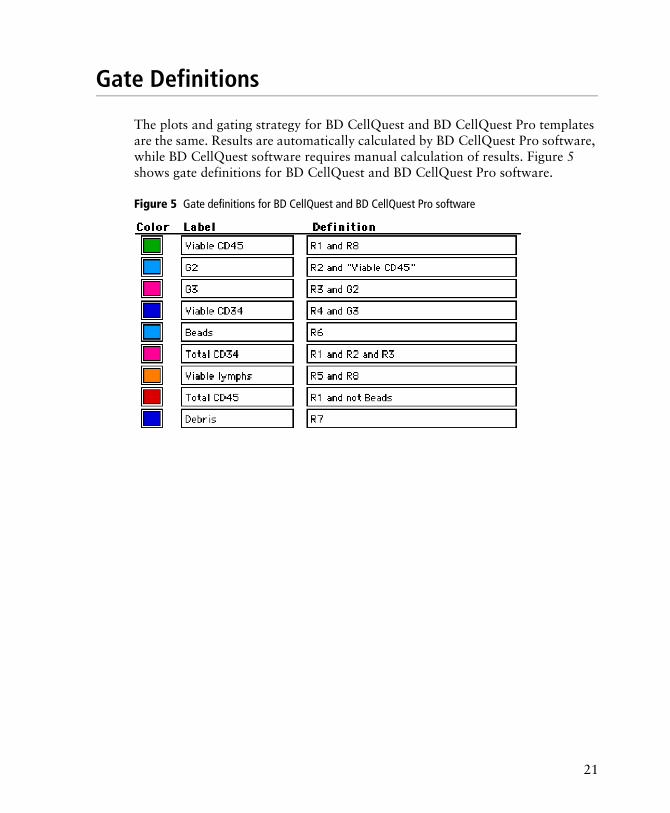
The plots and gating strategy for BD CellQuest and BD CellQuest Pro templates are the same. Results are automatically calculated by BD CellQuest Pro software, while BD CellQuest software requires manual calculation of results. Figure 5 shows gate definitions for BD CellQuest and BD CellQuest Pro software.
Figure 5 Gate definitions for BD CellQuest and BD CellQuest Pro software

22 BD Stem Cell Enumeration Application Guide
Gating Strategy
The following table explains the template gating strategy.
Dot Plot Explanation
Plot 8: 7-AAD vs SSC
This plot contains the first gate to be adjusted and is used to identify viable cells (7-AAD–).
Adjust R8 to enclose the 7-AAD– events. The region extends beyond the top of the plot on the y-axis, beyond the far left of the plot on the x-axis, and excludes positive-stained cells.
If there are a large number of red (dead) events outside R8, see page 39 for troubleshooting information.
Plot 7: 7-AAD vs SSC
This plot is gated on the Total CD34 gate (R1 and R2 and R3) and is used during compensation optimization (FL3%–FL2). See page 11.
This plot displays total CD34 cells and confirms proper adjustment of region R8 on Plot 8.
If the instrument is appropriately set up and compensated, the gated viable CD34 cells will exhibit the same level of fluorescence as the viable lymphocytes in Plot 8.
020
040
060
080
010
00
7-AAD
SSC-
H
R8
100 101 102 103 104
020
040
060
080
010
00
7-AAD
SSC-
H
R8
100 101 102 103 104

23
Plot 1: CD45 vs SSC
This plot is ungated and is used to include all CD45dim to CD45bright events and excludes debris, platelets, and unlysed red blood cells (RBCs), which are all CD45–.
Adjust the R1 leucocyte gate to extend above the top of the plot to include high SSC events that are CD45+. Adjust the left side of the gate to include all CD45+ cells, including dim CD45+ events that are CD34+. The right side can extend to the edge of the plot.
Adjust polygon region R5 around the lymphocytes. Include only as many events as necessary to define the viable lymphocyte population displayed in Plot 6.
Tip Display fewer events on this plot so that the limits of the lymphocytes are easier to define.
Plot 2: CD34 vs SSC
This plot displays viable CD45 (G1) cells and is used to identify CD34+ cells. Adjust R2 to include all CD34+ events.
NOTE This region should exclude any platelets that form a streak between neutrophils and CD34+ events. See page 38 to view a plot showing a platelet streak.
Dot Plot Explanation
R5
020
040
060
080
010
00
CD45 FITC
SSC-
H
R1
100 101 102 103 104
R2
020
040
060
080
010
00
CD34 PE
SSC-
H
100 101 102 103 104

24 BD Stem Cell Enumeration Application Guide
Plot 3: CD45 vs SSC
This plot displays G2 cells and is used to further define the viable CD34+CD45+ cell population.
Adjust R3 to include only those events that form a cluster with low to intermediate SSC and CD45dim expression. Adjust R3 to exclude any lymphocytes or monocytes seen to the right of the stem cell cluster.
Plot 6: FSC vs SSC
This plot displays Viable Lymphs (R5 and R8) and is used to establish the minimum FSC and SSC ranges for R4.
Display region R4 on this plot and adjust the position so that only viable lymphs from R5 are included.
R7 is an acquisition exclusion gate used to exclude debris. Region 7 should not exceed FSC channel 200 and SSC channel 200 and should not encroach the lymphocyte population because events in R7 will be excluded from the data file.
Plot 4: FSC vs SSC
This plot displays G3 (R3 and G2) cells and is used to identify viable stem cells (CD34+).
Adjust R4 to include only those events that form a cluster with low to intermediate SSC and medium to high FSC.
The gate serves to exclude platelets and debris that can show weak, nonspecific binding of CD34 and CD45. Its lower FSC boundary is adjusted in Plot 6. Region R4 is the lymph/blast region and will be adjusted by scatter of lymphocytes.
Tip This plot can be gated on R1 and R2 and R3 to display Total CD34+ cells instead of Viable CD34+ cells.
Dot Plot Explanation
R3
020
040
060
080
010
00
CD45 FITC
SSC-
H R1
100 101 102 103 104
R4
0 200 400 600 800
020
040
060
080
010
00SS
C-H
1000
R7
FSC-H
R4
0 200 400 600 800
020
040
060
080
010
00SS
C-H
1000FSC-H
25
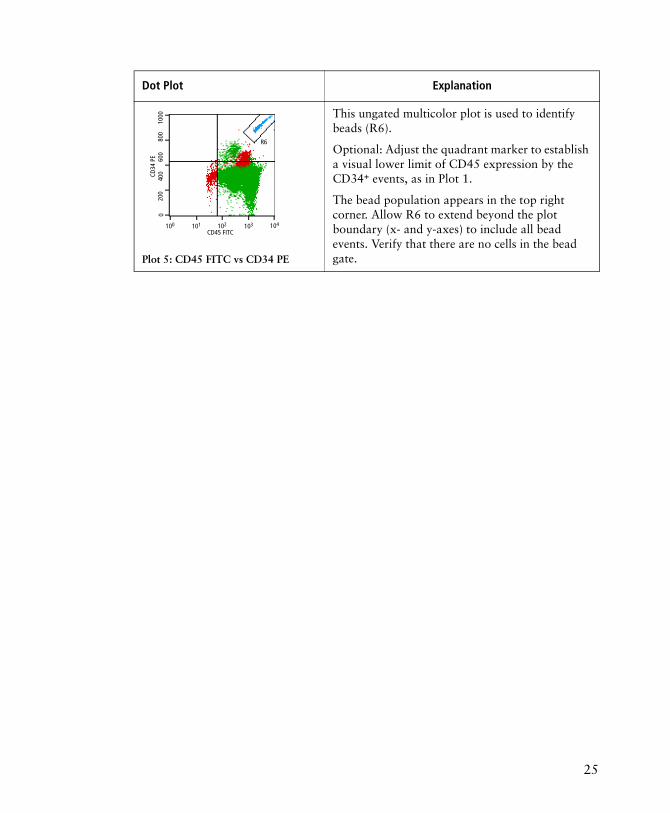
Plot 5: CD45 FITC vs CD34 PE
This ungated multicolor plot is used to identify beads (R6).
Optional: Adjust the quadrant marker to establish a visual lower limit of CD45 expression by the CD34+ events, as in Plot 1.
The bead population appears in the top right corner. Allow R6 to extend beyond the plot boundary (x- and y-axes) to include all bead events. Verify that there are no cells in the bead gate.
Dot Plot Explanation
R6
CD45 FITC
CD34
PE
020
040
060
010
0080
0
100 101 102 103 104
26 BD Stem Cell Enumeration Application Guide
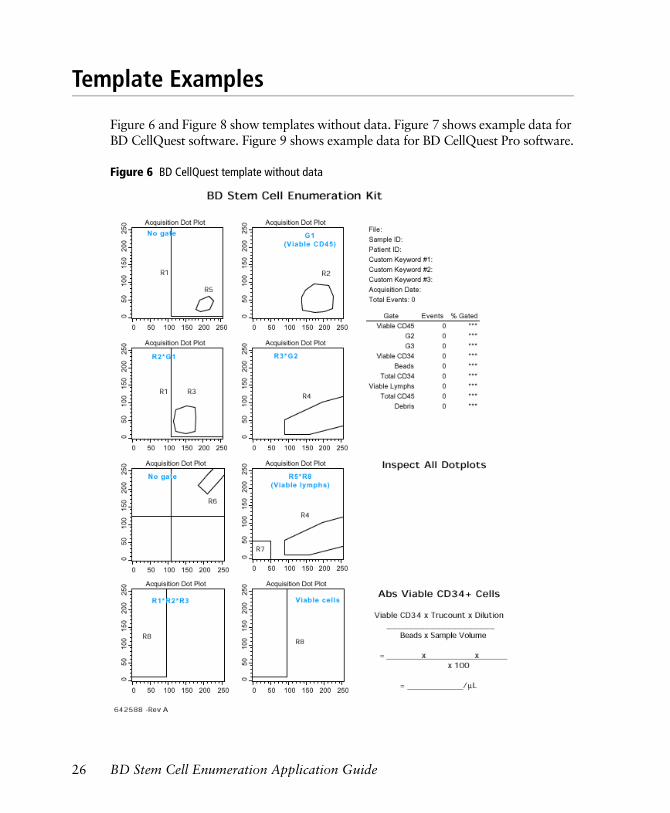
Template Examples
Figure 6 and Figure 8 show templates without data. Figure 7 shows example data for BD CellQuest software. Figure 9 shows example data for BD CellQuest Pro software.
Figure 6 BD CellQuest template without data
27
Figure 7 BD CellQuest template with example data

28 BD Stem Cell Enumeration Application Guide
Figure 8 BD CellQuest Pro template without data
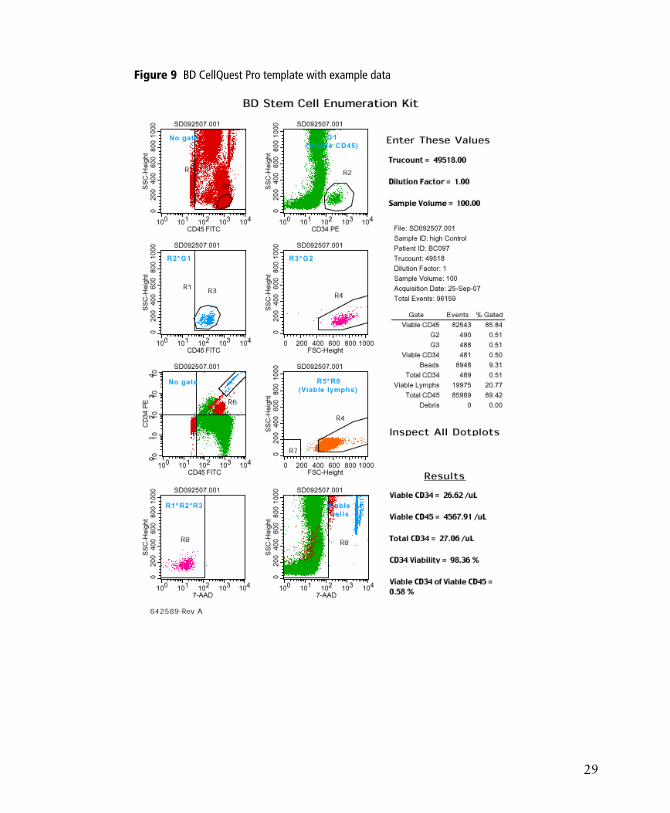
29
Figure 9 BD CellQuest Pro template with example data

30 BD Stem Cell Enumeration Application Guide
Troubleshooting
The following section provides assistance for problems you might have using the BD Stem Cell Enumeration assay. If additional assistance is required, contact your local BD Biosciences technical support representative. See our website, bdbiosciences.com, for up-to-date contact information.
Troubleshooting
Observation Possible Causes Recommended Solutions
No events in acquisition display
No sample in tube Add sample to the tube or install a new sample tube.
Sample not mixed properly
Vortex the sample to suspend the cells and beads.
Sample injection tube clogged or air bubble in the flow cell
See the cytometer manual for instrument instructions.
Communication failure between computer and flow cytometer: GPIO error, cannot read instrument status
1 Turn off the computer and the flow cytometer.
2 Check the GPIO cable connections.
3 Turn on the cytometer. Then, turn on the computer.
31
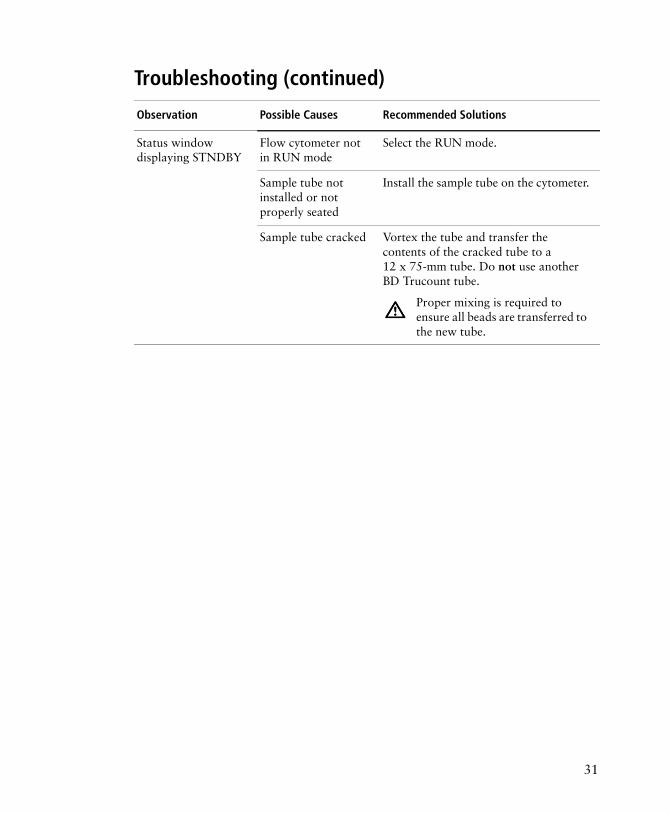
Status window displaying STNDBY
Flow cytometer not in RUN mode
Select the RUN mode.
Sample tube not installed or not properly seated
Install the sample tube on the cytometer.
Sample tube cracked Vortex the tube and transfer the contents of the cracked tube to a 12 x 75-mm tube. Do not use another BD Trucount tube.
Proper mixing is required to ensure all beads are transferred to the new tube.
Troubleshooting (continued)
Observation Possible Causes Recommended Solutions
32 BD Stem Cell Enumeration Application Guide
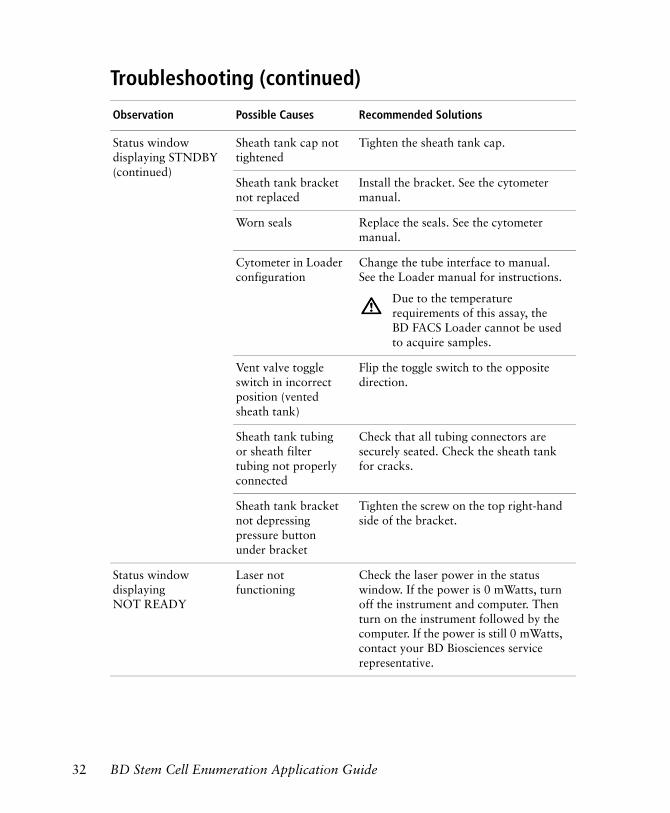
Status window displaying STNDBY (continued)
Sheath tank cap not tightened
Tighten the sheath tank cap.
Sheath tank bracket not replaced
Install the bracket. See the cytometer manual.
Worn seals Replace the seals. See the cytometer manual.
Cytometer in Loader configuration
Change the tube interface to manual. See the Loader manual for instructions.
Due to the temperature requirements of this assay, the BD FACS Loader cannot be used to acquire samples.
Vent valve toggle switch in incorrect position (vented sheath tank)
Flip the toggle switch to the opposite direction.
Sheath tank tubing or sheath filter tubing not properly connected
Check that all tubing connectors are securely seated. Check the sheath tank for cracks.
Sheath tank bracket not depressing pressure button under bracket
Tighten the screw on the top right-hand side of the bracket.
Status window displaying NOT READY
Laser not functioning
Check the laser power in the status window. If the power is 0 mWatts, turn off the instrument and computer. Then turn on the instrument followed by the computer. If the power is still 0 mWatts, contact your BD Biosciences service representative.
Troubleshooting (continued)
Observation Possible Causes Recommended Solutions
33
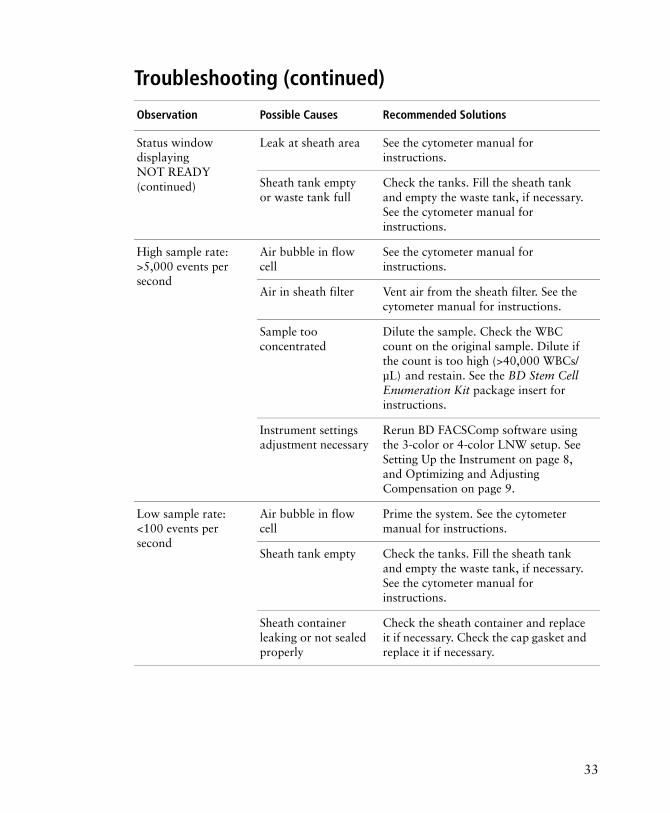
Status window displaying NOT READY (continued)
Leak at sheath area See the cytometer manual for instructions.
Sheath tank empty or waste tank full
Check the tanks. Fill the sheath tank and empty the waste tank, if necessary. See the cytometer manual for instructions.
High sample rate: >5,000 events per second
Air bubble in flow cell
See the cytometer manual for instructions.
Air in sheath filter Vent air from the sheath filter. See the cytometer manual for instructions.
Sample too concentrated
Dilute the sample. Check the WBC count on the original sample. Dilute if the count is too high (>40,000 WBCs/µL) and restain. See the BD Stem Cell Enumeration Kit package insert for instructions.
Instrument settings adjustment necessary
Rerun BD FACSComp software using the 3-color or 4-color LNW setup. See Setting Up the Instrument on page 8, and Optimizing and Adjusting Compensation on page 9.
Low sample rate: <100 events per second
Air bubble in flow cell
Prime the system. See the cytometer manual for instructions.
Sheath tank empty Check the tanks. Fill the sheath tank and empty the waste tank, if necessary. See the cytometer manual for instructions.
Sheath container leaking or not sealed properly
Check the sheath container and replace it if necessary. Check the cap gasket and replace it if necessary.
Troubleshooting (continued)
Observation Possible Causes Recommended Solutions

34 BD Stem Cell Enumeration Application Guide
Low sample rate: <100 events per second (continued)
Sample tube cracked Vortex the tube and transfer the contents of the cracked tube to a 12 x 75-mm tube. Do not use another BD Trucount tube.
Sample not adequately mixed
Vortex the sample to suspend the cells and beads.
Clog in sample injection tube
Call your BD Biosciences service representative.
Flow rate not set to HI
Set the flow rate to HI.
Erratic event rate Worn seals See the cytometer manual for instructions.
Cytometer in Loader configuration
Change the tube interface to manual. See the Loader manual for instructions.
Due to the temperature requirements of this assay, the BD FACS Loader cannot be used to acquire samples.
Partially blocked sample injection tube
Call your BD Biosciences service representative.
Sheath tank empty or waste tank full
Check the tanks. Fill the sheath tank and empty the waste tank, if necessary. See the cytometer manual for instructions.
Unusual population distribution
Air bubble in flow cell
See the cytometer manual for instructions.
Air leak at sheath tank
See the cytometer manual for instructions.
Troubleshooting (continued)
Observation Possible Causes Recommended Solutions

35
Unusual population distribution (continued)
Partially blocked sample injection port (SIP)
1 Fill a tube with 3 mL of 10% CONTRAD® cleaning solution, and install on the SIP.
2 Move the support arm to the side and allow the vacuum to aspirate for 1 minute.
3 Move the support arm to the center and run the CONTRAD tube on HI for 10 minutes.
4 Remove the tube and Prime twice to remove CONTRAD from the SIP and flow cell.
5 Install a tube of DI water, run for 10 minutes, and set the cytometer to STNDBY when done.
Sheath filter dirty or has air
Change the sheath filter or purge air. See the cytometer manual for instructions.
Flow cell dirty Perform the monthly cleaning procedure. See the cytometer manual for instructions.
Improperly set seals on SIP tube
Replace the seals. See the cytometer manual.
Cytometer in Loader configuration
Change the tube interface to manual. See the Loader manual for instructions.
Due to the temperature requirements of this assay, the BD FACS Loader cannot be used to acquire samples.
Wrong parameters chosen in plot
Make sure that the plots follow the gating strategy. See page 22.
Troubleshooting (continued)
Observation Possible Causes Recommended Solutions
36 BD Stem Cell Enumeration Application Guide
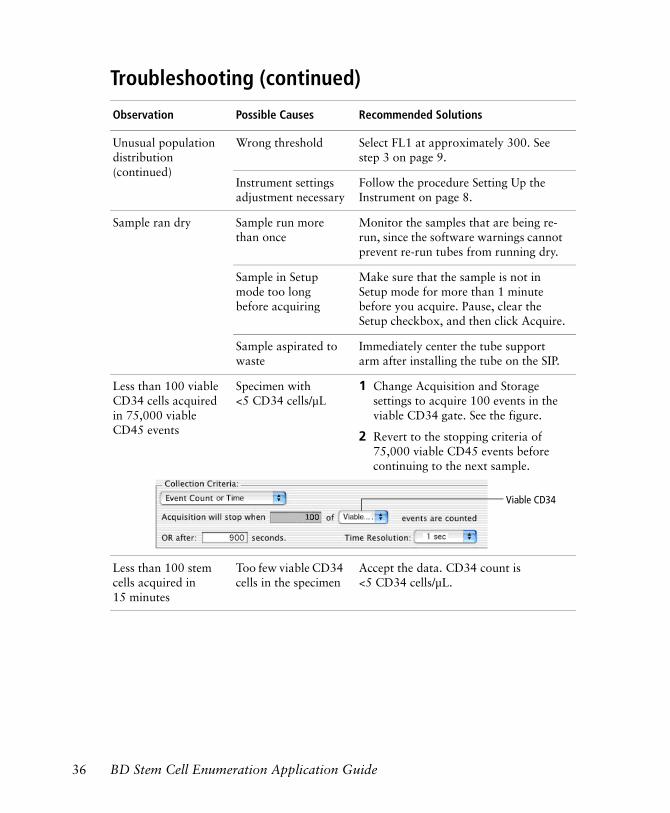
Unusual population distribution (continued)
Wrong threshold Select FL1 at approximately 300. See step 3 on page 9.
Instrument settings adjustment necessary
Follow the procedure Setting Up the Instrument on page 8.
Sample ran dry Sample run more than once
Monitor the samples that are being re-run, since the software warnings cannot prevent re-run tubes from running dry.
Sample in Setup mode too long before acquiring
Make sure that the sample is not in Setup mode for more than 1 minute before you acquire. Pause, clear the Setup checkbox, and then click Acquire.
Sample aspirated to waste
Immediately center the tube support arm after installing the tube on the SIP.
Less than 100 viable CD34 cells acquired in 75,000 viable CD45 events
Specimen with <5 CD34 cells/µL
1 Change Acquisition and Storage settings to acquire 100 events in the viable CD34 gate. See the figure.
2 Revert to the stopping criteria of 75,000 viable CD45 events before continuing to the next sample.
Less than 100 stem cells acquired in 15 minutes
Too few viable CD34 cells in the specimen
Accept the data. CD34 count is <5 CD34 cells/µL.
Troubleshooting (continued)
Observation Possible Causes Recommended Solutions
Viable CD34
37
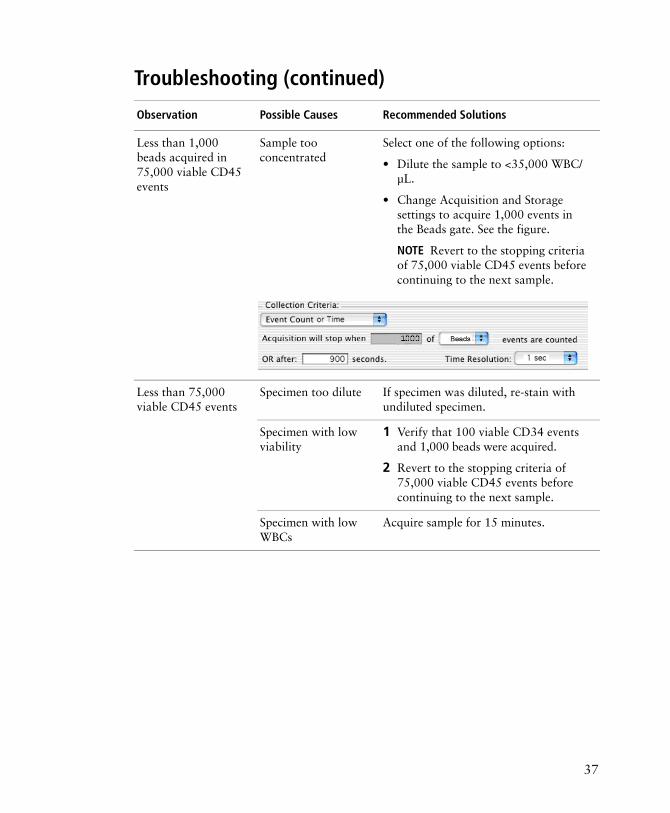
Less than 1,000 beads acquired in 75,000 viable CD45 events
Sample too concentrated
Select one of the following options:
• Dilute the sample to <35,000 WBC/µL.
• Change Acquisition and Storage settings to acquire 1,000 events in the Beads gate. See the figure.
NOTE Revert to the stopping criteria of 75,000 viable CD45 events before continuing to the next sample.
Less than 75,000 viable CD45 events
Specimen too dilute If specimen was diluted, re-stain with undiluted specimen.
Specimen with low viability
1 Verify that 100 viable CD34 events and 1,000 beads were acquired.
2 Revert to the stopping criteria of 75,000 viable CD45 events before continuing to the next sample.
Specimen with low WBCs
Acquire sample for 15 minutes.
Troubleshooting (continued)
Observation Possible Causes Recommended Solutions
38 BD Stem Cell Enumeration Application Guide
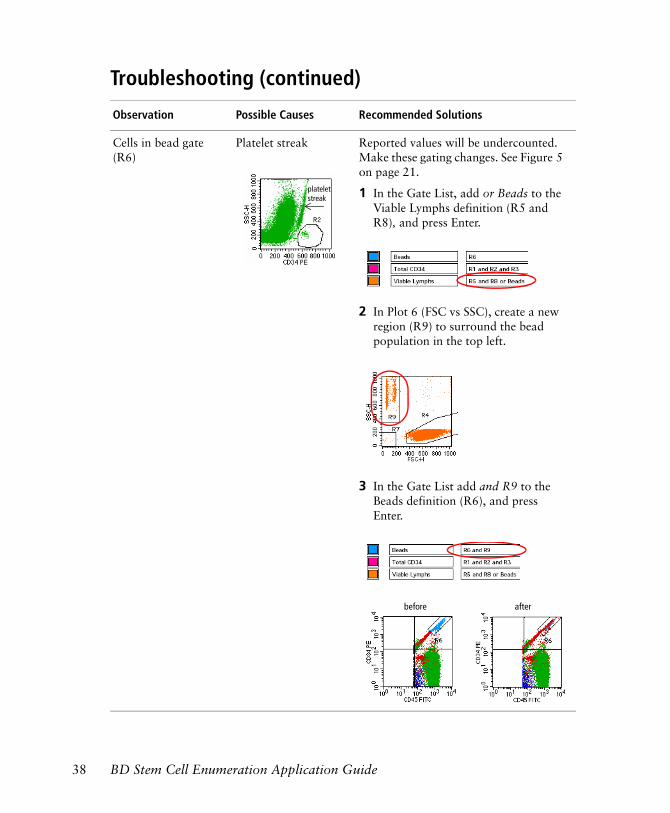
Cells in bead gate (R6)
Platelet streak Reported values will be undercounted. Make these gating changes. See Figure 5 on page 21.
1 In the Gate List, add or Beads to the Viable Lymphs definition (R5 and R8), and press Enter.
2 In Plot 6 (FSC vs SSC), create a new region (R9) to surround the bead population in the top left.
3 In the Gate List add and R9 to the Beads definition (R6), and press Enter.
Troubleshooting (continued)
Observation Possible Causes Recommended Solutions
plateletstreak
before after

39
Many dead cells in Plot 8 causing viability to fluctuate with small changes to R2
Dead cells in R2 are being included in the Total CD34 count, causing lower than expected viability (see calculations on page 19)
Small changes to R2 cause large changes in the viability calculation or Total CD34 count. This is seen in older or thawed samples with many 7-AAD+ (non-viable) events.
In the following example:
• Viable cells are green
• Dead CD34 cells are magenta
• Other dead cells are red
1 While observing the Gate stats view, adjust R2 so that the Viable CD34 count is maximized while the Total CD34 count is minimized.
NOTE Look for the CD34+ (magenta) cells on your computer screen. They should appear inside R2 and to the right of the viable population.
Tip If you prefer, ungate plot 2 to see where the dead (red) cells are interfering with the position of R2. Select Multicolor Gating in the Inspector. Be sure to set the gating back to viable CD45 before running the next sample.
Troubleshooting (continued)
Observation Possible Causes Recommended Solutions
Plot 8
Plot 5
Plot 8
Plot 2
Position of plots on template
Plot 2 gated Plot 2 ungated

40 BD Stem Cell Enumeration Application Guide
Many dead cells in Plot 8 causing viability to fluctuate with small changes to R2 (continued)
1 For quality control, observe Plot 5 (ungated quadrant plot). Verify that the CD34+ cells are above the horizontal quadrant and low in CD45.
Difficulty adjusting compensation
The sample is under compensated; only some of the CD34 cells fall inside R8
Raise the FL3–%FL2 value to bring the CD34 cells inside R8.
The sample is over compensated; some of the CD34 cells are off-scale
Lower the FL3–%FL2 value to bring the CD34 cells off the left edge of the plot. Verify the left edge of R8 is off the plot to include all CD34 cells.
The sample is properly compensated
The FL3 median of the total CD34 population is the same as the FL3 median of the lymphocyte population on R8. No adjustment needed.
Troubleshooting (continued)
Observation Possible Causes Recommended Solutions
Plot 5
viable CD34 cells
under compensated
over compensated
proper compensation

41
Performance
For assay performance information, see the BD Stem Cell Enumeration Kit package insert.

THIS PAGE INTENTIONALLY LEFT BLANK