
BD FACSCanto Clinical Software Reference Manuals Guide...BD FACSCanto clinical software streamlines...
188
bdbiosciences.com Part No. 643086 Rev. A July 2007 BD Biosciences 2350 Qume Drive San Jose, CA 95131-1807 USA Tel (877) 232-8995 Fax (800) 325-9637 Brazil Tel (55) 11-5185-9995 Fax (55) 11-5185-9895 Europe Tel (32) 2 400 98 95 Fax (32) 2 401 70 94 Mexico Toll Free 01-800-236-2543 Tel (52) 55 5999 8296 Japan Nippon Becton Dickinson Company, Ltd. Toll Free 0120-8555-90 Asia Pacific Fax (65) 6-860-1590 Canada Toll Free (888) 259-0187 Fax (888) 229-9918 Tel (65) 6-861-0633 Tel (905) 542-8028 [email protected] [email protected] [email protected] For In Vitro Diagnostic Use Tel 81-24-593-5405 Fax 81-24-593-5761 Fax (52) 55 5999 8288 BD FACSCanto Clinical Software Reference Manual
Transcript of BD FACSCanto Clinical Software Reference Manuals Guide...BD FACSCanto clinical software streamlines...
bdbiosciences.comPart No. 643086 Rev. AJuly 2007
BD Biosciences2350 Qume DriveSan Jose, CA 95131-1807USATel (877) 232-8995Fax (800) [email protected]
For In Vitro Diagnosti
BD FACSCantoClinical SoftwareReference Manual
Brazil Tel (55) 11-5185-9995Fax (55) 11-5185-9895
Europe Tel (32) 2 400 98 95Fax (32) 2 401 70 94
MexicoToll Free 01-800-236-2543Tel (52) 55 5999 8296
JapanNippon Becton Dickinson Company, Ltd.Toll Free 0120-8555-90
Asia Pacific
Fax (65) 6-860-1590
CanadaToll Free (888) 259-0187
Fax (888) 229-9918
Tel (65) 6-861-0633Tel (905) 542-8028
c Use
Tel 81-24-593-5405Fax 81-24-593-5761
Fax (52) 55 5999 8288

© 2007, Becton, Dickinson and Company. All rights reserved. No part of this publication may be reproduced, transmitted, transcribed, stored in retrieval systems, or translated into any language or computer language, in any form or by any means: electronic, mechanical, magnetic, optical, chemical, manual, or otherwise, without prior written permission from BD Biosciences.
The information in this manual is subject to change without notice. BD Biosciences reserves the right to change its products and services at any time to incorporate the latest technological developments. Although this manual has been prepared with every precaution to ensure accuracy, BD Biosciences assumes no liability for any errors or omissions, nor for any damages resulting from the application or use of this information. BD Biosciences welcomes customer input on corrections and suggestions for improvement.
BD FACSCanto clinical software © Becton, Dickinson and Company. This software is the property of Becton, Dickinson and Company. Each sale of a stored unit of this software grants the purchaser a nontransferable, nonexclusive, personal license. This software may not be duplicated, reproduced, or copied in any form or by any means whatsoever, except as otherwise permitted by law.
BD, BD logo and all other trademarks are property of Becton, Dickinson and Company © 2007 BD
Adobe, Acrobat, and Reader are registered trademarks of Adobe Systems Incorporated. Microsoft, Windows, and Excel are registered trademarks of Microsoft Corporation. VxWorks is a trademark of Wind River Systems, Inc.
All other company and product names might be trademarks of the respective companies with which they are associated.
Notice
BD Biosciences delivers software and workstations that are intended for running the instruments supplied by BD Biosciences. It is the responsibility of the buyer/user to ensure that all added electronic files including software and transport media are virus free. If the workstation is used for Internet access or purposes other than those specified by BD Biosciences, it is the buyer/user’s responsibility to install and maintain up-to-date virus protection software. BD Biosciences does not make any warranty with respect to the workstation remaining virus free after installation. BD Biosciences is not liable for any claims related to or resulting from buyer/user's failure to install and maintain virus protection.
History
Revision Date Change Made
337977 Rev. A 4/04 Initial release
339859 Rev. A 9/04 US IVD release, new limitation added
339863 Rev. A 9/04 New limitation added; updated shutdown procedure; new title page
343372 Rev. A 9/05 Updated for 6-color reagent and BD FACSCanto clinical software v2.0; removed Running Samples chapter, added Software Reports chapter
640802 Rev. A 5/06 Updated for BD FACSCanto clinical software v2.1
643086 Rev. A 7/07 Updated for BD FACSCanto clinical software v2.2

Contents
About This Manual vii
Conventions . . . . . . . . . . . . . . . . . . . . . . . . . . . . . . . . . . . . . . . . . . . . . . . . . viii
Technical Assistance . . . . . . . . . . . . . . . . . . . . . . . . . . . . . . . . . . . . . . . . . . . ix
Chapter 1: Introduction 11
Requirements . . . . . . . . . . . . . . . . . . . . . . . . . . . . . . . . . . . . . . . . . . . . . . . . 12
Compatibility . . . . . . . . . . . . . . . . . . . . . . . . . . . . . . . . . . . . . . . . . . . . . . . . 13
Limitations . . . . . . . . . . . . . . . . . . . . . . . . . . . . . . . . . . . . . . . . . . . . . . . . . . 14
Chapter 2: Starting Up 15
Starting the Software . . . . . . . . . . . . . . . . . . . . . . . . . . . . . . . . . . . . . . . . . . 16
Software Overview . . . . . . . . . . . . . . . . . . . . . . . . . . . . . . . . . . . . . . . . . . . . 16
Becoming Familiar with Toolbars . . . . . . . . . . . . . . . . . . . . . . . . . . . . . 19
Using the Carousel Window . . . . . . . . . . . . . . . . . . . . . . . . . . . . . . . . . . 20
Viewing Status Indicators . . . . . . . . . . . . . . . . . . . . . . . . . . . . . . . . . . . . 21
Rearranging Window Components . . . . . . . . . . . . . . . . . . . . . . . . . . . . 24
Becoming Familiar with the Worklist . . . . . . . . . . . . . . . . . . . . . . . . . . . 25
Understanding the Workflow . . . . . . . . . . . . . . . . . . . . . . . . . . . . . . . . . . . . 29
Chapter 3: Reports 31
Cytometer Setup Reports . . . . . . . . . . . . . . . . . . . . . . . . . . . . . . . . . . . . . . . 32
Application Setup Reports . . . . . . . . . . . . . . . . . . . . . . . . . . . . . . . . . . . . . . 35
Levey-Jennings Reports . . . . . . . . . . . . . . . . . . . . . . . . . . . . . . . . . . . . . . . . . 38
Lab Reports . . . . . . . . . . . . . . . . . . . . . . . . . . . . . . . . . . . . . . . . . . . . . . . . . 40
iii

Chapter 4: User Options 43
Options while Running the Cytometer . . . . . . . . . . . . . . . . . . . . . . . . . . . . . 44
Entering New Lot IDs . . . . . . . . . . . . . . . . . . . . . . . . . . . . . . . . . . . . . . . 44
Placing the Cytometer in Standby . . . . . . . . . . . . . . . . . . . . . . . . . . . . . . 52
Connecting to the Cytometer . . . . . . . . . . . . . . . . . . . . . . . . . . . . . . . . . 53
Understanding Worklist Options . . . . . . . . . . . . . . . . . . . . . . . . . . . . . . . . . . 54
Opening an Existing Worklist . . . . . . . . . . . . . . . . . . . . . . . . . . . . . . . . . 55
Using an Acquisition Worklist as a Template . . . . . . . . . . . . . . . . . . . . . 56
Importing a Worklist from BD FACS SPA . . . . . . . . . . . . . . . . . . . . . . . 57
Printing . . . . . . . . . . . . . . . . . . . . . . . . . . . . . . . . . . . . . . . . . . . . . . . . . . . . . 58
Printing a Worklist . . . . . . . . . . . . . . . . . . . . . . . . . . . . . . . . . . . . . . . . . 59
Printing a Lab Report . . . . . . . . . . . . . . . . . . . . . . . . . . . . . . . . . . . . . . . 61
Printing a Setup Report . . . . . . . . . . . . . . . . . . . . . . . . . . . . . . . . . . . . . . 62
Printing a Levey-Jennings Report . . . . . . . . . . . . . . . . . . . . . . . . . . . . . . 63
Customizing Software Defaults . . . . . . . . . . . . . . . . . . . . . . . . . . . . . . . . . . . 64
Customizing the Lab Report Countdown . . . . . . . . . . . . . . . . . . . . . . . . 64
Customizing File Locations . . . . . . . . . . . . . . . . . . . . . . . . . . . . . . . . . . . 66
Customizing Windows and Toolbars . . . . . . . . . . . . . . . . . . . . . . . . . . . 67
Entering Comments into a Lab or LJ Report . . . . . . . . . . . . . . . . . . . . . . . . . 68
Viewing Previous Levey-Jennings Plots . . . . . . . . . . . . . . . . . . . . . . . . . . . . . 70
Changing Your Password . . . . . . . . . . . . . . . . . . . . . . . . . . . . . . . . . . . . . . . 72
Chapter 5: Lab Manager Options 73
Installing the Software . . . . . . . . . . . . . . . . . . . . . . . . . . . . . . . . . . . . . . . . . . 74
Uninstalling the Software . . . . . . . . . . . . . . . . . . . . . . . . . . . . . . . . . . . . 79
Managing Files . . . . . . . . . . . . . . . . . . . . . . . . . . . . . . . . . . . . . . . . . . . . . . . 80
Changing Default File Locations . . . . . . . . . . . . . . . . . . . . . . . . . . . . . . . 83
Managing User Accounts . . . . . . . . . . . . . . . . . . . . . . . . . . . . . . . . . . . . . . . 85
Setting Up New Users . . . . . . . . . . . . . . . . . . . . . . . . . . . . . . . . . . . . . . . 85
Editing User Information . . . . . . . . . . . . . . . . . . . . . . . . . . . . . . . . . . . . 88
Deleting Users . . . . . . . . . . . . . . . . . . . . . . . . . . . . . . . . . . . . . . . . . . . . . 88
iv BD FACSCanto Clinical Software Reference Manual
Disabling User Accounts . . . . . . . . . . . . . . . . . . . . . . . . . . . . . . . . . . . . 89
Enabling User Accounts . . . . . . . . . . . . . . . . . . . . . . . . . . . . . . . . . . . . . 90
Changing Fluidics Startup Preferences . . . . . . . . . . . . . . . . . . . . . . . . . . . . . 90
Changing Setup Preferences . . . . . . . . . . . . . . . . . . . . . . . . . . . . . . . . . . . . . 92
Changing the Levey-Jennings File Preferences . . . . . . . . . . . . . . . . . . . . 92
Specifying Levey-Jennings View Preferences . . . . . . . . . . . . . . . . . . . . . . 93
Hiding the “Reviewed By” Field . . . . . . . . . . . . . . . . . . . . . . . . . . . . . . 96
Printing the Setup Report Automatically . . . . . . . . . . . . . . . . . . . . . . . . 96
Changing Worklist Report Header Preferences . . . . . . . . . . . . . . . . . . . . . . . 97
Changing Acquisition Preferences . . . . . . . . . . . . . . . . . . . . . . . . . . . . . . . . . 97
Changing Plots in the Acquisition View . . . . . . . . . . . . . . . . . . . . . . . . . 98
Changing Acquisition Targets . . . . . . . . . . . . . . . . . . . . . . . . . . . . . . . . 99
Changing the Lag Time Before Recording . . . . . . . . . . . . . . . . . . . . . . . 100
Changing the Lab Report Countdown . . . . . . . . . . . . . . . . . . . . . . . . . . 101
Changing Lab Report Preferences . . . . . . . . . . . . . . . . . . . . . . . . . . . . . . . . . 102
Changing Plots in the Lab Report View . . . . . . . . . . . . . . . . . . . . . . . . . 103
Changing Subset Results for a Reagent . . . . . . . . . . . . . . . . . . . . . . . . . 104
Changing Alarm Ranges for Subset Results . . . . . . . . . . . . . . . . . . . . . . 105
Choosing QC Values . . . . . . . . . . . . . . . . . . . . . . . . . . . . . . . . . . . . . . . 106
Hiding Error Messages . . . . . . . . . . . . . . . . . . . . . . . . . . . . . . . . . . . . . . 109
Disabling Comments . . . . . . . . . . . . . . . . . . . . . . . . . . . . . . . . . . . . . . . 110
Choosing the Lab Report Language . . . . . . . . . . . . . . . . . . . . . . . . . . . . 110
Choosing Header Information . . . . . . . . . . . . . . . . . . . . . . . . . . . . . . . . 110
Automatically Printing the Lab Report . . . . . . . . . . . . . . . . . . . . . . . . . . 111
Disabling Automatic PDF Creation of Lab Reports . . . . . . . . . . . . . . . . 112
Other Options . . . . . . . . . . . . . . . . . . . . . . . . . . . . . . . . . . . . . . . . . . . . . . . 113
Setting Results Preferences . . . . . . . . . . . . . . . . . . . . . . . . . . . . . . . . . . . 113
Customizing Header Information for Both Lab and Setup Reports . . . . 115
Adding a Logo to Reports . . . . . . . . . . . . . . . . . . . . . . . . . . . . . . . . . . . 116
Contents v
Chapter 6: Troubleshooting 119
General Software Troubleshooting . . . . . . . . . . . . . . . . . . . . . . . . . . . . . . . . 120
Setup Troubleshooting . . . . . . . . . . . . . . . . . . . . . . . . . . . . . . . . . . . . . . . . . 125
Setup Wizard Messages . . . . . . . . . . . . . . . . . . . . . . . . . . . . . . . . . . . . . . 126
Setup Report Failure Messages . . . . . . . . . . . . . . . . . . . . . . . . . . . . . . . . 130
Levey-Jennings Errors and Messages . . . . . . . . . . . . . . . . . . . . . . . . . . . . 133
Acquisition Troubleshooting . . . . . . . . . . . . . . . . . . . . . . . . . . . . . . . . . . . . . 134
Analysis Troubleshooting for 4- and 6-Color TBNK . . . . . . . . . . . . . . . . . . . 138
QC Messages . . . . . . . . . . . . . . . . . . . . . . . . . . . . . . . . . . . . . . . . . . . . . 138
4- and 6-Color TBNK Troubleshooting . . . . . . . . . . . . . . . . . . . . . . . . . . . . . 143
Disabling the Loader . . . . . . . . . . . . . . . . . . . . . . . . . . . . . . . . . . . . . . . . . . . 146
Appendix A: Menus and Keyboard Shortcuts 147
Menus . . . . . . . . . . . . . . . . . . . . . . . . . . . . . . . . . . . . . . . . . . . . . . . . . . . . . . 148
Keyboard Shortcuts . . . . . . . . . . . . . . . . . . . . . . . . . . . . . . . . . . . . . . . . . . . . 150
Menu Command Shortcuts . . . . . . . . . . . . . . . . . . . . . . . . . . . . . . . . . . . 151
Appendix B: Technical Overview for BD Multitest 4- and 6-Color Reagents 155
Panels and Reagents . . . . . . . . . . . . . . . . . . . . . . . . . . . . . . . . . . . . . . . . . . . 156
Acquisition Stopping Criteria . . . . . . . . . . . . . . . . . . . . . . . . . . . . . . . . . . . . 157
Gate Hierarchy . . . . . . . . . . . . . . . . . . . . . . . . . . . . . . . . . . . . . . . . . . . . . . . 158
Visual Check for BD Multitest Reagents . . . . . . . . . . . . . . . . . . . . . . . . . . . . 163
Default Settings . . . . . . . . . . . . . . . . . . . . . . . . . . . . . . . . . . . . . . . . . . . . . . . 168
Options Defaults . . . . . . . . . . . . . . . . . . . . . . . . . . . . . . . . . . . . . . . . . . . 168
Reagent Defaults . . . . . . . . . . . . . . . . . . . . . . . . . . . . . . . . . . . . . . . . . . . 170
Alarm Ranges Defaults . . . . . . . . . . . . . . . . . . . . . . . . . . . . . . . . . . . . . . 175
Report Defaults . . . . . . . . . . . . . . . . . . . . . . . . . . . . . . . . . . . . . . . . . . . 176
Lab Manager Preferences Defaults . . . . . . . . . . . . . . . . . . . . . . . . . . . . . 178
Index 181
vi BD FACSCanto Clinical Software Reference Manual

About This Manual
This manual contains reference information about BD FACSCanto™ clinical software. Designed for the BD FACSCanto™ and the BD FACSCanto™ II flow cytometers, the software handles setup, acquisition, analysis, and automated loading of samples.
For information about cytometer components, maintenance, and troubleshooting, and instructions on how to run samples using the software, refer to the printed instructions for use for either the BD FACSCanto or the BD FACSCanto II flow cytometer. Further details can be found in the reference manual, provided on the documentation CD, for either the BD FACSCanto or the BD FACSCanto II flow cytometer. For application-specific instructions, refer to the individual application guides and information supplied with the reagents.
The BD FACSCanto Clinical Software Reference Manual assumes you have a working knowledge of basic Microsoft® Windows® operation. If you are not familiar with the Windows operating system, refer to the documentation provided with your computer.
Before using BD FACSCanto clinical software, print and review the ReadMe file for BD FACSCanto clinical software that is included on both the software and documentation CD. It contains important information that is not included in the printed or electronic documentation.
vii
Conventions
The following tables list conventions used throughout this manual. Table 1 lists symbols that are used to alert you to a potential hazard. Text and keyboard conventions are shown in Table 2.
Table 1 Hazard symbols
Symbol Meaning
Caution: hazard or unsafe practice that could result in material damage, data loss, minor or severe injury, or death
Table 2 Text and keyboard conventions
Convention Use
Tip Highlights features or hints that can save time and prevent difficulties
NOTICE Describes important features or instructions
Italics Italics are used to highlight book titles and new or unfamiliar terms on their first appearance in the text.
> The arrow indicates a menu choice. For example, “choose File > Print” means to choose Print from the File menu.
Ctrl+X When used with key names, a dash means to press two keys simultaneously. For example, Ctrl+P means to hold down the Control key while pressing the letter p.
viii BD FACSCanto Clinical Software Reference Manual

Technical Assistance
For technical questions or assistance:
• In BD FACSCanto clinical software, select Help > BD FACSCanto Software Help. Use the full-text online search feature to locate topics specific to the operation you are performing.
• In BD FACSCanto clinical software, select Help > Online Training to access online training courses on the BD Biosciences website.
• See Chapter 6, Troubleshooting.
If additional assistance is required, contact your local BD Biosciences technical support representative or supplier.
When contacting BD Biosciences, have the following information available:
• Product name, catalog number, and serial number
• Error messages
• Details of system performance
For instrument support within the US, call (877) 232-8995, prompt 2, 2.
For support within Canada, call (888) 259-0187.
Customers outside the US and Canada, contact your local BD representative or distributor.
About This Manual ix

x BD FACSCanto Clinical Software Reference Manual
1
Introduction
BD FACSCanto clinical software streamlines your workflow by combining instrument QC and setup, acquisition and analysis, and optional automated sample loading in one easy-to-use package. Compensation settings are automatically recalculated during voltage adjustments. Auto-gating algorithms isolate populations of interest, but the software allows manual gating, if necessary. Internal QC checks the validity of your results. You can print results in a customizable lab report.
This chapter discusses these topics:
• Requirements on page 12
• Compatibility on page 13
11
Requirements
Hardware
• BD FACSCanto or BD FACSCanto II flow cytometer and fluidics cart
• BD FACSCanto workstation
• BD Biosciences recommended printer
• (Optional) BD FACS™ Loader for automated acquisition
Software
• Microsoft Windows XP Professional OS with Service Pack 2 or later
• Microsoft .NET Framework v1.1*
• BD FACSDiva™ software v5.0 (installs firmware components required for acquisition workstations)
• Adobe® Acrobat® Reader® software v6.0*
Reagents
• BD FACS™ 7-color setup beads
• BD Multitest™ reagents for sample staining
• BD FACSFlow™ sheath fluid, BD™ FACSClean solution, and BD FACS™ shutdown solution for cytometer operation
For other flow cytometer requirements, refer to the reference manual or instructions for use for either the BD FACSCanto or the BD FACSCanto II flow cytometer.
* Installed by the BD FACSCanto clinical software installer, if not already installed
12 BD FACSCanto Clinical Software Reference Manual

Compatibility
Data Files
BD FACSCanto clinical software writes flow cytometry standard (FCS) 3.0 data files. The software reads FCS data files produced by BD FACSCanto clinical software only.
Result Files
The software generates result files in comma separated value (CSV) format, readable by a spreadsheet application such as Microsoft Excel®.
Reports
The software automatically creates setup reports and application setup reports in PDF format, and can also be set to automatically generate lab reports in PDF format.
Worklists
BD FACSCanto clinical software can import worklists from BD FACS™ Sample Prep Assistant (SPA) software v2.0, v3.0, and v3.01.
Other Software
FCS and setup files created within BD FACSCanto clinical software can be imported into BD FACSDiva software v5.0 and v6.0.
Interference
There are no known incompatibilities with BD FACSCanto clinical software. Virus scanning programs could slow down the software’s processing speed.
Do not read FCS files created with version 2.2 using an earlier version of BD FACSCanto software. Earlier versions will show incorrect results.
Chapter 1: Introduction 13

Limitations
• For in vitro diagnostic use (IVD) when used with IVD reagents. Refer to the reagent package insert for application-specific limitations.
• For use only with BD FACS™ 7-color setup beads for setup and reagents (eg, BD Multitest™) that have been cleared for use on the BD FACSCanto and BD FACSCanto II flow cytometers.
• This software is for use only on the BD FACSCanto and BD FACSCanto II flow cytometers.
14 BD FACSCanto Clinical Software Reference Manual

2
Starting Up
Use this chapter to familiarize yourself with BD FACSCanto software the first time you use it.
• Starting the Software on page 16
• Software Overview on page 16
• Understanding the Workflow on page 29
15
Starting the Software
To start BD FACSCanto clinical software, do one of the following:
• Double-click the shortcut icon on the desktop.
• Select Start > Programs > BD FACSCanto Software > BD FACSCanto Software.
The Login dialog appears.
Logging In
The lab administrator should be the first user to log in to the software. A BD Biosciences service representative will give the password to the administrator, who can then access the software and set up users. See Setting Up New Users on page 85.
Tip Keep a copy of the administrator password in a secure location in case you forget it.
To log in, use the following procedure.
1 Select your User ID from the menu.
2 Enter your password, then click Login.
The main application window appears.
Software Overview
After you log in, the main window appears. Table 2-1 provides a brief overview of window components.
shortcut icon
16 BD FACSCanto Clinical Software Reference Manual

Table 2-1 Main window components
Component Function
Menu bar Contains the File, View, Worklist, Cytometer, Tools, and Help menus. See Application Menus on page 148.
Toolbars Contain buttons that provide quick access to menu commands. See Becoming Familiar with Toolbars on page 19.
Workspace Displays the Worklist, Acquisition, Lab Report, and Levey-Jennings tabs, depending upon where you are in the workflow.
Status bar Provides information about the cytometer’s current state, the cytometer-software connection, and the amount of time elapsed since login.
menu bar
workspace
toolbars
status bar
minimize maximize close
carousel window
status window
cytometer control window
Chapter 2: Starting Up 17

Minimize, Maximize, and Close buttons (in title bar)
Minimize button—Reduces the application to a button on the Windows taskbar.
Maximize button—Fills the screen with the main window.
Close button—Exits the application and prompts the Fluidics Shutdown procedure.
Carousel window Shows a graphic representation of a carousel rack and the rack ID of the currently selected sample. See Using the Carousel Window on page 20.
Status window Provides information on the current status of the flow cytometer. See Viewing Status Indicators on page 21.
Cytometer control windows Includes Detectors, Thresholds, and Spectral Overlap tabs.
For information, refer to the instructions for use for your cytometer.
Table 2-1 Main window components (continued)
Component Function
18 BD FACSCanto Clinical Software Reference Manual

Becoming Familiar with Toolbars
Toolbars can be moved within the main window or hidden.
• To move a toolbar, drag the grab bar to a new position on the screen.
• To hide a toolbar, select it from the View menu.
To show a hidden toolbar, select it again.
Use buttons on the software toolbars for the following.
Standard Toolbar
Worklist Toolbar
Log out
Create a new, blank acquisition worklist
Create a new analysis worklist
Open an existing worklist
Save the current worklist
Print the current workspace view
Run Add selected files
Pause Add files in folder
Stop
Skip
End Recording
Optimize
grab bar
acquisition analysis
Chapter 2: Starting Up 19

Using the Carousel Window
The Carousel window shows a graphic representation of a Loader carousel.
When you are setting up a worklist, the Carousel window shows the carousel ID for the currently selected sample.
As you enter sample information and assign tubes, carousel positions change from gray (unassigned) to white (assigned). The sample currently selected in the worklist is represented by one or two blue circles, depending upon the number of tubes in the panel.
During a run, the window shows the ID of the carousel that is currently running. Blue indicates the position of the current sample.
current worklist selection (two-tube panel)
carousel ID
no tube assigned
tube assigned
completed
currently acquiring sample (two-tube panel)
ready to run
20 BD FACSCanto Clinical Software Reference Manual
Viewing Status Indicators
The Status window displays important information about the cytometer. See Figure 2-2. The light on the Status bar turns red if there is something you must fix before you can continue. In the Status window, the text for a parameter turns red to alert you that a problem exists, although you might still be able to run the software. See Table 2-2 on page 22 for information about each parameter.
Status window parameters and values differ depending on whether the software is connected to the BD FACSCanto or the BD FACSCanto II flow cytometer.
Chapter 2: Starting Up 21

Figure 2-1 BD FACSCanto II cytometer Status window
Table 2-2 Status window
ParameterAcceptable
RangeDetails
Waste Tank Buffer — OK or Error
For errors, see on page 120.
Tube Guide Statusa — Loader or Manual
Indicates tube loading method.
Loader Status — Door Open, Door Closed, or Error
For Loader troubleshooting, refer to the reference manual for either the BD FACSCanto or BD FACSCanto II flow cytometer.
Vacuum, Pump, Float Status
— OK or Error
For errors, see on page 120.
no error conditionserror conditions
status light
status alert
22 BD FACSCanto Clinical Software Reference Manual
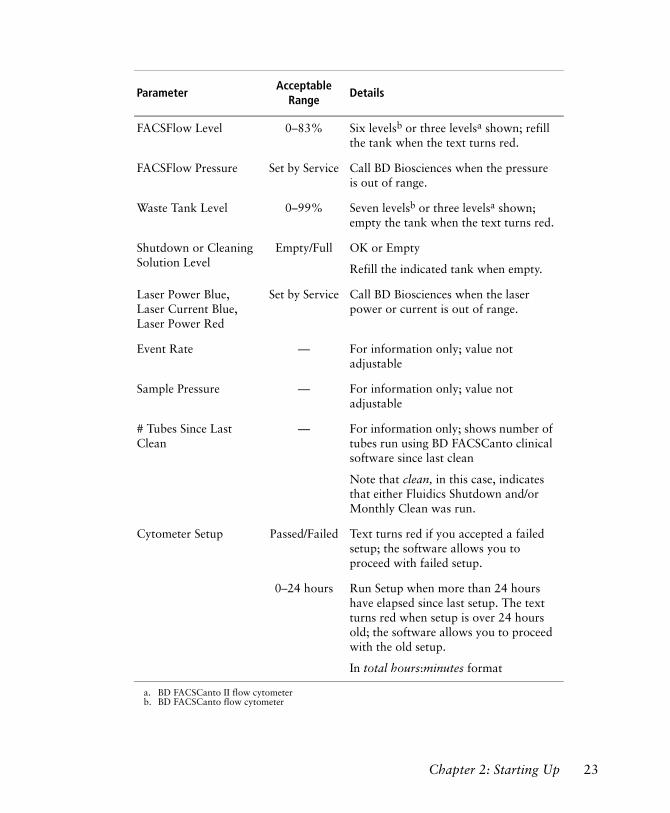
FACSFlow Level 0–83% Six levelsb or three levelsa shown; refill the tank when the text turns red.
FACSFlow Pressure Set by Service Call BD Biosciences when the pressure is out of range.
Waste Tank Level 0–99% Seven levelsb or three levelsa shown; empty the tank when the text turns red.
Shutdown or Cleaning Solution Level
Empty/Full OK or Empty
Refill the indicated tank when empty.
Laser Power Blue, Laser Current Blue, Laser Power Red
Set by Service Call BD Biosciences when the laser power or current is out of range.
Event Rate — For information only; value not adjustable
Sample Pressure — For information only; value not adjustable
# Tubes Since Last Clean
— For information only; shows number of tubes run using BD FACSCanto clinical software since last clean
Note that clean, in this case, indicates that either Fluidics Shutdown and/or Monthly Clean was run.
Cytometer Setup Passed/Failed Text turns red if you accepted a failed setup; the software allows you to proceed with failed setup.
0–24 hours Run Setup when more than 24 hours have elapsed since last setup. The text turns red when setup is over 24 hours old; the software allows you to proceed with the old setup.
In total hours:minutes format
a. BD FACSCanto II flow cytometerb. BD FACSCanto flow cytometer
ParameterAcceptable
RangeDetails
Chapter 2: Starting Up 23

Rearranging Window Components
You can rearrange the main window as needed. Hide, move, resize, or merge the Carousel, Status, and cytometer control windows.
To close a window, click the Close button in the title bar of the window.
To view the window again, select the name of the window from the View menu.
• To move a window, drag the title bar to a new position on the screen. You can position a window to fill the upper half of the screen by dragging the window to the upper-left corner of the worklist.
To return the window to the right side of the screen, double-click the window’s title bar.
• To resize a window, place the mouse pointer over the window’s border. When the pointer changes to a double-headed arrow, drag the border.
• To merge windows, drag one window on top of another. Each window is represented in the shared space by a tab.
To separate a merged window, drag the tab of the window out of the window’s frame.
Close button
24 BD FACSCanto Clinical Software Reference Manual

Becoming Familiar with the Worklist
Enter all sample and panel information into the worklist. You can also import a worklist to automatically fill in the appropriate fields.
Use the keyboard or barcode reader to enter sample information in worklist fields. Use the keyboard or mouse to select the Panel type and Carousel rack ID.
The column headers under Panel Information change, depending on which panel you are running, and which line is currently selected.
You can create, save, and print worklists.
• For information on creating a worklist, refer to the instructions for your cytometer.
• For information on saving and reusing a worklist, see Using an Acquisition Worklist as a Template on page 56.
• For information on printing a worklist, see Printing a Worklist on page 59.
Worklist Symbols
The following symbols might appear as you enter information into the worklist.
Indicates the currently selected field or line of information.
Indicates that the current field is editable.
Indicates that information in the current field has been changed.
Chapter 2: Starting Up 25

Resizing Worklist Columns
You can expand or shrink the width of worklist columns by dragging column dividers to the right or left.
Indicates the next line without entries.
Indicates a problem with a worklist entry.
Place your cursor over the symbol for more information about the problem. For example, in the following figure, a pop-up with the information The following characters are not valid for this field indicates that the colon (:) must be removed from the entry.
26 BD FACSCanto Clinical Software Reference Manual
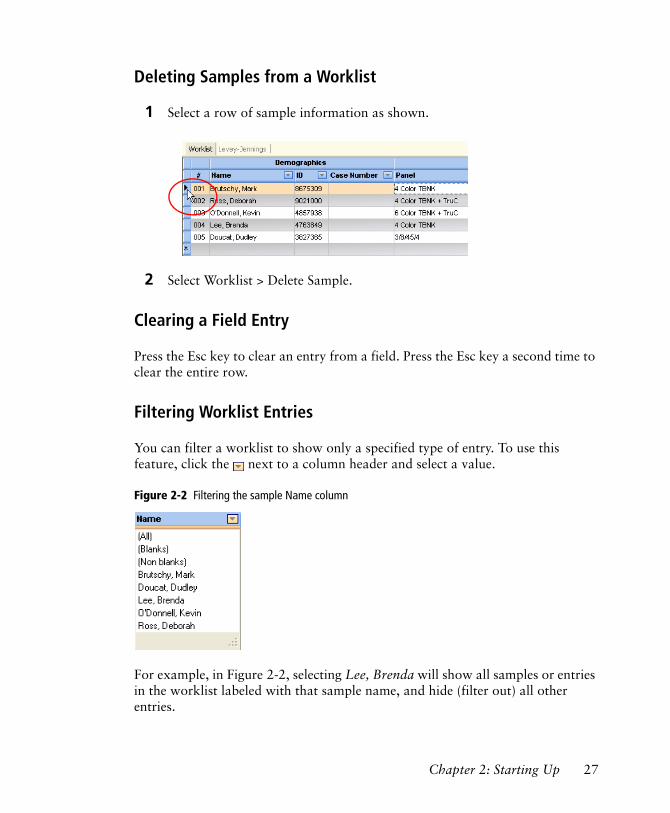
Deleting Samples from a Worklist
1 Select a row of sample information as shown.
2 Select Worklist > Delete Sample.
Clearing a Field Entry
Press the Esc key to clear an entry from a field. Press the Esc key a second time to clear the entire row.
Filtering Worklist Entries
You can filter a worklist to show only a specified type of entry. To use this feature, click the next to a column header and select a value.
Figure 2-2 Filtering the sample Name column
For example, in Figure 2-2, selecting Lee, Brenda will show all samples or entries in the worklist labeled with that sample name, and hide (filter out) all other entries.
Chapter 2: Starting Up 27

Different columns offer different filtering choices. The following table shows choices that are available for all filterable columns.
Table 2-3 Filter choices
Filter Choices Meaning
All No filter applied; worklist shows all entries.
Blanks Worklist shows only rows that have no entries in this column.
NonBlanks Worklist shows only rows that have entries in this column.
28 BD FACSCanto Clinical Software Reference Manual
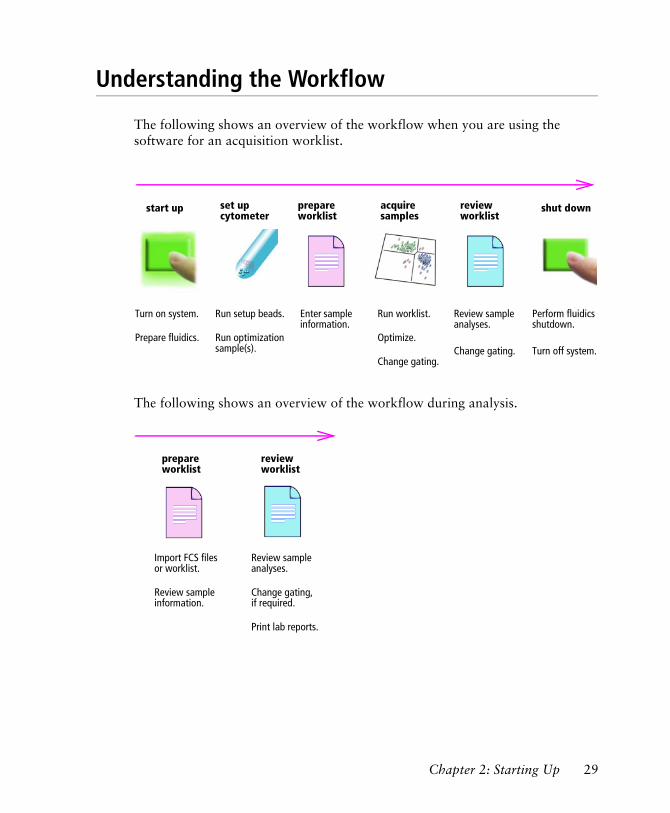
Understanding the Workflow
The following shows an overview of the workflow when you are using the software for an acquisition worklist.
The following shows an overview of the workflow during analysis.
start up
Turn on system.
Prepare fluidics.
Run setup beads.
Run optimization sample(s).
Enter sample information.
Run worklist.
Optimize.
Change gating.
Review sample analyses.
Change gating.
Perform fluidics shutdown.
Turn off system.
set up cytometer
prepare worklist
acquire samples
review worklist
shut down
Import FCS files or worklist.
Review sample information.
Review sample analyses.
Change gating, if required.
Print lab reports.
prepare worklist
review worklist
Chapter 2: Starting Up 29

30 BD FACSCanto Clinical Software Reference Manual
3
Reports
The software generates four types of reports, which are described in this chapter:
• Cytometer Setup Reports on page 32
• Application Setup Reports on page 35
• Levey-Jennings Reports on page 38
• Lab Reports on page 40
31

Cytometer Setup Reports
The Cytometer Setup Report becomes available after you run cytometer setup with BD FACS 7-color setup beads. You can access the report by clicking View Setup Report in the Cytometer Setup Wizard prior to optimization.
The Setup Report does not reflect assay-specific instrument settings. Figure 3-1 on page 33 shows an example of a Cytometer Setup Report.
32 BD FACSCanto Clinical Software Reference Manual

Figure 3-1 Cytometer Setup Report (example)
Report Header—Contains basic information about the cytometer, software version, institution, operator, and overall result.
• PASS indicates that all pass/fail specifications were met.
• FAIL indicates that at least one pass/fail specification was out of range.
Setup Beads—Details the bead product used, its catalog number, lot ID, and expiration date.
1
2
3
4
56
7
1
2
Chapter 3: Reports 33

Detectors—Provides the following information (Figure 3-2):
• Laser (a)—Indicates which laser excited the stained particle to emit light collected for that detector.
• FL Target (b)—Fluorescence target value in log form. The software adjusts the voltage so that the setup bead is at the target value. For more information about the FL Target, refer to the bead package insert.
• Voltage (c)—Voltage required to place the beads at the fluorescence target values (b). ΔVoltage (d) indicates the change in volts from the last setup. The difference between the two values should be less than 50 volts. A difference of less than 50 will pass (g). A difference of 50 or greater will fail.
• Sensitivity (e)—Measure of the cytometer's ability to resolve dimly stained cells. The measurement includes contributions from efficiency of photon collection, background signal, and intrinsic brightness of each fluorophore. A sensitivity value greater than the Spec value (f) means that the detector passes the sensitivity specification (g).
• P/F (g)—Indicates whether the Sensitivity (e) or ΔVoltage (d) passed or failed. A fail in either category will cause an overall Fail (g) for that detector.
Figure 3-2 Columns in the Detectors section of Setup Report
Compensation—Displays spectral overlap values calculated during setup for the current voltages. Values ≤100% will pass; values >100% will fail.
Lasers—Provides information about each laser and whether or not it passes the power specifications (in milliwatts) determined by BD Biosciences. The laser current (measured in ampere) is also provided.
Fluidics—Shows whether or not the sheath pressure meets BD Biosciences determined specifications. It also shows sample pressure voltage for low, medium, and high flow rates, a useful troubleshooting measurement.
3
ed fa b gc
4
5
6
34 BD FACSCanto Clinical Software Reference Manual

For help with out of range values on Setup Reports, see Setup Troubleshooting on page 125 or refer to the BD FACS 7-color setup beads package insert.
Application Setup Reports
An Application Setup Report shows assay-specific instrument settings. The software calculates and uses these settings if you choose not to optimize with biological samples. If you optimize, your adjustments will be used. Display this report by clicking View Report in the Cytometer Setup Optimization dialog after optimization.
Figure 3-3 Cytometer Setup Optimization dialog
Application Setup Reports do not display any pass or fail information. Pass or fail information is found on the Cytometer Setup Report. Figure 3-4 on page 36 shows an example of an Application Setup Report.
Comments—Provides an area to write additional information on a Cytometer Setup Report after you print the report.
7
Chapter 3: Reports 35

Figure 3-4 Example Application Setup Report
Report Header—Contains basic information about the cytometer and operator. The report title specifies the clinical application the values apply to.
Cytometer Setup—Details the bead product used, its catalog number, lot ID, and expiration date. Information from the cytometer setup (page 32) is used when calculating assay-specific setup.
1
2
3
4
5
6
1
2
36 BD FACSCanto Clinical Software Reference Manual

Detectors—Shows either BD Biosciences–generated voltages or user-optimized voltages.
• BD Biosciences–generated voltages means that default values were used to generate the application-specific setup.
• After you manually optimize, the software stores user-optimized voltages. The next time you run setup, the voltages will update based on both the default values and the last optimization values.
Compensation—Displays spectral overlap values automatically calculated for the voltages listed in the Detectors section.
Threshold—Indicates the parameter(s) used as the threshold for a clinical application during optimization. It also shows the logical operator in effect for the threshold(s). You can alter the default threshold parameter(s) and the logical operator, if needed. Logical operator choices are as follows:
• OR (any one threshold)
• AND (all selected thresholds)
Comments—Provides an area to write additional information on an Application Setup Report after you print the report.
3
4
5
6
Chapter 3: Reports 37

3
Levey-Jennings Reports
Levey-Jennings Reports contain Levey-Jennings plots, which track the cytometer setup data over time.
Figure 3-5 Example Levey-Jennings Report
Report Header—Contains basic information about the cytometer, software version, institution, and operator. The header is always included. Lab managers cannot alter the header.
Levey-Jennings plots—Included for the detectors, lasers, and other parameters specified by the lab manager in the Levey-Jennings Preferences dialog (see Specifying Levey-Jennings View Preferences on page 93). You can have up to 20 plots in a report.
1
2
4
1
2
38 BD FACSCanto Clinical Software Reference Manual

All Levey-Jennings plots contain the same basic elements.
Comments—Can be entered on a Levey-Jennings Report by any operator. See Entering Comments into a Lab or LJ Report on page 68 for instructions.
3
Element Description
a Title The attribute under observation
b Lot ID line If more than one lot ID is used, two lot ID symbols will appear in the plot and legend; only two lot IDs can be visualized by the software in the plots
c Data point A cytometer setup
d Thick blue line Mean
e Thin blue line +/- 1 standard deviation (SD) from the mean
f Thin blue line +/- 2 SD from the mean; an additional line can show +/- 3 SD from the mean, if selected as an alarm boundary; minimum and maximum lab manager–entered values can appear instead of SD
g Red X Data point outside alarm boundary
h x axis Time, with dates for data points
i y axis Value depends upon which attribute is being plotted; can be volts (detectors), sensitivity, mWatts (laser power), amps (laser current), spillover, channel
a b
h
g
de
f
c
Legend
i
4
Chapter 3: Reports 39

Lab Reports
You can view or print a Lab Report for every analyzed sample in a worklist.
Figure 3-6 Lab Report example
1
3
4
5
6
8
2 7
40 BD FACSCanto Clinical Software Reference Manual

A lab manager chooses which Report Header information to include on Lab Reports (see Choosing Header Information on page 110). If a lab manager selects Sample Name and Sample ID, these worklist entries will become the first and second lines of the header (see the sample Lab Report in Figure 3-6 on page 40).
Values entered in the panel-specific columns of the worklist will appear here as well. (In Figure 3-6 on page 40, Column #1, Column#2, and Column #3 are the columns specific to the 4 Color TBNK + TruC panel.)
This section shows the plots and the analyzed data, as well as the total number of events collected, the reagent lot ID used, and the name of the FCS file generated for each tube.
This section reports the results of the analysis for each tube. A lab manager can choose which results to display and alter alarm ranges (see Changing Subset Results for a Reagent on page 104 and Changing Alarm Ranges for Subset Results on page 105).
If a result falls outside the alarm range, the text is highlighted in red, and the message One or more results are outside the alarm range appears in the QC Messages section of the Lab Report.
QC Messages shows the following:
• Lab manager–selected quality control values (see Choosing QC Values on page 106)
• Message indicating a failure occurred (see QC Messages on page 138)
• Message when one or more results are outside the alarm range
Any operator can electronically enter or edit Comments on a Lab Report. See Entering Comments into a Lab or LJ Report on page 68.
The small print on the left shows the serial number of the cytometer.
The small print on the right shows the software version used to do the assay.
The small print on the left shows the name of the FCS file.
The small print on the right shows the reagent lot ID.
The small print on the left shows the name of the FCS file.
The small print on the right shows the reagent lot ID.
1
2
3
out of range results
4
5
6
7
8
Chapter 3: Reports 41

42 BD FACSCanto Clinical Software Reference Manual

4
User Options
Certain software options are available only if you have lab manager privileges. See Lab Manager Options on page 73. The following options are available to all users of BD FACSCanto clinical software.
• Options while Running the Cytometer on page 44
• Understanding Worklist Options on page 54
• Printing on page 58
• Customizing Software Defaults on page 64
• Entering Comments into a Lab or LJ Report on page 68
• Viewing Previous Levey-Jennings Plots on page 70
• Changing Your Password on page 72
43

Options while Running the Cytometer
• Entering New Lot IDs on this page
• Placing the Cytometer in Standby on page 52
• Connecting to the Cytometer on page 53
Entering New Lot IDs
BD FACSCanto clinical software stores lot information for setup beads, reagents, and BD Trucount™ beads. To enter information for a new lot, see the following sections:
• Entering Lot Information for Setup Beads Manually on page 45
• Entering Lot Information for Setup Beads with the Barcode Reader on page 49
• Entering a Reagent Lot ID Manually on page 51
• Entering an Absolute Count Bead Lot ID on page 51
44 BD FACSCanto Clinical Software Reference Manual

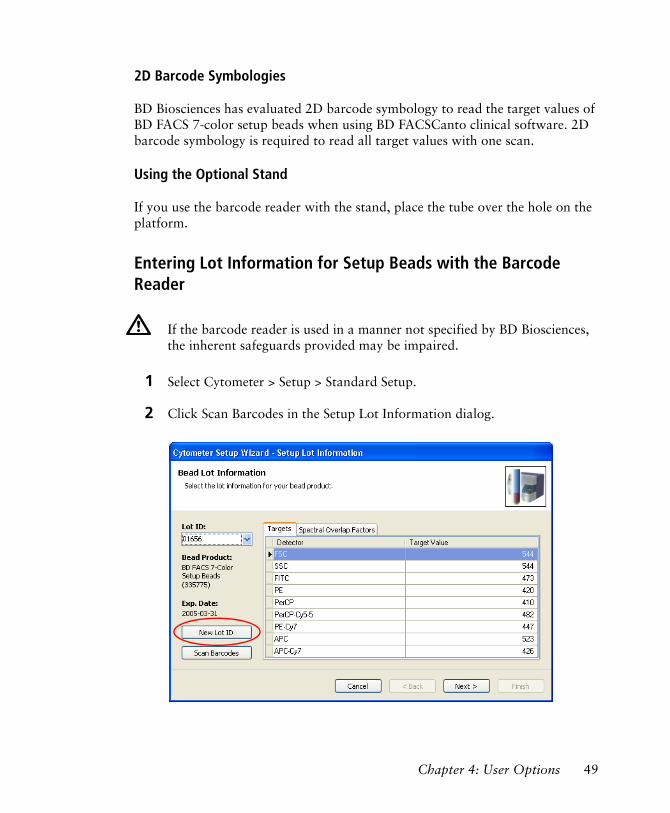
Entering Lot Information for Setup Beads Manually
1 Select Cytometer > Setup > Standard Setup.
2 Click New Lot ID in the Setup Lot Information dialog.
Figure 4-1 Setup Lot Information dialog
3 Select the bead product, enter the lot ID and the expiration date, and click OK.
Chapter 4: User Options 45

Figure 4-2
.
4 In the Setup Lot Information dialog, enter the target values for the bead lot.
To change a target value, select the current value in the Target Value field and enter the new value. Repeat until you have edited all target values.
Target values determine where the software places the setup beads during detector and spectral overlap adjustments. They must be edited for every new bead lot. Target values are provided with each box of beads. See Figure 4-3 on page 47 for an example setup beads label.
For BD FACS 7-color setup beads, locate this information on the foil reagent packet, the target values sticker, or the side of the reagent box. Do not use the numbers on the setup beads tube.
46 BD FACSCanto Clinical Software Reference Manual

Figure 4-3 Example setup beads label
5 Click the Spectral Overlap Factors tab, then enter the spectral overlap factors for the bead lot.
Spectral overlap factors correct for mismatches in spectral overlap between the setup beads and cells so that the sample cells will be properly compensated. They must be edited for every new bead lot. Spectral overlap factors are provided with each box of beads.
To change a value, select the field containing the value you want to change and enter the new value. Repeat until all required values are entered.
Get new printout from Val.
Chapter 4: User Options 47

6 Click Finish.
Using the Barcode Reader for the BD FACSCanto System
1D Barcode Symbologies
Although data entry using barcodes is generally more reliable than manual data entry, it is not guaranteed to be 100% accurate. To increase accuracy when using the barcode reader, enable the checksum feature.
BD Biosciences has evaluated the following 1D barcode symbologies for use with the BD FACSCanto and BD FACSCanto II flow cytometers, and has these recommendations:
If the barcode reader is used in a manner not specified by BD Biosciences, the inherent safeguards provided may be impaired.
Using barcode symbologies without checksums enabled increases the likelihood of incorrect information transfer, including sample ID assignments. This can result in a mismatch of sample IDs and sample results.
Barcode Symbology Recommendation
Code 128 Preferred.
Code 39 Acceptable if barcode labels are printed with the checksum digit. By default, the barcode reader recognizes the checksum digit when reading the Code 39 symbology. However, if labels are printed without a checksum digit, contact your BD service representative for instructions on disabling the checksum feature.
Codabar The barcode reader does not support the checksum feature when reading the Codabar symbology.
48 BD FACSCanto Clinical Software Reference Manual
2D Barcode Symbologies
BD Biosciences has evaluated 2D barcode symbology to read the target values of BD FACS 7-color setup beads when using BD FACSCanto clinical software. 2D barcode symbology is required to read all target values with one scan.
Using the Optional Stand
If you use the barcode reader with the stand, place the tube over the hole on the platform.
Entering Lot Information for Setup Beads with the Barcode Reader
1 Select Cytometer > Setup > Standard Setup.
2 Click Scan Barcodes in the Setup Lot Information dialog.
If the barcode reader is used in a manner not specified by BD Biosciences, the inherent safeguards provided may be impaired.
Chapter 4: User Options 49
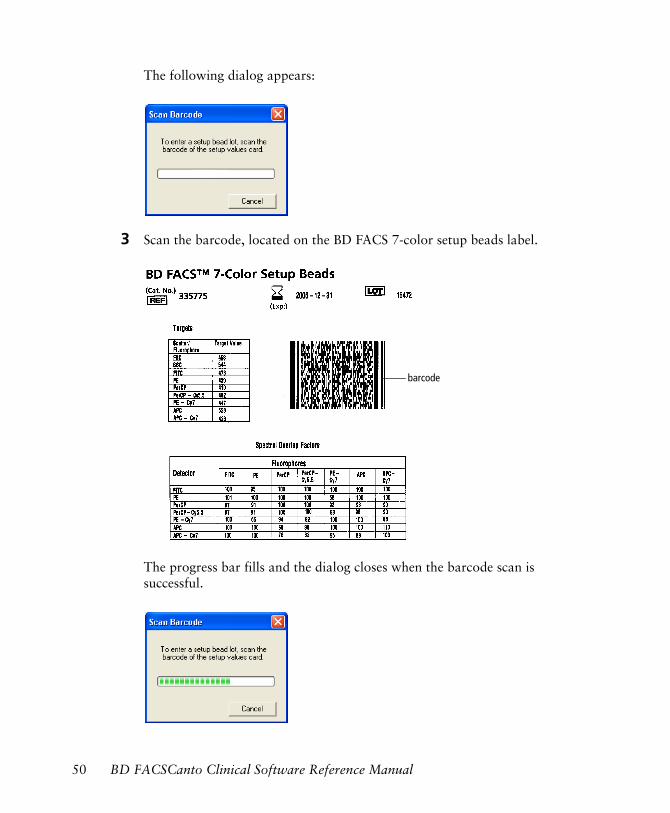
The following dialog appears:
3 Scan the barcode, located on the BD FACS 7-color setup beads label.
The progress bar fills and the dialog closes when the barcode scan is successful.
barcode
50 BD FACSCanto Clinical Software Reference Manual

The lot ID, expiration date, target values, and spectral overlap factors for the bead product appear on the appropriate tab of the Setup Lot Information dialog.
See Entering Lot Information for Setup Beads Manually on page 45 for more information.
4 Check all affected software fields for accuracy against the setup beads label.
Entering a Reagent Lot ID Manually
1 Select Tools > Lot IDs.
2 On the appropriate Reagents tab, select a Reagent Name from the list and enter the new Lot ID. Click OK.
Entering an Absolute Count Bead Lot ID
1 Select Tools > Lot IDs.
2 In the Lot IDs dialog, click the Absolute Count Beads tab.
3 Enter the Lot ID and Beads/Pellet, which can be found on the pouch.
Reagents tabs
Chapter 4: User Options 51

4 Click OK.
Placing the Cytometer in Standby
Placing the cytometer in standby disconnects the software from the cytometer, which allows you to run BD FACSDiva software without quitting BD FACSCanto clinical software.
1 Select Cytometer > Standby.
2 Click Yes in the confirmation dialog.
The fluidics shut down and the software disconnects from the cytometer.
Note the messages in the status bar:
To obtain accurate results, it is critical that you enter this information accurately. Double-check your entry.
52 BD FACSCanto Clinical Software Reference Manual
Connecting to the Cytometer
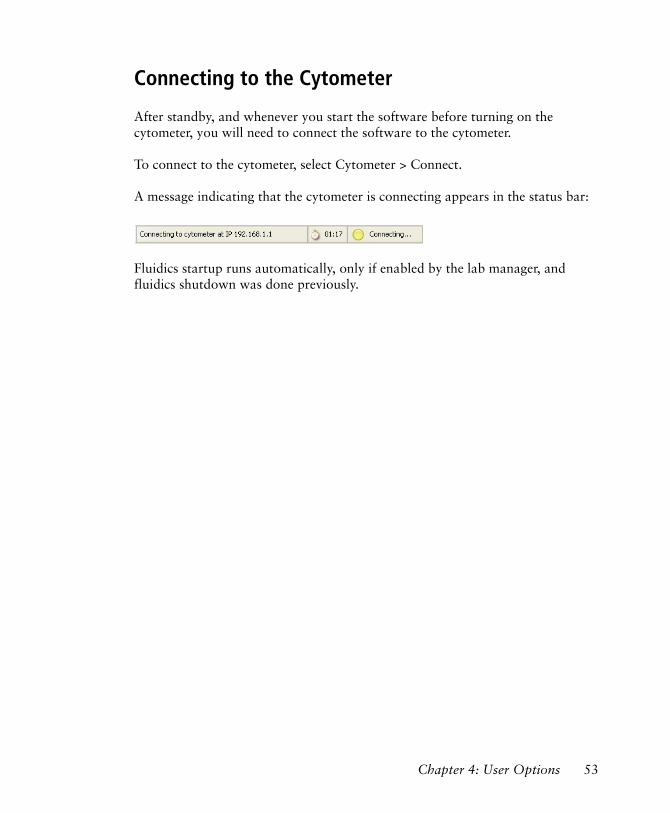
After standby, and whenever you start the software before turning on the cytometer, you will need to connect the software to the cytometer.
To connect to the cytometer, select Cytometer > Connect.
A message indicating that the cytometer is connecting appears in the status bar:
Fluidics startup runs automatically, only if enabled by the lab manager, and fluidics shutdown was done previously.
Chapter 4: User Options 53

Understanding Worklist Options
When you first open BD FACSCanto software, a new blank worklist appears by default.
You can enter information into this worklist, or you can:
• Open an existing acquisition worklist.
• Start a new acquisition worklist using a saved worklist as a template.
• Import a Sample Prep Assistant worklist.
For information on entering information into a worklist, refer to the instructions for use for either the BD FACSCanto or the BD FACSCanto II flow cytometer.
new blankworklist
54 BD FACSCanto Clinical Software Reference Manual

Opening an Existing Worklist
1 Select File > Open Worklist.
2 Navigate to and select an acquisition worklist (WKL), and click Open.
By default, worklists are saved in the C:\Program Files\BD FACSCanto Software\Worklists folder.
3 View the status of worklist samples in the Status fields.
For a description of Status entries, refer to Reviewing a Worklist in the instructions for use for your cytometer.
If an existing acquisition worklist contains samples that were not yet run, you can run the worklist again. You can also add samples to the worklist. Refer to the instructions for use for your cytometer.
Chapter 4: User Options 55

Once an acquisition worklist contains FCS files for each sample in the worklist, you cannot run it again. To run a skipped tube, double-click the tube’s Status field, and from the Lab Report view, click the Re-Run button.
Using an Acquisition Worklist as a Template
Any saved acquisition worklist can be reused as a template. When you open a saved worklist as described in this section, sample information and FCS file name fields are cleared. Enter new sample information to use the worklist again.
1 Select File > New Acquisition Worklist.
2 Navigate to the folder containing your saved worklists and select a file. Click Open.
By default, worklists are saved in the C:\Program Files\BD FACSCanto Software\Worklists folder.
Tip Start a new, empty worklist by selecting blank.wkl from the worklists folder (this file comes with the software). Or, you can click on the toolbar.
3 (Optional) Enter new sample IDs for each sample.
The software retains the panel type and carousel information from your saved worklist, and assigns default sample IDs. (Sample IDs partially determine the FCS file name for each sample.) Keep or change the information, as needed. You can also enter sample names and case numbers, if you like.
56 BD FACSCanto Clinical Software Reference Manual
Importing a Worklist from BD FACS SPA
You can import sample information from a worklist created in BD FACS Sample Prep Assistant (SPA) software version 2.0 or later.
1 Select File > Import SPA Worklist.
Sample information can be imported only into a new, blank worklist. You cannot add imported information to a worklist that is already started.
2 Navigate to and select a worklist, then click Open.
By default, SPA worklists are stored in Program Files\BDApps\SPA\DataFiles on the system where Sample Prep Assistant software is installed.
Tip Create a SPA Worklist folder within the BD FACSCanto Worklists folder to help locate files.
3 Review the imported information and edit missing or incorrect entries, if needed.
4 If you are running samples with the Loader, verify the carousel IDs for each sample and print the worklist.
To import the worklist, all reagent and panel names must exactly match those used in BD FACSCanto clinical software.
Chapter 4: User Options 57
If carousel IDs are missing or incorrect, select the correct carousel ID from the drop-down menu. Print the worklist and use it as a guide when you are filling the carousels.
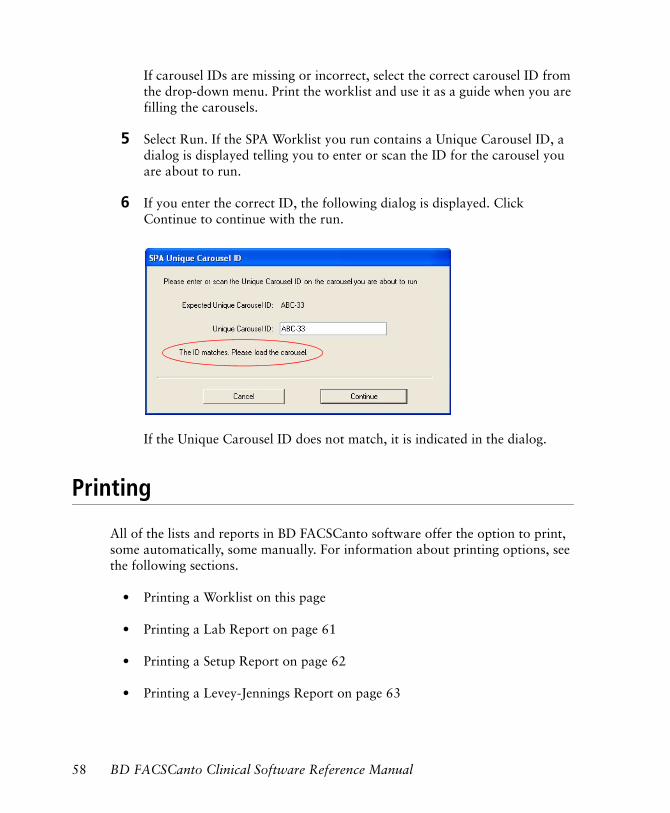
5 Select Run. If the SPA Worklist you run contains a Unique Carousel ID, a dialog is displayed telling you to enter or scan the ID for the carousel you are about to run.
6 If you enter the correct ID, the following dialog is displayed. Click Continue to continue with the run.
If the Unique Carousel ID does not match, it is indicated in the dialog.
Printing
All of the lists and reports in BD FACSCanto software offer the option to print, some automatically, some manually. For information about printing options, see the following sections.
• Printing a Worklist on this page
• Printing a Lab Report on page 61
• Printing a Setup Report on page 62
• Printing a Levey-Jennings Report on page 63
58 BD FACSCanto Clinical Software Reference Manual

Printing a Worklist
You can print a worklist before running it to assist you when loading a carousel. You can also print after a worklist finishes to serve as a summary report of the samples run.
Always preview a worklist before printing it to ensure that all required information is visible before you print it.
1 Select File > Print Preview.
2 Use buttons in the Preview window to set up for printing (Figure 4-4 on page 60).
Chapter 4: User Options 59

Figure 4-4 Using Print Preview buttons
f
• To print the worklist, select File > Print.
3 To exit, select File > Exit.
Move document in window Select zoom percentage from menu
Set up printer and then print
Print as isGo to first page, previous page, next page, or last page
Add custom headers and footers Number of pages to view in window
Magnify selection Add background color
Zoom in Close preview
Zoom out
60 BD FACSCanto Clinical Software Reference Manual

Exporting the Worklist to Another Format
Alternatively, you can make the worklist into a PDF document or a graphic document, using these steps.
1 Select File > Print Preview.
2 From the Preview window’s main menu, select File > Export To > PDF Document or Graphic Document.
Printing a Lab Report
To print a Lab Report, select File > Print while viewing it.
To print all Lab Reports in a worklist at once, select File > Print All Lab Reports.
Printing a Lab Report Automatically
You can set Lab Report Options to print Lab Reports automatically after the cytometer acquires each sample. This option applies only to the current user. Preferences are saved from one login session to the next.
1 Select Tools > Options.
2 Click .
The Lab Report Options dialog appears.
Chapter 4: User Options 61

3 Select the checkbox to Automatically print Lab Report after each sample.
4 Enter the number of report copies to print per sample, and click OK.
You can print up to 10 copies.
Printing a Setup Report
To print a Setup Report, select File > Print while viewing it.
Setup Reports are automatically saved as PDF files in C:\Program Files\BD FACSCanto Software\SetupReports.
If you do not print a report immediately after setup, you can open and print the PDF file. For information on how files are named, see Table 5-1 on page 80.
62 BD FACSCanto Clinical Software Reference Manual

Printing Setup Reports Automatically
You can print Setup Reports automatically after both setup and optimized setup. This option applies only to the current user. Preferences are saved from one login session to the next.
Tip Enable this option to make sure formatted reports are printed after setup and optimization.
1 Select Tools > Options.
2 Click .
3 Select the checkbox to Automatically print Setup Report and click OK.
Printing a Levey-Jennings Report
1 In the main window, select the Levey-Jennings tab.
2 Select File > Print.
Previewing a Levey-Jennings Report Before Printing
1 Select File > Print Preview.
2 Use buttons in the Preview window to set up for printing (Figure 4-4 on page 60).
3 To print the report, select File > Print.
4 To exit, select File > Exit.
Chapter 4: User Options 63
Customizing Software Defaults
• Customizing the Lab Report Countdown on this page
• Customizing File Locations on page 66
• Customizing Windows and Toolbars on page 67
Customizing the Lab Report Countdown
Lab managers set the default for the Lab Report countdown, but each user can set a user-specific preference that will be saved from one login session to the next.
The Lab Report countdown controls the amount of time the Lab Report displays at the end of sample acquisition. During the countdown, you can pause and re-gate the current sample (showing in the Lab Report view).
Options for customizing the Lab Report countdown are as follows:
Option Explanation
Off, wait before continuing
Countdown dialog does not appear. The Lab Report appears prior to the Acquisition view for the next tube. You must click Start to continue to the next tube.
Off, continue automatically
Countdown dialog does not appear. Acquisition of next tube starts automatically.
On, time to display countdown (sec)
Countdown dialog appears, allowing you to pause and re-gate, if necessary.
64 BD FACSCanto Clinical Software Reference Manual

Specifying a Display Time for the Lab Report Countdown
1 Select Tools > Options.
2 Click .
3 Select On, time to display countdown (sec).
4 Enter a number of seconds, from 1 to 10, and click OK.
Chapter 4: User Options 65
Customizing File Locations
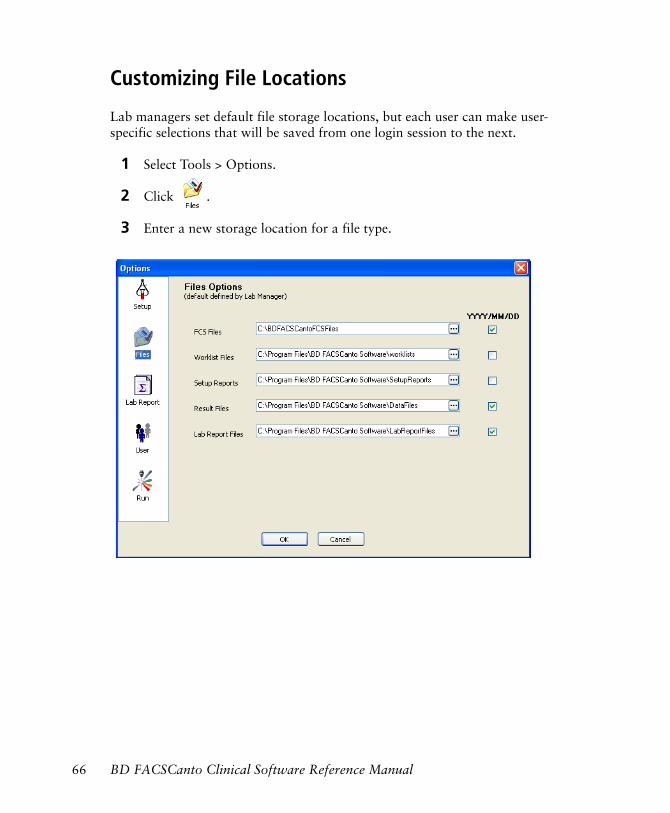
Lab managers set default file storage locations, but each user can make user-specific selections that will be saved from one login session to the next.
1 Select Tools > Options.
2 Click .
3 Enter a new storage location for a file type.
66 BD FACSCanto Clinical Software Reference Manual

Enter a new location or find a location by browsing.
• To browse, click .
• Select or create a folder.
• Click OK.
4 To designate that a type of file is stored in a location consisting of year, month, and date folders, ensure that the directory checkbox (YYYY/MM/DD) is selected for that type of file.
For FCS Files, Result Files, and Lab Report Files, the YYYY/MM/DD checkboxes are selected by default. For Worklist Files or Setup Reports, the YYYY/MM/DD checkboxes are not selected by default. You can select or clear these checkboxes for any of the file types.
5 Click OK to save changes.
Customizing Windows and Toolbars
You can show, hide, change the appearance of, or relocate many of the windows and toolbars in the main window. The change lasts until you log off or quit the software.
Chapter 4: User Options 67

Hiding Windows and Toolbars
1 From the main menu, select View.
The indicates visible windows or toolbars.
2 Select a window or toolbar to hide and then select it.
The disappears, and the window becomes hidden.
To show the window or toolbar again, reselect it in the menu.
Entering Comments into a Lab or LJ Report
Lab Reports and Levey-Jennings (LJ) Reports allow any reviewer to enter text into the Comments field. To enter or edit comments, do the following:
1 At the Lab Report or Levey-Jennings Report view, click Comments.
68 BD FACSCanto Clinical Software Reference Manual

Figure 4-5 Example Lab Report
A dialog appears.
2 Enter text into the Comments field or edit the existing text.
Tip Copy and paste unformatted text into the Lab Report Comments dialog.
Chapter 4: User Options 69
3 Click OK.
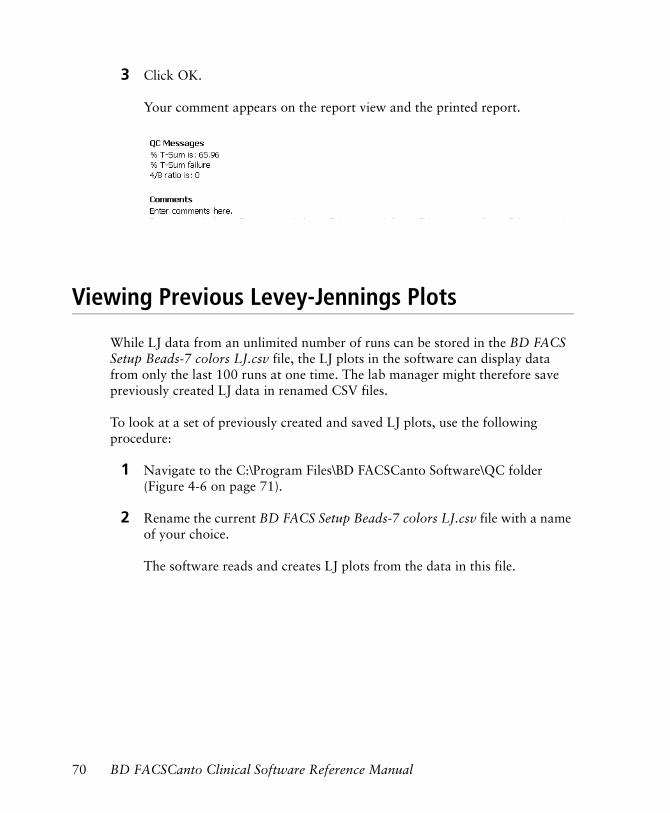
Your comment appears on the report view and the printed report.
Viewing Previous Levey-Jennings Plots
While LJ data from an unlimited number of runs can be stored in the BD FACS Setup Beads-7 colors LJ.csv file, the LJ plots in the software can display data from only the last 100 runs at one time. The lab manager might therefore save previously created LJ data in renamed CSV files.
To look at a set of previously created and saved LJ plots, use the following procedure:
1 Navigate to the C:\Program Files\BD FACSCanto Software\QC folder (Figure 4-6 on page 71).
2 Rename the current BD FACS Setup Beads-7 colors LJ.csv file with a name of your choice.
The software reads and creates LJ plots from the data in this file.
70 BD FACSCanto Clinical Software Reference Manual

Figure 4-6 Location of current file
3 Rename the previously created file to BD FACS Setup Beads-7 colors LJ.csv.
In Figure 4-6, the previously created file is 2005 FebBD FACS Setup Beads-7 colors LJ.csv.
4 In the main window, select the Levey-Jennings tab.
5 Click Refresh.
The software reads the previous files, which display in the Levey-Jennings view.
Viewing Current Levey-Jennings Plots
The software automatically updates the LJ plots after you accept a cytometer setup. To view the current LJ plots, simply select the Levey-Jennings tab. There is no need to click the Refresh button.
current filepreviously created file
Chapter 4: User Options 71

Changing Your Password
To change your password, follow these steps.
1 Select Tools > Options.
2 Click .
3 Click Change Password.
4 Enter your old password, a new password of up to 30 characters, and then confirm the new password. Click OK.
You can use any alphanumeric character. Passwords are case sensitive.
5 Click OK to close the Options dialog.
72 BD FACSCanto Clinical Software Reference Manual

5
Lab Manager Options
In BD FACSCanto clinical software, lab managers administer user accounts and set defaults for functions such as printing, fluidics startup, and what appears on a Lab Report or Levey-Jennings Report. Whoever installs the software and creates the first account during installation assumes lab manager status. That individual can then create other user accounts, including more lab managers. There can be one or many lab managers.
You must have Windows XP administrator privileges to install the software (page 74). You must have lab manager privileges to do the following:
• Managing Files on page 80
• Managing User Accounts on page 85
• Changing Fluidics Startup Preferences on page 90
• Changing Setup Preferences on page 92
• Changing Worklist Report Header Preferences on page 97
• Changing Acquisition Preferences on page 97
• Changing Lab Report Preferences on page 102
• Other Options on page 113
73

Most examples within this chapter show 4- and 6-color TBNK panel details. For clinical application defaults and examples, refer to the individual clinical application guides.
Installing the Software
BD FACSCanto software is already installed on your computer. Follow these steps if you need to re-install the software.
Before you begin, uninstall the current software. (See Uninstalling the Software on page 79.) Make sure you have no programs running that might conflict with the installer software.
1 Insert the BD FACSCanto software installation CD into the CD-ROM drive.
The installer should start up automatically. If it doesn’t, use Windows Explorer to view the CD contents, and double-click the Setup.exe icon.
2 Click Next to begin the installation.
3 If you are prompted to do so, install Microsoft .NET Framework.
Installation will not continue if you do not have Microsoft .NET Framework software installed.
4 Review and accept the license agreement.
5 Enter your user name and company name. Click Next.
74 BD FACSCanto Clinical Software Reference Manual

6 If you are prompted to do so, click OK to install Adobe Acrobat Reader.
You need Acrobat Reader to view PDF documents. Follow the instructions in the dialogs and accept all default options to install Acrobat Reader.
Keep the default of Anyone who uses this computer (all users). Otherwise, only the person who installed the software will have access to it.
Chapter 5: Lab Manager Options 75

7 Review the setup information and click Next.
By default, the installer places all components in C:\Program Files\BD FACSCanto Software. To install components in a different location, click the Browse button and navigate to a different folder.
8 Review the installation settings and click Next.
76 BD FACSCanto Clinical Software Reference Manual

The installer loads the software and its support files on the selected hard disk.
9 When prompted, choose to save or overwrite your existing user account file.
• To reuse your existing user information, click No and go to step 10.
• To start a new list of users, click Yes.
Create the first user account when prompted. This user will have lab manager privileges. Enter the user name and password, then click OK.
Chapter 5: Lab Manager Options 77
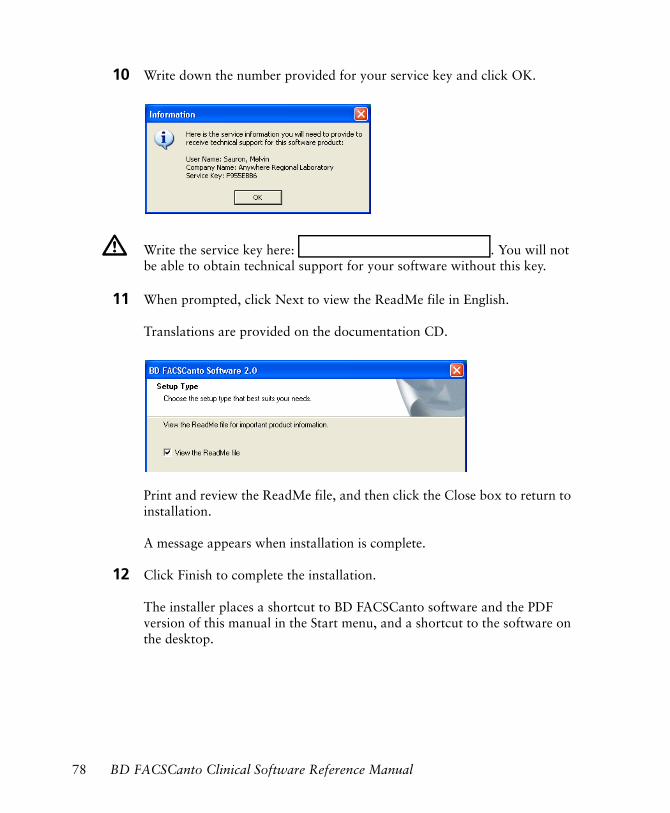
10 Write down the number provided for your service key and click OK.
11 When prompted, click Next to view the ReadMe file in English.
Translations are provided on the documentation CD.
Print and review the ReadMe file, and then click the Close box to return to installation.
A message appears when installation is complete.
12 Click Finish to complete the installation.
The installer places a shortcut to BD FACSCanto software and the PDF version of this manual in the Start menu, and a shortcut to the software on the desktop.
Write the service key here: . You will not be able to obtain technical support for your software without this key.
78 BD FACSCanto Clinical Software Reference Manual

The installer places the software and all supporting files in one of three folders on the specified drive.
• D:\BDFACSCantoFCSFiles
• C:\Program Files\BD FACSCanto Software
• C:\Program Files\Common Files\BD
Translated copies of the PDF version of this manual can be found on the BD FACSCanto documentation CD.
Uninstalling the Software
Follow the steps in this section if you need to uninstall the software. Uninstalling will not remove your data files.
1 From the Windows Start menu, select Settings > Control Panel > Add or Remove Programs.
2 Select BD FACSCanto Software, and click Change/Remove.
3 Click OK to confirm.
4 Follow the prompts on the screen to remove all installed components, then click Finish.
5 Close the Add or Remove Programs window.
Chapter 5: Lab Manager Options 79

Managing Files
The software creates the following file types (Table 5-1).
Tip To open a file while running BD FACSCanto clinical software, make a copy of the file and open the copy.
Do not change the properties of these files, or BD FACSCanto clinical software might not run. For example, do not make them Read-only.
Do not open support files in another software application while BD FACSCanto clinical software is running.
Table 5-1 Files
File Type Default Name Default Location Description
FCS (.fcs) SampleID[3-digit worklist entry number]. [3-digit tube number].fcs
D:\BDFACSCantoFCSFiles\yyyy\Month\dd
Saves event data, cytometer settings, analysis (including manual gates), and any user comments for a tube; FCS 3.0 format used
Levey-Jennings (.csv)
BD FACS Setup Beads - 7 colors LJ.csv
C:\Program Files\BD FACSCanto Software\QC
Contains the following QC data for 30, 60, or an unlimited number of samples (if designated by the lab manager):
• Run date and time
• Cytometer setup bead lot ID
• Detector voltages
• Sample and sheath pressure
• Spectral overlap values
• Power and spec for each laser, current for blue laser
Acquisition Worklist (.wkl)
Worklist.wkl C:\Program Files\ BD FACSCanto Software\Worklists
List of sample information and associated FCS files
80 BD FACSCanto Clinical Software Reference Manual

Analysis Worklist (.wka)
Worklist.wka C:\Program Files\ BD FACSCanto Software\Worklists
List of sample information and associated FCS files
Setup Report (.pdf)
setup type_yyyyMMdd_hhmm.pdf
C:\Program Files\BD FACSCanto Software\SetupReports
Consists of a PDF file of a Setup Report from a specific time and date, saved automatically
Lab Report (.pdf)
SampleID[3-digit worklist entry number] .pdf
C:\Program Files\BD FACSCanto Software\LabReport Files\yyyy\Month\dd
Consists of a PDF file of a Lab Report from a specific time and date, saved if specified by lab manager
Usage Trace (.csv)
yyyy Month.csv; for example, 2003 March.csv
C:\Program Files\Common Files\BD
Tracks the following information for all users:
• User name
• Full name
• Application name
• Role
• Department
• Institution
• Login time, login date
• Logout time, logout date
Setup Results (.dat)
SetupResult.dat
C:\Program Files\Common Files\BD\Setup Results
Contains data from the latest saved setup
Optimized Setup Result (.opt)
panel type.opt; for example, 4 Color TBNK.opt
C:\Program Files\Common Files\BD\Setup Results
Contains data from the latest optimized setup
Result (.csv)
ddMMyyyy.csv C:\Program Files\BD FACSCanto Software\DataFiles\yyyy\Month\dd
Tracks sample and panel information and all subset results on a daily basis
Table 5-1 Files (continued)
File Type Default Name Default Location Description
Chapter 5: Lab Manager Options 81

The following figure shows how the folders are organized.
Figure 5-1 Folder locations
Process Control Results (.csv)
LotID.csv C:\Program Files\BD FACSCanto Software\DataFiles
Tracks results of process control samples to an export-friendly data file (CSV format)
Table 5-1 Files (continued)
File Type Default Name Default Location Description
82 BD FACSCanto Clinical Software Reference Manual
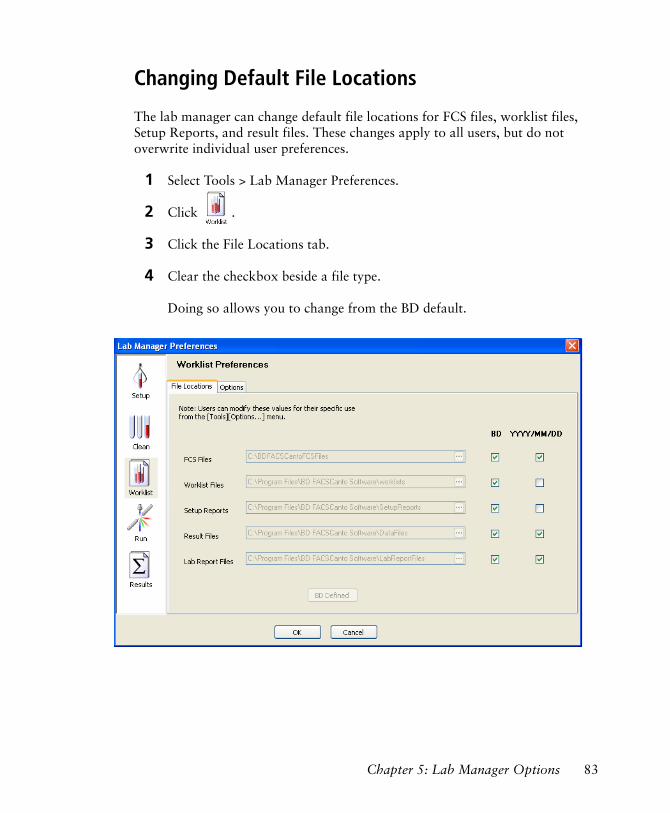
Changing Default File Locations
The lab manager can change default file locations for FCS files, worklist files, Setup Reports, and result files. These changes apply to all users, but do not overwrite individual user preferences.
1 Select Tools > Lab Manager Preferences.
2 Click .
3 Click the File Locations tab.
4 Clear the checkbox beside a file type.
Doing so allows you to change from the BD default.
Chapter 5: Lab Manager Options 83

5 Enter a new location, or find a location by browsing.
• To browse, click .
• Select or create a folder.
• Click OK.
6 To designate that a type of file is stored in a location consisting of year, month, and date folders, ensure that the directory checkbox (YYYY/MM/DD) is selected for that type of file.
For FCS Files, Result Files, and Lab Report Files, the YYYY/MM/DD checkboxes are selected by default. For Worklist Files or Setup Reports, the YYYY/MM/DD checkboxes are not selected by default. You can select or clear these checkboxes for any of the file types.
7 To revert to the BD-defined storage location, select the checkbox next to the file type.
To revert all file locations back to BD defaults, click BD Defined.
8 Click OK to save changes.
84 BD FACSCanto Clinical Software Reference Manual

Managing User Accounts
• Setting Up New Users on page 85
• Editing User Information on page 88
• Deleting Users on page 88
• Disabling User Accounts on page 89
• Enabling User Accounts on page 90
NOTICE User account information is stored in a file with the administrator password. If you lose the password, user information could also be lost. Keep a copy of the administrator password in a secure location in case you forget it.
Setting Up New Users
Before other users can run samples, the lab manager needs to set up user accounts.
1 From the main menu, select Tools > Users and Passwords.
2 (Optional) Create a list of departments.
• Click Departments.
• Click New Department.
A new department name appears in the Department list.
• Enter the following information in each field.
Field or Menu Explanation
Department Name Up to 30 characters
Director Name (Optional) Up to 30 characters
Chapter 5: Lab Manager Options 85

• Continue to add departments as needed.
You can create up to 50 departments.
• Click OK when you are done.
3 Create a list of users.
• Click New User.
Institution Name (Optional) Up to 30 characters
Address (Optional) Up to 3 lines, with 40 characters per line
Tel. No. (Optional) Up to 30 characters
Fax No. (Optional) Up to 30 characters
URL (Optional) Up to 200 characters
Field or Menu Explanation
86 BD FACSCanto Clinical Software Reference Manual
The default name (User 1) appears on the list.
• Enter the following information for each user.
• Continue to add users.
You can have up to 50 enabled users (including lab managers).
4 Create a password for each new user.
• Select a user.
• Click Password.
• Enter a password and confirm it.
Field or Menu Explanation
User Name Up to 25 characters—name the user selects from the menu during login and enters with the password
Full Name Up to 30 characters—name that appears on report headers
Initials Up to 10 characters
Role
• Operator
• Lab Manager
Non-administrative privileges only, cannot add new users
Administrative privileges, includes approved user-list creation
Additional Text Up to 30 characters
Department User’s department affiliation
Select from the list of predefined departments.
Chapter 5: Lab Manager Options 87

• Click OK.
• Continue until all users have passwords.
5 Click OK to close the Users and Passwords dialog.
Editing User Information
To edit user information:
1 Select Tools > Users and Passwords.
2 Select a user name from the list.
3 Edit information as needed.
4 To change the password, click Password; enter the new password and confirm it, and then click OK.
5 Click OK.
Deleting Users
To delete a user, follow these steps. Deleted user names are removed from the login menu, but their FCS files are retained.
1 Select Tools > Users and Passwords.
2 Select a user from the list.
88 BD FACSCanto Clinical Software Reference Manual
3 Click Delete User.
4 Click Yes to confirm.
5 Click OK.
You cannot delete the currently logged-in user (yourself).
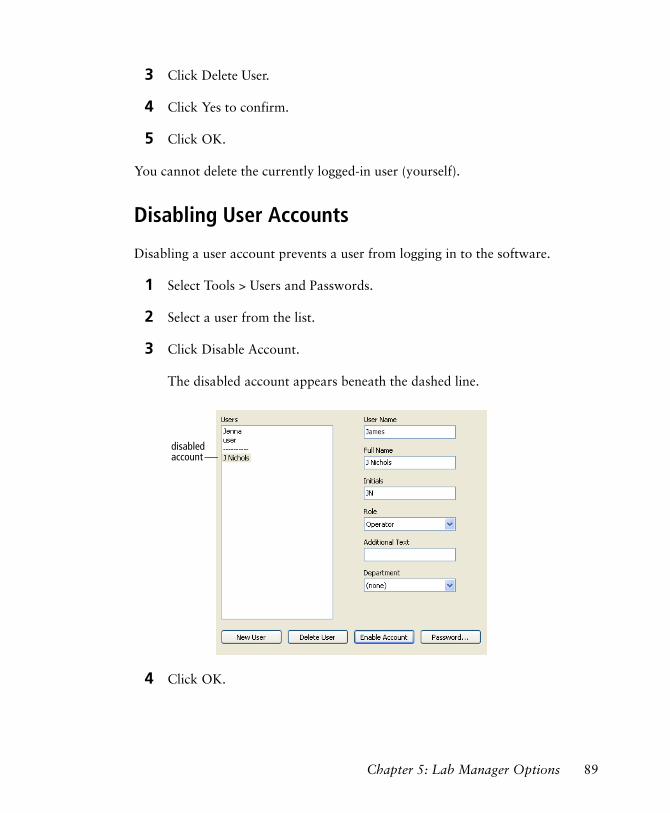
Disabling User Accounts
Disabling a user account prevents a user from logging in to the software.
1 Select Tools > Users and Passwords.
2 Select a user from the list.
3 Click Disable Account.
The disabled account appears beneath the dashed line.
4 Click OK.
disabled account
Chapter 5: Lab Manager Options 89
The account holder can no longer log in to the software.
Enabling User Accounts
To enable a user account that was previously disabled:
1 Select Tools > Users and Passwords.
2 Select a disabled account from the list.
3 Click Enable Account.
4 Click OK.
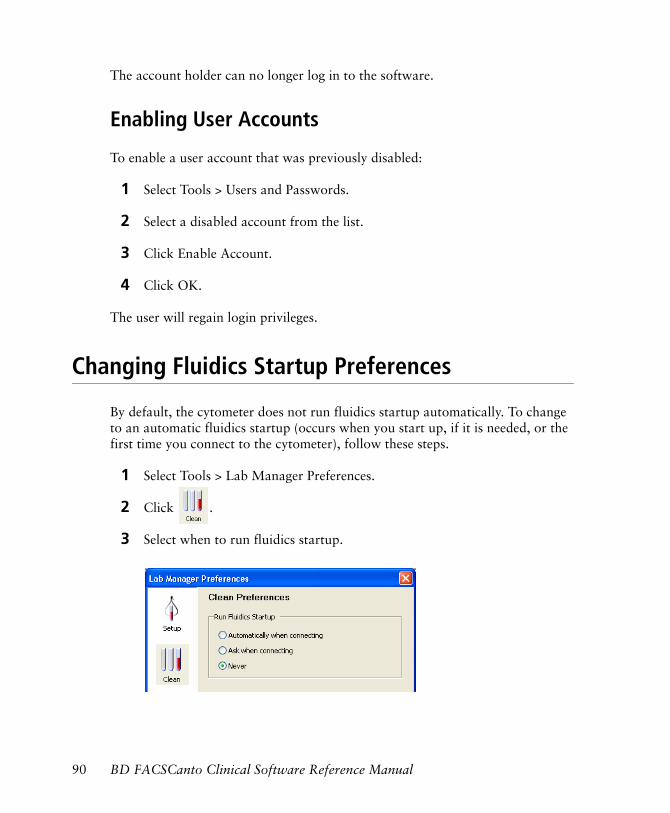
The user will regain login privileges.
Changing Fluidics Startup Preferences
By default, the cytometer does not run fluidics startup automatically. To change to an automatic fluidics startup (occurs when you start up, if it is needed, or the first time you connect to the cytometer), follow these steps.
1 Select Tools > Lab Manager Preferences.
2 Click .
3 Select when to run fluidics startup.
90 BD FACSCanto Clinical Software Reference Manual

The default is Never.
4 Click OK.
Option Explanation
Automatically when connecting
Fluidics startup runs automatically at startup or when you connect after standby, if needed. (It is needed if a fluidics shutdown was run previously.)
Ask when connecting Whenever the software connects to the cytometer, a dialog asks whether you want to run fluidics startup. This will happen at startup or when you connect after standby, if needed.
Never Automatic fluidics startup never occurs automatically.
Chapter 5: Lab Manager Options 91

Changing Setup Preferences
You can make the following changes to cytometer setup preferences:
• Changing the Levey-Jennings File Preferences on page 92
• Specifying Levey-Jennings View Preferences on page 93
• Hiding the “Reviewed By” Field on page 96
• Printing the Setup Report Automatically on page 96
Changing the Levey-Jennings File Preferences
You can change the default number of entries (30) stored in the LJ file.
1 Select Tools > Lab Manager Preferences.
2 Click .
3 Select a total number of entries to store.
Select 30, 60, or unlimited entries.
4 Click OK.
92 BD FACSCanto Clinical Software Reference Manual

Specifying Levey-Jennings View Preferences
You can specify how much of the LJ data to display in the Levey-Jennings view and in the Levey-Jennings Report.
1 Select Tools > Levey-Jennings.
The Levey-Jennings Preferences dialog appears.
2 To show a parameter, select the checkbox beside it.
If you don’t want a parameter to show in the Levey-Jennings view or report, clear its checkbox.
Select up to 20 parameters to display in LJ plots.
3 Change the scale, if needed, for a parameter’s Levey-Jennings plot.
Chapter 5: Lab Manager Options 93

By default, Auto Scale is selected, and the software fits the scale to the data points to be displayed. To change to a custom scale with fixed top and bottom values, do the following:
• Select a parameter.
In Figure 5-2, FITC Voltage is selected.
• Clear the Auto Scale checkbox.
• Enter the minimum and maximum values for the scale into the appropriate fields.
Figure 5-2 Changing the scale for Levey-Jennings FITC data
4 Change the alarm boundaries, if needed, for a parameter’s Levey-Jennings plot.
An alarm symbol will appear on the Levey-Jennings view tab when a data point falls outside the specified boundaries.
To change the default boundaries, do the following:
• Select a parameter.
• From the Alarm Boundary menu, make a selection.
alarm
94 BD FACSCanto Clinical Software Reference Manual

For example, a choice of +/- 3SD means that an alarm will appear if the data is outside the boundaries of -3 to +3 standard deviations of the data mean.
• To enter a custom minimum or maximum, select Min, Max, or Min and Max. Then, enter the required Min or Max into the appropriate field.
5 Change the number of runs to display in each LJ plot.
You can display the data from up to 100 cytometer setups in each LJ plot.
6 Select the number of plots to display together in each LJ view window.
You can view 1, 2, or 4 plots at a time in the Levey-Jennings view window. How you group plots determines how they print in the Levey-Jennings Report.
7 Click OK when done changing Levey-Jennings preferences.
No alarm will appear for a parameter when data falls outside the boundaries unless you choose to display a LJ plot for that parameter.
Chapter 5: Lab Manager Options 95

Hiding the “Reviewed By” Field
You can hide the Reviewed by field that by default appears on Setup Reports.
To hide this field, follow these steps.
1 Select Tools > Lab Manager Preferences.
2 Click .
3 Clear the checkbox beside Review field on Setup Report.
4 Click OK.
Printing the Setup Report Automatically
By default, the software does not print Setup Reports automatically after cytometer setup. To change the default to automatic printing after setup (pre-optimized and optimized), follow these steps.
1 Select Tools > Lab Manager Preferences.
2 Click .
3 Select the Automatically print Setup Report checkbox.
4 Click OK.
96 BD FACSCanto Clinical Software Reference Manual

Changing Worklist Report Header Preferences
To select header information specific to the Worklist Report, do the following.
1 Select Tools > Reports.
2 On the Header tab, click the beside Worklist.
A list of choices expands.
3 Select the header information you want to show on the Worklist Report.
Clear the items you do not want on the Worklist Report.
4 Click OK when you have finished.
Changing Acquisition Preferences
Acquisition preferences vary according to the application you are running. You can make the following changes in cytometer acquisition:
• Changing Plots in the Acquisition View on page 98
• Changing Acquisition Targets on page 99
• Changing the Lag Time Before Recording on page 100
Chapter 5: Lab Manager Options 97

• Changing the Lab Report Countdown on page 101
Changing Plots in the Acquisition View
You can change default plots in the acquisition view for a reagent as follows.
1 Select Tools > Reagents.
2 Select a reagent type and reagent from the respective menus.
3 On the Acquisition Plots tab, select the number of plots to show during acquisition.
4 Select parameters for the x- and y-axes for each plot.
Parameter choices will vary depending on the reagent.
5 Continue to select reagents and modify acquisition plots, if appropriate.
6 Click OK when you are done.
The software will save the new acquisition plot templates.
98 BD FACSCanto Clinical Software Reference Manual

Changing Acquisition Targets
To change the acquisition targets for a reagent, follow these steps.
1 Select Tools > Reagents.
2 Select a reagent type and a reagent from the respective menus.
3 Click the Acquisition Targets tab.
4 Enter a minimum number of lymphs.
You can enter 0–3,000,000 lymphs. If you enter 0, the software will ignore lymphocytes as a target and use time as the acquisition target instead.
5 Enter a maximum time.
You can enter 0–900 seconds. If you enter 0, the software will ignore time as a target and use lymphs as the acquisition target instead.
When you specify both lymphs and time, acquisition stops when one of the criteria is met.
Chapter 5: Lab Manager Options 99

Time and lymphs cannot both be 0.
6 Continue to select reagents and modify the acquisition targets, if appropriate.
7 Click OK when you are done.
The software will save the new acquisition targets.
Tip You don’t need to click OK after each target. You can define all targets and then click OK once at the end.
Changing the Lag Time Before Recording
The lag time occurs between the start of acquisition (when you click Run) and the start of data recording. This lag prevents data from being recorded while the sample flow stabilizes. Follow these steps to change the default lag time of 10 seconds.
1 Select Tools > Lab Manager Preferences.
2 Click .
3 Enter a lag time.
The acceptable range is 3–15 seconds.
100 BD FACSCanto Clinical Software Reference Manual

4 Click OK.
Changing the Lab Report Countdown
The Lab Report countdown controls the amount of time the Lab Report displays at the end of sample acquisition. Lab managers set the default time, but each user can set a user-specific preference that is saved from one login session to the next.
1 Select Tools > Lab Manager Preferences.
2 Click .
3 Enter a number of seconds.
Chapter 5: Lab Manager Options 101

The acceptable range is 0–10 seconds.
4 Click OK.
Changing Lab Report Preferences
You can make the following changes to Lab Report defaults:
• Changing Plots in the Lab Report View on page 103
• Changing Subset Results for a Reagent on page 104
• Changing Alarm Ranges for Subset Results on page 105
• Choosing QC Values on page 106
• Hiding Error Messages on page 109
102 BD FACSCanto Clinical Software Reference Manual

• Disabling Comments on page 110
• Choosing the Lab Report Language on page 110
• Choosing Header Information on page 110
• Automatically Printing the Lab Report on page 111
Changing Plots in the Lab Report View
Follow these steps to change the default plots at the Lab Report view.
1 Select Tools > Reagents.
2 Select a reagent type and reagent from the respective menus.
3 Click the Lab Report Plots tab.
4 Select the number of plots to show.
5 Select a type for each plot (dot plot or histogram).
A histogram presents single-parameter data. The horizontal x-axis shows signal intensity and the vertical y-axis shows the number of events.
Chapter 5: Lab Manager Options 103

A dot plot presents two-parameter data. Each axis displays the values of one parameter. A dot represents an event.
6 Select parameters for the x- and y-axes for each plot.
For histograms, you can only select the x-axis parameter.
Parameter choices will vary depending on the reagent.
7 Continue to select reagents and modify Lab Report plots, if appropriate.
8 Click OK when you are done.
Changing Subset Results for a Reagent
To change the default options for subset results, which show on the Lab Report, follow these steps.
1 Select Tools > Reagents.
2 Select a reagent type and reagent from the menus.
3 Click the Subset Results tab.
4 Select checkboxes for the subset results to include.
Clear checkboxes for the subset results to exclude.
104 BD FACSCanto Clinical Software Reference Manual

Subset results choices will vary, depending on the reagent.
5 Click OK when you are done.
Changing Alarm Ranges for Subset Results
When a result falls outside of the specified range, the software prints the result in red text on the Lab Report to bring attention to it. You can change the default alarm ranges for subset results.
BD Biosciences recommends that you establish appropriate ranges for your laboratory.
1 Select Tools > Alarm Ranges.
2 Select a panel type.
Chapter 5: Lab Manager Options 105
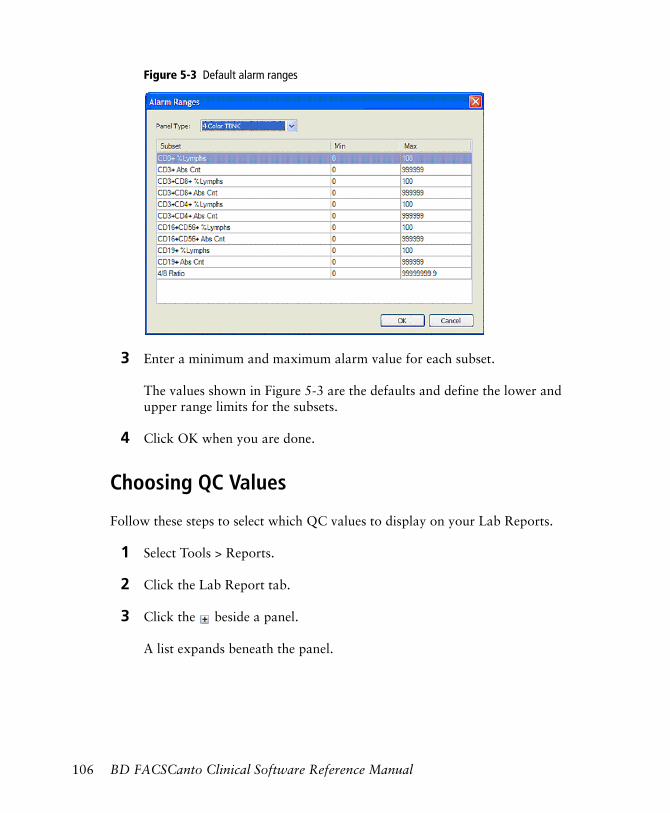
Figure 5-3 Default alarm ranges
3 Enter a minimum and maximum alarm value for each subset.
The values shown in Figure 5-3 are the defaults and define the lower and upper range limits for the subsets.
4 Click OK when you are done.
Choosing QC Values
Follow these steps to select which QC values to display on your Lab Reports.
1 Select Tools > Reports.
2 Click the Lab Report tab.
3 Click the beside a panel.
A list expands beneath the panel.
106 BD FACSCanto Clinical Software Reference Manual

4 Select the QC results you want to show on the Lab Report.
Clear those that you do not want on the Lab Report. You can also choose to hide all QC results for the panel by clearing the checkbox beside the panel.
5 Click OK when you have finished.
Deciding Which QC Results to Include
QC results provide information about the analytic reliability of the cytometer and your methods. Which results you include will depend upon the panels you run and your laboratory’s needs.
If you receive QC error messages on your Lab Report, follow these general suggestions.
1 Check the gating for the tube.
Chapter 5: Lab Manager Options 107

2 See QC Messages on page 138.
CD3% Difference
This QC result looks at result consistency within a panel.
CD3+, as a percentage of lymphocytes, is enumerated for each tube in the panel. The difference between the percentages is reported.
% T-Sum
CD4+ and CD8+ cells are enumerated as a percentage of lymphocytes. CD3+, as a percentage of lymphocytes, is enumerated for each of the two tubes, and the two values are averaged.
The following result is reported:
CD4+CD8+ events are included in both CD4+ and CD8+ counts. Thus, the double-positive events are counted twice.
If the absolute value of the T-Sum is greater than 10, % T-Sum failure appears on the Lab Report.
Lymphosum
The lymphosum is an internal QC check.
CD19+ and CD16+56+ cells are enumerated as a percentage of lymphocytes. CD3+, as a percentage of lymphocytes, is enumerated for each tube in the panel. For two tube panels, the values are averaged.
The following result is reported:
CD3 % consistency maximum CD3+%lymphs minimum CD3+%lymphs–=
T-sum CD3+ CD4+ CD8++( )–=
Lymphosum Average CD3+⟨ ⟩ CD19+ CD16+56++ +=
108 BD FACSCanto Clinical Software Reference Manual

If the lymphosum falls beyond the default 95–105% range, Lymphosum failure appears on the Lab Report.
4/8 Ratio
The software will determine a CD4/CD8 ratio if a panel contains one or more reagents with a CD3+CD4+ population, and one or more reagents with a CD3+CD8+ population. CD4+CD8+ events are included in both CD4+ and CD8+
counts. Thus, the double-positive events are counted twice.
For a panel containing one CD3+CD4+ and one CD3+CD8+ population, the software uses this formula:
Hiding Error Messages
By default, the Lab Report displays error messages. You can set the software so no error messages display on the report. However, results outside the alarm range will still appear in red text, and a Needs Review status will still appear in the Status column for samples that require it.
To hide error messages, follow these steps.
1 Select Tools > Reports.
2 Click the Lab Report tab.
3 Clear the checkbox beside Display Error Message on Lab Report.
4 Click OK.
To show error messages again, select the checkbox beside Display Error Message on Lab Report.
4/8 ratioCD3+CD4+events
CD3+CD8+events
----------------------------------------=
Chapter 5: Lab Manager Options 109

Disabling Comments
By default, the Lab Report allows you to enter comments. To disable comments, follow these steps.
1 Select Tools > Reports.
2 Select the Lab Report tab.
3 Clear the checkbox beside Enable Comments Section for Lab Report.
4 Click OK.
To enable comments again, select the checkbox beside Enable Comments Section for Lab Report.
Choosing the Lab Report Language
1 Select Tools > Reports.
2 Click the Lab Report tab.
3 Select a language from the menu.
4 Click OK.
Choosing Header Information
You can specify which header information to include on Lab Reports.
1 Select Tools > Reports.
2 On the Header tab, click the beside Lab Report.
110 BD FACSCanto Clinical Software Reference Manual

3 Select the header items you want to show on the Lab Report.
Clear the items that you do not want on the Lab Report.
4 Click OK when you have finished.
Automatically Printing the Lab Report
By default, the software does not automatically print Lab Reports. To enable automatic printing, do the following.
1 Select Tools > Lab Manager Preferences.
2 Click .
3 Click the Options tab.
4 Select the Automatically print lab reports checkbox.
Chapter 5: Lab Manager Options 111

5 Enter the number of copies to print.
You can enter up to 10.
6 Click OK.
Disabling Automatic PDF Creation of Lab Reports
By default, the software automatically creates PDF files of the Lab Reports. To disable automatic PDF creation, do the following:
1 Select Tools > Lab Manager Preferences.
2 Click .
3 Click the Options tab.
4 Clear the Export Lab Report to PDF files checkbox.
112 BD FACSCanto Clinical Software Reference Manual

5 Click OK.
Other Options
You can make the following changes to these defaults:
• Setting Results Preferences on page 113
• Customizing Header Information for Both Lab and Setup Reports on page 115
• Adding a Logo to Reports on page 116
Setting Results Preferences
You can choose which results are exported to the results file that is created daily.
1 Select Tools > Lab Manager Preferences.
2 Click .
Chapter 5: Lab Manager Options 113

3 Select a topic from the menu.
4 Select or clear fields associated with the topic.
The information for selected fields will be exported.
The information for cleared fields will not be exported.
5 Select another topic.
6 Select or clear fields associated with the topic.
7 Continue until all needed topics and fields have been included for export.
8 Select the order for exported information.
• Click Order.
• Select a line of information.
114 BD FACSCanto Clinical Software Reference Manual
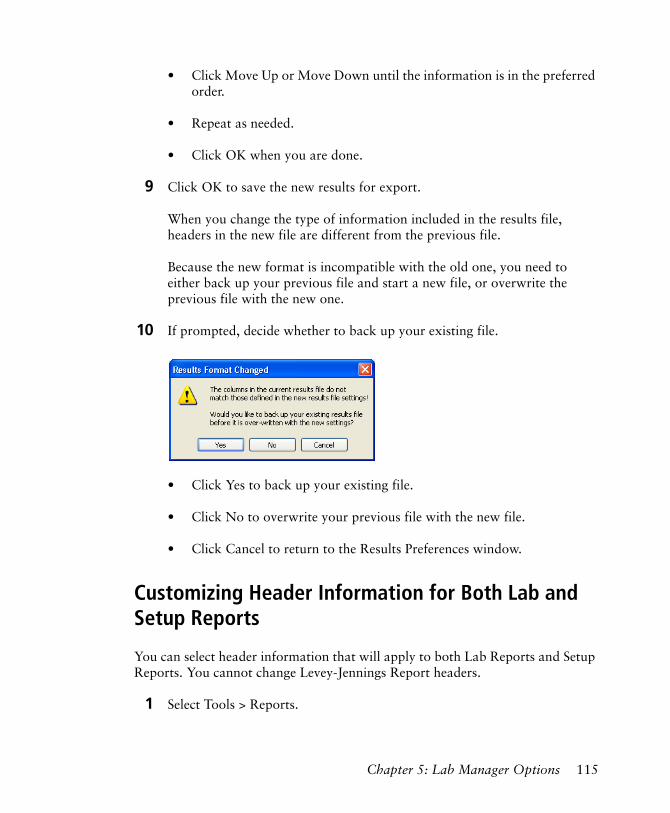
• Click Move Up or Move Down until the information is in the preferred order.
• Repeat as needed.
• Click OK when you are done.
9 Click OK to save the new results for export.
When you change the type of information included in the results file, headers in the new file are different from the previous file.
Because the new format is incompatible with the old one, you need to either back up your previous file and start a new file, or overwrite the previous file with the new one.
10 If prompted, decide whether to back up your existing file.
• Click Yes to back up your existing file.
• Click No to overwrite your previous file with the new file.
• Click Cancel to return to the Results Preferences window.
Customizing Header Information for Both Lab and Setup Reports
You can select header information that will apply to both Lab Reports and Setup Reports. You cannot change Levey-Jennings Report headers.
1 Select Tools > Reports.
Chapter 5: Lab Manager Options 115
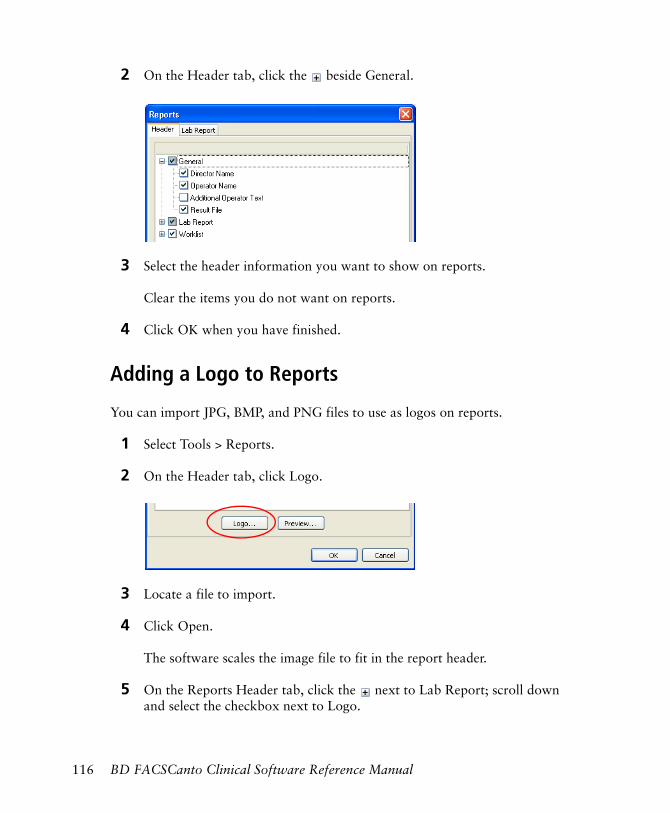
2 On the Header tab, click the beside General.
3 Select the header information you want to show on reports.
Clear the items you do not want on reports.
4 Click OK when you have finished.
Adding a Logo to Reports
You can import JPG, BMP, and PNG files to use as logos on reports.
1 Select Tools > Reports.
2 On the Header tab, click Logo.
3 Locate a file to import.
4 Click Open.
The software scales the image file to fit in the report header.
5 On the Reports Header tab, click the next to Lab Report; scroll down and select the checkbox next to Logo.
116 BD FACSCanto Clinical Software Reference Manual

6 (Optional) Click Preview to view an example of a report header.
7 Click OK to save the new logo to all headers.
logo location
Chapter 5: Lab Manager Options 117

118 BD FACSCanto Clinical Software Reference Manual
6
Troubleshooting
The tips in this section can help you troubleshoot issues that might arise when using this software. For instrument troubleshooting, refer to the reference manual or instructions for your cytometer. You can also find application-specific troubleshooting in the information supplied with reagents and reagent kits.
If you need additional assistance, contact BD Biosciences. Refer to our website, bdbiosciences.com, for up-to-date contact information.
Troubleshooting suggestions can be found under the following topics:
• General Software Troubleshooting on page 120
• Setup Troubleshooting on page 125
• Acquisition Troubleshooting on page 134
• Analysis Troubleshooting for 4- and 6-Color TBNK on page 138
• Disabling the Loader on page 146
119

General Software Troubleshooting
Observation or Error Message
Possible Causes Recommended Solutions
Software not responding Software frozen Press Ctrl+Shift-Esc. Locate BD FACSCanto software in the Windows Task Manager; click End Task.
If acquisition is in progress, data will be lost.
Software not connecting to cytometer, or connection error messages
Multiple 1 If there are any error messages, follow the directions on screen.
2 Make sure the cytometer power is on.
3 Check the Ethernet cable connection to the cytometer and computer.
4 Verify the fluidics cart is plugged in and the power on.
5 Shut down the software, computer, and cytometer, and then restart them.
Barcode reader errors Dirty barcode reader window
Clean the barcode reader window with isopropyl or ethyl alcohol and try again.
Blurred or damaged barcode label
Try scanning with a duplicate label (if available), or enter data manually.
120 BD FACSCanto Clinical Software Reference Manual

Fluidics pressure errors Kinked tubing Remove any kinks in tubing to the fluidics cart.
Detached tubing Check fluidics connections between the fluidics cart and cytometer. Make sure the waste tank is properly connected to the cart. If this is unsuccessful, call BD Biosciences.
Air lock in filter Check the filter in the fluidics cart. Verify the bottom bleeder valve on the filter is fully tightened. Open the top bleeder valve. If no fluid leaks out, remove the air lock as described in the reference manual for your cytometer.
Fluidics cart power is switched off or Auxiliary air switch is in the wrong position
Verify the settings of the power switch and auxiliary air switch on the fluidics cart. Refer to the reference manual for your cytometer, if needed.
Multiple Follow the directions on the screen.
General Software Troubleshooting (continued)
Observation or Error Message
Possible Causes Recommended Solutions
Chapter 6: Troubleshooting 121
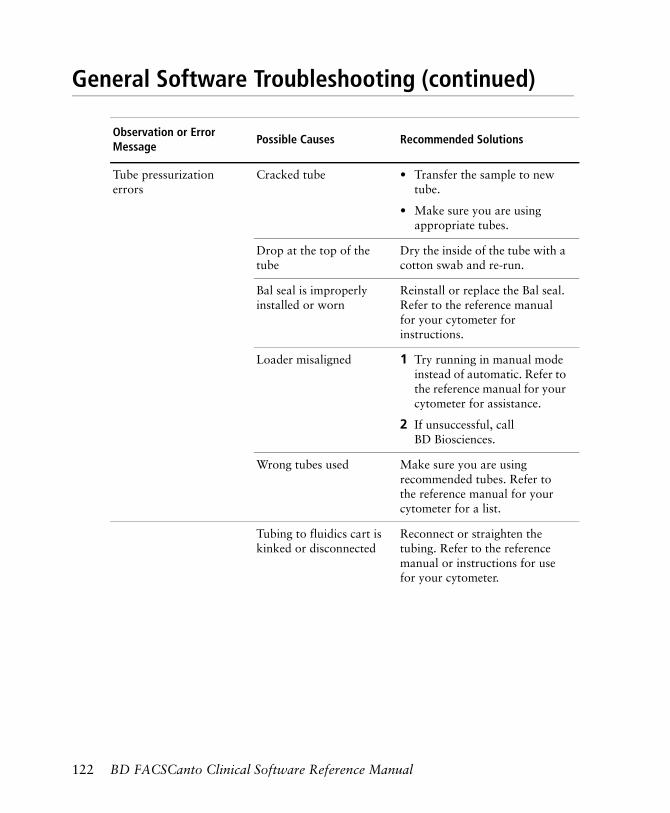
Tube pressurization errors
Cracked tube • Transfer the sample to new tube.
• Make sure you are using appropriate tubes.
Drop at the top of the tube
Dry the inside of the tube with a cotton swab and re-run.
Bal seal is improperly installed or worn
Reinstall or replace the Bal seal. Refer to the reference manual for your cytometer for instructions.
Loader misaligned 1 Try running in manual mode instead of automatic. Refer to the reference manual for your cytometer for assistance.
2 If unsuccessful, call BD Biosciences.
Wrong tubes used Make sure you are using recommended tubes. Refer to the reference manual for your cytometer for a list.
Tubing to fluidics cart is kinked or disconnected
Reconnect or straighten the tubing. Refer to the reference manual or instructions for use for your cytometer.
General Software Troubleshooting (continued)
Observation or Error Message
Possible Causes Recommended Solutions
122 BD FACSCanto Clinical Software Reference Manual
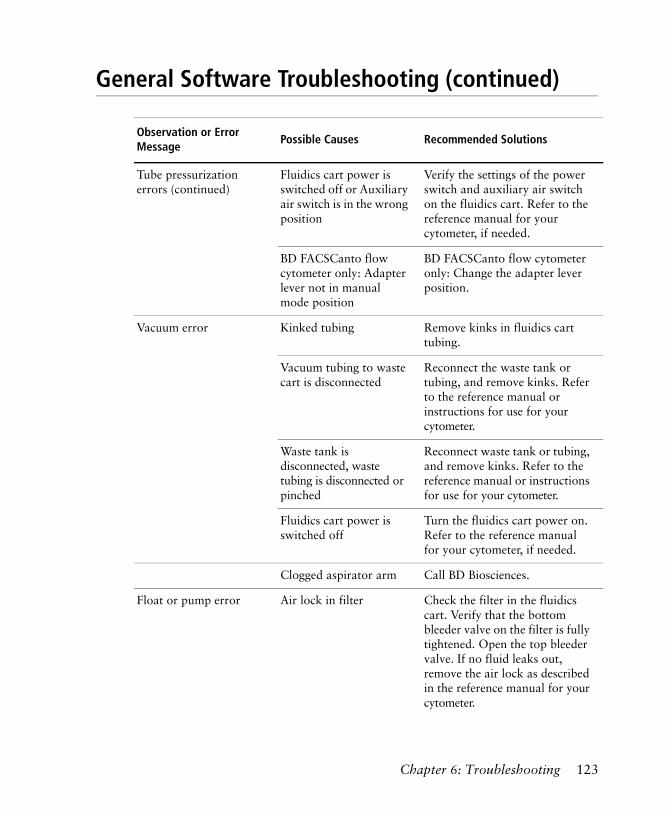
Tube pressurization errors (continued)
Fluidics cart power is switched off or Auxiliary air switch is in the wrong position
Verify the settings of the power switch and auxiliary air switch on the fluidics cart. Refer to the reference manual for your cytometer, if needed.
BD FACSCanto flow cytometer only: Adapter lever not in manual mode position
BD FACSCanto flow cytometer only: Change the adapter lever position.
Vacuum error Kinked tubing Remove kinks in fluidics cart tubing.
Vacuum tubing to waste cart is disconnected
Reconnect the waste tank or tubing, and remove kinks. Refer to the reference manual or instructions for use for your cytometer.
Waste tank is disconnected, waste tubing is disconnected or pinched
Reconnect waste tank or tubing, and remove kinks. Refer to the reference manual or instructions for use for your cytometer.
Fluidics cart power is switched off
Turn the fluidics cart power on. Refer to the reference manual for your cytometer, if needed.
Clogged aspirator arm Call BD Biosciences.
Float or pump error Air lock in filter Check the filter in the fluidics cart. Verify that the bottom bleeder valve on the filter is fully tightened. Open the top bleeder valve. If no fluid leaks out, remove the air lock as described in the reference manual for your cytometer.
General Software Troubleshooting (continued)
Observation or Error Message
Possible Causes Recommended Solutions
Chapter 6: Troubleshooting 123

Cytometer malfunction Call BD Biosciences.
BD FACSCanto II flow cytometer only:Tube not present error
Tube is not fully seated Remove and then reinstall the tube; verify that the tube is fully seated against the top plate.
Tube is not aligned on the SIT
Remove and then reinstall the tube; verify that the tube is straight and fully seated.
Cracked tube Transfer the sample to a new tube.
BD FACSCanto II flow cytometer only:Tube guide not present error
Tube guide is not in place Verify that the tube guide is in place.
Tube guide sensor malfunction
Call BD Biosciences.
General Software Troubleshooting (continued)
Observation or Error Message
Possible Causes Recommended Solutions
124 BD FACSCanto Clinical Software Reference Manual

Setup Troubleshooting
• For help with messages that appear in the setup wizard, see the next section.
• For help with messages that appear on a Setup Report, see Setup Report Failure Messages on page 130.
• For help with preparing the setup beads, refer to the BD FACS 7-color setup beads package insert.
Chapter 6: Troubleshooting 125

Setup Wizard Messages
Messages Possible Causes Recommended Solutions
No acquisition events were received from cytometer
Bubbles are in the flow cell
Check the flow cell for bubbles. If found, run the De-gas Flow Cell command. Refer to the reference manual for your cytometer for assistance.
No setup beads are in the sample tube
Prepare another tube of beads and run setup again.
Laser shutter is engaged Make sure the flow cell access door is completely closed.
Detector failure 1 Verify that all optical filters and holders are in place within the octagon and trigon.
2 Call BD Biosciences.
Laser failure Check the laser power in the Status window. If it is outside the acceptable range, call BD Biosciences.
Clogged SIT Clean the flow cell as described in the reference manual for your cytometer. If this doesn’t help, call BD Biosciences.
Internal firmware error Restart the instrument.
126 BD FACSCanto Clinical Software Reference Manual

Failed to place [name of beads] on scale.
or
Failed to find [name of beads]
Bubbles in the flow cell Check the flow cell for bubbles. If found, run the De-gas Flow Cell command. Refer to the reference manual for your cytometer for assistance.
Software is using saved settings from a failed setup
Delete the SetupResults.dat file from C:\Program Files\ Common Files\BD\Setup Results, and run the setup again.
Detector failure 1 Ensure that all optical filters and holders are in place within the octagon and trigon.
2 Call BD Biosciences.
Laser failure Check the laser power status in the Status window. If it is outside the acceptable range, call BD Biosciences.
Wrong beads used for setup
Use only BD FACS 7-color setup beads.
Incorrect laser delay Call BD Biosciences.
No valid data points Internal setup error Delete the SetupResults.dat file from C:\Program Files\ Common Files\BD\Setup Results, and run the setup again.
Setup Wizard Messages (continued)
Messages Possible Causes Recommended Solutions
Chapter 6: Troubleshooting 127

A communication error was encountered
Communication problem between hardware and software
1 Turn on the power.
2 Connect the Ethernet cable to the cytometer and computer.
3 Shut down the software, computer, and cytometer, and restart them.
Fluidics cart is off or disconnected
Switch on the fluidics cart circuit breaker; make sure the power cable is connected at both ends.
Cytometer setup was aborted by user
Setup was aborted Perform the setup again.
Cytometer setup was aborted because the loader door was opened
Loader cover was removed
Perform setup again, keeping the loader cover closed.
Communication error Exit setup and start again. Make sure the Loader door status is Open (even if you are not using the Loader).
There is a vacuum error See Vacuum error on page 123.
See Vacuum error on page 123.
There is a pump error Disrupted communication between fluidics cart and cytometer
Make sure the communications cable from cytometer to fluidics cart is attached at both ends. Refer to the reference manual or instructions for use for your cytometer.
Setup Wizard Messages (continued)
Messages Possible Causes Recommended Solutions
128 BD FACSCanto Clinical Software Reference Manual

There is a float switch error
Plenum fails to fill with fluid
• Sheath tank is not attached to the fluidics cart
Reconnect the sheath cubitainer. Refer to the instructions for use for your cytometer.
• Sheath tubing from the fluidics cart to the cytometer is not attached or is pinched
Reconnect the sheath tubing. Refer to the reference manual or instructions for use for your cytometer.
• Sheath filter is not primed
Always select Cytometer > Cleaning Modes > Prime After Tank Refill after changing the sheath cubitainer.
• Air lock is in the sheath filter
Remove the air lock as described in the reference manual or instructions for use for your cytometer.
• Air lock is in the bubble filter
Perform a bubble filter purge. Refer to the reference manual or instructions for use for your cytometer.
Setup Wizard Messages (continued)
Messages Possible Causes Recommended Solutions
Chapter 6: Troubleshooting 129

Setup Report Failure Messages
Failed Possible Causes Recommended Solutions
Detector voltage Wrong target value was used
Make sure the target values in the software match those printed on the setup bead card. If needed, enter new targets. See Entering Lot Information for Setup Beads Manually on page 45.
Bubbles in the flow cell Check the flow cell for bubbles. If found, run the De-gas Flow Cell command. Refer to the reference manual for your cytometer for assistance.
Weak laser Check the laser power status in the Status window. If it is outside the acceptable range, call BD Biosciences.
Change in ambient temperature since last setup
Accept the failed setup, then run setup again.
Change in bead lot Changing the bead lot might generate what appears to be a detector voltage failure. This could be due to bead lot variation; no failure has occurred. Note for your records that the bead lot was changed. If you accept the failed setup, the next time you run setup, the software will account for the bead lot difference, and no failure should be generated.
130 BD FACSCanto Clinical Software Reference Manual

Sensitivity Flow cell is contaminated
Clean the flow cell as described in the instructions for use for your cytometer.
Optical problem Make sure all filters are firmly seated in the octagon and trigon.
Wrong target values Match the target values in the software to those printed on the reagent box. Re-enter them, if needed.
Bead tube suspension is too old
Run setup again with a fresh tube of setup beads.
Spectral overlap Expired bead lot Run setup again with a fresh tube of setup beads.
Software is using saved settings from a failed setup
Delete the SetupResults.dat file from C:\Program Files\Common Files\BD\Setup Results, and run setup again.
Wrong values Verify the spectral overlap values match those provided with the BD FACS 7-color setup beads being used. Re-enter them, if needed.
Optical problem Make sure all filters are firmly seated in the octagon and trigon.
Laser power Laser failure Check the laser power status in the Status window. If it is outside the acceptable range, call BD Biosciences.
Setup Report Failure Messages (continued)
Failed Possible Causes Recommended Solutions
Chapter 6: Troubleshooting 131
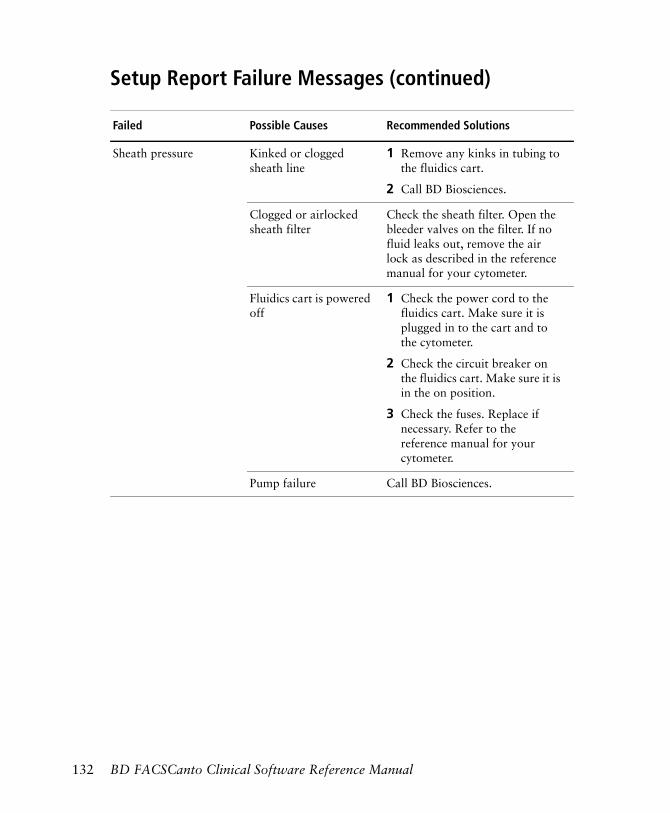
Sheath pressure Kinked or clogged sheath line
1 Remove any kinks in tubing to the fluidics cart.
2 Call BD Biosciences.
Clogged or airlocked sheath filter
Check the sheath filter. Open the bleeder valves on the filter. If no fluid leaks out, remove the air lock as described in the reference manual for your cytometer.
Fluidics cart is powered off
1 Check the power cord to the fluidics cart. Make sure it is plugged in to the cart and to the cytometer.
2 Check the circuit breaker on the fluidics cart. Make sure it is in the on position.
3 Check the fuses. Replace if necessary. Refer to the reference manual for your cytometer.
Pump failure Call BD Biosciences.
Setup Report Failure Messages (continued)
Failed Possible Causes Recommended Solutions
132 BD FACSCanto Clinical Software Reference Manual

Levey-Jennings Errors and Messages
Observation Possible Causes Recommended Solutions
LJ plots empty, no data, no error message appears
BD FACS Setup Beads-7 colors LJ.csv file is missing
• If the file was renamed, give the file its original name, then click Refresh.
• If the file was moved from the default directory, move it back, then click Refresh.
LJ plots empty, no data, error message appears
BD FACS Setup Beads-7 colors LJ.csv file is corrupted
Delete the BD FACS Setup Beads-7 colors LJ.csv file, and run setup again. The software will create a new set of plots.
BD FACS Setup Beads-7 colors LJ.csv file is open or in use by another application
1 Close the file or application.
2 Click the Refresh button at the top of the Levey-Jennings tab.
BD FACS Setup Beads-7 colors LJ.csv file contains invalid data
Delete the BD FACS Setup Beads-7 colors LJ.csv file, and run setup again. The software will create a new set of plots.
Chapter 6: Troubleshooting 133

Acquisition Troubleshooting
Observation Possible Causes Recommended Solutions
No events in plots after clicking Run
Laser shutter is engaged Make sure the flow cell access door is completely closed.
No sample is in the tube Add sample to the tube or install a new sample tube.
Cracked tube • Transfer the sample to a new tube.
• Make sure you are using appropriate tubes.
Sample was not mixed properly
Make sure you vortex the sample before loading it onto the SIT.
Threshold is not set to the correct parameter
Set the threshold to the correct parameter for your application.
Threshold is too low or too high
Adjust the threshold. Refer to the instructions for use for your cytometer.
Detector voltage is too low Increase the voltage. Refer to the instructions for use for your cytometer.
SIT is clogged 1 Clean the flow cell. Refer to the reference manual for your cytometer.
2 If unsuccessful, call BD Biosciences.
Fewer events than expected in gated population
Events left out of the gate When changing or moving a gate, make sure events on the axis are included.
Incorrect plot parameters Right-click the plot axes and verify that appropriate parameters are displayed.
134 BD FACSCanto Clinical Software Reference Manual

Unexpected events in plot
Incorrect gating Verify the gating.
Wrong target value was used Make sure the target values in the software match those printed on the reagent box. If needed, enter new targets. See Entering Lot Information for Setup Beads Manually on page 45.
Unexpectedly high event rate
Threshold is too low Increase the threshold. Refer to the instructions for use for your cytometer.
Sample is too concentrated Dilute the sample.
Bubbles are in the flow cell Check the flow cell for bubbles. If found, run the De-gas Flow Cell command. Refer to the reference manual for your cytometer for assistance.
Unexpectedly low event rate
Sample was not adequately mixed
Vortex the sample before running it on cytometer.
Threshold is too high Decrease the threshold. Refer to the instructions for use for your cytometer.
SIT is clogged 1 Clean the flow cell. Refer to the reference manual for your cytometer.
2 If unsuccessful, call BD Biosciences.
Sample aggregates Prepare a new sample. Filter before staining.
Acquisition Troubleshooting (continued)
Observation Possible Causes Recommended Solutions
Chapter 6: Troubleshooting 135

Distorted populations or unexpected pattern in plot
Cytometer settings are adjusted incorrectly
Optimize the scatter parameters.
Bubbles are in the flow cell Check the flow cell for bubbles. If found, run the De-gas Flow Cell command. Refer to the reference manual for your cytometer for assistance.
Flow cell is dirty Clean the flow cell.
Poor sample preparation Do the sample preparation again.
Wrong panel was selected Check the panel selection; make sure the plot parameters are appropriate for your assay.
Incorrect gating Verify the gating.
Tubes were run in the wrong order
Re-run the tubes in the correct order.
SIT was not cleaned between tubes
• BD FACSCanto flow cytometer: Make sure you push the aspirator arm all the way to the left when loading a tube manually. This activates the flush between sample tubes.
• BD FACSCanto II flow cytometer: Select Cytometer > Cleaning Modes > SIT Flush to perform an extra SIT Flush.
If an extra SIT flush is regularly required, call BD Biosciences.
Acquisition Troubleshooting (continued)
Observation Possible Causes Recommended Solutions
136 BD FACSCanto Clinical Software Reference Manual
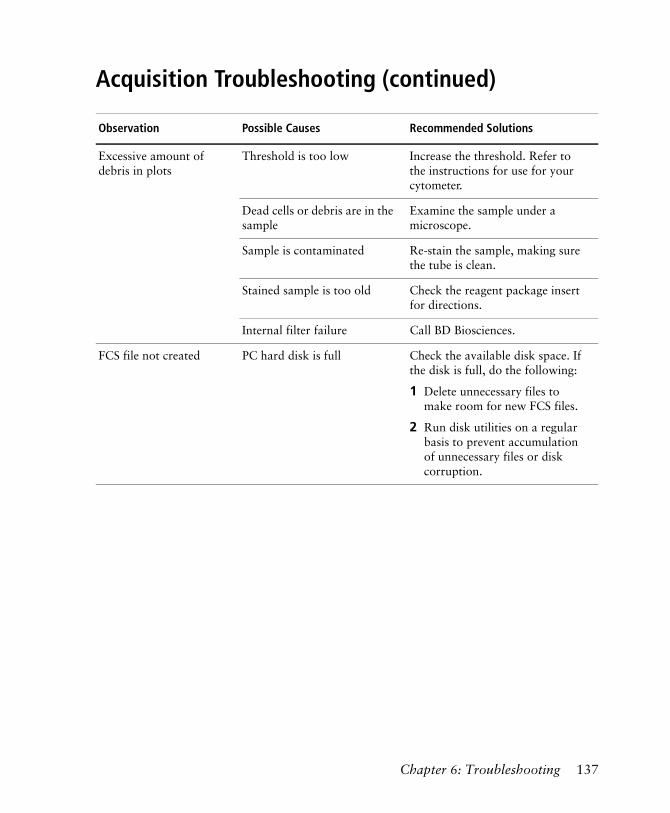
Excessive amount of debris in plots
Threshold is too low Increase the threshold. Refer to the instructions for use for your cytometer.
Dead cells or debris are in the sample
Examine the sample under a microscope.
Sample is contaminated Re-stain the sample, making sure the tube is clean.
Stained sample is too old Check the reagent package insert for directions.
Internal filter failure Call BD Biosciences.
FCS file not created PC hard disk is full Check the available disk space. If the disk is full, do the following:
1 Delete unnecessary files to make room for new FCS files.
2 Run disk utilities on a regular basis to prevent accumulation of unnecessary files or disk corruption.
Acquisition Troubleshooting (continued)
Observation Possible Causes Recommended Solutions
Chapter 6: Troubleshooting 137

Analysis Troubleshooting for 4- and 6-Color TBNK
• For help with messages that appear on a Lab Report, see QC Messages.
• For help with visual identification of dot plot problems, see 4- and 6-Color TBNK Troubleshooting on page 143.
You can also refer to the individual application guides for non–4- and 6-color TBNK troubleshooting.
QC Messages
Message Possible Causes Recommended Solutions
Lymph gate failure: Gate manually
No usable lymph gate • Adjust the lymph gate manually.
• If necessary, run the sample again.
No beads detected BD Trucount tubes were not used
Re-run the sample using a BD Trucount tube.
Wrong panel was chosen Select a panel that does not rely on BD Trucount tubes.
Missing bead pellet Handle BD Trucount tubes according to the package insert. Re-run the sample with a new tube.
138 BD FACSCanto Clinical Software Reference Manual

Sample quality questionable
Donor-specific anomaly Adjust gates manually to include the required subsets.
Insufficient mixing during sample preparation: cell populations elongated in the CD3 vs SSC and FITC vs PE plots
Re-stain the sample. Vortex after blood and reagent are added to the tube. Make sure no blood remains on the side of the tube.
Sample not lysed adequately: cell populations in the CD45 vs SSC plot extend upward
Prepare the sample again, ensuring complete lysis.
Aged blood and/or stained sample: granulocytes have low side scatter in the CD45 vs SSC plot; no distinct monocyte population is present
Refer to your reagent insert for stability limitations.
Excessive mixing: debris is encroaching on populations in the CD45 vs SSC plot
Re-stain the sample and run it again.
Not enough reagent was added during sample preparation: fluorescence parameters are dimmer than expected
Re-stain the sample, following the instructions in the reagent insert.
Low voltage for SSC detector
Increase the SSC voltage and run the sample(s) again.
Multiple Look at the dot plots in 4- and 6-Color TBNK Troubleshooting on page 143. Re-run the sample.
Sample was not mixed properly
Vortex the sample before loading it onto the SIT.
QC Messages (continued)
Message Possible Causes Recommended Solutions
Chapter 6: Troubleshooting 139

Default [gate name] gating used: Visually inspect
Very few events in the indicated gate
Inspect the plot(s) containing the indicated gate and make sure the required events are included. Adjust the gate, if needed.
Inappropriate instrument settings
Check the instrument settings values. Run setup again, if needed.
Insufficient beads acquired (<500)
Not using BD Trucount tubes
Re-run using BD Trucount tubes.
Missing bead pellet Handle BD Trucount tubes according to the package insert. Re-run using a new tube.
Sample was not mixed properly
Make sure you vortex the sample before loading it onto the SIT.
Cell concentration is too high
Dilute the sample, re-stain, and run it again.
Change the acquisition targets in Reagents Tools (lab manager only). See Changing Acquisition Targets on page 99.
Sample aggregates Filter the sample.
Less than 2,500 Lymphocytes collected
or
Could not acquire the user-requested number of lymphocytes
Lymphopenic sample Determine if the number of lymphocytes collected meets your laboratory’s criteria. Adjust the acquisition time, if needed (lab managers only). See Changing Acquisition Targets on page 99.
Excessive debris Increase the threshold. Refer to the instructions for use for your cytometer.
QC Messages (continued)
Message Possible Causes Recommended Solutions
140 BD FACSCanto Clinical Software Reference Manual

Manual gate is in effect
Gates were adjusted manually
Verify that all gates are placed correctly.
% T-sum failure Large number of double-positive or double-negative T cells
Inspect the gates and include all required events. Adjust the gates manually, if needed.
Lymphosum failure Staining error 1 Check the dot plot.
2 Check the reagent package insert and follow the instructions. Review the pipetting technique.
Events incorrectly classified as T, B, or NK
Inspect the gates and make sure required events are included. Adjust the gates manually, if needed.
CD3% difference failure
Inter-tube value is outside CDC guidelines (see page 157)
Follow your laboratory QC guidelines on how to use this data.
Run as Field Service Engineer
Data was collected under BD Service login name
Log in to the software with the correct login name and run the sample(s) again.
Cytometer settings were generated from a failed setup result
Data was collected with instrument settings from a failed setup
Run the setup, make sure that it passes, and run the sample(s) again.
Sheath pressure low during recording: Visually inspect
Data was collected with low sheath pressure
Inspect the data. If needed, resolve the sheath pressure error and run the sample(s) again. See Fluidics pressure errors on page 121.
QC Messages (continued)
Message Possible Causes Recommended Solutions
Chapter 6: Troubleshooting 141
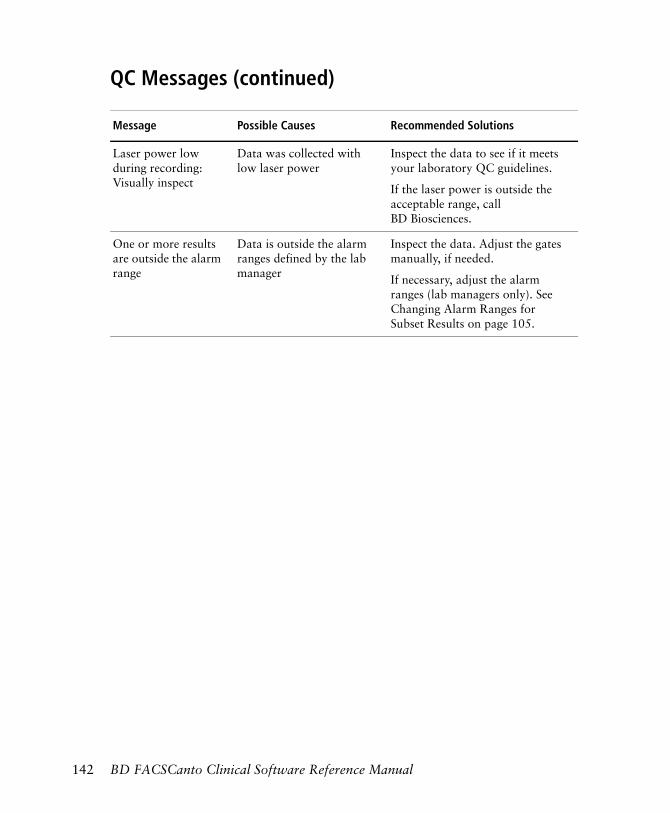
Laser power low during recording: Visually inspect
Data was collected with low laser power
Inspect the data to see if it meets your laboratory QC guidelines.
If the laser power is outside the acceptable range, call BD Biosciences.
One or more results are outside the alarm range
Data is outside the alarm ranges defined by the lab manager
Inspect the data. Adjust the gates manually, if needed.
If necessary, adjust the alarm ranges (lab managers only). See Changing Alarm Ranges for Subset Results on page 105.
QC Messages (continued)
Message Possible Causes Recommended Solutions
142 BD FACSCanto Clinical Software Reference Manual

4- and 6-Color TBNK Troubleshooting
Observation Possible Causes Recommended Solutions
Cell populations in CD45 vs SSC extend upward
Inadequate lysing of sample
Prepare the sample again, and ensure complete lysis.
Granulocytes with low side scatter in CD45 vs SSC plot, no distinct monocyte population
Aged blood or stained cells
Refer to the reagent package insert for stability limitations.
Chapter 6: Troubleshooting 143
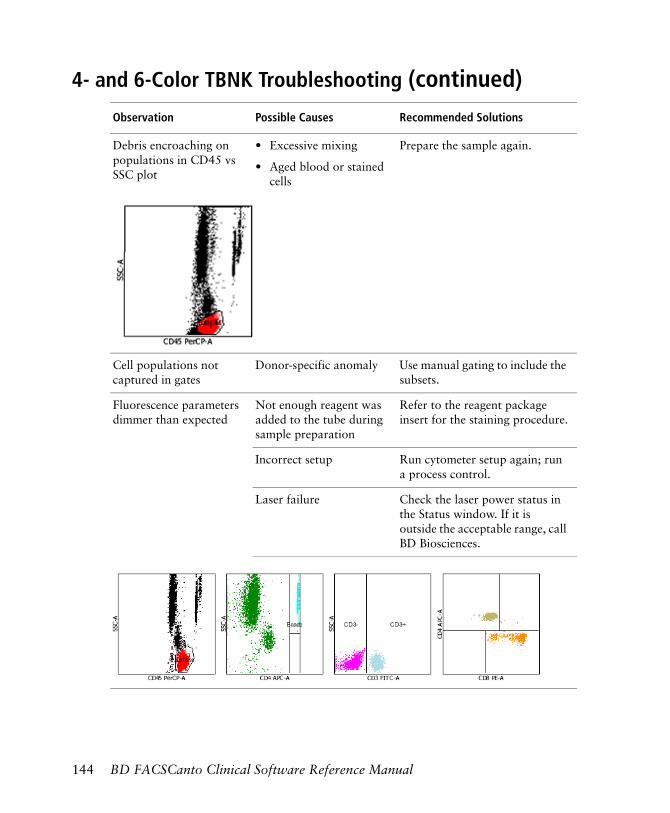
Debris encroaching on populations in CD45 vs SSC plot
• Excessive mixing
• Aged blood or stained cells
Prepare the sample again.
Cell populations not captured in gates
Donor-specific anomaly Use manual gating to include the subsets.
Fluorescence parameters dimmer than expected
Not enough reagent was added to the tube during sample preparation
Refer to the reagent package insert for the staining procedure.
Incorrect setup Run cytometer setup again; run a process control.
Laser failure Check the laser power status in the Status window. If it is outside the acceptable range, call BD Biosciences.
4- and 6-Color TBNK Troubleshooting (continued)Observation Possible Causes Recommended Solutions
144 BD FACSCanto Clinical Software Reference Manual

Vertically compressed populations
Side scatter is too low Reacquire the sample. Set SSC so that granulocytes reach to top of the CD45 vs SSC plot.
Lipemic sample Check the reagent package insert for instructions.
Indistinct populations; events sparse or missing from one population; lack of separation between CD3– and CD3+ cluster
Incorrect spectral overlap Re-run setup, optimizing for the application. Re-run the sample.
Granulocytes cut off at top of plot; stretched monocyte population
High SSC Re-run setup, optimizing for the application. Re-run the sample, lowering the SSC.
4- and 6-Color TBNK Troubleshooting (continued)Observation Possible Causes Recommended Solutions
Chapter 6: Troubleshooting 145

Disabling the Loader
If a problem occurs that requires you to temporarily disable the Loader and run tubes manually, you can make the software behave as though the Loader is not part of your system. Dialogs reminding you to insert the Loader, and other software notifications, no longer appear.
1 Select Tools > Options.
2 Click .
3 Select the Ignore Loader checkbox in the Run Options dialog.
4 Click OK.
4- and 6-Color TBNK Troubleshooting (continued)Observation Possible Causes Recommended Solutions
146 BD FACSCanto Clinical Software Reference Manual

Appendix A
Menus and Keyboard Shortcuts
This appendix provides a visual map of all BD FACSCanto software menus and a list of the available keyboard shortcuts.
• Menus on page 148
• Keyboard Shortcuts on page 150
147

Menus
Application Menus
The Cytometer > Cleaning Modes menu differs depending on whether the software is connected to the BD FACSCanto or the BD FACSCanto II flow cytometer.
Cytometer menu, BD FACSCanto flow cytometer Cytometer menu, BD FACSCanto II flow cytometer
148 BD FACSCanto Clinical Software Reference Manual

Contextual Menus
Activate contextual menus by right-clicking on the indicated software components.
Plot Parameters Hide/Show Windows Sort WorklistRight-click on x or y parameters of dot plots.
Right-click on title bars of Carousel, Status, Detectors, Thresholds, and Spectral Overlap windows.
Right-click on worklist field headers.
Tools menu, all users Tools menu, lab managers
Help menu
Appendix A: Menus and Keyboard Shortcuts 149

Keyboard Shortcuts
Keyboard shortcuts are provided for the following functions.
FunctionKey Combination
When to Use Shortcut
New Acquisition Worklist Ctrl+N When no worklist is running
Open Worklist Ctrl+O When no worklist is running
Save Worklist Ctrl+S When worklist is stopped or completed
Print Ctrl+P Anytime except when Lab Report is in view
Hide/Show Detectors Ctrl+1 Anytime
Hide/Show Spectral Overlap
Ctrl+F2 Anytime
Hide/Show Thresholds Ctrl+F3 Anytime
Delete Sample Ctrl+Delete When sample is selected in worklist
Cut Ctrl+X When item is selected; works in most text-edit fields
Copy Ctrl+C When item is selected; works in most text-edit fields
Paste Ctrl+V When item is selected; works in most text-edit fields
150 BD FACSCanto Clinical Software Reference Manual

Menu Command Shortcuts
To select menu commands using the keyboard, you must first open a menu using these key combinations:
Then, you can select a command using its designated keyboard shortcut (indicated by an underline).
For example, to select the Lot IDs command from the Tools menu, follow these steps.
1 Press Alt+T to open the Tools menu.
2 Press L to open Lot IDs.
The underline beneath the L indicates the keyboard shortcut.
(To access the Options dialog, you would press O.)
Open File Menu Alt+F
Open View Menu Alt+V
Open Worklist Menu Alt+W
Open Cytometer menu Alt+C
Open Tools menu Alt+T
Open Help menu Alt+H
Appendix A: Menus and Keyboard Shortcuts 151

Instrument Control Window Shortcuts
Use the following keys to increase or decrease values for the Detectors, Thresholds, and Spectral Overlap windows.
Function Key Combination When to Use Shortcut
Large increase or decrease in value
Ctrl+Page Up
Ctrl+Page Down
When row is selected
Small increase or decrease in value Ctrl+up arrow
Ctrl+down arrow
When row is selected
arrow controls
152 BD FACSCanto Clinical Software Reference Manual

Function Keys
Use the function keys on the keyboard to operate the flow cytometer.
Function Function Key When to Use Shortcut
Connect to cytometer F4 Software is disconnected from the cytometer or the cytometer is in Standby
Run F5 For an acquisition worklist, the laser must be warmed-up; a prepared worklist has entries in all required fields
Pause F6 Acquisition or Analysis worklist is in progress
Stop F7 Acquisition or Analysis worklist is in progress and paused
Skip F8 Acquisition worklist is in progress and paused
End Recording F9 Acquisition worklist is in progress
Optimize F11 Acquisition worklist is in progress and paused
Add Data Files F12 Analysis worklist is open
Appendix A: Menus and Keyboard Shortcuts 153

154 BD FACSCanto Clinical Software Reference Manual

Appendix B
Technical Overview forBD Multitest 4- and 6-Color
Reagents
This appendix covers these topics:
• Panels and Reagents on page 156
• Acquisition Stopping Criteria on page 157
• Gate Hierarchy on page 158
• Visual Check for BD Multitest Reagents on page 163
• Default Settings on page 168
155

Panels and Reagents
BD Biosciences provides seven panels. You cannot edit or delete these panels. The number of sample tubes and the reagents associated with the tubes for each panel appear in the columns to the right.
Panel Tubes Reagents
4 Color TBNK 1
2
CD3 FITC/CD8 PE/CD45 PerCP/CD4 APC
CD3 FITC/CD16+56 PE/CD45 PerCP/CD19 APC
4 Color TBNK + TruC
1
2
CD3 FITC/CD8 PE/CD45 PerCP/CD4 APC + BD Trucount tube
CD3 FITC/CD16+56 PE/CD45 PerCP/CD19 APC + BD Trucount tube
3/16+56/45/19 1 CD3 FITC/CD16+56 PE/CD45 PerCP/CD19 APC
3/16+56/45/19 + TruC
1 CD3 FITC/CD16+56 PE/CD45 PerCP/CD19 APC + BD Trucount tube
3/8/45/4 1 CD3 FITC/CD8 PE/CD45 PerCP/CD4 APC
3/8/45/4 + TruC 1 CD3 FITC/CD8 PE/CD45 PerCP/CD4 APC + BD Trucount tube
6 Color TBNK + TruC
1 CD3 FITC/CD16+56 PE/CD45 PerCP-Cy5.5/CD4 PE-Cy7/CD19 APC/CD8 APC-Cy7 + BD Trucount tube
156 BD FACSCanto Clinical Software Reference Manual
Acquisition Stopping Criteria
The following acquisition stopping criteria are used by BD FACSCanto clinical software for reagents for which the expert lymph gate is applied in CD45 vs SSC.
The software collects 10,000 total events, applies the expert lymph gate, and calculates the number of lymphocytes in the gate. The software continues acquiring until the user-specified number of lymphocytes is reached. If fewer than the CDC-recommended number of lymphocytes are obtained (at least 2,500*), a QC Message appears on the Lab Report.
BD FACSCanto clinical software always reports a subset value regardless of whether the acquisition criteria were met.
NOTICE Once the software finishes acquiring a sample, it recalculates the expert lymph gate and reapplies it. The gate boundaries might change slightly, sometimes resulting in fewer than 2,500 lymphocytes being reported on the Lab Report.
* Mandy FF, Nicholson JK, McDougal JS. Guidelines for performing single-platform absolute CD4+ T-cell deter-minations with CD45 gating for persons infected with human immunodeficiency virus. Centers for Disease Control and Prevention. MMWR Recomm Rep. 2003;52(RR-2):1-13.
Appendix B: Technical Overview for BD Multitest 4- and 6-Color Reagents 157

Gate Hierarchy
The following information describes the subset order and plots BD FACSCanto clinical software uses when analyzing samples stained with BD Multitest 4- and 6-color reagents.
BD Multitest 4-Color Reagents
3/8/45/4 + TruC
Plot Population(s) of Interest Visual Representation of Hierarchy
1 CD45 vs SSC
2 CD4 vs SSC
3 CD3 vs SSC
4 CD8 vs CD4
Lymphocytes
BD Trucount beads
CD3+
CD4–CD8+
CD4+CD8–
CD4+CD8+
all particles
CD3–
CD4– CD8+
CD4+ CD8–
CD4+ CD8+
CD3+
4
1
2 3
lymphocytes beads and all non-lymphocytes
beads
158 BD FACSCanto Clinical Software Reference Manual

3/8/45/4
Plot Population(s) of Interest Visual Representation of Hierarchy
1 CD45 vs SSC
2 CD3 vs SSC
3 CD8 vs CD4
Lymphocytes
CD3+
CD4–CD8+
CD4+CD8–
CD4+CD8+
all particles
CD3–
CD3+
3
1
CD4– CD8+
CD4+ CD8–
CD4+ CD8+
2
lymphocytes
Appendix B: Technical Overview for BD Multitest 4- and 6-Color Reagents 159

3/16+56/45/19 + TruC
Plot Population(s) of Interest Visual Representation of Hierarchy
1 CD45 vs SSC
2 CD19 vs SSC
3 CD3 vs SSC
4 CD16+56 vs CD19
Lymphocytes
BD Trucount beads
CD3– cells
CD16+56– CD19+ cells
CD16+56+ CD19– cells
all particles
1
3 CD3+
CD16+56– CD19+
CD16+56+ CD19–
CD3–
4
2
lymphocytes beads and all non-lymphocytes
beads
160 BD FACSCanto Clinical Software Reference Manual

3/16+56/45/19
Plot Population(s) of Interest Visual Representation of Hierarchy
1 CD45 vs SSC
2 CD3 vs SSC
3 CD16+56 vs CD19
Lymphocytes
CD3– cells
CD16+56– CD19+ cells
CD16+56+ CD19– cells
all particles
1
2 CD3+
CD3–
3
CD16+56– CD19+
CD16+56+ CD19–
lymphocytes
Appendix B: Technical Overview for BD Multitest 4- and 6-Color Reagents 161

s
BD Multitest 6-Color Reagent
3/16+56/45/4/19/8 + TruC
Plot Population(s) of Interest Visual Representation of Hierarchy
1 CD45 vs SSC
2 CD19 vs SSC
3 CD3 vs SSC
4 CD4 vs CD8
5 CD16+56 vs CD19
Lymphocytes
BD Trucount beads
CD3– cellsCD3+ cells
CD3+ cell subsets:
CD4–CD8+ cellsCD4+CD8– cellsCD4+CD8+ cells
CD3– cell subsets
(CD16+CD56)–CD19+ cells(CD16+CD56)+CD19– cells
all particles
1
3
CD16+56– CD19+
CD16+56+ CD19–
CD3–
5
3 CD3+
4
CD4–CD8+
CD4+CD8–
CD4+CD8+
lymphocytes beads and all non-lymphocyte
beads
162 BD FACSCanto Clinical Software Reference Manual

Visual Check for BD Multitest Reagents
The following is a step-by-step guide for visually inspecting plots to determine the integrity of BD Multitest 4-color stained samples. Not all plots will be present for every reagent.
1 Inspect the CD45 vs SSC plot (Figure B-1).
For all reagents, an acceptable CD45 vs SSC plot displays:
• Distinct lymphocyte, monocyte, granulocyte clusters
• BD Trucount beads (if a BD Trucount tube was used)
• A compact lymphocyte cluster with low SSC
• A possible basophil cluster
• Threshold set to ensure a visible valley between debris and the CD45+ cluster
Figure B-1 Acceptable CD45 vs SSC plot
Lipemic samples are problematic. You must visually inspect the data.
granulocytes
basophils
BD Trucount beads
lymphocytes
monocytes
Appendix B: Technical Overview for BD Multitest 4- and 6-Color Reagents 163

A questionable CD45 vs SSC plot might display the following (see Figure B-2):
• Dispersed lymphocyte, granulocyte, or monocyte cluster
• Lymphocyte cluster merged with debris or monocytes
• Granulocyte cluster losing SSC
• No visible monocyte cluster
• No discernible clusters other than the lymphocyte cluster
• Change in the relative position of the monocyte cluster to the lymphocyte cluster
Figure B-2 Questionable CD45 vs SSC plot
granulocytes
debris
BD Trucount beads
lymphocytes
monocytes
164 BD FACSCanto Clinical Software Reference Manual
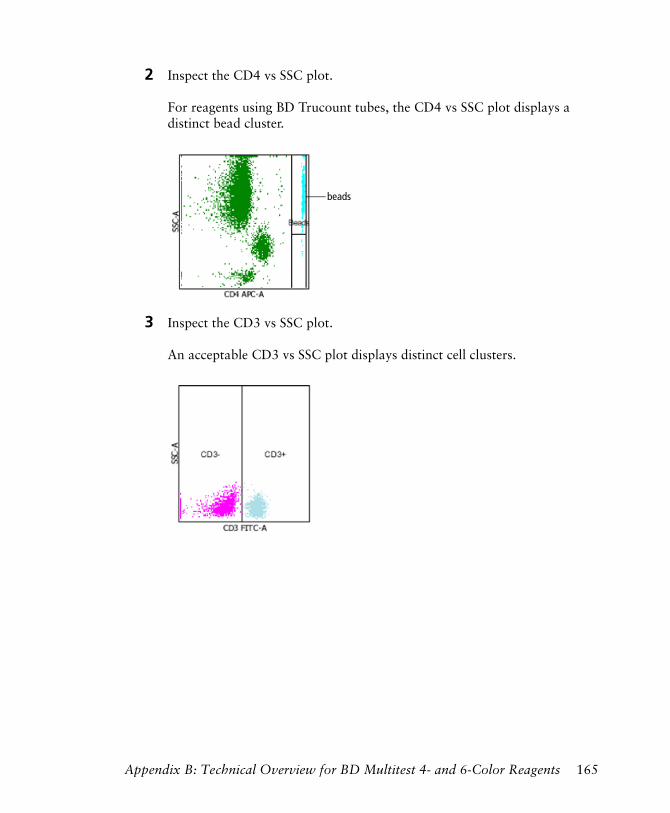
2 Inspect the CD4 vs SSC plot.
For reagents using BD Trucount tubes, the CD4 vs SSC plot displays a distinct bead cluster.
3 Inspect the CD3 vs SSC plot.
An acceptable CD3 vs SSC plot displays distinct cell clusters.
beads
Appendix B: Technical Overview for BD Multitest 4- and 6-Color Reagents 165

A questionable CD3 vs SSC plot might display any of the following:
• Dispersed cell clusters
• Merged clusters
• Lack of distinction between CD3– and CD3+ cluster
If you are still uncertain about the sample integrity, take corrective action such as restaining or redrawing the sample.
4 Inspect the CD16+56 vs CD19 plot, if present.
An acceptable CD16+56 vs CD19 plot displays distinct cell clusters.
A questionable CD16+56 vs CD19 plot might display any of the following:
• Dispersed cell clusters
166 BD FACSCanto Clinical Software Reference Manual

• Merged clusters
If you are still uncertain about the sample integrity, take corrective action such as restaining or redrawing the sample.
5 Inspect the CD8 vs CD4 plot(s), if present.
An acceptable CD8 vs CD4 plot displays distinct cell clusters.
A questionable CD8 vs CD4 plot might display any of the following:
• Dispersed cell clusters
• Merged clusters
Appendix B: Technical Overview for BD Multitest 4- and 6-Color Reagents 167
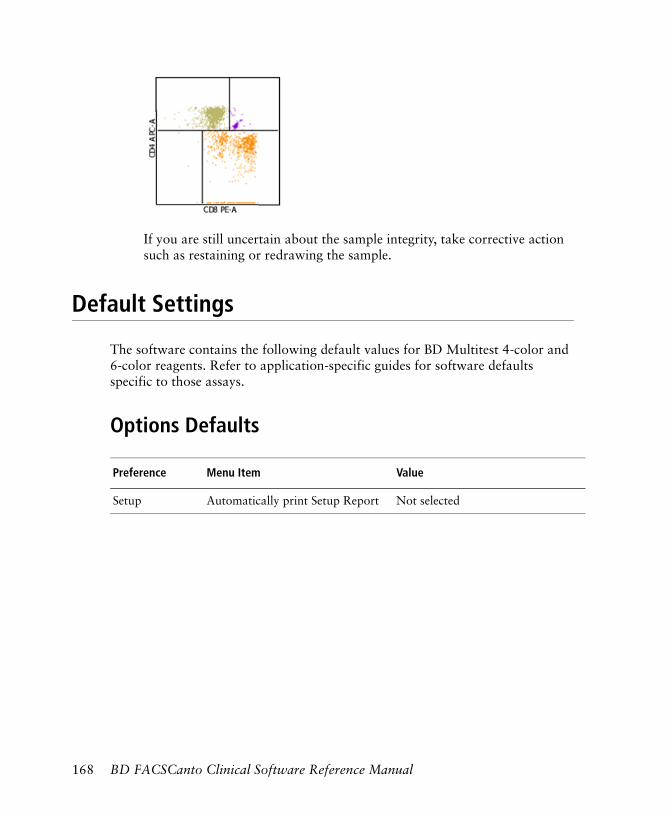
If you are still uncertain about the sample integrity, take corrective action such as restaining or redrawing the sample.
Default Settings
The software contains the following default values for BD Multitest 4-color and 6-color reagents. Refer to application-specific guides for software defaults specific to those assays.
Options Defaults
Preference Menu Item Value
Setup Automatically print Setup Report Not selected
168 BD FACSCanto Clinical Software Reference Manual
Files File Locations
• FCS Files • C:\BDFACSCantoFCSFiles\yyyy\Month\dda
• Worklist Files • C:\Program Files\BD FACSCanto Software\worklists
• Setup Report Files • C:\Program Files\BD FACSCanto Software\Setup Reports
• Result Files • C:\Program Files\BD FACSCanto Software\DataFiles\yyyy\Month\dd
Lab Report Lab Report Countdown 10 seconds
Automatically print Lab Report after each sample
Not selected
Number of copies to print for Lab Report
—
a. Where yyyy represents a four-digit year (eg, 2007) and dd represents a two-digit day (eg, 02).
Preference Menu Item Value
Appendix B: Technical Overview for BD Multitest 4- and 6-Color Reagents 169

Reagent Defaults
Only lab managers can change the following preferences.
4-Color Multitest
Reagent
CD3/CD8/CD45/CD4
Acquisition Plots (left to right on Lab Report)
# Plots 3
Plot 1 X axis CD45 PerCP-A
Y axis SSC-A
Plot 2 X axis CD3 FITC-A
Y axis SSC-A
Plot 3 X axis CD8 PE-A
Y axis CD4 APC-A
Subset Results Include All selected
Acquisition Targets
Min Lymphs to acquire
2,500
Max time to acquire (sec)
300
170 BD FACSCanto Clinical Software Reference Manual

CD3/CD16+56/CD45/CD19
Acquisition Plots (left to right on Lab Report)
# Plots 3
Plot 1 X axis CD45 PerCP-A
Y axis SSC-A
Plot 2 X axis CD3 FITC-A
Y axis SSC-A
Plot 3 X axis CD16+56 PE-A
Y axis CD19 APC-A
Subset Results Include All selected
Acquisition Targets
Min Lymphs to acquire
2,500
Max time to acquire (sec)
300
4-Color Multitest (continued)
Reagent
Appendix B: Technical Overview for BD Multitest 4- and 6-Color Reagents 171
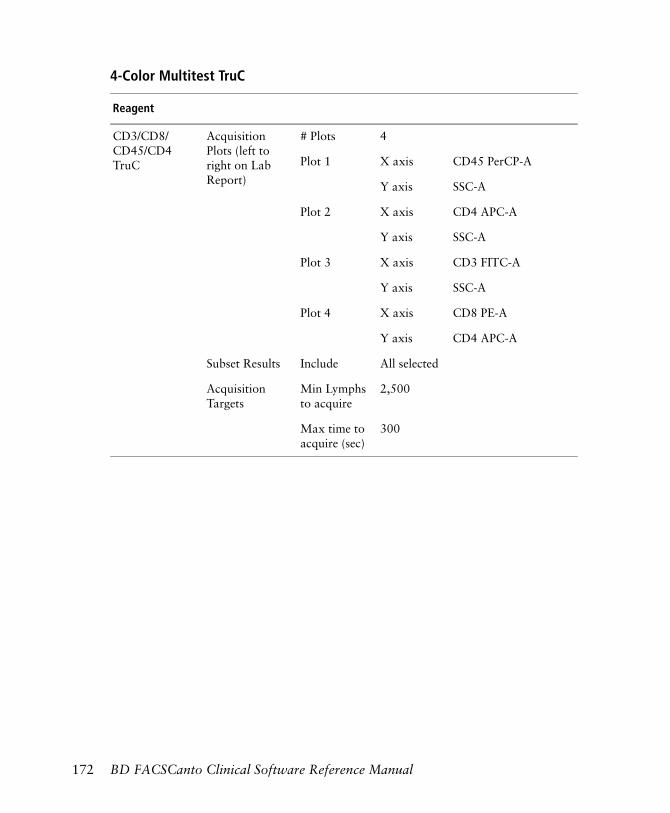
4-Color Multitest TruC
Reagent
CD3/CD8/CD45/CD4 TruC
Acquisition Plots (left to right on Lab Report)
# Plots 4
Plot 1 X axis CD45 PerCP-A
Y axis SSC-A
Plot 2 X axis CD4 APC-A
Y axis SSC-A
Plot 3 X axis CD3 FITC-A
Y axis SSC-A
Plot 4 X axis CD8 PE-A
Y axis CD4 APC-A
Subset Results Include All selected
Acquisition Targets
Min Lymphs to acquire
2,500
Max time to acquire (sec)
300
172 BD FACSCanto Clinical Software Reference Manual

CD3/CD16+56/CD45/CD19 TruC
Acquisition Plots (left to right on Lab Report)
# Plots 4
Plot 1 X axis CD45 PerCP-A
Y axis SSC-A
Plot 2 X axis CD19 APC-A
Y axis SSC-A
Plot 3 X axis CD3 FITC-A
Y axis SSC-A
Plot 4 X axis CD16+56 PE-A
Y axis CD19 APC-A
Subset Results Include All selected
Acquisition Targets
Min Lymphs to acquire
2,500
Max time to acquire (sec)
300
4-Color Multitest TruC (continued)
Reagent
Appendix B: Technical Overview for BD Multitest 4- and 6-Color Reagents 173

6-Color Multitest TruC
Reagent
CD3/CD16+56/CD45/CD4/CD19/CD8/ TruC
Acquisition Plots (left to right on Lab Report)
# Plots 5
Plot 1 X axis CD45 PerCP-Cy5.5-A
Y axis SSC-A
Plot 2 X axis CD19 APC-A
Y axis SSC-A
Plot 3 X axis CD3 FITC-A
Y axis SSC-A
Plot 4 X axis CD8 APC-Cy7-A
Y axis CD4 PE-Cy7-A
Plot 5 X axis CD16+56 PE-A
Y axis CD19 APC-A
Subset Results Include All selected
Acquisition Targets
Min Lymphs to acquire
2,500
Max time to acquire (sec)
300
174 BD FACSCanto Clinical Software Reference Manual
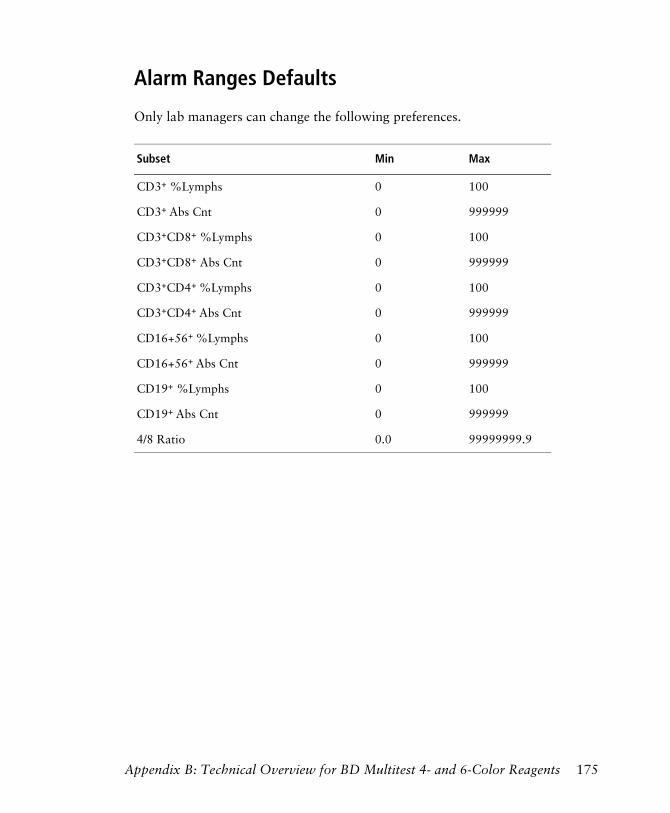
Alarm Ranges Defaults
Only lab managers can change the following preferences.
Subset Min Max
CD3+ %Lymphs 0 100
CD3+ Abs Cnt 0 999999
CD3+CD8+ %Lymphs 0 100
CD3+CD8+ Abs Cnt 0 999999
CD3+CD4+ %Lymphs 0 100
CD3+CD4+ Abs Cnt 0 999999
CD16+56+ %Lymphs 0 100
CD16+56+ Abs Cnt 0 999999
CD19+ %Lymphs 0 100
CD19+ Abs Cnt 0 999999
4/8 Ratio 0.0 99999999.9
Appendix B: Technical Overview for BD Multitest 4- and 6-Color Reagents 175

Report Defaults
By default, reports include the following. Only lab managers can make changes to these options.
Report Option Default Content
General header information Director Name
Operator Name
Name of Result File
Lab Report header information Sample Name
Sample ID
Case Number
Panel Name
Date Acquired
Date Analyzed
Status
Reviewer Name
Worklist header information Software Name
Date
Time
Cytometer Name and Serial Number
QC values to show on Lab Report:
• 4 Color TBNK (+ TruC)
• 3/16+56/45/19 (+ TruC)
• 3/8/45/4 (+ TruC)
• 6 Color TBNK (+ TruC)
• CD3% difference, % T-Sum, Lymphosum, 4/8 ratio
• Lymphosum
• CD3% difference, 4/8 ratio
• % T-Sum, Lymphosum, 4/8 ratio
Display Error Message on Lab Report Selected
176 BD FACSCanto Clinical Software Reference Manual
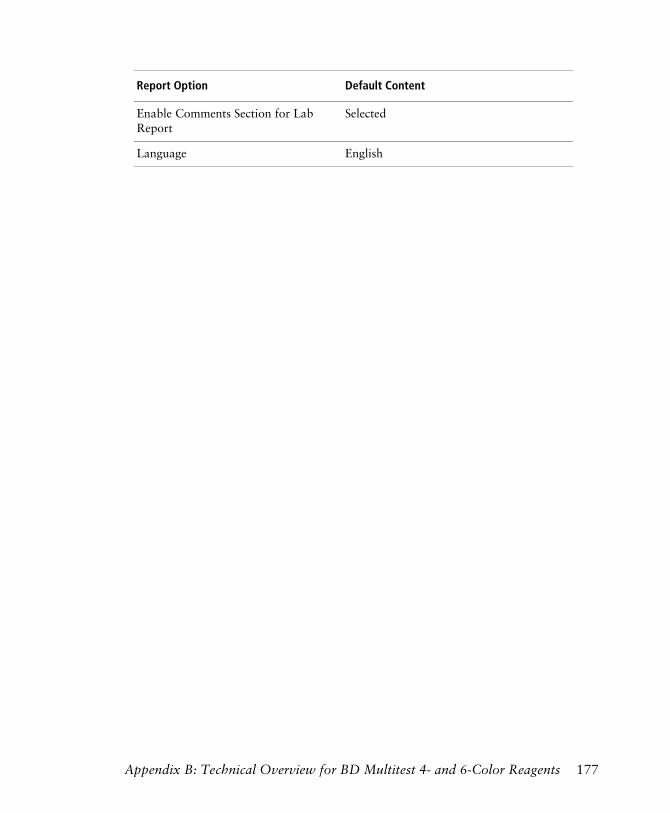
Enable Comments Section for Lab Report
Selected
Language English
Report Option Default Content
Appendix B: Technical Overview for BD Multitest 4- and 6-Color Reagents 177
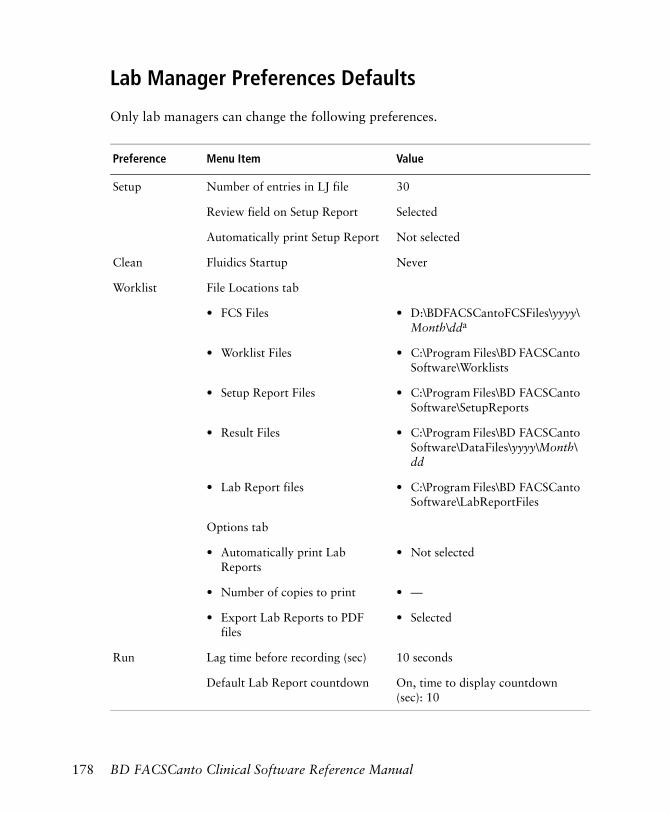
Lab Manager Preferences Defaults
Only lab managers can change the following preferences.
Preference Menu Item Value
Setup Number of entries in LJ file 30
Review field on Setup Report Selected
Automatically print Setup Report Not selected
Clean Fluidics Startup Never
Worklist File Locations tab
• FCS Files • D:\BDFACSCantoFCSFiles\yyyy\Month\dda
• Worklist Files • C:\Program Files\BD FACSCanto Software\Worklists
• Setup Report Files • C:\Program Files\BD FACSCanto Software\SetupReports
• Result Files • C:\Program Files\BD FACSCanto Software\DataFiles\yyyy\Month\dd
• Lab Report files • C:\Program Files\BD FACSCanto Software\LabReportFiles
Options tab
• Automatically print Lab Reports
• Not selected
• Number of copies to print • —
• Export Lab Reports to PDF files
• Selected
Run Lag time before recording (sec) 10 seconds
Default Lab Report countdown On, time to display countdown (sec): 10
178 BD FACSCanto Clinical Software Reference Manual

Results Schedule Information The following values are selected:
• Institution
• Director
• Operator
• Cytometer
• Cytometer Serial Number
• Software Version
Sample Information The following values are selected:
• Sample Name
• Sample ID
• Case Number
• Panel Name
• Collection Date
• Date Analyzed
• Abs Cnt Bead Name
• Abs Cnt Bead Lot ID
• Abs Cnt Beads/Pellet
• Comments
Cross Tube Results All values are selected.
CD3/CD8/CD45/CD4 All values are selected.
CD3/CD8/CD45/CD4 TruC All values are selected.
CD3/CD16+56/CD45/CD19 All values are selected.
CD3/CD16+56/CD45/CD19 TruC All values are selected.
CD3/CD16+56/CD45/CD4/CD19/CD8 TruC
All values are selected.
a. Where yyyy represents a four-digit year (eg, 2007) and dd represents a two-digit day (eg, 02).
Preference Menu Item Value
Appendix B: Technical Overview for BD Multitest 4- and 6-Color Reagents 179

180 BD FACSCanto Clinical Software Reference Manual
Index
Symbols
26% T-sum
about 108failure 141
Numerics
4/8 ratio 109
A
absolute count bead lot IDs 51accounts see usersacquisition
lag 100no events 134plots 98stopping criteria 99, 157targets 99workflow 29
addingdepartments 85lab managers 77, 87users 85
adjusting, cytometer settings 152administrative access 73, 77, 87Adobe Acrobat Reader, installing 75alarm ranges
changing 105default settings 175
analysistroubleshooting 138workflow 29
application menus 17, 148Application Setup Reports 35assistance, technical ix, 119
B
BD FACSCanto software see softwareBD FACSDiva software 12, 13BD FACSFlow level 23BD Multitest
see also reagentsdefault settings 168gating 104, 158plots, troubleshooting 143
beadsabsolute count lot IDs 51adding new lots 45spectral overlap factors 47target values
entering 46setup report and 34
C
carouselID 20, 57, 58window 20
CD3% difference 108changing password 72
181

cleaning solution level 23columns, resizing 26comments
,lab reportsdisabling 110
lab reportsentering 68
compatibility, software 13computer, requirements 12connecting cytometer 53connectivity status 17contextual menus 149controls, export file 82conventions, manual viiicurrent, laser 23, 34customer support ix, 119cytometer
connecting 53disconnect error 120errors 128putting in standby 52settings, adjusting 152setup age 23status 21
D
defaultfile names and locations 80gating used (message) 140lab manager settings 178report contents 176settings, BD Multitest 168
deletingusers 88worklist entries 27
departments, defining 85detectors
errors during setup 130setup report values, explained 34
disabling users 89disconnecting software 52, 120
E
enabling users 90errors
cytometer 128detector voltages 130disconnected from cytometer 120float 123fluidics pressure 121, 132laser 131messages, hiding 109pump 123setup 127status 21tube pressurization 122, 123vacuum 123
eventsnot showing 126, 134, 135rate 23troubleshooting 134, 135
exportingFCS files 13results 113
F
FACSCanto software see softwareFACSFlow level 23FCS files
compatibility 13not created 137storage location 66, 80, 83
182 BD FACSCanto Clinical Software Reference Manual
filesBD FACSCanto 80compatibility 13default locations 66, 83FCS 80installation locations 79, 82Levey-Jennings 80locations 82optimized setup reports 35optimized setup results 81process control 82ReadMe vii, 78result 13, 81, 113setup reports 32setup results 81usage trace 81worklist 80
filtering worklists 27float
error 123status 22
fluid levels 23fluidics
pressure errors 121, 132startup 90
folders, BD FACSCanto software 79, 82function keys 153
G
gating, hierarchies 104, 158
H
hardware requirements 12headers
general 115lab reports 110
hiding windows 24
I
ID, carousel 20, 57importing
FCS files 13worklists 13, 57
inspecting plots 163installing
Adobe Acrobat Reader 75BD FACSCanto software 74Microsoft .NET framework 74
insufficient beads acquired 140interference, software 13
K
keyboard shortcuts 150keys, function 153
L
lab managersabout 73adding 77, 87default preferences 178
lab reportscomments, disabling 110display time 101header information 110hiding error messages 109language 110printing 61, 111reagent plots 103sections explained 38viewing 64
lag, acquisition 100language, lab report 110laser
current 23, 34errors 131power 23, 34
Index 183

levels, fluid 23Levey-Jennings
files 80preferences 92reports 38
Loadererror 22status 22
locations, file storage 66, 82, 83login, software 16logo, report 116lot IDs
absolute count beads 51reagents 51setup beads 45
lymph gate failure 138lymphosum
about 108failure 141
lymphsstopping criteria for 99, 157
M
Manual gate in effect (message) 141menus
commands 17, 148shortcuts 151
Microsoft .NET, installing 74moving windows 24
N
No beads detected (message) 138
O
online training ixopening worklists 55optimization settings file 81
P
panels, about 156passwords
changing 72creating 87entering 16
plotsacquisition defaults 98BD Multitest
examples 143reagents 103, 158
excessive debris 137inspecting 163troubleshooting 143unexpected events in 135, 136
populationsBD Multitest reagents 104, 158troubleshooting 134, 136
power, laser 23, 34preferences
Levey-Jennings 92run 100setup 92, 96
pressureerrors, tube 122, 123fluidics 121, 132sample 23
print preview 60printing
lab reports 61, 111Levey-Jennings reports 63setup reports 62, 96worklists 59
process controls 82pump
error 123status 22
184 BD FACSCanto Clinical Software Reference Manual

Q
QCmessages 107, 138values 106, 107
R
rack, carousel 20, 57ReadMe file vii, 78reagents
lab report plots 103limitations 14lot IDs 51per panel 156plots for 98requirements 12subset results 104, 158
registration key 78reinstalling software 74reports
Application Setup 35Cytometer Setup 32default settings 176displaying QC values 106headers 110, 115lab
comments 110display time 101hiding error messages 109language 110printing 111reagent plots 103sections explained 38
Levey-Jennings 38logos 116
requirements, system 12re-running worklists 55resizing 26
windows 24worklist columns 26
result filesabout 81compatibility 13content 113storage location 83
directory checkbox 66reviewing setup reports 96run preferences 100
S
samplepressure 23quality 139
sample prep assistant (SPA)compatibility 13importing worklists 57
samples, deleting from worklist 27service key 78settings
adjusting 152alarm ranges 105, 175default software 168lab manager defaults 178report 176
setupage 23Application Setup 35Cytometer setup 32errors 127preferences 92, 96reports
comments 35, 37printing 62, 96storage location 66, 83
results file 81troubleshooting 125
Index 185

shortcutskeyboard 150menu commands 151software 78
shutdown solution level 23software
about 11BD FACSDiva 12, 13compatibility 13connecting 53default settings 168disconnecting 52file locations 79, 82files, BD FACSCanto 80installing 74interference 13limitations 14logging in 16menus 17, 148not responding 120requirements 12shortcuts 78starting 16uninstalling 79
sorting worklists 27spectral overlap
factors, beads 47optimized setup report 36setup report 34
standard toolbar 19standby, cytometer 52starting
fluidics 90software 16
statusbar 17errors 21window 21
subset results 104, 158
T
target values, setup beads 46targets, acquisition 99technical assistance ix, 119templates, acquisition worklist 56threshold
control shortcuts 152controls, location 16optimized setup report 36
timeacquisition 99display (lab report) 101pre-acquisition 100
toolbarsabout 19standard 19viewing 68
training, online ixtroubleshooting
analysis 138BD Multitest plots 143event rate 135FCS files 137no events 126, 134plots 137, 143populations 134, 136QC messages 107, 138setup 125
tube pressurization errors 122, 123typographical conventions viii
U
uninstalling software 79unique carousel ID 58usage trace files 81
186 BD FACSCanto Clinical Software Reference Manual

usersadding 85deleting 88disabling 89editing information 88enabling 90lab managers 73, 77, 87
V
vacuumerror 123status 22
viewinglab reports 64options 24toolbars 68windows 68
W
waste level 23window components 16windows
carousel 20hiding 24moving 24resizing 24status 21viewing 68
workflow 29worklist toolbar 19
worklistsabout 25deleting samples 27files 80importing 13, 57opening 55printing 59re-running 55sorting entries 27storage locations 66, 80, 83templates 56undoing entries 27
workstation requirements 12
Index 187

188 BD FACSCanto Clinical Software Reference Manual


![l>lf·· E ·B; -I,:,C-·-1·1V · cat. no.i bd lj.657 bd lj.6]5 bd 4630 bd 4·627 bd 4628 bd 4886 bd 4546 bd 4·545 bd 4544 bd 4542 bd lj,588 bd lj.593 bd 0102 bd 4636 bd 4632 bd](https://static.fdocuments.in/doc/165x107/5f7c69bb7d840d18665ab1e6/llf-e-b-ic-11v-cat-noi-bd-lj657-bd-lj65-bd-4630-bd-4627-bd-4628-bd.jpg)


