BBHN Mesh Network Client Handbook for Emergency Responders€¦ · BBHN Mesh Network Client...
14
BBHN Mesh Network Client Handbook for Emergency Responders Santa Clara County RACES April 2015
-
Upload
truongxuyen -
Category
Documents
-
view
230 -
download
0
Transcript of BBHN Mesh Network Client Handbook for Emergency Responders€¦ · BBHN Mesh Network Client...

BBHN Mesh NetworkClient Handbook
for Emergency Responders
Santa Clara County RACES
April 2015

April 17, 2015 2 / 28
Table of Contents1 INTRODUCTION................................................................................................... 3
1.1 OVERVIEW ........................................................................................................... 31.2 INTENDED AUDIENCE.............................................................................................. 31.3 HOW TO USE THIS GUIDE ......................................................................................... 31.4 REVISIONS ........................................................................................................... 3
2 MESH NODE STARTUP......................................................................................... 42.1 INTRODUCTION ..................................................................................................... 42.2 FIRST-TIME POWER ON............................................................................................ 42.3 STANDARD POWER ON SEQUENCE.............................................................................. 52.4 ACCESSING THE LINKSYS / MESH CONFIGURATION......................................................... 52.5 REVIEWING THE MESH STATUS ................................................................................. 62.6 MESH NODE SETUP ............................................................................................... 72.7 TROUBLESHOOTING................................................................................................ 7
3 ZULTYS PHONE OPERATIONS .............................................................................. 83.1 RESET TO FACTORY DEFAULTS .................................................................................. 83.2 NORMAL PHONE POWER UP PROCEDURE .................................................................... 83.3 DETERMINE THE PHONE‘S IP ADDRESS ....................................................................... 83.4 ACCESSING THE PHONE INTERFACE ............................................................................ 93.5 FIRST-TIME PHONE SETUP ..................................................................................... 103.6 TEST THE PHONE.................................................................................................. 113.7 TROUBLESHOOTING.............................................................................................. 12
4 MESH WEBSITE ACCESS......................................................................................144.1 INTRODUCTION ................................................................................................... 144.2 FINDING WEBSITES ............................................................................................... 144.3 ON THE SCC WEBSITE........................................................................................... 154.4 TROUBLESHOOTING.............................................................................................. 15
5 WEBCAM ...........................................................................................................165.1 INTRODUCTION ................................................................................................... 165.2 FINDING WEBCAMS ............................................................................................. 165.3 CONTROLLING THE WEBCAM.................................................................................. 165.4 TROUBLESHOOTING.............................................................................................. 17
6 FTP SERVER........................................................................................................186.1 INTRODUCTION ................................................................................................... 186.2 FINDING FTP SERVERS.......................................................................................... 186.3 ACCESSING THE FTP SERVER WITH WINDOWS EXPLORER .............................................. 186.4 MOVING FILES WITH WINDOWS EXPLORER................................................................ 206.5 ACCESSING THE FTP SERVER WITH FILEZILLA.............................................................. 206.6 TROUBLESHOOTING.............................................................................................. 21
7 NETWORK SHARES.............................................................................................227.1 INTRODUCTION ................................................................................................... 227.2 USING NETWORK SHARES....................................................................................... 227.3 TROUBLESHOOTING.............................................................................................. 23
8 INSTANT MESSAGING WITH HAMCHAT..............................................................248.1 INTRODUCTION ................................................................................................... 248.2 FINDING A CHAT SERVER ....................................................................................... 248.3 SENDING A MESSAGE WITH HAMCHAT...................................................................... 248.4 TROUBLESHOOTING.............................................................................................. 26
April 17, 2015 27 / 28
NOTES

April 17, 2015 26 / 28
6. It is better to send one sentence at a time (short) instead of typing an entire paragraph (long).
7. When done, let people know you are signing off so there is a record of you leaving in case someone is looking for you.
8.4 Troubleshooting
Problem Try this
Cannot connect to the Chat service
1. Notify the Mesh Network Administrator if this problem arises.
April 17, 2015 3 / 28
1 Introduction
1.1 Overview
The client–server computing model is a distributed application structure that partitions tasks between the providers of a resource or service, called servers, and service requesters, called clients. This description aligns nicely with the deployment approach taken by Santa Clara County RACES and its participating cities when considering a BroadBand HamNet™ Mesh Network deployment.
The purpose of the “BBHN Client Handbook for Emergency Responders” is to provide ARES/RACES responders with a straight forward reference for configuring, integrating, and operating a client BBHN Mesh Node within a deployed Mesh Network.
The title rightfully implies that there is a companion “BBHN Server Handbook for Emergency Responders” that describes the configuration and setup of a Linux-based server and resident applications that would support a network of BBHN Mesh Clients.
1.2 Intended Audience
ARES/RACES members can use it as a minimalist field reference when arriving and joining a Mesh Network. The guide will also provide RACES Event and Emergency Planners with the menu of available services that can be deployed.
1.3 How to use this guide
This guide presents information on what we believe are the standard set of network services that would enhance communications by our served agencies in the execution of an emergency response and recovery.
Drills are a good time to carefully step through all the offered network services described in the guide to understand what they are, how they work, the opportunities and limitations that they each present, and challenge you to look for ways that they can enhance the response.
During an actual activation and Mesh Network deployment, the guide is a quick reference of the steps that may be needed, given how infrequent we are deployed.
1.4 Revisions
To ensure the information remains relevant, accurate, and up-to-date, revisions to the guide will occur as corrections are applied or new services and capabilities are added.
The guide is only as good as its content. All users are encouraged to submit corrections and updates as they are uncovered.
Submit updates to Jim Oberhofer, [email protected].

April 17, 2015 4 / 28
2 MESH Node Startup
2.1 Introduction
The value of using the BBHN software is that the user interface is the same regardless of the mesh hardware on which it is flashed. However, the two available classes of WiFi Routers– Linksys WRT54G and Ubiquiti – have different antenna, mounting, power, and cabling requirements; these will not be addressed here, but will be generally referenced as needed.
For the initial setup, a PC/laptop connected to the node is required. Beyond the first setup, no PC/laptop is required.
NOTE: This guide does not address flashing the router. Refer to the BBHN website for instructions on installing the firmware.
2.2 First-time power on
Confirm the node network cabling1. Router to VoIP Phone2. Router to PC
Confirm the Power configuration1. Power Source to Router2. Power Source to Phone3. Power Source to PC
Apply power to all devices
1. Mesh Router: The boot process will take about 1 minute.
a. Linksys: Once the DMZ LED goes out, the node is ready for use.
b. Ubiquiti Nano stations: the far right hand lamp will flash green. After about a minute, it will stop and the third lamp from left will lite Red. At that point, the unit is ready for use.
c. Ubiquiti Titanium Bullet: no LEDs… just wait 1 minute.
2. VoIP Phone: The boot process will up to 1 minute depending on the Router boot process.
a. Zultys Phone: The phone flashes the Red and Yellow LED above and below the keypad. Both LEDs turn off after the power stabilizes.
b. Within a minute, check for a dial tone. If you hear one:i. the phone has power, and
ii. the phone has been assigned an IP address by the Router.
c. If you did not hear a dial-tone:i. check the network cable between the phone and the router
and reset or power cycle the phone.
April 17, 2015 25 / 28
The Chat form opens in a different browser tab.
1. Note the Auto-Refresh button at the bottom. When checked, your page will be refreshed about once every second or 2 depending on the number of users on the system. Please CHECK this box so you don’t miss any text messages addressed to you.
2. The field right above the Check box is the message text entry field. Enter your message and press the Enter key or the Send button. Your text string is posted to the server and received by anyone, including you, who is also currently logged into HamChat.
To send a message,
3. For the first message, get some greeting out there so your call sign gets on the board.
4. While this is faster than email for quick messages, there is still some network latency from the time you press Send to the time it is displayed on the other users form.
5. What you will not see is whether they are in the middle of typing a response.
April 17, 2015 24 / 28
8 Instant Messaging with HamChat
8.1 Introduction
Instant messaging, often referred to as "IM" or "IMing," is exchanging text messages over the network in real-time. Instant messaging differs from ordinary e-mail because of the speed of the message exchange as well as making a continued exchange simpler than sending e-mail back and forth.
The HamChat is a BBHNN Mesh Network application that runs on the Mesh server to allow keyboard-to-keyboard chats between any connected users on the same mesh network. By using your web browser instead of chat client software, the complexity is reduced and the speed to deploy is increased.
8.2 Finding a Chat Server
1. There are 2 ways to determine if a Chat Server is available:
a. Query the Mesh Network.
b. Ask the Mesh Network Administrator
2. To query the Mesh Network,
a. Start up your browser.
b. Connect to your local Mesh Node with the URL: http://localnode:8080
c. Press the Mesh Status button. This form reports the list of Mesh Node neighbors that your node can hear, and any Services that these nodes may offer.
d. Look for something like CHAT or something similar under the service header. It if is highlighted, click on it to access the application. Note the URL so you can go direct to it the next time.
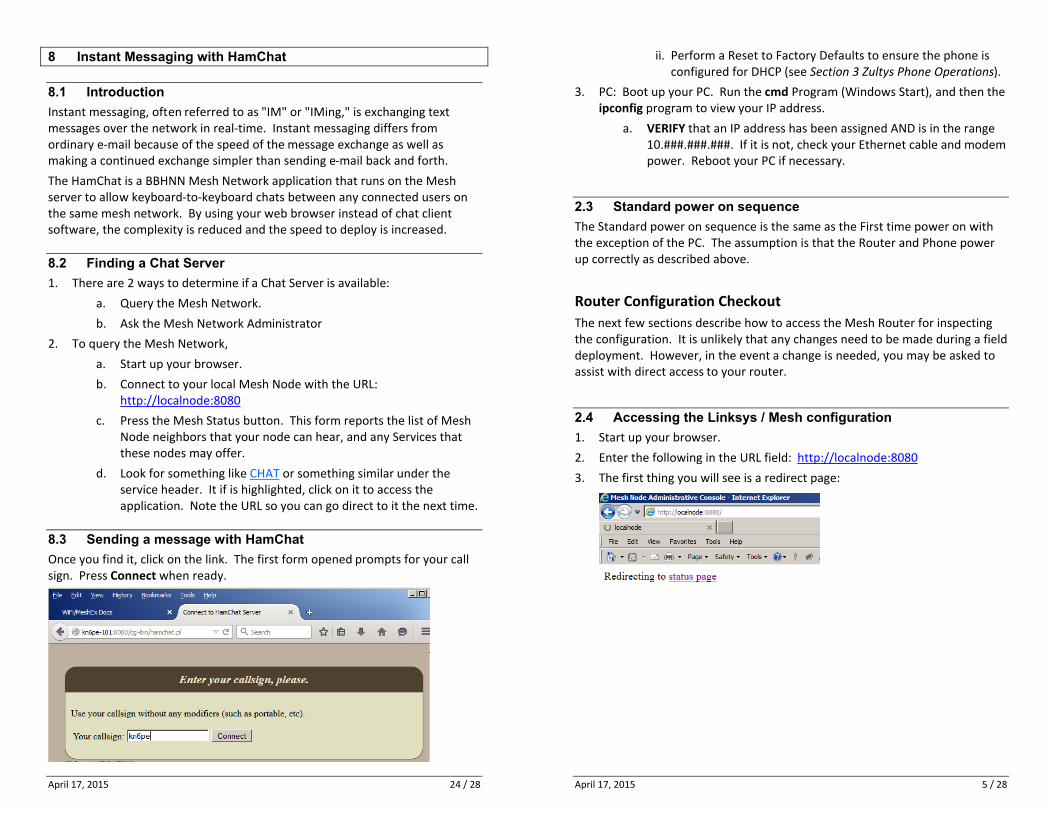
8.3 Sending a message with HamChat
Once you find it, click on the link. The first form opened prompts for your call sign. Press Connect when ready.
April 17, 2015 5 / 28
ii. Perform a Reset to Factory Defaults to ensure the phone is configured for DHCP (see Section 3 Zultys Phone Operations).
3. PC: Boot up your PC. Run the cmd Program (Windows Start), and then the ipconfig program to view your IP address.
a. VERIFY that an IP address has been assigned AND is in the range 10.###.###.###. If it is not, check your Ethernet cable and modem power. Reboot your PC if necessary.
2.3 Standard power on sequence
The Standard power on sequence is the same as the First time power on with the exception of the PC. The assumption is that the Router and Phone power up correctly as described above.
Router Configuration Checkout
The next few sections describe how to access the Mesh Router for inspecting the configuration. It is unlikely that any changes need to be made during a field deployment. However, in the event a change is needed, you may be asked to assist with direct access to your router.
2.4 Accessing the Linksys / Mesh configuration
1. Start up your browser.
2. Enter the following in the URL field: http://localnode:8080
3. The first thing you will see is a redirect page:

April 17, 2015 6 / 28
4. The Main Mesh Status page is presented.
In this example, the node name is “k6kp-100”, and the firmware versionis 3.0.0.
2.5 Reviewing the Mesh Status
1. Press the Mesh Status button. This form reports the local Host name (your Mesh Node name) and the list of Mesh Node neighbors that you can hear.
NOTE: Current neighbors are other nodes which have a direct link with your node. Remote Nodes are other nodes which are one or more network hops away.
April 17, 2015 23 / 28
d. In the folder field, enter the path string, including the backslashes.
e. Then press OK or Finish.
f. If everything is correct, Windows Explorer will open to the share location.
g. Begin accessing data files as if they were located on your PC.
7.3 Troubleshooting
Problem Try this
Cannot connect to the network share
1. Turn off Wireless and other interfaces if they are on. Disconnect from any external networks if connected.
2. Double-check the Share path, and it is in the form \\<server>\<name>.
3. Try entering the share path using the IP address instead: \\10.12.13.14\<share_name>
Cannot save an updated file
1. Possible messages: “document in use by
another user” or “file open in READ ONLY”
2. The file is open to another user. Before editing, ensure you have it locked to you (the app does that) so do don’t end up abandoning your entries.
My saved content is no longer there
1. DO NOT download a file, update it off-line, and then upload the file. You may overwrite someone else’s content.

April 17, 2015 22 / 28
7 Network Shares
7.1 Introduction
A network share (also known as a network drive) is space on a server that is accessible over the network. Data on these servers can be accessed by a local PC transparently as if it was a resource on your machine.
Network shares are an advertised service on a mesh network, but not a click-able service like the Webcam or Website links. Network shares are identified by SMB (Server Message Block protocol).
Shares are usually configured on a server in one of 2 ways:
1. Anonymous shares. These shares are open anyone who can get to them, and offers no file level security. Anonymous shares are ideal for a closed network settings with no external access, and there is little risk of someone from the outside getting in.
2. Protected shares. These shares require a logon and password to get in. These shares can hold group- or individual-specific data. These shares To access a network share, you need to know 3 things:
To access either type of share, you will need to know the Path to the server and file share. Once you have the share mapped in, it will look like a separate disc drive on our PC.
A word of caution: It is important that you maintain your PC’s virus checking capabilities. Even though you are not on the public internet, a co-worker may unknowingly have a virus that gets passed on in a file.
When in doubt, virus scan before opening.
7.2 Using network shares
To map in a network share, do the following:
6. Get the following from the Mesh Network Administrator:
a. Path to the Share. This will be in the form \\<server>\<share name> (Includes the backslashes)
b. Logon and Password. If this is a protected share, you will need both.
7. To map in a share, Open Windows explorer, and then…
a. Windows XP: select Tools > Map Network Drive
b. Windows 7, 8: Find the Network Icon (on the left, right-click on it, and select Map Network Drive
c. Pick an unassigned Drive Letter (I usually start at the end of the alphabet).
April 17, 2015 7 / 28
2. Other controls on this page:
a. Refresh: one-time refresh of the results on this page.
b. Auto: automatically refreshes the results of this page about every 10 seconds.
c. Quit: Exits this page and returns to the main status page.
3. Note the list of neighbors and any services they offer. In the above example, you see the following:
a. Neighbor: kn6pe-100. Alias: sccserver (this is an Example)
b. Services (NOTE not all nodes will have all these services):a. CAM: two Webcams are listed as availableb. FTP: File Transfer Protocol, this site hosts an FTP
server for file upload and downloadc. HTTP: This neighbor offers HTTP web servicesd. SIP: This node hosts a SIP PBX Phone servere. SMB: This service offers a mappable file share.
4. Note the neighbors and their services that you see.
5. When done, press Quit.
2.6 Mesh Node Setup1. Access to the Setup form requires a logon.
c. Logon: root .d. Password: mesh .
NOTE: This information is specific for Santa Clara County RACES. Consult with the Mesh Network Administrator or station owner in a different situation.
2.7 TroubleshootingProblem Try this
No LEDs eliminated 1. Confirm that the router is correctly connected to the power source.
Cannot see any other Mesh Node.
1. Check that the Mesh Router is powered on. Observe the front LEDs.
2. Log on to the Router and check the following on the Mesh Node home page:
a. The Mesh Node name is assigned; confirm an FCC call sign is shown on the top of the page.
b. The “firmware version” is set to 3.0.0.c. The “configuration” is set to mesh
NOTE: BBHN firmware versions 1.0.0 and 3.0.0 are incompatible. All nodes should be on at least v3.0.0. v3.0.0 and v3.1.0- are compatible with each other.

April 17, 2015 8 / 28
3 Zultys Phone Operations
3.1 Reset to Factory Defaults
This step should be done whenever you are connecting your phone to a new network for the first time or if you are unsure of the phone settings last made (it must be set to DHCP). Check with the MESH Network Administrator to determine if this step is required.
1. Perform a Reset to Factory Defaults for your Zultys ZIP2 phone:
a. Ensure that there is no power connected to the ZIP2 (do not connect the power adapter).
b. Pick up the handset.
c. While pressing the ‘1’ button, connect power to the phone. Do not release the ‘1’ button until both the red and yellow LEDs stop flashing; this usually takes about 10 seconds.
d. Disconnect power from the ZIP2 by removing the power adapter.
3.2 Normal Phone Power up procedure
1. Once a phone has been configured into the network, the following is the normal Phone power up procedure.
a. Connect the Phone to the Mesh router using an Ethernet cable.
b. Connect power to the ZIP2.
c. The phone quickly flashes twice the red LED above the keypad and the yellow LED below the keypad. Both LEDs turn off a few seconds after the power stabilizes.
2. Within a minute, check for a dial tone. If you hear one, this means:
a. the phone has power, and
b. the phone has been assigned an IP address by the Router.
3. If you did not hear a dial-tone, see Section 3.7. Troubleshooting.
3.3 Determine the Phone‘s IP Address
1. Before we can configure it, we need to find the Phone’s IP Address. Do the following:
a. Turn the Phone over and record the MAC Address. It will be a mix of HEX characters, 12 digits long.
b. Record the MAC Address for this phone: ________________
c. From the browser, connect to your router http://localnode:8080
April 17, 2015 21 / 28
6.6 Troubleshooting
Problem Try this
Cannot connect to the FTP server
1. Turn off Wireless and other interfaces if they are on.
2. Disconnect from any external networks if connected.
3. Enter in the full URL string including the http://portion of the address (i.e.: http://ftpserver).
4. Contact the Network Administrator and confirm the FTP Server is up and running.
Cannot upload a file to a specific directory.
The FTP data directory structure is can be tightly managed in terms of user access. Problems could be:
1. You are attempting to upload a file to an FTP data directory that is set to READ-ONLY. ACTION: contact the Network administrator for the correct upload data directory.
2. The logon information does not give you permission to upload a file to a specific directory.ACTION: contact the Network administrator for a logon that is granted permission to perform the upload.

April 17, 2015 20 / 28
5. Note there are 2 folders in this location:
a. download. This is a READ-ONLY directory that contains files to be downloaded to your machine.
i. If you attempt to put (write) a file in this folder, you will get an error stating you “… do not have permission to put files on this server”.
b. upload. This is a WRITE-ONLY directory for uploading files that you may need to submit. Once submitted, it cannot be overwritten or deleted.
i. If you attempt to replace a file with a new version, you will get an error. If you have to upload a replacement file, give the file name a version number, such as “my-data-file-v2.doc”.
ii. If you attempt to download (read) a file, you will get an error.
6. Double-click on each folder and take a look at what files are already loaded in there.
6.4 Moving files with Windows Explorer
1. To upload a file: Open a separate Windows Explorer, navigate to the location where the file for uploaded is located, and drag the file into the FTP data directory.
2. To download a file: In a different Windows Explorer, drag the file from the FTP Data directory to your local file location.
6.5 Accessing the FTP server with FileZilla
FileZilla is a popular program for working with FTP Servers. On running it, it is simply a matter of filling in the Address name “sccserver” and pressing enter. It immediately fills in “anonymous as the login and a default password.
1. The top text box shows you the exchange between FileZilla and the Server. This is a good place to check for errors.
2. The Local Site Box is your local directory, and below that are the files in the selected directory.
3. The Remote Site Box (right of Local Site) shows you where you are on the FTP server.
4. Uploading files is as easy as selecting the Local Directory and Remote Site Directory and dragging a file from that Local to Remote directory.
5. The process is the reverse for downloading files.
April 17, 2015 9 / 28
d. Select the Setup link. Enter the router’s logon and password.
e. Select the Port Forwarding, DHCP, and Services link.
f. Look under the Current DHCP Leases section.
g. Find the entry that matches the phones’ MAC address that you identified from Step 1 above. Record the corresponding IP Address below.
h. Record the IP Address for this phone: __________________
3.4 Accessing the Phone Interface
1. This procedure addresses manually entering the configuration using the phone’s web interface.
2. Open your browser and enter the phone’s IP address in the URL address line.
3. From the left menu, select LAN. Note the various network settings that the phone discovered. Note that “Dynamic IP Assignment” (DHCP) is set to YES.

April 17, 2015 10 / 28
3.5 First-time Phone Setup
NOTE: Use this procedure whenever a new phone is being configured into an existing network. Connect the Mesh Network Administer for the Server Name, Logon, and Password.
1. Most of the phone settings can be defaulted. However, we do need to make this phone unique on the network.
2. From the left menu, select SIP.
NOTE: “sccserver” is not a domain name. The domain name for the mesh is “local.mesh”. So, the full name for this server would be sccsever.local.mesh.
Example: extension 7001
3. The following needs to be confirmed or entered for the phone to work.
a. SIP Server Settings: Defines where the Phone can find the SIP server (manages all Telephone call processing). The 3 three fields that MUST be filled in are:
i. Server Address: _______________ii. Port Number: 5060___________
iii. Domain Name: _______________
b. Gateway Settings. This section uniquely identifies the phone on the Phone Network. On boot up, the phone connects to the SIP
April 17, 2015 19 / 28
Logon: anonymousPassword: < blank > or < email address>
2. After you are logged in, you are looking at the FTP root directory. Note the directories and files that you see. Double-click on a directory link to explore these directories.
3. To open the FTP Server in Windows Explorer from Internet Explorer,
a. select View > Open FTP Site in File Explorer
4. You can also copy the displayed URL and paste it in the File Explorer File Path field as follows:
a. Run Windows Explorer.
b. The File Navigation line is actually settable.
c. With the FTP URL discovered above, enter it here, and press enter:
d. If the FTP server requires a password, you will be prompted for it. If it is an “anonymous” FTP login, you will be taken directly to the file locations on the server.

April 17, 2015 18 / 28
6 FTP Server
6.1 Introduction
The File Transfer Protocol (FTP) is a standard Internet protocol for transmitting files between computers on the Internet.
The FTP Server resides on a computer connected to the network and listens for requests for access. The FTP Client is software that resides on your computer. The easiest was to access the server is from Windows Explorer. Another popular software package that exists for Windows and MACs is FileZilla. On the iPhone, FTP Client Pro (~$5) works well.
To access the server, you need to know the following:
1. Server name. This is either an IP address or Fully Qualified domain Name, like ftp.myserver.org.
2. Logon and Password. See your network administrator for logon details.
3. The name of the file to upload or download.
6.2 Finding FTP Servers
1. There are 2 ways to determine if an FTP Server is available:
a. Query the Mesh Network.
b. Ask the Mesh Network Administrator
2. To query the Mesh Network,
a. Start up your browser.
b. Connect to your local Mesh Node with the URL: http://localnode:8080
c. Press the Mesh Status button. This form reports the list of Mesh Node neighbors that your node can hear, and any Services that these nodes may offer.
d. Look for something like an FTP service. It if is highlighted, click on it to access the website. Note the URL so you can go direct to it the next time.
6.3 Accessing the FTP server with Windows Explorer
Microsoft’s Windows Explorer is the easiest way to upload and download a file. Once Windows Explorer is pointing to the FTP server, it is simply a matter of dragging and dropping files to and from the FTP data directory.
1. At the Mesh Node Status Screen, click on the FTP link for the FTP site listed. A new window will open and prompt for the logon and password.
April 17, 2015 11 / 28
Server (above), and then registers with the phone’s user name and password that you will enter here. Once registered, you can then make and receive phone calls. The fields are:
i. Phone Number: ____________ (OK to leave blank)ii. Caller ID Name: ____________ (OK to leave blank)
iii. Port: 5060___________iv. AEC ON: [ON] (must be ON)v. User Name: _____________ (from Network Admin)
vi. Password: _____________ (from Network Admin)
c. Press Save SIP Settings.
4. Reset the phone. All settings stored to the phone do not take effect until you power cycle or reset the phone. Do either of the following:
a. Remove Phone power for a few seconds and then reapply power.
b. To reset the phone, i. select Reset from the Left menu
ii. select Reset and execute Main Application, and then iii. press the Reset button at the bottom of the phone.
5. The phone will restart as described in Section 3.2 Normal Phone Power up procedure.
3.6 Test the phone
1. Along with having all the phone numbers configured in, the SIP server for this workshop has 2 additional means for testing your phone’s setup.
a. Dial “100” This is a very basic phone-to-SIP Server test.
b. Dial “200” Reply with your extension number.
c. Dial “5000” This is an echo test. Listen to the description and follow the prompts.

April 17, 2015 12 / 28
NOTE: The above listed extensions are not universally available on all phone systems. Confirm the best method to test your phone with the Mesh Network Administrator.
3.7 Troubleshooting
Problem Try this
No Dial Tone 1. Check the network cable between the phone and the router and power cycle or reset the phone again.
2. Perform a Reset to Factory Defaults to ensure the phone is configured for DHCP. Then, re-enter the phone configuration.
Rapid busy signal when making a call
Your phone did not register with the SIP Server.1. Check for a Dial Tone2. Check the LAN connection between the Phone
and Mesh Router3. Check the phone’s power connection4. Check your settings: confirm …
a. Server Nameb. Port Numberc. User Named. Password
5. Power cycle or reset the phone6. Check with the Network Administrator that the
SIP server is operational.
April 17, 2015 17 / 28
a. A form to prompt for Logon and Password. If you are presented with such a form, check the Event website or contract your Mesh Network Administrator for the logon and password.
b. Viewing area where the image is present.
c. An Azimuth control. Also known as Pan, controls the view up to 360 degrees around the Webcam site.
d. An elevation control. Also known as Tilt, controls the view up or down over a specific range around the Webcam site.
e. Continuous monitoring control. This is a control that puts the camera in a continuous pan where it rotates through its range of coverage.
f. Also try mousing over a control; there may be a hint underneath.
5.4 Troubleshooting
Problem Try this
Cannot connect to the webcam
1. Turn off Wireless and other interfaces if they are on.
2. Disconnect from any external networks if connected.
3. Enter in the full URL string including the http://portion of the address (i.e.: http://scccam1).
4. Contact the Network Administrator and confirm the web services are up and running.
Cannot access the Webcam controls
1. Verify that the logon and password are correct.
2. If more than one camera is present, make sure you have the logon and password for the correct camera.
Azimuth or elevation changes after I set it.
1. It is possible for more than one user to log on to the camera at a time. The last person to touch a control is the one that controls it. In short: you may be competing for access with someone else.

April 17, 2015 16 / 28
5 Webcam
5.1 Introduction
A Web Camera, also known as an Internet protocol or IP camera, is a type of digital video camera commonly employed for surveillance that, unlike analog closed circuit television (CCTV) cameras, can send and receive data via a computer network and the Internet.
Most off-the-shelf Webcams are accessed by entering the camera’s IP addresses into your browser. Some also require a logon and password to access the video. Webcams are either fixed (what you are pointing at is what you see) or have the ability to remotely control the direction (azimuth) and Tilt (elevation) so you can see all around the camera. Steerable cameras are typically used for monitoring and security purposes.
Webcam controls are usually accessed in a browser window, essentially making it a video server.
5.2 Finding Webcams
1. There are 2 ways to determine if Webcams are available:
a. Query the Mesh Network.
b. Ask the Mesh Network Administrator
2. To query the Mesh Network,
a. Start up your browser.
b. Connect to your local Mesh Node with the URL: http://localnode:8080
c. Press the Mesh Status button. This form reports the list of Mesh Node neighbors that your node can hear, and any Services that these nodes may offer.
d. Look for a service name that implies it is a Camera, such as CAMor something similar. It if is highlighted, click on it to access the website. Note the URL so you can go direct to it the next time.
e. If the Webcam prompts for a logon and password, contact the Mesh Network Administrator for details.
5.3 Controlling the Webcam
1. Because there is no standard user interface for webcams, no specific instructions are presented here. However, in general, a Webcam UI may present the following features and controls.
April 17, 2015 13 / 28
This page intentionally left blank

April 17, 2015 14 / 28
4 Mesh Website Access
4.1 Introduction
Mesh-based websites are an excellent way to deliver network, event, and organization information at the time of the deployment. During your station deployment, you should be briefed as to whether one or more websites are available.
4.2 Finding websites
1. There are 2 ways to determine if a web site is available:
a. Query the Mesh Network.
b. Ask the Mesh Network Administrator
2. To query the Mesh Network,
a. Start up your browser.
b. Connect to your local Mesh Node with the URL: http://localnode:8080
c. Press the Mesh Status button. This form reports the list of Mesh Node neighbors that your node can hear, and any Services that these nodes may offer.
d. Look for something like web, WWW or HTTP under the serviceheader. It if is highlighted, click on it to access the website. Note the URL so you can go direct to it the next time.
April 17, 2015 15 / 28
4.3 On the SCC website
1. For direct access to the website, do the following:
a. Turn off your WiFi if you are also connected to another network.
b. Open your browser, and enter http://sccserver in your browser’sURL field.
c. For SCC Mesh, the site may contain any of the following information:
i. Mesh-related downloads
ii. Network Phone Book – names and extensions of VoIP phones currently deployed.
iii. Links to Webcams – these can also be found by querying the Mesh Network as described above.
iv. Information about File Shares – Your network may support the ability to map in a network file share.
v. Information about FTP Server – Your network may support the ability to upload and download files from your FTP client.
vi. Other information as dictated by your particular deployment.
d. Spend some time familiarizing yourself with the website so you fully understand what capabilities are available.
4.4 Troubleshooting
Problem Try this
Cannot connect to the website
1. Turn off Wireless and other interfaces if they are on.
2. Disconnect from any external networks if connected.
3. Enter in the full URL string including the http://portion of the address (i.e.: http://sccserver).
4. Contact the Network Administrator and confirm the web services are up and running.