BBC Micro:Bit and iPad - Glow Blogs – Central
14
BBC Micro:Bit and iPad The BBC Micro:Bit is a small programmable chip that can be programmed to light up or even control your phones. In this Help Card you will: o Understand how to connect to your MicroBit with an iPad o Understand how to write code for a Micro:Bit o Understand how to flash the code to the Micro:Bit To be able to connect to your Micro:Bit please make sure your iPad’s Bluetooth is switched on. 1. Open the App Store (shown below). 2. Search for MicroBit (shown below).
Transcript of BBC Micro:Bit and iPad - Glow Blogs – Central

BBC Micro:Bit and iPad
The BBC Micro:Bit is a small programmable chip that can be programmed to light
up or even control your phones.
In this Help Card you will:
o Understand how to connect to your MicroBit with an iPad
o Understand how to write code for a Micro:Bit
o Understand how to flash the code to the Micro:Bit
To be able to connect to your Micro:Bit please make sure your iPad’s Bluetooth is
switched on.
1. Open the App Store (shown below).
2. Search for MicroBit (shown below).

3. Click on the cloud to download (shown
below).
4. Click Open to Open the app (shown below).

5. We are now going to connect to the Micro Bit so please click connections
(shown below).

6. Click Pair a new Micro:Bit (shown below).
7. Hold A + B and press and release reset on your Micro:Bit and then click next
(shown below). This will put the Micro:Bit into paring mode.
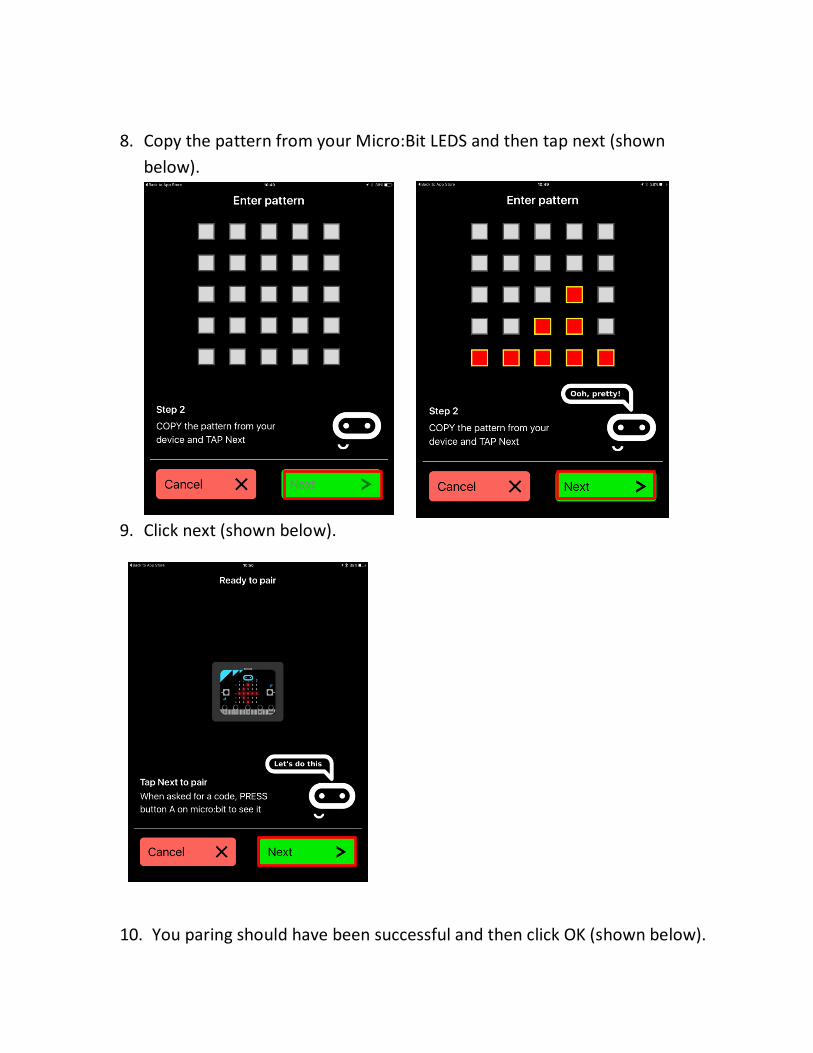
8. Copy the pattern from your Micro:Bit LEDS and then tap next (shown
below).
9. Click next (shown below).
10. You paring should have been successful and then click OK (shown below).

11. Click Home (shown below).
12. Click Create Code (shown below).

13. Click on New Project under Microsoft Block Editor (shown below).

14. You will see the following page click on Input (shown below).
15. Click and drag “on A button pressed” (shown below).

16. Click Basic and then click and drag show string ‘Hello’ (shown below).

17. Click and drag the show string ‘Hello’ into the purple loop (shown below).
18. Click on ‘Hello’ and you will see the following screen (shown below).

19. Enter some text into the box (shown below).
20. You will see the following screen, click on compile (shown below).

21. You will see the following screen this will disappear after a few seconds
(shown below).
22. You will then see this page click on open in “Micro:Bit” (shown below)

23. Click on Flash, this will copy the file onto your Micro:Bit (shown below)
24. You will then see the loading page (shown below left), this will change
once the file has finished copying over and you will see the following
screen, click OK (shown below right).

25. Now click the A button your Micro:Bit and you should see what you
entered when we made the code (shown below).


![The BBC micro:bit – from the UK to the World · 2019. 7. 2. · back to its work with the BBC Micro [4], the BBC described the micro:bit as its \most ambitious education initiative](https://static.fdocuments.in/doc/165x107/6045f56e3dde89755d776f36/the-bbc-microbit-a-from-the-uk-to-the-2019-7-2-back-to-its-work-with-the.jpg)