BB - Facet Jewelry Making digital supplement to bead&button magazine bb ra subscriber exclusive •...
14
A DIGITAL SUPPLEMENT TO BEAD&BUTTON MAGAZINE BB extra SUBSCRIBER EXCLUSIVE • AUGUST 2017 STITCH DELIGHTFUL SUMMER BUTTERFLIES! p.3 Big and beautiful flower earrings p. 30 FacetJewelry.com/BeadAndButton AUGUST 2017 • Issue 140 GO BEYOND THE BASICS WITH SHAPED PEYOTE Make a sleek chain mail pendant p. 37 YOUR GUIDE TO PORTABLE BEAD LOOMSp.18 Stitch a honey of a bracelet in CRAWp. 44 • How to create vacation keepsakes p. 56 • 11 great tips for traveling with beads p. 8 • 7 must-see bead and jewelry exhibits across the U.S. p. 11 & 82 plus p. 74 WITH BEADS! Say yes to Elegant stackable bangles! p. 26 SQUARES, TRIANGLES & ARCHES: THE BUILDING BLOCKS OF DESIGN Aravir bracelet & earrings p.6 • Folk art earrings p.9 Treasure of the pyramids bracelet p.12
Transcript of BB - Facet Jewelry Making digital supplement to bead&button magazine bb ra subscriber exclusive •...
A DIGITALSUPPLEMENT TO BEAD&BUTTON
MAGAZINE
BBextraSUBSCRIBER EXCLUSIVE • AUGUST 2017
STITCH DELIGHTFUL SUMMER BUTTERFLIES! p. 3
Big and beautiful flower earrings p. 30
FacetJewelry.com/BeadAndButton
AUGUST 2017 • Issue 140
GO BEYOND THE BASICS WITH
SHAPED PEYOTE
Make a sleekchain mail pendant p. 37
YOUR GUIDE TO PORTABLE BEAD LOOMS p. 18
Stitch a honey of a braceletin CRAW p. 44
• How to create vacation keepsakes p. 56 • 11 great tips for traveling with beads p. 8
• 7 must-see bead and jewelry exhibits across the U.S. p. 11 & 82
plus
p. 74
WITH BEADS!
Say yes toElegantstackablebangles!
p. 26
SQUARES, TRIANGLES & ARCHES: THE BUILDING BLOCKS OF DESIGN
Aravir bracelet & earrings p.6 • Folk art earrings p.9
Treasure of the pyramids bracelet p. 12
>>
Visit Bead&Button online at FacetJewelry.com
welcome
Visit Bead&Button online at FacetJewelry.com for free projects,
videos, blogs, galleries, designchallenges, and more, all updated daily.
Butterfly wings bracelet ................................................ p. 3
Aravir bracelet & earrings ............................................. p. 6
Folk art earrings ............................................................. p. 9
Treasure of the pyramids bracelet ...............................p. 12
A beady transformation
Editor, Bead&[email protected]
An amazing thing happens when a creative individual takes the time to play and experiment with her material of choice — tiny bits and bobs come together to form something that didn’t exist before. And while it can’t be said to be unusual — creativity is evident in every facet of our world, including in the forests, skies, and oceans of the natural environment — it can nevertheless be wonderful, surprising, and captivating. For instance, consider how a few arches and circles have become butterflies in Kerstin Kallin’s clever bracelet (p. 3). Or how Thomasin Alyxander’s earrings (p. 9) evoke quilt patterns but on a very small scale. Likewise, the pyramids have been shrunk down to wearable proportions in Anna Elizabeth Draeger’s bracelet (p. 12), but the structure still inspires a bit of awe and wonder. And Annamaria Dudas reveals how triangles can become other shapes right before your very eyes in her stunning bracelet-and-earrings set (p. 6). All of these pieces started as small piles of basic shapes — squares, triangles, and circles — and have evolved into wonder-ful designs that bring us joy. How’s that for amazing? Happy beading!
All of these pieces
started as small
piles of basic
shapes . . . and
have evolved into
wonderful designs
that bring us joy.
Contents
This logo is for use on masthead only. Do not use less than 100% of full size.
ADVERTISING
Corporate Advertising Director Ann E. Smith
Advertising Sales Lori Schneider
Ad Services Representatives Melissa Valuch, Nanette Hackbarth
B&B Extra is published bimonthly by Kalmbach Publishing Co., 21027 Crossroads Circle, P.O. Box 1612, Waukesha, WI 53187-1612
Editor Julia Gerlach
Senior Art Director Lisa A. Bergman
Associate Editors Connie Whittaker, Diane Jolie
Contributing Editor Cindy Crain Newman
Editorial Assistant Lora Groszkiewicz
Graphic Designer Lisa M. Schroeder
Photographer Bill Zuback
Illustrator Kellie Jaeger
Editorial Director Diane M. Bacha
© 2017 Kalmbach Publishing Co. All rights reserved. This publication may not be reproduced in part or in whole without written permission from the publisher. The designs in B&B Extra are for your personal enjoyment. They may not be taught or sold without permission.
Two ways to make a quartz crystal pendant by Julia Gerlach.
Discover the power of The Red Woman with this intricate choker by Sue Neel.
Make adorable wire owlets by Brenda Schweder.
Use wire mesh to make a stunning, light-weight neckpiece by Stacey Neilson.
© 2017 Kalmbach Publishing Co. This material may not be reproduced in any form without permission from the publisher.
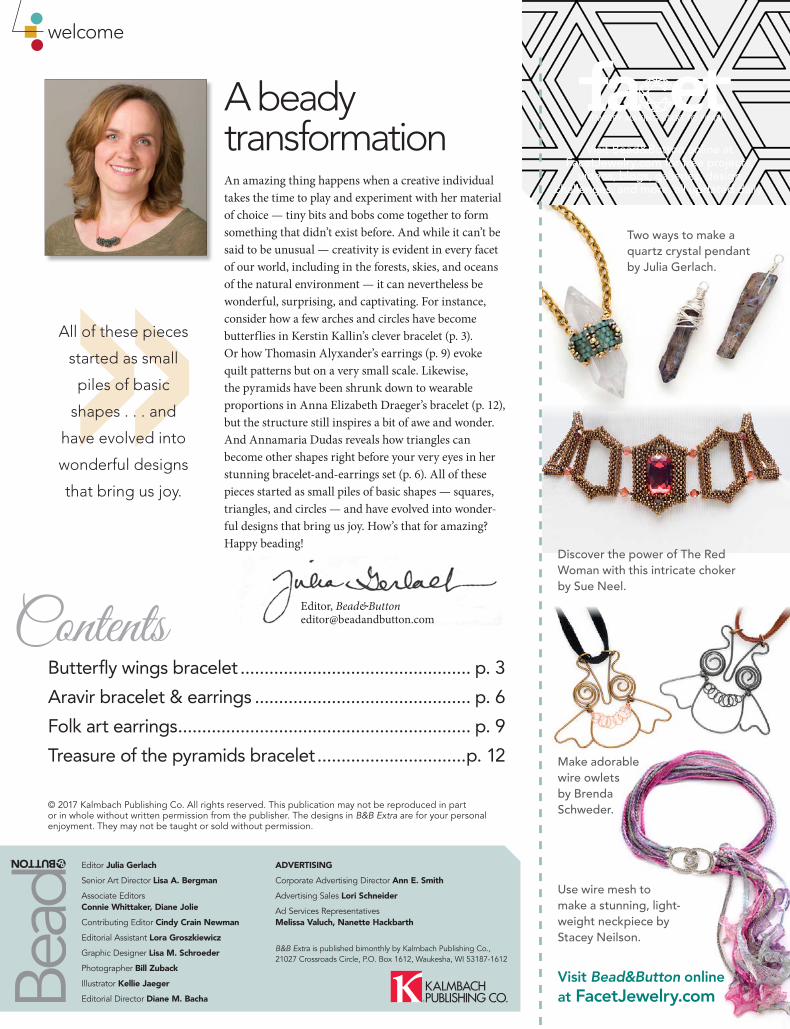
August 2017 3
BUTTER-FLY WINGS BRACELETdesigned by Kerstin Kallin
DIFFICULTY
bead weaving
ab
cd
a
b
c
d
a
b
c
d
5 x 10 mm Arcos bead
110 seed bead
150 seed bead
2.5 x 3 mmMinos bead
August 2017 4
I designed this bracelet in mid-summer when the softly-curved Arcos beads reminded me of a kaleidoscope of butterflies in flight.
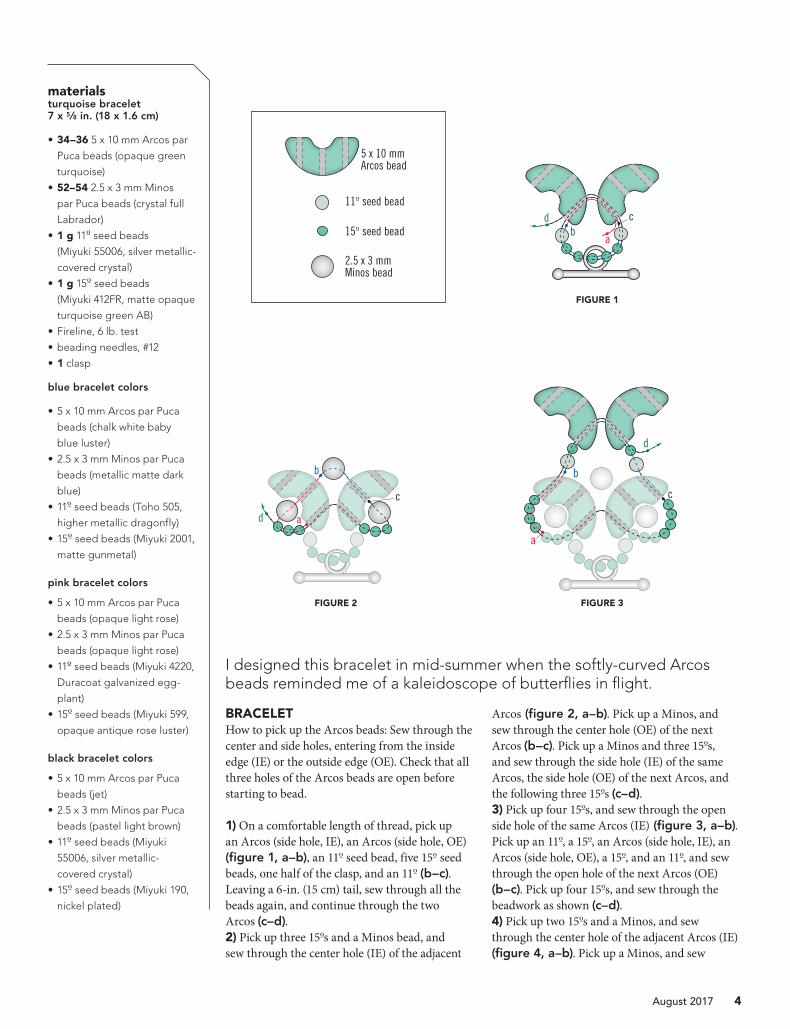
BRACELETHow to pick up the Arcos beads: Sew through the center and side holes, entering from the inside edge (IE) or the outside edge (OE). Check that all three holes of the Arcos beads are open before starting to bead.
1) On a comfortable length of thread, pick up an Arcos (side hole, IE), an Arcos (side hole, OE) (figure 1, a–b), an 110 seed bead, five 150 seed beads, one half of the clasp, and an 110 (b–c). Leaving a 6-in. (15 cm) tail, sew through all the beads again, and continue through the two Arcos (c–d).2) Pick up three 150s and a Minos bead, and sew through the center hole (IE) of the adjacent
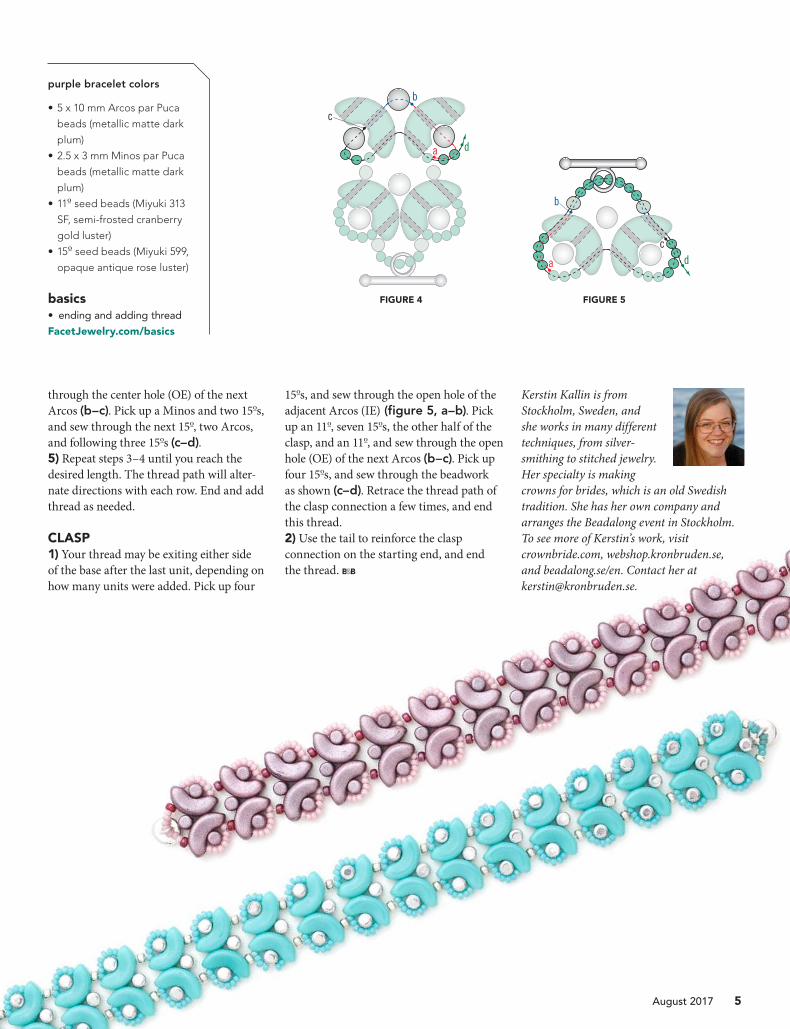
Arcos (figure 2, a–b). Pick up a Minos, and sew through the center hole (OE) of the next Arcos (b–c). Pick up a Minos and three 150s, and sew through the side hole (IE) of the same Arcos, the side hole (OE) of the next Arcos, and the following three 150s (c–d). 3) Pick up four 150s, and sew through the open side hole of the same Arcos (IE) (figure 3, a–b). Pick up an 110, a 150, an Arcos (side hole, IE), an Arcos (side hole, OE), a 150, and an 110, and sew through the open hole of the next Arcos (OE) (b–c). Pick up four 150s, and sew through the beadwork as shown (c–d).4) Pick up two 150s and a Minos, and sew through the center hole of the adjacent Arcos (IE) (figure 4, a–b). Pick up a Minos, and sew
materials turquoise bracelet 7 x 5 ⁄8 in. (18 x 1.6 cm)
• 34–36 5 x 10 mm Arcos par
Puca beads (opaque green
turquoise)
• 52–54 2.5 x 3 mm Minos
par Puca beads (crystal full
Labrador)
• 1 g 110 seed beads
(Miyuki 55006, silver metallic-
covered crystal)
• 1 g 150 seed beads
(Miyuki 412FR, matte opaque
turquoise green AB)
• Fireline, 6 lb. test
• beading needles, #12
• 1 clasp
blue bracelet colors
• 5 x 10 mm Arcos par Puca
beads (chalk white baby
blue luster)
• 2.5 x 3 mm Minos par Puca
beads (metallic matte dark
blue)
• 110 seed beads (Toho 505,
higher metallic dragonfly)
• 150 seed beads (Miyuki 2001,
matte gunmetal)
pink bracelet colors
• 5 x 10 mm Arcos par Puca
beads (opaque light rose)
• 2.5 x 3 mm Minos par Puca
beads (opaque light rose)
• 110 seed beads (Miyuki 4220,
Duracoat galvanized egg-
plant)
• 150 seed beads (Miyuki 599,
opaque antique rose luster)
black bracelet colors
• 5 x 10 mm Arcos par Puca
beads (jet)
• 2.5 x 3 mm Minos par Puca
beads (pastel light brown)
• 110 seed beads (Miyuki
55006, silver metallic-
covered crystal)
• 150 seed beads (Miyuki 190,
nickel plated)
FIGURE 1
FIGURE 2 FIGURE 3
a
b
c
d
b
da
c
August 2017 5
through the center hole (OE) of the next Arcos (b–c). Pick up a Minos and two 150s, and sew through the next 150, two Arcos, and following three 150s (c–d).5) Repeat steps 3–4 until you reach the desired length. The thread path will alter-nate directions with each row. End and add thread as needed.
CLASP1) Your thread may be exiting either side of the base after the last unit, depending on how many units were added. Pick up four
150s, and sew through the open hole of the adjacent Arcos (IE) (figure 5, a–b). Pick up an 110, seven 150s, the other half of the clasp, and an 110, and sew through the open hole (OE) of the next Arcos (b–c). Pick up four 150s, and sew through the beadwork as shown (c–d). Retrace the thread path of the clasp connection a few times, and end this thread.2) Use the tail to reinforce the clasp connection on the starting end, and end the thread. B&B
purple bracelet colors
• 5 x 10 mm Arcos par Puca
beads (metallic matte dark
plum)
• 2.5 x 3 mm Minos par Puca
beads (metallic matte dark
plum)
• 110 seed beads (Miyuki 313
SF, semi-frosted cranberry
gold luster)
• 150 seed beads (Miyuki 599,
opaque antique rose luster)
basics• ending and adding thread
FacetJewelry.com/basics
FIGURE 4 FIGURE 5
Kerstin Kallin is from Stockholm, Sweden, and she works in many different techniques, from silver- smithing to stitched jewelry. Her specialty is making crowns for brides, which is an old Swedish tradition. She has her own company and arranges the Beadalong event in Stockholm. To see more of Kerstin’s work, visit crownbride.com, webshop.kronbruden.se, and beadalong.se/en. Contact her at [email protected].
© 2017 Kalmbach Publishing Co. This material may not be reproduced in any form without permission from the publisher.
August 2017 6
ARAVIR BRACELET & EARRINGSdesigned by Annamaria Dudas
DIFFICULTY
bead weaving

ab
c
d a
b
c
ab c
2.5 x 5 mm SuperDuobead, color A
2.5 x 5 mm SuperDuobead, color B
3 mm fire-polishedbead, color C
3 mm fire-polishedbead, color D
110 seed bead
150 seed bead, color E
150 seed bead, color F
d
a
b
ce
d
abc
August 2017 7
The name “Aravir” comes from Tolkien, as I am a huge fan of fantasy. Translated into “Elfish,” it is a character’s name, but it also means “royal jewel.” I believe this set is worthy of being worn by a noblewoman.
BRACELETThroughout this project, keep your tension tight and retrace your thread paths at least twice. End and add thread as needed.
Square component
1) On a comfortable length of thread, pick up a repeating pattern of an 110 seed bead, a color B SuperDuo bead, an 110, and a color A SuperDuo bead three times, leaving a 15-in. (38 cm) tail. Tie the beads into a ring with a square knot, and sew through all the beads at least once more, and exit a B. Keep the tension tight. Sew through the open hole of the same B (figure 1, a–b).2) Pick up an 110, skip the next A, and sew through the open hole of the following B (b–c). Repeat this stitch two times to complete the round (c–d), and retrace the thread path. This forms the first triangle component.3) Sew through the other hole of the same B to reverse direction (figure 2, a–b). Continue through the next 110 and A, and the open hole of the same A to reverse direction again (b–c). The next and successive triangles you attach will always be connected to an already existing A.4) Pick up an 110, a B, an 110, an A, an 110, a B, an 110, an A, an 110, a B, and an 110, and sew through the A your thread exited at the start of this step. Retrace the thread path (figure 3, a–b), sew through the first two
beads to exit the first B added, and continue through the open hole of the same B (b–c). 5) Working as in step 2, pick up an 110, skip the next A, and sew through the open hole of the following B. Repeat this stitch twice to complete the second triangle. 6) Sew through the beadwork as in step 3 get into position to start the next triangle. 7) To make the third triangle component, repeat steps 4–6.8) To make the fourth triangle component, pick up an 110, a B, and an 110, position the third component near the first, and sew through the open hole of the adjacent A in the first component (figure 4, a–b). Pick up an 110, a B, an 110, an A, an 110, a B, and an 110, and sew through the A your thread exited at the start of this step. Retrace the thread path (b–c), and sew through the first two beads added in this step to exit the first B (c–d). Sew through the open hole of the same B (d–e). Complete the triangle as before.9) To embellish the center of the square, sew through the beadwork to exit the inner hole of an inner B. Pick up a color C 3 mm fire-polished bead, and sew through the next B (figure 5, a–b). Repeat this stitch three times, and retrace the thread path (b–c). Sew through the beadwork as shown to exit the open hole of an A on an outside corner (c–d).
materials bracelet 61⁄2 in. (16.5 cm)
• 2.5 x 5 mm SuperDuo beads
- 6 g (68) color A (opaque
white shimmer)
- 8 g (120) color B (silver)
• 3 mm fire-polished beads
- 40 color C (pastel emerald)
- 24 color D (Labrador)
• 5 g 110 seed beads (Miyuki
4217, Duracoat galvanized
seafoam)
• 150 seed beads
- 1 g color E (Miyuki 4217,
Duracoat galvanized sea-
foam)
- 1 g color F (Miyuki 4201,
Duracoat galvanized silver)
• 1 6 mm magnetic clasp
• Fireline, 8 lb. test
• beading needles, #12
earrings 11⁄2 x 1 in. (3.8 x 2.5 cm; same colors as bracelet)
• 2.5 x 5 mm SuperDuo beads
- 20 color A
- 30 color B
• 8 3 mm fire-polished beads,
color C
• 1 g 110 seed beads
• 10 150 seed beads, color E
• 1 pair of ear wires
basics• square knot
• ending and adding thread
FacetJewelry.com/basics
FIGURE 1 FIGURE 2 FIGURE 3
FIGURE 4 FIGURE 5
d
ab
c
d
efa
b
c
d
a
b
c
August 2017 8
Hexagon component
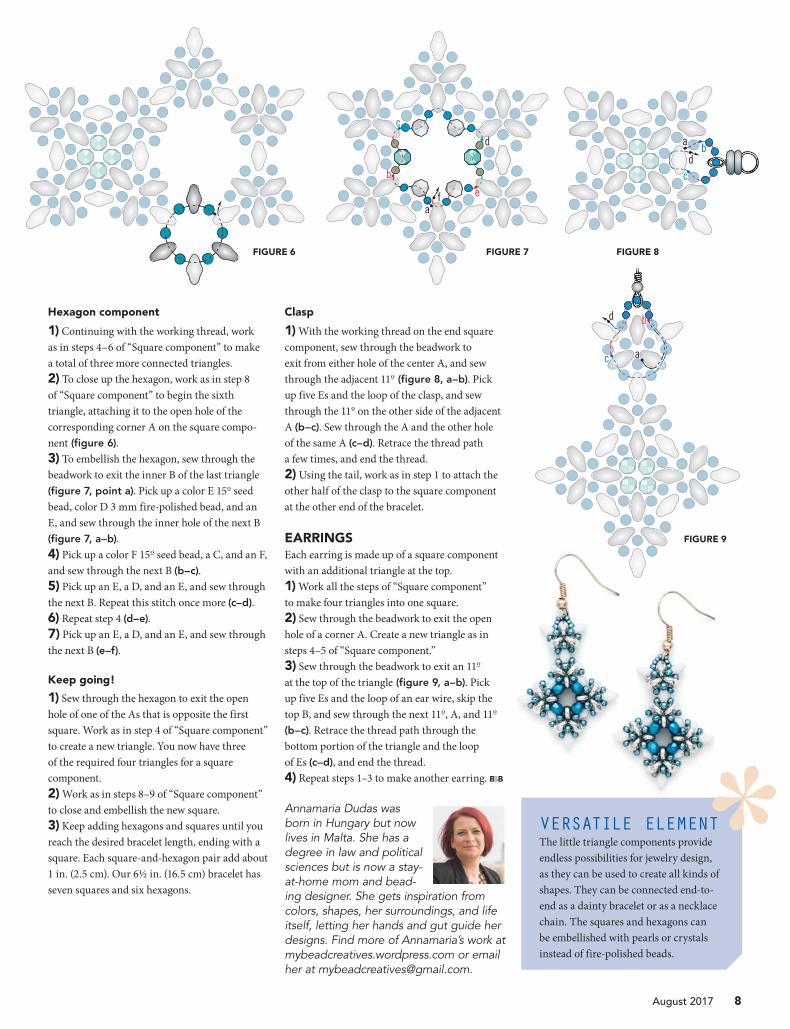
1) Continuing with the working thread, work as in steps 4–6 of “Square component” to make a total of three more connected triangles.2) To close up the hexagon, work as in step 8 of “Square component” to begin the sixth triangle, attaching it to the open hole of the corresponding corner A on the square compo-nent (figure 6). 3) To embellish the hexagon, sew through the beadwork to exit the inner B of the last triangle
(figure 7, point a). Pick up a color E 150 seed bead, color D 3 mm fire-polished bead, and an E, and sew through the inner hole of the next B
(figure 7, a–b). 4) Pick up a color F 150 seed bead, a C, and an F, and sew through the next B (b–c). 5) Pick up an E, a D, and an E, and sew through the next B. Repeat this stitch once more (c–d).6) Repeat step 4 (d–e). 7) Pick up an E, a D, and an E, and sew through the next B (e–f).
Keep going!
1) Sew through the hexagon to exit the open hole of one of the As that is opposite the first square. Work as in step 4 of “Square component” to create a new triangle. You now have three of the required four triangles for a square component. 2) Work as in steps 8–9 of “Square component” to close and embellish the new square.3) Keep adding hexagons and squares until you reach the desired bracelet length, ending with a square. Each square-and-hexagon pair add about 1 in. (2.5 cm). Our 6½ in. (16.5 cm) bracelet has seven squares and six hexagons.
Clasp
1) With the working thread on the end square component, sew through the beadwork to exit from either hole of the center A, and sew through the adjacent 110 (figure 8, a–b). Pick up five Es and the loop of the clasp, and sew through the 110 on the other side of the adjacent A (b–c). Sew through the A and the other hole of the same A (c–d). Retrace the thread path a few times, and end the thread.2) Using the tail, work as in step 1 to attach the other half of the clasp to the square component at the other end of the bracelet.
EARRINGSEach earring is made up of a square component with an additional triangle at the top. 1) Work all the steps of “Square component” to make four triangles into one square.2) Sew through the beadwork to exit the open hole of a corner A. Create a new triangle as in steps 4–5 of “Square component.” 3) Sew through the beadwork to exit an 110 at the top of the triangle (figure 9, a–b). Pick up five Es and the loop of an ear wire, skip the top B, and sew through the next 110, A, and 110 (b–c). Retrace the thread path through the bottom portion of the triangle and the loop of Es (c–d), and end the thread.4) Repeat steps 1–3 to make another earring. B&B
Annamaria Dudas was born in Hungary but now lives in Malta. She has a degree in law and political sciences but is now a stay-at-home mom and bead-ing designer. She gets inspiration from colors, shapes, her surroundings, and life itself, letting her hands and gut guide her designs. Find more of Annamaria’s work at mybeadcreatives.wordpress.com or email her at [email protected].
VERSATILE ELEMENTThe little triangle components provide endless possibilities for jewelry design, as they can be used to create all kinds of shapes. They can be connected end-to-end as a dainty bracelet or as a necklace chain. The squares and hexagons can be embellished with pearls or crystals instead of fire-polished beads.
FIGURE 6 FIGURE 7 FIGURE 8
FIGURE 9
© 2017 Kalmbach Publishing Co. This material may not be reproduced in any form without permission from the publisher.
August 2017 9
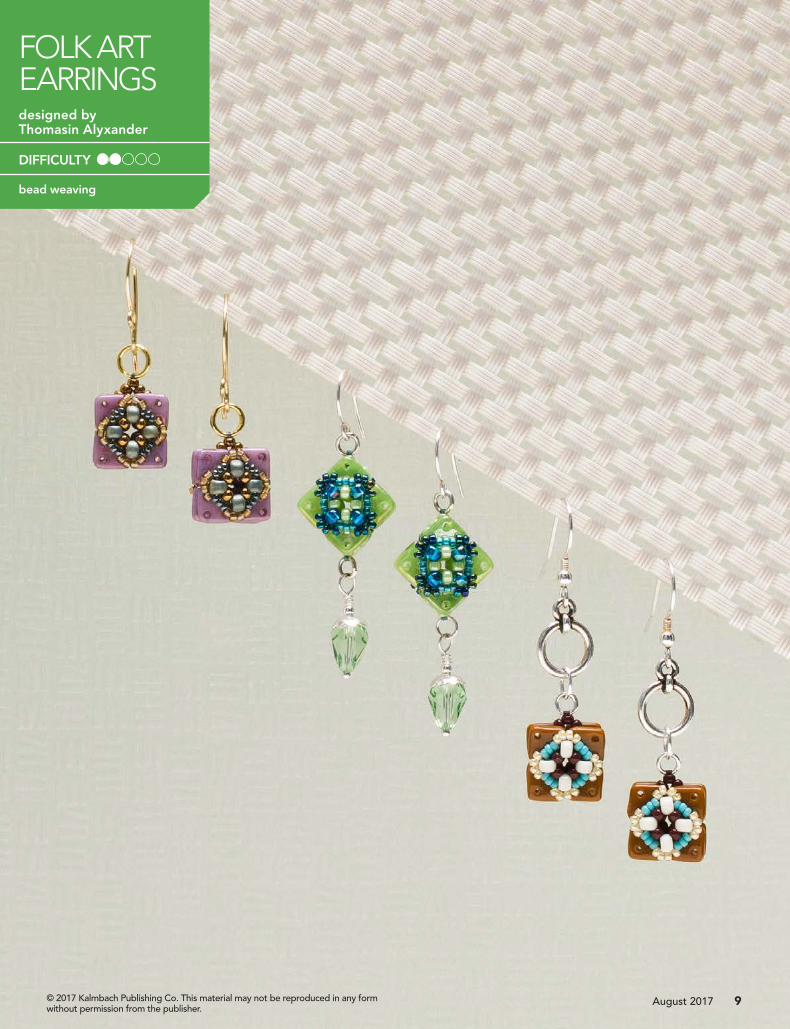
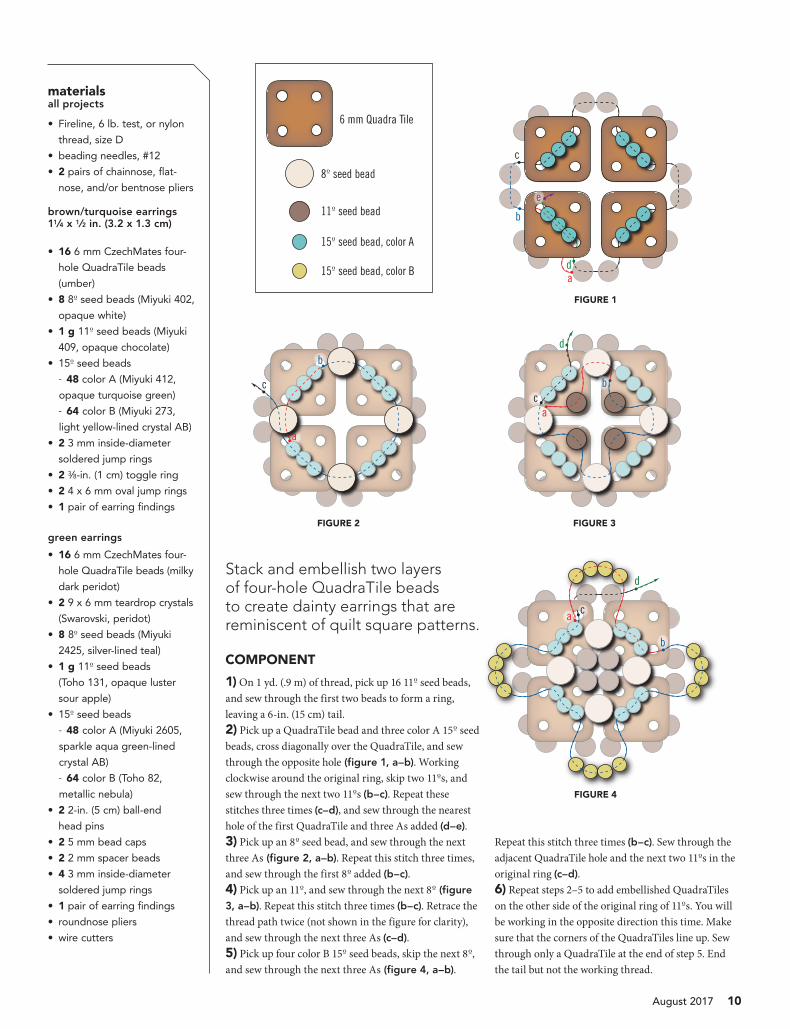
FOLK ART EARRINGSdesigned by Thomasin Alyxander
DIFFICULTY
bead weaving
a
b
c
d
e
a
b
c
a
bc
d
6 mm Quadra Tile
80 seed bead
110 seed bead
150 seed bead, color A
150 seed bead, color B
a
b
c
d
August 2017 10
Stack and embellish two layers of four-hole QuadraTile beads to create dainty earrings that are reminiscent of quilt square patterns.
COMPONENT
1) On 1 yd. (.9 m) of thread, pick up 16 110 seed beads, and sew through the first two beads to form a ring, leaving a 6-in. (15 cm) tail. 2) Pick up a QuadraTile bead and three color A 150 seed beads, cross diagonally over the QuadraTile, and sew through the opposite hole (figure 1, a–b). Working clockwise around the original ring, skip two 110s, and sew through the next two 110s (b–c). Repeat these stitches three times (c–d), and sew through the nearest hole of the first QuadraTile and three As added (d–e).3) Pick up an 80 seed bead, and sew through the next three As (figure 2, a–b). Repeat this stitch three times, and sew through the first 80 added (b–c). 4) Pick up an 110, and sew through the next 80 (figure
3, a–b). Repeat this stitch three times (b–c). Retrace the thread path twice (not shown in the figure for clarity), and sew through the next three As (c–d).5) Pick up four color B 150 seed beads, skip the next 80, and sew through the next three As (figure 4, a–b).
materials all projects
• Fireline, 6 lb. test, or nylon
thread, size D
• beading needles, #12
• 2 pairs of chainnose, flat-
nose, and/or bentnose pliers
brown/turquoise earrings11⁄4 x 1⁄2 in. (3.2 x 1.3 cm)
• 16 6 mm CzechMates four-
hole QuadraTile beads
(umber)
• 8 80 seed beads (Miyuki 402,
opaque white)
• 1 g 110 seed beads (Miyuki
409, opaque chocolate)
• 150 seed beads
- 48 color A (Miyuki 412,
opaque turquoise green)
- 64 color B (Miyuki 273,
light yellow-lined crystal AB)
• 2 3 mm inside-diameter
soldered jump rings
• 2 3⁄8-in. (1 cm) toggle ring
• 2 4 x 6 mm oval jump rings
• 1 pair of earring findings
green earrings
• 16 6 mm CzechMates four-
hole QuadraTile beads (milky
dark peridot)
• 2 9 x 6 mm teardrop crystals
(Swarovski, peridot)
• 8 80 seed beads (Miyuki
2425, silver-lined teal)
• 1 g 110 seed beads
(Toho 131, opaque luster
sour apple)
• 150 seed beads
- 48 color A (Miyuki 2605,
sparkle aqua green-lined
crystal AB)
- 64 color B (Toho 82,
metallic nebula)
• 2 2-in. (5 cm) ball-end
head pins
• 2 5 mm bead caps
• 2 2 mm spacer beads
• 4 3 mm inside-diameter
soldered jump rings
• 1 pair of earring findings
• roundnose pliers
• wire cutters
FIGURE 1
FIGURE 2 FIGURE 3
FIGURE 4
Repeat this stitch three times (b–c). Sew through the adjacent QuadraTile hole and the next two 110s in the original ring (c–d).6) Repeat steps 2–5 to add embellished QuadraTiles on the other side of the original ring of 110s. You will be working in the opposite direction this time. Make sure that the corners of the QuadraTiles line up. Sew through only a QuadraTile at the end of step 5. End the tail but not the working thread.

ab
cd
e a
bc
de
f g
hi
26StitchedElements
Thomasin Alyxander
ENDLESS JEWELRY POSSIBILITIES
26Stitched
Includes:• Clear, precise instructions take you through each project step by step
• Tons of options so you can pick elements to suit your mood — and your schedule
• New and exciting ways to use the latest bead shapes
It’s that easy!
Stitch. Combine.Connect.
9 7 8 1 6 2 7 0 0 2 0 5 9
5 2 2 9 9
ISBN 978-1-62700-205-9
0 6 4 4 6 5 1 7 8 6 1 2
67861
www.JewelryandBeadingStore.com
$22.99CAN $23.99
Learn to makethese simplecomponentsand discovercountless jewelry options!
Use seed beads, crystals, the latest shaped
beads, and more as you learn to create 26 different
components. Then connect those components — one style
or many — in quick and easy ways for stunning results. The
possibilities are endless!
26 QU
ICK
STITCH
ED ELEM
ENTS
ALY
XA
ND
ERBKS-67861-CV1,4.indd 1
6/26/15 2:41 PM
August 2017 11
7) Repeat steps 1–6 to make a second component.
FINISHING Square formation (brown and purple earrings)
1) With the thread exiting a QuadraTile toward the original ring of 110s, sew through the next two 110s (figure 5, a–b). Pick up three 110s and a soldered jump ring, and sew back through the three 110s (b–c). Continue through the next 14 110s in the original ring (c–d). 2) Pick up two 110s, sew through the 110 attached to the jump ring and the jump ring. Sew back through the three 110s you just sewed through (d–e). Sew through a few more beads in the original ring of 110s, and end the thread.3) Use an oval jump ring to connect the soldered jump ring to the toggle ring portion of a clasp. Open the loop of an ear wire, and connect it to the loop of the toggle ring. Another option is to attach an ear wire directly to the soldered jump ring, as in the purple earrings.4) Repeat steps 1–3 to finish the other earring.
Diamond formation with dangle (green earrings)
1) With the thread exiting a QuadraTile, sew through the next four 110s in the original ring
(figure 6, a–b). Pick up three 110s and a jump ring, and sew back through the three 110s just
FIGURE 5
FIGURE 6
picked up (b–c). Continue through the next eight 110s in the ring (c–d).2) Pick up three 110s and a jump ring, sew back through the same three 110s (d–e), and continue through the next six 110s in the ring (e–f). 3) Pick up two 110s, and sew through the 110 attached to the jump ring and the jump ring. Sew back through the three 110s you just sewed through (f–g). Continue through the next eight 110s in the ring as shown (g–h).4) Complete the jump ring attachment on this end of the component as before (h–i). Sew through a few more beads in the ring of 110s, and end the thread.5) On a head pin, string a 9 x 6 mm crystal drop, a bead cap, and a spacer. Make the first half of a wrapped loop, attach it to one of the jump rings, and complete the wraps. 6) Open the loop of an ear wire, and connect it to the opposite jump ring.7) Repeat steps 1–6 to complete the other earring. B&B
Thomasin Alyxander and her two dogs, Penelope and Ruby, run Ubeadquitous, a bead store in Windsor, California. When not bead-ing, she enjoys drinking tea and eating chocolate with her nose in a book. To see more of Thomasin’s work, visit ubeadquitous.com and email her at [email protected].
purple earring colors• 6 mm CzechMates four-
hole QuadraTile beads
(luster opaque amethyst)
• 80 seed beads (Toho
8R512F, higher metallic
frosted blue haze)
• 110 seed beads (Miyuki
457L, metallic light
bronze)
• 150 seed beads
- color A (Miyuki 1816,
black-lined chartreuse)
- color B (Toho 278, gold-
lined rainbow topaz)
basics
• ending thread
• square knot
• opening and closing
loops and jump rings
• wrapped loops
FacetJewelry.com/basics
MAKE A BRACELETMake several components, and attach two jump rings to each (on opposite sides). Connect them together to make a playful bracelet. For even more options, make the bracelet reversible by using a different colorway on the second side.
MORE EASY-TO-MAKE DESIGNSThomasin is the author of 26 Quick-Stitched Elements: Endless Jewelry Possibilities. Find it at JewelryandBeadingStore.com.
ITS YOUR STYLE These earrings can flatter any face by using the square or diamond orienta-tion, adding dangles, or hanging from lengths of chain.
© 2017 Kalmbach Publishing Co. This material may not be reproduced in any form without permission from the publisher.
August 2017 12
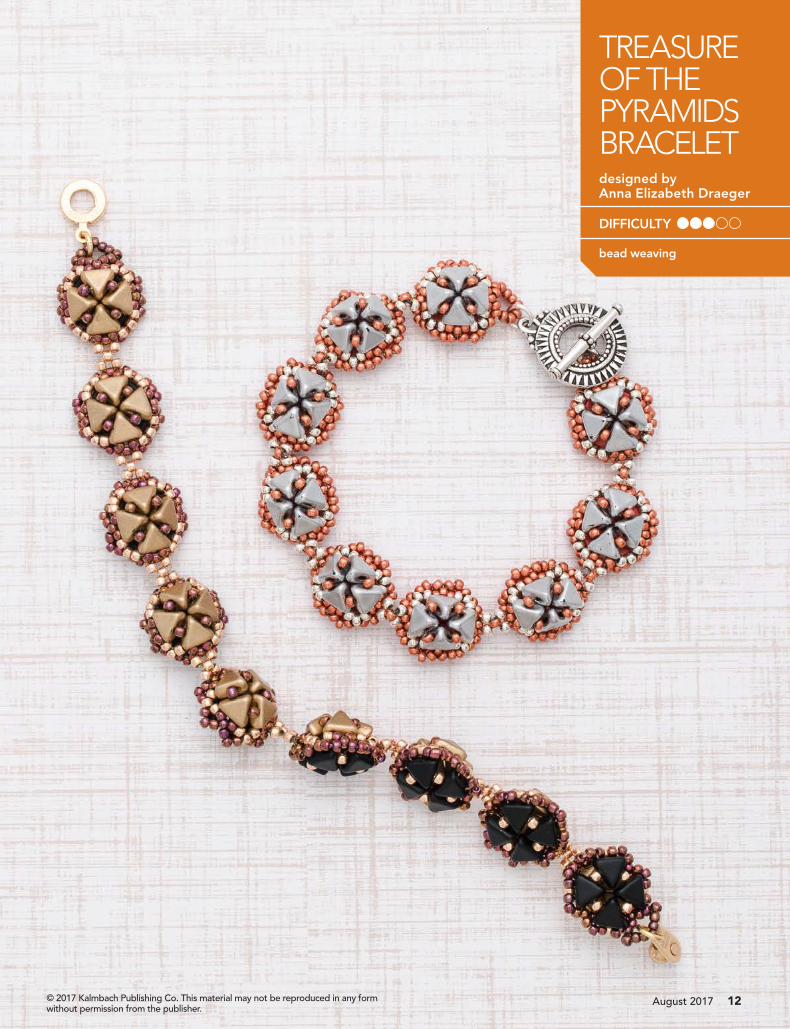
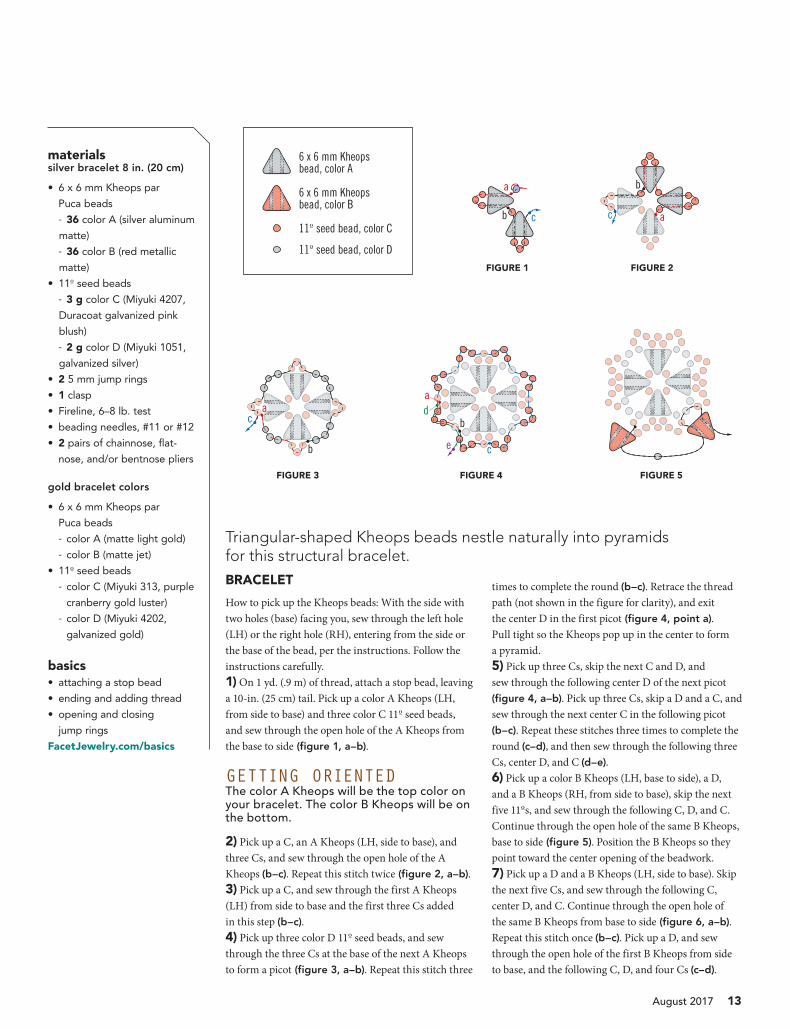
TREASURE OF THE PYRAMIDS BRACELETdesigned by Anna Elizabeth Draeger
DIFFICULTY
bead weaving
a
b c a
b
c
a
b
c
a
b
c
d
e
6 x 6 mm Kheopsbead, color A
6 x 6 mm Kheopsbead, color B
110 seed bead, color C
110 seed bead, color D
August 2017 13
Triangular-shaped Kheops beads nestle naturally into pyramids for this structural bracelet.BRACELET
How to pick up the Kheops beads: With the side with two holes (base) facing you, sew through the left hole (LH) or the right hole (RH), entering from the side or the base of the bead, per the instructions. Follow the instructions carefully.1) On 1 yd. (.9 m) of thread, attach a stop bead, leaving a 10-in. (25 cm) tail. Pick up a color A Kheops (LH, from side to base) and three color C 110 seed beads, and sew through the open hole of the A Kheops from the base to side (figure 1, a–b).
GETTING ORIENTED The color A Kheops will be the top color on your bracelet. The color B Kheops will be on the bottom.
2) Pick up a C, an A Kheops (LH, side to base), and three Cs, and sew through the open hole of the A Kheops (b–c). Repeat this stitch twice (figure 2, a–b).3) Pick up a C, and sew through the first A Kheops (LH) from side to base and the first three Cs added in this step (b–c).4) Pick up three color D 110 seed beads, and sew through the three Cs at the base of the next A Kheops to form a picot (figure 3, a–b). Repeat this stitch three
times to complete the round (b–c). Retrace the thread path (not shown in the figure for clarity), and exit the center D in the first picot (figure 4, point a). Pull tight so the Kheops pop up in the center to form a pyramid.5) Pick up three Cs, skip the next C and D, and sew through the following center D of the next picot (figure 4, a–b). Pick up three Cs, skip a D and a C, and sew through the next center C in the following picot (b–c). Repeat these stitches three times to complete the round (c–d), and then sew through the following three Cs, center D, and C (d–e).6) Pick up a color B Kheops (LH, base to side), a D, and a B Kheops (RH, from side to base), skip the next five 110s, and sew through the following C, D, and C. Continue through the open hole of the same B Kheops, base to side (figure 5). Position the B Kheops so they point toward the center opening of the beadwork. 7) Pick up a D and a B Kheops (LH, side to base). Skip the next five Cs, and sew through the following C, center D, and C. Continue through the open hole of the same B Kheops from base to side (figure 6, a–b). Repeat this stitch once (b–c). Pick up a D, and sew through the open hole of the first B Kheops from side to base, and the following C, D, and four Cs (c–d).
materials silver bracelet 8 in. (20 cm)
• 6 x 6 mm Kheops par
Puca beads
- 36 color A (silver aluminum
matte)
- 36 color B (red metallic
matte)
• 110 seed beads
- 3 g color C (Miyuki 4207,
Duracoat galvanized pink
blush)
- 2 g color D (Miyuki 1051,
galvanized silver)
• 2 5 mm jump rings
• 1 clasp
• Fireline, 6–8 lb. test
• beading needles, #11 or #12
• 2 pairs of chainnose, flat-
nose, and/or bentnose pliers
gold bracelet colors
• 6 x 6 mm Kheops par
Puca beads
- color A (matte light gold)
- color B (matte jet)
• 110 seed beads
- color C (Miyuki 313, purple
cranberry gold luster)
- color D (Miyuki 4202,
galvanized gold)
basics• attaching a stop bead
• ending and adding thread
• opening and closing
jump rings
FacetJewelry.com/basics
FIGURE 1
FIGURE 3 FIGURE 4 FIGURE 5
FIGURE 2
ac
b
d a
b
cd a
bc
9 7 8 1 6 2 7 0 0 3 1 8 6
5 2 1 9 9
ISBN 978-1-62700-318-6
0 6 4 4 6 5 1 7 8 8 7 2
www.JewelryandBeadingStore.com
$21.99CAN $22.99
67887
JEWELRY
DESIG
NS W
ITH CZ
ECHM
ATES B
EAD
S
DR
AEG
ER
Anna Elizabeth Draeger
Jewelry Designs withCzechMates Beads
Stitch Beaded Beauties featuringCzechMates Beads
Stitching with two- and four-hole beads is easier than ever when
you use CzechMates beads. Inspired by this clever beading
system, designer and teacher Anna Elizabeth Draeger’s latest
collection of projects showcases these shaped beads. Choose
from bracelets, earrings, beaded beads, necklaces, pendants, and
more. You can even mix and match bead shapes for more
design possibilities.
MAKE EASY-TO-STITCH PROJECTS WITH EASY-TO-USE SHAPED BEADS
JEWELRY DESIGNS WITH CZECHMATES BEADS INCLUDES:
• Projects using Bar, Brick, Crescent, Lentil, QuadraLentil, QuadraTile, Tile,
and Triangle beads, along with crystals, seed beads, pearls, and more
• Complete, clear instructions and illustrations
• Design and color alternatives for even more ideas
NEW BOOKAnna’s newest book, Jewelry Designs with CzechMates Beads is now available. Get it at JewelryandBeadingStore.com.
August 2017 14
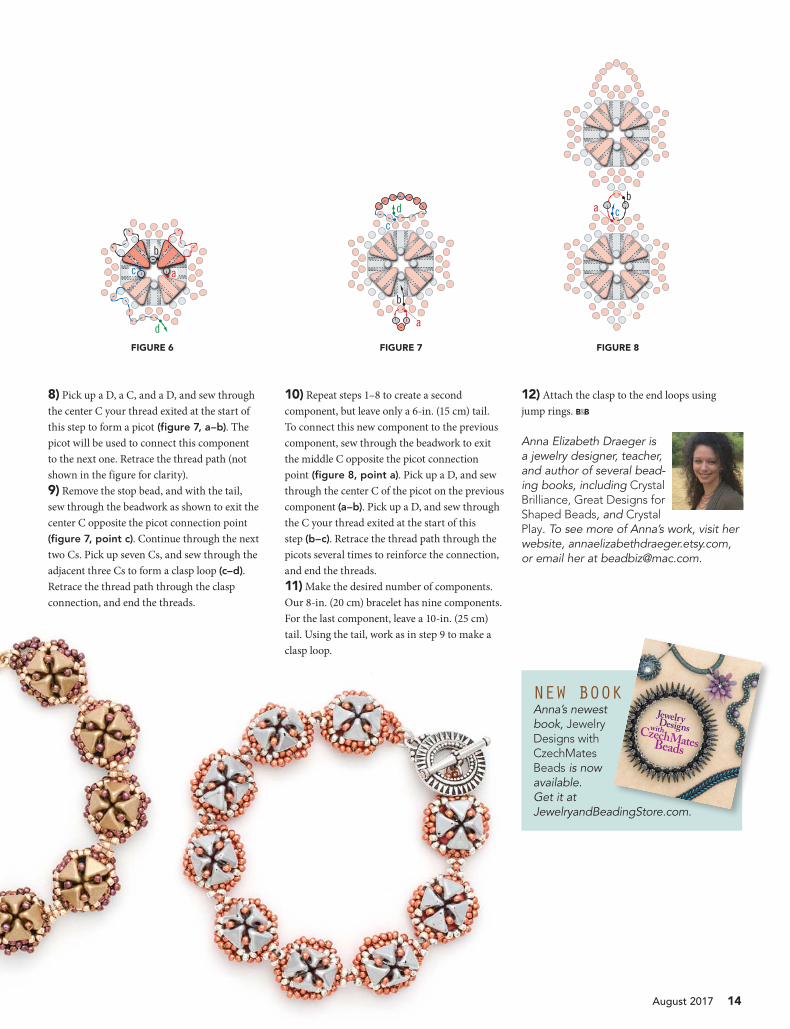
8) Pick up a D, a C, and a D, and sew through the center C your thread exited at the start of this step to form a picot (figure 7, a–b). The picot will be used to connect this component to the next one. Retrace the thread path (not shown in the figure for clarity). 9) Remove the stop bead, and with the tail, sew through the beadwork as shown to exit the center C opposite the picot connection point (figure 7, point c). Continue through the next two Cs. Pick up seven Cs, and sew through the adjacent three Cs to form a clasp loop (c–d). Retrace the thread path through the clasp connection, and end the threads.
10) Repeat steps 1–8 to create a second component, but leave only a 6-in. (15 cm) tail. To connect this new component to the previous component, sew through the beadwork to exit the middle C opposite the picot connection point (figure 8, point a). Pick up a D, and sew through the center C of the picot on the previous component (a–b). Pick up a D, and sew through the C your thread exited at the start of this step (b–c). Retrace the thread path through the picots several times to reinforce the connection, and end the threads.11) Make the desired number of components. Our 8-in. (20 cm) bracelet has nine components. For the last component, leave a 10-in. (25 cm) tail. Using the tail, work as in step 9 to make a clasp loop.
12) Attach the clasp to the end loops using jump rings. B&B
Anna Elizabeth Draeger is a jewelry designer, teacher, and author of several bead-ing books, including Crystal Brilliance, Great Designs for Shaped Beads, and Crystal Play. To see more of Anna’s work, visit her website, annaelizabethdraeger.etsy.com, or email her at [email protected].
FIGURE 6 FIGURE 7 FIGURE 8