Basketball Coaching Manual - Official Website
80
Transcript of Basketball Coaching Manual - Official Website


2
Issaquah Parks & Recreation 301 Rainier Blvd S. / P.O. Box 1307 Issaquah, WA. 98027 Dear Volunteer Coach, On behalf of the Issaquah Parks and Recreation Department and the Issaquah Park Board, we thank you for volunteering your time and effort with the Issaquah Parks & Recreation Youth Basketball Program! Our program has grown steadily since its formation in 1973, and continues to be successful! This program should be a positive learning experience for the players, coaches, parents and staff. These are the primary objectives of the Issaquah Parks and Recreation Department. Please read and understand the goals of our program, and carry yourself in a manner that is consistent with the spirit of our league. As a volunteer coach, you are an integral part of our program. Your donation of time, effort, and leadership is much appreciated by our staff and community, and will greatly influence your players, parents and spectators. Sports programs are a fantastic way to learn important values of life, and with your guidance we believe everyone will have an exciting and pleasurable season!
Sincerely,
Jared Behl Lisa Echert
Jared Behl Lisa Echert Recreation Supervisor Recreation Coordinator 425-837-3324 425-837-3308 [email protected] [email protected]

3
MANUAL OUTLINE
• Mission, Philosophy and Program Goals ……………………………………………………………..…….4 • Coaches’ Expectations ……………………………………………………………………………………..…….5-8 • Facility Rules and Guidelines ………………………………………………………………….…………….…..9 • Teaching the game - Developmental Stages of learning basketball…….………….………. 10 FUNdamental Stage (K-3rd Grade)…………………………………………..………...…….11 Learning to train Stage (3rd –6th Grade)………….…….…………………….…………..14 Train to train Stage (6th-10th Grade…………………..…………………………………….18 • Grade Specific Tips and Expectations…………………………………………………………………..…..22 • Getting Started - Running Practices ……………………………..……………………………………….. 29 • Skills, Drills, & Games ……………………………………………………………………………………………..32 Warm-up & Fundamental Movement .……………………………………………………..32 Footwork …………….…………………………………………………………………………………. 34 Ball Handling/ Dribbling ………………………….……………………………………………….41 Passing & Receiving ………………………………….……………………………………………. 45 Shooting ……………………………………………………………………………………………….. 52 Defense ………………………………………………………………………………………………… 60 Rebounding ………………………………………………………………………………………….. 66 Motion Offense …………………………………………..…………………….………………….. 68 Rules …………………………………………………………………………………………………….. 73 References ……………………………………………………………………………………………. 80

4
ISSAQUAH PARKS & RECREATION MISSION STATEMENT
“Provide Greater Issaquah Area residents, especially the youth, with opportunities to
participate in diverse recreational, cultural and civic activities.”
YOUTH BASKETBALL PROGRAM PHILOSOPHY
The purpose of the Issaquah Parks & Recreation Youth Basketball Program is to provide a quality experience in basketball emphasizing character, teamwork, learning, sportsmanship,
participation, fun, fitness and competition for area youth.
PROGRAM GOALS
FUN & LEARNING All players, coaches and parents should enjoy the program while learning the basic fundamentals, skills, and rules of basketball. CHARACTER & SPORTSMANSHIP Teach the players how to win with humility, lose with dignity, and most importantly, respect their opponents and fellow teammates. Teach players how to conform to rules of the game; being competitive, while playing in the spirit of the game. TEAMWORK & COMPETITION Every player should feel part of the team. Basketball is a team game in which all players must contribute to have success. Expose the players to competition in a positive manner. PARTICIPATION & FITNESS All players will play each game. Stress good effort and doing your best! Players can receive good healthy exercise.
“Just play. Have fun. Enjoy the game!”
- Michael Jordan

5
ROLE OF THE COACH
As a coach in youth sports, you must assume the responsibility of ensuring that each
participant has an enjoyable and safe experience learning the fundamentals of basketball. To fulfill these responsibilities, a coach must wear many different hats. Listed below are some
prominent roles you may take on as a coach.
TEACHER Teach fundamental skills, sportsmanship and teamwork in an appropriate manner. COMMUNICATOR A picture is worth a thousand words. New skills should be introduced with proper demonstration. MOTIVATOR Coaches should encourage their players by praising their efforts. Kids like to be told they are doing a good job! MENTOR Assume a mentorship role when parent(s) are not available. Listen and express interest in player’s well being. BEHAVIOR MEDIATOR Establish and enforce team rules to govern player’s behavior. Reward and correct behaviors fairly for all players. Focus more on good behavior rather than negative. CHEERLEADER Choose goals/tasks that are challenging, but attainable. Offer praise to those deserving and offer encouragement to those who do not. FRIEND Ensure all players feel accepted. Be open and listen to concerns or problems players may have and offer advice when necessary.
“There is no greater gift to a kid than that of a good coach” - Bruce Brown, motivational speaker
6
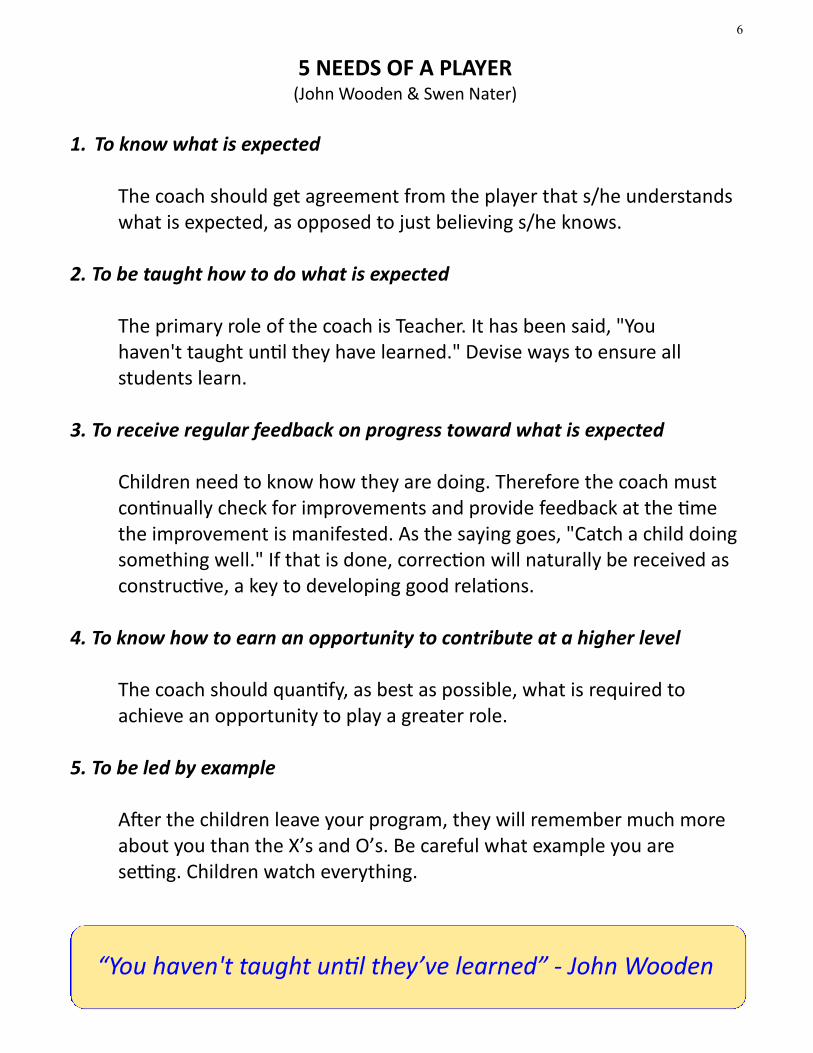
5 NEEDS OF A PLAYER (John Wooden & Swen Nater)
1. To know what is expected
The coach should get agreement from the player that s/he understands what is expected, as opposed to just believing s/he knows.
2. To be taught how to do what is expected
The primary role of the coach is Teacher. It has been said, "You haven't taught until they have learned." Devise ways to ensure all students learn.
3. To receive regular feedback on progress toward what is expected
Children need to know how they are doing. Therefore the coach must continually check for improvements and provide feedback at the time the improvement is manifested. As the saying goes, "Catch a child doing something well." If that is done, correction will naturally be received as constructive, a key to developing good relations.
4. To know how to earn an opportunity to contribute at a higher level
The coach should quantify, as best as possible, what is required to achieve an opportunity to play a greater role.
5. To be led by example After the children leave your program, they will remember much more about you than the X’s and O’s. Be careful what example you are setting. Children watch everything.
“You haven't taught until they’ve learned” - John Wooden
7
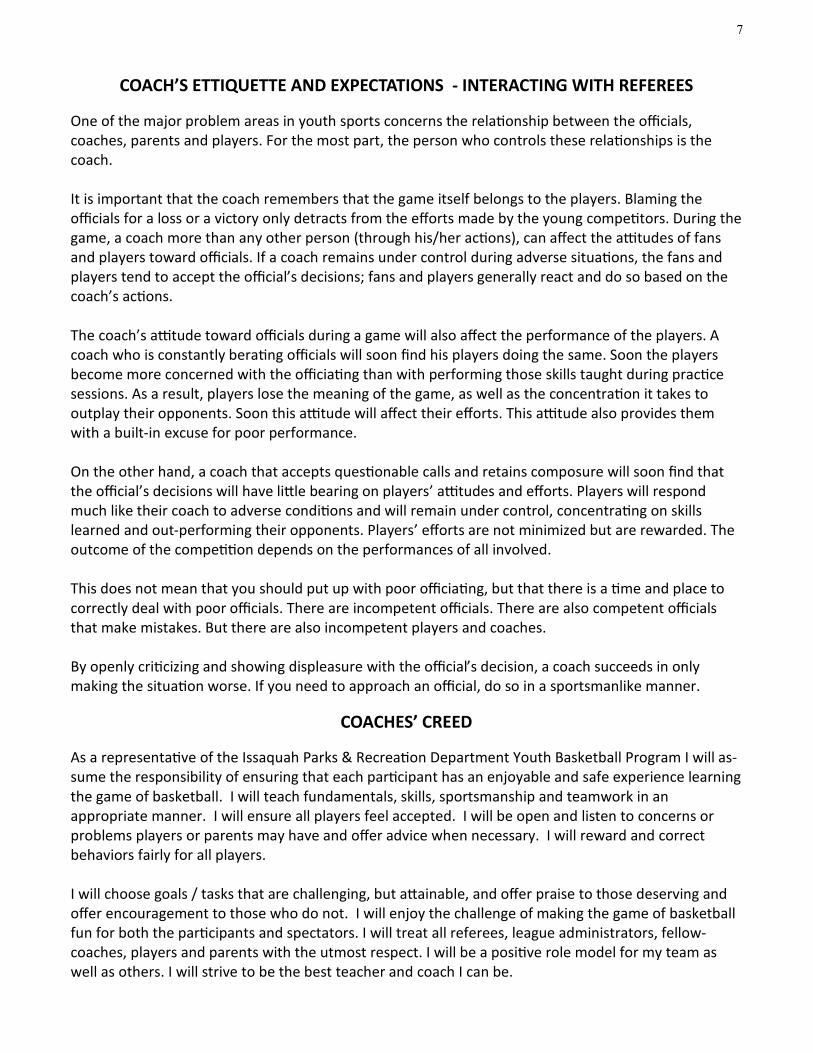
COACH’S ETTIQUETTE AND EXPECTATIONS - INTERACTING WITH REFEREES
One of the major problem areas in youth sports concerns the relationship between the officials, coaches, parents and players. For the most part, the person who controls these relationships is the coach. It is important that the coach remembers that the game itself belongs to the players. Blaming the officials for a loss or a victory only detracts from the efforts made by the young competitors. During the game, a coach more than any other person (through his/her actions), can affect the attitudes of fans and players toward officials. If a coach remains under control during adverse situations, the fans and players tend to accept the official’s decisions; fans and players generally react and do so based on the coach’s actions. The coach’s attitude toward officials during a game will also affect the performance of the players. A coach who is constantly berating officials will soon find his players doing the same. Soon the players become more concerned with the officiating than with performing those skills taught during practice sessions. As a result, players lose the meaning of the game, as well as the concentration it takes to outplay their opponents. Soon this attitude will affect their efforts. This attitude also provides them with a built-in excuse for poor performance. On the other hand, a coach that accepts questionable calls and retains composure will soon find that the official’s decisions will have little bearing on players’ attitudes and efforts. Players will respond much like their coach to adverse conditions and will remain under control, concentrating on skills learned and out-performing their opponents. Players’ efforts are not minimized but are rewarded. The outcome of the competition depends on the performances of all involved. This does not mean that you should put up with poor officiating, but that there is a time and place to correctly deal with poor officials. There are incompetent officials. There are also competent officials that make mistakes. But there are also incompetent players and coaches. By openly criticizing and showing displeasure with the official’s decision, a coach succeeds in only making the situation worse. If you need to approach an official, do so in a sportsmanlike manner.
COACHES’ CREED
As a representative of the Issaquah Parks & Recreation Department Youth Basketball Program I will as-sume the responsibility of ensuring that each participant has an enjoyable and safe experience learning the game of basketball. I will teach fundamentals, skills, sportsmanship and teamwork in an appropriate manner. I will ensure all players feel accepted. I will be open and listen to concerns or problems players or parents may have and offer advice when necessary. I will reward and correct behaviors fairly for all players. I will choose goals / tasks that are challenging, but attainable, and offer praise to those deserving and offer encouragement to those who do not. I will enjoy the challenge of making the game of basketball fun for both the participants and spectators. I will treat all referees, league administrators, fellow-coaches, players and parents with the utmost respect. I will be a positive role model for my team as well as others. I will strive to be the best teacher and coach I can be.

8
COACHES’ CODE OF CONDUCT
1. Coaches should have read, and understand, all the Coach documents provided by the Issaquah Parks & Recreation department; including the “Etiquette & Expectations” sections outlined in the coaches’ manual.
2. Coaches must understand that the Issaquah Parks & Recreation Winter Youth Basketball Program is a recreational league and, as such, will coach his/her team in a manner consistent with the spirit of “basketball is played for fun” for both his/her team and for his/her opponents as well.
3. All players must play at least half of the game; this is to be strictly adhered to. The purpose of these games is to allow all children to participate regardless of ability and to teach sportsman-ship above all else. This is not an ability-based competition program.
4. Coaches will show respect for the referees at all times. This is an opportunity to teach our players how to address officials. Coaches are responsible for overseeing the manner in which people in attendance from his/her team address the referee or official. Coaches are also responsible for moderating the behavior of people on their sideline; letting everyone know that there is no (zero) challenging or disrespectful comments/actions directed toward any ref-eree, player, or adult, before, during, or immediately after a game. A coach may not step onto the court without the referee’s permission. Any physical assaults will be reported and within the jurisdiction of the police.
5. It is forbidden and not within the scope of Coach for the Issaquah Parks & Recreation program for any Coach to drive a team player to/from the games (except his/her own children and those of personal friends where it is understood that the Coach is driving as a family friend, but explicitly not within their Coaching authority).
6. Coaches should never touch a player (or any other person at practices or games) in anger. Coaches should also refrain from too much touching – be aware of your gestures. A simple arm around the shoulder is one thing – swatting a player on the behind is another. Absolutely no touching of any private areas (even if covered by clothing) is allowed at any time. A coach will be held solely responsible for any inappropriate touching.
7. Disciplinary action, including banishment from coaching in any further Issaquah Parks & Recre-ation programs will occur if a coach uses threatening gestures or language, or pushes or strikes any player, coach, referee, or league official.
8. LYSTEDT LAW (HB 1824) CONCUSSION AND SUDDEN CARDIAC ARREST AWARENESS ACT (SSB 5083) INFORMATION ACKNOWLEDGEMENT: I promise to read and review, until I fully under-stand, the Concussion information and Sudden Cardiac Arrest information provided to me in my Coaches Packet by the City of Issaquah Parks and Recreation Department as a volunteer coach. I must comply with the parameters of how to treat a participant of a head concussion and if someone collapses of possible sudden cardiac arrest. If I don’t understand the infor-mation provided to me, it is my responsibility to ask the Issaquah Parks & Recreation staff for clarification.

9
RULES FOR ISSAQUAH SCHOOL DISTRICT FACILITY USE
RULES & REMINDERS • Respect Issaquah School District schools, staff and others that may be using the facility. • No dribbling, running, screaming or playing in the hallways – the gym is the only area we are per-
mitted to use. • If you are early for your practice time, please have your team wait quietly and patiently in the hall-
way or outside. • If there is a meeting in one of the rooms, be respectful and keep your team quiet. • All siblings MUST BE SUPERVISED. To make things easier you may want to suggest that siblings be
left at home if possible. Siblings seem to be the culprits in regards to damage and mischief. • Absolutely no food or drink in the gym! Water bottles are okay, but please throw empty water
bottles away and wipe up any spills. • Do not deface, damage, rip down, etc. any Issaquah School District property. If there is something
on a dry erase or chalk board, make sure you or your team does not erase it. • Do not allow your team/siblings to play with climbing ropes, mats or other equipment belonging to
the school. • No chairs on the gym floor. They can scratch the floor. • If you need help moving anything – baskets, bleachers, equipment, etc., please find a custodian to
help you. • If there is a double booking, do not challenge the other party, either share the gym or leave. • If there is a school function in the gym, do not demand the space is yours. School District functions
have priority – please leave the building and tell your scheduler. • Leave the gym better than the way you found it. If there is garbage – throw it away. • If a dust mop is available – please dust mop the floor after your practice. Do not push dust into the
corners or push it outside. Please throw it in the garbage. • When your time is up – please leave the facility. • If using Beaver Lake Middle School – please enter through the front doors to the gym. Note: The
portable hoops are OFF LIMITS.

10
GETTING STARTED - COMMUNICATE WITH PARENTS
Make sure to communicate with your players and parents as soon as you have your team roster. It is recommended that you call your players/parents the first time to make sure you have the correct contact information. Pre-season meeting Holding a pre-season parent meeting before the first practice is beneficial for the parents, players and coach. Take this opportunity to inform parents of the goals and expectations of the program as out-lined in the Youth Basketball Coaches’ Manual, as well as communicate team expectations. This is a good time to: • Build familiarity between the coach and parents.
• Communicate philosophy.
• Verify contact information.
• Clarify expectations of the players and parents.
• Enlist parent helpers for team practices and games.
• Assign a team manager to handle team communications.
• Designate a “Team Mom or Dad” to arrange a schedule for snacks and refreshments for each game,
as well as end of season celebrations.
TEACHING THE GAME
As a volunteer coach, one of the more challenging aspects of the job is determining what and how you
are going to teach your players. In the following sections we will outline several different developmen-
tal stages as well as age/ grade specific teaching strategies that will help you in teaching the game of
basketball.
The Long-term Athlete Development Model is based on the “Canadian Sport For Life Resource Paper”
which was developed by Canadian world leaders in the area of child and sport development. It has
since been adopted by Canada and USA Youth Basketball. The model is athlete/child centered and
coach and administrator driven. Its main focus is to help develop children athletes that become and
remain engaged in sports for life, thus creating a more active and healthy society. Within the
framework of the Long-term Athlete Development Model are different stages of learning and
development.

11
FUNdamental Stage (K - 3rd Grade)
Ages 6-8 females, 6-9 males The main goal at this level is to learn the fundamental movement skills through basketball in a positive fun way. The focus in this stage is fun, not winning. The emphasis should be focused on giving children the basic fundamental movement skills i.e. agility, balance, coordination and speed. Providing these basic athletic skills will help build a base for the child in learning basketball specific skills throughout the program. Developmental Considerations
Physical/ Motor
• No sense of pace: Running, jumping, skipping, hopping and balance are not fully developed
• Large muscles are more developed than smaller ones
• Cardiovascular system is still developing, may not be able to run long periods of time
• Females develop faster than males at this stage
Psychological/ Cognitive/ Emotional/ Social
• Kids are individually oriented
• Short attention span
• Blossoming imaginations
• Like and need to be lead by coach
• Peer influence very strong
• Kids like and need rules and structure
• Typically this is first exposure to team sport
• Kids need to feel secure in practice and games
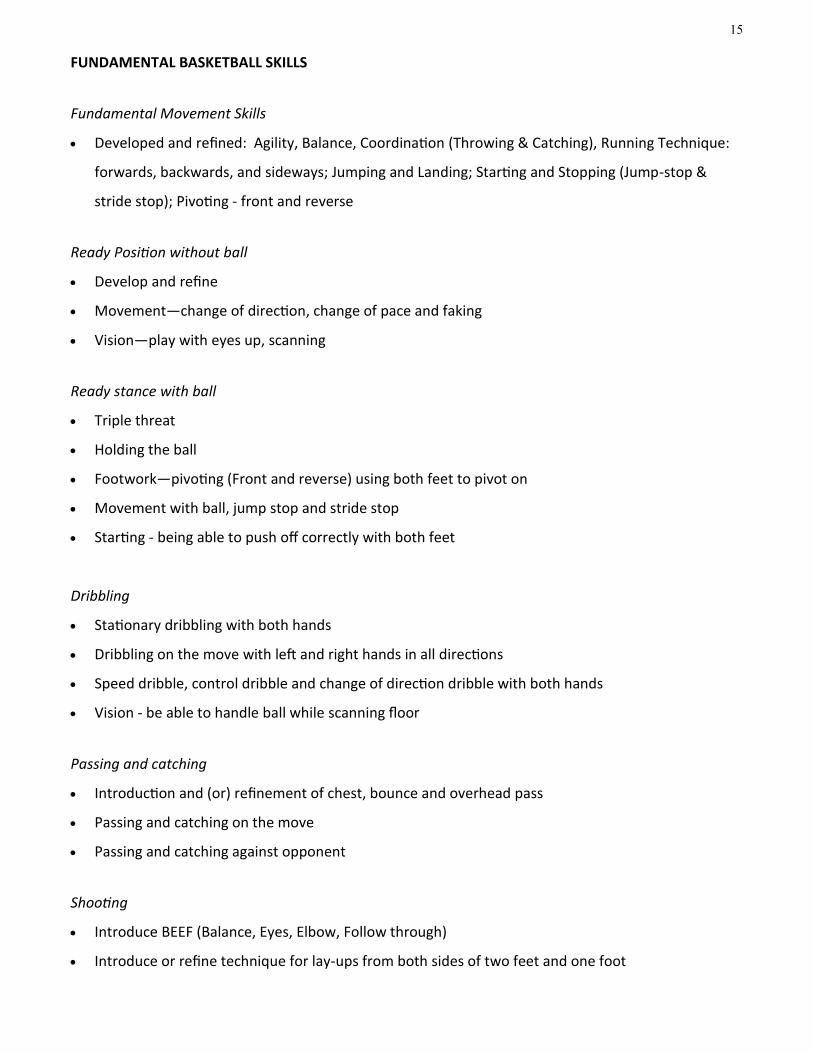
FUNDAMENTAL BASKETBALL SKILLS
Fundamental Movement Skills
• Agility, Balance, Coordination (Throwing & Catching)
• Running Technique - forwards, backwards, and sideways
• Jumping and landing, starting and stopping (Jump-stop & stride stop)
• Pivoting - front and reverse
12
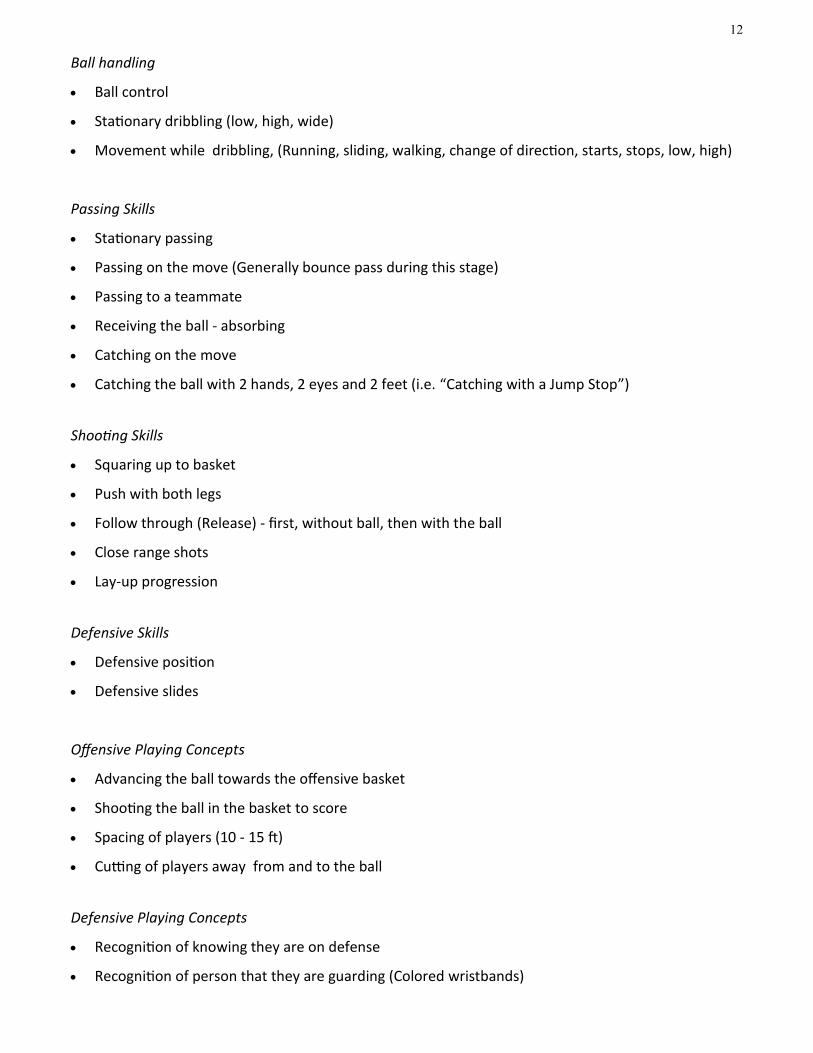
Ball handling
• Ball control
• Stationary dribbling (low, high, wide)
• Movement while dribbling, (Running, sliding, walking, change of direction, starts, stops, low, high)
Passing Skills
• Stationary passing
• Passing on the move (Generally bounce pass during this stage)
• Passing to a teammate
• Receiving the ball - absorbing
• Catching on the move
• Catching the ball with 2 hands, 2 eyes and 2 feet (i.e. “Catching with a Jump Stop”)
Shooting Skills
• Squaring up to basket
• Push with both legs
• Follow through (Release) - first, without ball, then with the ball
• Close range shots
• Lay-up progression
Defensive Skills
• Defensive position
• Defensive slides
Offensive Playing Concepts
• Advancing the ball towards the offensive basket
• Shooting the ball in the basket to score
• Spacing of players (10 - 15 ft)
• Cutting of players away from and to the ball
Defensive Playing Concepts
• Recognition of knowing they are on defense
• Recognition of person that they are guarding (Colored wristbands)

13
• When defending the ball, staying between person they are guarding and basket
Coaching Implications
• Coach needs to promote success for all players through proper structure of practices
• Emphasize confidence and familiarity with the ball, (Every child needs to have access to a ball the
whole session)
• Short training sessions 50—60 min.
• Basic athletic skills should be developed in this phase, i.e. the ABC’S of Athleticism: Agility, Balance,
Coordination and Speed
• Short duration, anaerobic activities should be used, i.e. short burst of energy (Endurance should be
developed through play and games
• Give short, clear directions with a “follow me” approach
• Provide positive reinforcement and encouragement often - Make it FUN!
• Introduce basic warm-up and cool down
• Introduce simple debriefing, I.e. “what did we do well? What did we learn? What did you like best”?

14
Learning to Train Stage (3rd - 6th Grade)
Ages 9- 11 females, 10 -11 males
This is the major motor learning stage. One of the most important periods of motor development is
between the ages of 9-12. During this period, children are developmentally ready to acquire the
fundamental movement skills that are the cornerstone of all athletic development. In addition, the
basic basketball skills should be mastered.
Athletes at this stage should need to learn how to train at a basic level. They should be introduced to
the basic technical and tactical basketball skills and ancillary capacities such as: warm-up, cool down,
stretching, hydration and nutrition, recovery and mental preparation. The focus of this stage is not
competition! Fundamental movement and sport skills must be stressed during this time period.
Developmental Considerations
Physical/ Motor
• Strength training using athlete’s own body weight should be used; hopping and bounding can be
safely implemented
• Speed can be trained in this phase, and should be done during warm-up phase of training
• Stretching exercises should become routine - dynamic stretching should become a routine during
the beginning of practice, while static stretching is done at the end
• The central nervous system is almost fully developed
Psychological/ Cognitive/ Emotional/ Social
• Players have the ability to recall specific information from memory
• Players have the ability to use knowledge to interpret and draw conclusions
• Players must feel it is OK to make mistakes
• Players can accept responsibility
• Players enjoy cooperation with both teammates and coaches
• Some players may be less responsive due to fear of failure
• Values are created and reinforced by group/ team
• Players can start to learn about communication and values such as: Respect, Honesty and Integrity
15
FUNDAMENTAL BASKETBALL SKILLS
Fundamental Movement Skills
• Developed and refined: Agility, Balance, Coordination (Throwing & Catching), Running Technique:
forwards, backwards, and sideways; Jumping and Landing; Starting and Stopping (Jump-stop &
stride stop); Pivoting - front and reverse
Ready Position without ball
• Develop and refine
• Movement—change of direction, change of pace and faking
• Vision—play with eyes up, scanning
Ready stance with ball
• Triple threat
• Holding the ball
• Footwork—pivoting (Front and reverse) using both feet to pivot on
• Movement with ball, jump stop and stride stop
• Starting - being able to push off correctly with both feet
Dribbling
• Stationary dribbling with both hands
• Dribbling on the move with left and right hands in all directions
• Speed dribble, control dribble and change of direction dribble with both hands
• Vision - be able to handle ball while scanning floor
Passing and catching
• Introduction and (or) refinement of chest, bounce and overhead pass
• Passing and catching on the move
• Passing and catching against opponent
Shooting
• Introduce BEEF (Balance, Eyes, Elbow, Follow through)
• Introduce or refine technique for lay-ups from both sides of two feet and one foot

16
Developing One on One skills
• Triple threat stance
• Reading defense
• Ball fakes and foot fakes
Getting Open
• Moving to get open
• Coming to the pass
• Pivot to be an offensive threat
Defensive stance
• Introduce stance
• Moving in defensive stance while staying between player you are guarding and basket
• Guarding the ball - maintaining a gap between the defender and ball handler
Defensive stance away from ball
• Seeing the player you are guarding and the ball
• Helping your teammates
• Recovering to the player you are guarding
Offensive Playing Concepts
• Playing with the purpose of scoring
• Spacing (12-15 ft)
• Give and go concept
• Pass, cut and replace/fill
Defensive Playing Concepts
• On ball defense (Staying between person and basket)
• Off ball defense (Staying near man but always seeing ball)
• Sprinting back on defense
Coaching Implications
• Coach must provide strong direction - supervision should be exercised by coach
• Coach should gradually give players responsibility

17
• Create optimum learning environment, match skill and drill levels
• Coach must not play favorites. Early matures become leaders, treat all players equally
• Coach must be able to demonstrate skill
• Positive reinforcement is imperative
• Players can be taught lessons about warm-up, cool down and nutrition
• Players can further learn about communication and values such as: Respect, Honesty, Integrity,
Work Ethic and Teamwork
18
Train to Train Stage (6th - 10th Grade)
Ages 11- 15 females, 12 -16 males
The physical capacities that need to be trained are now completely dependent on the developmental
age of individual. As a coach, you must be aware of the differences in the maturation rates of your
players. Many basketball skills will be introduced at this stage. It is important to note that this stage
may be an entry level for some, as others have moved on to AAU and Select. The overall goal at this
stage is to continue to build the athletic base and develop well rounded basketball players. Oh, and of
course FUN!
FUNDAMENTAL BASKETBALL SKILLS
Ready Stance - without ball
• Develop and refine
• Refine defensive stance
• Vision - play with eyes up
Ready stance - with ball
• Refine footwork - pivoting (front and reverse), using both feet to pivot on
• Decision making before the catch
• Jump stops, stride stops
• Ball handling - becoming comfortable with the ball under pressure while maintaining vision
Dribbling/ Ball Handling
• Expand the dribbling repertoire
• Refine and develop speed, control, change of direction, retreat and change of pace against a de-
fender
• Making reads and reacting
• Refine ability to dribble while scanning the floor
Passing and Catching
• Expand the passing repertoire. Add variations to the basic passes (bounce, chest, overhead)
• Increasing the speed at which the ball can be passed and received

19
• Developing ball fake and pass fake concepts
• Making proper reads
• Passing to the post
Shooting
• Review and refine the BEEF (balance, eyes, elbow, follow through)
• Form shooting close to the basket
• Develop shot ready techniques, i.e. catch and shoot from a pass in various directions
• Develop shooting off of dribble
• Review and refine lay-up repertoire, i.e. baby hook, reverse, power and off hand
• Develop free throw shooting routine
• Shooting and lay ups under defensive pressure
• Expand shooting repertoire, i.e. off dribble, off catch, different angles and speed, range (the empha-
sis should be on above progression)
Getting Open
• Using change of direction, change of pace and screens– V-cut, L-cut and using screens
• Read and react to defense
• Move to the pass
1 on 1 Skills
• Squaring to the basket aggressively (looking at the rim and being a threat)
• Develop 1 vs. 1 repertoire, i.e. off dribble, jab fakes, shot fakes, combinations
• Read and react to defense
• Play from a variety of positions
Multi-player Movements
• Pass and catch
• Penetration principles (Drive and kick)
• Pick (Ball Screen)
• Screen away from ball
• Moving without the ball

20
• Ball movement (emphasize ball reversals)
Transition Offense (Moving from defense to offense)
• Develop the concepts of lanes and outlets
• Recognize advantages while advancing ball
• Read and reacting to defense
• Emphasize players playing all positions
• Emphasize ball movement
Defense on the ball
• Introduce the concept of ball, ball side and help side defense
• Introduce the concept or refine concept of maintaining the gap and change of direction against a
ball handler with emphasis on ball pressure
• Introduce and develop the concept of contesting a shot, pass, and dead ball
• Introduce concept of influencing offense to a certain side of the floor or weak hand
• Introduce the concept of defending ball screens
Defense off the ball
• Refine and develop stance—open and closed
• Introduce denial defense
• Introduce and develop help, rotate and recovery
• Develop defending ball screens
• Moving from one defensive stance to another, i.e. on ball, denial and help
Rebounding
• Develop skill of “boxing out” on defense
• Develop skills of offensive rebounding
Transition Defense (moving from offense to defense)
• Introduce concept of team defensive balance (Offensive rebounders and safeties)
• Defending basket, ball and lanes in transition
• Sprinting back to recover

21
Offensive Playing Concepts
• Reading and reacting to defense
• 1 on 1 concepts
• Penetration principles—using the dribble and pass wisely, movement without ball
• Spacing 12—15 ft
• Cutting, I.e. basket cuts, V-cuts, L-cuts, and replacing
• Ball screen and screening away concepts
• Ball movement and ball reversals
• Rebounding
• Communication
In transition
• Attack form the middle toward the elbow
• Outlet passes, catching and passing to the person ahead
• Running fast and wide
• Communication
Defensive Concepts
• On the ball strategies
• Off the ball strategies, i.e. denial, help, rotate and recover
• Concept of influencing to a side
• Challenging shots
• Rebounding
• Communication
In transition
• Defending the basket, defending the ball and a player
• Communication

22
GRADE SPECIFIC TIPS & LEAGUE EXPECTATIONS
Kindergarten - 1st Grade - See full set of rules in following sections
• K-2nd Grade will play on 8ft Hoop
• One coach from each team will be permitted on the court to assist his/her team. Coaches
are encouraged to assist both teams in learning the game of basketball.
• Defense must play man to man and will use the colored wristband system to assist in know-
ing who they are guarding.
• The pick up line (12 second line) is at the top of the three point line and will be clearly
marked. Defense may not pick up the offense until the 12 second line is penetrated.
• There is no stealing off the dribble, but steals off the pass are permitted.
• Double dribble and traveling will be called loosely—players will be given reminders to drib-
ble, etc.
• There will be mandatory substitutions every five (5) minutes and all players must play
equally.
• Screening WILL NOT be allowed K-2nd grade.
What to expect from the referee...
• Encourage players to run in the right direction as well as teach where to shoot the ball and
when and where to play defense.
• Emphasize dribbling when moving with the ball and call traveling loosely.
• Teach the wristband concept of playing man to man defense.
• Explain where the pick up line is and what its purpose is.
• Explain once the pick up line is crossed, the entire half court is open to the defense for that
possession.
• Encourage defensive players to keep their hands up on defense.
• Will call obvious out of bounds but will allow play to go on if forward progress is being
made and players are attempting to dribble the ball down court.
23
GRADE SPECIFIC TIPS & LEAGUE EXPECTATIONS
2nd Grade - See full set of rules in following sections
• 2nd Grade will play on 8ft Hoop.
• One coach from each team will be permitted on the court to assist his/her team, but coach-
es are encouraged to assist both teams in learning the game of basketball.
• 2nd grade coaches are encouraged to relinquish “control” by gradually moving off the court
during games.
• Defense must play man to man and will use the colored wristband system to assist in know-
ing who they are guarding.
• The pick up line (12 second line) is at the top of the three point line and will be clearly
marked. Defense may not pick up the offense until the 12 second line is penetrated.
• There is no stealing off the dribble, but steals off the pass are permitted.
• Double dribble and traveling will start to be call more tightly - players will be given remind-
ers to dribble, etc. but referees will gradually start to call games tighter as the season pro-
gresses.
• There will be mandatory substitutions every five (5) minutes and all players must play equal-
ly.
• Screening WILL NOT be allowed in 2nd grade.
What to expect from the referee...
• Encourage players to run in the right direction as well as teach where to shoot the ball and
when and where to play defense.
• Emphasize dribbling when moving with the ball and will call violations more tightly.
• Teach the wristband concept of playing man to man defense.
• Explain where the pick up line is and what its purpose is.
• Explain once the pick up line is crossed, the entire half court is open to the defense for that
possession.
• Encourage defensive players to keep their hands up on defense.

24
GRADE SPECIFIC TIPS & LEAGUE EXPECTATIONS
3rd Grade - See full set of rules in following sections
• 3rd graders will play on a 10ft hoop.
• Coaches are no longer allowed on the court.
• Defense must play “man to man”.
• Players will no longer wear colored wristbands.
• Stealing is permitted.
• Double dribble and traveling will be called tightly.
• The pick up line (12 second line) is at the top of the key and clearly marked.
• The defense may not pick up the offense until the 12 second line is crossed.
• Once the pick up line is crossed the defense may extend to half court for the remainder of
the possession.
• Foul shots will be taken from a range that the player can be more successful (if a player can-
not get the ball to the basket, the referee will let the player step closer to the hoop).
• There is no zone defense or double teaming allowed, but help defense is permitted if the
player is within 12ft of the basket and 6ft of the player’s man. As soon as the original de-
fender recovers, the help defender must return to their man.
• There will be mandatory substitutions every five minutes and all players must play equally.
What to expect from the referee...
• To coach and progressively emphasize and teach the key aspects of the game throughout
season.
• Line up players at the beginning of each substitution to match up with their opponent.
• Allow stealing, but encourage players not to reach.
• Call traveling and double dribble tightly.
• Call fouls such as illegal screens, reaching, shooting and non-shooting fouls.
• Call 5 seconds in the key.
• Call out of bounds tightly.
25
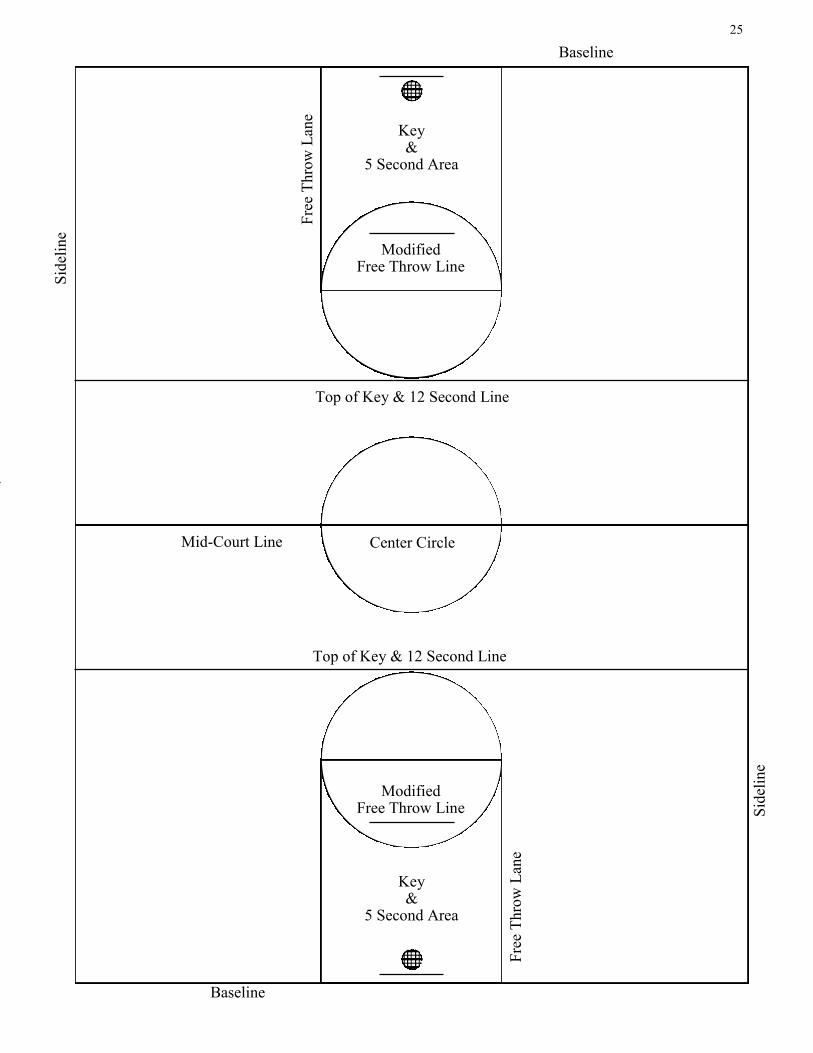
Mid-Court Line Center Circle
Fre
e T
hro
w L
ane
Key &
5 Second Area
Baseline
Sid
elin
e
Top of Key & 12 Second Line
Modified Free Throw Line
Fre
e T
hro
w L
ane
Key &
5 Second Area
Baseline S
idel
ine
Modified Free Throw Line
Top of Key & 12 Second Line

26
GRADE SPECIFIC TIPS & LEAGUE EXPECTATIONS
4th & 5th Grade - See full set of rules in following sections
• Defense must play “man to man”.
• Stealing is permitted.
• Double dribble and traveling will be called tightly.
• The pick up line (12 second line) is at half court and will be clearly marked.
• The defense may not pick up the offense until the 12 second line is crossed.
• Once the pick up line is crossed the defense may extend to half court for the remainder of
the possession.
• Over and back will be explained and called progressively.
• Foul shots will be taken from a range that the player can be more successful (if a player can-
not get the ball to the basket, the referee will let the player step closer to the hoop).
• Scorekeepers will be tracking personal fouls.
• Proper screening technique will continue to be emphasized. Illegal screens will be called
tightly from the first day of games.
• There is no zone defense or double teaming allowed, but help defense is permitted if the
player is within 12ft of the basket and 6ft of the player’s man. As soon as the original de-
fender recovers, the help defender must return to their man.
• There will be mandatory substitutions every five minutes and all players must play equally.
What to expect from the referee...
• To coach and progressively emphasize and teach the key aspects of the game throughout
the season.
• Line up players at the beginning of each substitution to match up with their opponent.
• Allow stealing, but encourage players not to reach.
• Call traveling and double dribble tightly.
• Call fouls such as illegal screens, reaching, shooting and non-shooting fouls.
• Call 5 seconds in the key.
• Call out of bounds tightly.

27
GRADE SPECIFIC TIPS & LEAGUE EXPECTATIONS
Middle School - See full set of rules in following sections
• Defense must play “man to man”.
• Violations will be called tightly.
• The pick up line (10 second line) is at half court.
• The defense may not pick up the offense until the 10 second line is crossed.
• Once the pick up line is crossed the defense may extend to half court for the remainder of
the possession.
• Foul shots will be taken from the official foul line.
• All violations will be called tightly.
High School - See full set of rules in following sections
• Full high school rules apply (There are exceptions when teams are leading by a certain
amount of points).
• Games will be officiated by association referees.
• Violations will be called tightly.
• Foul shots will be taken from the official foul line.
• All violations will be called tightly.
What to expect from the referee...
• To call game tightly according to league rules.
• Line up players at the beginning of each substitution to match up with their opponent
(Middle school only).
• Call violations tightly.
• Encourage good sportsmanship and not tolerate fighting or offensive language.
• Remove any player, coach or parent who displays poor sportsmanship.

28
Mid-Court Line Center Circle
3 Point Line
Fre
e T
hro
w L
ane
Key
Top of Key
Free Throw Line
Baseline
Sid
elin
e
Top of Key
3 Point Line Free Throw Line
Fre
e T
hro
w L
ane
Key
Baseline S
idel
ine
29
RUNNING PRACTICES
Running quality, efficient and fun practices can be challenging as recreation basketball coach. With only
one hour per week, varying degree of experience and ability, finding ways to keep kids engaged, getting
better and having fun is crucial.
As a coach, you are also a teacher. Teaching is the process of planned action that enhances learning
and performance. The key to teaching/coaching is keeping things simple.
When teaching a skill or activity use the I.D.E.A. principle:
Teaching a skill:
I - Introduce the skill
D - Demonstrate the skill
E - Explain the skill
A - Attend to learning by letting them do it!
Keys to Making Practices Fun
• Make your practices fast paced
Plan ahead. Planning is the number one key to a successful, fun practice
Move from drills to games quickly
Limit time standing in lines
Again, plan, plan, plan
• Set rules and expectations early
Your practice will be more fun and effective if everyone knows what is expected from them
in terms of behavior and effort
Set rules—rules keep kids safe and help keep the practice organized

30
• Get your players’ attention
Establish a jingle or quick signal to get your players’ attention quickly, i.e. “1-2-3 eyes on me,
1,2 eyes on you” or a quick whistle or clap.
Keep instructions short, sweet and to the point.
• Be positive and upbeat
Your attitude is key! Your players will feed off your attitude and enthusiasm.
Keep goals clear for yourself - Remind yourself that winning is not the goal. Measure. your
success by the progress and enjoyment of your players.
Make corrections at the appropriate time and make sure to praise improvement and a job
well done.
• Plan and structure practices appropriately
Again, planning out practices is the most important part of running successful sessions.
Have a written plan so you know exactly what comes next (plan in breaks).
If you have a new skill or drill to teach the team, introduce at the beginning of session when
kids are more attentive.
Each drill should last 3 - 5 minutes.
Plan fun games in between challenging, less fun drills.
Plan longer drills after drills so you can set-up without making kids wait.
Have players set up drills.
Be creative! You can make games or competitions out of almost anything. If a drill only in-
volves 4-5 players, have the others do ball handling drills, i.e. Figure 8’s, etc. to keep them
busy.
• Making drills fun
Be creative!
Turn any drill into a fun game (tracked missed shots, give points for completed passes, etc.
Use games like Simon says, sharks & minnows, red-light, green-light and other childhood
games.
Add props like cones (to dribble through), chairs (to teach proper defensive stance), or other items

31
to add fun into practice. Use your imagination—be creative!
GAME TIME
Games should be fun and enjoyable and should allow players to play freely and practice all of the things
they are learning. Players may be nervous before games, so make sure to spend some time in practice
teaching your players what to expect during games.
Considerations
• Let parents know how early to show up for games.
• What warm-up drill will your team do before a game?
• Making sure parents know what behavior is acceptable on the sidelines and in the game: cheering
for both teams, no negative comments, no coaching from the sidelines, good sportsmanship. You
will set the tone as the coach—set a good example!
• What is the purpose of the game? Not winning. Your job will be to continually re-direct them to
look at their own effort and development.
• Have a plan for keeping track of playing time and rotations - see player rotation here. Remember
the developmental stage your players are in and don’t get frustrated!

32
SKILLS, DRILLS & GAMES
In the following sections you will find skills, drills and games that will help you teach the fundamentals
of basketball. For some of the drills you will find links to our online instructional videos to help you
better understand and see them in action.
Warm-up & Fundamental Movement drills/games:
Dynamic stretching i.e. skipping, carioca, high knees, lateral slides, etc. should be done at the beginning
of practice. Static stretching should be done at the end of practice.
“Follow the Leader” (K-3rd Grade): Basic game of follow the leader. You start off as the leader and get
them moving. Jogging, sliding, jumping, lunging, skipping, the options are limitless. After they get the
idea of the drill let the players take turns being the leader.
“Coach Says” (K-3rd Grade): Game is similar to “Simon Says” but instead you have them perform tasks
when “Coach says”. Things like jump on one foot, do 5 defensive slides to the left, show me Triple
Threat position, jump stop, skip hop, etc. Use your imagination. When a player reacts when a command
is given without “coach says” in the command, that player is out until the game is over.
“Foot Fire” (K-2nd Grade): Spread players around the floor in a ready, defensive position. On your com-
mand, yell “Heat em up”. This signals to your players to start pumping their feet like pistons of an en-
gine. When you say right your players will turn to the right; when you say left they will turn to the left.
You can make this a game by mixing up your cadence, and the players who turn the wrong way will be
“out”. Add variations to this drill by having the players slide to the specific direction you point to. Intro-
duce the defensive drop-step and slide by pointing to the back corners of the gym (diagonal).
“Red Light, Green Light (K-3rd Grade): Have all players line up on the baseline without a ball. On your
call of “Green Light” players begin running towards the other baseline. Have them walk for the first
couple of rounds. On “Red Light” the players must stop either with a stride stop or jump stop and get
into the “ready threat” position. Continue drill to the other end of the court.

33
“Frogs in a Pond” (K-2nd Grade): Place cones a couple of feet apart all the way across the court from
sideline to sideline. Instruct players that they are now frogs who must jump across the pond (court)
Start with having players jump with two feet from cone to cone. Then have them try jumping from one
foot and land on the other foot from cone to cone.
“Run to the Spot” (K-3rd Grade): Designate several areas around the court such as 3 point line, free
throw line, low block, elbow, you can mark these with cones to make it easier. The players start close
to you and on your command they run to the spot you call out as quickly as possible and back. Empha-
sis is on starting in an athletic stance, a quick first step, and speed.
“Run and Jump” (All Grades): All players spread out across base line. Have them run towards other
baseline, on your whistle the players jump or leap from one foot and land on both feet. Focus should
be on landing low and balanced. Give points to players who don't fall forward and who land balanced
and low. Do several rounds.
“Form Running” (4th-10th grade): Have players line up in five lines on the baseline. On coaches com-
mand, the first five players will execute one of the following form running movements, i.e. jogging, high
knees, butt kickers, slides, back peddle, carioca, skipping, hopping etc.
“Mirror Shuffle” (All Grades): Pair up players. Have players face each other along the baseline. No ball
is needed. Have one player start as the defensive player. Players get into the defensive stance. The
offensive player simply jogs in a zig zap manner down to the opposite baseline. The defensive player
shuffles/slides to keep in front of the offensive player. When they get to the baseline players switch
roles and proceed back to the start line. You can progress and add the ball into the drill. The offensive
player dribbles zig zag down the court.

34
Footwork:
Footwork is of utmost importance in all sports, but particularly in the game of Basketball.
It is recommended that players execute footwork as follows:
• Maintain a balanced position
• Move along straight lines whenever possible
• Change directions sharply
• Execute combinations of footwork patterns and fakes with and without ball
When introducing players to the fundamentals of footwork, start without the ball - it distracts begin-
ning players and should only be introduced when players can correctly perform fundamentals without
the ball.
“Ready Position” - The ready position is a balance stance that provides a strong base and therefore en-
ables players to initiate movement in any direction
To get a in a ready position, emphasize the following:
• Feet shoulder width apart
• Weight distributed evenly on balls of both feet
• Bend ankles, knees and hips
• Head up looking forward, back fairly straight
• Hands ready
“Triple Threat Position” - The triple threat position is an extremely important stance in basketball, as
all offensive moments originate from this position. This should be one of the first things you teach your
players, as it is something they will always use.
Whenever a player catches the ball they should always face the basket and get into “Triple Threat”
stance. This stance allows them to be an offensive threat. From the “Triple Threat” position, the player
can 1. score 2. pass or 3. dribble - note that this is the order of the three that should be taught. Players
should always look to the hoop to score to pose a threat, pass to an open teammate and dribble only
to improve passing angle or to drive to the basket.

35
To get into the “Triple Threat” position, emphasize the following:
• Feet are shoulder width apart
• Shooting foot slightly ahead of non shooting foot
• Weight is evenly distributed on balls of feet
• Knees bent, butt down, back slightly flexed
• Hold ball in shooting position
Running
Players need to be able to run forward, backward, change pace while running and change direction
while running.
Change of pace running - change of direction running is the basis of many offensive and defensive ma-
neuvers. For example, players often need to change from running forward to running backward, or
vice versa when getting back on defense.
It is recommended that that players change direction as follows:
• Slow down, plant outside foot in the direction opposite of the new direction.
• Flex knee of the planted leg, and drop the hips to lower the body’s center of gravity.
• Push forcefully off the outside foot, and simultaneously take a short, powerful step in the
new direction.
Change of Direction Running Drills:
Relay Races (All Grades): Players divide into groups of three or four, and line up at the baseline. The
first player in each line runs backward from the baseline to the half court line, forward from half court
line, backward from opposite baseline back to half court line. The next player begins and the sequence
is repeated.
Whistle Drill (All Grades): In this drill, players react to a whistle. On the first single whistle, players
start running from the offensive ready position. At each single whistle players change direction. On the
first double whistle the drill ends.

36
Stopping
Stopping in basketball is one of the most important fundamental skills. There are number of methods
of stopping in basketball: the jump stop, stride stop and stutter stop.
In the Jump Stop, both feet land simultaneously and slightly staggered, making either foot available to
be the pivot. In the Stride Stop, the feet land one after the other and are staggered, making the first
foot to contact the floor the pivot foot. In a Stutter Stop, the land after a series of stuttering (rapid fire)
steps to close out on offensive players and limit forward momentum.
When teaching the Jump Stop, emphasize the following:
• Player begins in a ready position and moves forward
• Body lowers, two feet land simultaneously, slightly staggered
• Body lowers, knees bend, arms balance
• Player ends up balanced sitting in their “Imaginary Chair”
When teaching the Stride Stop, emphasize the following:
• Player begins in a ready position and moves forward
• Body lowers, feet land one after the other, slightly staggered
• First foot to contact floor becomes the pivot foot
• Body lowers, knees bend, arms balance
• Body in ready position
When teaching the Stutter Stop, emphasize the following:
• Player begins in a ready position and moves forward
• Body lowers, feet slow down through a series of stutter steps
• Body lowers, knees bend, arms balance
• Body in ready position
Pivoting
Pivoting is one of the most important, basic skills a player must master. Pivoting occurs when a player
rotates his/her body position, maintaining balance with one foot in constant contact with the floor.

37
Once a pivot foot is established it cannot be changed. For this reason, it is recommended that you
teach kids to catch the ball with their hands, eyes and feet - in other words, catch with a jump stop so
their pivot foot is not pre-determined.
A player can use a Pivot to:
• Protect the ball from a defensive player
• Improve view of the court while under pressure
• Square up to the basket
• Improve passing or driving lane
• Beating the defense by pivoting around him/her
When teaching the Pivot, emphasize the following:
• Keep pivot foot stuck to the floor
• Stay low
• Pivot quickly and aggressively
• Lead with elbows and ball
• Stay in “Triple Threat” stance
Types of pivots:
Front Pivot - in the front pivot, a player turns forward while pivoting on one foot. The player
does not lose sight of the basket and remains in “Triple Threat” position throughout the en-
tire movement.
Reverse Pivot - In the reverse pivot, the player turns their back away from where they were.
Again, the player must remain in a “Triple Threat” positon so they can protect the Ball.
Footwork Drills:
“Red Light, Green Light” (K-3rd Grade): Have all players line up on the baseline without a ball. On your
call of “Green Light” players begin running towards the other baseline. Have them walk for the first
couple of rounds. On “Red Light” the players must stop either with a stride stop or jump stop and get
into the “ready threat” position. Continue drill to the other end of the court.

38
“Dribble Pivot - Squish the Bug” (3rd - 10th Grade): Form 5 lines on the baseline. Each player should
have ball in ready position. On coaches signal, the first 5 players dribble to the free throw line extend-
ed area (can also use cones) with right hand and perform a jump stop or stride stop. After the players
execute the jump stop, they will perform a front pivot on their left foot ending in a ready position fac-
ing coach. On coach’s command players will then perform an inside pivot on the same left foot ending
in the position they started in. On the next coach’s command, the players at the free throw line extend-
ed area will continue the drill onto the half court line and perform the same sequence of pivots. The
next five players will execute drill to the free throw line extended area and continue on following the
first group. The drill will end at the opposite baseline that the drill started at. At each line (i.e. free
throw extended, half court and baseline) players will execute the pivot. On the way back, players will
perform the same drill using their left hand and right foot as their pivot foot. Video available here.
“Pivot Drill” (All Grades): Players assume a “Triple Threat” position, on the coaches command players
perform both front and reverse pivots to protect the ball from the imaginary defender. Add defender
to drill to make more game like.
“Stop and Pivot Drill” (All Grades): At designated lines or cones on the court, have each player perform
a jump stop or stride stop and perform either a front or reverse pivot. You can also have players start
dribbling and stop at random signal or whistle.
“Red Light, Green Light W/ Ball” (K-3rd Grade): Have all players line up on the baseline with a ball. In
“Triple Threat”, on your call of “Green Light” players begin dribbling toward the other baseline. Have
them walk for the first couple of rounds. On “Red Light” the players must stop either with a jump stop
or stride stop and get into the “Triple Threat” position. On your command, have players perform either
a front or reverse pivot. Emphasize staying low and being strong with the ball. On “Green Light” the
players continue dribbling under control until the next “Red Light”. Continue drill to the other end of
the court.
“Multi Skill Warm-up Drill” - “Coach Pat’s Drill” (2nd - 10th Grade): Partner players into twos and
spread the groups of two across the sideline or baseline. There will be 1 ball per partner group. On
Coaches command, the first player will dribble 8-12 ft. and perform a jump stop. The player will then
perform a front or reverse pivot toward their partner and execute a bounce, chest or over the head
pass (Coaches’ discretion). After the player makes the pass, s/he will hustle back to the place where
they started. Meanwhile, their partner is executing the same steps of the drill. The drill continues for 3-
5 minutes. Add variations to the pivot and types of passes. Video available here.

39
Pivot 21 (3rd - 10th Grade): This is a really fun drill that improves pivoting, footwork, , ball-handling, and lay ups. It's fun because the drill acts as a game and it's fast paced. The players will really get into it! The goal of the game is to make 21 lay ups before the other team. You'll divide your players into two equal teams. Each team should get in their own line on either side of the basket. You'll need two chairs positioned just past the three point line. Place a ball on both chairs. If you don’t have chairs you can just set the ball on the floor. You'll need two coaches or players to replace balls. Each coach should have a ball. So you'll have a total of four balls for this drill. On the coach's command, the first player in each line will sprint to the chair and pick up the ball. After picking up the ball, they should pivot, dribble to the basket, and shoot a lay up. (Even though it's a race, make sure they use good pivoting footwork and lay up form). The coach should replace the ball as it's removed from the chair. The next player in line can start running to the chair as soon as the first player shoots their lay up. After the player shoots the lay up, they get their own rebound and immediately pass the ball to their coach. After passing the outlet to the coach, the player should get back in line and be ready to go again. The goal is to make 21 baskets before the other team. Whoever reaches 21 first, wins! You can reward the winner with Gatorades or just about anything they will enjoy. The drill can get chaotic at times, but it's fun! When running this drill, you'll want to make sure the kids are using proper pivots and proper form shooting lay ups. They will want to go as fast as possible, but don't let them make bad pivots. You should also specify which pivot they'll use for the drill. (Front pivot with left foot, back pivot with right foot, etc.) You'll want to make sure they dribble with the appropriate hand (use left hand of left side of the basket and vice versa).
40
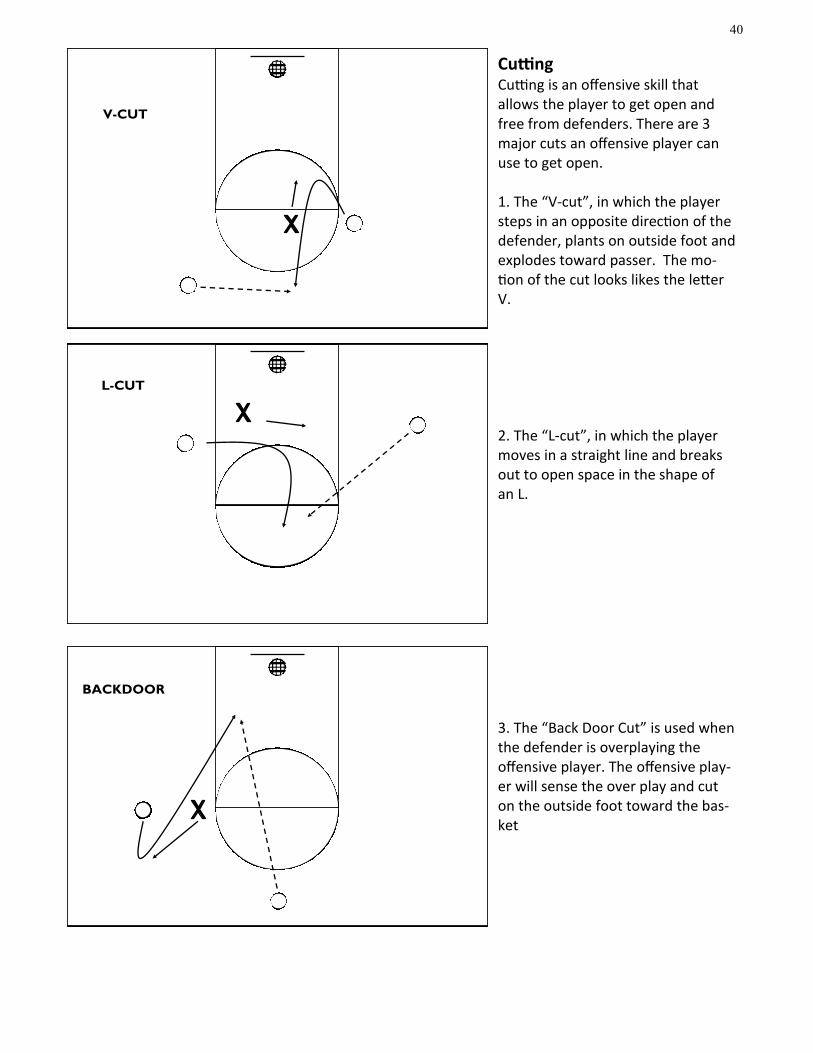
L-CUT
V-CUT
BACKDOOR
Cutting Cutting is an offensive skill that allows the player to get open and free from defenders. There are 3 major cuts an offensive player can use to get open. 1. The “V-cut”, in which the player steps in an opposite direction of the defender, plants on outside foot and explodes toward passer. The mo-tion of the cut looks likes the letter V. 2. The “L-cut”, in which the player moves in a straight line and breaks out to open space in the shape of an L. 3. The “Back Door Cut” is used when the defender is overplaying the offensive player. The offensive play-er will sense the over play and cut on the outside foot toward the bas-ket

41
Ball Handling and Ball Familiarization:
Becoming comfortable with how the basketball feels is a critical first step for young players. The more often they have a ball in their hands, the quicker their touch will develop. They must be able to hold and move the ball properly before they can begin to work on fine motor skills like dribbling and shooting. When teaching ball handling/ ball familiarization drills, emphasize the following:
• Keep eyes up and off the ball. • Players should be in a balanced position – feet shoulder width wide. • Use your fingertips, not your palms – fingertips exert more control. • Learn to become comfortable with the basketball using both hands. • Encourage players to try to go faster in these drills – Encourage mistakes!
Ball Handling/ Ball Familiarization Drills: For these drills, each player should have their own ball. It is important to encourage mistakes when doing these drills, as the more mistakes one makes, the better they become. Always try to go faster and do drills at maximum speed; especially with more advanced players. 1. Finger Tipping – tip ball back and forth between fingers at different heights and different distances
from body.
2. Hand Slaps – slap ball with alternate hands; make sure to pound the ball hard.
3. Body Circles – players circle ball by moving the ball from one hand to the other around the body.
One can start by doing circles around the head, then moving down to the chest then around the
waist, down to the knees and finally ending by doing circles around the ankles. To add variety to
the drill, move the ball back up the body, changing the direction of the circles.
4. Leg Circles – in a stride stance, circle ball around one leg, then the other.
5. Figure 8’s – Player stands with legs shoulder width apart and weaves the ball through the legs in a
figure 8 fashion. Player weaves the ball in both directions and may also perform the drill while
walking forward. Work on developing speed.
6. Pretzel – Player holds the ball between their legs with one hand in front of their legs, the other be-
hind. Player must keep the ball in this position while changing hands on the ball – the hand in front
moves to the back, and the hand in back moves to the front. Repeat. Work on speed.
7. See Saw – Player holds the ball behind the knees – release the ball between the legs then catch the
ball with two hands in-front of the knees – release the ball again and catch it with both hands once
again behind the knees. Work on developing speed.
8. Ball Throw – Player start with ball in front of body, toss ball in air, clap as many times as possible
and catch ball behind body. Try to increase the number of claps.

42
Dribbling: Dribbling is the act of bouncing the ball against the floor with one hand while running, walking or standing. The purpose of dribbling is to:
• Advance the ball into offensive end when a pass is not possible. • Improve an opportunity for passing or shooting. • Relieve pressure in a congested area. • Make an offensive move to the basket.
When teaching dribbling, emphasize the following:
• Start in triple threat position. • Keep center of gravity low, body compact and moving together. • Keep head up and never watch the ball; maintain court awareness. • Push the ball down with fingertips; don’t slap at ball. • Keep dribble low; less chance of defender deflecting it. • Protect the ball with body, outside leg and non-dribbling arm against defensive pressure or
in congested areas. • Learn to use both hands effectively.
Types of Dribbling: Stationary Dribble In the static dribble, players dribble the ball under control and in a stationary, protected position. When performing Static Dribbling, emphasize the following:
• Start with knees flexed and feet shoulder width apart. • Head up and eyes forward. • Foot of non-dribbling hand forward. • Ball dribbled with dribble hand slightly ahead of back foot. • Push ball to floor using fingertips, not palms. • Elbow bent, wrist follows through. • As ball returns to hand, repeat the pushing motion. • Protect the ball by keeping the non-dribbling shoulder, arm and leg between the ball and
defensive players. Control Dribble The control dribble is a low, controlled, protected dribble that players use while moving at medium-slow speed. Players use this dribble to improve a passing angle, move ball away from defensive pres-sure in congested areas or move the ball up the court toward the basket when closely guarded.

43
Speed Dribble Players use the speed dribble when they are running near top speed and are in an uncontested area with little defensive pressure, for example, on a fast break or breakaway. Change of Direction Dribble When changing direction while dribbling, players plant in one direction, change dribbling hands, then push in the opposite direction. When performing Change of Direction Dribble, emphasize the following:
• Plant outside foot. • Bend knees to lower center of gravity. • Push off outside foot. • Step and transfer weight on to opposite foot. • Keep the ball tight to the body. • Bounce ball slightly ahead and towards opposite hand. • Change pace-accelerate into change of direction.
Types of Change of Direction Dribble:
• Crossover in Front of Body • Crossover Between the Legs • Spin Dribble • Behind the Back Dribble
Teaching progression Dribbling drills should be practiced in this progression:
• Static/ Stationary – Stressing the technique using both hands. • Dribbling with Movement – Control Dribble, Speed Dribble. • Change of Direction. • Games Approach – Dribbling in the half court offense and transition.
Stationary Dribbling Drills: “Stationary Dribbling Drill” (All Ages) – Have player stand with feet shoulder width apart, knees flexed with back straight and chin up. Player bounces ball at waist height, ball is kept tight to body and bounced ‘hard’ to the floor. Use both left and right hands. Encourage players to stay low to the ground while keeping eyes off the ball. Video available here. “Push Pull” (3rd - 10th Grade) – Have the player bring the ball out in front of body, then back behind body with one hand. The arm and hand will be working as a lever, swing back and forth while bouncing the ball. “Half Cross Over” (3rd - 10th Grade) – Using one hand at a time, have the player bring the ball from outside one knee to outside the other knee, back and forth in front of the body.

44
Dribbling with Movement Drills: “Cone Dribbling” (Grade K - 2nd) – Have Players line up at a starting point on the baseline. Position cones on court so players must dribble between the cones, weaving their way through. Emphasize that this drill is not focused on speed, rather control, feel and change of direction. “Partner Control Dribble Drill” (Grades 3rd - 10th) – Two players dribble within an area of the floor bounded by lines, and try to steal each other’s ball while maintaining their dribble. “Speed Control Dribble” (Grades 2nd - 10th) – Players gather at one end of the gym and divide into groups of 3 or 4; every player in every group has a ball. On a signal, the first player from each group starts a speed dribble; on the next signal, each switches to a control dribble. Players also change hands while they are dribbling and stop and start without traveling. “Speed Dribble Relay Race” (Grades 2nd - 10th) – Players gather at one end of the gym and divide into teams of 3 or 4. On a signal, the first player on each team speed-dribbles to the far end of the gym, re-turns with the speed-dribble with the other hand, and passes to the next player on the team. The win-ning team is first to have all its members finish dribbling. “Dribble Tag” (All grades) - Dribble tag is played by designating a court of play, giving every player a basketball and then designating one person to start as “it”. From there, the person who is “it” chases the other players (all while dribbling) and looks to tag them somewhere on their body. Here are some rules and progressions you can add to the game to tailor it to your desires: After the person who is “it,” tag someone else. They immediately leave the field of play and perform some sort of skill. Allow partic-ipants to only dribble with their weak hands. Make a rule that the player who is “it” must tag a shoul-der or knee of the other player for it to be a successful tag. Increase or decrease the field of play. “Knock Out” (Grade 2nd - 10th) - This drill is a fun drill and a great way to teach young players how to handle game pressure. Spread players across the court, with each kid having a ball. Use court lines to set boundaries for the game. On your command, the players will control dribble around the playing boundaries, while trying to knock the ball away from other players (Everyone against everyone). If a player’s ball is knocked free, he or she is “out” and has to sit out on the sideline. As the game progress-es, and players are being knocked out, make sure to “shrink” the boundaries. The game will end with the last two players in the top key circle trying to knock each other’s ball out. If you don’t want kids standing around once knocked out, you can have them partner pass or form shoot on the sideline. Vid-eo available here. “Run-a-way Reindeer” (Grade 3rd - 5th) - Have one person be Santa (he/she wears red pinnie or a Santa hat). Select two other players to be his/her elves (they wear green pinnies). The others are the reindeer and line up on the baseline. When Santa says, “Happy Holidays”, the reindeer must dribble to the other side of the gym without Santa or his/her elves catching them. Once the reindeer are caught, they stand ina designated area (behind pylons, by the bleachers) and they have to do ball circles around their body (try other ball handling drills – ball taps, ball circles around legs, etc). The last person playing wins and Santa announces the winner is Rudolph! If time allows, play this twice and let Rudolph become the new Santa and select different elves to catch the reindeer.
45
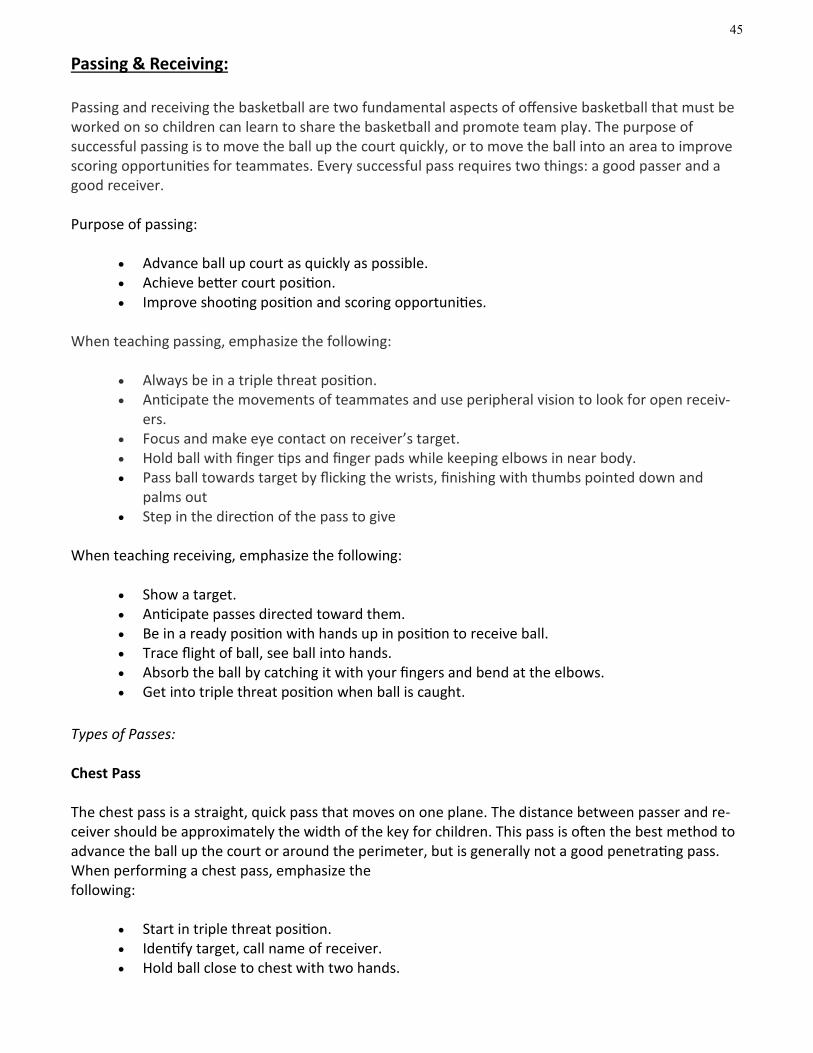
Passing & Receiving: Passing and receiving the basketball are two fundamental aspects of offensive basketball that must be worked on so children can learn to share the basketball and promote team play. The purpose of successful passing is to move the ball up the court quickly, or to move the ball into an area to improve scoring opportunities for teammates. Every successful pass requires two things: a good passer and a good receiver. Purpose of passing:
• Advance ball up court as quickly as possible. • Achieve better court position. • Improve shooting position and scoring opportunities.
When teaching passing, emphasize the following:
• Always be in a triple threat position. • Anticipate the movements of teammates and use peripheral vision to look for open receiv-
ers. • Focus and make eye contact on receiver’s target. • Hold ball with finger tips and finger pads while keeping elbows in near body. • Pass ball towards target by flicking the wrists, finishing with thumbs pointed down and
palms out • Step in the direction of the pass to give
When teaching receiving, emphasize the following:
• Show a target. • Anticipate passes directed toward them. • Be in a ready position with hands up in position to receive ball. • Trace flight of ball, see ball into hands. • Absorb the ball by catching it with your fingers and bend at the elbows. • Get into triple threat position when ball is caught.
Types of Passes: Chest Pass The chest pass is a straight, quick pass that moves on one plane. The distance between passer and re-ceiver should be approximately the width of the key for children. This pass is often the best method to advance the ball up the court or around the perimeter, but is generally not a good penetrating pass. When performing a chest pass, emphasize the following:
• Start in triple threat position. • Identify target, call name of receiver. • Hold ball close to chest with two hands.

46
• Fingers point to target. • Keep elbows close to sides. • Step into the pass. • Extend arms forward at chest level. • Snap wrists. • Follow through so palms face outward and thumbs point to the floor. • Return to ready position.
Bounce Pass The bounce pass is similar to a chest pass except the ball hits the ground about two-thirds of the dis-tance towards the receiver and hitting the receiver in their target hands. The bounce pass is effective when either the passer and/or receiver is being pressured. The bounce pass is the most effective pass into the post to penetrate the key. When performing a bounce pass, emphasize the following:
• Start in triple threat position. • Identify target, call name of receiver. • Hold ball close to chest with two hands. • Fingers point to target. • Keep elbows close to sides. • Take one step towards receiver. • Extend arms forward at chest level. • Snap wrists. • Follow through so palms face outward and thumbs point to floor. • Bounce ball 2/3 of the distance to receiver. • Return to ready position.
Overhead Pass The overhead pass is effective during transition to cover a longer distance in advancing and out- letting the ball up the court.
• When performing an overhead pass, emphasize the following: • Start in triple threat position. • Identify target, call name of receiver. • Transfer and hold ball over the top of head with two hands. • Take one step towards receiver. • Extend arms forward over head level. • Snap wrists. • Follow through so palms face outward and thumbs point to floor. • Return to ready position.
One Handed Push Pass Once players have mastered the chest pass and bounce pass, they can move to the one handed push pass. This pass is slightly quicker than the chest pass and a more natural movement to make.

47
When performing a one handed push pass, emphasize the following:
• From triple threat position, locate target, call name of receiver. • Ball in front of hip of lead foot. • Shooting hand is behind ball, non shooting hand on side of ball. • Step forward on to front foot. • Push ball towards target with shooting hand. • Target is receiver’s chest. • Wrist snaps and follows through. • Fingers and thumb point at the floor.
Passing drills should be practiced in this progression:
• Stationary – stressing the technique. • Passing on the run; in motion. • Games approach – Passing in the half court offense and transition. • Incorporate fakes such as i) looking away; ii) faking one way and going the other way.
Passing & Receiving Drills: “Wall Passing” (K - 2nd Grade) – Have players stand two to six meters from a wall and throw chest
passes at the wall; the player aims at a target at about chest height and concentrates on technique. The
player begins the drill close to the wall but moves farther away as skill increases. Execute other passes:
bounce pass, overhead pass, one hand push pass.
“Partner Passing” (K - 10th Grade) – Have players partner up and stand about 10-15 feet apart.
Player will then execute the instructed pass, back and forth to each other. The receiver must always
give a target, and the passer must always try to hit that target. Execute all passes. Add variations such
as movements such as sliding. Video available here.
“Multi Skill Warm-up Drill” - “Coach Pat’s Drill” (2nd - 10th Grade): Partner players into twos and
spread the groups of two across the sideline or baseline. There will be 1 ball per partner group. On
Coaches command, the first player will dribble 8-12 ft. and perform a jump stop. The player will then
perform a front or reverse pivot toward their partner and execute a bounce, chest or over the head
pass. After the player makes the pass, s/he will hustle back to the place where they started. Meanwhile,
their partner is executing the same steps of the drill. The drill continues for 3-5 minutes. Add variations
to the pivot and types of passes. To view this video click here.

48
“Crocodile Passing” (Grades K - 2nd) – The objective here is to teach passing and catching while pro-gressing towards the Hoop. The floor is the water, which is filled with crocodiles who like to eat basket-balls that hit the water. Spread out 2-3-4 players under a hoop with one Ball. The player with ball pass-es to someone and moves forward to an open spot. Whomever the ball was passed to needs to con-centrate and catch the ball without it hitting the floor (crocodiles are waiting). They then pass to a different person and moves forward. Keep passing until everyone. “Full Court Passing Game” (Grades 6th - 10th) - Full court game of basketball with no dribbles. Divide into two even teams. Explain the object of the game is to complete at least five passes in a row in order to score a point. If the ball is dropped or intercepted, the other team begins its attempt to make five passes. Emphasize on passing concepts – proper spacing, defensive position, open passing lanes, etc.
49
P A S S I N G
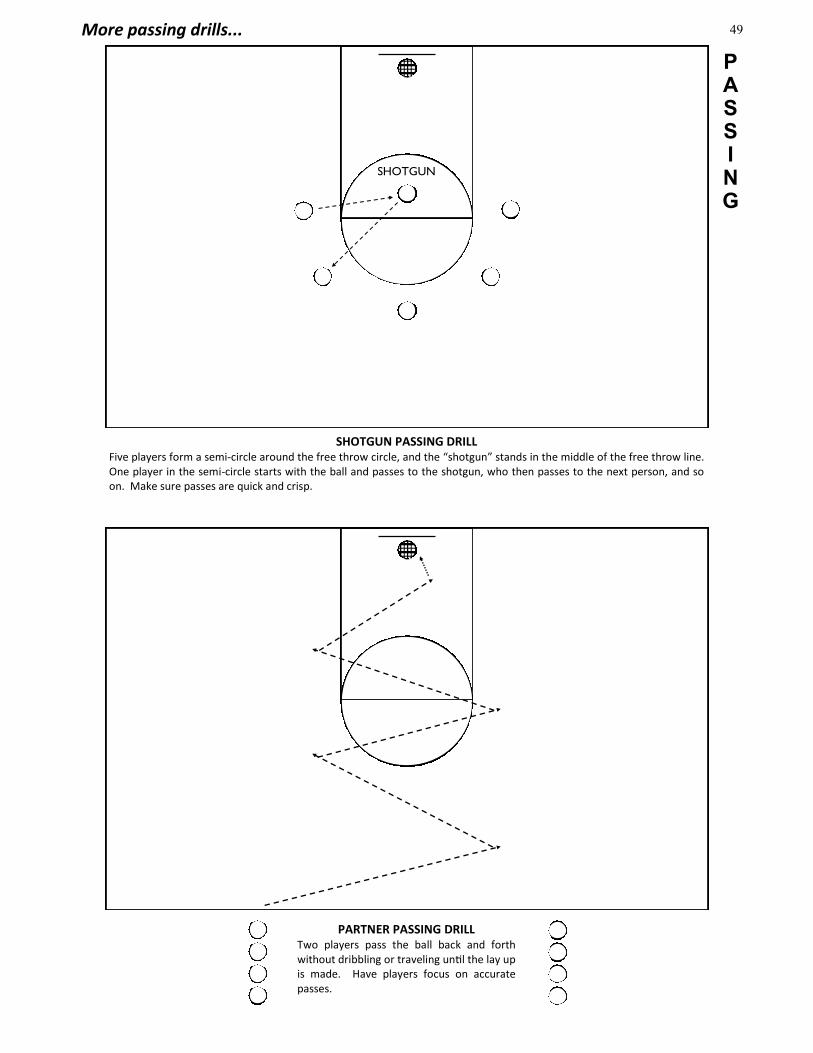
SHOTGUN PASSING DRILL Five players form a semi-circle around the free throw circle, and the “shotgun” stands in the middle of the free throw line. One player in the semi-circle starts with the ball and passes to the shotgun, who then passes to the next person, and so on. Make sure passes are quick and crisp.
SHOTGUN
PARTNER PASSING DRILL Two players pass the ball back and forth without dribbling or traveling until the lay up is made. Have players focus on accurate passes.
More passing drills...

50
P A S S I N G
MONKEY IN THE MIDDLE Players pass the ball at least two players away while the “bull” in the middle tries to deflect or intercept the pass. If the bull is successful, the passer who threw the pass is now the bull. Concentrate on quick, crisp pass-es. Number of passers can vary.
MONKEY
BASIC PASSES DRILL This drill allows players to practice chest, bounce, overhead and baseball passes. The player at the front of the line passes to the player at the front of the opposite line, then runs to the end of the opposite line. Focus on good, accurate passes as well as pass reception.
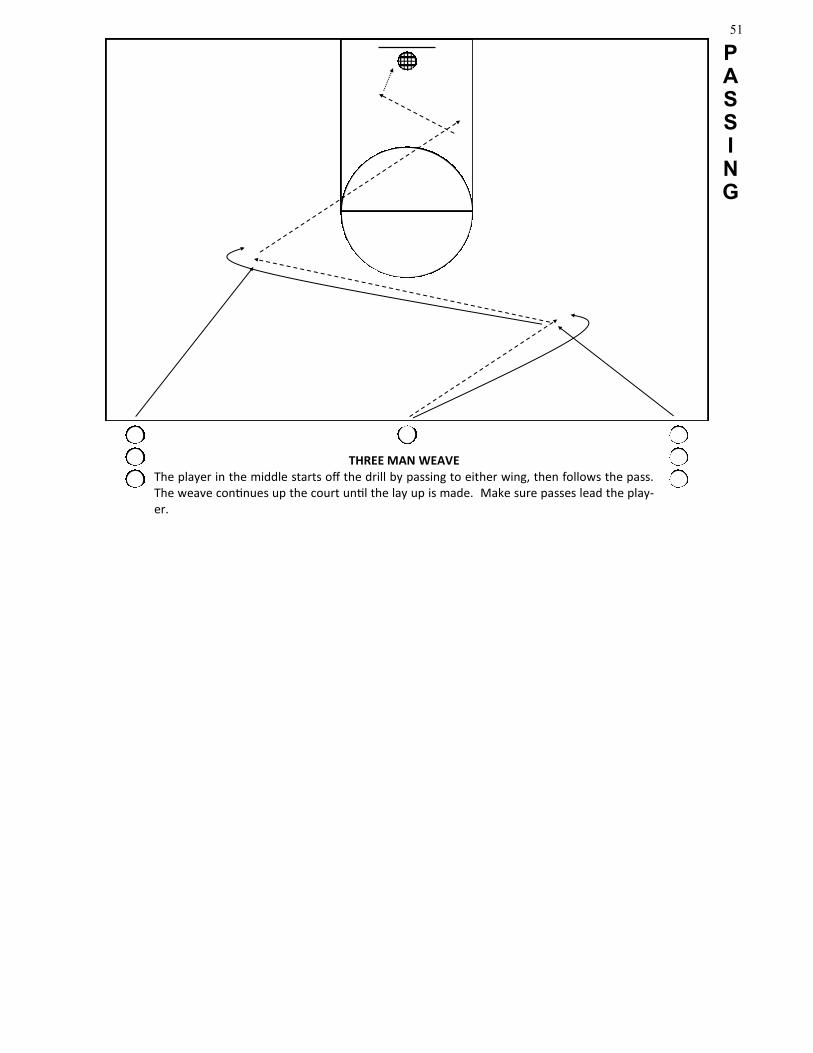
51
P A S S I N G
THREE MAN WEAVE The player in the middle starts off the drill by passing to either wing, then follows the pass. The weave continues up the court until the lay up is made. Make sure passes lead the play-er.

52
Shooting: Shooting is a key basketball skill that is learned through repetition of proper techniques. Not all players become great shooters, but with good technique and plenty of practice, any player can develop into a good shooter. When teaching shooting, it is important to be aware of individual differences among players. Not all players have the strength or coordination necessary to use the same technique, but two players can use slightly different styles and still adhere to the basic principles of shooting. Habits form early in young players – it is essential that proper technique is ingrained in athletes at an early age. The concept here is for young shooters to learn the basic shooting principles and positive action necessary to allow them to develop their shooting ability and become better shooters as they mature. Shooting is a fine motor skill and players must practice a great deal in order to become good shooters. Fortunately, most players enjoy shooting and gladly practice it on their own. However, practicing can be much more productive if players incorporate the following basic principles:
• Aim at the hoop – have a “quiet eye” on the target. • Select an appropriate angle of release where the elbow finishes at forehead level. • Use all joints that can be used – knees, elbows, and wrist. • Incorporate hip extension to add power. • Start from a balanced position – triple threat position. • Practice. Practice. Practice. • Take psychological factors into account – concentration, shot selection, and confidence. It is important for coaches to judge the following factors during the stages of an athlete’s shooting.
Shooting for K-2nd Grade
• Ready Position • Hold ball with two hands—Make a “W” with hands • Place ball at forehead with “Pizza Hand” • Bend knees - “Sit in your invisible Chair” • Shooting elbow connected to the knee • “Push the ball up toward the sky and reach for the stars!”
Shooting for 3rd grade and older using the “B-E-E-F” acronym Form shooting is done at a slow pace concentrating on achieving the perfect form. The movements are exaggerated for emphasis. You can also break it down further by concentrating on a specific body part i.e. wrist, foot, elbow. Following the “B-E-E-F” technique will help break down proper shooting form by emphasizing Balance, Eyes, Elbow, & Follow Through. Introducing “B-E-E-F” techniques
• Balance - Player squares up to basket with toes pointed to hoop; feet shoulder width apart with knees flexed. (Note: When players are bending their knees, it is important to make sure their buttocks are down and back; bending knees with back straight and buttocks directly under torso is incorrect).

53
• Eyes – Eyes should be focused on target (basket); never leaving target during shot. • Elbow/ Hand placement – Extend shooting hand directly in front of you and then bend it 90
degrees (making an “L”) upward at the elbow; cup your shooting hand so that the ball fits in it with the guide hand guiding the ball in position. As the ball is raised up to the release point, guide hand fingers are pointed to the ceiling.
• Follow through – Release the ball off the fingers and push fingers through the ball while
bringing the wrist through, to put some backspin on the ball. Follow through with the palm facing down; directing the ball into the basket. End with hand in the “cookie jar”.
Shooting Drills: “Form Shooting” (2nd - 10th Grade) - Have players line up on a line on the court across from a partner. Each set of partners will have a ball. Using the BEEF concept, have players shoot the ball to each other focusing on balance, eyes on their target, elbow in and follow through. Have players focus on ending their shot with their elbow at eye level and extending their arm ending with a “floppy wrist” (hand in the cookie jar). This drill can be done individually on a wall or basket. Video available here. “Wall Shooting” (All Grades) – Have players line their forearms on wall so biceps are parallel with floor. Make sure toes are pointed straight at wall and all technical points are followed very closely. Player then steps back from wall, keeping arm at 90 degrees angle. Player then places ball on shooting hand and using the entire body, shoots ball up against wall, finishing on toes and holding follow through. Important that players do not shoot the ball too high on the wall as this will lead to incorrect form. “Bank Shot Shooting” (K - 2nd Grade) - Line kids up at the block of the lane line. Have each player shoot a shot from the block focusing on using the glass and the box on the shot. Have kids shoot for the upper corner of the box “Frog Shooting” (K - 2nd Grade) - In the early stages of teaching shooting progression, it is important to teach young players emphasis on the use of the legs. Perform a squat while picking up the ball from the ground. Place ten fingers on the ball gripping the ball only using the pads of the fingers. Raise the ball to the forehead at the same time pushing with your legs. The player should be able to look under the ball to see the target at release. This is to teach the proper activation of the shooting muscles. (Note: this should happen in a continuous motion. The children may sight the target by looking over the ball, but at the release you should encourage them to be looking under the ball. Power comes from the legs, finesse from the upper body.) Teaching the Lay-up The lay-up is a shot that is taken close to the basket. Lay-ups should be worked on from both the right and left hand sides. The lay-up is taken on the move, usually off the dribble or a pass. The name is derived from the action of shooting – that is, laying the ball off the backboard.

54
Power Lay-up The first specific layup that should be taught is the 2 foot lay-up. In particular, at the younger ages, teach players how to perform a “power lay-up” or a lay-up off of a jump stop. When teaching the pow-er, emphasize the following:
• Dribble toward the hoop under control • Take an angle to use the back board • Come to a controlled jump stop • Aim for the upper right corner of box • Keep eye on the hoop
1 Foot Lay up The 1 foot lay-up is a more complicated skill. When teaching the one foot lay-up, emphasize the following:
• By using the right hand on the right side and the left hand on the left side, players can use their body to protect the ball from the defender.
• To attain maximum height on the jump, players should jump off the foot on the side oppo-site the shooting hand.
• Players should convert forward movement into upward momentum by leaning back slightly dropping the hips, and shortening the last two or three strides.
• To set up the take off foot, players usually take stutter steps during the last few dribbles or just before receiving a pass.
• Players should concentrate on learning to pick up the ball with both hands. dropping the hips, and shortening the last two or three strides.
It is recommended that you use the following teaching progression to teach the lay-up off the dribble:
• Wall shooting • The One-Step Lay-up • The Two-Step Lay-up • The Three-Step Lay-up • The One Dribble Lay-up • The Complete Lay-up off the dribble
Wall Shooting Players should have a basic level of proficiency with the one-handed set shot before starting to learn the one foot lay-up – especially when learning with their weak hand. Players can develop proficiency with the weak hand by shooting one-handedset shots against a wall.

55
The One-Step Lay-up drill The player starts from just in front of the basket in the following stance:
• The feet are parallel and shoulder width apart. • The knees are bent. • The player is holding the ball; the shooting hand is behind the ball, and the off hand is on
the side of the ball. • The player concentrates on a point on the backboard. • The player then takes a step with the inside foot (for example, the left foot on the right
side) and shoots a lay-up. Emphasize the following points:
• Step with the correct foot. • Simultaneously jump and drive the opposite knee upward. • Shoot with the correct hand using the correct arm motion.
The Two-Step Lay-up drill To shoot a two-step lay-up, players back up one full step from the starting position for the one-step lay-up, and assume the triple threat position. They then take two steps and jump off the correct foot for shooting a lay-up. Emphasize the teaching points for the one-step lay-up and the following:
• To prepare for the jump, make the second step shorter than the first. • Keep the ball in front – do not move it from side to side.
The Three-Step Lay-up drill To shoot three-step lay-up, players position themselves three running steps from the basket (choosing a reference mark on the floor often ensures consistency). They then assume the starting position for the two-step lay-up and shoot a layup using three steps and no dribble. Shooting in this way is actually traveling, but it helps develop a running rhythm.
The One-Dribble Lay-up drill This part of the teaching progression is identical to the three-step lay-up except that the player adds a dribble that coincides with the first step. The key points of this sequence are as follows:
• Dribble the ball with the outside hand (i.e. the left hand when doing a left-handed lay-up). • The ball and the first step should hit the floor at the same time. • Pick up the ball by letting it bounce up into the dribbling hand. Trap the ball with the off
hand, thus forming a good shooting grip with the hands. The Complete Lay-up off the dribble drill To perform the lay-up off the dribble, players need to be able to take stutter steps – to make it possible to arrive on the correct foot for shooting. Concentrate on jumping off the correct foot using the follow-ing progression:

56
• Dribble on the spot; then shoot a one-dribble lay-up. • Start at about half-court, and dribble toward the basket at half to three-quarter speed to
shoot a lay-up.
Lay-Up Drills:
“Two Line Lay-ups” (3rd—10th Grade)– Players form two lines, one on each side of the basket at about the 3pt line. Start with the balls on the right hand side, have the players dribble in for lay-ups. As the lay-up is shot, a player from the other line rebounds and passes the ball to the next person in the lay-up line. Players then switch lines. Perform lay-ups from both sides. “Ball Toss Lay-ups” (3rd—10th Grade) – Have players toss the balls to themselves, catch with a jump stop. The player then pivots, still in a triple-threat stance facing the basket, and dribbles in for a lay-up. “Moves on the Move” (2nd - 10th Grade) – Start players at half court with balls. A pylon will be set up at the 3pt line of each side. Player dribbles towards pylon and executes the instructed cross over move and goes in for lay-up. Player then executes the same move on the other pylon going back the other way. As players improve, encourage them to go faster and harder. “Under Pressure” (4th - 10th Grade) - Place players in line at wing with ball. Coach will be near the low block as a mock defender with his or her hands up. On coach’s signal, the player will attack the basket off the dribble and attempt a lay-up under pressure.

57
SHOOTING
CIRCUIT DRILL Players must shoot 10 shots, one from each of the numbered areas, in sequence. The player with highest percent-age wins. Shots 2 and 10 are lay ups. The player must rebound own shots.
1 2
3
4 5
6
7
8
9 10
TOM’S DRILL The shooter starts out a either corner of the free throw lane, takes a shot and either slides from corner to corner, or from the corner to the outside. Rebounders can practice boxing out under the hoop. The re-bounder who get the ball will pass the ball the next shooting spot.
SLIDE
More shooting drills:

58
SHOOTING
COMPETITIVE SHOOTING Spilt the players in half forming two teams. Choose a spot on the court to shoot from. Have shooters take a shot, get the rebound, then pass to the outlet. Shooters only get one shot. The first team to 10 wins.
OR
OUTLET
OR
OUTLET
JUMPERS This drill is similar to the Competitive Shooting Drill, but a defender is added. The defender (X) waves a hand in the face of the shooters, but do not block the shot. The defender gets the rebound, passes to the outlet and goes to the back of the line. The shooter then goes on defense.
OR
OUTLET
OR
OUTLET

59
SHOOTING
FAKE’EM OUT OF THEIR SHOES Each player faces chairs representing the defense. With a strong fake one way, a player rolls around the opposite side, dribbles up to the next chair, stops abruptly, gives a head fake and shoots. After rebounding the ball, each player goes to a different line.
CONE DRILL Have players dribble up to the cone and shoot a jump shot. This forces them to go straight up. Make sure they are land-ing with feet shoulder width apart, providing a more solid base. This will also help when they start rebounding.
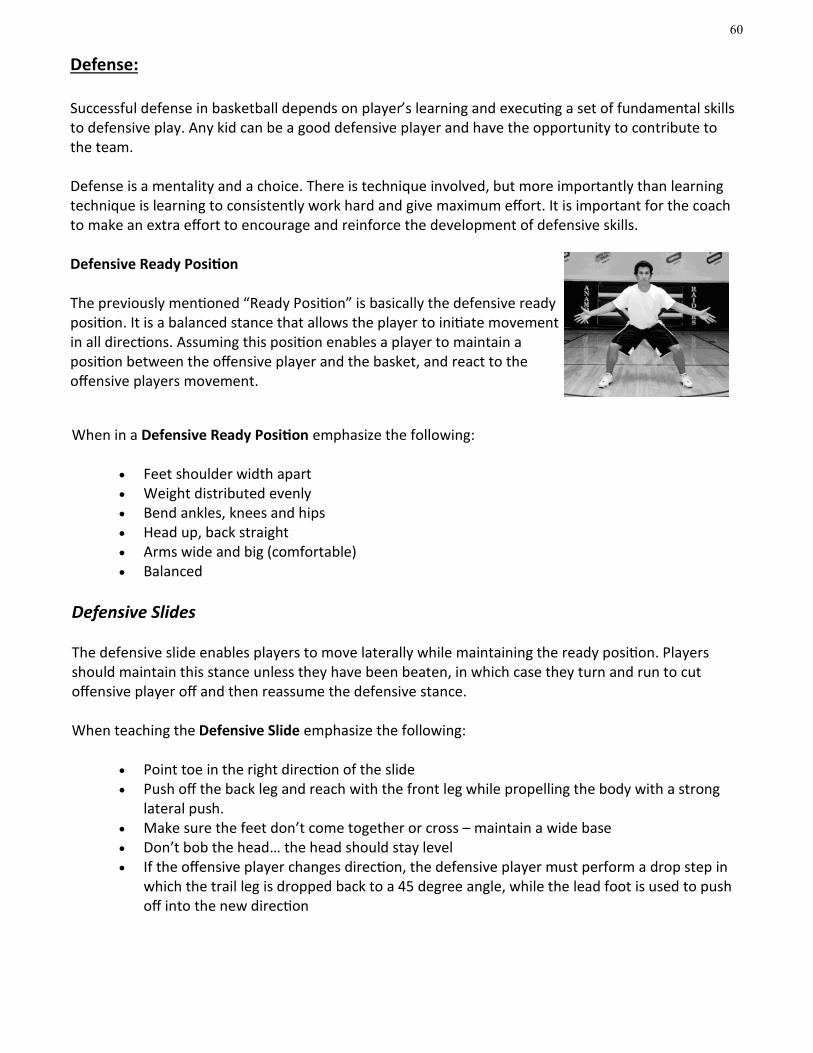
60
Defense: Successful defense in basketball depends on player’s learning and executing a set of fundamental skills to defensive play. Any kid can be a good defensive player and have the opportunity to contribute to the team. Defense is a mentality and a choice. There is technique involved, but more importantly than learning technique is learning to consistently work hard and give maximum effort. It is important for the coach to make an extra effort to encourage and reinforce the development of defensive skills. Defensive Ready Position The previously mentioned “Ready Position” is basically the defensive ready position. It is a balanced stance that allows the player to initiate movement in all directions. Assuming this position enables a player to maintain a position between the offensive player and the basket, and react to the offensive players movement.
When in a Defensive Ready Position emphasize the following:
• Feet shoulder width apart • Weight distributed evenly • Bend ankles, knees and hips • Head up, back straight • Arms wide and big (comfortable) • Balanced
Defensive Slides The defensive slide enables players to move laterally while maintaining the ready position. Players should maintain this stance unless they have been beaten, in which case they turn and run to cut offensive player off and then reassume the defensive stance. When teaching the Defensive Slide emphasize the following:
• Point toe in the right direction of the slide • Push off the back leg and reach with the front leg while propelling the body with a strong
lateral push. • Make sure the feet don’t come together or cross – maintain a wide base • Don’t bob the head… the head should stay level • If the offensive player changes direction, the defensive player must perform a drop step in
which the trail leg is dropped back to a 45 degree angle, while the lead foot is used to push off into the new direction

61
Defending the Player with/without the Ball When guarding the dribbler, the following points should be followed:
• Get low and ready to move in any direction • Stay at least one arm’s length away from your player • Keep eyes on the mid-section of player • Stay between the ball and the basket • Once the offensive player has started to dribble, drop-step and perform defensive slides to
maintain proper defensive positioning • Pressure the dribbler to reverse direction or pick up his/her dribble • If beaten, turn and sprint to regain position between the dribbler and the defensive basket
When guarding a player without the ball, the defender must do the following:
• Be between their man and the ball • Be in the Ready Position • Point to the ball and to their man • Be below the ball so that they can see the ball and their man
Defensive concepts: Players are often over taught the details of team defense to the point that they forget the basic con-cepts. Some of the basic concepts we want to teach the players on the ball defense:
• To “mirror” the offensive players movements. • To turn the ball handler in a new direction. • To channel the ball handler in one direction.
Defensive Footwork Drills: “Foot Fire” (K-2nd Grade): Spread players around the floor in a ready, defensive position. On your
command, yell “Heat em up”. This signals to your players to start pumping their feet like pistons of an
engine. When you say right your players will turn to the “right”; when you say “left” they will turn to
the left. You can make this a game by mixing up your cadence, and the players who turn the wrong way
will be “out”. Add variations to this drill by having the players slide to the specific direction you point
to. Introduce the defensive drop-step and slide by pointing to the back corners of the gym (diagonal).
“Military Drill” (All Grades): On your command of “stance!”, everybody slaps the floor and yells
“stance”. This is a good time to walk around to kids and give them a light nudge to make sure they are
balanced. On next command, yell “choppers”. On this command, players are to run on the spot (foot
fire) while remaining in their stance. Coaches can then instruct players to perform the required move-

62
ment based on the hand signals: If coach points left, kids defensive slide 3 times to the left
(maintaining foot fire motion). If coach points right, kids defensive slide 3 times to the right
(maintaining foot fire motion). If coach points up, kids jump up with a hand in the air and yell “shot” –
this simulates a shot challenge. If coach points down, kids jump on floor and back to their feet. This
drill encourages kids to become familiar with the concept of a defensive ready position, defensive
slides, hard work and gets them to be vocal.
“Lane Slides” (All Grades): Players line up on one side of the key and perform lateral slides – slides
from one side of the key to the other. Players may make this drill competitive by recording the number
of slides in a specific period of time. Make sure they keep the correct form. Chest up, butt down, short
choppy steps.
“Partner Zig-Zag Drill “(3rd—10th Grade): Players form pairs: one offensive and one defensive player.
The offensive player dribbles the length of the court in a zigzag pattern while the defensive player uses
drop steps and defensive slides. Defensive players should stay one arm’s length away from the ball-
handler. When reaching the baseline, reverse roles and continue the drill. As players become better at
this drill, they can increase the speed and intensity at which it is performed.
Team Defense
(3rd - 10th Grade)
Team defense means that everybody on the floor is working together to prevent the other team from
advancing the ball to an advantageous position (on the floor) and denying them an opportunity for a
good shot. It is not the player who is guarding the basketball that is responsible for stopping that
player from scoring – it is all five defenders on the court. These defenders work as a cohesive unit,
providing support for teammates wherever needed. Nowhere else in the game of basketball is
communication as important as on the defensive end. When teaching the concept of team defense to
younger players, the most important concept they need to grasp is that of seeing the ball,
regardless of its position on the floor. For example, if a player’s man is on the side of the floor opposite
to the ball, they must be able to not only see their man, but the ball as well. So that if their teammate
gets beat off the dribble, the off ball defender can be there to help. Therefore, the “help side
defender”, as they are called, must be in a Man-You-Ball relationship, meaning that the defender is
between the man they are guarding and the ball. They are able to see both. He is in a position called a

63
Pistol Stance, in which he has both fingers pointing: one at their check and one at the ball. If a player is
in this stance, they will be aware of where the ball is and where their person is.
To see both the ball and defender’s check, that defender must be below the line of the ball.
The line of the ball is as follows:
• If player 2 has the ball, player 1’s defender is a step back of the line of the ball.
• In being a step back of the line of the ball, 1’s defender is able to see what 2 is doing.
• If 2 happens to drive the ball to the basket, 1’s defender may provide help to stop the drib-
ble.
“Defend the House” (K - 2nd Grade): Split kids into two teams: one offense and the other defense. The
offensive team will start at half-court, while the defensive team will begin at the baseline. Both groups
will have colored wrist bands on. Set offensive “spots” (I.e. cones, etc.) around the three point line for
the offensive players to run to. On coach’s command, “Defend the House!”, the offensive players will
run to their “Spots”, while the defense will run out to defend the offensive player with their same col-
ored wristband. When all players have “closed” out on their man, the coach will pass the ball in to the
offense and they will play out one possession. You can also modify this drill to run in a full court
setting. Both teams will be on the same baseline. When the coach yells “Defend the House”, the defen-
sive team will run down to the opposite key, while the offense is running to their “spots” simultaneous-
ly . Once the defense has matched up the coach will pass the ball in and players will play out the pos-
session.
1 Line of Ball
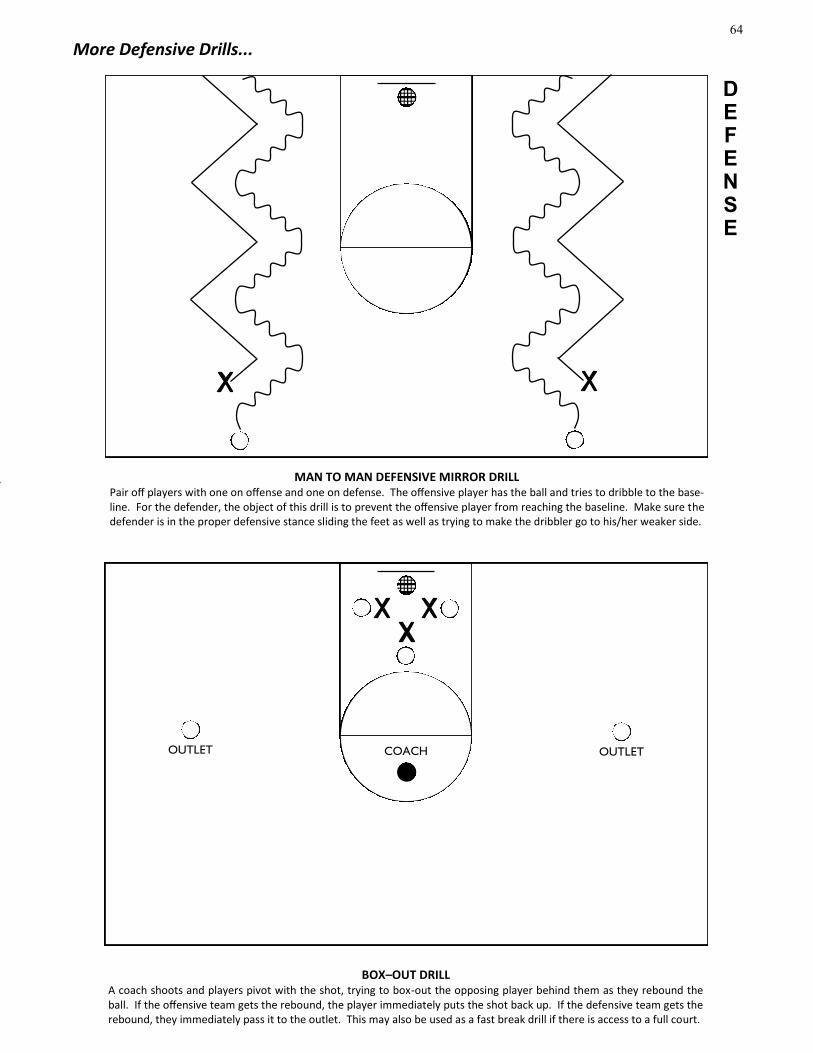
64
DEFENSE
MAN TO MAN DEFENSIVE MIRROR DRILL Pair off players with one on offense and one on defense. The offensive player has the ball and tries to dribble to the base-line. For the defender, the object of this drill is to prevent the offensive player from reaching the baseline. Make sure the defender is in the proper defensive stance sliding the feet as well as trying to make the dribbler go to his/her weaker side.
BOX–OUT DRILL A coach shoots and players pivot with the shot, trying to box-out the opposing player behind them as they rebound the ball. If the offensive team gets the rebound, the player immediately puts the shot back up. If the defensive team gets the rebound, they immediately pass it to the outlet. This may also be used as a fast break drill if there is access to a full court.
COACH OUTLET OUTLET
More Defensive Drills...
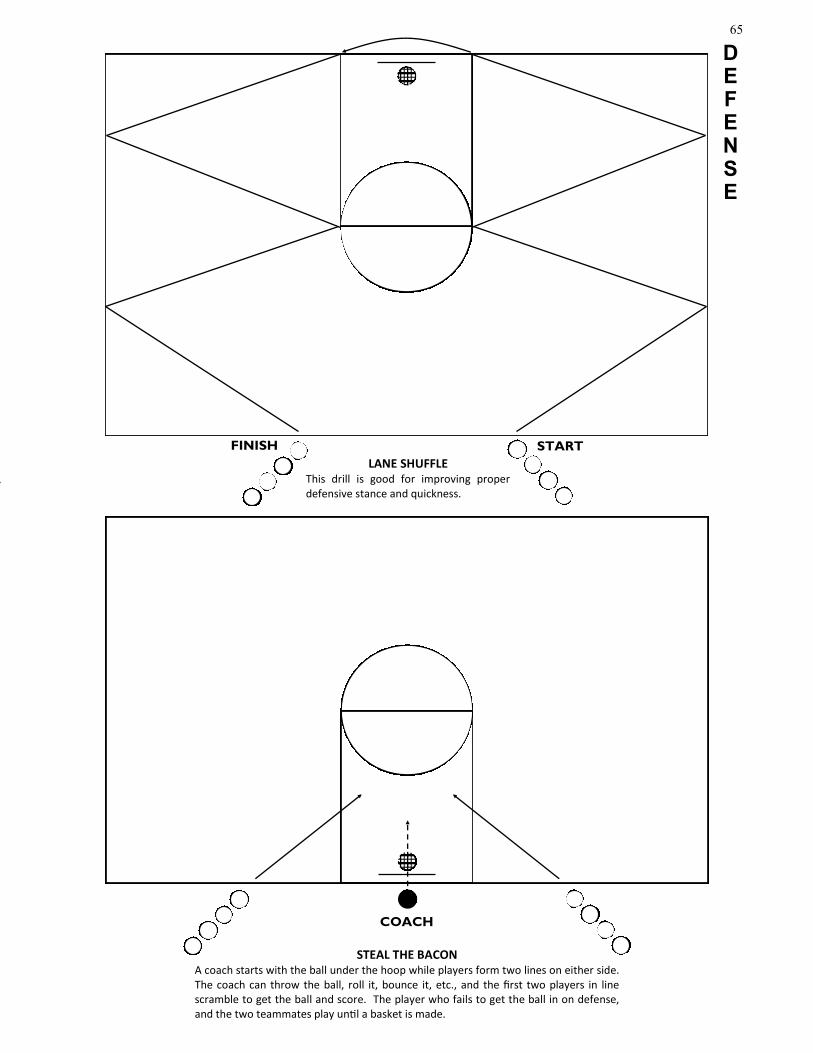
65
DEFENSE
FINISH START
LANE SHUFFLE This drill is good for improving proper defensive stance and quickness.
STEAL THE BACON A coach starts with the ball under the hoop while players form two lines on either side. The coach can throw the ball, roll it, bounce it, etc., and the first two players in line scramble to get the ball and score. The player who fails to get the ball in on defense, and the two teammates play until a basket is made.
COACH

66
Rebounding:
The focus of rebounding for young players should be on creating a desire for the basketball. As a coach,
you must place great emphasis on the importance of having possession of the ball. Any player, regard-
less of their size can be an effective rebounder, and it is important for young players to understand
this. Rebounding, much like defense, is a choice. A player either wants to be a good rebounder or they
do not.
Unlike scoring, rebounding involves all five players on the floor. Every player is a potential rebounder
on each missed shot. Thus to out-rebound the other team, each player must neutralize the player he or
she is guarding, every time on the floor. There are some technical points that should be covered, but
above all, an importance and a desire for the ball
When teaching rebounding, emphasize the following:
• The first thing to do when a shot is taken is not to follow the ball, but to find your man. Re-
bounding begins when the shot is released, not after it hits the rim.
• Next, you must go and make contact with your person. If you can’t make contact with your
person, cut him/her off from going to the basket.
• Now you must turn and “Boxout” your person – getting your elbows up, arms up and out,
your butt down and legs flexed. Contact must be maintained with your person.
• Finally, go and get the ball with 2 hands and 2 feet – 2 hands to secure the ball and 2 feet to
land on the ground in a wide, balanced stance. If you can’t rebound the ball, at least get a
piece of the ball to “keep it alive”. Come down with the ball chinned, and held tightly in
hands with elbows out and ball below chin.
• Successful rebounding is simply a matter of desire, aggressiveness, awareness and con-
sistency.

67
Rebounding Drills:
“Comfort Rebounding Drill” (K - 1st Grade) – Have players line up on baseline. Instruct kids to have
their hands above their head. Hold the ball above their head and hands, and gently drop the ball so
players can get the feel and confidence of catching the ball above their heads.
“Snatch it Drill” (K - 2nd Grade) - At the younger ages, often times kids are reluctant to catch the ball
with their hands over their head. Spread players out on the sideline. You and another coach will have a
ball. Walk down the line and have each player jump and snatch the ball from your hands. Emphasize
“chinning” the ball as they are landing in order to secure the ball. Another good way to drill rebounding
at this age is to simply toss the ball to your players while their hands are above their heads. This will
build confidence and they will become more confident in catching the ball.
“Back to Back Box-Outs” (3rd - 10th Grade) – Have players stand back to back, and on the coach’s cue,
they get low, legs wide, butt down, elbows up and push against each other. Use the center court as a
marker. Have each player start on either side of the line, back to back and try to push each other out as
far as possible.
“Circle Box-Outs” (4th - 10th Grade) – Have players partner up and line up around one of the three cir-
cles on the court. Have them face each other, with one person on the inside of the circle (defender),
and the other on the outside (offensive player). Place a ball in the middle of the circle. On coach’s cue,
the player on the outside tries to get the basketball, while the player on the inside, turns and boxes
out, preventing the offensive player from getting the ball. Have them switch roles after a few tries.
“Rebounding to One-on-One” (3rd - 10th Grade) – Divide players into two separate lines, form each
line just inside the free throw line at the corners of the key. These two separate lines form two differ-
ent teams. The players at the front of each line are up first. Coach shoots the ball and misses on pur-
pose so there is a rebound. The two players compete to get the rebound. The player who gets the re-
bound tries to score while the other player plays defense. Only one shot is allowed. The teams com-
pete to a score of five. One point for making a basket.
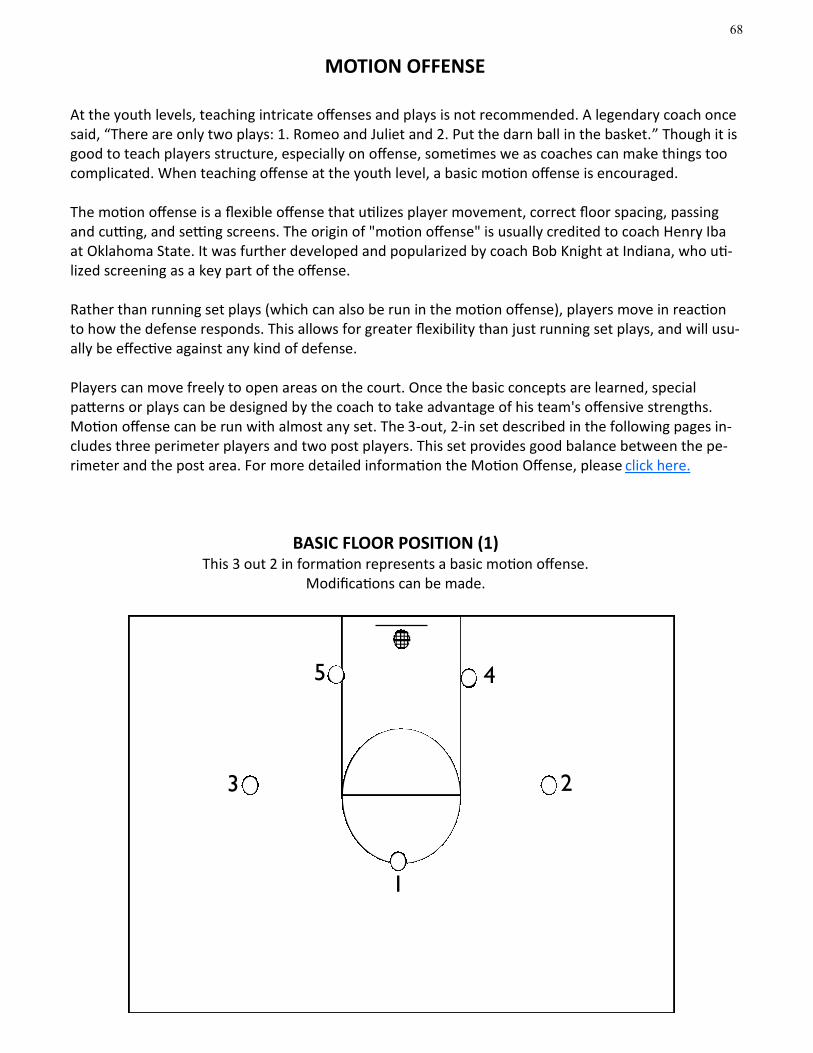
68
MOTION OFFENSE
At the youth levels, teaching intricate offenses and plays is not recommended. A legendary coach once said, “There are only two plays: 1. Romeo and Juliet and 2. Put the darn ball in the basket.” Though it is good to teach players structure, especially on offense, sometimes we as coaches can make things too complicated. When teaching offense at the youth level, a basic motion offense is encouraged. The motion offense is a flexible offense that utilizes player movement, correct floor spacing, passing and cutting, and setting screens. The origin of "motion offense" is usually credited to coach Henry Iba at Oklahoma State. It was further developed and popularized by coach Bob Knight at Indiana, who uti-lized screening as a key part of the offense. Rather than running set plays (which can also be run in the motion offense), players move in reaction to how the defense responds. This allows for greater flexibility than just running set plays, and will usu-ally be effective against any kind of defense. Players can move freely to open areas on the court. Once the basic concepts are learned, special patterns or plays can be designed by the coach to take advantage of his team's offensive strengths. Motion offense can be run with almost any set. The 3-out, 2-in set described in the following pages in-cludes three perimeter players and two post players. This set provides good balance between the pe-rimeter and the post area. For more detailed information the Motion Offense, please click here.
BASIC FLOOR POSITION (1) This 3 out 2 in formation represents a basic motion offense.
Modifications can be made.
4
1
2 3
5
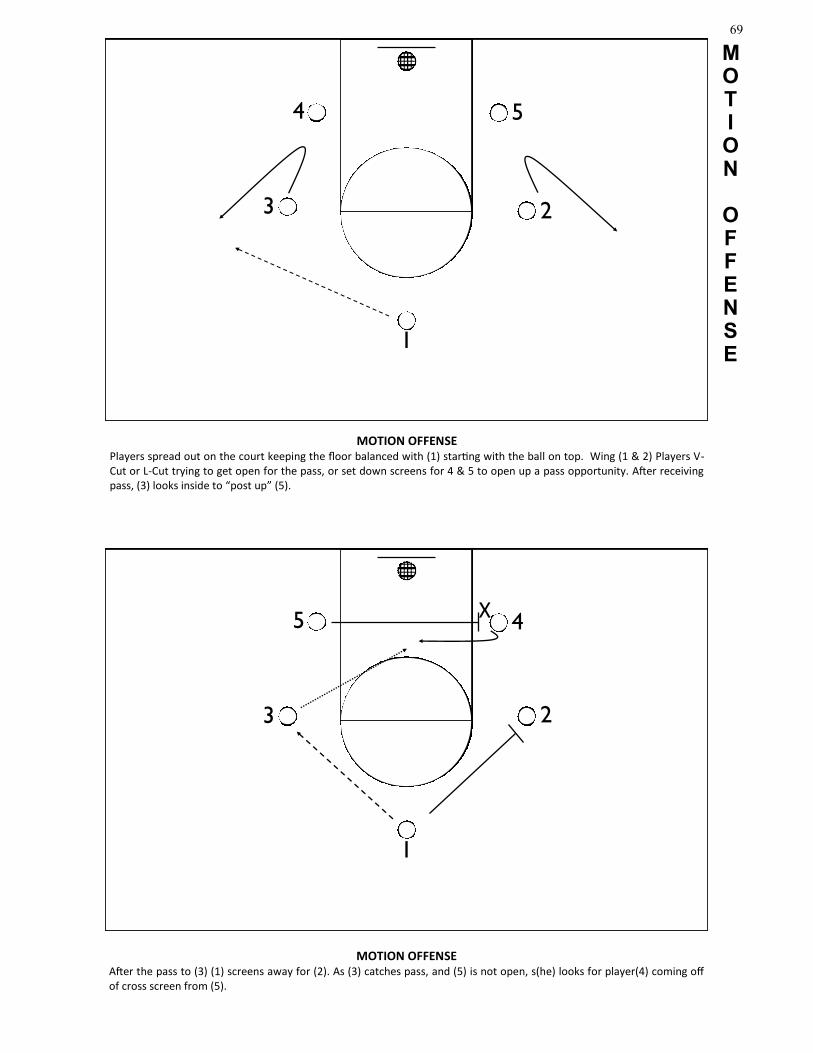
69
MOTION
OFFENSE
MOTION OFFENSE Players spread out on the court keeping the floor balanced with (1) starting with the ball on top. Wing (1 & 2) Players V-Cut or L-Cut trying to get open for the pass, or set down screens for 4 & 5 to open up a pass opportunity. After receiving pass, (3) looks inside to “post up” (5).
1
2 3
5 4
MOTION OFFENSE After the pass to (3) (1) screens away for (2). As (3) catches pass, and (5) is not open, s(he) looks for player(4) coming off of cross screen from (5).
1
2 3
4 5 X
70
MOTION
OFFENSE
MOTION OFFENSE (CONT.) If (4) is not open on the low block (3) can look to score or pass to (2) coming off screen from (1). (2) looks to curl off of screen and receive pass from (3) looking to score.
2
1 3
5 4
MOTION OFFENSE (CONT.) (2) now has ball at the top of the key. (1) and (3) can either V-cut to get open or down screen for (4) and (5). When receiving pass, (1) and (3) can look to score, or pass into the post. If the initial look to (4) or (5) is not open, (4) and (5) can screen away for each other. The motion action continues until desired shot.
2
1 3
5 4
X

71
INBOUNDS
PLAYS
INBOUNDS PLAY (1)
2
3
5 4
1
INBOUNDS PLAY (2) “STACK” Players (1), (2), (3), and (4) stack themselves in the lane while (5) passes in the ball. When (5) starts the inbounds play, (1) drops back to the top of the key, (2) slides out to the side, and (3) screens for (4), who rolls to the basket. The order in which the players stack themselves can vary.
2 4
3 1
5

72
SIMPLIFIED
FAST
BREAK
SIMPLIFIED FAST BREAK The rebounder passes the ball to the nearest outlet (usually a guard), who take the ball up the middle. Whichever guard did not get the outlet pass fills the lane on his side. The rebounder then follows up as a trailer in the middle. Forwards who were not rebounders fill their side lanes also. An even simpler version is for the center to always be the trailer and the forwards to always fill the side lanes.
OUTLET

73
LEAGUE RULES K – 5th GRADE BASKETBALL
1. Officials and Gym Supervisors have complete authority over the game. Any coach, player, parent or spectator using foul or abusive language, or otherwise exhibiting poor sportsmanship will be automatically ejected from the playing area.
2. Issaquah Parks & Recreation reserves the right to dismiss any coach who does not adhere to the rules and phi-losophy of the program as set by the Issaquah Parks & Recreation Department.
3. All technical fouls are automatic two (2) points. Any coach receiving two (2) or more technical fouls during the season will be dismissed from coaching.
4. A junior size ball (27.5” diameter) will be used for boys 1st – 5th grade games and girls 2nd – 5th grade games. A mini size ball (25” diameter) will be used for boys kindergarten and girls kindergarten – 1st grade games.
5. K – 2nd grade will play on an 8ft. hoop. 3rd – 5th grade will play on a 10ft. hoop.
6. Each quarter is ten (10) minutes long with a running clock.
7. Each game will start with a jump ball. During all other circumstances possession will alternate.
8. Each player must play at least 20 minutes unless there are more than 10 players on a team. No player may play more than 20 minutes unless there are less than 10 players in attendance. Here is the breakdown of play-ing time dependent on how many players are on the team:
• 6 Players 2 players play 30 minutes, 4 players play 35 minutes • 7 Players 2 play 25 minutes, 5 play 30 minutes • 8 Players 8 play 25 minutes • 9 Players 4 play 25 minutes, 5 play 20 minutes • 10 Players All play 20 minutes • 11 Players 7 play 20 minutes, 4 play 15 minutes • 12 Players 4 play 20 minutes, 8 play 15 minutes
If the above participation rules are violated without prior agreement between the opposing coaches, referees, and scorekeepers, (due) to players illness, arriving late etc. the violating team may FORFEIT the game. Refer to score sheet for breakdown of minutes.
9. The clock will be stopped at the 5-minute mark for mandatory substitutions for all players. Substitution of players is not a time out. Please move players in and out of the game as quickly as possible to maximize play-ing time.
10. Each team is allowed two time-outs per game. Coaches or players may not request time-out when the oppos-ing team has control of the ball.
11. 3rd – 5th grade offensive players may not be in the key for more than five (5) seconds. K –2nd grade, time is unlimited.
12. All K – 2nd grade players will wear colored wristbands so they know who to guard. All attempts to match the players up evenly is required. Intentionally unbalancing the match ups via wristband is unacceptable and if there is a noticeable imbalance the referees will hand out the wristbands to the players.
13. Defense: Use of man to man defense only, no zone or trapping defenses.
Defense Guideline – A defensive player must remain within six (6) feet of the offensive player he or she is guarding when the offensive player is within twelve (12) feet from the basket.

74
Help defense outside the key area is permitted, but defender must recover to his or her “player” once the player who was beat recovers.
14. No full court press.
15. Fast breaks are permissible, but defensive player may attempt to stop the break by picking up offen-sive player at the pick-up line even if he or she is not “guarding” that player (Official’s judgment).
16. The offensive team has five (5) seconds to inbound the ball.
17. Defense may pick up the offensive team at the top of the key with the exception of boys 4th and 5th grade leagues (see rule #18). Offensive team has 12 seconds to penetrate the top of the key line. Once ball has passed the top of the key line, defense may pick up offense anywhere on the court (Exception – Rule #15).
18. Defense may pick up the offensive team at the half court line in the boys 4th and 5th grade leagues. Remainder of rule #17 applies.
19. Continual isolation offense (one-on-one, two-on-two) will not be permitted. (Official’s judgment)
20. The use of screens in the K-2 program is prohibited. 21. Stealing or blocked shots will not be allowed in the K-2 program. This means that the defensive
player may not take the ball from an offensive player while dribbling, holding, or shooting the bas-ketball. Balls stolen on a pass and blocked shots are permitted as long as the defenders arms are straight up.
22. Free throws are awarded to an offensive player fouled on the shot. The free throw shooter may not cross the foul line until the ball touches the rim. Players in a marked lane space may enter the key immediately after the ball touches the rim.
23. One and one foul shots will be taken on the seventh and all successive fouls except shooting fouls. The player fouled is allowed one free throw. If the basket is made, the shooter gets another free throw. If the shooter misses on the first or second shot, the ball is in play.
24. No three (3) point shots will be awarded in the K-5th grade program.
25. A traveling violation will be called if a player falls to the floor while holding the ball, gets to his/her feet while holding the ball, or takes more than one step while holding the ball.
26. In the event that a player fouls out of a game and all other players’ times are used up, the rest of the playing time will be distributed amongst the remaining players.
27. In the event of an injured player unable to continue to play, and all other players’ times are used up, the rest of the playing time will be distributed amongst the remaining players.
28. A violation will be called if a player intentionally kicks the ball.
29. Incidental Contact - The fact that contact occurs does not constitute a foul. Opponents in equally fa-vorable positions run the risk of physical contact.
75
MIDDLE SCHOOL LEAGUE RULES
1. Officials and Gym Supervisors have complete authority over the game. Any coach, player, parent or spectator using foul or abusive language, or otherwise exhibiting poor sportsmanship will be auto-matically ejected from the playing area. Only one coach is permitted to stand during a game and must stay inside coaching box.
2. Issaquah Parks & Recreation reserves the right to dismiss any coach who does not adhere to the rules and philosophy of the program as set by the Issaquah Parks & Recreation Department.
3. All technical fouls are an automatic 2 points and possession of the ball. Any coach receiving a tech-nical foul must remain seated for the duration of the game. Any coach violating these rules will be dismissed from the gym. Any coach receiving two (2) or more technical fouls during the season may be dismissed from coaching. The Gym Supervisor holds total discretion.
4. A regulation size ball will be used for the boys 7th/8th grade league. Boys 6th and all girls leagues will use official women’s size ball (B120 or 28.5).
5. Each quarter is ten (10) minutes long with a running clock. Last minute of the game will be stopped clock.
6. Each game will begin with a jump ball. During all other circumstances possession will alternate.
7. Each player must play at least 20 minutes unless there are more than 10 players on a team. No play-er may play more than 20 minutes unless there are less than 10 players in attendance. Playing time for late arrivals will be half the remaining time in the game. Breakdown of playing time dependent on how many players are on the team:
• 6 Players 2 players play 30 minutes, 4 players play 35 minutes • 7 Players 2 play 25 minutes, 5 play 30 minutes • 8 Players 8 play 25 minutes • 9 Players 4 play 25 minutes, 5 play 20 minutes • 10 Players All play 20 minutes • 11 Players 7 play 20 minutes, 4 play 15 minutes • 12 Players 4 play 20 minutes, 8 play 15 minutes
If the above participation rules are violated without prior agreement between the opposing coaches, referees, and scorekeepers, (due) to players illness, arriving late etc. the violating team may FOR-FEIT the game.
8. The clock will be stopped at the 5-minute mark for mandatory substitutions for all players. Substitu-tion of players is not a time out. Please move players in and out of the game as quickly as possible to maximize playing time.
9. Each team is allowed three (3) time outs per game and one (1) time out during overtime. Coaches or players may not request time out when the opposing team has control of the ball. If a coach calls time out, and does not have timeouts remaining, they will be charged with a “Technical Foul”. (See above for Technical Foul ruling).
10. Overtime periods shall consist of one (1), two (2) minute period with a stopped clock the last minute. Second overtime: The first team to score wins. Possession determined by jump ball.
11. An offensive player may not be in the key for more than three (3) seconds in the boys and girls leagues.
12. Full court press will be allowed during the last two (2) minutes of the game when the difference in
score is less than ten (10) points. If a team is ahead by ten (10) points or more, they cannot press.
13. Defense: All teams are required to play man-to-man defense. Zone defense and trapping is not al-

76
lowed. Double teaming is not allowed EXCEPT when the offensive player with the ball is in the key.
Help defense outside the key area is permitted, but defender must recover to his or her “player”
once the player who was beat recovers. Illegal Defense: “Any defense that deviates from man to man defense, i.e. zone defense, trapping,
or double teaming”. Continual violation of this rule will result in a called “team foul”. 14. Fast breaks are permissible, but defensive team may attempt to stop the break by picking up offen-
sive team at mid-court (Official’s judgment).
15. Defense may pick up the offensive team at half court. Offensive team has ten (10) seconds to have the ball penetrate the mid-court line.
16. Continual isolation offense (one-on-one, two-on-two) will not be permitted.
17. Free throws are awarded to an offensive player fouled on the shot. The free throw shooter may not cross the foul line until the ball touches the rim. Players in a marked lane space may enter the key after the ball touches the rim.
18. “One and one” foul shots will be taken on the 7th-9th fouls except shooting fouls. Two free throws will be awarded after the 10th team foul.
19. A traveling violation will be called if a player falls to the floor while holding the ball, gets to his/her feet while holding the ball, or takes more than one step while holding the ball.
20. In the event that a player fouls out of a game in the 4th quarter, and all other players’ time is used up,
the opposing coach will determine which player finishes the game.
21. In the event of an injured player unable to continue to play, and all other players’ times are used up, the rest of the playing time will be distributed amongst the remaining players.
22. If a player shows up late for a game, he or she must play half of the remaining time left in the game.
23. A violation will be called if a player intentionally kicks the ball.
24. Incidental Contact - The fact that contact occurs does not constitute a foul. Opponents in equally fa-vorable positions run the risk of physical contact.
25. A team may play a game with only 4 players. If a team has fewer than 4 players before the start of the game, they will forfeit. Please note the opposing team has the option to play with 5 players, but also can choose to play 4 players. If the opposing team chooses to play with 4 players, the minimum playing time requirement for all players will be 15 minutes.
26. If a team is down to four (4) eligible players during the course of the game due to other players foul-
ing out, the coach of that team may choose one of the following options:
1. To play with those four players for the remainder of the game. Note – if the fourth player fouls out, option 2 will be applied.
2. Fill the 5th spot of the team with a player(s) of the opposing team’s choice. The team will
be assessed a team & technical foul (automatic 2 points to opposing team and the ball); this is the penalty for continuing play with an in-eligible player. If the team is in the bo-nus penalty foul-wise, they will be awarded two (2) points for the technical, shoot the foul shot(s), and retain possession of the ball. Any foul committed by the replacement player thereafter will result in a team foul, and be considered a technical foul; automatic two (2)

77
points, and possession of the ball will go to the other team.

78
9th -12th GRADE BASKETBALL LEAGUE RULES 1. Officials and Gym Supervisors have complete authority over the game. Any coach, player, parent or spec-tator using foul or abusive language, or otherwise exhibiting poor sportsmanship will be automatically eject-ed from the playing area. Only one coach is permitted to stand during a game and must stay inside coaching box. 2. Issaquah Parks & Recreation reserves the right to dismiss any coach who does not adhere to the rules and philosophy of the program as set by the Issaquah Parks & Recreation Department. 3. All technical fouls are an automatic 2 points and possession of the ball. Any coach receiving a technical foul must remain seated for the duration of the game. Any coach violating these rules will be dismissed from the gym. Any coach receiving two (2) or more technical fouls during the season may be dismissed from coaching. The Gym Supervisor holds total discretion. 4. A regulation size ball will be used for the boys 9-12th
Grade League. 5. Each quarter is ten (10) minutes long with a running clock. Last minute of the game will be stopped clock. 6. Each game will begin with a jump ball. During all other circumstances possession will alternate. 7. Each player must play at least 20 minutes unless there are more than 10 players on a team. No player may play more than 20 minutes unless there are less than 10 players in attendance. Playing time for late arrivals will be half the remaining time in the game. Breakdown of playing time dependent on how many players are on the team: • 6 Players 2 players play 30 minutes, 4 players play 35 minutes • 7 Players 2 play 25 minutes, 5 play 30 minutes • 8 Players 8 play 25 minutes • 9 Players 4 play 25 minutes, 5 play 20 minutes • 10 Players All play 20 minutes • 11 Players 7 play 20 minutes, 4 play 15 minutes • 12 Players 4 play 20 minutes, 8 play 15 minutes If the above participation rules are violated without prior agreement between the opposing coaches, referees, and scorekeepers, (due) to player illness, arriving late etc. the violating team may FORFEIT the game. 8. The clock will be stopped at the 5-minute mark for mandatory substitutions for all players. Substitution of players is not a time out. Please move players in and out of the game as quickly as possible to maximize play-ing time. 9. Each team is allowed three (3) time outs per game and one (1) time out during overtime. Coaches or play-ers may not request time out when the opposing team has control of the ball. If a coach calls time out, and does not have timeouts remaining, they will be charged with a “Technical Foul”. (See above for Technical Foul ruling). 10. Overtime periods shall consist of one (1), two (2) minute period with a stopped clock the last minute. Second overtime: The first team to score wins. Possession determined by jump ball. 11. An offensive player may not be in the key for more than three (3) seconds. 12. Defense: High School rules will be used for the Boys 9th - 12th grade leagues except for the following:
Full court press will be allowed for the duration of the game. If a team is ahead by ten (10) or more points they cannot full court press until the lead is less than ten (10).
Zone Defense is permitted. If a team is ahead by fifteen (15) or more points, they must play man to man defense until the lead is less than fifteen (15).

79
13. Continual isolation offense (one-on-one, two-on-two) will not be permitted. 14. Free throws are awarded to an offensive player fouled on the shot. The free throw shooter may not cross the foul line until the ball touches the rim. Players in a marked lane space may enter the key after the ball touches the rim. 15. “One and one” foul shots will be taken on the 7th-9th fouls except shooting fouls. Two free throws will be awarded after the 10th team foul. 16. A traveling violation will be called if a player falls to the floor while holding the ball, gets to his/her feet while holding the ball, or takes more than one step while holding the ball. 17. In the event that a player fouls out of a game in the 4th quarter, and all other players’ time is used up, the opposing coach will determine which player finishes the game. 18. In the event of an injured player unable to continue to play, and all other players’ times are used up, the rest of the playing time will be distributed amongst the remaining players. 19. A violation will be called if a player intentionally kicks the ball. 20. Incidental Contact - The fact that contact occurs does not constitute a foul. Opponents in equally favora-ble positions run the risk of physical contact. 21. A team may play a game with only 4 players. If a team has fewer than 4 players before the start of the game, they will forfeit. Please note the opposing team has the option to play with 5 players, but also can choose to play 4 players. If the opposing team chooses to play with 4 players, the minimum playing time re-quirement for all players will be 15 minutes. 22. If a team is down to four (4) eligible players during the course of the game due to other players fouling out, the coach of that team may choose one of the following options:
1. To play with those four players for the remainder of the game. Note – if the fourth player fouls out, option 2 will be applied.
2. Fill the 5th spot of the team with a player(s) of the opposing team’s choice. The team will be
assessed a team & technical foul (automatic 2 points to opposing team and the ball); this is the penal-
ty for continuing play with an in-eligible player. If the team is in the bonus penalty foul-wise, they
will be awarded two (2) points for the technical, shoot the foul shot(s), and retain possession of the
ball. Any foul committed by the replacement player thereafter will result in a team foul, and be con-
sidered a technical foul; automatic two (2) points, and possession of the ball will go to the other team.

80
REFERENCES Basketball Canada: http://www.basketball.ca/en Breakthrough Basketball: www.breakthroughbasketball.com Coaches Clipboard: http://www.coachesclipboard.net/ Leading with the Heart: Coach K's Successful Strategies for Basketball, Busi ness, and Life. 2001. Krzyzewski, M. Proactive Coaching: http://www.proactivecoaching.info/ USA Basketball: http://www.usab.com/ You Haven’t Taught Until They’ve Learned: John Wooden's Teaching Principles and Practices. 2005. Nater, S. & Gallimore, R. Wooden: A Coach’s Life. 2014. Davis, S.