Basics of Garment Constructionncert.nic.in/vocational/pdf/ivsm103.pdf · 2019-04-08 · garment,...
18
3 INTRODUCTION Sewing is a creative and interesting art and skill. To prepare a well-finished garment, its stitching is done by combining the different garment components. Garment construction is a technical accomplishment that requires the knowledge and skills of basic sewing techniques— application of stitches, seams, darts, gathers, pleats and edge finishing, etc. Its appropriate application in garment construction is necessary for a good quality product. A garment that is made, will be attractive if it fits well, and proper attention is paid to its finer details. A Sewing Machine Operator must be aware about the two sides of the fabric—the right side and wrong side. These can be mainly identified by the selvedge of the fabric. Generally the selvedges appear less finished on the wrong side and are smoother on the right side. It is essential to know and practise the various types of stitch, especially constructive stitches which include temporary and permanent stitches. To construct the garment, various types of seam are also used such as flat seam, lapped seam, French seam, slot seam, etc. The edges of garments are finished using different type of edge finishes like pinked finish, edge stitched finish, double stitch finish, etc. This Unit will help you learn about the various type of stitches, seams, edge finishes, etc., all of which have a key role in garment construction. Basics of Garment Construction Unit 3.indd 72 29-Mar-2019 02:48:05 PM 2019-20
Transcript of Basics of Garment Constructionncert.nic.in/vocational/pdf/ivsm103.pdf · 2019-04-08 · garment,...

3
IntroductIon
Sewing is a creative and interesting art and skill. To prepare a well-finished garment, its stitching is done by combining the different garment components. Garment construction is a technical accomplishment that requires the knowledge and skills of basic sewing techniques— application of stitches, seams, darts, gathers, pleats and edge finishing, etc. Its appropriate application in garment construction is necessary for a good quality product. A garment that is made, will be attractive if it fits well, and proper attention is paid to its finer details.
A Sewing Machine Operator must be aware about the two sides of the fabric—the right side and wrong side. These can be mainly identified by the selvedge of the fabric. Generally the selvedges appear less finished on the wrong side and are smoother on the right side.
It is essential to know and practise the various types of stitch, especially constructive stitches which include temporary and permanent stitches. To construct the garment, various types of seam are also used such as flat seam, lapped seam, French seam, slot seam, etc. The edges of garments are finished using different type of edge finishes like pinked finish, edge stitched finish, double stitch finish, etc. This Unit will help you learn about the various type of stitches, seams, edge finishes, etc., all of which have a key role in garment construction.
Basics of Garment Construction
Unit 3.indd 72 29-Mar-2019 02:48:05 PM
2019-20

Basics of Garment construction
73
SeSSIon 1: VarIouS typeS of StItch
This session will help provide the student with a through understanding of the various kinds of stitch.
StitchesAlmost every garment or other stitched articles we sew, needs some hand stitches. Thus, we should be able to handle the needle and thread to carry out hand stitches competently. Before learning stitching on the sewing machine, one should learn the basic hand stitches which are very commonly used in the manufacturing of garments and other articles. A stitch may be defined as one unit of conformation resulting from one or more strands or loops of thread intralooping, interlooping or passing into or through the material. Intralooping is the passing of a loop of thread through another loop formed by the same thread, while interlooping is the passing of a loop of thread through another loop formed by a different thread.
The basic hand stitches are divided into two types depending on their use.
Constructive stitchesIt is a line made by a portion of sewing thread passed over and under an equal or unequal number of threads for construction purpose. Such stitches can be classified as temporary and permanent stitches.
1. Temporary stitchesSuch stitches are used to hold the garment or fabric pieces together before permanent stitches are made. These stitches are also known as tacking or basting stitches. Usually this stitch is horizontal and it is worked from the right to the left side with a knot.
Various kind of tacking/basting stitches are as follows.
(i) Even bastingIt is used to hold the fabric together temporarily, but more securely than in uneven basting. Make even stitches of about ¼ inch to ⅜ inch long. When easing
noteS
Unit 3.indd 73 29-Mar-2019 02:48:06 PM
2019-20

Sewing Machine OperatOr – claSS iX
74
one layer of the fabric to another layer, hold the layer to be eased on top and gather this top layer to stitch (Fig. 3.1).
(ii) Uneven bastingThis is used to mark or to hold fabrics together, only where there is no strain on the stitches. Use this type of basting, as the guideline on the upper side of the fabric is at least twice than that on the underside of the fabric. Make a long stitch, about ½ inch on one side of the fabric and then a short stitch ¼ inch on the other side of the fabric (Fig. 3.2).
(iii) Diagonal bastingThis is used to hold two pieces of fabric together when more than one row of tacking is required. For example, when you are attaching interfacing to a collar or mounting a fabric on to an underlining, etc. It may be done vertically or horizontally (Fig. 3.3).
(iv) Slip bastingAlso called invisible hand basting, it is used when working from the right side of the fabric, and to mark fitting alterations, or on occasions where patterns have to be joined accurately. For example, strips, checks, etc. Turn under one edge of the material on the seam line. Pin the folded edge carefully to the seam line on the other edge with pins at right angles to the seam. Take even tacking stitches alternately through the fold and through the single edge on the seam line (Fig. 3.4).
2. Permanent stitchesThe stitches that form a part of the stitched garment are called permanent stitches.
(i) Running stitchThis is the simplest form of hand stitch which is used mainly for gathering and shirring fabrics. When it is used for both gathering and shirring, make sure that enough thread should be left to make an unbroken line of stitches. It is similar to the even basting, but the stitches are much smaller. The stitches should be straight, fine and evenly spaced and mostly about
Fig. 3.1: Even basting
Fig. 3.2: Uneven basting
Fig. 3.3: Diagonal basting
Fig. 3.4: Slip basting
Unit 3.indd 74 06-Mar-2019 03:23:46 PM
2019-20

Basics of Garment construction
75
1/16 inch to ⅛ inch in length. To carry out the running stitch, take several very small stitches on to the point of the needle before drawing the thread through the fabric. The stitches should be as small as the thickness of the fabric to allow less than 2mm on fine fabrics (Fig. 3.5).
(ii) Back stitchIt is considered to be very strong and is many a times used as a substitute for machine stitching. It is mainly applied when extra strength is needed. Back stitch is very useful for making strong seams and for finishing off a line of stitching. The stitches on the front of the work are small and appear continuous. To work the back stitch, make a small stitch back from left to right. Then make a double length stitch forward on the wrong side of the fabric. So the needle emerges a stitch’s length in front of the first one. Repeat this way, keeping the stitches uniform in size and fairly firm (Fig. 3.6).
(iii) Run and back or combination stitchIn this combination, a back stitch and three or four running stitches are combined and can be used for working plain seams done by hand. This stitch is worked faster than the back stitch and stronger than the running stitch.
(iv) Hem stitchIt is used for hems on medium weight or lightweight fabrics. It is mainly used to fasten a raw edge which should be turned in or to flatten a seam. It appears as small slanting stitches on the wrong side of the fabric. The stitch size will depend on the fabric. The thread should not be pulled taut or the fabric will pucker (Fig. 3.7).
(v) Half back stitchThis stitch is quite similar to the back stitch, but with a longer stitch at the back side of the fabric. To carry out the stitch, make a small stitch back from left to right and then make a stitch forwards, two and a half times as long, on the wrong side of the work. Make another small stitch from left to right on the right side.
Fig. 3.5: Running stitch
Fig. 3.6: Back stitch
Fig. 3.7: Hem stitch
Unit 3.indd 75 06-Mar-2019 03:23:47 PM
2019-20

Sewing Machine OperatOr – claSS iX
76
(vi) OversewingIt is used to finish seam edges on fabrics which fray easily. To carry out the stitch, hold the fabric with the edge to be worked away from the worker. Insert the needle ⅛ to ¼ inch from the edge, and bring the thread over the edge of the fabric. Make the next stitch ¼ inch further on.
(vii) Blind hemming stitchThis stitch is worked on the inside fold of the hem so that the stitches are almost invisible; thus, the name ‘blind’. The thread should not be pulled tightly. To carry out the stitch, hold the work with the fold of the hem towards you, take a very small stitch inside the hem fold edge, picking up a thread of the single fabric on the point of the needle before taking another stitch on the inside hem fold of the garment.
(viii) Buttonhole stitchThis stitch is worked with the needle pointing towards you, and the fabric edge away from you. To carry out the stitch, insert the needle in the right side of the edge of the buttonhole. Bring it out ⅛ inch below. Loop the thread hanging from the eye of the needle from right to left under the point of the needle and draw the needle upwards to knot the thread at the buttonhole edge.
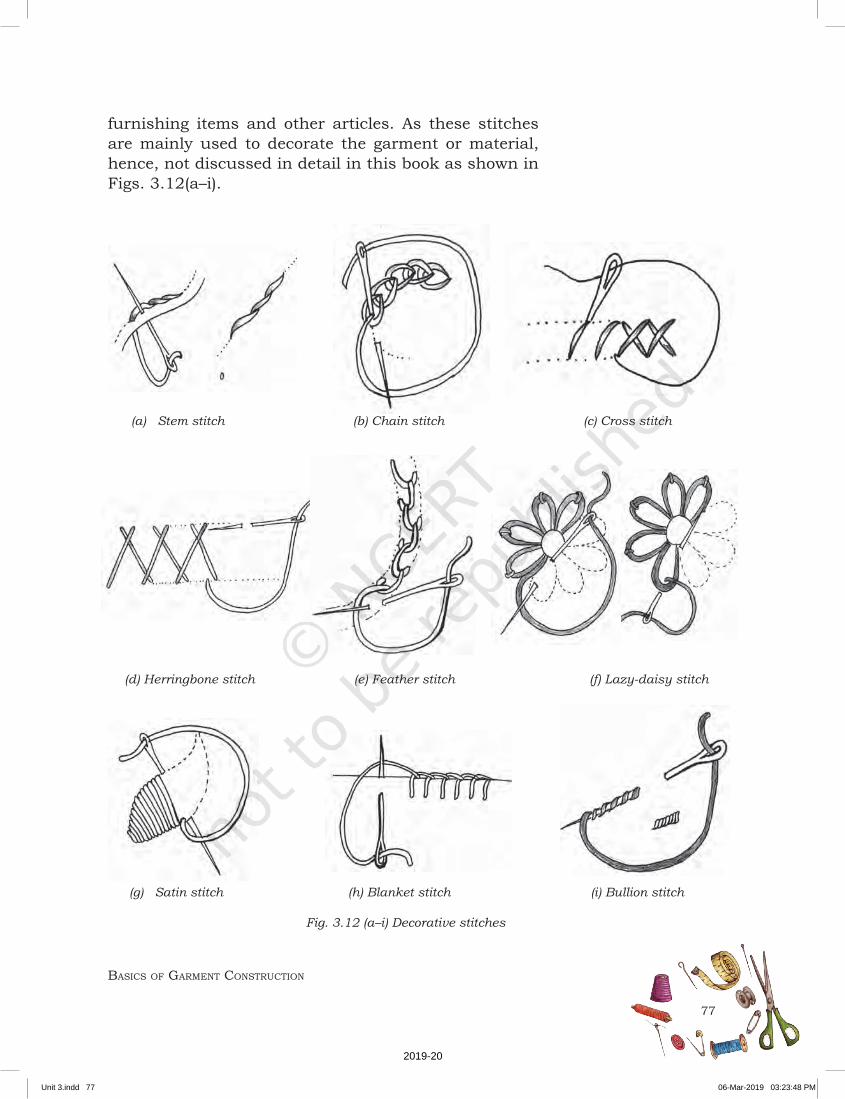
Decorative stitchesThese stitches are also known as embroidery stitches. This art is practised on all kinds of pliable material with different types of threads, precious and semi-precious stones, pearls, shells, beads, etc. There are different kind of hand embroidery stitches. Some of the common hand embroidery stitches are stem stitch, chain stitch, herringbone stitch, feather stitch, lazy-daisy, satin stitch, cross stitch, Bullion stitch, etc., which are used to decorate garments, home
Fig. 3.8: Half back stitch
Fig. 3.9: Oversewing stitch
Fig. 3.10: Blind hemming stitch
Fig. 3.11: Buttonhole stitch
Unit 3.indd 76 06-Mar-2019 03:23:47 PM
2019-20
Basics of Garment construction
77
furnishing items and other articles. As these stitches are mainly used to decorate the garment or material, hence, not discussed in detail in this book as shown in Figs. 3.12(a–i).
(a) Stem stitch (b) Chain stitch (c) Cross stitch
(d) Herringbone stitch (e) Feather stitch (f) Lazy-daisy stitch
(g) Satin stitch (h) Blanket stitch (i) Bullion stitch
Fig. 3.12 (a–i) Decorative stitches
Unit 3.indd 77 06-Mar-2019 03:23:48 PM
2019-20

Sewing Machine OperatOr – claSS iX
78
Practical Exercises
Activity 1
Make a scrapbook of the constructive and decorative stitches and label them.
Material Required1. Coloured pens/pencils 2. Scrapbook3. Pictures of constructive and decorative stitches4. Scissors5. Adhesive/glue
Procedure1. Search and collect the pictures of different types of
constructive and decorative stitches.2. Cut the pictures very neatly with scissors.3. Paste them in a scrapbook.4. Label them.
Activity 2
Prepare samples of hand stitches as given in this session.
Material Required 1. Cotton fabric to prepare samples (12" x 12") 2. Needle 3. Thread 4. Frame 5. Pen 6. Pencil 7. Eraser 8. A3-sized chart sheet 9. Glue10. Markers/coloured pens
Procedure1. Use slip basting, running stitch, back stitch and hem stitch
to finish four sides of the sample fabric.2. Make different constructive (temporary and permanent)
stitches on the sample.3. Paste them on the chart sheet and write where they are used.4. Label them. 5. Place the chart in the classroom/practical lab.
noteS
Unit 3.indd 78 06-Mar-2019 03:23:49 PM
2019-20

Basics of Garment construction
79
Check Your Progress
A. Fill in the blanks with the most appropriate answer from the choices given below
1. ____________ stitch forms part of a stitched garment.(a) Temporary (b) Permanent(c) Constructive (d) Hem
2. ____________ stitch is of equal length about ¼ inch on both sides of the fabric.(a) Uneven basting(b) Slip basting(c) Diagonal basting (d) Even basting
3. ____________ stitch is used for hems on medium or lightweight fabrics.(a) Hem (b) Back (c) Run and back (d) Decorative
B. Short answer questions
1. Write short notes on the following(a) Decorative stitches (b) Buttonhole stitch
C. Long answer questions
1. Describe how to make temporary stitches.2. Describe how to make permanent stitches.
SeSSIon 2: dIfferent type of SeamS
Seams refer to the stitching line where two pieces of fabric are stitched together. It is the basic building unit of any garment or stitched article. It is an application of a series of stitches or stitch types to one or several thickness of material. Seams mainly construct the structure of the garment or stitched article. It is also used for decorative purpose. Decorative seams are mainly used for decorative purposes while functional seams are used mainly for the purpose of construction. An example of decorative seams is a tucked seam, and example of functional seam is flat seam, French seam,
noteS
Unit 3.indd 79 06-Mar-2019 03:23:49 PM
2019-20

Sewing Machine OperatOr – claSS iX
80
etc. Good appearance in a seam normally means smooth fabric joins with no missed or uneven stitches and no damage to the material being sewn. Alternatively, it means regular gathering to form a style feature, or a varying but controlled amount of ease to ensure a good fit of the garment to the body. With the wide variety of fibre types and fabric construction available, good seam appearance during manufacturing requires different techniques. Once it has been achieved, it should be maintained throughout the lifetime of the garment, despite the many problems that arise during wearing, washing and dry-cleaning. Performance of the seams means the achievement of strength, comfort, durability and elasticity. Seams should be as strong as the fabric.
Following are the points to be considered while making seams. Seams are commonly machine stitched but one can hand stitch a seam using back stitch. Before making a seam, ensure that the needle and thread used are appropriate for the fabric weight and texture. Because the seams of a garment must withstand wear and tear, the beginning and the end of the line of stitching should be secured with a few back stitches. To prevent fraying, enough quantity of fabric should always be left between the line of stitching and the fabric edge.
There are different type of seams, and the type of fabric and garment should determine the one you select. Some commonly used seams are given below.
Flat seamIt is the basic seam (functional seam), joining the edges of two pieces of fabric. This seam is used on medium weight fabrics where there is no special strain on the seam. Mostly, plain straight stitch is used to stitch the seam. Flat seam can be used on most of the garments and the seam edges should always be finished as appropriate for the type of fabric. Although a flat seam is always made with the right side of the fabric facing, some other seams will require to be initiated with the wrong sides of the fabric facing. With the right sides of the fabric facing, pin the fabric together at both the ends of the seam line and at intervals along the seam
noteS
Unit 3.indd 80 06-Mar-2019 03:23:49 PM
2019-20

Basics of Garment construction
81
line leaving an allowance of about ¾ inches properly, close to the seam line. Then stitch along the seam line, back stitching a couple of stitches at each end to secure the seam, and remove the pins. After removing the pins, finish the seam edge by pinking it or as necessary for the fabric. Press the seam as stitched and then press it open, using a pressing cloth between the iron and the fabric.
Channel seamThis is a decorative seam mostly used in trousers, pockets of jeans, jackets, etc. It has a strip of fabric behind it which is visible through the seam fold. It can be made of contrasting fabric, if desired. With the right sides of the fabric together, pin and tack along the seam line. Press the seam open and cut an underlay of the same or contrasting fabric 1 inch wider than the two seam edges. With the wrong side of the work facing you, centre the right side of the underlay on the seam and pin in the position. Pin and then stitch an equal distance, each side from the seam depression. Remove the pins and tacking, then press as stitched.
(a) Tacked fabric together (b) Underlay pinned to seam
(c) Completed seam
Fig. 3.14 (a, b, c) Channel seam
(a)
(b)
(c)
(d)Fig.3.13 (a, b, c, d) Flat seam
Unit 3.indd 81 06-Mar-2019 03:23:49 PM
2019-20

Sewing Machine OperatOr – claSS iX
82
Lapped seam This seam is used for joining sections of interfacing to avoid bulking, that is a mass of fabric getting thick. Lap one edge of the fabric over the other with the seam lines directly over each other. Tack and then stitch along the seam line with a wide zigzag stitch or a straight stitch. Trim the seam edges (Fig. 3.15).
Flat felled seam This is a flat, durable and strong seam used mainly on men’s sports shirts, work clothes, children’s clothes and pyjamas. It is time consuming and difficult to make on curved edges and on bulky fabrics. Place the fabric pieces to be joined at the wrong side facing, and then stitch on the seam line. Press both seam allowances together in the same direction and trim the under seam allowance to ⅛ inch and the upper one to ⅜ inch (Fig. 3.16 a). Turn under the raw edge of the wide seam allowance so as to make a smooth fold of ¼ inch wide. Stitch close to the folded edge on the right side of the garment. The right side of the seam shows two rows of stitching and wrong side shows only one row of stitching (Fig. 3.16 b).
French seamIt is a narrow seam generally used for fine fabrics or for those fabrics which fray easily. It is a seam within a seam. When finished, it should be about ¼ inch or less in width. To make the French seam, place the wrong sides of the fabric together (Fig. 3.17 a). Pin and tack in position close to the seam line. Stitch ¼ inch to the right of the seam line to the end of the seam. Press as stitched. Pressing can be done using hands to form a crease or using a heat pressing iron. Then trim the seam allowance to ⅛ inch. Press the seam open. Then turn the right sides of the fabric together. Fold on the stitch line and press. Tack in position. Stitch along the seam line and press as stitched (Fig. 3.17 b).
Fig. 3.15: Lapped seam
(b)Fig. 3.16 (a, b) Flat felled seam
(a)
(a)
(b)Fig.3.17 (a, b) French seam
Unit 3.indd 82 06-Mar-2019 03:23:50 PM
2019-20

Basics of Garment construction
83
Mantua maker’s seamIt is used to attach a frill to a straight piece of fabric. With the right sides of the fabric together, tack along the seam line and stitch. Trim the frill seam allowance to ¼ inch. Double fold the other seam allowance over the raw edge down to the seam line. Stitch very close to the seam line then remove tacking and press the seam upwards, keeping away from the frill.
Double stitch seamIt is used mainly for sheer fabrics. To make this seam, take the right sides of the fabric together, tack and stitch along the seam line and press as stitched. Make another line of stitching in the seam allowance ¼ inch from the first line, using a fine multi stitch zigzag or straight stitch. Then trim the raw edge using a scissors or a pinking shear to prevent the fabric from fraying.
Lingerie seamIt is used mainly for making very fine seams. It is so named because of its use in lingerie. To make the seam, take the right sides of the fabric facing; pin, tack and then stitch along the seam line. Then press as stitched. Finish the seam edges with pinking scissors and press both seam allowances to one side. Stitch seam edges on the right side with small stitches of zigzag.
Tucked seamIt is a decorative seam and generally used as a design feature on a garment. If a tucked seam is used on a fabric which frays easily, the seam edges should be finished by oversewing. To make a tucked seam, take the right side of the fabric facing you, turn under the seam allowance on one piece of fabric, and then pin
(a)
(b)
Fig. 3.18 (a, b) Mantua maker’s seam
Fig. 3.19: Double stitch seam
Fig. 3.20: Lingerie seam
(a) (b) (c)Fig. 3.21 (a, b, c) Tucked seam
Unit 3.indd 83 06-Mar-2019 03:23:51 PM
2019-20

Sewing Machine OperatOr – claSS iX
84
into place. Place the folded edge of the seam line on the right side of the second piece of fabric, putting the edges together. Tack and stitch the desired width from the folded edge. Remove tacking threads and trim off the seam edge underneath the seam. Press as stitched.
Practical Exercises
Activity 1
To identify the various seams used on a pair of denim jeans, pillow covers, shirt, skirt, frock, bloomer and blouse.
Material Required 1. A pair of denim jeans 2. Pillow covers 3. Shirt 4. Skirt 5. Frock 6. Bloomer 7. Blouse 8. Pen 9. Pencil 10. A3-sized chart sheet 11. Eraser
Procedure1. Place each of the above items in front of you.2. Begin by observing and identifying the seams used in each
of these. Make a note of your observations. 3. Now take an A3-sized chart sheet and draw out a table. 4. While preparing the chart, remember to refer to the notes
you made earlier. 5. List the names of the items you observed such as frock,
shirt, blouse, etc., on the left side. Now write your observations on the kind of seams used in each of these on the right side of the table.
Activity 2
Prepare samples of different seams as given in this session.
Material Required 1. Cotton fabric to prepare samples (12" x 12") 2. Needle, thread and scissors 3. Pen
noteS
Unit 3.indd 84 06-Mar-2019 03:23:51 PM
2019-20

Basics of Garment construction
85
Practical Exercises
Check Your Progress
4. Eraser 5. Pencil 6. Practical file 7. Adhesive/glue 8. Markers/coloured pens 9. Sewing machine10. Bobbin/bobbin case
Procedure1. Prepare samples of different seams.2. Finish the edges of the samples.3. Attach them in the practical file and write where they are used.4. Label them.
A. Fill in the blanks with the most appropriate answer from the choices given below.
1. Channel seam is a _____________ seam.(a) decorative(b) functional(c) Both (a) and (b)(d) None of the above
2. ________________ seam is used for joining section or parts of interfacing to avoid bulk.(a) Welt (b) Lapped(c) Channel (d) French
3. Tucked seam is a _____________________ seam.(a) functional(b) decorative(c) Both (a) and (b)(d) None of the above
4. ________________ is a seam within a seam.(a) Flat (b) French(c) Lapped (d) Channel
B. Short answer questions
1. Write short notes on the following(a) Double stitch seam(b) Lapped seam(c) Lingerie seam
C. Long answer question
1. Describe the various type of seams in detail along with a diagram.
noteS
Unit 3.indd 85 06-Mar-2019 03:23:51 PM
2019-20

Sewing Machine OperatOr – claSS iX
86
SeSSion 3: edge FiniSheS
Edge finishes are made to prevent fraying of the raw edges of the fabric or garment and thus, make the fabric edge more durable and attractive. They also provide a neat appearance to the inner side of the garment. Although edge finishes are not essential for completion of the garment, it can add durability to a garment’s life. There are various types of edge finishes. They may be carried out by hand stitches or by sewing machine. Some of the common edge finishes are described in this session.
Different type of edge finishes
Pinked finishThis is a quick method of finishing done with pinking shears (a kind of fabric cutting scissors). After stitching, trim the edges, preferably at a distance of ⅛ inch by using pinking scissors (also called pinking shears). This technique is not used on fabrics that ravel badly (Fig. 3.22).
Edge stitched finishThis is a neat finish for light to medium-weight, non-bulky fabrics. In this finish, the seam is stitched and pressed open. Then turn under ¼ inch on each seam edge. Stitch close to the fold without catching the garment (Fig. 3.23). This is a bulky type of finish and is not suitable for deeply curved seams. This finish is mostly used on unlined coats and jackets where the seam allowance is wide.
Double stitch finishAfter making a plain seam, to carry out double stitch finish work, an extra line of stitching is made about ¼ inch from the raw edge of the fabric or garment (Fig. 3.24). This is done for a plain unfinished seam or pinked seam. It is not suitable for bulky fabrics. This type of finish is commonly used on sheer fabrics.
Fig. 3.22: Pinked finish
Fig. 3.23: Edge stitched finish
Fig. 3.24: Double stitch finish
Unit 3.indd 86 29-Mar-2019 02:56:44 PM
2019-20

Basics of Garment construction
87
Herringbone finishThis finish neatens the raw edges of heavy material like flannel, brocade, tweed, etc. It also holds down the turning, making the seam flat, avoiding the bulkiness. After pressing the seam open, herringbone stitches are worked on the two raw edges (Fig. 3.25).
Bound seam edge finishIn this method, the seam is pressed open and a separate piece of binding (a double folded bias strip) is attached to both the seam edges (Fig. 3.26) and tacked. It is often used on lightweight fabrics like silk, chiffon, etc.
Fig. 3.25: Herringbone finish
Fig. 3.26: Bound seam edge finish
Practical Exercises
Activity 1
Draw pictures of various types of edge finishes and prepare a scrapbook.
Material Required1. Pen 2. Pencil3. Sharpener 4. Eraser5. Scrapbook6. Ruler7. Markers/coloured pens
Procedure1. Draw edge finishes on the scrapbook and write where they
are used.2. Label them.
Activity 2
Prepare samples of edge finishes as given in this session.
Material Required 1. Cotton fabric to prepare samples (12"X12") 2. Needle and thread 3. A3-sized chart sheet 4. Adhesive/glue 5. Pen
Unit 3.indd 87 29-Mar-2019 02:56:45 PM
2019-20

Sewing Machine OperatOr – claSS iX
88
Practical Exercises
6. Pencil 7. Eraser 8. Markers 9. Coloured pens10. Pinking scissors 11. Sewing machine 12. Bobbin/bobbin case
Procedure1. Preparesamplesofedgefinishes.2. Paste them on a chart sheet. 3. Label them.4. Place the chart in the classroom or practical lab.
Check Your ProgressA. Fill in the blanks with the most appropriate answer from the choices given below.
1. ______________ seam edge is trimmed with pinking shears and gives a zigzag appearance.(a)Pinkedfinish(b) Herringbone(c)Double-stitchfinish(d) None of the above
2. In ______________, a separate piece of binding is attached to both seam edges.(a) pinked edge(b)boundseamedgefinish(c) herringbonefinish(d) double stitch
3. ______________finishissuitableforheavyfabrics.(a) Pinked edge(b) Edge stitch(c) Herringbone(d) None of the above
4. ______________finishiscommonlyusedonsheerfabrics.(a) Herringbone (b) Double stitch (c) Bound seam edge(d) Edge stitch
5. Edgefinishesaremadetoprevent______________oftherawedges of the fabric/garment.(a) Basting(b) Hemming(c) Fraying(d) None of the above
Notes
Unit 3.indd 88 07-Mar-2019 02:48:59 PM
2019-20

Basics of Garment construction
89
B. Short answer questions
1. Write short notes on the following(a) Bound seam edge finish(b) Herringbone finish(c) Pinked seam(d) Edge stitch finish
2. Explain the double stitch finish.
C. Long answer question
1. Describe various type of edge finishes and their use in detail along with diagrams.
noteS
Unit 3.indd 89 06-Mar-2019 03:23:52 PM
2019-20


![Iftikhar et al., Textile Sci Eng 2018, 8:3 e 10.4172/2165 ... · are four classes of seams such as; superimposed seam, lapped seam, bound seam and flat seam [9]. Durability of clothing](https://static.fdocuments.in/doc/165x107/5e98baf098727a3607054248/iftikhar-et-al-textile-sci-eng-2018-83-e-1041722165-are-four-classes-of.jpg)