Basic Users Guide - SLAC National Accelerator LaboratoryBasic Users Guide Basic Users Guide Date...
62
i UNIX DEVELOPMENT ENVIRONMENT Basic Users Guide 16 th September 2003 Last Revision: 20 December 2005 Greg White, Michael Zelazny, Kristi Luchini SLAC, Stanford University, California, USA.
Transcript of Basic Users Guide - SLAC National Accelerator LaboratoryBasic Users Guide Basic Users Guide Date...

i
UNIX DEVELOPMENT ENVIRONMENT
Basic Users Guide
16th September 2003 Last Revision: 20 December 2005
Greg White, Michael Zelazny, Kristi Luchini SLAC, Stanford University, California, USA.

ii
iii
Revision History Date Revision Description Author 09/13/03 1.0 Initial Version Greg White 09/28/03 1.1 Added Sweep Greg White 10/11/03 1.11 Modified Sweep Greg White 11/19/03 1.2 Added Developing Programs Greg White 11/23/03 2.0 Added Support for External Software Greg White 12/11/03 2.01 Corrected CVS Support for External Sw Greg White 01/23/04 2.1 Added Startup File handling Greg White 02/05/04 2.2 Added config file handling Greg White 03/15/04 2.3 Added Matlab file support Bob Hall 05/17,20/04 2.4 Added Oracle script support Judy Rock Reference: See also the Unix Development Environment “Principles of Design”. That document describes the design of the mechanisms and tools described in this document. Modifying this file: This file is located in $CD_SOFT/html/unix/dev/ug/BUG.doc (http://www.slac.Stanford.edu/grp/cd/soft/unix/dev/ug/BUG.doc). It is on the web at http://www.slac.Stanford.edu/grp/cd/soft/unix/dev/ug/BUG.pdf When modifying this file, please also create the pdf version and put it in the same directory. Both the BUG.doc and BUG.pdf are part of the Contribute site. So, please use the Dreamweaver/Contribute check-in/check-out facility when modifying these files so as not to step on other people’s edits.
iv
Table of Contents
1. PURPOSE..........................................................................................................................................1 1.1. OVERVIEW ....................................................................................................................................1 1.2. SCOPE ...........................................................................................................................................1
2. SETUP AND PRELIMINARIES......................................................................................................2 2.1. GET A USER ACCOUNT FOR AFS MACHINES...................................................................................2 2.2. GET RSA AUTHENTICATED............................................................................................................2 2.3. LET HEPIX CONFIGURE YOUR UNIX ACCOUNT ..............................................................................2 2.4. JOIN G-CD:SOFT AND G-CD:SOFT-REL-LIB ACL PROTECTION GROUPS..............................................2 2.5. ENVS.CSH ....................................................................................................................................2
3. THE SOFTWARE RELEASE ESCALATION PROCEDURE ......................................................3
4. DEVELOPING EPICS DISPLAYS..................................................................................................5 4.1. DISPLAY DIRECTORIES...................................................................................................................5 4.2. BASIC SETUP REQUIREMENTS ........................................................................................................5 4.3. CVS CHECKOUT ...........................................................................................................................5 4.4. EDIT DISPLAYS..............................................................................................................................5 4.5. “MAKE” DISPLAYS........................................................................................................................6 4.6. TESTING IN YOUR OWN DIRECTORY................................................................................................6 4.7. ANNOUNCE YOUR RELEASE ...........................................................................................................6 4.8. UPDATE CVS ................................................................................................................................6 4.9. UPDATE MANIFEST FILE ................................................................................................................7 4.10. RELEASE YOUR DISPLAYS INTO THE CONTROL SYSTEM ................................................................7
4.10.1. Release to “tst” and test.......................................................................................................7 4.10.2. Release to "dev" and test ......................................................................................................8 4.10.3. Release to "new" and test .....................................................................................................8
4.11. RELEASE YOUR CVS RESERVATION...............................................................................................9 5. DEVELOPING SCRIPTS............................................................................................................... 10
5.1. EXECUTABLE/NON-EXECUTABLE SCRIPTS .................................................................................... 10 5.2. SCRIPT DIRECTORIES ................................................................................................................... 10 5.3. BASIC SETUP REQUIREMENTS FOR SCRIPT DEVELOPMENT ........................................................... 10 5.4. CVS CHECKOUT ......................................................................................................................... 10 5.5. EDIT SCRIPTS .............................................................................................................................. 11 5.6. “MAKE” SCRIPTS ......................................................................................................................... 11 5.7. TESTING IN YOUR OWN DIRECTORY.............................................................................................. 11 5.8. ANNOUNCE YOUR RELEASE ......................................................................................................... 12 5.9. UPDATE CVS .............................................................................................................................. 12 5.10. UPDATE MANIFEST FILE ............................................................................................................ 12 5.11. RELEASE YOUR SCRIPTS INTO THE CONTROL SYSTEM................................................................. 12
5.11.1. Release to “TST” and test .................................................................................................. 13 5.11.2. Release to “DEV” and test................................................................................................. 13 5.11.3. Release to “NEW” and test ................................................................................................ 14
5.12. RELEASE YOUR CVS RESERVATION............................................................................................. 14 6. DEVELOPING PROGRAMS......................................................................................................... 15
6.1. OVERVIEW .................................................................................................................................. 15 6.2. REFERENCES ............................................................................................................................... 15 6.3. PROGRAM FILE DIRECTORIES ...................................................................................................... 15
v
6.3.1. Source Code Directories ...................................................................................................... 15 6.3.2. Executable Code Directories................................................................................................ 16
6.4. BASIC SETUP REQUIREMENTS FOR PROGRAM DEVELOPMENT....................................................... 16 6.5. CVS CHECKOUT ......................................................................................................................... 16 6.6. EDIT SOURCE CODE..................................................................................................................... 16 6.7. MAKEFILES ................................................................................................................................. 16
6.7.1. The Build Specification in Makefile.Host.............................................................................. 17 6.7.2. Example Makefile.Host ........................................................................................................ 18
6.8. MAKING AND BUILDING .............................................................................................................. 19 6.9. TESTING IN YOUR OWN DIRECTORY.............................................................................................. 19 6.10. ANNOUNCE YOUR RELEASE ....................................................................................................... 19 6.11. UPDATE CVS ............................................................................................................................ 19 6.12. UPDATE MANIFEST FILE ............................................................................................................ 20 6.13. RELEASE YOUR PROGRAM INTO THE CONTROL SYSTEM.............................................................. 20
6.13.1. Release to “TST” and test .................................................................................................. 20 6.13.2. Release to “DEV” and test................................................................................................. 21 6.13.3. Release to “NEW” and test ................................................................................................ 21
6.14. RELEASE YOUR CVS RESERVATION............................................................................................. 22 7. DEVELOPING EXTERNAL PACKAGES ................................................................................... 23
7.1. OVERVIEW .................................................................................................................................. 23 7.2. REFERENCES ............................................................................................................................... 23 7.3. RELEASE SUPPORT ...................................................................................................................... 23
7.3.1. Creating Release Support for External Software .................................................................. 24 7.3.2. Test the release support makefiles ........................................................................................ 25 7.3.3. CVS the Release Support Files ............................................................................................. 26 7.3.4. Create the Reference Directory ............................................................................................ 26 7.3.5. Do the first release into our release areas ............................................................................ 26
7.4. CVS SUPPORT FOR EXTERNAL SOFTWARE................................................................................... 26 8. STARTUP FILE HANDLING........................................................................................................ 28
8.1. STARTUP FILES AND DIRECTORIES ............................................................................................... 28 8.2. TYPE I STARTUP FILES ................................................................................................................ 28 8.3. BASIC SETUP REQUIREMENTS ...................................................................................................... 28 8.4. CVS CHECKOUT ......................................................................................................................... 29 8.5. EDIT STARTUP SCRIPTS ............................................................................................................... 29 8.6. “MAKE” THE STARTUP FILES........................................................................................................ 29 8.7. TESTING IN YOUR OWN DIRECTORY.............................................................................................. 30 8.8. UPDATE MANIFEST FILE .............................................................................................................. 30 8.9. RELEASE PELIMINARIES............................................................................................................... 30 8.10. UPDATE CVS ............................................................................................................................ 30 8.11. RELEASE YOUR SCRIPTS INTO THE CONTROL SYSTEM................................................................. 31
8.11.1. Release to “TST” and test .................................................................................................. 31 8.11.2. Release to “DEV” and test................................................................................................. 31 8.11.3. Release to “NEW” and test ................................................................................................ 32
8.12. RELEASE YOUR CVS RESERVATION............................................................................................. 32 9. CONFIGURATION FILE SUPPORT ........................................................................................... 33
9.1. REFERENCES ............................................................................................................................... 33 9.2. CONFIGURATION FILES AND THEIR DIRECTORIES ......................................................................... 33
9.2.1. User Configuration Files Directories ................................................................................... 33 9.2.2. System Configuration Files Directories................................................................................ 33
9.3. BASIC SETUP REQUIREMENTS ...................................................................................................... 34 9.4. CVS CHECKOUT ......................................................................................................................... 34
vi
9.5. EDIT CONFIG ............................................................................................................................... 34 9.6. “MAKE” CONFIGURATION FILES................................................................................................... 34 9.7. UPDATE MANIFEST FILE .............................................................................................................. 34 9.8. RELEASE PELIMINARIES............................................................................................................... 35 9.9. UPDATE CVS .............................................................................................................................. 35 9.10. RELEASE YOUR SCRIPTS INTO THE CONTROL SYSTEM................................................................. 35
9.10.1. Release to “TST” and test .................................................................................................. 35 9.10.2. Release to “DEV” and test................................................................................................. 35
9.11. RELEASE YOUR CVS RESERVATION............................................................................................. 36 10. ORACLE SCRIPT SUPPORT ..................................................................................................... 37
10.1. BASIC SETUP REQUIREMENTS .................................................................................................... 37 10.2. CVS CHECKOUT........................................................................................................................ 37 10.3. EDIT ORACLE FILE..................................................................................................................... 37 10.4. “MAKE” ORACLE FILES ............................................................................................................. 38 10.5. UPDATE MANIFEST FILE ............................................................................................................ 38 10.6. RELEASE PRELIMINARIES........................................................................................................... 38 10.7. UPDATE CVS ............................................................................................................................ 38 10.8. RELEASE YOUR SCRIPTS INTO THE CONTROL SYSTEM................................................................. 38
10.8.1. Release to “TST” and test .................................................................................................. 39 10.8.2. Release to “DEV” and test................................................................................................. 39
10.9. RELEASE YOUR CVS RESERVATION............................................................................................. 39 11. MATLAB FILE SUPPORT .......................................................................................................... 40
11.1. MATLAB SCRIPTS AND STANDALONE EXECUTABLES.................................................................. 40 11.2. MATLAB FILE DIRECTORIES....................................................................................................... 40 11.3. BASIC SETUP REQUIREMENTS FOR MATLAB FILE DEVELOPMENT ............................................... 40 11.4. CVS CHECKOUT........................................................................................................................ 40 11.5. EDIT SCRIPTS ............................................................................................................................ 41 11.6. “MAKE” SCRIPTS ....................................................................................................................... 41 11.7. TESTING IN YOUR OWN DIRECTORY............................................................................................ 42 11.8. ANNOUNCE YOUR RELEASE ....................................................................................................... 42 11.9. UPDATE CVS ............................................................................................................................ 42 11.10. UPDATE MANIFEST FILE .......................................................................................................... 42 11.11. RELEASE YOUR SCRIPTS INTO THE CONTROL SYSTEM............................................................... 42
11.11.1. Release to “TST” and test ................................................................................................ 43 11.11.2. Release to “DEV” and test............................................................................................... 43 11.11.3. Release to “NEW” and test .............................................................................................. 44
11.12. RELEASE YOUR CVS RESERVATION ........................................................................................... 44 12. DEVELOPING IOC SOFTWARE............................................................................................... 45
12.1. SETUP AND PRELIMINARIES ....................................................................................................... 45 12.2. GETTING STUFF INTO YOUR AREA............................................................................................... 45
13. RELEASE ANNOUNCEMENTS ................................................................................................. 50 13.1. WHOM TO INFORM AND WHEN ................................................................................................... 50 13.2. THE RELEASE ANNOUNCEMENT EMAIL MESSAGE ........................................................................ 50
14. PUTTING A DIRECTORY IN CVS ............................................................................................ 51 14.1. IN OUTLINE AND PREPARATION ................................................................................................. 51 14.2. BASIC SETUP REQUIREMENTS .................................................................................................... 51 14.3. CREATE OR REVIEW THE DIRECTORY TO BE IMPORTED INTO CVS ............................................... 51
14.3.1. Importing from an Existing $CD_SOFT/ref Directory........................................................ 51 14.4. IMPORT THE DIRECTORY............................................................................................................ 51
vii
14.5. CHECK THE REFERENCE DIRECTORY.......................................................................................... 52 14.6. CHECK RELEASING STILL WORKS.............................................................................................. 52
15. CONVERTING SOFTWARE TO NEW RELEASE SUPPORT................................................ 53 15.1. BASIC SETUP REQUIREMENTS AND PRELIMINARIES .................................................................... 53 15.2. CVS CHECKOUT.......................................................................................................................... 53 15.3. CONVERT MAKEFILES ................................................................................................................ 53 15.4. RELEASE USING THE NEW SCHEME ............................................................................................. 53
16. SWEEP .......................................................................................................................................... 55 16.1. SWEEP PROCEDURE ................................................................................................................... 55
Basic Users Guide
Basic Users Guide
Date
12/20/05 3:17 PM Rev
8 Page
1
1. Purpose The purpose of this document is to describe how to develop controls software in the Unix environment of the SLAC accelerator complex.
1.1. Overview This document describes, for a programmer, how to check software out of cvs, modify it, build it (such as compile, link etc), put it back into cvs, compile it in our shared areas, and then release it through a progressive escalation procedure that helps to stage the release of code.
1.2. Scope At the time of writing, we are in a transitionary period regarding the development environment. This document describes the “new” development environment, whose code, displays, scripts and so on, are based under /afs/slac/g/cd/soft/ ($CD_SOFT). There is another existing environment and directory area for code, displays and scripts, under /afs/slac/g/pepii/. This document does not deal with development of that. The distinction is described further in Overall Requirements and Design of the Unix Development Environment Presently the following are supported by the new development environment described here:
1. EPICS displays (dm and dm2k). See chapter 3 2. shell scripts, both “non-executable” (by source in csh or ./ in sh), and
“executable” (those run in a sub-process) by just typing their name. See chapter 5
3. “Programs”. As you’d expect, applications, libraries and utilities built from source code. See chapter 6.
Basic Users Guide
Basic Users Guide
Date
12/20/05 3:17 PM Rev
8 Page
2
2. Setup and Preliminaries This chapter describes how to set yourself up for developing Unix hosted controls software for the SLAC accelerator complex.
2.1. Get a User Account for AFS machines If you do not already have a SLAC Unix Account (which allows you to log in to such machines as “flora”, then this is the first step. See: http://www2.slac.stanford.edu/comp/slacwide/account/account.html
2.2. Get RSA authenticated In order to use the automatic software distribution mechanism, one needs to use ssh authentication to access the production accounts on the production hosts. See: http://www.slac.stanford.edu/grp/cd/soft/unix/dev/slaconly/rsasetup.html In particular you must follow the instructions for RSA authentication to the cddev account on production machines (the second of authorized key file edits).
2.3. Let HEPiX configure your Unix account HEPiX is the new mechanism by which all user accounts at SLAC are being configured with the basic environment variables. See: http://www.slac.stanford.edu/grp/cd/soft/unix/slaconly/hepix.html .
2.4. Join g-cd:soft and g-cd:soft-rel-lib ACL protection groups The Unix controls system release directories are protected by Access Control Lists. In order to release software you must be a member of g-cd:soft and g-cd:soft-rel-lib protection groups. Ask a member of their owning group, g-cd, to add you to those groups (type >pts mem g-cd on an AFS host to see who is a member of g-cd). Use the same “pts mem” command to see if you’re already a member of those groups. For more information on these protection groups, and additional groups protecting specific kinds of file, see the Principles of Design document, Ch 3.
2.5. ENVS.csh The tcsh script $CD_SOFT/dev/script/ENVS.csh sets up development and runtime environments, on both “development” (AFS, like flora) and “production” (NFS, like opi00gtw00) machines. You need to source this file before proceeding with any work described in this document. You may consider adding this to your .cshrc. source /afs/slac/g/cd/soft/dev/script/ENVS.csh
Basic Users Guide
Basic Users Guide
Date
12/20/05 3:17 PM Rev
8 Page
3
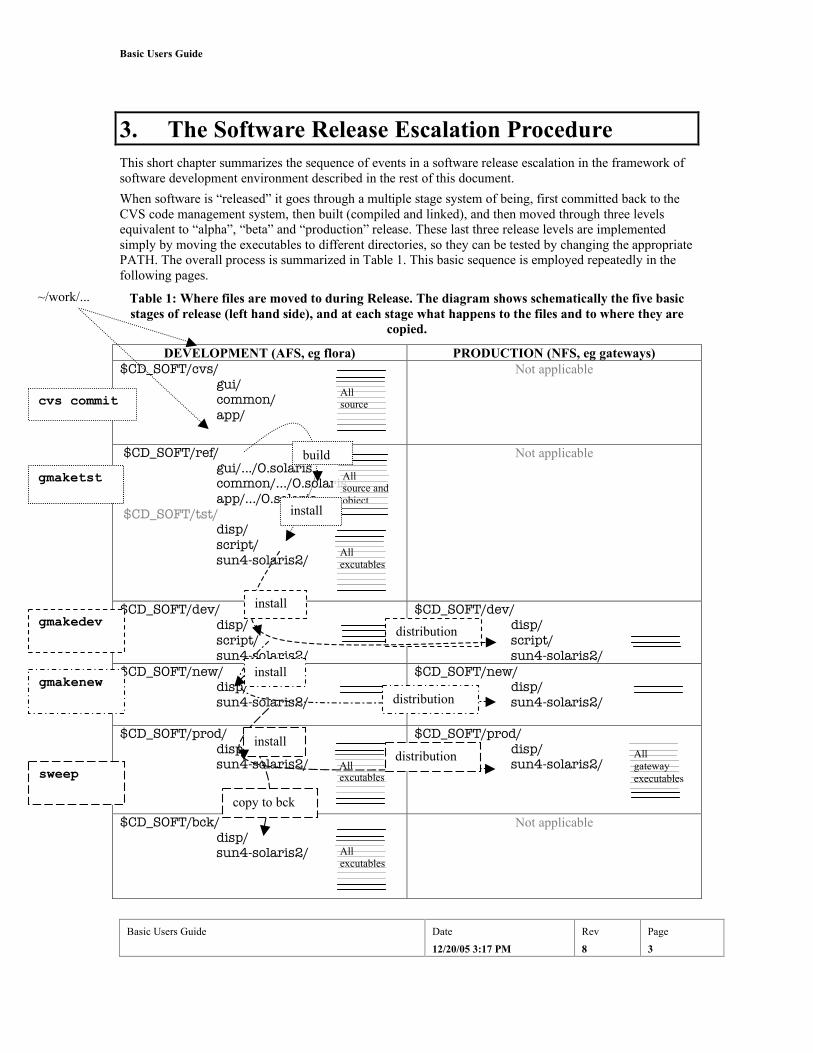
3. The Software Release Escalation Procedure This short chapter summarizes the sequence of events in a software release escalation in the framework of software development environment described in the rest of this document. When software is “released” it goes through a multiple stage system of being, first committed back to the CVS code management system, then built (compiled and linked), and then moved through three levels equivalent to “alpha”, “beta” and “production” release. These last three release levels are implemented simply by moving the executables to different directories, so they can be tested by changing the appropriate PATH. The overall process is summarized in Table 1. This basic sequence is employed repeatedly in the following pages.
Table 1: Where files are moved to during Release. The diagram shows schematically the five basic stages of release (left hand side), and at each stage what happens to the files and to where they are
copied.
DEVELOPMENT (AFS, eg flora) PRODUCTION (NFS, eg gateways) $CD_SOFT/cvs/ gui/ common/ app/
Not applicable
$CD_SOFT/ref/ gui/.../O.solaris common/.../O.solaris app/.../O.solaris $CD_SOFT/tst/ disp/ script/ sun4-solaris2/
Not applicable
$CD_SOFT/dev/ disp/ script/ sun4-solaris2/
$CD_SOFT/dev/ disp/ script/ sun4-solaris2/
$CD_SOFT/new/ disp/ sun4-solaris2/
$CD_SOFT/new/ disp/ sun4-solaris2/
$CD_SOFT/prod/ disp/ sun4-solaris2/
$CD_SOFT/prod/ disp/ sun4-solaris2/
$CD_SOFT/bck/ disp/ sun4-solaris2/
Not applicable
All excutables
All excutables
All excutables
All source and object
All gateway executables
All source
cvs commit
gmaketst
build
distribution
~/work/...
gmakedev install
install
gmakenew install
distribution
sweep
install distribution
copy to bck
Basic Users Guide
Basic Users Guide
Date
12/20/05 3:17 PM Rev
8 Page
4
Basic Users Guide
Basic Users Guide
Date
12/20/05 3:17 PM Rev
8 Page
5
4. Developing EPICS Displays This chapter describes how to create or modify EPICS displays. It covers the basic setup requirements, where the relevant files reside in the development file-system, how to create or checkout display files from CVS, and how to release changes back into the control system.
4.1. Display directories The EPICS displays are kept in CVS in modules stemming from “gui/disp/config/”. Therefore the reference directories are under $CD_SOFT/ref/gui/disp/config/. The release directory for displays is “disp” (i.e. $CD_SOFT/{ref,dev,new,prod}/disp/.)
4.2. Basic Setup Requirements This procedure assumes the following environment variables are setup: CD_DISP, CD_SOFT, CD_DISP_CFG, EPICS_DISPLAY_PATH, and CD_SCRIPT. If your login process has not already done so, you can setup the environment with source /afs/slac/g/cd/soft/dev/script/ENVS.csh.
Make sure environment variable CVSROOT is set to /afs/slac/g/cd/soft/cvs (printenv CVSROOT). If it is not, source $CD_SCRIPT/cvsSetEnv.csh
4.3. CVS Checkout From your own working directory (e.g. ~/work), do a cvs checkout of the display or displays you want to edit. For instance, the following would check out those displays in the tarf directory of EPICS displays (see 4.1): cvs checkout gui/disp/config/tarf The following checks out only the display whizzbang.adl cvs checkout gui/disp/config/tarf/whizzbang.adl1
Then cd down to the directory containing the files you checked out (cd gui/disp/config/tarf if the above example). From the checkout directory, you can do more CVS commands pertaining to that directory, e.g. cvs checkout anothertarfdisplay.adl. After cding down, you may want to do a gmake now, just to check you got everything you need to do a build: gmake
4.4. Edit Displays Presently we edit EPICS displays with edd, e.g.: edd whizzbang.adl
Note that, by default edd creates a .dl file, but our standard is to create .adl files for every display, and then compile the adl files into dl using an adl-to-dl compiler. Therefore,
1 Remember that to build executables, such as dl files from adl files you will need the makefiles of their directory, so if you do check out only one display you will also need to checkout Makefile and Makefile.Host from the same directory.
Basic Users Guide
Basic Users Guide
Date
12/20/05 3:17 PM Rev
8 Page
6
from edd, you must create the .adl file and then run the Makefile to create the dl file. To create the .adl file, right-mouse-click (MB3), and select “report display”.
4.5. “Make” Displays Having edited your displays, you must now compile them (adl-to-dl). The list of displays to be “made” are listed in Makefile.Host. Therefore, if you have created a new new display, add a line in Makefile.Host. Add to the dmDISPS line for a dm display, or add a DISPS line for a dm2k display: emacs Makefile.Host
Having updated the Makefile.Host for new displays, you are ready to build. Just issue gmake in the directory you checked out: gmake
gmake automatically creates a .dl file for dm displays in a subdirectory named /O.solaris. Additionally it installs the displays (dl and adl) into a directory named “disp”, which, if it doesn’t exist already, it will create in the directory from which you checked out the displays. In the above example that would be ~/work/disp. If you have only checked out some subset of the displays in a CVS directory, or you want only to build some subset of the displays in your checkout directory, then you have to tell gmake which ones they are by overriding the definitions of the dmDISPS and DISPS macros in Makefile.Host on the gmake command line: gmake dmDISPS=whizzbang.dl DISPS=.
4.6. Testing in your own directory To test (with dm or dm2k), first put your “disp” directory in your EPICS_DISPLAY_PATH. E.g: setenv EPICS_DISPLAY_PATH ${HOME}/work/disp:${!#:1}
dm whizzbang.dl
When you have finished testing, it’s a good idea to remove ~/work/disp from your EPICS display path, since future invocations of displays will look there rather than the standard release directories, and where you thought you were testing released software, you will in fact be running hat’s in your test directory. delpath EPICS_DISPLAY_PATH ${HOME}/work/disp2
4.7. Announce your Release Before starting your release, don’t forget to send email to sw_release, (see 6 below for checklist). Also, inform the control room associated with the release you are making.
4.8. Update CVS If you have created a new display (one that wasn’t previously in CVS), you have to tell CVS about it: cvs add mynewdisplay.adl
2 Don’t try to use the ~ form for specifying your home directory in path manipulation aliases like delpath, because ~ is not expanded by the shell before being used in alias macro replacement. Use ${HOME} instead.
Basic Users Guide
Basic Users Guide
Date
12/20/05 3:17 PM Rev
8 Page
7
Before putting your changed files into CVS (cvs commit), it’s a good idea to check that noone else has changed the same files you changed while you had them checked out. To do that, you can do a cvs status. If files have changed in the repository since you have checked them out you can do a cvs update; CVS will mark any files that were modified by someone else with an M. If it was able to merge your changes into their changes it will stop there. If it couldn’t do the merge, it will report “conflicts during merge”. When you’re sure of all your edits, commit your changes back to CVS: cvs commit
4.9. Update Manifest File Those displays from the directory which are normally run on “production” machines (i.e. gateways like opi00gtw00) have to be listed in the directory’s manifest file. This file lists all the files which the distribution system must export over to the production machines for you. So, if you have added a new display, and it must be run on a gateway, then you will have to edit the file named manifest, and add a line naming each file to be exported to it. For EPICS displays each line must be of the form disp/<filename> because EPICS displays are always installed into a subdirectory named “disp”. We normally export both the adl and dl file to production machines, so make sure to add a line for both the .adl & .dl files of dm displays: emacs3 manifest
If no manifest file exists for the directory, you will have to create one and add it to CVS (cvs add manifest).
4.10. Release your displays into the Control System Release is a three stage process. You will first release only to development machines, then to both development and production machines (but to a place on production machines which is not known by any other EPICS display – that is, not on the production EPICS_DISPLAY_PATH), and finally to the production area of both development and production machines. Only at this last stage will a user starting a new display see your changes. You use the first two stages to test your changes. All three of these release stages are managed by a script that will ask you for your password and verify that you have the unix privilege to make the release. They will also ask you why you are making the release, and log your reply. The log is in $CD_SOFT/log/release.log, which is on the web at http://www.slac.stanford.edu/grp/cd/soft/log/release.log.
4.10.1. Release to “tst” and test The first stage of release is “tst” and is performed by the command “gmaketst”. It involves compiling the new dm displays, and installing all changed dl and adl files into $CD_SOFT/ref/disp/. For instance, to release files you changed in CVS directory gui/disp/config/tarf, you would just issue: gmaketst gui/disp/config/tarf
To test the display in this first stage of release, first add the tst release directory to the EPICS_DISPLAY_PATH, then invoke dm or dm2k
3 Any editor will do the job of course. Emacs is common but complicated. Some unix programmers prefer vi, which can be confusing too. A very simple editor on all unix systems is called pico.
Basic Users Guide
Basic Users Guide
Date
12/20/05 3:17 PM Rev
8 Page
8
setenv EPICS_DISPLAY_PATH ${CD_SOFT}/ref/disp:${!#:1}
dm whizzbang.dl &
Remember to remove $CD_SOFT/ref/disp from your EPICS_DISPLAY_PATH when you have finished testing: delpath EPICS_DISPLAY_PATH ${CD_SOFT}/ref/disp
4.10.2. Release to "dev" and test The next stage of release is “dev” with gmakedev. This stage releases the displays now in $CD_SOFT/ref/disp to $CD_SOFT/dev/disp/. On development machines, since $CD_SOFT/dev/disp/ is in the default EPICS_DISPLAY_PATH of users on development machines (who have setup to use the new development environment) any display which is released to this level will be the default display which comes up for those users. Files at the dev level of release are also deployed to the production machines (into $CD_SOFT/dev/disp/ on production). Unlike on development machines though, on production machines $CD_SOFT/dev/disp is NOT in the default EPICS_DISPLAY_PATH of control system processes. That fact is useful for testing your display on production, with production data, without actually releasing it to production. To test your display on production while it is at the dev level of release you have to add it to the EPICS_DISPLAY_PATH of a production login by hand. For instance, say you had changed a display in gui/disp/config/pepii/ gmakedev gui/disp/config/pepii
This may take some time to complete, so give it some time. Take time to test your release at this stage. First test on development; remember that $CD_SOFT/dev/disp is already in the default EPICS_DISPLAY_PATH on development, so you don’t need to add it. Then log into a production machine, like opi00, add $CD_SOFT/dev/disp to the EPICS_DISPLAY_PATH, and start the display you changed: E.g.: ssh –X –l cddev opi00gtw00
cddev> setenv EPICS_DISPLAY_PATH $CD_SOFT/dev/disp:${!#:1}
cddev> dm pepiimain & If you have time then, it’s a good idea to leave your displays at “dev” for a day or two before you do a “new” release, so they can be tested by other people on development before being fully released.
4.10.3. Release to "new" and test The last level of release a developer is concerned with is “new”, done with gmakenew. This stage releases the displays you changed now in $CD_SOFT/dev/disp to $CD_SOFT/new/disp/. $CD_SOFT/new/disp/ is in the default EPICS_DISPLAY_PATH of all users of on both development and production machines, so any display which is released to this level will be the default display which comes up on both development and production. So, there is no need to change the EPICS_DISPLAY_PATH to get changes released to new.

Basic Users Guide
Basic Users Guide
Date
12/20/05 3:17 PM Rev
8 Page
9
After testing your display in dev, (go back to a development machine if you had logged into production to make your test), issue, for instance: gmakenew gui/disp/config/pepii Test your new displays with dm or dm2k, either on the development host, or on the production host, or both. You can restart the display on production from the SCP if there is a button for doing so. Or: ssh –l cddev –X opi00gtw00 dm whizbang.dl
This marks the end of the release sequence that a developer goes through. Once a week or so, all displays that are in the "new" stage of release, are "swept" to "prod". The sweep is done for all software presently in new by one designated person, typically after the Monday morning meeting. The sweep procedure sends email to sw_release when it’s done.
4.11. Release your cvs reservation cd back up to your working directory (ex. ~/work). Then give up your CVS checkout with cvs release: cvs release gui
Finally rm -fr gui to cleanup your work space and avoid confusion - cvs never deletes anything!
Basic Users Guide
Basic Users Guide
Date
12/20/05 3:17 PM Rev
8 Page
10
5. Developing Scripts This chapter describes how to introduce and edit shell scripts into the unix control system. It covers the distinction between executable and non-executable scripts made in the unix control system, where scripts of both kinds are kept, and the basic setup pre-requisites for editing and running scripts.
5.1. Executable/non-executable scripts Non-executable scripts in all shells in general, are those which are executed in the same process as the executer, so that they use and modify the same environment. Put simply, scripts which you “source” are “non-executable”. Remember though, the “source” unix command is only in csh shell and derivatives, like tcsh, which is the default shell at SLAC. But in sh for instance, in-process shell script execution is done through a different syntax. In sh they are invoked by ./<script-name>. Executable scripts are those which are executed in a sub-process of the caller’s process. They are called by just typing the script’s name. The x NIS bits of an executable script must be on (even if it’s in AFS, otherwise the PATH hashing system won’t recognize it). Remember, if the script is executable (if it's not sourced, but run by just typing its filename (in csh)), then it should have the #!/bin/sh –f line at the top to specify which shell it should execute in; but if it is sourced it should not have that line, because sourced scripts just execute in the csh shell instance they're sourced from, by definition. Also, executable scripts should not be given a filename extension (like .sh). However, if the script is non-executable, then our standard is that its filename should include an extension giving the shell name, e.g. .csh.
5.2. Script Directories Scripts may be put in any CVS directory, but many are in directories under common/ for instance, $CD_SOFT/ref/common/tool. The release directories are:
1. solaris/bin/, is the release dir for executable scripts (i.e. $CD_SOFT/{tst,dev,new,prod}/solaris/bin/).
2. script/, is the release dir for non-executable scripts. Non-executable scripts are only released to tst and dev. (i.e. $CD_SOFT/{tst, dev}/script/).
5.3. Basic Setup Requirements for Script Development If your login process has not already done so, you can setup the environment with source /afs/slac/g/cd/soft/dev/script/ENVS.csh.
Make sure environment variable CVSROOT is set to /afs/slac/g/cd/soft/cvs (printenv CVSROOT). If it is not, source $CD_SCRIPT/cvsSetEnv.csh
5.4. CVS Checkout From your own working directory (ex. ~/work) check out the cvs module in which the script you want to modify is located, or to which you want to add a script. For example: cvs checkout common/tool The following would check out only the script “trimfile”:
Basic Users Guide
Basic Users Guide
Date
12/20/05 3:17 PM Rev
8 Page
11
cvs checkout common/tool/trimfile
To manage the release of scripts you will need the makefiles from their directory, so if you do check out only one or two scripts by name, you will also need to additionally checkout Makefile and Makefile.Host from the same directory. Then cd down to the directory containing the files you checked out (cd common/tool if the above example). From the checkout directory, you can do more CVS commands pertaining to that directory, e.g. cvs checkout InstallDev.csh.
5.5. Edit Scripts Edit the file you want to change, or create a new script. If you a create a new script, remember to add the standard csh or sh header from $CD_REF/common/stds/unix/header/. Don’t forget the #!/bin/sh at the top of an sh (bourne shell) executable script. Don’t put it in if the script is intended to be sourced (that is, “non-executable”), partly because it has no meaning in a sourced script, and partly because there is no other way to tell how a script should be run.
5.6. “Make” scripts The scripts in each directory must be listed in macro definitions in the directory’s Makefile.Host file. Therefore, if you add a new script, you must update Makefile.Host to add a SCRIPTS line or SCRPTS line. Add executable scripts to SCRIPTS, and non-executable scripts to SCRPTS. Just write a line of the form SCRIPTS += filename for every file you are adding. Having updated the Makefile.Host for new scripts, you are ready to build. Just issue gmake in the directory you checked out: gmake
gmake moves executable scripts to a subdirectory named /O.solaris. Additionally it installs the scripts into a test install directory. Executable scripts will be installed into a local directory named “<host-architecture>/bin/ with the right NIS bits set. On our AFS Solaris development machines, extending the above example, that would be ~/work/sun4-solaris2/bin/. Non-executables will be installed into a local directory named “script”, for instance ~/work/script/. Note the location of the install directories, off the directory from which you did the cvs checkout, not subdirectories of the checkout directory itself. If you have only checked out some subset of the displays in a CVS directory, or you want only to build some subset of the scripts in your checkout directory, then you have to tell gmake which ones they are by overriding the definitions of the SCRIPTS and SCRPTS macros in Makefile.Host on the gmake command line: gmake SCRIPTS=trimfile SCRPTS=
5.7. Testing in your own directory To test executable scripts, first put the install directory at the head of your PATH. E.g. setenv PATH ~/work/sun4-solaris2/bin:${PATH}
Test your script.
Basic Users Guide
Basic Users Guide
Date
12/20/05 3:17 PM Rev
8 Page
12
5.8. Announce your Release Before starting your release, don’t forget to send email to sw_release, (see 6 below for checklist).
5.9. Update CVS If you have created a new script (one that wasn’t previously in CVS), you have to tell CVS about it before you can cvs commit it (see below): cvs add mynewscript
Before putting your changed files into CVS (cvs commit), it’s a good idea to check that no-one else has changed the same files you changed while you had them checked out. To do that, do a cvs update. CVS will mark any files that were modified by someone else with an M. If it was able to merge your changes into their changes it will stop there. If it couldn’t do the merge, it will report “conflicts during merge”. To track down who has done what, use cvs status. When you’re sure of all your edits, commit your changes back to CVS: cvs commit
5.10. Update Manifest File Those scripts from the directory which are normally run on “production” machines (i.e. gateways like opi00gtw00) have to be listed in the directory’s manifest file. This file lists all the files which the distribution system must export over to the production machines for you. So, if you have added a new script, and it must be run on a gateway, then you will have to edit the file named manifest, and add a line naming each file to be exported to it. For executable scripts, each line must be of the form <host-architecture>/bin/<filename>. The host architecture is normally solaris on AFS machines, so for example trimfile’s entry in common/tool’s manifest file is solaris/bin/trimfile. For non- executable scripts each line must be of the form script/<filename>. E.g. script/ENVS.csh. emacs4 manifest
If no manifest file exists for the directory, you will have to create one and add it to CVS (cvs add manifest).
5.11. Release your scripts into the Control System Release is a three stage process. You will first release only to development machines, then to both development and production machines (but to a place on production machines which is not known to other scripts on production – that is, not on the production PATH – and therefore does not affect the running controls system), and finally to the production area of both development and production machines. Only at this last stage will a user or process starting the script on production see your changes. You use the first two stages to test your changes. All three of these release stages are managed by scripts that will ask you for your password and verify that you have the unix privilege to make the release. They will also ask you why you are making the release, and log your reply. The log is in
4 Any editor will do the job of course. Emacs is common but complicated. Some unix programmers prefer vi, which can be confusing too. A very simple editor on all unix systems is called pico.
Basic Users Guide
Basic Users Guide
Date
12/20/05 3:17 PM Rev
8 Page
13
$CD_SOFT/log/release.log, which is on the web at http://www.slac.stanford.edu/grp/cd/soft/log/release.log.
5.11.1. Release to “TST” and test The first stage of release is “tst” and is performed by the command “gmaketst”. It moves non-executable scripts from their CVS reference directory to their tst release directory $CD_SOFT/tst/script/, and executable scripts to their tst release directory $CD_SOFT/tst/solaris/bin/ (it also sets the NIS “x” bit of executable scripts). For instance, to release scripts which you changed in CVS directory common/tool, you would issue: gmaketst common/tool5 To test executable scripts, remember, the default value of PATH does not include $CD_SOFT/tst/solaris/bin/.This is so that you can release your script, but without it yet being used by other people. So, to test your changes you have to add the tst directory to your PATH: setenv PATH ${CD_SOFT}/tst/solaris/bin:${PATH}
If you added a new executable script, you may have to rehash: rehash
Then just type the executable script’s file basename. For instance to test trimfile: trimfile
To test non-executable csh shell scripts, source them from the tst directory. For instance to test a new version of ENVS.csh: source $CD_SOFT/tst/script/ENVS.csh
5.11.2. Release to “DEV” and test The second stage of release is “dev” and is performed by the command “gmakedev”. It escalates non-executable scripts from their tst release directory to their dev directory, $CD_SOFT/dev/script/, and executable scripts from their tst release directory to their dev directory, $CD_SOFT/dev/solaris/bin/.E.g.: gmakedev common/tool On development hosts, the dev directory of executable scripts is already in the default PATH, ahead of the new and prod directories (see below). This is so you can release to a public place on the development machines and colleagues can test your changes before you release them to production. So, everyone using a development machine will now be using your release, and to test a script you only need to rehash, and then just type its file basename. E.g.: rehash
trimfile Additionally, gmakedev checks which of the files which were changed or added, are also listed in the manifest file, and exports those over to production for you.
5 You can issue the gmaketst <directory> command from anywhere, such as your working directory. Alternatively, you can cd to the reference directory (like $CD_SOFT/ref/common/tool), and just type gmaketst without the directory arg.
Basic Users Guide
Basic Users Guide
Date
12/20/05 3:17 PM Rev
8 Page
14
On production hosts, the dev directory of executable scripts is deliberately NOT in the default PATH. So if you want to test the script on production, log in, change the PATH to include dev, and run the script. E.g.: ssh –X –l cddev opi00gtw00
cddev> setenv PATH ${CD_SOFT}/dev/solaris/bin:${PATH}
cddev> rehash; trimfile
To test non-executable csh shell scripts, on either development or production hosts, just source them from the dev directory just as from the tst directory. DEV is the final level of release for non-executable scripts. However, executable scripts must also be released to NEW, and go through the "sweep" procedure.
5.11.3. Release to “NEW” and test The last stage of release that a programmer does, is “NEW”. NEW is performed by the command “gmakenew”. It escalates executable6 scripts from the DEV directory for executables, to the NEW directory for executables: $CD_SOFT/new/solaris/bin/..E.g.: gmakenew common/tool The NEW directoryis in the default PATH of all users on both production and development nodes. So, you don’t need to add anything to the PATH to test your changes or for anyone else to test them. You should test your changes on production, even if they worked at the development level, before you go on to new things. From development you can execute a script on production with ssh, for instance to test trimfile: ssh –l cddev –X opi00gtw00 {rehash; trimfile}
This marks the end of the release sequence that a developer goes through. Once a week or so, all software which is at the "new" stage of release, is "swept" to "prod". The sweep is done for all software presently in new by one designated person, typically after the Monday morning meeting. The sweep procedure sends email to sw_release when it’s done.
5.12. Release your cvs reservation cd back up to your working directory (ex. ~/work). Then give up your CVS checkout with cvs release. Note that cvs release requires that the argument is precisely the same argument as was used to do the cvs checkout. cvs release common/tool
Finally rm -fr common/tool to cleanup your work space and avoid confusion - cvs never deletes anything! If you have reserved other directories higher up the directory hierarchy, don’t delete those too by accident.
6 Note that non-executables don’t go to the NEW level, their release journey ends at DEV
Basic Users Guide
Basic Users Guide
Date
12/20/05 3:17 PM Rev
8 Page
15
6. Developing Programs This chapter describes how to add, and change, compiled programs that we write for the host side of the unix based control system. Front-end (IOC) control programs we write, and 3rd party software, are described elsewhere. More specifically, this chapter deals with programs which are built and released using the Software Group’s makefile system. The next chapter deals with how to release external packages and 3rd party software, which is more formally understood as software not built by our makefile system, but whose release is still done using our release management system7.
6.1. Overview Programs are written, debugged and tested, as far as they can be, on “development” machines. These are roughly speaking the “AFS” or “Taylored” machines like the flora cluster. A framework for makefiles is used to build the programs, whose aim is that a developer need only “fill-in-the-blanks” in a makefile to construct a complete build specification. Once tested, only the necessary executable images (self contained programs, executable libraries etc) are copied from the development machines to “production” machines to run the accelerator. The copying is done automatically, to the right place, as part of the release support described below.
6.2. References For details about the control system development environment design, and how the following fits into the general scheme, see the first couple of chapters of the Principles of Design document. For a description of the Makefile system, and Release Support, see later chapters. For a description of the EPICS IOC applications makefile system, on which our makefile system is based, see the EPICS document IOC Software Configuration Management. Our system was based on the R3.13.6 version of IOC Configuration makefiles. For the list of recognized makefile macros which a developer uses to specify a build, such as PROD, SRCS, USR_LDFLAGS and so on, see specifically the IOC Software Configuration Management part 4.3 Description of Makefiles8,
6.3. Program File Directories This section outlines the important AFS file-system directories used for control system program development.
6.3.1. Source Code Directories All program source code is kept in sub-directories of the two directories $CD_SOFT/ref/app and $CD_SOFT/ref/util. Following the basic correspondence principle of all our software, the CVS repository modules are therefore $CD_SOFT/cvs/app/ and util/. Any new program should be created in a new subdirectory of one of these two:
7 The word “program” is used generally to include both “applications”, which are understood loosely as high level, often interactive programs, and “utilities”, which are low level tools and foundational software. The word “package” is used specifically for program suites in /afs/slac/package/. 8 http://epics.aps.anl.gov/asd/controls/epics/EpicsDocumentation/AppDevManuals/iocScm-3.13.2/buildingComponents.html#DescriptionOfMakefiles
Basic Users Guide
Basic Users Guide
Date
12/20/05 3:17 PM Rev
8 Page
16
1. app/. This is for applications (high level, particularly interactive, programs or suites).
2. util/. This is for software utilities, toolkits, frameworks and libraries. This chapter will describe how to modify and build code in those directories, and release it into the running control system. For help in getting a new program’s code and release support files into those directories see chapters 14 and 15 respectively.
6.3.2. Executable Code Directories Most of our host side unix software runs on Solaris hosts, so executables are released by the procedure described below, are placed into $CD_SOFT/{ref,dev,new,prod}/solaris/bin/). The directories $CD_SOFT/new/solaris/bin and $CD_SOFT/prod/solaris/bin are in the default PATH on production hosts. $CD_SOFT/dev/solaris/bin is additionally in the PATH, preceding the other two, on development hosts.
6.4. Basic Setup Requirements for Program Development If your login process has not already done so, you need to setup the development environment with source /afs/slac/g/cd/soft/dev/script/ENVS.csh. Make sure environment variable CVSROOT is set to /afs/slac/g/cd/soft/cvs (printenv CVSROOT). If it is not, source $CD_SCRIPT/cvsSetEnv.csh
6.5. CVS Checkout From your own working directory (ex. ~/work) check out the cvs module in which the program you want to modify is located, or to which you want to add9. For example: cvs checkout util/alh_hrtbeat_mon Then cd down to the directory containing the files you checked out (cd util/alh_hrtbeart_mon extending the above example). You may want to immediately run a gmake, to make sure the checked-out program builds: just gmake
6.6. Edit Source Code Edit the source files you want to change, or create new ones. If you create new ones, remember to add the standard headers to them, from templates in $CD_REF/common/stds/unix/header/.
6.7. Makefiles Programs we develop ourselves for ourselves (as opposed to 3rd party packages we adapt, and packages we develop for possible outside consumption - both of which are discussed in the next chapter), use a variation of the EPICS makefile system we have developed, to define the build. The makefile system can build for a number of target platforms, and is
9 Unlike on VMS, in the unix development environment it does not make much sense to CVS checkout only a single source file, even when that is the only one you want to modify. That’s because the makefiles want to check whether any source file has been touched, so they search the build directory for all the source files mentioned in the makefile, and they’ll complain if those files aren’t found.
Basic Users Guide
Basic Users Guide
Date
12/20/05 3:17 PM Rev
8 Page
17
intended to provide a level of compiler and linker consistency across all our programs. Additionally, the makefiles manage software release through the release directories. The makefile framework files (sometimes confusingly called “config” files), are in $CD_SOFT/ref/common/make/. See the references above for help with those files, and the list of supported macros used to define builds in the system. The idea is a program only needs two short makefiles in its directory to use this system. It must have a very short file named Makefile in each directory, whose basic job is just to define the subdirectories to be searched for source code to build, and it must have a Makefile.Host in each source code subdirectory. If your program is simple, and you just have a single directory, so it contains the source code, then you’ll have both these two makefiles in that directory:
Makefile: This file is necessary, but you only need to change it from the template to add DIRS specifications for each source code subdirectory of your program. Makefile.Host: This specifies the build.
You can find templates of these in $CD_REF/common/stds/unix/template/.
6.7.1. The Build Specification in Makefile.Host The build specification in Makefile.Host won’t look like the familiar target/pre-requisite rules you may be used to seeing in makefile. All the build rules have been predefined, leaving only the variables, the file-names themselves, plus maybe a few complier and linker options, to be defined by you. The variables are defined by a set of recognized make macros, which you write in Makefile.Host. The complete set of recognized macros is in the IOC Configuration Management document, part 4.3, “Defining Makefiles” (see references above). However, the simplest example would be just to use:
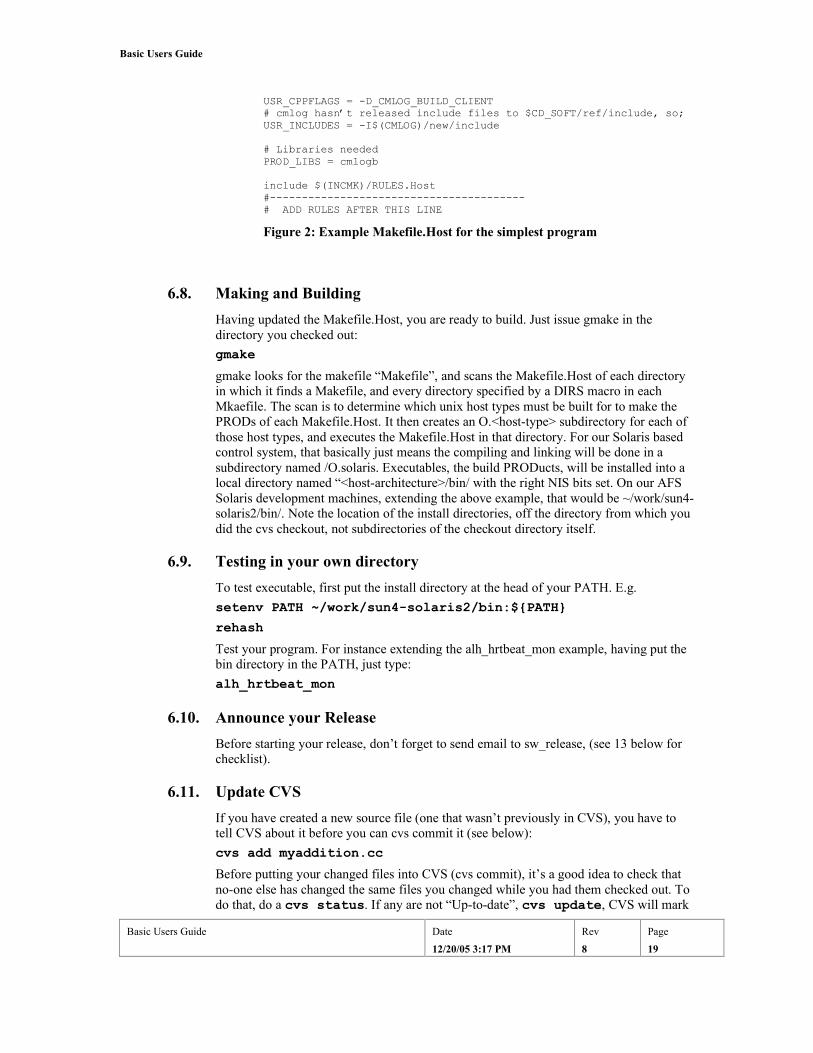
PROD : This defines the name of executable to produce SRCS : This defines the list of source files which must be complied and linked together to produce <PROD>. PROD_LIBS : The (non-system) libraries needed to link <PROD>.
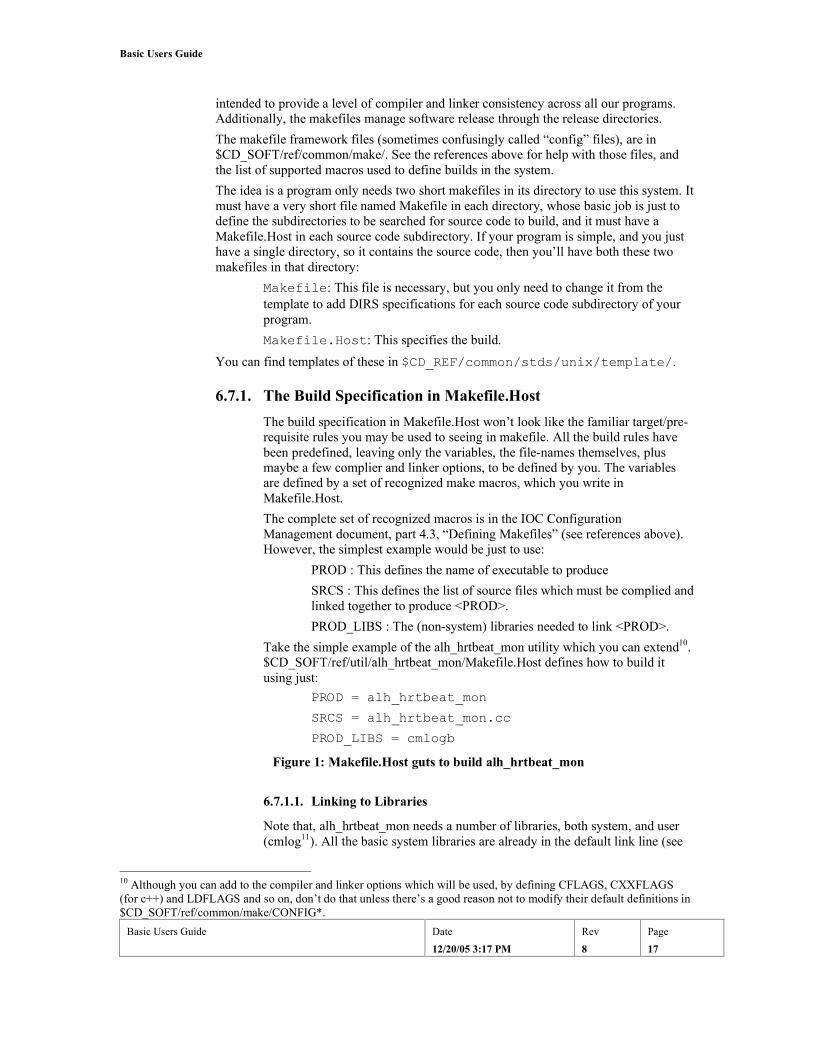
Take the simple example of the alh_hrtbeat_mon utility which you can extend10. $CD_SOFT/ref/util/alh_hrtbeat_mon/Makefile.Host defines how to build it using just:
PROD = alh_hrtbeat_mon
SRCS = alh_hrtbeat_mon.cc
PROD_LIBS = cmlogb
Figure 1: Makefile.Host guts to build alh_hrtbeat_mon
6.7.1.1. Linking to Libraries
Note that, alh_hrtbeat_mon needs a number of libraries, both system, and user (cmlog11). All the basic system libraries are already in the default link line (see
10 Although you can add to the compiler and linker options which will be used, by defining CFLAGS, CXXFLAGS (for c++) and LDFLAGS and so on, don’t do that unless there’s a good reason not to modify their default definitions in $CD_SOFT/ref/common/make/CONFIG*.
Basic Users Guide
Basic Users Guide
Date
12/20/05 3:17 PM Rev
8 Page
18
the definition of ARCH_DEP_LDLIBS), so there was no need to override that or USR_LIBS to supply libraries such as X11, thread, nal, socket etc, to the link. The cmlog library is supplied by defining PROD_LIBS – libraries required for linking <PROD>. Additionally, you should avoid specifying libraries explicitly anyway because all the libraries we use should be the dynamically linked kind (entered at run-time), usually named libsomething.so on Solaris systems, which should all be on the LD_LIBRARY_PATH. Avoid using .a (archive) libraries, which create static and therefore inline code, since it means restarting the executable when changing library code. And only use the USR_LDFLAGS for giving link options, not for specifying libraries.
6.7.1.2. Which C++ Compiler?
Both the GNU g++ and Solaris CC compilers are supported by the makefile framework, but the support for GNU g++ is far the most sophisticated. You have to specify which you wan to use for compiling .cc source code using CPLUSPLUS (there is no default setting!). For CC, you additionally have to say which is the default pedantry (CXXCMPLR).
6.7.1.3. Precompile, Compile, and Link options
Don’t confuse precompile, compile, and linker options when setting your own values of the makefile macros. For inatance, -D, which creates a #define for the compile is a precompiler option specified in USR_CPPFLAGS. –I tells the precompiler where to look for include files (but USR_INCLUDES should be used for that in preference to USR_CPPFLAGS). These should not be put in the compiler options (USR_CFLAGS and USR_CXXFLAGS), or linker options.
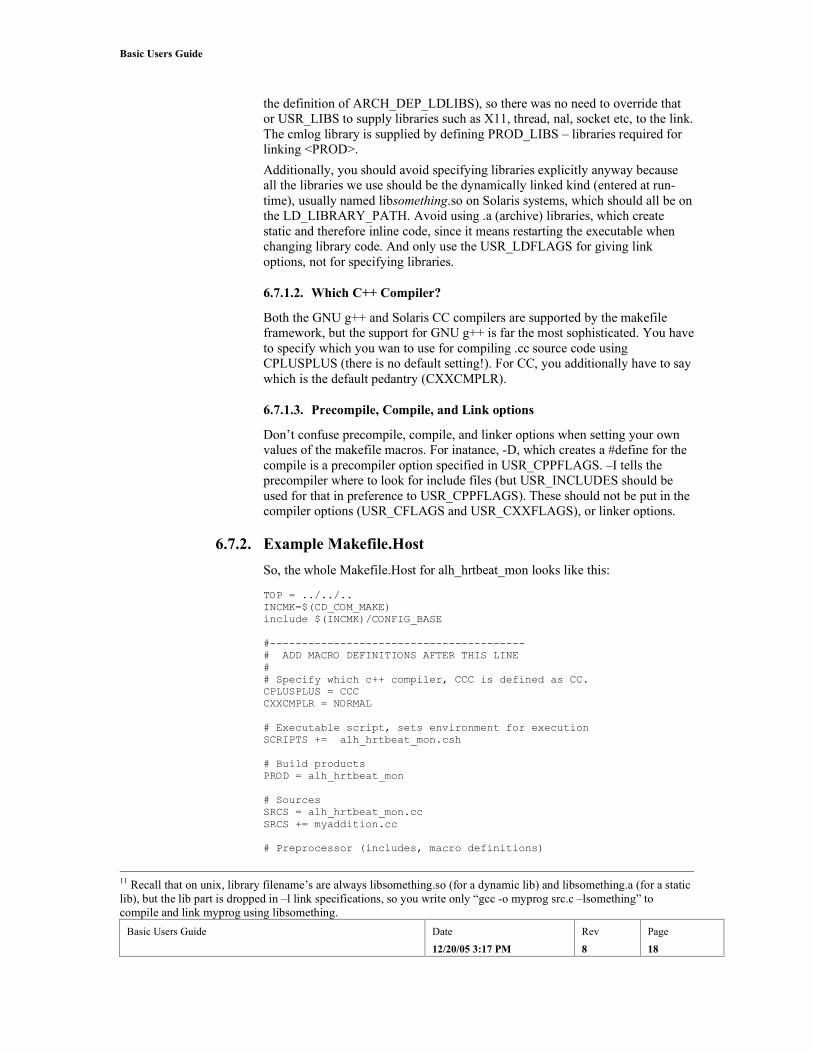
6.7.2. Example Makefile.Host So, the whole Makefile.Host for alh_hrtbeat_mon looks like this:
TOP = ../../.. INCMK=$(CD_COM_MAKE) include $(INCMK)/CONFIG_BASE #---------------------------------------- # ADD MACRO DEFINITIONS AFTER THIS LINE # # Specify which c++ compiler, CCC is defined as CC. CPLUSPLUS = CCC CXXCMPLR = NORMAL # Executable script, sets environment for execution SCRIPTS += alh_hrtbeat_mon.csh # Build products PROD = alh_hrtbeat_mon # Sources SRCS = alh_hrtbeat_mon.cc SRCS += myaddition.cc # Preprocessor (includes, macro definitions)
11 Recall that on unix, library filename’s are always libsomething.so (for a dynamic lib) and libsomething.a (for a static lib), but the lib part is dropped in –l link specifications, so you write only “gcc -o myprog src.c –lsomething” to compile and link myprog using libsomething.
Basic Users Guide
Basic Users Guide
Date
12/20/05 3:17 PM Rev
8 Page
19
USR_CPPFLAGS = -D_CMLOG_BUILD_CLIENT # cmlog hasn’t released include files to $CD_SOFT/ref/include, so; USR_INCLUDES = -I$(CMLOG)/new/include # Libraries needed PROD_LIBS = cmlogb include $(INCMK)/RULES.Host #---------------------------------------- # ADD RULES AFTER THIS LINE
Figure 2: Example Makefile.Host for the simplest program
6.8. Making and Building Having updated the Makefile.Host, you are ready to build. Just issue gmake in the directory you checked out: gmake
gmake looks for the makefile “Makefile”, and scans the Makefile.Host of each directory in which it finds a Makefile, and every directory specified by a DIRS macro in each Mkaefile. The scan is to determine which unix host types must be built for to make the PRODs of each Makefile.Host. It then creates an O.<host-type> subdirectory for each of those host types, and executes the Makefile.Host in that directory. For our Solaris based control system, that basically just means the compiling and linking will be done in a subdirectory named /O.solaris. Executables, the build PRODucts, will be installed into a local directory named “<host-architecture>/bin/ with the right NIS bits set. On our AFS Solaris development machines, extending the above example, that would be ~/work/sun4-solaris2/bin/. Note the location of the install directories, off the directory from which you did the cvs checkout, not subdirectories of the checkout directory itself.
6.9. Testing in your own directory To test executable, first put the install directory at the head of your PATH. E.g. setenv PATH ~/work/sun4-solaris2/bin:${PATH}
rehash
Test your program. For instance extending the alh_hrtbeat_mon example, having put the bin directory in the PATH, just type: alh_hrtbeat_mon
6.10. Announce your Release Before starting your release, don’t forget to send email to sw_release, (see 13 below for checklist).
6.11. Update CVS If you have created a new source file (one that wasn’t previously in CVS), you have to tell CVS about it before you can cvs commit it (see below): cvs add myaddition.cc
Before putting your changed files into CVS (cvs commit), it’s a good idea to check that no-one else has changed the same files you changed while you had them checked out. To do that, do a cvs status. If any are not “Up-to-date”, cvs update, CVS will mark
Basic Users Guide
Basic Users Guide
Date
12/20/05 3:17 PM Rev
8 Page
20
any files that were modified by someone else with an M. If it was able to merge your changes into their changes it will stop there. If it couldn’t do the merge, it will report “conflicts during merge”. When you’re sure of all your edits, commit your changes back to CVS: cvs commit We have modified cvs commit so it immediately automatically updates the reference directory files whenever a change is made to CVS.
6.12. Update Manifest File The names of programs which are normally run on “production” machines (i.e. gateways like opi00gtw00) have to be listed in the directory’s manifest file. The manifest file lists all the files which the distribution system must export over to the production machines for you. So, if you have added a new executable (a new PROD to a Makefile.Host), and it must be run on a gateway, then you will have to edit the file named manifest, and add a line naming each file to be exported to it. For executables each line must be of the form <host-architecture>/bin/<filename>. The host architecture is normally solaris on AFS machines, so for example alh_hrtbeat_mon’s entry in util/alh_hrtbeat_mon/manifest file is solaris/bin/alh_hrtbeat_mon Any non-executable shell scripts which are used to set up the environment or run the executable, or it’s boot st file, should also be added to the manifest. For non- executable scripts, each line must be of the form script/<filename>. E.g. script/myscript.csh. emacs12 manifest
If no manifest file exists for the directory, you will have to create one and add it to CVS (cvs add manifest).
6.13. Release your program into the Control System Release is a three-stage process. You will first release only to development machines, then to both development and production machines (but to a place on production machines which is not known to other programs running on production – that is, not on the production PATH – and therefore does not affect the running controls system), and finally to the production area of both development and production machines. Only at this last stage will a user or process started on production see your changes. You use the first two stages to test your changes. All three of these release stages are managed by scripts that will ask you for your password and verify that you have the unix privilege to make the release. They will also ask you why you are making the release, and log your reply. The log is in $CD_SOFT/log/release.log, which is on the web at http://www.slac.stanford.edu/grp/cd/soft/log/release.log.
6.13.1. Release to “TST” and test The first stage of release is “tst” and is performed by the command “gmaketst”. gmaketst simply runs gmake in the reference directory, which following your cvs commit, will have the latest version of all the files. The gmake, if successful, will create executables in $CD_SOFT/tst/solaris/bin/
12 Any editor will do the job of course. Emacs is common but complicated. Some unix programmers prefer vi, which can be confusing too. A very simple editor on all unix systems is called pico.
Basic Users Guide
Basic Users Guide
Date
12/20/05 3:17 PM Rev
8 Page
21
gmaketst util/alh_hrtbeat_mon To test executables, remember, the default value of PATH does not include $CD_SOFT/tst/solaris/bin/.This is so that you can cvs commit your program, and build it, without it yet being used by other people. So, to test your changes you have to add the tst directory to your PATH: setenv PATH ${CD_SOFT}/tst/solaris/bin:${PATH}
If you added a new executable, you may have to rehash: rehash
Then just type the executable file’s basename. For instance to test alh_hrtbeat_mon alh_hrtbeat_mon
6.13.2. Release to “DEV” and test The second stage of release is “dev” and is performed by the command “gmakedev”. It escalates executables from their tst release directory to their dev directory, $CD_SOFT/dev/solaris/bin/.E.g.: gmakedev util/alh_hrtbeat_mon On development hosts, the dev directory of executables is already in the default PATH, ahead of the new and prod directories (see below). This is so you can release to a public place on the development machines and colleagues can test your changes before you release them to production. So, everyone using a development machine will now be using your release, and to test a program you only need to rehash, and then just type its file basename. E.g.: rehash
alh_hrtbeat_mon Additionally, gmakedev checks which of the files which were changed or added, are also listed in the manifest file, and exports those over to production for you. On production hosts, the dev directory of executables is deliberately NOT in the default PATH. So if you want to test on production, log in, change the PATH to include dev, and then run your program. E.g.: ssh –X –l cddev opi00gtw00
cddev> setenv PATH ${CD_SOFT}/dev/solaris/bin:${PATH}
cddev> rehash; alh_hrtbeat_mon
6.13.3. Release to “NEW” and test The last stage of release that a programmer does, is “NEW”. NEW is performed by the command “gmakenew”. It escalates executables from the DEV directory for executables, to the NEW directory for executables: $CD_SOFT/new/solaris/bin/..E.g.: gmakenew util/alh_hrtbeat_mon The NEW directory is in the default PATH of all users on both production and development nodes. So, you don’t need to add anything to the PATH to test your changes or for anyone else to test them. You should test your changes on production, even if they worked at the development level, before you go on to new things.

Basic Users Guide
Basic Users Guide
Date
12/20/05 3:17 PM Rev
8 Page
22
From development you can run an executable on production with ssh, for instance to test alh_hrtbeat_mon: ssh –l cddev –X opi00gtw00 {rehash; alh_hrtbeat_mon}
This marks the end of the release sequence that a developer goes through. Once a week or so, all software which is at the "new" stage of release, is "swept" to "prod". The sweep is done for all software presently in “new” by one designated person, typically after the Monday morning meeting. The sweep procedure sends email to sw_release when it’s done.
6.14. Release your cvs reservation cd back up to your working directory (ex. ~/work). Then give up your CVS checkout with cvs release. Note that cvs release requires that the argument is precisely the same argument as was used to do the cvs checkout. cvs release util/alh_hrtbeat_mon
Finally rm -fr util/hrtbeat_mon to cleanup your work space and avoid confusion - cvs never deletes anything! If you have reserved other directories higher up the directory hierarchy, don’t delete those too by accident.
Basic Users Guide
Basic Users Guide
Date
12/20/05 3:17 PM Rev
8 Page
23
7. Developing External Packages This chapter deals with the support we have for version-controlled releases of external software “packages”, such as EPICS extensions. Packages, in this context, are defined as software suites which were not built by our makefile framework. They may or may not have been written by us. Examples are to be found in /afs/slac/package/, especially /afs/slac/package/epics/slaconly/R3.13.6/extensions/src/. Even though they have not been built using our standard framework, our standard framework can still release them in a controlled way –see 7.3 below. Optionally, a developer can choose to put the source code of an external package they are responsible for in our CVS repository – see 7.4 below.
7.1. Overview The system described here allows a developer to release executables in a controlled way, into the Unix Control system, without that software having to be built using our makefiles. The executable (either a program, or a library) of the package which you want to release into our standard release directories, may start out being located anywhere on the AFS file-system. A common location is likely to be somewhere under /afs/slac/package/, for example, cmlog’s source code is in /afs/slac/package/cmlog/. Additionally, this chapter describes support for source-code management of external software packages in our CVS repository.
7.2. References See the Principles of Design for descriptions of the software release makefile framework. Those makefiles implement the release system described below.
7.3. Release Support This section details how to support the release of executables, libraries, and other supporting files, into the unix control system. The basic idea is to use the familiar Makefile and Makefile.Host makefiles that we use for regular software we write, except only to use the release support component of those makefiles. That is, we wont build the external software using our make rules, but we will be able to use gmaketst, gmakedev, gmakenew and sweep, to move the executables, libraries and assorted configuration files from where-ever, into our release areas. In this way, the executables of the external software will be put into our standard PATHs, and, if wanted, can be put on production machines using our distribution scheme: Directory Standard Use $CD_SOFT/cvs/ext/ Required CVS Repository of the supporting files for
releasing external software package executables (Makefile and Makefile.Host), any additional configuration files we need to add, and any manifest file needed for distribution of the package to production machines. This is not the CVS repository of the source code itself – see 7.4
$CD_SOFT/ref/ext/ Required The reference area for above. /afs/slac/package/<subd> Optional The external software source code, executables,
and assorted supporting files, as distributed from its vendor, might optionally placed here –see Note below.
Basic Users Guide
Basic Users Guide
Date
12/20/05 3:17 PM Rev
8 Page
24
Table 2: Directories Supporting Release of External Software
Note that the use of CVS is not a requirement for the source code of external software packages to be used in the control system, but if our CVS repository is used (in the locations described in Table 3), then the resulting executables must be released by our release mechanism, as described here.
7.3.1. Creating Release Support for External Software This section details how a developer creates the necessary infrastructure to release external software into the control system.
7.3.1.1. Makefiles and other supporting files
Each external package that is released through this scheme, must have a CVS directory under $D_REF/ext/, in which are placed the makefiles which do the release. These makefiles are regular instances of the familiar Makefile and Makefile.Host, except that they don’t contain the source code specifications that detail what to build the executable from (SRCS macro and so on); they only contain the PROD, LIBS and other macros that say what the executables and libraries are named and where to get them. Into any directory, like ~/work/ext/, (which has the important property that you can write files 2 directory levels above it – which will be important for testing) copy the template Makefile and Makefile.Host from $CD_REF/common/stds/unix/template/. source $CD_SOFT/dev/script/ENVS.csh
cd
mkdir work; cd work
mkdir ext; cd ext
cp $CD_REF/common/stds/unix/template/Makefile* .
Check that the TOP variables in these Makefiles are right. The TOPs have to have enough ../ in them to get from the subdirectory of $CD_SOFT/ref/ext/ that the makefiles will be run from, to $CD_SOFT/ref/. The default values from the template is right for a projects makefiles in an immediate subdirectory of $CD_SOFT/ref/ext/.
7.3.1.2. Edit the Makefiles, to get executables and other files from elsewhere
Makefile needs little or no modification: TOP=../.. INCMK=$(CD_COM_MAKE) include $(INCMK)/CONFIG_BASE include $(INCMK)/RULES_ARCHS
Figure 3: makefile "Makefile" for releasing cmlog
Makefile.Host does need to be edited. It needs to be told the names of the deliverables it must get, and where to get them. To tell it the names of the deliverables use the regular variables like PROD and LIBRARY.

Basic Users Guide
Basic Users Guide
Date
12/20/05 3:17 PM Rev
8 Page
25
Do not fully qualify the file-names13. Instead use the gmake command “vpath” to direct gmake to the deliverable names. Note that vpath must be given a pattern argument (no pattern means clear all previous patterns, it doesn’t mean match all patterns); so you can use a fully qualified pattern, like “cmSpy” to get cmSpy. A representative extract of the Makefile.Host that handles releasing cmlog and all its associated applications’ executables and libraries, is given below: TOP = ../../.. INCMK=$(CD_COM_MAKE) include $(INCMK)/CONFIG_BASE #---------------------------------------- # ADD MACRO DEFINITIONS AFTER THIS LINE # # cmlog base package vpath cmlog% /afs/slac/package/cmlog/prod/bin/solaris PROD = cmlog PROD += cmlogAdmin PROD += cmlogClientD PROD += cmlogConverter vpath cmSpy /afs/slac/package/cmlog/appl/cmSpy/ PROD += cmSpy vpath fwdBro /afs/slac/package/cmlog/appl/fwdBro/prod/ PROD += fwdBro
# libraries. vpath %.so /afs/slac/package/cmlog/prod/lib/solaris/ vpath %.a /afs/slac/package/cmlog/prod/lib/solaris/ SHARED_LIBRARIES = YES LIBRARY := cmlog #cmlogb data db include $(INCMK)/RULES.Host #---------------------------------------- # ADD RULES AFTER THIS LINE
Figure 4: Makefile.Host in $CD_REF/ext/cmlog/ that releases cmlog executables and libraries from /afs/slac/package/cmlog/
Not that, having created the makefiles that do the release, the procedure for doing the release is identical to that for releasing software we write. That is, follow exactly the same procedure as that given in chapter 6 for developing programs. The following describes how to release the release support itself, for the first time.
7.3.2. Test the release support makefiles You can test the release support makefiles:
13 Fully qualified names, like PROD = /afs/slac/package/cmlog/prod/solaris/bin/cmlog only works for some kinds of file, and there is a problem with using VPATH (the makefiles attempt to construct libraries found with VPATH), but the vpath mechanism is that which the makefile framework has been modified to recognize.
Basic Users Guide
Basic Users Guide
Date
12/20/05 3:17 PM Rev
8 Page
26
~/work/ext> gmake
This will copy the deliverables you specified in the PROD, LIBRARY, SCRIPT and other variables in Makefile.Host, to the default local install directories for their filetype. Ie, cmlog will be copied from /afs/slac/package/cmlog/prod/bin/solaris to the local directory ../../sun4-solaris2/bin/. Test the moved executables by adding the local directories to PATH and LD_LIBRARY_PATH etc, and running them.
7.3.3. CVS the Release Support Files Import the release support files (plus other configuration files and any manifest file), in CVS module “ext”. For the cmlog example, this would be: cvs import –m “Release Support for cmlog” \
ext/cmlog CD_SOFT R1_0
Check the output to verify it imported all the files you want, and no more.
7.3.4. Create the Reference Directory Change directory to $CD_SOFT/ref and create the first cvs checkout of the ext sub-module you just imported. For instance, if in the cvs import command, you said you wanted to create a module named ext/cmlog, as we did in the example above, then you must create the initial checkout of ext/cmlog. Don’t forget to release it too: cd $CD_SOFT/ref
cvs checkout ext/cmlog
cvs release ext/cmlog
7.3.5. Do the first release into our release areas The following will move the deliverables specified through our release directories. gmaketst will fetch them from the locations specified in the vpath commands in Makefile.Host, and place them in tst stage of release (as is usual for gmaketst). gmakedev and gmakenew will escalate the deliverables in the usual way. mail [email protected]
gmaketst ext/cmlog
gmakedev ext/cmlog
gmakenew ext/cmlog
7.4. CVS Support for External Software In addition to release support, maintainers of external software may choose to put the source code of the packages in our CVS repository. All such external software source code shall go in sub-directories of one specially designated CVS module, $CD_SOFT/cvs/package/. Note, only the source code may be placed here, no executables. It’s worth pointing out though, that CVS does not require that all the files in a source directory that is “under
Basic Users Guide
Basic Users Guide
Date
12/20/05 3:17 PM Rev
8 Page
27
CVS control” need to be in CVS. So you could, with careful use of cvs import and cvs add, put only the source code from a directory that contains source, object, and executable, into CVS. The rules we require are:
1. Only the CVS repository module “package” may be used for external software. $CD_SOFT/{cvs,ref}/package/.
2. There must be a matching $CD_SOFT/ref/ext/ directory for each $CD_SOFT/ref/package/ directory. The executables (and deliverables) of all software whose source is in our CVS repository, must be released using our release procedure, as detailed above in this chapter, and that includes $CD_SOFT/ref/package/. In other words, if you use our CVS repository, you must use our release procedure.
3. Do not symlink out of $CD_SOFT/ref/package/, only symlink in14. For instance, do not create symlink $CD_SOFT/ref/package/cmlog@ to point to /afs/slac/package/cmlog/src/, but you may create /afs/slac/package/cmlog/src@ to point to $CD_SOFT/ref/package/cmlog/ if you like.
Directory Standard Use $CD_SOFT/cvs/package/ Required If an external software suite does use our CVS
repository for its source code, then it must be placed in a sub-directory of this CVS directory. Ie, cvs import to package/<subd>.
$CD_SOFT/ref/package/ Required The ref directory for above.
/afs/slac/package/<subd> Optional You may have other files for your package in /afs/slac/package/, such as EPICS extensions, and you may want to build there. You can symlink from /afs/slac/package/<subd> to $CD_SOFT/ref/package/<subd>.
Table 3: Directories Supporting CVS of External Software
To use this system, just follow the instructions in chapter 14, “Putting a directory in CVS”, with one important exception: where you use the cvs import command, don’t use the tags we use for software written by us (CD_SOFT and R1_0). Instead use tags you as the maintainer will remember and help you. The first is the vendor tag – it specifies who supplied us the software (eg JLAB), the second is the version tag. It has nothing to do with CVS’s internal version numbering, it’s just a free format string to help you tag the the package that comes in a version number. But, take care to set it intelligently because it will be your primary way to merge source code of new versions that come in from the vendor, with our modifications. Such merge operations can be done using cvs update giving a tag. See the CVS manual for using cvs update with a tag. E.g.: cvs import –m “Initial Import” package/cmlog JLAB R2_1
Don’t forget to create the initial cvs checkout, and cvs release that initial checkout.
14 This is so that we can write unix find commands which search all our source code. These have to be able to traverse symlinks, but if we symlink out into the unknown, who knows how long a find command will take to complete.
Basic Users Guide
Basic Users Guide
Date
12/20/05 3:17 PM Rev
8 Page
28
8. Startup File Handling This chapter describes how to create or modify so-called “start-up” files. These are the files used to start or restart an application, for instance at host boot time. It covers the basic setup requirements, where the relevant files reside in the development file-system, how to create or checkout display files from CVS, and how to release changes back into the control system.
8.1. Startup files and Directories There are two kinds of startup-file for each program. Both kinds have names which start st.<something>.
1. Those that are literally executed directly by the host’s startup sequence. These are located in the host’s /etc/init.d/ directory. Call these “type I” startup files. These are, at present not in CVS, and are not released by our release system.
2. Those that setup the environment for a program to run, and then run it. Call these “type II” startup files. These we keep in CVS, with the program they run, and these are escalated through our release procedures. For instance, the program cmdSrv, which is under the “app” CVS module, keeps its startup files in $CD_SOFT/ref/app/cmdSrv/script/st.*. In release, all programs deliver their type II startup files to $CD_SOFT/{tst,dev,new,prod}/solaris/sys.
The normal sequence of events is that a type I startup file does nothing except execute the type II startup file.
8.2. Type I Startup Files The only job these have is to find and execute the type II startup file. They do this using a PATH. On development machines, type I startup files search the following directories for type II startup files: /afs/slac/g/cd/soft/new/solaris/sys /afs/slac/g/cd/soft/prod/solaris/sys On production machines, type I startup files search the following directories for type II startup files: /usr/local/cd/soft/new/solaris/sys /usr/local/cd/soft/prod/soalris/sys The rest of this chapter is devoted to describing the development of Type II startup files.
8.3. Basic Setup Requirements If your login process has not already done so, you must set up the standard development environment with source /afs/slac/g/cd/soft/dev/script/ENVS.csh. Make sure environment variable CVSROOT is set to /afs/slac/g/cd/soft/cvs (printenv CVSROOT). If it is not, source $CD_SCRIPT/cvsSetEnv.csh.
Basic Users Guide
Basic Users Guide
Date
12/20/05 3:17 PM Rev
8 Page
29
8.4. CVS Checkout From your own working directory (ex. ~/work) check out the cvs module in which the startup script you want to modify is located, or to which you want to add a startup script. For example: cvs checkout app/cmdSrv/script The following would check out only the file st.cmdSrv.dev: cvs checkout app/cmdSrv/script/st.cmdSrv.dev
To manage the release of startup files you will need the makefiles from their directory, so if you do check out only one or two scripts by name, you will also need to additionally checkout Makefile and Makefile.Host from the same directory.
8.5. Edit Startup Scripts Edit the file you want to change, or create a new startup script. If you a create a new script, remember to add the standard csh or sh header from $CD_REF/common/stds/unix/header/. Don’t forget the #!/bin/sh at the top of an sh (bourne shell) executable script. All startup scripts should be in sh, and remember, these files are always executable, they’re never “sourced” like csh scripts often are.
8.6. “Make” the startup files Each file that must be escalated from a directory, must be listed in “functional file-type” macro definitions in the directory’s Makefile.Host file. The macro tells the makefile system what kind of file it is, and therefore how to handle the file – where to put it. The functional file-type for startup files is “STARTUP”. Therefore, if you add a new startup file, you must update Makefile.Host to add a STARTUP line for each startup file you add. For instance, app/cmdSrv/script’s Makefile.Host looks like this: ~greg> more $CD_SOFT/ref/app/cmdSrv/script/Makefile.Host
…
# General tools (executable scripts)
# Startup cmdSrv process
STARTUP += st.cmdSrv.prod
STARTUP += st.cmdSrv.nlcdev
STARTUP += st.cmdSrv.pepii
STARTUP += st.cmdSrv.dev … Having updated the Makefile.Host for new startup-scripts, you are ready to build. Just issue gmake in the directory you checked out: gmake
gmake moves executables, of which startup scripts are an example, to a subdirectory named O.<host-architecture>. If necessary it creates the subdir for you. If your’re on a solaris machine, this will be O.solaris. Additionally it installs the scripts into a test install directory off the project “TOP”. Since STARTUP files are one instance of system-administration files, and all system

Basic Users Guide
Basic Users Guide
Date
12/20/05 3:17 PM Rev
8 Page
30
administration files go in directories named <host-architecture>/sys, the startup files are additionally put in ${TOP}/solaris/sys/. TOP is defined in the Makefile.Host.
8.7. Testing in your own directory To test executable scripts, first put the install directory at the head of your PATH. E.g. setenv PATH ~/work/sun4-solaris2/bin:${PATH}
Test your startup script thoroughly. If a startup script fails when in production, it may cause a control system host computer not to boot.
8.8. Update Manifest File Those scripts from the directory which are normally run on “production” machines (i.e. gateways like opi00gtw00) have to be listed in the directory’s manifest file. This file lists all the files which the distribution system must export over to the production machines for you. Our type II startup files typically are run on production machines, so, if you have added a new startup-script, you have to edit the file named manifest, and add a line naming each file to be exported to it. For STARTUP scripts, each line must be of the form <host-architecture>/sys/<filename>. The host architecture is normally solaris on AFS machines, so for example: ~greg/work> more app/cmdSrv/script/manifest solaris/sys/st.cmdSrv.dev solaris/sys/st.cmdSrv.nlcdev solaris/sys/st.cmdSrv.pepii solaris/sys/st.cmdSrv.pro
If no manifest file exists for the directory, you will have to create one and add it to CVS (cvs add manifest).
8.9. Release Peliminaries Before starting your release you have to warn the production system administrators of your changes. Also, don’t forget to send email to sw_release, (see 6 below for checklist).
8.10. Update CVS If you have created a new script (one that wasn’t previously in CVS), you have to tell CVS about it before you can cvs commit it (see below): cvs add st.mynewstartupscript
Before putting your changed files into CVS (cvs commit), it’s a good idea to check that no-one else has changed the same files you changed while you had them checked out. To do that, do a cvs update. CVS will mark any files that were modified by someone else with an M. If it was able to merge your changes into their changes it will stop there. If it couldn’t do the merge, it will report “conflicts during merge”. To track down who has done what, use cvs status. When you’re sure of all your edits, commit your changes back to CVS: cvs commit
Basic Users Guide
Basic Users Guide
Date
12/20/05 3:17 PM Rev
8 Page
31
8.11. Release your scripts into the Control System Release is a three stage process. You will first release only to development machines, then to both development and production machines (but to a place on production machines which is not known to other scripts on production – that is, not on the production PATH – and therefore does not affect the running controls system), and finally to the production area of both development and production machines. Only at this last stage will a user or process starting the script on production see your changes. You use the first two stages to test your changes. All three of these release stages are managed by scripts that will ask you for your password and verify that you have the unix privilege to make the release. They will also ask you why you are making the release, and log your reply. The log is in $CD_SOFT/log/release.log, which is on the web at http://www.slac.stanford.edu/grp/cd/soft/log/release.log. The SW_LOG elog is also updated.
8.11.1. Release to “TST” and test The first stage of release is “tst” and is performed by the command “gmaketst”. gmaketst, and all the other release verbs (see blow), release all the files which have changed in the ref directory you release, not just necessarily the STARTUP scripts. Still, the description below concentrates only on what happens to startup files. gmaketst moves startup-scripts to their tst release directory $CD_SOFT/tst/solaris/sys/ (it also sets the NIS “x” bit of executable scripts). For instance, to release scripts which you changed in CVS directory app/cmdSrv/script, you would issue: gmaketst app/cmdSrv/script Remember, the PATH does deliberately, not include the startup files directory by default. To test startup-scripts: setenv PATH ${CD_SOFT}/tst/solaris/sys:${PATH}
If you added a new executable script, you may have to rehash: rehash
Then just type the executable script’s file basename. For instance to test st.cmdSrv.dev st.cmdSrv.dev
8.11.2. Release to “DEV” and test The second stage of release is “dev” and is performed by the command “gmakedev”. It escalates startup scripts from their tst release directory to their dev directory, $CD_SOFT/dev/solaris/sys/.E.g.: gmakedev app/cmdSrv/script Additionally, gmakedev checks which of the files which were changed or added, are also listed in the manifest file, and exports those over to production for you. Again, remember, the PATH does deliberately not include the startup files directory by default, and this goes for production machines as well as dev. To test startup-scripts in dev then: ssh –X –l cddev opi00gtw00
cddev> setenv PATH ${CD_SOFT}/dev/solaris/sys:${PATH}
Basic Users Guide
Basic Users Guide
Date
12/20/05 3:17 PM Rev
8 Page
32
cddev> rehash; st.cmdSrv.prod
8.11.2.1. That’s all folks!
DEV is the last stage of release a developer is allowed to go for STARTUP scripts! Only a system-administrator may escalate the script past this point, so they have to do the actions below.
8.11.3. Release to “NEW” and test The last stage of release for a startup file, other that the sweep, is “NEW”. NEW is performed by the command “gmakenew”. It escalates scripts from the DEV directory for executables, to the NEW directory for executables: $CD_SOFT/new/solaris/sys/..E.g.: gmakenew app/cmdSrv/script
8.12. Release your cvs reservation cd back up to your working directory (ex. ~/work). Then give up your CVS checkout with cvs release. Note that cvs release requires that the argument is precisely the same argument as was used to do the cvs checkout. cvs release app/cmdSrv/script
Finally rm -fr app/cmdSrv/script to cleanup your work space and avoid confusion - cvs never deletes anything! If you have reserved other directories higher up the directory hierarchy, don’t delete those too by accident.

Basic Users Guide
Basic Users Guide
Date
12/20/05 3:17 PM Rev
8 Page
33
9. Configuration File Support This chapter describes how to create or modify configuration files. This is a general term for files which contain define the configuration of some piece of software. We distinguish two types of configuration, though it’s not intended to be a rigorous distinction:
1. “User” configurations. These are typically written by physicists or other users of the control system.
2. “System” configurations. These are typically written by one of the control system or support people. E.g. the file some network system program might use to list the ports on which it operates.
This chapter covers the basic setup requirements, where the relevant files reside in the development file-system, how to create or checkout configuration files from CVS, and how to release changes back into the control system. File Type Macro Reference Dir Release Dirs CONF $CD_SOFT/ref/cnf/… $CD_SOFT/{tst,dev}/conf/
CONFSYS $CD_SOFT/ref/… $CD_SOFT/{tst,dev}/confsys/
Table 4: Config File Support Summary
9.1. References For a summary of what a release is, see Chapter 3. For details about the control system development environment design, in particular about CVS and an explanation of the release scheme, see the first couple of chapters of the Principles of Design document.
9.2. Configuration Files and their Directories The directories are different for user configuration files than for system configurations.
9.2.1. User Configuration Files Directories User configuration files are kept in their own CVS directory, $CD_SOFT/ref/cnf/. Under this directory are subdirectories for each application or use to which configuration files are put. User configuration files are released first to $CD_SOFT/tst/conf/, and then, after some testing, to $CD_SOFT/dev/conf/. These delivery directories are “flat”, they contain, in the single directory, all the files in all the sub-diretories of $CD_SOFT/ref/cnf/.
9.2.2. System Configuration Files Directories On the other hand, system configuration files do not have their own directory in CVS, they may originate in any of the CVS source directories under $CD_SOFT/ref/. System configuration files are released first to $CD_SOFT/tst/confsys/, and then, after some testing, to $CD_SOFT/dev/confsys/. These delivery
Basic Users Guide
Basic Users Guide
Date
12/20/05 3:17 PM Rev
8 Page
34
directories are “flat”, they contain, in the single directory, all the system configuration files in all the subdiretories of $CD_SOFT/ref/.
Note that the intention is that all, and only, user configuration files, are intended to be under $CD_SOFT/ref/cnf/, whereas system configuration files are kept with the programs they configure, anywhere in ref.
9.3. Basic Setup Requirements If your login process has not already done so, you must set up the standard development environment with source /afs/slac/g/cd/soft/dev/script/ENVS.csh. Make sure environment variable CVSROOT is set to /afs/slac/g/cd/soft/cvs (printenv CVSROOT). If it is not, source $CD_SCRIPT/cvsSetEnv.csh.
9.4. CVS Checkout From your own working directory (ex. ~/work) check out the CVS module in which the config file you want to modify is located, or to which you want to add one. For example: cvs checkout cnf/channelWatcher Then go down to your copy of the directory you checked out; cd cnf/channelWatcher
9.5. Edit Config Edit the file you want to change, or create a new one. Use a standard editor, like vi, or emacs. There is a very simple editor named “pico” on most unix systems.
9.6. “Make” configuration files Each file that must be released from a source directory (such as cnf/channelWatcher), must be listed in “functional file-type” macro definitions in the directory’s Makefile.Host file. The macro tells the makefile system what kind of file each file is. From that, the makefile system works out where to put each file. The functional file-type for user configuration files is “CONF”. Therefore, if you add a new startup file, you must update Makefile.Host to add a CONF line for each startup file you add. Having updated the Makefile.Host for new config files, you are ready to build. Just issue gmake in the directory you checked out: gmake
gmake moves user configs (CONF) to a test install directory conf/ which it creates at the project root. The ”project root” is the directory in which you did the CVS checkout above, so in this example it would have created subdirectory conf under ~work. System configs (CONFSYS) are installed under the project root in confsys/.
9.7. Update Manifest File Those configs needed on “production” machines (i.e. gateways like opi00gtw00) have to be listed in the directory’s manifest file. This file lists all the files which the release system must export over to the production machines for you. So, if you have added a new config-file which is to be used on production, you have to edit the file named manifest, and add a line naming each file to be exported to it. If there is no manifest
Basic Users Guide
Basic Users Guide
Date
12/20/05 3:17 PM Rev
8 Page
35
file, you have to create on in an editor. You must add lines for each file to be exported to production, e.g.: conf/myconfigfile conf/anotherconf.fl confsys/assytemconfigfile.conf
9.8. Release Peliminaries Before starting your release you send email to sw_release, (see 6 below for checklist), and inform the relevant control room of your changes.
9.9. Update CVS If you have created a new config (one that wasn’t previously in CVS), you have to tell CVS about it before you can cvs commit it (see below): cvs add mynewconfig
Before putting your changed files into CVS (cvs commit), it’s a good idea to check that no-one else has changed the same files you changed while you had them checked out. To do that, do a cvs update. CVS will mark any files that were modified by someone else with an M. If it was able to merge your changes into their changes, it will stop there. If it couldn’t do the merge, it will report “conflicts during merge”. To track down who has done what, use cvs status. When you’re sure of all your edits, commit your changes back to CVS: cvs commit
9.10. Release your scripts into the Control System Release of configs is a two stage process. You will first release only to a test area ($CD_SOFT/tst/conf/) that is not used by programs running in a production capacity. Also, tst is not mirrored to the production machines. Then, some testing, you release to the production area of both development and production machines (dev). Only at this last stage will a user or process which uses the config file see your changes.
9.10.1. Release to “TST” and test The first stage of release is “tst” and is performed by the command “gmaketst”. gmaketst (and gmakedev, see below), release all the files which have changed in the ref directory you released, not just necessarily the CONF files. Following the execution of gmaketst, CONF files will be found in $CD_SOFT/tst/conf/. gmaketst cnf/channelWatcher If you can, test your changes at this level of release before going further.
9.10.2. Release to “DEV” and test The second stage of release is “dev” and is performed by the command “gmakedev”. It escalates files from tst/conf/ release directory to the dev directory, dev/conf/: gmakedev cnf/channelWatcher Additionally, gmakedev checks which of the files which were changed or added, are also listed in the manifest file, and exports those over to production for you.
Basic Users Guide
Basic Users Guide
Date
12/20/05 3:17 PM Rev
8 Page
36
So, on both development and production computers, you will find all the user config files in a directory named $CD_SOFT/dev/conf/.
9.10.2.1. That’s all folks!
DEV is the last stage of release for configuration files. “DEV” is obviously something of a misnomer because even though the files have only been released to the “dev” level, they are never-the-less released to production machines. The rule is, files which don’t respond to a search path are only released up to the DEV level, because there would be no way for a program to dependably use the files if it were allowed to be anywhere in the regular 3 stage release system.
9.11. Release your cvs reservation cd back up to your working directory (ex. ~/work). Then give up your CVS checkout with cvs release. Note that cvs release requires that the argument is precisely the same argument as was used to do the cvs checkout. cvs release –d cnf/channelWatcher
Basic Users Guide
Basic Users Guide
Date
12/20/05 3:17 PM Rev
8 Page
37
10. Oracle Script Support For information on ESD Oracle database development, including available Oracle instances, users, and client tools see http://www.slac.stanford.edu/grp/cd/soft/database/index.html This chapter describes how to create or modify Oracle SQL and PL/SQL scripts and SQL Loader control files. SQL and PL/SQL scripts are not executable from a Unix shell, but are run from an Oracle login session. Description of these files:
• SQL script: A sequence of sql statements that performs a database operation. • PL/SQL script: Written in PL/SQL, the Oracle procedural language, these scripts are run to load
stored procedures or functions into the database, or as standalone programs. • SQL Loader control file: A configuration file defining the layout of an ascii input data file that is
to be loaded into the database using SQL Loader. The file also contains other parameters associated with the file load.
This chapter covers the basic setup requirements, where the relevant files reside in the development file-system, how to create or checkout Oracle scripts and control files from CVS, and how to release changes back into the control system. File Type Macro Reference Dir Release Dirs ORAS $CD_SOFT/ref/<<various>> $CD_SOFT/{tst,dev}/ora/
Table 5: Oracle File Support Summary
Oracle scripts are generally associated with specific applications, and are maintained in individual application CVS and reference directories.
10.1. Basic Setup Requirements If your login process has not already done so, you must set up the standard development environment with source /afs/slac/g/cd/soft/dev/script/ENVS.csh. Make sure environment variable CVSROOT is set to /afs/slac/g/cd/soft/cvs (printenv CVSROOT). If it is not, source $CD_SCRIPT/cvsSetEnv.csh.
10.2. CVS Checkout From your own working directory (ex. ~/work) check out the CVS module in which the Oracle file you want to modify is located, or to which you want to add one. For example: cvs checkout app/pvudb_load Then go down to your copy of the directory you checked out; cd app/pvudb_load
10.3. Edit Oracle file Edit the file you want to change, or create a new one. Use a standard editor, like vi, or emacs. There is a very simple editor named “pico” on most unix systems.
Basic Users Guide
Basic Users Guide
Date
12/20/05 3:17 PM Rev
8 Page
38
10.4. “Make” Oracle files Each file that must be released from a source directory (such as app/pvudb_load), must be listed in “functional file-type” macro definitions in the directory’s Makefile.Host file. The macro tells the makefile system what kind of file each file is. From that, the makefile system works out where to put each file. The functional file-type for Oracle files is “ORAS”. Therefore, if you add a new startup file, you must update Makefile.Host to add an ORAS line for each startup file you add. Having updated the Makefile.Host for new ORAS files, you are ready to build. Just issue gmake in the directory you checked out: gmake
gmake moves Oracle files (ORAS) to a test install directory ora/ which it creates at the project root. The ”project root” is the directory in which you did the CVS checkout above, so in this example it would have created subdirectory ora under ~work.
10.5. Update Manifest File Those Oracle files needed on “production” machines (i.e. gateways like opi00gtw00) have to be listed in the directory’s manifest file. This file lists all the files which the release system must export over to the production machines for you. So, if you have added a new Oracle file which is to be used on production, you have to edit the file named manifest, and add a line naming each file to be exported to it. If there is no manifest file, you have to create on in an editor. You must add lines for each file to be exported to production, e.g.: ora/pvlist_to_pvudb.sql
ora/load_pvu_recs.pl
10.6. Release Preliminaries Before starting your release you send email to sw_release, (see below for checklist), and inform the relevant control room of your changes.
10.7. Update CVS If you have created a new Oracle file (one that wasn’t previously in CVS), you have to tell CVS about it before you can cvs commit it (see below): cvs add myneworafile
Before putting your changed files into CVS (cvs commit), it’s a good idea to check that no-one else has changed the same files you changed while you had them checked out. To do that, do a cvs update. CVS will mark any files that were modified by someone else with an M. If it was able to merge your changes into their changes, it will stop there. If it couldn’t do the merge, it will report “conflicts during merge”. To track down who has done what, use cvs status. When you’re sure of all your edits, commit your changes back to CVS: cvs commit
10.8. Release your scripts into the Control System Release of Oracle files is a two stage process. You will first release only to a test area ($CD_SOFT/tst/ora/) that is not used by programs running in a production capacity. Also, tst is not mirrored to the production machines. Then, some testing, you release to the
Basic Users Guide
Basic Users Guide
Date
12/20/05 3:17 PM Rev
8 Page
39
production area of both development and production machines (dev). Only at this last stage will a user or process which uses the Oracle file see your changes.
10.8.1. Release to “TST” and test The first stage of release is “tst” and is performed by the command “gmaketst”. gmaketst (and gmakedev, see below), release all the files which have changed in the ref directory you released, not just necessarily the ORAS files. Following the execution of gmaketst, ORAS files will be found in $CD_SOFT/tst/ora/. gmaketst app/pvudb_load If you can, test your changes at this level of release before going further.
10.8.2. Release to “DEV” and test The second stage of release is “dev” and is performed by the command “gmakedev”. It escalates files from tst/ora/ release directory to the dev directory, dev/ora/: gmakedev app/pvudb_load Additionally, gmakedev checks which of the files which were changed or added, are also listed in the manifest file, and exports those over to production for you. So, on both development and production computers, you will find all the Oracle files in a directory named $CD_SOFT/dev/ora/.
10.8.2.1. That’s all folks!
DEV is the last stage of release for Oracle files. “DEV” is obviously something of a misnomer because even though the files have only been released to the “dev” level, they are never-the-less released to production machines. The rule is, files which don’t respond to a search path are only released up to the DEV level, because there would be no way for a program to dependably use the files if it were allowed to be anywhere in the regular 3 stage release system.
10.9. Release your cvs reservation cd back up to your working directory (ex. ~/work). Then give up your CVS checkout with cvs release. Note that cvs release requires that the argument is precisely the same argument as was used to do the cvs checkout. cvs release –d app/pvudb_load
Basic Users Guide
Basic Users Guide
Date
12/20/05 3:17 PM Rev
8 Page
40
11. Matlab File Support This chapter describes how to introduce Matlab scripts and compiled Matlab standalone executables into the unix control system.
11.1. Matlab Scripts and Standalone Executables Matlab scripts are files with the extension “.m” that are run in the Matlab run-time environment. They are written using the Matlab scripting language and may call Matlab extension functions, such as Matlab Channel Access (MCA) and Matlab Archiver Retrieval (MAR) functions. A Matlab standalone executable is created from Matlab scripts that have been compiled by the Matlab Compiler to produce an executable program that is run without the need for a Matlab run-time license.
11.2. Matlab File Directories Matlab scripts may be put in any CVS directory. The release directories are:
1. matlab/, is the release dir for Matlab scripts (i.e. $CD_SOFT/{tst,dev,new,prod}/matlab/).
2. bin/solaris/, is the release dir for Matlab standalone executables (i.e. $CD_SOFT/{tst,dev,new,prod}/solaris/bin/).
11.3. Basic Setup Requirements for Matlab File Development If your login process has not already done so, you can setup the environment with source /afs/slac/g/cd/soft/dev/script/ENVS.csh.
Make sure environment variable CVSROOT is set appropriately (printenv CVSROOT). If it is desired to set this to /afs/slac/g/cd/soft/cvs and it is not set to this currently, source $CD_SCRIPT/cvsSetEnv.csh. The instructions in this chapter are only applicable to Matlab software built under $CD_SOFT/ref with CVS repository $CD_SOFT/cvs. If you are developing an EPICS extension under /afs/slac/package/epics (in which case the environment variable CVSROOT should be set to /afs/slac/package/epics/slaconly/cvs) and need to build a Matlab standalone executable, you must build it using the makefile system that extension uses. After the executable has been built you may follow the instructions in Chapter 7 on Releasing External Software to release the executable into our release directories using the MCC_PROD macro instead of the PROD macro.
11.4. CVS Checkout From your own working directory (ex. ~/work) check out the cvs module in which the Matlab scripts you want to modify is located, or to which you want to add one or more scripts. For example: cvs checkout matlab/src/toolbox The following would check out only the Matlab script “example.m”: cvs checkout matlab/src/toolbox/example.m
To manage the release of Matlab scripts you will need the makefiles from their directory, so if you do check out only one or two Matlab scripts by name, you will also need to additionally checkout Makefile and Makefile.Host from the same directory.
Basic Users Guide
Basic Users Guide
Date
12/20/05 3:17 PM Rev
8 Page
41
Then cd down to the directory containing the files you checked out (cd matlab/src/toolbox if the above example). From the checkout directory, you can do more CVS commands pertaining to that directory, e.g. cvs checkout example2.m.
11.5. Edit Scripts Edit the files you want to change or create new Matlab script files.
11.6. “Make” scripts The Matlab scripts in each directory must be listed in macro definitions in the directory’s Makefile.Host file. Therefore, if you add a new Matlab script, you must update Makefile.Host to add a MATS line or, to create a Matlab standalone executable, lines for MCC_PROD_SRCS, MCC_PROD_LIB, and MCC_PROD. For Matlab scripts to be run in the Matlab run-time environment, just add a line of the form MATS += filename for every Matlab script file you wish to add. If instead one or more Matlab scripts are to be compiled by the Matlab compiler to produce a standalone executable, add a line of the form MCC_PROD_SRCS += filename for each Matlab script to be compiled. It should be noted that the Makefile.Host file is run in the directory below where it is located so the source files should be referenced as being one level higher (e.g., MCC_PROD_SRCS = ../atest.m). If there are calls to Matlab extension functions in the Matlab source scripts, a line of the form MCC_PROD_LIB = filename must be added to Makefile.Host (e.g., MCC_PROD_LIB = libMar, for the Matlab Archiver Retrieval library). It is assumed that “.h” and “.mlib” files are associated with the library name. For example, see the Matlab Channel Access or Matlab Archiver Retrieval sections of the SLAC Matlab: PEPII, NLC Development, SPEAR web page for information regarding the creation of these files. For these libraries, the associated “.h” and “.mlib” files are located in $EPICS_EXTENSIONS/lib/solaris. Finally, there must be a line of the form MCC_PROD = filename to specify the name of the generated standalone executable file (e.g., MCC_PROD = atest). Having updated the Makefile.Host file, you are ready to build. Just issue gmake in the directory you checked out: gmake
gmake installs Matlab scripts into a local directory named “matlab”, for instance ~work/matlab/. gmake compiles Matlab standalone executable source scripts in a subdirectory named /O.solaris. Additionally it installs the generated standalone executable into a test install directory. The Matlab standalone executable will be installed in a local directory named “<host-architecture>/bin/. On our AFS Solaris development machines, extending the above example, that would be ~/work/sun4-solaris2/bin. Note the location of the install directories, off the directory from which you did the cvs checkout, not subdirectories of the checkout directory itself. If you have only checked out some subset of the Matlab scripts in a CVS directory, or you want only to build some subset of the scripts in your checkout directory, then you have to tell gmake which ones they are by overriding the definitions of the MATS macro in Makefile.Host on the gmake command line: gmake MATS=example.m MATS=

Basic Users Guide
Basic Users Guide
Date
12/20/05 3:17 PM Rev
8 Page
42
11.7. Testing in your own directory To test Matlab standalone executables, first put the install directory at the head of your PATH. E.g. setenv PATH ~/work/sun4-solaris2/bin:${PATH}
Then test the executable.
11.8. Announce your Release Before starting your release, don’t forget to send email to sw_release.
11.9. Update CVS If you have created a new script (one that wasn’t previously in CVS), you have to tell CVS about it before you can cvs commit it (see below): cvs add mynewmatlabscript
Before putting your changed files into CVS (cvs commit), it’s a good idea to check that no-one else has changed the same files you changed while you had them checked out. To do that, do a cvs update. CVS will mark any files that were modified by someone else with an M. If it was able to merge your changes into their changes it will stop there. If it couldn’t do the merge, it will report “conflicts during merge”. To track down who has done what, use cvs status. When you’re sure of all your edits, commit your changes back to CVS: cvs commit
11.10. Update Manifest File Those Matlab scripts and standalone executables which are normally run on “production” machines (i.e. gateways like opi00gtw00) have to be listed in the directory’s manifest file. This file lists all the files which the distribution system must export over to the production machines for you. So, if you have added a new Matlab script or standalone executable, and it must be run on a gateway, then you will have to edit the file named manifest, and add a line naming each file to be exported to it. For Matlab standalone executables, each line must be of the form <host-architecture>/bin/<filename>. The host architecture is normally solaris on AFS machines, so for example test’s entry in common/tool’s manifest file is solaris/bin/test. For Matlab scripts each line must be of the form matlab/<filename>. E.g. matlab/example.m. emacs15 manifest
If no manifest file exists for the directory, you will have to create one and add it to CVS (cvs add manifest).
11.11. Release your scripts into the Control System Release is a three stage process. You will first release only to development machines, then to both development and production machines (but to a place on production machines which is not known to other Matlab scripts or standalone executables on
15 Any editor will do the job of course. Emacs is common but complicated. Some unix programmers prefer vi, which can be confusing too. A very simple editor on all unix systems is called pico.
Basic Users Guide
Basic Users Guide
Date
12/20/05 3:17 PM Rev
8 Page
43
production – that is, not on the production PATH – and therefore does not affect the running controls system), and finally to the production area of both development and production machines. Only at this last stage will a user or process starting the script on production see your changes. You use the first two stages to test your changes. All three of these release stages are managed by scripts that will ask you for your password and verify that you have the unix privilege to make the release. They will also ask you why you are making the release, and log your reply. The log is in $CD_SOFT/log/release.log, which is on the web at http://www.slac.stanford.edu/grp/cd/soft/log/release.log.
11.11.1.Release to “TST” and test The first stage of release is “tst” and is performed by the command “gmaketst”. It moves Matlab scripts from their CVS reference directory to their tst release directory $CD_SOFT/tst/matlab/, and Matlab standalone executables to their tst release directory $CD_SOFT/tst/solaris/bin/ (it also sets the NIS “x” bit of executable scripts). For instance, to release Matlab scripts which you changed in CVS directory matlab/src/toolbox, you would issue: gmaketst matlab/src/toolbox16 To test executable scripts, remember, the default value of PATH does not include $CD_SOFT/tst/solaris/bin/.This is so that you can release your standalone executable, but without it yet being used by other people. So, to test your changes you have to add the tst directory to your PATH: setenv PATH ${CD_SOFT}/tst/solaris/bin:${PATH}
If you added a new standalone executable, you may have to rehash: rehash
Then just type the executable script’s file basename. For instance to test atest: atest
11.11.2.Release to “DEV” and test The second stage of release is “dev” and is performed by the command “gmakedev”. It escalates Matlab scripts from their tst release directory to their dev directory, $CD_SOFT/dev/matlab/, and Matlab standalone executables from their tst release directory to their dev directory, $CD_SOFT/dev/solaris/bin/.E.g.: gmakedev matlab/src/toolbox On development hosts, the dev directory of a Matlab standalone executable is already in the default PATH, ahead of the new and prod directories (see below). This is so you can release to a public place on the development machines and colleagues can test your changes before you release them to production. So, everyone using a development machine will now be using your release, and to test a script you only need to rehash, and then just type its file basename. E.g.: rehash
16 You can issue the gmaketst <directory> command from anywhere, such as your working directory. Alternatively, you can cd to the reference directory (like $CD_SOFT/ref/common/tool), and just type gmaketst without the directory arg.
Basic Users Guide
Basic Users Guide
Date
12/20/05 3:17 PM Rev
8 Page
44
atest Additionally, gmakedev checks which of the files which were changed or added, are also listed in the manifest file, and exports those over to production for you. On production hosts, the dev directory of Matlab standalone executables is deliberately NOT in the default PATH. So if you want to test the script on production, log in, change the PATH to include dev, and run the executable. E.g.: ssh –X –l cddev opi00gtw00
cddev> setenv PATH ${CD_SOFT}/dev/solaris/bin:${PATH}
cddev> rehash; atest
11.11.3. Release to “NEW” and test The last stage of release that a programmer does, is “NEW”. NEW is performed by the command “gmakenew”. It escalates Matlab scripts from their dev directory to their new directory, $CD_SOFT/new/matlab, and Matlab standalone executables from the DEV directory to the NEW directory: $CD_SOFT/new/solaris/bin/..E.g.: gmakenew matlab/src/toolbox The NEW directory is in the default PATH of all users on both production and development nodes. So, you don’t need to add anything to the PATH to test your changes or for anyone else to test them. You should test your changes on production, even if they worked at the development level, before you go on to new things. From development you can execute a script on production with ssh, for instance to test atest: ssh –l cddev –X opi00gtw00 {rehash; atest}
This marks the end of the release sequence that a developer goes through. Once a week or so, all software which is at the "new" stage of release, is "swept" to "prod". The sweep is done for all software presently in new by one designated person, typically after the Monday morning meeting. The sweep procedure sends email to sw_release when it’s done.
11.12. Release your cvs reservation cd back up to your working directory (ex. ~/work). Then give up your CVS checkout with cvs release. Note that cvs release requires that the argument is precisely the same argument as was used to do the cvs checkout. cvs release matlab/src/toolbox
Finally rm -fr matlab/src/toolbox to cleanup your work space and avoid confusion - cvs never deletes anything! If you have reserved other directories higher up the directory hierarchy, don’t delete those too by accident.
Basic Users Guide
Basic Users Guide
Date
12/20/05 3:17 PM Rev
8 Page
45
12. Developing IOC Software NOTE: This chapter is a pre-release draft of how we INTEND to handle IOC software development. Presently ONLY the bic follows this procedure. Do not use this procedure for other software. This chapter deals with how to develop software that is intended to run in an EPICS Input/Output Controller (IOC). IOCs are the basic computer of the front-end of the EPICS control system, and therefore run a large proportion of our low and mid-level controls. EPICS (Experimental Physics and Industrial Control system) is a framework for plant controls software, and includes much of the fundamental software for such things as crate control, process variable database management, and displays. In this chapter we will check out existing IOC software from its CVS area, modify it, and deploy it to an IOC.
12.1. Setup and Preliminaries EPICS at SLAC has quite a complicated framework, and its setup varies slightly for each accelerator system in which EPICS is used at SLAC. These details are described further in http://www.slac.stanford.edu/grp/cd/soft/share/slaconly/how-to/epicsSetup.html . However, for the purposes of development, as opposed to running, the normal setup for development is done by sourcing the basic EPICS development environment setup script: source /afs/slac/g/pepii/ctrl/prod/bin/solaris/epicsSetupDev The CVS Repository and Reference Areas are:
The IOC software is in CVS module “ioc” in the ESD Software CVS repository, whose root is $CD_SOFT/cvs, so all cvs checkouts will be carried out of directories under that directory. You may want to verify that your CVSROOT environment variable points to that repository: printenv CVSROOT
/afs/slac/g/cd/soft/cvs
Although there is only once CVS module for IOC software though, there are three reference areas, one for each EPICS version we use! The reference areas are: $CD_REF/epics/R3.13.1/ioc $CD_REF/epics/R3.13.2/ioc $CD_REF/epics/R3.13.6/ioc The relevance of this is discussed in .
12.2. Getting stuff into your area Begin by creating a new working directory in your area, e.g.: cd
mkdir work
cd work Checkout the code you wish to work on from CVS. For example, to get the BIC sequences: cvs checkout ioc/bicApp/src/seq If you will be able to test from your own directory later, checking out more is a better idea, for instance the whole application:

Basic Users Guide
Basic Users Guide
Date
12/20/05 3:17 PM Rev
8 Page
46
cvs checkout ioc/bicApp One important item the latter picks up is the config directory. You can also use a symbolic link pointing to $CD_BASE/config, but if you do, please take note of Kristi’s warning:
When you build in your own area, using a symbolic link for the config directory which points to $CD_BASE/config, do not perform a "gmake clean" at the top level directory. You can execute "gmake clean" one level down, but not at the top. Also, please remove all symbolic links in these directories to any production area. This is to avoid the problem of deleting and rebuilding a production directory which we discovered was happening in your local epics application area. You can move around the development tree easily by using the environment variables, or just place your symbolic links elsewhere. This will be necessary at least until the write protection is placed on the reference directories (along with some user scripts for cvs and gmake). I don't expect the scripts to be available anytime soon so you'll need to be aware of how the EPICS config (makefile) work to prevent corruption of production directories.
The CVS document describing all the gory CVS detail is: http://www.slac.stanford.edu/grp/cd/soft/cvs/cvs_for_ioc_deveopment.html 2) Build Following the above example: cd ~ronc/work/ioc/bicApp/src/seq gmake This will create /bin directories like /O.mv167. This is the fun part, actually working on code. Just keep editing and “making” until you are happy. 3) Test from your area makeIocBootLinks This script will ask you a bunch of questions, answer these and the symbolic links for booting will be created for you. An example invocation: [flora04] ~/wk3 > makeIocBootLinks Enter ioc nodename: bletch Enter 4-char microname: BL44 Supported cpu's are mv167,mv177,niCpu030,mv2700,mv2400 Enter cpu [mv167]: Available subnets are lavc,cad,pub2,nlcdev,leb,pepii,bbr Enter subnet [lavc]: Do you want to load EPICS [y/n]: y Supported EPICS applications are bic,gpib,lum,rf,tarf,pack,vib Enter EPICS application name [common]: bic Enter startup file [../boot/startup/st.bl44.cmd]: ./st.bl44.cmd Enter EPICS release [R3.13.6]: ------------------------------------- EPICS Version R3.13.6 ...Changing directory to /afs/slac/g/cd/soft/ioc/bletch ...Creating symbolic links for booting node bletch -----------------------------------------
Basic Users Guide
Basic Users Guide
Date
12/20/05 3:17 PM Rev
8 Page
47
Verify IOC Links for bletch Warning, EPICS IOC Application startup script startupE DOES NOT EXIST!!! Warning, invalid links have been found Finished checking symbolic links! ----------------------------------------- Finished creating IOC boot links! ------------------------------------- Note that this was an illegal IOC and a non-existant application. I had to go delete the ...ioc/bletch subdirectory after this. You can see from this that the existing IOC support areas are changed with this command. This would typically be done with an existing CDVWx, for example. ***** IT IS NOT CLEAR TO ME HOW THIS BOOTLINK KNOWS HOW TO GET YOUR CODE IN YOUR DIRECTORY! ****** 4) Put the fixed code and/or databases back into CVS See the CVS document for full details, but: “Cvs commit ioc” will probably work. You can also clean-up your reservation with: “Cvs release ioc”. You can then delete the working directory in your area, if you wish (rm –r work) Then update the reference areas, with something like: >cd $CD_IOC/ref/epics/R3.13.6/ioc/bicAPp >cvs update Then do a make to produce the newest, best code and databases in the production area: >gmake These last few steps need to be done for all the relevant epics versions (mostly .2 and .6). 5) Test again from the production area As (3) above. 6) Move the code to the production machine This will be an automated procedure someday. Now I typically FTP or SCP the new files to the production area on the gateway machine. I typically log in to gateway 0 as cddev and FTP back to the development machine to fetch things. The gateway directory of interest for code is: $CD_SOFT/ioc/prod/bin/mv167 (with different subdirectories for different CPUs). For databases:
Basic Users Guide
Basic Users Guide
Date
12/20/05 3:17 PM Rev
8 Page
48
$CD_SOFT/ioc/prod/db For database definitions: $CD_SOFT/ioc/prod/dbd 7) Retest At this time we are converting from the “old” or “3.13.2” support areas to the “new” or “3.13.6” areas. An overview of a few characteristics of these areas is seen below. The differentiation is between the PEP-II LLRF application and “others”, typified by the BIC: Version Path on development machine Notes “Old” LLRF
3.13.1 /afs/slac/g/pepii/llrf/ctrl/R3.13.1/epicsApp Venerable production version
3.13.2 As above, but 3.13.2 Used in development only “New” LLRF
3.13.1 Same as below, but 3.13.1 Backup production version
3.13.2 Same as below, but 3.13.2 Just in case 3.13.6 /afs/slac/g/cd/soft/ioc/prod/rfApp,
also known as: /afs/slac/g/cd/soft/ref/epics /R3.13.6/ioc/rfApp
Current production version, pointed at by $RF
“Old” BIC
3.13.2 /afs/slac/g/pepii/bic/ctrl/dev/epicsApp Venerable production version
“New” BIC
3.13.2 Same as below, but 3.13.2 Backup production version
3.13.6 /afs/slac/g/cd/soft/ioc/prod/bicApp, also known as: /afs/slac/g/cd/soft/ref/epics/ R3.13.6/ioc/bicApp
Planned production version, pointed at by $BIC
The rest of this sheet has dealt only with the “new” setup, since the “old” is handled very differently, and since we really, really want to be off the old support completely! 7) Editing Displays http://www.slac.stanford.edu/grp/cd/soft/pg/Displays.html 8) Setup scripts http://www.slac.stanford.edu/grp/cd/soft/share/slaconly/how-to/epicsSetup.html 9) (Future) deployment A document to describe the environment settings necessary to use ESD's software deployment facility is in http://www.slac.stanford.edu/grp/cd/soft/pg/ReleaseSetup.html. Gmake - builds in ref Gmake dev - moves to dev dir on AFS
Basic Users Guide
Basic Users Guide
Date
12/20/05 3:17 PM Rev
8 Page
49
Distdev - distribute files listed in manifest to dev dir on production Gmake new - moves to new dir on AFS Distnew - distribute files listed in manifest to new dir on production Gmake prod - moves to prod dir on AFS. Distprod - distribute files listed in manifest to prod dir on production
Basic Users Guide
Basic Users Guide
Date
12/20/05 3:17 PM Rev
8 Page
50
13. Release Announcements This chapter lists items to think about when advertising a new release.
13.1. Whom to inform and when A day or two before a major release, obviously inform interested users of your software, and those whose software will possibly be affected. Just before any release, even small ones, send an email message to [email protected] (see below). This is a heads-up to other developers who may have released, or are thinking of releasing, to the same directory, because any one release in a directory sweeps all the other partial releases along with it. Also, it allows other programmers, who may be chasing a released bug, or other problem, after your release, to eliminate your release from the list of potential causes of their problem.
13.2. The release announcement email message After you have tested your changes, but before you cvs commit your changes and start the release process, send email to “sw_release”. Include the following:
1. In general terms, describe the function of your new release. Target this to the physicists and other users, or colleagues in the software group
2. Which directory you are going to release (e.g. common/tool). To which level (e.g. NEW) for the same reason as above
3. What type of files are releasing (e.g. scripts, EPICS displays) 4. Individual filenames only if they will be recognized by anyone and are
particularly important. Remember the release log lists all the files being released 5. Roughly when you intend to start.
For example, from a development unix host you might type: mail [email protected] Subject: Release of common/tool to NEW this afternoon This afternoon I would like to release common/tool to NEW to add argument checking to the trimfile script. CTRL-D
Basic Users Guide
Basic Users Guide
Date
12/20/05 3:17 PM Rev
8 Page
51
14. Putting a directory in CVS This chapter describes the procedure for putting files into the Software Group’s “Version Control System”. Note that, putting the files in CVS is not enough to make it so they can be released using the new release procedures. If you want release support, then you will additionally have to add the directories you put in CVS to the release procedure support system (see 15 below). Additionally, this doesn’t cover IOC software, which uses CVS tags to keep track of which files go with which version of EPICS. Since this document only covers the “new” development environment, it only covers the procedure for software going into the CVS repository whose directory root is at /afs/slac/g/cd/soft/cvs/ ($CD_SOFT/cvs).
14.1. In Outline and Preparation We shall use the cvs import command, described at http://www.cvshome.org/docs/manual/cvs-1.11.6/cvs_13.html#SEC105. Import does whole directories at a time, not individual files, and must be run from the directory which already contains the files you want to import. You tell it where to put the directory in the CVS repository.
14.2. Basic Setup Requirements Make sure environment variable CVSROOT is set to /afs/slac/g/cd/soft/cvs (printenv CVSROOT). If it is not, source $CD_SCRIPT/cvsSetEnv.csh
14.3. Create or review the directory to be imported into CVS Check that there are no files in the directory to be imported that you don’t want in CVS. The import command will ignore and not import only those files which match any pattern in the CVSIGNORE environment variable, so you may want to change that: printenv CVSIGNORE
O.* *~ *.class
14.3.1. Importing from an Existing $CD_SOFT/ref Directory If the directory you want to import into CVS is already in our reference area under ($CD_SOFT/ref), then bear in mind that to re-create the reference directory you have to delete what’s in there to do the initial checkout. So, it’s a good idea to copy the files out of the existing ref directory, to a temporary working directory, and import them from there. E.g., to import into CVS, all the files in all the directories under $CD_SOFT/ref/common/sys-admin/: mkdir work
cd work
cp –R $CD_SOFT/common/sys-admin/* .
14.4. Import the Directory From the directory that contains the files to be imported, issue the cvs import command. It takes 3 important arguments:
Basic Users Guide
Basic Users Guide
Date
12/20/05 3:17 PM Rev
8 Page
52
1. The CVS directory you want to create. This will define where the software you import will reside in our CVS tree (under $CD_SOFT/cvs), and therefore also where it will reside in our reference area (under $CD_SOFT/ref). For instance, if you say cvs import common/tool, CVS will take all the files in the working directory (like ~/work) and put them in $CD_SOFT/cvs/common/tool/.
2. "vendor tag" is a free form text string . Our standard for this tag is CD_SOFT, when we're the vendors.
3. "release tag", is also a free form text string you're supposed to use to identify the version release id of the software you're putting in CVS. For EPICS software, we use a release tag like R3_13_6, for all other software, for the initial release, we use R1_0.
Having worked out the right arguments, issue the cvs import command. The example below includes an in-line cvs comment. For instance, if ~/work contains all the files you want to import, then from ~/work, issue: cvs import –m “Admin tools” common/sys-admin CD_SOFT R1_0
Check the output to verify it imported all the files you want, and no more.
14.5. Check the Reference Directory Unless your import was under module “epics” (CD_SOFT/ref/epics) our cvs management scripts should have taken care of creating the new directory in $CD_SOFT/ref for you. Otherwise, for epics, you should go to $CD_SOFT/and make the first checkout: cd $CD_SOFT/ref
cvs checkout epics/yourdir
cvs release epics/yourdir From this point on, the release scripts will keep the release directory up to date.
14.6. Check Releasing Still Works If the directory you imported was not handled by the release procedure, you’re all done. If it was, then you should check releasing still works: mail [email protected]
gmaketst common/sys-admin
gmakedev common/sys-admin
gmakenew common/sys-admin
Basic Users Guide
Basic Users Guide
Date
12/20/05 3:17 PM Rev
8 Page
53
15. Converting Software to new Release Support This chapter describes how you convert a directory that does have makefiles in it that conform to the old release support system, to the new one. This is basically a matter of editing the two makefiles, Makefile and Makefile.Host, so that they use the new makefile include files, those in $CD_SOFT/ref/common/make, rather than those in $CD_SOFT?ref/common/build, and to change their build root (removing one set of ../).
15.1. Basic Setup Requirements and Preliminaries If your login process has not already done so, setup the basic environment with source /afs/slac/g/cd/soft/dev/script/ENVS.csh.
Make sure environment variable CVSROOT is set to /afs/slac/g/cd/soft/cvs (printenv CVSROOT). If it is not, source $CD_SCRIPT/cvsSetEnv.csh This procedure incorporates doing a release to check that the conversion worked, so mail sw_release, to tell them what you are doing (see 6 above).
15.2. cvs checkout Checkout the directory to be converted (if it’s not in CVS yet, do that first, see 14 above). For instance, to convert the files in reference directory $CD_SOFT/ref/common/sys-admin to being released through the new system: cd
mkdir work
cd work
cvs checkout common/sys-admin
15.3. Convert makefiles Edit the makefiles. There are two makefiles used in both the old and new systems, sinc eboth are based on the EPICS application makefile system: To both Makefile, and Makefile.Host, make the following 4 edits: Remove one set of ../ from the definition of $(TOP) Insert the macro definition INCMK=$(CD_COM_MAKE) Replace ../../etc/CONFIG_BASE with $(INCMK)/CONFIG_BASE Replace ../../etc/RULES_ARCHS with $(INCMK)/RULES_ARCHS Check the makefiles build the directory: gmake
Verify that the makefiles created the right install directories and that they were created in the directory from which you did the cvs checkout. For instance, in this example we did the cvs checkout in ~/work, so we should have install directories like ~/work/script/ and ~/work/sun4-solaris2/.
15.4. Release using the new scheme If everything looks right, cvs commit the changes to the makefiles, and do a release:
Basic Users Guide
Basic Users Guide
Date
12/20/05 3:17 PM Rev
8 Page
54
mail [email protected]
cvs commit
cd $CD_SOFT/ref/common/sys-admin
gmaketst
gmakedev
gmakenew
Basic Users Guide
Basic Users Guide
Date
12/20/05 3:17 PM Rev
8 Page
55
16. Sweep This chapter describes how to perform the weekly “sweep”. A programmer typically releases their software up to the NEW stage of release, which, as described in previous sections, puts their code, displays, and other files, in a directory named $CD_SOFT/new/ on both production and development machines. Those “NEW” directories are used as a beta-testing area for the software, since they are in the PATH of all processes running the control system. The so called “sweep” procedure, completes the release process, by moving all those files which have been released to NEW, into PROD, and deleting them from NEW (hence the term “sweep”). Specifically it moves all the files in $CD_SOFT/new/ to $CD_SOFT/prod/ on development machines and if those files are also named in a manifest file, they are also copied to the production host’s $CD_SOFT/prod/ (and deleted from production’s $CD_SOFT/new/). The sweep is typically carried out once a week, usually Monday morning and is usually carried out by the group’s admin assistant. That person performs the following steps:
16.1. Sweep Procedure Log onto cddev on a development (AFS) node. Then issue the following commands: source /afs/slac/g/cd/soft/dev/script/ENVS.csh
klog17
sweep
The sweep will produce a log file, in $CD_SOFT/log/sweep.log, and send email to the group when it has completed.
17 It’s very likely you don’t have to klog. The rules for whether you do involve whether you, as the user who logged into cddev, are a member of the cddev:cddev AFS group, and whether you made an authenticated login or not. The safe thing to do, if you do not do the sweep often, is to klog. See the Principles of Design.