Basic User's Guide · Basic User's Guide MFC-J480DW Online User's Guide This Basic User's Guide...
77
Basic User's Guide MFC-J480DW Online User's Guide This Basic User's Guide contains basic instructions and information for your Brother machine. For more advanced instructions and information, see the Online User's Guide at solutions.brother.com/manuals
Transcript of Basic User's Guide · Basic User's Guide MFC-J480DW Online User's Guide This Basic User's Guide...
Basic User's GuideMFC-J480DW
Online User's GuideThis Basic User's Guide contains basicinstructions and information for your Brothermachine.For more advanced instructions andinformation, see the Online User's Guide atsolutions.brother.com/manuals

If you need to call Customer Service
Please complete this information for future reference:
Model Number: MFC-J480DW
Serial Number: 1
Date of Purchase:Place of Purchase:
1 The serial number is on the back of the machine. Retain this User’s Guide with your salesreceipt as a permanent record of your purchase, in the event of theft, fire or warrantyservice.
Register your product online at
http://www.brother.com/html/registration
© 2015 Brother Industries, Ltd. All rights reserved.
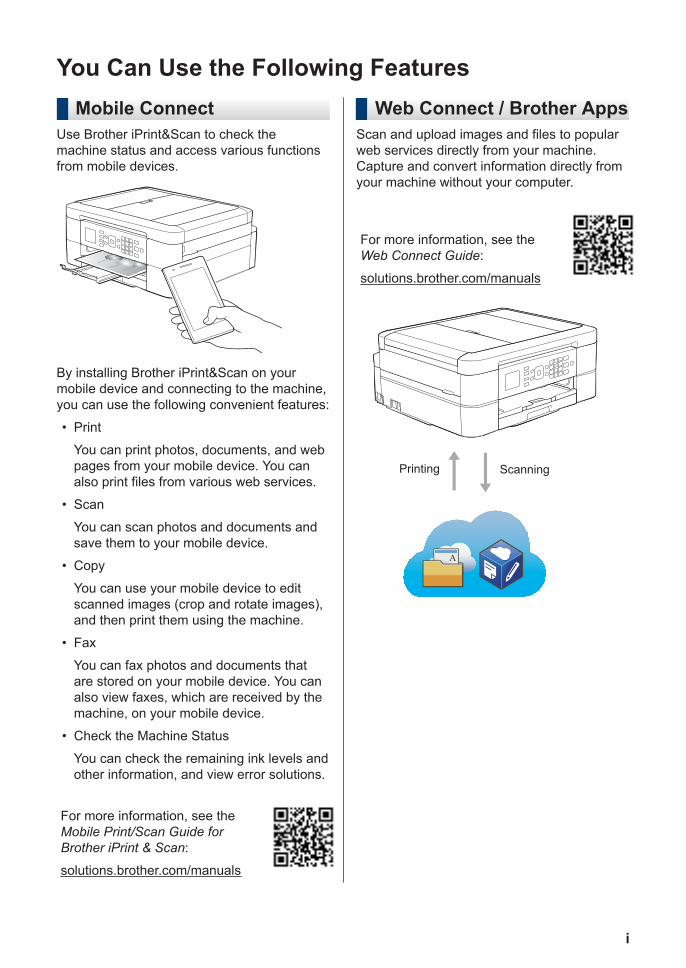
You Can Use the Following FeaturesMobile Connect
Use Brother iPrint&Scan to check themachine status and access various functionsfrom mobile devices.
By installing Brother iPrint&Scan on yourmobile device and connecting to the machine,you can use the following convenient features:
You can print photos, documents, and webpages from your mobile device. You canalso print files from various web services.
• Scan
You can scan photos and documents andsave them to your mobile device.
• Copy
You can use your mobile device to editscanned images (crop and rotate images),and then print them using the machine.
• Fax
You can fax photos and documents thatare stored on your mobile device. You canalso view faxes, which are received by themachine, on your mobile device.
• Check the Machine Status
You can check the remaining ink levels andother information, and view error solutions.
For more information, see theMobile Print/Scan Guide forBrother iPrint & Scan:
solutions.brother.com/manuals
Web Connect / Brother AppsScan and upload images and files to popularweb services directly from your machine.Capture and convert information directly fromyour machine without your computer.
For more information, see theWeb Connect Guide:
solutions.brother.com/manuals
Printing Scanning
i

User's Guides and Where to Find ThemWhich Guide? What's in It? Where Is It?
Product Safety Guide Read this Guide first. Please read the SafetyInstructions before you set up your machine.See this Guide for trademarks and legallimitations.
Printed / In the box
Quick Setup Guide Follow the instructions for setting up yourmachine, and installing the drivers andsoftware for the operating system andconnection type you are using.
Printed / In the box
Basic User's Guide Learn the basic PC-Print, Scan, Copy andFax operations and basic machinemaintenance. See troubleshooting tips.
Printed / In the box
Online User's Guide This guide includes the additional contents ofthe Basic User’s Guide.
In addition to information about the PC-Print,Scan, Copy, Fax and Brother ControlCenteroperations, useful information is includedabout using the machine on a network.
HTML and PDF file /Brother SolutionsCenter 1
Web Connect Guide This Guide provides useful information aboutaccessing Internet services from the Brothermachine, as well as downloading images,printing data and uploading files directly toInternet services.
PDF file / BrotherSolutions Center 1
AirPrint Guide This Guide provides information for usingAirPrint to print from OS X v10.8.5 or laterand your iPhone, iPod touch, iPad, or otheriOS device to your Brother machine withoutinstalling a printer driver.
PDF file / BrotherSolutions Center 1
Google Cloud Print Guide This Guide provides details about how to useGoogle Cloud Print™ services for printingover the Internet.
PDF file / BrotherSolutions Center 1
Mobile Print/Scan Guidefor Brother iPrint&Scan
This Guide provides useful information aboutprinting from your mobile device, andscanning from your Brother machine to yourmobile device when connected to a Wi-Fi®network.
PDF file / BrotherSolutions Center 1
1 Visit solutions.brother.com/manuals.
ii
Basic Operations and Where to Find InstructionsThe contents of the Basic User's Guide are also included in the Online User's Guide with moredetails.
Features Contents Guide
Setup Load paper Basic User's Guide
Connect the machine to your computer Quick Setup Guide
Connect the machine to your mobiledevice
Quick Setup Guide
Copy Copy a document Basic User's Guide
Various types of copies (2-sided copies,and so on)
Online User's Guide
Print Print from your computer (Windows®/Macintosh)
Basic User's Guide
Print from your mobile device (BrotheriPrint&Scan)
Mobile Print/Scan Guide
Print using the AirPrint function AirPrint Guide
Print using the Google Cloud Printfunction
Google Cloud Print Guide
Print data downloaded from a cloudservice
Web Connect Guide
Fax Send and receive a fax Basic User's Guide
Transfer a fax to your computer Online User's Guide
Send and receive a fax using yourcomputer
Basic User's Guide
Send and view a fax using your mobiledevice (Brother iPrint&Scan)
Mobile Print/Scan Guide
Scan Scan from the machine Basic User's Guide
Scan from your computer Basic User's Guide
Scan from your mobile device (BrotheriPrint&Scan)
Mobile Print/Scan Guide
Save scanned data to a cloud service Web Connect Guide
Additionalinformation
Error messages Basic User's Guide
Troubleshooting Basic User's Guide
Specifications Online User's Guide
iii
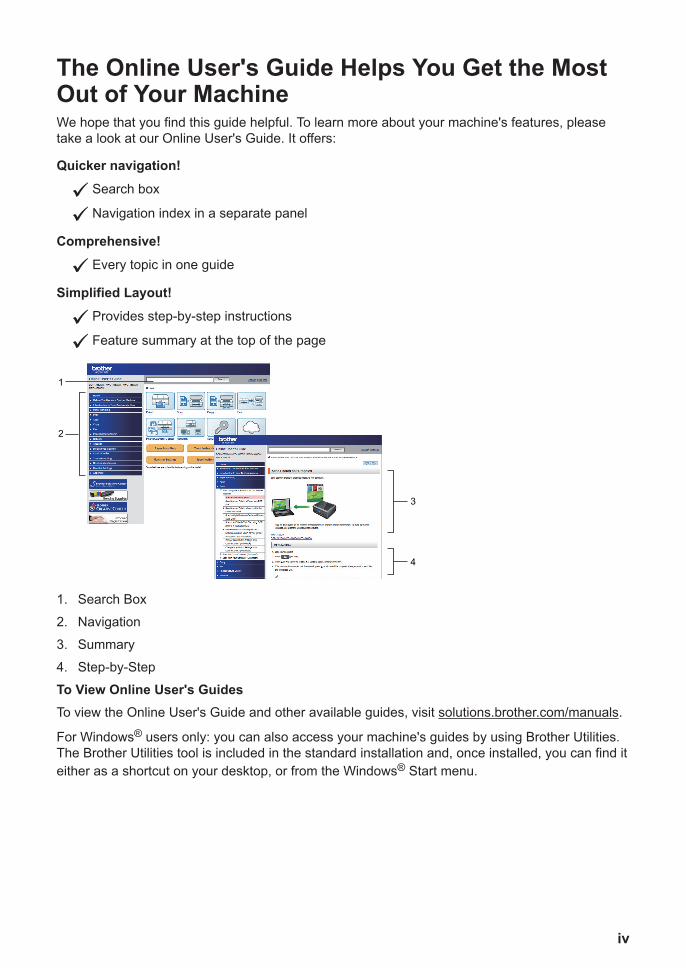
The Online User's Guide Helps You Get the MostOut of Your MachineWe hope that you find this guide helpful. To learn more about your machine's features, pleasetake a look at our Online User's Guide. It offers:
Quicker navigation!
Search box
Navigation index in a separate panel
Comprehensive!
Every topic in one guide
Simplified Layout!
Provides step-by-step instructions
Feature summary at the top of the page
1
2
3
4
1. Search Box
2. Navigation
3. Summary
4. Step-by-Step
To View Online User's GuidesTo view the Online User's Guide and other available guides, visit solutions.brother.com/manuals.
For Windows® users only: you can also access your machine's guides by using Brother Utilities.The Brother Utilities tool is included in the standard installation and, once installed, you can find iteither as a shortcut on your desktop, or from the Windows® Start menu.
iv
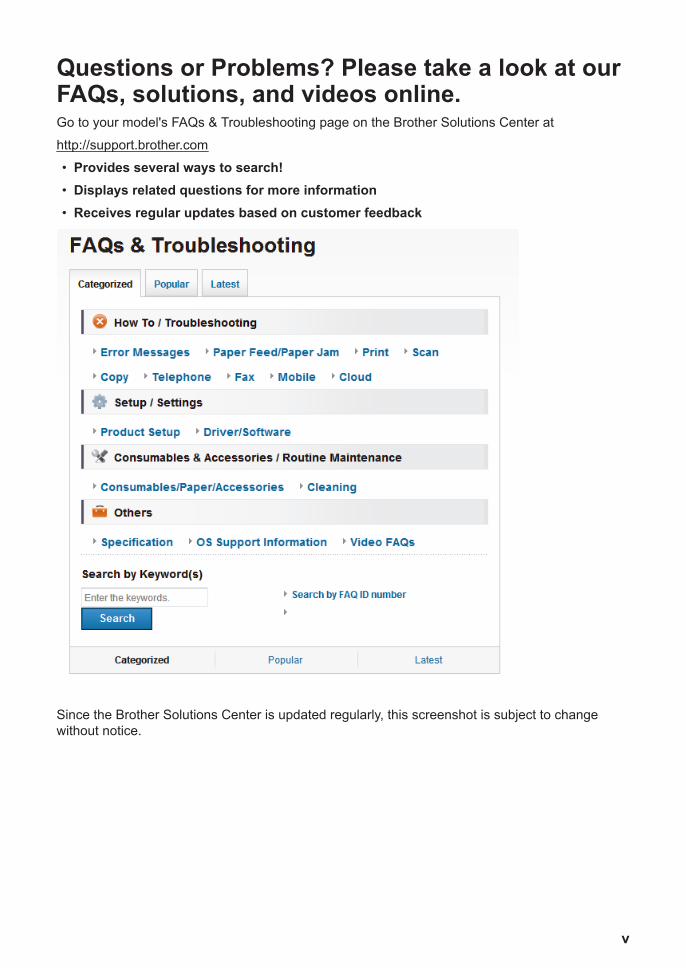
Questions or Problems? Please take a look at ourFAQs, solutions, and videos online.Go to your model's FAQs & Troubleshooting page on the Brother Solutions Center at
http://support.brother.com
• Provides several ways to search!• Displays related questions for more information• Receives regular updates based on customer feedback
Since the Brother Solutions Center is updated regularly, this screenshot is subject to changewithout notice.
v
Definitions of NotesWe use the following symbols and conventions throughout this User's Guide:
IMPORTANTIMPORTANT indicates a potentially hazardous situation which, if not avoided, may result indamage to property or loss of product functionality.
NOTENOTE specifies the operating environment, conditions for installation, or special conditions ofuse.
Tips icons provide helpful hints and supplementary information.
BoldBold style identifies buttons on the machine's control panel or computer screen.
ItalicsItalicised style emphasises an important point or refers you to a related topic.
[Courier New]Courier New font identifies messages shown on the machine's LCD.
• Most of the illustrations in this User's Guide show the MFC-J480DW.
vi

For the Latest Driver UpdatesGo to your model's Downloads page on the Brother Solutions Center athttp://support.brother.com to download drivers.
To keep your machine’s performance up-to-date, check there for the latest firmware upgrades.
Compilation and Publication NoticeThis manual has been compiled and published to provide the latest product safety information atthe time of publication. The information contained in this manual may be subject to change.
For the latest manual, visit us at solutions.brother.com/manuals.
vii
1 General Information ............................................................................................ 1
Control Panel Overview.............................................................................................1
LCD Overview ...........................................................................................................5
Access Brother Utilities (Windows®) .........................................................................6Uninstall the Brother Software and Drivers (Windows®) .................................6
2 Paper Handling .................................................................................................... 7
Load Paper ................................................................................................................7Load paper in the paper tray............................................................................7Change the Check Paper Size Setting ............................................................9
Change the Paper Size and Paper Type...................................................................9
Recommended Print Media .....................................................................................10
Handle and Use Print Media....................................................................................10
3 Print .....................................................................................................................11
Print from Your Computer........................................................................................11Print a Document (Macintosh) .......................................................................11Print a Document (Windows®) .......................................................................11Print on Both Sides of the Paper Automatically (Automatic 2-sidedPrinting) (Windows®) .....................................................................................11Print More Than One Page on a Single Sheet of Paper (N in 1)(Windows®)....................................................................................................12Print Photos from ControlCenter4 (Windows®) .............................................12
4 Copy ................................................................................................................... 14
Copy a Document ...................................................................................................14
Copy Settings ..........................................................................................................15Copy Options .................................................................................................15
5 Scan.................................................................................................................... 17
Scan from Your Computer (Windows®) ...................................................................17Scan Using ControlCenter4 Home Mode (Windows®) ..................................17
Scan Using the Scan Button on Your Brother Machine...........................................18Scan Using the Scan Button on the Machine ................................................18
6 Fax ...................................................................................................................... 20
Before Faxing ..........................................................................................................20Set Your Station ID ........................................................................................20Telephone Line Interference/VoIP..................................................................20Receive Modes ..............................................................................................21Choose the Correct Receive Mode................................................................22
Table of Contents
viii
Set the F/T Ring Time (Pseudo/Double-ring).................................................24Set the Number of Rings Before the Machine Answers (Ring Delay) ...........24
Store Numbers ........................................................................................................25Store Address Book Numbers .......................................................................25Change or Delete Address Book Names or Numbers ...................................25
Telephone Services and External Devices ..............................................................27Voice Mail ......................................................................................................27Distinctive Ring (For some countries)............................................................27FaxAbility (For New Zealand) ........................................................................27Voice Over Internet Protocol (VoIP)...............................................................27Connection of an External Telephone Answering Device (TAD)....................27External and Extension Telephones ..............................................................27
Fax Using Your Machine .........................................................................................28Send a Fax ....................................................................................................28
Fax Using Your Computer (PC-FAX).......................................................................30Send Faxes from Your Computer ..................................................................30Receive Faxes on Your Computer (Windows® only) .....................................30
A Routine Maintenance ........................................................................................ 32
Clean the Scanner...................................................................................................32
Check the Print Quality............................................................................................32
Check the Print Alignment from Your Brother Machine ...........................................34
B Troubleshooting ................................................................................................ 35
Identify the Problem.................................................................................................35
Error and Maintenance Messages...........................................................................37Transfer Your Faxes or Fax Journal Report...................................................42
Troubleshooting for Wireless LAN setup .................................................................44Wireless LAN Report Error Codes.................................................................44
Fax and Telephone Problems..................................................................................46Troubleshooting for Other Fax Problems.......................................................47
Print or Scan Problems............................................................................................49Troubleshooting for Other Print Problems .....................................................51
Document and Paper Jams.....................................................................................52Document Jams.............................................................................................52Printer Jam or Paper Jam..............................................................................53
C Appendix ............................................................................................................ 60
Enter Text on Your Brother Machine........................................................................60
Supply Specifications ..............................................................................................62
D Index ................................................................................................................... 64
ix
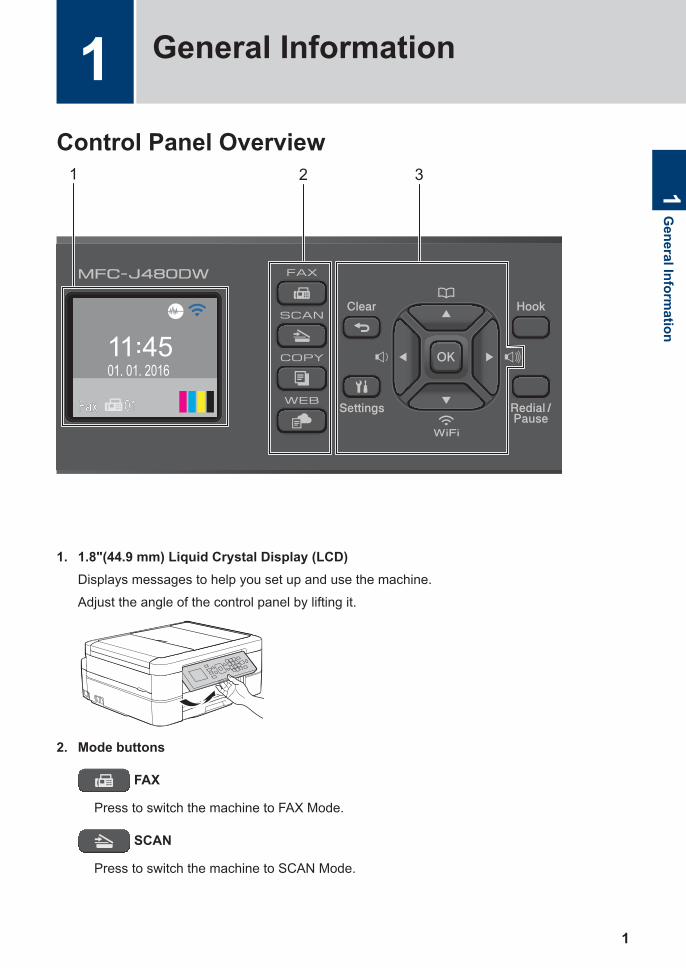
Control Panel Overview
01. 01. 2016
FaxFax 0101
321
1. 1.8"(44.9 mm) Liquid Crystal Display (LCD)Displays messages to help you set up and use the machine.
Adjust the angle of the control panel by lifting it.
2. Mode buttons
FAX
Press to switch the machine to FAX Mode.
SCAN
Press to switch the machine to SCAN Mode.
1 General Information1
General Inform
ation
1
COPY
Press to switch the machine to COPY Mode.
WEB
Press to switch the machine to WEB Mode.
3. Settings buttons
ClearPress to delete characters or to go back to the previous menu level.
SettingsPress to access the main menu.
OKPress to choose a setting.
d or c
Press to adjust the ring volume while the machine is idle.
• Press to store Speed Dial and Group numbers in the machine's memory.
• Press to look up and dial numbers that are stored in the machine's memory.
Press to configure the wireless settings while the machine is idle.
a or bPress to scroll through the menus and options.
d or cPress to move the cursor left or right on the LCD.
2
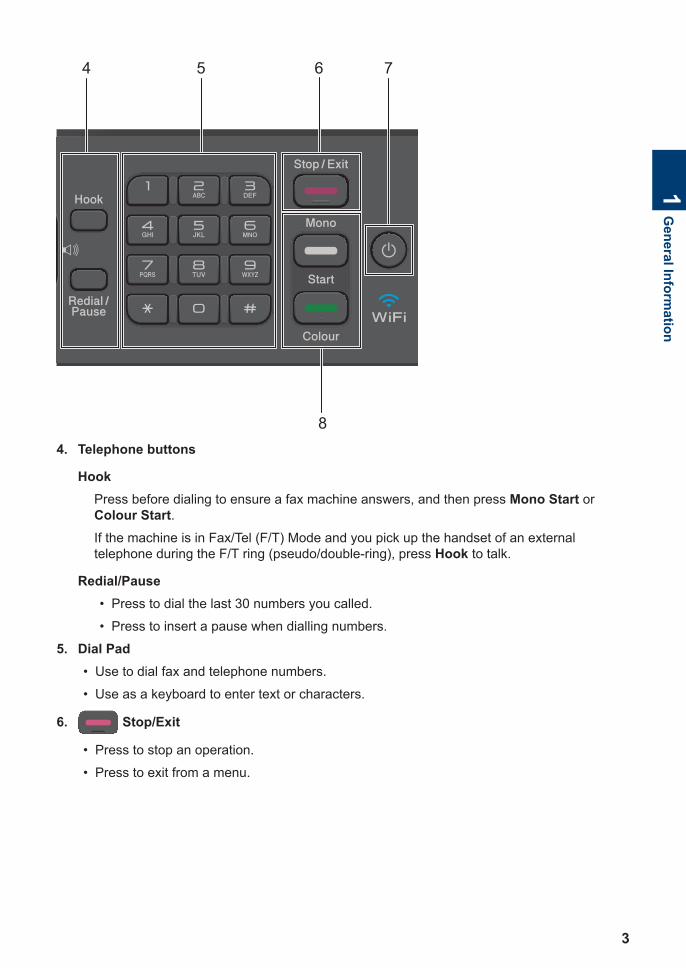
54
8
76
4. Telephone buttons
HookPress before dialing to ensure a fax machine answers, and then press Mono Start orColour Start.If the machine is in Fax/Tel (F/T) Mode and you pick up the handset of an externaltelephone during the F/T ring (pseudo/double-ring), press Hook to talk.
Redial/Pause• Press to dial the last 30 numbers you called.
• Press to insert a pause when dialling numbers.
5. Dial Pad• Use to dial fax and telephone numbers.
• Use as a keyboard to enter text or characters.
6. Stop/Exit
• Press to stop an operation.
• Press to exit from a menu.
1G
eneral Information
3
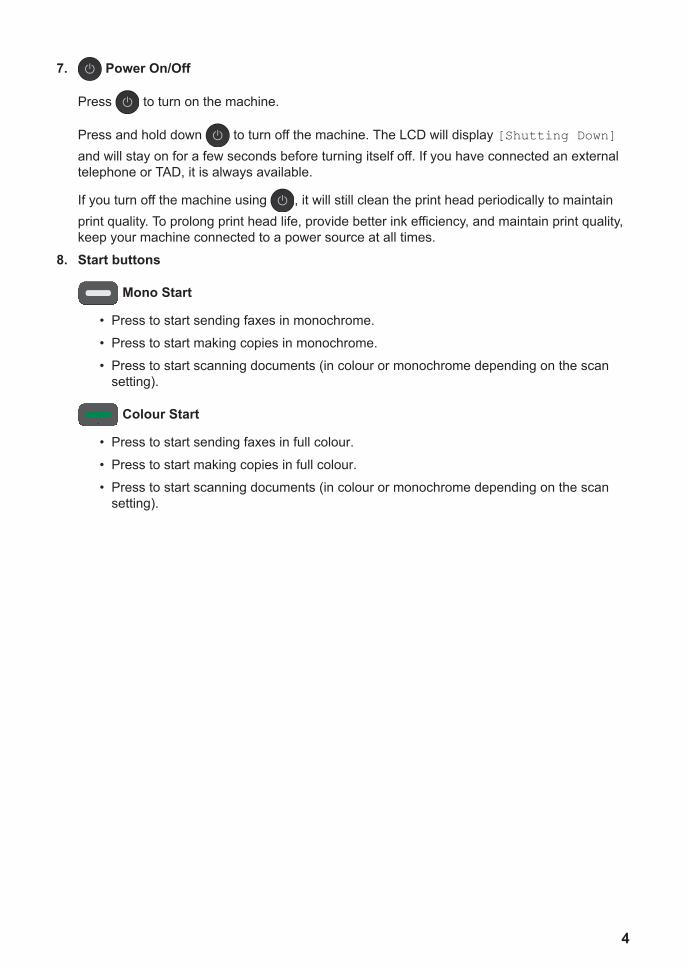
7. Power On/Off
Press to turn on the machine.
Press and hold down to turn off the machine. The LCD will display [Shutting Down]and will stay on for a few seconds before turning itself off. If you have connected an externaltelephone or TAD, it is always available.
If you turn off the machine using , it will still clean the print head periodically to maintainprint quality. To prolong print head life, provide better ink efficiency, and maintain print quality,keep your machine connected to a power source at all times.
8. Start buttons
Mono Start
• Press to start sending faxes in monochrome.
• Press to start making copies in monochrome.
• Press to start scanning documents (in colour or monochrome depending on the scansetting).
Colour Start
• Press to start sending faxes in full colour.
• Press to start making copies in full colour.
• Press to start scanning documents (in colour or monochrome depending on the scansetting).
4
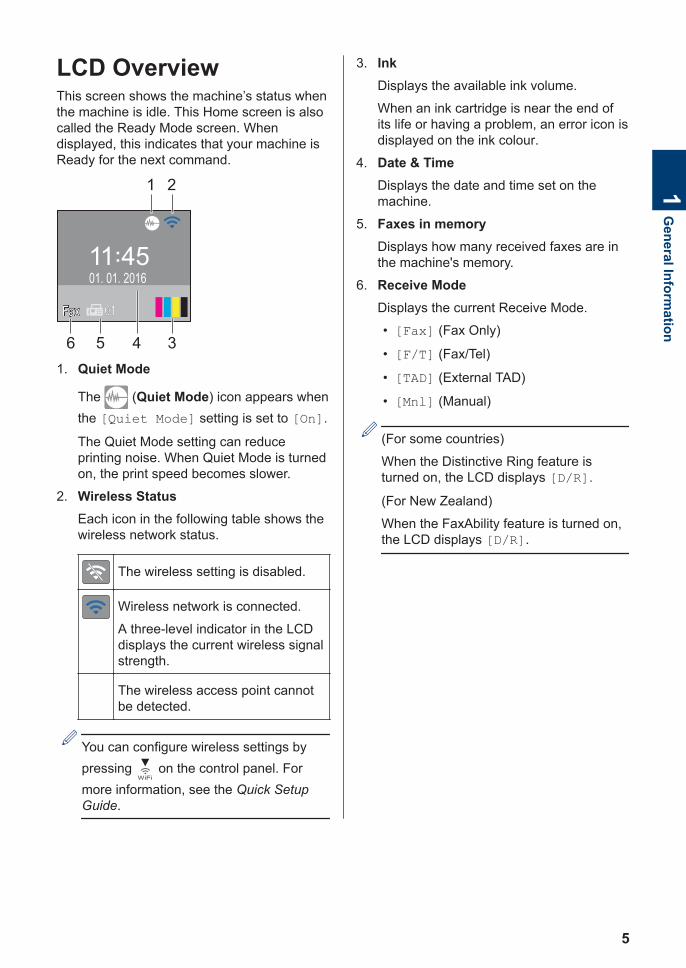
LCD OverviewThis screen shows the machine’s status whenthe machine is idle. This Home screen is alsocalled the Ready Mode screen. Whendisplayed, this indicates that your machine isReady for the next command.
01. 01. 2016
FaxFax 0101
1
346
2
5
1. Quiet Mode
The (Quiet Mode) icon appears whenthe [Quiet Mode] setting is set to [On].
The Quiet Mode setting can reduceprinting noise. When Quiet Mode is turnedon, the print speed becomes slower.
2. Wireless StatusEach icon in the following table shows thewireless network status.
The wireless setting is disabled.
Wireless network is connected.
A three-level indicator in the LCDdisplays the current wireless signalstrength.
The wireless access point cannotbe detected.
You can configure wireless settings bypressing on the control panel. Formore information, see the Quick SetupGuide.
3. InkDisplays the available ink volume.
When an ink cartridge is near the end ofits life or having a problem, an error icon isdisplayed on the ink colour.
4. Date & TimeDisplays the date and time set on themachine.
5. Faxes in memoryDisplays how many received faxes are inthe machine's memory.
6. Receive ModeDisplays the current Receive Mode.
• [Fax] (Fax Only)
• [F/T] (Fax/Tel)
• [TAD] (External TAD)
• [Mnl] (Manual)
(For some countries)
When the Distinctive Ring feature isturned on, the LCD displays [D/R].
(For New Zealand)
When the FaxAbility feature is turned on,the LCD displays [D/R].
1G
eneral Information
5

Access Brother Utilities(Windows®)Brother Utilities is an application launcherthat offers convenient access to all Brotherapplications installed on your computer.
1 Do one of the following:
• (Windows® XP, Windows Vista® andWindows® 7)
Click (Start) > All Programs >
Brother > Brother Utilities.
• (Windows® 8)
Tap or click (Brother Utilities)either on the Start screen or thedesktop.
• (Windows® 8.1)
Move your mouse to the lower leftcorner of the Start screen and click
(if you are using a touch-baseddevice, swipe up from the bottom ofthe Start screen to bring up the Appsscreen).
When the Apps screen appears, tapor click (Brother Utilities).
2 Select your machine.
3 Choose the operation you want to use.
Uninstall the BrotherSoftware and Drivers(Windows®)
1 Launch (Brother Utilities).
2 Click the drop-down list, and then selectyour model name (if not alreadyselected). Click Tools in the leftnavigation bar, and then click Uninstall.Follow the instructions in the dialog boxto uninstall the software and drivers.
6
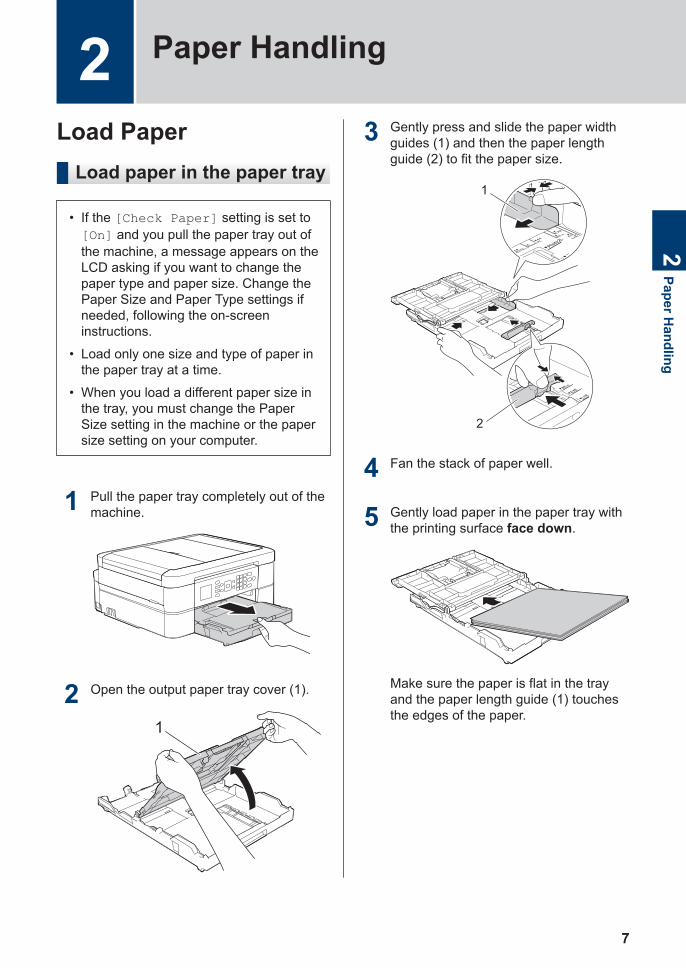
Load PaperLoad paper in the paper tray
• If the [Check Paper] setting is set to[On] and you pull the paper tray out ofthe machine, a message appears on theLCD asking if you want to change thepaper type and paper size. Change thePaper Size and Paper Type settings ifneeded, following the on-screeninstructions.
• Load only one size and type of paper inthe paper tray at a time.
• When you load a different paper size inthe tray, you must change the PaperSize setting in the machine or the papersize setting on your computer.
1 Pull the paper tray completely out of themachine.
2 Open the output paper tray cover (1).
1
3 Gently press and slide the paper widthguides (1) and then the paper lengthguide (2) to fit the paper size.
1
2
4 Fan the stack of paper well.
5 Gently load paper in the paper tray withthe printing surface face down.
Make sure the paper is flat in the trayand the paper length guide (1) touchesthe edges of the paper.
2 Paper Handling2
Paper Handling
7
1
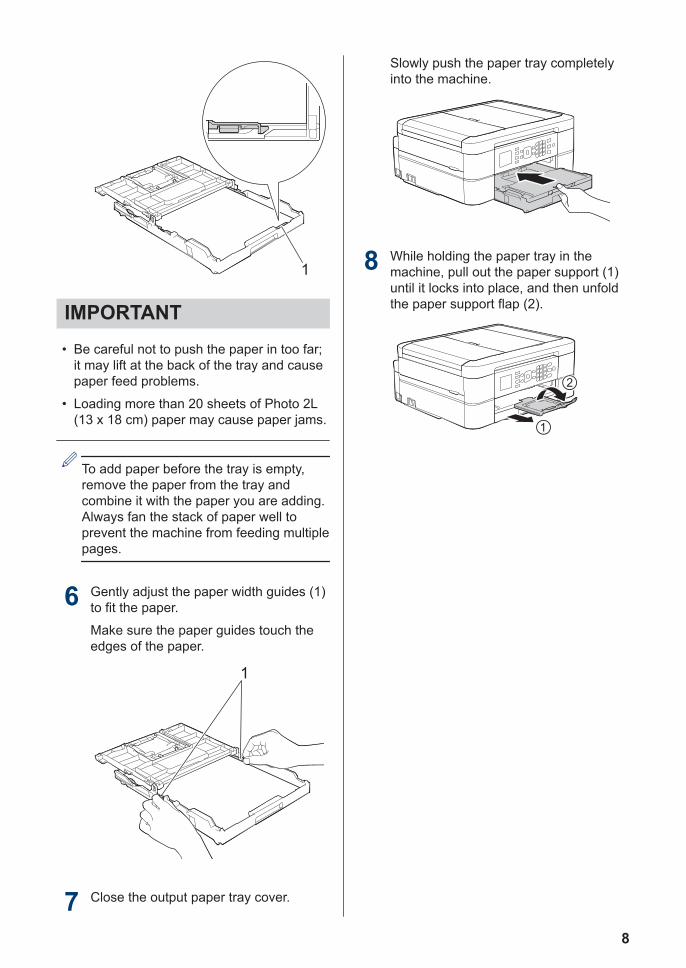
IMPORTANT• Be careful not to push the paper in too far;
it may lift at the back of the tray and causepaper feed problems.
• Loading more than 20 sheets of Photo 2L(13 x 18 cm) paper may cause paper jams.
To add paper before the tray is empty,remove the paper from the tray andcombine it with the paper you are adding.Always fan the stack of paper well toprevent the machine from feeding multiplepages.
6 Gently adjust the paper width guides (1)to fit the paper.
Make sure the paper guides touch theedges of the paper.
1
7 Close the output paper tray cover.
Slowly push the paper tray completelyinto the machine.
8 While holding the paper tray in themachine, pull out the paper support (1)until it locks into place, and then unfoldthe paper support flap (2).
2
1
8
Change the Check PaperSize Setting
If the Check Paper setting is set to [On] andyou pull the paper tray out of the machine, theLCD displays a message asking if you want tochange the Paper Size and Paper Typesettings.
The default setting is [On].
1 Press Settings.
2 Press a or b to select the following:
a. Select [General Setup].Press OK.
b. Select [Check Paper]. Press OK.
c. Select [On] or [Off]. Press OK.
3 Press Stop/Exit.
• Error and Maintenance Messages onpage 37
Related Information
Change the Paper Sizeand Paper TypeSet the Paper Size and Paper Type settingsfor the paper tray.
• To get the best print quality, set themachine for the type of paper you areusing.
• When you change the size of the paperyou load in the tray, you must change thePaper Size setting on the LCD at the sametime.
1 Press Settings.
2 Press a or b to select the following:
a. Select [General Setup].Press OK.
b. Select [Paper Type]. Press OK.
c. Select [Plain Paper], [InkjetPaper], [Brother BP71] or[Other Glossy]. Press OK.
d. Select [Paper Size]. Press OK.
e. Select the paper size option youwant, and then press OK.
3 Press Stop/Exit.
The machine ejects paper with the printedsurface face up onto the paper tray at thefront of the machine. When you useglossy paper, remove each sheet at onceto prevent smudging or paper jams.
• Error and Maintenance Messages onpage 37
Related Information
2Paper H
andling
9
Recommended PrintMediaFor the best print quality, we recommendusing the Brother paper listed in the table.
If Brother paper is not available in yourcountry, we recommend testing various papertypes before purchasing large quantities.
Brother paper
Paper Type Item
A4 Plain BP60PA
A4 Glossy Photo BP71GA4
A4 Inkjet (Matte) BP60MA
10 x 15 cm GlossyPhoto BP71GP
Handle and Use PrintMedia• Store paper in its original packaging and
keep it sealed. Keep the paper flat andaway from moisture, direct sunlight andheat.
• Avoid touching the shiny (coated) side ofphoto paper.
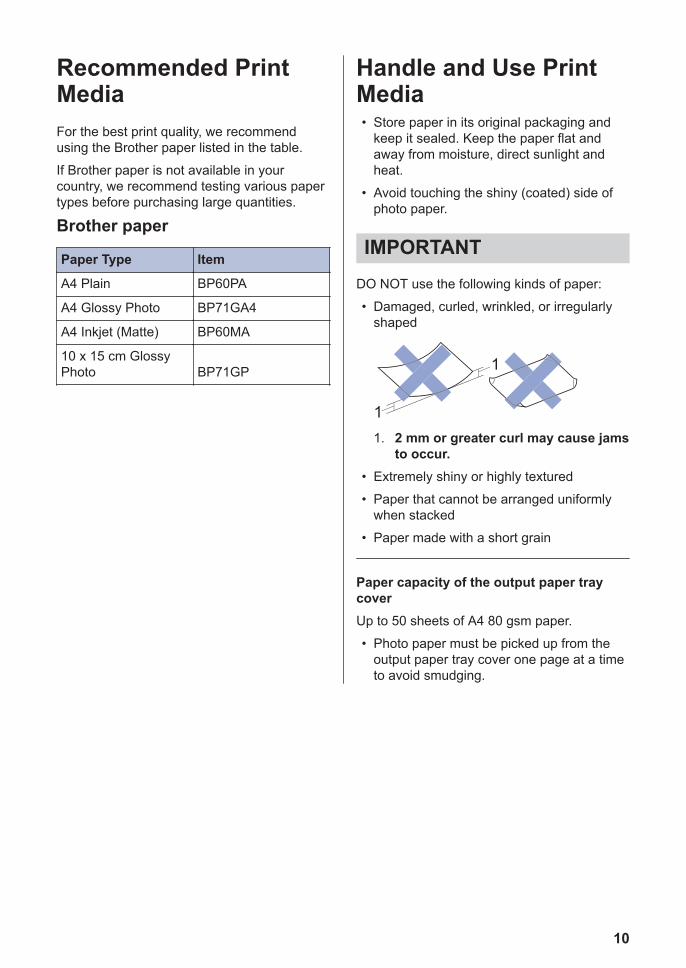
IMPORTANTDO NOT use the following kinds of paper:
• Damaged, curled, wrinkled, or irregularlyshaped
1
1
1. 2 mm or greater curl may cause jamsto occur.
• Extremely shiny or highly textured
• Paper that cannot be arranged uniformlywhen stacked
• Paper made with a short grain
Paper capacity of the output paper traycoverUp to 50 sheets of A4 80 gsm paper.
• Photo paper must be picked up from theoutput paper tray cover one page at a timeto avoid smudging.
10
Print from Your ComputerPrint a Document(Macintosh)
For printing instructions, see the Online User'sGuide: Print from Your Computer (Macintosh).
Print a Document(Windows®)
1 Select the print command in yourapplication.
2 Select Brother MFC-XXXX (whereXXXX is the name of your model).
3 Click Print.
4 Complete your print operation.
For more information, see the OnlineUser's Guide: Print from Your Computer(Windows®).
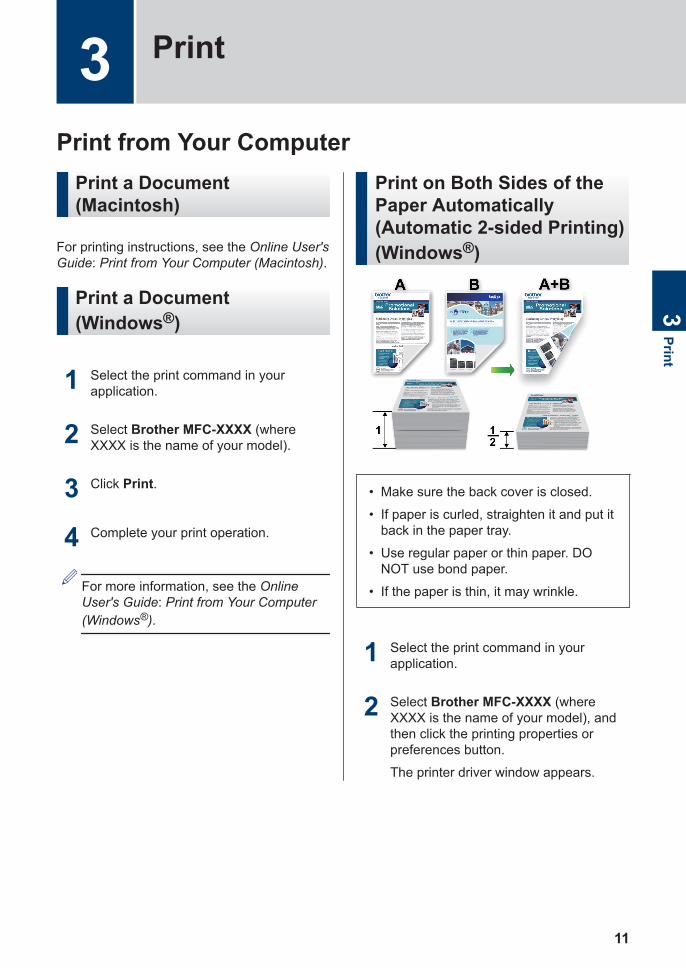
Print on Both Sides of thePaper Automatically(Automatic 2-sided Printing)(Windows®)
• Make sure the back cover is closed.
• If paper is curled, straighten it and put itback in the paper tray.
• Use regular paper or thin paper. DONOT use bond paper.
• If the paper is thin, it may wrinkle.
1 Select the print command in yourapplication.
2 Select Brother MFC-XXXX (whereXXXX is the name of your model), andthen click the printing properties orpreferences button.
The printer driver window appears.
3 Print3
11
3 In the Orientation field, select either thePortrait or Landscape option to set theorientation of your printout.
If your application software contains asimilar layout feature, we recommendusing the one in the application.
4 Click the 2-sided / Booklet drop-downlist, and then select 2-sided.
5 Click the 2-sided Settings button.
6 Select one of the options from the2‑sided Type menu.
7 Select the Binding Offset check box ifyou want to specify the offset for bindingin inches or millimetres.
8 Click OK to return to the printer driverwindow.
9 Change other printer settings if needed.
The Borderless feature is not availablewhen using this option.
10 Click OK again, and then complete yourprint operation.
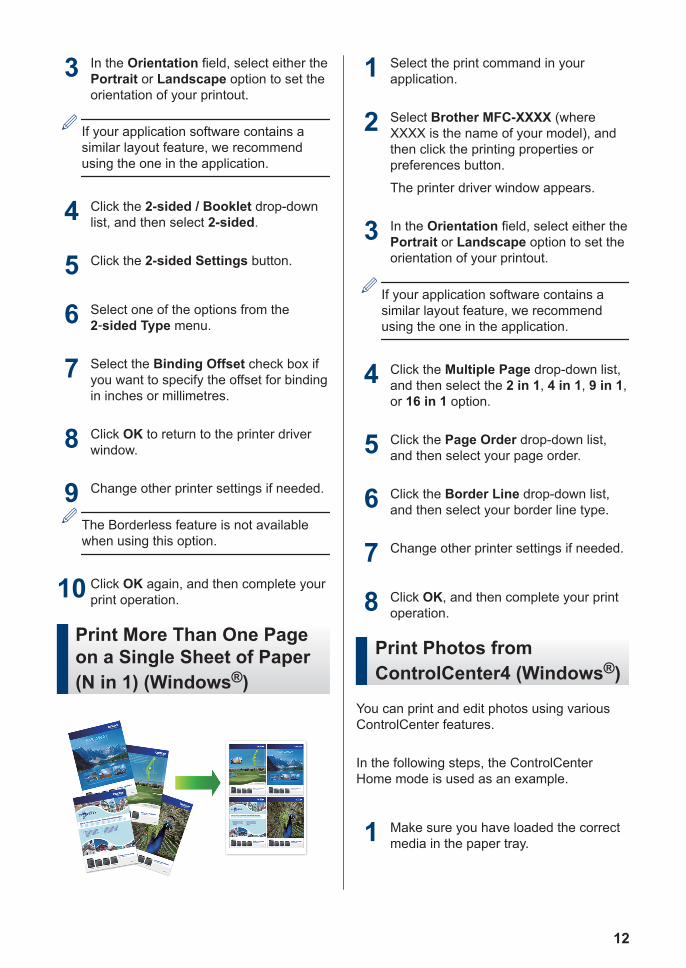
Print More Than One Pageon a Single Sheet of Paper(N in 1) (Windows®)
1 Select the print command in yourapplication.
2 Select Brother MFC-XXXX (whereXXXX is the name of your model), andthen click the printing properties orpreferences button.
The printer driver window appears.
3 In the Orientation field, select either thePortrait or Landscape option to set theorientation of your printout.
If your application software contains asimilar layout feature, we recommendusing the one in the application.
4 Click the Multiple Page drop-down list,and then select the 2 in 1, 4 in 1, 9 in 1,or 16 in 1 option.
5 Click the Page Order drop-down list,and then select your page order.
6 Click the Border Line drop-down list,and then select your border line type.
7 Change other printer settings if needed.
8 Click OK, and then complete your printoperation.
Print Photos fromControlCenter4 (Windows®)
You can print and edit photos using variousControlCenter features.
In the following steps, the ControlCenterHome mode is used as an example.
1 Make sure you have loaded the correctmedia in the paper tray.
12
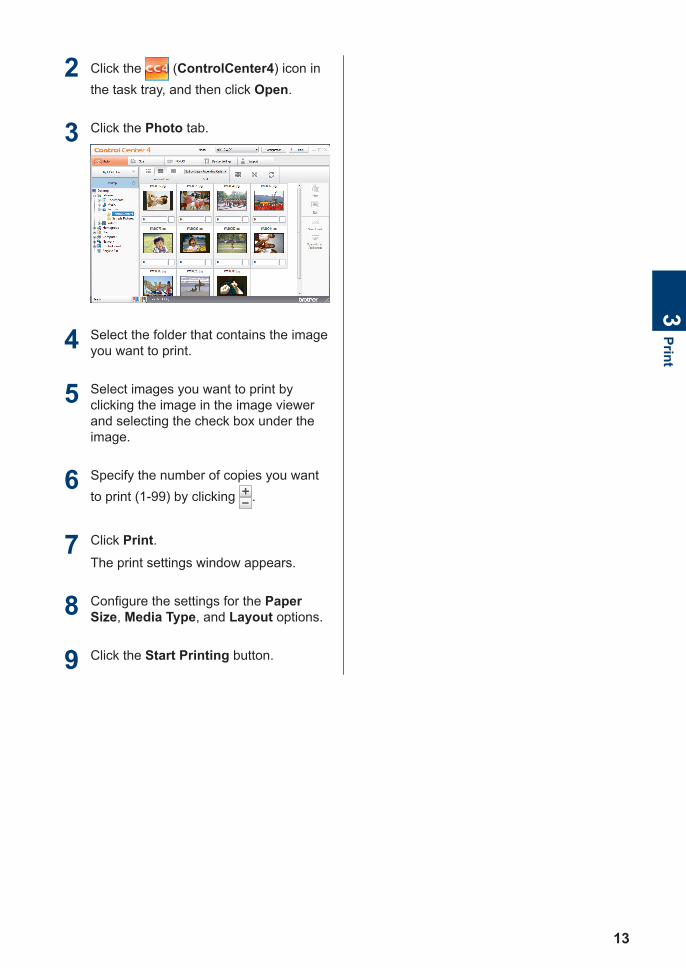
2 Click the (ControlCenter4) icon inthe task tray, and then click Open.
3 Click the Photo tab.
4 Select the folder that contains the imageyou want to print.
5 Select images you want to print byclicking the image in the image viewerand selecting the check box under theimage.
6 Specify the number of copies you wantto print (1-99) by clicking .
7 Click Print.The print settings window appears.
8 Configure the settings for the PaperSize, Media Type, and Layout options.
9 Click the Start Printing button.
3Print
13
Copy a Document
1 Make sure you have loaded the correctsize paper in the paper tray.
2 Do one of the following:
• Place the document face down onthe scanner glass.
• Place the document face down in theADF.
(If you are copying multiple pages,we recommend using the ADF.)
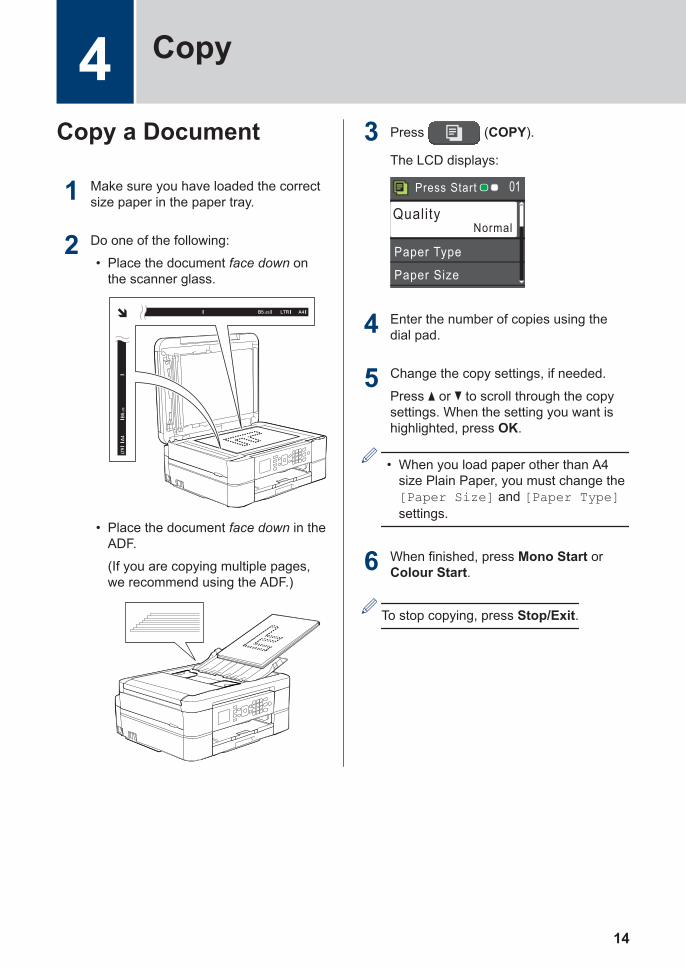
3 Press (COPY).
The LCD displays:
Press Start
NormalQuality
Paper Type
Paper Size
01
4 Enter the number of copies using thedial pad.
5 Change the copy settings, if needed.
Press a or b to scroll through the copysettings. When the setting you want ishighlighted, press OK.
• When you load paper other than A4size Plain Paper, you must change the[Paper Size] and [Paper Type]settings.
6 When finished, press Mono Start orColour Start.
To stop copying, press Stop/Exit.
4 Copy
14
Copy SettingsCopy Options
Option DescriptionQuality Select a copy resolution for your type of document.
• When you select the Normal option, Plain Paper is the onlyPaper Type option.
Paper Type Select a paper type.
If you are copying on special paper, set the machine for the type ofpaper you are using to get the best print quality.
Paper Size Select a paper size.
If you are copying on paper other than A4 size, you must change thePaper Size setting.
Enlarge/Reduce 100% -
Enlarge Select an enlargement ratio for thenext copy.
Reduce Select a reduction ratio for the nextcopy.
Fit to Page Adjusts the copy size to fit on thepaper size you have set.
Custom(25-400%) Enter an enlargement or reductionratio.
Density Increase the density to make the text darker.
Decrease the density to make the text lighter.
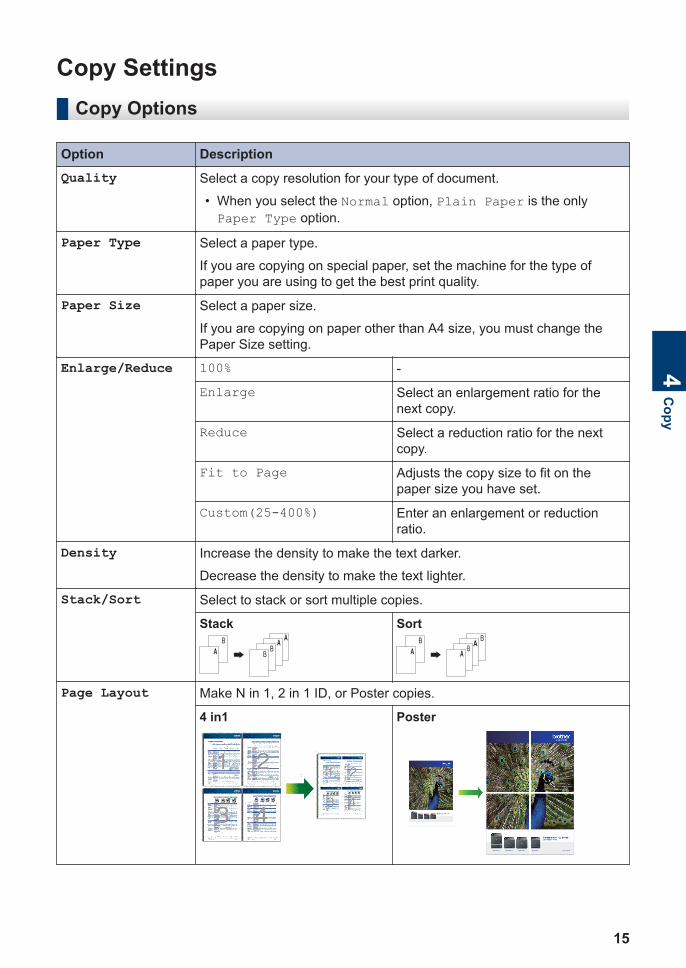
Stack/Sort Select to stack or sort multiple copies.
Stack
B
B
A BBAA
SortB
AB
B
A A
Page Layout Make N in 1, 2 in 1 ID, or Poster copies.
4 in1 Poster
4C
opy
15
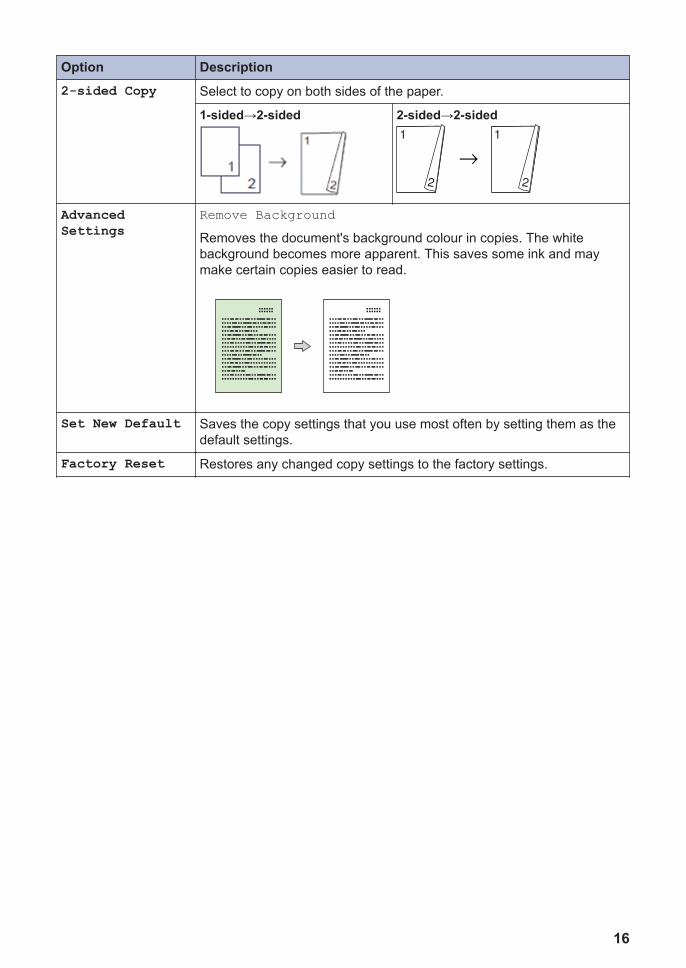
Option Description2-sided Copy Select to copy on both sides of the paper.
1-sided→2-sided 2-sided→2-sided11
2
11
2
AdvancedSettings
Remove BackgroundRemoves the document's background colour in copies. The whitebackground becomes more apparent. This saves some ink and maymake certain copies easier to read.
Set New Default Saves the copy settings that you use most often by setting them as thedefault settings.
Factory Reset Restores any changed copy settings to the factory settings.
16
Scan from YourComputer (Windows®)There are several ways you can use yourcomputer to scan photos and documents onyour Brother machine. Use the softwareapplications provided by Brother, or use yourfavourite scanning application.
Scan Using ControlCenter4Home Mode (Windows®)
Select Home Mode as the mode setting forControlCenter4.
1 Load your document.
2 Click the (ControlCenter4) icon inthe task tray, and then click Open.
3 Click the Scan tab.
4 Select the Document Type.
5 Change the document's Scan Size, ifneeded.
6 Click (Scan).
The machine starts scanning, and thescanned image appears in the imageviewer.
7 If you scanned multiple pages using theADF, click the left or right arrow buttonsto preview each scanned page.
8 Crop the scanned image, if needed.
9 Do one of the following:
• Click (Save) to save scanneddata.
• Click (Print) to print scanneddata.
• Click (Open with anApplication) to open scanned datain another application.
• Click (Send E-mail) to attachscanned data to an email.
• Click (OCR) to convert yourscanned document to an editable textfile.
5 Scan5
Scan
17
Scan Using the ScanButton on Your BrotherMachine
Scan Using the Scan Buttonon the Machine
Use the Scan button on the machine tomake temporary changes to the scansettings. To make permanent changes, useBrother's ControlCenter software.
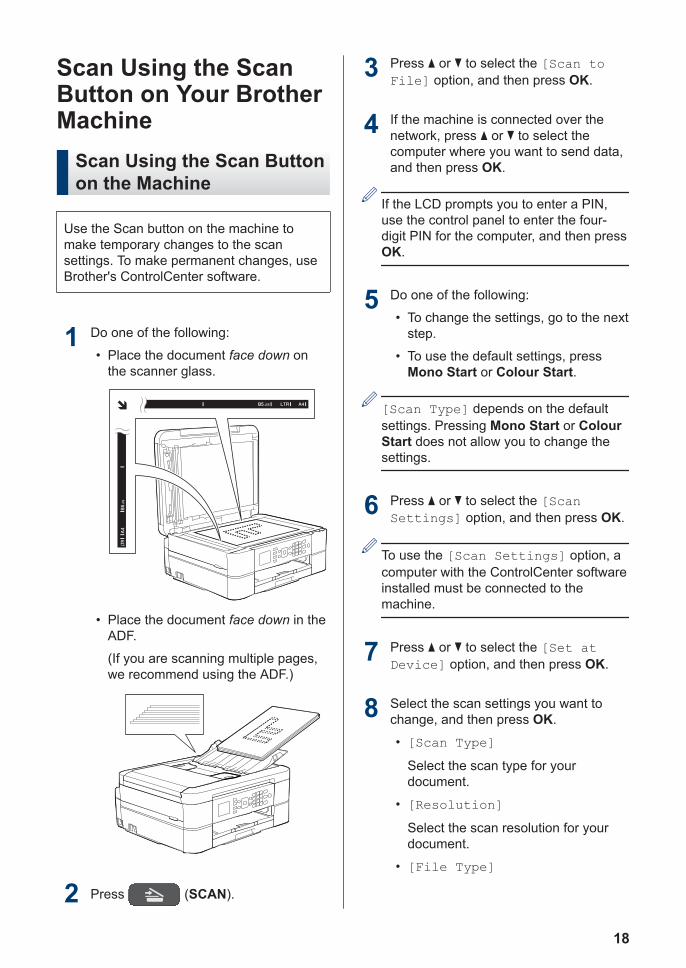
1 Do one of the following:
• Place the document face down onthe scanner glass.
• Place the document face down in theADF.
(If you are scanning multiple pages,we recommend using the ADF.)
2 Press (SCAN).
3 Press a or b to select the [Scan toFile] option, and then press OK.
4 If the machine is connected over thenetwork, press a or b to select thecomputer where you want to send data,and then press OK.
If the LCD prompts you to enter a PIN,use the control panel to enter the four-digit PIN for the computer, and then pressOK.
5 Do one of the following:
• To change the settings, go to the nextstep.
• To use the default settings, pressMono Start or Colour Start.
[Scan Type] depends on the defaultsettings. Pressing Mono Start or ColourStart does not allow you to change thesettings.
6 Press a or b to select the [ScanSettings] option, and then press OK.
To use the [Scan Settings] option, acomputer with the ControlCenter softwareinstalled must be connected to themachine.
7 Press a or b to select the [Set atDevice] option, and then press OK.
8 Select the scan settings you want tochange, and then press OK.
• [Scan Type]Select the scan type for yourdocument.
• [Resolution]Select the scan resolution for yourdocument.
• [File Type]
18
Select the file format for yourdocument.
• [Scan Size]Select the scan size for yourdocument.
• [Remove Background]Change the amount of backgroundcolour that is removed.
9 Press Mono Start or Colour Start.
[Scan Type] depends on the settingsyou have selected. Pressing Mono Startor Colour Start does not allow you tochange the settings.
5Scan
19

Before FaxingSet Your Station ID
Set the machine's Station ID if you want thedate and time to appear on each fax yousend.
1 Press Settings.
2 Press a or b to select the following:
a. Select [Initial Setup].Press OK.
b. Select [Station ID]. Press OK.
3 Enter your fax number (up to 20 digits)using the dial pad, and then press OK.
4 Enter your name (up to 20 characters)using the dial pad, and then press OK.
For more information about how to entertext, see the Appendix.
5 Press Stop/Exit.
Telephone Line Interference/VoIP
If you are having problems sending orreceiving a fax due to possible interference onthe telephone line or if you are using a VoIPsystem, we recommend changing the modemspeed to minimise errors in fax operations.
1 Press Settings.
2 Press a or b to select the following:
a. Select [Initial Setup].Press OK.
b. Select [Compatibility].Press OK.
c. Select [Normal] or [Basic(forVoIP)]. Press OK.
• [Basic(for VoIP)] reducesthe modem speed to 9,600 bpsand turns off colour fax receivingand ECM, except for colour fax-sending. Unless interference is arecurring problem on yourtelephone line, you may prefer touse it only when needed.
To improve compatibility withmost VoIP services, Brotherrecommends changing thecompatibility setting to[Basic(for VoIP)].
• [Normal] sets the modemspeed at 14,400 bps.
3 Press Stop/Exit.
• VoIP (Voice over IP) is a type of phonesystem that uses an Internetconnection, rather than a traditionalphone line.
• Brother does not recommend the useof a VoIP line. VoIP limitations ingeneral can cause some functions ofthe fax machine not to work correctly.
• Error and Maintenance Messages onpage 37
• Fax and Telephone Problems on page 46
Related Information
6 Fax
20
Receive ModesSome receive modes answer automatically([Fax Only] and [Fax/Tel]). You maywant to change the Ring Delay before usingthese modes.
Fax Only[Fax Only] mode automatically willanswer every call as a fax.
Fax/Tel[Fax/Tel] mode helps you manageincoming calls, by recognising whether theyare fax or voice calls and handling them inone of the following ways:
• Faxes will be received automatically.
• Voice calls will start the F/T ring to tellyou to pick up the line. The F/T ring is apseudo/double-ring made by yourmachine.
ManualTo receive a fax in [Manual] mode, lift thehandset of the external telephone or pressthe Hook button. When you hear fax tones(short repeating beeps), press the Startbutton, and then select [Receive] toreceive a fax. You can also use the FaxDetect feature to receive faxes by lifting ahandset on the same line as the machine.
External TAD[External TAD] mode lets an externalanswering device manage your incomingcalls.
Incoming calls will be handled in thefollowing ways:
• Faxes will be received automatically.
• Voice callers can record a message onthe external TAD.
• Fax and Telephone Problems on page 46Related Information
6Fax
21
Choose the Correct Receive Mode
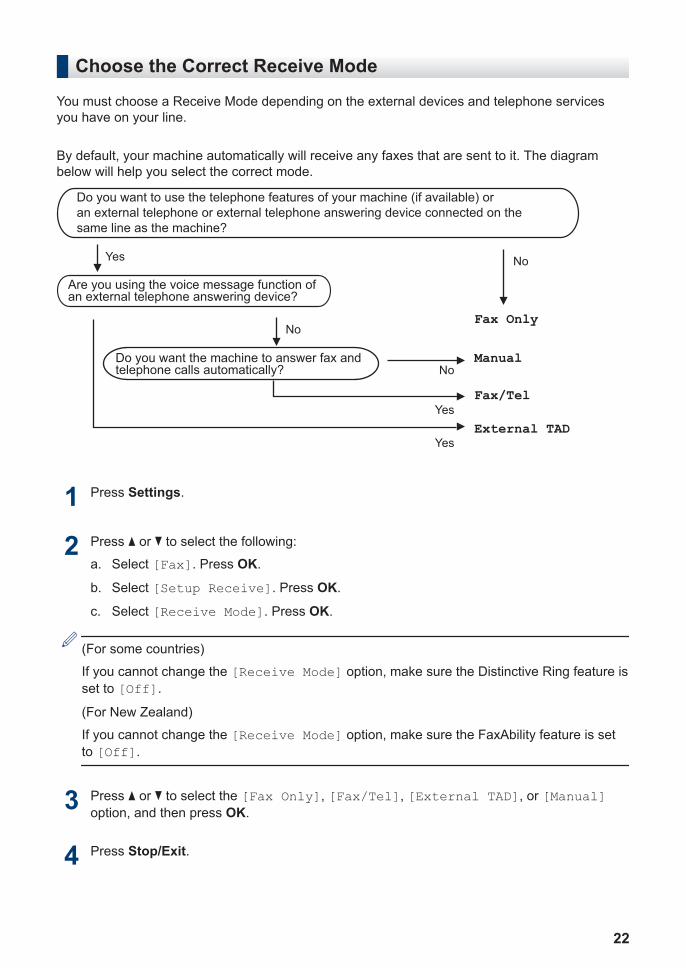
You must choose a Receive Mode depending on the external devices and telephone servicesyou have on your line.
By default, your machine automatically will receive any faxes that are sent to it. The diagrambelow will help you select the correct mode.
Do you want to use the telephone features of your machine (if available) or
an external telephone or external telephone answering device connected on the
same line as the machine?
Yes
Fax Only
No
No
NoManual
Yes
External TAD
Fax/Tel
Are you using the voice message function of an external telephone answering device?
Do you want the machine to answer fax and telephone calls automatically?
Yes
1 Press Settings.
2 Press a or b to select the following:
a. Select [Fax]. Press OK.
b. Select [Setup Receive]. Press OK.
c. Select [Receive Mode]. Press OK.
(For some countries)
If you cannot change the [Receive Mode] option, make sure the Distinctive Ring feature isset to [Off].
(For New Zealand)
If you cannot change the [Receive Mode] option, make sure the FaxAbility feature is setto [Off].
3 Press a or b to select the [Fax Only], [Fax/Tel], [External TAD], or [Manual]option, and then press OK.
4 Press Stop/Exit.
22
• Fax and Telephone Problems on page 46• Troubleshooting for Other Fax Problems on page 47
Related Information
6Fax
23
Set the F/T Ring Time(Pseudo/Double-ring)
When you set the Receive Mode to [Fax/Tel], if the call is a fax, your machine willreceive it automatically. However, if it is avoice call, the machine will sound the F/T ring(pseudo/double-ring) for the time you set inthe F/T Ring Time option. When you hear theF/T ring, it means that a voice caller is on theline.
Because the F/T ring is a setting only on yourBrother machine, extension and externaltelephones will not ring; however, you can stillanswer the machine's call on any telephone.
1 Press Settings.
2 Press a or b to select the following:
a. Select [Fax]. Press OK.
b. Select [Setup Receive].Press OK.
c. Select [F/T Ring Time].Press OK.
d. Select how long the machine willdouble-ring to alert you to a voicecall. Press OK.
3 Press Stop/Exit.
Even if the caller hangs up during thepseudo/double-ringing, the machine willcontinue to ring for the set time.
Set the Number of RingsBefore the MachineAnswers (Ring Delay)
When somebody calls your machine, you willhear the normal telephone ring sound. Thenumber of rings is set in the Ring Delayoption.
• The Ring Delay setting sets the numberof times the machine rings before itanswers in [Fax Only] and [Fax/Tel] modes.
• If you have external or extensiontelephones on the same line as themachine, select the maximum number ofrings.
1 Press Settings.
2 Press a or b to select the following:
a. Select [Fax]. Press OK.
b. Select [Setup Receive].Press OK.
c. Select [Ring Delay]. Press OK.
d. Select the number of times you wantthe line to ring before the machineanswers. Press OK.
• If you select [0], the machine willanswer immediately and the line willnot ring at all (available only for somecountries).
3 Press Stop/Exit.
24
Store NumbersYou can set up your machine to store faxnumbers in the Address Book.
If you lose electrical power, the AddressBook numbers that are in the machine'smemory will not be lost.
Store Address BookNumbers
You can store up to 40 two-digit Speed Dialcodes, and each code has a name.
1 Press (Address Book).
2 Press a or b to select [Set SpeedDial] and then press OK.
3 Do the following steps:
a. Press a or b to select the two-digitSpeed Dial code where you want tostore the number. Press OK.
b. Enter the name (up to 16 characters)using the dial pad. Press OK.
c. Enter the fax or telephone number(up to 20 digits). Press OK.
• Press Redial/Pause to insert a pausebetween numbers. You can pressRedial/Pause as many times asneeded to increase the length of thepause.
• Be sure to include the area code whenentering a fax or telephone number.Depending on the country, the CallerID names and history may not bedisplayed correctly if the area code isnot registered with the fax or telephonenumber.
d. Press a or b to select [Complete]and then press OK.
To store another Speed Dial code,repeat these steps.
4 Press Stop/Exit.
Change or Delete AddressBook Names or Numbers
You can change or delete an Address Bookname or number that has already beenstored.
1 Press (Address Book).
2 Press a or b to select [Set SpeedDial] and then press OK.
3 Press a or b to select the following:
a. Select the two-digit Speed Dial codewhere you want to change thenumber. Press OK.
b. Select [Change]. Press OK.
To delete the number, select [Delete]and then press OK. Press 1 [Yes] toconfirm.
4 Do one of the following:
• To change the name, press a or b toselect [Name] and then press OK.Enter the name (up to 16 characters)using the dial pad. Press OK.
• To change the fax or telephonenumber, press a or b to select [Fax/Tel], and then press OK. Enter thefax or telephone number (up to 20digits). Press OK.
How to change the stored name ornumber:
To change a character, press d or c toposition the cursor to under the characteryou want to change, and then pressClear. Enter the new character.
5 Press a or b to select [Complete] andthen press OK to finish.
6Fax
25

6 Press Stop/Exit.
26
Telephone Services and External DevicesYou may be able to use the following services and connections with your Brother machine.
These are summaries of ways to connect your machine. For more information about eachtopic, see the Online User's Guide.
Voice MailIf you have a Voice Mail service on thetelephone line that your Brother machine isconnected to, it may conflict with your Brothermachine when receiving incoming faxes. Ifusing this service, we suggest setting theBrother machine's Receive Mode to Manual.
Distinctive Ring (For somecountries)
Distinctive Ring is a telephone-companyservice that allows you to have two differentphone numbers on a single line. Eachtelephone number has its own ring pattern.You can program your Brother machine toreceive faxes automatically on one of the twonumbers.
FaxAbility (For NewZealand)
FaxAbility is a service offered by Telecom thatallows you to have an additional number onone phone line, with its own distinctive ringpattern. This way, when you get an incomingcall, you can identify the number being calledby its ring.
Voice Over Internet Protocol(VoIP)
VoIP is a type of phone system that uses anInternet connection instead of a traditionaltelephone line. Your machine may not workwith some VoIP systems. If you havequestions about how to connect your machineto a VoIP system, contact your VoIP provider.
Connection of an ExternalTelephone AnsweringDevice (TAD)
You may choose to connect an externalanswering device to your Brother machine. Toreceive faxes successfully, you must connectit correctly. When recording an outgoingmessage on your external TAD, werecommend recording 5 seconds of silence atthe beginning of your message, and limitingyour speaking to 20 seconds. Set yourmachine’s Receive Mode to External TAD.
External and ExtensionTelephones
You can connect a separate telephone to yourmachine. If you answer a fax call on anextension or external telephone, you canmake your machine receive the fax bypressing * 5 1 (* 9 1 for New Zealand). If themachine answers a voice call and pseudo/double-rings for you to take over, press # 5 1(# 9 1 for New Zealand) to take the call on anextension telephone.
6Fax
27
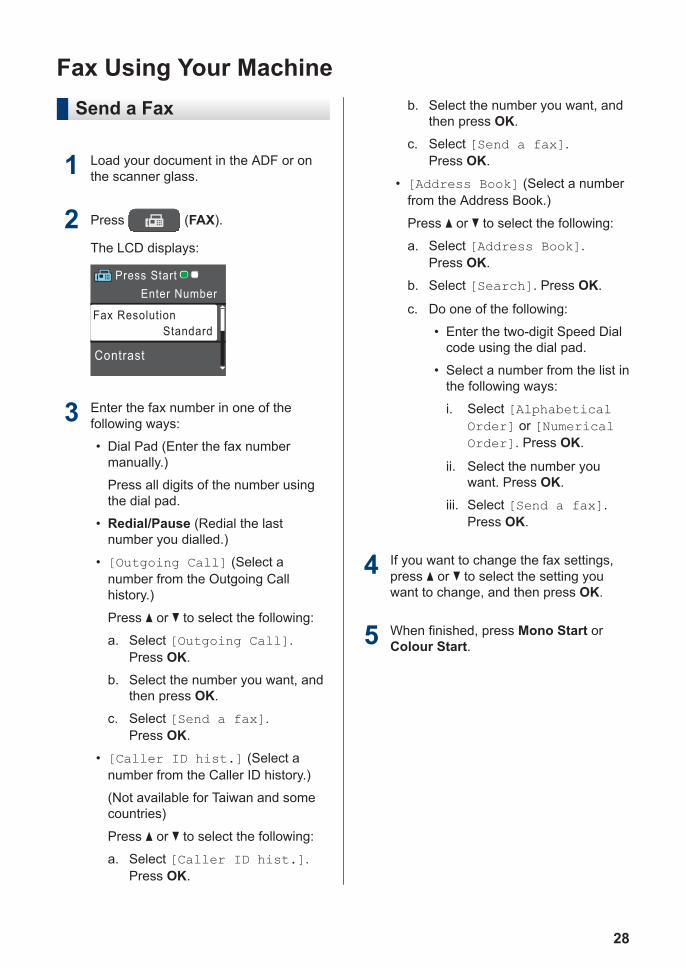
Fax Using Your MachineSend a Fax
1 Load your document in the ADF or onthe scanner glass.
2 Press (FAX).
The LCD displays:
Press Start
Enter Number
Contrast
Fax Resolution
Standard
3 Enter the fax number in one of thefollowing ways:
• Dial Pad (Enter the fax numbermanually.)
Press all digits of the number usingthe dial pad.
• Redial/Pause (Redial the lastnumber you dialled.)
• [Outgoing Call] (Select anumber from the Outgoing Callhistory.)
Press a or b to select the following:
a. Select [Outgoing Call].Press OK.
b. Select the number you want, andthen press OK.
c. Select [Send a fax].Press OK.
• [Caller ID hist.] (Select anumber from the Caller ID history.)
(Not available for Taiwan and somecountries)
Press a or b to select the following:
a. Select [Caller ID hist.].Press OK.
b. Select the number you want, andthen press OK.
c. Select [Send a fax].Press OK.
• [Address Book] (Select a numberfrom the Address Book.)
Press a or b to select the following:
a. Select [Address Book].Press OK.
b. Select [Search]. Press OK.
c. Do one of the following:
• Enter the two-digit Speed Dialcode using the dial pad.
• Select a number from the list inthe following ways:
i. Select [AlphabeticalOrder] or [NumericalOrder]. Press OK.
ii. Select the number youwant. Press OK.
iii. Select [Send a fax].Press OK.
4 If you want to change the fax settings,press a or b to select the setting youwant to change, and then press OK.
5 When finished, press Mono Start orColour Start.
28
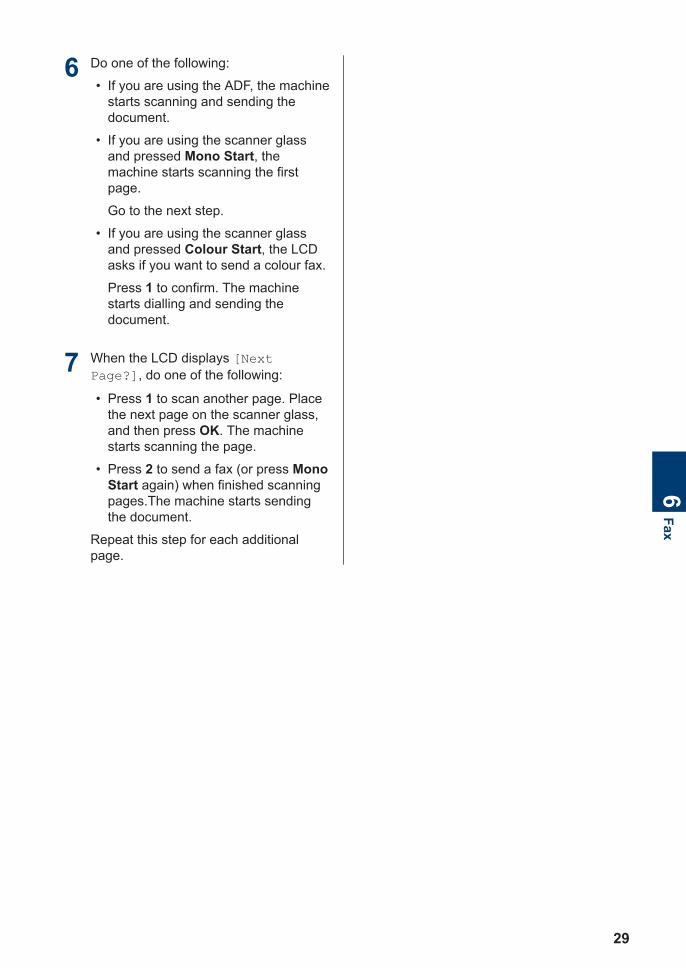
6 Do one of the following:
• If you are using the ADF, the machinestarts scanning and sending thedocument.
• If you are using the scanner glassand pressed Mono Start, themachine starts scanning the firstpage.
Go to the next step.
• If you are using the scanner glassand pressed Colour Start, the LCDasks if you want to send a colour fax.
Press 1 to confirm. The machinestarts dialling and sending thedocument.
7 When the LCD displays [NextPage?], do one of the following:
• Press 1 to scan another page. Placethe next page on the scanner glass,and then press OK. The machinestarts scanning the page.
• Press 2 to send a fax (or press MonoStart again) when finished scanningpages.The machine starts sendingthe document.
Repeat this step for each additionalpage.
6Fax
29

Fax Using Your Computer (PC-FAX)Send Faxes from YourComputer
The Brother PC-FAX feature lets you send afile, created in any application on yourcomputer, as a standard fax and even attacha cover page.
For Windows®:
For more information, see the Online User'sGuide: PC-FAX for Windows®.
For Macintosh:
For more information, see the Online User'sGuide: PC-FAX for Macintosh.
1 From your application select File, andthen Print.(The steps may vary depending on yourapplication.)
The Print dialog box appears.
2 Select Brother PC-FAX.
3 Click Print.The Brother PC-FAX user interfaceappears.
4 Enter the recipient’s fax number.
a. Use your computer keyboard or clickthe Brother PC-FAX user interface'snumeric keypad.
b. Click Add Send Address.
You can also select a stored number fromthe Address Book.
5 Click Start.Your document is sent to the Brothermachine and then faxed to the recipient.
Contact the application's vendor if you needmore support.
Receive Faxes on YourComputer (Windows® only)
Use Brother's PC-FAX software to receivefaxes on your computer, screen them, andprint only those faxes you want.
• Even if you turn off your computer (atnight or on the weekend, for example),your machine will receive and store yourfaxes in its memory. The number ofreceived faxes that are stored in thememory appears on the LCD.
• When you start your computer and thePC-Fax Receive software runs, yourMFC transfers your faxes to yourcomputer automatically.
• For PC-Fax Receive to work, the PC-FAX Receive software must be runningon your computer.
• Before you can set up PC-Fax Receive,you must install the Brother software anddrivers on your computer. Make sureyour Brother machine is connected toyour computer and turned on.
• If your machine displays an error and isunable to print faxes from memory, usePC-FAX to transfer your faxes to acomputer.
• PC-Fax Receive is not available forMacintosh.
30
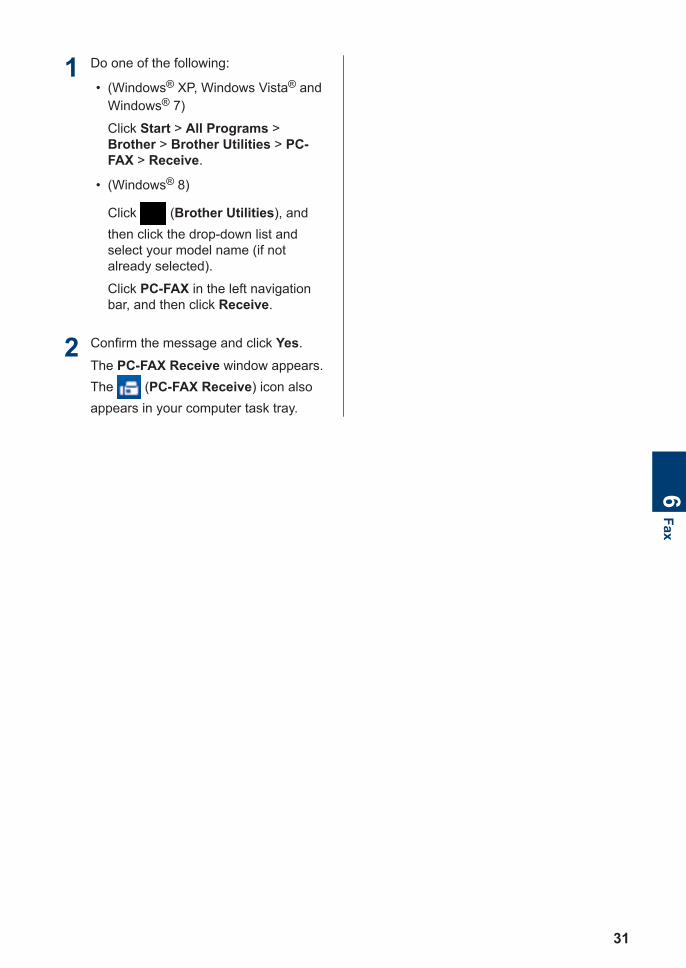
1 Do one of the following:
• (Windows® XP, Windows Vista® andWindows® 7)
Click Start > All Programs >Brother > Brother Utilities > PC-FAX > Receive.
• (Windows® 8)
Click (Brother Utilities), andthen click the drop-down list andselect your model name (if notalready selected).
Click PC-FAX in the left navigationbar, and then click Receive.
2 Confirm the message and click Yes.
The PC-FAX Receive window appears.The (PC-FAX Receive) icon alsoappears in your computer task tray.
6Fax
31
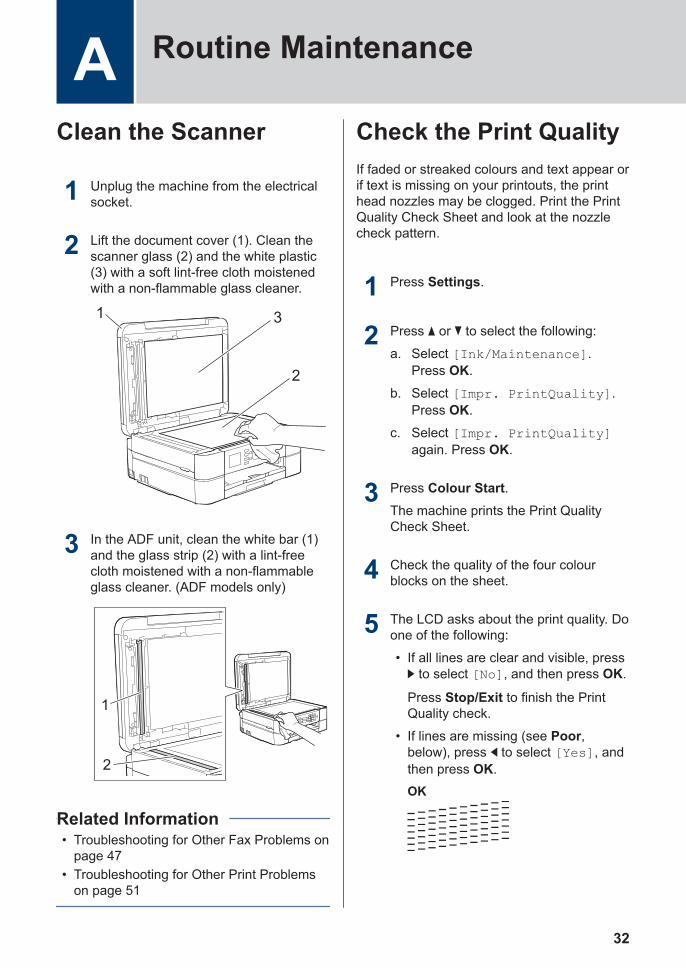
Clean the Scanner
1 Unplug the machine from the electricalsocket.
2 Lift the document cover (1). Clean thescanner glass (2) and the white plastic(3) with a soft lint-free cloth moistenedwith a non-flammable glass cleaner.
2
1 3
3 In the ADF unit, clean the white bar (1)and the glass strip (2) with a lint-freecloth moistened with a non-flammableglass cleaner. (ADF models only)
2
1
• Troubleshooting for Other Fax Problems onpage 47
• Troubleshooting for Other Print Problemson page 51
Related Information
Check the Print QualityIf faded or streaked colours and text appear orif text is missing on your printouts, the printhead nozzles may be clogged. Print the PrintQuality Check Sheet and look at the nozzlecheck pattern.
1 Press Settings.
2 Press a or b to select the following:
a. Select [Ink/Maintenance].Press OK.
b. Select [Impr. PrintQuality].Press OK.
c. Select [Impr. PrintQuality]again. Press OK.
3 Press Colour Start.The machine prints the Print QualityCheck Sheet.
4 Check the quality of the four colourblocks on the sheet.
5 The LCD asks about the print quality. Doone of the following:
• If all lines are clear and visible, pressc to select [No], and then press OK.
Press Stop/Exit to finish the PrintQuality check.
• If lines are missing (see Poor,below), press d to select [Yes], andthen press OK.OK
A Routine Maintenance
32
Poor
6 The LCD asks you to check the printquality of each colour. Press d or c toselect the pattern (1–4) that mostclosely matches the printing result, andthen press OK.
7 Do one of the following:
• If print head cleaning is needed,press OK to start the cleaningprocedure.
• If print head cleaning is not needed,the Maintenance screen reappearson the LCD. Press Stop/Exit to finishthe Print Quality check.
8 After the cleaning procedure is finished,the LCD asks if you want to check theprint quality again.
Press 1 [Yes] to start the print qualitycheck, and then press Colour Start.The machine prints the Print QualityCheck Sheet again. Check the quality ofthe four colour blocks on the sheetagain.
If you clean the print head and the print hasnot improved, try installing a new GenuineBrother Brand replacement ink cartridge foreach problem colour. Try cleaning the printhead again. If the print has not improved,contact Brother customer service or your localBrother dealer.
IMPORTANTDO NOT touch the print head. Touching theprint head may cause permanent damage andmay void the print head's warranty.
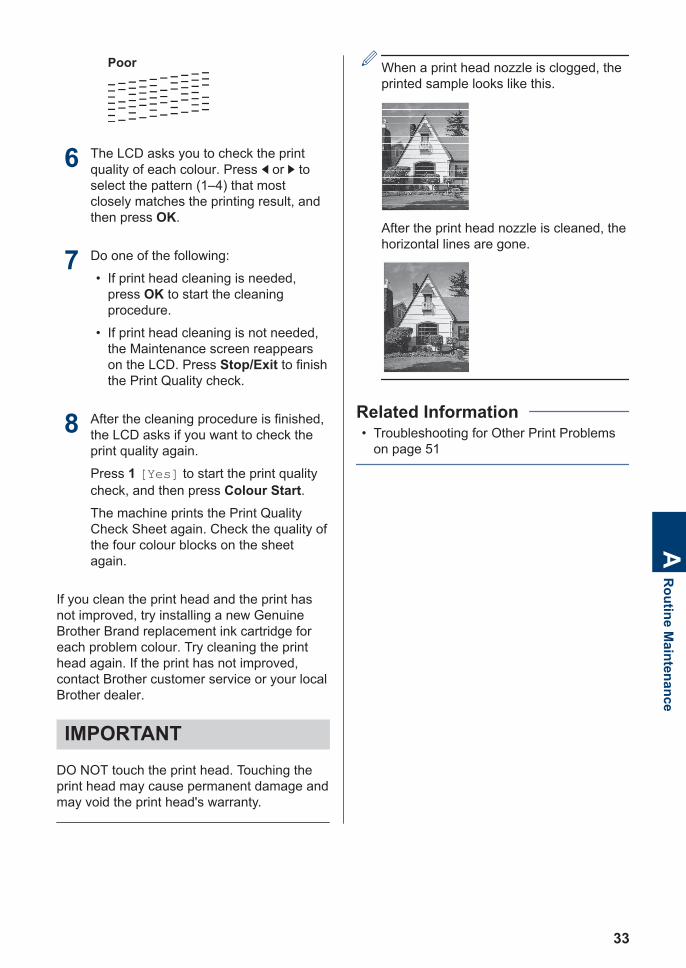
When a print head nozzle is clogged, theprinted sample looks like this.
After the print head nozzle is cleaned, thehorizontal lines are gone.
• Troubleshooting for Other Print Problemson page 51
Related Information
AR
outine Maintenance
33
Check the PrintAlignment from YourBrother MachineIf your printed text becomes blurred or imagesbecome faded after transporting the machine,adjust the print alignment.
1 Press Settings.
2 Press a or b to select the following:
a. Select [Ink/Maintenance].Press OK.
b. Select [Impr. PrintQuality].Press OK.
c. Select [Alignment]. Press OK.
3 Press OK.
4 Press Mono Start or Colour Start.The machine starts printing theAlignment Check Sheet.
(A)
5 For the (A) pattern, press d or c toselect the number of the test print thathas the fewest visible vertical stripes(1-9), and then press OK.
In the example above, row number 6 isthe best choice.
Repeat this step for the rest of thepatterns.
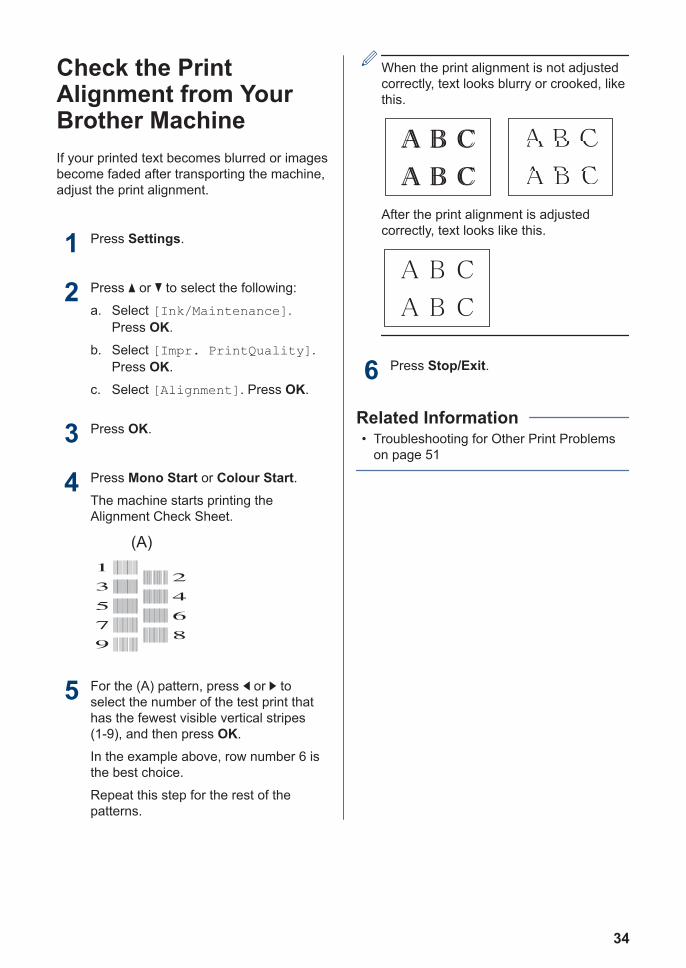
When the print alignment is not adjustedcorrectly, text looks blurry or crooked, likethis.
After the print alignment is adjustedcorrectly, text looks like this.
6 Press Stop/Exit.
• Troubleshooting for Other Print Problemson page 51
Related Information
34
Use this section to resolve problems you may encounter when using your Brother machine.
Identify the ProblemEven if there seems to be a problem with your machine, you can correct most problems yourself.
First, check the following:
• The machine's power cord is connected correctly and the machine's power is on.
• All of the machine's orange protective parts have been removed.
• The ink cartridges are installed correctly.
• The Scanner Cover and the Jam Clear Cover are fully closed.
• Paper is inserted correctly in the paper tray.
• The interface cables are securely connected to the machine and the computer, or the wirelessconnection is set up on both the machine and your computer.
• (For network models) The access point (for wireless), router, or hub is turned on and its linkbutton is blinking.
• Check the LCD or the machine's status in Status Monitor on your computer.
Find the Error Find the Solution
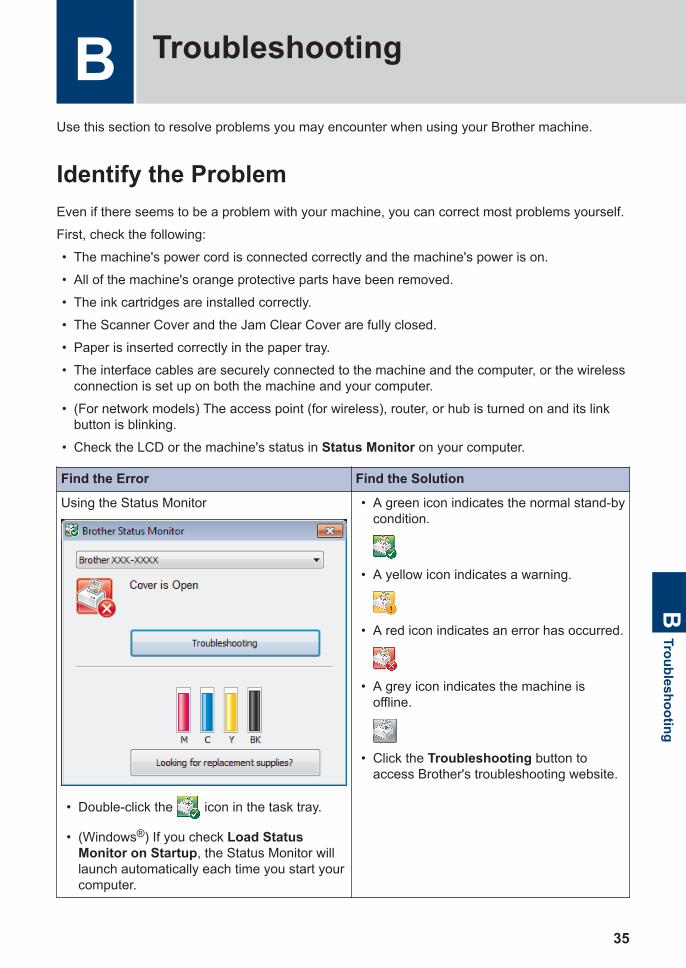
Using the Status Monitor
• Double-click the icon in the task tray.
• (Windows®) If you check Load StatusMonitor on Startup, the Status Monitor willlaunch automatically each time you start yourcomputer.
• A green icon indicates the normal stand-bycondition.
• A yellow icon indicates a warning.
• A red icon indicates an error has occurred.
• A grey icon indicates the machine isoffline.
• Click the Troubleshooting button toaccess Brother's troubleshooting website.
B TroubleshootingB
Troubleshooting
35

Find the Error Find the Solution
Using the LCD 1. Follow the messages on the LCD.
2. See the instructions in the following Errorand Maintenance Messages table.
3. If you cannot resolve the error, pleaserefer to the Online User's Guide: Errorand Maintenance Messages or see FAQson the Brother Solutions Center at
http://support.brother.com
36
Error and Maintenance MessagesThe most common error and maintenance messages are shown in the table. To see moredetailed information, read the Online User's Guide.
You can correct most errors and perform routine maintenance yourself. If you need more tips, goto your model's FAQs & Troubleshooting page on the Brother Solutions Center at http://support.brother.com.
Error Message ActionAbsorber NearFull The ink absorber box or flushing box must be replaced soon. Contact
Brother customer service or your local Brother dealer.
B&W Print OnlyReplace Ink
One or more of the colour ink cartridges have reached the end of theirlives.
Replace the ink cartridges.
For more information, see the Online User's Guide: Replace the InkCartridges.
The machine will stop all print operations and you will not be able touse the machine until you change to a new ink cartridge in thefollowing cases:
• If you unplug the machine or take out the ink cartridge.
• (Windows®) If you select Slow Drying Paper in the Basic tab ofthe printer driver.
(Macintosh) If you select Slow Drying Paper in the Print Settingsdrop-down list of the printer driver.
Cannot Detect Take out the new ink cartridge and reinstall it slowly and firmly until itlatches.
For more information, see the Online User's Guide: Replace the InkCartridges.
Remove the used ink cartridge and install a new one.
Replace the cartridge with a Brother Original ink cartridge. If the errormessage remains, contact Brother customer service or your localBrother dealer.
Slowly turn the ink cartridge so that the ink supply port is pointingdownward, and then reinstall the cartridge.
Check the model numbers of the ink cartridges and install the correctink cartridges.
See Related Information: Supply Specifications at the end of thissection.
Cannot Detect Ink Replace the cartridge with a Brother Original ink cartridge. If the errormessage remains, contact Brother customer service or your localBrother dealer.
BTroubleshooting
37
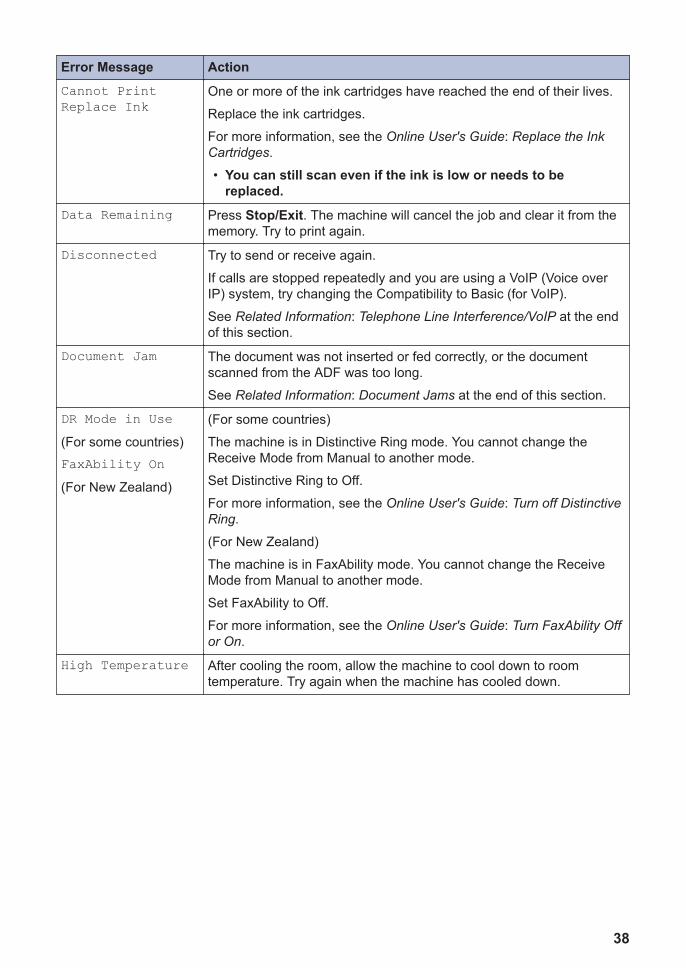
Error Message ActionCannot PrintReplace Ink
One or more of the ink cartridges have reached the end of their lives.
Replace the ink cartridges.
For more information, see the Online User's Guide: Replace the InkCartridges.
• You can still scan even if the ink is low or needs to bereplaced.
Data Remaining Press Stop/Exit. The machine will cancel the job and clear it from thememory. Try to print again.
Disconnected Try to send or receive again.
If calls are stopped repeatedly and you are using a VoIP (Voice overIP) system, try changing the Compatibility to Basic (for VoIP).
See Related Information: Telephone Line Interference/VoIP at the endof this section.
Document Jam The document was not inserted or fed correctly, or the documentscanned from the ADF was too long.
See Related Information: Document Jams at the end of this section.
DR Mode in Use(For some countries)FaxAbility On(For New Zealand)
(For some countries)
The machine is in Distinctive Ring mode. You cannot change theReceive Mode from Manual to another mode.
Set Distinctive Ring to Off.
For more information, see the Online User's Guide: Turn off DistinctiveRing.
(For New Zealand)
The machine is in FaxAbility mode. You cannot change the ReceiveMode from Manual to another mode.
Set FaxAbility to Off.
For more information, see the Online User's Guide: Turn FaxAbility Offor On.
High Temperature After cooling the room, allow the machine to cool down to roomtemperature. Try again when the machine has cooled down.
38
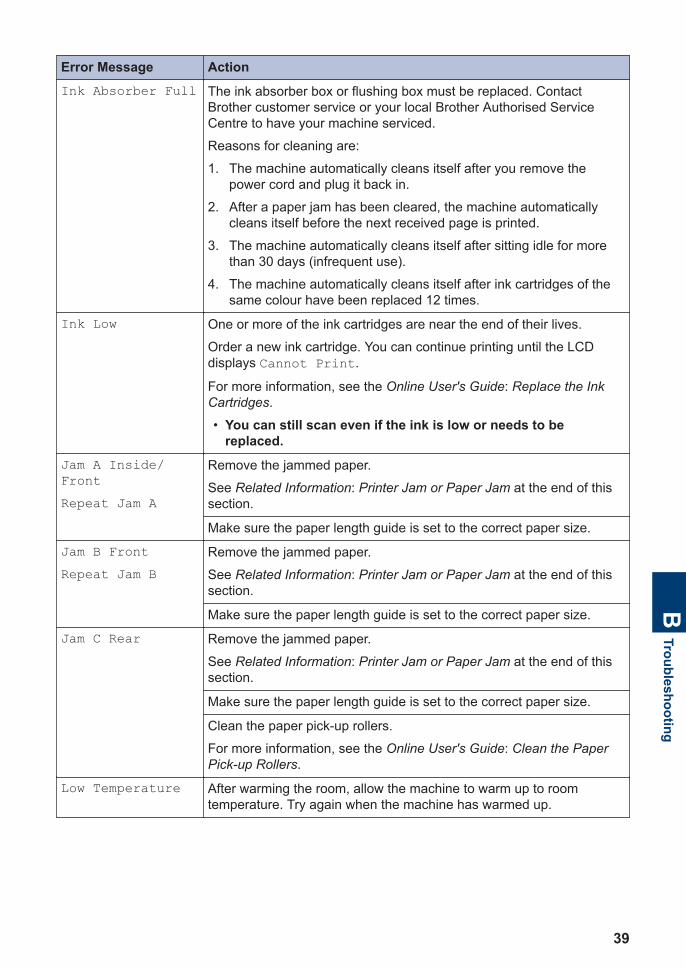
Error Message ActionInk Absorber Full The ink absorber box or flushing box must be replaced. Contact
Brother customer service or your local Brother Authorised ServiceCentre to have your machine serviced.
Reasons for cleaning are:
1. The machine automatically cleans itself after you remove thepower cord and plug it back in.
2. After a paper jam has been cleared, the machine automaticallycleans itself before the next received page is printed.
3. The machine automatically cleans itself after sitting idle for morethan 30 days (infrequent use).
4. The machine automatically cleans itself after ink cartridges of thesame colour have been replaced 12 times.
Ink Low One or more of the ink cartridges are near the end of their lives.
Order a new ink cartridge. You can continue printing until the LCDdisplays Cannot Print.
For more information, see the Online User's Guide: Replace the InkCartridges.
• You can still scan even if the ink is low or needs to bereplaced.
Jam A Inside/FrontRepeat Jam A
Remove the jammed paper.
See Related Information: Printer Jam or Paper Jam at the end of thissection.
Make sure the paper length guide is set to the correct paper size.
Jam B FrontRepeat Jam B
Remove the jammed paper.
See Related Information: Printer Jam or Paper Jam at the end of thissection.
Make sure the paper length guide is set to the correct paper size.
Jam C Rear Remove the jammed paper.
See Related Information: Printer Jam or Paper Jam at the end of thissection.
Make sure the paper length guide is set to the correct paper size.
Clean the paper pick-up rollers.
For more information, see the Online User's Guide: Clean the PaperPick-up Rollers.
Low Temperature After warming the room, allow the machine to warm up to roomtemperature. Try again when the machine has warmed up.
BTroubleshooting
39
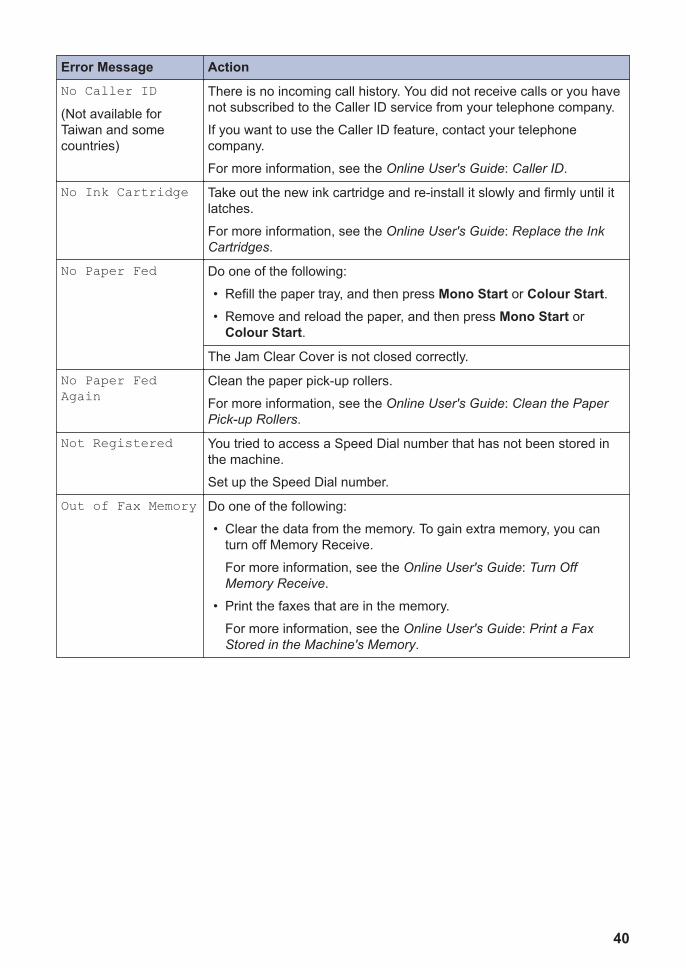
Error Message ActionNo Caller ID(Not available forTaiwan and somecountries)
There is no incoming call history. You did not receive calls or you havenot subscribed to the Caller ID service from your telephone company.
If you want to use the Caller ID feature, contact your telephonecompany.
For more information, see the Online User's Guide: Caller ID.
No Ink Cartridge Take out the new ink cartridge and re-install it slowly and firmly until itlatches.
For more information, see the Online User's Guide: Replace the InkCartridges.
No Paper Fed Do one of the following:
• Refill the paper tray, and then press Mono Start or Colour Start.• Remove and reload the paper, and then press Mono Start or
Colour Start.
The Jam Clear Cover is not closed correctly.
No Paper FedAgain
Clean the paper pick-up rollers.
For more information, see the Online User's Guide: Clean the PaperPick-up Rollers.
Not Registered You tried to access a Speed Dial number that has not been stored inthe machine.
Set up the Speed Dial number.
Out of Fax Memory Do one of the following:
• Clear the data from the memory. To gain extra memory, you canturn off Memory Receive.
For more information, see the Online User's Guide: Turn OffMemory Receive.
• Print the faxes that are in the memory.
For more information, see the Online User's Guide: Print a FaxStored in the Machine's Memory.
40
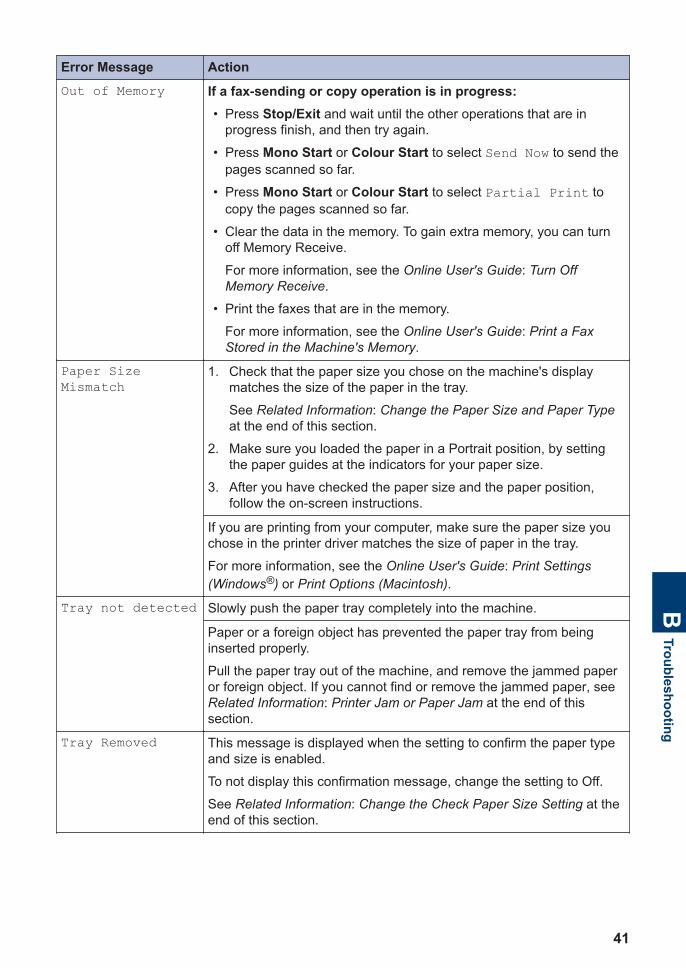
Error Message ActionOut of Memory If a fax-sending or copy operation is in progress:
• Press Stop/Exit and wait until the other operations that are inprogress finish, and then try again.
• Press Mono Start or Colour Start to select Send Now to send thepages scanned so far.
• Press Mono Start or Colour Start to select Partial Print tocopy the pages scanned so far.
• Clear the data in the memory. To gain extra memory, you can turnoff Memory Receive.
For more information, see the Online User's Guide: Turn OffMemory Receive.
• Print the faxes that are in the memory.
For more information, see the Online User's Guide: Print a FaxStored in the Machine's Memory.
Paper SizeMismatch
1. Check that the paper size you chose on the machine's displaymatches the size of the paper in the tray.
See Related Information: Change the Paper Size and Paper Typeat the end of this section.
2. Make sure you loaded the paper in a Portrait position, by settingthe paper guides at the indicators for your paper size.
3. After you have checked the paper size and the paper position,follow the on-screen instructions.
If you are printing from your computer, make sure the paper size youchose in the printer driver matches the size of paper in the tray.
For more information, see the Online User's Guide: Print Settings(Windows®) or Print Options (Macintosh).
Tray not detected Slowly push the paper tray completely into the machine.
Paper or a foreign object has prevented the paper tray from beinginserted properly.
Pull the paper tray out of the machine, and remove the jammed paperor foreign object. If you cannot find or remove the jammed paper, seeRelated Information: Printer Jam or Paper Jam at the end of thissection.
Tray Removed This message is displayed when the setting to confirm the paper typeand size is enabled.
To not display this confirmation message, change the setting to Off.
See Related Information: Change the Check Paper Size Setting at theend of this section.
BTroubleshooting
41
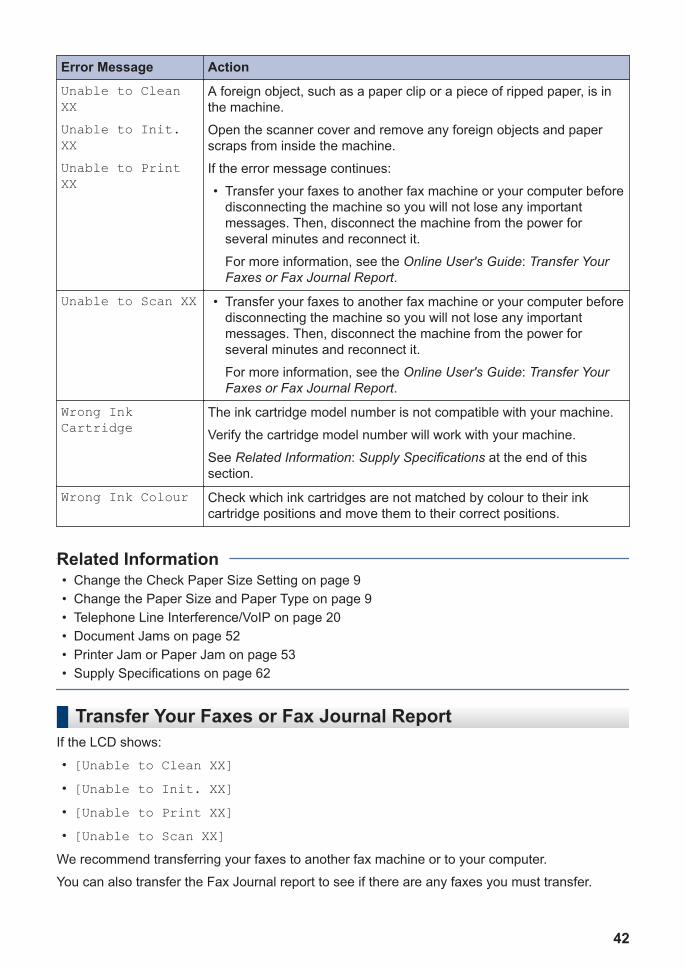
Error Message ActionUnable to CleanXXUnable to Init.XXUnable to PrintXX
A foreign object, such as a paper clip or a piece of ripped paper, is inthe machine.
Open the scanner cover and remove any foreign objects and paperscraps from inside the machine.
If the error message continues:
• Transfer your faxes to another fax machine or your computer beforedisconnecting the machine so you will not lose any importantmessages. Then, disconnect the machine from the power forseveral minutes and reconnect it.
For more information, see the Online User's Guide: Transfer YourFaxes or Fax Journal Report.
Unable to Scan XX • Transfer your faxes to another fax machine or your computer beforedisconnecting the machine so you will not lose any importantmessages. Then, disconnect the machine from the power forseveral minutes and reconnect it.
For more information, see the Online User's Guide: Transfer YourFaxes or Fax Journal Report.
Wrong InkCartridge
The ink cartridge model number is not compatible with your machine.
Verify the cartridge model number will work with your machine.
See Related Information: Supply Specifications at the end of thissection.
Wrong Ink Colour Check which ink cartridges are not matched by colour to their inkcartridge positions and move them to their correct positions.
• Change the Check Paper Size Setting on page 9• Change the Paper Size and Paper Type on page 9• Telephone Line Interference/VoIP on page 20• Document Jams on page 52• Printer Jam or Paper Jam on page 53• Supply Specifications on page 62
Related Information
Transfer Your Faxes or Fax Journal ReportIf the LCD shows:
• [Unable to Clean XX]• [Unable to Init. XX]• [Unable to Print XX]• [Unable to Scan XX]
We recommend transferring your faxes to another fax machine or to your computer.
You can also transfer the Fax Journal report to see if there are any faxes you must transfer.
42
For more information, see the Online User's Guide: Transfer Your Faxes or Fax Journal Report.
BTroubleshooting
43
Troubleshooting for Wireless LAN setupWireless LAN Report Error Codes
If the Wireless LAN Report shows that the connection failed, check the error code on the printedreport and see the corresponding instructions in the table:
Error Code Problem and Recommended Solutions
TS-01 The wireless setting is not activated, change the wireless setting to ON.
TS-02 The wireless access point/router cannot be detected.
1. Check the following two points:
• Unplug the power to your wireless access point/router, wait for 10seconds, and then plug it back in.
• If your WLAN access point/router is using MAC address filtering,confirm that the MAC address of the Brother machine is allowed in thefilter.
2. If you manually entered the SSID and security information (SSID/authentication method/encryption method/Network Key), the informationmay be incorrect.
Reconfirm the SSID and security information and re-enter the correctinformation if needed.
TS-04 The Authentication/Encryption methods used by the selected wireless accesspoint/router are not supported by your machine.
For infrastructure mode, change the authentication and encryption methods ofthe wireless access point/router. Your machine supports the followingauthentication methods:
• WPA-Personal
TKIP or AES
• WPA2-Personal
AES
• Open
WEP or None (without encryption)
• Shared key
WEP
If your problem is not solved, the SSID or network settings you entered maybe incorrect. Confirm the wireless network settings.
For Ad-Hoc Mode, change the authentication and encryption methods of yourcomputer for the wireless setting. Your machine supports Open authenticationonly, with optional WEP encryption.
TS-05 The security information (SSID/Network Key) is incorrect.
Confirm the SSID and Network Key. If your router uses WEP encryption, enterthe key used as the first WEP key. Your Brother machine supports the use ofthe first WEP key only.
44
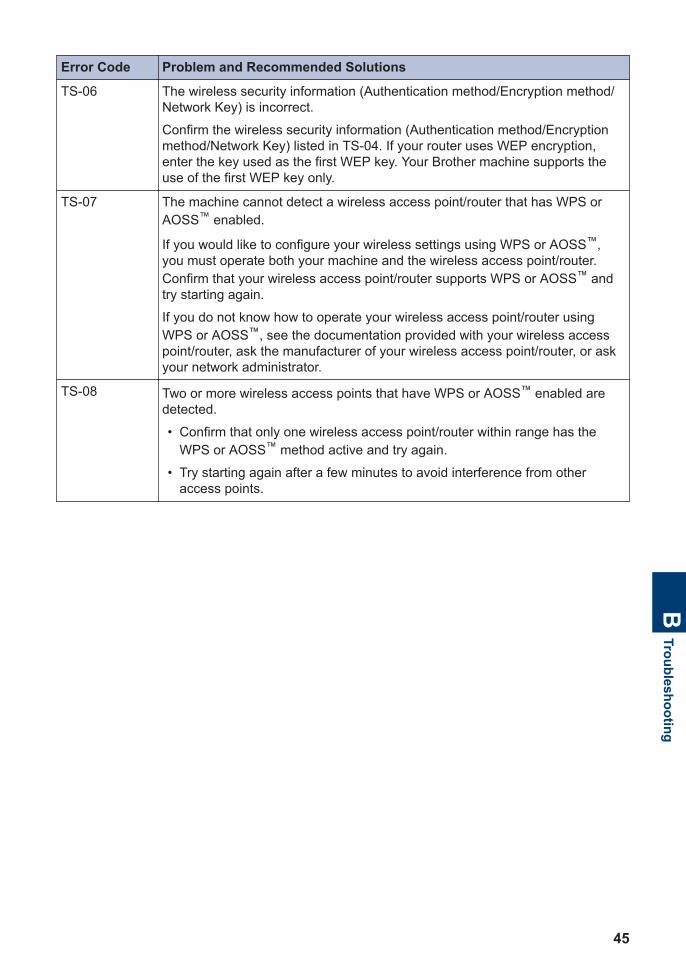
Error Code Problem and Recommended Solutions
TS-06 The wireless security information (Authentication method/Encryption method/Network Key) is incorrect.
Confirm the wireless security information (Authentication method/Encryptionmethod/Network Key) listed in TS-04. If your router uses WEP encryption,enter the key used as the first WEP key. Your Brother machine supports theuse of the first WEP key only.
TS-07 The machine cannot detect a wireless access point/router that has WPS orAOSS™ enabled.
If you would like to configure your wireless settings using WPS or AOSS™,you must operate both your machine and the wireless access point/router.Confirm that your wireless access point/router supports WPS or AOSS™ andtry starting again.
If you do not know how to operate your wireless access point/router usingWPS or AOSS™, see the documentation provided with your wireless accesspoint/router, ask the manufacturer of your wireless access point/router, or askyour network administrator.
TS-08 Two or more wireless access points that have WPS or AOSS™ enabled aredetected.
• Confirm that only one wireless access point/router within range has theWPS or AOSS™ method active and try again.
• Try starting again after a few minutes to avoid interference from otheraccess points.
BTroubleshooting
45

Fax and Telephone ProblemsIf you cannot send or receive a fax, check the following:
1 Connect one end of the telephone line cord to the area labelled "LINE", and then connectthe other end of the telephone line cord directly to a telephone wall socket.
If you can send and receive faxes when the telephone line is directly connected to the fax,the problem may be unrelated to the machine. Please contact your telephone serviceprovider for connection issues.
2 Check the receive mode.
See Related Information:
• Receive Modes
• Choose the Correct Receive Mode
3 Try changing the compatibility settings.
You may be able to send and receive faxes by lowering the connection speed.
For more information, see Related Information: Telephone Line Interference/VoIP.
If the problem still is not resolved, turn the machine off, and then turn it on.
• Telephone Line Interference/VoIP on page 20• Receive Modes on page 21• Choose the Correct Receive Mode on page 22
Related Information
46
Troubleshooting for Other Fax Problems
Difficulties Suggestions
Cannot send a fax. Check all line cord connections. Make sure the telephone line cord isplugged into the telephone wall socket and the LINE socket of themachine. Make sure your machine has a dial tone by pressing theHook button in Fax mode. If you subscribe to DSL or VoIP services,contact your service provider for connection instructions.
Print the Transmission Verification Report and check for an error.
Ask the other party to check that the receiving machine has paper.
Cannot receive a fax. Check all line cord connections. Make sure the telephone line cord isplugged into the telephone wall socket and the LINE socket of themachine.
Make sure your machine has a dial tone by pressing the Hook button inFax mode. If you hear static or interference on your fax line, contactyour local telephone provider.
If you are using a telephone answering machine (External TAD mode)on the same line as the Brother machine, make sure your answeringmachine is set up correctly.
1. Connect the external TAD as shown in the illustration.
For more information, see the Online User's Guide: External TAD(Telephone Answering Device).
2. Set your answering machine to answer in one or two rings.
3. Record the outgoing message on your answering machine.
• Record five seconds of silence at the beginning of your outgoingmessage.
• Limit your speaking to 20 seconds.
• End your outgoing message with your Remote Activation Codefor people sending manual faxes. For example: “After the beep,leave a message or press *51 (*91 for New Zealand) and Startto send a fax.”
4. Set your answering machine to answer calls.
5. Set your Brother machine’s Receive Mode to External TAD.
See Related Information: Choose the Correct Receive Mode at theend of this section.
Make sure your Brother machine’s Fax Detect feature is turned On.Fax Detect is a feature that allows you to receive a fax even if youanswered the call on an external or extension telephone.
Left and right marginsare cut off or a singlepage is printed on twopages.
Turn on Auto Reduction.
BTroubleshooting
47
Difficulties Suggestions
Dialling does not work.(No dial tone)
Check all line cord connections.
Change Tone/Pulse setting. (Available only for some countries)
Poor sending quality. Try changing your resolution to Fine or S.Fine.
Make a copy to check your machine’s scanner operation. If the copyquality is not good, clean the scanner.
See Related Information: Clean the Scanner at the end of this section.
Vertical black lineswhen sending.
Black vertical lines on faxes you send are typically caused by dirt orcorrection fluid on the glass strip. Clean the glass strip.
See Related Information: Clean the Scanner at the end of this section.
• Choose the Correct Receive Mode on page 22• Clean the Scanner on page 32
Related Information
48
Print or Scan Problems
IMPORTANTUsing non-Brother supplies may affect the print quality, hardware performance, and machinereliability.
If you cannot print or scan a document, check the following:
1 All of the machine's protective parts have been removed.
2 The interface cables are securely connected to the machine and the computer.
3 The printer or scanner driver has been installed correctly.
4 (Scan problem only)
Confirm the machine is assigned with an available IP address. (Windows®)
a. Do one of the following:
(Windows® XP, Windows Vista® and Windows® 7)
Click (Start) > All Programs > Brother > Brother Utilities.
Click the drop-down list and select your model name (if not already selected). ClickScan in the left navigation bar, and then click Scanners and Cameras.
(Windows® 8)
Click (Brother Utilities), and then click the drop-down list and select your model
name (if not already selected). Click Scan in the left navigation bar, and then clickScanners and Cameras.
b. Do one of the following:
(Windows® XP)
Right-click a scanner device, and then select Properties. The Network ScannerProperties dialog box appears.
(Windows Vista®, Windows® 7 and Windows® 8)
Click the Properties button.
c. Click the Network Setting tab to confirm the machine's IP address.
BTroubleshooting
49
Try printing with your machine. If the problem still remains, uninstall and reinstall theprinter driver.
5 If the problem still remains after trying all the above, try the following:
For a USB interface connection
• Change the USB cable for a new one.
• Use a different USB port.
For a Wireless Network connection
• Confirm your machine's Wireless status on the LCD.
The wireless connection setting is disabled. Enable the WLAN connection andset up the wireless network connection.
The wireless access point cannot be detected. Set up the wireless networkconnection again.
The wireless network is connected. A three-level indicator in the LCD displaysthe current wireless signal strength.
You can configure wireless settings by pressing on the control panel.
If you cannot print on both sides of paper, check the following:
6 Change the paper size setting in the printer driver to A4.
50
Troubleshooting for Other Print Problems
Difficulties Suggestions
Poor print quality Check the print quality.
See Related Information: Check the Print Quality at the end of thissection.
Make sure the Media Type setting in the printer driver or the PaperType setting in the machine’s menu matches the type of paper you areusing.
For more information, see the Online User's Guide: Print Settings(Windows®) or Print Options (Macintosh).
White horizontal linesappear in text orgraphics.
Check the print quality.
See Related Information: Check the Print Quality at the end of thissection.
The machine printsblank pages.
Check the print quality.
See Related Information: Check the Print Quality at the end of thissection.
Characters and linesare blurred.
Check the printing alignment.
See Related Information: Check the Print Alignment from Your BrotherMachine at the end of this section.
Printing appears dirtyor ink seems to run.
If you are using photo paper, make sure the glossy side of the photopaper is face down in the tray and you have set the correct paper type.If you are printing a photo from your computer, set the Media Type inthe printer driver.
Photo paper does notfeed correctly.
When you print on Brother Photo paper, load one extra sheet of thesame photo paper in the paper tray. An extra sheet has been includedin the paper package for this purpose.
Vertical black lines orstreaks appear incopies.
Black vertical lines on copies are typically caused by dirt or correctionfluid on the glass strip. Clean the glass strip, scanner glass, and thewhite bar and white plastic above them.
See Related Information: Clean the Scanner at the end of this section.
Check that the speck of dirt has been removed.
Black marks or spotsappear in copies.
Black marks or spots on copies are typically caused by dirt orcorrection fluid on the scanner glass. Clean the scanner glass andwhite plastic above it.
See Related Information: Clean the Scanner at the end of this section.
Check that the speck of dirt has been removed.
• Clean the Scanner on page 32• Check the Print Quality on page 32• Check the Print Alignment from Your Brother Machine on page 34
Related Information
BTroubleshooting
51
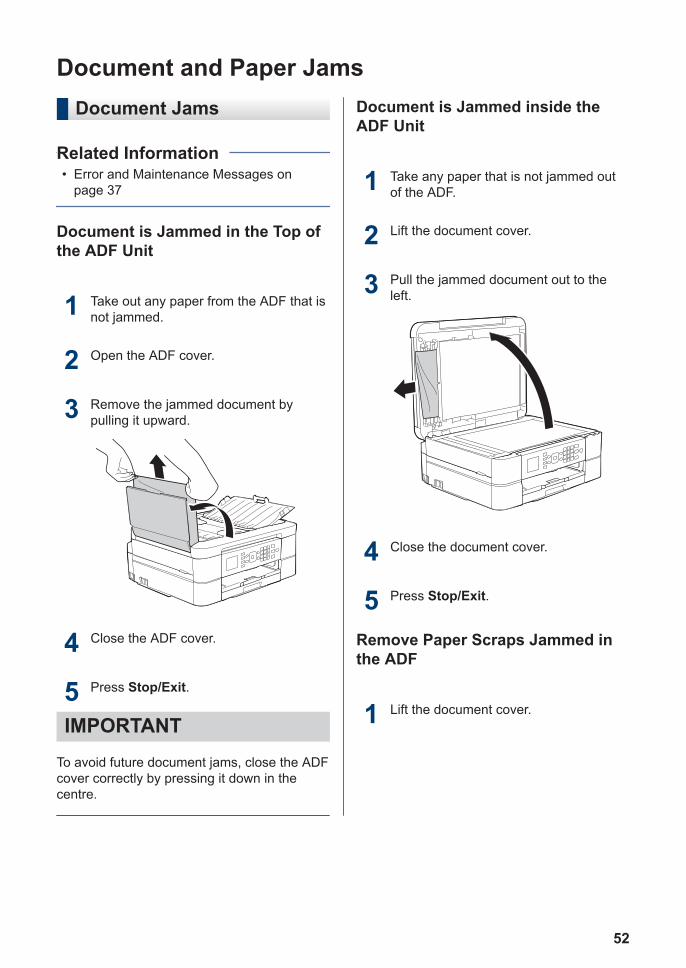
Document and Paper JamsDocument Jams
• Error and Maintenance Messages onpage 37
Related Information
Document is Jammed in the Top ofthe ADF Unit
1 Take out any paper from the ADF that isnot jammed.
2 Open the ADF cover.
3 Remove the jammed document bypulling it upward.
4 Close the ADF cover.
5 Press Stop/Exit.
IMPORTANTTo avoid future document jams, close the ADFcover correctly by pressing it down in thecentre.
Document is Jammed inside theADF Unit
1 Take any paper that is not jammed outof the ADF.
2 Lift the document cover.
3 Pull the jammed document out to theleft.
4 Close the document cover.
5 Press Stop/Exit.
Remove Paper Scraps Jammed inthe ADF
1 Lift the document cover.
52
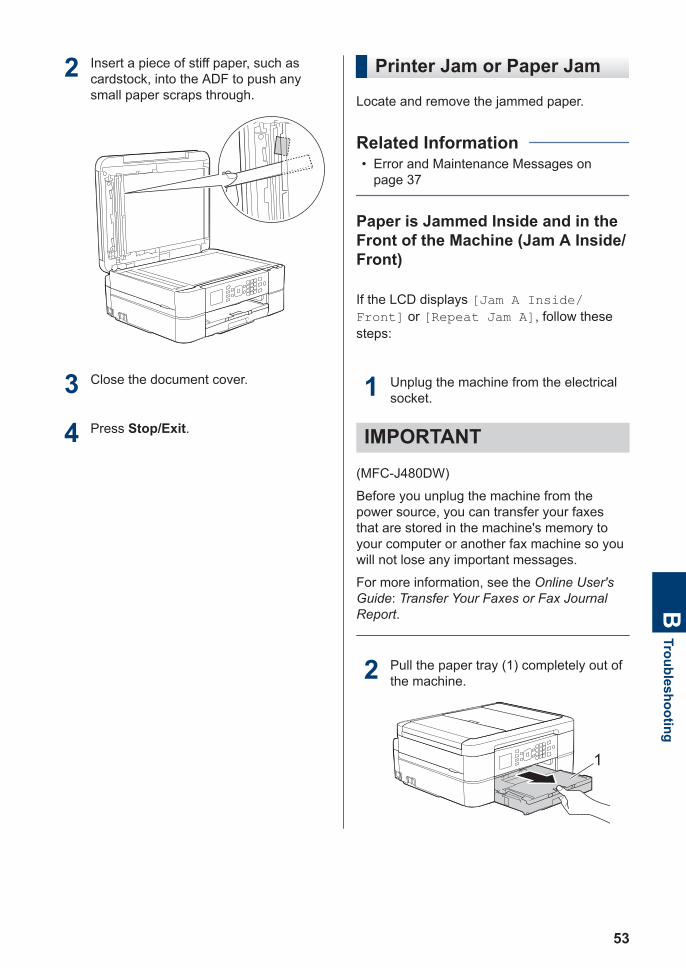
2 Insert a piece of stiff paper, such ascardstock, into the ADF to push anysmall paper scraps through.
3 Close the document cover.
4 Press Stop/Exit.
Printer Jam or Paper Jam
Locate and remove the jammed paper.
• Error and Maintenance Messages onpage 37
Related Information
Paper is Jammed Inside and in theFront of the Machine (Jam A Inside/Front)
If the LCD displays [Jam A Inside/Front] or [Repeat Jam A], follow thesesteps:
1 Unplug the machine from the electricalsocket.
IMPORTANT(MFC-J480DW)
Before you unplug the machine from thepower source, you can transfer your faxesthat are stored in the machine's memory toyour computer or another fax machine so youwill not lose any important messages.
For more information, see the Online User'sGuide: Transfer Your Faxes or Fax JournalReport.
2 Pull the paper tray (1) completely out ofthe machine.
1
BTroubleshooting
53
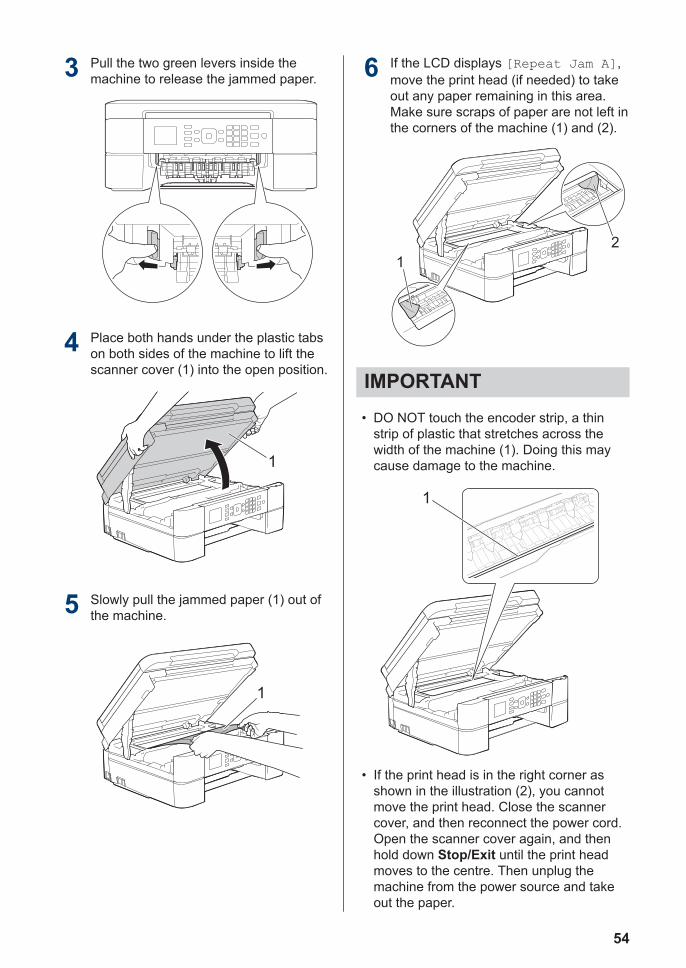
3 Pull the two green levers inside themachine to release the jammed paper.
4 Place both hands under the plastic tabson both sides of the machine to lift thescanner cover (1) into the open position.
1
5 Slowly pull the jammed paper (1) out ofthe machine.
1
6 If the LCD displays [Repeat Jam A],move the print head (if needed) to takeout any paper remaining in this area.Make sure scraps of paper are not left inthe corners of the machine (1) and (2).
1
2
IMPORTANT• DO NOT touch the encoder strip, a thin
strip of plastic that stretches across thewidth of the machine (1). Doing this maycause damage to the machine.
1
• If the print head is in the right corner asshown in the illustration (2), you cannotmove the print head. Close the scannercover, and then reconnect the power cord.Open the scanner cover again, and thenhold down Stop/Exit until the print headmoves to the centre. Then unplug themachine from the power source and takeout the paper.
54
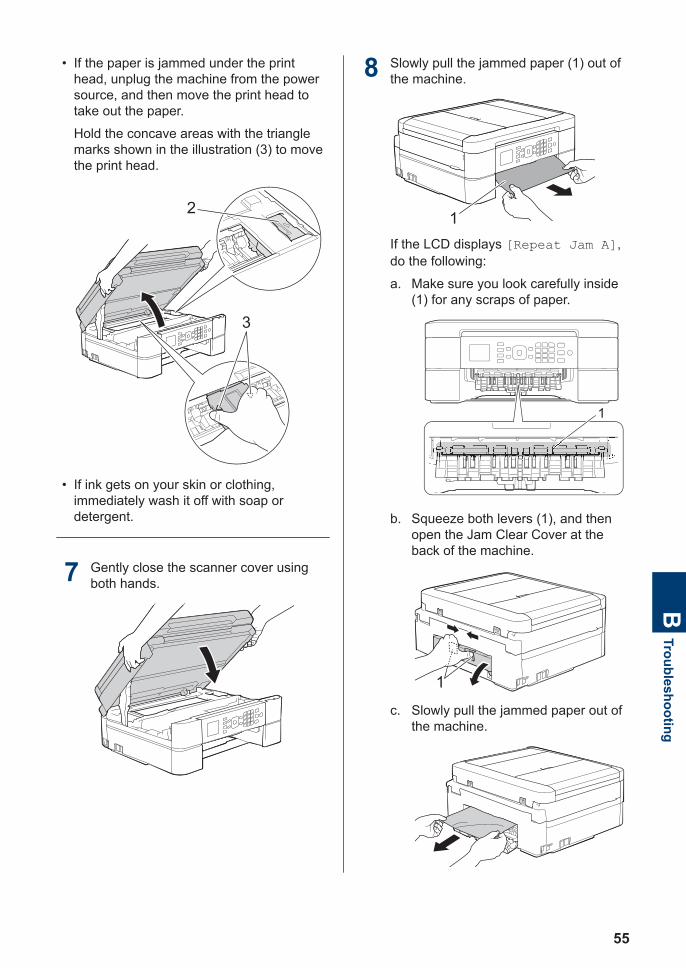
• If the paper is jammed under the printhead, unplug the machine from the powersource, and then move the print head totake out the paper.
Hold the concave areas with the trianglemarks shown in the illustration (3) to movethe print head.
3
2
• If ink gets on your skin or clothing,immediately wash it off with soap ordetergent.
7 Gently close the scanner cover usingboth hands.
8 Slowly pull the jammed paper (1) out ofthe machine.
1
If the LCD displays [Repeat Jam A],do the following:
a. Make sure you look carefully inside(1) for any scraps of paper.
1
b. Squeeze both levers (1), and thenopen the Jam Clear Cover at theback of the machine.
1
c. Slowly pull the jammed paper out ofthe machine.
BTroubleshooting
55

d. Close the Jam Clear Cover. Makesure the cover is closed completely.
9 Put the paper tray firmly back in themachine.
10 While holding the paper tray in themachine, pull out the paper support (1)until it locks into place, and then unfoldthe paper support flap (2).
2
1
11 Reconnect the power cord.
Paper is Jammed in the Front of theMachine (Jam B Front)
If the LCD displays [Jam B Front] or[Repeat Jam B], follow these steps:
1 Unplug the machine from the electricalsocket.
IMPORTANT(MFC-J480DW)
Before you unplug the machine from thepower source, you can transfer your faxesthat are stored in the machine's memory toyour computer or another fax machine so youwill not lose any important messages.
For more information, see the Online User'sGuide: Transfer Your Faxes or Fax JournalReport.
2 Pull the paper tray (1) completely out ofthe machine.
1
3 Pull the two green levers inside themachine to release the jammed paper.
56
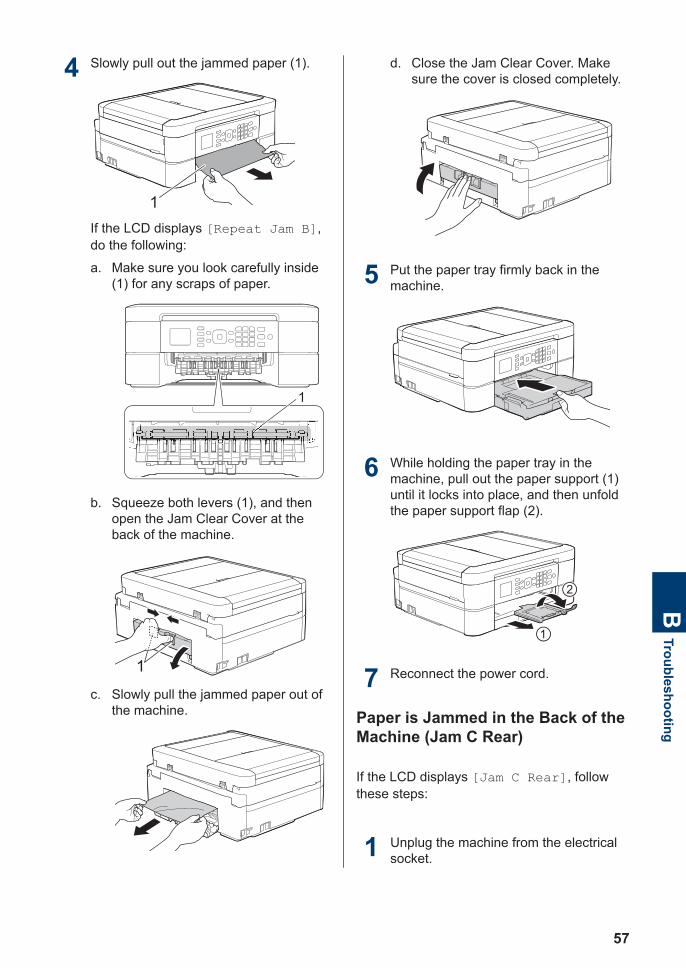
4 Slowly pull out the jammed paper (1).
1
If the LCD displays [Repeat Jam B],do the following:
a. Make sure you look carefully inside(1) for any scraps of paper.
1
b. Squeeze both levers (1), and thenopen the Jam Clear Cover at theback of the machine.
1
c. Slowly pull the jammed paper out ofthe machine.
d. Close the Jam Clear Cover. Makesure the cover is closed completely.
5 Put the paper tray firmly back in themachine.
6 While holding the paper tray in themachine, pull out the paper support (1)until it locks into place, and then unfoldthe paper support flap (2).
2
1
7 Reconnect the power cord.
Paper is Jammed in the Back of theMachine (Jam C Rear)
If the LCD displays [Jam C Rear], followthese steps:
1 Unplug the machine from the electricalsocket.
BTroubleshooting
57
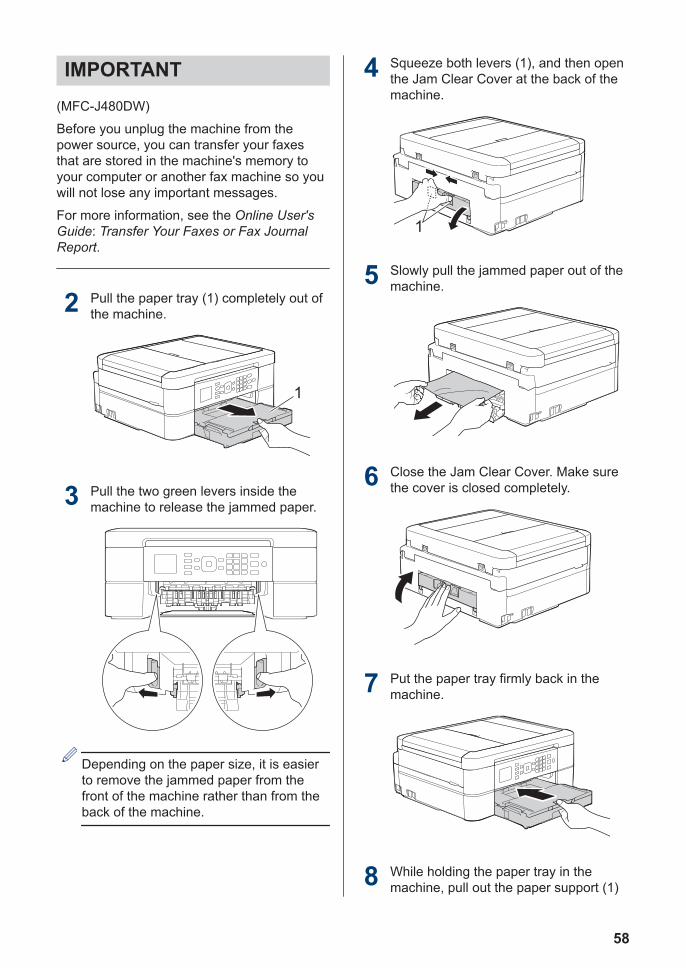
IMPORTANT(MFC-J480DW)
Before you unplug the machine from thepower source, you can transfer your faxesthat are stored in the machine's memory toyour computer or another fax machine so youwill not lose any important messages.
For more information, see the Online User'sGuide: Transfer Your Faxes or Fax JournalReport.
2 Pull the paper tray (1) completely out ofthe machine.
1
3 Pull the two green levers inside themachine to release the jammed paper.
Depending on the paper size, it is easierto remove the jammed paper from thefront of the machine rather than from theback of the machine.
4 Squeeze both levers (1), and then openthe Jam Clear Cover at the back of themachine.
1
5 Slowly pull the jammed paper out of themachine.
6 Close the Jam Clear Cover. Make surethe cover is closed completely.
7 Put the paper tray firmly back in themachine.
8 While holding the paper tray in themachine, pull out the paper support (1)
58
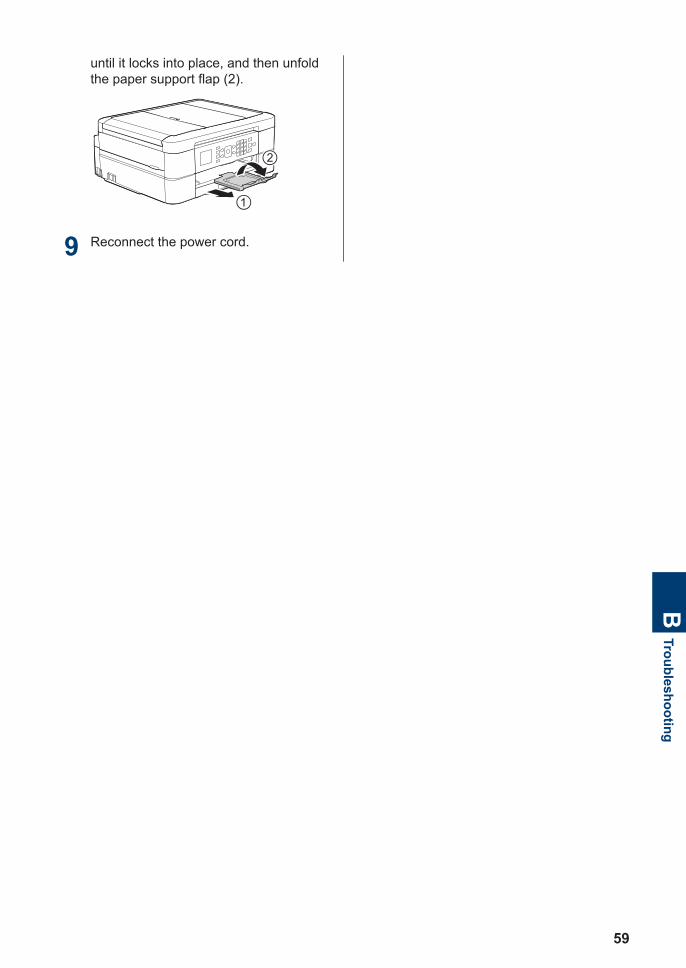
until it locks into place, and then unfoldthe paper support flap (2).
2
1
9 Reconnect the power cord.
BTroubleshooting
59
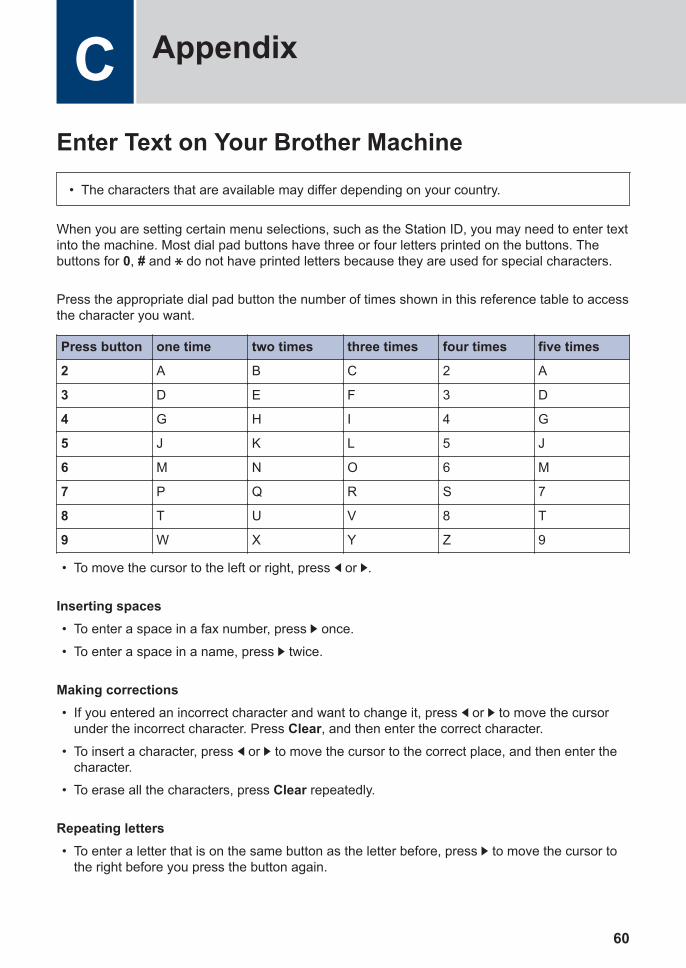
Enter Text on Your Brother Machine
• The characters that are available may differ depending on your country.
When you are setting certain menu selections, such as the Station ID, you may need to enter textinto the machine. Most dial pad buttons have three or four letters printed on the buttons. Thebuttons for 0, # and do not have printed letters because they are used for special characters.
Press the appropriate dial pad button the number of times shown in this reference table to accessthe character you want.
Press button one time two times three times four times five times
2 A B C 2 A
3 D E F 3 D
4 G H I 4 G
5 J K L 5 J
6 M N O 6 M
7 P Q R S 7
8 T U V 8 T
9 W X Y Z 9
• To move the cursor to the left or right, press d or c.
Inserting spaces• To enter a space in a fax number, press c once.
• To enter a space in a name, press c twice.
Making corrections• If you entered an incorrect character and want to change it, press d or c to move the cursor
under the incorrect character. Press Clear, and then enter the correct character.
• To insert a character, press d or c to move the cursor to the correct place, and then enter thecharacter.
• To erase all the characters, press Clear repeatedly.
Repeating letters• To enter a letter that is on the same button as the letter before, press c to move the cursor to
the right before you press the button again.
C Appendix
60
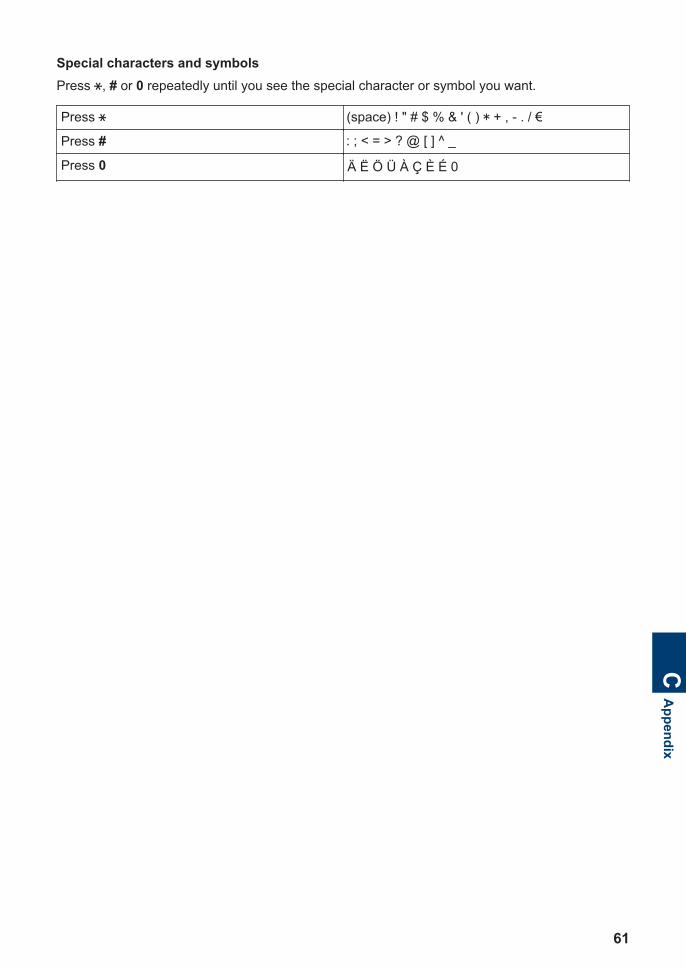
Special characters and symbolsPress , # or 0 repeatedly until you see the special character or symbol you want.
Press
Press #
Press 0 Ä Ë Ö Ü À Ç È É 0
CA
ppendix
61
Supply Specifications
Ink The machine uses individual Black, Yellow, Cyan and Magenta ink cartridgesthat are separate from the print head assembly.
Service Lifeof InkCartridge
The first time you install a set of ink cartridges the machine will use an amountof ink to fill the ink delivery tubes for high quality printouts. This process willonly happen once. After this process is complete the cartridges provided withyour machine will have a lower yield than regular capacity cartridges (80 %).With all following ink cartridges you can print the specified number of pages.
Replacement Supplies
(For Australia and otherOceania countries)
(For other countries)
Standard Yield Black LC231BK LC261BK
Standard Yield Yellow LC231Y LC261Y
Standard Yield Cyan LC231C LC261C
Standard Yield Magenta LC231M LC261M
Black, Yellow, Cyan and Magenta - Approximately 260 pages 1
(For Australia and otherOceania countries)
(For other countries)
High Yield Black LC233BK LC263BK
High Yield Yellow LC233Y LC263Y
High Yield Cyan LC233C LC263C
High Yield Magenta LC233M LC263M
Black, Yellow, Cyan and Magenta - Approximately 550 pages 1
For more information about the replacement supplies, visit us http://www.brother.com/pageyield
What is Innobella?Innobella is a range of genuine supplies offered by Brother. The name "Innobella" derives fromthe words "Innovation" and "Bella" (meaning "Beautiful" in Italian) and is a representation of the"innovative" technology providing you with "beautiful" and "long lasting" print results.
When you print photo images, Brother recommends Innobella glossy photo paper (BP71 series)for high quality. Brilliant prints are made easier with Innobella Ink and paper.
1 Approx. cartridge yield is declared in accordance with ISO/IEC 24711
62
If you’re using Windows®, double-click the Brother CreativeCenter icon on your desktop toaccess our FREE website designed as a resource to help you easily create and printcustomized materials for business and home use with photos, text and creative touch.
Mac users can access Brother CreativeCenter at this web address: http://www.brother.com/creativecenter
• Error and Maintenance Messages on page 37Related Information
CA
ppendix
63
D Index
AAddress Book...................................... 25ADF (automatic document feeder).14, 18Automatic
fax receive.......................................21
CCleaning
scanner........................................... 32Control Panel Overview......................... 1Copy.................................................... 14
settings............................................15
DDistinctive Ring.................................... 27Document
how to load................................14, 18
EEntering Text........................................60Error messages................................... 37
FFax
F/T ring time.................................... 24ring delay.........................................24station ID......................................... 20telephone line compatibility............. 20
Fax receive.......................................... 21Fax, from computer..............................30
JJams.................................................... 52
document........................................ 52paper............................................... 53
MManual
receive.............................................21
PPaper
check paper setting........................... 9how to load .......................................7
Print......................................................11alignment check.............................. 34quality check................................... 32
RReceive Mode................................ 21, 22
SScan.....................................................17Supplies............................................... 62
TTAD (Telephone Answering Device),external.......................................... 21, 27Transferring your faxes or Fax Journalreport................................................... 42Troubleshooting
document and paper jams ..............52error and maintenance messages ..37fax and telephone problems ...........46print or scan problems ....................49
VVoice Mail............................................ 27VoIP systems................................. 20, 27
WWireless LAN report.............................44
64
For Australia Only:Support – For technical support of your Brother Product other than what youcan resolve through the User’s Guide, please visit our website or Solutionswebsite (see below) to find an answer to FAQs/Troubleshooting, locatingDrivers & Software.Alternatively, please contact the Product Support Centre for any customercare/technical support enquiry.To contact Brother International (Aust) Pty Ltd for support on a Brotherproduct please see the details listed below:
Product Support Centre:AustraliaBrother International(Aust) Pty Ltd
Phone:Fax:Solutions Site:Website:Email:
02 8875 600002 9870 7223http://support.brother.comhttp://www.brother.com.auTo submit an e-mail enquiry, visithttp://www.brother.com.au go to Service andSupport area and follow the prompts.
Our Technical Support Consultants are available 5 days a week by phoneduring the hours of 8.30am to 5.00pm (EST/EDST) Monday to Friday.
For New Zealand Only:For technical support for your Brother Product please refer to this user guideand the FAQ’s available on our Brother Solutions website,http://support.brother.com.Drivers, software, user guides and technical references are all available onour Brother Solutions website.If you require further assistance please contact Brother International (NZ)Limited on the following numbers
Initial setup and 14 day product supportTechnical Support for those using Genuine BrotherConsumablesTechnical Support for those not using Genuine Consumables24 / 7 Automated Self HelpBrother Recycle AssistanceFax Assistance
0800 454 6770800 329 1110900 552 1520800 652 1520800 632 4670800 837 822
Our Technical Support Consultants are available 7 days a week by phoneduring the hours of 8.30am to 5pm Monday to Friday and 9am to 5pmSaturday and Sunday.Email AssistancePlease visit http://www.brother.co.nz and submit a helpdesk enquiry from ourService and Support page.Web AssistancePlease visit http://www.brother.co.nz under Service and Support forFrequently Asked Questions, Driver downloads, Warranty information andService Centres.

Visit us on the World Wide Webhttp://www.brother.com
This machine is approved for use in the country of purchase only. Local Brothercompanies or their dealers will support only machines purchased in their own countries.
Made from 100% recycled paper(excludes cover)
LEX029040-00OCE/ASAVersion 0