Basic Microbiology Skills Part 1 - Carolina
24
15-4771 Basic Microbiology Skills Part 1 TEACHER’S MANUAL WITH STUDENT INSTRUCTIONS by Priya and Shiladitya DasSarma
Transcript of Basic Microbiology Skills Part 1 - Carolina
15-4771
Basic MicrobiologySkills Part 1
TEACHER’S MANUAL WITH STUDENT INSTRUCTIONS
by Priya and Shiladitya DasSarma
©2005 Priya and Shiladitya DasSarma Printed in USA
Basic Microbiology Part 1
Teacher’s ManualStudent Objectives . . . . . . . . . . . . . . . . . . . . . . . . . . . . . . . . . . . . . . . . . . . . . . . . . . . . . . . . . . . . . 3Summary . . . . . . . . . . . . . . . . . . . . . . . . . . . . . . . . . . . . . . . . . . . . . . . . . . . . . . . . . . . . . . . . . . . . . 3Background . . . . . . . . . . . . . . . . . . . . . . . . . . . . . . . . . . . . . . . . . . . . . . . . . . . . . . . . . . . . . . . . . . . 3Materials . . . . . . . . . . . . . . . . . . . . . . . . . . . . . . . . . . . . . . . . . . . . . . . . . . . . . . . . . . . . . . . . . . . . . 5Teacher Preparation . . . . . . . . . . . . . . . . . . . . . . . . . . . . . . . . . . . . . . . . . . . . . . . . . . . . . . . . . . . . 5Examination of Colonies and Explanation of Results. . . . . . . . . . . . . . . . . . . . . . . . . . . . . . . . . . . 6Further Investigation. . . . . . . . . . . . . . . . . . . . . . . . . . . . . . . . . . . . . . . . . . . . . . . . . . . . . . . . . . . . 7Glossary . . . . . . . . . . . . . . . . . . . . . . . . . . . . . . . . . . . . . . . . . . . . . . . . . . . . . . . . . . . . . . . . . . . . . . 8Further Reading and Information . . . . . . . . . . . . . . . . . . . . . . . . . . . . . . . . . . . . . . . . . . . . . . . . . . 9
Photocopy MastersStudent Instructions . . . . . . . . . . . . . . . . . . . . . . . . . . . . . . . . . . . . . . . . . . . . . . . . . . . . . . . . . . S-1
Pre-Lab Worksheet. . . . . . . . . . . . . . . . . . . . . . . . . . . . . . . . . . . . . . . . . . . . . . . . . . . . . . . . . S-3Procedures . . . . . . . . . . . . . . . . . . . . . . . . . . . . . . . . . . . . . . . . . . . . . . . . . . . . . . . . . . . . . . . S-6Post Lab Analysis . . . . . . . . . . . . . . . . . . . . . . . . . . . . . . . . . . . . . . . . . . . . . . . . . . . . . . . . . . S-7
About the authors
Priya and Shil DasSarma have studied Halobacterium sp. NRC-1 for over 20 years. They are enthusiastic aboutmaking these safe, convenient microbes accessible to educators and students at all levels. Visit their website athttp://www.carolina.com/life_science/halobacteria for more information, ideas, and contact information.

T e a c h e r ’ s M a n u a l 3
• To learn and practice sterile technique
• To learn how to streak plates
• To learn to isolate and examine individual colonies
In this laboratory exercise, students will practice sterile technique and willlearn the basic plating technique of streaking. They will streak a plate in apattern they select from three options illustrated in the Student Instructionsand will compare results from the three different patterns. They will alsoobserve their colonies for different phenotypes.
Microbiology, the study of single-celled microscopic life, is full of unknownsand questions to explore. Also, microbiology is critical in today’s food,medical, and biotechnical industries. Students should know basic microbiologyand microbiology skills in order to comprehend the world they live in.
There is no better way for students to learn about microorganisms than tostudy them in the laboratory. Many microbiology questions can be investigatedin your classroom or laboratory. Your students could do community analysis todiscover which microbes are present in their environment, or they couldcharacterize isolated strains. They may also investigate the role of microbes inmaterial cycling as a way to learn about the vital role of microbes in thenatural environment.
Since microbes are everywhere—on our hands, our clothes, and our laboratorywork surfaces—a problem with many microbiology studies in the classroom orschool lab is the risk of contamination of cultures by unwanted species.Avoiding contamination is everyday work for those who use microbiology intheir professions. In medicine, researchers and technicians grow microbes fromsick patients in order to identify the pathogen (disease-causing agent), or totest a pathogen’s antibiotic resistance. This work with known or potentialpathogens requires special laboratory procedures for handling, containment,and disposal. These procedures are also used in the food and biotechnologyindustries, where workers carefully monitor microbe strains and populations(e.g., the milk supply is regularly tested for harmful microbes.)
To deal with the problem of contamination, microbiologists follow a basic setof procedures known as sterile or aseptic technique. Sterile technique is usedfor culturing and transferring cultures, and for streaking plates to isolate andpurify strains. In this lab, students will learn and practice sterile technique.Basic sterile technique is described in the Student Instructions.
While learning sterile technique, students will practice another importantmicrobiology skill, streaking plates. The goal of streaking agar plates is togenerate individual colonies for examination or study. The technique is alsoused to isolate individual microbial species from a mixture of microbes in a
Basic Microbiology Skills Part 1
StudentObjectives
Summary
Background

sample. In order to generate single colonies on a plate by streaking, you musthave good streaking technique. Consider that an inoculating loop dipped intoa pure culture of Halobacterium may pick up 10,000,000 cells. If a plate isstreaked correctly, some of these cells will be spread out enough to growindividual colonies.
For this exercise, students will use a pure culture of Halobacterium sp. NRC-1.Halobacterium sp. NRC-1 is a member of the Archaea and grows in extremelysalty environments including salt marshes, hypersaline lakes and ponds (e.g.,the Great Salt Lake), solar salt production facilities, and brine inclusions insalt crystals in salt mines. In these environments, the salt concentrations arebetween 3 and 5 M (nearly saturated). Halobacterium is grown on medium sosalty that few other organisms would survive it. In fact, Halobacterium will lyseat total salinities below 1.0–2.0 M. (For comparison, sea water has a totalsalinity of 0.6 M, while human blood contains only 0.14 M NaCl). For thesereasons and the fact that Halobacterium is not known to cause any humandisease, these microbes are ideal for beginning practice of sterile technique.Using these microbes allows students to practice the hand motions of steriletechnique without the concern that they will culture a pathogen orcontaminate their workspace with the microbe they are using. However,emphasize to your students that the point of the exercise is to learn goodsterile technique, so they should use the same care they would use if they wereworking with a known pathogen.
Additional BackgroundIn addition to discussing sterile technique with your students, you may wish toreview other basic information about how microbes are grown and isolated inthe lab. In this review you may wish to include the following information.
In order to identify microbes, laboratory workers initially examine the size,shape, color, and consistency of colonies formed by the microbe. To reliablyand easily do this and to study other identifying and interesting aspects of agiven microbe, workers must be able to culture the microbe in the laboratory.In the laboratory, specific microbes are grown in a medium containing thenutrients that they need to grow, often including certain sugars, amino acids,vitamins, and minerals. The medium may be a liquid, or it may be a solid suchas an agar plate. In addition, the nutritional content of media may varydepending upon what kind of microbe a worker wants to grow.
Once they are placed into or on the appropriate media, microbes are thenincubated (grown) at a particular temperature and under specific conditionsdepending upon their growth requirements. For example, some microbes aregrown in the presence of oxygen (aerobically), others, in the absence ofoxygen (anaerobically). The organism your students will use, Halobacteriumsp. NRC-1, generally grows aerobically, using oxygen, but it also has facultativeanaerobic and phototrophic capabilities and so can grow without oxygen inthe presence of light.
Generally, microbes divide by binary fission, the splitting of one parent cellinto two daughter cells. Each doubling represents a new generation. Theamount of time required for a single cell to go through the division cycle toform a new generation is called the doubling time or generation time. The
4 T e a c h e r ’ s M a n u a l
B a s i c M i c r o b i o l o g y S k i l l s P a r t 1

generation time of various microbes ranges from a few minutes (e.g., 20minutes for common laboratory E. coli in rich medium) to a year or more forslow-growing species. For Halobacterium sp. NRC-1, the generation time underoptimal growth conditions is about 6 hours.
Usually, after 25 generations, a single cell has spawned a colony visible to theunaided eye. In most cases, this single colony is composed of millions of clonesof the original parental cell. The parental cell of a colony is sometimes referredto as a colony-forming unit or cfu. The number of viable cells in a culture isoften quantified as cfu/volume.
Included in the kit40 petri dishes8 bottles Halobacterium Agar, 135 mL eachHalobacterium liquid culture128 sterile inoculating loopsautoclavable disposal bagTeacher’s Manual with photocopy master for Student Instructions
Needed, but not suppliedhand lenses, or dissecting microscope(s)wax markers or lab pensBunsen burnersresealable plastic bags or plastic food-storage boxes*Incubator, 42° or 37°Disinfectant for benchtop (e.g., alcohol or bleach solution)
*If an incubator is not available, the plates may be stored on the labbench. If the plates are incubated at 42°C, results may be obtained in 7 days, and if at 37°C, 7–14 days. If the plates are incubated at roomtemperature on the bench, it may take 2 weeks or longer to see theresults, depending on the temperature of your lab.
You will need to
• pour plates.
• read through the entire booklet to familiarize yourself with theinformation and instructions given to the students.
• photocopy sets of Student Guides for individuals or teams.
• decide how and when to share the Additional Background informationand the Explanation of Results with the students.
Preparing Media Plates1. To melt the medium, slightly loosen the cap(s) and set the bottle(s) of
medium in a pot of water and bring it to a boil. Make sure the water levelis even with the level of the medium in the bottle(s). Leave the bottle inthe boiling water until the medium has completely melted. This will takeapproximately 30 minutes.
T e a c h e r ’ s M a n u a l 5
B a s i c M i c r o b i o l o g y S k i l l s P a r t 1
Materials
TeacherPreparation
2. Allow the medium to cool to 55°C either by allowing the pot of water tocool to that temperature or by letting the bottle(s) sit for several minutesat room temperature. The bottle(s) should feel comfortably hot to thetouch when around 55°C.
3. Disinfect the work surface. Wash your hands thoroughly. Unpack the petridishes, being careful not to disturb their sterility. Align the sterile platesalong the edge of a clean, level tabletop away from any draft or breeze.
4. Remove the cap and flame the mouth of a bottle of medium. Lift the lid ofa petri plate just enough to pour in the molten medium. Carefully, pour toa depth of about 5 mm per plate. Replace the lid immediately to preventcontamination.
5. Repeat Step 4 with the other bottle(s) of medium.
6. Let the petri plates stand undisturbed until they solidify (about 1 hour).Let the plates sit out until any condensation on the lid evaporates.
7. Dispose of the empty bottles in an autoclave disposal bag.
For the lab procedure, see the Student Instructions.
Have your students compare results with each other and then drawconclusions about whether they would use the same or a different streakingtechnique the next time they do the exercise.
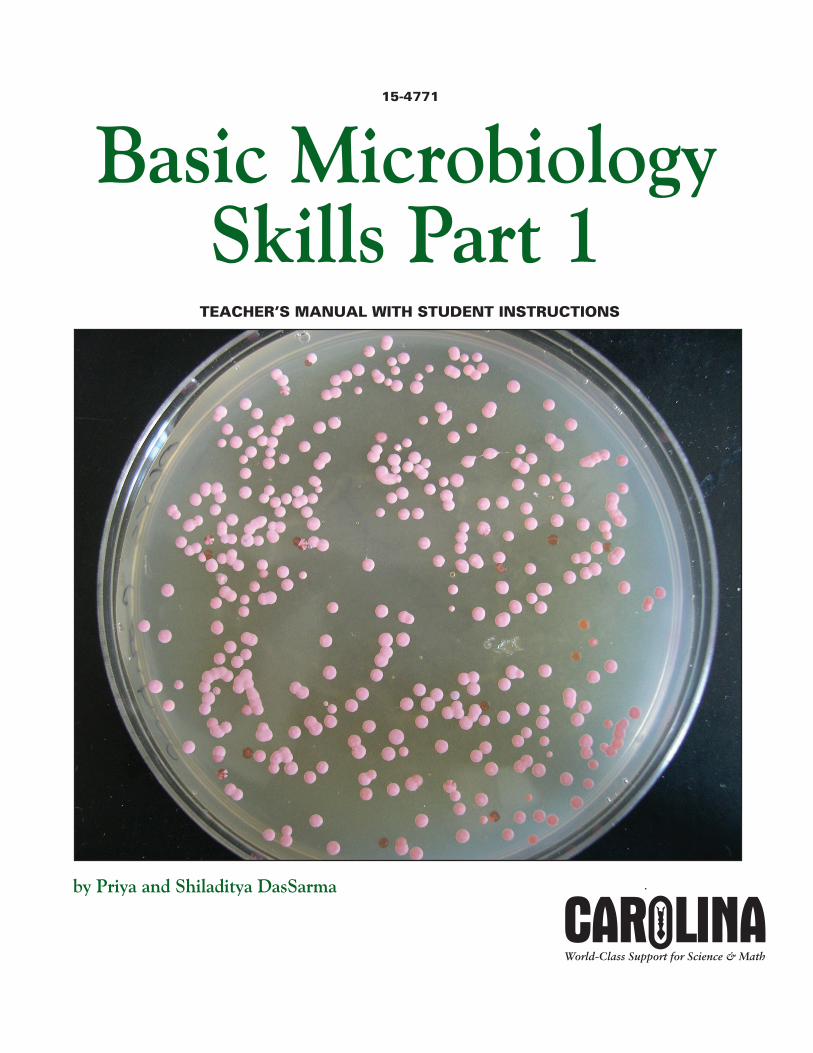
In addition, have your students watch for the development of the followingthree possible phenotypes (all represented on the plate shown on the cover ofthis manual):
• Vac+, or wild-type, pink colonies. In the cells in these colonies,Halobacterium’s red pigmentation is somewhat altered by the presence ofgas vesicles, internal oganelles that refract light and enable the cells tofloat in a liquid culture. Halobacterium converts light energy to chemicalenergy. Thus, this ability to float is advantageous, because it allowsHalobacterium cells to float near the surface of natural lakes and pondswhere the light is most intense.
• Vac– , or red colonies. Halobacterium’s red color is due to its pigments-carotenoids and bacteriorhodopsin. Bacteriorhodopsin enables the cellsto convert light energy to chemical energy in a method similar to, butdifferent from photosynthesis.
• Sectored colonies. These colonies result from mutations that occur in thefounder cells during a colony’s growth. A sectored colony consists of a mixof Vac+ and Vac– cells and can resemble a pie with different-colored (redor pink) slices.
Why do these colonies look so different from one another? It is because of thepresence of Insertion Sequences (IS elements), or “jumping genes,” which “jump”into other genes at random. The insertion of the IS element often interrupts agene’s coding sequence in a way that causes the gene to become nonfunctional.In a Halobacterium cell, when an IS element jumps into one of the genes thatnormally code for the creation of gas vesicles, the disruption can render the cell andits progeny unable to produce gas vesicles. The absence of gas vesicles results in a
6 T e a c h e r ’ s M a n u a l
B a s i c M i c r o b i o l o g y S k i l l s P a r t 1
Examination ofColonies andExplanation ofResults

phenotypic (observable) change that is due to a genotypic (genetic) change—a change from pink to red cells as a result of a change in the DNA sequence.
If you or your students want to investigate further with Halobacterium, youcould try to keep the culture going. One option is to pick individual coloniesfrom the streaked plates with a sterile loop or toothpick and use them toinitiate individual 5-mL liquid cultures. Grow these cultures in a shakingincubator. BSYC medium (recipe follows) may be used for the cultures.
Potential questions to look into include: What is the appearance of culturesobtained from pink versus red or sectored colonies? What is the effect oftemperature on the growth rate of the culture? Will the liquid culture grow inthe absence of shaking? Why or why not?
Once a test-tube culture appears turbid, you can use it to streak a fresh plate,as you did initially. The plate colonies should be clones (identical progenycells) of the original cell that you picked. In the case where the original colonywas pink (wild type), there may be a few red or sectored colonies indicatingthe mutations discussed earlier.
Recipe for BSYC Medium (makes 1 L) BSYC medium is inexpensive and is suitable for most educational purposesusing Halobacterium sp. NRC-1.
Materials
1-L beaker or flask1-L graduated cylinder2 1-L bottlesautoclave tapedeionized waterstir barstir plate (preferably heatable)weigh boats250 g sodium chloride (NaCl)20 g magnesium sulfate (MgSO4•7H2O)3 g (Tri) sodium citrate (Na3C6H5O7)2 g potassium chloride (KCl)5 g yeast extract5 g casamino acids5 M sodium hydroxide (NaOH) for adjusting pHConcentrated HCl for adjusting pH
1. Place a beaker with a stir bar and 700 mL of deionized water onto a stirplate and set the speed to low.
2. Add NaCl and turn on the heat to low-medium. Warm to 50˚C in orderto help dissolve the salt (this may take up to 15 minutes).
3. Once the salt has fully dissolved, add the MgSO4•7H2O, Na3C6H5O7,KCl , yeast extract, and casamino acids.
T e a c h e r ’ s M a n u a l 7
B a s i c M i c r o b i o l o g y S k i l l s P a r t 1
FurtherInvestigation
4. Once all the ingredients have dissolved, adjust the pH to 7.2 using 5 MNaOH or concentrated HCl.
5. Bring the volume to 1 L with deionized water. Mix.
6. Split the 1 L into two 1-L bottles to prevent overflow during autoclaving.
7. Autoclave at 15 lbs/in2 and 121°C for 35 minutes.
Storage ConditionsCultures can be stored for 2–3 months on plates or as liquid cultures at 4°C.Store the plates in a sealed plastic food container to prevent them from drying out.
The DasSarma Team would be happy to discuss projects with students andeducators and can be reached by email: [email protected].
Aerobic using oxygen for metabolism.
Anaerobic not using oxygen for metabolism. Some anaerobes cannot survivein the presence of oxygen.
Agar plate a medium made solid by the addition of agar, a seaweed derivative.The medium contains specific nutrients for culturing specific microbes. Aplate is most often prepared in a petri dish.
Archaea a domain of life believed to be the most ancient and to containorganisms believed to be similar to ancient prokaryotes. This domain ofunicellular organisms includes the halophiles, organisms that grow in high-saltenvironments; methanogans, anaerobes that produce methane; andthermophiles, which thrive in high-temperature environments.
Bacteriorhodopsin a red pigment that enables some microbes to turn solarenergy into chemical energy.
Binary fission splitting of a parent cell into two daughter cells.
Carotenoids a group of pigments ranging from yellow to red that occur widelyamong a variety of organisms. They help protect Halobacterium from theharmful effects of UV radiation.
Clone a genetic duplicate of an organism. A microbial colony consists ofclones of the founding cell.
Colony a visible cluster of millions of microbial cells resulting from binaryfission of a founder cell and its daughters and so on.
Colony-forming unit (cfu) a microbial cell capable of undergoing binaryfission and founding a colony.
Generation time length of time for a particular microbe to complete itsdivision cycle to form two new daughter cells.
Genotype the genetic makeup of an organism, either in total or in terms ofone or a few sets of alleles.
8 T e a c h e r ’ s M a n u a l
B a s i c M i c r o b i o l o g y S k i l l s P a r t 1
Glossary

Incubate to furnish appropriate conditions for an inoculated solid or liquidmedium to produce colonies or larger populations of the inoculated microbes.
Inoculum living material used to initiate a culture of microbes
Insertion sequences (IS elements) sections of DNA that insert at randominto the genome, causing mutations that often bring about phenotypic change;also known as “jumping genes.”
Lyse to cause the breaking open of a cell wall and membrane such that thecontents are released and the cell dies (the breaking open itself is referred toas “lysing”).
Medium substrate or material on or in which microbes are grown for study.
Microbiology the study of single-celled life forms.
Pathogen a disease-causing agent.
Phenotype observable characteristic of an organism, e.g., brown, blue, orgreen eyes in people.
Pure culture colony or collection of microorganisms containing only onetype. A pure culture is usually obtained after a series of cultures has beenperformed to isolate a particular microbe.
Salinity measure of the proportion of salt in a substance. Aquatic halophileslive in water of high salinity.
Solar salt production collection of sea salt by means of flooding shallow poolsand allowing the sun to evaporate the water. The brine is moved to pools ofsuccessively higher salt concentration until crystals form.
Sterile technique (aseptic technique) accepted laboratory practices gearedtoward preventing contamination of cultures and the laboratory andsurroundings. Sterile technique covers procedures regarding lab preparation,transfer of cultures, and cleanup and disposal.
Streak to spread a microbial sample over the surface of a plate in order toisolate colonies. Usually, streaking is done as a pattern of zigzags.
DasSarma, S., and P. Arora. 2002. “Halophiles,” Encyclopedia of Life Sciences,Vol. 8, p. 458-66, London: Nature Publishing Group.
DasSarma, S. 2004. Genome sequence of an extremely halophilic archaeon, inMicrobial Genomes, pp. 383-99, C.M. Fraser, T. Read, and K.E. Nelson (eds.),Humana Press, Inc, Totowa, NJ.
DasSarma, S., and P. Arora. 1997. Genetic analysis of the gas vesicle genecluster in haloarchaea. FEMS Microbiol. Lett. 153:1-10.
DasSarma, S., et al. (eds). 1995. Archaea: A Laboratory Manual - Halophiles,Cold Spring Harbor Laboratory Press, Cold Spring Harbor, NY.
Ng, W.V., S.P. Kennedy, G.G Mahairas, B. Berquist, M. Pan, H.D. Shukla, S.R. Lasky, N.S. Baliga , V. Thorsson , J. Sbrogna, S. Swartzell, D. Weir, J. Hall, T.A. Dahl, R. Welti, Y.A. Goo, B. Leithauser, K. Keller, R. Cruz,M.J. Danson, D.W. Hough, D.G. Maddocks, P.E. Jablonski, M.P. Krebs,C.M. Angevine, H. Dale, T.A. Isenbarger, R.F. Peck, M. Pohlschroder, J.L. Spudich, K.H. Jung, M. Alam, T. Freitas, S. Hou, C.J. Daniels,
T e a c h e r ’ s M a n u a l 9
B a s i c M i c r o b i o l o g y S k i l l s P a r t 1
FurtherReading andInformation

P.P. Dennis, A.D. Omer, H. Ebhardt, T.M. Lowe, P. Liang, M. Riley, L. Hood, S. DasSarma. 2000. Genome sequence of Halobacterium speciesNRC-1. Proc. Natl. Acad. Sci. USA 97:12176-81.
Wayne’s Word®: California’s Pink Salt Lakes: A Strange Phenomenon Causedby Red Halobacteria. http://waynesword.palomar.edu/plsept98.htm
Salt of the Early Earth, Mullen, L., Astrobiology Magazine, June 11, 2002http://www.astrobio.net/news/article223.html
The HaloEd Project: A Web site dedicated to biotechnology educationhttp://zdna2.umbi.umd.edu/~haloed/
http://www.carolina.com/life_science/halobacteria/index.asp
10 T e a c h e r ’ s M a n u a l
B a s i c M i c r o b i o l o g y S k i l l s P a r t 1

IntroductionMicrobiology, the study of single-celled microscopic life, is full of unknowns and questions to explore.Also, microbiology is a critical component of today’s food, medical, and biotechnical industries.
There is no better way to learn about microorganisms than to study them in the laboratory. Even so,since microbes are everywhere—on our hands, our clothes, and our laboratory work surfaces—specialprecautions must be taken to avoid contamination of cultures with unwanted species. Avoidingcontamination is everyday work for those who use microbiology in their professions. In medicine,researchers and technicians grow microbes from sick patients in order to identify the pathogen (disease-causing agent) or to test a pathogen’s antibiotic resistance. This work with known or potential pathogensrequires special laboratory procedures for handling, containing, and disposing of cultures. The same ruleapplies in the food and biotechnology industries, where workers carefully monitor microbe strains andpopulations (e.g. the milk supply is regularly tested for harmful microbes.)
To deal with the problem of contamination, microbiologists follow a basic set of procedures known assterile or aseptic technique. Sterile technique is used for culturing and transferring cultures, and forstreaking plates to isolate and purify strains. In this lab, you will learn and practice sterile techniquewhile developing another microbiology skill—streaking a plate.
The goal of streaking agar plates is to generate individual colonies for examination or study. The techniqueis also used to isolate individual microbial species from a mixture of microbes in a sample. In order togenerate single colonies on a plate by streaking, you must have good streaking technique. Consider that aninoculating loop dipped into a pure culture of Halobacterium may pick up 10,000,000 cells. If a plate isstreaked correctly, some of these cells will be spread out enough to grow individual colonies.
For this exercise, you will use a pure culture of Halobacterium sp. NRC-1. Halobacterium sp. NRC-1 is amember of the Archaea and grows in extremely salty environments. Because it causes no known diseasein humans and because most other microbes cannot even survive in the high salt concentration of itsgrowth medium, Halobacterium is a good microbe for practicing sterile technique. You can practice thehand motions of sterile technique without concern that you might unintentionally culture a pathogen orcontaminate your workspace with the microbe you are using. Still, since the point of the exercise is tolearn good sterile technique, you should use the same care as if working with a known pathogen.
In this laboratory exercise, you will practice sterile technique, learn basic plating techniques, and streaka plate in a pattern that you select from three options illustrated on page S-4. You will examine yourculture plates and compare your results with those of other students.
Sterile Technique1. Before beginning, wipe your work area with a disinfectant such as alcohol or bleach and wash your
hands with soap and water.
2. Light your burner. Openings (lips) of test tubes and flasks must be flamed during the transfer ofmedia or cultures. Heating the container directs air convection currents upward and away from theopening, momentarily preventing airborne contaminants from entering. It is essential to perform thetransfer quickly, before the opening cools. Hold test tubes at a 45° angle in your left hand if you areright-handed, or in your right hand if you are left-handed. Use your other hand to hold yourtransferring instrument (in this case a loop) and to remove and hold the cap with your little finger.
Student Instructions Name
15-4771 Date
Basic Microbiology Skills Part 1
© 2 0 0 5 P r i y a a n d S h i l a d i t y a D a s S a r m a S-1


Flame the top of the tube. Take out the inoculum (culture you are transferring), reflame theopening, and replace the cap.
3. When working with petri plates, always hold the lid over the plate to prevent contaminants fromlanding on the surface of the agar. Always place the lid back on as soon as possible. Realize that thelid is designed to fit loosely to allow diffusion of air around the edges, while minimizing thepossibility of contamination. When you lift the lid, hold it directly over the plate. Do not place thelid on the benchtop.
4. When finished, turn off the burner and again wipe your work area with a disinfectant and wash yourhands.
5. Dispose of microbial cultures in a safe manner. This usually involves either autoclaving all labwarethat comes in contact with cultures or soaking it in a bleach solution before disposal.
© 2 0 0 5 P r i y a a n d S h i l a d i t y a D a s S a r m a S-2


Pre-Lab WorksheetDefine the following terms:
media _____________________________________________________________________________
agar _______________________________________________________________________________
aerobic ____________________________________________________________________________
anaerobic __________________________________________________________________________
colonies ____________________________________________________________________________
pathogen ___________________________________________________________________________
sterile/aseptic technique _______________________________________________________________
List the important steps of sterile technique in microbiological work.
___________________________________________________________________________________
___________________________________________________________________________________
___________________________________________________________________________________
___________________________________________________________________________________
___________________________________________________________________________________
© 2 0 0 5 P r i y a a n d S h i l a d i t y a D a s S a r m a S-3
Basic Microbiology Skills Part 1 Name
15-4771 Date


Pick out the streaking technique from above that you think will result in the best spacing of colonies onan agar plate. Explain why you think that streaking pattern will work best.
___________________________________________________________________________________
___________________________________________________________________________________
___________________________________________________________________________________
Try all three streaking techniques in the circles that follow, using a pencil or pen to draw the streaks.After you have tried the streaks on paper, decide which one of the three patterns you want to use onyour agar plate.
© 2 0 0 5 P r i y a a n d S h i l a d i t y a D a s S a r m a S-4
Basic Microbiology Skills Part 1 Name
15-4771 Date
First streak
Second streak
First streak
Second streakThird streak
Third streak
Fourth streak


© 2 0 0 5 P r i y a a n d S h i l a d i t y a D a s S a r m a S-5
Basic Microbiology Skills Part 1 Name
15-4771 Date
Describe the materials and methods you will use (including conditions for incubation).


Procedures1. Review sterile technique and plate-streaking procedure. Since live microbes will be used, it is vital
that you use good laboratory technique.
2. Start with a clean, organized, and disinfected work surface. Wipe down the laboratory benchtopwith a disinfectant such as bleach or ethanol.
3. Label your plate on the bottom of the smaller half of the petri dish. Make sure the date, type oforganism plated, and your initials are clearly written along the edge, so as not to impede viewing theculture as it grows.
4. Remove the top of the petri dish and hold it in your left hand (if right-handed, or the other wayaround if left-handed), face down.
5. Dip your sterile loop into the liquid culture.
6. You have already selected the streakpattern to use for your plate. First touchthe agar plate gently on the surface, andwithout lifting the loop from the surface,move it in a zigzag manner for streak #1.Be gentle with the streaking. If you dig into the agar, the cells will be deposited ina less aerobic environment, which reducesgrowth. At the end of streak #1, lift theloop. Discard the old loop and unwrap anew sterile loop to make streak #2 (If youwere using a metal loop, you would flamethe loop to sterilize it, and then let it coolenough to continue with the next streak.)Using a new sterile loop for each streak is important in order to spread the cellsenough to get individual colonies.
7. If additional streaks are needed tocomplete your chosen pattern, continue in the same manner for streak #3 and/or streak #4 as youdid for streak #2.
8. Place the cover on the petri plate and let the plate sit on the lab bench for 20 minutes to allow thecells to adhere to the agar surface.
9. Now, turn the petri plate upside-down to prevent condensation from dripping onto the agar surfaceand possibly causing contamination. The inverted plates will now be placed in airtight plastic boxesor bags and incubated as directed by your teacher. The boxes or bags will keep the plates from dryingout during the extended incubation time. The plates should be checked after 2 hours to make surethat there is not any condensation on the agar surface or on the lid of the petri plate. If there iscondensation, put the lid on at a slant and allow the plate to dry out for 10–15 minutes. Then,replace the lid fully.
10. After the number of days designated by your teacher, use a hand lens or stereomicroscope toexamine your plate for colonies. Continue your observations of colony development and growthover several days. Pay particular attention to any apparent difference between colonies. Note: If youare incubating plates at room temperature rather than in an incubator, it may be 2 weeks before yousee any results.
© 2 0 0 5 P r i y a a n d S h i l a d i t y a D a s S a r m a S-6
Streaking a plate

Post Lab AnalysisDraw the results of your plate streaking. Describe the appearance of the colonies on your plate.
Observe your classmates’ plates and record your observations here. Look for any correlation betweenstreaking method and results.
Would you choose a different streaking method next time? Why or why not?
Do you notice any differences between the different colonies regarding their phenotype? Can you comeup with any explanations for any differences you see among the colonies on your plate?
© 2 0 0 5 P r i y a a n d S h i l a d i t y a D a s S a r m a S-7
Basic Microbiology Skills Part 1 Name
15-4771 Date

Carolina Biological Supply Company2700 York Road, Burlington, North Carolina 27215
Phone: 800.334.5551 • Fax: 800.222.7112Technical Support: 800.227.1150 • www.carolina.com
CB163100509