
Basic Analysis - Sas Institute · any direct, indirect, incidental, special, exemplary, or...
414
Version 14 JMP, A Business Unit of SAS SAS Campus Drive Cary, NC 27513 “The real voyage of discovery consists not in seeking new landscapes, but in having new eyes.” Marcel Proust Basic Analysis
Transcript of Basic Analysis - Sas Institute · any direct, indirect, incidental, special, exemplary, or...

Version 14
JMP, A Business Unit of SASSAS Campus DriveCary, NC 27513
“The real voyage of discovery consists not in seeking newlandscapes, but in having new eyes.”
Marcel Proust
Basic Analysis

The correct bibliographic citation for this manual is as follows: SAS Institute Inc. 2018. JMP® 14 Basic Analysis. Cary, NC: SAS Institute Inc.
JMP® 14 Basic Analysis
Copyright © 2018, SAS Institute Inc., Cary, NC, USA
ISBN 978-1-63526-493-7 (Hardcopy)ISBN 978-1-63526-490-6 (EPUB)ISBN 978-1-63526-491-3 (MOBI)ISBN 978-1-63526-492-0 (Web PDF)
All rights reserved. Produced in the United States of America.
For a hard-copy book: No part of this publication may be reproduced, stored in a retrieval system, or transmitted, in any form or by any means, electronic, mechanical, photocopying, or otherwise, without the prior written permission of the publisher, SAS Institute Inc.
For a web download or e-book: Your use of this publication shall be governed by the terms established by the vendor at the time you acquire this publication.
The scanning, uploading, and distribution of this book via the Internet or any other means without the permission of the publisher is illegal and punishable by law. Please purchase only authorized electronic editions and do not participate in or encourage electronic piracy of copyrighted materials. Your support of others’ rights is appreciated.
U.S. Government License Rights; Restricted Rights: The Software and its documentation is commercial computer software developed at private expense and is provided with RESTRICTED RIGHTS to the United States Government. Use, duplication or disclosure of the Software by the United States Government is subject to the license terms of this Agreement pursuant to, as applicable, FAR 12.212, DFAR 227.7202-1(a), DFAR 227.7202-3(a) and DFAR 227.7202-4 and, to the extent required under U.S. federal law, the minimum restricted rights as set out in FAR 52.227-19 (DEC 2007). If FAR 52.227-19 is applicable, this provision serves as notice under clause (c) thereof and no other notice is required to be affixed to the Software or documentation. The Government’s rights in Software and documentation shall be only those set forth in this Agreement.
SAS Institute Inc., SAS Campus Drive, Cary, North Carolina 27513-2414.
March 2018
SAS® and all other SAS Institute Inc. product or service names are registered trademarks or trademarks of SAS Institute Inc. in the USA and other countries. ® indicates USA registration.

Other brand and product names are trademarks of their respective companies.
SAS software may be provided with certain third-party software, including but not limited to open-source software, which is licensed under its applicable third-party software license agreement. For license information about third-party software distributed with SAS software, refer to http://support.sas.com/thirdpartylicenses.
Technology License Notices
• Scintilla - Copyright © 1998-2017 by Neil Hodgson <[email protected]>.
All Rights Reserved.
Permission to use, copy, modify, and distribute this software and its documentation for any purpose and without fee is hereby granted, provided that the above copyright notice appear in all copies and that both that copyright notice and this permission notice appear in supporting documentation.
NEIL HODGSON DISCLAIMS ALL WARRANTIES WITH REGARD TO THIS SOFTWARE, INCLUDING ALL IMPLIED WARRANTIES OF MERCHANTABILITY AND FITNESS, IN NO EVENT SHALL NEIL HODGSON BE LIABLE FOR ANY SPECIAL, INDIRECT OR CONSEQUENTIAL DAMAGES OR ANY DAMAGES WHATSOEVER RESULTING FROM LOSS OF USE, DATA OR PROFITS, WHETHER IN AN ACTION OF CONTRACT, NEGLIGENCE OR OTHER TORTIOUS ACTION, ARISING OUT OF OR IN CONNECTION WITH THE USE OR PERFORMANCE OF THIS SOFTWARE.
• Telerik RadControls: Copyright © 2002-2012, Telerik. Usage of the included Telerik RadControls outside of JMP is not permitted.
• ZLIB Compression Library - Copyright © 1995-2005, Jean-Loup Gailly and Mark Adler.
• Made with Natural Earth. Free vector and raster map data @ naturalearthdata.com.
• Packages - Copyright © 2009-2010, Stéphane Sudre (s.sudre.free.fr). All rights reserved.
Redistribution and use in source and binary forms, with or without modification, are permitted provided that the following conditions are met:
Redistributions of source code must retain the above copyright notice, this list of conditions and the following disclaimer.
Redistributions in binary form must reproduce the above copyright notice, this list of conditions and the following disclaimer in the documentation and/or other materials provided with the distribution.
Neither the name of the WhiteBox nor the names of its contributors may be used to endorse or promote products derived from this software without specific prior written permission.

THIS SOFTWARE IS PROVIDED BY THE COPYRIGHT HOLDERS AND CONTRIBUTORS “AS IS” AND ANY EXPRESS OR IMPLIED WARRANTIES, INCLUDING, BUT NOT LIMITED TO, THE IMPLIED WARRANTIES OF MERCHANTABILITY AND FITNESS FOR A PARTICULAR PURPOSE ARE DISCLAIMED. IN NO EVENT SHALL THE COPYRIGHT OWNER OR CONTRIBUTORS BE LIABLE FOR ANY DIRECT, INDIRECT, INCIDENTAL, SPECIAL, EXEMPLARY, OR CONSEQUENTIAL DAMAGES (INCLUDING, BUT NOT LIMITED TO, PROCUREMENT OF SUBSTITUTE GOODS OR SERVICES; LOSS OF USE, DATA, OR PROFITS; OR BUSINESS INTERRUPTION) HOWEVER CAUSED AND ON ANY THEORY OF LIABILITY, WHETHER IN CONTRACT, STRICT LIABILITY, OR TORT (INCLUDING NEGLIGENCE OR OTHERWISE) ARISING IN ANY WAY OUT OF THE USE OF THIS SOFTWARE, EVEN IF ADVISED OF THE POSSIBILITY OF SUCH DAMAGE.
• iODBC software - Copyright © 1995-2006, OpenLink Software Inc and Ke Jin (www.iodbc.org). All rights reserved.
Redistribution and use in source and binary forms, with or without modification, are permitted provided that the following conditions are met:
– Redistributions of source code must retain the above copyright notice, this list of conditions and the following disclaimer.
– Redistributions in binary form must reproduce the above copyright notice, this list of conditions and the following disclaimer in the documentation and/or other materials provided with the distribution.
– Neither the name of OpenLink Software Inc. nor the names of its contributors may be used to endorse or promote products derived from this software without specific prior written permission.
THIS SOFTWARE IS PROVIDED BY THE COPYRIGHT HOLDERS AND CONTRIBUTORS “AS IS” AND ANY EXPRESS OR IMPLIED WARRANTIES, INCLUDING, BUT NOT LIMITED TO, THE IMPLIED WARRANTIES OF MERCHANTABILITY AND FITNESS FOR A PARTICULAR PURPOSE ARE DISCLAIMED. IN NO EVENT SHALL OPENLINK OR CONTRIBUTORS BE LIABLE FOR ANY DIRECT, INDIRECT, INCIDENTAL, SPECIAL, EXEMPLARY, OR CONSEQUENTIAL DAMAGES (INCLUDING, BUT NOT LIMITED TO, PROCUREMENT OF SUBSTITUTE GOODS OR SERVICES; LOSS OF USE, DATA, OR PROFITS; OR BUSINESS INTERRUPTION) HOWEVER CAUSED AND ON ANY THEORY OF LIABILITY, WHETHER IN CONTRACT, STRICT LIABILITY, OR TORT (INCLUDING NEGLIGENCE OR OTHERWISE) ARISING IN ANY WAY OUT OF THE USE OF THIS SOFTWARE, EVEN IF ADVISED OF THE POSSIBILITY OF SUCH DAMAGE.
• bzip2, the associated library “libbzip2”, and all documentation, are Copyright © 1996-2010, Julian R Seward. All rights reserved.
Redistribution and use in source and binary forms, with or without modification, are permitted provided that the following conditions are met:

Redistributions of source code must retain the above copyright notice, this list of conditions and the following disclaimer.
The origin of this software must not be misrepresented; you must not claim that you wrote the original software. If you use this software in a product, an acknowledgment in the product documentation would be appreciated but is not required.
Altered source versions must be plainly marked as such, and must not be misrepresented as being the original software.
The name of the author may not be used to endorse or promote products derived from this software without specific prior written permission.
THIS SOFTWARE IS PROVIDED BY THE AUTHOR “AS IS” AND ANY EXPRESS OR IMPLIED WARRANTIES, INCLUDING, BUT NOT LIMITED TO, THE IMPLIED WARRANTIES OF MERCHANTABILITY AND FITNESS FOR A PARTICULAR PURPOSE ARE DISCLAIMED. IN NO EVENT SHALL THE AUTHOR BE LIABLE FOR ANY DIRECT, INDIRECT, INCIDENTAL, SPECIAL, EXEMPLARY, OR CONSEQUENTIAL DAMAGES (INCLUDING, BUT NOT LIMITED TO, PROCUREMENT OF SUBSTITUTE GOODS OR SERVICES; LOSS OF USE, DATA, OR PROFITS; OR BUSINESS INTERRUPTION) HOWEVER CAUSED AND ON ANY THEORY OF LIABILITY, WHETHER IN CONTRACT, STRICT LIABILITY, OR TORT (INCLUDING NEGLIGENCE OR OTHERWISE) ARISING IN ANY WAY OUT OF THE USE OF THIS SOFTWARE, EVEN IF ADVISED OF THE POSSIBILITY OF SUCH DAMAGE.
• R software is Copyright © 1999-2012, R Foundation for Statistical Computing.
• MATLAB software is Copyright © 1984-2012, The MathWorks, Inc. Protected by U.S. and international patents. See www.mathworks.com/patents. MATLAB and Simulink are registered trademarks of The MathWorks, Inc. See www.mathworks.com/trademarks for a list of additional trademarks. Other product or brand names may be trademarks or registered trademarks of their respective holders.
• libopc is Copyright © 2011, Florian Reuter. All rights reserved.
Redistribution and use in source and binary forms, with or without modification, are permitted provided that the following conditions are met:
– Redistributions of source code must retain the above copyright notice, this list of conditions and the following disclaimer.
– Redistributions in binary form must reproduce the above copyright notice, this list of conditions and the following disclaimer in the documentation and / or other materials provided with the distribution.

– Neither the name of Florian Reuter nor the names of its contributors may be used to endorse or promote products derived from this software without specific prior written permission.
THIS SOFTWARE IS PROVIDED BY THE COPYRIGHT HOLDERS AND CONTRIBUTORS “AS IS” AND ANY EXPRESS OR IMPLIED WARRANTIES, INCLUDING, BUT NOT LIMITED TO, THE IMPLIED WARRANTIES OF MERCHANTABILITY AND FITNESS FOR A PARTICULAR PURPOSE ARE DISCLAIMED. IN NO EVENT SHALL THE COPYRIGHT OWNER OR CONTRIBUTORS BE LIABLE FOR ANY DIRECT, INDIRECT, INCIDENTAL, SPECIAL, EXEMPLARY, OR CONSEQUENTIAL DAMAGES (INCLUDING, BUT NOT LIMITED TO, PROCUREMENT OF SUBSTITUTE GOODS OR SERVICES; LOSS OF USE, DATA, OR PROFITS; OR BUSINESS INTERRUPTION) HOWEVER CAUSED AND ON ANY THEORY OF LIABILITY, WHETHER IN CONTRACT, STRICT LIABILITY, OR TORT (INCLUDING NEGLIGENCE OR OTHERWISE) ARISING IN ANY WAY OUT OF THE USE OF THIS SOFTWARE, EVEN IF ADVISED OF THE POSSIBILITY OF SUCH DAMAGE.
• libxml2 - Except where otherwise noted in the source code (e.g. the files hash.c, list.c and the trio files, which are covered by a similar license but with different Copyright notices) all the files are:
Copyright © 1998 - 2003 Daniel Veillard. All Rights Reserved.
Permission is hereby granted, free of charge, to any person obtaining a copy of this software and associated documentation files (the “Software”), to deal in the Software without restriction, including without limitation the rights to use, copy, modify, merge, publish, distribute, sublicense, and/or sell copies of the Software, and to permit persons to whom the Software is furnished to do so, subject to the following conditions:
The above copyright notice and this permission notice shall be included in all copies or substantial portions of the Software.
THE SOFTWARE IS PROVIDED “AS IS”, WITHOUT WARRANTY OF ANY KIND, EXPRESS OR IMPLIED, INCLUDING BUT NOT LIMITED TO THE WARRANTIES OF MERCHANTABILITY, FITNESS FOR A PARTICULAR PURPOSE AND NONINFRINGEMENT. IN NO EVENT SHALL DANIEL VEILLARD BE LIABLE FOR ANY CLAIM, DAMAGES OR OTHER LIABILITY, WHETHER IN AN ACTION OF CONTRACT, TORT OR OTHERWISE, ARISING FROM, OUT OF OR IN CONNECTION WITH THE SOFTWARE OR THE USE OR OTHER DEALINGS IN THE SOFTWARE.
Except as contained in this notice, the name of Daniel Veillard shall not be used in advertising or otherwise to promote the sale, use or other dealings in this Software without prior written authorization from him.
• Regarding the decompression algorithm used for UNIX files:
Copyright © 1985, 1986, 1992, 1993

The Regents of the University of California. All rights reserved.
THIS SOFTWARE IS PROVIDED BY THE REGENTS AND CONTRIBUTORS “AS IS” AND ANY EXPRESS OR IMPLIED WARRANTIES, INCLUDING, BUT NOT LIMITED TO, THE IMPLIED WARRANTIES OF MERCHANTABILITY AND FITNESS FOR A PARTICULAR PURPOSE ARE DISCLAIMED. IN NO EVENT SHALL THE REGENTS OR CONTRIBUTORS BE LIABLE FOR ANY DIRECT, INDIRECT, INCIDENTAL, SPECIAL, EXEMPLARY, OR CONSEQUENTIAL DAMAGES (INCLUDING, BUT NOT LIMITED TO, PROCUREMENT OF SUBSTITUTE GOODS OR SERVICES; LOSS OF USE, DATA, OR PROFITS; OR BUSINESS INTERRUPTION) HOWEVER CAUSED AND ON ANY THEORY OF LIABILITY, WHETHER IN CONTRACT, STRICT LIABILITY, OR TORT (INCLUDING NEGLIGENCE OR OTHERWISE) ARISING IN ANY WAY OUT OF THE USE OF THIS SOFTWARE, EVEN IF ADVISED OF THE POSSIBILITY OF SUCH DAMAGE.
1. Redistributions of source code must retain the above copyright notice, this list of conditions and the following disclaimer.
2. Redistributions in binary form must reproduce the above copyright notice, this list of conditions and the following disclaimer in the documentation and/or other materials provided with the distribution.
3. Neither the name of the University nor the names of its contributors may be used to endorse or promote products derived from this software without specific prior written permission.
• Snowball - Copyright © 2001, Dr Martin Porter, Copyright © 2002, Richard Boulton.
All rights reserved.
Redistribution and use in source and binary forms, with or without modification, are permitted provided that the following conditions are met:
1. Redistributions of source code must retain the above copyright notice, this list of conditions and the following disclaimer.
2. Redistributions in binary form must reproduce the above copyright notice, this list of conditions and the following disclaimer in the documentation and / or other materials provided with the distribution.
3. Neither the name of the copyright holder nor the names of its contributors may be used to endorse or promote products derived from this software without specific prior written permission.
THIS SOFTWARE IS PROVIDED BY THE COPYRIGHT HOLDERS AND CONTRIBUTORS \ʺAS IS\ʺ AND ANY EXPRESS OR IMPLIED WARRANTIES, INCLUDING, BUT NOT LIMITED TO, THE IMPLIED WARRANTIES OF MERCHANTABILITY AND FITNESS FOR A PARTICULAR PURPOSE ARE
DISCLAIMED. IN NO EVENT SHALL THE COPYRIGHT HOLDER OR CONTRIBUTORS BE LIABLE FOR ANY DIRECT, INDIRECT, INCIDENTAL, SPECIAL, EXEMPLARY, OR CONSEQUENTIAL DAMAGES (INCLUDING, BUT NOT LIMITED TO, PROCUREMENT OF SUBSTITUTE GOODS OR SERVICES; LOSS OF USE, DATA, OR PROFITS; OR BUSINESS INTERRUPTION) HOWEVER CAUSED AND ON ANY THEORY OF LIABILITY, WHETHER IN CONTRACT, STRICT LIABILITY, OR TORT (INCLUDING NEGLIGENCE OR OTHERWISE) ARISING IN ANY WAY OUT OF THE USE OF THIS SOFTWARE, EVEN IF ADVISED OF THE POSSIBILITY OF SUCH DAMAGE.
Get the Most from JMP®
Whether you are a first-time or a long-time user, there is always something to learn about JMP.
Visit JMP.com to find the following:
• live and recorded webcasts about how to get started with JMP
• video demos and webcasts of new features and advanced techniques
• details on registering for JMP training
• schedules for seminars being held in your area
• success stories showing how others use JMP
• a blog with tips, tricks, and stories from JMP staff
• a forum to discuss JMP with other users
http://www.jmp.com/getstarted/

ContentsBasic Analysis
1 Learn about JMP . . . . . . . . . . . . . . . . . . . . . . . . . . . . . . . . . . . . . . . . . . . . . . . . . . . . . . . . . . . . . . . . . . . . . . . . . .19Documentation and Additional Resources
Formatting Conventions . . . . . . . . . . . . . . . . . . . . . . . . . . . . . . . . . . . . . . . . . . . . . . . . . . . . . . . . . . . . 21JMP Documentation . . . . . . . . . . . . . . . . . . . . . . . . . . . . . . . . . . . . . . . . . . . . . . . . . . . . . . . . . . . . . . . . 22
JMP Documentation Library . . . . . . . . . . . . . . . . . . . . . . . . . . . . . . . . . . . . . . . . . . . . . . . . . . . . . 22JMP Help . . . . . . . . . . . . . . . . . . . . . . . . . . . . . . . . . . . . . . . . . . . . . . . . . . . . . . . . . . . . . . . . . . . . . . 28
Additional Resources for Learning JMP . . . . . . . . . . . . . . . . . . . . . . . . . . . . . . . . . . . . . . . . . . . . . . 28Tutorials . . . . . . . . . . . . . . . . . . . . . . . . . . . . . . . . . . . . . . . . . . . . . . . . . . . . . . . . . . . . . . . . . . . . . . . 28Sample Data Tables . . . . . . . . . . . . . . . . . . . . . . . . . . . . . . . . . . . . . . . . . . . . . . . . . . . . . . . . . . . . . 29Learn about Statistical and JSL Terms . . . . . . . . . . . . . . . . . . . . . . . . . . . . . . . . . . . . . . . . . . . . . 29Learn JMP Tips and Tricks . . . . . . . . . . . . . . . . . . . . . . . . . . . . . . . . . . . . . . . . . . . . . . . . . . . . . . . 29Tooltips . . . . . . . . . . . . . . . . . . . . . . . . . . . . . . . . . . . . . . . . . . . . . . . . . . . . . . . . . . . . . . . . . . . . . . . . 29JMP User Community . . . . . . . . . . . . . . . . . . . . . . . . . . . . . . . . . . . . . . . . . . . . . . . . . . . . . . . . . . . 30JMP Books by Users . . . . . . . . . . . . . . . . . . . . . . . . . . . . . . . . . . . . . . . . . . . . . . . . . . . . . . . . . . . . . 30The JMP Starter Window . . . . . . . . . . . . . . . . . . . . . . . . . . . . . . . . . . . . . . . . . . . . . . . . . . . . . . . . 30
Technical Support . . . . . . . . . . . . . . . . . . . . . . . . . . . . . . . . . . . . . . . . . . . . . . . . . . . . . . . . . . . . . . . . . . 31
2 Introduction to Basic Analysis . . . . . . . . . . . . . . . . . . . . . . . . . . . . . . . . . . . . . . . . . . . . . . . . . . . . . . .33Overview of Fundamental Analysis Methods
3 Distributions. . . . . . . . . . . . . . . . . . . . . . . . . . . . . . . . . . . . . . . . . . . . . . . . . . . . . . . . . . . . . . . . . . . . . . . . . . . . . . . . .35Using the Distribution Platform
Overview of the Distribution Platform . . . . . . . . . . . . . . . . . . . . . . . . . . . . . . . . . . . . . . . . . . . . . . . 38Example of the Distribution Platform . . . . . . . . . . . . . . . . . . . . . . . . . . . . . . . . . . . . . . . . . . . . . . . . 39Launch the Distribution Platform . . . . . . . . . . . . . . . . . . . . . . . . . . . . . . . . . . . . . . . . . . . . . . . . . . . . 40The Distribution Report . . . . . . . . . . . . . . . . . . . . . . . . . . . . . . . . . . . . . . . . . . . . . . . . . . . . . . . . . . . . 41
Histograms . . . . . . . . . . . . . . . . . . . . . . . . . . . . . . . . . . . . . . . . . . . . . . . . . . . . . . . . . . . . . . . . . . . . 43The Frequencies Report . . . . . . . . . . . . . . . . . . . . . . . . . . . . . . . . . . . . . . . . . . . . . . . . . . . . . . . . . 46The Quantiles Report . . . . . . . . . . . . . . . . . . . . . . . . . . . . . . . . . . . . . . . . . . . . . . . . . . . . . . . . . . . 46The Summary Statistics Report . . . . . . . . . . . . . . . . . . . . . . . . . . . . . . . . . . . . . . . . . . . . . . . . . . . 46
Distribution Platform Options . . . . . . . . . . . . . . . . . . . . . . . . . . . . . . . . . . . . . . . . . . . . . . . . . . . . . . . 49Options for Categorical Variables . . . . . . . . . . . . . . . . . . . . . . . . . . . . . . . . . . . . . . . . . . . . . . . . . . . . 50
Display Options for Categorical Variables . . . . . . . . . . . . . . . . . . . . . . . . . . . . . . . . . . . . . . . . . 51

10 Basic Analysis
Histogram Options for Categorical Variables . . . . . . . . . . . . . . . . . . . . . . . . . . . . . . . . . . . . . . 51Save Options for Categorical Variables . . . . . . . . . . . . . . . . . . . . . . . . . . . . . . . . . . . . . . . . . . . 52
Options for Continuous Variables . . . . . . . . . . . . . . . . . . . . . . . . . . . . . . . . . . . . . . . . . . . . . . . . . . . 52Display Options for Continuous Variables . . . . . . . . . . . . . . . . . . . . . . . . . . . . . . . . . . . . . . . . 53Histogram Options for Continuous Variables . . . . . . . . . . . . . . . . . . . . . . . . . . . . . . . . . . . . . 54Normal Quantile Plot . . . . . . . . . . . . . . . . . . . . . . . . . . . . . . . . . . . . . . . . . . . . . . . . . . . . . . . . . . . 55Outlier Box Plot . . . . . . . . . . . . . . . . . . . . . . . . . . . . . . . . . . . . . . . . . . . . . . . . . . . . . . . . . . . . . . . . 56Quantile Box Plot . . . . . . . . . . . . . . . . . . . . . . . . . . . . . . . . . . . . . . . . . . . . . . . . . . . . . . . . . . . . . . . 57Stem and Leaf . . . . . . . . . . . . . . . . . . . . . . . . . . . . . . . . . . . . . . . . . . . . . . . . . . . . . . . . . . . . . . . . . . 58CDF Plot . . . . . . . . . . . . . . . . . . . . . . . . . . . . . . . . . . . . . . . . . . . . . . . . . . . . . . . . . . . . . . . . . . . . . . . 58Test Mean . . . . . . . . . . . . . . . . . . . . . . . . . . . . . . . . . . . . . . . . . . . . . . . . . . . . . . . . . . . . . . . . . . . . . . 59Test Std Dev . . . . . . . . . . . . . . . . . . . . . . . . . . . . . . . . . . . . . . . . . . . . . . . . . . . . . . . . . . . . . . . . . . . 60Test Equivalence . . . . . . . . . . . . . . . . . . . . . . . . . . . . . . . . . . . . . . . . . . . . . . . . . . . . . . . . . . . . . . . . 61Confidence Intervals . . . . . . . . . . . . . . . . . . . . . . . . . . . . . . . . . . . . . . . . . . . . . . . . . . . . . . . . . . . . 62Prediction Intervals . . . . . . . . . . . . . . . . . . . . . . . . . . . . . . . . . . . . . . . . . . . . . . . . . . . . . . . . . . . . . 63Tolerance Intervals . . . . . . . . . . . . . . . . . . . . . . . . . . . . . . . . . . . . . . . . . . . . . . . . . . . . . . . . . . . . . 63Capability Analysis . . . . . . . . . . . . . . . . . . . . . . . . . . . . . . . . . . . . . . . . . . . . . . . . . . . . . . . . . . . . . 63Fit Distributions . . . . . . . . . . . . . . . . . . . . . . . . . . . . . . . . . . . . . . . . . . . . . . . . . . . . . . . . . . . . . . . . 67Save Options for Continuous Variables . . . . . . . . . . . . . . . . . . . . . . . . . . . . . . . . . . . . . . . . . . . 72
Additional Examples of the Distribution Platform . . . . . . . . . . . . . . . . . . . . . . . . . . . . . . . . . . . . 74Example of Selecting Data in Multiple Histograms . . . . . . . . . . . . . . . . . . . . . . . . . . . . . . . . 74Example Using a By Variable . . . . . . . . . . . . . . . . . . . . . . . . . . . . . . . . . . . . . . . . . . . . . . . . . . . . 75Examples of the Test Probabilities Option . . . . . . . . . . . . . . . . . . . . . . . . . . . . . . . . . . . . . . . . . 76Example of Prediction Intervals . . . . . . . . . . . . . . . . . . . . . . . . . . . . . . . . . . . . . . . . . . . . . . . . . . 78Example of Tolerance Intervals . . . . . . . . . . . . . . . . . . . . . . . . . . . . . . . . . . . . . . . . . . . . . . . . . . 79Example of Capability Analysis . . . . . . . . . . . . . . . . . . . . . . . . . . . . . . . . . . . . . . . . . . . . . . . . . . 81
Statistical Details for the Distribution Platform . . . . . . . . . . . . . . . . . . . . . . . . . . . . . . . . . . . . . . . 82Standard Error Bars . . . . . . . . . . . . . . . . . . . . . . . . . . . . . . . . . . . . . . . . . . . . . . . . . . . . . . . . . . . . . 82Quantiles . . . . . . . . . . . . . . . . . . . . . . . . . . . . . . . . . . . . . . . . . . . . . . . . . . . . . . . . . . . . . . . . . . . . . . 82Summary Statistics . . . . . . . . . . . . . . . . . . . . . . . . . . . . . . . . . . . . . . . . . . . . . . . . . . . . . . . . . . . . . 83Normal Quantile Plot . . . . . . . . . . . . . . . . . . . . . . . . . . . . . . . . . . . . . . . . . . . . . . . . . . . . . . . . . . . 84Wilcoxon Signed Rank Test . . . . . . . . . . . . . . . . . . . . . . . . . . . . . . . . . . . . . . . . . . . . . . . . . . . . . . 85Standard Deviation Test . . . . . . . . . . . . . . . . . . . . . . . . . . . . . . . . . . . . . . . . . . . . . . . . . . . . . . . . . 87Normal Quantiles . . . . . . . . . . . . . . . . . . . . . . . . . . . . . . . . . . . . . . . . . . . . . . . . . . . . . . . . . . . . . . 87Saving Standardized Data . . . . . . . . . . . . . . . . . . . . . . . . . . . . . . . . . . . . . . . . . . . . . . . . . . . . . . . 87Prediction Intervals . . . . . . . . . . . . . . . . . . . . . . . . . . . . . . . . . . . . . . . . . . . . . . . . . . . . . . . . . . . . . 88Tolerance Intervals . . . . . . . . . . . . . . . . . . . . . . . . . . . . . . . . . . . . . . . . . . . . . . . . . . . . . . . . . . . . . 88Capability Analysis . . . . . . . . . . . . . . . . . . . . . . . . . . . . . . . . . . . . . . . . . . . . . . . . . . . . . . . . . . . . . 89Continuous Fit Distributions . . . . . . . . . . . . . . . . . . . . . . . . . . . . . . . . . . . . . . . . . . . . . . . . . . . . 95Discrete Fit Distributions . . . . . . . . . . . . . . . . . . . . . . . . . . . . . . . . . . . . . . . . . . . . . . . . . . . . . . . 102

Basic Analysis 11
Fitted Quantiles . . . . . . . . . . . . . . . . . . . . . . . . . . . . . . . . . . . . . . . . . . . . . . . . . . . . . . . . . . . . . . . 105Fit Distribution Options . . . . . . . . . . . . . . . . . . . . . . . . . . . . . . . . . . . . . . . . . . . . . . . . . . . . . . . . 105
4 Introduction to Fit Y by X. . . . . . . . . . . . . . . . . . . . . . . . . . . . . . . . . . . . . . . . . . . . . . . . . . . . . . . . . . . . . 109Examine Relationships Between Two Variables
Overview of the Fit Y by X Platform . . . . . . . . . . . . . . . . . . . . . . . . . . . . . . . . . . . . . . . . . . . . . . . . 111Launch the Fit Y by X Platform . . . . . . . . . . . . . . . . . . . . . . . . . . . . . . . . . . . . . . . . . . . . . . . . . . . . . 111
Launch Specific Analyses from the JMP Starter Window . . . . . . . . . . . . . . . . . . . . . . . . . . 112
5 Bivariate Analysis . . . . . . . . . . . . . . . . . . . . . . . . . . . . . . . . . . . . . . . . . . . . . . . . . . . . . . . . . . . . . . . . . . . . . . . 113Examine Relationships between Two Continuous Variables
Example of Bivariate Analysis . . . . . . . . . . . . . . . . . . . . . . . . . . . . . . . . . . . . . . . . . . . . . . . . . . . . . . 116Launch the Bivariate Platform . . . . . . . . . . . . . . . . . . . . . . . . . . . . . . . . . . . . . . . . . . . . . . . . . . . . . . 116The Bivariate Plot . . . . . . . . . . . . . . . . . . . . . . . . . . . . . . . . . . . . . . . . . . . . . . . . . . . . . . . . . . . . . . . . . 117Fitting Options . . . . . . . . . . . . . . . . . . . . . . . . . . . . . . . . . . . . . . . . . . . . . . . . . . . . . . . . . . . . . . . . . . . 118
Fitting Options . . . . . . . . . . . . . . . . . . . . . . . . . . . . . . . . . . . . . . . . . . . . . . . . . . . . . . . . . . . . . . . . 119Fitting Option Categories . . . . . . . . . . . . . . . . . . . . . . . . . . . . . . . . . . . . . . . . . . . . . . . . . . . . . . . 121Fit the Same Option Multiple Times . . . . . . . . . . . . . . . . . . . . . . . . . . . . . . . . . . . . . . . . . . . . . 121
Histogram Borders . . . . . . . . . . . . . . . . . . . . . . . . . . . . . . . . . . . . . . . . . . . . . . . . . . . . . . . . . . . . . . . . 122Fit Mean . . . . . . . . . . . . . . . . . . . . . . . . . . . . . . . . . . . . . . . . . . . . . . . . . . . . . . . . . . . . . . . . . . . . . . . . . 122
Fit Mean Report . . . . . . . . . . . . . . . . . . . . . . . . . . . . . . . . . . . . . . . . . . . . . . . . . . . . . . . . . . . . . . . 123Fit Line and Fit Polynomial . . . . . . . . . . . . . . . . . . . . . . . . . . . . . . . . . . . . . . . . . . . . . . . . . . . . . . . . 123
Linear Fit and Polynomial Fit Reports . . . . . . . . . . . . . . . . . . . . . . . . . . . . . . . . . . . . . . . . . . . 124Fit Special . . . . . . . . . . . . . . . . . . . . . . . . . . . . . . . . . . . . . . . . . . . . . . . . . . . . . . . . . . . . . . . . . . . . . . . . 130
Fit Special Reports and Menus . . . . . . . . . . . . . . . . . . . . . . . . . . . . . . . . . . . . . . . . . . . . . . . . . . 131Flexible . . . . . . . . . . . . . . . . . . . . . . . . . . . . . . . . . . . . . . . . . . . . . . . . . . . . . . . . . . . . . . . . . . . . . . . . . . 131
Fit Spline . . . . . . . . . . . . . . . . . . . . . . . . . . . . . . . . . . . . . . . . . . . . . . . . . . . . . . . . . . . . . . . . . . . . . . 132Kernel Smoother . . . . . . . . . . . . . . . . . . . . . . . . . . . . . . . . . . . . . . . . . . . . . . . . . . . . . . . . . . . . . . . 133Fit Each Value . . . . . . . . . . . . . . . . . . . . . . . . . . . . . . . . . . . . . . . . . . . . . . . . . . . . . . . . . . . . . . . . . 134
Fit Orthogonal . . . . . . . . . . . . . . . . . . . . . . . . . . . . . . . . . . . . . . . . . . . . . . . . . . . . . . . . . . . . . . . . . . . . 134Orthogonal Regression Report . . . . . . . . . . . . . . . . . . . . . . . . . . . . . . . . . . . . . . . . . . . . . . . . . . 135
Robust . . . . . . . . . . . . . . . . . . . . . . . . . . . . . . . . . . . . . . . . . . . . . . . . . . . . . . . . . . . . . . . . . . . . . . . . . . . 135Fit Robust . . . . . . . . . . . . . . . . . . . . . . . . . . . . . . . . . . . . . . . . . . . . . . . . . . . . . . . . . . . . . . . . . . . . . 136Fit Cauchy . . . . . . . . . . . . . . . . . . . . . . . . . . . . . . . . . . . . . . . . . . . . . . . . . . . . . . . . . . . . . . . . . . . . 136
Density Ellipse . . . . . . . . . . . . . . . . . . . . . . . . . . . . . . . . . . . . . . . . . . . . . . . . . . . . . . . . . . . . . . . . . . . 136Correlation Report . . . . . . . . . . . . . . . . . . . . . . . . . . . . . . . . . . . . . . . . . . . . . . . . . . . . . . . . . . . . . 137
Nonpar Density . . . . . . . . . . . . . . . . . . . . . . . . . . . . . . . . . . . . . . . . . . . . . . . . . . . . . . . . . . . . . . . . . . . 138Group By . . . . . . . . . . . . . . . . . . . . . . . . . . . . . . . . . . . . . . . . . . . . . . . . . . . . . . . . . . . . . . . . . . . . . . . . 139Fitting Menus . . . . . . . . . . . . . . . . . . . . . . . . . . . . . . . . . . . . . . . . . . . . . . . . . . . . . . . . . . . . . . . . . . . . 139
Fitting Menu Options . . . . . . . . . . . . . . . . . . . . . . . . . . . . . . . . . . . . . . . . . . . . . . . . . . . . . . . . . . 140Diagnostics Plots . . . . . . . . . . . . . . . . . . . . . . . . . . . . . . . . . . . . . . . . . . . . . . . . . . . . . . . . . . . . . . 143

12 Basic Analysis
Additional Examples of the Bivariate Platform . . . . . . . . . . . . . . . . . . . . . . . . . . . . . . . . . . . . . . 144Example of the Fit Special Option . . . . . . . . . . . . . . . . . . . . . . . . . . . . . . . . . . . . . . . . . . . . . . . 144Example of the Fit Orthogonal Option . . . . . . . . . . . . . . . . . . . . . . . . . . . . . . . . . . . . . . . . . . . 146Example of the Fit Robust Command . . . . . . . . . . . . . . . . . . . . . . . . . . . . . . . . . . . . . . . . . . . . 148Example of Group By Using Density Ellipses . . . . . . . . . . . . . . . . . . . . . . . . . . . . . . . . . . . . 150Example of Group By Using Regression Lines . . . . . . . . . . . . . . . . . . . . . . . . . . . . . . . . . . . . 151Example of Grouping Using a By Variable . . . . . . . . . . . . . . . . . . . . . . . . . . . . . . . . . . . . . . . 152
Statistical Details for the Bivariate Platform . . . . . . . . . . . . . . . . . . . . . . . . . . . . . . . . . . . . . . . . . 153Fit Line . . . . . . . . . . . . . . . . . . . . . . . . . . . . . . . . . . . . . . . . . . . . . . . . . . . . . . . . . . . . . . . . . . . . . . . 154Fit Spline . . . . . . . . . . . . . . . . . . . . . . . . . . . . . . . . . . . . . . . . . . . . . . . . . . . . . . . . . . . . . . . . . . . . . 154Fit Orthogonal . . . . . . . . . . . . . . . . . . . . . . . . . . . . . . . . . . . . . . . . . . . . . . . . . . . . . . . . . . . . . . . . 154Summary of Fit Report . . . . . . . . . . . . . . . . . . . . . . . . . . . . . . . . . . . . . . . . . . . . . . . . . . . . . . . . . 155Lack of Fit Report . . . . . . . . . . . . . . . . . . . . . . . . . . . . . . . . . . . . . . . . . . . . . . . . . . . . . . . . . . . . . 156Parameter Estimates Report . . . . . . . . . . . . . . . . . . . . . . . . . . . . . . . . . . . . . . . . . . . . . . . . . . . . 156Smoothing Fit Reports . . . . . . . . . . . . . . . . . . . . . . . . . . . . . . . . . . . . . . . . . . . . . . . . . . . . . . . . . 157Correlation Report . . . . . . . . . . . . . . . . . . . . . . . . . . . . . . . . . . . . . . . . . . . . . . . . . . . . . . . . . . . . . 157
6 Oneway Analysis . . . . . . . . . . . . . . . . . . . . . . . . . . . . . . . . . . . . . . . . . . . . . . . . . . . . . . . . . . . . . . . . . . . . . . . . 159Examine Relationships between a Continuous Y and a Categorical X Variable
Overview of Oneway Analysis . . . . . . . . . . . . . . . . . . . . . . . . . . . . . . . . . . . . . . . . . . . . . . . . . . . . . 162Example of Oneway Analysis . . . . . . . . . . . . . . . . . . . . . . . . . . . . . . . . . . . . . . . . . . . . . . . . . . . . . . 162Launch the Oneway Platform . . . . . . . . . . . . . . . . . . . . . . . . . . . . . . . . . . . . . . . . . . . . . . . . . . . . . . 164
Data Format . . . . . . . . . . . . . . . . . . . . . . . . . . . . . . . . . . . . . . . . . . . . . . . . . . . . . . . . . . . . . . . . . . 164The Oneway Plot . . . . . . . . . . . . . . . . . . . . . . . . . . . . . . . . . . . . . . . . . . . . . . . . . . . . . . . . . . . . . . . . . 165Oneway Platform Options . . . . . . . . . . . . . . . . . . . . . . . . . . . . . . . . . . . . . . . . . . . . . . . . . . . . . . . . . 166
Display Options . . . . . . . . . . . . . . . . . . . . . . . . . . . . . . . . . . . . . . . . . . . . . . . . . . . . . . . . . . . . . . . 169Quantiles . . . . . . . . . . . . . . . . . . . . . . . . . . . . . . . . . . . . . . . . . . . . . . . . . . . . . . . . . . . . . . . . . . . . . . . . 170
Outlier Box Plots . . . . . . . . . . . . . . . . . . . . . . . . . . . . . . . . . . . . . . . . . . . . . . . . . . . . . . . . . . . . . . 171Means/Anova and Means/Anova/Pooled t . . . . . . . . . . . . . . . . . . . . . . . . . . . . . . . . . . . . . . . . . . 172
The Summary of Fit Report . . . . . . . . . . . . . . . . . . . . . . . . . . . . . . . . . . . . . . . . . . . . . . . . . . . . . 172The t-test Report . . . . . . . . . . . . . . . . . . . . . . . . . . . . . . . . . . . . . . . . . . . . . . . . . . . . . . . . . . . . . . . 173The Analysis of Variance Report . . . . . . . . . . . . . . . . . . . . . . . . . . . . . . . . . . . . . . . . . . . . . . . . 174The Means for Oneway Anova Report . . . . . . . . . . . . . . . . . . . . . . . . . . . . . . . . . . . . . . . . . . . 175The Block Means Report . . . . . . . . . . . . . . . . . . . . . . . . . . . . . . . . . . . . . . . . . . . . . . . . . . . . . . . 176Mean Diamonds and X-Axis Proportional . . . . . . . . . . . . . . . . . . . . . . . . . . . . . . . . . . . . . . . 176Mean Lines, Error Bars, and Standard Deviation Lines . . . . . . . . . . . . . . . . . . . . . . . . . . . . 177
Analysis of Means Methods . . . . . . . . . . . . . . . . . . . . . . . . . . . . . . . . . . . . . . . . . . . . . . . . . . . . . . . 177Analysis of Means for Location . . . . . . . . . . . . . . . . . . . . . . . . . . . . . . . . . . . . . . . . . . . . . . . . . 178Analysis of Means for Scale . . . . . . . . . . . . . . . . . . . . . . . . . . . . . . . . . . . . . . . . . . . . . . . . . . . . . 179Analysis of Means Charts . . . . . . . . . . . . . . . . . . . . . . . . . . . . . . . . . . . . . . . . . . . . . . . . . . . . . . 180

Basic Analysis 13
Analysis of Means Options . . . . . . . . . . . . . . . . . . . . . . . . . . . . . . . . . . . . . . . . . . . . . . . . . . . . . 180Compare Means . . . . . . . . . . . . . . . . . . . . . . . . . . . . . . . . . . . . . . . . . . . . . . . . . . . . . . . . . . . . . . . . . . 181
Using Comparison Circles . . . . . . . . . . . . . . . . . . . . . . . . . . . . . . . . . . . . . . . . . . . . . . . . . . . . . . 183Each Pair, Student’s t . . . . . . . . . . . . . . . . . . . . . . . . . . . . . . . . . . . . . . . . . . . . . . . . . . . . . . . . . . . 184All Pairs, Tukey HSD . . . . . . . . . . . . . . . . . . . . . . . . . . . . . . . . . . . . . . . . . . . . . . . . . . . . . . . . . . . 184With Best, Hsu MCB . . . . . . . . . . . . . . . . . . . . . . . . . . . . . . . . . . . . . . . . . . . . . . . . . . . . . . . . . . . 184With Control, Dunnett’s . . . . . . . . . . . . . . . . . . . . . . . . . . . . . . . . . . . . . . . . . . . . . . . . . . . . . . . . 186Each Pair Stepwise, Newman-Keuls . . . . . . . . . . . . . . . . . . . . . . . . . . . . . . . . . . . . . . . . . . . . . 186Compare Means Options . . . . . . . . . . . . . . . . . . . . . . . . . . . . . . . . . . . . . . . . . . . . . . . . . . . . . . . 187
Nonparametric Tests . . . . . . . . . . . . . . . . . . . . . . . . . . . . . . . . . . . . . . . . . . . . . . . . . . . . . . . . . . . . . . 187The Wilcoxon, Median, Van der Waerden, and Friedman Rank Test Reports . . . . . . . . 189Kolmogorov-Smirnov Two-Sample Test Report . . . . . . . . . . . . . . . . . . . . . . . . . . . . . . . . . . . 190Nonparametric Multiple Comparisons . . . . . . . . . . . . . . . . . . . . . . . . . . . . . . . . . . . . . . . . . . . 192
Unequal Variances . . . . . . . . . . . . . . . . . . . . . . . . . . . . . . . . . . . . . . . . . . . . . . . . . . . . . . . . . . . . . . . . 194Tests That the Variances Are Equal Report . . . . . . . . . . . . . . . . . . . . . . . . . . . . . . . . . . . . . . . 195
Equivalence Test . . . . . . . . . . . . . . . . . . . . . . . . . . . . . . . . . . . . . . . . . . . . . . . . . . . . . . . . . . . . . . . . . . 197Robust . . . . . . . . . . . . . . . . . . . . . . . . . . . . . . . . . . . . . . . . . . . . . . . . . . . . . . . . . . . . . . . . . . . . . . . . . . . 197
Robust Fit . . . . . . . . . . . . . . . . . . . . . . . . . . . . . . . . . . . . . . . . . . . . . . . . . . . . . . . . . . . . . . . . . . . . . 197Cauchy Fit . . . . . . . . . . . . . . . . . . . . . . . . . . . . . . . . . . . . . . . . . . . . . . . . . . . . . . . . . . . . . . . . . . . . 198
Power . . . . . . . . . . . . . . . . . . . . . . . . . . . . . . . . . . . . . . . . . . . . . . . . . . . . . . . . . . . . . . . . . . . . . . . . . . . . 198Power Details Window and Reports . . . . . . . . . . . . . . . . . . . . . . . . . . . . . . . . . . . . . . . . . . . . . 199
Normal Quantile Plot . . . . . . . . . . . . . . . . . . . . . . . . . . . . . . . . . . . . . . . . . . . . . . . . . . . . . . . . . . . . . 200CDF Plot . . . . . . . . . . . . . . . . . . . . . . . . . . . . . . . . . . . . . . . . . . . . . . . . . . . . . . . . . . . . . . . . . . . . . . . . . 200Densities . . . . . . . . . . . . . . . . . . . . . . . . . . . . . . . . . . . . . . . . . . . . . . . . . . . . . . . . . . . . . . . . . . . . . . . . . 200Matching Column . . . . . . . . . . . . . . . . . . . . . . . . . . . . . . . . . . . . . . . . . . . . . . . . . . . . . . . . . . . . . . . . 201Additional Examples of the Oneway Platform . . . . . . . . . . . . . . . . . . . . . . . . . . . . . . . . . . . . . . . 201
Example of an Analysis of Means Chart . . . . . . . . . . . . . . . . . . . . . . . . . . . . . . . . . . . . . . . . . . 202Example of an Analysis of Means for Variances Chart . . . . . . . . . . . . . . . . . . . . . . . . . . . . . 203Example of the Each Pair, Student’s t Test . . . . . . . . . . . . . . . . . . . . . . . . . . . . . . . . . . . . . . . . 204Example of the All Pairs, Tukey HSD Test . . . . . . . . . . . . . . . . . . . . . . . . . . . . . . . . . . . . . . . . 206Example of the With Best, Hsu MCB Test . . . . . . . . . . . . . . . . . . . . . . . . . . . . . . . . . . . . . . . . 208Example of the With Control, Dunnett’s Test . . . . . . . . . . . . . . . . . . . . . . . . . . . . . . . . . . . . . 209Example of the Each Pair Stepwise, Newman-Keuls Test . . . . . . . . . . . . . . . . . . . . . . . . . . 211Example Contrasting All of the Compare Means Tests . . . . . . . . . . . . . . . . . . . . . . . . . . . . 212Example of the Nonparametric Wilcoxon Test . . . . . . . . . . . . . . . . . . . . . . . . . . . . . . . . . . . . 212Example of the Unequal Variances Option . . . . . . . . . . . . . . . . . . . . . . . . . . . . . . . . . . . . . . . 215Example of an Equivalence Test . . . . . . . . . . . . . . . . . . . . . . . . . . . . . . . . . . . . . . . . . . . . . . . . . 216Example of the Robust Fit Option . . . . . . . . . . . . . . . . . . . . . . . . . . . . . . . . . . . . . . . . . . . . . . . 217Example of the Power Option . . . . . . . . . . . . . . . . . . . . . . . . . . . . . . . . . . . . . . . . . . . . . . . . . . . 219Example of a Normal Quantile Plot . . . . . . . . . . . . . . . . . . . . . . . . . . . . . . . . . . . . . . . . . . . . . . 220

14 Basic Analysis
Example of a CDF Plot . . . . . . . . . . . . . . . . . . . . . . . . . . . . . . . . . . . . . . . . . . . . . . . . . . . . . . . . . 221Example of the Densities Options . . . . . . . . . . . . . . . . . . . . . . . . . . . . . . . . . . . . . . . . . . . . . . . 222Example of the Matching Column Option . . . . . . . . . . . . . . . . . . . . . . . . . . . . . . . . . . . . . . . 223Example of Stacking Data for a Oneway Analysis . . . . . . . . . . . . . . . . . . . . . . . . . . . . . . . . 225
Statistical Details for the Oneway Platform . . . . . . . . . . . . . . . . . . . . . . . . . . . . . . . . . . . . . . . . . . 231Comparison Circles . . . . . . . . . . . . . . . . . . . . . . . . . . . . . . . . . . . . . . . . . . . . . . . . . . . . . . . . . . . . 231Power . . . . . . . . . . . . . . . . . . . . . . . . . . . . . . . . . . . . . . . . . . . . . . . . . . . . . . . . . . . . . . . . . . . . . . . . 232Summary of Fit Report . . . . . . . . . . . . . . . . . . . . . . . . . . . . . . . . . . . . . . . . . . . . . . . . . . . . . . . . . 233Tests That the Variances Are Equal . . . . . . . . . . . . . . . . . . . . . . . . . . . . . . . . . . . . . . . . . . . . . . 234Nonparametric Test Statistics . . . . . . . . . . . . . . . . . . . . . . . . . . . . . . . . . . . . . . . . . . . . . . . . . . . 235
7 Contingency Analysis. . . . . . . . . . . . . . . . . . . . . . . . . . . . . . . . . . . . . . . . . . . . . . . . . . . . . . . . . . . . . . . . . . 239Examine Relationships between Two Categorical Variables
Example of Contingency Analysis . . . . . . . . . . . . . . . . . . . . . . . . . . . . . . . . . . . . . . . . . . . . . . . . . . 241Launch the Contingency Platform . . . . . . . . . . . . . . . . . . . . . . . . . . . . . . . . . . . . . . . . . . . . . . . . . . 242The Contingency Report . . . . . . . . . . . . . . . . . . . . . . . . . . . . . . . . . . . . . . . . . . . . . . . . . . . . . . . . . . 243Contingency Platform Options . . . . . . . . . . . . . . . . . . . . . . . . . . . . . . . . . . . . . . . . . . . . . . . . . . . . . 244Mosaic Plot . . . . . . . . . . . . . . . . . . . . . . . . . . . . . . . . . . . . . . . . . . . . . . . . . . . . . . . . . . . . . . . . . . . . . . . 245
Pop-Up Menu . . . . . . . . . . . . . . . . . . . . . . . . . . . . . . . . . . . . . . . . . . . . . . . . . . . . . . . . . . . . . . . . . 246Contingency Table . . . . . . . . . . . . . . . . . . . . . . . . . . . . . . . . . . . . . . . . . . . . . . . . . . . . . . . . . . . . . . . . 248
Description of the Contingency Table . . . . . . . . . . . . . . . . . . . . . . . . . . . . . . . . . . . . . . . . . . . . 249Tests . . . . . . . . . . . . . . . . . . . . . . . . . . . . . . . . . . . . . . . . . . . . . . . . . . . . . . . . . . . . . . . . . . . . . . . . . . . . . 250
Description of the Tests Report . . . . . . . . . . . . . . . . . . . . . . . . . . . . . . . . . . . . . . . . . . . . . . . . . 250Fisher’s Exact Test . . . . . . . . . . . . . . . . . . . . . . . . . . . . . . . . . . . . . . . . . . . . . . . . . . . . . . . . . . . . . 251
Analysis of Means for Proportions . . . . . . . . . . . . . . . . . . . . . . . . . . . . . . . . . . . . . . . . . . . . . . . . . 251Correspondence Analysis . . . . . . . . . . . . . . . . . . . . . . . . . . . . . . . . . . . . . . . . . . . . . . . . . . . . . . . . . 251
Understanding Correspondence Analysis Plots . . . . . . . . . . . . . . . . . . . . . . . . . . . . . . . . . . . 252Correspondence Analysis Options . . . . . . . . . . . . . . . . . . . . . . . . . . . . . . . . . . . . . . . . . . . . . . 252The Details Report . . . . . . . . . . . . . . . . . . . . . . . . . . . . . . . . . . . . . . . . . . . . . . . . . . . . . . . . . . . . . 252
Cochran-Mantel-Haenszel Test . . . . . . . . . . . . . . . . . . . . . . . . . . . . . . . . . . . . . . . . . . . . . . . . . . . . . 253Agreement Statistic . . . . . . . . . . . . . . . . . . . . . . . . . . . . . . . . . . . . . . . . . . . . . . . . . . . . . . . . . . . . . . . 253Relative Risk . . . . . . . . . . . . . . . . . . . . . . . . . . . . . . . . . . . . . . . . . . . . . . . . . . . . . . . . . . . . . . . . . . . . . 254Two Sample Test for Proportions . . . . . . . . . . . . . . . . . . . . . . . . . . . . . . . . . . . . . . . . . . . . . . . . . . . 254Measures of Association . . . . . . . . . . . . . . . . . . . . . . . . . . . . . . . . . . . . . . . . . . . . . . . . . . . . . . . . . . . 255Cochran Armitage Trend Test . . . . . . . . . . . . . . . . . . . . . . . . . . . . . . . . . . . . . . . . . . . . . . . . . . . . . . 256Exact Test . . . . . . . . . . . . . . . . . . . . . . . . . . . . . . . . . . . . . . . . . . . . . . . . . . . . . . . . . . . . . . . . . . . . . . . . 257Additional Examples of the Contingency Platform . . . . . . . . . . . . . . . . . . . . . . . . . . . . . . . . . . . 257
Example of Analysis of Means for Proportions . . . . . . . . . . . . . . . . . . . . . . . . . . . . . . . . . . . 258Example of Correspondence Analysis . . . . . . . . . . . . . . . . . . . . . . . . . . . . . . . . . . . . . . . . . . . 259Example of a Cochran Mantel Haenszel Test . . . . . . . . . . . . . . . . . . . . . . . . . . . . . . . . . . . . . 262

Basic Analysis 15
Example of the Agreement Statistic Option . . . . . . . . . . . . . . . . . . . . . . . . . . . . . . . . . . . . . . . 263Example of the Relative Risk Option . . . . . . . . . . . . . . . . . . . . . . . . . . . . . . . . . . . . . . . . . . . . . 264Example of a Two Sample Test for Proportions . . . . . . . . . . . . . . . . . . . . . . . . . . . . . . . . . . . 265Example of the Measures of Association Option . . . . . . . . . . . . . . . . . . . . . . . . . . . . . . . . . . 266Example of the Cochran Armitage Trend Test . . . . . . . . . . . . . . . . . . . . . . . . . . . . . . . . . . . . 267
Statistical Details for the Contingency Platform . . . . . . . . . . . . . . . . . . . . . . . . . . . . . . . . . . . . . . 268Agreement Statistic Option . . . . . . . . . . . . . . . . . . . . . . . . . . . . . . . . . . . . . . . . . . . . . . . . . . . . . 268Odds Ratio Option . . . . . . . . . . . . . . . . . . . . . . . . . . . . . . . . . . . . . . . . . . . . . . . . . . . . . . . . . . . . . 268Tests Report . . . . . . . . . . . . . . . . . . . . . . . . . . . . . . . . . . . . . . . . . . . . . . . . . . . . . . . . . . . . . . . . . . . 269Details Report in Correspondence Analysis . . . . . . . . . . . . . . . . . . . . . . . . . . . . . . . . . . . . . . 270
8 Logistic Analysis. . . . . . . . . . . . . . . . . . . . . . . . . . . . . . . . . . . . . . . . . . . . . . . . . . . . . . . . . . . . . . . . . . . . . . . . . 271Examine Relationships between a Categorical Y and a Continuous X Variable
Overview of Logistic Regression . . . . . . . . . . . . . . . . . . . . . . . . . . . . . . . . . . . . . . . . . . . . . . . . . . . 273Example of Nominal Logistic Regression . . . . . . . . . . . . . . . . . . . . . . . . . . . . . . . . . . . . . . . . . . . . 274Launch the Logistic Platform . . . . . . . . . . . . . . . . . . . . . . . . . . . . . . . . . . . . . . . . . . . . . . . . . . . . . . . 275The Logistic Report . . . . . . . . . . . . . . . . . . . . . . . . . . . . . . . . . . . . . . . . . . . . . . . . . . . . . . . . . . . . . . . 276
Logistic Plot . . . . . . . . . . . . . . . . . . . . . . . . . . . . . . . . . . . . . . . . . . . . . . . . . . . . . . . . . . . . . . . . . . . 277Iterations . . . . . . . . . . . . . . . . . . . . . . . . . . . . . . . . . . . . . . . . . . . . . . . . . . . . . . . . . . . . . . . . . . . . . . 278Whole Model Test . . . . . . . . . . . . . . . . . . . . . . . . . . . . . . . . . . . . . . . . . . . . . . . . . . . . . . . . . . . . . 278Fit Details . . . . . . . . . . . . . . . . . . . . . . . . . . . . . . . . . . . . . . . . . . . . . . . . . . . . . . . . . . . . . . . . . . . . . 279Parameter Estimates . . . . . . . . . . . . . . . . . . . . . . . . . . . . . . . . . . . . . . . . . . . . . . . . . . . . . . . . . . . 280
Logistic Platform Options . . . . . . . . . . . . . . . . . . . . . . . . . . . . . . . . . . . . . . . . . . . . . . . . . . . . . . . . . . 281ROC Curves . . . . . . . . . . . . . . . . . . . . . . . . . . . . . . . . . . . . . . . . . . . . . . . . . . . . . . . . . . . . . . . . . . . 282Save Probability Formula . . . . . . . . . . . . . . . . . . . . . . . . . . . . . . . . . . . . . . . . . . . . . . . . . . . . . . . 283Inverse Prediction . . . . . . . . . . . . . . . . . . . . . . . . . . . . . . . . . . . . . . . . . . . . . . . . . . . . . . . . . . . . . 283
Additional Examples of Logistic Regression . . . . . . . . . . . . . . . . . . . . . . . . . . . . . . . . . . . . . . . . . 283Example of Ordinal Logistic Regression . . . . . . . . . . . . . . . . . . . . . . . . . . . . . . . . . . . . . . . . . 284Additional Example of a Logistic Plot . . . . . . . . . . . . . . . . . . . . . . . . . . . . . . . . . . . . . . . . . . . 286Example of ROC Curves . . . . . . . . . . . . . . . . . . . . . . . . . . . . . . . . . . . . . . . . . . . . . . . . . . . . . . . . 288Example of Inverse Prediction Using the Crosshair Tool . . . . . . . . . . . . . . . . . . . . . . . . . . . 289Example of Inverse Prediction Using the Inverse Prediction Option . . . . . . . . . . . . . . . . 290
Statistical Details for the Logistic Platform . . . . . . . . . . . . . . . . . . . . . . . . . . . . . . . . . . . . . . . . . . 291
9 Tabulate. . . . . . . . . . . . . . . . . . . . . . . . . . . . . . . . . . . . . . . . . . . . . . . . . . . . . . . . . . . . . . . . . . . . . . . . . . . . . . . . . . . . . 293Create Summary Tables Interactively
Example of the Tabulate Platform . . . . . . . . . . . . . . . . . . . . . . . . . . . . . . . . . . . . . . . . . . . . . . . . . . 295Launch the Tabulate Platform . . . . . . . . . . . . . . . . . . . . . . . . . . . . . . . . . . . . . . . . . . . . . . . . . . . . . . 298
Use the Dialog . . . . . . . . . . . . . . . . . . . . . . . . . . . . . . . . . . . . . . . . . . . . . . . . . . . . . . . . . . . . . . . . . 300Add Statistics . . . . . . . . . . . . . . . . . . . . . . . . . . . . . . . . . . . . . . . . . . . . . . . . . . . . . . . . . . . . . . . . . 301
The Tabulate Output . . . . . . . . . . . . . . . . . . . . . . . . . . . . . . . . . . . . . . . . . . . . . . . . . . . . . . . . . . . . . . 305

16 Basic Analysis
Analysis Columns . . . . . . . . . . . . . . . . . . . . . . . . . . . . . . . . . . . . . . . . . . . . . . . . . . . . . . . . . . . . . 306Grouping Columns . . . . . . . . . . . . . . . . . . . . . . . . . . . . . . . . . . . . . . . . . . . . . . . . . . . . . . . . . . . . 306Column and Row Tables . . . . . . . . . . . . . . . . . . . . . . . . . . . . . . . . . . . . . . . . . . . . . . . . . . . . . . . 307Edit Tables . . . . . . . . . . . . . . . . . . . . . . . . . . . . . . . . . . . . . . . . . . . . . . . . . . . . . . . . . . . . . . . . . . . . 308
Tabulate Platform Options . . . . . . . . . . . . . . . . . . . . . . . . . . . . . . . . . . . . . . . . . . . . . . . . . . . . . . . . . 309Show Test Build Panel . . . . . . . . . . . . . . . . . . . . . . . . . . . . . . . . . . . . . . . . . . . . . . . . . . . . . . . . . 310Right-Click Menu for Columns . . . . . . . . . . . . . . . . . . . . . . . . . . . . . . . . . . . . . . . . . . . . . . . . . 310
Additional Examples of the Tabulate Platform . . . . . . . . . . . . . . . . . . . . . . . . . . . . . . . . . . . . . . . 311Example of Creating Different Tables and Rearranging Contents . . . . . . . . . . . . . . . . . . . 311Example of Combining Columns into a Single Table . . . . . . . . . . . . . . . . . . . . . . . . . . . . . . 315Example Using a Page Column . . . . . . . . . . . . . . . . . . . . . . . . . . . . . . . . . . . . . . . . . . . . . . . . . 317
10 Simulate . . . . . . . . . . . . . . . . . . . . . . . . . . . . . . . . . . . . . . . . . . . . . . . . . . . . . . . . . . . . . . . . . . . . . . . . . . . . . . . . . . . . . 319Answer Challenging Questions with Parametric Resampling
Overview of the Simulate Platform . . . . . . . . . . . . . . . . . . . . . . . . . . . . . . . . . . . . . . . . . . . . . . . . . 321Examples That Use Simulate . . . . . . . . . . . . . . . . . . . . . . . . . . . . . . . . . . . . . . . . . . . . . . . . . . . . . . . 321
Construct Nonparametric Confidence Intervals for Variance Components . . . . . . . . . . 322Conduct a Permutation Test . . . . . . . . . . . . . . . . . . . . . . . . . . . . . . . . . . . . . . . . . . . . . . . . . . . . 327Explore Retaining a Factor in Generalized Regression . . . . . . . . . . . . . . . . . . . . . . . . . . . . . 330Conduct Prospective Power Analysis for a Nonlinear Model . . . . . . . . . . . . . . . . . . . . . . 335
Launch the Simulate Window . . . . . . . . . . . . . . . . . . . . . . . . . . . . . . . . . . . . . . . . . . . . . . . . . . . . . . 343The Simulate Window . . . . . . . . . . . . . . . . . . . . . . . . . . . . . . . . . . . . . . . . . . . . . . . . . . . . . . . . . . . . 344The Simulate Results Table . . . . . . . . . . . . . . . . . . . . . . . . . . . . . . . . . . . . . . . . . . . . . . . . . . . . . . . . 344
Simulation Results Report . . . . . . . . . . . . . . . . . . . . . . . . . . . . . . . . . . . . . . . . . . . . . . . . . . . . . . 345Simulated Power Report . . . . . . . . . . . . . . . . . . . . . . . . . . . . . . . . . . . . . . . . . . . . . . . . . . . . . . . 345
11 Bootstrapping. . . . . . . . . . . . . . . . . . . . . . . . . . . . . . . . . . . . . . . . . . . . . . . . . . . . . . . . . . . . . . . . . . . . . . . . . . . . . 347Approximate the Distribution of a Statistic through Resampling
Overview of Bootstrapping . . . . . . . . . . . . . . . . . . . . . . . . . . . . . . . . . . . . . . . . . . . . . . . . . . . . . . . . 349Example of Bootstrapping . . . . . . . . . . . . . . . . . . . . . . . . . . . . . . . . . . . . . . . . . . . . . . . . . . . . . . . . . 350Bootstrapping Window Options . . . . . . . . . . . . . . . . . . . . . . . . . . . . . . . . . . . . . . . . . . . . . . . . . . . 352Stacked Results Table . . . . . . . . . . . . . . . . . . . . . . . . . . . . . . . . . . . . . . . . . . . . . . . . . . . . . . . . . . . . . 353Unstacked Bootstrap Results Table . . . . . . . . . . . . . . . . . . . . . . . . . . . . . . . . . . . . . . . . . . . . . . . . . 354Analysis of Bootstrap Results . . . . . . . . . . . . . . . . . . . . . . . . . . . . . . . . . . . . . . . . . . . . . . . . . . . . . . 355Additional Example of Bootstrapping . . . . . . . . . . . . . . . . . . . . . . . . . . . . . . . . . . . . . . . . . . . . . . 356Statistical Details for Bootstrapping . . . . . . . . . . . . . . . . . . . . . . . . . . . . . . . . . . . . . . . . . . . . . . . . 360
Calculation of Fractional Weights . . . . . . . . . . . . . . . . . . . . . . . . . . . . . . . . . . . . . . . . . . . . . . . 361Bias-Corrected Percentile Intervals . . . . . . . . . . . . . . . . . . . . . . . . . . . . . . . . . . . . . . . . . . . . . . 361

Basic Analysis 17
12 Text Explorer . . . . . . . . . . . . . . . . . . . . . . . . . . . . . . . . . . . . . . . . . . . . . . . . . . . . . . . . . . . . . . . . . . . . . . . . . . . . . . 363Explore Unstructured Text in Your Data
Overview of the Text Explorer Platform . . . . . . . . . . . . . . . . . . . . . . . . . . . . . . . . . . . . . . . . . . . . . 365Text Processing Steps . . . . . . . . . . . . . . . . . . . . . . . . . . . . . . . . . . . . . . . . . . . . . . . . . . . . . . . . . . 366
Example of the Text Explorer Platform . . . . . . . . . . . . . . . . . . . . . . . . . . . . . . . . . . . . . . . . . . . . . . 367Launch the Text Explorer Platform . . . . . . . . . . . . . . . . . . . . . . . . . . . . . . . . . . . . . . . . . . . . . . . . . 370
Customize Regex: Regular Expression Editor . . . . . . . . . . . . . . . . . . . . . . . . . . . . . . . . . . . . . 373The Text Explorer Report . . . . . . . . . . . . . . . . . . . . . . . . . . . . . . . . . . . . . . . . . . . . . . . . . . . . . . . . . . 377
Summary Counts Report . . . . . . . . . . . . . . . . . . . . . . . . . . . . . . . . . . . . . . . . . . . . . . . . . . . . . . . 378Term and Phrase Lists . . . . . . . . . . . . . . . . . . . . . . . . . . . . . . . . . . . . . . . . . . . . . . . . . . . . . . . . . . 379
Text Explorer Platform Options . . . . . . . . . . . . . . . . . . . . . . . . . . . . . . . . . . . . . . . . . . . . . . . . . . . . 382Text Preparation Options . . . . . . . . . . . . . . . . . . . . . . . . . . . . . . . . . . . . . . . . . . . . . . . . . . . . . . . 382Text Analysis Options . . . . . . . . . . . . . . . . . . . . . . . . . . . . . . . . . . . . . . . . . . . . . . . . . . . . . . . . . . 388Save Options . . . . . . . . . . . . . . . . . . . . . . . . . . . . . . . . . . . . . . . . . . . . . . . . . . . . . . . . . . . . . . . . . . 390Report Options . . . . . . . . . . . . . . . . . . . . . . . . . . . . . . . . . . . . . . . . . . . . . . . . . . . . . . . . . . . . . . . . 391
Latent Class Analysis . . . . . . . . . . . . . . . . . . . . . . . . . . . . . . . . . . . . . . . . . . . . . . . . . . . . . . . . . . . . . . 392Latent Semantic Analysis (SVD) . . . . . . . . . . . . . . . . . . . . . . . . . . . . . . . . . . . . . . . . . . . . . . . . . . . . 393
SVD Report . . . . . . . . . . . . . . . . . . . . . . . . . . . . . . . . . . . . . . . . . . . . . . . . . . . . . . . . . . . . . . . . . . . 394SVD Report Options . . . . . . . . . . . . . . . . . . . . . . . . . . . . . . . . . . . . . . . . . . . . . . . . . . . . . . . . . . . 395
Topic Analysis . . . . . . . . . . . . . . . . . . . . . . . . . . . . . . . . . . . . . . . . . . . . . . . . . . . . . . . . . . . . . . . . . . . . 397Discriminant Analysis . . . . . . . . . . . . . . . . . . . . . . . . . . . . . . . . . . . . . . . . . . . . . . . . . . . . . . . . . . . . . 399Additional Example of the Text Explorer Platform . . . . . . . . . . . . . . . . . . . . . . . . . . . . . . . . . . . 401
A References. . . . . . . . . . . . . . . . . . . . . . . . . . . . . . . . . . . . . . . . . . . . . . . . . . . . . . . . . . . . . . . . . . . . . . . . . . . . . . . . . 405
Index. . . . . . . . . . . . . . . . . . . . . . . . . . . . . . . . . . . . . . . . . . . . . . . . . . . . . . . . . . . . . . . . . . . . . . . . . . . . . . . . . . . . . . . . . . 409Basic Analysis

18 Basic Analysis

Chapter 1Learn about JMP
Documentation and Additional Resources
This chapter includes details about JMP documentation, such as book conventions, descriptions of each JMP book, the Help system, and where to find other support.

20 Learn about JMP Chapter 1Basic Analysis
ContentsFormatting Conventions . . . . . . . . . . . . . . . . . . . . . . . . . . . . . . . . . . . . . . . . . . . . . . . . . . . . . . . . . . 21JMP Documentation . . . . . . . . . . . . . . . . . . . . . . . . . . . . . . . . . . . . . . . . . . . . . . . . . . . . . . . . . . . . . . 22
JMP Documentation Library . . . . . . . . . . . . . . . . . . . . . . . . . . . . . . . . . . . . . . . . . . . . . . . . . . . . 22JMP Help . . . . . . . . . . . . . . . . . . . . . . . . . . . . . . . . . . . . . . . . . . . . . . . . . . . . . . . . . . . . . . . . . . . . 28
Additional Resources for Learning JMP . . . . . . . . . . . . . . . . . . . . . . . . . . . . . . . . . . . . . . . . . . . . . 28Tutorials . . . . . . . . . . . . . . . . . . . . . . . . . . . . . . . . . . . . . . . . . . . . . . . . . . . . . . . . . . . . . . . . . . . . . 28Sample Data Tables . . . . . . . . . . . . . . . . . . . . . . . . . . . . . . . . . . . . . . . . . . . . . . . . . . . . . . . . . . . . 29Learn about Statistical and JSL Terms . . . . . . . . . . . . . . . . . . . . . . . . . . . . . . . . . . . . . . . . . . . . 29Learn JMP Tips and Tricks. . . . . . . . . . . . . . . . . . . . . . . . . . . . . . . . . . . . . . . . . . . . . . . . . . . . . . 29Tooltips . . . . . . . . . . . . . . . . . . . . . . . . . . . . . . . . . . . . . . . . . . . . . . . . . . . . . . . . . . . . . . . . . . . . . . 29JMP User Community . . . . . . . . . . . . . . . . . . . . . . . . . . . . . . . . . . . . . . . . . . . . . . . . . . . . . . . . . 30JMP Books by Users . . . . . . . . . . . . . . . . . . . . . . . . . . . . . . . . . . . . . . . . . . . . . . . . . . . . . . . . . . . 30The JMP Starter Window . . . . . . . . . . . . . . . . . . . . . . . . . . . . . . . . . . . . . . . . . . . . . . . . . . . . . . . 30
Technical Support . . . . . . . . . . . . . . . . . . . . . . . . . . . . . . . . . . . . . . . . . . . . . . . . . . . . . . . . . . . . . . . . 31

Chapter 1 Learn about JMP 21Basic Analysis Formatting Conventions
Formatting Conventions
The following conventions help you relate written material to information that you see on your screen:
• Sample data table names, column names, pathnames, filenames, file extensions, and folders appear in Helvetica font.
• Code appears in Lucida Sans Typewriter font.
• Code output appears in Lucida Sans Typewriter italic font and is indented farther than the preceding code.
• Helvetica bold formatting indicates items that you select to complete a task:
– buttons
– check boxes
– commands
– list names that are selectable
– menus
– options
– tab names
– text boxes
• The following items appear in italics:
– words or phrases that are important or have definitions specific to JMP
– book titles
– variables
• Features that are for JMP Pro only are noted with the JMP Pro icon . For an overview of JMP Pro features, visit https://www.jmp.com/software/pro/.
Note: Special information and limitations appear within a Note.
Tip: Helpful information appears within a Tip.

22 Learn about JMP Chapter 1JMP Documentation Basic Analysis
JMP Documentation
JMP offers documentation in various formats, from print books and Portable Document Format (PDF) to electronic books (e-books).
• Open the PDF versions from the Help > Books menu.
• All books are also combined into one PDF file, called JMP Documentation Library, for convenient searching. Open the JMP Documentation Library PDF file from the Help > Books menu.
• You can also purchase printed documentation and e-books on the SAS website:
https://www.sas.com/store/search.ep?keyWords=JMP
JMP Documentation Library
The following table describes the purpose and content of each book in the JMP library.
Document Title Document Purpose Document Content
Discovering JMP If you are not familiar with JMP, start here.
Introduces you to JMP and gets you started creating and analyzing data. Also learn how to share your results.
Using JMP Learn about JMP data tables and how to perform basic operations.
Covers general JMP concepts and features that span across all of JMP, including importing data, modifying columns properties, sorting data, and connecting to SAS.

Chapter 1 Learn about JMP 23Basic Analysis JMP Documentation
Basic Analysis Perform basic analysis using this document.
Describes these Analyze menu platforms:
• Distribution
• Fit Y by X
• Tabulate
• Text Explorer
Covers how to perform bivariate, one-way ANOVA, and contingency analyses through Analyze > Fit Y by X. How to approximate sampling distributions using bootstrapping and how to perform parametric resampling with the Simulate platform are also included.
Essential Graphing Find the ideal graph for your data.
Describes these Graph menu platforms:
• Graph Builder
• Scatterplot 3D
• Contour Plot
• Bubble Plot
• Parallel Plot
• Cell Plot
• Scatterplot Matrix
• Ternary Plot
• Treemap
• Chart
• Overlay Plot
The book also covers how to create background and custom maps.
Profilers Learn how to use interactive profiling tools, which enable you to view cross-sections of any response surface.
Covers all profilers listed in the Graph menu. Analyzing noise factors is included along with running simulations using random inputs.
Document Title Document Purpose Document Content

24 Learn about JMP Chapter 1JMP Documentation Basic Analysis
Design of Experiments Guide
Learn how to design experiments and determine appropriate sample sizes.
Covers all topics in the DOE menu and the Specialized DOE Models menu item in the Analyze > Specialized Modeling menu.
Fitting Linear Models Learn about Fit Model platform and many of its personalities.
Describes these personalities, all available within the Analyze menu Fit Model platform:
• Standard Least Squares
• Stepwise
• Generalized Regression
• Mixed Model
• MANOVA
• Loglinear Variance
• Nominal Logistic
• Ordinal Logistic
• Generalized Linear Model
Document Title Document Purpose Document Content

Chapter 1 Learn about JMP 25Basic Analysis JMP Documentation
Predictive and Specialized Modeling
Learn about additional modeling techniques.
Describes these Analyze > Predictive Modeling menu platforms:
• Modeling Utilities
• Neural
• Partition
• Bootstrap Forest
• Boosted Tree
• K Nearest Neighbors
• Naive Bayes
• Model Comparison
• Formula Depot
Describes these Analyze > Specialized Modeling menu platforms:
• Fit Curve
• Nonlinear
• Functional Data Explorer
• Gaussian Process
• Time Series
• Matched Pairs
Describes these Analyze > Screening menu platforms:
• Response Screening
• Process Screening
• Predictor Screening
• Association Analysis
• Process History Explorer
The platforms in the Analyze > Specialized Modeling > Specialized DOE Models menu are described in Design of Experiments Guide.
Document Title Document Purpose Document Content

26 Learn about JMP Chapter 1JMP Documentation Basic Analysis
Multivariate Methods
Read about techniques for analyzing several variables simultaneously.
Describes these Analyze > Multivariate Methods menu platforms:
• Multivariate
• Principal Components
• Discriminant
• Partial Least Squares
• Multiple Correspondence Analysis
• Factor Analysis
• Multidimensional Scaling
• Item Analysis
Describes these Analyze > Clustering menu platforms:
• Hierarchical Cluster
• K Means Cluster
• Normal Mixtures
• Latent Class Analysis
• Cluster Variables
Quality and Process Methods
Read about tools for evaluating and improving processes.
Describes these Analyze > Quality and Process menu platforms:
• Control Chart Builder and individual control charts
• Measurement Systems Analysis
• Variability / Attribute Gauge Charts
• Process Capability
• Pareto Plot
• Diagram
• Manage Spec Limits
Document Title Document Purpose Document Content
Chapter 1 Learn about JMP 27Basic Analysis JMP Documentation
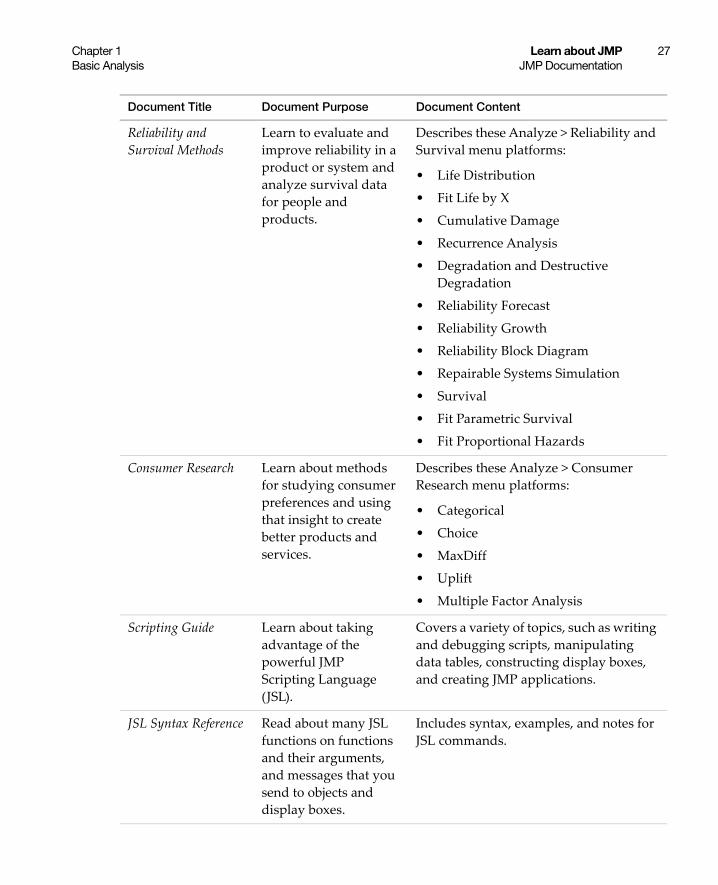
Reliability and Survival Methods
Learn to evaluate and improve reliability in a product or system and analyze survival data for people and products.
Describes these Analyze > Reliability and Survival menu platforms:
• Life Distribution
• Fit Life by X
• Cumulative Damage
• Recurrence Analysis
• Degradation and Destructive Degradation
• Reliability Forecast
• Reliability Growth
• Reliability Block Diagram
• Repairable Systems Simulation
• Survival
• Fit Parametric Survival
• Fit Proportional Hazards
Consumer Research Learn about methods for studying consumer preferences and using that insight to create better products and services.
Describes these Analyze > Consumer Research menu platforms:
• Categorical
• Choice
• MaxDiff
• Uplift
• Multiple Factor Analysis
Scripting Guide Learn about taking advantage of the powerful JMP Scripting Language (JSL).
Covers a variety of topics, such as writing and debugging scripts, manipulating data tables, constructing display boxes, and creating JMP applications.
JSL Syntax Reference Read about many JSL functions on functions and their arguments, and messages that you send to objects and display boxes.
Includes syntax, examples, and notes for JSL commands.
Document Title Document Purpose Document Content

28 Learn about JMP Chapter 1Additional Resources for Learning JMP Basic Analysis
Note: The Books menu also contains two reference cards that can be printed: The Menu Card describes JMP menus, and the Quick Reference describes JMP keyboard shortcuts.
JMP Help
JMP Help is an abbreviated version of the documentation library that provides targeted information. You can open JMP Help in several ways:
• On Windows, press the F1 key to open the Help system window.
• Get help on a specific part of a data table or report window. Select the Help tool from the Tools menu and then click anywhere in a data table or report window to see the Help for that area.
• Within a JMP window, click the Help button.
• Search and view JMP Help on Windows using the Help > Help Contents, Search Help, and Help Index options. On Mac, select Help > JMP Help.
• Search the Help at https://jmp.com/support/help/ (English only).
Additional Resources for Learning JMP
In addition to JMP documentation and JMP Help, you can also learn about JMP using the following resources:
••••••••
Tutorials
You can access JMP tutorials by selecting Help > Tutorials. The first item on the Tutorials menu is Tutorials Directory. This opens a new window with all the tutorials grouped by category.
If you are not familiar with JMP, then start with the Beginners Tutorial. It steps you through the JMP interface and explains the basics of using JMP.

Chapter 1 Learn about JMP 29Basic Analysis Additional Resources for Learning JMP
The rest of the tutorials help you with specific aspects of JMP, such as designing an experiment and comparing a sample mean to a constant.
Sample Data Tables
All of the examples in the JMP documentation suite use sample data. Select Help > Sample Data Library to open the sample data directory.
To view an alphabetized list of sample data tables or view sample data within categories, select Help > Sample Data.
Sample data tables are installed in the following directory:
On Windows: C:\Program Files\SAS\JMP\14\Samples\Data
On Macintosh: \Library\Application Support\JMP\14\Samples\Data
In JMP Pro, sample data is installed in the JMPPRO (rather than JMP) directory. In JMP Shrinkwrap, sample data is installed in the JMPSW directory.
To view examples using sample data, select Help > Sample Data and navigate to the Teaching Resources section. To learn more about the teaching resources, visit http://jmp.com/tools.
Learn about Statistical and JSL Terms
The Help menu contains the following indexes:
Statistics Index Provides definitions of statistical terms.
Scripting Index Lets you search for information about JSL functions, objects, and display boxes. You can also edit and run sample scripts from the Scripting Index.
Learn JMP Tips and Tricks
When you first start JMP, you see the Tip of the Day window. This window provides tips for using JMP.
To turn off the Tip of the Day, clear the Show tips at startup check box. To view it again, select Help > Tip of the Day. Or, you can turn it off using the Preferences window.
Tooltips
JMP provides descriptive tooltips when you place your cursor over items, such as the following:
• Menu or toolbar options

30 Learn about JMP Chapter 1Additional Resources for Learning JMP Basic Analysis
• Labels in graphs
• Text results in the report window (move your cursor in a circle to reveal)
• Files or windows in the Home Window
• Code in the Script Editor
Tip: On Windows, you can hide tooltips in the JMP Preferences. Select File > Preferences > General and then deselect Show menu tips. This option is not available on Macintosh.
JMP User Community
The JMP User Community provides a range of options to help you learn more about JMP and connect with other JMP users. The learning library of one-page guides, tutorials, and demos is a good place to start. And you can continue your education by registering for a variety of JMP training courses.
Other resources include a discussion forum, sample data and script file exchange, webcasts, and social networking groups.
To access JMP resources on the website, select Help > JMP User Community or visit https://community.jmp.com/.
JMP Books by Users
Additional books about using JMP that are written by JMP users are available on the JMP website:
https://www.jmp.com/en_us/software/books.html
The JMP Starter Window
The JMP Starter window is a good place to begin if you are not familiar with JMP or data analysis. Options are categorized and described, and you launch them by clicking a button. The JMP Starter window covers many of the options found in the Analyze, Graph, Tables, and File menus. The window also lists JMP Pro features and platforms.
• To open the JMP Starter window, select View (Window on the Macintosh) > JMP Starter.
• To display the JMP Starter automatically when you open JMP on Windows, select File > Preferences > General, and then select JMP Starter from the Initial JMP Window list. On Macintosh, select JMP > Preferences > Initial JMP Starter Window.

Chapter 1 Learn about JMP 31Basic Analysis Technical Support
Technical Support
JMP technical support is provided by statisticians and engineers educated in SAS and JMP, many of whom have graduate degrees in statistics or other technical disciplines.
Many technical support options are provided at https://www.jmp.com/support, including the technical support phone number.

32 Learn about JMP Chapter 1Technical Support Basic Analysis

Chapter 2Introduction to Basic Analysis
Overview of Fundamental Analysis Methods
This book describes the initial types of analyses that you often perform in JMP:
• The Distribution platform illustrates the distribution of a single variable using histograms, additional graphs, and reports. Once you know how your data is distributed, you can plan the appropriate type of analysis going forward. See Chapter 3, “Distributions”.
• The Fit Y by X platform analyzes the pair of X and Y variables that you specify, by context, based on modeling type. See Chapter 4, “Introduction to Fit Y by X”. The four types of analyses include:
– The Bivariate platform, which analyzes the relationship between two continuous X variables. See Chapter 5, “Bivariate Analysis”.
– The Oneway platform, which analyzes how the distribution of a continuous Y variable differs across groups defined by a categorical X variable. See Chapter 6, “Oneway Analysis”.
– The Contingency platform, which analyzes the distribution of a categorical response variable Y as conditioned by the values of a categorical X factor. See Chapter 7, “Contingency Analysis”.
– The Logistic platform, which fits the probabilities for response categories (Y) to a continuous X predictor. See Chapter 8, “Logistic Analysis”.
• The Tabulate platform interactively constructs tables of descriptive statistics. See Chapter 9, “Tabulate”.
• The Simulate feature provides parametric and nonparametric simulation capability. See Chapter 10, “Simulate”.
• Bootstrap analysis approximates the sampling distribution of a statistic. The data is re-sampled with replacement and the statistic is computed. This process is repeated to produce a distribution of values for the statistic. See Chapter 11, “Bootstrapping”.
• The Text Explorer platform enables you to categorize and analyze unformatted text data. You can use regular expressions to clean up the data before you proceed to analysis. See Chapter 12, “Text Explorer”.

34 Introduction to Basic Analysis Chapter 2Basic Analysis

Chapter 3Distributions
Using the Distribution Platform
The Distribution platform illustrates the distribution of a single variable using histograms, additional graphs, and reports. The word univariate simply means involving one variable instead of two (bivariate) or many (multivariate). However, you can examine the distribution of several individual variables within a report. The report content for each variable changes depending on whether the variable is categorical (nominal or ordinal) or continuous.
Once you know how your data is distributed, you can plan the appropriate type of analysis going forward.
The Distribution report window is interactive. Clicking on a histogram bar highlights the corresponding data in any other histograms and in the data table. See Figure 3.1.
Figure 3.1 Example of the Distribution Platform

36 Distributions Chapter 3Basic Analysis
ContentsOverview of the Distribution Platform . . . . . . . . . . . . . . . . . . . . . . . . . . . . . . . . . . . . . . . . . . . . . . 38
Categorical Variables . . . . . . . . . . . . . . . . . . . . . . . . . . . . . . . . . . . . . . . . . . . . . . . . . . . . . . . . . . 38Continuous Variables . . . . . . . . . . . . . . . . . . . . . . . . . . . . . . . . . . . . . . . . . . . . . . . . . . . . . . . . . . 38
Example of the Distribution Platform . . . . . . . . . . . . . . . . . . . . . . . . . . . . . . . . . . . . . . . . . . . . . . . 39Launch the Distribution Platform. . . . . . . . . . . . . . . . . . . . . . . . . . . . . . . . . . . . . . . . . . . . . . . . . . . 40The Distribution Report . . . . . . . . . . . . . . . . . . . . . . . . . . . . . . . . . . . . . . . . . . . . . . . . . . . . . . . . . . . 41
Histograms. . . . . . . . . . . . . . . . . . . . . . . . . . . . . . . . . . . . . . . . . . . . . . . . . . . . . . . . . . . . . . . . . . . 43The Frequencies Report . . . . . . . . . . . . . . . . . . . . . . . . . . . . . . . . . . . . . . . . . . . . . . . . . . . . . . . . 46The Quantiles Report . . . . . . . . . . . . . . . . . . . . . . . . . . . . . . . . . . . . . . . . . . . . . . . . . . . . . . . . . . 46The Summary Statistics Report . . . . . . . . . . . . . . . . . . . . . . . . . . . . . . . . . . . . . . . . . . . . . . . . . . 46
Distribution Platform Options . . . . . . . . . . . . . . . . . . . . . . . . . . . . . . . . . . . . . . . . . . . . . . . . . . . . . 49Options for Categorical Variables . . . . . . . . . . . . . . . . . . . . . . . . . . . . . . . . . . . . . . . . . . . . . . . . . . . 50
Display Options for Categorical Variables . . . . . . . . . . . . . . . . . . . . . . . . . . . . . . . . . . . . . . . . 51Histogram Options for Categorical Variables . . . . . . . . . . . . . . . . . . . . . . . . . . . . . . . . . . . . . . 51Save Options for Categorical Variables . . . . . . . . . . . . . . . . . . . . . . . . . . . . . . . . . . . . . . . . . . . 52
Options for Continuous Variables . . . . . . . . . . . . . . . . . . . . . . . . . . . . . . . . . . . . . . . . . . . . . . . . . . 52Display Options for Continuous Variables . . . . . . . . . . . . . . . . . . . . . . . . . . . . . . . . . . . . . . . . 53Histogram Options for Continuous Variables . . . . . . . . . . . . . . . . . . . . . . . . . . . . . . . . . . . . . 54Normal Quantile Plot . . . . . . . . . . . . . . . . . . . . . . . . . . . . . . . . . . . . . . . . . . . . . . . . . . . . . . . . . . 55Outlier Box Plot . . . . . . . . . . . . . . . . . . . . . . . . . . . . . . . . . . . . . . . . . . . . . . . . . . . . . . . . . . . . . . . 56Quantile Box Plot. . . . . . . . . . . . . . . . . . . . . . . . . . . . . . . . . . . . . . . . . . . . . . . . . . . . . . . . . . . . . . 57Stem and Leaf . . . . . . . . . . . . . . . . . . . . . . . . . . . . . . . . . . . . . . . . . . . . . . . . . . . . . . . . . . . . . . . . 58CDF Plot . . . . . . . . . . . . . . . . . . . . . . . . . . . . . . . . . . . . . . . . . . . . . . . . . . . . . . . . . . . . . . . . . . . . . 58Test Mean . . . . . . . . . . . . . . . . . . . . . . . . . . . . . . . . . . . . . . . . . . . . . . . . . . . . . . . . . . . . . . . . . . . . 59Test Std Dev . . . . . . . . . . . . . . . . . . . . . . . . . . . . . . . . . . . . . . . . . . . . . . . . . . . . . . . . . . . . . . . . . . 60Test Equivalence . . . . . . . . . . . . . . . . . . . . . . . . . . . . . . . . . . . . . . . . . . . . . . . . . . . . . . . . . . . . . . 61Confidence Intervals . . . . . . . . . . . . . . . . . . . . . . . . . . . . . . . . . . . . . . . . . . . . . . . . . . . . . . . . . . . 62Prediction Intervals . . . . . . . . . . . . . . . . . . . . . . . . . . . . . . . . . . . . . . . . . . . . . . . . . . . . . . . . . . . . 63Tolerance Intervals . . . . . . . . . . . . . . . . . . . . . . . . . . . . . . . . . . . . . . . . . . . . . . . . . . . . . . . . . . . . 63Capability Analysis . . . . . . . . . . . . . . . . . . . . . . . . . . . . . . . . . . . . . . . . . . . . . . . . . . . . . . . . . . . . 63Fit Distributions. . . . . . . . . . . . . . . . . . . . . . . . . . . . . . . . . . . . . . . . . . . . . . . . . . . . . . . . . . . . . . . 67Save Options for Continuous Variables . . . . . . . . . . . . . . . . . . . . . . . . . . . . . . . . . . . . . . . . . . . 72
Additional Examples of the Distribution Platform . . . . . . . . . . . . . . . . . . . . . . . . . . . . . . . . . . . . 74Example of Selecting Data in Multiple Histograms. . . . . . . . . . . . . . . . . . . . . . . . . . . . . . . . . 74Example Using a By Variable . . . . . . . . . . . . . . . . . . . . . . . . . . . . . . . . . . . . . . . . . . . . . . . . . . . 75Examples of the Test Probabilities Option. . . . . . . . . . . . . . . . . . . . . . . . . . . . . . . . . . . . . . . . . 76Example of Prediction Intervals . . . . . . . . . . . . . . . . . . . . . . . . . . . . . . . . . . . . . . . . . . . . . . . . . 78Example of Tolerance Intervals. . . . . . . . . . . . . . . . . . . . . . . . . . . . . . . . . . . . . . . . . . . . . . . . . . 79Example of Capability Analysis . . . . . . . . . . . . . . . . . . . . . . . . . . . . . . . . . . . . . . . . . . . . . . . . . 81

Chapter 3 Distributions 37Basic Analysis
Statistical Details for the Distribution Platform. . . . . . . . . . . . . . . . . . . . . . . . . . . . . . . . . . . . . . . . 82Standard Error Bars . . . . . . . . . . . . . . . . . . . . . . . . . . . . . . . . . . . . . . . . . . . . . . . . . . . . . . . . . . . . 82Quantiles . . . . . . . . . . . . . . . . . . . . . . . . . . . . . . . . . . . . . . . . . . . . . . . . . . . . . . . . . . . . . . . . . . . . . 82Summary Statistics. . . . . . . . . . . . . . . . . . . . . . . . . . . . . . . . . . . . . . . . . . . . . . . . . . . . . . . . . . . . . 83Normal Quantile Plot . . . . . . . . . . . . . . . . . . . . . . . . . . . . . . . . . . . . . . . . . . . . . . . . . . . . . . . . . . 84Wilcoxon Signed Rank Test . . . . . . . . . . . . . . . . . . . . . . . . . . . . . . . . . . . . . . . . . . . . . . . . . . . . . 85Standard Deviation Test . . . . . . . . . . . . . . . . . . . . . . . . . . . . . . . . . . . . . . . . . . . . . . . . . . . . . . . . 87Normal Quantiles. . . . . . . . . . . . . . . . . . . . . . . . . . . . . . . . . . . . . . . . . . . . . . . . . . . . . . . . . . . . . . 87Saving Standardized Data . . . . . . . . . . . . . . . . . . . . . . . . . . . . . . . . . . . . . . . . . . . . . . . . . . . . . . 87Prediction Intervals . . . . . . . . . . . . . . . . . . . . . . . . . . . . . . . . . . . . . . . . . . . . . . . . . . . . . . . . . . . . 88Tolerance Intervals. . . . . . . . . . . . . . . . . . . . . . . . . . . . . . . . . . . . . . . . . . . . . . . . . . . . . . . . . . . . . 88Capability Analysis . . . . . . . . . . . . . . . . . . . . . . . . . . . . . . . . . . . . . . . . . . . . . . . . . . . . . . . . . . . . 89Continuous Fit Distributions . . . . . . . . . . . . . . . . . . . . . . . . . . . . . . . . . . . . . . . . . . . . . . . . . . . . 95Discrete Fit Distributions . . . . . . . . . . . . . . . . . . . . . . . . . . . . . . . . . . . . . . . . . . . . . . . . . . . . . . 102Fitted Quantiles . . . . . . . . . . . . . . . . . . . . . . . . . . . . . . . . . . . . . . . . . . . . . . . . . . . . . . . . . . . . . . 105Fit Distribution Options . . . . . . . . . . . . . . . . . . . . . . . . . . . . . . . . . . . . . . . . . . . . . . . . . . . . . . . 105

38 Distributions Chapter 3Overview of the Distribution Platform Basic Analysis
Overview of the Distribution Platform
The treatment of variables in the Distribution platform is different, depending on the modeling type of the variable, which can be categorical (nominal or ordinal) or continuous.
Categorical Variables
For categorical variables, the initial graph that appears is a histogram. The histogram shows a bar for each level of the ordinal or nominal variable. You can also add a divided (mosaic) bar chart.
The Frequencies report show counts and proportions. You can add confidence intervals and test the probabilities from the options in the red triangle menu.
Continuous Variables
For numeric continuous variables, the initial graphs show a histogram and an outlier box plot. The histogram shows a bar for grouped values of the continuous variable. The following options are also available:
• normal quantile plot
• quantile box plot
• stem and leaf plot
• CDF plot
The reports show selected quantiles and summary statistics. Additional report options are available in the red triangle menu for the following:
• saving ranks, probability scores, normal quantile values, and so on, as new columns in the data table (Save options)
• testing the mean and standard deviation of the column against a constant you specify (Test Mean and Test Std Dev options)
• fitting various distributions and nonparametric smoothing curves (Continuous Fit and Discrete Fit options)
• performing a capability analysis for a quality control application
• confidence intervals, prediction intervals, and tolerance intervals

Chapter 3 Distributions 39Basic Analysis Example of the Distribution Platform
Example of the Distribution Platform
Suppose that you have data on 40 students, and you want to see the distribution of age and height among the students.
1. Select Help > Sample Data Library and open Big Class.jmp.
2. Select Analyze > Distribution.
3. Select age and height and click Y, Columns.
4. Click OK.
Figure 3.2 Example of the Distribution Platform
From the histograms, you notice the following:
• The ages are not uniformly distributed.
• For height, there are two points with extreme values (that might be outliers).
Click on the bar for 50 in the height histogram to take a closer look at the potential outliers.

40 Distributions Chapter 3Launch the Distribution Platform Basic Analysis
• The corresponding ages are highlighted in the age histogram. The potential outliers are age 12.
• The corresponding rows are highlighted in the data table. The names of the potential outliers are Lillie and Robert.
Add labels to the potential outliers in the height histogram.
1. Select both outliers.
2. Right-click on one of the outliers and select Row Label.
Label icons are added to these rows in the data table.
3. Resize the box plot wider to see the full labels.
Figure 3.3 Potential Outliers Labeled
Launch the Distribution Platform
Launch the Distribution platform by selecting Analyze > Distribution.
Figure 3.4 The Distribution Launch Window

Chapter 3 Distributions 41Basic Analysis The Distribution Report
Y, Columns Assigns the variables that you want to analyze. A histogram and associated reports appear for each variable.
Weight Assigns a variable that specifies weights for observations on continuous Ys. For categorical Ys, the Weight column is ignored. Any statistic that is based on the sum of the weights is affected by weights.
Freq Assigns a frequency variable to this role. This is useful if your data are summarized. In this instance, you have one column for the Y values and another column for the frequency of occurrence of the Y values. The sum of this variable is included in the overall count appearing in the Summary Statistics report (represented by N). All other moment statistics (mean, standard deviation, and so on) are also affected by the Freq variable.
By Produces a separate report for each level of the By variable. If more than one By variable is assigned, a separate report is produced for each possible combination of the levels of the By variables.
Histograms Only Removes everything except the histograms from the report window.
For general information about launch windows, see the Get Started chapter in the Using JMP book.
After you click OK, the Distribution report window appears. See “The Distribution Report” on page 41.
The Distribution Report
Follow the instructions in “Example of the Distribution Platform” on page 39 to produce the report shown in Figure 3.5.

42 Distributions Chapter 3The Distribution Report Basic Analysis
Figure 3.5 The Initial Distribution Report Window
Note: If you apply only the Hidden row state to rows in the data table, the corresponding points do not appear in plots that show points. However, histograms are constructed using the hidden rows. If you want to exclude rows from the construction of the histograms and from analysis results, apply the Exclude row state. Then select Redo > Redo Analysis from the red triangle menu next to Distributions.
The initial Distribution report contains a histogram and reports for each variable. Note the following:
• To replace a variable in a report, from the Columns panel of the associated data table, drag and drop the variable into the axis of the histogram.
• To insert a new variable into a report, creating a new histogram, drag and drop the variable outside of an existing histogram. The new variable can be placed before, between, or after the existing histograms.
Note: To remove a variable, select Remove from the red triangle menu.

Chapter 3 Distributions 43Basic Analysis The Distribution Report
• The red triangle menu next to Distributions contains options that affect all of the variables. See “Distribution Platform Options” on page 49.
• The red triangle menu next to each variable contains options that affect only that variable. See “Options for Categorical Variables” on page 50 or “Options for Continuous Variables” on page 52. If you hold down the Control key and select a variable option, the option applies to all of the variables in the report that have the same modeling type.
• Histograms visually display your data. See “Histograms” on page 43.
• The initial report for a categorical variable contains a Frequencies report. See “The Frequencies Report” on page 46.
• The initial report for a continuous variable contains a Quantiles and a Summary Statistics report. See “The Quantiles Report” on page 46 and “The Summary Statistics Report” on page 46.
Histograms
Histograms visually display your data. For categorical (nominal or ordinal) variables, the histogram shows a bar for each level of the ordinal or nominal variable. For continuous variables, the histogram shows a bar for grouped values of the continuous variable.
Highlighting data Click on a histogram bar or an outlying point in the graph. The corresponding rows are highlighted in the data table, and corresponding sections of other histograms are also highlighted, if applicable. See “Highlight Bars and Select Rows” on page 45.
Creating a subset Double-click on a histogram bar, or right-click on a histogram bar and select Subset. A new data table that contains only the selected data is created.
Resizing the entire histogram Place your cursor over the histogram borders until you see a double-sided arrow. Then click and drag the borders.
Rescaling the axis Click and drag on an axis to rescale it.
Alternatively, place your cursor over the axis until you see a hand. Then, double-click on the axis and set the parameters in the Axis Specification window.
Resizing histogram bars (Continuous variables only) There are multiple options to resize histogram bars. See “Resize Histogram Bars for Continuous Variables” on page 44.
Specifying your selection Specify the data that you select in multiple histograms. See “Specify Your Selection in Multiple Histograms” on page 45.
To see additional options for the histogram or the associated data table:
• Right-click on a histogram. For details, see the Using JMP book.

44 Distributions Chapter 3The Distribution Report Basic Analysis
• Right-click on an axis. You can add a label or modify the axis. For details, see the JMP Reports chapter in the Using JMP book.
• Click on the red triangle next to the variable, and select Histogram Options. Options are slightly different depending on the variable modeling type. See “Options for Categorical Variables” on page 50 or “Options for Continuous Variables” on page 52.
Resize Histogram Bars for Continuous Variables
Resize histogram bars for continuous variables by using the following:
• the Grabber (hand) tool
• the Set Bin Width option
• the Increment option
Use the Grabber Tool
The Grabber tool is a quick way to explore your data.
1. Select Tools > Grabber.
Note: (Windows only) To see the menu bar, you might need to place your cursor over the bar below the window title. You can also change this setting in File > Preferences > Windows Specific.
2. Place the grabber tool anywhere in the histogram.
3. Click and drag the histogram bars.
Think of each bar as a bin that holds a number of observations. For vertical histograms:
• Moving the hand to the left increases the bin width and combines intervals. The number of bars decreases as the bar size increases.
• Moving the hand to the right decreases the bin width, producing more bars.
• Moving the hand up or down shifts the bin locations on the axis, which changes the contents and size of each bin.
Note: If you have changed the histogram orientation to horizontal, reverse these directions. Move the hand down to increase bin width, up to decrease bin width, and left or right to shift bin locations on the axis.
Use the Set Bin Width Option
The Set Bin Width option is a more precise way to set the width for all bars in a histogram. To use the Set Bin Width option, from the red triangle menu for the variable, select Histogram Options > Set Bin Width. Change the bin width value.

Chapter 3 Distributions 45Basic Analysis The Distribution Report
Use the Increment Option
The Increment option is another precise way to set the bar width. To use the Increment option, double-click on the axis, and change the Increment value.
Highlight Bars and Select Rows
Clicking on a histogram bar highlights the bar and selects the corresponding rows in the data table. The appropriate portions of all other graphical displays also highlight the selection. Figure 3.6 shows the results of highlighting a bar in the height histogram. The corresponding rows are selected in the data table.
Tip: To deselect specific histogram bars, press the Control key and click the highlighted bars.
Figure 3.6 Highlighting Bars and Rows
Specify Your Selection in Multiple Histograms
Extend or narrow your selection in histograms as follows:
• To extend your selection, hold down the Shift key and select another bar. This is the equivalent of using an or operator.
Select a bar to highlight rows and parts of other output.

46 Distributions Chapter 3The Distribution Report Basic Analysis
• To narrow your selection, hold down the Control and Alt keys (Windows) or Command and Option keys (Macintosh) and select another bar. This is the equivalent of using an and operator.
Related Information
• For an example, see “Example of Selecting Data in Multiple Histograms” on page 74.
The Frequencies Report
For nominal and ordinal variables, the Frequencies report lists the levels of the variables, along with the associated frequency of occurrence and probabilities.
For each level of a categorical (nominal or ordinal) variable, the Frequencies report contains the information described in the following list. Missing values are omitted from the analysis.
Tip: Click a value in the Frequencies report to select the corresponding data in the histogram and data table.
Level Lists each value found for a response variable.
Count Lists the number of rows found for each level of a response variable. If you use a Freq variable, the Count is the sum of the Freq variables for each level of the response variable.
Prob Lists the probability (or proportion) of occurrence for each level of a response variable. The probability is computed as the count divided by the total frequency of the variable, shown at the bottom of the table.
StdErr Prob Lists the standard error of the probabilities. This column might be hidden. To show the column, right-click in the table and select Columns > StdErr Prob.
Cum Prob Contains the cumulative sum of the column of probabilities. This column might be hidden. To show the column, right-click in the table and select Columns > Cum Prob.
The Quantiles Report
For continuous variables, the Quantiles report lists the values of selected quantiles (sometimes called percentiles). For statistical details, see “Quantiles” on page 82.
The Summary Statistics Report
For continuous variables, the Summary Statistics report displays the mean, standard deviation, and other summary statistics. You can control which statistics appear in this report

Chapter 3 Distributions 47Basic Analysis The Distribution Report
by selecting Customize Summary Statistics from the red triangle menu next to Summary Statistics.
Tip: You can specify which summary statistics show in the report each time you run a Distribution analysis for a continuous variable. Select File > Preferences > Platforms > Distribution Summary Statistics, and select the ones that you want to appear.
• “Description of the Summary Statistics Report” describes the statistics that appear by default.
• “Additional Summary Statistics” describes additional statistics that you can add to the report using the Customize Summary Statistics window.
Description of the Summary Statistics Report
Mean Estimates the expected value of the underlying distribution for the response variable, which is the arithmetic average of the column’s values. It is the sum of the nonmissing values divided by the number of nonmissing values.
Std Dev The normal distribution is mainly defined by the mean and standard deviation. These parameters provide an easy way to summarize data as the sample becomes large:
– 68% of the values are within one standard deviation of the mean
– 95% of the values are within two standard deviations of the mean
– 99.7% of the values are within three standard deviations of the mean
Std Err Mean The standard error of the mean, which estimates the standard deviation of the distribution of the mean.
Upper and Lower Mean Confidence Limits Are 95% confidence limits about the mean. They define an interval that is very likely to contain the true population mean.
N Is the total number of nonmissing values.
Additional Summary Statistics
Sum Weight The sum of a column assigned to the role of Weight (in the launch window). Sum Wgt is used in the denominator for computations of the mean instead of N.
Sum The sum of the response values.
Variance The sample variance, and the square of the sample standard deviation.
Skewness Measures sidedness or symmetry.

48 Distributions Chapter 3The Distribution Report Basic Analysis
Kurtosis Measures peakedness or heaviness of tails. See “Kurtosis” on page 84 for formula details.
CV The percent coefficient of variation. It is computed as the standard deviation divided by the mean and multiplied by 100. The coefficient of variation can be used to assess relative variation. For example, it can be used when comparing the variation in data measured in different units or with different magnitudes.
N Missing The number of missing observations.
N Zero The number of zero values.
N Unique The number of unique values.
Uncorrected SS The uncorrected sum of squares or sum of values squared.
Corrected SS The corrected sum of squares or sum of squares of deviations from the mean.
Autocorrelation (Appears only if you have not specified a Frequency variable.) First autocorrelation that tests if the residuals are correlated across the rows. This test helps detect non-randomness in the data.
Minimum Represents the 0 percentile of the data.
Maximum Represents the 100 percentile of the data.
Median Represents the 50th percentile of the data.
Mode The value that occurs most often in the data. If there are multiple modes, the smallest mode appears.
Trimmed Mean The mean calculated after removing the smallest p% and the largest p% of the data. The value of p is entered in the Enter trimmed mean percent text box at the bottom of the window. The Trimmed Mean option is not available if you have specified a Weight variable.
Geometric Mean The nth root of the product of the data. For example, geometric means are often used to calculate interest rates. The statistic is also helpful when the data contains a large value in a skewed distribution.
Note: Negative values result in missing numbers, and zero values (with no negative values) result in zero.
Range The difference between the maximum and minimum of the data.
Interquartile Range The difference between the 3rd and 1st quartiles.

Chapter 3 Distributions 49Basic Analysis Distribution Platform Options
Median Absolute Deviation (Does not appear if you have specified a Weight variable.) The median of the absolute deviations from the median.
Proportion Zero The proportion of nonmissing values that are equal to zero.
Proportion Nonzero The proportion of nonmissing values that are not equal to zero.
Robust Mean The robust mean, calculated in a way that is resistant to outliers, using Huberʹs M-estimation. See Huber and Ronchetti (2009).
Robust Std Dev The robust standard deviation, calculated in a way that is resistant to outliers, using Huberʹs M-estimation. See Huber and Ronchetti (2009).
Enter (1-alpha) for mean confidence interval Specify the alpha level for the mean confidence interval.
Enter trimmed mean percent Specify the trimmed mean percentage. The percentage is trimmed off each side of the data.
Summary Statistics Options
The red triangle menu next to Summary Statistics contains these options:
Customize Summary Statistics Select which statistics you want to appear from the list. You can select or deselect all summary statistics.
Show All Modes Shows all of the modes if there are multiple modes.
For statistical details, see “Summary Statistics” on page 83.
Distribution Platform Options
The red triangle menu next to Distributions contains options that affect all of the reports and graphs in the Distribution platform.
Uniform Scaling Scales all axes with the same minimum, maximum, and intervals so that the distributions can be easily compared.
Stack Changes the orientation of the histogram and the reports to horizontal and stacks the individual distribution reports vertically. Deselect this option to return the report window to its original layout.
Arrange in Rows Enter the number of plots that appear in a row. This option helps you view plots vertically rather than in one wide row.

50 Distributions Chapter 3Options for Categorical Variables Basic Analysis
Save for Adobe Flash platform (.SWF) Saves the histograms as .swf files that are Adobe Flash player compatible. Use these files in presentations and in web pages. This option also saves an HTML page that shows you the correct code for using the resulting .swf file.
For more information about this option, go to https://jmp.com/support/swfhelp/en.
See the JMP Reports chapter in the Using JMP book for more information about the following options:
Local Data Filter Shows or hides the local data filter that enables you to filter the data used in a specific report.
Redo Contains options that enable you to repeat or relaunch the analysis. In platforms that support the feature, the Automatic Recalc option immediately reflects the changes that you make to the data table in the corresponding report window.
Save Script Contains options that enable you to save a script that reproduces the report to several destinations.
Save By-Group Script Contains options that enable you to save a script that reproduces the platform report for all levels of a By variable to several destinations. Available only when a By variable is specified in the launch window.
Options for Categorical Variables
The red triangle menus next to each variable in the report window contain additional options that apply to the variable. This section describes the options that are available for categorical (nominal or ordinal) variables.
Display Options See “Display Options for Categorical Variables” on page 51.
Histogram Options See “Histogram Options for Categorical Variables” on page 51.
Mosaic Plot Displays a mosaic bar chart for each nominal or ordinal response variable. A mosaic plot is a stacked bar chart where each segment is proportional to its group’s frequency count.
Order By Reorders the histogram, mosaic plot, and Frequencies report in ascending or descending order, by count. To save the new order as a column property, use the Save > Value Ordering option.
Test Probabilities Displays a report that tests hypothesized probabilities. See “Examples of the Test Probabilities Option” on page 76 for more details.

Chapter 3 Distributions 51Basic Analysis Options for Categorical Variables
Confidence Interval This menu contains confidence levels. Select a value that is listed, or select Other to enter your own. JMP computes score confidence intervals.
Save See “Save Options for Categorical Variables” on page 52.
Remove Permanently removes the variable and all its reports from the Distribution report.
Display Options for Categorical Variables
Frequencies Shows or hides the Frequencies report. See “The Frequencies Report” on page 46.
Horizontal Layout Changes the orientation of the histogram and the reports to vertical or horizontal.
Axes on Left Moves the Count, Prob, and Density axes to the left instead of the right.
This option is applicable only if Horizontal Layout is selected.
Histogram Options for Categorical Variables
Histogram Shows or hides the histogram. See “Histograms” on page 43.
Vertical Changes the orientation of the histogram from a vertical to a horizontal orientation.
Std Error Bars Draws the standard error bar on each level of the histogram.
Separate Bars Separates the histogram bars.
Histogram Color Changes the color of the histogram bars.
Count Axis Adds an axis that shows the frequency of column values represented by the histogram bars.
Prob Axis Adds an axis that shows the proportion of column values represented by histogram bars.
Density Axis Adds an axis that shows the length of the bars in the histogram.
The count and probability axes are based on the following calculations:
prob = (bar width)*density
count = (bar width)*density*(total count)
Show Percents Labels the percent of column values represented by each histogram bar.

52 Distributions Chapter 3Options for Continuous Variables Basic Analysis
Note: To specify the number of decimal places, right-click the histogram and select Customize > Histogram.
Show Counts Labels the frequency of column values represented by each histogram bar.
Save Options for Categorical Variables
Level Numbers Creates a new column in the data table called Level <colname>. The level number of each observation corresponds to the histogram bar that contains the observation.
Value Ordering (Use with the Order By option) Creates a new value ordering column property in the data table, reflecting the new order.
Script to Log Displays the script commands to generate the current report in the log window. Select View > Log to see the log window.
Options for Continuous Variables
The red triangle menus next to each variable in the report window contain additional options that apply to the variable. This section describes the options that are available for continuous variables.
Display Options See “Display Options for Continuous Variables” on page 53.
Histogram Options See “Histogram Options for Continuous Variables” on page 54.
Normal Quantile Plot Helps you visualize the extent to which the variable is normally distributed. See “Normal Quantile Plot” on page 55.
Outlier Box Plot Shows the distribution and helps you identify possible outliers. See “Outlier Box Plot” on page 56.
Quantile Box Plot Shows specific quantiles from the Quantiles report. See “Quantile Box Plot” on page 57.
Stem and Leaf See “Stem and Leaf” on page 58.
CDF Plot Creates a plot of the empirical cumulative distribution function. See “CDF Plot” on page 58.
Test Mean Perform a one-sample test for the mean. See “Test Mean” on page 59.

Chapter 3 Distributions 53Basic Analysis Options for Continuous Variables
Test Std Dev Perform a one-sample test for the standard deviation. See “Test Std Dev” on page 60.
Test Equivalence Assesses whether a population mean is equivalent to a hypothesized value. See “Test Equivalence” on page 61.
Confidence Interval Choose confidence intervals for the mean and standard deviation. See “Confidence Intervals” on page 62.
Prediction Interval Choose prediction intervals for a single observation, or for the mean and standard deviation of the next randomly selected sample. See “Prediction Intervals” on page 63.
Tolerance Interval Computes an interval to contain at least a specified proportion of the population. See “Tolerance Intervals” on page 63.
Capability Analysis Measures the conformance of a process to given specification limits. See “Capability Analysis” on page 63.
Continuous Fit Fits distributions to continuous variables. See “Fit Distributions” on page 67.
Discrete Fit (Available when all data values are integers.) Fits distributions to discrete variables. See “Fit Distributions” on page 67.
Save Saves information about continuous or categorical variables. See “Prediction Intervals” on page 63.
Remove Permanently removes the variable and all its reports from the Distribution report.
Display Options for Continuous Variables
Quantiles Shows or hides the Quantiles report. See “The Quantiles Report” on page 46.
Set Quantile Increment Changes the quantile increment or revert to the default quantile increment.
Custom Quantiles Sets custom quantiles by values or by increments. You can specify the confidence level and choose whether to compute smoothed empirical likelihood quantiles (for large data sets, this can take some time).
– For details about how the weighted average quantiles are estimated, see “Quantiles” on page 82.
– For details about distribution-free confidence limits for the weighted average quantiles, see section 5.2 in Meeker et al. (2017).

54 Distributions Chapter 3Options for Continuous Variables Basic Analysis
– Smoothed empirical likelihood quantiles are based on a kernel density estimate. For more details about how these quantiles and their confidence limits are estimated, see Chen and Hall (1993).
Summary Statistics Shows or hides the Summary Statistics report. See “The Summary Statistics Report” on page 46.
Customize Summary Statistics Adds or removes statistics from the Summary Statistics report. See “The Summary Statistics Report” on page 46.
Horizontal Layout Changes the orientation of the histogram and the reports to vertical or horizontal.
Axes on Left Moves the Count, Prob, Density, and Normal Quantile Plot axes to the left instead of the right.
This option is applicable only if Horizontal Layout is selected.
Histogram Options for Continuous Variables
Histogram Shows or hides the histogram. See “Histograms” on page 43.
Shadowgram Replaces the histogram with a shadowgram. To understand a shadowgram, consider that if the bin width of a histogram is changed, the appearance of the histogram changes. A shadowgram overlays histograms with different bin widths. Dominant features of a distribution are less transparent on the shadowgram.
Note that the following options are not available for shadowgrams:
– Std Error Bars
– Show Counts
– Show Percents
Vertical Changes the orientation of the histogram from a vertical to a horizontal orientation.
Std Error Bars Draws the standard error bar on each level of the histogram using the standard error. The standard error bar adjusts automatically when you adjust the number of bars with the hand tool. See “Resize Histogram Bars for Continuous Variables” on page 44, and “Standard Error Bars” on page 82.
Set Bin Width Changes the bin width of the histogram bars. See “Resize Histogram Bars for Continuous Variables” on page 44.
Histogram Color Changes the color of the histogram bars.

Chapter 3 Distributions 55Basic Analysis Options for Continuous Variables
Count Axis Adds an axis that shows the frequency of column values represented by the histogram bars.
Note: If you resize the histogram bars, the count axis also resizes.
Prob Axis Adds an axis that shows the proportion of column values represented by histogram bars.
Note: If you resize the histogram bars, the probability axis also resizes.
Density Axis The density is the length of the bars in the histogram. Both the count and probability are based on the following calculations:
prob = (bar width)*density
count = (bar width)*density*(total count)
When looking at density curves that are added by the Fit Distribution option, the density axis shows the point estimates of the curves.
Note: If you resize the histogram bars, the density axis also resizes.
Show Percents Labels the proportion of column values represented by each histogram bar.
Show Counts Labels the frequency of column values represented by each histogram bar.
Normal Quantile Plot
Use the Normal Quantile Plot option to visualize the extent to which the variable is normally distributed. If a variable is normally distributed, the normal quantile plot approximates a diagonal straight line. This type of plot is also called a quantile-quantile plot, or Q-Q plot.
The normal quantile plot also shows Lilliefors confidence bounds (Conover 1980) and probability and normal quantile scales.

56 Distributions Chapter 3Options for Continuous Variables Basic Analysis
Figure 3.7 Normal Quantile Plot
Note the following information:
• The y-axis shows the column values.
• The upper x-axis shows the normal quantile scale.
• The lower x-axis shows the empirical cumulative probability for each value.
• The dashed red line shows the Lilliefors confidence bounds.
For statistical details, see “Normal Quantile Plot” on page 84.
Outlier Box Plot
Use the outlier box plot (also called a Tukey outlier box plot) to see the distribution and identify possible outliers. Generally, box plots show selected quantiles of continuous distributions.
Figure 3.8 Outlier Box Plot
Note the following aspects about outlier box plots:
• The horizontal line within the box represents the median sample value.
median sample value
confidence diamond
1st quartile
3rd quartile
whisker
whisker
shortest half

Chapter 3 Distributions 57Basic Analysis Options for Continuous Variables
• The confidence diamond contains the mean and the upper and lower 95% of the mean. If you drew a line through the middle of the diamond, you would have the mean. The top and bottom points of the diamond represent the upper and lower 95% of the mean.
• The ends of the box represent the 25th and 75th quantiles, also expressed as the 1st and 3rd quartile, respectively.
• The difference between the 1st and 3rd quartiles is called the interquartile range.
• The box has lines that extend from each end, sometimes called whiskers. The whiskers extend from the ends of the box to the outermost data point that falls within the distances computed as follows:
1st quartile - 1.5*(interquartile range)3rd quartile + 1.5*(interquartile range)If the data points do not reach the computed ranges, then the whiskers are determined by the upper and lower data point values (not including outliers).
• The bracket outside of the box identifies the shortest half, which is the most dense 50% of the observations (Rousseeuw and Leroy 1987).
Remove Objects from the Outlier Box Plot
To remove the confidence diamond or the shortest half, proceed as follows:
1. Right-click on the outlier box plot and select Customize.
2. Click Box Plot.
3. Deselect the check box next to Confidence Diamond or Shortest Half.
For more details about the Customize Graph window, see the JMP Reports chapter in the Using JMP book.
Quantile Box Plot
The Quantile Box Plot displays specific quantiles from the Quantiles report. If the distribution is symmetric, the quantiles in the box plot are approximately equidistant from each other. At a glance, you can see whether the distribution is symmetric. For example, if the quantile marks are grouped closely at one end, but have greater spacing at the other end, the distribution is skewed toward the end with more spacing. See Figure 3.9.
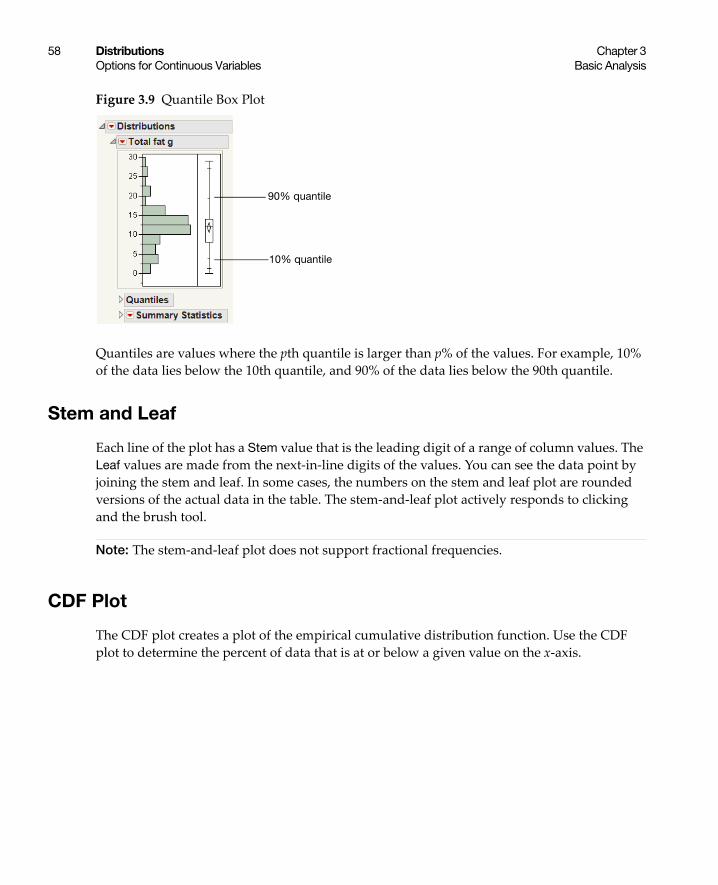
58 Distributions Chapter 3Options for Continuous Variables Basic Analysis
Figure 3.9 Quantile Box Plot
Quantiles are values where the pth quantile is larger than p% of the values. For example, 10% of the data lies below the 10th quantile, and 90% of the data lies below the 90th quantile.
Stem and Leaf
Each line of the plot has a Stem value that is the leading digit of a range of column values. The Leaf values are made from the next-in-line digits of the values. You can see the data point by joining the stem and leaf. In some cases, the numbers on the stem and leaf plot are rounded versions of the actual data in the table. The stem-and-leaf plot actively responds to clicking and the brush tool.
Note: The stem-and-leaf plot does not support fractional frequencies.
CDF Plot
The CDF plot creates a plot of the empirical cumulative distribution function. Use the CDF plot to determine the percent of data that is at or below a given value on the x-axis.
90% quantile
10% quantile
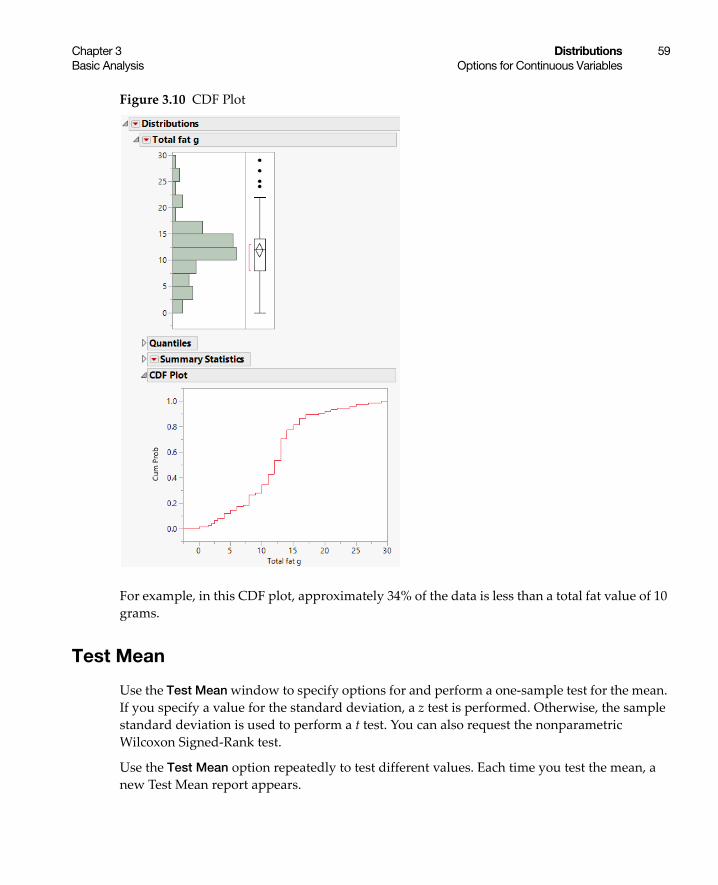
Chapter 3 Distributions 59Basic Analysis Options for Continuous Variables
Figure 3.10 CDF Plot
For example, in this CDF plot, approximately 34% of the data is less than a total fat value of 10 grams.
Test Mean
Use the Test Mean window to specify options for and perform a one-sample test for the mean. If you specify a value for the standard deviation, a z test is performed. Otherwise, the sample standard deviation is used to perform a t test. You can also request the nonparametric Wilcoxon Signed-Rank test.
Use the Test Mean option repeatedly to test different values. Each time you test the mean, a new Test Mean report appears.

60 Distributions Chapter 3Options for Continuous Variables Basic Analysis
Description of the Test Mean Report
Statistics That Are Calculated for Test Mean
t Test (or z Test) Lists the value of the test statistic and the p-values for the two-sided and one-sided alternatives.
Signed-Rank (Appears only if the Wilcoxon Signed-Rank test is selected.) Lists the value of the Wilcoxon signed-rank statistic followed by p-values for the two-sided and one-sided alternatives. The test uses the Pratt method to address zero values. This is a nonparametric test whose null hypothesis is that the median equals the postulated value. It assumes that the distribution is symmetric. See “Wilcoxon Signed Rank Test” on page 85.
Probability Values
Prob > |t| The probability of obtaining an absolute t value by chance alone that is greater than the observed t value when the population mean is equal to the hypothesized value. This is the p-value for observed significance of the two-tailed t test.
Prob > t The probability of obtaining a t value greater than the computed sample t ratio by chance alone when the population mean is not different from the hypothesized value. This is the p-value for an upper-tailed test.
Prob < t The probability of obtaining a t value less than the computed sample t ratio by chance alone when the population mean is not different from the hypothesized value. This is the p-value for a lower-tailed test.
Descriptions of the Test Mean Options
PValue animation Starts an interactive visual representation of the p-value. Enables you to change the hypothesized mean value while watching how the change affects the p-value.
Power animation Starts an interactive visual representation of power and beta. You can change the hypothesized mean and sample mean while watching how the changes affect power and beta.
Remove Test Removes the mean test.
Test Std Dev
Use the Test Std Dev option to perform a one-sample test for the standard deviation (details in Neter et al. 1990). Use the Test Std Dev option repeatedly to test different values. Each time you test the standard deviation, a new Test Standard Deviation report appears.

Chapter 3 Distributions 61Basic Analysis Options for Continuous Variables
Test Statistic Provides the value of the Chi-square test statistic. See “Standard Deviation Test” on page 87.
Min PValue The probability of obtaining a more extreme Chi-square value by chance alone when the population standard deviation does not differ from the hypothesized value. See “Standard Deviation Test” on page 87.
Prob>ChiSq The probability of obtaining a Chi-square value greater than the computed sample Chi-square by chance alone when the population standard deviation is not different from the hypothesized value. This is the p-value for observed significance of a one-tailed t test.
Prob<ChiSq The probability of obtaining a Chi-square value less than the computed sample Chi-square by chance alone when the population standard deviation is not different from the hypothesized value. This is the p-value for observed significance of a one-tailed t test.
Test Equivalence
The equivalence test assesses whether a population mean is equivalent to a hypothesized value. You must define a threshold difference that is considered equivalent to no difference. The Test Equivalence option uses the Two One-Sided Tests (TOST) approach. Two one-sided t tests are constructed for the null hypotheses that the difference between the true mean and the hypothesized value exceeds the threshold. If both null hypotheses are rejected, this implies that the true difference does not exceed the threshold. You conclude that the mean can be considered practically equivalent to the hypothesized value.
When you select the Test Equivalence option, you specify the Hypothesized Mean, the threshold difference (Difference Considered Practically Zero), and the Confidence Level. The Confidence Level is 1 - alpha, where alpha is the significance level for each one-sided test.
The Test Equivalence report in Figure 3.11 is for the variable BMI in the Diabetes.jmp sample data table. The Hypothesized Mean is 26.5 and the Difference Considered Practically Zero is specified as 0.5.
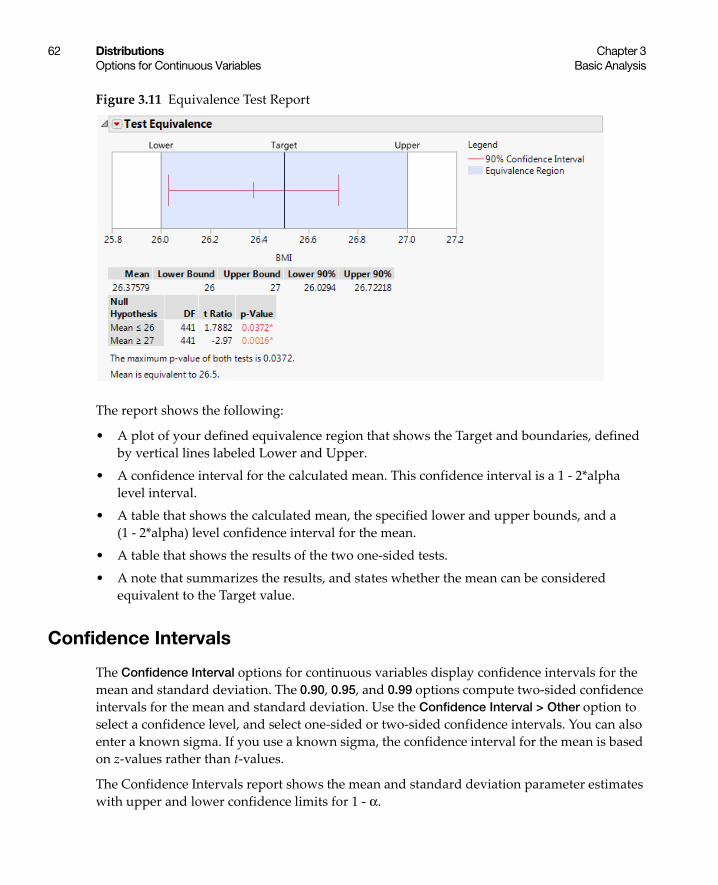
62 Distributions Chapter 3Options for Continuous Variables Basic Analysis
Figure 3.11 Equivalence Test Report
The report shows the following:
• A plot of your defined equivalence region that shows the Target and boundaries, defined by vertical lines labeled Lower and Upper.
• A confidence interval for the calculated mean. This confidence interval is a 1 - 2*alpha level interval.
• A table that shows the calculated mean, the specified lower and upper bounds, and a (1 - 2*alpha) level confidence interval for the mean.
• A table that shows the results of the two one-sided tests.
• A note that summarizes the results, and states whether the mean can be considered equivalent to the Target value.
Confidence Intervals
The Confidence Interval options for continuous variables display confidence intervals for the mean and standard deviation. The 0.90, 0.95, and 0.99 options compute two-sided confidence intervals for the mean and standard deviation. Use the Confidence Interval > Other option to select a confidence level, and select one-sided or two-sided confidence intervals. You can also enter a known sigma. If you use a known sigma, the confidence interval for the mean is based on z-values rather than t-values.
The Confidence Intervals report shows the mean and standard deviation parameter estimates with upper and lower confidence limits for 1 - α.

Chapter 3 Distributions 63Basic Analysis Options for Continuous Variables
Prediction Intervals
Prediction intervals concern a single observation, or the mean and standard deviation of the next randomly selected sample. The calculations assume that the given sample is selected randomly from a normal distribution. Select one-sided or two-sided prediction intervals.
When you select the Prediction Interval option for a variable, the Prediction Intervals window appears. Use the window to specify the confidence level, the number of future samples, and either a one-sided or two-sided limit.
Related Information
• For statistical details, see “Prediction Intervals” on page 88.
• For an example, see “Example of Prediction Intervals” on page 78.
Tolerance Intervals
A tolerance interval contains at least a specified proportion of the population. It is a confidence interval for a specified proportion of the population, not the mean, or standard deviation. Complete discussions of tolerance intervals are found in Meeker et al. (2017) and in Tamhane and Dunlop (2000).
When you select the Tolerance Interval option for a variable, the Tolerance Intervals window appears. Use the window to specify the confidence level, the proportion to cover, a one-sided or two-sided limit, and the method. The two available methods are Assume Normal Distribution and Nonparametric. The Assume Normal Distribution option computes tolerance intervals that are based on the assumption that the sample was randomly selected from a normal distribution. The Nonparametric option computes distribution-free tolerance intervals.
Related Information
• For statistical details, see “Tolerance Intervals” on page 88.
• For an example, see “Example of Tolerance Intervals” on page 79.
Capability Analysis
Capability analysis measures the conformance of a process to defined specification limits. By default, capability is calculated based on a normal distribution, but it can also be calculated for other distributions.

64 Distributions Chapter 3Options for Continuous Variables Basic Analysis
Specification Limits
From a report, to save specification limits to the data table as a column property, select Save > Spec Limits from the red triangle menu next to the name of the analysis variable. When you repeat the capability analysis, the saved specification limits are automatically retrieved.
To save the specification limits and distribution for a capability analysis based on a fitted distribution, select Save Spec Limits from the red triangle menu for the fitted distribution. This option saves a column property for the specification limits and a second one for the distribution that was fit.
Note the following:
• If a column contains a Spec Limits column property, the Capability Analysis report based on the normal distribution is automatically created.
Tip: To add specification limits to several columns at once, see the Statistical Details appendix in the Quality and Process Methods book.
• If a column does not contain specification limits, create the Capability Analysis report by selecting Capability Analysis from the red triangle menu and setting the specification limits.
• If you fit a distribution to your data (using the Continuous or Discrete Fit options in the red triangle menu), create the Capability Analysis report by selecting Spec Limits from the red triangle menu in the “Fit Distributions”report.
Description of the Capability Analysis Window
The Capability Analysis window appears when you select the Capability Analysis option from the red triangle menu next to the name of the analysis variable and the corresponding column does not contain a Spec Limits column property. For an example of using this window, see “Example of Capability Analysis” on page 81.
In the Capability Analysis window, you specify options for the capability analysis, including specification limits, the underlying distribution for the analysis, and the estimation method for sigma.

Chapter 3 Distributions 65Basic Analysis Options for Continuous Variables
Figure 3.12 Capability Analysis Window
Spec Limits Specifies the Lower Spec Limit, the Target, and the Upper Spec Limit for the capability analysis. At least one of these must be a nonmissing value.
<Distribution type> Specifies the distribution that is used when calculating the capability statistics and the percent out of the specification limits. By default, the normal distribution is used.
Long Term Sigma Estimates Sigma using the overall sigma.
Specified Sigma Specifies a fixed value for Sigma. You must specify the fixed value for Sigma in the box to the right of this option.
Moving Range, Range Span Estimates Sigma using a moving range average. You must specify the span of the moving range in the box to the right of this option.
Short Term Sigma, Group by Fixed Subgroup Size Estimates Sigma using the short term sigma. You must specify the number of observations in the subgroups in the box to the right of this option.
Note: If you specify a distribution other than Normal, the selections for sigma are ignored. The fitted distribution report contains a Quantile Sigma report that estimates sigma as the square root of the variance of the fitted distribution. For more information about the relationship between the parameters in the Parameter Estimates report and the expected value and variance of the fitted distributions, see “Continuous Fit Distributions” on page 95 and “Discrete Fit Distributions” on page 102.
For more information about the calculations for the long term sigma, moving range sigma, and the short term sigma, see “Variation Statistics” on page 90.
Description of the Capability Analysis Report
The Capability Analysis report contains a table that contains the specification limits as well as the portion of data that fall outside the specification limits.

66 Distributions Chapter 3Options for Continuous Variables Basic Analysis
Specification and Value Lists the values that you specified for each specification limit and the target.
Portion and % Actual Portion labels describe the numbers in the % Actual column, as follows:
– Below LSL gives the percentage of the data that is below the lower specification limit.
– Above USL gives the percentage of the data that is above the upper specification limit.
– Total Outside gives the total percentage of the data that is either below LSL or above USL.
The Capability Analysis report also contains one or more Sigma reports. Each Sigma report contains a graphical representation of the distribution and specification limits and the following statistics:
Capability and Index Type and value for each process capability index.
Note: By default, the capability indices in the Long Term Sigma report use the Cp labeling that is used in the other sigma reports. To use Ppk labeling in the Long Term Sigma report, select the File > Preferences > Platforms > Distribution > PpK Capability Labeling preference.
Upper CI and Lower CI (Appear only in the Long Term Sigma report.) Confidence interval for each capability index value.
Portion and Percent Portion labels describe the numbers in the Percent column, as follows:
– Below LSL gives the percentage of the fitted distribution that is below the lower specification limit.
– Above USL gives the percentage of the fitted distribution that is above the upper specification limit.
– Total Outside gives the total percentage of the fitted distribution that is either below LSL or above USL.
PPM The PPM (parts per million) value is equivalent to the Percent column multiplied by 10,000.
Sigma Quality Sigma Quality is frequently used in Six Sigma methods, and is also referred to as the process sigma. For more information about the calculation of the Sigma Quality values, see “Sigma Quality Statistics” on page 94.
Description of the Capability Analysis Options
Z Bench (Available only in Capability Analysis reports that are not inside a Fitted <distribution> report.) Shows the values (represented by Index) of the Benchmark Z

Chapter 3 Distributions 67Basic Analysis Options for Continuous Variables
statistics. According to the AIAG Statistical Process Control manual, Z represents the number of standard deviation units from the process average to a value of interest, such as an engineering specification. When used in capability assessment, Z USL is the distance to the upper specification limit and Z LSL is the distance to the lower specification limit. For more information about the calculation of the Benchmark Z values, see “Benchmark Z Statistics” on page 95.
Capability Animation (Available only for capability analyses based on the normal distribution.) Interactively change the specification limits and the process mean to explore the effects on the capability statistics.
Related Information
• For statistical details, see “Capability Analysis” on page 89.
• For an example, see “Example of Capability Analysis” on page 81.
• For the Process Capability platform, see the Process Capability chapter in the Quality and Process Methods book.
Fit Distributions
Use the Continuous Fit or Discrete Fit options to fit a distribution to a continuous variable.
A curve is overlaid on the histogram, and a Parameter Estimates report is added to the report window. A red triangle menu contains additional options. See “Fit Distribution Options” on page 69.
Note: The Life Distribution platform also contains options for distribution fitting that might use different parameterizations and allow for censoring. See the Life Distribution chapter in the Reliability and Survival Methods book.
Continuous Fit
Use the Continuous Fit options to fit the following distributions to a continuous variable.
• The Normal distribution is often used to model measures that are symmetric with most of the values falling in the middle of the curve. JMP uses the unbiased estimate when determining the parameters for the Normal distribution.
• The LogNormal distribution is often used to model values that are constrained by zero but have a few very large values. The LogNormal distribution can be obtained by exponentiating the Normal distribution. JMP uses the maximum likelihood estimation when determining the parameters for the LogNormal distribution.

68 Distributions Chapter 3Options for Continuous Variables Basic Analysis
• The Weibull distribution, Weibull with threshold distribution, and Extreme Value distribution often provide a good model for estimating the length of life, especially for mechanical devices and in biology.
• The Exponential distribution is especially useful for describing events that randomly occur over time, such as survival data. The exponential distribution might also be useful for modeling elapsed time between the occurrence of non-overlapping events. Examples of non-overlapping events include the time between a user’s computer query and response of the server, the arrival of customers at a service desk, or calls coming in at a switchboard.
• The Gamma distribution is bound by zero and has a flexible shape.
• The Beta distribution is useful for modeling the behavior of random variables that are constrained to fall in the interval 0,1. For example, proportions always fall between 0 and 1.
• The Normal Mixtures distribution fits a mixture of normal distributions. This flexible distribution is capable of fitting multi-modal data. You can also fit two or more distributions by selecting the Normal 2 Mixture, Normal 3 Mixture, or Other options.
• The Smooth Curve distribution fits a smooth curve using nonparametric density estimation (kernel density estimation). The smooth curve is overlaid on the histogram and a slider appears beneath the plot. Control the amount of smoothing by changing the kernel standard deviation with the slider. The initial Kernel Std estimate is calculated from the standard deviation of the data.
• The SHASH distribution is also known as the sinh-arcsinh distribution. This distribution is similar to Johnson distributions in that it is a transformation to normality, but the SHASH distribution includes the normal distribution as a special case. This distribution can be symmetric or asymmetric.
• The Johnson Su, Johnson Sb, and Johnson Sl Distributions are useful for its data-fitting capabilities because it supports every possible combination of skewness and kurtosis.
• The Generalized Log (Glog) distribution is useful for fitting data that are rarely normally distributed and often have non-constant variance, like biological assay data.
Comparing All Distributions
The All option fits all applicable continuous distributions to a variable. The Compare Distributions report contains statistics about each fitted distribution. Use the check boxes to show or hide a fit report and overlay curve for the selected distribution. By default, the best fit distribution is selected.
The Show Distribution list is sorted by AICc in ascending order.
If your variable contains negative values, the Show Distribution list does not include those distributions that require data with positive values. Only continuous distributions are fitted by this command. Distributions with threshold parameters, like Beta and Johnson Sb, are not included in the list of possible distributions.

Chapter 3 Distributions 69Basic Analysis Options for Continuous Variables
Related Information
For statistical details, see the following sections:
• “Continuous Fit Distributions” on page 95
• “Fitted Quantiles” on page 105
• “Fit Distribution Options” on page 105
Discrete Fit
The Discrete Fit option is available when all data values are integers. Use the Discrete Fit options to fit a distribution (such as Poisson or Binomial) to a discrete variable. The available distributions are as follows:
• Poisson
• Gamma Poisson
• Binomial
• Beta Binomial
Related Information
For statistical details, see the following sections:
• “Discrete Fit Distributions” on page 102
• “Fitted Quantiles” on page 105
• “Fit Distribution Options” on page 105
Fit Distribution Options
Each fitted distribution report has a red triangle menu that contains additional options.
Diagnostic Plot Creates a quantile or a probability plot. See “Diagnostic Plot” on page 70.
Density Curve Uses the estimated parameters of the distribution to overlay a density curve on the histogram.
Goodness of Fit Computes the goodness of fit test for the fitted distribution. See “Goodness of Fit” on page 71.
Fix Parameters Enables you to fix parameters and re-estimate the non-fixed parameters. An Adequacy LR (likelihood ratio) Test report also appears, which tests your new parameters to determine whether they fit the data.
Quantiles Returns the unscaled and uncentered quantiles for the specific lower probability values that you specify.

70 Distributions Chapter 3Options for Continuous Variables Basic Analysis
Set Spec Limits for K Sigma Use this option when you do not know the specification limits for a process and you want to use its distribution as a guideline for setting specification limits.
Usually, specification limits are derived using engineering considerations. If there are no engineering considerations, and if the data represents a trusted benchmark (well behaved process), then quantiles from a fitted distribution are often used to help set specification limits. See “Fit Distribution Options” on page 105.
Spec Limits Computes generalizations of the standard capability indices, based on the specification limits and target you specify. See “Spec Limits” on page 72.
Save Fitted Quantiles Saves the fitted quantile values as a new column in the current data table. See “Fitted Quantiles” on page 105.
Save Density Formula Creates a new column in the current data table that contains fitted values that have been computed by the density formula. The density formula uses the estimated parameter values.
Save Spec Limits Saves the specification limits as a column property. See “Fit Distribution Options” on page 105.
Save Transformed Creates a new column and saves a formula. The formula can transform the column to normality using the fitted distribution. This option is available only when one of the Johnson distributions or the Glog distribution is fit.
Remove Fit Removes the distribution fit from the report window.
Diagnostic Plot
The Diagnostic Plot option creates a quantile or a probability plot. Depending on the fitted distribution, the plot is in one of the following four formats.
The Fitted Quantiles versus the Data
• Weibull with threshold
• Gamma
• Beta
• Poisson
• GammaPoisson
• Binomial
• BetaBinomial

Chapter 3 Distributions 71Basic Analysis Options for Continuous Variables
The Fitted Probability versus the Data
• Normal
• Normal Mixtures
• Exponential
The Fitted Probability versus the Data on Log Scale
• Weibull
• LogNormal
• Extreme Value
The Fitted Probability versus the Standard Normal Quantile
• Shash
• Johnson Sl
• Johnson Sb
• Johnson Su
• Glog
The following options are available in the Diagnostic Plot red triangle menu:
Rotate Reverses the x- and y-axes.
Confidence Limits Draws Lilliefors 95% confidence limits for the Normal Quantile plot, and 95% equal precision bands with a = 0.001 and b = 0.99 for all other quantile plots (Meeker and Escobar 1998).
Line of Fit Draws the straight diagonal reference line. If a variable fits the selected distribution, the values fall approximately on the reference line.
Median Reference Line Draws a horizontal line at the median of the response.
Goodness of Fit
The Goodness of Fit option computes the goodness of fit test for the fitted distribution. The goodness of fit tests are not Chi-square tests, but are EDF (Empirical Distribution Function) tests. EDF tests offer advantages over the Chi-square tests, including improved power and invariance with respect to histogram midpoints.
• For Normal distributions, the Shapiro-Wilk test for normality is reported when the sample size is less than or equal to 2000. The KSL test is computed for samples that are greater than 2000.
• For discrete distributions that have sample sizes less than or equal to 30, the Goodness of Fit test is formed using two one-sided exact Kolmogorov tests combined to form a

72 Distributions Chapter 3Options for Continuous Variables Basic Analysis
near-exact test. See Conover (1972). For sample sizes greater than 30, a Pearson Chi-squared goodness of fit test is performed.
Related Information
• For statistical details, see “Fit Distribution Options” on page 105.
Spec Limits
The Spec Limits option opens a window that enables you to enter specification limits and a target. Then generalizations of the standard capability indices are computed. Note that for the normal distribution, 3σ is both the distance from the lower 0.135 percentile to median (or mean) and the distance from the median (or mean) to the upper 99.865 percentile. These percentiles are estimated from the fitted distribution, and the appropriate percentile-to-median distances are substituted for 3σ in the standard formulas.
Related Information
• For statistical details, see “Fit Distribution Options” on page 105.
Save Options for Continuous Variables
Use the Save menu options to save information about continuous variables. Each Save option generates a new column in the current data table. The new column is named by appending the variable name (denoted <colname> in the following definitions) to the Save command name. See Table 3.1.
Select the Save options repeatedly to save the same information multiple times under different circumstances, such as before and after combining histogram bars. If you use a Save option multiple times, the column name is numbered (name1, name2, and so on) to ensure unique column names.
Table 3.1 Descriptions of Save Options
Option Column Added to Data Table
Description
Level Numbers Level <colname>
The level number of each observation corresponds to the histogram bar that contains the observation. The histogram bars are numbered from low to high, beginning with 1.
Note: To maintain source information, value labels are added to the new column, but they are turned off by default.

Chapter 3 Distributions 73Basic Analysis Options for Continuous Variables
Level Midpoints Midpoint <colname>
The midpoint value for each observation is computed by adding half the level width to the lower level bound.
Note: To maintain source information, value labels are added to the new column, but they are turned off by default.
Ranks Ranked <colname>
Provides a ranking for each of the corresponding column’s values starting at 1. Duplicate response values are assigned consecutive ranks in order of their occurrence in the data table.
Ranks averaged RankAvgd <colname>
If a value is unique, then the averaged rank is the same as the rank. If a value occurs k times, the average rank is computed as the sum of the value’s ranks divided by k.
Prob Scores Prob <colname>
For N nonmissing scores, the probability score of a value is computed as the averaged rank of that value divided by N + 1. This column is similar to the empirical cumulative distribution function.
Normal Quantiles N-Quantile <colname>
Saves the Normal quantiles. See “Normal Quantile Plot” on page 84.
Standardized Std <colname> Saves standardized values. See “Saving Standardized Data” on page 87.
Centered Centered <colname>
Saves values for centering on zero.
Robust Standardized
Robust Std <colname>
Saves a column that contains the response value centered around the robust mean and standardized using the robust standard deviation.
Robust Centered Robust Centered <colname>
Saves a column that contains the response value centered around the robust mean.
Table 3.1 Descriptions of Save Options (Continued)
Option Column Added to Data Table
Description

74 Distributions Chapter 3Additional Examples of the Distribution Platform Basic Analysis
Additional Examples of the Distribution Platform
• “Example of Selecting Data in Multiple Histograms”• “Example Using a By Variable”• “Examples of the Test Probabilities Option”• “Example of Prediction Intervals”• “Example of Tolerance Intervals”• “Example of Capability Analysis”
Example of Selecting Data in Multiple Histograms
1. Select Help > Sample Data Library and open Companies.jmp.
2. Select Analyze > Distribution.
3. Select Type and Size Co and click Y, Columns.
4. Click OK.
You want to see the type distribution of companies that are small.
5. Click on the bar next to small.
You can see that there are more small computer companies than there are pharmaceutical companies. To broaden your selection, add medium companies.
6. Hold down the Shift key. In the Size Co histogram, click on the bar next to medium.
You can see the type distribution of small and medium sized companies. See Figure 3.13 at left. To narrow your selection, you want to see the small and medium pharmaceutical companies only.
Spec Limits (none) Stores the specification limits applied in a capability analysis as a column property of the corresponding column in the current data table. Automatically retrieves and displays the specification limits when you repeat the capability analysis.
Script to Log (none) Prints the script to the log window. Run the script to recreate the analysis.
Table 3.1 Descriptions of Save Options (Continued)
Option Column Added to Data Table
Description

Chapter 3 Distributions 75Basic Analysis Additional Examples of the Distribution Platform
7. Hold down the Control and Shift keys (on Windows) or the Command and Shift keys (on Macintosh). In the Type histogram, click in the Computer bar to deselect it.
You can see how many of the small and medium companies are pharmaceutical companies. See Figure 3.13 at right.
Figure 3.13 Selecting Data in Multiple Histograms
Example Using a By Variable
1. Select Help > Sample Data Library and open Lipid Data.jmp.
2. Select Analyze > Distribution.
3. Select Cholesterol and click Y, Columns.
4. Select Gender and click By.
This results in a separate analysis for each level of Gender (female and male).
5. Click OK.
Change the orientation of the histograms and the reports.
6. From the red triangle next to Distributions, select Stack.
Add a smooth curve to both histograms.
7. Hold down the Ctrl key. From the red triangle next to Cholesterol, select Continous Fit > Smooth Curve.
Broaden the selection using the Shift key.
Narrow the selection using Control + Shift (Windows) or Command + Shift (Macintosh).

76 Distributions Chapter 3Additional Examples of the Distribution Platform Basic Analysis
Figure 3.14 Separate Distributions by Gender
Examples of the Test Probabilities Option
Initiate a test probability report for a variable with more than two levels:
1. Select Help > Sample Data Library and open VA Lung Cancer.jmp.
2. Select Analyze > Distribution.
3. Select Cell Type and click Y, Columns.
4. Click OK.
5. From the red triangle menu next to Cell Type, select Test Probabilities.
See Figure 3.15 at left.
Initiate a test probability report for a variable with exactly two levels:
1. Select Help > Sample Data Library and open Penicillin.jmp.
2. Select Analyze > Distribution.
3. Select Response and click Y, Columns.
4. Click OK.
5. From the red triangle menu next to Response, select Test Probabilities.

Chapter 3 Distributions 77Basic Analysis Additional Examples of the Distribution Platform
See Figure 3.15 at right.
Figure 3.15 Examples of Test Probabilities Options
Example of Generating the Test Probabilities Report
To generate a test probabilities report for a variable with more than two levels:
1. Refer to Figure 3.15 at left. Type 0.25 in all four Hypoth Prob fields.
2. Click the Fix hypothesized values, rescale omitted button.
3. Click Done.
Likelihood Ratio and Pearson Chi-square tests are calculated. See Figure 3.16 at left.
To generate a test probabilities report for a variable with exactly two levels:
1. Refer to Figure 3.15 at right. Type 0.5 in both Hypoth Prob fields.
2. Click the probability less than hypothesized value button.
3. Click Done.
Exact probabilities are calculated for the binomial test. See Figure 3.16 at right.
report options for a variable with exactly two levels
report options for a variable with more than two levels

78 Distributions Chapter 3Additional Examples of the Distribution Platform Basic Analysis
Figure 3.16 Examples of Test Probabilities Reports
Example of Prediction Intervals
Suppose you are interested in computing prediction intervals for the next 10 observations of ozone level.
1. Select Help > Sample Data Library and open Cities.jmp.
2. Select Analyze > Distribution.
3. Select OZONE and click Y, Columns.
4. Click OK.
5. From the red triangle next to OZONE, select Prediction Interval.

Chapter 3 Distributions 79Basic Analysis Additional Examples of the Distribution Platform
Figure 3.17 The Prediction Intervals Window
6. In the Prediction Intervals window, type 10 next to Enter number of future samples.
7. Click OK.
Figure 3.18 Example of a Prediction Interval Report
In this example, you can be 95% confident about the following:
• Each of the next 10 observations will be between 0.013755 and 0.279995.
• The mean of the next 10 observations will be between 0.115596 and 0.178154.
• The standard deviation of the next 10 observations will be between 0.023975 and 0.069276.
Example of Tolerance Intervals
Suppose you want to estimate an interval that contains 90% of ozone level measurements.
1. Select Help > Sample Data Library and open Cities.jmp.

80 Distributions Chapter 3Additional Examples of the Distribution Platform Basic Analysis
2. Select Analyze > Distribution.
3. Select OZONE and click Y, Columns.
4. Click OK.
5. From the red triangle menu next to OZONE, select Tolerance Interval.
Figure 3.19 The Tolerance Intervals Window
6. Keep the default selections, and click OK.
Figure 3.20 Example of a Tolerance Interval Report
In this example, you can be 95% confident that at least 90% of the population lie between 0.057035 and 0.236715, based on the Lower TI (tolerance interval) and Upper TI values.

Chapter 3 Distributions 81Basic Analysis Additional Examples of the Distribution Platform
Example of Capability Analysis
Suppose you want to characterize the acidity of pickles. The lower and upper specification limits are 8 and 17, respectively.
1. Select Help > Sample Data Library and open Quality Control/Pickles.jmp.
2. Select Analyze > Distribution.
3. Select Acid and click Y, Columns.
4. Click OK.
5. From the red triangle menu next to Acid, select Capability Analysis.
6. Type 8 for the Lower Spec Limit.
7. Type 17 for the Upper Spec Limit.
8. Keep the rest of the default selections, and click OK.
9. Click the Acid red triangle and deselect Histogram Options > Vertical.
Figure 3.21 Example of the Capability Analysis Report

82 Distributions Chapter 3Statistical Details for the Distribution Platform Basic Analysis
The specification limits are added to the histogram so that the data can be visually compared to the limits. As you can see, some of the acidity levels are below the lower specification limit, and some are very close to the upper specification limit. The Capability Analysis results are added to the report. The CPK value is 0.510, indicating a process that is not capable, relative to the given specification limits.
Statistical Details for the Distribution Platform
• “Standard Error Bars”• “Quantiles”• “Summary Statistics”• “Normal Quantile Plot”• “Wilcoxon Signed Rank Test”• “Standard Deviation Test”• “Normal Quantiles”• “Saving Standardized Data”• “Prediction Intervals”• “Tolerance Intervals”• “Capability Analysis”• “Continuous Fit Distributions”• “Discrete Fit Distributions”• “Fitted Quantiles”• “Fit Distribution Options”
Standard Error Bars
Standard error bars are calculated using the standard error where pi=ni/n.
Quantiles
This section describes how quantiles are computed.
To compute the pth quantile of n nonmissing values in a column, arrange the n values in ascending order and call these column values y1, y2, ..., yn. Compute the rank number for the pth quantile as p / 100(n + 1).
• If the result is an integer, the pth quantile is that rank’s corresponding value.
npi 1 pi–( )

Chapter 3 Distributions 83Basic Analysis Statistical Details for the Distribution Platform
• If the result is not an integer, the pth quantile is found by interpolation. The pth quantile, denoted qp, is computed as follows:
where:– n is the number of nonmissing values for a variable
– y1, y2, ..., yn represents the ordered values of the variable
– yn+1 is taken to be yn
– i is the integer part and f is the fractional part of (n+1)p.
– (n + 1)p = i + f
For example, suppose a data table has 15 rows and you want to find the 75th and 90th quantile values of a continuous column. After the column is arranged in ascending order, the ranks that contain these quantiles are computed as follows:
and
The value y12 is the 75th quantile. The 90th quantile is interpolated by computing a weighted average of the 14th and 15th ranked values as y90 = 0.6y14 + 0.4y15.
Summary Statistics
This section contains statistical details for specific statistics in the Summary Statistics report.
Mean
The mean is the sum of the nonmissing values divided by the number of nonmissing values. If you assigned a Weight or Freq variable, the mean is computed by JMP as follows:
1. Each column value is multiplied by its corresponding weight or frequency.
2. These values are added and divided by the sum of the weights or frequencies.
qp 1 f–( )yi f( )yi 1++=
75100--------- 15 1+( ) 12= 90
100--------- 15 1+( ) 14.4=

84 Distributions Chapter 3Statistical Details for the Distribution Platform Basic Analysis
Std Dev
The standard deviation measures the spread of a distribution around the mean. It is often denoted as s and is the square root of the sample variance, denoted s2.
Std Err Mean
The standard error mean is computed by dividing the sample standard deviation, s, by the square root of N. In the launch window, if you specified a column for Weight or Freq, then the denominator is the square root of the sum of the weights or frequencies.
Skewness
Skewness is based on the third moment about the mean and is computed as follows:
where
and wi is a weight term (= 1 for equally weighted items).
Kurtosis
Kurtosis is based on the fourth moment about the mean and is computed as follows:
where wi is a weight term (= 1 for equally weighted items). Using this formula, the Normal distribution has a kurtosis of 0. This formula is often referred to as the excess kurtosis.
Normal Quantile Plot
The empirical cumulative probability for each value is computed as follows:
s s2 where =
s2 wi yi yw–( )2
N 1–-------------------------------
i 1=
N
=
yw weighted mean=
wi
32---
zi3 N
N 1–( ) N 2–( )------------------------------------- zi
xi x–s
-------------=
n n 1+( )n 1–( ) n 2–( ) n 3–( )---------------------------------------------------- wi
2 xi x–s
------------- 4 3 n 1–( )2
n 2–( ) n 3–( )----------------------------------–
i 1=
n
riN 1+--------------

Chapter 3 Distributions 85Basic Analysis Statistical Details for the Distribution Platform
where ri is the rank of the ith observation, and N is the number of nonmissing (and nonexcluded) observations.
The normal quantile values are computed as follows:
where Φ is the cumulative probability distribution function for the normal distribution.
These normal quantile values are Van Der Waerden approximations to the order statistics that are expected for the normal distribution.
Wilcoxon Signed Rank Test
The Wilcoxon signed-rank test can be used to test for the median of a single population or to test matched-pairs data for a common median. In the case of matched pairs, the test reduces to testing the single population of paired differences for a median of 0. The test assumes that the underlying population is symmetric.
The Wilcoxon test allows tied values. The test statistic is adjusted for differences of zero using a method suggested by Pratt. See Lehmann and D’Abrera (2006), Pratt (1959), and Cureton (1967).
Testing for the Median of a Single Population
• There are N observations:
X1, X2, ..., XN
• The null hypothesis is:
H0: median = m
• The differences between observations and the hypothesized value m are calculated as follows:
Dj = Xj - m
Testing for the Equality of Two Population Medians with Matched Pairs Data
A special case of the Wilcoxon signed-rank test is applied to matched-pairs data.
• There are N pairs of observations from two populations:
X1, X2, ..., XN and Y1, Y2, ..., YN
• The null hypothesis is:
H0: medianX - Y = 0
• The differences between pairs of observations are calculated as follows:
Φ 1– riN 1+--------------

86 Distributions Chapter 3Statistical Details for the Distribution Platform Basic Analysis
Dj = Xj -Yj
Wilcoxon Signed-Rank Test Statistic
The test statistic is based on the sum of the signed ranks. Signed ranks are defined as follows:
• The absolute values of the differences, , are ranked from smallest to largest.
• The ranks start with the value 1, even if there are differences of zero.
• When there are tied absolute differences, they are assigned the average, or midrank, of the ranks of the observations.
Denote the rank or midrank for a difference by Rj. Define the signed rank for as follows:
• If the difference is positive, the signed rank is Rj.
• If the difference is zero, the signed rank is 0.
• If the difference is negative, the signed rank is -Rj.
The signed-rank statistic is computed as follows:
Define the following:
is the number of signed ranks that equal zero
R+ is the sum of the positive signed ranks
Then the following holds:
Wilcoxon Signed-Rank Test P-Values
For , exact p-values are calculated.
For N > 20, a Student’s t approximation to the statistic defined below is used. Note that a correction for ties is applied. See Iman (1974) and Lehmann and D’Abrera (2006).
Under the null hypothesis, the mean of W is zero. The variance of W is given by the following:
Dj
Dj Dj
DjDjDj
W 12--- signed ranks
j 1=
N
=
d0
W R+ 14--- N N 1+( ) d0 d0 1+( )–[ ]–=
N 20≤
Var W( ) 124------ N N 1+( ) 2N 1+( ) d0 d0 1+( ) 2d0 1+( )– 1
2---·
di di 1+( ) di 1–( )i 0>
·–=

Chapter 3 Distributions 87Basic Analysis Statistical Details for the Distribution Platform
The last summation in the expression for Var(W) is a correction for ties. The notation di for i > 0 represents the number of values in the ith group of nonzero signed ranks. (If there are no ties for a given signed rank, then di = 1 and the summand is 0.)
The statistic t given by the following has an approximate t distribution with N - 1 degrees of freedom:
Standard Deviation Test
Here is the formula for calculating the Test Statistic:
The Test Statistic is distributed as a Chi-square variable with n - 1 degrees of freedom when the population is normal.
The Min PValue is the p-value of the two-tailed test, and is calculated as follows:
2*min(p1,p2)
where p1 is the lower one-tail p-value and p2 is the upper one-tail p-value.
Normal Quantiles
The normal quantile values are computed as follows:
where:
is the cumulative probability distribution function for the normal distribution.
ri is the rank of the ith observation.
N is the number of nonmissing observations.
Saving Standardized Data
The standardized values are computed using the following formula:
t W Var W( )⁄=
n 1–( )s2
σ2----------------------
Φ 1– riN 1+--------------
Φ
X X–SX
--------------

88 Distributions Chapter 3Statistical Details for the Distribution Platform Basic Analysis
where:
X is the original column
is the mean of column X
is the standard deviation of column X
Prediction Intervals
The formulas that JMP uses for computing prediction intervals are as follows:
• For m future observations:
for
• For the mean of m future observations:
for .
• For the standard deviation of m future observations:
for
where m = number of future observations, and n = number of points in current analysis sample.
• The one-sided intervals are formed by using 1-α in the quantile functions.
For more information, see Meeker et al. (2017, ch. 4).
Tolerance Intervals
This section contains statistical details for one-sided and two-sided tolerance intervals.
Normal Distribution-Based Intervals
One-Sided Interval
The one-sided interval is computed as follows:
Upper Limit =
Lower Limit =
X
SX
y˜m
ym,[ ] X t 1 α 2m⁄– n 1–;( ) 1 1n---+× s×±= m 1≥
Yl Yu,[ ] X t 1 α 2⁄ n 1–,–( )1m---- 1
n---+ s××±= m 1≥
sl su,[ ] s 1F 1 α 2⁄ n 1 m 1–,–( );–( )---------------------------------------------------------× s F 1 α 2⁄ m 1 n 1–,–( );–( )×,= m 2≥
x g's+
x g's–

Chapter 3 Distributions 89Basic Analysis Statistical Details for the Distribution Platform
where:
=
t is the quantile from the non-central t-distribution.
is the standard normal quantile.
Two-Sided Interval
The two-sided interval is computed as follows:
where
s = standard deviation and is a constant.
To determine g, consider the fraction of the population captured by the tolerance interval. Tamhane and Dunlop (2000) give this fraction as follows:
where Φ denotes the standard normal c.d.f. (cumulative distribution function). Therefore, g solves the following equation:
where 1-γ is the fraction of all future observations contained in the tolerance interval.
More information is given in Tables J.1a, J.1b, J.6a, and J.6b of Meeker et al. (2017).
Nonparametric Intervals
For more information about the computation of the nonparametric tolerance intervals, see Meeker et al. (2017, sec. 5.3).
Capability Analysis
This section contains details about the computation of the statistics in the Capability Analysis report.
g' t 1 α– n 1– Φ 1– p( ) n⋅, ,( ) n⁄
Φ 1–
TpLTpU,[ ] x g 1 α 2⁄ pL n,;–( )s – x g 1 α 2⁄ pU n,;–( )+ s,[ ]=
g 1 α 2⁄ p ,n;–( )
Φ x gs μ–+σ
------------------------ Φ x gs– μ–
σ------------------------ –
P Φ X gs μ–+σ
------------------------- Φ X gs– μ–
σ------------------------- – 1 γ–≥
1 α–=

90 Distributions Chapter 3Statistical Details for the Distribution Platform Basic Analysis
Variation Statistics
All capability analyses use the same formulas. Options differ in how sigma (σ) is computed:
Long-term Uses the overall sigma. This option is used for statistics, and computes sigma as follows:
Note: By default, the capability indices in the Long Term Sigma report use the Cp labeling that is used in the other sigma reports. To use Ppk labeling in the Long Term Sigma report, select the File > Preferences > Platforms > Distribution > PpK Capability Labeling preference.
Specified Sigma Enables you to enter a specific, known sigma for computing capability indices. Sigma is user-specified, and is therefore not computed.
Moving Range Enables you to enter a moving range span to compute sigma as follows:
where:
is the average of the moving ranges.
d2(n) is the expected value of the range of n independent normally distributed variables with unit standard deviation.
Short Term Sigma, Group by Fixed Subgroup Size If r is the number of subgroups of size nj and each ith subgroup is defined by the order of the data, sigma is computed as follows:
where
This formula is commonly referred to as the Root Mean Square Error, or RMSE.
Quantile Sigma (Appears only for capability analyses based on fitted distributions.) Uses the square root of the variance of the fitted distribution. For more information about the relationship between the parameters in the Parameter Estimates report and the expected value and variance of the fitted distributions, see “Continuous Fit Distributions” on page 95 and “Discrete Fit Distributions” on page 102.
Ppk
σxi x–( )2
n 1–---------------------
i 1=
n
=
σ Rd2 n( )--------------=
R
σ 1r---
Xij Xi–( )2
nj 1–---------------------------
j 1=
nj
i 1=
r
= Xi1nj----- Xij
j 1=
nj
=

Chapter 3 Distributions 91Basic Analysis Statistical Details for the Distribution Platform
Capability Indices for Normal Distributions
This section provides details about the calculation of capability indices for normal data.
For a process characteristic with mean μ and standard deviation σ, the population-based capability indices are defined as follows.
Cp =
Cpl =
Cpu =
Cpk =
Cpm =
where:
LSL is the lower specification limit.
USL is the upper specification limit.
T is the target value.
For sample-based capability indices, the parameters are replaced by their estimates. The estimate for σ uses the method that you specified in the Capability Analysis window. See “Variation Statistics” on page 90.
If either of the specification limits is missing, the capability indices containing the missing specification limit are reported as missing.
Tip: A capability index of 1.33 is often considered to be the minimum value that is acceptable. For a normal distribution, a capability index of 1.33 corresponds to an expected number of nonconforming units of about 6 per 100,000.
Confidence Intervals for Capability Indices
Note: Confidence intervals for capability indices appear only in the Long Term Sigma report.
The 100(1 - α)% confidence interval for Cp is calculated as follows:
USL LSL–6σ
----------------------------
μ LSL–3σ
--------------------
USL μ–3σ
---------------------
min( Cpl, Cpu )
min T LSL– USL T )–,(
3σ 1 T μ–σ
------------- 2
+
-------------------------------------------------------------

92 Distributions Chapter 3Statistical Details for the Distribution Platform Basic Analysis
where:
is the estimated value for Cp.
is the (α/2)th quantile of a chi-square distribution with n - 1 degrees of freedom.
n is the number of observations.
The 100(1 - α)% confidence interval for Cpk is calculated as follows:
where:
is the estimated value for Cpk.
is the (1 - α/2)th quantile of a standard normal distribution.
n is the number of observations.
The 100(1 - α)% confidence interval for CPM is calculated as follows:
where:
is the estimated value for CPM.
is the (α/2)th quantile of a chi-square distribution with γ degrees of freedom.
n is the number of observations.
is the mean of the observations.
CPχα 2⁄ n 1–,
2
n 1–--------------------------- CP
χ1 α 2⁄– n 1–,2
n 1–-----------------------------------,
CP
χα 2⁄ n 1–,2
Cpk 1 Φ 1–1 α 2⁄–
19nCpk
2----------------- 1
2 n 1–( )--------------------+– Cpk 1 Φ 1–
1 α 2⁄–1
9nCpk2
----------------- 12 n 1–( )--------------------++,
Cpk
Φ 1–1 α 2⁄–
CPMˆχα 2⁄ γ,
2
γ------------------ CPMˆ
χ1 α 2⁄– γ,2
γ--------------------------,
CPMˆ
χα 2⁄ γ,2
γn 1 x T–
s------------ 2+
2
1 2 x T–s
------------ 2
+------------------------------------------=
x

Chapter 3 Distributions 93Basic Analysis Statistical Details for the Distribution Platform
T is the target value.s is the long-term sigma estimate.
Note: The confidence interval for CPM is computed only when the target value is centered between the lower and upper specification limits.
Lower and upper confidence limits for CPL and CPU are computed using the method of Chou et al. (1990).
The 100(1 - α)% confidence limits for CPL (denoted by CPLL and CPLU) satisfy the following equations:
where
where
where:
tn-1(δ) has a non-central t-distribution with n - 1 degrees of freedom and noncentrality parameter δ.
is the estimated value for Cpl.
The 100(1 - α)% confidence limits for CPU (denoted by CPUL and CPUU) satisfy the following equations:
where
where
where:
tn-1(δ) has a non-central t-distribution with n - 1 degrees of freedom and noncentrality parameter δ.
is the estimated value for Cpu.
Capability Indices for Nonnormal Distributions
This section describes how capability indices are calculated for nonnormal distributions. These generalized capability indices are defined as follows:
Cp =
Pr tn 1– δL( ) 3Cpl n≥[ ] α 2⁄= δL 3CPLL n=
Pr tn 1– δU( ) 3Cpl n≤[ ] α 2⁄= δU 3CPLU n=
Cpl
Pr tn 1– δL( ) 3Cpu n≥[ ] α 2⁄= δL 3CPUL n=
Pr tn 1– δU( ) 3Cpu n≤[ ] α 2⁄= δU 3CPUU n=
Cpu
USL LSL–P0.99865 P0.00135–------------------------------------------------

94 Distributions Chapter 3Statistical Details for the Distribution Platform Basic Analysis
Cpk =
Cpm =
Cpl =
Cpu =
where:
LSL is the lower specification limit.
USL is the upper specification limit.
T is the target value.
Pα is the α*100th percentile of the fitted distribution.
For the calculation of Cpm, μ and σ are estimated using the expected value and square root of the variance of the fitted distribution. For more information about the relationship between the parameters in the Parameter Estimates report and the expected value and variance of the fitted distributions, see “Continuous Fit Distributions” on page 95 and “Discrete Fit Distributions” on page 102.
Sigma Quality Statistics
The Sigma Quality statistics for each Portion (Below LSL, Above USL, and Total Outside) are calculated as follows:
where:
Pct is the value in the Percent column of the report.
is the (1 - Pct/100)th quantile of a standard normal distribution.
Note: Even though the Percent Below LSL and Percent Above USL sum to the Percent Total Outside value, the Sigma Quality Below LSL and Sigma Quality Above USL values do not sum to the Sigma Quality Total Outside value. This is because calculating Sigma Quality involves finding normal distribution quantiles, and is therefore not additive.
min Cpl Cpu,( )
min T LSL–P0.5 P0.00135–------------------------------------- USL T–
P0.99865 P0.5–-------------------------------------,
1 μ T–σ
------------- 2
+
----------------------------------------------------------------------------------------------
P0.5 LSL–P0.5 P0.00135–-------------------------------------
USL P0.5–P0.99865 P0.5–-------------------------------------
Sigma Quality Φ 1–1 Pct 100⁄– 1.5+=
Φ 1–1 Pct 100⁄–

Chapter 3 Distributions 95Basic Analysis Statistical Details for the Distribution Platform
Benchmark Z Statistics
Benchmark Z statistics are available only for capability analyses based on the normal distribution. The Benchmark Z statistics are calculated as follows:
Z Bench =
Z LSL = = 3 * Cpl
Z USL = = 3 * Cpu
where:
LSL is the lower specification limit.
USL is the upper specification limit.
μ is the sample mean.
σ is the sample standard deviation.
is the (1 - P(LSL) -P(USL))th quantile of a standard normal distribution.
P(LSL) = Prob(X < LSL) = 1 - Φ(Z LSL).P(USL) = Prob(X > USL) = 1 - Φ(Z USL).Φ is the standard normal cumulative distribution function.
Continuous Fit Distributions
This section contains statistical details for the options in the Continuous Fit menu.
Normal
The Normal fitting option estimates the parameters of the normal distribution. The normal distribution is often used to model measures that are symmetric with most of the values falling in the middle of the curve. Select the Normal fitting for any set of data and test how well a normal distribution fits your data.
The parameters for the normal distribution are as follows:
• μ (the mean) defines the location of the distribution on the x-axis
• σ (standard deviation) defines the dispersion or spread of the distribution
The standard normal distribution occurs when and . The Parameter Estimates table shows estimates of μ and σ, with upper and lower 95% confidence limits.
Φ 1–1 P LSL( )– P USL( )–
μ LSL–σ
--------------------
USL μ–σ
---------------------
Φ 1–1 P LSL( )– P USL( )–
μ 0= σ 1=

96 Distributions Chapter 3Statistical Details for the Distribution Platform Basic Analysis
pdf: for ; ; 0 < σ
E(x) = μ
Var(x) = σ2
LogNormal
The LogNormal fitting option estimates the parameters μ (scale) and σ (shape) for the two-parameter lognormal distribution. A variable Y is lognormal if and only if is normal. The data must be greater than zero.
pdf: for ; ; 0 < σ
E(x) =
Var(x) =
Weibull, Weibull with Threshold, and Extreme Value
The Weibull distribution has different shapes depending on the values of α (scale) and β (shape). It often provides a good model for estimating the length of life, especially for mechanical devices and in biology.
The pdf for the Weibull and Weibull with Threshold distributions is as follows:
pdf: for α,β > 0;
E(x) =
Var(x) =
where is the Gamma function.
The Weibull option sets the threshold parameter (θ) to zero. The Weibull with Threshold option, estimates the threshold parameter (θ) using the value of the minimum observation and
1
2πσ2----------------- x μ–( )2
2σ2--------------------–exp ∞– x ∞< < ∞– μ ∞< <
X Y( )ln=
1σ 2π--------------
x( )log μ–( )– 2
2σ2-------------------------------------exp
x----------------------------------------------------- 0 x≤ ∞– μ ∞< <
μ σ2 2⁄+( )exp
2 μ σ2+( )( )exp 2μ σ2+( )exp–
βα--- x θ–
α------------ β 1– x θ–
α------------ β–exp θ x<
θ αΓ 1 1β---+
+
α2 Γ 1 2β---+
Γ2 1 1β---+
–
Γ . )(

Chapter 3 Distributions 97Basic Analysis Statistical Details for the Distribution Platform
estimates α and β using the rest of the observations. If you know what the threshold should be, set it by using the Fix Parameters option. See “Fit Distribution Options” on page 69.
Note: The Distribution platform uses a different estimation technique for the threshold parameter in the Weibull with Threshold distribution than does the Life Distribution platform. The Life Distribution estimation method is recommended for fitting this distribution. See the Life Distribution chapter in the Reliability and Survival Methods book.
The Extreme Value distribution is equivalent to a two-parameter Weibull (α, β) distribution reparameterized as δ = 1 / β and λ = ln(α).
Exponential
The exponential distribution is especially useful for describing events that randomly occur over time, such as survival data. The exponential distribution might also be useful for modeling elapsed time between the occurrence of non-overlapping events. Examples of non-overlapping events include the time between a user’s computer query and response of the server, the arrival of customers at a service desk, or calls coming in at a switchboard.
The Exponential distribution is a special case of the two-parameter Weibull when β = 1 and α = σ, and also a special case of the Gamma distribution when α = 1.
pdf: for 0 < σ;
E(x) = σ
Var(x) = σ2
Devore (1995) notes that an exponential distribution is memoryless. Memoryless means that if you check a component after t hours and it is still working, the distribution of additional lifetime (the conditional probability of additional life given that the component has lived until t) is the same as the original distribution.
Gamma
The Gamma fitting option estimates the gamma distribution parameters, α > 0 and σ > 0. The parameter α, called alpha in the fitted gamma report, describes shape or curvature. The parameter σ, called sigma, is the scale parameter of the distribution. A third parameter, θ, called the Threshold, is the lower endpoint parameter. It is set to zero by default, unless there are negative values. You can also set its value by using the Fix Parameters option. See “Fit Distribution Options” on page 69.
pdf: for ; 0 < α,σ
1σ--- x σ⁄–( )exp 0 x≤
1Γ α( )σα-------------------- x θ–( )α 1– x θ–( )– σ⁄( )exp θ x≤

98 Distributions Chapter 3Statistical Details for the Distribution Platform Basic Analysis
E(x) = ασ + θ
Var(x) = ασ2
• The standard gamma distribution has σ = 1. Sigma is called the scale parameter because values other than 1 stretch or compress the distribution along the x-axis.
• The Chi-square distribution occurs when σ = 2, α = ν/2, and θ = 0.
• The exponential distribution is the family of gamma curves that occur when α = 1 and θ = 0.
The standard gamma density function is strictly decreasing when . When , the density function begins at zero, increases to a maximum, and then decreases.
Beta
The standard beta distribution is useful for modeling the behavior of random variables that are constrained to fall in the interval 0,1. For example, proportions always fall between 0 and 1. The Beta fitting option estimates two shape parameters, α > 0 and β > 0. There are also θ and σ, which are used to define the lower threshold as θ, and the upper threshold as θ + σ. The beta distribution has values for the interval only. The θ is estimated as the minimum value, and σ is estimated as the range. The standard beta distribution occurs when θ = 0 and σ = 1.
Set parameters to fixed values by using the Fix Parameters option. The upper threshold must be greater than or equal to the maximum data value, and the lower threshold must be less than or equal to the minimum data value. For details about the Fix Parameters option, see “Fit Distribution Options” on page 69.
pdf: for ; 0 < σ,α,β
E(x) =
Var(x) =
where is the Beta function.
Normal Mixtures
The Normal Mixtures option fits a mixture of normal distributions. This flexible distribution is capable of fitting multi-modal data.
χ ν( )2
α 1≤ α 1>
θ x θ σ+( )≤ ≤
1B α β,( )σα β 1–+------------------------------------------- x θ–( )α 1– θ σ x–+( )β 1– θ x θ σ+≤ ≤
θ σ αα β+-------------+
σ2αβα β+( )2 α β 1+ +( )-------------------------------------------------
B . )(

Chapter 3 Distributions 99Basic Analysis Statistical Details for the Distribution Platform
Fit a mixture of two or three normal distributions by selecting the Normal 2 Mixture or Normal 3 Mixture options. Alternatively, you can fit a mixture of k normal distributions by selecting the Other option. A separate mean, standard deviation, and proportion of the whole is estimated for each group.
pdf:
E(x) =
Var(x) =
where μi, σi, and πi are the respective mean, standard deviation, and proportion for the ith
group, and is the standard normal pdf.
Smooth Curve
The Smooth Curve option fits a smooth curve using nonparametric density estimation (kernel density estimation). The smooth curve is overlaid on the histogram and a slider appears beneath the plot. Control the amount of smoothing by changing the kernel standard deviation with the slider. The initial Kernel Std estimate is calculated from the standard deviation of the data.
SHASH
The SHASH option fits a sinh-arcsinh (SHASH) distribution. The SHASH distribution is based on a transformation of the normal distribution and includes the normal distribution as a special case. It can be symmetric or asymmetric. The shape is determined by the two shape parameters, γ and δ. For more information about the SHASH distribution, see Jones and Pewsey (2009).
Note: When γ = 0 and δ = 1, the SHASH distribution is equivalent to the normal distribution with location θ and scale σ.
Johnson Su, Johnson Sb, Johnson Sl
The Johnson system of distributions contains three distributions that are all based on a transformed normal distribution. These three distributions are the following:
πiσi----- φ
x μi–σi
--------------
i 1=
k
πii 1=
k μi
πi μi2 σi
2+( )i 1=
k πi
i 1=
k μi
2
–
φ . )(

100 Distributions Chapter 3Statistical Details for the Distribution Platform Basic Analysis
• Johnson Su, which is unbounded.
• Johnson Sb, which has bounds on both tails. The bounds are defined by parameters that can be estimated.
• Johnson Sl, which is bounded in one tail. The bound is defined by a parameter that can be estimated. The Johnson Sl family contains the family of lognormal distributions.
The S refers to system, the subscript of the range. Although we implement a different method, information about selection criteria for a particular Johnson system can be found in Slifker and Shapiro (1980).
Johnson distributions are popular because of their flexibility. In particular, the Johnson distribution system is noted for its data-fitting capabilities because it supports every possible combination of skewness and kurtosis.
If Z is a standard normal variate, then the system is defined as follows:
where, for the Johnson Su:
where, for the Johnson Sb:
and for the Johnson Sl, where .
Johnson Su
pdf: for ; 0 < θ,δ
Z γ δf Y( )+=
f Y( ) Y 1 Y2++ ln Y1–sinh= =
Y X θ–σ
-------------= ∞– X ∞< <
f Y( ) Y1 Y–------------- ln=
Y X θ–σ
-------------= θ X θ σ+< <
σ 1±=
f Y( ) Y( )ln=
Y X θ–σ
-------------=θ X ∞ if σ< < 1=∞– X θ if σ< < 1–=
δσ--- 1 x θ–
σ------------ 2
+1– 2⁄
φ γ δ x θ–σ
------------ sinh 1–+ ∞– x θ γ, , ∞< <

Chapter 3 Distributions 101Basic Analysis Statistical Details for the Distribution Platform
Johnson Sb
pdf: for θ < x < θ+σ; 0 < σ
Johnson Sl
pdf: for θ < x if σ = 1; θ > x if σ = -1
where is the standard normal pdf.
Note the following:
• Parameter estimates may be different between machines due to the order of operations and machine precision.
• The parameter confidence intervals are hidden in the default report. Parameter confidence intervals are not very meaningful for Johnson distributions, because they are transformations to normality. To show parameter confidence intervals, right-click in the report and select Columns > Lower 95% and Upper 95%.
Generalized Log (Glog)
This distribution is useful for fitting data that are rarely normally distributed and often have non-constant variance, like biological assay data. The Glog distribution is described with the parameters μ (location), σ (scale), and λ (shape).
pdf:
for ; 0 < σ;
The Glog distribution is a transformation to normality, and comes from the following relationship:
If z = ~ N(0,1), then x ~ Glog(μ,σ,λ).
When λ = 0, the Glog reduces to the LogNormal (μ,σ).
φ γ δ x θ–σ x θ–( )–-------------------------- ln+ δσ
x θ–( ) σ x θ–( )–( )------------------------------------------------
δx θ–---------------φ γ δ x θ–
σ------------ ln+
φ . )(
φ 1σ--- x x2 λ2++
2-------------------------------- log μ–
x x2 λ2++
σ x2 λ2 x x2 λ2++ +( )------------------------------------------------------------
0 λ≤ ∞– μ ∞< <
1σ--- x x2 λ2++
2-------------------------------- log μ–

102 Distributions Chapter 3Statistical Details for the Distribution Platform Basic Analysis
Note: The parameter confidence intervals are hidden in the default report. Parameter confidence intervals are not very meaningful for the GLog distribution, because it is a transformation to normality. To show parameter confidence intervals, right-click in the report and select Columns > Lower 95% and Upper 95%.
All
In the Compare Distributions report, the ShowDistribution list is sorted by AICc in ascending order.
The formula for AICc is as follows:
AICc =
where:
– logL is the log-likelihood.
– n is the sample size.
– ν is the number of parameters.
If the column contains negative values, the Distribution list does not include those distributions that require data with positive values. Only continuous distributions are listed. Distributions with threshold parameters, such as Beta and Johnson Sb, are not included in the list of possible distributions.
Discrete Fit Distributions
This section contains statistical details for the options in the Discrete Fit menu.
Poisson
The Poisson distribution has a single scale parameter λ > 0.
pmf: for ; x = 0,1,2,...
E(x) = λVar(x) = λ
Since the Poisson distribution is a discrete distribution, the overlaid curve is a step function, with jumps that occur at every integer.
-2logL 2ν 2ν ν 1+( )n ν 1+( )–--------------------------+ +
e λ– λx
x!--------------- 0 λ ∞<≤

Chapter 3 Distributions 103Basic Analysis Statistical Details for the Distribution Platform
Gamma Poisson
This distribution is useful when the data is a combination of several Poisson(μ) distributions and each Poisson(μ) distribution has a different μ. One example is the overall number of accidents combined from multiple intersections, when the mean number of accidents (μ) varies between the intersections.
The Gamma Poisson distribution results from assuming that x|μ follows a Poisson distribution and μ follows a Gamma(α,τ). The Gamma Poisson has parameters λ = ατ and σ = τ+1. The parameter σ is a dispersion parameter. If σ > 1, there is over dispersion, meaning there is more variation in x than explained by the Poisson alone. If σ = 1, x reduces to Poisson(λ).
pmf: for ; ; x = 0,1,2,...
E(x) = λVar(x) = λσ
where is the Gamma function.
Remember that x|μ ~ Poisson(μ), while μ~ Gamma(α,τ). The platform estimates λ = ατ and σ = τ+1. To obtain estimates for α and τ, use the following formulas:
If the estimate of σ is 1, the formulas do not work. In that case, the Gamma Poisson has reduced to the Poisson(λ), and is the estimate of λ.
If the estimate for α is an integer, the Gamma Poisson is equivalent to a Negative Binomial with the following pmf:
for
with r = α and (1-p)/p = τ.
Run demoGammaPoisson.jsl in the JMP Samples/Scripts folder to compare a Gamma Poisson distribution with parameters λ and σ to a Poisson distribution with parameter λ.
Γ x λσ 1–------------+
Γ x 1+( )Γ λσ 1–------------
------------------------------------------- σ 1–σ
------------ x
σ
λσ 1–------------–
0 λ< 1 σ≤
Γ . )(
τ σ 1–=
α λ
τ---=
λ
p y( ) y r 1–+y
pr 1 p–( )y= 0 y≤

104 Distributions Chapter 3Statistical Details for the Distribution Platform Basic Analysis
Binomial
The Binomial option accepts data in two formats: a constant sample size, or a column containing sample sizes.
pmf: for ; x = 0,1,2,...,n
E(x) = npVar(x) = np(1-p)where n is the number of independent trials.
Note: The confidence interval for the binomial parameter is a Score interval. See Agresti and Coull (1998).
Beta Binomial
This distribution is useful when the data is a combination of several Binomial(p) distributions and each Binomial(p) distribution has a different p. One example is the overall number of defects combined from multiple manufacturing lines, when the mean number of defects (p) varies between the lines.
The Beta Binomial distribution results from assuming that x|π follows a Binomial(n,π) distribution and π follows a Beta(α,β). The Beta Binomial has parameters p = α/(α+β) and δ = 1/(α+β+1). The parameter δ is a dispersion parameter. When δ > 0, there is over dispersion, meaning there is more variation in x than explained by the Binomial alone. When δ < 0, there is under dispersion. When δ = 0, x is distributed as Binomial(n,p). The Beta Binomial exists only when .
pmf:
for ; ; x = 0,1,2,...,n
E(x) = npVar(x) = np(1-p)[1+(n-1)δ]
where is the Gamma function.
Remember that x|π ~ Binomial(n,π), while π ~ Beta(α,β). The parameters p = α/(α+β) and δ = 1/(α+β+1) are estimated by the platform. To obtain estimates of α and β, use the following formulas:
nx px 1 p–( )n x– 0 p 1≤ ≤
n 2≥
nx
Γ 1δ--- 1– Γ x p 1
δ--- 1– + Γ n x– 1 p–( ) 1
δ--- 1– +
Γ p 1δ--- 1– Γ 1 p–( ) 1
δ--- 1– Γ n 1
δ--- 1–+
-----------------------------------------------------------------------------------------------------------------------------
0 p 1≤ ≤ max pn p– 1–---------------------– 1 p–
n 2– p+---------------------–( , ) δ 1≤ ≤
Γ . )(

Chapter 3 Distributions 105Basic Analysis Statistical Details for the Distribution Platform
If the estimate of δ is 0, the formulas do not work. In that case, the Beta Binomial has reduced to the Binomial(n,p), and is the estimate of p.
The confidence intervals for the Beta Binomial parameters are profile likelihood intervals.
Run demoBetaBinomial.jsl in the JMP Samples/Scripts folder to compare a Beta Binomial distribution with dispersion parameter δ to a Binomial distribution with parameters p and n = 20.
Fitted Quantiles
The fitted quantiles in the Diagnostic Plot and the fitted quantiles saved with the Save Fitted Quantiles command are formed using the following method:
1. The data are sorted and ranked. Ties are assigned different ranks.
2. Compute the p[i] = rank[i]/(n+1).
3. Compute the quantile[i] = Quantiled(p[i]) where Quantiled is the quantile function for the specific fitted distribution, and i = 1,2,...,n.
Fit Distribution Options
This section describes Goodness of Fit tests for fitting distributions and statistical details for specification limits pertaining to fitted distributions.
Goodness of Fit
α p 1 δ–δ
----------- =
β 1 p–( ) 1 δ–δ
----------- =
p
Table 3.2 Descriptions of JMP Goodness of Fit Tests
Distribution Parameters Goodness of Fit Test
Normala μ and σ are unknown Shapiro-Wilk (for n ≤ 2000) Kolmogorov-Smirnov-Lillefors (for n > 2000)
μ and σ are both known Kolmogorov-Smirnov-Lillefors
either μ or σ is known (none)

106 Distributions Chapter 3Statistical Details for the Distribution Platform Basic Analysis
Set Spec Limits for K Sigma
Type a K value and select one-sided or two-sided for your capability analysis. Tail probabilities corresponding to K standard deviations are computed from the Normal distribution. The probabilities are converted to quantiles for the specific distribution that you have fitted. The resulting quantiles are used for specification limits in the capability analysis. This option is similar to the Quantiles option, but you provide K instead of probabilities. K corresponds to the number of standard deviations that the specification limits are away from the mean.
LogNormal μ and σ are known or unknown
Kolmogorovʹs D
Weibull α and β known or unknown
Cramér-von Mises W2
Weibull with threshold α, β and θ known or unknown
Cramér-von Mises W2
Extreme Value α and β known or unknown
Cramér-von Mises W2
Exponential σ is known or unknown Kolmogorovʹs D
Gamma α and σ are known Cramér-von Mises W2
either α or σ is unknown (none)
Beta α and β are known Kolmogorovʹs D
either α or β is unknown (none)
Binomial ρ is known or unknown and n is known
Kolmogorovʹs D (for n ≤ 30) Pearson χ2 (for n > 30)
Beta Binomial ρ and δ known or unknown
Kolmogorovʹs D (for n ≤ 30) Pearson χ2 (for n > 30)
Poisson λ known or unknown Kolmogorovʹs D (for n ≤ 30) Pearson χ2 (for n > 30)
Gamma Poisson λ or σ known or unknown Kolmogorovʹs D (for n ≤ 30) Pearson χ2 (for n > 30)
a. For the three Johnson distributions and the Glog distribution, the data are transformed toNormal, then the appropriate test of normality is performed.
Table 3.2 Descriptions of JMP Goodness of Fit Tests (Continued)
Distribution Parameters Goodness of Fit Test

Chapter 3 Distributions 107Basic Analysis Statistical Details for the Distribution Platform
For example, for a Normal distribution, where K = 3, the 3 standard deviations below and above the mean correspond to the 0.00135th quantile and 0.99865th quantile, respectively. The lower specification limit is set at the 0.00135th quantile, and the upper specification limit is set at the 0.99865th quantile of the fitted distribution. A capability analysis is returned based on those specification limits.

108 Distributions Chapter 3Statistical Details for the Distribution Platform Basic Analysis

Chapter 4Introduction to Fit Y by X
Examine Relationships Between Two Variables
The Fit Y by X platform analyzes the pair of X and Y variables that you specify, by context, based on modeling type.
Here are the four types of analyses:
• Bivariate fitting
• One-way analysis of variance
• Logistic regression
• Contingency table analysis
Figure 4.1 Examples of Four Types of Analyses
Continuous X Nominal or Ordinal X
Con
tinuo
us Y
Nom
inal
or
Ord
inal
Y
Bivariate Oneway
Logistic Contingency

110 Introduction to Fit Y by X Chapter 4Basic Analysis
ContentsOverview of the Fit Y by X Platform . . . . . . . . . . . . . . . . . . . . . . . . . . . . . . . . . . . . . . . . . . . . . . . 111Launch the Fit Y by X Platform . . . . . . . . . . . . . . . . . . . . . . . . . . . . . . . . . . . . . . . . . . . . . . . . . . . . 111
Launch Specific Analyses from the JMP Starter Window. . . . . . . . . . . . . . . . . . . . . . . . . . . 112

Chapter 4 Introduction to Fit Y by X 111Basic Analysis Overview of the Fit Y by X Platform
Overview of the Fit Y by X Platform
The Fit Y by X platform is a collection of four specific platforms (or types of analyses).
Launch the Fit Y by X Platform
Launch the Fit Y by X platform by selecting Analyze > Fit Y by X.
Figure 4.2 The Fit Y by X Launch Window
Specific Platform
Modeling Types Description
Bivariate Continuous Y by continuous X Analyzes the relationship between two continuous variables. See “Bivariate Analysis”.
Oneway Continuous Y by nominal or ordinal X
Analyzes how the distribution of a continuous Y variable differs across groups defined by a categorical X variable. See “Oneway Analysis”.
Logistic Nominal or ordinal Y by continuous X
Fits the probabilities for response categories to a continuous X predictor. See “Logistic Analysis”.
Contingency Nominal or ordinal Y by nominal or ordinal X
Analyzes the distribution of a categorical response variable Y as conditioned by the values of a categorical X factor. See “Contingency Analysis”.

112 Introduction to Fit Y by X Chapter 4Launch the Fit Y by X Platform Basic Analysis
Bivariate, Oneway, Logistic, Contingency This grid shows which analysis results from the different combinations of data types. Once you have assigned your columns, the applicable platform appears as a label above the grid.
Block (Optional, for Oneway and Contingency only):
– For the Oneway platform, identifies a second factor, which forms a two-way analysis without interaction. The data should be balanced and have equal counts in each block by group cell. If you specify a Block variable, the data should be balanced and have equal counts in each block by group cell. In the plot, the values of the Y variable are centered by the Block variable.
– For the Contingency platform, identifies a second factor and performs a Cochran-Mantel-Haenszel test.
For more information about launch windows, see the Get Started chapter in the Using JMP book.
Launch Specific Analyses from the JMP Starter Window
From the JMP Starter window, you can launch a specific analysis (Bivariate, Oneway, Logistic, or Contingency). If you select this option, specify the correct modeling types (Y and X variables) for the analysis. See Table 4.1.
To launch a specific analysis from the JMP Starter Window, click the Basic category, and select a specific analysis.
Most of the platform launch options are the same. However, the naming for some of the Y and X platform buttons is tailored for the specific analysis that you are performing.
Table 4.1 Platforms and Buttons
Platform or Analysis Y Button X Button
Fit Y by X Y, Response X, Factor
Bivariate Y, Response X, Regressor
Oneway Y, Response X, Grouping
Logistic Y, Categorical Response X, Continuous Regressor
Contingency Y, Response Category X, Grouping Category

Chapter 5Bivariate Analysis
Examine Relationships between Two Continuous Variables
The Bivariate platform shows the relationship between two continuous variables. It is the continuous by continuous personality of the Fit Y by X platform. The word bivariate simply means involving two variables instead of one (univariate) or many (multivariate).
The Bivariate analysis results appear in a scatterplot. Each point on the plot represents the X and Y values for a single observation; in other words, each point represents two variables. Using the scatterplot, you can see at a glance the degree and pattern of the relationship between the two variables. You can interactively add other types of fits, such as simple linear regression, polynomial regression, and so on.
Figure 5.1 Example of Bivariate Analysis

114 Bivariate Analysis Chapter 5Basic Analysis
ContentsExample of Bivariate Analysis. . . . . . . . . . . . . . . . . . . . . . . . . . . . . . . . . . . . . . . . . . . . . . . . . . . . . 116Launch the Bivariate Platform. . . . . . . . . . . . . . . . . . . . . . . . . . . . . . . . . . . . . . . . . . . . . . . . . . . . . 116The Bivariate Plot . . . . . . . . . . . . . . . . . . . . . . . . . . . . . . . . . . . . . . . . . . . . . . . . . . . . . . . . . . . . . . . 117Fitting Options. . . . . . . . . . . . . . . . . . . . . . . . . . . . . . . . . . . . . . . . . . . . . . . . . . . . . . . . . . . . . . . . . . 118
Fitting Options. . . . . . . . . . . . . . . . . . . . . . . . . . . . . . . . . . . . . . . . . . . . . . . . . . . . . . . . . . . . . . . 119Fitting Option Categories. . . . . . . . . . . . . . . . . . . . . . . . . . . . . . . . . . . . . . . . . . . . . . . . . . . . . . 121Fit the Same Option Multiple Times . . . . . . . . . . . . . . . . . . . . . . . . . . . . . . . . . . . . . . . . . . . . 121
Histogram Borders . . . . . . . . . . . . . . . . . . . . . . . . . . . . . . . . . . . . . . . . . . . . . . . . . . . . . . . . . . . . . . 122Fit Mean . . . . . . . . . . . . . . . . . . . . . . . . . . . . . . . . . . . . . . . . . . . . . . . . . . . . . . . . . . . . . . . . . . . . . . . 122
Fit Mean Report . . . . . . . . . . . . . . . . . . . . . . . . . . . . . . . . . . . . . . . . . . . . . . . . . . . . . . . . . . . . . . 123Fit Line and Fit Polynomial . . . . . . . . . . . . . . . . . . . . . . . . . . . . . . . . . . . . . . . . . . . . . . . . . . . . . . . 123
Linear Fit and Polynomial Fit Reports . . . . . . . . . . . . . . . . . . . . . . . . . . . . . . . . . . . . . . . . . . . 124Fit Special . . . . . . . . . . . . . . . . . . . . . . . . . . . . . . . . . . . . . . . . . . . . . . . . . . . . . . . . . . . . . . . . . . . . . . 130
Fit Special Reports and Menus . . . . . . . . . . . . . . . . . . . . . . . . . . . . . . . . . . . . . . . . . . . . . . . . . 131Flexible . . . . . . . . . . . . . . . . . . . . . . . . . . . . . . . . . . . . . . . . . . . . . . . . . . . . . . . . . . . . . . . . . . . . . . . . 131
Fit Spline. . . . . . . . . . . . . . . . . . . . . . . . . . . . . . . . . . . . . . . . . . . . . . . . . . . . . . . . . . . . . . . . . . . . 132Kernel Smoother . . . . . . . . . . . . . . . . . . . . . . . . . . . . . . . . . . . . . . . . . . . . . . . . . . . . . . . . . . . . . 133Fit Each Value . . . . . . . . . . . . . . . . . . . . . . . . . . . . . . . . . . . . . . . . . . . . . . . . . . . . . . . . . . . . . . . 134
Fit Orthogonal . . . . . . . . . . . . . . . . . . . . . . . . . . . . . . . . . . . . . . . . . . . . . . . . . . . . . . . . . . . . . . . . . . 134Orthogonal Regression Report . . . . . . . . . . . . . . . . . . . . . . . . . . . . . . . . . . . . . . . . . . . . . . . . . 135
Robust . . . . . . . . . . . . . . . . . . . . . . . . . . . . . . . . . . . . . . . . . . . . . . . . . . . . . . . . . . . . . . . . . . . . . . . . . 135Fit Robust . . . . . . . . . . . . . . . . . . . . . . . . . . . . . . . . . . . . . . . . . . . . . . . . . . . . . . . . . . . . . . . . . . . 136Fit Cauchy . . . . . . . . . . . . . . . . . . . . . . . . . . . . . . . . . . . . . . . . . . . . . . . . . . . . . . . . . . . . . . . . . . 136
Density Ellipse . . . . . . . . . . . . . . . . . . . . . . . . . . . . . . . . . . . . . . . . . . . . . . . . . . . . . . . . . . . . . . . . . . 136Correlation Report . . . . . . . . . . . . . . . . . . . . . . . . . . . . . . . . . . . . . . . . . . . . . . . . . . . . . . . . . . . 137
Nonpar Density . . . . . . . . . . . . . . . . . . . . . . . . . . . . . . . . . . . . . . . . . . . . . . . . . . . . . . . . . . . . . . . . . 138Quantile Density Contours Report . . . . . . . . . . . . . . . . . . . . . . . . . . . . . . . . . . . . . . . . . . . . . . 139
Group By . . . . . . . . . . . . . . . . . . . . . . . . . . . . . . . . . . . . . . . . . . . . . . . . . . . . . . . . . . . . . . . . . . . . . . 139Fitting Menus. . . . . . . . . . . . . . . . . . . . . . . . . . . . . . . . . . . . . . . . . . . . . . . . . . . . . . . . . . . . . . . . . . . 139
Fitting Menu Options . . . . . . . . . . . . . . . . . . . . . . . . . . . . . . . . . . . . . . . . . . . . . . . . . . . . . . . . . 140Diagnostics Plots . . . . . . . . . . . . . . . . . . . . . . . . . . . . . . . . . . . . . . . . . . . . . . . . . . . . . . . . . . . . . 143
Additional Examples of the Bivariate Platform . . . . . . . . . . . . . . . . . . . . . . . . . . . . . . . . . . . . . . 144Example of the Fit Special Option . . . . . . . . . . . . . . . . . . . . . . . . . . . . . . . . . . . . . . . . . . . . . . 144Example of the Fit Orthogonal Option . . . . . . . . . . . . . . . . . . . . . . . . . . . . . . . . . . . . . . . . . . 146Example of the Fit Robust Command . . . . . . . . . . . . . . . . . . . . . . . . . . . . . . . . . . . . . . . . . . . 148Example of Group By Using Density Ellipses . . . . . . . . . . . . . . . . . . . . . . . . . . . . . . . . . . . . 150Example of Group By Using Regression Lines. . . . . . . . . . . . . . . . . . . . . . . . . . . . . . . . . . . . 151Example of Grouping Using a By Variable . . . . . . . . . . . . . . . . . . . . . . . . . . . . . . . . . . . . . . . 152
Statistical Details for the Bivariate Platform . . . . . . . . . . . . . . . . . . . . . . . . . . . . . . . . . . . . . . . . . 153

Chapter 5 Bivariate Analysis 115Basic Analysis
Fit Line . . . . . . . . . . . . . . . . . . . . . . . . . . . . . . . . . . . . . . . . . . . . . . . . . . . . . . . . . . . . . . . . . . . . . . 154Fit Spline . . . . . . . . . . . . . . . . . . . . . . . . . . . . . . . . . . . . . . . . . . . . . . . . . . . . . . . . . . . . . . . . . . . . 154Fit Orthogonal . . . . . . . . . . . . . . . . . . . . . . . . . . . . . . . . . . . . . . . . . . . . . . . . . . . . . . . . . . . . . . . 154Summary of Fit Report . . . . . . . . . . . . . . . . . . . . . . . . . . . . . . . . . . . . . . . . . . . . . . . . . . . . . . . . 155Lack of Fit Report. . . . . . . . . . . . . . . . . . . . . . . . . . . . . . . . . . . . . . . . . . . . . . . . . . . . . . . . . . . . . 156Parameter Estimates Report . . . . . . . . . . . . . . . . . . . . . . . . . . . . . . . . . . . . . . . . . . . . . . . . . . . . 156Smoothing Fit Reports. . . . . . . . . . . . . . . . . . . . . . . . . . . . . . . . . . . . . . . . . . . . . . . . . . . . . . . . . 157Correlation Report . . . . . . . . . . . . . . . . . . . . . . . . . . . . . . . . . . . . . . . . . . . . . . . . . . . . . . . . . . . . 157

116 Bivariate Analysis Chapter 5Example of Bivariate Analysis Basic Analysis
Example of Bivariate Analysis
This example uses the SAT.jmp sample data table. SAT test scores for students in the 50 U.S. states, plus the District of Columbia, are divided into two areas: verbal and math. You want to find out how the percentage of students taking the SAT tests is related to verbal test scores for 2004.
1. Select Help > Sample Data Library and open SAT.jmp.
2. Select Analyze > Fit Y by X.
3. Select 2004 Verbal and click Y, Response.
4. Select % Taking (2004) and click X, Factor.
5. Click OK.
Figure 5.2 Example of SAT Scores by Percent Taking
You can see that the verbal scores were higher when a smaller percentage of the population took the test.
Launch the Bivariate Platform
To perform a bivariate analysis, do the following:
1. Select Analyze > Fit Y by X.
2. Enter a continuous column for Y, Response.
3. Enter a continuous column for X, Factor.

Chapter 5 Bivariate Analysis 117Basic Analysis The Bivariate Plot
Figure 5.3 The Bivariate Launch Window
The word Bivariate appears above the diagram, to indicate that you are performing a bivariate analysis.
Note: You can also launch a bivariate analysis from the JMP Starter window. Select View > JMP Starter > Basic > Bivariate.
For information about this launch window, see “Introduction to Fit Y by X” chapter on page 109.
The Bivariate Plot
To produce the plot shown in Figure 5.4, follow the instructions in “Example of Bivariate Analysis” on page 116.

118 Bivariate Analysis Chapter 5Fitting Options Basic Analysis
Figure 5.4 The Bivariate Plot
Note: Lines of equality appear in cases where the slope is not constrained to 1.
The Bivariate report begins with a plot for each pair of X and Y variables. Replace variables in the plot by dragging and dropping a variable, in one of two ways: swap existing variables by dragging and dropping a variable from one axis to the other axis; or, click on a variable in the Columns panel of the associated data table and drag it onto an axis.
You can interact with this plot just as you can with other JMP plots (for example, resizing the plot, highlighting points with the arrow or brush tool, and labeling points). For details about these features, see the JMP Reports chapter in the Using JMP book.
You can fit curves on the plot and view statistical reports and additional menus using the fitting options that are located within the red triangle menu. See “Fitting Options” on page 118.
Fitting Options
Note: The Fit Group menu appears if you have specified multiple Y or multiple X variables. Menu options allow you to arrange reports or order them by RSquare. See the Standard Least Squares chapter in the Fitting Linear Models book for more information.
The Bivariate Fit red triangle menu contains display options, fitting options, and control options.
Show Points Hides or shows the points in the scatterplot. A check mark indicates that points are shown.

Chapter 5 Bivariate Analysis 119Basic Analysis Fitting Options
Histogram Borders Attaches histograms to the x- and y-axes of the scatterplot. A check mark indicates that histogram borders are turned on. See “Histogram Borders” on page 122.
Note: When you apply only the Hidden row state to rows in the data table, the corresponding points do not appear in the scatterplot. However, the histograms are constructed using the hidden rows. If you want to exclude rows from the construction of the histograms and from analysis results, apply the Exclude row state and select Redo > Redo Analysis from the Bivariate red triangle menu.
Summary Statistics Shows the summary statistics for the plot, such as the correlation and confidence intervals, mean, and standard deviation.
Group By Lets you select a classification (or grouping) variable. A separate analysis is computed for each level of the grouping variable, and regression curves or ellipses are overlaid on the scatterplot. See “Group By” on page 139.
See the JMP Reports chapter in the Using JMP book for more information about the following options:
Local Data Filter Shows or hides the local data filter that enables you to filter the data used in a specific report.
Redo Contains options that enable you to repeat or relaunch the analysis. In platforms that support the feature, the Automatic Recalc option immediately reflects the changes that you make to the data table in the corresponding report window.
Save Script Contains options that enable you to save a script that reproduces the report to several destinations.
Save By-Group Script Contains options that enable you to save a script that reproduces the platform report for all levels of a By variable to several destinations. Available only when a By variable is specified in the launch window.
Fitting Options
Each fitting option adds the following:
• a line, curve, or distribution to the scatterplot
• a red triangle menu to the report window
• a specific report to the report window
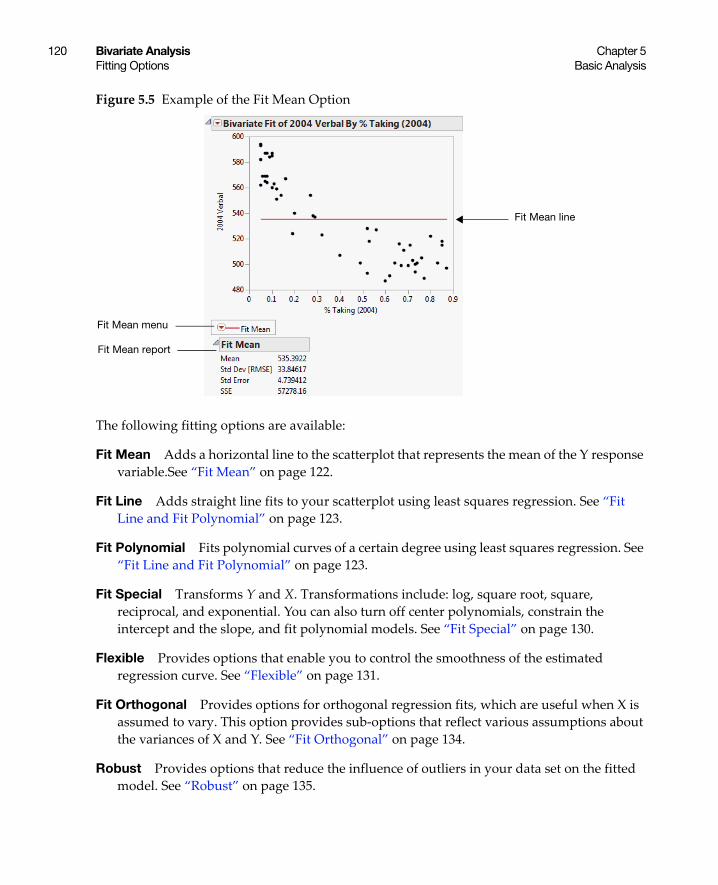
120 Bivariate Analysis Chapter 5Fitting Options Basic Analysis
Figure 5.5 Example of the Fit Mean Option
The following fitting options are available:
Fit Mean Adds a horizontal line to the scatterplot that represents the mean of the Y response variable.See “Fit Mean” on page 122.
Fit Line Adds straight line fits to your scatterplot using least squares regression. See “Fit Line and Fit Polynomial” on page 123.
Fit Polynomial Fits polynomial curves of a certain degree using least squares regression. See “Fit Line and Fit Polynomial” on page 123.
Fit Special Transforms Y and X. Transformations include: log, square root, square, reciprocal, and exponential. You can also turn off center polynomials, constrain the intercept and the slope, and fit polynomial models. See “Fit Special” on page 130.
Flexible Provides options that enable you to control the smoothness of the estimated regression curve. See “Flexible” on page 131.
Fit Orthogonal Provides options for orthogonal regression fits, which are useful when X is assumed to vary. This option provides sub-options that reflect various assumptions about the variances of X and Y. See “Fit Orthogonal” on page 134.
Robust Provides options that reduce the influence of outliers in your data set on the fitted model. See “Robust” on page 135.
Fit Mean line
Fit Mean menu
Fit Mean report

Chapter 5 Bivariate Analysis 121Basic Analysis Fitting Options
Density Ellipse Plots density ellipsoids for the bivariate normal distribution fit to the X and Y variables. See “Density Ellipse” on page 136.
Nonpar Density Plots density contours based on a smoothed surface. The contours describe the density of data points. See “Nonpar Density” on page 138.
Note: You can remove a fit using the Remove Fit option. For details, see “Fitting Menu Options” on page 140.
Fitting Option Categories
Fitting option categories include regression fits and density estimation.
Fit the Same Option Multiple Times
You can select the same fitting option multiple times, and each new fit is overlaid on the scatterplot. You can try fits, exclude points and refit, and you can compare them on the same scatterplot.
To apply a fitting option to multiple analyses in your report window, hold down the Ctrl key and select a fitting option.
Category Description Fitting Options
Regression Fits Regression methods fit a curve to the observed data points. The fitting methods include least squares fits as well as spline fits, kernel smoothing, orthogonal fits, and robust fits.
Fit MeanFit LineFit PolynomialFit SpecialFlexibleFit OrthogonalRobust
Density Estimation
Density estimation fits a bivariate distribution to the points. You can either select a bivariate normal density, characterized by elliptical contours, or a general nonparametric density.
Density EllipseNonpar Density

122 Bivariate Analysis Chapter 5Histogram Borders Basic Analysis
Histogram Borders
The Histogram Borders option appends histograms to the x- and y-axes of the scatterplot. You can use the histograms to visualize the marginal distributions of the X and Y variables.
Figure 5.6 Example of Histogram Borders
Fit Mean
Using the Fit Mean option, you can add a horizontal line to the scatterplot that represents the mean of the Y response variable. You can start by fitting the mean and then use the mean line as a reference for other fits (such as straight lines, confidence curves, polynomial curves, and so on).

Chapter 5 Bivariate Analysis 123Basic Analysis Fit Line and Fit Polynomial
Figure 5.7 Example of Fit Mean
Fit Mean Report
The Fit Mean report shows summary statistics about the fit of the mean.
Mean Mean of the response variable. The predicted response when there are no specified effects in the model.
Std Dev [RMSE] Standard deviation of the response variable. Square root of the mean square error, also called the root mean square error (or RMSE).
Std Error Standard deviation of the response mean. Calculated by dividing the RMSE by the square root of the number of values.
SSE Error sum of squares for the simple mean model. Appears as the sum of squares for Error in the analysis of variance tables for each model fit.
For details about the options in the Fit Mean menu, see “Fitting Menus” on page 139.
Fit Line and Fit Polynomial
Using the Fit Line option, you can add straight line fits to your scatterplot using least squares regression. Using the Fit Polynomial option, you can fit polynomial curves of a certain degree using least squares regression.
Fit Mean line
Fit Mean menu
Fit Mean report

124 Bivariate Analysis Chapter 5Fit Line and Fit Polynomial Basic Analysis
Figure 5.8 Example of Fit Line and Fit Polynomial
Figure 5.8 shows an example that compares a linear fit to the mean line and to a degree 2 polynomial fit.
Note the following information:
• The Fit Line output is equivalent to a polynomial fit of degree 1.
• The Fit Mean output is equivalent to a polynomial fit of degree 0.
For details about the options in the Linear Fit and Polynomial Fit Degree menus, see “Fitting Menus” on page 139. For statistical details about this fit, see “Fit Line” on page 154.
Linear Fit and Polynomial Fit Reports
The Linear Fit and Polynomial Fit reports begin with the equation of fit.
Figure 5.9 Example of Equations of Fit

Chapter 5 Bivariate Analysis 125Basic Analysis Fit Line and Fit Polynomial
Tip: You can edit the equation by clicking on it.
Each Linear and Polynomial Fit Degree report contains at least three reports. A fourth report, Lack of Fit, appears only if there are X replicates in your data.
Summary of Fit Report
The Summary of Fit reports show the numeric summaries of the response for the linear fit and polynomial fit of degree 2 for the same data. You can compare multiple Summary of Fit reports to see the improvement of one model over another, indicated by a larger RSquare value and smaller Root Mean Square Error.
Figure 5.10 Summary of Fit Reports for Linear and Polynomial Fits
The Summary of Fit report contains the following columns:
RSquare Measures the proportion of the variation explained by the model. The remaining variation is not explained by the model and attributed to random error. The RSquare is 1 if the model fits perfectly.
Note: A low RSquare value suggests that there may be variables not in the model that account for the unexplained variation. However, if your data are subject to a large amount of inherent variation, even a useful regression model may have a low RSquare value. Read the literature in your research area to learn about typical RSquare values.
The RSquare values in Figure 5.10 indicate that the polynomial fit of degree 2 gives a small improvement over the linear fit. See “Summary of Fit Report” on page 155.
RSquare Adj Adjusts the RSquare value to make it more comparable over models with different numbers of parameters by using the degrees of freedom in its computation. See “Summary of Fit Report” on page 155.
Root Mean Square Error Estimates the standard deviation of the random error. It is the square root of the mean square for Error in the Analysis of Variance report. See Figure 5.12.
Mean of Response Provides the sample mean (arithmetic average) of the response variable. This is the predicted response when no model effects are specified.

126 Bivariate Analysis Chapter 5Fit Line and Fit Polynomial Basic Analysis
Observations Provides the number of observations used to estimate the fit. If there is a weight variable, this is the sum of the weights.
Lack of Fit Report
Note: The Lack of Fit report appears only if there are multiple rows that have the same x value.
Using the Lack of Fit report, you can estimate the error, regardless of whether you have the right form of the model. This occurs when multiple observations occur at the same x value. The error that you measure for these exact replicates is called pure error. This is the portion of the sample error that cannot be explained or predicted no matter what form of model is used. However, a lack of fit test might not be of much use if it has only a few degrees of freedom for it (few replicated x values).
Figure 5.11 Examples of Lack of Fit Reports for Linear and Polynomial Fits
The difference between the residual error from the model and the pure error is called the lack of fit error. The lack of fit error can be significantly greater than the pure error if you have the wrong functional form of the regressor. In that case, you should try a different type of model fit. The Lack of Fit report tests whether the lack of fit error is zero.
The Lack of Fit report contains the following columns:
Source The three sources of variation: Lack of Fit, Pure Error, and Total Error.
DF The degrees of freedom (DF) for each source of error.
– The Total Error DF is the degrees of freedom found on the Error line of the Analysis of Variance table (shown under the “Analysis of Variance Report” on page 127). It is the difference between the Total DF and the Model DF found in that table. The Error DF is partitioned into degrees of freedom for lack of fit and for pure error.
– The Pure Error DF is pooled from each group where there are multiple rows with the same values for each effect. See “Lack of Fit Report” on page 156.
– The Lack of Fit DF is the difference between the Total Error and Pure Error DF.

Chapter 5 Bivariate Analysis 127Basic Analysis Fit Line and Fit Polynomial
Sum of Squares The sum of squares (SS for short) for each source of error.
– The Total Error SS is the sum of squares found on the Error line of the corresponding Analysis of Variance table, shown under “Analysis of Variance Report” on page 127.
– The Pure Error SS is pooled from each group where there are multiple rows with the same value for the x variable. This estimates the portion of the true random error that is not explained by model x effect. See “Lack of Fit Report” on page 156.
– The Lack of Fit SS is the difference between the Total Error and Pure Error sum of squares. If the lack of fit SS is large, the model might not be appropriate for the data. The F-ratio described below tests whether the variation due to lack of fit is small enough to be accepted as a negligible portion of the pure error.
Mean Square The sum of squares divided by its associated degrees of freedom. This computation converts the sum of squares to an average (mean square). F-ratios for statistical tests are the ratios of mean squares.
F Ratio The ratio of mean square for lack of fit to mean square for Pure Error. It tests the hypothesis that the lack of fit error is zero.
Prob > F The probability of obtaining a greater F-value by chance alone if the variation due to lack of fit variance and the pure error variance are the same. A high p value means that there is not a significant lack of fit.
Max RSq The maximum R2 that can be achieved by a model using only the variables in the model. See “Lack of Fit Report” on page 156.
Analysis of Variance Report
Analysis of variance (ANOVA) for a regression partitions the total variation of a sample into components. These components are used to compute an F-ratio that evaluates the effectiveness of the model. If the probability associated with the F-ratio is small, then the model is considered a better statistical fit for the data than the response mean alone.
The Analysis of Variance reports in Figure 5.12 compare a linear fit (Fit Line) and a second degree (Fit Polynomial). Both fits are statistically better from a horizontal line at the mean.
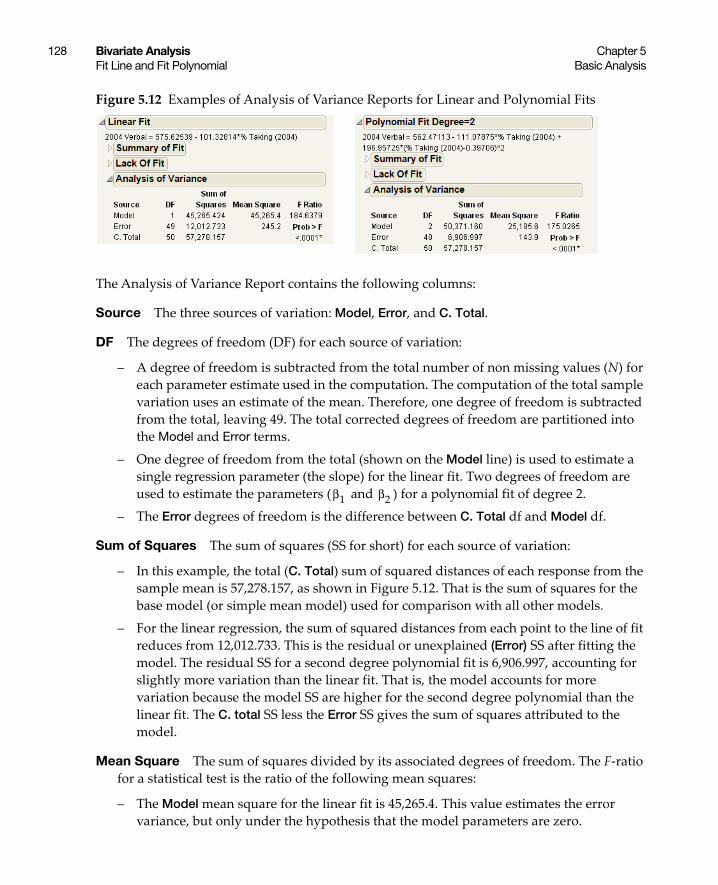
128 Bivariate Analysis Chapter 5Fit Line and Fit Polynomial Basic Analysis
Figure 5.12 Examples of Analysis of Variance Reports for Linear and Polynomial Fits
The Analysis of Variance Report contains the following columns:
Source The three sources of variation: Model, Error, and C. Total.
DF The degrees of freedom (DF) for each source of variation:
– A degree of freedom is subtracted from the total number of non missing values (N) for each parameter estimate used in the computation. The computation of the total sample variation uses an estimate of the mean. Therefore, one degree of freedom is subtracted from the total, leaving 49. The total corrected degrees of freedom are partitioned into the Model and Error terms.
– One degree of freedom from the total (shown on the Model line) is used to estimate a single regression parameter (the slope) for the linear fit. Two degrees of freedom are used to estimate the parameters ( and ) for a polynomial fit of degree 2.
– The Error degrees of freedom is the difference between C. Total df and Model df.
Sum of Squares The sum of squares (SS for short) for each source of variation:
– In this example, the total (C. Total) sum of squared distances of each response from the sample mean is 57,278.157, as shown in Figure 5.12. That is the sum of squares for the base model (or simple mean model) used for comparison with all other models.
– For the linear regression, the sum of squared distances from each point to the line of fit reduces from 12,012.733. This is the residual or unexplained (Error) SS after fitting the model. The residual SS for a second degree polynomial fit is 6,906.997, accounting for slightly more variation than the linear fit. That is, the model accounts for more variation because the model SS are higher for the second degree polynomial than the linear fit. The C. total SS less the Error SS gives the sum of squares attributed to the model.
Mean Square The sum of squares divided by its associated degrees of freedom. The F-ratio for a statistical test is the ratio of the following mean squares:
– The Model mean square for the linear fit is 45,265.4. This value estimates the error variance, but only under the hypothesis that the model parameters are zero.
β1 β2

Chapter 5 Bivariate Analysis 129Basic Analysis Fit Line and Fit Polynomial
– The Error mean square is 245.2. This value estimates the error variance.
F Ratio The model mean square divided by the error mean square. The underlying hypothesis of the fit is that all the regression parameters (except the intercept) are zero. If this hypothesis is true, then both the mean square for error and the mean square for model estimate the error variance, and their ratio has an F-distribution. If a parameter is a significant model effect, the F-ratio is usually higher than expected by chance alone.
Prob > F The observed significance probability (p-value) of obtaining a greater F-value by chance alone if the specified model fits no better than the overall response mean. Observed significance probabilities of 0.05 or less are often considered evidence of a regression effect.
Parameter Estimates Report
The terms in the Parameter Estimates report for a linear fit are the intercept and the single x variable.
For a polynomial fit of order k, there is an estimate for the model intercept and a parameter estimate for each of the k powers of the X variable.
Figure 5.13 Examples of Parameter Estimates Reports for Linear and Polynomial Fits
The Parameter Estimates report contains the following columns:
Term Lists the name of each parameter in the requested model. The intercept is a constant term in all models.
Estimate Lists the parameter estimates of the linear model. The prediction formula is the linear combination of these estimates with the values of their corresponding variables.
Std Error Lists the estimates of the standard errors of the parameter estimates. They are used in constructing tests and confidence intervals.
t Ratio Lists the test statistics for the hypothesis that each parameter is zero. It is the ratio of the parameter estimate to its standard error. If the hypothesis is true, then this statistic has a Student’s t-distribution.

130 Bivariate Analysis Chapter 5Fit Special Basic Analysis
Prob>|t| Lists the observed significance probability calculated from each t-ratio. It is the probability of getting, by chance alone, a t-ratio greater (in absolute value) than the computed value, given a true null hypothesis. Often, a value below 0.05 (or sometimes 0.01) is interpreted as evidence that the parameter is significantly different from zero.
To reveal additional statistics, right-click in the report and select the Columns menu. Statistics not shown by default are as follows:
Lower 95% The lower endpoint of the 95% confidence interval for the parameter estimate.
Upper 95% The upper endpoint of the 95% confidence interval for the parameter estimate.
Std Beta The standardized parameter estimate. It is useful for comparing the effect of X variables that are measured on different scales. See “Parameter Estimates Report” on page 156.
VIF The variance inflation factor.
Design Std Error The design standard error for the parameter estimate. See “Parameter Estimates Report” on page 156.
Fit Special
Note: For an example of this option, see “Example of the Fit Special Option” on page 144.
Using the Fit Special option, you can transform Y and X. Transformations include the following: log, square root, square, reciprocal, and exponential. You can also constrain the slope and intercept, fit a polynomial of specific degree, and center the polynomial.
The Specify Transformation or Constraint Window contains the following options:
Y Transformation Use these options to transform the Y variable.
X Transformation Use these options to transform the X variable.
Degree Use this option to fit a polynomial of the specified degree.
Centered Polynomial To turn off polynomial centering, deselect the Centered Polynomial check box. See Figure 5.19. Note that for transformations of the X variable, polynomial centering is not performed. Centering polynomials stabilizes the regression coefficients and reduces multicollinearity.
Constrain Intercept to Select this check box to constrain the model intercept to be the specified value.

Chapter 5 Bivariate Analysis 131Basic Analysis Flexible
Constrain Slope to Select this check box to constrain the model slope to be the specified value.
For details about the red triangle options for this fit, see “Fitting Menus” on page 139.
Fit Special Reports and Menus
Depending on your selections in the Fit Special window, you see different reports and menus. The flowchart in Figure 5.14 shows you what reports and menus you see depending on your choices.
Figure 5.14 Example of Fit Special Flowchart
Transformed Fit Report
The Transformed Fit report contains the reports described in “Linear Fit and Polynomial Fit Reports” on page 124. However, if you transformed Y, the Fit Measured on Original Scale report appears. This shows the measures of fit based on the original Y variables, and the fitted model transformed back to the original scale.
Flexible
Use the options in the Flexible menu to control the smoothness of the estimated regression curve.
• Fit Spline uses a penalized least squares approach. Adjust the degree of smoothness using the parameter lambda. See “Fit Spline” on page 132.
Transformation?
Yes No
Transformed Fit Report and menu
Degree?
1 2-5
Linear Fit Report and menu
Polynomial Fit Report and menu

132 Bivariate Analysis Chapter 5Flexible Basic Analysis
• Kernel Smoother is based on locally weighted fits. Control the influence of local behavior using the parameter alpha. See “Kernel Smoother” on page 133.
• Fit Each Value calculates the mean response at each X value. See “Fit Each Value” on page 134.
Fit Spline
Using the Fit Spline option, you can fit a smoothing spline that varies in smoothness (or flexibility) according to the lambda (λ) value. The lambda value is a tuning parameter in the spline formula. As the value of λ decreases, the error term of the spline model has more weight and the fit becomes more flexible and curved. As the value of λ increases, the fit becomes stiff (less curved), approaching a straight line.
Note the following information:
• The smoothing spline can help you see the expected value of the distribution of Y across X.
• The points closest to each piece of the fitted curve have the most influence on it. The influence increases as you lower the value of λ, producing a highly flexible curve.
• If you want to use a lambda value that is not listed on the menu, select Fit Spline > Other. If the scaling of the X variable changes, the fitted model also changes. To prevent this from happening, select the Standardize X option. Note that the fitted model remains the same for either the original X variable or the scaled X variable.
• You might find it helpful to try several λ values. You can use the Lambda slider beneath the Smoothing Spline report to experiment with different λ values. However, λ is not invariant to the scaling of the data. For example, the λ value for an X measured in inches, is not the same as the λ value for an X measured in centimeters.
For details about the options in the Smoothing Spline Fit menu, see “Fitting Menus” on page 139. For statistical details about this fit, see “Fit Spline” on page 154.
Smoothing Spline Fit Report
The Smoothing Spline Fit report contains the R-Square for the spline fit and the Sum of Squares Error. You can use these values to compare the spline fit to other fits, or to compare different spline fits to each other.
R-Square Measures the proportion of variation accounted for by the smoothing spline model. For more information, see “Smoothing Fit Reports” on page 157.
Sum of Squares Error Sum of squared distances from each point to the fitted spline. It is the unexplained error (residual) after fitting the spline model.
Change Lambda Enables you to change the λ value, either by entering a number, or by moving the slider.

Chapter 5 Bivariate Analysis 133Basic Analysis Flexible
Kernel Smoother
The Kernel Smoother option produces a curve formed by repeatedly finding a locally weighted fit of a simple curve (a line or a quadratic) at sampled points in the domain. The many local fits (128 in total) are combined to produce the smooth curve over the entire domain. This method is also called Loess or Lowess, which was originally an acronym for Locally Weighted Scatterplot Smoother. See Cleveland (1979).
Use this method to quickly see the relationship between variables and to help you determine the type of analysis or fit to perform.
For details about the options in the Local Smoother menu, see “Fitting Menus” on page 139.
Local Smoother Report
The Local Smoother report contains the R-Square for the smoother fit and the Sum of Squares Error. You can use these values to compare the smoother fit to other fits, or to compare different smoother fits to each other.
R-Square Measures the proportion of variation accounted for by the smoother model. For more information, see “Smoothing Fit Reports” on page 157.
Sum of Squares Error Sum of squared distances from each point to the fitted smoother. It is the unexplained error (residual) after fitting the smoother model.
Local Fit (lambda) Select the polynomial degree for each local fit. Quadratic polynomials can track local bumpiness more smoothly. Lambda is the degree of certain polynomials that are fitted by the method. Lambda can be 0, 1 or 2.
Weight Function Specify how to weight the data in the neighborhood of each local fit. Loess uses tri-cube. The weight function determines the influence that each xi and yi has on the fitting of the line. The influence decreases as xi increases in distance from x and finally becomes zero.
Smoothness (alpha) Controls how many points are part of each local fit. Use the slider or type in a value directly. Alpha is a smoothing parameter. It can be any positive number, but typical values are 1/4 to 1. As alpha increases, the curve becomes smoother.
Robustness Re-weights the points to de-emphasize points that are farther from the fitted curve. Specify the number of times to repeat the process (number of passes). The goal is to converge the curve and automatically filter out outliers by giving them small weights.

134 Bivariate Analysis Chapter 5Fit Orthogonal Basic Analysis
Fit Each Value
The Fit Each Value option fits a value to each unique X value. The fitted values are the means of the response for each unique X value.
For details about the options in the Fit Each Value menu, see “Fitting Menus” on page 139.
Fit Each Value Report
The Fit Each Value report shows summary statistics about the model fit.
Number of Observations Gives the total number of observations.
Number of Unique Values Gives the number of unique X values.
Degrees of Freedom Gives the pure error degrees of freedom.
Sum of Squares Gives the pure error sum of squares.
Mean Square Gives the pure error mean square.
Fit Orthogonal
Note: For an example of this option, see “Example of the Fit Orthogonal Option” on page 146.
The Fit Orthogonal option fits linear models that account for variability in X as well as Y.
Fit Orthogonal Options
Select one of the following options to specify a variance ratio.
Univariate Variances, Prin Comp Uses the univariate variance estimates computed from the samples of X and Y. This turns out to be the standardized first principal component. This option is not a good choice in a measurement systems application since the error variances are not likely to be proportional to the population variances.
Equal Variances Uses 1 as the variance ratio, which assumes that the error variances are the same. Using equal variances is equivalent to the non-standardized first principal component line. Suppose that the scatterplot is scaled the same in the X and Y directions. When you show a normal density ellipse, you see that this line is the longest axis of the ellipse.
Fit X to Y Uses a variance ratio of zero, which indicates that Y effectively has no variance.

Chapter 5 Bivariate Analysis 135Basic Analysis Robust
Specified Variance Ratio Lets you enter any ratio that you want, giving you the ability to make use of known information about the measurement error in X and response error in Y.
For details about the options in the Orthogonal Fit Ratio menu, see “Fitting Menus” on page 139. For statistical details about this fit, see “Fit Orthogonal” on page 154.
Orthogonal Regression Report
The Orthogonal Regression report shows summary statistics about the orthogonal regression model.
Variable Gives the names of the variables used to fit the line.
Mean Gives the mean of each variable.
Std Dev Gives the standard deviation of each variable.
Variance Ratio Gives the variance ratio used to fit the line.
Correlation Gives the correlation between the two variables.
Intercept Gives the intercept of the fitted line.
Slope Gives the slope of the fitted line.
LowerCL Gives the lower confidence limit for the slope.
UpperCL Gives the upper confidence limit for the slope.
Alpha Enter the alpha level used in computing the confidence interval.
Robust
Note: For an example of this option, see “Example of the Fit Robust Command” on page 148.
The Robust option provides two methods to reduce the influence of outliers in your data set. Outliers can lead to incorrect estimates and decisions.
For details about the options in the Robust Fit and Cauchy Fit menus, see “Fitting Menus” on page 139.

136 Bivariate Analysis Chapter 5Density Ellipse Basic Analysis
Fit Robust
The Fit Robust option reduces the influence of outliers in the response variable. The Huber M-estimation method is used. Huber M-estimation finds parameter estimates that minimize the Huber loss function:
where
ei refers to the residuals
The Huber loss function penalizes outliers and increases as a quadratic for small errors and linearly for large errors. In the JMP implementation, k = 2. For more details about robust fitting, see Huber (1973) and Huber and Ronchetti (2009).
Fit Cauchy
Assumes that the errors have a Cauchy distribution. A Cauchy distribution has fatter tails than the normal distribution, resulting in a reduced emphasis on outliers. This option can be useful if you have a large proportion of outliers in your data. However, if your data are close to normal with only a few outliers, this option can lead to incorrect inferences. The Cauchy option estimates parameters using maximum likelihood and a Cauchy link function.
Density Ellipse
Note: For an example of this option, see “Example of Group By Using Density Ellipses” on page 150.
Using the Density Ellipse option, you can draw an ellipse (or ellipses) that contains the specified mass of points. The number of points is determined by the probability that you select from the Density Ellipse menu.
For details about the options in the Bivariate Normal Ellipse menu, see “Fitting Menus” on page 139.
l e˜
( ) ρ ei( )i=
ρ e( )
12---e2 if e k<
k e 12---k2– if e k≥
=

Chapter 5 Bivariate Analysis 137Basic Analysis Density Ellipse
Figure 5.15 Example of Density Ellipses
The density ellipsoid is computed from the bivariate normal distribution fit to the X and Y variables. The bivariate normal density is a function of the means and standard deviations of the X and Y variables and the correlation between them. The Other selection lets you specify any probability greater than zero and less than or equal to one.
These ellipses are both density contours and confidence curves. As confidence curves, they show where a given percentage of the data is expected to lie, assuming the bivariate normal distribution.
The density ellipsoid is a good graphical indicator of the correlation between two variables. The ellipsoid collapses diagonally as the correlation between the two variables approaches either 1 or –1. The ellipsoid is more circular (less diagonally oriented) if the two variables are less correlated.
Correlation Report
The Correlation report that accompanies each Density Ellipse fit shows the correlation coefficient for the X and Y variables.
Note: To see a matrix of ellipses and correlations for many pairs of variables, use the Multivariate platform in the Analyze > Multivariate Methods menu.
Variable Gives the names of the variables used in creating the ellipse
Mean Gives the average of both the X and Y variable.
Std Dev Gives the standard deviation of both the X and Y variable.
A discussion of the mean and standard deviation are in the section “The Summary Statistics Report” on page 46 in the “Distributions” chapter.

138 Bivariate Analysis Chapter 5Nonpar Density Basic Analysis
Correlation The Pearson correlation coefficient. If there is an exact linear relationship between two variables, the correlation is 1 or –1 depending on whether the variables are positively or negatively related. If there is no relationship, the correlation tends toward zero.
For more information, see “Correlation Report” on page 157.
Signif. Prob Probability of obtaining, by chance alone, a correlation with greater absolute value than the computed value if no linear relationship exists between the X and Y variables.
Number Gives the number of observations used in the calculations.
Nonpar Density
When a plot shows thousands of points, the mass of points can be too dark to show patterns in density. Using the Nonpar Density (nonparametric density) option makes it easier to see the patterns.
Nonpar Density estimates a smooth nonparametric bivariate surface that describes the density of data points. The plot adds a set of contour lines showing the density (Figure 5.16). The contour lines are quantile contours in 5% intervals. This means that about 5% of the points generated from the estimated nonparametric distribution are below the lowest contour, 10% are below the next contour, and so on. The highest contour has about 95% of the points below it.
Figure 5.16 Example of Nonpar Density
To change the size of a nonparametric density contour grid, press Shift and select Nonpar Density from the Bivariate red triangle menu. Enter a larger value than the default 102 points.
For details about the options in the Quantile Density Contours menu, see “Fitting Menus” on page 139.

Chapter 5 Bivariate Analysis 139Basic Analysis Group By
Quantile Density Contours Report
The Quantile Density Contours report shows the standard deviations used in creating the nonparametric density.
Group By
Note: For examples of this option, see “Example of Group By Using Density Ellipses” on page 150 and “Example of Group By Using Regression Lines” on page 151.
Using the Group By option, you can select a classification (grouping) variable. When a grouping variable is in effect, the Bivariate platform computes a separate analysis for each level of the grouping variable.The scatterplot shows the fitted models (lines, curves, contours, or ellipses) for each grouping variable. The fit for each level of the grouping variable is identified beneath the scatterplot, with individual popup menus.
When a grouping variable is in effect, the Group By option is checked in the Bivariate Fit red triangle menu. You can change the grouping variable by first selecting the Group By option to remove (uncheck) the existing variable. Then, select the Group By option again and respond to its window as before.
The Group By option enables you to generate separate analyses by a grouping variable while plotting the fits on the same scatterplot. This allows you to visually compare the fits across groups.
Fitting Menus
In addition to a report, each fitting option adds a fitting menu to the report window. The following table shows the fitting menus that correspond to each fitting option.
Fitting Option Fitting Menu
Fit Mean Fit Mean
Fit Line Linear Fit
Fit Polynomial Polynomial Fit Degree=X*

140 Bivariate Analysis Chapter 5Fitting Menus Basic Analysis
*X=variable character or number
Fitting Menu Options
The Fitting menu for the option that you have selected contains options that apply to that fit.
• “Options That Apply to Most Fits” on page 140
• “Options That Apply to Multiple Fits” on page 141
• “Options That Apply to Bivariate Normal Ellipse” on page 142
• “Options That Apply to Quantile Density Contours” on page 142
Options That Apply to Most Fits
Line of Fit Displays or hides the line or curve describing the model fit. For the Bivariate Normal Ellipse report, this option shows or hides the ellipse representing the contour border. Not applicable for Quantile Density Colors.
Line Color Lets you select from a palette of colors for assigning a color to each fit. Not applicable for Quantile Density Colors.
Line Style Lets you select from the palette of line styles for each fit. Not applicable for Quantile Density Colors.
Fit Special Linear Fit
Polynomial Fit Degree=X*
Transformed Fit X*
Constrained Fits
Fit Spline Smoothing Spline Fit, lambda=X*
Kernel Smoother Local Smoother
Fit Each Value Fit Each Value
Fit Orthogonal Orthogonal Fit Ratio=X*
Fit Robust Robust Fit
Fit Cauchy Cauchy Fit
Density Ellipse Bivariate Normal Ellipse P=X*
Nonpar Density Quantile Density Colors
Fitting Option Fitting Menu

Chapter 5 Bivariate Analysis 141Basic Analysis Fitting Menus
Line Width Lets you change the line widths for the line of fit. The default line width is the thinnest line. Not applicable for Quantile Density Colors.
Report Turns the fit’s report on and off. Does not modify the Bivariate plot.
Remove Fit Removes the fit from the graph and removes its report.
Options That Apply to Multiple Fits
Confid Curves Fit Displays or hides the confidence limits for the expected value (mean). This option is not available for the Fit Spline, Density Ellipse, Fit Each Value, and Fit Orthogonal fits and is dimmed on those menus.
Confid Curves Indiv Displays or hides the confidence limits for an individual predicted value. The confidence limits reflect variation in the error and variation in the parameter estimates. This option is not available for the Fit Mean, Fit Spline, Density Ellipse, Fit Each Value, and Fit Orthogonal fits and is dimmed on those menus.
Save Predicteds Creates a new column in the current data table called Predicted colname where colname is the name of the Y variable. This column includes the prediction formula and the computed sample predicted values. The prediction formula computes values automatically for rows that you add to the table. This option is not available for the Fit Each Value and Density Ellipse fits and is dimmed on those menus.
You can use the Save Predicteds and Save Residuals options for each fit. If you use these options multiple times or with a grouping variable, it is best to rename the resulting columns in the data table to reflect each fit.
Save Residuals Creates a new column in the current data table called Residuals colname where colname is the name of the Y variable. Each value is the difference between the actual (observed) value and its predicted value. Unlike the Save Predicteds option, this option does not create a formula in the new column. This option is not available for the Fit Each Value and Density Ellipse fits and is dimmed on those menus.
You can use the Save Predicteds and Save Residuals options for each fit. If you use these options multiple times or with a grouping variable, it is best to rename the resulting columns in the data table to reflect each fit.
Save Studentized Residuals Creates a new column in the data table containing the result of dividing the residual by the standard error of the residual.
Mean Confidence Limit Formula Creates a new column in the data table containing a formula for the mean confidence intervals.
Indiv Confidence Limit Formula Creates a new column in the data table containing a formula for the individual confidence intervals.

142 Bivariate Analysis Chapter 5Fitting Menus Basic Analysis
Plot Residuals (Linear, Polynomial, and Fit Special Only) Produces five diagnostic plots: residual by predicted, actual by predicted, residual by row, residual by X, and a normal quantile plot of the residuals. See “Diagnostics Plots” on page 143.
Set a Level Enables you to set the alpha level used in computing confidence bands for various fits.
Confid Shaded Fit Draws the same curves as the Confid Curves Fit option and shades the area between the curves.
Confid Shaded Indiv Draws the same curves as the Confid Curves Indiv option and shades the area between the curves.
Save Coefficients Saves the spline coefficients as a new data table, with columns called X, A, B, C, and D. The X column gives the knot points. A, B, C, and D are the intercept, linear, quadratic, and cubic coefficients of the third-degree polynomial. These coefficients span from the corresponding value in the X column to the next highest value.
Options That Apply to Bivariate Normal Ellipse
Shaded Contour Shades the area inside the density ellipse.
Select Points Inside Selects the points inside the ellipse.
Select Points Outside Selects the points outside the ellipse.
Options That Apply to Quantile Density Contours
Kernel Control Displays a slider for each variable, where you can change the standard deviation that defines the range of X and Y values for determining the density of contour lines.
5% Contours Shows or hides the 5% contour lines.
Contour Lines Shows or hides the 10% contour lines.
Contour Fill Fills the areas between the contour lines.
Color Theme Changes the color theme of the contour lines.
Select Points by Density Selects points that fall in a user-specified quantile range.
Color by Density Quantile Colors the points according to density.
Save Density Quantile Creates a new column containing the density quantile each point is in.

Chapter 5 Bivariate Analysis 143Basic Analysis Fitting Menus
Mesh Plot Is a three-dimensional plot of the density over a grid of the two analysis variables. See Figure 5.17.
Modal Clustering Creates a new column in the current data table and fills it with cluster values.
Note: If you save the modal clustering values first and then save the density grid, the grid table also contains the cluster values. The cluster values are useful for coloring and marking points in plots.
Save Density Grid Saves the density estimates and the quantiles associated with them in a new data table. The grid data can be used to visualize the density in other ways, such as with the Scatterplot 3D or the Contour Plot platforms.
Figure 5.17 Example of a Mesh Plot
Diagnostics Plots
The Plot Residuals option creates residual plots and other plots to diagnose the model fit. The following plots are available:
Residual by Predicted Plot is a plot of the residuals versus the predicted values. A histogram of the residuals is also created.
Actual by Predicted Plot is a plot of the actual values versus the predicted values.
Residual by Row Plot is a plot of the residual values versus the row number.
Residual by X Plot is a plot of the residual values versus the X variable.
Residual Normal Quantile Plot is a Normal quantile plot of the residuals.

144 Bivariate Analysis Chapter 5Additional Examples of the Bivariate Platform Basic Analysis
Additional Examples of the Bivariate Platform
• “Example of the Fit Special Option”• “Example of the Fit Orthogonal Option”• “Example of the Fit Robust Command”• “Example of Group By Using Density Ellipses”• “Example of Group By Using Regression Lines”• “Example of Grouping Using a By Variable”
Example of the Fit Special Option
To transform Y as log and X as square root, proceed as follows:
1. Select Help > Sample Data Library and open SAT.jmp.
2. Select Analyze > Fit Y by X.
3. Select 2004 Verbal and click Y, Response.
4. Select % Taking (2004) and click X, Factor.
5. Click OK.
Figure 5.18 Example of SAT Scores by Percent Taking
6. From the red triangle menu for Bivariate Fit, select Fit Special. The Specify Transformation or Constraint window appears. For a description of this window, see “Fit Special” on page 130.

Chapter 5 Bivariate Analysis 145Basic Analysis Additional Examples of the Bivariate Platform
Figure 5.19 The Specify Transformation or Constraint Window
7. Within Y Transformation, select Natural Logarithm: log(y).
8. Within X Transformation, select Square Root: sqrt(x).
9. Click OK.

146 Bivariate Analysis Chapter 5Additional Examples of the Bivariate Platform Basic Analysis
Figure 5.20 Example of Fit Special Report
Figure 5.20 shows the fitted line plotted on the original scale. The model appears to fit the data well, as the plotted line goes through the cloud of points.
Example of the Fit Orthogonal Option
This example involves two parts. First, standardize the variables using the Distribution platform. Then, use the standardized variables to fit the orthogonal model.
Standardize the Variables
1. Select Help > Sample Data Library and open Big Class.jmp.

Chapter 5 Bivariate Analysis 147Basic Analysis Additional Examples of the Bivariate Platform
2. Select Analyze > Distribution.
3. Select height and weight and click Y, Columns.
4. Click OK.
5. Hold down the Ctrl key. On the red triangle menu next to height, select Save > Standardized.
Holding down the Ctrl key broadcasts the operation to all variables in the report window. Notice that in the Big Class.jmp sample data table, two new columns have been added.
6. Close the Distribution report window.
Use the Standardized Variables to Fit the Orthogonal Model
1. From the Big Class.jmp sample data table, select Analyze > Fit Y by X.
2. Select Std weight and click Y, Response.
3. Select Std height and click X, Factor.
4. Click OK.
5. From the red triangle menu, select Fit Line.
6. From the red triangle menu, select Fit Orthogonal. Then select each of the following:– Equal Variances
– Fit X to Y
– Specified Variance Ratio and type 0.2.
– Specified Variance Ratio and type 5.
Figure 5.21 Example of Orthogonal Fitting Options
Fit Line
Fit X to Y

148 Bivariate Analysis Chapter 5Additional Examples of the Bivariate Platform Basic Analysis
The scatterplot in Figure 5.21 shows the standardized height and weight values with various line fits that illustrate the behavior of the orthogonal variance ratio selections. The standard linear regression (Fit Line) occurs when the variance of the X variable is considered to be very small. Fit X to Y is the opposite extreme, when the variation of the Y variable is ignored. All other lines fall between these two extremes and shift as the variance ratio changes. As the variance ratio increases, the variation in the Y response dominates and the slope of the fitted line shifts closer to the Y by X fit. Likewise, when you decrease the ratio, the slope of the line shifts closer to the X by Y fit.
Example of the Fit Robust Command
The data in the Weight Measurements.jmp sample data table shows the height and weight measurements taken by 40 students.
1. Select Help > Sample Data Library and open Weight Measurements.jmp.
2. Select Analyze > Fit Y by X.
3. Select weight and click Y, Response.
4. Select height and click X, Factor.
5. Click OK.
6. From the red triangle menu, select Fit Line.
7. From the red triangle menu, select Robust > Fit Robust.

Chapter 5 Bivariate Analysis 149Basic Analysis Additional Examples of the Bivariate Platform
Figure 5.22 Example of Robust Fit
If you look at the standard Analysis of Variance report, you might wrongly conclude that height and weight do not have a linear relationship, since the p-value is 0.1203. However, when you look at the Robust Fit report, you would probably conclude that they do have a linear relationship, because the p-value there is 0.0489. It appears that some of the measurements are unusually low, perhaps due to incorrect user input. These measurements were unduly influencing the analysis.

150 Bivariate Analysis Chapter 5Additional Examples of the Bivariate Platform Basic Analysis
Example of Group By Using Density Ellipses
This example uses the Hot Dogs.jmp sample data table. The Type column identifies three different types of hot dogs: beef, meat, or poultry. You want to group the three types of hot dogs according to their cost variables.
1. Select Help > Sample Data Library and open Hot Dogs.jmp.
2. Select Analyze > Fit Y by X.
3. Select $/oz and click Y, Response.
4. Select $/lb Protein and click X, Factor.
5. Click OK.
6. From the red triangle menu, select Group By.
7. From the list, select Type.
8. Click OK.
If you look at the Group By option again, you see it has a check mark next to it.
9. From the red triangle menu, select Density Ellipse > 0.90.
To color the points according to Type, proceed as follows:
10. Right-click on the scatterplot and select Row Legend.
11. Select Type in the column list and click OK.
Figure 5.23 Example of Group By
The ellipses in Figure 5.23 show clearly how the different types of hot dogs cluster with respect to the cost variables.

Chapter 5 Bivariate Analysis 151Basic Analysis Additional Examples of the Bivariate Platform
Example of Group By Using Regression Lines
Use a grouping variable to overlay regression lines to compare slopes of the different groups.
1. Select Help > Sample Data Library and open Big Class.jmp.
2. Select Analyze > Fit Y by X.
3. Select weight and click Y, Response.
4. Select height and click X, Factor.
5. Click OK.
To create the example on the left in Figure 5.24:
6. Select Fit Line from the red triangle menu.
To create the example on the right in Figure 5.24:
7. From the Linear Fit menu, select Remove Fit.
8. From the red triangle menu, select Group By.
9. From the list, select sex.
10. Click OK.
11. Select Fit Line from the red triangle menu.
Figure 5.24 Example of Regression Analysis for Whole Sample and Grouped Sample
The scatterplot to the left in Figure 5.24 has a single regression line that relates weight to height. The scatterplot to the right shows separate regression lines for males and females.

152 Bivariate Analysis Chapter 5Additional Examples of the Bivariate Platform Basic Analysis
Example of Grouping Using a By Variable
Another method of grouping is to specify a By variable in the launch window. This results in separate reports and graphics for each level of the By variable (or combinations of By variables).
1. Select Help > Sample Data Library and open Big Class.jmp.
2. Select Analyze > Fit Y by X.
3. Select weight and click Y, Response.
4. Select height and click X, Factor.
5. Select sex and click By.
6. Click OK.
7. Hold down Ctrl, then select Fit Line from the red triangle menu.

Chapter 5 Bivariate Analysis 153Basic Analysis Statistical Details for the Bivariate Platform
Figure 5.25 Example of By Variable Plots
There are separate analyses for each level of the By variable (sex). So you see a scatterplot for the females and a scatterplot for the males.
Statistical Details for the Bivariate Platform
• “Fit Line”• “Fit Spline”• “Fit Orthogonal”• “Summary of Fit Report”• “Lack of Fit Report”
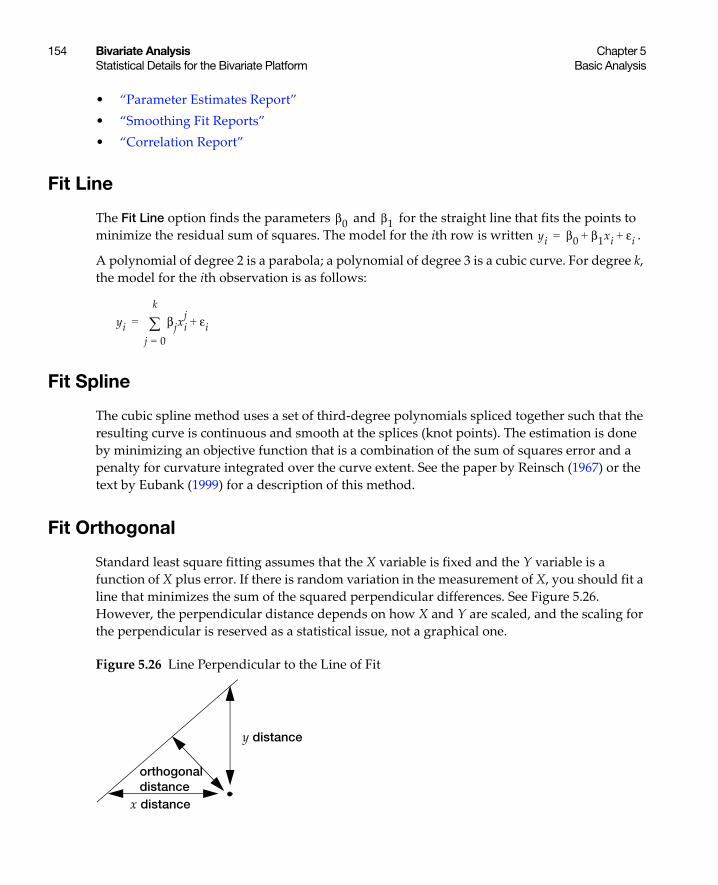
154 Bivariate Analysis Chapter 5Statistical Details for the Bivariate Platform Basic Analysis
• “Parameter Estimates Report”• “Smoothing Fit Reports”• “Correlation Report”
Fit Line
The Fit Line option finds the parameters and for the straight line that fits the points to minimize the residual sum of squares. The model for the ith row is written .
A polynomial of degree 2 is a parabola; a polynomial of degree 3 is a cubic curve. For degree k, the model for the ith observation is as follows:
Fit Spline
The cubic spline method uses a set of third-degree polynomials spliced together such that the resulting curve is continuous and smooth at the splices (knot points). The estimation is done by minimizing an objective function that is a combination of the sum of squares error and a penalty for curvature integrated over the curve extent. See the paper by Reinsch (1967) or the text by Eubank (1999) for a description of this method.
Fit Orthogonal
Standard least square fitting assumes that the X variable is fixed and the Y variable is a function of X plus error. If there is random variation in the measurement of X, you should fit a line that minimizes the sum of the squared perpendicular differences. See Figure 5.26. However, the perpendicular distance depends on how X and Y are scaled, and the scaling for the perpendicular is reserved as a statistical issue, not a graphical one.
Figure 5.26 Line Perpendicular to the Line of Fit
β0 β1yi β0 β1xi εi+ +=
yi βjxij εi+
j 0=
k
=
y distance
x distance
orthogonal distance

Chapter 5 Bivariate Analysis 155Basic Analysis Statistical Details for the Bivariate Platform
The fit requires that you specify the ratio of the variance of the error in Y to the error in X. This is the variance of the error, not the variance of the sample points, so you must choose carefully. The ratio is infinite in standard least squares because is zero. If you do an orthogonal fit with a large error ratio, the fitted line approaches the standard least squares line of fit. If you specify a ratio of zero, the fit is equivalent to the regression of X on Y, instead of Y on X.
The most common use of this technique is in comparing two measurement systems that both have errors in measuring the same value. Thus, the Y response error and the X measurement error are both the same type of measurement error. Where do you get the measurement error variances? You cannot get them from bivariate data because you cannot tell which measurement system produces what proportion of the error. So, you either must blindly assume some ratio like 1, or you must rely on separate repeated measurements of the same unit by the two measurement systems.
An advantage to this approach is that the computations give you predicted values for both Y and X; the predicted values are the point on the line that is closest to the data point, where closeness is relative to the variance ratio.
Confidence limits are calculated as described in Tan and Iglewicz (1999).
Summary of Fit Report
RSquare
Using quantities from the corresponding analysis of variance table, the RSquare for any continuous response fit is calculated as follows:
RSquare Adj
The RSquare Adj is a ratio of mean squares instead of sums of squares and is calculated as follows:
The mean square for Error is in the Analysis of Variance report. See Figure 5.12. You can compute the mean square for C. Total as the Sum of Squares for C. Total divided by its respective degrees of freedom.
σy2( ) σx
2( )⁄ σx2
Sum of Squares for ModelSum of Squares for C. Total------------------------------------------------------------------------
1 Mean Square for ErrorMean Square for C. Total------------------------------------------------------------------–

156 Bivariate Analysis Chapter 5Statistical Details for the Bivariate Platform Basic Analysis
Lack of Fit Report
Pure Error DF
For the Pure Error DF, consider the cases where more than one observation has the same value for height. In general, if there are g groups having multiple rows with identical values for each effect, the pooled DF, denoted DFp, is as follows:
where ni is the number of observations in the ith group.
Pure Error SS
For the Pure Error SS, in general, if there are g groups having multiple rows with the same x value, the pooled SS, denoted SSp, is written as follows:
where SSi is the sum of squares for the ith group corrected for its mean.
Max RSq
Because Pure Error is invariant to the form of the model and is the minimum possible variance, Max RSq is calculated as follows:
Parameter Estimates Report
Std Beta
Std Beta is calculated as follows:
where is the estimated parameter, sx and sy are the standard deviations of the X and Y variables.
DFp ni 1–( )i 1=
g
=
SSp SSii 1=
g
=
1SS Pure error( )
SS Total for whole model( )----------------------------------------------------------------------–
β sx sy⁄( )
β

Chapter 5 Bivariate Analysis 157Basic Analysis Statistical Details for the Bivariate Platform
Design Std Error
Design Std Error is calculated as the standard error of the parameter estimate divided by the RMSE.
Smoothing Fit Reports
R-Square is equal to 1-(SSE/C.Total SS), where C.Total SS is available in the Fit Line ANOVA report.
Correlation Report
The Pearson correlation coefficient is denoted r, and is computed as follows:
where
Where is either the weight of the ith observation if a weight column is specified, or 1 if no weight column is assigned.
rxysxy
sx2sy
2---------------= sxy
wi xi xi–( ) yi yi–( )df
-----------------------------------------------------=
wi

158 Bivariate Analysis Chapter 5Statistical Details for the Bivariate Platform Basic Analysis

Chapter 6Oneway Analysis
Examine Relationships between a Continuous Y and a Categorical XVariable
Using the Oneway or Fit Y by X platform, you can explore how the distribution of a continuous Y variable differs across groups defined by a single categorical X variable. For example, you might want to find out how different categories of the same type of drug (X) affect patient pain levels on a numbered scale (Y).
The Oneway platform is the continuous by nominal or ordinal personality of the Fit Y by X platform. The analysis results appear in a plot, and you can interactively add additional analyses, such as the following:
• a one-way analysis of variance to fit means and to test that they are equal
• nonparametric tests
• a test for homogeneity of variance
• multiple-comparison tests on means, with means comparison circles
• outlier box plots overlaid on each group
• power details for the one-way layout
Figure 6.1 Oneway Analysis

160 Oneway Analysis Chapter 6Basic Analysis
ContentsOverview of Oneway Analysis . . . . . . . . . . . . . . . . . . . . . . . . . . . . . . . . . . . . . . . . . . . . . . . . . . . . 162Example of Oneway Analysis . . . . . . . . . . . . . . . . . . . . . . . . . . . . . . . . . . . . . . . . . . . . . . . . . . . . . 162Launch the Oneway Platform . . . . . . . . . . . . . . . . . . . . . . . . . . . . . . . . . . . . . . . . . . . . . . . . . . . . . 164
Data Format . . . . . . . . . . . . . . . . . . . . . . . . . . . . . . . . . . . . . . . . . . . . . . . . . . . . . . . . . . . . . . . . . 164The Oneway Plot . . . . . . . . . . . . . . . . . . . . . . . . . . . . . . . . . . . . . . . . . . . . . . . . . . . . . . . . . . . . . . . . 165Oneway Platform Options . . . . . . . . . . . . . . . . . . . . . . . . . . . . . . . . . . . . . . . . . . . . . . . . . . . . . . . . 166
Display Options. . . . . . . . . . . . . . . . . . . . . . . . . . . . . . . . . . . . . . . . . . . . . . . . . . . . . . . . . . . . . . 169Quantiles. . . . . . . . . . . . . . . . . . . . . . . . . . . . . . . . . . . . . . . . . . . . . . . . . . . . . . . . . . . . . . . . . . . . . . . 170
Outlier Box Plots . . . . . . . . . . . . . . . . . . . . . . . . . . . . . . . . . . . . . . . . . . . . . . . . . . . . . . . . . . . . . 171Means/Anova and Means/Anova/Pooled t . . . . . . . . . . . . . . . . . . . . . . . . . . . . . . . . . . . . . . . . . . 172
The Summary of Fit Report . . . . . . . . . . . . . . . . . . . . . . . . . . . . . . . . . . . . . . . . . . . . . . . . . . . . 172The t-test Report . . . . . . . . . . . . . . . . . . . . . . . . . . . . . . . . . . . . . . . . . . . . . . . . . . . . . . . . . . . . . 173The Analysis of Variance Report. . . . . . . . . . . . . . . . . . . . . . . . . . . . . . . . . . . . . . . . . . . . . . . . 174The Means for Oneway Anova Report. . . . . . . . . . . . . . . . . . . . . . . . . . . . . . . . . . . . . . . . . . . 175The Block Means Report . . . . . . . . . . . . . . . . . . . . . . . . . . . . . . . . . . . . . . . . . . . . . . . . . . . . . . 176Mean Diamonds and X-Axis Proportional . . . . . . . . . . . . . . . . . . . . . . . . . . . . . . . . . . . . . . . 176Mean Lines, Error Bars, and Standard Deviation Lines . . . . . . . . . . . . . . . . . . . . . . . . . . . . 177
Analysis of Means Methods . . . . . . . . . . . . . . . . . . . . . . . . . . . . . . . . . . . . . . . . . . . . . . . . . . . . . . 177Analysis of Means for Location. . . . . . . . . . . . . . . . . . . . . . . . . . . . . . . . . . . . . . . . . . . . . . . . . 178Analysis of Means for Scale . . . . . . . . . . . . . . . . . . . . . . . . . . . . . . . . . . . . . . . . . . . . . . . . . . . . 179Analysis of Means Charts . . . . . . . . . . . . . . . . . . . . . . . . . . . . . . . . . . . . . . . . . . . . . . . . . . . . . 180Analysis of Means Options . . . . . . . . . . . . . . . . . . . . . . . . . . . . . . . . . . . . . . . . . . . . . . . . . . . . 180
Compare Means. . . . . . . . . . . . . . . . . . . . . . . . . . . . . . . . . . . . . . . . . . . . . . . . . . . . . . . . . . . . . . . . . 181Using Comparison Circles . . . . . . . . . . . . . . . . . . . . . . . . . . . . . . . . . . . . . . . . . . . . . . . . . . . . . 183Each Pair, Student’s t . . . . . . . . . . . . . . . . . . . . . . . . . . . . . . . . . . . . . . . . . . . . . . . . . . . . . . . . . 184All Pairs, Tukey HSD . . . . . . . . . . . . . . . . . . . . . . . . . . . . . . . . . . . . . . . . . . . . . . . . . . . . . . . . . 184With Best, Hsu MCB . . . . . . . . . . . . . . . . . . . . . . . . . . . . . . . . . . . . . . . . . . . . . . . . . . . . . . . . . . 184With Control, Dunnett’s . . . . . . . . . . . . . . . . . . . . . . . . . . . . . . . . . . . . . . . . . . . . . . . . . . . . . . . 186Each Pair Stepwise, Newman-Keuls . . . . . . . . . . . . . . . . . . . . . . . . . . . . . . . . . . . . . . . . . . . . 186Compare Means Options . . . . . . . . . . . . . . . . . . . . . . . . . . . . . . . . . . . . . . . . . . . . . . . . . . . . . . 187
Nonparametric Tests. . . . . . . . . . . . . . . . . . . . . . . . . . . . . . . . . . . . . . . . . . . . . . . . . . . . . . . . . . . . . 187The Wilcoxon, Median, Van der Waerden, and Friedman Rank Test Reports. . . . . . . . . . 189Kolmogorov-Smirnov Two-Sample Test Report . . . . . . . . . . . . . . . . . . . . . . . . . . . . . . . . . . 190Nonparametric Multiple Comparisons . . . . . . . . . . . . . . . . . . . . . . . . . . . . . . . . . . . . . . . . . . 192
Unequal Variances . . . . . . . . . . . . . . . . . . . . . . . . . . . . . . . . . . . . . . . . . . . . . . . . . . . . . . . . . . . . . . 194Tests That the Variances Are Equal Report . . . . . . . . . . . . . . . . . . . . . . . . . . . . . . . . . . . . . . . 195
Equivalence Test . . . . . . . . . . . . . . . . . . . . . . . . . . . . . . . . . . . . . . . . . . . . . . . . . . . . . . . . . . . . . . . . 197Robust . . . . . . . . . . . . . . . . . . . . . . . . . . . . . . . . . . . . . . . . . . . . . . . . . . . . . . . . . . . . . . . . . . . . . . . . . 197
Robust Fit . . . . . . . . . . . . . . . . . . . . . . . . . . . . . . . . . . . . . . . . . . . . . . . . . . . . . . . . . . . . . . . . . . . 197

Chapter 6 Oneway Analysis 161Basic Analysis
Cauchy Fit . . . . . . . . . . . . . . . . . . . . . . . . . . . . . . . . . . . . . . . . . . . . . . . . . . . . . . . . . . . . . . . . . . . 198Power . . . . . . . . . . . . . . . . . . . . . . . . . . . . . . . . . . . . . . . . . . . . . . . . . . . . . . . . . . . . . . . . . . . . . . . . . . 198
Power Details Window and Reports. . . . . . . . . . . . . . . . . . . . . . . . . . . . . . . . . . . . . . . . . . . . . 199Normal Quantile Plot . . . . . . . . . . . . . . . . . . . . . . . . . . . . . . . . . . . . . . . . . . . . . . . . . . . . . . . . . . . . 200CDF Plot . . . . . . . . . . . . . . . . . . . . . . . . . . . . . . . . . . . . . . . . . . . . . . . . . . . . . . . . . . . . . . . . . . . . . . . 200Densities . . . . . . . . . . . . . . . . . . . . . . . . . . . . . . . . . . . . . . . . . . . . . . . . . . . . . . . . . . . . . . . . . . . . . . . 200Matching Column . . . . . . . . . . . . . . . . . . . . . . . . . . . . . . . . . . . . . . . . . . . . . . . . . . . . . . . . . . . . . . . 201Additional Examples of the Oneway Platform . . . . . . . . . . . . . . . . . . . . . . . . . . . . . . . . . . . . . . . 201
Example of an Analysis of Means Chart. . . . . . . . . . . . . . . . . . . . . . . . . . . . . . . . . . . . . . . . . . 202Example of an Analysis of Means for Variances Chart . . . . . . . . . . . . . . . . . . . . . . . . . . . . . 203Example of the Each Pair, Student’s t Test . . . . . . . . . . . . . . . . . . . . . . . . . . . . . . . . . . . . . . . . 204Example of the All Pairs, Tukey HSD Test . . . . . . . . . . . . . . . . . . . . . . . . . . . . . . . . . . . . . . . . 206Example of the With Best, Hsu MCB Test . . . . . . . . . . . . . . . . . . . . . . . . . . . . . . . . . . . . . . . . 208Example of the With Control, Dunnett’s Test . . . . . . . . . . . . . . . . . . . . . . . . . . . . . . . . . . . . . 209Example of the Each Pair Stepwise, Newman-Keuls Test . . . . . . . . . . . . . . . . . . . . . . . . . . . 211Example Contrasting All of the Compare Means Tests . . . . . . . . . . . . . . . . . . . . . . . . . . . . . 212Example of the Nonparametric Wilcoxon Test . . . . . . . . . . . . . . . . . . . . . . . . . . . . . . . . . . . . 212Example of the Unequal Variances Option . . . . . . . . . . . . . . . . . . . . . . . . . . . . . . . . . . . . . . . 215Example of an Equivalence Test. . . . . . . . . . . . . . . . . . . . . . . . . . . . . . . . . . . . . . . . . . . . . . . . . 216Example of the Robust Fit Option . . . . . . . . . . . . . . . . . . . . . . . . . . . . . . . . . . . . . . . . . . . . . . . 217Example of the Power Option . . . . . . . . . . . . . . . . . . . . . . . . . . . . . . . . . . . . . . . . . . . . . . . . . . 219Example of a Normal Quantile Plot . . . . . . . . . . . . . . . . . . . . . . . . . . . . . . . . . . . . . . . . . . . . . 220Example of a CDF Plot . . . . . . . . . . . . . . . . . . . . . . . . . . . . . . . . . . . . . . . . . . . . . . . . . . . . . . . . 221Example of the Densities Options . . . . . . . . . . . . . . . . . . . . . . . . . . . . . . . . . . . . . . . . . . . . . . . 222Example of the Matching Column Option . . . . . . . . . . . . . . . . . . . . . . . . . . . . . . . . . . . . . . . . 223Example of Stacking Data for a Oneway Analysis . . . . . . . . . . . . . . . . . . . . . . . . . . . . . . . . . 225
Statistical Details for the Oneway Platform . . . . . . . . . . . . . . . . . . . . . . . . . . . . . . . . . . . . . . . . . . 231Comparison Circles . . . . . . . . . . . . . . . . . . . . . . . . . . . . . . . . . . . . . . . . . . . . . . . . . . . . . . . . . . . 231Power . . . . . . . . . . . . . . . . . . . . . . . . . . . . . . . . . . . . . . . . . . . . . . . . . . . . . . . . . . . . . . . . . . . . . . . 232Summary of Fit Report . . . . . . . . . . . . . . . . . . . . . . . . . . . . . . . . . . . . . . . . . . . . . . . . . . . . . . . . 233Tests That the Variances Are Equal . . . . . . . . . . . . . . . . . . . . . . . . . . . . . . . . . . . . . . . . . . . . . . 234Nonparametric Test Statistics. . . . . . . . . . . . . . . . . . . . . . . . . . . . . . . . . . . . . . . . . . . . . . . . . . . 235

162 Oneway Analysis Chapter 6Overview of Oneway Analysis Basic Analysis
Overview of Oneway Analysis
A one-way analysis of variance tests for differences between group means. The total variability in the response is partitioned into two parts: within-group variability and between-group variability. If the between-group variability is large relative to the within-group variability, then the differences between the group means are considered to be significant.
Example of Oneway Analysis
This example uses the Analgesics.jmp sample data table. Thirty-three participants were administered three different types of analgesics (A, B, and C). The participants were asked to rate their pain levels on a sliding scale. You want to find out if the means for A, B, and C are significantly different.
1. Select Help > Sample Data Library and open Analgesics.jmp.
2. Select Analyze > Fit Y by X.
3. Select pain and click Y, Response.
4. Select drug and click X, Factor.
5. Click OK.
Figure 6.2 Example of Oneway Analysis
You notice that one drug (A) has consistently lower scores than the other drugs. You also notice that the x-axis ticks are unequally spaced. The length between the ticks is proportional to the number of scores (observations) for each drug.
Perform an analysis of variance on the data.
6. From the red triangle menu for Oneway Analysis, select Means/Anova.

Chapter 6 Oneway Analysis 163Basic Analysis Example of Oneway Analysis
Note: If the X factor has only two levels, the Means/Anova option appears as Means/Anova/Pooled t, and adds a Pooled t-test report to the report window.
Figure 6.3 Example of the Means/Anova Option
Note the following observations:
• Mean diamonds representing confidence intervals appear.
– The line near the center of each diamond represents the group mean. At a glance, you can see that the mean for each drug looks significantly different.
– The vertical span of each diamond represents the 95% confidence interval for the mean of each group.
See “Mean Diamonds and X-Axis Proportional” on page 176.
• The Summary of Fit table provides overall summary information about the analysis.

164 Oneway Analysis Chapter 6Launch the Oneway Platform Basic Analysis
• The Analysis of Variance report shows the standard ANOVA information. You notice that the Prob > F (the p-value) is 0.0053, which supports your visual conclusion that there are significant differences between the drugs.
• The Means for Oneway Anova report shows the mean, sample size, and standard error for each level of the categorical factor.
Launch the Oneway Platform
To perform a oneway analysis, do the following:
1. Select Analyze > Fit Y by X.
2. Enter a continuous column for Y, Response.
3. Enter a nominal or ordinal column for X, Factor.
Figure 6.4 The Fit Y By X Launch Window
The word Oneway appears above the diagram, to indicate that you are performing a oneway analysis.
Note: You can also launch a oneway analysis from the JMP Starter window. Select View > JMP Starter > Basic > Oneway.
For more information about this launch window, see “Introduction to Fit Y by X” chapter on page 109.
Data Format
The Oneway platform requires that each row contain information for one or more observations with the same level of the X variable. If a row represents more than one

Chapter 6 Oneway Analysis 165Basic Analysis The Oneway Plot
observation, you must use a Weight or Freq variable to indicate how many observations the row represents.
When oneway data are in a format other than a JMP data table, sometimes they are arranged so that a row contains information for multiple observations. To analyze the data in JMP, you must import the data and restructure it so that each row of the JMP data table contains information for a single observation. See “Example of Stacking Data for a Oneway Analysis” on page 225.
The Oneway Plot
The Oneway plot shows the response points for each X factor value. You can compare the distribution of the response across the levels of the X factor. The distinct values of X are sometimes called levels.
Replace variables in the plot in one of two ways: swap existing variables by dragging and dropping a variable from one axis to the other axis; or, click on a variable in the Columns panel of the associated data table and drag it onto an axis.
You can add reports, additional plots, and tests to the report window using the options in the red triangle menu for Oneway Analysis. See “Oneway Platform Options” on page 166.
To produce the plot shown in Figure 6.5, follow the instructions in “Example of Oneway Analysis” on page 162.
Figure 6.5 The Oneway Plot
Note: Any rows that are excluded in the data table are also hidden in the Oneway plot.

166 Oneway Analysis Chapter 6Oneway Platform Options Basic Analysis
Oneway Platform Options
Note: The Fit Group menu appears if you have specified multiple Y or X variables. Menu options allow you to arrange reports or order them by RSquare. See the Standard Least Squares chapter in the Fitting Linear Models book for more information.
When you select a platform option, objects can be added to the plot, and a report is added to the report window. For examples, see Table 6.1.
The red triangle menu for Oneway Analysis provides the following options. Some options might not appear unless specific conditions are met.
Quantiles Lists the following quantiles for each group:
– 0% (Minimum)
– 10%
– 25%
– 50% (Median)
– 75%
– 90%
– 100% (Maximum)
Activates Box Plots from the Display Options menu. See “Quantiles” on page 170.
Means/Anova Fits means for each group and performs a one-way analysis of variance to test if there are differences among the means. See “Means/Anova and Means/Anova/Pooled t” on page 172.
Table 6.1 Examples of Options and Elements
Platform Option Object Added to Plot Report Added to Report Window
Quantiles Box plots Quantiles report
Means/Anova Mean diamonds Oneway ANOVA reports
Means and Std Dev Mean lines, error bars, and standard deviation lines
Means and Std Deviations report
Compare Means Comparison circles
(except Each Pair Stepwise, Newman-Keuls option)
Means Comparison reports

Chapter 6 Oneway Analysis 167Basic Analysis Oneway Platform Options
Note: If the X factor has two levels, the menu option changes to Means/Anova/Pooled t and produces a Pooled t-test report assuming equal variances.
Means and Std Dev Gives summary statistics for each group. The standard errors for the means use individual group standard deviations rather than the pooled estimate of the standard deviation.
The plot now contains mean lines, error bars, and standard deviation lines. For a brief description of these elements, see “Display Options” on page 169. For more details about these elements, see “Mean Lines, Error Bars, and Standard Deviation Lines” on page 177.
t test (Available only if the X factor has two levels.) Produces a t-test report assuming that the variances are not equal. See “The t-test Report” on page 173.
Analysis of Means Methods Provides five commands for performing Analysis of Means (ANOM) procedures. There are commands for comparing means, variances, and ranges. See “Analysis of Means Methods” on page 177.
Compare Means Provides multiple-comparison methods for comparing sets of group means. See “Compare Means” on page 181.
Nonparametric Provides nonparametric comparisons of group locations. See “Nonparametric Tests” on page 187.
Unequal Variances Performs four tests for equality of group variances. Also gives the Welch test, which is an ANOVA test for comparing means when the variances within groups are not equal. See “Unequal Variances” on page 194.
Equivalence Test Tests that a difference is less than a threshold value. See “Equivalence Test” on page 197.
Robust Provides two methods for reducing the influence of outliers on your data. See “Robust” on page 197.
Power Provides calculations of statistical power and other details about a given hypothesis test. See “Power” on page 198.
The Power Details window and reports also appear within the Fit Model platform. For further discussion and examples of power calculations, see the Statistical Details appendix in the Fitting Linear Models book.
Set α Level You can select an option from the most common alpha levels or specify any level with the Other selection. Changing the alpha level results in the following actions:
– recalculates confidence limits
– adjusts the mean diamonds on the plot (if they are showing)

168 Oneway Analysis Chapter 6Oneway Platform Options Basic Analysis
– modifies the upper and lower confidence level values in reports
– changes the critical number and comparison circles for all Compare Means reports
– changes the critical number for all Nonparametric Multiple Comparison reports
Normal Quantile Plot Provides the following options for plotting the quantiles of the data in each group:
– Plot Actual by Quantile generates a quantile plot with the response variable on the y-axis and quantiles on the x-axis. The plot shows quantiles computed within each level of the categorical X factor.
– Plot Quantile by Actual reverses the x- and y-axes.
– Line of Fit draws straight diagonal reference lines on the plot for each level of the X variable. This option is available only once you have created a plot (Actual by Quantile or Quantile by Actual).
CDF Plot Plots the cumulative distribution function for all of the groups in the Oneway report. See “CDF Plot” on page 200.
Densities Compares densities across groups. See “Densities” on page 200.
Matching Column Specify a matching variable to perform a matching model analysis. Use this option when the data in your Oneway analysis comes from matched (paired) data, such as when observations in different groups come from the same participant.
The plot now contains matching lines that connect the matching points. See “Matching Column” on page 201.
Save Saves the following quantities as new columns in the current data table:
– Save Residuals saves values computed as the response variable minus the mean of the response variable within each level of the factor variable.
– Save Standardized saves standardized values of the response variable computed within each level of the factor variable. This is the centered response divided by the standard deviation within each level.
– Save Normal Quantiles saves normal quantile values computed within each level of the categorical factor variable.
– Save Predicted saves the predicted mean of the response variable for each level of the factor variable.
Display Options Adds or removes elements from the plot. See “Display Options” on page 169.
See the JMP Reports chapter in the Using JMP book for more information about the following options:

Chapter 6 Oneway Analysis 169Basic Analysis Oneway Platform Options
Local Data Filter Shows or hides the local data filter that enables you to filter the data used in a specific report.
Redo Contains options that enable you to repeat or relaunch the analysis. In platforms that support the feature, the Automatic Recalc option immediately reflects the changes that you make to the data table in the corresponding report window.
Save Script Contains options that enable you to save a script that reproduces the report to several destinations.
Save By-Group Script Contains options that enable you to save a script that reproduces the platform report for all levels of a By variable to several destinations. Available only when a By variable is specified in the launch window.
Display Options
Using Display Options, you can add or remove elements from a plot. Some options might not appear unless they are relevant.
All Graphs Shows or hides all graphs.
Points Shows or hides data points on the plot.
Box Plots Shows or hides outlier box plots for each group. For an example, see “Conduct the Oneway Analysis” on page 229.
Mean Diamonds Draws a horizontal line through the mean of each group proportional to its x-axis. The top and bottom points of the mean diamond show the upper and lower 95% confidence points for each group. See “Mean Diamonds and X-Axis Proportional” on page 176.
Mean Lines Draws a line at the mean of each group. See “Mean Lines, Error Bars, and Standard Deviation Lines” on page 177.
Mean CI Lines Draws lines at the upper and lower 95% confidence levels for each group.
Mean Error Bars Identifies the mean of each group and shows error bars one standard error above and below the mean. See “Mean Lines, Error Bars, and Standard Deviation Lines” on page 177.
Grand Mean Draws the overall mean of the Y variable on the plot.
Std Dev Lines Shows lines one standard deviation above and below the mean of each group. See “Mean Lines, Error Bars, and Standard Deviation Lines” on page 177.

170 Oneway Analysis Chapter 6Quantiles Basic Analysis
Comparison Circles Shows or hides comparison circles. This option is available only when one of the Compare Means options is selected. See “Comparison Circles” on page 231. For an example, see “Conduct the Oneway Analysis” on page 229.
Connect Means Connects the group means with a straight line.
Mean of Means Draws a line at the mean of the group means.
X-Axis proportional Makes the spacing on the x-axis proportional to the sample size of each level. See “Mean Diamonds and X-Axis Proportional” on page 176.
Points Spread Spreads points over the width of the interval
Points Jittered Adds small spaces between points that overlay on the same y value. The horizontal adjustment of points varies from 0.375 to 0.625 with a 4*(Uniform-0.5)5 distribution.
Matching Lines (Only appears when the Matching Column option is selected.) Connects matching points.
Matching Dotted Lines (Only appears when the Matching Column option is selected.) Draws dotted lines to connect cell means from missing cells in the table. The values used as the endpoints of the lines are obtained using a two-way ANOVA model.
Histograms Draws side-by-side histograms to the right of the original plot.
Robust Mean Lines (Appears only when a Robust option is selected.) Draws a line at the robust mean of each group.
Legend Displays a legend for the Normal Quantile Plot, CDF Plot, and Densities options.
Quantiles
The Quantiles report lists selected percentiles for each level of the X factor variable. The median is the 50th percentile, and the 25th and 75th percentiles are called the quartiles.
The Quantiles option adds the following elements to the plot:
• the grand mean representing the overall mean of the Y variable
• outlier box plots summarizing the distribution of points at each factor level

Chapter 6 Oneway Analysis 171Basic Analysis Quantiles
Figure 6.6 Outlier Box Plot and Grand Mean
Note: To hide these elements, click the red triangle next to Oneway Analysis and select Display Options > Box Plots or Grand Mean.
Outlier Box Plots
The outlier box plot is a graphical summary of the distribution of data. Note the following aspects about outlier box plots (see Figure 6.7):
• The horizontal line within the box represents the median sample value.
• The ends of the box represent the 75th and 25th quantiles, also expressed as the 3rd and 1st quartile, respectively.
• The difference between the 1st and 3rd quartiles is called the interquartile range.
• Each box has lines, sometimes called whiskers, that extend from each end. The whiskers extend from the ends of the box to the outermost data point that falls within the distances computed as follows:3rd quartile + 1.5*(interquartile range)
1st quartile - 1.5*(interquartile range)
If the data points do not reach the computed ranges, then the whiskers are determined by the upper and lower data point values (not including outliers).
grand mean
outlier box plot

172 Oneway Analysis Chapter 6Means/Anova and Means/Anova/Pooled t Basic Analysis
Figure 6.7 Examples of Outlier Box Plots
Means/Anova and Means/Anova/Pooled t
The Means/Anova option performs an analysis of variance. If the X factor contains exactly two levels, this option appears as Means/Anova/Pooled t. In addition to the other reports, a Pooled t-test report assuming pooled (or equal) variances appears.
Mean diamonds are added to the Oneway plot See “Display Options” on page 169 and “Mean Diamonds and X-Axis Proportional” on page 176.
Reports See “The Summary of Fit Report” on page 172, “The Analysis of Variance Report” on page 174, “The Means for Oneway Anova Report” on page 175, “The t-test Report” on page 173, and “The Block Means Report” on page 176.
– The t-test report appears only if the Means/Anova/Pooled t option is selected.
– The Block Means report appears only if you have specified a Block variable in the launch window.
The Summary of Fit Report
The Summary of Fit report shows a summary for a one-way analysis of variance.
Rsquare Measures the proportion of the variation accounted for by fitting means to each factor level. The remaining variation is attributed to random error. The R2 value is 1 if fitting the group means account for all the variation with no error. An R2 of 0 indicates that
median sample value
75% quantile or 3rd quartile
25% quantile or 1st quartile
whisker

Chapter 6 Oneway Analysis 173Basic Analysis Means/Anova and Means/Anova/Pooled t
the fit serves no better as a prediction model than the overall response mean. For more information, see “Summary of Fit Report” on page 233.
R2 is also called the coefficient of determination.
Note: A low RSquare value suggests that there may be variables not in the model that account for the unexplained variation. However, if your data are subject to a large amount of inherent variation, even a useful ANOVA model may have a low RSquare value. Read the literature in your research area to learn about typical RSquare values.
Adj Rsquare Adjusts R2 to make it more comparable over models with different numbers of parameters by using the degrees of freedom in its computation. For more information, see “Summary of Fit Report” on page 233.
Root Mean Square Error Estimates the standard deviation of the random error. It is the square root of the mean square for Error found in the Analysis of Variance report.
Mean of Response Overall mean (arithmetic average) of the response variable.
Observations (or Sum Wgts) Number of observations used in estimating the fit. If weights are used, this is the sum of the weights. See “Summary of Fit Report” on page 233.
The t-test Report
Note: This option is applicable only for the Means/Anova/Pooled t option.
There are two types of t-Tests:
• Equal variances. If you select the Means/Anova/Pooled t option, a Pooled t-Test report appears. This t-Test assumes equal variances.
• Unequal variances. If you select the t-Test option from the red triangle menu, a t-Test report appears. This t-Test assumes unequal variances.
The t-test report contains the following columns:
t Test plot Shows the sampling distribution of the difference in the means, assuming the null hypothesis is true. The vertical red line is the actual difference in the means. The shaded areas correspond to the p-values.
Difference Shows the estimated difference between the two X levels. In the plots, the Difference value appears as a red line that compares the two levels.
Std Err Dif Shows the standard error of the difference.
Upper CL Dif Shows the upper confidence limit for the difference.

174 Oneway Analysis Chapter 6Means/Anova and Means/Anova/Pooled t Basic Analysis
Lower CL Dif Shows the lower confidence limit for the difference.
Confidence Shows the level of confidence (1-alpha). To change the level of confidence, select a new alpha level from the Set α Level command from the platform red triangle menu.
t Ratio Value of the t-statistic.
DF The degrees of freedom used in the t-test.
Prob > |t| The p-value associated with a two-tailed test.
Prob > t The p-value associated with a upper-tailed test.
Prob < t The p-value associated with an lower-tailed test.
The Analysis of Variance Report
The Analysis of Variance report partitions the total variation of a sample into two components. The ratio of the two mean squares forms the F ratio. If the probability associated with the F ratio is small, then the model is a better fit statistically than the overall response mean.
Note: If you specified a Block column, then the Analysis of Variance report includes the Block variable.
Source Lists the three sources of variation, which are the model source, Error, and C. Total (corrected total).
DF Records an associated degrees of freedom (DF for short) for each source of variation:
– The degrees of freedom for C. Total are N - 1, where N is the total number of observations used in the analysis.
– If the X factor has k levels, then the model has k - 1 degrees of freedom.
The Error degrees of freedom is the difference between the C. Total degrees of freedom and the Model degrees of freedom (in other words, N - k).
Sum of Squares Records a sum of squares (SS for short) for each source of variation:
– The total (C. Total) sum of squares of each response from the overall response mean. The C. Total sum of squares is the base model used for comparison with all other models.
– The sum of squared distances from each point to its respective group mean. This is the remaining unexplained Error (residual) SS after fitting the analysis of variance model.

Chapter 6 Oneway Analysis 175Basic Analysis Means/Anova and Means/Anova/Pooled t
The total SS minus the error SS gives the sum of squares attributed to the model. This tells you how much of the total variation is explained by the model.
Mean Square Is a sum of squares divided by its associated degrees of freedom:
– The Model mean square estimates the variance of the error, but only under the hypothesis that the group means are equal.
– The Error mean square estimates the variance of the error term independently of the model mean square and is unconditioned by any model hypothesis.
F Ratio Model mean square divided by the error mean square. If the hypothesis that the group means are equal (there is no real difference between them) is true, then both the mean square for error and the mean square for model estimate the error variance. Their ratio has an F distribution. If the analysis of variance model results in a significant reduction of variation from the total, the F ratio is higher than expected.
Prob>F Probability of obtaining (by chance alone) an F value greater than the one calculated if, in reality, there is no difference in the population group means. Observed significance probabilities of 0.05 or less are often considered evidence that there are differences in the group means.
The Means for Oneway Anova Report
The Means for Oneway Anova report summarizes response information for each level of the nominal or ordinal factor.
Level Lists the levels of the X variable.
Number Lists the number of observations in each group.
Mean Lists the mean of each group.
Std Error Lists the estimates of the standard deviations for the group means. This standard error is estimated assuming that the variance of the response is the same in each level. It is the root mean square error found in the Summary of Fit report divided by the square root of the number of values used to compute the group mean.
Lower 95% and Upper 95% Lists the lower and upper 95% confidence interval for the group means.

176 Oneway Analysis Chapter 6Means/Anova and Means/Anova/Pooled t Basic Analysis
The Block Means Report
If you have specified a Block variable on the launch window, the Means/Anova and Means/Anova/Pooled t commands produce a Block Means report. This report shows the means for each block and the number of observations in each block.
Mean Diamonds and X-Axis Proportional
A mean diamond illustrates a sample mean and confidence interval.
Figure 6.8 Examples of Mean Diamonds and X-Axis Proportional Options
Note the following observations:
• The top and bottom of each diamond represent the (1-alpha)x100 confidence interval for each group. The confidence interval computation assumes that the variances are equal across observations. Therefore, the height of the diamond is proportional to the reciprocal of the square root of the number of observations in the group.
• If the X-Axis proportional option is selected, the horizontal extent of each group along the x-axis (the horizontal size of the diamond) is proportional to the sample size for each level of the X variable. Therefore, the narrower diamonds are usually taller, because fewer data points results in a wider confidence interval.
• The mean line across the middle of each diamond represents the group mean.
• Overlap marks appear as lines above and below the group mean. For groups with equal sample sizes, overlapping marks indicate that the two group means are not significantly different at the given confidence level. Overlap marks are computed as group mean ± . Overlap marks in one diamond that are closer to the mean of another diamond than that diamond’s overlap marks indicate that those two groups are not different at the given confidence level.
95% confidence interval
x-axis proportional x-axis not proportional group mean
overlap marks
2( ) 2⁄ CI 2⁄×

Chapter 6 Oneway Analysis 177Basic Analysis Analysis of Means Methods
• The mean diamonds automatically appear when you select the Means/Anova/Pooled t or Means/Anova option from the platform menu. However, you can show or hide them at any time by selecting Display Options > Mean Diamonds from the red triangle menu.
Mean Lines, Error Bars, and Standard Deviation Lines
Show mean lines by selecting Display Options > Mean Lines. Mean lines indicate the mean of the response for each level of the X variable.
Mean error bars and standard deviation lines appear when you select the Means and Std Dev option from the red triangle menu. See Figure 6.9. To turn each option on or off singly, select Display Options > Mean Error Bars or Std Dev Lines.
Figure 6.9 Mean Lines, Mean Error Bars, and Std Dev Lines
Analysis of Means Methods
Analysis of means (ANOM) methods compare means and variances and other measures of location and scale across several groups. You might want to use these methods under these circumstances:
• to test whether any of the group means are statistically different from the overall (sample) mean
• to test whether any of the group standard deviations are statistically different from the root mean square error (RMSE)
• to test whether any of the group ranges are statistically different from the overall mean of the ranges
Note: Within the Contingency platform, you can use the Analysis of Means for Proportions when the response has two categories. For details, see the “Contingency Analysis” chapter on page 239.
std dev lines
mean line
mean error bar

178 Oneway Analysis Chapter 6Analysis of Means Methods Basic Analysis
For a description of ANOM methods and to see how JMP implements ANOM, see the book by Nelson et al. (2005).
Analysis of Means for Location
You can test whether groups have a common mean or center value using the following options:
• ANOM
• ANOM with Transformed Ranks
ANOM
Use ANOM to compare group means to the overall mean. This method assumes that your data are approximately normally distributed. See “Example of an Analysis of Means Chart” on page 202.
ANOM with Transformed Ranks
This is the nonparametric version of the ANOM analysis. Use this method if your data is clearly non-normal and cannot be transformed to normality. ANOM with Transformed Ranks compares each group’s mean transformed rank to the overall mean transformed rank. The ANOM test involves applying the usual ANOM procedure and critical values to the transformed observations.
Transformed Ranks
Suppose that there are n observations. The transformed observations are computed as follows:
• Rank all observations from smallest to largest, accounting for ties. For tied observations, assign each one the average of the block of ranks that they share.
• Denote the ranks by R1, R2, ..., Rn.
• The transformed rank corresponding to the ith observations is:
The ANOM procedure is applied to the values Transformed Ri. Since the ranks have a uniform distribution, the transformed ranks have a folded normal distribution. For details, see Nelson et al. (2005).
Transformed Ri Normal QuantileRi
2n 1+---------------- 0.5+=

Chapter 6 Oneway Analysis 179Basic Analysis Analysis of Means Methods
Analysis of Means for Scale
You can test for homogeneity of variation within groups using the following options:
• ANOM for Variances
• ANOM for Variances with Levene (ADM)
• ANOM for Ranges
ANOM for Variances
Use this method to compare group standard deviations (or variances) to the root mean square error (or mean square error). This method assumes that your data is approximately normally distributed. To use this method, each group must have at least four observations. For details about the ANOM for Variances test, see Wludyka and Nelson (1997) and Nelson et al. (2005). For an example, see “Example of an Analysis of Means for Variances Chart” on page 203.
ANOM for Variances with Levene (ADM)
This method provides a robust test that compares the group means of the absolute deviations from the median (ADM) to the overall mean ADM. Use ANOM for Variances with Levene (ADM) if you suspect that your data is non-normal and cannot be transformed to normality. ANOM for Variances with Levene (ADM) is a nonparametric analog of the ANOM for Variances analysis. For more information about the ANOM for Variances with Levene (ADM) test, see Levene (1960) or Brown and Forsythe (1974).
ANOM for Ranges
Use this test to compare group ranges to the mean of the group ranges. This is a test for scale differences based on the range as the measure of spread. For details, see Wheeler (2003).
Note: ANOM for Ranges is available only for balanced designs and specific group sizes. See “Restrictions for ANOM for Ranges Test” on page 179.
Restrictions for ANOM for Ranges Test
Unlike the other ANOM decision limits, the decision limits for the ANOM for Ranges chart uses only tabled critical values. For this reason, ANOM for Ranges is available only for the following:
• groups of equal sizes
• groups specifically of the following sizes: 2–10, 12, 15, and 20
• number of groups between 2 and 30
• alpha levels of 0.10, 0.05, and 0.01

180 Oneway Analysis Chapter 6Analysis of Means Methods Basic Analysis
Analysis of Means Charts
Each Analysis of Means Methods option adds a chart to the report window that shows the following:
• an upper decision limit (UDL)
• a lower decision limit (LDL)
• a horizontal (center) line that falls between the decision limits and is positioned as follows:
– ANOM: the overall mean
– ANOM with Transformed Ranks: the overall mean of the transformed ranks
– ANOM for Variances: the root mean square error (or MSE when in variance scale)
– ANOM for Variances with Levene (ADM): the overall absolute deviation from the mean
– ANOM for Ranges: the mean of the group ranges
If a group’s plotted statistic falls outside of the decision limits, then the test indicates that there is a statistical difference between that group’s statistic and the overall average of the statistic for all the groups.
Analysis of Means Options
Each Analysis of Means Methods option adds an Analysis of Means red triangle menu to the report window.
Set Alpha Level Select an option from the most common alpha levels or specify any level with the Other selection. Changing the alpha level modifies the upper and lower decision limits.
Note: For ANOM for Ranges, only the selections 0.10, 0.05, and 0.01 are available.
Show Summary Report The reports are based on the Analysis of Means method:
– For ANOM, creates a report showing group means and decision limits.
– For ANOM with Transformed Ranks, creates a report showing group mean transformed ranks and decision limits.
– For ANOM for Variances, creates a report showing group standard deviations (or variances) and decision limits.
– For ANOM for Variances with Levene (ADM), creates a report showing group mean ADMs and decision limits.
– For ANOM for Ranges, creates a report showing group ranges and decision limits.

Chapter 6 Oneway Analysis 181Basic Analysis Compare Means
Graph in Variance Scale (Only for ANOM for Variances) Changes the scale of the y-axis from standard deviations to variances.
Display Options Display options include the following:
– Show Decision Limits shows or hides decision limit lines.
– Show Decision Limit Shading shows or hides decision limit shading.
– Show Center Line shows or hides the center line statistic.
– Point Options: Show Needles shows the needles. This is the default option. Show Connected Points shows a line connecting the means for each group. Show Only Points shows only the points representing the means for each group.
Compare Means
Note: Another method for comparing means is ANOM. See “Analysis of Means Methods” on page 177.
Use the Compare Means options to perform multiple comparisons of group means. All of these methods use pooled variance estimates for the means. Each Compare Means option, except for the Each Pair Stepwise, Newman-Keuls method, adds comparison circles next to the plot and specific reports to the report window. For details about comparison circles, see “Using Comparison Circles” on page 183.
Option Description Nonparametric Menu Option
Each Pair, Student’s t
Computes individual pairwise comparisons using Student’s t-tests. If you make many pairwise tests, there is no protection across the inferences. Therefore, the alpha-size (Type I error rate) across the hypothesis tests is higher than that for individual tests. See “Each Pair, Student’s t” on page 184.
Nonparametric > Nonparametric Multiple Comparisons > Wilcoxon Each Pair

182 Oneway Analysis Chapter 6Compare Means Basic Analysis
Note: If you have specified a Block column, then the multiple comparison methods are performed on data that has been adjusted for the Block means.
For an example showing all of these tests, see “Example Contrasting All of the Compare Means Tests” on page 212.
All Pairs, Tukey HSD
Shows a test that is sized for all differences among the means. This is the Tukey or Tukey-Kramer HSD (honestly significant difference) test (Tukey 1953; Kramer 1956). This test is an exact alpha-level test if the sample sizes are the same, and conservative if the sample sizes are different (Hayter 1984). See “All Pairs, Tukey HSD” on page 184.
Nonparametric > Nonparametric Multiple Comparisons > Steel-Dwass All Pairs
With Best, Hsu MCB
Tests whether the means are less than the unknown maximum or greater than the unknown minimum. This is the Hsu MCB test (Hsu 1996; Hsu 1981). See “With Best, Hsu MCB” on page 184.
none
With Control, Dunnett’s
Tests whether the means are different from the mean of a control group. This is Dunnett’s test (Dunnett 1955). See “With Control, Dunnett’s” on page 186.
Nonparametric > Nonparametric Multiple Comparisons > Steel With Control
Each Pair Stepwise, Newman-Keuls
Tests whether there are differences between the means using the Studentized range test in a stepwise procedure. This is the Newman-Keuls or Student-Newman-Keuls method (Keuls, 1952). This test is less conservative and more powerful than a Tukey HSD test. See “Each Pair Stepwise, Newman-Keuls” on page 186.
none
Option Description Nonparametric Menu Option

Chapter 6 Oneway Analysis 183Basic Analysis Compare Means
Using Comparison Circles
Note: To permanently hide the comparison circles plot, select File > Preferences > Platforms > Oneway and deselect the Comparison Circles option.
Each multiple comparison test, except for the Each Pair Stepwise, Newman-Keuls method, begins with a comparison circles plot, which is a visual representation of group mean comparisons. Figure 6.10 shows the comparison circles for the All Pairs, Tukey HSD method. Other comparison tests lengthen or shorten the radii of the circles.
Figure 6.10 Visual Comparison of Group Means
Compare each pair of group means visually by examining the intersection of the comparison circles. The outside angle of intersection tells you whether the group means are significantly different. See Figure 6.11.
• Circles for means that are significantly different either do not intersect, or intersect slightly, so that the outside angle of intersection is less than 90 degrees.
• If the circles intersect by an angle of more than 90 degrees, or if they are nested, the means are not significantly different.
Figure 6.11 Angles of Intersection and Significanceangle greater than 90 degrees
angle equal to 90 degrees
angle less than 90 degrees
not significantly different
borderline significantly different
significantly different

184 Oneway Analysis Chapter 6Compare Means Basic Analysis
If the intersection angle is close to 90 degrees, you can verify whether the means are significantly different by clicking on the comparison circle to select it. See Figure 6.12. To deselect circles, click in the white space outside the circles.
Figure 6.12 Highlighting Comparison Circles
Related Information
• “Comparison Circles” on page 231
Each Pair, Student’s t
The Each Pair, Student’s t test shows the Student’s t-test for each pair of group levels and tests only individual comparisons. See “Example of the Each Pair, Student’s t Test” on page 204.
All Pairs, Tukey HSD
The All Pairs, Tukey HSD test (also called Tukey-Kramer) protects the significance tests of all combinations of pairs, and the HSD intervals become greater than the Student’s t pairwise LSDs. Graphically, the comparison circles become larger and differences are less significant.
The q statistic is calculated as follows: q* = (1/sqrt(2)) * q where q is the required percentile of the studentized range distribution. For more details, see the description of the T statistic by Neter et al. (1990). See also “Example of the All Pairs, Tukey HSD Test” on page 206.
With Best, Hsu MCB
The With Best, Hsu MCB test determines whether the mean for a given level exceeds the maximum mean of the remaining levels, or is smaller than the minimum mean of the remaining levels. See Hsu (1996). For an example of this test, see “Example of the With Best, Hsu MCB Test” on page 208.
Groups that are different from the selected group appear as thick gray circles.
Groups that are not different from the selected group appear as thin red circles.
The selected group appears as a thick red circle.

Chapter 6 Oneway Analysis 185Basic Analysis Compare Means
The quantiles for the Hsu MCB test vary by the level of the categorical variable. Unless the sample sizes are equal across levels, the comparison circle technique is not exact. The radius of a comparison circle is given by the standard error of the level multiplied by the largest quantile value. Use the p-values of the tests to obtain precise assessments of significant differences. See “Comparison with Max and Min” on page 185.
Note: Means that are not regarded as the maximum or the minimum by MCB are also the means that are not contained in the selected subset of Gupta (1965) of potential maximums or minimum means.
Confidence Quantile
This report gives the quantiles for each level of the categorical variable. These correspond to the specified value of Alpha.
Comparison with Max and Min
The report shows p-values for one-sided Dunnett tests. For each level other than the best, the p-value given is for a test that compares the mean of the sample best level to the mean of each remaining level treated as a control (potentially best) level. The p-value for the sample best level is obtained by comparing the mean of the second sample best level to the mean of the sample best level treated as a control.
The report shows three columns.
Level The level of the categorical variable.
with Max p-Value For each level of the categorical variable, this column gives a p-value for a test that the mean of that level exceeds the maximum mean of the remaining levels. Use the tests in this column to screen out levels whose means are significantly smaller than or equal to the (unknown) largest true mean.
with Min p-Value For each level of the categorical variable, this column gives a p-value for a test that the mean of that level is smaller than the minimum mean of the remaining levels. Use the tests in this column to screen out levels whose means are significantly greater than or equal to the (unknown) smallest true mean.
LSD Threshold Matrix
The first report shown is for the maximum and the second is for the minimum.
For the maximum report, a column shows the row mean minus the column mean minus the LSD. If a value is positive, the row mean is significantly higher than the mean for the column, and the mean for the column is not the maximum.

186 Oneway Analysis Chapter 6Compare Means Basic Analysis
For the minimum report, a column shows the row mean minus the column mean plus the LSD. If a value is negative, the row mean is significantly less than the mean for the column, and the mean for the column is not the minimum.
With Control, Dunnett’s
The With Control, Dunnett’s test compares a set of means against the mean of a control group. The LSDs that it produces are between the Student’s t and Tukey-Kramer LSDs, because they are sized to refrain from an intermediate number of comparisons. For an example of this test, see “Example of the With Control, Dunnett’s Test” on page 209.
In the Dunnett’s report, the quantile appears, and can be used in a manner similar to a Student’s t-statistic. The LSD threshold matrix shows the absolute value of the difference minus the LSD. If a value is positive, its mean is more than the LSD apart from the control group mean and is therefore significantly different.
Each Pair Stepwise, Newman-Keuls
The Each Pair Stepwise, Newman-Keuls test compares the sample means using an iterative, stepwise procedure. For an example of this test, see “Example of the Each Pair Stepwise, Newman-Keuls Test” on page 211. The procedure JMP uses for testing J group means is described as follows:
1. Perform Tukey’s HSD test on the difference between the group means that have the largest range (the largest and smallest means), where the number of groups is equal to J.
– If there is no significant difference, stop the procedure and set all p-values to 1.
– If there is a significant difference, continue.
2. Perform Tukey’s HSD test on the difference between the two means with the next largest range. Set the number of groups for the test equal to J-1.
– If there is no significant difference, set the p-values of any subranges of the two means to 1. Continue the testing procedure for ranges that are not contained within the two means. If there are no such ranges, stop the procedure.
– If there is a significant difference, continue.
3. Repeat step 2 until there are no ranges remaining to test.
After the first non-significant test, the remaining p-values are set equal to 1. After a significant test, the level that is not included in the subsequent Tukey’s HSD test retains the p-value of the previous test. This is the p-value that is reported for that level in the Ordered Differences Report.
d

Chapter 6 Oneway Analysis 187Basic Analysis Nonparametric Tests
The quantile used for Tukey’s HSD is different for each test and is based on the number of group means between the means being tested. In the Newman-Keuls report, the Smallest Quantile Considered is the quantile of the last Tukey’s HSD test that was performed.
Note: There are no mean circles added to the Comparison Circles graph when you use the Each Pair Stepwise, Newman-Keuls test. This is because each comparison has a different cut-off depending on the number of means between the two means being tested. Therefore, each circle would be a different size.
Compare Means Options
The Means Comparisons reports for all four tests contain a red triangle menu with customization options.
Difference Matrix Shows a table of all differences of means.
Confidence Quantile Shows the t-value or other corresponding quantiles used for confidence intervals.
LSD Threshold Matrix Shows a matrix showing if a difference exceeds the least significant difference for all comparisons.
Connecting Letters Report (Not available for With Best, Hsu MCB and With Control, Dunnett’s.) Shows the traditional letter-coded report where means that are not sharing a letter are significantly different.
Ordered Differences Report (Not available for With Best, Hsu MCB and With Control, Dunnett’s.) Shows all the positive-side differences with their confidence interval band overlaid on the plot. Confidence intervals that do not fully contain their corresponding bar are significantly different from each other.
Detailed Comparisons Report (Available only for Each Pair, Student’s t.) Shows a detailed report for each comparison. Each section shows the difference between the levels, standard error and confidence intervals, t-ratios, p-values, and degrees of freedom. A plot illustrating the comparison appears on the right of each report.
Nonparametric Tests
Nonparametric tests are useful when the usual analysis of variance assumption of normality is not viable. The Nonparametric options provide several methods for testing the hypothesis of equal means or medians across groups. Nonparametric multiple comparison procedures are also available to control the overall error rate for pairwise comparisons. Nonparametric tests

188 Oneway Analysis Chapter 6Nonparametric Tests Basic Analysis
use functions of the response ranks, called rank scores. See Hajek (1969) and SAS Institute Inc. (2017a).
Note the following:
• For the Wilcoxon, Median, Van der Waerden, and Friedman Rank tests, if the X factor has more than two levels, a chi-square approximation to the one-way test is performed.
• If you specify a Block column, the nonparametric tests (except for the Friedman Rank Test) are conducted on data values that are centered using the block means.
Wilcoxon Test Performs a test based on Wilcoxon rank scores. The Wilcoxon rank scores are the simple ranks of the data. The Wilcoxon test is the most powerful rank test for errors with logistic distributions. If the factor has more than two levels, the Kruskal-Wallis test is performed. For information about the report, see “The Wilcoxon, Median, Van der Waerden, and Friedman Rank Test Reports” on page 189. For an example, see “Example of the Nonparametric Wilcoxon Test” on page 212.
The Wilcoxon test is also called the Mann-Whitney test.
Median Test Performs a test based on Median rank scores. The Median rank scores are either 1 or 0, depending on whether a rank is above or below the median rank. The Median test is the most powerful rank test for errors with double-exponential distributions. For information about the report, see “The Wilcoxon, Median, Van der Waerden, and Friedman Rank Test Reports” on page 189.
van der Waerden Test Performs a test based on Van der Waerden rank scores. The Van der Waerden rank scores are the ranks of the data divided by one plus the number of observations transformed to a normal score by applying the inverse of the normal distribution function. The Van der Waerden test is the most powerful rank test for errors with normal distributions. For information about the report, see “The Wilcoxon, Median, Van der Waerden, and Friedman Rank Test Reports” on page 189.
Kolmogorov Smirnov Test (Available only when the X factor has two levels.) Performs a test based on the empirical distribution function, which tests whether the distribution of the response is the same across the groups. Both an approximate and an exact test are given. For information about the report, see “Kolmogorov-Smirnov Two-Sample Test Report” on page 190.
Friedman Rank Test (Available only when a Block variable is specified in the launch window.) Performs a test based on Friedman Rank scores. The Friedman Rank scores are the ranks of the data within each level of the blocking variable. The parametric version of this test is a repeated measures ANOVA. For information about the report, see “The Wilcoxon, Median, Van der Waerden, and Friedman Rank Test Reports” on page 189.
Note: There must be an equal number of observations within each block.

Chapter 6 Oneway Analysis 189Basic Analysis Nonparametric Tests
Exact Test Provides options for performing exact versions of the Wilcoxon, Median, van der Waerden, and Kolmogorov-Smirnov tests. These options are available only when the X factor has two levels. Results for both the approximate and the exact test are given.
For information about the report, see “2-Sample, Exact Test” on page 190. For an example involving the Wilcoxon Exact Test, see “Example of the Nonparametric Wilcoxon Test” on page 212.
The Wilcoxon, Median, Van der Waerden, and Friedman Rank Test Reports
For each test, the report shows the descriptive statistics followed by the test results. Test results appear in the 1-Way Test, ChiSquare Approximation report and, if the X variable has exactly two levels, a 2-Sample Test, Normal Approximation report also appears. The descriptive statistics are the following:
Level The levels of X.
Count The frequencies of each level.
Score Sum The sum of the rank score for each level.
Expected Score The expected score under the null hypothesis that there is no difference among class levels.
Score Mean The mean rank score for each level.
(Mean-Mean0)/Std0 The standardized score. Mean0 is the mean score expected under the null hypothesis. Std0 is the standard deviation of the score sum expected under the null hypothesis. The null hypothesis is that the group means or medians are in the same location across groups.
2-Sample Test, Normal Approximation
When you have exactly two levels of X, a 2-Sample Test, Normal Approximation report appears. This report gives the following:
S Gives the sum of the rank scores for the level with the smaller number of observations.
Z Gives the test statistic for the normal approximation test. For details, see “Two-Sample Normal Approximations” on page 236.
Prob>|Z| Gives the p-value, based on a standard normal distribution, for the normal approximation test.

190 Oneway Analysis Chapter 6Nonparametric Tests Basic Analysis
1-Way Test, ChiSquare Approximation
This report gives results for a chi-square test for location. For details, see Conover (1999).
ChiSquare Gives the values of the chi-square test statistic. For details, see “One-Way ChiSquare Approximations” on page 237.
DF Gives the degrees of freedom for the test.
Prob>ChiSq Gives the p-value for the test. The p-value is based on a ChiSquare distribution with degrees of freedom equal to the number of levels of X minus 1.
2-Sample, Exact Test
If your data are sparse, skewed, or heavily tied, exact tests might be more suitable than approximations based on asymptotic behavior. When you have exactly two levels of X, JMP Pro computes test statistics for exact tests. Select Nonparametric > Exact Test and select the test of your choice. A 2-Sample: Exact Test report appears. This report gives the following:
S Gives the sum of the rank scores for the observations in the smaller group. If the two levels of X have the same numbers of observations, then the value of S corresponds to the last level of X in the value ordering.
Prob ≤ S Gives a one-sided p-value for the test.
Prob ≥ |S-Mean| Gives a two-sided p-value for the test.
Kolmogorov-Smirnov Two-Sample Test Report
The Kolmogorov-Smirnov test is available only when X has exactly two levels. The report shows descriptive statistics followed by test results. The descriptive statistics are the following:
Level The two levels of X.
Count The frequencies of each level.
EDF at Maximum For a level of X, gives the value of the empirical cumulative distribution function (EDF) for that level at the value of X for which the difference between the two EDFs is a maximum. For the row named Total, gives the value of the pooled EDF (the EDF for the entire data set) at the value of X for which the difference between the two EDFs is a maximum.
Deviation from Mean at Maximum For each level, gives the value obtained as follows:

Chapter 6 Oneway Analysis 191Basic Analysis Nonparametric Tests
– Compute the difference between the EDF at Maximum for the given level and the EDF at maximum for the pooled data set (Total).
– Multiply this difference by the square root of the number of observations in that level, given as Count.
Kolmogorov-Smirnov Asymptotic Test
This report gives the details for the test.
KS A Kolmogorov-Smirnov statistic computed as follows:
The formula uses the following notation:
– xj, j = 1, ..., n are the observations
– ni is the number of observations in the ith level of X
– F is the pooled cumulative empirical distribution function
– Fi is the cumulative empirical distribution function for the ith level of X
This version of the Kolmogorov-Smirnov statistic applies even when there are more than two levels of X. Note, however, that JMP only performs the Kolmogorov-Smirnov analysis when X has only two levels of X.
KSa An asymptotic Kolmogorov-Smirnov statistic computed as , where n is the total
number of observations.
D=max|F1-F2| The maximum absolute deviation between the EDFs for the two levels. This is the version of the Kolmogorov-Smirnov statistic typically used to compare two samples.
Prob > D The p-value for the test. This is the probability that D exceeds the computed value under the null hypothesis of no difference between the levels.
D+ = max(F1-F2) A one-sided test statistic for the alternative hypothesis that the level of the first group exceeds the level of the second group.
Prob > D+ The p-value for the test of D+.
D- = max(F2-F1) A one-sided test statistic for the alternative hypothesis that the level of the second group exceeds the level of the first group
Prob > D- The p-value for the test of D-.
KS maxj
1n--- ni Fi xj( ) F xj( )–( )2
i=
KS n

192 Oneway Analysis Chapter 6Nonparametric Tests Basic Analysis
Kolmogorov-Smirnov Exact Test
For the Kolmogorov-Smirnov exact test, the report gives the same statistics as does the asymptotic test, but the p-values are computed to be exact.
Nonparametric Multiple Comparisons
This option provides several methods for performing nonparametric multiple comparisons. These tests are based on ranks and, except for the Wilcoxon Each Pair test, control for the overall experimentwise error rate. For details about these tests, see See Dunn (1964) and Hsu (1996). For information about the reports, see “Nonparametric Multiple Comparisons Procedures” on page 192.
Tip: While Friedman’s test for nonparametric repeated measures ANOVA is not directly supported in JMP, it can be performed as follows: Calculate the ranks within each block. Define this new column to have an ordinal modeling type. Enter the ranks as Y in the Fit Y by X platform. Enter one of the effects as a blocking variable. Obtain Cochran-Mantel-Haenszel statistics.
Nonparametric Multiple Comparisons Procedures
Wilcoxon Each Pair Performs the Wilcoxon test on each pair. This procedure does not control for the overall alpha level. This is the nonparametric version of the Each Pair, Student’s t option found on the Compare Means menu. See “Wilcoxon Each Pair, Steel-Dwass All Pairs, and Steel with Control” on page 193.
Steel-Dwass All Pairs Performs the Steel-Dwass test on each pair. This is the nonparametric version of the All Pairs, Tukey HSD option found on the Compare Means menu. See “Wilcoxon Each Pair, Steel-Dwass All Pairs, and Steel with Control” on page 193.
Steel With Control Compares each level to a control level. This is the nonparametric version of the With Control, Dunnett’s option found on the Compare Means menu. See “Wilcoxon Each Pair, Steel-Dwass All Pairs, and Steel with Control” on page 193.
Dunn All Pairs for Joint Ranks Performs a comparison of each pair, similar to the Steel-Dwass All Pairs option. The Dunn method computes ranks for all the data, not just the pair being compared. The reported p-value reflects a Bonferroni adjustment. It is the unadjusted p-value multiplied by the number of comparisons. If the adjusted p-value exceeds 1, it is reported as 1. See “Dunn All Pairs for Joint Ranks and Dunn with Control for Joint Ranks” on page 194.

Chapter 6 Oneway Analysis 193Basic Analysis Nonparametric Tests
Dunn With Control for Joint Ranks Compares each level to a control level, similar to the Steel With Control option. The Dunn method computes ranks for all the data, not just the pair being compared. The reported p-Value reflects a Bonferroni adjustment. It is the unadjusted p-value multiplied by the number of comparisons. If the adjusted p-value exceeds 1, it is reported as 1. See “Dunn All Pairs for Joint Ranks and Dunn with Control for Joint Ranks” on page 194.
Wilcoxon Each Pair, Steel-Dwass All Pairs, and Steel with Control
The reports for these multiple comparison procedures give test results and confidence intervals. For these tests, observations are ranked within the sample obtained by combining only the two levels used in a given comparison.
q* The quantile used in computing the confidence intervals.
Alpha The alpha level used in computing the confidence interval. You can change the confidence level by selecting the Set α Level option from the Oneway menu.
Level The first level of the X variable used in the pairwise comparison.
- Level The second level of the X variable used in the pairwise comparison.
Score Mean Difference The mean of the rank score of the observations in the first level (Level) minus the mean of the rank scores of the observations in the second level (-Level), where a continuity correction is applied.
Denote the number of observations in the first level by n1 and the number in the second level by n2. The observations are ranked within the sample consisting of these two levels. Tied ranks are averaged. Denote the sum of the ranks for the first level by ScoreSum1 and for the second level by ScoreSum2.
If the difference in mean scores is positive, then the Score Mean Difference is given as follows:
Score Mean Difference = (ScoreSum1 - 0.5)/n1 - (ScoreSum2 + 0.5)/n2
If the difference in mean scores is negative, then the Score Mean Difference is given as follows:
Score Mean Difference = (ScoreSum1 + 0.5)/n1 - (ScoreSum2 -0.5)/n2
Std Error Dif The standard error of the Score Mean Difference.
Z The standardized test statistic, which has an asymptotic standard normal distribution under the null hypothesis of no difference in means.
p-Value The p-value for the asymptotic test based on Z.

194 Oneway Analysis Chapter 6Unequal Variances Basic Analysis
Hodges-Lehmann The Hodges-Lehmann estimator of the location shift. All paired differences consisting of observations in the first level minus observations in the second level are constructed. The Hodges-Lehmann estimator is the median of these differences. The Difference Plot bar graph shows the size of the Hodges-Lehmann estimate.
Lower CL The lower confidence limit for the Hodges-Lehmann statistic.
Note: Not computed if group sample sizes are large enough to cause memory issues.
Upper CL The upper confidence limit for the Hodges-Lehmann statistic.
Note: Not computed if group sample sizes are large enough to cause memory issues.
Dunn All Pairs for Joint Ranks and Dunn with Control for Joint Ranks
These comp are based on the rank of an observation in the entire data set. For the Dunn with Control for Joint Ranks tests, you must select a control level.
Level The first level of the X variable used in the pairwise comparison.
- Level he second level of the X variable used in the pairwise comparison.
Score Mean Difference The mean of the rank score of the observations in the first level (Level) minus the mean of the rank scores of the observations in the second level (-Level), where a continuity correction is applied. The ranks are obtained by ranking the observations within the entire sample. Tied ranks are averaged. The continuity correction is described in “Score Mean Difference” on page 193.
Std Error Dif The standard error of the Score Mean Difference.
Z The standardized test statistic, which has an asymptotic standard normal distribution under the null hypothesis of no difference in means.
p-Value The p-value for the asymptotic test based on Z.
Unequal Variances
When the variances across groups are not equal, the usual analysis of variance assumptions are not satisfied and the ANOVA F test is not valid. JMP provides four tests for equality of group variances and an ANOVA that is valid when the group sample variances are unequal. The concept behind the first three tests of equal variances is to perform an analysis of variance on a new response variable constructed to measure the spread in each group. The fourth test is Bartlett’s test, which is similar to the likelihood ratio test under normal distributions.
Chapter 6 Oneway Analysis 195Basic Analysis Unequal Variances
Note: Another method to test for unequal variances is ANOMV. See “Analysis of Means Methods” on page 177.
The following Tests for Equal Variances are available:
O’Brien Constructs a dependent variable so that the group means of the new variable equal the group sample variances of the original response. An ANOVA on the O’Brien variable is actually an ANOVA on the group sample variances (O’Brien 1979; Olejnik and Algina 1987).
Brown-Forsythe Shows the F test from an ANOVA where the response is the absolute value of the difference of each observation and the group median (Brown and Forsythe 1974).
Levene Shows the F test from an ANOVA where the response is the absolute value of the difference of each observation and the group mean (Levene 1960). The spread is measured as (as opposed to the SAS default ).
Bartlett Compares the weighted arithmetic average of the sample variances to the weighted geometric average of the sample variances. The geometric average is always less than or equal to the arithmetic average with equality holding only when all sample variances are equal. The more variation there is among the group variances, the more these two averages differ. A function of these two averages is created, which approximates a χ2-distribution (or, in fact, an F distribution under a certain formulation). Large values correspond to large values of the arithmetic or geometric ratio, and therefore to widely varying group variances. Dividing the Bartlett Chi-square test statistic by the degrees of freedom gives the F value shown in the table. Bartlett’s test is not very robust to violations of the normality assumption (Bartlett and Kendall 1946).
F Test 2-sided (Available only if there are two levels of the X variable.) If there are only two groups tested, then a standard F test for unequal variances is also performed. The F test is the ratio of the larger to the smaller variance estimate. The p-value from the F distribution is doubled to make it a two-sided test.
Note: If you have specified a Block column, then the variance tests are performed on data after it has been adjusted for the Block means.
See “Example of the Unequal Variances Option” on page 215.
Tests That the Variances Are Equal Report
The Tests That the Variances Are Equal report shows the differences between group means to the grand mean and to the median, and gives a summary of testing procedures.
zij yij yi–= z2ij yij yi–( )2=

196 Oneway Analysis Chapter 6Unequal Variances Basic Analysis
If the equal variances test reveals that the group variances are significantly different, use Welch’s test instead of the regular ANOVA test. The Welch statistic is based on the usual ANOVA F test. However, the means are weighted by the reciprocal of the group mean variances (Welch 1951; Brown and Forsythe 1974; Asiribo and Gurland 1990). If there are only two levels, the Welch ANOVA is equivalent to an unequal variance t-test.
Description of the Tests that the Variances Are Equal Report
Level Lists the factor levels occurring in the data.
Count Records the frequencies of each level.
Std Dev Records the standard deviations of the response for each factor level. The standard deviations are equal to the means of the O’Brien variable. If a level occurs only once in the data, no standard deviation is calculated.
MeanAbsDif to Mean Records the mean absolute difference of the response and group mean. The mean absolute differences are equal to the group means of the Levene variable.
MeanAbsDif to Median Records the absolute difference of the response and group median. The mean absolute differences are equal to the group means of the Brown-Forsythe variable.
Test Lists the names of the tests performed.
F Ratio Records a calculated F statistic for each test. See “Tests That the Variances Are Equal” on page 234.
DFNum Records the degrees of freedom in the numerator for each test. If a factor has k levels, the numerator has k - 1 degrees of freedom. Levels occurring only once in the data are not used in calculating test statistics for O’Brien, Brown-Forsythe, or Levene. The numerator degrees of freedom in this situation is the number of levels used in calculations minus one.
DFDen Records the degrees of freedom used in the denominator for each test. For O’Brien, Brown-Forsythe, and Levene, a degree of freedom is subtracted for each factor level used in calculating the test statistic. If a factor has k levels, the denominator degrees of freedom is n - k.
p-Value Probability of obtaining, by chance alone, an F-ratio value larger than the one calculated if in reality the variances are equal across all levels.
Note: A warning appears if any level of the X variable contains fewer than 5 observations. For more information about the performance of the above tests with small sample sizes, see Brown and Forsythe (1974) and Miller (1972).

Chapter 6 Oneway Analysis 197Basic Analysis Equivalence Test
Description of the Welch’s Test Report
F Ratio Shows the F test statistic for the equal means test.
DFNum Records the degrees of freedom in the numerator of the test. If a factor has k levels, the numerator has k - 1 degrees of freedom. Levels occurring only once in the data are not used in calculating the Welch ANOVA. The numerator degrees of freedom in this situation is the number of levels used in calculations minus one.
DFDen Records the degrees of freedom in the denominator of the test. See “Tests That the Variances Are Equal” on page 234.
Prob>F Probability of obtaining, by chance alone, an F value larger than the one calculated if in reality the means are equal across all levels. Observed significance probabilities of 0.05 or less are considered evidence of unequal means across the levels.
t Test Shows the relationship between the F ratio and the t Test. Calculated as the square root of the F ratio. Appears only if the X factor has two levels.
Equivalence Test
Equivalence tests assess whether there is a practical difference in means. You must pick a threshold difference for which smaller differences are considered practically equivalent. The most straightforward test to construct uses two one-sided t-tests from both sides of the difference interval. If both tests reject (or conclude that the difference in the means differs significantly from the threshold), then the groups are practically equivalent. The Equivalence Test option uses the Two One-Sided Tests (TOST) approach. See “Example of an Equivalence Test” on page 216.
Robust
Outliers can lead to incorrect estimates and decisions. The Robust option provides two methods to reduce the influence of outliers in your data set: Robust Fit and Cauchy Fit.
Robust Fit
The Robust Fit option reduces the influence of outliers in the response variable. The Huber M-estimation method is used. Huber M-estimation finds parameter estimates that minimize the Huber loss function:

198 Oneway Analysis Chapter 6Power Basic Analysis
where
ei refers to the residuals
The Huber loss function penalizes outliers and increases as a quadratic for small errors and linearly for large errors. For more details about robust fitting, see Huber (1973) and Huber and Ronchetti (2009). See “Example of the Robust Fit Option” on page 217.
Cauchy Fit
The Cauchy fit option assumes that the errors have a Cauchy distribution. A Cauchy distribution has fatter tails than the normal distribution, resulting in a reduced emphasis on outliers. This option can be useful if you have a large proportion of outliers in your data. However, if your data are close to normal with only a few outliers, this option can lead to incorrect inferences. The Cauchy option estimates parameters using maximum likelihood and a Cauchy link function.
Power
The Power option calculates statistical power and other details about a given hypothesis test. See “Example of the Power Option” on page 219. For statistical details, see “Power” on page 232.
• LSV (the Least Significant Value) is the value of some parameter or function of parameters that would produce a certain p-value alpha. Said another way, you want to know how small an effect would be declared significant at some p-value alpha. The LSV provides a measuring stick for significance on the scale of the parameter, rather than on a probability scale. It shows how sensitive the design and data are.
• LSN (the Least Significant Number) is the total number of observations that would produce a specified p-value alpha given that the data has the same form. The LSN is defined as the number of observations needed to reduce the variance of the estimates enough to achieve a significant result with the given values of alpha, sigma, and delta (the significance level, the standard deviation of the error, and the effect size). If you need more
l e˜
( ) ρ ei( )i=
ρ e( )
12---e2 if e k<
k e 12---k2– if e k≥
=
Chapter 6 Oneway Analysis 199Basic Analysis Power
data to achieve significance, the LSN helps tell you how many more. The LSN is the total number of observations that yields approximately 50% power.
• Power is the probability of getting significance (p-value < alpha) when a real difference exists between groups. It is a function of the sample size, the effect size, the standard deviation of the error, and the significance level. The power tells you how likely your experiment is to detect a difference (effect size), at a given alpha level.
Note: When there are only two groups in a one-way layout, the LSV computed by the power facility is the same as the least significant difference (LSD) shown in the multiple-comparison tables.
Power Details Window and Reports
The Power Details window and reports are the same as those in the general fitting platform launched by the Fit Model platform. For more details about power calculation, see the Statistical Details appendix in the Fitting Linear Models book.
For each of four columns Alpha, Sigma, Delta, and Number, fill in a single value, two values, or the start, stop, and increment for a sequence of values. See Figure 6.32. Power calculations are performed on all possible combinations of the values that you specify.
Alpha (α) Significance level, between 0 and 1 (usually 0.05, 0.01, or 0.10). Initially, a value of 0.05 shows.
Sigma (σ) Standard error of the residual error in the model. Initially, RMSE, the estimate from the square root of the mean square error is supplied here.
Delta (δ) Raw effect size. For details about effect size computations, see the Standard Least Squares chapter in the Fitting Linear Models book. The first position is initially set to the square root of the sums of squares for the hypothesis divided by n; that is, .
Number (n) Total sample size across all groups. Initially, the actual sample size is put in the first position.
Solve for Power Solves for the power (the probability of a significant result) as a function of all four values: α, σ, δ, and n.
Solve for Least Significant Number Solves for the number of observations needed to achieve approximately 50% power given α, σ, and δ.
Solve for Least Significant Value Solves for the value of the parameter or linear test that produces a p-value of α. This is a function of α, σ, n, and the standard error of the estimate. This feature is available only when the X factor has two levels and is usually used for individual parameters.
δ SS n⁄=

200 Oneway Analysis Chapter 6Normal Quantile Plot Basic Analysis
Adjusted Power and Confidence Interval When you look at power retrospectively, you use estimates of the standard error and the test parameters.
– Adjusted power is the power calculated from a more unbiased estimate of the non-centrality parameter.
– The confidence interval for the adjusted power is based on the confidence interval for the non-centrality estimate.
Adjusted power and confidence limits are computed only for the original Delta, because that is where the random variation is.
Normal Quantile Plot
You can create two types of normal quantile plots:
• Plot Actual by Quantile creates a plot of the response values versus the normal quantile values. The quantiles are computed and plotted separately for each level of the X variable.
• Plot Quantile by Actual creates a plot of the normal quantile values versus the response values. The quantiles are computed and plotted separately for each level of the X variable.
The Line of Fit option shows or hides the lines of fit on the quantile plots.
See “Example of a Normal Quantile Plot” on page 220.
CDF Plot
A CDF plot shows the cumulative distribution function for all of the groups in the Oneway report. CDF plots are useful if you want to compare the distributions of the response across levels of the X factor. See “Example of a CDF Plot” on page 221.
Densities
The Densities options provide several ways to compare the distribution and composition of the response across the levels of the X factor. There are three density options:
• Compare Densities shows a smooth curve estimating the density of each group. The smooth curve is the density estimate for each group.
• Composition of Densities shows the summed densities, weighted by each group’s counts. At each X value, the Composition of Densities plot shows how each group contributes to the total.

Chapter 6 Oneway Analysis 201Basic Analysis Matching Column
• Proportion of Densities shows the contribution of the group as a proportion of the total at each X level.
See “Example of the Densities Options” on page 222.
Matching Column
Use the Matching Column option to specify a matching (ID) variable for a matching model analysis. The Matching Column option addresses the case when the data in a one-way analysis come from matched (paired) data, such as when observations in different groups come from the same participant. See “Example of the Matching Column Option” on page 223.
Note: A special case of matching leads to the paired t-test. The Matched Pairs platform handles this type of data, but the data must be organized with the pairs in different columns, not in different rows.
The Matching Column option performs two primary actions:
• It fits an additive model (using an iterative proportional fitting algorithm) that includes both the grouping variable (the X variable in the Fit Y by X analysis) and the matching variable that you select. The iterative proportional fitting algorithm makes a difference if there are hundreds of participants, because the equivalent linear model would be very slow and would require huge memory resources.
• It draws lines between the points that match across the groups. If there are multiple observations with the same matching ID value, lines are drawn from the mean of the group of observations.
The Matching Column option automatically activates the Matching Lines option connecting the matching points. To turn the lines off, select Display Options > Matching Lines.
The Matching Fit report shows the effects with F tests. These are equivalent to the tests that you get with the Fit Model platform if you run two models, one with the interaction term and one without. If there are only two levels, then the F test is equivalent to the paired t-test.
Note: For details about the Fit Model platform, see the Model Specification chapter in the Fitting Linear Models book.
Additional Examples of the Oneway Platform
• “Example of an Analysis of Means Chart”

202 Oneway Analysis Chapter 6Additional Examples of the Oneway Platform Basic Analysis
• “Example of an Analysis of Means for Variances Chart”• “Example of the Each Pair, Student’s t Test”• “Example of the All Pairs, Tukey HSD Test”• “Example of the With Best, Hsu MCB Test”• “Example of the With Control, Dunnett’s Test”• “Example of the Each Pair Stepwise, Newman-Keuls Test”• “Example Contrasting All of the Compare Means Tests”• “Example of the Nonparametric Wilcoxon Test”• “Example of the Unequal Variances Option”• “Example of an Equivalence Test”• “Example of the Robust Fit Option”• “Example of the Power Option”• “Example of a Normal Quantile Plot”• “Example of a CDF Plot”• “Example of the Densities Options”• “Example of the Matching Column Option”• “Example of Stacking Data for a Oneway Analysis”
Example of an Analysis of Means Chart
1. Select Help > Sample Data Library and open Analgesics.jmp.
2. Select Analyze > Fit Y by X.
3. Select pain and click Y, Response.
4. Select drug and click X, Factor.
5. Click OK.
6. From the red triangle menu, select Analysis of Means Methods > ANOM.

Chapter 6 Oneway Analysis 203Basic Analysis Additional Examples of the Oneway Platform
Figure 6.13 Example of Analysis of Means Chart
For the example in Figure 6.13, the means for drug A and C are statistically different from the overall mean. The drug A mean is lower and the drug C mean is higher. Note the decision limits for the drug types are not the same, due to different sample sizes.
Example of an Analysis of Means for Variances Chart
This example uses the Spring Data.jmp sample data table. Four different brands of springs were tested to see what weight is required to extend a spring 0.10 inches. Six springs of each brand were tested. The data was checked for normality, since the ANOMV test is not robust to non-normality. Examine the brands to determine whether the variability is significantly different between brands.
1. Select Help > Sample Data Library and open Spring Data.jmp.
2. Select Analyze > Fit Y by X.
3. Select Weight and click Y, Response.
4. Select Brand and click X, Factor.
5. Click OK.
6. From the red triangle menu, select Analysis of Means Methods > ANOM for Variances.
7. From the red triangle menu next to Analysis of Means for Variances, select Show Summary Report.

204 Oneway Analysis Chapter 6Additional Examples of the Oneway Platform Basic Analysis
Figure 6.14 Example of Analysis of Means for Variances Chart
From Figure 6.14, notice that the standard deviation for Brand 2 exceeds the lower decision limit. Therefore, Brand 2 has significantly lower variance than the other brands.
Example of the Each Pair, Student’s t Test
This example uses the Big Class.jmp sample data table. It shows a one-way layout of weight by age, and shows the group comparison using comparison circles that illustrate all possible t-tests.
1. Select Help > Sample Data Library and open Big Class.jmp.
2. Select Analyze > Fit Y by X.
3. Select weight and click Y, Response.
4. Select age and click X, Factor.
5. Click OK.
6. From the red triangle menu, select Compare Means > Each Pair, Student’s t.
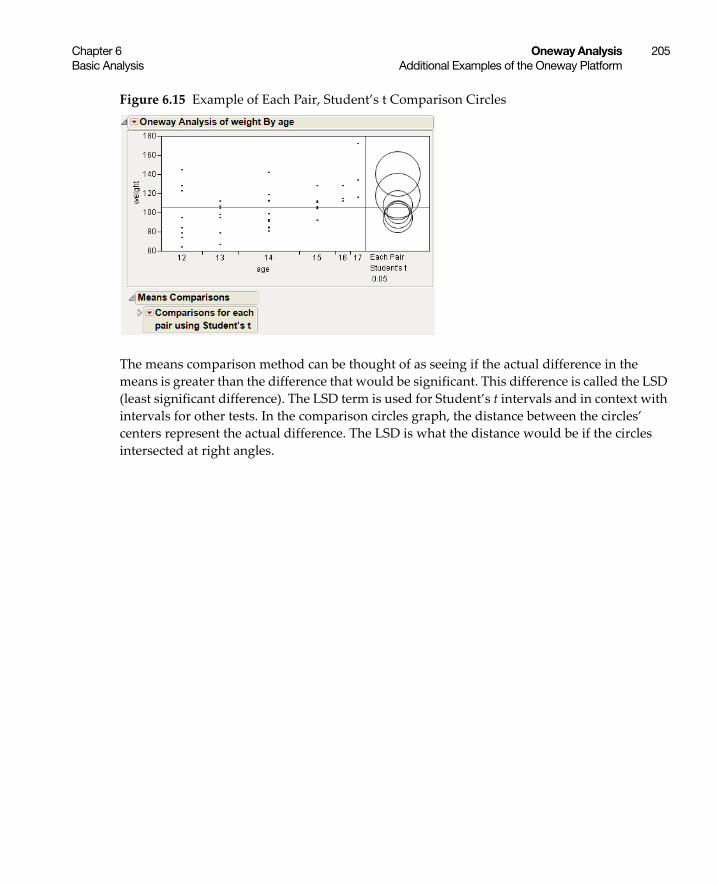
Chapter 6 Oneway Analysis 205Basic Analysis Additional Examples of the Oneway Platform
Figure 6.15 Example of Each Pair, Student’s t Comparison Circles
The means comparison method can be thought of as seeing if the actual difference in the means is greater than the difference that would be significant. This difference is called the LSD (least significant difference). The LSD term is used for Student’s t intervals and in context with intervals for other tests. In the comparison circles graph, the distance between the circles’ centers represent the actual difference. The LSD is what the distance would be if the circles intersected at right angles.

206 Oneway Analysis Chapter 6Additional Examples of the Oneway Platform Basic Analysis
Figure 6.16 Example of Means Comparisons Report for Each Pair, Student’s t
In Figure 6.16, the LSD threshold table shows the difference between the absolute difference in the means and the LSD (least significant difference). If the values are positive, the difference in the two means is larger than the LSD, and the two groups are significantly different.
Example of the All Pairs, Tukey HSD Test
1. Select Help > Sample Data Library and open Big Class.jmp.
2. Select Analyze > Fit Y by X.
3. Select weight and click Y, Response.
4. Select age and click X, Factor.
5. Click OK.
6. From the red triangle menu, select Compare Means > All Pairs, Tukey HSD.

Chapter 6 Oneway Analysis 207Basic Analysis Additional Examples of the Oneway Platform
Figure 6.17 Example of All Pairs, Tukey HSD Comparison Circles
Figure 6.18 Example of Means Comparisons Report for All Pairs, Tukey HSD

208 Oneway Analysis Chapter 6Additional Examples of the Oneway Platform Basic Analysis
In Figure 6.18, the Tukey-Kramer HSD Threshold matrix shows the actual absolute difference in the means minus the HSD, which is the difference that would be significant. Pairs with a positive value are significantly different. The q* (appearing above the HSD Threshold Matrix table) is the quantile that is used to scale the HSDs. It has a computational role comparable to a Student’s t.
Example of the With Best, Hsu MCB Test
1. Select Help > Sample Data Library and open Big Class.jmp.
2. Select Analyze > Fit Y by X.
3. Select weight and click Y, Response.
4. Select age and click X, Factor.
5. Click OK.
6. From the red triangle menu, select Compare Means > With Best, Hsu MCB.
Figure 6.19 Examples of With Best, Hsu MCB Comparison Circles

Chapter 6 Oneway Analysis 209Basic Analysis Additional Examples of the Oneway Platform
Figure 6.20 Example of Means Comparisons Report for With Best, Hsu MCB
The Comparison with Max and Min report compares the mean of each level to the maximum and the minimum of the means of the remaining levels. For example, the mean for age 15 differs significantly from the maximum of the means of the remaining levels. The mean for age 17 differs significantly from the minimum of the means of the remaining levels. The maximum mean could occur for age 16 or age 17, because neither mean differs significantly from the maximum mean. By the same reasoning, the minimum mean could correspond to any of the ages other than age 17.
Example of the With Control, Dunnett’s Test
1. Select Help > Sample Data Library and open Big Class.jmp.
2. Select Analyze > Fit Y by X.
3. Select weight and click Y, Response.

210 Oneway Analysis Chapter 6Additional Examples of the Oneway Platform Basic Analysis
4. Select age and click X, Factor.
5. Click OK.
6. From the red triangle menu, select Compare Means > With Control, Dunnett’s.
7. Select the group to use as the control group. In this example, select age 12.
Alternatively, click on a row to highlight it in the scatterplot before selecting the Compare Means > With Control, Dunnett’s option. The test uses the selected row as the control group.
8. Click OK.
Figure 6.21 Example of With Control, Dunnett’s Comparison Circles
Using the comparison circles in Figure 6.21, you can conclude that level 17 is the only level that is significantly different from the control level of 12.
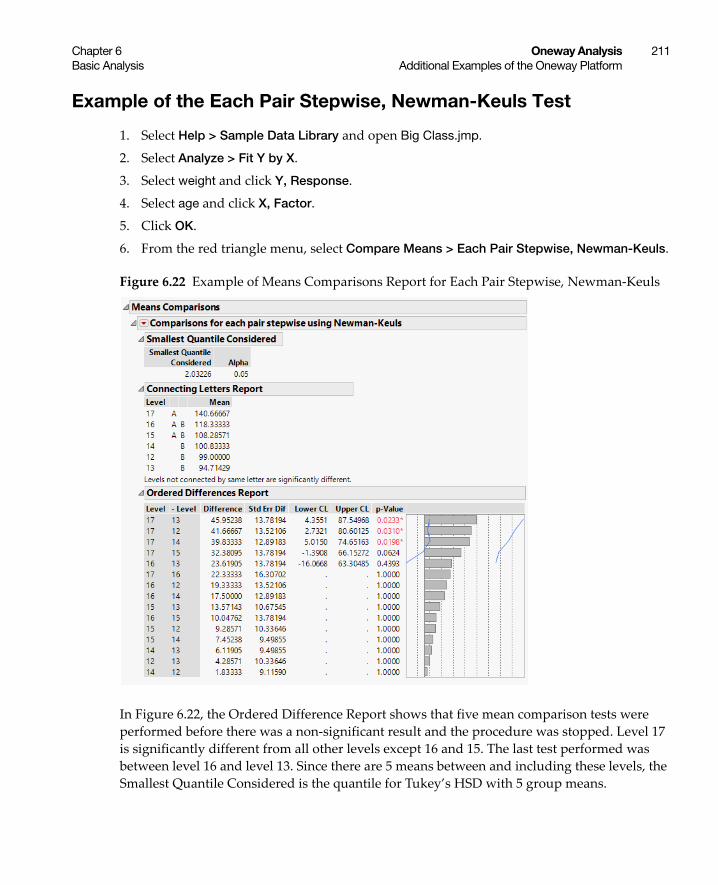
Chapter 6 Oneway Analysis 211Basic Analysis Additional Examples of the Oneway Platform
Example of the Each Pair Stepwise, Newman-Keuls Test
1. Select Help > Sample Data Library and open Big Class.jmp.
2. Select Analyze > Fit Y by X.
3. Select weight and click Y, Response.
4. Select age and click X, Factor.
5. Click OK.
6. From the red triangle menu, select Compare Means > Each Pair Stepwise, Newman-Keuls.
Figure 6.22 Example of Means Comparisons Report for Each Pair Stepwise, Newman-Keuls
In Figure 6.22, the Ordered Difference Report shows that five mean comparison tests were performed before there was a non-significant result and the procedure was stopped. Level 17 is significantly different from all other levels except 16 and 15. The last test performed was between level 16 and level 13. Since there are 5 means between and including these levels, the Smallest Quantile Considered is the quantile for Tukey’s HSD with 5 group means.

212 Oneway Analysis Chapter 6Additional Examples of the Oneway Platform Basic Analysis
Example Contrasting All of the Compare Means Tests
1. Select Help > Sample Data Library and open Big Class.jmp.
2. Select Analyze > Fit Y by X.
3. Select weight and click Y, Response.
4. Select age and click X, Factor.
5. Click OK.
6. From the red triangle menu, select each one of the Compare Means options. For the With Control, Dunnett’s option, select age 17 as the control group.
Although the four methods all test differences between group means, different results can occur.
Figure 6.23 Comparison Circles for Four Multiple Comparison Tests
From Figure 6.23, notice that for the Student’s t and Hsu methods, age group 15 (the third circle from the top) is significantly different from the control group and appears gray. But, for the Tukey and Dunnett method, age group 15 is not significantly different, and appears red.
Example of the Nonparametric Wilcoxon Test
Suppose you want to test whether the mean profit earned by companies differs by type of company. In Companies.jmp, the data consist of various metrics on two types of companies, Pharmaceutical (12 companies) and Computer (20 companies).
1. Select Help > Sample Data Library and open Companies.jmp.
2. Select Analyze > Fit Y by X.
3. Select Profits ($M) and click Y, Response.
4. Select Type and click X, Factor.
5. Click OK.

Chapter 6 Oneway Analysis 213Basic Analysis Additional Examples of the Oneway Platform
6. From the red triangle menu, select Display Options > Box Plots.
Figure 6.24 Computer Company Profit Distribution
The box plots suggest that the distributions are not normal or even symmetric. There is a very large value for the company in row 32 that might affect parametric tests.
7. From the red triangle menu, select Means/ANOVA/Pooled t.
Figure 6.25 Company Analysis of Variance

214 Oneway Analysis Chapter 6Additional Examples of the Oneway Platform Basic Analysis
The F test shows no significance because the p-value is large (p = 0.1163). This might be due to the large value in row 32 and the possible violation of the normality assumption.
8. From the red triangle menu, select t Test.
Figure 6.26 t-Test Results
The Prob > |t| for a two-sided test is 0.0671. The t Test does not assume equal variances, but the unequal variances t-test is also a parametric test.
9. From the red triangle menu, select Nonparametric > Wilcoxon Test.
Figure 6.27 Wilcoxon Test Results
The Wilcoxon test is a nonparametric test. It is based on ranks and so is resistant to outliers. Also, it does not require normality.
Both the normal and the chi-square approximations for the Wilcoxon test statistic indicate significance at a p-value of 0.0010. You conclude that there is a significant difference in the location of the distributions, and conclude that mean profit differs based on company type.
The normal and chi-square tests are based on the asymptotic distributions of the test statistics. If you have JMP Pro, you can conduct an exact test.
10. From the red triangle menu, select Nonparametric > Exact Test > Wilcoxon Exact Test.

Chapter 6 Oneway Analysis 215Basic Analysis Additional Examples of the Oneway Platform
Figure 6.28 Wilcoxon Exact Test Results
The observed value of the test statistic is S = 283. This is the sum of the ranks for the level of Type with the smaller sample size (pharmaceuticals). The probability of observing an absolute difference from the mean midrank that exceeds the absolute value of S minus the mean of the midranks is 0.0005. This is a two-sided test for a difference in location and supports rejecting the hypothesis that profits do not differ by type of company.
In this example, the nonparametric tests are more appropriate than the normality-based ANOVA test and the unequal variances t-test. The nonparametric tests are resistant to the large value in row 32 and do not require the assumption of normality.
Example of the Unequal Variances Option
Suppose you want to test whether two variances (males and females) are equal, instead of two means.
1. Select Help > Sample Data Library and open Big Class.jmp.
2. Select Analyze > Fit Y by X.
3. Select height and click Y, Response.
4. Select sex and click X, Factor.
5. Click OK.
6. From the red triangle menu, select Unequal Variances.

216 Oneway Analysis Chapter 6Additional Examples of the Oneway Platform Basic Analysis
Figure 6.29 Example of the Unequal Variances Report
Since the p-value from the 2-sided F-Test is large, you cannot conclude that the variances are unequal.
Example of an Equivalence Test
This example uses the Big Class.jmp sample data table. Examine if the difference in height between males and females is less than 6 inches.
1. Select Help > Sample Data Library and open Big Class.jmp.
2. Select Analyze > Fit Y by X.
3. Select height and click Y, Response.

Chapter 6 Oneway Analysis 217Basic Analysis Additional Examples of the Oneway Platform
4. Select sex and click X, Factor.
5. Click OK.
6. From the red triangle menu, select Equivalence Test.
7. Type 6 as the difference considered practically zero.
8. Click OK.
Figure 6.30 Example of an Equivalence Test
Using two one-sided tests, you can see that the p-value is small for both. Therefore, you can conclude that the difference in population means is significantly located somewhere between -6 and 6. For your purposes, you can declare the means to be practically equivalent.
Example of the Robust Fit Option
The data in the Drug Toxicity.jmp sample data table shows the toxicity levels for three different formulations of a drug.
1. Select Help > Sample Data Library and open Drug Toxicity.jmp.
2. Select Analyze > Fit Y by X.
3. Select Toxicity and click Y, Response.
4. Select Formulation and click X, Factor.
5. Click OK.
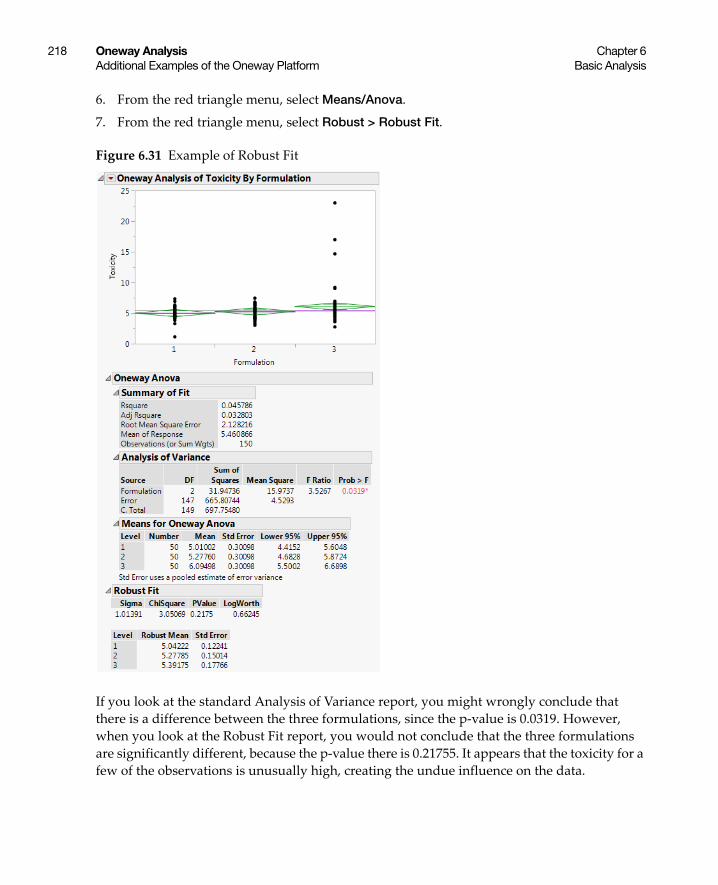
218 Oneway Analysis Chapter 6Additional Examples of the Oneway Platform Basic Analysis
6. From the red triangle menu, select Means/Anova.
7. From the red triangle menu, select Robust > Robust Fit.
Figure 6.31 Example of Robust Fit
If you look at the standard Analysis of Variance report, you might wrongly conclude that there is a difference between the three formulations, since the p-value is 0.0319. However, when you look at the Robust Fit report, you would not conclude that the three formulations are significantly different, because the p-value there is 0.21755. It appears that the toxicity for a few of the observations is unusually high, creating the undue influence on the data.

Chapter 6 Oneway Analysis 219Basic Analysis Additional Examples of the Oneway Platform
Example of the Power Option
1. Select Help > Sample Data Library and open Typing Data.jmp.
2. Select Analyze > Fit Y by X.
3. Select speed and click Y, Response.
4. Select brand and click X, Factor.
5. Click OK.
6. From the red triangle menu, select Power.
7. Within the From row, type 2 for Delta (the third box) and type 11 for Number.
8. Within the To row, type 6 for Delta, and type 17 in the Number box.
9. Within the By row, type 2 for both Delta and Number.
10. Select the Solve for Power check box.
Figure 6.32 Example of the Power Details Window
11. Click Done.
Note: The Done button remains dimmed until all of the necessary options are applied.

220 Oneway Analysis Chapter 6Additional Examples of the Oneway Platform Basic Analysis
Power is computed for each combination of Delta and Number, and appears in the Power report.
To plot the Power values:
12. From the red triangle menu at the bottom of the report, select Power Plot.
Figure 6.33 Example of the Power Report
13. You might need to click and drag vertically on the Power axis to see all of the data in the plot.
Power is plotted for each combination of Delta and Number. As you might expect, the power rises for larger Number (sample sizes) values and for larger Delta values (difference in means).
Example of a Normal Quantile Plot
1. Select Help > Sample Data Library and open Big Class.jmp.
2. Select Analyze > Fit Y by X.
3. Select height and click Y, Response.
4. Select sex and click X, Factor.
5. Click OK.
6. From the red triangle menu, select Normal Quantile Plot > Plot Actual by Quantile.

Chapter 6 Oneway Analysis 221Basic Analysis Additional Examples of the Oneway Platform
Figure 6.34 Example of a Normal Quantile Plot
From Figure 6.34, notice the following:
• The Line of Fit appears by default.
• The data points track very closely to the line of fit, indicating a normal distribution.
Example of a CDF Plot
1. Select Help > Sample Data Library and open Analgesics.jmp.
2. Select Analyze > Fit Y by X.
3. Select pain and click Y, Response.
4. Select drug and click X, Factor.
5. Click OK.
6. From the red triangle menu, select CDF Plot.
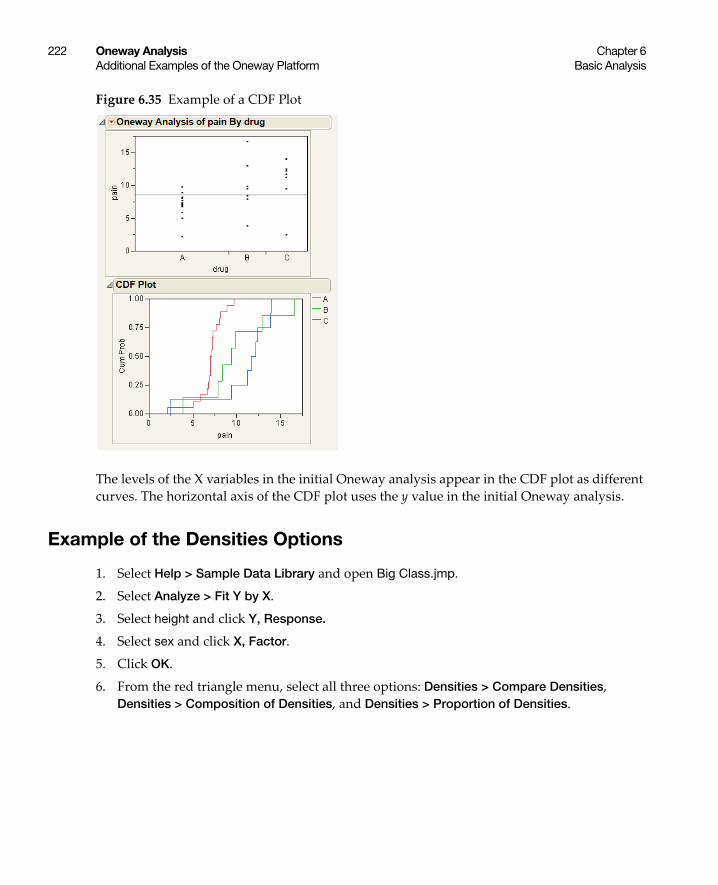
222 Oneway Analysis Chapter 6Additional Examples of the Oneway Platform Basic Analysis
Figure 6.35 Example of a CDF Plot
The levels of the X variables in the initial Oneway analysis appear in the CDF plot as different curves. The horizontal axis of the CDF plot uses the y value in the initial Oneway analysis.
Example of the Densities Options
1. Select Help > Sample Data Library and open Big Class.jmp.
2. Select Analyze > Fit Y by X.
3. Select height and click Y, Response.
4. Select sex and click X, Factor.
5. Click OK.
6. From the red triangle menu, select all three options: Densities > Compare Densities, Densities > Composition of Densities, and Densities > Proportion of Densities.

Chapter 6 Oneway Analysis 223Basic Analysis Additional Examples of the Oneway Platform
Figure 6.36 Example of the Densities Options
Example of the Matching Column Option
This example uses the Matching.jmp sample data table, which contains data on six animals and the miles that they travel during different seasons.
1. Select Help > Sample Data Library and open Matching.jmp.
2. Select Analyze > Fit Y by X.
3. Select miles and click Y, Response.
4. Select season and click X, Factor.
5. Click OK.
6. From the red triangle menu, select Matching Column.
7. Select subject as the matching column.
females contributed about 61% to height density at this X level
contribution of males to height densitycontribution of females to height density

224 Oneway Analysis Chapter 6Additional Examples of the Oneway Platform Basic Analysis
8. Click OK.
Figure 6.37 Example of the Matching Column Report
The plot graphs the miles traveled by season, with subject as the matching variable. The labels next to the first measurement for each subject on the graph are determined by the species and subject variables.
The Matching Fit report shows the season and subject effects with F tests. These are equivalent to the tests that you get with the Fit Model platform if you run two models, one with the interaction term and one without. If there are only two levels, then the F test is equivalent to the paired t-test.
Note: For details about the Fit Model platform, see the Model Specification chapter in the Fitting Linear Models book.

Chapter 6 Oneway Analysis 225Basic Analysis Additional Examples of the Oneway Platform
Example of Stacking Data for a Oneway Analysis
When your data are in a format other than a JMP data table, sometimes they are arranged so that a row contains information for multiple observations. To analyze the data in JMP, you must import the data and restructure it so that each row of the JMP data table contains information for a single observation. For example, suppose that your data are in a spreadsheet. The data for parts produced on three production lines are arranged in three sets of columns. In your JMP data table, you need to stack the data from the three production lines into a single set of columns so that each row represents the data for a single part.
Description and Goals
This example uses the file Fill Weights.xlsx, which contains the weights of cereal boxes randomly sampled from three different production lines. Figure 6.38 shows the format of the data.
• The ID columns contain an identifier for each cereal box that was measured.
• The Line columns contain the weights (in ounces) for boxes sampled from the corresponding production line.
Figure 6.38 Data Format
The target fill weight for the boxes is 12.5 ounces. Although you are interested in whether the three production lines are meeting the target, initially you want to see whether the three lines are achieving the same mean fill rate. You can use Oneway to test for differences among the mean fill weights.
To use the Oneway platform, you need to do the following:
1. Import the data into JMP. See “Import the Data” on page 226.
2. Reshape the data so that each row in the JMP data table reflects only a single observation. Reshaping the data requires that you stack the cereal box IDs, the line identifiers, and the weights into columns. See “Stack the Data” on page 227.

226 Oneway Analysis Chapter 6Additional Examples of the Oneway Platform Basic Analysis
Import the Data
This example illustrates two ways to import data from Microsoft Excel into JMP. Select one method or explore both:
• Use the File > Open option to import data from a Microsoft Excel file using the Excel Import Wizard. See “Import the Data Using the Excel Import Wizard” on page 226. This method is convenient for any Excel file.
• Copy and paste data from Microsoft Excel into a new JMP data table. See “Copy and Paste the Data from Excel” on page 227. You can use this method with small data files.
For more information on how to import data from Microsoft Excel, see the Import Your Data chapter in the Using JMP book.
Import the Data Using the Excel Import Wizard
1. Select Help > Sample Data Library and open Fill Weights.xlsx located in the Samples/Import Data folder.
The file opens in the Excel Import Wizard.
2. Type 3 next to Column headers start on on row.
In the Excel file, row 1 contains information about the table and row 2 is blank. The column header information starts on row 3.
3. Type 2 for Number of rows with column headers.
In the Excel file, rows 3 and 4 both contain column header information.
4. Click Import.
Figure 6.39 JMP Table Created Using Excel Import Wizard
The data are placed in seven rows and multiple IDs appear in each row. For each of the three lines, there are an ID and Weight column, giving a total of six columns.
Notice that the “Weights” part of the ID column name is unnecessary and misleading. You could rename the columns now, but it will be more efficient to rename the columns after you stack the data.
5. Proceed to “Stack the Data” on page 227.

Chapter 6 Oneway Analysis 227Basic Analysis Additional Examples of the Oneway Platform
Copy and Paste the Data from Excel
1. Open Fill Weights.xlsx in Microsoft Excel.
2. Select the data inside the table but exclude the unnecessary “Weights” heading.
3. Right-click and select Copy.
4. In JMP, select File > New > Data Table.
5. Select Edit > Paste with Column Names.
The Edit > Paste with Column Names option is used when you have column names included in the selection on the clipboard.
Figure 6.40 JMP Table Created Using Paste with Column Names
6. Proceed to “Stack the Data” on page 227.
Stack the Data
Use the Stack option to place one observation in each row of a new data table. For more information on the Stack option, see the Reshape Data chapter in the Using JMP book.
1. In the JMP data table, select Tables > Stack.
2. Select all six columns and click Stack Columns.
3. Select Multiple Series Stack.
You are stacking two series, ID and Line, so you do not change the Number of Series, which is set to 2 by default. The columns that contain the series are not contiguous. They alternate (ID, Line A, ID, Line B, ID, Line C). For this reason, you do not check Contiguous.
4. Deselect Stack By Row.
5. Select Eliminate Missing Rows.
6. Enter Stacked next to Output table name.
7. Click OK.
In the new data table, Data and Data 2 are columns containing the ID and Weight data.
8. Right-click the Label column heading and select Delete Columns.
The entries in the Label column were the column headings for the box IDs in the imported data table. These entries are not needed.

228 Oneway Analysis Chapter 6Additional Examples of the Oneway Platform Basic Analysis
9. Rename each column by double-clicking on the column header. Change the column names as follows:
– Data to ID
– Label 2 to Line
– Data 2 to Weight
10. In the Columns panel, click on the icon to the left of ID and select Nominal.
Although ID is given as a number, it is an identifier and should be treated as nominal when modeling. This is not an issue in this example, but it is good practice to assign the appropriate modeling type to a column.
11. (Only applies if you imported the data from Excel using File > Open.) Do the following:
1. Click the Line column header to select the column and select Cols > Recode.
2. Change the values in the New Values column to match those in Figure 6.41 below.
Figure 6.41 Recode Column Values
3. Click Done > In place.
Your new data table is now properly structured for JMP analysis. Each row contains data for a single cereal box. The first column gives the box ID, the second gives the production line, and the third gives the weight of the box (Figure 6.42).

Chapter 6 Oneway Analysis 229Basic Analysis Additional Examples of the Oneway Platform
Figure 6.42 Recoded Data Table
Conduct the Oneway Analysis
For this part of the example, you will:
• Conduct a Oneway Analysis of Variance to test for differences in the mean fill weights among the three production lines.
• Obtain Comparison Circles to explore which lines might differ.
• Label points by ID in case you want to reweigh or further examine their boxes.
Before beginning, verify that you are using the Stacked data table.
1. Select Analyze > Fit Y by X.
2. Select Weight and click Y, Response.
3. Select Line and click X, Factor.
4. Click OK.
5. From the red triangle menu, select Means/Anova.
The mean diamonds in the plot show 95% confidence intervals for the production line means. The points that fall outside the mean diamonds might seem like outliers, however they are not. To see this, add box plots to the plot.
6. From the red triangle menu, select Display Options > Box Plots.
All points fall within the box plots boundaries, therefore they are not outliers.
7. From the data table, in the Columns panel, right-click ID and select Label/Unlabel.
8. In the plot, hover over the points with your mouse to see their ID values, as well as their Line and Weight data. See Figure 6.43.
9. From the red triangle menu, select Compare Means > All Pairs, Tukey HSD.
Comparison circles appear in a panel to the right of the plot.

230 Oneway Analysis Chapter 6Additional Examples of the Oneway Platform Basic Analysis
10. Click the bottom comparison circle.
Figure 6.43 Oneway Analysis of Weight by Line
In the Analysis of Variance report, the p-value of 0.0102 provides evidence that the means are not all equal. In the plot, the comparison circle for Line C is selected and appears red. Since the circle for Line B appears as thick gray, the mean for Line C differs from the mean for Line B at the 0.05 significance level. The means for Lines A and B do not show a statistically significant difference.
The mean diamonds shown in the plot span 95% confidence intervals for the means. The numeric bounds for the 95% confidence intervals are given in the Means for Oneway ANOVA report. Both of these indicate that the confidence intervals for Lines B and C do not contain the target fill weight of 12.5: Line B appears to overfill and Line C appears to underfill. For these two production lines, the underlying causes that result in off-target fill weights must be addressed.

Chapter 6 Oneway Analysis 231Basic Analysis Statistical Details for the Oneway Platform
Statistical Details for the Oneway Platform
• “Comparison Circles”• “Power”• “Summary of Fit Report”• “Tests That the Variances Are Equal”• “Nonparametric Test Statistics”
Comparison Circles
One approach to comparing two means is to determine whether their actual difference is greater than their least significant difference (LSD). This least significant difference is a Student’s t-statistic multiplied by the standard error of the difference of the two means and is written as follows:
The standard error of the difference of two independent means is calculated from the following relationship:
When the means are uncorrelated, these quantities have the following relationship:
These squared values form a Pythagorean relationship, illustrated graphically by the right triangle shown in Figure 6.44.
Figure 6.44 Relationship of the Difference between Two Means
The hypotenuse of this triangle is a measuring stick for comparing means. The means are significantly different if and only if the actual difference is greater than the hypotenuse (LSD).
LSD tα 2⁄ std μ1 μ2–( )=
std μ1 μ2–( )[ ]2 std μ1( )[ ]2 std μ2( )[ ]2+=
LSD2 tα 2⁄ std μ1 μ2–( )( )[ ]2
tα 2⁄ std μ1( )[ ]2
tα 2⁄ stdμ2[ ]2+= =
tα2---
std μ1 μ2–( )⋅
tα2---
std μ2( )⋅
tα2---
std μ1( )⋅

232 Oneway Analysis Chapter 6Statistical Details for the Oneway Platform Basic Analysis
Suppose that you have two means that are exactly on the borderline, where the actual difference is the same as the least significant difference. Draw the triangle with vertices at the means measured on a vertical scale. Also, draw circles around each mean so that the diameter of each is equal to the confidence interval for that mean.
Figure 6.45 Geometric Relationship of t-test Statistics
The radius of each circle is the length of the corresponding leg of the triangle, which is .
The circles must intersect at the same right angle as the triangle legs, giving the following relationship:
• If the means differ exactly by their least significant difference, then the confidence interval circles around each mean intersect at a right angle. That is, the angle of the tangents is a right angle.
Now, consider the way that these circles must intersect if the means are different by greater than or less than the least significant difference:
• If the circles intersect so that the outside angle is greater than a right angle, then the means are not significantly different. If the circles intersect so that the outside angle is less than a right angle, then the means are significantly different. An outside angle of less than 90 degrees indicates that the means are farther apart than the least significant difference.
• If the circles do not intersect, then they are significantly different. If they nest, they are not significantly different. See Figure 6.11.
The same graphical technique works for many multiple-comparison tests, substituting a different probability quantile value for the Student’s t.
Power
To compute power, you make use of the noncentral F distribution. The formula (O’Brien and Lohr 1984) is given as follows:
Power = Prob(F > Fcrit, ν1, ν2, nc)
tα2---
std μ1 μ2–( )⋅
tα2---
std μ2( )⋅
tα2---
std μ1( )⋅
μ2
μ1
tα 2⁄ std μi( )

Chapter 6 Oneway Analysis 233Basic Analysis Statistical Details for the Oneway Platform
where:
F is distributed as the noncentral and is the 1 - α quantile of the F distribution with ν1 and ν2 degrees of freedom.
ν1 = r -1 is the numerator df.
ν2 = r(n -1) is the denominator df.
n is the number per group.
r is the number of groups.
nc = n(CSS)/σ2 is the non-centrality parameter.
is the corrected sum of squares.
μg is the mean of the gth group.
μ is the overall mean.
σ2 is estimated by the mean squared error (MSE).
Summary of Fit Report
Rsquare
Using quantities from the Analysis of Variance report for the model, the R2 for any continuous response fit is always calculated as follows:
Adj Rsquare
Adj Rsquare is a ratio of mean squares instead of sums of squares and is calculated as follows:
The mean square for Error is found in the Analysis of Variance report and the mean square for C. Total can be computed as the C. Total Sum of Squares divided by its respective degrees of freedom. See “The Analysis of Variance Report” on page 174.
F nc v1 v, , 2( ) Fcrit F 1 α– v1 v2, ,( )=
CSS μg μ–( )2
g 1=
r
=
Sum of Squares (Model)Sum of Squares (C Total)------------------------------------------------------------------
1 Mean Square (Error)Mean Square (C Total)-----------------------------------------------------------–

234 Oneway Analysis Chapter 6Statistical Details for the Oneway Platform Basic Analysis
Tests That the Variances Are Equal
F Ratio
O’Brien’s test constructs a dependent variable so that the group means of the new variable equal the group sample variances of the original response. The O’Brien variable is computed as follows:
where n represents the number of yijk observations.
Brown-Forsythe is the model F statistic from an ANOVA on where is the median response for the ith level.
The Levene F is the model F statistic from an ANOVA on where is the mean response for the ith level.
Bartlett’s test is calculated as follows:
where and
and ni is the count on the ith level and si2 is the response sample variance on the ith level. The
Bartlett statistic has a χ2-distribution. Dividing the Chi-square test statistic by the degrees of freedom results in the reported F value.
Welch’s Test F Ratio
The Welch’s Test F Ratio is computed as follows:
where , , ,
rijk
nij 1.5–( )nij yijk yi··j
–( )2
0.5sij2 nij 1–( )–
nij 1–( ) nij 2–( )-------------------------------------------------------------------------------------------------------=
zij yij yi–= yi
zij yij yi .–= yi .
T
vviv----si
2
i
log vi si2( )log
i–
1
1vi----
i
1v---–
3 k 1–( )--------------------
+
-----------------------------------------------------------------------= vi ni 1–= v vii=
F
wi yi y..–( )2
i
k 1–-------------------------------------
1 2 k 2–( )
k2 1–-------------------
1wiu------–
2
ni 1–-----------------------
i+
------------------------------------------------------------------------=
wini
si2-----= u wi
i= y..
wiyi .u
------------i=

Chapter 6 Oneway Analysis 235Basic Analysis Statistical Details for the Oneway Platform
and ni is the count on the ith level, is the mean response for the ith level, and si2 is the
response sample variance for the ith level.
Welch’s Test DF Den
The Welch approximation for the denominator degrees of freedom is as follows:
where wi, ni, and u are defined as in the F ratio formula.
Nonparametric Test Statistics
This section provides formulas for the test statistics used in the Wilcoxon, Median, van der Waerden, and Friedman Rank tests.
Notation
The tests are based on scores and use the following notation.
j = 1,..., n The observations in the entire sample.
i = 1,..., k The levels of X, where k is the total number of levels.
n1, n2, ..., nk The number of observations in each of the k levels of X.
Rj The midrank of the jth observation. The midrank is the observation’s rank if it is not tied and its average rank if it is tied.
α A function of the midranks used to define scores for the various tests.
The following notation is used when a Block variable is specified in the launch window.
b = 1,..., B The levels of the blocking variable, where B is the total number of blocks.
Rbi The midrank of the ith level of X within block b.
The function α defines scores as follows:
Wilcoxon Scores
Median Scores
yi .
df 1
3
k2 1–--------------
1wiu------–
2
ni 1–-----------------------
i
--------------------------------------------------------=
α Rj( ) Rj=

236 Oneway Analysis Chapter 6Statistical Details for the Oneway Platform Basic Analysis
Let nt denote the number of observations tied at the median. Then nt is given by the following:
van der Waerden Scores
Friedman Rank Scores
Two-Sample Normal Approximations
Tests based on the normal approximation are given only when X has exactly two levels. The notation used in this section is defined in “Notation” on page 235. The statistics that appear in the Two-Sample Normal Approximation report are defined below.
S The statistic S is the sum of the values α(Rj) for the observations in the smaller group. If the two levels of X have the same numbers of observations, then the value of S corresponds to the last level of X in the value ordering.
Z The value of Z is given as follows:
Note: The Wilcoxon test adds a continuity correction. If (S - E(S)) is greater than zero, then 0.5 is subtracted from the numerator. If (S - E(S)) is less than zero, then 0.5 is added to the numerator.
E(S) The expected value of S under the null hypothesis. Denote the number of observations in the smaller level, or in the last level in the value ordering if the two groups have the same number of observations, by nl:
α Rj( )
1 if Rj n 1+( ) 2⁄>
0 if Rj n 1+( ) 2⁄<
t if Rj = median
=
ntnt 2⁄( ) if nt is even
nt 1+( ) 2nt( ) if nt is odd⁄
=
α Rj( ) Standard Normal Quantile Rj n 1+( )⁄( )=
α Rbi( ) Rbi=
Z S E S( )–( ) Var S( )⁄=

Chapter 6 Oneway Analysis 237Basic Analysis Statistical Details for the Oneway Platform
Var(S) Define ave to be the average score across all observations. Then the variance of S is given as follows:
Two-Sample Normal Approximations for Friedman Rank Test
When you use the Friedman Rank test, the calculations for the two-sample normal approximation is the same as above, except that the variance of S is different. The formula for the variance of S is as follows:
One-Way ChiSquare Approximations
Note: The ChiSquare test based on the Wilcoxon scores is known as the Kruskal-Wallis test.
The notation used in this section is defined in “Notation” on page 235. The following quantities are used in calculating the ChiSquare statistic:
Ti The total of the scores for the ith level of X.
E(Ti) The expected value of the total score for level i under the null hypothesis of no difference in levels, given as follows:
Var(T) Define ave to be the average score across all observations. Then the variance of T is given as follows:
E S( )nln----- α Rj( )
j 1=
n
=
Var S( )n1n2
n n 1–( )-------------------- α Rj( ) ave–( )2
j 1=
n
=
Var S( ) Bn 1–( )----------------- α Rj( ) ave–( )2
j 1=
n
=
E Ti( )nin----- α Rj( )
j 1=
n
=
Var T( ) 1n 1–( )----------------- α Rj( ) ave–( )2
j 1=
n
=

238 Oneway Analysis Chapter 6Statistical Details for the Oneway Platform Basic Analysis
The value of the test statistic is given below. This statistic is asymptotically ChiSquare on k - 1 degrees of freedom.
One-Way ChiSquare Approximations for Friedman Rank Test
The ChiSquare test statistic for the Friedman Rank Test is calculated as follows:
C Ti E Ti( )–( )2
i 1=
k
ni⁄
Var T( )⁄=
C
Ti E Ti( )–( )2
i 1=
k
ni⁄
1k 1–( )---------------- α Rj( ) ave–( )2 ni⁄
j 1=
n
--------------------------------------------------------------------------=

Chapter 7Contingency Analysis
Examine Relationships between Two Categorical Variables
The Contingency or Fit Y by X platform lets you explore the distribution of a categorical (nominal or ordinal) variable Y across the levels of a second categorical variable X. The Contingency platform is the categorical by categorical personality of the Fit Y by X platform. The analysis results include a mosaic plot, frequency counts, and proportions. You can interactively perform additional analyses and tests on your data, such as an Analysis of Means for Proportions, a correspondence analysis plot, and so on.
Figure 7.1 Example of Contingency Analysis

240 Contingency Analysis Chapter 7Basic Analysis
ContentsExample of Contingency Analysis . . . . . . . . . . . . . . . . . . . . . . . . . . . . . . . . . . . . . . . . . . . . . . . . . 241Launch the Contingency Platform . . . . . . . . . . . . . . . . . . . . . . . . . . . . . . . . . . . . . . . . . . . . . . . . . 242
Data Format . . . . . . . . . . . . . . . . . . . . . . . . . . . . . . . . . . . . . . . . . . . . . . . . . . . . . . . . . . . . . . . . . 243The Contingency Report . . . . . . . . . . . . . . . . . . . . . . . . . . . . . . . . . . . . . . . . . . . . . . . . . . . . . . . . . 243Contingency Platform Options . . . . . . . . . . . . . . . . . . . . . . . . . . . . . . . . . . . . . . . . . . . . . . . . . . . . 244Mosaic Plot . . . . . . . . . . . . . . . . . . . . . . . . . . . . . . . . . . . . . . . . . . . . . . . . . . . . . . . . . . . . . . . . . . . . . 245
Pop-Up Menu . . . . . . . . . . . . . . . . . . . . . . . . . . . . . . . . . . . . . . . . . . . . . . . . . . . . . . . . . . . . . . . 246Contingency Table. . . . . . . . . . . . . . . . . . . . . . . . . . . . . . . . . . . . . . . . . . . . . . . . . . . . . . . . . . . . . . . 248
Description of the Contingency Table . . . . . . . . . . . . . . . . . . . . . . . . . . . . . . . . . . . . . . . . . . . 249Tests . . . . . . . . . . . . . . . . . . . . . . . . . . . . . . . . . . . . . . . . . . . . . . . . . . . . . . . . . . . . . . . . . . . . . . . . . . . 250
Description of the Tests Report . . . . . . . . . . . . . . . . . . . . . . . . . . . . . . . . . . . . . . . . . . . . . . . . . 250Fisher’s Exact Test . . . . . . . . . . . . . . . . . . . . . . . . . . . . . . . . . . . . . . . . . . . . . . . . . . . . . . . . . . . . 251
Analysis of Means for Proportions . . . . . . . . . . . . . . . . . . . . . . . . . . . . . . . . . . . . . . . . . . . . . . . . . 251Correspondence Analysis . . . . . . . . . . . . . . . . . . . . . . . . . . . . . . . . . . . . . . . . . . . . . . . . . . . . . . . . 251
Understanding Correspondence Analysis Plots. . . . . . . . . . . . . . . . . . . . . . . . . . . . . . . . . . . 252Correspondence Analysis Options . . . . . . . . . . . . . . . . . . . . . . . . . . . . . . . . . . . . . . . . . . . . . . 252The Details Report. . . . . . . . . . . . . . . . . . . . . . . . . . . . . . . . . . . . . . . . . . . . . . . . . . . . . . . . . . . . 252
Cochran-Mantel-Haenszel Test . . . . . . . . . . . . . . . . . . . . . . . . . . . . . . . . . . . . . . . . . . . . . . . . . . . . 253Agreement Statistic . . . . . . . . . . . . . . . . . . . . . . . . . . . . . . . . . . . . . . . . . . . . . . . . . . . . . . . . . . . . . . 253Relative Risk. . . . . . . . . . . . . . . . . . . . . . . . . . . . . . . . . . . . . . . . . . . . . . . . . . . . . . . . . . . . . . . . . . . . 254Two Sample Test for Proportions . . . . . . . . . . . . . . . . . . . . . . . . . . . . . . . . . . . . . . . . . . . . . . . . . . 254Measures of Association. . . . . . . . . . . . . . . . . . . . . . . . . . . . . . . . . . . . . . . . . . . . . . . . . . . . . . . . . . 255Cochran Armitage Trend Test . . . . . . . . . . . . . . . . . . . . . . . . . . . . . . . . . . . . . . . . . . . . . . . . . . . . . 256Exact Test . . . . . . . . . . . . . . . . . . . . . . . . . . . . . . . . . . . . . . . . . . . . . . . . . . . . . . . . . . . . . . . . . . . . . . 257Additional Examples of the Contingency Platform . . . . . . . . . . . . . . . . . . . . . . . . . . . . . . . . . . . 257
Example of Analysis of Means for Proportions . . . . . . . . . . . . . . . . . . . . . . . . . . . . . . . . . . . 258Example of Correspondence Analysis . . . . . . . . . . . . . . . . . . . . . . . . . . . . . . . . . . . . . . . . . . . 259Example of a Cochran Mantel Haenszel Test . . . . . . . . . . . . . . . . . . . . . . . . . . . . . . . . . . . . . 262Example of the Agreement Statistic Option . . . . . . . . . . . . . . . . . . . . . . . . . . . . . . . . . . . . . . 263Example of the Relative Risk Option . . . . . . . . . . . . . . . . . . . . . . . . . . . . . . . . . . . . . . . . . . . . 264Example of a Two Sample Test for Proportions . . . . . . . . . . . . . . . . . . . . . . . . . . . . . . . . . . . 265Example of the Measures of Association Option . . . . . . . . . . . . . . . . . . . . . . . . . . . . . . . . . . 266Example of the Cochran Armitage Trend Test . . . . . . . . . . . . . . . . . . . . . . . . . . . . . . . . . . . . 267
Statistical Details for the Contingency Platform. . . . . . . . . . . . . . . . . . . . . . . . . . . . . . . . . . . . . . 268Agreement Statistic Option . . . . . . . . . . . . . . . . . . . . . . . . . . . . . . . . . . . . . . . . . . . . . . . . . . . . 268Odds Ratio Option . . . . . . . . . . . . . . . . . . . . . . . . . . . . . . . . . . . . . . . . . . . . . . . . . . . . . . . . . . . 268Tests Report . . . . . . . . . . . . . . . . . . . . . . . . . . . . . . . . . . . . . . . . . . . . . . . . . . . . . . . . . . . . . . . . . 269Details Report in Correspondence Analysis . . . . . . . . . . . . . . . . . . . . . . . . . . . . . . . . . . . . . . 270

Chapter 7 Contingency Analysis 241Basic Analysis Example of Contingency Analysis
Example of Contingency Analysis
This example uses data collected from car polls. The data include respondent attributes: sex, marital status, and age. The data also include attributes of the respondent’s car: country of origin, the size, and the type. Examine the relationship between car sizes (small, medium, and large) and the cars’ country of origin.
1. Select Help > Sample Data Library and open Car Poll.jmp.
2. Select Analyze > Fit Y by X.
3. Select size and click Y, Response.
4. Select country and click X, Factor.
5. Click OK.
Figure 7.2 Example of Contingency Analysis

242 Contingency Analysis Chapter 7Launch the Contingency Platform Basic Analysis
From the mosaic plot and legend in Figure 7.2, notice the following:
• Very few Japanese cars fall into the Large size category.
• The majority of the European cars fall into the Small and Medium size categories.
• The majority of the American cars fall into the Large and Medium size categories.
Launch the Contingency Platform
To perform a contingency analysis, do the following:
1. Select Analyze > Fit Y by X.
2. Enter a nominal or ordinal column for Y, Response.
3. Enter a nominal or ordinal column for X, Factor.
Figure 7.3 The Fit Y by X Launch Window
The word Contingency appears above the diagram, to indicate that you are performing a contingency analysis.
Note: You can also launch a contingency analysis from the JMP Starter window. Select View > JMP Starter > Basic > Contingency.
For more information about this launch window, see “Introduction to Fit Y by X” chapter on page 109.

Chapter 7 Contingency Analysis 243Basic Analysis The Contingency Report
Data Format
Categorical data are often presented in summary form, where there is only one row in the data table for each combination of levels of the Y and X variables. In this situation, use the Freq or Weight variable to indicate the number of observations that each row represents. For an example of summarized categorical data, see “Example of Analysis of Means for Proportions” on page 258.
The Contingency Report
To produce the plot shown in Figure 7.4, follow the instructions in “Example of Contingency Analysis” on page 241.
Figure 7.4 Example of a Contingency Report

244 Contingency Analysis Chapter 7Contingency Platform Options Basic Analysis
Note: Any rows that are excluded in the data table are also hidden in the Mosaic Plot.
The Contingency report initially shows a Mosaic Plot, a Contingency Table, and a Tests report. You can add other analyses and tests using the options that are located within the red triangle menu. For details about all of these reports and options, see “Contingency Platform Options” on page 244.
Contingency Platform Options
Note: The Fit Group menu appears if you have specified multiple Y variables. Menu options allow you to arrange reports or order them by RSquare. See the Standard Least Squares chapter in the Fitting Linear Models book for more information.
Use the platform options within the red triangle menu next to Contingency Analysis to perform additional analyses and tests on your data.
Mosaic Plot A graphical representation of the data in the Contingency Table. See “Mosaic Plot” on page 245.
Contingency Table A two-way frequency table. There is a row for each factor level and a column for each response level. See “Contingency Table” on page 248.
Tests Analogous to the Analysis of Variance table for continuous data. The tests show that the response level rates are the same across X levels. See “Tests” on page 250.
Set α level Changes the alpha level used in confidence intervals. Select one of the common values (0.10, 0.05, 0.01) or select a specific value using the Other option.
Analysis of Means for Proportions Appears only if the response has exactly two levels. Compares response proportions for the X levels to the overall response proportion. See “Analysis of Means for Proportions” on page 251.
Correspondence Analysis Shows which rows or columns of a frequency table have similar patterns of counts. In the correspondence analysis plot, there is a point for each row and for each column of the contingency table. See “Correspondence Analysis” on page 251.
Cochran Mantel Haenszel Tests if there is a relationship between two categorical variables after blocking across a third classification. See “Cochran-Mantel-Haenszel Test” on page 253.
Agreement Statistic Appears only when the X and Y variables have the same levels. Displays the Kappa statistic (Agresti 1990), its standard error, confidence interval,

Chapter 7 Contingency Analysis 245Basic Analysis Mosaic Plot
hypothesis test, and Bowker’s test of symmetry, also know as McNemarʹs test. See “Agreement Statistic” on page 253.
Relative Risk Appears only when the X and Y variables have two levels. Calculates risk ratios. See “Relative Risk” on page 254.
Odds Ratio Appears only when the X and Y variables have two levels. Produces a report of the odds ratio. For more information, see “Odds Ratio Option” on page 268.
The report also gives a confidence interval for this ratio. You can change the alpha level using the Set α Level option.
Two Sample Test for Proportions Appears only when the X and Y variables have two levels. Performs a two-sample test for proportions. This test compares the proportions of the Y variable between the two levels of the X variable. See “Two Sample Test for Proportions” on page 254.
Measures of Association Describes the association between the variables in the contingency table. See “Measures of Association” on page 255.
Cochran Armitage Trend Test Appears only when one variable has two levels and the other variable is ordinal. Tests for trends in binomial proportions across levels of a single variable. See “Cochran Armitage Trend Test” on page 256.
Exact Test Provides exact versions of the following tests:
– Fisher’s Test
– Cochran Armitage Trend Test
– Agreement Statistic
See “Exact Test” on page 257.
Mosaic Plot
The mosaic plot is a graphical representation of the two-way frequency table or Contingency Table. A mosaic plot is divided into rectangles, so that the vertical length of each rectangle is proportional to the proportions of the Y variable in each level of the X variable. The mosaic plot was introduced by Hartigan and Kleiner (1981) and refined by Friendly (1994).
To produce the plot shown in Figure 7.5, follow the instructions in “Example of Contingency Analysis” on page 241.
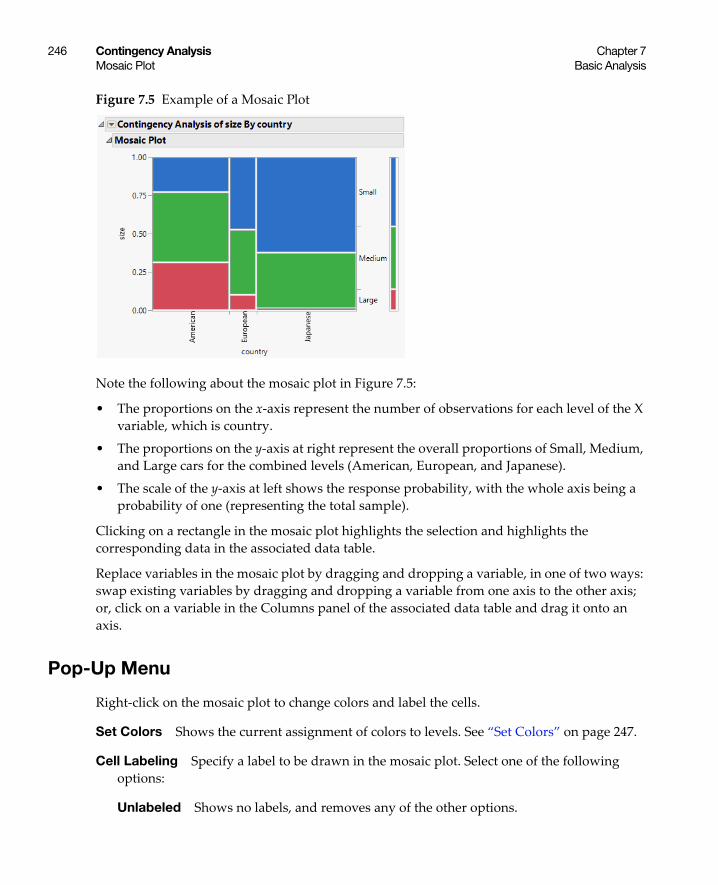
246 Contingency Analysis Chapter 7Mosaic Plot Basic Analysis
Figure 7.5 Example of a Mosaic Plot
Note the following about the mosaic plot in Figure 7.5:
• The proportions on the x-axis represent the number of observations for each level of the X variable, which is country.
• The proportions on the y-axis at right represent the overall proportions of Small, Medium, and Large cars for the combined levels (American, European, and Japanese).
• The scale of the y-axis at left shows the response probability, with the whole axis being a probability of one (representing the total sample).
Clicking on a rectangle in the mosaic plot highlights the selection and highlights the corresponding data in the associated data table.
Replace variables in the mosaic plot by dragging and dropping a variable, in one of two ways: swap existing variables by dragging and dropping a variable from one axis to the other axis; or, click on a variable in the Columns panel of the associated data table and drag it onto an axis.
Pop-Up Menu
Right-click on the mosaic plot to change colors and label the cells.
Set Colors Shows the current assignment of colors to levels. See “Set Colors” on page 247.
Cell Labeling Specify a label to be drawn in the mosaic plot. Select one of the following options:
Unlabeled Shows no labels, and removes any of the other options.

Chapter 7 Contingency Analysis 247Basic Analysis Mosaic Plot
Show Counts Shows the number of observations in each cell.
Show Percents Shows the percent of observations in each cell.
Show Labels Shows the levels of the Y variable corresponding to each cell.
Show Row Labels Shows the row labels for all of the rows represented by the cell.
Note: For descriptions of the remainder of the right-click options, see the JMP Reports chapter in the Using JMP book.
Set Colors
When you select the Set Colors option, the Select Colors for Values window appears.
Figure 7.6 Select Colors for Values Window
The default mosaic colors depend on whether the response column is ordinal or nominal, and whether there is an existing Value Colors column property. To change the color for any level, click on the oval in the second column of colors and pick a new color.
Description of the Select Colors for Values Window
Macros Computes a color gradient between any two levels, as follows:
– The Gradient Between Ends option applies a gradient to all levels of the variable.
– If you select a range of levels (by dragging the mouse over the levels that you want to select, or pressing the Shift key and clicking the first and last level), the Gradient Between Selected Points option applies a color gradient to the levels that you have selected.
– Flip the color order by selecting Reverse Colors.
– Undo any of your changes by selecting Revert to Old Colors.
Color Theme Changes the colors for each value based on a color theme.
Save Colors to Column If you select this check box, a new column property (Value Colors) is added to the column in the associated data table. To edit this property from the data table, select Cols > Column Info.

248 Contingency Analysis Chapter 7Contingency Table Basic Analysis
Contingency Table
The Contingency Table is a two-way frequency table. There is a row for each factor level and a column for each response level.
To produce the plot shown in Figure 7.7, follow the instructions in “Example of Contingency Analysis” on page 241.
Figure 7.7 Example of a Contingency Table
Note the following about Contingency tables:
• The Count, Total%, Col%, and Row% correspond to the data within each cell that has row and column headings (such as the cell under American and Large).
• The last column contains the total counts for each row and percentages for each row.
• The bottom row contains total counts for each column and percentages for each column.
For example, in Figure 7.7, focus on the cars that are large and come from America. The following table explains the conclusions that you can make about these cars using the Contingency Table.
Table 7.1 Conclusions Based on Example of a Contingency Table
Number Description Label in Table
36 Number of cars that are both large and come from America
Count
11.88% Percentage of all cars that are both large and come from America (36/303)a.
Total%

Chapter 7 Contingency Analysis 249Basic Analysis Contingency Table
Tip: To show or hide data in the Contingency Table, from the red triangle menu next to Contingency Table, select the option that you want to show or hide.
Description of the Contingency Table
Count Cell frequency, margin total frequencies, and grand total (total sample size).
Total% Percent of cell counts and margin totals to the grand total.
Row% Percent of each cell count to its row total.
Col% Percent of each cell count to its column total.
Expected Expected frequency (E) of each cell under the assumption of independence. Computed as the product of the corresponding row total and column total divided by the grand total.
Deviation Observed cell frequency (O) minus the expected cell frequency (E).
Cell Chi Square Chi-square values computed for each cell as (O - E)2 / E.
Col Cum Cumulative column total.
Col Cum% Cumulative column percentage.
Row Cum Cumulative row total.
Row Cum% Cumulative row percentage.
85.71% Percentage of large cars that come from America (36/42)b
Col%
31.30% Percentage of American cars that are large (36/115)c. Row%
37.95% Percentage of all cars that come from America (115/303).
(none)
13.86% Percentage of all cars that are large (42/303). (none)
a. 303 is the total number of cars in the poll.b. 42 is the total number of large cars in the poll.c. 115 is the total number of American cars in the poll.
Table 7.1 Conclusions Based on Example of a Contingency Table (Continued)
Number Description Label in Table

250 Contingency Analysis Chapter 7Tests Basic Analysis
Tests
The Tests report shows the results for two tests to determine whether the response level rates are the same across X levels.
To produce the report shown in Figure 7.8, follow the instructions in “Example of Contingency Analysis” on page 241.
Figure 7.8 Example of a Tests Report
Note the following about the Chi-square statistics:
• When both categorical variables are responses (Y variables), the Chi-square statistics test that they are independent.
• You might have a Y variable with a fixed X variable. In this case, the Chi-square statistics test that the distribution of the Y variable is the same across each X level.
Description of the Tests Report
N Total number of observations.
DF Records the degrees of freedom associated with the test. The degrees of freedom are equal to (c - 1)(r - 1), where c is the number of columns and r is the number of rows.
-LogLike Negative log-likelihood, which measures fit and uncertainty (much like sums of squares in continuous response situations).
Rsquare (U) Portion of the total uncertainty attributed to the model fit.
– An R2 of 1 means that the factors completely predict the categorical response.
– An R2 of 0 means that there is no gain from using the model instead of fixed background response rates.
For more information, see “Tests Report” on page 269.
Test Lists two Chi-square statistical tests of the hypothesis that the response rates are the same in each sample category. For more information, see “Tests Report” on page 269.

Chapter 7 Contingency Analysis 251Basic Analysis Analysis of Means for Proportions
Prob>ChiSq Lists the probability of obtaining, by chance alone, a Chi-square value greater than the one computed if no relationship exists between the response and factor. If both variables have only two levels, Fisher’s exact probabilities for the one-tailed tests and the two-tailed test also appear.
Fisher’s Exact Test
This report gives the results of Fisher’s exact test for a 2x2 table. The results appear automatically for 2x2 tables. For more details about Fisher’s exact test, and for details about the test for r x c tables, see “Exact Test” on page 257.
Analysis of Means for Proportions
Note: For a description of Analysis of Means methods, see the document by Nelson et al. (2005). See also “Example of Analysis of Means for Proportions” on page 258.
If the response has two levels, you can use this option to compare response proportions for the X levels to the overall response proportion. This method uses the normal approximation to the binomial. Therefore, if the sample sizes are too small, a warning appears in the results.
The following options appear in the red triangle menu:
Set Alpha Level Selects the alpha level used in the analysis.
Show Summary Report Produces a report that shows the response proportions with decision limits for each level of the X variable. The report indicates whether a limit has been exceeded.
Switch Response Level for Proportion Changes the response category used in the analysis.
Display Options Shows or hides the decision limits, decision limit shading, center line, and point options.
Correspondence Analysis
Note: See also “Example of Correspondence Analysis” on page 259.
Correspondence analysis is a graphical technique to show which rows or columns of a frequency table have similar patterns of counts. In the correspondence analysis plot, there is a

252 Contingency Analysis Chapter 7Correspondence Analysis Basic Analysis
point for each row and for each column. Use Correspondence Analysis when you have many levels, making it difficult to derive useful information from the mosaic plot.
Understanding Correspondence Analysis Plots
The row profile can be defined as the set of rowwise rates, or in other words, the counts in a row divided by the total count for that row. If two rows have very similar row profiles, their points in the correspondence analysis plot are close together. Squared distances between row points are approximately proportional to Chi-square distances that test the homogeneity between the pair of rows.
Column and row profiles are alike because the problem is defined symmetrically. The distance between a row point and a column point has no meaning. However, the directions of columns and rows from the origin are meaningful, and the relationships help interpret the plot.
Correspondence Analysis Options
Use the options in the red triangle menu next to Correspondence Analysis to produce a 3-D scatterplot and add column properties to the data table.
3D Correspondence Analysis Produces a 3-D scatterplot.
Save Value Ordering Takes the order of the levels sorted by the first correspondence score coefficient and makes a column property for both the X and Y columns.
The Details Report
The Details report contains statistical information about the correspondence analysis and shows the values used in the plot.
Singular Value Provides the singular value decomposition of the contingency table. For the formula, see “Details Report in Correspondence Analysis” on page 270.
Inertia Lists the square of the singular values, reflecting the relative variation accounted for in the canonical dimensions.
Portion Portion of inertia with respect to the total inertia.
Cumulative Shows the cumulative portion of inertia. If the first two singular values capture the bulk of the inertia, then the 2-D correspondence analysis plot is sufficient to show the relationships in the table.
X variable c1, c2, c3 The values plotted on the Correspondence Analysis plot (Figure 7.11).

Chapter 7 Contingency Analysis 253Basic Analysis Cochran-Mantel-Haenszel Test
Y variable c1, c2, c3 The values plotted on the Correspondence Analysis plot (Figure 7.11).
Cochran-Mantel-Haenszel Test
Note: See also “Example of a Cochran Mantel Haenszel Test” on page 262.
The Cochran-Mantel-Haenszel test discovers if there is a relationship between two categorical variables after blocking across a third classification.
Correlation of Scores Applicable when both Y or X are ordinal or interval. The alternative hypothesis is that there is a linear association between Y and X in at least one level of the blocking variable.
Row Score by Col Categories Applicable when Y is ordinal or interval. The alternative hypothesis is that, for at least one level of the blocking variable, the mean scores of the r rows are unequal.
Col Score by Row Categories Applicable when X is ordinal or interval. The alternative hypothesis is that, for at least one level of the blocking variable, the mean scores of the c columns are unequal.
General Assoc. of Categories Tests that for at least one level of the blocking variable, there is some type of association between X and Y.
Agreement Statistic
Note: For statistical details, see “Agreement Statistic Option” on page 268. See also “Example of the Agreement Statistic Option” on page 263.
When the two variables have the same levels, the Agreement Statistic option is available. This option shows the Kappa statistic (Agresti 1990), its standard error, confidence interval, hypothesis test, and Bowker’s test of symmetry.
The Kappa statistic and associated p-value given in this section are approximate. An exact version of the agreement statistic is available. See “Exact Test” on page 257.
Kappa Shows the Kappa statistic.
Std Err Shows the standard error of the Kappa statistic.
Lower 95% Shows the lower endpoint of the confidence interval for Kappa.

254 Contingency Analysis Chapter 7Relative Risk Basic Analysis
Upper 95% Shows the upper endpoint of the confidence interval for Kappa.
Prob>Z Shows the p-value for a one-sided test for Kappa. The null hypothesis tests if Kappa equals zero.
Prob>|Z| Shows the p-value for a two-sided test for Kappa.
ChiSquare Shows the test statistic for Bowker’s test. For Bowker’s test of symmetry, the null hypothesis is that the probabilities in the square table satisfy symmetry, or that pij=pji for all pairs of table cells. When both X and Y have two levels, this test is equal to McNemar’s test.
Prob>ChiSq Shows the p-value for the Bowker’s test.
Relative Risk
Note: See also “Example of the Relative Risk Option” on page 264.
Calculate risk ratios for 2x2 contingency tables using the Relative Risk option. Confidence intervals also appear in the report. You can find more information about this method in Agresti (1990, sect. 3.4.2).
The Choose Relative Risk Categories window appears when you select the Relative Risk option. You can select a single response and factor combination, or you can calculate the risk ratios for all combinations of response and factor levels.
Two Sample Test for Proportions
Note: See also “Example of a Two Sample Test for Proportions” on page 265.
When both the X and Y variables have two levels, you can request a confidence interval for a difference between two proportions. It also outputs the test corresponding to the confidence interval.
Description Shows the test being performed.
Proportion Difference Shows the difference in the proportions between the levels of the X variable.
Lower 95% Shows the lower endpoint of the confidence interval for the difference. Based on the adjusted Wald confidence interval.

Chapter 7 Contingency Analysis 255Basic Analysis Measures of Association
Upper 95% Shows the upper endpoint of the confidence interval for the difference. Based on the adjusted Wald confidence interval.
Adjusted Wald Test Shows two-tailed and one-tailed tests.
Prob Shows the p-values for the tests.
Response <variable> category of interest Select which response level to use in the test.
Measures of Association
Note: See also “Example of the Measures of Association Option” on page 266.
You can request several statistics that describe the association between the variables in the contingency table by selecting the Measures of Association option.
Gamma Based on the number of concordant and discordant pairs and ignores tied pairs. Takes values in the range -1 to 1.
Kendall’s Tau-b Similar to Gamma and uses a correction for ties. Takes values in the range -1 to 1.
Stuart’s Tau-c Similar to Gamma and uses an adjustment for table size and a correction for ties. Takes values in the range -1 to 1.
Somers’ D An asymmetric modification of Tau-b.
– The C|R denotes that the row variable X is regarded as an independent variable and the column variable Y is regarded as dependent.
– Similarly, the R|C denotes that the column variable Y is regarded as an independent variable and the row variable X is dependent.
Somers’ D differs from Tau-b in that it uses a correction for ties only when the pair is tied on the independent variable. It takes values in the range -1 to 1.
Lambda Asymmetric Differs for C|R and R|C.
– For C|R, is interpreted as the probable improvement in predicting the column variable Y given knowledge of the row variable X.
– For R|C, is interpreted as the probable improvement in predicting the row variable X given knowledge about the column variable Y.
Takes values in the range 0 to 1.

256 Contingency Analysis Chapter 7Cochran Armitage Trend Test Basic Analysis
Lambda Symmetric Loosely interpreted as the average of the two Lambda Asymmetric measures. Takes values in the range 0 to 1.
Uncertainty Coef
– For C|R, is the proportion of uncertainty in the column variable Y that is explained by the row variable X.
– For R|C, is interpreted as the proportion of uncertainty in the row variable X that is explained by the column variable Y.
Takes values in the range 0 to 1.
Uncertainty Coef Symmetric Symmetric version of the two Uncertainty Coef measures. Takes values in the range 0 to 1.
Notes:
• Each statistic appears with its standard error and confidence interval.
• Gamma, Kendall’s Tau-b, Stuart’s Tau-c, and Somers’ D are measures of ordinal association that consider whether the variable Y tends to increase as X increases. They classify pairs of observations as concordant or discordant. A pair is concordant if an observation with a larger value of X also has a larger value of Y. A pair is discordant if an observation with a larger value of X has a smaller value of Y. These measures are appropriate only when both variables are ordinal.
• The Lambda and Uncertainty measures are appropriate for ordinal and nominal variables.
For computational details about the measures of association statistics, see the FREQ Procedure chapter in the SAS/STAT 14.3 User’s Guide (2017). The following references also contain additional information:
• Brown and Benedetti (1977)
• Goodman and Kruskal (1979)
• Kendall and Stuart (1979)
• Snedecor and Cochran (1980)
• Somers (1962)
Cochran Armitage Trend Test
Note: See also “Example of the Cochran Armitage Trend Test” on page 267.
This Cochran Armitage Trend tests for trends in binomial proportions across the levels of a single variable. This test is appropriate only when one variable has two levels and the other

Chapter 7 Contingency Analysis 257Basic Analysis Exact Test
variable is ordinal. The two-level variable represents the response, and the other represents an explanatory variable with ordered levels. The null hypothesis is the hypothesis of no trend, which means that the binomial proportion is the same for all levels of the explanatory variable.
The test statistic and p-values given in this test are approximate. An exact version of the trend test is available. See “Exact Test” on page 257.
Exact Test
The following Exact tests are available in the Contingency platform:
Fisher’s Exact Test Performs Fisher’s Exact test for an r x c table. This is a test for association between two variables. Fisher’s exact test assumes that the row and column totals are fixed, and uses the hypergeometric distribution to compute probabilities.
This test does not depend on any large-sample distribution assumptions. This means it is appropriate for situations where the Likelihood Ratio and Pearson tests become less reliable, like for small sample sizes or sparse tables.
The report includes the following information:
Table Probability (P) Gives the probability for the observed table. This is not the p-value for the test.
Two-sided Prob ≤ P Gives the p-value for the two-sided test.
For 2x2 tables, the Fisher’s Exact test is automatically performed, unless one row or column contains all zeros (in this case, the test can not be calculated). See “Tests” on page 250.
Exact Cochran Armitage Trend Test Performs the exact version of the Cochran Armitage Trend Test. This test is available only when one of the variables has two levels. For more details about the trend test, see “Cochran Armitage Trend Test” on page 256.
Exact Agreement Statistic Performs an exact test for testing agreement between variables. This is an exact test for the Kappa statistic. This is available only when the two variables have the same levels. For more details about agreement testing, see “Agreement Statistic” on page 253.
Additional Examples of the Contingency Platform
• “Example of Analysis of Means for Proportions”

258 Contingency Analysis Chapter 7Additional Examples of the Contingency Platform Basic Analysis
• “Example of Correspondence Analysis”• “Example of a Cochran Mantel Haenszel Test”• “Example of the Agreement Statistic Option”• “Example of the Relative Risk Option”• “Example of a Two Sample Test for Proportions”• “Example of the Measures of Association Option”• “Example of the Cochran Armitage Trend Test”
Example of Analysis of Means for Proportions
This example uses the Office Visits.jmp sample data table, which records late and on-time appointments for six clinics in a geographic region. 60 random appointments were selected from 1 week of records for each of the six clinics. To be considered on-time, the patient must be taken to an exam room within five minutes of their scheduled appointment time. Examine the proportion of patients that arrived on-time to their appointment.
1. Select Help > Sample Data Library and open Office Visits.jmp.
2. Select Analyze > Fit Y by X.
3. Select On Time and click Y, Response.
4. Select Clinic and click X, Factor.
5. Select Frequency and click Freq.
6. Click OK.
7. From the red triangle menu next to Contingency Analysis, select Analysis of Means for Proportions.
8. From the red triangle menu next to Analysis of Means for Proportions, select Show Summary Report and Switch Response Level for Proportion.

Chapter 7 Contingency Analysis 259Basic Analysis Additional Examples of the Contingency Platform
Figure 7.9 Example of Analysis of Means for Proportions
Figure 7.9 shows the proportion of patients who were on-time from each clinic. From Figure 7.9, notice the following:
• The proportion of on-time arrivals is the highest for clinic F, followed by clinic B.
• Clinic D has the lowest proportion of on-time arrivals, followed by clinic A.
• Clinic E and clinic C are close to the average, and do not exceed the decision limits.
Example of Correspondence Analysis
This example uses the Cheese.jmp sample data table, which is taken from the Newell cheese tasting experiment, reported in McCullagh and Nelder (1989). The experiment records counts more than nine different response levels across four different cheese additives.
1. Select Help > Sample Data Library and open Cheese.jmp.
2. Select Analyze > Fit Y by X.
3. Select Response and click Y, Response.
The Response values range from one to nine, where one is the least liked, and nine is the best liked.
4. Select Cheese and click X, Factor.
A, B, C, and D represent four different cheese additives.

260 Contingency Analysis Chapter 7Additional Examples of the Contingency Platform Basic Analysis
5. Select Count and click Freq.
6. Click OK.
Figure 7.10 Mosaic Plot for the Cheese Data
From the mosaic plot in Figure 7.10, you notice that the distributions do not appear alike. However, it is challenging to make sense of the mosaic plot across nine levels. A correspondence analysis can help define relationships in this type of situation.
7. To see the correspondence analysis plot, from the red triangle menu next to Contingency Analysis, select Correspondence Analysis.
Figure 7.11 Example of a Correspondence Analysis Plot
least liked
neutral
most liked

Chapter 7 Contingency Analysis 261Basic Analysis Additional Examples of the Contingency Platform
Figure 7.11 shows the correspondence analysis graphically, with the plot axes labeled c1 and c2. Notice the following:
• c1 seems to correspond to a general satisfaction level. The cheeses on the c1 axis go from least liked at the top to most liked at the bottom.
• Cheese D is the most liked cheese, with responses of 8 and 9.
• Cheese B is the least liked cheese, with responses of 1,2, and 3.
• Cheeses C and A are in the middle, with responses of 4,5,6, and 7.
8. From the red triangle menu next to Correspondence Analysis, select 3D Correspondence Analysis.
Figure 7.12 Example of a 3-D Scatterplot
From Figure 7.12, notice the following:
• Looking at the c1 axis, responses 1 through 5 appear to the right of 0 (positive). Responses 6 through 9 appear to the left of 0 (negative).
• Looking at the c2 axis, A and C appear to the right of 0 (positive). B and D appear to the left of 0 (negative).
• You can conclude that c1 corresponds to the general satisfaction (from least to most liked).

262 Contingency Analysis Chapter 7Additional Examples of the Contingency Platform Basic Analysis
Example of a Cochran Mantel Haenszel Test
This example uses the Hot Dogs.jmp sample data table. Examine the relationship between hot dog type and taste.
1. Select Help > Sample Data Library and open Hot Dogs.jmp.
2. Select Analyze > Fit Y by X.
3. Select Type and click Y, Response.
4. Select Taste and click X, Factor.
5. Click OK.
6. From the red triangle menu next to Contingency Analysis, select Cochran Mantel Haenszel.
7. Select Protein/Fat as the grouping variable and click OK.
Figure 7.13 Example of a Cochran-Mantel-Haenszel Test
From Figure 7.13, you notice the following:
• The Tests report shows a marginally significant Chi-square probability of about 0.0799, indicating some significance in the relationship between hot dog taste and type.

Chapter 7 Contingency Analysis 263Basic Analysis Additional Examples of the Contingency Platform
• The Cochran Mantel Haenszel report shows that the p-value for the general association of categories is 0.2816, which is much larger than 5%.
Example of the Agreement Statistic Option
This example uses the Attribute Gauge.jmp sample data table. The data gives results from three people (raters) rating fifty parts three times each. Examine the relationship between raters A and B.
1. Select Help > Sample Data Library and open Attribute Gauge.jmp.
2. Select Analyze > Fit Y by X.
3. Select A and click Y, Response.
4. Select B and click X, Factor.
5. Click OK.
6. From the red triangle menu next to Contingency Analysis, select Agreement Statistic.
Figure 7.14 Example of the Agreement Statistic Report
From Figure 7.14, you notice that the agreement statistic of 0.86 is high (close to 1) and the p-value of <.0001 is small. This reinforces the high agreement seen by looking at the diagonal

264 Contingency Analysis Chapter 7Additional Examples of the Contingency Platform Basic Analysis
of the contingency table. Agreement between the raters occurs when both raters give a rating of 0 or both give a rating of 1.
Example of the Relative Risk Option
This example uses the Car Poll.jmp sample data table. Examine the relative probabilities of being married and single for the participants in the poll.
1. Select Help > Sample Data Library and open Car Poll.jmp.
2. Select Analyze > Fit Y by X.
3. Select marital status and click Y, Response.
4. Select sex and click X, Factor.
5. Click OK.
6. From the red triangle menu next to Contingency Analysis, select Relative Risk.
The Choose Relative Risk Categories window appears.
Figure 7.15 The Choose Relative Risk Categories Window
Note the following about the Choose Relative Risk Categories window:
• If you are interested in only a single response and factor combination, you can select that here. For example, if you clicked OK in the window in Figure 7.15, the calculation would be as follows:
• If you would like to calculate the risk ratios for all ( =4) combinations of response and factor levels, select the Calculate All Combinations check box. See Figure 7.16.
7. Ask for all combinations by selecting the Calculate All Combinations check box. Leave all other default selections as is.
P Y Married= X Female=( )P Y Married= X Male=( )---------------------------------------------------------------------------
2 2×

Chapter 7 Contingency Analysis 265Basic Analysis Additional Examples of the Contingency Platform
Figure 7.16 Example of the Risk Ratio Report
To see how the relative risk is calculated, proceed as follows:
1. Examine the first entry in the Relative Risk report, which is P(Married|Female)/P(Married|Male).
2. You can find these probabilities in the Contingency Table. Since the probabilities are computed based on two levels of sex, which differs across the rows of the table, use the Row% to read the probabilities, as follows:
P(Married|Female)=0.6884
P(Married|Male) = 0.6121
Therefore, the calculations are as follows:
P(Married|Female)/P(Married|Male) = = 1.1247
Example of a Two Sample Test for Proportions
This example uses the Car Poll.jmp sample data table. Examine the probability of being married for males and females.
1. Select Help > Sample Data Library and open Car Poll.jmp.
2. Select Analyze > Fit Y by X.
3. Select marital status and click Y, Response.
4. Select sex and click X, Factor.
5. Click OK.
6. From the red triangle menu next to Contingency Analysis, select Two Sample Test for Proportions.
0.68840.6121----------------

266 Contingency Analysis Chapter 7Additional Examples of the Contingency Platform Basic Analysis
Figure 7.17 Example of the Two Sample Test for Proportions Report
In this example, you are comparing the probability of being married between females and males. See the Row% in the Contingency Table to obtain the following:
P(Married|Female)=0.6884P(Married|Male) = 0.6121
The difference between these two numbers, 0.0763, is the Proportion Difference shown in the report. The two-sided confidence interval is [-0.03175, 0.181621]. The p-value by the adjusted Wald method corresponding to the confidence interval is 0.1686, which is close to the p-value (0.1665) by Pearson’s Chi-square test. Generally, Pearson’s Chi-square test is more popular than the modified Wald’s test for testing the difference of two proportions.
Example of the Measures of Association Option
This example uses the Car Poll.jmp sample data table. Examine the probability of being married for males and females.
1. Select Help > Sample Data Library and open Car Poll.jmp.
2. Select Analyze > Fit Y by X.
3. Select marital status and click Y, Response.
4. Select sex and click X, Factor.
5. Click OK.
6. From the red triangle menu next to Contingency Analysis, select Measures of Association.

Chapter 7 Contingency Analysis 267Basic Analysis Additional Examples of the Contingency Platform
Figure 7.18 Example of the Measures of Association Report
Since the variables that you want to examine (sex and marital status) are nominal, use the Lambda and Uncertainty measures. All of them are small, so it seems that there is a weak association between sex and marital status.
Example of the Cochran Armitage Trend Test
1. Select Help > Sample Data Library and open Car Poll.jmp.
For the purposes of this test, change size to an ordinal variable:
2. In the Columns panel, right-click on the icon next to size and select Ordinal.
3. Select Analyze > Fit Y by X.
4. Select sex and click Y, Response.
5. Select size and click X, Factor.
6. Click OK.
7. From the red triangle menu next to Contingency Analysis, select Cochran Armitage Trend Test.
Figure 7.19 Example of the Cochran Armitage Trend Test Report
The two-sided p-value (0.7094) is large. From this, you cannot conclude that there is a relationship in the proportion of male and females that purchase different sizes of cars.

268 Contingency Analysis Chapter 7Statistical Details for the Contingency Platform Basic Analysis
Statistical Details for the Contingency Platform
• “Agreement Statistic Option”• “Odds Ratio Option”• “Tests Report”• “Details Report in Correspondence Analysis”
Agreement Statistic Option
Viewing the two response variables as two independent ratings of the n subjects, the Kappa coefficient equals +1 when there is complete agreement of the raters. When the observed agreement exceeds chance agreement, the Kappa coefficient is positive, with its magnitude reflecting the strength of agreement. Although unusual in practice, Kappa is negative when the observed agreement is less than chance agreement. The minimum value of Kappa is between -1 and 0, depending on the marginal proportions.
The Kappa coefficient is computed as follows:
where and
Note that is the proportion of subjects in the th cell, such that .
The asymptotic variance of the simple kappa coefficient is estimated by the following:
where , and
See Cohen (1960) and Fleiss et al. (1969).
For Bowker’s test of symmetry, the null hypothesis is that the probabilities in the two-by-two table satisfy symmetry (pij=pji).
Odds Ratio Option
The Odds Ratio is calculated as follows:
κP0 Pc–1 Pc–------------------= P0 pii
i= Pc pi+p+i
i=
pij i j,( ) pijj
i 1=
var A B C–+
1 Pc–( )2n--------------------------= A pii 1 pi+ p+i+( ) 1 κ–( )–[ ]
2
i= B 1 κ–( )2 pij p+i pj++( )
2
i j≠=
C κ Pc 1 κ–( )–[ ]2
=

Chapter 7 Contingency Analysis 269Basic Analysis Statistical Details for the Contingency Platform
where pij is the count in the ith row and jth column of the 2x2 table.
Tests Report
Rsquare (U)
Rsquare (U) is computed as follows:
The total negative log-likelihood is found by fitting fixed response rates across the total sample.
Test
The two Chi-square tests are as follows:
The Likelihood Ratio Chi-square test statistic is computed as twice the negative log-likelihood for Model in the Tests table. Some books use the notation G2 for this statistic. The difference of two negative log-likelihoods, one with whole-population response probabilities and one with each-population response rates, is written as follows:
where and
This formula can be more compactly written as follows:
The Pearson Chi-square test statistic is calculated by summing the squares of the differences between the observed and expected cell counts. The Pearson Chi-square test exploits the property that frequency counts tend to a normal distribution in very large samples. The familiar form of this Chi-square statistic is as follows:
where O is the observed cell counts and E is the expected cell counts. The summation is over all cells. There is no continuity correction done here, as is sometimes done in 2-by-2 tables.
p11 p22×p12 p21×-----------------------
log likelihood for Model–log likelihood for Corrected Total–--------------------------------------------------------------------------------------------
G2 2 nij–( ) pj( )lnij nij pij( )ln–
ij–= pij
nijN------= pj
NjN------=
G2 2 nijnijeij------
lnj
i=
χ2 O E–( )2
E----------------------=

270 Contingency Analysis Chapter 7Statistical Details for the Contingency Platform Basic Analysis
Details Report in Correspondence Analysis
Lists the singular values of the following equation:
where:
• P is the matrix of counts divided by the total frequency
• r and c are row and column sums of P
• the Ds are diagonal matrices of the values of r and c
Dr0.5– P rc'–( )Dc
0.5–

Chapter 8Logistic Analysis
Examine Relationships between a Categorical Y and a Continuous XVariable
The Logistic platform fits the probabilities for response categories to a continuous x predictor. The fitted model estimates probabilities for each x value. The Logistic platform is the nominal or ordinal by continuous personality of the Fit Y by X platform. There is a distinction between nominal and ordinal responses on this platform:
• Nominal logistic regression estimates a set of curves to partition the probability among the responses.
• Ordinal logistic regression models the probability of being less than or equal to a given response. This has the effect of estimating a single logistic curve, which is shifted horizontally to produce probabilities for the ordered categories. This model is less complex and is recommended for ordered responses.
Figure 8.1 Examples of Logistic Regression
Ordinal Logistic Regression Nominal Logistic Regression

272 Logistic Analysis Chapter 8Basic Analysis
ContentsOverview of Logistic Regression . . . . . . . . . . . . . . . . . . . . . . . . . . . . . . . . . . . . . . . . . . . . . . . . . . 273
Nominal Logistic Regression. . . . . . . . . . . . . . . . . . . . . . . . . . . . . . . . . . . . . . . . . . . . . . . . . . . 273Ordinal Logistic Regression. . . . . . . . . . . . . . . . . . . . . . . . . . . . . . . . . . . . . . . . . . . . . . . . . . . . 273
Example of Nominal Logistic Regression . . . . . . . . . . . . . . . . . . . . . . . . . . . . . . . . . . . . . . . . . . . 274Launch the Logistic Platform. . . . . . . . . . . . . . . . . . . . . . . . . . . . . . . . . . . . . . . . . . . . . . . . . . . . . . 275
Data Structure . . . . . . . . . . . . . . . . . . . . . . . . . . . . . . . . . . . . . . . . . . . . . . . . . . . . . . . . . . . . . . . 276The Logistic Report . . . . . . . . . . . . . . . . . . . . . . . . . . . . . . . . . . . . . . . . . . . . . . . . . . . . . . . . . . . . . . 276
Logistic Plot . . . . . . . . . . . . . . . . . . . . . . . . . . . . . . . . . . . . . . . . . . . . . . . . . . . . . . . . . . . . . . . . . 277Iterations. . . . . . . . . . . . . . . . . . . . . . . . . . . . . . . . . . . . . . . . . . . . . . . . . . . . . . . . . . . . . . . . . . . . 278Whole Model Test . . . . . . . . . . . . . . . . . . . . . . . . . . . . . . . . . . . . . . . . . . . . . . . . . . . . . . . . . . . . 278Fit Details . . . . . . . . . . . . . . . . . . . . . . . . . . . . . . . . . . . . . . . . . . . . . . . . . . . . . . . . . . . . . . . . . . . 279Parameter Estimates . . . . . . . . . . . . . . . . . . . . . . . . . . . . . . . . . . . . . . . . . . . . . . . . . . . . . . . . . . 280
Logistic Platform Options . . . . . . . . . . . . . . . . . . . . . . . . . . . . . . . . . . . . . . . . . . . . . . . . . . . . . . . . 281ROC Curves . . . . . . . . . . . . . . . . . . . . . . . . . . . . . . . . . . . . . . . . . . . . . . . . . . . . . . . . . . . . . . . . . 282Save Probability Formula. . . . . . . . . . . . . . . . . . . . . . . . . . . . . . . . . . . . . . . . . . . . . . . . . . . . . . 283Inverse Prediction . . . . . . . . . . . . . . . . . . . . . . . . . . . . . . . . . . . . . . . . . . . . . . . . . . . . . . . . . . . . 283
Additional Examples of Logistic Regression . . . . . . . . . . . . . . . . . . . . . . . . . . . . . . . . . . . . . . . . 283Example of Ordinal Logistic Regression . . . . . . . . . . . . . . . . . . . . . . . . . . . . . . . . . . . . . . . . . 284Additional Example of a Logistic Plot . . . . . . . . . . . . . . . . . . . . . . . . . . . . . . . . . . . . . . . . . . . 286Example of ROC Curves . . . . . . . . . . . . . . . . . . . . . . . . . . . . . . . . . . . . . . . . . . . . . . . . . . . . . . 288Example of Inverse Prediction Using the Crosshair Tool . . . . . . . . . . . . . . . . . . . . . . . . . . . 289Example of Inverse Prediction Using the Inverse Prediction Option . . . . . . . . . . . . . . . . . 290
Statistical Details for the Logistic Platform . . . . . . . . . . . . . . . . . . . . . . . . . . . . . . . . . . . . . . . . . . 291

Chapter 8 Logistic Analysis 273Basic Analysis Overview of Logistic Regression
Overview of Logistic Regression
Logistic regression has a long tradition with widely varying applications such as modeling dose-response data and purchase-choice data. Unfortunately, many introductory statistics courses do not cover this fairly simple method. Many texts in categorical statistics cover it (Agresti 1990), in addition to texts on logistic regression (Hosmer and Lemeshow 1989). Some analysts use the method with a different distribution function, the normal. In that case, it is called probit analysis. Some analysts use discriminant analysis instead of logistic regression because they prefer to think of the continuous variables as Ys and the categories as Xs and work backwards. However, discriminant analysis assumes that the continuous data are normally distributed random responses, rather than fixed regressors.
Simple logistic regression is a more graphical and simplified version of the general facility for categorical responses in the Fit Model platform. For examples of more complex logistic regression models, see the Logistic Regression chapter in the Fitting Linear Models book.
Nominal Logistic Regression
Nominal logistic regression estimates the probability of choosing one of the response levels as a smooth function of the x factor. The fitted probabilities must be between 0 and 1, and must sum to 1 across the response levels for a given factor value.
In a logistic probability plot, the y-axis represents probability. For k response levels, k - 1 smooth curves partition the total probability (which equals 1) among the response levels. The fitting principle for a logistic regression minimizes the sum of the negative natural logarithms of the probabilities fitted to the response events that occur (that is, maximum likelihood).
Ordinal Logistic Regression
When Y is ordinal, a modified version of logistic regression is used for fitting. The cumulative probability of being at or below each response level is modeled by a curve. The curves are the same for each level except that they are shifted to the right or left.
The ordinal logistic model fits a different intercept, but the same slope, for each of r - 1 cumulative logistic comparisons, where r is the number of response levels. Each parameter estimate can be examined and tested individually, although this is seldom of much interest.
The ordinal model is preferred to the nominal model when it is appropriate because it has fewer parameters to estimate. In fact, it is practical to fit ordinal responses with hundreds of response levels.

274 Logistic Analysis Chapter 8Example of Nominal Logistic Regression Basic Analysis
Example of Nominal Logistic Regression
This example uses the Penicillin.jmp sample data table. The data in this example comes from an experiment where 5 groups, each containing 12 rabbits, were injected with streptococcus bacteria. Once the rabbits were confirmed to have the bacteria in their system, they were given different doses of penicillin. You want to find out whether the natural log (In(dose)) of dosage amounts has any effect on whether the rabbits are cured.
1. Select Help > Sample Data Library and open Penicillin.jmp.
2. Select Analyze > Fit Y by X.
3. Select Response and click Y, Response.
4. Select In (dose) and click X, Factor.
Notice that JMP automatically fills in Count for Freq. Count was previously assigned the role of Freq.
5. Click OK.

Chapter 8 Logistic Analysis 275Basic Analysis Launch the Logistic Platform
Figure 8.2 Example of Nominal Logistic Report
The plot shows the fitted model, which is the predicted probability of being cured, as a function of ln(dose). The p-value is significant, indicating that the dosage amounts have a significant effect on whether the rabbits are cured.
Tip: To change the response level that is analyzed, use the Value Ordering column property.
Launch the Logistic Platform
To perform a logistic analysis, do the following:
1. Select Analyze > Fit Y by X.
2. Enter a nominal or ordinal column for Y, Response.
3. Enter a continuous column for X, Factor.

276 Logistic Analysis Chapter 8The Logistic Report Basic Analysis
Figure 8.3 Fit Y by X Launch Window
The word Logistic appears above the image, to indicate that you are performing a logistic analysis.
Note: You can also launch a logistic analysis from the JMP Starter window. Select View > JMP Starter > Basic > Logistic.
When the response is binary and has a nominal modeling type, a Target Level menu appears in the launch window. Use this menu to specify the level of the response whose probability you want to model.
For more information about the Fit Y by X launch window, see “Introduction to Fit Y by X” chapter on page 109.
Data Structure
Your data can consist of unsummarized or summarized data:
Unsummarized data There is one row for each observation containing its X value and its Y value.
Summarized data Each row represents a set of observations with common X and Y values. The data table must contain a column that gives the counts for each row. Enter this column as Freq in the launch window.
The Logistic Report
To produce the plot shown in Figure 8.4, follow the instructions in “Example of Nominal Logistic Regression” on page 274.

Chapter 8 Logistic Analysis 277Basic Analysis The Logistic Report
Figure 8.4 Example of a Logistic Report
The Logistic report window contains the Logistic plot, the Iterations report, the Whole Model Test report, the Fit Details report, and the Parameter Estimates report.
Note: The red triangle menu provides more options that can add to the initial report window. See “Logistic Platform Options” on page 281.
Logistic Plot
Note: See also “Additional Example of a Logistic Plot” on page 286.
The logistic probability plot gives a complete picture of what the logistic model is fitting. At each x value, the probability scale in the y direction is divided up (partitioned) into probabilities for each response category. The probabilities are measured as the vertical distance between the curves, with the total across all Y category probabilities summing to 1.

278 Logistic Analysis Chapter 8The Logistic Report Basic Analysis
Replace variables in the plot by clicking on a variable in the Columns panel of the associated data table and dragging it onto an axis.
Iterations
The Iterations report shows each iteration and the evaluated criteria that determine whether the model has converged. Iterations appear only for nominal logistic regression.
Whole Model Test
The Whole Model Test report shows if the model fits better than constant response probabilities. This report is analogous to the Analysis of Variance report for a continuous response model. It is a specific likelihood ratio Chi-square test that evaluates how well the categorical model fits the data.
The negative sum of natural logs of the observed probabilities is called the negative log-likelihood (–LogLikelihood). The negative log-likelihood for categorical data plays the same role as sums of squares in continuous data: twice the difference in the negative log-likelihood from the model fitted by the data and the model with equal probabilities is a Chi-square statistic. This test statistic examines the hypothesis that the x variable has no effect on the responses.
Values of the RSquare (U) (sometimes denoted as R2) range from 0 to 1. High R2 values are indicative of a good model fit, and are rare in categorical models.
The Whole Model Test report contains the following columns:
Model Sometimes called Source.
– The Reduced model only contains an intercept.
– The Full model contains all of the effects as well as the intercept.
– The Difference is the difference of the log-likelihoods of the full and reduced models.
DF Records the degrees of freedom associated with the model.
–LogLikelihood Measures variation, sometimes called uncertainty, in the sample.
Full (the full model) is the negative log-likelihood (or uncertainty) calculated after fitting the model. The fitting process involves predicting response rates with a linear model and a logistic response function. This value is minimized by the fitting process.
Reduced (the reduced model) is the negative log-likelihood (or uncertainty) for the case when the probabilities are estimated by fixed background rates. This is the background uncertainty when the model has no effects.

Chapter 8 Logistic Analysis 279Basic Analysis The Logistic Report
The difference of these two negative log-likelihoods is the reduction due to fitting the model. Two times this value is the likelihood ratio Chi-square test statistic.
For more information, see the Statistical Details appendix in the Fitting Linear Models book.
Chi-Square The likelihood ratio Chi-square test of the hypothesis that the model fits no better than fixed response rates across the whole sample. It is twice the –LogLikelihood for the Difference Model. It is two times the difference of two negative log-likelihoods, one with whole-population response probabilities and one with each-population response rates. For more information, see “Statistical Details for the Logistic Platform” on page 291.
Prob>ChiSq The observed significance probability, often called the p value, for the Chi-square test. It is the probability of getting, by chance alone, a Chi-square value greater than the one computed. Models are often judged significant if this probability is below 0.05.
RSquare (U) The proportion of the total uncertainty that is attributed to the model fit, defined as the Difference negative log-likelihood value divided by the Reduced negative log-likelihood value. An RSquare (U) value of 1 indicates that the predicted probabilities for events that occur are equal to one: There is no uncertainty in predicted probabilities. Because certainty in the predicted probabilities is rare for logistic models, RSquare (U) tends to be small. For more information, see “Statistical Details for the Logistic Platform” on page 291.
Note: RSquare (U) is also know as McFadden’s pseudo R-square.
AICc The corrected Akaike Information Criterion. See the Statistical Details appendix in the Fitting Linear Models book.
BIC The Bayesian Information Criterion. See the Statistical Details appendix in the Fitting Linear Models book.
Observations Sometimes called Sum Wgts. The total sample size used in computations. If you specified a Weight variable, this is the sum of the weights.
Fit Details
The Fit Details report contains the following statistics:
Measure The available measures of fit are as follows:
Entropy RSquare compares the log-likelihoods from the fitted model and the constant probability model.

280 Logistic Analysis Chapter 8The Logistic Report Basic Analysis
Generalized RSquare is a measure that can be applied to general regression models. It is based on the likelihood function L and is scaled to have a maximum value of 1. The Generalized RSquare measure simplifies to the traditional RSquare for continuous normal responses in the standard least squares setting. Generalized RSquare is also known as the Nagelkerke or Craig and Uhler R2, which is a normalized version of Cox and Snell’s pseudo R2. See Nagelkerke (1991).
Mean -Log p is the average of -log(p), where p is the fitted probability associated with the event that occurred.
RMSE is the root mean square error, where the differences are between the response and p (the fitted probability for the event that actually occurred).
Mean Abs Dev is the average of the absolute values of the differences between the response and p (the fitted probability for the event that actually occurred).
Misclassification Rate is the rate for which the response category with the highest fitted probability is not the observed category.
For Entropy RSquare and Generalized RSquare, values closer to 1 indicate a better fit. For Mean -Log p, RMSE, Mean Abs Dev, and Misclassification Rate, smaller values indicate a better fit.
Training The value of the measure of fit.
Definition The algebraic definition of the measure of fit.
Parameter Estimates
The nominal logistic model fits a parameter for the intercept and slope for each of logistic comparisons, where k is the number of response levels. The Parameter Estimates report lists these estimates. Each parameter estimate can be examined and tested individually, although this is seldom of much interest.
Term Lists each parameter in the logistic model. There is an intercept and a slope term for the factor at each level of the response variable, except the last level.
Estimate Lists the parameter estimates given by the logistic model.
Std Error Lists the standard error of each parameter estimate. They are used to compute the statistical tests that compare each term to zero.
Chi-Square Lists the Wald tests for the hypotheses that each of the parameters is zero. The Wald Chi-square is computed as (Estimate/Std Error)2.
Prob>ChiSq Lists the observed significance probabilities for the Chi-square tests.
k 1–

Chapter 8 Logistic Analysis 281Basic Analysis Logistic Platform Options
Covariance of Estimates
Reports the estimated variances of the parameter estimates, and the estimated covariances between the parameter estimates. The square root of the variance estimates is the same as those given in the Std Error section.
Logistic Platform Options
Note: The Fit Group menu appears if you have specified multiple Y variables. Menu options allow you to arrange reports or order them by RSquare. See the Standard Least Squares chapter in the Fitting Linear Models book for more information.
Odds Ratios Adds odds ratios to the Parameter Estimates report. For more details, see the Logistic Regression chapter in the Fitting Linear Models book.
This option is available only for a response with two levels.
Inverse Prediction Prediction of x values from given y values. For more information, see “Inverse Prediction” on page 283.
This option is available only for two-level nominal responses.
Logistic Plot Shows or hides the logistic plot.
Plot Options The Plot Options menu includes the following options:
Show Points Toggles the points on or off.
Show Rate Curve Is useful only if you have several points for each x-value. In these cases, you get reasonable estimates of the rate at each value, and compare this rate with the fitted logistic curve. To prevent too many degenerate points, usually at zero or one, JMP only shows the rate value if there are at least three points at the x-value.
Line Color Enables you to pick the color of the plot curves.
ROC Curve A Receiver Operating Characteristic curve is a plot of sensitivity by (1 – specificity) for each value of x. See “ROC Curves” on page 282.
Lift Curve Produces a lift curve for the model. A lift curve shows the same information as a ROC curve, but in a way to dramatize the richness of the ordering at the beginning. The Y-axis shows the ratio of how rich that portion of the population is in the chosen response level compared to the rate of that response level as a whole. See the Logistic Regression chapter in the Fitting Linear Models book for details about lift curves.

282 Logistic Analysis Chapter 8Logistic Platform Options Basic Analysis
Save Probability Formula Creates new data table columns that contain formulas. See “Save Probability Formula” on page 283.
See the JMP Reports chapter in the Using JMP book for more information about the following options:
Redo Contains options that enable you to repeat or relaunch the analysis. In platforms that support the feature, the Automatic Recalc option immediately reflects the changes that you make to the data table in the corresponding report window.
Save Script Contains options that enable you to save a script that reproduces the report to several destinations.
Save By-Group Script Contains options that enable you to save a script that reproduces the platform report for all levels of a By variable to several destinations. Available only when a By variable is specified in the launch window.
ROC Curves
Note: See also “Example of ROC Curves” on page 288.
Suppose you have an x value that is a diagnostic measurement and you want to determine a threshold value of x that indicates the following:
• A condition exists if the x value is greater than the threshold.
• A condition does not exist if the x value is less than the threshold.
For example, you could measure a blood component level as a diagnostic test to predict a type of cancer. Now consider the diagnostic test as you vary the threshold and, thus, cause more or fewer false positives and false negatives. You then plot those rates. The ideal is to have a very narrow range of x criterion values that best divides true negatives and true positives. The Receiver Operating Characteristic (ROC) curve shows how rapidly this transition happens, with the goal being to have diagnostics that maximize the area under the curve.
Two standard definitions used in medicine are as follows:
• Sensitivity, the probability that a given x value (a test or measure) correctly predicts an existing condition. For a given x, the probability of incorrectly predicting the existence of a condition is 1 – sensitivity.
• Specificity, the probability that a test correctly predicts that a condition does not exist.
A ROC curve is a plot of sensitivity by (1 – specificity) for each value of x. The area under the ROC curve is a common index used to summarize the information contained in the curve.

Chapter 8 Logistic Analysis 283Basic Analysis Additional Examples of Logistic Regression
When you do a simple logistic regression with a binary outcome, there is a platform option to request a ROC curve for that analysis. After selecting the ROC Curve option, a window asks you to specify which level to use as positive.
If a test predicted perfectly, it would have a value above which the entire abnormal population would fall and below which all normal values would fall. It would be perfectly sensitive and then pass through the point (0,1) on the grid. The closer the ROC curve comes to this ideal point, the better its discriminating ability. A test with no predictive ability produces a curve that follows the diagonal of the grid (DeLong et al. 1988).
The ROC curve is a graphical representation of the relationship between false-positive and true-positive rates. A standard way to evaluate the relationship is with the area under the curve, shown below the plot in the report. In the plot, a yellow line is drawn at a 45 degree angle tangent to the ROC Curve. This marks a good cutoff point under the assumption that false negatives and false positives have similar costs.
Save Probability Formula
The Save Probability Formula option creates new data table columns. These data table columns save the following:
• formulas for linear combinations (typically called logits) of the x factor
• prediction formulas for the response level probabilities
• a prediction formula that gives the most likely response
Inverse Prediction
Note: See also “Example of Inverse Prediction Using the Crosshair Tool” on page 289 and “Example of Inverse Prediction Using the Inverse Prediction Option” on page 290.
Inverse prediction is the opposite of prediction. It is the prediction of x values from given y values. But in logistic regression, instead of a y value, you have the probability attributed to one of the Y levels. This feature works only for two-level nominal responses.
The Fit Model platform also has an option that gives an inverse prediction with confidence limits. The Standard Least Squares chapter in the Fitting Linear Models book gives more information about inverse prediction.
Additional Examples of Logistic Regression
This section contains additional examples using logistic regression.
284 Logistic Analysis Chapter 8Additional Examples of Logistic Regression Basic Analysis
• “Example of Ordinal Logistic Regression”• “Additional Example of a Logistic Plot”• “Example of ROC Curves”• “Example of Inverse Prediction Using the Crosshair Tool”• “Example of Inverse Prediction Using the Inverse Prediction Option”
Example of Ordinal Logistic Regression
This example uses the AdverseR.jmp sample data table to illustrate an ordinal logistic regression. Suppose you want to model the severity of an adverse event as a function of treatment duration value.
1. Select Help > Sample Data Library and open AdverseR.jmp.
2. Right-click on the icon to the left of ADR SEVERITY and change the modeling type to ordinal.
3. Select Analyze > Fit Y by X.
4. Select ADR SEVERITY and click Y, Response.
5. Select ADR DURATION and click X, Factor.
6. Click OK.

Chapter 8 Logistic Analysis 285Basic Analysis Additional Examples of Logistic Regression
Figure 8.5 Example of Ordinal Logistic Report
You interpret this report the same way as the nominal report. See “The Logistic Report” on page 276.
In the plot, markers for the data are drawn at their x-coordinate. When several data points appear at the same y position, the points are jittered. That is, small spaces appear between the data points so you can see each point more clearly.
Where there are many points, the curves are pushed apart. Where there are few to no points, the curves are close together. The data pushes the curves in that way because the criterion that is maximized is the product of the probabilities fitted by the model. The fit tries to avoid points attributed to have a small probability, which are points crowded by the curves of fit. See the Fitting Linear Models book for more information about computational details.
For details about the Whole Model Test report and the Parameter Estimates report, see “The Logistic Report” on page 276. In the Parameter Estimates report, an intercept parameter is estimated for every response level except the last, but there is only one slope parameter. The intercept parameters show the spacing of the response levels. They always increase monotonically.

286 Logistic Analysis Chapter 8Additional Examples of Logistic Regression Basic Analysis
Additional Example of a Logistic Plot
This example uses the Car Physical Data.jmp sample data table to show an additional example of a logistic plot. Suppose you want to use weight to predict car size (Type) for 116 cars. Car size can be one of the following, from smallest to largest: Sporty, Small, Compact, Medium, or Large.
1. Select Help > Sample Data Library and open Car Physical Data.jmp.
2. In the Columns panel, right-click on the icon to the left of Type, and select Ordinal.
3. Right-click on Type, and select Column Info.
4. From the Column Properties menu, select Value Ordering.
5. Verify that the data are in the following top-down order: Sporty, Small, Compact, Medium, Large.
6. Click OK.
7. Select Analyze > Fit Y by X.
8. Select Type and click Y, Response.
9. Select Weight and click X, Factor.
10. Click OK.
The report window appears.
Figure 8.6 Example of Type by Weight Logistic Plot
In Figure 8.6, note the following observations:
• The first (bottom) curve represents the probability that a car at a given weight is Sporty.

Chapter 8 Logistic Analysis 287Basic Analysis Additional Examples of Logistic Regression
• The second curve represents the probability that a car is Small or Sporty. Looking only at the distance between the first and second curves corresponds to the probability of being Small.
• As you might expect, heavier cars are more likely to be Large.
• Markers for the data are drawn at their x-coordinate, with the y position jittered randomly within the range corresponding to the response category for that row.
If the x -variable has no effect on the response, then the fitted lines are horizontal and the probabilities are constant for each response across the continuous factor range. Figure 8.7 shows a logistic plot where Weight is not useful for predicting Type.
Figure 8.7 Examples of Sample Data Table and Logistic Plot Showing No y by x Relationship
Note: To re-create the plots in Figure 8.7 and Figure 8.8, you must first create the data tables shown here, and then perform steps 7-10 at the beginning of this section.
If the response is completely predicted by the value of the factor, then the logistic curves are effectively vertical. The prediction of a response is near certain (the probability is almost 1) at each of the factor levels. Figure 8.8 shows a logistic plot where Weight almost perfectly predicts Type.

288 Logistic Analysis Chapter 8Additional Examples of Logistic Regression Basic Analysis
Figure 8.8 Examples of Sample Data Table and Logistic Plot Showing an Almost Perfect y by x Relationship
In this case, the parameter estimates become very large and are labeled unstable in the regression report. In these cases, you might consider using the Generalized Linear Model personality with Firth bias-adjusted estimates. See the Generalized Linear Models chapter in the Fitting Linear Models book.
Example of ROC Curves
To demonstrate ROC curves, proceed as follows:
1. Select Help > Sample Data Library and open Penicillin.jmp.
2. Select Analyze > Fit Y by X.
3. Select Response and click Y, Response.
4. Select In (dose) and click X, Factor.
Notice that JMP automatically fills in Count for Freq. Count was previously assigned the role of Freq.
5. Click OK.
6. From the red triangle menu, select ROC Curve.
7. Select Cured as the positive, and click OK.
Note: This example shows a ROC Curve for a nominal response. For details about ordinal ROC curves, see the Partition chapter in the Predictive and Specialized Modeling book.
The results for the response by In (dose) example are shown here. The ROC curve plots the probabilities described above, for predicting response. Note that in the ROC Table, the row with the highest Sens-(1-Spec) is marked with an asterisk.

Chapter 8 Logistic Analysis 289Basic Analysis Additional Examples of Logistic Regression
Figure 8.9 Examples of ROC Curve and Table
Since the ROC curve is well above a diagonal line, you conclude that the model has good predictive ability.
Example of Inverse Prediction Using the Crosshair Tool
In a study of rabbits who were given penicillin, you want to know what dose of penicillin results in a 0.5 probability of curing a rabbit. In this case, the inverse prediction for 0.5 is called the ED50, the effective dose corresponding to a 50% survival rate. Use the crosshair tool to visually approximate an inverse prediction.
To see which dose is equally likely either to cure or to be lethal, proceed as follows:
1. Select Help > Sample Data Library and open Penicillin.jmp.
2. Select Analyze > Fit Y by X.
3. Select Response and click Y, Response.
4. Select In (dose) and click X, Factor.
Notice that JMP automatically fills in Count for Freq. Count was previously assigned the role of Freq.

290 Logistic Analysis Chapter 8Additional Examples of Logistic Regression Basic Analysis
5. Click OK.
6. Click on the crosshairs tool.
7. Place the horizontal crosshair line at about 0.5 on the vertical (Response) probability axis.
8. Move the cross-hair intersection to the prediction line, and read the In(dose) value that shows on the horizontal axis.
In this example, a rabbit with a In (dose) of approximately -0.9 is equally likely to be cured as it is to die.
Figure 8.10 Example of Crosshair Tool on Logistic Plot
Example of Inverse Prediction Using the Inverse Prediction Option
If your response has exactly two levels, the Inverse Prediction option enables you to request an exact inverse prediction. You are given the x value corresponding to a given probability of the lower response category, as well as a confidence interval for that x value.
To use the Inverse Prediction option, proceed as follows:
1. Select Help > Sample Data Library and open Penicillin.jmp.
2. Select Analyze > Fit Y by X.
3. Select Response and click Y, Response.
4. Select In (dose) and click X, Factor.
Notice that JMP automatically fills in Count for Freq. Count was previously assigned the role of Freq.
5. Click OK.
6. From the red triangle menu, select Inverse Prediction. See Figure 8.11.
7. Type 0.95 for the Confidence Level.

Chapter 8 Logistic Analysis 291Basic Analysis Statistical Details for the Logistic Platform
8. Select Two sided for the confidence interval.
9. Request the response probability of interest. Type 0.5 and 0.9 for this example, which indicates you are requesting the values for ln (dose) that correspond to a 0.5 and 0.9 probability of being cured.
10. Click OK.
The Inverse Prediction plot appears.
Figure 8.11 Inverse Prediction Window
Figure 8.12 Example of Inverse Prediction Plot
The estimates of the x values and the confidence intervals are shown in the report as well as in the probability plot. For example, the value of ln (dose) that results in a 90% probability of being cured is estimated to be between -0.526 and 0.783.
Statistical Details for the Logistic Platform
This section contains statistical details for the Whole Model Test report.

292 Logistic Analysis Chapter 8Statistical Details for the Logistic Platform Basic Analysis
Chi-Square
The Chi-Square statistic is sometimes denoted G2 and is written as follows:
where the summations are over all observations instead of all cells.
RSquare (U)
The ratio of this test statistic to the background log-likelihood is subtracted from 1 to calculate R2. More simply, RSquare (U) is computed as follows:
using quantities from the Whole Model Test report.
Note: RSquare (U) is also known as McFadden’s pseudo R-square.
G2 2 p background( )ln– p model( )ln––( )=
negative log-likelihood for Differencenegative log-likelihood for Reduced---------------------------------------------------------------------------------------------------

Chapter 9Tabulate
Create Summary Tables Interactively
Use the Tabulate platform to interactively construct tables of descriptive statistics. The Tabulate platform is an easy and flexible way to present summary data in tabular form. Tables are built from grouping columns, analysis columns, and statistics keywords.
Figure 9.1 Tabulate Examples

294 Tabulate Chapter 9Basic Analysis
ContentsExample of the Tabulate Platform. . . . . . . . . . . . . . . . . . . . . . . . . . . . . . . . . . . . . . . . . . . . . . . . . . 295Launch the Tabulate Platform . . . . . . . . . . . . . . . . . . . . . . . . . . . . . . . . . . . . . . . . . . . . . . . . . . . . . 298
Use the Dialog . . . . . . . . . . . . . . . . . . . . . . . . . . . . . . . . . . . . . . . . . . . . . . . . . . . . . . . . . . . . . . . 300Add Statistics . . . . . . . . . . . . . . . . . . . . . . . . . . . . . . . . . . . . . . . . . . . . . . . . . . . . . . . . . . . . . . . . 301
The Tabulate Output. . . . . . . . . . . . . . . . . . . . . . . . . . . . . . . . . . . . . . . . . . . . . . . . . . . . . . . . . . . . . 305Analysis Columns . . . . . . . . . . . . . . . . . . . . . . . . . . . . . . . . . . . . . . . . . . . . . . . . . . . . . . . . . . . . 306Grouping Columns . . . . . . . . . . . . . . . . . . . . . . . . . . . . . . . . . . . . . . . . . . . . . . . . . . . . . . . . . . . 306Column and Row Tables . . . . . . . . . . . . . . . . . . . . . . . . . . . . . . . . . . . . . . . . . . . . . . . . . . . . . . 307Edit Tables . . . . . . . . . . . . . . . . . . . . . . . . . . . . . . . . . . . . . . . . . . . . . . . . . . . . . . . . . . . . . . . . . . 308
Tabulate Platform Options . . . . . . . . . . . . . . . . . . . . . . . . . . . . . . . . . . . . . . . . . . . . . . . . . . . . . . . . 309Show Test Build Panel . . . . . . . . . . . . . . . . . . . . . . . . . . . . . . . . . . . . . . . . . . . . . . . . . . . . . . . . 310Right-Click Menu for Columns. . . . . . . . . . . . . . . . . . . . . . . . . . . . . . . . . . . . . . . . . . . . . . . . . 310
Additional Examples of the Tabulate Platform. . . . . . . . . . . . . . . . . . . . . . . . . . . . . . . . . . . . . . . 311Example of Creating Different Tables and Rearranging Contents. . . . . . . . . . . . . . . . . . . . 311Example of Combining Columns into a Single Table . . . . . . . . . . . . . . . . . . . . . . . . . . . . . . 315Example Using a Page Column. . . . . . . . . . . . . . . . . . . . . . . . . . . . . . . . . . . . . . . . . . . . . . . . . 317

Chapter 9 Tabulate 295Basic Analysis Example of the Tabulate Platform
Example of the Tabulate Platform
You have data containing height measurements for male and female students. You want to create a table that shows the mean height for males and females and the aggregate mean for both sexes. You want the table to look like Figure 9.2.
Figure 9.2 Table Showing Mean Height
1. Select Help > Sample Data Library and open Big Class.jmp.
2. Select Analyze > Tabulate.
Since height is the variable you are examining, you want it to appear at the top of the table.
3. Click height and drag it into the Drop zone for columns.
Figure 9.3 Height Variable Added

296 Tabulate Chapter 9Example of the Tabulate Platform Basic Analysis
You want the statistics by sex, and you want sex to appear on the side.
4. Click sex and drag it into the blank cell next to the number 2502.
Figure 9.4 Sex Variable Added
Instead of the sum, you want it to show the mean.
5. Click Mean and drag it on top of Sum.

Chapter 9 Tabulate 297Basic Analysis Example of the Tabulate Platform
Figure 9.5 Mean Statistic Added
You also want to see the combined mean for males and females.
6. Click All and drag it on top of sex. Or, you can simply select the Add Aggregate Statistics check box.

298 Tabulate Chapter 9Launch the Tabulate Platform Basic Analysis
Figure 9.6 All Statistic Added
7. (Optional) Click Done.
The completed table shows the mean height for females, males, and the combined mean height for both.
Launch the Tabulate Platform
To launch the Tabulate platform, select Analyze > Tabulate.

Chapter 9 Tabulate 299Basic Analysis Launch the Tabulate Platform
Figure 9.7 The Tabulate Interactive Table
Note: For details about red triangle options, see “Tabulate Platform Options” on page 309.
The Tabulate window contains the following options:
Interactive table/dialog Switch between the two modes. Use the interactive table mode to drag and drop items, creating a custom table. Use the dialog mode to create a simple table using a fixed format. See “Use the Dialog” on page 300.
Statistics options Lists standard statistics. Drag any statistic from the list to the table to incorporate it. See “Add Statistics” on page 301.
Drop zone for columns Drag and drop columns or statistics here to create columns.
Note: If the data table contains columns with names equal to those in the Statistics options, be sure to drag and drop the column name from the column list; otherwise, JMP may substitute the statistic of the same name in the table.
Drop zone for rows Drag and drop columns or statistics here to create rows.

300 Tabulate Chapter 9Launch the Tabulate Platform Basic Analysis
Resulting cells Shows the resulting cells based on the columns or statistics that you drag and drop.
Freq Identifies the data table column whose values assign a frequency to each row. This option is useful when a frequency is assigned to each row in summarized data.
Weight Identifies the data table column whose variables assign weight (such as importance or influence) to the data.
Page Column Generates separate tables for each category of a nominal or ordinal column. See “Example Using a Page Column” on page 317.
Include missing for grouping columns Creates a separate group for missing values in grouping columns. When unchecked, missing values are not included in the table. Note that any missing value codes that you have defined as column properties are taken into account.
Order by count of grouping columns Changes the order of the table to be in descending order of the values of the grouping columns.
Add Aggregate Statistics Adds aggregate statistics for all rows and columns.
Default Statistics Enables you to change the default statistics that appear when you drag and drop analysis or non-analysis (for example, grouping) columns.
Change Format Enables you to change the numeric format for displaying specific statistics. See “Change Numeric Formats” on page 304.
Change Plot Scale (Only appears if Show Chart is selected from the red triangle menu.) Enables you to specify a uniform custom scale.
Uniform plot scale (Only appears if Show Chart is selected from the red triangle menu.) Deselect this box for each column of bars to use the scale determined separately from the data in each displayed column.
Use the Dialog
If you prefer not to drag and drop and build the table interactively, you can create a simple table using the Dialog interface. After selecting Analyze > Tabulate, select Dialog from the menu, as shown in Figure 9.8. You can make changes to the table by selecting Show Control Panel from the red triangle menu, and then drag and drop new items into the table.

Chapter 9 Tabulate 301Basic Analysis Launch the Tabulate Platform
Figure 9.8 Using the Dialog
The dialog contains the following options:
Include marginal statistics Aggregates summary information for categories of a grouping column.
For quantile statistics, enter value (%) Type the value at which the specific percentage of the argument is less than or equal to. For example, 75% of the data is less than the 75th quantile. This applies to all grouping columns.
Statistics Once you’ve selected a column, select a standard statistic to apply to that column. See “Add Statistics” on page 301.
Grouping (row labels) Select the column to use as the row label.
Grouping (column labels) Select the column to use as the column label.
Add Statistics
Tip: You can select both a column and a statistic at the same time and drag them into the table.

302 Tabulate Chapter 9Launch the Tabulate Platform Basic Analysis
Tabulate supports a list of standard statistics. The list is displayed in the control panel. You can drag any keyword from that list to the table, just like you do with the columns. Note the following:
• The statistics associated with each cell are calculated on values of the analysis columns from all observations in that category, as defined by the grouping columns.
• All of the requested statistics have to reside in the same dimension, either in the row table or in the column table.
• If you drag a continuous column into a data area, it is treated as an analysis column.
Note: Analysis columns are numeric, continuous columns for which you want to compute statistics. See “Analysis Columns” on page 306.
Tabulate uses the following keywords:
N Provides the number of nonmissing values in the column. This is the default statistic when there is no analysis column.
Mean Provides the arithmetic mean of a column’s values. It is the sum of nonmissing values (and if defined, multiplied by the weight variable) divided by the Sum Wgt.
Std Dev Provides the sample standard deviation, computed for the nonmissing values. It is the square root of the sample variance.
Min Provides the smallest nonmissing value in a column.
Max Provides the largest nonmissing value in a column.
Range Provides the difference between Max and Min.
% of Total Computes the percentage of total of the whole population. The denominator used in the computation is the total of all the included observations, and the numerator is the total for the category. If there is no analysis column, the % of Total is the percentage of total of counts. If there is an analysis column, the % of Total is the percentage of the total of the sum of the analysis column. Thus, the denominator is the sum of the analysis column over all the included observations, and the numerator is the sum of the analysis column for that category. You can request different percentages by dragging the keyword into the table.
– Dropping one or more grouping columns from the table to the % of Total heading changes the denominator definition. For this, Tabulate uses the sum of these grouping columns for the denominator.
– To get the percentage of the column total, drag all the grouping columns on the row table and drop them onto the % of Total heading (same as Column %). Similarly, to get

Chapter 9 Tabulate 303Basic Analysis Launch the Tabulate Platform
the percentage of the row total, drag all grouping columns on the column table and drop them onto the % of Total heading (same as Row %).
N Missing Provides the number of missing values.
N Categories Provides the number of distinct categories in the analysis column.
Sum Provides the sum of all values in the column. This is the default statistic for analysis columns when there are no other statistics for the table.
Sum Wgt Provides the sum of all weight values in a column. Or, if no column is assigned the weight role, Sum Wgt is the total number of nonmissing values.
Variance Provides the sample variance, computed for the nonmissing values. It is the sum of squared deviations from the mean, divided by the number of nonmissing values minus one.
Std Err Provides the standard error of the mean. It is the standard deviation divided by the square root of N. If a column is assigned the role of weight, then the denominator is the square root of the sum of the weights.
CV (Coefficient of Variation) Provides the measure of dispersion, which is the standard deviation divided by the mean multiplied by one hundred.
Median Provides the 50th percentile, which is the value where half the data are below and half are above or equal to the 50th quantile (median).
Geometric Mean The nth root of the product of the data. For example, geometric means are often used to calculate interest rates. The statistic is also helpful when the data contains a large value in a skewed distribution.
Note: Negative values result in missing numbers, and zero values (with no negative values) result in zero.
Interquartile Range Provides the difference between the 3rd quartile and 1st quartile.
Quantiles Provides the value at which the specific percentage of the argument is less than or equal to. For example, 75% of the data is less than the 75th quantile. You can request different quantiles by clicking and dragging the Quantiles keyword into the table, and then entering the quantile into the box that appears.
Column % Provides the percent of each cell count to its column total if there is no analysis column. If there is an analysis column, the Column % is the percent of the column total of the sum of the analysis column. For tables with statistics on the top, you can add Column % to tables with multiple row tables (stacked vertically).

304 Tabulate Chapter 9Launch the Tabulate Platform Basic Analysis
Row % Provides the percent of each cell count to its row total if there is no analysis column. If there is an analysis column, the Row % is the percent of the row total of the sum of the analysis column. For tables with statistics on the side, you can add Row % to tables with multiple column tables (side by side tables).
All Aggregates summary information for categories of a grouping column.
Change Numeric Formats
The formats of each cell depend on the analysis column and the statistics. For counts, the default format has no decimal digits. For each cell defined by some statistics, JMP tries to determine a reasonable format using the format of the analysis column and the statistics requested. To override the default format:
1. Click the Change Format button at the bottom of the Tabulate window.
2. In the panel that appears, enter the field width, a comma, and then the number of decimal places that you want displayed in the table. See Figure 9.9.
3. To exhibit the cell value in Percent format, add a comma after the number of decimal places and type the word Percent.
4. (Optional) If you would like JMP to determine the best format for you to use, type the word Best in the text box.
JMP now considers the precision of each cell value and selects the best way to show it.
5. Click OK to implement the changes and close the Format section, or click Set Format to see the changes implemented without closing the Format section.
Figure 9.9 Changing Numeric Formats

Chapter 9 Tabulate 305Basic Analysis The Tabulate Output
The Tabulate Output
The Tabulate output consists of one or more column tables concatenated side by side, and one or more row tables concatenated top to bottom. The output might have only a column table or a row table.
Figure 9.10 Tabulate Output
Creating a table interactively is an iterative process:
• Click the items (columns or statistics) from the appropriate list, and drag them into the drop zone (for rows or columns). See “Edit Tables” on page 308, and “Column and Row Tables” on page 307.
• Add to the table by repeating the drag and drop process. The table updates to reflect the latest addition. If there are already column headings or row labels, you can decide where the addition goes relative to the existing items.
Note the following about clicking and dragging:
• JMP uses the modeling type to determine a column’s role. Continuous columns are assumed to be analysis columns. See “Analysis Columns” on page 306. Ordinal or nominal columns are assumed to be grouping columns. See “Grouping Columns” on page 306.
• When you drag and drop multiple columns into the initial table:

306 Tabulate Chapter 9The Tabulate Output Basic Analysis
– If the columns share a set of common values, they are combined into a single table. A crosstabulation of the column names and the categories gathered from these columns is generated. Each cell is defined by one of the columns and one of the categories.
– If the columns do not share common values, they are put into separate tables.
– You can always change the default action by right-clicking on a column and selecting Combine Tables or Separate Tables. For more details, see “Right-Click Menu for Columns” on page 310.
• To nest columns, create a table with the first column, and then drag the additional columns into the first column.
• In a properly created table, all grouping columns are together, all analysis columns are together, and all statistics are together. Therefore, JMP does not intersperse a statistics keyword within a list of analysis columns. JMP also does not insert an analysis column within a list of grouping columns.
• You can drag columns from the Table panel in the data table onto a Tabulate table instead of using the Tabulate Control Panel.
Note: The Tabulate table is updated when you add data to the open data table, delete rows, and recode the data.
Analysis Columns
Analysis columns are any numeric columns for which you want to compute statistics. They are continuous columns. Tabulate computes statistics on the analysis columns for each category formed from the grouping columns.
Note that all the analysis columns have to reside in the same dimension, either in the row table or in the column table.
Grouping Columns
Grouping columns are columns that you want to use to classify your data into categories of information. They can have character, integer, or even decimal values, but the number of unique values should be limited. Grouping columns are either nominal or ordinal.
Note the following:
• If grouping columns are nested, Tabulate constructs distinct categories from the hierarchical nesting of the values of the columns. For example, from the grouping columns Sex with values F and M, and the grouping column Marital Status with values Married and Single, Tabulate constructs four distinct categories: F and Married, F and Single, M and Married, M and Single.

Chapter 9 Tabulate 307Basic Analysis The Tabulate Output
• You can specify grouping columns for column tables as well as row tables. Together they generate the categories that define each table cell.
• Tabulate does not include observations with a missing value for one or more grouping columns by default. You can include them by checking the Include missing for grouping columns option.
• To specify codes or values that should be treated as missing, use the Missing Value Codes column property. You can include these by checking the Include missing for grouping columns option. For more details about Missing Value Codes, see The Column Info Window chapter in the Using JMP book.
Column and Row Tables
In Tabulate, a table is defined by its column headings and row labels. These sub-tables are referred to as row tables and column tables. See Figure 9.11.
Example of Row and Column Tables
1. Select Help > Sample Data Library and open Car Poll.jmp.
2. Select Analyze > Tabulate.
3. Drag size into the Drop zone for rows.
4. Drag country to the left of the size heading.
5. Drag Mean over the N heading.
6. Drag Std Dev below the Mean heading.
7. Drag age above the Mean heading.
8. Drag type to the far right of the table.
9. Drag sex under the table.
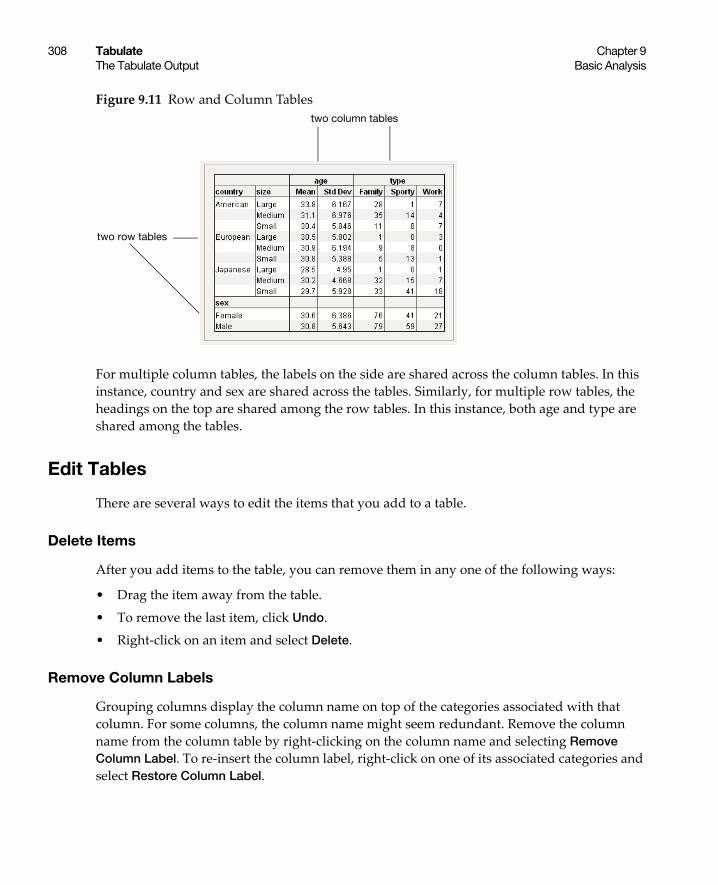
308 Tabulate Chapter 9The Tabulate Output Basic Analysis
Figure 9.11 Row and Column Tables
For multiple column tables, the labels on the side are shared across the column tables. In this instance, country and sex are shared across the tables. Similarly, for multiple row tables, the headings on the top are shared among the row tables. In this instance, both age and type are shared among the tables.
Edit Tables
There are several ways to edit the items that you add to a table.
Delete Items
After you add items to the table, you can remove them in any one of the following ways:
• Drag the item away from the table.
• To remove the last item, click Undo.
• Right-click on an item and select Delete.
Remove Column Labels
Grouping columns display the column name on top of the categories associated with that column. For some columns, the column name might seem redundant. Remove the column name from the column table by right-clicking on the column name and selecting Remove Column Label. To re-insert the column label, right-click on one of its associated categories and select Restore Column Label.
two column tables
two row tables

Chapter 9 Tabulate 309Basic Analysis Tabulate Platform Options
Edit Statistical Key Words and Labels
You can edit a statistical key word or a statistical label. For example, instead of Mean, you might want to use the word Average. Right-click on the word that you want to edit and select Change Item Label. In the box that appears, type the new label. Alternatively, you can type directly into the edit box.
If you change one statistics keyword to another statistics keyword, JMP assumes that you actually want to change the statistics, not just the label. It would be as if you have deleted the statistics from the table and added the latter.
Tabulate Platform Options
The following options are available from the red triangle menu next to Tabulate:
Show Table Displays the summarized data in tabular form.
Show Chart Displays the summarized data in bar charts that mirrors the table of summary statistics. The simple bar chart enables visual comparison of the relative magnitude of the summary statistics. By default, all columns of bars share the same scale. You can have each column of bars use the scale determined separately from the data in each displayed column, by clearing the Uniform plot scale check box. You can specify a uniform custom scale using the Change Plot Scale button. The charts are either 0-based or centered on 0. If the data are all nonnegative, or all non-positive, the charts baseline is at 0. Otherwise, the charts are centered on 0.
Show Control Panel Displays the control panel for further interaction.
Show Shading Displays gray shading boxes in the table when there are multiple rows.
Show Tooltip Displays tips that appear when you move the mouse over areas of the table.
Show Test Build Panel Displays the control area that lets you create a test build using a random sample from the original table. This is particularly useful when you have large amounts of data. See “Show Test Build Panel” on page 310.
Make Into Data Table Makes a data table from the report. There is one data table for each row table, because labels of different row tables might not be mapped to the same structure.
Full Path Column Name Uses the fully qualified column names of grouping columns for the column name in the created data table.
See the JMP Reports chapter in the Using JMP book for more information about the following options:

310 Tabulate Chapter 9Tabulate Platform Options Basic Analysis
Local Data Filter Shows or hides the local data filter that enables you to filter the data used in a specific report.
Redo Contains options that enable you to repeat or relaunch the analysis. In platforms that support the feature, the Automatic Recalc option immediately reflects the changes that you make to the data table in the corresponding report window.
Save Script Contains options that enable you to save a script that reproduces the report to several destinations.
For a description of the options in the Select Columns red triangle menu, see the Get Started chapter in the Using JMP book.
Show Test Build Panel
If you have a very large data table, you might want to use a small subset of the data table to try out different table layouts to find one that best shows the summary information. In this case, JMP generates a random subset of the size as specified and uses that subset when it builds the table. To use the test build feature:
1. From the red triangle menu next to Tabulate, select Show Test Build Panel.
2. Enter the size of the sample that you want in the box under Sample Size (>1) or Sampling Rate (<1), as shown in Figure 9.12. The size of the sample can be either the proportion of the active table that you enter or the number of rows from the active table.
Figure 9.12 The Test Build Panel
3. Click Resample.
4. To see the sampled data in a JMP data table, click the Test Data View button. When you dismiss the test build panel, Tabulate uses the full data table to regenerate the tables as designed.
Right-Click Menu for Columns
Right-click on a column in Tabulate to see the following options:
Delete Deletes the selected column.
Use as Grouping column Changes the analysis column to a grouping column.

Chapter 9 Tabulate 311Basic Analysis Additional Examples of the Tabulate Platform
Use as Analysis column Changes the grouping column to an analysis column.
Change Item Label (Appears only for separate or nested columns) Type a new label.
Combine Tables (Columns by Categories) (Appears only for separate or nested columns) Combines separate or nested columns. See “Example of Combining Columns into a Single Table” on page 315.
Separate Tables (Appears only for combined tables) Creates a separate table for each column.
Nest Grouping Columns Nests grouping columns vertically or horizontally.
Additional Examples of the Tabulate Platform
• “Example of Creating Different Tables and Rearranging Contents”• “Example of Combining Columns into a Single Table”• “Example Using a Page Column”
Example of Creating Different Tables and Rearranging Contents
This example contains the following steps:
1. “Create a Table of Counts” on page 311
2. “Create a Table Showing Statistics” on page 313
3. “Rearrange the Table Contents” on page 314
Create a Table of Counts
Suppose that you would like to create a table that contains counts for how many people in a survey own Japanese, European, and American cars, broken down by the size of the car. You want the table to look Figure 9.3.

312 Tabulate Chapter 9Additional Examples of the Tabulate Platform Basic Analysis
Figure 9.13 Table Showing Counts of Car Ownership
1. Select Help > Sample Data Library and open Car Poll.jmp.
2. Select Analyze > Tabulate.
3. Click country and drag it into the Drop zone for rows.
4. Click size and drag it to the right of the country heading.
Figure 9.14 Country and Size Added to the Table

Chapter 9 Tabulate 313Basic Analysis Additional Examples of the Tabulate Platform
Create a Table Showing Statistics
Suppose that you would like to see the mean (average) and the standard deviation of the age of people who own each size of car. You want the table to look like Figure 9.15.
Figure 9.15 Table Showing Mean and Standard Deviation by Age
1. Start from Figure 9.14. Click age and drag it to the right of the size heading.
2. Click Mean and drag it over Sum.
3. Click Std Dev and drag it below Mean.
Std Dev is placed below Mean in the table. Dropping Std Dev above Mean places Std Dev above Mean in the table.

314 Tabulate Chapter 9Additional Examples of the Tabulate Platform Basic Analysis
Figure 9.16 Age, Mean, and Std Dev Added to the Table
Rearrange the Table Contents
Suppose that you would prefer size to be on top, showing a crosstab layout. You want the table to look like Figure 9.17.
Figure 9.17 Size on Top
To rearrange the table contents, proceed as follows:
1. Start from Figure 9.16. Click on the size heading and drag it to the right of the table headings. See Figure 9.18.
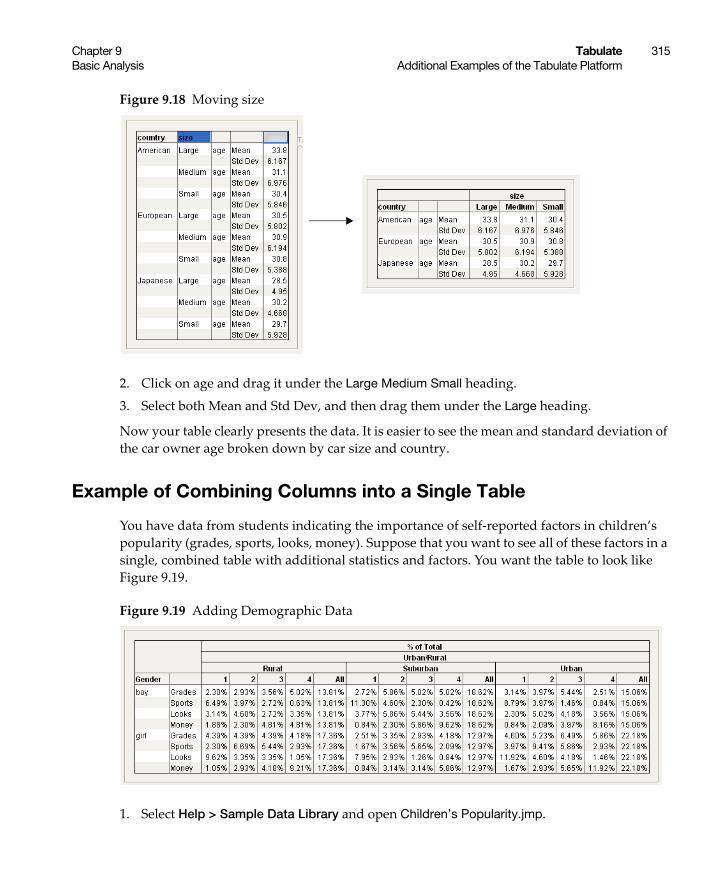
Chapter 9 Tabulate 315Basic Analysis Additional Examples of the Tabulate Platform
Figure 9.18 Moving size
2. Click on age and drag it under the Large Medium Small heading.
3. Select both Mean and Std Dev, and then drag them under the Large heading.
Now your table clearly presents the data. It is easier to see the mean and standard deviation of the car owner age broken down by car size and country.
Example of Combining Columns into a Single Table
You have data from students indicating the importance of self-reported factors in children’s popularity (grades, sports, looks, money). Suppose that you want to see all of these factors in a single, combined table with additional statistics and factors. You want the table to look like Figure 9.19.
Figure 9.19 Adding Demographic Data
1. Select Help > Sample Data Library and open Children’s Popularity.jmp.

316 Tabulate Chapter 9Additional Examples of the Tabulate Platform Basic Analysis
2. Select Analyze > Tabulate.
3. Select Grades, Sports, Looks, and Money and drag them into the Drop zone for rows.
Figure 9.20 Columns by Categories
Notice that a single, combined table appears.
Tabulate the percentage of the one to four ratings of each category.
4. Drag Gender into the empty heading at left.
5. Drag % of Total above the numbered headings.
6. Drag All beside the number 4.
Figure 9.21 Gender, % of Total, and All Added to the Table

Chapter 9 Tabulate 317Basic Analysis Additional Examples of the Tabulate Platform
Break down the tabulation further by adding demographic data.
7. Drag Urban/Rural below the % of Total heading.
Figure 9.22 Urban/Rural Added to the Table
You can see that for boys in rural, suburban, and urban areas, sports are the most important factor for popularity. For girls in rural, suburban, and urban areas, looks are the most important factor for popularity.
Example Using a Page Column
You have data containing height measurements for male and female students. You want to create a table that shows the mean height by the age of the students. Then you want to stratify your data by sex in different tables. To do so, add the stratification column as a page column, which will build the pages for each group. You want the table to look like Figure 9.23.
Figure 9.23 Mean Height of Students by Sex
1. Select Help > Sample Data Library and open Big Class.jmp.
2. Select Analyze > Tabulate.
Since height is the variable you are examining, you want it to appear at the top of the table.
3. Click height and drag it into the Drop zone for columns.
Females Males

318 Tabulate Chapter 9Additional Examples of the Tabulate Platform Basic Analysis
You want the statistics by age, and you want age to appear on the side.
4. Click age and drag it into the blank cell next to the number 2502.
5. Click sex and drag it into Page Column.
6. Select F from the Page Column list to show the mean heights for only females.
7. Select M from the Page Column list to show the mean heights for only males. You can also select None Selected to show all values.
Figure 9.24 Using a Page Column

Chapter 10Simulate
Answer Challenging Questions with Parametric Resampling
The Simulate platform is available only in JMP Pro.
The Simulate feature provides powerful parametric and nonparametric simulation capability. Use Simulate to do the following:
• Expand on the bootstrap to provide parametric bootstrapping.
• Obtain power calculations in nonstandard situations.
• Approximate the distribution of statistics, such as predicted values, and confidence intervals, in nonstandard situations.
• Conduct permutation tests.
• Explore the effect of assumptions about predictors on models.
• Explore various “what if” scenarios relative to your models.
• Evaluate new or existing statistical methods.
The Simulate option is available in many reports, including all of those that support Bootstrap. To access the Simulate option, right-click in a report.
Figure 10.1 Power Analysis Using Simulate

320 Simulate Chapter 10Basic Analysis
ContentsOverview of the Simulate Platform . . . . . . . . . . . . . . . . . . . . . . . . . . . . . . . . . . . . . . . . . . . . . . . . 321Examples That Use Simulate . . . . . . . . . . . . . . . . . . . . . . . . . . . . . . . . . . . . . . . . . . . . . . . . . . . . . . 321
Construct Nonparametric Confidence Intervals for Variance Components . . . . . . . . . . . 322Conduct a Permutation Test . . . . . . . . . . . . . . . . . . . . . . . . . . . . . . . . . . . . . . . . . . . . . . . . . . . 327Explore Retaining a Factor in Generalized Regression . . . . . . . . . . . . . . . . . . . . . . . . . . . . . 330Conduct Prospective Power Analysis for a Nonlinear Model . . . . . . . . . . . . . . . . . . . . . . . 335
Launch the Simulate Window. . . . . . . . . . . . . . . . . . . . . . . . . . . . . . . . . . . . . . . . . . . . . . . . . . . . . 343The Simulate Window . . . . . . . . . . . . . . . . . . . . . . . . . . . . . . . . . . . . . . . . . . . . . . . . . . . . . . . . . . . 344The Simulate Results Table . . . . . . . . . . . . . . . . . . . . . . . . . . . . . . . . . . . . . . . . . . . . . . . . . . . . . . . 344
Simulation Results Report . . . . . . . . . . . . . . . . . . . . . . . . . . . . . . . . . . . . . . . . . . . . . . . . . . . . . 345Simulated Power Report . . . . . . . . . . . . . . . . . . . . . . . . . . . . . . . . . . . . . . . . . . . . . . . . . . . . . . 345

Chapter 10 Simulate 321Basic Analysis Overview of the Simulate Platform
Overview of the Simulate Platform
The Simulate platform provides simulated results for a column of statistics in a report. Right-click on a column of statistics in a report and select Simulate. In the Simulate window, specify a column in your data table that forms the basis for your simulation. This is the column that you switch out. This column can have any role in the analysis. In particular, it can be a response or a predictor in a model. You then specify a column in your data table that contains a formula that you want to use for the simulation. This is the column that you switch in. It functions as a surrogate for the column that you switched out.
Note: Your data table must contain a column that has a random component.
The method works as follows. A column of simulated values is generated based on the formula in the formula column that you switch in. The entire analysis that generated the report containing the statistics of interest is rerun using this new column of simulated values to replace the column that you switched out. This process is repeated N times, where N is the total number of samples that you specify.
The Simulate analysis produces an output data table showing a summary of the analysis.
• Each row of the data table represents the results of the analysis for one column of simulated values.
• There is a column for each row of the report table involved in the simulation.
• There are scripts to facilitate your analysis.
Tip: The Simulate platform reruns the entire analysis that appears in the platform report from which Simulate is invoked. As a result, Simulate may run slowly for your selected column because of extraneous analyses in the report. If Simulate is taking a long time, remove extraneous options from the platform report prior to running Simulate.
Examples That Use Simulate
This section provides several examples of the use of Simulate. Additional examples, also listed below, can be found in other books:
• “Construct Nonparametric Confidence Intervals for Variance Components” on page 322
• “Conduct a Permutation Test” on page 327
• “Explore Retaining a Factor in Generalized Regression” on page 330
• “Conduct Prospective Power Analysis for a Nonlinear Model” on page 335

322 Simulate Chapter 10Examples That Use Simulate Basic Analysis
• For an example that shows how to simulate a confidence interval for Ppk and the percent nonconforming for a non-normal variable, see the Process Capability chapter in the Quality and Process Methods book.
Construct Nonparametric Confidence Intervals for Variance Components
In this example, you are interested in the effects of temperature, time, and the amount of catalyst on a reaction. Temperature is a very-hard-to-change variable (whole plot factor), time is hard-to-change (subplot factor), and the amount of catalyst is easy-to-change. For information on whole plot and subplot factors, see the Custom Designs chapter in the Design of Experiments Guide.
Your goal is to obtain nonparametric confidence intervals for the whole-plot and sub-plot variance components. Previous studies have suggested that the whole-plot standard deviation is about twice the error standard deviation, while the sub-plot error is about 1.5 times the error standard deviation. The Wald intervals given in the REML report, which assume that the variance components are asymptotically normal, have poor coverage properties. You will obtain confidence intervals using percentiles of the simulated distributions of the variance components.
In this example, you will do the following:
• Construct a custom design for your split-split-plot experiment. See “Construct the Design” on page 322.
• Fit a model using the REML method. See “Fit the Model” on page 325.
• Simulate variance component estimates in order to obtain percentile confidence intervals for the variance components. See “Generate Confidence Intervals” on page 325.
Construct the Design
If you prefer to skip the steps in this section, select Help > Sample Data Library and open Design Experiment/Catalyst Design.jmp. In the Catalyst Design.jmp data table, click the green triangle next to the DOE Simulate script. Then go to “Fit the Model” on page 325.
1. Select DOE > Custom Design.
2. In the Factors outline, type 3 next to Add N Factors.
3. Click Add Factor > Continuous.
4. Double-click to rename these factors Temperature, Time, and Catalyst.
Keep the default Values of –1 and 1 for these factors.
5. For Temperature, click Easy and select Very Hard.

Chapter 10 Simulate 323Basic Analysis Examples That Use Simulate
This defines Temperature to be a whole plot factor.
6. For Time, click Easy and select Hard for Time.
This defines Time to be a subplot factor.
7. Click Continue.
8. In the Model outline, select Interactions > 2nd.
This adds all two-way interactions to the model.
9. Click the Custom Design red triangle and select Simulate Responses.
This opens the Simulate Responses window after you select Make Table to construct the design table.
Note: Setting the Random Seed in step 10 and Number of Starts in step 11 reproduces the exact results shown in this example. In constructing a design on your own, these steps are not necessary.
10. (Optional) Click the Custom Design red triangle and select Set Random Seed. Type 12345 and click OK.
11. (Optional) Click the Custom Design red triangle and select Number of Starts. Type 1000 and click OK.
12. Click Make Design.
13. Click Make Table.
Note: The entries in your Y and Y Simulated columns will differ from those that appear in Figure 10.2.

324 Simulate Chapter 10Examples That Use Simulate Basic Analysis
Figure 10.2 Design Table
Figure 10.3 Simulate Responses Window
The design table and a Simulate Responses window appear. Notice that the design table contains a DOE Simulate script. At any time, you can run this script to specify different parameter values.
Continue to the next section, where you specify standard deviations for the whole plot and subplot errors, and fit a REML model to the first set of simulated values.

Chapter 10 Simulate 325Basic Analysis Examples That Use Simulate
Fit the Model
Assume that the whole plot and subplot errors are normal. Based on your estimates of their standard deviations, if the error standard deviation is about 1 unit, the whole plot standard deviation is about 2 units and the subplot standard deviation is about 1.5 units. Since you are only interested in the whole- and sub-plot variation, you do not need to change the values assigned to Effects in the Simulate Responses outline.
1. In the Distribution panel (Figure 10.3), next to Whole Plots σ, type 2.
Notice that the Normal distribution is selected by default, indicating that normal error will be added to the formula.
2. Next to Subplots σ, type 1.5.
3. Click Apply.
In the data table, the formula for Y Simulated updates to reflect your specifications. To view the formula, click on the plus sign to the right of the column name in the Columns panel.
4. In the data table, click the green triangle next to the Model script.
5. Click the Y variable next to the Y button and click Remove.
6. Click Y Simulated and click the Y button.
This action replaces Y with a column that contains a simulation formula.
7. Click Run.
The model that is fit is based on a single set of simulated responses.
Note: Because the values in Y Simulated are randomly generated, the entries in your report will differ from those that appear in Figure 10.4.
Figure 10.4 REML Report Showing Wald Confidence Intervals
Generate Confidence Intervals
Next, simulate values for the variance components and use these to construct simulated percentile confidence intervals.

326 Simulate Chapter 10Examples That Use Simulate Basic Analysis
1. In the REML Variance Components Estimates outline, right-click in the Var Component column and select Simulate.
Figure 10.5 Simulate Window
In your simulations, you replace the column Y Simulated, which you used to run your model, with a new instance of the column Y Simulated, which generates a new column of simulated values for each simulation. The column on which you right-clicked and that appears as selected, Var Component, will be simulated for each effect listed in the Parameter Estimates table.
2. Next to Number of Samples, enter 200.
3. (Optional) Next to Random Seed, enter 456.
This reproduces the values shown in Figure 10.6, except for the values in row 1.
4. Click OK.
The entries in your row 1 will differ from those that appear in Figure 10.6.
Figure 10.6 Table of Simulated Results for Var Component (Partial View)

Chapter 10 Simulate 327Basic Analysis Examples That Use Simulate
The first row of the Fit Least Squares Simulate Results (Var Component) data table contains the initial values of Var Component and is excluded. The remaining rows contain simulated values.
5. Run the Distribution script.
Figure 10.7 Distribution Plots for Variance Components (Partial View)
For each variance component, confidence intervals at various confidence levels are shown in the Simulation Results report (Figure 10.7). Compare the 95% intervals in the Alpha=0.05 row of each table to the intervals given in the REML report (Figure 10.4):
– The simulated 95% confidence interval for the whole-plot variance component is -3.296 to 22.863. The Wald interval given in the REML report is -1.973 to 5.086.
– The simulated 95% confidence interval for the sub-plot variance component is -0.332 to 10.459. The Wald interval given in the REML report is -0.605 to 1.223.
The intervals that you obtain using simulation are considerably wider than the REML interval calculated from your single set of values. For more precise intervals, consider running a larger number of simulations.
Conduct a Permutation Test
In this example, you are studying the effects of three drugs on pain. You are interested in whether they differ in their effects. Because you have a very small sample size and are somewhat concerned about violations of the usual ANOVA assumptions, you will use Simulate to conduct a permutation test.
First, you construct a formula that randomly shuffles the pain measurements among the three drugs. Under the null hypothesis of no effect, any of these allocations is as likely as any other.

328 Simulate Chapter 10Examples That Use Simulate Basic Analysis
It follows that the F ratios obtained in this manner approximate the distribution of F ratios under the null hypothesis. Finally, you compare the observed value of the F ratio to the null distribution obtained by simulation.
Define the Simulation Formula
1. Select Help > Sample Data Library and open Analgesics.jmp.
2. Select Cols > New Columns.
3. Type Pain Shuffled for Column Name.
4. From the Column Properties list, select Formula.
5. In the function list, select Row > Col Stored Value.
6. In the Columns list, double-click pain.
7. Click the insert key (^) in the list of symbols above the editor panel.
8. From the list of functions, select Random > Col Shuffle.
Figure 10.8 Completed Formula
This formula randomly shuffles the entries in the pain column.
9. Click OK in the Formula Editor window.
10. Click OK in the Column Info window.
Perform the Permutation Test
1. Select Analyze > Fit Y by X.
2. Select pain and click Y, Response.
3. Select drug and click X, Factor.
4. Click OK.
5. Click the Oneway Analysis red triangle and select Means/Anova.
Figure 10.9 Analysis of Variance Report

Chapter 10 Simulate 329Basic Analysis Examples That Use Simulate
Notice that the F ratio is 6.2780.
6. In the Analysis of Variance outline, right-click on the F Ratio column and select Simulate.
7. In the Column to Switch Out list, click pain.
8. In the Column to Switch In list, click Pain Shuffled.
9. Next to Number of Samples, enter 1000.
10. (Optional) Next to Random Seed, enter 456.
This reproduces the values in this example.
Figure 10.10 Completed Simulate Window
11. Click OK.
In the table of simulated results, the columns for C. Total and Error are empty, since the F Ratio value in the Analysis of Variance table only applies to drug.
12. In the table of simulated values, run the Distribution script.

330 Simulate Chapter 10Examples That Use Simulate Basic Analysis
Figure 10.11 Simulated Distribution of F Ratios under the Null Distribution
The observed F ratio value of 6.2780 is represented with a red line in the histogram. This value falls in the upper 0.5% of the simulated null distribution of F ratios. This presents strong evidence that the three drugs differ in their effects on pain.
Explore Retaining a Factor in Generalized Regression
In this example, a pharmaceutical manufacturer has historical information on the dissolution of a tablet inside the body and various factors that may affect the dissolution rate. A tablet with a dissolution rate below 70 is considered defective. You want to understand which factors affect dissolution rate.
In this example, you will do the following:
• Construct a generalized regression model.
• Fit a reduced model using the non-zeroed terms.
• Based on the reduced model, use simulation to explore the likelihood that one of the factors is included in the model.

Chapter 10 Simulate 331Basic Analysis Examples That Use Simulate
Fit the Model
In this section, you fit a model using generalized regression. If you prefer not to work through the steps in this section, click the green triangle next to the Generalized Regression script in the Tablet Production.jmp data table to obtain the model.
1. Select Help > Sample Data Library and open Tablet Production.jmp.
2. Select Analyze > Fit Model.
3. Click Dissolution and click Y.
4. Select Mill Time through Atomizer Pressure and click Add.
5. From the Personality menu, select Generalized Regression.
6. Click Run.
7. In the Model Launch panel, click Go.
Figure 10.12 Model Based on Adaptive Lasso
You are interested in the parameter estimates shown in the Adaptive Lasso with AICc Validation report. Based on the non-zero parameter estimates, the model suggests that Mill Time, Screen Size, Blend Time, Blend Speed, Compressor, Coating Viscosity, and Spray Rate are related to Dissolution.
Reduce the Model
Before reducing the model, ensure that no columns are selected in the Tablet Production.jmp data table. Selected columns are not deselected in the first step below. Ensuring that no columns are selected prevents the inadvertent inclusion of columns with zeroed terms.

332 Simulate Chapter 10Examples That Use Simulate Basic Analysis
If you prefer not to work through the steps in this section, click the green triangle next to the Generalized Regression Reduced Model script in the Tablet Production.jmp data table to obtain the reduced model.
1. Click the red triangle next to Adaptive Lasso with AICc Validation and select Relaunch with Active Effects.
This opens a Fit Model window that places the terms with nonzero coefficient estimates in the Parameter Estimates reports into the Construct Model Effects list. The response is entered as Y. The Generalized Regression personality is selected.
2. Click Run.
3. In the Model Launch panel, click Go.
Figure 10.13 Reduced Model Using Adaptive Lasso
Notice that the estimate for Blend Speed has a confidence interval (Lower 95%) that comes very close to including zero. Next, perform a simulation study to see how often Blend Speed would be included in the model had other data values from the dissolution distribution been observed.
Explore the Inclusion of Blend Speed in the Model
Use the report for the reduced model (Figure 10.13) in the steps below.
1. Click the red triangle next to Adaptive Lasso with AICc Validation and select Save Columns > Save Simulation Formula.
This adds a new column called Dissolution Simulation Formula to the Tablet Production.jmp data table.
2. (Optional) In the data table Columns panel, click the plus sign to the right of Dissolution Simulation Formula.

Chapter 10 Simulate 333Basic Analysis Examples That Use Simulate
Figure 10.14 Simulation Formula
For each row, this formula simulates a value that could be obtained given the model and the distribution of Dissolution, which is estimated to be Normal with standard deviation about 1.998.
3. Click Cancel.
4. Go back to the reduced model report window. In the Parameter Estimates for Original Predictors report, right-click in the Estimate column and select Simulate.
5. Next to Number of Samples, enter 300.
For the simulation, you ask JMP to replace the Dissolution column in each of 300 analyses with values simulated using the Dissolution Simulation Formula column.
6. (Optional) Set the Random Seed to 123.
This reproduces the values in this example.
Figure 10.15 Completed Simulation Window

334 Simulate Chapter 10Examples That Use Simulate Basic Analysis
7. Click OK.
The first row of the table contains the initial values of the Estimates and is excluded. The remaining rows contain simulated values.
8. Run the Distribution script.
9. Press the Ctrl key, click the Intercept red triangle menu, and select Display Options > Customize Summary Statistics.
10. Select N Zero.
11. Click OK.
12. Scroll to the Distribution report for Blend Speed.
Figure 10.16 Histogram of Simulated Blend Speed Coefficient Estimates
The Summary Statistics report shows that for 97/300 = 32.3% of the simulations, the Blend Speed estimates are zero.

Chapter 10 Simulate 335Basic Analysis Examples That Use Simulate
Conduct Prospective Power Analysis for a Nonlinear Model
In this example, you are interested in the main effects of six continuous factors on whether a part passes or fails inspection. The response is binomial and you can afford a total of 60 runs.
You will do the following:
1. Construct a custom design for your experiment. See “Construct the Design” on page 336.
Note: Although a custom design is not optimal for a non-linear situation, in this example, for simplicity, you will use the Custom Design platform rather than the Nonlinear Design platform. For an example illustrating why a design constructed using the Nonlinear Design platform is better than an orthogonal design, see the Nonlinear Designs chapter in the Design of Experiments Guide.
2. Fit a logistic model using the Generalized Linear Model personality. See “Fit the Generalized Linear Model” on page 339.
3. Simulate likelihood ratio test p-values to explore the power of detecting a difference over a range of probability values that is determined by the linear predictor. See “Explore Power” on page 340.
Plan for the Example
You will model the probability of a success using a generalized linear model with the logit as a link function. The logit link function fits a logistic model:
where π(X) denotes the probability that a part passes at the given design settings X = (X1, X2, ..., X6).
Denote the linear predictor by L(X):
You will explore power for the following values of the coefficients of the linear predictor:
Coefficient Value
β0 0
β1 1
β2 .9
π X( ) 1
1 eβ0 β1X1 … β6X6+ + +( )–
+----------------------------------------------------------------------=
L X( ) β0 β1X1 … β6X6+ + +=
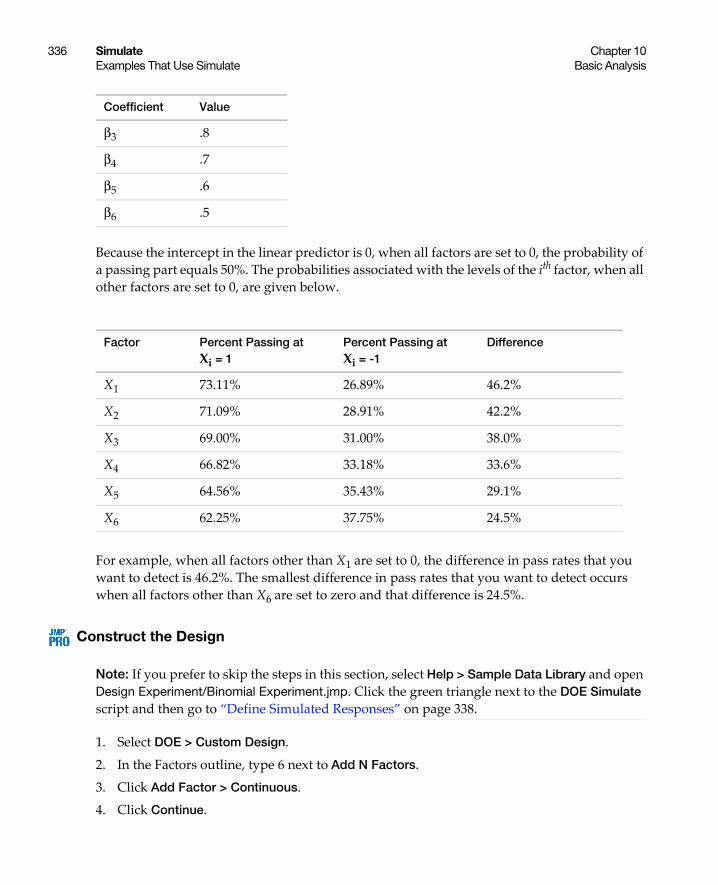
336 Simulate Chapter 10Examples That Use Simulate Basic Analysis
Because the intercept in the linear predictor is 0, when all factors are set to 0, the probability of a passing part equals 50%. The probabilities associated with the levels of the ith factor, when all other factors are set to 0, are given below.
For example, when all factors other than X1 are set to 0, the difference in pass rates that you want to detect is 46.2%. The smallest difference in pass rates that you want to detect occurs when all factors other than X6 are set to zero and that difference is 24.5%.
Construct the Design
Note: If you prefer to skip the steps in this section, select Help > Sample Data Library and open Design Experiment/Binomial Experiment.jmp. Click the green triangle next to the DOE Simulate script and then go to “Define Simulated Responses” on page 338.
1. Select DOE > Custom Design.
2. In the Factors outline, type 6 next to Add N Factors.
3. Click Add Factor > Continuous.
4. Click Continue.
β3 .8
β4 .7
β5 .6
β6 .5
Factor Percent Passing at Xi = 1
Percent Passing at Xi = -1
Difference
X1 73.11% 26.89% 46.2%
X2 71.09% 28.91% 42.2%
X3 69.00% 31.00% 38.0%
X4 66.82% 33.18% 33.6%
X5 64.56% 35.43% 29.1%
X6 62.25% 37.75% 24.5%
Coefficient Value

Chapter 10 Simulate 337Basic Analysis Examples That Use Simulate
You are constructing a main effects design, so do not make any changes to the Model outline.
5. Under Number of Runs, type 60 next to User Specified.
6. Click the Custom Design red triangle and select Simulate Responses.
This opens the Simulate Responses window after you select Make Table to construct the design table.
Note: Setting the Random Seed in step 7 and Number of Starts in step 8 reproduces the exact results shown in this example. In constructing a design on your own, these steps are not necessary.
7. (Optional) Click the Custom Design red triangle and select Set Random Seed. Type 12345 and click OK.
8. (Optional) Click the Custom Design red triangle and select Number of Starts. Type 1 and click OK.
9. Click Make Design.
10. Click Make Table.
Note: The entries in your Y and Y Simulated columns will differ from those that appear in Figure 10.17.
Figure 10.17 Partial View of Design Table

338 Simulate Chapter 10Examples That Use Simulate Basic Analysis
Figure 10.18 Simulate Responses Window
The design table and a Simulate Responses window appear. Two columns are added to the design table:
– Y contains a set of values simulated according to the specifications in the Simulate Responses window.
– Y Simulated contains a formula that calculates its values using the formula for the model that is specified in the Simulate Responses window. To view the formula, click on the plus sign to the right of the column name in the Columns panel.
Continue to the next section, where you simulate binomial responses and fit a generalized linear model to these simulated responses.
Define Simulated Responses
Your plan is to simulate binomial response data where the probability of success is given by a logistic model. For more information on Simulate Response, see the Custom Designs chapter in the Design of Experiments Guide.
Note: If you prefer to skip the steps in this section, click the green triangle next to the Simulate Model Responses script. Then go to “Fit the Generalized Linear Model” on page 339.
1. In the Simulate Responses window (Figure 10.18), type the following values under Y:
– Next to Intercept, type 0.
– Next to X1, 1 is entered by default. Keep that value.
– Next to X2, type 0.9.
– Next to X3, type 0.8.
– Next to X4, type 0.7.
– Next to X5, type 0.6.

Chapter 10 Simulate 339Basic Analysis Examples That Use Simulate
– Next to X6, type 0.5.
2. In the Distribution outline, select Binomial.
Leave the value for N set to 1, indicating that there is only one unit per trial.
Figure 10.19 Completed Simulate Responses Window
3. Click Apply.
In the design data table, the Y Simulated column is replaced with a formula column that generates binomial values. A column called Y N Trials indicates the number of trials for each run.
4. (Optional) Click on the plus sign to the right of Y Simulated in the Columns panel.
Figure 10.20 Random Binomial Formula for Y Simulated
5. Click Cancel.
Fit the Generalized Linear Model
1. In the data table, click the green triangle next to the Model script.
2. Click the Y variable next to the Y button and click Remove.
3. Click Y Simulated and click the Y button.
You are replacing Y with a column that contains randomly generated binomial values.
4. From the Personality menu, select Generalized Linear Model.

340 Simulate Chapter 10Examples That Use Simulate Basic Analysis
5. From the Distribution menu, select Binomial.
Notice that the Logit function appears in the Link Function menu.
6. Click Run.
The model that is fit is based on a single set of simulated binomial responses.
Explore Power
Next, explore the power of tests to detect a difference over the range of probability values determined by the linear predictor with the coefficient values given in “Plan for the Example” on page 335.
1. In the Effect Tests outline, right-click in the Prob>ChiSq column and select Simulate.
Figure 10.21 Simulate Window
The column Y Simulated under the Column to Switch Out contains the values that were used to fit the model. When you select the column Y Simulated under Column to Switch In, for each simulation, you are telling JMP to replace the values in Y Simulated with a new column of values that are simulated using the formula in the column Y Simulated.
The column you have selected in the report, Prob>ChiSq, is the p-value for a likelihood ratio test of whether the associated main effect is 0. The Prob>ChiSq value will be simulated for each effect listed in the Effect Tests table.
2. Next to Number of Samples, enter 500.
3. (Optional) Next to Random Seed, enter 123 and then click outside the text box.
4. Click OK.
A Generalized Linear Model Simulate Results data table appears.
Note: Because response values are simulated, your simulated p-values will differ from those shown in Figure 10.22.

Chapter 10 Simulate 341Basic Analysis Examples That Use Simulate
Figure 10.22 Table of Simulated Results, Partial View
The first row of the table contains the initial values of Prob>ChiSq and is excluded. The remaining 500 rows contain simulated values.
5. Run the Power Analysis script.
Note: Because response values are simulated, your simulated power results will differ from those shown in Figure 10.23.
Figure 10.23 Distribution Plots for the First Three Effects

342 Simulate Chapter 10Examples That Use Simulate Basic Analysis
The histograms plot the 500 simulated Prob>ChiSq values for each main effect. The Simulated Power outline shows the simulated Rejection Rate in the 500 simulations.
For easier viewing, stack the reports and de-select the plots, as follows.
6. Click the Distributions red triangle and select Stack.
7. Press Ctrl and click the X1 red triangle, and de-select Outlier Box Plot.
8. Press Ctrl and click the X1 red triangle, then select Histogram Options and de-select Histogram.
Note: Because response values are simulated, your simulated power results will differ from those shown in Figure 10.24.
Figure 10.24 Power Results for the First Three Effects
In the Simulated Power outlines, the Rejection Rate for each row gives the proportion of p-values that are smaller than the corresponding Alpha. For example, for X3, which corresponds to a coefficient value of 0.8 and a probability difference of 38%, the simulated power for a 0.05 significance level is 379/500 = 0.758. Table 10.1 summarizes the estimated power at the 0.05 significance level for all effects. Notice how power decreases as the Difference to Detect decreases. Also notice that the power to detect an effect as large as 24.5% (X6) is only approximately 0.37.

Chapter 10 Simulate 343Basic Analysis Launch the Simulate Window
Note: Because response values are simulated, your simulated power results will differ from those shown in Table 10.1.
Launch the Simulate Window
To launch the Simulate window, right-click on a column of calculated values in a report window and select Simulate. Simulate is available in many reports, including all reports that support bootstrapping. To use Simulate, the data table must contain a formula with a random component that simulates data.
Table 10.1 Simulated Power at Significance Level 0.05
Factor Percent Passing at Xi = 1
Percent Passing at Xi = -1
Difference to Detect
Simulated Power (Rejection Rate) at Alpha=0.05
X1 73.11% 26.89% 46.2% 0.852
X2 71.09% 28.91% 42.2% 0.828
X3 69.00% 31.00% 38.0% 0.758
X4 66.82% 33.18% 33.6% 0.654
X5 64.56% 35.43% 29.1% 0.488
X6 62.25% 37.75% 24.5% 0.372

344 Simulate Chapter 10The Simulate Window Basic Analysis
The Simulate Window
Figure 10.25 Simulate Window for Tablet Production.jmp
The Simulate window contains these panels and options:
Column to Switch Out The column that is replaced by the Column to Switch In.
Column to Switch In The column that replaces replace the Column to Switch Out. The analysis will be repeated with values simulated according to the formula in the Column to Switch In. Only columns with formulas are listed in the Column to Switch In panel.
Number of Samples Number of times that the report is re-run for a set of simulated data. The default value is 2500.
Random Seed A value that controls the simulated results. The random seed makes the results reproducible.
When you click OK in the Simulation window, a window that shows a progress bar and a Stop Early button appears. The number of the sample being simulated is shown above the progress bar. If you click Stop Early, the simulated values that have been computed up to that point are presented in a Simulate Results table. The window also shows you which analyses are being run at any given time.
The Simulate Results Table
Simulate results appear in a table. Note the following:
• The first row of the table contains the values for the table items that appear in the report. For this reason, the first row is always excluded.

Chapter 10 Simulate 345Basic Analysis The Simulate Results Table
• The remaining rows give the simulation results. The number of remaining rows is equal to the Number of Samples you specified in the Simulate launch window.
• The rows in the report are identified by the first column in the report table that contains the selected column of calculated values. A column appears in the simulated results table for each item in this first column.
• The table contains a Distribution script that constructs a Distribution report. This report contains histograms, quantiles, summary statistics, and simulation results for each column in the simulated results data table. In addition to the standard Distribution report, the report contains the following items:
– A red line that denotes the original estimate appears on the histogram.
– A Simulation Results report containing the original estimate, as well as confidence intervals and empirical p-values for the simulation. See “Simulation Results Report” on page 345.
– If the values in the simulated results data table have a PValue format, a Simulated Power report is also provided. See “Simulated Power Report” on page 345.
• The table contains a Power Analysis script only if you have simulated a column of p-values. This script constructs a Distribution report showing histograms of p-values and provides a Simulated Power report. See “Simulated Power Report” on page 345.
Simulation Results Report
Original Estimate The value of the original estimate, also shown in the first row of the Simulate Results data table. This estimate is labeled Y0.
Confidence Intervals Lower and upper limits for quantile-based confidence intervals at the following significance levels: 0.05, 0.10, 0.20, and 0.50.
Empirical p-Values The empirical p-values for a two-sided test and both one-sided tests that compare the simulated values to the original estimate. These p-values are computed as the proportions of the simulated values that fall in the ranges that are specified in the Test column of the report.
Simulated Power Report
Alpha The significance level: 0.01, 0.05, 0.10, and 0.20.
Rejection Count The number of simulations where the test rejects at the corresponding significance level.
Rejection Rate The proportion of simulations where the test rejects at the corresponding significance level.

346 Simulate Chapter 10The Simulate Results Table Basic Analysis
Lower 95% and Upper 95% Lower and upper limits for a 95% confidence interval for the simulated rejection rate. The interval is computed using the Wilson score method. See Wilson (1927).
Tip: Increase the Number of Samples for a narrower confidence interval.

Chapter 11Bootstrapping
Approximate the Distribution of a Statistic through Resampling
Bootstrapping is available only in JMP Pro.
Bootstrapping is a resampling method for approximating the sampling distribution of a statistic. You can use bootstrapping to estimate the distribution of a statistic and its properties, such as its mean, bias, standard error, and confidence intervals. Bootstrapping is especially useful in the following situations:
• The theoretical distribution of the statistic is complicated or unknown.
• Inference using parametric methods is not possible because of violations of assumptions.
Note: Bootstrap is available only from a right-click in a report. It is not a platform command.
Figure 11.1 Bootstrapping Results for a Slope Parameter

348 Bootstrapping Chapter 11Basic Analysis
ContentsOverview of Bootstrapping . . . . . . . . . . . . . . . . . . . . . . . . . . . . . . . . . . . . . . . . . . . . . . . . . . . . . . . 349Example of Bootstrapping . . . . . . . . . . . . . . . . . . . . . . . . . . . . . . . . . . . . . . . . . . . . . . . . . . . . . . . . 350Bootstrapping Window Options. . . . . . . . . . . . . . . . . . . . . . . . . . . . . . . . . . . . . . . . . . . . . . . . . . . 352Stacked Results Table . . . . . . . . . . . . . . . . . . . . . . . . . . . . . . . . . . . . . . . . . . . . . . . . . . . . . . . . . . . . 353Unstacked Bootstrap Results Table. . . . . . . . . . . . . . . . . . . . . . . . . . . . . . . . . . . . . . . . . . . . . . . . . 354Analysis of Bootstrap Results . . . . . . . . . . . . . . . . . . . . . . . . . . . . . . . . . . . . . . . . . . . . . . . . . . . . . 355Additional Example of Bootstrapping . . . . . . . . . . . . . . . . . . . . . . . . . . . . . . . . . . . . . . . . . . . . . . 356Statistical Details for Bootstrapping . . . . . . . . . . . . . . . . . . . . . . . . . . . . . . . . . . . . . . . . . . . . . . . . 360
Calculation of Fractional Weights. . . . . . . . . . . . . . . . . . . . . . . . . . . . . . . . . . . . . . . . . . . . . . . 361Bias-Corrected Percentile Intervals. . . . . . . . . . . . . . . . . . . . . . . . . . . . . . . . . . . . . . . . . . . . . . 361

Chapter 11 Bootstrapping 349Basic Analysis Overview of Bootstrapping
Overview of Bootstrapping
Bootstrapping repeatedly resamples the observations that are used in your report to construct an estimate of the distribution of a statistic or statistics. The observations are assumed to be independent.
In the simple bootstrap, the n observations are resampled with replacement to produce a bootstrap sample of size n. Note that some observations might not appear in the bootstrap sample, and others might appear multiple times. The number of times that an observation occurs in the bootstrap sample is called its bootstrap weight. For each bootstrap iteration, the entire analysis that produced the statistic of interest is rerun with these changes:
• the bootstrap sample of n observations is the data set
• the bootstrap weight is a frequency variable in the analysis platform
This process is repeated to produce a distribution of values for the statistic or statistics of interest.
However, the simple bootstrap can sometimes be inadequate. For example, suppose your data set is small or you have a logistic regression setting where you can encounter separation issues. In such cases, JMP enables you to conduct Bayesian bootstrapping using fractional weights. When fractional weights are used, a fractional weight is associated with each observation. The fractional weights sum to n. The statistic of interest is computed by treating the fractional weights as a frequency variable in the analysis platform. For information about fractional weights, see “Fractional Weights” on page 352 and “Calculation of Fractional Weights” on page 361.
To run a bootstrap analysis in a report, right-click in a table column that contains the statistic that you want to bootstrap and select Bootstrap.
Note: Bootstrap is available only from a right-click in a report. It is not a platform command.
JMP provides bootstrapping in most statistical platforms. The observations that comprise the sample are all observations that are used in the calculations for the statistics of interest. If the report uses a frequency column, the observations in that column are treated as if they were repeated the number of times indicated by the Freq variable. If the report uses a Weight variable, Bootstrap treats it as it was treated in the calculations for the report.
Tip: Bootstrap reruns the entire analysis that appears in the platform report from which Bootstrap is invoked. As a result, Bootstrap might run slowly for your selected column because of extraneous analyses in the report. If Bootstrap is running slowly, remove extraneous options from the platform report before running Bootstrap.

350 Bootstrapping Chapter 11Example of Bootstrapping Basic Analysis
Example of Bootstrapping
This example uses the Car Physical Data.jmp sample data table. A tire manufacturer wants to predict an engine’s horsepower from the engine’s displacement (in3). The company is most interested in estimating the slope of the relationship between the variables. The slope values help the company predict the corresponding change in horsepower when the displacement changes.
In this example, the regression assumption of homogeneity of variance is violated, so the confidence limits from the regression analysis for the slope might be misleading. For this reason, the company uses a bootstrap estimate of the confidence interval for the slope.
1. Select Help > Sample Data Library and open Car Physical Data.jmp.
2. Select Analyze > Fit Y by X.
3. Select Horsepower and click Y, Response.
4. Select Displacement and click X, Factor.
5. Click OK.
6. Select Fit Line from the Bivariate Fit red triangle menu.
The slope estimate is 0.503787, approximately 0.504.
7. (Optional) Right-click in the Parameter Estimates report and select Columns > Lower 95%.
8. (Optional) Right-click in the Parameter Estimates report and select Columns > Upper 95%.
The confidence limits from the regression analysis for the slope are 0.4249038 and 0.5826711.
9. Right-click the Estimate column in the Parameter Estimates report and select Bootstrap (Figure 11.2).
Figure 11.2 The Bootstrap Option

Chapter 11 Bootstrapping 351Basic Analysis Example of Bootstrapping
The column that you right-click is relevant when the Split Selected Column option is selected. For more information, see “Bootstrapping Window Options” on page 352.
10. Type 1000 for the Number of Bootstrap Samples.
11. (Optional) To match the results in Figure 11.3, type 12345 for the Random Seed.
12. Click OK.
The bootstrap process runs and produces a Bootstrap Results data table with unstacked results for the slope and intercept.
Next, analyze the bootstrapped slope.
13. In the Bootstrap Results table, run the Distribution script.
The Distribution report includes the Bootstrap Confidence Limits report (Figure 11.3).
Figure 11.3 Bootstrap Report
The estimate of the slope (step 6) is 0.504. Based on the bootstrap results for 95% coverage, the company can estimate the slope to be between 0.40028 and 0.61892. When the displacement is changed by one unit, with 95% confidence, the horsepower changes by some amount between 0.40028 and 0.61892. The bootstrap confidence interval for the slope (0.400 to 0.619) is slightly wider than the confidence interval (0.425 to 0.583) obtained using the usual regression assumptions in step 7 and step 8.
Note: The BC Lower and BC Upper columns in the Bootstrap Confidence Limits report refer to bias-corrected intervals. See “Bias-Corrected Percentile Intervals” on page 361.

352 Bootstrapping Chapter 11Bootstrapping Window Options Basic Analysis
Bootstrapping Window Options
To perform a bootstrap analysis, right-click on a numeric column of sample statistics in a table in a report window and select Bootstrap. The selected column is highlighted, and the Bootstrapping window appears. After you select options and click OK in the Bootstrapping window, bootstrap results for every statistic in the column appear in the default results table.
The Bootstrapping window contains the following options:
Number of Bootstrap Samples Sets the number of times that you want to resample the data and compute the statistics. A larger number results in more precise estimates of the statistics’ properties. By default, the number of bootstrap samples is set to 2500.
Random Seed Sets a random seed that you can re-enter in subsequent runs of the bootstrap analysis to duplicate your current results. By default, no seed is set.
Fractional Weights Performs a Bayesian bootstrap analysis. In each bootstrap iteration, each observation is assigned a weight that is calculated as described in “Calculation of Fractional Weights” on page 361. The weighted observations are used in computing the statistics of interest. By default, the Fractional Weights option is not selected and a simple bootstrap analysis is conducted.
Tip: Use the Fractional Weights option if the number of observations that are used in your analysis is small or if you are concerned about separation in a logistic regression setting.
Suppose that Fractional Weights is selected. For each bootstrap iteration, each observation that is used in the report is assigned a nonzero weight. These weights sum to n, the number of observations used in the calculations of the statistics of interest. For more information about how the weights are calculated and used, see “Calculation of Fractional Weights” on page 361.
Split Selected Column Places bootstrap results for each statistic in the column that you selected for bootstrapping into a separate column in the Bootstrap Results table. Each row of the Bootstrap Results table (other than the first) corresponds to a single bootstrap sample.
If you deselect this option, a Stacked Bootstrap Results table appears. For each bootstrap iteration, this table contains results for the entire report table that contains the column that you selected for bootstrapping. Results for each row of the report table appear as rows in the Stacked Bootstrap Results table. Each column in the report table defines a column in the Stacked Bootstrap Results table. For an example, see “Stacked Results Table” on page 353.

Chapter 11 Bootstrapping 353Basic Analysis Stacked Results Table
Discard Stacked Table if Split Works (Applicable only if the Split Selected Column option is selected.) Determines the number of results tables produced by Bootstrap.
If the Discard Stacked Table if Split Works option is not selected, then two Bootstrap tables are shown:
– The Stacked Bootstrap Results table, which contains bootstrap results for each row of the table containing the column that you selected for bootstrapping. This table gives bootstrap results for every statistic in the report, where each column is defined by a statistic.
– The unstacked Bootstrap Results table, which is obtained by splitting the stacked table and providing results only for the column that is selected in the original report.
If the Discard Stacked Table if Split Works option is selected and if the Split Selected Column operation is successful, the Stacked Bootstrap Results table is not shown.
Stacked Results Table
The initial results of a bootstrap analysis appear in a stacked results table (Figure 11.4). This table might not appear if you have selected the Discard Stacked Table if Split Works option. Figure 11.4 shows a bootstrap table that is based on the Parameter Estimates report obtained by fitting a Bivariate model in Fit Y by X to Car Physical Data.jmp. See “Overview of Bootstrapping” on page 349.
Figure 11.4 Stacked Bootstrap Results Table
Note the following about the stacked results table:
• For each bootstrap sample, there is a row for each value given in the first column of the report table. These values are shown in a column whose name is the name of the first column in the report table. In this example, for each bootstrap sample there is a row containing results for each Term: Intercept and Displacement, which appear in the Term column.
• The data table columns that are used in the analysis appear in the table. In this example, X is Displacement, and Y is Horsepower.

354 Bootstrapping Chapter 11Unstacked Bootstrap Results Table Basic Analysis
• There is a column for every column in the report table that you are bootstrapping. In this example, the columns are ~Bias, Estimate, Std Error, t Ratio, and Prob>|t|. Note that ~Bias is a column in the Fit Y by X report that is hidden unless one of the parameter estimates is biased.
• The BootID• column identifies the bootstrap sample. The rows where BootID• = 0 correspond to the original estimates. Those rows are marked with an X and have the excluded row state. In this example, each bootstrap sample is used to calculate results for two rows: the results for Intercept and the results for Displacement.
• The data table name begins with “Stacked Bootstrap Results”.
If you selected the Split Selected Column option, an unstacked results table might also appear. See “Unstacked Bootstrap Results Table” on page 354.
Unstacked Bootstrap Results Table
Select Split Selected Column to create a bootstrap table that contains separate columns for the report column that you selected. Each column corresponds to a Term in the report table. For example, in Figure 11.5, the Estimate column from Figure 11.4 is split into two columns (Displacement and Intercept), one for each level of Term.
Figure 11.5 Unstacked Bootstrap Results Table
Note the following about the unstacked results table:
• There is a single row for each bootstrap sample.
• The data table columns used in the analysis appear in the table. In this example, X is Displacement, and Y is Horsepower.
• There is a column for each row of the report that was bootstrapped.
• If you specified a Random Seed in the Bootstrapping window, the bootstrap results table contains a table variable called Random Seed that gives its value.

Chapter 11 Bootstrapping 355Basic Analysis Analysis of Bootstrap Results
• The unstacked bootstrap results table contains a Source table script and a Distribution table script. The Distribution table script enables you to quickly obtain statistics based on the bootstrap samples, including bootstrap confidence intervals.
• The BootID• column identifies the bootstrap sample. The row where BootID• = 0 corresponds to the original estimates. That row is marked with an X and has the excluded row state. In the unstacked bootstrap table, each row is calculated from a single bootstrap sample.
• The data table name ends with “Bootstrap Results (<colname>)”, where <colname> identifies the column in the report that was bootstrapped.
Analysis of Bootstrap Results
Analyze your bootstrap results using the Distribution platform:
• If your analysis produced an unstacked bootstrap results table, run the Distribution script in the table.
• If your analysis produced a stacked bootstrap results table, select Analyze > Distribution and assign the columns of interest to the appropriate roles. In most cases, it is appropriate to assign the column that corresponds to the first column in the report table to the By role.
The Distribution platform provides summary statistics for your bootstrap results. It also produces a Bootstrap Confidence Limits report for any table that contains a BootID• column (Figure 11.6).
You can use the Distribution report to obtain two types of bootstrap confidence intervals:
• The Quantiles report provides percentile intervals. For example, to construct a 95% confidence interval using the percentile method, use the 2.5% and 97.5% quantiles as the interval bounds.
• The Bootstrap Confidence Limits report provides bias-corrected percentile intervals. The report shows intervals with 95%, 90%, 80%, and 50% coverage levels. The BC Lower and BC Upper columns show the lower and upper endpoints, respectively. For more information about the computation of the bias-corrected percentile intervals, see “Bias-Corrected Percentile Intervals” on page 361.

356 Bootstrapping Chapter 11Additional Example of Bootstrapping Basic Analysis
Figure 11.6 Bootstrap Confidence Limits Report
The Original Estimate at the bottom of the Bootstrap Confidence Limits report is the estimate of the statistic using the original data.
For more information about interpreting the Bootstrap Confidence Limits report, see “Overview of Bootstrapping” on page 349. Efron (1981) describes the methods for both the percentile interval and the bias-corrected percentile interval.
Additional Example of Bootstrapping
This example illustrates the benefits of the Fractional Weights (Bayesian Bootstrap) option for a small data table. The data consist of a response, Y, measured on three samples of each of seven different soil types. A scientist is interested in finding a confidence interval for the mean response for the wabash soil type.
Because each soil type has only three observations, the simple bootstrap has the potential to exclude all three of the observations for wabash from a bootstrap sample. The Fractional Weights option ensures that all observations for every soil type are represented in all bootstrap samples.
The scientist examines the distribution of wabash sample means from both bootstrap methods:
• “Simple Bootstrap Analysis” on page 357
• “Bayesian Bootstrap Analysis” on page 359

Chapter 11 Bootstrapping 357Basic Analysis Additional Example of Bootstrapping
Simple Bootstrap Analysis
1. Select Help > Sample Data Library and open Snapdragon.jmp.
2. Select Analyze > Fit Y by X.
3. Select Y and click Y, Response.
4. Select Soil and click X, Factor.
5. Click OK.
6. Select Means/Anova from the Oneway Analysis red triangle menu.
7. In the Means for Oneway Anova report, right-click the Mean column and select Bootstrap.
8. Type 1000 for the Number of Bootstrap Samples.
9. (Optional) To match the results in Figure 11.7, type 12345 for the Random Seed.
10. Click OK.
Figure 11.7 Bootstrap Results for a Simple Bootstrap
The missing values in Figure 11.7 represent bootstrap iterations in which none of the observations for a given soil type were selected for the bootstrap sample.
11. Select Analyze > Distribution.
12. Select wabash and click Y, Columns.
13. Click OK.

358 Bootstrapping Chapter 11Additional Example of Bootstrapping Basic Analysis
Figure 11.8 Distribution of wabash Means from a Simple Bootstrap
Figure 11.8 shows the distribution of wabash means from the simple bootstrap analysis. Notice the following:
– The Summary Statistics report indicates that the number of rows containing bootstrap means for wabash is N = 961. Although you conducted 1,000 iterations, 39 bootstrap samples did not contain any of the three observations for wabash.
– The histogram of sample means is not smooth, with peaks at the two extremes. The three values for wabash are 38.2, 37.8, and 31.9. The peak at the low end of the distribution results from bootstrap samples that contain only the value 31.9. The peak at the high end results from bootstrap samples that contain one or both of the values 38.2 and 37.8.

Chapter 11 Bootstrapping 359Basic Analysis Additional Example of Bootstrapping
Next, use the Fractional Weights (Bayesian Bootstrap) option to avoid obtaining missing values from the bootstrap samples and to smooth the distribution of bootstrapped means.
Bayesian Bootstrap Analysis
1. In the Oneway Analysis report, right-click the Mean column in the Means for Oneway Anova report and select Bootstrap.
2. Type 1000 for the Number of Bootstrap Samples.
3. (Optional) To match the results in Figure 11.9, type 12345 for the Random Seed.
4. Select the Fractional Weights option.
5. Click OK.
Figure 11.9 Bootstrap Results for a Bayesian Bootstrap
There are no missing values in the Bayesian Bootstrap results table. All 21 rows in the Snapdragon.jmp data table are included, with varying bootstrap weights, in each bootstrap sample.
6. Select Analyze > Distribution.
7. Select wabash and click Y, Columns.
8. Click OK.

360 Bootstrapping Chapter 11Statistical Details for Bootstrapping Basic Analysis
Figure 11.10 Distribution of wabash Means from a Bayesian Bootstrap
The Bayesian Bootstrap produces a much smoother distribution for the wabash sample means. All 1,000 bootstrap samples include the three observations for wabash. For each iteration, the wabash sample mean is calculated using different fractional weights.
The Bootstrap Confidence Limits report shows that a 95% confidence interval for the mean is 32.6396 to 37.8168.
Statistical Details for Bootstrapping
• “Calculation of Fractional Weights”
Chapter 11 Bootstrapping 361Basic Analysis Statistical Details for Bootstrapping
• “Bias-Corrected Percentile Intervals”
Calculation of Fractional Weights
The Fractional Weights option is based on the Bayesian bootstrap (Rubin 1981). The number of times that an observation occurs in a given bootstrap sample is called its bootstrap weight. In the simple bootstrap, the bootstrap weights for each bootstrap sample are determined using simple random sampling with replacement.
In the Bayesian approach, sampling probabilities are treated as unknown parameters and their posterior distribution is obtained using a non-informative prior. Estimates of the probabilities are obtained by sampling from this posterior distribution. These estimates are used to construct the bootstrap weights, as follows:
• Randomly generate a vector of n values from a gamma distribution with shape parameter equal to (n - 1)/n and scale parameter equal to 1.
Note: Rubin (1981) uses 1 as the gamma shape parameter. The shape parameter that is used in JMP Pro ensures that the mean and variance of the fractional weights are equal to the mean and variance of the simple bootstrap weights.
• Compute S = sum of the n values.
• Compute the fractional weights by multiplying the vector of n values by n/S.
• If a Freq or Weight variable is specified for the analysis, multiply the fractional weights by the Freq or Weight values on a row-by-row basis. The sum of the values of the Freq or Weight variable must be greater than 1.
This procedure scales the fractional weights to have mean and variance equal to those of the simple bootstrap weights. The fractional bootstrap weights are positive, sum to n, and have a mean of 1.
Bias-Corrected Percentile Intervals
This section describes the calculation of the bias-corrected (BC) confidence intervals that appear in the Bootstrap Confidence Limits report when you run the Distribution script in the Bootstrap Results table. Bias-corrected percentile intervals improve on the ability of percentile intervals in accounting for asymmetry in the bootstrap distribution. See Efron (1981).
Notation
• p* is the proportion of bootstrap samples with an estimate of the statistic of interest that is less than or equal to the original estimate.
• z0 is the p* quantile of a standard normal distribution.

362 Bootstrapping Chapter 11Statistical Details for Bootstrapping Basic Analysis
• zα is the α quantile of a standard normal distribution.
Bias-Corrected Confidence Interval Endpoints
The endpoints of a (1 - α) bias-corrected confidence intervals are given by quantiles of the bootstrap distribution:
• The lower endpoint is the quantile.
• The upper endpoint is the quantile.
Φ 2z0 zα+( )
Φ 2z0 z1 α–+( )

Chapter 12Text Explorer
Explore Unstructured Text in Your Data
Many features in this platform are available only in JMP Pro and noted with this icon.
The Text Explorer platform enables you to analyze unstructured text, such as comment fields in surveys or incident reports. Interact with the text data by using tools to combine similar terms, recode misspecified terms, and understand the underlying patterns in your textual data.
The JMP Pro version of the platform also contains analysis tools that use singular value decomposition (SVD) to group similar documents into topics. You can cluster text documents or cluster terms that are in a collection of documents. You can also cluster documents using latent class analysis.
Figure 12.1 SVD Plots in Text Explorer

364 Text Explorer Chapter 12Basic Analysis
ContentsOverview of the Text Explorer Platform . . . . . . . . . . . . . . . . . . . . . . . . . . . . . . . . . . . . . . . . . . . . 365
Text Processing Steps . . . . . . . . . . . . . . . . . . . . . . . . . . . . . . . . . . . . . . . . . . . . . . . . . . . . . . . . . 366Example of the Text Explorer Platform . . . . . . . . . . . . . . . . . . . . . . . . . . . . . . . . . . . . . . . . . . . . . 367Launch the Text Explorer Platform. . . . . . . . . . . . . . . . . . . . . . . . . . . . . . . . . . . . . . . . . . . . . . . . . 370
Customize Regex: Regular Expression Editor . . . . . . . . . . . . . . . . . . . . . . . . . . . . . . . . . . . . 373The Text Explorer Report . . . . . . . . . . . . . . . . . . . . . . . . . . . . . . . . . . . . . . . . . . . . . . . . . . . . . . . . . 377
Summary Counts Report . . . . . . . . . . . . . . . . . . . . . . . . . . . . . . . . . . . . . . . . . . . . . . . . . . . . . . 378Term and Phrase Lists . . . . . . . . . . . . . . . . . . . . . . . . . . . . . . . . . . . . . . . . . . . . . . . . . . . . . . . . 379
Text Explorer Platform Options . . . . . . . . . . . . . . . . . . . . . . . . . . . . . . . . . . . . . . . . . . . . . . . . . . . 382Text Preparation Options . . . . . . . . . . . . . . . . . . . . . . . . . . . . . . . . . . . . . . . . . . . . . . . . . . . . . . 382Text Analysis Options. . . . . . . . . . . . . . . . . . . . . . . . . . . . . . . . . . . . . . . . . . . . . . . . . . . . . . . . . 388Save Options . . . . . . . . . . . . . . . . . . . . . . . . . . . . . . . . . . . . . . . . . . . . . . . . . . . . . . . . . . . . . . . . 390Report Options . . . . . . . . . . . . . . . . . . . . . . . . . . . . . . . . . . . . . . . . . . . . . . . . . . . . . . . . . . . . . . 391
Latent Class Analysis . . . . . . . . . . . . . . . . . . . . . . . . . . . . . . . . . . . . . . . . . . . . . . . . . . . . . . . . . . . . 392Latent Semantic Analysis (SVD) . . . . . . . . . . . . . . . . . . . . . . . . . . . . . . . . . . . . . . . . . . . . . . . . . . . 393
SVD Report. . . . . . . . . . . . . . . . . . . . . . . . . . . . . . . . . . . . . . . . . . . . . . . . . . . . . . . . . . . . . . . . . . 394SVD Report Options . . . . . . . . . . . . . . . . . . . . . . . . . . . . . . . . . . . . . . . . . . . . . . . . . . . . . . . . . . 395
Topic Analysis . . . . . . . . . . . . . . . . . . . . . . . . . . . . . . . . . . . . . . . . . . . . . . . . . . . . . . . . . . . . . . . . . . 397Topic Analysis Report . . . . . . . . . . . . . . . . . . . . . . . . . . . . . . . . . . . . . . . . . . . . . . . . . . . . . . . . 397Topic Analysis Report Options . . . . . . . . . . . . . . . . . . . . . . . . . . . . . . . . . . . . . . . . . . . . . . . . . 398
Discriminant Analysis . . . . . . . . . . . . . . . . . . . . . . . . . . . . . . . . . . . . . . . . . . . . . . . . . . . . . . . . . . . 399Discriminant Analysis Report . . . . . . . . . . . . . . . . . . . . . . . . . . . . . . . . . . . . . . . . . . . . . . . . . . 400Discriminant Analysis Report Options . . . . . . . . . . . . . . . . . . . . . . . . . . . . . . . . . . . . . . . . . . 400
Additional Example of the Text Explorer Platform . . . . . . . . . . . . . . . . . . . . . . . . . . . . . . . . . . . 401

Chapter 12 Text Explorer 365Basic Analysis Overview of the Text Explorer Platform
Overview of the Text Explorer Platform
Unstructured text data are common. For example, unstructured text data could result from a free response field in a survey, product review comments, or incident reports. The Text Explorer platform enables you to explore unstructured text in order to better understand its meaning. Text analysis is often an iterative process, so you might alternate between curating and analyzing the list of terms.
Curating the List of Terms
Text analysis uses some unique terminology. A term or token is the smallest piece of text, similar to a word in a sentence. However, you can define terms in many ways, including through the use of regular expressions; the process of breaking the text into terms is called tokenization.
• A phrase is a short collection of terms; the platform has options to manage phrases that are specified as terms in and of themselves.
• A document refers to a collection of words; in a JMP data table, the unstructured text in each row of the text column corresponds to a document.
• A corpus refers to a collection of documents.
It is often desirable to exclude some common words from the analysis. These excluded words are called stop words. The platform has a default list of stop words, but you can also add specific words as stop words. Although stop words are not eligible to be terms, they can be used in phrases.
You can also recode terms; this is useful for combining synonyms into one common term.
Stemming is the process of combining words with identical beginnings (stems) by removing the endings that differ. This results in “jump”, “jumped”, and “jumping” all being treated as the term “jump·”. The stemming procedure is similar to the procedure used in the Snowball string processing language. When a phrase is stemmed, each word in the phrase is stemmed as it would be stemmed as a stand-alone term.
Analyzing the List of Terms
Text analysis in the Text Explorer platform uses a bag of words approach. Other than in the formation of phrases, the order of terms is ignored. The analysis is based on the term counts.
After you curate the list of terms through the use of regular expressions, stop words, recoding, and stemming, you can perform analyses on the curated list of terms. The analysis options in the platform are based on the document term matrix (DTM). Each row in the DTM corresponds to a document (a cell in a text column of a JMP data table). Each column in the DTM corresponds to a term from the curated term list. This approach implements the bag of words approach since it ignores word ordering. In its simplest form, each cell of the DTM contains

366 Text Explorer Chapter 12Overview of the Text Explorer Platform Basic Analysis
the frequency (number of occurrences) of the column’s term in the row’s document. There are various other weighting schemes for the DTM; these are described in “Save Options” on page 390.
The analysis options that are available in the platform first perform a singular value decomposition (SVD) on the document term matrix. This can greatly reduce the number of columns needed to represent the term information in the data. For more details about singular value decomposition, see the Statistical Details appendix in the Multivariate Methods book. Hierarchical clustering options are available for clustering the terms and for clustering the documents. These options enable you to group similar terms or documents together.
Platform Workflow
The expected steps for using the Text Explorer platform are as follows:
1. Specify the method for tokenizing (either built-in or customized regular expression).
2. Use the report to specify additional stop words, add phrases to the term list, perform recodes of terms, and specify exceptions to stemming rules.
3. Specify the preference for stemming.
4. Use word and phrase counts, SVD, and clustering approaches to identify important terms and phrases.
Note: The SVD and clustering options are available only in JMP Pro.
5. Save results for use in further analysis: the term table, the DTM, the singular vectors, or other results.
Note: The option to save the singular vectors is available only in JMP Pro.
6. Save Phrase, Recode, and Stop Words properties for use in future analyses of similar text data.
Text Processing Steps
The text is processed in three stages: tokenizing, phrasing, and terming.
Tokenizing Stage
The Tokenizing stage performs the following operations:
1. Convert text to lowercase.
2. Apply Tokenizing method (either Basic Words or Regex) to group characters into tokens.
3. Recode tokens based on specified recode definitions. Note that recoding occurs before stemming.

Chapter 12 Text Explorer 367Basic Analysis Example of the Text Explorer Platform
Phrasing Stage
The Phrasing stage collects phrases that occur in the corpus (collection of documents) and enables you to specify that individual phrases be treated as terms. Phrases cannot start or end with a stop word, but they can contain a stop word.
Terming Stage
The Terming stage creates the Term List from the tokens and phrases that result from the previous stages.
For each token, the Terming stage performs the following operations:
1. Check that the minimum and maximum length requirements specified in the launch window are met. Tokens that contain only numbers are excluded from this operation.
2. Check that the token is qualified to become a term; tokens parsed by the Basic Words tokenization method must contain at least one alphabetical or Unicode character. Tokens that contain only numbers are excluded from this operation. The Regex tokenization method uses regular expressions to determine what characters are part of a token.
3. Check that the token is not a stop word.
4. Apply stemming and stem exceptions.
For each phrase that you add, the Terming stage performs the following operations:
1. Add the phrase to the Term List. Phrases should apply stemming to each word in the phrase that is stemmed in the Term List. Phrases that have different raw tokens but the same stems are combined in the Term List.
2. Remove token term occurrences that appear in the phrase.
Example of the Text Explorer Platform
In this example, you want to explore the text responses from a survey about pets.
1. Select Help > Sample Data Library and open Pet Survey.jmp.
2. Select Analyze > Text Explorer.
3. Select Survey Response and click Text Columns.
4. Click OK.

368 Text Explorer Chapter 12Example of the Text Explorer Platform Basic Analysis
Figure 12.2 Example of Initial Text Explorer Report
At a glance, you can see that there are 372 unique terms in 194 documents. In all, there are 1921 tokenized terms. The most common term is “cat”, and it occurs 55 times.
5. From the red triangle menu next to Text Explorer for Survey Response, select Term Options > Stemming > Stem All Terms.
6. In the Phrase List table, select cat food and dog food, right-click on the selection, and select Add Phrase.
The terms cat food and dog food are included in the Term List.
7. Scroll down in the Term List and find the cat and dog food entries.
You can see that there are four occurrences of each phrase.
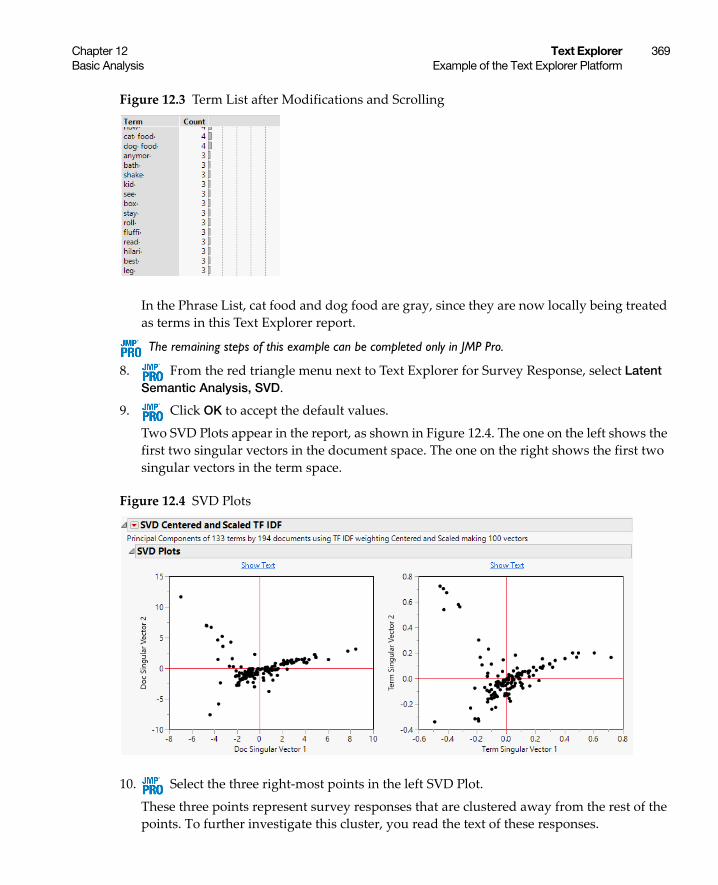
Chapter 12 Text Explorer 369Basic Analysis Example of the Text Explorer Platform
Figure 12.3 Term List after Modifications and Scrolling
In the Phrase List, cat food and dog food are gray, since they are now locally being treated as terms in this Text Explorer report.
The remaining steps of this example can be completed only in JMP Pro.
8. From the red triangle menu next to Text Explorer for Survey Response, select Latent Semantic Analysis, SVD.
9. Click OK to accept the default values.
Two SVD Plots appear in the report, as shown in Figure 12.4. The one on the left shows the first two singular vectors in the document space. The one on the right shows the first two singular vectors in the term space.
Figure 12.4 SVD Plots
10. Select the three right-most points in the left SVD Plot.
These three points represent survey responses that are clustered away from the rest of the points. To further investigate this cluster, you read the text of these responses.

370 Text Explorer Chapter 12Launch the Text Explorer Platform Basic Analysis
11. Click the Show Text button that is above the left SVD Plot.
Figure 12.5 Text of Selected Documents
A window appears that contains the text of the three documents represented by the selected points. These survey responses are similar in that they all refer to some combination of “funny”, “cat”, and “video”. These documents have larger positive values for the first singular vector than the rest of the documents. These larger values indicate that they are different from the rest of the documents in that dimension.
Further investigation of the singular vector dimensions could lead to interpretations of what the dimensions represent. For example, many of the documents on the far right of the plot are responses that are about cats. On the far left, many of the responses are about dogs. Therefore, the first singular vector is picking up differences based on whether the response was about a cat or a dog.
Launch the Text Explorer Platform
Launch the Text Explorer platform by selecting Analyze > Text Explorer.
Figure 12.6 The Text Explorer Launch Window
The Text Explorer launch window contains the following options:
Text Columns Assigns the columns that contain text data. If you specify multiple columns, a separate analysis is created for each column.

Chapter 12 Text Explorer 371Basic Analysis Launch the Text Explorer Platform
Validation In JMP Pro, you can enter a Validation column. If you click the Validation button with no columns selected in the Select Columns list, you can add a validation column to your data table. For more information about the Make Validation Column utility, see the Modeling Utilities chapter in the Predictive and Specialized Modeling book.
The specification of a Validation column does not affect the calculation of the document-term matrix. However, when a Validation column is specified, only the training set is used for the Latent Class Analysis, Latent Semantic Analysis, Topic Analysis, and Discriminant Analysis options.
ID Assigns a column used to identify separate respondents in the Save Stacked DTM for Association output data table. This output data table is suitable for association analysis. This column is also used to identify separate respondents in the Latent Class Analysis report.
By Identifies a column that creates a report consisting of separate analyses for each level of the variable. If more than one By variable is assigned, a separate report is produced for each possible combination of the levels of the By variables.
Note: If you specify a By variable, the Customize Regex option and settings apply to all levels of the By variables.
Language Specifies the language used for text processing. This affects stemming and the built-in lists of stop words, recodes, and phrases. This option is independent of the language in which JMP is running. Unless the Language platform preference is set, the Language option is set according to the JMP Display Language preference. However, the Language option in Text Explorer does not support Korean. If the JMP Display Language is Korean, this option defaults to English.
Maximum Words per Phrase Specifies a maximum number of words that a phrase can contain to be included as a phrase in the analysis.
Maximum Number of Phrases Specifies the maximum number of phrases that appear in the Phrase List.
Minimum Characters per Word Specifies the number of characters that a word must contain to be included as a term in the analysis.
Maximum Characters per Word Specifies the largest number of characters (up to 2000) that a word can contain to be included as a term in the analysis.
Stemming (Available only when the Language option is set to English, German, Spanish, French, or Italian.) Specifies a method for combining terms with similar beginning characters but different endings. The following options are available:
No Stemming No terms are combined.

372 Text Explorer Chapter 12Launch the Text Explorer Platform Basic Analysis
Stem for Combining Stems only the terms where two or more terms stem to the same term.
Stem All Terms Stems all terms.
Note: The use of the Stemming option also affects phrases that have been added to the Term List. Phrase identification occurs after terms within a phrase have been stemmed. For example, “dogs bark” and “dog barks” would both match the specified phrase “dog· bark·”.
Tokenizing (Available only when the Language option is set to English, German, Spanish, French, or Italian.) Specifies a method for parsing the text into terms or tokens. The following tokenization options are available:
Regex Parses text using a default set of built-in regular expressions. If you want to add to, remove, or edit the set of regular expressions used to parse the text, select the Customize Regex option. See “Customize Regex: Regular Expression Editor” on page 373.
Basic Words Text is parsed into words based on a set of characters that typically separate words. These characters include spaces, tabs, new lines, and most punctuation marks. If you want numbers to be parsed into terms for the analysis, select the Treat Numbers as Words option. If you do not select this option, pieces of text between delimiters that contain only numbers are ignored in the tokenizing step.
Tip: You can view the default set of delimiters using the Display Options > Show Delimiters option in a Text Explorer report that uses the Basic Words Tokenizing method.
Customize Regex (Available only with the Regex Tokenizing method.) Enables you to use the Text Explorer Regular Expression Editor window to modify the Regex settings. Use this option to accommodate non-traditional words. Examples include phone numbers or words formed by a combination of characters and numbers. Using the Customize Regex option is not recommended unless the default Regex method is not giving you the results that you need. This can happen when your text contains structures that the default Regex method does not recognize. See “Customize Regex: Regular Expression Editor” on page 373.
Treat Numbers as Words (Available only with the Basic Words Tokenizing method.) Allows numbers to be tokenized as terms in the analysis. When this option is selected, the Minimum Characters per Word setting is ignored for terms that contain numeric digits.
After you click OK on the launch window, the Text Explorer Regular Expression Editor window appears if you selected Customize Regex in the launch window. Otherwise, the Text Explorer report appears.

Chapter 12 Text Explorer 373Basic Analysis Launch the Text Explorer Platform
Note: The processing of text input is not case-sensitive. All text is converted to lowercase internally prior to tokenization and all analysis steps. This conversion affects the processing of regular expressions and the aggregation of terms in the Text Explorer output.
Customize Regex: Regular Expression Editor
When you select the Customize Regex option, the Text Explorer Regular Expression Editor appears. Use this window to parse text documents using a wide variety of built-in regular expressions, such as phone numbers, times, or monetary values. You can also create your own regular expression definitions.
Note: Using the Customize Regex option is recommended only if you are not getting desired results from the default Regex method. This can happen when your text contains structures that the default Regex method does not recognize.
Tip: If Japanese, Chinese (Simplified), or Chinese (Traditional) is specified as the Language option in the launch window, the list of Regex patterns is updated to a single Regex for the specified language. If you want to add other Regex patterns, it is recommended that you add them after the single Regex pattern. You should avoid using the Words pattern before the language-specific Regex pattern, because the Words pattern can gather long runs of Asian language characters into single words.
Figure 12.7 Text Explorer Regular Expression Editor

374 Text Explorer Chapter 12Launch the Text Explorer Platform Basic Analysis
Parsing with the Script Editor Box
The script editor box at the top of the window shows you how the parsing would proceed for sample text. The results of parsing the regular expressions in the Regex Editor list are highlighted in colors that correspond to the colors in the Regex Editor list.
• Click the Previous and Next row buttons to populate the script editor box with text from your own data. This enables you to see how a given row of text data is parsed.
• Click the Save to Column button to save a new column to the data table that contains the result of the regular expression tokenization. For more information about specifying the result of the regular expression, see “Editing the Regular Expressions” on page 374.
Note: The Save to Column button uses only the regular expression to match text. The following settings are not used: stop words, recodes, stemming, phrases, or minimum and maximum characters per word to modify the output of the regular expression.
Adding Regular Expressions
To add a regular expression to be used in tokenization, click the plus sign below the list. The Regex Library Selections window appears. This window contains all the built-in regular expressions as well as any recently modified regular expressions that you created in previous instances of the Regular Expression Editor. Built-in regular expressions are labeled. Custom regular expressions that are saved in your library are labeled with the name that you specified. Only the most recent expression for a given name is stored in the Regex Library.
Select one or more regular expressions in the list and click OK to add the selected regular expressions to be used in tokenization. Use the Delete Selected Item button to remove one or more custom regular expressions from the Regex Library. The Regex Library for each user is stored as a JSL file in a directory called TextExplorer. The location of this directory is based on your computer’s operating system, as follows:
• Windows: "C:/Users/<username>/AppData/Roaming/SAS/JMP/TextExplorer/"
• Macintosh: "/Users/<username>/Library/Application Support/JMP/TextExplorer/"
These files can be shared with other users, but you should not edit the file directly. Use the Regular Expression Editor instead.
Editing the Regular Expressions
Terms are tokenized by processing the regular expressions in the order specified in the Regex Editor panel. To change the order of the regular expressions, select a regular expression in the list and click the up or down arrow buttons below the list. You can also drag and drop items in the regular expression list to change the order of execution. A blue triangle represents the currently selected regular expression. To remove a regular expression and exclude it from the tokenization, select it in the list and click the minus sign below the list. The “Leftover” regular expression cannot be removed and must appear last in the sequence of regular expressions.

Chapter 12 Text Explorer 375Basic Analysis Launch the Text Explorer Platform
When you select a regular expression in the list, the editable fields in the Regex Editor panel refer to the selected regular expression. Click and type in any of these fields to edit them.
Each regular expression has the following attributes:
Title Specifies a name used to identify the regular expression in the current window (as well as in the Regex Library later).
Regex Specifies the regular expression definition. The regular expression must have at least one set of parentheses to designate the regular expression capture.
Result Specifies what replaces the text matched by the regular expression. This value can be static text, blank, or the value of the regular expression capture. The regular expression capture is defined as the result of the Regex definition:
– To replace the matched text with static text, specify the static text in the Result field.
– To ignore the matched text, leave the Result field blank.
– To keep the text that results from the outer-most parentheses in the regular expression, use “\1” (without quotation marks) in the Result field.
– To keep the entire result of the regular expression, use “\0” (without quotation marks) in the Result field.
Example (Optional) Specifies an example text string with colors indicating the behavior of the regular expression.
Comment (Optional) Specifies a comment to explain the regular expression and its behavior.
Color Specifies the color used to identify matches of the regular expression in the text in the Script Editor box and in the Example field. Use the arrow buttons to change the color.
Note: If the regular expression definition in the Regex field is invalid, a red X appears next to the name of the regular expression in the list of regular expressions.
Creating a Custom Regular Expression
Follow these steps to create your own custom regular expression:
1. Click the plus sign below the list.
2. In the Regex Library Selections window, note that the Blank regular expression is selected.
3. Click OK.
4. Edit the Regex definition in the Regex Editor panel.
5. Give your custom regular expression a unique name in the Title field.

376 Text Explorer Chapter 12Launch the Text Explorer Platform Basic Analysis
Tip: When editing the Regex definition field, it is helpful to have the Log window open and visible. Some error messages appear only in the Log window. To open the Log window, select View > Log. There are many internet resources available for troubleshooting regular expressions, such as https://regexr.com/.
The Word Separator List
The Word Separator List button enables you to specify a list of characters that occur between words in the tokenization process. The between-word characters cannot begin a word, but they can appear inside a word if one of the regular expressions allows it. You can add or remove characters from the list in the window that appears when you click the button. By default, the only character in the list is a whitespace character. In the Separator Characters window, click the Reset button to undo any modifications to the list of separator characters. Modifications to the list of separator characters are applied only to the current regular expression tokenization.
The processing of the specified regular expressions and the required “Leftover” regular expression proceeds as follows:
1. Compare the current character in the text stream to the list of separator characters.
– If the character is in the list of separator characters, ignore the character, process any accumulated characters in the “Leftover” temporary string, move to the next character, and repeat step 1.
– If the character is not in the list of separator characters, go to step 2.
2. Compare the string starting at the current character to each regular expression (one at a time, up to, but not including, the “Leftover” regular expression).
– If the string starting at the current character matches one of the regular expressions, the following events occur. Any accumulated characters in the “Leftover” temporary string are processed. The value of the Result field is saved as a term. The current character in the text stream becomes the character following the matched string. The processing returns to step 1.
– If the string starting at the current character does not match any of the regular expressions up to the “Leftover” regular expression, go to step 3.
3. Collect characters into the “Leftover” temporary string by appending the current character and setting the current character to the next character in the text stream. Return to step 1.
– The “Leftover” temporary string is accumulated one character at a time, until one of the other regular expressions produces a match.
– The default Result of the “Leftover” regular expression is to discard the accumulated “Leftover” temporary string.

Chapter 12 Text Explorer 377Basic Analysis The Text Explorer Report
Tips:
• If you set the Result of the “Leftover” regular expression to \1, you might want to add more separator characters, such as punctuation marks. This ensures that your results do not include the specified punctuation marks.
• You might want to add more regular expressions from the Regex Library or create custom ones to capture terms of interest rather than changing the Result of the “Leftover” regular expression to \1.
The processing follows the above steps until reaching the end of the text string for each row in the data table.
Saving the Results to a Column in the Data Table
Click the Save to Column button to save to the data table a new column that contains the results of the regular expression tokenization. The new column is a character column with the same name as the text column specified in the Text Explorer launch window; a number is appended to the name so that the column names are unique.
Note: When you save the results of the custom regular expression tokenization to a column in the data table, the regular expression process is run on the original text in each row of the data table. It is not run on the version of the text string that was converted to lowercase.
Closing the Text Explorer Regular Expression Editor
After you click OK in the Text Explorer Regular Expression Editor window, the following events occur:
1. The custom regular expressions defined in the Text Explorer Regular Expression Editor window are saved to the Regex Library.
Caution: The custom Regex Library is saved only when you click OK and there are customized regular expressions. The most recently saved regular expressions will be available next time. Use unique names to keep additional regular expressions in the Regex Library. To ensure that a regular expression is available later, you can save a script from the Text Explorer report window.
2. The Text Explorer report appears. The report shows the result of using the specified regular expression settings to tokenize the text.
The Text Explorer Report
The Text Explorer report window contains the Summary Counts report and the Term and Phrase Lists report.

378 Text Explorer Chapter 12The Text Explorer Report Basic Analysis
Figure 12.8 Example of a Text Explorer Report
Summary Counts Report
The first table in the Text Explorer report window contains the following summary statistics:
Number of Terms The number of terms in the Term List.
Number of Cases The number of documents in the corpus.
Total Tokens The total number of terms in the corpus.
Tokens per Case The number of tokens divided by the number of cases.
Number of Non-empty Cases The number of documents in the corpus that contain at least one term.
Portion Non-empty per Case The proportion of documents in the corpus that contain at least one term.

Chapter 12 Text Explorer 379Basic Analysis The Text Explorer Report
Term and Phrase Lists
The Term and Phrase Lists report contains tables of terms and phrases found in the text after tokenization has occurred. See Figure 12.8 for an example of the Term and Phrase Lists report. The Count column in the Term List indicates the number of occurrences of the term in the corpus. The Count column in the Phrase List indicates the number of occurrences of the phrase in the corpus; the N column indicates the number of words in the phrase.
By default, the Terms List is sorted in descending count order; terms that are tied in count are sorted alphabetically. The Phrases List is sorted in descending count order; phrases that are tied in count are then sorted in descending length (N) order. Further ties in the Phrases List are sorted alphabetically. The sort order of each list can be changed to alphabetical sorting using the options in each list.
The phrases that appear in the Phrase List are determined by the settings of the Maximum Words per Phrase and Maximum Number of Phrases options in the launch window. Phrases that occur only one time in the data table do not appear in the Phrase List.
Phrases can be specified as terms at various scopes. Phrases in the Phrase List that have been specified as terms are colored based on the scope of the phrase specification. See Table 12.1. For more information about specifying phrases in different scopes, see “Term Options Management Windows” on page 386.
Actions for Terms and Phrases
You can access options in the Term List and Phrase List tables by selecting items and then right-clicking in the left-most column of each table. You can save each table as a data table by right-clicking in the Count column of each table and selecting Make into Data Table.
Term List Pop-up Menu Options
When you right-click in the Term column of the Term List table, a pop-up menu appears with the following options:
Table 12.1 Colors for Specified Phrases
Scope Color
Built-in Red
User Library Green
Project Blue
Column Property Orange
Local Gray

380 Text Explorer Chapter 12The Text Explorer Report Basic Analysis
Select Rows Selects rows in the data table that contain the selected terms.
Show Text Shows the documents that contain the selected terms.
Note: By default, only the first 10,000 documents are shown. If there are more than 10,000 documents that contain a selected term, a window appears that enables you to increase this limit.
Alphabetical Order Toggles the sort order of the Term List between alphabetical order and descending Count order.
Copy Places the selected terms onto the clipboard.
Color Enables you to assign a color to the selected terms.
Label Places labels on the corresponding points in the Term SVD Plot for the selected terms.
Containing Phrases Selects the phrases in the Phrase List table that contain the selected terms.
Save Indicators Saves an indicator column to the data table for each term selected in the Term List. The value of the indicator column for each row is 1 if the document in that row contains the term and 0 otherwise.
Save Formula Saves a column formula to the data table for each term selected in the Term List. The column formula for each row evaluates to 1 if the document in that row contains the term and 0 otherwise. This is useful for new documents.
Recode Enables you to change the values for one or more terms. Select the terms in the list before selecting this option. After you select this option, the Recode window appears. See the Enter and Edit Data chapter in the Using JMP book.
Add Stop Word Adds the selected terms to the list of stop words and removes those terms from the Term List. This action also updates the Phrase List.
Add Stem Exception (Available only when the Language option is set to English, German, Spanish, French, or Italian.) Adds the selected terms to the list of terms that are excluded from stemming.
Remove Phrase (Available only when a specified phrase is selected in the Term List.) Removes the selected phrase from the set of specified phrases and updates the Term Counts accordingly.
Show Filter Shows or hides a search filter above the Term List. See “Search Filter Options” on page 381.
Make into Data Table Creates a JMP data table from the report table.

Chapter 12 Text Explorer 381Basic Analysis The Text Explorer Report
Make Combined Data Table Searches the report for other tables like the one you selected and combines them into a single JMP data table.
Phrase List Pop-up Menu Options
When you right-click in the Phrase column of the Phrase List table, a pop-up menu appears with the following options:
Select Rows Selects rows in the data table that contain the selected phrases.
Show Text Shows the documents that contain the selected phrases.
Save Indicators Saves an indicator column to the data table for each phrase selected in the Phrase List. The value of the indicator column for each row is 1 if the document in that row contains the phrase and 0 otherwise.
Alphabetical Order Toggles the sort order of the Phrase List between alphabetical order and descending Count order.
Copy Places the selected phrases onto the clipboard.
Select Contains Selects larger phrases in the Phrase List that contain the selected phrase.
Select Contained Selects smaller phrases in the Phrase List and terms in the Term List that are contained by the selected phrase.
Add Phrase Adds the selected phrases to the Term List and updates the Term Counts accordingly.
Add Stop Word Adds the selected phrases to the list of stop words. This action also updates the Term List.
Show Filter Shows or hides a search filter above the Phrase List. See “Search Filter Options” on page 381.
Make into Data Table Creates a JMP data table from the report table.
Make Combined Data Table Searches the report for other tables like the one you selected and combines them into a single JMP data table.
Search Filter Options
Click the down arrow button next to the search box to refine your search.
Contains Terms Returns items that contain a part of the search criteria. A search for “ease oom” returns messages such as “Release Zoom” but not “Partial Least Squares”.

382 Text Explorer Chapter 12Text Explorer Platform Options Basic Analysis
Contains Phrase Returns items that contain the exact search criteria. A search for “text box” returns entries that contain “text” followed directly by “box” (for example, “Context Box” and “Text Box”).
Starts with Phrase Returns items that start with the search criteria.
Ends with Phrase Returns items that end with the search criteria.
Whole Phrase Returns items that consist of the entire string. A search for “text box” returns entries that contain only “text box”.
Regular Expression Enables you to use the wildcard (*) and period (.) in the search box. Searching for “get.*name” looks for items that contain “get” followed by one or more words. It returns “Get Color Theme Names”, “Get Name Info”, and “Get Effect Names”, and so on.
Invert Result Returns items that do not match the search criteria.
Match All Terms Returns items that contain both strings. A search for “t test” returns elements that contain either or both of the search strings: “Pat Test”, “Shortest Edit Script” and “Paired t test”.
Ignore Case Ignores the case in the search criteria.
Match Whole Words Returns items that contain each word in the string based on the Match All Terms setting. If you search for “data filter”, and Match All Terms is selected, entries that contain both “data” and “filter” are returned.
Text Explorer Platform Options
This section describes the options available in the Text Explorer platform.
• “Text Preparation Options”• “Text Analysis Options”• “Save Options”• “Report Options”
Text Preparation Options
The Text Explorer red triangle menu contains the following options for text preparation:
Display Options Shows a submenu of options to control the report display.

Chapter 12 Text Explorer 383Basic Analysis Text Explorer Platform Options
Show Word Cloud Shows or hides the Word Cloud report. The Word Cloud red triangle menu enables you to change the layout and font for the word cloud. See “Word Cloud Options” on page 385.
The word cloud can be interactively resized by changing the width. The height is then determined automatically. The rows in the Term List are linked to the terms in the Word Cloud.
Show Term List Shows or hides the Term List.
Show Phrase List Shows or hides the Phrase List.
Show Term and Phrase Options Shows buttons in the Term and Phrase Lists report corresponding to the options available in the pop-up menus for each list. See “Term and Phrase Lists” on page 379.
Show Summary Counts Shows or hides the Summary Counts table. See “Summary Counts Report” on page 378.
Show Stop Words Shows or hides a list of the stop words used in the analysis. A built-in list of stop words is used initially. To add a stop word, right-click on it in the Term List and select Add Stop Word from the pop-up menu. See “Term Options Management Windows” on page 386.
Show Recodes Shows or hides a list of the recoded terms. See “Term Options Management Windows” on page 386.
Show Specified Phrases Shows or hides a list of the phrases that have been specified by the user to be treated as terms. See “Term Options Management Windows” on page 386.
Show Stem Exceptions (Available only when the Language option is set to English, German, Spanish, French, or Italian.) Shows or hides the terms that are excluded from stemming. See “Term Options Management Windows” on page 386.
Show Delimiters (Available only when the Language option is set to English, German, Spanish, French, or Italian and the selected Tokenizing method is Basic Words.) Shows or hides the delimiters used by the Basic Words Tokenizing method. To modify the set of delimiters used, you must use the Add Delimiters() or Set Delimiters() messages in JSL.
Show Stem Report (Available only when the Language option is set to English, German, Spanish, French, or Italian and the selected Stemming method is not No Stemming.) Shows or hides the Stemming report that contains two tables of stemming results. The table on the left maps each stem to the corresponding terms. The table on the right maps each term to its corresponding stem.

384 Text Explorer Chapter 12Text Explorer Platform Options Basic Analysis
Show Selected Rows Opens a window that contains the text of the documents that are in the currently selected rows.
Show Filters for All Tables Shows or hides filters that can be used for searching tables in the report. This option applies to the following tables: Stop Words, Specified Phrases, Stem Exceptions, Term List, Phrase List, and the Stem Report. For more information about the filter tool, see “Search Filter Options” on page 381.
Term Options Shows a submenu of options that apply to the Term List.
Stemming (Available only when the Language option is set to English, German, Spanish, French, or Italian.) See the description of stemming options in “Launch the Text Explorer Platform” on page 370.
Include Builtin Stop Words Specifies if the stop words used in the tokenizing process include built-in stop words or not.
Include Builtin Phrases Specifies if the phrases used in the tokenizing process include built-in phrases or not.
Manage Stop Words Shows a window that enables you to add or remove stop words. The changes made can be applied at the User, Column, and Local levels. You can also specify Local Exceptions that exclude stop words that are specified in any of the other levels. See “Term Options Management Windows” on page 386.
Manage Recodes Shows a window that enables you to add or remove recodes. The changes made can be applied at the User, Column, and Local levels. You can also specify Local Exceptions that exclude recodes that are specified in any of the other levels. See “Term Options Management Windows” on page 386.
Manage Phrases Shows a window that enables you to add or remove the phrases that are treated as terms. The changes made can be applied at the User, Column, and Local levels. You can also specify Local Exceptions that exclude phrases that are specified in any of the other levels. See “Term Options Management Windows” on page 386.
Manage Stem Exceptions (Available only when the Language option is set to English, German, Spanish, French, or Italian.) Shows a window that enables you to add or remove exceptions to stemming. The changes made can be applied at the User, Column, and Local levels. You can also specify Local Exceptions that exclude stem exceptions that are specified in any of the other levels. See “Term Options Management Windows” on page 386.
Parsing Options Shows a submenu of options that apply to parsing and tokenization.

Chapter 12 Text Explorer 385Basic Analysis Text Explorer Platform Options
Tokenizing (Available only when the Language option is set to English, German, Spanish, French, or Italian.) See the description of tokenizing options in “Launch the Text Explorer Platform” on page 370.
Customize Regex (Available only with the Regex Tokenizing method.) Shows the Customize Regex window. This option enables you to modify the Regex settings for the current Text Explorer report.
Note: If you specified a By variable in the platform launch window, the Customize Regex option automatically broadcasts to all level of the By variables.
Treat Numbers as Words (Available only when the Language option is set to English, German, Spanish, French, or Italian and Basic Words is the selected Tokenizing method.) Allows numbers to be tokenized as terms in the analysis. Note that this option is affected by the setting for Minimum characters per word.
Word Cloud Options
The Word Cloud red triangle menu contains the following options:
Layout Specifies the arrangement of the terms in the Word Cloud. By default, the Layout is set to Ordered.
Ordered Presents the terms in horizontal lines ordered from most to least frequent.
Alphabetical Presents the terms in horizontal lines sorted in ascending alphabetical order.
Centered Presents the terms in a cloud and sized by frequency.
Coloring Specifies the coloring of the terms in the Word Cloud. By default, the Coloring is set to None.
None Colors each term the same color as it is colored in the Term List.
Uniform Color Colors each term the same color. You can change this color in the Legend.
Arbitrary Grays Colors each term in varying shades of gray.
Arbitrary Colors Colors each term in various colors. You can adjust the colors in the Legend.
By column values Colors each term on a gradient color scale. The scale is based on the score for a term generated by the Score Terms by Column option. You can adjust the colors and gradient in the Legend.

386 Text Explorer Chapter 12Text Explorer Platform Options Basic Analysis
Font Specifies the font, style, and size of the terms in the Word Cloud.
Show Legend Shows or hides the legend for the Word Cloud.
Term Options Management Windows
Phrase, stop word, recode, and stem exception information can be specified for many different scopes. They can be stored in the following locations: the Text Explorer user library (User scope), the current project, a column property for the analysis column (Column scope), or in a platform script (Local scope). You can save the local specifications and local exceptions for a specific instance of Text Explorer by saving the script for the Text Explorer report.
The Term Options management windows are four similar windows that enable you to manage the collections of stop words, recodes, phrases, and stem exceptions. Figure 12.9 shows the Manage Stop Words window. The Manage Phrases and Manage Stem Exceptions are identical to the Manage Stop Words window. The Manage Recodes window differs slightly. See “Manage Recodes” on page 388.
Figure 12.9 Manage Stop Words Window
Manage Stop Words
The Manage Stop Words window contains multiple lists of stop words that represent the different scopes (or locations) of specified stop words. Below each list is a text edit box and an add button. These controls enable you to add custom stop words to each scope. You can move stop words from one scope to another by dragging them. You can copy and paste items from one list to another list. Two buttons at the bottom of the window move the selected items from one scope to the next, either left or right. The X button removes the selected items from their current scope. You can edit existing items in the lists by double-clicking on an item and changing the text.

Chapter 12 Text Explorer 387Basic Analysis Text Explorer Platform Options
Language Specifies the list of Built-in stop words and to which language the user library selections are saved. If you select Apply Items for Language, the changes are saved to the master user library. The Language setting applies only to the Built-in, User, and Project scopes.
Built-in (Locked) Lists the built-in list of stop words for the specified language. You can exclude a built-in stop word by placing it in the Local Exceptions list.
User Lists the stop words in the user library for the specified language.
Project (Available only when Text Explorer is launched within a project that contains a folder named “TextExplorer”.) Lists the stop words in the current project for the specified language.
Column Lists the stop words in the “Stop Words” column property for the text column.
Local Lists the stop words in the local scope. They can be specified when Text Explorer is launched via JSL. These stop words are used only in the current Text Explorer platform report.
Local Exceptions Lists words that are not treated as stop words in the current Text Explorer platform. They can be specified when Text Explorer is launched via JSL. The words listed in Local Exceptions override words listed in all of the other scopes.
Import Enables you to import stop words from a text file. The stop words are copied to the clipboard. You can paste them into any of the lists other than Built-in.
Export Enables you to export stop words to the clipboard or to a text file. An Export window appears that enables you to select the scopes for which you would like to export stop words and the location of the export.
The user library files are located in a TextExplorer directory. The location of this directory is based on your computer’s operating system:
• Windows: "C:/Users/<username>/AppData/Roaming/SAS/JMP/TextExplorer/<lang>/"
• Macintosh: "/Users/<username>/Library/Application Support/JMP/TextExplorer/<lang>/"
The master user library files are located in the TextExplorer directory itself. These files are not language-specific.
The project files are located in a TextExplorer folder in the project.
When you click OK, changes to the User, Project, and Column lists are saved to the user library, the project, and the column properties, respectively. Anything specified in the Local and Local Exceptions lists is saved only when you save the script of the Text Explorer report.
If saving Stop Words to the user library, the file is named stopwords.txt. If saving to a column property, the property is called “Stop Words”.

388 Text Explorer Chapter 12Text Explorer Platform Options Basic Analysis
Manage Recodes
The Manage Recodes window differs slightly from the Manage Stop Words window. Instead of one text edit box below each list, there are two text edit boxes. The old value (specified in the top box) is recoded to the new value (specified in the bottom box).
If saving Recodes to the user library, the file is named recodes.txt. If saving to a column property, the property is called “Recodes”.
Manage Phrases
If saving Phrases to the user library, the file is named phrases.txt. If saving to a column property, the property is called “Phrases”.
Manage Stem Exceptions
If saving Stem Exceptions to the user library, the file is named stemExceptions.txt. If saving to a column property, the property is called “Stem Exceptions”.
Note: The Local Exceptions list in the Manage Stem Exceptions window lists stem exceptions that are excluded from the stem exception list. The words in this list are involved in the stemming operation.
Text Analysis Options
The Text Explorer red triangle menu contains the following analysis options:
Latent Class Analysis Performs a latent class analysis on the binary weighted document term matrix using sparse matrix routines. See “Latent Class Analysis” on page 392.
When you select Latent Class Analysis from the Text Explorer red triangle menu, a Specifications window appears with the following options:
Maximum Number of Terms The maximum number of terms included in the latent class analysis.
Minimum Term Frequency The minimum number of occurrences a term must have to be included in the latent class analysis.
Number of Clusters The number of clusters in the latent class analysis.
Latent Semantic Analysis, SVD Performs a partial singular value decomposition of the document term matrix. See “Latent Semantic Analysis (SVD)” on page 393.
Discriminant Analysis Predicts membership of each document in a group or category based on the document term matrix. See “Discriminant Analysis” on page 399.

Chapter 12 Text Explorer 389Basic Analysis Text Explorer Platform Options
Singular Value Decomposition Specifications Windows
The analysis options in the Text Explorer platform are based on the Document Term Matrix (DTM). The DTM is formed by creating a column for each term in the Term List (up to a specified Maximum Number of Terms). Each text document (equivalent to a row in the data table) corresponds to a row of the DTM. The values in the cells of the DTM depend on the type of weighting specified by the user in the Specifications window.
Figure 12.10 shows the Singular Value Decomposition Specifications window. When you select options from the Text Explorer red triangle menu that perform a singular value decomposition on the document term matrix, the Specifications window appears with the following options:
Maximum Number of Terms The maximum number of terms included in the singular value decomposition.
Minimum Term Frequency The minimum number of occurrences a term must have to be included in the singular value decomposition.
Weighting The weighting scheme that determines the values that go into the cells of the document term matrix. The weighting scheme options are described in “Document Term Matrix Specifications Window” on page 390.
Number of Singular Vectors The number of singular vectors in the singular value decomposition. The default value is the minimum of the number of documents, the number of terms, or 100.
Centering and Scaling Options for centering and scaling of the document term matrix. You can choose between Centered and Scaled, Centered, and Uncentered. By default, the document term matrix is both centered and scaled.
Figure 12.10 SVD Specification Window

390 Text Explorer Chapter 12Text Explorer Platform Options Basic Analysis
Save Options
The Text Explorer red triangle menu contains the following options to save information to data tables, table columns, and column properties:
Save Document Term Matrix Saves columns to the data table for each column of the document term matrix (up to a specified Maximum Number of Terms).
Save Stacked DTM for Association Saves a stacked version of the document-term matrix to a JMP data table. The stacked format is appropriate for analysis in the Association Analysis platform. For more information, see the Association Analysis chapter in the Predictive and Specialized Modeling book. If you specify an ID variable in the Text Explorer launch window, the ID variable is used to identify the rows that each term came from in the original text data table. The stacked table also contains a table script to launch Association Analysis.
Save DTM Formula Saves a vector-valued formula column to the data table. The length of the vector depends on user-specified options for the maximum number of terms, the minimum term frequency, and the weighting. The resulting column uses the Text Score() JSL function. For more information about this function, see Help > Scripting Index.
Save Term Table Creates a JMP data table that contains each term from the Term List, the number of occurrences, and the number of documents that contain each term. If you select the Score Terms by Column option after selecting Save Term Table, a column containing scores for each term is added to the data table created by the Save Term Table option.
Score Terms by Column Saves scores based on values in a specified column to the JMP data table created by the Save Term Table option. The scores for each term are the mean value of the specified column weighted by the number of occurrences of the term in each row. If you have already selected the Save Term Table option, the Score Terms by Column option adds a column containing scores to the data table created by the Save Term Table option. Otherwise, the JMP data table for the term table is created. When the specified column is not Continuous, columns containing scores for each level in the specified column are created.
Document Term Matrix Specifications Window
When you select the Save Document Term Matrix and Save DTM Formula options from the Text Explorer red triangle menu, the Document Term Matrix Specifications window appears with the following options:
Maximum Number of Terms The maximum number of terms included in the document term matrix.

Chapter 12 Text Explorer 391Basic Analysis Text Explorer Platform Options
Minimum Term Frequency The minimum number of occurrences a term must have to be included in the document term matrix.
Weighting The weighting scheme that determines the values that go into the cells of the document term matrix.
The following options are available for Weighting:
Binary Assigns 1 if a term occurs in each document and 0 otherwise. This is the default weighting, unless an SVD analysis has previously been run.
Ternary Assigns 2 if a term occurs more than once in each document, 1 if it occurs only once and 0 otherwise.
Frequency Assigns the count of a term’s occurrence in each document.
Log Freq Assigns log10( 1 + x ), where x is the count of a term’s occurrence in each document.
TF IDF Assigns TF * log10( nDoc / nDocTerm ). Abbreviation for term frequency - inverse document frequency. This is the default weighting. The terms in the formula are defined as follows:
TF = frequency of the term in the documentnDoc = number of documents in the corpusnDocTerm = number of documents that contain the term
Note: If you select Save Document Term Matrix or Save DTM Formula after you have run an SVD analysis, the Specifications window contains the specifications from the most recent SVD analysis.
Report Options
See the JMP Reports chapter in the Using JMP book for more information about the following options:
Local Data Filter Shows or hides the local data filter that enables you to filter the data used in a specific report.
Redo Contains options that enable you to repeat or relaunch the analysis. In platforms that support the feature, the Automatic Recalc option immediately reflects the changes that you make to the data table in the corresponding report window.
Save Script Contains options that enable you to save a script that reproduces the report to several destinations.

392 Text Explorer Chapter 12Latent Class Analysis Basic Analysis
Save By-Group Script Contains options that enable you to save a script that reproduces the platform report for all levels of a By variable to several destinations. Available only when a By variable is specified in the launch window.
Latent Class Analysis
Latent class analysis enables you to group the documents from the corpus into clusters of similar documents. The Latent Class Analysis report contains the Bayesian Information Criterion (BIC) value for the model and a Show Text button. If one or more clusters in the Cluster Mixture Probabilities table is selected, the Show Text button opens a window that contains the text of the documents that are deemed most likely to belong to the selected cluster.
The Latent Class Analysis red triangle menu contains the following options:
Display Options Specifies the contents of the Latent Class Analysis report. By default, all of the report options are shown except for the word clouds for each cluster.
Cluster Mixture Probabilities Shows or hides a table of the probability of an observation belonging to each cluster.
Tip: You can select one or more rows in the Mixture Probabilities by Cluster table to select the observations assigned to the corresponding clusters.
Term Probabilities by Cluster Shows or hides a table of terms with an estimate for each cluster of the conditional probability that a document contains the term, given that the document belongs to a particular cluster. By default, the terms in this table are sorted by descending frequency in the corpus.
The Cluster Most Characteristic column shows the cluster that the term occurs in at the highest rate.
The Cluster Most Probable column shows the cluster in which a randomly chosen document that contains the term is most likely to be found.
Top Terms by Cluster Show or hides a table of the ten terms with the highest scores in each cluster. The score St,c for term t in cluster c is calculated as follows:
where mean(pt) is the mean of the term probabilities by cluster for term t and pt,c is the term probability by cluster for term t in cluster c.
St c, 100 mean• pt( ) 10pt c,
mean pt( )------------------------
log•=

Chapter 12 Text Explorer 393Basic Analysis Latent Semantic Analysis (SVD)
MDS Plot Shows or hides a multidimensional scaling plot, which is a two-dimensional representation of the proximity of the clusters. For more information about MDS plots, see the Multidimensional Scaling chapter in the Multivariate Methods book. The Show Text button opens a window that contains the text of the selected documents.
Cluster Probabilities by Row Shows or hides the Mixture Probabilities table, which displays probabilities of cluster membership for each row. The Most Likely Cluster column indicates the cluster with the highest probability of membership for each row.
Word Clouds by Cluster Shows or hides a matrix of word clouds, one for each cluster.
Save Probabilities Saves the values in the Mixture Probabilities table to the corresponding rows in the data table.
Save Probability Formulas Saves a formula column to the data table for each cluster as well as a formula column for the most likely cluster.
The score formula that is saved uses the Text Score() JSL function with the weighting argument set to “LCA”.
Color by Cluster Colors each row in the data table according to its most likely cluster.
Remove Removes the Latent Class Analysis report from the Text Explorer report.
For more information about latent class analysis, see the Latent Class Analysis chapter in the Multivariate Methods book.
Note: The LCA algorithm that is used in the Text Explorer platform takes advantage of the specific structure of the document term matrix. For this reason, the LCA results in the Text Explorer platform do not exactly match the results in the Latent Class Analysis platform.
Latent Semantic Analysis (SVD)
Latent semantic analysis is centered around computing a partial singular value decomposition (SVD) of the document term matrix (DTM). This decomposition reduces the text data into a manageable number of dimensions for analysis. Latent semantic analysis is equivalent to performing principal components analysis (PCA).
The partial singular value decomposition approximates the DTM using three matrices: U, S, and V‘. The relationship between these matrices is defined as follows:
DTM ≈ U * S * V‘
Define nDoc as the number of documents (rows) in the DTM, nTerm as the number of terms (columns) in the DTM, and nVec as the specified number of singular vectors. Note that nVec

394 Text Explorer Chapter 12Latent Semantic Analysis (SVD) Basic Analysis
must be less than or equal to min(nDoc, nTerm). It follows that U is an nDoc by nVec matrix that contains the left singular vectors of the DTM. S is a diagonal matrix of dimension nVec. The diagonal entries in S are the singular values of the DTM. V‘ is an nVec by nTerm matrix. The rows in V‘ (or columns in V) are the right singular vectors.
The right singular vectors capture connections among different terms with similar meanings or topic areas. If three terms tend to appear in the same documents, the SVD is likely to produce a singular vector in V‘ with large values for those three terms. The U singular vectors represent the documents projected into this new term space.
Latent semantic analysis also captures indirect connections. If two words never appear together in the same document, but they generally appear in documents with another third word, the SVD is able to capture some of that connection. If two documents have no words in common but contain words that are connected in the dimension-reduced space, they map to similar vectors in the SVD output.
The SVD transforms text data into a fixed-dimensional vector space, making it amenable to all types of clustering, classification, and regression techniques. The Save options enable you to export this vector space to be analyzed in other JMP platforms.
The DTM, by default, is centered, scaled, and divided by nDoc minus 1 before the singular value decomposition is carried out. This analysis is equivalent to a PCA of the correlation matrix of the DTM.
You can also specify Centered or Uncentered in the Specifications window. If you specify Centered, the DTM is centered and divided by nDoc minus 1 before the singular value decomposition. This analysis is equivalent to a PCA of the covariance matrix of the DTM. If you specify Uncentered, the DTM is divided by nDoc before the singular value decomposition. This analysis is equivalent to a PCA of the unscaled DTM.
The SVD implementation takes advantage of the sparsity of the DTM even when the DTM is centered.
SVD Report
The Latent Semantic Analysis option produces two SVD plots and a table of the singular values from the singular value decomposition.
SVD Plots
The first plot contains a point for each document. For a given document, the point that is plotted is defined by the document’s values in the first two singular vectors (the first two columns of the U matrix) multiplied by the diagonal singular values matrix (S). This plot is equivalent to the Score Plot in the Principal Components platform. Each point in this plot

Chapter 12 Text Explorer 395Basic Analysis Latent Semantic Analysis (SVD)
represents a document (row of the data table). You can select the points in this plot to select the corresponding rows in the data table.
The second plot contains a point for each term. For a given term, the point that is plotted is defined by the term’s values in the first two singular vectors (the first two rows of the V‘ matrix) multiplied by the diagonal singular values matrix (S). This plot is equivalent to the Loadings Plot in the Principal Components platform. In this plot, the points correspond to rows in the Term List table.
Above each of the SVD Plots, you can click a Show Text button to open a window that contains the text of the selected points in the plot.
Singular Values
Below the document and term SVD plots, a table of the singular values appears. These are the diagonal entries of the S matrix in the singular value decomposition of the document term matrix. The Singular Values table also contains a column of corresponding eigenvalues for the equivalent principal components analysis. Like in the Principal Components platform, there are columns for the percent and cumulative percent of variation explained by each eigenvalue (or singular value). You can use the Cum Percent column to decide what percent of variance from the DTM you want to preserve, and then use the corresponding number of singular vectors.
SVD Report Options
The SVD red triangle menu contains the following options:
SVD Scatterplot Matrix Shows or hides a scatterplot matrix of the term and document singular value decomposition vectors. You are prompted to select the size of the scatterplot matrix when you select this option. This scatterplot matrix enables you to visualize more than the first two dimensions of the singular value decomposition. The Show Text button opens a window that contains the text of the selected documents.

396 Text Explorer Chapter 12Latent Semantic Analysis (SVD) Basic Analysis
Figure 12.11 SVD Scatterplots of Document and Term Spaces
Topic Analysis, Rotated SVD Performs a varimax rotated partial singular value decomposition of the document term matrix to produce groups of terms called topics. You can select this option multiple times to find different numbers of topics. See “Topic Analysis” on page 397.
Cluster Terms Shows or hides a hierarchical clustering analysis of the terms in the data. To the right of the dendrogram, there are options to set the number of clusters and save the clusters to a data table. For each term, this data table contains its frequency, the number of documents that contain it, and its assigned cluster.

Chapter 12 Text Explorer 397Basic Analysis Topic Analysis
Cluster Documents Shows or hides a hierarchical clustering analysis of the documents in the data. To the right of the dendrogram, there are options to set the number of clusters, save the clusters to a column in the data table, and show the documents in a selected branch of the dendrogram plot.
Save Document Singular Vectors Saves a user-specified number of singular vectors from the document singular value decomposition as columns to the data table.
Save Singular Vector Formula Saves a vector-valued formula column containing the document singular value decomposition to the data table. The resulting column uses the Text Score() JSL function. For more information about this function, see Help > Scripting Index.
Save Term Singular Vectors Saves a user-specified number of singular vectors from the terms singular value decomposition as columns to a new data table where each row corresponds to a term. If a Term Table data table is already open, this option saves the columns to that data table.
Remove Removes the SVD report from the Text Explorer report window.
Topic Analysis
The Topic Analysis, Rotated SVD option performs a varimax rotation on the partial singular value decomposition (SVD) of the document term matrix (DTM). You must specify a number of rotated singular vectors, which corresponds to the number of topics that you want to retain from the DTM. After you specify a number of topics, the Topic Analysis report appears.
Topic analysis is equivalent to a rotated principal component analysis (PCA). The varimax rotation takes a set of singular vectors and rotates them to make them point more directly in the coordinate directions (toward the terms). This rotation makes the vectors help explain the text as each rotated vector orients toward a set of terms. Negative values indicate a repulsion force. The terms with negative values occur in a topic less frequently compared to the terms with positive values.
Topic Analysis Report
The Topic Analysis report shows the terms that have the largest loadings in each topic after rotation. There are additional reports that show the components of the rotated singular value decomposition.
The Top Loadings by Topic report shows a table of terms for each topic. The terms in each table are the ones that have the largest loadings in absolute value for each topic. Each table is

398 Text Explorer Chapter 12Topic Analysis Basic Analysis
sorted in descending order by the absolute value of the loading. These tables can be used to determine conceptual themes that correspond to each topic.
The Topic Analysis report also contains the following reports:
Topic Loadings Contains a matrix of the loadings across topics for each term. This matrix is equivalent to the factor loading matrix in a rotated PCA.
Word Clouds by Topic Contains a matrix of word clouds, one for each topic.
Topic Scores Contains a matrix of document scores for each topic. Documents with higher scores in a topic are more likely to be associated with that topic.
Topic Scores Plots Contains a Show Text button and a plot of document scores for each topic. The Show Text button opens a window that contains the text of the selected documents.
The topic scores plot is a visual representation of the matrix in the Document Topic Scores report. Each panel in the plot corresponds to one of the topics, or one of the rows of the Document Topic Scores matrix. Within each panel, each point corresponds to one of the documents in the corpus, or one of the columns of the Document Topic Scores matrix.
Variance Explained by Each Topic Contains a table of the variance explained by each topic. The table also contains columns for the percent and cumulative percent of the variation explained by each topic.
Rotation Matrix Contains the rotation matrix for the varimax rotation.
Topic Analysis Report Options
The Topic Analysis red triangle menu contains the following options:
Topic Scatterplot Matrix Shows or hides a scatterplot matrix of the rotated singular value decomposition vectors. The Show Text button opens a window that contains the text of the selected documents.
Display Options Contains options to show or hide content that appears in the Topic Analysis report. See “Topic Analysis Report” on page 397.
Save Document Topic Vectors Saves a user-specified number of singular vectors from the rotated singular value decomposition as columns to the data table.
Save Topic Vector Formula Saves a vector-valued formula column containing the rotated singular value decomposition to the data table. The resulting column uses the Text Score() JSL function. For more information about this function, see Help > Scripting Index.

Chapter 12 Text Explorer 399Basic Analysis Discriminant Analysis
Save Term Topic Vectors Saves the topic vectors as columns to the data table created by the Save Term Table option.
Remove Removes the Topic Analysis report from the SVD report.
Discriminant Analysis
Discriminant analysis predicts membership of each document in a group or category based on the columns in the document term matrix (DTM). Specifically, discriminant analysis predicts a classification of each document into a category of a response column. When you select the Discriminant Analysis option, you must select a response column that contains categories or groups. Group membership is predicted by the columns of the DTM. For more information about discriminant analysis, see the Discriminant Analysis chapter in the Multivariate Methods book.
The discriminant analysis method in the Text Explorer platform is based on a singular value decomposition of the DTM, where each group of the response column has its own group mean that is used to center the DTM. The discriminant analysis method in the Text Explorer platform is faster than the Discriminant Analysis platform because it takes advantage of the sparsity of the DTM.
Discriminant Analysis Specifications Window
The Discriminant Analysis option in the Text Explorer platform is based on the Document Term Matrix (DTM). The DTM is formed by creating a column for each term in the Term List (up to a specified Maximum Number of Terms). Each text document (equivalent to a row in the data table) corresponds to a row of the DTM. The values in the cells of the DTM depend on the type of weighting specified by the user in the Specifications window.
When you select the Discriminant Analysis option from the Text Explorer red triangle menu, the Specifications window appears with the following options:
Maximum Number of Terms The maximum number of terms included in the discriminant analysis.
Minimum Term Frequency The minimum number of occurrences a term must have to be included in the discriminant analysis.
Weighting The weighting scheme that determines the values that go into the cells of the document term matrix. The weighting scheme options are described in “Document Term Matrix Specifications Window” on page 390.

400 Text Explorer Chapter 12Discriminant Analysis Basic Analysis
Number of Singular Vectors The number of singular vectors in the discriminant analysis. The default value is the minimum of the number of documents, the number of terms, or 100.
Discriminant Analysis Report
By default, the Discriminant Analysis report in the Text Explorer platform contains two open reports: the Classification Summary and the Discriminant Scores. The other reports are initially closed.
The Discriminant Analysis report also contains the following reports:
Term Means Provides a table of the terms used in the discriminant analysis. The terms correspond to the columns of the DTM. The table contains the means in each group for each term, as well as the overall mean and weighted standard deviation for each term.
Squared Distances to Each Group Provides a table that contains the squared Mahalanobis distances to each group for each document. For more information about Mahalanobis distances, see the Correlations and Multivariate Techniques chapter in the Multivariate Methods book.
Probabilities to Each Group Provides a table that contains the probability that a document belongs to each group.
Classification Summary Provides a report that summarizes the discriminant scores. This report corresponds to the Score Summaries report in the Discriminant Analysis platform report.
Discriminant Scores Provides a table of the predicted classification of each document and other supporting information. This table corresponds to the Discriminant Scores table in the Discriminant Analysis platform report.
Discriminant Analysis Report Options
The Discriminant Analysis red triangle menu contains the following options:
Canonical Plot Shows or hides a plot of the documents and group means in canonical space. Canonical space is the space that most separates the groups. If there are more than two levels of the response variable, you must specify the number of canonical coordinates. If you specify more than two canonical coordinates, this option produces a matrix of canonical plots.

Chapter 12 Text Explorer 401Basic Analysis Additional Example of the Text Explorer Platform
Save Probabilities Saves a probability column to the data table for each response level as well as a column that contains the most likely response. The Most Likely response column contains the level with the highest probability based on the model.
Each probability column gives the posterior probability of an observation’s membership in that level of the response. The Response Probability column property is saved to each probability column. For more information about the Response Probability column property, see the Column Info Window chapter in the Using JMP book.
Save Probability Formulas Saves formula columns to the data table for the prediction of the most likely response. The first saved column contains a formula that uses the Text Score() function to calculate the probability for each response level. There are also columns that contain probabilities for each response level as well as a column that contains the predicted response.
Save Canonical Scores Saves columns to the data table that contain the scores from canonical space for each observation. Canonical space is the space that most separates the groups. The column for the kth canonical score is named Canonical<k>.
Remove Removes the Discriminant Analysis report from the Text Explorer report window.
Additional Example of the Text Explorer Platform
This example looks at aircraft incident reports from the National Transportation Safety Board for events occurring in 2001 in the United States. You want to explore the text that contains a description of the results of the investigation into the cause of each incident. You also want to find themes in the collection of incident reports.
1. Select Help > Sample Data Library and open Aircraft Incidents.jmp.
2. Select Rows > Color or Mark by Column.
3. Select Fatal from the columns list and click OK.
The rows that contain accidents involving fatalities are colored red.
4. Select Analyze > Text Explorer.
5. Select Narrative Cause from the Select Columns list and click Text Columns.
6. From the Stemming list, select Stem All Terms.
7. From the Tokenizing list, select Basic Words.
8. Click OK.

402 Text Explorer Chapter 12Additional Example of the Text Explorer Platform Basic Analysis
Figure 12.12 Text Explorer Report for Narrative Cause
From the report, you see that there are almost 51,000 tokens and about 1,900 unique terms.
9. Right-click on pilot· in the Term List and select Select Rows.
From the number of selected rows in the data table, you see that some form of the word “pilot” occurs in more than 1,300 of the incident reports.
10. Right-click on pilot· and select Add Stop Word.
Because some form of the word “pilot” occurs frequently compared to other terms, these terms do not provide much information to differentiate among documents. All of the terms that stem to pilot· are added to the stop word list.
The remaining steps of this example can be completed only in JMP Pro.
11. From the red triangle menu next to Text Explorer for Narrative Cause, select Latent Semantic Analysis, SVD.
This is the first analysis step toward topic analysis, which performs a rotation of the SVD.
12. In the Specifications window, type 50 for Minimum Term Frequency.
Because there are approximately 51,000 tokens, this frequency is equivalent to a term that represents at least 0.1% of all the terms.
13. Click OK.

Chapter 12 Text Explorer 403Basic Analysis Additional Example of the Text Explorer Platform
Figure 12.13 SVD Plots for Narrative Cause
There is not a lot of difference in the document SVD plot between fatal and non-fatal incidents.
14. From the red triangle menu next to SVD Centered and Scaled TF IDF, select Topic Analysis, Rotated SVD.
You want to look for groups of terms that form topics.
15. Type 5 for Number of Topics.
16. Click OK.
Figure 12.14 Top Loadings by Topics for Narrative Cause
The terms for each topic with the highest loadings enable you to interpret whether the topic is capturing a theme in the incident reports.

404 Text Explorer Chapter 12Additional Example of the Text Explorer Platform Basic Analysis
For example, Topic 1 has high loadings for power, loss, and engine, indicating a theme of losing power to the engine as a cause of the incident. This corresponds to the phrase “loss of engine power” occurring 273 times in the set of incident reports.
Based on the words with high loadings in Topic 2, it can be described as being related to incidents that involved darkness or low altitude.
At this stage of the text analysis, you have many choices in how to proceed. Text analysis is an iterative process, so you might use topic information to further curate your term list by adding stop words or specifying phrases. You might save the weighted document-term matrix, the vectors from the SVD or rotated SVD as numeric columns in your data table and use them in other JMP analysis platforms. When you use these columns in other platforms, you can also include other columns from your data table in further analyses.

Appendix AReferences
Agresti, A. (1990). Categorical Data Analysis. New York: John Wiley & Sons.Agresti, A., and Coull, B. A. (1998). “Approximate is Better Than ‘Exact’ for Interval
Estimation of Binomial Proportions.” American Statistician 52:119–126.Asiribo, O., and Gurland, J. (1990). “Coping with Variance Heterogeneity.” Communication in
Statistics: Theory and Methods 19:4029–4048.Bartlett, M. S., and Kendall, D. G. (1946). “The Statistical Analysis of Variance-Heterogeneity
and the Logarithmic Transformation.” Supplement to the Journal of the Royal Statistical Society 8:128–138.
Bissell, A. F. (1990). “How Reliable is Your Capability Index?” Applied Statistics 30:331–340.Brown, M. B., and Benedetti, J. K. (1977). “Sampling Behavior of Tests for Correlation in
Two-Way Contingency Tables.” Journal of the American Statistical Association 72:305–315.Brown, M. B., and Forsythe, A. B. (1974). “Robust Tests for Equality of Variances.” Journal of the
American Statistical Association 69:364–367.Chen, S.-X., and Hall, P. (1993). “Empirical Likelihood Confidence Intervals for Quantiles.” The
Annals of Statistics 21:1166–1181.Chou, Y.-M., Owen, D. B., and Borrego, S. A. (1990). “Lower Confidence Limits on Process
Capability Indices.” Journal of Quality Technology 22:223–229.Cleveland, W. S. (1979). “Robust Locally Weighted Regression and Smoothing Scatterplots.”
Journal of the American Statistical Association 74:829–836.Cohen, J. (1960). “A Coefficient of Agreement for Nominal Scales.” Education Psychological
Measurement 20:37–46.Conover, W. J. (1972). “A Kolmogorov Goodness-of-fit Test for Discontinuous Distributions.”
Journal of the American Statistical Association 67:591–596.Conover, W. J. (1980). Practical Nonparametric Statistics. New York: John Wiley & Sons.Conover, W. J. (1999). Practical Nonparametric Statistics. 3rd ed. New York: John Wiley & Sons.Cureton, E. E. (1967). “The Normal Approximation to the Signed-Rank Sampling Distribution
when Zero Differences are Present.” Journal of the American Statistical Association 62:1068–1069.
DeLong, E. R., DeLong, D. M., and Clarke-Pearson, D. L. (1988). “Comparing the Areas under Two or More Correlated Receiver Operating Characteristic Curves: A Nonparametric Approach.” Biometrics 44:837–845.
Devore, J. L. (1995). Probability and Statistics for Engineering and the Sciences. Pacific Grove, CA: Duxbury Press.

406 References Appendix ABasic Analysis
Dunn, O. J. (1964). “Multiple Comparisons Using Rank Sums.” Technometrics 6:241–252.Dunnett, C. W. (1955). “A Multiple Comparisons Procedure for Comparing Several Treatments
with a Control.” Journal of the American Statistical Association 50:1096–1121.Efron, B. (1981). “Nonparametric Standard Errors and Confidence Intervals.” The Canadian
Journal of Statistics 9:139–158.Eubank, R. L. (1999). Nonparametric Regression and Spline Smoothing. 2nd ed. Boca Raton,
Florida: CRC.Fleiss, J. L., Cohen, J., and Everitt, B. S. (1969). “Large-Sample Standard Errors of Kappa and
Weighted Kappa.” Psychological Bulletin 72:323–327.Friendly, M. (1994). “Mosaic Displays for Multi-Way Contingency Tables.” Journal of the
American Statistical Association 89:190–200.Goodman, L. A., and Kruskal, W. H. (1979). Measures of Association for Cross Classification. New
York: Springer-Verlag.Gupta, S. S. (1965). “On Some Multiple Decision (Selection and Ranking) Rules. Technometrics
7:225–245.Hajek, J. (1969). A Course in Nonparametric Statistics. San Francisco: Holden-Day.Hartigan, J. A., and Kleiner, B. (1981). “Mosaics for Contingency Tables.” In Computer Science
and Statistics: Proceedings of the Thirteenth Symposium on the Interface, edited by W. F. Eddy, 268–273. New York: Springer-Verlag.
Hayter, A. J. (1984). “A Proof of the Conjecture That the Tukey-Kramer Method Is Conservative.” Annals of Mathematical Statistics 12: 61–75.
Hosmer, D. W., and Lemeshow, S. (1989). Applied Logistic Regression. New York: John Wiley & Sons.
Hsu, J. (1981). “Simultaneous Confidence Intervals for All Distances from the ‘Best’.” Annals of Statistics 9:1026–1034.
Hsu, J. C. (1996). Multiple Comparisons: Theory and Methods. London: Chapman and Hall.Huber, P. J. (1973). “Robust Regression: Asymptotics, Conjecture, and Monte Carlo.” Annals of
Statistics 1:799–821.Huber, P. J., and Ronchetti, E. M. (2009). Robust Statistics. 2nd ed. New York: John Wiley &
Sons.Iman, R. L. (1974). “Use of a t-statistic as an Approximation to the Exact Distribution of
Wilcoxon Signed Ranks Test Statistic.” Communications in Statistics—Simulation and Computation 3:795–806.
Jones, M. C., and Pewsey, A. (2009). “Sinh-Arcsinh Distributions.” Biometrika 96:761–780.Kendall, M., and Stuart, A. (1979). The Advanced Theory of Statistics. 4th ed. Vol. 2. New York:
Macmillan.Keuls, M. (1952). “The Use of the ‘Studentized Range’ in Connection with an Analysis of
Variance.” Euphytica 1.2:112-122.Kramer, C. Y. (1956). “Extension of Multiple Range Tests to Group Means with Unequal
Numbers of Replications.” Biometrics 12:307–310.

Appendix A References 407Basic Analysis
Lehmann, E. L., and D’Abrera, H. J. M. (2006). Nonparametrics: Statistical Methods Based on Ranks. Rev. ed. San Francisco: Holden-Day.
Levene, H. (1960). “Robust Tests for the Equality of Variance.” In Contributions to Probability and Statistics: Essays in Honor of Harold Hotelling, edited by I. Olkin, S. G. Ghurye, W. Hoeffding, W. G. Madow, and H. B. Mann. Palo Alto, CA: Stanford University Press.
McCullagh, P., and Nelder, J. A. (1989). Generalized Linear Models. London: Chapman and Hall.Meeker, W. Q., and Escobar, L. A. (1998). Statistical Methods for Reliability Data. New York: John
Wiley & Sons.Meeker, W. Q., Hahn, G. J., and Escobar, L. A. (2017). Statistical Intervals: A Guide for
Practitioners and Researchers. 2nd ed. New York: John Wiley & Sons.Miller, A. J. (1972). “Letter to the Editor.” Technometrics 14:507.Nagelkerke, N. J. D. (1991). “A Note on a General Definition of the Coefficient of
Determination.” Biometrika 78:691–692.Nelson, P. R., Wludyka, P. S., and Copeland, K. A. F. (2005). The Analysis of Means: A Graphical
Method for Comparing Means, Rates, and Proportions. Philadelphia: Society for Industrial and Applied Mathematics.
Neter, J., Wasserman, W., and Kutner, M. H. (1990). Applied Linear Statistical Models. 3rd ed. Boston: Irwin.
O’Brien, R. G. (1979). “A General ANOVA Method for Robust Tests of Additive Models for Variances.” Journal of the American Statistical Association 74:877–880.
OʹBrien, R., and Lohr, V. (1984). “Power Analysis For Linear Models: The Time Has Come.” Proceedings of the Ninth Annual SAS Userʹs Group International Conference, 840–846. Cary, NC: SAS Institute Inc.
Olejnik, S. F., and Algina, J. (1987). “Type I Error Rates and Power Estimates of Selected Parametric and Nonparametric Tests of Scale.” Journal of Educational Statistics 12:45–61.
Pratt, J. W. (1959). “Remarks on Zeros and Ties in the Wilcoxon Signed Rank Procedures.” Journal of the American Statistical Association 54:655–667.
Reinsch, C. H. (1967). “Smoothing by Spline Functions.” Numerische Mathematik 10:177–183.Rousseeuw, P. J., and Leroy, A. M. (1987). Robust Regression and Outlier Detection. New York:
John Wiley & Sons.Rubin, D. (1981). “The Bayesian Bootstrap.” The Annals of Statistics 9:130–134.SAS Institute Inc. (2017a). “Introduction to Nonparametric Analysis.” In SAS/STAT 14.3 User’s
Guide. Cary, NC: SAS Institute Inc. Retrieved December 22, 2017 from http://support.sas.com/documentation/onlinedoc/stat/143/intronpar.pdf.
SAS Institute Inc. (2017b). “The FREQ Procedure.” In SAS/STAT 14.3 User’s Guide. Cary, NC: SAS Institute Inc. Retrieved December 22, 2017 from http://support.sas.com/documentation/onlinedoc/stat/143/freq.pdf
Slifker, J. F., and Shapiro, S. S. (1980). Technometrics 22:239–246.Snedecor, G. W., and Cochran, W. G. (1980). Statistical Methods. 7th ed. Ames, Iowa: Iowa State
University Press.

408 References Appendix ABasic Analysis
Somers, R. H. (1962). “A New Asymmetric Measure of Association for Ordinal Variables.” American Sociological Review 27:799–811.
Tan, C. Y., and Iglewicz, B. (1999). “Measurement-Methods Comparisons and Linear Statistical Relationship.” Technometrics 41:192–201.
Tamhane, A. C., and Dunlop, D. D. (2000). Statistics and Data Analysis. Englewood Cliffs, NJ: Prentice-Hall.
Tukey, J. W. (1953). “The Problem of Multiple Comparisons.” In Multiple Comparisons, 1948–1983, edited by H. I. Braun, vol. 8 of The Collected Works of John W. Tukey (published 1994), 1–300. London: Chapman & Hall. Unpublished manuscript.
Welch, B. L. (1951). “On the Comparison of Several Mean Values: An Alternative Approach.” Biometrika 38:330–336.
Wheeler, D. J. (2003). Range Based Analysis of Means. Knoxville, TN: SPC Press.Wilson, E. B. (1927). “Probable Inference, the Law of Succession, and Statistical Inference.”
Journal of the American Statistical Association 22:209–212.Wludyka, P. S., and Nelson, P. R. (1997). “An Analysis-of-Means-Type Test for Variances From
Normal Populations.” Technometrics 39:274–285.

IndexBasic Analysis
Numerics3D Correspondence Analysis option 252–2615% Contours option 142
AAgreement Statistic option 244, 253–254, 268All fits 68–102All Graphs option 169All Pairs, Tukey HSD test 182, 184–208Analysis of Means
charts 180–203for Proportions option 244, 251options 180–181
Analysis of Means Methods 167, 177–181Analysis of Variance
See also Onewayreport 127–129, 174–175
ANOMSee also Analysis of Meansfor Variances 203–204Transformed Ranks 178
ANOMV display options 180
BBartlett test 195Beta Binomial fit 104–105Beta fit 68, 98Binomial fit 104Bivariate Normal Ellipse menu 139–142Bivariate platform 113
example 116launching 116options 118–121, 139–143report window 117
Block button 112Block Means report 176
bootstrapping 347–362Box plots 169Brown-Forsythe test 195
CCapability Analysis option 63–67, 89–95CDF plot 168, 200Cell Labeling option 246Change Format option 300Change Item Label 309Change Plot Scale option 300Cluster Documents, Text Explorer 397Cluster Terms, Text Explorer 396Cochran Armitage Trend Test 245, 256–257Cochran Mantel Haenszel test 244, 253Coefficient of Variation 303Color by Density Quantile option 142Color Theme option 247column tables 307Compare Densities option 200Compare Means options 167, 181–187comparison circles 170, 183–184, 231–232Composition of Densities option 200Confid Curves Fit option 141Confid Curves Indiv option 141Confid Quantile option 187Confid Shaded Fit option 142Confid Shaded Indiv option 142Confidence Interval options 51, 62Confidence Limits option 71Connect Means option 170Connecting Letters Report 187Contingency platform 239
example 241–242launching 242options 244–245report window 243

410 IndexBasic Analysis
Contingency Table 244, 248–249Continuous Fit options 67–102Contour Fill option 142Contour Lines option 142Correlation report 137Correspondence Analysis option 244, 251Count Axis option 51, 55Covariance of Estimates report 281
DDensities options 168, 200Density Axis option 51, 55Density Curve option 69Density Ellipse option 136–138density estimation fits 121Detailed Comparisons Report 187Details report 252Diagnostic Plot option 69–71Difference Matrix option 187Discrete Fit options 69–105Display Options 168–170, 181, 251
for categorical variables 51for continuous variables 53–54
Distribution platform 35categorical variables in 38continuous variables in 38example 39–40launching 40options 49–74report window 41–43
Document Term Matrix, Text Explorer 365
EEach Pair Stepwise, Newman-Keuls 182Each Pair, Student’s t test 181, 184–206Equal Variances option 134Equivalence Test option 61, 167, 197–217Exact Test 245, 257
See also Fisher’s Exact Testoptions 189
Exponential fit 68, 97Extreme Value fit 97
FFisher’s Exact Test 251Fit Each Value
menu 139–141option 134report 134
Fit Line option 120, 123–130, 154Fit Mean
menu 139–141option 120, 122–123report 123
Fit Orthogonal option 134–135, 154Fit Polynomial option 120, 123–157Fit Special option 120, 130–131Fit Spline option 132–133, 154Fit X to Y option 134Fit Y by X platform 109Fix Parameters option 69Frequencies
option 51report 46
Friedman Rank Test 188
GGamma fit 68, 97Gamma Poisson fit 103GLog fit 68, 101–102Goodness of Fit
option 69tests 71–106
Gradient Between Ends option 247Gradient Between Selected Points option 247Grand Mean option 169Graph in Variance Scale option 181Group By option 119, 139
HHistogram Options 54histograms 43–75
borders option 119, 122color option 51, 54creating subsets 43highlighting data 43, 45option in Oneway 170

Index 411Basic Analysis
options for continuous variables 54–55rescaling 43resizing 43–44selecting data 45specifying data 43
Horizontal Layout option 51, 54
IInclude missing for grouping columns
option 300Inverse Prediction option 281Iterations report 278
Jjitter 285Johnson fits 68, 99–101
KKernel Control option 142Kolmogorov Smirnov Test 188Kruskal-Wallis test, see Wilcoxon Test
LLack of Fit report 126–127language processing, Text Explorer 371Latent Class Analysis option, Text
Explorer 388, 392Latent Semantic Analysis, SVD in Text
Explorer 388Levene test 195Lift Curve option 281Line Color option 140Line of Fit option 71, 140, 200Line Style option 140Line Width option 141Linear Fit
menu 139–142report 124–157
Logistic platform 271See also logistic regressionCovariance of Estimates report 281examples 274–275, 284–288Iterations report 278launching 275
logistic plot 277, 281options 281–283Parameter Estimates report 280report window 276–281Whole Model Test report 278–280
logistic regression 271, 273LogNormal fit 67, 96LSD Threshold Matrix option 187
MMacros option 247Make Into Data Table option 309Mann-Whitney test, see Wilcoxon TestMatching Column option 168, 201Matching Dotted Lines option 170Matching Lines option 170, 201Max (summary statistics) 302Mean CI Lines option 169Mean Diamonds option 169, 176–177Mean Error Bars option 169, 177Mean Lines option 169, 177Mean of Means option 170Means and Std Dev option 167Means for Oneway Anova report 175Means/Anova option 166, 172Means/Anova/Pooled t option 167, 172Measures of Association option 245, 255–256Median (summary statistics) 303Median Reference Line option 71Median Test 188Mesh Plot option 143Min (summary statistics) 302Model Clustering option 143Mosaic Plot
in Contingency 244–247option in Distribution 52
NN and N Missing (summary statistics) 303N Categories (summary statistics) 303Nonpar Density option 138–139Nonparametric
options 167tests 187–188
Normal fit 67, 95

412 IndexBasic Analysis
Normal Mixtures fits 68, 98Normal Quantile Plot 55–56, 168, 200Number of Cases, Text Explorer 378Number of Non-empty Cases, Text
Explorer 378
OO’Brien test 195Odds Ratios option 245, 281Oneway platform 159, 162
example 162–164launching 164options 166–170plot 165
Order by count of grouping columns option 300
Order By option 50Ordered Differences Report 187Orthogonal Fit Ratio menu 139–141Orthogonal Regression report 135Outlier Box Plot 56–57
PParameter Estimates report 129–157, 280parametric resampling, Simulate platform 319Parsing Options, Text Explorer 384Plot Actual by Quantile option 200Plot Options menu in Logistic 281Plot Quantile by Actual option 200Plot Residuals option 142Points Jittered option 170Points option 169Points Spread option 170Poisson fit 102Polynomial Fit Degree menu 139Polynomial Fit report 124–157Portion of Non-empty Cases, Text Explorer 378Power option 167, 198–200, 232–233Prediction Interval option 63–79, 88Prob Axis option 51, 55Proportion of Densities option 201
QQuantile Box Plot 57–58
Quantile Density Contours menu 139–143Quantile Density Contours report 139Quantiles
option 53, 69, 82, 166, 170–172report 46
Rranges, summary statistics 302regression fits for Bivariate 121regular expression editor, Text Explorer 373Relative Risk option 245, 254Remove Column Label 308Remove Fit option 70, 141Report option 141Restore Column Label 308Reverse Colors option 247Revert to Old Colors option 247ROC Curve option 281Rotate option 71row profile 252row tables 307
Ssample size, in tabulate 310Save Coefficients option 142Save Colors to Column option 247Save commands in Distribution 72–74Save Density Formula command 70Save Density Grid option 143Save Density Quantile option 142Save Fitted Quantiles command 70Save for Adobe Flash platform (.SWF)
option 50Save options
in Oneway 168Save Predicteds option 141Save Probability Formula option 282Save Residuals option 141Save Spec Limits command 70Save Value Ordering option 252Saved Transformed command 70Select Colors for Values window 247Select Points by Density option 142Select Points Inside option 142Select Points Outside option 142

Index 413Basic Analysis
Separate Bars option 51Set Alpha Level option
for Bivariate 142for Contingency 244, 251for Oneway 167, 180
Set Bin Width option 54Set Colors option 246Set Spec Limits for K Sigma option 70Shaded Contour option 142Shadowgram option 54Shash fit 68Show Center Line option 181Show Chart option 309Show Control Panel option 309Show Counts option 52, 55Show Decision Limit Shading option 181Show Decision Limits option 181Show Delimiters, Text Explorer 383Show Percents option 51, 55Show Points option
for Bivariate 118Show Shading option 309Show Stem Report, Text Explorer 383Show Summary Report option 180, 251Show Table option 309Show Test Build Panel option 309Show tooltip option 309Simulate platform data table results 344Smooth Curve fit 68, 99Smoothing Spline Fit
menu 139report 132
Spec Limits option 70, 72Specified Variance Ratio option 135Specify Transformation or Constraint
window 131, 144Stack option 49Standard Deviation 302Standard Error 303Std Dev and Std Err (summary statistics) 302Std Dev Lines option 169, 177Std Error Bars option 51, 54Steel With Control test 192Steel-Dwass All Pairs test 192Stem and Leaf plot 58Stemming, Text Explorer 365, 371
stop words, Text Explorer 365, 386Student’s t test 181, 184–206Subset option 43Summary of Fit report 125–126, 172Summary Statistics
customize 54options 49report 46, 54
SVD Scatterplot Matrix, Text Explorer 395Switch Response Level for Proportion
option 251
Tt test
option 167report 173–174
Tabulate 293–318term (token), Text Explorer 365Term Options, Text Explorer 384Test Mean option 59–60Test Probabilities option 50–78Test Std Dev option 60–61Tests
option in Contingency 244report 250–251
Text ExplorerCluster Documents 397Cluster Terms 396editing regular expressions 373language processing 371Latent Class Analysis option 388, 392Latent Semantic Analysis, SVD 388Number of Cases 378Number of Non-empty Cases 378Parsing Options 384platform options 382Portion of Non-empty Cases 378Show Delimiters 383Show Stem Report 383Stemming 365, 371stop words 365, 386SVD Scatterplot Matrix 395term (token) 365Term Options 384Tokenizing 372Tokens per Case 378

414 IndexBasic Analysis
Topic Analysis, Rotated SVD 396Topic Scatterplot Matrix 398Total Tokens 378
Text Explorer, Word Separator List 376Tokenizing, Text Explorer 372Tokens per Case, Text Explorer 378Tolerance Interval option 63–80, 88–89Topic Analysis, Rotated SVD in Text
Explorer 396Topic Scatterplot Matrix, Text Explorer 398Total Tokens, Text Explorer 378Transformed Fit
menu 139report 131
Treat Numbers as Words, Text Explorer 372Two Sample Test for Proportions 245, 254–255
UUnequal Variances 167, 194–195Uniform plot scale option 300Uniform Scaling option 49Univariate Variances, Prin Comp option 134
Vvan der Waerden Test 188Variance (summary statistics) 303Vertical option 51, 54
W-ZWeibull fits 68, 96Welch’s test 196Whole Model Test report 278–280Wilcoxon
Each Pair test 192Test 188
With Best, Hsu MCB test 182, 184–209With Control, Dunnett’s test 182, 186Word Separator List, Text Explorer 376X Axis proportional option 170, 176–177X, Continuous Regressor button 112X, Grouping button 112X, Grouping Category button 112X, Regressor button 112Y, Categorical Response button 112
Y, Response Category button 112