Basic Accommodations in Microsoft Word
19
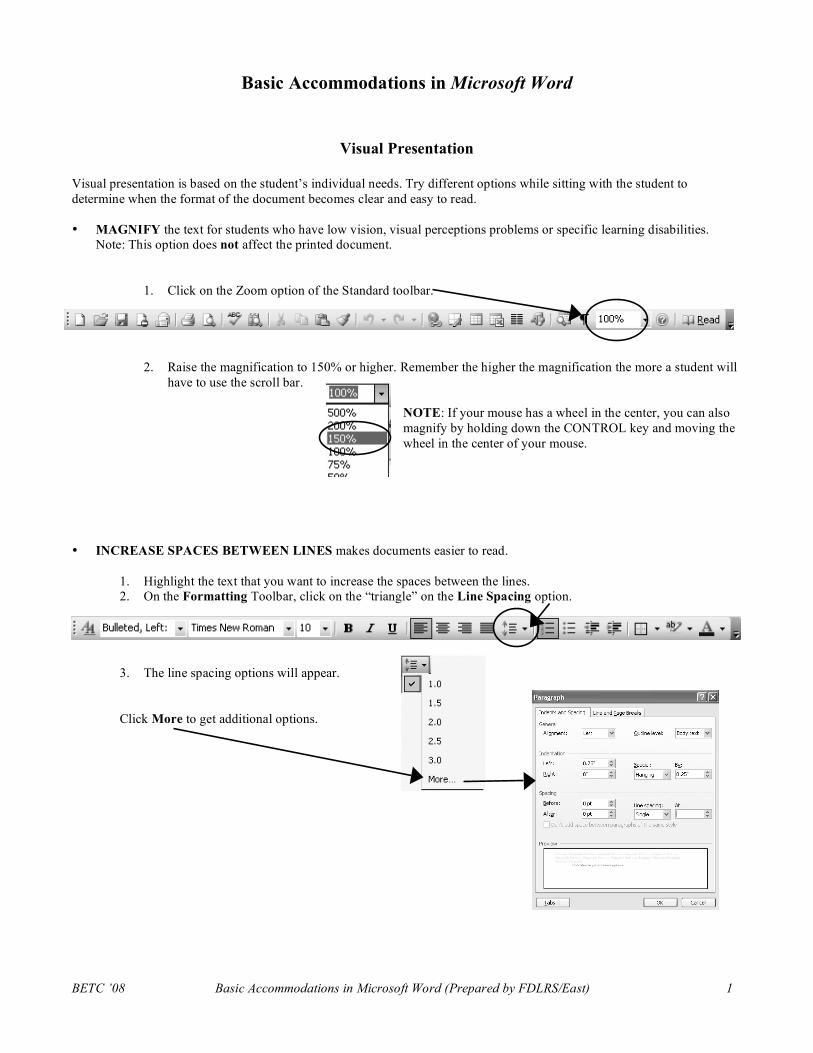
BETC ’08 Basic Accommodations in Microsoft Word (Prepared by FDLRS/East) 1 Basic Accommodations in Microsoft Word Visual Presentation Visual presentation is based on the student’s individual needs. Try different options while sitting with the student to determine when the format of the document becomes clear and easy to read. • MAGNIFY the text for students who have low vision, visual perceptions problems or specific learning disabilities. Note: This option does not affect the printed document. 1. Click on the Zoom option of the Standard toolbar. 2. Raise the magnification to 150% or higher. Remember the higher the magnification the more a student will have to use the scroll bar. NOTE: If your mouse has a wheel in the center, you can also magnify by holding down the CONTROL key and moving the wheel in the center of your mouse. • INCREASE SPACES BETWEEN LINES makes documents easier to read. 1. Highlight the text that you want to increase the spaces between the lines. 2. On the Formatting Toolbar, click on the “triangle” on the Line Spacing option. 3. The line spacing options will appear. Click More to get additional options.
Transcript of Basic Accommodations in Microsoft Word
BETC ’08 Basic Accommodations in Microsoft Word (Prepared by FDLRS/East) 1
Basic Accommodations in Microsoft Word
Visual Presentation
Visual presentation is based on the student’s individual needs. Try different options while sitting with the student to determine when the format of the document becomes clear and easy to read. • MAGNIFY the text for students who have low vision, visual perceptions problems or specific learning disabilities.
Note: This option does not affect the printed document.
1. Click on the Zoom option of the Standard toolbar.
2. Raise the magnification to 150% or higher. Remember the higher the magnification the more a student will
have to use the scroll bar.
NOTE: If your mouse has a wheel in the center, you can also magnify by holding down the CONTROL key and moving the wheel in the center of your mouse.
• INCREASE SPACES BETWEEN LINES makes documents easier to read.
1. Highlight the text that you want to increase the spaces between the lines. 2. On the Formatting Toolbar, click on the “triangle” on the Line Spacing option.
3. The line spacing options will appear.
Click More to get additional options.
BETC ’08 Basic Accommodations in Microsoft Word (Prepared by FDLRS/East) 2
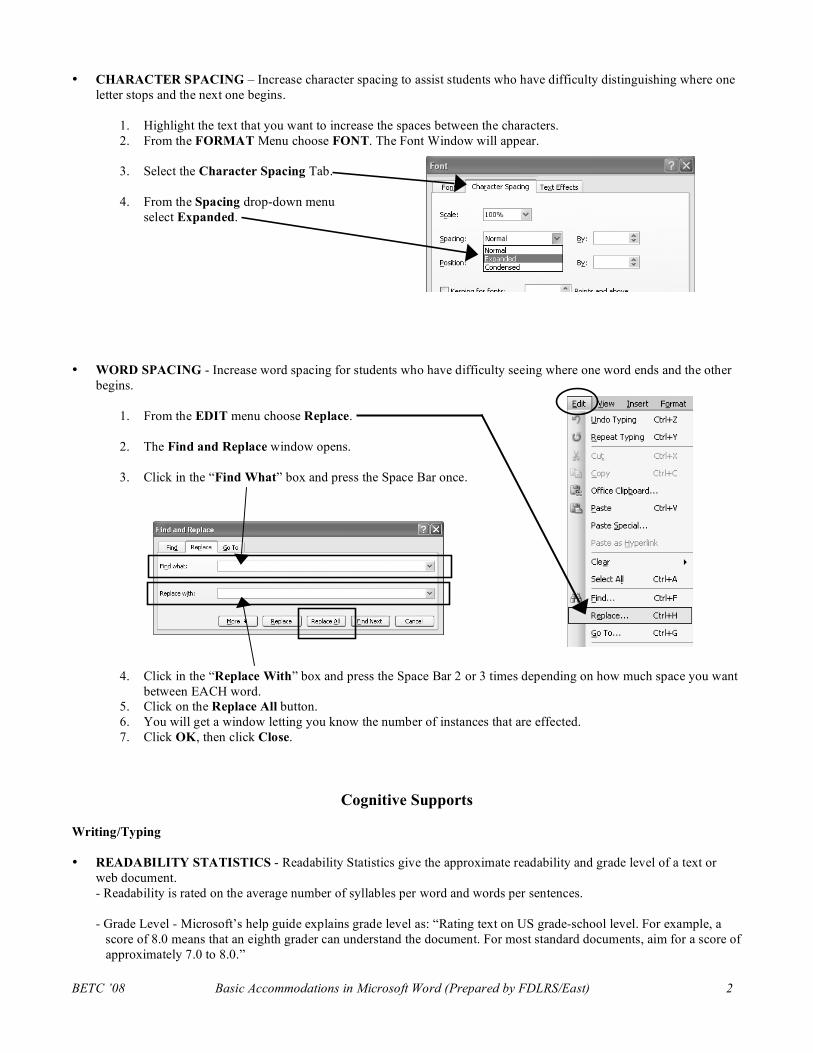
• CHARACTER SPACING – Increase character spacing to assist students who have difficulty distinguishing where one letter stops and the next one begins.
1. Highlight the text that you want to increase the spaces between the characters. 2. From the FORMAT Menu choose FONT. The Font Window will appear.
3. Select the Character Spacing Tab.
4. From the Spacing drop-down menu
select Expanded.
• WORD SPACING - Increase word spacing for students who have difficulty seeing where one word ends and the other begins.
1. From the EDIT menu choose Replace.
2. The Find and Replace window opens.
3. Click in the “Find What” box and press the Space Bar once.
4. Click in the “Replace With” box and press the Space Bar 2 or 3 times depending on how much space you want between EACH word.
5. Click on the Replace All button. 6. You will get a window letting you know the number of instances that are effected. 7. Click OK, then click Close.
Cognitive Supports
Writing/Typing • READABILITY STATISTICS - Readability Statistics give the approximate readability and grade level of a text or
web document. - Readability is rated on the average number of syllables per word and words per sentences. - Grade Level - Microsoft’s help guide explains grade level as: “Rating text on US grade-school level. For example, a score of 8.0 means that an eighth grader can understand the document. For most standard documents, aim for a score of approximately 7.0 to 8.0.”
BETC ’08 Basic Accommodations in Microsoft Word (Prepared by FDLRS/East) 3
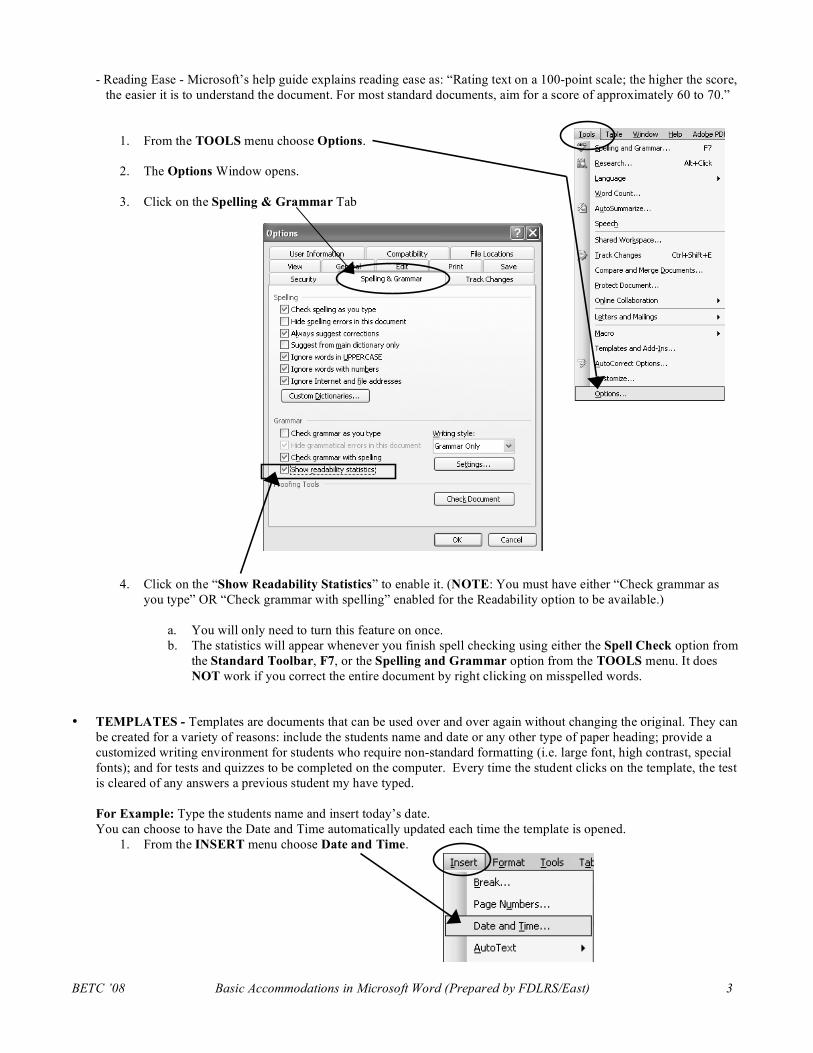
- Reading Ease - Microsoft’s help guide explains reading ease as: “Rating text on a 100-point scale; the higher the score, the easier it is to understand the document. For most standard documents, aim for a score of approximately 60 to 70.”
1. From the TOOLS menu choose Options.
2. The Options Window opens.
3. Click on the Spelling & Grammar Tab
4. Click on the “Show Readability Statistics” to enable it. (NOTE: You must have either “Check grammar as you type” OR “Check grammar with spelling” enabled for the Readability option to be available.)
a. You will only need to turn this feature on once. b. The statistics will appear whenever you finish spell checking using either the Spell Check option from
the Standard Toolbar, F7, or the Spelling and Grammar option from the TOOLS menu. It does NOT work if you correct the entire document by right clicking on misspelled words.
• TEMPLATES - Templates are documents that can be used over and over again without changing the original. They can
be created for a variety of reasons: include the students name and date or any other type of paper heading; provide a customized writing environment for students who require non-standard formatting (i.e. large font, high contrast, special fonts); and for tests and quizzes to be completed on the computer. Every time the student clicks on the template, the test is cleared of any answers a previous student my have typed. For Example: Type the students name and insert today’s date. You can choose to have the Date and Time automatically updated each time the template is opened.
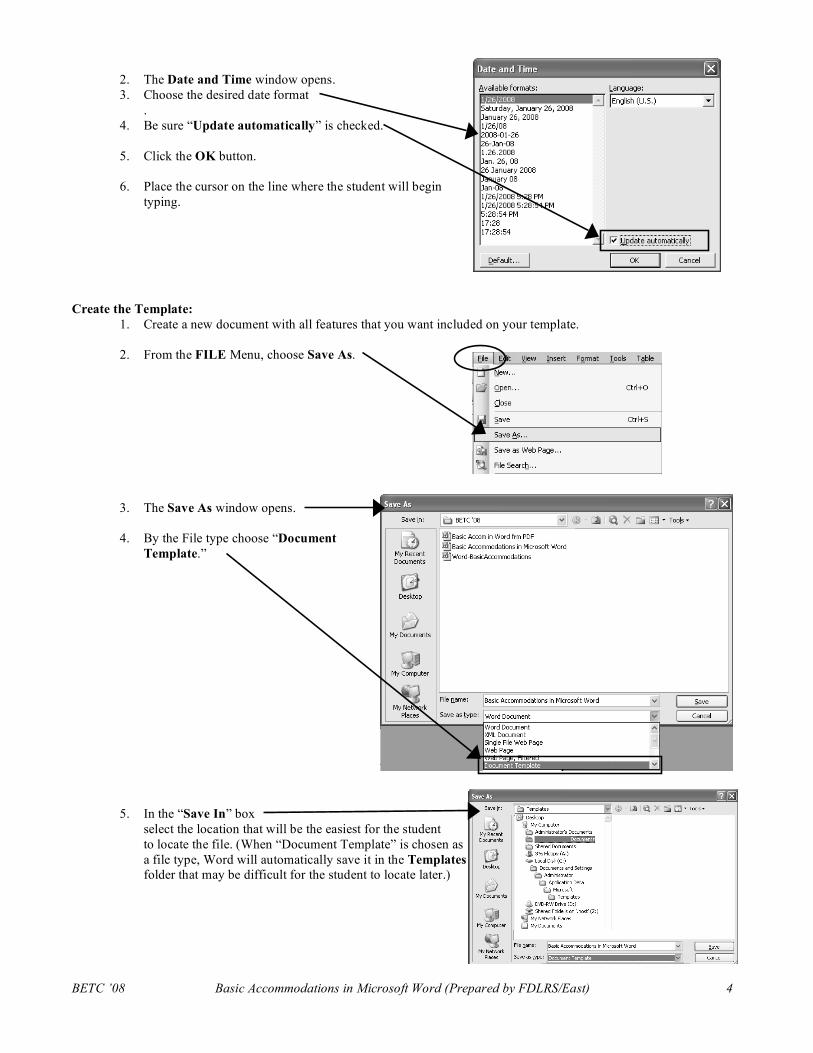
1. From the INSERT menu choose Date and Time.
BETC ’08 Basic Accommodations in Microsoft Word (Prepared by FDLRS/East) 4
2. The Date and Time window opens. 3. Choose the desired date format
. 4. Be sure “Update automatically” is checked.
5. Click the OK button.
6. Place the cursor on the line where the student will begin
typing.
Create the Template:
1. Create a new document with all features that you want included on your template.
2. From the FILE Menu, choose Save As.
3. The Save As window opens.
4. By the File type choose “Document Template.”
5. In the “Save In” box select the location that will be the easiest for the student to locate the file. (When “Document Template” is chosen as a file type, Word will automatically save it in the Templates folder that may be difficult for the student to locate later.)
BETC ’08 Basic Accommodations in Microsoft Word (Prepared by FDLRS/East) 5
6. Name the file and press Save. NOTE: A template icon has yellow binding on the top of the icon. A document icon has the top right corner folder over.
Using the Template: 1. Open the created template by double-clicking on the template icon. Notice that it is clear of any typing. (Do
NOT right-click to open a template as it will open the original template and a Save will cause it to be overwritten.)
2. Type and Save the document as normal Word Document. (Do NOT change the File type). • CREATING LINED PAPER – Creating lined provides increased visual feedback to support spatial orientation in
handwriting. Using Tables to create lined paper provides: increased visual feedback to support spatial orientation in handwriting; increased visual feedback to support spatial awareness in writing; and decreased visual attention needed for spatial orientation skills in handwriting.
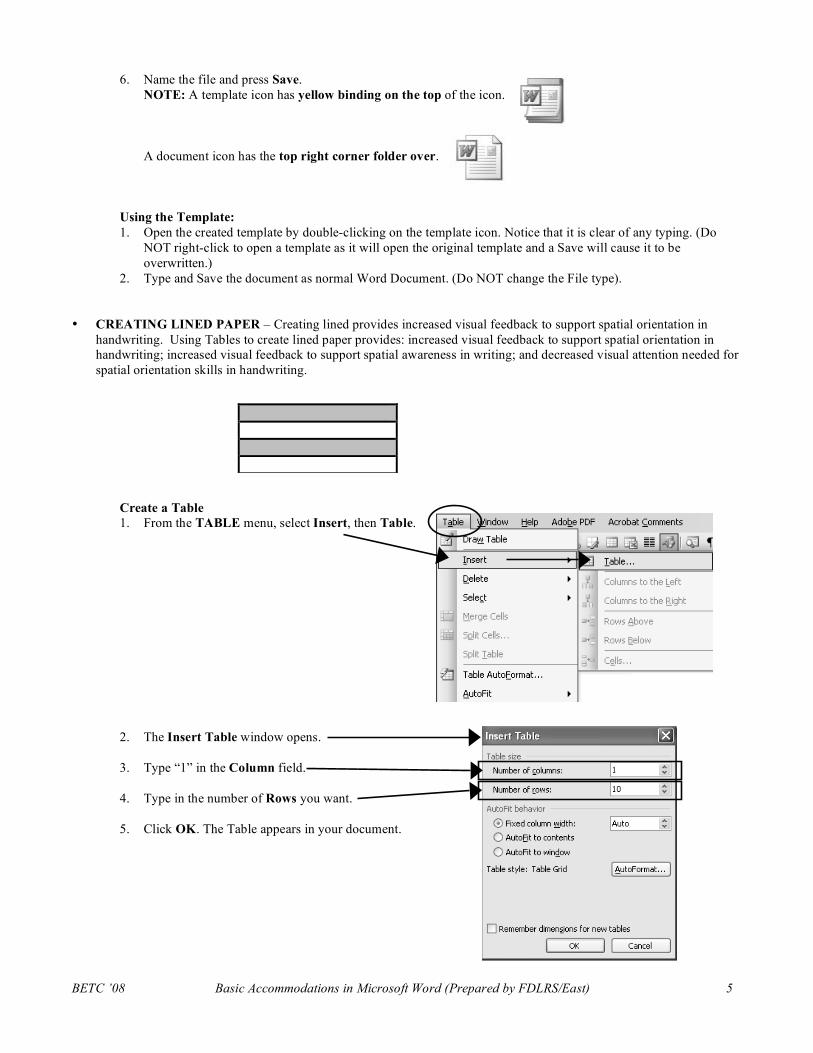
Create a Table 1. From the TABLE menu, select Insert, then Table.
2. The Insert Table window opens.
3. Type “1” in the Column field.
4. Type in the number of Rows you want.
5. Click OK. The Table appears in your document.
BETC ’08 Basic Accommodations in Microsoft Word (Prepared by FDLRS/East) 6
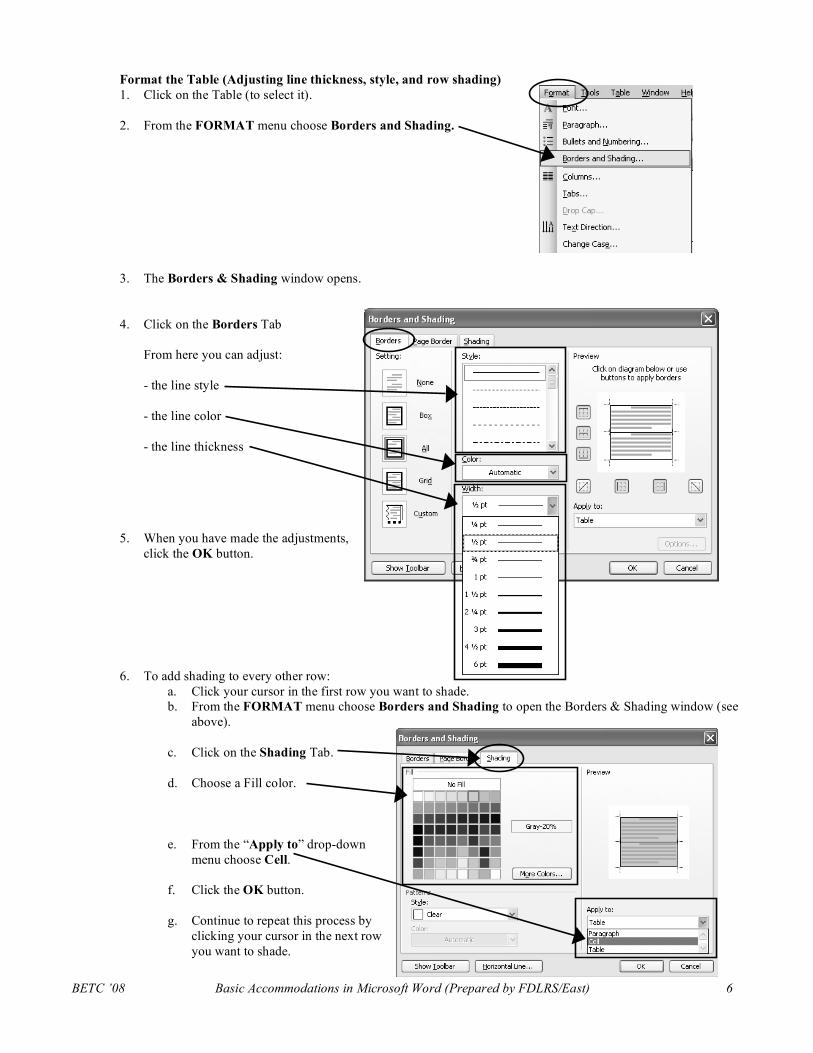
Format the Table (Adjusting line thickness, style, and row shading) 1. Click on the Table (to select it).
2. From the FORMAT menu choose Borders and Shading.
3. The Borders & Shading window opens.
4. Click on the Borders Tab From here you can adjust: - the line style - the line color - the line thickness
5. When you have made the adjustments, click the OK button.
6. To add shading to every other row: a. Click your cursor in the first row you want to shade. b. From the FORMAT menu choose Borders and Shading to open the Borders & Shading window (see
above).
c. Click on the Shading Tab.
d. Choose a Fill color.
e. From the “Apply to” drop-down menu choose Cell.
f. Click the OK button.
g. Continue to repeat this process by clicking your cursor in the next row you want to shade.
BETC ’08 Basic Accommodations in Microsoft Word (Prepared by FDLRS/East) 7
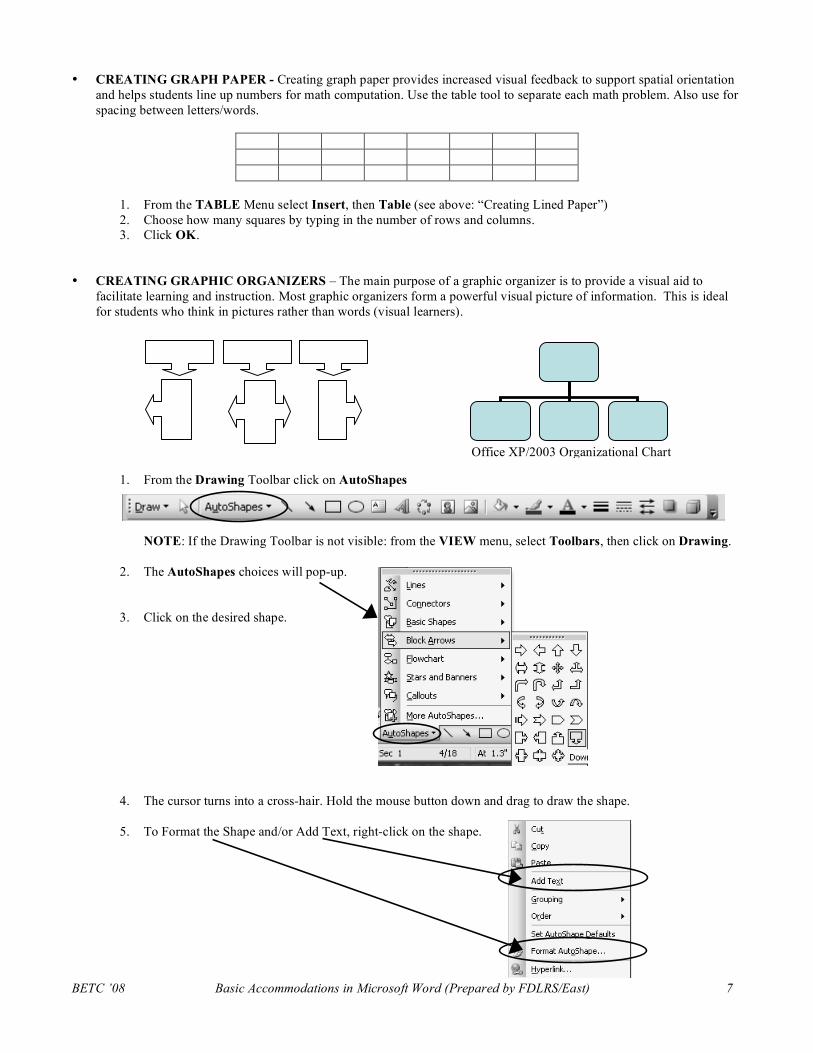
• CREATING GRAPH PAPER - Creating graph paper provides increased visual feedback to support spatial orientation and helps students line up numbers for math computation. Use the table tool to separate each math problem. Also use for spacing between letters/words.
1. From the TABLE Menu select Insert, then Table (see above: “Creating Lined Paper”) 2. Choose how many squares by typing in the number of rows and columns. 3. Click OK.
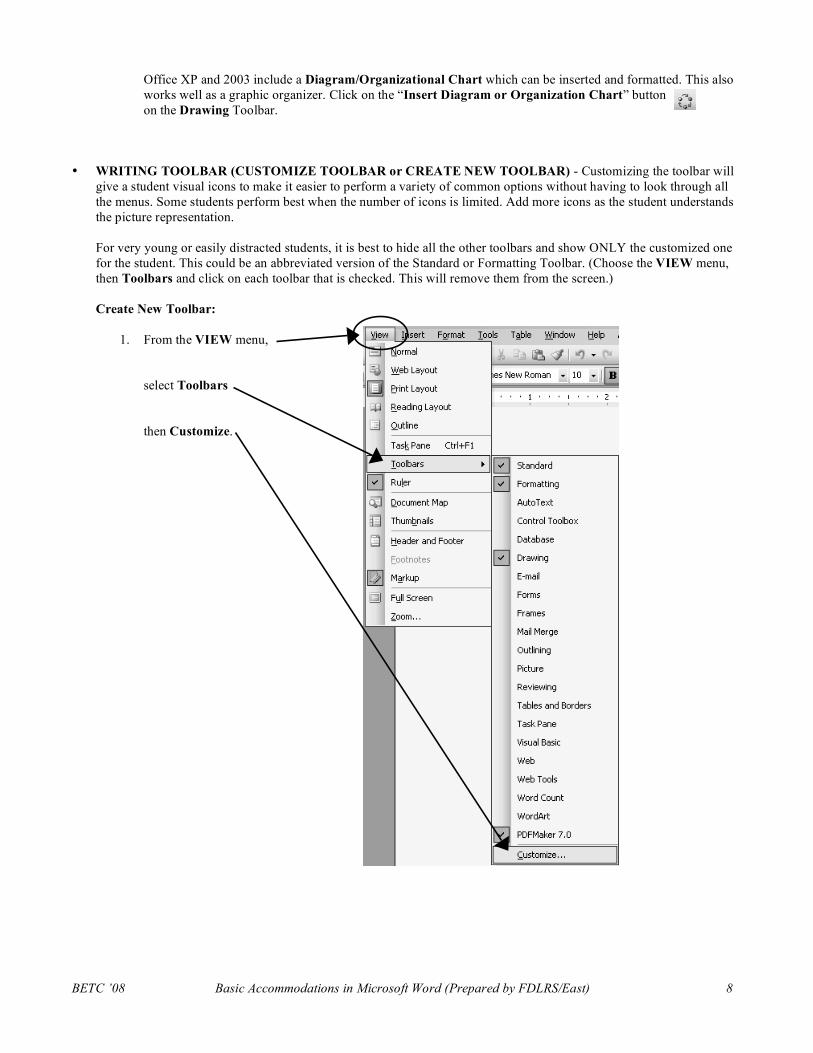
• CREATING GRAPHIC ORGANIZERS – The main purpose of a graphic organizer is to provide a visual aid to facilitate learning and instruction. Most graphic organizers form a powerful visual picture of information. This is ideal for students who think in pictures rather than words (visual learners).
1. From the Drawing Toolbar click on AutoShapes NOTE: If the Drawing Toolbar is not visible: from the VIEW menu, select Toolbars, then click on Drawing.
2. The AutoShapes choices will pop-up.
3. Click on the desired shape.
4. The cursor turns into a cross-hair. Hold the mouse button down and drag to draw the shape.
5. To Format the Shape and/or Add Text, right-click on the shape.
Office XP/2003 Organizational Chart
BETC ’08 Basic Accommodations in Microsoft Word (Prepared by FDLRS/East) 8
Office XP and 2003 include a Diagram/Organizational Chart which can be inserted and formatted. This also works well as a graphic organizer. Click on the “Insert Diagram or Organization Chart” button on the Drawing Toolbar.
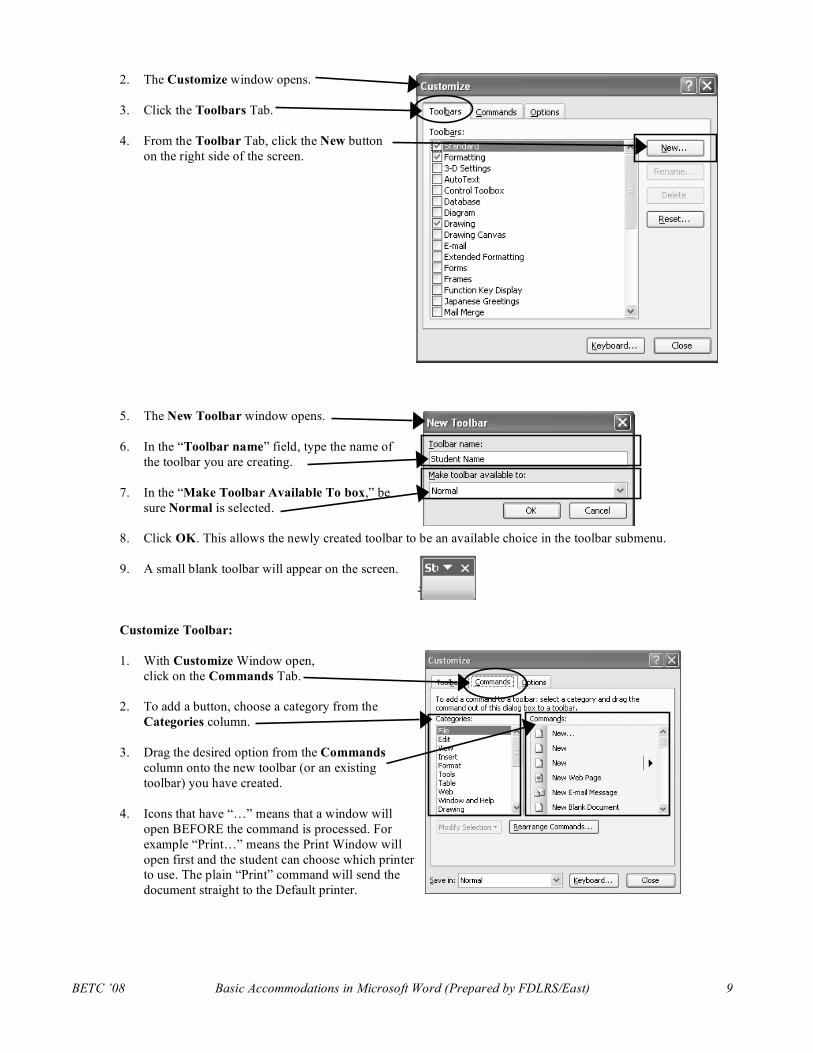
• WRITING TOOLBAR (CUSTOMIZE TOOLBAR or CREATE NEW TOOLBAR) - Customizing the toolbar will give a student visual icons to make it easier to perform a variety of common options without having to look through all the menus. Some students perform best when the number of icons is limited. Add more icons as the student understands the picture representation. For very young or easily distracted students, it is best to hide all the other toolbars and show ONLY the customized one for the student. This could be an abbreviated version of the Standard or Formatting Toolbar. (Choose the VIEW menu, then Toolbars and click on each toolbar that is checked. This will remove them from the screen.) Create New Toolbar:
1. From the VIEW menu, select Toolbars then Customize.
BETC ’08 Basic Accommodations in Microsoft Word (Prepared by FDLRS/East) 9
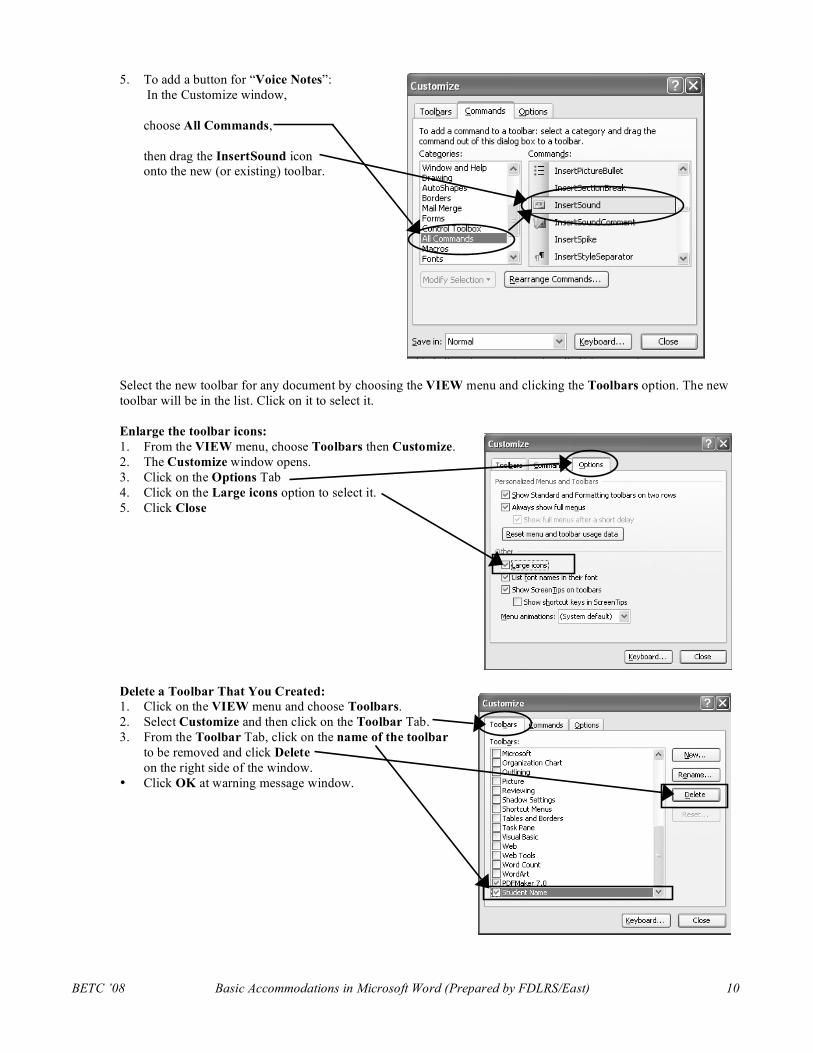
2. The Customize window opens.
3. Click the Toolbars Tab.
4. From the Toolbar Tab, click the New button on the right side of the screen.
5. The New Toolbar window opens.
6. In the “Toolbar name” field, type the name of the toolbar you are creating.
7. In the “Make Toolbar Available To box,” be sure Normal is selected.
8. Click OK. This allows the newly created toolbar to be an available choice in the toolbar submenu.
9. A small blank toolbar will appear on the screen.
Customize Toolbar: 1. With Customize Window open,
click on the Commands Tab.
2. To add a button, choose a category from the Categories column.
3. Drag the desired option from the Commands column onto the new toolbar (or an existing toolbar) you have created.
4. Icons that have “…” means that a window will open BEFORE the command is processed. For example “Print…” means the Print Window will open first and the student can choose which printer to use. The plain “Print” command will send the document straight to the Default printer.
BETC ’08 Basic Accommodations in Microsoft Word (Prepared by FDLRS/East) 10
5. To add a button for “Voice Notes”: In the Customize window, choose All Commands, then drag the InsertSound icon onto the new (or existing) toolbar.
Select the new toolbar for any document by choosing the VIEW menu and clicking the Toolbars option. The new toolbar will be in the list. Click on it to select it. Enlarge the toolbar icons: 1. From the VIEW menu, choose Toolbars then Customize. 2. The Customize window opens. 3. Click on the Options Tab 4. Click on the Large icons option to select it. 5. Click Close
Delete a Toolbar That You Created: 1. Click on the VIEW menu and choose Toolbars. 2. Select Customize and then click on the Toolbar Tab. 3. From the Toolbar Tab, click on the name of the toolbar
to be removed and click Delete on the right side of the window.
• Click OK at warning message window.
BETC ’08 Basic Accommodations in Microsoft Word (Prepared by FDLRS/East) 11
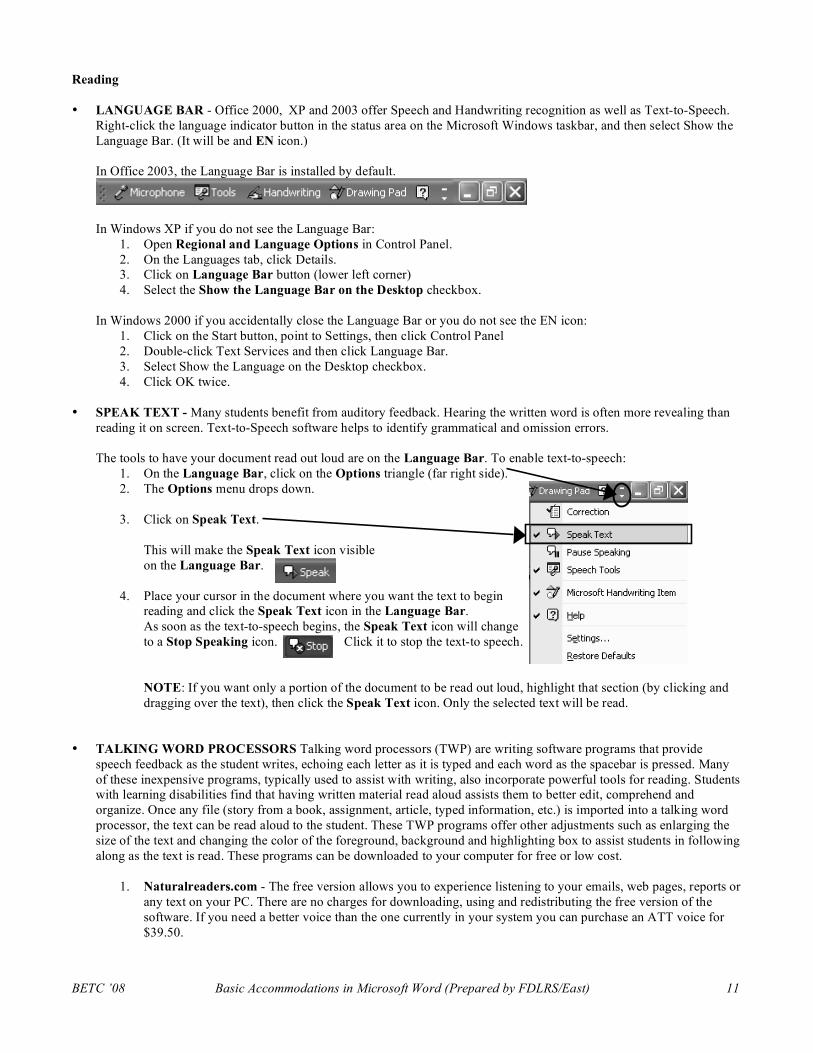
Reading • LANGUAGE BAR - Office 2000, XP and 2003 offer Speech and Handwriting recognition as well as Text-to-Speech.
Right-click the language indicator button in the status area on the Microsoft Windows taskbar, and then select Show the Language Bar. (It will be and EN icon.) In Office 2003, the Language Bar is installed by default.
In Windows XP if you do not see the Language Bar:
1. Open Regional and Language Options in Control Panel. 2. On the Languages tab, click Details. 3. Click on Language Bar button (lower left corner) 4. Select the Show the Language Bar on the Desktop checkbox.
In Windows 2000 if you accidentally close the Language Bar or you do not see the EN icon:
1. Click on the Start button, point to Settings, then click Control Panel 2. Double-click Text Services and then click Language Bar. 3. Select Show the Language on the Desktop checkbox. 4. Click OK twice.
• SPEAK TEXT - Many students benefit from auditory feedback. Hearing the written word is often more revealing than
reading it on screen. Text-to-Speech software helps to identify grammatical and omission errors. The tools to have your document read out loud are on the Language Bar. To enable text-to-speech:
1. On the Language Bar, click on the Options triangle (far right side). 2. The Options menu drops down.
3. Click on Speak Text.
This will make the Speak Text icon visible on the Language Bar.
4. Place your cursor in the document where you want the text to begin reading and click the Speak Text icon in the Language Bar. As soon as the text-to-speech begins, the Speak Text icon will change to a Stop Speaking icon. Click it to stop the text-to speech. NOTE: If you want only a portion of the document to be read out loud, highlight that section (by clicking and dragging over the text), then click the Speak Text icon. Only the selected text will be read.
• TALKING WORD PROCESSORS Talking word processors (TWP) are writing software programs that provide speech feedback as the student writes, echoing each letter as it is typed and each word as the spacebar is pressed. Many of these inexpensive programs, typically used to assist with writing, also incorporate powerful tools for reading. Students with learning disabilities find that having written material read aloud assists them to better edit, comprehend and organize. Once any file (story from a book, assignment, article, typed information, etc.) is imported into a talking word processor, the text can be read aloud to the student. These TWP programs offer other adjustments such as enlarging the size of the text and changing the color of the foreground, background and highlighting box to assist students in following along as the text is read. These programs can be downloaded to your computer for free or low cost.
1. Naturalreaders.com - The free version allows you to experience listening to your emails, web pages, reports or any text on your PC. There are no charges for downloading, using and redistributing the free version of the software. If you need a better voice than the one currently in your system you can purchase an ATT voice for $39.50.
BETC ’08 Basic Accommodations in Microsoft Word (Prepared by FDLRS/East) 12
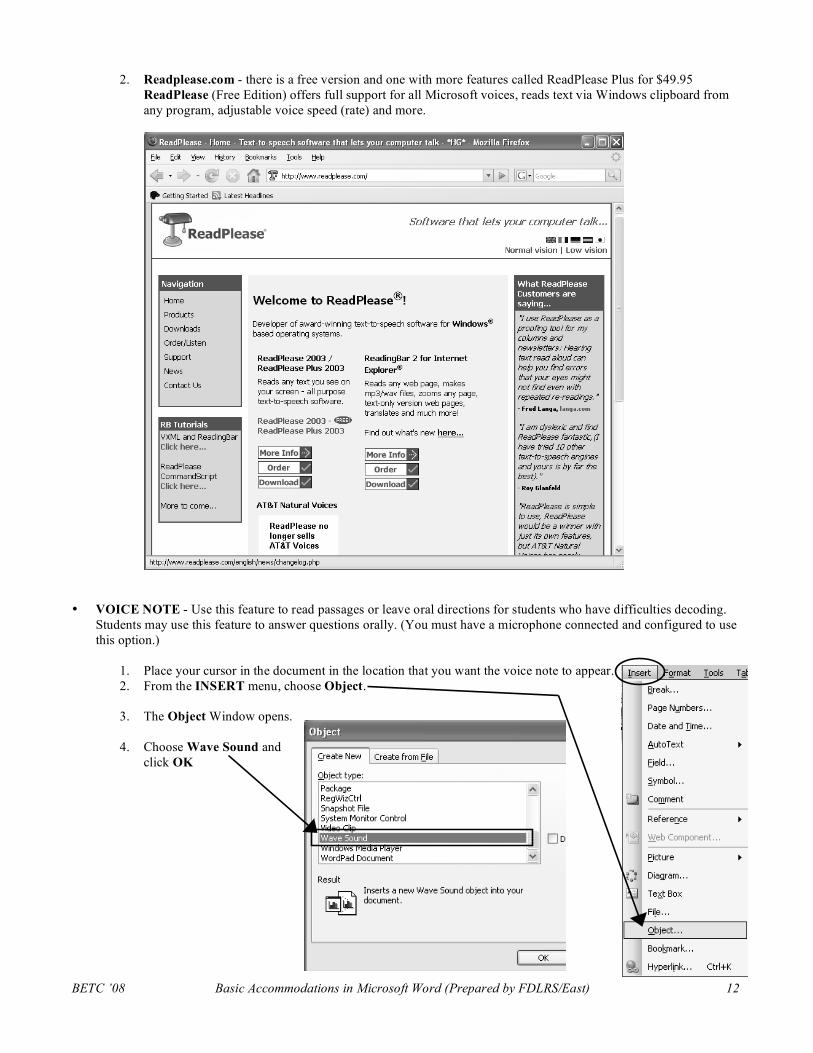
2. Readplease.com - there is a free version and one with more features called ReadPlease Plus for $49.95 ReadPlease (Free Edition) offers full support for all Microsoft voices, reads text via Windows clipboard from any program, adjustable voice speed (rate) and more.
• VOICE NOTE - Use this feature to read passages or leave oral directions for students who have difficulties decoding. Students may use this feature to answer questions orally. (You must have a microphone connected and configured to use this option.)
1. Place your cursor in the document in the location that you want the voice note to appear. 2. From the INSERT menu, choose Object.
3. The Object Window opens.
4. Choose Wave Sound and
click OK
BETC ’08 Basic Accommodations in Microsoft Word (Prepared by FDLRS/East) 13
5. The Sound Object window opens. 6. Click on the Red button to record. 7. Press the Black rectangle to stop. 8. Press the Left Double-Triangles to rewind. 9. Click the Black Triangle to preview the note you just recorded.
10. Click the Close Box (X) to close the recording window.
11. A Speaker icon will appear on the document.
12. Double-click on the Speaker to listen to the recording.
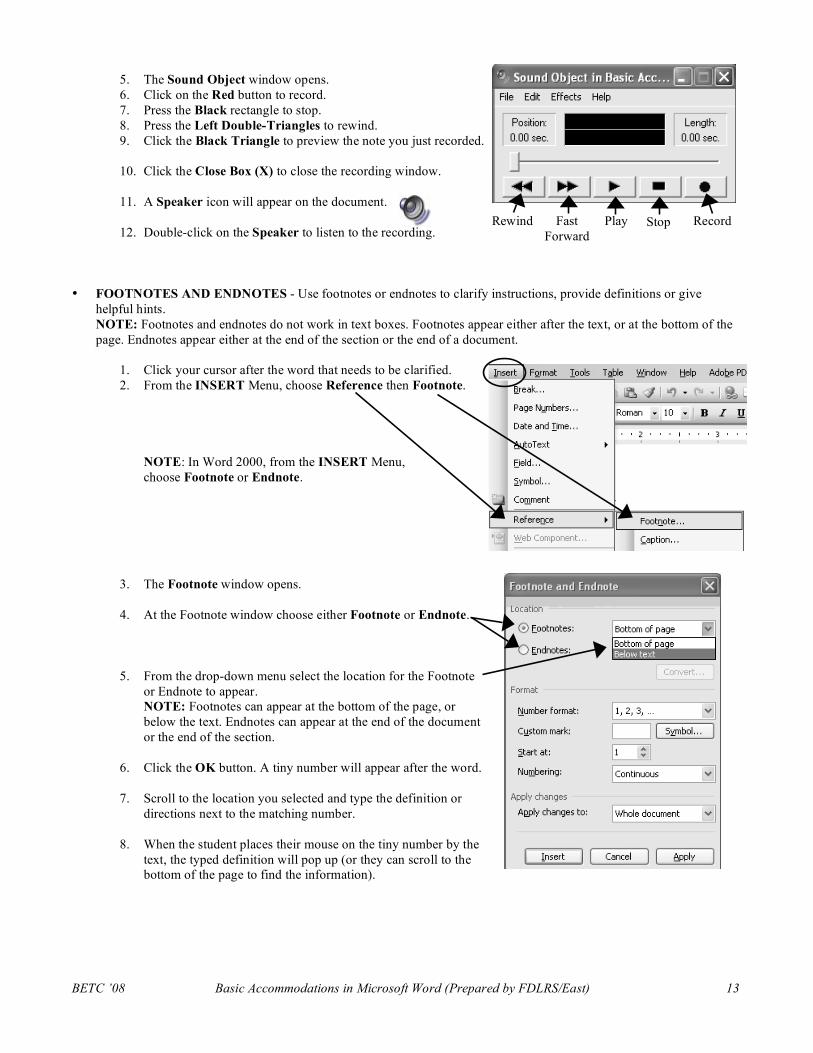
• FOOTNOTES AND ENDNOTES - Use footnotes or endnotes to clarify instructions, provide definitions or give helpful hints. NOTE: Footnotes and endnotes do not work in text boxes. Footnotes appear either after the text, or at the bottom of the page. Endnotes appear either at the end of the section or the end of a document.
1. Click your cursor after the word that needs to be clarified. 2. From the INSERT Menu, choose Reference then Footnote.
NOTE: In Word 2000, from the INSERT Menu, choose Footnote or Endnote.
3. The Footnote window opens.
4. At the Footnote window choose either Footnote or Endnote.
5. From the drop-down menu select the location for the Footnote or Endnote to appear. NOTE: Footnotes can appear at the bottom of the page, or below the text. Endnotes can appear at the end of the document or the end of the section.
6. Click the OK button. A tiny number will appear after the word.
7. Scroll to the location you selected and type the definition or directions next to the matching number.
8. When the student places their mouse on the tiny number by the text, the typed definition will pop up (or they can scroll to the bottom of the page to find the information).
Record Play Stop Fast Forward
Rewind
BETC ’08 Basic Accommodations in Microsoft Word (Prepared by FDLRS/East) 14
NOTE: Because hovering the mouse over the tiny number pops up the definition, it is suggested to put Footnotes at the bottom of the page, and Endnotes at the end of the document, to reduce clutter on the page. Example:
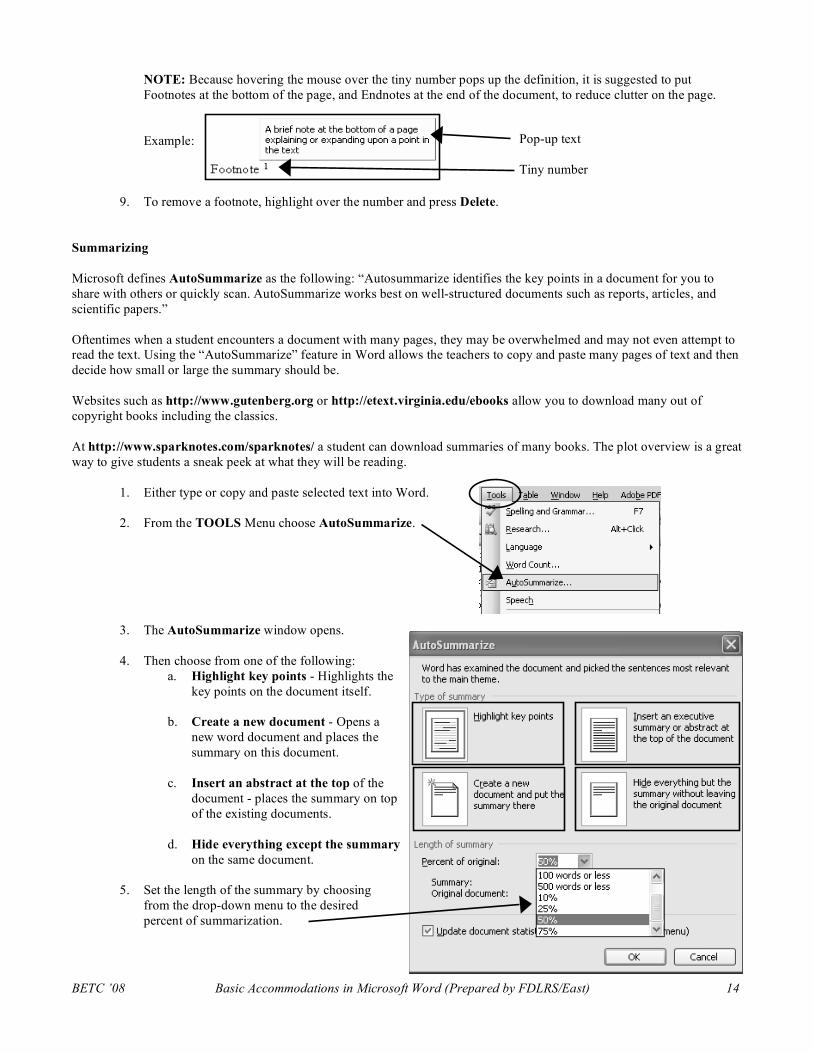
9. To remove a footnote, highlight over the number and press Delete. Summarizing Microsoft defines AutoSummarize as the following: “Autosummarize identifies the key points in a document for you to share with others or quickly scan. AutoSummarize works best on well-structured documents such as reports, articles, and scientific papers.” Oftentimes when a student encounters a document with many pages, they may be overwhelmed and may not even attempt to read the text. Using the “AutoSummarize” feature in Word allows the teachers to copy and paste many pages of text and then decide how small or large the summary should be. Websites such as http://www.gutenberg.org or http://etext.virginia.edu/ebooks allow you to download many out of copyright books including the classics. At http://www.sparknotes.com/sparknotes/ a student can download summaries of many books. The plot overview is a great way to give students a sneak peek at what they will be reading.
1. Either type or copy and paste selected text into Word.
2. From the TOOLS Menu choose AutoSummarize.
3. The AutoSummarize window opens.
4. Then choose from one of the following: a. Highlight key points - Highlights the
key points on the document itself.
b. Create a new document - Opens a new word document and places the summary on this document.
c. Insert an abstract at the top of the document - places the summary on top of the existing documents.
d. Hide everything except the summary on the same document.
5. Set the length of the summary by choosing from the drop-down menu to the desired percent of summarization.
Pop-up text Tiny number
BETC ’08 Basic Accommodations in Microsoft Word (Prepared by FDLRS/East) 15
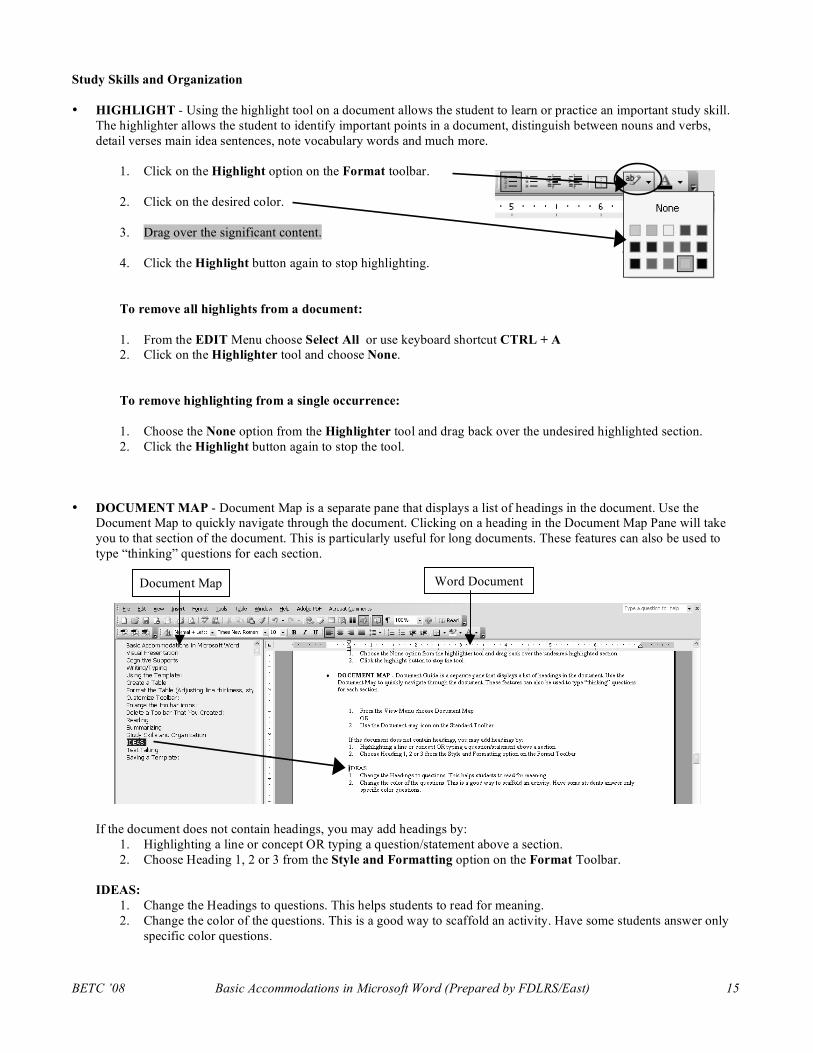
Study Skills and Organization • HIGHLIGHT - Using the highlight tool on a document allows the student to learn or practice an important study skill.
The highlighter allows the student to identify important points in a document, distinguish between nouns and verbs, detail verses main idea sentences, note vocabulary words and much more.
1. Click on the Highlight option on the Format toolbar.
2. Click on the desired color.
3. Drag over the significant content.
4. Click the Highlight button again to stop highlighting.
To remove all highlights from a document: 1. From the EDIT Menu choose Select All or use keyboard shortcut CTRL + A 2. Click on the Highlighter tool and choose None.
To remove highlighting from a single occurrence: 1. Choose the None option from the Highlighter tool and drag back over the undesired highlighted section. 2. Click the Highlight button again to stop the tool.
• DOCUMENT MAP - Document Map is a separate pane that displays a list of headings in the document. Use the Document Map to quickly navigate through the document. Clicking on a heading in the Document Map Pane will take you to that section of the document. This is particularly useful for long documents. These features can also be used to type “thinking” questions for each section. If the document does not contain headings, you may add headings by:
1. Highlighting a line or concept OR typing a question/statement above a section. 2. Choose Heading 1, 2 or 3 from the Style and Formatting option on the Format Toolbar.
IDEAS:
1. Change the Headings to questions. This helps students to read for meaning. 2. Change the color of the questions. This is a good way to scaffold an activity. Have some students answer only
specific color questions.
Document Map Word Document
BETC ’08 Basic Accommodations in Microsoft Word (Prepared by FDLRS/East) 16
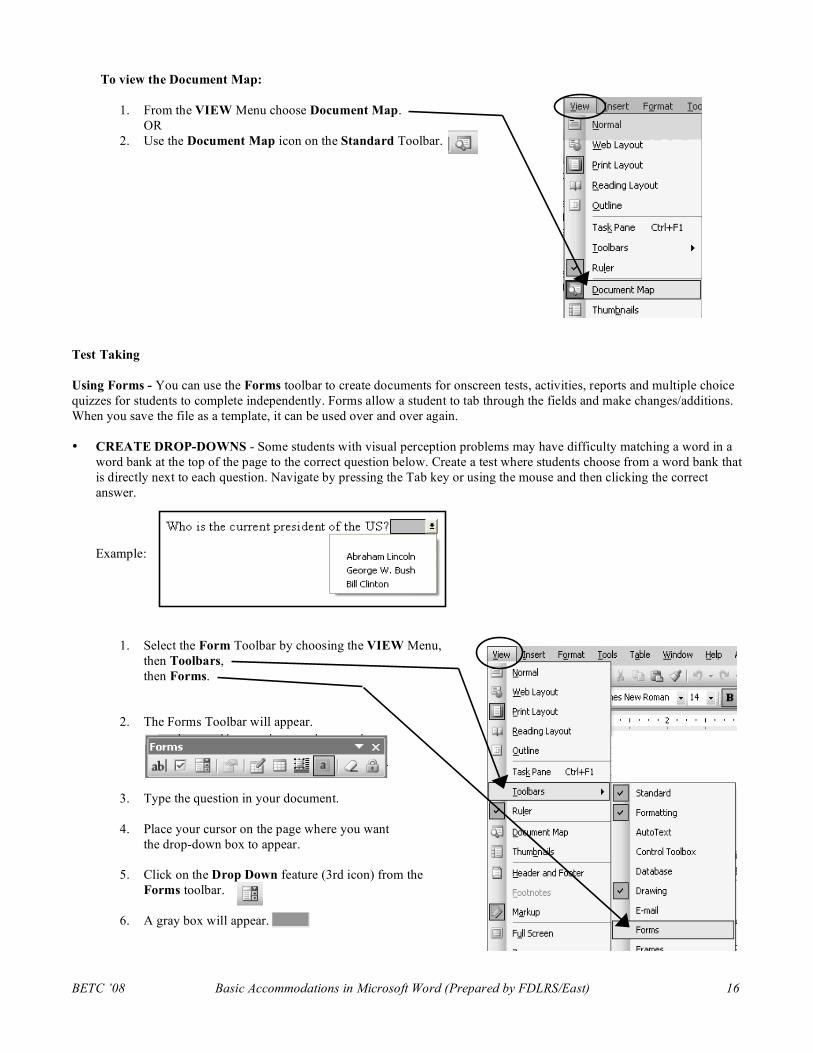
To view the Document Map:
1. From the VIEW Menu choose Document Map. OR
2. Use the Document Map icon on the Standard Toolbar. Test Taking Using Forms - You can use the Forms toolbar to create documents for onscreen tests, activities, reports and multiple choice quizzes for students to complete independently. Forms allow a student to tab through the fields and make changes/additions. When you save the file as a template, it can be used over and over again. • CREATE DROP-DOWNS - Some students with visual perception problems may have difficulty matching a word in a
word bank at the top of the page to the correct question below. Create a test where students choose from a word bank that is directly next to each question. Navigate by pressing the Tab key or using the mouse and then clicking the correct answer. Example:
1. Select the Form Toolbar by choosing the VIEW Menu,
then Toolbars, then Forms.
2. The Forms Toolbar will appear.
3. Type the question in your document.
4. Place your cursor on the page where you want the drop-down box to appear.
5. Click on the Drop Down feature (3rd icon) from the Forms toolbar.
6. A gray box will appear.
BETC ’08 Basic Accommodations in Microsoft Word (Prepared by FDLRS/East) 17
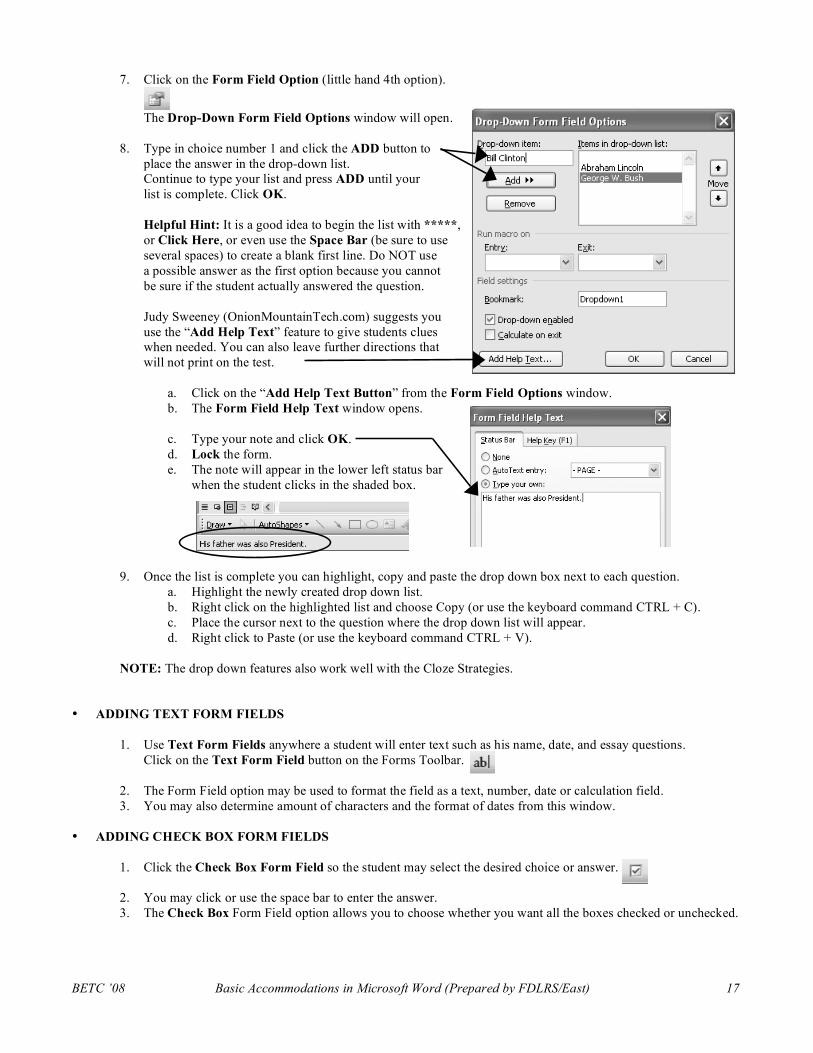
7. Click on the Form Field Option (little hand 4th option).
The Drop-Down Form Field Options window will open.
8. Type in choice number 1 and click the ADD button to place the answer in the drop-down list. Continue to type your list and press ADD until your list is complete. Click OK. Helpful Hint: It is a good idea to begin the list with *****, or Click Here, or even use the Space Bar (be sure to use several spaces) to create a blank first line. Do NOT use a possible answer as the first option because you cannot be sure if the student actually answered the question. Judy Sweeney (OnionMountainTech.com) suggests you use the “Add Help Text” feature to give students clues when needed. You can also leave further directions that will not print on the test.
a. Click on the “Add Help Text Button” from the Form Field Options window. b. The Form Field Help Text window opens.
c. Type your note and click OK. d. Lock the form. e. The note will appear in the lower left status bar
when the student clicks in the shaded box.
9. Once the list is complete you can highlight, copy and paste the drop down box next to each question. a. Highlight the newly created drop down list. b. Right click on the highlighted list and choose Copy (or use the keyboard command CTRL + C). c. Place the cursor next to the question where the drop down list will appear. d. Right click to Paste (or use the keyboard command CTRL + V).
NOTE: The drop down features also work well with the Cloze Strategies.
• ADDING TEXT FORM FIELDS
1. Use Text Form Fields anywhere a student will enter text such as his name, date, and essay questions. Click on the Text Form Field button on the Forms Toolbar.
2. The Form Field option may be used to format the field as a text, number, date or calculation field. 3. You may also determine amount of characters and the format of dates from this window.
• ADDING CHECK BOX FORM FIELDS
1. Click the Check Box Form Field so the student may select the desired choice or answer.
2. You may click or use the space bar to enter the answer. 3. The Check Box Form Field option allows you to choose whether you want all the boxes checked or unchecked.
BETC ’08 Basic Accommodations in Microsoft Word (Prepared by FDLRS/East) 18
• PROTECTING THE FORM/TEST
1. Be sure you click on the Lock option and then close the form toolbar BEFORE you Save. This will prevent a curious student from clicking on the lock option. If you want multiple students to use the same test save the document as a Template.
- You must UNLOCK the form to make any editing changes. - Spell Check does NOT work when a form is locked. - Text Readers do NOT read locked forms.
2. Save Test/Forms as Templates - Once your forms/tests are created, protected and you have removed the Form toolbar, save it as a template so that you may use the form/text again (See “Templates” section above).
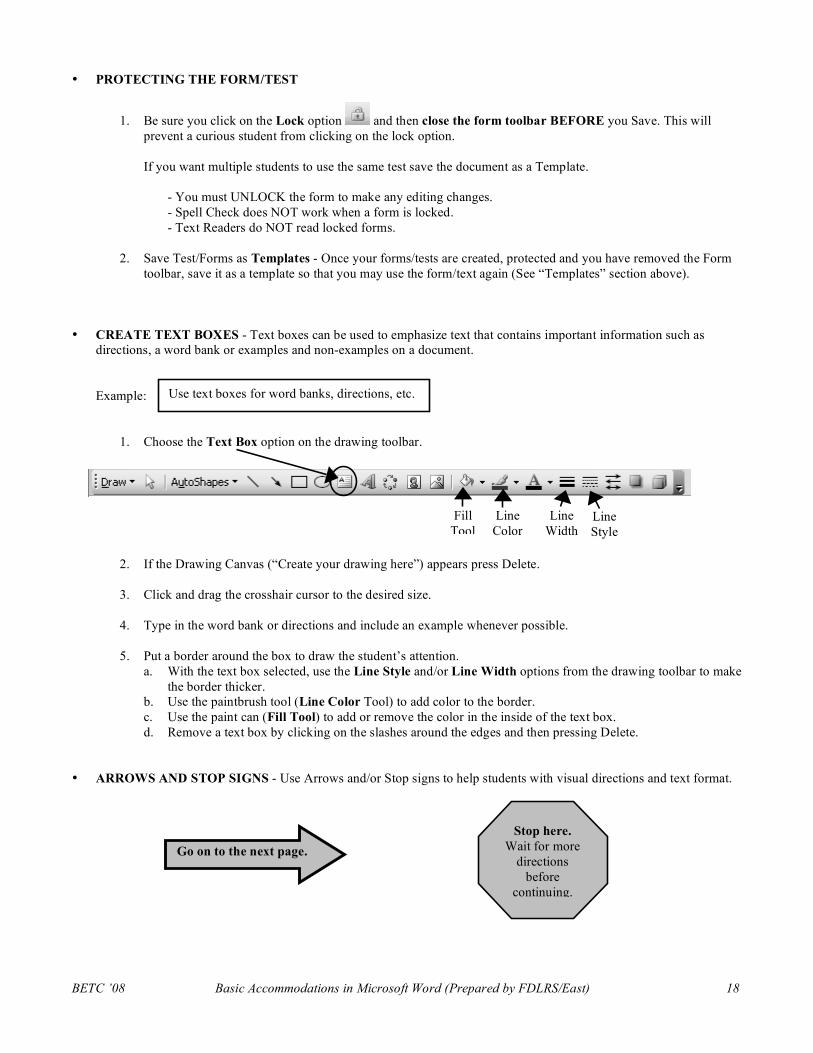
• CREATE TEXT BOXES - Text boxes can be used to emphasize text that contains important information such as directions, a word bank or examples and non-examples on a document. Example:
1. Choose the Text Box option on the drawing toolbar.
2. If the Drawing Canvas (“Create your drawing here”) appears press Delete.
3. Click and drag the crosshair cursor to the desired size.
4. Type in the word bank or directions and include an example whenever possible.
5. Put a border around the box to draw the student’s attention. a. With the text box selected, use the Line Style and/or Line Width options from the drawing toolbar to make
the border thicker. b. Use the paintbrush tool (Line Color Tool) to add color to the border. c. Use the paint can (Fill Tool) to add or remove the color in the inside of the text box. d. Remove a text box by clicking on the slashes around the edges and then pressing Delete.
• ARROWS AND STOP SIGNS - Use Arrows and/or Stop signs to help students with visual directions and text format.
Use text boxes for word banks, directions, etc.
Line Style
Fill Tool
Line Color
Line Width
Go on to the next page. Stop here.
Wait for more directions
before continuing.
BETC ’08 Basic Accommodations in Microsoft Word (Prepared by FDLRS/East) 19
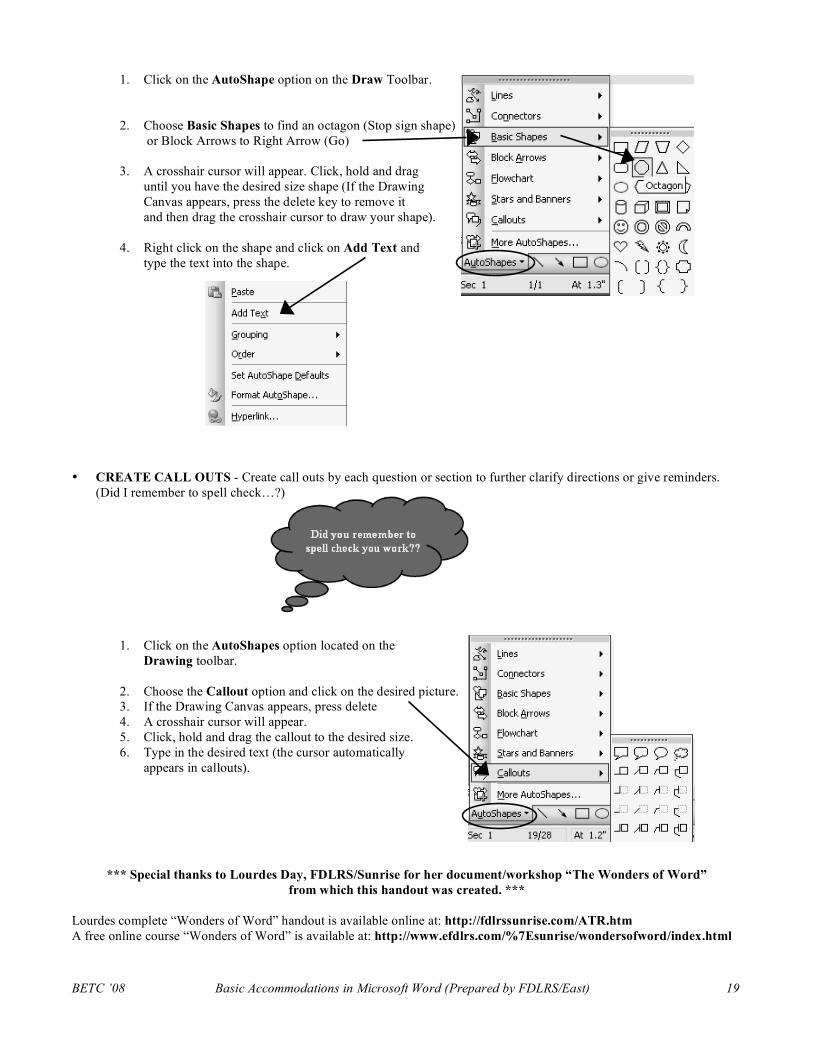
1. Click on the AutoShape option on the Draw Toolbar.
2. Choose Basic Shapes to find an octagon (Stop sign shape) or Block Arrows to Right Arrow (Go)
3. A crosshair cursor will appear. Click, hold and drag until you have the desired size shape (If the Drawing Canvas appears, press the delete key to remove it and then drag the crosshair cursor to draw your shape).
4. Right click on the shape and click on Add Text and type the text into the shape.
• CREATE CALL OUTS - Create call outs by each question or section to further clarify directions or give reminders. (Did I remember to spell check…?)
1. Click on the AutoShapes option located on the Drawing toolbar.
2. Choose the Callout option and click on the desired picture. 3. If the Drawing Canvas appears, press delete 4. A crosshair cursor will appear. 5. Click, hold and drag the callout to the desired size. 6. Type in the desired text (the cursor automatically
appears in callouts).
*** Special thanks to Lourdes Day, FDLRS/Sunrise for her document/workshop “The Wonders of Word” from which this handout was created. ***
Lourdes complete “Wonders of Word” handout is available online at: http://fdlrssunrise.com/ATR.htm A free online course “Wonders of Word” is available at: http://www.efdlrs.com/%7Esunrise/wondersofword/index.html