Bante221 Portable pH Meter - Pacific...
26
Bante221 Portable pH/ORP Meter Instruction Manual BANTE INSTRUMENTS LIMITED Technology to create the future...
Transcript of Bante221 Portable pH Meter - Pacific...

Bante221 Portable pH/ORP Meter
Instruction Manual
BANTE INSTRUMENTS LIMITED
Technology to create the future...
BANTE221 PORTABLE PH/ORP METER 1
Introduction Thank you for selecting the Bante221 portable pH meter. This manual provides a step-by-step guide to help you operate the meter, please
carefully read the following instructions before use.
Unpacking the Meter The following list describes the standard accessories of the meter. After the unpacking, please check all accessories are complete. If any
are damaged or missing, please contact nearest distributor.
ACCESSORIES:
■ pH Electrode, Temperature Probe
■ pH Buffer Solutions (pH4.01, 7.00, 10.01)
■ Battery
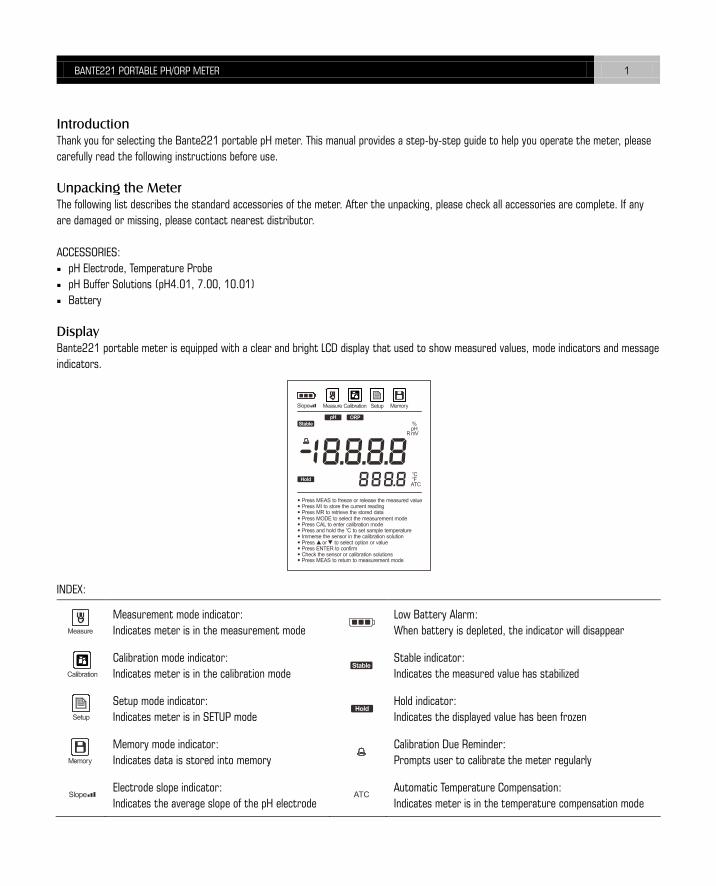
Display Bante221 portable meter is equipped with a clear and bright LCD display that used to show measured values, mode indicators and message
indicators.
INDEX:
Measurement mode indicator:
Indicates meter is in the measurement mode
Low Battery Alarm:
When battery is depleted, the indicator will disappear
Calibration mode indicator:
Indicates meter is in the calibration mode
Stable indicator:
Indicates the measured value has stabilized
Setup mode indicator:
Indicates meter is in SETUP mode
Hold indicator:
Indicates the displayed value has been frozen
Memory mode indicator:
Indicates data is stored into memory
Calibration Due Reminder:
Prompts user to calibrate the meter regularly
Electrode slope indicator:
Indicates the average slope of the pH electrode
Automatic Temperature Compensation:
Indicates meter is in the temperature compensation mode

BANTE221 PORTABLE PH/ORP METER 2
Keypad The meter has a succinct membrane keypad, names and symbols describe the each function key controls.
MEAS|
■ Power the meter ON/OFF.
■ Freezes the measured value on the display, press the key again to resume measuring.
■ In the calibration or temperature setting mode, exits current mode and returns to measurement.
MODE|oC
■ Toggles between pH, mV and ORP measurement modes.
■ Press and hold the key to enter temperature setting mode.
CAL|
■ Press the key to enter the calibration mode.
■ Press and hold the key to enter the setup menu.
MI|
■ Press the key to store current measured value.
■ Press key in setup mode to scroll up through menu.
■ Press key in temperature setting mode to increase the setting value.
MR|
■ Press the key to view calibration report or stored data.
■ Press key in setup mode to scroll down through menu.
■ Press key in temperature setting mode to decrease the setting value.
ENTER
■ Confirms the calibration, setting value or displayed option.
■ Press and hold the key to turn On/Off the backlight.
Connectors Bante221 portable meter provides 2 connectors for connecting the various types of sensors.
2 1

BANTE221 PORTABLE PH/ORP METER 3
INDEX:
No. CONNECTOR FUNCTION
1 BNC Connector For connecting the pH or ORP electrode
2 Phone Jack For connecting the temperature probe
Inserting the Batteries Before using the meter, insert three 1.5V “AA” alkaline batteries into battery compartment, follow the procedure outlined below.
1. Remove the battery cover from meter’s backside.
2. Insert the batteries into the battery compartment, note polarity.
3. Replace the battery cover into its original position. Installation is completed.
When batteries are depleted, the meter allows you to use the USB cable connected to computer as a temporarily power supply.
Connecting the Electrode Take out the pH or ORP electrode from the carrying case. Insert BNC connector into corresponding connector socket. Rotate and push the
connector clockwise until it locks. After connection is completed, DO NOT pull on the sensor cord. Always make sure that the connector is
clean and dry.
BANTE221 PORTABLE PH/ORP METER 4
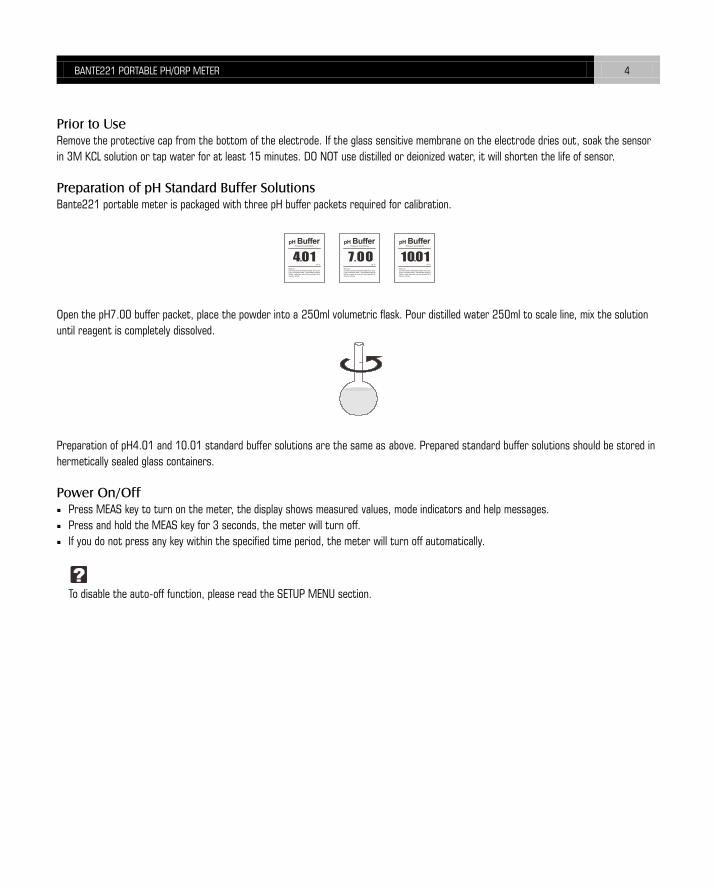
Prior to Use Remove the protective cap from the bottom of the electrode. If the glass sensitive membrane on the electrode dries out, soak the sensor
in 3M KCL solution or tap water for at least 15 minutes. DO NOT use distilled or deionized water, it will shorten the life of sensor.
Preparation of pH Standard Buffer Solutions Bante221 portable meter is packaged with three pH buffer packets required for calibration.
Open the pH7.00 buffer packet, place the powder into a 250ml volumetric flask. Pour distilled water 250ml to scale line, mix the solution
until reagent is completely dissolved.
Preparation of pH4.01 and 10.01 standard buffer solutions are the same as above. Prepared standard buffer solutions should be stored in
hermetically sealed glass containers.
Power On/Off ■ Press MEAS key to turn on the meter, the display shows measured values, mode indicators and help messages.
■ Press and hold the MEAS key for 3 seconds, the meter will turn off.
■ If you do not press any key within the specified time period, the meter will turn off automatically.
To disable the auto-off function, please read the SETUP MENU section.
BANTE221 PORTABLE PH/ORP METER 5
Setup Menu
Bante221 portable meter contains an integrated setup menu that allows you to customize each displayed option to meet measurement
requirements.
pH MODE:
PARAMETER DESCRIPTION OPTIONS DESCRIPTION DEFAULT
pH Buffers:
Select your desired pH buffers for calibration and
auto-recognition
USA Standard ■
NIST Standard
DIN Standard
User-Defined Buffer
Calibration Points:
Select the number of calibration points
1 point
2 points
3 points ■
4 points
5 points
Resolution:
Sets the resolution for pH measurement
0.001pH ■
0.01pH
0.1pH
Measurement Unit:
Sets the default temperature unit
Degrees Celsius ■
Degrees Fahrenheit
ORP MODE:
PARAMETER DESCRIPTION OPTIONS DESCRIPTION DEFAULT
Resolution:
Sets the resolution for ORP measurement
0.1mV ■
1mV
GENERAL OPTIONS:
PARAMETER DESCRIPTION OPTIONS DESCRIPTION DEFAULT
Stable Criteria:
Sets the stability standard for measurement or
calibration. When the “LO” option is enabled, measuring
value will stabilize quickly. When the “HI” option is
enabled, measuring value will stabilize slowly.
Low ■
High
BANTE221 PORTABLE PH/ORP METER 6
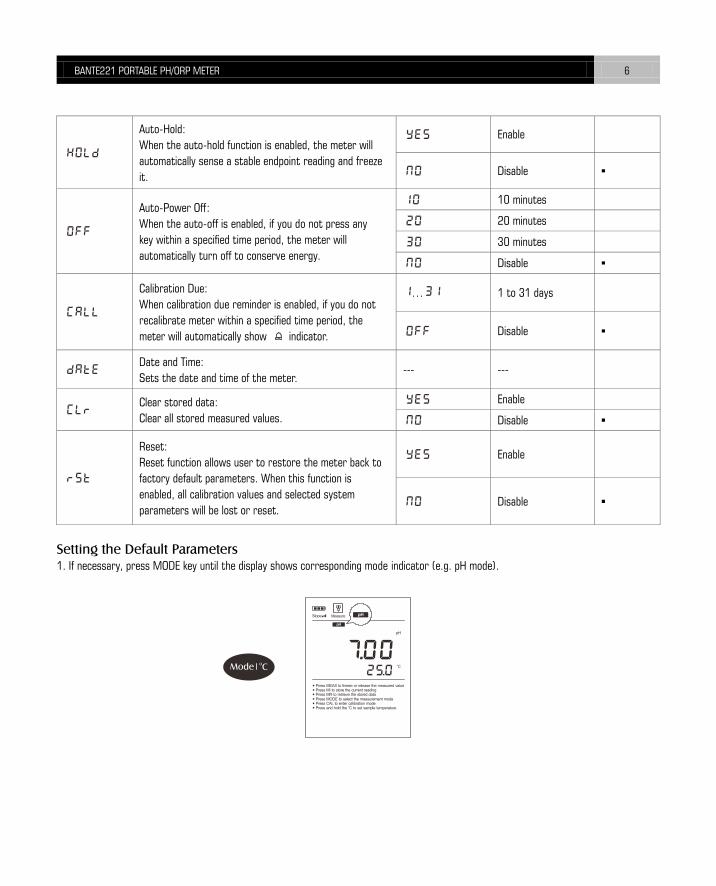
Auto-Hold:
When the auto-hold function is enabled, the meter will
automatically sense a stable endpoint reading and freeze
it.
Enable
Disable ■
Auto-Power Off:
When the auto-off is enabled, if you do not press any
key within a specified time period, the meter will
automatically turn off to conserve energy.
10 minutes
20 minutes
30 minutes
Disable ■
Calibration Due:
When calibration due reminder is enabled, if you do not
recalibrate meter within a specified time period, the
meter will automatically show indicator.
… 1 to 31 days
Disable ■
Date and Time:
Sets the date and time of the meter. --- ---
Clear stored data:
Clear all stored measured values.
Enable
Disable ■
Reset:
Reset function allows user to restore the meter back to
factory default parameters. When this function is
enabled, all calibration values and selected system
parameters will be lost or reset.
Enable
Disable ■
Setting the Default Parameters 1. If necessary, press MODE key until the display shows corresponding mode indicator (e.g. pH mode).

BANTE221 PORTABLE PH/ORP METER 7
2. Press and hold the key for 3 seconds, the meter enters setup menu, the display shows selectable parameter and page number.
3. Press or key to scroll through menu, select the parameter you want to set (Refer to Setup Menu section).
4. Press ENTER key to confirm, the display shows an option in the submenu.
5. Press or key to select an option.
6. Press ENTER key to confirm, the meter returns to measurement mode. Setting is completed.
You can easily set each default parameter as per the above method.
Enter
………Parameter
………Page number
………Parameter
………Option
BANTE221 PORTABLE PH/ORP METER 8
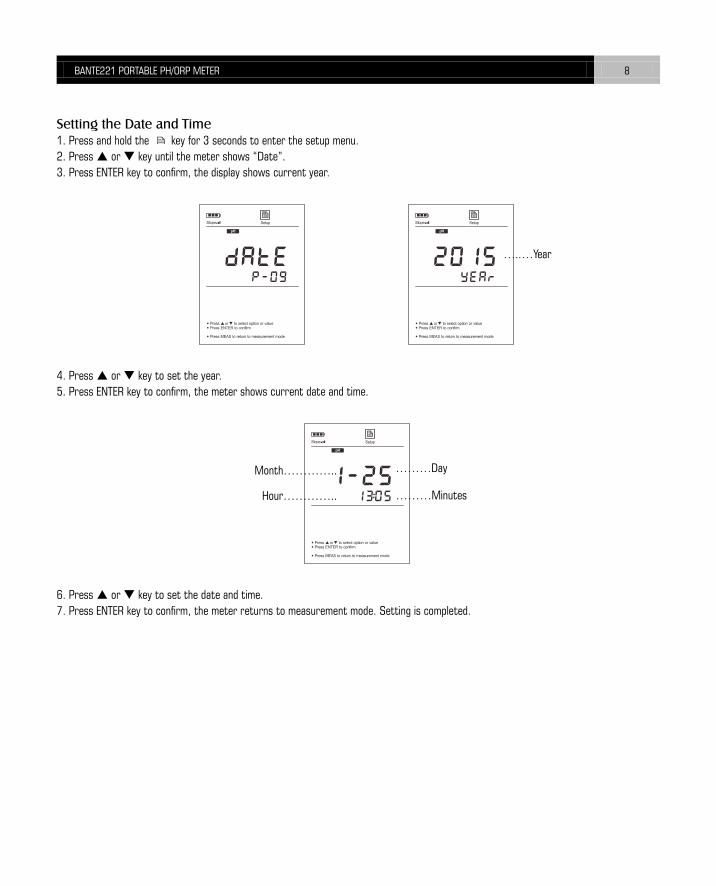
Setting the Date and Time 1. Press and hold the key for 3 seconds to enter the setup menu.
2. Press or key until the meter shows “Date”.
3. Press ENTER key to confirm, the display shows current year.
4. Press or key to set the year.
5. Press ENTER key to confirm, the meter shows current date and time.
6. Press or key to set the date and time.
7. Press ENTER key to confirm, the meter returns to measurement mode. Setting is completed.
………Day Month…………..
………Minutes Hour…………..
…..…Year

BANTE221 PORTABLE PH/ORP METER 9
Temperature Compensation In order to get accurate measuring results, you need to enable the manual or automatic temperature compensation before measurement
or calibration.
AUTOMATIC TEMPERATURE COMPENSATION:
■ Insert the connector of temperature probe into the meter’s phone jack.
■ The “ATC” indicator will show on the display, the meter is now switched to automatic temperature compensation mode.
MANUAL TEMPERATURE COMPENSATION:
1. DO NOT connect the temperature probe to meter.
2. Press and hold the oC key for 3 seconds to enter temperature setting mode.
3. Press or key to set the temperature value of sample.
4. Press ENTER key to confirm, the meter returns to measurement mode. Setting is completed.
In the temperature setting mode, press or key once, the setting value will increase or decrease by 0.1. Press and hold the or
key, the setting value will increase or decrease by 1.
BANTE221 PORTABLE PH/ORP METER 10
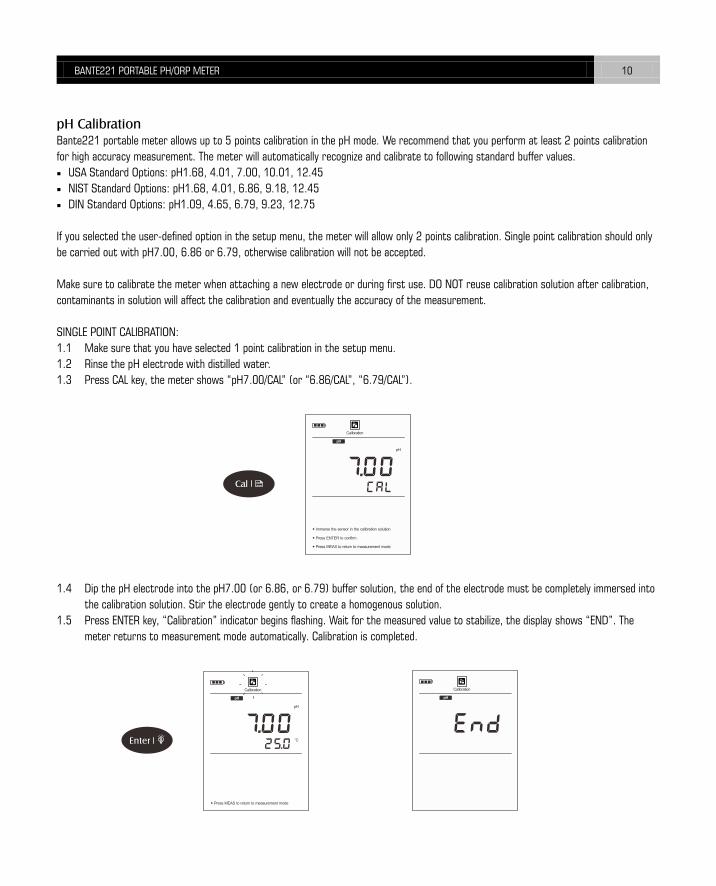
pH Calibration Bante221 portable meter allows up to 5 points calibration in the pH mode. We recommend that you perform at least 2 points calibration
for high accuracy measurement. The meter will automatically recognize and calibrate to following standard buffer values.
■ USA Standard Options: pH1.68, 4.01, 7.00, 10.01, 12.45
■ NIST Standard Options: pH1.68, 4.01, 6.86, 9.18, 12.45
■ DIN Standard Options: pH1.09, 4.65, 6.79, 9.23, 12.75
If you selected the user-defined option in the setup menu, the meter will allow only 2 points calibration. Single point calibration should only
be carried out with pH7.00, 6.86 or 6.79, otherwise calibration will not be accepted.
Make sure to calibrate the meter when attaching a new electrode or during first use. DO NOT reuse calibration solution after calibration,
contaminants in solution will affect the calibration and eventually the accuracy of the measurement.
SINGLE POINT CALIBRATION:
1.1 Make sure that you have selected 1 point calibration in the setup menu.
1.2 Rinse the pH electrode with distilled water.
1.3 Press CAL key, the meter shows “pH7.00/CAL” (or “6.86/CAL”, “6.79/CAL”).
1.4 Dip the pH electrode into the pH7.00 (or 6.86, or 6.79) buffer solution, the end of the electrode must be completely immersed into
the calibration solution. Stir the electrode gently to create a homogenous solution.
1.5 Press ENTER key, “Calibration” indicator begins flashing. Wait for the measured value to stabilize, the display shows “END”. The
meter returns to measurement mode automatically. Calibration is completed.
BANTE221 PORTABLE PH/ORP METER 11
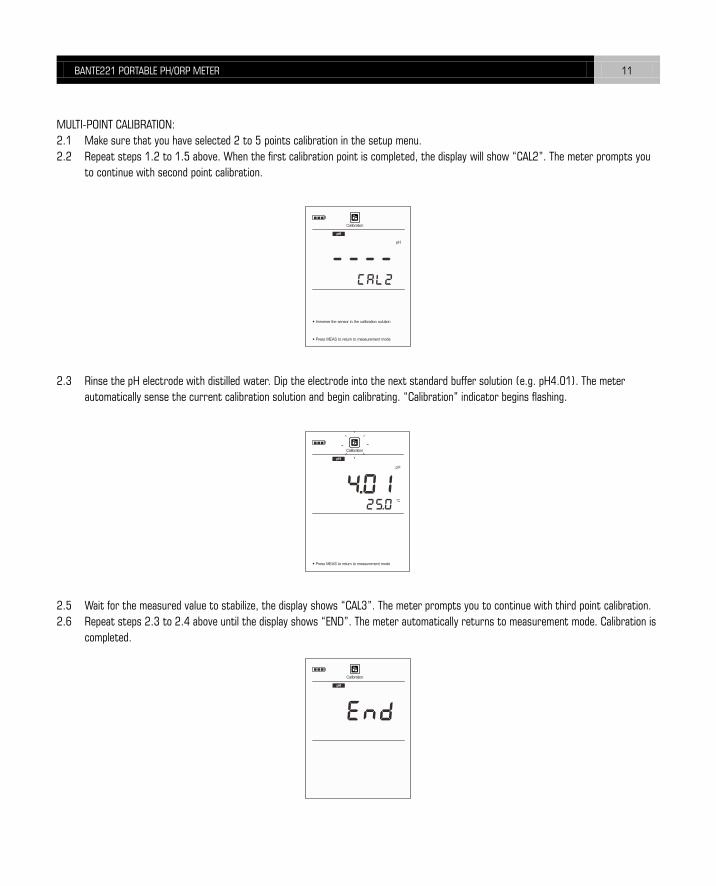
MULTI-POINT CALIBRATION:
2.1 Make sure that you have selected 2 to 5 points calibration in the setup menu.
2.2 Repeat steps 1.2 to 1.5 above. When the first calibration point is completed, the display will show “CAL2”. The meter prompts you
to continue with second point calibration.
2.3 Rinse the pH electrode with distilled water. Dip the electrode into the next standard buffer solution (e.g. pH4.01). The meter
automatically sense the current calibration solution and begin calibrating. “Calibration” indicator begins flashing.
2.5 Wait for the measured value to stabilize, the display shows “CAL3”. The meter prompts you to continue with third point calibration.
2.6 Repeat steps 2.3 to 2.4 above until the display shows “END”. The meter automatically returns to measurement mode. Calibration is
completed.

BANTE221 PORTABLE PH/ORP METER 12
pH CALIBRATION WITH THE USER-DEFINED BUFFERS:
3.1 Make sure that you have selected “USER” option in the setup menu.
3.2 Rinse the pH electrode with distilled water. Dip the electrode into the custom buffer solution. Stir the sensor gently. The meter
shows the current measured value.
3.3 Press or key to increase or decrease displayed value, press ENTER key to confirm. “Calibration” indicator begins flashing.
3.4 Wait for the measured value to stabilize, the display shows “CAL2”. The meter prompts you to continue with second point
calibration.
3.5 Rinse the pH electrode with distilled water. Dip the electrode into the next custom buffer solution.
3.6 Press or key to increase or decrease displayed value, press ENTER key to confirm. “Calibration” indicator begins flashing.
3.7 Wait for the measured value to stabilize, the display shows “END”. The meter automatically returns to measurement mode.
Calibration is completed.
■ During the calibration process, if you want to exit the calibration mode, press MEAS key, the meter will return to measurement mode
immediately.
■ Electrode indicator will show average slope of the pH electrode after calibration. When the electrode or calibration result does not meet
measurement requirements, the indicator will disappear on the display.

BANTE221 PORTABLE PH/ORP METER 13
pH Calibration Report This program lets you check the pH electrode parameter for diagnostic purposes.
1. Press MR key in the pH measurement mode, the meter shows “LOC”.
2. Press or key until the display shows “ELE” (Electrode Diagnosis).
3. Press ENTER key to confirm, the meter shows the last calibration date (Format: mm-dd).
4. Press key, the meter shows “OFS” (Zero-point offset potential).
5. Press key again, the meter shows the electrode slope of each calibration point.
6. After the browsing, press MEAS key, the meter returns to measurement mode.
MR
Enter
MR
mV MR
%….....Slope
….....Calibration Points

BANTE221 PORTABLE PH/ORP METER 14
ORP Calibration Bante221 portable meter allows 1 point calibration in the relative mV mode, but calibration is not necessary unless exact readout
agreement with a work standard and at a specific ORP value is needed.
1. Press MODE key until the meter shows indicator.
2. Rinse the ORP electrode with distilled water. Dip the electrode into the calibration solution. Stir the sensor gently.
3. Press CAL key, the meter shows current measured value.
4. Press or key to set the displayed value, press ENTER key to confirm. “Calibration” indicator begins flashing.
6. Wait for the measured value to stabilize, the display shows “End”. The meter returns measurement mode. Calibration is completed.
R.mV
R.mV
R.mV

BANTE221 PORTABLE PH/ORP METER 15
ORP Calibration Report This program lets you check the offset potential of the ORP electrode.
1. Press MR key in the ORP measurement mode, the meter shows “LOC”.
2. Press or key until the display shows “ELE” (Electrode Diagnosis).
3. Press ENTER key to confirm, the meter shows the last calibration date (Format: mm-dd).
4. Press key, the meter shows “OFS” (Offset Potential).
5. After the browsing, press MEAS key, the meter returns to measurement mode.
Temperature Calibration During the measurement, when automatic temperature compensation is enabled, if the temperature reading displayed differs from that of
an accurate thermometer, you need to calibrate the meter.
1. Press and hold the oC key for 3 seconds to enter temperature calibration mode, the display shows current temperature reading.
2. Press or key to set the temperature value, press ENTER key to confirm. Calibration is completed.
MR
mV
BANTE221 PORTABLE PH/ORP METER 16
pH Measurement 1. Press MODE key until the meter shows indicator.
2. Rinse the pH electrode thoroughly with distilled or de-ionised water.
3. Dip the electrode into the sample solution, stir the sensor gently.
4. Wait for the reading to stabilize, record the measured value on the display.
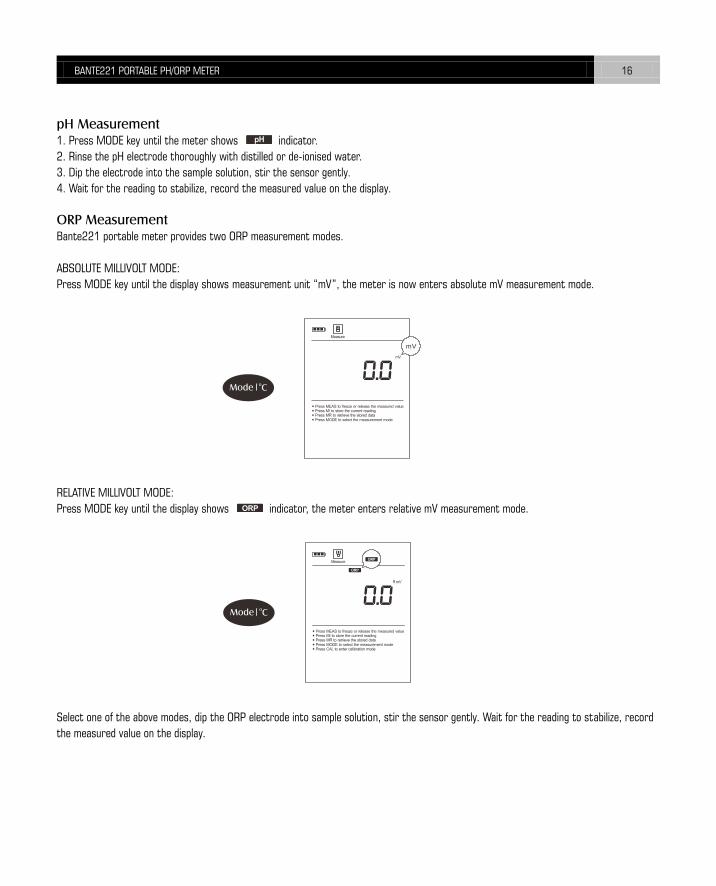
ORP Measurement Bante221 portable meter provides two ORP measurement modes.
ABSOLUTE MILLIVOLT MODE:
Press MODE key until the display shows measurement unit “mV”, the meter is now enters absolute mV measurement mode.
RELATIVE MILLIVOLT MODE:
Press MODE key until the display shows indicator, the meter enters relative mV measurement mode.
Select one of the above modes, dip the ORP electrode into sample solution, stir the sensor gently. Wait for the reading to stabilize, record
the measured value on the display.
mV

BANTE221 PORTABLE PH/ORP METER 17
Hold Function Bante221 portable meter contains two data hold modes. When the Auto-Hold function is enabled, the meter will automatically sense a
stable endpoint measured value and freeze it, “HOLD” indicator appears on the display. If the Auto-Hold function is disabled, press key,
the meter will immediately freeze currently displayed value. Press the key again to release the measured reading, you can continue to take
measurement.
Storing and Recalling Data from Memory The meter allows up to 500 data sets to be stored and recalled.
MEMORY INPUT:
In the measurement mode, press MI key to input measured value into the memory, “Memory” indicator appears on the display.
MEMORY RECALL:
1. Press MR key in the measurement mode, the meter shows “LOC” (Data Log).
2. Press ENTER key to confirm, the meter shows page number of the stored data set.
MI

BANTE221 PORTABLE PH/ORP METER 18
3. Press key, the meter shows the date and time of the stored data set (Format: mm-dd).
4. Press key again, the display shows the stored data.
5. Press MEAS key, the meter exits current mode and returns to measurement mode.
Enter
MR
MR
…..….Page Number
BANTE221 PORTABLE PH/ORP METER 19
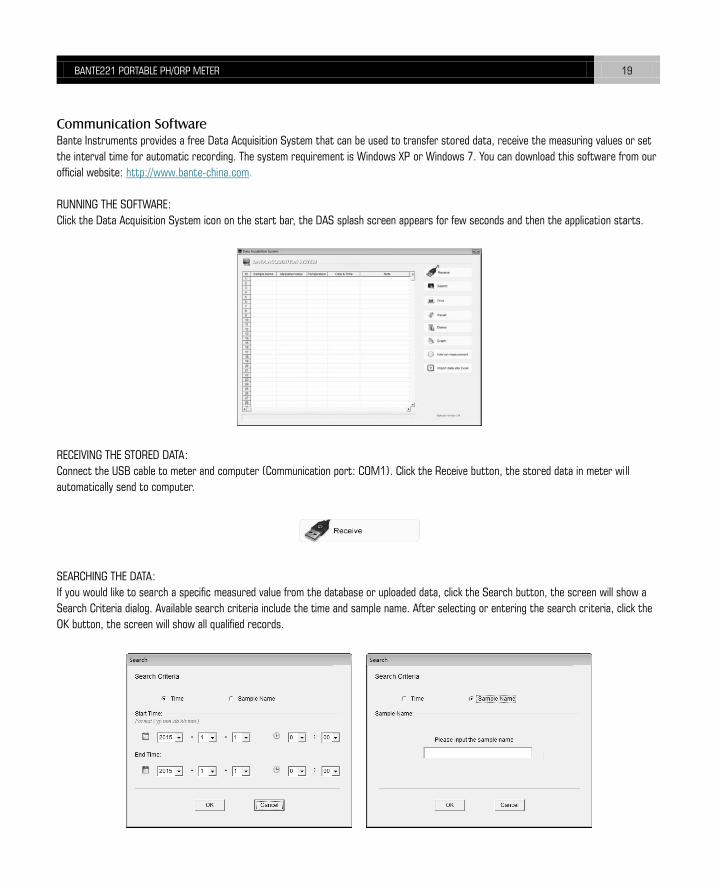
Communication Software Bante Instruments provides a free Data Acquisition System that can be used to transfer stored data, receive the measuring values or set
the interval time for automatic recording. The system requirement is Windows XP or Windows 7. You can download this software from our
official website: http://www.bante-china.com.
RUNNING THE SOFTWARE:
Click the Data Acquisition System icon on the start bar, the DAS splash screen appears for few seconds and then the application starts.
RECEIVING THE STORED DATA:
Connect the USB cable to meter and computer (Communication port: COM1). Click the Receive button, the stored data in meter will
automatically send to computer.
SEARCHING THE DATA:
If you would like to search a specific measured value from the database or uploaded data, click the Search button, the screen will show a
Search Criteria dialog. Available search criteria include the time and sample name. After selecting or entering the search criteria, click the
OK button, the screen will show all qualified records.

BANTE221 PORTABLE PH/ORP METER 20
PRINT THE REPORT:
If you would like to print current data, click the Print button, the printer will output data sheet.
DATA RECALL:
DAS data acquisition system has a large database used to store the all uploaded data. If you need to view previous data, click the Recall
button, the screen will show all data in the database.
DELETE THE DATA:
If you need to delete the certain data, click on the data field, then click the Delete button. Note: Once deleted, the data cannot be
recovered.
GRAPH MODE: The graph mode will help user to view variations of the measured parameter continuously. Click the Graph button, the screen will immediately show curve graph, measuring value and temperature.
BANTE221 PORTABLE PH/ORP METER 21
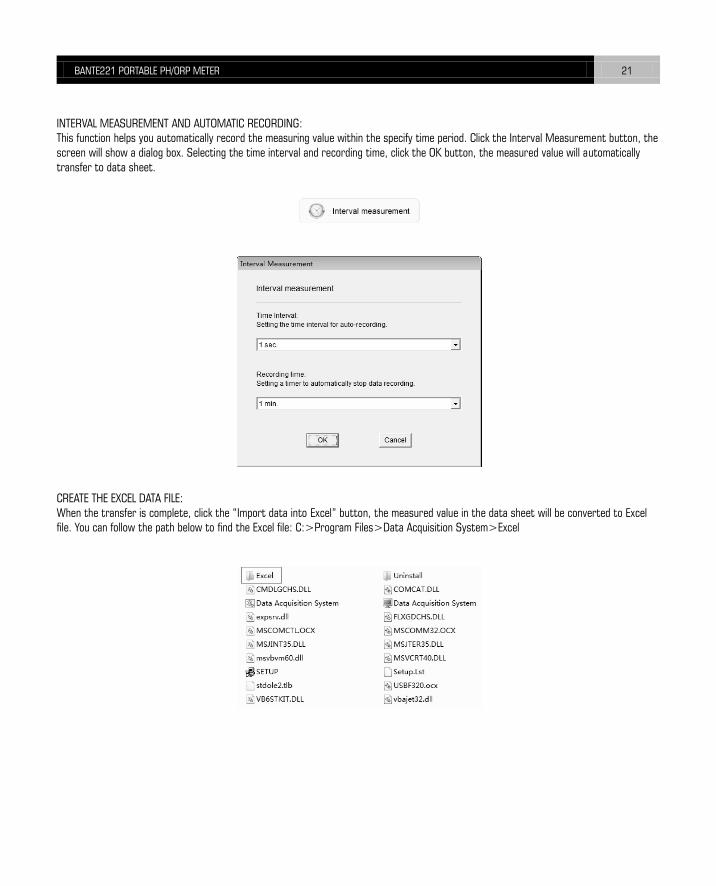
INTERVAL MEASUREMENT AND AUTOMATIC RECORDING: This function helps you automatically record the measuring value within the specify time period. Click the Interval Measurement button, the screen will show a dialog box. Selecting the time interval and recording time, click the OK button, the measured value will automatically transfer to data sheet.
CREATE THE EXCEL DATA FILE: When the transfer is complete, click the “Import data into Excel” button, the measured value in the data sheet will be converted to Excel file. You can follow the path below to find the Excel file: C:>Program Files>Data Acquisition System>Excel

BANTE221 PORTABLE PH/ORP METER 22
Electrode Care and Maintenance Since pH electrode is susceptible to dirt and contamination, clean as necessary depending on the extent and condition of use.
AFTER MEASURING:
Rinse the pH electrode in distilled water, store the sensor into the electrode storage solution.
CLEANING THE ELECTRODE:
■ Salt deposits:
Soak the electrode in warm tap water to dissolve deposits, then thoroughly rinse with distilled water.
■ Oil or Grease film:
Wash the pH electrode bulb gently in some detergents and water. If necessary, using the alcohol to clean the electrode bulb, then rinse
with distilled water. Place the electrode in the electrode storage solution for 30 minutes.
■ Clogged reference junction:
Heat a diluted KCl solution to 60 to 80oC. Place the sensing part of the sensor into the heated solution for about 10 minutes. Allow the
sensor to cool in some unheated KCl solution.
■ Protein deposits:
Prepare a 1% pepsin solution in 0.1M of HCL. Place the electrode in the solution for 10 minutes. Rinse the sensor with distilled water.
REACTIVATING THE ELECTRODE:
If stored and cleaned properly, the electrode should be ready for immediate use. However, a dehydrated bulb may cause sluggish response.
To rehydrate the bulb, immerse the electrode in a pH4.01 buffer solution for 10 to 30 minutes. If this fails, the electrode requires
activation.
■ Soak the electrode in 0.1M HCl for 5 minutes.
■ Remove and rinse with distilled water, then place in 0.1M NaOH for 5 minutes.
■ Remove and rinse again, and soak in electrode storage solution for 30 minutes.
HOW TO PREPARE THE ELECTRODE STORAGE SOLUTION:
■ Dissolve 22.365 grams of potassium chloride reagent (KCL) in the 100mL distilled water.
■ Pour the 50mL of KCL solution into the beaker.
■ Pour the 50mL of pH4.01 standard buffer solution into the same beaker.
■ Stir the solution until the solution has thoroughly mixed. Preparation is completed.

BANTE221 PORTABLE PH/ORP METER 23
Optional pH Electrodes Bante221 portable meter is equipped with a general purpose pH electrode, if it can not fully meet your measurement requirements, please
refer to the table below to select an applicable sensor.
SAMPLE TYPE P11 P12 P13 P14 P16 P17 P18 P19 P20 P21
Agar ■
Beer ■ ■ ■ ■ ■ ■ ■
Blood Products ■ ■ ■ ■ ■
Bread, Dough ■ ■
Cement ■
Cosmetics ■ ■ ■ ■ ■ ■
Dairy Products ■ ■ ■ ■ ■
Education ■ ■ ■ ■
Fats/Cream ■
Field Use ■ ■ ■ ■
Fish Products ■ ■
Lab Flasks ■
Low Ionic ■ ■
Meat, Cheese ■ ■
Micro Samples ■
Paint ■ ■ ■
Photographic
Soil ■ ■
Surface ■
Test Tubes ■ ■
Tris Buffer ■
Viscose Samples ■
Troubleshooting
LCD DISPLAY CAUSE CORRECTIVE ACTION
Electrode dried out Soak the pH electrode in 3M KCL solution for 10 minutes
Measured value is out of range Check the electrode whether clogged, dirty or broken
Incorrect pH buffer solutions Use fresh pH buffer solutions for calibration
Electrode is out of service life Replace the pH electrode
Keypad is not working properly Replace the batteries

BANTE221 PORTABLE PH/ORP METER 24
Specifications
MODEL BANTE221
pH
Range -2.000~20.000pH
Accuracy 0.002pH
Resolution 0.1, 0.01, 0.001pH
Calibration Points 1 to 5 points, USA, NIST, DIN Standards
Temperature Compensation 0~100°C, 32~212°F, Manual or Automatic
mV
Range -1999.9~1999.9mV
Accuracy ± 0.2mV
Resolution 0.1, 1mV
Calibration Points 1 point (Only for Relative mV mode)
Calibration Range ± 200mV
Temperature
Range 0~105°C, 32~221°F
Accuracy ± 0.5°C, ± 0.9°F
Resolution 0.1°C
Calibration Points 1 point
Calibration Range Measured value ± 10°C
Others
Hold Function Manual or Automatic
Stability Conditions Low or High
Calibration Due 0 to 31 days
Power Off Manual or Automatic (10, 20, 30 minutes)
Reset Function Yes
Memory Stores up to 500 data sets
Output USB Communication Interface
Connector BNC
Display LCD
Power Requirements 3×1.5V “AA” Batteries
Dimensions 170(L)× 85(W)× 30(H)mm
Weight 300g

Hazardous Substance Statement Bante Instruments is committed to the reduction and eventual elimination of all hazardous substances in both the manufacturing process
and finished products we supply. We have an active manufacturing and procurement program to minimize and eliminate the use of harmful
heavy metals such as cadmium, lead, mercury and the like. New technologies and design parameters are also promoting these efforts and
we expect to have little or no such materials in our product in the coming years. We welcome our customer suggestions on how to speed
up these efforts.
Warranty The warranty period for meter is one year from the date of shipment. Above warranty does not cover sensor and calibration solutions. For
more information, please contact nearest authorized distributor.
BANTE INSTRUMENTS LIMITED
E-mail: [email protected]
Phone: +8621-6404-1598
Website: www.bante-china.com
The information in this document is subject to change without notice. Copyright © Bante Instruments Limited, 2015. All rights reserved.