UJ Teaching Students "Learning to Be"?1 UJ Teaching Students to Learn to be…?

BannerWeb for Students
April 2018
Frequently Asked Questions
Checking Your Holds
Checking Your Registration Status and Time
Looking Up Classes
Registering for Classes
Dropping Classes
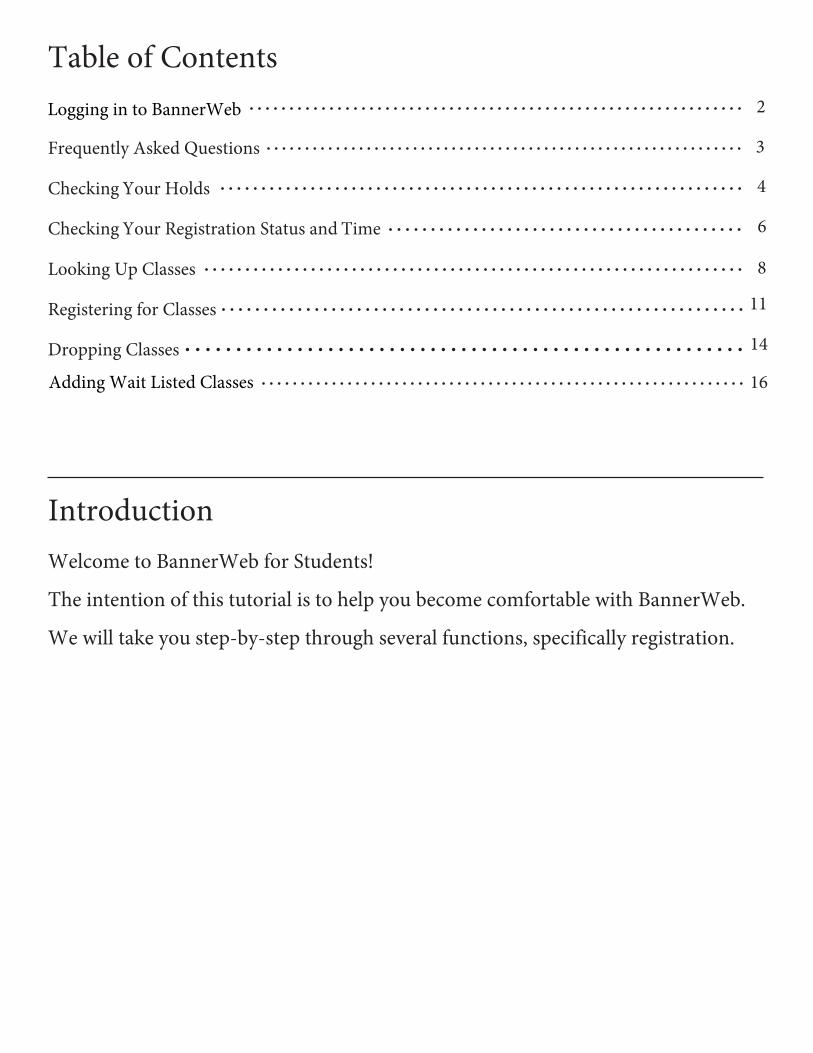
Table of Contents2
4
6
8
11
14
16
IntroductionWelcome to BannerWeb for Students!
The intention of this tutorial is to help you become comfortable with BannerWeb.
We will take you step-by-step through several functions, specifically registration.
Logging in to BannerWeb
3
Adding Wait Listed Classes

Logging in to BannerWeb
3. Enter your PIN.
If you have forgotten your PIN, click onForgot PIN? or [email protected] requesting yourPIN be reset.
4. Click Login.
This will take you to BannerWeb.
1. Go to BannerWeb at
www.presby.edu/cgi-bin/prod_load.pl
2. Enter your User ID. You may use yourPC ID number, PC email login name,SSN, or your "My PC application ID".
This tutorial will help you log in to BannerWeb. To do this, you will need to know your User ID and PIN.
2
From BannerWeb, you can update personal information, register for classes, check grades, and review financial aid information, among other tasks.

3
BannerWeb FAQ What is BannerWeb?
BannerWeb is the system used by the College to provide applicants, students, faculty and staff with access via the web to certain personal, academic, and financial data that is maintained in the Banner administrative software system.
Do I need to have a specific PC or software platform to use BannerWeb?
BannerWeb is designed to work with most mainstream internet browsers. It is supported on Chrome, IE and Firefox on Windows; and Safari and Firefox on Mac.
Where do I find BannerWeb and how do I use it?
BannerWeb can be accessed through the College’s main web site (www.presby.edu/cgi-bin/prod_load.pl). To log in, you will need your User ID and PIN. What is my BannerWeb User ID? Your User ID is your student ID number, PC email login name (minus the “@presby.edu”), Social Security number, or your “My PC Application” ID. You may use any of these ID’s to log into BannerWeb.
I can’t remember my PIN. What do I do?
Enter your User ID and click the “Forgot PIN” button. You will be prompted with the security questions you have set up. Enter the answer; you are then prompted to set up a new PIN. If you receive a message that your security question is not set up, you will need to send an email to [email protected] requesting that your PIN be reset. You should include your student ID # or BannerWeb User ID. This email is monitored during standard office hours, Monday – Friday, 8:30 – 5:00.
Who do I contact if I cannot get BannerWeb to work?
If you think the problem is with BannerWeb itself (i.e. BannerWeb does not seem to respond) you should send an email to [email protected] noting the problem. If the problem appears to be computer or application related (i.e. the computer keeps crashing or the browser does not work) and you are a current PC student, you should contact ResNet at ext. 7100. If you have a question about specific information in BannerWeb (i.e. class registration or financial aid), contact the appropriate office.
What should I do if I think someone knows my PIN?
First, never give out your PIN to anyone else. Your PIN allows you to view confidential data. When you first log into BannerWeb, you must agree to the terms of usage in the college’s Acceptable Computer Use Policy. Please remember that it is your responsibility not to divulge your PIN to other individuals. Secondly, it is good practice to change your PIN regularly to ensure that even if a third party did learn an old PIN, it would not work.
If you believe that someone has been using your BannerWeb ID and PIN you should change your PIN and email [email protected] immediately, or call Information Technology at ext. 8218.
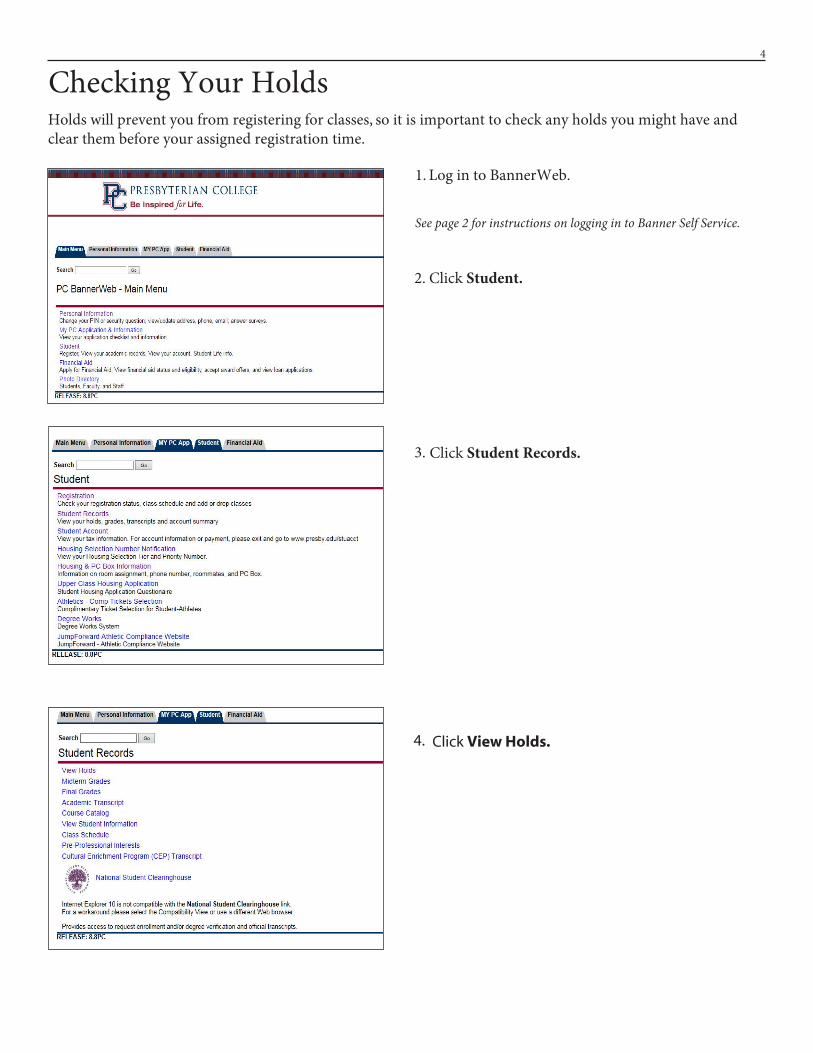
Checking Your HoldsHolds will prevent you from registering for classes, so it is important to check any holds you might have and clear them before your assigned registration time.
1. Log in to BannerWeb.
See page 2 for instructions on logging in to Banner Self Service.
2. Click Student.
3. Click Student Records.
4
Click View Holds.4.

Any holds that may prevent registration will be listed on this page. In addition, holds on grades and transcripts will be listed here.
Why do I have a hold on my account? Students may be blocked from registration by holds that may be placed by various offices - including: Business OfficeResidence LifePublic SafetyFinancial AidDean of StudentsLibrary
Students should take special note of the office placing the hold and contact them prior to registration to resolve the hold and have it removed.
5

Checking Your Registration Status and TimeThis section will show you how to find when you are scheduled to register.
1. Log in to BannerWeb.
See page 2 for instructions on logging in to BannerWeb.
2. Click Student .
3. Click Registration.
4. Click Registration Status.
6

This screen will tell you when you can register and list your class for registration purposes (which may be different than your actual class).
7

Looking Up ClassesThis section will help you look up the classes for which you want to register.
8
1. Log in to BannerWeb.
See page 2 for instructions on logging in to BannerWeb.
2. Click Student.
3. Click Registration.
4. Click Look Up Classes.
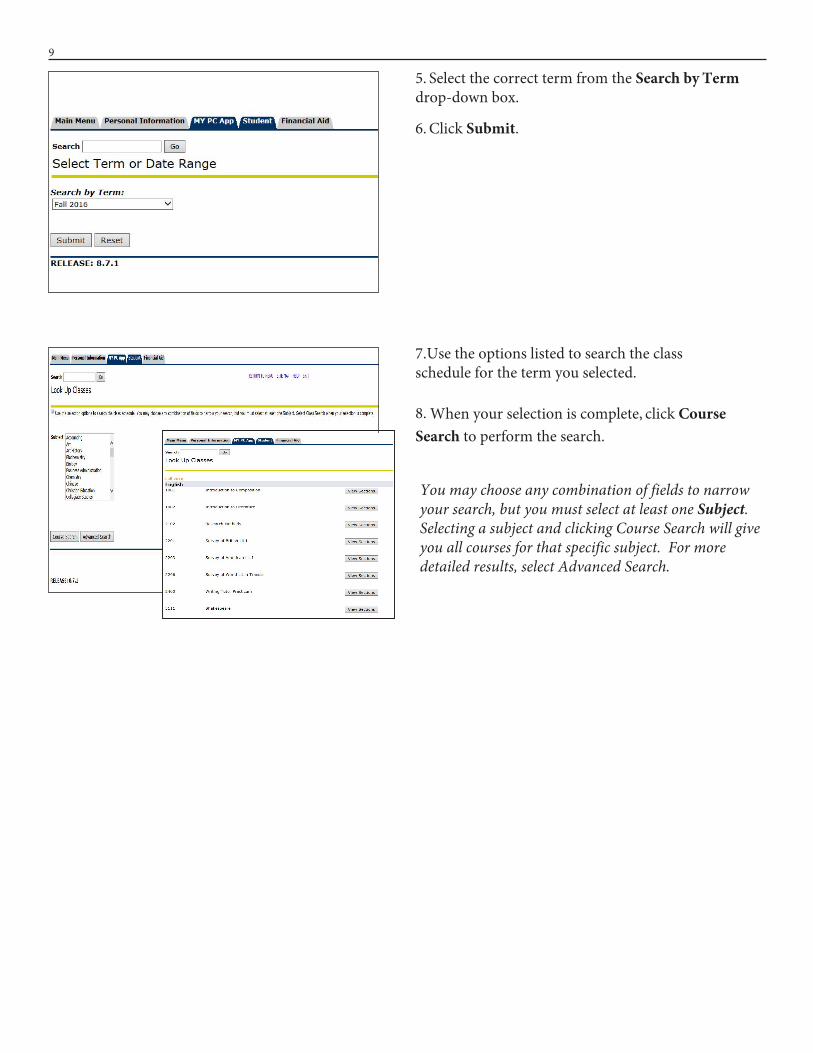
5. Select the correct term from the Search by Termdrop-down box.
6. Click Submit.
7. Use the options listed to search the classschedule for the term you selected.
You may choose any combination of fields to narrow your search, but you must select at least one Subject. Selecting a subject and clicking Course Search will give you all courses for that specific subject. For more detailed results, select Advanced Search.
8. When your selection is complete, click CourseSearch to perform the search.
9

A screen with your search results should appear. This listing includes the:
The Advanced Search option will allow you to narrow down your search. You may select specific courses, days, times, and instructors. For the maximum results, leave these items blank.
1. CRN (which you will use for registering in the class),2. Subject3. Course4. Section5. Campus6. Credit hours7. Title8. Days and Time course meets9. Cap (number of students who can be enrolled in the class)10. Act (number of students who have already enrolled in the
class)11. Rem (number of available spaces in the class12. WL Cap/WL Act/WL Rem (Wait List capacity,
actual enrollment, remaining spots)13. XL Cap/XL Act/XL Rem (only if course is cross- listed)14. Instructor15. Date (term dates)16. Location17. Attribute (how course will be applied in
DegreeWorks)
10

Registering for ClassesThis section will help you through the registration process. The process is the same for adding classes.
1. Log in to BannerWeb.
See page 2 for instructions on logging in to BannerWeb.
2. Click Student.
3. Click Registration.
4. Click Add or Drop Classes.
11
5. Make sure the term selected in the drop-down box is correct (ex. Fall 2016).
6. Click Submit.

7. Type one Course Reference Number (CRN) intoeach field.If you do not know the CRNs for the classes you wish to take, click Class Search.
8. Click Submit Changes.
A screen confirming your registration should appear. If any of the classes for which you wanted to register do not appear in the Current Schedule area, scroll down the page to view the error messages, which will tell you why you were not able to register.
12
For help with registration error messages (pre-requisites, closed sections, etc.), please contact the department of the course for which you are registering.
For a directory of department locations and phone numbers, visithttp://www.provost.uncc.edu/CampusDirectory/.
16
For help with registration error messages (pre-requisites, closed sections, etc.), please contact the department of the course for which you are registering or your advisor.

5. Make sure the term selected in the drop-down box is correct (Fall 2006).
6. Click Submit.
7.Type one Course Reference Number (CRN) into each field.
If you do not know the CRNs for the classes you wish to take, click Class Search.
8. Click Submit Changes.
A screen confirming your registration should appear. If any of the classes for which you wanted to register do not appear in the Current Schedule area, scroll down the page to view the error messages, which will tell you why you were not able to register.
15 13
You may add yourself to the wait list of a course that is full. This option will appear in the Registration Add Errors section. Note: You may only register/waitlist for one section of a course.
Select the drop down box option to add yourself to the wait list.
If a seat opens in the course, you will receive an email that instructs you to add the course within 72 hours. If you do not do so, the next one in line will receive the seat.

14
Dropping ClassesThis section will help you through the process of dropping classes. This may be done during the drop/add period at the beginning of each semester. After drop/add closes, you will not be able to make changes to your schedule. Note: If attempting to drop all courses, you will not be able to drop your last class. You must contact the Registrar's Office to do that.
1. Log in to BannerWeb.
See page 2 for instructions on logging in to BannerWeb.
2. Click Student.
3. Click Registration.
4. Click Add or Drop Classes.
Your current schedule will appear.5.
If dropping a course for a future term, click Select Termon previous screen.
6. Using the drop-down box beside the course you wantto drop, select Web Drop.
7. Click Submit Changes.

15
Your revised schedule will appear.
Note: You will NOT be able to drop your last class via BannerWeb. You must contact the Registrar's Office to do this.

16
Adding Wait Listed ClassesIf you have added yourself to a wait list, you have 72 hours to add the course once you receive the notification email.
1. Log in to BannerWeb.
See page 2 for instructions on logging in to BannerWeb.
2. Click Student.
3. Click Registration.
4. Click Add or Drop Classes.
5. Your current schedule will appear.
If adding a course for a future term, click Select Termon previous screen.
6. Using the drop-down box beside the course you wantto add, select Web Registered.
7. Click Submit Changes.