Banner 7.x Student Overview - Home Page – Community ... · Banner 7.x Student Overview v. 2.0...
25
Community College of Rhode Island October 2006 Version 2.0 Banner 7.x Student Overview
Transcript of Banner 7.x Student Overview - Home Page – Community ... · Banner 7.x Student Overview v. 2.0...
Community College of Rhode Island October 2006
Version 2.0
Banner 7.x Student Overview

TABLE OF CONTENTS
1 BANNER BASICS .................................................................................................................4
2 FORMS ...................................................................................................................................5 2.1 TYPES OF FORMS.........................................................................................................................................5 2.2 ACCESSING FORMS......................................................................................................................................5
2.2.1 ‘Go To’ box............................................................................................................................................5 2.2.2 Navigating the Hierarchical Tree Menu Structure ................................................................................5 2.2.3 Direct Access .........................................................................................................................................6 2.2.4 Options Menu.........................................................................................................................................6
2.3 FORM ELEMENTS AND NAVIGATION ...........................................................................................................7 3 SEARCHING .........................................................................................................................7
3.1 SEARCH TERMS ...........................................................................................................................................8 3.2 PERSON SEARCHES......................................................................................................................................8
3.2.1 Person Search Form (SOAIDEN)..........................................................................................................8 3.2.2 Person Search Detail Form (SOAIDNS) .............................................................................................10 3.2.3 System Identification (GUASYST)........................................................................................................11
3.3 OTHER SEARCH FORMS .............................................................................................................................11 3.3.1 Schedule Section Query Form (SSASECQ) .........................................................................................11
4 COMMON FORMS.............................................................................................................12 4.1 GENERAL PERSON IDENTIFICATION FORM (SPAIDEN) ............................................................................12 4.2 HOLD INFORMATION (SOAHOLD)...........................................................................................................13 4.3 GENERAL STUDENT (SGASTDN) .............................................................................................................14
4.3.1 General Student Summary Form (SGASTDQ).....................................................................................15 4.4 SCHEDULE FORM (SSASECT) ..................................................................................................................15 4.5 REGISTRATION QUERY FORM (SFAREGQ) ..............................................................................................16
APPENDIX A. BANNER TIPS ..................................................................................................17
APPENDIX B. NAME FIELD SEARCH ..................................................................................18
APPENDIX C. BANNER 7 NAVIGATION..............................................................................19
APPENDIX D. COMMON ERRORS........................................................................................20
APPENDIX E. INSTALLING ORACLE JINITIATOR .........................................................21
APPENDIX F. UNINSTALLING OLDER JINITIATOR ......................................................23
APPENDIX G. BANNER 7.X HIGHLIGHTS..........................................................................25
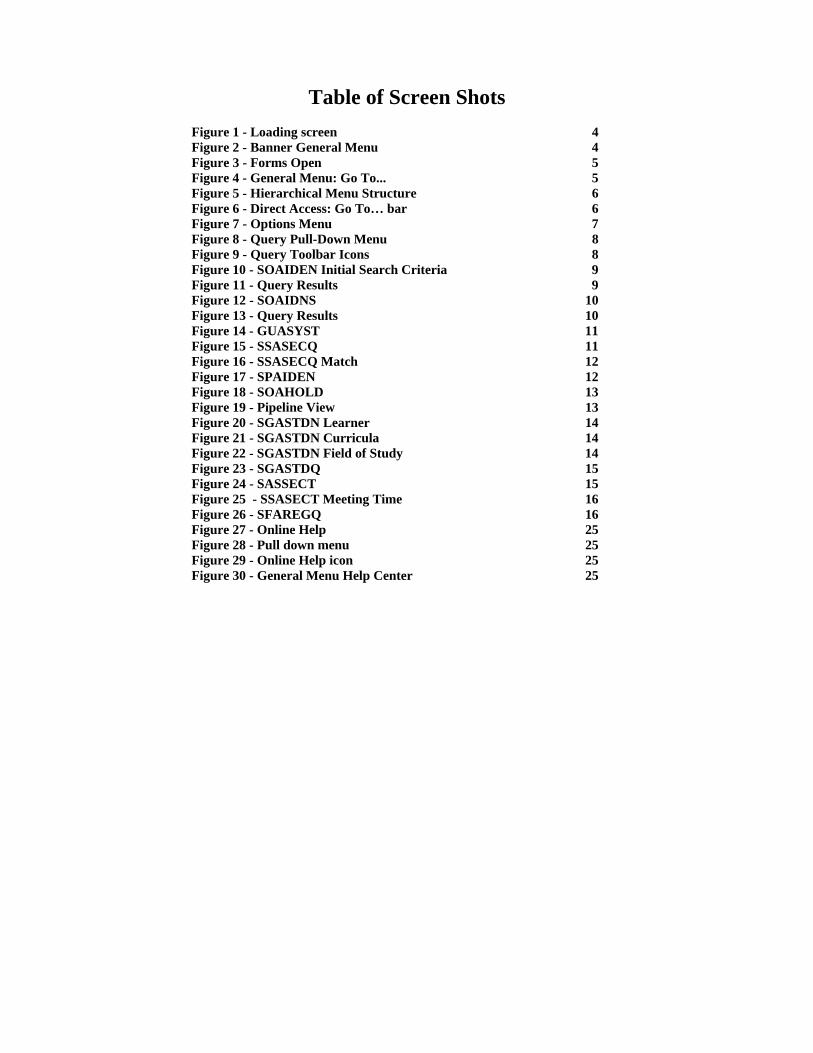
Table of Screen Shots
Figure 1 - Loading screen 4 Figure 2 - Banner General Menu 4 Figure 3 - Forms Open 5 Figure 4 - General Menu: Go To... 5 Figure 5 - Hierarchical Menu Structure 6 Figure 6 - Direct Access: Go To… bar 6 Figure 7 - Options Menu 7 Figure 8 - Query Pull-Down Menu 8 Figure 9 - Query Toolbar Icons 8 Figure 10 - SOAIDEN Initial Search Criteria 9 Figure 11 - Query Results 9 Figure 12 - SOAIDNS 10 Figure 13 - Query Results 10 Figure 14 - GUASYST 11 Figure 15 - SSASECQ 11 Figure 16 - SSASECQ Match 12 Figure 17 - SPAIDEN 12 Figure 18 - SOAHOLD 13 Figure 19 - Pipeline View 13 Figure 20 - SGASTDN Learner 14 Figure 21 - SGASTDN Curricula 14 Figure 22 - SGASTDN Field of Study 14 Figure 23 - SGASTDQ 15 Figure 24 - SASSECT 15 Figure 25 - SSASECT Meeting Time 16 Figure 26 - SFAREGQ 16 Figure 27 - Online Help 25 Figure 28 - Pull down menu 25 Figure 29 - Online Help icon 25 Figure 30 - General Menu Help Center 25

Banner 7.x Student Overview v. 2.0 October 2006 Page 4 of 25
1 Banner Basics Banner is a web-based application accessed with an Internet browser. The CCRI Information Technology department supports Internet Explorer, Microsoft’s browser. A browser plug-in will install, with some user interaction, the first time Banner is started on a computer. (See Appendix E) Once the proper software is installed, clicking the Banner Login button will bring up an initiation screen which must remain open the entire Banner session. (See Figure 1) This window can be minimized without interfering with the session. Banner loads and runs in a separate window. (See Figure 2) Banner is a collection of screens or forms organized into functional areas or products. The Banner products CCRI uses are Student, Financial Aid, Finance, Human Resources and General. Modules are organized within each product with the actual forms built around the functions of the module. Some of the modules found in the Student product are; Course Catalog, General Person, Faculty Load, Admissions, Registration and Academic History. The job function of the user determines which products, modules, and forms he or she can see and access.
Figure 1 - Loading screen
Figure 2 - Banner General Menu

Banner 7.x Student Overview v. 2.0 October 2006 Page 5 of 25
2 Forms A form is a grouping of information organized into sections or blocks for easier viewing. Like a paper form that has multiple pages, a form may consist of multiple screens. There is more than one kind of form and each type may have different functions and ways of displaying information.
2.1 Types of Forms Inquiry – Used to look up existing data. Application – Most common type of form. Provides data entry and query capabilities. Query – Used to look up existing data. Can only be accessed from another form. Usually shows
multiple records in a list format.
2.2 Accessing Forms Banner allows multiple forms to be open at once. Generally, the best practice is to close a form before opening another form, especially when entering data. . The open forms are displayed along the top of the Banner window. (See Figure 3)
Figure 3 - Forms Open
2.2.1 ‘Go To’ box At the Banner General Menu screen, type the 7-character form name directly into the ‘Go To’ box. Press Enter on the keyboard to open the form. (See Figure 4)
Figure 4 - General Menu: Go To...
2.2.2 Navigating the Hierarchical Tree Menu Structure Find the desired product, i.e. Student or Financial, double-click to expand the menu, continue double-clicking until the needed form name is displayed. Double-click the form name or press enter on the keyboard. (See Figure 5)

Banner 7.x Student Overview v. 2.0 October 2006 Page 6 of 25
Figure 5 - Hierarchical Menu Structure
2.2.3 Direct Access From the menu bar, select File Direct Access, a ‘Go To’ bar will open at the top of the current form. (See Figure 6) Type the name of the form in the box, press Enter on keyboard. To close ‘Go To’ bar, select File Direct Access again.
Using Direct Access to open a form will leave the current form open.
Figure 6 - Direct Access: Go To… bar
2.2.4 Options Menu The Options menu is a way of navigating to different blocks of the current form or opening related forms. Each form and possibly each block may have different destinations listed on the Options menu; some may have no options listed. Click Options then click the desired form or block. (See Figure 7)
Using Direct Access to open a form will leave the current form open.

Banner 7.x Student Overview v. 2.0 October 2006 Page 7 of 25
Figure 7 - Options Menu
2.3 Form Elements and Navigation Keyboard Navigation Definition Pull-Down Menu and Toolbar Icons
Next Previous
Field
Labeled space, check-box, radio-button, or text box on a form. Used to display, enter, or query for information.
Tab or Enter Shift + Tab
Record
Groups of fields comprising a logical unit. Some forms display more than one record at a time; use the horizontal scroll bar to view all records.
Up- Arrow Down-Arrow
Block
Chucks of information grouped together. **Key Block - Contains information that determines what is entered or displayed on the remainder of the form.
** Rollback to return to Key Block
Ctrl + Page-Up
Ctrl + Page-Down
3 Searching
Many form fields will only accept specific values or codes. The search icon indicates the ability to open a query form, or pick a value from a list or Validation Table. Query forms use the query functions found in the query pull-down menu or the query icons on the toolbar. (See Figures 8 & 9)

Banner 7.x Student Overview v. 2.0 October 2006 Page 8 of 25
Figure 8 - Query Pull-Down Menu
Figure 9 - Query Toolbar Icons
3.1 Search Terms Query – to search for specific information, data or objects Criteria – the specific information provided to the system to perform the search. Query forms
usually have multiple fields that can be used in a search. For example, you can search for a specific class section on SSASECQ using one or more of the following fields; term, campus, subject, course and/ or session
Match – the search criteria are compared against the system’s records and only those records that match are returned to the query form or search field
Case Sensitive – data is entered into Banner in a specific way. A query form that is case sensitive will only match those records that have the same capitalization as the criteria. For example, on a case sensitive form a last name search for Mcdonald will not match the records spelled McDonald. Always assume the query form is case sensitive unless a ‘Case Sensitive Query’ option field is present
Validation Tables – a validation table is a list of valid codes for a given field usually accessed by
pressing the Search icon Wildcard – a special character used in a query to replaced one or more other characters
o % (percent sign) represents any number of missing characters o _ (underscore) represents one or more occurrence of a missing character
To get these results… Enter these criteria… All entries that contain ma %ma% All entries that begin with ma ma% All entries that end with ma %ma All entries that have m as a second character _m%
3.2 Person Searches All forms with an ID field in the key block will have a search icon. Clicking the search icon will open either a specific person search form or a menu box with type-specific search options. A methodical name search should be conducted prior to concluding that a person does not exist in the Banner system.
3.2.1 Person Search Form (SOAIDEN) Query Form (not case sensitive by default) The Person Search Form is accessed from most forms that require an ID number in the key block. The fields are ID, Last Name, First Name, Middle Name, Birth Date, Change Indicator, and Type. A search can use all or any combinations of the fields except Birth Date. The Change Indicator field identifies a change was made to the record and the type of change. The two indicators are ‘I’ for an ID change and ‘N’ for a name change.

Banner 7.x Student Overview v. 2.0 October 2006 Page 9 of 25
There is variability of the data entered in the Middle Name field so it is advised to use this field only as a reference. Enter the criteria for the search; usually Last and First Name. Use wildcards to expand the search especially if the spelling of a name can vary. (See Figure 10) Once the criteria are entered, click Query Execute or press F8 on the keyboard.
Figure 10 - SOAIDEN Initial Search Criteria If the person is not in the list or the system did not find a match, try again using new criteria, perhaps utilizing wildcards.
To perform another search when records were returned, click Rollback or click Query Cancel.
To perform another search when no records were return, Tab to the appropriate field
Figure 11 - Query Results
If a record was found and the search was started from a calling form like SPAIDEN or
SGASTDN; click in the ID field, click the Select icon or File Select. The selected ID will now be displayed in the calling form’s key block, click Block Next to view on the form.

Banner 7.x Student Overview v. 2.0 October 2006 Page 10 of 25
3.2.2 Person Search Detail Form (SOAIDNS) Query Form (Case Sensitive) This form may be used to further determine the correct person to be used for processing. The General Student Block will provide the general student information such as student type, degree, college, and major. The Address Block will provide the student's address information. The searchable fields are ID, Last Name, First Name, and Change Indicator. Enter criteria in the appropriate fields, pay attention to capitalization. Click Query Execute. (See Figure 12)
From SOAIDEN, highlight the most closely matching record, click Query Count Hits. SOAIDNS will open with the values for the last and first name fields from SOAIDEN. Click Query Execute. (See Figure 12)
Figure 12 - SOAIDNS Scroll through the matched records looking at the General Learner and Address Details blocks. If the General Learner block is empty, the person has not been a student here before. (See Figure 13)
Figure 13 - Query Results
If a record was found and the search was started from a calling form like SPAIDEN or
SGASTDN; click in the ID field, click the Select icon or File Select. The selected ID will now be displayed in the calling form’s key block, click Block Next to view on the form.

Banner 7.x Student Overview v. 2.0 October 2006 Page 11 of 25
3.2.3 System Identification (GUASYST) Key Information: ID Use this form to identify the Banner systems that contain information about an ID. Each system is also broken down into key modules, such as Recruiting or Admissions in the Student System. GUASYST is simply a quick-reference to systems where further information about an ID may be stored. (See Figure 14)
Figure 14 - GUASYST
3.3 Other Search Forms There are numerous other query forms that have similar functionality but may look different than an ID search form. Fortunately, the search methods are the same including the use of the Query pull down menu and toolbar icons. (See Figures 8 & 9)
3.3.1 Schedule Section Query Form (SSASECQ) Query Form This form is used to view enrollment, location, and additional summary information and to find the CRN number for a class section. It can be access directly or by clicking the search icon next to the CRN field of the SSASECT form (See Section 4.4). This form displays two records at a time; if more records are matched, use the scroll bar to view. Any combination of fields can be used in the search. (See Figure 15) For example, Search criteria: Find all ADNU classes on the Knight campus for fall 2006 term Enter: Term = 200630 Subject = ADNU Campus = KN Click Query Execute
Figure 15 - SSASECQ Two records matched the criteria. (See Figure 16)
Banner 7.x Student Overview v. 2.0 October 2006 Page 12 of 25
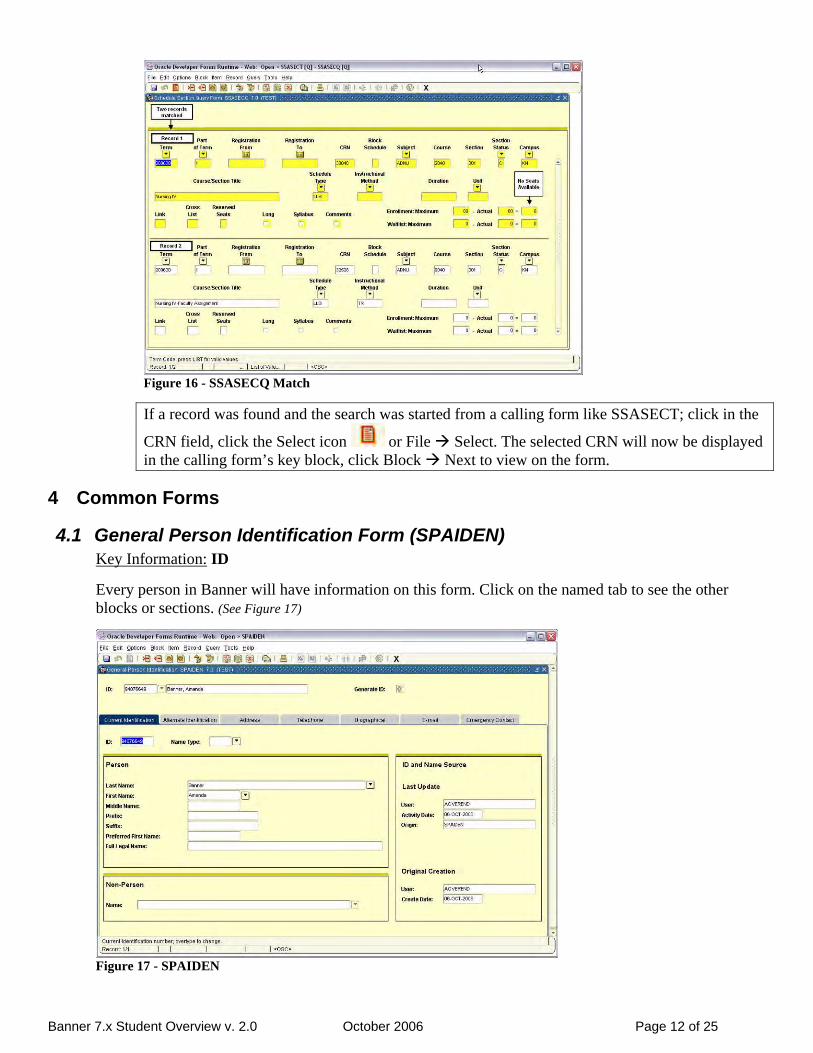
Figure 16 - SSASECQ Match
If a record was found and the search was started from a calling form like SSASECT; click in the
CRN field, click the Select icon or File Select. The selected CRN will now be displayed in the calling form’s key block, click Block Next to view on the form.
4 Common Forms
4.1 General Person Identification Form (SPAIDEN) Key Information: ID Every person in Banner will have information on this form. Click on the named tab to see the other blocks or sections. (See Figure 17)
Figure 17 - SPAIDEN
Banner 7.x Student Overview v. 2.0 October 2006 Page 13 of 25
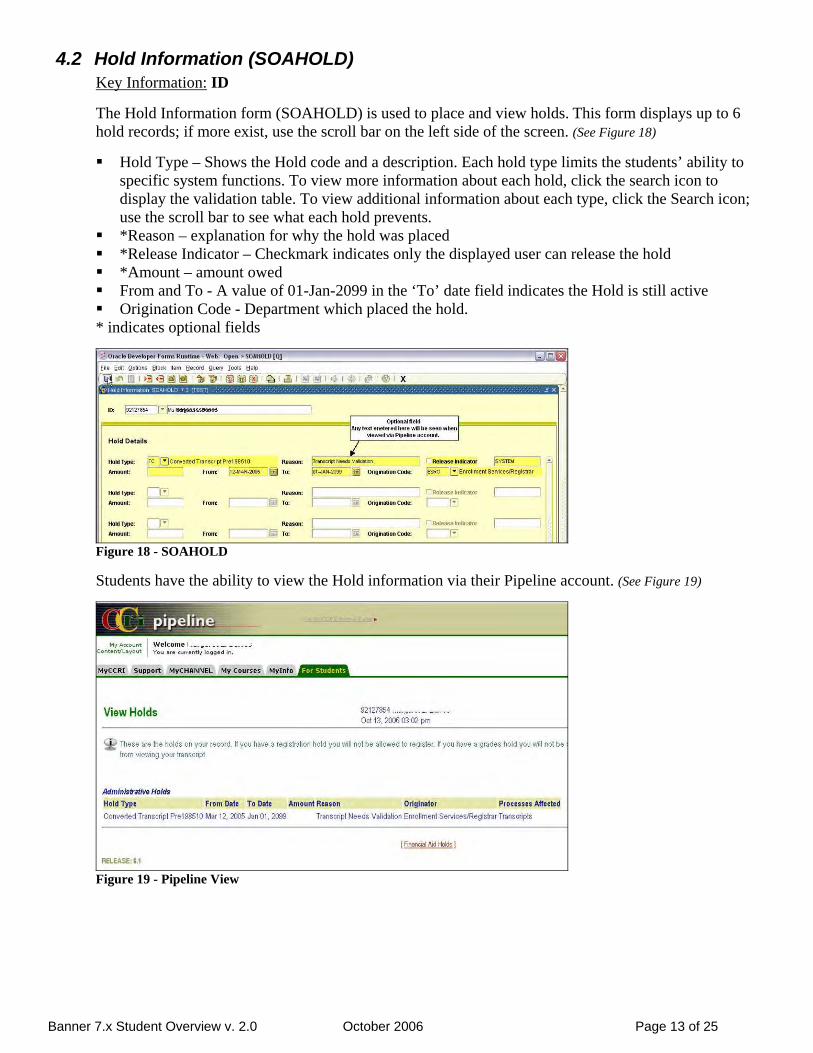
4.2 Hold Information (SOAHOLD) Key Information: ID The Hold Information form (SOAHOLD) is used to place and view holds. This form displays up to 6 hold records; if more exist, use the scroll bar on the left side of the screen. (See Figure 18)
Hold Type – Shows the Hold code and a description. Each hold type limits the students’ ability to
specific system functions. To view more information about each hold, click the search icon to display the validation table. To view additional information about each type, click the Search icon; use the scroll bar to see what each hold prevents.
*Reason – explanation for why the hold was placed *Release Indicator – Checkmark indicates only the displayed user can release the hold *Amount – amount owed From and To - A value of 01-Jan-2099 in the ‘To’ date field indicates the Hold is still active Origination Code - Department which placed the hold.
* indicates optional fields
Figure 18 - SOAHOLD Students have the ability to view the Hold information via their Pipeline account. (See Figure 19)
Figure 19 - Pipeline View

Banner 7.x Student Overview v. 2.0 October 2006 Page 14 of 25
4.3 General Student (SGASTDN) Key Information: ID and Term Code (optional) This form displays General Student records one at a time. The Term field is optional, however, on this form it is used to limit the number of records displayed. If the most current term is entered all records will be viewable, however; if an early term is entered, only those records that were effective for that term or earlier will be viewable.
Clicking the Student Summary search icon will open the General Student Summary (SGASTDQ) form which shows summary term records in a list format. (See Section 4.3.1) There are several blocks of this form which are accessed from the Options menu or by clicking the named tab. (See Figures 20, 21 & 22)
Figure 20 - SGASTDN Learner
Figure 21 - SGASTDN Curricula
Figure 22 - SGASTDN Field of Study

4.3.1 General Student Summary Form (SGASTDQ) Key Information: ID is the only field required This form can be access directly or by clicking the search icon in the key block of SGASTDN. ID is a required field but term code should be left blank to view all the records. This form displays general student records in a list view. As each record is selected in the Student Summary block, the Curricula Summary and Field of Study blocks will display the information connected to that term record. (See Figure 23)
Double-click the record to return it to SGASTDN.
Figure 23 - SGASTDQ
4.4 Schedule Form (SSASECT) Key: Term Code and CRN (Course Reference Number) The Schedule Form (SSASECT) displays class section information. There are other blocks including Meeting Time and Assigned Instructor; use the Options menu or Next Block. (See Figures 24 & 25)
Figure 24 - SASSECT

Banner 7.x Student Overview v. 2.0 October 2006 Page 16 of 25
Figure 25 - SSASECT Meeting Time
4.5 Registration Query Form (SFAREGQ) Key Information: Term Code and ID The Registration Query Form (SFAREGQ) provides an online view of a student’s schedule. The form displays all currently registered courses and related information, three records at a time. Use the vertical scroll bar to view any additional classes. (See Figure 26)
Figure 26 - SFAREGQ

Banner 7.x Student Overview v. 2.0 October 2006 Page 17 of 25
Appendix A. Banner Tips
General CCRI ID numbers begin with ‘9’ and are 8 digits long.
o The ID fields are 9 characters long to fit a Social Security number. Press the Tab key on the keyboard to display the name when a CCRI ID is typed.
Most functions can be executed from a pull-down list on the menu bar, pressing an icon on the toolbar, or a function key on the keyboard. (See Appendix C)
Banner has several way of alerting the user that an error has occurred. The most common way is by displaying the error in the Auto Hint/ Status Line. The Auto Hint/ Status Line is located at the bottom of the Banner screen. It is also where processing messages and keyboard shortcuts are displayed.
Forms In most cases, Key Block information will transfer from one form to another. Be sure that the key block
is correct before clicking Next Block. o Be especially careful with Term fields.
To change key block information on a form, such as the person or term, click Rollback . Clicking in a row makes it the active row; indicated by a color change. Banner keeps track of the forms opened during a session and lists them by order of use on the File pull
down menu. To reopen a form, click File FormName
Using this method to open a form will leave the current form open.
Banner 7.x Student Overview v. 2.0 October 2006 Page 18 of 25
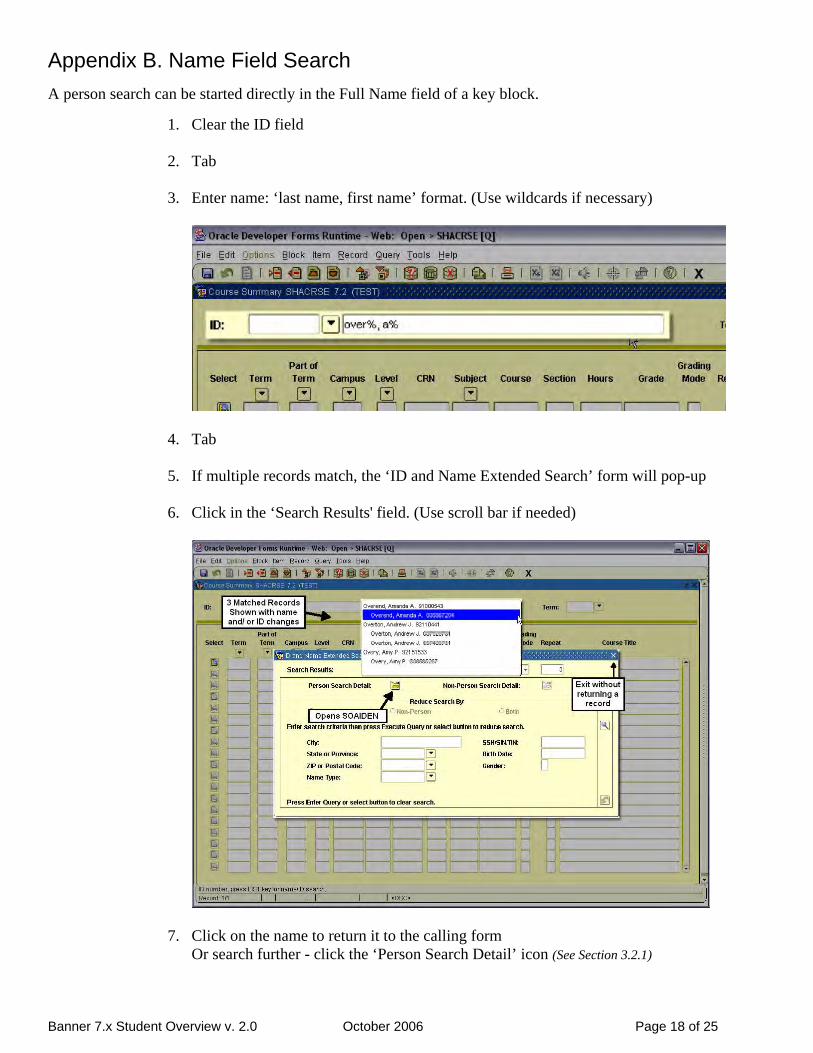
Appendix B. Name Field Search A person search can be started directly in the Full Name field of a key block.
1. Clear the ID field 2. Tab
3. Enter name: ‘last name, first name’ format. (Use wildcards if necessary)
4. Tab 5. If multiple records match, the ‘ID and Name Extended Search’ form will pop-up
6. Click in the ‘Search Results' field. (Use scroll bar if needed)
7. Click on the name to return it to the calling form Or search further - click the ‘Person Search Detail’ icon (See Section 3.2.1)

Banner 7.x Student Overview v. 2.0 October 2006 Page 19 of 25
Appendix C. Banner 7 Navigation
Banner Navigation Function Menu Bar Pull-Down Keystroke Option Toolbar Icons
General Functions
Save or Commit File Save F10
Rollback File Rollback Shift + F7
Select File Select Shift + F3
Record Functions
Insert Record Record Insert F6
Remove Record Record Remove Shift + F6
Previous Record Record Previous Up Arrow
Next Record Record Next Down Arrow
Block Functions
Next Block Block Next Ctrl + Page Down
Previous Block Block Previous Ctrl + Page Up
Query Functions
Enter Query Query Enter F7
Execute Query Query Execute F8
Cancel Query Query Cancel Ctrl + Q
General Functions
Online Help Help Online Help
Exit File Exit Ctrl + Q
Banner 7.x Student Overview v. 2.0 October 2006 Page 20 of 25
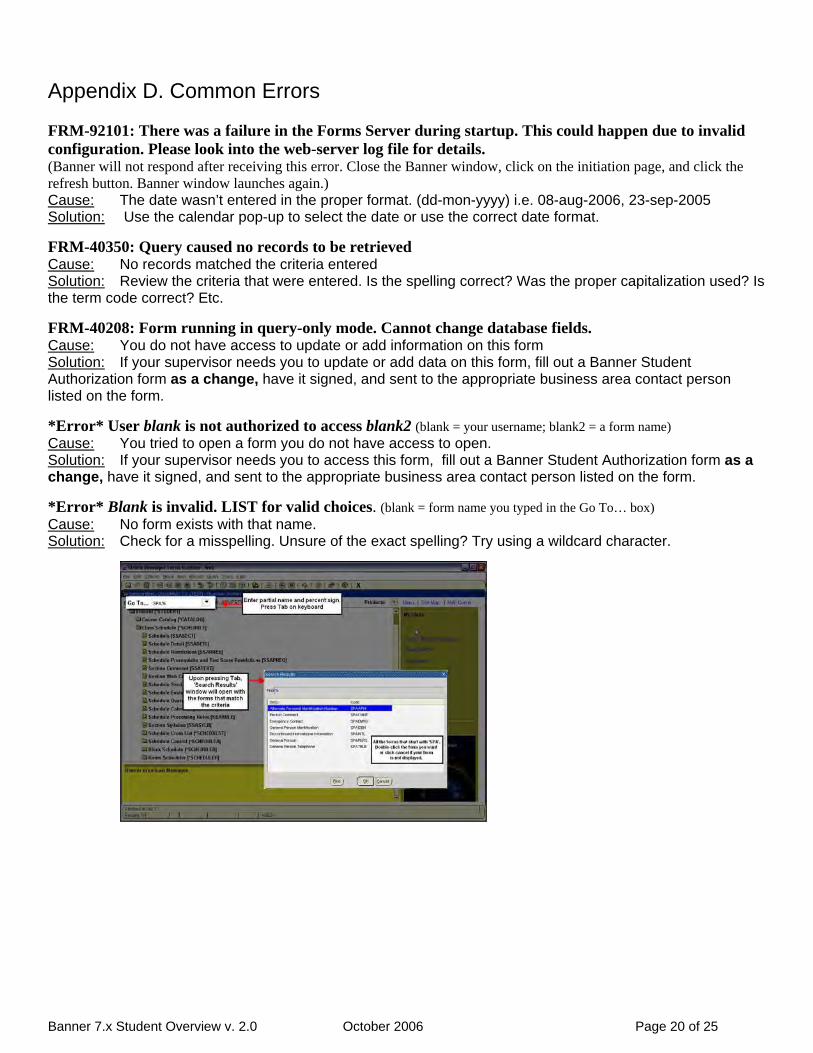
Appendix D. Common Errors FRM-92101: There was a failure in the Forms Server during startup. This could happen due to invalid configuration. Please look into the web-server log file for details. (Banner will not respond after receiving this error. Close the Banner window, click on the initiation page, and click the refresh button. Banner window launches again.) Cause: The date wasn’t entered in the proper format. (dd-mon-yyyy) i.e. 08-aug-2006, 23-sep-2005 Solution: Use the calendar pop-up to select the date or use the correct date format. FRM-40350: Query caused no records to be retrieved Cause: No records matched the criteria entered Solution: Review the criteria that were entered. Is the spelling correct? Was the proper capitalization used? Is the term code correct? Etc. FRM-40208: Form running in query-only mode. Cannot change database fields. Cause: You do not have access to update or add information on this form Solution: If your supervisor needs you to update or add data on this form, fill out a Banner Student Authorization form as a change, have it signed, and sent to the appropriate business area contact person listed on the form.
*Error* User blank is not authorized to access blank2 (blank = your username; blank2 = a form name) Cause: You tried to open a form you do not have access to open. Solution: If your supervisor needs you to access this form, fill out a Banner Student Authorization form as a change, have it signed, and sent to the appropriate business area contact person listed on the form. *Error* Blank is invalid. LIST for valid choices. (blank = form name you typed in the Go To… box) Cause: No form exists with that name. Solution: Check for a misspelling. Unsure of the exact spelling? Try using a wildcard character.

Appendix E. Installing Oracle JInitiator
Banner Login and JInitiator Install Step 1
Open Internet Explorer. Navigate to Banner Project page. http://it.ccri.edu/Banner/ Click Banner Login button.
Step 2
‘Internet Explorer – Security Warning’ dialogue box appears. Click Install.
Step 3 ‘Software Installation’ dialogue box appears. Click Continue Anyway.

Banner 7.x Student Overview v. 2.0 October 2006 Page 22 of 25
Step 4
‘Oracle JInitiator Setup’ dialogue box appears. The Destination Folder indicates where the JInitiator will be installed. Click Next.
Step 5
‘Installation Complete’ dialogue box appears. Click OK. **If an error message is displayed; remove all versions of Oracle JInitiator (see Appendix F) and try the installation again. **
Step 6
The Banner logon box should appear.

Banner 7.x Student Overview v. 2.0 October 2006 Page 23 of 25
Appendix F. Uninstalling Older JInitiator
If you receive the following error after trying to install the Banner 7 JInitiator please follow the steps below to uninstall all previous versions. "Error while registering the Oracle JInitiator 1.3.1.18 registry keys"
Step 1
Close all Internet Explorer windows. In the lower left-hand corner of the computer desktop, Click the Start button.
Step 2
Click Control Panel.
Step 3
Click Add or Remove Programs. Different icon depending on the view of your Control Panel.
Step 4
Scroll down the alphabetically list of programs looking for versions of Oracle JInitiator. There may be more than one. Select Oracle JInitiator 1.x.x.xxxx Click Change/Remove.

Banner 7.x Student Overview v. 2.0 October 2006 Page 24 of 25
Step 5
‘Confirm File Deletion’ dialogue box appears. Click Yes.
Step 8
‘Remove Shared File?’ dialogue box appears. Click Yes to All.
Step 9
Another ‘Removed Shared File?’ dialogue box appears. Click Yes.
Step 10
‘Remove Programs from Your Computer’ dialogue box appears. Once all components have been removed, Click OK.
Repeat steps 4 thru 10 to remove all versions of Oracle JInitiator.

Banner 7.x Student Overview v. 2.0 October 2006 Page 25 of 25
Appendix G. Banner 7.x Highlights
Plus signs on hierarchical tree menu replaced with Folder icon. You can select the product, application
or form name then double-click or hit the enter key to expand/ collapse the menu or open the selected form.
Direct Access form replaced by Go To... toolbar
Spyglass replaced by Search icon Open form names will display in the title bar when multiple forms are open. The [Q] symbol indicates
the ability to view the information available on this form but no data entry or modification is allowed. Many of the forms previously available through the Option menu have been replaced with tabs. Date field now have a calendar pop-up for choosing the date Right-clicking in a form sometimes will bring up some basic Banner tools and any forms available on
the Options menu. Online Help - Displays help information in a new browser window. Content determined by form opened
when Help is accessed. (See Figure 29) o Help pull-down from Menu bar (See Figure 30) o Online Help toolbar icon (See Figure 31) o Help Center link on General Menu (See Figure 32)
Figure 27 - Online Help
Figure 29 - Online Help icon
Figure 28 - Pull
down menu
Figure 30 - General Menu Help Center