Bank Manager - Phoenix Accounting Corporation - Home
42
Accounting for Windows Bank Manager • 519 Bank Manager Overview The Bank Manager is used to manage checking and savings accounts. The Bank Manager serves the following functions: • Set up and maintain bank information including MICR information. MICR is an optional module used to print checks on blank check stock paper. • Create and print checks • Create and track deposits, bank charges, and interest charges • Receive deposits for payments from A/R, POS, and P/M modules • Help you reconcile your bank statements
Transcript of Bank Manager - Phoenix Accounting Corporation - Home

Accounting for Windows Bank Manager •• 519
Bank Manager
Overview
The Bank Manager is used to manage checking and savings accounts. The Bank Manager serves the following functions:
• Set up and maintain bank information including MICR information. MICR is an optional module used to print checks on blank check stock paper.
• Create and print checks • Create and track deposits, bank charges, and interest charges • Receive deposits for payments from A/R, POS, and P/M
modules • Help you reconcile your bank statements

520 •• Bank Manager Accounting for Windows
Flowchart
The following figure is the flowchart for the Bank Manager. The first step involves setting up the bank information and the vendor information. The next step is to enter the checkbook transactions, such as checks, deposits, bank charges, and service charges. After this, you can print the checks.
If you have been receiving payments from A/R, POS, and P/M modules, you can select these transactions and make a single deposit into the checkbook. This makes reconciliation very easy.
After all your transactions are done you should back up your data from the Backup option in the File menu. The next step is to post the data to update the G/L financial statements.
You can use the reconciliation option to match your checkbook to the bank statements.
G/L Reports
Journal Entries Created
Bank Maintenance
Enter/Edit Vendors
Enter/Edit Checkbook
Backup Data
Post Bank Deposits
Post Checkbook
Print Checks

Accounting for Windows Bank Manager •• 521
Quick Start for Bank Manager/Checkbook
Please refer to the Quick Start Guide chapter for the quick steps to create Accounts, and setup your General Ledger. You will also be shown how to quickly enter your starting balances.
Vendor Maintenance
For more information on Vendor maintenance, refer to the Accounts Payable chapter.
Bank Maintenance
The purpose of the Bank Maintenance option is to:
• Allow you create multiple Bank (or Checking) accounts in the system.
• Track setup information for the Bank account such as the Payer’s Address, Bank Address, the next check number, and setup information for printing MICR Checks. MICR is an optional module that allows you print checks on blank check stock paper.
For more information on the Bank Maintenance option, please refer to the Accounts Payable chapter.
522 •• Bank Manager Accounting for Windows
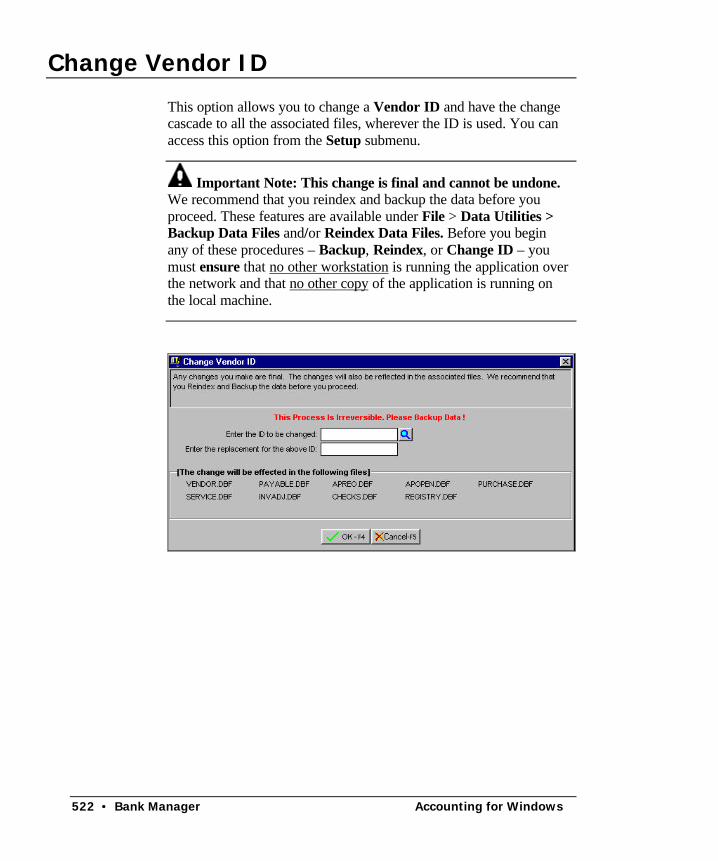
Change Vendor ID
This option allows you to change a Vendor ID and have the change cascade to all the associated files, wherever the ID is used. You can access this option from the Setup submenu.
Important Note: This change is final and cannot be undone. We recommend that you reindex and backup the data before you proceed. These features are available under File > Data Utilities > Backup Data Files and/or Reindex Data Files. Before you begin any of these procedures – Backup, Reindex, or Change ID – you must ensure that no other workstation is running the application over the network and that no other copy of the application is running on the local machine.

Accounting for Windows Bank Manager •• 523
Bank Manager Setup
In the Bank Manager Setup, you can select various options to apply to your checks and your Reconciliation Reports. Those options display in the screen:
The various options are explained in more detail in Enter/Edit Checkbook and Reconcile Checkbook.
Enter/Edit Checkbook
This option is used to enter checks that can be printed later. In addition, you can distribute (or split) a check to multiple General Ledger accounts.

524 •• Bank Manager Accounting for Windows
Important Note: Even though the program will let you select an A/P Vendor, any checks entered through Bank Manager will NOT affect or show up in the A/P module.
Creating a New Checkbook Transaction
You can create a new Checkbook Transaction as follows:
Step 1: Do not enter a number in the Edit Transaction Number field. The program will automatically determine the next Transaction number.
Step 2: The cursor will be at the Transaction Type field. You can now fill in the Checkbook information. You can chose from Manual Check, Computer Check, Deposit, Service Charge, and Interest Earned. An explanation of the fields on the Checkbook Transaction screen is available at page 526.
Enter checkbook transactions like checks, deposits, service charges, and interest earned.
Split checks into multiple accounts.
Know your latest account balance instantly

Accounting for Windows Bank Manager •• 525
Editing a Checkbook Transaction
You can edit a previously saved (but unposted) Checkbook Transaction as follows:
Step 1: Place the cursor in the Edit Transaction Number field.
Step 2: Type in the Transaction Number to edit. If you do not know the Transaction number, you can click on the Browse-F3 button to bring up a list of Transactions currently on file. You can select a Transaction from this list to view or to edit it.
Step 3: Press the Enter key.
Step 4: The Checkbook Transaction displays on the screen. You can now make changes to the Checkbook Transaction as long as it has not been posted. Click on the Save-F4 button to save the changes.
Deleting a Checkbook Transaction
You can delete a previously saved (but unposted) Checkbook Transaction as follows:
Step 1: Place the cursor in the Edit Transaction Number field.
Step 2: Type in the Transaction number you want to delete. If you do not know the Transaction number, you can click on the Browse-F3 button to bring up a list of Transactions currently on file. You can select a transaction from this list to view or to delete it.
Step 3: Press the Enter key.
Step 4: The Checkbook Transaction displays on the screen. You can now delete the Checkbook Transaction as long as it has not been posted. Click on the Delete-F8 button to delete the transaction.

526 •• Bank Manager Accounting for Windows
Checkbook Fields The data entry fields that are available are:
Checking Account: Enter your checking account number here, if different from the default number. Checking accounts are set up using the Bank Maintenance option in the Bank Manager module. As default, the program will automatically display the checking account number from the Company Setup option. You can click on the Browse-F3 button to select a different checking account number. In addition, you can type in a new account number and press the Enter key to add a new checking account number.
Transaction Number: If you want to edit a previously saved (but unposted) Checkbook transaction, enter the transaction number here. This field will not be visible if you do not have previously saved/unposted Checkbook transactions.
Important Note: How the Checkbook Transaction Number for the current transaction is determined: This program has the ability to open multiple Checkbook transaction screens (e.g. while you are in the middle of working on a Checkbook transaction for a Vendor you can open another Checkbook transaction screen). In order to prevent conflicts between both these open windows, the program does not determine the Checkbook transaction number until you save the Checkbook transaction.
When you save the Checkbook Transaction, the program will automatically obtain the next Checkbook transaction number display the message Saving Checkbook transaction number XX. If you are entering the Checkbook transactions after the fact, you can override this feature by going to the Checkbook transaction number field and entering the Checkbook transaction number directly.

Accounting for Windows Bank Manager •• 527
Transaction Type: Select one of the following transaction types:
• Manual Check: Hand written checks that are not printed by the program. If you select the manual check option, you will be required to enter in a number in the check number field.
• Computer Check: Checks that you wish the computer to print for you.
• Deposit: Deposits that you will be making to your checking account.
• Service Charge: The money charged to you by the bank for services like over draft, monthly fees etc.
• Interest Earned: The interest earned in your checking account.
Balance: When you click on Save on the bottom of this screen, the program will automatically update the checkbook balance. This includes unposted and posted checkbook and G/L Transactions. If you wish to know how the checkbook balance is computed, please refer to page 530. (This is not a data entry field).
Important Note: If the checking account has a positive balance, it will display in blue. If the account balance is negative, it will display in red.
Vendor ID: Enter the Vendor ID number for the vendor for whom you want to create this transaction. You can browse the list of vendors in the system by clicking on the Browse button. If you type in a valid Vendor ID, the program will automatically bring up the vendor name and address. You can edit the address if required.
You do not necessarily need to add a Vendor. If you do not wish to add a vendor to the Vendor File, when asked to add a vendor select No.
Pay to the Order of: This field displays for manual and computer check transactions. If you select a Vendor ID number, the name and address information will automatically display. If you do not have a Vendor ID number for the recipient of this check, you can enter the information manually.
If any of the fields in this section are left blank, the cursor will move to the next available field based on the following criteria:

528 •• Bank Manager Accounting for Windows
• If the Transaction Type selected is Manual Check and you have enabled the option in Bank Manager to auto-generate check numbers, the cursor will move to the Date field. If you have not enabled this function, the cursor will move to the Check No. field.
• For all other types of transaction types, the cursor will move to the Date field.
Check No: Enter the Check Number in this field. This field is available for manual checks only. The manual check number will be generated automatically if you select that option in Bank Manager Setup.
Date: Type in the Date of the check or select a date from the Calendar button to the right of this field. Note that this date does not mean that the check will post to the same month. All checks post to the month that matches the posting date. You can change the posting date when you select the option called Post Checkbook option from the Checkbook menu.
Amount: Type in the total amount of the checkbook transaction. If you intend to disburse (split) the check to multiple accounts, you must put the total of all the disbursements in this field. You do the actual disbursements in another field.
Memo: Type in a brief description of the checkbook transaction. This will automatically print on the check unless you disable this option in the Bank Maintenance Setup.
Job: If you have enabled Job tracking, you will be required to enter a Job ID in this field. You can enable Job Tracking from the Job Setup menu. If transaction does not require a Job ID, then you can create a dummy Job ID like 99 and then assign it to the transaction.
Reference: Enter the Reference number for the checkbook transaction. This is for information purposes only.
Check Disbursements (or Splits): You SHOULD NOT enter the checking account for ANY type of a checkbook transaction in this field. This includes checks, deposits, bank charges, and interest

Accounting for Windows Bank Manager •• 529
earned. The only exception to this rule is you are transferring funds to another checking account. This is discussed on page 533.
You are required to allocate an account number to each disbursement. You can disburse or split each transaction to an unlimited number of G/L accounts. On the left side, you enter the Account ID number, and on the right side, enter the amount that needs to be disbursed to that account. You can Save the transaction only if the sum of all the disbursements is equal to the total amount of the transaction.
When you print a check with more than eight splits, then the program will void out a check for each set of eight splits.
Example #1 if you have 10 splits, the program will print 8 splits on the first check, void it out, and print 2 splits on the next check with the total amount of the check.
Example #2 if you have 20 splits, the program will print 8 splits on the first check, void it out. Next the program will print another 8 splits on the second check, void it out. Finally, the program will print the remainder of the 4 splits on the third check with the total amount of the check.
When you write a check for an expense to the company, say to the Power Company, you may use the expense account Electric Company (account # 52110 in the sample Chart of Accounts). If you are writing a check to purchase an asset, use an asset account (e.g. machinery, or inventory for resale). For deposits, you may enter the account that is the source of the deposit (e.g. Accounts Receivable). For Service Charges, you would usually use an expense account called Bank Charges, and for Interest Payments you may use an income account. Refer to the accounting primer for details on assets, and expense accounts. If you are not sure what account to allocate to the checkbook transaction, we recommend that you consult your accountant.

530 •• Bank Manager Accounting for Windows
Important Note: For Deposits, always enter the account from which the money is being received, (e.g. Sales, Accounts Receivable, Owner Equity, etc.). The program automatically knows that the money will be going to the Checking Account.
Department: If you have Department tracking enabled in the G/L Setup, enter the Department ID for this vendor. You can use Departmental tracking only if you have the General Ledger module installed.
Invoice No.: If you are paying an invoice, enter the invoice number here. This information is optional. If you enter an invoice number, it will print on the check stub.
Description: Enter a brief description for the payment. This information is optional.
Void: This button only appears when you are viewing a manual or computer check transaction (either posted or unposted). Clicking on this button will void the selected transaction.
Checkbook Balance Calculation
The checkbook balance, reconciliation screen, and checkbook register reports are based solely on transactions in the Bank module. The following are different ways that transactions are created in the Bank module.
• Entries made from the Enter/Edit Checkbook option of the Bank menu
• Posted A/P payments • Posted Payroll checks • Posted P/M refund checks • Deposits from A/R, POS, and P/M that have been posted to the
checkbook

Accounting for Windows Bank Manager •• 531
Important Note: When A/R, POS, and P/M payments are posted to the G/L an entry is made into a table that tracks payments needing to be deposited into the Checkbook. To deposit posted A/R, POS, and P/M payments into the checkbook, select the Deposit A/R, POS, and P/M Payments sub menu from the A/R, P/M, or Bank menu and use the Select Payments to Deposit and Post Deposits to Checkbook options.
* Unposted transactions will be considered only if Create Posted Check Entry in the Bank Manager is checked
NOTE: B/M above stands for Bank Manager
Frequently Asked Questions
How Do I Manually Enter Payroll Checks in the Checkbook?
The Enter/Edit Checkbook option will let you enter negative disbursements on the line items (splits). This is especially useful if you have an outside payroll service that issues payroll checks directly to your employees, and you do not use the payroll module. If you use the payroll module, then enter the checks directly from the payroll program using the Enter/Edit Past Payroll Checks option.
Here is an example: Your outside payroll service issues a payroll check to an employee with the following information:
Tax Amount Gross Pay 1,000.00 Employee Soc. Sec Tax 62.00 Employee Medicare 14.50 Employee Federal Tax 127.84 Employee State Tax 40.29
Net Pay 755.37 Employer Soc. Sec Tax 62.00 Employer Medicare 14.50

532 •• Bank Manager Accounting for Windows
When entering this check in the Enter/Edit Checkbook option here is what you will do:
Enter the employee name and address. Mark the Transaction Type as a Manual Check and enter the check number. In the Amount field, enter the net pay amount (i.e. 755.37).
In the Splits (disbursements), enter the amounts as follows:
Account ID Account Name Amount 25060 Federal Tax -127.84 25070 FICA – Employee -62.00 25080 Medicare Employee -14.50 25090 State Tax Employee -40.29 52340 Payroll Expense Employee 1000.00 25010 FICA – Employer -62.00 25020 Medicare – Employer -14.50 52340 Payroll Expense Employer 76.50
You will note that all the tax liabilities were entered as a negative number and were assigned to the Payroll Liability accounts in G/L. The Gross pay is entered as a positive number and is assigned to the Employee Payroll Expense Account.
The employer contributions were also entered as a negative number and were assigned to the Payroll Liability accounts in G/L. In addition, the last entry is a positive number determined by adding up all the employer contributions to the Employer Payroll Expense account.
Important Note: The above example assumes that the account numbers are from the default chart of accounts. If you are using a different set of accounts, replace them with the appropriate account numbers.

Accounting for Windows Bank Manager •• 533
How Do I Transfer Money from One Checkbook to Another?
Let us say you want to transfer $1,000.00 from checking account#11010 (Wells Fargo Bank) to checking account #11020 (First Federal Bank).
You can accomplish this as follows:
Step 1: From the Bank menu select the Enter/Edit Checkbook option.
Step 2: In the Transaction Type field, select the type as Deposit.
Step 3: Type the Date of the transfer.
Step 4: In the Amount field, type in the amount as $1,000.00.
Step 5: In the Memo field type in “Transfer from Wells Fargo”.
Step 6: In the Checking Account field type in the account into which you are going to transfer/deposit the money (i.e. 11020).
Step 7: In the Account ID field, we will need to use an intermediary transfer account to temporarily record this amount. If you are using the account numbers that came with the default chart of accounts, you can use account # 11100 (Undeposited Cash).
Step 8: In the Amount field type 10000.00. Press the Save-F4 button to save the transaction. After this transaction is saved, a blank new transaction is displayed.
Step 9: In the Transaction Type field, select the type as Manual Check.
Step 10: In the Check No field, type the word TRANSFER.

534 •• Bank Manager Accounting for Windows
Step 11: Type the Date of the transfer.
Step 12: In the Amount field, type in the amount as $1,000.00.
Step 13: In the Memo field type in “Transfer to First Federal”.
Step 14: In the Checking Account field type in the account from which you are going to transfer the money (i.e. 11010).
Step 15: In the Account ID field, we will need to use the same intermediary transfer account used in Step 7 above (i.e. account # 11100 – Undeposited Cash).
Step 16: In the Amount field type 10000.00. Press the Save-F4 button to save the transaction.
How Do I Set Up the Beginning Balance for My Checkbook?
Step 1: From the Bank menu, select the Enter/Edit Checkbook option.
Step 2: In the Checking Account field, type in the checking account for the offsetting G/L account – This would usually be 11010. That is your default G/L Cash Account number.
Step 3: If you have a positive cleared balance, select the Transaction Type – Deposit. If the cleared balance is negative, you will select Transaction Type – Manual Check. The following steps will be the same.
Step 4: Enter the Date and then the Amount.
Step 5: In the Memo field, type in “Starting Balance.”

Accounting for Windows Bank Manager •• 535
Step 6: In the Account ID field, enter the same number as your Checking Account number if you have already set up your G/L and do not want the G/L to be affected by this transaction. If you do want the transaction to affect the G/L, enter the appropriate G/L account number (e.g. 31010 for Owner’s Equity).
Step 7: Click on Save-F4 to save this transaction to the database.
If there are some transactions that have not yet cleared your bank, you will need to enter separate transactions for each one. Once you have finished, this will set the beginning balance for the checkbook in the Bank module.
The final step is to select Reconcile Checkbook from the menu and mark the transaction that reflects the cleared portion of the beginning balance as cleared.
How Do I Enter the Starting Balance for a New Checking Account?
Let us say you have opened a checking account #11030 with an amount of $500.00. You can accomplish this as follows:
Step 1: From the Bank menu, select the Enter/Edit Checkbook option.
Step 2: In the Checking Account field, type in the account you are depositing the money into (i.e. 11030).
Step 3: In the Transaction Type field, select the type as Deposit.
Step 4: Type the Date of the Deposit.
Step 5: In the Amount field, type in “500.”
Step 6: In the Memo field, type in “Starting Balance”.

536 •• Bank Manager Accounting for Windows
Step 7: In the Account ID field, we will need to specify where the money came from – If the money came from the sale of merchandise, use any Income account number like 41010. If the money came from the owner, you can use the Owners equity (i.e. 31010) account number.
Step 8: Press the Save-F4 button to save the transaction. After you save this transaction, a blank new transaction screen displays.
How Do I Fix Errors in the Checkbook Balance?
If the G/L Checking Account balance and the Bank Checking Account balance do not match, check for the following first:
• Unposted Bank transactions, which would not show up in G/L. To check this, run a Checkbook Report. Select to print Unposted Transactions only, and increase the date range to include at least one year. If any records are found, this will account for a portion or all of the discrepancy.
• Undeposited A/R, POS, and P/M payments, which would not show in the Bank module. To check for this, select the Deposit Transaction Report from the Deposit A/R, POS, and P/M Payments submenu. Select to print Unposted Transactions only, increase the date range to at least one year, and select both Marked and Unmarked for Deposit. If any records are found, this will account for a portion or all of the discrepancy.
If a discrepancy still exists, either a transaction was created in G/L that affects the checking account and would not reflect in the Bank module, or a transaction was created in Bank module that used the checking account for both the debt and the credit.
To correct the discrepancy at this point, you need to determine which balance is incorrect. Next, determine which Problem/Solution applies. See the following scenarios:
Problem #1: My Cash Account balance in G/L is correct, but the Checking Account balance is too high in Bank module.

Accounting for Windows Bank Manager •• 537
Solution #1: You can perform the following steps to correct the problem:
Select Enter/Edit Checkbook option from the Bank menu and then select the following:
• Transaction Type: Service Charge • Description: Enter “Checkbook Adjustment” • Amount: Enter the amount by which the balance needs to be
adjusted. • Account ID: Enter the same number as the Checking Account
number on the top of the data entry screen. • Amount: Enter again, in the grid field, the amount by which the
balance needs to be adjusted.
When you click on Save-F4, the Cash balance in G/L is not affected and the Checkbook balance is decreased in the Bank module.
Problem #2: My Cash Account balance in G/L is correct, but the Checking Account balance is too low in Bank module.
Solution #2: Select the Enter/Edit Checkbook option from the Bank module and follow the same steps as in Solution #1, except select Deposit instead of Service Charge as the Transaction Type.
When you click on Save-F4, the Cash balance in G/L is not affected and the Checkbook balance is increased in the Bank module.
Problem #3: My checking account balance is correct, but the Cash Account balance in G/L is too high.
Solution #3: Perform the following steps to correct the problem:
Select the Enter/Edit G/L Transactions from the G/L module menu and enter the following:
Line #1
• Account ID: Enter the G/L Cash Account number. • Description: Enter “Cash Adjustment.”

538 •• Bank Manager Accounting for Windows
• Credit: Enter the amount by which the balance needs to be adjusted.
Line #2
• Account ID: Enter the offsetting account. (Consult with your accountant if you do not know what that should be).
• Description: Enter “Cash Adjustment.” • Debit: Enter the amount by which the balance needs to be
adjusted.
When you click on Save-F4, the Checking Account balance in the Bank module is not affected while the Cash Account in G/L is decreased by the amount that you entered.
Problem #4: My Checking Account balance is correct, but the Cash Account balance in G/L is too low.
Solution #4: Perform the same procedure as in Solution #3, except enter the amount to adjust in Credit on Line #1 and in Debit on Line #2 (the reverse of what you would do in Solution #3).
When you click on Save-F4, the Checking Account balance in the Bank module is not affected while the Cash Account in G/L is increased.
How Do I Enter and Print a Check?
Let us say you want to print a check for $500.00 from the checking account #11010. You can accomplish this as follows:
Step 1: From the Bank menu, select the Enter/Edit Checkbook option.
Step 2: In the Checking Account field, type in the checking account number (i.e. 11010).
Step 3: In the Transaction Type field, select the type as Computer Check.

Accounting for Windows Bank Manager •• 539
Step 4: In the Vendor ID field, click on Browse-F3 button and select the Vendor to whom you wish to issue the check.
If you do not have this vendor set up, you can leave the Vendor ID field blank, and type in the vendor’s name and address in the Pay To The Order Of field.
Step 5: Type the Date of the check.
Step 6: In the Amount field, type in the amount as $500.00.
Step 7: In the Memo field, type in the memo to describe the nature of the check.
Step 8: In the Account ID field, we will need to use the account number that best matches the reason for writing the check. If you incurred an expense, then use an expense account number (e.g. 52100 for the Phone Company). If you are purchasing some inventory to resell, you can use 13010 – the Inventory account number.
Step 9: In the Amount field to the right of Account ID, type 500.00.
Step 10: Click on the Print-F2 button on the lower right of your screen to print and save the check.
How Do I Void a Check?
You can void a posted or unposted check by selecting the Transaction # from the Enter/Edit Checkbook screen and then clicking on the Void button.
When an unposted check is voided, the program creates a deposit transaction for the same amount. When you void a posted check, in addition to creating a deposit transaction, a reversing entry will be created for the ledger entries in G/L. The date of the new ledger transaction will be the same as the original ledger entry date.

540 •• Bank Manager Accounting for Windows
How Do I Track and Pay a Loan with the Bank Manager?
Let us say you purchased a truck for $10,000 on a loan from the “Bank of the People”. Now you want to enter and track the loan using the Bank Manager and General Ledger. Also, assume that the monthly payment is for $250.00.
If you have the Accounts Payable module, we would recommend that you use it instead of Bank Manager. This is because A/P can create recurring entries for your monthly payments for the loan.
However, if required, you can accomplish this as follows from the Bank Manager and the G/L Program:
Step 1: First we need to create the Asset (the truck) and the Liability (Loan) accounts with balances in G/L. From the G/L menu, select the Setup and then the Chart of Accounts Maintenance option.
Step 2: Create a new Asset account as Follows: Account ID: 15011 Description: Company Truck Account Type: Fixed Asset
Step 3: Create a new Liability account as follows: Account ID: 26011 Description: Loan for Company Truck Account Type: Long Term Liability
Step 4: From the G/L menu select the Enter/Edit G/L Transactions. Complete it as follows: Journal Transaction No: Leave blank

Accounting for Windows Bank Manager •• 541
Journal Source: JE Journal Date: Type in the Date of the Loan
Account ID Description Debit Credit 15011 Company Truck 10000.00 26011 Loan for Company Truck 10000.00
Step 5: You can write a check for the monthly payment by from the Bank menu by selecting the Enter/Edit Checkbook option.
Step 6: In the Transaction Type field, select the type as Computer Check.
Step 7: In the Vendor ID field, click on Browse-F3 button and select the Vendor to whom you wish to issue the check. If you do have any Vendors set up, it will be a good idea to set the “Bank of the People” up as a Vendor by typing a unique ID in the Vendor ID field.
Step 8: Type the Date of the check.
Step 9: In the Amount field, type in the amount as $250.00.
Step 10: In the Memo field type in Truck Loan Payment.
Step 11: In the Checking Account field type in the checking account number (i.e. 11010).
Step 12: In the Account ID field, we will need to use the account number for the Loan (i.e. 26011).
Step 13: In the Amount field type 250.00. Click on the Save-F4 button to save the transaction.
Step 14: You can now use the Print Checks option from the Bank menu to print the check.

542 •• Bank Manager Accounting for Windows
Print Checks
This option allows you to print checks marked as Computer checks. You must print all checks marked as Computer checks, or the program will not allow you to post your checks to the checkbook.
If you do not wish to print checks to a printer, you can print them to the screen.
Checking Account: The program will print the checks for this checking account. The default checking account from the Company Setup screen is automatically displayed here. If required, you can
click on the button to select a checking account.
Starting Check Number: The program will automatically display the next starting check number from the Bank Maintenance option.

Accounting for Windows Bank Manager •• 543
Range of checks: Enter the starting and the ending transaction numbers to print. To print all transactions, enter FIRST for the Starting Trans. Number and LAST for the Ending Trans. Number.
You can then indicate whether you want the check to be printed on the Printer, Screen, Disk, File, or E-Mail. Click on OK to print checks or Cancel to abort the printing process. If you are printing to a file, you may type in a filename.
You have the option to include or exclude the Memo from printing on your checks. You can make this selection from the Bank Maintenance Setup option.
You also have the option to have either invoice details or account details on your check stub. The default is to print invoice details. You can change this option in the Bank Manager Setup screen. You would typically select to have the account details print on the check stub if you hand them over to an accountant or bookkeeper to record the appropriate entries.
Important Note: After printing checks to the screen, if you are going to reprint the checks to the printer, you will need to re-enter the correct initial starting check number.

544 •• Bank Manager Accounting for Windows
Form Styles
The form style determines how the check will look when it prints. You can choose from the following check styles:
Checks Available from Zland Forms
Style# Description
4600 Plain Paper MICR Check for optional MICR Module – Purchase blank Security Check style#49083 without any printing on it.
49083 Check (Laser) (8.5” x 11”). Parts Available: 1
86103 Check (Dot Matrix) (8.5” x 7” Detached). Top Stub. Parts Available: 1 or 2, carbonless.
86913 Check (Dot Matrix) (8.5” x 7” Detached). Bottom Stub
86933 Check (Dot Matrix) (8.5” x 7” Detached).Top Stub
86953 Check (Dot Matrix) (8.5” x 7” Detached). Top Stub. Parts Available: 1,2 & 3, carbonless.
772511 Double Window Envelope for checks with safety tint pattern
Ordering Forms
You can order the Preprinted Forms like checks, invoices, statements, W-2, and 1099 forms from our national supplier Zland Forms.
Important Note: This program is designed to print on forms supplied by Zland Forms only. You may have alignment problems with forms supplied from a different manufacturer. We guarantee compatibility only with forms supplied by Zland Forms.
Please refer to the on-line Forms Brochure included with the program for information on ordering forms or FREE SAMPLES.

Accounting for Windows Bank Manager •• 545
You can order the Preprinted Forms like checks, invoices, statements, W-2, and 1099 forms from our national supplier Zland Forms. For placing an order or obtaining FREE FORM SAMPLES, you can reach Zland Forms at:
(800) 2-BUY FORMS
Post Checkbook
When Do I Select This Option? You should select this option after you have entered the checkbook transactions for the month.
What Should I Do Prior to Selecting This Option?
Prior to selecting this option, you must do three things:
1. Print all your computer checks at least once. 2. Print the Check Register report to ensure that all the data is
correct. 3. Backup all the data files from the Backup option in the File
menu. In case of an unwanted or an incorrect posting, you will then be able to restore from this backup using the Restore option in the File menu.
What Does This Option Do?
To post, select the Post Checkbook option from the Bank Manager module.
When you select this option, the program will ask you to confirm that you want to continue with this process. Click on OK to continue or Cancel to abort the process.

546 •• Bank Manager Accounting for Windows
The program will display the posting date, which will be the system date from your computer. All the transactions will be posted to the month in which this date falls. If you want to change the date, you may do so at this point.
You can choose the following posting options:
Post All UnPosted Transactions: This option will post all transactions that have not been posted before. This option is the default choice.
Post By Date Range: You can choose to post transactions that have the transaction date in the date range you specify. Use this option to post a part of the unposted transactions. This option is useful if you have transactions for multiple periods and you wish to post transactions that fall in a specific period only.
Post By Transaction Range: You can choose to post transactions that have the transaction number in the range you specify. Use this option to post a part of the unposted transactions. This option is useful if you want to post a single transaction or a group of consecutive transactions.
The following points describe the actual posting process in detail:
• The details of all the debits and credits are posted to the general ledger. This posting may be viewed from the Enter/Edit G/L Transactions option. The Journal Entries created have the Journal Source as CK to signify that this posting originated from the Bank Manager/Checkbook option. The G/L Accounts are posted as follows:

Accounting for Windows Bank Manager •• 547
Action Account Number
Account Type
Source Of The Account Number
Manual and Computer Checks, and Service Charges
Credited – Checking Account
11010 (or the selected Checking account no.)
Cash
Checkbook Transactions
Debited All the accounts in the split section of the checkbook transaction
Typically Expense or an Asset account
Accounts listed in the Split section of the checkbook transaction.
Deposits and Interest Earned
Debited - Checking Account
11010 (or the selected Checking account no.)
Cash
Checkbook Transactions
Credited All the accounts in the disbursements for the check. For details, refer to page 528.
Typically Income or an Asset account.
Accounts listed in the Split section of the checkbook transaction.
• Checkbook transactions will be marked as posted. You can view
or print them. You cannot edit them. • The Job Profitability report will be updated for the appropriate
Job. This will be done only if you had enabled Job Tracking in the Job Setup option.

548 •• Bank Manager Accounting for Windows
Bank Deposits
This option is used to select payments received from O/E, A/R, POS, and P/M so that you can make a combined deposit in your checkbook. Let us say you deposit your payments to the bank on a daily basis. You may receive several payments from your customers during the course of the day. At the end of the day, you would normally make only one deposit to the bank.
Important Note: This option will not include deposits directly entered into the checkbook from the Enter/Edit Checkbook option.
The purpose of this option is:
1. To allow you to take all the payments for the day and create a single deposit into the checkbook reconciliation screen. When you reconcile at the end of the month, you would then have a single deposit to match up with the bank statement – instead of trying to match individual payments to deposits.
2. To print a deposit transaction report. Many banks will accept the report along with the deposit. This will save you time in completing a bank deposit slip.
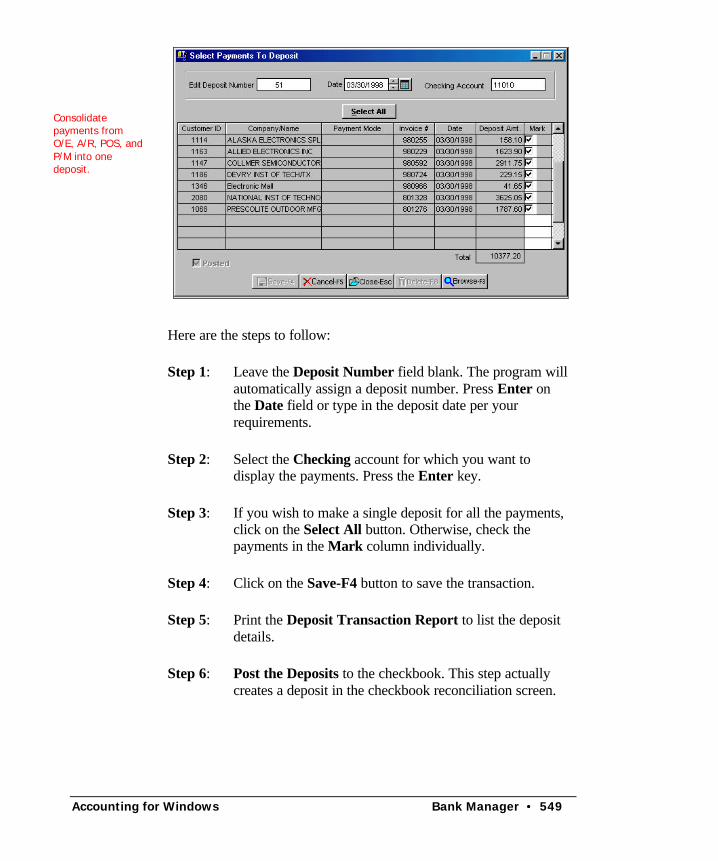
Select Payments to Deposit
This option lists all the payments received from:
• Order Entry (O/E) • Accounts Receivable (A/R) • Point-Of-Sale (POS) • Property Management (P/M)
Accounting for Windows Bank Manager •• 549
Here are the steps to follow:
Step 1: Leave the Deposit Number field blank. The program will automatically assign a deposit number. Press Enter on the Date field or type in the deposit date per your requirements.
Step 2: Select the Checking account for which you want to display the payments. Press the Enter key.
Step 3: If you wish to make a single deposit for all the payments, click on the Select All button. Otherwise, check the payments in the Mark column individually.
Step 4: Click on the Save-F4 button to save the transaction.
Step 5: Print the Deposit Transaction Report to list the deposit details.
Step 6: Post the Deposits to the checkbook. This step actually creates a deposit in the checkbook reconciliation screen.
Consolidate payments from O/E, A/R, POS, and P/M into one deposit.

550 •• Bank Manager Accounting for Windows
Deposit Transaction Report
Important Note on Deposit Transaction Report: There is a check box “Group by Deposit Number.” When checked, transactions not marked for deposit will be grouped together. Transactions marked for deposit will be grouped by the deposit transaction number. Each group will then be listed based on how you have chosen to sort. When unchecked, the transactions will be listed based only on how you have chosen to sort.
DATE: 08/23/98 PAGE NO.: 1
Deposit Transaction Report Joe Smith & Company 8876 Broadway Avenue Moorpark, CA 93021 CHECKING ACCOUNT: 11010 - Checking Account 1 BANK: First City Bank DEPOSITS FROM: 08/23/99 TO 08/23/99
CUSTOMER ID COMPANY SOURCE OF DEPOSIT INVOICE NO INV.DATE DEPOSIT 1 A/R Payment 54578 08/23/1999 190.00 1 A/R Payment 55487 08/23/1999 9298.13 CENTRAL A/R Payment 56984 08/23/1999 47923.70 DEPOSIT # 1 TOTAL : 57411.83 SUMMARY : TOTAL MARKED DEPOSITS: 57411.83 TOTAL UNMARKED DEPOSITS: 0.00

Accounting for Windows Bank Manager •• 551
Post Deposits to Checkbook
When you select this option, the program will create a deposit for the checkbook reconciliation screen. You should back up your data before performing this step, by selecting the Backup button in the lower left corner of the screen.
The program will display the posting date, which will be the system date from your computer. All the transactions will be posted as a deposit for that particular date. If you want to change the date, you may do so at this point.
You will be asked to confirm if you want to continue with this process. Click on OK-F4 to continue or Cancel-F5 to abort the process.
Reconcile Checkbook
What Is Checkbook Reconciliation?
Checkbook Reconciliation is the process of matching your checkbook to the bank statement. This process is done once a month when you receive your bank statement.
Reconcile bank statements and bring your checkbook into balance.

552 •• Bank Manager Accounting for Windows
What Do You Need to Do Prior to Choosing This Option?
Prior to selecting this option, you should make sure all your checks have been entered using the Enter/Edit Checkbook option in the Bank Manager menu.
Performing a Checkbook Reconciliation
When you first select this option, enter the Checking Account number. The program will default to the Checking Account number from the Company Setup. If you need to reconcile a different checking account, type in its G/L Account number here.
In order to limit the number of transactions on the screen, you can type in a Date Range. However All transactions that are Not marked as Reconciled will be listed, irrespective of the selected date range. This is because a check for a prior period may have cleared in the date range you specify.
In addition, you will be required to enter the Ending Balance as per the Bank Statement.
Reconcile one bank statement at a time. If you have more than one bank statement to reconcile, start with the oldest bank statement, and work your way up to the current bank statement. It is a good idea to reconcile your bank account regularly so that you do not have to deal with many transactions at the same time.
On this screen, the following command buttons are available:
Finish Later: This button allows you to save the current status of the reconciliation, so that you can come back later to complete it. An example of a possible use for this button would be entering bank charges at one time, and completing the reconciliation at another time.
Accounting for Windows Bank Manager •• 553
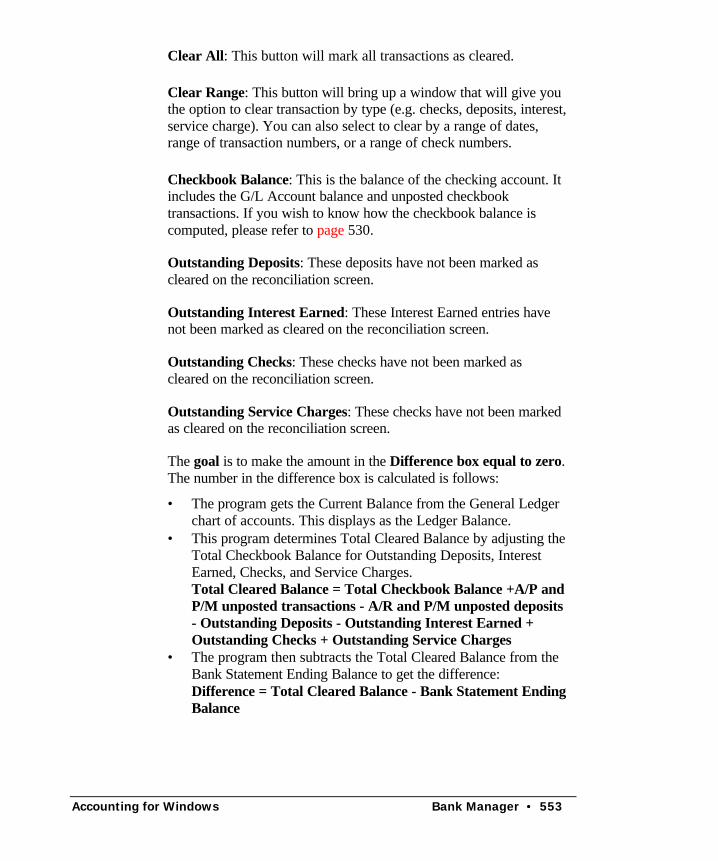
Clear All: This button will mark all transactions as cleared.
Clear Range: This button will bring up a window that will give you the option to clear transaction by type (e.g. checks, deposits, interest, service charge). You can also select to clear by a range of dates, range of transaction numbers, or a range of check numbers.
Checkbook Balance: This is the balance of the checking account. It includes the G/L Account balance and unposted checkbook transactions. If you wish to know how the checkbook balance is computed, please refer to page 530.
Outstanding Deposits: These deposits have not been marked as cleared on the reconciliation screen.
Outstanding Interest Earned: These Interest Earned entries have not been marked as cleared on the reconciliation screen.
Outstanding Checks: These checks have not been marked as cleared on the reconciliation screen.
Outstanding Service Charges: These checks have not been marked as cleared on the reconciliation screen.
The goal is to make the amount in the Difference box equal to zero. The number in the difference box is calculated is follows:
• The program gets the Current Balance from the General Ledger chart of accounts. This displays as the Ledger Balance.
• This program determines Total Cleared Balance by adjusting the Total Checkbook Balance for Outstanding Deposits, Interest Earned, Checks, and Service Charges. Total Cleared Balance = Total Checkbook Balance +A/P and P/M unposted transactions - A/R and P/M unposted deposits - Outstanding Deposits - Outstanding Interest Earned + Outstanding Checks + Outstanding Service Charges
• The program then subtracts the Total Cleared Balance from the Bank Statement Ending Balance to get the difference: Difference = Total Cleared Balance - Bank Statement Ending Balance

554 •• Bank Manager Accounting for Windows
To mark a transaction as cleared, check the cleared column for the transaction. You remove the checkmark to mark a transaction as not cleared.
Use the Cancel-F5 button to abort the reconciliation process. When the Difference box shows the number as zero, your account is reconciled, you may click on the Save-F4 button to continue.
What Should I Do If the Difference Is Not Zero?
The various possibilities for this situation are broken down in the groups below:
• One or more of the transactions is missing, or has an incorrect amount.
• One or more of the cleared or outstanding transactions is not marked correctly.
To determine which transaction type (e.g. a check, deposit, service charge, or interest earned) is incorrect, try comparing the totals for the respective types in the Cleared Items row with your bank statement. The correct transaction types will match with the respective totals in your bank statement.
Sometimes your bank statement will have these individual transaction types grouped into two types, Total Debits and Total Credits. Total Debits consists of Checks and Service charges. Total Credits consists of Deposits and Interest earned. If a transaction is marked (cleared) incorrectly, you may remove the cleared checkmark.
If a transaction is missing, then click on the Close button. Re-enter the transaction using the Enter/Edit Checkbook option, then go back to the Reconcile Checkbook option and mark this transaction(s) as cleared.
If a transaction has an incorrect amount, then click on the Close button. Once a check, deposit, or bank charge is posted, it cannot be edited. In order to correct this you will need to enter in a reverse

Accounting for Windows Bank Manager •• 555
transaction in the checkbook and repost it to neutralize the effect of the incorrect transaction. The following table shows possible combinations.
Incorrect Transaction
Reverse Transaction
Check Deposit
Bank Charge Deposit
Bank Interest Bank Charge
Deposit Bank Charge
Make these changes, using the Enter/Edit Checkbook option. Then go back to the Reconcile Checkbook option and mark this transaction(s) as cleared.
Once you have reconciled your bank statement (i.e. the difference box shows the amount as zero), click on the Save-F4 button. If you had selected to print the Bank Reconciliation Statement, you have the option to print this report.
Reconciliation Reports
You can select from two styles of reconciliation reports. The selected style will apply to both the Reconciliation Summary and to the Detailed Statement. You select these styles in the Bank Manager Setup. The difference in the two styles is as follows:
Style 1: The ledger balance and outstanding transactions that display on the reconciliation report include all transactions, regardless of the reconciliation period entered.
Style 2: The ledger balance and outstanding transactions displayed on the reconciliation report include transactions up to the ending date entered. Taking the Total Cleared Balance on the reconciliation screen and adjusting it with the outstanding transactions calculates the ledger balance.

556 •• Bank Manager Accounting for Windows
Summary Reconciliation Report – Style 1
Summary Reconciliation Report – Style 2

Accounting for Windows Bank Manager •• 557
Detail Reconciliation Report – Style 1

558 •• Bank Manager Accounting for Windows
Detailed Reconciliation Report – Style 2

Accounting for Windows Bank Manager •• 559
Reports
Transaction Detail Report
Transaction Detail Report
Zland 11988 Challenger Court Moorpark, CA 93021-2071 Starting Balance: 0.00
Date Check # Trans # Payee Mod Account ID Description Amount C Balance
01/05/1999 DEP 35 JOHN SMITH & CO BM 42040 Other Income 2434.75 N
Memo: Us Test 2434.75 2434.75
01/05/1999 DEP 36 JOHN SMITH & CO BM 12010 Accounts Receivable 31155.10 N
Memo: 1/05/99 Deposit 31155.10 33589.85
01/05/1999 DEP 37 JOHN SMITH & CO BM 12010 Accounts Receivable 71258.74 N
Memo: 1/05/99 71258.74 104848.59
01/05/1999 DEP 38 JOHN SMITH & CO BM 12010 Accounts Receivable 6205.98 N
Memo: 1/05/99 6205.98 111054.57
Source Module (Mod) Checks Total: 0.00 Ending Balance: 111054.57
AR = Accounts Receivable PM = Property Management Deposits Total: 111054.57
AP = Accounts Payable PY = Payroll Interest Total: 0.00
BM = Bank Manager Service Charges Total: 0.00
Starting Balance: This includes all checkbook transactions and manual G/L Journal Entries prior to 01/01/1999
Check Register Report – Summary
Check Register Report-Summary Zland 11988 Challenger Court Moorpark, CA 93021-2071
Starting Balance: 0.00
Date Check # Trans # Payee Mod Memo Reference Amount C Balance
01/05/1999 DEP 35 JOHN SMITH & CO BM Us Test 2434.75 N 2434.75
01/05/1999 DEP 36 JOHN SMITH & CO BM 1/05/99 Deposit 31155.10 N 33589.85
01/05/1999 DEP 37 JOHN SMITH & CO BM 1/05/99 71258.74 N 104848.59
01/05/1999 DEP 38 JOHN SMITH & CO BM 1/05/99 6205.98 N 111054.57
Source Module (Mod) Checks Total: Ending Balance: 111054.57
AR = Accounts Receivable PM = Property Management Deposits Total: 111054.57
AP = Accounts Payable PY = Payroll Interest Total: 0.00
BM = Bank Manager Service Charges Total: 0.00

560 •• Bank Manager Accounting for Windows
Check Register Report – G/L Accounts
Check Register Report-G/L Accounts Zland 11988 Challenger Court Moorpark, CA 93021-2071
Account ID Description Check # Date Trans # Payee Mod Invoice #/Desc Amount
12010 Accounts Receivable DEP 01/05/199 36 JOHN SMITH & CO BM 010598/D-2 31155.10
DEP 01/05/199 37 JOHN SMITH & CO BM 010598/D-3 71258.74
DEP 01/05/199 38 JOHN SMITH & CO BM 010598/D-4 6205.98
Total: 108619.82
42040 Other Income DEP 01/05/199 35 JOHN SMITH & CO BM 60501/D-1 2434.75
Total: 2434.75
Source Module (Mod) Checks Total: 0.00 Grand Total: 111054.57
AR = Accounts Receivable PM = Property Management Deposits Total: 111054.57
AP = Accounts Payable PY = Payroll Interest Total: 0.00
BM = Bank Manager Service Charges Total: 0.00
Vendor Reports
For more information on Vendor Reports (Listing, Mailing Labels, Notes, and History Reports), refer to the Accounts Payable chapter.