
Badgy User s Guide RevA En
25
user guide Evolis Card Printer c 2008. All rights reserved. Rev. A - April 2008
Transcript of Badgy User s Guide RevA En

user guideEvolis Card Printer c 2008. All rights reserved. Rev. A - April 2008

INTRODUCTION
Thank you for choosing an Evolis Card Printer
The aim of this user guide is to assist you, step-by-step, in discovering your new printer and putting it to work for you.By taking the time to review these pages, you will get more detailed knowledge about your printer and its capabilities,while optimising the time needed to install and start using the product.
As for all Evolis products, particular care has been used in writing this manual. But if an error has stillmanaged to slip into these pages, please let us know by sending an email to [email protected]
REGISTER YOUR BADGY
To benefit from driver updates, information and promotions, please register on the www.badgy.com web site.Click on ‘Support’ and fill in the registration form including your printer model and serial number (on underside or yourprinter).
ICONS
The following icons are used in this guide to highlight important information:
Information that emphasises or supplements important points of the main text.
Advises you that failure to take or avoid a specific action could result in physical harm to you, or result inphysical damage to the hardware.
CHAPTERS
Please refer to the bookmarks (top left of your screen) for the chapters of this user guide.
1
2

PACKAGING
The Badgy is shipped with a set of accessories that we invite you to examine.Please take note that this list may vary in terms of the geographic area where you are located.
The printer is shipped in an original container specially designed to ensure that the product is protected against anyrisk of damage during shipment. In the event of visible damage at the time of delivery, do not hesitate to contact theshipper and immediately inform your Evolis dealer who will provide you with all necessary assistance.
Evolis has paid particular attention to the quality of this shipping material and we ask you to keep it in a clean, dryspace.
This packaging will be required if you need to return the printer. If the printer is returned without the original packaging and components are damaged during transit, these components will not be covered by theguarantee.
ITEMS INCLUDED WITH YOUR PRINTER
� Power supply unit - VP ELECTRONIQUE or SWITCHBOX Type F10723-A or FDF0503-A.
� Main power cable. � USB interface cable (length 1:80 m).
� CD-Rom drivers & documentations. � Quick start.
� Consumer kit (ribbon cartridge, 100 blank cards, cleaning card, cleaning cloth and cleaning swab).
� Evolis limited guarantee document (must be consulted).
In the absence of one of these components, please contact Evolis via the web site: www.badgy.com
Only use the power supply delivered with your Badgy.VP ELECTRONIQUE or SWITCHBOX Type F10723-A or VP ELECTRONIQUE Type EA10723.Only use the USB cable delivered with your Badgy.
3
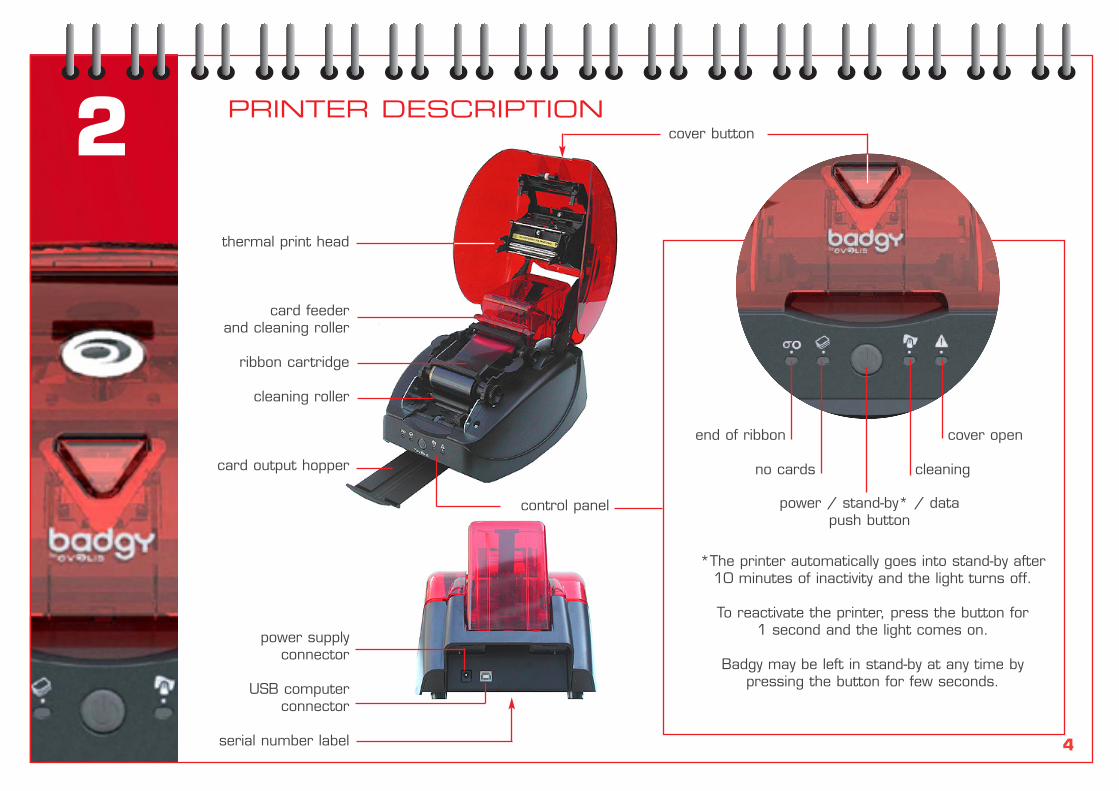
PRINTER DESCRIPTION2thermal print head
card feederand cleaning roller
ribbon cartridge
cleaning roller
card output hopper
power supplyconnector
USB computerconnector
serial number label
control panel
cover button
power / stand-by* / datapush button
*The printer automatically goes into stand-by after10 minutes of inactivity and the light turns off.
To reactivate the printer, press the button for1 second and the light comes on.
Badgy may be left in stand-by at any time bypressing the button for few seconds.
end of ribbon
no cards
cover open
cleaning
4

3 RIBBON CARTRIDGE
Badgy uses one type of colour ribbon (also called multi-panel ribbon).
Evolis original ribbons are specially designed to guarantee optimum operation of your printer without any risk of damage. The use of ribbons from any other source could seriously damage the print head,consequently entailing the immediate interruption of the factory warranty.
For optimum printing quality, Evolis recommends cleaning all the equipment each time a ribbon is changed.Refer to Chapter 5 - Servicing and Maintenance.
Installing the ribbon cartridge
1 Open cover.
2 Insert cartridge as illustrated(toothed wheels to the right).
3 Close cover and push downuntil you hear an audible click..
The ribbon will be automatically positionedwhen a new printing task is launched.
5
4
6
CARDS
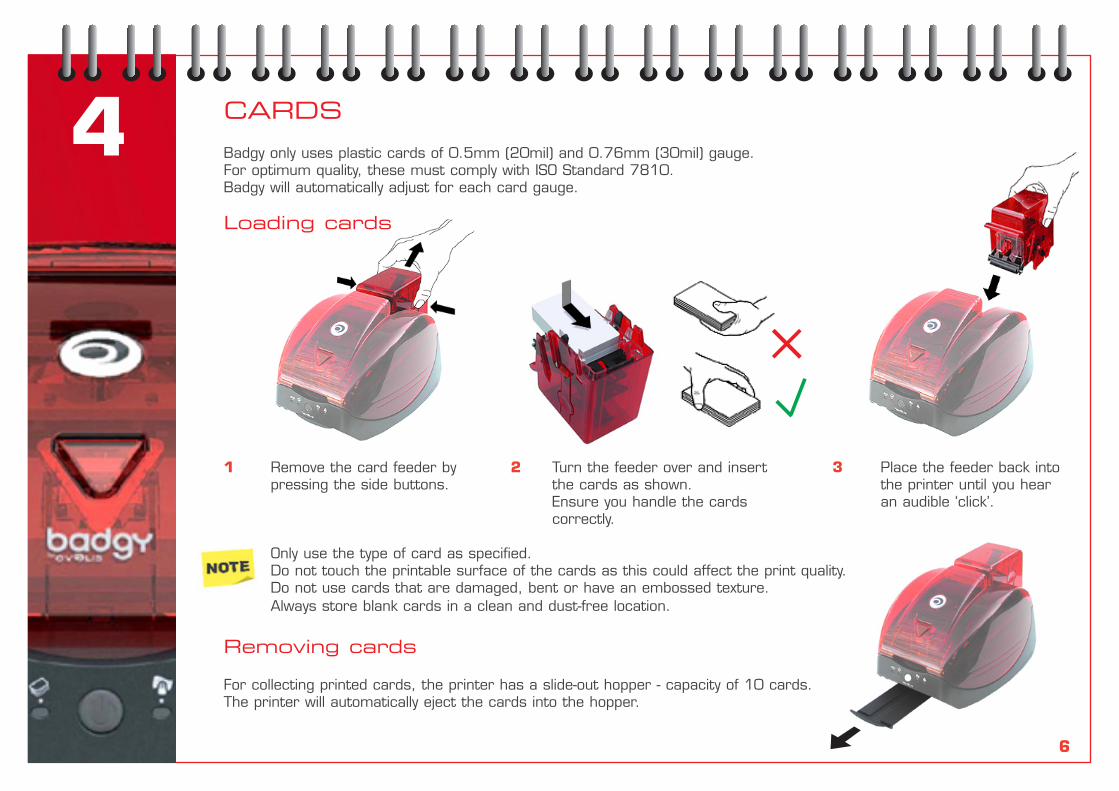
Badgy only uses plastic cards of 0.5mm (20mil) and 0.76mm (30mil) gauge.For optimum quality, these must comply with ISO Standard 7810.Badgy will automatically adjust for each card gauge.
Loading cards
1 Remove the card feeder by 2 Turn the feeder over and insert 3 Place the feeder back intopressing the side buttons. the cards as shown. the printer until you hear
Ensure you handle the cards an audible ‘click’.correctly.
Only use the type of card as specified.Do not touch the printable surface of the cards as this could affect the print quality.Do not use cards that are damaged, bent or have an embossed texture.Always store blank cards in a clean and dust-free location.
Removing cards
For collecting printed cards, the printer has a slide-out hopper - capacity of 10 cards. The printer will automatically eject the cards into the hopper.

INSTALLING THE DRIVER
Windows print driver
The Badgy driver operates with Windows XP, Server 2003 and Vista 32 and 64-bits.
Installing the print driver
To install your print driver, you will need the CD-Rom ‘Drivers and Documentation’ shipped with your printer.
Place this CD-Rom into your computer and open ‘Drivers’.
This program will guide you through the appropriate installation.
Do not connect the USB cable to your computer until requested by the Driver program.For connection procedure, refer to Chapter 6 - Connecting the Printer.
Make sure you conform to the installation guidelines. Some versions of Windows may require the user to have Administrator rights to install the driver.
Default printerDepending on your application, it may be imporatnt to define Badgy as a default printing peripheral device.
Proceed as follows:
� Using the Start button at the bottom left of the Windows task bar, select Printers and Faxes.� Select your printer with a left mouse click - ‘Badgy’ for example.� Then use the right mouse click to open a menu and choose Define as the default printer.
5
7
CONNECTING THE PRINTER
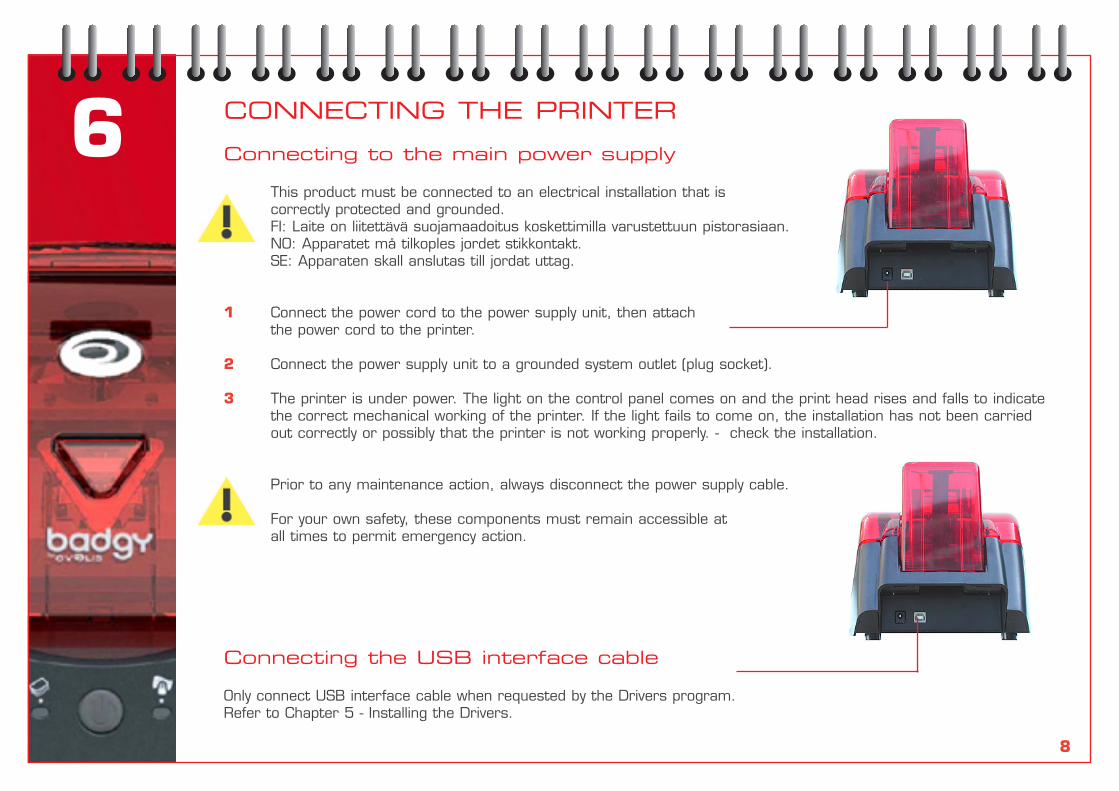
Connecting to the main power supply
This product must be connected to an electrical installation that iscorrectly protected and grounded.FI: Laite on liitettävä suojamaadoitus koskettimilla varustettuun pistorasiaan.NO: Apparatet må tilkoples jordet stikkontakt.SE: Apparaten skall anslutas till jordat uttag.
1 Connect the power cord to the power supply unit, then attachthe power cord to the printer.
2 Connect the power supply unit to a grounded system outlet (plug socket).
3 The printer is under power. The light on the control panel comes on and the print head rises and falls to indicate the correct mechanical working of the printer. If the light fails to come on, the installation has not been carried out correctly or possibly that the printer is not working properly. - check the installation.
Prior to any maintenance action, always disconnect the power supply cable.
For your own safety, these components must remain accessible atall times to permit emergency action.
Connecting the USB interface cable
Only connect USB interface cable when requested by the Drivers program.Refer to Chapter 5 - Installing the Drivers.
6
8

CONTROL PANEL MESSAGESRefer to Chapter 2 - Printer Description for details of the control panel
OFF ON FLASHING
7PRINTER READY Printer ready to receive data.
PROCESSING Printer receiving data.
RIBBON � No ribbon in printer.� Ribbon has finished.� Ribbon installed incorrectly.� Ribbon is cut.Printer restarts with new card.
CARD FEEDER � Card feeder installed incorrectly.� No card in feeder.� The cards are curved.� The cards are stuck together.Push button for 1 second - process restarts.
9

PRINTER CLEANING ALERT � Printer cleaning required.(AFTER 400 CARDS) Refer to Chapter 9 Servicing and Maintenance.
PRINTER CLEANING ALERT � Printer cleaning essential.(AFTER 500 CARDS) Refer to Chapter 9 Servicing and Maintenance.
PRINTER COVER OPEN � Printer cover open.Close cover - process restarts.
MECHANICAL PROBLEM � Card jammed in printer.� Mechanical part is faulty.Press the push button for one second.If the problem persists, log on to www.badgy.comfor assistance.
COOLING MODE � Print head cooling system activated.Printer stops working for a few seconds. As soon as print head reaches the normal working temperature, process continues.
10
PRINTING A TEST CARD
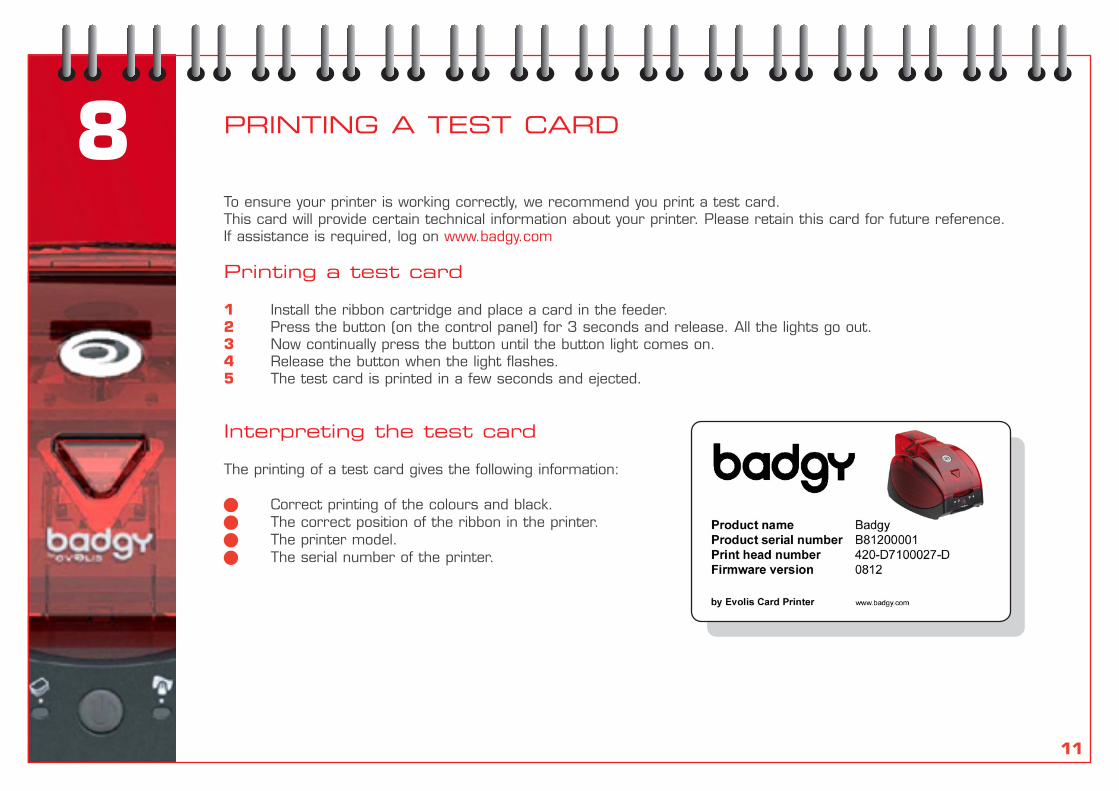
To ensure your printer is working correctly, we recommend you print a test card.This card will provide certain technical information about your printer. Please retain this card for future reference.If assistance is required, log on www.badgy.com
Printing a test card
1 Install the ribbon cartridge and place a card in the feeder.2 Press the button (on the control panel) for 3 seconds and release. All the lights go out.3 Now continually press the button until the button light comes on.4 Release the button when the light flashes.5 The test card is printed in a few seconds and ejected.
Interpreting the test card
The printing of a test card gives the following information:
� Correct printing of the colours and black.� The correct position of the ribbon in the printer.� The printer model.� The serial number of the printer.
11
8
SERVICING AND MAINTENANCE
This chapter is dedicated to the regular servicing of your Badgy.
Please follow these instructions carefully to ensure your printer continues to operate correctly.
Keep your Warranty in effect!
The factory warranty is subject to strict compliance with ordinary maintenance instructions and specifically to compliance with the equipment cleaning cycle intervals.Failure to comply with the procedures described in this chapter entails cancellation of the warranty of the print head.Evolis will not be liable if the printer is used under non-approved maintenance conditions.Indeed, the print head is subject to wear and tear. This is a very sensitive component of the printer of which lifespan can be shortened in case the neighbouring environment of the printer /print head or the cards is not dust-free.The cards inserted must be clean and dust proof.Moreover, the frequency and quality of cleanings are key in helping extend the print head lifespan.Please comply with these instructions.
9
12
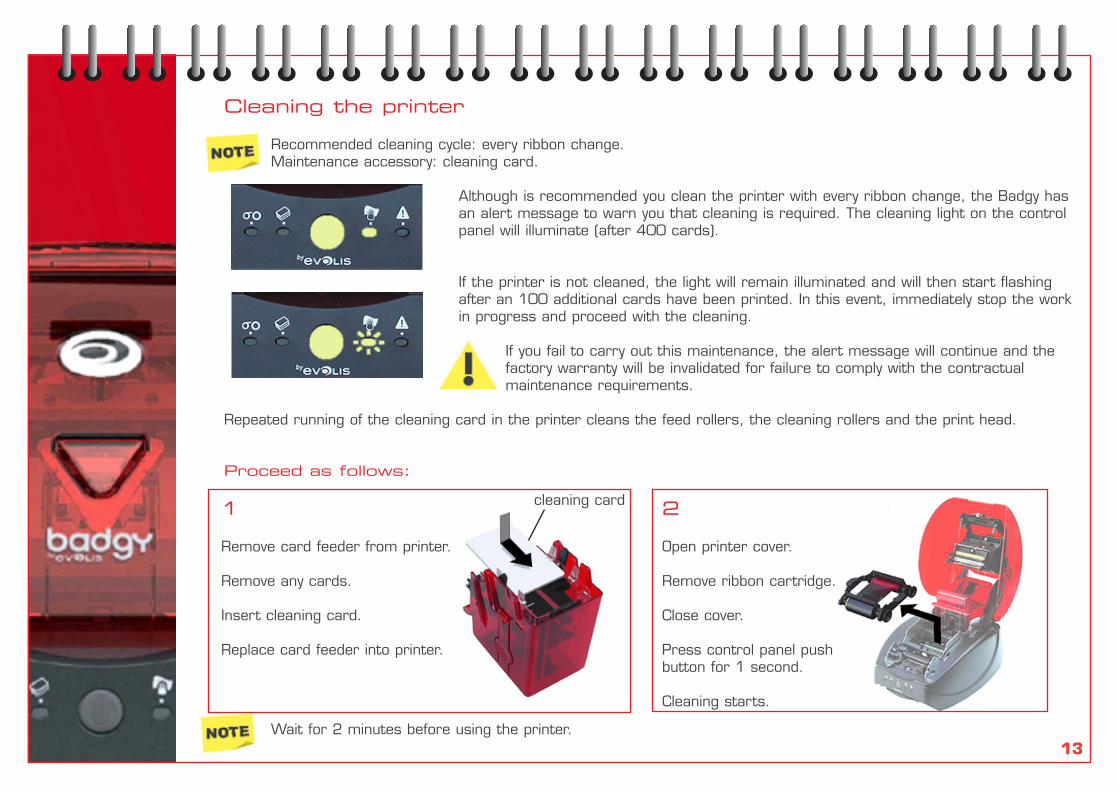
Cleaning the printer
Recommended cleaning cycle: every ribbon change.Maintenance accessory: cleaning card.
Although is recommended you clean the printer with every ribbon change, the Badgy has an alert message to warn you that cleaning is required. The cleaning light on the control panel will illuminate (after 400 cards).
If the printer is not cleaned, the light will remain illuminated and will then start flashing after an 100 additional cards have been printed. In this event, immediately stop the work in progress and proceed with the cleaning.
If you fail to carry out this maintenance, the alert message will continue and the factory warranty will be invalidated for failure to comply with the contractualmaintenance requirements.
Repeated running of the cleaning card in the printer cleans the feed rollers, the cleaning rollers and the print head.
Proceed as follows:
Wait for 2 minutes before using the printer.
1
Remove card feeder from printer.
Remove any cards.
Insert cleaning card.
Replace card feeder into printer.
2
Open printer cover.
Remove ribbon cartridge.
Close cover.
Press control panel pushbutton for 1 second.
Cleaning starts.
cleaning card
13

Servicing the cleaning rollers
There are two cleaning rollers in your printer - one inside near the front - the other fitted to the card feeder.The function of the cleaning rollers is to eliminate any residual dust on the cards before they enter the printing mechanism.These rollers should therefore become dirty. This is a sign of efficiency.To supplement the standard cleaning of the printer, we suggest you thoroughly clean the rollers using the cleaning cloth(part of consumer kit).
Recommended cleaning cycle: every ribbon change.Maintenance accessory: cleaning cloth.
Proceed as follows:
Wait for 2 minutes before using the printer.
1
Open cover.
Remove ribbon cartridge(if installed).
Release cleaning roller.
Using the cleaning clothrub lightly over surface.
When dry, relocate into printer.
2
Remove card feeder.
Clean roller by rubbinglightly over surface.
Relocate into printer.
14
15
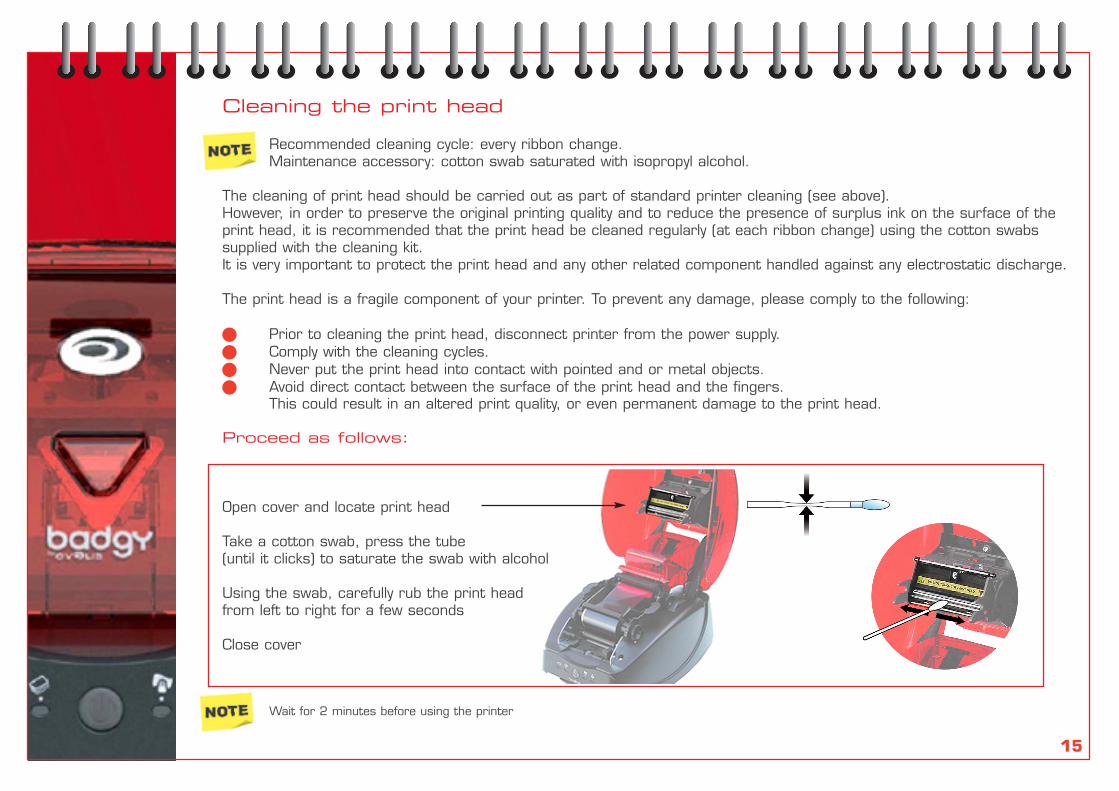
Cleaning the print head
Recommended cleaning cycle: every ribbon change.Maintenance accessory: cotton swab saturated with isopropyl alcohol.
The cleaning of print head should be carried out as part of standard printer cleaning (see above).However, in order to preserve the original printing quality and to reduce the presence of surplus ink on the surface of theprint head, it is recommended that the print head be cleaned regularly (at each ribbon change) using the cotton swabssupplied with the cleaning kit.It is very important to protect the print head and any other related component handled against any electrostatic discharge.
The print head is a fragile component of your printer. To prevent any damage, please comply to the following:
� Prior to cleaning the print head, disconnect printer from the power supply.� Comply with the cleaning cycles.� Never put the print head into contact with pointed and or metal objects.� Avoid direct contact between the surface of the print head and the fingers.
This could result in an altered print quality, or even permanent damage to the print head.
Proceed as follows:
Open cover and locate print head
Take a cotton swab, press the tube(until it clicks) to saturate the swab with alcohol
Using the swab, carefully rub the print headfrom left to right for a few seconds
Close cover
Wait for 2 minutes before using the printer

10 TROUBLESHOOTING
How to resolve certain problems that may arise.
Never use a metal tool or object to work on your equipment: you run the risk of injury or damaging the equipment.
Freeing a jammed card
Control panel display - MECHANICAL PROBLEM - Work is interrupted.
DO NOT turn the unit off: This would lead to a loss of printing jobs in progress that are stored in the printer’s memory.
To remove the card:
1 Open the cover and remove ribbon.
2 Press the push button on the control panel to run the transportation rollers. If the card is still stuck inside the printer, push it manually towards the printer outlet. If there are several cards, always push the top one first.
3 Replace ribbon and close cover.
4 Press the push button for 1 second.
To prevent card jamming:
1 Make sure that the card thickness is correct - 0.5mm (20mil) or 0.76mm (30mil) gauge.
2 Check that the cards are not curved (store cards horizontally).Check are not stuck together (shuffle cards before loading).
16

Printing problems
The following information will help you solve potential print quality problems that may arise.
Nothing prints1 Check the print driver
� Check for the presence of the print driver of the Badgy printer in the Windows parameters.� Make sure the Badgy printer is selected as the default printer
2 Check your equipment’s power supply� The power cord is correctly connected to the printer and to a working outlet.� The printer is powered. The button must be illuminated.� The power supply used is the one shipped with the printer.
3 Check the USB interface cable� Check the connection between the computer and printer.
4 Check the ribbon� Make sure the ribbon is correctly installed and that the cover is closed.
5 Check the cards� Check there are cards in the feeder.� Check that there is no jamming.
6 Print a test cardRefer to Chapter 8.
A blank card is ejected1 Check the ribbon
� Make sure the ribbon is not finished or damaged. Replace or reinstall as applicable.
2 Components of the print head maybe damaged� Print a test card.If the test card does not print, refer to the Trouble Shooting section on the Badgy web site (www.badgy.com)for more information.
17

The print quality is not sufficient
Small spots appear on the card White horizontal lines
Card surface maybe contaminated. Ribbon cartridge not installed correctly.� Ensure cards are clean. � Ensure ribbon is correctly rolled onto the spools.� Use a new pack of cards. � Ensure there are no wrinkles in the ribbon.
Dirty printer / cleaning rollers. Print head is dirty or damaged.� Clean printer. � Clean or replace print head.
Inconsistant printing Blurry image
Ribbon maybe damaged. Ribbon cartridge not installed correctly.� Replace ribbon cartridge. � Ensure ribbon is correctly rolled onto the spools.
Contrast values maybe incorrect. Ribbon may not be correctly synchronised.� Adjust in software. � Open and close cover to resynchronise ribbon.
Print head is dirty. Dirty printer / cleaning rollers.� Clean print head. � Clean printer / clean print head.
Incorrect cards being used. Incorrect cards being used.� Ensure cards corresponds to the required specification. � Ensure cards corresponds to the required specification.(Refer to chapter 4) (Refer to chapter 4)
It is recommended that all cards are purchased from an Evolis supplier. The use of cards from another source may result in unsatisfactory printing.
18

Partial or incorrect printing
1 Check the parameters defined for the printing
� Make sure no element of your formatting is outside the print margins.� Check the orientation of the document selected in the configuration of the print driver (Landscape or Portrait).
2 Check the interface cable
� If some unusual characters print out, check you are using the USB interface cable appropriate for your printer.� Check the connection between the computer and printer.� Try using another cable of the same type.
3 Ensure the printer is clean
� Clean the printer and cleaning rollers.Refer to Chapter 9 - Servicing and Maintenance.
4 Ensure the cards are clean
� Check the cards are stored in a dust-free location.
5 Check the ribbon
� Ensure the ribbon cartridge is correctly installed.� Check the ribbon is unrolling freely.
6 Check the print head
� If horizontal (white) lines appear on the card, some components of the print head may be dirty or damaged.Refer to Chapter 9 - Servicing and Maintenance.If the problem continues, refer to the Trouble Shooting section on the Badgy web site (www.badgy.com)for more information.
19

11 ASSISTANCE
In order to assist you on a day-to-day basis, Evolis has created a web site - www.badgy.com
For unresolved problems, log on this site and click on ‘Support’ for technical assistance and trouble shooting.
It maybe necessary to provide the following information:
� The model and serial number of your printer.� The type of configuration and the operating system you are using.� A description of the problem that has occurred.� A description of the steps you have taken to solve the problem.
The badgy web site also provides driver updates, information and promotions.
20
12 SPECIFICATIONS
General Specifications� 300 dpi resolution for high colour printing quality.� Fast printing: 40 seconds per card.� Detachable feeder: capacity - 100 cards. � Slide-out hopper: capacity - 10 cards.� USB connection. � 16 MB RAM.� Automatic card thickness adjustment.� Printer colour: Fire Red.
Print modes� Colour dye sublimation and monochrome thermal transfer.� Maximum print area: 51.18 x 82.8 mm / 2.01" x 3.26" (margins of 1.40 mm / 0.055")
Printing speed� 40 seconds per card.
Printer driver� WindowsTM XP, 2003 Server and Vista 32 & 64 bits.
Software� Office Cards for badges personalization and printing.
Ribbon type� Colour ribbon for 100 prints (YMCKO).
Warranty� 1 year (printer and print head), unlimited number of prints.
Card types� All PVC, PVC laminated, composite and PET plastic cards.
21

Card format� Credit card format: 53.98 (W) x 85.60 (L) mm / 2.125" (W) x 3.375" (L) - ISO CR-80 – ISO 7810.
Card thickness� From 0.50 mm (20 mil) to 0.76 mm (30 mil).
Card feeder capacity � 100 cards of 0.76 mm (30 mil) guage.
Output hipper capacity� 10 cards of 0.76 mm (30 mil) guage.
Printer dimensions (L x H x W)� Without output hopper: 271 x 166 x 194mm / 10.66" x 6.53" x 7.63"� With output hopper: 374 x 166 x 194mm / 14.72" x 6.53" x 7.63"
Printer weight � 2.4 Kg (5.3 Lbs)
Connections � USB 1.1 (2.0 compatible 2.0) - cable supplied.
Electrical� Power supply: 100-240 V AC, 50-60 Hz, 1,5 or 1,8 A� Printer: 24 V DC, 3 A
Environmental� Min-max operating temperature: from 15° to 30°C (59° to 86° F)� Humidity: from 20% to 65% non-condensing.� Min-max storage temperature: from -5° to +70°C (23° to 158° F)� Storage humidity: from 20% to 70% non-condensing.� Operating ventilation: free air.
Regulatory compliance� RF interferences: CE, FCC Class B, VCCI and CCC approved.
22

COPYRIGHT INFORMATIONEvolis Card Printer © April 2008. All rights reserved.
Copyright NoticeUsers must respect the copyright laws applicable in their country. This manual must not be photocopied, translated,reproduced or transmitted in whole or in part for any reason and by the means that might be, albeit electronic ormechanical, without the express, written authorisation of the company Evolis Card Printer.All information contained herein may be subject to modification without prior notice.Evolis Card Printer accepts no liability for any possible errors herein, nor for any accidental damage or damage causedthrough the dissemination or the use of this guide.
TrademarksBadgy is a trademark and Evolis is a registered trademark of Evolis Card Printer.Windows is a registered trademarks of Microsoft Corp. All other trademarks or registered trademarks are marks of theirrespective holders. OfficeCard is a trademark of Mediasoft Technologies.
Warranty InformationRefer to the Warranty booklet enclosed with your Badgy printer for terms and conditions.
Product Disposal - WEEE Directive
This symbol indicates that when the last user wishes to discard this product, it must be sent to appropriate facilities for recovery and recycling.By not discarding this product along with other household-type waste, the volume of waste sent toincinerators or landfills will be reduced and natural resources will be conserved. Your Evolis printer should be recycled according to your local standards. For more information, please contact Evolis at: [email protected].
13
23
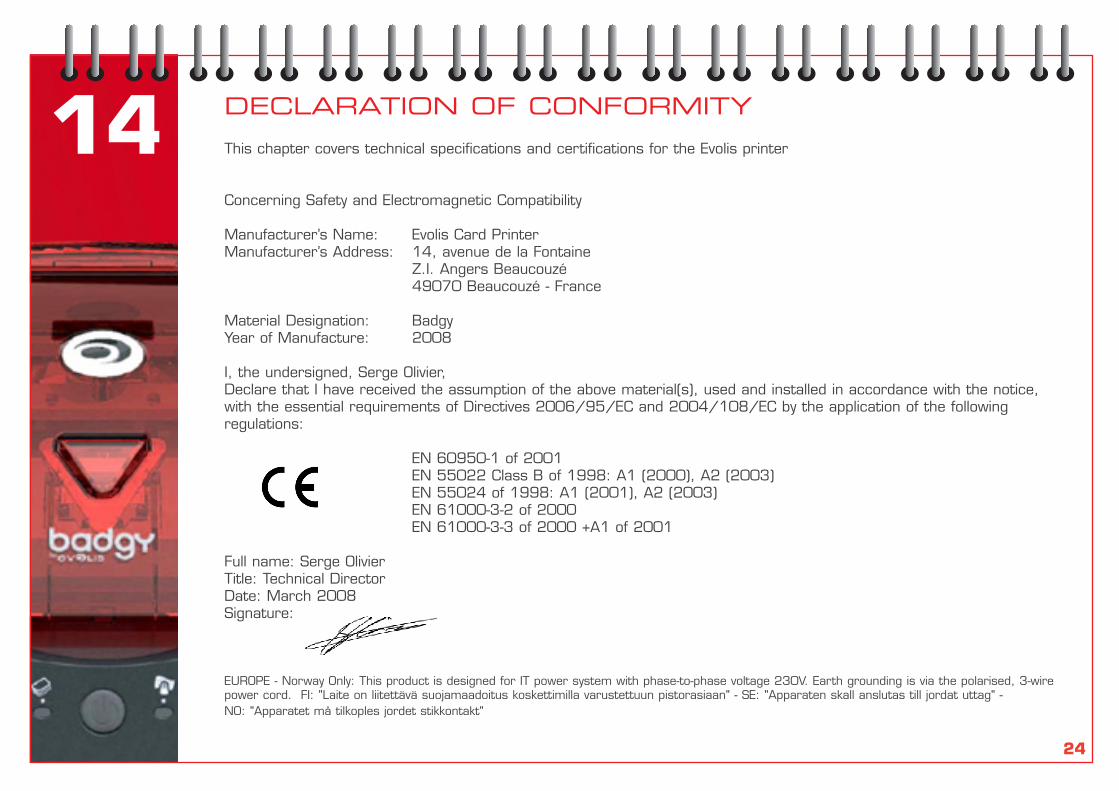
14 DECLARATION OF CONFORMITY
This chapter covers technical specifications and certifications for the Evolis printer
Concerning Safety and Electromagnetic Compatibility
Manufacturer’s Name: Evolis Card PrinterManufacturer’s Address: 14, avenue de la Fontaine
Z.I. Angers Beaucouzé49070 Beaucouzé - France
Material Designation: BadgyYear of Manufacture: 2008
I, the undersigned, Serge Olivier,Declare that I have received the assumption of the above material(s), used and installed in accordance with the notice,with the essential requirements of Directives 2006/95/EC and 2004/108/EC by the application of the followingregulations:
EN 60950-1 of 2001EN 55022 Class B of 1998: A1 (2000), A2 (2003)EN 55024 of 1998: A1 (2001), A2 (2003)EN 61000-3-2 of 2000EN 61000-3-3 of 2000 +A1 of 2001
Full name: Serge OlivierTitle: Technical DirectorDate: March 2008Signature:
EUROPE - Norway Only: This product is designed for IT power system with phase-to-phase voltage 230V. Earth grounding is via the polarised, 3-wirepower cord. FI: "Laite on liitettävä suojamaadoitus koskettimilla varustettuun pistorasiaan" - SE: "Apparaten skall anslutas till jordat uttag" - NO: "Apparatet må tilkoples jordet stikkontakt"
24

FCC Statement (for U.S.A.)Federal Communications Commission Radio Frequency Interferences Statement
Badgy model conforms to the following specifications: FCC Part 15, Subpart A, Section 15.107(a) and Section 15.109(a)Class B digital device.Supplemental information:This equipment has been tested and finds to comply with the limits for a Class B digital device, pursuant to part 15 of theFCC Rules. These limits are designed to provide reasonable protection against harmful interference in a residentialinstallation. This equipment generates uses and can radiate radio frequency energy and, if not installed and used inaccordance with the instructions, may cause harmful interference to radio communications. However, there is noguarantee that interference will not occur in a particular installation. If this equipment does cause harmful interference toradio or television reception, which can be determined by turning the equipment off and on, the user is encouraged to tryto correct the interference’s by one or more of the following measures:- Reorient or relocate the receiving antenna.- Increase the separation between the equipment and the receiver.- Connect the equipment into an outlet on a circuit different from that to which the receiver is connected.- Consult the dealer or an experienced radio/TV technician for help.Use of a shielded cable is required to comply within Class B limits of Part 15 of FCC Rules.Pursuant to Part 15.21 of the FCC Rules, any changes or modifications to this equipment not expressly approved byEvolis Card Printer may cause, harmful interference and void the FCC authorisation to operate this equipment.
VCCI (for Japan)
This is a Class B product based on the standard of the Voluntary Control Council for Interference from Information Technology Equipment (VCCI).If this is used near a radio or television receiver in a domestic environment, it may cause radio interference.Install and use the equipment according to the user guide.
25