BackPack Card Carrierstampingpro.com/wp-content/uploads/Backpackcardholder2.pdfembellish backpack...
3
Supplies: 1 sheet of 12” x 12” Designer Series Paper (DSP) 1 sheet of 12” x 12” coordinating cardstock (for the backpack) 2 sheets of coordinating cardstock (8-1/2” x 11” - for layering) 6 notecards w/envelopes (3-1/2” x 5 -SU! #107311) 20”-22” of coordinating ribbon (for the handle/strap) 2 Designer brads (flower, filigree or rhinestone) 12” Paper Cutter w/ both cutting and scoring blades Sticky Strip, Snail Adhesive, Dimensionals Scallop Circle, Clear Circle, Fun Flowers and Scallop Envelope dies for the Big Shot Greeting stamps and coordinating stamp pads Various punches and ribbons for embellishing as desired Velcro dot Directions: Step 1: Cut the 12” x 12” piece of colored cardstock for the backpack as shown the diagram on the left below. You will end up with a 7-3/4” x 12” piece (for the backpack), a 4-1/4” square (for the outer pocket) and a 4-1/4” x 7-1/2” piece (to cut the flower parts for the outside of the backpack). Step 2: Score the 7-3/4” x 12” piece at 1-3/4”, 5-3/4”, 7-1/2” and 11-1/2” along the long edge and at 6” along the shorter edge as shown on the diagram on the right. Cut at solid lines up to the bottom scored line as shown. Chiaki Haverstick, Independent SU! Demonstrator • (714) 550-9342 • e-mail: [email protected] visit my blog: www.stampingpro.com • order online: www.chiaki.stampinup.net BackPack Card Carrier Use just one sheet of DSP to embellish this backpack and 6 coordinating cards 12” 4-1/2” 7-3/4” 4-1/2” x 4-1/4” piece for pocket 7-1/2” 4-1/4” 7-3/4” x 12” piece for backpack use for cutting flowers to embellish backpack Step 3: Cut the pocket piece using the Scallop Envelope die (out of the 4-1/4” square piece. Note that you only need about 1/2” of the flap at the bottom of the envelope). Cut two flowers using the Fun Flowers die (out of the 4-1/4” x 7-1/2” piece). Step 4: Cut a scallop circle out of one of the 8-1/2” x 11” pieces of colored cardstock using your Big Shot. is will make your top flap that holds the backpack closed. Set the rest of the cardstock aside to use later (to cut the pieces you’ll need for layering your greetings). 6” 12” 1-3/4” 5-3/4” 7-1/2” 11-1/2” 7-3/4” Backpack
Transcript of BackPack Card Carrierstampingpro.com/wp-content/uploads/Backpackcardholder2.pdfembellish backpack...

Supplies:1 sheet of 12” x 12” Designer Series Paper (DSP) 1 sheet of 12” x 12” coordinating cardstock (for the backpack)2 sheets of coordinating cardstock (8-1/2” x 11” - for layering)6 notecards w/envelopes (3-1/2” x 5 -SU! #107311)20”-22” of coordinating ribbon (for the handle/strap) 2 Designer brads (flower, filigree or rhinestone)12” Paper Cutter w/ both cutting and scoring bladesSticky Strip, Snail Adhesive, DimensionalsScallop Circle, Clear Circle, Fun Flowers and Scallop Envelope dies forthe Big ShotGreeting stamps and coordinating stamp padsVarious punches and ribbons for embellishing as desiredVelcro dot
Directions:Step 1: Cut the 12” x 12” piece of colored cardstock for the backpack as shown the diagram on the left below. You will end up with a 7-3/4” x 12” piece (for the backpack), a 4-1/4” square (for the outer pocket) and a 4-1/4” x 7-1/2” piece (to cut the flower parts for the outside of the backpack).
Step 2: Score the 7-3/4” x 12” piece at 1-3/4”, 5-3/4”, 7-1/2” and 11-1/2” along the long edge and at 6” along the shorter edge as shown on the diagram on the right. Cut at solid lines up to the bottom scored line as shown.
Chiaki Haverstick, Independent SU! Demonstrator • (714) 550-9342 • e-mail: [email protected] my blog: www.stampingpro.com • order online: www.chiaki.stampinup.net
BackPack Card CarrierUse just one sheet of DSP to embellish this backpack and 6 coordinating cards
12”
4-1/2”
7-3/4”
4-1/2” x 4-1/4” piece for pocket
7-1/2”
4-1/4”
7-3/4” x 12”piece for backpack
use for cutting flowers to embellish backpack
Step 3: Cut the pocket piece using the Scallop Envelope die (out of the 4-1/4” square piece. Note that you only need about 1/2” of the flap at the bottom of the envelope). Cut two flowers using the Fun Flowers die (out of the 4-1/4” x 7-1/2” piece).
Step 4: Cut a scallop circle out of one of the 8-1/2” x 11” pieces of colored cardstock using your Big Shot. This will make your top flap that holds the backpack closed. Set the rest of the cardstock aside to use later (to cut the pieces you’ll need for layering your greetings).
6”
12”
1-3/4” 5-3/4” 7-1/2” 11-1/2”
7-3/4”
Backpack
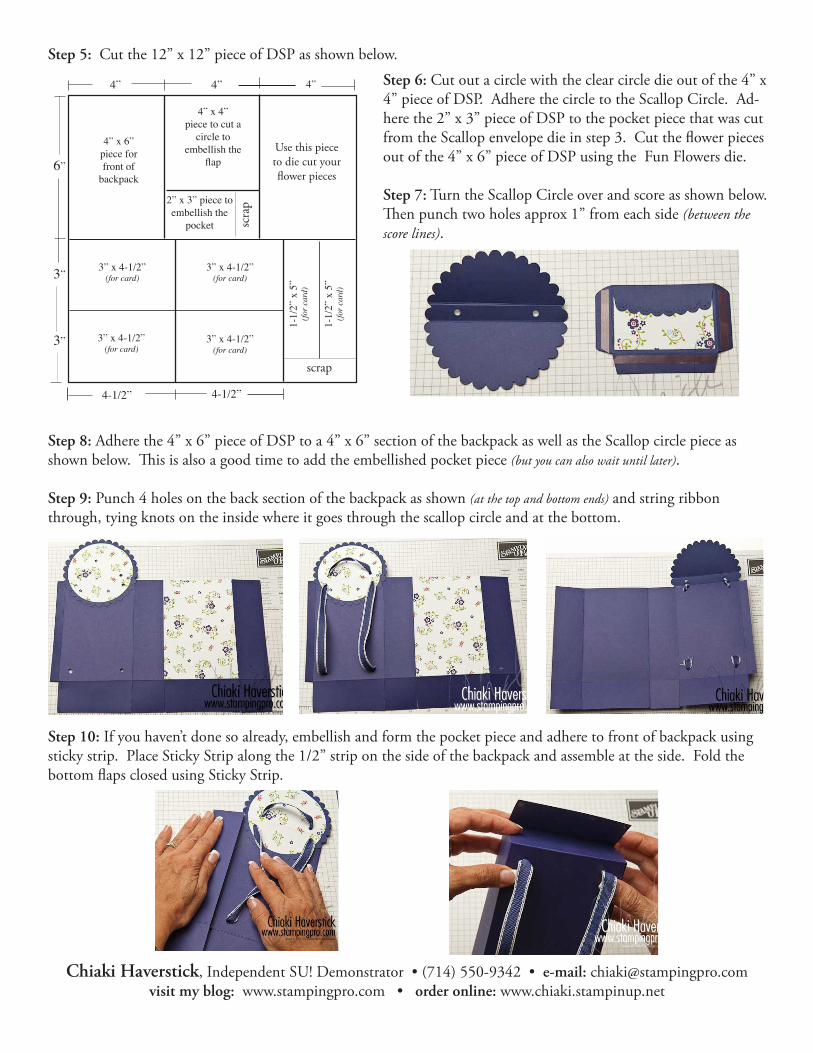
Step 6: Cut out a circle with the clear circle die out of the 4” x 4” piece of DSP. Adhere the circle to the Scallop Circle. Ad-here the 2” x 3” piece of DSP to the pocket piece that was cut from the Scallop envelope die in step 3. Cut the flower pieces out of the 4” x 6” piece of DSP using the Fun Flowers die.
Step 7: Turn the Scallop Circle over and score as shown below. Then punch two holes approx 1” from each side (between the score lines).
Step 10: If you haven’t done so already, embellish and form the pocket piece and adhere to front of backpack using sticky strip. Place Sticky Strip along the 1/2” strip on the side of the backpack and assemble at the side. Fold the bottom flaps closed using Sticky Strip.
4” 4”
6”Use this piece to die cut your flower pieces
4”
4” x 4”piece to cut a
circle toembellish the
flap
scra
p
4” x 6”piece for front of
backpack
3” x 4-1/2”(for card)
2” x 3” piece to embellish the
scrap
1-1/
2” x
5”
(for c
ard)
1-1/
2” x
5”
(for c
ard)
3” x 4-1/2”(for card)
3” x 4-1/2”(for card)
3” x 4-1/2”(for card)
3”
3”
4-1/2” 4-1/2”
Step 5: Cut the 12” x 12” piece of DSP as shown below.
Chiaki Haverstick, Independent SU! Demonstrator • (714) 550-9342 • e-mail: [email protected] my blog: www.stampingpro.com • order online: www.chiaki.stampinup.net
Step 8: Adhere the 4” x 6” piece of DSP to a 4” x 6” section of the backpack as well as the Scallop circle piece as shown below. This is also a good time to add the embellished pocket piece (but you can also wait until later).
Step 9: Punch 4 holes on the back section of the backpack as shown (at the top and bottom ends) and string ribbon through, tying knots on the inside where it goes through the scallop circle and at the bottom.
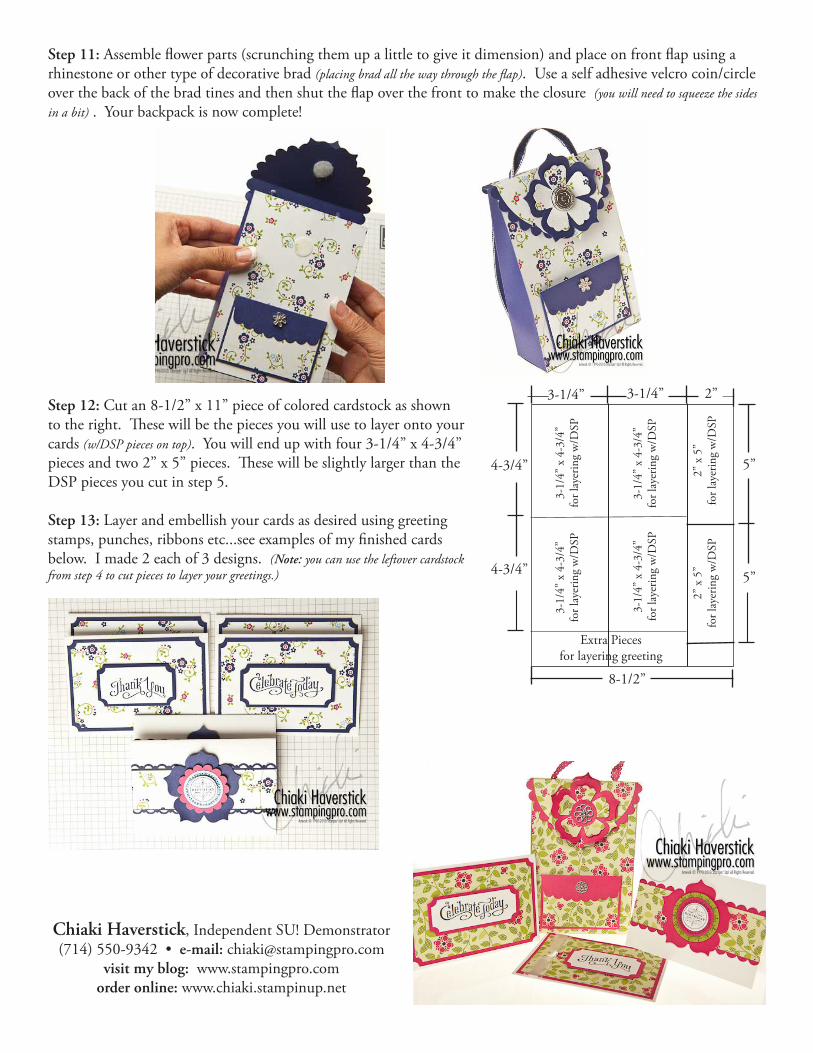
Step 11: Assemble flower parts (scrunching them up a little to give it dimension) and place on front flap using a rhinestone or other type of decorative brad (placing brad all the way through the flap). Use a self adhesive velcro coin/circle over the back of the brad tines and then shut the flap over the front to make the closure (you will need to squeeze the sides in a bit) . Your backpack is now complete!
Chiaki Haverstick, Independent SU! Demonstrator(714) 550-9342 • e-mail: [email protected]
visit my blog: www.stampingpro.com order online: www.chiaki.stampinup.net
Extra Piecesfor layering greeting
3-1/
4” x
4-3
/4”
for l
ayer
ing
w/D
SP
3-1/
4” x
4-3
/4”
for l
ayer
ing
w/D
SP
3-1/
4” x
4-3
/4”
for l
ayer
ing
w/D
SP
3-1/
4” x
4-3
/4”
for l
ayer
ing
w/D
SP
2” x
5”
for l
ayer
ing
w/D
SP2”
x 5
”fo
r lay
erin
g w
/DSP
4-3/4”
3-1/4” 3-1/4”
4-3/4”
2”
5”
5”
8-1/2”
Step 12: Cut an 8-1/2” x 11” piece of colored cardstock as shown to the right. These will be the pieces you will use to layer onto your cards (w/DSP pieces on top). You will end up with four 3-1/4” x 4-3/4” pieces and two 2” x 5” pieces. These will be slightly larger than the DSP pieces you cut in step 5.
Step 13: Layer and embellish your cards as desired using greeting stamps, punches, ribbons etc...see examples of my finished cards below. I made 2 each of 3 designs. (Note: you can use the leftover cardstock from step 4 to cut pieces to layer your greetings.)