
Back To Basics Golf Insturction
52
BACK TO BASICS GRIPHSTANCEHPOSTURE CHIPSHPUTTSHBUNKERS 00 COVER.CDP copy 3 8/12/08 08:21:04
-
Upload
todays-golfer -
Category
Documents
-
view
214 -
download
0
description
Basic golf instruction tips can be found in the 'Back To Basics Golf Instruction eMag'
Transcript of Back To Basics Golf Insturction

BACK TOBASICS
GRIPHSTANCEHPOSTURECHIPSHPUTTSHBUNKERS
00 COVER.CDP copy 3 8/12/08 08:21:04

Your most important lesson...The ultimate step-by-step guide to building a sound, repeatable golf game
Many golfers say that the most important lesson they ever take is the first one. The lesson
where a PGA professional shows you how to hold the club, stand to the ball, make a swing and with a bit of luck hit the shot. These basics of golf are so important, but how often after that initial lesson do we ever think about them? In most cases the answer is never!
Whether you are an absolute beginner, part-time player or avid fanatic a sound knowledge of the basics of golf is crucial if you want to improve. That’s why
we’ve devised this ‘Back to Basics’ booklet.
It covers all the essential elements of the game from tee to green that you need to understand if you are to play to your potential and enjoy your golf more.
The good news is that the basic techniques for all the different shots in golf don’t vary that much – yes there are crucial differences, but in most cases the grip, stance and posture are the same or very similar.
Remember, the basics really don’t just apply to beginners. Even the greatest players in the world are constantly checking
those fundamentals to make sure their swing is sound.
Now’s the perfect time to refine your swing and sharpen up your short-game skills before the new golfing season starts. So what are you waiting for? Take this guide to the driving range or out on the course to help you with your practice and get ‘Back to Basics’. Good luck!
Carly Cummins Instruction Editor
02-3 contents.CDP.CCLM copy.indd 2 8/12/08 13:55:37

Your most important lesson... Contents
Meet The Pros
BACK TO BASICS
4 GRIP Get this key part of the game right and the rest is easy (ish)!
10 STANCEStand and deliver! Make sure you set up correctly.
12 BALL POSITIONWhere to place the ball in your stance for each club.
14 POSTUREGet into an athletic address position, ready to hit the shot.
16 AIMZoom in on your target to hit more accurate shots.
18 SWINGThe fundamental moves from the takeaway to the finish.
22 IMPACTUnderstanding where the club should be at the moment it strikes the ball.
24 ROUGH RECOVERYHow to get out of those tricky lies in deep grass.
26 PUTTING GRIPA step-by-step guide to forming the putter grip correctly.
28 HOLE MORE PUTTSThe correct stance and the correct stroke to roll the ball into the hole.
32 GREEN READINGMake frustrating three-putts a thing of the past by learning to read greens better.
34 BEAT BUNKERSThe basics you need to splash the ball out of a greenside trap.
38 CHIP IT CLOSERHow to chip the ball onto the green with consistency.
42 FAIRWAY BUNKERThe keys to playing those tricky long bunker shots from the fairway.
46 PITCH PRACTICESee the killer drills that will help you knock approach shots near the pin.
The head pro at John O’Gaunt golf club is a specialist in video swing analysis. He talks you through all those long game fundamentals.
A top coach based at the Drivetime Golf Centre in Warrington. Adrian uses his knowledge to explain the skills needed for all greenside shots.
At Cornelia Golf Club, a Nick Faldo championship-designed course in Belek, Turkey. 0099 242 710 16 00, www.corneliaresort.com
Lee Scarbrow Adrian Fryer Shot on location
02-3 contents.CDP.CCLM copy.indd 3 9/12/08 11:02:04

The GripOVerLApA great golf swing starts with the perfect grip. Learn how to hold the club correctly by following these seven easy steps...
04-9 Grips.CDP.CCLM copy.indd 4 8/12/08 14:00:53

Start by holding the club so that the face is perfectly square. The lines on the clubface should be pointing straight up.
Next press your left thumb in towards your left index finger so that they are touching. There should be no gap between them.
Place your left hand, left palm down, on top of the grip so that the V formed between the thumb and the hand is pointing at your right armpit.
Curl your fingers around leaving a two finger-sized gap above your little finger of the left hand on the grip. Any more and you’re gripping too low, any less too high.
Introduce the right hand by placing the lifeline of the right hand against the back of the left thumb with your palm facing the target.
Curl the fingers of your right hand around the grip, resting your first knuckle of the little finger next to the second knuckle of your index finger of the left hand.
The right thumb and index finger should press through the club at one another.
1. START SQUARE
2. THUMB IN
3. CHECK ‘V’
4. SMALL GAP
5. ADD RIGHT
6. OVERLAP
7. UNITE THE HANDS
BACK TO BASICS grIp
back to basics Today’s Golfer 5
04-9 Grips.CDP.CCLM copy.indd 5 8/12/08 14:01:18

PRESSURECHECKPOINTS
6 Today’s Golfer back to basics
You should be able to hold
the club in your index finger and thumb of the
right hand.
04-9 Grips.CDP.CCLM copy.indd 6 8/12/08 14:01:26

BACK TO BASICS grIp
back to basics Today’s Golfer 7
T he left hand should be able to hold the club between your index finger and the base of your palm.
04-9 Grips.CDP.CCLM copy.indd 7 8/12/08 14:01:33
8 Today’s Golfer back to basics
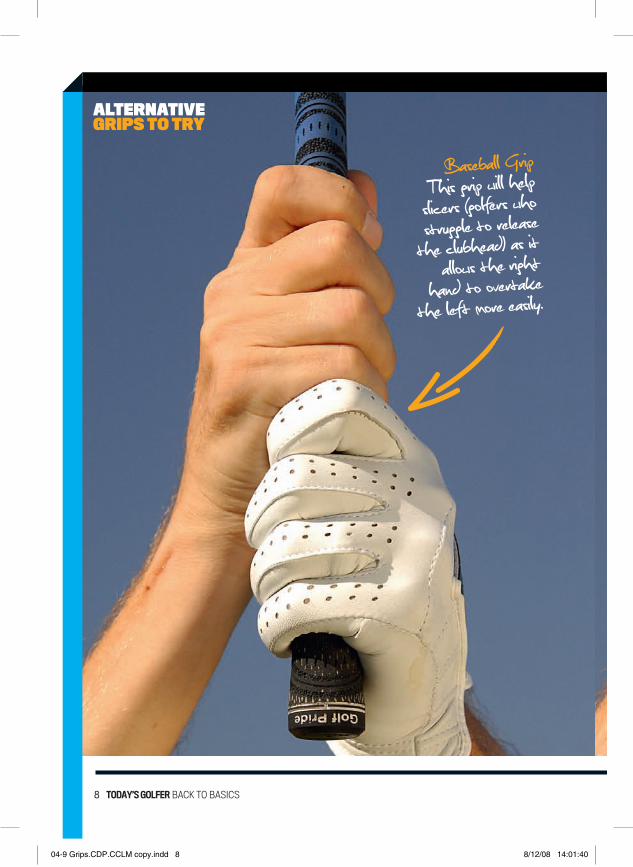
Baseball Grip T his grip will help slicers (golfers who struggle to release the clubhead) as it
allows the right hand to overtake
the left more easily.
ALTERNATIVEGRIPS TO TRY
04-9 Grips.CDP.CCLM copy.indd 8 8/12/08 14:01:40

BACK TO BASICS grIp
back to basics Today’s Golfer 9
Interlocking Grip T his grip positions the left hand weaker on
the club, which is useful for golfers who hook the ball as it will help them keep the hands quieter through the
hitting area.
04-9 Grips.CDP.CCLM copy.indd 9 8/12/08 14:01:46

ATHLETICSTANCEYou need to build the perfect stance to ensure you are set up correctly for each different club at address
Great stability With the ideal stance you should feel balanced, poised and ready to fire.
010-11 Stance.CDP.CCLM copy.indd 10 8/12/08 13:53:17

BACK TO BASICS STAnCe
back to basics Today’s Golfer 11
It is really important that you start your set-up by standing perpendicular to your target line. That means standing with your feet absolutely together positioned directly opposite the golf ball.
Move your right foot away from the target in accordance to which club you are playing. For a short iron move it to just inside shoulder width, a mid-iron shoulder width and your woods just past shoulder width.
Move your left foot outwards towards the target depending on what club you are using - one golf ball width for your driver, two for a fairway wood and three golf ball widths for an iron.
Point your left foot out slightly towards the target. This allows the body to clear through the left leg while maintaining balance. If the left leg is too square it blocks your turn through the ball and restricts your balance.
Press your knees outwards slightly to help give you powerful thighs and more stability during the movement in your swing.
1. SQUARE ON 4. MOVE RIGHT
2. STEP LEFT
3. LEFT TOE OUT
5. PRESS THE KNEES OUTWARDS
010-11 Stance.CDP.CCLM copy.indd 11 8/12/08 13:53:35

BALL POSITIONStart feet together then move them...
12 Today’s Golfer BACK TO BASICS
Wedges: Move the left foot four ball widths to the left and the right foot away to one ball’s width inside shoulder wide.
TRADING PLACES
12-13 TG SUPP Ball position.indd.CCLM copy.PDP 2 15/12/08 15:53:48

BACK TO BASICS Today’s Golfer 13
9-6 iron: Move the left foot three ball widths to the left and the right foot to just inside shoulder wide.5-3 iron: Move the left two ball
widths to the left and the right to shoulder width. Woods: Move your left foot a ball’s width to the left and the right just past shoulder width.
BACK TO BASICS GRIP
12-13 TG SUPP Ball position.indd.CCLM copy.PDP 3 15/12/08 16:00:51

perfectpostureLearn how to get into an athletic address position to hit the ball powerfully and consistently
Look for the
correct body
angles at address.
014-015 SUPP Posture CDP.CCLM copy.indd 14 8/12/08 13:53:46

Start by flexing your knees to engage your thigh muscles. This will stabilise your lower body.
1. FLEX THE KNEES
BACK TO BASICS pOSTure
back to basics Today’s Golfer 15
Next, grip the golf club and hold it out at waist height so that the shaft of the club is parallel to the ground.
2. HOLD THE CLUB OUT
Lower the club to the ball maintaining the height in your shoulders to keep length in the spine for leverage and rotation.
3. LOWER THE CLUB
An easy way to check that you are balanced is to drop the club from your right shoulder through your knee without toppling over.
Your weight should be central on the balls of your feet. Rock forward and backwards in your shoes until you find the centred position.
5. CHECK YOUR BaLaNCE4. WEigHT DiSTRiBUTiON CHECK
014-015 SUPP Posture CDP.CCLM copy.indd 15 8/12/08 13:54:10

accurateaimingBe precise with your alignment and you’ll stand a greater chance of hitting the target
Common faults
● If you address the ball so that your body points beyond 90 degrees you’ll be aiming to the right.● If you address the ball so that your body points under 90 degrees you’ll be aiming to the left.
Stand behind
the ball and pick
a point to aim at.
016-017 SUPP Aim CDP.CCLM copy.indd 16 8/12/08 13:54:21
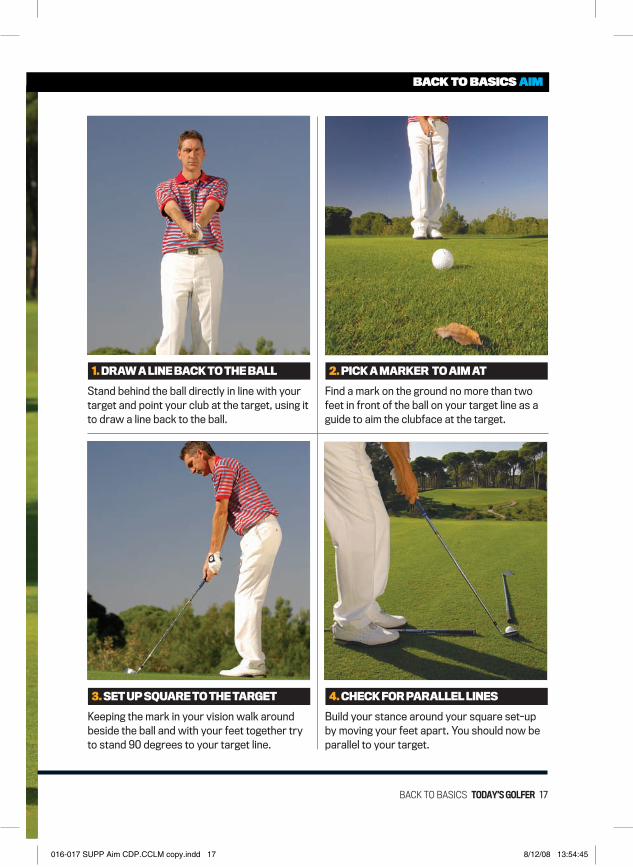
Build your stance around your square set-up by moving your feet apart. You should now be parallel to your target.
Find a mark on the ground no more than two feet in front of the ball on your target line as a guide to aim the clubface at the target.
Keeping the mark in your vision walk around beside the ball and with your feet together try to stand 90 degrees to your target line.
Stand behind the ball directly in line with your target and point your club at the target, using it to draw a line back to the ball.
4. CHECK FOR PARALLEL LINES
2. PICK A MARKER TO AIM AT
3. SET UP SQUARE TO THE TARGET
1. DRAW A LINE BACK TO THE BALL
BACK TO BASICS AIm
back to basics Today’s Golfer 17
016-017 SUPP Aim CDP.CCLM copy.indd 17 8/12/08 13:54:45
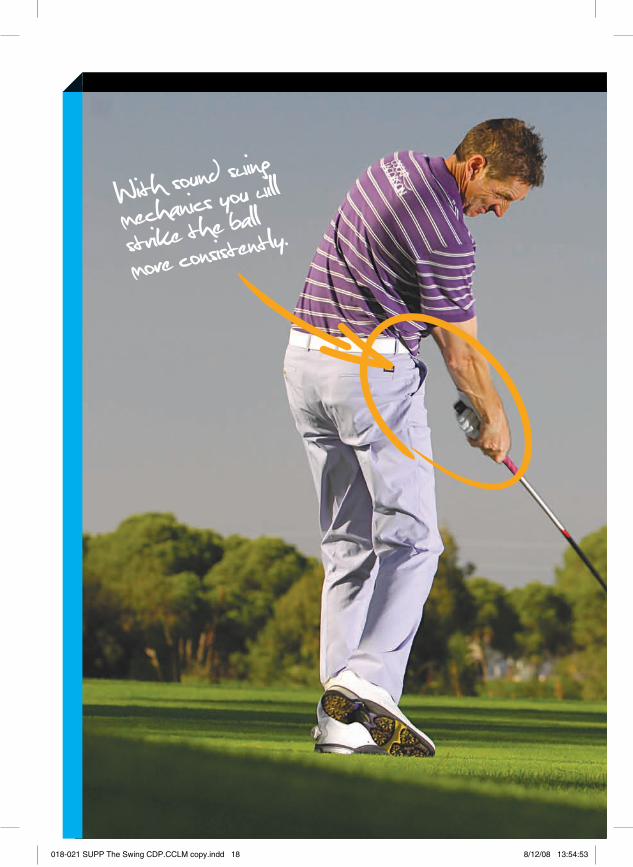
With sound swing
mechanics you will
strike the ball
more consistently.
018-021 SUPP The Swing CDP.CCLM copy.indd 18 8/12/08 13:54:53

MoT YOUR GOLF swinGUse these fundamentals to get the club following the correct path around your body and you’ll hit longer, straighter shots
BACK TO BASICS SwIng
TURn OveR FOR8 sTeps TO a beTTeR swinG...
018-021 SUPP The Swing CDP.CCLM copy.indd 19 8/12/08 13:54:59

20 Today’s Golfer back to basics
To complete the backswing make sure your left shoulder has travelled past your chin and not under, as this can cause a tilt.
The left hand, left shoulder and clubhead should form a perfect line parallel to your target line with the clubface vertical.
Hinge the left hand to set the club on plane. The butt of the club will be pointing at the ball if your club is set on the correct plane.
Start the swing by rotating the clubface away from the ball while moving the left shoulder across to create width as well as rotation.
4. LEFT SHOULDER PAST CHIN
2. HALFWAY BACK CHECK
3. LEFT HAND HINGES
1. SMOOTH TAKEAWAY
018-021 SUPP The Swing CDP.CCLM copy.indd 20 8/12/08 13:55:13
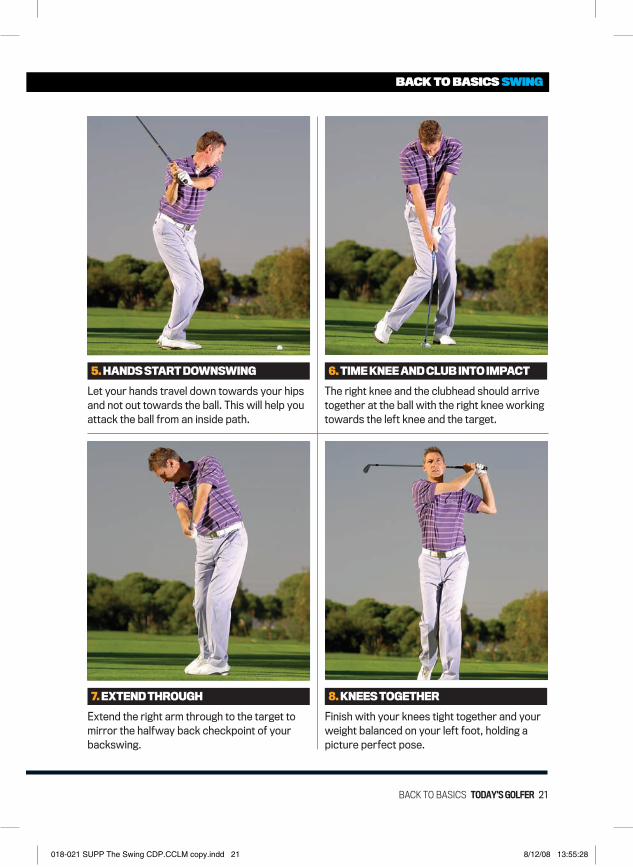
Finish with your knees tight together and your weight balanced on your left foot, holding a picture perfect pose.
The right knee and the clubhead should arrive together at the ball with the right knee working towards the left knee and the target.
Extend the right arm through to the target to mirror the halfway back checkpoint of your backswing.
Let your hands travel down towards your hips and not out towards the ball. This will help you attack the ball from an inside path.
8. KNEES TOGETHER
6. TIME KNEE AND CLUB INTO IMPACT
7. EXTEND THROUGH
5. HANDS START DOWNSWING
BACK TO BASICS SwIng
back to basics Today’s Golfer 21
018-021 SUPP The Swing CDP.CCLM copy.indd 21 8/12/08 13:55:28

aceimpactCrunch the ball off the turf with irons and launch it up with woods
Let the hips clear to give the arms room to release.
022-023 SUPP Impact CDP.CCLM copy.indd 22 8/12/08 13:55:53

Impact is the moment of truth in golf and the most important point in the swing. While impact is not static it’s very important that we know where the club should be at the precise moment it strikes the ball. Where the clubface is arriving from and pointing at will determine where the ball flies.
Impact is not a position you stop in but merely a point that the club is travelling through.
1. The clubface is square to your target line.2. The shaft of the club is leaning forwards.3. The hips have cleared so that your belt buckle is facing the target.4. The right knee is level with the clubhead.5. The back of your left hand is slightly bowed and travelling towards the target.
RemembeR
Keys to the coRRect impact
BACK TO BASICS ImpACT
back to basics Today’s Golfer 23
1
2 3
022-023 SUPP Impact CDP.CCLM copy.indd 23 8/12/08 13:56:23

roughrecoveryThe key to getting your round back on track after you’ve found a bad lie is to get your ball back in play with minimum pain!
Drive it out By using a club with plenty of loft you can power the ball back into play.
024-25 Rough LM.CDP copy.indd 24 8/12/08 13:56:30

BACK TO BASICS rOugh
back to basics Today’s Golfer 25
Get down low to the grass and have a close look at how the ball is sitting in order to choose the club you need to get the ball back into play. Always err on the side of caution and take more loft rather than less. If in doubt just get it out.
The swing for this shot needs to be short, steep and exaggerated. Pick the club up vertically towards the sky by using plenty of wrist hinge quickly. This will avoid it getting snagged up in the grass in the takeaway.
Everything needs to be extreme in your set-up. Position the ball well back in your stance and lean the shaft forwards so that the hands sit ahead of the ball. Then widen your stance to anchor your body lower to the ground.
You often need more force to get out of the rough so grip down at the bottom of the handle and grip a little tighter. A firmer pressure will help you keep control of the club when it enters the long grass and prevent the club from turning over.
Drive down powerfully into the back of the ball on the same steep angle of attack. Keep your hands ahead of the club to help drill the ball out of the buried lie.
1. ASSESS LIE 4. STEEP SWING
2. BALL BACK
3. GRIP DOWN
5. POWER INTO IMPACT
024-25 Rough LM.CDP copy.indd 25 8/12/08 13:56:43

putting the gripFollow these pointers to hold the putter in a manner so that the hands stay quiet in the putting action
026-27 Putting Grips.CDP.CCLM copy.indd 26 8/12/08 13:56:50

Start by positioning the putter handle in the lifeline that runs below the thumb pad of the left hand.
The back of the left hand should face the target. Extend the index finger straight down the handle.
Introduce the right-hand side on to the putter handle so that it faces the target.
Wrap the fingers of the right hand around the handle and point the thumb straight down the top end of the grip.
Place the index finger of the left hand over the middle finger of the right hand to form the traditional reverse overlap putting grip.
1. IN LIFELINE
2. FACE TARGET
3. ADD RIGHT
4. WRAP FINGERS
5. OVERLAP
BACK TO BASICS puTTIng grIp
back to basics Today’s Golfer 27
AlternAtive putting grips
1. This grip is good for golfers who have the yips as it reduces independent hand motion which interferes with the stroke and helps get the hands working together with the shoulders as one unit.
2. Positioning the left hand low and the right hand high offers more stability to the putting stroke and stops the left wrist collapsing, keeping the club square to the target.
ClAw grip
reverse hAnds
1 2
026-27 Putting Grips.CDP.CCLM copy.indd 27 8/12/08 13:57:05
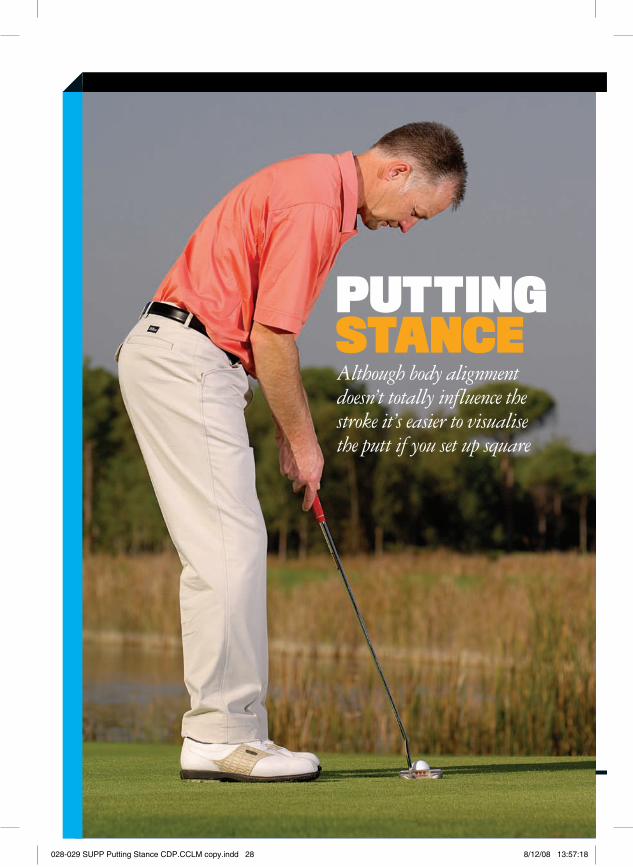
puttingstanceAlthough body alignment doesn’t totally influence the stroke it’s easier to visualise the putt if you set up square
028-029 SUPP Putting Stance CDP.CCLM copy.indd 28 8/12/08 13:57:18

To help you read putts correctly your eyes need to be directly over the target line. Check this by suspending the grip end of the putter beneath your eyes. The ball should be positioned below where the putterhead hangs in line with the shaft.
checkpoint
BACK TO BASICS puTTIng STAnCe
back to basics Today’s Golfer 29
1. Your feet should be shoulder-width apart, parallel to your aim line.2. Position the ball inside your left heel so the putt is struck with topspin.3. Bend forward from the hips, elbows tucked in.4. Position your eyes over the target line.
Set-Up keYS
1
2
3
028-029 SUPP Putting Stance CDP.CCLM copy.indd 29 8/12/08 13:57:42
030-31 Putting stroke LM.CDP copy.indd 30 8/12/08 13:57:52

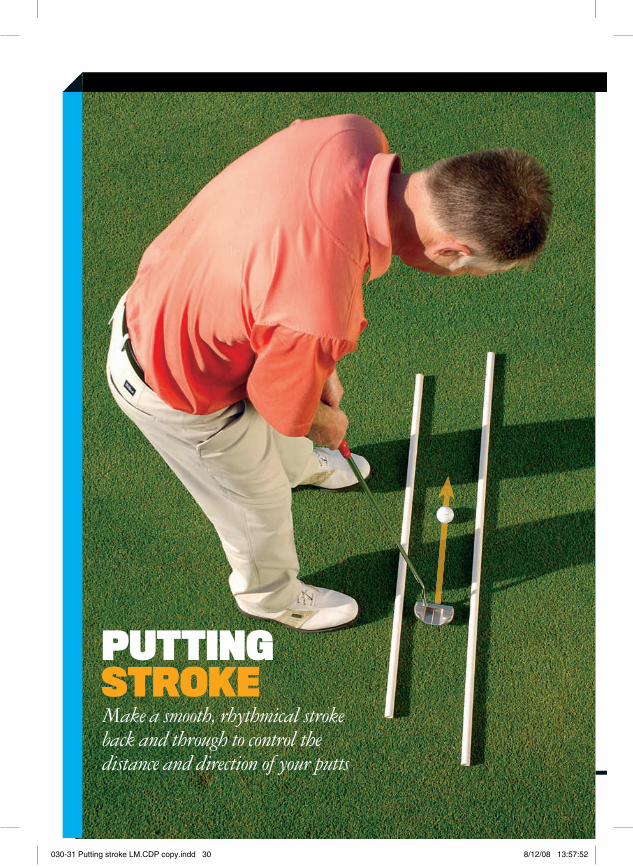
1. The length of the putting stroke should vary depending on the length of the putt.2. Allow the putterhead to swing straight back and through for short putts and on a slight arc for longer putts.3. Maintain a smooth tempo and rhythm to your stroke, avoiding any noticeable ‘hit’.4. Keep the lower body static so that the stroke happens from the arms and shoulders only.5. Keep the back of the left hand and putter face tracking through square to the target for as long as possible.
STROKE KEYS
BACK TO BASICS puTTIng STrOKe
back to basics Today’s Golfer 31
5
2
3 Left leads Keep the hands passive by getting the back of the wrist to point to the hole.
030-31 Putting stroke LM.CDP copy.indd 31 8/12/08 13:58:03

GREENREADINGLearn to prowl around the hole to gauge the slopes and judge the break on your putts accurately
Crouch down to help
you
see the slopes more
clearly.
032-033 SUPP Green Reading CDP LM copy.indd 32 8/12/08 13:58:18

Pay particular attention to the slopes around the hole. This is where the ball is slowing and gravity will affect it the most.
Squat down low behind the ball to study the contours of the green and visualise the ball’s journey to the hole.
Next, walk down the length of your putt to the hole observing the size of the slopes from the side-on view. Try to identify any break points.
Analysis of the slopes should start as you walk up onto the green. Observe the surrounding terrain and look for the natural fall and slopes.
4. HOLE ANALYSIS
2. SQUAT DOWN
3. LOOK SIDE-ON
1. APPROACH ANALYSIS
BACK TO BASICS green reAdIng
back to basics Today’s Golfer 33
032-033 SUPP Green Reading CDP LM copy.indd 33 8/12/08 13:58:42

bunkerbasicsGreat bunker play is all about taking the right amount of sand with the right amount of force. Follow these steps to get it right...
034-037 SUPP Bunker Basics LM CDP copy.indd 34 8/12/08 13:58:51

Shuffle your feet into the sand to ensure that the bottom of the swing arc happens lower than the ball, helping you strike the sand first.
Open your stance so that you’re aiming 10 feet left of the pin, flex your knees and position your feet just wider than your shoulders.
2. SHUFFLE FEEt IN
1. OpEN StaNcE
bunkerbasics
BACK TO BASICS BunKer
back to basics Today’s Golfer 35
Strike the sand
before the ball for
greenside shots.
034-037 SUPP Bunker Basics LM CDP copy.indd 35 8/12/08 13:59:06
36 Today’s Golfer back to basics
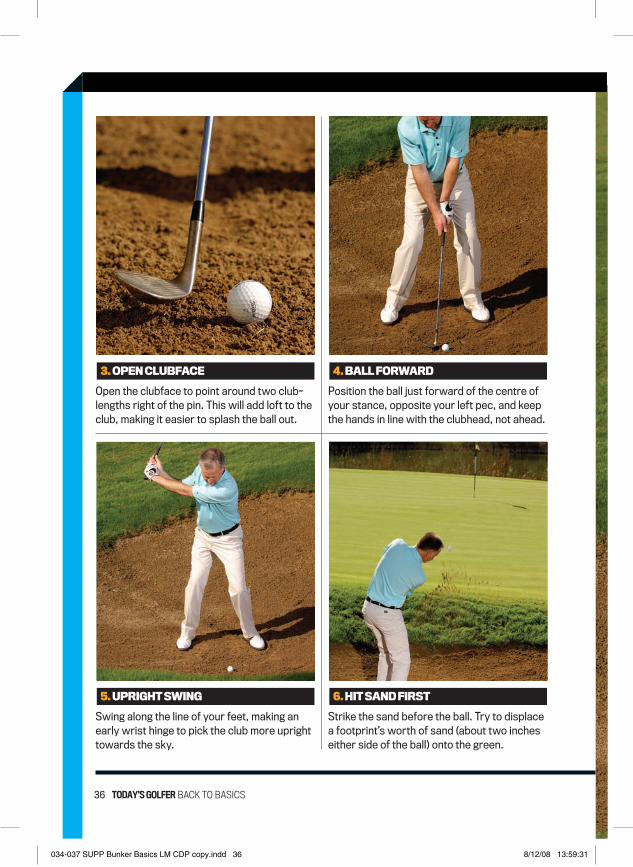
Strike the sand before the ball. Try to displace a footprint’s worth of sand (about two inches either side of the ball) onto the green.
Position the ball just forward of the centre of your stance, opposite your left pec, and keep the hands in line with the clubhead, not ahead.
Swing along the line of your feet, making an early wrist hinge to pick the club more upright towards the sky.
Open the clubface to point around two club-lengths right of the pin. This will add loft to the club, making it easier to splash the ball out.
6. Hit sand first
4. Ball forward
5. UprigHt swing
3. open clUBface
034-037 SUPP Bunker Basics LM CDP copy.indd 36 8/12/08 13:59:31
BACK TO BASICS BunKer
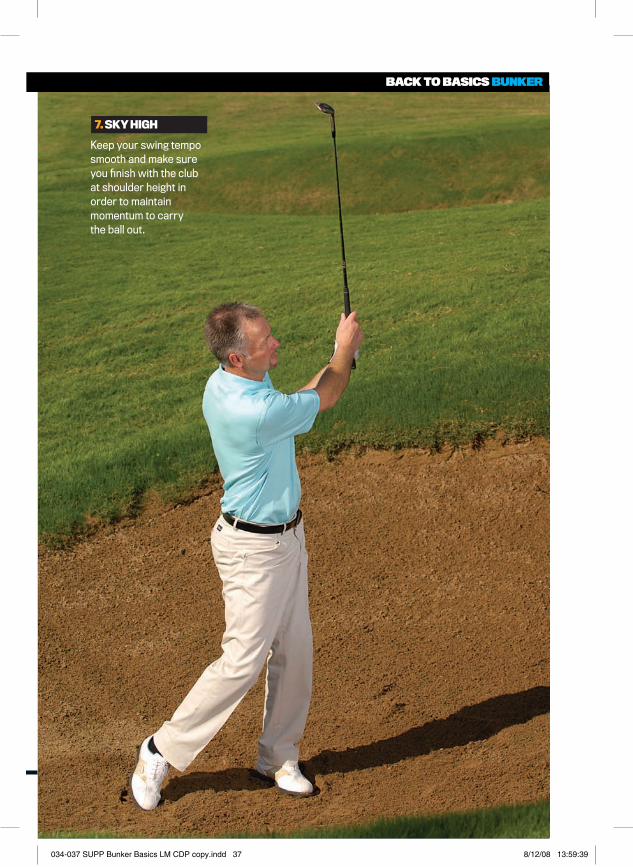
Keep your swing tempo smooth and make sure you finish with the club at shoulder height in order to maintain momentum to carry the ball out.
7. Sky high
034-037 SUPP Bunker Basics LM CDP copy.indd 37 8/12/08 13:59:39
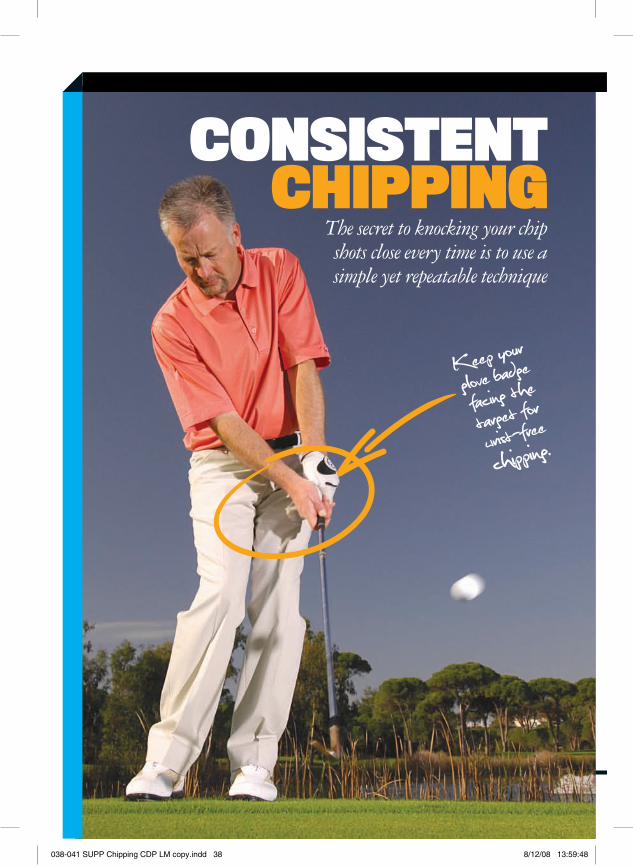
consistentchipping
The secret to knocking your chip shots close every time is to use a simple yet repeatable technique
Keep your
glove badge
facing the
target for
wrist-free
chipping.
038-041 SUPP Chipping CDP LM copy.indd 38 8/12/08 13:59:48
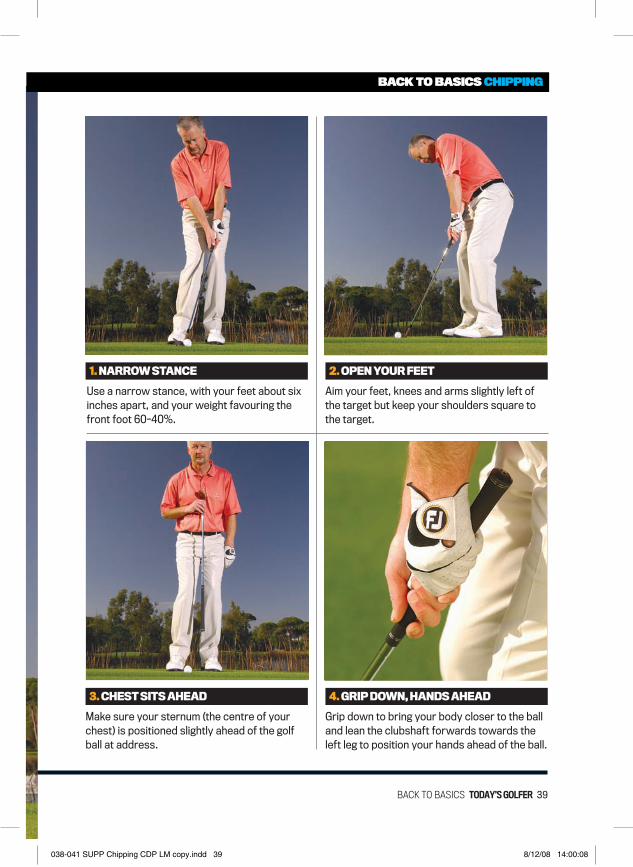
Grip down to bring your body closer to the ball and lean the clubshaft forwards towards the left leg to position your hands ahead of the ball.
Aim your feet, knees and arms slightly left of the target but keep your shoulders square to the target.
Make sure your sternum (the centre of your chest) is positioned slightly ahead of the golf ball at address.
Use a narrow stance, with your feet about six inches apart, and your weight favouring the front foot 60-40%.
4. GRIP DOWN, HANDS AHEAD
2. OPEN YOUR FEET
3. CHEST SITS AHEAD
1. NARROW STANCE
BACK TO BASICS ChIppIng
back to basics Today’s Golfer 39
038-041 SUPP Chipping CDP LM copy.indd 39 8/12/08 14:00:08

CONSISTENTCHIPPING
1. T he stroke is a pendulum action where the upper body and club are moved by a mini turn back and through
2. T he hands should lead the clubhead into impact, assisted by a subtle turning motion from the hips and knees.
40 Today’s Golfer back to basics
038-041 SUPP Chipping CDP LM copy.indd 40 8/12/08 14:00:28

BACK TO BASICS ChIppIng
3. Keep the
backswing and
throughswing sim
ilar in
length with the
left
wrist remaining fo
rward
through impact.
back to basics Today’s Golfer 41
038-041 SUPP Chipping CDP LM copy.indd 41 8/12/08 14:00:45

FAIRWAYBUNKERThe secret to playing from fairway traps is not to get over ambitious with your club selection. Take sufficient loft to fly the ball over the lip and out
42 Today’s Golfer back to basics
C lean connection
Strike the ball first
before contacting the
sand to ensure maximum
carry distance.
042-45 SUPP Fairbunker LM.CDP copy.indd 42 8/12/08 14:01:55

FAIRWAYBUNKER
BACK TO BASICS fAIrwAy BunKer
back to basics Today’s Golfer 43
042-45 SUPP Fairbunker LM.CDP copy.indd 43 8/12/08 14:02:01
44 Today’s Golfer back to basics
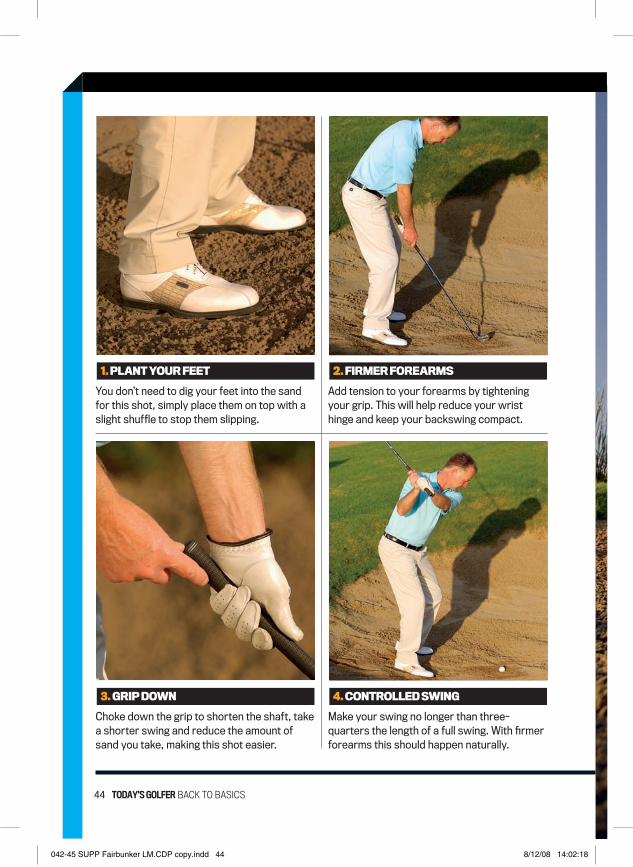
Make your swing no longer than three-quarters the length of a full swing. With firmer forearms this should happen naturally.
Add tension to your forearms by tightening your grip. This will help reduce your wrist hinge and keep your backswing compact.
Choke down the grip to shorten the shaft, take a shorter swing and reduce the amount of sand you take, making this shot easier.
You don’t need to dig your feet into the sand for this shot, simply place them on top with a slight shuffle to stop them slipping.
4. CONTROLLED SWING
2. FIRMER FOREARMS
3. GRIP DOWN
1. PLANT YOUR FEET
042-45 SUPP Fairbunker LM.CDP copy.indd 44 8/12/08 14:02:18

BACK TO BASICS fAIrwAy BunKer
Use a sweeping motion to pick the ball off the top of the surface of the sand, only taking a minimal amount of sand after striking the ball.
5. PICK THE BALL
Transfer your weight
smoothly through to help
you contact the ball first
before striking the sand.
042-45 SUPP Fairbunker LM.CDP copy.indd 45 8/12/08 14:02:24

PERFECT PITCHINGDifferent distances can be achieved by regulating the amount of body turn, arm swing and making subtle adjustments to the set-up
Vary the length
of
your swing to al
ter
the distance th
e
ball travels.
046-049 SUPP Pitching CDP LM copy.indd 46 8/12/08 14:02:39

Lean the shaft of the club a touch towards the target so the hands sit slightly ahead of the ball to encourage a downward strike to get spin.
Aim your feet slightly to the left of the target (open) but keep your shoulders square to the target.
Position the ball in the centre of your stance, directly below your sternum (the centre of your chest).
Narrow your stance so that your feet aren’t quite shoulder-width apart and spread your weight 50/50 between the feet.
4. HANDS AHEAD
2. opEN your StANcE
3. cENtrAL BALL poSItIoN
1. SEt up For FEEL
BACK TO BASICS pITChIng
back to basics Today’s Golfer 47
046-049 SUPP Pitching CDP LM copy.indd 47 8/12/08 14:03:07

48 Today’s Golfer back to basics
Allow your wrists to hinge so that they form an L-shape with the arms to set the club on the correct plane in the backswing.
The throughswing should be a mirror image of the backswing. Keep the length the same to ensure perfect distance control.
Swing the arms back, varying the length of your backswing depending on the distance of the shot - hip, chest or shoulder height.
Keep a smooth, even tempo throughout the swing, focusing on the body turn and arm swing working together as one unit.
8. CONSTANT TEMPO
6. L-SHAPE HINGE
7. MIRROR IMAGE
5. VARY BACKSWING LENGTH
046-049 SUPP Pitching CDP LM copy.indd 48 8/12/08 14:03:38

BACK TO BASICS pITChIng
Strike down into impact to ensure a crisp connection.
9. HIT DOWN
Hit down into the base of the ball to make your pitch shots spin and stop.
046-049 SUPP Pitching CDP LM copy.indd 49 8/12/08 14:03:46

BACK TO BASICS: YOUR CHECKLISTThe 10 most important things to remember from this booklet - tick each one as you master it...
BACK TO BASICS CHECKLIST
50 Today’s Golfer back to basics
With the club in your lifelines, the Vs formed between your thumb and hand point at the opposite armpit.
Ensure your weight is evenly spread between both feet and centred on the balls of your feet at address.
The back of your left hand should face the target and you should be able to make a wrist-free stroke.
You are set up open to your target and are aiming to strike a point in the sand two inches behind the ball.
Your feet are planted on top of the sand and with firm forearms you swing shorter and pick the ball off the surface.
1. THE GRIP
3. BALANCE
5. PUTTING GRIP
7. BUNKER
9. FAIRWAY SAND
Move the ball position depending on the club - nearer the left foot for longer clubs and more central for short ones.
Pick a point to aim at ahead of the ball in line with your target. Build your stance parallel (at 90˚) to this target line.
The top of your back is flat so that your eye line is directly over the ball to help you picture the putt accurately.
You alter the length of your backswing using an L-shape swing to vary how far the ball travels.
A narrow stance with your weight favouring the forward foot and the centre of your chest slightly ahead of ball.
2. BALL POSITION
4. AIM
6. PUTTING STANCE
8. PITCHING
10. CHIPPING
■
■
■
■
■ ■
■
■
■
■
050 Checklist LM CDP copy.indd 50 8/12/08 14:04:26

054_TG_237 p5.indd 1 23/10/07 15:27:01051 Web ad CV.indd 1 8/12/08 15:11:43

052 TG Compare A5 copy.indd 1 8/12/08 15:58:22