B890 4G LTE Smart Hub Getting Started GuideB890 4G LTE Smart Hub Getting Started Guide . HUAWEI...
21
B890 4G LTE Smart Hub Getting Started Guide HUAWEI TECHNOLOGIES CO., LTD.
Transcript of B890 4G LTE Smart Hub Getting Started GuideB890 4G LTE Smart Hub Getting Started Guide . HUAWEI...

B890 4G LTE Smart Hub
Getting Started Guide
HUAWEI TECHNOLOGIES CO., LTD.

Thank You for Purchasing the B890 4G LTE Smart Hub!
Before You Begin
What’s in the Box :
1. B890 4G LTE Smart Hub
2. Power adapter
3. 1 Ethernet Cable
2

Getting Started: Setting up your B890 4G LTE Smart Hub Follow these simple steps to setup your 4G LTE Smart Hub.
Place the 4G LTE Smart Hub at an indoor open area or close to a window if possible. Obstructions such as concrete or wooden walls may affect the transmission of wireless signals.
Keep the 4G LTE Smart Hub away from the household electrical appliances that produce strong electric or magnetic fields, such as microwaves, refrigerators, or satellite dish antennas.
Step 1 Insert SIM card into the Smart Hub’s SIM Card Slot.
1. Open and rotate the protective cover on top of your B890 4G LTE Smart Hub, to expose the SIM card slot.
2. Insert the SIM card into the card slot (until you hear a click). Ensure that the beveled edge of the SIM card aligns with that of the card slot.
3. Rotate and close the protective cover.
3
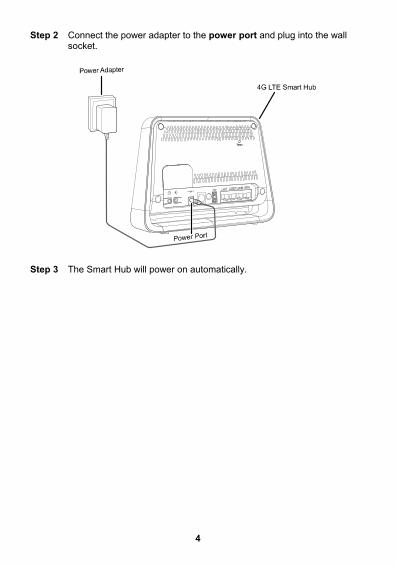
Step 2 Connect the power adapter to the power port and plug into the wall socket.
Step 3 The Smart Hub will power on automatically.
4

Getting Started: Setting up an Internet Connection Connecting your devices (computer, laptop, tablet, etc.) to the Internet
You are able to connect to the Internet via a wired or wireless (Wi-Fi) connection. Follow the instructions below to set up your connection of choice.
Wired connection with an Ethernet Cable Step 1 Connect the Yellow Ethernet cable provided to one of the 3 LAN ports
and connect the other end to your computer.
Note:
Do not connect the Yellow Ethernet cable to the WAN port that is closest to the right hand side of the device.
Step 2 Wait approximately 30 - 60 seconds for the connection to establish. Check the indicators on the front panel of your Smart Hub. If they are lit as outlined you are ready to use the internet with your new Smart Hub!
5

Power
Solid White: the Smart Hub is powered on.
Wireless Signal
indicator
Solid Blue or Cyan: The Smart Hub is registered
with the wireless network.
If this indicator is red and blinking, power off the
Smart Hub and ensure your SIM card is inserted
correctly.
Wireless Dial-up
indicator
Solid: The Smart Hub is connected to
the wireless network.
If this indicator is blinking continuously, power off
the Smart Hub for 2 minutes and try again.
/ /
LAN indicators
Solid: 1, 2 or 3 will be lit depending on which
LAN port you are connected to.
Blinking: data is transferring.
6

Wireless (Wi-Fi) Connection Follow these simple steps to connect up to 32 Wi-Fi enabled devices to the Internet through your 4G LTE Smart Hub:
Note:
The Wi-Fi Name (SSID) and Wi-Fi Password (WIFI KEY) are printed on the Wireless Security Sticker located on the bottom of your B890 4G LTE Smart Hub.
To protect your wireless network from unauthorized access, change the Wi-Fi Name (SSID) and Wi-Fi Password (WIFI KEY) at regular intervals. For details, see the online help information on the web user interface.
Step 1
Ensure that on the front panel is solid and Wi-Fi is enabled on your device (computer, laptop, tablet, etc.)
Step 2
From your device, scan for wireless networks in your area. Connect to the network name that matches the Wi-Fi Name (SSID) found on the Wireless Security Sticker.
Step 3
When prompted for your wireless security settings, enter the Wi-Fi Password listed on the Wireless Security Sticker (Wi-Fi Password is case sensitive).
Note:
If you are using Windows Vista or later, you can press the WPS button on the top of your Smart Hub for 6 seconds in lieu of entering the Wi-Fi Password.
Step 4
Wait approximately 30 seconds for the connection to establish. Your Wi-Fi enabled device will notify you when it is connected.
Step 5
You may connect up to 32 Wi-Fi enabled devices. Repeat steps 1 through 4.
7

8

Getting Started: Setting up your Phone Follow these simple steps to connect a Phone to your 4G LTE Smart Hub.
Step 1 For voice calls, connect a standard telephone to the Telephone Port using a RJ-11 cable (you will require a voice plan in addition to a data plan to use this feature).
Important Notice:
If the B890 4G LTE Smart Hub is to be connected to the existing wall outlet telephone wiring the existing wiring MUST first be disconnected from any outside landline telephone network. Not disconnecting from any outside landline telephone network will cause excessive heat or even damage the Smart Hub.
Step 2 Check the indicators on the front panel of your Smart Hub. At minimum the indicators must be lit as outlined.
You are ready to make your first phone call on your new Smart Hub! Refer to the section “Using your 4G LTE Smart Hub’s Phone Features” for more help on using a phone with your Smart Hub.
Note:
Radio signals can interfere with the telephone call connection and quality. To eliminate the risk of possible interference, place the telephone at least 1 meter away from the B890 4G LTE Smart Hub.
Fax is not support on this 4G LTE Smart Hub.
9

inserted correctly.
Power
Solid White: The Smart Hub is powered on.
Wireless Signal indicator
Solid Blue or Cyan: The Smart Hub is
registered with the wireless network.
If this indicator is red and blinking, power off the
4G LTE Smart Hub and ensure your SIM card is
Telephone indicator
Not lit
Solid white when you are on a call.
This indicator will blink when you are receiving a
call in addition to your phone ringing.
10

11
Using Your 4G LTE Smart Hub’s Phone Features The 4G LTE Smart Hub offers the ability to make calls via your wireless service. Please familiarize yourself with the Smart Hub’s calling features below. (Instructions may vary depending on the telephone model and for cordless handsets)
Forwarding a Call Forward All Incoming Calls
All your incoming calls will be forwarded to another number.
To activate:
Step 1 Dial *21* before the area code and number you want to forward your calls to e.g. *21*4161234567#
Step 2 You will hear a tone that indicates call forwarding has been activated.
To deactivate it:
Dial #21#. When you hear a tone hang up, Call Forwarding has been cancelled.
Forwarding Calls when Busy
Only when you are on the phone and the line is busy, your incoming calls will get forwarded.
To activate:
Step 1 Dial *67* before the area code and number you want to forward your calls to e.g. *67*4161234567#
Step 2 You will hear a tone that indicates call forwarding has been activated.
To deactivate:
Dial #67#. When you hear a tone hang up, Call Forwarding has been cancelled.
Call Forward No Answer
Only if your phone rings and is not answered, your incoming calls will get forwarded.
To activate:
Step 1 Dial *61* before the area code and number you want to forward your calls to e.g. *61*4161234567#.
Step 2 You will hear a tone that indicates call forwarding has been activated.
To deactivate it:
Dial #61#. When you hear a tone hang up, Call Forwarding has been cancelled.

12
Making a conference call
To make a conference call:
Step 1
During a call, ask the recipient to hold, then press the Flash/Talk key (varies by telephone model).
Step 2
Dial the next number. Step 3
When the call is answered, press the Flash/Talk key to connect both calls.
Your conference call is set up.
To disconnect one of the participants: During the call, press the Flash/Talk key (varies by telephone model).
The participant who was last to join the call is disconnected.
To end the conference call: Hang up or Press the End key to end the call.
Your conference call ends.
Call Waiting When another call comes in, Call Waiting alerts you with two fast beeps. You either accept the second incoming call or let it to go straight to voice mail. Either way, you never miss a call.
Call Waiting works with Call Display, so you can see who is calling before deciding to interrupt your first call.
You can disable Call Waiting for those calls you don't want interrupted.
To activate Call Waiting:
Dial *43# and hang up after you hear a tone indicating Call Waiting has been activated.
To Deactivate Call Waiting:
Dial #43# and hang up after you hear a tone indicating Call Waiting has been deactivated.
To Accept a Call Waiting:
Press the Hang up/Hook down (varies by phone model) during the call.
To Alternate between Calls:
Press the Hang up/Hook down (varies by phone model) during the call.

13
Caller ID Caller ID shows the phone numbers of your incoming calls so you have the flexibility to choose whether to answer the call. When used with Call Waiting, you see incoming phone numbers even if you are on another call.
Using outbound Caller ID, you can choose to block your number as "Restricted".
To Block your caller ID on an outbound call:
Dial #31# and hang up after you hear a tone.
To Unblock your caller ID on an outbound call:
Dial *31# and hang up after you hear a tone.
Checking your voice mail You can check your voice mail from your telephone or another phone.
From your telephone:
Step 1 Dial your 4G LTE Smart Hub number. A message tells you if you have any voice mail messages.
Step 2 If you have messages, follow the prompts.
From another phone:
Step 1 Dial your 4G LTE Smart Hub number. Your voice mail greeting plays. Step 2 During your voice mail greeting, press the * key. Step 3 Type your password and follow the prompts.

Wireless only
Static APN
First Time Quick Setup Wizard The first time you go to the Web user interface site, you will be presented with the opportunity to quickly setup your Smart Hub credentials via the Quick Setup Wizard. After completing the Quick Setup Wizard, you can choose Settings > Quick Setup to access this setup again.
Step 1 Launch a web browser, and enter http://192.168.1.1 in the address bar.
Step 2 Enter the website password, and log in to the web user interface. The default password is printed on the Wireless Security Sticker located on the bottom of the 4G LTE Smart Hub. You must choose a new password for the web user interface to continue. Once your password has been changed, you will be redirected to the Quick Setup Wizard page shown below.
Step 3 The default profile should have 4G High Speed Wireless Profileuser set to and Click Next to continue.
Step 4
The Profile List should be set to match sim card inserted
should be set . Click Next to continue.
14

Step 5 Configure WLAN basic settings in the page.
SSID Name: The SSID is the name of your wireless network. Use a unique name to identify your wireless network so that you can easily connect from your wireless clients.
SSID Broadcast: Select Enable to broadcast the SSID of your 4G LTE Smart Hub, or select Disable to hide. If the SSID Broadcast option is disabled, other people will not be able scan and detect your 4G LTE Smart Hub’s SSID.
Click Next to continue. Step 6 Configure WLAN security settings.
Setting a strong wireless security level (such as WPA2-PSK – AES+TKIP) can prevent unauthorized access to your wireless network. Please enter the Security Key that you wish to use, or leave this field unchanged to use the default Security Key. Click Next to continue.
Step 7 Review your settings then click Finish to save configuration.
15

Changing your 4G LTE Smart Hub Settings You can configure and manage the 4G LTE Smart Hub settings using the web user interface.
Step 1 Launch a web browser, and enter http://192.168.1.1 in the address bar.
Step 2 Enter the password, and log in to the web user interface. The default password is printed on the Wireless Security Sticker located on the bottom of the 4G LTE Smart Hub.
Note:
To protect your Smart Hub, only one user can log in to the web user interface at a time.
To protect your account, change the password immediately. For details, see the online help information on the web user interface.
16

Getting to Know Your Device Appearance
1. Power button 2. Power port 3. Telephone port 4. USB port 5. LAN ports
6. WAN port 7. Wi-Fi/WPS button 8. Dial-up button 9. SIM card slot
1. Power indicator 2. Network status indicator 3. Wi-Fi/WPS indicator 4. SMS indicator 5. Call status indicator 6. Wireless dialing indicator 7. LAN indicators 8. Ethernet dialing indicator 9. USB indicator 10. Signal strength indicator light
17

Indicators The front panel of your B890 4G LTE Smart Hub provides simple and intuitive indicators so that you can easily learn the B890 Smart Hub’s status by observing the indicator lights.
Indicator Status
Power indicator
On: Smart Hub powered on.
Off: Smart Hub powered off.
Network status indicator
Fast red blinking: SIM card unavailable (SIM card not installed or malfunctioning, or PIN code not verified).
Steady blue: Smart Hub registered with 4G network.
Steady cyan: Smart Hub registered with LTE network.
Off: no signal received.
Note:
This indicator does not represent the actual wireless signal strength of the device. Login to the Web User Interface to view actual signal strength.
Signal Strength indicator
light
Blue: The signal strength indicator light will be lit across the bottom based on wireless coverage. Login to the Web User Interface to view actual signal strength.
Wi-Fi/WPS indicator
Steady on: Wi-Fi turned on or data transfer in progress.
Blinking: WPS connection being set up.
Off: Wi-Fi turned off.
18

Indicator Status
SMS / Voicemail
indicator
Steady on: inbox full.
Blinking: new messages.
Telephone indicator
Steady on: call in progress.
Slow blinking: incoming call.
Wireless connection
indicator
Steady on: connected to a 4G/LTE network.
Slow blinking: connecting to a 4G/LTE network.
/ /
LAN indicators
Steady on: network cable connected.
Blinking: data transfer in progress.
Off: network cable not connected.
Ethernet (Wired Internet)
dialing indicator
Steady on: connected to an Ethernet network.
Slow blinking: connecting to an Ethernet network.
USB indicator
On: USB storage device connected.
Off: USB storage device not connected.
19

Advanced Features: Installing External Antenna In areas with poor network coverage, connect an external antenna to the B890's external antenna port for better signal reception.
Step 1 Remove the cover from the antenna port. (Keep it in a safe place.)
Step 2 Screw external antenna fully into the SMA1 antenna port, as shown in the following figure.
Step 3 If it’s necessary, screw another external antenna fully into the SMA2 antenna port to get a stronger receiving signal.
Important Notice:
Do not install an external antenna to SMA2 unless there is already an external antenna connected to SMA1. Only installing an external antenna to SMA2 will result in your Smart Hub not being able to connect to the Internet. Only installing external antenna to SMA1 is allowed.
Only use the external antenna indoors, and do not use it during a thunderstorm.
Note:
Before using an external antenna, log in to the web management page ( http://192.168.1.1 and set antenna mode on "outer"
For details, see the help information on the web management page.
20

Restoring Factory Defaults If you are uncertain of which settings you have configured or changed, you can restore the factory default settings of the B890 4G LTE Smart Hub, and then reconfigure.
To restore the factory defaults, use a sharp-pointed object to press and hold the RESET button until the signal indicators on the B890 4G LTE Smart Hub blinks.
After the factory default settings are restored, the B890 4G LTE Smart Hub will restart automatically.
Note:
Restoring factory defaults will delete all the B890 Smart Hub's user-defined settings and restore all settings on the web user interface to their defaults.
For More Information If the B890 4G LTE Smart Hub does not work properly:
See the online help information on the web user interface
Restart the B890 4G LTE Smart Hub using the power button, then unplug the Smart Hub for 2 minutes.
Press and hold the Dial-Up button on the top of the Smart Hub for 10 seconds.
Remove and reinsert your SIM card.
Try using the Smart Hub with a different Phone, different RJ-11 or Ethernet cable or a different computer.
Restore the B890 4G LTE Smart Hub to its factory defaults.
21