B asic S kills - Cilinder.be · M aking a copy of a docum ent / 19 C hanging the nam e of an icon /...
177
Basic Skills
-
Upload
truongkhue -
Category
Documents
-
view
214 -
download
0
Transcript of B asic S kills - Cilinder.be · M aking a copy of a docum ent / 19 C hanging the nam e of an icon /...

Basic Skills
Apple Computer, Inc.This manual and the software described in it arecopyrighted, with all rights reserved. Under thecopyright laws, this manual or the software may not becopied, in whole or part, without written consent ofApple, except in the normal use of the software or tomake a backup copy of the software. The sameproprietary and copyright notices must be affixed toany permitted copies as were affixed to the original.This exception does not allow copies to be made forothers, whether or not sold, but all of the materialpurchased (with all backup copies) may be sold, given,or loaned to another person. Under the law, copyingincludes translating into another language or format.
Balloon Help, DocViewer, Finder, and TrueType aretrademarks of Apple Computer, Inc.HyperCard is a registered trademark of Apple Computer,Inc., licensed to Claris Corporation.MacWrite is a registered trademark of ClarisCorporation.Adobe, Adobe Illustrator, and PostScript are trademarksof Adobe Systems Incorporated, which may beregistered in certain jurisdictions.Helvetica, Linotronic, and Times are registeredtrademarks of Linotype Company.Microsoft and MS-DOS are registered trademarks ofMicrosoft Corporation.You may use the software on any computer owned by
you, but extra copies cannot be made for this purpose. NuBus is a trademark of Texas Instruments.The Apple logo is a registered trademark of AppleComputer, Inc. Use of the “keyboard” Apple logo(Option-Shift-k) for commercial purposes without theprior written consent of Apple may constitutetrademark infringement and unfair competition inviolation of federal and state laws.
QuarkXPress is a registered trademark of Quark, Inc.Retrospect Remote is a registered trademark of DantzDevelopment Corporation.UNIX is a registered trademark of UNIX SystemLaboratories, Inc.
© Apple Computer, Inc., 199320525 Mariani AvenueCupertino, CA 95014-6299(408) 996-1010
Simultaneously published in the United States andCanada.Mention of third-party products is for informationalpurposes only and constitutes neither an endorsementnor a recommendation. Apple assumes noresponsibility with regard to the performance or use ofthese products.
Apple, the Apple logo, AppleLink, AppleShare,AppleTalk, A/UX, EtherTalk, LaserWriter, LocalTalk,and Macintosh are trademarks of Apple Computer, Inc.,registered in the United States and other countries.
Contents
Preface: About This Guide / xiii
1 Working on the Desktop / 1The Apple Workgroup Server 95 environment / 2Turning the computer on and off / 2The Finder and the desktop / 3Using the mouse / 4Working with icons / 6Working with windows / 7
Making a window bigger or smaller / 8Moving hidden contents of a window into view / 9Closing a window / 10Moving a window / 11
Working with menus / 12Choosing an item from a menu / 13
Using keyboard shortcuts / 13Using the Trash / 14Working with programs / 15
Opening a program / 15Creating a document / 16Selecting text / 16Changing text / 17Saving your work / 17Switching programs / 18Closing a document / 18Quitting a program / 19

Making a copy of a document / 19Changing the name of an icon / 20Using Balloon Help / 20
2 Getting Started With A/UX 3.0.1 / 23Introduction to A/UX / 24Starting A/UX / 24Logging in to an account / 26Changing your password / 28Using CommandShell / 29
Making CommandShell active / 30Switching between CommandShell and the Finder / 31
Using the A/UX System Console window / 31Displaying the A/UX System Console window / 31Clearing the A/UX System Console window / 32Closing the A/UX System Console window / 32How A/UX notifies you of an alert message / 32
Using CommandShell to monitor errors / 33Logging out / 34Shutting down A/UX / 34
3 Using Files and Folders / 37The Finder icons in A/UX / 38
Folder icons / 38File, program, and utility icons / 39File-system icons / 40
Using files and folders in the Finder / 41Creating and naming folders / 42
Saving your files in different locations / 42Rearranging icons on the desktop / 43Finding a file or a folder / 43
iv Contents

Finding an item by name / 44Finding a file or folder by characteristics other than name / 44Finding files and folders through a two-stage search / 45Uses of the Find menu item / 46
Using an alias / 47Creating an alias / 47Locating the item to which an alias points / 48
Moving an item onto the desktop / 48Getting information about a file / 48Locking a file / 49Using the View menu / 50
4 Backing Up Your Work With Disks or Tape Cassettes / 51Working with disks / 52
Formatting floppy disks for a Macintosh file system / 52Locking a floppy disk / 54Copying a file from a hard disk to a floppy disk / 54Restoring a file from a floppy disk to a hard disk / 55If you have a problem copying files to a floppy disk / 55Ejecting a floppy disk / 56
If you have problems ejecting a floppy disk / 56
Working with tape cassettes / 57Compatible tapes / 58Tapes supplied with the server / 58Inserting tape cassettes / 59Status lights / 59
The caution signal / 60Removing tape cassettes / 61Locking a cassette / 61Avoiding high humidity / 61Cleaning the tape-drive heads / 62
Contents v

5 Working With TextEditor / 63Introduction to TextEditor / 64Starting TextEditor / 65Creating a document / 66
Entering text / 66Cutting and pasting text / 68
Saving a new document / 70Editing an existing document / 72
Opening a file / 72Opening read-only files / 73
Deleting and rewriting text / 74Copying and pasting between documents / 74Finding and changing text / 76
Finding text / 76Replacing text / 78
Formatting and other features / 79Formatting text / 80Shifting a block of text left or right / 80Arranging multiple windows / 81Marking a place in the file / 83
Printing / 86Printing an entire document / 86Printing a selected part of a document / 87
Quitting TextEditor / 88
6 Printing From the Desktop / 89Printer connections / 90Choosing a printer / 92Using Macintosh printing techniques / 94
The PrintMonitor program / 94Transferring fonts to a LaserWriter printer / 95
vi Contents

7 Customizing the Finder Environment / 97Installing files in the System Folder / 98Removing files from the System Folder / 99Specifying which items you want opened at startup / 99Installing an item in the Apple menu / 100Using fonts / 100
Outline fonts and bitmapped fonts / 100Installing fonts / 101Removing fonts / 101
Setting the time, date, and alarm / 101Changing the time and date / 102Setting a time for the Alarm Clock to go off / 103Turning off the alarm / 104
Adjusting the way the mouse works / 105Adjusting the way the keyboard works / 106
Character repeat and layout / 106Controlling the pointer from the keyboard / 108
Setting the alert sound / 108Changing the sound and volume / 109Installing a sound / 110Recording sounds / 110Removing a sound / 111
Changing the screen’s appearance / 112Changing the desktop pattern / 112Adjusting the blinking of a menu item / 113Adjusting the blinking of the insertion point / 114Changing the items in the Label menu / 114Changing the way the contents of windows appear / 116Changing the appearance of icons / 116
Changing an icon / 117Assigning a label and a color to an icon / 118
Changing the highlight color / 118Changing the color of windows / 120Displaying colors or grays / 121
Contents vii

Adjusting screen brightness / 122Configuring multiple monitors / 122Turning off the Empty Trash warning / 124Adding application programs to your system / 125
Appendix Menu Reference / 127The Finder environment / 128
The Apple menu / 128About This Macintosh... / 128Desk accessories / 129
The File menu / 129New Folder / 129Open / 129Print / 130Close Window / 130Close All / 130Get Info / 130Sharing... / 131UNIX Permissions... / 131Duplicate / 132Make Alias / 133Put Away / 133Find... / 133Find Again / 134Page Setup... / 134Print Window... / 134
The Edit menu / 135Undo / 135Cut / 135Copy / 135Paste / 136Clear / 136Select All / 136Show Clipboard / 136
The View menu / 136Small Icon / 136Icon / 137Name / 137Size / 138
viii Contents

Kind / 139Label / 139Date / 140
The Label menu / 140The Special menu / 141
Clean Up Window / 141Empty Trash... / 141Eject Disk / 141Erase Disk... / 142Restart / 142Shut Down / 142Logout / 142
The Help menu / 142About Balloon Help... / 143Show Balloons / 143Finder Shortcuts / 143
The Application menu / 143Hide Program / 144Hide Others / 144Show All / 144
The TextEditor program / 144The TextEditor File menu / 144
New... / 145Open... / 145Close / 145Save / 145Save as... / 146Save a Copy... / 146Revert to Saved / 146Page Setup... / 146Print Selection / 146Quit / 146
The TextEditor Edit menu / 147Undo / 147Cut / 147Copy / 147Paste / 148Clear / 148Select All / 148Show Clipboard / 148Format... / 148
Contents ix

Align / 149Shift Left / 149Shift Right / 149
The TextEditor Find menu / 149Find... / 149Find Same / 149Find Selection / 150Display Selection / 150Replace... / 150Replace Same / 150
The TextEditor Mark menu / 150Mark... / 150Unmark... / 150List of markers / 151
The TextEditor Window menu / 151Tile Windows / 151Stack Windows / 151List of open windows / 151
Glossary / 153
Index / 159
x Contents

Preface About This Guide
This guide describes basic features of the operating-system environmentfor the Apple Workgroup Server 95. The operating system that the serveruses is A/UX, Apple’s version of the UNIX® operating system. A/UX offersexcellent performance and lets you take advantage of both Macintosh andUNIX capabilities.
What you need to know
Basic Skills is intended for users who are unfamiliar with the Finderapplication program and the desktop environment. You do not need to befamiliar with A/UX to use this guide.
This manual presents the skills you need for using the Finder in the A/UXenvironment. Many of the chapters contain tutorials to help you learnessential techniques and concepts. More advanced information on usingA/UX Version 3.0.1 to administer the Apple Workgroup Server 95 isprovided in Server Administration With A/UX 3.0.1.
What this guide contains
Basic Skills contains the following chapters:n Chapter 1, “Working on the Desktop,” teaches you how to turn on your
computer and how to perform basic operations.n Chapter 2, “Getting Started With A/UX 3.0.1,” teaches you how to start
up A/UX, log in to an account, change your password, log out, and shutdown A/UX.

n Chapter 3, “Using Files and Folders,” teaches you how to maneuverwithin the A/UX file hierarchy and work with files and folders.
n Chapter 4, “Backing Up Your Work With Disks or Tape Cassettes,”teaches you how to transfer files and folders to and from floppy disksand tape cassettes.
n Chapter 5, “Working With TextEditor,” introduces you to theMacintosh-style text editor that comes with A/UX, which allows you tocreate and edit text-only files by using the Macintosh menus and amouse.
n Chapter 6, “Printing From the Desktop,” describes the different kindsof printer connections you can use and the various ways of sending afile to the printer while you are using A/UX.
n Chapter 7, “Customizing the Finder Environment,” describes severaladjustments you can make to your work environment, based on yourpersonal preferences.
n The appendix, “Menu Reference,” describes the items in the Finder andTextEditor menus.
The glossary contains definitions of all A/UX terms introduced in thisguide.
Conventions used in this guide
Although A/UX links the UNIX and Macintosh environments, the twoenvironments use different terminology. For example, Macintosh users arefamiliar with the word folder. This term represents essentially the samething that UNIX users call a directory. The term folder is particularlymeaningful when you are using the Macintosh desktop or Finder, becauseyou see items that look like folders. In the UNIX environment, however, theterm directory is more useful.
For that reason, this guide uses Macintosh terminology when describinghow to work with the desktop, and UNIX terminology when describingUNIX operations.
xii Preface
The Courier font
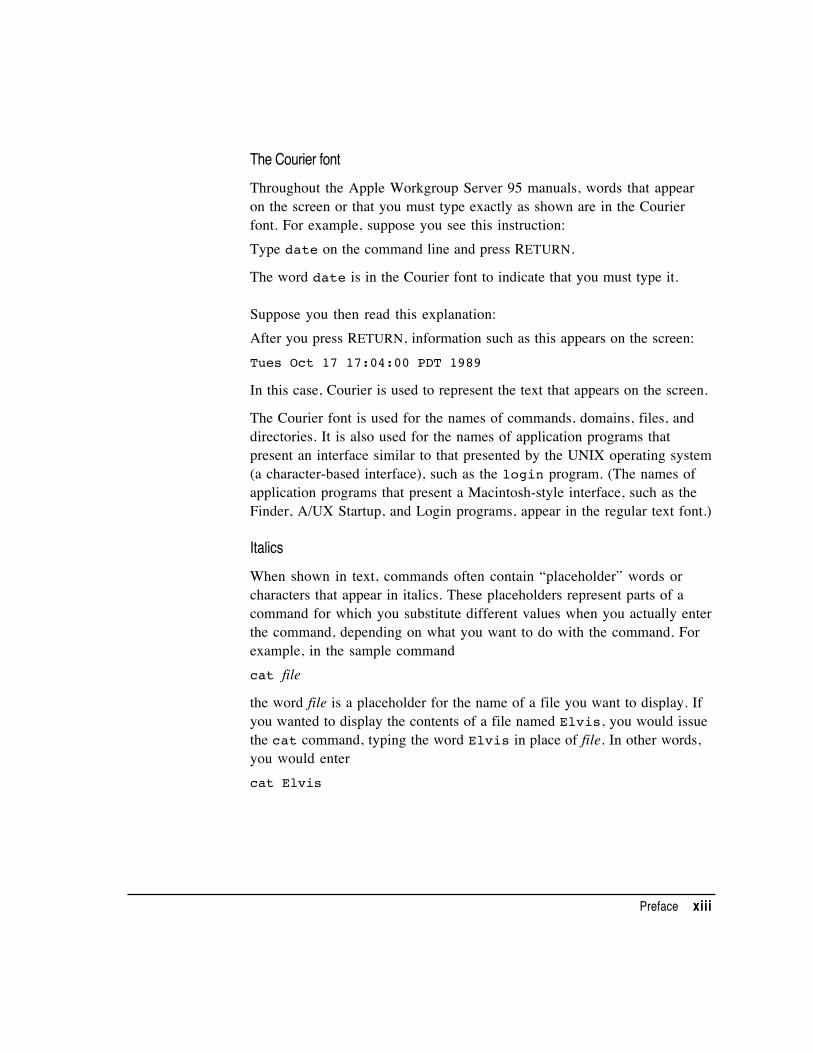
Throughout the Apple Workgroup Server 95 manuals, words that appearon the screen or that you must type exactly as shown are in the Courierfont. For example, suppose you see this instruction:Type date on the command line and press RETURN.
The word date is in the Courier font to indicate that you must type it.
Suppose you then read this explanation:After you press RETURN, information such as this appears on the screen:Tues Oct 17 17:04:00 PDT 1989
In this case, Courier is used to represent the text that appears on the screen.
The Courier font is used for the names of commands, domains, files, anddirectories. It is also used for the names of application programs thatpresent an interface similar to that presented by the UNIX operating system(a character-based interface), such as the login program. (The names ofapplication programs that present a Macintosh-style interface, such as theFinder, A/UX Startup, and Login programs, appear in the regular text font.)
Italics
When shown in text, commands often contain “placeholder” words orcharacters that appear in italics. These placeholders represent parts of acommand for which you substitute different values when you actually enterthe command, depending on what you want to do with the command. Forexample, in the sample commandcat file
the word file is a placeholder for the name of a file you want to display. Ifyou wanted to display the contents of a file named Elvis, you would issuethe cat command, typing the word Elvis in place of file. In other words,you would entercat Elvis
Preface xiii

Sometimes italic placeholders are used in other contexts—for example, torepresent text that appears on the screen or to represent the value of a fieldin a file. Here is a sample prompt that might appear on your screen:Apple Computer, Inc. (hostname)login:
In this prompt, the word hostname is a placeholder for the name of the hostcomputer to which you can log in.
On-line help and documentation
You can display information about features of the desktop and get on-screen help in several ways.
Balloon Help
The Apple Workgroup Server 95 software comes with a feature calledBalloon Help, which provides immediate on-screen help when you need it.If at any time you don’t understand the instructions in this guide—or ifyou see a window, button, menu, command, or icon that you want to knowmore about—use Balloon Help to get the help you need. For instructionson using Balloon Help, see Chapter 1, “Working on the Desktop.”
On-line documentation
The contents of this guide, and of most of the other documentation thatcomes with the Apple Workgroup Server 95, are provided in electronicform so that you can display them on your screen. If you prefer using on-line forms of documentation, you can use the on-line utility called AppleDocViewer, which comes with the Apple Workgroup Server 95. The user’sguide for Apple DocViewer is itself provided in on-line form, in theDocumentation folder on your server. The Apple DocViewer QuickReference Card, packaged with the Apple Workgroup Server 95, explainshow to start Apple DocViewer and display the user’s guide.
xiv Preface

For more information
For information about how to set up your system and run A/UX for thefirst time, see Setting Up and Managing Your Server, which explains howto set up your server, peripheral devices, and software, and discussesstrategies for administering your server.
For information about using A/UX 3.0.1 to perform advancedadministration procedures, see Server Administration With A/UX 3.0.1:Advanced Concepts and Procedures.
For detailed information on A/UX, see the A/UX 3.0 documentation suite.
Preface xv
1 Working on the Desktop
This chapter introduces the workspace, called the desktop, that appears onyour computer screen. Before you read this chapter, you should have set upyour server according to the instructions in Setting Up and Managing YourServer. This chapter covers the following topics:n turning the computer on and offn understanding the desktop and the Findern using the mousen using icons, windows, and menusn performing simple desktop functions, such as opening programs and
copying files
If you are already familiar with the fundamentals of the Macintoshenvironment, proceed to Chapter 2, “Getting Started With A/UX 3.0.1.”Chapter 2 discusses desktop features and activities that relate to the A/UXoperating system.

The Apple Workgroup Server 95 environment
The Apple Workgroup Server 95 operating system, A/UX 3.0.1, combines twocomputing environments: the UNIX® operating system and the Macintoshoperating system. A/UX differs from other versions of UNIX because it offersthe flexibility and ease of use of the Macintosh user interface. Because A/UXlets you use the Macintosh desktop features, you do not need to be familiarwith the UNIX environment to use the capabilities of the Apple WorkgroupServer 95.
The desktop is displayed by an application called the Finder. The Finderbehaves in a slightly different manner in the A/UX environment than it does inthe Macintosh environment. Because the Apple Workgroup Server 95 uses theA/UX operating system, this guide describes the use and behavior of theFinder specifically in the A/UX environment.
Turning the computer on and off
Before you start up the computer, you should set up your hardware accordingto the instructions in Setting Up and Managing Your Server.
To turn on the computer:
n Press the POWER ON key.
The POWER ON key is the key marked with a small triangle. It is at the top ofthe keyboard, either near the center or in the upper-right corner.
Apple ADB Keyboard Apple ADB Extended Keyboard
2 Chapter 1 / Working on the Desktop

The computer starts up and displays a dialog box that shows you the status ofthe startup procedure. More detailed information about the startup process iscontained in the next chapter. When the startup process is finished, the desktopappears.
To turn off your computer, you use the mouse to choose a command from amenu. If you need to learn these skills, read the rest of this chapter and thencome back to this section to turn off your computer.
To turn off the computer:
1 Point to the Special menu name in the menu bar.
2 Press and hold down the mouse button.
3 Drag through the items in the menu until the Shut Down item is highlighted, and thenrelease the mouse button.
The computer and the monitor turn off.
IMPORTANT If you have Small Computer System Interface (SCSI) devices,such as hard disks, connected to your computer, turn them off after you turnoff the computer.
The Finder and the desktop
When you start up your system, the desktop appears. The desktop is displayedby the Finder program. This program is always open, although it need notalways be the active program (that is, the program currently being used).
The desktop screen is a field of gray (or another color) with a menu bar acrossthe top, an icon (small picture) near the upper-right corner representing thestartup disk, and a Trash icon near the lower-right corner. The menu barcontains the names of menus, which are lists of actions that you can perform.You display, or “pull down,” a menu by pointing to its name and clicking.(The rest of this chapter explains more fully how to use elements on thedesktop.) You might also see windows open in the gray area. (Windows aredescribed later in this chapter.)
The Finder and the desktop 3

The desktop is your workspace on the computer, providing you with a simpleway of thinking about using your computer:n Icons represent containers of information. Disks, programs, files, and so
forth are all shown as icons.n Windows let you view the information in the containers. When you open an
icon, a window appears.n Menus provide lists of actions you can perform on selected icons, windows,
or window contents.
The following figure shows a sample desktop with icons, windows, and amenu pulled down.
Chapter 3, “Using Files and Folders,” explains in more detail how to use thesefeatures of the desktop.
Using the mouse
You use the mouse to control the movements of a pointer on the screen.Usually, the pointer looks like an arrow. Much of the work you do on thedesktop involves four mouse actions: pointing, clicking, pressing, anddragging.
4 Chapter 1 / Working on the Desktop
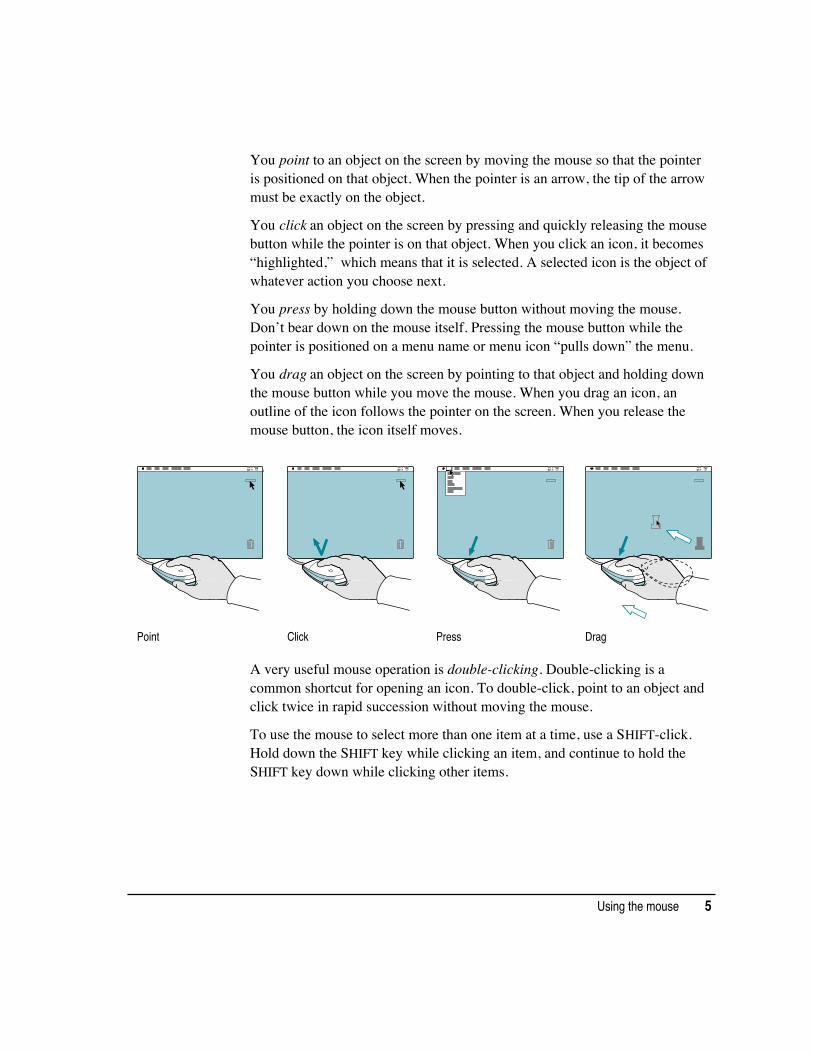
You point to an object on the screen by moving the mouse so that the pointeris positioned on that object. When the pointer is an arrow, the tip of the arrowmust be exactly on the object.
You click an object on the screen by pressing and quickly releasing the mousebutton while the pointer is on that object. When you click an icon, it becomes“highlighted,” which means that it is selected. A selected icon is the object ofwhatever action you choose next.
You press by holding down the mouse button without moving the mouse.Don’t bear down on the mouse itself. Pressing the mouse button while thepointer is positioned on a menu name or menu icon “pulls down” the menu.
You drag an object on the screen by pointing to that object and holding downthe mouse button while you move the mouse. When you drag an icon, anoutline of the icon follows the pointer on the screen. When you release themouse button, the icon itself moves.
Point Click Press Drag
A very useful mouse operation is double-clicking. Double-clicking is acommon shortcut for opening an icon. To double-click, point to an object andclick twice in rapid succession without moving the mouse.
To use the mouse to select more than one item at a time, use a SHIFT-click.Hold down the SHIFT key while clicking an item, and continue to hold theSHIFT key down while clicking other items.
Using the mouse 5

Working with icons
The desktop relies on pictorial representations (icons) to show files, disks,menus, options, or other features. Much of the work you perform on thedesktop involves icons. Opening an icon allows you to view its contents in awindow, unless the icon represents an application program. When you open aprogram icon, a blank window opens, ready for use.
To open an icon:
1 Click the icon once to select it.
The icon becomes highlighted to show that it is selected.
2 Point to the File menu name in the menu bar.
3 Press the mouse button to “pull down” the File menu.
4 Drag the arrow pointer to the Open item.(the second item in the File menu) so that it ishighlighted, and then release the mouse button.
When you choose the Open item, the selected icon opens into a window.The icon itself becomes filled in with a pattern of dots, indicating that it hasbeen opened.
A faster way to open an icon is by double-clicking it. To double-click an icon,position the pointer on the icon and click twice in rapid succession.
When you open an icon representing a file created by an application program,you open both the file and the program.
6 Chapter 1 / Working on the Desktop

Working with windows
Information on the desktop is displayed in windows. Every window hasseveral features that help you view the window’s contents. You cann make the window bigger or smallern move hidden contents into view
You can have several windows open on the screen, but only one window at atime can be the active window. Before you work with the contents of awindow, you need to make that window the active window. The activewindow is the one with solid lines across the top (the title bar), on either sideof its title. When windows overlap, the active window is the one that’s infront. Click anywhere in a window to make it the active window.
Title bar
Active window
Working with windows 7

Making a window larger or smaller
You can change a window’s size by dragging its size box or by clicking itszoom box.
Zoom box
Size box
To change a window’s size with the size box:
1 Point to the size box in the lower-right corner of the active window. (If you don’t have awindow open, select the hard disk icon and choose the Open item from the File menu.)
2 Drag the size box in any direction, and then release the mouse button.
An outline indicates the window’s new size as you drag. You can drag in anydirection to make the window larger or smaller, wider or narrower.
To change a window’s size with the zoom box:
1 Click the zoom box near the right end of the title bar.
The window “zooms” to a size that shows all of its contents.
2 Click the zoom box again.
The window zooms back to its previous size.Clicking the zoom box is a quick way to view as much of a window’s contentsas your screen size allows.
8 Chapter 1 / Working on the Desktop

Moving hidden contents of a window into view
Without changing the size of the window, you can view any contents that arecurrently out of sight by using the window’s scroll bars and scroll arrows.
Right arrowHorizontal scroll barLeft arrow
Down arrow
Vertical scroll bar
Up arrowScroll box
To view the contents by manipulating the scroll bars:
1 Open the System Folder alias icon on your hard disk.
2 Point to the size box in the lower-right corner of the System Folder window.
3 Drag the size box diagonally to make the window smaller (about half its current size),then release the mouse button.
The bars across the bottom (the horizontal scroll bar) and along the right edge(the vertical scroll bar) of the System Folder window should now be gray,indicating that the window has contents that you cannot see at its current size.
4 Press the right scroll arrow at the right end of the horizontal scroll bar.
The contents of the window scroll past, bringing into view the icons that hadbeen out of sight and to the right.A small white box, called the scroll box, moves to the right across the scrollbar, showing what part of the window’s contents you’re looking at.
5 Press the left scroll arrow at the left end of the horizontal scroll bar.
The contents of the window scroll past, bringing back into view the icons thathad been out of sight and to the left. The scroll box moves to the left across thebar, showing what part of the window’s contents you’re looking at.
Working with windows 9

6 Drag the scroll box toward the middle of the horizontal scroll bar, and then release themouse button.
Now the icons near the middle of the window should be visible.
7 Press the down scroll arrow at the bottom of the vertical scroll bar.
The contents of the window scroll past, bringing into view the icons that hadbeen out of sight and toward the bottom. The scroll box moves down along thebar.
8 Press the up scroll arrow at the top of the vertical scroll bar.
The contents of the window scroll past, bringing into view the icons that hadbeen out of sight and toward the top. The scroll box moves up along the bar.
9 Drag the scroll box toward the middle of the vertical scroll bar, and then release themouse button.
Now the icons near the middle of the window should be visible.
Changing the size of a window or moving the contents of a window does notchange its contents. The contents remain the same; only what you see of thecontents changes.
Closing a window
When you no longer need to see the contents of a window, you can close it byclicking the close box.
Close box
10 Chapter 1 / Working on the Desktop

To close a window:
1 Point to the close box near the left end of the title bar of the active window.
2 Click the close box.
The window closes, and its icon is no longer filled in with a pattern of dots.
You can also close a window by choosing the Close Window item from theFile menu.
Moving a window
You can move a window anywhere on the screen by dragging its title bar. Bychanging the position and the size of windows, you can arrange windows inany way that works best for you.
To move a window:
1 Point to the title bar of the active window (anywhere on the title bar except the close boxor the zoom box).
2 Drag the title bar in any direction, and then release the mouse button.
When you drag a window’s title bar, an outline of the window follows thepointer on the screen. When you release the mouse button, the window itselfmoves to the position of the outline.Notice that the active window stays in front of other windows if the windowsoverlap.
Working with windows 11

Working with menus
Menus come in two types: pull-down menus and pop-up menus. The menus inthe menu bar are pull-down menus, as illustrated in the following figure.
The Help menuUsed to display information about items on the screen
Menu barYou pull down menusfrom here
Menu titles.
The Application menuShows the programsthat are currently open
A selected iconMenu commandsaffect whatever you’ve selected
Dimmed commandNot available
The Edit menuPulled down
Pop-up menus often appear in special windows called dialog boxes, which youuse to set options or preferences. You can recognize a pop-up menu by asmall, solid, downward pointing triangle next to its name. The name shows thecurrent option or preference. A pop-up menu is shown in the next figure.
Pop-up menu (closed)Clicking the triangle or the menu titledisplays the menu and allows you tochoose a menu item.
12 Chapter 1 / Working on the Desktop
Choosing an item from a menu
To choose an item from a menu, point to the menu name, press to “pull down”or “pop up” the menu, drag to the item you want to choose so that it’shighlighted, and then release the mouse button.
Some menu items allow you to display subordinate menus called submenus. Amenu item containing a submenu has a small, solid triangle next to it, pointingto the right. The submenu appears when you highlight the menu itemcontaining it.
To choose an item from a submenu:
1 Point to the menu name and press to pull down or pop up the menu.
2 Drag to the menu item so that the submenu appears.
3 Drag sideways to the submenu, drag to the submenu item you want to choose so that it’shighlighted, and then release the mouse button.
Using keyboard shortcuts
Rather than choosing an item from a menu, you can often use a keyboardshortcut to perform the same function as the menu item. These shortcutsinvolve a combination of keypresses and always involve the use of at least onemodifier key, such as the COMMAND (x) key or the OPTION key. Somecommon keyboard shortcuts are shown in menus to the right of the menu itemsthat they correspond to. The following table lists popular shortcuts.
Using keyboard shortcuts 13
Keypress Action
x–N Creates a new folder or in some programs, this shortcut creates a newdocument.
x–O Opens the selected item.
x–W Closes the selected item.
x–D Duplicates the selected item.
Arrow key Selects the next item in the direction of the arrow (up, down, left, or right ).
TAB key Selects the next item alphabetically (except in the Chooser).
Character key (A, B, C…) Selects the first item whose name begins with the that character (or thecharacter following closest to it in the alphabet)
x–DOWN ARROW Opens the selected icon.
x–OPTION–DOWN ARROW Opens the selected icon and closes the current folder.
x–UP ARROW Opens the folder that contains the current folder.
x–OPTION–UP ARROW Opens the folder that contains the current folder, and closes the current folder.
x–OPTION–O Opens the selected folder and closes the current folder.
RETURN or ENTER In the Finder: Selects the selected icon’s name for editing, or saves theedited name.
In a dialog box: Has the same effect as clicking the button with the bold outlinearound it..
Using the Trash
When you no longer need or want a file or folder, you throw it away bydragging its icon to the Trash (an icon of a trash can in the lower-right cornerof the desktop). When you put a file or folder in the Trash, the Trash iconbulges to indicate that it is no longer empty. At this point, you can open theTrash (by double-clicking its icon or by selecting it and choosing the Opencommand from the File menu) and examine its contents.
When you want to permanently remove the contents of the Trash, chooseEmpty Trash from the Special menu. The Trash icon no longer bulges,indicating that it is empty. Once you empty the Trash, the items arepermanently removed from your system. Until you choose Empty Trash, youdo not free any space on your hard disk.
14 Chapter 1 / Working on the Desktop

Working with programs
This section provides general information about working with programs. Forspecific information about a particular program, see the manuals that camewith the program.
To practice using a program to create a document and save your work, you canuse TextEditor, a simple word-processing program that comes withyour computer.
Opening a program
The easiest way to open a program is by double-clicking its icon. Position thepointer on the program’s icon and then press and release the mouse buttontwice in quick succession without moving the mouse.
You can also open a program by using the File menu. For example, you wouldfollow these steps to open the TextEditor program:
1 Click the program icon once to select it.
2 Point to the File menu name in the menu bar.
3 Press to pull down the File menu.
4 Drag to the Open item (the second item in the File menu) so that it is highlighted, andthen release the mouse button.
When you choose the Open command, the selected icon opens into a window.The icon itself becomes filled in with a pattern of dots, indicating that it hasbeen opened.
When you open the TextEditor program, the following events occur:n An untitled window opens.n The TextEditor menu names appear in the menu bar.n The Application menu icon at the right end of the menu bar becomes the
TextEditor icon.
Working with programs 15
Creating a document
The untitled TextEditor window you just opened is like a blank sheet of paper,a document waiting to be created. In the upper-left corner of the emptydocument is a blinking vertical line. The line is called the insertion pointbecause it marks the place where the text you type will be inserted. As youtype text, you can use the mouse to move the insertion point to any place inyour document.
Selecting text
You can select text in your document in several ways. You can select a singleword by double-clicking it.
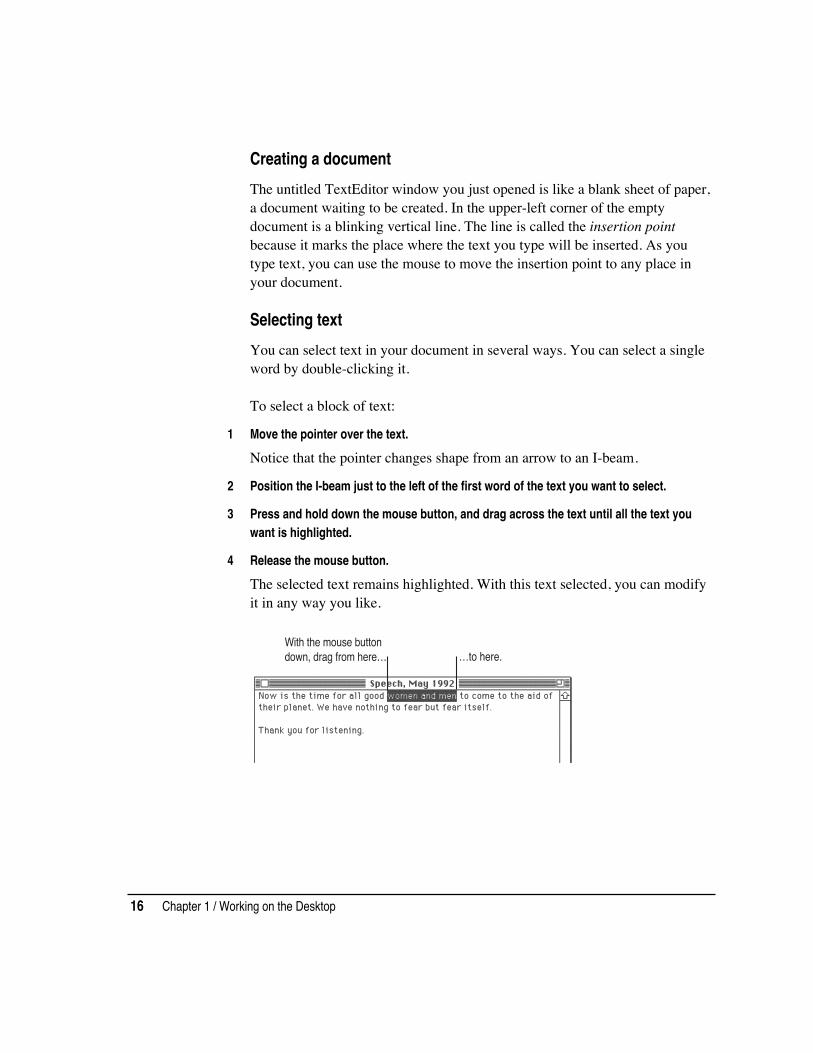
To select a block of text:
1 Move the pointer over the text.
Notice that the pointer changes shape from an arrow to an I-beam.
2 Position the I-beam just to the left of the first word of the text you want to select.
3 Press and hold down the mouse button, and drag across the text until all the text youwant is highlighted.
4 Release the mouse button.
The selected text remains highlighted. With this text selected, you can modifyit in any way you like.
With the mouse buttondown, drag from here… …to here.
16 Chapter 1 / Working on the Desktop

Changing text
When you are creating or modifying a document, you can delete, duplicate, ormove text in your document and between several documents. To do this, youuse the Cut., Copy, and Paste commands in the Edit menu
n To delete text, select the text and choose Cut from the Edit menu or press COMMAND-X.
n To duplicate text, select the text and choose Copy from the Edit menu or pressCOMMAND-C.
Once you have cut or copied text, it is stored on the Clipboard—a temporarylocation in memory—and you can place it in other parts of your document orin other documents. To move text, first cut or copy the desired text and thenplace the insertion point where you want the text to be added (that is, move theI-beam to the new location and click). Then choose Paste from the Edit menuor press COMMAND-V. Chapter 5, “Working With TextEditor,” discussesthese operations in detail and provides examples.
Saving your work
Until you save your work, it exists only on the screen and in the computer’stemporary memory. Unless you tell the computer that you want to save yourchanges, they are lost when you turn off your computer or quit the program.
To save your work:
n Choose Save from the File menu, or press COMMAND-S.
If you have not already named the file in which to save your work, a directorydialog box appears, asking you for a name for your file. Enter a name andclick Save.
A directory dialog box allows you to view contents of disks and folders so thatyou can save a document in a particular folder or disk, or open a documentthat’s in a particular folder or disk. A directory dialog box appears when youchoose Save for the first time or whenever you choose Save As or Open froma program’s File menu.
Working with programs 17

Switching programs
You can have several programs open at one time. The number of programsdepends on how much memory your computer has. However, only oneprogram at a time can be the active program—the active program is the onewhose window is in front of the other open program windows.
For example, when you open TextEditor, that program is the active programand the TextEditor window is the active window. But TextEditor is not theonly program running. The Finder (the program that displays the desktop) isalso open, but right now it is not active.
Use either of these methods to switch between programs that are open:
nnnn Click anywhere in a window to make it the active window and its program theactive program.
nnnn Choose the name of the program from the Application menu.
The Application menu lists all of the programs that are currently running andallows you to switch between them. This menu is located in the right corner ofthe menu bar.
Closing a document
When you close a document, you do not close the program that you used tocreate it. (Closing a program is called quitting.) The program remains openand remains the active program until you quit the program or make anotherprogram the active program.
To close a document:
1 Make the document’s window active by clicking anywhere in the window.
2 Click the window’s close box (near the left end of the title bar) or choose Close from theFile menu.
Respond to any messages that appear by clicking the appropriate buttons.
18 Chapter 1 / Working on the Desktop

Quitting a program
Quitting a program closes the program as well as any documents you mayhave open that were created with that program. Quitting a program is not thesame as closing a document. Closing a document leaves the program open andactive.
To quit a program:
1 Ensure that the program is the active program.
Click in a window belonging to the program, or, if no such windows are open,choose the program from the Application menu.
2 Choose Quit from the File menu, or press COMMAND-Q.
Respond to any messages that appear by clicking the appropriate buttons.
Making a copy of a document
It is often convenient to make a copy of a document so you can preserve theoriginal while making changes to the copy. You can copy a document whileusing the Finder, without having to open the program that created it.
To copy a document:
1 Click the document’s icon to select it.
2 Choose Duplicate from the File menu, or press COMMAND-D.
Making a copy of a document 19

Changing the name of an icon
You can change the name of an icon to anything you like. An icon name cancontain any combination of characters—including spaces, uppercase andlowercase letters, and numbers—except the colon (:) character. When youopen a renamed icon, the new name appears as the title of the window.
To rename an icon:
1 Click the name (not the icon itself) that you want to change.
When the name is selected, it is highlighted and a box appears around it. Thearrow pointer becomes an I-beam pointer.
2 To replace the entire name, simply type the new name. To change part of the name,use the I-beam pointer to select the characters you want to change, and then typeyour changes.
The text that you type replaces the selected text.
Using Balloon Help
The Apple Workgroup Server 95 comes with an on-screen help system calledBalloon Help. You can display Balloon Help information any time you don’tunderstand the instructions in this guide—or if you see a window, button,menu, menu item, or icon that you want to know more about.
To use Balloon Help:
1 Choose Show Balloons from the Help menu.
20 Chapter 1 / Working on the Desktop

2 Position the pointer over the item you want to know more about.
A balloon appears with an explanation of that item.
You can turn off Balloon Help at any time by choosing Hide Balloons fromthe Help menu.
Using Balloon Help 21
2 Getting Started With A/UX 3.0.1
This chapter introduces A/UX and covers the following topics:n starting a work sessionn logging in to A/UXn changing your passwordn working in a command-line environment with the CommandShell
applicationn viewing alert and error messages in the A/UX System Console windown logging out of A/UXn shutting down A/UX

Introduction to A/UX
A/UX, the operating system for the Apple Workgroup Server 95, joins twosystems that have different histories and different styles of operation. Theyare the UNIX operating system and the Macintosh Operating System. Inpractical terms, this means that with A/UX you use the UNIX operatingsystem through the Macintosh user interface. You use Macintosh icons andmouse operations to manipulate the commands and utilities that give UNIXits flexibility and power.
While you are running A/UX, the Finder allows you to open files andfolders, close them, copy them, and move them, and to perform a variety ofother functions as well. You can use the Finder to manipulate files andfolders. This is true whether they are stored in a UNIX file system or in aMacintosh file system.
Starting A/UX
When you press the POWER ON key to start up the computer, the A/UXStartup program begins to run A/UX. A series of screens appear, eachscreen containing a progress bar to inform you of the progress of thestartup sequence. One of these screens is shown here.
The A/UX Startup program checks the condition of the UNIX file systemseach time you start A/UX and fixes problems identified during the check.For example, problems can be caused if the system was shut downimproperly the last time it was used. This check can last for several minutes.
Note: While the A/UX Startup program is starting A/UX, the screen mightflicker or even become blank for a moment. However, the progress barshould reappear quickly and the process should continue.
24 Chapter 2 / Getting Started With A/UX 3.0.1

While A/UX is starting, a Cancel button appears at the right end of theprogress bar. You can halt the Startup program by clicking the Cancel button.
The Cancel button changes to a Messages button after a few seconds. Ifyou click the Messages button, a small window appears that displays statusmessages describing the progress of the startup process.
IMPORTANT A/UX might display advisory messages during the startupsequence. In some cases, you must supply information in response to themessage. If this happens, an alert box appears and tells you that there is amessage for you. When you click the OK button in the alert box, the A/UXSystem Console window opens. In this window, you can see the messagesand enter any information that the program requests. For furtherinformation on the A/UX System Console window, see “Using the A/UXSystem Console Window” later in this chapter and Server AdministrationWith A/UX 3.0.1.
By default, the Apple Workgroup Server 95 starts up in the Finderenvironment for the root account. (See the next section, “Logging In toan Account,” to learn how to change the default.) The Finder environmentthat appears after startup contains several important elements. The filehierarchy icon, labeled with a slash (/) character, represents the disk area forfile systems and important applications. The MacPartition icon representsthe A/UX Startup program and important startup files. If you log in to auser account, the system also displays a folder that allows you to quicklyaccess your home directory.
File hierarchy icon
MacPartition icon
Home directory folder
Starting A/UX 25

Logging in to an account
When it is shipped, the Apple Workgroup Server 95 is set up so that you donot need to log in to A/UX. When the server starts up, you are automaticallyplaced in the Finder environment for the account whose name is found inthe Autologin file. The Autologin file can contain no more than oneentry. By default, this entry is root. This entry tells the system toautomatically log you in to the root account at startup. You can changethe account name in this file to the name of another account if you preferthe system to log you into another account at startup. You can also requireusers to log in to the system by deleting the entry in the Autologin file,leaving the file empty. (For information about editing text files such as theAutologin file, see Chapter 5, “Working With TextEditor.”)
The Autologin file is located in the Preferences folder of the LoginSystem Folder. (The Login System Folder is found in the sys folder of themac folder on the hard disk labeled with a slash.)
As shipped, A/UX contains a Guest account, to which anyone can log in,and a start account, that is used for tutorial purposes. In addition, yoursystem administrator may have created a user account that is meant foryour personal use.
The start account and the Guest account can be used by several users,although your system administrator may require use of a password forlogging in to those accounts in order to limit the number of people whohave access to them. As shipped, the password for the start account ismy.password and the guest account has no password. (For information oncreating accounts, see Server Administration With A/UX 3.0.1.)
If your system is configured for logging in, the Login dialog box, shown inthe following figure, appears as soon as A/UX Startup has started A/UX.You can log in whenever the Login dialog box is on the screen.
26 Chapter 2 / Getting Started With A/UX 3.0.1

To log in to an account:
1 Click the Registered User button in the Login dialog box, unless it is already selected.
2 Type your login name in the Name text box.
If you are logging in to the root account, type root. If you are logging into a user account, type the login name. Remember to enter the login nameexactly as specified, using lowercase letters unless uppercase letters areindicated.
3 Press RETURN.
The text insertion point moves to the Password text box. You can also movethe insertion point by pressing the TAB key or by clicking in the Passwordtext box. Each user account has its own password to ensure system security.(For information on changing your account password, see “ChangingYour Password” later in this chapter.)If your user account was created without a password, you may be asked toassign your own password by typing it in the space provided.
4 Type your password in the Password text box.
A gray rectangle expands through the Password text box as you enter eachcharacter. The characters are hidden from view to prevent others fromreading your password.
IMPORTANT Like UNIX, A/UX is case sensitive—that is, it distinguishesbetween uppercase and lowercase letters. Therefore, if your passwordconsists of all lowercase letters, the system won’t recognize it if you type itwith any uppercase letters.
Logging in to an account 27

5 Click the Login button or press RETURN.
If you make a mistake while typing your login name or password, double-click the Name or Password text box to select the text; then press theDELETE key.Type the login name or password again, and click Login or press RETURN.If the password and the login name are correct, the system logs you in andthe desktop appears after a few moments.
Changing your password
If your system is set up for logging in, you can change your password. Usea password that you can remember without writing it down. Don’t use apassword that is easy to deduce, such as your name spelled backward, yourcomputer login name in uppercase letters, or the name of a family member.You should change your password from time to time for additionalsecurity. To change your password:
1 Display the Login dialog box.
If you are already logged in, choose Logout from the Finder’s Specialmenu to display the Login dialog box.
2 Choose Change Password from the Options menu.
The Change Password dialog box appears.
28 Chapter 2 / Getting Started With A/UX 3.0.1
This dialog box lists the special restrictions that apply to the characters youcan use in a password. If your system administrator overrides theserequirements, a description of them does not appear in the dialog box.
3 Enter your login name.
4 Enter your old password.
5 Enter your new password.
Another dialog box appears, asking you to confirm your new password.
6 Enter your new password again.
The Login dialog box reappears with the Name and Password text boxesfilled in. You can use the Options menu again before completing the loginprocess, if necessary.
7 Click the Login button in the Login dialog box.
The system logs you in to A/UX, and your new password takes effect. Youmust enter it the next time you log in.
Using CommandShell
CommandShell is a program that allows you to display one or morewindows in which you can communicate with A/UX by entering commandson a command line, as is traditionally done on most UNIX systems. Whenyou use CommandShell, you communicate with A/UX through a utility calla shell. Like the Finder, a shell establishes an interface between you and theoperating system. It accepts the commands that you enter and passes themon to the operating system, which executes them. It also displays theoperating system’s responses.
There are several standard shells, each of which interprets your commandsand the operating system’s responses somewhat differently than the others.For more information on CommandShell, see Server Administration WithA/UX 3.0.1.
Using CommandShell 29

Making CommandShell active
Before you start CommandShell, the Finder should be the active program.(Its menu bar should appear at the top of the screen.)
To make CommandShell active:
n Choose CommandShell from the Application menu, which is at the right side of themenu bar.
A window labeled “CommandShell 1” appears and becomes the activewindow.
When the CommandShell window becomes active, the CommandShellmenu bar appears. It contains commands that allow you to manipulate theCommandShell windows and their contents.
30 Chapter 2 / Getting Started With A/UX 3.0.1

Switching between CommandShell and the Finder
You can return to the Finder by clicking on any portion of a Finderwindow or by choosing Finder from the Application menu. When youmake the Finder the active application in this manner, CommandShellremains open. You can make CommandShell active again by clicking onany portion of a CommandShell window or by choosing CommandShellfrom the Application menu.
IMPORTANT The folder that you are using in the Finder does not determinethe directory in which your CommandShell windows are working.
Using the A/UX System Console window
When you are working in the A/UX environment, the system may generatemessages regarding its status. In a traditional UNIX environment, thesemessages appear on a console terminal. Typically, the system administratormonitors these messages, which alert the administrator to take action toavert or remedy a problem. In A/UX, the system messages appear in theA/UX System Console window, a CommandShell window that you displayby choosing its name from the Window menu when CommandShell isactive.
Displaying the A/UX System Console window
To view the contents of the A/UX System Console window:
1 Choose CommandShell from the Application menu.
A CommandShell window becomes active and the CommandShell menuitems become available.
2 Choose A/UX System Console from the Windows menu, or press COMMAND-0 (that is, thenumber zero).
The A/UX System Console window opens. For information on the messagesthat may appear in the window, or for information on how to respond to arequest for information, see Server Administration With A/UX 3.0.1.
Using the A/UX System Console window 31
Clearing the A/UX System Console window
You should clear the messages from the A/UX System Console windowperiodically so that you can tell when new messages appear.
To clear the A/UX System Console window:
n Choose Clear Lines Off Top from the Commands menu.
All the information in the window disappears.
Closing the A/UX System Console window
You use the close box to close the A/UX System Console window, just asyou would to close any other window. Note that when you close the A/UXSystem Console window, none of the information in the window is lost.Closing the System Console window is equivalent to “hiding” it.
How A/UX notifies you of an alert message
If A/UX needs to bring an alert message to your attention, an icon flashesin the menu bar and an alert box appears. If CommandShell is not theactive program, a diamond-shaped symbol also appears alongside theCommandShell item in the Application menu. Choose this item to activateCommandShell; then choose A/UX System Console from the Windowsmenu to display the alert message.
You can change this default behavior to suppress the alert box, the flashingmenu-bar icon, or both.
To change how A/UX notifies you of an alert message:
1 In CommandShell, choose Notification Levels from the Preferences menu.
A dialog box like this one appears.
32 Chapter 2 / Getting Started With A/UX 3.0.1

2 Click the appropriate buttons and then click OK.
Using CommandShell to monitor errorsIf you are using your Apple Workgroup Server 95 as an AppleShare server,the reporting of many system problems is more comprehensive. By storingsystem messages in a scrolling window available on the server only, A/UXpreserves system errors for future reference. An example of a systemmessage is the message that a disk is full. Such a message would begenerated after each failed attempt to place data on a server volume by anyclient anywhere on the network. As in any other type of AppleShare serverconfiguration, the client would also receive an alert box in the event of adisk-full error.
The system administrator receives the added value of being directlyinformed of such errors at the server location because the A/UX SystemConsole window is updated with a corresponding but brief A/UX errormessage. The previous section tells you how to display these messages. Formore detailed information on CommandShell, see Server AdministrationWith A/UX 3.0.1.
IMPORTANT The error notification feature will be disabled if you quitCommandShell. The program must be running in order for error messagesto be properly routed to the System Console window. To leaveCommandShell running while you use the desktop for other work, chooseHide CommandShell from the Application menu. Do not choose the Quitcommand.
Using CommandShell to monitor errors 33
Logging out
Logging out is a simple way of ending your work session on the AppleWorkgroup Server 95 without shutting down the computer. Logging outallows you to leave the server in a secure state requiring the next user to login.
If you have deleted the account name from the Autologin file, the Logindialog box will appear when you log out. If you have not deleted the entryin the Autologin file, you are immediately logged back in to the system.Setting up your system this way provides a convenient way to restart theFinder without shutting down A/UX.
To log out of your account:
1 Choose Finder from the Application menu to be sure that the Finder is the active program.
The Application menu appears when you click the icon at the right end ofthe menu bar.
2 Choose Logout from the Special menu.
The system reminds you to save all your unsaved work.
After you log out, the Login dialog box reappears, indicating that you havelogged out successfully. The computer remains on and A/UX is stillrunning.Note: If you are using AppleShare Pro, logging out cancels your activeprograms.
Shutting down A/UX
Sometimes you need to shut down the server to do system maintenance,such as adding peripheral devices or repairing a file system. You must haveroot privileges to shut down the computer.
WARNING Don’t manually turn off the computer while A/UX isrunning. Doing so may corrupt the file system and cause loss of data.Always use the correct shutdown proceduire to turn off the computer.
34 Chapter 2 / Getting Started With A/UX 3.0.1

To shut down A/UX:
1 With either the Login dialog box or the desktop displayed, choose Shut Down from the Specialmenu.
If you want to shut down and start up again immediately, choose Restartinstead of Shut Down. The Restart dialog box appears. If you are notlogged in to the root account, you will be prompted for the password forthat account.If you are the sole user of your system, the system shuts down. If otherusers are using your server, the Shut Down dialog box appears.
2 If others are using the system or its services, type a warning message in the text box of thedialog box.
Your message will be sent to other users to warn them that the system isshutting down.
3 Type a number specifying the delay, in minutes, between the time the message is transmittedand the time at which the other users must finish logging out.
Give the other users a reasonable amount of time to save their work and tolog out.
4 Click the Shut Down button.
After the delay you have specified, the system shuts down. (If you areworking in the Restart dialog box, click the Restart button; after thespecified delay, the system restarts.)
Shutting down A/UX 35
3 Using Files and Folders
This chapter helps you work with the files and folders on your AppleWorkgroup Server 95. It introduces you to the various icons that appear on theFinder desktop and then tells you how ton create, name, and save files and foldersn organize files on the desktopn search for filesn work with aliasesn obtain special information about a file, such as when it was created and
whether it is lockedn control the way files are listed in a window

The Finder icons in A/UX
This section identifies the various objects that appear on the desktop when youuse the Finder in the A/UX environment and explains how you use them.
The A/UX operating system contains many files, folders, and applicationprograms, each of which is represented by an icon in the Finder.
Folder icons
This section illustrates the different folder icons that may appear in the desktopenvironment.
Folder An icon that resembles either of these two iconsrepresents a folder for which you have read permission—that is, the ability to open the folder and see what files orfolders are in it. You may or may not have writepermission for the folder—that is, the ability to add,rename, or remove items. A marked tab like the one onthe folder labeled start.bak indicates that you own thefolder, which means that you created it or that ownershiphas been transferred to you.
Locked folder This icon indicates that you cannot openthis folder, nor can you change any of its contents.
Drop box This icon represents a folder for which youhave write permission only. You cannot open the folder orread the files in the folder, but you can place files in it.
Active System Folder This icon represents the SystemFolder that the system is currently using.
38 Chapter 3 / Using Files and Folders
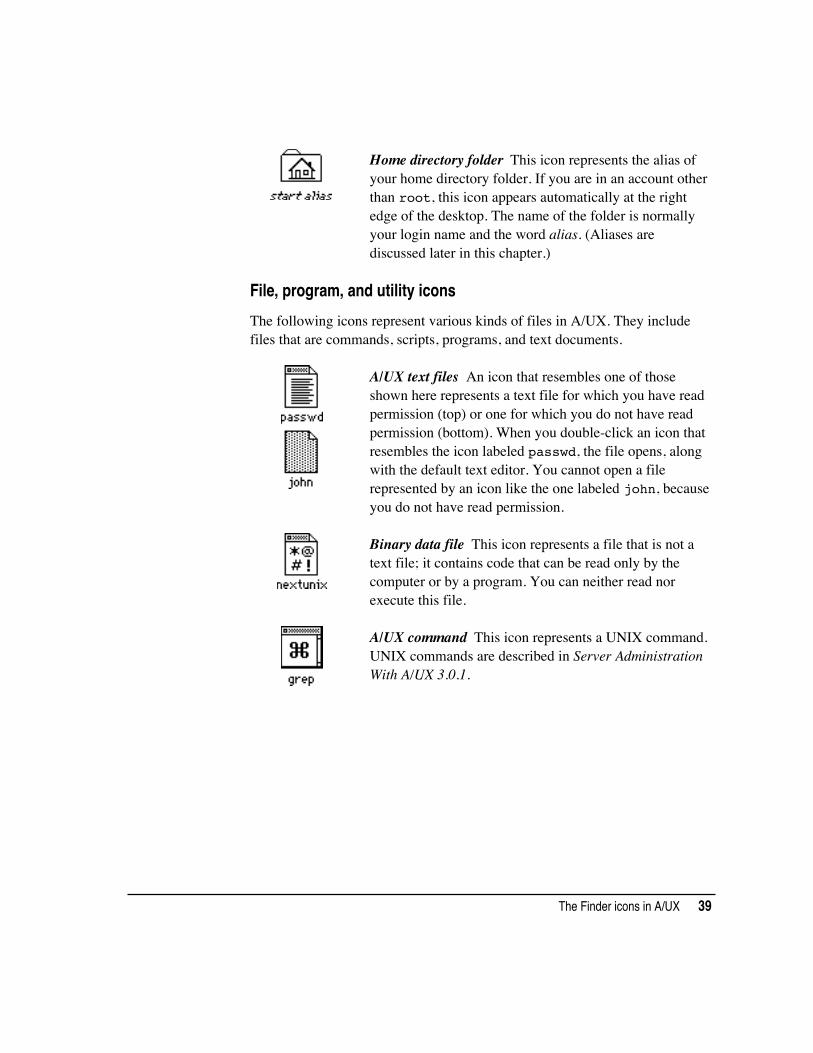
Home directory folder This icon represents the alias ofyour home directory folder. If you are in an account otherthan root, this icon appears automatically at the rightedge of the desktop. The name of the folder is normallyyour login name and the word alias. (Aliases arediscussed later in this chapter.)
File, program, and utility icons
The following icons represent various kinds of files in A/UX. They includefiles that are commands, scripts, programs, and text documents.
A/UX text files An icon that resembles one of thoseshown here represents a text file for which you have readpermission (top) or one for which you do not have readpermission (bottom). When you double-click an icon thatresembles the icon labeled passwd, the file opens, alongwith the default text editor. You cannot open a filerepresented by an icon like the one labeled john, becauseyou do not have read permission.
Binary data file This icon represents a file that is not atext file; it contains code that can be read only by thecomputer or by a program. You can neither read norexecute this file.
A/UX command This icon represents a UNIX command.UNIX commands are described in Server AdministrationWith A/UX 3.0.1.
The Finder icons in A/UX 39

Shell script This icon represents a shell script, oftencalled simply a script. A script is an executable text filethat contains a series of commands for the computer tocarry out. Many scripts are created by systemadministrators and by users on site and are not an integralpart of the A/UX operating system. Note the similaritybetween this icon and the A/UX command icon shownearlier. For information on creating scripts, see A/UXShells and Shell Programming, available with the A/UX3.0 documentation suite.
Executable file (without read permission) This iconrepresents an application program that you can run, but forwhich you do not have read permission. Many programs(such as those supplied by other manufacturers) arerepresented by custom-designed icons, which appear inplace of this icon.
HyperCard program icon This icon is an example of aMacintosh program (the HyperCard® program). OnA/UX, you can start a Macintosh program such asHyperCard by double-clicking the icon.
File-system icons
This section describes icons that represent UNIX and Macintosh file systems.Server Administration With A/UX 3.0.1 discusses UNIX file systems in moredetail.
UNIX file system (or / folder) icon This icon representsthe root level of the UNIX file system. For a discussionof the traditional representation of the UNIX file systemas an inverted tree, see Server Administration With A/UX3.0.1.
40 Chapter 3 / Using Files and Folders

Macintosh file system This icon represents a partition ora hard disk that contains a Macintosh file system.
Macintosh floppy disk This icon represents a floppy diskformatted with the Macintosh file system. The systemdoes not display an icon for a floppy disk that is formattedwith a UNIX file system or that contains UNIX data. Youhave access to such a floppy disk only by entering UNIXcommands in CommandShell. For more information onUNIX commands and CommandShell, see ServerAdministration With A/UX 3.0.1.
Using files and folders in the Finder
In traditional UNIX terminology, the term directory is used for the object thatis called a folder in the Macintosh environment. Consequently, in traditionalUNIX terms, a file system contains directories, which, in turn, can containfiles and other directories. The UNIX file systems supported by A/UX followthe same structural paradigm.
Although people working in the CommandShell environment find it useful tothink in traditional UNIX terms, and refer to directories rather than folders,those who are using the Finder prefer to think in terms of folder and file icons.Because the Finder is discussed in this section, the term folder is usedconsistently here.
The Finder has a few rules and limitations. When you name or rename filesand folders, observe the following restrictions:n Names can contain no more than 31 characters.n Names cannot contain colons (:). In the Finder, colons indicate the next
item in a pathname. If you try to use a colon, the Finder converts it to ahyphen.
Using files and folders in the Finder 41
Creating and naming folders
Most programs let you create and name a new folder in the directory dialogbox that appears when you first save a document or when you choose Save Asfrom the File menu.
To create and name a new folder when the Finder is active:1 Choose New Folder from the File menu.
A new folder icon named “untitled folder” appears in the active window (or onthe desktop if no window is active). The name is already selected.
2 Type a name for the folder and press RETURN.
You open, move, copy, and remove folder icons in the same way that you doany other icons.
Saving your files in different locations
The first time you save a document that you’re creating with an applicationprogram, a directory dialog box appears.
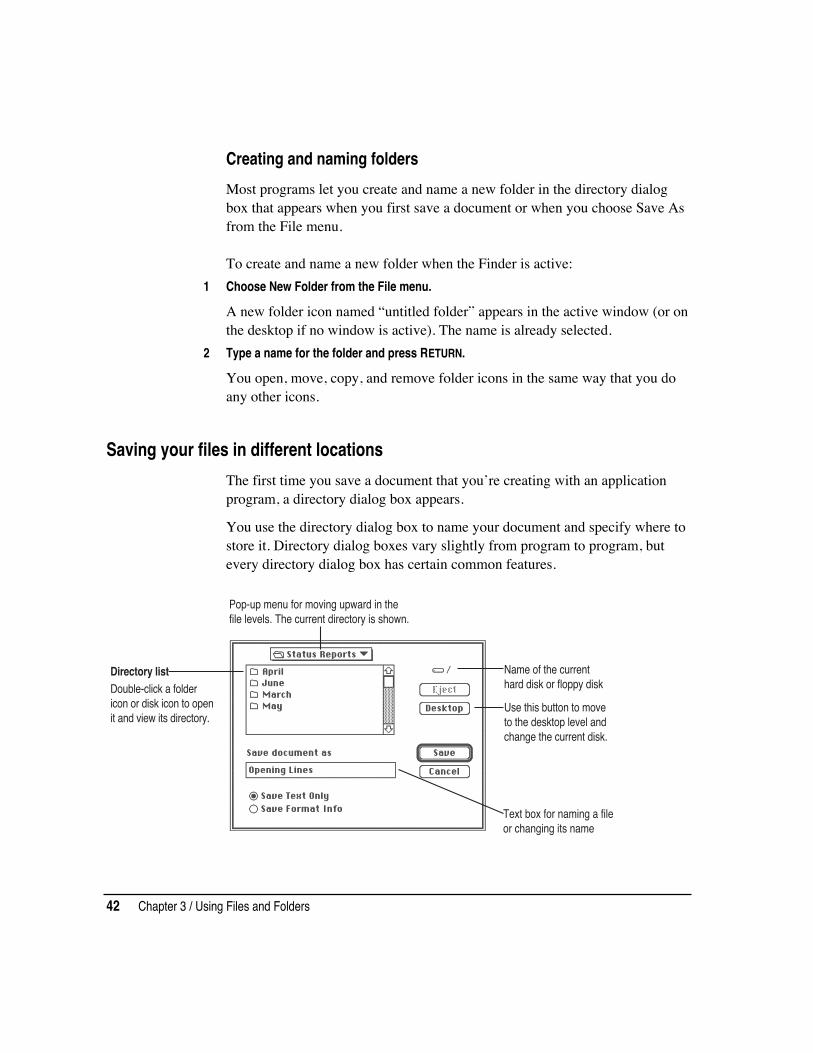
You use the directory dialog box to name your document and specify where tostore it. Directory dialog boxes vary slightly from program to program, butevery directory dialog box has certain common features.
Name of the currenthard disk or floppy disk
Use this button to moveto the desktop level andchange the current disk.
Text box for naming a fileor changing its name
Pop-up menu for moving upward in thefile levels. The current directory is shown.
Directory listDouble-click a foldericon or disk icon to openit and view its directory.
42 Chapter 3 / Using Files and Folders
The dialog box always contains a pop-up menu that allows you to view thedirectory path for the file and determine where to store the file. The pop-upmenu has a small, solid triangle, pointing down, next to its name. The menuname indicates the folder in which to save the file. In the preceding figure, thefolder is Status Reports. You can change folders by selecting a folder from thelist below the pop-up menu or by choosing a different folder from the pop-upmenu.
Rearranging icons on the desktop
Choose the Clean Up item from the Special menu to “straighten up” the iconsin the active window or on the desktop. (The wording of the Clean Up itemchanges depending on which icons are active or selected.)
To arrange icons alphabetically by name or according to the list viewdisplayed most recently in that window, hold down the OPTION key whilechoosing Clean Up Window. Holding down the OPTION key also moves theicons toward the upper-left portion of the window.
When the item is Clean Up All, you can line up all of the icons near the rightedge of the screen by holding down the OPTION key while choosing Clean UpAll.
If one or more icons are selected, holding down the SHIFT key while choosingthe Clean Up item rearranges the selected items only.
Finding a file or a folder
When the Finder is the active program, you can use the Find item in the Filemenu to find a file or folder on any disk whose icon is on the desktop. (TheFind item cannot locate files inside the System file, such as fonts and sounds.You must open the System file to see its contents.)
Finding a file or folder 43

Finding an item by name
To find a file or folder by name:1 Choose Find from the File menu, or press COMMAND-F.
A Find dialog box appears.2 In the text box, type the name (or part of the name) of the file or folder you want to find.
It doesn’t matter whether you type uppercase or lowercase letters, as long asthe letters that you type are in the name of the item you’re looking for.
3 Click the Find button.
The first item that matches the name (or partial name) that you typed appears,highlighted, in a Finder window. If no match is found, your computer emits anthe alert sound.
4 To see the next matching item, choose Find Again from the File menu, or pressCOMMAND-G.
If no more matches are found, your computer emits an alert sound.
Finding a file or folder by characteristics other than name
You can use the Find command to find a file or a folder by searching for itssize, its label, the date it was created or modified, or other characteristics.
To Find an item by a feature other than name:1 Choose Find from the File menu.
A Find dialog box appears.2 Click the More Choices button.
The dialog box that appears lets you set different search characteristicsthrough pop-up menus; together, these characteristics form a search order.The contents of the middle pop-up menu and the text area vary according tothe item selected in the left pop-up menu.
3 Press the pop-up menu on the left to open it, drag to choose an item, and then releasethe mouse button.
4 Press the pop-up menu in the middle to open it, drag to choose an item, and then releasethe mouse button.
5 Adjust the date, choose an item, or type text in the upper-right area of the dialog box.
44 Chapter 3 / Using Files and Folders
6 Choose a search location from the pop-up menu labeled Search.
You can choose to search all disks, a specific disk, or the active Finderwindow.
7 If you want all found items displayed at once, click the checkbox labeled “all at once” sothat an X appears.
8 Click the Find button when you have finished setting your search characteristics.
The first item that matches your search characteristics is shown highlighted ina Finder window. To see the next item found, choose Find Again from the Filemenu (or press COMMAND-G).When the items found are displayed all at once, they are shown highlighted inone or more Finder windows.
Finding files and folders through a two-stage search
You can use two sets of characteristics and locate the files and folders thatmeet both sets of characteristics.
To find items matching two search requirements:1 Choose the first set of characteristics that you want to search for.
2 Click the “all at once” checkbox so that an X appears.
When this option is selected, the items that are found will be displayed(highlighted) in a list.
3 Click the Find button.
The items found are shown highlighted in a Finder window.4 Choose Find from the File menu again, before you click or take any other action.
You choose Find before taking any other action so that the items located in thefirst stage of the search remain highlighted.
5 Choose the second set of characteristics that you want to search for.
6 Choose “the selected items” in the Search pop-up menu.
7 Click Find to begin the second stage of your search.
The search is limited to the items found in the first stage, and only thosematching both sets of characteristics are highlighted.
Finding a file or folder 45

Uses of the Find menu item
The Find menu item can help you locate files quickly, organize largequantities of documents, and develop an efficient system for backing up andarchiving your work. The following table shows examples of how you mightuse the Find menu item.
Search characteristic What can be located
Name Files whose names you can’t recall exactly.
All files and folders for which you use a standard name, such as statusreports or expense reports.
Files whose locations you have forgotten.Kind All application programs.
All aliases. (Aliases are described in the next section.)Size Large files, to make space available on a disk.Label All files to which you added the same label (such as “top secret”). See
Chapter 7, “Customizing the Finder Environment,” for information aboutlabeling.
Lock Locked files, to unlock them for editing.Modification date All files changed since a certain date, for regular backup of new and
changed files.Creation date All files created before a certain date, for archiving or erasing outdated
material.
46 Chapter 3 / Using Files and Folders

Using an alias
An alias is a pointer that you can place in any folder to represent a program ordocument. When you place an alias in a folder, you are not copying the actualprogram or document into the folder; you are simply placing an icon in thefolder as a signpost. An alias points to the original file that it represents, sowhen you open an alias, you’re actually opening the original file. Any changesyou make to the file and save are stored with the original file. An alias canserve as a signpost to a file, a folder, a disk, and other kinds of items—even ashared item that you use over a network. You can make as many aliases for anitem as you want.
Creating an alias
To create an alias:
1 Select the item for which you want to make an alias.
2 Choose Make Alias from the File menu.
The alias icon appears on top of the original. Its name is in italics and endswith the word alias. The name is already selected.
3 Change the name of the alias if you want to, and then move it to wherever you want toput it—in a different folder, for example, or on the desktop.
You may want to place the alias in the Apple Menu Items folder in the SystemFolder. Placing an alias in this folder allows you to open the original file byusing the Apple menu at the left end of the menu bar.
Using an alias 47

Locating the item to which an alias points
You can locate the item that an alias represents by opening the alias’s Infowindow.
To find the item to which an alias points:
1 Select the icon of the alias for which you want to find the original item.
2 Choose Get Info from the File menu.
The alias’s Info window appears.
3 Click the Find Original button.
The window containing the original item opens, with the item’s iconhighlighted.
If you have deleted the item that the alias represents, a message appears,reporting that the original can’t be found. Aliases are not deleted when theoriginal files are deleted.
Moving an item onto the desktop
You can make an item easy to find by dragging its icon to the desktop fromany window. The icon stays on the desktop until you remove the disk onwhich the item is actually stored.
If you’ve placed an icon on the desktop, you can put it back in its originallocation by selecting it and then choosing the Put Away item from the Filemenu.
Getting information about a file
When you’re working on the desktop, you can choose the Get Info item fromthe File menu to display information about a file, such as when a documentwas created or how much memory a program needs.
To get information about a file:
1 Select the item for which you want information.
48 Chapter 3 / Using Files and Folders
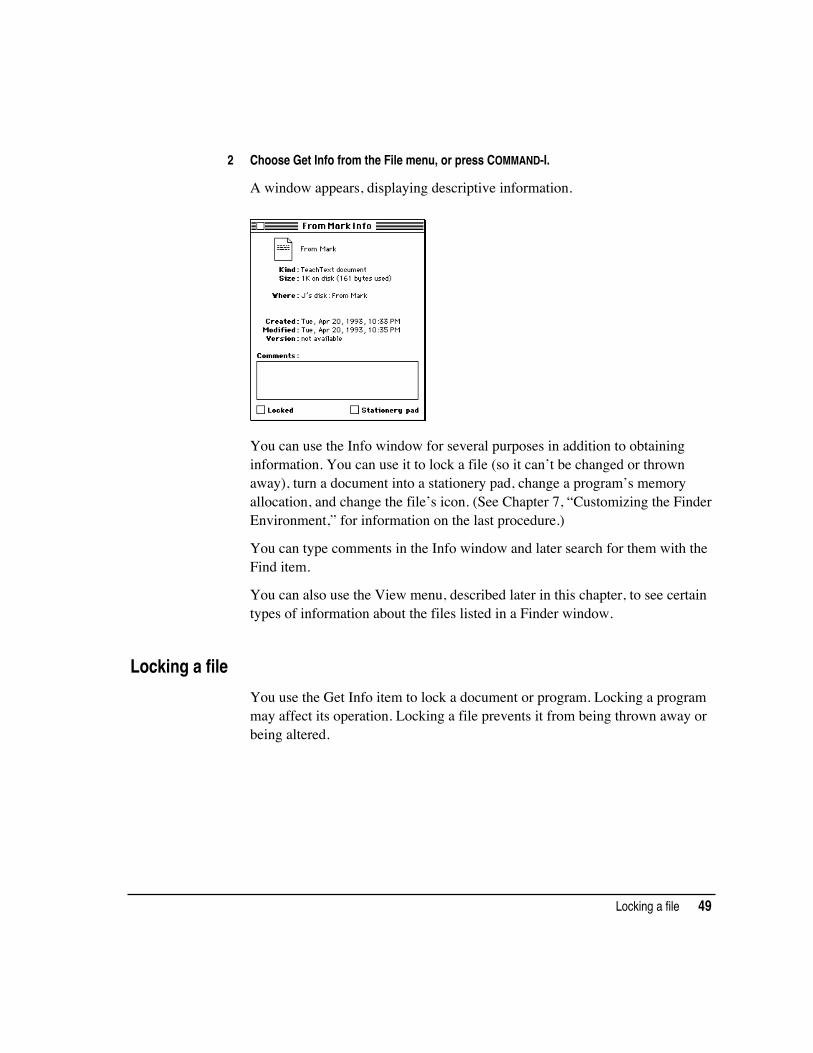
2 Choose Get Info from the File menu, or press COMMAND-I.
A window appears, displaying descriptive information.
You can use the Info window for several purposes in addition to obtaininginformation. You can use it to lock a file (so it can’t be changed or thrownaway), turn a document into a stationery pad, change a program’s memoryallocation, and change the file’s icon. (See Chapter 7, “Customizing the FinderEnvironment,” for information on the last procedure.)
You can type comments in the Info window and later search for them with theFind item.
You can also use the View menu, described later in this chapter, to see certaintypes of information about the files listed in a Finder window.
Locking a file
You use the Get Info item to lock a document or program. Locking a programmay affect its operation. Locking a file prevents it from being thrown away orbeing altered.
Locking a file 49
To lock a file:
1 Select the item and choose Get Info from the File menu.
The file’s Info window appears, as shown in the previous section.
2 Click the Locked checkbox in the lower-left corner so that an X appears.
Note: You can’t lock a folder, but you can lock the items in a folder, includingthe contents of folders that you’re sharing on a network. You can lock an alias,but doing so does not lock the original file. Locking an alias merely protects itfrom being thrown away.
Using the View menu
You can use the View menu to display the contents of a window by icon or bysmall icon, or according to name, size, kind, date, or label. (See Chapter 7,“Customizing the Finder Environment,” for information on using the Viewscontrol panel to change how files are listed and what information is included.)
Windows are set initially to show items by icon. One of the other views (smallicon, name, size, kind, label, or date) can be useful when you have too manyfiles to see easily as icons, or if you want your files arranged according to aparticular attribute. For example, listing documents by the date and time oftheir most recent modification makes backing up files an orderly task.
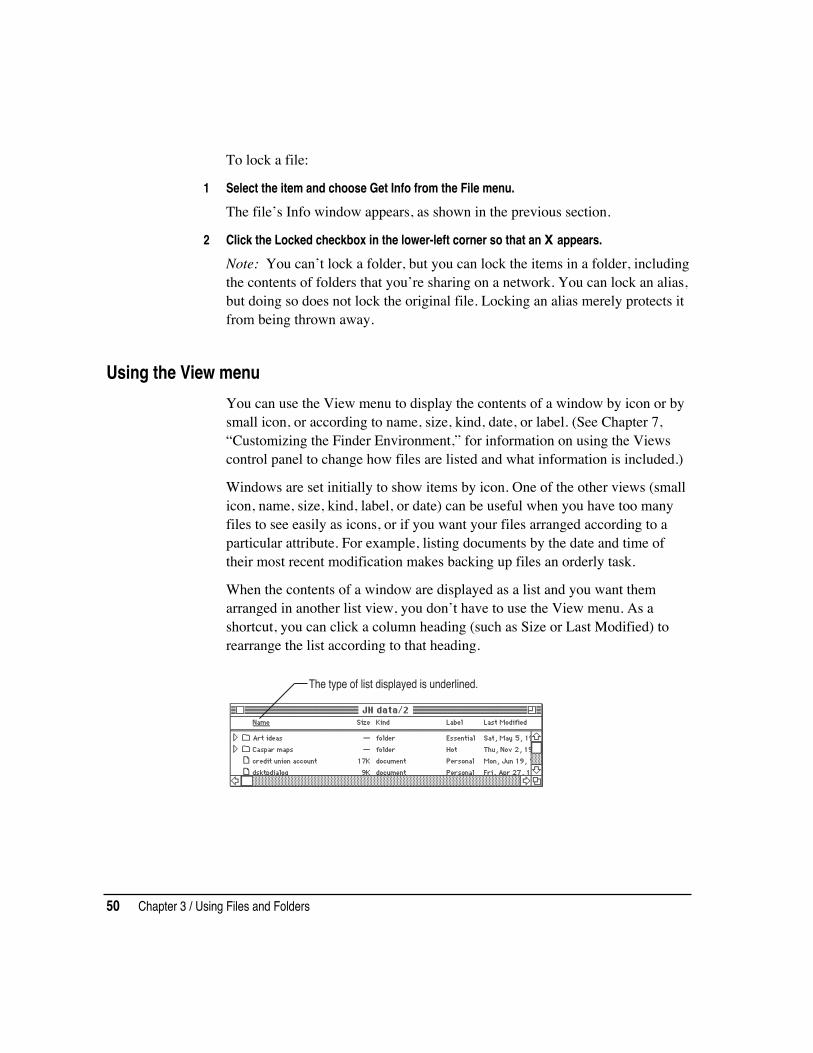
When the contents of a window are displayed as a list and you want themarranged in another list view, you don’t have to use the View menu. As ashortcut, you can click a column heading (such as Size or Last Modified) torearrange the list according to that heading.
The type of list displayed is underlined.
50 Chapter 3 / Using Files and Folders

4 Backing Up Your Work With Disks or TapeCassettes
This chapter describes how to work with floppy disks and tape drives. Ittells you how ton format, lock, copy, and eject floppy disksn back up files from your hard disk to a floppy diskn restore files onto your hard diskn work with and maintain your tape-backup unit

Working with disks
This section tells you how to use floppy disks and hard disks with yourApple Workgroup Server 95, how to make backup copies of critical files onfloppy disks, and how to restore the files to your hard disk.
It is important that you make backup copies of individual files as youcreate and revise them, and that you back up the entire system periodically.Making backups prevents you from losing data or programs should yourdisk or your system fail. For information on backing up your entiresystem, see Server Administration With A/UX 3.0.1.
Formatting floppy disks for a Macintosh file system
Before you can use a brand-new floppy disk, you must perform aprocedure known as formatting. During formatting, the computer writesinformation onto the disk, enabling it to accept either a Macintosh or aUNIX file system. For information about formatting floppy disks for aUNIX file system, see Server Administration With A/UX 3.0.1.
If you insert a floppy disk that has already been formatted for a Macintoshfile system, its icon appears near the right edge of the screen. The icon willresemble the one shown here.
If the floppy disk has not been formatted for a Macintosh file system, yourserver displays a series of alert boxes to guide you through the formattingprocess.
52 Chapter 4 / Backing Up Your Work With Disks or Tape Cassettes

To format a floppy disk for a Macintosh file system:
1 Insert the disk.
An alert box appears, telling you that the disk is unreadable. For high-density disks, the following alert box appears.
For 800K disks, this alert box appears.
You can cancel the formatting process and eject the disk by clicking theEject button.
2 For high-density disks, click the button labeled Initialize in the alert box. For 800K disks, clickthe button labeled Two-Sided in the alert box.
The next alert box appears.
3 Click the Erase button.
Click Cancel if the disk contains data that you don’t want to erase.
Working with disks 53
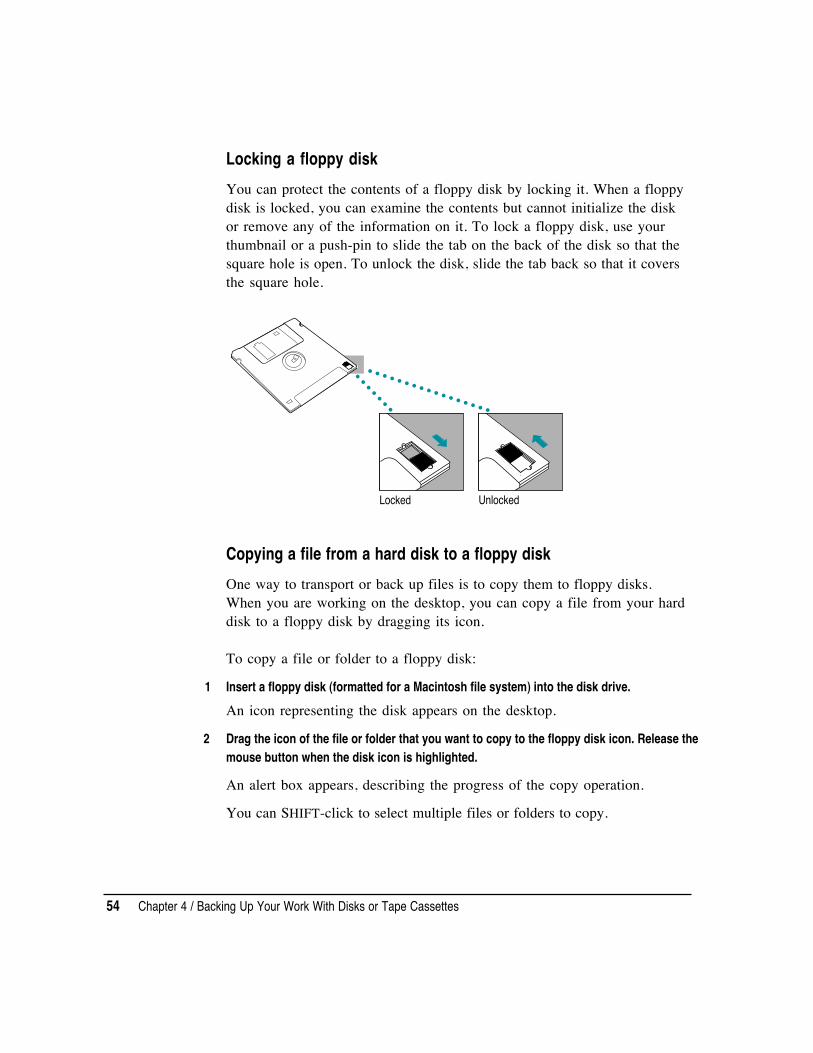
Locking a floppy disk
You can protect the contents of a floppy disk by locking it. When a floppydisk is locked, you can examine the contents but cannot initialize the diskor remove any of the information on it. To lock a floppy disk, use yourthumbnail or a push-pin to slide the tab on the back of the disk so that thesquare hole is open. To unlock the disk, slide the tab back so that it coversthe square hole.
Locked Unlocked
Copying a file from a hard disk to a floppy disk
One way to transport or back up files is to copy them to floppy disks.When you are working on the desktop, you can copy a file from your harddisk to a floppy disk by dragging its icon.
To copy a file or folder to a floppy disk:
1 Insert a floppy disk (formatted for a Macintosh file system) into the disk drive.
An icon representing the disk appears on the desktop.
2 Drag the icon of the file or folder that you want to copy to the floppy disk icon. Release themouse button when the disk icon is highlighted.
An alert box appears, describing the progress of the copy operation.
You can SHIFT-click to select multiple files or folders to copy.
54 Chapter 4 / Backing Up Your Work With Disks or Tape Cassettes

You can back up the work you store on a hard disk by copying individualfiles to another disk in the usual way (dragging their icons to the icon ofthe other disk). You can back up the contents of an entire floppy disk bydragging its icon to another floppy disk icon or to a hard disk icon.
You can also use a commercial backup program, such as RetrospectRemote, to copy some or all files from a hard disk to another hard disk, toa tape drive, or to a series of floppy disks. If your server is equipped withthe optional tape-backup unit, see the section “Working With TapeCassettes” later in this chapter.
Restoring a file from a floppy disk to a hard disk
A/UX provides an easy way to restore files or folders that were backed upby dragging their icons to a disk.
To restore a backed-up file:
1 Insert in the drive the floppy disk containing the file you want to restore.
An icon representing the disk appears on the desktop.
2 Double-click the disk icon to display a window that shows the contents of the disk.
3 Select the icon of the file or folder that you want to restore and drag it to the folder on thehard disk on which you want it to reside.
An alert box appears, describing the progress of the copy operation.You can SHIFT-click to select multiple files or folders to restore.
If you have a problem copying files to a floppy disk
If you can’t save files on a floppy disk, then the disk is damaged or locked,it’s too full to store more information, or the disk drive is not workingproperly. These actions can help you identify the problem:n Make sure that the tab on the back of the disk is in the unlocked
position (that is, make sure the square hole is closed).n If an alert box reports that the disk is not initialized, and you know that
it has been initialized, eject the disk and carefully insert it again. If thesame message appears, the disk is probably damaged.
Working with disks 55

n If an alert box reports that the disk is full, eject that disk and insertanother that has adequate space for your document, or removeunneeded files from the disk.
n Check the disk for obvious damage to the plastic case or the slidingmetal shutter.
n Insert a different disk and try saving again. If you can’t save your fileson the second disk, the problem may be with the disk drive. Beforeconcluding that the disk drive is the problem, save your files on a disk ina different drive, if you have one, and then restart the server. In the drivethat you think may be malfunctioning, insert a disk that you know is notdamaged, and try the same operation again. If you still can’t use thatdrive to save files, see your authorized Apple service provider.
Ejecting a floppy disk
You can eject a floppy disk by using any of the following methods:n Click the disk icon to select it, and choose Put Away from the File menu.
The icon disappears from the desktop and the disk is ejected.n Drag the disk icon to the Trash. The disk icon disappears from the
desktop and the disk is ejected. (Dragging a disk to the Trash does noterase the disk’s contents.)
n Click the disk icon to select it, and choose Eject Disk in the Specialmenu. The disk’s icon remains on the desktop, but it’s dimmed.
You can use the first two methods to remove a hard disk icon from thedesktop (or to remove an icon for a disk that you’re connected to over anetwork).
All three methods also work with CD-ROM discs.
If you have problems ejecting a floppy disk
If the drive won’t eject a floppy disk when you perform one of the ejectoperations, either the signal to eject the disk is not reaching the computeror the disk or drive is damaged.
56 Chapter 4 / Backing Up Your Work With Disks or Tape Cassettes

To eject a disk when standard operations don’t work:
1 To eject a disk in the internal drive, hold down the COMMAND (! ) and SHIFT keys, and pressthe number 1 key in the top row of the keyboard. To eject a disk in an external floppy disk driveor the second internal drive, press COMMAND-SHIFT and the number 2 key at the same time.
2 If step 1 doesn’t work, shut down the server by choosing Shut Down from the Special menu. Ifthe disk isn’t ejected, hold down the mouse button while you turn the computer on again.
3 If step 2 doesn’t work, carefully insert the end of a large straightened paper clip into the smallhole to the right of the disk drive’s opening. Push gently until the disk is ejected. Do not useexcessive force.
4 If step 3 doesn’t work, take the computer or disk drive to your authorized Apple serviceprovider to have the disk removed. Never try to force or pry a disk from a drive.
Working with tape cassettes
You need to read this section only if your server includes the internal tape-backup unit.
The internal 3.5-inch DDS-DC DAT drive and accompanying software canperform full or partial backup and restore procedures for all of the data onyour hard disks. In addition, the drive automatically performs errorcorrection and data compression of the files that you back up and restore.The error-correction feature helps ensure a high level of data integrity. Thedata-compression feature allows more data to fit on a cassette than doconventional backup mechanisms.
When you first supply power to your system, the tape drive performs a self-test. Both tape-drive status lights on the front of the server flash amberduring the test. If for some reason the self-test fails, the light on the rightbecomes solid amber.
Working with tape cassettes 57

Your server comes with the Retrospect Remote software from Dantz, whichprovides an easy-to-use interface for backing up and restoring data. Youcan also use standard UNIX utilities such as tar or cpio to back up yourdata. For more information about how to use the Retrospect Remotesoftware, see the Retrospect Remote documentation . For more informationabout A/UX backup utilities, see Server Administration With A/UX 3.0.1.
Compatible tapes
Your internal DAT drive is compatible with MRS-quality DDS tapecassettes. MRS (Media Recognition System) cassettes are the highest qualitydigital data tape available. Your internal tape drive requires this level ofquality to perform backup operations successfully. See your authorizedApple service provider for more MRS-quality DDS tape cassettes or theircompatible substitutes. Compatible cassettes are typically stamped “DigitalData Storage.” If you use cassettes not approved by your authorized Appleservice provider, you void the warranty on your tape drive.Note: Some vendors of computer products may refer to DDS cassettes asdigital audio tape (DAT) cassettes. However, DAT cassettes have a differentmechanical specification from DDS cassettes. Certain DAT cassettes maywork with your tape drive; your authorized Apple service provider can tellyou which ones will work.
Tapes supplied with the server
Two cassettes are supplied with your Apple Workgroup Server 95. The firstis a blank DDS cassette for backup and restore operations. (The blank tapeincluded with your system can record up to eight gigabytes of data inabout three hours.) The second is a cleaning cassette; its operation isdiscussed later in this chapter.
58 Chapter 4 / Backing Up Your Work With Disks or Tape Cassettes

Inserting tape cassettes
To use a cassette, you insert it into the tape slot in the front panel of theserver, as shown in this figure.
As you insert the cassette, the drive pulls it into place and performs aloading sequence, which includes threading and rewinding the tape andchecking for error conditions. The loading procedure takes about 30seconds. When the procedure is completed, a status light on the front of theserver glows a steady green. The other light alternates between green andamber to let you know that the tape is being accepted by the drive. Thenext section explains the status lights more fully.
Status lights
Located next to the tape drive opening are two lights that inform you of thestatus of tape operations. The light on the left is the cassette light, and thelight on the right is the drive light. A solid green light indicates normaloperation; a solid amber light indicates a warning condition. Alternating,flashing lights indicate activity between the tape drive and the SCSI bus.
Working with tape cassettes 59
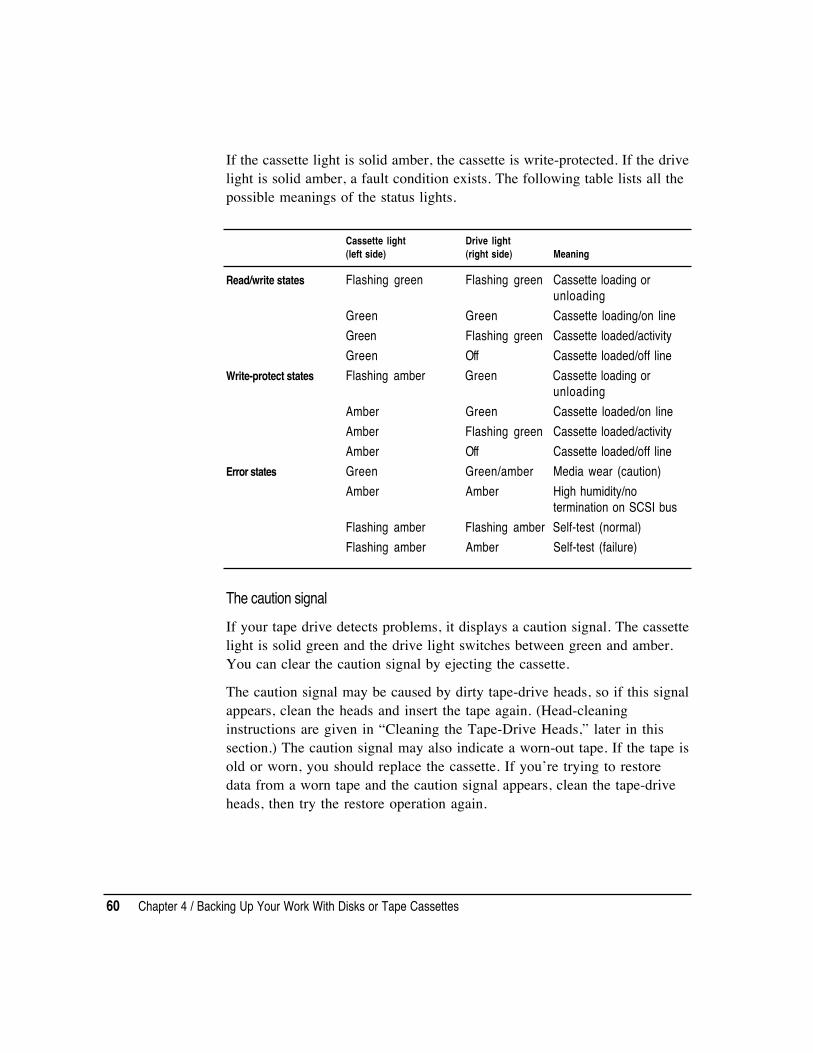
If the cassette light is solid amber, the cassette is write-protected. If the drivelight is solid amber, a fault condition exists. The following table lists all thepossible meanings of the status lights.
Cassette light Drive light(left side) (right side) Meaning
Read/write states Flashing green Flashing green Cassette loading or unloading
Green Green Cassette loading/on lineGreen Flashing green Cassette loaded/activityGreen Off Cassette loaded/off line
Write-protect states Flashing amber Green Cassette loading or unloading
Amber Green Cassette loaded/on lineAmber Flashing green Cassette loaded/activityAmber Off Cassette loaded/off line
Error states Green Green/amber Media wear (caution)Amber Amber High humidity/no
termination on SCSI busFlashing amber Flashing amber Self-test (normal)Flashing amber Amber Self-test (failure)
The caution signal
If your tape drive detects problems, it displays a caution signal. The cassettelight is solid green and the drive light switches between green and amber.You can clear the caution signal by ejecting the cassette.
The caution signal may be caused by dirty tape-drive heads, so if this signalappears, clean the heads and insert the tape again. (Head-cleaninginstructions are given in “Cleaning the Tape-Drive Heads,” later in thissection.) The caution signal may also indicate a worn-out tape. If the tape isold or worn, you should replace the cassette. If you’re trying to restoredata from a worn tape and the caution signal appears, clean the tape-driveheads, then try the restore operation again.
60 Chapter 4 / Backing Up Your Work With Disks or Tape Cassettes

Removing tape cassettes
You can remove a tape cassette at any time by pressing the eject buttonlocated under the tape slot on the right side. You should not press the ejectbutton while the tape is in use. The documentation for Retrospect Remotecontains additional methods for ejecting cassettes when using theRetrospect Remote software.Note: Standard UNIX eject commands will not release a cassette from thetape drive.
Locking a cassette
You can lock a DDS cassette by sliding the tab on the back of the cassetteso that the hole is visible. Once a tape cassette is locked, data can be readfrom the cassette but not written to it.
A solid amber cassette light indicates a locked cassette.
Avoiding high humidity
Whenever your tape drive detects water condensation, both status lightsglow solid amber. This warning signal cancels any commands in progress.Furthermore, any commands that access the tape are rejected. The tapedrive then unthreads the tape to prevent tape and tape-head damage.
To minimize the chance of condensation, adhere to the environmentalrequirements in Setting Up and Managing Your Server, and follow thesegeneral cassette guidelines:n Use tape cassettes at temperatures between 5° C (40° F) and 40° C
(113° F).n If you expose the tape cassettes to temperatures outside the operating
limits, you can stabilize them by leaving them in the proper operatingtemperature for a minimum of two hours.
Follow these guidelines to avoid temperature problems:n Avoid exposing cassettes to severe temperature conditions. For example,
don’t store a cassette in a car in bright sunlight.n Avoid transferring data to or from a tape cassette when the temperature
is changing by more than 10° F per hour (roughly 5° C per hour).
Working with tape cassettes 61
Cleaning the tape-drive heads
The most common reason for the display of a caution signal on the frontpanel is that the tape-drive heads are dirty. Although your tape drive has abuilt-in roller for cleaning the heads during normal operation, you stillneed to perform a separate cleaning step as part of preventive maintenance.
Your system comes with a cleaning cassette that you should use to clean thetape-drive heads after every 25 hours of running time.
Use only a DDS cleaning cassette. When you insert the cleaning cassetteinto the drive, the drive automatically loads it and cleans the heads. Whenthe cleaning process is completed, the drive automatically ejects thecassette. Keep a record of how many times you use the cleaning cassette.After 25 uses, replace it.
The interval at which you clean the tape drive depends on how often youuse it. In general, if you back up daily, you should clean the drive weekly.If you back up weekly, you should clean the tape drive once a month.
For more information about using the cleaning cartridge, refer to theinstructions provided with the cleaning cartridge. For additional cleaningcassettes, see your authorized Apple service provider.
62 Chapter 4 / Backing Up Your Work With Disks or Tape Cassettes

5 Working With TextEditor
This chapter describes how to use the TextEditor application program to createand edit text files. It presents tutorials with step-by-step instructions that showyou how to accomplish simple writing and editing tasks.
This chapter discusses the following topics:n starting and quitting the TextEditor programn creating and saving documentsn editing and formatting textn printing documents with TextEditor
If you are not familiar with Macintosh text-editing tools, you should read thisentire chapter. Otherwise, you can start with “Formatting and Other Features,”and read other sections as needed.
Introduction to TextEditorThe TextEditor application program allows you to create and edit text files byusing the mouse and menu items in the traditional Macintosh manner.TextEditor creates a file that contains only the text characters that you type atyour keyboard (including tab and return characters). This kind of file is calleda text-only file (or an ASCII text file), which means that the file does notcontain any formatting commands (such as font settings) that might confuseother programs that try to use your file. A text-only file can be read by anytext-editing or word-processing program. Moreover, you can use TextEditor towrite programs or shell scripts, which should never contain hidden formattingcharacters.To preserve the text-only nature of its text files and still allow you certainformatting choices, TextEditor gives you the option of saving the file’sformatting information. It saves this information in a separate file called aresource fork while it saves the text characters in a text-only file. Theseformatting choices include adjusting the tab settings and choosing fonts. Thesefeatures are described later in this chapter.The resource fork has the same filename as the text file, but it is preceded by apercent sign (%).Because TextEditor reads and writes text-only files, you can use it to workwith files created with any other text-only text editor. Thus, you can editMacWrite® files saved with the Text-Only option. When you choose the Openitem, TextEditor’s directory dialog box displays a list of all text files in thefolder, regardless of the program used to create the file.A/UX also comes with a commonly used UNIX text editor called vi (whichstands for visual editor). This text editor is available on the A/UX CD-ROM;however, it is not installed automatically. To learn how to install this editor,consult Setting Up and Managing Your Server. TextEditor can read and edittext files created with vi, and vice versa. For information about working withvi, consult A/UX Text-Editing Tools in the A/UX 3.0 documentation suite.
64 Chapter 5 / Working With TextEditor

To work through the tutorial in this chapter, you must work in the/users/start folder or log in to the start account. When the server isshipped, the password for the start account is my.password. (For informationabout the start account and logging in, see Chapter 2, “Getting Started WithA/UX 3.0.1.”)
Starting TextEditorYou can start TextEditor from the Finder by double-clicking the TextEditoricon, an alias of the TextEditor icon, or a text-file icon.This tutorial shows you how to start TextEditor by creating an alias of theTextEditor icon and then double-clicking the alias.TextEditor is located in the Applications folder.
To create a TextEditor alias:
1 Open the Applications folder and select the TextEditor icon.
2 Choose Make Alias from the File menu.
A new icon named “TextEditor alias” appears in the Applications window.If an alert box appears, asking whether you want the alias icon to appear on thedesktop, click Yes.
Startring TextEditor 65
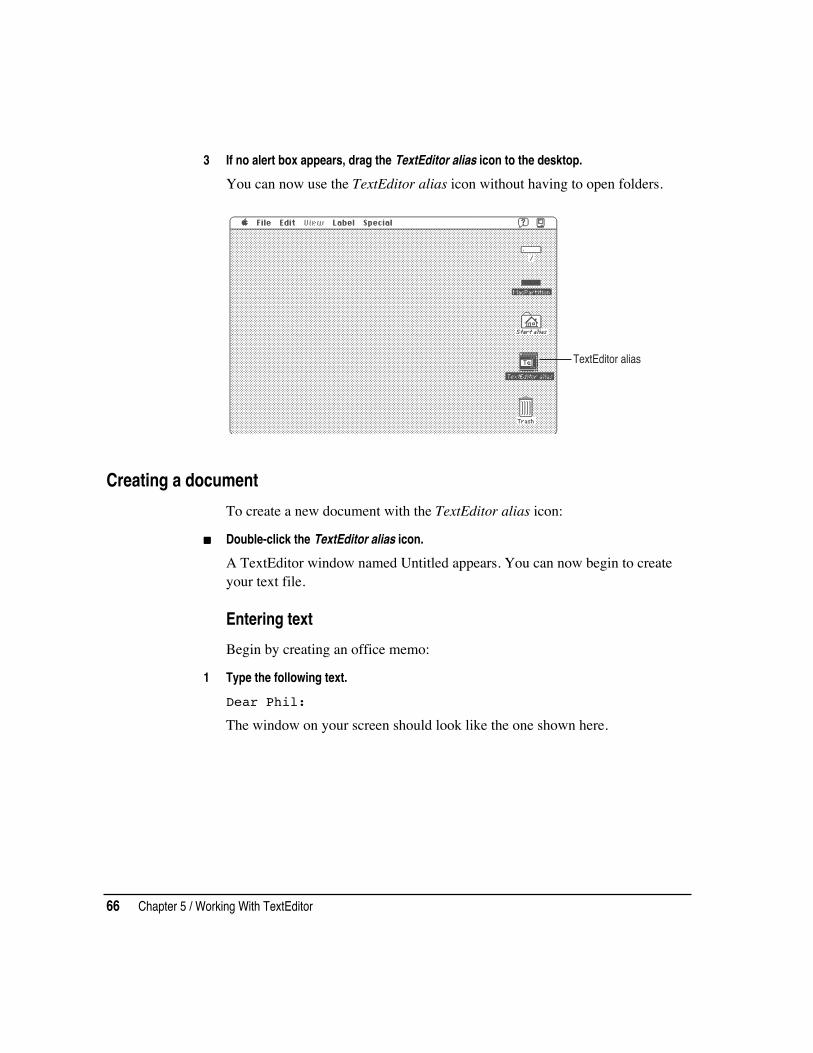
3 If no alert box appears, drag the TextEditor alias icon to the desktop.
You can now use the TextEditor alias icon without having to open folders.
TextEditor alias
Creating a document
To create a new document with the TextEditor alias icon:
nnnn Double-click the TextEditor alias icon.
A TextEditor window named Untitled appears. You can now begin to createyour text file.
Entering text
Begin by creating an office memo:
1 Type the following text.
Dear Phil:
The window on your screen should look like the one shown here.
66 Chapter 5 / Working With TextEditor

2 Press the RETURN key twice and type the following text:
I received your letter about the purchase of land for anew office building.
You have probably typed past the edge of the window. Unlike many wordprocessors, TextEditor does not automatically move to the next line when youtype past the right edge of the window. This is a feature that programmers finduseful.
3 Move the I-beam pointer to where you want the line break to be; then click.
This action repositions the insertion point on the line. You can also move theinsertion point to the left by pressing and holding down the LEFT ARROWkey.
4 Press RETURN to move the rest of the sentence to the next line.
5 Move the insertion point to the end of the text, and press RETURN twice to start a newparagraph.
6 Type the following text. Remember to press RETURN to go to the next line before youreach the edge of the screen again.
It's true that the financial reports for the last quarterare not in yet, but there is a general feeling that thenumbers look good. This might be the perfect time tosubmit your plan.
7 Press RETURN twice to create a new paragraph, and then type the following text:
I don't want to rush you, but perhaps you should get readyto take advantage of a real opportunity.
Creating a document 67

Cutting and pasting text
The sentence that you typed in step 7 in the preceding section might lookbetter right before the material you typed in step 6. The two paragraphs wouldthen read as follows:I don't want to rush you, but perhaps you should get readyto take advantage of a real opportunity.
It's true that the financial reports for the last quarterare not in yet, but there is a general feeling that thenumbers look good. This might be the perfect time tosubmit your plan.
To rearrange the text:
1 Place the I-beam just before the first letter of the sentence beginning I don’t want.
2 Hold down the mouse button and drag the I-beam past the period after the words realopportunity. Release the mouse button.
The text is now selected.
You can perform various operations with a block of selected text. In this case,you are going to cut and paste the text.
68 Chapter 5 / Working With TextEditor
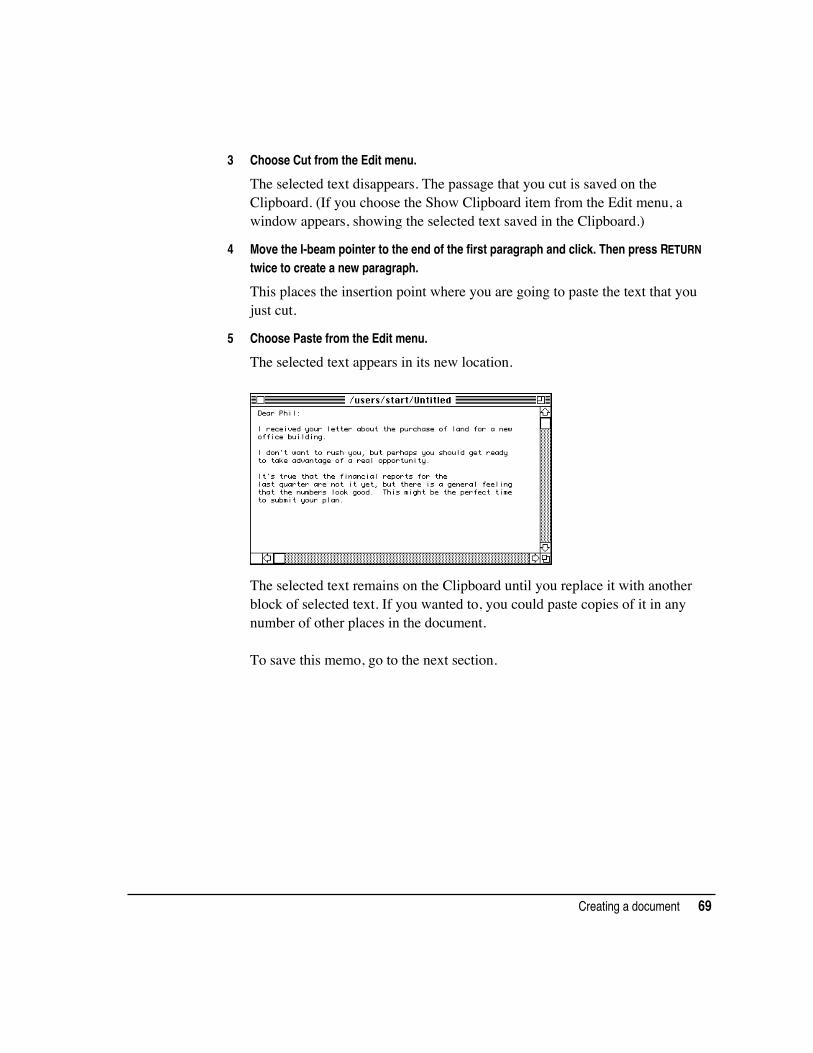
3 Choose Cut from the Edit menu.
The selected text disappears. The passage that you cut is saved on theClipboard. (If you choose the Show Clipboard item from the Edit menu, awindow appears, showing the selected text saved in the Clipboard.)
4 Move the I-beam pointer to the end of the first paragraph and click. Then press RETURNtwice to create a new paragraph.
This places the insertion point where you are going to paste the text that youjust cut.
5 Choose Paste from the Edit menu.
The selected text appears in its new location.
The selected text remains on the Clipboard until you replace it with anotherblock of selected text. If you wanted to, you could paste copies of it in anynumber of other places in the document.
To save this memo, go to the next section.
Creating a document 69

Saving a new document
If you wish to keep a file you have created, you must save the file and give it aname.
To save the memo:
1 Display the File menu.
Point to the menu name, and press and hold down the mouse button. The firstthree of the following four items allow you to save a file:n Saven Save Asn Save a Copyn Revert to Saved(The actions of all four commands are described at the end of this exercise,after step 5.)
2 Choose Save As.
A Save As dialog box appears, asking you to specify a name for the file.
3 Type the name memo2 in the “Save document as” field.
70 Chapter 5 / Working With TextEditor

4 Be sure that the Save Text Only button is selected.
If you had used any of the formatting options (described later in this chapter),you could have saved them in a separate file by selecting Save Format Info.The document would then be saved in two files, memo2 and %memo2. Thesecond of these, the resource fork, would preserve the formatting information.However, since you haven’t used the formatting options, it isn’t necessary tocreate an extra file.
5 Click Save.
The memo is saved as a file with the filename memo2.
Here is a summary of the four File menu items that deal with changes to a file:Save: If the file in the active window already has a filename, the Save itemautomatically saves it under its current name, without closing it. The originalversion of the file of that name is overwritten in the process. This menu item isdimmed (and therefore cannot be used) if the file hasn’t been modified since itwas last saved.Save As: In addition to using this menu item to name a new file (as you havejust done), you can use it while working on a file that already has a name. Thislets you save an edited file under a new name, leaving the original intact. Thefile that you originally opened remains unchanged, just as it was when lastsaved.Save a Copy: This menu item saves the file, in its current state, under a newfilename. You can then continue editing the original file.Revert to Saved: Use the Revert to Saved item to throw away any changes youhave made since you last saved the document. This item is dimmed if thedocument has not been modified since it was last saved.
Saving a new document 71

Editing an existing document
The tutorials in this section show how to edit or rewrite a document that youhave created.
Opening a file
If TextEditor is running, you can open a file for editing by choosing Openfrom the File menu. This item allows you to open any text-only file, regardlessof what application was used to create the file.
To open a document:
1 Choose Open from the File menu.
A directory dialog box appears.
2 Double-click the name memo1.
The document appears in a window and is ready for editing.
Alternately, to open a document:
nnnn Double-click the icon of the file to be edited.
TextEditor starts running and the file that you clicked is opened for editing.
72 Chapter 5 / Working With TextEditor

To find the file to use with this tutorial:
1 Open the start folder. This folder is contained in the users folder on the slash (/)hard disk.
If you have not quit TextEditor since working through the last tutorial, you arealready working in the start folder.
2 Double-click the memo1 file icon.
The memo1 file is opened and the document is displayed. Now you can alterthis document and save it under a new name.
Opening read-only files
You can open a file for which you have read permission but not writepermission. To do this, be sure that you have selected the “Open read only”checkbox at the bottom of the Open dialog box. If you open a document forwhich you do not have write permission, an icon indicating that you don’thave write permission appears at the lower-left corner of the window. You canread the document, but you cannot change it.
Icon representing no write permission
Editing an existing document 73

Deleting and rewriting text
Examine the beginning of memo1 on your screen. Notice the sentence thatbegins halfway through the second line of the first paragraph of memo1(“Every salesperson who’s . . .”).
To delete or alter text:
1 Select the phrase Every salesperson who's.
Drag the I-beam across the phrase to just past the word who's; then releasethe mouse button.
2 With the phrase selected, type the following text:
The salespeople who have
The selected text disappears as soon as you begin to type. This is the fastestway to replace a block of text. It saves you the trouble of first deleting text andthen typing the new text.
3 Select the letter s at the end of the word knows in the next line; then press DELETE todelete the letter.
Copying and pasting between documents
Next, you will add the entire memo you have just edited to the bottom of abusiness letter. The letter is in the start folder, in the file letter1.
To select the material to be copied:
1 With the window that contains memo1 displayed, choose Select All from the Edit menu.
This menu item selects the entire document.
2 Choose Copy from the Edit menu.
The selected text (in this case, the entire memo) is saved on the Clipboard.
74 Chapter 5 / Working With TextEditor

To open the document to which you’ll copy the text:
1 Choose Open from the File menu.
This displays a list of all the files in the start folder.
2 Double-click letter1.
3 Scroll to the end of the letter by using the scroll bar at the right edge of the window.
4 Place the insertion point at the end of the signature and press RETURN twice to start anew paragraph; then choose Shift Left from the Edit menu to move the insertion point tothe left margin.
5 Type the following postscript:
PS: To give you a clear idea of our level of commitment tocustomer support, I'm appending a memo I recently sent tomy staff.
6 Press RETURN twice to skip two lines; then choose Paste from the Edit menu.
All of the copied text appears at the insertion point.
Normally you would now save the changed file, but because other users usethese tutorials, don’t save the changes.
To close a document without saving your changes:
1 Choose Revert to Saved from the File menu.
The Revert to Saved item causes all changes to the document to be removed.An alert box appears.
2 Click OK.
The alert box disappears.
Editing an existing document 75

3 Click the close box of the letter1 window (the small square at the upper-left corner ofthe window).
The window that contains memo1 is still displayed.
4 Close the memo1 window without saving the changes by clicking its close box or bychoosing Close from the File menu.
Finding and changing text
One of the most important time-saving features of a text editor is its ability tosearch through a document for a specific word, phrase, or string of charactersand to change it automatically.
Finding text
TextEditor lets you find a word, phrase, or character string.
To find a specific block of text:
1 Open the start folder and double-click the memo1 icon to open the document.
2 Choose Find from the Find menu.
A dialog box like this one appears.
76 Chapter 5 / Working With TextEditor

3 Click the Entire Word button and the Case Sensitive checkbox.
You click the Entire Word button to find the item only when it is anindependent word (that is, when it is not part of another word). You wouldclick Literal instead of Entire Word if you wanted to find all instances of astring of characters, even when the string is embedded in another word. Thus,if you clicked Literal and searched for the word it, the system would find bit,split, flit, and so on.You select the Case Sensitive checkbox to tell the system to search only forwords with the same uppercase and lowercase letters as the word you indicate.
4 Type good in the “Find what string?” text box.
5 Click the Find button.
The word good in the last line of the document becomes highlighted.The dialog box displayed by the Find command gives you the followingoptions as well:Search Backwards: Searches backward from the current selection to thebeginning of the file. (Normally, the search moves forward and stops at theend of the file.)Wrap-Around Search: Searches forward from the location of the insertionpoint to the end of the file, then starts again at the beginning of the file andcontinues the search up to the starting insertion-point position.Note: You can reverse the direction of a search operation by pressing SHIFT asyou select the menu item or by pressing SHIFT while you click OK. Forexample, if you are in the middle of a file and you want to find a string thatoccurs earlier in the document, hold down the SHIFT key while you click Find.The search then proceeds backward through the first part of the file. Thedirection is changed for the current search only.
Editing an existing document 77

Replacing text
TextEditor lets you find a word, phrase, or text string and replace itautomatically with a different word, phrase, or text string.
To replace a text string:
1 Open the start folder (in the users folder), and double-click to open memo1.
2 Choose Replace from the Find menu.
A dialog box like this one appears.
3 Select Entire Word and Case Sensitive.
You click the Entire Word button to find the item only when it is anindependent word (that is, when it is not part of another word). You wouldclick Literal instead of Entire Word if you wanted to find all instances of astring of characters even when the string is embedded in another word. Thus,if you clicked Literal and searched for the word it, the system would find bit,split, flit, and so on.You select the Case Sensitive checkbox to tell the system to search only forwords with the same uppercase and lowercase letters as the word you indicate.
4 Type good in the “Find what string?” text box.
5 Type excellent in the field labeled “Replace with what string?”
6 Click Replace (or press RETURN).
The word good is replaced by the word excellent.
78 Chapter 5 / Working With TextEditor
The dialog box displayed by the Replace command gives you the followingoptions as well:
Replace All: Changes all occurrences of the word good (or whatever stringyou indicate) automatically.
Cancel: Removes the dialog box. No further action is taken.
Search Backwards: Searches backward from the current selection to thebeginning of the file. (Normally, the search moves forward and stops at theend of the file.)
Wrap-Around Search: Searches forward from the location of the insertionpoint to the end of the file, then starts again at the beginning of the file andcontinues the search up to the starting insertion-point position.
Formatting and other features
If you use any formatting features, you can save the formatting information byselecting Save Formatting Information in the Save As dialog box. This causesan extra file, called the resource fork, to be saved. The resource fork containsthe formatting information.
The Edit menu and the Window menu make the following features available toyou:n selecting fontsn selecting tab settingsn automatically aligning text with the previous line (Auto Indent)n showing invisible characters, such as tabs, spaces, and returnsn shifting a block of text left or right by one tab stopn aligning selected text with the top line of the selectionn arranging multiple windows to be stacked one over the other or tiled
(placed alongside one another)n marking a place in the file
The following sections explain how to use these features.
Formatting and other features 79

Formatting text
You can use the Format item to change the font and size of text, set tabs,automatically align text, and display or hide “invisible” characters.
To use the Format item:
1 Choose Format from the Edit menu.
A dialog box like this one appears.
Selecting font and sizeSelect the desired font and size.
Automatically aligning textClick this checkbox to select AutoIndent. You can click it again to de-select it, thus turning off Auto Indent.
Selecting tab settingsType the desired number of spacesin this text box.
Showing invisible charactersClick this checkbox to display spaces, tabs, returns,and control characters. You can click it again todeselect it, thus hiding the “invisible” characters.
2 When you have finished formatting the text, click OK.
Shifting a block of text left or right
To shift an entire block of text one tab stop to the left or to the right:
1 Select the block of text.
2 Choose Shift Left (or Shift Right) from the Edit menu.
80 Chapter 5 / Working With TextEditor

Arranging multiple windows
If you are editing several documents at the same time, you have a choice ofstacking or tiling the windows.
To rearrange windows on the screen:
1 Choose Open from the File menu.
2 Double-click the memo1 file in the start folder.
The document appears in a window and is ready for editing.
3 Choose Open from the File menu again.
4 Double-click the letter1 file.
The windows are stacked by default, as shown here.
Formatting and other features 81
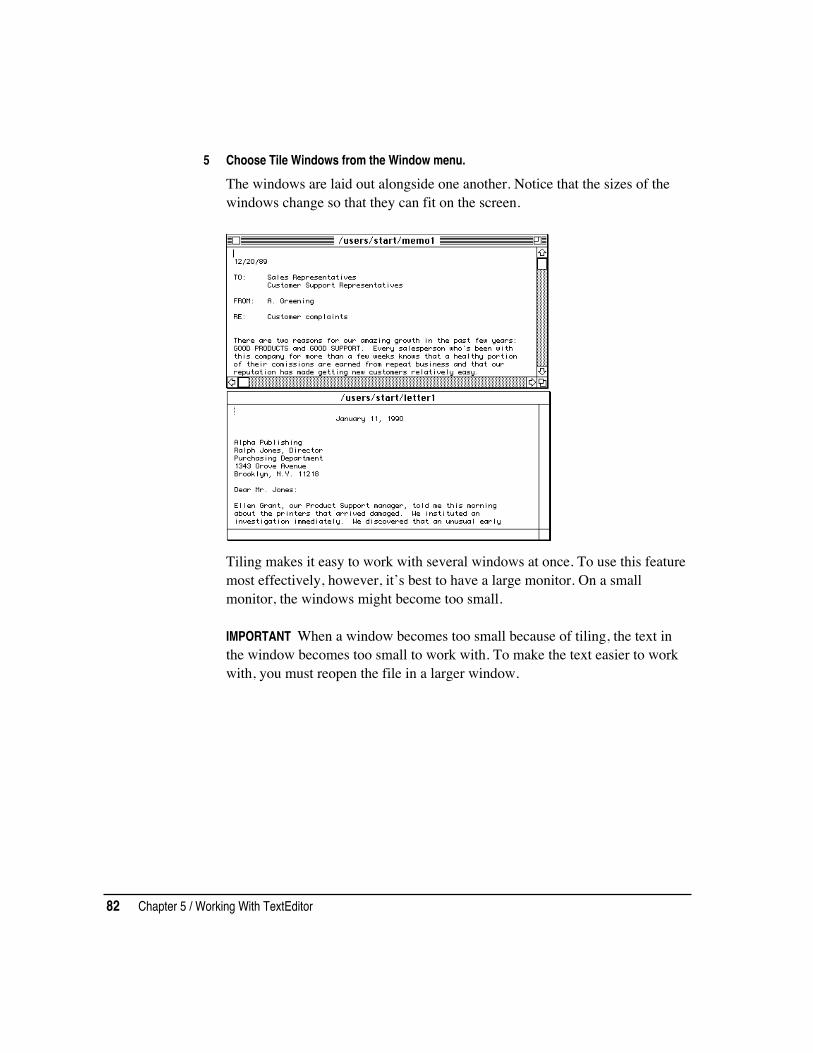
5 Choose Tile Windows from the Window menu.
The windows are laid out alongside one another. Notice that the sizes of thewindows change so that they can fit on the screen.
Tiling makes it easy to work with several windows at once. To use this featuremost effectively, however, it’s best to have a large monitor. On a smallmonitor, the windows might become too small.
IMPORTANT When a window becomes too small because of tiling, the text inthe window becomes too small to work with. To make the text easier to workwith, you must reopen the file in a larger window.
82 Chapter 5 / Working With TextEditor

6 Choose Stack Windows from the Window menu.
The windows change to a stacked layout.
Marking a place in the file
If you need to return periodically to specific locations in a long or complexdocument, you can place invisible, named markers at those points. You canthen jump instantly to any of the marked places in the document. This savesyou the time and trouble of having to scroll through the document to find thoseplaces.
The tutorial in this section teaches you how to mark and unmark a document.The tutorial uses letter1 (in the start folder) as a sample document,although markers are most useful in long, complex files.
Formatting and other features 83

To place two named markers in letter1:
1 Highlight the word We at the beginning of the second paragraph.
2 Choose Mark from the Mark menu.
A dialog box like this one appears.
The text box contains the highlighted word, which you will use as the name ofthe marker. If you wanted to give the marker a different name, you would typethe name in the text box.
84 Chapter 5 / Working With TextEditor

3 Click OK.
The first marker, We, is placed at the beginning of the sentence. The dialogbox disappears.
4 Click at the beginning of the third paragraph of letter1.The insertion point appears there.
5 Choose Mark from the Mark menu again.
6 Type the numeral 2.
That is the name of the second marker.
7 Click OK.
8 Now display the Mark menu.
The menu now contains a list of the markers that you have placed in thedocument.
9 Choose We from the Mark menu.
The insertion point moves to the We marker. If you choose 2, the insertionpoint moves to the third paragraph.
Formatting and other features 85

To remove these markers:
1 Choose Unmark from the Mark menu.
A dialog box like this one appears.
2 Select the name of the marker that you want to remove (in this case, 2).
3 Click Delete.
If you look at the Mark menu, you can see that the marker you have deleted isno longer on the list.
4 Repeat steps 1 through 3 to delete the We marker.
Printing
TextEditor allows you to print either an entire document or a selection from adocument. Be sure that your computer is properly connected to a printer andthat you use the Chooser (in the Apple menu) to choose a printer. Forinformation on printer connections, see Chapter 6, “Printing From theDesktop.”
Printing an entire document
To print an entire document:
1 Open the document in TextEditor.
86 Chapter 5 / Working With TextEditor

2 Choose Print Window from the File menu.
The print-file dialog box appears.
3 Click Print to begin printing.
Printing a selected part of a document
To print a block of text:
1 Place the insertion point at the beginning of the text to be selected.
2 Drag the I-beam pointer to the end of the desired selection and release the mouse button.
The selected text is highlighted.
3 Choose Print Selection from the File menu.
The print-file dialog box appears.
4 Click Print to start printing.
Printing 87

Quitting TextEditor
To quit TextEditor:
1 Choose Quit from the File menu.
If you have made changes to a file, an alert box appears, asking whether youwant to save those changes.
2 Click Save or Don’t Save, or click Cancel if you change your mind about quitting.
To leave the tutorial files unchanged for later use, click Don’t Save.
88 Chapter 5 / Working With TextEditor

6 Printing From the Desktop
This chapter discusses printing with the Macintosh interface. It covers thefollowing topics:n how printers may be connected to your systemn how to choose a printern Macintosh printing techniques
For information about printing using UNIX commands, see ServerAdministration With A/UX 3.0.1.

Printer connections
Before you can print a document, you must have a printer properly connectedto your system or to the network. See Setting Up and Managing Your Serverfor information on connecting a printer to the computer. For basic informationon connecting a printer to a network, see Server Administration WithA/UX 3.0.1.
To print from Macintosh applications, you can reach a printer in two basicways:n Use a printer that is connected directly to a printer port on the computer.
Printer connected directly to server.
Text documents from CommandShellor Macintosh documents
A/UX does not support the LaserWriter SC or the Personal LaserWriter SCprinter.Note: A LaserWriter IISC printer that is directly connected to the SCSI portwon’t work with the Apple Workgroup Server 95.n Use a printer that is connected to an AppleTalk network through the printer
port to a LocalTalk cable system or through the built-in Ethernet card to anEthernet cable system.Any computer on the network can send files created with a text editor or aMacintosh program to the printer. The files are printed in the order in whichthey are received.
90 Chapter 6 / Printing From the Desktop

Printer connected by means of an AppleTalk network.
Printer with Ethernet connectorsconnected by means ofan AppleTalk network.
AppleTalkrouter
Text documents from CommandShell or Macintosh documents.
LocalTalk connection
EtherTalk connections to router
Printer connections 91

People who use CommandShell and UNIX commands for printing use theTransmission Control Protocol/Internet Protocol (TCP/IP) over the type ofnetwork shown in the preceding figure. They can print on the same printerused by Macintosh programs. TCP/IP and AppleTalk coexist on the samenetwork cable.
CommandShell users can also print on a printer that is directly connected toanother workstation on the TCP/IP network as long as the computer is anotherA/UX system or a computer that supports the printer daemon, lpd. Fordetailed information about printing from CommandShell, see ServerAdministration With A/UX 3.0.1.
Choosing a printer
Before you can print a file in the Apple Workgroup Server 95 environment,you must specify which printer you want to use. Use the Chooser (in the Applemenu) to select a printer. Some programs direct you to choose Page Setup afterusing the Chooser. For further information, see the guide that came with theprogram you are using.
You can choose any printer that is connected to your computer or yournetwork through AppleTalk software, LocalTalk (or LocalTalk-compatible)cables, and EtherTalk cables.
To choose a printer that is connected directly to your computer or is on yourAppleTalk network:
92 Chapter 6 / Printing From the Desktop

1 Choose Chooser from the Apple menu.
The Chooser window opens. An icon appears in the upper-left part of thewindow, representing each of the printer types for which you have printerresources installed in the currently active System file. The AppleShare iconappears if you have access to one or more file servers.
List of available printers
Background printingoption; when on, allowsyou to continue workingwhile your files print
Printer and server icons
AppleTalk zonesavailable (if on a network)
2 Click the icon representing the type of printer you want to use.
3 Select the appropriate zone from the AppleTalk Zones list, if applicable.
4 Select the appropriate printer name in the LaserWriter printer list.
5 Click the close box.
The Chooser window closes; you are ready to print.
Choosing a printer 93

Using Macintosh printing techniques
You can use the Finder to print a Macintosh file (for example, one created by aMacintosh program). You must have chosen a printer as described in theprevious section.
To print a Macintosh file from the Finder:
1 Select the document you want to print by clicking its icon.
2 Choose Print from the File menu.
The print-file dialog box appears. Change settings in the dialog box asnecessary.
3 Click Print.
You can also print from within a Macintosh program. Consult the manual thatcame with the program for more information on printing.
The PrintMonitor program
The PrintMonitor program keeps track of the status of your printing operation.If the system has messages for you regarding a file that you are trying toprint—for example, that the printer has run out of paper—a flashingPrintMonitor icon appears over the Application menu icon. You can read themessage and respond as necessary by opening the Application menu andchoosing PrintMonitor.
94 Chapter 6 / Printing From the Desktop

Transferring fonts to a LaserWriter printer
If you’re using a LaserWriter printer that’s equipped to handle thePostScriptTM programming language and you want to print using PostScriptoutline fonts that are not built into your printer, you can transfer, or download,outline fonts from your System Folder to the printer. ( The PostScriptprogramming language describes the characters, symbols, and imagesappearing on each page of a document.) Downloading fonts saves you printingtime if you plan to print a batch of documents that use those fonts.
When you download a font, it’s stored in the printer’s memory or on a harddisk attached to the printer. You can download as many outline fonts as theprinter’s memory and hard-disk space allow.
You download a font by using the LaserWriter Font Utility, which is suppliedon the system software disks.
To transfer fonts to a printer:
1 Locate and open the LaserWriter Font Utility icon.
2 Choose Display Available Fonts from the File menu.
A dialog box appears, showing you what fonts are already loaded into theprinter.
3 Choose Download Fonts from the File menu to add new fonts.
A dialog box like this one appears.
Using Macintosh printing techniques 95

4 If the font that you want to download is not listed, click the Add button to add fonts to thelist.
A directory dialog box appears. You use this dialog box to locate the fonts youwant.
5 Click the name of the font you want, then click Add.
You can press the SHIFT key while you click to select more than one font.
6 When you’ve added all the fonts you want to download, click Done.
The directory dialog box disappears, and the fonts you added are listed in theFont Utility dialog box.
7 Click the Download button to send all the fonts in the list to the printer or its hard disk.
A status box appears. The status box contains a Cancel button that you canclick to stop the process.
8 Click OK when the status box reports the results of downloading.
9 Choose Quit from the File menu.
96 Chapter 6 / Printing From the Desktop

7 Customizing the Finder Environment
You can customize your working environment to suit your needs andpreferences. This chapter tells you how to perform a number of alterations toyour environment, includingn installing items and removing items from the System Foldern arranging items so that they are opened at startup or available through the
Apple menun adding and removing fontsn adjusting the way your mouse and keyboard workn changing your computer’s alert soundn altering your screen’s appearancen setting up more than one monitorn installing application programs

Installing files in the System Folder
Certain types of programs and other files need to be installed in the SystemFolder so that your server can use them as part of the system software. Yourserver has three System Folders that control different aspects of operation.The Startup System Folder controls the startup process, the Login SystemFolder determines your environment when you log in, and the System Foldercontrols your environment while you are logged in and using your account.You only need to make changes to the System Folder, and you should notalter the contents of the Startup System Folder or the Login System Folder.Only one System Folder in A/UX is active at a time. It is the one with apicture of a computer on its folder icon. All three System Folders are found inthe sys folder, which is located in the mac folder.
The types of files you can install in the System Folder includen system extensions and control panels (also called INITs and cDEVs)n files of preferences for application programsn drivers for printers, scanners, and other devicesn soundsn fonts
Sometimes these files are installed by means of an installer program thatcomes with the files. Check the instructions that came with the files for anyspecific installation procedures.
To install a file that does not require special treatment:
nnnn Drag the file’s icon to the System Folder icon (not the System Folder window).
The file is stored in a specific folder inside the System Folder. When youdrag a file’s icon to the System Folder icon, the Finder recognizes which typeof file it is and stores it in the appropriate folder.
98 Chapter 7 / Customizing the Finder Environment
If you drag one of these files to the System Folder window rather than to theSystem Folder icon, the file is not stored in the appropriate folderautomatically. Items that you want to put in the Apple Menu Items folder orthe Startup Items folder inside the System Folder need to be dragged to thatspecific folder. (See the instructions later in this chapter for installing Applemenu items and for specifying the files you want opened at startup.)
Removing files from the System Folder
Depending on the external devices you use, whether you’re part of a network,and how you use your server, you can remove the following types of filesfrom your System Folder if you want to conserve space:n Apple menu items that you don’t use. (You need the control panels, but
you may not need the Calculator or the Puzzle, for example.)n Extra fonts, sounds, or keyboard files that you have installed.
To remove a file from the System Folder:
nnnn Drag its icon out of the System Folder or out of any folder inside of the System Folder.
If you drag the files to the Trash, but think you might have future use forthem, be sure you have backup copies of the files on floppy disks.
Specifying which items you want opened at startup
To have a file (a program or a document) open automatically when you startup your server:
1 Open the System Folder.
2 Drag the file’s icon or its alias to the Startup Items folder.
Any programs or documents (or their aliases) that you put in the StartupItems folder are opened when you start up your server. You can have as manyfiles open automatically as your computer’s memory allows.
If you no longer want a file to open automatically when you start up yourserver, remove the file’s icon (or its alias) from the Startup Items folder.
Specifying which items you want opened at startup 99

Installing an item in the Apple menu
To have a program, document, or other item appear in the Apple menu:
1 Open the System Folder.
2 Drag the item’s icon or its alias to the Apple Menu Items folder.
You remove an item from the Apple menu by opening the Apple Menu Itemsfolder and dragging the item’s icon (or its alias) out of the folder.
Using fonts
A font is a collection of letters, numbers, and symbols in a distinctivetypographic design. Several fonts are installed in the System file with yourApple Workgroup Server 95. You can install additional fonts and removefonts. Additional fonts are supplied with the system software. Fonts are alsoavailable from independent manufacturers, user groups, and computerbulletin board services.
Outline fonts and bitmapped fonts
Your computer uses two types of fonts: outline and bitmapped. Both types offonts are installed in the System file in the System Folder.
Outline fonts (also called scalable or variable-size fonts) describe each letter,number, or symbol as a mathematical formula that defines the character’sshape and adjusts itself to make the character’s size larger or smaller. Youneed, therefore, only a single outline font in a particular typeface (such asTimes®) to be able to print or display that typeface in different sizes.
The outline fonts supplied with your Apple Workgroup Server 95 are calledTrueType fonts.
By contrast, bitmapped fonts (also called fixed-size fonts) describe eachcharacter as a grid of black and white dots (called a bitmap), which is arendering of the character’s shape in a specific size.
Your computer needs a separate bitmapped font of a typeface in each size itprints or displays, such as 12-point Times or 10-point Helvetica®.
100 Chapter 7 / Customizing the Finder Environment

Installing fonts
To install a font:
1 Quit all programs that are open.
Pull down the Application menu to make sure that the Finder is the only openprogram. Choose any other open program from the Application menu, andthen choose Quit from the File menu.
2 Locate the icon of the font that you want to install, and drag it to the System Folder icon(not the System Folder window).
To select multiple icons, hold down the SHIFT key while you click the iconfor each font.A dialog box appears, letting you know that the fonts will be stored in theSystem file, where they belong.
3 Click OK.
Removing fonts
To remove a font:
1 Open the System Folder.
2 Locate the System file icon and open it.
3 Locate the icon of the font that you want to remove, and drag it out of the Systemwindow and out of the System Folder window. (SHIFT-click to select more than oneicon.)
4 Close the System window and the System Folder window.
Setting the time, date, and alarm
Your computer has a clock that keeps track of the time and date. (A batterykeeps it running when the computer is turned off.) An alarm clock feature isalso available.
Setting the time, date, and alarm 101
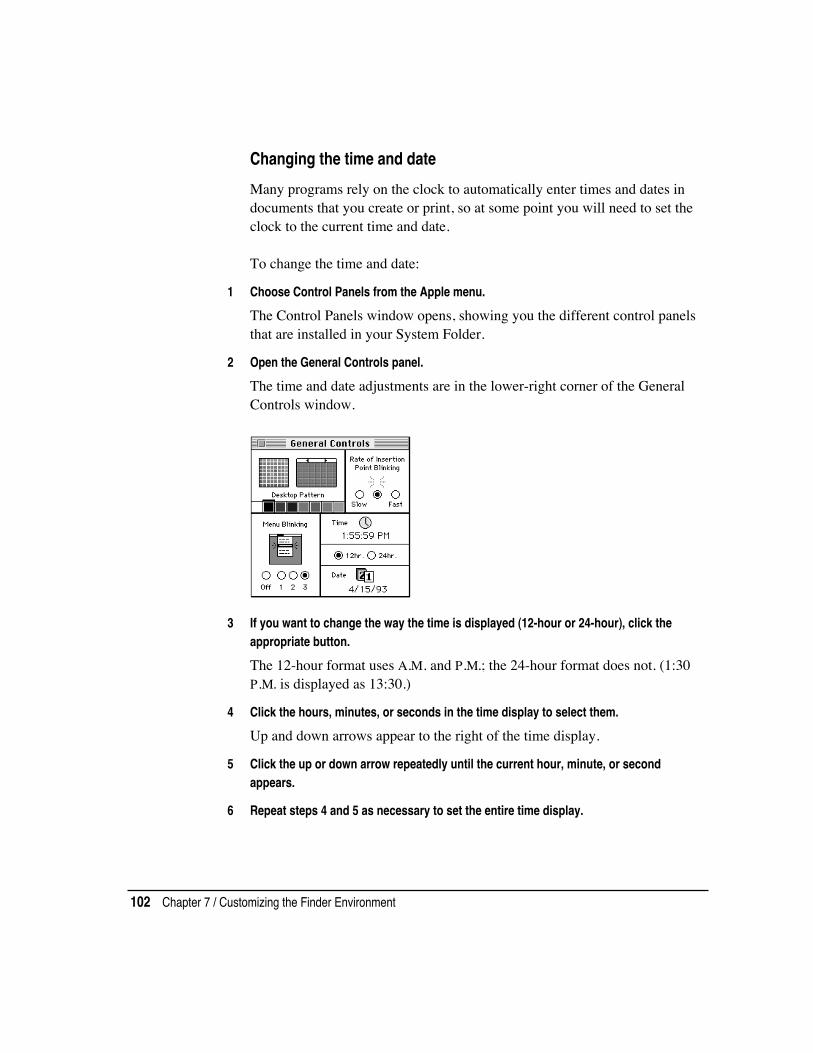
Changing the time and date
Many programs rely on the clock to automatically enter times and dates indocuments that you create or print, so at some point you will need to set theclock to the current time and date.
To change the time and date:
1 Choose Control Panels from the Apple menu.
The Control Panels window opens, showing you the different control panelsthat are installed in your System Folder.
2 Open the General Controls panel.
The time and date adjustments are in the lower-right corner of the GeneralControls window.
3 If you want to change the way the time is displayed (12-hour or 24-hour), click theappropriate button.
The 12-hour format uses A.M. and P.M.; the 24-hour format does not. (1:30P.M. is displayed as 13:30.)
4 Click the hours, minutes, or seconds in the time display to select them.
Up and down arrows appear to the right of the time display.
5 Click the up or down arrow repeatedly until the current hour, minute, or secondappears.
6 Repeat steps 4 and 5 as necessary to set the entire time display.
102 Chapter 7 / Customizing the Finder Environment

7 In the date display, click the month, day, or year to select it.
Up and down arrows appear to the right of the date display.
8 Click the up or down arrow repeatedly until the current month, day, or year appears.
9 Repeat steps 7 and 8 as necessary to set the entire date display.
10 Close the General Controls window.
You can also set the time and date in the Alarm Clock, which you open bychoosing Alarm Clock from the Apple menu.
Setting a time for the Alarm Clock to go off
You can set the Alarm Clock to alert you when it’s time for an appointmentor a meeting.
To set the Alarm Clock:
1 Choose Alarm Clock from the Apple menu.
The Alarm Clock opens.
2 Click the upward-pointing lever near the upper-right corner to expand the Alarm Clock.
The lever points downward, and the Alarm Clock expands to its full size.
3 Click the Alarm Clock icon in the lower-right corner to select it.
The Alarm Clock icon is highlighted when you select it. The time thatappears in the middle row is the current Alarm Clock setting.
Setting the time, date, and alarm 103

4 Click the hours, minutes, or seconds in the Alarm Clock setting to select them.
Up and down arrows appear to the right of the time display.
5 Click the up or down arrow repeatedly until the hour, minute, or second at which youwant the alarm to go off appears.
6 Repeat steps 4 and 5 as necessary.
7 Click the button to the left of the Alarm Clock setting to turn on the alarm.
When you click, the button moves up, and the Alarm Clock icon changes toindicate that the alarm is turned on. (Clicking again turns the alarm off.)
8 Click the close box to close the Alarm Clock.
The alarm will not go off unless you close the Alarm Clock, click the lever tomake the Alarm Clock smaller, click elsewhere in the controls, or makeanother window active.
Turning off the alarm
When the system clock reaches the time set for the alarm, the alert soundplays twice (or the menu bar flashes once, if the speaker volume is set tozero) and an alarm clock icon blinks over the Apple icon at the left end of themenu bar.
To turn off the alarm:
1 Choose Alarm Clock from the Apple menu.
2 Click the lever to expand the Alarm Clock.
3 Click the button to the left of the Alarm Clock setting so that the button moves down.
4 Close the Alarm Clock.
104 Chapter 7 / Customizing the Finder Environment

Adjusting the way the mouse works
You can adjust two aspects of mouse operation in the Mouse control panel:tracking, which is the relation between mouse movement on your desk andpointer movement on the screen, and the rate of double-clicking recognition.
To adjust mouse tracking:
1 Choose Control Panels from the Apple menu.
The Control Panels window appears.
2 Open the Mouse control panel.
The Mouse control panel window appears.
3 Click the tracking speed that you want to specify for the mouse pointer.
If you click Fast, the pointer moves more than twice as fast as you move themouse. The Very Slow option is useful for drawing with the mouse or agraphics tablet, because the pointer moves at a constant speed relative tomouse movement.Your selection takes effect immediately and remains in effect until you selecta different tracking option.
4 Close the Mouse control panel.
Adjusting the way the mouse works 105

To adjust double-clicking speed:
1 Open the Mouse control panel.
2 Click the double-clicking speed you want to use.
You may have to adjust the double-clicking speed if your computer oftenmisinterprets two clicks as a double click, or a double click as two singleclicks.Your selection remains in effect until you select a different double-clickingspeed.
3 Close the Mouse control panel.
Adjusting the way the keyboard works
This section tells you how to customize various keyboard functions,including the character repeat rate and control of the pointer with thekeyboard.
Character repeat and layout
You can adjust the rate at which a character repeats when you hold down itskey, as well as the length of the delay before the character begins repeating.You can also change the layout—that is, the arrangement of the keys on thekeyboard.
To adjust the rate at which a key repeats when it is held down:
1 Choose Control Panels from the Apple menu.
The Control Panels window opens.
106 Chapter 7 / Customizing the Finder Environment

2 Open the Keyboard control panel.
3 Click the button for the rate you want.
The buttons for this option are in the upper-left corner of the control panel.After you close the control panel, your selection remains in effect until youchange it.
To adjust the delay before keys repeat:
1 Open the Keyboard control panel.
2 Click the button for the delay you want.
If the keys repeat when you don’t want them to, adjust the keyboard’ssensitivity to your touch by setting a longer delay before a character beginsrepeating. (If you click the Off button, the keys don’t repeat at all.)After you close the control panel, your selection remains in effect until youchange it.
Adjusting the way the keyboard works 107

To change the keyboard layout:
1 Click the name of the keyboard layout you want to use.
Depending on the country in which you bought your server, you may have achoice of more than one keyboard layout. (Additional keyboard layouts areavailable from various sources, and you install them in the System Folder asyou would fonts or sounds.)After you close the control panel, your selection remains in effect until youchange it.
2 Close the Keyboard control panel.
Controlling the pointer from the keyboard
With a software feature called Mouse Keys, you can use the numeric keypadon the right side of the keyboard (instead of the mouse) to control themovement of the pointer on the screen.
n To turn on Mouse Keys, press COMMAND-SHIFT-CLEAR. (The CLEAR key is on thenumeric keypad.)
n To turn off Mouse Keys, press CLEAR.
With Mouse Keys turned on, you can click, drag, and perform all of the usualmouse actions from the numeric keypad. The 5 key serves as the mousebutton: Press once to click; press twice to double-click. The 0 key locks themouse button down for dragging. Pressing the decimal point key (to the rightof 0) or the 5 key unlocks the mouse button.
You can adjust the speed at which the pointer moves on the screen and thelength of the delay before the pointer starts moving when you press a mousekey. You make these adjustments in the Easy Access control panel. (ChooseControl Panels from the Apple menu, and open Easy Access.)
Setting the alert sound
Many programs cause the computer to make a sound, called the alert sound,when your attention is required or when you’re giving a command orattempting an action that the computer cannot recognize or perform at thattime.
108 Chapter 7 / Customizing the Finder Environment

Changing the sound and volume
You can choose among several sounds that you want the computer to make.You can also set the sound’s volume.
To chose an alert sound:
1 Choose Control Panels from the Apple menu.
2 Open the Sound control panel.
The Sound control panel opens. The alert sound that your computer iscurrently using is already selected.
3 Click the name of the alert sound that you want the computer to use.
When you select a sound, the computer plays the sound at the current volumesetting.
4 Drag the slide control up or down to set the volume level.
If you want to be alerted silently: Drag the slide control to 0. The computerwill not emit an alert sound; instead, the menu bar will flash.
5 Close the Sound control panel.
Setting the alert sound 109
Installing a sound
The Apple Workgroup Server 95 comes with a standard set of alert sounds.You can obtain additional sounds from independent manufacturers, usergroups, and computer bulletin board services.
To install a sound:
n Drag its icon to the System Folder icon (not the System Folder window).
The sound is automatically installed in the System file, where it belongs.
Once you add a sound to the System file, it is listed in the Sound controlpanel.
Recording sounds
Your Apple Workgroup Server 95 can accept and process sound input. Thesecomputers come with a sound input port, to which you can connect either amicrophone (which must be purchased separately) or a phono jack adapter (torecord sounds from another audio source, such as a compact disc or an audiocassette).
You can record a sound and add it to your available alert sounds in the Soundcontrol panel. Make sure you’ve connected a microphone to your computer asdescribed in the setup book that came with your microphone.
To record an alert sound:
1 Choose Control Panels from the Apple menu.
2 Open the Sound control panel.
The Sound control panel appears. Icons representing the available soundinput devices appear near the bottom of the window.
3 Click the icon that represents the sound input device you want to use.
4 Click the Add button.
A dialog box that looks like the controls of a tape recorder appears.
110 Chapter 7 / Customizing the Finder Environment

5 To record your new sound, click the Record button.
Recording begins immediately; you have ten seconds to record your sound.There is no recording volume control.
6 Click Stop to stop recording.
7 To listen to the sound you recorded, click Play.
8 To save the sound you recorded, click Save.
A dialog box appears in which you name your new sound.
9 Type a name for the sound.
10 Click OK.
The new sound appears in the Alert Sounds list in the Sound control panel.
When you’ve finished recording new sounds, close the Sound control panel.
Removing a sound
IMPORTANT Make sure you have backup copies of the sounds before youremove them from your system.
To remove sounds from the Sound control panel:
1 Choose Control Panels from the Apple menu.
2 Open the Sound control panel.
3 Click the name of the sound you want to remove.
Make sure you select the correct sound. You cannot undo the next step.
4 Click the Remove button and then click OK.
5 Close the Sound control panel.
You can also remove a sound by selecting it and then choosing Cut or Clearfrom the Edit menu or by dragging its icon out of the System file and out ofthe System Folder.
Setting the alert sound 111
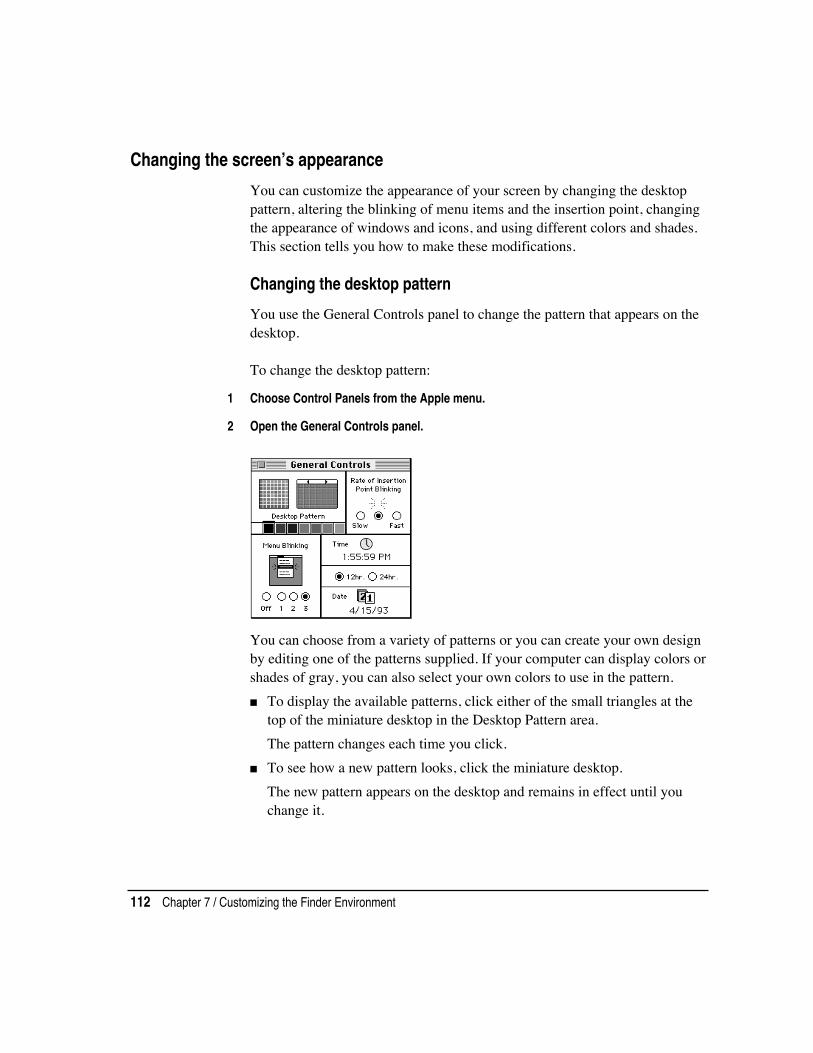
Changing the screen’s appearance
You can customize the appearance of your screen by changing the desktoppattern, altering the blinking of menu items and the insertion point, changingthe appearance of windows and icons, and using different colors and shades.This section tells you how to make these modifications.
Changing the desktop pattern
You use the General Controls panel to change the pattern that appears on thedesktop.
To change the desktop pattern:
1 Choose Control Panels from the Apple menu.
2 Open the General Controls panel.
You can choose from a variety of patterns or you can create your own designby editing one of the patterns supplied. If your computer can display colors orshades of gray, you can also select your own colors to use in the pattern.n To display the available patterns, click either of the small triangles at the
top of the miniature desktop in the Desktop Pattern area.The pattern changes each time you click.
n To see how a new pattern looks, click the miniature desktop.The new pattern appears on the desktop and remains in effect until youchange it.
112 Chapter 7 / Customizing the Finder Environment

n To edit a pattern, click in the square to the left of the miniature desktop.Each dot in the square changes color when you click it. Your changes aredisplayed in the miniature desktop.
n To use another color, click the color in the color bar (below the wordsDesktop Pattern) to select it, then click the dots you want to change in thesquare to the left of the miniature desktop.To make a new color available in the color bar, double-click a color in thecolor bar and then choose a new color from the color wheel in the dialogbox that appears. For more information about changing colors, see thesections “Changing the Highlight Color” and “Changing the Color ofWindows” later in this chapter.
3 When you’ve finished creating your new pattern, click in the miniature desktop todisplay the pattern on your desktop.
4 Double-click the miniature desktop to save the new pattern.
Otherwise, it is lost when you display another pattern in the miniaturedesktop.
Adjusting the blinking of a menu item
You can change the number of times a menu item blinks when it’s chosen.
To adjust menu blinking:
1 Choose Control Panels from the Apple menu.
2 Open the General Controls panel.
You adjust the blinking of a menu item with the controls in the lower-leftcorner.
3 Click the button for the number of times you want the menu item to blink.
Clicking the Off button prevents a menu item from blinking.
Changing the screen’s appearance 113

The option you selected remains in effect until you change it.
Adjusting the blinking of the insertion point
You can adjust how quickly the insertion point blinks. (The insertion pointindicates where any text you type appears.)
To adjust the blinking of the insertion point:
1 Choose Control Panels from the Apple menu.
2 Open the General Controls panel.
You adjust the blinking of the insertion point with the controls in the upper-right corner.
3 Click the button for the blinking rate you want.
When you click, the insertion point in the control panel shows the rate ofblinking you selected.The option you selected remains in effect until you change it.
Changing the items in the Label menu
You can change the labels (and colors, if your monitor displays colors orshades of gray) available in the Label menu. You make these changes in theLabels control panel.
114 Chapter 7 / Customizing the Finder Environment

To change a label in the Label menu:
n Drag across the text to select it, and then type your new label.
To change a color in the label menu:
1 Click the color you want to change in the Label control panel.
The color wheel dialog box appears.
2 Click a color on the color wheel to select it.
The new color is displayed in the upper half of the color square. The currentcolor remains in the lower half of the square for comparison.
3 To experiment with other colors or shades, drag the pointer around the wheel, or clickat another point on the wheel.
The new color is displayed in the upper half of the color square as you dragor click.
4 Click OK when you have selected the color you want.
The color wheel dialog box disappears.
5 Close the Labels control panel.
The labels and colors you selected remain in effect until you change them.
Changing the screen’s appearance 115

Changing the way the contents of windows appear
You can change the way the contents of Finder windows are displayed in thedifferent views available from the View menu (the icon view, the small-iconview, and the list views by name, size, kind, label, and date).
To change the appearance of windows:
n Choose Control Panels from the Apple menu, and open the Views control panel.
Options for the size oficons displayed in listviews
Options for layout of icons
Pop-up menu of fonts foricon names and list views
Pop-up menu of fontsizes for icon namesand list views
Option to snap icons toan invisible grid when-ever they are moved
Options for informationdisplayed in list views
n Change any of these options:
n the font and font size used in all views (press to open the pop-up menu,then drag to choose a font or a size)
n the arrangement of icons in icon and small-icon viewsn the size of icons used in list viewsn what information is included in list views, including folder sizes and the
amount of available space on the disk
The options you select remain in effect until you change them.
Changing the appearance of icons
You can customize icons by changing the icons themselves. If your computerdisplays colors or shades of gray, you can have icons appear in a specificcolor that’s associated with a label from the Label menu.
116 Chapter 7 / Customizing the Finder Environment

Changing an icon
Using a graphics program, you can create or copy the picture you want to useas an icon, and then paste it into an icon’s Info window.
Some icons can’t be changed, including those for control panels and otherparts of the system software. Every icon fits inside a 32-pixel square. (Apixel, or picture element, is the smallest dot you can draw on the screen.)
To change an icon:
1 In a graphics program, select the picture that you want to use for the icon.
A moving dashed lineindicates the selected areain many graphics programs.
2 Copy the picture by choosing Copy from the Edit menu.
3 Switch to the Finder, then click the icon you want to change. Don’t double-click.
4 Choose Get Info from the File menu.
The icon’s Info window opens.
5 Click the icon at the upper-left corner of the Info window to select it.
A box appears around the icon when it’s selected. If no box appears whenyou click, the icon can’t be changed.
A box around the iconindicates that it’s selected.
Changing the screen’s appearance 117
6 Choose Paste from the Edit menu.
The picture you copied replaces the selected icon in the Info window. If thepicture is bigger than the icon, it automatically shrinks to fit.
7 Click the close box to close the Info window.
You can change an icon back to its original form by clicking the picture inthe upper-left corner of the Info window and choosing Cut from the Editmenu.
Assigning a label and a color to an icon
You can add a label and its associated color to each icon. A label is differentfrom the icon’s name. The label is visible only when the contents of awindow are displayed as a list. The associated color is visible whenever thecomputer is set to display colors or grays.
Labels provide a way to group related files. You can choose By Label fromthe View menu, and all files with the same label will be grouped together. Ifyou have a color monitor, you can identify related icons by assigning a labeland its color to each group.
To assign a label and color to an icon:
1 Click the icon to select it.
2 Choose the label (and color) that you want from the Label menu.
See the section “Changing the Items in the Label Menu,” earlier in thischapter, for information on changing the labels and colors.
Changing the highlight color
If your computer displays colors or shades of gray, you can use the Colorcontrol panel to change the color your computer uses for highlightingselected text on the screen.
118 Chapter 7 / Customizing the Finder Environment
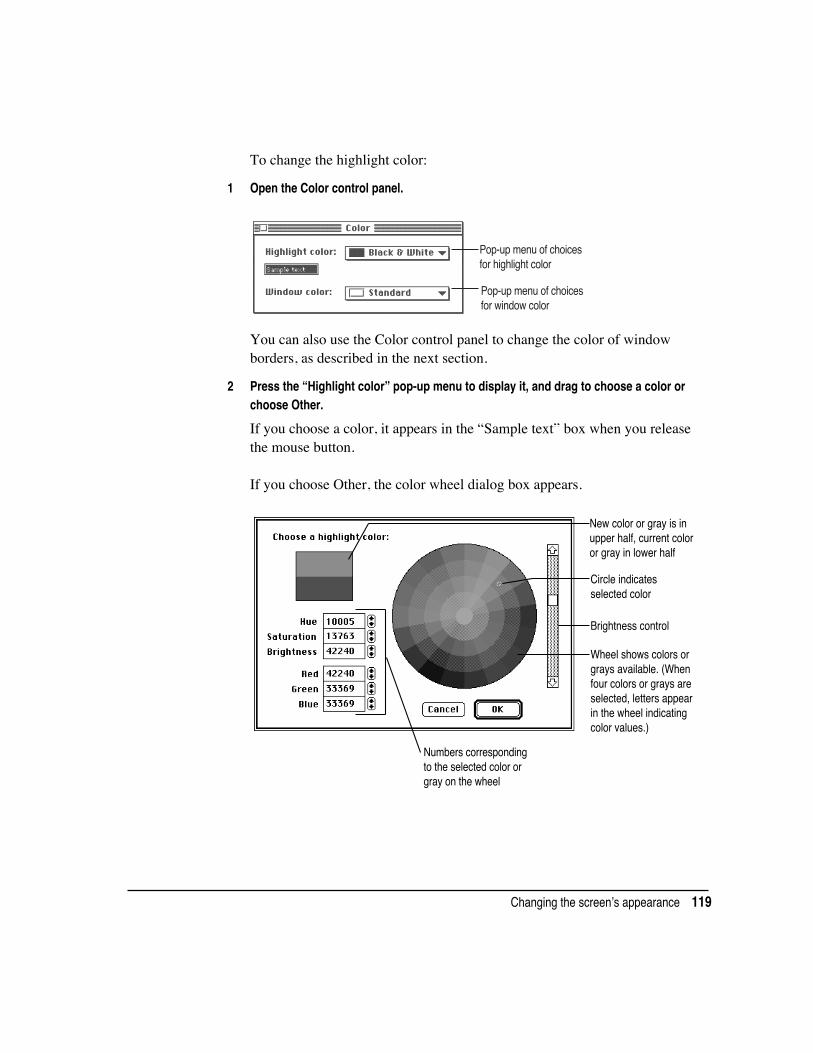
To change the highlight color:
1 Open the Color control panel.
Pop-up menu of choicesfor highlight color
Pop-up menu of choicesfor window color
You can also use the Color control panel to change the color of windowborders, as described in the next section.
2 Press the “Highlight color” pop-up menu to display it, and drag to choose a color orchoose Other.
If you choose a color, it appears in the “Sample text” box when you releasethe mouse button.
If you choose Other, the color wheel dialog box appears.
New color or gray is inupper half, current coloror gray in lower half
Circle indicatesselected color
Brightness control
Wheel shows colors orgrays available. (Whenfour colors or grays areselected, letters appearin the wheel indicatingcolor values.)
Numbers correspondingto the selected color orgray on the wheel
Changing the screen’s appearance 119

3 To change the brightness of the color wheel, drag the scroll box up or down.
4 Click a color on the color wheel to select it.
The new color is displayed in the upper half of the color square if yourmonitor is set to display 16 or more colors or grays. The current colorremains in the lower half of the square for comparison; you can click there togo back to it.
5 To experiment with other colors or shades, drag the pointer around the wheel or click atanother point on the wheel.
Each new color is displayed in the upper half of the color square as you dragor click.
6 Click OK when you have selected the color you want.
The color wheel dialog box disappears. The new highlight color is displayedin the “Sample text” box in the Color control panel.The highlight color you have specified takes effect immediately and remainsin effect until you change it.
Changing the color of windows
If your computer displays colors or shades of gray, you can use the Colorcontrol panel to change the color of window borders.
You can also use the Color control panel to change the color your computeruses for highlighting selected text on the screen, as described in the precedingsection.
To change the color of window borders:
n Press the pop-up menu labeled “Window color” to display it, and then drag to choose anew color.
The color you choose takes effect immediately and remains in effect until youchange it.
120 Chapter 7 / Customizing the Finder Environment

Displaying colors or grays
If your computer displays colors or shades of gray, you can use the Monitorscontrol panel to designate the number of colors or shades of gray you wantdisplayed. (The number of colors or shades your computer can displaydepends on its video capability.)
If you have more than one monitor, you also use the Monitors control panelto configure them, as described later in this chapter.
To display colors or shades of gray:
1 Open the Monitors control panel.
2 If you have more than one monitor, click the icon of the monitor whose colors you wantto adjust.
A dark border appears around the icon to show that it is selected.
3 Click the Grays or the Colors button.
Some monitors can display only shades of gray, even if you click the Colorsbutton.
4 Click the number of colors or shades of gray you want displayed on the selectedmonitor (or click Black & White).
Your changes take effect immediately. The number of colors or shades ofgray you have specified remains in effect until you change it.
Changing the screen’s appearance 121

Adjusting screen brightness
Most monitor models have brightness and contrast dials on the monitor or abrightness dial on the computer itself. See the Setting Up and ManagingYour Server for more information.Note: You should turn down the brightness if you’ll be away from yourcomputer for a while. If an image is left on the screen for several hours, itmay begin to “burn in” and damage the screen. You can use “screen saver”programs, available from various sources, to dim the screen automatically ordisplay a moving image after a set period of inactivity.
Configuring multiple monitors
If you use more than one monitor with your computer, you use the Monitorscontrol panel to indicate the monitors’ positions and designate one as themain monitor (the one that displays the menu bar). You also use the Monitorscontrol panel to set the number of colors or shades of gray you wantdisplayed. (See the earlier section “Displaying Colors or Grays.”)
To indicate monitor position:
1 Open the Monitors control panel.
Clicking this button displays adialog box, indicating the type ofvideo card to which the selectedmonitor is connected.
Colors in this boxcorrespond to thenumber of colors theselected monitor is setto display.
Drag this small menu bar to themonitor you want to display themenu bar.
The dark line around a monitoricon indicates that it is selected.
Icons for the monitors connected tothe Macintosh, showing their IDnumbers and their relative positions.
Clicking this button dis-plays each monitor’s IDnumber on its screen.
122 Chapter 7 / Customizing the Finder Environment
2 Check the ID numbers of your monitors by clicking the Identify button.
A large number appears in the center of each monitor’s screen; it correspondsto the number of the icon in the control panel.The ID numbers help you identify which icon belongs to which monitor.
3 Decide which monitor is your main monitor, and drag the menu bar to the top of thatmonitor icon.
The menu bar snaps to the top of that monitor icon when you release themouse button.If one of your monitors displays colors or shades of gray, you may want tomake it the main monitor so that you can use the color capabilities of yourprograms and of the Finder.If your monitors are different sizes, you may want to make the largest one themain monitor, because some programs limit their window size to the size ofthe main monitor.
4 Drag the icons of the other monitors to their positions relative to the main monitor.
To avoid becoming disoriented when you’re using the monitors, position themonitor icons so that they correspond to their actual positions on your desk.The pointer can cross from one screen to another where the monitors’ iconstouch in the control panel.
5 Choose Restart from the Special menu.
The positions you have specified remain in effect until you change them andrestart your computer.
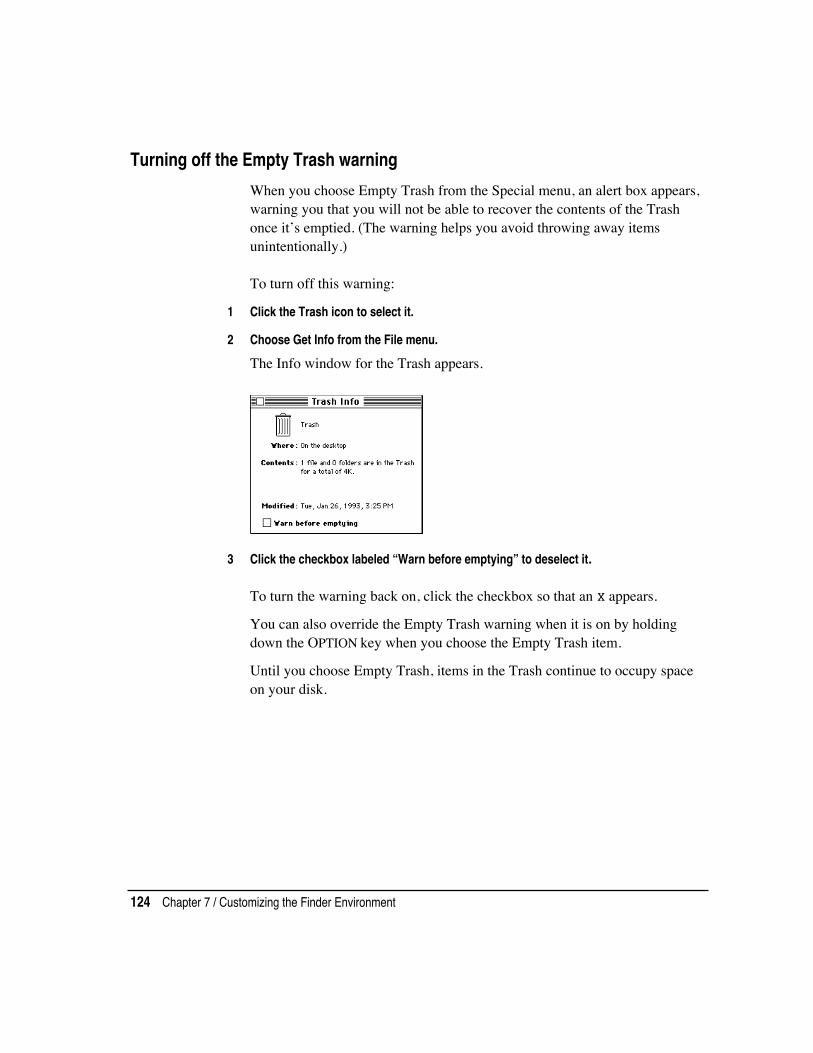
Turning off the Empty Trash warning
When you choose Empty Trash from the Special menu, an alert box appears,warning you that you will not be able to recover the contents of the Trashonce it’s emptied. (The warning helps you avoid throwing away itemsunintentionally.)
To turn off this warning:
1 Click the Trash icon to select it.
2 Choose Get Info from the File menu.
The Info window for the Trash appears.
3 Click the checkbox labeled “Warn before emptying” to deselect it.
To turn the warning back on, click the checkbox so that an X appears.
You can also override the Empty Trash warning when it is on by holdingdown the OPTION key when you choose the Empty Trash item.
Until you choose Empty Trash, items in the Trash continue to occupy spaceon your disk.
124 Chapter 7 / Customizing the Finder Environment

Adding application programs to your system
When you install an application program on your system, it is best to install itin your home directory folder. If you are the system administrator and youinstall a program that is to be used by all users of the system, install it in theApplications folder.
To add the program to the Applications folder:
1 If the program is on a floppy disk, insert it in the floppy disk drive, and double-click itsicon to display the files or folders to be transferred.
2 Double-click the disk icon labeled with a slash character (/) to open it.
3 Locate the Applications folder icon, and double-click the icon to open the folder.
4 Drag the appropriate files or folders from the floppy disk to the open Applicationsfolder.
If you want to be able to start the program by double-clicking its icon on thedesktop, use an alias of its icon.
To create an alias:
n Highlight the icon, and choose Make Alias in the File menu.
You can move the alias icon to the desktop. You also can move it to theApple Menu Items folder in the System Folder to make it available in theApple menu.
Depending on how many users work with the installed programs you mayfind it necessary to adjust the system memory cache. For details, see ServerAdministration With A/UX 3.0.1.
Adding application programs to your system 125

Appendix Menu Reference
This appendix provides a quick reference for the menu items that youencounter while working in the Finder environment and the TextEditorapplication. It describes the function of each menu item in the order inwhich the items appear in each menu.

The Finder environment
This section describes the menu items to which you have access when youare working in the Finder. The Finder is the program that creates thedesktop and that underlies other open programs. The Finder also grantsyou easy access to all of the files, programs, and utilities on your system.
The Apple menu
The Apple menu lists available desk accessories and contains informationitems identifying versions of software and their developers. Your Applemenu also contains the items that you have installed in your computer’sApple Menu Items folder.
About This Macintosh...
This item identifies the hardware and system software you are using. Thesystem software version you are using is shown to the right of “SystemSoftware.” It also presents information regarding the allocation ofmemory. When you switch to another program, this item becomes “Aboutprogram name” and displays proprietary information about the activeprogram.
128 Appendix / Menu Reference

Desk accessories
Desk accessories are miniature application programs. Several deskaccessories—Alarm Clock, Calculator, Chooser, Key Caps, Note Pad,Puzzle, and Scrapbook—are shipped with your computer.
You can add desk accessories, folders, programs, and other objects byplacing them in the Apple Menu Items folder that is in your SystemFolder. See “Installing an Item in the Apple Menu” in Chapter 7,“Customizing the Finder Environment.”
The File menu
The File menu, shown in the following figure, contains the menu itemsthat help you manage your desktop environment.
New Folder
This menu item creates a new folder, also called a directory, in the activewindow. Each new folder is created with the name “untitled folder.” Youcan immediately change the name of the folder by typing a new namewhile the title is still selected. The keyboard shortcut is COMMAND-N.
Open
This menu item opens the selected file, folder, or program in the Finder.The keyboard shortcut is COMMAND-O.
The Finder environment 129
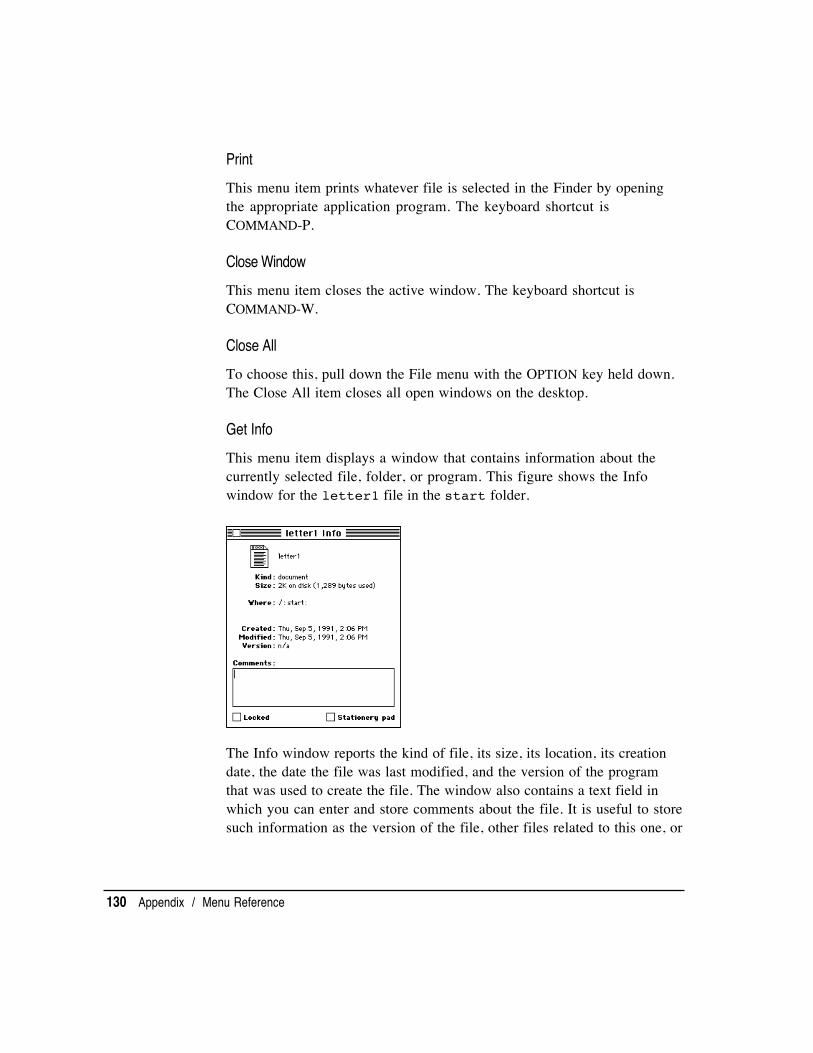
This menu item prints whatever file is selected in the Finder by openingthe appropriate application program. The keyboard shortcut isCOMMAND-P.
Close Window
This menu item closes the active window. The keyboard shortcut isCOMMAND-W.
Close All
To choose this, pull down the File menu with the OPTION key held down.The Close All item closes all open windows on the desktop.
Get Info
This menu item displays a window that contains information about thecurrently selected file, folder, or program. This figure shows the Infowindow for the letter1 file in the start folder.
The Info window reports the kind of file, its size, its location, its creationdate, the date the file was last modified, and the version of the programthat was used to create the file. The window also contains a text field inwhich you can enter and store comments about the file. It is useful to storesuch information as the version of the file, other files related to this one, or
130 Appendix / Menu Reference
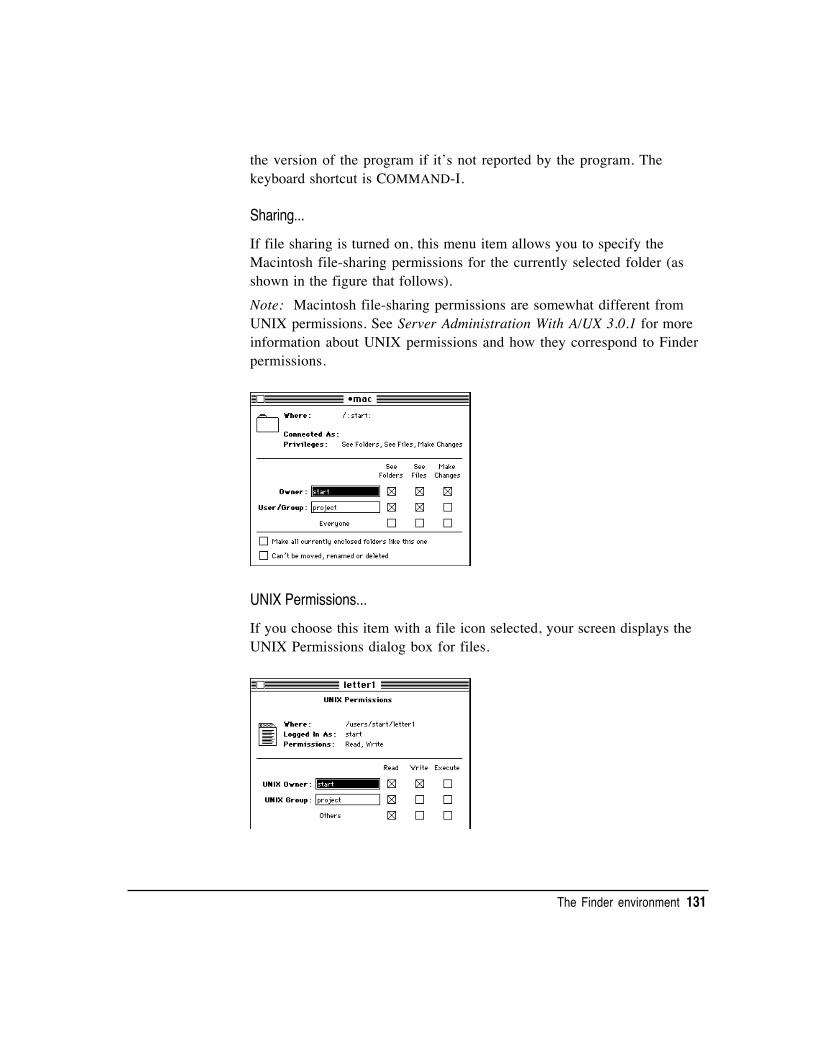
the version of the program if it’s not reported by the program. Thekeyboard shortcut is COMMAND-I.
Sharing...
If file sharing is turned on, this menu item allows you to specify theMacintosh file-sharing permissions for the currently selected folder (asshown in the figure that follows).Note: Macintosh file-sharing permissions are somewhat different fromUNIX permissions. See Server Administration With A/UX 3.0.1 for moreinformation about UNIX permissions and how they correspond to Finderpermissions.
UNIX Permissions...
If you choose this item with a file icon selected, your screen displays theUNIX Permissions dialog box for files.
The Finder environment 131

If you have highlighted a folder before choosing UNIX Permissions, yourscreen displays the UNIX Permissions dialog box for folders.
This dialog box shows the selected folder’s permissions in UNIXterminology. You can display its permissions in Macintosh terminologyby clicking “The Show Mac view” button. This dialog box appears.
You can change to the UNIX permissions again by clicking the button.
Duplicate
This menu item makes a copy of a selected file, folder, or program. Thekeyboard shortcut is COMMAND-D.
132 Appendix / Menu Reference
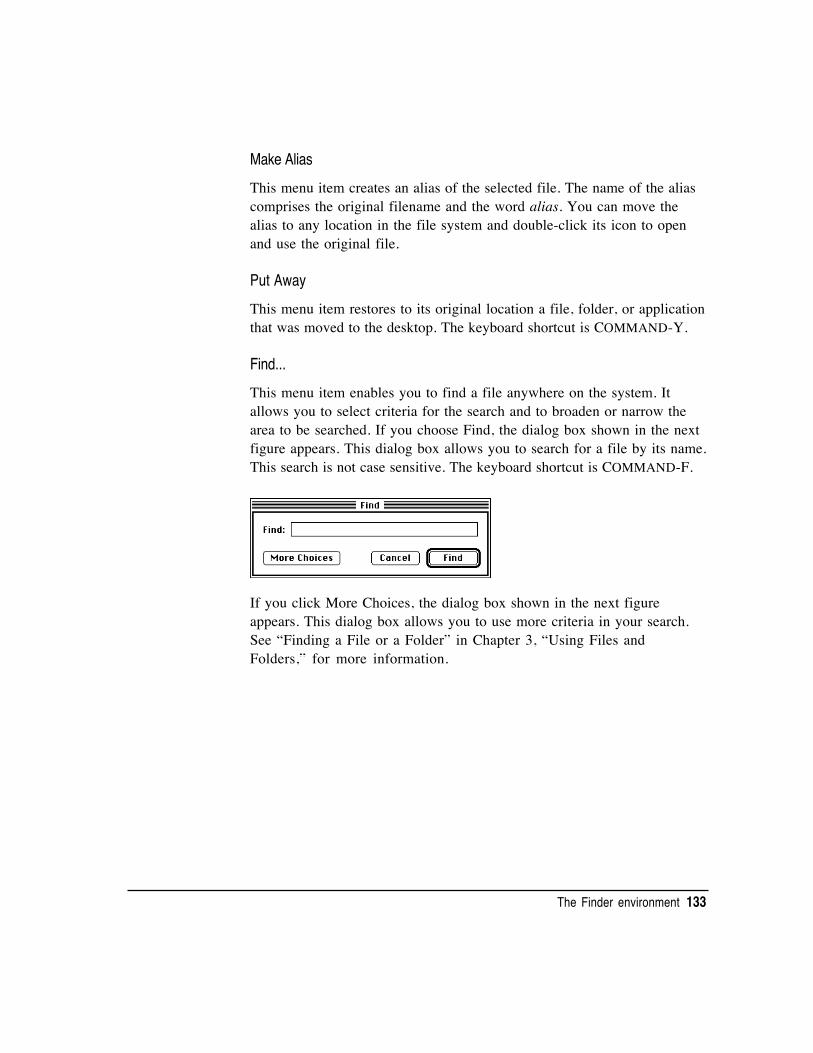
Make Alias
This menu item creates an alias of the selected file. The name of the aliascomprises the original filename and the word alias. You can move thealias to any location in the file system and double-click its icon to openand use the original file.
Put Away
This menu item restores to its original location a file, folder, or applicationthat was moved to the desktop. The keyboard shortcut is COMMAND-Y.
Find...
This menu item enables you to find a file anywhere on the system. Itallows you to select criteria for the search and to broaden or narrow thearea to be searched. If you choose Find, the dialog box shown in the nextfigure appears. This dialog box allows you to search for a file by its name.This search is not case sensitive. The keyboard shortcut is COMMAND-F.
If you click More Choices, the dialog box shown in the next figureappears. This dialog box allows you to use more criteria in your search.See “Finding a File or a Folder” in Chapter 3, “Using Files andFolders,” for more information.
The Finder environment 133

The Fewer Choices button redisplays the initial dialog box.
Find Again
This menu item allows you to repeat the search you performed with Find.See the description of Find just given. The keyboard shortcut isCOMMAND-G.
Page Setup...
This menu item presents the Page Setup dialog box for the printer typethat you have selected in the Chooser. This figure shows the Page Setupdialog box for a LaserWriter printer.
The Page Setup dialog box displayed by other programs may lookdifferent. See the manual that came with your program for moreinformation.
Print Window...
This menu item prints a list of the contents of the active window. Whenyou choose this item, the Print dialog box appears. When you click OK, adirectory listing is sent to the printer you have selected in the Chooser.
134 Appendix / Menu Reference
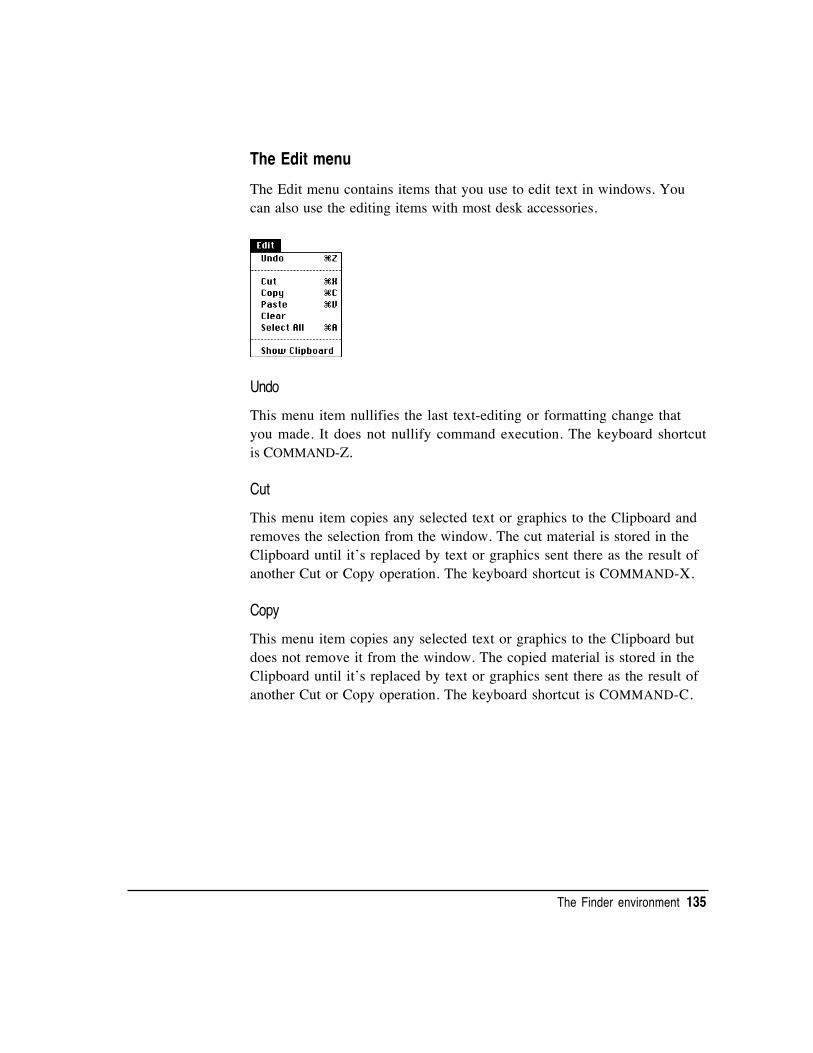
The Edit menu
The Edit menu contains items that you use to edit text in windows. Youcan also use the editing items with most desk accessories.
Undo
This menu item nullifies the last text-editing or formatting change thatyou made. It does not nullify command execution. The keyboard shortcutis COMMAND-Z.
Cut
This menu item copies any selected text or graphics to the Clipboard andremoves the selection from the window. The cut material is stored in theClipboard until it’s replaced by text or graphics sent there as the result ofanother Cut or Copy operation. The keyboard shortcut is COMMAND-X.
Copy
This menu item copies any selected text or graphics to the Clipboard butdoes not remove it from the window. The copied material is stored in theClipboard until it’s replaced by text or graphics sent there as the result ofanother Cut or Copy operation. The keyboard shortcut is COMMAND-C.
The Finder environment 135

Paste
This menu item inserts the contents of the Clipboard into the window atthe insertion point. The keyboard shortcut is COMMAND-V.
Clear
This menu item removes any selected text or graphics from the windowbut does not copy it to the Clipboard. Any material removed with theClear item is no longer available. Choosing Clear is equivalent to pressingthe DELETE key.
Select All
This menu item selects all of the text and graphics in the window. Thekeyboard shortcut is COMMAND-A.
Show Clipboard
This menu item displays the contents of the Clipboard in a separatewindow.
The View menu
The View menu provides items for altering the way the Finder displays thecontents of a disk or a folder. A checkmark appears next to the activelisting method. See Chapter 3, “Using Files and Folders,” for informationon uses of the View menu.
Small Icon
When you view the contents of a disk or folder by small icon, the Finderdisplays miniature representations of each file, folder, or program icon inthis window.
136 Appendix / Menu Reference

Icon
When you view the contents of a disk or folder by icon, the Finderdisplays the full-size representation of each file, folder, or program icon inthe window.
Name
When you view the contents of a disk or folder by name, the Finderdisplays an alphabetized list of the different files, folders, and programs inthe window.
The Finder environment 137
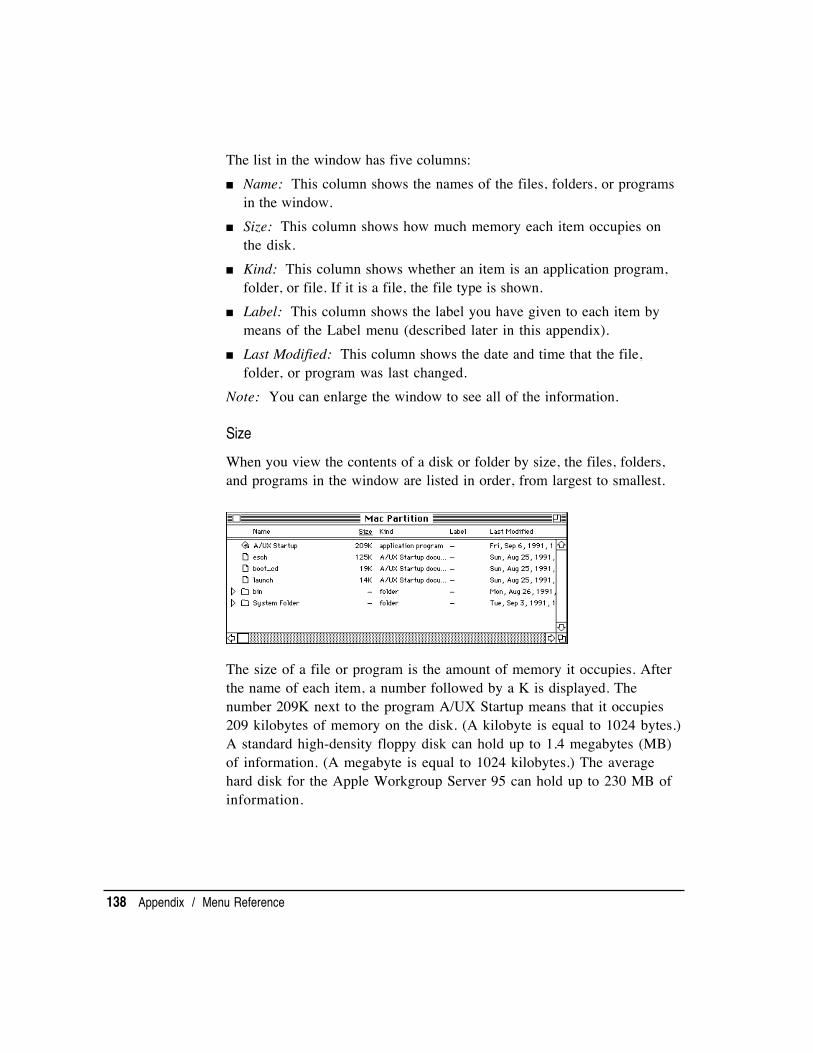
The list in the window has five columns:n Name: This column shows the names of the files, folders, or programs
in the window.n Size: This column shows how much memory each item occupies on
the disk.n Kind: This column shows whether an item is an application program,
folder, or file. If it is a file, the file type is shown.n Label: This column shows the label you have given to each item by
means of the Label menu (described later in this appendix).n Last Modified: This column shows the date and time that the file,
folder, or program was last changed.Note: You can enlarge the window to see all of the information.
Size
When you view the contents of a disk or folder by size, the files, folders,and programs in the window are listed in order, from largest to smallest.
The size of a file or program is the amount of memory it occupies. Afterthe name of each item, a number followed by a K is displayed. Thenumber 209K next to the program A/UX Startup means that it occupies209 kilobytes of memory on the disk. (A kilobyte is equal to 1024 bytes.)A standard high-density floppy disk can hold up to 1.4 megabytes (MB)of information. (A megabyte is equal to 1024 kilobytes.) The averagehard disk for the Apple Workgroup Server 95 can hold up to 230 MB ofinformation.
138 Appendix / Menu Reference

Kind
When you view the contents of a disk or folder by kind, the files, folders,and programs are listed alphabetically by type.
Label
The Label menu in the Finder allows you to give each file or folder a labelthat categorizes it. (See “The Label Menu,” later in this appendix, forfurther information.) Viewing items by label sorts them in the order inwhich the labels occur in the Label menu.
The Finder environment 139

Date
When you view the contents of a disk or folder by date, the files, folders,and programs in the window are displayed with the most recently createdor modified one listed first.
Note: You can click each column heading to view the contents of awindow in a specific way. For example, if you want to view the contents bykind, click the Kind column heading.
The Label menu
The Label menu supplies a list of labels that you can apply to any file orfolder. You can then choose Label in the Views menu to list itemsaccording to the labels you have assigned to them. If you have a colormonitor, the labels appear in different colors. For more information, see“Assigning a Label and a Color to an Icon” and “Changing the Items inthe Label Menu” in Chapter 7, “Customizing the Finder Environment.”
140 Appendix / Menu Reference

The Special menu
The Special menu contains the items you use to log out, shut down thesystem, and restart the computer. It also provides items that you use forspecial tasks, such as deleting the files that you placed in the Trash.
Clean Up Window
This menu item rearranges icons on a disk or in a folder so that they areeasier to see. You can use this item only when you are viewing thecontents of a disk or folder by icon or by small icon. If you hold downthe OPTION key while you pull down the Special menu, you can clean upthe window by name, kind, label, and so on. The name of the Clean Upitem changes depending on the last viewing method used.
Empty Trash...
This menu item deletes any files, folders, or programs you have placed inthe Trash. You can recover items placed in the Trash before you emptythe Trash. Once you empty the Trash, the items cannot be recovered.
Eject Disk
This menu item causes the selected floppy disk to be ejected. Thekeyboard shortcut is COMMAND-E.
The Finder environment 141

Erase Disk...
This menu item completely erases any information on the selected disk.To use this item, you must first select the disk you want to erase.
WARNING When you erase a disk, its contents cannot be recovered.
Restart
This menu item shuts down the computer and starts it up again. When youuse this item, you must enter the password for the root account unlessyou are already logged in as root.
Shut Down
This menu item shuts down the computer. To use this command, you mustenter the password for the root account unless you are already logged inas root.
Logout
This menu item ends the current work session. When you choose this item,all open programs are closed and you return to the Login dialog box,unless the auto-login feature is enabled. If this feature is enabled, allprograms are shut down and processes are stopped, and your desktop is inthe same state as when you start up your computer. For a completediscussion of the auto-login feature, see “Logging In to an Account” inChapter 2, “Getting Started With A/UX 3.0.1.”
The Help menu
The Help menu makes Balloon Help available or turns Balloon Help off.
142 Appendix / Menu Reference
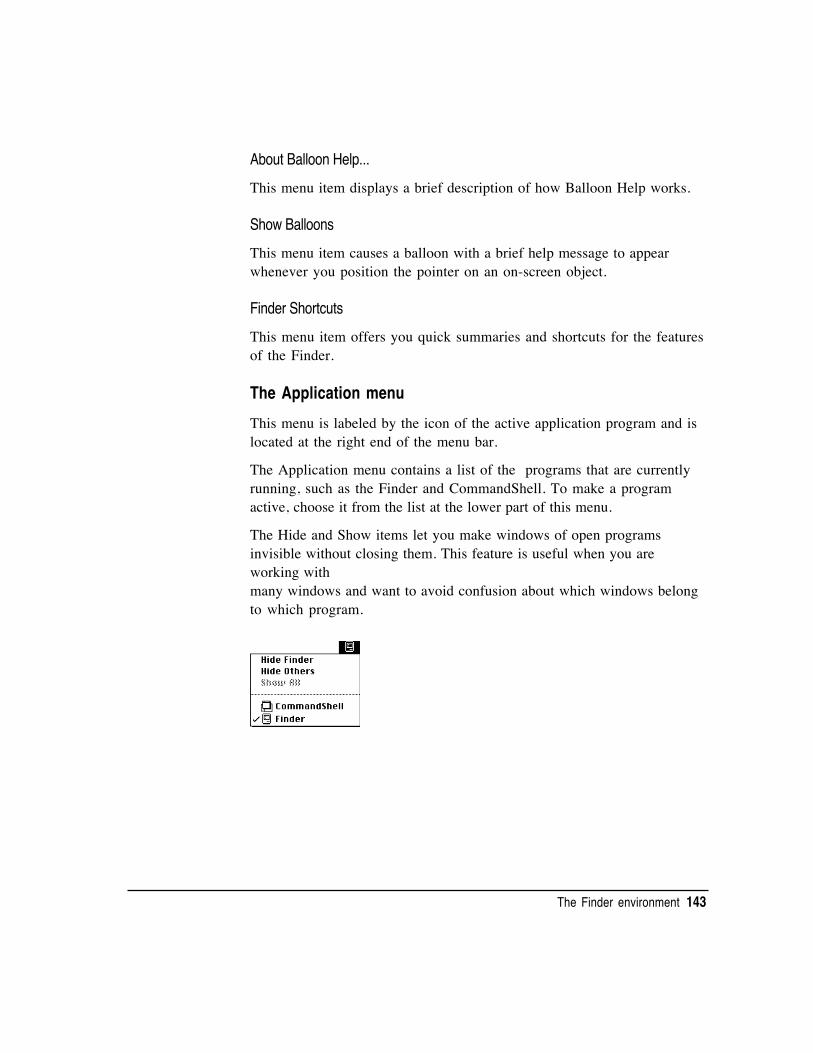
About Balloon Help...
This menu item displays a brief description of how Balloon Help works.
Show Balloons
This menu item causes a balloon with a brief help message to appearwhenever you position the pointer on an on-screen object.
Finder Shortcuts
This menu item offers you quick summaries and shortcuts for the featuresof the Finder.
The Application menu
This menu is labeled by the icon of the active application program and islocated at the right end of the menu bar.
The Application menu contains a list of the programs that are currentlyrunning, such as the Finder and CommandShell. To make a programactive, choose it from the list at the lower part of this menu.
The Hide and Show items let you make windows of open programsinvisible without closing them. This feature is useful when you areworking withmany windows and want to avoid confusion about which windows belongto which program.
The Finder environment 143

Hide Program
This menu item hides all windows of the active program. For example, ifthe Finder is the active program, this menu item causes all of the Finderwindows to disappear, and switches you to whichever program was mostrecently opened. When a program other than the Finder is active, thismenu item switches you to the Finder.
Hide Others
This menu item hides all windows except those of the active program.
Show All
This menu item redisplays hidden windows for all open programs.
The TextEditor program
TextEditor is a word-processing program that lets you create textdocuments by means of the mouse and Macintosh-like editing techniques.See Chapter 5, “Working With TextEditor,” for a tutorial on its use.
The TextEditor File menu
The TextEditor File menu contains items for creating, opening, closing,saving, and printing TextEditor files.
144 Appendix / Menu Reference

New...
This menu item creates a new document. When you choose New, the Newdialog box appears. This dialog box is shown in the following figure. Youuse this dialog box to enter a name for the document and select a folder inwhich it will be stored. The keyboard shortcut is COMMAND-N.
Open...
This menu item allows you to open documents and text-only files createdwith TextEditor. When you choose Open, an Open dialog box appears andallows you to select a file. The keyboard shortcut is COMMAND-O.Note: When you open a file, it appears in a new window. However, if youtry to open a document that’s already open in another window, thatwindow is brought to the front.
Close
This menu item closes the active window. The keyboard shortcut isCOMMAND-W.
Save
This menu item saves the file in the active window under the file’s currentname, without closing the window. The Save item is dimmed if thecontents of the window haven’t been modified since the file was last saved.The keyboard shortcut is COMMAND-S.
The TextEditor program 145

Save as...
This menu item displays a dialog box that allows you to make a copy ofthe file in the active window and save it under a different name. Thisaction allows you to continue editing the file under a new name. The oldfile retains its original name without being changed.
Save a Copy...
This menu item displays a dialog box that allows you to save the file in theactive window as a new file with the name “Copy Of Filename.” You canthen continue editing the original file.
Revert to Saved
This menu item throws away any changes you have made since you lastsaved the file in the active window. This item is dimmed if you haven’tmodified the file since you last saved it.
Page Setup...
This menu item displays a dialog box that allows you to set parameters forprinting a file; the dialog box is the standard Page Setup dialog box forthe type of printer that you have selected in the Chooser. See Chapter 6,“Printing From the Desktop,” for more information.
Print Selection
This menu item prints the selected contents of the active window.
Quit
This menu item closes the TextEditor program and returns you to theFinder, first allowing you to save all open documents. The keyboardshortcut is COMMAND-Q.
146 Appendix / Menu Reference

The TextEditor Edit menu
You use the items in this menu to change the contents of the activeTextEditor window. The TextEditor Edit menu contains a few specialmenu items in addition to the usual Macintosh editing commands.
Undo
This menu item nullifies the last text-editing or formatting change thatyou made. The keyboard shortcut is COMMAND-Z.
Cut
This menu item copies any selected text to the Clipboard and removes thetext from the window. The text is stored in the Clipboard until it’sreplaced by text sent there as a result of another Cut or Copy operation.The keyboard shortcut is COMMAND-X.
Copy
This menu item copies any selected text to the Clipboard but does notremove it from the window. The text is stored in the Clipboard until it’sreplaced by text sent there as a result of another Cut or Copy operation.The keyboard shortcut is COMMAND-C.
The TextEditor program 147
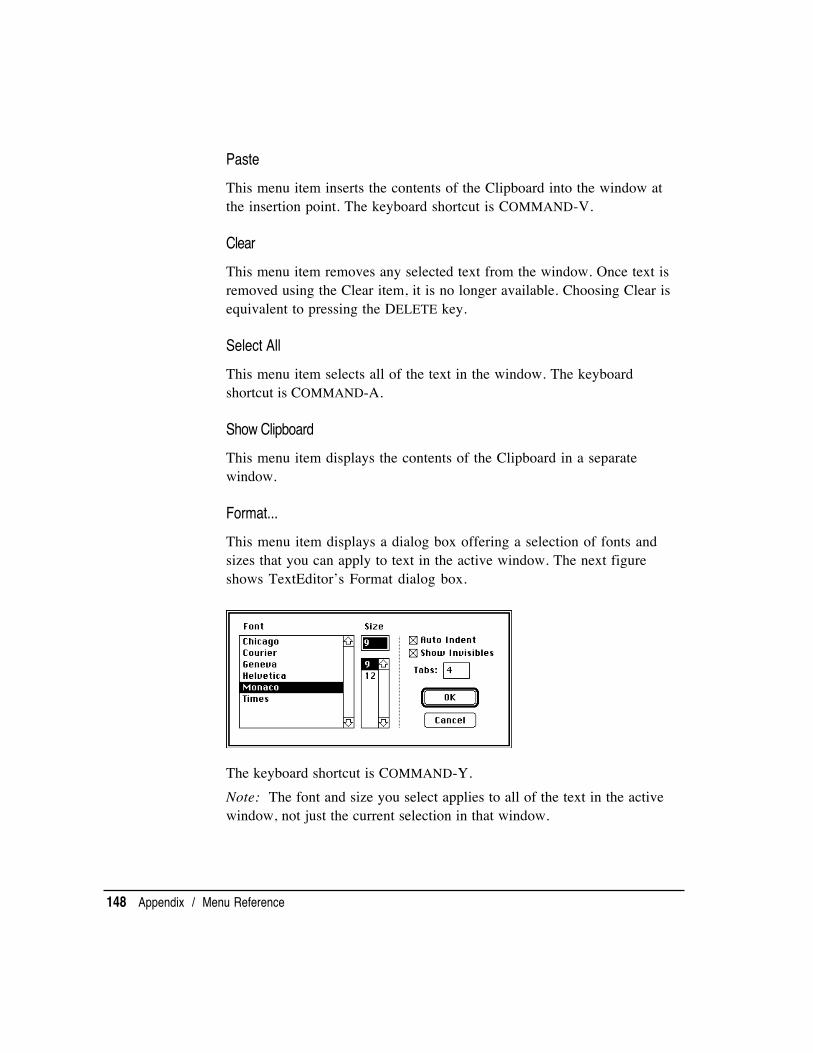
Paste
This menu item inserts the contents of the Clipboard into the window atthe insertion point. The keyboard shortcut is COMMAND-V.
Clear
This menu item removes any selected text from the window. Once text isremoved using the Clear item, it is no longer available. Choosing Clear isequivalent to pressing the DELETE key.
Select All
This menu item selects all of the text in the window. The keyboardshortcut is COMMAND-A.
Show Clipboard
This menu item displays the contents of the Clipboard in a separatewindow.
Format...
This menu item displays a dialog box offering a selection of fonts andsizes that you can apply to text in the active window. The next figureshows TextEditor’s Format dialog box.
The keyboard shortcut is COMMAND-Y.Note: The font and size you select applies to all of the text in the activewindow, not just the current selection in that window.
148 Appendix / Menu Reference

Align
This menu item aligns any selected text with the top line of the selection.
Shift Left
This menu item moves any selected text one tab stop to the left. Thekeyboard shortcut is COMMAND-[ (left bracket).
Shift Right
This menu item moves any selected text one tab stop to the right. Thekeyboard shortcut is COMMAND-] (right bracket).Note: If you hold down the SHIFT key while choosing Shift Left or ShiftRight, the selected text shifts by one space rather than by one tab.
The TextEditor Find menu
You use items in this menu to search for and replace text inTextEditor windows.
Find...
This menu item displays the Find dialog box, which allows you to find thetext string that you specify. By default, TextEditor searches forward fromthe selected text in the active window and stops searching when it reachesthe end of the document; it doesn’t go back to the beginning of thedocument. The keyboard shortcut is COMMAND-F.
Find Same
This menu item repeats the last Find operation on the active window. Thekeyboard shortcut is COMMAND-G.
The TextEditor program 149

Find Selection
This menu item finds the next occurrence of the search string in the activewindow. The keyboard shortcut is COMMAND-H.
Display Selection
This menu item causes the selected text in the active window to scroll intoview.
Replace...
This menu item displays a dialog box that allows you to search for aspecified text string throughout a file and replaces that string with adifferent string. The keyboard shortcut is COMMAND-R.
Replace Same
This menu item repeats the last Replace operation on the active window.The keyboard shortcut is COMMAND-T.
The TextEditor Mark menu
A marker is a portion of text or a position in a block of text that has beengiven a name. Markers help you navigate within documents that containblocks of text that you must locate repeatedly—as, for example, inprogram listings.
Mark...
This menu item displays a dialog box that allows you to create a newmarker in a TextEditor document. The keyboard shortcut is COMMAND-M.
Unmark...
This menu item displays a dialog box that allows you to remove a markerfrom a TextEditor document.
150 Appendix / Menu Reference

List of markers
This part of the window lists all existing markers. You can jump to thelocation of a marker by choosing the marker’s name in this menu.
The TextEditor Window menu
The TextEditor Window menu allows you to tile or stack any TextEditorwindows on the desktop.
Tile Windows
This menu item tiles any open windows—that is, displays them alongsideeach other.
Stack Windows
This menu item stacks any open windows—that is, displays them layeredon top of one other.
List of open windows
This part of the menu lists all open TextEditor windows. A checkmarkappears next to the active window. You can change the active window bychoosing its name in this menu.
The TextEditor program 151

Glossary
active program The program you’re currentlyusing. Several programs can be open at a time, butonly one is active. Open programs are listed in theApplication menu; a checkmark indicates the activeprogram.active window The window in which you canwork, and where the next action takes place. Anactive window’s title bar is highlighted and it is thefrontmost window on the screen. See also titlebar.alert box A box that contains a message. Themessage warns you that you’re asking yourcomputer to do something it can’t do, or that you’reabout to destroy some of your information. In thesecases, the message is often accompanied by the alertsound.alias In Macintosh terminology, an icon thatrepresents a specific file, folder, or disk icon, andthat you can open in place of the original icon. Youcan leave the original file in its place while movingthe alias icon to another place in the file system forconvenience. By default, the name of the alias iconis the name of the original file, plus the word alias.Apple menu The menu at the far-left end of themenu bar. Use this menu to get information aboutmemory use, to open desk accessories and items inthe Apple Menu Items folder, and to change ControlPanel settings.application A program used to perform a particulartask, such as computer-aided drawing, documentpreparation, accounting, or payroll management.See also program.
ASCII text file See text file.back up To make a copy of files or folders ontoanother disk or onto tape so that you won’t loseinformation if the original file or folder is lost ordamaged.bit Short for binary digit. The smallest unit ofinformation the computer can use.button An image of a push-button in a dialog box.You click the button to select an option or tocomplete an action.byte A unit of information. One byte is equal toeight bits. See also bit.case sensitive Able to distinguish betweenuppercase characters and lowercase characters.Programming languages are case sensitive whenthey require all uppercase letters, all lowercaseletters, or proper use of uppercase and lowercaseletters.checkbox A small box associated with an option ina dialog box or window. When you click thecheckbox, you can change the option or affectrelated options. An option is on when you see an Xin the checkbox.choose To pick a command from a menu. Younormally choose a command after you selectsomething for the command to act on—for example,selecting a disk and choosing the Open commandfrom the File menu.
click (verb) To position the pointer on something,and then press and quickly release the mouse button.(noun) The act of clicking.Clipboard A place in the computer’s memory thattemporarily stores whatever you last cut or copiedby using Edit menu commands.close box The small box on the left side of the titlebar of an active window. Clicking the close boxcloses the window.control panels Programs that you use to changefeatures such as mouse tracking, desktop appearance, sound, andkeyboard operation. A window with availablecontrol panels appears when you choose ControlPanels from the Apple menu. See also Apple menu.current directory The directory in which you arecurrently working. This directory is the startingreference point for all relative pathnames you enter.Also called the working directory.cursor See insertion point.default A preset value or action that the system usesor performs unless you give it a different instruction.dialog box A box that appears on your screen,containing a message or requesting information from you.Sometimes the message warns you that you’re asking yourcomputer to do something it can’t do, or that you’reabout to destroy information. In these cases, themessage is often accompanied by a an alert sound.directory A file that contains a list of other files;similar to a folder in a Macintosh hierarchical filesystem.double-click To position the pointer where youwant an action to take place, and then press andrelease the mouse button twice in quick successionwithout moving the mouse.drag To position the pointer on an object on thescreen, press and hold down the mouse button,move the mouse, and release the down mousebutton. When you release the mouse button, youeither confirm a selection or move the object to anew location.Ethernet A hardware medium designed to providehigh-speed interconnection between computers.
execute permission Permission to execute (run) afile, usually an application or program. See alsoread permission, write permission.file (1) For UNIX-based operating systems, anarray of bytes; no other structure is implied byUNIX systems, which even treat peripheral deviceslike files. (2) For the Macintosh Operating System,any named, ordered collection of information storedon a disk. Application programs and documents areexamples of files. You create a file when you typetext or draw graphics, give the material a name, andsave it on a disk.Finder The application that maintains theMacintosh desktop and starts up other programs.You use it to manage documents and applicationsand to get information to and from disks. It controlsthe desktop you see upon starting up your computer.folder A holder of documents and applications onthe desktop. Folders, like UNIX file systemdirectories, allow you to organize information in ahierarchical fashion.font A collection of print characters unified by adistinctive look. Times, Geneva, and Courier areexamples of fonts.fork A part of a Macintosh file; each file has twoforks. The data fork stores the text only, and theresource fork stores formatting information such asfont and tab settings.format (1) To divide a disk into tracks and sectorswhere information can be stored. Blank disks mustbe formatted before you can save information onthem. (2) To change the appearance of a text tile byusing different fonts, indents, tab settings, margins,and so forth.hierarchical file system (HFS) A method oforganization, used by the Macintosh OperatingSystem, in which disk files are grouped togetherwithin directories and subdirectories (folders withinfolders). HFS is used on hard disks and on floppydisks. In a hierarchical file system, a file is specifiedby its pathname rather than by a single filename.
154 Glossary

highlight To make something visually distinct. Forexample, when you select a block of text usingTextEditor, the selected text is highlighted—itappears as light letters on a dark background ratherthan as dark letters on a light background.home directory Usually the first directory youenter upon login, as designated in the file/etc/passwd. You can tailor your environment bymodifying various files in your home directory.home directory folder The folder that representsyour home directory on the Finder. See alsohome directory.icon An image on the screen, usually representingan item such as a file, document, disk, or applicationprogram that you can select and open.I-beam A pointer used to position the insertionpoint or to select a block of text. It resembles acapital letter I. See also insertion point.insertion point The place in a document where textyou type will be added. The insertion point appearsas a blinking vertical bar. It is not the same as acursor.kilobyte (K) A measurement of information storage.A kilobyte is equal to 1024 bytes.log in To identify yourself to the system byentering the login name of your account and youraccount password.login name The name of a user’s account. Used foridentification purposes. Same as the account name.MacPartition The part of your Apple WorkgroupServer 95 hard disk that contains the A/UX Startupprogram and related files and some systemadministration commands that you can use if youcannot start up A/UX.
manual page (Also called man page.) Referencematerial describing a specific command. With theApple Workgroup Server 95, you can display amanual page on your screen by entering thecommand man commandname in CommandShell.(Replace the placeholder commandname with thename of the command you want to learn about.)menu A list of actions or options presented by anapplication program, from which you can choose.With Macintosh-style programs, a menu appearswhen you point to the menu’s title in the menu barat the top of the screen and press the mouse button.Dragging through the menu and releasing the mousebutton while a command is highlighted choosesthat command.mouse A small device that you move around on aflat surface next to your computer. The mousecontrols a pointer on the screen whose movementscorrespond to those of the mouse. You use thepointer to select operations, move data, and drawimages on the screen.mouse button The button on the top of the mouse.In general, pressing the mouse button initiates someaction affecting whatever is under the pointer, andreleasing the button completes the action.multitasking The ability of an operating systemsuch as A/UX to perform multiple activitiessimultaneously.network A collection of interconnected,individually controlled computers, along with thehardware and software used to connect them. Anetwork allows users to share data and peripheraldevices and to exchange electronic mail.operating system Low-level software that controlsa computer by performing such basic tasks asinput/output (I/O), memory management, andinterrupt handling.
Glossary 155

password A unique set of characters that must beentered before a user can gain access to a system orperform some actions. For example, you must knowthe password for the root account to shut down thesystem.pointer (1) An arrow or other symbol on the screenthat moves as you move the mouse. You use thepointer to choose commands, select and move iconsand text, and draw images. (2) In programming, anitem of information consisting of the memoryaddress of some other item.pop-up menu A menu, usually appearing inside adialog box, that is hidden until you move the pointto its title and press the mouse button. A pop-upmenu is indicated by a box with a shadow and adownward-pointing triangle next to the menu’sname. The name is also the current menu choice.Compare pull-down menu. See also dialog box.port A socket on the back panel of a computerwhere you plug in a cable for connection to anetwork or a peripheral device.program A file containing coded instructions to thecomputer. Programs can be very simple, such as theAlarm Clock control panel, or highly complex, suchas a desktop publishing program.See also application.pull-down menu A menu that is hidden until youmove the pointer to its title and press the mousebutton. Menus in the menu bar are pull-downmenus. Compare pop-up menu.read permission Permission to view a file but notto make changes (write) to the file. See also executepermission, write permission.ROM Acronym for read-only memory. Memorywhose contents can be read, but not changed, andthat is used for storing permanent information.root (1) The top directory in a UNIX directoryhierarchy. Indicated by a slash character ( / ), it isthe first element in every absolute pathname. (2)The user with unlimited system privileges. Alsocalled the superuser.
scroll bar A rectangular bar that can be along theright or bottom of a window. Clicking or draggingin the scroll bar causes your view of the windowto change.SCSI See Small Computer System Interface.select To designate where the next action takesplace. To select something using a mouse, you clickan icon or drag across text. In some applications,you can select items in menus by typing a letter ornumber at a prompt, by using a combinationkeypress, or by using arrow keys.SHIFT-click To hold down the SHIFT key whileclicking to select more than one icon at a time, orextend a selected block of text without draggingthrough it again.size box A box in the lower-right corner of someactive windows. Dragging the size box resizes thewindow.Small Computer System Interface (SCSI) Aspecification of mechanical, electrical, andfunctional standards for connecting small computerswith intelligent peripheral devices such as harddisks, printers, and CD-ROM disks.System Folder A folder containing systemsoftware. An A/UX system contains a minimum offive system folders; however, only one can be activeat a time. The active System Folder contains aminiature computer in its folder icon.system software Software that supports applicationprograms by managing memory and bycommunicating with input and output devices. Seealso application.text box The rectangular field in a dialog boxwhere you can type information. See also dialogbox.text file A file containing information expressed intext form and whose contents are interpreted ascharacters, using the American Standard Code forInformation Interchange (ASCII) format. TextEditorsaves the text of a file as a text file (the data fork)and formatting information in a separate file (theresource fork). See also fork.
156 Glossary

text-only file See text file.tile To arrange a group of windows so that theiredges are touching one another (like the tiles on atiled floor), rather than overlapping one another.title bar The horizontal bar at the top of a windowthat shows the name of the window. When thewindow is active, the title bar is highlighted with aseries of horizontal lines. You can move the windowby dragging the title bar.UNIX operating system A general-purpose time-sharing system and related set of utilities, originallydeveloped at AT&T Bell Laboratories. A/UX is anenhanced version of the UNIX operating system,combining UNIX with the Macintosh interface.user account The permission to log in to A/UXunder an assigned login name, usually with a uniquepassword, and usually with a specifically assignedhome directory. See also home directory, loginname.
user name See login name.user permission Permission for the owner of thefile to use the file. If a file has only user permission,no other users can read it, write to it, or run(execute) it. See also execute permission, readpermission, write permission.window The area that displays information on adesktop; you view a document in a window. Youcan open or close a window, move it around on thedesktop, and sometimes change its size, scrollthrough it, and edit its contents.write permission Permission to write to a file. Seealso execute permission, read permission.zoom box A small box in the upper-right corner ofsome windows. Clicking the zoom box resizes thewindow so that you can see all of its contents (ifpossible); clicking the zoom box again returns thewindow to its original size.
Glossary 157

Index
AAbout Balloon Help menu item 143About This Macintosh menu item 128accounts, logging in 26-28active system folder icon 38Alarm Clock 103-104alert sound 108-111alias 47-48
application programs and 125locking 50TextEditor and 65-66
Align menu item 149amber light 57, 59-60Apple DocViewer xivApple menu 128-129
installing items in 10Apple Menu Items folder 100
alias and 47AppleShare Pro, logging out and 34AppleTalk network 90-92
zones 93Application menu 12, 143-144
CommandShell and 30-31error monitoring and 33program switching and 18
application programs, adding 125arrow pointer 16arrows, scroll 9ASCII text file 64Autologin file 26, 34A/UX 3.0.1 operating system 2, 24-25
command icon 39shutting down 34-35
Bbacking up 55-56
sounds and 111tape cassettes 57-62
Balloon Help 20-21, 142-143bars, scroll 9-10binary data file icon 39bitmapped fonts 100
CCancel button 25Cancel option 79case sensitivity 27, 77-78caution signal 60CD-ROM discs 56-57Change Password menu item 28-29characters
invisible 80repeat rate 106-107
Chooser menu item 92-93Clean Up menu item 43Clear Lines Off Top menu item 32Clear menu item 136, 148Clear Up Window menu item 141clicking 5
from keyboard 108Clipboard 17, 69Close All menu item 130close box 10-11Close menu item 18, 76, 145Close Window menu item 11, 130

closingdocuments 18System Console window 32windows 10-11
colon (:) 20file names and 41
colordesktop pattern and 113highlight 118-120icons and 118labels and 114-115
Color control panel 119-120color wheel 119-120COMMAND key 13-14command, dimmed 12COMMAND–0 (zero) 31COMMAND–[ (left bracket) 149COMMAND–] (right bracket) 149COMMAND–A 136, 148COMMAND–C 17, 135, 147COMMAND–D 19, 132COMMAND–E 141COMMAND-F 44-45, 133, 149COMMAND–G 44-45, 134, 149COMMAND–H 150COMMAND–I 49, 130COMMAND–M 150COMMAND–N 129, 145COMMAND–O 129, 145COMMAND–P 130COMMAND–Q 19, 146COMMAND–R 150COMMAND–S 17, 145COMMAND–Shift 57COMMAND–Shift-Clear 108COMMAND–T 150COMMAND–V 17, 136, 148COMMAND–W 130, 145COMMAND–X 17, 135, 147COMMAND–Y 133, 148COMMAND–Z 135, 147
Commands menu 32CommandShell program 29-31
error monitoring and 33printing and 92
computers, turning on and off 2-3Control Panels window 102-103
keyboard and 106mouse and 105-106
copyingbetween documents 74-76documents 19to floppy disk 54-56icons 118
Copy menu item 17, 135in TextEditor 74-75, 147
Courier font xiiicreating
documents 16, 66folders 42
Cut menu item 17, 69, 135, 147
Ddata-compression feature 57DAT (digital audio tape) 58date, changing 102-103Date menu item 140DDS (digital data storage) 58DELETE key 74, 136, 148desk accessories 129desktop
changing pattern of 112-113Finder program and 3-4
dialog boxes 12
160 Index
diamond-shaped symbol 32digital audio tape (DAT) cassettes 58digital data storage (DDS) tape cassettes 58dimmed command 12directory. See foldersdirectory dialog box 42-43disks 52-57Display Available Fonts menu item 95Display Selection menu item 150documents 144-151
closing 18copying 19creating 16, 66editing 17, 72-79listing 50naming 42-43saving 17, 70-71
double-clicking 5changing speed 106from keyboard 108
Download Fonts menu item 95-96dragging 5
from keyboard 108drop box icon 38Duplicate menu item 19, 132
EEasy Access control panel 108Edit menu 17, 68-69, 135-136
formatting and 79eject button 61Eject Disk menu item 56, 141Empty Trash menu item 14, 124, 141Entire Word button 77-78Erase Disk menu item 142error-correction feature 57errors, CommandShell and 33Ethernet card 90-91executable file icon 40
FFast option 105file hierarchy icon 25File menu 70-71, 129-134
icons and 6program opening and 15
filesASCII 64copying 54-56finding 43-46getting information on 48-49installing in System Folder 98-99locking 49-50Macintosh 94-96marking places in 83-86name restrictions 41opening 72-73read-only 73removing from System Folder 99resource fork 64restoring 55text-only 64
file sharing 131Find Again from the File menu item 44-45Find Again menu item 134Finder program 128-144
CommandShell and 31desktop and 3-4environment 128
Finder Shortcuts menu item 143Find from the File menu item 44-45Find menu item 43-46, 133
in TextEditor 76-77, 149Find Same menu item 149Find Selection menu item 150fixed-size fonts 100floppy disk icon 41floppy disks 52-57folder icon 38folders 41-42
copying 54-56finding 43-46
Index 161

fontsdownloading 95-96installing 101removing 101selecting 80transferring to LaserWriter 95-96using 100-101
Format menu item 80, 148formatting 79-86
disks 52-53information file 64
GGeneral Controls panel 102-103, 112-114Get Info menu item 130
alias and 48files and 48-49
graphics program 117grays, shades of 121green light 59-60Guest account 26
Hhardware 128Help menu 12, 20-21, 142-143hidden contents, viewing 9Hide Balloons menu item 21Hide CommandShell menu item 33Hide Others menu item 144Hide Program menu item 144home directory 25
icon 39humidity, tape drive and 61hyphen (-) 41
I, JI-beam pointer 16Icon menu item 137icons
alias and 47changing a file's 49changing appearance of 116-118defined 4file hierarchy 25file-system 40-41Finder program 38-41flashing 32floppy disk 52
folder 38-39hard disk 56MacPartition 25name changing 20no write permission 73opening 6rearranging 43System Folder 98TextEditor 65-66text file 39
ID numbers 123Info window 130
for alias 48for file 49
insertion point 16, 67adjusting blinking of 114
internal tape-backup unit 57-62
Kkeyboard
adjusting 106-108layout of 108shortcuts 13
Keyboard control panel 107-108Kind menu item 139
162 Index

LLabel menu 114-115, 140Label menu item 139Labels control panel 115labels, icons and 118LaserWriter Font Utility 95-96LaserWriter IISC printer 90LaserWriter SC printer 90line breaks 67Literal button 77-78loading procedure 59LocalTalk cable system 90locked folder icon 38locking
files 49-50floppy disk 54tape cassette 61
logging in 26-28logging out 34Login dialog box 26-29Login System Folder 26, 98Logout menu item 34, 142
MMacintosh file system icon 41Macintosh Operating System 24Macintosh program icon 40MacPartition icon 25Make Alias menu item 47, 65, 125, 133marking 83-86, 150-151Mark menu item 84-85, 150Media Recognition System (MRS) 58memory 138
changing allocation 49menu bar 3-4, 12
main monitor and 123menus 12-13
adjusting blinking of items 113-114defined 4
messagesalerts 32A/UX advisory 25clearing 32Empty Trash menu item and 124printing and 94system 31warning of shut down 35
monitors, configuring multiple 122-123Monitors control panel 121-122mouse
adjusting movement 105-106using 4-5
Mouse Keys feature 108
NName menu item 137-138names
changing icon 20of documents 42-43
login 27restrictions for files 41
New Folder menu item 42, 129New menu item 145Notification Levels menu item 32-33
Oon-line documentation xivOpen menu item 6, 15, 129
in TextEditor 72-73, 145OPTION key 13-14
Clean Up Window and 43Empty Trash menu item and 124File menu and 130Special menu and 141
Options menu 28-29outline fonts 100
Index 163

PPage Setup menu item 92, 134, 146passwords 26
changing 28-29Password text box 27Paste menu item 17, 69, 136
in TextEditor 75, 148pasting
between documents 74-76icons 118text 68-69
patterns 112-113percent sign (%) 64Personal LaserWriter SC printer 90pixel 117pointer 4-5, 16
keyboard and 108pop-up menus 12PostScript fonts 95POWER ON key 2Preferences menu 32-33pressing 5printers
choosing 92connections 90-92
printingMacintosh techniques 94-96in TextEditor 86-87
Print menu item 130PrintMonitor program 94Print Selection menu item 87, 146Print Window menu item 87, 134programs
switching 18working with 15-19
progress bar 24pull-down menus 12Put Away menu item 48, 56, 133
QQuit menu item 19, 88, 146
Rread permission 40, 73recording sounds 110-111Replace All option 79Replace menu item 78-79, 150Replace Same menu item 150resource fork 64, 71, 79Restart menu item 35, 142restoring 55Retrospect Remote 55, 58Revert to Saved menu item 71, 75, 146root account 25root privileges 34
SSave a Copy menu item 71, 146Save As menu item 70-71, 146Save Format Info menu item 71, 79Save menu item 17, 71, 145scalable fonts 100screens
brightness of 122customizing 112-121
screen saver programs 122script icon 40scroll box 9Search Backwards option 77, 79searching. See Find menu itemSelect All menu item 74, 136, 148selecting text 16, 68Sharing menu item 131shell script icon 40shell utility 29-31SHIFT key
mouse movement and 5searches and 77Shift Left/Right and 149
Shift Left menu item 80, 149Shift Right menu item 80, 149Show All menu item 144Show Balloons menu item 20, 143
164 Index

Show Clipboard menu item 136, 148Shut Down menu item 3, 35, 57, 142size box 8Size menu item 138Small Computer System Interface (SCSI) devices 3Small Icon menu item 136-137software, system 128Sound control panel 109-111Special menu 34-35, 43, 141-142
Trash and 14turning computer off and 3
Stack Windows menu item 83, 151start account 26Startup Items folder 99Startup program 24-25Startup System Folder 98stationery pad 49status lights 57, 59-60submenus 13System Console window 25, 31-33System Folder 98-99
fonts and 101System Folder window 9, 99system software 128
Ttab settings 80tape cassettes 57-62tape drive
environmental concerns 61head cleaning 60, 62
temperature, tape drive and 61text
aligning 80deleting 74editing 68-69entering 66-67finding 76-77formatting 80replacing 78-79selecting 68
TextEditor program 64, 144-151Edit menu 147-149File menu 144-146Find menu 149-150Mark menu 150-151opening 15quitting 88starting 65-66Window menu 151
text file icon 39text-only file 64Tile Windows menu item 82, 151time, changing 102-103title bar 7tracking, changing speed 105Transmission Control Protocol/Internet Protocol
(TCP/IP) 92Trash 14
disk ejecting and 56emptying warning 124System Folder and 99
TrueType fonts 100tutorial 65
UUndo menu item 135, 147UNIX operating system 2
command icon 39file system icon 40printing and 92
UNIX Permissions menu item 131-132Unmark menu item 86, 150utility programs 29-31
Vvariable-size fonts 100Very Slow option 105View menu 50, 136-140Views control panel 116vi (visual editor) text editor 64
Index 165

W, X, YWindow menu, formatting and 79windows 151
active 7arranging multiple 81-83changing appearance of 116changing size 8closing 10-11colors of 120defined 4hidden contents 9moving 11
Wrap-Around Search option 77, 79write permission 73
Zzoom box 8
166 Index

The Apple Publishing System
Basic Skills was written, edited, and composed on a desktoppublishing system using Apple Macintosh computers, anAppleTalk network system, Microsoft Word, and QuarkXPress.Line art was created with Adobe Illustrator. Proof pages wereprinted on Apple LaserWriter printers. Final pages were outputdirectly to separated film on a Linotronic L300. PostScript™,the LaserWriter page-description language, was developed byAdobe Systems Incorporated.
Text type is Times Roman and display type is NarrowHelvetica. Ornaments and hardware icons are custom symbolsdesigned for AppleComputer and incorporated into theAppleIcon Font. Some elements, such as program listings, areset in Apple Courier, a fixed-width font.