AXIS SKS-3 RHI Heat Meter
52
AXIS INDUSTRIES HEAT METER CALCULATOR SKS – 3 BASIC TECHNICAL DESCRIPTION USER MANUAL Kulautuvos g. 45a, LT47190 Kaunas, Lithuania tel. (+370 37) 360234; fax. (+370 37) 360358. [email protected] www.axis.lt
-
Upload
thorne-derrick -
Category
Technology
-
view
169 -
download
5
Transcript of AXIS SKS-3 RHI Heat Meter
AXIS INDUSTRIES
HEAT METER CALCULATOR
SKS – 3
BASIC TECHNICAL DESCRIPTION
USER MANUAL
Kulautuvos g. 45a,
LT47190 Kaunas,
Lithuania
tel. (+370 37) 360234;
fax. (+370 37) 360358.
www.axis.lt
Jack Nottidge
Heattracing

Heat meter calculator SKS-3 PESKS3MID01 2
CONTENTS
Safety information.................................................................................. 3
EC declaration of conformity................................................................ 3
1. Application field.................................................................................... 4
2. Technical data..........................................................……......…............ 9
3. Accessories and sub-assemblies of heat meter..............………...….... 15
4. Operating principle.....................................………........................….. 15
5. Marking and sealing....................……….....................................….... 17
6. Safety requirements..............................................................………… 17
7. Installation........................................................................………........ 17
8. Operation..............................................................................………… 26
9. Reverification..................................................................…………...... 37
10. Transportation and storage…………………………………………... 37
11. Warranty......................................................…………….................... 37
12. Acceptance certificate…………………………………………….….. 38
Annex A Displaying and configuration data ................................ 39
Annex B Mounting diagrams.................……………..… ………... 43
Annex C Numbering of terminals............................................... ….. 48
Annex D Outline and mounting dimensions.....………………......... 49
For EU Customers only - WEEE Marking.
Marking of electrical and electronic equipment in accordance with Article 11 (2) of
Directive 2002/96/EC
This symbol on the product indicates that it will not be treated as household waste. It must
be handed over to the applicable take-back scheme for the recycling of electrical and
electronic equipment. For more detailed information about the recycling of this product,
please contact your local municipal office.

Heat meter calculator SKS-3 PESKS3MID01 3
SAFETY INFORMATION
Warning!
Switch off mains power supply before changing, repairing, connecting or disconnecting
system parts! Power switch has to be installed close to the calculator.
The heat meter calculator SKS-3 is made and inspected in compliance with EN61010-1.
There are no life dangerous factors, when calculation unit is powered from 3,6 V lithium battery.
The lithium batteries must be properly returned.
If calculation unit is powered from mains power supply, it contains dangerous ~230 V electrical
current. It is necessary to follow general safety requirements during installation and maintenance
process.
The electrical connections must be made in compliance with the relevant standard while
observing local safety regulations.
Only qualified technical personnel may install and maintain heat meters (certificates for electrical
installation work with equipment up to 1000 V are required). Personnel must be familiar with
appropriate technical documentation and general safety instructions. To ensure safe operation, the
user must observe the notes and warnings contained in this instruction.
Device comply with safety class II. Protective grounding is not required, because housing is made
from plastics, and conductive parts are not exposed to the surface.
To protect power circuits from current overrun, 1A fuse, marked “F1”, is mounted on the bottom
side of power supply module. Remove power supply module to replace the fuse.
If relay output current exceeds 2 A, it may damage output circuits. It is recommended to use
additional protection circuits to protect relay outputs from damage.
Operation safety requires reliable insolation of electrical circuits, stable mounting of calculating
unit and proper grounding of all system components.
Safety requirements for flow, temperature and pressure sensors are provided in appropriate
technical documentation.
EC DECLARACION OF CONFORMITY
AB „Axis Industries“ herewith declares, that this product complies with the relevant requirements
of the following directives:
- 2004/22/EC Measuring instruments Directive
- 2004/108/EC EMC Directive
- 2006/95/EC Low voltage Directive
EC-type examination certificate
LT-1621-MI004-001

Heat meter calculator SKS-3 PESKS3MID01 4
1. APPLICATION FIELD
SKS-3 is designed for metering and monitoring of heating and cooling.energy in closed or open
heating/cooling systems, installed in dwelling houses, office buildings or energy plants.
The calculator SKS-3 is a sub-assembly of a heat meter, together with standard flow sensors
(based on ultrasonic, electromagnetic or mechanical measurement principle with standard pulse output),
temperature and pressure sensors.
SKS-3 measures and calculates supplied flow parameters, displays measurement data on the
display, records and stores data in the internal archive.
Heat meter calculator SKS-3 corresponds to essential requirements of the Technical Regulation
for Measuring Instruments, dated 30 March 2006 (transposing in the NB’s country law Directive
2004/22/EC of 31 March 2004 on measuring instruments):
- Annex I Essential requirements
- Annex MI-004 Heat meter ,
SKS-3 complies with the European standard LST EN 1434 “Heat meters”.
SKS-3 fulfils “C” class environment protection requirements according to LST EN1434-1:2007
Ambient temperature at +5 oC to +55
oC (non-condensing,indoor installation),
Mechanical environment class: M1 ,
Electromagnetic environment class: E2.
The calculator can serve two independent heating systems simultaneously:
- up to 5 temperature measurement channels,
- up to 5 flow measurement channels,
- up to 2 pressure measurement channels.
The user may select one of seven possible installation diagrams (measuring circuits) , according to
the application type:
Selection possibility
Application type
Conditional
type
reference
For the
first
heating
system
For the
second
heating
system
For closed heating systems. Flow sensor on supply pipe U1 +* +
For closed heating systems. Flow sensor on return pipe U2 +* +
For closed heating systems.
Flow sensor installed in heating circuit
U3 +* -
For open heating systems.
Flow sensors on supply and return pipes
A1 + -
For open heating systems and measurement of supplied
heating energy.Flow sensors on replenishment and return pipes
A2 + -
For single-pipe hot water supply systems A3 +* -
For open heating systems and measurement of supplied heating
energy.Flow sensors on replenishment and supply pipes
A4 + -
For flow, temperature, pressure measurement (The possibility
of the measurement of the thermal energy is not available)
U0 - +
Note. 1)
- The requirements of the Directive 2004/22/EC are applied to measuring circuits U1 and U2.
The national technical rules are applied to the following measuring circuits: U3; A1; A2; A3; A4; U0.
U0 is applied only to measurement of individual parameters (flow, temperature, pressure) and is not used
for accounting of thermal energy. 2)
-At least one of the programmed measurement schemes of calculator must be U1 or U2 3)
* - For these diagrams it is provided tariffing (and measurement of energy for cooling) function.
In this case it is possible to apply to the second heating system only the scheme U0.

Heat meter calculator SKS-3 PESKS3MID01 5
Number of heating
system
Type of permissible measuring
circuits
Number of flow
sensors
Number of
temperature sensors
First heating system U1, U2, U3, A1, A2, A3, A4 V1, V2 T1, T2, T5
Second heating system U0, U1, U2 V3, V4, V5 T3, T4
Note: Pressure sensors (p1,p2) are intended for the application in any heating system
Measurement diagrams and energy calculation formulas are provided in the Table 1. Flow,
temperature and pressure measurement channels that are not used for heat energy measurement can be
used to monitor other parameters. Measured volume can be converted into weight expression, using
practically measured flow temperature.
Jack Nottidge
Heattracing

Heat meter calculator SKS-3 PESKS3MID01 6
Heat meter calculator SKS-3 PESKS3MID01 7
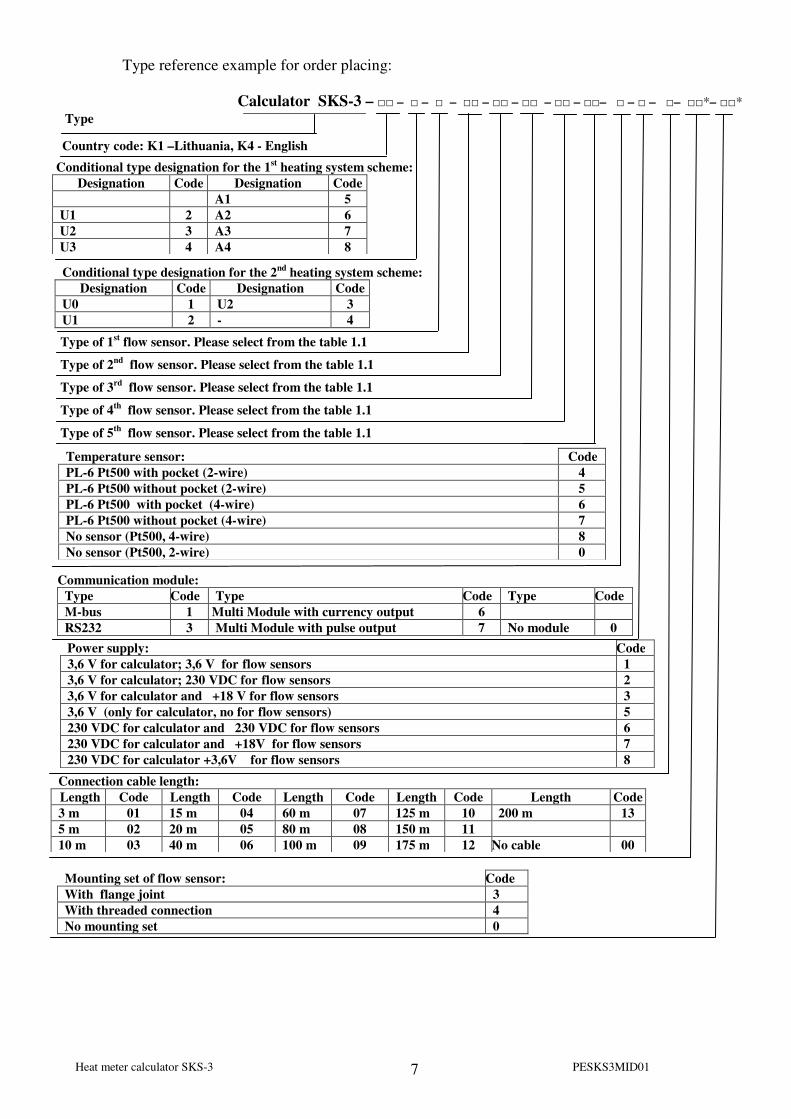
Type reference example for order placing:
Type
Communication module:
Type Code Type Code Type Code
M-bus 1 Multi Module with currency output 6
RS232 3 Multi Module with pulse output 7 No module 0
Temperature sensor: Code
PL-6 Pt500 with pocket (2-wire) 4
PL-6 Pt500 without pocket (2-wire) 5
PL-6 Pt500 with pocket (4-wire) 6
PL-6 Pt500 without pocket (4-wire) 7
No sensor (Pt500, 4-wire) 8
No sensor (Pt500, 2-wire) 0
Conditional type designation for the 1st heating system scheme:
Designation Code Designation Code
A1 5
U1 2 A2 6
U2 3 A3 7
U3 4 A4 8
Calculator SKS-3 – □□ – □ – □ – □□ – □□ – □□ – □□ – □□– □ – □ – □– □□*– □□*
Country code: K1 –Lithuania, K4 - English
Type of 1st flow sensor. Please select from the table 1.1
Power supply: Code
3,6 V for calculator; 3,6 V for flow sensors 1
3,6 V for calculator; 230 VDC for flow sensors 2
3,6 V for calculator and +18 V for flow sensors 3
3,6 V (only for calculator, no for flow sensors) 5
230 VDC for calculator and 230 VDC for flow sensors 6
230 VDC for calculator and +18V for flow sensors 7
230 VDC for calculator +3,6V for flow sensors 8
Connection cable length:
Length Code Length Code Length Code Length Code Length Code
3 m 01 15 m 04 60 m 07 125 m 10 200 m 13
5 m 02 20 m 05 80 m 08 150 m 11
10 m 03 40 m 06 100 m 09 175 m 12 No cable 00
Mounting set of flow sensor: Code
With flange joint 3
With threaded connection 4
No mounting set 0
Type of 2nd
flow sensor. Please select from the table 1.1
Type of 3rd
flow sensor. Please select from the table 1.1
3-iojo srauto jutiklio tipas. Jutiklių tipai ir jų kodai pateikti 1.1 lentelėje Type of 4
th flow sensor. Please select from the table 1.1
4-ojo srauto jutiklio tipas. Jutiklių tipai ir jų kodai pateikti 1.1 lentelėje Type of 5
th flow sensor. Please select from the table 1.1
5-ojo srauto jutiklio tipas. Jutiklių tipai ir jų kodai pateikti 1.1 lentelėje
Conditional type designation for the 2nd
heating system scheme:
Designation Code Designation Code
U0 1 U2 3
U1 2 - 4

Heat meter calculator SKS-3 PESKS3MID01 8
Table 1.1. Flow sensor coding
Type of flow sensor Code
Ultrasonic flow sensor SDU-1 DN25 17
Ultrasonic flow sensor SDU-1 DN32 18
Ultrasonic flow sensor SDU-1 DN40 19
Ultrasonic flow sensor SDU-1 DN50 20
Ultrasonic flow sensor SDU-1 DN65 21
Ultrasonic flow sensor SDU-1 DN80.2 22
Ultrasonic flow sensor SDU-1 DN80.1 23
Ultrasonic flow sensor SDU-1 DN100.2 24
Ultrasonic flow sensor SDU-1 DN100.1 25
Ultrasonic flow sensor SDU-1 DN150.2 26
Ultrasonic flow sensor SDU-1 DN150.1 27
Ultrasonic flow sensor SDU-1 DN200.2 28
Ultrasonic flow sensor SDU-1 DN200.1 29
No flow sensor 00
When placing orders, please find type reference examples for sub- assemblies (flow, temperature
and pressure sensors – selected from Chapter 3) in related technical documents.

Heat meter calculator SKS-3 PESKS3MID01 9
2. TECHNICAL DATA
2.1. General information
Only technical description of calculator is provided in this document. Technical description of
other sub- assemblies (flow, temperature, pressure sensors – according to the modification, selected by
customer, as described in the paragraph 3) is provided in appropriate technical documents.
2.2. Heat energy measurement
2.2.1. Heat energy measurement error of calculator – not more than ±(0,5+2 / ∆Θ) %,
Where ∆Θ – temperature difference between measured flow and return temperatures (oC),
depending on energy calculation formula (from Table 1). The smallest temperature difference from
(Θ1-Θ2) and (Θ1-Θ5) is used to calculate heating energy E1 for measurement diagrams A1, A2, A4.
2.2.2. Heat energy calculation
Consumed heat energy is calculated according to formulas provided in Table 1.
It is possible to perform calculations in two ways, using pressure values *:
- programmed individually for each particular heating system *;
- practically measured ( 1-st pressure channel corresponds to the supply pipe, 2-nd – return
pipe).
Possible heat energy measurement algorithms (individually selected for each particular
measurement system)*:
• standard unidirectional flow measurement, energy is calculated without any restrictions,
• special unidirectional flow measurement, energy is calculated:
a) when flow rate exceeds programmed maximum allowed value -
according to programmed rated maximum value for appropriate flow
channel;
b) when flow rate is under programmed minimum allowed value -
according to programmed rated minimum value for appropriate flow
channel;
c) when temperature difference is under programmed minimum
allowed value – according to programmed rated minimum temperature
difference Θ1-Θ2 (for the 1-st heating system) or Θ3-Θ4 (for the 2-nd
heating system).
Error code is generated when parameter values exceed given limits. Also, in
that case the device stopc calculating working time, and calculates error
duration.
• winter / summer flow in 2-nd channel is measured in both directions, energy is calculated
taking into account flow direction without any limitations (only for “A1”
measurement scheme – see Table 1).
Calculated energy is stored in main register and in corresponding tariff register (1 or 2) when tariff
condition is activated.
Tariff condition is programmed in configuration mode. One of the following conditionds can be
programmed independent of 1st or 2
nd tariff:
When the tariff conditions are fulfilled the consummed heat energy is counted in corresponding
tariff register (energy E2 orE3). Energy to the main register E1 and energy to the next register is
not counted.
Energy to the main register E1 is counted, when conditions of one of the activated tariffs are not
fulfilled.
When the tariff with the condition „T1<T2“ is active , energy Et is calculated by formulas in 1
Table, marked with „*“.
Alternate of thermal energy is calculated each 10 s depending on water volume and measured
temperatures by formulas, depending on selected measurement scheme (Table 1).

Heat meter calculator SKS-3 PESKS3MID01 10
2.3. Temperature measurement Number of sensor inputs (measurement channels) 1…5
Temperature sensors type Standard version - Pt500
(by order Pt1000)
Absolute temperature Θ measurement error no more than ± 0,3 oC
Sensor connection method 2-wire, 4-wire
Max. cable length between calculator and
each of the sensors:
for the 4-wire method not more than 200 m
for the 2-wire method not more than 5 m
Measuring range 0…160 oC
Displaying range -40…160 oC
Temperature difference (Θ1-Θ2 and Θ3-Θ4)
measuring range 2…160 oC
Resolution of temperatures and temperature
difference 0, 1 oC
Recorded errors and error duration Θ >160 oC (or open circuit),
Θ < -40 oC (or short-circuit ),
temperature difference Θ1-Θ2 or Θ3-Θ4
is below programmed ∆Θmin value (See
cl.8.6)
2.4. Flow measurement
Number of pulse inputs 1…5
Pulse input device class IB (or IC- if noise filter is not available)
Pulse value programmable
Input noise filter programmable (only for class IB)
Max. cable length between calculator and
each of the sensors not more than 200 m (see table 2)
Reverse flow measurement possibility
(using direction indication signal) possible for 2-nd flow channel
Recorded errors and error duration short circuit, disengaged flow sensor,
(or log.1) longer than 2 s
flow rate exceeds programmed maximum
allowed value
flow rate is under programmed minimum
allowed value
Measurement units m3 or t (only for 1 …4 flow measurement
channel)
Maximum permissible input pulse frequency and
minimal permissible pulse or pause duration,
depending on pulse type and cable lenght:
Table 2
Power supply type for calculator, flow
pulse input type
Sensor
cable
length, m
Maximum permissible
pulse frequency, Hz
Minimal permissible
pulse or pause
duration, ms
Mains supply
or active pulses
Up to 200 1000 (5)*) 0,5 (100) *
)
Up to 10 200 (5)*) 2,5 (100) *
) Battery supply and passive pulses
(transistor key or mechanical contact) Up to 100 10 (5)*) 50 (100) *
)
*) - values in brackets for pulse input devices class IB

Heat meter calculator SKS-3 PESKS3MID01 11
2.5. Pressure measurement
Inputs (measurement channel ) 0…2
Display units kPa
Fiducial error not more than ± 0,5 % of the upper limit of
the measurement range
Pressure measurement ranges:
- lower limit 0 kPa
- upper limit programmable
Input current limits 0-5 mA, 0-20 mA, 4-20 mA (programmable)
2.6. Time measurement
Relative time measurement error not more than ± 0,01 %
Calculator measures:
- real time - calendar
- time, when device is powered on
- total operation time, when 1st and 2
nd measurement systems are functioning normally
- normal operation time for each measurement system
- total failure time, when at least one temperature or flow sensor is broken
- failure time for each measurement system (in the case of temperature or flow sensor failure)
- time, when flow rate exceeds programmed maximum allowed value for channels q1…q4
- time, when flow rate is under programmed minimum allowed value for channels q1…q4
- time, when temperature difference is under programmed minimum allowed value Θ1-Θ2 or
Θ3-Θ4.
Display resolution:
• the real time display 1 s
• for operating time display 0,01 h
Time of storage date not less than 10 years
2.7. Display (LCD)
The device is equipped with 8-digits LCD (Liquid Crystal Display) with special symbols to
display parameters, measurement units and operation modes
The following information can be displayed:
- integral and instantaneous measured parameters, listed in the Table 4.
- archive data, listed in Table 4.
- device configuration information (see Fig. 8.7).
- report printing control information (see Fig.8.5).
Display resolution (directly corresponding with pulse output value), depending on programmed
maximum flow rate value (the highest value in the energy calculation formula for each particular heating
system), is provided in the Table 3.
Table 3
Maximum
programmed flow
rate, m3/h
Displayed fluid volume (mass)
lowest digit value
(flow pulse output value), m3
Displayed energy lowest digit
value (energy pulse output
value),
MWh, Gcal, GJ
Maximum
value of
thermal
power, MW
≤ 5 0,001 0,0001 3
≤ 50 0,01 0,001 30
≤ 500 0,1 0,01 300
> 500 1 0,1 3000
Heat meter calculator SKS-3 PESKS3MID01 12
2.8. Measured and recorded parameters are listed in the Table 4
Table 4
Arbitrary
symbol Parameter
Display capacity,
measurement units, measurement ranges
Recorded in
archive
Integral parameters
∑E Total energy consumed in 1-st and 2-nd system
E1 Energy consumed in 1-st system
E2 Energy consumed in 2-nd system
E3 Energy consumed for heating in 1-st system (or
„L3“ tariff energy)
8digits,
MWh, Gcal, GJ*
V1(M1) Fluid volume (mass) in 1-st system
V2 (M2) Fluid volume (mass) in 2-nd system 8 digits,
m3 (t)
-M2 Reverse flow fluid mass in 2-nd channel (only for
“winter / summer” algorithm) 8 digits,
m3 (t)
M1-M2 Fluid volume (mass) difference between 1-st and
2-nd measurement channels 8 digits,
t
V3 (M3) Fluid volume (mass) in 3-rd system
V4 (M4) Fluid volume (mass) in 4-th system 8 digits ,
m3 (t)
M3-M4 Fluid volume (mass) difference between 3-rd and
4-th measurement channels 8 digits,
t
Absolute values
every hour,
alterations every
hour, day and
month
td1 Operation time of 1-st heating system
td2 Operation time of 2-nd heating system
t∑ Total operation time
8 digits,
0,01 h
Er∑ Common measurement errors 3 digits
Er 1 Flow measurement errors 5 digits
Er 2 Temperature measurement errors 5 digits
V5 Fluid volume (mass) in 5-th channel 8 digits, m3 -------
Instantaneous parameters
∑P Total instantaneous thermal power on 1-st and 2-
nd systems
P1 Thermal power on 1-st system
P2 Thermal power on 2-nd system
P3 Thermal power on 1-st system consumed for
heating (or „L2“tariff thermal power)
5 digits,
kW
-------
q1 Flow rate on 1-st channel
q2 Flow rate on 2-nd channel
q3 Flow rate on 3-rd channel
q4 Flow rate on 4-th channel
q5 Flow rate on 5-th channel
5 digits,
m3 /h
-------
p1 1-st channel fluid pressure
p2 2-nd channel fluid pressure 0 - 2500,0 kPa
Θ1 1-st channel fluid temperature
Θ2 2-nd channel fluid temperature
0-160 oC
- 40,00 ...+160,00 oC
Θ1-Θ2 1-st and 2-nd channel temperature difference 3- 160 oC
± (0...160,00) oC
Θ3 3-rd channel fluid temperature
Θ4 4-th channel fluid temperature
0-160 oC
- 40,00 ...+160,00 oC
Θ3-Θ4 3-rd and 4-th channel temperature difference 3- 160 oC
± (0...160,00) oC
Θ5 5-th channel fluid temperature 0-160 oC
- 40,00 ...+160,00 oC
Average
hourly, daily and
monthly data

Heat meter calculator SKS-3 PESKS3MID01 13
2.9. Data recording and storage
Following daily, weekly and monthly parameter values are recorded in calculator’s memory:
- absolute integral instantaneous parameter values (listed in Table 4)
- hourly, weekly and monthly alterations of integral parameters (listed in Table 4)
- hourly, weekly and monthly average values for all measured temperature and pressure values
- error and information codes (see paragraph. 8.2.1) that occurred during the last hour, day and
month
Archive data is retained even if device is disconnected from power supply for the whole lifetime
period.
Data logger capacity:
up to 32 last months – for daily and monthly records,
up to 3,5 last months (2600 hours) - for hourly records.
2.10. External communication modules and interfaces
Optical interface EN 62056-21:2003 (IEC 62056-21:2002)
(integrated into the front panel)
The following communication modules are available as options:
Two configurable pulse-frequency outputs
(available only with optional plug-in multi Active +18 V (when mains supply)
module SKU46 with pulse outputs) Passive (Umax42 V, I< 20 mA )
Two configurable current outputs
(available only with optional plug-in multi
module SKU45 with current outputs) 0-20mA or 4-20mA
Configurable double relay output
for limiting regulation or alarm function
Available only with mains power supply module
(see paragraphs 2.11 and 2.12). 230V, 2A
Serial digital communication interface M-bus, CL or RS -232
(as optional plug-in module),
The configurable pulse-frequency output in “pulse mode” can be used for thermal energy (ΣE, E1,
E2, E3) or quantity of water V1 (M1), V2(M2), V3(M3), V4(M4), V5 pulses Pulse value will correspond
to the lowest digit of indicated parameter.
The configurable pulse-frequency (or current) output in “frequency mode” can be used for thermal
power (ΣP, P1, P2, P3), flow rate (q1, q2, q3, q4, q5), temperature (Θ1, Θ2, Θ3, Θ4, Θ5) or pressure
(p1, p2) pulses.
2.11. Regulation functions (additionally): Using electrically-controlled valve gives the possibility:
• automatically maintain selected parameter value within defined limits,
• prevent selected parameter from exceeding maximum allowed value,
• prevent selected parameter from falling below minimal allowed value.
Following parameters can be selected for regulation:
• any thermal power (P1…P3),
• any flow rate (q1…q5) or any flow rate difference (q1-q2 or q3-q4)
• any temperature (Θ1 … Θ5),
• any temperature difference (Θ1- Θ2 or Θ3-Θ4),
• any pressure (p1 or p2) or pressure difference (p1-p2).

Heat meter calculator SKS-3 PESKS3MID01 14
!!!! NOTE: Regulation will be efficient only if regulated valve is installed in such way that it can
inpact regulated parameter.
Regulation speed (time interval from fully opening the valve to fully closing the valve) can be
selected within boundaries 10…999 s.
Following electrically-controlled valves may be used for regulation:
• with separate control inputs for opening and closing the valve,
• where current required to open or close the valve does not exced 2A,
• where voltage required to open or close the valve does not exceed 230 V (if control
voltage is different from ~230V 50Hz – appropriate additional valve power supply module
should be used),
• where time interval from fully opening the valve to fully closing the valve is within
10…999 s.
2.12. Alarm function (additionally): If regulation function is not required, relay output can be used to generate alarm signal. Relay
contacts will close, if:
- selected parameter value exceeds measurement limits,
- selected parameter exceeds maximum allowed value,
- selected parameter falls below minimum allowed value.
Any parameter listed in paragraph 2.11. can be used to generate alarm signal.
Relay output can handle electrical current up to 2A from 230V source
2.13. Supply voltage
Mains supply AC (50±2) Hz, 230 V 10
15
+
− %,
Power supply < 3 VA (only for calculator)
(consumption of energy per year to 26.3 kWh)
Power supply < 15 VA
(for calculator and extra sensors, consumption of
energy per year to 131.5 kWh)
Readings are unavailable in case of malfunction of the power supply of calculator . Readings will again
be available only to the renewal of the power supply.
Baterry 3,6 VDC, D-cell lithium
Replacement interval:
only for calculator not less than 12 years,
for calculator
and 2 extra ultrasobic flow sensors not less than 6 years,
2.14. Power supply for sensors
Voltage for powering pressure or flow sensors +18 V ± 10 %
(only for calculator with mains supply module) total current < 400 mA.
Voltage for powering flow sensors +3,6 V ± 10 %,
(only for calculator with mains supply module) total current < 20 mA.
Voltage for powering ultrasonic flow sensors +3,6 V ± 10 %,
(for calculator with supply from baterry) total current < 120 mkA.
2.15. Mechanical data
Dimensions of calculator 159 mm x 52 mm x 142 mm
Weight of calculator 0,5 kg.

Heat meter calculator SKS-3 PESKS3MID01 15
Protection class IP65
Envoronmental class Meets EN1434 class C
Ambient temperature at +5 oC to +55
oC
(non-condensing,indoor installation)
Relative humidity < 93 %
Mechanical environment class: M1
2.16 Electromagnetic environment class: E2
3. ACCESSORIES AND SUB-ASSEMBLIES OF HEAT METER
Required sub-assemblies and accessories may be delivered according to the particular application
and flow measurement scheme, as defined by the customer (listed in Table 5)
Table 5
Item Amount,
pcs
1. Heat meter calculator SKS-3 1
2. Technical description, user manual for SKS-3 1
3. Mounting kit of calculator 1*
3. Internal baterry 3,6 V 1*
4. Internal 230 V mains power supply module SKM37 1*
5. Communication module SKS43 with M-bus interface 1*
6. Communication module SKU45 with M-bus, CL, RS-232 interfaces and two current
outputs
1*
7. Communication module SKU46 with M-bus, CL, RS-232 interfaces and two pulse outputs 1*
8. Communication module SKS48 with RS-232 interface 1*
9. Temperature sensors PL, Pt500 1…5*
10. User manual for temperature sensors type PL 1…3*
11. Ultrasonic flow sensor SDU-1 1…4*
12. User manual for Ultrasonic flow sensor SDU-1 1…4*
13. Optical interface adapter (compatible with RS-232 interface) 1*
14. CD with remote data reading and service software 1*
REMARKS: 1. “*” – required options selected by the customer,
2. Heat meter may be equipped with other types of flow and temperature sensors, if they
correspond to requirements listed in paragraph 2, requirements of EN1434 standard and have the EC-
type examination certificate by Directive 2004/22/EC
4. OPERATING PRINCIPLE
The calculator SKS-3 is a sub-assembly of a heat meter, together with standard flow sensors,
temperature and pressure sensors.
Flow sensors, based on ultrasonic, electromagnetic or mechanical measurement principle, can be
used for flow rate measurement. Suitable types of flow sensors are listed in Table 5. Other types of flow
sensors can also be used if they correspond to requirements provided in paragraph 2.
Flow sensors are connected to the calculator using two-wire or three-wire cable. Flow sensors can
be powered from calculator power supply, from own internal battery or directly from mains power source.
Operation principles of flow sensors are described in appropriate technical documents, provided together
with flow sensors.
Heat meter calculator SKS-3 is multi-channell programmable measurement device. It can
measure and record simultaneously parameters from 2 heating systems up to 5 temperature measurement
channels, up to 5 flow measurement channels and up to 2 pressure measurement channels.

Heat meter calculator SKS-3 PESKS3MID01 16
The user may select one of eight possible measurement scheme, depending on measurement
system configuration and in justice to the heating (conditioning) scheme type.
Sensor output signals are passed to appropriate calculator’s inputs:
- flow rate values are transmitted as pulses,
- pressure values are transmitted as limited current,
- temperature values are transmitted as resistance alterations.
Later analog signals are converted into digital code and used by microprocessor to calculate flow
rate, temperature and pressure on relevant measurement channel.
Consumed fluid volume corresponds to received number of metering pulses, taking into account
pulse value. Consumed fluid mass is calculated by integrating volume alterations multiplied by relevant
fluid density, taking into account measured fluid temperature and measured (or preprogrammed) pressure.
Heat energy is calculated using formulas provided in Table 1.
The following pressure values can be used for calculations:
- programmed individually for each particular heating system
- practically measured (1-st pressure channel corresponds to the supply pipe, 2-nd – return pipe).
Possible heat energy calculation algorithms (individual for each measurement system):
• standard unidirectional flow measurement, energy is calculated without any
restrictions,
• special unidirectional flow measurement, energy is calculated:
a) when flow rate exceeds programmed maximum allowed value -
according to programmed rated maximum value for appropriate flow
channel;
b) when flow rate is under programmed minimum allowed value -
according to programmed rated minimum value for appropriate flow
channel;
c) when temperature difference is under programmed minimum
allowed value – according to programmed rated minimum temperature
difference Θ1-Θ2 (for the 1-st heating system) or Θ3-Θ4 (for the 2-nd
heating system).
Error code is generated when parameter values exceed given limits. Also, in
that case the device stopc calculating working time, and calculates error
duration.
• winter/summer flow in 2-nd channel is measured in both directions, energy is calculated
taking into account flow direction without any limitations (only for “A”
measurement scheme – see Table 1).
Flow in 2-nd channel is recorded separately – direct inlet flow as (“2”) and
return flow in opposite direction - as (“-2”).
Information on flow direction is received using separate logical signal, connected to 4-th flow input. In
this case, only 1-st, 2-nd and 5-th flow sensors can be used for flow measurement.
Parameters measured in each measurement channel together with archive parameters are stored in
memory and can be displayed on LCD, printed, transmitted througt optical interface or through bi-
directional galvanically-insolated M-Bus, CL or RS-232 interface.
If current output module is used, 1-st current output parameter will correspond to 1-st pulse output
parameter (respectively 2-nd current output parameter will correspond to 2-st pulse output parameter). In
this case output frequency mode should be activated (1000 Hz frequency will correspond with upper
current limit). User may set current limits by using appropriate jumpers.
Heat meter calculator SKS-3 PESKS3MID01 17
5. MARKING AND SEALING
5.1.Marking:
There are following information on the front panel of calculator - manufacturer’s trade mark , type
of calculator, serial number, year of manufacture, EC-type examination certificate number, limits of the
temperature, limits of the temperature diferences, environmental class by LST EN1434-1,
el;ectromagnetic and mechanical environmental class, enclosure protection class, type of temperature
sensors, conditional designation of measuring scheme for1st and 2nd heating system, flow sensor placing
(in forward or return pipe), flow inputs pulse values, maximum flow rate, power supply.
Numbers of terminal pins are marked close to the terminal
5.2.Seals:
Manufacturer’s seal is used to cover one of the bolts on the cabinet lid is sealed (Fig. 8.2)
After verification one of the bolts on the cabinet lid is sealed (Fig. 8.2)
Retaining (fixing) parts on the junction between upper and lower part of the housing are sealed by
using hanging seal (see Appendix D).
5.3. Flow, temperature and pressure sensors are marked and sealed according to requirements
provided in relevant technical documentation.
6. SAFETY REQUIREMENTS
The calculator is made and inspected in compliance with EN61010-1.
There are no life dangerous factors, when calculation unit is powered from 3,6 V lithium battery.
If calculation unit is powered from mains power supply, it contains dangerous ~230 V electrical current.
It is necessary to follow general safety requirements during installation and maintenance process.
The electrical connections must be made in compliance with the relevant standard while
observing local safety regulations. Only qualified technical personnel may install and maintain heat
meters (certificates for electrical installation work with equipment up to 1000 V are required). Personnel
must be familiar with appropriate technical documentation and general safety instructions. To ensure safe
operation, the user must observe the notes and warnings contained in this instruction.
Protective grounding is not required, because housing is made from plastics, and conductive parts are
not exposed to the surface. Device comply with the II safety class.
To protect power circuits from current overrun, 1A fuse, marked “F1”, is mounted on the bottom
side of power supply module. Remove power supply module to replace the fuse.
If relay output current exceeds 2 A, it may damage output circuits. It is recommended to use
additional protection circuits to protect relay outputs from damage.
Operation safety requires reliable insolation of electrical circuits, stable mounting of calculating
unit and proper grounding of all system components.
Safety requirements for flow, temperature and pressure sensors are provided in appropriate
technical documentation.
Warning! Switch off mains power supply before changing, repairing, connecting or
disconnecting system parts! Power switch has to be installed close to the calculator.
7. INSTALLATION
Basic requirements
Before installing the device:
- check if all parts listed in the documentation are available,
- check if there are no visible mechanical defects,
- check if there are valid labels of manufacturer and certification authority.
Only qualified personnel may install the equipment, following the requirements listed in this
document, in technical documentation of other system components and in heat meter installation project.

Heat meter calculator SKS-3 PESKS3MID01 18
Mechanical mounting
Calculator may be installed in heated premises, on vertical surface. It may not be exposed to direct
sunlight.
Calculator can be mounted in five different ways:
Wall mounting, without possibility sealing of mounting
Wall mounting, with possibility sealing of mounting (fig.4)
Mounting on standard DIN-rail (fig.5)
Panel mounting (fig.6)

Heat meter calculator SKS-3 PESKS3MID01 19
7.1.3. Flow, temperature and pressure sensors have to be installed according to installation
requirements given in the corresponding installation manuals and by requirements as provided in Annex
B, Table B1.
Electrical installation of calculator, flow, temperature and pressure sensors is performed according to
selected measurement scheme (Table 1) and appropriate installation diagrams (Apendix B), also
according to technical requirements for other system components. Description of connection terminal pins
is provided in Appendix C.
Cross-section for each signal cable should be not less than 0,14 mm2. If cable length between
calculation unit and sensors exceeds 5 m, shielded cables have to be used. Cables should be run through
rubber seal caps and anchored with clamps. Four-, three- or two-wire cable should be used respectively.
Cable shield should be connected to appropriate terminal pins (see diagram in Appendix B) or to any free
contacts marked with symbol “ “, either anchored with metal clamps.
Calculation unit may be connected to mains power suplly only through switch (nominal current 0,1
A), placed close to the device, using two-wire cable with cross-section of each wire not less than 0,5
mm2.
To ground the equipment, copper wire with cross-section not less than 0,5 mm2 should be used.
Shielded cable should be used for all connections longer than 1,5 m. The shield should be properly
grounded. It is recommended to use plastic or metal sleeves for additional cable protection.
7.2. Setting up the configuration
The calculating unit is universal device for measurement of supplied (consumed) heating energy.
The calculating unit has to be customized for the particular application, putting into account the type of
heating system, also types of flow, temperature and pressure sensors. After placing an order, calculating
unit is adapted to one of eight possible measurement schemes. Energy calculation formulas and
measurement schemes are presented in the Table 1. Flow, temperature and pressure channels, not utilized
for heat energy measurement, cal be used to control other parameters. It is possible to select measurement
units for flow measurement (volume units or mass units – according to measured media temperature).
The calculator has to be programmed for the specific application using the control buttons � and
�, also the configuration button “SET” (under the lid, see Fig. 8.1 and 8.2).
To enter the configuration mode, open the lid and press the button “SET”. Press the “SET” button
once more to leave the programming mode.
When configuration (programming) mode is active, label “SET” is displayed in the upper right
conner of the display. All parameters have to be programmed. Possible parameter limits and abbreviations
are listed in Appendix A.
The algorithm for setting up parameters is shown in Fig. 7.1.
REMARK: 1. All parameters marked with the symbols “*”, “**” have to be programmed
correspondingly in the same way.
2. Readings on the indicator ( for example: “1.00E-2”) are presented in exponential
form.
There: X.XX E XX
For example: indicated value 1,25E-2 = 1,25*10-2
= 0,00125.
Exponent value
Base value

Heat meter calculator SKS-3 PESKS3MID01 20
Fig. 7.1. Programming the calculator – setting up operation modes. “1, 5, 6, 7, 10, 11, 12, 16E, 17, 18”
parameter values have to be ordered individually for each device, and can not be changed during
operation. Parameters “21...25” are not displayed in battery-powered version.
Serial number
* Customer number
* Real time calendar
* Real time clock
Serial communication
interface data transfer rate
(“1”wire,”2”-optical)
* Serial communication
interface address
* 1-st heating system
scheme and energy
calculation algorithm.
For example: scheme -
U2, algorithm – 1
* replacement date of
the battery
SET
Test mode
Off -deactivated
On-activated �
* Flow input pulse value
on inputs q1…q5. For
example, 10 l/ pulse.
* Maximum flow rate for
inputs q1...q5 For example:
qmax =360 m3/h
** Number of active flow
inputs (q1..q5). Only
active input numbers are displayed.
** Number of active
temprature inputs
(ΘΘΘΘ1..ΘΘΘΘ5).
Only active input numbers
are displayed.
* Minimum flow rate
qmin for inputs q1…q5
For example: qmin= 0,05 m3/h
* Maximum projected
flow rate for inputs
q1…q5 qmaxproj. For
example: 360 m3/h
* Minimum projected
flow rate for inputs
q1…q5 qminproj.
For example: 0,05 m3/h
B
Set day:
12.31 (<month>.<day>)
-yearly set day,
--.30 (-.<day>) - Monthly set day,
-- . -- - function is off
Condition of tariff „L2“
Tariff is active, if
(ΘΘΘΘ1-ΘΘΘΘ2)<0oC
(cooling meter).
OFF–tariff is deactivated
Condition of tariff „L3“
Tariff is active from7:00 till 23:00 h.
OFF–tariff is deactivated
** Number of active
pressure inputs (p1..p2).
Only active input
numbers are displayed
* 2-nd heating system
scheme and energy
calculation algorithm.
For example: scheme -
U2, algorithm – 1
� �
� �
� �
� �
� �
� �
� �
� �
� �
� �
� �
� �
� �
� �
� �
� �
� �
� �
� �
� �
� �
� �
� �
� �
� �
� �
� �
A

Heat meter calculator SKS-3 PESKS3MID01 21
Flow input pulse type,
minimal pulse period (in
ms) and measurement
units for inputs q1…q5.
For example: pulse type
- 1 pulse period 2 ms, measurement units - m3
q1…q5 srauto įėjimų
� �
� �
B
Type of 5-th temperature
sensor (for example:
PT500)
* or number of month
and to it corresponding
pre-programmed value of
temperature ΘΘΘΘ5, if
measurement of ΘΘΘΘ5 is
deactivated
(„- -„ - ΘΘΘΘ5 value are
applied to all months
Type of temperature
sensors ΘΘΘΘ1... ΘΘΘΘ4
For example: Pt1000.
Minimum value of
temperature difference
ΘΘΘΘ1-ΘΘΘΘ2 For example : 2 oC
Minimum value of
temperature difference
ΘΘΘΘ1-ΘΘΘΘ2 For example: 2 OC
* Minimum projected
value of temperature
difference ΘΘΘΘ1-ΘΘΘΘ2
For example: 2 oC
* 2-nd pressure input
current limits. 4-20 mA
* 1-st pressure input
current limits. 4-20 mA
* 1-st input maximum
rated pressure value.
For example:2500 kPa
* 2-nd input maximum
rated pressure value
For example:2500 kPa
Pressure value for
calculation (1 system).
Standard value: 1,6 MPa
Thermal energy units
For example:MWh
Report printing
by wire interface-1
(by optical interface– 2)
and report language
For example: L -lithuanian
* 1-st pulse/frequency
output parameter.
For example: ΘΘΘΘ5
Regulation funcion
activated (On). For
example: regulated
parameter - ΘΘΘΘ5.
* Lower limit (min.
value) for regulated
parameter. For example:
ΘΘΘΘ5min = 40 oC
* * Integral constant
for regulation time.
For example: 250 s
A
� �
� �
� �
� �
� �
� �
* Minimum projected
value of temperature
difference ΘΘΘΘ3-ΘΘΘΘ4
For example: 2 oC � �
� �
� �
� �
� �
Pressure value for
calculation (2 system).
Standard value: 1,6MPa
� �
� �
� �
� �
* 2-nd pulse/frequency
output parameter.
For example : ΘΘΘΘ5
� �
� �
� �
* Upper limit (min.
value) for regulated
parameter. For example:
ΘΘΘΘ5max = 110 oC
� �
� �
* Valve runtime, s.
For example: 240 s
� �
Software version
number
� �
LCD segment test
Segmentų testas
� �
� �

Heat meter calculator SKS-3 PESKS3MID01 22
Setting up parameter values:
- before setting up the parameters test mode should be deactivated (Test:off). Test mode is
described in paragraph 8.7.
- product number is individual and unchangeable,
- 1, 5, 6, 7, 10, 11, 12, 16E, 17, 18 parameter values have to be ordered individually for each
particular device, they are customized during manufacturing and unchangeable after installation.
Parameters marked with “*” should be programmed
as shown in Fig. 7.2:
Select the parameter to be modified, then press and
hold button � until parameter value starts blinking –
alteration mode is entered. Parameter codes, meanings and
acceptable limits are listed in Appendix A.
Select required digit by pressing button �. Shortly
pressing button �, set the required value. Save changes by
holding button � pressed and return to display mode. All
parameters marked with “*” in Fig. 7.1 can be modified in
the same way.
Parameters marked with “**” should be
programmed as shown in Fig. 7.3:
Select the parameter to be modified, then enter
measurement channel selection mode by holding down
button �. Choose flow, temperature or pressure channels,
and select required measurement channel number by
shortly pressing button �, then activate or deactivate
selected measurement channel by shortly pressing button
�. Parameter codes, meanings and acceptable limits are
listed in Appendix A.
Save changes by holding button � pressed and
return to previous display mode. All parameters marked
with “**” in Fig. 7.1 can be modified in the same way.
Sequence of displayed parameters may vary depending on selected measurement scheme and
number of sensors installed.
Note. The displayed parameters listing order can vary or some parameters aren’t displayed
depending on regional user requirements.
Customer number
�
Entering customer ID:
- - select symbol
position,
- - change
value
�
�
�
Fig. 7.2.
Setting up parameters marked with “*”
(for example, Customer number )
Calendar
� �
�
� �
�
1-st pressure measurement channel
- ON/OFF
�
2-nd pressure measurement channel
- ON/OFF
�
� �
�
Fig. 7.3. Setting up parameters marked with “**”
(for example: pressure measurement channel)
Heat meter calculator SKS-3 PESKS3MID01 23
Configuration of calculator is possible via optical (or Wire) interface and in conjunction with the
programme SKS3knfg.exe
Parameterization (programming) procedure
Measurement schemes and energy calculation algorithms should be checked according to
individual heat meter data (see Paragraph 13), and other configuration parameters are entered:
- check measurement circuits (U0, U1, U2, U3, A1, A2, A3, A4) separately for the 1-st and
2-nd heating system according to Table 1
- check parameter registration algorithms for the 1-st and 2-nd heating system (see
Paragraph 4)
- check energy measurement units (MWh, Gcal, GJ)
- check pressure values used to calculate energy and fluid mass values individually for the
1-st and 2-nd heating system
Note: If pressure value is set to 0, energy and fluid mass consumed in that heating system
will be calculated using practically measured pressure values
- set (pre-program) Θ5 temperature value, if temperature sensor T5 is not used (only for A1
measurement scheme)
- flow, temperature and pressure measurement channels are activated (only for channels
that are used for measurement and connected to appropriate sensors). If energy calculation
algorithm “3 – winter / summer” is used, 4-th flow sensor is disabled.
- select flow measurement display units (m3 or t) (mass units – only for measurement
schemes from Table 1, where approproate temperature sensors are used),
Individual parameters of flow, temperature and pressure sensors for each measurement channel
should be verified and pre-set:
- check flow sensor output pulse values for each measurement channel
- check maximum and minimum flow rate for each measurement channel
- pre-set designated minimum and maximum flow values, used for energy calculation when
measured flow rate exceeds allowed measurement limits (only when “2 – special” energy
calculation algorithm is used)
- check pulse input type:
“1” – without cable detachment control
“2” – with cable detachment control – sensor operation error is generated, when cable is
disconnected for more than 2 seconds
- minimum allowed pulse period (ms), used for pulse input noise filter (it is necessary to
define time interval from first received pulse, when additional received pulses will be
ignored). Selected time interval should be shorter than designated pulse period at
maximum allowed pulse frequency
Note: If value is set to 0, noise filter is turned off
- check temperature sensor type (e.g Pt500,Pt1000) for each active measurement channel
- check normalized temperature difference for each pair of temperature sensors (Θ1-Θ2 and
Θ3-Θ4). It should be not less than 2 oC
- pre-set designated temperature difference value (Θ1-Θ2 or Θ3-Θ4), that will be used for
energy calculation when “2” – „special“ energy calculation algorithm is applied, and
temperature difference is under programmed minimum allowed value
- select normalized current limits for provided pressure sensors (0-5 mA, 0-20 mA or
4-20 mA)
- set pressure values for provided pressure sensors that correspond to upper designated
current limit.
Setting and verifying other parameters:
- set customer ID number

Heat meter calculator SKS-3 PESKS3MID01 24
- activate (if necessary) tariff function „L2“ and „L3“, set condition of tariff and set
allowed swichover values
- check report printing language (E - English, P– Russian, L – Lithuanian),
- set communication interface address and data transfer rate,
- check and set (if necessary) real time clock and calendar,
- set suggested next battery replacement date (or current date plus 12 years for mains
power supply version). Suggested battery replacement date is calculated by adding estimated battery
operation time to the current date. Estimated battery operation time is given in the Table 6:
Table 6
Number of flow sensors powered from calculator battery Battery operation time, years
- 12
1…2 6
- set parameters for pulse outputs PULSE1 and PULSE2
When required integral parameter (energy or flow volume) is selected, output pulses are generated
on pulse output. Pulse value will correspond to the lowest digit of indicated parameter. When
instantaneous parameter (power, temperature or pressure) is selected, signal with frequency from 0 to
1000 Hz is generated, or output current changes within appropriate range that corresponds to normalized
measurement values of selected parameter (if current output is available).
Setting regulator (or alarm signal) relay output parameters
Set regulator (or alarm signal) relay output parameters (only for mains supply version, when
regulation or alarm options are available):
- select regulated (controlled) parameter or deactivate relay output
- set upper parameter range value (when parameter exceeds this value, relay output contacts
“∨” will be closed)
- set lower parameter range value (when parameter falls below this value, relay output
contacts “∧” will be closed)
- set full valve run time, in seconds (according to valve documentation)
- set integral regulation time constant – pause intervals between opening the valve, after
each 1 % of valve runtime. If this value is set to “0” – valve will be permanently closed
(opened). For alarm function only “∅” value should be used
Configuration of calculator is possible via optical (or Wire) interface and in conjunction with the
programme SKS3knfg.exe
Setting up jumpers
If voltage “+U” from the pin 9 is used to power flow or pressure sensors, the jumper “+U” (beside
terminal block) should be:
- in position “BAT”, if sensors should be powered with 3,6 V voltage (only in this case, if
internal baterry is used)
- in position “3,6 V”, if sensors should be powered with 3,6 V voltage (only in this case, if
mains supply module is used)
- in position “18 V”, if sensors should be powered with 18 V voltage (only in this case, if
mains supply module is used)
If the calculator is equipped with additional universal interface module (including M-bus, CL,
RS-232 interfaces and two current outputs):
- M-bus, CL or RS-232 interface is activated by plugging in the jumpers “CL – M-bus – RS-
232” in such way, that required interface type appears beside the terminal pins “46,,,48”.
Marking on the jumper board will show the functional description of the pins.

Heat meter calculator SKS-3 PESKS3MID01 25
- required current limits of the 1-st and 2-nd current outputs are set by switching the jumpers
“I1” and “I2” into one of the following positions: “4-20 mA” or “0-20 mA”.
If the calculator is equipped with universal interface module (including M-bus, CL, RS-232
interfaces and two pulse outputs):
- M-bus, CL or RS-232 interface is activated by plugging in the jumpers “CL – M-bus – RS-
232” in such way, that required interface type appears beside the terminal pins “46,,,48”.
Marking on the jumper board will show the functional description of the pins.
- required type of pulses output are set by switching the jumpers „+P1 +P2 GND“:
Galvanically isolated passive pulses outputs - not jumpers
Not galvanically isolated active (-18 V) pulses output „Puls1“- „GND“ and „+P1“
Not galvanically isolated active (-18 V) pulses output „Puls2“- „GND“ and „+P2“
Optional modules. Exchanging of modules
Calculator may be delivered with 230 V power supply module or 3,6 V battery power supply and
one of the four external communication modules. Possible options are listed in the paragraph 3.
Communication module types and specific application restrictions are described in the Table 7.
Table 7
Communication module type Purpose, functions Application restrictions
SKS43
M-bus
Allows connecting the device to M-bus
network (up to 254 devices in parallel) in
distance up to 2 km
Suitable for all power
supply options
SKU45
Universal with two current
outputs
User may choose one of three available
interfaces (M-bus, CL, RS-232).
Two current outputs are available, with
user-selectable current limits ( “4-20
mA” or “0-20 mA”)
Only for 230 V power
supply
SKU46
Universal with two pulse
outputs
User may choose one of three available
interfaces (M-bus, CL, RS-232).
Two pulse outputs are available, with
user-selectable type - galvanically
isolated passive pulses or not galvanically
isolated active (+18V) pulses
Only for 230 V power
supply
SKS48
Special type, compatible with
RS-232 interface
Distance up to 15 m. Designed to connect
equipment with RS-232 interface, where
RTS +9...+12 V and DTR -9...-12 V
signals are used
Suitable for all power
supply options
Mains supply or battery module is in the bottom part of the calculator, on the right side beside the
terminal block, while communication interface module is on the left side.
Modules can be exchanged on-site, by opening the lid, unscrewing the appropriate fixing bolt and
pulling out the module from the connector.
!!!! Disconnect the equipment from mains supply before replacing modules!
7.5 Verification of installation and set-up
After installing the heat meter, let measured fluid flow through the flow sensor, and switch on the
power supply. Measured parameter values should be indicated on the display, if the heat meter
(calculating unit, flow, pressure and temperature sensors) is installed correctly. If measured parameter
values are not displayed correctly, it is necessary to verify the installation.

Heat meter calculator SKS-3 PESKS3MID01 26
8. OPERATION
8.1. Display description
INT PAR LOG PRN INF
Key to symbols Description
1. Groups of parameters (display levels) ▼
INT Integral parameters
▼
PAR Informative parameters
▼
LOG Archive data and set day values
▼
PRN Printing the reports
▼
INF Information on heat meter configuration and regulator control parameters
2. Number and group of indicated parameters
Σ Cumulated parameter value (for example, total heating energy consumed
by the 1-st and 2-nd system (E1+E2))
1…5 Number of measurement system (for example, power or energy
consumed by 1-st or 2-nd system) or number of measurement channel
(volume, flow, temperature, pressure measurement etc.)
1-2 (3-4) Differences (for example, difference in amount of heating media (M1-
M2), (M3-M4) or temperature difference (Θ1-Θ2, Θ3-Θ4))
3. Operation mode
H Hourly archive data is being printed (displayed)
D Daily archive data is being printed (displayed)
M Monthly archive data is being printed (displayed)
TEST Test mode
SET Parameterization mode
4. Measurement units
m3 (
t) Volume (mass)
m3/h (t/h) Flow rate
kPa Pressure o C Temperature, temperature difference
GJ, Gcal, MWh, kWh Energy
kW Power
h Hours
5. Additional information
R Relay output is activated, normal operation
R< Parameter value is below minimum permissible value (for relay outputs)
<R Parameter value exceeds maximum permissible value (for relay outputs)
^ ; v Regulator status: ^ - opening the valve, v - closing the valve
1. Groups of
parameters
3. Operation mode
4. Measurenent units
2. Parameter numbers and
group numbers
5. Additional
information

Heat meter calculator SKS-3 PESKS3MID01 27
Selection of measured and indicated parameters is performed using two control buttons � and �
(Fig. 8.1). Configuration is modified with control buttons � and �, and parameterization button “SET”
(under the cover, see Fig. 8.2).
Five display levels in normal mode are available: current value of integral parameters (“INT”),
instantaneous parameters (“PAR”), archive data and set day values (“LOG”), printing reports (“PRN”)
and viewing configuration data (“INF”).
Press and hold (> 3 s) button to move to the next display level, and button to return to the
previous level.
Fig. 8.3 Selecting the display level.
Arbitrary symbols, used in the diagrams:
To view data in the same display level press shortly (< 3 s) buttons or . The display will
switch automatically to the highest level of displaying current values of integral parameters, or – if at
least one error has been detected – error code will be displayed after 5 minutes of inactivity.
Sequence of displayed parameters may vary depending on selected measurement scheme and
number of installed sensors. The displayed parameters listing order can vary or some parameters
aren’t displayed depending on regional user requirements.
8.2. Displaying integral parameter values (level 1)
It is possible to display the following integral measured values in 1st display level “INT”:
E1+E2, E1, E2, E3, M1(V1), M2(V2), -M2, (M1-M2), M3(V3), M4(V4),(M3-M4),
operation time,
measurement errors.
To move to another parameter value in the same display level, shortly press buttons: � - next
parameter, � - previous parameter (Fig. 8.4).
Sequence of displayed parameters may vary depending on selected measurement scheme and
number of sensors installed.
To return to the instantaneous parameters level, press and hold button �.
PAR LOG PRN INF INT � �
� �
� �
� �
� �
Fig.8.1 Front of the calculator, cover closed, without seals Fig. 8.2 The cover is open
Control button�and �
Configuration button „SET”
Manufacturer warranty mark
Test frequency“8192 Hz”
Verification seal
� - left button, � - right button, - long press (> 3 s) - short press(< 3 s)

Heat meter calculator SKS-3 PESKS3MID01 28
General error code
Error code of flow
sensors
Error code of temperature
sensors
Total time of normal
operation
1-st system normal
operation time
2-nd system normal
operation time
� �
� �
� �
� �
� �
Reverse flow fluid volume
(mass) for 2-nd channel
(winter/summer operation
mode only)
Difference of mass
M1-M2
� �
� �
3-rd channel fluid
volume (or mass)
� �
Difference of mass
M3-M4
� �
Fig. 8.4. Displaying integral parameter values
Operating time
(without energy
calculation error), hours
� �
Total energy ΣΣΣΣE====E1+E2
(consumed in both systems)
Energy E1 (consumed in
1-st system)
� �
Energy E3 (consumed in
1-st system for heating or
in tariff register „L3“)
� �
1-st channel fluid volume
(or mass)
2-nd channel fluid volume
(or mass)
� �
� �
� �
Energy E2 (consumed in
2-nd system or in tariff
register „L2“)
� �
� �
4-th channel fluid
volume (or mass)
� �
PAR LOG PRN INF INT � �
� �
� �
� �
� �
5-th channel fluid
volume (or mass)
� �

Heat meter calculator SKS-3 PESKS3MID01 29
8.2.1. Error code may consist from up to 5 symbols. Each symbol may have values 0…9
1) General errors:
1-st or 2-nd heating systems error codes:
0 - no error, normal operation,
5- flow rate outside designated limits or temperature difference is under programmed
minimum allowed value (only when energy calculation algorithm “2 – special” is
applied),
8 – flow or temperature sensor error.
calculator error code:
0 - no error, normal operation,
1 – warning – estimated batery lifetime less than 6 months.
2) Status of flow sensors:
Error code description:
0 - no error, normal operation,
2 - flow rate is under programmed minimum allowed value,
4 - flow rate exceeds programmed maximum allowed value,
8 - sensor failure (broken connection or disconnected power supply).
3) Status of temperature sensors:
Error code description:
0 - no error, normal operation,
1 – temperature difference is under programmed minimum allowed value,
8 - sensor failure (oper circuit or short circuit).
1-st heating system operation error
2-nd heating system operation error
Calculator error
Status of sensor Θ1
Status of sensor Θ2
Status of sensor Θ3
Status of sensor Θ4
Status of sensor Θ5
Status of flow sensor q1
Status of flow sensor q2
darbo būklė Status of flow sensor q3
Status of flow sensor q4
Status of flow sensor q5

Heat meter calculator SKS-3 PESKS3MID01 30
8.3. Displaying instantaneous parameter values (level 2)
It is possible to display all instantaneous parameter values in display level “PAR”:
P1+P2, P1, P2, P3, q1, q2, q3, q4, q5, Θ1, Θ2, Θ1-Θ2, Θ3, Θ4, Θ3-Θ4, Θ5, p1, p2.
Parameter values are displayed in sequence, shortly pressing buttons: � - next parameter, � -
previous parameter (Fig. 8.5). Sequence of displayed parameters may vary depending on selected
measurement scheme and number of active sensors. To display archive data press and hold button �, to
return to integral parameter display mode press and hold button �.
Device will return to current instantaneous parameter display mode automatically after 5 minutes
PAR LOG PRN INF INT � �
� �
� �
� �
� �
� �
1-st heating system
power (P1)
2-nd heating system
(or tariff„L2“) power P2
� �
1-st system consumed
for heating (or
tariff„L3“) power P3
� �
Flow rate on 1-st
channel q1
� �
Flow rate on 2-nd
channel q2
� �
Flow rate on 3-rd
channel q3
Total power
ΣΣΣΣP= P1+P2
� � � �
1-st channel fluid
pressure p1
� �
2-nd channel fluid
pressure p2
� �
4-th channel fluid
temperature ΘΘΘΘ4
� �
5-th channel fluid
temperature ΘΘΘΘ5
Temperature
difefrence
ΘΘΘΘ3- ΘΘΘΘ4
� �
� �
Flow rate on 4-th
channel q4
� �
1-st channel (flow pipe)
fluid temperature ΘΘΘΘ1
� �
2-nd channel (return)
fluid temperature ΘΘΘΘ2
� �
Temperature
difefrence ΘΘΘΘ1- ΘΘΘΘ2
Flow rate on 5-the
channel q5
� �
� �
3-rd channel fluid
temperature ΘΘΘΘ3
� �
Fig. 8.5 Displaying instantaneous parameter values

Heat meter calculator SKS-3 PESKS3MID01 31
8.4. Displaying set day data and archive data (level 3)
8.4.1. When set day and archive data viewing mode (“LOG”) is entered (and set day function is
active), set day time stamp value (The date format is <day>.<month>.<year>) will be displayed in turn
with relevant parameter value (accumulated energy value) :
By shortly pressing button � you can select the required parameter value for viewing
By shortly pressing button � you can select for viewing previous set day parameters values
(previous months or previous years data depends on configuration of calculator)
To display archive data press and hold button �.
When archive data viewing mode is entered, time stamp value will be displayed
(The date format is <hour> <day>.<month>) in turn with relevant parameter value and parameter
group ID (in three seconds interval). For example, alteration of E1 during 19-th of January, 13-th hour:
Press and hold button � while time is displayed to select required time interval: date is displayed,
and first character starts blinking (it is possible to select required time interval now). Move cursor
(blinking character) in closed circle by shortly pressing button �. Alterate selected value by shortly
pressing button �. Confirm the selection and return to previous display level by holding down button �.
Select parameter group by shortly pressing button � while parameter is displayed (display zone
D):
H – hourly values increase; average hourly pressure and temperature values group with registered
error and error occurrence time,
D – daily values increase; average daily pressure and temperature values group with registered
error and error occurrence time,
M – monthly values increase; average monthly pressure and temperature values group with
registered error and error occurrence time,
[no symbol] – group of absolute parameter values at the real time point.
Shortly pressing button � while parameter is displayed will allow to select desired time point or
interval. List of parameters is presented in the Table 8:
Zone C Parameter number
Zone D Parameter group
Zone E Measurement units or
parameter type
Zone A
Parameter code
Zone B
Parameter value
Heat meter calculator SKS-3 PESKS3MID01 32
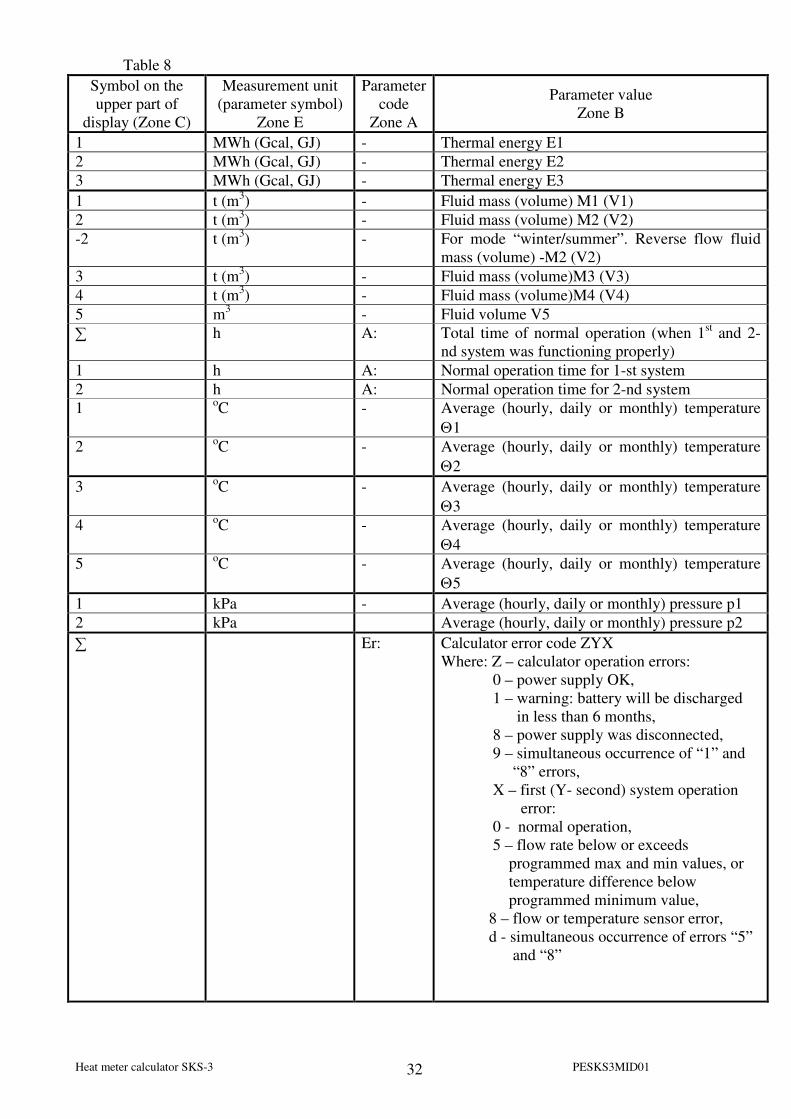
Table 8
Symbol on the
upper part of
display (Zone C)
Measurement unit
(parameter symbol)
Zone E
Parameter
code
Zone A
Parameter value
Zone B
1 MWh (Gcal, GJ) - Thermal energy E1
2 MWh (Gcal, GJ) - Thermal energy E2
3 MWh (Gcal, GJ) - Thermal energy E3
1 t (m3) - Fluid mass (volume) M1 (V1)
2 t (m3) - Fluid mass (volume) M2 (V2)
-2 t (m3) - For mode “winter/summer”. Reverse flow fluid
mass (volume) -M2 (V2)
3 t (m3) - Fluid mass (volume)M3 (V3)
4 t (m3) - Fluid mass (volume)M4 (V4)
5 m3
- Fluid volume V5
∑ h A: Total time of normal operation (when 1st and 2-
nd system was functioning properly)
1 h A: Normal operation time for 1-st system
2 h A: Normal operation time for 2-nd system
1 oC - Average (hourly, daily or monthly) temperature
Θ1
2 oC - Average (hourly, daily or monthly) temperature
Θ2
3 oC - Average (hourly, daily or monthly) temperature
Θ3
4 oC - Average (hourly, daily or monthly) temperature
Θ4
5 oC - Average (hourly, daily or monthly) temperature
Θ5
1 kPa - Average (hourly, daily or monthly) pressure p1
2 kPa Average (hourly, daily or monthly) pressure p2
∑ Er: Calculator error code ZYX
Where: Z – calculator operation errors:
0 – power supply OK,
1 – warning: battery will be discharged
in less than 6 months,
8 – power supply was disconnected,
9 – simultaneous occurrence of “1” and
“8” errors,
X – first (Y- second) system operation
error:
0 - normal operation,
5 – flow rate below or exceeds
programmed max and min values, or
temperature difference below
programmed minimum value,
8 – flow or temperature sensor error,
d - simultaneous occurrence of errors “5”
and “8”

Heat meter calculator SKS-3 PESKS3MID01 33
Table 8 cont.
Symbol on the
upper part of
display (Zone C)
Measurement unit
(parameter symbol)
Zone E
Parameter
code
Zone A
Parameter value
Zone B
1 m3
Er: Flow sensor status code
where:
status of sensor q1
status of sensor q2
status of sensor q3
status of sensor q4
status of sensor q5
0 - normal operation,
2 – flow rate below programmed minimum
allowed value,
4 – flow rate exceeds programmed maximum
allowed value,
8 – sensor failure (broken connection or
disconnected power source),
6 - simultaneous occurrence of errors “2” and
“4”,
A - simultaneous occurrence of errors “8” and
“2”,
C - simultaneous occurrence of errors “8” and
“4”,
E - simultaneous occurrence of errors “8”,”4”
and “2”
2 oC Er: Temperature sensor status code
where: status of sensor Θ1
status of sensor Θ2
status of sensor Θ3
status of sensor Θ4
status of sensor Θ5
0 - normal operation,
1 - temperature difference is below programmed
minimum allowed value
8 - sensor error (open circuit or short circuit),
9- simultaneous occurrence of errors “8” and “1”
∑ h 8: Device run-time
1 h 8: 1-st system failure time
2 h 8: 2-nd system failure time
1-2 h 1: Time when temperature difference Θ1 - Θ2 is
below programmed minimum allowed value
3-4 h 1: Time when temperature difference Θ3 - Θ4 is
below programmed minimum allowed value
1 h 2: Time when flow rate q1 is below programmed
minimum allowed value
2 h 2: Time when flow rate q2 is below programmed
minimum allowed value
3 h 2: Time when flow rate q3 is below programmed
minimum allowed value
4 h 2: Time when flow rate q4 is below programmed
minimum allowed value

Heat meter calculator SKS-3 PESKS3MID01 34
Table 8 cont.
Symbol on the
upper part of
display (Zone C)
Measurement unit
(parameter symbol)
Zone E
Parameter
code
Zone A
Parameter value
Zone B
1 h 4: Time when flow rate q1 exceeds maximum
allowed value
2 h 4: Time when flow rate q2 exceeds maximum
allowed value
3 h 4: Time when flow rate q3 exceeds maximum
allowed value
4 h 4: Time when flow rate q4 exceeds maximum
allowed value
To move to the next level - “PRN” - press and hold button �.
8.5. Printing reports (level 4)
Connect printer to calculator using external communication interface or optical communication
adapter. Printer serial port data transfer rate should be the same as defined in calculator settings. Printer
should be set to condensed printing mode.
For printing report via wire interface – in configuration parameter “18” – to set value “1”, for
printing via optical interface – to set value “2” (see page 18)
Fig. 8.6 Conection of printer via optilal interface
To enter report printing mode, press and hold button � several times, until label “PRN” is
reached. LCD will display the following:
Select blinking LCD zone (report type, time interval or heating system number) by shortly
pressing button �. Define the following report options by shortly pressing button �:
- report type
Ac – printing consolidated report,
Er – printing error list,
In – printing current values if integral parameters,
CF – printing device configuration parameters,
Report type
System number Time interval

Heat meter calculator SKS-3 PESKS3MID01 35
RL – printing current parameter values;
- time interval
H – printing hourly average parameter values,
D – printing daily average parameter values,
M – printing monthly average parameter values;
- heating system number
1 – printing report for 1-st heating system,
2 – printing report for 2-nd heating system.
Holding down button � will allow to select report starting date and time. LCD displays:
Starting date and time should be defined. First character starts blinking. Press button � to move to
another character (selected character starts blinking). Required value can be set by shortly pressing button
�. For hourly report starting hour, day and month should be defined. For daily report – starting day and
month, for monthly report – only starting month should be defined.
Holding down button � stores the selection, and report ending date selection mode will be
activated. LCD displays:
Report ending date and time is defined in the same way as describe above.
Printing will start after holding down button � one more time. While report is being printed,
blinking label “Print” will be displayed. Printing can be paused and started again (for example, to add
paper) by shortly pressing button �. If printing is paused, label “Print” will stop blinking.
Press and hold button � to move to another - “INF” – menu level.
Report examples are provided in Appendix H:
Error codes provided in printed report are the same as used in archive (Table 8).
Press and hold button � to stop printing in any time.
8.6. Displaying configuration settings and programming relay output parameters
Use configuration data inspection mode “INF” to view device configuration settings
(programmed parameters and operation modes) and – if regulation function is activated – to change relay
output parameter values.
All parameters listed in Appendix A, Table A1, are displayed in sequence as shown in Fig. 7.1.
Shortly pressing button � move to the next parameter, and button � - move to the previous parameter.
Display sequence may vary depending on selected measurement scheme, number of active sensors and
operation mode.
8.6.1. Programming relay output parameters in regulation mode
Configaration parameters with codes “21:” ..”25:” (Appendix A, Table A1) are dedicated for
programming relay output parameters. When information data inspection mode “INF” is entered, it is
possible to activate or deactivate regulation function, also to choose regulated parameter and control relay
output manually by shortly pressing buttons � or � and selecting the parameter “21:”.
When button � is pressed for long time, regulation status symbol “On” or “Off” starts blinking.
Shortly pressing button � will activate (“On”) or deactivate (“Off”) regulation function. Shortly pressing
button � will activate regulated parameter selection mode (parameter will start blinking). Select regulated
parameter code (see Appendix A, Table A1) by shortly pressing button �.
If regulation mode is deactivated (“Off”), it is possible to control the regulated valve manually.
Shortly press button � - symbol “R” starts blinking. Pressing button � will start closing the valve –
symbol “vR” will be displayed. Pressing button � one more time will start opening the valve – symbol
“^R” will be displayed. Pressing button � once again will switch off valve control – only symbol “R”
will be displayed.

Heat meter calculator SKS-3 PESKS3MID01 36
Upper limit of regulated parameter value (parameter code “22:”) and lower limit of regulated
parameter value (parameter code “23:”), also valve runtime (parameter code “24:L” and regulation speed
(pause intervals between opening the valve, after each 1 % of valve run time – parameter code “25:P”)
can be modified if required, as described in Paragraph 7.
To return to instantaneous parameter display mode (“INT”) press and hold button �.
Parameter codes, meanings and allowed regulation limits are provided in Appendix A.
8.7. Activating test mode
8.7.1. Test mode is used for quick testing of calculator. When test mode
is activated (“TEST” label displayed), calculation process is stopped and all
integral parameter values are stored in the memory. Calculation process
starts again after leaving test mode.
8.7.2. Activating test mode
After opening the lid, briefly press the programming button “SET”.
Calculation unit enters programming mode, label “SET” is displayed on the
upper part of LCD together with the message “test: off”. By long pressing
the control button � activate test mode (message “test: on” appears on
LCD). When programming button “SET” is pressed, the device enters test
mode – label “TEST” appears on the upper part of LCD. Select tested
parameter (E1, E2, Θ1, Θ2, Θ3, Θ4, Θ5, p1, p2) by shortly or long and
shortly pressing the button �.
Shortly pressing the button � will imitate flow pulses, directly
relevant to fluid volume V1…V4 (The values of the volume can be seen on
the indicator in the end of the test). According to really measured
temperature values, energy is calculated, and output pulses are generated.
Calculation duration – 100 s (During the test on the indicator the message
"TEST" is blinking).
All parameters are displayed on LCD in the same way as in the main
menu, only integral values are calculated starting from zero.
Press the programming button “SET” once more to leave test mode.
After leaving test mode, previously recorded integral parameter values are
displayed.
8.8. Remote data transmission
8.8.1. For data transmission from the calculator to the data reading device can be used the optical
interface (optical head is placed on the front panel of the calculator , as shown in Figure 8.6, and is
connected to interface RS-232 of data reading device) or other wired serial interface (depending on type
of the completed module of communication under table 7) .
8.8.2. As the reading device it is possible to use the computer, the telephone modem, modem
GSM, the Internet modem and so on.
Scheme of direct connection of calculator to interface RS-232 of PC is presented in fig.6 of Annex
B. Scheme of direct connection of calculator to interface RS-232 of modem or printer in fig.7 of Annex
B.
The data reading rate and parity (it is switched off or even) on the data reading device should
correspond to established on the calculator
8.8.3. By using the serial communication interface it is possible to perform:
In normal mode:
- To read out all measured data and the data from calculator archive
- To read out and change the settings of regulator
- To read out the configuration settings of calculator.
In parameterization mode "SET" (this can be activated by pressing the button "SET"):
SET
�
Test mode deactivated
Test mode activated
P
Heat energy test mode
- select
parameter,
- simulate
flow (m3)
�
�
�
Heat meter calculator SKS-3 PESKS3MID01 37
- To read out all measured data and the data from calculator archive
- To read out and change the settings of regulator
- To read out and change the configuration settings of calculator (only listed in Table A1 in
section “Before installation”.
Reading of data and configuration of calculator settings can be performed via digital
communications interface and in conjunction with the configuration programme installed on PC.
8.8.4. Restriction of operating time of optical interface for battery supply version:
The optical interface starts work (is activated) only after pressing any control button and shuts
down after 5 minutes, after the last pressing any button or after completing data transmission via
interface.
8.8.5.The total working time of serial communication interface, for protection of the battery
against premature discharge (only for battery supply version), is limited.
Total time of sending and receiving data per month not more than 80 min (interface is blocked
after declime of time limit). It can be unblocked after forced activation with any control button not more
than for 5 min.
9. RE VERIFICATION
9.1. Metrological control of heat meter parameters is performed according to requirements defined
in general verification methodology BPM 8871101-45:2003 and verification instruction PI3268601- 34
9.2. Reverification instruction is provided separately
9.4. Flow, temperature and pressure sensors are recertified according to requirements of relevant
certification methodologies
10. TRANSPORTATION AND STORAGE REQUIREMENTS
10.1. Requirements for safe transportation and storage of flow, temperature and pressure sensors
are provided in relevant technical documentation.
10.2. Packed equipment may be transported in any type of covered vehicle. Equipment should be
anchored reliably to avoid shock and possibility to shift inside vehicle.
10.3. Equipment should be protected against mechanical damage and shock.
10.4. Equipment should be stored in dry, heated premises, where environment temperature is not
lower than +5 oC. No agresive chemical substances should be stored together because of corrosion
hazard.
11. WARRANTY
11.1. Manufacturer gives the warranty that equipment parameters will meet the technical
requirements, listed in the paragraph 2 of this document, if transportation, storage and operation
conditions will be followed.
11.2. Waranty period - 12 months from bringing into operation, but not more than 18 months from
manufacturing date.
Manufacturer’s address:
AB “AXIS INDUSTRIES”,
Kulautuvos g. 45a,
LT47190 Kaunas,
Lithuania
tel. (+370 37) 360234;
fax. (+370 37) 360358.
www.axis.lt

Heat meter calculator SKS-3 PESKS3MID01 38
12. ACCEPTANCE CERTIFICATE
12.1. SKS-3, serial Nr.. ...............…. corresponds to LST EN 1434 requirements and may be put
into operation.
Signature ........................ Date of production : ….. / ….. / 20.....

Heat meter calculator SKS-3 PESKS3MID01 39

Heat meter calculator SKS-3 PESKS3MID01 40
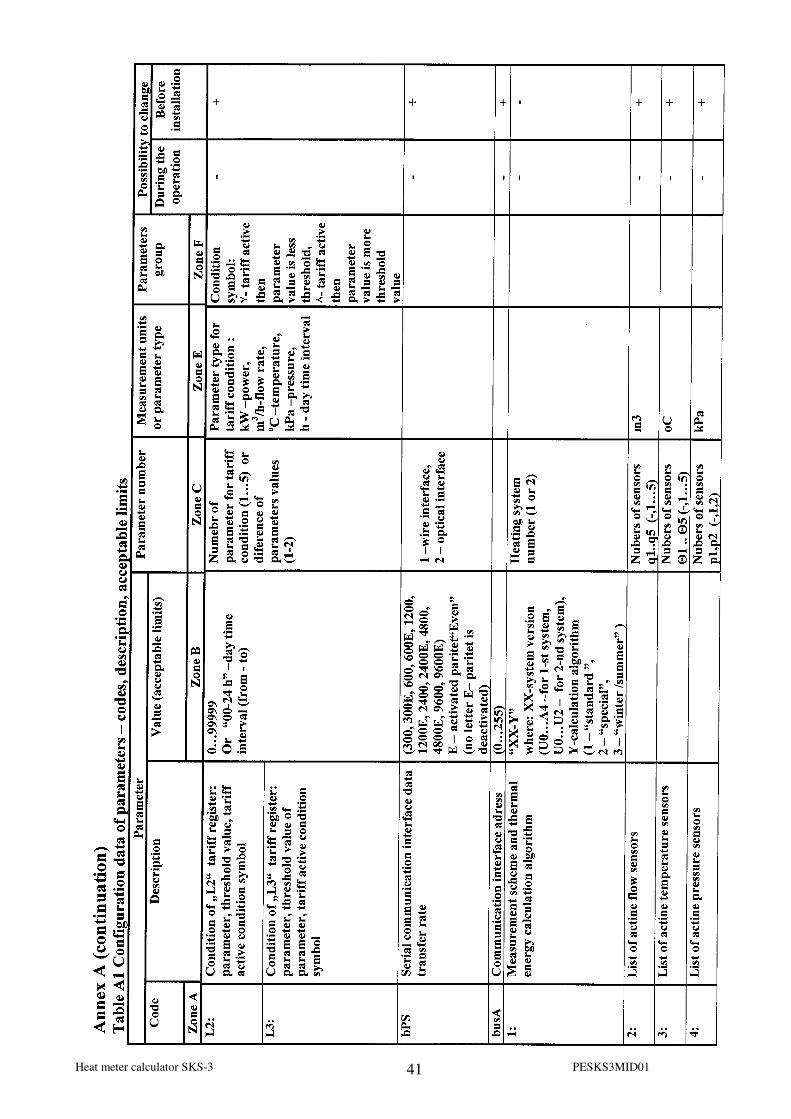
Heat meter calculator SKS-3 PESKS3MID01 41

Heat meter calculator SKS-3 PESKS3MID01 42

Heat meter calculator SKS-3 PESKS3MID01 43
Annex B
Fig. B1. 4-wire conection method for temperature sensors
T1 … T5 - temperature sensors V1 … V5 - flow sensors p1 ... p2 -pressure sensors
F1…Fi – pulse outputs
Remarks: 1. Only required for selected measurement scheme sensors should be connected
2. Pressure sensors presented in this diagram are powered from separate power source.
Other options are presented in Fig. B3.
3. Flow sensor V2 connection diagram for energy measurement algorithm “3
– winter / summer” is presented in Fig. B5. In this case flow sensor V4 not available.
4. Diagram for connecting the regulating valve is presented in Fig. B4.
Inte
rfa
ce
56 57 58 59 50 60 61 62 63 50 69 17 16 18
5 1 2 6 50 7 3 4 8 50 68 11 50 55
73 74 75 76 77 78 70 71 72 26 27 289 11 10 11 52 11 53 11 54 64 65 66 67 50
60 61 62 63
T4
p1
+Current
- Current
68
11
+ Pulse
Ground
F118
17
28
27
26
230 V
50 Hz
64 65 66 67
T5
+Current
- Current
p2
69
17
7 3 4 8
T2
+ Pulse
Ground
V4
54
11+Pulse
Ground
V3
53
11
+ Power supply
+ Pulse
Ground
9
10
11
V1
+ Power supply
+ Pulse
Ground
9
52
11
V2
5 1 2 6
T1
CL- Rx L1
CL+ Tx L1
- GND -
CL
RS
-232
M-b
us
73
74
75
76
77
78
Ground
I1
I2
Current
output
56 57 58 59
T3
+ Pulse
Ground
F216
17
+ Pulse
Ground
55
11
V5
Power supply
module(SKM37)
Communication
module (SKU45)
Inte
rfa
ce
56 57 58 59 50 60 61 62 63 50 69 17 16 1856 57 58 59 50 60 61 62 63 50 69 17 16 18
5 1 2 6 50 7 3 4 8 50 68 11 50 555 1 2 6 50 7 3 4 8 50 68 11 50 55
73 74 75 76 77 7873 74 75 76 77 78 70 71 7270 71 72 26 27 2826 27 289 11 10 11 52 11 53 11 54 64 65 66 67 509 11 10 11 52 11 53 11 54 64 65 66 67 50
60 61 62 63
T4
60 61 62 63
T4
p1
+Current
- Current
68
11
+ Pulse
Ground
F118
17
+ Pulse
Ground
F118
17
28
27
26
230 V
50 Hz
64 65 66 67
T5
64 65 66 67
T5
+Current
- Current
p2
69
17
7 3 4 8
T2
+ Pulse
Ground
V4
54
11+Pulse
Ground
V3
53
11
+ Power supply
+ Pulse
Ground
9
10
11
V1
+ Power supply
+ Pulse
Ground
9
52
11
V2
5 1 2 6
T1
5 1 2 6
T1
CL- Rx L1
CL+ Tx L1
- GND -
CL
RS
-232
M-b
us
73
74
75
76
77
78
Ground
I1
I2
Current
output
56 57 58 59
T3
56 57 58 59
T3
+ Pulse
Ground
F216
17
+ Pulse
Ground
55
11
V5
Power supply
module(SKM37)
Communication
module (SKU45)
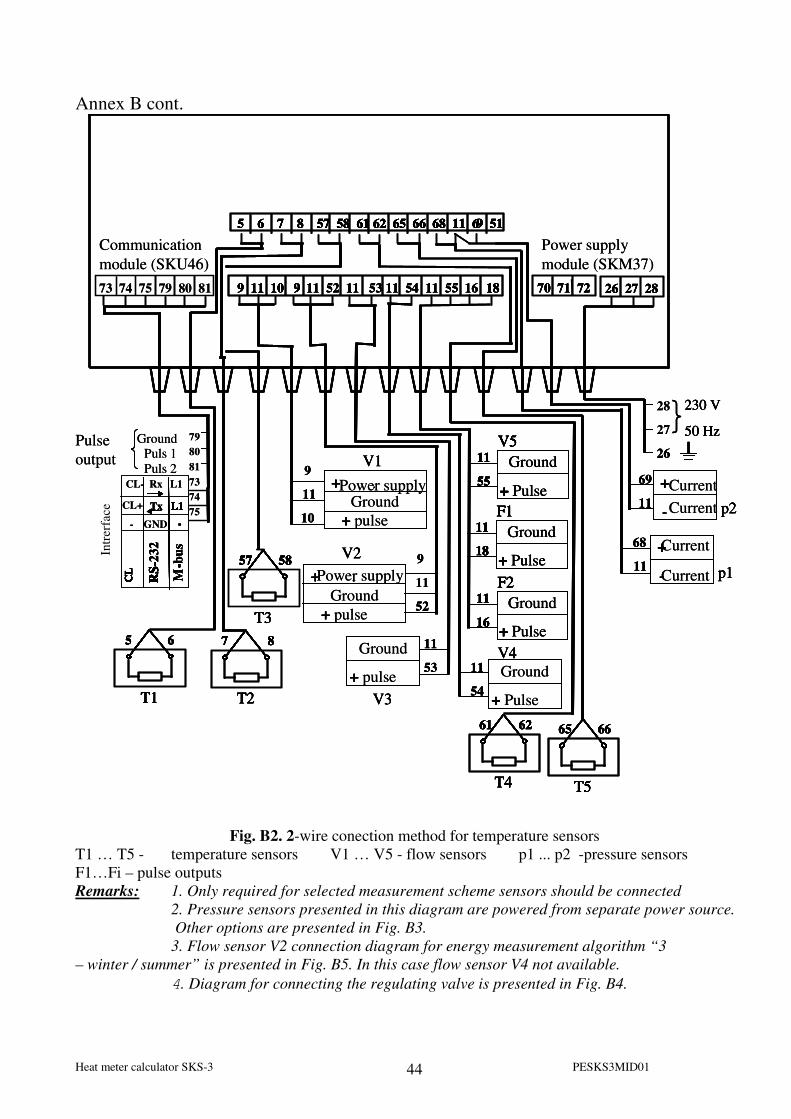
Heat meter calculator SKS-3 PESKS3MID01 44
Annex B cont.
Fig. B2. 2-wire conection method for temperature sensors
T1 … T5 - temperature sensors V1 … V5 - flow sensors p1 ... p2 -pressure sensors
F1…Fi – pulse outputs
Remarks: 1. Only required for selected measurement scheme sensors should be connected
2. Pressure sensors presented in this diagram are powered from separate power source.
Other options are presented in Fig. B3.
3. Flow sensor V2 connection diagram for energy measurement algorithm “3
– winter / summer” is presented in Fig. B5. In this case flow sensor V4 not available.
4. Diagram for connecting the regulating valve is presented in Fig. B4.
p1
5 6 7 8 57 58 61 62 65 66 68 11 69 51
70 71 72 26 27 289 11 10 9 11 52 11 53 11 54 11 55 16 18
Ground
+ Pulse
V511
55
28
27
26
230 V
50 Hz
+
-
68
11
Ground
+ Pulse
V411
54
Ground
+ pulse
V3
11
53
+Power supply.
Ground
+ pulse
9
11
10
V1
+ . Power supply
Ground
+ pulse
9
11
52
V2
p2
+Current
-
69
11
5 6
T1
7 8
T2
57 58
T3
61 62
T4
65 66
T5
CL- Rx L1
Tx L1
- GND -
CL
RS
-23
2
M-b
us
73
81
GroundPuls 1
Puls 2
Tx L1
-
CL
RS
- -
L1
-
CL
RS
- -
L1
-
- -
Ground
+ Pulse
F111
18
Ground
+ Pulse
F211
16
Power supply
module (SKM37)
Communication
module (SKU46)
p1
5 6 7 8 57 58 61 62 65 66 68 11 69 515 6 7 8 57 58 61 62 65 66 68 11 69 51
73 74 75 79 80 81 70 71 72 26 27 289 11 10 9 11 52 11 53 11 54 11 55 16 189 11 10 9 18
+
V511
55+
V511
55
26
230 V
50 Hz
+
-
68
11
+
V411
54+
V3
11
53
+
+
9
11
10
V1
+
+
9
52
V2
p2
+
-
69
11
5 6
T1
5 6
T1
7 8
T2
7 8
T2
57 58
T3
57 58
T3
61 62
T4
61 62
T4
65 66
T5
65 66
T5
L1
-
CL
RS
-23
2
M-b
us
Pulse
output
CL+
-
CL
RS
- -
-
CL
RS
- -
-
- - +
F111
18+
F111
18
+
F211
16+
F211
16
Current
Current
Current
75
74
79
80
p1
5 6 7 8 57 58 61 62 65 66 68 11 69 515 6 7 8 57 58 61 62 65 66 68 11 69 51
70 71 7270 71 72 26 27 2826 27 289 11 10 9 11 52 11 53 11 54 11 55 16 189 11 10 9 11 52 11 53 11 54 11 55 16 18
Ground
+ Pulse
V511
55
Ground
+ Pulse
V511
55
28
27
26
230 V
50 Hz
+
-
68
11
Ground
+ Pulse
V411
54
Ground
+ pulse
V3
11
53
+Power supply.
Ground
+ pulse
9
11
10
V1
+ . Power supply
Ground
+ pulse
9
11
52
V2
p2
+Current
-
69
11
5 6
T1
5 6
T1
7 8
T2
7 8
T2
57 58
T3
57 58
T3
61 62
T4
61 62
T4
65 66
T5
65 66
T5
CL- Rx L1
Tx L1
- GND -
CL
RS
-23
2
M-b
us
73
81
GroundPuls 1
Puls 2
Tx L1
-
CL
RS
- -
L1
-
CL
RS
- -
L1
-
- -
Ground
+ Pulse
F111
18
Ground
+ Pulse
F111
18
Ground
+ Pulse
F211
16
Ground
+ Pulse
F211
16
Power supply
module (SKM37)
Communication
module (SKU46)
p1
5 6 7 8 57 58 61 62 65 66 68 11 69 515 6 7 8 57 58 61 62 65 66 68 11 69 51
73 74 75 79 80 81 70 71 72 26 27 289 11 10 9 11 52 11 53 11 54 11 55 16 189 11 10 9 18
+
V511
55+
V511
55
26
230 V
50 Hz
+
-
68
11
+
V411
54+
V3
11
53
+
+
9
11
10
V1
+
+
9
52
V2
p2
+
-
69
11
5 6
T1
5 6
T1
7 8
T2
7 8
T2
57 58
T3
57 58
T3
61 62
T4
61 62
T4
65 66
T5
65 66
T5
L1
-
CL
RS
-23
2
M-b
us
Pulse
output
CL+
-
CL
RS
- -
-
CL
RS
- -
-
- - +
F111
18+
F111
18
+
F211
16+
F211
16
Current
Current
Current
75
74
79
80
Intr
erfa
ce
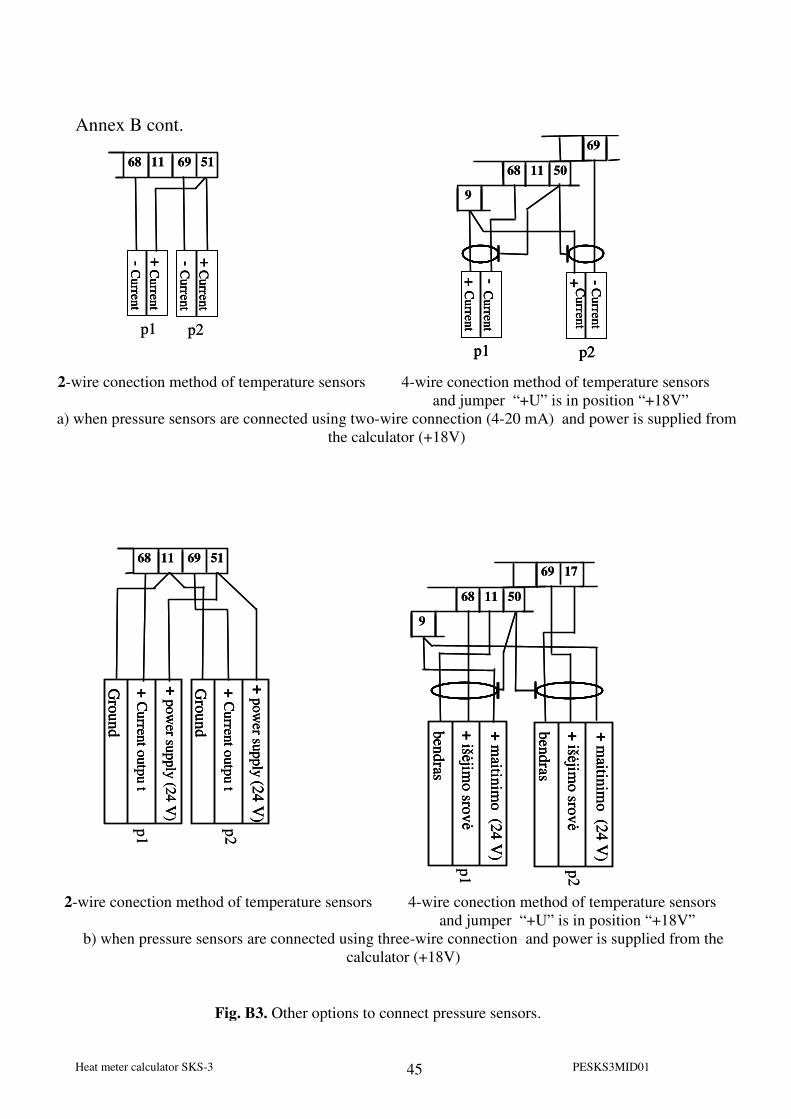
Heat meter calculator SKS-3 PESKS3MID01 45
Annex B cont.
2-wire conection method of temperature sensors 4-wire conection method of temperature sensors
and jumper “+U” is in position “+18V”
b) when pressure sensors are connected using three-wire connection and power is supplied from the
calculator (+18V)
Fig. B3. Other options to connect pressure sensors.
p1
+m
aitinim
o (2
4 V
)
+ išėjim
o sro
vė
ben
dras
p2
+m
aitinim
o (2
4 V
)
+ išėjim
o sro
vė
ben
dras
69 17
68 11 50
9
p1
+m
aitinim
o (2
4 V
)
+ išėjim
o sro
vė
ben
dras
+m
aitinim
o (2
4 V
)
+ išėjim
o sro
vė
ben
dras
p2
+m
aitinim
o (2
4 V
)
+ išėjim
o sro
vė
ben
dras
+m
aitinim
o (2
4 V
)
+ išėjim
o sro
vė
ben
dras
69 17
68 11 50
9
2-wire conection method of temperature sensors 4-wire conection method of temperature sensors
and jumper “+U” is in position “+18V”
a) when pressure sensors are connected using two-wire connection (4-20 mA) and power is supplied from
the calculator (+18V)
p2
-C
urren
t
Curren
t+
69
68 11 50
9
p1
-C
urren
t
Curren
t+
p2
-C
urren
t
Curren
t+
p2
-C
urren
t
Curren
t+
69
68 11 50
9
p1
-C
urren
t
Curren
t+
p1
-C
urren
t
Curren
t+
68 11 69 51
p2p1
+C
urren
t
Curren
t-+
Curren
t
Curren
t-
68 11 69 51
p2p1
+C
urren
t
Curren
t- +
Curren
t
Curren
t-+
Curren
t
Curren
t- +
Curren
t
Curren
t-
p1
+p
ow
er sup
ply
(24
V)
+C
urren
t outp
ut
Gro
un
d
p2
+ p
ow
er sup
ply
(24
V)
+ C
urren
t outp
ut
Gro
un
d
68 11 69 51
p1
+p
ow
er sup
ply
(24
V)
+C
urren
t outp
ut
Gro
un
d
+p
ow
er sup
ply
(24
V)
+C
urren
t outp
ut
Gro
un
d
p2
+ p
ow
er sup
ply
(24
V)
+ C
urren
t outp
ut
Gro
un
d
+ p
ow
er sup
ply
(24
V)
+ C
urren
t outp
ut
Gro
un
d
68 11 69 51
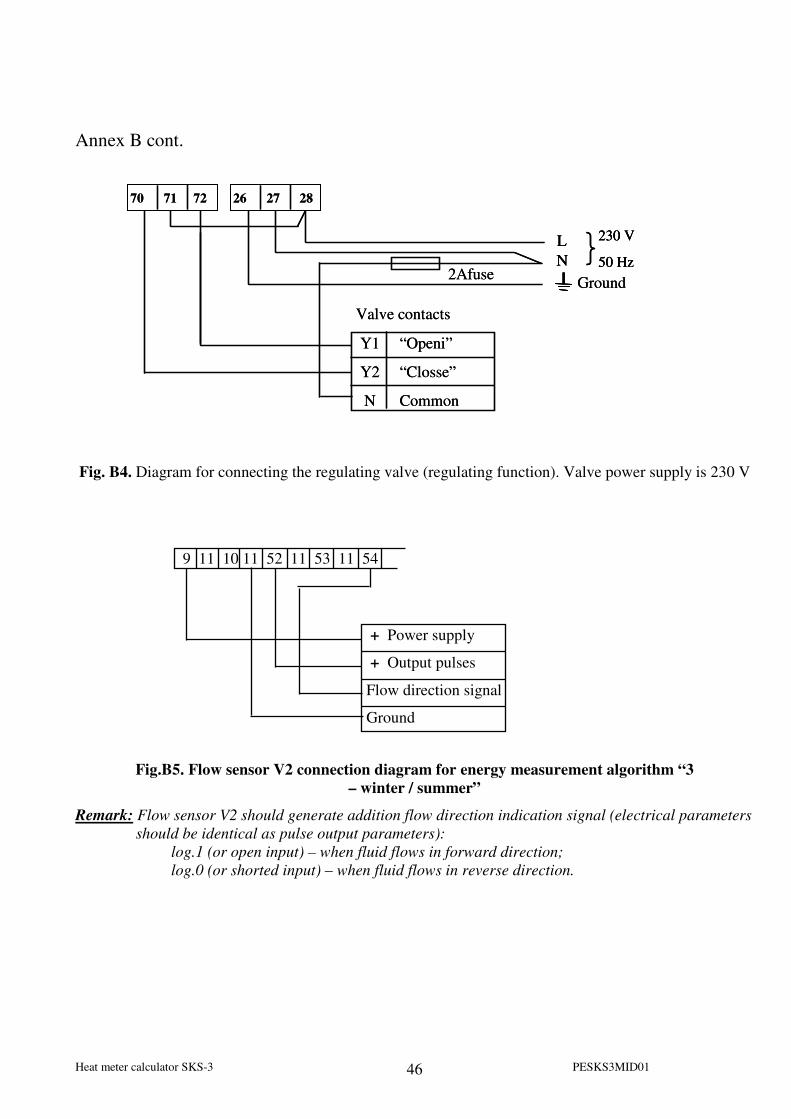
Heat meter calculator SKS-3 PESKS3MID01 46
Annex B cont.
Fig. B4. Diagram for connecting the regulating valve (regulating function). Valve power supply is 230 V
Fig.B5. Flow sensor V2 connection diagram for energy measurement algorithm “3
– winter / summer”
Remark: Flow sensor V2 should generate addition flow direction indication signal (electrical parameters
should be identical as pulse output parameters):
log.1 (or open input) – when fluid flows in forward direction;
log.0 (or shorted input) – when fluid flows in reverse direction.
+ Power supply
+ Output pulses
Flow direction signal
Ground
9 11 10 11 52 11 53 11 54
Y1 “Openi”
Y2 “Closse”
N Common
2AfuseN
L 230 V
50 Hz
70 71 72 26 27 28
Ground
Valve contacts
Y1 “Openi”
Y2 “Closse”
N Common
2AfuseN
L
N
L 230 V
50 Hz
230 V
50 Hz
70 71 72 26 27 28
Ground
Valve contacts

Heat meter calculator SKS-3 PESKS3MID01 47
Annex B cont.
Fig.B6. Scheme of direct connection of calculator to interface RS-232 of PC
Fig.B7. Scheme of direct connection of calculator to interface RS-232 of modem or printer
Rx
Tx
GND
- DTR
+RTS
73 (Rx)
74 (Tx)
75 (GND)
3
2
5
4
7
Interface RS-232 of PC
25 pins 9 pins
SKS - 3
Module
SKS48
SKS - 3
2
3
7
20
4
-
- -
Module
SKU45 (46)

Heat meter calculator SKS-3 PESKS3MID01 48
Annex C Table C1. Numbering of terminals
Terminal number Marking Signal description
9 +U +3,6V or +18V power supply voltage for flow or pressure sensors
11 -q1 Ground for 1-st flow sensor (-)
10 +q1 Pulse input signal from 1-st flow sensor (+)
11 -q2 Ground for 2-nd flow sensor (-)
52 +q2 Pulse input signal from 2-nd flow sensor (+)
11 -q3 Ground for 3-rd flow sensor (-)
53 +q3 Pulse input signal from 3-rd flow sensor (+)
11 -q4 Ground for 4-th flow sensor (-)
54 +q4 Pulse input signal from 4-th flow sensor (+)
64 T5 Current terminal for 5-th temperature sensor“+I”
65 T5 Voltage terminal for 5-th temperature sensor“+U”
66 T5 Voltage terminal for 5-th temperature sensor“-U”
67 T5 Current terminal for 5-th temperature sensor“-I”
50 ╧ Shield terminal (for 5-th temperature sensor etc. )
5 T1 Current terminal for 1-st temperature sensor “+I”
1 T1 Voltage terminal for 1-st temperature sensor “+U”
2 T1 Voltage terminal for 1-st temperature sensor “-U”
6 T1 Current terminal for 1-st temperature sensor “-I”
50 ╧ Shield terminal (for 1-st remperature sensor etc.)
7 T2 Current terminal for 2-nd temperature sensor “+I”
3 T2 Voltage terminal for 2-nd temperature sensor “+U”
4 T2 Voltage terminal for 2-nd temperature sensor “-U”
8 T2 Current terminal for 2-nd temperature sensor “-I”
50 ╧ Shield terminal (for 2-nd temperature sensor etc. )
68 p1 Input current terminal for 1-st pressure sensor
11 p1-/q1- Common ground for 1-st pressure sensor, 2-nd frequency/pulse output or 5-th flow sensor (-)
50 ╧ Shield terminal (for 1-st pressure sensor etc. )
55 +q5 5-th flow sensor pulse input (+)
56 T3 Current terminal for 3-rd temperature sensor “+I”
57 T3 Voltage terminal for 3-rd temperature sensor “+U”
58 T3 Voltage terminal for 3-rd temperature sensor “-U”
59 T3 Current terminal for 3-rd temperature sensor “-I”
50 ╧ Shield terminal (for 2-nd temperature sensor etc. )
60 T4 Current terminal for 3-rd temperature sensor “+I”
61 T4 Voltage terminal for 3-rd temperature sensor “+U”
62 T4 Voltage terminal for 3-rd temperature sensor “-U”
63 T4 Current terminal for 3-rd temperature sensor “-I”
50 ╧ Shield terminal (for 2-nd temperature sensor etc. )
69 p2 Pulse input signal from 2-nd pressure sensor
17 ┴ Ground for 2-nd pressure sensor or 1-st pulse output (-)
16 F1 1-st frequency output (+)
18 F2 2-nd frequency output (+)
51 +18 V +18V power supply voltage for flow or pressure sensors
76 ┴ Current output ground (-)
77 Iout1 1-st current output (+)
78 Iout2 2-st current output (+)
79 ┴ Pulse output ground (-)
80 Puls1 1-st pulse output (+)
81 Puls2 2-st pulse output (+)
24, (73) BUS M-Bus interface L1 signal (M-Bus , CL – -CL or RS232 – Rx (input))
25, (74) BUS M-Bus interface L2 signal (M-Bus , CL – +CL or RS232 – Tx (output))
75 BUS Ground for RS-232 interface “GND”
70 ˇ Relay output “decrease”
71 R Relay output ground
72 ˆ Relay output “increase”
26 ╧ Main ground
27 230V Mains power supply (230V AC)
28 230V Mains power supply (230V AC)

Heat meter calculator SKS-3 PESKS3MID01 49
Annex D
D1. Mounting dimensions of calculator
D1.1. Adapter plate according to figure 8 of EN1434-2:2007 for wall mounting of calculator
It can be used for wall mounting, if the aperture in the wall is too large for the calculator
1 – calculator SKS-3
2 – adapter plate
3 – screw M4x6
4 - screw M4x12

Heat meter calculator SKS-3 PESKS3MID01 50
Annex D cont.
D2. Wall mounting, without possibility sealing of mounting
D3. Wall mounting, with possibility sealing of mounting
D4. Mounting on standard DIN-rail

Heat meter calculator SKS-3 PESKS3MID01 51
Annex D cont.
D5. Panel mounting
a) DN (25,32)
b) DN 50
D6. Mounting on flow sensor type SDU-1.
Flow temperature max. 90 oC.

Heat meter calculator SKS-3 PESKS3MID01 52
Jack Nottidge
Heattracing


![001april [Sks]](https://static.fdocuments.in/doc/165x107/55cf9971550346d0339d6d9a/001april-sks.jpg)