AWS Service Catalog...AWS Service Catalog Administrator Guide Constraints modify your catalog. IAM...
126
AWS Service Catalog Administrator Guide
Transcript of AWS Service Catalog...AWS Service Catalog Administrator Guide Constraints modify your catalog. IAM...

AWS Service CatalogAdministrator Guide

AWS Service Catalog Administrator Guide
AWS Service Catalog: Administrator GuideCopyright © 2020 Amazon Web Services, Inc. and/or its affiliates. All rights reserved.
Amazon's trademarks and trade dress may not be used in connection with any product or service that is notAmazon's, in any manner that is likely to cause confusion among customers, or in any manner that disparages ordiscredits Amazon. All other trademarks not owned by Amazon are the property of their respective owners, who mayor may not be affiliated with, connected to, or sponsored by Amazon.

AWS Service Catalog Administrator Guide
Table of ContentsWhat Is AWS Service Catalog? .... . . . . . . . . . . . . . . . . . . . . . . . . . . . . . . . . . . . . . . . . . . . . . . . . . . . . . . . . . . . . . . . . . . . . . . . . . . . . . . . . . . . . . . . . . . . . . . . . . . . . . . . . . 1
Overview .... . . . . . . . . . . . . . . . . . . . . . . . . . . . . . . . . . . . . . . . . . . . . . . . . . . . . . . . . . . . . . . . . . . . . . . . . . . . . . . . . . . . . . . . . . . . . . . . . . . . . . . . . . . . . . . . . . . . . . . . . . . . . . . . 1Users ... . . . . . . . . . . . . . . . . . . . . . . . . . . . . . . . . . . . . . . . . . . . . . . . . . . . . . . . . . . . . . . . . . . . . . . . . . . . . . . . . . . . . . . . . . . . . . . . . . . . . . . . . . . . . . . . . . . . . . . . . . . . . . 1Products ... . . . . . . . . . . . . . . . . . . . . . . . . . . . . . . . . . . . . . . . . . . . . . . . . . . . . . . . . . . . . . . . . . . . . . . . . . . . . . . . . . . . . . . . . . . . . . . . . . . . . . . . . . . . . . . . . . . . . . . . . 2Provisioned Products ... . . . . . . . . . . . . . . . . . . . . . . . . . . . . . . . . . . . . . . . . . . . . . . . . . . . . . . . . . . . . . . . . . . . . . . . . . . . . . . . . . . . . . . . . . . . . . . . . . . . . . . . 2Portfolios ... . . . . . . . . . . . . . . . . . . . . . . . . . . . . . . . . . . . . . . . . . . . . . . . . . . . . . . . . . . . . . . . . . . . . . . . . . . . . . . . . . . . . . . . . . . . . . . . . . . . . . . . . . . . . . . . . . . . . . . . 2Versioning .... . . . . . . . . . . . . . . . . . . . . . . . . . . . . . . . . . . . . . . . . . . . . . . . . . . . . . . . . . . . . . . . . . . . . . . . . . . . . . . . . . . . . . . . . . . . . . . . . . . . . . . . . . . . . . . . . . . . . . 2Permissions .... . . . . . . . . . . . . . . . . . . . . . . . . . . . . . . . . . . . . . . . . . . . . . . . . . . . . . . . . . . . . . . . . . . . . . . . . . . . . . . . . . . . . . . . . . . . . . . . . . . . . . . . . . . . . . . . . . . . 2Constraints ... . . . . . . . . . . . . . . . . . . . . . . . . . . . . . . . . . . . . . . . . . . . . . . . . . . . . . . . . . . . . . . . . . . . . . . . . . . . . . . . . . . . . . . . . . . . . . . . . . . . . . . . . . . . . . . . . . . . . . 3Initial Administrator Workflow ..... . . . . . . . . . . . . . . . . . . . . . . . . . . . . . . . . . . . . . . . . . . . . . . . . . . . . . . . . . . . . . . . . . . . . . . . . . . . . . . . . . . . . . . . . 3Initial End User Workflow ..... . . . . . . . . . . . . . . . . . . . . . . . . . . . . . . . . . . . . . . . . . . . . . . . . . . . . . . . . . . . . . . . . . . . . . . . . . . . . . . . . . . . . . . . . . . . . . . 3
Quotas .... . . . . . . . . . . . . . . . . . . . . . . . . . . . . . . . . . . . . . . . . . . . . . . . . . . . . . . . . . . . . . . . . . . . . . . . . . . . . . . . . . . . . . . . . . . . . . . . . . . . . . . . . . . . . . . . . . . . . . . . . . . . . . . . . . . 4Setting Up .... . . . . . . . . . . . . . . . . . . . . . . . . . . . . . . . . . . . . . . . . . . . . . . . . . . . . . . . . . . . . . . . . . . . . . . . . . . . . . . . . . . . . . . . . . . . . . . . . . . . . . . . . . . . . . . . . . . . . . . . . . . . . . . . . . . . . 6
Sign Up for Amazon Web Services .... . . . . . . . . . . . . . . . . . . . . . . . . . . . . . . . . . . . . . . . . . . . . . . . . . . . . . . . . . . . . . . . . . . . . . . . . . . . . . . . . . . . . . . . . . . . 6Grant Permissions to Administrators and End Users ... . . . . . . . . . . . . . . . . . . . . . . . . . . . . . . . . . . . . . . . . . . . . . . . . . . . . . . . . . . . . . . . . . . . . . 6Grant Permissions to Administrators ... . . . . . . . . . . . . . . . . . . . . . . . . . . . . . . . . . . . . . . . . . . . . . . . . . . . . . . . . . . . . . . . . . . . . . . . . . . . . . . . . . . . . . . . . . . 6Grant Permissions to End Users ... . . . . . . . . . . . . . . . . . . . . . . . . . . . . . . . . . . . . . . . . . . . . . . . . . . . . . . . . . . . . . . . . . . . . . . . . . . . . . . . . . . . . . . . . . . . . . . . . 8
Getting Started .... . . . . . . . . . . . . . . . . . . . . . . . . . . . . . . . . . . . . . . . . . . . . . . . . . . . . . . . . . . . . . . . . . . . . . . . . . . . . . . . . . . . . . . . . . . . . . . . . . . . . . . . . . . . . . . . . . . . . . . . . . . . . . . 9Step 1: Download the Template .... . . . . . . . . . . . . . . . . . . . . . . . . . . . . . . . . . . . . . . . . . . . . . . . . . . . . . . . . . . . . . . . . . . . . . . . . . . . . . . . . . . . . . . . . . . . . . . . 9
Template Download .... . . . . . . . . . . . . . . . . . . . . . . . . . . . . . . . . . . . . . . . . . . . . . . . . . . . . . . . . . . . . . . . . . . . . . . . . . . . . . . . . . . . . . . . . . . . . . . . . . . . . . . . 9Template Overview .... . . . . . . . . . . . . . . . . . . . . . . . . . . . . . . . . . . . . . . . . . . . . . . . . . . . . . . . . . . . . . . . . . . . . . . . . . . . . . . . . . . . . . . . . . . . . . . . . . . . . . . . . 9
Step 2: Create a Key Pair ... . . . . . . . . . . . . . . . . . . . . . . . . . . . . . . . . . . . . . . . . . . . . . . . . . . . . . . . . . . . . . . . . . . . . . . . . . . . . . . . . . . . . . . . . . . . . . . . . . . . . . . . 12Step 3: Create a Portfolio .... . . . . . . . . . . . . . . . . . . . . . . . . . . . . . . . . . . . . . . . . . . . . . . . . . . . . . . . . . . . . . . . . . . . . . . . . . . . . . . . . . . . . . . . . . . . . . . . . . . . . . . 12Step 4: Create a Product .... . . . . . . . . . . . . . . . . . . . . . . . . . . . . . . . . . . . . . . . . . . . . . . . . . . . . . . . . . . . . . . . . . . . . . . . . . . . . . . . . . . . . . . . . . . . . . . . . . . . . . . . 13Step 5: Add a Template Constraint ... . . . . . . . . . . . . . . . . . . . . . . . . . . . . . . . . . . . . . . . . . . . . . . . . . . . . . . . . . . . . . . . . . . . . . . . . . . . . . . . . . . . . . . . . . . 13Step 6: Add a Launch Constraint ... . . . . . . . . . . . . . . . . . . . . . . . . . . . . . . . . . . . . . . . . . . . . . . . . . . . . . . . . . . . . . . . . . . . . . . . . . . . . . . . . . . . . . . . . . . . . . 14Step 7: Grant End Users Access to the Portfolio .... . . . . . . . . . . . . . . . . . . . . . . . . . . . . . . . . . . . . . . . . . . . . . . . . . . . . . . . . . . . . . . . . . . . . . . . 15Step 8: Test the End User Experience .... . . . . . . . . . . . . . . . . . . . . . . . . . . . . . . . . . . . . . . . . . . . . . . . . . . . . . . . . . . . . . . . . . . . . . . . . . . . . . . . . . . . . . . 16
Getting Started Library .... . . . . . . . . . . . . . . . . . . . . . . . . . . . . . . . . . . . . . . . . . . . . . . . . . . . . . . . . . . . . . . . . . . . . . . . . . . . . . . . . . . . . . . . . . . . . . . . . . . . . . . . . . . . . . . . . . 17Prerequisites ... . . . . . . . . . . . . . . . . . . . . . . . . . . . . . . . . . . . . . . . . . . . . . . . . . . . . . . . . . . . . . . . . . . . . . . . . . . . . . . . . . . . . . . . . . . . . . . . . . . . . . . . . . . . . . . . . . . . . . . . . . 17Reference Architectures .... . . . . . . . . . . . . . . . . . . . . . . . . . . . . . . . . . . . . . . . . . . . . . . . . . . . . . . . . . . . . . . . . . . . . . . . . . . . . . . . . . . . . . . . . . . . . . . . . . . . . . . . . . 17High Reliability Architectures .... . . . . . . . . . . . . . . . . . . . . . . . . . . . . . . . . . . . . . . . . . . . . . . . . . . . . . . . . . . . . . . . . . . . . . . . . . . . . . . . . . . . . . . . . . . . . . . . . . 17Learn More .... . . . . . . . . . . . . . . . . . . . . . . . . . . . . . . . . . . . . . . . . . . . . . . . . . . . . . . . . . . . . . . . . . . . . . . . . . . . . . . . . . . . . . . . . . . . . . . . . . . . . . . . . . . . . . . . . . . . . . . . . . . 18
Security ... . . . . . . . . . . . . . . . . . . . . . . . . . . . . . . . . . . . . . . . . . . . . . . . . . . . . . . . . . . . . . . . . . . . . . . . . . . . . . . . . . . . . . . . . . . . . . . . . . . . . . . . . . . . . . . . . . . . . . . . . . . . . . . . . . . . . . . . . 19Data Protection .... . . . . . . . . . . . . . . . . . . . . . . . . . . . . . . . . . . . . . . . . . . . . . . . . . . . . . . . . . . . . . . . . . . . . . . . . . . . . . . . . . . . . . . . . . . . . . . . . . . . . . . . . . . . . . . . . . . . . 19
Protecting Data with Encryption .... . . . . . . . . . . . . . . . . . . . . . . . . . . . . . . . . . . . . . . . . . . . . . . . . . . . . . . . . . . . . . . . . . . . . . . . . . . . . . . . . . . . . 20Identity and Access Management .... . . . . . . . . . . . . . . . . . . . . . . . . . . . . . . . . . . . . . . . . . . . . . . . . . . . . . . . . . . . . . . . . . . . . . . . . . . . . . . . . . . . . . . . . . . . 20
Audience .... . . . . . . . . . . . . . . . . . . . . . . . . . . . . . . . . . . . . . . . . . . . . . . . . . . . . . . . . . . . . . . . . . . . . . . . . . . . . . . . . . . . . . . . . . . . . . . . . . . . . . . . . . . . . . . . . . . . . . 21Controlling Access .... . . . . . . . . . . . . . . . . . . . . . . . . . . . . . . . . . . . . . . . . . . . . . . . . . . . . . . . . . . . . . . . . . . . . . . . . . . . . . . . . . . . . . . . . . . . . . . . . . . . . . . . . 21Predefined AWS Managed Policies ... . . . . . . . . . . . . . . . . . . . . . . . . . . . . . . . . . . . . . . . . . . . . . . . . . . . . . . . . . . . . . . . . . . . . . . . . . . . . . . . . . . . 21Console Access for End Users ... . . . . . . . . . . . . . . . . . . . . . . . . . . . . . . . . . . . . . . . . . . . . . . . . . . . . . . . . . . . . . . . . . . . . . . . . . . . . . . . . . . . . . . . . . . 22Product Access for End Users ... . . . . . . . . . . . . . . . . . . . . . . . . . . . . . . . . . . . . . . . . . . . . . . . . . . . . . . . . . . . . . . . . . . . . . . . . . . . . . . . . . . . . . . . . . . 23Example Policies ... . . . . . . . . . . . . . . . . . . . . . . . . . . . . . . . . . . . . . . . . . . . . . . . . . . . . . . . . . . . . . . . . . . . . . . . . . . . . . . . . . . . . . . . . . . . . . . . . . . . . . . . . . . . . 23
Logging and Monitoring .... . . . . . . . . . . . . . . . . . . . . . . . . . . . . . . . . . . . . . . . . . . . . . . . . . . . . . . . . . . . . . . . . . . . . . . . . . . . . . . . . . . . . . . . . . . . . . . . . . . . . . . . . 26Compliance Validation .... . . . . . . . . . . . . . . . . . . . . . . . . . . . . . . . . . . . . . . . . . . . . . . . . . . . . . . . . . . . . . . . . . . . . . . . . . . . . . . . . . . . . . . . . . . . . . . . . . . . . . . . . . . 26Resilience .... . . . . . . . . . . . . . . . . . . . . . . . . . . . . . . . . . . . . . . . . . . . . . . . . . . . . . . . . . . . . . . . . . . . . . . . . . . . . . . . . . . . . . . . . . . . . . . . . . . . . . . . . . . . . . . . . . . . . . . . . . . . . 27Infrastructure Security ... . . . . . . . . . . . . . . . . . . . . . . . . . . . . . . . . . . . . . . . . . . . . . . . . . . . . . . . . . . . . . . . . . . . . . . . . . . . . . . . . . . . . . . . . . . . . . . . . . . . . . . . . . . . 27Security Best Practices .... . . . . . . . . . . . . . . . . . . . . . . . . . . . . . . . . . . . . . . . . . . . . . . . . . . . . . . . . . . . . . . . . . . . . . . . . . . . . . . . . . . . . . . . . . . . . . . . . . . . . . . . . . . 27
Managing Catalogs .... . . . . . . . . . . . . . . . . . . . . . . . . . . . . . . . . . . . . . . . . . . . . . . . . . . . . . . . . . . . . . . . . . . . . . . . . . . . . . . . . . . . . . . . . . . . . . . . . . . . . . . . . . . . . . . . . . . . . . . . 29Managing Portfolios ... . . . . . . . . . . . . . . . . . . . . . . . . . . . . . . . . . . . . . . . . . . . . . . . . . . . . . . . . . . . . . . . . . . . . . . . . . . . . . . . . . . . . . . . . . . . . . . . . . . . . . . . . . . . . . . 29
Creating, Viewing, and Deleting Portfolios ... . . . . . . . . . . . . . . . . . . . . . . . . . . . . . . . . . . . . . . . . . . . . . . . . . . . . . . . . . . . . . . . . . . . . . . . . 29Viewing Portfolio Details ... . . . . . . . . . . . . . . . . . . . . . . . . . . . . . . . . . . . . . . . . . . . . . . . . . . . . . . . . . . . . . . . . . . . . . . . . . . . . . . . . . . . . . . . . . . . . . . . . 30Creating and Deleting Portfolios ... . . . . . . . . . . . . . . . . . . . . . . . . . . . . . . . . . . . . . . . . . . . . . . . . . . . . . . . . . . . . . . . . . . . . . . . . . . . . . . . . . . . . . 30Adding Products ... . . . . . . . . . . . . . . . . . . . . . . . . . . . . . . . . . . . . . . . . . . . . . . . . . . . . . . . . . . . . . . . . . . . . . . . . . . . . . . . . . . . . . . . . . . . . . . . . . . . . . . . . . . . . 30
iii

AWS Service Catalog Administrator Guide
Adding Constraints ... . . . . . . . . . . . . . . . . . . . . . . . . . . . . . . . . . . . . . . . . . . . . . . . . . . . . . . . . . . . . . . . . . . . . . . . . . . . . . . . . . . . . . . . . . . . . . . . . . . . . . . . . 32Granting Access to Users ... . . . . . . . . . . . . . . . . . . . . . . . . . . . . . . . . . . . . . . . . . . . . . . . . . . . . . . . . . . . . . . . . . . . . . . . . . . . . . . . . . . . . . . . . . . . . . . . . 33
Managing Products ... . . . . . . . . . . . . . . . . . . . . . . . . . . . . . . . . . . . . . . . . . . . . . . . . . . . . . . . . . . . . . . . . . . . . . . . . . . . . . . . . . . . . . . . . . . . . . . . . . . . . . . . . . . . . . . . . 33Viewing the Products Page .... . . . . . . . . . . . . . . . . . . . . . . . . . . . . . . . . . . . . . . . . . . . . . . . . . . . . . . . . . . . . . . . . . . . . . . . . . . . . . . . . . . . . . . . . . . . . 33Creating Products ... . . . . . . . . . . . . . . . . . . . . . . . . . . . . . . . . . . . . . . . . . . . . . . . . . . . . . . . . . . . . . . . . . . . . . . . . . . . . . . . . . . . . . . . . . . . . . . . . . . . . . . . . . . 34Adding Products to Portfolios ... . . . . . . . . . . . . . . . . . . . . . . . . . . . . . . . . . . . . . . . . . . . . . . . . . . . . . . . . . . . . . . . . . . . . . . . . . . . . . . . . . . . . . . . . . 35Updating Products ... . . . . . . . . . . . . . . . . . . . . . . . . . . . . . . . . . . . . . . . . . . . . . . . . . . . . . . . . . . . . . . . . . . . . . . . . . . . . . . . . . . . . . . . . . . . . . . . . . . . . . . . . . 35Deleting Products ... . . . . . . . . . . . . . . . . . . . . . . . . . . . . . . . . . . . . . . . . . . . . . . . . . . . . . . . . . . . . . . . . . . . . . . . . . . . . . . . . . . . . . . . . . . . . . . . . . . . . . . . . . . 36Managing Versions .... . . . . . . . . . . . . . . . . . . . . . . . . . . . . . . . . . . . . . . . . . . . . . . . . . . . . . . . . . . . . . . . . . . . . . . . . . . . . . . . . . . . . . . . . . . . . . . . . . . . . . . . 36
Using Constraints ... . . . . . . . . . . . . . . . . . . . . . . . . . . . . . . . . . . . . . . . . . . . . . . . . . . . . . . . . . . . . . . . . . . . . . . . . . . . . . . . . . . . . . . . . . . . . . . . . . . . . . . . . . . . . . . . . . . 37Launch Constraints ... . . . . . . . . . . . . . . . . . . . . . . . . . . . . . . . . . . . . . . . . . . . . . . . . . . . . . . . . . . . . . . . . . . . . . . . . . . . . . . . . . . . . . . . . . . . . . . . . . . . . . . . . 37Notification Constraints ... . . . . . . . . . . . . . . . . . . . . . . . . . . . . . . . . . . . . . . . . . . . . . . . . . . . . . . . . . . . . . . . . . . . . . . . . . . . . . . . . . . . . . . . . . . . . . . . . . . 39Tag Update Constraints ... . . . . . . . . . . . . . . . . . . . . . . . . . . . . . . . . . . . . . . . . . . . . . . . . . . . . . . . . . . . . . . . . . . . . . . . . . . . . . . . . . . . . . . . . . . . . . . . . . . 40Stack Set Constraints ... . . . . . . . . . . . . . . . . . . . . . . . . . . . . . . . . . . . . . . . . . . . . . . . . . . . . . . . . . . . . . . . . . . . . . . . . . . . . . . . . . . . . . . . . . . . . . . . . . . . . . 40Template Constraints ... . . . . . . . . . . . . . . . . . . . . . . . . . . . . . . . . . . . . . . . . . . . . . . . . . . . . . . . . . . . . . . . . . . . . . . . . . . . . . . . . . . . . . . . . . . . . . . . . . . . . . 41
Using Service Actions .... . . . . . . . . . . . . . . . . . . . . . . . . . . . . . . . . . . . . . . . . . . . . . . . . . . . . . . . . . . . . . . . . . . . . . . . . . . . . . . . . . . . . . . . . . . . . . . . . . . . . . . . . . . . . 49Prerequisites ... . . . . . . . . . . . . . . . . . . . . . . . . . . . . . . . . . . . . . . . . . . . . . . . . . . . . . . . . . . . . . . . . . . . . . . . . . . . . . . . . . . . . . . . . . . . . . . . . . . . . . . . . . . . . . . . . . 50Step 1: Configure end user permissions .... . . . . . . . . . . . . . . . . . . . . . . . . . . . . . . . . . . . . . . . . . . . . . . . . . . . . . . . . . . . . . . . . . . . . . . . . . . . 50Step 2: Create a service action .... . . . . . . . . . . . . . . . . . . . . . . . . . . . . . . . . . . . . . . . . . . . . . . . . . . . . . . . . . . . . . . . . . . . . . . . . . . . . . . . . . . . . . . . 51Step 3: Associate the service action with a product version .... . . . . . . . . . . . . . . . . . . . . . . . . . . . . . . . . . . . . . . . . . . . . . . . . 51Step 4: Test the end user experience .... . . . . . . . . . . . . . . . . . . . . . . . . . . . . . . . . . . . . . . . . . . . . . . . . . . . . . . . . . . . . . . . . . . . . . . . . . . . . . . 52Step 5: Troubleshooting .... . . . . . . . . . . . . . . . . . . . . . . . . . . . . . . . . . . . . . . . . . . . . . . . . . . . . . . . . . . . . . . . . . . . . . . . . . . . . . . . . . . . . . . . . . . . . . . . . 52
Adding AWS Marketplace Products to Your Portfolio .... . . . . . . . . . . . . . . . . . . . . . . . . . . . . . . . . . . . . . . . . . . . . . . . . . . . . . . . . . . . . . . . . . 53Managing AWS Marketplace Products Using AWS Service Catalog .... . . . . . . . . . . . . . . . . . . . . . . . . . . . . . . . . . . . . . . . 54Managing and Adding AWS Marketplace Products Manually ... . . . . . . . . . . . . . . . . . . . . . . . . . . . . . . . . . . . . . . . . . . . . . . . . 54
Portfolio Sharing .... . . . . . . . . . . . . . . . . . . . . . . . . . . . . . . . . . . . . . . . . . . . . . . . . . . . . . . . . . . . . . . . . . . . . . . . . . . . . . . . . . . . . . . . . . . . . . . . . . . . . . . . . . . . . . . . . . . 58Relationship Between Shared and Imported Portfolios ... . . . . . . . . . . . . . . . . . . . . . . . . . . . . . . . . . . . . . . . . . . . . . . . . . . . . . . . 59Sharing a Portfolio .... . . . . . . . . . . . . . . . . . . . . . . . . . . . . . . . . . . . . . . . . . . . . . . . . . . . . . . . . . . . . . . . . . . . . . . . . . . . . . . . . . . . . . . . . . . . . . . . . . . . . . . . 60
Using AWS CloudFormation StackSets .... . . . . . . . . . . . . . . . . . . . . . . . . . . . . . . . . . . . . . . . . . . . . . . . . . . . . . . . . . . . . . . . . . . . . . . . . . . . . . . . . . . . . . 62Stack sets vs. stack instances .... . . . . . . . . . . . . . . . . . . . . . . . . . . . . . . . . . . . . . . . . . . . . . . . . . . . . . . . . . . . . . . . . . . . . . . . . . . . . . . . . . . . . . . . . . 62Stack set constraints ... . . . . . . . . . . . . . . . . . . . . . . . . . . . . . . . . . . . . . . . . . . . . . . . . . . . . . . . . . . . . . . . . . . . . . . . . . . . . . . . . . . . . . . . . . . . . . . . . . . . . . . 62
Managing Budgets .... . . . . . . . . . . . . . . . . . . . . . . . . . . . . . . . . . . . . . . . . . . . . . . . . . . . . . . . . . . . . . . . . . . . . . . . . . . . . . . . . . . . . . . . . . . . . . . . . . . . . . . . . . . . . . . . . 62Prerequisites ... . . . . . . . . . . . . . . . . . . . . . . . . . . . . . . . . . . . . . . . . . . . . . . . . . . . . . . . . . . . . . . . . . . . . . . . . . . . . . . . . . . . . . . . . . . . . . . . . . . . . . . . . . . . . . . . . . 63Creating a Budget .... . . . . . . . . . . . . . . . . . . . . . . . . . . . . . . . . . . . . . . . . . . . . . . . . . . . . . . . . . . . . . . . . . . . . . . . . . . . . . . . . . . . . . . . . . . . . . . . . . . . . . . . . 64Associating a Budget .... . . . . . . . . . . . . . . . . . . . . . . . . . . . . . . . . . . . . . . . . . . . . . . . . . . . . . . . . . . . . . . . . . . . . . . . . . . . . . . . . . . . . . . . . . . . . . . . . . . . . 64Viewing a Budget .... . . . . . . . . . . . . . . . . . . . . . . . . . . . . . . . . . . . . . . . . . . . . . . . . . . . . . . . . . . . . . . . . . . . . . . . . . . . . . . . . . . . . . . . . . . . . . . . . . . . . . . . . . 65Disassociating a Budget .... . . . . . . . . . . . . . . . . . . . . . . . . . . . . . . . . . . . . . . . . . . . . . . . . . . . . . . . . . . . . . . . . . . . . . . . . . . . . . . . . . . . . . . . . . . . . . . . . 65
Managing Provisioned Products ... . . . . . . . . . . . . . . . . . . . . . . . . . . . . . . . . . . . . . . . . . . . . . . . . . . . . . . . . . . . . . . . . . . . . . . . . . . . . . . . . . . . . . . . . . . . . . . . . . . . . . . . 66Managing All Provisioned Products as Administrator ... . . . . . . . . . . . . . . . . . . . . . . . . . . . . . . . . . . . . . . . . . . . . . . . . . . . . . . . . . . . . . . . . . . 66Changing Provisioned Product Owner .... . . . . . . . . . . . . . . . . . . . . . . . . . . . . . . . . . . . . . . . . . . . . . . . . . . . . . . . . . . . . . . . . . . . . . . . . . . . . . . . . . . . . . 66
See Also .... . . . . . . . . . . . . . . . . . . . . . . . . . . . . . . . . . . . . . . . . . . . . . . . . . . . . . . . . . . . . . . . . . . . . . . . . . . . . . . . . . . . . . . . . . . . . . . . . . . . . . . . . . . . . . . . . . . . . . . 67Tutorial: Identifying User Resource Allocation .... . . . . . . . . . . . . . . . . . . . . . . . . . . . . . . . . . . . . . . . . . . . . . . . . . . . . . . . . . . . . . . . . . . . . . . . . . . 67
Managing Tags .... . . . . . . . . . . . . . . . . . . . . . . . . . . . . . . . . . . . . . . . . . . . . . . . . . . . . . . . . . . . . . . . . . . . . . . . . . . . . . . . . . . . . . . . . . . . . . . . . . . . . . . . . . . . . . . . . . . . . . . . . . . . . . 71AutoTags .... . . . . . . . . . . . . . . . . . . . . . . . . . . . . . . . . . . . . . . . . . . . . . . . . . . . . . . . . . . . . . . . . . . . . . . . . . . . . . . . . . . . . . . . . . . . . . . . . . . . . . . . . . . . . . . . . . . . . . . . . . . . . . 71TagOption Library .... . . . . . . . . . . . . . . . . . . . . . . . . . . . . . . . . . . . . . . . . . . . . . . . . . . . . . . . . . . . . . . . . . . . . . . . . . . . . . . . . . . . . . . . . . . . . . . . . . . . . . . . . . . . . . . . . 72
Launching a Product with TagOptions .... . . . . . . . . . . . . . . . . . . . . . . . . . . . . . . . . . . . . . . . . . . . . . . . . . . . . . . . . . . . . . . . . . . . . . . . . . . . . . 72Managing TagOptions .... . . . . . . . . . . . . . . . . . . . . . . . . . . . . . . . . . . . . . . . . . . . . . . . . . . . . . . . . . . . . . . . . . . . . . . . . . . . . . . . . . . . . . . . . . . . . . . . . . . . 75
Monitoring .... . . . . . . . . . . . . . . . . . . . . . . . . . . . . . . . . . . . . . . . . . . . . . . . . . . . . . . . . . . . . . . . . . . . . . . . . . . . . . . . . . . . . . . . . . . . . . . . . . . . . . . . . . . . . . . . . . . . . . . . . . . . . . . . . . . . 77Monitoring Tools ... . . . . . . . . . . . . . . . . . . . . . . . . . . . . . . . . . . . . . . . . . . . . . . . . . . . . . . . . . . . . . . . . . . . . . . . . . . . . . . . . . . . . . . . . . . . . . . . . . . . . . . . . . . . . . . . . . . . 77
Automated Tools ... . . . . . . . . . . . . . . . . . . . . . . . . . . . . . . . . . . . . . . . . . . . . . . . . . . . . . . . . . . . . . . . . . . . . . . . . . . . . . . . . . . . . . . . . . . . . . . . . . . . . . . . . . . . 77CloudWatch Metrics ... . . . . . . . . . . . . . . . . . . . . . . . . . . . . . . . . . . . . . . . . . . . . . . . . . . . . . . . . . . . . . . . . . . . . . . . . . . . . . . . . . . . . . . . . . . . . . . . . . . . . . . . . . . . . . . . 77
Enabling CloudWatch Metrics ... . . . . . . . . . . . . . . . . . . . . . . . . . . . . . . . . . . . . . . . . . . . . . . . . . . . . . . . . . . . . . . . . . . . . . . . . . . . . . . . . . . . . . . . . . . 78Available Metrics and Dimensions .... . . . . . . . . . . . . . . . . . . . . . . . . . . . . . . . . . . . . . . . . . . . . . . . . . . . . . . . . . . . . . . . . . . . . . . . . . . . . . . . . . . . 78Viewing AWS Service Catalog Metrics ... . . . . . . . . . . . . . . . . . . . . . . . . . . . . . . . . . . . . . . . . . . . . . . . . . . . . . . . . . . . . . . . . . . . . . . . . . . . . . . 79
Product and Service Integrations .... . . . . . . . . . . . . . . . . . . . . . . . . . . . . . . . . . . . . . . . . . . . . . . . . . . . . . . . . . . . . . . . . . . . . . . . . . . . . . . . . . . . . . . . . . . . . . . . . . . . . 80Connector for ServiceNow ..... . . . . . . . . . . . . . . . . . . . . . . . . . . . . . . . . . . . . . . . . . . . . . . . . . . . . . . . . . . . . . . . . . . . . . . . . . . . . . . . . . . . . . . . . . . . . . . . . . . . . 80
Background .... . . . . . . . . . . . . . . . . . . . . . . . . . . . . . . . . . . . . . . . . . . . . . . . . . . . . . . . . . . . . . . . . . . . . . . . . . . . . . . . . . . . . . . . . . . . . . . . . . . . . . . . . . . . . . . . . . 81
iv

AWS Service Catalog Administrator Guide
Getting Started .... . . . . . . . . . . . . . . . . . . . . . . . . . . . . . . . . . . . . . . . . . . . . . . . . . . . . . . . . . . . . . . . . . . . . . . . . . . . . . . . . . . . . . . . . . . . . . . . . . . . . . . . . . . . . 81Release Notes .... . . . . . . . . . . . . . . . . . . . . . . . . . . . . . . . . . . . . . . . . . . . . . . . . . . . . . . . . . . . . . . . . . . . . . . . . . . . . . . . . . . . . . . . . . . . . . . . . . . . . . . . . . . . . . . 81Baseline Permissions .... . . . . . . . . . . . . . . . . . . . . . . . . . . . . . . . . . . . . . . . . . . . . . . . . . . . . . . . . . . . . . . . . . . . . . . . . . . . . . . . . . . . . . . . . . . . . . . . . . . . . . 82Configuring AWS Service Catalog .... . . . . . . . . . . . . . . . . . . . . . . . . . . . . . . . . . . . . . . . . . . . . . . . . . . . . . . . . . . . . . . . . . . . . . . . . . . . . . . . . . . . 86Configuring ServiceNow ..... . . . . . . . . . . . . . . . . . . . . . . . . . . . . . . . . . . . . . . . . . . . . . . . . . . . . . . . . . . . . . . . . . . . . . . . . . . . . . . . . . . . . . . . . . . . . . . . 87Validating Configurations .... . . . . . . . . . . . . . . . . . . . . . . . . . . . . . . . . . . . . . . . . . . . . . . . . . . . . . . . . . . . . . . . . . . . . . . . . . . . . . . . . . . . . . . . . . . . . . . 95ServiceNow Additional Features .... . . . . . . . . . . . . . . . . . . . . . . . . . . . . . . . . . . . . . . . . . . . . . . . . . . . . . . . . . . . . . . . . . . . . . . . . . . . . . . . . . . . . . 97Version 2.3.4 Release Transition Instructions .... . . . . . . . . . . . . . . . . . . . . . . . . . . . . . . . . . . . . . . . . . . . . . . . . . . . . . . . . . . . . . . . . . . . . 99
Connector for Jira Service Desk .... . . . . . . . . . . . . . . . . . . . . . . . . . . . . . . . . . . . . . . . . . . . . . . . . . . . . . . . . . . . . . . . . . . . . . . . . . . . . . . . . . . . . . . . . . . . . 101Background .... . . . . . . . . . . . . . . . . . . . . . . . . . . . . . . . . . . . . . . . . . . . . . . . . . . . . . . . . . . . . . . . . . . . . . . . . . . . . . . . . . . . . . . . . . . . . . . . . . . . . . . . . . . . . . . . . 101Jira Service Desk Supported Versions and Releases .... . . . . . . . . . . . . . . . . . . . . . . . . . . . . . . . . . . . . . . . . . . . . . . . . . . . . . . . . . 102Getting Started .... . . . . . . . . . . . . . . . . . . . . . . . . . . . . . . . . . . . . . . . . . . . . . . . . . . . . . . . . . . . . . . . . . . . . . . . . . . . . . . . . . . . . . . . . . . . . . . . . . . . . . . . . . . 102Release Notes .... . . . . . . . . . . . . . . . . . . . . . . . . . . . . . . . . . . . . . . . . . . . . . . . . . . . . . . . . . . . . . . . . . . . . . . . . . . . . . . . . . . . . . . . . . . . . . . . . . . . . . . . . . . . . 103Baseline Permissions .... . . . . . . . . . . . . . . . . . . . . . . . . . . . . . . . . . . . . . . . . . . . . . . . . . . . . . . . . . . . . . . . . . . . . . . . . . . . . . . . . . . . . . . . . . . . . . . . . . . . 104Configuring AWS Service Catalog .... . . . . . . . . . . . . . . . . . . . . . . . . . . . . . . . . . . . . . . . . . . . . . . . . . . . . . . . . . . . . . . . . . . . . . . . . . . . . . . . . . 108Configuring Jira Service Desk .... . . . . . . . . . . . . . . . . . . . . . . . . . . . . . . . . . . . . . . . . . . . . . . . . . . . . . . . . . . . . . . . . . . . . . . . . . . . . . . . . . . . . . . . 109IT Lifecycle Management Setup and Use Case .... . . . . . . . . . . . . . . . . . . . . . . . . . . . . . . . . . . . . . . . . . . . . . . . . . . . . . . . . . . . . . . . . 113Validating Configurations .... . . . . . . . . . . . . . . . . . . . . . . . . . . . . . . . . . . . . . . . . . . . . . . . . . . . . . . . . . . . . . . . . . . . . . . . . . . . . . . . . . . . . . . . . . . . . 118Jira Additional Administrator Features .... . . . . . . . . . . . . . . . . . . . . . . . . . . . . . . . . . . . . . . . . . . . . . . . . . . . . . . . . . . . . . . . . . . . . . . . . . . . 119
Document History .... . . . . . . . . . . . . . . . . . . . . . . . . . . . . . . . . . . . . . . . . . . . . . . . . . . . . . . . . . . . . . . . . . . . . . . . . . . . . . . . . . . . . . . . . . . . . . . . . . . . . . . . . . . . . . . . . . . . . . . 120
v

AWS Service Catalog Administrator GuideOverview
What Is AWS Service Catalog?AWS Service Catalog enables organizations to create and manage catalogs of IT services that areapproved for use on AWS. These IT services can include everything from virtual machine images, servers,software, and databases to complete multi-tier application architectures. AWS Service Catalog allowsorganizations to centrally manage commonly deployed IT services, and helps organizations achieveconsistent governance and meet compliance requirements. End users can quickly deploy only theapproved IT services they need, following the constraints set by your organization.
AWS Service Catalog provides the following benefits:
• Standardization
Administer and manage approved assets by restricting where the product can be launched, the typeof instance that can be used, and many other configuration options. The result is a standardizedlandscape for product provisioning for your entire organization.
• Self-service discovery and launch
Users browse listings of products (services or applications) that they have access to, locate the productthat they want to use, and launch it all on their own as a provisioned product.
• Fine-grain access control
Administrators assemble portfolios of products from their catalog, add constraints and resource tagsto be used at provisioning, and then grant access to the portfolio through AWS Identity and AccessManagement (IAM) users and groups.
• Extensibility and version control
Administrators can add a product to any number of portfolios and restrict it without creating anothercopy. Updating the product to a new version propagates the update to all products in every portfoliothat references it.
For more information, see the AWS Service Catalog detail page.
The AWS Service Catalog API provides programmatic control over all end-user actions as an alternativeto using the AWS Management Console. For more information, see AWS Service Catalog DeveloperGuide.
Overview of AWS Service CatalogAs you get started with AWS Service Catalog, you'll benefit from understanding its components and theinitial workflows for administrators and end users.
UsersAWS Service Catalog supports the following types of users:
• Catalog administrators (administrators) – Manage a catalog of products (applications and services),organizing them into portfolios and granting access to end users. Catalog administrators prepare AWS
1

AWS Service Catalog Administrator GuideProducts
CloudFormation templates, configure constraints, and manage IAM roles that are assigned to productsto provide for advanced resource management.
• End users – Receive AWS credentials from their IT department or manager and use the AWSManagement Console to launch products to which they have been granted access. Sometimes referredto as simply users, end users may be granted different permissions depending on your operationalrequirements. For example, a user may have the maximum permission level (to launch and manageall of the resources required by the products they use) or only permission to use particular servicefeatures.
ProductsA product is an IT service that you want to make available for deployment on AWS. A product consistsof one or more AWS resources, such as EC2 instances, storage volumes, databases, monitoringconfigurations, and networking components, or packaged AWS Marketplace products. A product can bea single compute instance running AWS Linux, a fully configured multi-tier web application running in itsown environment, or anything in between. You create a product by importing an AWS CloudFormationtemplate. AWS CloudFormation templates define the AWS resources required for the product, therelationships between resources, and the parameters that end users can plug in when they launch theproduct to configure security groups, create key pairs, and perform other customizations.
Provisioned ProductsAWS CloudFormation stacks make it easier to manage the lifecycle of your product by enabling you toprovision, tag, update, and terminate your product instance as a single unit. An AWS CloudFormationstack includes an AWS CloudFormation template, written in either JSON or YAML format, and itsassociated collection of resources. A provisioned product is a stack. When an end user launches a product,the instance of the product that is provisioned by AWS Service Catalog is a stack with the resourcesnecessary to run the product. For more information, see AWS CloudFormation User Guide.
PortfoliosA portfolio is a collection of products, together with configuration information. Portfolios help managewho can use specific products and how they can use them. With AWS Service Catalog, you can createa customized portfolio for each type of user in your organization and selectively grant access tothe appropriate portfolio. When you add a new version of a product to a portfolio, that version isautomatically available to all current users. You also can share your portfolios with other AWS accountsand allow the administrator of those accounts to distribute your portfolios with additional constraints,such as limiting which EC2 instances a user can create. Through the use of portfolios, permissions,sharing, and constraints, you can ensure that users are launching products that are configured properlyfor the organization’s needs and standards.
VersioningAWS Service Catalog allows you to manage multiple versions of the products in your catalog. Thisallows you to add new versions of templates and associated resources based on software updatesor configuration changes. When you create a new version of a product, the update is automaticallydistributed to all users who have access to the product, allowing the user to select which version of theproduct to use. Users can update running instances of the product to the new version quickly and easily.
PermissionsGranting a user access to a portfolio enables that user to browse the portfolio and launch the productsin it. You apply AWS Identity and Access Management (IAM) permissions to control who can view and
2

AWS Service Catalog Administrator GuideConstraints
modify your catalog. IAM permissions can be assigned to IAM users, groups, and roles. When a userlaunches a product that has an IAM role assigned to it, AWS Service Catalog uses the role to launch theproduct's cloud resources using AWS CloudFormation. By assigning an IAM role to each product, youcan avoid giving users permissions to perform unapproved operations and enable them to provisionresources using the catalog.
ConstraintsConstraints control the ways that specific AWS resources can be deployed for a product. You can usethem to apply limits to products for governance or cost control. There are different types of AWS ServiceCatalog constraints: launch constraints, notification constraints, and template constraints.
With launch constraints, you specify a role for a product in a portfolio. This role is used to provision theresources at launch, so you can restrict user permissions without impacting users' ability to provisionproducts from the catalog.
Notification constraints enable you to get notifications about stack events using an Amazon SNS topic.
Template constraints restrict the configuration parameters that are available for the user when launchingthe product (for example, EC2 instance types or IP address ranges). With template constraints, you reusegeneric AWS CloudFormation templates for products and apply restrictions to the templates on a per-product or per-portfolio basis.
Initial Administrator WorkflowThe following diagram shows the initial workflow for an administrator when creating a catalog.
Initial End User WorkflowUsing the state of the administrator workflow as a starting point, the following diagram shows the initialworkflow for an end user. This example shows the end user product view and provisioning tasks, on theright, as well as the administrator's tasks, on the left. The tasks are numbered in order.
3

AWS Service Catalog Administrator GuideQuotas
AWS Service Catalog default service quotasYour AWS account has the following default quotas related to AWS Service Catalog.
You can use AWS Service Quotas to manage your quotas or to request a quota increase. For moreinformation about Service Quotas, see What Is Service Quotas? in the Service Quotas User Guide. To learnhow to request a quota increase, see Requesting a Quota Increase.
Regional quotas
• Portfolios: 100• Products: 350
Portfolio quotas
• Users, groups, and roles per portfolio: 100• Products per portfolio: 150• Tags per portfolio: 20• Shared accounts per portfolio: 5000• Tag values per tag key: 25
Product quotas
• Users, groups, and roles per product: 200• Product versions per product: 100• Tags per product: 20
4

AWS Service Catalog Administrator GuideQuotas
• Tag values per tag key: 25
Provisioned product quotas
• Tags per provisioned product: 50
Constraint quotas
• Constraints per product per portfolio: 100
Service action quotas
• Service actions per region: 200• Service action associations per product version: 25
TagOption quotas
• TagOptions per resource: 25• Values per TagOption: 25
AWS Organizations quotas
• AWS Service Catalog delegated administrators per organization: 50
5

AWS Service Catalog Administrator GuideSign Up for Amazon Web Services
Setting Up for AWS Service CatalogBefore you get started with AWS Service Catalog, complete the following tasks.
Sign Up for Amazon Web ServicesTo use Amazon Web Services (AWS), you will need to sign up for an AWS account.
To sign up for an AWS account
1. Open https://portal.aws.amazon.com/billing/signup.
2. Follow the online instructions.
Part of the sign-up procedure involves receiving a phone call and entering a verification code on thephone keypad.
AWS sends you a confirmation email after the sign up process is complete. At any time, you can viewyour current account activity and manage your account by going to https://aws.amazon.com/ andchoosing My Account, AWS Management Console.
Grant Permissions to Administrators and End UsersCatalog administrators and end users require different IAM permissions to use AWS Service Catalog.As a catalog administrator, you must have IAM permissions that allow you to access the AWS ServiceCatalog administrator console, create products, and manage products. Before your end users can useyour products, you must grant them permissions that allow them to access the AWS Service Catalog enduser console, launch products, and manage launched products as provisioned products.
AWS Service Catalog provides many of these permissions using managed policies. AWS maintains thesepolicies and provides them in the AWS Identity and Access Management (IAM) service. You can use thesepolicies by attaching them to the IAM users, groups, or roles that you and your end users use.
• Identity and Access Management in AWS Service Catalog (p. 20)
• Grant Permissions to AWS Service Catalog Administrators (p. 6)
• Grant Permissions to AWS Service Catalog End Users (p. 8)
Grant Permissions to AWS Service CatalogAdministrators
As a catalog administrator, you require access to the AWS Service Catalog administrator console view andIAM permissions that allow you to perform tasks such as the following:
• Creating and managing portfolios
6

AWS Service Catalog Administrator GuideGrant Permissions to Administrators
• Creating and managing products
• Adding template constraints to control the options that are available to end users when launching aproduct
• Adding launch constraints to define the IAM roles that AWS Service Catalog assumes when end userslaunch products
• Granting end users access to your products
You, or an administrator who manages your IAM permissions, must attach policies to your IAM user,group, or role that are required to complete this tutorial.
To grant permissions to a catalog administrator
1. Open the IAM console at https://console.aws.amazon.com/iam/.
2. In the navigation pane, choose Users. If you have already created an IAM user that you would liketo use as the catalog administrator, choose the user name and choose Add permissions. Otherwise,create a user as follows:
a. Choose Add user.
b. For User name, type ServiceCatalogAdmin.
c. Select Programmatic access and AWS Management Console access.
d. Choose Next: Permissions.
3. Choose Attach existing policies directly.
4. Choose Create policy and do the following:
a. Choose the JSON tab.
b. Copy the following example policy and paste it in Policy Document:
{ "Version": "2012-10-17", "Statement": [ { "Effect": "Allow", "Action": [ "ec2:CreateKeyPair", "iam:AddRoleToInstanceProfile", "iam:AddUserToGroup", "iam:AttachGroupPolicy", "iam:CreateAccessKey", "iam:CreateGroup", "iam:CreateInstanceProfile", "iam:CreateLoginProfile", "iam:CreateRole", "iam:CreateUser", "iam:Get*", "iam:List*", "iam:PutRolePolicy", "iam:UpdateAssumeRolePolicy" ], "Resource": [ "*" ] } ]}
c. Choose Review policy.
d. For Policy Name, type ServiceCatalogAdmin-AdditionalPermissions.
7
AWS Service Catalog Administrator GuideGrant Permissions to End Users
e. You must grant administrators permissions for Amazon S3 so they can access templates storedby AWS Service Catalog in Amazon S3. For more information, see User Policy Examples in theAmazon Simple Storage Service Developer Guide
f. Choose Create Policy.5. Return to the browser window with the permissions page and choose Refresh.6. In the search field, type ServiceCatalog to filter the policy list.7. Select the checkboxes for the AWSServiceCatalogAdminFullAccess and ServiceCatalogAdmin-
AdditionalPermissions policies, and then choose Next: Review.8. If you are updating a user, choose Add permissions.
If you are creating a user, choose Create user. You can download or copy the credentials and thenchoose Close.
9. To sign in as the catalog administrator, use your account-specific URL. To find this URL, chooseDashboard in the navigation pane and choose Copy Link. Paste the link in your browser, and use thename and password of the IAM user you created or updated in this procedure.
Grant Permissions to AWS Service Catalog EndUsers
Before the end user can use AWS Service Catalog, you must grant access to the AWS Service Catalog enduser console view. To grant access, you attach policies to the IAM user, group, or role that is used by theend user. In the following procedure, we attach the AWSServiceCatalogEndUserFullAccess policy to anIAM group. For more information, see Predefined AWS Managed Policies (p. 21).
To grant permissions to an end user group
1. Open the IAM console at https://console.aws.amazon.com/iam/.2. In the navigation pane, choose Groups.3. Choose Create New Group and do the following:
a. For Group Name, type Endusers, and then choose Next Step.b. In the search field, type AWSServiceCatalog to filter the policy list.c. Select the checkbox for the AWSServiceCatalogEndUserFullAccess policy, and then choose
Next Step. You also have the option to choose AWSServiceCatalogEndUserReadOnlyAccessinstead.
d. On the Review page, choose Create Group.4. In the navigation pane, choose Users.5. Choose Add user and do the following:
a. For User name, type a name for the user.b. Select AWS Management Console access.c. Choose Next: Permissions.d. Choose Add user to group.e. Select the checkbox for the Endusers group and choose Next: Tags and then Next: Review.f. On the Review page, choose Create user. Download or copy the credentials and then choose
Close.
8

AWS Service Catalog Administrator GuideStep 1: Download the Template
Getting StartedThis tutorial introduces you to the key tasks that you do as a catalog administrator. You create a productthat is based on an AWS CloudFormation template, which defines the AWS resources used by theproduct. The product, Linux Desktop, is a cloud development environment that runs on Amazon Linux.You add the product to a portfolio and distribute it to the end user. Finally, you log in as the end user totest the product.
Before You Begin
Complete the tasks described in Setting Up for AWS Service Catalog (p. 6).
Tasks• Step 1: Download the AWS CloudFormation Template (p. 9)• Step 2: Create a Key Pair (p. 12)• Step 3: Create an AWS Service Catalog Portfolio (p. 12)• Step 4: Create an AWS Service Catalog Product (p. 13)• Step 5: Add a Template Constraint to Limit Instance Size (p. 13)• Step 6: Add a Launch Constraint to Assign an IAM Role (p. 14)• Step 7: Grant End Users Access to the Portfolio (p. 15)• Step 8: Test the End User Experience (p. 16)
Step 1: Download the AWS CloudFormationTemplate
To provision and configure portfolios and products, you use AWS CloudFormation templates, whichare JSON– or YAML-formatted text files. For more information, see Template Formats in the AWSCloudFormation User Guide. These templates describe the resources that you want to provision. You canuse the AWS CloudFormation editor or any text editor to create and save templates. For this tutorial,we've provided a simple template to get you started. This template launches a single Linux instanceconfigured for SSH access.
Template DownloadThe sample template provided for this tutorial, development-environment.template, is available athttps://awsdocs.s3.amazonaws.com/servicecatalog/development-environment.template.
Template OverviewThe text of the sample template follows:
{ "AWSTemplateFormatVersion" : "2010-09-09",
"Description" : "AWS Service Catalog sample template. Creates an Amazon EC2 instance running the Amazon Linux AMI. The AMI is chosen based on the region in which the stack is run. This example creates an EC2 security group for the instance to give you SSH access. **WARNING** This template creates an Amazon EC2 instance. You will be billed for the
9

AWS Service Catalog Administrator GuideTemplate Overview
AWS resources used if you create a stack from this template.",
"Parameters" : { "KeyName": { "Description" : "Name of an existing EC2 key pair for SSH access to the EC2 instance.", "Type": "AWS::EC2::KeyPair::KeyName" },
"InstanceType" : { "Description" : "EC2 instance type.", "Type" : "String", "Default" : "t2.micro", "AllowedValues" : [ "t2.micro", "t2.small", "t2.medium", "m3.medium", "m3.large", "m3.xlarge", "m3.2xlarge" ] },
"SSHLocation" : { "Description" : "The IP address range that can SSH to the EC2 instance.", "Type": "String", "MinLength": "9", "MaxLength": "18", "Default": "0.0.0.0/0", "AllowedPattern": "(\\d{1,3})\\.(\\d{1,3})\\.(\\d{1,3})\\.(\\d{1,3})/(\\d{1,2})", "ConstraintDescription": "Must be a valid IP CIDR range of the form x.x.x.x/x." } },
"Metadata" : { "AWS::CloudFormation::Interface" : { "ParameterGroups" : [{ "Label" : {"default": "Instance configuration"}, "Parameters" : ["InstanceType"] },{ "Label" : {"default": "Security configuration"}, "Parameters" : ["KeyName", "SSHLocation"] }], "ParameterLabels" : { "InstanceType": {"default": "Server size:"}, "KeyName": {"default": "Key pair:"}, "SSHLocation": {"default": "CIDR range:"} } } },
"Mappings" : { "AWSRegionArch2AMI" : { "us-east-1" : { "HVM64" : "ami-08842d60" }, "us-west-2" : { "HVM64" : "ami-8786c6b7" }, "us-west-1" : { "HVM64" : "ami-cfa8a18a" }, "eu-west-1" : { "HVM64" : "ami-748e2903" }, "ap-southeast-1" : { "HVM64" : "ami-d6e1c584" }, "ap-northeast-1" : { "HVM64" : "ami-35072834" }, "ap-southeast-2" : { "HVM64" : "ami-fd4724c7" }, "sa-east-1" : { "HVM64" : "ami-956cc688" }, "cn-north-1" : { "HVM64" : "ami-ac57c595" }, "eu-central-1" : { "HVM64" : "ami-b43503a9" } }
},
"Resources" : { "EC2Instance" : { "Type" : "AWS::EC2::Instance", "Properties" : { "InstanceType" : { "Ref" : "InstanceType" },
10
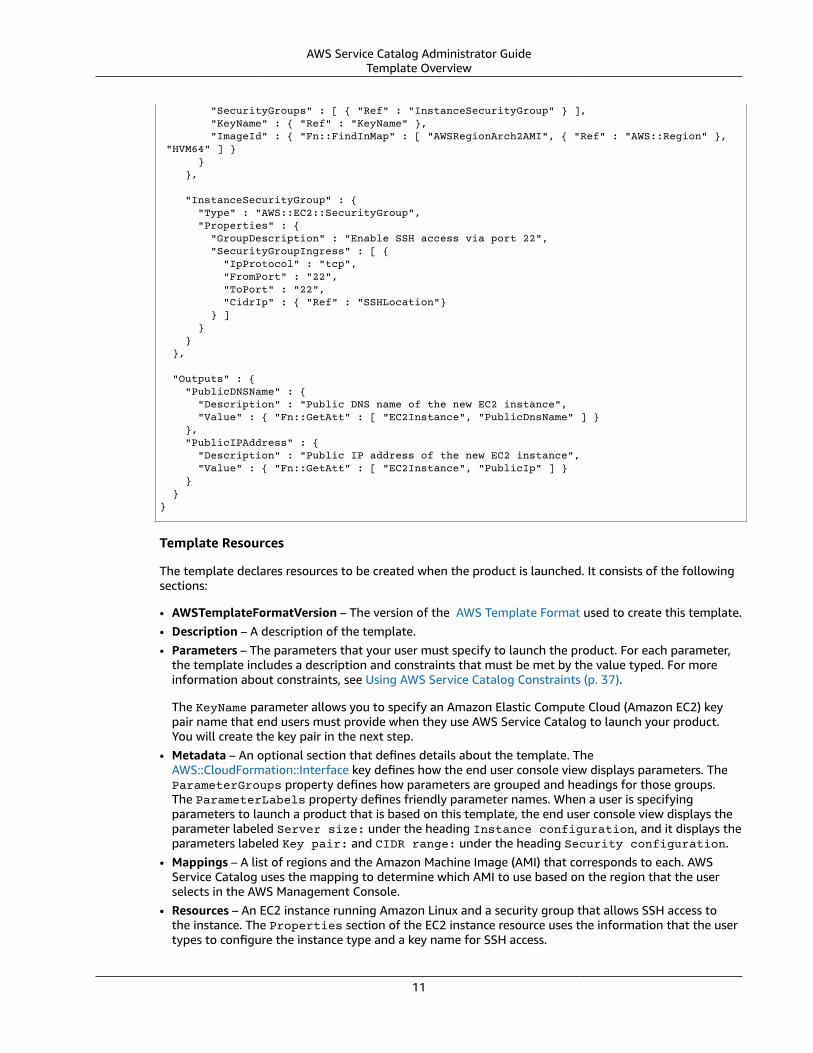
AWS Service Catalog Administrator GuideTemplate Overview
"SecurityGroups" : [ { "Ref" : "InstanceSecurityGroup" } ], "KeyName" : { "Ref" : "KeyName" }, "ImageId" : { "Fn::FindInMap" : [ "AWSRegionArch2AMI", { "Ref" : "AWS::Region" }, "HVM64" ] } } },
"InstanceSecurityGroup" : { "Type" : "AWS::EC2::SecurityGroup", "Properties" : { "GroupDescription" : "Enable SSH access via port 22", "SecurityGroupIngress" : [ { "IpProtocol" : "tcp", "FromPort" : "22", "ToPort" : "22", "CidrIp" : { "Ref" : "SSHLocation"} } ] } } },
"Outputs" : { "PublicDNSName" : { "Description" : "Public DNS name of the new EC2 instance", "Value" : { "Fn::GetAtt" : [ "EC2Instance", "PublicDnsName" ] } }, "PublicIPAddress" : { "Description" : "Public IP address of the new EC2 instance", "Value" : { "Fn::GetAtt" : [ "EC2Instance", "PublicIp" ] } } }}
Template Resources
The template declares resources to be created when the product is launched. It consists of the followingsections:
• AWSTemplateFormatVersion – The version of the AWS Template Format used to create this template.• Description – A description of the template.• Parameters – The parameters that your user must specify to launch the product. For each parameter,
the template includes a description and constraints that must be met by the value typed. For moreinformation about constraints, see Using AWS Service Catalog Constraints (p. 37).
The KeyName parameter allows you to specify an Amazon Elastic Compute Cloud (Amazon EC2) keypair name that end users must provide when they use AWS Service Catalog to launch your product.You will create the key pair in the next step.
• Metadata – An optional section that defines details about the template. TheAWS::CloudFormation::Interface key defines how the end user console view displays parameters. TheParameterGroups property defines how parameters are grouped and headings for those groups.The ParameterLabels property defines friendly parameter names. When a user is specifyingparameters to launch a product that is based on this template, the end user console view displays theparameter labeled Server size: under the heading Instance configuration, and it displays theparameters labeled Key pair: and CIDR range: under the heading Security configuration.
• Mappings – A list of regions and the Amazon Machine Image (AMI) that corresponds to each. AWSService Catalog uses the mapping to determine which AMI to use based on the region that the userselects in the AWS Management Console.
• Resources – An EC2 instance running Amazon Linux and a security group that allows SSH access tothe instance. The Properties section of the EC2 instance resource uses the information that the usertypes to configure the instance type and a key name for SSH access.
11

AWS Service Catalog Administrator GuideStep 2: Create a Key Pair
AWS CloudFormation uses the current region to select the AMI ID from the mappings defined earlierand assigns a security group to it. The security group is configured to allow inbound access on port 22from the CIDR IP address range that the user specifies.
• Outputs – Text that tells the user when the product launch is complete. The provided template getsthe public DNS name of the launched instance and displays it to the user. The user needs the DNSname to connect to the instance using SSH.
Step 2: Create a Key PairTo enable your end users to launch the product that is based on the sample template for this tutorial,you must create an Amazon EC2 key pair. A key pair is a combination of a public key that is used toencrypt data and a private key that is used to decrypt data. For more information about key pairs, seeAmazon EC2 Key Pairs in the Amazon EC2 User Guide for Linux Instances.
The AWS CloudFormation template for this tutorial, development-environment.template, includesthe KeyName parameter:
. . . "Parameters" : { "KeyName": { "Description" : "Name of an existing EC2 key pair for SSH access to the EC2 instance.", "Type": "AWS::EC2::KeyPair::KeyName" },. . .
End users must specify the name of a key pair when they use AWS Service Catalog to launch the productthat is based on the template.
If you already have a key pair in your account that you would prefer to use, you can skip ahead to Step 3:Create an AWS Service Catalog Portfolio (p. 12). Otherwise, complete the following steps.
To create a key pair
1. Open the Amazon EC2 console at https://console.aws.amazon.com/ec2/.2. In the navigation pane, under Network & Security, choose Key Pairs.3. On the Key Pairs page, choose Create Key Pair.4. For Key pair name, type a name that is easy for you to remember, and then choose Create.5. When the console prompts you to save the private key file, save it in a safe place.
ImportantThis is the only chance for you to save the private key file.
Step 3: Create an AWS Service Catalog PortfolioTo provide users with products, begin by creating a portfolio for those products.
To create a portfolio
1. Open the AWS Service Catalog console at https://console.aws.amazon.com/servicecatalog/.2. If you are using the AWS Service Catalog administrator console for the first time, choose Get started
to start the wizard for configuring a portfolio. Otherwise, choose Create portfolio.
12

AWS Service Catalog Administrator GuideStep 4: Create a Product
3. Type the following values:
• Portfolio name – Engineering Tools• Description – Sample portfolio that contains a single product.• Owner – IT ([email protected])
4. Choose Create.
Step 4: Create an AWS Service Catalog ProductAfter you have created a portfolio, you're ready to add a product. For this tutorial, you will create aproduct called Linux Desktop, a cloud development environment that runs on Amazon Linux.
To create a product
1. If you've just completed the previous step, the Portfolios page is already displayed. Otherwise, openhttps://console.aws.amazon.com/servicecatalog/.
2. Choose the name Engineering Tools to open the portfolio details page, and then choose Uploadnew product.
3. On the Enter product details page, type the following and then choose Next:
• Product name – Linux Desktop• Description – Cloud development environment configured for engineering staff.Runs AWS Linux.
• Provided by – IT• Vendor – (blank)
4. On the Enter support details page, type the following and then choose Next:
• Email contact – [email protected]• Support link – https://wiki.example.com/IT/support• Support description – Contact the IT department for issues deploying orconnecting to this product.
5. On the Version details page, choose Specify an Amazon S3 template URL, type the following, andthen choose Next:
• Select template – https://awsdocs.s3.amazonaws.com/servicecatalog/development-environment.template
• Version title – v1.0• Description – Base Version
6. On the Review page, choose Create.
Step 5: Add a Template Constraint to LimitInstance Size
Constraints add another layer of control over products at the portfolio level. Constraints can controlthe launch context of a product (launch constraints), or add rules to the AWS CloudFormation template(template constraints). For more information, see Using AWS Service Catalog Constraints (p. 37).
Now add a template constraint to the Linux Desktop product that prevents users from selecting largeinstance types at launch time. The development-environment template allows the user to select from
13

AWS Service Catalog Administrator GuideStep 6: Add a Launch Constraint
six instance types; this constraint limits valid instance types to the two smallest types, t2.micro andt2.small. For more information, see T2 Instances in the Amazon EC2 User Guide for Linux Instances.
To add a template constraint to the Linux Desktop product
1. On the portfolio details page, expand the Constraints section, and choose Add constraints.
2. In the Select product and type window, for Product, choose Linux Desktop. Then, for Constrainttype, choose Template.
3. Choose Continue.
4. For Description, type Small instance sizes.
5. Paste the following into the Template constraint text box:
{ "Rules": { "Rule1": { "Assertions": [ { "Assert" : {"Fn::Contains": [["t2.micro", "t2.small"], {"Ref": "InstanceType"}]}, "AssertDescription": "Instance type should be t2.micro or t2.small" } ] } }}
6. Choose Submit.
Step 6: Add a Launch Constraint to Assign an IAMRole
A launch constraint designates an IAM role that AWS Service Catalog assumes when an end user launchesa product. For this step, you will add a launch constraint to the Linux Desktop product so that AWSService Catalog can use the AWS resources that are part of the product's AWS CloudFormation template.This launch constraint will enable the end user to launch the product and, after it is launched, manage itas a provisioned product. For more information, see AWS Service Catalog Launch Constraints (p. 37).
Without a launch constraint, you would need to grant additional IAM permissions to your end usersbefore they could use the Linux Desktop product. For example, the ServiceCatalogEndUserAccesspolicy grants the minimum IAM permissions required to access the AWS Service Catalog end user consoleview. By using a launch constraint, you can keep your end users' IAM permissions to a minimum, which isan IAM best practice. For more information, see Grant least privilege in the IAM User Guide.
To add a launch constraint
1. Open the IAM console at https://console.aws.amazon.com/iam/.
2. In the navigation pane, choose Policies. Choose Create policy and do the following:
a. On the Create policy page, choose the JSON tab.
b. Copy the following example policy and paste it in Policy Document, replacing the placeholderJSON in the text field:
{ "Version": "2012-10-17",
14

AWS Service Catalog Administrator GuideStep 7: Grant End Users Access to the Portfolio
"Statement": [ { "Effect": "Allow", "Action": [ "cloudformation:CreateStack", "cloudformation:DeleteStack", "cloudformation:DescribeStackEvents", "cloudformation:DescribeStacks", "cloudformation:GetTemplateSummary", "cloudformation:SetStackPolicy", "cloudformation:ValidateTemplate", "cloudformation:UpdateStack", "ec2:*", "s3:GetObject", "servicecatalog:*", "sns:*" ], "Resource": "*" } ]}
c. Choose Review policy.d. For Policy Name, type linuxDesktopPolicy.e. Choose Create policy.
3. In the navigation pane, choose Roles. Choose Create role and do the following:
a. For Select role type, choose AWS service and then choose Service Catalog. Select the ServiceCatalog use case and then choose Next: Permissions.
b. Search for the linuxDesktopPolicy policy and then select the checkbox.c. Choose Next: Tags, and then Next: Review.d. For Role name, type linuxDesktopLaunchRole.e. Choose Create role.
4. Open the AWS Service Catalog console at https://console.aws.amazon.com/servicecatalog/.5. Choose the All engineering tools portfolio.6. On the portfolio details page, choose the Constraints tab, and then choose Create constraint.7. For Product, choose Linux Desktop, and for Constraint type, choose Launch. Choose Continue.8. On the Launch constraint page, choose Search IAM roles, choose linuxDesktopLaunchRole, and
then choose Submit.
Step 7: Grant End Users Access to the PortfolioNow that you have created a portfolio and added a product, you are ready to grant access to end users.
Prerequisites
If you haven't created an IAM group for the endusers, see Grant Permissions to AWS Service Catalog EndUsers (p. 8).
To provide access to the portfolio
1. On the portfolio details page, choose the Groups, roles, and users tab.2. Choose Add groups, roles, users.3. On the Groups tab, select the checkbox for the IAM group for the end users.4. Choose Add Access.
15

AWS Service Catalog Administrator GuideStep 8: Test the End User Experience
Step 8: Test the End User ExperienceTo verify that the end user can successfully access the end user console view and launch your product,sign in to AWS as the end user and perform those tasks.
To verify that the end user can access the end user console
1. To sign in as the IAM user, use account-specific URL. To find this URL, open the IAM console, chooseDashboard in the navigation pane, and choose Copy Link. Paste the link in your browser, and usethe name and password of the IAM user.
2. In the menu bar, choose the region in which you created the Engineering Tools portfolio.3. Open the AWS Service Catalog console at https://console.aws.amazon.com/servicecatalog/ and
select Service Catalog, Dashboard to see the following:
• Products – The products that the user can use.• Provisioned products – The provisioned products that the user has launched.
To verify that the end user can launch the Linux Desktop product
1. In the Products section of the console, choose Linux Desktop.2. Choose Launch product to start the wizard for configuring your product.3. On the Product version page, for Name, type Linux-Desktop.4. In the Version table, choose v1.0.5. Choose Next.6. On the Parameters page, type the following and choose Next:
• Server size – Choose t2.micro.• Key pair – Select the key pair that you created in Step 2: Create a Key Pair (p. 12).• CIDR range – Type a valid CIDR range for the IP address from which you will connect to the
instance. This can be the default value (0.0.0.0/0) to allow access from any IP address, your IPaddress followed by /32 to restrict access to your IP address only, or something in between.
7. On the Review page, review the information that you typed, and then choose Launch to launch thestack. The console displays the stack details page for the Linux-Desktop stack. The initial status ofthe product is Launching. It takes several minutes for AWS Service Catalog to launch the product. Tosee the current status, refresh your browser. After the product is launched, the status is Available.
16

AWS Service Catalog Administrator GuidePrerequisites
Getting Started LibraryAWS Service Catalog provides a Getting Started Library of well-architected product templates so you canget started quickly. You can copy any of the products in our Getting Started Library portfolios to yourown account, then customize them to suit your needs.
Topics• Prerequisites (p. 17)• Reference Architectures (p. 17)• High Reliability Architectures (p. 17)• Learn More (p. 18)
PrerequisitesBefore you use the templates in our Getting Started Library, make sure you have the following:
• The required permissions to use AWS CloudFormation templates. For more information, seeControlling Access with AWS Identity and Access Management.
• The required administrator permissions to manage AWS Service Catalog. For more information, see thesection called “Identity and Access Management” (p. 20).
Reference ArchitecturesOur Reference Architectures portfolio is a general repository available to all AWS Service Catalogadministrators. It contains well-architected, best practice templates for common AWS services, including:
• Compute - with Amazon EC2• Storage - with Amazon S3• Networking - with Amazon VPC• Database - with Amazon RDS
To view the Reference Architectures portfolio in the administrator console
1. In the AWS Service Catalog console, choose Portfolios.2. On the Portfolios page, choose the Getting Started library tab.3. Choose the Reference Architectures portfolio.4. You can browse the list of available product templates, copy them to your own portfolio, and
customize them.
You can view the repository of AWS Service Catalog Reference Architectures on GitHub here: SampleAWS CloudFormation templates and architecture for AWS Service Catalog.
High Reliability ArchitecturesOur High Reliability Architectures portfolio is a repository of well-architected, multi-region blueprints.Each blueprint provides prescriptive implementation guidance for AWS services commonly used to
17

AWS Service Catalog Administrator GuideLearn More
build multi-region workloads. Examples include patterns for managing infrastructure changes and datastorage backup and recovery for user identity, key-value, and object data across multiple regions.
Learn More• For more information about the well-architected framework, see AWS Well-Architected.
18

AWS Service Catalog Administrator GuideData Protection
Security in AWS Service CatalogCloud security at AWS is the highest priority. As an AWS customer, you benefit from a data center andnetwork architecture that is built to meet the requirements of the most security-sensitive organizations.
Security is a shared responsibility between AWS and you. The shared responsibility model describes thisas security of the cloud and security in the cloud:
• Security of the cloud – AWS is responsible for protecting the infrastructure that runs AWS services inthe AWS Cloud. AWS also provides you with services that you can use securely. Third-party auditorsregularly test and verify the effectiveness of our security as part of the AWS Compliance Programs. Tolearn about the compliance programs that apply to AWS Service Catalog, see AWS Services in Scope byCompliance Program.
• Security in the cloud – Your responsibility is determined by the AWS service that you use. You are alsoresponsible for other factors including the sensitivity of your data, your company’s requirements, andapplicable laws and regulations.
This documentation helps you understand how to apply the shared responsibility model when usingAWS Service Catalog. The following topics show you how to configure AWS Service Catalog to meet yoursecurity and compliance objectives. You also will be introduced to other AWS services that help you tomonitor and secure your AWS Service Catalog resources.
Topics• Data Protection in AWS Service Catalog (p. 19)• Identity and Access Management in AWS Service Catalog (p. 20)• Logging and Monitoring in AWS Service Catalog (p. 26)• Compliance Validation for AWS Service Catalog (p. 26)• Resilience in AWS Service Catalog (p. 27)• Infrastructure Security in AWS Service Catalog (p. 27)• Security Best Practices for AWS Service Catalog (p. 27)
Data Protection in AWS Service CatalogAWS Service Catalog conforms to the AWS shared responsibility model, which includes regulations andguidelines for data protection. AWS is responsible for protecting the global infrastructure that runs allthe AWS services. AWS maintains control over data hosted on this infrastructure, including the securityconfiguration controls for handling customer content and personal data. AWS customers and APNPartners, acting either as data controllers or data processors, are responsible for any personal data thatthey put in the AWS Cloud.
For data protection purposes, we recommend that you protect AWS account credentials and set upindividual user accounts with AWS Identity and Access Management (IAM), so that each user is given onlythe permissions necessary to fulfill their job duties. We also recommend that you secure your data in thefollowing ways:
• Use multi-factor authentication (MFA) with each account.• Use SSL/TLS to communicate with AWS resources.
• Set up API and user activity logging with AWS CloudTrail.
19

AWS Service Catalog Administrator GuideProtecting Data with Encryption
• Use AWS encryption solutions, along with all default security controls within AWS services.• Use advanced managed security services such as Amazon Macie, which assists in discovering and
securing personal data that is stored in Amazon S3.
We strongly recommend that you never put sensitive identifying information, such as your customers'account numbers, into free-form fields such as a Name field. This includes when you work with AWSService Catalog or other AWS services using the console, API, AWS CLI, or AWS SDKs. When you providea URL to an external server, don't include credentials information in the URL to validate your request tothat server.
For more information about data protection, see the AWS Shared Responsibility Model and GDPR blogpost on the AWS Security Blog.
Protecting Data with EncryptionEncryption at restAWS Service Catalog uses Amazon S3 buckets and Amazon DynamoDB databases that are encrypted atrest using Amazon-managed keys. To learn more, refer to information about encryption at rest providedby Amazon S3 and Amazon DynamoDB.
Encryption in transitAWS Service Catalog uses Transport Layer Security (TLS) and client-side encryption of information intransit between the caller and AWS.
You can privately access AWS Service Catalog APIs from your Amazon Virtual Private Cloud (AmazonVPC) by creating VPC endpoints. With VPC endpoints, the routing between the VPC and AWS ServiceCatalog is handled by the AWS network without the need for an internet gateway, NAT gateway, or VPNconnection.
The latest generation of VPC endpoints used by AWS Service Catalog is powered by AWS PrivateLink,an AWS technology enabling the private connectivity between AWS services using Elastic NetworkInterfaces with private IPs in your VPCs.
Identity and Access Management in AWS ServiceCatalog
Access to AWS Service Catalog requires credentials. Those credentials must have permission toaccess AWS resources, such as an AWS Service Catalog portfolio or product. AWS Service Catalogintegrates with AWS Identity and Access Management (IAM) to enable you to grant AWS Service Catalogadministrators the permissions they need to create and manage products, and to grant AWS ServiceCatalog end users the permissions they need to launch products and manage provisioned products.These policies are either created and managed by AWS or individually by administrators and end users.To control access, you attach these policies to the IAM users, groups, and roles that you use with AWSService Catalog.
Topics• Audience (p. 21)• Controlling Access (p. 21)• Predefined AWS Managed Policies (p. 21)• Console Access for End Users (p. 22)
20

AWS Service Catalog Administrator GuideAudience
• Product Access for End Users (p. 23)• Example Policies for Managing Provisioned Products (p. 23)
AudienceThe permissions you have via AWS Identity and Access Management (IAM) may depend on the role youplay in AWS Service Catalog.
Administrator - As an AWS Service Catalog administrator, you need full access to the administratorconsole and IAM permissions that allow you to perform tasks such as creating and managing portfoliosand products, managing constraints, and granting access to end users.
End user - Before your end users can use your products, you need to grant them permissions that givethem access to the AWS Service Catalog end user console. They can also have permissions to launchproducts and manage provisioned products.
IAM administrator - If you're an IAM administrator, you might want to learn details about how youcan write policies to manage access to AWS Service Catalog. To view example AWS Service Catalogidentity-based policies that you can use in IAM, see the section called “Predefined AWS ManagedPolicies” (p. 21).
Controlling AccessAn AWS Service Catalog portfolio gives your administrators a level of access control for your groups ofend users. When you add users to a portfolio, they can browse and launch any of the products in theportfolio. For more information, see the section called “Managing Portfolios” (p. 29).
ConstraintsConstraints control which rules are applied to your end users when launching a product from a specificportfolio. You use them to apply limits to products for governance or cost control. For more informationabout constraints, see the section called “Using Constraints” (p. 37).
AWS Service Catalog launch constraints give you more control over permissions needed by an end user.When your administrator creates a launch constraint for a product in a portfolio, the launch constraintassociates a role ARN that is used when your end users launch the product from that portfolio. Using thispattern, you can control access to AWS resource creation. For more information, see the section called“Launch Constraints” (p. 37).
Predefined AWS Managed PoliciesThe managed policies created by AWS grant the required permissions for common use cases. You canattach these policies to your IAM users and roles. For more information, see AWS Managed Policies in theIAM User Guide.
The following are the AWS managed policies for AWS Service Catalog.
Administrators• AWSServiceCatalogAdminFullAccess — Grants full access to the administrator console view and
permission to create and manage products and portfolios.• AWSServiceCatalogAdminReadOnlyAccess — Grants full access to the administrator console
view. Does not grant access to create or manage products and portfolios.End users
• AWSServiceCatalogEndUserFullAccess — Grants full access to the end user console view. Grantspermission to launch products and manage provisioned products.
21

AWS Service Catalog Administrator GuideConsole Access for End Users
• AWSServiceCatalogEndUserReadOnlyAccess — Grants read-only access to the end user consoleview. Does not grant permission to launch products or manage provisioned products.
To attach a policy to an IAM user
1. Open the IAM console at https://console.aws.amazon.com/iam/.2. In the navigation pane, choose Users.3. Choose the name (not the check box) of the IAM user.4. On the Permissions tab, choose Add permissions.5. On the Add permissions page, choose Attach existing policies directly.6. Select the check box next to the managed policy for AWS Service Catalog, and then choose Next:
Review.7. On the Permissions summary page, choose Add permissions.8. (Optional) You must grant administrators additional permissions for Amazon S3 if they need to use
a private CloudFormation template. For more information, see User Policy Examples in the AmazonSimple Storage Service Developer Guide
Deprecated PoliciesThe following managed policies are deprecated:
• ServiceCatalogAdminFullAccess — Use AWSServiceCatalogAdminFullAccess instead.• ServiceCatalogAdminReadOnlyAccess — Use AWSServiceCatalogAdminReadOnlyAccess instead.• ServiceCatalogEndUserFullAccess — Use AWSServiceCatalogEndUserFullAccess instead.• ServiceCatalogEndUserAccess — Use AWSServiceCatalogEndUserReadOnlyAccess instead.
Use the following procedure to ensure that your administrators and end users are granted permissionsusing the current policies.
To migrate from the deprecated policies to the current policies
1. Open the IAM console at https://console.aws.amazon.com/iam/.2. In the navigation pane, choose Policies.3. In the search field, type ServiceCatalog to filter the policy list. Choose the name (not the check
box) for ServiceCatalogAdminFullAccess.4. For each attached entity (user, group, or role), do the following:
a. Open the summary page for the entity.b. Add one of the current policies, as described in the procedure To attach a policy to an IAM
user (p. 22).c. On the Permissions tab, next to ServiceCatalogAdminFullAccess, choose Detach Policy. When
prompted for confirmation, choose Detach.5. Repeat the process for ServiceCatalogEndUserFullAccess.
Console Access for End UsersThe AWSServiceCatalogEndUserFullAccess and AWSServiceCatalogEndUserReadOnlyAccess policiesgrant access to the AWS Service Catalog end user console view. When a user who has either of thesepolicies chooses AWS Service Catalog in the AWS Management Console, the end user console viewdisplays the products they have permission to launch.
22

AWS Service Catalog Administrator GuideProduct Access for End Users
Before end users can successfully launch a product from AWS Service Catalog to which you give access,you must provide them additional IAM permissions to allow them to use each of the underlying AWSresources in a product's AWS CloudFormation template. For example, if a product template includesAmazon Relational Database Service (Amazon RDS), you must grant the users Amazon RDS permissionsto launch the product.
To learn about how to enable end users to launch products while enforcing least-access permissions toAWS resources, see the section called “Using Constraints” (p. 37).
If you apply the AWSServiceCatalogEndUserReadOnlyAccess policy, your users have access to theend user console, but they won't have the permissions that they need to launch products and manageprovisioned products. You can grant these permissions directly to an end user using IAM, but if you wantto limit the access that end users have to AWS resources, you should attach the policy to a launch role.You then use AWS Service Catalog to apply the launch role to a launch constraint for the product. Formore information about applying a launch role, launch role limitations, and a sample launch role, seeAWS Service Catalog Launch Constraints (p. 37).
NoteIf you grant users IAM permissions intended for AWS Service Catalog administrators, theadministrator console view displays instead. Don't grant end users these permissions unless youwant them to have access to the administrator console view.
Product Access for End UsersBefore end users can use a product to which you give access, you must provide them additionalIAM permissions to allow them to use each of the underlying AWS resources in a product's AWSCloudFormation template. For example, if a product template includes Amazon Relational DatabaseService (Amazon RDS), you must grant the users Amazon RDS permissions to launch the product.
If you apply the ServiceCatalogEndUserAccess policy, your users have access to the end user consoleview, but they won't have the permissions that they need to launch products and manage provisionedproducts. You can grant these permissions directly to an end user in IAM, but if you want to limit theaccess that end users have to AWS resources, you should attach the policy to a launch role. You thenuse AWS Service Catalog to apply the launch role to a launch constraint for the product. For moreinformation about applying a launch role, launch role limitations, and a sample launch role, see AWSService Catalog Launch Constraints (p. 37).
Example Policies for Managing Provisioned ProductsYou can create custom policies to help meet the security requirements of your organization. Thefollowing examples describe how to customize the access level for each action with support for user,role, and account levels. You can grant users access to view, update, terminate, and manage provisionedproducts created only by that user or created by others also under their role or the account to which theyare logged in. This access is hierarchical — granting account level access also grants role level access anduser level access, while adding role level access also grants user level access but not account level access.You can specify these in the policy JSON using a Condition block as accountLevel, roleLevel, oruserLevel.
These examples also apply to access levels for AWS Service Catalog API write operationsUpdateProvisionedProduct and TerminateProvisionedProduct, and read operationsDescribeRecord, ScanProvisionedProducts, and ListRecordHistory. TheScanProvisionedProducts and ListRecordHistory API operations use AccessLevelFilterKeyas input, and that key's values correspond to the Condition block levels discussed here (accountLevelis equivalent to an AccessLevelFilterKey value of "Account", roleLevel to "Role", and userLevelto "User"). For more information, see the AWS Service Catalog Developer Guide.
Examples
23

AWS Service Catalog Administrator GuideExample Policies
• Example: Full Admin Access to Provisioned Products (p. 24)• Example: End-user Access to Provisioned Products (p. 24)• Example: Partial Admin Access to Provisioned Products (p. 25)
Example: Full Admin Access to Provisioned ProductsThe following policy allows full read and write access to provisioned products and records within thecatalog at the account level.
{ "Version":"2012-10-17", "Statement":[ { "Effect":"Allow", "Action":[ "servicecatalog:*" ], "Resource":"*", "Condition": { "StringEquals": { "servicecatalog:accountLevel": "self" } } } ]}
This policy is functionally equivalent to the following policy:
{ "Version":"2012-10-17", "Statement":[ { "Effect":"Allow", "Action":[ "servicecatalog:*" ], "Resource":"*" } ]}
In other words, not specifying a Condition block in any policy for AWS Service Catalog is treated asthe same as specifying "servicecatalog:accountLevel" access. Note that accountLevel accessincludes roleLevel and userLevel access.
Example: End-user Access to Provisioned ProductsThe following policy restricts access to read and write operations to only the provisioned products orassociated records that the current user created.
{ "Version": "2012-10-17", "Statement": [ { "Effect": "Allow", "Action": [ "servicecatalog:DescribeProduct",
24

AWS Service Catalog Administrator GuideExample Policies
"servicecatalog:DescribeProductView", "servicecatalog:DescribeProvisioningParameters", "servicecatalog:DescribeRecord", "servicecatalog:ListLaunchPaths", "servicecatalog:ListRecordHistory", "servicecatalog:ProvisionProduct", "servicecatalog:ScanProvisionedProducts", "servicecatalog:SearchProducts", "servicecatalog:TerminateProvisionedProduct", "servicecatalog:UpdateProvisionedProduct" ], "Resource": "*", "Condition": { "StringEquals": { "servicecatalog:userLevel": "self" } } } ] }
Example: Partial Admin Access to Provisioned ProductsThe two policies below, if both applied to the same user, allow what might be called a type of "partialadmin access" by providing full read-only access and limited write access. This means the user can seeany provisioned product or associated record within the catalog's account but cannot perform anyactions on any provisioned products or records that aren't owned by that user.
The first policy allows the user access to write operations on the provisioned products that the currentuser created, but no provisioned products created by others. The second policy adds full access to readoperations on provisioned products created by all (user, role, or account).
{ "Version": "2012-10-17", "Statement": [ { "Effect": "Allow", "Action": [ "servicecatalog:DescribeProduct", "servicecatalog:DescribeProductView", "servicecatalog:DescribeProvisioningParameters", "servicecatalog:ListLaunchPaths", "servicecatalog:ProvisionProduct", "servicecatalog:SearchProducts", "servicecatalog:TerminateProvisionedProduct", "servicecatalog:UpdateProvisionedProduct" ], "Resource": "*", "Condition": { "StringEquals": { "servicecatalog:userLevel": "self" } } } ] }
{ "Version": "2012-10-17", "Statement": [ { "Effect": "Allow",
25

AWS Service Catalog Administrator GuideLogging and Monitoring
"Action": [ "servicecatalog:DescribeRecord", "servicecatalog:ListRecordHistory", "servicecatalog:ScanProvisionedProducts" ], "Resource": "*", "Condition": { "StringEquals": { "servicecatalog:accountLevel": "self" } } } ] }
Logging and Monitoring in AWS Service CatalogAWS Service Catalog is integrated with AWS CloudTrail, a service that captures all of the AWS ServiceCatalog API calls and delivers the log files to an Amazon S3 bucket that you specify. For moreinformation, see Logging AWS Service Catalog API Calls with CloudTrail.
You can also use notification constraints to set up Amazon SNS notifications about stack events. Formore information, see the section called “Notification Constraints” (p. 39).
Compliance Validation for AWS Service CatalogThird-party auditors assess the security and compliance of AWS Service Catalog as part of multiple AWScompliance programs, including the following:
• System and Organization Controls (SOC)• Payment Card Industry Data Security Standard (PCI DSS)• Federal Risk and Authorization Management Program (FedRAMP)• Health Insurance Portability and Accountability Act (HIPAA)
For a list of AWS services in scope of specific compliance programs, see AWS Services in Scope byCompliance Program. For general information, see AWS Compliance Programs.
You can download third-party audit reports using AWS Artifact. For more information, see DownloadingReports in AWS Artifact.
Your compliance responsibility when using AWS Service Catalog is determined by the sensitivity of yourdata, your company's compliance objectives, and applicable laws and regulations. AWS provides thefollowing resources to help with compliance:
• Security and Compliance Quick Start Guides – These deployment guides discuss architecturalconsiderations and provide steps for deploying security- and compliance-focused baselineenvironments on AWS.
• Architecting for HIPAA Security and Compliance Whitepaper – This whitepaper describes howcompanies can use AWS to create HIPAA-compliant applications.
• AWS Compliance Resources – This collection of workbooks and guides might apply to your industryand location.
• AWS Config – This AWS service assesses how well your resource configurations comply with internalpractices, industry guidelines, and regulations.
26

AWS Service Catalog Administrator GuideResilience
• AWS Security Hub – This AWS service provides a comprehensive view of your security state within AWSthat helps you check your compliance with security industry standards and best practices.
Resilience in AWS Service CatalogThe AWS global infrastructure is built around AWS Regions and Availability Zones. AWS Regions providemultiple physically separated and isolated Availability Zones, which are connected with low-latency,high-throughput, and highly redundant networking. With Availability Zones, you can design and operateapplications and databases that automatically fail over between Availability Zones without interruption.Availability Zones are more highly available, fault tolerant, and scalable than traditional single ormultiple data center infrastructures.
For more information about AWS Regions and Availability Zones, see AWS Global Infrastructure.
In addition to the AWS global infrastructure, AWS Service Catalog offers AWS Service Catalog self-service actions. With self-service actions, customers can reduce administrative maintenance and end-user training while adhering to compliance and security measures. With self-service actions, as theadministrator, you can enable end users to perform operational tasks such as backup and restore,troubleshoot issues, run approved commands, and request permissions in AWS Service Catalog. To learnmore, see the section called “Using Service Actions” (p. 49).
Infrastructure Security in AWS Service CatalogAs a managed service, AWS Service Catalog is protected by the AWS global network security proceduresthat are described in the Amazon Web Services: Overview of Security Processes whitepaper.
You use AWS published API calls to access AWS Service Catalog through the network. Clients mustsupport Transport Layer Security (TLS) 1.0 or later. We recommend TLS 1.2 or later. Clients must alsosupport cipher suites with perfect forward secrecy (PFS) such as Ephemeral Diffie-Hellman (DHE) orElliptic Curve Ephemeral Diffie-Hellman (ECDHE). Most modern systems such as Java 7 and later supportthese modes.
Additionally, requests must be signed by using an access key ID and a secret access key that is associatedwith an IAM principal. Or you can use the AWS Security Token Service (AWS STS) to generate temporarysecurity credentials to sign requests.
With AWS Service Catalog, you can control the Regions in which data is stored. Portfolios and productsare only available in the Regions in which you have made them available. You can use the CopyProductAPI to copy a product to another Region.
Security Best Practices for AWS Service CatalogAWS Service Catalog provides a number of security features to consider as you develop and implementyour own security policies. The following best practices are general guidelines and don’t represent acomplete security solution. Because these best practices might not be appropriate or sufficient for yourenvironment, treat them as helpful considerations rather than prescriptions.
You can define rules that limit the parameter values that a user enters when launching a product. Theserules are called template constraints because they constrain how the AWS CloudFormation template forthe product is deployed. You use a simple editor to create template constraints, and you apply them toindividual products.
27

AWS Service Catalog Administrator GuideSecurity Best Practices
AWS Service Catalog applies constraints when provisioning a new product or updating a product thatis already in use. It always applies the most restrictive constraint among all constraints applied to theportfolio and the product. For example, consider a scenario where the product allows all Amazon EC2instances to be launched and the portfolio has two constraints: one that allows all non-GPU type EC2instances to be launched and one that allows only t1.micro and m1.small EC2 instances to be launched.For this example, AWS Service Catalog applies the second, more restrictive constraint (t1.micro andm1.small).
Limit access end users have to AWS resources by attaching an IAM policy to a launch role. You then useAWS Service Catalog to create a launch constraint to use the role when launching the product.
28

AWS Service Catalog Administrator GuideManaging Portfolios
Managing CatalogsAWS Service Catalog provides an interface for managing portfolios, products, and constraints from anadministrator console.
NoteTo perform any of the tasks in this section, you must have administrator permissions for AWSService Catalog. For more information, see Identity and Access Management in AWS ServiceCatalog (p. 20).
Tasks• Managing Portfolios (p. 29)• Managing Products (p. 33)• Using AWS Service Catalog Constraints (p. 37)• AWS Service Catalog Service Actions (p. 49)• Adding AWS Marketplace Products to Your Portfolio (p. 53)• Portfolio Sharing (p. 58)• Using AWS CloudFormation StackSets (p. 62)• Managing Budgets (p. 62)
Managing PortfoliosYou create, view, and update portfolios on the Portfolios page in the AWS Service Catalog administratorconsole.
Tasks• Creating, Viewing, and Deleting Portfolios (p. 29)• Viewing Portfolio Details (p. 30)• Creating and Deleting Portfolios (p. 30)• Adding Products (p. 30)• Adding Constraints (p. 32)• Granting Access to Users (p. 33)
Creating, Viewing, and Deleting PortfoliosThe Portfolios page displays a list of the portfolios that you have created in the current region. Use thispage to create new portfolios, view a portfolio's details, or delete portfolios from your account.
To view the Portfolios page
1. Open the AWS Service Catalog console at https://console.aws.amazon.com/servicecatalog/.2. Select a different region as necessary.3. If you are new to AWS Service Catalog, you see the AWS Service Catalog start page. Choose Get
started to create a portfolio. Follow the instructions to create your first portfolio, and then proceedto the Portfolios page.
29

AWS Service Catalog Administrator GuideViewing Portfolio Details
While using AWS Service Catalog, you can return to the Portfolios page at any time; choose ServiceCatalog in the navigation bar and then choose Portfolios.
Viewing Portfolio DetailsIn the AWS Service Catalog administrator console, the Portfolio details page lists the settings for aportfolio. Use this page to manage the products in the portfolio, grant users access to products, andapply TagOptions and constraints.
To view the Portfolio details page
1. Open the AWS Service Catalog console at https://console.aws.amazon.com/servicecatalog/.
2. Choose the portfolio that you want to manage.
Creating and Deleting PortfoliosUse the Portfolios page to create and delete portfolios. Deleting a portfolio removes it from youraccount. Before you can delete a portfolio, you must remove all the products, constraints, and users thatit contains.
To create a new portfolio
1. Navigate to the Portfolios page.
2. Choose Create portfolio.
3. On the Create portfolio page, enter the requested information.
4. Choose Create. AWS Service Catalog creates the portfolio and displays the portfolio details.
To delete a portfolio
1. Navigate to the Portfolios page.
2. Select the portfolio by clicking the corresponding radio button or anywhere on the listing except onthe portfolio title.
3. Choose Delete portfolio.
4. Choose Continue.
Adding ProductsTo add products to a portfolio, you either create a new product or add an existing product from yourcatalog to the portfolio.
NoteThe AWS CloudFormation template that you upload when you create an AWS Service Catalogproduct is stored in an Amazon Simple Storage Service (Amazon S3) bucket that starts with cf-templates- in your AWS account. Do not delete these files unless you are sure that they are nolonger in use.
Adding a New ProductYou add new products directly from the portfolio details page. When you create a product from thispage, AWS Service Catalog adds it to the currently selected portfolio. You can also add a product toother portfolios.
30

AWS Service Catalog Administrator GuideAdding Products
To add a new product
1. Navigate to the Portfolios page, and then choose the name of the portfolio to which you want toadd the product.
2. On the portfolio details page, expand the Products section, and then choose Upload new product.
3. For Enter product details, enter the following:
• Product name – The name of the product.
• Short description – The short description. This description appears in search results to help theuser choose the correct product.
• Description – The full description. This description is shown in the product listing to help the userchoose the correct product.
• Provided by – The name or email address of your IT department or administrator.
• Vendor (optional) – The name of the application's publisher. This field allows users to sort theirproducts list to makes it easier to find the products that they need.
Choose Next.
4. For Enter support details, enter the following:
• Email contact (optional) – The email address for reporting issues with the product.
• Support link (optional) – A URL to a site where users can find support information or file tickets.The URL must begin with http:// or https://.
• Support description (optional) – A description of how users should use the Email contact andSupport link.
Choose Next.
5. On the Version details page, enter the following:
• Select template – An AWS CloudFormation template from a local drive or a URL that points to atemplate stored in Amazon S3. If you specify an Amazon S3 URL, it must begin with https://.The extension for the template file must be .template.
• Version title – the name of the product version (e.g., "v1", "v2beta"). No spaces are allowed.
• Description (optional) – A description of the product version including how this version differsfrom the previous version.
Choose Next.
6. On the Review page, verify that the information is correct, and then choose Confirm and upload.After a few seconds, the product appears in your portfolio. You might need to refresh your browserto see the product.
Adding an Existing Product
You can add existing products to a portfolio from three places: the Portfolios list, the portfolio detailspage, or the Products page.
To add an existing product to a portfolio
1. Navigate to the Portfolios page.
2. Choose a portfolio, and then choose Add product.
3. Choose a product, and then choose Add product to portfolio.
31

AWS Service Catalog Administrator GuideAdding Constraints
Removing a Product from a PortfolioWhen you no longer want users to use a product, remove it from a portfolio. The product is still availablein your catalog from the Products page, and you can still add it to other portfolios. You can removemultiple products from a portfolio at one time.
To remove a product from a portfolio
1. Navigate to the Portfolios page, and then choose the portfolio that contains the product. Theportfolio details page opens.
2. Expand the Products section.
3. Choose one or more products, and then choose Remove product.
4. Choose Continue.
Adding ConstraintsTo control how users are able to use products, add constraints. For more information about the types ofconstraints that AWS Service Catalog supports, see Using AWS Service Catalog Constraints (p. 37).
You add constraints to products after they have been placed in a portfolio.
To add a constraint to a product
1. Open the AWS Service Catalog console at https://console.aws.amazon.com/servicecatalog/.
2. Choose Portfolios and select a portfolio.
3. In the portfolio details page, expand the Constraints section and choose Add constraints.
4. For Product, select the product to which to apply the constraint.
5. For Constraint type, choose one of the following options:
• Launch – The IAM role that AWS Service Catalog uses to launch and manage the product. Formore information, see AWS Service Catalog Launch Constraints (p. 37).
• Notification – The Amazon SNS topic specified to receive notifications. For more information, seeAWS Service Catalog Notification Constraints (p. 39).
• Template – A JSON–formatted text file that contains one or more rules. Rules are added tothe AWS CloudFormation template used by the product. For more information, see TemplateConstraint Rules (p. 42).
• Stack Set – Uses AWS CloudFormation StackSets to specify multiple accounts and regions for theAWS Service Catalog product launch. For more information, see AWS Service Catalog Stack SetConstraints (p. 40).
• Tag Update – Allows you to update tags after the product has been provisioned. For moreinformation, see AWS Service Catalog Tag Update Constraints (p. 40).
6. Choose Continue.
To edit a constraint
1. Sign in to the AWS Management Console and open the AWS Service Catalog administrator consoleat https://console.aws.amazon.com/catalog/.
2. Choose Portfolios and select a portfolio.
3. In the portfolio details page, expand the Constraints section and select the constraint to edit.
4. Choose Edit constraints.
32
AWS Service Catalog Administrator GuideGranting Access to Users
5. Edit the constraint as needed, and choose Submit.
Granting Access to UsersGive users access to portfolios by using IAM users, groups, and roles. The best way to provide portfolioaccess for many users is to put the users in an IAM group and grant access to that group. That way youcan simply add and remove users from the group to manage portfolio access. For more information, seeIAM Users and Groups in the IAM User GuideUsing IAM.
In addition to access to a portfolio, IAM users must also have access to the AWS Service Catalog enduser console. You grant access to the console by applying permissions in IAM. For more information, seeIdentity and Access Management in AWS Service Catalog (p. 20).
To grant portfolio access to users or groups
1. In the portfolio details page, expand Users, groups and roles, and then choose Add user, group orrole.
2. Choose the Groups, Users, or Roles tab to add groups, users, or roles, respectively.3. Choose one or more users, groups, or roles, and then choose Add Access to grant them access to the
current portfolio.
TipTo grant access to a combination of groups, users, and roles, you can switch between thetabs without losing your selection.
To remove access to a portfolio
1. On the portfolio details page, choose the checkbox for the user or group.2. Choose Remove user, group or role.
Managing ProductsYou create products by packaging an AWS CloudFormation template with metadata, update products bycreating a new version based on an updated template, and group products together into portfolios todistribute them to users.
New versions of products are propagated to all users who have access to the product through a portfolio.When you distribute an update, end users can update existing provisioned products with just a few clicks.
Tasks• Viewing the Products Page (p. 33)• Creating Products (p. 34)• Adding Products to Portfolios (p. 35)• Updating Products (p. 35)• Deleting Products (p. 36)• Managing Versions (p. 36)
Viewing the Products PageYou manage products from the Products page in the AWS Service Catalog administrator console.
33

AWS Service Catalog Administrator GuideCreating Products
To view the Products page
1. Open the AWS Service Catalog console at https://console.aws.amazon.com/servicecatalog/.2. Choose Service Catalog in the navigation bar.3. Choose Products.
Creating ProductsYou create products from the Products page in the AWS Service Catalog administrator console.
To create a new AWS Service Catalog product
1. Navigate to the Products page.2. Choose Upload new product.3. For Enter product details, enter the following:
• Product name – The name of the product.• Short description – The short description. This description appears in search results to help the
user choose the correct product.• Description – The full description. This description is shown in the product listing to help the user
choose the correct product.• Provided by – The name of your IT department or administrator.• Vendor (optional) – The name of the application's publisher. This field allows users to sort their
products list to makes it easier to find the products that they need.
Choose Next.4. For Enter support details, enter the following:
• Email contact (optional) – The email address for reporting issues with the product.• Support link (optional) – A URL to a site where users can find support information or file tickets.
The URL must begin with http:// or https://.• Support description (optional) – A description of how users should use the Email contact and
Support link.
Choose Next.5. For Version details, enter the following:
• Select template – An AWS CloudFormation template from a local drive or a URL that points to atemplate stored in Amazon S3. If you specify an Amazon S3 URL, it must begin with https://.The extension for the template file must be .template.
• Version title – the name of the product version (e.g., "v1", "v2beta"). No spaces are allowed.• Description (optional) – A description of the product version including how this version differs
from the previous version.• Guidance – By default, product versions don't have any guidance, so end users can use that
version to update and launch provisioned products. If you set the guidance to deprecated, userscan make updates to a provisioned product but can't launch new provisioned products of thatversion.
6. Choose Next.7. On the Review page, verify that the information is correct, and then choose Confirm and upload.
After a few seconds, the product appears on the Products page. You might need to refresh yourbrowser to see the product.
34

AWS Service Catalog Administrator GuideAdding Products to Portfolios
You can also use CodePipeline to create and configure a pipeline to deploy your product templateto AWS Service Catalog and deliver changes you have made in your source repository. For moreinformation, see Tutorial: Create a Pipeline That Deploys to AWS Service Catalog.
Adding Products to PortfoliosYou can add products in any number of portfolios. When a product is updated, all of the portfolios thatcontain the product automatically receive the new version, including shared portfolios.
To add a product from your catalog to a portfolio
1. Navigate to the Products page.
2. Choose a product, choose Actions, and then choose Add product to portfolio.
3. Choose a portfolio, and then choose Add product to portfolio.
Updating ProductsWhen you need to update a product's AWS CloudFormation template, you create a new version of yourproduct. A new product version is automatically available to all users who have access to a portfolio thatcontains the product.
Users who are currently running a provisioned product of the previous version of the product can updatetheir provisioned product using the end user console view. When a new version of a product is available,users can use the Update provisioned product command on either the Provisioned product list orProvisioned product details pages.
NoteBefore you create a new version of a product, test your product updates in AWS CloudFormationto ensure that they work.
To create a new product version
1. Navigate to the Products page.
2. Choose the product name.
3. On the product details page, expand the Versions section, and then choose Create new version.
4. For Version details, enter the following:
• Select template – An AWS CloudFormation template from a local drive or a URL that points to atemplate stored in Amazon S3. If you specify an Amazon S3 URL, it must begin with https://.The extension for the template file must be .template and can be either JSON– or YAML-formatted text files. For more information, see Template Formats in the AWS CloudFormation UserGuide.
• Version title – the name of the product version (e.g., "v1", "v2beta"). No spaces are allowed.
• Description (optional) – A description of the product version including how this version differsfrom the previous version.
• Guidance – By default, product versions don't have any guidance, so end users can use thatversion to update and launch provisioned products. If you set the guidance to deprecated, userscan make updates to a provisioned product but can't launch new provisioned products of thatversion.
Choose Save.
35

AWS Service Catalog Administrator GuideDeleting Products
You can also use CodePipeline to create and configure a pipeline to deploy your product templateto AWS Service Catalog and deliver changes you have made in your source repository. For moreinformation, see Tutorial: Create a Pipeline That Deploys to AWS Service Catalog.
Deleting ProductsTo remove products from your account completely, delete them from your catalog. Deleting a productremoves all versions of the product from every portfolio that contains the product. Deleted productscannot be recovered.
If your product has a budget associated to it, you will need to disassociate the budget before you candelete the product. For more information on disassociating a budget, see the section called “ManagingBudgets” (p. 62).
To delete a product from your catalog
1. Navigate to the Products page.
2. Choose the product, choose Actions, and then choose Delete product.
3. Verify that you have chosen the product that you want to delete, and then choose Continue.
Managing VersionsYou assign product versions when you create a product, and you can update product versions any time.
Versions have an AWS CloudFormation template, a title, a description, a status, and guidance.
Version StatusA version can have one of three statuses:
• Active - An active version appears in the version list and allows users to launch it.
• Inactive - An inactive version is hidden from the version list. Existing provisioned products launchedfrom this version will not be affected.
• Deleted - If a version is deleted, it is removed from the version list. Deleting a version can't be undone.
Version GuidanceYou can set version guidance to provide information to end users about the product version. Versionguidance only affects active product versions.
There are two options for version guidance:
• None - By default, product versions don't have any guidance, so end users can use that version toupdate and launch provisioned products.
• Deprecated - With a deprecated version, users can make updates to a provisioned product but can'tlaunch new provisioned products using the deprecated version.
Updating VersionsYou assign product versions when creating a product, and you can also update a version any time. Formore information about creating a product, see Creating Products (p. 34).
36

AWS Service Catalog Administrator GuideUsing Constraints
To update a product version
1. In the AWS Service Catalog console, choose Products.2. From the product list, choose the product you want to update the version of.3. On the Product details page, choose the Versions tab, then choose the version you want to update.4. On the Version details page, edit the product version, then choose Save changes.
Using AWS Service Catalog ConstraintsYou apply constraints to control the rules that are applied to a product in a specific portfolio when theend users launches it. When the end users launches the product, they will see the rules you have appliedusing constraints. You can apply constraints to a product once it is put into a portfolio. Constraints areactive as soon as you create them, and they're applied to all current versions of a product that have notbeen launched.
Constraints• AWS Service Catalog Launch Constraints (p. 37)• AWS Service Catalog Notification Constraints (p. 39)• AWS Service Catalog Tag Update Constraints (p. 40)• AWS Service Catalog Stack Set Constraints (p. 40)• AWS Service Catalog Template Constraints (p. 41)
AWS Service Catalog Launch ConstraintsA launch constraint specifies the AWS Identity and Access Management (IAM) role that AWS ServiceCatalog assumes when an end user launches a product. An IAM role is a collection of permissions that anIAM user or AWS service can assume temporarily to use AWS services. For an introductory example, seeStep 6: Add a Launch Constraint to Assign an IAM Role (p. 14).
Launch constraints are associated with a product within the portfolio (product-portfolio association),not at the portfolio level or to a product across all portfolios. To associate a launch constraint with allproducts in a portfolio, you must apply the launch constraint to each product individually.
Without a launch constraint, end users must launch and manage products using their own IAMcredentials. To do so, they must have permissions for AWS CloudFormation, the AWS services usedby the products, and AWS Service Catalog. By using a launch role, you can instead limit the end users'permissions to the minimum that they require for that product. For more information about end userpermissions, see Identity and Access Management in AWS Service Catalog (p. 20).
To create and assign IAM roles, you must have the following IAM administrative permissions:
• iam:CreateRole
• iam:PutRolePolicy
• iam:PassRole
• iam:Get*
• iam:List*
Configuring a Launch RoleThe IAM role that you assign to a product as a launch constraint must have permissions to use thefollowing:
37

AWS Service Catalog Administrator GuideLaunch Constraints
• AWS CloudFormation• Services used in the AWS CloudFormation template for the product• Read access to the AWS CloudFormation template in Amazon S3
The IAM role also must have a trust relationship with AWS Service Catalog, which you assign by selectingAWS Service Catalog as the role type in the following procedure. The trust relationship allows AWSService Catalog to assume the role during the launch process to create resources.
NoteThe servicecatalog:ProvisionProduct, servicecatalog:TerminateProduct, andservicecatalog:UpdateProduct permissions cannot be assigned in a launch role. Youmust use IAM roles, as shown in the inline policy steps in the section Grant Permissions to AWSService Catalog End Users (p. 8).
To create a launch role
1. Open the IAM console at https://console.aws.amazon.com/iam/.2. Choose Roles.3. Choose Create New Role.4. Enter a role name and choose Next Step.5. Under AWS Service Roles next to AWS Service Catalog, choose Select.6. On the Attach Policy page, Choose Next Step.7. To create the role, choose Create Role.
To attach a policy to the new role
1. Choose the role that you created to view the role details page.2. Choose the Permissions tab, and expand the Inline Policies section. Then, choose click here.3. Choose Custom Policy, and then choose Select.4. Enter a name for the policy, and then paste the following into the Policy Document editor:
{ "Version":"2012-10-17", "Statement":[ { "Effect":"Allow", "Action":[ "servicecatalog:*", "cloudformation:CreateStack", "cloudformation:DeleteStack", "cloudformation:DescribeStackEvents", "cloudformation:DescribeStacks", "cloudformation:GetTemplateSummary", "cloudformation:SetStackPolicy", "cloudformation:ValidateTemplate", "cloudformation:UpdateStack", "s3:GetObject" ], "Resource":"*" } ]}
5. Add a line to the policy for each additional service that the product uses. For example, to addpermission for Amazon Relational Database Service (Amazon RDS), type a comma at the end of thelast line in the "Action" list, and then add the following line:
38

AWS Service Catalog Administrator GuideNotification Constraints
"rds:*"
6. Choose Apply Policy.
Applying a Launch Constraint
Next, assign the role to the product as a launch constraint. This tells AWS Service Catalog to assume therole when an end user launches the product.
To assign the role to a product
1. Open the AWS Service Catalog console at https://console.aws.amazon.com/servicecatalog/.
2. Choose the portfolio that contains the product.
3. Choose the Constraints tab and choose Create constraint.
4. Choose the product from Product and choose Launch under Constraint type. Choose Continue.
5. In the Launch constraint section, you can select an IAM role from your account, enter an IAM roleARN, or enter the role name.
If you specify the role name, when an account uses the launch constraint, the IAM role with thatname in the account will be used. This allows launch-role constraints to be account-agnostic so youcan create fewer resources per shared account.
NoteThe given role name must exist in the account used to create the launch constraint and theaccount of the user who launches a product with this launch constraint.
6. After specifying the IAM role, choose Create.
Verify That the Launch Constraint Is Applied
Verify that AWS Service Catalog uses the role to launch the product and that the provisioned productis created successfully by launching the product from the AWS Service Catalog console. To test aconstraint prior to releasing it to users, create a test portfolio that contains the same products and testthe constraints with that portfolio.
To launch the product
1. In the menu for the AWS Service Catalog console, choose Service Catalog, End user.
2. Choose the product to open the Product details page. In the Launch options table, verify that theAmazon Resource Name (ARN) of the role appears.
3. Choose Launch product.
4. Proceed through the launch steps, filling in any required information.
5. Verify that the product starts successfully.
AWS Service Catalog Notification ConstraintsA notification constraint specifies an Amazon SNS topic to receive notifications about stack events. TheSNS topic specifies the email address to receive the notifications.
Use the following procedure to create an SNS topic and subscribe to it.
39

AWS Service Catalog Administrator GuideTag Update Constraints
To create an SNS topic and a subscription
1. Open the Amazon SNS console at https://console.aws.amazon.com/sns/v3/home.
2. Choose Create topic.
3. Type a topic name and then choose Create topic.
4. Choose Create subscription.
5. For Protocol, select Email. For Endpoint, type an email address that you can use to receivenotifications. Choose Create subscription.
6. You'll receive a confirmation email with the subject line AWS Notification - SubscriptionConfirmation. Open the email and follow the directions to complete your subscription.
Use the following procedure to apply a notification constraint using the SNS topic that you created usingthe previous procedure.
To apply a notification constraint to a product
1. Open the AWS Service Catalog console at https://console.aws.amazon.com/servicecatalog/.
2. Choose the portfolio that contains the product.
3. Expand Constraints and choose Add constraints.
4. Choose the product from Product and set Constraint type to Notification. Choose Continue.
5. Choose Choose a topic from your account and select the SNS topic that you created from TopicName.
6. Choose Submit.
AWS Service Catalog Tag Update ConstraintsWith tag update constraints, AWS Service Catalog administrators can allow or disallow end users toupdate tags on resources associated with an AWS Service Catalog provisioned product. If tag updating isallowed, then new tags associated with the AWS Service Catalog product or portfolio will be applied toprovisioned resources during a provisioned product update.
To enable tag updates to a product
1. Open the AWS Service Catalog console at https://console.aws.amazon.com/servicecatalog/.
2. Choose the portfolio that contains the product you want to update.
3. Choose the Constraints tab and choose Add constraints.
4. Under Constraint type, choose Tag Update.
5. Choose the product from Product, then choose Continue.
6. On the Tag Updates page, select Enable Tag Updates.
7. Choose Submit.
AWS Service Catalog Stack Set ConstraintsNoteThis feature is currently in beta mode. AutoTags are not currently supported with AWSCloudFormation StackSets.
A stack set constraint allows you to configure product deployment options using AWS CloudFormationStackSets. You can specify multiple accounts and regions for the product launch.
40
AWS Service Catalog Administrator GuideTemplate Constraints
To apply a stack set constraint to a product
1. Open the AWS Service Catalog console at https://console.aws.amazon.com/servicecatalog/.
2. Choose the portfolio that contains the product.
3. Expand Constraints and choose Add constraints.
4. Choose the product from Product and set Constraint type to Stack Set. Choose Continue.
5. On the Stack Set constraint page, enter a description.
6. Choose the account(s) in which you want to create products.
7. Choose the region(s) in which you want to deploy products. Products are deployed in these regionsin the order that you specify.
8. Choose an IAM StackSet Administrator Role that will be used to manage your target accounts. Ifyou don't choose a role, StackSets will use the default ARN. Learn more about setting up stack setpermissions.
9. Choose Submit.
AWS Service Catalog Template ConstraintsTo limit the options that are available to end users when they launch a product, you apply templateconstraints. Apply template constraints to ensure that the end users can use products without breachingthe compliance requirements of your organization. You apply template constraints to a product in anAWS Service Catalog portfolio. A portfolio must contain one or more products before you can definetemplate constraints.
A template constraint consists of one or more rules that narrow the allowable values for parametersthat are defined in the product's underlying AWS CloudFormation template. The parameters in anAWS CloudFormation template define the set of values that users can specify when creating a stack.For example, a parameter might define the various instance types that users can choose from whenlaunching a stack that includes EC2 instances.
If the set of parameter values in a template is too broad for the target audience of your portfolio, youcan define template constraints to limit the values that users can choose when launching a product. Forexample, if the template parameters include EC2 instance types that are too large for users who shoulduse only small instance types (such as t2.micro or t2.small), then you can add a template constraintto limit the instance types that end users can choose. For more information about AWS CloudFormationtemplate parameters, see Parameters in the AWS CloudFormation User Guide.
Template constraints are bound within a portfolio. If you apply template constraints to a product in oneportfolio, and if you then include the product in another portfolio, the constraints will not apply to theproduct in the second portfolio.
If you apply a template constraint to a product that has already been shared with users, the constraintis active immediately for all subsequent product launches and for all versions of the product in theportfolio.
You define template constraint rules by using a rule editor or by writing the rules as JSON text in theAWS Service Catalog administrator console. For more information about rules, including syntax andexamples, see Template Constraint Rules (p. 42).
To test a constraint prior to releasing it to users, create a test portfolio that contains the same productsand test the constraints with that portfolio.
To apply template constraints to a product
1. Open the AWS Service Catalog console at https://console.aws.amazon.com/servicecatalog/.
41

AWS Service Catalog Administrator GuideTemplate Constraints
2. On the Portfolios page, choose the portfolio that contains the product to which you want to apply atemplate constraint.
3. Expand the Constraints section and choose Add constraints.4. In the Select product and type window, for Product choose the product for which you want to
define the template constraints. Then, for Constraint type, choose Template. Choose Continue.5. On the Template constraint builder page, edit the constraint rules by using the JSON editor or the
rule builder interface.
• To edit the JSON code for the rule, choose the Constraint Text Editor tab. Several samples areprovided on this tab to help you get started.
To build the rules by using a rule builder interface, choose the Rule Builder tab. On this tab, youcan choose any parameter that is specified in the template for the product, and you can specifythe allowable values for that parameter. Depending on the type of parameter, you specify theallowable values by choosing items in a checklist, by specifying a number, or by specifying a set ofvalues in a comma-separated list.
When you have finished building a rule, choose Add rule. The rule appears in the table on the RuleBuilder tab. To review and edit the JSON output, choose the Constraint Text Editor tab.
6. When you are done editing the rules for your constraint, choose Submit. To see the constraint, go tothe portfolio details page and expand Constraints.
Template Constraint RulesThe rules that define template constraints in an AWS Service Catalog portfolio describe when end userscan use the template and which values they can specify for parameters that are declared in the AWSCloudFormation template used to create the product they are attempting to use. Rules are useful forpreventing end users from inadvertently specifying an incorrect value. For example, you can add a ruleto verify whether end users specified a valid subnet in a given VPC or used m1.small instance types fortest environments. AWS CloudFormation uses rules to validate parameter values before it creates theresources for the product.
Each rule consists of two properties: a rule condition (optional) and assertions (required). The rulecondition determines when a rule takes effect. The assertions describe what values users can specify fora particular parameter. If you don't define a rule condition, the rule's assertions always take effect. Todefine a rule condition and assertions, you use rule-specific intrinsic functions, which are functions thatcan only be used in the Rules section of a template. You can nest functions, but the final result of a rulecondition or assertion must be either true or false.
As an example, assume that you declared a VPC and a subnet parameter in the Parameters section.You can create a rule that validates that a given subnet is in a particular VPC. So when a user specifiesa VPC, AWS CloudFormation evaluates the assertion to check whether the subnet parameter value is inthat VPC before creating or updating the stack. If the parameter value is invalid, AWS CloudFormationimmediately fail to create or update the stack. If users don't specify a VPC, AWS CloudFormation doesn'tcheck the subnet parameter value.
Syntax
The Rules section of a template consists of the key name Rules, followed by a single colon. Bracesenclose all rule declarations. If you declare multiple rules, they are delimited by commas. For each rule,you declare a logical name in quotation marks followed by a colon and braces that enclose the rulecondition and assertions.
A rule can include a RuleCondition property and must include an Assertions property. For eachrule, you can define only one rule condition; you can define one or more asserts within the Assertionsproperty. You define a rule condition and assertions by using rule-specific intrinsic functions, as shown inthe following pseudo template:
42

AWS Service Catalog Administrator GuideTemplate Constraints
"Rules" : { "Rule01" : { "RuleCondition" : { Rule-specific intrinsic function }, "Assertions" : [ { "Assert" : { Rule-specific intrinsic function }, "AssertDescription" : "Information about this assert" }, { "Assert" : { Rule-specific intrinsic function }, "AssertDescription" : "Information about this assert" } ] }, "Rule02" : { "Assertions" : [ { "Assert" : { Rule-specific intrinsic function }, "AssertDescription" : "Information about this assert" } ] }}
The pseudo template shows a Rules section containing two rules named Rule01 and Rule02. Rule01includes a rule condition and two assertions. If the function in the rule condition evaluates to true, bothfunctions in each assert are evaluated and applied. If the rule condition is false, the rule doesn't takeeffect. Rule02 always takes effect because it doesn't have a rule condition, which means the one assertis always evaluated and applied.
You can use the following rule-specific intrinsic functions to define rule conditions and assertions:
• Fn::And
• Fn::Contains
• Fn::EachMemberEquals
• Fn::EachMemberIn
• Fn::Equals
• Fn::If
• Fn::Not
• Fn::Or
• Fn::RefAll
• Fn::ValueOf
• Fn::ValueOfAll
Example: Conditionally Verify a Parameter Value
The following two rules check the value of the InstanceType parameter. Depending on the valueof the Environment parameter (test or prod), the user must specify m1.small or m1.large for theInstanceType parameter. The InstanceType and Environment parameters must be declared in theParameters section of the same template.
"Rules" : { "testInstanceType" : { "RuleCondition" : {"Fn::Equals":[{"Ref":"Environment"}, "test"]}, "Assertions" : [ { "Assert" : { "Fn::Contains" : [ ["m1.small"], {"Ref" : "InstanceType"} ] },
43

AWS Service Catalog Administrator GuideTemplate Constraints
"AssertDescription" : "For the test environment, the instance type must be m1.small" } ] }, "prodInstanceType" : { "RuleCondition" : {"Fn::Equals":[{"Ref":"Environment"}, "prod"]}, "Assertions" : [ { "Assert" : { "Fn::Contains" : [ ["m1.large"], {"Ref" : "InstanceType"} ] }, "AssertDescription" : "For the prod environment, the instance type must be m1.large" } ] }}
AWS Service Catalog Rule FunctionsIn the condition or assertions of a rule, you can use intrinsic functions, such as Fn::Equals, Fn::Not,and Fn::RefAll. The condition property determines if AWS CloudFormation applies the assertions.If the condition evaluates to true, AWS CloudFormation evaluates the assertions to verify whethera parameter value is valid when a provisioned product is created or updated. If a parameter values isinvalid, AWS CloudFormation does not create or update the stack. If the condition evaluates to false,AWS CloudFormation doesn't check the parameter value and proceeds with the stack operation.
Functions• Fn::And (p. 44)• Fn::Contains (p. 45)• Fn::EachMemberEquals (p. 45)• Fn::EachMemberIn (p. 46)• Fn::Equals (p. 46)• Fn::Not (p. 47)• Fn::Or (p. 47)• Fn::RefAll (p. 47)• Fn::ValueOf (p. 48)• Fn::ValueOfAll (p. 48)• Supported Functions (p. 49)• Supported Attributes (p. 49)
Fn::And
Returns true if all the specified conditions evaluate to true; returns false if any one of the conditionsevaluates to false. Fn::And acts as an AND operator. The minimum number of conditions that you caninclude is two, and the maximum is ten.
Declaration
"Fn::And" : [{condition}, {...}]
Parameters
condition
A rule-specific intrinsic function that evaluates to true or false.
44

AWS Service Catalog Administrator GuideTemplate Constraints
Example
The following example evaluates to true if the referenced security group name is equal to sg-mysggroup and if the InstanceType parameter value is either m1.large or m1.small:
"Fn::And" : [ {"Fn::Equals" : ["sg-mysggroup", {"Ref" : "ASecurityGroup"}]}, {"Fn::Contains" : [["m1.large", "m1.small"], {"Ref" : "InstanceType"}]}]
Fn::Contains
Returns true if a specified string matches at least one value in a list of strings.
Declaration
"Fn::Contains" : [[list_of_strings], string]
Parameters
list_of_strings
A list of strings, such as "A", "B", "C".string
A string, such as "A", that you want to compare against a list of strings.
Example
The following function evaluates to true if the InstanceType parameter value is contained in the list(m1.large or m1.small):
"Fn::Contains" : [ ["m1.large", "m1.small"], {"Ref" : "InstanceType"}]
Fn::EachMemberEquals
Returns true if a specified string matches all values in a list.
Declaration
"Fn::EachMemberEquals" : [[list_of_strings], string]
Parameters
list_of_strings
A list of strings, such as "A", "B", "C".string
A string, such as "A", that you want to compare against a list of strings.
Example
The following function returns true if the Department tag for all parameters of typeAWS::EC2::VPC::Id have a value of IT:
45

AWS Service Catalog Administrator GuideTemplate Constraints
"Fn::EachMemberEquals" : [ {"Fn::ValueOfAll" : ["AWS::EC2::VPC::Id", "Tags.Department"]}, "IT"]
Fn::EachMemberIn
Returns true if each member in a list of strings matches at least one value in a second list of strings.
Declaration
"Fn::EachMemberIn" : [[strings_to_check], [strings_to_match]]
Parameters
strings_to_check
A list of strings, such as "A", "B", "C". AWS CloudFormation checks whether each member in thestrings_to_check parameter is in the strings_to_match parameter.
strings_to_match
A list of strings, such as "A", "B", "C". Each member in the strings_to_match parameter iscompared against the members of the strings_to_check parameter.
Example
The following function checks whether users specify a subnet that is in a valid virtual private cloud(VPC). The VPC must be in the account and the region in which users are working with the stack. Thefunction applies to all parameters of type AWS::EC2::Subnet::Id.
"Fn::EachMemberIn" : [ {"Fn::ValueOfAll" : ["AWS::EC2::Subnet::Id", "VpcId"]}, {"Fn::RefAll" : "AWS::EC2::VPC::Id"}]
Fn::Equals
Compares two values to determine whether they are equal. Returns true if the two values are equal andfalse if they aren't.
Declaration
"Fn::Equals" : ["value_1", "value_2"]
Parameters
value
A value of any type that you want to compare with another value.
Example
The following example evaluates to true if the value for the EnvironmentType parameter is equal toprod:
46

AWS Service Catalog Administrator GuideTemplate Constraints
"Fn::Equals" : [{"Ref" : "EnvironmentType"}, "prod"]
Fn::Not
Returns true for a condition that evaluates to false, and returns false for a condition that evaluatesto true. Fn::Not acts as a NOT operator.
Declaration
"Fn::Not" : [{condition}]
Parameters
condition
A rule-specific intrinsic function that evaluates to true or false.
Example
The following example evaluates to true if the value for the EnvironmentType parameter is not equalto prod:
"Fn::Not" : [{"Fn::Equals" : [{"Ref" : "EnvironmentType"}, "prod"]}]
Fn::Or
Returns true if any one of the specified conditions evaluates to true; returns false if all of theconditions evaluate to false. Fn::Or acts as an OR operator. The minimum number of conditions thatyou can include is two, and the maximum is ten.
Declaration
"Fn::Or" : [{condition}, {...}]
Parameters
condition
A rule-specific intrinsic function that evaluates to true or false.
Example
The following example evaluates to true if the referenced security group name is equal to sg-mysggroup or if the InstanceType parameter value is either m1.large or m1.small:
"Fn::Or" : [ {"Fn::Equals" : ["sg-mysggroup", {"Ref" : "ASecurityGroup"}]}, {"Fn::Contains" : [["m1.large", "m1.small"], {"Ref" : "InstanceType"}]}]
Fn::RefAll
Returns all values for a specified parameter type.
47

AWS Service Catalog Administrator GuideTemplate Constraints
Declaration
"Fn::RefAll" : "parameter_type"
Parameters
parameter_type
An AWS-specific parameter type, such as AWS::EC2::SecurityGroup::Id orAWS::EC2::VPC::Id. For more information, see Parameters in the AWS CloudFormation UserGuide.
Example
The following function returns a list of all VPC IDs for the region and AWS account in which the stack isbeing created or updated:
"Fn::RefAll" : "AWS::EC2::VPC::Id"
Fn::ValueOf
Returns an attribute value or list of values for a specific parameter and attribute.
Declaration
"Fn::ValueOf" : [ "parameter_logical_id", "attribute" ]
Parameters
attribute
The name of an attribute from which you want to retrieve a value. For more information aboutattributes, see Supported Attributes (p. 49).
parameter_logical_id
The name of a parameter for which you want to retrieve attribute values. The parameter must bedeclared in the Parameters section of the template.
Examples
The following example returns the value of the Department tag for the VPC that is specified by theElbVpc parameter:
"Fn::ValueOf" : ["ElbVpc", "Tags.Department"]
If you specify multiple values for a parameter, the Fn::ValueOf function can return a list. For example,you can specify multiple subnets and get a list of Availability Zones where each member is the AvalibilityZone of a particular subnet:
"Fn::ValueOf" : ["ListOfElbSubnets", "AvailabilityZone"]
Fn::ValueOfAll
Returns a list of all attribute values for a given parameter type and attribute.
48

AWS Service Catalog Administrator GuideUsing Service Actions
Declaration
"Fn::ValueOfAll" : ["parameter_type", "attribute"]
Parameters
attribute
The name of an attribute from which you want to retrieve a value. For more information aboutattributes, see Supported Attributes (p. 49).
parameter_type
An AWS-specific parameter type, such as AWS::EC2::SecurityGroup::Id or AWS::EC2::VPC::Id. For moreinformation, see Parameters in the AWS CloudFormation User Guide.
Example
In the following example, the Fn::ValueOfAll function returns a list of values, where each member isthe Department tag value for VPCs with that tag:
"Fn::ValueOfAll" : ["AWS::EC2::VPC::Id", "Tags.Department"]
Supported Functions
You cannot use another function within the Fn::ValueOf and Fn::ValueOfAll functions. However,you can use the following functions within all other rule-specific intrinsic functions:
• Ref
• Other rule-specific intrinsic functions
Supported Attributes
The following list describes the attribute values that you can retrieve for specific resources andparameter types:
The AWS::EC2::VPC::Id parameter type or VPC IDs• DefaultNetworkAcl• DefaultSecurityGroup• Tags.tag_key
The AWS::EC2::Subnet::Id parameter type or subnet IDs• AvailabilityZone• Tags.tag_key• VpcId
The AWS::EC2::SecurityGroup::Id parameter type or security group IDs• Tags.tag_key
AWS Service Catalog Service ActionsAWS Service Catalog enables you to reduce administrative maintenance and end user training whileadhering to compliance and security measures. With service actions, as the administrator you can
49

AWS Service Catalog Administrator GuidePrerequisites
enable end users to perform operational tasks, troubleshoot issues, run approved commands, or requestpermissions in AWS Service Catalog. You use AWS Systems Manager documents to define service actions.The AWS Systems Manager documents provide access to pre-defined actions that implement AWS bestpractices, such as Amazon EC2 stop and reboot, and you can define custom actions too.
In this tutorial, you provide end users with the ability to restart an Amazon EC2 instance. You add thenecessary permissions, define the service action, associate the service action with a product, and test theend user experience using the action with a provisioned product.
PrerequisitesThis tutorial assumes that you have full AWS administrator permissions, you are already familiar withAWS Service Catalog, and that you already have a base set of products, portfolios, and users. If you arenot familiar with AWS Service Catalog, complete the Setting Up (p. 6) and Getting Started (p. 9) tasksbefore using this tutorial.
Topics• Step 1: Configure end user permissions (p. 50)• Step 2: Create a service action (p. 51)• Step 3: Associate the service action with a product version (p. 51)• Step 4: Test the end user experience (p. 52)• Step 5: Troubleshooting (p. 52)
Step 1: Configure end user permissionsEnd user accounts must have the necessary permissions to view and perform specific service actions. Inthis example, the end user needs permission to access the AWS Service Catalog service actions featureand to perform an Amazon EC2 restart.
To update permissions
1. Open the AWS Identity and Access Management (IAM) console at https://console.aws.amazon.com/iam/.
2. From the menu, choose Groups.3. On the Groups page, select the groups used by end users to access AWS Service Catalog resources.
In this example, we select the end user group. In your own implementation, choose the group that isused by the relevant end users.
4. On the Permissions tab of your group’s detail page, you either create a new policy or edit an existingpolicy. In this example, we add permissions to the existing policy by selecting the custom policycreated for the group’s AWS Service Catalog Provision and Terminate permissions.
5. On the Policy page, choose Edit Policy to add the necessary permissions. You can use either thevisual editor or the JSON editor to edit the policy. In this example, we use the JSON editor to add thepermissions. For this tutorial, add the following permissions to the policy:
{ "Version": "2012-10-17", "Statement": [ { "Sid": "Stmt1536341175150", "Action": [ "servicecatalog:ListServiceActionsForProvisioningArtifact", "servicecatalog:ExecuteprovisionedProductServiceAction", "ssm:DescribeDocument",
50

AWS Service Catalog Administrator GuideStep 2: Create a service action
"ssm:GetAutomationExecution", "ssm:StartAutomationExecution", "ssm:StopAutomationExecution", "cloudformation:ListStackResources", "ec2:DescribeInstanceStatus", "ec2:StartInstances", "ec2:StopInstances" ], "Effect": "Allow", "Resource": "*" } ]}
6. After you edit the policy, review and approve the change to the policy. Users in the end user groupnow have the necessary permissions to perform the Amazon EC2 restart action in AWS ServiceCatalog.
Step 2: Create a service actionNext, you create a service action to restart Amazon EC2 instances.
1. Open the AWS Service Catalog console at https://console.aws.amazon.com/sc/.
2. From the menu, choose Service actions.
3. On the service actions page, choose Create new action.
4. On the Create action page, choose an AWS Systems Manager document to define the service action.The Amazon EC2 Instance Restart action is defined by an AWS Systems Manager document, so wekeep the default option on the drop-down menu, Amazon documents.
5. Choose the AWS-RestartEC2Instance action.
6. Provide a name and description for the action that make sense for your environment and team. Theend user will see this description, so choose something that helps them understand what the actiondoes.
7. Under Parameter and target configuration, choose the SSM document parameter that will be thetarget of the action (for example, the Instance ID), and choose the target of the parameter. ChooseAdd parameter to add additional parameters.
8. Under Permissions, choose a role. We are using default permissions for this example. Otherpermission configurations are possible and are defined on this page.
9. After you have reviewed the configuration, choose Create action.
10. On the next page, a confirmation appears when the action has been created and is ready to use.
Step 3: Associate the service action with a productversionAfter you define an action, you must associate a product with that action.
1. On the Service actions page, choose AWS-RestartEC2instance, and then choose Associate action.
2. On the Associate action page, choose the product that you want your end users to take the serviceaction on. In this example, we choose Linux Desktop.
3. Select a product version. Note that you can use the topmost check box to select all versions.
4. Choose Associate action.
5. On the next page, a confirmation message appears.
51

AWS Service Catalog Administrator GuideStep 4: Test the end user experience
You have now created the service action in AWS Service Catalog. The next step of this tutorial is to usethe service action as an end user.
Step 4: Test the end user experienceEnd users can perform service actions on provisioned products. For the purposes of this tutorial, the enduser must have at least one provisioned product. The provisioned product should be launched from theproduct version that you associated with the service action in the previous step.
To access the service action as an end user
1. Log in to the AWS Service Catalog console as an end user.2. On the AWS Service Catalog dashboard, in the navigation pane, choose Provisioned products list.
The list shows the products that are provisioned for the end user's account.3. On the Provisioned products list page, choose the instance that is provisioned.4. On the Provisioned product details page, choose Actions in the upper right side, and then choose
the AWS-RestartEC2instance action.5. Confirm that you want to execute the custom action. You receive confirmation that the action has
been sent.
Step 5: TroubleshootingIf your service action execution fails, you can find the error message in the Outputs section of the serviceaction execution event on the Provisioned product page. Below you can see explanations for commonerror messages you may find.
NoteThe exact text of the error message is subject to change, so you should avoid using these in anykind of automated process.
Internal failure
AWS Service Catalog experienced an internal error. Try again later. If the issue persists, contact customersupport.
An error occurred (ThrottlingException) when calling the StartAutomationExecution operation
The service action execution was throttled by the backend service, such as SSM.
Access denied while assuming the role
AWS Service Catalog was unable to assume the role specified in the service action definition. Makesure that the servicecatalog.amazonaws.com principal, or a regional principal such as servicecatalog.us-east-1.amazonaws.com, is whitelisted in the role's trust policy.
An error occurred (AccessDeniedException) when calling the StartAutomationExecution operation:User is not authorized to perform: ssm:StartAutomationExecution on the resource.
The role specified in the service action definition does not have permissions to invokessm:StartAutomationExecution. Make sure the role has the appropriate SSM permissions.
Cannot find any resources with type TargetType in provisioned product
The provisioned product does not contain any resources that match the target type specified in the SSMdocument, such as AWS::EC2::Instance. Check your provisioned product for these resources or confirmthe document is correct.
Document with that name does not exist
52

AWS Service Catalog Administrator GuideAdding AWS Marketplace Products to Your Portfolio
The document specified in the service action definition does not exist.
Failed to describe SSM Automation document
AWS Service Catalog encountered an unknown exception from SSM when trying to describe the specifieddocument.
Failed to retrieve credentials for role
AWS Service Catalog encountered an unknown error when assuming the specified role.
Parameter has value "InvalidValue" not found in {ValidValue1}, {ValidValue2}
The parameter value passed to SSM is not in the allowed values list for the document. Confirm theparameters provided are valid, and try again.
Parameter type error. The value supplied for ParameterName is not a valid string.
The value of the parameter passed to SSM is not valid for the type on the document.
Parameter is not defined in service action definition
A parameter was passed to AWS Service Catalog that is not defined in the service action definition. Youcan only use parameters defined in the service action definition.
Step fails when it is executing/canceling action. Error message. Please refer to AutomationService Troubleshooting Guide for more diagnosis details.
A step in the SSM automation document failed. See the error in the message to troubleshoot further.
The following values for the parameter are not allowed because they are not in the provisionedproduct: InvalidResourceId
The user requested action on a resource that is not in the provisioned product.
TargetType not defined for SSM Automation document
Service actions require SSM automation documents to have a TargetType defined. Check your SSMautomation document.
Adding AWS Marketplace Products to YourPortfolio
You can add AWS Marketplace products to your portfolios to make those products available to your AWSService Catalog end users.
AWS Marketplace is an online store in which you can find, subscribe to, and immediately start using alarge selection of software and services. The types of products in AWS Marketplace include databases,application servers, testing tools, monitoring tools, content management tools, and business intelligencesoftware. AWS Marketplace is available at https://aws.amazon.com/marketplace.
You distribute an AWS Marketplace product to AWS Service Catalog end users by defining the product inan AWS CloudFormation template and adding the template to a portfolio. Any end user who has accessto the portfolio will be able to launch the product from the console.
AWS Marketplace supports AWS Service Catalog directly or subscribe and add products using the manualoption. We recommend adding products using the functionality specifically designed for AWS ServiceCatalog.
53

AWS Service Catalog Administrator GuideManaging AWS Marketplace
Products Using AWS Service Catalog
Managing AWS Marketplace Products Using AWSService CatalogYou can add your subscribed AWS Marketplace products directly to AWS Service Catalog using a custominterface. In AWS Marketplace, choose Service Catalog. For more information, see Copying Products toAWS Service Catalog in the AWS Marketplace Help and FAQ.
Managing and Adding AWS Marketplace ProductsManuallyComplete the following steps to subscribe to an AWS Marketplace product, define that product in anAWS CloudFormation template, and add the template to an AWS Service Catalog portfolio.
To subscribe to an AWS Marketplace product
1. Go to AWS Marketplace at https://aws.amazon.com/marketplace.2. Browse the products or search to find the product that you want to add to your AWS Service Catalog
portfolio. Choose the product to view the product details page.3. Choose Continue to view the fulfillment page, and then choose the Manual Launch tab.
The information on the fulfillment page includes the supported Amazon Elastic Compute Cloud(Amazon EC2) instance types, the supported AWS regions, and the Amazon Machine Image (AMI) IDthat the product uses for each AWS region. Note that some choices will affect cost. You will use thisinformation to customize the AWS CloudFormation template in later steps.
4. Choose Accept Terms to subscribe to the product.
After you subscribe to a product, you can access the information on the product fulfillment page inAWS Marketplace at any time by choosing Your Software, and then choosing the product.
To define your AWS Marketplace product in an AWS CloudFormation template
To complete the following steps, you will use one of the AWS CloudFormation sample templates as astarting point, and you will customize the template so that it represents your AWS Marketplace product.To access the sample templates, see Sample Templates in the AWS CloudFormation User Guide.
1. On the Sample Templates page in the AWS CloudFormation User Guide, choose a region that yourproduct will be used in. The region must be supported by your AWS Marketplace product. You canview the supported regions on the product fulfillment page in AWS Marketplace.
2. To view a list of service sample templates that are appropriate for the region, choose the Serviceslink.
3. You can use any of the samples that are appropriate for your needs as a starting point. The stepsin this procedure use the Amazon EC2 instance in a security group template. To view the sampletemplate, choose View , and then save a copy of the template locally so that you can edit it. Yourlocal file must have the .template extension.
4. Open your template file in a text editor.5. Customize the description at the top of the template. Your description might look like the following
example:
"Description": "Launches a LAMP stack from AWS Marketplace",
6. Customize the InstanceType parameter so that it includes only EC2 instance types that aresupported by your product. If your template includes unsupported EC2 instance types, the productwill fail to launch for your end users.
54

AWS Service Catalog Administrator GuideManaging and Adding AWS Marketplace Products Manually
a. On the product fulfillment page in AWS Marketplace, view the supported EC2 instance types inthe Pricing Details section, as in the following example:
b. In your template, change the default instance type to a supported EC2 instance type of yourchoice.
c. Edit the AllowedValues list so that it includes only EC2 instance types that are supported byyour product.
d. Remove any EC2 instance types that you do not want your end users to use when they launchthe product from the AllowedValueslist .
55

AWS Service Catalog Administrator GuideManaging and Adding AWS Marketplace Products Manually
When you are done editing the InstanceType parameter, it might look similar to the followingexample:
"InstanceType" : { "Description" : "EC2 instance type", "Type" : "String", "Default" : "m1.small", "AllowedValues" : [ "t1.micro", "m1.small", "m1.medium", "m1.large", "m1.xlarge", "m2.xlarge", "m2.2xlarge", "m2.4xlarge", "c1.medium", "c1.xlarge", "c3.large", "c3.large", "c3.xlarge", "c3.xlarge", "c3.4xlarge", "c3.8xlarge" ], "ConstraintDescription" : "Must be a valid EC2 instance type." },
7. In the Mappings section of your template, edit the AWSInstanceType2Arch mappings so thatonly supported EC2 instance types and architectures are included.
a. Edit the list of mappings by removing all EC2 instance types that are not included in theAllowedValues list for the InstanceType parameter.
b. Edit the Arch value for each EC2 instance type to be the architecture type that is supportedby your product. Valid values are PV64, HVM64, and HVMG2. To learn which architecture yourproduct supports, refer to the product details page in AWS Marketplace. To learn whicharchitectures are supported by EC2 instance families, see Amazon Linux AMI Instance TypeMatrix.
When you have finished editing the AWSInstanceType2Arch mappings, it might look similar to thefollowing example:
"AWSInstanceType2Arch" : { "t1.micro" : { "Arch" : "PV64" }, "m1.small" : { "Arch" : "PV64" }, "m1.medium" : { "Arch" : "PV64" }, "m1.large" : { "Arch" : "PV64" }, "m1.xlarge" : { "Arch" : "PV64" }, "m2.xlarge" : { "Arch" : "PV64" }, "m2.2xlarge" : { "Arch" : "PV64" }, "m2.4xlarge" : { "Arch" : "PV64" }, "c1.medium" : { "Arch" : "PV64" }, "c1.xlarge" : { "Arch" : "PV64" }, "c3.large" : { "Arch" : "PV64" }, "c3.xlarge" : { "Arch" : "PV64" }, "c3.2xlarge" : { "Arch" : "PV64" }, "c3.4xlarge" : { "Arch" : "PV64" }, "c3.8xlarge" : { "Arch" : "PV64" } },
8. In the Mappings section of your template, edit the AWSRegionArch2AMI mappings to associateeach AWS region with the corresponding architecture and AMI ID for your product.
a. On the product fulfillment page in AWS Marketplace, view the AMI ID that your product uses foreach AWS region, as in the following example:
56

AWS Service Catalog Administrator GuideManaging and Adding AWS Marketplace Products Manually
b. In your template, remove the mappings for any regions that you do not support.
c. Edit the mapping for each region to remove the unsupported architectures (PV64, HVM64, orHVMG2) and their associated AMI IDs.
d. For each remaining region and architecture mapping, specify the corresponding AMI ID from theproduct details page in AWS Marketplace.
When you have finished editing the AWSRegionArch2AMI mappings, your code might look similarto the following example:
"AWSRegionArch2AMI" : { "us-east-1" : {"PV64" : "ami-nnnnnnnn"}, "us-west-2" : {"PV64" : "ami-nnnnnnnn"}, "us-west-1" : {"PV64" : "ami-nnnnnnnn"}, "eu-west-1" : {"PV64" : "ami-nnnnnnnn"}, "eu-central-1" : {"PV64" : "ami-nnnnnnnn"}, "ap-northeast-1" : {"PV64" : "ami-nnnnnnnn"}, "ap-southeast-1" : {"PV64" : "ami-nnnnnnnn"}, "ap-southeast-2" : {"PV64" : "ami-nnnnnnnn"}, "sa-east-1" : {"PV64" : "ami-nnnnnnnn"} }
You can now use the template to add the product to an AWS Service Catalog portfolio. If you wantto make additional changes, see Working with AWS CloudFormation Templates to learn more abouttemplates.
To add your AWS Marketplace product to an AWS Service Catalog portfolio
1. Sign in to the AWS Management Console and navigate to the AWS Service Catalog administratorconsole at https://console.aws.amazon.com/servicecatalog/.
2. On the Portfolios page, choose the portfolio that you want to add your AWS Marketplace productto.
3. On the portfolio details page, choose Upload new product.
4. Type the requested product and support details.
5. On the Version details page, choose Upload a template file, choose Browse, and then choose yourtemplate file.
6. Type a version title and description.
57

AWS Service Catalog Administrator GuidePortfolio Sharing
7. Choose Next.8. On the Review page, verify that the summary is accurate, and then choose Confirm and upload. The
product is added your portfolio. It is now available to end users who have access to the portfolio.
Portfolio SharingTo make your AWS Service Catalog products available to users who are not in your AWS account, suchas users who belong to other organizations or to other AWS accounts in your organization, you shareyour portfolios with them. This can be done in several ways, including account-to-account sharing,organizational sharing, and deploying catalogs using stack sets.
Topics• Relationship Between Shared and Imported Portfolios (p. 59)• Sharing a Portfolio (p. 60)
Before you share your products and portfolios to other accounts, you must decide whether you wantto share a reference of the catalog or to deploy a copy of the catalog into each recipient account. Notethat if you deploy a copy, you must redeploy if there are updates you want to propagate to the recipientaccounts. You can use stack sets to deploy your catalog to many accounts at the same time. If you wantto share a reference (an imported version of your portfolio that stays in sync with the original), you canuse account-to-account sharing or you can share using AWS Organizations.
If you want to use stack sets to deploy a copy of your catalog, see How to set up a multi-region, multi-account catalog of company standard AWS Service Catalog products.
When you share a portfolio using account-to-account sharing or AWS Organizations, you allow an AWSService Catalog administrator of another AWS account to import your portfolio into his or her accountand distribute the products to end users in that account. This imported portfolio isn't an independentcopy. The products and constraints in the imported portfolio stay in sync with changes that you make tothe shared portfolio, the original portfolio that you shared. The recipient administrator, the administratorwith whom you share a portfolio, cannot change the products or constraints, but can add AWS Identityand Access Management (IAM) access for end users. For more information, see Granting Access toUsers (p. 33).
The recipient administrator can distribute the products to end users who belong to his or her AWSaccount in the following ways:
• By adding IAM users, groups, and roles to the imported portfolio.• By adding products from the imported portfolio to a local portfolio, a separate portfolio that the
recipient administrator creates and that belongs to his or her AWS account. The recipient administratorthen adds IAM users, groups, and roles to the local portfolio. The constraints that you applied to theproducts in the shared portfolio are also present in the local portfolio. The recipient administrator canadd additional constraints to the local portfolio, but cannot remove the imported constraints.
When you add products or constraints to the shared portfolio or remove products or constraints from it,the change propagates to all imported instances of the portfolio. For example, if you remove a productfrom the shared portfolio, that product is also removed from the imported portfolio. It is also removedfrom all local portfolios that the imported product was added to. If an end user launched a productbefore you removed it, the end user's provisioned product continues to run, but the product becomesunavailable for future launches.
If you apply a launch constraint to a product in a shared portfolio, it propagates to all imported instancesof the product. To override this launch constraint, the recipient administrator adds the product to a localportfolio and then applies a different launch constraint to it. The launch constraint that is in effect sets
58

AWS Service Catalog Administrator GuideRelationship Between Shared and Imported Portfolios
a launch role for the product. A launch role is an IAM role that AWS Service Catalog uses to provisionAWS resources (such as EC2 instances or RDS databases) when an end user launches the product. As anadministrator you can choose to designate a specific launch role ARN or a local role name. If you use therole ARN, the role will be used even if the end user belongs to a different AWS account than the one thatowns the launch role. If you use a local role name, the IAM role with that name in the end user's accountwill be used. For more information about launch constraints and launch roles, see AWS Service CatalogLaunch Constraints (p. 37). The AWS account that owns the launch role provisions the AWS resources,and this account incurs the usage charges for those resources. For more information, see AWS ServiceCatalog Pricing.
NoteYou cannot re-share products from a portfolio that has been imported or shared.
Relationship Between Shared and ImportedPortfoliosThe following table summarizes the relationship between an imported portfolio and a shared portfolioand the actions that an administrator who imports a portfolio can and can't take with that portfolio andthe products in it.
Element of SharedPortfolio
Relationship toImported Portfolio
RecipientAdministrator Can
RecipientAdministrator Cannot
Products and productversions
Inherited.
If the portfolio creatoradds products to orremoves products fromthe shared portfolio,the change propagatesto the importedportfolio.
Add imported productsto local portfolios.Products stay in syncwith shared portfolio.
Upload or add productsto the importedportfolio or removeproducts from theimported portfolio.
Launch constraints Inherited.
If the portfolio creatoradds launch constraintsto or removes launchconstraints from ashared product, thechange propagates toall imported instancesof the product.
If the recipientadministrator addsan imported productto a local portfolio,the imported launchconstraint that isapplied to that productis present in the localportfolio.
In a local portfolio,the administrator canoverride the importedlaunch constraint byapplying a different oneto the product.
Add launch constraintsto or remove launchconstraints from theimported portfolio.
Template constraints Inherited. In a local portfolio,the administratorcan add template
Remove the importedtemplate constraints.
59

AWS Service Catalog Administrator GuideSharing a Portfolio
Element of SharedPortfolio
Relationship toImported Portfolio
RecipientAdministrator Can
RecipientAdministrator Cannot
If the portfolio creatoradds a templateconstraint to orremoves a templateconstraints from ashared product, thechange propagates toall imported instancesof the product.
If the recipientadministrator adds animported product toa local portfolio, theimported templateconstraints that areapplied to that productare inherited by thelocal portfolio.
constraints that takeeffect in addition to theimported constraints.
IAM users, groups, androles
Not inherited. Add IAM users, groups,and roles that are inadministrator's AWSaccount.
Not applicable.
Sharing a PortfolioTo enable an AWS Service Catalog administrator for another AWS account to distribute your products toend users, share your AWS Service Catalog portfolio with them using either account-to-account sharingor AWS Organizations.
When you share a portfolio using account-to-account sharing or Organizations, you are sharing areference of that portfolio. The products and constraints in the imported portfolio stay in sync withchanges that you make to the shared portfolio, the original portfolio that you shared. The recipientcannot change the products or constraints, but can add AWS Identity and Access Management (IAM)access for end users.
NoteYou can't share a shared resource. This includes portfolios that contain a shared product.
Account-to-account sharingTo complete these steps, you must obtain the account ID of the target AWS account. The ID is providedon the My Account page in the AWS Management Console of the target account.
To share a portfolio with an AWS account
1. Open the AWS Service Catalog console at https://console.aws.amazon.com/servicecatalog/.2. On the Portfolios page, select the portfolio that you want to share, then choose Actions, and Share.3. In the Enter AWS account ID window, type the account ID of the AWS account that you are sharing
with. Then, choose Share. If sharing succeeds, a message on the Portfolios page confirms that theportfolio is linked with the target account. It also provides a URL that the recipient administratormust use to import the portfolio.
60

AWS Service Catalog Administrator GuideSharing a Portfolio
4. Send the URL to the AWS Service Catalog administrator of the target account. The URL opens theImport Portfolio page with the ARN of the shared portfolio automatically provided.
Importing a Portfolio
If an AWS Service Catalog administrator for another AWS account shares a portfolio with you, importthat portfolio into your account so that you can distribute its products to your end users.
To import the portfolio, you must get a URL for importing the portfolio from the administrator.
Open the URL, and on the Import Portfolio page, choose Import. The Portfolios page displays, and theportfolio is shown in the Imported Portfolios table.
You don't need to import a portfolio if the portfolio was shared through AWS Organizations.
Sharing with AWS OrganizationsYou can share AWS Service Catalog portfolios using AWS Organizations. First, you must decide if you'resharing from the master account or from a delegated administrator account. If you don't want to sharefrom your master account, register a delegated admin account and use it for sharing. Next, you mustdecide who to share to. You can share to the following entities:
• An organization account.• An organizational unit (OU).• The organization itself. (This shares with every account in the organization.)
Sharing from a master account
To share a portfolio with an organization
1. Open the AWS Service Catalog console at https://console.aws.amazon.com/servicecatalog/.2. On the Portfolios page, select the portfolio that you want to share, then choose Actions, and Share.3. In the Enter AWS account ID window, choose Organization.4. Select the Node Type and enter the Input Value for the organization you wish to share with.5. Choose Share.
Sharing from a delegated administrator account
The master account of an organization can register and de-register other accounts as delegatedadministrators for the organization. A delegated administrator can share AWS Service Catalog resourcesin their organization the same way a master account can. They are authorized to create, delete, and shareportfolios, and more.
To register or de-register a delegated admin, you must use the API or CLI from the master account. Formore information, see RegisterDelegatedAdministrator and DeregisterDelegatedAdministrator in theAWS Organizations API Reference.
NoteBefore you can designate a delegated admin, you must call EnableAWSOrganizationsAccess.
The procedure for sharing a portfolio from a delegated admin account is the same as sharing from amaster account, as seen above in the section called “Sharing from a master account” (p. 61).
If a member is de-registered as a delegated admin, the following occurs:
61

AWS Service Catalog Administrator GuideUsing AWS CloudFormation StackSets
• Portfolio shares that were created from that account are removed.
• They can no longer create new portfolio shares.
NoteIf the portfolio and shares created by a delegated admin do not get removed after thedelegated admin is de-registered, register and de-register the delegated admin again. This willremove the portfolio and shares created by that account.
Using AWS CloudFormation StackSetsNoteThis feature is currently in beta mode. AutoTags are not currently supported with AWSCloudFormation StackSets.
You can use AWS CloudFormation StackSets to launch AWS Service Catalog products across multipleregions and accounts. You can specify the order in which products deploy sequentially within regions.Across accounts, products are deployed in parallel. When launching, users can specify failure toleranceand the maximum number of accounts in which to deploy in parallel. For more information, see Workingwith AWS CloudFormation StackSets.
Stack sets vs. stack instancesA stack lets you create stacks in AWS accounts across regions by using a single AWS CloudFormationtemplate.
A stack instance refers to a stack in a target account within a region and is associated with only one stackset.
For more information, see StackSets Concepts.
Stack set constraintsIn AWS Service Catalog, you can use stack set constraints to configure product deployment options.
For more information, see the section called “Stack Set Constraints” (p. 40).
Managing BudgetsYou can use AWS Budgets to track your service costs and usage within AWS Service Catalog. You canassociate budgets with AWS Service Catalog products and portfolios.
AWS Budgets gives you the ability to set custom budgets that alert you when your costs or usage exceed(or are forecasted to exceed) your budgeted amount. Information about AWS Budgets is available athttps://aws.amazon.com/aws-cost-management/aws-budgets.
Tasks• Prerequisites (p. 63)
• Creating a Budget (p. 64)
• Associating a Budget (p. 64)
• Viewing a Budget (p. 65)
62

AWS Service Catalog Administrator GuidePrerequisites
• Disassociating a Budget (p. 65)
PrerequisitesBefore using AWS Budgets, you need to activate cost allocation tags in the AWS Billing and CostManagement console. For more information, see Activating User-Defined Cost Allocation Tags in theAWS Billing and Cost Management User Guide.
NoteTags take up to 24 hours to activate.
You also need to enable user access to the AWS Billing and Cost Management console for any users orgroups who will be using the Budgets feature. You can do this by creating a new policy for your users.
To allow IAM users to create budgets, you must also allow users to view billing information. If you wantto use Amazon SNS notifications, you can give users the ability to create Amazon SNS notifications, asshown in the policy example below.
To create the budgets policy
1. Open the IAM console at https://console.aws.amazon.com/iam/.2. In the navigation pane, choose Policies.3. In the content pane, choose Create policy.4. Choose the JSON tab and copy the text from the following JSON policy document. Paste this text
into the JSON text box.
{ "Version": "2012-10-17", "Statement": [ { "Sid": "Stmt1435216493000", "Effect": "Allow", "Action": [ "aws-portal:ViewBilling", "aws-portal:ModifyBilling", "budgets:ViewBudget", "budgets:ModifyBudget" ], "Resource": [ "*" ] }, { "Sid": "Stmt1435216552000", "Effect": "Allow", "Action": [ "sns:*" ], "Resource": [ "arn:aws:sns:us-east-1" ] } ]}
5. When you are finished, choose Review policy. The Policy Validator reports any syntax errors.6. On the Review page, give your policy a name. Review the policy Summary to see the permissions
granted by your policy, and then choose Create policy to save your work.
63
AWS Service Catalog Administrator GuideCreating a Budget
The new policy appears in the list of managed policies and is ready to attach to your users andgroups. For more information, see Create and Attach Customer Managed Policy in the AWS Identityand Access Management User Guide.
Creating a BudgetIn the AWS Service Catalog administrator console, the Products and Portfolios pages list informationabout existing products and portfolios and allow you to take actions on them. To create a budget, firstdecide which product or portfolio you want to associate the budget to.
To create a budget
1. Open the AWS Service Catalog console at https://console.aws.amazon.com/servicecatalog/.2. Choose either Products or Portfolios.3. Select the product or portfolio you want to add a budget to.4. Open the Actions menu, then choose Create budget.5. On the Budget creation page, associate one tag type to your budget.
There are two types of tags: AutoTags and TagOptions. AutoTags are tags that identify the portfolio,product, and user that launched a product, and are automatically applied by AWS Service Catalogto provisioned resources. A TagOption is an administrator-defined key-value pair managed in AWSService Catalog.
In order for spending that occurs on a portfolio or product to reflect on the associated budget,they must have the same tag. Note that a tag key being used for the first time can take 24 hours toactivate. For more information, see the section called “Prerequisites” (p. 63).
6. Choose Continue.7. You will be taken to the Set up your budget page. Continue your budget setup by following the
steps on Creating a Budget.
After you create a budget, you need to associate it to the product or portfolio.
Associating a BudgetEach portfolio or product can have one budget associated to it, but each budget can be associated tomultiple products and portfolios.
When you associate a budget to a product or portfolio, you will be able to view information about thebudget from that product or portfolio's detail page. In order for spending that occurs on the product orportfolio to be reflected on the budget, you must associate the same tags on both the budget and theproduct or portfolio.
NoteIf you delete a budget from within AWS Budgets, existing associations with AWS Service Catalogproducts and portfolios will still exist but AWS Service Catalog will be unable to display anyinformation about the deleted budget.
To associate a budget
1. Open the AWS Service Catalog console at https://console.aws.amazon.com/servicecatalog/.2. Choose either Products or Portfolios.3. Select the product or portfolio you want to associate a budget to.4. Open the Actions menu, then choose Associate budget.
64

AWS Service Catalog Administrator GuideViewing a Budget
5. On the Budget association page, select an existing budget. Then choose Continue.6. The Portfolios or Products table will now include data for the budget you just added.
Viewing a BudgetIf a budget is associated to a product, you can view information about the budget on the Products andProduct details page. If a budget is associated to a portfolio, you can view information about the budgeton the Portfolios and Portfolio details page.
Both the Portfolios and Products pages display budget information for existing resources. You can seecolumns displaying Current vs. budget and Forecast vs. budget.
When you click on a product or portfolio, you are taken to a detail page. These Portfolio detail andProduct detail pages have a section with detailed information about the associated budget. You can seethe budgeted amount, current spend, and forecasted spend. You also have the option to view budgetdetails and edit the budget.
Disassociating a BudgetYou can disassociate a budget from a portfolio or product.
NoteIf you delete a budget from within AWS Budgets, existing associations with AWS Service Catalogproducts and portfolios will still exist but AWS Service Catalog will be unable to display anyinformation about the deleted budget.
To disassociate a budget
1. Open the AWS Service Catalog console at https://console.aws.amazon.com/servicecatalog/.2. Choose Products or Portfolios.3. Select the product or portfolio you want to disassociate a budget from.4. Open the Actions menu, then choose Disassociate budget.5. An alert will appear asking you to confirm that you want to disassociate the budget. Choose
Confirm.
65

AWS Service Catalog Administrator GuideManaging All Provisioned Products as Administrator
Managing Provisioned ProductsAWS Service Catalog provides an interface for managing provisioned products. You can view, update, andterminate all provisioned products for your catalog based on access level. Refer to the following sectionsfor example procedures.
Topics
• Managing All Provisioned Products as Administrator (p. 66)
• Changing Provisioned Product Owner (p. 66)
• Tutorial: Identifying User Resource Allocation (p. 67)
Managing All Provisioned Products asAdministrator
To manage all provisioned products for the account, you will need AWSServiceCatalogAdminFullAccessor equivalent access to the provisioned product write operations. For more information, see Identity andAccess Management in AWS Service Catalog (p. 20).
To view and manage all provisioned products
1. Open the AWS Service Catalog console at https://console.aws.amazon.com/servicecatalog/.
If you are already logged in to the AWS Service Catalog console, choose Service Catalog, End user.
2. If necessary, scroll down to the Provisioned products section.
3. In the Provisioned products section, choose the View: list and select the level of access you wish tosee: User, Role, or Account. This displays all the provisioned products in the catalog.
4. Choose a provisioned product to view, update, or terminate. For more information about theinformation provided in this view, see Viewing Provisioned Product Information.
Changing Provisioned Product OwnerYou can change the owner of a provisioned product anytime. You need to know the ARN of the user orrole you want to set as the new owner.
By default, this feature is available to administrators using the AWSServiceCatalogAdminFullAccessmanaged policy. You can enable it for end users by granting them theservicecatalog:UpdateProvisionedProductProperties permission in AWS Identity and AccessManagement (IAM).
To change the owner of a provisioned product
1. In the AWS Service Catalog console, choose Provisioned products list.
2. Locate the provisioned product you want to update, then choose the three dots beside it and chooseChange provisioned product owner. You can also find the Change owner option on the provisionedproduct's detail page, in the Actions menu.
66

AWS Service Catalog Administrator GuideSee Also
3. In the dialog box, enter the ARN of the user or role you want to set as the new owner. An ARNbegins with arn: and includes other information separated by colons or slashes, for example,arn:aws:iam::123456789012:user/NewOwner.
4. Choose Submit. You will see a success message when the owner has been updated.
See Also• UpdateProvisionedProductProperties
Tutorial: Identifying User Resource AllocationYou can identify the user who provisioned a product and resources associated with the product using theAWS Service Catalog console. This tutorial helps translate this example to your own specific provisionedproducts.
To manage all provisioned products for the account, you need AWSServiceCatalogAdminFullAccess orequivalent access to the provisioned product write operations. For more information, see Identity andAccess Management in AWS Service Catalog (p. 20).
To identify the user who provisioned a product and the associated resources
1. Navigate to the provisioned products console in AWS Service Catalog console.
2. In the Provisioned products pane, for View:, choose Account.
67

AWS Service Catalog Administrator GuideTutorial: Identifying User Resource Allocation
3. Identify the provisioned product to investigate, and select the provisioned product.
4. Expand the Events section and note the Provisioned product ID and CloudformationStackARNvalues.
5. Use the provisioned product ID to identify the CloudTrail record that corresponds to this launch andidentify the requesting user (typically, this is entered as an email address during federation). In thisexample, it is "steve".
{ "eventVersion":"1.03","userIdentity": { "type":"AssumedRole", "principalId":"[id]:steve", "arn":"arn:aws:sts::[account number]:assumed-role/SC-usertest/steve", "accountId":[account number], "accessKeyId":[access key], "sessionContext": { "attributes": { "mfaAuthenticated":[boolean], "creationDate":[timestamp] }, "sessionIssuer": { "type":"Role", "principalId":"AROAJEXAMPLELH3QXY", "arn":"arn:aws:iam::[account number]:role/[name]",
68

AWS Service Catalog Administrator GuideTutorial: Identifying User Resource Allocation
"accountId":[account number], "userName":[username] } } }, "eventTime":"2016-08-17T19:20:58Z","eventSource":"servicecatalog.amazonaws.com", "eventName":"ProvisionProduct", "awsRegion":"us-west-2", "sourceIPAddress":[ip address], "userAgent":"Coral/Netty", "requestParameters": { "provisioningArtifactId":[id], "productId":[id], "provisioningParameters":[Shows all the parameters that the end user entered], "provisionToken":[token], "pathId":[id], "provisionedProductName":[name], "tags":[], "notificationArns":[] }, "responseElements": { "recordDetail": { "provisioningArtifactId":[id], "status":"IN_PROGRESS", "recordId":[id], "createdTime":"Aug 17, 2016 7:20:58 PM", "recordTags":[], "recordType":"PROVISION_PRODUCT", "provisionedProductType":"CFN_STACK", "pathId":[id], "productId":[id], "provisionedProductName":"testSCproduct", "recordErrors":[], "provisionedProductId":[id] } }, "requestID":[id], "eventID":[id], "eventType":"AwsApiCall", "recipientAccountId":[account number]}
6. Use the CloudformationStackARN value to identify AWS CloudFormation events to findinformation about resources created. You can also use the AWS CloudFormation API to obtain thisinformation. For more information, see AWS CloudFormation API Reference.
69

AWS Service Catalog Administrator GuideTutorial: Identifying User Resource Allocation
Note that you can perform steps 1 through 4 using the AWS Service Catalog API or the AWS CLI. Formore information, see AWS Service Catalog Developer Guide and AWS Service Catalog Command LineReference.
70

AWS Service Catalog Administrator GuideAutoTags
Managing Tags in AWS ServiceCatalog
AWS Service Catalog provides tags so you can categorize your resources. There are two types of tags:AutoTags and TagOptions.
AutoTags are tags that identify information about the origin of a provisioned resource in AWS ServiceCatalog and are automatically applied by AWS Service Catalog to provisioned resources.
TagOptions are key-value pairs managed in AWS Service Catalog that serve as templates for creatingAWS tags.
Topics• AWS Service Catalog AutoTags (p. 71)• AWS Service Catalog TagOption Library (p. 72)
AWS Service Catalog AutoTagsAutoTags are tags that identify information about the origin of a provisioned resource in AWS ServiceCatalog and are automatically applied by AWS Service Catalog to provisioned resources.
AutoTags include tags for the unique identifiers for portfolio, product, user, product version, andprovisioned product. This provides a set of tags that reflect the AWS Service Catalog structure thatcustomers have configured in the catalog. AutoTags do not count against the customer's 50-tag limit.
AWS Service Catalog AutoTags can help provide consistent tagging for your resources, which is usefulwhen setting budgets for a portfolio, product, or user. You can also use the AutoTags to identifyresources for post-launch operations such as setting AWS Config rules. AutoTags for your provisionedresources can be viewed in the Tags section of the downstream services used for provisioning, such asAWS CloudFormation, Amazon EC2, and Amazon S3.
AutoTag details
• aws:servicecatalog:portfolioArn - The ARN of the portfolio from which the provisioned product waslaunched.
• aws:servicecatalog:productArn - The ARN of the product from which the provisioned product waslaunched.
• aws:servicecatalog:provisioningPrincipalArn - The ARN of the provisioning principal (user) whocreated the provisioned product.
• aws:servicecatalog:provisionedProductArn - The provisioned product ARN.• aws:servicecatalog:provisioningArtifactIdentifier - The ID of the original provisioning artifact
(product version).
NoteAWS Service Catalog recently added two new AutoTags,aws:servicecatalog:provisionedProductArn andaws:servicecatalog:provisioningArtifactIdentifier. These new AutoTags will be automaticallybackfilled during updates on provisioned products.
71

AWS Service Catalog Administrator GuideTagOption Library
AWS Service Catalog TagOption LibraryTo allow administrators to easily manage tags on provisioned products, AWS Service Catalog provides aTagOption library. A TagOption is a key-value pair managed in AWS Service Catalog. It is not an AWS tag,but serves as a template for creating an AWS tag based on the TagOption.
The TagOption library makes it easier to enforce the following:
• A consistent taxonomy• Proper tagging of AWS Service Catalog resources• Defined, user-selectable options for allowed tags
Administrators can associate TagOptions with portfolios and products. During a product launch(provisioning), AWS Service Catalog aggregates the associated portfolio and product TagOptions, andapplies them to the provisioned product, as shown in the following diagram.
With the TagOption library, you can deactivate TagOptions and retain their associations to portfoliosor products, and reactivate them when you need them. This approach not only helps maintain libraryintegrity, it also allows you to manage TagOptions that might be used intermittently, or only underspecial circumstances.
You manage TagOptions with the AWS Service Catalog console or the TagOption library API. For moreinformation, see AWS Service Catalog API Reference.
Contents• Launching a Product with TagOptions (p. 72)• Managing TagOptions (p. 75)
Launching a Product with TagOptionsWhen a user launches a product that has TagOptions, AWS Service Catalog performs the followingactions on your behalf:
72

AWS Service Catalog Administrator GuideLaunching a Product with TagOptions
• Collects all TagOptions for the product and the launching portfolio.
• Ensures that only TagOptions with unique keys are used in a tag on the provisioned product. Usersget a multiple-choice value lists for a key. After the user chooses a value, it becomes a tag on theprovisioned product.
• Allows users to add non-conflicting tags to the product during provisioning.
The following use cases demonstrate how TagOptions work during launch.
Example 1: A Unique TagOption Key
An administrator creates TagOption[Group=Finance] and associates it with Portfolio1, which hasProduct1 with no TagOptions. When a user launches the provisioned product, the single TagOptionbecomes Tag[Group=Finance], as follows:
Example 2: A Set of TagOptions with the Same Key on aPortfolio
An administrator has placed two TagOptions with the same key on a portfolio, and there are noTagOptions with the same key on any products within that portfolio. During launch, the user must selectone of the two values associated with the key. The provisioned product is then tagged with the key andthe user-selected value.
73

AWS Service Catalog Administrator GuideLaunching a Product with TagOptions
Example 3: A Set of TagOptions with the Same Key on Both thePortfolio and a Product in that Portfolio
An administrator has placed several TagOptions with the same key on a portfolio, and there are alsoseveral TagOptions with the same key on the product within that portfolio. AWS Service Catalog createsa set of values from the aggregation (logical AND operation) of the TagOptions. When the user launchesthe product, he or she sees and selects from this set of values. The provisioned product is tagged withthe key and the user-selected value.
74

AWS Service Catalog Administrator GuideManaging TagOptions
Example 4: Multiple TagOptions with the Same Key andConflicting ValuesAn administrator has placed several TagOptions with the same key on a portfolio, and there are alsoseveral TagOptions with the same key on the product in that portfolio. AWS Service Catalog createsa set of values from the aggregation (logical AND operation) of the TagOptions. If the aggregationdoesn't find values for the key, AWS Service Catalog creates a tag with the same key and a value of sc-tagconflict-portfolioid-productid, where portfolioid and productid are the ARNs of theportfolio and product. This ensures that the provisioned product is tagged with the correct key and witha value that the administrator can find and correct.
Managing TagOptionsAs an administrator, you can create, remove, and edit TagOptions, and associate and disassociateTagOptions with a portfolio or product.
To create a TagOption (console)
1. Open the AWS Service Catalog console at https://console.aws.amazon.com/servicecatalog/.2. Choose TagOption library.3. Either type a new value for one of the key groupings or choose Create new TagOption and type a
new key and value.
After the new TagOption has been created, it's grouped by key-value pair and sorted alphabetically. Youcan delete a newly created TagOption by choosing Delete from library. This deletion feature is availableonly for newly created TagOptions. It's designed for quick management of mistyped TagOptions.
To create a TagOption using the AWS Service Catalog API, see CreateTagOption.
To associate a TagOption with a portfolio or product (console)
1. Open the AWS Service Catalog console at https://console.aws.amazon.com/servicecatalog/.2. Choose TagOption, select a TagOption, and select the portfolio or product to associate the
TagOption with.
Alternatively, from a portfolio or product detail page, choose Add TagOption and select theTagOption to associate the TagOption with.
3. Choose Save.
To associate a TagOption with a portfolio or product using the AWS Service Catalog API, seeAssociateTagOptionWithResource.
75

AWS Service Catalog Administrator GuideManaging TagOptions
To remove (disassociate) a TagOption from a portfolio or product (console)
1. Open the AWS Service Catalog console at https://console.aws.amazon.com/servicecatalog/.2. Choose TagOption, select a TagOption, and open the Detail page.3. Select the small x to the right of the portfolio or product from which you want to remove the
association.
Alternatively, from a portfolio or product Detail page, choose the small x to the right of theTagOption that you want to remove.
To remove a TagOption using the AWS Service Catalog API, see DisassociateTagOptionFromResource.
To edit a TagOption
1. Open the AWS Service Catalog console at https://console.aws.amazon.com/servicecatalog/.2. Choose TagOption library, select a TagOption, and edit the key or value.3. Choose Save.
76

AWS Service Catalog Administrator GuideMonitoring Tools
Monitoring in AWS Service CatalogYou can monitor your AWS Service Catalog resources using Amazon CloudWatch, which collects andprocesses raw data from AWS Service Catalog into readable metrics. These statistics are recorded for aperiod of two weeks, so that you can access historical information and gain a better perspective on howyour service is performing. AWS Service Catalog metric data is automatically sent to CloudWatch in 1-minute periods. For more information about CloudWatch, see the Amazon CloudWatch User Guide.
For a list of available metrics and dimensions, see AWS Service Catalog CloudWatch Metrics (p. 77).
Monitoring is an important part of maintaining the reliability, availability, and performance of AWSService Catalog and your AWS solutions. You should collect monitoring data from all of the parts ofyour AWS solution so that you can more easily debug a multi-point failure if one occurs. Before youstart monitoring AWS Service Catalog, you should create a monitoring plan that includes answers to thefollowing questions:
• What are your monitoring goals?• What resources will you monitor?• How often will you monitor these resources?• What monitoring tools will you use?• Who will perform the monitoring tasks?• Who should be notified when something goes wrong?
Monitoring ToolsAWS provides various tools that you can use to monitor AWS Service Catalog. You can configure someof these tools to do the monitoring for you, while some of the tools require manual intervention. Werecommend that you automate monitoring tasks as much as possible.
Automated Monitoring ToolsYou can use the following automated monitoring tools to watch AWS Service Catalog and report whensomething is wrong:
• Amazon CloudWatch alarms – Watch a single metric over a time period that you specify, and performone or more actions based on the value of the metric relative to a given threshold over a number oftime periods. The action is a notification sent to an Amazon Simple Notification Service (Amazon SNS)topic or Amazon EC2 Auto Scaling policy. CloudWatch alarms do not invoke actions simply becausethey are in a particular state; the state must have changed and been maintained for a specifiednumber of periods. To learn how to create an alarm, see Creating Amazon CloudWatch Alarms. Formore information on using Amazon CloudWatch metrics with AWS Service Catalog, see AWS ServiceCatalog CloudWatch Metrics (p. 77).
AWS Service Catalog CloudWatch MetricsYou can monitor your AWS Service Catalog resources using Amazon CloudWatch, which collects andprocesses raw data from AWS Service Catalog into readable metrics. These statistics are recorded for a
77

AWS Service Catalog Administrator GuideEnabling CloudWatch Metrics
period of two weeks, so that you can access historical information and gain a better perspective on howyour service is performing. AWS Service Catalog metric data is automatically sent to CloudWatch in 1-minute periods. For more information about CloudWatch, see the Amazon CloudWatch User Guide.
Topics
• Enabling CloudWatch Metrics (p. 78)
• Available Metrics and Dimensions (p. 78)
• Viewing AWS Service Catalog Metrics (p. 79)
Enabling CloudWatch MetricsAmazon CloudWatch metrics are enabled by default.
Available Metrics and DimensionsThe metrics and dimensions that AWS Service Catalog sends to Amazon CloudWatch are listed below.
AWS Service Catalog MetricsThe AWS/ServiceCatalog namespace includes the following metrics.
Metric Description
ProvisionedProductLaunchThe number of provisioned products launched for a given product andprovisioning artifact in a specified time period.
Units: Count
Valid statistics: Minimum, Maximum, Sum, Average
Dimensions for AWS Service Catalog MetricsAWS Service Catalog sends the following dimensions to CloudWatch.
Dimension Description
State This dimension filters the data you request for allprovisioned products launched with this specified state.This helps you categorize your data by the state oflaunch.
Valid State: SUCCEEDED, FAILED
ProductId This dimension filters the data you request for theidentified product id only. This helps you to pinpoint anexact product from which to be launched.
ProvisioningArtifactId This dimension filters the data you request for theidentified provisioning artifact id only. This helps you topinpoint an exact version of products from which to belaunched.
78

AWS Service Catalog Administrator GuideViewing AWS Service Catalog Metrics
Viewing AWS Service Catalog MetricsYou can view CloudWatch metrics in the CloudWatch console, which provides a fine-grained andcustomizable display of your resources, as well as the number of running tasks in a service.
Topics• Viewing AWS Service Catalog Metrics in the CloudWatch Console (p. 79)
Viewing AWS Service Catalog Metrics in the CloudWatchConsoleAWS Service Catalog metrics can be viewed in the CloudWatch console. The CloudWatch consoleprovides a detailed view of AWS Service Catalog metrics, and you can tailor the views to suit your needs.For more information about CloudWatch, see the Amazon CloudWatch User Guide.
To view metrics in the CloudWatch console
1. Open the CloudWatch console at https://console.aws.amazon.com/cloudwatch/.2. In the Metrics section in the left navigation, choose Service Catalog.3. Choose the metrics to view.
79

AWS Service Catalog Administrator GuideConnector for ServiceNow
Product and Service Integrationswith AWS Service Catalog
AWS Service Catalog is integrated with a number of AWS services and partner products and services. Usethe information in the following sections to help you configure AWS Service Catalog to integrate withthe products and services you use.
Topics
• AWS Service Management Connector for ServiceNow (p. 80)
• AWS Service Management Connector for Jira Service Desk (p. 101)
AWS Service Management Connector forServiceNow
To help customers integrate provisioning secure, compliant, and pre-approved AWS products into theirServiceNow portal, AWS created the AWS Service Management Connector for ServiceNow (formerly theAWS Service Catalog Connector).
The AWS Service Management Connector for ServiceNow allows ServiceNow end users to provision,manage, and operate AWS resources natively via ServiceNow. ServiceNow administrators can providepre-approved, secured and governed AWS resources to end users via AWS Service Catalog, executeautomation playbooks via AWS Systems Manager and track resources in the CMDB powered by AWSConfig seamlessly on ServiceNow with the AWS Service Management Connector.
ServiceNow end users can browse and request and provision pre-secured AWS solutions, viewconfiguration item details and execute workflows within ServiceNow on AWS resources. This simplifiesAWS product request actions for ServiceNow users and provides ServiceNow governance and oversightover AWS products.
The AWS-supplied connector is available at no charge in the ServiceNow store and supports ServiceNowplatform releases Orlando (O), New York (N), Madrid (M). This new feature is generally available in allAWS Regions where AWS Service Catalog, AWS Config, and AWS Systems Manager services are available.
Topics
• Background (p. 81)
• Getting Started (p. 81)
• Release Notes (p. 81)
• Baseline Permissions (p. 82)
• Configuring AWS Service Catalog (p. 86)
• Configuring ServiceNow (p. 87)
• Validating Configurations (p. 95)
• ServiceNow Additional Features (p. 97)
80

AWS Service Catalog Administrator GuideBackground
• Version 2.3.4 Release Transition Instructions (p. 99)
BackgroundAWS Service Catalog allows you to centrally manage commonly deployed AWS services and provisionedsoftware products. It helps your organization achieve consistent governance and compliancerequirements, while enabling users to quickly deploy only the approved AWS services they need.
AWS Config enables you to assess, audit, and evaluate the configurations of your AWS resources. AWSConfig continuously monitors and records your AWS resource configurations and allows you to automatethe evaluation of recorded configurations against desired configurations.
AWS Systems Manager gives you visibility and control of your infrastructure on AWS. Systems Managerprovides a unified user interface so you can view operational data from multiple AWS services and allowsyou to automate operational tasks across your AWS resources.
ServiceNow is an enterprise service management platform that places a service‑oriented lens on theactivities, tasks, and processes that make up day‑to‑day work life to enable a modern work environment.ServiceNow Service Catalog is a self-service application that end users can use to order IT services basedon request fulfillment approvals and workflows. The ServiceNow CMDB provides resource transparencyand relationships for the logical components of a service.
Getting StartedBefore installing the AWS Service Management Connector for ServiceNow, verify that you have thenecessary permissions in your AWS account and ServiceNow instance.
AWS prerequisitesTo get started, you need:
• To use AWS Service Catalog with the Connector, you need an AWS account configure with your AWSportfolios and products. For details, see Setting up for AWS Service Catalog.
• To see AWS Config details, the service settings need to be configured to record data for the resourcetypes of interest. It is recommended to include provisioned products and AWS CloudFormation stacksin addition to the major resource types used by your team. For details, see Setting up AWS Config withthe console.
• To use AWS Systems Manager Automation with the Connector, no AWS-side set up is required. Anumber of automation documents are provided by AWS as standard. If you have additional automationdocuments you wish to use, they will be available in the Connector. For details, see Working withAutomation Documents (Playbooks).
ServiceNow PrerequisitesIn addition to the AWS account, you need a ServiceNow instance to install the ServiceNow Connectorscoped application. The initial installation should occur in either an enterprise sandbox or a ServiceNowPersonal Developer Instance (PDI), depending on your organization’s technology governancerequirements. The ServiceNow administrator needs the admin role to install the Connector forServiceNow scoped application.
Release NotesVersion 3.0.4 of the AWS Service Management Connector for ServiceNow (formerly the AWS ServiceManagement Connector for ServiceNow) includes:
81

AWS Service Catalog Administrator GuideBaseline Permissions
• Streamlined install and configuration process for AWS accounts opted into ServiceNow scoped app.• AWS Service Catalog integration features such as:
• Rendering AWS Service Catalog portfolios and products in the ServiceNow Service Portal andFulfiller views.
• Enable ServiceNow administrators to create AWS Tags across provisioned products.• The ability to map synced AWS portfolios to ServiceNow groups.• The ability for ServiceNow users to request AWS Service Catalog products through ServiceNow.• The ability for administrators to view portfolio and product budgets and actual costs. (Requires
budgets to be associated within AWS Service Catalog.)• Support for AWS Service Catalog service actions for ServiceNow users to update and terminate
products.• Support for AWS CloudFormation StackSets, enabling launch of AWS Service Catalog products
across multiple regions and accounts.• Support for AWS CloudFormation Change Sets, enabling a preview of resource changes prior to a
launch or update.• AWS Config integration features such as:
• Rendering of AWS Config configuration item details for (EC2, RDS, Load Balancers, S3 Buckets,CloudFormation Stacks, etc.) into the ServiceNow CMDB.
• Ability to view the configuration item relationships for AWS resources in scope for this release.• AWS Systems Manager integration features such as:
• Rendering of AWS Systems Manager automation documents in the ServiceNow Service Portal andFulfiller (Standard User Interface) views.
• The ability for ServiceNow administrators to associate AWS Systems Manager automation for AWSaccounts opted into the Connector for ServiceNow scoped app.
• The ability for ServiceNow users to request and execute AWS Systems Manager automationdocuments through ServiceNow.
• Support for multiple AWS accounts.• Support for FIPS endpoints and usage in the AWS GovCloud West and East regions.• Support for the latest ServiceNow platform releases Orlando (O), New York (N), Madrid (M).
Baseline PermissionsThis section provides instructions on how to set up the baseline AWS users and permissions needed forthe AWS Service Management Connector for ServiceNow.
Available template for baseline permissionsTo use an AWS CloudFormation template to set up the AWS configurations of the Connector forServiceNow, see the AWS configurations for Connector for ServiceNow v3.0.4 - AWS Commercial Regionsand AWS GovCloud Regions.
NoteIf you use the Connector for ServiceNow v3.0.4_AWS Configuration template, skip toConfiguring AWS Service Catalog (p. 86).
For each AWS account, the Connector for ServiceNow requires two IAM users and one role:
• AWS Sync User: An IAM user to sync AWS resources to ServiceNow.• AWS End User role: An IAM user able to perform end user functionality to provision and execute
requests exposed through ServiceNow, including assuming any roles required to perform theprovisioning and execution.
82

AWS Service Catalog Administrator GuideBaseline Permissions
• SCConnect Launch role: IAM role used to place baseline AWS service permissions into the AWS ServiceCatalog launch constraints. Configuring this role enables segregation of duty through provisioningproduct resources on behalf of the ServiceNow end user. The SCConnectLaunch role baseline containspermissions to Amazon EC2 and Amazon S3 services. If your products contain more AWS services, youmust either include those services in the SCConnectLaunch role or create new launch roles.
Creating AWS Sync UserThe following section describes how to create the AWS Sync user and associate the appropriate IAMpermission. To perform this task, you need IAM permissions to create new users.
To create AWS Service Catalog sync user
1. Go to Creating an IAM user in your AWS account. Following the instructions there, create a sync user(that is, SMSyncUser). The user needs programmatic and AWS Management Console access to followthe Connector for ServiceNow installation instructions.
2. Set permissions for your sync user (SMSyncUser). Choose Attach existing policies directly andselect:
• AWSServiceCatalogAdminReadOnlyAccess (AWS managed policy)
• AmazonSSMReadOnlyAccess (AWS managed policy)
• AWSConfigUserAccess (AWS managed policy)
3. Add a policy allowing budgets:ViewBudget on all resources (*).
4. Review and choose Create User.
5. Note the access and secret access information. Download the .csv file that contains the usercredential information.
Creating AWS Service Catalog End UserThe following section describes how to create the AWS Service Catalog end user and associate theappropriate IAM permission. To perform this task, you need IAM permissions to create new users.
To create AWS Service Catalog end user
1. Go to Creating an IAM user in your AWS account. Following the instructions there, create a user (thatis, SMEndUser). The user needs programmatic and AWS Management Console access to follow theConnector for ServiceNow installation instructions.
For products using AWS CloudFormation StackSets, you need to create a StackSet inline policy. WithAWS CloudFormation StackSets, you are able to create products that are deployed across multipleaccounts and regions. Using an administrator account, you define and manage an AWS ServiceCatalog product, and use it as the basis for provisioning stacks into selected target accounts acrossspecified regions. You need to have the necessary permissions defined in your AWS accounts.
To set up the necessary permissions, go to Granting Permissions for Stack Set Operations. Followingthe instructions there, create an AWSCloudFormationStackSetAdministrationRole and anAWSCloudFormationStackSetExecutionRole.
Create the StackSet inline policy to enable provisioning a product across multiple regions within oneaccount.
{ "Version": "2012-10-17",
83

AWS Service Catalog Administrator GuideBaseline Permissions
"Statement": [ { "Action": [ "sts:AssumeRole" ], "Resource": [ "arn:aws:iam::123456789123:role/AWSCloudFormationStackSetExecutionRole" ], "Effect": "Allow" }, { "Effect": "Allow", "Action": [ "iam:GetRole", "iam:PassRole" ], "Resource": "arn:aws:iam::123456789123:role/AWSCloudFormationStackSetAdministrationRole" } ] }
NoteReplace 123456789123 with your account information. The Connector for ServiceNow AWSConfiguration - Commercial Regions and Connector for ServiceNow AWS Configuration -GovCloud Regions files include the stack set permissions.
2. Add the following permissions (policies) to the user:
• AWSServiceCatalogEndUserFullAccess (AWS managed policy)
• StackSet (inline policy) - Note: For AWS Service Catalog products with stack sets, you needto modify the SMEndUser to include the Read Only permissions for the services you want toprovision. For example, to provision an Amazon S3 bucket, include the AmazonS3ReadOnlyAccesspolicy to the SMEndUser.
• AmazonEC2ReadOnlyAccess (AWS managed policy)
• AmazonS3ReadOnlyAccess (AWS managed policy)
Creating SCConnectLaunch RoleThe following section describes how to create the SCConnectLaunch role. This role is used to placebaseline AWS service permissions into the AWS Service Catalog launch constraints. For more information,see AWS Service Catalog Launch Constraints.
To create SCConnectLaunch role
1. Create the AWSCloudFormationFullAccess policy. Choose create policy and then paste thefollowing in the JSON editor:
{ "Version": "2012-10-17", "Statement": [ { "Effect": "Allow", "Action": [ "cloudformation:DescribeStackResource", "cloudformation:DescribeStackResources", "cloudformation:GetTemplate", "cloudformation:List*",
84

AWS Service Catalog Administrator GuideBaseline Permissions
"cloudformation:DescribeStackEvents", "cloudformation:DescribeStacks", "cloudformation:CreateStack", "cloudformation:DeleteStack", "cloudformation:DescribeStackEvents", "cloudformation:DescribeStacks", "cloudformation:GetTemplateSummary", "cloudformation:SetStackPolicy", "cloudformation:ValidateTemplate", "cloudformation:UpdateStack", "cloudformation:CreateChangeSet", "cloudformation:DescribeChangeSet", "cloudformation:ExecuteChangeSet", "cloudformation:DeleteChangeSet", "s3:GetObject" ], "Resource": "*" } ] }
NoteAWSCloudFormationFullAccess now includes additional permissions for ChangeSets.
2. Create a policy called ServiceCatalogSSMActionsBaseline. Follow the instructions on Creating IAMPolicies, and paste the following into the JSON editor:
{ "Version": "2012-10-17", "Statement": [ { "Sid": "Stmt1536341175150", "Action": [ "servicecatalog:ListServiceActionsForProvisioningArtifact", "servicecatalog:ExecuteprovisionedProductServiceAction", "ssm:DescribeDocument", "ssm:GetAutomationExecution", "ssm:StartAutomationExecution", "ssm:StopAutomationExecution", "cloudformation:ListStackResources", "ec2:DescribeInstanceStatus", "ec2:StartInstances", "ec2:StopInstances" ], "Effect": "Allow", "Resource": "*" } ] }
3. Create the SCConnectLaunch role. Assign the trust relationship to AWS Service Catalog.
{ "Version": "2012-10-17", "Statement": [ { "Sid": "", "Effect": "Allow", "Principal": { "Service": "servicecatalog.amazonaws.com"
85

AWS Service Catalog Administrator GuideConfiguring AWS Service Catalog
}, "Action": "sts:AssumeRole" } ] }
4. Attach the relevant policies to the SCConnectLaunch role. Attach the following baseline IAMpolicies:
• AmazonEC2FullAccess (AWS managed policy)
• AmazonS3FullAccess (AWS managed policy)
• AWSCloudFormationFullAccess (custom managed policy)
• ServiceCatalogSSMActionsBaseline (custom managed policy)
Configuring AWS Service CatalogNow that you have created two IAM users with baseline permissions in each account, the next step is toconfigure AWS Service Catalog. This section describes how to configure AWS Service Catalog to have aportfolio that includes an Amazon S3 bucket product. Use the Amazon S3 template located at Creatingan Amazon S3 Bucket for Website Hosting for your preliminary product. Copy and save the Amazon S3template to your device.
To configure AWS Service Catalog
1. Create a portfolio by following the steps at Create an AWS Service Catalog Portfolio (p. 12).
2. To add the Amazon S3 bucket product to the portfolio you just created, in the AWS Service Catalogconsole, on the Upload new product page, enter product details.
3. For Select template, choose the Amazon S3 bucket AWS CloudFormation template you saved toyour device.
4. Set Constraint type to Launch for the product that you just created with the SCConnectLaunch rolein the baseline permissions. For additional launch constraint instructions, see AWS Service CatalogLaunch Constraints (p. 37).
NoteThe AWS configuration design requires each AWS Service Catalog product to have a launchconstraint. Failure to follow this step may result in an “Unable to Retrieve Parameter”message within ServiceNow Service Catalog.
5. Add the SnowEndUser IAM role to the AWS Service Catalog portfolio. For additional user accessinstructions, see Granting Access to Users (p. 33).
NoteThe AWS configuration design requires each AWS Service Catalog product to have either alaunch constraint or a stack set constraint. Failure to follow this step may result in an “Unable toRetrieve Parameter” error within ServiceNow Service Catalog.
Creating Stack Set ConstraintsAWS CloudFormation StackSets enable users to create products that are deployed across multipleaccounts and regions.
To apply a stack set constraint to an AWS Service Catalog product
1. Go to AWS Service Catalog as a catalog admin
86

AWS Service Catalog Administrator GuideConfiguring ServiceNow
2. Choose the portfolio that contains the product.
3. Expand Constraints and choose Add constraints.
4. Choose the product from Product and set Constraint type to Stack Set. Choose Continue.
5. On the Stack Set constraint page, enter a description.
6. Choose the account(s) in which you want to create products.
7. Choose the region(s) in which you want to deploy products. Products are deployed in these regionsin the order that you specify.
8. Choose the AWSCloudFormationStackSetAdministrationRole role that will be used to manage yourtarget accounts.
9. Choose the AWSCloudFormationStackSetExecutionRole role that the Administrator Role willassume.
10. Choose Submit.
Note that the Connector for ServiceNow v3.0.4 - AWS Commercial Regions and Connector forServiceNow v3.0.4 - AWS GovCloud Regions templates create the permissions as well as outputs neededfor stack set constraints. Example stack set outputs:
SCStackSetAdministratorRoleARN arn:aws:iam::123456789123:role/AWSCloudFormationStackSetAdministrationRole SCIAMStackSetExecutionRoleName AWSCloudFormationStackSetExecutionRole SCIAMAdminRoleARN arn:aws:iam::123456789123:role/AWSCloudFormationStackSetAdministrationRole
NoteReplace the 123456789123 with your account information.
Relating Budgets to Products and PortfoliosThe Connector for ServiceNow includes the ability for ServiceNow administrators to view budgets relatedto AWS Service Catalog products and portfolios. AWS Service Catalog administrators can create orassociate existing budgets to products and portfolios.
For more information on creating and associating budgets, see the section called “ManagingBudgets” (p. 62).
Configuring ServiceNowAfter completing the IAM and AWS Service Catalog configurations, the next configuration area to set upis ServiceNow. Installation tasks within ServiceNow include:
• Clear the ServiceNow platform cache.
• Clear the web browser cache.
• Activate two ServiceNow plugins.
• Install the ServiceNow Connector scoped application, and upload and commit the ServiceNowConnector Update Set.
• Configure ServiceNow platform system admin components.
• Configure AWS Service Management Connector scoped application, including accounts, scheduled jobssync, and permissions.
87
AWS Service Catalog Administrator GuideConfiguring ServiceNow
Clear the ServiceNow Platform CacheBefore installing the AWS Service Management scoped app, we recommend thatyou clear the ServiceNow platform cache by typing in the following URL: https://[InsertServiceNowInstanceNameHere]/cache.do
NoteEnsure that you install the update set in a non-production/sandbox environment. Consult aServiceNow system administrator if you need approval to clear the ServiceNow platform cache.
Clear the Web Browser CacheClear the web browser cache to clear previous rendered product forms.
Activate Two ServiceNow Plugins (User Criteria Scoped API andDiscovery, and Service Mappings Patterns)
Activate the User Criteria Scoped API Plugin
1. From your ServiceNow dashboard, type plugins into the navigation panel in the upper left.
2. When the System Plugins page populates, next to the dropdown that says Name, search for Usercriteria.
3. Choose User Criteria Scoped API and then choose Activate.
Activate the Discovery and Service Mappings Patterns Plugin
1. From your ServiceNow dashboard, type plugins into the navigation panel in the upper left.
2. When the System Plugins page populates, next to the dropdown that says Name, search forDiscovery.
3. Choose Discovery and Service Mapping Patterns and then choose Activate.
NoteThis plugin is free and is needed to align to CMDB tables available outside of ServiceNow’sfamily release CMDB updates.
Installing ServiceNow Connector Scoped ApplicationThe AWS Service Management Connector for ServiceNow is released as a conventional ServiceNowscoped application via a ServiceNow Update Set. ServiceNow update sets are code changes to the out-of-the-box platform and enable developers to move code across ServiceNow instance environments.The Connector for ServiceNow update set is available to download in the ServiceNow store. For usersinstalling the update set on a ServiceNow Personal Developer Instance (PDI), code for Connector forServiceNow version 3.0.4 was provided to you.
The Connector for ServiceNow version 3.0.4 update set may be applied to a "Madrid," "New York," or"Orlando" platform release of ServiceNow.
If you do not already have a ServiceNow instance, begin with the first step below. If you already have aServiceNow instance, proceed to Install the update set.
To obtain a ServiceNow instance
1. Go to Obtaining a Personal Developer Instance.
88

AWS Service Catalog Administrator GuideConfiguring ServiceNow
2. Create ServiceNow developer program credentials.
3. Follow the instructions for requesting a ServiceNow instance.
4. Capture your instance details, including URL, administrative ID, and temporary password credentials.
To install the update set
1. From your ServiceNow dashboard, type update sets into the navigation panel in the upper left.
2. Choose Retrieved Update Sets from the results.
3. Select Import Update Set from XML and upload the release XML file.
4. Select the AWS Service Management Connector for ServiceNow update set.
5. Choose Preview Update Set, which makes ServiceNow validate the connector update set.
6. Choose Update.
7. Choose Commit Update Set to apply the update set and create the application. This procedureshould complete 100%.
Configuring ServiceNow Platform System Admin Components
To enable the AWS Service Management Connector for ServiceNow scoped application named AWSService Management, the system admin must create a discovery source, and configure specific platformtables, forms, and views.
Create a discovery source AWS Service Management Connector entry
To allow AWS to report discovered CIs into your CMDB you must create a new discovery data sourcecalled AWS Service Management Connector. Perform the following steps:
1. Navigate to System Definition > Choice Lists.
2. Choose New.
3. Create a new entry with the following details:
• Table: Configuration Item [cmdb_ci]
• Element: discovery_source
• Label: AWS Service Management Connector
• Value: AWS Service Management Connector
NoteMake sure you are in Global mode in ServiceNow System Settings to modify System Definitions.
Enable permissions on ServiceNow Platform table (Catalog Item Category)
For AWS products to display under AWS portfolios as sub-categories in the ServiceNow Service Catalog,you need to modify the Application Access form for Catalog Item Category tables. This action isnecessary because a ServiceNow scoped API is not available for the Catalog Item Category table.
1. Enter "Tables" in the Navigator and choose System Definition, then choose Tables.
2. In the list of tables, search for a table with label "Catalog Item Category" (or with the name"sc_cat_item_category"). The list of tables will be displayed. Choose Category to view the formdefining the table..
3. Choose the "Application Access" tab on the form and choose the "Can Create", “Can Update, and "Candelete" checkboxes on the form. Choose the "Update" button.
89

AWS Service Catalog Administrator GuideConfiguring ServiceNow
ServiceNow Permissions for Administrators of the ConnectorScoped App.The AWS Service Management scoped app comes with two ServiceNow roles that enable accessto configure the application. This enables system admins to grant one or more users privileges toadminister the application without having to open up full sysadmin access to them. These roles can beassigned either to individual users or to one administrator user.
To set up application administrator privileges
1. Type Users in the navigator and select System Security – Users.2. Select a user to grant one or both previous roles (such as admin) to. You can also Create a User.3. Choose Edit on the Roles tab of the form.4. Filter the collection of roles by the prefix “x_”.5. Choose one or both of the following and add them to the user: x_126749_aws_sc_account_admin,
x_126749_aws_sc_portfolio_manager6. Choose Save.
To add AWS Service Catalog to ServiceNow Service Catalog categories
1. Navigate to Self Service | Service Catalog and select the Add content icon in the upper right.2. Select the AWS Service Catalog Product entry. Add it to your catalog home page by choosing the
first Add Here link on the second row of the selection panel at the bottom of the page.
To add AWS Systems Manager automation documents to ServiceNow Service Catalogcategories
1. Navigate to Self Service | Service Catalog and select the Add content icon in the upper right.2. Select the AWS Systems Manager entry. Add it to your catalog home page by choosing the first Add
Here link on the second row of the selection panel at the bottom of the page.
NoteThis Connector release will display all AWS Systems Manager documents available in the AWSaccount that has AWS Systems Manager selected.
System administrators can deactivate AWS Systems Manager documents requests by going to AWSSystems Manager > Automation Documents and deselecting the Active button. Once a document isdeactivated, end users will no longer see that document in the ServiceNow Service Catalog.
To add a change request type
1. If you are upgrading from a previous version of the AWS Service Management scoped app, you mustremove the AWS Product Termination change request type before creating a new change requesttype.
2. You must add a new change request type called AWS Provisioned Product Event for the scopedapplication to trigger an automated change request in Change Management. For instructions, seeAdd a new change request type.
3. Open an existing change request.4. Open the context (right-click) menu for Type and then choose Show Choice List.5. Choose New and fill in the following fields:
• Table: Change Request
90

AWS Service Catalog Administrator GuideConfiguring ServiceNow
• Label: AWS Provisioned Product Event
• Value: AWSProvisionedProductEvent
• Sequence: pick the next unused value
6. Submit the form.
Configuring AWS Service Management Connector ScopedApplicationHaving installed and configured the AWS Service Management Connector for ServiceNow in the previousprocedure, you must configure the scoped application and applicable roles.
To configure the AWS Service Management Connector scoped application permissions
1. In your ServiceNow instance, create a user group called Order_AWS_Products. Members of thisgroup will be able to order AWS Service Catalog products. For instructions, see Create a user group.
2. Grant ServiceNow permissions to the following users:
• System Administrator (admin): For simplicity in this example, user admin is designated asthe administrator of the AWS Service Management scoped application. Grant this user both ofthe administrative permissions from the adapter, x_126749_aws_sc_portfolio_manager andx_126749_aws_sc_account_admin. Add System Administrator to the new ServiceNow groupOrder_AWS_Products. In a real scenario, these roles would likely be granted to different users/groups.
• Abel Tuter: The user abel.tuter is chosen as an illustrative end user. Grant Abel the new roleOrder_AWS_Products. This allows him to order products from AWS.
ServiceNow Permissions Recap
ServiceNow Persona Scoped App Permissions ServiceNow Permission Type
Admin x_126749_aws_sc_portfolio_manager,x_126749_aws_sc_account_admin,Order_AWS_Products
Role (scoped app), Role (scopedapp), Group
End User (i.e. Abel Tuter) Order_AWS_Products Group
Configuring Accounts1. Log in as the system administrator.
2. Type AWS in the navigator. Go to the AWS Service Management scoped app.
3. In the AWS Service Management scoped app Accounts menu, create one entry for every AWSaccount. You need to use the keys and secret keys from the users you created in AWS.
To create account entry
1. Enter the name as an account entry identifier, such as Connector_Demo (for Commercial region), orConnector_Demo_GovCloud (for GovCloud region).
2. Enter AWS access key and secret access key from the AWS account sync user IAM configurations.
3. Enter AWS access key and secret access key from the AWS account end user IAM configurations.
4. Select AWS service integrations that you want visible for this AWS account. The choices include:
91

AWS Service Catalog Administrator GuideConfiguring ServiceNow
• AWS Service Catalog
• AWS Config
• AWS Systems Manager
5. Go to Account Regions. Select the Commercial or GovCloud Region. Note: To see the AWS accountregions, double-click on “Insert a new row…”.
6. Repeat the step above to insert additional Regions.
7. Save or update the account entries.
8. Validate AWS account connectivity in the next section.
Validating Connectivity to AWS RegionsYou can now validate connectivity to AWS regions between the ServiceNow Connector_Demo accountand the AWS IAM SMSyncUser and SMEndUser.
To validate connectivity to AWS account
1. In the AWS Service Management scoped app, choose Accounts.
2. Select Connector_Demo and choose Validate Account.
3. A successful connection result in the message, “Successfully validating AWS account in eachreferenced Region.”
If the AWS IAM access key or secret access key are incorrect, you will receive an error message.
Manually Syncing Scheduled JobsDuring the initial setup, manually execute the sync instead of waiting for Scheduled Jobs to run. Thedefault sync schedule is every 31 minutes.
To sync the accounts manually
1. Log in as system administrator.
2. Find Scheduled Jobs in the navigator panel.
3. Search for job Sync all Accounts, select it, and choose Execute Now.
NoteIf you do not see Execute Now in the upper left corner, choose Configure Job Definition.Execute Now will be visible.
Data is visible in the AWS Service Management scoped app menus after the adapter’s scheduledsynchronization job has run.
Granting Access to PortfoliosThis release of the Connector removes the need to link AWS identities to ServiceNow roles. To grantaccess to AWS Service Catalog products in ServiceNow, you must establish a link between the AWSService Catalog portfolios and the ServiceNow group (for example, Order_AWS_Products created earlierin the instructions as an installation example).
To grant access to AWS Service Catalog portfolios in ServiceNow
1. In the AWS Service Management scoped app, choose the Portfolios module.
92

AWS Service Catalog Administrator GuideConfiguring ServiceNow
2. Select the desired Portfolio ARN. You can double-click the AWS Service Catalog portfolio name.3. Select the Allowed Groups tab.4. Choose New and enter the Group named Order_AWS_Products.5. Choose Submit.
Configure AWS Tags Generated by ServiceNow AdministratorsThe AWS Service Management Connector v3.0.4 enables ServiceNow administrators to add tags(metadata) to provisioned products globally across the scoped app or granularly at the portfolio level.These tags are not visible to end users.
Two tag types are available in this release:
• Generic tags in which the admin can enter the key and value• ServiceNow Request Item tags in which the admin can enter the following syntax for key and value
Key Value
Requested Item Number ${REQUEST_NUMBER}
User ${USERNAME}
Requested for ${REQUESTED_FOR}
Opened by ${OPENED_BY}
To add generic AWS tags to AWS Service Catalog provisioned products in ServiceNow
1. In the AWS Service Management scoped app, choose the Tags module.2. Choose New.3. For Global tags, enter the Key and Value entries and choose Submit.4. For Portfolio tags, deselect Global check. The Portfolio field becomes available. Select the AWS
Service Catalog portfolio, enter the Key and Value entries, and choose Submit.
To add in-scope ServiceNow request item AWS tags to AWS Service Catalog provisionedproducts derived from ServiceNow
1. In the AWS Service Management scoped app, choose the Tags module.2. Choose New.3. For Global tags, enter the specific Key and Value entries for either User or Request Item Number, and
choose Submit.
Once products are provisioned, you can see in the AWS console that these tags are associated to theresource.
Configure the AWS Service Catalog Product WidgetComponents Viewable to End UsersTo address the varying personas of end users requesting AWS products, the Connector for ServiceNowincludes a scoped app setting to enable or disable components of the AWS product widget. By default,all AWS product components are enabled.
93
AWS Service Catalog Administrator GuideConfiguring ServiceNow
To modify the AWS product view
1. In the navigator, type System Properties and select AWS Service Catalog.
NoteMake sure you are in the AWS Service Management Connector scoped application mode.
2. Deselect any AWS product component such as:
• Enable editing of the AWS Service Catalog Product name.
• Enable selection of launch options for AWS Service Catalog Products. (Note that this component isonly visible if the AWS product has more than one launch path.)
• Enable selection of product versions for AWS Service Catalog. (Note that this component is onlyvisible if the AWS product has more than one product version.)
• Enable tags for AWS Service Catalog Products.
• Enable plans (ChangeSet) creation for product. (Note that if set to false the plan section will behidden.)
3. Choose Save.
Add the My AWS Products Widget to the Service Portal View
It is recommended that ServiceNow administrators add the My AWS Products widget to the ServiceNowPortal view. The widget enables users to view their AWS product requests, view outputs, and performpost-operational actions such as update, terminate, and service actions (AWS Systems Managerdocuments).
To include the My AWS Products widget on the Service Portal view
1. Log in as system administrator in the ServiceNow standard user interface (Fulfiller view).
2. In the navigator panel, find Service Portal.
3. Select Service Portal Configuration.
4. Select Designer.
5. Search for Service Portal in the filter.
6. Select the Service Portal box with a house image and the word Index in the lower right corner.
7. On the Widgets section in the left panel, type My AWS Products in the Filter Widget.
8. Drag the widget onto the Service Portal edit view to your desired location.
9. Preview your changes.
View Budgets Related to AWS Service Catalog Portfolios andProducts
ServiceNow administrators can view budgets and actual costs related to AWS Service Catalog portfoliosand products in the ServiceNow standard user interface.
To view portfolio budgets
1. Log in as system administrator.
2. In the navigator panel, search for AWS Service Catalog.
3. Select the Portfolios module.
4. Select the AWS Service Catalog portfolio that contains an associated budget.
94

AWS Service Catalog Administrator GuideValidating Configurations
5. Choose the Budget tab.
To view product budgets
1. Log in as system administrator.
2. In the navigator panel, search for AWS Service Catalog.
3. Select the Products module.
4. Select the AWS Service Catalog product that contains an associated budget.
5. Choose the Budget tab.
Validating ConfigurationsYou are now ready to validate the AWS Service Management Connector for ServiceNow installationprocedures.
AWS Service Catalog Integration Features
To order an AWS Service Catalog product
1. Log into your ServiceNow instance as the end user (for example, Abel Tuter).
2. Type Service Catalog in the navigation filter and choose Service Catalog.
3. Select the AWS Service Catalog S3 Storage product to provision.
4. Fill in the product request details including product name, parameters, and tags.
5. Choose Order Now to submit the ServiceNow request and provision the AWS Service Catalogproduct.
6. After approximately one minute, you receive an order status indicating that your request wassubmitted.
To view provisioned products
End users can view products in two places on the ServiceNow portal through request items (Requests) orMy AWS Products widgets.
To view products in Service Portal Requests
1. Choose Requests in the home page navigation bar.
2. Select the request item of your choice (contains the AWS Service Catalog product and request itemnumber).
NoteThe request item is updated with AWS product events and outputs. When the AWS productis terminated, the ServiceNow request item will go into a state of Closed Complete.
To view products in the My AWS Products widget Service Portal Requests
1. Go to the My AWS Products widget
2. Choose the AWS Select Product name that you entered into the request form.
3. View the Status and Product Events
4. If you want to perform post-provisioned operational actions, choose Request Update, Request Self-Service Action, or Terminate.
95

AWS Service Catalog Administrator GuideValidating Configurations
AWS Config Integration to ServiceNow CMDB
To see AWS Config details, the service settings need to be configured to record data for the resourcetypes of interest. For details, see Setting Up AWS Config with the Console.
To view configuration item details from AWS Config in the ServiceNow CMDB
1. Log into your ServiceNow instance as a user (for example, System Administrator) in the fulfiller view(standard user interface view).
2. In the navigator, type AWS Service Management.
3. Choose AWS Config.
Select and view relationships for available AWS resources. The following table illustrates the availableAWS resources, ServiceNow CMDB label, and table name.
AWS resources ServiceNow CMDB/Scoped AppTable Label
ServiceNow CMDB/Scoped AppTable Name
Accounts CMDB CI Cloud Service Accounts cmdb_ci_cloud_service_account
VPCs Cloud Networks cmdb_ci_network
Availability Zones Availability Zone cmdb_ci_availability_zone
EC2 Instances Virtual Machine Instance cmdb_ci_vm_instance
EBS Volumes Storage Volume cmdb_ci_storage_volume
Security Groups Compute Security Group cmdb_ci_compute_security_group
Auto Scaling Group Auto Scaling Groups x_126749_aws_sc_cmdb_ci_autoscaling_group
Network Interfaces Cloud Mgmt Network Interface cmdb_ci_nic
RDS Instances Cloud DataBase cmdb_ci_cloud_database
Subnets Cloud Subnet cmdb_ci_cloud_subnet
Load Balancers (V2) Load Balancer Service cmdb_ci_lb_service
S3 Buckets Cloud Object Storages cmdb_ci_cloud_object_storage
CloudFormation Stacks CloudFormation Stack x_126749_aws_sc_cmdb_ci_cloudformation_stack
CloudFormation ProvisionedProducts
CloudFormation ProvisionedProduct
x_126749_aws_sc_cmdb_ci_config_pp
Tags Key Value cmdb_key_value
NoteConfiguration items and relationships are based AWS resources in scope for this release. AWSRegions are displayed in configuration item relationships. If you have questions or feedback,email <[email protected]>.
96

AWS Service Catalog Administrator GuideServiceNow Additional Features
AWS Systems Manager Integration Features
To request an AWS Systems Manager automation document execution
1. Log into your ServiceNow instance as the end user (for example, Abel Tuter).
2. In the navigation filter, type AWS Systems Manager, then choose Systems Manager.
3. Select an AWS Systems Manager document to execute.
4. Fill in the request details including parameters and tags.
5. Choose Order Now to submit the ServiceNow request and execute the AWS Systems Managerdocument.
6. You will receive an order status indicating that your request was submitted.
To view AWS Systems Manager documents executions
1. Log into your ServiceNow instance as the end user (for example, Abel Tuter).
2. In the navigation filter, type AWS Systems Manager, then choose Automation Executions.
3. The user interface view displays the latest executions and provides their status.
ServiceNow Additional FeaturesThis section provides information about additional features for the AWS Service Management Connectorfor ServiceNow.
Viewing Products in the Standard User Interface (Fulfiller View)
To view provisioned products as an end user
1. Go to My Assets in the ServiceNow standard user interface.
2. In My Asset Requests, view the requests that have been made.
3. To view the product, personalize the list view to show the associated configuration item by choosingthe Settings icon in the header row of the table of asset requests.
4. Select Configuration item (configuration_item) and add it to the view with the > button. Move it to below Stage in the list.
5. The configuration item (the product that was ordered) shows in the list of assets.
6. To view the product, choose the configuration item name.
7. View the Outputs for the provisioned product in the Outputs tab of the form.
8. View the provisioning history of the product in the Product Events tab of the form.
To view provisioned products from the scoped app as an administrator
1. Log into your ServiceNow instance as the end user (for example, Abel Tuter).
2. Type AWS Service Catalog in the navigation filter and choose Provisioned Products.
3. The user interface view displays the provisioned products.
4. Select a provisioned product to see view the current status. You can also select post provisionedactions such as Request Update, Request Termination, as well as associated service actions.
97

AWS Service Catalog Administrator GuideServiceNow Additional Features
Ordering AWS Service Catalog Products Through theServiceNow Service Portal
The Connector for ServiceNow version 3.0.4 supports ordering AWS Service Catalog products throughService Portal by using the Service Catalog and Order Something views. The release also includes pagesand widgets that you can add to Service Portal that enable users to view their provisioned products.
NoteThe audience for the Service Portal Features section is a ServiceNow administrator orequivalent. The ServiceNow user requires permissions to modify the Service Portal.
Service Portal Widgets
The Connector for ServiceNow includes widgets that you can add to your Service Portal. It also includestwo alternative view Portal Pages for the following:
• My AWS Products – Provides an overview of all provisioned products owned by the user.
• AWS Product Details – Provides details of a single provisioned product.
To access the new widgets, you need to update the Service Portal Designer.
To update the Service Portal Designer
1. Go to Create and edit a page using the Service Portal Designer.
2. Following the instructions, choose the Service Portal Index page.
3. Under the Order Something container, add the My AWS Products widget.
4. The new widget appears on your main Service Portal view.
Service Portal Pages
The following section describes the two new pages available in the Service Portal Beta release of theAWS Service Management Connector, My AWS Products and AWS Product Details. You can add linksto these pages on the Service Portal home page or other pages by using the usual page configurationmechanism in Service Portal.
My AWS Products
Provides an overview of all provisioned products owned by the user. Terminated products are displayedseparately from current products in a panel that is collapsed on initial page load.
The My AWS Products page is available using the following format:
http://<insertinstancename>.service-now.com/sp?id=aws_sc_pp
AWS Product Details
Provides details of a single provisioned product.
The AWS Product Details page is available using the following format:
http://<insertinstancename>.service-now.com/sp?id=aws_sc_pp_details&sys_id=<provisioned product id>
98

AWS Service Catalog Administrator GuideVersion 2.3.4 Release Transition Instructions
Reference: AWS API calls used in the Connector• AWSBudgets.describeBudget
• AmazonConfig.describeConfigurationRecorders
• AmazonConfig.getResourceConfigHistory
• AmazonConfig.listDiscoveredResources
• AWSSecurityTokenService.getCallerIdentity
• AWSServiceCatalog.createProvisionedProductPlan
• AWSServiceCatalog.deleteProvisionedProductPlan
• AWSServiceCatalog.describePortfolio
• AWSServiceCatalog.describeProduct
• AWSServiceCatalog.describeProductAsAdmin
• AWSServiceCatalog.describeProductView
• AWSServiceCatalog.describeProvisionedProduct
• AWSServiceCatalog.describeProvisionedProductPlan
• AWSServiceCatalog.describeProvisioningParameters
• AWSServiceCatalog.describeRecord
• AWSServiceCatalog.executeProvisionedProductPlan
• AWSServiceCatalog.executeProvisionedProductServiceAction
• AWSServiceCatalog.listBudgetsForResource
• AWSServiceCatalog.listLaunchPaths
• AWSServiceCatalog.listPortfolioAccess
• AWSServiceCatalog.listPortfolios
• AWSServiceCatalog.listProvisionedProductPlans
• AWSServiceCatalog.listServiceActionsForProvisioningArtifact
• AWSServiceCatalog.listStackInstancesForProvisionedProduct
• AWSServiceCatalog.provisionProduct
• AWSServiceCatalog.searchProducts
• AWSServiceCatalog.searchProductsAsAdmin
• AWSServiceCatalog.terminateProvisionedProduct
• AWSServiceCatalog.updateProvisionedProduct
• AWSSimpleSystemsManagement.describeAutomationExecutions
• AWSSimpleSystemsManagement.describeDocument
• AWSSimpleSystemsManagement.getAutomationExecution
• AWSSimpleSystemsManagement.getDocument
• AWSSimpleSystemsManagement.listDocuments
• AWSSimpleSystemsManagement.startAutomationExecution
Version 2.3.4 Release Transition InstructionsPrevious versions of the AWS Service Catalog Connector for ServiceNow are not fully compatible withmajor release v3.0.4 due to:
• Streamlining the AWS Account configuration in the ServiceNow scoped app
99

AWS Service Catalog Administrator GuideVersion 2.3.4 Release Transition Instructions
• Removing the dependency of ServiceNow roles mapping to AWS identities.
Because of this, customers with previous versions (v2.3.4 and on) of the AWS Service Catalog Connectorin the ServiceNow production environments must plan to transition to version 3.0.4.
Major changes in version 3.0.4The AWS Service Management Connector for ServiceNow v3.0.4 includes:
• Adding AWS Config and AWS Systems Manager integration features to the Connector.
• Streamlining the Connector Scoped App to six modules (Getting Started, Accounts, Tags, AWS ServiceCatalog, AWS Config, AWS Systems Manager).
The AWS Service Management Connector for ServiceNow v3.0.4 no longer includes:
• Identities and Role Grants modules in the Connector Scoped app.
• Previously provisioned AWS Service Catalog products details in the Connector scoped app.
NoteThe provisioned products details are still visible within AWS Service Catalog for the customer’sAWS account. These details are no longer available in the ServiceNow Connector scoped appsince these products were mapped based on ServiceNow user role grants as opposed to thenew mapping to ServiceNow groups.
V2.3.4 Version Sunset Support and Transition to 3.0.4To provide customers time to plan and transition:
• AWS will support AWS Service Catalog Connector version 2.3.4 until December 31, 2021. Email<[email protected]> if you have any questions.
• Documentation for v2.3.4 is available. You will need to download and extract the zip file.
Transition RecommendationsTo transition to AWS Service Management Connector version 3.0.4 from a ServiceNow Productionenvironment:
• Install the AWS Service Management Connector in a ServiceNow sandbox instance.
• Follow the AWS Service Management Connector installation instructions starting at the section called“Baseline Permissions” (p. 82).
NoteThere is a known issue with committing update sets that have a previous version of theConnector installed. Previewing the update set is successful. However, at the conclusionof the committing update, an error appears that states: “Version loading was stopped byDictionaryUpdateLoader….” These errors are considered false positives after further testingthat the update set is not impacted. AWS is logging a ServiceNow support case and willprovide a new release if needed.
• Compare the two versions to plan how you move through your ServiceNow Development.
• Determine how you want to address AWS Service Catalog provisioned products in previous releases.
• Create a check list of all your transition action items that include but are not limited to:
• Transition plan
100
AWS Service Catalog Administrator GuideConnector for Jira Service Desk
• Decision point on AWS Service Catalog provisioned products.• Steps to update/install Connector in ServiceNow Development to Production environments.
• ServiceNow platform admin communications• End user communications
AWS Service Management Connector for JiraService Desk
To help customers integrate provisioning secure, compliant, and pre-approved AWS products into theirJira Service Desk portal, AWS created the AWS Service Management Connector for Jira Service Desk(formerly the AWS Service Management Connector).
The AWS Service Management Connector for Jira Service Desk allows Jira Service Desk end users toprovision, manage, and operate AWS resources natively via Atlassian’s Jira Service Desk. Jira ServiceDesk administrators can provide pre-approved, secured, and governed AWS resources to end users viaAWS Service Catalog, execute automation playbooks via AWS Systems Manager, and track resources ina configuration item view powered by AWS Config seamlessly on the Jira Service Desk with the AWSService Management Connector.
Jira Service Desk end users can browse, request, and provision pre-secured AWS solutions, viewconfiguration item details on provisioned products, and execute workflows within Jira Service Desk onAWS resources. This simplifies AWS product request actions for Jira Service Desk users and provides JiraService Desk governance and oversight over AWS products.
The AWS-supplied connector is available at no charge in the Atlassian Marketplace. This new featureis generally available in all AWS Regions where AWS Service Catalog, AWS Config, and AWS SystemsManager services are available.
Topics• Background (p. 101)• Jira Service Desk Supported Versions and Releases (p. 102)• Getting Started (p. 102)• Release Notes (p. 103)• Baseline Permissions (p. 104)• Configuring AWS Service Catalog (p. 108)• Configuring Jira Service Desk (p. 109)• IT Lifecycle Management Setup and Use Case (p. 113)• Validating Configurations (p. 118)• Jira Additional Administrator Features (p. 119)
BackgroundAWS Service Catalog allows you to centrally manage commonly deployed AWS services and provisionedsoftware products. It helps your organization meet consistent governance and compliance requirements,while enabling users to quickly deploy only the approved AWS services they need.
AWS Config enables you to assess, audit, and evaluate the configurations of your AWS resources. AWSConfig continuously monitors and records your AWS resource configurations and allows you to automatethe evaluation of recorded configurations against desired configurations.
101

AWS Service Catalog Administrator GuideJira Service Desk Supported Versions and Releases
AWS Systems Manager gives you visibility and control of your infrastructure on AWS. Systems Managerprovides a unified user interface so you can view operational data from multiple AWS services and allowsyou to automate operational tasks across your AWS resources.
Atlassian Jira Service Desk is service desk software for modern IT teams. Jira Service Desk requesttypes enable self-service for developers and end users to order IT services based on request fulfillmentapprovals and workflows.
Jira Service Desk Supported Versions and ReleasesThe AWS Service Management Connector for Jira Service Desk supports Jira Service Desk Server andData Center versions. Jira software (Jira Service Desk) releases are supported for the current and oneprevious version in each of the major, minor, and point release streams:
• Jira 8.8.0 (JSD 4.8.0)
• Jira 8.7.1 (JSD 4.7.1)
• Jira 8.7.0 (JSD 4.7.0)
• Jira 8.6.1 (JSD 4.6.1)
• Jira 8.5.4 (JSD 4.5.4)
• Jira 7.13.13 (JSD 3.16.13)
A Jira Service Desk Cloud Connector is also available in the Atlassian Marketplace. For more information,see AWS Service Catalog for Jira Service Desk Cloud.
Getting StartedBefore installing the AWS Service Management Connector for Jira Service Desk, you need an AWSaccount and an Atlassian instance with Jira Service Desk pre-installed. Verify that you have the necessarypermissions in your AWS account and Jira Service Desk software.
For a video showing how to integrate AWS products into your Jira Service Desk portal, see Integrate AWSProducts into Your Jira Service Desk Portal.
For a zip file containing Connector add-on code as well as AWS Configuration files, download and extractthe AWS Service Management Connector for JSD-Configuration Files.
NoteThe Jira Products on AWS Reference Deployment Quick Start is available to use AWS resourcesfor infrastructure required to install Jira Service Desk data center version.
AWS prerequisites
To get started:
• To use AWS Service Catalog with the Connector, you need an AWS account to configure your AWSportfolios and products. For details, see Setting Up for AWS Service Catalog (p. 6).
• To see AWS Config details, the service settings need to be configured to record data for the resourcetypes of interest. It is recommended to include provisioned products and AWS CloudFormation stacksin addition to the major resource types used by your team. For details,see Setting Up AWS Config withthe Console.
• To use AWS Systems Manager Automation with the Connector, no AWS-side setup is required. Anumber of automation documents are provided by AWS as standard. If you have additional automation
102

AWS Service Catalog Administrator GuideRelease Notes
documents you wish to use, they will be available in the Connector. For details, see Working withAutomation Documents (Playbooks).
For each AWS account, the Connector for Jira Service Desk also requires API access with the sectioncalled “Baseline Permissions” (p. 82) as described below.
Jira Service Desk prerequisitesIn addition to your AWS account, you need the Jira Service Desk software installed on your Atlassianinstance before you can install the AWS Service Management Connector add-on. The Jira Service Deskadministrator needs the admin role in order to install the AWS Service Management Connector add-on.
Before configuring your AWS connector, ensure that you follow Atlassian recommendations for securingyour Jira Service Desk instances. For more information, see Preventing Security Attacks.
The Connector for Jira Service Desk add-on is available to download in the Atlassian Marketplace.
Release NotesVersion 1.5.0 of the AWS Service Management Connector for Jira Service Desk (formerly the AWSService Management Connector) includes:
AWS Service Catalog integration features
• Rendering AWS Service Catalog portfolios and products in the Jira Service Desk Customer Portal andJira Agent views.
• The ability for Jira Service Desk administrators to associate Jira Service Desk approval groups to AWSService Catalog portfolios to require approvals for Jira Service Desk user product requests.
• The ability for Jira Service Desk users to request AWS Service Catalog products through Jira ServiceDesk.
• The ability for administrators to view portfolio and product budgets and actual costs. (Requiresbudgets to be associated within AWS Service Catalog.)
• Support for AWS Service Catalog self-service actions for Jira Service Desk users to update andterminate products.
• Support for AWS CloudFormation StackSets, enabling launch of AWS Service Catalog products acrossmultiple regions and accounts.
• Support for AWS CloudFormation Change Sets, enabling a preview of resource changes prior to alaunch or update.
AWS Config integration features
• Rendering of AWS Config configuration item details on provisioned AWS products via Jira Service Deskrequest.
• The ability to view the configuration item relationships in a tree structure.• The ability to associate AWS Config items details to Jira issues.
AWS Systems Manager integration features
• Rendering of AWS Systems Manager automation documents in the Jira Service Desk Customer Portaland Jira Agent views.
• The ability for Jira Service Desk administrators to associate AWS Systems Manager automation to Jiraprojects.
103

AWS Service Catalog Administrator GuideBaseline Permissions
• The ability for Jira Service Desk users to request and execute AWS Systems Manager automationdocuments through Jira Service Desk.
• The ability to create Jira issues (incidents) that provide actionable remediation suggestions via aConnector specific AWS Systems Manager automation document.
• Support for multiple AWS accounts.
• Support for FIPS endpoints and usage in the AWS GovCloud West region.
• Support for the latest releases of Jira Service Desk Server and Data Center versions.
Baseline PermissionsThis section provides instructions on how to set up the baseline AWS users and permissions needed forthe AWS Service Management Connector for Jira Service Desk. For each AWS account, the Connectorfor Jira Service Desk requires two sets of an access key identifier and a secret key for API access. Thesecorrespond to users in AWS Identity and Access Management (IAM). Specifically, you should set up:
• An IAM user to sync AWS resources to Jira Service Desk.
• An IAM user able to perform end user functionality to provision and execute requests exposed throughJira Service Desk, including assuming any roles required to perform the provisioning and execution(launch roles are recommended for AWS Service Catalog).
These can be the same user and can be an existing user, but in line with the best practice to give minimalpermissions it is recommended these be two new users for Connector.
Full details of the permissions required by these users is included below, with an AWS CloudFormationtemplate to facilitate setting this up. Baseline permissions enable an end user to provision the followingAWS services: Amazon Simple Storage Service and Amazon Elastic Compute Cloud. To allow end usersto provision AWS services beyond the baseline permissions, you must include the additional AWS servicepermissions to the appropriate roles.
NoteTo use an AWS CloudFormation template to set up the AWS configurations of the Connectorfor Jira Service Desk, see the two JSON AWS Configurations for Connector for Jira Service Deskv1.5.0 - AWS Commercial Regions and Connector for Jira Service Desk v1.5.0 - AWS GovCloudWest Region.
Creating AWS Service Management Connector Sync UserThe following section describes how to create the AWS Connector sync user and associate theappropriate IAM permissions. To perform this task, you need IAM permissions to create new users.
To create AWS Service Management Connector sync user
1. Go to Creating an IAM User in Your AWS Account. Following the instructions there, create a sync user(that is, SCSyncUser). The user needs programmatic and AWS Management Console access to followthe Connector for Jira Service Desk installation instructions.
2. Set permissions for your sync user (SCSyncUser). Choose Attach existing policies directly and selectthe AWSServiceCatalogAdminReadOnlyAccess policy and the AmazonSSMReadOnlyAccess policy.
3. Also add a policy allowing budgets:ViewBudget on all resources (*).
4. Review and choose Create User.
5. Note the access and secret access information. Download the .csv file that contains the usercredential information.
104

AWS Service Catalog Administrator GuideBaseline Permissions
Creating AWS Service Management Connector End UserThe following section describes how to create the AWS Service Management Connector end user andassociate the appropriate IAM permissions. To perform this task, you need IAM permissions to create newusers.
To create AWS Service Management Connector end user
1. Go to Creating an IAM User in Your AWS Account. Following the instructions there, create a user(such as SCEndUser). The user needs programmatic and AWS Management Console access to followthe Connector for Jira Service Desk installation instructions.
2. For products with AWS CloudFormation StackSets, you need to create a stack set inline policy. WithAWS CloudFormation StackSets, you can create products that are deployed across multiple accountsand regions. Using an administrator account, you define and manage an AWS Service Catalogproduct and use it as the basis for provisioning stacks into selected target accounts across specifiedregions. You need to have the necessary permissions defined in your AWS accounts.
To set up the necessary permissions, go to Granting Permissions for Stack Set Operations. Followingthe instructions there, create an AWSCloudFormationStackSetAdministrationRole and anAWSCloudFormationStackSetExecutionRole.
3. Create the stack set inline policy to enable provisioning a product across multiple regions in oneaccount, replacing the arn number string with your account number.
{ "Version": "2012-10-17", "Statement": [ { "Action": [ "sts:AssumeRole" ], "Resource": [ "arn:aws:iam::123456789123:role/AWSCloudFormationStackSetExecutionRole" ], "Effect": "Allow" }, { "Effect": "Allow", "Action": [ "iam:GetRole", "iam:PassRole" ], "Resource": "arn:aws:iam::123456789123:role/AWSCloudFormationStackSetAdministrationRole" } ]}
NoteThe Connector for Jira Service Desk v1.5.0 - AWS Commercial Regions and Connectorfor Jira Service Desk v1.5.0 - AWS GovCloud West Region templates include the AWSCloudFormation StackSet permissions.
4. Add the following permissions (policies) to the user SCEndUser:
• AWSServiceCatalogEndUserFullAccess - (AWS managed policy)• StackSet - (inline policy)• AmazonS3ReadOnlyAccess
105

AWS Service Catalog Administrator GuideBaseline Permissions
• AmazonEC2ReadOnlyAccess• AWSConfigUserAccess
NoteFor AWS Service Catalog products with AWS CloudFormation StackSets, you need to includethe read only permissions for the services you want to provision. For example, to provisionan Amazon S3 bucket, include the AmazonS3ReadOnlyAccess policy to the SCEndUserrole.
5. Also add a policy allowing the following on all resources (*): ssm:DescribeAutomationExecutions,ssm:DescribeDocument, and ssm:StartAutomationExecution.
6. Review and choose Create User.7. Note the access and secret access information. Download the .csv file that contains the user
credential information.
Creating SCConnectLaunch RoleThe following section describes how to create the SCConnectLaunch role. This role is used to placebaseline AWS service permissions into the AWS Service Catalog launch constraints. For more information,see AWS Service Catalog Launch Constraints (p. 37).
To create SCConnectLaunch role
1. Create the AWSCloudFormationFullAccess policy. Choose create policy and then paste thefollowing in the JSON editor.
{ "Version": "2012-10-17", "Statement": [ { "Effect": "Allow", "Action": [ "cloudformation:DescribeStackResource", "cloudformation:DescribeStackResources", "cloudformation:GetTemplate", "cloudformation:List*", "cloudformation:DescribeStackEvents", "cloudformation:DescribeStacks", "cloudformation:CreateStack", "cloudformation:DeleteStack", "cloudformation:DescribeStackEvents", "cloudformation:DescribeStacks", "cloudformation:GetTemplateSummary", "cloudformation:SetStackPolicy", "cloudformation:ValidateTemplate", "cloudformation:UpdateStack", "cloudformation:CreateChangeSet", "cloudformation:DescribeChangeSet", "cloudformation:ExecuteChangeSet", "cloudformation:DeleteChangeSet", "s3:GetObject" ], "Resource": "*" } ]}
106

AWS Service Catalog Administrator GuideBaseline Permissions
2. Create a policy called ServiceCatalogSSMActionsBaseline. Follow the instructions on Creating IAMPolicies, and paste the following into the JSON editor.
{ "Version": "2012-10-17", "Statement": [ { "Sid": "Stmt1536341175150", "Action": [ "servicecatalog:ListServiceActionsForProvisioningArtifact", "servicecatalog:ExecuteprovisionedProductServiceAction", "ssm:DescribeDocument", "ssm:GetAutomationExecution", "ssm:StartAutomationExecution", "ssm:StopAutomationExecution", "cloudformation:ListStackResources", "ec2:DescribeInstanceStatus", "ec2:StartInstances", "ec2:StopInstances" ], "Effect": "Allow", "Resource": "*" } ]}
3. Create the SCConnectLaunch role. Assign the trust relationship to AWS Service Catalog.
{ "Version": "2012-10-17", "Statement": [ { "Sid": "", "Effect": "Allow", "Principal": { "Service": "servicecatalog.amazonaws.com" }, "Action": "sts:AssumeRole" } ]}
4. Attach the relevant policies to the SCConnectLaunch role. Attach the following baseline IAMpolicies:
• AmazonEC2FullAccess (AWS managed policy)• AmazonS3FullAccess (AWS managed policy)• AWSCloudFormationFullAccess (custom managed policy)• ServiceCatalogSSMActionsBaseline (custom managed policy)
NoteTo use an AWS CloudFormation template to set up the AWS configurations of the Connectorfor Jira Service Desk, see the two JSON AWS Configurations for Connector for Jira Service Deskv1.5.0 - AWS Commercial Regions and Connector for Jira Service Desk v1.5.0 - AWS GovCloudWest Region.
107

AWS Service Catalog Administrator GuideConfiguring AWS Service Catalog
Configuring AWS Service CatalogNow that you have created two IAM users with baseline permissions in each account, the next step is toconfigure AWS Service Catalog. This section describes how to configure AWS Service Catalog to have aportfolio that includes an Amazon S3 bucket product. Use the Amazon S3 template located at Creatingan Amazon S3 Bucket for Website Hosting for your preliminary product. Copy and save the Amazon S3template to your device.
To configure AWS Service Catalog
1. Create a portfolio by following the steps at Step 3: Create an AWS Service Catalog Portfolio (p. 12).
2. To add the Amazon S3 bucket product to the portfolio you just created, in the AWS Service Catalogconsole, on the Upload new product page, enter product details.
3. For Select template, choose the Amazon S3 bucket AWS CloudFormation template you saved toyour device.
4. Set Constraint type to Launch for the product that you just created with the SCConnectLaunch rolein the baseline permissions. For additional launch constraint instructions, see AWS Service CatalogLaunch Constraints (p. 37).
NoteThe AWS configuration design requires each AWS Service Catalog product to have either alaunch or StackSet constraint. Failure to follow this step may result in an Unable to RetrieveParameter message within Jira Service Desk Service Catalog.
Creating Stack Set ConstraintAWS CloudFormation StackSets enable users to create products that are deployed across multipleaccounts and regions. In AWS Service Catalog, a stack set constraint allows you to configure productdeployment options.
To apply a stack set constraint to an AWS Service Catalog product
1. Go to AWS Service Catalog as a catalog administrator.
2. Choose the portfolio that contains the product you want to apply a constraint to.
3. Expand Constraints and choose Add constraints.
4. Choose the product from Product and set Constraint type to Stack Set. Choose Continue.
5. On the Stack set constraint page, enter a description.
6. Choose the accounts in which you want to create products.
7. Choose the regions in which you want to deploy products. Products are deployed in these regions inthe order that you specify.
8. Choose the AWSCloudFormationStackSetAdministratorRole role that will be used to manage yourtarget accounts.
9. Choose the AWSCloudFormationStackSetExecutionRole role that the administrator role willassume.
10. Choose Submit.
Note that the Connector for Jira Service Desk v1.5.0 - AWS Commercial Regions and Connector forJira Service Desk v1.5.0 - AWS GovCloud West Region templates create the permissions as well asthe outputs needed for stack set constraints. Example stack set outputs:
108

AWS Service Catalog Administrator GuideConfiguring Jira Service Desk
SCStackSetAdministratorRoleARN arn:aws:iam::123456789123:role/AWSCloudFormationStackSetAdministrationRole SCIAMStackSetExecutionRoleName AWSCloudFormationStackSetExecutionRole SCIAMAdminRoleARN arn:aws:iam::123456789123:role/AWSCloudFormationStackSetAdministrationRole
Note that AWS Service Catalog products can have either a stack set or a launch constraint, but notboth.
Configuring Jira Service DeskThe AWS Service Management Connector for Jira Service Desk is released as a conventional Jira ServiceDesk add-on. Add-ons are code changes to the Jira software that extend its functionality or extend thefunctionality of Jira Service Desk software. The Connector for Jira Service Desk add-on is available todownload in the Atlassian Marketplace.
After completing the IAM and AWS Service Catalog configurations, you must configure Jira Service Desk.Installation tasks within Jira Service Desk include:
• Clear your web browser cache.
• Install the Jira Service Desk Connector add-on.
• Configure AWS Service Management Connector add-on, including accounts, schedule sync, andrequest/approval permissions.
Clear Web Browser CacheClear your web browser cache to remove previously rendered Jira Service Desk forms.
Installing Jira Service Desk Connector Add-on1. Log in to your Jira instance as an admin.
2. Open the admin menu and choose Add-ons.
3. On the Manage add-ons screen, choose Find new apps or Find new add-ons from the left side ofthe page.
4. Find AWS Service Management Connector for JSD. The search results should include app versionscompatible with your Jira instance.
5. Choose Install to download and install your app.
6. Proceed to Configuring AWS Accounts and Regions.
Alternatively, you can download the code from the OBR file: AWS Service Management Connector forJira Service Desk v1.5.0 OBR.
1. Go to Manage apps.
2. Select Upload app and upload the OBR file.
3. Proceed to Configuring AWS Accounts and Regions.
The Connector for Jira Service Desk version 1.5.0 add-on can be applied to the following Jira software(Jira Service Desk) releases: 7.11.2 (JSD 3.14.2) to Jira 8.5.1 (JSD 4.5.1).
109

AWS Service Catalog Administrator GuideConfiguring Jira Service Desk
Configuring AWS Accounts and RegionsOnce the AWS Service Management Connector is installed, configure it by choosing the Jiraadministration icon in the top right, then choosing Add-ons.
1. From the AWS Service Catalog section on the left navigation menu, choose AWS Accounts.2. Choose Connect new account.3. Enter the account alias (used to identify the AWS account in the Connector).4. Enter the credentials for SC-sync-user. This is the access key identity and credentials for a sync user
saved from the AWS configuration. SC-sync-user credentials are used to retrieve portfolios andproducts to make them available through Jira Service Desk. You will have the opportunity to set thegroups allowed to access these.
5. Enter the credentials for SC-end-user. This is the access key identity and credentials for the end usersaved from the AWS configuration. The SC-end-user credentials are used to provision products onbehalf of a Jira user.
6. Add AWS Regions containing AWS Service Catalog products and portfolios that you want available inJira Service Desk.
7. Choose Test Connectivity.8. Upon successful connection status, choose Connect.
NoteWe recommend that the sync user and end user be new users in AWS used only with AWSService Management Connectors. These users should have minimum required privileges. AnAWS CloudFormation template with the minimal permissions for AWS Service ManagementConnectors is available.
Configuring AWS Service Catalog Portfolios within Jira
AWS Product Access
This section describes how to configure AWS Service Catalog portfolios within Jira.
Once your account or accounts are set up and connectivity is successful, use the AWS Account pageto manage, for each account, which groups are permitted to access each portfolio in each Region. Youcan expand and collapse each Region and edit and add groups for each portfolio. Only users in thedesignated groups have access to those products. By default, no groups have access.
NoteAt least one group must be associated to an AWS Service Catalog portfolio in order for JiraService Desk end users to request AWS products.
To provision products and portfolios
1. Choose AWS Accounts.2. Choose Manage for the AWS account on which you want to configure portfolios.3. Under Portfolios, expand the Region associated with the account. Portfolios are displayed under
each Region.4. In the Permission to request column, choose Add groups for the portfolios that you want to make
visible in Jira Service Desk. Select the group that you want to be able to see and request AWSService Catalog products.
NoteBecause the AWS Service Management Connector for Jira Service Desk allows Jira usersto provision AWS products in the portfolios their groups have access to, and to control
110

AWS Service Catalog Administrator GuideConfiguring Jira Service Desk
those provisioned products, users should be reminded of the importance of maintaining thesecurity of their Jira accounts.
5. If products in this portfolio do not require approvals, choose Save.
Jira Service Desk Approvals for Products in AWS Service Catalog Portfolios
The AWS Service Management Connector for Jira Service Desk enables administrators to configureapprovals for products at the portfolio level. All products within a portfolio that contains approvalpermissions will require approval, so AWS and Jira administrators may need to collaborate on the AWSService Catalog portfolio structure.
To configure the approval process
1. Choose AWS Accounts.2. Choose Manage on the AWS account for which you want to configure portfolio approvals.3. In the Permission to approve column, choose Add groups for the portfolios that require product
approvals.4. Select Require approval for provisioning.5. Under Permission to approve, choose Add group.6. Choose Save.
NoteIf a portfolio only has a group associated with Permissions to request, products within theportfolio immediately provision when the product request is submitted.
Viewing Products and Budgets
Two other tabs in the Admin -> AWS Accounts -> Manage section let you view information onportfolios, for reference. The Available Products tab lists the products in the portfolio and budgetaryinformation on each. The Budgets tab gives overall budgetary information on the portfolio.
Account Settings for Other Connector Features
There are no per-account settings for the other aspects of AWS exposed through the JSD Connector, suchas AWS Config and AWS Systems Manager Automation.
Configuring Connector Settings (Jira Project Enablement andRequest Type)Next, the AWS Service Management Connector for Jira Service Desk requires the add-on to be associatedto a Jira project and a request type. You can configure which Connector features are enabled for each Jiraproject.
For a new installation of Connector, the default project configuration is for all Connector features (AWSService Catalog, AWS Config, and AWS Systems Manager) to be enabled. If you are upgrading an existinginstallation, for security reasons, new features are initially not enabled.
To configure the default Connector features for specific AWS services
1. In the left navigation menu, under AWS Service Catalog, select Connector settings.2. At the top, under Connector features enabled by default, select each feature depending whether
you want projects using the default configuration to be able to use them or not.3. Choose Save.
111

AWS Service Catalog Administrator GuideConfiguring Jira Service Desk
To configure the Jira projects for which the AWS Service Management Connector for JiraService Desk is enabled
1. In the left navigation menu, under AWS Service Management Connector, select Connectorsettings.
2. Under Projects enabled for Connector, you must enable at least one Jira project. You can create anew Jira Service Desk project or add an existing one. Only users with access to the associated projectwill be able to access the Connector. When this update is applied, the Connector adds the necessaryissue types and other Jira items needed for AWS Service Catalog products to be available in thoseprojects. You can return to this screen and add or remove projects at any time.
3. Projects initially take the default configuration in regards which Connector features are enabled.Click Edit in a project row to change the configuration for individual projects. It is permitted forprojects to use more features than the default.
4. Choose Save.
NoteFor end users to be able to request AWS Service Catalog products, one or more projects must beenabled and users must have Jira permissions to create issues in the Jira project and Permissionto Request in the Jira settings for the AWS Account for at least one portfolio with products.
AWS Systems Manager enablement considerations: It Is not currently supported to have fine-grainedpermissions in Jira for which users/groups should be allowed to access which AWS Systems Managerautomation documents. If a project is enabled for Systems Manager Automation, then any user withpermission to create issues in that project will have the ability to run any of the automations. Access canbe restricted by limiting which users have access to projects with AWS Systems Manager Automationenabled.
To configure operational settings for the AWS Service Management Connector for JiraService Desk
1. In the left navigation menu, under AWS Service Management Connector, select Connectorsettings.
2. Under Operational settings, in the Synchronization interval field, you can change the sync intervalif you want. This interval determines how often Jira Service Desk syncs with AWS. Increasing thisnumber will reduce the number of API calls to AWS but will mean it takes longer for updates in AWSportfolios and automation documents to be reflected in the Connector. Information on activelyprovisioning products and ongoing automation executions updates more frequently.
3. Choose Save.
Configuring Project Request Type Groups
The AWS request type must be in a group for users to be able to access it in Jira Service Desk. EnablingJira projects, as described in Configuring Connector Settings (Jira Project Enablement and RequestType) (p. 111), makes AWS product request types available, but Jira Service Desk users won't see therequest type until it is added to a Request Type Group.
To configure request types
1. In the AWS Service Management Connector for Jira Service Desk, go to the Connector settings page.
2. In the Projects section, choose add the AWS request type.3. Select Add existing request type in the upper right-hand corner.4. Select Request AWS product from the available request type.5. Select Edit Groups for the Request AWS product request type.
112

AWS Service Catalog Administrator GuideIT Lifecycle Management Setup and Use Case
6. On the Edit groups form, select General, then choose Save.
NoteA custom Request AWS Product request type was created for the Connector for Jira ServiceDesk, so edits to the Request AWS Product request type are not required. You can add a requesttype to an existing group. If you don't have a group, create a new group and add the requesttype to it.
IT Lifecycle Management Setup and Use CaseThe AWS Service Management Connector for Jira Service Desk allows Jira Service Desk end-users toprovision, manage and operate AWS resources natively via Atlassian’s Jira Service Desk. To enable the ITLifecycle Management scenario, you need to configure:
• AWS Config Linked Resources• Suggested AWS Systems Manager Remediations for an Issue• Sample Use Case: Automatically Creating Jira Issues for IT Lifecycle Management, Rremediating non-
compliant public S3 buckets
AWS Config and suggested AWS Systems Manager remediationsfor any Jira issueThe Connector provides two fields that can be used and displayed for any issue.
• AWS Config Linked Resources: this field allows any resource with an entry in AWS Config to haveits AWS Config information displayed on the issue in Jira. The information can be expanded andinformation on relations also displayed. Multiple AWS resources can be linked to an issue.
• AWS Systems Manager Automation Suggested Remediation: this field allows SSM automationdocuments to be recorded against an issue. These are then displayed as suggested ways to correct theissue. When a Jira user views the issue, they can see these suggested remediations and click to applythem. Multiple suggested remediations can be attached to an issue.
The two fields can be used individually but they work very well together: when an incident is detectedon an AWS resource or set of resources, setting both allows a Jira user to see the Config information toconfirm or better understand the problem, apply remediations which fix common problems, and thenconfirm in the AWS Config information that the problem has been fixed.
To add AWS fields to an existing issue
1. The project or projects must be enabled for the Connector. This is done in Connector Settings underAdmin -> Manage Add-Ons, as described elsewhere in the Connector setup guide.
2. Go to Admin, then Projects, and open the project you wish to use these fields with.3. Choose the issue type you wish to use in the menu at left.4. Select to view "Fields" in the top right (if not already selected). It should then show a list of fields
enabled for the screen.5. Scroll to the bottom where there should be a textbox where you can type additional fields. Start
typing "AWS" then select the AWS field you want to use.6. Choose Add to apply.7. Repeat the previous step for the other field if you wish to use it.8. Repeat these steps for each issue type you wish you use these fields with. Some issue types may
share screens so the field may already be added for some.
113

AWS Service Catalog Administrator GuideIT Lifecycle Management Setup and Use Case
It is important also to make a note of the field ID for the field or fields you are using. This can be done bygoing to Admin -> Issues -> Custom fields and selecting Configure on each such field.
Inspect the URL that is opened to see the numeric field ID. It should be a 5-digit number. Alternatively,for any issue in a project where you’ve added the field (following the instructions above), the REST APIat /rest/api/2/issue/PRJ-1/editmeta (for example, http://localhost:2990/jira/rest/api/2/issue/PRJ-1/editmeta) will include information on the fields and should contain an entrycustomfield_#####: { ..., name: "AWS Config Linked Resources", ... }, where #####is the numeric field ID.
Once these fields are enabled for projects and issue types, use the Jira REST API to create or updateissues with values for these fields. This can be used from tools such as CloudWatch or AppDynamicsor Jenkins or a Systems Manager Automation Document (provided in the next section). The REST APIendpoint to update an issue is /rest/api/2/issue/issue-key and the general schema to pass to seta value is:
{ "update": { "customfield_field-ID": [ { "set": "value" } ] } }
See the examples below, or for more information on the REST API, see JIRA Developer Documentation :Updating an Issue via the JIRA REST APIs.
AWS Config Linked ResourcesThe AWS Config Linked Resources field should be set to the JSON string representation of a list ofobjects (maps) corresponding to the linked resources, each with the following keys:
• resourceId: the ID of the resource in AWS Config• resourceType: the type of the resource in AWS Config• accountName: the name/alias of the AWS account configured in Jira that should be used to access this
resource• region: the region where AWS Config should be accessed to get information on this resource
For example the following value would show information on the S3 bucket my-bucket in eu-central-1, using the account and end user credentials specified in Jira for the AWS Account identifiedin Jira as MyAccount1:
[ { "resourceId": "my-bucket", "resourceType": "AWS::S3::Bucket", "accountName": "MyAccount1", "region": "eu-central-1" } ]
AWS Systems Manager Automation Suggested RemediationThe AWS Systems Manager Automation Suggested Remediation field should be set to the JSON stringrepresentation of a list of objects (maps) corresponding to the automation documents to suggest asremediations, each with the following keys:
• documentName: the name of the Systems Manager automation document
114

AWS Service Catalog Administrator GuideIT Lifecycle Management Setup and Use Case
• description: a description of the remediation to display in Jira; this may be different to the documentdescription in AWS and might explain why it is a good remediation for the issue where this is being set
• accountName: the name/alias of the AWS account configured in Jira that should be used to access thisresource
• region: the region where AWS Config should be accessed to get information on this resource
For example, the following value would suggest the AWS-DisableS3BucketPublicReadWriteautomation document, with a nice description to show in Jira, to be applied in eu-central-1, using theaccount and end-user credentials specified in Jira for the AWS Account identified in Jira as MyAccount1:
[ { "documentName": "AWS-DisableS3BucketPublicReadWrite", "description": "This will make the bucket private, resolving the issue.", "accountName": "MyAccount1", "region": "eu-central-1" } ]
Scripting Field Creation
As an example, the following bash script using curl will link the above-noted resource to an issue andattach a suggested remediation. The values used below assume Jira is at `localhost:2990/jira` with login`admin:admin`, the issue is `PRJ-1`, and the field IDs are 10011 (AWS Config linked resources) and10010 (suggested remediation). These should be changed to reflect your environment.
1. Set these corresponding to your environment and issue:
JIRA_BASE_URL=http://localhost:2990/jira
JIRA_USER_PASS=admin:admin
ISSUE_KEY=PRJ-12. Set the field ID and edit the JSON record for an AWS Config resource to link
CUSTOM_FIELD_ID=customfield_10011cat > value.json EOF [ { "resourceId": "my-bucket", "resourceType": "AWS::S3::Bucket", "accountName": "MyAccount1", "region": "eu-central-1" } ]EOF
3. Define a helper function to escape the JSON
json_escape () { printf '%s' "$1" | python -c \ 'import json,sys; print(json.dumps(sys.stdin.read()))'}
4. Make the REST call to set the AWS Config Linked Resource field
curl -v -D- -X PUT -H "Content-Type: application/json" \
115

AWS Service Catalog Administrator GuideIT Lifecycle Management Setup and Use Case
--data '{ "update": { "'${CUSTOM_FIELD_ID}'": [ {"set": '"$( json_escape "$(cat value.json)")"' } ] } }' \ -u admin:admin ${JIRA_BASE_URL}/rest/api/2/issue/${ISSUE_KEY}
5. Set the field ID and edit the JSON record for a suggested remediation to attach
CUSTOM_FIELD_ID=customfield_10010cat > value.json EOF [ { "documentName": "AWS-DisableS3BucketPublicReadWrite", "description": "This will make the bucket private, resolving the issue.", "accountName": "MyAccount1", "region": "eu-central-1" } ]EOF
6. Make the REST call to set the AWS Systems Manager Automation Suggested Remediations field
curl -v -D- -X PUT -H "Content-Type: application/json" \ --data '{ "update": { "'${CUSTOM_FIELD_ID}'": [ {"set": '"$( json_escape "$(cat value.json)")"' } ] } }' \ -u ${JIRA_USER_PASS} ${JIRA_BASE_URL}/rest/api/2/issue/${ISSUE_KEY}
The issue should then show AWS Config for the bucket and a suggested remediation to make it private.
Creating Issues with Suggestions and a Linked AWS Resourcefrom AWS Systems ManagerA Systems Manager Automation Document is provided which can automatically create a Jira issue withthe fields set to have a linked AWS resource and up to three suggested remediation documents. Toinstall this automation document, download and extract the JSD Connector Create Remediation IssueAutomation and IT Lifecycle Demo.zip that contains two files:
• JSDConnector-CreateRemediationIssue.ssmdoc.yaml
• JSDConnector-function.zip
Follow these steps
1. Upload the file `JSDConnector-function.zip` to a bucket. The following command will do this(replacing `${BUCKET}` with the appropriate bucket):
aws s3 cp JSDConnector-function.zip s3://${BUCKET}/function.zip
2. Create the Systems Manager Automation Document, called JSDConnector-CreateRemediationIssue, with the contents taken from the file JSDConnector-CreateRemediationIssue.ssmdoc.yaml and an attachment Key=SourceUrl,Values=s3://${BUCKET}/, using the bucket name from the previous step as ${BUCKET}. The following commandwill do this (replacing ${BUCKET}):
116

AWS Service Catalog Administrator GuideIT Lifecycle Management Setup and Use Case
aws ssm create-document --name "JSDConnector-CreateRemediationIssue" --content "file://JSDConnector-CreateRemediationIssue.ssmdoc.yaml" --document-type "Automation" --document-format "YAML" --attachments "Key=SourceUrl,Values=s3://${BUCKET}/"
Once installed, use it as you would any other Systems Manager automation document, filling out theparameters and running it. Note this requires many of the same parameters as described previously inorder to connect to Jira.
You should then see an issue in Jira with AWS Config information and the suggested remediation shown.
Sample Use Case: Automatically Creating Issues for IT LifecycleManagement - Remediating non-compliant public S3 bucketsOnce the fields are enabled to an issue and the Systems Manager Automation Document is created, youcan set up rules to automatically create Jira issues for common problem categories in AWS and includesuggested remediations to make it easy for a Jira agents and end users to see problems and fix them.
This demo will create a Config Rule is AWS which detects public S3 buckets and makes it possible for aJira agents or end users to disable public access directly from Jira.
You will need to set up prerequisites, roles for the automation and lambda to execute as, and the Jirapassword as a secure string in Systems Manager Parameter Store.
To store the Jira password securely in Parameter Store
1. Open the AWS Console and go to Systems Manager -> Parameter Store.2. Choose Create parameter.3. Set the name as jira_password.4. Set the type as SecureString.5. Set the value as the password for the Jira user to be used to create issues.6. To save, choose Create parameter.
An AWS CloudFormation template is provided to assist setting up the role and config rule:JSDConnector-CreateRemediationIssue-MakePublicBucketsPrivateConfigRule.cfn.yaml
Install the template, setting the following parameters:
• JiraURL: the base URL to your Jira, such that appending `/rest/...` after it accesses the REST API• JiraUsername: the username to use to log in to Jira (with the password specified in `jira_password`)• SSMParameterName: `jira_password` (the parameter containing the Jira password)• ProjectKey: the key of the project (the token before the `-` in an issue), e.g. `PRJ`• IssueTypeName: this must exactly match the name of the issue type on the project in Jira• JiraAwsAccountName: the name of the AWS Account as configured in the Connector in Jira• JiraAwsAccountRegion: the region where this violating resource is found, e.g. `us-east-1`• JiraAwsResourceFieldId: enter the field ID of the AWS Config Linked Resources field in Jira, e.g.
`customfield_10011`• JiraRemediationsFieldId: enter the field ID of the AWS Systems Manager Automation Suggested
Remediation field in Jira, e.g. `customfield_10010`
117

AWS Service Catalog Administrator GuideValidating Configurations
The Config Rule will run automatically within the period specified. To see it in action immediately:
1. Create a public Amazon S3 bucket.2. Open the Config Rule in AWS Config and choose Re-evaluate. The rule and the automation
may take a short while to run, but within a few minutes you should see a new issue inJira with AWS Config information for the bucket which is in violation and suggesting theDisableS3BucketPublicReadWrite automation document as a remediation.
Validating ConfigurationsYou are now ready to validate the AWS Service Management Connector for Jira Service Desk installationprocedures.
AWS Service Catalog
To order an AWS Service Catalog product
1. Log in to your Jira Service Desk customer portal as the end user.2. In the Jira Service Desk customer portal, choose Request AWS product.3. Enter Summary details.4. Open the AWS product request detail menu and select a product to provision.5. Fill in the product request details, including product reference name, parameters, and tags.6. Choose Create to submit the Jira Service Desk request and provision the AWS Service Catalog
product.7. After the request processes, a message appears indicating that your request was created. When the
product is ready to provision, the end user is notified that the product is launching.
To view provisioned products
1. In the Jira Service Desk customer portal, go to Requests in the upper right corner.2. Select My Requests in the Jira Service Desk customer portal view.3. Select the AWS product you requested.4. The AWS product details will display, including the status of the product request, product events,
and activities.5. Once the product is in the Available status, end users can request post-provision operations actions
such as Request update, Request termination, and Request self-service actions. These actionsrender additional product events and activities within the request. Once the product is terminated,the request closes in a resolved state.
Systems Manager Automation
To execute an automation document
1. Log in to your Jira Service Desk customer portal as the end user.2. In the Jira Service Desk customer portal, choose Request AWS automation.3. Enter Summary details.4. Open the AWS automation request detail menu and select an automation document to execute.5. Fill in the automation request details, parameters and tags.6. Choose Create to submit the Jira Service Desk request and execute the AWS Systems Manager
Automation Document.
118

AWS Service Catalog Administrator GuideJira Additional Administrator Features
7. After the request processes, a message appears indicating that your request was created. As theautomation executes, the end user is notified of progress.
To view automation executions
1. In the Jira Service Desk customer portal, go to Requests in the upper right corner.2. Select My Requests in the Jira Service Desk customer portal view.3. Select the AWS automation execution you requested. The AWS automation execution details will
display, including the status of the execution, request details, and steps.
Jira Additional Administrator FeaturesThe following sections describe approvals and access controls that are available in Jira.
ApprovalsThe approval agent has access to a screen with the options to approve or reject the product request. Fora rejection, the agent can add a comment explaining why they are rejecting the request. The requester isable to see the status of the request, such as Waiting for Approval, Scheduled, Launching, or Available.
Changes to approver group members do not impact approvers identified for pre-existing issues but doaffect whether the approval is permitted. Approver users are assigned to the issue at the time the issueis created, and only these users are given the option to approve the request. The approver user must stillbe a member of the group when the approval is made, otherwise the approval is rejected.
As with AWS Service Catalog, all post-provision actions, including termination, are pre-approved for theuser or group who is approved to provision it.
Access ControlsAccess controls can be set on portfolios, as described earlier in this guide. Those access controls are inaddition to the per-project enablement: users must have access to an AWS Connector-enabled projectand belong to the groups enabled for a portfolio in order to provision products in that portfolio.
119

AWS Service Catalog Administrator Guide
Document HistoryThe following table describes important additions to the AWS Service Catalog documentation.
Feature Description Release Date
AWS ServiceQuotas
To learn about how AWS ServiceCatalog works with AWS ServiceQuotas, see AWS Service Catalogdefault service quotas (p. 4).
March 24, 2020
Getting StartedLibrary
To learn about the library of well-architected product templates offeredby AWS Service Catalog, see GettingStarted Library (p. 17).
March 10, 2020
Version Guidance To learn about product versionguidance, see Version Guidance (p. 36).
December 17, 2019
Connector for JiraService Desk
To begin using the Connector forJira Service Desk, see AWS ServiceManagement Connector for Jira ServiceDesk (p. 101).
November 21, 2019
New Version ofConnector forServiceNow
To learn about the updates to theConnector for ServiceNow, see AWSService Management Connector forServiceNow (p. 80).
November 18, 2019
New SecurityChapter
To learn about security in AWS ServiceCatalog, see Security in AWS ServiceCatalog (p. 19).
October 31, 2019
ChangingProvisionedProduct Owner
To learn about how to change theowner of provisioned products,see Changing Provisioned ProductOwner (p. 66).
October 31, 2019
New ResourceUpdate Constraint
To learn about how to use theRESOURCE_UPDATE constraint toupdate tags in provisioned products,see AWS Service Catalog Tag UpdateConstraints (p. 40).
April 17, 2019
Connector forServiceNow
To begin using the Connectorfor ServiceNow, see AWS ServiceManagement Connector forServiceNow (p. 80).
March 19, 2019
Support for AWSCloudFormationStackSets
To begin using AWS CloudFormationStackSets, see Using AWSCloudFormation StackSets (p. 62).
November 14, 2018
Self-serviceactions
To begin using self-service actions,see AWS Service Catalog ServiceActions (p. 49).
October 17, 2018
120

AWS Service Catalog Administrator Guide
Feature Description Release Date
CloudWatchmetrics
To learn about CloudWatch metrics,see AWS Service Catalog CloudWatchMetrics (p. 77).
September 26, 2018
Support forTagOptions
To manage tags, see AWS ServiceCatalog TagOption Library (p. 72).
June 28, 2017
Importing aportfolio
To import a portfolio shared fromanother AWS account, see Importing aPortfolio (p. 61).
February 16, 2016
Updates topermissionsinformation
To grant access to the end user consoleview, see Console Access for EndUsers (p. 22).
February 16, 2016
Initial release This is the initial release of the AWSService Catalog Administrator Guide.
July 9, 2015
121