AWS ELEMENTAL APPLIANCES AND SOFTWARE ORDER NOW …
12
1 AWS ELEMENTAL APPLIANCES AND SOFTWARE ORDER NOW USER GUIDE INTRODUCTION Welcome to the AWS Elemental Appliances and Software service’s Order Now user guide. This document is your step-by-step guide to placing orders for AWS Elemental Link directly through your AWS account. BEFORE YOU BEGIN In order to use the Order Now service, you will need an active AWS account. To create one, follow this link. Similar to other services on the AWS Management Console, access to the Order Now service is granted through IAM Policies assigned to each user provisioned within an account. Root account users (the individual who created the account; sometimes referred to as the “account admin”) have access to all services by default, and do not need to add any IAM policies to their user profile in order to use the Order Now service. Root account users can create additional users under the same AWS account ID. One common scenario is to create users with the permission to place new orders, and other users with the permission to download software and open technical support cases. To view and place orders, users need to have the “ElementalAppliancesSoftwareFullAccess” IAM Policy. To add this policy, follow this user guide. SECTION 1 – NAVIGATING TO THE ORDER NOW SERVICE Log into your AWS account by going to aws.amazon.com and selecting the “Sign into the Console” button in the upper right corner of the page. On the AWS Management Console homepage, navigate to the Services dropdown menu on the top banner and select “Elemental Appliances and Software” under the Media Services category.
Transcript of AWS ELEMENTAL APPLIANCES AND SOFTWARE ORDER NOW …

1
AWS ELEMENTAL APPLIANCES AND SOFTWARE ORDER NOW USER GUIDE
INTRODUCTION Welcome to the AWS Elemental Appliances and Software service’s Order Now user guide. This document is your step-by-step guide to placing orders for AWS Elemental Link directly through your AWS account. BEFORE YOU BEGIN In order to use the Order Now service, you will need an active AWS account. To create one, follow this link. Similar to other services on the AWS Management Console, access to the Order Now service is granted through IAM Policies assigned to each user provisioned within an account. Root account users (the individual who created the account; sometimes referred to as the “account admin”) have access to all services by default, and do not need to add any IAM policies to their user profile in order to use the Order Now service. Root account users can create additional users under the same AWS account ID. One common scenario is to create users with the permission to place new orders, and other users with the permission to download software and open technical support cases. To view and place orders, users need to have the “ElementalAppliancesSoftwareFullAccess” IAM Policy. To add this policy, follow this user guide. SECTION 1 – NAVIGATING TO THE ORDER NOW SERVICE Log into your AWS account by going to aws.amazon.com and selecting the “Sign into the Console” button in the upper right corner of the page. On the AWS Management Console homepage, navigate to the Services dropdown menu on the top banner and select “Elemental Appliances and Software” under the Media Services category.

2
On the Elemental Appliances and Software service home page, open the navigation panel on the left side of the page and select “AWS Elemental Link”:
This will take you to the product detail page of the AWS Elemental Link device. To begin your order, click “Start Order”:

3
SECTION 2 – PLACING YOUR ORDER THROUGH ORDER NOW Enter your order contact information. We will use this information to send you an order confirmation, or contact you if we have questions about your order. If you’d like this information used for the delivery contact, simply check the box “Use this information for delivery contact”. Each Order line enables you to define a specific quantity, AWS region in which to provision your device(s), and delivery address. Note: Ensure you are selecting the AWS region in which you plan to connect your device as input in AWS Elemental MediaLive; once provisioned, you will not be able to use it in any other AWS region.
If you have placed orders through the Elemental Appliances and Software service before, you will see a list of previously used delivery addresses from which you can select for your current order. To enter a new address, select “Add new address to address book”:

4
When adding a new address, a modal window will open in which to enter your address information. Before adding it to your address book, select the “Validate” button. This will present a suggested address based on our address validation service. Alternatively, you can select the address as you entered it:
If you chose to copy your order contact info to the delivery contact, you’ll see those fields prepopulated (Note: you’ll also need to add a phone number at which the shipping carrier can contact you if they have questions regarding your delivery).
5
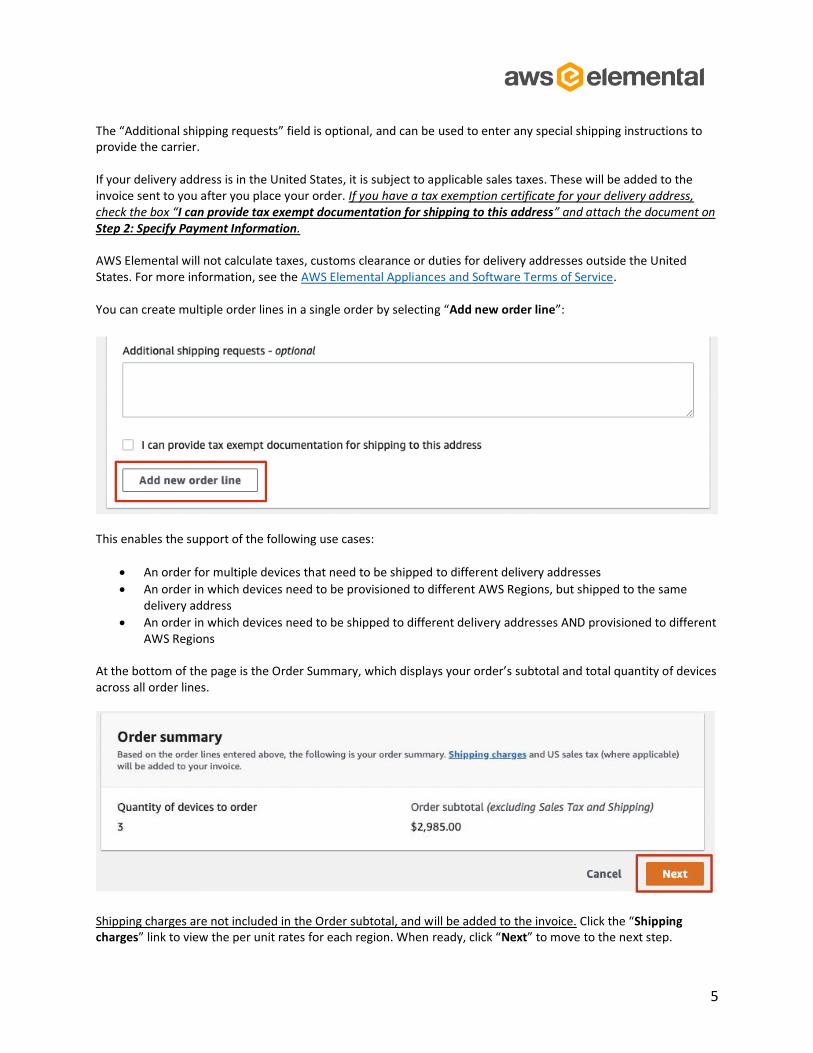
The “Additional shipping requests” field is optional, and can be used to enter any special shipping instructions to provide the carrier. If your delivery address is in the United States, it is subject to applicable sales taxes. These will be added to the invoice sent to you after you place your order. If you have a tax exemption certificate for your delivery address, check the box “I can provide tax exempt documentation for shipping to this address” and attach the document on Step 2: Specify Payment Information. AWS Elemental will not calculate taxes, customs clearance or duties for delivery addresses outside the United States. For more information, see the AWS Elemental Appliances and Software Terms of Service. You can create multiple order lines in a single order by selecting “Add new order line”:
This enables the support of the following use cases:
• An order for multiple devices that need to be shipped to different delivery addresses
• An order in which devices need to be provisioned to different AWS Regions, but shipped to the same delivery address
• An order in which devices need to be shipped to different delivery addresses AND provisioned to different AWS Regions
At the bottom of the page is the Order Summary, which displays your order’s subtotal and total quantity of devices across all order lines.
Shipping charges are not included in the Order subtotal, and will be added to the invoice. Click the “Shipping charges” link to view the per unit rates for each region. When ready, click “Next” to move to the next step.

6
On “Step 2: Specify payment information”, select your preferred Payment option:
If “Prepayment” is selected, we will send an invoice to the billing contact identified on this step. Once we receive payment, we will ship your order. If “Request invoice with approved payment options” is selected, you will need to enter a purchase order number and upload your PO document to submit your order. We will review your order and reach out to the Order Contact if needed. Otherwise, upon approval of the order, it will move to fulfillment. The Billing address details reflect the “Contact Information” under your AWS Account. To view these, click your account name on right-hand side of the top banner and select “My Account”:

7
Note: the Contact Information on this page relates to your AWS Account and is not specific to orders you place through the Elemental Appliances and Software service. You should only update the information on this page if you want it reflected across your use of all other AWS services within the Console.
You can update both the billing email and the billing account name and physical address for this specific order by entering a new email address in the billing email field, or clicking the “Update billing address” button:

8
Once you have confirmed the correct payment and billing details, select “Next” to move the final step, “Review and submit order”. This final page is a summary of your order. If anything needs to be corrected, click the “Edit” or “Previous” buttons to move back to the step requiring corrections. If “Cancel” is clicked, you’ll be returned to the AWS Elemental Link product detail page. If you are ready to place your order, click “Submit”:

9
Once your order is submitted, you’ll be taken to the Quotes and orders page within the Elemental Appliances and Software service. You will see your order under the “AWS Elemental Link order history” tab.

10
You will also receive an order confirmation email. Once your order has been processed, an invoice will be emailed to the billing contact identified on Step 2.

11
Once your order has shipped, you can find important details about your order, such as Serial numbers, Ship date, and Tracking number in your order details, accessible by clicking on your order from the Quotes and orders page:

12
You will also receive an email from UPS containing your tracking number and order details (Note: the “Transaction Reference Number” is the same as your “Confirmation Number”, pictured above in your order detail page):