AV Receiver - Abt Electronics · PDF fileyamaha electronics corporation, usa 6660 orangethorpe...
177
UCA AV Receiver OWNER’S MANUAL English
Transcript of AV Receiver - Abt Electronics · PDF fileyamaha electronics corporation, usa 6660 orangethorpe...

YAMAHA ELECTRONICS CORPORATION, USA 6660 ORANGETHORPE AVE., BUENA PARK, CALIF. 90620, U.S.A.YAMAHA CANADA MUSIC LTD. 135 MILNER AVE., SCARBOROUGH, ONTARIO M1S 3R1, CANADAYAMAHA ELECTRONIK EUROPA G.m.b.H. SIEMENSSTR. 22-34, 25462 RELLINGEN BEI HAMBURG, GERMANYYAMAHA ELECTRONIQUE FRANCE S.A. RUE AMBROISE CROIZAT BP70 CROISSY-BEAUBOURG 77312 MARNE-LA-VALLEE CEDEX02, FRANCEYAMAHA ELECTRONICS (UK) LTD. YAMAHA HOUSE, 200 RICKMANSWORTH ROAD WATFORD, HERTS WD18 7GQ, ENGLANDYAMAHA SCANDINAVIA A.B. J A WETTERGRENS GATA 1, BOX 30053, 400 43 VÄSTRA FRÖLUNDA, SWEDENYAMAHA MUSIC AUSTRALIA PTY, LTD. 17-33 MARKET ST., SOUTH MELBOURNE, 3205 VIC., AUSTRALIA
© 2007 All rights reserved.
Printed in Malaysia WK97700
UCA
AV Receiver
OWNER’S MANUALEnglish
RX-Z11_UCA-cv.fm Page 1 Thursday, October 4, 2007 4:15 PM
Black process 45.0° 240.0 LPI

2 En
Front panel
MASTER
MAIN ZONE
INPUT
ONOFF
MICOPTIMIZER
AUDIO SELECTSPEAKERS
A B
YPAOSILENT CINEMA
PHONES
ON/OFF
PURE DIRECT
VOLUME
MULTI ZONE
STRAIGHT TUNING MODE
ZONE ON/OFF
MENU
TONE CONTROLZONE
CONTROLSREC OUT/
ZONE 2
MEMORY BAND
EDIT
PRESET/TUNING
EFFECT DISPLAY MAN'L/AUTO SEARCH MODE
PUSH ENTER
PROGRAM
RL OPTICAL HDMI IN USBAUDIO
VIDEO AUX
S VIDEO VIDEO
ZONE 3 ZONE 4ZONE 2
MICOPTIMIZER
AUDIO SELECTSPEAKERS
A B
YPAOSILENT CINEMA
PHONES
MULTI ZONE
STRAIGHT TUNING MODE
ZONE ON/OFF
MENU
TONE CONTROLZONE
CONTROLSREC OUT/
ZONE 2
MEMORY BAND
EDIT
PRESET/TUNING
EFFECT DISPLAY MAN'L/AUTO SEARCH MODE
PUSH ENTER
PROGRAM
RL OPTICAL HDMI IN USBAUDIO
VIDEO AUX
S VIDEO VIDEO
ZONE 3 ZONE 4ZONE 2
A B
DF
C
EG IH
PO Q
J K L M N
(U.S.A. and Canada models)
01EN_00_Mihiraki_RX-Z11_U.fm Page 2 Thursday, October 4, 2007 5:18 PM
Black process 45.0° 240.0 LPI

3 En
Remote control
AMP
TV
SOURCE
ZONEMODE
SELECT SETUP ID MACRO
43
SYSTEM MEMORY
VOLUME
DVD CD
V-AUXMULTI
AVTV
PHONO
CD-R
POWERSTANDBYPOWERPOWER
DTV DVR VCR
DOCKTUNER XM
BDHD DVD
MDTAPE
CBLSAT
NETUSB
REC
SRCH MODELEVEL
BANDMENUTITLE
CLASSICAL 1 CLASSICAL 2 LIVE/CLUB ENTERTAIN
MEMORY
PC/MCX
RETURN DISPLAY
PRESET/CH
ENTER CAT.A-E
MUTE
21
NET RADIO
PRG SELECT
USB
MOVIE STEREO SUR. DECODE
EXTD SUR.
ENHANCER
THX STRAIGHT PURE DIRECT
PARTY SLEEP HDMI OUT AUDIO SEL
TV VOL TV CH TV 3D DSP
1 2 3 4
5 6 7 8
ENT
MUTE AUDIO
INPUT
9 0
CLASSICAL 1 CLASSICAL 2 LIVE/CLUB ENTERTAIN
MOVIE STEREO SUR. DECODEENHANCER
THX STRAIGHT
1 2 3 4
5 6 7 8
9 0
10
1
D
E
F
GH
I
J
LK
MN
O
P
2
3
4
5
6
7
8
9
0
A
B
C
R
Q
(U.S.A. and Canada models)
Backlight modeThe remote control is equipped with the motion sensor and the remote control lights up the backlight corresponding to the motions or operation. If you do not want to lights up the backlight when this unit detects motions, change the backlight mode (see page 124).
Simplified remote controlThis products is supplied with the simplified remote control. Refer to “Simplified remote control” on page 132.
Optional component control area button ( )You can control the desired component without changing the input source of this unit (see page 122).
(Australia model only)
01EN_00_Mihiraki_RX-Z11_U.fm Page 3 Thursday, October 4, 2007 5:18 PM
Black process 45.0° 240.0 LPI

IMPORTANT SAFETY INSTRUCTIONS
• Explanation of Graphical Symbols
The lightning flash with arrowhead symbol, within an equilateral triangle, is intended to alert you to the presence of uninsulated “dangerous voltage” within the product’s enclosure that may be of sufficient magnitude to constitute a risk of electric shock to persons.
The exclamation point within an equilateral triangle is intended to alert you to the presence of important operating and maintenance (servicing) instructions in the literature accompanying the appliance.
1 Read these instructions.2 Keep these instructions.3 Heed all warnings.4 Follow all instructions.5 Do not use this apparatus near water.6 Clean only with dry cloth.7 Do not block any ventilation openings. Install in accordance with the
manufacturer’s instructions.8 Do not install near any heat sources such as radiators, heat registers,
stoves, or other apparatus (including amplifiers) that produce heat.9 Do not defeat the safety purpose of the polarized or grounding-type
plug. A polarized plug has two blades with one wider than the other. A grounding type plug has two blades and a third grounding prong. The wide blade or the third prong are provided for your safety. If the provided plug does not fit into your outlet, consult an electrician for replacement of the obsolete outlet.
10 Protect the power cord from being walked on or pinched particularly at plugs, convenience receptacles, and the point where they exit from the apparatus.
11 Only use attachments/accessories specified by the manufacturer.12 Use only with the cart, stand, tripod, bracket, or table
specified by the manufacturer, or sold with the apparatus. When a cart is used, use caution when moving the cart/apparatus combination to avoid injury from tip-over.
13 Unplug this apparatus during lightning storms or when unused for long periods of time.
14 Refer all servicing to qualified service personnel. Servicing is required when the apparatus has been damaged in any way, such as power-supply cord or plug is damaged, liquid has been spilled or objects have fallen into the apparatus, the apparatus has been exposed to rain or moisture, does not operate normally, or has been dropped.
IMPORTANT SAFETY INSTRUCTIONS
Note to CATV system installer:This reminder is provided to call the CATV system installer’s attention to Article 820-40 of the NEC that provides guidelines for proper grounding and, in particular, specifies that the cable ground shall be connected to the grounding system of the building, as close to the point of cable entry as practical.
IMPORTANTPlease record the serial number of this unit in the space below.MODEL: Serial No.: The serial number is located on the rear of the unit. Retain this Owner’s Manual in a safe place for future reference.
FCC INFORMATION (for US customers)
1 IMPORTANT NOTICE: DO NOT MODIFY THIS UNIT!This product, when installed as indicated in the instructions contained in this manual, meets FCC requirements. Modifications not expressly approved by Yamaha may void your authority, granted by the FCC, to use the product.
2 IMPORTANT: When connecting this product to accessories and/or another product use only high quality shielded cables. Cable/s supplied with this product MUST be used. Follow all installation instructions. Failure to follow instructions could void your FCC authorization to use this product in the USA.
3 NOTE: This product has been tested and found to comply with the requirements listed in FCC Regulations, Part 15 for Class “B” digital devices. Compliance with these requirements provides a reasonable level of assurance that your use of this product in a residential environment will not result in harmful interference with other electronic devices.This equipment generates/uses radio frequencies and, if not installed and used according to the instructions found in the users manual, may cause interference harmful to the operation of other electronic devices.
Compliance with FCC regulations does not guarantee that interference will not occur in all installations. If this product is found to be the source of interference, which can be determined by turning the unit “OFF” and “ON”, please try to eliminate the problem by using one of the following measures:
Relocate either this product or the device that is being affected by the interference.
Utilize power outlets that are on different branch (circuit breaker or fuse) circuits or install AC line filter/s.
In the case of radio or TV interference, relocate/reorient the antenna. If the antenna lead-in is 300 ohm ribbon lead, change the lead-in to coaxial type cable.
If these corrective measures do not produce satisfactory results, please contact the local retailer authorized to distribute this type of product. If you can not locate the appropriate retailer, please contact Yamaha Electronics Corp., U.S.A. 6660 Orangethorpe Ave, Buena Park, CA 90620.
The above statements apply ONLY to those products distributed by Yamaha Corporation of America or its subsidiaries.
CAUTION
CAUTION: TO REDUCE THE RISK OF ELECTRIC SHOCK, DO NOT REMOVE
COVER (OR BACK). NO USER-SERVICEABLE PARTS INSIDE. REFER SERVICING TO QUALIFIED SERVICE PERSONNEL.
RISK OF ELECTRIC SHOCK DO NOT OPEN
4 En

CAUTION: READ THIS BEFORE OPERATING YOUR UNIT.
1 To assure the finest performance, please read this manual carefully. Keep it in a safe place for future reference.
2 Install this sound system in a well ventilated, cool, dry, clean place – away from direct sunlight, heat sources, vibration, dust, moisture, and/or cold. Allow ventilation space of at least 30 cm on the top, 20 cm on the left and right, and 20 cm on the back of this unit.
3 Locate this unit away from other electrical appliances, motors, or transformers to avoid humming sounds.
4 Do not expose this unit to sudden temperature changes from cold to hot, and do not locate this unit in an environment with high humidity (i.e. a room with a humidifier) to prevent condensation inside this unit, which may cause an electrical shock, fire, damage to this unit, and/or personal injury.
5 Avoid installing this unit where foreign objects may fall onto this unit and/or this unit may be exposed to liquid dripping or splashing. On the top of this unit, do not place:– Other components, as they may cause damage and/or discoloration
on the surface of this unit.– Burning objects (i.e. candles), as they may cause fire, damage to this
unit, and/or personal injury.– Containers with liquid in them, as they may fall and liquid may cause
electrical shock to the user and/or damage to this unit. 6 Do not cover this unit with a newspaper, tablecloth, curtain, etc. in order
not to obstruct heat radiation. If the temperature inside this unit rises, it may cause fire, damage to this unit, and/or personal injury.
7 Do not plug in this unit to a wall outlet until all connections are complete.
8 Do not operate this unit upside-down. It may overheat, possibly causing damage.
9 Do not use force on switches, knobs and/or cords.10 When disconnecting the power cable from the wall outlet, grasp the
plug; do not pull the cable.11 Do not clean this unit with chemical solvents; this might damage the
finish. Use a clean, dry cloth.12 Only voltage specified on this unit must be used. Using this unit with a
higher voltage than specified is dangerous and may cause fire, damage to this unit, and/or personal injury. Yamaha will not be held responsible for any damage resulting from use of this unit with a voltage other than specified.
13 To prevent damage by lightning, keep the power cord and outdoor antennas disconnected from a wall outlet or the unit during a lightning storm.
14 Do not attempt to modify or fix this unit. Contact qualified Yamaha service personnel when any service is needed. The cabinet should never be opened for any reasons.
15 When not planning to use this unit for long periods of time (i.e. vacation), disconnect the AC power plug from the wall outlet.
16 Install this unit near the AC outlet and where the AC power plug can be reached easily.
17 Be sure to read the “Troubleshooting” section on common operating errors before concluding that this unit is faulty.
18 Before moving this unit, press BMASTER ON/OFF to release it outward to the OFF position to turn off this unit, the main room, Zone 2, Zone 3, and Zone 4 and then disconnect the AC power plug from the AC wall outlet.
19 The batteries shall not be exposed to excessive heat such as sunshine, fire or like.
20 Excessive sound pressure from earphones and headphones can cause hearing loss.
Responsible Party: Yamaha Electronics Corporation, U.S.A.Address: 6660 Orangethorpe Avenue
Buena Park, CA 90620Telephone: 714-522-9105Fax: 714-670-0108Type of Equipment: AV ReceiverModel Name: RX-Z11
• This device complies with Part 15 of the FCC Rules.• Operation is subject to the following conditions:
– This device may not cause harmful interference.– This device must accept any interference received including interference
that may cause undesired operation.See the “Troubleshooting” section at the end of this manual if interference to radio reception is suspected.
Yamaha and the Electronic Industries Association’s Consumer Electronics Group want you to get the most out of your equipment by playing it at a safe level. One that lets the sound come through loud and clear without annoying blaring or distortion – and, most importantly, without affecting your sensitive hearing. Since hearing damage from loud sounds is often undetectable until it is too late, Yamaha and the Electronic Industries Association’s Consumer Electronics Group recommend you to avoid prolonged exposure from excessive volume levels.
Caution: Read this before operating your unit.
WARNINGTO REDUCE THE RISK OF FIRE OR ELECTRIC SHOCK, DO NOT EXPOSE THIS UNIT TO RAIN OR MOISTURE.
As long as this unit is connected to the AC wall outlet, it is not disconnected from the AC power source even if you turn off this unit by BMASTER ON/OFF. In this state, this unit is designed to consume a very small quantity of power.
FOR CANADIAN CUSTOMERSTo prevent electric shock, match wide blade of plug to wide slot and fully insert.This Class B digital apparatus complies with Canadian ICES-003.
COMPLIANCE INFORMATION STATEMENT (DECLARATION OF CONFORMITY PROCEDURE)
We Want You Listening For A Lifetime
5 En

Notices ..........................................................................................8Features......................................................................................10Getting started...........................................................................11Quick start guide.......................................................................13
Connections ...............................................................................20Optimizing the speaker setting for your listening room
(YPAO) ..................................................................................46Before starting the automatic setup ...............................................46Using the quick automatic setup....................................................47Using the basic automatic setup ....................................................48
Reviewing the result of the automatic setup .............................49Using advanced automatic setup ...................................................50
Playback.....................................................................................54Basic procedure .............................................................................54Selecting the MULTI CH INPUT component...............................54Selecting the HDMI OUT jack......................................................55Selecting the front speaker set .......................................................55
Using the Zone B feature...........................................................55Using your headphones .................................................................55Playing video sources in the background of an audio source........55Selecting audio input jacks (AUDIO SELECT)............................56Muting the audio output ................................................................56Using the sleep timer .....................................................................56
Canceling the sleep timer ..........................................................56Operating this unit by using the graphical user interface
(GUI) menu ...............................................................................57Items in GUI menu ....................................................................57Basic controls in the GUI menu ................................................57Basic operation of the GUI menu
by using the front panel controls...........................................57Sound field programs ...............................................................58
Selecting sound field programs .....................................................58Sound field program descriptions..................................................58
For audio music sources ............................................................59For various sources....................................................................61For visual sources of music .......................................................61For parties..................................................................................62For game programs....................................................................62For movie sources .....................................................................62Stereo playback .........................................................................63For compression artifacts
(Compressed Music Enhancer mode) ...................................63Surround decoder mode.............................................................63THX Surround mode .................................................................63Using sound field programs without surround speakers
(Virtual CINEMA DSP)........................................................64Enjoying multi-channel sources and sound field programs
with headphones (SILENT CINEMA) .................................64Using CINEMA DSP HD³ mode...................................................64Enjoying unprocessed input sources..............................................64
Deactivating the “STRAIGHT” mode ......................................64Using audio features .................................................................65
Enjoying pure hi-fi sound ..............................................................65Adjusting the tonal quality ............................................................65Adjusting the speaker level............................................................65
Recording...................................................................................66
FM/AM tuning .......................................................................... 68Automatic tuning .......................................................................... 68Manual tuning ............................................................................... 69Direct frequency tuning ................................................................ 69Selecting preset stations................................................................ 70Automatic preset tuning................................................................ 70Manual preset tuning .................................................................... 71Exchanging preset stations............................................................ 71
Using HD Radio™ features (U.S.A. model only) ................... 72Searching HD Radio stations by using the GUI menu ................. 72Selecting HD Radio™ audio programs ........................................ 73Displaying HD Radio™ information............................................ 73
Front panel display ................................................................... 73Video monitor........................................................................... 73
XM™ Satellite Radio tuning (U.S.A. and Canada models only)........................................ 74
Enjoying the XM HD Surround content................................... 74Connecting the XM™ Mini-Tuner Home Dock........................... 74Activating XM™ Satellite Radio.................................................. 74
Checking your XM Radio ID ................................................... 74Subscription of your XM Satellite Radio service..................... 74
Basic XM™ Satellite Radio operations........................................ 75All Channel Search mode ......................................................... 75Category Search mode.............................................................. 75Preset Search mode................................................................... 75Direct Number Access mode.................................................... 76
Setting the XM™ Satellite Radio preset channels........................ 76Displaying the XM™ Satellite Radio information ....................... 77
Displaying the XM Satellite Radio information in the front panel display ...................................................... 77
Displaying the XM Satellite Radio information in the video monitor ............................................................. 77
Using iPod™.............................................................................. 78Controlling iPod™........................................................................ 78
Remote control operation ......................................................... 78Controlling iPod in the simple remote mode............................ 78Controlling iPod in the menu browse mode ............................. 78The functions of the play information display.......................... 79
Using Network/USB features ................................................... 80Navigating the network and USB menus...................................... 80
Remote control operation ......................................................... 81Using a PC server or Yamaha MCX-2000 ................................... 82
Installing Windows Media Player 11 on your PC .................... 82Registering this unit on the Yamaha MCX-2000 ..................... 82
Using the Internet Radio ............................................................... 83Storing your favorite Internet Radio stations with bookmarks...... 83
Using a USB storage device or a USB portable audio player ...... 83Using shortcut buttons .................................................................. 84
Assigning the items to the numeric button (1-8) ...................... 84Select an item by using numeric buttons (1-8) ......................... 84
Contents
Introduction
Preparation
Basic Operation
Internal Source Operation
6 En

Contents
Prep
aration
Intro
du
ction
Basic O
peratio
nIn
ternal S
ou
rce O
peratio
nA
dvanced
O
peratio
nA
dd
ition
al In
form
ation
Advanced sound configurations .............................................. 86Selecting decoders .........................................................................86
Selecting decoders for 2-channel sources (surround decode mode) .......................................................86
Decoder descriptions.................................................................86Selecting decoders used with sound field programs .................86Selecting decoders for multi-channel sources...........................87
Playing back sources with the THX Surround modes...................87For 2-channel sources ...............................................................87For multi-channel sources .........................................................87
Graphical user interface (GUI) menu..................................... 88GUI menu overview ......................................................................90Stereo/Surround (Stereo/Surround menu) .....................................91Input Select....................................................................................96Manual Setup (Basic) ....................................................................99Manual Setup (Volume) ..............................................................102Manual Setup (Sound).................................................................103Manual Setup (Video) .................................................................107Manual Setup (Multi Zone) .........................................................109Manual Setup (Network) .............................................................111Manual Setup (Option) ................................................................112Signal Info. (Input signal information)........................................114Language .....................................................................................114
Saving and recalling the system settings (System Memory)................................................................ 115Saving the current system settings ..............................................115
Saving by the SYSTEM MEMORY buttons ..........................115Saving by the GUI menu operation.........................................115Renaming the stored settings ..................................................116Saved parameters for the main zone .......................................117Saved parameters for Zone 2, Zone 3, or Zone 4....................117
Loading the stored system settings..............................................118Loading by the SYSTEM MEMORY buttons ........................118Loading by the GUI menu operation ......................................118
Using examples ...........................................................................119Example 1: Switching the settings of this unit according
to the using situations..........................................................119Example 2: Switching the setting of this unit according
to the environment of the listening room............................119Controlling this unit by using the Web browser
(Web Control Center) ........................................................ 120Remote control features ......................................................... 121
Controlling this unit, a TV, or other components........................121Controlling this unit ................................................................121Controlling a TV .....................................................................121Controlling other components.................................................122Selecting a component to be controlled ..................................123Controlling optional components (Option mode) ...................123
Customizing the remote control ..................................................123Setting the backlight mode of the remote control (LIGHT)........124Setting remote control codes (P-SET).........................................124Programming codes from other remote controls (LEARN)........126Changing source names in the display window (RNAME) ........127Macro programming features ......................................................128
Recalling programmed macro-operations ...............................128Default macro functions ..........................................................129Programming macro operations (MACRO)............................129
Clearing configurations ...............................................................130Clearing function sets (CLEAR).............................................130Clearing a learned function (ERASE).....................................131
Simplified remote control............................................................132Setting the controlling zone of the simplified remote control......132Replacing the battery in the simplified remote control ...........132
Using multi-zone configuration ............................................. 133Step1: Planning the multi-zone system....................................... 134Step2: Connecting the speakers, external amplifiers,
and/or other components ........................................................ 135Using internal amplifier of this unit ....................................... 135Using external amplifiers ....................................................... 136Using the ZONE DIGITAL OUT (COAXIAL) jack ............. 136Connecting Zone video monitor............................................. 137Video signal up-conversion
to the zone component video signals ................................. 137Using REMOTE IN/OUT and TRIGGER OUT jacks
for Zone 2, Zone 3, and Zone 4.......................................... 138Step3: Setting the zone parameter .............................................. 139
Assigning the zone speakers................................................... 139Controlling Zone 2, Zone 3, or Zone 4....................................... 139
Basic operation ....................................................................... 139Selecting the input source Zone 2, Zone 3, or Zone 4............ 140Adjusting the volume level of Zone 2, Zone 3, or Zone 4 .......... 140Setting the sleep timer for Zone 2, Zone 3, or Zone 4 ........... 140Adjusting the tonal quality of Zone 2, Zone 3, or Zone 4........... 141Using the Zone OSD .............................................................. 141
Using the party mode.................................................................. 141Advanced setup....................................................................... 142
Using the advanced setup menu ................................................. 142
Troubleshooting...................................................................... 146Resetting the system ............................................................... 154Glossary ................................................................................... 155Sound field program information ......................................... 160Parametric equalizer information......................................... 164Block diagrams ....................................................................... 165Specifications........................................................................... 167Index ........................................................................................ 169List of remote control codes................................................... 173
Advanced Operation
Additional Information
“BMASTER ON/OFF” or “3DVD” (example) indicates the name of the parts on the front panel or the remote control. Refer to the cover pages at the top of this manual for the information about each position of the parts.
7 En

8 En
Manufactured under license from Dolby Laboratories.“Dolby”, “Pro Logic”, and the double-D symbol are trademarks of Dolby Laboratories.
Manufactured under license under U.S. Patent No’s: 5,451,942;5,956,674;5,974,380;5,978,762;6,226,616;6,487,535 & other U.S. and worldwide patents issued & pending. DTS is a registered trademark and the DTS logos, Symbol, DTS-HD and DTS-HD Master Audio are trademark of DTS, Inc. © 1996-2007 DTS, Inc. All Rights Reserved.
THX, the THX logo and Ultra2 Plus are trademarks of THX Ltd. which may be registered in some jurisdictions. All rights reserved. All other trademarks are the property of their respective owners.
“iPod” is a trademark of Apple Inc., registered in the U.S. and other countries.
MPEG Layer-3 audio coding technology licensed from Fraunhofer IIS and Thomson.
This receiver supports network connections.
“HDMI”, the “HDMI” logo, and “High-Definition Multimedia Interface” are trademarks or registered trademarks of HDMI Licensing LLC.
“SILENT CINEMA” is a trademark of YAMAHA CORPORATION.
The XM name and related logos are registered trademarks of XM Satellite Radio Inc.
This product is manufactured under license from Neural Audio Corporation and THX Ltd. YAMAHA CORPORATION hereby grants the user a non-exclusive, non-transferable, limited right of use to this product under U.S.A. and foreign patent, patent pending and other technology or trademarks owned by Neural Audio Corporation and THX Ltd. “Neural Surround”, “Neural Audio”, “Neural” and “NRL” are trademarks and logos owned by Neural Audio Corporation. THX is a trademark of THX Ltd., which may be registered in some jurisdictions. All rights reserved.
Windows XP, Windows Vista, Windows Internet Explorer, Windows Media Audio, Windows Media Connect, and Windows Media Player are either registered trademarks or trademarks of Microsoft corporation in the United States and/or other countries.
HD Radio™ technology manufactured under license from iBiquity Digital Corporation. “iBiquity Digital” and the “HD Radio” and “HD” symbols are registered trademarks of iBiquity Digital Corporation. U.S. and Foreign Patents.
Circle Surround II, Dialog Clarity, TruBass, SRS and the symbol are trademarks of SRS Labs, Inc. Circle Surround II, Dialog Clarity and TruBass technologies are incorporated under license from SRS Labs, Inc.
Notices
About this manual• y indicates a tip for your operation.• Some operations can be performed by using either the buttons on the
front panel or the ones on the remote control. In case the button names differ between the front panel and the remote control, the button name on the remote control is given in parentheses.
• This manual is printed prior to production. Design and specifications are subject to change in part as a result of improvements, etc. In case of differences between the manual and product, the product has priority.
• This unit is equipped with GUI language switching capability. In this manual, the illustrations of the GUI are examples when you set the GUI language to English.
• “AMAIN ZONE ON/OFF” or “3DVD” (example) indicates the name of the parts on the front panel or the remote control. Refer to the cover pages at the top of this manual for the information about each position of the parts.
• The symbol “” with page number(s) indicates the corresponding reference page(s).
iPodTM

IntroductionFeatures ................................................................................................ 10
Getting started ..................................................................................... 11Supplied accessories ................................................................................................................ 11Using the remote control ......................................................................................................... 12Opening and closing the front panel door ............................................................................... 12
Quick start guide .................................................................................. 13Preparation: Check the items ................................................................................................... 13Step 1: Set up your speakers .................................................................................................... 14Step 2: Connect your Blu-ray Disc/HD DVD player and other components .......................... 16Step 3: Turn on the power and start playback ......................................................................... 17What do you want to do with this unit? ................................................................................... 18
Intro
du
ction

Built-in 11-channel power amplifier Minimum RMS output power
(20 Hz to 20 kHz, 0.04% THD, 8 Ω)Front: 140 W + 140 WCenter: 140 WSurround: 140 W + 140 WSurround back: 140 W + 140 WFront presence: 50 W + 50 WRear presence: 50 W + 50 W
Sound field programs P. 58 Proprietary Yamaha technology for the creation of sound fields THX Ultra2 Plus surround modes P. 87 CINEMA DSP HD³ mode for creating intensive and accurate
stereoscopic sound field P. 64 Compressed Music Enhancer mode to improve the sound quality of
compression artifacts (such as the MP3 format) to that of a high-quality multi-channel source playback P. 63
Virtual CINEMA DSP P. 64 SILENT CINEMA P. 64
Digital audio decoders Dolby TrueHD, Dolby Digital Plus decoder DTS-HD Master Audio, DTS-HD High Resolution Audio decoder Dolby Digital/Dolby Digital EX decoder DTS/DTS-ES Matrix 6.1, Discrete 6.1, DTS 96/24 decoder Dolby Pro Logic/Dolby Pro Logic II/Dolby Pro Logic IIx decoder DTS NEO:6 decoder Neural-THX Surround decoder (U.S.A. and Canada models only) SRS CS II (U.S.A. model only)
HDMI™ (High-Definition Multimedia Interface) P. 29 HDMI interface for standard, enhanced or high-definition video as well
as multi-channel digital audio based on HDMI version 1.3a Automatic audio and video synchronization (lip sync) information
capability Deep Color (30/36 bit) and xvYCC color video signal transmission
capability High refresh rate and high resolution video signals capability High definition digital audio format signals capability Analog video to HDMI digital video up-conversion (composite video ↔
S-video ↔ component video → HDMI digital video) capability for monitor out
Analog and HDMI video signal up-scaling P. 107
Sophisticated FM/AM tuner P. 68 40-station random and direct preset tuning Automatic preset tuning Preset station shifting capability (preset editing) HD Radio™ digital broadcast reception capability (U.S.A. model only)
XM™ Satellite Radio (U.S.A. and Canada models only) P. 74 XM Satellite Radio tuning capability (using XM Mini-Tuner and Home
Dock, sold separately) Neural-THX Surround decoder to play back the XM HD content of XM
Satellite Radio broadcasts in multi-channels, resulting in a full surround sound experience P. 86
XM Satellite Radio information displaying capability
iPod controlling capability P. 78 DOCK terminal to connect a Yamaha iPod universal dock (such as the
YDS-10, sold separately), which supports iPod (Click and Wheel), iPod nano, and iPod mini
Network features P. 80 NETWORK port to connect a PC and Yamaha MCX-2000 or access the
Internet Radio via LAN DHCP automatic or manual network configuration
USB features P. 83 USB ports to connect a USB storage device, USB Hard disc drive, or a
USB portable audio player
Web control feature Web control capability of this unit by using a Web browser
P. 120
Automatic speaker setup features Advanced YPAO (Yamaha Parametric Room Acoustic Optimizer) for
automatic speaker setup P. 46 Specialized parametric equalizer for the standing wave reduction
P. 48 Multiple point measurement feature for multiple listening positions
P. 50 Speaker angle measurement feature for the optimized CINEMA DSP
effect P. 64
Other features 192-kHz/24-bit D/A converter GUI (graphical user interface) menus that allow you to optimize this unit
to suit your individual audio/video system P. 88 GUI display menu language switching capability (English, Japanese,
French, German, Spanish and Russian) P. 114 6 or 8-channel additional input jacks for discrete multi-channel input
P. 37 Multiple subwoofers connection capability P. 26 Analog video interlace/progressive conversion from 480i (NTSC)/576i
(PAL) to 480p/576p S-video signal input/output capability P. 30 Component video input/output capability includes (4 COMPONENT
VIDEO INs and 2 MONITOR OUTs) P. 29 Optical and coaxial digital audio signal jacks P. 29 Pure Direct mode for pure hi-fi sound for all sources P. 65 Adaptive dynamic range controlling capability P. 102 Adaptive DSP effect level controlling capability P. 102 Remote control with preset remote control codes, learning, macro and
buttons and display backlight capability P. 121 Simplified remote control P. 132 Advanced amplifier assign capability P. 142 Flexible assignable trigger out jack P. 114 Zone switching capability between the main zone and Zone 2/Zone 3/
Zone 4 using ZONE CONTROLS P. 109 Zone 2 video output (composite and component) and displaying OSD
(on-screen display) capability P. 137 System Memory capability for saving and recalling multiple system
parameter settings P. 115 Sleep timer P. 56
Features
10 En

Intro
du
ction
Check that you received all of the following parts.
The form of the supplied accessories varies depending on the models.
Installing batteries in the remote control
1 Take off the battery compartment cover.
2 Insert the four supplied batteries (AAA, LR03) according to the polarity markings (+ and –) on the inside of the battery compartment.
3 Snap the battery compartment cover back into place.
• Change all of the batteries if you notice the operation range of the remote control decreases.
• Do not use old batteries together with new ones.• Do not use different types of batteries (such as alkaline and manganese
batteries) together. Read the packaging carefully as these different types of batteries may have the same shape and color.
• We strongly recommend that you use alkaline batteries.• If the batteries have leaked, dispose of them immediately. Avoid touching
the leaked material or letting it come into contact with clothing, etc. Clean the battery compartment thoroughly before installing new batteries.
• Do not throw away batteries with general house waste; dispose of them correctly in accordance with your local regulations.
• If the remote control is without batteries for more than 2 minutes, or if exhausted batteries remain in the remote control, the contents of the memory may be cleared. When the memory is cleared, insert new batteries, set up the remote control code and program any acquired functions that may have been cleared.
Getting started
Supplied accessories
Note
AMP
TV
SOURCE
ZONEMODE
SELECT SETUP ID MACRO
43
SYSTEM MEMORY
VOLUME
DVD CD
V-AUXMULTI
AVTV
PHONO
CD-R
POWERSTANDBYPOWERPOWER
DTV DVR VCR
DOCKTUNER XM
BDHD DVD
MDTAPE
CBLSAT
NETUSB
REC
SRCH MODELEVEL
BANDMENUTITLE
CLASSICAL 1 CLASSICAL 2 LIVE/CLUB ENTERTAIN
MEMORY
PC/MCX
RETURN DISPLAY
PRESET/CH
ENTER CAT.A-E
MUTE
21
NET RADIO
PRG SELECT
USB
MOVIE STEREO SUR. DECODEENHANCER
THX STRAIGHT EXTD SUR.PURE DIRECT
PARTY SLEEP HDMI OUT AUDIO SEL
TV VOL TV CH TV 3D DSP
1 2 3 4
5 6 7 8
ENT.
MUTE AUDIO
INPUT
9 0 10
FRONTDIRECTION
Remote control Batteries (4) (AAA, LR03)
AM loop antenna(For conventional AM
radio tuning)
Optimizer microphone
Power cable
Indoor FM antenna(Two for U.S.A. model)
POWERSTANDBY
INPUT
SYSTEM MEMORY
41 32
INT SOURCE VOLUME
MUTE
PRESET
Simplified remote control Microphone base
AM loop antenna (For HD Radio tuning)
(U.S.A. model only)
(U.S.A. and Canada models)
13
2
Notes
11 En

Getting started
The remote control transmits a directional infrared ray.Be sure to aim the remote control directly at the remote control sensor on this unit during operation.
6LIGHTLights up the remote control buttons and the display window (4).
Display window (4)
[1] ID1/ID2 indicatorIndicates the currently selected remote control ID (see page 143).
[2] Transmit indicatorAppears while the remote control is sending infrared signals.
[3] Zone indicators Indicates the currently controlling zone (see page 139).
[4] Information displayShows the name of the selected input source that you can control.
Infrared window (1)Outputs infrared control signals. Aim this window at the component you want to operate.
Operation mode selector (F)The function of some buttons depends on the operation mode selector position.
AMPOperates the amplifier function of this unit.
SOURCEOperates the component selected with an input selector button (see page 122).
TVOperates the TV (see page 121).
• Do not spill water or other liquids on the remote control.• Do not drop the remote control.• Do not leave or store the remote control in the following types of
conditions:– places of high humidity, such as near a bath– places of high temperatures, such as near a heater or stove– places of extremely low temperatures– dusty places
When you want to use the controls behind the front panel door, open the door by gently pressing on the lower part of the panel. Keep the door closed when not using these controls.
Using the remote control
MASTER
MAIN ZONE
INPUT
ONOFF
MICOPTIMIZER
AUDIO SELECTSPEAKERS
A B
YPAOSILENT CINEMA
PHONES
ON/OFF
PURE DIRECT
VOLUME
MULTI ZONE
STRAIGHT TUNING MODE
ZONE ON/OFF
MENU
TONE CONTROLZONE
CONTROLSREC OUT/
ZONE 2
MEMORY FM/AM
EDIT
PRESET/TUNING
EFFECT DISPLAY MAN'L/AUTO CATEGORY SEARCH MODE
PUSH ENTER
PROGRAM
RL OPTICAL
HDMI IN USB
AUDIO
VIDEO AUX
S VIDEO VIDEO
ZONE 3 ZONE 4ZONE 2
30 30Approximately
6 m (20 ft)
Remote control sensor
MAINZONE 2
ID 2ID 1
ZONE 3ZONE 4
[1] [2]
[3] [4]
Notes
Backlight modeThe remote control is equipped with the motion sensor and the remote control lights up the backlight corresponding to the motions or operation. If you do not want to lights up the backlight when this unit detects motions, change the backlight mode (see page 124).
Opening and closing the front panel door
To open, press gently on the lower part of the panel.
12 En
Intro
du
ction
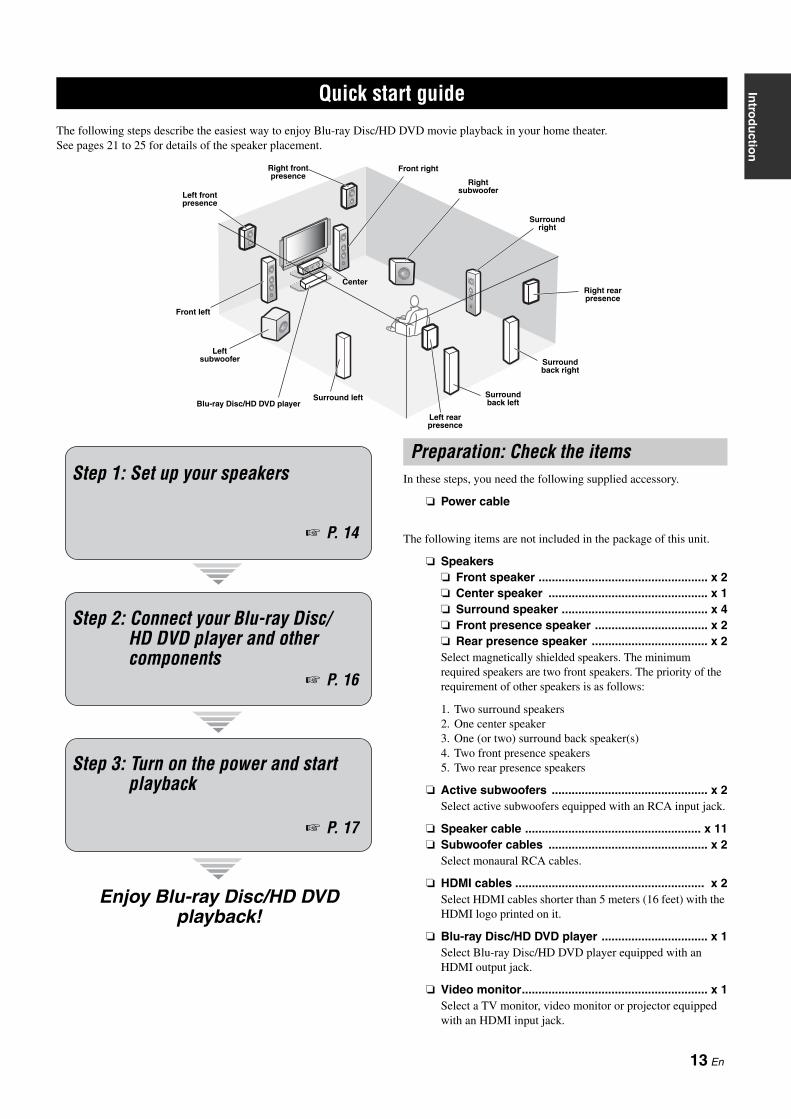
The following steps describe the easiest way to enjoy Blu-ray Disc/HD DVD movie playback in your home theater.See pages 21 to 25 for details of the speaker placement.
In these steps, you need the following supplied accessory.
Power cable
The following items are not included in the package of this unit.
Speakers Front speaker ................................................... x 2 Center speaker ................................................ x 1 Surround speaker ............................................ x 4 Front presence speaker .................................. x 2 Rear presence speaker ................................... x 2Select magnetically shielded speakers. The minimum required speakers are two front speakers. The priority of the requirement of other speakers is as follows:
1. Two surround speakers2. One center speaker3. One (or two) surround back speaker(s)4. Two front presence speakers5. Two rear presence speakers
Active subwoofers ............................................... x 2Select active subwoofers equipped with an RCA input jack.
Speaker cable ..................................................... x 11 Subwoofer cables ................................................ x 2
Select monaural RCA cables.
HDMI cables ......................................................... x 2Select HDMI cables shorter than 5 meters (16 feet) with the HDMI logo printed on it.
Blu-ray Disc/HD DVD player ................................ x 1Select Blu-ray Disc/HD DVD player equipped with an HDMI output jack.
Video monitor........................................................ x 1Select a TV monitor, video monitor or projector equipped with an HDMI input jack.
Quick start guide
Front right
Right subwoofer
Surround back right
Surround left
Front left
Surround back left
Surround right
Center
Right front presence
Blu-ray Disc/HD DVD player
Left subwoofer
Left front presence
Left rear presence
Right rear presence
Enjoy Blu-ray Disc/HD DVD playback!
Step 1: Set up your speakers
P. 14
Step 2: Connect your Blu-ray Disc/HD DVD player and other components
Step 3: Turn on the power and start playback
P. 16
P. 17
Preparation: Check the items
13 En

Quick start guide
Place your speakers in the room and connect them to this unit.
For other speaker configurationsIf you want to connect less than 11 speakers and 2 subwoofers, connect the speakers as follows.
Step 1: Set up your speakers
Front left Front right Center Surround
leftSurround
rightSurround back left
Surround back right
Front presence
left
Front presence
right
Rear presence
left
Rear presence
right
Subwoofer left
Subwoofer right
11.2/11.1
7.2/7.1
6.2/6.15.2/5.13.2/3.12.2/2.1
1 2 3 4
1 2 3 4 1 Make sure that this unit and the subwoofers are unplugged from the AC wall outlets.
2 Twist the exposed wires of the speaker cables together to prevent short circuits.3 Do not let the bare speaker wires touch each other.4 Do not let the bare speaker wires touch any metal part of this unit.
Surround right speaker
Surround back right speaker
Front right speaker
Center speaker
Loosen Insert TightenRight front
presence speakerRight rear
presence speaker
14 En

Quick start guide
Intro
du
ction
100100
Surround left speaker
Front left speaker
Right subwooferLeft subwoofer
Surround back left speaker
Left rear presence speaker
Left front presence speaker
Be sure to connect the left channel (L), right channel (R), “+” (red line) and “–” (white line) properly.
Check the impedance of the speaker you are connecting. If the impedance of your speaker is 6-ohm, change the setting of “SPEAKER IMP.” in “Advanced setup” (see page 142).
Note
Subwoofer cable
Subwoofercable
(U.S.A. model)
15 En

Quick start guide
1 Connect an HDMI cable to the HDMI output jack of your Blu-ray Disc/HD DVD player and the BD/HD DVD HDMI IN 1 jack of this unit.
2 Connect an HDMI cable to the HDMI OUT 1 jack of this unit and the HDMI input jack of your video monitor.
3 Connect the supplied power cable to AC IN of this unit and then plug the power cable and other components into the AC wall outlet.
yThis unit is equipped with AC OUTLET(S) that provide(s) power to other components. See page 42 for details.
Step 2: Connect your Blu-ray Disc/HD DVD player and other components
AC IN
HDMI
OUT 1 BD/HD DVDIN1
Make sure that this unit and the Blu-ray Disc/HD DVD player are unplugged from the AC wall outlets.
BD/HD DVD HDMI IN 1
AC IN
HDMI OUT 1
(U.S.A. model)
HDMI output jackHDMI cable
BD/HD DVD HDMI IN 1 jack
Blu-ray Disc/HD DVD player
AV receiver
HDMI input jack
HDMI cable
HDMI OUT 1 jack
Video monitor
AV receiver
General connection information
• General information on jacks and cable plugs P. 29
• General information on HDMI P. 29
• Speaker impedance setting P. 43
For further connections
• Using other kinds of speaker combinations P. 21
• Connecting a video monitor via various ways of connection P. 31
• Connecting a Blu-ray Disc/HD DVD player via various ways of connection
P. 32
• Connecting a DVD player via various ways of connection P. 33
• Connecting a DVD recorder or a digital video recorder P. 34
• Connecting a set-top box P. 33
• Connecting a CD player, an MD recorder, or a turntable P. 35
• Connecting an external amplifier P. 36
• Connecting a DVD player via multi-channel analog audio connection P. 37
• Connecting a Yamaha iPod universal dock P. 38
• Using the REMOTE IN/OUT jacks P. 38
• Using the TRIGGER OUT jacks P. 38
• Using the VIDEO AUX jacks on the front panel P. 39
• Connecting FM/AM antennas P. 41
• Connecting XM Mini-Tuner Home Dock P. 74
• Connecting this unit to your network P. 40
• Connecting a USB device P. 40
To the AC wall outlet
16 En

Quick start guide
Intro
du
ction
1 Turn on the video monitor connected to this unit.
2 Press BMASTER ON/OFF on the front panel inward to the ON position.
After this unit is turned on, it takes approximately 20 seconds until this unit produces sounds, and while “Please wait” appears in the front panel display, this unit does not accepts the front panel operations and stores the remote control operations. This unit performs the stored remote control operations after “Please wait” disappears.
3 Rotate the DINPUT selector to set the input source to “BD/HD DVD”.
yThe recommended sound field program is set for each input source (BD/HD DVD, etc.). You can also use various sound field programs and other sound modes for playback. Refer to the following pages for details:
– see pages 64 and 86 to use various sound field programs– see page 64 to turn on or off the sound effect– see page 65 to use the pure direct mode for high fidelity sound
4 Start playback of the desired Blu-ray Disc/HD DVD source on your player.
5 Rotate EVOLUME to adjust the volume.
After using this unit...
Press AMAIN ZONE ON/OFF to set this unit to the standby mode.
This unit is set to the standby mode and consumes a small amount of power in order to receive infrared signals from the remote control. To turn on this unit from the standby mode, press AMAIN ZONE ON/OFF on the front panel (or EPOWER on the remote control). See page 43 for details.
Are you enjoying playback?If there are some troubles with playback, check the settings as follows.
No sound is output.Are the speakers connected correctly?
Check the speaker connection.Are Your Blu-ray Disc/HD DVD player connected correctly?
Check the connection of the Blu-ray Disc/HD DVD player.Are the front speakers selected correctly?
Press GSPEAKERS A or GSPEAKERS B.Is volume setting correct?
Adjust the volume level.Does the Blu-ray Disc/HD DVD player play back correctly?
Check the setting of the Blu-ray Disc/HD DVD player.
No picture.Is the video monitor connected correctly?
Check the connection of the video monitor.If the video monitor is connected to the HDMI OUT 1 jack of this unit, is the “HDMI OUT SEL” setting correct?
Set the operation mode selector to CAMP and then press CHDMI OUT repeatedly to set “HDMI OUT SEL” to “OUT 1”.
Is Blu-ray Disc/HD DVD player connected correctly?Check the connection of the video monitor.
Is the input source setting of the video monitor correct?Check the setting of the input source of the video monitor.
Any other troubles?Refer to “Troubleshooting” on pages 146 to 153 for other troubles.
Step 3: Turn on the power and start playback
Check the type of the connected speakers.If the speakers are 6-ohm speakers, set “SPEAKER IMP.” to “6ΩMIN” before using this unit (see page 142).
Note
Automatic setup featureTo optimize the speaker settings for your listening room, use the automatic setup feature. See pages 47 to 52 for details.
17 En

Quick start guide
What do you want to do with this unit?
Using various input sources
• Basic operations of this unit P. 54
• Enjoying FM/AM radio programs P. 68
• Enjoying XM Satellite Radio programs P. 74
• Using your iPod with this unit P. 78
• Enjoying the contents stored on your PC P. 80
• Enjoying Internet radio programs and Podcasts P. 83
• Using USB devices with this unit P. 83
Using various sound features
• Using various sound field programs P. 58
• Using the Pure Direct mode for high fidelity sound P. 65
• Adjusting the tonal quality of the speakers P. 65
• Customizing the sound field programs P. 86
Additional features
• Setting the remote control P. 121
• Displaying the current input source signal information in the GUI P. 114
• Saving and recalling the system settings of this unit (System Memory) P. 115
• Controlling this unit using a Web browser P. 120
• Using headphones P. 55
• Using this unit in multiple rooms simultaneously (multi-zone configuration) P. 133
• Automatically turning off this unit P. 56
Manually adjusting various parameters of this unit
• Setting the language of the GUI menu P. 114
• Assigning the input/output jacks of this unit P. 96
• Setting the parameters for each input source P. 96
• Setting the parameters related to the volume level P. 102
• Adjusting the tonal quality of each channel manually by using the parametric equalizer P. 104
• Adjusting the audio and video synchronization P. 105
• Muting the selected speaker channel P. 106
• Setting the parameters related to the video signals P. 107
• Setting the basic speaker configuration P. 99
• Setting the network parameters P. 111
• Setting the parameters of the multi-zone feature P. 110
• Protecting the various settings P. 113
Adjusting the advanced parameters
• Setting the speaker impedance of the connected speakers P. 142
• Setting the language of the GUI menu P. 144
• Setting the video format of the connected video monitor P. 144
• Setting the parameters of this unit to default values P. 154
18 En

Preparation
Connections ......................................................................................... 20Rear panel .......................................................................................................................... 20Placing speakers ................................................................................................................. 21Connecting speakers .......................................................................................................... 23Using subwoofers .............................................................................................................. 26Using presence speakers .................................................................................................... 27Connecting the speaker cable ............................................................................................ 28Information on jacks and cable plugs ................................................................................ 29Information on HDMI™ .................................................................................................... 29Audio and video signal flow .............................................................................................. 30Connecting a TV monitor or projector .............................................................................. 31Connecting other components ........................................................................................... 32Using the VIDEO AUX jacks on the front panel .............................................................. 39Connecting the network ..................................................................................................... 40Connecting the USB storage devices to the USB ports ..................................................... 40Connecting the FM and AM antennas ............................................................................... 41Connecting the power cable ............................................................................................... 42Setting the speaker impedance and language .................................................................... 43Turning this unit on and off ............................................................................................... 43Front panel display ............................................................................................................ 44
Optimizing the speaker setting for your listening room (YPAO).............................................................................................................46
Before starting the automatic setup ................................................................................... 46Using the quick automatic setup ........................................................................................ 47Using the basic automatic setup ........................................................................................ 48Using advanced automatic setup ....................................................................................... 50
Prep
aration

Connections
2 RS-232C terminalThis is a control expansion terminal for custom installation. Consult your dealer for details.
Connections
Rear panel
SPEAKERS
SPEAKERS GND AMFM
ANTENNA-2
XM
DIGITAL OUTDOCKZONE OUTVIDEO OUTVIDEO INCOMPONENT VIDEO
COMPONENT VIDEO
AC OUTLETSSWITCHED
ZONE OUT PRE OUT
AC IN
GNDMULTI CH INPUT
RS-232C
TRIGGEROUT
REMOTE
ANTENNA-1
AUDIO OUT AUDIO INAUDIO IN
HDMINETWORKUSB
DIGITAL IN
COAXIAL
REAR PRESENCE/ZONE
FRONT PRESENCE/ZONE
SURROUND
(SINGLE)
SUR. BACK/BI-AMP
FRONT B/ ZONE
FRONT A
ZONE
DVR
PRPBYPRPBY
PRPBY
CBL/SAT
COMPONENT VIDEO
DVD
VIDEOVCRVCR DVR
VCR CD-R MD/TAPE CD-R CD PHONOMD/TAPEDVR
DVRDTVDVD CBL/SATS VIDEO
VIDEO
MONITOROUT
MONITOROUT
OUT
1
2
IN
OUT
IN
HD-Radio
FRONT (6CH) CENTER
SUBWOOFER SURROUND CENTER
(FRONT) (SINGLE)
SUR. BACK(REAR)SUBWOOFER
FRONTPRESENCE
REAR PRESENCEFRONTZONE 2 ZONE 3 ZONE 4SURROUNDSB (8CH)
GND
AM
FM
1
2
1
2
OUT 2OUT 1 BD/HD DVD
CD-R
DVD
DVR
DVD
DTV
CD
MD/TAPE
CBL/SAT
OPTICAL
OPTICAL
COAXIAL
BD/HD DVD
BD/HD DVD
8
7
6
5
4
3
2
1
EXTRA SP
REAR PRESENCE/ZONE
FRONT PRESENCE/ZONE
SURROUND
SUR. BACK/BI-AMP
FRONT B/ ZONE
FRONT A
CENTER
EXTRA SP
DVR
CBL/SAT
DVD
A
B
A
B
A
B
C
D
1 2 3 4 5 4 5
4 5
IN1 IN2 IN3 IN4
VCRDVRDTVDVD CBL/SAT1 2 3 4 5
+ +
R
L
R
L
R
L
R
L
R L
1
0
2 3 4 5 6 7 8
9 B C D E 1A (U.S.A. model)
Name Page
1 Speaker terminals 23
3 COMPONENT VIDEO jacks 31 – 33
Video component jacks
Zone video out jacks
DOCK terminal 38
4 USB port
5 NETWORK port 40
6 HDMI jacks 29
7 XM jack (U.S.A. and Canada models only) 74
8 ANTENNA terminals 41
9 TRIGGER OUT jack
REMOTE IN/OUT jacks 38
0 COMPONENT VIDEO MONITOR OUT jacks
A ANTENNA terminals (For HD radio, U.S.A. mode only) 41
B AC OUTLET(S) 42
C MULTI CH INPUT jacks 37
ZONE OUT jacks 135
PRE OUT jacks 36
D AC IN 42
E Audio component jacks 35
Digital audio jacks 32
ZONE DIGITAL OUT jack 136
20 En

Connections
Prep
aration
The speaker layout below shows the speaker setting we recommend. You can use it to enjoy the CINEMA DSP and multi-channel audio sources.
11.2/11.1 -channel speaker layout11.2/11.1-channel speaker layout is highly recommended for playback the sound of high definition audio formats (Dolby TrueHD, DTS-HD Master Audio, etc.) as well as the conventional audio sources with sound field programs. See page 23 for connection information.
Front left and right speakersThe front speakers are used for the main source sound plus effect sounds. Place these speakers at an equal distance from the ideal listening position. The distance of each speaker from each side of the video monitor should be the same.
Center speakerThe center speaker is for the center channel sounds (dialog, vocals, etc.). If for some reason it is not practical to use a center speaker, you can do without it. Best results, however, are obtained with the full system.
Surround left and right speakersThe surround speakers are used for effect and surround sounds.
Surround back left and right speakersThe surround back speakers supplement the surround speakers and provide more realistic front-to-back transitions.
Front and rear presence left and right speakersSee page 27 for details.
Left and right subwoofersSee page 26 for details.
Placing speakers
FR
FL
SBR
SBL
RPL
FPL
FPR
RPR
SL
SRRSW
LSW
C
60˚
30˚
SBRSBLRPRRPL
FPRFPL
FL FRC
SL
SR
SR80˚
SL
Speaker indications
FL/FR: Front left/rightC: Center
SL/SR: Surround left/rightSBL/SBR: Surround back left/rightFPL/FPR: Front presence left/rightRPL/RPR: Rear presence left/right
LSW/RSW: Left/right subwoofer
30 cm (12 in) or more
Using di-pole speakers
It is recommended that you use di-pole speakers for surround left and right channels for the accurate playback with the THX surround modes. When you use di-pole speakers, place the surround and surround back speakers as below. Set the distance between surround back speakers rather narrow compared with the conventional speaker layout.
FL
SRSL
FRC
SBRSBL
: Di-pole speaker
: Direction of the di-pole speaker phase
21 En

Connections
7.2/7.1 (or 6.2/6.1) -channel speaker layoutSee page 23 for connection information.
Front left and right speakersCenter speakerSurround left and right speakersThe functions and settings of each speaker are the same as those for the 11.2/11.1-channel speaker layout (see page 21).
Surround back left and right speakersThe surround back speakers supplement the surround speakers and provide more realistic front-to-back transitions.If you use a single surround back speaker, connect the single surround back speaker to the SUR.BACK/BI-AMP (SINGLE) speaker terminal and place the speaker behind the listening position. The surround back left and right channel signals are mixed down and output at the single surround back speaker when you set “Surround Back” to “Small x1” or “Large x1” (see page 100).
SubwooferSee page 26 for details.
yYou can also use the front presence speakers (see page 27) instead of the surround back speakers.
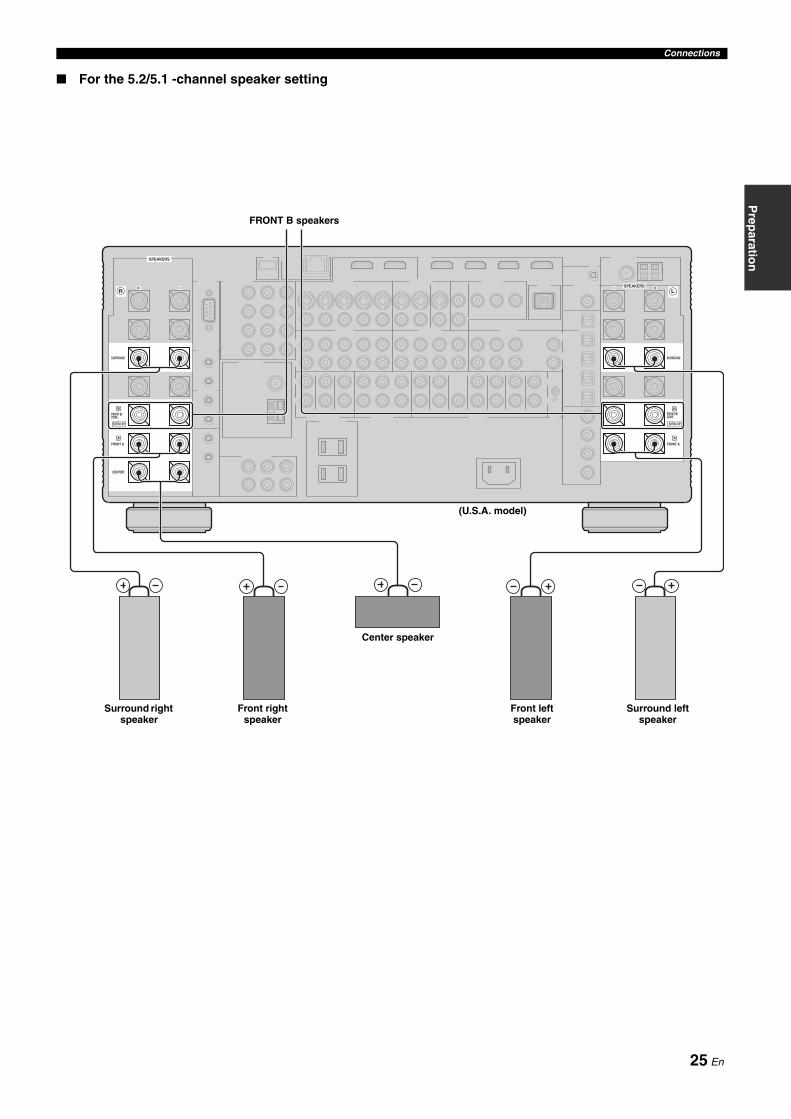
5.2/5.1 -channel speaker layoutSee page 23 for connection information.
Front left and right speakersCenter speakerSubwooferThe functions and settings of each speaker are the same as those for the 11.2/11.1-channel speaker layout (see page 21).
Surround left and right speakersConnect the surround speakers to the SURROUND speaker terminals even if you place the surround speakers behind the listening position. For the smooth and unbroken sound field behind the listening position, place the surround left and right speakers farther back compared with the placement in the 11.2/11.1-channel speaker layout. The surround back channel signals are directed to the surround left and right speakers when “Surround Back” is set to “None” (see page 100).
SubwooferSee page 26 for details.
FR
FL
SBR
SBL
SL
SR
C
RSW
LSW
Speaker indications
FL/FR: Front left/rightC: Center
SL/SR: Surround left/rightSBL/SBR: Surround back
left/rightLSW/RSW: Left/right subwoofer
60˚
30˚
SBRSBL
FL FRC
SL
SR
SR80˚
SL
30 cm (12 in) or more
FR
FL
SL
SR
RSW
LSW
C
60˚
30˚
FL FRC
SL
SR
SR80˚
SL
Speaker indications
FL/FR: Front left/rightC: Center
SL/SR: Surround left/rightLSW/RSW: Left/right subwoofer
For other speaker combinationsYou can enjoy multi-channel sources with sound field programs by using a speaker combination other than the speaker combinations shown above.Use the automatic setup feature (see page 46) or set the “Speaker Set” parameters in “Manual Setup” (see page 99) to output the surround sounds at the connected speakers.
22 En

Connections
Prep
aration
Be sure to connect the left channel (L), right channel (R), “+” (red line) and “–” (white line) properly. If the connections are faulty, this unit cannot reproduce the input sources accurately.
• A speaker cord is actually a pair of insulated cables running side by side. Cables are colored or shaped differently, perhaps with a stripe, groove or ridge. Connect the striped (grooved, etc.) cable to the “+” (red line) terminals of this unit and your speaker. Connect the plain cable to the “–” (white line) terminals.
• You can also use the REAR ZONE/PRESENCE, FRONT ZONE/PRESENCE, and/or EXTRA SP speaker terminals for the Zone 2, Zone 3, and/or Zone 4 speakers (see page 139). You can also use all speaker terminals of this unit for the Zone 2, Zone 3, and/or Zone 4 speakers (see page 143).
For the 11.2/11.1 (or 9.2/9.1) -channel speaker setting
Connecting speakers
Caution
• Before connecting the speakers, make sure that this unit is turned off (see page 43).• Do not let the bare speaker wires touch each other or do not let them touch any metal part of this unit. This could damage this unit and/
or speakers.• Use magnetically shielded speakers. If this type of speaker still creates interference with the monitor, place the speakers away from the
monitor.• If you are to use 6-ohm speakers, be sure to set “SPEAKER IMP.” to “6ΩMIN” before using this unit (see page 43).
Notes
SPEAKERS
SPEAKERS
REAR PRESENCE/ZONE
FRONT PRESENCE/ZONE
SURROUND
(SINGLE)
SUR. BACK/BI-AMP
FRONT B/ ZONE
FRONT A
EXTRA SP
REAR PRESENCE/ZONE
FRONT PRESENCE/ZONE
SURROUND
SUR. BACK/BI-AMP
FRONT B/ ZONE
FRONT A
CENTER
EXTRA SP
A
B
A
B
+ +R L
Surround right speaker
Center speaker
Right rearpresence
speaker
(U.S.A. model)
FRONT B speakers
Right frontpresence
speaker
Left front presence speaker
Left rear presence speaker
Surround back right speaker
Front right speaker
Front left speaker
Surround back left speaker
Surround left speaker
23 En

Connections
For the 7.2/7.1 (or 6.2/6.1) -channel speaker setting
* If you use a single surround back speaker, connect the speaker to the SUR.BACK/BI-AMP (SINGLE) speaker terminal.
SPEAKERS
SPEAKERS
SURROUND
(SINGLE)
SUR. BACK/BI-AMP
FRONT B/ ZONE
FRONT A
EXTRA SP
SURROUND
SUR. BACK/BI-AMP
FRONT B/ ZONE
FRONT A
CENTER
EXTRA SP
A
B
A
B
+ +R L
Surround right speaker
Center speaker
(U.S.A. model)
FRONT B speakers
Surround back right speaker
Front right speaker
Front left speaker
Surround back left speaker *
Surround left speaker
24 En
Connections
Prep
aration
For the 5.2/5.1 -channel speaker setting
SPEAKERS
SPEAKERS
SURROUND
FRONT B/ ZONE
FRONT A
EXTRA SP
SURROUND
FRONT B/ ZONE
FRONT A
CENTER
EXTRA SP
A
B
A
B
+ +R L
Surround right speaker
Center speaker
(U.S.A. model)
FRONT B speakers
Front right speaker
Front left speaker
Surround left speaker
25 En

Connections
The use of subwoofers with built-in amplifiers, such as the Yamaha Active Servo Processing Subwoofer System, is effective not only for reinforcing bass frequencies from any or all channels, but also for reproducing the high fidelity sound of the LFE (low-frequency effect) channel included in digital audio signals. Turn it slightly toward the center of the room to reduce wall reflections. You can use one or two subwoofers and select various positions of the subwoofers.
Configuration 1: Front left and right
Set “Configuration” in “Subwoofer” to “Stereo” (see page 100).
Speaker indicationsFL/FR: Front left/right
C: CenterSL/SR: Surround left/right
SBL/SBR: Surround back left/rightLSW/RSW: Left/right subwoofer
Configuration 2: Front and rear
Set “Configuration” in “Subwoofer” to “Front & Rear” (see page 100).
Speaker indicationsFL/FR: Front left/right
C: CenterSL/SR: Surround left/right
SBL/SBR: Surround back left/rightFSW/RSW: Front/rear subwoofer
Configuration 3: A single subwoofer
Set “Configuration” in “Subwoofer” to “Monaural” (see page 100).
Speaker indicationsFL/FR: Front left/right
C: CenterSL/SR: Surround left/right
SBL/SBR: Surround back left/rightSW: Subwoofer
Connecting subwoofers
Using subwoofers
C
LSW RSW
SL SR
FL FR
SBRSBL
C
RSW
FSW
SL SR
FL FR
SBRSBL
C
SW
SL SR
FL FR
SBRSBL
PRE OUT
(FRONT)
(REAR)SUBWOOFER
R
L
Left (or front) subwoofer
Right (or rear) subwoofer (U.S.A. model)
yIf you connect a single subwoofer, connect the subwoofer to the left SUBWOOFER PRE OUT jacks.
26 En

Connections
Prep
aration
The presence speakers supplement the sound from the front and surround back speakers with extra ambient effects produced by the sound field programs (see page 58). Presence speakers function more effectively when the CINEMA DSP HD³ mode is active (see page 64). You can adjust the vertical position of dialogues with using the front presence speakers (see page 91).
If “Front Presence” is set to “None”, the rear presence speakers also do not function and you cannot activate the CINEMA DSP HD³ mode.
Front presence speakers
Rear presence speakers
* Place the rear presence left and right speakers so that the distance between the rear presence left and right speakers is same as the distance between front presence left and right speakers.
Using presence speakers
Note
FR
FPRFPL
C
FL
0.5 to 1 m (1 to 3 ft)
1.8 m(6 ft) orhigher
Speaker indications
FL: Front leftFR: Front right
C: CenterFPL: Front presence leftFPR: Front presence right
0.5 to 1 m (1 to 3 ft)
1.8 m (6 ft) or higher
*
RPLRPR
SBR SBLSLSR
1.8 m (6 ft) or higher
Speaker indications
SL: Surround leftSR: Surround right
SBL: Surround back leftSBR: Surround back rightRPL: Rear presence leftRPR: Rear presence right
1.8 m (6 ft) or higher
*
27 En

Connections
1 Remove approximately 10 mm (0.4 in) of insulation from the end of each speaker cable and then twist the exposed wires of the cable together to prevent short circuits.
2 Loosen the knob.
3 Insert one bare wire into the hole on the side of each terminal.
4 Tighten the knob to secure the wire.
Connecting the banana plug
Tighten the knob and then insert the banana plug connector into the end of the corresponding terminal.
Using bi-amplification connections
This unit allows you to make bi-amplification connections to one speaker system. Check if your speakers support bi-amplification. To make the bi-amplification connections, use the FRONT A and SUR.BACK/BI-AMP terminals as shown below. To activate the bi-amplification connections, set “BI-AMP” to “ON” in “Advanced setup” (see page 143).
When you make the conventional connection, make sure that the shorting bars are put into the terminals of the speakers appropriately. Refer to the instruction manuals of the speakers for details.
Connecting the speaker cable
10 mm (0.4 in)
Red line: positive (+)White line: negative (–)
CautionRemove the shorting bars or bridges of your speakers to separate the LPF (low pass filter) and HPF (high pass filter) crossovers.
Note
Red line: positive (+)White line: negative (–)
banana plug
+ R +L(SINGLE)
SUR. BACK/BI-AMP
FRONT B/ ZONE
FRONT B/
FRONT A
EXTRA SP
A
B
SUR. BACK/BI-AMP
FRONT B/ ZONE
FRONT A
EXTRA SP
A
B
This unit
LeftRight
Front speakers
28 En
Connections
Prep
aration
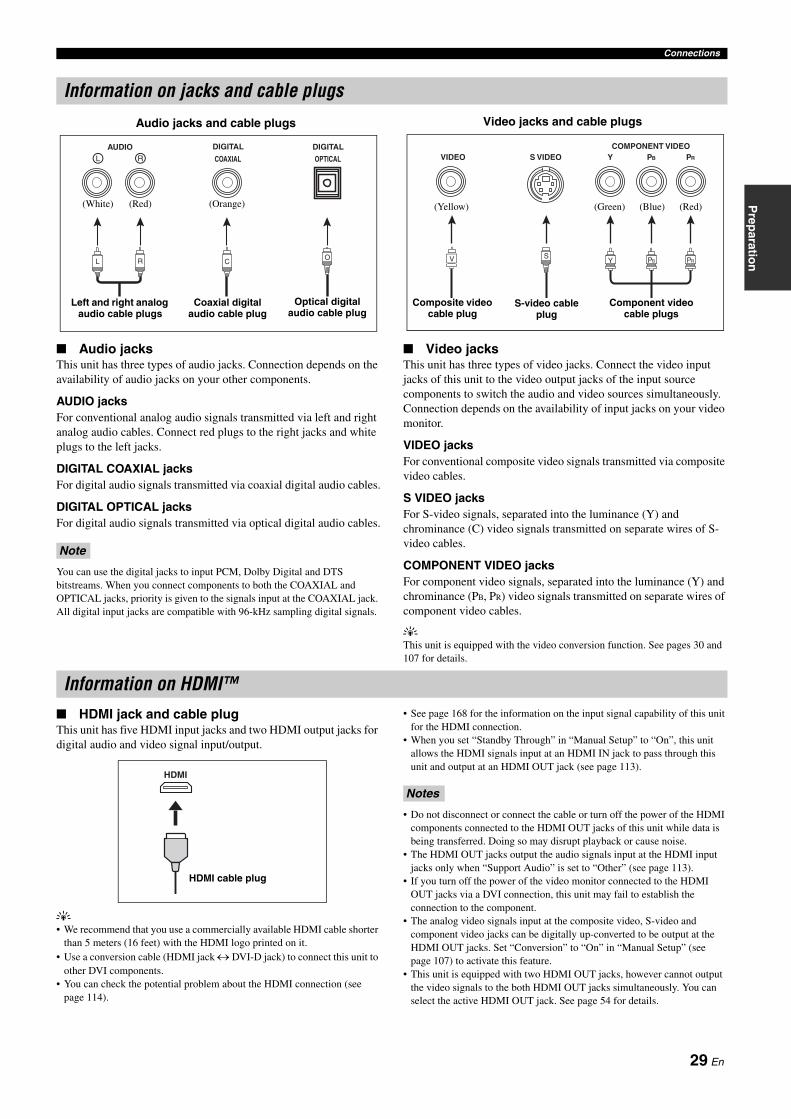
Audio jacksThis unit has three types of audio jacks. Connection depends on the availability of audio jacks on your other components.
AUDIO jacksFor conventional analog audio signals transmitted via left and right analog audio cables. Connect red plugs to the right jacks and white plugs to the left jacks.
DIGITAL COAXIAL jacksFor digital audio signals transmitted via coaxial digital audio cables.
DIGITAL OPTICAL jacksFor digital audio signals transmitted via optical digital audio cables.
You can use the digital jacks to input PCM, Dolby Digital and DTS bitstreams. When you connect components to both the COAXIAL and OPTICAL jacks, priority is given to the signals input at the COAXIAL jack. All digital input jacks are compatible with 96-kHz sampling digital signals.
Video jacksThis unit has three types of video jacks. Connect the video input jacks of this unit to the video output jacks of the input source components to switch the audio and video sources simultaneously. Connection depends on the availability of input jacks on your video monitor.
VIDEO jacksFor conventional composite video signals transmitted via composite video cables.
S VIDEO jacksFor S-video signals, separated into the luminance (Y) and chrominance (C) video signals transmitted on separate wires of S-video cables.
COMPONENT VIDEO jacksFor component video signals, separated into the luminance (Y) and chrominance (PB, PR) video signals transmitted on separate wires of component video cables.
yThis unit is equipped with the video conversion function. See pages 30 and 107 for details.
HDMI jack and cable plugThis unit has five HDMI input jacks and two HDMI output jacks for digital audio and video signal input/output.
y• We recommend that you use a commercially available HDMI cable shorter
than 5 meters (16 feet) with the HDMI logo printed on it.• Use a conversion cable (HDMI jack ↔ DVI-D jack) to connect this unit to
other DVI components.• You can check the potential problem about the HDMI connection (see
page 114).
• See page 168 for the information on the input signal capability of this unit for the HDMI connection.
• When you set “Standby Through” in “Manual Setup” to “On”, this unit allows the HDMI signals input at an HDMI IN jack to pass through this unit and output at an HDMI OUT jack (see page 113).
• Do not disconnect or connect the cable or turn off the power of the HDMI components connected to the HDMI OUT jacks of this unit while data is being transferred. Doing so may disrupt playback or cause noise.
• The HDMI OUT jacks output the audio signals input at the HDMI input jacks only when “Support Audio” is set to “Other” (see page 113).
• If you turn off the power of the video monitor connected to the HDMI OUT jacks via a DVI connection, this unit may fail to establish the connection to the component.
• The analog video signals input at the composite video, S-video and component video jacks can be digitally up-converted to be output at the HDMI OUT jacks. Set “Conversion” to “On” in “Manual Setup” (see page 107) to activate this feature.
• This unit is equipped with two HDMI OUT jacks, however cannot output the video signals to the both HDMI OUT jacks simultaneously. You can select the active HDMI OUT jack. See page 54 for details.
Information on jacks and cable plugs
Note
COAXIAL
DIGITALAUDIO
OPTICAL
DIGITALRL
CORL
Left and right analog audio cable plugs
Optical digital audio cable plug
Coaxial digital audio cable plug
Audio jacks and cable plugs
(Red)(White) (Orange)
VIDEO S VIDEOCOMPONENT VIDEO
Y R PB P
PBY PRSV
Composite video cable plug
S-video cable plug
Component video cable plugs
Video jacks and cable plugs
(Yellow) (Green) (Blue) (Red)
Information on HDMI™
HDMI
HDMI cable plug
Notes
29 En

Connections
Audio signal flow
• 2-channel as well as multi-channel PCM, Dolby Digital and DTS signals input at the HDMI input jacks can be output at the HDMI OUT jacks only when “Support Audio” is set to “Other” (see page 113).
• The following types of audio signals can be only input at HDMI input jacks:– DSD– Dolby TrueHD– Dolby Digital Plus– DTS-HD Master Audio– DTS-HD High Resolution Audio
Video signal flow
yYou can deinterlace and convert the resolution of the video signals by using “Video” parameters. See page 107 for details.
• When the analog video signals are input at the COMPONENT VIDEO, S VIDEO and VIDEO jacks, the priority order of the input signals is as follows: 1. COMPONENT VIDEO2. S VIDEO3. VIDEO
• This unit is equipped with the two COMPONENT VIDEO MONITOR OUT jacks and HDMI OUT jacks. The COMPONENT VIDEO MONITOR OUT 1 and 2 outputs the same video signals and you can use both COMPONENT VIDEO OUT jacks simultaneously.
• Digital video signals input at the HDMI input jacks cannot be output from analog video output jacks.
• The analog component video signals (with 480i (NTSC)/576i (PAL) of resolution only) are converted to the S-video or composite video signals and output at the VIDEO or S VIDEO MONITOR OUT jacks.
• The GUI signal is not output at the DVR OUT and VCR OUT jacks and is not recorded.
Audio and video signal flow
Notes
DIGITAL AUDIO(OPTICAL)
DIGITAL AUDIO(COAXIAL)
HDMI
AUDIO
OutputInput
Notes
S VIDEO
VIDEO
COMPONENTVIDEO
HDMI
Through
OutputInput
“Conversion”: “On” (see page 107)
30 En

Connections
Prep
aration
Connect your TV (or projector) to one of the HDMI OUT jacks, the COMPONENT VIDEO MONITOR OUT jacks, the S VIDEO MONITOR OUT jack or the VIDEO MONITOR OUT jack of this unit.
yYou can select to play back HDMI audio signals on this unit or on another HDMI component connected to the HDMI OUT jacks on the rear panel of this unit. Use the “Support Audio” parameter in “Option” to select the component to play back HDMI audio signals (see page 113).
• This unit is equipped with two HDMI OUT jacks, however cannot output the video signals to the both HDMI OUT jacks simultaneously. You can select the active HDMI OUT jack. Set the operation mode selector to FAMP and then press CHDMI OUT repeatedly.
• If you connect a video monitor or projector to one of the HDMI OUT jack, connect the component to the HDMI OUT 1 jack.
• Some video monitors connected to this unit via a DVI connection fail to recognize the HDMI audio/video signals being input if they are in the standby mode. In this case, the HDMI indicator flashes irregularly.
• The GUI menu is not overlaid on the input video image depending on the input video signal format and the setting of the parameters in “Wall Paper” (see page 108). In this case, the GUI menu appears with the wall paper or gray background.
• If the connected video monitor is compatible with the automatic audio and video synchronization feature (automatic lip sync feature), this unit adjusts the audio and video timing automatically (see page 105). Connect the video monitor to the HDMI OUT jacks of this unit to use the feature.
Connecting a TV monitor or projector
Make sure that this unit and other components are unplugged from the AC wall outlets.
Notes
VIDEO OUT
COMPONENT VIDEO
HDMI
PRPBY
MONITOROUT
MONITOROUT
1
2
OUT 2OUT 1
PRPB V SY
PRPBY
TV
Video in
Component video in
HDMI in
indicates recommended connections
indicates alternative connections
Projector
S-video in
HDMI in
Component video in
(U.S.A. model)
31 En

Connections
• When “Conversion” is set to “Off” (see page 107), be sure to make the same type of video connections as those made for your TV (see page 31). For example, if you connected your TV to the VIDEO MONITOR OUT jack of this unit, connect your other components to the VIDEO jacks.
• When “Conversion” is set to “On” (see page 107), the converted video signals are output only at the MONITOR OUT jacks. When recording a source, you must make the same type of video connections between each component.
• To make a digital connection to a component other than the default component assigned to each DIGITAL INPUT or DIGITAL OUTPUT jack, select the corresponding setting for “Optical Input”, “Optical Output”, or “Coaxial Input” in “I/O Assignment” (see page 96).
• If you connect your DVD player to both the DIGITAL INPUT (OPTICAL) and the DIGITAL INPUT (COAXIAL) jacks, priority is given to the signals input at the DIGITAL INPUT (COAXIAL) jack.
Connecting a Blu-ray Disc or HD DVD playerConnect your Blu-ray Disc or HD DVD player to the HDMI IN1 jack of this unit to perform the features of the Blu-ray Disc or HD DVD completely.
Connecting other components
Notes
Make sure that this unit and other components are unplugged from the AC wall outlets.
COMPONENT VIDEO
HDMI
DIGITAL IN
PRPBY
BD/HD DVD
COAXIAL
BD/HD DVD
7
6
BD/HD DVD
A
IN1
PRPBY
C
Blu-ray Disc or HD DVD player
HDMI out
Component out Coaxial out
indicates recommended connections
indicates alternative connections
(U.S.A. model)
32 En
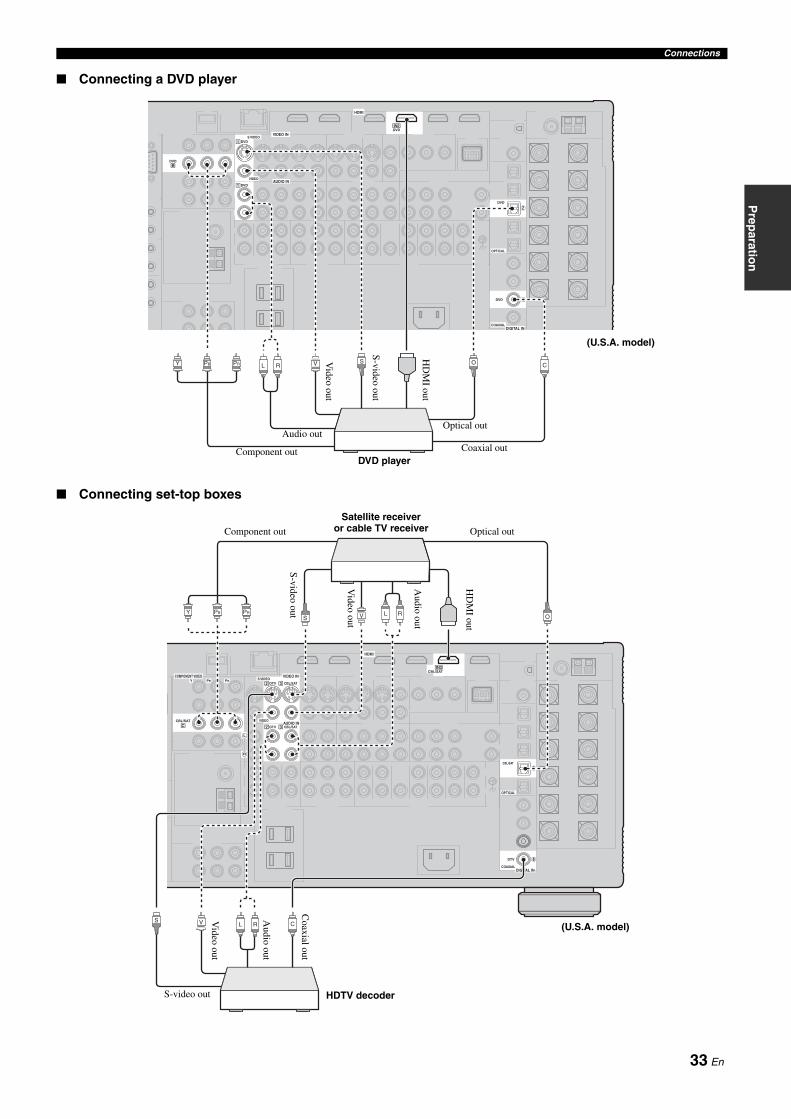
Connections
Prep
aration
Connecting a DVD player
Connecting set-top boxes
VIDEO IN
AUDIO IN
HDMI
DIGITAL IN
DVD
DVDS VIDEO
VIDEO
DVD
DVD
OPTICAL
COAXIAL
7
2
DVDB
1
IN2
DVD1
L R C
O
V SPRPBY
DVD player
HD
MI out
Coaxial outComponent out
S-video out
Video out
Audio outOptical out
(U.S.A. model)
VIDEO INCOMPONENT VIDEO
AUDIO IN
HDMI
DIGITAL IN
PRPBY
CBL/SAT
DTV CBL/SATS VIDEO
VIDEO
DTV
CBL/SAT
OPTICAL
COAXIAL
8
3
CBL/SATC
2 3
IN3
DTV CBL/SAT2 3
R
L
L R OVSPRPBY
L R CVS
Satellite receiver or cable TV receiver
Coaxial out
Component out
Video out
Audio out
S-video out
Optical outA
udio out
Video out
S-video out
HD
MI out
HDTV decoder
(U.S.A. model)
33 En

Connections
Connecting a DVD recorder
Connecting a VCR
VIDEO OUTVIDEO INCOMPONENT VIDEO
AUDIO OUTAUDIO IN
HDMI
DIGITAL IN
DVR
PRPBYDVR
DVR
DVRS VIDEO
VIDEO
DVR
OPTICAL
4
DVRD
4
IN4
DVR4
4
4
R
L
L RV VS SPRPBY L R
O
DVD recorderOptical out
S-video in
Video in
Audio in
Video out
Audio out
HDMI out
Component out
S-video out
(U.S.A. model)
VIDEO OUTVIDEO IN
AUDIO OUTAUDIO IN
VCRVCR
VCR
S VIDEO
VIDEO
5
VCR5
5
5
V L RVL RSS
VCR
S-video in
Video in
Audio out
Video out
S-video out
Audio in
indicates recommended connections
indicates alternative connections
(U.S.A. model)
34 En

Connections
Prep
aration
Connecting audio components
• Connect your turntable to the GND terminal of this unit to reduce noise in the signal. However, you may hear less noise without the connection to the GND terminal for some turntables.
• The PHONO jacks are only compatible with a turntable with an MM or a high-output MC cartridge. To connect a turntable with a low-output MC cartridge to the PHONO jacks, use an in-line boosting transformer or an MC-head amplifier.
• When you connect both the DIGITAL INPUT (OPTICAL) jack and the DIGITAL INPUT (COAXIAL) jack to an audio component, the priority is given to the DIGITAL INPUT (COAXIAL) jack.
Notes
DIGITAL OUT
GND
AUDIO OUT AUDIO IN
DIGITAL IN
CD-R MD/TAPE CD-R CD PHONOMD/TAPE
CD-R
CD
MD/TAPE
OPTICAL
OPTICAL
COAXIAL
5
1
R
L
L R L R L R
L RL R L R C
O
O
CD recorder
Turntable
CD player
MD recorder or tape deck
Optical in
Audio out
Audio out
Ground
Audio in
Coaxial out
Audio out
indicates recommended connections
indicates alternative connections
Optical out
Audio in
Audio out
(U.S.A. model)
35 En
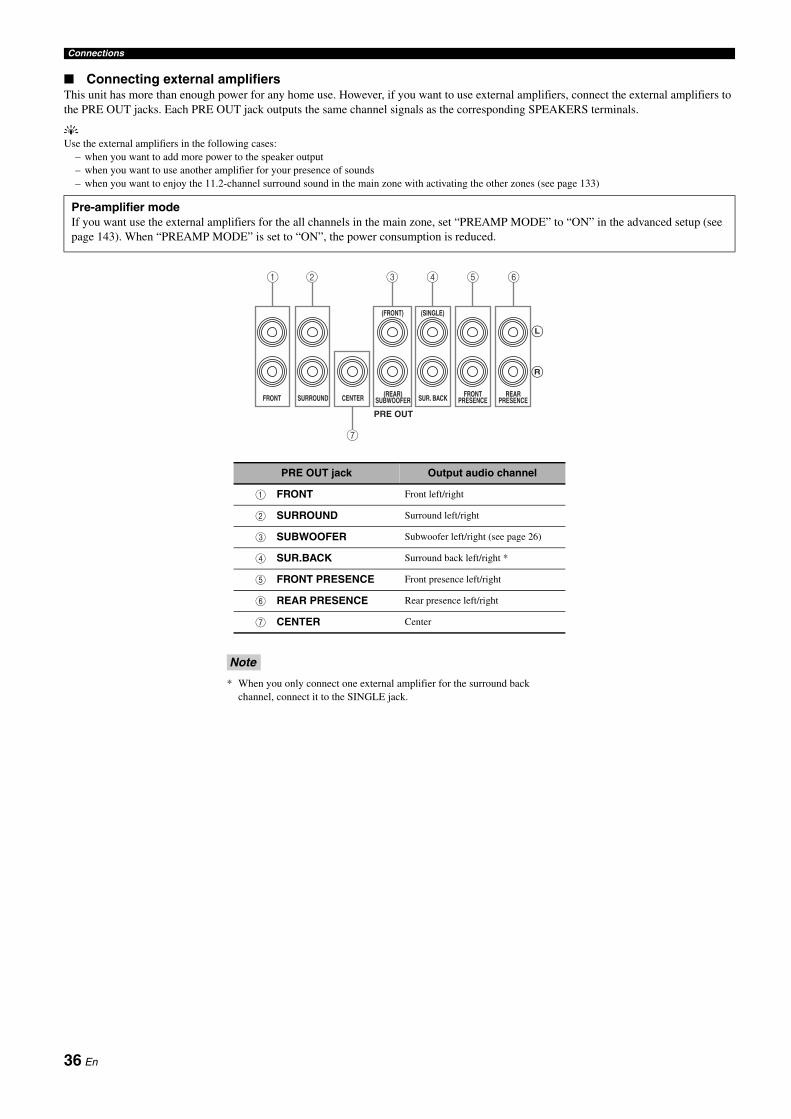
Connections
Connecting external amplifiersThis unit has more than enough power for any home use. However, if you want to use external amplifiers, connect the external amplifiers to the PRE OUT jacks. Each PRE OUT jack outputs the same channel signals as the corresponding SPEAKERS terminals.
yUse the external amplifiers in the following cases:
– when you want to add more power to the speaker output– when you want to use another amplifier for your presence of sounds– when you want to enjoy the 11.2-channel surround sound in the main zone with activating the other zones (see page 133)
Pre-amplifier modeIf you want use the external amplifiers for the all channels in the main zone, set “PREAMP MODE” to “ON” in the advanced setup (see page 143). When “PREAMP MODE” is set to “ON”, the power consumption is reduced.
PRE OUT jack Output audio channel
1 FRONT Front left/right
2 SURROUND Surround left/right
3 SUBWOOFER Subwoofer left/right (see page 26)
4 SUR.BACK Surround back left/right *
5 FRONT PRESENCE Front presence left/right
6 REAR PRESENCE Rear presence left/right
7 CENTER Center
PRE OUT
SURROUND CENTER
(FRONT) (SINGLE)
SUR. BACK(REAR)SUBWOOFER
FRONTPRESENCE
REAR PRESENCEFRONT
R
L
1 2 3
7
4 5 6
* When you only connect one external amplifier for the surround back channel, connect it to the SINGLE jack.
Note
36 En

Connections
Prep
aration
Connecting a multi-format player or an external decoderThis unit is equipped with 6 additional input jacks (left and right FRONT, CENTER, left and right SURROUND and SUBWOOFER) for discrete multi-channel input from a multi-format player, external decoder, sound processor or pre-amplifier.If you set “Input Channels” to “8ch” in “Multi CH Assign” (see page 98), you can use the input jacks assigned as “Front Input” in “Multi CH Assign” (see page 98) together with the MULTI CH INPUT jacks to input 8-channel signals.Connect the output jacks on your multi-format player or external decoder to the MULTI CH INPUT jacks. Be sure to match the left and right outputs to the left and right input jacks for the front and surround channels.
• When you select the component connected to the MULTI CH INPUT jacks as the input source (see page 54), this unit automatically turns off the digital sound field processor, and you cannot select sound field programs.
• The audio signals input at the CENTER and SUBWOOFER MULTI CH INPUT jacks are mixed down to the left and right headphone channels.• This unit redirects the audio signals input at the CENTER and/or SUBWOOFER MULTI CH INPUT jacks to the front left and right speaker channels when
you set “Center” and/or “Configuration” in “Speaker Set” to “None” (see page 100). We recommend that you connect at least a 5.1-channel speaker system before using this feature.
For 6-channel input For 8-channel input
* The analog audio input jacks assigned as “Front Input” in “Multi CH Assign” (see page 98).
Notes
MULTI CH INPUT
FRONT (6CH) CENTER
SUBWOOFERSURROUNDSB (8CH)
R
L
L R L R
Subwoofer out
Multi-format player/External decoder
Center out
Surround out
Front out
Note
MULTI CH INPUT
FRONT (6CH) CENTER
SUBWOOFERSURROUNDSB (8CH)
R
L
R
L
L R L R L R
Multi-format player/External decoder
Surround back out
Subw
oofer out
Center out
Surround out
*
Front out
37 En

Connections
Connecting a Yamaha iPod universal dockThis unit is equipped with the DOCK terminal on the rear panel that allows you to connect a Yamaha iPod universal dock (such as the YDS-10, sold separately) where you can station your iPod and control playback of your iPod using the supplied remote control. Connect a Yamaha iPod universal dock (such as the YDS-10, sold separately) to the DOCK terminal on the rear panel of this unit using its dedicated cable.
Using REMOTE IN/OUT jacksWhen the components have the capability of the transmission of the remote control signals, connect the REMOTE IN and REMOTE OUT jacks to the remote control input and output jacks with the monaural analog mini cable as follows.
* You can connect another set of infrared signal receiver and Yamaha component to the REMOTE IN 2 and OUT 2 jacks same as the REMOTE IN 1 and OUT 1 jacks.
Using the TRIGGER OUT jacksThis unit can control the components (for example, the electric screen, projector, etc.) corresponding to the selected input source and activating/deactivating the desired zone. This unit sends the 12 V/15 mA direct electric current at the TRIGGER OUT jacks according to the settings of “Trigger Output” in “Manual Setup” (see page 114). Connect one of the TRIGGER OUT jack of this unit and the trigger input jack (or control input jack) of the components with the monaural analog mini cable as follows.
* You can connect another component to the TRIGGER OUT 2 jack same as the TRIGGER OUT 1 jack.
The function when you use this feature with the components may vary depending on the components. Refer to the instruction manuals of the connected components.
DOCK
Yamaha iPod universal dock (such as the YDS-10,
sold separately)
(U.S.A. model)
REMOTE
OUT
IN
OUT
IN
1
2
Controlled component (CD or DVD player, etc.)
*Remote
control inRemotecontrol out
Infrared signal receiver or controlling component
Note
TRIGGEROUT
1
2
Electric screen, projector, etc.
*
38 En

Connections
Prep
aration
Use the VIDEO AUX jacks on the front panel to connect a game console or a video camera to this unit.
Using the VIDEO AUX jacks on the front panel
CautionBe sure to turn down the volume of this unit and other components before making connections.
MASTER
MAIN ZONE
INPUT
ONOFF
MICOPTIMIZER
AUDIO SELECTSPEAKERS
A B
YPAOSILENT CINEMA
PHONES
ON/OFF
PURE DIRECT
VOLUME
MULTI ZONE
STRAIGHT TUNING MODE
ZONE ON/OFF
MENU
TONE CONTROLZONE
CONTROLSREC OUT/
ZONE 2
MEMORY BAND
EDIT
PRESET/TUNING
EFFECT DISPLAY MAN'L/AUTO SEARCH MODE
PUSH ENTER
PROGRAM
RL OPTICAL HDMI IN USBAUDIO
VIDEO AUX
S VIDEO VIDEO
ZONE 3 ZONE 4ZONE 2
RL OPTICALAUDIOS VIDEO VIDEO HDMI IN
OVS L R
Game console or video camera
Optical output
Video output
S-Video output
Audio output
HD
MI output
Recommended
Alternative
39 En

Connections
To connect this unit to your network, plug one end of a network cable (CAT-5 or higher straight cable) into the NETWORK port of this unit, and plug the other end into one of the LAN ports on your router that supports the DHCP (Dynamic Host Configuration Protocol) server function. The following diagram shows a connection example where this unit is connected to one of the LAN ports on a 4-port router. To enjoy music files saved on your PC and Yamaha MCX-2000, access the Internet Radio, or control this unit by using your PC, each device must be connected properly in the network.
• You must use an STP (shielded twisted pair) cable (commercially available) to connect a network hub or router and this unit.• If the DHCP server function on your router is disabled, you need to configure the network settings manually (see page 111).• Yamaha MCX-2000, MCX-A10 and MCX-C15 may not be for sale in same locations.
This unit is equipped with both the front and rear USB ports. Connect the USB storage device (for example, a high capacity USB hard disk drive) to the front or rear USB port of this unit. Set “USB Select” in “Input Select” to “Front” or “Rear” to select the active USB port (see page 98). The initial setting of “USB Select” is “Front”. The initial setting of “USB Select” is “Front”.
• We do not guarantee the power supply and operation of all the connected USB devices.• See page 83 for more information about the USB storage devices that this unit is supported to.
Connecting the network
Notes
NETWORK
LAN
WAN
Router
PC
Modem
Yamaha MCX-2000Internet
Yamaha MCX-C15
Yamaha MCX-A10 (with optional speakers)
Network cable
Connecting the USB storage devices to the USB ports
Notes
USB
USB storage device
TONE CONTROLT/2
EDIT
DE
PUSH ENTER
L HDMI IN USB
USB storage device or USB portable audio player
(Rear panel) (Front panel)
40 En

Connections
Prep
aration
Both FM and AM indoor antennas are supplied with this unit. Connect each antenna correctly to the designated terminals. In general, these antennas should provide sufficient signal strength.
• The AM loop antenna should be placed away from this unit.• The AM loop antenna should always be connected, even if an outdoor AM
antenna is connected to this unit.• A properly installed outdoor antenna provides clearer reception than an
indoor one. If you experience poor reception quality, install an outdoor antenna. Consult the nearest authorized Yamaha dealer or service center about outdoor antennas.
Connecting the wire of the AM loop antenna
yThe wire of the AM loop antenna does not have any polarity and you can connect either end of the wire to AM or GND terminal.
Assembling the supplied AM loop antenna
Connecting the HD Radio antennas (U.S.A. model only)
This unit is equipped with two FM and AM antenna terminals. Connect the supplied AM loop antenna for the HD Radio tuning to the ANTENNA-1 AM and GND terminals, and the supplied AM loop antenna for the conventional AM tuning to the ANTENNA-2 AM and GND terminals. And also, connect the supplied indoor FM antennas to the ANTENNA-1 and ANTENNA-2 FM terminals.
yYou can select whether this unit tune to the conventional FM and AM stations or HD Radio FM and AM stations by selecting “HD Radio” or “TUNER” in “Input Select” (see page 96) and in “Manual Setup” (see page 110).
Assembling the supplied AM loop antenna(For HD Radio tuning, U.S.A. model only)
Connecting the wire of the AM loop antenna
Connecting the FM and AM antennas
Note for U.S.A. customersWhen you use the FM/AM tuning feature in the main zone only, connect the supplied indoor FM antenna and AM loop antenna to the AMTENNA-1 terminals only. Refer to the right column.
Notes
GND AMFM
ANTENNA-2
Ground (GND terminal)For maximum safety and minimum interference, connect the antenna GND terminal to a good earth ground. A good earth ground is a metal stake driven into moist earth.
Outdoor AM antennaUse a 5 to 10 m (16 to 32 ft) vinyl-covered wire extended outdoors from a window.
Indoor FMantenna
(supplied)
AM loop antenna (supplied)
(U.S.A. model)
Open the lever Insert Close the lever
ANTENNA-1HD-Radio
GND
AM
FM
AM loop antenna (supplied)
Ground (GND terminal)For maximum safety and minimum interference, connect the antenna GND terminal to a good earth ground. A good earth ground is a metal stake driven into moist earth.
Outdoor AM antennaUse a 5 to 10 m (16 to 32 ft) vinyl-covered wire extended outdoors from a window.
Indoor FM antenna(supplied)
(U.S.A. model)
Press and hold Insert Release
41 En

Connections
Connecting the AC power cablePlug the supplied AC power cable into the AC inlet after all other connections are complete, and then plug the AC power cable into an AC wall outlet.
AC OUTLET(S) (SWITCHED)Australia model ..................................................... 1 outletU.S.A. and Canada models....................................2 outlets
Use these outlet(s) to supply power to any connected components. Connect the power cable of your other components to these outlet(s). Power to these outlet(s) is supplied when this unit is turned on. However, power to these outlet(s) is cut off when this unit is turned off. For information on the maximum power or the total power consumption of the components that can be connected to these outlet(s), see “Specifications” on page 167.
Connecting the power cable
AC IN
To the AC wall outlet
42 En

Connections
Prep
aration
Before using this unit, set the speaker impedance of the connected speakers and the language of the menu items and messages.
1 Make sure this unit is turned off.
2 Press and hold MPROGRAM on the front panel and then press BMASTER ON/OFF inward to the ON position to turn on this unit.Press and hold MPROGRAM until “ADVANCED SETUP” appears in the front panel display.
3 Rotate MPROGRAM to select “SPEAKER IMP.”.
4 Press MPROGRAM repeatedly to select “8ΩMIN” or “6ΩMIN”.
5 Rotate MPROGRAM to select “LANGUAGE”.
6 Press MPROGRAM repeatedly to select the desired language setting.Choices: ENGLISH (English), JAPANESE (Japanese),
FRENCH (French), GERMAN (German), SPANISH (Spanish), RUSSIAN (Russian)
• You can also select the language setting by using GUI menu. See page 114 for details.
• Some languages are not displayed in the front panel display or Zone OSD.
··· The selected language is displayed.
— ··· The selected language is not displayed. The menu items and messages are displayed in English.
7 Press BMASTER ON/OFF to release it outward to the OFF position to save the new setting and turn off this unit.The setting you made is reflected next time you turn on this unit.
Turning on this unit
Press BMASTER ON/OFF on the front panel inward to the ON position to turn on this unit.When you turn on this unit by pressing BMASTER ON/OFF, the main zone is turned on.
After this unit is turned on, it takes approximately 20 seconds until this unit produces sounds, and while “Please wait” appears in the front panel display, this unit does not accepts the front panel operations and stores the remote control operations. This unit performs the stored remote control operations after “Please wait” disappears.
Turning off this unit
Press BMASTER ON/OFF on the front panel again to release it outward to the OFF position to turn off this unit.
• AMAIN ZONE ON/OFF on the front panel as well as EPOWER and DSTANDBY on the remote control are operational only when BMASTER ON/OFF is pressed inward to the ON position.
• Basically, we recommend that you use the standby mode to turn off this unit.
Set the main zone to the standby mode
Press AMAIN ZONE ON/OFF (or DSTANDBY) to set the main zone to the standby mode.In the standby mode, this unit consumes a small amount of power in order to receive infrared signals from the remote control.
Turning on the main zone from the standby mode
Press AMAIN ZONE ON/OFF (or EPOWER) to turn on the main zone.
y• When you turn on this unit, there will be a delay for a few seconds before
this unit can reproduce sound.• These buttons are operational only when BMASTER ON/OFF is pressed
inward to the ON position.
Setting the speaker impedance and language
CautionIf you are to use 6-ohm speakers, set “SPEAKER IMP.” to “6ΩMIN” as follows BEFORE using this unit.
Notes
LANGUAGE GUI menuFront panel
displayZone OSD
RUSSIAN —
JAPANESE — —
Other languages
PUSH ENTER
PROGRAM
MASTER
While holding down
ADVANCED SETUP
Turning this unit on and off
Note
Notes
If there are some problems...• First, turn off and then turn on this unit again.• If problems persist, initialize the parameters of this unit. See
page 154 for details.
43 En
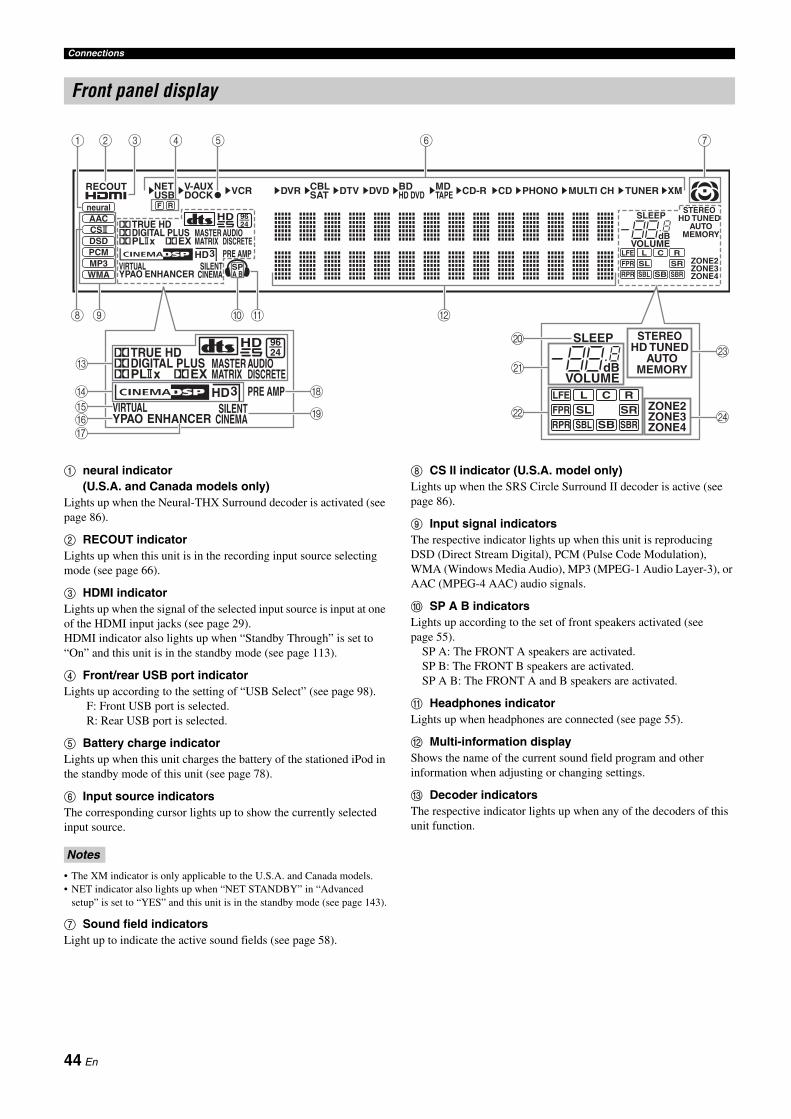
Connections
1 neural indicator(U.S.A. and Canada models only)
Lights up when the Neural-THX Surround decoder is activated (see page 86).
2 RECOUT indicatorLights up when this unit is in the recording input source selecting mode (see page 66).
3 HDMI indicatorLights up when the signal of the selected input source is input at one of the HDMI input jacks (see page 29).HDMI indicator also lights up when “Standby Through” is set to “On” and this unit is in the standby mode (see page 113).
4 Front/rear USB port indicatorLights up according to the setting of “USB Select” (see page 98).
F: Front USB port is selected.R: Rear USB port is selected.
5 Battery charge indicatorLights up when this unit charges the battery of the stationed iPod in the standby mode of this unit (see page 78).
6 Input source indicatorsThe corresponding cursor lights up to show the currently selected input source.
• The XM indicator is only applicable to the U.S.A. and Canada models.• NET indicator also lights up when “NET STANDBY” in “Advanced
setup” is set to “YES” and this unit is in the standby mode (see page 143).
7 Sound field indicatorsLight up to indicate the active sound fields (see page 58).
8 CS II indicator (U.S.A. model only)Lights up when the SRS Circle Surround II decoder is active (see page 86).
9 Input signal indicatorsThe respective indicator lights up when this unit is reproducing DSD (Direct Stream Digital), PCM (Pulse Code Modulation), WMA (Windows Media Audio), MP3 (MPEG-1 Audio Layer-3), or AAC (MPEG-4 AAC) audio signals.
0 SP A B indicatorsLights up according to the set of front speakers activated (see page 55).
SP A: The FRONT A speakers are activated.SP B: The FRONT B speakers are activated.SP A B: The FRONT A and B speakers are activated.
A Headphones indicatorLights up when headphones are connected (see page 55).
B Multi-information displayShows the name of the current sound field program and other information when adjusting or changing settings.
C Decoder indicatorsThe respective indicator lights up when any of the decoders of this unit function.
Front panel display
A BSP
RECOUT
MASTER AUDIOMATRIX DISCRETE
PRE AMPHD3VIRTUAL SILENT
CINEMAYPAO ENHANCER
HD 9624
VOLUME
SLEEPSTEREO
HD TUNEDAUTO
MEMORY
ZONE2ZONE3ZONE4
q PL xq DIGITAL PLUSq TRUE HD
q EX dB
t
C RLLFESRSLFPR
SB SBRSBLRPR
neuralAACCSDSDPCMMP3WMA
TUNER XMMULTI CHPHONOCDCD-RDVDDTVDVRVCR MD TAPE
BD HD DVD
CBL SAT
V-AUX DOCK
NET USBF R
J
KC
H
I
DEFG
L
M
N
2 31 4 5 6 7
B98 0 A
VOLUME
SLEEP STEREOHD TUNED
AUTOMEMORY
ZONE2ZONE3ZONE4
dB
C RLLFESRSLFPR
SB SBRSBLRPR
MASTER AUDIOMATRIX DISCRETE
PRE AMPHD3VIRTUAL SILENT
CINEMAYPAO ENHANCER
HD 9624
q PL xq DIGITAL PLUSq TRUE HD
q EX
t
Notes
44 En

Connections
Prep
aration
D DSP indicatorsThe respective indicator lights up when any of the sound field programs are selected.
CINEMA DSP HD indicatorLights up when you select a CINEMA DSP or HiFi DSP sound field program (see page 58).
HD³ indicatorLights up when the CINEMA DSP HD³ mode is active (see page 64).
E VIRTUAL indicatorLights up when the Virtual CINEMA DSP mode is active (see page 64).
F YPAO indicatorLights up when you run “Auto Setup” and when the speaker settings set in “Auto Setup” are used without any modifications (see page 46).
G ENHANCER indicatorLights up when the Compressed Music Enhancer mode is selected (see page 63).
H PRE AMP indicatorLights up when this unit is in the pre-amplifier mode (see page 143).
I SILENT CINEMA indicatorLights up when headphones are connected and a sound field program is selected (see page 64).
J SLEEP indicatorLights up while the sleep timer is on (see page 56).
K VOLUME level indicatorIndicates the current volume level.
yWhen the audio output is muted, the VOLUME level indicator flashes (see page 54).
L Input channel and speaker indicators
Input channel indicators• Indicate the channel components of the current digital input
signal.• Light up or flash according to the settings of the speakers
when this unit is in the auto setup procedure (see page 46) or the speaker level setting procedure in the “Speaker Level” (see page 102).
Presence speaker indicatorsLight up according to setting for “Front Presence” and “Rear Presence” (see page 100) in “Speaker Set” when this unit is in the auto setup procedure (see page 46) or the speaker level setting procedure in the “Speaker Level” (see page 102).
yYou can make settings for the presence and surround back speakers automatically by running “Auto Setup” (see page 46) or manually by adjusting settings for “Front Presence”, “Rear Presence” (see page 100), and “Surround Back” (see page 100) in “Speaker Set”.
M Tuner indicatorsLights up when this unit is in the FM, AM or XM Satellite Radio tuning mode.
TUNED indicatorLights up when this unit is tuned into a station (see page 68).
STEREO indicatorLights up when this unit is receiving a strong signal for an FM stereo broadcast while the AUTO indicator is lit (see page 68).
AUTO indicatorLights up when this unit is in the automatic tuning mode (see page 68).
MEMORY indicatorFlashes to show that a station can be stored (see page 70).
yMEMORY indicator also flashes while this unit is in the shortcut memory preset mode of Network (see page 84).
HD indicator (U.S.A. model only)Lights up when this unit is tuned into the HD Radio reception band.
N ZONE2/ZONE3/ZONE4 indicatorsLights up when Zone 2, Zone 3, or Zone 4 is turned on (see page 133).
Presence speaker indicators
Input channel indicators C RLLFE
SRSLFPR
SB SBRSBLRPR
45 En
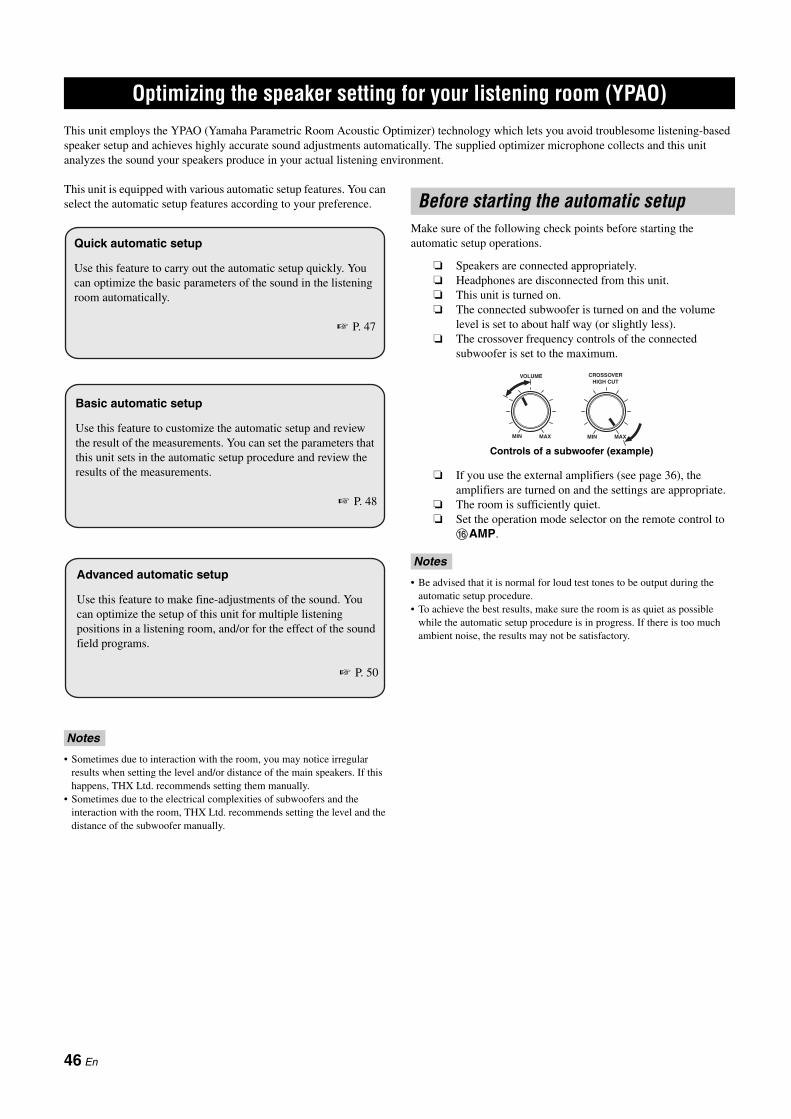
Optimizing the speaker setting for your listening room (YPAO)
This unit employs the YPAO (Yamaha Parametric Room Acoustic Optimizer) technology which lets you avoid troublesome listening-based speaker setup and achieves highly accurate sound adjustments automatically. The supplied optimizer microphone collects and this unit analyzes the sound your speakers produce in your actual listening environment.
This unit is equipped with various automatic setup features. You can select the automatic setup features according to your preference.
• Sometimes due to interaction with the room, you may notice irregular results when setting the level and/or distance of the main speakers. If this happens, THX Ltd. recommends setting them manually.
• Sometimes due to the electrical complexities of subwoofers and the interaction with the room, THX Ltd. recommends setting the level and the distance of the subwoofer manually.
Make sure of the following check points before starting the automatic setup operations.
Speakers are connected appropriately. Headphones are disconnected from this unit. This unit is turned on. The connected subwoofer is turned on and the volume
level is set to about half way (or slightly less). The crossover frequency controls of the connected
subwoofer is set to the maximum.
If you use the external amplifiers (see page 36), the amplifiers are turned on and the settings are appropriate.
The room is sufficiently quiet. Set the operation mode selector on the remote control to
FAMP.
• Be advised that it is normal for loud test tones to be output during the automatic setup procedure.
• To achieve the best results, make sure the room is as quiet as possible while the automatic setup procedure is in progress. If there is too much ambient noise, the results may not be satisfactory.
Optimizing the speaker setting for your listening room (YPAO)
Notes
Advanced automatic setup
Use this feature to make fine-adjustments of the sound. You can optimize the setup of this unit for multiple listening positions in a listening room, and/or for the effect of the sound field programs.
P. 50
Basic automatic setup
Use this feature to customize the automatic setup and review the result of the measurements. You can set the parameters that this unit sets in the automatic setup procedure and review the results of the measurements.
P. 48
Quick automatic setup
Use this feature to carry out the automatic setup quickly. You can optimize the basic parameters of the sound in the listening room automatically.
P. 47
Before starting the automatic setup
Notes
VOLUME
MIN MAX MIN MAX
CROSSOVER HIGH CUT
Controls of a subwoofer (example)
46 En

Optimizing the speaker setting for your listening room (YPAO)
Prep
aration
Use this feature to optimize the sound of this unit to the listening room quickly.
1 Connect the supplied optimizer microphone to the OPTIMIZER MIC jack on the front panel.“MIC ON” appears in the front panel display.
If “GUI” appears in the front panel display as follows, the menu screen (GUI) is displayed in the video monitor and you cannot proceed the quick automatic setup. In such a case, press NMENU to turn off the GUI or use the basic automatic setup procedure (see page 48).
2 Place the optimizer microphone at your normal listening position on a flat level surface with the omni-directional microphone heading upward.
yIt is recommended that you use a tripod (etc.) to affix the optimizer microphone at the same height as your ears would be when you are seated in your listening position. You can use the attached screw of a tripod (etc.) to fix the optimizer microphone to the tripod (etc.).
3 Press MPROGRAM on the front panel to start the measurements.
This unit starts the measurements immediately. Loud test tones are output from each speaker during the automatic setup procedure. During the setup procedure, following messages appear in the front panel display.
yTo cancel the automatic setup procedure, rotate EVOLUME.
• During the automatic setup procedure, do not perform any operation on this unit.
• Keep quiet when you leave the room. The necessary time for the automatic setup procedure may differ depending on the environment of the listening room and connected speakers (from 30 seconds to 5 minutes).
4 Once this unit completes all measurements and adjustments successfully, following message appears in the front panel display.
yYou can check the detailed results of the measurements by using the video monitor. See page 49 for details.
Using the quick automatic setup
Note
MICOPTIMIZER
AUDIO SELECTSPEAKERS
A B
YPAOSILENT CINEMA
PHONES
MULTI ZONE
STRAIGHT TUNING MODE
ZONE ON/OFF
MENU
TONE CONTROLZONE
CONTROLSREC OUT/
ZONE 2
MEMORY BAND
EDIT
PRESET/TUNING
EFFECT DISPLAY MAN'L/AUTO SEARCH MODE
PUSH ENTER
PROGRAM
RL OPTICAL HDMI IN USBAUDIO
VIDEO AUX
S VIDEO VIDEO
ZONE 3 ZONE 4ZONE 2
Omni-directional microphone
A U T O S E T U P
E N T E R T O S T A R T
G U I
R X - Z 1 1
Optimizer microphone
Before proceeding next operationOnce you perform the next operation, this unit starts the automatic setup procedure immediately. For more accurate measurements, we recommend that you move to the wall where speakers are not around.
Notes
If error or warning message appears...Error message appears in the front panel display. See the “Auto Setup” section in “Troubleshooting” on page 152 for a complete list of error messages and proper remedies.
A U T O S E T U P
A N A L I Z I N G
A U T O S E T U P
M E A S U R I N G
A U T O S E T U P
P R E P A R I N G
C O M P L E T E D
P L S U N P L U G M I C
E R R O R : E - 0 1
P R E S S E N T E R
47 En

Optimizing the speaker setting for your listening room (YPAO)
5 Disconnect the optimizer microphone to exit from the automatic setup mode.The optimizer microphone is sensitive to heat. Keep it away from direct sunlight and do not place it on top of this unit.
Use this feature to customize the measurements and the settings of the automatic setup using the connected video monitor.
1 Turn on the connected video monitor.
2 Connect the supplied optimizer microphone to this unit and then place the microphone appropriately.Refer to the steps 1 and 2 of “Using the quick automatic setup” on page 47.
3 Press IMENU on the remote control.Following menu screen appears in the video monitor.
4 Press 9k to select “Setup Menu” and then 9h.The list of the measurements in the automatic setup appears in the screen.
5 Press 9k / n repeatedly to select the desired measurement item and then press 9ENTER repeatedly to select whether the selected measurement is carried out.Check mark appears in the check box of the measurement that this unit carries out.
When you use THX speakers, clear the check mark of “Size” and then make sure that “Small” or “Small x2” are selected in “Speaker Set” (see page 99).
6 Once you have finished the settings, press 9l to return to the previous menu level and then press 9n to select “Start”.
7 Press 9ENTER to start the measurements.
This unit starts the measurements immediately. Loud test tones are output from each speaker during the automatic setup procedure.
• During the automatic setup procedure, do not perform any operation on this unit.
• Keep quiet when you leave the room. The necessary time for the automatic setup procedure may differ depending on the environment of the listening room and connected speakers (from 30 seconds to 5 minutes).
yTo cancel the automatic setup procedure, press 0RETURN. The error message “E09:User Cancel” appears in the menu screen and this unit stops the measurement immediately (see page 49).
Using the basic automatic setup
Information
Setup Menu
Start Start:ENTER
Measurement Descriptions
Multi Measure (Multiple point measurement)
You can make adjustments of this unit for multiple listening positions. For details, refer to “Using advanced automatic setup” on page 50. In the basic automatic setup, leave the setting to the default.
Wiring (Speaker wiring)
This unit checks and adjusts which speakers are connected and the polarity of each speaker.
Distance (Speaker distance)
This unit checks and adjusts the distance of each speaker from the listening position and adjusts the timing of each channel.
Size (Speaker size)
This unit checks and adjusts the frequency response of each speaker and sets the appropriate low-frequency crossover for each channel.
Equalizing (Speaker equalizing)
Parametric equalizer adjusts the level of the specified frequency bands. This unit automatically selects the crucial frequency bands for the listening room and adjusts the level of the selected frequency bands to create a cohesive sound field in the room.
Level (Speaker level)
This unit checks and adjusts the volume level of each speaker.
Standing Wave (Standing wave cancelling)
Standing waves are the sound waves generated in a room due to the acoustic characteristics of the room and audio system, etc., and the acoustic standing waves may interrupt the accurate reproduction of the source sound and distort the characteristics of the sound produced by this unit. This unit reduces the effects of the standing waves in the listening with the specially customized parametric equalizer.
Angle (Speaker angle)
For details, refer to “Using advanced automatic setup” on page 50. In the basic automatic setup, clear the check mark.
Note
Notes
48 En

Optimizing the speaker setting for your listening room (YPAO)
Prep
aration
8 Once all measurement items are set successfully, following display appears in the menu screen.
In this menu, you can perform the following operations:• Press 9n and select “Setup” to set the measured values.• Press 9k and select “Retry” to retry the automatic setup
procedure. This unit starts the automatic setup procedure immediately again.
• Press 9h and select “Detail” to view information about measurement results and warning messages. In the information display, press 9k / n repeatedly to toggle between the parameters. See page 50 for details.
• Press 9l to cancel the measurement results and exit from the automatic setup menu.
9 Press IMENU to turn off the GUI menu.
• After you have completed the automatic setup procedure, be sure to disconnect the optimizer microphone.
• The optimizer microphone is sensitive to heat. Keep it away from direct sunlight and do not place it on top of this unit.
Reviewing the result of the automatic setupUse this feature to review the result of the automatic setup.
1 Set the operation mode selector to FAMP and then press IMENU to turn on the GUI screen.
2 Press 9k / n repeatedly and then 9h to select “Auto Setup”.
3 Press 9k to select “Information”.
4 Press 9h and then 9k / n repeatedly to select the desired check items.
If error or warning messages appear...
When this unit detects potential problems during the automatic setup procedure, error or warning messages appears in the result display. See the “Auto Setup” section in “Troubleshooting” on page 152 for a complete list of error or warning messages and proper remedies.Press 9l to view the detailed information of the error or warning messages.
Notes
Angle Check
Angle
Result
RetryExit Detail
Setup
Measurement OverSuccessfully
Angle Check
Angle
Result
RetryExit Detail
Setup
Measurement OverW1:Out of PhaseW3:Level Error
Error or warning messagesError or warning messages
Input Select
Manual Setup
Auto Setup
System Memory
Signal Info.
Information
Setup Menu
Start
Information
Setup Menu
Start
Multi Measure
Wiring
Distance
Multi Measure
Wiring
Distance
Size
Left RightFront NRM NRMCenter NRMSur. NRM NRMS.Back NRM NRMF.PRNS NRM NRMR.PRNS NRM NRMSubWfr DET DET
Reload:ENTER
49 En

Optimizing the speaker setting for your listening room (YPAO)
y• You can reload the displayed result of the automatic setup by pressing 9ENTER.
• The results of the measurement that are the causes of the warning message(s) appear in red.
• “–––” appears when no speaker is connected to the corresponding speaker channel or this unit does not measure the corresponding speaker channel yet.
• If you change speakers, speaker positions, or the layout of your listening environment, run “Auto Setup” again to recalibrate your system.
• The distances displayed in the “Distance” results may be longer than the actual distance depending on the characteristics of your subwoofer or external amplifiers if you connect them.
• In the “Equalizing” results, different values may be set for the same band to provide finer adjustments.
• Even if you change the setting of “PEQ Select”, the equalizer type that is displayed in “Equalizing” is not changed.
5 Once you finish the review of the result of the automatic setup, press 9l repeatedly to exit from the automatic setup menu.
y• You can also set the parametric equalizer type by using “Parametric EQ” in
“Manual Setup” (see page 104).• You can set the connected subwoofer phases by using “Phase” in “Manual
Setup” (see page 101).
You can use the multiple-point measurement feature to optimize up to eight listening positions in a listening room and speaker angle measurement feature to optimize the speakers for the effects of the sound field programs.
• Before starting the operations, prepare the supplied microphone base.• You can make fine adjustments of this unit by using the multiple-point
measurement and speaker angle measurement features, however it takes from 30 seconds to 3 minutes to make the measurements at each listening point.
The following listening room is set as the example in the following instructions.
1/2/3/4/5/6/7: Listening positions
1 Turn on the connected video monitor.
2 Connect the supplied optimizer microphone to this unit and then place the microphone appropriately.Refer to the steps 1 and 2 of “Using the quick automatic setup” on page 47. First, place the optimizer microphone to the listening position 1.
Measurement Descriptions
Multi Measure (Multiple point measurement)
Displays the number of the points the measurements are carried out at. For details, refer to “Using advanced automatic setup” on this page.
Wiring (Speaker wiring)
Displays the polarity of each connected speaker.– “NRM” appears when the polarity of the connected
speaker is normal.– “REV” appears when the polarity of the connected
speaker is reversed.– “DET” appears when this unit detects the
subwoofer(s) is connected.– “–––” appears when no speaker is connected to the
corresponding speaker channel.
Distance (Speaker distance)
Displays the speaker distance from the listening position. Press 9h repeatedly to switch the unit to display the value of the each speaker distance.
Size (Speaker size)
Displays the size of the connected speakers and the bass cross over frequency (“Cross”).
– “LRG” appears when the connected speaker has the ability to reproduce the low-frequency signals effectively.
– “SML” appears when the connected speaker does not have the ability to reproduce the low-frequency signals effectively.
Equalizing (Speaker equalizing)
Displays the result of the adjustment of the frequency responses of each connected speaker. You can switch the parametric equalizer type that appears in the result display by pressing 9h repeatedly in the “Equalizing” result display. To apply the result that is displayed in the display, press 9ENTER.Choices: Natural, Flat, Front
– Select “Natural” to average out the frequency response of all speakers with higher frequencies being less emphasized. Recommended if the “Flat” setting sounds a little harsh.
– Select “Flat” to average the frequency response of all speakers. Recommended if all of your speakers are of similar quality.
– Select “Front” to adjust the frequency response of each speaker in accordance with the sound of your front speakers. Recommended if your front speakers are of much higher quality than your other speakers.
Level (Speaker level)
Displays the result of the adjustment of each connected speaker output level. You can display the result of the adjustment of the speaker level for each parametric equalizer type (see above) by pressing 9h repeatedly. Select “Through” to display the result when this unit does not use the parametric equalizer.
Standing Wave (Standing wave cancelling)
Displays the active band frequencies of the special parametric equalizer for each speaker. Press 9h repeatedly to switch the result of the front and rear speaker.
Angle (Speaker angle)
Displays the angles of the front speakers, surround speakers, front presence speakers and rear presence speakers at the measured point.
Notes
Using advanced automatic setup
Notes
1 7
2 643 5
50 En

Optimizing the speaker setting for your listening room (YPAO)
Prep
aration
3 Press IMENU on the remote control.Following menu screen appears in the video monitor.
4 Press 9k to select “Setup Menu” and then 9h.The list of the measurements in the automatic setup appears in the screen.
5 Press 9k repeatedly to select “Multi Measure”.
6 Press 9h and then 9k / n repeatedly to set the number of the listening positions you want to make the measurement at.Choices: 1, 2, 3, 4, 5, 6, 7, 8
7 Press 9l to return to the previous menu level and then press 9n repeatedly to select “Angle”.
8 Make sure that a check mark appears in the check box of “Angle”.If the check mark does not appears, press 9ENTER to select the check box.
9 Once you have finished the settings, press 9l to return to the previous menu level and then press 9n to select “Start”.This unit starts the measurement procedure. See page 48 for details.
10 Once this unit pauses the automatic measurement procedure and then “Put the microphone at 2nd listening position” appears in the display, move the optimizer microphone to the listening position 2.
11 Press 9ENTER to start the measurement at the next listening position.
yTo skip the measurements at the remaining listening positions, press 9n.
12 Repeat steps 10 and 11 until the measurements at all listening points are completed.
13 Once following display appears in the video monitor, place the supplied microphone base at the listening point you want to be seated most frequently as follows.Make sure that the arrow mark on the microphone base points the center speaker or between the front left and right speakers.
For the accurate measurements of the speaker angles, we strongly recommend that you use a tripod (etc.) to affix the microphone base at the same height as your ears would be when you are seated in your listening position. You can use the attached screw of a tripod (etc.) to fix the microphone base to the tripod (etc.).
14 Place the optimizer microphone to the “(1)” position on the microphone base.
Information
Setup Menu
Start Start:ENTER
3
Information
Setup Menu
Start
Multi Measure
Wiring
Distance
Pre Check
Main Check
Wiring
Distance
Put the microphone at2nd listening position
Next:ENTERSkip:
Note
1
23
FRONTDIRECTION
Equalizing
Level
Angle Check
Angle
Result
Put the microphone at1st listening position
Next:ENTER
Microphone base
51 En

Optimizing the speaker setting for your listening room (YPAO)
15 Once the setting has been completed, press 9ENTER.This unit starts the measurements of the speaker angles.
16 Once the following display appears in the video monitor, move the optimizer microphone to the “(2)” position on the microphone base.
17 Press 9ENTER to resume the measurements.
18 Once the following display appears in the video monitor, move the optimizer microphone to the “(3)” position on the microphone base.
19 Press 9ENTER to resume the measurements.
20 Once the measurement procedure has been complete, following display appears in the video monitor.See page 49 for details.
1
23
Equalizing
Level
Angle Check
Angle
Result
Put the microphone at2nd listening position
Next:ENTER
1
23
Equalizing
Level
Angle Check
Angle
Result
Put the microphone at3rd listening position
Next:ENTER
Angle Check
Angle
Result
RetryExit Detail
Setup
Measurement OverSuccessfully
For other configuration of the listening positionThe following examples indicate the measurement points when there is a listening position or are two listening positions.
Example 1: Two listening positionsWe recommend that you make measurements in front of and behind the listening positions as well as the listening positions.
Example 2: One listening positionWe recommend that you make measurements around the listening position as well as the listening position.
1 2
4
3
24
5
1
3
52 En

Basic Operation
Playback ................................................................................................ 54Basic procedure ................................................................................................................. 54Selecting the MULTI CH INPUT component ................................................................... 54Selecting the HDMI OUT jack .......................................................................................... 55Selecting the front speaker set ........................................................................................... 55Using your headphones ...................................................................................................... 55Playing video sources in the background of an audio source ............................................ 55Selecting audio input jacks (AUDIO SELECT) ................................................................ 56Muting the audio output .................................................................................................... 56Using the sleep timer ......................................................................................................... 56Operating this unit by using the graphical user interface (GUI) menu .............................. 57
Sound field programs .......................................................................... 58Selecting sound field programs ......................................................................................... 58Sound field program descriptions ...................................................................................... 58Using CINEMA DSP HD³ mode ....................................................................................... 64Enjoying unprocessed input sources .................................................................................. 64
Using audio features ............................................................................ 65Enjoying pure hi-fi sound .................................................................................................. 65Adjusting the tonal quality ................................................................................................ 65Adjusting the speaker level ................................................................................................ 65
Recording ............................................................................................. 66
Basic O
peratio
n

Playback
1 Turn on the video monitor connected to this unit.
y• If you connect two video monitors to the HDMI OUT jacks of this
unit, press CHDMI OUT repeatedly to select the active video monitor.
• You can control this unit by using the graphical user interface (GUI) screen. See page 57 for details.
• You can turn on or off the short message displays in the video monitor. See page 108 for details.
2 Rotate the DINPUT selector (or press one of the input selector buttons (3)) to select the desired input source.
The name of the currently selected input source appears in the front panel display and in the short message display for a few seconds.
3 Start playback on the selected source component or select a broadcast station.• Refer to the instruction manuals for the source component.• See page 68 for details about FM/AM tuning instructions.• (U.S.A. and Canada models only) See page 74 for details
about XM Satellite Radio tuning instruction.• See page 78 for details about the iPod operation with this
unit.• See page 80 for details about playback of Internet Radio
programs and the music contents in the PC or USB storage devices.
4 Rotate EVOLUME (or press JVOLUME +/–) to adjust the volume to the desired output level.Control range: Mute, –80.0 dB (minimum) to
+16.5 dB (maximum)
ySee page 65 to adjust the level of each speaker.
5 Rotate the MPROGRAM selector (or press one of the sound field program selector buttons (Q) repeatedly) to select the desired sound field program.The name of the selected sound field program appears in the front panel display and in the short message display. See page 58 for details about sound field programs.
• Sound field programs cannot be selected when the component connected to the MULTI CH INPUT jacks is selected as the input source (see page 54).
• Press HSTRAIGHT and the rotate MPROGRAM to select the desired sound field program when “TUNER” or “XM” (U.S.A. and Canada models only) is selected as the input source.
y• Choose a sound field program based on your listening preference, not
merely on the name of the program.• When you select an input source, this unit automatically selects the
last sound field program used with the corresponding input source.
Use this feature to select the component connected to the MULTI CH INPUT jacks (see page 37) as the input source.
Rotate the DINPUT selector (or press 3MULTI) to select “MULTI CH”.
yUse “MULTI CH” menu in “Input Select” to set the parameters for MULTI CH (see page 98).
Sound field programs cannot be selected when the component connected to the MULTI CH INPUT jacks is selected as the input source (see page 58).
Playback
CautionExtreme caution should be exercised when you play back CDs encoded in DTS. If you play back a CD encoded in DTS on a DTS-incompatible CD player, you will only hear some unwanted noise that may damage your speakers. Check whether your CD player supports CDs encoded in DTS. Also, check the sound output level of your CD player before you play back a CD encoded in DTS.
yTo play DTS-encoded CDs when using a digital audio connection, set “Decoder Mode” in “Input Select” to “DTS” before playback (see page 97).
Before performing the following operations, set the operation mode selector on the remote control to FAMP.
Basic procedure
TUNER XMMULTI CHPHONOCDCD-RDVDDTVDVRVCR MD TAPE
BD HD DVD
CBL SAT
V-AUX DOCK
NET USB
DVD
Currently selected input source
Available input sources
(U.S.A. model)
Notes
Selecting the MULTI CH INPUT component
Note
Movie
Sci-Fi
Currently selected sound field program
Currently selected sound field program category
54 En

Playback
Basic O
peratio
n
Use this feature to select the HDMI OUT jack to output the input signals.
Press CHDMI OUT on the remote control repeatedly to select the desired setting of “HDMI OUT SEL”.Each time you press CHDMI OUT, the front panel display changes as shown below.
Use this feature to turn the front speaker system (FRONT A and/or FRONT B) on or off.
Press GSPEAKERS A and/or GSPEAKERS B on the front panel to turn on or off the set of front speakers connected to the FRONT A and/or EXTRA SP speaker terminals.
Turn off the volume level of this unit when you switch the front speaker setting.
Using the Zone B featureWhen you set “Speaker B” to “ZoneB” (see page 109), you can use the speakers connected to the EXTRA SP speaker terminals in another room (Zone B).
Press GSPEAKERS B on the front panel repeatedly to turn on or off the Zone B speakers.When you activate the Zone B speakers, all the speakers in the main room are muted.
You cannot activate both the main room and Zone B speakers simultaneously.
Connect a pair of headphones with a stereo analog audio cable plug to the PHONES jack on the front panel.
yWhen you select a sound field program, the SILENT CINEMA mode activates automatically (see page 64).
• When you connect headphones, no signals are output at the speaker terminals.
• All digital multi-channel audio signals (except DSD signals) are mixed down to the left and right headphone channels.
• If you connect or disconnect your headphones to or from this unit in the party mode, the sounds in the zones that join in the party mode are muted for a moment.
You can combine a video image from a video source with sound from an audio source. For example, you can enjoy listening to classical music while viewing beautiful scenery from the video source in the video monitor.
Press the input selector buttons (3) to select a video source and then an audio source.
ySet the “BGV” parameter in the “MULTI CH” menu to the desired setting to select the default background video input source of the MULTI CH INPUT sources (see page 98).
Selecting the HDMI OUT jack
Choice Functions
OUT 1 Outputs the signals at the HDMI OUT 1 jack.
OUT 2 Outputs the signals at the HDMI OUT 2 jack.
OFF Does not output any signals at the HDMI OUT 1 and 2 jacks. Select this setting when you do not use the video monitor connected to one of the HDMI OUT jacks.
Selecting the front speaker set
Note
Note
OUT 1 OUT 2
OFF
Using your headphones
Notes
Playing video sources in the background of an audio source
MASTER
MAIN ZONE
INPUT
ONOFF
MICOPTIMIZER
AUDIO SELECTSPEAKERS
A B
YPAOSILENT CINEMA
PHONES
ON/OFF
PURE DIRECT
VOLUME
MULTI ZONE
STRAIGHT TUNING MODE
ZONE ON/OFF
MENU
TONE CONTROLZONE
CONTROLSREC OUT/
ZONE 2
MEMORY BAND
EDIT
PRESET/TUNING
EFFECT DISPLAY MAN'L/AUTO SEARCH MODE
PUSH ENTER
PROGRAM
RL OPTICAL HDMI IN USBAUDIO
VIDEO AUX
S VIDEO VIDEO
ZONE 3 ZONE 4ZONE 2
DVD CD
V-AUXMULTI PHONO
CD-R
DTV DVR VCR
DOCK XMTUNER
BDHD DVD
MDTAPE
CBLSAT
NETUSB
: Audio source buttons
: Video source buttons
(U.S.A. and Canada models)
55 En

Playback
This unit comes with a variety of input jacks. Use this feature (audio input jack select) to switch the input jack assigned to an input source when more than one jacks are assigned to an input source.
y• We recommend setting the audio input jack select to “AUTO” in most
cases.• You can adjust the default the audio input jack select of this unit by using
“Audio Select” in “Option” (see page 112).• You can also set the audio input jack select setting in “Audio Select” in
“Input Select” (see page 97).
1 Rotate the DINPUT selector (or press one of the input selector buttons (3)) to select the desired input source.
2 Press FAUDIO SELECT (or OAUDIO SEL) repeatedly to select the desired Audio input jack select setting.
This feature is not available when no digital input jack (OPTICAL, COAXIAL and HDMI) are assigned. Use “I/O Assignment” in “Input Select” to reassign the respective input jack (see page 96).
Press LMUTE on the remote control to mute the audio output. Press LMUTE again to resume the audio output.“VOLUME” flashes in the front panel display when the audio output is muted.
y• You can also rotate EVOLUME on the front panel or press JVOLUME
+/– on the remote control to resume the audio output.• You can adjust the muting level by using the “Muting Type” parameter in
“Volume” (see page 103).
Use this feature to automatically set the main zone to the standby mode after a certain amount of time. The sleep timer is useful when you are going to sleep while this unit is playing or recording a source. The sleep timer also automatically turns off any external components connected to the AC OUTLET(S) (see page 42).
1 Press one of the input selector buttons (3) on the remote control to select the desired input source.
2 Start playback on the selected source component or select a broadcast station.Refer to the operating instructions for the source component.See page 68 for details about tuning instructions.
3 Press CSLEEP repeatedly to set the amount of time.Each time you press CSLEEP, the front panel display changes as shown below.
The SLEEP indicator flashes while you are switching the amount of time for the sleep timer. Once the sleep timer is set, the SLEEP indicator lights up in the front panel display, and the display returns to the selected sound field program.
Canceling the sleep timer
Press CSLEEP repeatedly until “OFF” appears in the front panel display.
The SLEEP indicator turns off, and “OFF” disappears from the front panel display after a few seconds.
y• The sleep timer setting can also be canceled by pressing AMAIN ZONE
ON/OFF (or DSTANDBY) to set the main zone to the standby mode.• You can also set the sleep timer for Zone 2, Zone 3, or Zone 4. See
page 140 for details.
Selecting audio input jacks (AUDIO SELECT)
AUTO Automatically selects input signals in the following order:(1) HDMI(2) Digital signals(3) Analog signals
HDMI Selects only HDMI signals. When HDMI signals are not input, no sound is output.
COAX/OPT Automatically selects input signals in the following order:(1) Digital signals input at the COAXIAL jack.(2) Digital signals input at the OPTICAL jack.When no signals are input, no sound is output.
ANALOG Selects only analog signals. If no analog signals are input, no sound is output.
Note
Muting the audio output
Available input sources
TUNER XMMULTI CHPHONOCDCD-RDVDDTVDVRVCR MD TAPE
BD HD DVD
CBL SAT
V-AUX DOCK
NET USB
A.SEL: AUTO
(U.S.A. model)Currently selected Audio input jack select
setting
Using the sleep timer
120min. 90min.
60min.30min.OFF
SLEEP
SLEEP
120min.
Flashes
SLEEP
STRAIGHT
Lights up
SLEEP
OFF
Disappears
56 En

Playback
Basic O
peratio
n
This unit features a sophisticated graphical user interface (GUI) menu that helps you to control the amplifier function of this unit. With the GUI menu, you can view the information of the signals being input and the status of this unit. You can also set up this unit using the GUI menu (see page 88).
Items in GUI menu
y• Set the operation mode selector to FAMP when you operate this unit by using GUI menu.• See page 88 for details about the contents in the menu area.• This unit reserves the previously selected GUI menu.
Basic controls in the GUI menu Basic operation of the GUI menu by using the front panel controls
Operating this unit by using the graphical user interface (GUI) menu
DVD
Manual Setup -40.0dB
qPLIIx Movie Sci-Fi
Currently selected decoder
Currently selected sound field program
Menu area
Currently selectedinput source
Currently selectedmenu item
Current menu directory Volume level (see page 54)
Stereo/Surround
Input Select
Manual Setup
Auto Setup
System Memory
Sound
Video
Basic
Multi Zone
Network
Button Function
9 Cursor k / n Selects the item in the current menu level.
9 Cursor h Selects the currently selected menu item and moves to the next menu level.
9 Cursor l Returns to the previous menu level.
9 ENTER Selects the currently selected menu item and moves to the next menu level.
I MENU Turns on or off the GUI menu.
MPROGRAM Function
Turn left/right Selects the item in the current menu level.
PressSelects the currently selected menu item and moves to the next menu level.
Button Functions
NMENU Turns on or off the GUI menu.
Pl Returns to the previous menu level.
QhSelects the currently selected menu item and moves to the next menu level.
57 En

Sound field programs
This unit is equipped with a variety of precise digital decoders that allow you to enjoy multi-channel playback from almost any stereo or multi-channel sound source. This unit is also equipped with a Yamaha digital sound field processing (DSP) chip containing several sound field programs which you can use to enhance your playback experience.
y• The Yamaha CINEMA DSP sound field program are compatible with all Dolby Digital, DTS, Dolby Surround, Dolby TrueHD, and DTS-HD sources.• The Yamaha HiFi DSP sound field programs recreate real-world acoustic environments made from precise measurements taken in actual concert halls, music
venues, movie theaters, etc. Thus, you may notice variations in the strength of the reflections coming from the front, back, left and right.
Rotate the MPROGRAM selector (or set the operation mode selector to FAMP and then press one of the sound field selector buttons (Q) repeatedly).The name of the selected sound field program appears in the front panel display and in the short message display.
• When you select an input source, this unit automatically selects the last sound field program used with the corresponding input source.
• Sound field programs cannot be selected when the component connected to the MULTI CH INPUT jacks is selected as the input source (see page 54) or when this unit is in the Pure Direct mode (see page 65).
• Sampling frequencies higher than 96 kHz are sampled down to 96 kHz or lower and then sound field programs are applied.
yYou can select the desired sound field programs and setting the parameters by using GUI menu. See page 91 for details.
ySelect a sound field program based on your listening preference, not merely on the name of the program, etc.
The available sound field parameters and the created sound fields differ depending on the input sources and the settings of this unit.
Sound field programs
Selecting sound field programs
Notes
Sound field program descriptions
This program clearly reproduces the finely elaborated sound design of the latest science fiction and special effects-featuring movies. You can enjoy a variety of cinematographically created virtual spaces reproduced with clear separation between dialog, sound effects and background music.
Name of the program
Created sound fields
CINEMA DSP or
HiFi DSP
Sci-Fi
Program description
SizeV/H balanceF/R balanceAtmosphere
Small
Vertical
Front
Simple
Large
Horizontal
Rear
Complex
Characteristics of the program (see page 59)
Sound field indicators
yWhen the CINEMA DSP HD³ mode is active (see page 64), the HD³ sound field indicators light up.
Note
Presence sound field
Listening position
Surround left sound field
Surround right sound field
Surround back sound field
HD³ sound field indicators
58 En

Sound field programs
Basic O
peratio
n
For audio music sources
yFor audio music sources, we also recommend using the Pure Direct mode (see page 65), the “STRAIGHT” mode (see page 64), or surround decode mode (see page 86).
CLASSICAL 1
Descriptions of the characteristics of the sound field programsFollowing indexes indicates the characteristics and trends of each sound field program.
Size of sound field space (Size)(For the HiFi DSP and CINEMA DSP programs)
Indicates the size of the sound field to be generated. If the value for this item is small, the sound is that of a small space, while if the value is large, the sound is that of a vast space.
Vertical/horizontal balance (V/H balance)(For the HiFi DSP and CINEMA DSP programs)
Indicates the balance of the vertical (height) and horizontal directions for the sound field to be generated. If this item is more in the horizontal direction, the sound is that of a space with strong reflections from the walls, while if it is more in the vertical direction, the sound is that of a space with strong reflections from the ceiling.
Front/rear balance (F/R balance)(For the CINEMA DSP programs only)
A CINEMA DSP sound field processing expressing whether the effect is stronger towards the front or rear. When the effect is stronger towards the front, the listener senses a feeling of openness and depth towards the screen, while when the effect is stronger towards the rear, the listener gets a sense of envelopment and movement. Suits basically all types of contents for programs with a good front/rear balance, and is effective when selected appropriately for programs in which the balance is more towards either the front or rear.
Sound field atmosphere (Atmosphere)(For the HiFi DSP programs)
The sound field to be generated is evaluated according to whether it is nearer to one or the other of the following;Simple: Sounds that fade straight-forwardly, with a light, gentle impression, depending on the program. This suits almost all contents relatively well, but provides little brilliance or powerfulness. Complex: Sounds transform in complex ways as they fade out, with a rich, brilliant impression, depending on the program. This is extremely effective for the right contents, but is suited for a smaller range of contents.
(For the CINEMA DSP programs)
The sound field to be generated is evaluated according to whether it is nearer to one or the other of the following;Calm: An overall composed, moderate effect, stressing the overall quality of the atmosphere without aiming at any extreme effects. This suits almost all contents relatively well, but provides little showiness or powerfulness.Powerful: Designed with specific contents in mind (expressing vast spaces, feverish excitement, etc.). This is extremely effective for the right contents, but is suited for a smaller range of contents.
Hall in Munich A
This sound field simulates a concert hall with approximately 2500 seats in Munich, using stylish wood for the interior finishing as normal standards for European concert halls. Fine, beautiful reverberations spread richly, creating a calming atmosphere. The listener’s virtual seat is at the center left of the arena.
Hall in Munich B
This hall is frequently used for recording orchestral music, and is a shoe-box type concert hall with around 1300 seats. The hall is constructed from marble, resulting in relatively flat resonance. Further, the high ceiling causes sound to reverberate for longer than usual.
Hall in Frankfurt
This is a large shoe-box type concert hall with around 2400 seats located in Frankfurt. This hall has a very solid, powerful sound. The listener’s virtual seat is in the center-right section on the first floor.
The characteristics of the sound field programs may differ depending on the settings of the listening room, etc.
Note
Small Large
Vertical Horizontal
Front Rear
Simple Complex
Calm Powerful
CLASSICAL 11
HiFi DSP Size
V/H balance
Atmosphere
Small
Vertical
Simple
Large
Horizontal
Complex
HiFi DSP Size
V/H balance
Atmosphere
Small
Vertical
Simple
Large
Horizontal
Complex
HiFi DSP Size
V/H balance
Atmosphere
Small
Vertical
Simple
Large
Horizontal
Complex
59 En
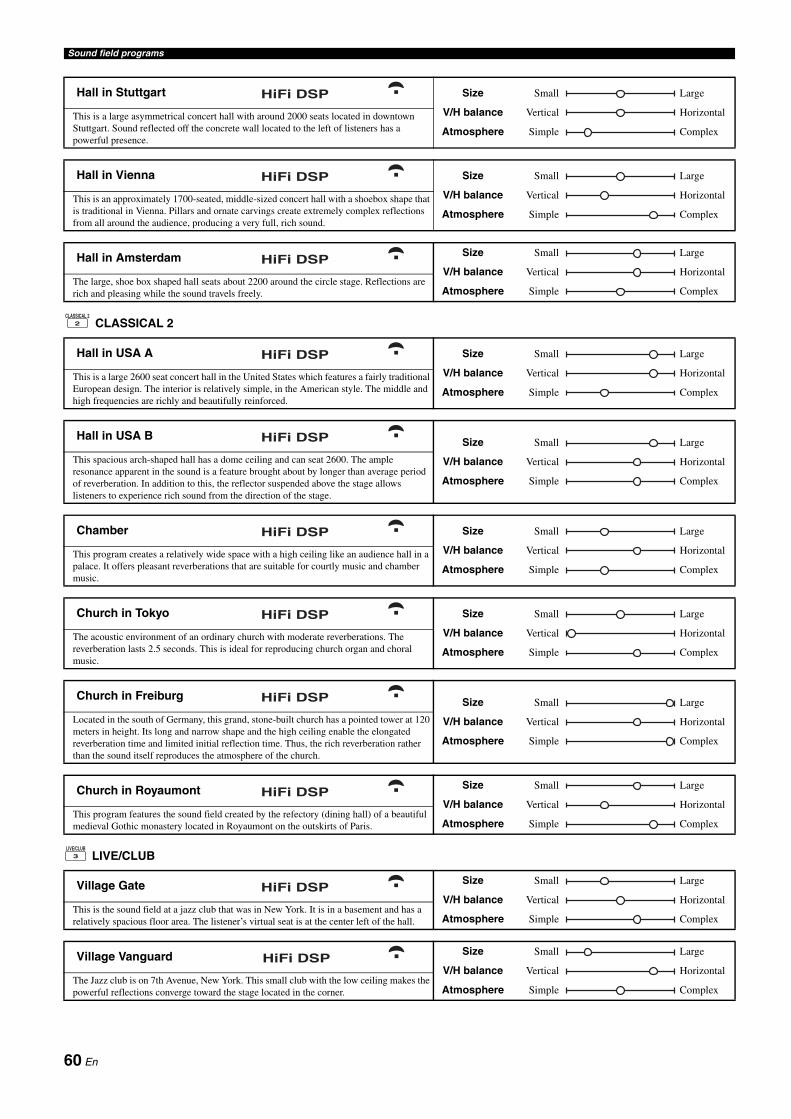
Sound field programs
CLASSICAL 2
LIVE/CLUB
Hall in Stuttgart
This is a large asymmetrical concert hall with around 2000 seats located in downtown Stuttgart. Sound reflected off the concrete wall located to the left of listeners has a powerful presence.
Hall in Vienna
This is an approximately 1700-seated, middle-sized concert hall with a shoebox shape that is traditional in Vienna. Pillars and ornate carvings create extremely complex reflections from all around the audience, producing a very full, rich sound.
Hall in Amsterdam
The large, shoe box shaped hall seats about 2200 around the circle stage. Reflections are rich and pleasing while the sound travels freely.
Hall in USA A
This is a large 2600 seat concert hall in the United States which features a fairly traditional European design. The interior is relatively simple, in the American style. The middle and high frequencies are richly and beautifully reinforced.
Hall in USA B
This spacious arch-shaped hall has a dome ceiling and can seat 2600. The ample resonance apparent in the sound is a feature brought about by longer than average period of reverberation. In addition to this, the reflector suspended above the stage allows listeners to experience rich sound from the direction of the stage.
Chamber
This program creates a relatively wide space with a high ceiling like an audience hall in a palace. It offers pleasant reverberations that are suitable for courtly music and chamber music.
Church in Tokyo
The acoustic environment of an ordinary church with moderate reverberations. The reverberation lasts 2.5 seconds. This is ideal for reproducing church organ and choral music.
Church in Freiburg
Located in the south of Germany, this grand, stone-built church has a pointed tower at 120 meters in height. Its long and narrow shape and the high ceiling enable the elongated reverberation time and limited initial reflection time. Thus, the rich reverberation rather than the sound itself reproduces the atmosphere of the church.
Church in Royaumont
This program features the sound field created by the refectory (dining hall) of a beautiful medieval Gothic monastery located in Royaumont on the outskirts of Paris.
Village Gate
This is the sound field at a jazz club that was in New York. It is in a basement and has a relatively spacious floor area. The listener’s virtual seat is at the center left of the hall.
Village Vanguard
The Jazz club is on 7th Avenue, New York. This small club with the low ceiling makes the powerful reflections converge toward the stage located in the corner.
HiFi DSP Size
V/H balance
Atmosphere
Small
Vertical
Simple
Large
Horizontal
Complex
HiFi DSP Size
V/H balance
Atmosphere
Small
Vertical
Simple
Large
Horizontal
Complex
HiFi DSPSize
V/H balance
Atmosphere
Small
Vertical
Simple
Large
Horizontal
Complex
CLASSICAL 22
HiFi DSP Size
V/H balance
Atmosphere
Small
Vertical
Simple
Large
Horizontal
Complex
HiFi DSP Size
V/H balance
Atmosphere
Small
Vertical
Simple
Large
Horizontal
Complex
HiFi DSP Size
V/H balance
Atmosphere
Small
Vertical
Simple
Large
Horizontal
Complex
HiFi DSP Size
V/H balance
Atmosphere
Small
Vertical
Simple
Large
Horizontal
Complex
HiFi DSP Size
V/H balance
Atmosphere
Small
Vertical
Simple
Large
Horizontal
Complex
HiFi DSPSize
V/H balance
Atmosphere
Small
Vertical
Simple
Large
Horizontal
Complex
LIVE/CLUB3
HiFi DSPSize
V/H balance
Atmosphere
Small
Vertical
Simple
Large
Horizontal
Complex
HiFi DSPSize
V/H balance
Atmosphere
Small
Vertical
Simple
Large
Horizontal
Complex
60 En

Sound field programs
Basic O
peratio
n
For various sources
ENTERTAIN
For visual sources of music
ENTERTAIN
The Bottom Line
This is the sound field at stage front in The Bottom Line, that was a famous New York jazz club once. The floor can seat 300 people to the left and right in a sound field offering real and vibrant sound.
Cellar Club
This program simulates a live house with a low ceiling and homey atmosphere. A realistic, live sound field features powerful sound as if the listener is in a row in front of a small stage.
The Roxy Theatre
This is the sound field of a rock music live house in Los Angeles, with approximately 460 seats. The listener’s virtual seat is at the center left of the hall.
Warehouse Loft
The warehouse resembles some lofts in Soho. Sound reflects off the concrete walls clearly with a lot of energy.
Arena
This is the sound field of a large arena, with just the right sense of distance from the stage. A dynamic sound field reproduces the power of live performances.
Sports
This program allows the listeners to enjoy stereo sport broadcasts and studio variety programs with enriched live feeling. In sports broadcasts, the voices of the commentator and sportscaster are positioned clearly on the center while the atmosphere of the stadium expands in an optimum space to offer the listeners with a feeling of presence in the stadium.
Music Video
This sound field offers an image of a concert hall for live performance of pop, rock and jazz music. The listener can indulge oneself in a hot live space thanks to the presence sound field that emphasizes the vividness of vocals and solo play and the beat of rhythm instruments, and to the surround sound field that reproduces the space of a big live hall.
Recital/Opera
This program controls the amount of reverberations at an optimum level and emphasizes the depth and clarity of human voices. “Recital/Opera” offers the reverberations of an orchestra box in front of the listener at the same time as providing the acoustic positioning and feeling of presence on the stage. The surround sound field is relatively moderate, but the data for concert hall effects are used to represent the inherent beauty of music. The listener will not be fatigued even after long hours of opera entertainment.
Pavilion
This program reproduces vocals clearly, letting you feel the spaciousness of a pavilion. Reverberation, which is somewhat delayed, reproduces the live acoustics unique to a pavilion, and helps to make concert scenes more exciting.
HiFi DSP Size
V/H balance
Atmosphere
Small
Vertical
Simple
Large
Horizontal
Complex
HiFi DSP Size
V/H balance
Atmosphere
Small
Vertical
Simple
Large
Horizontal
Complex
HiFi DSPSize
V/H balance
Atmosphere
Small
Vertical
Simple
Large
Horizontal
Complex
HiFi DSPSize
V/H balance
Atmosphere
Small
Vertical
Simple
Large
Horizontal
Complex
HiFi DSPSize
V/H balance
Atmosphere
Small
Vertical
Simple
Large
Horizontal
Complex
ENTERTAIN4
Size
V/H balance
F/R balance
Atmosphere
Small
Vertical
Front
Calm
Large
Horizontal
Rear
Powerful
ENTERTAIN4
Size
V/H balance
F/R balance
Atmosphere
Small
Vertical
Front
Calm
Large
Horizontal
Rear
Powerful
Size
V/H balance
F/R balance
Atmosphere
Small
Vertical
Front
Calm
Large
Horizontal
Rear
Powerful
Size
V/H balance
F/R balance
Atmosphere
Small
Vertical
Front
Calm
Large
Horizontal
Rear
Powerful
61 En
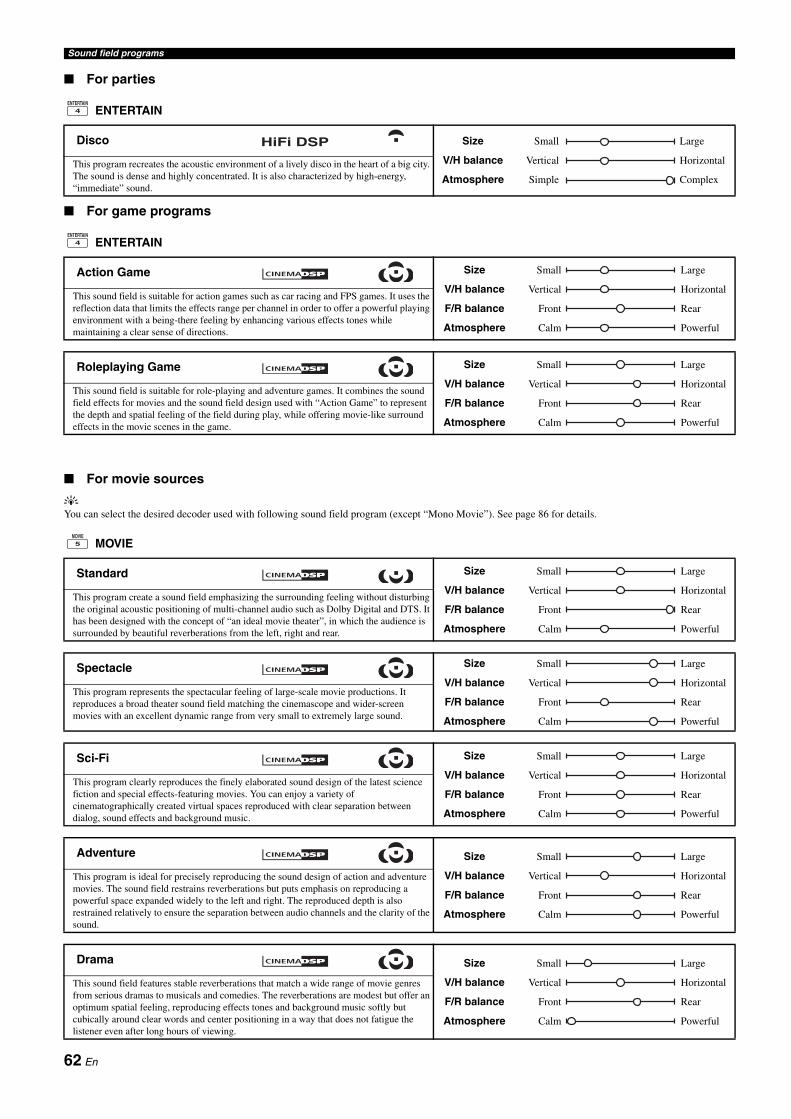
Sound field programs
For parties
ENTERTAIN
For game programs
ENTERTAIN
For movie sources
yYou can select the desired decoder used with following sound field program (except “Mono Movie”). See page 86 for details.
MOVIE
Disco
This program recreates the acoustic environment of a lively disco in the heart of a big city. The sound is dense and highly concentrated. It is also characterized by high-energy, “immediate” sound.
Action Game
This sound field is suitable for action games such as car racing and FPS games. It uses the reflection data that limits the effects range per channel in order to offer a powerful playing environment with a being-there feeling by enhancing various effects tones while maintaining a clear sense of directions.
Roleplaying Game
This sound field is suitable for role-playing and adventure games. It combines the sound field effects for movies and the sound field design used with “Action Game” to represent the depth and spatial feeling of the field during play, while offering movie-like surround effects in the movie scenes in the game.
Standard
This program create a sound field emphasizing the surrounding feeling without disturbing the original acoustic positioning of multi-channel audio such as Dolby Digital and DTS. It has been designed with the concept of “an ideal movie theater”, in which the audience is surrounded by beautiful reverberations from the left, right and rear.
Spectacle
This program represents the spectacular feeling of large-scale movie productions. It reproduces a broad theater sound field matching the cinemascope and wider-screen movies with an excellent dynamic range from very small to extremely large sound.
Sci-Fi
This program clearly reproduces the finely elaborated sound design of the latest science fiction and special effects-featuring movies. You can enjoy a variety of cinematographically created virtual spaces reproduced with clear separation between dialog, sound effects and background music.
Adventure
This program is ideal for precisely reproducing the sound design of action and adventure movies. The sound field restrains reverberations but puts emphasis on reproducing a powerful space expanded widely to the left and right. The reproduced depth is also restrained relatively to ensure the separation between audio channels and the clarity of the sound.
Drama
This sound field features stable reverberations that match a wide range of movie genres from serious dramas to musicals and comedies. The reverberations are modest but offer an optimum spatial feeling, reproducing effects tones and background music softly but cubically around clear words and center positioning in a way that does not fatigue the listener even after long hours of viewing.
ENTERTAIN4
HiFi DSP Size
V/H balance
Atmosphere
Small
Vertical
Simple
Large
Horizontal
Complex
ENTERTAIN4
Size
V/H balance
F/R balance
Atmosphere
Small
Vertical
Front
Calm
Large
Horizontal
Rear
Powerful
Size
V/H balance
F/R balance
Atmosphere
Small
Vertical
Front
Calm
Large
Horizontal
Rear
Powerful
MOVIE5
Size
V/H balance
F/R balance
Atmosphere
Small
Vertical
Front
Calm
Large
Horizontal
Rear
Powerful
Size
V/H balance
F/R balance
Atmosphere
Small
Vertical
Front
Calm
Large
Horizontal
Rear
Powerful
Size
V/H balance
F/R balance
Atmosphere
Small
Vertical
Front
Calm
Large
Horizontal
Rear
Powerful
Size
V/H balance
F/R balance
Atmosphere
Small
Vertical
Front
Calm
Large
Horizontal
Rear
Powerful
Size
V/H balance
F/R balance
Atmosphere
Small
Vertical
Front
Calm
Large
Horizontal
Rear
Powerful
62 En

Sound field programs
Basic O
peratio
n
Stereo playback
STEREO
For compression artifacts (Compressed Music Enhancer mode)
ENHANCER
Surround decoder mode
SUR. DECODE
THX Surround mode
THXUse this feature to play back sources with the accurate surround processing programs compliant with the THX specifications. See page 86 for details.
Mono Movie
This program is provided for reproducing monaural video sources such as a classic movie in an atmosphere of a good old movie theater. The program produces the optimum expansion and reverberation to the original audio to create a comfortable space with a certain sound depth.
Size
V/H balance
F/R balance
Atmosphere
Small
Vertical
Front
Calm
Large
Horizontal
Rear
Powerful
2ch Stereo
Use this program to mix down multi-channel sources to 2 channels.
11ch Stereo
Use this program to output sound from all speakers. When you play back multi-channel sources, this unit downmixes the source to 2 channels, and then output the sound from all speakers. This program creates a larger sound field and is ideal for background music at parties, etc.
Straight Enhancer
Use this program to improve the sound enhancer nearest to the original depth and width of the 2-channel or multi-channel compression artifacts.
11ch Enhancer
Use this program to play back compression artifacts in 11-channel stereo.
Surround Decode
Use this program to play back sources with using the desired surround decoders.
STEREO6
HiFi DSP
ENHANCER7
SUR. DECODE8
THX9
63 En

Sound field programs
Using sound field programs without surround speakers (Virtual CINEMA DSP)
Virtual CINEMA DSP allows you to enjoy the CINEMA DSP or HiFi DSP sound field programs without surround speakers. It creates virtual speakers to reproduce the natural sound field.When you set “Surround” to “None” (see page 100), Virtual CINEMA DSP activates automatically whenever you select a CINEMA DSP or HiFi DSP sound field program (see page 58).
Virtual CINEMA DSP will not activate even when “Surround” is set to “None” (see page 100) and you select a CINEMA DSP or HiFi DSP sound field program in the following cases:
– when the component connected to the MULTI CH INPUT jacks is selected as the input source (see page 54).
– when headphones are connected to the PHONES jack.– when this unit is in the “11ch Stereo” mode.
Enjoying multi-channel sources and sound field programs with headphones (SILENT CINEMA)
SILENT CINEMA allows you to enjoy multi-channel music or movie sound through ordinary headphones. SILENT CINEMA activates automatically whenever you connect headphones to the PHONES jack while listening to CINEMA DSP or HiFi DSP sound field programs (see page 58). When activated, the SILENT CINEMA indicator lights up in the front panel display.
• SILENT CINEMA does not activate when the component connected to the MULTI CH INPUT jacks is selected as the input source (see page 54).
• SILENT CINEMA is not effective when the Pure Direct (see page 65) or “2ch Stereo” mode (see page 63) is selected, or when this unit is in the “STRAIGHT” mode.
CINEMA DSP HD³ mode creates the intensive and accurate stereoscopic sound field in the listening room. You can activate and deactivate the CINEMA DSP HD³ mode.
Press P3D DSP repeatedly to turn on and off the CINEMA DSP HD³ mode.• “HD CUBIC:ON” appears in the front panel display and the HD³
indicator (see page 45) and HD³ sound field indicators light up while this unit is in the CINEMA DSP HD³ mode. CINEMA DSP HD³ mode creates the intensive and stereoscopic sound field in the listening room.
• “HD CUBIC:OFF” appears in the front panel display and the HD³ indicator disappears when the CINEMA DSP HD³ mode is turned off. Conventional CINEMA DSP mode creates the large and expanding sound field in the listening room.
• “HD CUBIC:––” appears when the CINEMA DSP HD³ mode is not available.
• If you set “Front Presence” to “None”, this unit cannot activate the CINEMA DSP HD³ mode.
• This unit activates the CINEMA DSP HD³ mode only when you select one of the CINEMA DSP or HiFi DSP sound field programs (except the “11ch Stereo” mode).
• When your headphones are connected to this unit, this unit cannot activate the CINEMA DSP HD³ mode.
When this unit is in the “STRAIGHT” mode, 2-channel stereo sources are output from only the front left and right speakers and multi-channel sources are decoded straight into the appropriate channels without any additional effect processing.
yYou can also select the “STRAIGHT” mode by using GUI menu. See page 92 for details.
Press HSTRAIGHT (or RSTRAIGHT) to select “STRAIGHT”.
y• The names of the audio signal format of the input source and the active
decoder appear in the front panel display.• You can select the extended surround mode used with the “STRAIGHT”
mode by pressing NEXTD SUR. (see page 86).
Deactivating the “STRAIGHT” mode
Press HSTRAIGHT (or RSTRAIGHT) so that “STRAIGHT” disappears from the front panel display.The sound effect is turned back on.
yYou can also select desired sound field program by rotating MPROGRAM (or press one of the desired sound field program buttons (Q)) repeatedly.
Note
Notes
Before performing the following operation, set the operation mode selector on the remote control to FAMP.
Using CINEMA DSP HD³ mode
Notes
Enjoying unprocessed input sources
STRAIGHT
64 En

Basic Operation
Basic O
peratio
n
Use the Pure Direct mode to enjoy the pure fidelity sound of the selected source. When the Pure Direct mode is activated, this unit plays back the selected source with the least circuitry.
Press CPURE DIRECT (or MPURE DIRECT) to turn on or off the Pure Direct mode.The CPURE DIRECT button on the front panel lights up and the front panel display automatically turns off while this unit is in the Pure Direct mode.
• When you set Audio input jack selects to “Auto”, “HDMI”, or “Coax/Opt” (see page 56) and play back the bitstreams or multi-channel PCM sources, this unit activates the corresponding decoder.
• The following operations are not possible when this unit is in the Pure Direct mode:– switching the sound field program– displaying the GUI menu– operating video functions (video conversion, etc.)
• The Pure Direct mode is automatically canceled whenever this unit is turned off.
• When you set “Pure Direct” in “Manual Setup” to “Video On”, you can display the video images of the current input source (see page 106). You cannot use the GUI menu while this unit is un the Pure Direct mode even if “Pure Direct” in “Manual Setup” to “Video On”
• While this unit is in the Pure Direct mode, you cannot activate Zone 2, Zone 3, and Zone 4, and when this unit is in the Pure Direct mode, Zone 2, Zone 3, and Zone 4 are automatically tuned off.
yThe front panel display turns on momentarily when an operation is performed.
Use this feature to adjust the balance of bass and treble for the front L/R and center speaker channels and the subwoofer channel.
1 Press QTONE CONTROL on the front panel.
2 Press MPROGRAM repeatedly to select the high-frequency response (TREBLE), or the low-frequency response (BASS).
3 Rotate MPROGRAM to adjust the high-frequency response (TREBLE), or the low-frequency response (BASS).Control range: –6.0 dB to +6.0 dB
• If you increase or decrease the high-frequency or the low-frequency sound to an extreme level, the tonal quality of the surround speakers may not match that of the front L/R and center speakers and the subwoofer.
• TONE CONTROL is not effective when PURE DIRECT or the THX Surround mode is selected, or when MULTI CH is selected as the input source.
yUse “Tone Control” parameter in “Sound” menu to adjust the balance of bass and treble output to your speakers or headphones by using GUI menu. See page 105 for details.
You can adjust the output level of each speaker while listening to a music source. This is also possible when playing sources input at the MULTI CH INPUT jacks.
This operation will override the level adjustments made in “Auto Setup” (see page 46) and “Speaker Level” (see page 102).
1 Press 8LEVEL on the remote control repeatedly to select the speaker you want to adjust.
yOnce you press 8LEVEL on the remote control, you can also select the speaker by pressing 9k / n.
2 Press 9l / h to adjust the speaker output level.• Press 9h to increase the value.• Press 9l to decrease the value.Control range: –10.0 dB to +10.0 dB
Using audio features
Before performing the following operation, set the operation mode selector on the remote control to FAMP.
Enjoying pure hi-fi sound
Notes
Adjusting the tonal quality
Notes
Adjusting the speaker level
Note
Display Adjusted speaker
FRONT L Front left speaker
FRONT R Front right speaker
CENTER Center speaker
SUR. L Surround left speaker
SUR. R Surround right speaker
SB L Surround back left speaker
SB R Surround back right speaker
SWFR L Subwoofer left
SWFR R Subwoofer right
FP L Front presence left speaker
FP R Front presence right speaker
RP L Rear presence left speaker
RP R Rear presence right speaker
65 En

Recording
Recording adjustments and other operations are performed from the recording components. Refer to the operating instructions for those components.
• When this unit is set to the standby mode, you cannot record between other components connected to this unit.• TONE CONTROL (see page 65) and the volume settings, the speaker level (see page 102) and the sound field programs (see page 58) do not affect recorded
material.• When this unit is in the Pure Direct mode, no signals output at the OUT (REC) jacks.• The source connected to the MULTI CH INPUT jacks of this unit cannot be recorded.• The XM Satellite Radio signals (U.S.A. and Canada models only) cannot be output at the audio OUT (REC) jacks.• The FM/AM tuner, Internet Radio, PC or MCX audio signals are only output at the analog OUT (REC) jacks.• Digital signals input at the DIGITAL INPUT jacks are not output at the analog audio OUT (REC) jacks for recording. Likewise, analog signals input at the
AUDIO IN jacks are not output at the DIGITAL OUTPUT jack. Therefore, if your source component is connected to provide only digital or analog signals, you can only record digital or analog signals.
• A given input source is not output on the same OUT (REC) channel.• S-video and composite video signals pass independently through the video circuits of this unit. Therefore, when recording or dubbing video signals input
from a video source component that provides only an S-video or a composite video signal, you can record only an S-video or a composite video signal on your VCR.
• The analog audio and video signals input at the DOCK terminal can be output at the analog audio OUT (REC) jacks and DVR or VCR OUT jacks for recording.
• Check the copyright laws in your country to record from CDs, radio, etc. Recording of copyrighted material may infringe copyright laws.
yDo a test recording before you start an actual recording.
1 Turn on all the connected components.
2 Press PREC OUT/ZONE2 until the RECOUT indicator lights up in the front panel display.This unit in the recording source selecting mode.
3 Rotate MPROGRAM to select the source component you want to record from.Carry out the operation while the RECOUT indicator is lit.
ySelect “SOURCE” to record the currently selected input source.
4 Start playback on the selected source component or select a broadcast station.
5 Start recording on the recording component.
Recording
CautionThe DTS signal is a digital bitstream. Attempting to digitally record the DTS bitstream will result in noise being recorded. Therefore, if you want to use this unit to record sources encoded in DTS, the following considerations and adjustments need to be made. To play DTS-encoded DVDs and CDs (when using a digital audio connection) on your DTS-compatible player, follow its operating instructions to make a setting so that the analog signal will be output from the player.
Notes
If you play back a video source that uses scrambled or encoded signals to prevent it from being dubbed, the picture itself may be disturbed due to those signals.
RECOUT
66 En

Internal Source Operation
FM/AM tuning ...................................................................................... 68Automatic tuning .............................................................................................................. 68Manual tuning ................................................................................................................... 69Direct frequency tuning .................................................................................................... 69Selecting preset stations .................................................................................................... 70Automatic preset tuning .................................................................................................... 70Manual preset tuning ........................................................................................................ 71Exchanging preset stations ............................................................................................... 71
Using HD Radio™ features (U.S.A. model only) ............................... 72Searching HD Radio stations by using the GUI menu ..................................................... 72Selecting HD Radio™ audio programs ............................................................................ 73Displaying HD Radio™ information ................................................................................ 73
XM™ Satellite Radio tuning (U.S.A. and Canada models only) ...... 74Connecting the XM™ Mini-Tuner Home Dock ............................................................... 74Activating XM™ Satellite Radio ...................................................................................... 74Basic XM™ Satellite Radio operations ............................................................................ 75Setting the XM™ Satellite Radio preset channels ........................................................... 76Displaying the XM™ Satellite Radio information ........................................................... 77
Using iPod™ ........................................................................................ 78Controlling iPod™ ............................................................................................................ 78
Using Network/USB features ............................................................. 80Navigating the network and USB menus .......................................................................... 80Using a PC server or Yamaha MCX-2000 ........................................................................ 82Using the Internet Radio ................................................................................................... 83Using a USB storage device or a USB portable audio player .......................................... 83Using shortcut buttons ...................................................................................................... 84
Intern
al So
urce O
peratio
n

FM/AM tuning
There are 3 tuning methods: automatic, manual and direct frequency. Automatic tuning is effective when station signals are strong and there is no interference. If the signal from the station you want to select is weak, tune into it manually. You can also tune into the desired station by entering the frequency. You can use the automatic and manual preset tuning features to store up to 40 stations (A1 to E8: 8 preset station numbers in each of the 5 preset station groups). Furthermore, you can recall any preset stations and exchange the assignment of two preset stations with each other.(U.S.A. model only) This unit is equipped with an HD Radio reception feature. The operations of the HD Radio tuning are same as the conventional FM/AM tuning. For details about the specific features of the HD Radio, refer to “Using HD Radio™ features (U.S.A. model only)” on pages 72 to 73.
Orient the connected FM and AM antennas for the best reception.
Automatic tuning is effective when station signals are strong and there is no interference.
1 Rotate the DINPUT selector (or press 3TUNER) to select “TUNER” as the input source.
y(U.S.A. model only) “HD Radio” appears in the front panel display when the tuner mode is set to the HD Radio reception mode.
2 Press KBAND (or 8BAND) repeatedly to select the desired reception band.“FM” or “AM” appears in the front panel display.
3 Make sure that the AUTO indicator lights up and a colon (:) does not appear in the front panel display.
y• If the AUTO indicator does not light up in the front panel display, this
unit is in the manual tuning mode. Press ITUNING MODE on the front panel to set this unit to the automatic tuning mode.
• If a colon (:) appears in the front panel display, this unit is in the preset station tuning mode, and automatic tuning is not possible. Press LPRESET/TUNING (or ISRCH MODE) to turn the colon (:) off.
4 Rotate MPROGRAM (or press 9PRESET/CH k / n) to begin automatic tuning.When this unit is tuned into a station, the TUNED indicator lights up and the frequency of the received station is shown in the front panel display. • Rotate MPROGRAM rightward (or press 9PRESET/
CHk) to tune into higher frequency.• Rotate MPROGRAM leftward (or press 9PRESET/
CHn) to tune into a lower frequency.
y(U.S.A. model only) If the station that you tune this unit into is the HD Radio station, the HD indicator also appears in the front panel display. See page 72 for details about the HD Radio features.
FM/AM tuning
Note
Before performing the following operations, set the operation mode selector on the remote control to FSOURCE.
Automatic tuning
AUTOA FM 88.9 MHz
Lights upNo colon (:)
(U.S.A. model)
Tuning information in the video monitorYou can display the FM/AM tuning information in the video monitor. Press KDISPLAY on the remote control repeatedly to turn the information display on and off.
y• (U.S.A. model only) If the station that you tune this unit into is the HD
Radio station, HD Radio information appears in the video monitor. See page 73 for details.
• You can set the time for which the tuning information is displayed in the video monitor by using the “On Screen” parameter in “Manual Setup” (see page 108).
• You can display the tuning information in the Zone video monitor (see page 141).
Radio Information
A : FM 88.9MHz STEREO AUTOTUNED
68 En

FM/AM tuning
Intern
al So
urce
Op
eration
If the signal received from the station you want to select is weak, tune into it manually.
Manually tuning into an FM station automatically switches the tuner to monaural reception to increase the signal quality.
1 Rotate the DINPUT selector on the front panel to select “TUNER” as the input source.
2 Press KBAND to select the desired reception band.“FM” or “AM” appears in the front panel display.
3 Press ITUNING MODE so that the AUTO indicator disappears from the front panel display.
If a colon (:) appears in the front panel display, this unit is in the preset station tuning mode, and automatic tuning is not possible. Press LPRESET/TUNING to turn the colon (:) off.
4 Rotate MPROGRAM to tune into the desired station manually.• Rotate MPROGRAM rightward to tune into a higher
frequency.• Rotate MPROGRAM leftward to tune into a lower
frequency.
Use this feature tune into the desired station directly by entering the frequency.
1 Press 8BAND on the remote control repeatedly to select the desired reception band.“FM” or “AM” appears in the front panel display.
2 Make sure that a colon (:) does not appear in the front panel display.
yIf a colon (:) appears in the front panel display, you cannot enter the frequency of the desired station. Press LPRESET/TUNING on the front panel to turn the colon (:) off.
3 Enter the frequency of the desired station by pressing the numeric buttons (B).Example: To tune into 103.7 MHz
y• If you enter the number that is inappropriate for the frequency,
“ERROR” appears in the front panel display and then this unit automatically tunes into the last selected station.
• If this unit cannot tune into the station you enter the frequency of, this unit automatically tuned into the last selected station.
• (Australia model only)You can omit entering the decimal place when you are attempting to tune into a station which frequency ends with “0”.
Before performing the following operations, set the operation mode selector on the remote control to FSOURCE and then press 3TUNER.
Manual tuning
Note
A FM 88.9 MHz
No colon (:)
(U.S.A. model)
Direct frequency tuning
A FM 88.9 MHz
No colon (:)
(U.S.A. model)
CLASSICAL 11
LIVE/CLUB3
ENHANCER7
STRAIGHT0
FM 1--.- MHz
FM 10-.- MHz
FM 103.- MHz
TUNED
FM 103.7 MHz
(U.S.A. model)
69 En

FM/AM tuning
You can tune into any desired station simply by selecting the preset station group and number under which it was stored.
1 Make sure that a colon (:) appears in the front panel display.If the colon (:) does not appears in the front panel display, press LPRESET/TUNING (or ISRCH MODE so that the colon (:) appears.
2 Press MPROGRAM (or press 9A-E l / h repeatedly) to select the desired preset station group (A to E).The preset station group letter appears in the front panel display and changes each time you push MPROGRAM.
3 Rotate MPROGRAM (or press 9PRESET/CH k / n repeatedly) to select a preset station number (1 to 8).The preset station group and number appear in the front panel display along with station band and frequency.
y You can also select the desired preset station number by pressing the numeric button (1 to 8) (B).
(Canada and Australia models) You can use the automatic preset tuning feature to store up to 40 FM stations with strong signals (A1 to E8: 8 preset station numbers in each of the 5 preset station groups) in order. You can then recall any preset station easily by selecting the preset station number.
(U.S.A. model) You can use the automatic preset tuning feature to store up to 40 AM HD Radio, FM HD Radio, and analog FM radio stations with strong signals.
yTo preset the AM stations, use the manual preset tuning feature.
1 Rotate the DINPUT selector (or press 3TUNER) to select “TUNER” the input source.
2 Press KBAND (or 8BAND) repeatedly to select “FM” as the reception band.“FM” appears in the front panel display.
(Canada and Australia models)
3 Press and hold JMEMORY (or 0MEMORY) for more than 3 seconds.
The AUTO and MEMORY indicators flash. After approximately 10 seconds, automatic presetting starts from the current frequency and proceeds toward higher frequencies.When the automatic presetting is completed, the AUTO and MEMORY indicators disappear.
y • You can specify the preset number from which this unit stores FM
stations. After you perform step 3, press MPROGRAM (or 9A-E l / h) repeatedly to select the desired preset group and then rotate MPROGRAM (or press 9PRESET/CH k / n repeatedly) to select the preset station number which the first station will be stored.
• You can begin the tuning toward lower frequencies to store FM stations automatically. Press LPRESET/TUNING so that the colon (:) disappears from the front panel display and then turn MPROGRAM leftward after pressing and holding JMEMORY for more than 3 seconds.
(U.S.A. model)
3 Press and hold JMEMORY (or 0MEMORY) for more than 3 seconds.The AUTO and MEMORY indicators flash, and this unit starts automatic presetting starts from the current frequency and proceeds toward higher frequencies immediately. This unit searches the stations by the following order:
1. FM HD Radio stations2. AM HD Radio stations3. Analog FM stations
When the automatic presetting is completed, the AUTO and MEMORY indicators disappear.
y “Please wait” appears in the front panel display when this unit is searching the stations by using the tuner unit that is not selected by “TUNER” (see page 96).
• Any stored station data existing under a preset station number is cleared when you store a new station under the same preset station number.
• If the number of received stations does not reach 40 (E8), automatic preset tuning automatically stops after searching for all the available stations.
• Only FM stations with sufficient signal strength are stored automatically by automatic preset tuning. If the station you want to store is weak in signal strength, tune into it manually and store it as described in “Manual preset tuning” on page 71.
Before performing the following operations, set the operation mode selector on the remote control to FSOURCE and then press 3TUNER.
Selecting preset stations
Preset the desired stations to this unit by using the automatic or manual preset tuning features in advance (see “Automatic preset tuning” on this page and “Manual preset tuning” on page 71).
Automatic preset tuning
A:FM 88.9 MHz
Colon (:)
A1:FM 88.9 MHz
Notes
AUTOMEMORYA1:FM 88.9 MHz
Flash
70 En

FM/AM tuning
Intern
al So
urce
Op
eration
Use this feature to store the desired FM and AM stations manually.You can also store up to 40 stations (A1 to E8: 8 preset station numbers in each of the 5 preset station groups) manually.
1 Tune into the desired station.See pages 68 and 69 for tuning instructions.
2 Press JMEMORY (or 0MEMORY).The MEMORY indicator flashes in the front panel display for approximately 10 seconds.
3 Press MPROGRAM (or 9A-E l / h) repeatedly to select a preset station group (A to E) while the MEMORY indicator is flashing.The selected preset station group letter appears. Check that the colon (:) appears in the front panel display.
4 Rotate MPROGRAM (or press 9PRESET/CH k / n repeatedly) to select a preset station number (1 to 8) while the MEMORY indicator is flashing.• Rotate MPROGRAM rightward to select a higher preset
station number.• Rotate MPROGRAM leftward to select a lower preset
station number.
5 Press JMEMORY (or 0MEMORY) while the MEMORY indicator is flashing.The station band and frequency appear in the front panel display with the preset station group and number you have selected. The MEMORY indicator disappears from the front panel display.
• Any stored station data existing under a preset station number is cleared when you store a new station under the same preset station number.
• The reception mode (stereo or monaural) is stored along with the station frequency.
You can exchange the assignments of two preset stations with each other. The example below describes the procedure to exchange preset station “E1” with “A5”.
1 Select preset station “E1” using MPROGRAM on the front panel.See “Selecting preset stations” on page 70.
2 Press and hold LEDIT for more than 3 seconds.The MEMORY indicator flashes in the front panel display.
3 Select preset station “A5” using MPROGRAM.The MEMORY indicator flash in the front panel display.See “Selecting preset stations” on page 70.
4 Press LEDIT again.“E1–A5” appears in the front panel display and the assignments of the two preset stations are exchanged.
Before performing the following operations, set the operation mode selector on the remote control to FSOURCE and then press 3TUNER.
Manual preset tuning
MEMORY
Flashes
MEMORYA1:FM 88.9 MHz
Preset station group
FlashesColon (:)
MEMORYA1:FM 88.9 MHz
Preset station number Flashes
Notes
Exchanging preset stations
A1:FM 88.9 MHz
The displayed station has been stored as A1.
MEMORYE1:FM 88.9 MHz
EDIT
Flashes
MEMORYA5:FM 88.9 MHz
EDIT
Flashes
A5:FM 88.9 MHz
E1-A5
71 En

Using HD Radio™ features (U.S.A. model only)
HD Radio is a new technology that enables FM and AM radio stations to broadcast programs digitally. Digital broadcasting provides listeners with radically improved audio quality and reception as well as new data services. Furthermore, supplemental program services allow listeners to select from up to 8 HD Radio programs multicast on a single FM HD Radio channel. For further information on HD Radio, visit “http://www.ibiguity.com/”.This unit is equipped with an HD Radio reception feature, facilitating CD quality FM broadcasts as well as analog FM stereo quality AM broadcasts. In addition, this unit can receive both audio and data (such as song titles, artist names, program types, and comments) from supplemental program services (HD1 to HD8).
This unit is capable of receiving both hybrid and all-digital HD Radio station signals. However, this unit may not automatically receive all-digital FM station signals and the automatic tuning operation may stop. In this case, select one of the preset stations, or manually tune into the all-digital FM station you want to select, and then set the tuning mode back to the automatic tuning mode by pressing ITUNING MODE.
You can select the preset HD Radio stations by the names of the stations.
Before using this feature, preset the HD Radio stations to this unit in advance.
1 Set the operation mode selector to FAMP and then press IMENU to display the GUI menu.The top GUI menu appears in the video monitor.
2 Press 9k to select “Input Select” and then press 9h.
3 Press 9k / n repeatedly to select “TUNER” and then press 9h.
4 Press 9n repeatedly to select “HD Radio”
5 Press 9k / n to select “Station Search” and then press 9h.
6 Press 9ENTER to enter the search menu.
7 Press 9l / h repeatedly to place the _ (underscore) under the space or character you want to edit and then 9k / n repeatedly to select the character you want to use.
y• Press 9ENTER to switch between character types.• Press 9h repeatedly to select “EXIT” to cancel the search.
8 Press 9h repeatedly to select “Search” and then press 9ENTER to start searching.Once this unit finishes the search, the result appears in the video monitor as follows.
9 Press 9k / n repeatedly to select the desired station in the result of the search.The selected station is highlighted in the result.
10 Press IMENU to exit from the GUI menu.
Using HD Radio™ features (U.S.A. model only)
Note
Multi-zone configurations and the HD Radio tuning functions This unit has both an HD Radio receiver unit and a conventional FM/AM radio receiver unit. You can set the tuner mode for each zone (main zone, Zone 2, Zone 3, or Zone 4) by setting “TUNER” in “Input Select” (see page 96) or “Manual Setup” (see page 102). Default setting for each zone is as follows:Main zone: HD Radio (HD Radio tuning mode)Other zones: TUNER (Conventional FM/AM tuning mode)
Searching HD Radio stations by using the GUI menu
Note
Station Search
Volume Trim
Rename
CAPITAL
SEARCH EXIT
Station Search
Volume Trim
Rename
ResultA1 WXYZ-FMA5 WUSC-AM
72 En

Using HD Radio™ features (U.S.A. model only)
Intern
al So
urce
Op
eration
Use this feature to select one of the 8 HD Radio audio programs (HD1 to HD8) when the unit is in the tuner mode. Each audio program contains data programs.
Press APRG SELECT b / a on the remote control repeatedly to toggle between HD Radio audio programs.The HD indicator may disappear from the front panel display while toggling between data programs.
• Only 1 HD Radio audio program (HD1) is available for AM broadcasts, while up to 8 audio programs (HD1 to HD8) are available for FM broadcasts.
• When reception for an audio program ceases, the HD indicator disappears from the front panel display and HD1 is automatically selected after approximately 20 seconds.
• Some audio programs may not contain data programs depending on the broadcasting station and the time period.
• The audio programs from HD2 to HD8 can be selected only when they contain data programs.
There are 3 types of front panel displays that show HD Radio information when the unit is in the tuner mode: frequency, station and music information.
Front panel display
Press KDISPLAY on the remote control repeatedly to turn on and off the HD Radio information display.
(Upper line: Station name / FM or AM / Audio program)Station information is available when a station name is received as data in 4 alphabetical codes.
(Lower line: Song title / Artist name / Program types / Comment)Music information is available only when data programs are received.If the music information is long, it automatically scrolls to the left in the front panel display.
yYou can set the front panel display mode by using the “Scroll” parameter in “Front Panel Disp.” (see page 112).
Video monitor
Press KDISPLAY on the remote control.The following information is displayed in the video monitor.
y• To turn off the displayed information screen, press KDISPLAY again.• You can set the time for which the HD Radio information is displayed in
the video monitor by using the “On Screen” parameter in “Manual Setup” (see page 108).
• You can display the HD Radio information in the Zone video monitor (see page 141).
• The current HD Radio reception level appears on the top of the HD Radio information screen. For the best reception, adjust the orientation of the antenna so that “ ” or “ ” is displayed here.
Before performing the following operations, set the operation mode selector on the remote control to FSOURCE and then press 3TUNER.
Selecting HD Radio™ audio programs
Notes
Displaying HD Radio™ information
WXYZ-FM : HD1
Frankie Zipper
HD Radio Information
Station A FM 100.1MHzName WXYZ-FMProgram HD1 HD2 HD3 HD4 HD5 HD6 HD7 HD8Program type Pops
Road to IndiaFrankie Zipper70’s great performance of Frankie Zipper
Hold: ENTER
STEREO AUTOHD
HD Radio Reception level
73 En

XM™ Satellite Radio tuning (U.S.A. and Canada models only)
XM Satellite Radio offers an extraordinary variety of commercial-free music, plus the best in sports, news, talk and entertainment. XM is broadcast in superior digital audio from coast to coast. From rock to reggae, from classical to hip hop, XM has something for every music fan. XM’s dedication to playing the richest selection of music is matched by its passion for live sporting events, talk radio, up-to-the-minute news, stand-up comedy, children’s programming, and much more.
The XM Satellite Radio service is only available in the 48 contiguous United States (not available in Alaska and Hawaii) and Canada.
Enjoying the XM HD Surround content
This unit is equipped with the Neural-THX Surround decoder that plays back the XM HD surround sound content of the XM Satellite Radio broadcasts in multi-channels, resulting in a full surround sound experience (see page 86).
Connect XM Mini-Tuner and Home Dock (each sold separately) to the XM jack on the rear panel of this unit. For information on your XM Mini-Tuner and Home Dock, see the operating instructions provided with XM Mini-Tuner Dock.
yTo ensure optimal reception of the XM Satellite Radio signals, the antenna of Home Dock must be placed at or near a south-facing window with no obstacles in the path to the sky. You can mount it indoors or outdoors.
If “CHECK ANTENNA” or “CHECK XM TUNER” appears in the front panel display, the connection and setting of the antenna, Home Dock, or XM Mini-Tuner may not correct (see page 149).
Checking your XM Radio IDOnce you have installed the XM Mini-Tuner Home Dock, inserted the XM Mini-Tuner, connected the Home Dock to your XM Ready home audio system, and installed the antenna, you are ready to subscribe and begin receiving XM programming. There are three places to find your eight character XM Radio ID: on the XM Mini-Tuner, on the XM Mini-Tuner package, and on XM Channel 0 (see page 76). Record the Radio ID in the following eight squares for reference.
The XM Radio ID does not use the letters “I”, “O”, “S” or “F”.
Subscription of your XM Satellite Radio service
For U.S. customersURL: http://activate.xmradio.com/Phone: 1-800-XMRADIO (1-800-967-2346)
For Canadian customersURL: http://www.xmradio.ca/Phone (XM’s Listener Care): 1-877-GET-XMSR (1-877-438-9677)
You will need a major credit card. XM will send a signal from the satellites to activate the full channel lineup. Activation normally takes 10 to 15 minutes, but during peak busy periods you may need to keep your XM Ready home audio system on for up to an hour. When you can access the full channel lineup on your XM Ready home audio system you are done.
XM™ Satellite Radio tuning (U.S.A. and Canada models only)
XM Satellite Radio online informationFor U.S. customers: http://www.xmradio.com/For Canadian customers: http://www.xmradio.ca/
Note
XM READY legal disclaimerHardware and required monthly subscription sold separately. Other fees and taxes, including a one-time activation fee may apply. Subscription fee is consumer only. All fees and programming subject to change. Channels with frequent explicit language are indicated with an XL. Channel blocking is available for XM radio receivers by calling 1-800-XMRADIO (US residents) and 1-877-GET-XMSR (Canadian residents). For a full listing of the XM commercial-free channels and advertising-supported channels, visit lineup.xmradio.com (US residents) or www.xmradio.ca (Canadian residents). Subscriptions subject to Customer Agreement available at xmradio.com (US residents) and xmradio.ca (Canadian residents). Service only available in the 48 contiguous United States and Canada. ©2007 XM Satellite Radio Inc. All rights reserved. All other trademarks are the property of their respective owners.
Connecting the XM™ Mini-Tuner Home Dock
Note
XM
XM Mini-Tuner and XM Home Dock (sold separately)
(U.S.A. and Canada models)
Activating XM™ Satellite Radio
Note
Note
74 En

XM™ Satellite Radio tuning (U.S.A. and Canada models only)
Intern
al So
urce
Op
eration
1 Rotate the DINPUT selector (or press 3XM) to select “XM” as the input source.The cursor on the left of the XM indicator lights up in the front panel display and the XM Satellite Radio information (such as channel number, channel name, category, artist name, or song title) for the currently selected channel appears in the front panel display.
yWhen you select “XM” as the input source, this unit automatically recalls the previously selected channel.
The XM Satellite Radio signals cannot be output at the AUDIO OUT (REC) jacks.
2 Search for a channel by using one of the XM Satellite Radio search modes.• To select a channel from the all channel list, see “All
Channel Search mode”.• To select a channel by category, see “Category Search
mode”.• To select a channel from the preset channels, see “Preset
Search mode”.• To select the desired channel directly by entering the channel
number, see “Direct Number Access mode” on page 76.
y• You can use the Neural-THX Surround decoder to enjoy the XM HD
surround sound content of the XM Satellite Radio broadcasts in multi-channels (see page 86).
• You can set the XM Satellite Radio preset channels (see page 76).• You can display the XM Satellite Radio information in the front
panel display or video monitor (see page 77).
All Channel Search mode
1 Press LSEARCH MODE (or ISRCH MODE) repeatedly to select “ALL CH SEARCH”.
yYou can change the channel category by pressing MPROGRAM (or 9CAT. l / h) repeatedly.
2 Rotate MPROGRAM (or 9PRESET/CH k / n) repeatedly to search for a channel within all channels.
yYou can search for a channel quickly by pressing and holding 9PRESET/CH k / n.
Category Search mode
1 Press LSEARCH MODE (or ISRCH MODE) repeatedly to select “CAT SEARCH”.
2 Press MPROGRAM (or 9CAT. l / h) repeatedly to change the channel category.
3 Rotate MPROGRAM (or 9PRESET/CH k / n) repeatedly to search for a channel within the selected channel category.
yYou can search for a channel quickly by pressing and holding 9PRESET/CH k / n.
Preset Search modePrior to selecting a preset channel in the Preset Search mode, you must preset XM Satellite Radio channels. For details, see “Setting the XM™ Satellite Radio preset channels” on page 76.
yThe initial factory setting of all preset channels (A1 to E8) is “[001] Preview”.
1 Press LSEARCH MODE (or ISRCH MODE) repeatedly to select “PRESET SEARCH”.
2 Press MPROGRAM (or 9CAT. l / h) repeatedly to change the preset channel group (A to E).
3 Rotate MPROGRAM (or 9PRESET/CH k / n) repeatedly to change the preset channel number (1 to 8).
yYou can also select the preset channel number directly by pressing the numeric buttons (1 to 8) on the remote control.
Before performing the following operations, set the operation mode selector on the remote control to FSOURCE.
Basic XM™ Satellite Radio operations
Note
TUNER XMMULTI CHPHONOCDCD-RDVDDTVDVRVCR MD TAPE
BD HD DVD
CBL SAT
V-AUX DOCK
NET USB
[001] Preview
Lights up
(U.S.A. and Canada models)
ALL CH SEARCH
CAT SEARCH
PRESET SEARCH
75 En

XM™ Satellite Radio tuning (U.S.A. and Canada models only)
Direct Number Access mode
1 Press ISRCH MODE on the remote control repeatedly to select “ALL CH SEARCH” or “CAT SEARCH”.
2 Press the numeric buttons (B) on the remote control to enter the desired three-digit channel number.For example, to enter the number 123, press the numeric buttons as shown below.
The display changes as follows.
y• To enter a one-digit or two-digit channel number, press the numeric
buttons (B) on the remote control and then press NENT to confirm the input number.
• If no button is pressed within a few seconds after you enter a one-digit or two-digit number, this unit automatically confirms the entered channel number.
• If you enter the number 0, this unit displays your XM Radio ID (see page 74).
You can use this feature to store up to 40 XM Satellite Radio channels (A1 to E8: 8 preset channel numbers in each of the 5 preset channel groups). You can then recall any preset channel easily by selecting the preset channel group and number as described in “Preset Search mode” on page 75.
1 Search for a channel you want to set as a preset channel by using one of the XM Satellite Radio search modes.
2 Press JMEMORY (or 0MEMORY). The MEMORY indicator flashes in the front panel display for approximately 10 seconds.
You must proceed to and carry out steps 3 through 5 while the MEMORY indicator is flashing in the front panel display.
3 Press MPROGRAM (or 9CAT. l / h) repeatedly to select a preset channel group (A to E) while the MEMORY indicator is flashing. The preset channel group letter appears in the front panel display.
4 Rotate MPROGRAM (or 9PRESET/CH k / n) repeatedly to select a preset channel number (1 to 8) while the MEMORY indicator is flashing.The preset channel number appears in the front panel display.
ALL CH SEARCH
CAT SEARCH
or
CLASSICAL 11
CLASSICAL 22
LIVE/CLUB3
<XM> --1
<XM> -12
<XM>123
Before performing the following operations, set the operation mode selector on the remote control to FSOURCE and then press 3XM.
Setting the XM™ Satellite Radio preset channels
Note
[043] XMU
Currently selected channel number
MEMORY
Flashes
MEMORYC [043] XMU
Currently selected preset channel group Flashes
MEMORYC5 [043] XMU
Currently selected preset channel number Flashes
76 En

XM™ Satellite Radio tuning (U.S.A. and Canada models only)
Intern
al So
urce
Op
eration
5 Press JMEMORY (or 0MEMORY) to set the selected XM Satellite Radio channel as a preset channel while the MEMORY indicator is flashing.A colon (:) appears next to the preset channel number for confirmation, and the MEMORY indicator turns off in the front panel display.
Once you set a new preset channel, the one previously stored in the same preset channel group and number is cleared.
You can display the XM Satellite Radio information (such as channel number, channel name, category, artist name, or song title) for the currently selected channel in the front panel display or video monitor.
If a status message or an error message appears in the front panel display or video monitor, see the “XM Satellite Radio (U.S.A. and Canada models only)” section in “Troubleshooting” on page 146 for appropriate remedies.
Displaying the XM Satellite Radio information in the front panel display
Press IDISPLAY (or KDISPLAY) repeatedly to toggle between the following XM Satellite Radio information display modes.
When the channel number / name is displayed:
When the channel category is displayed:
When the artist name / song title is displayed:
y• You can set the front panel display mode by using the “Scroll” parameter
in “Front Panel Disp.” (see page 112).• If the XM Satellite Radio information contains a character that cannot be
recognized by this unit, the character will be displayed with a space.
Displaying the XM Satellite Radio information in the video monitor
Press IDISPLAY or (KDISPLAY).The following information screen is displayed in the video monitor.
y• To turn off the displayed information screen, press IDISPLAY (or KDISPLAY) again.
• You can set the time for which the XM Satellite Radio information is displayed in the video monitor by using the “On Screen” parameter in “Manual Setup” (see page 108).
• To hold the XM Satellite Radio information screen, press 9ENTER on the remote control while it is being displayed in the video monitor.
• The XM Satellite Radio information screen on hold is released if you press 9ENTER on the remote control again or if you change the XM Satellite Radio channel.
• This unit can save up to two XM Satellite Radio information screens for future reference. To view the previous two XM Satellite Radio information screens, press 8TITLE on the remote control repeatedly while the current XM Satellite Radio information screen is being hold.
• The current XM Satellite Radio reception level appears on the top of the XM Satellite Radio information screen. For the best reception, adjust the
orientation of the antenna of Home Dock so that “ ” or “ ” is displayed here. “no signal” is displayed if Home Dock is not connected to this unit. In this case, check the antenna connections (see page 74).
• You can display the XM Satellite Radio information in the Zone video monitor (see page 141).
Note
Before performing the following operations, set the operation mode selector on the remote control to FSOURCE and then press 3XM.
Displaying the XM™ Satellite Radio information
Note
C5: [043] XMU
Colon (:)
Channel number / name
Channel category
Artist name / Song title
[043] XMU
<CAT>Rock
Coldplay / Spe
XM Satellite Radio reception level
XM InformationAll CH Search
CH NUMBER 043 (Current)CH NAME XMUCATEGORY RockNAME ColdplayTITLE Speed of sound
Hold: ENTER
77 En

Using iPod™
Once you have stationed your iPod in a Yamaha iPod universal dock (such as the YDS-10, sold separately) connected to the DOCK terminal of this unit (see page 38), you can enjoy playback of your iPod using the supplied remote control. You can also use the Compressed Music Enhancer mode of this unit to enhance the sound quality of the compression artifacts (such as the MP3 format) stored on your iPod (see page 63).
• Only iPod (Click and Wheel), iPod nano, and iPod mini are supported.• Some features may not be compatible depending on the model or the software version of your iPod.
y• For a complete list of status messages that appear in the front panel display and video monitor, see the “iPod” section in “Troubleshooting” on page 152.• Once your iPod is stationed in a Yamaha iPod universal dock (such as the YDS-10, sold separately) connected to the DOCK terminal of this unit, this unit
begins signal transmission with your iPod.• Once the connection between your iPod and this unit is complete, “iPod connected” appears in the front panel display.• Your iPod battery is automatically charged when your iPod is stationed in a Yamaha iPod universal dock (such as the YDS-10, sold separately) connected to
the DOCK terminal of this unit as long as this unit is turned on. You can also select whether this unit charges the battery of the stationed iPod or not when this unit is in the standby mode by selecting the “Standby Charge” parameter in “iPod” (see page 112).
• While the stationed iPod is being charged in the standby mode of this unit, the battery charge indicator (see page 44) appears in the front panel display. Once the charge is complete (or after 4 hours from the start of the charge), the indicator disappears.
You can control your iPod when “DOCK” is selected as the input source. The operations of your iPod can be done with the aid of the GUI screen of this unit (menu browse mode) or without it (simple remote mode).
Remote control operation
Controlling iPod in the simple remote modeYou can perform the basic operations of your iPod (play, stop, skip, etc.) using the supplied remote control without the aid of the video monitor.
y• You can view the photos or video clips stored on your iPod (some models
only).• Operations can be also done with the controls on your iPod.
Controlling iPod in the menu browse modeYou can perform the advanced operations of your iPod using the supplied remote control with the aid of the video monitor. The name of the song being played appears in the front panel display according to the “Scroll” parameter in “Front Panel Disp.” (see page 112). You can also browse the songs stored on your iPod in the by using your video monitor. Further, you can change or adjust settings for your iPod to suit your personal preferences.
• Operations cannot be done with the controls on your iPod.• The Yamaha logo appears in the display window of your iPod.• There are some characters that cannot be displayed in the front panel
display or in the GUI screen of this unit. Those characters are replaced with underscores “_”.
• You cannot browse the photos or video clips stored on your iPod in the GUI screen. Use the simple remote mode to enjoy watching the photos or video clips stored on your iPod.
• You can set the time for which the GUI screen of iPod is displayed in the video monitor by using the “On Screen” parameter in “Manual Setup” (see page 108).
1 Press KDISPLAY on the remote control.The following display appears in the video monitor.
Using iPod™
Notes
Controlling iPod™
Before performing the following operations, set the operation mode selector on the remote control to FSOURCE and then press 3DOCK.
Button Function
9 ENTER Subsequent menu
k Menu up
n Menu down
l Previous menu
h Subsequent menu
A ll Search backward (Press and hold)
hh Search forward (Press and hold)
a Skip forward
b Skip backward
s Stop
e Pause (Menu browse mode)Play/Pause (Simple remote mode)
p Play (Menu browse mode)Play/Pause (Simple remote mode)
I MENU Previous menu
K DISPLAY Display
Notes
Before performing the following operations, set the operation mode selector on the remote control to FSOURCE and then press 3DOCK.
Top
PlaylistArtistsAlbumsSongsGenresComposersSettings
78 En

Using iPod™
Intern
al So
urce
Op
eration
2 Press 9k / n / l / h to navigate the iPod menu and then press 9ENTER to begin playback of the selected song.Choices: Playlist (playlists), Artists (artists),
Albums (albums), Songs (songs), Genres (genres), Composers (composers), Settings (settings)
• Playlist > Songs• Artists > Albums > Songs• Albums > Songs• Songs• Genres > Artists > Albums > Songs• Composers > Albums > Songs• Settings > Shuffle, Repeat
Shuffle (Shuffle)Use this feature to set this unit to play songs or albums in random order.Choices: Off, Songs, Albums• Select “Off ” to deactivate this feature.• Select “Songs” to set this unit to play songs in random order.• Select “Albums” to set this unit to play albums in random order.
• When “Shuffle” is set to a setting other than “Off ”, “ ” appears in the top right corner while songs or albums are being shuffled.
• Press 9ENTER repeatedly to toggle between the settings of “Shuffle”.
Repeat (Repeat)Use this feature to set this unit to repeat one song or a sequence of songs.Choices: Off, One, All• Select “Off ” to deactivate this feature.• Select “One” to set this unit to repeat one song.• Select “All” to set this unit to repeat a sequence of songs.
• When “Repeat” is set to a setting other than “Off ”, “ ” or “ ” appears in the top right corner while one song or a sequence of songs are being repeated.
• Press 9ENTER repeatedly to toggle between the settings of “Repeat”.• Press KDISPLAY again to turn off the iPod menu.
The functions of the play information display
1 Track number/total tracks
2 Name of the album
3 Name of the song
4 Elapsed time
5 (playback), (pausing), (search forward) or
(search backward)
6 Shuffle and repeat icons
7 Name of the artist
8 Progress bar
9 Remaining time
Notes
Notes
iPod menu in the Zone OSDYou can control your iPod by using the Zone OSD. The design and functions may be different from the iPod menu displayed in the video monitor in the main zone.
0:51 -7:44
Road to India
Made-to-order
Frankie Zipper
1/91
2
3
4
56
7
8
9
iPod Information
79 En

Using Network/USB features
This unit is equipped with network and USB features that allow you to enjoy WAV (PCM format only), MP3, MPEG-4 AAC, and WMA files saved on your PC, Yamaha MCX-2000, USB storage device and USB portable audio player or access the Internet Radio.
• Yamaha MCX-2000 may not be for sale in some locations.• For further details about networking, refer to the operation manuals supplied with your network devices. Also refer to technical reference books, if needed.• Some WAV, MP3, MPEG-4 AAC, and WMA files may not be playable or may be noisy when played.
yFor a complete list of status messages that appear in the front panel display and video monitor, see the “Network and USB” section in “Troubleshooting” on page 150.
The following diagram shows the construction of the network and USB menu.
* Only the available PC servers and MCX-2000 are displayed.
yYou can also browse and select the desired contents by using your PC. See page 120 for details.
Using Network/USB features
Notes
Navigating the network and USB menus
Note
NET/USB PC/MusicCAST(MCX-2000)
Popular Stations
New Stations
USB
Server*
Internet Radio
Files/Directories
Help
Location
Podcasts
Bookmark
Genres
Selects an Internet Radio station that has been added to the “Bookmark” list (see page 83).
Selects an Internet Radio station or a Podcast service by location.
Broadcasts voice-assisted guidelines on various topics of the related Internet service.
Selects a file by navigating directories.
Selects an Internet Radio station or a Podcast service by genre.
Selects an Internet Radio station from the ones that have recently started the service.
Selects an Internet Radio station from the list of popular stations.
Selects a Podcast service by location or genre.
My Added Station Selects an Internet Radio station that you add to the list of the stations.
80 En
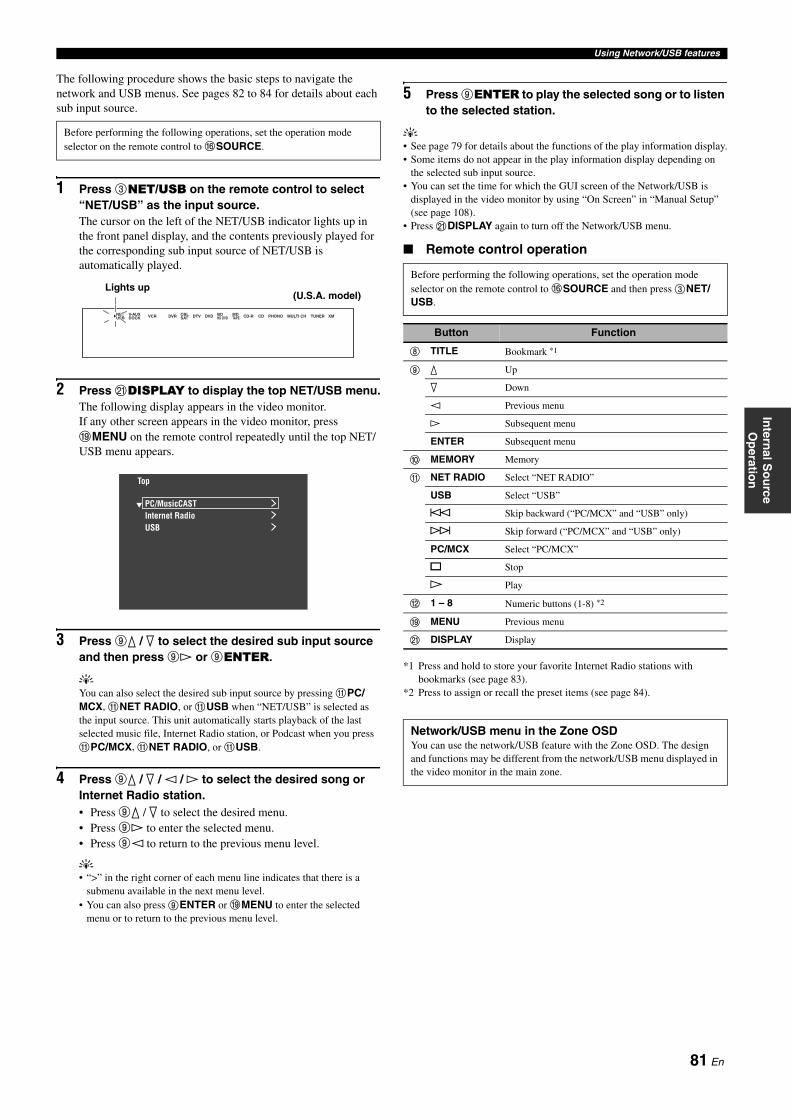
Using Network/USB features
Intern
al So
urce
Op
eration
The following procedure shows the basic steps to navigate the network and USB menus. See pages 82 to 84 for details about each sub input source.
1 Press 3NET/USB on the remote control to select “NET/USB” as the input source.The cursor on the left of the NET/USB indicator lights up in the front panel display, and the contents previously played for the corresponding sub input source of NET/USB is automatically played.
2 Press KDISPLAY to display the top NET/USB menu.The following display appears in the video monitor.If any other screen appears in the video monitor, press IMENU on the remote control repeatedly until the top NET/USB menu appears.
3 Press 9k / n to select the desired sub input source and then press 9h or 9ENTER.
yYou can also select the desired sub input source by pressing APC/MCX, ANET RADIO, or AUSB when “NET/USB” is selected as the input source. This unit automatically starts playback of the last selected music file, Internet Radio station, or Podcast when you press APC/MCX, ANET RADIO, or AUSB.
4 Press 9k / n / l / h to select the desired song or Internet Radio station.• Press 9k / n to select the desired menu.• Press 9h to enter the selected menu.• Press 9l to return to the previous menu level.
y• “>” in the right corner of each menu line indicates that there is a
submenu available in the next menu level.• You can also press 9ENTER or IMENU to enter the selected
menu or to return to the previous menu level.
5 Press 9ENTER to play the selected song or to listen to the selected station.
y• See page 79 for details about the functions of the play information display.• Some items do not appear in the play information display depending on
the selected sub input source.• You can set the time for which the GUI screen of the Network/USB is
displayed in the video monitor by using “On Screen” in “Manual Setup” (see page 108).
• Press KDISPLAY again to turn off the Network/USB menu.
Remote control operation
*1 Press and hold to store your favorite Internet Radio stations with bookmarks (see page 83).
*2 Press to assign or recall the preset items (see page 84).
Before performing the following operations, set the operation mode selector on the remote control to FSOURCE.
TUNER XMMULTI CHPHONOCDCD-RDVDDTVDVRVCR MD TAPE
BD HD DVD
CBL SAT
V-AUX DOCK
NET USB
Lights up(U.S.A. model)
Top
PC/MusicCASTInternet RadioUSB
Before performing the following operations, set the operation mode selector on the remote control to FSOURCE and then press 3NET/USB.
Button Function
8 TITLE Bookmark *1
9 k Up
n Down
l Previous menu
h Subsequent menu
ENTER Subsequent menu
0 MEMORY Memory
A NET RADIO Select “NET RADIO”
USB Select “USB”
b Skip backward (“PC/MCX” and “USB” only)
a Skip forward (“PC/MCX” and “USB” only)
PC/MCX Select “PC/MCX”
s Stop
p Play
B 1 – 8 Numeric buttons (1-8) *2
I MENU Previous menu
K DISPLAY Display
Network/USB menu in the Zone OSDYou can use the network/USB feature with the Zone OSD. The design and functions may be different from the network/USB menu displayed in the video monitor in the main zone.
81 En

Using Network/USB features
Use this feature to enjoy music files saved on your PC or Yamaha MCX-2000. MCX-2000 is a music server that enhances the concept of Yamaha exclusive MusicCAST, a digital music delivery method over a personal network.
1 Install Windows Media Player 11 on your PC, or register this unit on your Yamaha MCX-2000.• Refer to “Installing Windows Media Player 11 on your PC”
and “Registering this unit on the Yamaha MCX-2000” on page 82.
• This procedure is needed only the first time.• (PC only) You may need to make some setting of Windows
Media Player 11 to start the contents sharing. Refer to the attached documents of Windows Media Player 11.
2 Turn on your PC or MCX-2000.The PC server or MCX-2000 is added to the server list on the submenu of PC/MusicCAST.
3 Select a desired server or MusicCAST to begin playback.
• Yamaha MCX-2000 may not be for sale in some locations.• You can connect this unit to up to 15 PC servers and 1 MCX-2000, and
each server must be connected to the same subnet as this unit.• Some WAV, MP3, MPEG-4 AAC, and WMA files on your PC may not be
playable or may be noisy when played.• (MCX-2000 only) Files marked with an asterisk (*) have not been
converted to MP3 format. You cannot play back such files immediately unless you set the “Receive PCM Stream” setting of this unit to “ON” on MCX-2000. For details, refer to the instruction manual of MCX-2000.
y• While a song is being played, the time elapsed is displayed at the bottom
of the playback information screen.• You can use Ab / a to skip backward/forward and Ah / s to start/stop playback independently from the menu in the video monitor.
• You can set the settings for repeat and shuffle mode by using the “Play Style” parameters in “NET/USB” (see page 98).
• You can set the front panel display mode by using the “Scroll” parameter in “Front Panel Disp.” (see page 112).
Installing Windows Media Player 11 on your PCWith Windows Media Player 11, you can play back the audio files on your PC. For details refer to the documents of Windows Media Player 11.
yYou can also play back the audio files on your PC with Windows Media Connect 2.0 installed.
1 Install Windows Media Player 11 on your PC.You can download the installer of Windows Media Player 11 from the Microsoft website, or use the upgrade function of the installed Microsoft Windows Media Player.
2 Turn on your PC and then share a folder on the PC.The Shared folder is added to the server list on the submenu of PC/MusicCAST.
• If the operating system (OS) of your PC is Windows Vista, Windows Media Player 11 is pre-installed (except some products).
• Some security software installed on your PC (anti-virus software, firewall software, etc.) may block the access of this unit to your PC. In such cases, configure the security software appropriately.
Registering this unit on the Yamaha MCX-2000You must register this unit on your Yamaha MCX-2000 so that this unit can be recognized by your Yamaha MCX-2000. For details, refer to the operation manual supplied with your Yamaha MCX-2000.
1 Turn off this unit.
2 Set your Yamaha MCX-2000 to the “Auto Config” mode.
3 Turn on this unit.• MCX-2000 is added to the server list on the submenu of PC/
MCX.• The client ID of this unit appears in the OSD of your
Yamaha MCX-2000 (shown as CL-XXXXX), and this completes the automatic configuration procedure.
• The latter part of the client ID of this unit is same as the last 5 digits of the MAC address of this unit. For details about MAC address, see page 112.
• To clear the registered client ID of this unit, use the “Manual Config” mode of your Yamaha MCX-2000 (refer to the instruction manual of MCX-2000) and then set “INITIALIZE” in the advanced setup menu of this unit to “NETWORK” (see page 142).
• The client control functions of MusicCAST over this unit other than “View Play Info”, “Receive PCM Stream” and “Edit Client title” are not available. Avoid using these functions as it will stop the playback on this unit.
Using a PC server or Yamaha MCX-2000
Notes
Notes
Notes
82 En
Using Network/USB features
Intern
al So
urce
Op
eration
Use this feature to listen to Internet Radio stations. This unit uses the vTuner Internet Radio station database service particularly customized for this unit, providing over 2000 radio station database. Further, you can store your favorite stations with bookmarks.
• This service may be discontinued without notice.• Some Internet Radio stations may not be played even if they are selected in
the NET RADIO menu.• To listen to the Internet Radio, connect this unit to your network (see
page 40).• A narrowband Internet connection (i.e. 56K modem, ISDN) will not
provide satisfactory results, and a broadband connection is strongly recommended (i.e. a cable modem, an xDSL modem, etc.). For detailed information, consult with your ISP.
y• You can use Ah / s to start/stop playback independently from the menu
in the video monitor.• “Podcast” is a type of the Internet Radio service, and there are a number of
Podcast services available on the Internet. The Podcast is not a continuous service. That is, this unit stops playback when an episode of the Podcast ends.
• Some security devices (such as firewall) may block the access of this unit to Internet Radio stations. In such cases, configure the security settings appropriately.
Storing your favorite Internet Radio stations with bookmarks
Use this feature to select your favorite Internet Radio stations quickly.
Press and hold 8TITLE on the remote control while the selected Internet Radio station service is being broadcast.The stored Internet Radio station is added to the “Bookmark” list (see page 80).
y• To remove the stored station from the list, select the item in the first level
of the “Bookmark” list and then press and hold 8TITLE on the remote control.
• You can also register your favorite Internet Radio stations to this unit by accessing the following website with the web browser on your PC. To use this feature, you need the MAC address of this unit as the ID number and your e-mail address to create your personal account. Use “Information” in the “Network” menu to display the MAC address of this unit (see page 111). For details, refer to the help information on the website.URL: http://yradio.vtuner.com/
Use this feature to enjoy WAV (PCM format only), MP3, WMA and MPEG-4 AAC files saved on your USB storage device or USB portable audio player connected to the USB port on the front panel of this unit.This unit is equipped with the front and rear USB ports. Set “USB Select” in “Input Select” to “Front” or “Rear” to select the active USB port (see page 98).
• This unit supports USB mass storage class devices or USB MTP devices using FAT 16 or FAT 32.
• Only the first partition is displayed in the GUI menu. You cannot select files in other partitions.
• Up to 8 levels of directory hierarchy and 500 music files per directory are recognized.
• Some devices may not work properly even if they meet the requirements.• Some WAV, MP3, WMA and MPEG-4 AAC files may not be playable or
may be noisy when played.• When you connect your USB storage device or USB portable audio player,
there may be an about 10 seconds delay.
y• While a song is being played, the time elapsed is displayed at the bottom
of the playback information screen.• You can use Ab / a to skip backward/forward and Ah / s to start/stop playback independently from the menu in the video monitor.
• You can set the settings for repeat and shuffle mode by using the “Play Style” parameters in “NET/USB” (see page 98).
• You can set the front panel display mode by using the “Scroll” parameter in “Front Panel Disp.” (see page 112).
Using the Internet Radio
Notes
Using a USB storage device or a USB portable audio player
Notes
83 En

Using Network/USB features
Use this feature to access the desired music sources (WAV, MP3 and WMA files on the connected PC, MCX-2000 or USB storage devices and Internet Radio stations) directly. You can preset 8 items in each sub input sources.
Assigning the items to the numeric button (1-8)
1 Press 3NET/USB to select “NET/USB” as the input source.
2 Select a desired music source you want to assign to the numeric button (1-8) (B), and then play back the source.See page 81 for details.
3 Press 0MEMORY.This unit in the memory preset mode. The MEMORY indicator flashes and following message appears in the video monitor and front panel display.
yWhen you do not complete each of the following steps within 10 seconds, the memory preset mode is automatically canceled. In this case, start over from step 3.
4 Press desired numeric buttons (1-8) (B).The number of the selected numeric button appears in the video monitor or front panel display.
5 Press 9ENTER or 0MEMORY to confirm the preset.
Select an item by using numeric buttons (1-8) (B)
1 Press 3NET/USB to select “NET/USB” as the input source.
2 Select the desired sub input source.
3 Press one of the numeric button (1-8) (B) which the desired item is assigned to select the item as the input source.The selected preset number appears in the front panel display, and this unit starts the playback of the source assigned to the selected numeric button.
• “Empty Memory!” appears in the front panel display and the short message display when you press the numeric button (1-8) (B) to which no items are assigned.
• This unit does not recall the correct item assigned to the selected numeric button (1-8) (B) in the following cases:– the connected USB device is incorrect.– the PC or MCX-2000 which stores the selected item is turned off or
disconnected from the network.– the selected Internet Radio station is temporary unavailable or out
of service.– the directory of the selected item has been changed.
yThis unit stores the relative position of the preset items in a directory or playlist, and does not recall the correct item by using numeric buttons (1-8) (B) if you add or delete music files to or from the same directory or playlist as the preset items. In such cases, preset the desired item to the numeric buttons (1-8) (B) again.We recommend the following methods:
PC server/MCX-2000Create eight playlists which contain the desired items, and then preset the top item of each playlist to the numeric buttons (1-8) (B). When you change the items which are preset to the numeric buttons (1-8) (B), replace the registered items in the playlist with the desired items without deleting the playlist.
USB storage devicesCreate eight directories which contain the desired items in a directory beside the directory which contains all music files, and then preset the top item of each directory to the numeric buttons (1-8) (B). When you change the items which are preset to the numeric buttons (1-8) (B), replace the items in the directory to the desired items without deleting the directory.
Using shortcut buttons
Before performing the following operations, set the operation mode selector on the remote control to FSOURCE.
MEMORY
TUNER XMMULTI CHPHONOCDCD-RDVDDTVDVRVCR MD TAPE
BD HD DVD
CBL SAT
V-AUX DOCK
NET USB
-: PC/MCX
FlashesPreset number
MEMORY
TUNER XMMULTI CHPHONOCDCD-RDVDDTVDVRVCR MD TAPE
BD HD DVD
CBL SAT
V-AUX DOCK
NET USB
1: PC/MCX
FlashesSelected preset number
Before performing the following operations, set the operation mode selector on the remote control to FSOURCE.
Notes
TUNER XMMULTI CHPHONOCDCD-RDVDDTVDVRVCR MD TAPE
BD HD DVD
CBL SAT
V-AUX DOCK
NET USB
1: PC/MCX
Selected preset number
84 En

Advanced OperationAdvanced sound configurations ........................................................ 86
Selecting decoders ................................................................................................................... 86Playing back sources with the THX Surround modes ............................................................. 87
Graphical user interface (GUI) menu .................................................. 88GUI menu overview ................................................................................................................ 90Stereo/Surround (Stereo/Surround menu) ............................................................................... 91Input Select .............................................................................................................................. 96Manual Setup (Basic) .............................................................................................................. 99Manual Setup (Volume) ......................................................................................................... 102Manual Setup (Sound) ........................................................................................................... 103Manual Setup (Video) ........................................................................................................... 107Manual Setup (Multi Zone) ................................................................................................... 109Manual Setup (Network) ....................................................................................................... 111Manual Setup (Option) .......................................................................................................... 112Signal Info. (Input signal information) .................................................................................. 114Language ............................................................................................................................... 114
Saving and recalling the system settings (System Memory) ......... 115Saving the current system settings ........................................................................................ 115Loading the stored system settings ........................................................................................ 118Using examples ..................................................................................................................... 119
Controlling this unit by using the Web browser (Web Control Center) ..... 120
Remote control features .................................................................... 121Controlling this unit, a TV, or other components .................................................................. 121Customizing the remote control ............................................................................................ 123Setting the backlight mode of the remote control (LIGHT) .................................................. 124Setting remote control codes (P-SET) ................................................................................... 124Programming codes from other remote controls (LEARN) .................................................. 126Changing source names in the display window (RNAME) .................................................. 127Macro programming features ................................................................................................ 128Clearing configurations ......................................................................................................... 130Simplified remote control ...................................................................................................... 132
Using multi-zone configuration ........................................................ 133Step1: Planning the multi-zone system ................................................................................. 134Step2: Connecting the speakers, external amplifiers, and/or other components ................... 135Step3: Setting the zone parameter ......................................................................................... 139Controlling Zone 2, Zone 3, or Zone 4 .................................................................................. 139Using the party mode ............................................................................................................ 141
Advanced setup ................................................................................. 142Using the advanced setup menu ............................................................................................ 142
Advan
ced O
peratio
n

Advanced sound configurations
Selecting decoders for 2-channel sources (surround decode mode)
Use this feature to play back sources with selected decoders. You can play back 2-channel sources on multi-channels.
Set the operation mode selector to FAMP and then press QSUR. DECODE repeatedly on the remote control to select the surround decode mode.You can select desired surround decoder modes depending on the type of source you are playing and your personal preference.
yYou can select the desired decoder and adjust the decoder parameter settings by using GUI menu. See page 92 for details.
Decoder descriptions
yWhen you select the surround decode mode for the multi-channel digital sources, this unit automatically selects the corresponding decoder for each source.
Selecting decoders used with sound field programs
Use this feature to select the desired decoder used with MOVIE sound field programs (except “Mono Movie”) or THX Surround mode. Use “Decoder Type” parameter in “Stereo/Surround” to set the desired decoder (see page 92).
Available decoders (Decoder Type)
For MOVIE sound field programs (see page 62)Choices: PLIIx Movie (PLII Movie), Neo:6 Cinema
For THX Cinema modeChoices: Pro Logic, PLIIx Movie (PL II Movie), Neo:6
Cinema, Neural-THX (U.S.A. and Canada models only), Off
For THX Music modeChoices: Pro Logic, PLIIx Music (PL II Music), Neo:6 Music,
Neural-THX (U.S.A. and Canada models only), Off
For THX Games modeChoices: Pro Logic, PL II Game, Neo:6 Cinema, Neural-THX
(U.S.A. and Canada models only), Off
When you select “Decoder Type” to “Off” in the THX Surround mode, this unit activates the decoder corresponding to the input source.
Advanced sound configurations
Selecting decoders
Pro Logic
Dolby Pro Logic processing for any sources.
PLIIx MoviePLII Movie
Dolby Pro Logic IIx (or Dolby Pro Logic II) processing for movie sources. The Pro Logic IIx decoder is not available when “Surround Back” is set to “None” or using headphones (see page 100).
PLIIx MusicPLII Music
Dolby Pro Logic IIx (or Dolby Pro Logic II) processing for music sources. The Pro Logic IIx decoder is not available when “Surround Back” is set to “None” or using headphones (see page 100).
PLIIx GamePLII Game
Dolby Pro Logic IIx (or Dolby Pro Logic II) processing for game sources. The Pro Logic IIx decoder is not available when “Surround Back” is set to “None” or using headphones (see page 100).
Neo:6 Music
DTS processing for music sources.
Dolby Pro Logic IIx (or Dolby Pro Logic II) processing for music sources. The Pro Logic IIx decoder is not available when “Surround Back” is set to “None” or using headphones (see page 100).
Decoder description
Name of the decoder (Decoder Type)
PLIIx MusicPLII Music
Neo:6 Cinema
DTS processing for movie sources.
CSII Cinema(U.S.A. model only)
SRS Circle Surround II processing for movie sources.
CSII Music(U.S.A. model only)
SRS Circle Surround II processing for music sources.
Neural-THX(U.S.A. and Canada models only)
Neural-THX Surround processing for any sources. The Neural-THX Surround decoder is especially suitable for the XM HD Surround program of XM Satellite Radio.
Notes
86 En

Advanced sound configurations
Advan
ced
Op
eration
Selecting decoders for multi-channel sourcesIf you connected surround back speakers, use this feature to enjoy 6.1/7.1-channel playback for multi-channel sources using the Dolby Pro Logic IIx, Dolby Digital EX, DTS-ES, or Neural-THX decoders.
1 Set the operation mode selector to FAMP and then press NEXTD SUR. on the remote control repeatedly to switch between 5.1 and 6.1/7.1-channel playback.
2 Press 9l / h repeatedly to select a decoder while the name of the decoder is displayed when you select other than “AUTO” or “OFF”.
yUse this feature to activate the desired decoder manually when this unit cannot detect the signal flag encoded to the input sources correctly.
• The available decoders vary depending on the setting of the speakers and the input sources.
• 6.1/7.1-channel playback is not possible in the following cases:– when “Surround” (see page 100) or “Surround Back” (see page 100) is
set to “None”.– when the component connected to the MULTI CH INPUT jacks is being
played.– when the source being played does not contain surround left and right
channel signals.– when a Dolby Digital KARAOKE source is being played.– when this unit is in the stereo playback, 7ch Enhancer (see page 94) or
Pure Direct (see page 65) mode.– when “BI-AMP” is set to “ON” (see page 143).
• When this unit is turned off, this setting will be reset to “AUTO”.• “Neural-THX” is only available on the U.S.A. and Canada models and you
can select “Neural-THX” only when this unit is in the “STRAIGHT” mode (see page 64), surround decode mode (see page 86), or THX Surround mode.
Use this feature to play back sources with the accurate surround processing programs compliant with the THX specifications.
Rotate MPROGRAM (or set the operation mode selector to FAMP and then press QTHX repeatedly) to select the desired THX Surround mode.You can select the THX Surround mode for movies, music, or games.
For 2-channel sourcesYou can select the following THX Surround programs.
yWhen this unit is in the THX Cinema, THX Music, or THX Games mode, you can select the desired surround decoder (see page 86).
For multi-channel sourcesYou can select the following THX Surround programs.
yTo optimize the speaker settings for the THX Surround modes, set the parameters in “THX Set” (see page 99) appropriately.
Choice Functions
AUTO Activates the optimum decoder to play back signals in 6.1/7.1 channels when this unit recognizes a signal flag being input.
Decoders(PLIIx Movie, PLIIx Music, EX/ES, EX, Neural-THX)
Use this feature to activate the desired decoders for the playback of multi-channel sources manually.
OFF Does not use any decoders to create 6.1/7.1 channels.
Notes
Playing back sources with the THX Surround modes
Cinema
THX Surround mode for the 2-channel movie sources. This unit decodes the sources by the selected decoder.
Music
THX Surround mode for the 2-channel music sources. This unit decodes the sources by the selected decoder before THX processing.
Games
THX Surround mode for the 2-channel game audio. This unit decodes the sources by the selected decoder before THX processing.
Ultra2 CinemaSurround EXCinema
THX Surround modes for the multi-channel movie sources. When this unit activates the Dolby Digital EX decoder (see left), this unit automatically selects the THX Surround EX mode, and when this unit activates the decoders for 6.1/7.1-channel playback, this unit automatically selects the THX Cinema mode.
Ultra2 Music
THX Surround mode for the multi-channel music sources.
Ultra2 Games
THX Surround mode for the multi-channel game audio.
System MemoryYou can store the settings of this unit optimized for the THX Surround modes and recall then easily by using the system memory feature. See page 115 for details.
87 En

Graphical user interface (GUI) menu
RX-Z11 GUI menu tree
Graphical user interface (GUI) menu
Stereo/Surround P. 91
Input Select P. 96
Manual Setup
XM (U.S.A. and Canada models only)TUNERMULTI CHPHONOCDCD-RMD/TAPEBD/HD DVDDVDDTVCBL/SATDVRVCRV-AUXDOCKNET/USB
Adaptive DRCAdaptive DSP LvlMax VolumeInitial VolumeMuting Type
LFE Level
Dynamic Range
S-Wave ControlParametric EQTone Control
Lipsync
Pure DirectChannel Mute
ConversionHDMI ProcessingComponent I/PHDMI ResolutionHDMI AspectShort MessageOn ScreenPositionWall Paper
Test ToneTHX Set
Speaker Set
Speaker DistanceSpeaker Level
Volume P. 102
Sound P. 103
Video P. 107
Basic P. 99
SpeakersHeadphonesSpeakersHeadphones
ControlBassTrebleAuto BypassHDMI AutoAutoManual
THX Ultra2 SWFRBndry Gain CompSB Speaker Dist.THX Loudness PlusFrontCenterSurroundSurround BackFront PresenceRear PresenceSubwoofer Configuration
PhaseBass Out
88 En

Graphical user interface (GUI) menu
Advan
ced
Op
eration
Auto Setup P. 46
System Memory P. 115
Signal Info. P. 114
Multi Zone P. 109
Network P. 111
Option P. 112
Main
Zone2
Zone3
Zone4
Audio Info.Video Info.
English
FrançaisDeutschEspañolРусский
Language P. 114
Speaker BZone SP AssignParty Mode SetZone2 Set
Zone3 Set
Zone4 Set
Zone OSD
ConfigurationInformation
Front Panel Disp.iPodAudio SelectDecoder ModeEXTD SurroundMemory GuardHDMI SetTrigger Output
Main LoadMain SaveMain Rename
Zone2 LoadZone2 SaveZone2 Rename
Zone3 LoadZone3 SaveZone3 Rename
Zone4 LoadZone4 SaveZone4 Rename
Zone2 VolumeZone2 Max Vol.Zone2 Initial Vol.Zone2 BalanceZone2 MonoMuting TypeTuner Select (U.S.A. model only)
Zone3 VolumeZone3 Max Vol.Zone3 Initial Vol.Zone3 BalanceZone3 MonoMuting TypeTuner Select (U.S.A. model only)
Zone4 VolumeZone4 Max Vol.Zone4 Initial Vol.Zone4 BalanceZone4 MonoMuting TypeTuner Select (U.S.A. model only)
Trigger1Trigger2
89 En

Graphical user interface (GUI) menu
This unit features a sophisticated graphical user interface (GUI) menu that helps you to control the amplifier function of this unit. With the GUI menu, you can view the information of the signals being input and the status of this unit.
Stereo/Surround (Stereo/Surround menu)Use this feature to select the sound field programs and customize the program parameter settings (see page 91).
Input Select (Input select menu)Use this feature to select the input source and customize the parameters of each input source (see page 96).
Manual Setup (Manual setup menu)Use this feature to manually adjust speaker and system parameters.
Volume (Volume menu)See page 102 for details.
Sound (Sound menu)See page 103 for details.
Video (Video menu)See page 107 for details.
Basic (Basic menu)See page 99 for details.
Multi Zone (Multi-zone menu)See page 109 for details.
Network (Network and USB menu)See page 111 for details.
Option (Option menu)See page 112 for details.
Auto Setup (Automatic setup menu)Use this feature to run the automatic setup and specify which speaker parameters to be adjusted (see page 46).
System Memory (System memory menu)Use this feature to store and recall various settings of this unit (see page 115).
Signal Info. (Signal information)Use this feature to check audio and video signal information (see page 114).
Language (GUI language menu)Use this feature to select the language of your choice that appears in the GUI menu of this unit (see page 114).
y• You can also select the GUI language using “LANGUAGE” parameter in “Advanced setup” in the front panel display (see page 144).• See page 57 for details about the basic operations in GUI menu.• Refer to the “Graphical user interface (GUI) menu” on page 88 for the complete menu structure.
GUI menu overview
Stereo/Surround
Input Select
Manual Setup
Auto Setup
System Memory
Volume
Sound
Video
90 En
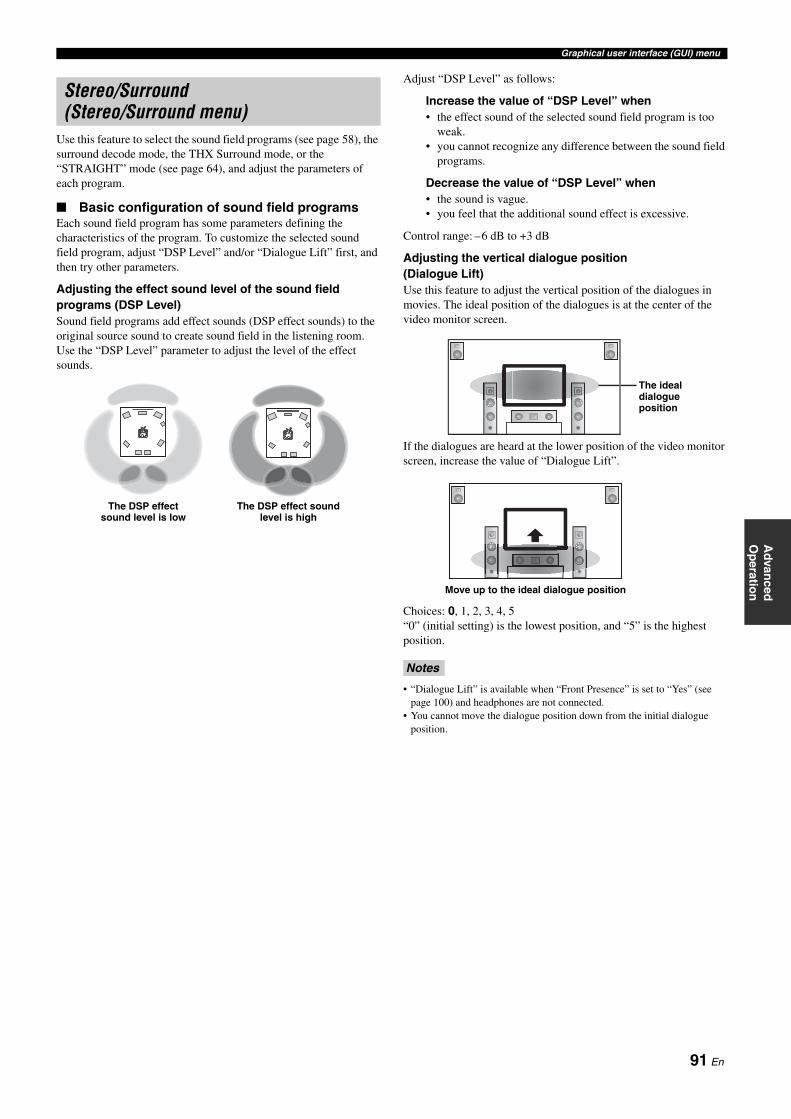
Graphical user interface (GUI) menu
Advan
ced
Op
eration
Use this feature to select the sound field programs (see page 58), the surround decode mode, the THX Surround mode, or the “STRAIGHT” mode (see page 64), and adjust the parameters of each program.
Basic configuration of sound field programsEach sound field program has some parameters defining the characteristics of the program. To customize the selected sound field program, adjust “DSP Level” and/or “Dialogue Lift” first, and then try other parameters.
Adjusting the effect sound level of the sound field programs (DSP Level)Sound field programs add effect sounds (DSP effect sounds) to the original source sound to create sound field in the listening room. Use the “DSP Level” parameter to adjust the level of the effect sounds.
Adjust “DSP Level” as follows:
Increase the value of “DSP Level” when• the effect sound of the selected sound field program is too
weak.• you cannot recognize any difference between the sound field
programs.
Decrease the value of “DSP Level” when• the sound is vague.• you feel that the additional sound effect is excessive.
Control range: –6 dB to +3 dB
Adjusting the vertical dialogue position (Dialogue Lift)Use this feature to adjust the vertical position of the dialogues in movies. The ideal position of the dialogues is at the center of the video monitor screen.
If the dialogues are heard at the lower position of the video monitor screen, increase the value of “Dialogue Lift”.
Choices: 0, 1, 2, 3, 4, 5“0” (initial setting) is the lowest position, and “5” is the highest position.
• “Dialogue Lift” is available when “Front Presence” is set to “Yes” (see page 100) and headphones are not connected.
• You cannot move the dialogue position down from the initial dialogue position.
Stereo/Surround (Stereo/Surround menu)
The DSP effect sound level is low
The DSP effect sound level is high
Notes
The ideal dialogue position
Move up to the ideal dialogue position
91 En
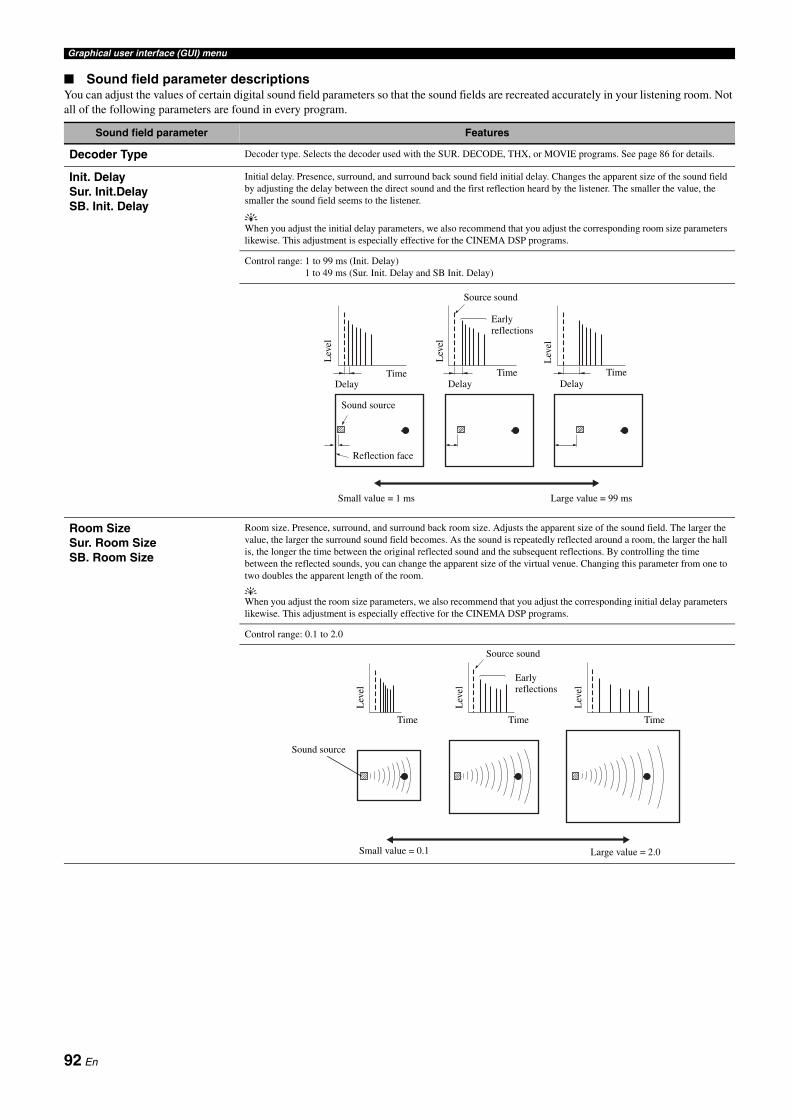
Graphical user interface (GUI) menu
Sound field parameter descriptionsYou can adjust the values of certain digital sound field parameters so that the sound fields are recreated accurately in your listening room. Not all of the following parameters are found in every program.
Sound field parameter Features
Decoder Type Decoder type. Selects the decoder used with the SUR. DECODE, THX, or MOVIE programs. See page 86 for details.
Init. DelaySur. Init.DelaySB. Init. Delay
Initial delay. Presence, surround, and surround back sound field initial delay. Changes the apparent size of the sound field by adjusting the delay between the direct sound and the first reflection heard by the listener. The smaller the value, the smaller the sound field seems to the listener.
yWhen you adjust the initial delay parameters, we also recommend that you adjust the corresponding room size parameters likewise. This adjustment is especially effective for the CINEMA DSP programs.
Control range: 1 to 99 ms (Init. Delay)1 to 49 ms (Sur. Init. Delay and SB Init. Delay)
Room SizeSur. Room SizeSB. Room Size
Room size. Presence, surround, and surround back room size. Adjusts the apparent size of the sound field. The larger the value, the larger the surround sound field becomes. As the sound is repeatedly reflected around a room, the larger the hall is, the longer the time between the original reflected sound and the subsequent reflections. By controlling the time between the reflected sounds, you can change the apparent size of the virtual venue. Changing this parameter from one to two doubles the apparent length of the room.
yWhen you adjust the room size parameters, we also recommend that you adjust the corresponding initial delay parameters likewise. This adjustment is especially effective for the CINEMA DSP programs.
Control range: 0.1 to 2.0
Source sound
Early reflections
Time Time TimeDelay Delay Delay
Sound source
Reflection face
Lev
el
Small value = 1 ms Large value = 99 ms
Lev
el
Lev
el
Lev
el
Lev
el
Lev
el
Time Time Time
Source sound
Early reflections
Small value = 0.1 Large value = 2.0
Sound source
92 En
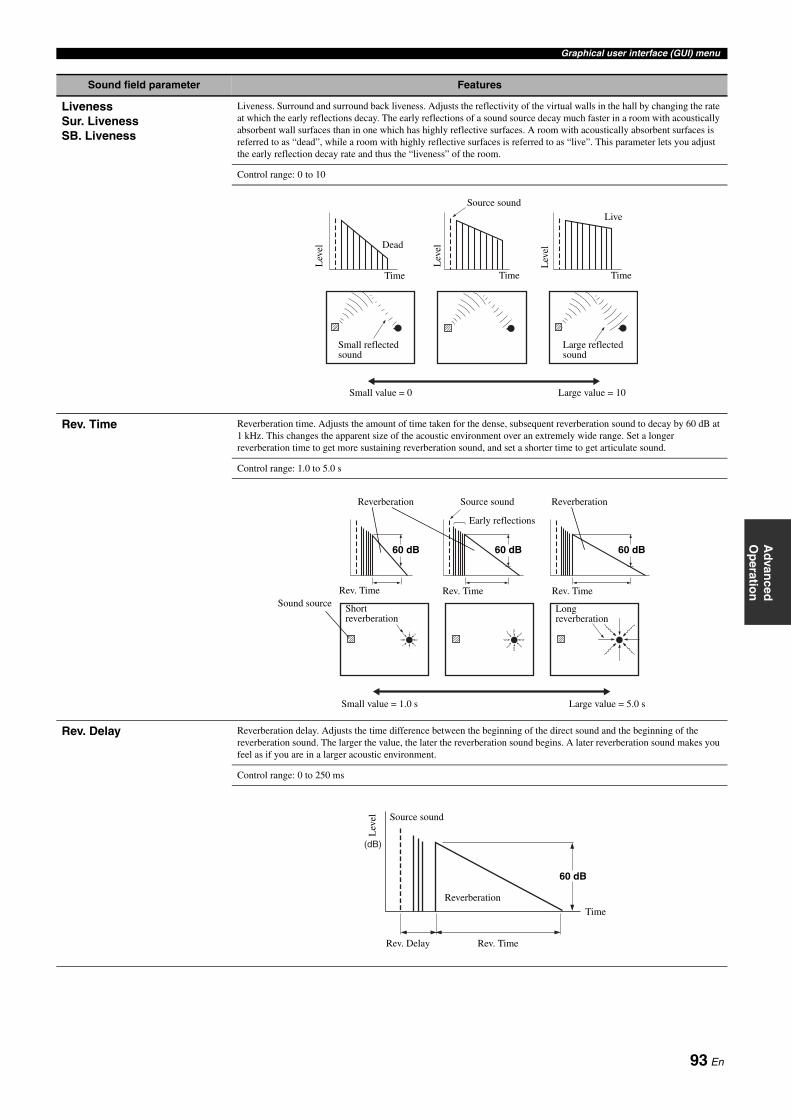
Graphical user interface (GUI) menu
Advan
ced
Op
eration
LivenessSur. LivenessSB. Liveness
Liveness. Surround and surround back liveness. Adjusts the reflectivity of the virtual walls in the hall by changing the rate at which the early reflections decay. The early reflections of a sound source decay much faster in a room with acoustically absorbent wall surfaces than in one which has highly reflective surfaces. A room with acoustically absorbent surfaces is referred to as “dead”, while a room with highly reflective surfaces is referred to as “live”. This parameter lets you adjust the early reflection decay rate and thus the “liveness” of the room.
Control range: 0 to 10
Rev. Time Reverberation time. Adjusts the amount of time taken for the dense, subsequent reverberation sound to decay by 60 dB at 1 kHz. This changes the apparent size of the acoustic environment over an extremely wide range. Set a longer reverberation time to get more sustaining reverberation sound, and set a shorter time to get articulate sound.
Control range: 1.0 to 5.0 s
Rev. Delay Reverberation delay. Adjusts the time difference between the beginning of the direct sound and the beginning of the reverberation sound. The larger the value, the later the reverberation sound begins. A later reverberation sound makes you feel as if you are in a larger acoustic environment.
Control range: 0 to 250 ms
Sound field parameter Features
Source sound
Lev
el
Lev
el
Lev
elDead
Live
Time Time Time
Small reflected sound
Large reflected sound
Small value = 0 Large value = 10
Reverberation ReverberationSource sound
Rev. Time Rev. Time Rev. TimeSound source Short
reverberationLong reverberation
Small value = 1.0 s Large value = 5.0 s
Early reflections
60 dB 60 dB 60 dB
(dB)
Lev
el Source sound
Reverberation
Rev. TimeRev. Delay
Time
60 dB
93 En

Graphical user interface (GUI) menu
Stereo program parameter descriptions
Compressed Music Enhancer mode parameter descriptions
Rev. Level Reverberation level. Adjusts the volume of the reverberation sound. The larger the value, the stronger the reverberation becomes.
Control range: 0 to 100%
Sound field parameter Features
Direct(“2ch Stereo” only)
2-channel stereo direct. Bypasses the decoders and DSP processors of this unit for pure hi-fi stereo sound when playing 2-channel analog sources.
Choices: Auto, Off
y• Select “Auto” to bypass the decoders, DSP processors and the tone control circuitry only when “BASS” and “TREBLE”
are set to “BYPASS” (see page 65).• Select “Off” not to bypass the decoders, DSP processors and the tone control circuitry when “BASS” and “TREBLE”
are set to “BYPASS”.• When multi-channel signals are input, they are downmixed to 2 channels and output from the front left and right
speakers.• The low-frequency signals of the front left and right channels are redirected to the subwoofer in the following cases:
– “Bass Out” is set to “Front & SWFR” (see page 101).– “Front” is set to “Small” (see page 99) and “Bass Out” is set to “SWFR” (see page 101).
Center LevelSurround L LevelSurround R LevelSur.Back L LevelSur.Back R LevelF.PRNS L LevelF.PRNS R LevelR.PRNS L LevelR.PRNS R Level(“11ch Stereo” only)
11-channel stereo center, surround left, surround right, surround back, presence left and presence right levels. Adjusts the volume level of each channel in the 11-channel stereo mode. The available parameters differ depending on the speaker settings.
Control range: 0 to 100%
The Compressed Music Enhancer mode
Features
Level(“Straight Enhancer” and “11ch Enhancer” only)
Straight enhancer or 11-channel enhancer effect level. Select “High” or “Low” to adjust the effect for the high-frequency.
Choices: High, Low
Sound field parameter Features
Source sound
Lev
el
Rev. Level
Time
94 En

Graphical user interface (GUI) menu
Advan
ced
Op
eration
Decoder parameter descriptions
Initialize (Program parameters initialization)Use this feature to initialize the parameter of the selected sound field program.Choices: No, Yes
• Select “Yes” and then press 9ENTER to set the program parameters to the factory default settings.• Select “No” (or press 9l) to cancel the program parameter initialization.
yUse “DSP PARAM” of “INITIALIZE” in “Advanced setup” to initialize the parameters of all sound field programs (see page 144).
Decoder parameter Features
Panorama(“PLIIx Music” and “PLII Music” only)
Pro Logic IIx Music and Pro Logic II Music panorama. Sends stereo signals to the surround speakers as well as the front speakers for a wraparound effect.
Choices: Off, On
Center Width(“PLIIx Music” and “PLII Music” only)
Pro Logic IIx Music and Pro Logic II Music center width. Moves the center channel output completely towards the center speaker or towards the front left and right speakers. A larger value moves the center channel output towards the front left and right speakers.
Control range: 0 (center channel sound is output only from the center speaker) to 7 (center channel sound is output only from the front left and right speakers)
Initial setting: 3
Dimension(“PLIIx Music” and “PLII Music” only)
Pro Logic IIx Music and Pro Logic II Music dimension. Adjusts the sound field either towards the front or towards the rear.
Control range: –3 (towards the rear) to +3 (towards the front)
Initial setting: STD (standard)
Center Image(“Neo:6 Music” only)
DTS Neo:6 Music center image. Adjusts the front left and right channel output relative to the center channel to make the center channel more or less dominant as necessary.
Control range: 0.0 (center channel sound is output only from the front left and right speakers) to1.0 (center channel sound output only from the center speaker)
Initial setting: 0.3
FOCUS(“CSII Movie” and “CSII Music” only)
CSII Movie and CSII Music focus. Adjusts the clearness of a sound image by elevating the perception of the sound image to compensate for non-optimally placed speakers from a lower location. A larger value makes speakers sound as if they are positioned at ear level.
Control range: 0 (lower location) to 8 (higher location)
TruBass(“CSII Movie” and “CSII Music” only)
CSII Movie and CSII Music TruBass. Adjusts the lower register by producing the perception of improved low frequency performance. A larger value improves bass even without a subwoofer and provides deeper, richer bass in the presence of a subwoofer.
Control range: 0 (standard low-frequency performance) to 8 (enhanced low-frequency performance)
Rev. Level
Dialogue Lift
Initialize No
Yes
95 En

Graphical user interface (GUI) menu
Use this feature to reassign digital input/outputs, select the input signal, rename the inputs, or adjust the level of the signal input at each input source.
• Some parameters described above may not be available for all input sources and some parameters are only available for specific input sources.
• You can set “Volume Trim” for each sub input source separately.• The “Play Style” setting is effective to both “PC/MCX” and “USB”.
Station Search (U.S.A. model only)Use this feature to select the preset HD Radio stations by the name of the stations. See page 72 for details.
I/O Assignment (Input/output assignment)
Use this feature to assign the input/output jacks according to the component to be used if the initial settings of this unit do not correspond to your needs. Change the following parameters to reassign the respective jacks and effectively connect more components.Once the input/output jacks are reassigned, you can select the corresponding component by using the DINPUT selector (or the input selector buttons(3)).
Example 1: Assigning the CD DIGITAL INPUT COAXIAL jack to “VCR”.
1 Select “Input Select” in the GUI menu and then select “VCR”.
2 Select “I/O Assignment” and then “Coaxial Input”.
3 Select “5CD”.
Example 2: Clearing a jack assignment.
1 Select “Input Select” and then select the desired input source (“DVD”, etc.).
2 Select “I/O Assignment” and then select the desired jack assignment (“Coaxial Input”, “Optical Input”, “Optical Output”, “Analog I/O” “Component Video”, or “HDMI”).
3 Select “None” and then press 9ENTER to clear the assignment.
• “None” appears in the GUI when any input source is not assigned to the input/output jack.
• You cannot select a specific item more than once for the same type of jack.• When you connect a component to both the COAXIAL and OPTICAL
jacks, priority is given to signals input at the COAXIAL jack.
Input Select
Input sourceSub input
sourceParameter
XM(U.S.A. and Canada models only)
—
Volume TrimRename
TUNER HD Radio (U.S.A. model only)
Station Search (U.S.A. model only)Volume TrimRename
TUNER (U.S.A. model only)
Volume TrimRename
MULTI CH
—
Volume TrimRenameMulti CH AssignBGV
PHONOCDCD-RMD/TAPEBD/HD DVDDVDDTVCBL/SATDVRVCR
—
I/O AssignmentAudio SelectDecoder ModeVolume TrimRename
V-AUX
—
I/O AssignmentAudio SelectDecoder ModeVolume TrimRename
DOCK—
Volume TrimRename
NET/USB PC/MCX Volume TrimPlay Style
NET RADIO Volume Trim
USB USB SelectVolume TrimPlay Style
NotesNotes
I/O Assignment
Audio Select
Decoder Mode
Coaxial Input
Optical Input
Optical Output
96 En

Graphical user interface (GUI) menu
Advan
ced
Op
eration
Audio Select (Audio input jack select)Use this feature to select the type of the input jack you want to use.
y• You can also select the audio input jack by pressing FAUDIO SELECT
(or OAUDIO SEL). See page 56 for details.• You can set the default audio input jack select of this unit by using “Audio
Select” in “Option” (see page 112).
This feature is not available when no digital input jack (OPTICAL, COAXIAL and HDMI) are assigned. In addition, “HDMI” is not available as an Audio input jack select setting when the HDMI input jacks are not used. Use “I/O Assignment” in “Input Select” to reassign the respective input jack.
Decoder Mode (Decoder mode)Use this feature to switch the decoder mode. You can designate the reassigned digital input jacks (see page 96) for digital audio signals.
Volume Trim (Volume trimming)Use this feature to adjust the level of the signal input at each input source. This feature is useful if you want to balance the level of each input source to avoid sudden changes in volume when switching between input sources.Control range: –6.0 dB to +6.0 dBInitial setting: 0.0 dB
yThis parameter also affects the signals output at the ZONE OUT jacks.
You can only adjust the volume for the current input source using this setting.
Rename (Rename)Use this feature to change the name of the inputs in the GUI menu or the front panel display menu. (“DVD” is used as the source component in the following example.)
1 Press 9l / h to place the _ (underscore) under the space or character you want to edit.
2 Press 9ENTER repeatedly to select a character type (CAPITAL/SMALL/LATIN CAPITAL/LATIN SMALL/FIGURE/MARK).
3 Press 9k / n to select the character you want to use and 9l / h to move to the next one.• You can use up to 9 characters for each memory.• Press 9n to change the character in the following order, or
press 9k to go in the reverse order:CAPITAL A to Z, spaceSMALL a to z, spaceLATIN CAPITAL Ä, Ö, Ü, etc., spaceLATIN SMALL ä, ö, ü, etc., spaceFIGURE 0 to 9, spaceMARK !, #, %, &, etc., space
• Press 9ENTER to switch between character types.• Press 9h repeatedly to select “RESET” to set the name of
the input source to the initial name.
• The character types you can select differ depending on the setting in “Language” (see page 114).
• If you set “Language” to “ ”, you can also select Japanese characters.
4 Press 9l / h repeatedly to select “OK” and press 9ENTER when complete.
y• Repeat steps 1 to 4 to rename each input.• You can also change the name of the input source that appears in the
display window (4) on the remote control. Refer to “Changing source names in the display window (RNAME)” on page 127.
You can only change the name of the current input source (except for multi channel input sources) using this setting.
Choice Functions
Auto Automatically selects input signals in the following order:(1) HDMI(2) Digital signals(3) Analog signals
HDMI Selects only HDMI signals. When HDMI signals are not input, no sound is output.
Coax/Opt Automatically selects input signals in the following order:(1) Digital signals input at the COAXIAL jack.(2) Digital signals input at the OPTICAL jack.When no signals are input, no sound is output.
Analog Selects only analog signals. If no analog signals are input, no sound is output.
Note
Choice Functions
Auto Automatically detects digital audio signal input types and selects the appropriate decoder.
DTS Activates the DTS decoder when digital audio signals are input.
Note
Notes
Note
Decoder Mode
Volume Trim
Rename
CAPITAL
DVD
OK RESET
97 En

Graphical user interface (GUI) menu
Multi CH Assign (Multi channel assignment)
Use this feature to set the direction of the signals input into the center, subwoofer and surround channels when a source component is connected to the MULTI CH INPUT jacks.
Input Channels (Input channels)Use this setting to select the number of channels input from an external decoder (see page 37).
Depending on the settings of the zone configuration, no sound is output at the surround back speakers even if you set “Input Channels” to “8ch”. In this case, select “6ch” and set the audio output setting of the source component to 6 channels.
Front Input (Front left and right channels input jacks)If you selected “8ch” in “Input Channels”, you can select analog jacks at which front left and right channel signals from an external decoder will be input.Choices: CD, CD-R, MD/TAPE, BD/HD DVD, DVD, DTV,
CBL/SAT, DVR, VCR, V-AUX
If you have renamed an input source in “Rename” (see page 97), the name of the input source appears in the choices of this parameter.
BGV (Back ground video)Use this feature to select the video source played in the background of the sources input at the MULTI CH INPUT jacks.
If you have renamed an input source in “Rename” (see page 97), the name of the input source appears in the choices of this parameter.
Play Style (Playback styles)Use this feature to adjust the playback style according to your preference. You can shuffle songs in a random order or repeat one specific song or a sequence of songs.
Repeat (Repeat)Use this feature to set this unit to repeat one song or a sequence of songs.
• If “Repeat” is set to “Single”, the setting will be reset to “Off” when this unit is turned off.
• When you set “BGV” to “Last”, you can select the background video source by using the remote control only.
Shuffle (Shuffle)Use this feature to set this unit to play songs or albums in a random order.
USB Select (USB port select)Selects the component connected to the front or rear USB port as the input source (see page 40).
Choice Description
6ch Select “6ch” the connected component outputs discrete 6-channel audio signals.
8ch Select “8ch” the connected component outputs discrete 8-channel audio signals. Also set “Front Input” (see below) to the analog audio jacks at which the front left and right channel signals output from the connected component are input.
Note
Note
Choice Functions
BD/HD DVD, DTV, CBL/SAT, DVD, DVR, VCR, V-AUX
Selects the corresponding input source as the background video source.
Last Automatically selects the last selected video source as the background video source.
Off Does not play the video source in the background.
Note
Choice Functions
Off Deactivates the repeat function.
Single Repeats one song. “ ” appears in the top right corner of the playback status screen.
All Repeats a sequence of songs. “ ” appears in the top right corner of the playback status screen.
Notes
Choice Functions
Off Deactivates the shuffle function.
On Play songs or albums in a random order. “ ” appears in the top right corner of the playback status screen.
Choice Functions
Front Selects the component connected to the front USB port as the input source.
Rear Selects the component connected to the rear USB port as the input source.
98 En
Graphical user interface (GUI) menu
Advan
ced
Op
eration
Use this menu to manually adjust any speaker setting.
y• Most of the parameters described in the basic menu are set automatically
when you run “Auto Setup”. You can use the basic menu to make further adjustments, but we recommend running “Auto Setup” first.
• You can reset these parameters by performing the “Auto Setup” procedure (see page 46).
• If your subwoofer can adjust the output volume and the crossover frequency, set the volume to about half way (or slightly less) and set the crossover frequency to the maximum.
Test Tone (Test tone)Turns the test tone output on or off for “Speaker Set”, “Speaker Distance”, and “Speaker Level” settings.
• Loud test tones will be output when “On” is selected. In this case, make sure no children are present in the listening room.
• This function is automatically turned off if you exit “Basic”.
THX Set (THX settings)Use this feature to set the parameters to optimize the THX Surround modes (see page 87).
THX Ultra2 SWFR (THX Ultra2 subwoofer setting)Use this feature to select whether the connected subwoofers are the THX Ultra2 certified subwoofers.
When “THX Ultra2 SWFR” is set to “No”, you cannot select “Bndry Gain Comp” is automatically set to “Off”.
Bndry Gain Comp (Boundary gain compensation)Use this feature to improve boomy bass when the listening position is closer to the rear wall.
SB Speaker Dist. (Surround back speaker distance)Use this feature to set the distance between the left surround back speaker and right surround back speaker.
The unit used in this parameter differs depending on the setting of “Unit” in “Speaker Distance” (see page 101).
THX Loudness Plus (Loudness plus setting)THX Loudness Plus function compensates for the total and spatial shifts that occur when the volume is reduced by intelligently adjusting ambient surround channel levels and frequency response.Use this feature to select whether this unit automatically activates the THX Loudness Plus function in the THX Surround modes.
Speaker Set (Speaker settings)Use to manually adjust any speaker setting.
yIf you are not satisfied with the bass sounds from your speakers, you can change these settings according to your preference.
Front (Front speakers)
When “Bass Out” is set to “Front” (see page 101), you can select only “Large” in “Front”. If the value of “Front” is set to other than “Large” in advance, this unit change the value to “Large” automatically.
Manual Setup (Basic)
Choice Functions
Off This unit does not output the test tone for the “Speaker Set”, “Speaker Level”, and “Speaker Distance” settings.
On This unit outputs the test tone for the “Speaker Set”, “Speaker Level”, and “Speaker Distance” settings.While “Test Tone” is set to “On”, the volume level is automatically set to 0 dB.
Notes
Choice Descriptions
Yes Select this setting when the connected subwoofers are the THX Ultra2 certified subwoofers.
No Select this setting when the connected subwoofers are not the THX Ultra2 certified subwoofers.
Note
Choice Descriptions
Off Select this setting when you do not want to use the boundary gain compensation feature.
On Select this setting to activate the boundary gain compensation feature.
Choice Descriptions
Under 1ft (Under 0.3m)
Select this setting when the distance between the two surround back speakers is less than 0.3 m (1 foot).
1 – 4ft (0.3-1.2m) Select this setting when the distance between the two surround back speakers is 0.3 m to 1.2 m (1 foot to 4 feet).
Over 4ft (over 1.2m)
Select this setting when the distance between the two surround back speakers is over 1.2 m (4 feet).
Note
Choice Descriptions
Off Deactivates the Loudness Plus function.
On Activates the Loudness Plus function in the THX Surround modes.
Measure for the speaker sizeThe woofer section of a speaker is
– 16 cm (6.5 in) or larger: large– smaller than 16 cm (6.5 in): small
yTHX Ltd. recommends you that you set “Front”, “Center”, “Surround”, and “Surround Back” to “Small” and “Cross Over” to “80Hz (THX)”.To select the crossover frequency of the speaker(s) manually, select “Small” and then set “Cross Over” (see page 100).
Choice Descriptions
Large Select this setting when the front speakers are large.
Small Select this setting when the front speakers are small.
Note
99 En

Graphical user interface (GUI) menu
Center (Center speaker)
Surround (Surround left/right speakers)
ySee page 23 for the connection information of the surround speakers.
Surround Back (Surround back left/right speakers)
ySee page 23 for the connection information of the surround speakers.
Cross Over (Cross over)Use this feature to select the crossover frequency of the speaker(s) that is set to “Small”. All frequencies below the selected frequency will be sent to the subwoofers or to the speakers set to “Large” in “Speaker Set” (see pages 99).Choices: 40Hz, 60Hz, 80Hz (THX), 90Hz, 100Hz, 110Hz, 120Hz,
160Hz, 200Hz
yIf your subwoofers can adjust the output volume and the crossover frequency, set the volume to about half way (or slightly less) and set the crossover frequency to the maximum.
Front Presence (Front presence speakers)Use this feature if you want to use the front presence speakers connected to this unit.
• If you set “Front Presence” to “None”, you cannot activate the CINEMA DSP HD³ mode (see page 64).
• “Dialogue Lift” is available when “Front Presence” is set to “Yes” and headphones are not connected.
Rear Presence (Rear presence speakers)Use this feature if you want to use the rear presence speakers connected to this unit.
Subwoofer (Subwoofer)
Configuration (Subwoofer configuration)Use this feature to select the configuration of the subwoofers (see page 26).
yIf your subwoofer can adjust the output volume and the crossover frequency, set the volume to about half way (or slightly less) and set the crossover frequency to the maximum.
Choice Descriptions
Large Select this setting when the center speaker is large.
Small Select this setting when the center speaker is small.
None Select this setting when you do not use the center speaker. The center channel signals are directed to the front left and right speakers.
Choice Descriptions
Large Select this setting when the surround speakers are large.
Small Select this setting when the surround speakers are small.
None Select this setting when you do not use the surround speakers. This unit is set to the Virtual CINEMA DSP mode (see page 64), and “Surround Back” is automatically set to “None”.
Choice Descriptions
Large x1 Select this setting when the single surround back speaker is large.
Large x2 Select this setting when the surround back left and right speakers are Large.
Small x1 Select this setting when the single surround back speaker is small.
Small x2 Select this setting when the surround back left and right speakers are small.
None Select this setting when you do not use the surround back speakers. The surround back channel signals are directed to the surround left and right speakers.
Choice Descriptions
Yes Select this setting when you use the front presence speakers.
None Select this setting when you do not use the front presence speakers. “Rear Presence” is automatically set to “None”.
Notes
Choice Descriptions
Yes Select this setting when you use the rear presence speakers.
None Select this setting when you do not use the rear presence speakers.
Choice Descriptions
Front & Rear Select this setting when you place the subwoofers to the front and rear of the listening room.
Stereo Select this setting when you place the subwoofers to the left and right of the listening room.
Monaural Select this setting when you use a single subwoofer.
None Select this setting when you do not use a subwoofer.
100 En

Graphical user interface (GUI) menu
Advan
ced
Op
eration
Phase (Subwoofer phase)Use this feature to switch the phase of your subwoofers if bass sounds are lacking or unclear.
Bass Out (Bass out)Use this feature to select the speakers that output the LFE (low-frequency effect) and the low-frequency signals.THX Ltd. recommends that “Bass Out” to “SWFR”.
LFE signals output
Low-frequency signals output
*1 Output(s) the low-frequency signals of the front channels and other speakers set to “Small”.
*2 Always output the low-frequency signals of the front channels.*3 Output the low-frequency signals if the speakers are set to “Large”.*4 Outputs the low-frequency signals of the speakers set to “Small” or
“None”.
Speaker Distance (Speaker distance)Use this feature to manually adjust the distance of each speaker and the delay applied to the respective channel. Ideally, each speaker should be the same distance from the main listening position. However, this is not possible in most home situations. Thus, a certain amount of delay must be applied to the sound from each speaker so that all sounds will arrive at the listening position at the same time.
Speaker distancesControl range: 0.30 to 24.00 m (1.0 to 80.0 ft)Initial setting: 3.00 m (10.0 ft)Control step: 0.05 m (0.2 ft)
yIf your subwoofer can adjust the output volume and the crossover frequency, set the volume to about half way (or slightly less) and set the crossover frequency to the maximum.
• The available speaker channels differ depending on the setting of the speakers.
• If you are only using one surround back speaker, connect it to the SUR.BACK SINGLE jack, and adjust the distance in “Surround Back L”.
Unit (Unit)Selects the unit for displaying the values of “Speaker Distance” parameter.Initial setting: Feet (U.S.A. and Canada models)
Meter (Other models)
Choice Functions
Normal Does not change the phase of your subwoofers.
L Reverse Sets the phase of the left (or front) subwoofer to reverse.
R Reverse Sets the phase of the right (or rear) subwoofer to reverse.
L&R Reverse Sets the phase of the both subwoofers to reverse.
Choice
Subwoofers and speakers
SubwoofersFront
speakersOther
speakers
Front & SWFR
Output No output No output
SWFR Output No output No output
Front No output Output No output
Choice
Subwoofers and speakers
SubwoofersFront
speakersOther
speakers
Front & SWFR
*1 *2 *3
SWFR *4 *3 *3
Front No output *1 *3
Speaker Distance Adjusted speaker
Front L Front left speaker
Front R Front right speaker
Center Center speaker
Surround L Surround left speaker
Surround R Surround right speaker
Surround Back L Surround back left speaker
Surround Back R Surround back right speaker
Front Presence L Front presence left speaker
Front Presence R Front presence right speaker
Rear Presence L Rear presence left speaker
Rear Presence R Rear presence right speaker
Subwoofer L Subwoofer left
Subwoofer R Subwoofer right
Notes
Choice Functions
Meter (m) Adjusts speaker distances in meters.
Feet (ft) Adjusts speaker distances in feet.
101 En

Graphical user interface (GUI) menu
Speaker Level (Speaker level)Use this feature to manually balance the speaker levels between the front left or surround left speakers and each speaker selected in “Speaker Set” (see page 99).Control range: –10.0 dB to +10.0 dBInitial setting: 0.0 dBControl step: 0.5 dB
y• If your subwoofer can adjust the output volume and the crossover
frequency, set the volume to about half way (or slightly less) and set the crossover frequency to the maximum.
• If you use a handheld sound pressure level meter, hold at arm’s length and point upwards so that the meter is in the listening position. With the meter set to the 70 dB scale and to C SLOW, calibrate each speaker to 75 dB.
• The available speaker channels differ depending on the setting of the speakers.
• If you are only using one surround back speaker, connect it to the SUR.BACK SINGLE jack, and adjust the balance in “Surround Back L”.
• The setting of “Speaker Level” changes depending on the setting of “PEQ Select” in “Manual Setup” (see page 104).
Use this menu to manually adjust the various volume settings.
Adaptive DRC (Adaptive dynamic range control)Use this feature to adjust the dynamic range in conjunction with the volume level. This feature is useful when you are listening at lower volumes or at night. When “Adaptive DRC” is set to “Auto”, this unit controls the dynamic range as follows:
– If the VOLUME setting is low: the dynamic range is narrow– If the VOLUME setting is high: the dynamic range is wide
y• You can also adjust the dynamic range of the bitstream signal sources by
using “Dynamic Range” in “Sound” (see page 103).• This function is also useful for listening with your headphones.
• The adaptive dynamic range control feature does not function when this unit is in the THX Surround modes (see page 87) or Pure Direct mode (see page 65).
• If you set “Direct” in “2ch Stereo” to “Auto” (see page 94) and this unit is in the 2ch Stereo mode, the adaptive dynamic range control feature does not function in some cases.
Adaptive DSP Lvl (Adaptive DSP effect level)Use this feature to make fine adjustments of the DSP effect level (see page 91) automatically in conjunction with the volume level.
Even if you set “Adaptive DSP Lvl” to “Auto”, this unit does not change but fine-tunes the specified value of “DSP Level” (see page 91).
Max Volume (Maximum volume)Use this feature to set the maximum volume level in the main zone. This feature is useful to avoid the unexpected loud sound by mistake. For example, the original volume range is –80.0 dB to +16.5 dB. However, when “Max Volume” is set to –5.0 dB, the volume range becomes –80.0 dB to –5.0 dB.Control range: –30.0 dB to +15.0 dB, +16.5 dBControl step: 5.0 dB
Speaker Level Adjusted speaker
Front L Front left speaker
Front R Front right speaker
Center Center speaker
Surround L Surround left speaker
Surround R Surround right speaker
Surround Back L Surround back left speaker
Surround Back R Surround back right speaker
Front Presence L Front presence left speaker
Front Presence R Front presence right speaker
Rear Presence L Rear presence left speaker
Rear Presence R Rear presence right speaker
Subwoofer L Subwoofer left
Subwoofer R Subwoofer right
Notes
Manual Setup (Volume)
Choice Functions
Auto Adjusts the dynamic range automatically.
Off Does not adjust the dynamic range automatically.
Notes
Choice Functions
Auto Adjusts the DSP effect level in conjunction with the volume level.
Off Does not adjust the DSP effect level automatically.
Note
Input level
Out
put l
evel
Out
put l
evel
Input level
AUTO
OFF
AUTO
OFF
VOLUME: low VOLUME: high
102 En

Graphical user interface (GUI) menu
Advan
ced
Op
eration
Initial Volume (Initial volume)Use this feature to set the volume level of the main zone when the power of this unit is turned on.Choices: Off, Mute, –80.0 dB to +16.5 dBControl step: 0.5 dB
• When this unit is in the auto setup procedure, the volume level is automatically set to 0 dB regardless of the current “Max Volume” setting.
• The “Max Volume” setting takes priority over the initial volume setting. For example, if “Initial Volume” is set to –20.0 dB and “Max Volume” is set to –30.0 dB, the volume level is automatically set to –30.0 dB when you turn on the power of this unit next time.
Muting Type (Muting type)Use this feature to adjust how much the mute function reduces the output volume (see page 56).
Use this menu to adjust the sound parameters.
LFE Level (Low-frequency effect level)Use this feature to adjust the output level of the LFE (low-frequency effect) channel according to the capacity of your subwoofer or headphones. The LFE channel carries low-frequency special effects which are only added to certain scenes. This setting is effective only when this unit decodes bitstream signals.Control range: –20.0 to 0.0 dBControl step: 1.0 dB
Speakers (Speaker low-frequency effect level)Select to adjust the speaker LFE level.
Headphones (Headphone low-frequency effect level)Select to adjust the headphone LFE level.
Depending on the settings of “Bass Out” (see page 101), some signals may not be output at the SUBWOOFER PRE OUT jacks.
Dynamic Range (Dynamic range)Use this feature to select the amount of dynamic range compression to be applied to your speakers or headphones. This setting is effective only when the unit is decoding bitstream signals.
Speakers (Speaker dynamic range)Adjusts the dynamic range compression for the speakers.
Headphones (Headphone dynamic range)Adjusts the dynamic range compression for the headphones.
S-Wave Control (Standing wave control)Use this menu to activate or deactivate the specially customized parametric equalizer to reduce the effects of acoustic standing waves in the listening room. See page 48 for details.
Notes
Choice Functions
Full Mutes all the audio output.
–20dB Reduces the current volume by 20 dB.
–40dB Reduces the current volume by 40 dB.
Manual Setup (Sound)
Note
Choice Functions
MAX Preserves the greatest amount of dynamic range.
STD Adjusts the dynamic range to medium. When this unit is decoding Dolby TrueHD signals, the dynamic range control is always active regardless of the instruction of the input source signals.
MIN/AUTO • MIN: Adjusts the dynamic range to narrow when this unit is decoding bitstream signals (except Dolby TrueHD).
• AUTO: Adjusts the dynamic range according to the instruction of the input source signals when this unit is decoding Dolby TrueHD signals.
Choice Functions
On Activates the parametric equalizer.
Off Deactivates the parametric equalizer.
103 En

Graphical user interface (GUI) menu
Parametric EQ (Parametric equalizer)Use this feature to adjust the parametric equalizer of each speaker.
PEQ Data Copy (Parametric equalizer data copy)Use this feature to copy the result data of the automatic setup to the manual configuration area. You can select the parametric equalizer type applied to the copied result data of the automatic setup. See page 50 for the descriptions of each parametric equalizer type.
PEQ Select (Parametric equalizer type select)Use this feature to select the parametric equalizer type that applied to the results of the automatic setup. See page 50 for the descriptions of each parametric equalizer type.
• When you carry out the automatic setup, this unit automatically set “PEQ Select” to “Natural”.
• “Speaker Level” settings (see page 102) also changes corresponding to the setting of “PEQ Select”.
• This unit does not change the configurations of “Manual” even if you perform the automatic setup.
Manual parametric equalizer configuration of each speaker Use this feature to adjust the tonal quality of each speaker. You can copy the results of the automatic setup for the base of the manual configuration by using “PEQ Data Copy”. Set “PEQ Select” to “Manual” in advanced.
1 Press 9k / n / l / h to select “Test Tone” or the speaker you want to adjust.
Test ToneUse this feature to select whether to turn on or off the test tone output while you are adjusting the tonal quality of each speaker.
2 Press 9h to access the settings window.
3 Press 9k / n / l / h to select “PARAM” and then press 9ENTER to select a parameter from “Band” (band), “Freq.” (frequency) or “Q” (Q factor).
yYou can adjust “Gain” (gain) with any parameter.
Choice Descriptions
Flat → Manual Copies the result of the automatic setup that the “Flat” type parametric equalizer is applied to.
Front → Manual Manual Copies the result of the automatic setup that the “Front” type parametric equalizer is applied to.
Natural → Manual Copies the result of the automatic setup that the “Natural” type parametric equalizer is applied to.
Choice Descriptions
Manual Applies the manually configured parametric equalizer in “Manual Setup”.
Flat Applies the “Flat” type parametric equalizer.
Front Applies the “Front” type parametric equalizer.
Natural Applies the “Natural” type parametric equalizer.
Through Does not use the parametric equalizer.
Notes
Dynamic Range
S-Wave Control
Parametric EQ
Tone Control
Lipsync
Subwoofer L
Subwoofer R
Test Tone
PEQ Data Copy
PEQ Select
Choice Adjusted speaker
Front L Front left speaker
Front R Front right speaker
Center Center speaker
Surround L Surround left speaker
Surround R Surround right speaker
Surround Back L Surround back left speaker
Surround Back R Surround back right speaker
Front Presence L Front presence left speaker
Front Presence R Front presence right speaker
Rear Presence L Rear presence left speaker
Rear Presence R Rear presence right speaker
Subwoofer L Subwoofer left
Subwoofer R Subwoofer right
Choice Functions
On Outputs the test tone.
Off Does not output the test tone.
PEQ Data Copy
PEQ Select
Front L
Front R
Center
PARAM RESETEDIT EXIT
Band/Gain
104 En

Graphical user interface (GUI) menu
Advan
ced
Op
eration
4 Press 9n to select “EDIT” and press 9ENTER to access the edit window.For more information on the parametric equalizer and each parameter, see page 160.
The parameter selected in “PARAM” is highlighted.• Press 9l / h to adjust the parameter.• Press 9k / n to adjust the “Gain”.• Press 9ENTER to exit the edit window.
y• When you select “Band” in step 3, you can use this menu as a graphic
equalizer.• “Band #4”, “Band #5”, “Band #6”, and “Band #7” can adjust the
frequencies above of 500 Hz.• When you select “Subwoofer L” or “Subwoofer R” in step 1 and
“Band” in step 3, you can adjust “Band #1”, “Band #2”, and “Band #3” only. In this case, “Band #1”, “Band #2”, and “Band #3” can adjust the frequencies below of 250 Hz.
5 Repeat steps 3 and 4 until you are satisfied with the results.
yIf you want to reset all “Parametric EQ” parameter settings for the selected speaker, select “RESET” and press 9ENTER.
6 Select “EXIT” and press 9ENTER to exit from the settings window.
Tone Control (Tone control)Use this feature to adjust the balance of bass and treble output to your speakers or headphones.
Tone Control is not effective when:– the Pure Direct mode (see page 65) is selected.– one of the THX Surround mode is selected (see page 87).– MULTI CH is selected as the input source.
Control (Tone control)
y“Speaker” and “Headphone” adjustments are stored independently. The adjustments for “Speaker” affects the front left/right, center, presence left/right speaker channels and Subwoofer channel.
Bass (Bass control)Use this feature to adjust low-frequencies output to your speakers or headphones.Choices: 125 Hz, 350 Hz, 500 HzControl range: – 6.0 dB to +6.0 dBInitial setting: 0.0 dB
Treble (Treble control)Use this feature to adjust high-frequencies output to your speakers or headphones.Choices: 2.5 kHz, 3.5 kHz, 8.0 kHzControl range: – 6.0 dB to +6.0 dBInitial setting: 0.0 dB
Auto Bypass (Auto bypass)Use this feature to select whether the audio output bypasses the tone control circuitry when “Treble” and “Bass” are set to 0 dB (see page 65).
Lipsync (Audio and video synchronization)
Use this feature to adjust the audio and video synchronization.
HDMI Auto (HDMI automatic lip sync mode)If the connected video monitor is connected to the HDMI OUT jack of this unit and compatible with the automatic audio and video synchronization function (automatic lip sync), this unit adjusts the audio and video synchronization automatically. Use this feature to activate or deactivate the automatic lip sync.
Note
Choice Functions
Speaker Adjust the bass/treble balance of your speakers.
Headphone Adjust the bass/treble balance of your headphones.
PEQ Data Copy
PEQ Select
Front L
Front R
Center
Band #1Gain 0.0dBFreq. 62.5HzQ 1.000
Choice Functions
Auto Automatically bypasses the tone control circuitry to provide the purest signal possible when “Treble” and “Bass” are set to 0 dB.
Off Does not bypass the tone control circuitry.
Choice Descriptions
Off Select this setting if the connected video monitor is compatible with the automatic lip sync. Use “Auto” to make fine adjustments of the audio and video synchronization.
On Select this setting if the video monitor is not compatible with the automatic lip sync or you do not want to use the automatic lip sync. Use “Manual” to adjustment the audio and video synchronization.
+6
0
-6
Control
Bass
Treble
Auto Bypass
SpeakerFreq.: 350HzGain: 0.0dB
+6
0
-6
Control
Bass
Treble
Auto Bypass
SpeakerFreq.: 3.5kHzGain: 0.0dB
105 En
Graphical user interface (GUI) menu
Auto (Automatic audio delay adjustment)Use this feature to make fine adjustments of the audio and video synchronization when you set “HDMI Auto” to “On”.Control range: 0 to 240 msControl step: 1 ms
y“offset” indicates the difference between the value of the audio delay that this unit sets automatically and the value of the audio delay that you set in “HDMI Auto”. This unit stores the value of “Offset” and applies the value to other automatic lip sync compatible video monitors.
Manual (Manual audio delay adjustment)Use this feature to adjust the delay of the sound output manually to synchronize audio with video images when you set “HDMI Auto” to “Off”.Control range: 0 to 240 msControl step: 1 ms
Pure Direct (Pure Direct)Use this feature to select whether this unit outputs the video signals when this unit is in the Pure Direct mode.
You cannot use the GUI menu while this unit is in the Pure Direct mode even if “Pure Direct” is set to “Video On”.
Channel Mute (Channel mute)Use this feature to mute specific speaker channels.
Mode (Mode)Use this feature to activate or deactivate the “Channel Mute” setting for each speaker.
Each speaker settingsSelect whether this unit mutes each speaker channel when you set “Mode” to “Enable”.
Choice Functions
Video Off Does not output video signals.
Video On Outputs video signals. For the better sound quality, this unit only activates the limited video features.
Note
Choice Functions
Disable Deactivates the “Channel Mute” function.
Enable Activates the “Channel Mute” function.
Channel Mute Speaker channel
Front L Front left
Front R Front right
Center Center
Surround L Surround left
Surround R Surround right
Surround Back L Surround back left
Surround Back R Surround back right
Front Presence L Front presence left speaker
Front Presence R Front presence right speaker
Rear Presence L Rear presence left speaker
Rear Presence R Rear presence right speaker
Subwoofer L Subwoofer left
Subwoofer R Subwoofer right
Choice Functions
Mute On Mutes the selected speaker channel.
Mute Off Does not mute the selected speaker channel.
106 En

Graphical user interface (GUI) menu
Advan
ced
Op
eration
Use this menu to adjust the video parameters.
Use the “VIDEO” in “INITIALIZE” to set the parameters in “Manual Setup (Video)” (except “Short Message” and “On Screen”) to the factory presets (see page 144).
Conversion (Video conversion)Use this feature to activate or deactivate the video scaling as well as the HDMI up-conversion of the analog video signals input at the VIDEO, S VIDEO, and COMPONENT VIDEO jacks.
• For optimal video performance, THX Ltd. recommends that you set “Conversion” to “Off” to allow video signals to pass through the system without processing (e.g., video signals input at the COMPONENT VIDEO jacks are output at the COMPONENT VIDEO MONITOR OUT jacks without any processing).
• The converted video signals are only output at the MONITOR OUT jacks. When recording a video source, you must make the same type of video connections between each component.
• When composite video or S-video signals from a VCR are converted into component video signals, the picture quality may suffer depending on your VCR.
• If “Conversion” is set to “Off”, the “Component I/P”, “HDMI Resolution”, “HDMI Processing”, “HDMI Aspect”, and “Short Message” features are deactivated.
• Set “Conversion” to “On” to display the short message.• This unit does not convert 480 line video signals and 576 line video signals
interchangeably.• The analog component video signals with 480i (NTSC)/576i (PAL) of
resolution are converted into the S-video or composite video signals and output at the S VIDEO MONITOR OUT and VIDEO MONITOR OUT jacks.
• Even when “Conversion” is set to “On”, HDMI digital signals are not converted to analog video signals.
• Unconventional signals input at the VIDEO or S VIDEO jacks cannot be converted or may be output abnormally. In such cases, set “Conversion” to “Off”.
• When non-standard video signals (such as video signals from a video game console) are input, this unit does not display short messages in the video monitor even if “Conversion” is set to “On”.
• When the analog component video signals with 480p/576p of resolution are input at the COMPONENT VIDEO jacks and the video monitor is connected to the VIDEO MONITOR OUT or S VIDEO MONITOR OUT jack of this unit, the GUI screen is not displayed in the video monitor.
HDMI Processing (HDMI video processing) Use this feature to select whether this unit processes the video signals input at the HDMI IN jacks.
Component I/P (Component interlace/progressive conversion)
Use this feature to activate or deactivate the analog interlace/progressive conversion of the analog video signals input at the composite video, S-video and component video jacks so that the analog video signals deinterlaced from 480i (NTSC)/576i (PAL) to 480p/576p are output at the COMPONENT MONITOR OUT jacks.
• If your video monitor does not support analog video signals with 480p/576p of resolution, the GUI screen may not be displayed on your video monitor when “Component I/P” is set to “On”. In such a case, set “INITIALIZE” in “Advanced setup” parameter to “VIDEO” (see page 144).
• When you set “HDMI Processing” to “On”, you may not set “Component I/P” in some cases.
HDMI Resolution (HDMI video signal resolution)
Use this feature to activate or deactivate the HDMI up-scaling of the analog and HDMI video signals input at the composite video, S-video and component video and HDMI IN jacks so that the up-scaled video signals are output at the HDMI OUT jacks.This unit up-scales the analog video signals as follows:
• 480i (NTSC)/576i (PAL) → 480p/576p, 1080i, 720p, or 1080p
• 480p/576p → 1080i, 720p, or 1080p• 1080i → 480p/576p, 720p, 1080p• 720p → 480p/576p, 1080i, 1080p
The input video signals may be down-scaled depending on the setting of “HDMI Resolution”.
Manual Setup (Video)
Note
Choice Functions
On Converts composite, S-video, and component video signals interchangeably and up-converts composite, S-video, and component video signals to HDMI video signals.
Off Does not convert any signals.
Notes
Choice Functions
Off Select this setting when you do not want this unit to process the video signals input at the HDMI IN jacks even if “Conversion” is set to “On”.
On Select this setting when you want this unit to process the video signals input at the HDMI IN jacks when “Conversion” is set to “On”.
Choice Functions
On Activates the analog interlace/progressive up-conversion of the analog video signals.
Off Deactivates the analog interlace/progressive up-conversion of the analog video signals.
Notes
Choice Functions
Through Does not up-scale any video signals.
480p (or 576p), 1080i, 720p, 1080p
Up-scales video signals to 480p or 576p, 1080i, 720p, or 1080p of resolution.
Note
107 En

Graphical user interface (GUI) menu
HDMI Aspect (HDMI aspect ratio)Use this feature to select whether this unit converts the aspect ratio of 4:3 video signals and outputs at the HDMI OUT jacks.
• When “HDMI Resolution” is set to “Through”, you cannot make any adjustments to “HDMI Aspect”.
• If the aspect ratio of the input video source is other than 4:3, this unit automatically ignores the setting of “HDMI Aspect”.
• When “HDMI Aspect” is set to “Smart Zoom”, the video images of the edge of the video monitor are rather stretched.
Short Message (Short message display)Use this feature to activate or deactivate the short message display displayed in the main zone video monitor function.
The short message display does not appear in the following cases:– when the component video signals with 720p, 1080i or 1080p
resolutions are input– when HDMI video signals are input
On Screen (On-screen display time)Use this feature to set the time for which the AM/FM tuning information, HD Radio information, XM Satellite Radio information, iPod menu, or NET/USB menu is displayed in the video monitor after you perform a certain operation.
yThis setting is applied to the GUI menu in the main zone and OSD in Zone 2, Zone 3, or Zone 4.
Position (GUI screen position)Use this feature to adjust the vertical and horizontal position of the GUI screen.Control range: –5 (downward/left) to +5 (upward/right)
Wall Paper (Wall paper)Use this feature to display the wall paper or gray background in your video monitor when there is no video signal being input.
When “Conversion” is set to “Off”, no background is displayed even if “Wall Paper” is set to other than “None”.
Choice Functions
Through Does not make any adjustments to the aspect ratio for the HDMI video signal sources.
16:9 Normal Displays video images with the aspect ratio of 4:3 on your video monitor with the aspect ratio of 16:9. Black stripes appear on the right and left sides as a result.
Smart Zoom Fits video images with the aspect ratio of 4:3 to your video monitor with the aspect ratio of 16:9. The signals are input with 720p, 1080i or 1080p of resolution, this setting does not affect the video signals output at the HDMI OUT jack.
Notes
Choice Functions
On Activates the short message display function.
Off Deactivates the short message display function.
Note
Choice Functions
Always Displays the menu unceasingly during an operation.
10sec Turns off the menu 10 seconds after you perform a certain operation.
30sec Turns off the menu 30 seconds after you perform a certain operation.
Button Moving direction of the GUI display
9 k Up
9 n Down
9 h Right
9 l Left
Choice Functions
None Does not display any background in your video monitor.
Piano Displays a background image (the photograph of a piano) in your monitor when there is no video signal being input.
Horn Displays a background image (the photograph of a horn) in your monitor when there is no video signal being input.
Electric Guitar Displays a background image (the photograph of an electric guitar) in your monitor when there is no video signal being input.
Gray Display a gray background in your monitor when there is no video signal being input.
Note
:0
+
:0 //Short Message
On Screen
Position
Wall Paper
108 En

Graphical user interface (GUI) menu
Advan
ced
Op
eration
Use this menu to set the functions of the multi-zone configuration.
Speaker B (Speaker B setting)Use this feature to select the location of the FRONT B speakers.
• If you connect headphones to the PHONES jack of this unit, the sound is output from both the headphones and the speakers connected to the EXTRA SP terminals when “Speaker B” is set to “ZoneB”.
• If a sound field program is selected when “Speaker B” is set to “ZoneB”, this unit automatically enters the Virtual CINEMA DSP mode (see page 64).
Zone SP Assign (Zone speaker assignment)Use this feature to assign the speaker terminals for Zone 2, Zone 3, and Zone 4. See page 139 for details.
Party Mode Set (Party mode settings)The party mode enables you to play the same source in multiple zones simultaneously (see page 141). Use “Party Mode Set” menu to configure the functions of this unit when this unit is in the party mode.
Main 11ch Stereo (Main zone 11-channel stereo)Use this feature to select whether the sound field program of the main zone is fixed to “11ch Stereo” when this unit is in the party mode.
Target : Zone2/Target : Zone3/Target : Zone4 (Party mode target zone setting)Use this feature to specify which zone joins to the party mode.
Zone2 Set/Zone3 Set/Zone4 Set(Zone 2/Zone 3/Zone 4 settings)
Zone2 Volume/Zone3 Volume/Zone4 Volume (Zone 2/Zone 3/Zone 4 volume)Use this menu to select whether this unit controls the volume level of the audio signals output at the ZONE OUT (ZONE2, ZONE3, or ZONE4) jacks.
• When “Zone2 Volume”, “Zone3 Volume”, or “Zone4 Volume” is set to “Fixed”, you cannot select the following parameters: – Zone2 Max Vol./Zone3 Max Vol./Zone4 Max Vol. – Zone2 Initial Vol./Zone3 Initial Vol./Zone4 Initial Vol.– Zone2 Balance/Zone3 Balance/Zone4 Balance
• Even if you set “Zone2 Volume” to “Variable”, the volume control on this unit does not function to the output level of the ZONE DIGITAL OUT (COAXIAL) jack (see page 136).
Zone2 Max Vol./Zone3 Max Vol./Zone4 Max Vol. (Zone 2/Zone 3/Zone 4 Maximum volume setting)Use this feature to set the maximum volume level in the Zone 2, Zone 3, or Zone 4. Control range: –30.0 dB to +15 .0 dB, +16.5 dBControl step: 5.0 dB
The “Zone2 Max Vol.”, “Zone3 Max Vol.”, or “Zone4 Max Vol.” setting takes priority over the “Zone2 Initial Vol.”, “Zone3 Initial Vol.”, or “Zone4 Initial Vol.” setting. For example, “Zone2 Initial Vol.” is set to –20.0 dB and then “Zone2 Max Vol.” is set to –30.0 dB, the volume level is automatically set to –30.0 dB when you turn on the power of this unit next time.
Zone2 Initial Vol./Zone3 Initial Vol./Zone4 Initial Vol. (Zone 2/Zone 3/Zone 4 initial volume setting)Use this feature to set the volume level of Zone 2, Zone 3, or Zone 4 when the power of each zone is turned on.Control range: Off, Mute, –80.0 dB to +16.5 dBControl step: 0.5 dB
The “Zone2 Max Vol.”, “Zone3 Max Vol.”, or “Zone4 Max Vol.” setting takes priority over the “Zone2 Initial Vol.”, “Zone3 Initial Vol.”, “Zone4 Initial Vol.” setting.
Zone2 Balance/Zone3 Balance/Zone4 Balance (Zone 2/Zone 3/Zone 4 balance)Use this feature to adjust the balance of the volume of the left and right channels in each zone.Choices: L10 to L1, 0, R1 to R10
Manual Setup (Multi Zone)
Choice Descriptions
Main Select this setting when you use the speakers connected to the EXTRA SP speaker terminals in the main room. This unit outputs the same audio signals at the EXTRA SP terminals as the FRONT A speaker terminals.
ZoneB Select this setting when you use the speakers connected to the EXTRA SP speaker terminals in another room. When you turn off the FRONT A and FRONT B is turned on, all the speakers including the subwoofer in the main room are muted and this unit outputs sounds at the FRONT B terminals only.
Notes
Choice Descriptions
Off Select this setting to select the sound field program in the main zone as you like.
On Select this setting to fix the sound field program of the main zone to “11ch Stereo” mode when this unit is in the party mode.
Choice Descriptions
Disable Select this setting not to join the selected zone to the party mode. You can select the input source of the selected zone independently even if this unit is in the party mode.
Enable Select this setting to join the selected zone to the party mode. When this unit is in the party mode, the zone which this unit plays back the same source as the main zone in the zones join in the party mode.
Choice Descriptions
Fixed Select this setting when you want to control the volume level of the selected zone on the external amplifier. This unit fixes the ZONE OUT (ZONE 2 or ZONE 3) volume level to a standard line level.
Variable Select this setting when you want to control the volume level of the selected zone on this unit. You can adjust the ZONE OUT (ZONE 2 or ZONE 3) volume level simultaneously with CVOLUME +/– on the remote control.
Notes
Note
Note
109 En

Graphical user interface (GUI) menu
Zone2 Mono/Zone3 Mono/Zone4 Mono (Zone 2/Zone 3/Zone 4 monaural mode)Use this feature to select whether you play back sources monaurally in the selected zone.
Muting Type (Zone 2/Zone 3/Zone 4 muting type)Use this feature to adjust how much the mute function reduces the output volume of the selected zone.
Tuner Select (Zone 2/Zone 3/Zone 4 tuner function select)(U.S.A. model only)Selects whether this unit receives HD Radio station signals in the selected zone (see page 41).
Zone OSD (Zone on-screen display)Use this feature to display the operational status of Zone 2, Zone 3, and Zone 4 on the Zone 2 video monitor connected to the ZONE VIDEO jacks on the rear panel of this unit. The Zone 2, Zone 3, and Zone 4 information to be displayed is listed as follows:• The input source• The volume level• The audio mute status• The tonal quality status• iPod or network/USB menu when “DOCK” or “NET/USB” is
selected as the input source of Zone 2, Zone 3, and/or Zone 4• FM/AM tuning information when “TUNER” is selected as the
input source of Zone 2, Zone 3, and/or Zone 4• HD Radio information when this unit is tuned into a HD Radio
station in Zone 2, Zone 3, or Zone 4• The XM Satellite Radio information when “XM” is selected as
the input source of Zone 2, Zone 3, and/or Zone 4 (U.S.A. and Canada models only)
• You can connect up to two composite and one component video monitors to the ZONE OUT VIDEO jacks and ZONE OUT COMPONENT VIDEO jacks. If you connect multiple video monitors to the ZONE VIDEO and ZONE OUT COMPONENT VIDEO jacks, these video monitors display the same video images of the input source of Zone 2.
• When you set “Zone OSD” to “Zone All”, the operational status of Zone 3 and Zone 4 appears on the Zone 2 video monitor(s) even if Zone 2 is turned off.
Choice Descriptions
Off Turns off the monaural playback mode. This unit plays back sources in stereo.
On Turns on the monaural playback mode. This unit mixes down the left and right channel signals and plays the sources monaurally.
Choice Functions
Full Mutes all the audio output.
–20dB Reduces the current volume by 20 dB.
–40dB Reduces the current volume by 40 dB.
Choice Functions
TUNER Receives the conventional AM/FM radio signals from the ANTENNA–2 terminals.
HD Radio Receives HD Radio station signals from the ANTENNA–1 terminals.
Choice Functions
Zone2 Displays the operational status of Zone 2 only.
Zone All Displays the operational status of Zone 2, Zone 3, and Zone 4.
Notes
110 En

Graphical user interface (GUI) menu
Advan
ced
Op
eration
Use this menu to adjust the network and USB system parameters.
Configuration (Network configuration)Use this feature to view the network parameters (IP address, etc.) or to change them manually.
DHCP (DHCP setting)Use this feature to select whether this unit can obtain the network parameters (IP address, subnet mask, default gateway, primary DNS server and secondary DNS server) from the DHCP server of the connected network.
IP Address (IP address)Use this parameter to specify an IP address assigned to this unit. This value must not duplicate the one used for other devices in the target network.
Subnet Mask (Subnet mask)Use this parameter to specify the subnet mask value assigned to this unit.
yFor most of the cases, the subnet mask value can be set as “255.255.255.0”.
Default Gateway (Default gateway)Use this parameter to specify the IP address of the default gateway.
DNS Server (P) (Primary DNS server)
DNS Server (S) (Secondary DNS server)Use this parameter to specify the IP address of the primary and secondary DNS (Domain Name System) servers.
If you have only one DNS address, enter the DNS address in “DNS Server (P)”. If you have two or more DNS addresses, enter one of them in “DNS Server (P)” and another in “DNS Server (S)”.
Setup (Setup)Select “Setup” to confirm the settings of the “Configuration” parameters.
Procedure of the network configuration
1 From the top GUI menu, press 9k / n on the remote control repeatedly and then 9h to select “Configuration”.
2 Press 9k / n repeatedly and then 9h to select “DHCP”.
3 Press 9k / n to select “On” or “Off” and then 9ENTER to confirm.• If you select “On”, you do not have to set other network parameters.
Refer to step 5 and finish the configuration.• If you select “Off”, you need to set other network parameters. Refer
to steps 4 through 6 to set the parameters.
When “DHCP” is set to “On”, you cannot select and adjust any other network settings. To specify the other parameters, you need to first set “DHCP” to “Off”.
4 Press 9k / n to select the desired parameter and then 9h.
5 Press 9l / h repeatedly to select the digit to change and then press 9k / n repeatedly to change the number.
6 Press 9ENTER to confirm the setting of the parameter.
7 Repeat steps 4 through 6 to configure each network parameter.
8 Press 9n repeatedly to select “Setup” and then 9ENTER to finish configuration.
In case you have changed your network configuration, you may need to reconfigure the network settings again.
yYou can reset the network settings of this unit to the initial factory settings by using “NETWORK” of “INITIALIZE” in the advanced setup menu (see page 144).
Manual Setup (Network)
Choice Descriptions
On Select this setting when this unit can obtain the network parameters from the DHCP server of the connected network.
Off Select this setting when you set the network parameters manually.
Note
Note
Note
111 En

Graphical user interface (GUI) menu
Information (Network information)Use this feature to display the network system information.
The above display is an example.
MAC Address (MAC (Media Access Control) address)This information displays the MAC address that is assigned to this unit.
Status (Network status)This information displays the current link status of the network.Display status: 10BASE-T, 100BASE-TX, No Link,
Full Duplex, Half Duplex
“No Link” appears when network connection is not made.
System (System ID)This information displays the system ID that is assigned to this unit.
This menu adjusts the optional system settings.
Front Panel Disp. (Front panel display setting)
Dimmer (Dimmer)Use this feature to adjust the brightness of the front panel display.Control range: – 4 to 0
Scroll (Front panel display message scroll)Use this feature to set whether to display the information (such as song title or channel name) in the front panel display in a continuous manner or by the first 14 alphanumeric characters after scrolling all characters once when “HD Radio”, “XM”, “DOCK”, or “NET/USB” is selected as the input source.
iPod (iPod settings)
Standby Charge (iPod charge on the standby mode)Use this feature to select whether this unit charges the battery of the stationed iPod or not when this unit is in the standby mode (see page 78).
Audio Select (Default audio input jack select)
Use this feature to designate the default audio input jack select setting (see page 96) for the input sources connected to the DIGITAL INPUT jacks when you turn on the power of this unit.
Note
Note
Configuration
Information
MAC Address00:00:00:00:00:00
Status100BASE-TXFull Duplex
SystemABCDE123
Manual Setup (Option)
Choice Functions
Continue Continuous mode.Select this to display the operation status in the front panel display in a continuous manner.
Once Scroll-once mode.Select this to display the operation status in the front panel display by the first 14 alphanumeric characters after scrolling all characters once.
Choice Functions
Auto Charges the battery of the stationed iPod when this unit is turned on and in the standby mode.
Off Charges the battery of the stationed iPod only when this unit is turned on.
Choice Functions
Auto Automatically detects the type of audio input signals and selects the appropriate audio input jack select setting.
Last Automatically selects the last audio input jack select setting used for the connected input source.
0Dimmer
Scroll
112 En

Graphical user interface (GUI) menu
Advan
ced
Op
eration
Decoder Mode (Default decoder mode)Use this feature to designate the default decoder mode (see page 97) for the input sources when you turn on the power of this unit.
EXTD Surround (Default extended surround decoder mode setting)
Use this feature to designate the extended surround decoder mode (see page 87) for the input sources connected to the DIGITAL INPUT jacks when you turn on the power of this unit.
Memory Guard (Memory guard)Use this feature to prevent accidental changes to sound field program parameter values and other system settings.
yWhen you select the protected parameter, “ ” appears at the bottom left of the GUI screen. You can adjust the parameters when you select the parameter and “ ” does not appear at the bottom left of the GUI menu even if “Memory Guard” is set to “On”.
HDMI Set (HDMI settings)Use this feature to adjust the HDMI support audio.
Support Audio (Support audio)Use this feature to select whether to play back HDMI audio signals on this unit or on another HDMI component connected to the HDMI OUT jacks on the rear panel of this unit.
Available audio/video signals depend on the specification of the connected video monitor. Refer to the instruction manual of each connected component.
Standby Through (Standby through)Use this feature whether this unit allows the HDMI signals input at the HDMI IN jacks to pass thorough this unit when this unit is in the standby mode. You can also designate an HDMI IN jack and an HDMI OUT jack that accept the signals when “Standby Through” is set to “On” and this unit is in the standby mode.
• When “Standby Through” is set to “On” and this unit is in the standby mode, the audio signals are only output at the HDMI OUT 1 or HDMI OUT 2.
• When “Standby Through” is set to “On”, the amount of power consumption in the standby mode is increase.
Input/output jack selectWhen “Standby Through” is set to “On”, you can designate an HDMI IN jack and an HDMI OUT jack that accept the signals when this unit in in the standby mode.
Input (HDMI IN jack select)Use this feature to select an HDMI IN jack select that accepts HDMI signals when this unit is in the standby mode.
Output (HDMI OUT jack select) Use this feature to select an HDMI OUT jack select that outputs HDMI signals when this unit is in the standby mode.
Choice Functions
Auto Automatically detects the type of input signals and select the appropriate decoder mode setting.
Last Automatically selects the last decoder mode setting used for the connected input source.
Choice Functions
Auto Automatically detects the input digital audio signals and activates the appropriate decoder.
Last Selects the last selected extended surround decoder mode.
Choice Functions
Off Turns off the “Memory Guard” feature.
On Protects the following parameters:– sound field program parameters– GUI menu parameters– speaker levels settings
Choice Functions
RX-Z11 Plays back HDMI audio signals on this unit. The HDMI audio signals input at the HDMI input jacks of this unit are not output to the HDMI component connected to the HDMI OUT jacks on the rear panel of this unit.
Other Plays back HDMI audio signals on another HDMI component connected to the HDMI OUT jacks.
Note
Choice Functions
Off Does not accept the HDMI signals when this unit is in the standby mode.
On Accepts the HDMI signals when this unit is in the standby mode.
Notes
Choice Selected HDMI IN jack
IN1 HDMI IN1
IN2 HDMI IN2
IN3 HDMI IN3
IN4 HDMI IN4
FRONT Front HDMI IN
Choice Selected HDMI OUT jack
OUT 1 HDMI OUT1
OUT 2 HDMI OUT2
113 En

Graphical user interface (GUI) menu
Trigger Output (Trigger output)Use this feature to select the functions of each TRIGGER OUT jack of this unit.
Trigger operation mode
Source (Source)After selecting the input source, you can set the function of the TRIGGER OUT jacks when the corresponding input source is selected.
Manual (Manual)
You can display the format, sampling frequency, channel, bit rate and flag data of the current input signal.
Audio Info. (Audio information)
• “–––” appears when this unit cannot display the corresponding information.
• Some high definition audio bitstream contents may not include the discrete surround back left and right channel signals but are encoded at the bitrate of 192 kHz.
• Even if you make settings to output bitstreams directly, some players convert the Dolby TrueHD or Dolby Digital Plus bitstreams to the Dolby Digital bitstreams, while converting the DTS-HD Master Audio or DTS-HD High Resolution Audio bitstreams to the DTS bitstreams.
Video Info. (Video information)
HDMI error and message
Use this feature to select the language of the menu items and messages.Choices: English (English), (Japanese),
Français (French), Deutsch (German), Español (Spanish), Русский (Russian)
yYou can also select the language using the “LANGUAGE” parameter in “Advanced setup” in the front panel display (see page 144).
··· The selected language is displayed.
— ··· The selected language is not displayed. The menu items and messages are displayed in English.
Choice Function
Trigger1 Sets the functions for the TRIGGER OUT 1 jack.
Trigger2 Sets the functions for the TRIGGER OUT 2 jack.
Choice Descriptions
Power Select this setting to send the voltage signals at the selected TRIGGER OUT jack while the selected zone is turned on.
Source Select this setting to send the voltage signals at the selected TRIGGER OUT jack while the selected input source is selected.
Manual Select this setting to send the voltage signals manually.
Choice Descriptions
Input High Sends the voltage when you select the input source you set in “Source”.
Input Low Stops sending the voltage when you select the input source you set in “Source”.
Choice Function
High Sends the voltage signals.
Low Stops sending the voltage signals.
Signal Info. (Input signal information)
Format Signal format. When this unit cannot detect a digital signal, it automatically switches to analog input.
Sampling The number of samples per second taken from a continuous signal to make a discrete signal.
Channel The number of source channels in the input signal (front/surround/LFE). For example, a multi-channel soundtrack with 3 front channels, 2 surround channels and LFE, is displayed as “3/2/0.1”.
Bitrate The number of bits passing a given point per second.
Dialogue The dialogue normalization level preset to the current input bitstream signal (see page 159).
Flag1/Flag2 Flag data encoded in the bitstream, or PCM signals that cue this unit to automatically switch decoders (“Surround EX”, etc.).
Notes
HDMI Signal Type of the source video signals and the video signals output at the HDMI OUT jack of this unit.
HDMI Resolution Resolution of the input signal (analog or HDMI) and the output signal (HDMI).
Analog Resolution Resolution of the source video signals and the analog video signals output at the COMPONENT MONITOR OUT jacks of this unit.
HDMI Error(HDMI Message)
Error message for HDMI sources or connected HDMI devices. See page 150 for details.
Message Cause
Device Over The number of the connected HDMI components is over the limit.
HDCP authentication failed.
Out of Resolution The connected monitor is not compatible with the resolution of the input video signal.
Language
Language GUI menuFront panel
displayZone OSD
Русский (Russian)
—
(Japanese)
— —
Other languages
114 En

Saving and recalling the system settings (System Memory)
Advan
ced
Op
eration
Use this feature to save and recall up to 10 of your favorite setting for the main zone. You can also save up to four of your favorite settings for Zone 2, Zone 3, or Zone 4.
Saving by the 7SYSTEM MEMORY buttonsYou can save the current system settings stored in “Memory1” to “Memory4” by pressing the corresponding 7SYSTEM MEMORY buttons.
Press and hold one of the 7SYSTEM MEMORY buttons on the remote control for 4 seconds.“MEMORY 1 SAVE” (example) appears in the front panel display, and then this unit saves the current system setting to the corresponding memory number.
• If system settings are already saved in the selected memory number, this unit overwrites the old system settings.
• To save the system settings for Zone 2, Zone 3, or Zone 4, press HZONE on the remote control repeatedly to select the operation zone setting of the remote control and then press and hold the desired 7SYSTEM MEMORY button for 4 seconds. You can save the system settings for the selected Zone only when the zone is turned on.
• This unit saves the parameters in the groups you select by using the GUI menu when you save the parameters by using the 7SYSTEM MEMORY buttons.
Saving by the GUI menu operationYou can save the current system settings stored in “Memory1” to “Memory10” by using the “System Memory” menu in the GUI menu.
1 Press IMENU on the remote control.The top menu appears in the video monitor.
2 Press 9k / n repeatedly to select “System Memory” and then press 9h.The “System Memory” menu appears in the video monitor.
3 Press 9k / n repeatedly to select the desired zone and then press 9h.In the following example, you select “Main” (main zone). The list of the memory number appears in the video monitor.
4 Press 9k / n repeatedly to select “Main Save” and then press 9h.The following menu appears in the video monitor.
5 Press 9k / n repeatedly to select the desired memory number (“Memory1” to “Memory10” or “Memory4”) and then press 9h.The list of the saved items appears in the video monitor.
Saving and recalling the system settings (System Memory)
Saving the current system settings
Before performing the following operations, set the operation mode selector on the remote control to FAMP.
Notes
43
SYSTEM MEMORY
21
Stereo/Surround
Input Select
Manual Setup
Auto Setup
System Memory
Volume
Sound
Video
Main
Zone2
Zone3
Main Load
Main Save
Main Rename
Main Load
Main Save
Main Rename
Memory1
Memory2
Memory3
Memory1
Memory2
Memory3
Main SaveInput/HDMI OutAudioVolumeSP ConfigVideoOption
Save
Group of the system parameters
Memory1
Memory2
Memory3
Main SaveInput/HDMI OutAudioVolumeSP ConfigVideoOption
Save
Select: ENTER
115 En

Saving and recalling the system settings (System Memory)
y• If you select “Zone2”, “Zone3”, or “Zone4” in step 3, you can select
“Memory1” to “Memory4”. You can save the parameters for the selected zone only when the zone is turned on.
• If system settings are already saved in the selected memory number, this unit overwrite to old system settings.
• If you save the system settings to “Memory1” to “Memory4”, you can load the stored settings by pressing the corresponding 7SYSTEM MEMORY buttons (see page 118).
6 Press 9k / n repeatedly to select the group of parameters and then press 9ENTER to select or clear the checkbox of the group.This unit saves the parameters in the checked groups. Refer to “Saved parameters for the main zone” on page 117.
If the selected zone is other than “Main”, you can select “Input”, “Volume”, and “Tone Control”. See page 117 for details.
7 Press 9n repeatedly to select “Save” and then 9ENTER to save the current system settings to the selected memory number.
yYou can cancel the saving by pressing 9l.
8 Press IMENU again to exit from the GUI menu.
Renaming the stored settingsUse this feature to rename the stored settings. The name of each memory number appears in the GUI menu or front panel display.
1 Press IMENU on the remote control.The top menu appears in the video monitor.
2 Press 9k / n repeatedly to select “System Memory” and then press 9h.The “System Memory” menu appears in the video monitor.
3 Press 9k / n repeatedly to select the desired zone and then press 9h.In the following example, “Main” is selected.
4 Press 9k / n repeatedly to select “Main Rename” (example) and then 9h.The list of the memory number appears in the video monitor.
5 Press 9k / n repeatedly to select the desired memory number and then 9h.The rename display appears in the video monitor.
6 Press 9ENTER repeatedly to select a character type (CAPITAL/SMALL/LATIN CAPITAL/LATIN SMALL/FIGURE/MARK).
7 Press 9k / n to select the character you want to use and 9l / h to move to the next one.• You can use up to 9 characters for each memory.• Press 9n to change the character in the following order, or
press 9k to go in the reverse order:CAPITAL A to Z, spaceSMALL a to z, spaceLATIN CAPITAL Ä, Ö, Ü, etc.LATIN SMALL ä, ö, ü, etc.FIGURE 0 to 9, spaceMARK !, #, %, &, etc.
• Press 9ENTER to switch between character types.
yPress 9h repeatedly to select “RESET” and then press 9ENTER to set the name of the memory to the initial name.
• The character types you can select differ depending on the setting in “Language” (see page 114).
• If you set “Language” to “ ”, you can also select Japanese characters.
Note
Memory1
Memory2
Memory3
Main SaveInput/HDMI OutAudioVolumeSP ConfigVideoOption
Save
Current selected group of the parametersappears in red
Select: ENTER
Memory1
Memory2
Memory3
Main SaveInput/HDMI OutAudioVolumeSP ConfigVideoOption
Save
Save: ENTER
Notes
Memory1
Memory2
Memory3
CAPITAL
Memory1
OK RESET
116 En
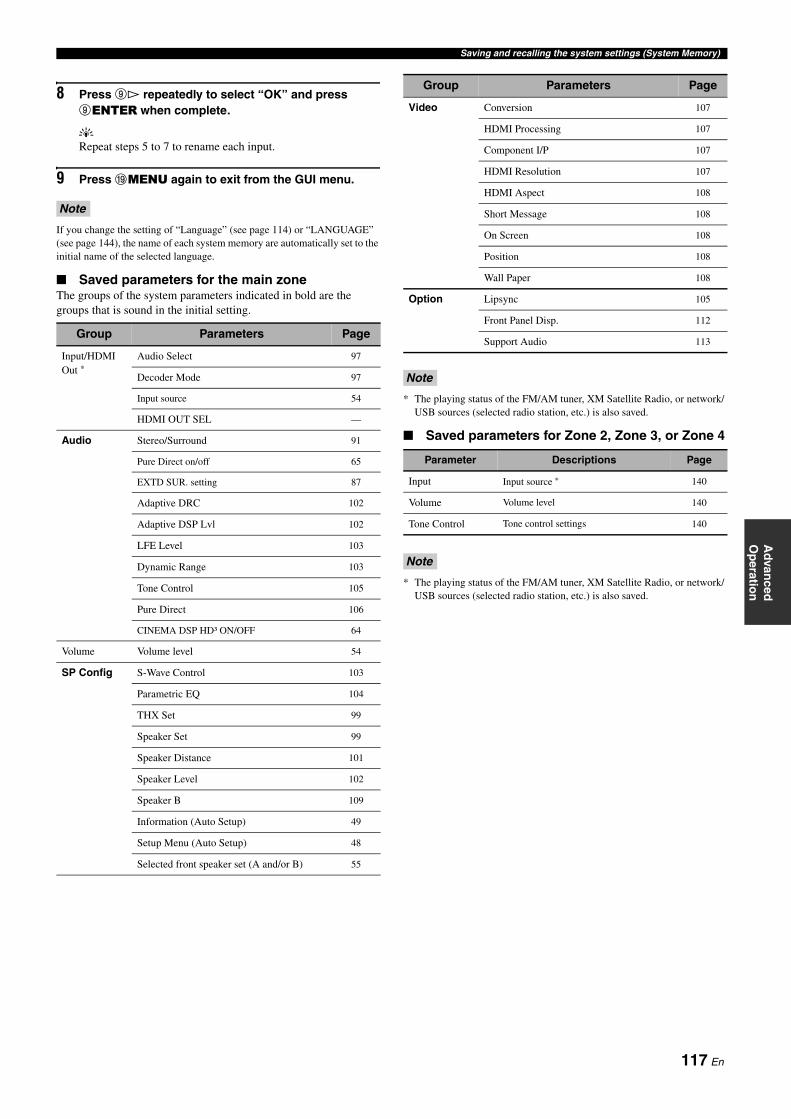
Saving and recalling the system settings (System Memory)
Advan
ced
Op
eration
8 Press 9h repeatedly to select “OK” and press 9ENTER when complete.
yRepeat steps 5 to 7 to rename each input.
9 Press IMENU again to exit from the GUI menu.
If you change the setting of “Language” (see page 114) or “LANGUAGE” (see page 144), the name of each system memory are automatically set to the initial name of the selected language.
Saved parameters for the main zoneThe groups of the system parameters indicated in bold are the groups that is sound in the initial setting.
* The playing status of the FM/AM tuner, XM Satellite Radio, or network/USB sources (selected radio station, etc.) is also saved.
Saved parameters for Zone 2, Zone 3, or Zone 4
* The playing status of the FM/AM tuner, XM Satellite Radio, or network/USB sources (selected radio station, etc.) is also saved.
Note
Group Parameters Page
Input/HDMI Out *
Audio Select 97
Decoder Mode 97
Input source 54
HDMI OUT SEL —
Audio Stereo/Surround 91
Pure Direct on/off 65
EXTD SUR. setting 87
Adaptive DRC 102
Adaptive DSP Lvl 102
LFE Level 103
Dynamic Range 103
Tone Control 105
Pure Direct 106
CINEMA DSP HD³ ON/OFF 64
Volume Volume level 54
SP Config S-Wave Control 103
Parametric EQ 104
THX Set 99
Speaker Set 99
Speaker Distance 101
Speaker Level 102
Speaker B 109
Information (Auto Setup) 49
Setup Menu (Auto Setup) 48
Selected front speaker set (A and/or B) 55
Video Conversion 107
HDMI Processing 107
Component I/P 107
HDMI Resolution 107
HDMI Aspect 108
Short Message 108
On Screen 108
Position 108
Wall Paper 108
Option Lipsync 105
Front Panel Disp. 112
Support Audio 113
Note
Parameter Descriptions Page
Input Input source * 140
Volume Volume level 140
Tone Control Tone control settings 140
Note
Group Parameters Page
117 En

Saving and recalling the system settings (System Memory)
Loading by the 7SYSTEM MEMORY buttonsYou can recall the system settings stored in “Memory1” to “Memory4” by pressing the corresponding 7SYSTEM MEMORY buttons.
yTo recall the system settings for Zone 2, Zone 3, or Zone 4, press HZONE on the remote control repeatedly to select the operation zone setting of the remote control in advance. You can recall the system settings for the selected zone only when the zone is turned on.
1 Press one of the 7SYSTEM MEMORY buttons on the remote control to select the desired memory number.“MEMORY 1 LOAD” (example) appears in the front panel display.
y“EMPTY” appears in the menu screen if no system settings are stored in the selected memory number.
2 Press the selected 7SYSTEM MEMORY button once more to confirm the selection.This unit loads the settings stored in the selected memory number.
Loading by the GUI menu operation
1 Press IMENU on the remote control.The top menu appears in the video monitor.
2 Press 9k / n repeatedly to select “System Memory” and then press 9h.The “System Memory” menu appears in the video monitor.
3 Press 9k / n repeatedly to select the desired zone and then press 9h.In the following example, you select “Main” (main zone). The list of the memory number appears in the video monitor.
You can recall the system settings for the selected zone only when the zone is turned on.
4 Press 9k / n to select “Main Load” and then press 9h.The following menu appears in the video monitor.
yIf system settings are already stored in the selected memory number, the stored system parameter settings appear in the menu screen. “Memory Empty” appears in the menu screen if no system settings are stored in the selected memory number.
5 Press 9k / n repeatedly to select the desired memory number where the system settings are stored and then press 9h.Once “Load: ENTER” appears in the video monitor, press 9ENTER to confirm the loading.
yYou can cancel the loading by pressing 9l.
6 Press IMENU to exit from the GUI menu.
Loading the stored system settings
• Before performing the following operations, set the operation mode selector on the remote control to FAMP.
• This unit overwrites the stored settings to the current settings of this unit. If you do not want to erase the current settings, save the current settings to any System Memory number in advance.
Note
Main Load
Main Save
Main Rename
Memory1
Memory2
Memory3
Memory1
Memory2
Memory3
Main SaveInput/HDMI OutAudioVolumeSP ConfigVideoOption
Memory1
Memory2
Memory3
Main SaveInput/HDMI OutAudioVolumeSP ConfigVideoOption
Save
Load: ENTER
118 En

Saving and recalling the system settings (System Memory)
Advan
ced
Op
eration
Example 1: Switching the settings of this unit according to the using situations
Use the following example to change the settings of this unit according to the using situations just by pressing the 7SYSTEM MEMORY buttons.
SYSTEM MEMORY 1: Settings for enjoying movieSave the following settings to enjoy movies. You can switch the input source, sound field program, and the HDMI OUT jack simultaneously.
Recommended parameter settingsInput source: BD/HD DVD (see page 54)“HDMI OUT SEL” setting: OUT 2 (see page 55)Sound field program: Sci-Fi (see page 58)“Dimmer”: – 4 (see page 112)
Saved parameter groupsInput/HDMI Out, Audio, Option
SYSTEM MEMORY 2: Settings for enjoying TV programsWhen you want to play back the audio signals input at the CBL/SAT HDMI IN 3 jack on the speakers of the TV connected to the HDMI OUT 1 jack to enjoy TV programs, use the following settings. You can set input source and output component of the audio signals simultaneously.
Recommended parameter settingsInput source: CBL/SAT (see page 54)“HDMI OUT SEL” setting: OUT 1 (see page 55)“Support Audio” setting: Other (see page 113)
Saved parameter groupsInput/HDMI Out, Audio
SYSTEM MEMORY 3: Settings for the book-reading timeWhen you enjoy reading books with listening to your favorite Internet radio service, use the following settings. You can recall the desired input source, Internet radio service, and audio settings simultaneously.
Recommended parameter settingsInput source: NET/USB (Net Radio) (see page 54)Sound field program: 11ch Enhancer (see page 58)Volume level: Slightly low (see page 54)
yBefore saving the settings, select the desired Internet radio service (see page 83).
Saved parameter groupsInput/HDMI Out, Audio, Volume
SYSTEM MEMORY 4: Settings for enjoying gamesSave the following settings to enjoy roleplaying games. You can switch the input source, sound field program, and the HDMI OUT jack simultaneously.
Recommended parameter settingsInput source: V-AUX (see page 54)Sound field program: Roleplaying Game (see page 58)“HDMI OUT SEL” setting: OUT 2 (see page 55)
Saved parameter groupsInput/HDMI Out, Audio
Example 2: Switching the setting of this unit according to the environment of the listening room
Use the following example to change the speaker and audio settings according to the environment of the listening room and the situation.
SYSTEM MEMORY 1: Settings for a single listening positionSave the result of the automatic setup for a single listening position.
Recommended parameter settingsAutomatic setup: The result when you perform the measurement for the single listening position (see page 46).
Saved parameter groupSP Config
SYSTEM MEMORY 2: Settings for multiple listening positionsSave the result of the automatic setup for the multiple listening positions.
Recommended parameter settingsAutomatic setup: The result when you perform the measurement for the multiple listening positions (see page 46).
Saved parameter groupSP Config
SYSTEM MEMORY 3: Settings for the midnight listeningThe acoustic characteristics may change whether curtains are opened or closed. Use the following settings for the listening when you want to enjoy movies in midnight with low volume level.
Recommended parameter settingsAutomatic setup: The result when you perform the measurement with the curtains are closed (see page 46).“Adaptive DRC” setting: Auto (see page 102)“Adaptive DSP Lvl” setting: Auto (see page 102)
Saved parameter groupsAudio, SP Config
Using examples
43
SYSTEM MEMORY
21
SYSTEM MEMORY 2Settings for enjoying TV programs
SYSTEM MEMORY 4Settings for enjoying games
SYSTEM MEMORY 3Settings for the book-reading time
SYSTEM MEMORY 1Settings for enjoying movie
43
SYSTEM MEMORY
21
SYSTEM MEMORY 2Settings for multiple listening positions
SYSTEM MEMORY 1Settings for a single listening position
SYSTEM MEMORY 3Settings for the midnight listening
119 En

Controlling this unit by using the Web browser (Web Control Center)
You can operate this unit by using a Web browser. You can select the input source and sound field program, browse the iPod or network/USB contents, select the preset items, and adjust the parameters of this unit by using the graphical user interface (Web Control Center) that appears in the Web browser. Check the IP address of this unit by using “IP Address” in “Network” menu (see page 111) in advance, and then enter the IP address to the Web browser to access this unit to control it.
y• To use this feature, this unit and your PC must be connected properly in the network. See page 40 for details of the connections.• We recommend that you use Windows Internet Explorer 6 or 7 that is installed on Windows XP or Windows Vista PC to access this unit.• You can select whether this unit accepts the controls by using the Web browser when this unit is in the standby mode. See page 143 for details.• You can register the MAC address of the PCs you want to use to control this unit and limit the PCs that can control this unit by using the Web browser. You
can select that this unit allows the access to this unit by the PCs whose MAC addresses are registered to this unit or allows the access by any PCs by using “MAC FILTER” in “Advanced setup” (see page 144).
Controlling this unit by using the Web browser (Web Control Center)
Power on/offSelecting the input source Controlling Network/USB features
And many other features...Adjusting the system parameters
Web browser
PC
Control
120 En

Remote control features
Advan
ced
Op
eration
In addition to controlling this unit, the remote control can also operate other audiovisual components made by Yamaha and other manufacturers. To control your TV or other components, you must set up the appropriate remote control code for each input source (see page 124).
Controlling this unitSet the operation mode selector to FAMP to control this unit.
*1 These buttons always control this unit regardless of the operation mode selector position.
*2 These buttons control this unit only when the component operation mode selector is set to FAMP.
*3 (Australia model only)3 is the optional component control area button. You can control the desired component without changing the input source of this unit.
Controlling a TVSet the operation mode selector to FTV to control your TV. To control your TV, you must set the appropriate remote control code to the TV control area in advance (see page 124).
*1 2TV POWER can always turn on or off the power of the TV regardless of the operation mode selector position.
*2 These buttons control your TV only when the operation mode selector is set to FTV. For details, see the “TV” column on page 122.
*3 These buttons control your TV only when the operation mode selector is set to FTV or FSOURCE.
yIf no code has been set to the “TV” area, the remote control operates the component that is set to the “DTV” area (see page 124).
Remote control features
Controlling this unit, a TV, or other components
Notes
AMP
TV
SOURCE
ZONEMODE
SELECT SETUP ID MACRO
43
SYSTEM MEMORY
VOLUME
DVD CD
V-AUXMULTI
AVTV
PHONO
CD-R
POWERSTANDBYPOWERPOWER
DTV DVR VCR
DOCKTUNER XM
BDHD DVD
MDTAPE
CBLSAT
NETUSB
REC
SRCH MODELEVEL
BANDMENUTITLE
CLASSICAL 1 CLASSICAL 2 LIVE/CLUB ENTERTAIN
MEMORY
PC/MCX
RETURN DISPLAY
PRESET/CH
ENTER CAT.A-E
MUTE
21
NET RADIO
PRG SELECT
USB
MOVIE STEREO SUR. DECODE
EXTD SUR.
ENHANCER
THX STRAIGHT PURE DIRECT
PARTY SLEEP HDMI OUT AUDIO SEL
TV VOL TV CH TV 3D DSP
1 2 3 4
5 6 7 8
ENT.
MUTE AUDIO
INPUT
9 0 10
Set to AMP
*1
*1
*2
*2
(U.S.A. and Canada models)
*3 (Australia model only)
Notes
Remote control Functions
TV VOL +/– Increases or decreases the volume level.
TV CH +/– Changes the currently selected channel.
TV MUTE Mutes the audio output.
TV INPUT Switches the input source.
AMP
TV
SOURCE
ZONEMODE
SELECT SETUP ID MACRO
43
SYSTEM MEMORY
VOLUME
DVD CD
V-AUXMULTI
AVTV
PHONO
CD-R
POWERSTANDBYPOWERPOWER
DTV DVR VCR
DOCKTUNER XM
BDHD DVD
MDTAPE
CBLSAT
NETUSB
REC
SRCH MODELEVEL
BANDMENUTITLE
CLASSICAL 1 CLASSICAL 2 LIVE/CLUB ENTERTAIN
MEMORY
PC/MCX
RETURN DISPLAY
PRESET/CH
ENTER CAT.A-E
MUTE
21
NET RADIO
PRG SELECT
USB
MOVIE STEREO SUR. DECODE
EXTD SUR.
ENHANCER
THX STRAIGHT PURE DIRECT
PARTY SLEEP HDMI OUT AUDIO SEL
TV VOL TV CH TV 3D DSP
1 2 3 4
5 6 7 8
ENT.
MUTE AUDIO
INPUT
9 0 10
Set to TV
*1
*2
*2
*3
(U.S.A. and Canada models)
121 En

Remote control features
Controlling other componentsSet the operation mode selector to FSOURCE to control other components selected with the input selector buttons (3). You must set the appropriate remote control code for each input source in advance (see page 124). The following table shows the function of each control button used to control other components assigned to each input selector button (3). Be advised that some buttons may not correctly operate the selected component.
yThe remote control has 16 modes (control areas) to control components so that the remote control can operate up to 16 different components.
*1 This button is operational only when the original remote control supplied with the component has a POWER button.*2 These buttons operate your video recorder (DVD recorder etc.) only when you set the appropriate remote control code for DVR (see page 124).
AMP
TV
SOURCE
ZONEMODE
SELECT SETUP ID MACRO
43
SYSTEM MEMORY
VOLUME
DVD CD
V-AUXMULTI
AVTV
PHONO
CD-R
POWERSTANDBYPOWERPOWER
DTV DVR VCR
DOCKTUNER XM
BDHD DVD
MDTAPE
CBLSAT
NETUSB
SRCH MODELEVELPRESET/CH
21
VOLUME
REC
SRCH MODELEVEL
BANDMENUTITLE
CLASSICAL 1 CLASSICAL 2 LIVE/CLUB ENTERTAIN
MEMORY
PC/MCX
RETURN DISPLAY
PRESET/CH
ENTER CAT.A-E
MUTE
NET RADIO
PRG SELECT
USB
MOVIE STEREO SUR. DECODE
EXTD SUR.
ENHANCER
THX STRAIGHT PURE DIRECT
PARTY SLEEP HDMI OUT AUDIO SEL
TV VOL TV CH TV 3D DSP
1 2 3 4
5 6 7 8
ENT.
MUTE AUDIO
INPUT
9 0 10
[1] [2]
[3][4]
[5]
[6]
[7]
[8]
[9][10]
Set to SOURCE
(U.S.A. and Canada models)
Blu-ray Disc/ HD DVD player/ recorder
DVD player LD playerDVD recorder/Digital video recorder
VCR TV Cable TV/ Satellite tuner CD player MD recorder/
CD recorder Tape deck Tuner
[1] AV POWER Power *1 Power *1 Power *1 Power *1 Power *1 DVR power *2 Power *1 Power *1 Power *1 Power *1 Power *1
[2] TITLE, BAND
Title Title Title Title Band
[3] PRESET/CH k
Menu up Menu up Menu up Channel up Menu up Channel up Menu up
PRESET/CH n
Menu down Menu down Menu down Channel down Menu down Channel down Menu down
CAT. A-E l Menu left Menu left Menu left Menu left Menu left
CAT. A-E h Menu right Menu right Menu right Menu rightDirection A/B
Menu right
ENTER Menu enter Menu enter Menu enter Menu enter Menu enter
[4] RETURN, MEMORY
Return Return Return Return Memory
[5] REC Record (recorder)
Disc skip Record Record DVR record *2 DVR record *2 Disc skip Record Record
e Pause Pause Pause Pause Pause DVR pause *2 DVR pause *2 Pause Pause Pause
p Play Play Play Play Play DVR play *2 DVR play *2 Play Play Play
s Stop Stop Stop Stop Stop DVR stop *2 DVR stop *2 Stop Stop Stop
llSearch backward
Search backward
Search backward
Search backward
Search backward
DVR search backward *2
DVR search backward *2
Search backward
Search backward
Search backward
hh Search forward Search forward Search forward Search forwardSearch forward
DVR search forward *2
DVR search forward *2 Search forward Search forward
Search forward
b Skip backward Skip backward Skip backward Skip backwardSkip backward
DVR skip backward *2
DVR skip backward *2 Skip backward Skip backward Direction A
a Skip forward Skip forward Skip forward Skip forward Skip forwardDVR skip forward *2
DVR skip forward *2 Skip forward Skip forward Direction B
[6] 1-9, 0, +10Numeric buttons Numeric buttons Numeric buttons Numeric buttons
Numeric buttons
Numeric buttons Numeric buttons Numeric buttons Numeric buttonsNumeric buttons
[7] MENU,SRCH MODE
Menu Menu Menu Menu Search mode
[8] DISPLAY Display Display Display Display Display Display Display Display Display Display
[9] ENT Index Index Chapter/time Index Enter Enter Enter Index Index Enter
[10] AUDIO Audio Audio Audio Audio
Notes
122 En
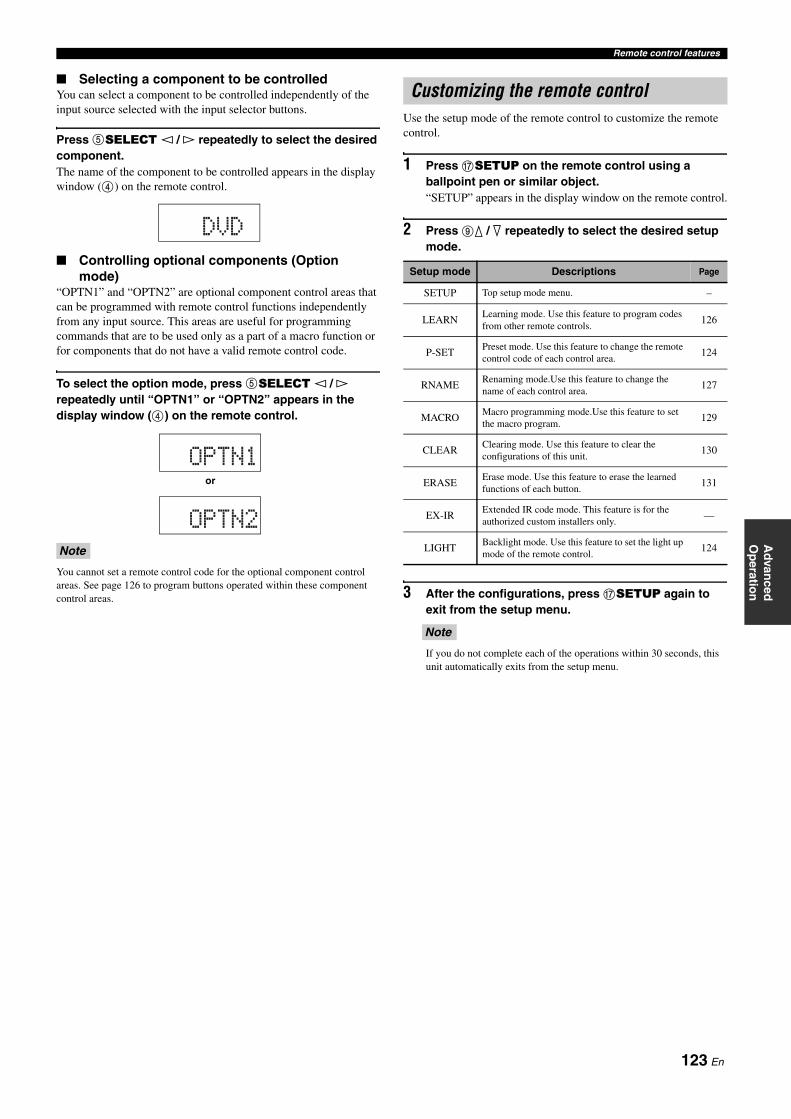
Remote control features
Advan
ced
Op
eration
Selecting a component to be controlledYou can select a component to be controlled independently of the input source selected with the input selector buttons.
Press 5SELECT l / h repeatedly to select the desired component.The name of the component to be controlled appears in the display window (4) on the remote control.
Controlling optional components (Option mode)
“OPTN1” and “OPTN2” are optional component control areas that can be programmed with remote control functions independently from any input source. This areas are useful for programming commands that are to be used only as a part of a macro function or for components that do not have a valid remote control code.
To select the option mode, press 5SELECT l / h repeatedly until “OPTN1” or “OPTN2” appears in the display window (4) on the remote control.
You cannot set a remote control code for the optional component control areas. See page 126 to program buttons operated within these component control areas.
Use the setup mode of the remote control to customize the remote control.
1 Press GSETUP on the remote control using a ballpoint pen or similar object.“SETUP” appears in the display window on the remote control.
2 Press 9k / n repeatedly to select the desired setup mode.
3 After the configurations, press GSETUP again to exit from the setup menu.
If you do not complete each of the operations within 30 seconds, this unit automatically exits from the setup menu.
Note
DVD
or
OPTN1
OPTN2
Customizing the remote control
Setup mode Descriptions Page
SETUP Top setup mode menu. –
LEARNLearning mode. Use this feature to program codes from other remote controls.
126
P-SETPreset mode. Use this feature to change the remote control code of each control area.
124
RNAMERenaming mode.Use this feature to change the name of each control area.
127
MACROMacro programming mode.Use this feature to set the macro program.
129
CLEARClearing mode. Use this feature to clear the configurations of this unit.
130
ERASEErase mode. Use this feature to erase the learned functions of each button.
131
EX-IRExtended IR code mode. This feature is for the authorized custom installers only.
—
LIGHTBacklight mode. Use this feature to set the light up mode of the remote control.
124
Note
123 En

Remote control features
You can set the backlight mode of the remote control.
1 Press GSETUP on the remote control using a ballpoint pen or similar object.“SETUP” appears in the display window (4) on the remote control.
2 Press 9k / n repeatedly to select “LIGHT” and then press 9ENTER.“LIGHT” and the current “LIGHT” setting appears in the display window (4) alternately.
3 Press 9k / n to select the desired setting.
4 Press GSETUP again to exit from the setup mode.
yYou can light up the backlight by pressing 6LIGHT anytime.
You can control other components by setting the appropriate remote control codes. Codes can be set up for each control area. For a complete list of available remote control codes, refer to “List of remote control codes” at the end of this manual.
The following table shows the default component (Library: component category) and the remote control code for each control area.
Remote control code default settings
You may not be able to operate your Yamaha component even if a Yamaha remote control code is preset as listed above. In this case, try setting another Yamaha remote control code.
1 Press GSETUP on the remote control using a ballpoint pen or similar object.The remote control enters the setup menu. “SETUP” appears in the display window (4) on the remote control.
2 Press 9k / n repeatedly to select “P-SET” and then press 9ENTER.The remote control enters the preset mode. “P-SET” and name of the currently selected control area appears in the display window (4) alternately.
Setting the backlight mode of the remote control (LIGHT)
Choice Descriptions
ON Lights up the backlight when a button is pressed or the remote control detects a motion.
OFF Lights up the backlight only when 6LIGHT is pressed.
Setting remote control codes (P-SET)
LIGHT ON
Current “LIGHT” setting
Control areaLibrary
(component category)
ManufacturerDefault code
MULTI DVD Yamaha 04306
V-AUX — — —
PHONO — — —
MD TAPE MD Yamaha 00409
BDHD DVD
DVD Yamaha 04306
DVD DVD Yamaha 04306
CD CD Yamaha 01105
CD-R CD-R Yamaha 01405
CBLSAT
— — —
DTV — — —
DVR DVR Yamaha 00707
VCR — — —
TUNER SOURCE Yamaha 00012
DOCK SOURCE Yamaha 00012
NETUSB
SOURCE Yamaha 00012
XM (U.S.A. and
Canada models)SOURCE Yamaha 00012
(TAPE)(Australia model)
TAPE Yamaha 00311
TV — — —
Note
SETUP
P-SET
124 En

Remote control features
Advan
ced
Op
eration
3 Set the operation mode selector to GSOURCE and then press an input selector button (3) or 5SELECT l / h repeatedly to select the control area you want to customize.“P-SET” and name of the selected control area appears in the display window (4) alternately.
yIf you want to select “TV”, set the operation mode selector to FTV.
4 Press 9ENTER.The five-digit code set for the selected control area appears in the display window (4).
“00000” appears in the display window (4) if no code has been set.
5 Press the numeric buttons (B) to enter the five-digit remote control code for the component you want to use.For a complete list of available remote control codes, refer to “List of remote control codes” at the end of this manual.
yYou can also enter the desired number by pressing 9 k / n / l / h repeatedly.
6 Press 9ENTER to set the number.“OK” appears in the display window (4) if setting was successful.“NG” appears in the display window (4) if the setting was unsuccessful. In this case, start over from step 3.
yIf you continuously want to set up another code for another control area, repeat steps 3 through 6.
7 Press GSETUP again to exit from the setup mode.
8 Press Ap or 2AV POWER to confirm whether you can control your component using the remote control.
yIf operation is not possible and the manufacturer of your component has more than one code, try each of them until you find the correct one.
• “ERROR” appears in the display window (4) on the remote control if you press a button not indicated in the respective step, or when you press more than one button simultaneously.
• The supplied remote control does not contain all possible codes for commercially available audio and video components (including Yamaha components). If operation is not possible with any of the remote control codes, program the new remote control function using the learning feature (see “Programming codes from other remote controls (LEARN)” on page 126) or use the remote control supplied with the component.
• Functions programmed using the learning mode take priority over remote control code functions.
• If you set “00012” as the remote control code of the selected control area, you can operate the currently selected internal source (TUNER, XM, DOCK, or NET/USB).Note
P-SET DVD
04306
SETUP
Notes
125 En

Remote control features
You can program remote control codes from other remote controls. Use the learning feature if you want to program functions not included in the basic operations covered by the remote control codes, or an appropriate remote control code is not available. You can program the function of other remote control to the buttons in the highlighted areas in the following illustration. The buttons can be programmed independently for each control area.
• The remote control transmits infrared rays. If the other remote control also uses infrared rays, this remote control can learn most of its functions. However, you may not be able to program some special signals or extremely long transmissions. Refer to the operating instructions for the other remote control.
• You cannot program the desired remote control code even if you select the buttons in the highlighted area in the above illustration depending on the selected control area and the assigned library.
1 Set the operation mode selector to FSOURCE and then press an input selector button (3) to select the desired control area.The name of the control area you want to customize appears in the display window (4) on the remote control.
y• You can also select the desired control area by pressing 5SELECT l / h repeatedly.
• If you want to select “TV”, set the operation mode selector to FTV.
Make sure that the operation mode selector is set to FSOURCE or FTV. When you set the operation mode selector to FAMP and program a remote control codes from other remote controls, the programmed key cannot operate the amplifier function of this unit.
2 Press GSETUP using a ballpoint pen or similar object.“SETUP” appears in the display window (4).
3 Press 9k / n repeatedly to select “LEARN” and then press 9ENTER.The remote control enters the learning mode. “LEARN” and the name of the selected control area appears in the display window (4) alternately.
4 Place this remote control about 5 to 10 cm (2 to 4 in) apart from the other remote control on a flat surface so that their infrared transmitters are aimed at each other and then press 9ENTER.“L–KEY” appears in the display window (4).
5 Press the button for which you want to program the new function.“START” appears in the display window (4).
Programming codes from other remote controls (LEARN)
Notes
Note
AMP
TV
SOURCE
ZONEMODE
SELECT SETUP ID MACRO
43
SYSTEM MEMORY
VOLUME
DVD CD
V-AUXMULTI
AVTV
PHONO
CD-R
POWERSTANDBYPOWERPOWER
DTV DVR VCR
DOCKTUNER XM
BDHD DVD
MDTAPE
CBLSAT
NETUSB
REC
SRCH MODELEVEL
BANDMENUTITLE
CLASSICAL 1 CLASSICAL 2 LIVE/CLUB ENTERTAIN
MEMORY
PC/MCX
RETURN DISPLAY
PRESET/CH
ENTER CAT.A-E
MUTE
21
NET RADIO
PRG SELECT
USB
MOVIE STEREO SUR. DECODE
EXTD SUR.
ENHANCER
THX STRAIGHT PURE DIRECT
PARTY SLEEP HDMI OUT AUDIO SEL
TV VOL TV CH TV 3D DSP
1 2 3 4
5 6 7 8
ENT.
MUTE AUDIO
INPUT
9 0 10
Set to SOURCE
(U.S.A. and Canada models)
DVD
SETUP
START DVD
AM
P
TV
SOURCEZONEMODE
SELECTSETUP
IDMACRO
43
SY
STE
M M
EM
OR
Y
VO
LUM
E
DV
DC
D
V-AU
XM
ULTI
AV
TV
PHONO
CD
-R
PO
WE
RSTANDBY
PO
WE
RP
OW
ER
DTV
DV
RV
CR
DO
CK
TUN
ERX
M
BDHD DVD
MD
TAP
E
CB
LS
AT
NE
TU
SB
SRCH MODELEVEL
BANDMENU
TITLE
MEMORYRETURN
DISPLAY
PRESET/CH
ENTERCAT.A-E
MUTE
21
5 to 10 cm (2 to 4 in)
Other remote control
L-KEY
(U.S.A. and Canada models)
AM
P
TV
SOURCEZONEMODE
SELECTSETUP
IDMACRO
43
SY
STE
M M
EM
OR
Y
VO
LUM
E
DV
DC
D
V-AU
XM
ULTI
AV
TV
PHONO
CD
-R
PO
WE
RSTANDBY
PO
WE
RP
OW
ER
DTV
DV
RV
CR
DO
CK
TUN
ERX
M
BDHD DVD
MD
TAP
E
CB
LS
AT
NE
TU
SB
SRCH MODELEVEL
BANDMENU
TITLE
MEMORYRETURN
DISPLAY
PRESET/CH
ENTERCAT.A-E
21
START
(U.S.A. and Canada models)
126 En
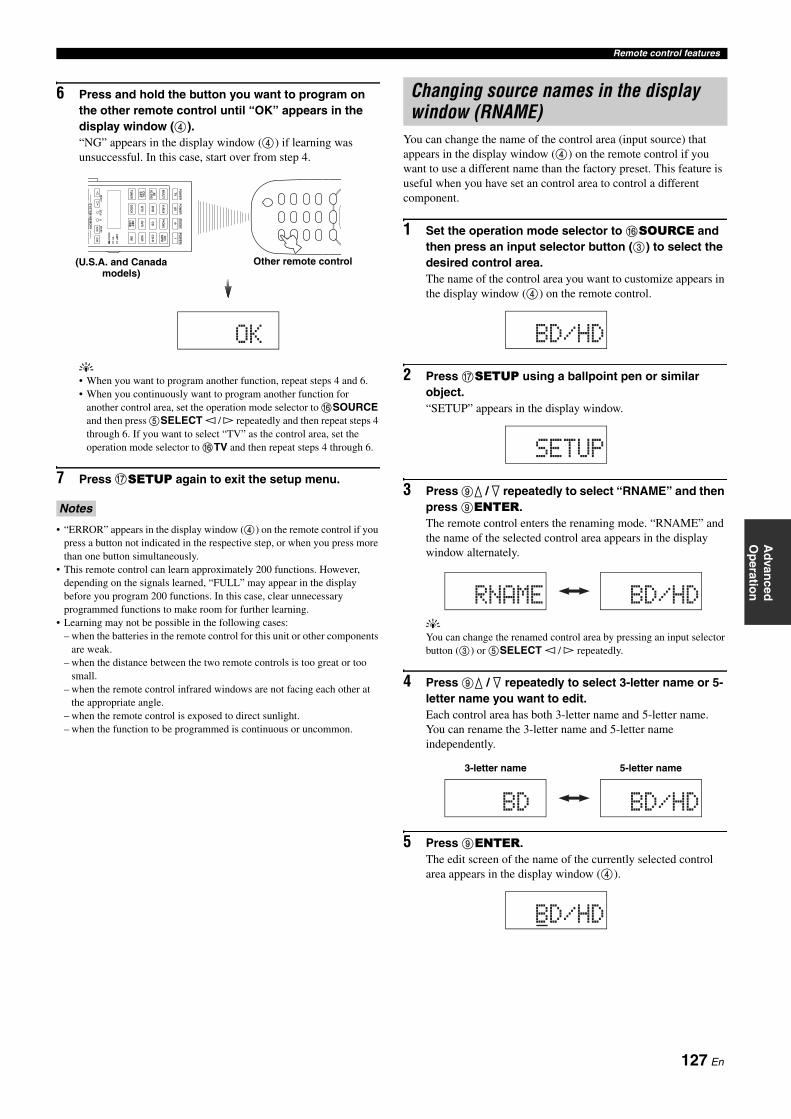
Remote control features
Advan
ced
Op
eration
6 Press and hold the button you want to program on the other remote control until “OK” appears in the display window (4).“NG” appears in the display window (4) if learning was unsuccessful. In this case, start over from step 4.
y• When you want to program another function, repeat steps 4 and 6.• When you continuously want to program another function for
another control area, set the operation mode selector to FSOURCE and then press 5SELECT l / h repeatedly and then repeat steps 4 through 6. If you want to select “TV” as the control area, set the operation mode selector to FTV and then repeat steps 4 through 6.
7 Press GSETUP again to exit the setup menu.
• “ERROR” appears in the display window (4) on the remote control if you press a button not indicated in the respective step, or when you press more than one button simultaneously.
• This remote control can learn approximately 200 functions. However, depending on the signals learned, “FULL” may appear in the display before you program 200 functions. In this case, clear unnecessary programmed functions to make room for further learning.
• Learning may not be possible in the following cases:– when the batteries in the remote control for this unit or other components
are weak.– when the distance between the two remote controls is too great or too
small.– when the remote control infrared windows are not facing each other at
the appropriate angle.– when the remote control is exposed to direct sunlight.– when the function to be programmed is continuous or uncommon.
You can change the name of the control area (input source) that appears in the display window (4) on the remote control if you want to use a different name than the factory preset. This feature is useful when you have set an control area to control a different component.
1 Set the operation mode selector to FSOURCE and then press an input selector button (3) to select the desired control area.The name of the control area you want to customize appears in the display window (4) on the remote control.
2 Press GSETUP using a ballpoint pen or similar object.“SETUP” appears in the display window.
3 Press 9k / n repeatedly to select “RNAME” and then press 9ENTER.The remote control enters the renaming mode. “RNAME” and the name of the selected control area appears in the display window alternately.
yYou can change the renamed control area by pressing an input selector button (3) or 5SELECT l / h repeatedly.
4 Press 9k / n repeatedly to select 3-letter name or 5-letter name you want to edit.Each control area has both 3-letter name and 5-letter name. You can rename the 3-letter name and 5-letter name independently.
5 Press 9ENTER.The edit screen of the name of the currently selected control area appears in the display window (4).
Notes
AM
P
TV
SOURCEZONEMODE
SELECTSETUP
IDMACRO
SY
STE
M M
EM
OR
Y
DV
DC
D
V-AU
XM
ULTI
AV
TV
PHONO
CD
-R
PO
WE
RSTANDBY
PO
WE
RP
OW
ER
DTV
DV
RV
CR
DO
CK
TUN
ERX
M
BDHD DVD
MD
TAP
E
CB
LS
AT
NE
TU
SB
Other remote control
OK
(U.S.A. and Canada models)
Changing source names in the display window (RNAME)
BD/HD
SETUP
RNAME BD/HD
BD BD/HD
3-letter name 5-letter name
BD/HD
127 En

Remote control features
6 Press 9l / h repeatedly to move the cursor (_) to the position you want to edit.
7 Press 9k / n repeatedly to select and enter the desired character.Pressing 9k changes the character as follows:A to Z, a to z, 0, 1 to 9, space, - (minus), + (plus), / (slash) and : (colon).
yPressing 9n changes the characters in reverse order.
8 Repeat steps 6 and 7 until you change all the letters you want.
9 Press 9ENTER to set the new name.“OK” appears in the display window (4) on the remote control if renaming was successful.
yWhen you want to rename the another name of the selected control area, press the input selector button (3) or 5SELECT l / h repeatedly to select the desired control area and then press 9ENTER and then carry out the operations of steps 4 through 9.
10 Press GSETUP again to exit the setup menu.The new name of the control area appears in the display window (4).
“ERROR” appears in the display window (4) on the remote control if you press a button not indicated in the respective step, or when you press more than one button simultaneously.
The macro programming feature makes it possible to perform a series of operations with the press of a single button. For example, when you want to play a CD, normally you would turn on the components, select the CD input, and press the play button to start playback. The macro programming feature lets you perform all of these operations simply by pressing the CD macro button. The buttons listed as macro buttons below are factory set with macro programs. You can also program your own macros (see page 129).
Recalling programmed macro-operations
1 Press HMACRO on the remote control.
2 Press the desired macro button.“M:the 3-letter name of the selected control area” (for example, “M:DVD”) appears in the display window (4), and this unit transmits the programmed functions. When you press DSTANDBY or EPOWER, “M:STB” or “M:PWR” appears in the display window (4), and this unit transmits the programmed functions.
3 Press HMACRO again to exit from the macro-operation mode.
• While the remote control is running a macro program, it does not accept any other operation until it has completed running the program (the transmission indicator in the display stops flashing).
• Continue to aim the remote control at the component the macro is operating until the macro operation is complete.
• If you do not complete each of the operations within 30 seconds, this unit automatically exits from the macro-operation mode.
Note
HDDVD
Macro programming features
Notes
AMP
TV
SOURCE
ZONEMODE
SELECT SETUP ID MACRO
43
SYSTEM MEMORY
DVD CD
V-AUXMULTI
AVTV
PHONO
CD-R
POWERSTANDBYPOWERPOWER
DTV DVR VCR
DOCKTUNER XM
BDHD DVD
MDTAPE
CBLSAT
NETUSB
21
MACRO
Macro buttons
(U.S.A. and Canada models)
MACRO
128 En

Remote control features
Advan
ced
Op
eration
Default macro functions
*1 Set the appropriate remote control code for TV in advance (see page 124).
*2 This unit plays the last received station or selected contents before the unit was set in the standby mode.
Programming macro operations (MACRO)You can program your own macro and use the macro programming feature to transmit several remote control commands in sequence at the press of a button. Be sure to set up remote control codes or perform learning operations before programming the macro.
• The default macro is not cleared when a new macro is programmed for a button. The default macro can be used again when the programmed macro is cleared.
• It is not possible to add a new signal (macro step) to the default macro. Programming a macro changes all macro contents.
• We do not recommend that you program continuous operations (for example, volume control) in a macro.
1 Press GSETUP on the remote control using a ballpoint pen or similar object.“SETUP” appears in the display window (4).
2 Press 9k / n repeatedly to select “MACRO” and then press 9ENTER.The remote control enters the macro-programming mode. “MACRO” and “M:the three-letter name of the selected control area” (for example, “M:DVD”) appears in the display window (4) alternately.
3 Press the desired macro button you want to assign the macro program to and then press 9ENTER.“M:the three-letter name of the selected macro button” (for example, “M:DVD”) and the name of the currently selected control area appears in the display window (4) alternately.When you press DSTANDBY or EPOWER, “M:STB” or “M:PWR” and the name of the currently selected control area appears in the display window (4) alternately.
4 Press the buttons for the functions you want to include in the macro operation in sequence.
Pressing macro
To automatically transmit these signals First Second
—
(U.S.A. and
Canada models)
(Australia
model)
STANDBY STANDBY
POWER
POWER
POWER
TV (*1)
MULTI MULTI
V-AUX V-AUX
PHONO PHONO
MDTAPE
MDTAPE
BDHD DVD
BDHD DVD
DVD DVD
CD CD
CD-R CD-R
CBLSAT
CBLSAT
DTV DTV
DVR DVR
VCR VCR
TUNER TUNER
DOCK DOCK
NETUSB
NETUSB
(*2)
XM
XM (*2)
Notes
SETUP
MACRO M:DVD
129 En

Remote control features
ExampleSet the input source to DVD → Turn on the DVD player → Turn on the video monitor
Step 1 (“MCR1”): Press DVD.Step 2 (“MCR2”): Press AV POWER.Step 3 (“MCR3”): Press TV POWER.
• To change the selected input area, press 5SELECT l / h. Pressing the input selector buttons will program a macro step, whereas 5SELECT l / h only changes the selected input area.
• The position of the operation mode selector (AMP/TV/SOURCE) affects the assigned function. When the operation mode selector is set to FAMP or FTV, the input source selectors do not function.
5 Press HMACRO to confirm the program.You can set up to 10 steps (10 functions). After you have set 10 steps, “FULL” appears and the remote control automatically exits from the macro programming mode.
6 Press GSETUP again to exit from the setup mode.
“ERROR” appears in the display window (B) if you press more than one button simultaneously.
You can clear all changes made in each function set, such as learned functions, macros, renamed control area names and setup remote control ID.
Clearing function sets (CLEAR)
1 Press GSETUP on the remote control using a ballpoint pen or similar object.“SETUP” appears in the display window (4).
2 Press 9k / n repeatedly to select “CLEAR” and then press 9ENTER.The remote control enters the clear mode. “CLEAR” and “L:the three-letter name of the selected control area” (for example, “L:DVD”) appears in the display window (4) alternately.
3 Press 9k / n repeatedly to select the desired clear mode.
4 Press and hold 9ENTER for about 3 seconds.When the clearing is successful, “OK” appears in the display window (4).
• “NG” appears in the display window (4) if clearing was unsuccessful.• “ERROR” appears in the display window (4) if you press a button not
indicated in the respective step, or if you press more than one button simultaneously.
Notes
Note
DVD CD
V-AUXMULTI
AVTV
PHONO
CD-R
POWERSTANDBYPOWERPOWER
DTV DVR VCR
DOCKTUNER XM
BDHD DVD
MDTAPE
CBLSAT
NETUSB
1
23
Indicates the number of macro steps entered
Flashes alternately so you can set the next step
(Selected macro button)
(Selected control area)
MCR 1
M:DVD
DVD
(U.S.A. and Canada models)
Clearing configurations
Clear mode Descriptions
L:DVD (etc.) (L:Three-digit name of the selected control area) Clears all learned functions the respective control area. You can change the control area to be cleared by pressing the desired input selector button (3) or 5SELECT l / h repeatedly.
L:AMP Sets all learned functions for controlling the amplifier functions to the initial factory settings. Set the operation mode selector to FAMP to select this clear mode.
L:TV Clears all learned functions for TV control area. Set the operation mode selector to FTV to select this clear mode.
L:ALL Clears all learned functions.
M:DVD (etc.) (M:Name of the selected macro button) Clears the macro programmed for the selected macro button (see page 129). The assigned macro to the selected macro button reverts to the initial factory macro. Press the desired macro button if you want to change the macro button you want to clear the programmed functions of.
M:ALL Clears all programmed macros. The assigned macro to the selected macro button reverts to the initial factory macro.
RNAME Set all the name of the control areas to the default settings.
FCTRY Set all settings of the remote control to the initial factory settings.
Notes
SETUP
CLEAR L:DVD
130 En

Remote control features
Advan
ced
Op
eration
5 Press GSETUP again to exit from the setup mode.
Clearing a learned function (ERASE)
1 Press GSETUP using a ballpoint pen or similar object.“SETUP” appears in the display window (4).
2 Press 9k / n repeatedly to select “ERASE” and then press 9ENTER.The remote control enters the learning mode. “ERASE” and the name of the currently selected control area appears in the display window (4) alternately.
3 Set the operation mode selector to FSOURCE and then press an input selector button (3).“ERASE” and the name of the selected control area appears in the display window (4) alternately.
y• You can also select the desired control area by pressing 5SELECT l / h repeatedly.
• If you want to erase the function learned in the AMP or TV control area, set the operation mode selector to FAMP or FTV.
4 Press 9ENTER.“E-KEY” appears in the display window (4).
5 Press and hold the button you want to clear for about 3 seconds.If clearing is successful, “ERASE” and “OK” appears in the display window (4).
y• If you continuously want to clear another function, repeat step 3.• Once you clear a learned function, the button reverts to the factory
setting (or to the manufacturer setting if you have set remote control codes).
6 Press GSETUP again to exit from the setup mode.
• “NG” appears in the display window (4) on the remote control if clearing was unsuccessful.
• “ERROR” appears in the display window (4) if you press more than one button simultaneously.
Notes
SETUP
ERASE DVD
E-KEY
ERASE OK
131 En
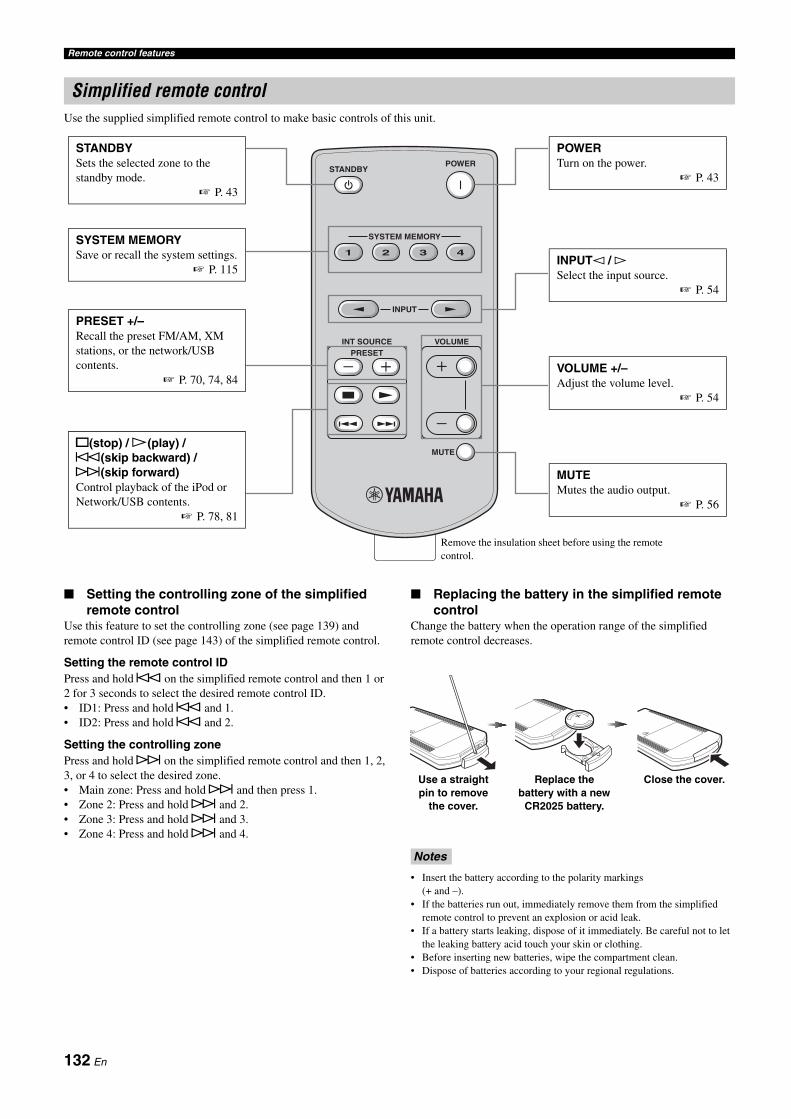
Remote control features
Use the supplied simplified remote control to make basic controls of this unit.
Setting the controlling zone of the simplified remote control
Use this feature to set the controlling zone (see page 139) and remote control ID (see page 143) of the simplified remote control.
Setting the remote control IDPress and hold b on the simplified remote control and then 1 or 2 for 3 seconds to select the desired remote control ID.• ID1: Press and hold b and 1.• ID2: Press and hold b and 2.
Setting the controlling zonePress and hold a on the simplified remote control and then 1, 2, 3, or 4 to select the desired zone.• Main zone: Press and hold a and then press 1.• Zone 2: Press and hold a and 2.• Zone 3: Press and hold a and 3.• Zone 4: Press and hold a and 4.
Replacing the battery in the simplified remote control
Change the battery when the operation range of the simplified remote control decreases.
• Insert the battery according to the polarity markings (+ and –).
• If the batteries run out, immediately remove them from the simplified remote control to prevent an explosion or acid leak.
• If a battery starts leaking, dispose of it immediately. Be careful not to let the leaking battery acid touch your skin or clothing.
• Before inserting new batteries, wipe the compartment clean.• Dispose of batteries according to your regional regulations.
Simplified remote control
POWERSTANDBY
INPUT
SYSTEM MEMORY
41 32
INT SOURCE VOLUME
MUTE
PRESET
STANDBYSets the selected zone to the standby mode.
P. 43
SYSTEM MEMORYSave or recall the system settings.
P. 115INPUTl / hSelect the input source.
P. 54
PRESET +/–Recall the preset FM/AM, XM stations, or the network/USB contents.
P. 70, 74, 84
s(stop) / p(play) / b(skip backward) / a(skip forward)Control playback of the iPod or Network/USB contents.
P. 78, 81
POWERTurn on the power.
P. 43
VOLUME +/–Adjust the volume level.
P. 54
MUTEMutes the audio output.
P. 56
Remove the insulation sheet before using the remote control.
Notes
Use a straight pin to remove
the cover.
Replace the battery with a new
CR2025 battery.
Close the cover.
132 En

Using multi-zone configuration
Advan
ced
Op
eration
This unit allows you to configure a multi-zone audio/video system. The multi-zone configuration feature enables you to set this unit to reproduce separate input sources in the main zone, second zone (Zone 2), third zone (Zone 3), and forth zone (Zone 4). You can control this unit from the second, third, or forth zone using the supplied remote control.
Using multi-zone configuration
Step 1: Planning the multi-zone system
First, plan the total multi-zone system with this unit carefully. P. 134
Step 2: Connecting the speakers and/or external amplifiers
Wire cables between rooms and connect the component and speakers to this unit. P. 135
Step 3: Set the zone parameters
Once you have finished the connections, turn on this unit and then set the parameters in “Multi Zone” menu (see page 109).
– Use “Zone SP Assign” to designate the speaker terminals of this unit to each zone. P. 139
– Use “Zone2 Set”, “Zone3 Set”, or “Zone4 Set” parameters to set the volume settings and other functions in each zone.
P. 109
133 En

Using multi-zone configuration
This unit can control the audio and video system in the main zone and up to 3 optional zone (Zone 2, Zone 3, and Zone 4), and you can use the internal amplifiers or external amplifiers in Zone 2, Zone 3, or Zone 4. The multi-zone system configuration differs depending on your requirements and equipment. Before connecting the speakers and/or external amplifiers for the multi-zone configuration, plan the total design of your multi-zone system.When you plan the system, consider the following points:
1. Do you want to use the internal amplifiers of this unit or external amplifiers?2. How many zones do you want to use this unit for?3. How many channels do you want to use in the main zone?4. If you use the internal amplifiers for the other zones, you cannot use some channels in the main zone in some cases.5. How many speakers do you have?6. Do you want to use the visual sources other than the main zone?
ySince there are many possible ways to connect and use this unit in a multi-zone configuration, we recommend that you consult with your nearest authorized Yamaha dealer or service center for the planning and setup of the multi-zone system that best meet your requirements.
In the following instruction, following system configuration is the example. When you use this system configuration, you can enjoy 7.2-channel playback in the main zone and 2-channel playback in the optional two zones. You can also enjoy 5.2-channel playback in the main zone and 2-channel playback in the optional three zones.
Step1: Planning the multi-zone system
Pre-amplifier modeIf you want use the external amplifiers for the all channels in the main zone, you can use all the speaker terminals of this unit for Zone 2, Zone 3, and/or Zone 4 (Pre-amplifier mode). Set “PREAMP MODE” to “ON” in the advanced setup (see page 142).
MASTER
MAIN ZONE
INPUT
ONOFF
MICOPTIMIZER
AUDIO SELECTSPEAKERS
A B
YPAOSILENT CINEMA
PHONES
ON/OFF
PURE DIRECT
VOLUME
MULTI
ZONE
STRAIGHT TUNING MODE
ZONE ON/OFF
MENU
TONE CONTROLZONE
CONTROLSREC OUT/
ZONE 2
MEMORY FM/AM
EDIT
PRESET/TUNING
EFFECT DISPLAY MAN'L/AUTO CATEGORY SEARCH MODE
PUSH ENTER
PROGRAM
RL OPTICAL
HDMI IN USB
AUDIO
VIDEO AUX
S VIDEO VIDEO
ZONE 3 ZONE 4ZONE 2
Zone 2
Zone 3
Zone 4
Main zone
This unit
Speakers you can use simultaneously
Speakers you can use alternately. If you turn on Zone 4, the surround back speakers in the main zone do not output sounds.
134 En

Using multi-zone configuration
Advan
ced
Op
eration
You need the following additional equipment to use the multi-room functions of this unit:• An infrared signal receiver in Zone 2, Zone 3, and/or Zone 4.• An infrared emitter in the main room. This emitter transmits the infrared signals from the remote control in Zone 2, Zone 3, and/or Zone 4
to the main room (to a CD player or DVD player, for example).• An amplifier and speakers for Zone 2, Zone 3, and/or Zone 4.• A video monitor for the second room.
Using internal amplifier of this unit
To make the system of the example, connect the speakers in the main zone and other zones as follows:
You can assign the following speaker terminals to Zone 2, Zone 3, and/or Zone 4 freely.
Step2: Connecting the speakers, external amplifiers, and/or other components
Important safety noticeThe speaker terminals of this Receiver should not be connected to a Passive Loudspeaker Selector Box or more than one loudspeaker per channel.Connection to a Passive Loudspeaker Selector Box or multiple speakers per channel could create an abnormally low impedance load resulting in amplifier damage. See this owner’s manual for correct usage.Compliance with minimum speaker impedance information for all channels must be maintained at all times. This information is found on the back panel of your Receiver.
REAR PRESENCE/ZONE
FRONT PRESENCE/ZONE
SURROUND
SUR. BACK/BI-AMP
FRONT B/ ZONE
FRONT A
CENTER
EXTRA SP
A
B
+R
SPEAKERS
REAR PRESENCE/ZONE
FRONT PRESENCE/ZONE
SURROUND
(SINGLE)
SUR. BACK/BI-AMP
FRONT B/ ZONE
FRONT A
EXTRA SP
A
B
+L
Zone 2
Zone 3
Main zone surround
Main zone surround
back
Zone 4
Main zone front
Main zone center
Right speaker terminals
Left speaker terminals
SPEAKERS
REAR ZONE/ PRESENCE
FRONT ZONE/ PRESENCE
SURROUND
(SINGLE)
SUR. BACK/BI-AMP
FRONT B/ ZONE/ PRESENCE
FRONT B/
FRONT A
EXTRA SP
REAR PRESENCE/ZONE
FRONT PRESENCE/ZONE
SURROUND
SUR. BACK/BI-AMP
FRONT B/ ZONE
FRONT A
CENTER
EXTRA SP
A
B
A
B
+ +R L
REAR PRESENCE/ZONE
FRONT PRESENCE/ZONE
SURROUND
SUR. BACK/BI-AMP
FRONT B/ ZONE
EXTRA SP
+R
B
SPEAKERS
REAR PRESENCE/ZONE
FRONT PRESENCE/ZONE
SURROUND
(SINGLE)
SUR. BACK/BI-AMP
FRONT B/ ZONE
FRONT A
EXTRA SP
A
B
+L
135 En

Using multi-zone configuration
Using external amplifiersWhen you use the external amplifiers in the Zone 2, Zone 3, and/or Zone 4, connect the external amplifiers to the ZONE OUT jacks of this unit with the analog audio cables.
• To avoid unexpected noise, DO NOT use the Zone 2/Zone 3 feature with CDs encoded in DTS.• Adjust the Zone 2/Zone 3 volume by using the amplifier in the second/third room when “Zone2 Volume”, “Zone3 Volume”, or “Zone4 Volume” are set to
“Fixed” (see page 109).
Using the ZONE DIGITAL OUT (COAXIAL) jackWhen you connect an external amplifier in Zone 2 to the ZONE DIGITAL OUT (COAXIAL) jack, you can play back the digital and analog audio sources in Zone 2.
Audio signal flow for Zone 2
Even if you set “Zone2 Volume” to “Variable” (see page 109), the volume control on this unit does not function to the output level of the ZONE DIGITAL OUT (COAXIAL) jack.
Notes
Compatible audio signals in the Zone 2, Zone 3, and/or Zone 4When you connect the external amplifiers in Zone 2, Zone 3, and/or Zone 4 to the ZONE OUT jacks of this unit, this unit can transmit the analog audio signals only. In this setting, this unit cannot play back the digital audio sources input at the DIGITAL IN jacks and HDMI IN jacks in Zone 2, Zone 3, and/or Zone 4.
yWhen this unit is in the party mode (see page 141), this unit can output the audio signals input at the HDMI IN jacks or DIGITAL IN jacks at the ZONE OUT jacks.
ZONE OUTZONE 2 ZONE 3 ZONE 4
ZONE OUTZONE 2 ZONE 3 ZONE 4
L R L R L R
This unit
Zone 2 Zone 3 Zone 4
Other amplifierOther amplifierOther amplifier
Audio in Audio in Audio in
DIGITAL OUT
COAXIALZONE
DIGITAL OUT
COAXIAL
ZONE
CCoaxial in
ZONE(COAXIAL)
DIGITAL INCOAXIAL
DIGITAL INOPTICAL
AUDIO IN ZONE OUT
Input Output
Note
136 En

Using multi-zone configuration
Advan
ced
Op
eration
Connecting Zone video monitorConnect the video monitor(s) in Zone 2 to the ZONE OUT VIDEO and/or ZONE OUT COMPONENT VIDEO jacks. If you connect the multiple zone video monitors to ZONE OUT VIDEO and/or ZONE OUT COMPONENT VIDEO jacks, the video monitors play back the same source simultaneously.
Video signal up-conversion to the zone component video signals
Low-quality video signals input at the VIDEO or S VIDEO jacks may not be output at the ZONE OUT COMPONENT VIDEO jacks correctly.
Note
DIGITAL OUTZONE OUT
COAXIAL
ZONE
PRPBYCOMPONENT VIDEOVIDEO
1
ZONE OUT
PRPBYCOMPONENT VIDEOVIDEO
PRPBYVV
This unit
Zone 2 Zone 3 Zone 4
Zone monitorZone monitorZone monitor
Source component
Video in Video inComponent in
COMPONENTVIDEO
VIDEO
COMPONENTVIDEO
VIDEO
S-VIDEO
137 En
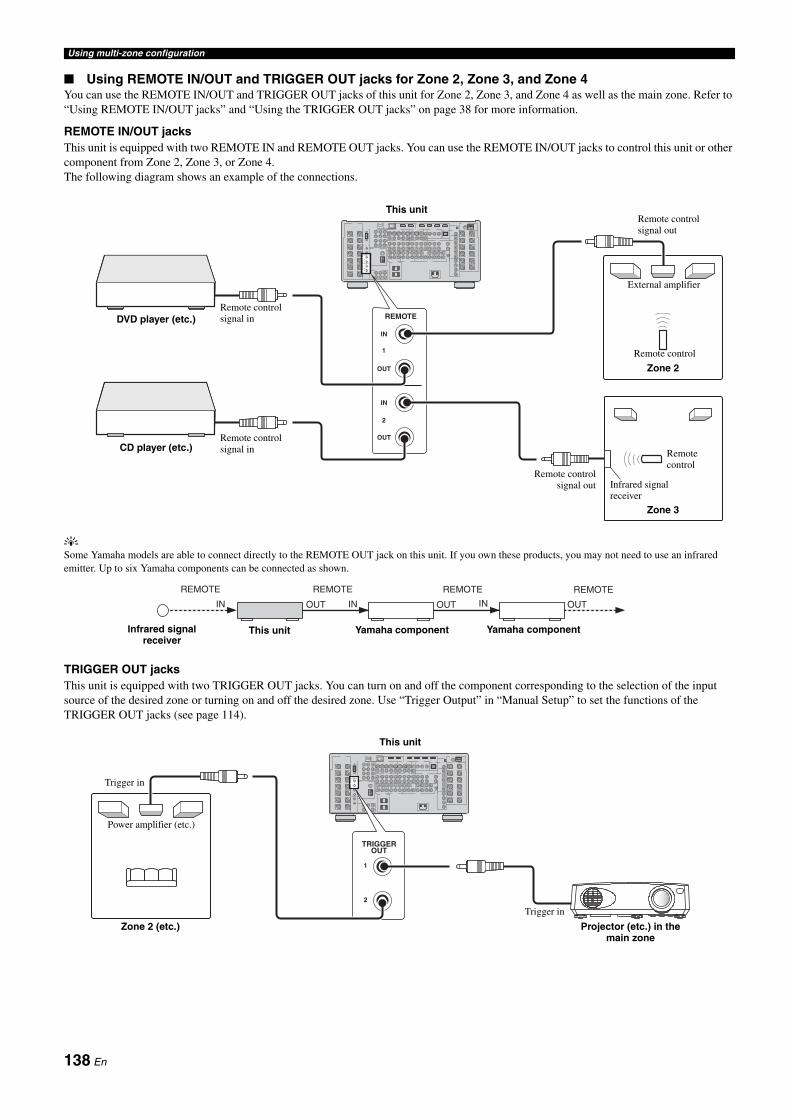
Using multi-zone configuration
Using REMOTE IN/OUT and TRIGGER OUT jacks for Zone 2, Zone 3, and Zone 4You can use the REMOTE IN/OUT and TRIGGER OUT jacks of this unit for Zone 2, Zone 3, and Zone 4 as well as the main zone. Refer to “Using REMOTE IN/OUT jacks” and “Using the TRIGGER OUT jacks” on page 38 for more information.
REMOTE IN/OUT jacksThis unit is equipped with two REMOTE IN and REMOTE OUT jacks. You can use the REMOTE IN/OUT jacks to control this unit or other component from Zone 2, Zone 3, or Zone 4.The following diagram shows an example of the connections.
ySome Yamaha models are able to connect directly to the REMOTE OUT jack on this unit. If you own these products, you may not need to use an infrared emitter. Up to six Yamaha components can be connected as shown.
TRIGGER OUT jacksThis unit is equipped with two TRIGGER OUT jacks. You can turn on and off the component corresponding to the selection of the input source of the desired zone or turning on and off the desired zone. Use “Trigger Output” in “Manual Setup” to set the functions of the TRIGGER OUT jacks (see page 114).
REMOTE
OUT
1
2
IN
1
2
REMOTE
OUT
1
2
IN
OUT
IN
This unit
Remote control signal in
Remote control signal in
DVD player (etc.)
CD player (etc.)
Zone 2
Zone 3
Infrared signal receiver
Remote control
Remote controlsignal out
Remote control signal out
Remote control
External amplifier
OUTOUT IN
REMOTE
IN
REMOTE
OUT IN
REMOTE REMOTE
This unit Yamaha component Yamaha componentInfrared signal receiver
TRIGGEROUT
1
2
TRIGGEROUT
1
2
This unit
Projector (etc.) in the main zone
Zone 2 (etc.)
Power amplifier (etc.)
Trigger in
Trigger in
138 En

Using multi-zone configuration
Advan
ced
Op
eration
After the connection, turn on this unit and then set the assignment of the speaker terminals and other zone parameters.
Assigning the zone speakersUse “Zone SP Assign” to set the zone that each speaker terminal are used for.
1 Press IMENU on the remote control.The top GUI menu appears in the video monitor.
2 Press 9k / n repeatedly to select “Manual Setup” and then 9h.
3 Press 9k / n repeatedly to select “Multi Zone” and then 9h.“Multi Zone” menu appears in the GUI screen.
4 Press9k / n repeatedly to select “Zone SP Assign” and then press 9h.Following display appears in the GUI screen.
5 Press 9k / n repeatedly to select the desired speaker terminals and then 9l / h repeatedly to select the desired zone you want to use the speaker connected to the selected speaker terminals.When “PREAMP MODE” in the advanced setup is set to “OFF” (see page 143), “FRONT”, “CENTER”, “SUR.” and “S.BACK” are fixed to “M” (the main zone).To make the system of the example (see page 134), set “Zone SP Assign” as follows:
Speaker terminal indicationsF.PRNS: FRONT PRESENCE speaker terminalsEXTRA: EXTRA SP speaker terminalsFRONT: FRONT A speaker terminals
CENTER: CENTER speaker terminalsSUR.: SURROUND speaker terminals
S.BACK: SUR.BACK speaker terminalsR.PRNS: REAR PRESENCE speaker terminals
6 Once you have finished the settings of all the speaker terminals, press 9ENTER to confirm the setting and exit from the “Zone SP Assign” screen.
7 Set other zone parameters appropriately.See pages 109 and 110 for details.
8 Once you have finished the settings of the zone parameters, press IMENU to exit the GUI menu.
You can select the zone you want to control by using the control buttons on the front panel or on the remote control.
Basic operation
Front panel operations
1 Press OZONE 2, OZONE 3, or OZONE 4 on the front panel to individually turn on or off Zone 2, Zone 3, or Zone 4.
2 Press OZONE CONTROLS on the front panel repeatedly to select the zone you want to control.Each time you press OZONE CONTROLS, the front panel display changes as shown below, and the indicator for the currently selected zone flashes for approximately 10 seconds. However, no indicator flashes when the main zone is selected.
ZONE2Controls the Zone 2 functions.
ZONE3Controls the Zone 3 functions.
ZONE4Controls the Zone 4 functions.
y• You must complete this step within 10 seconds while the selected
zone flashes in the front panel display. Otherwise, the currently selected zone mode is automatically canceled. In this case, press OZONE CONTROLS again.
• The initial setting is ZONE2 when Zone 2, Zone 3, and Zone 4 are turned on.
Step3: Setting the zone parameter
M 2 3 4F.PRNSEXTRAFRONTCENTERSUR.S.BACKR.PRNS
Speaker B
Zone SP Assign
Party Mode Set
Zone2 SetZone: /SP terminal: /
Exit: ENTER
M 2 3 4F.PRNSEXTRAFRONTCENTERSUR.S.BACKR.PRNS
Zone indicationsM: Main zone2: Zone 23: Zone 34: Zone 4
PREAMP MODEWhen “PREAMP MODE” in the advanced setup is set to “ON” (see page 143), you can assign all the speaker terminals of this unit to Zone 2, Zone 3, or Zone 4. The audio signals for the main zone are only output at the PRE OUT jacks.
Controlling Zone 2, Zone 3, or Zone 4
ZONE2 ZONE3 ZONE4
No indicator flashes when the main zone is selected.
139 En

Using multi-zone configuration
3 Perform the operations in the selected zone.For further operations, refer to the following pages:
yTo turn off the desired zone, press OZONE 2, OZONE 3, or OZONE 4 again.
Remote control operations
1 Press HZONE repeatedly to select the zone you want to control.“MAIN”, “ZONE 2”, “ZONE 3”, or “ZONE 4” indicator appears in the display window (4) on the remote control.
2 Press EPOWER to turn on the selected zone.
3 Perform the operations in the selected zone.For further operations, refer to the following pages:
yTo turn off the desired zone, press DSTANDBY.
Selecting the input source Zone 2, Zone 3, or Zone 4
Rotate the DINPUT selector on the front panel (or set the operation mode selector to FAMP and then press one of the input selector buttons (3)) to select the input source of the selected zone.• Select “TUNER” as the input source to use the TUNER features
in the selected zone. For details about the TUNER operations, see “FM/AM tuning” on page 68.
• Select “XM” as the input source to use the XM Satellite Radio features in the selected zone. For details about the XM Satellite Radio operations, see “XM™ Satellite Radio tuning (U.S.A. and Canada models only)” on page 74.
• Select “DOCK” as the input source to use the iPod features in the selected zone. For details about the iPod operations, see “Using iPod™” on page 78.
• Select “NET/USB” as the input source to use the network/USB operations features in the selected zone. For details about the iPod operations, see “Using Network/USB features” on page 80.
• The selected input sources are shared across all zones.• If you set the recording source other than “SOURCE” (see page 66), the
input source of Zone 2 is fixed to the source you set as the recording source.
Adjusting the volume level of Zone 2, Zone 3, or Zone 4
Rotate EVOLUME on the front panel (or press JVOLUME +/–) to adjust the volume level of the selected zone.
yPress LMUTE on the remote control to mute the sound output to the selected zone.
When you use the external amplifiers in Zone 2 or Zone 3, JVOLUME +/– can be used only when “Zone2 Volume”, “Zone3 Volume”, or “Zone4 Volume” is set to “Variable” in “Zone2 Set”, “Zone3 Set”, or “Zone4 Set” (see page 109).
Setting the sleep timer for Zone 2, Zone 3, or Zone 4
Use this feature to turn off the desired zone to the standby mode after a contain amount of time.
Set the operation mode selector to FAMP on the remote control and then press CSLEEP repeatedly to set the amount of time.Each time you press CSLEEP, the sleep timer setting changes as shown below.
Descriptions Page
“Selecting the input source Zone 2, Zone 3, or Zone 4” 140
“Adjusting the volume level of Zone 2, Zone 3, or Zone 4” 140
“Adjusting the tonal quality of Zone 2, Zone 3, or Zone 4” 141
Descriptions Page
“Selecting the input source Zone 2, Zone 3, or Zone 4” 140
“Adjusting the volume level of Zone 2, Zone 3, or Zone 4” 140
“Adjusting the tonal quality of Zone 2, Zone 3, or Zone 4” 141
Operate the following operations after activating the Zone 2, Zone 3, or Zone 4 operation mode.
MAIN
ZONE 2 ZONE 3 ZONE 4(Zone 2) (Zone 3) (Zone 4)
(Main zone)
Notes
Note
120min. 90min.
60min.30min.OFF
140 En

Using multi-zone configuration
Advan
ced
Op
eration
Adjusting the tonal quality of Zone 2, Zone 3, or Zone 4
1 Press QTONE CONTROL on the front panel.
2 Press MPROGRAM repeatedly to select the high-frequency response (TREBLE), the low-frequency response (BASS).
3 Rotate MPROGRAM to adjust the high-frequency response (BASS).Control range: –10.0 dB to +10.0 dB
Using the Zone OSDYou can display the FM/AM radio, XM Satellite Radio (U.S.A. and Canada models only), or HD Radio tuning information in the Zone video monitor. You can also browse and select the iPod or network/USB contents by using the Zone OSD.
1 Set the operation mode selector to FSOURCE and then press the desired input selector button (3).
2 Press KDISPLAY on the remote control to turn on the Zone OSD.
3 Press 9k / n / l / h and 9ENTER repeatedly to navigate the menu on the Zone OSD.
• The OSD menu appears in English even if you set “LANGUAGE” to “JAPANESE” or “RUSSIAN” (see page 144).
• There are some characters that cannot be displayed in the front panel display or in the OSD of this unit. Those characters are replaced with underscores “_”.
• You can set the time for which the Zone OSD is displayed in the Zone video monitor by using “On Screen” in “Manual Setup” (see page 108).
yShort message displays are also appears in the Zone video monitor. Use “Zone OSD” in “Manual Setup” to select that this unit displays the operational information of all zones or zone 2 only (see page 110).
Use this feature to play the main zone sources in the other zones simultaneously. This feature is useful to play back a back ground music in multiple zone in a home party.
1,2,3 ··· In the party mode, this unit distributes the same sources to the zones which join the party mode.
4 ··· You can also operate the specific zone separately when this unit is in the party mode.
Turning on the party mode
Press CPARTY on the remote control to turn on the party mode.“PARTY MODE ON” appears in the front panel display and then the main zone and the zones which join the party mode are turned on.
Turning off the party mode
Press CPARTY again to turn off the party mode.“PARTY MODE OFF” appears in the front panel display and then the main zone and the zones that joins the party mode are turned off.
yWhen this unit is in the party mode, the audio signals that is input at the HDMI IN jacks or DIGITAL IN jacks are output at the ZONE OUT jacks.
• If you select “MULTI CH” as the input source, this unit does not output any sounds when this unit is in the party mode.
• When you change the input source of the zone that joins the party mode, the input source of the main zone also changes same as the operated zone.
• When this unit is in the party mode, no signals are not output at the OUT (REC) jacks.
Notes
>
>
>
PC/MCX
NET RADIO
USB
TOP
Using the party mode
Before performing the following operations, set the operation mode selector on the remote control to FAMP.
Notes
Selecting the zones joining the party modeYou can select the zone that joins the party mode by using the “Party Mode Set” parameters. If a zone does not join the party mode, you can play back a source in the zone independently from the main zone. See page 109 for details.
MASTER
MAIN ZONE
INPUT
ONOFF
MICOPTIMIZER
AUDIO SELECTSPEAKERS
A B
YPAOSILENT CINEMA
PHONES
ON/OFF
PURE DIRECT
VOLUME
MULTI ZONE
STRAIGHT TUNING MODE
ZONE ON/OFF
MENU
TONE CONTROLZONE
CONTROLSREC OUT/
ZONE 2
MEMORY FM/AM
EDIT
PRESET/TUNING
EFFECT DISPLAY MAN'L/AUTO CATEGORY SEARCH MODE
PUSH ENTER
PROGRAM
RL OPTICAL
HDMI IN USB
AUDIO
VIDEO AUX
S VIDEO VIDEO
ZONE 3 ZONE 4ZONE 2
1 2
34
141 En

Advanced setup
This unit has additional menus that are displayed in the front panel display. The advanced setup menu offers additional operations to adjust and customize the way this unit operates. Change the initial settings (indicated in bold under each parameter) to reflect the needs of your listening environment.
• The settings you make are reflected next time you press BMASTER ON/OFF inward to the ON position to turn on this unit (see page 43).• Only BMASTER ON/OFF and MPROGRAM are effective while you are using the advanced setup menu.• All the other operations cannot be made while you are using the advanced setup menu.• The advanced setup menu is only available in the front panel display.
1 Press BMASTER ON/OFF on the front panel to release it outward to the OFF position to turn off this unit.
2 Press and hold MPROGRAM and then press BMASTER ON/OFF inward to the ON position to turn on this unit.Press and hold MPROGRAM until “ADVANCED SETUP” appears in the front panel display.
3 Rotate the MPROGRAM to select the parameter you want to adjust.The name of the selected parameter appears in the front panel display.
4 Push MPROGRAM repeatedly to change the selected parameter setting.
5 Press BMASTER ON/OFF to release it outward to the OFF position to save the new setting and turn off this unit.
yThe settings you made are reflected next time you turn on this unit.
Speaker impedance SPEAKER IMP.
Use this feature to set the speaker impedance of this unit so that it matches that of your speakers.
Remote sensor REMOTE SENSOR
Use this feature to activate or deactivate the signal-receiving capability of the remote control sensor on the front panel of this unit.
We recommend setting the parameter to “ON” in most cases.
Advanced setup
Notes
Using the advanced setup menu
ADVANCED SETUP
Choice Descriptions
8ΩMIN Select this setting to set the speaker impedance to 8 Ω. The impedance of each speaker must be 8 Ω or higher.
6ΩMIN Select this setting to set the speaker impedance to 6 Ω. The impedance of each speaker must be 6 Ω or higher.
Choice Descriptions
ON Select this setting if you want to activate the signal-receiving capability of the remote control sensor.
OFF Select this setting if you want to deactivate the signal-receiving capability of the remote control sensor.
Note
142 En

Advanced setup
Advan
ced
Op
eration
Wake on RS-232C access RS-232C STANDBY
Use this feature to set this unit to transmit data via the RS-232C interface when this unit is in the standby mode.
Initial setting:[U.S.A. Canada models]: YES[Other models]: NO
Network standby NET STANDBY
Use this feature to select whether this unit accepts the commands via LAN network when this unit is in the standby mode (see page 120).
If you set “NET STANDBY” to “YES”, the amount of power consumption in the standby mode is increased.
Remote control ID setting REMOTE CON AMP
Use this feature to set the remote control ID of this unit for remote control recognition.
Setting remote control IDUse this feature to set the remote control ID. This feature is useful when you control multiple Yamaha AV receiver or amplifier with using the remote control.
Press GID repeatedly using a ballpoint pen or similar object on the remote control to select the desired remote control ID.Each time you press G ID, the remote control ID indicator changes as shown below.
yTo set the remote control ID of the simplified remote control, see page 132 for details.
Cooling fan operation mode FAN MODE
Use this feature to set the operation of the cooling fan of this unit.
Bi-amplifier mode BI-AMP
Use this feature to activate or deactivate the bi-amplifier function.
When “BI-AMP” is set to “ON”, the SUR.BACK/BI-AMP terminals cannot be used to connect surround back speakers in that the SUR.BACK/BI-AMP terminals are already used for the bi-amplifier connection (see page 28).
Pre-amplifier mode PREAMP MODE
Use this feature to select whether you use this unit as the pre-amplifier in the main zone and use all the internal amplifiers for the other zones.
Recovery and backup of the system settings RECOV./BACKUP
Use this feature to save and restore the settings of this unit.
• This unit does not save the FM/AM preset stations, preset network/USB items, and system memory settings.
• If no settings are saved, you cannot select “RECOVERY”.
See page 142 for the operation of the advanced setup.
Choice Functions
YES Select this setting to set this unit to transmit data via the RS-232C interface.
NO Select this setting to set this unit not to transmit data via the RS-232C interface.
Choice Functions
YES Accepts the operations via LAN network when this unit is in the standby mode.
NO Does not accept the operations via LAN network when this unit is in the standby mode.
Note
Choice Descriptions
ID1 Select this setting when the ID of the remote control is set to “ID1”
ID2 Select this setting when the ID of the remote control is set to “ID2”
ID
ID1
ID2ID
Choice Descriptions
AUTO Select this setting to set the fan to operate automatically according to the temperature of this unit.
CONT. Select this setting to set the fan to activate continuously regardless of the temperature of this unit.
Choice Descriptions
ON Select this setting if you want to activate the bi-amplifier function.
OFF Select this setting if you want to deactivate the bi-amplifier function.
Note
Choice Descriptions
ON Select this setting when you use this unit as the pre-amplifier in the main zone. The audio signals for the main zone are only output at the PRE OUT jacks of this unit. You can assign all speaker terminals for the other zones.
OFF Select this setting to use the internal amplifiers of this unit for the main zone, Zone 2, Zone 3, or Zone 4.
Choice Select
RECOVERY Restoring the saved setting of this unit.
BACKUP Saves the current settings of this unit.
CANCEL Cancels the recovery or backup of the settings of this unit.
Notes
143 En

Advanced setup
Parameter initialization INITIALIZE
Use this feature to reset the parameters of this unit to the initial factory settings. You can select the category of parameters to be initialized.
• Use “Initialize” in the sound field program menu to initialize the parameters of the desired program (see page 95).
• When the network settings are reset, “DHCP” in “Network” is automatically set to “On” (see page 111) and the registered client ID of this unit on your Yamaha MCX-2000 is cleared (see page 82).
MAC address filter MAC FILTER
Use this feature to filter the access to this unit via LAN to control this unit by the MAC address of the accessing PC (see page 120).
yYou can register the MAC address that is allowed to access when “MAC FILTER” is set to “ON” by using the Web browser (see page 120).
TV format TV FORMAT
Use this feature to set the color encoding format of your television.Choices: NTSC, PALInitial setting:[U.S.A., Canada, General and Korea models]: NTSC[Other models]: PAL
This setting is applied to the video monitor in the main zone, Zone 2, Zone 3, and Zone 4.
HDMI monitor check MONITOR CHECK
Use this feature to activate or deactivate the monitor check function of this unit.
Language LANGUAGE
Use this feature to select the language of your choice that appears in the GUI (graphical user interface) menu, OSD display in the zone monitor and the messages that appear in the front panel display.Choices: ENGLISH (English), JAPANESE (Japanese), FRENCH
(French), GERMAN (German), SPANISH (Spanish), RUSSIAN (Russian)
You can also select the language setting by using GUI menu. See page 114 for details.
··· The selected language is displayed.
— ··· The selected language is not displayed. The menu items and messages are displayed in English.
See page 142 for the operation of the advanced setup.
Choice Descriptions
DSP PARAM Select this setting to initialize all the parameters of the sound field parameters (see page 91).
VIDEO Select this setting except “Short Message” and “On Screen” (see page 108).
NETWORK Select this setting except “Short Message” and “On Screen” (see page 108).
ALL Select this setting to initialize all the parameters of this unit.
CANCEL Select this setting to cancel the initialization procedure.
Notes
Choice Descriptions
ON Only allows to accept the access from the PC whose MAC address is registered to this unit.
OFF Allows to accept the access from any PC.
Note
Choice Descriptions
YES This unit receives the information of the available video signal resolutions from the video monitor connected via HDMI and you can only select the resolutions supported by the video monitor in “HDMI Resolution” (see page 107).
SKIP You can select any resolution in “HDMI Resolution”.
Note
LANGUAGE GUI menuFront panel
displayZone OSD
RUSSIAN —
JAPANESE — —
Other languages
144 En

Additional InformationTroubleshooting ..................................................................... 146
Resetting the system ............................................................. 154
Glossary ................................................................................. 155
Sound field program information ......................................... 160
Parametric equalizer information ......................................... 164
Block diagrams ...................................................................... 165
Specifications ........................................................................ 167
Index ........................................................................................ 169
Ad
ditio
nal In
form
ation

Troubleshooting
Refer to the table below when this unit does not function properly. If the problem you are experiencing is not listed below or if the instruction below does not help, turn off this unit, disconnect the power cable, and contact the nearest authorized Yamaha dealer or service center.
General
Troubleshooting
Problem Cause Remedy See page
This unit fails to turn on or enters the standby mode soon after the power is turned on.
The power cable is not connected or the plug is not completely inserted.
Connect the power cable firmly. —
The speaker impedance setting is incorrect. Set the speaker impedance to match your speakers. 43
The protection circuitry has been activated. Make sure that all speaker wire connections on this unit and on all speakers are secure and that the wire for each connection does not touch anything other than its respective connection.
23
This unit has been exposed to a strong external electric shock (such as lightning or strong static electricity).
Set this unit to the standby mode, disconnect the power cable, plug it back in after 30 seconds and then use it normally.
—
No sound. Incorrect input or output cable connections. Connect the cables properly. If the problem persists, the cables may be defective.
31-39
Audio input jack select is set to “HDMI”, “Coax/Opt” or “Analog”.
Set the audio input jack select to “Auto”. 56
Audio input jack select is set to “Analog” while the input source component outputs digital audio signals.
Set the audio input jack select to “Auto” or “Coax/Opt”. 56
No appropriate input source has been selected. Select an appropriate input source with the D INPUT selector on the front panel (or the input selector buttons (3) on the remote control).
54
Speaker connections are not secure. Secure the connections. 23
The volume is turned down. Turn up the volume. —
The front speakers to be used have not been selected properly.
Select the front speakers by pressing GSPEAKER A or GSPEAKER B on the front panel.
55
The sound is muted. Press LMUTE or JVOLUME +/– on the remote control to resume audio output and then adjust the volume.
56
Signals this unit cannot reproduce are being input from a source component, such as a CD-ROM.
Play a source whose signals can be reproduced by this unit. —
The HDMI components connected to this unit do not support the HDCP copy protection standards.
Connect HDMI components that support the HDCP copy protection standards.
29
“Support Audio” is set to “Other” and HDMI audio signals are not being played back on this unit.
Set “Support Audio” in “Option” to “RX-Z11”. 113
No picture. The output and input for the picture are connected to different types of video jacks.
Set “Conversion” to “On” or connect your source components in the same way as you connect your video monitor to this unit.
107
This unit outputs the video signals are not supported in the video monitor connected to the HDMI OUT jack.
Set the “INITIALIZE” to “VIDEO” to reset the video parameters.
144
Set “MONITOR CHECK” to “YES”. 144
Input selector setting of the video monitor is incorrect.
Set the input source selector setting of the video monitor appropriately.
—
Pure Direct mode is active. Turn off the Pure Direct mode. —
Set “Pure Direct” in “Sound” to “Video On”. 106
Non-standard video signals are input.
The HDMI OUT jack that the video monitor is connected is not selected.
Press CHDMI OUT on the remote control repeatedly. 55
Short message displays in the main zone do not appear in the video monitor.
“Short Message” is set to “Off”. Set “Short Message” to “On”. 108
“Conversion” is set to “Off”. Set “Conversion” to “On”. 107
The signals input at the HDMI input jacks are being output at the HDMI OUT jack.
146 En

Troubleshooting
Ad
ditio
nal
Info
rmatio
n
The sound suddenly goes off.
The protection circuitry has been activated because of a short circuit, etc.
Check that the speaker impedance setting is correct. 43, 142
Check that the speaker wires are not touching each other and then turn this unit back on.
—
The sleep timer has turned off this unit. Turn on this unit, and play the source again. —
The sound is muted. Press LMUTE or JVOLUME +/– on the remote control to resume audio output.
56
Sound is heard from the speaker on one side only.
Incorrect cable connections. Connect the cables properly. If the problem persists, the cables may be defective.
23
Incorrect settings in “Speaker Level”. Adjust the “Speaker Level” settings. 102
Only the center speaker outputs substantial sound.
When playing a monaural source with a CINEMA DSP program, the source signal is directed to the center channel, and the front and surround speakers output effect sounds.
No sound is heard from the center speaker.
“Center” in “Speaker Set” is set to “None”. Set “Center” to “Small” or “Large”. 100
One of the HiFi DSP programs (except for “11ch Stereo”) has been selected and analog 2-channel source is being input.
Try another sound field program if you want to output sound from the center speaker.
58
No sound is heard from the presence speakers.
The sound field programs are turned off. Press HSTRAIGHT to turn them on. 64
You are using a source or program combination that does not output sound from all channels.
Try another sound field program. 54
No sound is heard from the surround speakers.
“Surround” in “Speaker Set” is set to “None”. Set “Surround” to “Small” or “Large”. 100
This unit is in the “STRAIGHT” mode and a source which does not contain the surround channel signals is being played back.
Press HSTRAIGHT on the front panel so that “STRAIGHT” disappears from the front panel display.
64
No sound is heard from the subwoofer.
“Bass Out” in “Speaker Set” is set to “Front” when a Dolby Digital or DTS signal is being played.
Set “Bass Out” to “SWFR” or “Front & SWFR”. 101
“Bass Out” in “Speaker Set” is set to “SWFR” or “Front” when a 2-channel source is being played.
Set “Bass Out” to “Front & SWFR”. 101
The source does not contain low-frequency signals.
No sound is heard from the surround back speakers.
“Surround” in “Speaker Set” is set to “None” and “Surround Back” is automatically set to “None”.
Set “Surround” and “Surround Back” to a setting other than “None”.
100
“Surround Back” in “Speaker Set” is set to “None”.
Set “Surround Back” to a setting other than “None”. 100
The audio input sources cannot be played in the desired digital audio signal format. (Desired input source indicator or decoder indicator in the front panel display does not light up.)
The connected component is not set to output Dolby Digital or DTS digital signals.
Make an appropriate setting following the operating instructions for your component.
—
Audio input jack select is set to “Analog”. Set the audio input jack select to “Auto”. 56
A humming sound is heard.
Incorrect cable connections. Connect the audio cables firmly. If the problem persists, the cables may be defective.
—
No connection from the turntable to the GND terminal.
Connect the grounding cable of the turntable to the GND terminal of this unit.
35
The volume level is low while a record is being played.
The record is being played on a turntable with an MC cartridge.
Connect the turntable to this unit through an MC-head amplifier.
35
The volume level cannot be increased, or the sound is distorted.
The component connected to the AUDIO OUT jacks of this unit is turned off.
Turn on the power of the component. —
The sound effect cannot be recorded.
It is not possible to record the sound effect with a recording component.
A source cannot be recorded by a digital recording component connected to the DIGITAL OUTPUT jack.
The source component is not connected to the DIGITAL INPUT jacks of this unit.
Connect the source component to the DIGITAL INPUT jacks. 32, 35
Some components cannot record Dolby Digital or DTS sources.
Problem Cause Remedy See page
147 En

Troubleshooting
Tuner
A source cannot be recorded by an analog component connected to the AUDIO OUT jacks.
The source component is not connected to the analog AUDIO IN jacks of this unit.
Connect the source component to the analog AUDIO IN jacks. 35
The sound field parameters and some other settings of this unit cannot be changed.
“Memory Guard” in “Option” is set to “On”. Set “Memory Guard” to “Off”. 113
This unit does not operate properly.
The internal microcomputer has been frozen by an external electric shock (such as lightning or excessive static electricity) or by a power supply with low voltage.
Disconnect the power cable from the AC wall outlet and then plug it in again after about 30 seconds.
—
“CHECK SP WIRES” appears in the front panel display.
Speaker cables are short-circuited. Make sure all speaker cables are connected correctly. 23
There is noise interference from digital or radio frequency equipment.
This unit is too close to the digital or high-frequency equipment.
Move this unit further away from such equipment. —
The picture is disturbed. The video source uses scrambled or encoded signals to prevent dubbing.
This unit suddenly enters the standby mode.
The internal temperature becomes too high and the overheat protection circuitry has been activated.
Wait about 1 hour for this unit to cool down and then turn it back on.
—
Problem Cause Remedy See page
Problem Cause Remedy See page
FM
FM stereo reception is noisy.
The characteristics of FM stereo broadcasts may cause this problem when the transmitter is too far away or the antenna input is poor.
Check the antenna connections. 41
Try using a high-quality directional FM antenna. —
Use the manual tuning method. 69
There is distortion, and clear reception cannot be obtained even with a good FM antenna.
There is multi-path interference. Adjust the antenna position to eliminate multi-path interference.
—
The desired station cannot be tuned into with the automatic tuning method.
The signal is too weak. Use a high-quality directional FM antenna. —
Use the manual tuning method. 69
Previously preset stations can no longer be tuned into.
This unit has been disconnected for a long period.
Preset the stations again. 70, 71
AM
The desired station cannot be tuned into with the automatic tuning method.
The signal is weak or the antenna connections are loose.
Tighten the AM loop antenna connections and orient it for the best reception.
—
Use the manual tuning method. 69
There are continuous crackling and hissing noises.
Supplied AM loop antenna is not connected. Connect the AM loop antenna correctly even if you use an outdoor antenna.
41
Noises can result from lightning, fluorescent lamps, motors, thermostats and other electrical equipment.
Use an outdoor antenna and a ground wire. This will help somewhat, but it is difficult to eliminate all noise.
—
There are buzzing and whining noises.
A TV set is being used nearby. Move this unit away from the TV set. —
148 En

Troubleshooting
Ad
ditio
nal
Info
rmatio
n
XM Satellite Radio (U.S.A. and Canada models only)If an operation takes longer than usual or an error occurs, one of the following messages may appear in the front panel display. In this case, read the cause and follow the corresponding remedies.
Remote control
Status message Cause Remedy See page
CHECK XM TUNER XM Mini-Tuner and Home Dock are not connected to the XM jack of this unit or do not work properly.
Check XM Mini-Tuner and Home Dock connections. 74
CHECK ANTENNA The antenna is not connected to XM Home Dock correctly.
Check the connection of the antenna and orient it for the best reception level.
74
UPDATING The XM user encryption code is being updated. Wait until the encryption code is updated. —
NO SIGNAL The signal is too weak. Adjust the orientation of the antenna of Home Dock for the best reception level.
74
LOADING It takes longer than 4 seconds for audio or text data to be decoded.
Wait until the decoding process has finished. —
OFF AIR The XM Satellite Radio channel you selected is not currently broadcasting any signals.
Check the channel number again or select another XM Satellite Radio channel.
—
<XM> - - - The Channel Station ID (SID) is no longer available.
- - - / - - - No artist name or song title is available.
<CAT> - - - No channels are available for the selected category.
Select another channel category by pressing MPROGRAM on the front panel (or 9CAT. l / h on the remote control) repeatedly.
75
Problem Cause Remedy See page
The remote control does not work or function properly.
Wrong distance or angle. The remote control will function within a maximum range of 6 m (20 ft) and no more than 30 degrees off-axis from the front panel.
12
Direct sunlight or lighting (from an inverter type of fluorescent lamp, etc.) is striking the remote control sensor of this unit.
Reposition this unit. —
The batteries are weak. Replace all batteries. 11
The batteries do not last long and get quickly exhausted.
Using alkaline batteries is strongly recommended. —
Set the backlight mode to “OFF”. 124
The operation mode selector is set incorrectly. Set the operation mode selector correctly.When operating this unit, set it to the FAMP position.When operating the component selected by the input selector button, set it to the FSOURCE position.When operating the TV, set it to the FTV position.
—
The remote control code was not correctly set. Set the remote control code correctly using “List of remote control codes” at the end of this manual.
124
Try setting another code of the same manufacturer using “List of remote control codes” at the end of this manual.
124
The remote control ID of the remote control and this unit do not match.
Match the remote control ID of this unit and the remote control.
124
The remote control does not work or function properly.
Even if the remote control code is correctly set, there are some models that do not respond to the remote control.
Program the necessary functions independently into the programmable buttons using the Learn feature.
126
The remote control does not learn new functions.
The batteries of this remote control and/or the other remote control are too weak.
Replace the batteries. 11
The distance between the two remote controls is too much or too little.
Place the remote controls at the proper distance. 126
The signal coding or modulation of the other remote control is not compatible with this remote control.
Learning is not possible. —
Memory capacity is full. Delete other unnecessary functions to make room for the new functions.
130
149 En

Troubleshooting
HDMI
Network and USB
Problem Cause Remedy See page
No picture or sound The number of the connected HDMI components is over the limit.
Reduce the number of the connected HDMI components. —
HDCP authentication failed. Check that the connected HDMI components support the HDCP copy protection standards.
—
Problem Cause Remedy See page
The PC server/MCX-2000/Internet Radio does not function properly.
The IP address is not set properly. Set the DHCP server function of the router to ON. Alternately, perform manual configuration according to the current operating environment.
111
The network cable is not connected. Connect it properly. 40
The music in the PC server cannot be played back.
The PC does not have Windows Media Player 11 or Windows Media Connect 2.0 installed in it.
Install Windows Media Player 11 or Windows Media Connect 2.0 in the PC.
—
The music is recorded in a format that cannot be played on this unit. This unit cannot play music formats other than WMA, MP3, MPEG-4 AAC, and WAV (PCM format). Also note that it cannot play certain music files even if these are recorded in the WMA, MP3, MPEG-4 AAC, or WAV format.
Play music recorded in a format that this unit is compatible with.
—
The MusicCAST server cannot be connected.
You are attempting to connect to MCX-1000. The MusicCAST server that can be connected by this unit is MCX-2000.
Use MCX-2000 or the PC server. —
Auto Configuration is not executed. Execute “Auto Configure”. 82
“Disconnected” is displayed even when a USB device is present.
This unit recognized the USB storage device as an illegal device.
Turn this unit off then on again. 83
The Internet Radio cannot be played.
The firewall of the network device is activated. The Internet Radio can be played only when it passes through the port designated by each radio station. The port number is variable depending on radio station.
Check the firewall setting of the network device. —
Connection to the Internet is disconnected. Check the configuration of the network device, and then contact the network connection provider.
—
The music files and directories in the USB device cannot be viewed.
The music files and directories are placed in locations other than the FAT area.
Place music files and directories in the FAT area. —
You are attempting to browse directory hierarchies of over 8 levels or a directory with more than 500 files.
Modify the data structure on your USB device. —
The USB device cannot be recognized.
The connected USB device is USB portable audio player.
Some devices may become easier to recognize when they are inserted before turning this unit on.
83
This unit does not recall the correct item by using numeric buttons (1-8).
The connected USB device is incorrect. Connect the USB device that stores the preset item. 83
The directory that stores the selected item is changed.
Preset the desired item to the numeric button (1-8) again. 84
This unit does not recall the selected item by using numeric buttons (1-8).
The USB device is not connected correctly. Connect the correct USB device properly. 40
The PC or MCX-2000 that stores the selected item is turned off.
Turn on the PC or MCX-2000. 82
The selected Internet Radio station is temporary unavailable or out of service.
Try again when the selected Internet Radio is providing the service.
83
Preset other Internet Radio stations. 83
150 En

Troubleshooting
Ad
ditio
nal
Info
rmatio
n
Error message Cause Remedy See page
Please wait (Starting Server)
This unit is in the middle of waking up MCX-2000 that has been set to the standby mode.
Wait for approximately 20 seconds. —
Connect error There is a problem with the signal path from your network to this unit.
Check the connection between this unit and the LAN port on your router or hub.
40
Make sure your router is properly connected and turned on. Also, make sure your modem is properly connected and turned on when you are attempting to listen to Internet Radio.
40
Disconnected Your USB storage device or USB portable audio player has been disconnected from the USB port of this unit.
Check the connection between this unit and your USB storage device or USB portable audio player.
—
The PC server or MCX-2000 previously connected to this unit no longer exists.
Connect this unit to the available PC server or MCX-2000. 82
There is a problem with the signal path from your USB storage device or USB portable audio player to this unit.
Turn off this unit and reconnect your USB storage device or USB portable audio player to the USB port of this unit.
43
Try resetting your USB storage device or USB portable audio player.
—
Access error This unit cannot access your USB storage device or USB portable audio player.
Try another USB storage device or USB portable audio player. —
There is a problem with the signal path from your USB storage device or USB portable audio player to this unit.
Turn off this unit and reconnect your USB storage device or USB portable audio player to the USB port of this unit.
43
Try resetting your USB storage device or USB portable audio player.
—
Unable to play This unit cannot play back the songs currently stored on your PC.
Make sure Windows Media Player 11 or Windows Media Connect 2.0 is installed on your PC.
—
Check that the songs currently stored on your PC are playable (MP3, WMA, MPEG-4 AAC, and WAV).
—
Store some other playable music files (MP3, WMA, MPEG-4 AAC, and WAV) on your PC.
—
The network may be overloaded with heavy traffic, and playback is interrupted.
Try preparing a network exclusively for use with this unit to separate it from general network traffic.
—
List updated The list of the contents stored on your PC server or MCX-2000 has been updated.
Bookmark ON The desired Internet Radio station has been added to the “Bookmarks” list.
Bookmark OFF The stored Internet Radio station has been removed from the “Bookmarks” list.
Empty Memory! No items are assigned to the selected numeric button.
Assign the desired item to the numeric button. 84
Not found! This unit cannot find the assigned item for the selected numeric button.
Connect the USB device that stores the preset item. —
Turn on the PC or MCX-2000. 82
Try again when the selected Internet Radio is providing the service.
83
Preset the desired item to the numeric button (1-8) again. 84
USB Overloaded Over current passes through the connected USB device.
Turn off this unit and then disconnect the USB device. If the message appears when you connect the USB device again, this unit may not compatible with the USB device.
—
151 En

Troubleshooting
iPod
In case of a transmission error without a status message appearing in the front panel and in the video monitor, check the connection to your iPod (see page 38).
Auto Setup
Before Auto Setup
Note
Status message Cause Remedy See page
Loading... This unit is in the middle of recognizing the connection with your iPod.
This unit is in the middle of acquiring song lists from your iPod.
Connect error There is a problem with the signal path from your iPod to this unit.
Turn off this unit and reconnect the Yamaha iPod universal dock to the DOCK terminal of this unit.
38
Try resetting your iPod. —
Unknown iPod The iPod being used is not supported by this unit. Only iPod (Click and Wheel), iPod nano, and iPod mini are supported.
—
iPod connected Your iPod is properly stationed in a Yamaha iPod universal dock (such as the YDS-10, sold separately) connected to the DOCK terminal of this unit, and the connection between your iPod and this unit is complete.
Disconnected Your iPod was removed from a Yamaha iPod universal dock (such as YDS-10 sold separately) connected to the DOCK terminal of this unit.
Station your iPod back in a Yamaha iPod universal dock (such as YDS-10 sold separately) connected to the DOCK terminal of this unit.
38
Unable to play This unit cannot play back the songs currently stored on your iPod.
Check that the songs currently stored on your iPod are playable.
—
Store some other playable music files on your iPod. —
Error message Cause Remedy See page
Connect MIC! Optimizer microphone is not connected. Connect the supplied optimizer microphone to the OPTIMIZER MIC jack on the front panel.
47
Unplug Phones! Headphones are connected. Unplug the headphones. —
No Setup Menu! No check items are selected as the measurement items.
Select the desired check item. 48
Memory Guard! “Memory Guard” is set to “On”. Set “Memory Guard” to “Off”. 113
152 En

Troubleshooting
Ad
ditio
nal
Info
rmatio
n
During Auto Setup
After Auto Setup
• If the “ERROR” or “WARNING” screens appears, check the cause of the problem, then run “Auto Setup” again.• If warning “W2” or “W3” appears, the adjustment are made, however the adjustments may not be optimal.• Depending on the speakers, warning “W1” may appears even if the speakers connections are correct.• If error “E10” occurs repeatedly, please contact a qualified Yamaha service center.
Error message Cause Remedy See page
E01:No Front SP Front L/R channel signals are not detected. Check the front L/R speaker connections. 23
E02:No Sur. SP A surround channel signal is not detected. Check the surround speaker connections. 23
E03:No F. PRNS SP A front presence channel signal is not detected. Check the front presence speaker connections. 23
E04:SBR → SBL Only right surround back channel signal is detected.
Connect the surround back speaker to the SUR.BACK/BI-AMP (SINGLE) terminal if you only have one surround back speaker.
23
E05:Noisy Background noise is too loud. Try running “Auto Setup” in a quiet environment. —
Turn off noisy electric equipment like air conditioners or move them away from the optimizer microphone.
—
E06:Check Sur. Surround back speakers are connected, though surround L/R speakers are not.
Connect surround speakers when you use surround back speakers.
23
E07:No MIC The optimizer microphone was unplugged during the “Auto Setup” procedure.
Connect the supplied optimizer microphone to the OPTIMIZER MIC jack on the front panel.
47
E08:No R.PRNS SP A rear presence channel signal is not detected. Check the rear presence speaker connections. 23
E09:User Cancel The “Auto Setup” procedure was cancelled due to user activity.
Run “Auto Setup” again. 46
E10:Internal Err. An internal error occurred. Run “Auto Setup” again. 46
Warning message Cause Remedy See page
W1:Out of Phase Speaker polarity is not correct. This message may appear depending on the speakers even when the speakers are connected correctly.
Check the speaker connections for proper polarity (+ or –).
23
W2:Over Distance The distance between the speaker and the listening position is over 24 m (80 ft).
Bring the speaker closer to the listening position. —
W3:Level Error The difference of volume level among speakers is excessive.
Readjust the speaker installation so that all speakers are set in locations with similar conditions.
—
Check the speaker connections. 23
Use speakers of similar quality. —
Adjust the output volume of the subwoofer. 46
W4:SP Mismatch The result of the wiring check of “Auto Setup” is different from “Speaker Set” in “Manual Setup”.
Use “Speaker Set” in “Manual Setup” to adjust the speaker settings manually.
99
“Wiring” check procedure is skipped. Select “Wiring” in “Setup Menu”. 48
Notes
153 En

Resetting the system
Use this feature to reset all the parameters of this unit to the initial factory settings.
• This procedure completely resets all the parameters of this unit including the GUI menu parameters.• The initial factory settings are activated next time you turn on this unit.
yTo cancel the initialization procedure at any time without making any changes, press BMASTER ON/OFF on the front panel to release it outward to the OFF position.
1 Press BMASTER ON/OFF on the front panel to release it outward to the OFF position to turn off this unit.
2 Press and hold MPROGRAM and then press BMASTER ON/OFF inward to the ON position to turn on this unit.Press and hold MPROGRAM until “ADVANCED SETUP” appears in the front panel display.
3 Rotate MPROGRAM to select “INITIALIZE”.
4 Press MPROGRAM repeatedly to select “ALL”.
y• Select “CANCEL” to cancel the initialization procedure without
making any changes.• You can initialize the video parameters or sound field program
parameters separately. See page 144 for details.
5 Press BMASTER ON/OFF to release it outward to the OFF position to confirm your selection and turn off this unit.
Resetting the system
Notes
ADVANCED SETUP
INITIALIZE
CANCEL
INITIALIZE
ALL
154 En
Glossary
Ad
ditio
nal
Info
rmatio
n
Audio and video synchronization (lip sync)
Lip sync, an abbreviation for lip synchronization, is a technical term that involves both a problem and a capability of maintaining audio and video signals synchronized during post-production and transmission. Whereas the audio and video latency requires complex end-user adjustments, HDMI version 1.3 incorporates an automatic audio and video syncing capability that allows devices to perform this synchronization automatically and accurately without user interaction.
Bi-amplification connectionA bi-amplification connection uses two amplifiers for a speaker. One amplifier is connected to the woofer section of a loudspeaker while the other is connected to the combined mid and tweeter section. With this arrangement each amplifier operates over a restricted frequency range. This restricted range presents each amplifier with a much simpler job and each amplifier is less likely to influence the sound in some way. The internal crossover of the speaker consists of a LPF (low pass filter) and a HPF (high pass filter). As its name implies, the LPF passes frequencies below a cutoff and rejects frequencies above the cutoff frequency. Likewise, the HPF passes frequencies above its cutoff.
Component video signalWith the component video signal system, the video signal is separated into the Y signal for the luminance and the PB and PR signals for the chrominance. Color can be reproduced more faithfully with this system because each of these signals is independent. The component signal is also called the “color difference signal” because the luminance signal is subtracted from the color signal. A monitor with component input jacks is required in order to output component signals.
Composite video signalWith the composite video signal system, the video signal is composed of three basic elements of a video picture: color, brightness and synchronization data. A composite video jack on a video component transmits these three elements combined.
Deep ColorDeep Color refers to the use of various color depths in displays, up from the 24-bit depths in previous versions of the HDMI specification. This extra bit depth allows HDTVs and other displays go from millions of colors to billions of colors and eliminate on-screen color banding for smooth tonal transitions and subtle gradations between colors. The increased contrast ratio can represent many times more shades of gray between black and white. Also Deep Color increases the number of available colors within the boundaries defined by the RGB or YCbCr color space.
Dolby DigitalDolby Digital is a digital surround sound system that gives you completely independent multi-channel audio. With 3 front channels (front L/R and center), and 2 surround stereo channels, Dolby Digital provides 5 full-range audio channels. With an additional channel especially for bass effects, called LFE (Low Frequency Effect), the system has a total of 5.1-channels (LFE is counted as 0.1 channel). By using 2-channel stereo for the surround speakers, more accurate moving sound effects and surround sound environment are possible than with Dolby Surround. The wide dynamic range from maximum to minimum volume reproduced by the 5 full-range channels and the precise sound orientation generated using digital sound processing provide listeners with unprecedented excitement and realism. With this unit, any sound environment from monaural up to a 5.1-channel configuration can be freely selected for your enjoyment.
Dolby Digital EXDolby Digital EX creates 6 full-bandwidth output channels from 5.1-channel sources. This is done using a matrix decoder that derives 3 surround channels from the 2 in the original recording. For the best results, Dolby Digital EX should be used with movie sound tracks recorded with Dolby Digital Surround EX. With this additional channel, you can experience more dynamic and realistic moving sound especially with scenes with “fly-over” and “fly-around” effects.
Dolby Digital PlusDolby Digital Plus is an advanced audio technology developed for high-definition programming and media including HD broadcasts, HD DVD, and Blu-ray Disc. Selected as a mandatory audio standard for HD DVD and as an optional audio standard for Blu-ray Disc, this technology delivers multichannel sound with discrete channel output. Supporting bitrates up to 6.0 Mbps, Dolby Digital Plus can carry up to 7.1 discreet audio channels simultaneously. Supported by HDMI version 1.3 and designed for the optical disc players and AV receivers/amplifiers of the future, Dolby Digital Plus also remains fully compatible with the existing multichannel audio systems that incorporate Dolby Digital.
Dolby Pro Logic IIDolby Pro Logic II is an improved technique used to decode vast numbers of existing Dolby Surround sources. This new technology enables a discrete 5-channel playback with 2 front left and right channels, 1 center channel, and 2 surround left and right channels instead of only 1 surround channel for conventional Pro Logic technology. There are three modes available: “Music mode” for music sources, “Movie mode” for movie sources and “Game mode” for game sources.
Dolby Pro Logic IIxDolby Pro Logic IIx is a new technology enabling discrete multi-channel playback from 2-channel or multi-channel sources. There are three modes available: “Music mode” for music sources, “Movie mode” for movie sources (for 2-channel sources only) and “Game mode” for game sources.
Glossary
155 En

Glossary
Dolby SurroundDolby Surround uses a 4-channel analog recording system to reproduce realistic and dynamic sound effects: 2 front left and right channels (stereo), a center channel for dialog (monaural), and a surround channel for special sound effects (monaural). The surround channel reproduces sound within a narrow frequency range. Dolby Surround is widely used with nearly all video tapes and laser discs, and in many TV and cable broadcasts as well. The Dolby Pro Logic decoder built into this unit employs a digital signal processing system that automatically stabilizes the volume on each channel to enhance moving sound effects and directionality.
Dolby TrueHDDolby TrueHD is an advanced lossless audio technology developed for high-definition disc-based media including HD DVD and Blu-ray Disc. Selected as a mandatory audio standard for HD DVD and as an optional audio standard for Blu-ray Disc, this technology delivers sound that is bit-for-bit identical to the studio master, offering a high-definition home theater experience. Supporting bitrates up to 18.0 Mbps, Dolby TrueHD can carry up to 8 discrete channels of 24-bit/96 kHz audio simultaneously. Supported by HDMI version 1.3 and designed for the optical disc players and AV receivers/amplifiers of the future, Dolby TrueHD also remains fully compatible with the existing multichannel audio systems and retains the metadata capability of Dolby Digital, allowing dialog normalization and dynamic range control.
DSDDirect Stream Digital (DSD) technology stores audio signals on digital storage media, such as Super Audio CDs. Using DSD, signals are stored as single bit values at a high-frequency sampling rate of 2.8224 MHz, while noise shaping and oversampling are used to reduce distortion, a common occurrence with very high quantization of audio signals. Due to the high sampling rate, better audio quality can be achieved than that offered by the PCM format used for normal audio CDs.
DTS 96/24DTS 96/24 offers an unprecedented level of audio quality for multi-channel sound on DVD video, and is fully backward-compatible with all DTS decoders. “96” refers to a 96 kHz sampling rate compared to the typical 48 kHz sampling rate. “24” refers to 24-bit word length. DTS 96/24 offers sound quality transparent to the original 96/24 master, and 96/24 5.1-channel sound with full-quality full-motion video for music programs and motion picture soundtracks on DVD video.
DTS Digital SurroundDTS digital surround was developed to replace the analog soundtracks of movies with a 6.1-channel digital sound track, and is now rapidly gaining popularity in movie theaters around the world. DTS, Inc. has developed a home theater system so that you can enjoy the depth of sound and natural spatial representation of DTS digital surround in your home. This system produces practically distortion-free 6-channel sound (technically, front left and right, center, surround left and right, and LFE 0.1 (subwoofer) channels for a total of 5.1 channels). This unit incorporates a DTS-ES decoder that enables 6.1-channel reproduction by adding the surround back channel to the existing 5.1-channel format.
DTS ExpressDTS Express is an advanced audio technology for the optional feature on Blu-ray Disc or HD DVD, which offers high-quality, low bit rate audio optimized for network streaming, and Internet applications. DTS Express is used for the Secondary Audio feature of Blu-ray Disc or the Sub Audio feature of HD DVD. These features deliver audio commentaries (for example, the additional commentaries made by the director of a film) on demand by the users via the Internet, etc. DTS Express signals are mixed down with the main audio stream on the player component, and the component sends the mixed audio stream to the AV receivers/amplifiers via digital coaxial, digital optical, or analog connections.
DTS-HD Master AudioDTS-HD Master Audio is an advanced lossless audio technology developed for high-definition disc-based media including HD DVD and Blu-ray Disc. Selected as a mandatory audio standard for both HD DVD and Blu-ray Disc, this technology delivers sound that is bit-for-bit identical to the studio master, offering a high-definition home theater experience. Supporting bitrates up to 18.0 Mbps for HD DVD and up to 24.5 Mbps for Blu-ray Disc, DTS-HD Master Audio can carry up to 7.1 discrete channels of 24-bit/96 kHz audio simultaneously. Supported by HDMI version 1.3 and designed for the optical disc players and AV receivers/amplifiers of the future, DTS-HD Master Audio also remains fully compatible with the existing multichannel audio systems that incorporate DTS Digital Surround.
DTS-HD High Resolution AudioDTS-HD High Resolution Audio is an high resolution audio technology developed for high-definition disc-based media including HD DVD and Blu-ray Disc. Selected as an optional audio standard for both HD DVD and Blu-ray Disc, this technology delivers sound that is virtually indistinguishable from the original, offering a high-definition home theater experience. Supporting bitrates up to 3.0 Mbps for HD DVD and 6.0 Mbps for Blu-ray Disc, DTS-HD High Resolution Audio can carry up to 7.1 discrete channels of 24-bit/96 kHz audio simultaneously. Supported by HDMI version 1.3 and designed for the optical disc players and AV receivers/amplifiers of the future, DTS-HD High Resolution Audio also remains fully compatible with the existing multichannel audio systems that incorporate DTS Digital Surround.
HDMIHDMI (High-Definition Multimedia Interface) is the first industry-supported, uncompressed, all-digital audio/video interface. Providing an interface between any source (such as a set-top box or AV receiver) and an audio/video monitor (such as a digital television), HDMI supports standard, enhanced or high-definition video as well as multi-channel digital audio using a single cable. HDMI transmits all ATSC HDTV standards and supports 8-channel digital audio, with bandwidth to spare to accommodate future enhancements and requirements.When used in combination with HDCP (High-bandwidth Digital Content Protection), HDMI provides a secure audio/video interface that meets the security requirements of content providers and system operators. For further information on HDMI, visit the HDMI website at “http://www.hdmi.org/”.
156 En

Glossary
Ad
ditio
nal
Info
rmatio
n
LFE 0.1 channelThis channel reproduces low-frequency signals. The frequency range of this channel is from 20 Hz to 120 Hz. This channel is counted as 0.1 because it only enforces a low-frequency range compared to the full-range reproduced by the other 5/6 channels in Dolby Digital or DTS 5.1/6.1-channel systems.
MP3One of the audio compression methods used by MPEG. It employs the irreversible compression method, which achieves a high compression rate by thinning out the data of hardly audible part to the human ears. It is said to be capable of compressing the data quantity by about 1/11 (128 kbps) while maintaining a similar audio quality to music CD.
MPEG-4 AACAn MPEG-4 audio standard. As it allows compression of data at a bit rate lower than that of MPEG-2 AAC, it is used among others for mobile telephones, portable audio players and other low-capacity devices requiring high sound quality.In addition to the above types of devices, MPEG-4 AAC is also used to distribute contents on the Internet, and as such is supported by computers, media servers and many other devices.
Neo:6Neo:6 decodes the conventional 2-channel sources for 6- channel playback by the specific decoder. It enables playback with the full-range channels with higher separation just like digital discrete signal playback. There are two modes available: “Music mode” for music sources and “Cinema mode” for movie sources.
Neural-THX Surround“Neural-THX®” Surround is taking surround sound to the next level. This revolutionary new technology delivers the rich envelopment and discrete image detail of surround sound in a format that is fully compatible with stereo. Neural-THX Surround reduces the bandwidth needed for broadcasters to deliver true, multi-channel surround presentations, and enables 7.1-channel support for gaming and movies. By unmasking the audio details, typically lost by other playback systems, audiences will experience the deep ambience and subtle details of movies, music and games. And with this technology being used by sound designers during content creation, as well as embedded into playback devices, Neural-THX Surround promises a listening experience that is true to the original mix. Neural-THX Surround has been chosen as the official surround sound broadcast format for XM Satellite Radio’s “XM HD Surround”, as well as other leading FM/HD radio stations worldwide. For additional information, please visit http://www.neuralsurround.com/.
PCM (Linear PCM)Linear PCM is a signal format under which an analog audio signal is digitized, recorded and transmitted without using any compression. This is used as a method of recording CDs and DVD audio. The PCM system uses a technique for sampling the size of the analog signal per very small unit of time. Standing for “Pulse Code Modulation”, the analog signal is encoded as pulses and then modulated for recording.
Sampling frequency and number of quantized bits
When digitizing an analog audio signal, the number of times the signal is sampled per second is called the sampling frequency, while the degree of fineness when converting the sound level into a numeric value is called the number of quantized bits. The range of rates that can be played back is determined based on the sampling rate, while the dynamic range representing the sound level difference is determined by the number of quantized bits. In principle, the higher the sampling frequency, the wider the range of frequencies that can be played back, and the higher the number of quantized bits, the more finely the sound level can be reproduced.
SRS CS II (SRS Circle Surround II)SRS CS II (SRS Circle Surround II) is a high-performance 6.1 channel matrix surround sound decoding system. It is the next-generation of the original SRS Circle Surround technology, incorporating powerful industry-first features including the dialog clarity enhancement technology and added cinema-like bass to the front channels and subwoofer.
S-video signalWith the S-video signal system, the video signal normally transmitted using a pin cable is separated and transmitted as the Y signal for the luminance and the C signal for the chrominance through the S-video cable. Using the S VIDEO jack eliminates video signal transmission loss and allows recording and playback of even more beautiful images.
WAVWindows standard audio file format, which defines the method of recording the digital data obtained by converting audio signals. It does not specify the compression (coding) method so a desired compression method can be used with it. By default, it is compatible with the PCM method (no compression) and some compression methods including the ADPCM method.
WMAAn audio compression method developed by Microsoft Corporation. It employs the irreversible compression method, which achieves a high compression rate by thinning out the data of hardly audible part to the human ears. It is said to be capable of compressing the data quantity by about 1/22 (64 kbps) while maintaining a similar audio quality to music CD.
xvYCCA color space standard supported by HDMI version 1.3. It is a more extensive color space than sRGB, and allows the expression of colors that could not be expressed before. While remaining compatible with the color gamut of sRGB standards, xvYCC expands the color space and can thus produce more vivid, natural images. It is particularly effective for still pictures and computer graphics.
157 En
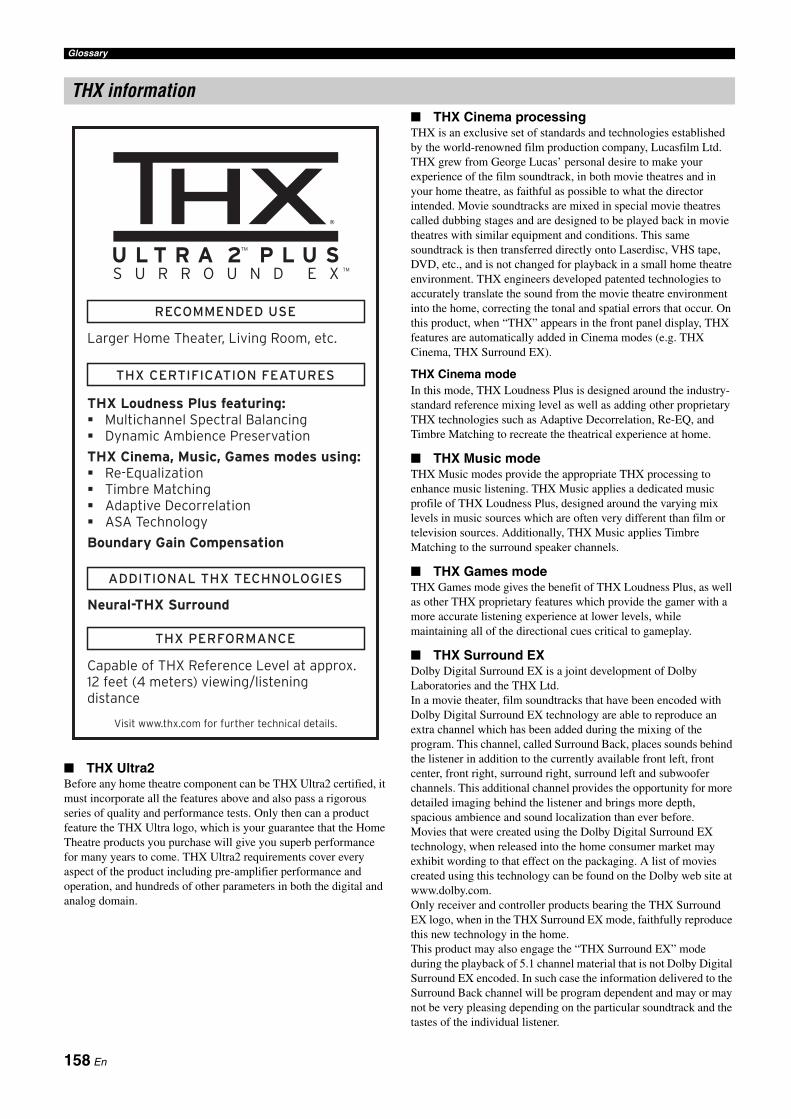
Glossary
THX Ultra2Before any home theatre component can be THX Ultra2 certified, it must incorporate all the features above and also pass a rigorous series of quality and performance tests. Only then can a product feature the THX Ultra logo, which is your guarantee that the Home Theatre products you purchase will give you superb performance for many years to come. THX Ultra2 requirements cover every aspect of the product including pre-amplifier performance and operation, and hundreds of other parameters in both the digital and analog domain.
THX Cinema processingTHX is an exclusive set of standards and technologies established by the world-renowned film production company, Lucasfilm Ltd. THX grew from George Lucas’ personal desire to make yourexperience of the film soundtrack, in both movie theatres and in your home theatre, as faithful as possible to what the director intended. Movie soundtracks are mixed in special movie theatres called dubbing stages and are designed to be played back in movie theatres with similar equipment and conditions. This same soundtrack is then transferred directly onto Laserdisc, VHS tape, DVD, etc., and is not changed for playback in a small home theatre environment. THX engineers developed patented technologies to accurately translate the sound from the movie theatre environment into the home, correcting the tonal and spatial errors that occur. On this product, when “THX” appears in the front panel display, THX features are automatically added in Cinema modes (e.g. THX Cinema, THX Surround EX).
THX Cinema modeIn this mode, THX Loudness Plus is designed around the industry-standard reference mixing level as well as adding other proprietary THX technologies such as Adaptive Decorrelation, Re-EQ, and Timbre Matching to recreate the theatrical experience at home.
THX Music modeTHX Music modes provide the appropriate THX processing to enhance music listening. THX Music applies a dedicated music profile of THX Loudness Plus, designed around the varying mix levels in music sources which are often very different than film or television sources. Additionally, THX Music applies Timbre Matching to the surround speaker channels.
THX Games modeTHX Games mode gives the benefit of THX Loudness Plus, as well as other THX proprietary features which provide the gamer with a more accurate listening experience at lower levels, while maintaining all of the directional cues critical to gameplay.
THX Surround EXDolby Digital Surround EX is a joint development of Dolby Laboratories and the THX Ltd.In a movie theater, film soundtracks that have been encoded with Dolby Digital Surround EX technology are able to reproduce an extra channel which has been added during the mixing of the program. This channel, called Surround Back, places sounds behind the listener in addition to the currently available front left, front center, front right, surround right, surround left and subwoofer channels. This additional channel provides the opportunity for more detailed imaging behind the listener and brings more depth, spacious ambience and sound localization than ever before.Movies that were created using the Dolby Digital Surround EX technology, when released into the home consumer market may exhibit wording to that effect on the packaging. A list of movies created using this technology can be found on the Dolby web site at www.dolby.com.Only receiver and controller products bearing the THX Surround EX logo, when in the THX Surround EX mode, faithfully reproduce this new technology in the home.This product may also engage the “THX Surround EX” mode during the playback of 5.1 channel material that is not Dolby Digital Surround EX encoded. In such case the information delivered to the Surround Back channel will be program dependent and may or may not be very pleasing depending on the particular soundtrack and the tastes of the individual listener.
THX information
158 En

Glossary
Ad
ditio
nal
Info
rmatio
n
THX Ultra2 Cinema modeTHX Ultra2 Cinema mode plays 5.1 movies using all 8 speakers giving you the best possible movie watching experience. In this mode, ASA processing blends the side surround speakers and back surround speakers providing the optimal mix of ambient and directional surround sounds. This mode permits the playback of a non Surround EX/ES encoded 5.1 movie to be played back over a 7.1 system. DTS-ES (Matrix and 6.1 Discrete) and Dolby Digital Surround EX encoded soundtracks will be automatically detected, if the appropriate flag has been encoded. Some Dolby Digital Surround EX soundtracks are missing the digital flag that allows automatic switching. If you know that the movie that you are watching is encoded in Surround EX, you can manually select the THX Surround EX playback mode, otherwise THX Ultra2 Cinema mode will apply ASA processing to provide optimum replay.
THX Ultra2 Music modeFor the playback of multi-channel music the THX Ultra2 Music mode should be selected. In this mode THX ASA processing is applied to the surround channels of all 5.1 encoded music sources such as DTS, Dolby Digital and DVD-Audio to provide a wide stable rear soundstage.
THX Ultra2 Games modeFor the playback of stereo and multi-channel game audio the THX Ultra2 Games mode should be selected. In this mode THX ASA processing is applied to the surround channels of all 5.1 and 2.0 encoded game sources such as analog, PCM, DTS and Dolby Digital. This accurately places all game audio surround information, providing a full 360 degree playback environment. THX Ultra2 Games mode is unique as it gives you a smooth transition of audio in all points of the surround field.
THX Loudness PlusTHX Loudness Plus is a new volume control technology featured in THX Ultra2 Plus™ and THX Select2 Plus™ Certified receivers. With THX Loudness Plus, home theater audiences can now experience the rich details in a surround mix at any volume level. Aconsequence of turning the volume below Reference Level is that certain sound elements can be lost or perceived differently by the listener. THX Loudness Plus compensates for the tonal and spatial shifts that occur when the volume is reduced by intelligently adjusting ambient surround channel levels and frequency response. This enables users to experience the true impact of soundtracks regardless of the volume setting. THX Loudness Plus is automatically applied when listening in any THX listening mode. The new THX Cinema, THX Music, and THX Games modes are tailored to apply the proper THX Loudness Plus settings for each type of content.
Re-EqualizationThe tonal balance of a film soundtrack will be excessively bright and harsh when played back over audio equipment in the home because film soundtracks were designed to be played back in large movie theatres using very different professional equipment. Re-Equalization restores the correct tonal balance for watching a movie soundtrack in a small home environment.
Adaptive DecorrelationIn a movie theatre, a large number of surround speakers help create an enveloping surround sound experience, but in a home theatre there are usually only two speakers. This can make the surround speakers sound like headphones that lack spaciousness and envelopment. The surround sounds will also collapse into the closest speaker as you move away from the middle seating position. Adaptive Decorrelation slightly changes one surround channel's time and phase relationship with respect to the other surround channel. This expands the listening position and creates – with only two speakers – the same spacious surround experience as in a movie theatre.
Timbre MatchingThe human ear changes our perception of a sound depending on the direction from which the sound is coming. In a movie theatre, there is an array of surround speakers so that the surround information is all around you. In a home theatre, you use only two speakers located to the side of your head. The Timbre Matching feature filters the information going to the surround speakers so that they more closely match the tonal characteristics of the sound coming from the front speakers. This ensures seamless panning between the front and surround speakers.
BGC (Boundary Gain Compensation)If your chosen listening room layout (for practical or aesthetic reasons) results in the most of the listeners being close to the rear wall, the resulting bass level can be sufficiently reinforced by the boundary that the overall sound quality becomes “boomy”. THX Ultra2 receivers and controllers contain the BGC (Boundary Gain Compensation) feature to provide an improved bass balance. “Bndry Gain Comp” can be selected by setting “THX Ultra2 SWFR” to “Yes” in “THX Set” of “Manual Setup”.
ASA (Advanced Speaker Array)ASA is a proprietary THX technology which processes the sound fed to 2 side and 2 back surround speakers to provide the optimal surround sound experience. When you set up your home theater system using all eight speaker outputs (Left, Center, Right, Surround Right, Surround Back Right, Surround Back Left, Surround Left and Subwoofer), be sure to go to the “THX Set” screen and choose the setting that most closely corresponds to the speaker spacing, which will re-optimize the surround sound-field. ASA is used in three modes; THX Ultra2 Cinema, THX Ultra2 Music and THX Ultra2 Games.
Dialogue normalizationDialogue Normalization (Dial Norm) is a feature of Dolby Digital, which is used to keep the programs at the same average listening level so the user does not have to change the volume control between Dolby Digital programs.When playing back software which has been encoded in Dolby Digital, sometimes you may see a brief message in the front panel display which will read “Dial Norm X dB” (X being a numeric value). The display is showing how the program level relates with THX calibration level. If you want to play the program at calibrated theatrical levels, you may wish to adjust the volume. For example, if you see the following message: “Dial Norm + 4 dB” in the front panel display, to keep the overall output level at THX calibrated loudness, just turn down the volume control by 4 dB. However, unlike a movie theater where the playback loudness is preset, you can choose your preferred volume setting for best enjoyment.
159 En

Sound field program information
Elements of a sound fieldWhat really creates the rich, full tones of a live instrument are the multiple reflections from the walls of the room. In addition to making the sound live, these reflections enable us to tell where the player is situated as well as the size and shape of the room in which we are sitting.There are two distinct types of sound reflections that combine to make up the sound field in addition to the direct sound coming straight to our ears from the player’s instrument.
Early reflectionsReflected sounds reach our ears extremely rapidly (50 ms to 100 ms after the direct sound), after reflecting from one surface only (for example, from a wall or the ceiling). Early reflections actually add clarity to the direct sound.
ReverberationsThese are caused by reflections from more than one surface (for example, from the walls, and the ceiling) so numerous that they merge together to form a continuous sonic afterglow. They are non-directional and lessen the clarity of the direct sound.
Direct sound, early reflections and subsequent reverberations taken together help us to determine the subjective size and shape of the room, and it is this information that the digital sound field processor reproduces in order to create sound fields.
If you could create the appropriate early reflections and subsequent reverberations in your listening room, you would be able to create your own listening environment. The acoustics in your room could be changed to those of a concert hall, a dance floor, or a room with virtually any size at all. This ability to create sound fields at will is exactly what Yamaha has done with the digital sound field processor.
CINEMA DSPSince the Dolby Surround and DTS systems were originally designed for use in movie theaters, their effect is best felt in a theater having many speakers designed for acoustic effects. Since home conditions, such as room size, wall material, number of speakers, and so on, can differ so widely, it is inevitable that there are differences in the sound heard. Based on a wealth of actually measured data, Yamaha CINEMA DSP provides the audiovisual experience of a movie theater in the listening room of your own home by using the Yamaha original sound field technology combined with various digital audio systems.
CINEMA DSP HD³The actually measured sound field data contain the information of the height of the sound images. CINEMA DSP HD³ feature achieves the reproduction of the accurate height of the sound images so that it creates the accurate and intensive stereoscopic sound fields in a listening room.
SILENT CINEMAYamaha has developed a natural, realistic sound effect DSP algorithm for headphones. Parameters for headphones have been set for each sound field so that accurate representations of all the sound field programs can be enjoyed on headphones.
Virtual CINEMA DSPYamaha has developed a Virtual CINEMA DSP algorithm that allows you to enjoy DSP sound field surround effects even without any surround speakers by using virtual surround speakers. It is even possible to enjoy Virtual CINEMA DSP using a minimal two-speaker system that does not include a center speaker.
Compressed Music EnhancerThe Compressed Music Enhancer feature of this unit enhances your listening experience by regenerating the missing harmonics in a compression artifact. As a result, flattened complexity due to the loss of high-frequency fidelity as well as lack of bass due to the loss of low-frequency bass is compensated, providing improved performance of the overall sound system.
Sound field program information
160 En

Sound field program information
Ad
ditio
nal
Info
rmatio
n
Sound output in each sound field programSound output from each speaker depends on the type of audio signals being input. Refer to the diagrams in the table below to understand the speaker layout for each sound field program.
Be advised that there may be no or not enough sound output from speakers depending on the type of input source being played back. Furthermore, there may be some channels that can only be used partially when they are adjusted to specific aspects of movies, such as special sound effects, etc.
Note
Front left speaker Surround right speaker Front presence right speaker
Center speaker Surround back left speaker Rear presence left speaker
Front right speaker Surround back right speaker Rear presence right speaker
Surround left speaker Front presence left speaker
Speaker from which sound is being output Speaker from which no sound is being output
L SR FPR
C SBL RPL
R SBR RPR
SL FPL
Speaker settings
11-channel 5-channel
1 —
2
3
4
5
6
L
C
R
SL
SBRSBL
FPL FPR
RPL RPR
SR
L
C
R
SL
SBRSBL
SR
FPL FPR
RPL RPR
L
C
R
SL SR
L
C
R
SL
SBRSBL
SR
FPL FPR
RPL RPR
L
C
R
SL SR
L
C
R
SL
SBRSBL
SR
FPL FPR
RPL RPR
L
C
R
SL SR
L
C
R
SL
SBRSBL
SR
FPL FPR
RPL RPR
L
C
R
SL SR
L
C
R
SL
SBRSBL
SR
FPL FPR
RPL RPR
L
C
R
SL SR
Speaker settings
11-channel 5-channel
7
8
9
0
A
L
C
R
SL
SBRSBL
SR
FPL FPR
RPL RPR
L
C
R
SL SR
L
C
R
SL
SBRSBL
SR
FPL FPR
RPL RPR
L
C
R
SL SR
L
C
R
SL
SBRSBL
SR
FPL FPR
RPL RPR
L
C
R
SL SR
L
C
R
SL
SBRSBL
SR
FPL FPR
RPL RPR
L
C
R
SL SR
L
C
R
SL
SBRSBL
SR
FPL FPR
RPL RPR
L
C
R
SL SR
161 En

Sound field program information
*1 / / / : OFF
*2 / / / : ON or discrete 6.1/7.1-channel audio signals are input.
q EX q PL x neural
q EX q PL x neural
Program HD³Input audio source
2-channel (monaural) 2-channel (stereo) 5.1-channel*1 6.1/7.1-channel*2
CLASSICAL1Hall in Munich AHall in Munich BHall in FrankfurtHall in StuttgartHall in ViennaHall in Amsterdam
CLASSICAL2Hall in USA AHall in USA BChamberChurch in TokyoChurch in FreiburgChurch in Royaumont
LIVE/CLUBVillage GateVillage VanguardThe Bottom LineCellar ClubThe Roxy TheatreWarehouse LoftArena
ON 1 1 3 4
OFF 2 2 3 4
ENTERTAINMENTSportsMusic VideoRecital/OperaPavilionDiscoAction GameRoleplaying Game
MOVIEStandardSpectacleSci-FiAdventureDrama
ON 3 4 3 4
OFF5 4 3 4
MOVIEMono Movie
ON 3 3 3 4
OFF 5 6 3 4
STEREO2ch Stereo
–– 7 7 7 7
STEREO11ch Stereo
MUSIC ENHANCER11ch Enhancer
–– 4 4 4 4
SUR.DECODESurround Decoder
(Pro Logic)–– 8 9 9 0
SUR.DECODESurround Decoder
(PLIIx Movie/PLII Movie)(PLIIx Game/PLII Game)(Neo:6 Cinema)(CSII Cinema)(CSII Music)(Neural-THX)
–– 8 0 9 0
SUR.DECODESurround Decoder
(PLIIx Music/PLII Music)(Neo:6 Music)
–– A 0 9 0
THXCinema (Pro Logic) –– 8 9 0 0
THXCinema (PLIIx Movie/PLII Movie/Neo: 6 Cinema/Neural-THX)
–– 8 0 0 0
THXMusic –– A 0 0 0
THXGames –– 8 0 0 0
STRAIGHTPure DirectMUSIC ENHANCER
Straight Enhancer
–– 7 7 9 0
162 En

Sound field program information
Ad
ditio
nal
Info
rmatio
n
Available parameters for each sound field program
Available sound field parameter may differ depending on the speaker settings.
Note
CLASSICAL1Hall in Munich A
Hall in Munich B
Hall in Frankfurt
Hall in Stuttgart
Hall in Vienna
Hall in Amsterdam
CLASSICAL2Hall in USA A
Hall in USA B
Chamber
Church in Tokyo
Church in Freiburg
Church in Royaumont
LIVE/CLUBVillage Gate
Village Vanguard
The Bottom Line
Cellar Club
The Roxy Theatre
Warehouse Loft
Arena
ENTERTAINMENTSports
Music Video
Recital/Opera
Pavilion
Disco
Action Game
Roleplaying Game
MOVIEStandard
Spectacle
Sci-Fi
Adventure
Drama
Mono Movie
STEREO2ch Stereo
11ch Stereo
SUR. DECODESurround Decoder
THXCinema/Ultra2 Cinema/Surround EX
MUSIC ENHANCERStraight Enhancer/11ch Enhancer
Deco
der Typ
e
DS
P L
evel
Init. D
elay
Ro
om
Size
Liven
ess
Su
r. Init.D
elay
Su
r. Ro
om
Size
Su
r. Liven
ess
SB
. Init. D
elay
SB
. Ro
om
Size
SB
. Liven
ess
Rev. T
ime
Rev. D
elay
Rev. L
evel
Dialo
gu
e Lift
Deco
der Typ
e
Cen
ter Level
Su
rrou
nd
L
Level
Su
rrou
nd
R
Level
Su
r.Back L
L
evel
Su
r.Back R
L
evel
F.PR
NS
L
Level
F.PR
NS
R
Level
R.P
RN
S L
L
evel
R.P
RN
S R
L
evel
Direct
Level
Deco
der
Param
eters
Dialo
gu
e Lift
163 En

Parametric equalizer information
This unit employs Yamaha Parametric Room Acoustic Optimizer (YPAO) technology, together with the Parametric EQ settings (see page 104), to optimize the frequency characteristics of its parametric equalizer to match your listening environment. YPAO uses a combination of the following three parameters (Frequency, Gain and Q factor) to provide highly precise adjustment of the frequency characteristics.
FrequencyThis parameter is adjustable in one-third octave increments between 32 Hz and 16 kHz.
GainThis parameter is adjustable in increments of 0.5 dB between –20 and +6 dB.
Q factorThe width of the specified frequency band is referred to as the Q factor. This parameter is adjustable between the values 0.5 and 10.
YPAO adjusts frequency characteristics to suit your listening requirements using a combination of the above three parameters (Frequency, Gain and Q factor) for each equalizer band in this unit’s parametric equalizer. This unit has 7 equalizer bands for each channel.The use of multiple equalizer bands enables more precise adjustments of frequency characteristics (as in Figure 2). This is not possible using only a single equalizer band (as in Figure 1).
Figure 1
Figure 2
Standing waveA wave generated when two waves of the same length, frequency and speed but traveling in opposite directions overlap. Standing waves appear to be stationary and simply oscillating in a fixed position without progressing.Under certain conditions, the sound leaving a speaker and the sound reflecting off a wall, etc., in a room resonate. When this happens, it has a major effect on the frequency response in the room, and depending on the listening position sounds of specific frequencies may sound loud or inversely may be hard to hear. As a result, this hampers accurate reproduction of the sound source.This unit is equipped with a parametric equalizer to reduce the effect of standing waves. The equalizer’s settings can be optimized through automatic measurements. Even more accurate settings can be made by taking measurements at other positions.
Parametric equalizer information
Gain
Frequency
Original frequency characteristic
Band 1
Frequency characteristic after correction
Gain
Frequency
Band 1
Band 2
Frequency characteristic after correction
Original frequency characteristic
164 En

Block diagrams
Ad
ditio
nal
Info
rmatio
n
Audio section
Block diagrams
CD
HD/BD DVD
DVD
DTV
MD /TAPE
DVD
CBL/SAT
DVR
IN (Front)
IN 1
IN 2
IN 3
IN 4
XM
NET
REC/ZoneSelector
INPUTSelector
DIT
HDMISelector
XM Rx
USB (Front)
USB (Rear)
PHY
USBSelector
DIR
HDMIRx
NET/USB
Sele
ctor
Audi
o DA
C
DecoderCinema
DSPYPAO,etc.
ZONE OUT/DVR
CD-R
OUT 1
OUT 2
HDMITx
HDMITx
Switc
h
Volu
me PHONES
SUR BACK
REAR PRES
SURROUND
FRONT
FRONT PRES
CENTER (Mono)
SUB WOOFER
COAXIAL DIGITAL IN
OPTICAL DIGITAL IN
HDMI IN
XM
NET
USB
* XM: U.S.A. and Canada models Only
Main
Zone
HDMI
DSP
HDMI
Main
Zone
Audio ADC
ZONE2/REC OUT (COAXIAL DIGITAL)
REC OUT (OPTICAL DIGITAL)
HDMI OUT
HEAD PHONES
PRE OUT
SURR
SB/FRONT
C, SW
PHONO
CD-R
CD
MD/TAPE
DVD
DTV/LD
DVR
VCR
CBL/SAT
V-AUX
DOCK
FM/AM
HD Radio
PHONO EQ
INPUTSelector
REC/ZoneSelector
TUNER
TUNER
FRONT
CENTER (Mono)
SURROUND
SUR BACK
FRONT PRES
REAR PRES
SUR BACK
ZONE 2
ZONE 3
ZONE 4
VCR
DVR
MD/TAPE
CD-R
Amp
Assi
gn S
EL
Switc
h(Re
play
)
Switc
h
Volu
me
Zone
Mon
o
Source/RECSelector Sw
itch
Switc
h
SPEAKER OUT
ZONE OUT
REC OUT
Power Amplifier
Main/Source
REC/Zone
Multi-ch
Main
XM/NET
Zone
SourceREC
MULTI CH INPUT
AUDIO IN
AUDIO IN with Video
TUNER
* HD Radio: U.S.A. model Only
165 En

Block diagrams
Video section
IN (Front)
IN 1
IN 2
IN 3
IN 4
HDMISelector
HDMIRx
Sele
ctor
VideoI/P Converter
VideoSelector
Sele
ctor
HDMITx
HDMITx
OUT 1
OUT 2
INPUTSelector
VideoDecoder
GUIProcessor
VideoI/P Converter Video
Encoder
SEL
SEL
SEL
MONITOR OUT 1
MONITOR OUT 2
ZONE2 OUT
MONITOR OUTV-AUX
HDMI
DVD
DTV
CBL/SAT
DVR
VCR
DOCK
INPUTSelector
REC/ZoneSelector
Video Decoder
VideoEncoder
Source/RECSelector
ZoneOSD
SEL
DVR
VCR
MONITOR OUT
ZONE2 OUT 1
ZONE2 OUT 2
DVR
VCR
SEL
INPUTSelector
REC/ZoneSelector
Source/RECSelector
BD/HD DVD
DVD
CBL/SAT
DVR
V-AUX
DVD
DTV
CBL/SAT
DVR
VCR
DOCK
HDMI IN
COMPONENT VIDEO IN
S VIDEO IN
VIDEO IN
HDMI OUT
MONITOR OUT(COMPONENT VIDEO)
ZONE2 OUT (COMPONENT VIDEO)
MONITOR OUT (S VIDEO)
REC OUT (S VIDEO)
MONITOR OUT (VIDEO)
ZONE2 OUT (VIDEO)
REC OUT (VIDEO)
YPbPr
Y/C
CVBS
Source/Main
REC/Zone
Source/Main
REC/Zone
166 En

Specifications
Ad
ditio
nal
Info
rmatio
n
AUDIO SECTION• Minimum RMS Output Power (20 Hz to 20 kHz, 0.04% THD, 8 Ω)
Front, Center, Surround, Surround back ............................................... 140 WFront presence, Rear presence ................................................................. 50 W
• Dynamic Power (IHF)Front L/R 8/6/4/2 Ω ........................................................ 185/230/290/385 W
• Dynamic Headroom8 Ω ......................................................................................................... 1.2 dB
• Damping Factor (IHF)Front L/R 1 kHz, 8 Ω ................................................................... 150 or more
• Input Sensitivity/Input ImpedancePHONO .................................................................................... 3.5 mV/47 kΩCD, etc. .................................................................................... 200 mV/47 kΩMULTI CH INPUT ................................................................. 200 mV/47 kΩ
• Maximum Input VoltagePHONO (1 kHz, 0.1% THD) .................................................. 60 mV or moreCD, etc. (1 kHz, 0.5% THD) ..................................................... 2.4 V or more
• Rated Output Voltage/Output ImpedanceAUDIO OUT ........................................................................... 200 mV/900 ΩPRE OUT .................................................................................... 1.0 V/500 ΩSUBWOOFER ............................................................................ 2.0 V/500 ΩZONE OUT ................................................................................ 1.0 V/1.4 kΩ
• Headphone Jack Rated Output/ImpedanceCD, etc. (1 kHz, 40 mV, 8 Ω) .................................................. 150 mV/100 Ω
• Frequency ResponseCD to Front L/R, Pure Direct ............................. 10 Hz to 100 kHz, +0/–3 dB
• RIAA Equalization DeviationPHONO (20 Hz to 20 kHz) ............................................................ 0 ± 0.5 dB
• Total Harmonic DistortionPHONO to AUDIO OUT (20 Hz to 20 kHz, 1 V) ..................... 0.02% or lessCD, etc. to Front L/R (20 Hz to 20 kHz, 70 W, 8 Ω) ................. 0.02% or less
• Signal to Noise Ratio (IHF-A Network)PHONO (2.5 mV) to Front L/R[U.S.A. and Canada models] .................................................... 80 dB or morePHONO (5 mV) to Front L/R[Australia model] ..................................................................... 81 dB or more[Other models] ......................................................................... 86 dB or moreCD, etc. (250 mV) to Front L/R ............................................. 100 dB or more
• Residual Noise (IHF-A Network)Front L/R .................................................................................... 70 µV or less
• Channel Separation (1 kHz/10 kHz)PHONO (shortened) to Front L/R ................................. 70 dB/60 dB or moreCD, etc. (5.1 kΩ shortened) to Front L/R ..................... 70 dB/60 dB or more
• Tone Control (Front L/R, Center, Subwoofer)BASS Boost/Cut .......................................................................... ±6 dB/50 HzBASS Turnover Frequency .................................................................. 350 HzTREBLE Boost/Cut .................................................................. ±6 dB/20 kHzTREBLE Turnover Frequency ............................................................ 3.5 kHz
• Zone 2/Zone 3 Tone ControlBASS Boost/Cut ...................................................................... ±10 dB/100 HzBASS Turnover Frequency .................................................................. 380 HzTREBLE Boost/Cut ................................................................ ±10 dB/10 kHzTREBLE Turnover Frequency ............................................................ 1.6 kHz
• Filter Characteristics (fc=40/60/80/90/100/110/120/160/200 Hz)H.P.F. (Front, Center, Surround, Surround Back: Small) ................ 12 dB/oct.L.P.F. (Subwoofer) .......................................................................... 24 dB/oct.
VIDEO SECTION
• Video Format [MONITOR OUT] (Wall Paper)[U.S.A. and Canada models] ......................................................... NTSC/PAL[Australia model] .......................................................................... PAL/NTSC
• Video Format (Video Conversion) .................................................... NTSC/PAL
• Signal LevelComposite ................................................................................... 1 Vp-p/75 ΩS-video .................................... 1 Vp-p/75 Ω (Y), 0.286 or 0.3 Vp-p/75 Ω (C)Component ..................................... 1 Vp-p/75 Ω (Y), 0.7 Vp-p/75 Ω (PB/PR)Maximum Input Level (Video Conversion Off) ................... 1.5 Vp-p or more
• Signal to Noise Ratio (Video Conversion Off) ........................... 70 dB or more
• Frequency Response [MONITOR OUT]Component (Video Conversion Off)
............................................................................... 5 Hz to 100 MHz, ±3 dB
• Video Format [ZONE OUT] (Gray Back)[U.S.A. and Canada models] ......................................................... NTSC/PAL[Australia model] .......................................................................... PAL/NTSC
• Video signal type [ZONE COMPONENT OUT](Video conversion) ............................................................................ NTSC/PAL
FM SECTION• Tuning Range
[U.S.A. and Canada models] ............................................. 87.5 to 107.9 MHz[Australia model] .......................................................... 87.50 to 108.00 MHz
• 50 dB Quieting Sensitivity (IHF)Mono/Stereo ........................................................... 2.0/25 µV (17.3/39.2 dBf)
• Usable Sensitivity (IHF) ........................................................ 1.0 µV (11.2 dBf)
• Selectivity (400 kHz) ................................................................................ 70 dB
• Signal to Noise Ratio (IHF)Mono/Stereo ................................................................................ 76 dB/70 dB
• Harmonic Distortion (1 kHz)Mono/Stereo ...................................................................................... 0.2/0.3%
• Stereo Separation (1 kHz) Stereo ......................................................................................................40 dB
• Frequency Response Stereo ............................................................... 20 Hz to 15 kHz, +0.5, –2 dB
• Antenna Input (unbalanced) ........................................................................ 75 Ω
AM SECTION• Tuning Range
[U.S.A. and Canada models] ................................................. 530 to 1710 kHz[Australia model] .................................................................. 531 to 1611 kHz
• Usable Sensitivity .............................................................................. 300 µV/m
• Antenna ..........................................................................................Loop antenna
GENERAL• Power Supply
[U.S.A. and Canada models] ................................................ AC 120 V, 60 Hz[Australia model] ................................................................. AC 240 V, 50 Hz
• Power Consumption ................................................................. 800 W/1000 VA
• Standby Power Consumption ........................................................ 0.1 W or less
• AC Outlets[U.S.A. and Canada models] ....................... 2 (Total 100 W/0.8 A maximum)[Australia model] ........................................................... 1 (100 W maximum)
• Dimensions (W x H x D) .................................................. 435 x 210 x 497 mm(17-1/8 x 8-1/4 x 19-9/16 in)
• Weight .......................................................................... 34.0 kg (74.0 lbs 15 oz)
* Specifications are subject to change without notice.
Specifications
167 En

Specifications
HDMI signal compatibility
Audio signals
y• If the input source component can decode the bitstream audio signals of
audio commentaries, you can play back the audio sources with the audio commentaries mixed down by using the following connections:– multi-channel analog audio input (see page 37)– DIGITAL INPUT OPTICAL (or COAXIAL)
• Refer to the supplied instruction manuals of the input source component, and set the component appropriately.
• When CPPM copy-protected DVD audio is played back, video and audio signals may not be output depending on the type of the DVD player.
• This unit is not compatible with HDCP-incompatible HDMI or DVI components.
• To decode audio bitstream signals on this unit, set the input source component appropriately so that the component outputs the bitstream audio signals directly (does not decode the bitstream signals on the component). Refer to the supplied instruction manuals for details.
• This unit is not compatible with the audio commentary features (for example, the special audio contents downloaded via Internet) of Blu-ray Disc or HD DVD. This unit does not play back the audio commentaries of the Blu-ray Disc or HD DVD contents.
Video signalsThis unit is compatible with the video signals of the following resolutions:
Video signal format– 480i/60 Hz– 576i/50 Hz– 480p/60 Hz– 576p/50 Hz– 720p/60 Hz, 50 Hz– 1080i/60 Hz, 50 Hz– 1080p/60 Hz, 50 Hz, 24 Hz
Compatibility with Deep Color and xvYCC video signalsThis unit accepts 30 or 36 bit Deep Color video signals. Set “HDMI Resolution” to “Through” or “HDMI Processing” to “Off” (see page 107) to output the Deep Color and xvYCC video signals from the HDMI OUT jacks without any processing (see page 107). If you set “HDMI Processing” to “On”and “HDMI Resolution” to other than “Through”, this unit converts the Deep Color and xvYCC video signals to the video signals with normal color depth and color space. If the video monitor is not compatible with the Deep Color or xvYCC video signals, the video source may not play back correctly.
Default input assignment of HDMI input jacks
Audio signal typesAudio signal
formatsCompatible media
2ch Linear PCM
2ch, 32-192 kHz, 16/20/24 bit
CD, DVD-Video, DVD-Audio, etc.
Multi-ch Linear PCM
8ch, 32-192 kHz, 16/20/24 bit
DVD-Audio, etc.
DSD 2/5.1ch, 2.8224 MHz, 1 bit
SACD, etc.
Bitstream Dolby Digital, DTS
DVD-Video, etc.
Bitstream (High definition audio)
Dolby TrueHD, Dolby Digital Plus, DTS-HD Master Audio, DTS-HD High Resolution Audio
Blu-ray Disc,HD DVD, etc.
Notes
HDMI input jack Assigned input source
IN1 BD/HD DVD
IN2 DVD
IN3 CBL/SAT
IN4 DVR
Front HDMI IN jack V-AUX
The HDMI interface of this unit is based on the following standards:• HDMI Version 1.3a (High-Definition Multimedia Interface
Specification Version 1.3a) licensed by HDMI Licensing, LLC.
• HDCP (High-bandwidth Digital Content Protection System) licensed by Digital Content Protection, LLC.
168 En

Index
Ad
ditio
nal
Info
rmatio
n
Numerics11.1-channel speaker connection ..................... 2311.1-channel speaker layout ............................ 2111.2-channel speaker connection ..................... 2311.2-channel speaker layout ............................ 2111ch Enhancer ................................................. 6311ch Stereo ...................................................... 632ch Stereo ........................................................ 635.1-channel speaker connection ....................... 255.1-channel speaker layout .............................. 225.2-channel speaker connection ....................... 255.2-channel speaker layout .............................. 227.1-channel speaker connection ....................... 247.1-channel speaker layout .............................. 227.2-channel speaker connection ....................... 247.2-channel speaker layout .............................. 22
AAC IN .............................................................. 20AC OUTLET(S) ........................................ 20, 42Action Game .................................................... 62Activating XM Satellite Radio ........................ 74Adaptive DRC ............................................... 102Adaptive DSP effect level ............................. 102Adaptive DSP Lvl .......................................... 102Adaptive dynamic range control .................... 102Adjusting speaker level ................................... 65Adjusting tonal quality .................................... 65Advanced automatic setup ............................... 50Advanced setup .............................................. 142Advanced sound configurations ...................... 86Adventure ........................................................ 62ALL CH SEARCH .......................................... 75All Channel Search, XM tuning ...................... 75AM antenna connection ................................... 41AM tuning ........................................................ 68AMP, Operation mode selector ....................... 12ANTENNA terminals ...................................... 20Arena ............................................................... 61Audio and video synchronization .................. 105Audio cable plugs ............................................ 29Audio component connection .......................... 35Audio component jacks ................................... 20Audio Info. ..................................................... 114Audio information ......................................... 114Audio input jack select .................................... 97Audio input jack selection ............................... 56AUDIO jacks ................................................... 29Audio jacks ...................................................... 29AUDIO SELECT ............................................. 56Audio Select ............................................ 97, 112Audio signal flow ............................................ 30Auto ............................................................... 106Auto Bypass ................................................... 105Auto bypass ................................................... 105AUTO indicator, Front panel display .............. 45Auto Setup, troubleshooting .......................... 152Automatic audio delay adjustment ................ 106Automatic preset tuning, FM/AM tuning ........ 70Automatic tuning, FM/AM tuning ................... 68
BBack ground video ........................................... 98Background video source playback ................. 55Basic automatic setup ...................................... 48Basic, Manual Setup ........................................ 99Basic, Manual setup ......................................... 99Bass Cross Over ............................................. 100
Bass cross over ...............................................100Bass Out .........................................................101Bass out ..........................................................101Battery charge indicator,
Front panel display .......................................44BGV .................................................................98BI-AMP ..........................................................143bi-amplification connections ............................28Bi-amplifier mode ..........................................143Blu-ray Disc player connection ........................32Bndry Gain Comp ............................................99Bookmarks, network menu ..............................80Boundary gain compensation ...........................99
CCable plugs .......................................................29CAT SEARCH, XM tuning .............................75Category Search, XM tuning ............................75Cellar Club .......................................................61Center .............................................................100Center Image ....................................................95Center Level .....................................................94Center speaker ................................................100Center Width ....................................................95Chamber ...........................................................60Channel Mute .................................................106Channel mute .................................................106Church in Freiburg ...........................................60Church in Royaumont ......................................60Church in Tokyo ..............................................60Cinema .............................................................87CINEMA DSP HD³ mode ................................64CINEMA DSP indicator,
Front panel display .......................................45CLASSICAL 1 .................................................59CLASSICAL 2 .................................................60Component I/P ...............................................107Component interlace/progressive
conversion ..................................................107COMPONENT VIDEO jacks ....................20, 29COMPONENT
VIDEO MONITOR OUT jacks ...................20Configuration .................................................100Connecting a Blu-ray Disc player ....................32Connecting a DVD recorder .............................34Connecting a multi-format player ....................37Connecting a VCR ...........................................34Connecting an external decoder .......................37Connecting an HD DVD player .......................32Connecting an iPod universal dock ..................38Connecting audio components .........................35Connecting external amplifiers ........................36Connecting network .........................................40Connecting power cable ...................................42Connecting speaker cable .................................28Connecting subwoofers ....................................26Connecting the USB memory devices .............40Connecting to the rear USB ports ....................40Connecting XM Mini-Tuner Home Dock ........74Connection, AM antenna .................................41Connection, DVD player ..................................33Connection, FM antenna ..................................41Connection, projector .......................................31Connection, set-top box ...................................33Connection, TV monitor ..................................31Controlling other components,
remote control ............................................122Conversion .....................................................107Cooling fan operation mode ...........................143
CS II indicator, Front panel display ................. 44CSII Cinema .................................................... 86CSII Music ....................................................... 86
DDecoder descriptions ....................................... 86Decoder indicators, Front panel display .......... 44Decoder Mode ............................................... 113Decoder parameter descriptions ...................... 95Decoder selection ............................................ 86Decoder Type .................................................. 92Default audio input jack select ...................... 112Default decoder mode .................................... 113Default Gateway ............................................ 111Default gateway ............................................. 111DHCP ............................................................. 111DHCP setting ................................................. 111Dialogue Lift, Sound field parameter .............. 91Digital audio jacks ........................................... 20DIGITAL COAXIAL jacks ............................. 29DIGITAL OPTICAL jacks .............................. 29Dimension ........................................................ 95Dimmer .......................................................... 112Dimmer .......................................................... 112Dipole speaker using ....................................... 21Direct ............................................................... 94Direct frequency tuning, FM/AM tuning ........ 69Direct number access, XM tuning ................... 76Disco ................................................................ 62Display window, remote control ..................... 12Displaying HD Radio information .................. 73Displaying XM Satellite Radio information ....... 77DNS Server (P) .............................................. 111DNS Server (S) .............................................. 111DOCK terminal ................................................ 20Drama .............................................................. 62DSP indicators, Front panel display ................ 45DSP Level, Sound field parameter .................. 91DVD player connection ................................... 33DVD recorder connection ................................ 34Dynamic Range ............................................. 103Dynamic range ............................................... 103
EEffect sound level of the
sound field parameter .................................. 91ENHANCER ................................................... 63ENHANCER indicator,
Front panel display ...................................... 45ENTERTAIN ................................................... 61External amplifier connection ......................... 36External decoder connection ........................... 37
FFAN MODE .................................................. 143Files/Directories, USB menu ........................... 80FM antenna connection ................................... 41FM tuning ........................................................ 68FOCUS ............................................................ 95Front ................................................................. 99Front Panel Disp. ........................................... 112Front panel display .......................................... 44Front panel display message scroll ................ 112Front panel display setting ............................. 112Front panel door ............................................... 12Front Presence ............................................... 100Front Presence L Level .................................... 94Front Presence R Level .................................... 94Front presence speakers ........................... 27, 100
Index
169 En

Index
Front speaker set selection ............................... 55Front speakers .................................................. 99Front/rear USB port indicator,
Front panel display ...................................... 44
GGenres, network menu ..................................... 80Graphic user interface (GUI) screen ................ 88Graphical user interface menu ......................... 57GUI language setting ....................................... 43GUI menu ........................................................ 57GUI screen position ....................................... 108
HHall in Amsterdam ........................................... 60Hall in Frankfurt .............................................. 59Hall in Munich A ............................................. 59Hall in Munich B ............................................. 59Hall in Stuttgart ................................................ 60Hall in USA A .................................................. 60Hall in USA B .................................................. 60Hall in Vienna .................................................. 60HD Cubic indicator, Front panel display ......... 45HD DVD player connection ............................ 32HD indicator, Front panel display .................... 45HD Radio ......................................................... 72HD Radio information display ......................... 73HD Radio station search .................................. 72HDMI ............................................................... 29HDMI Aspect ................................................. 108HDMI aspect ratio ......................................... 108HDMI Auto .................................................... 105HDMI automatic lip sync mode ..................... 105HDMI IN jack select ...................................... 113HDMI indicator, Front panel display ............... 44HDMI jack ....................................................... 29HDMI jacks ...................................................... 20HDMI monitor check ..................................... 144HDMI OUT jack select .................................. 113HDMI Processing .......................................... 107HDMI Resolution .......................................... 107HDMI Set ....................................................... 113HDMI settings ................................................ 113HDMI video processing ................................. 107HDMI video signal resolution ....................... 107HDMI, troubleshooting .................................. 150Headphone using .............................................. 55Headphones indicator, Front panel display ......... 44Help, network menu ......................................... 80HiFi DSP .......................................................... 59Hi-fi sound playback ........................................ 65
II/O Assignment ................................................ 96ID1/ID2 indicator, remote control ................... 12Information .................................................... 112Information display, remote control ................ 12Infrared window, remote control ..................... 12Init. Delay ........................................................ 92Initial Volume ................................................ 103Initial volume ................................................. 103INITIALIZE ................................................... 144Initialize, Sound field parameter ...................... 95Input ............................................................... 113Input channel indicators,
Front panel display ...................................... 45Input output jack select .................................. 113Input Select ...................................................... 96Input signal indicators, Front panel display ........ 44Input signal information, GUI menu .............. 114Input source indicators, Front panel display ....... 44Input/output assignment ................................... 96Internet Radio using ......................................... 83
Internet Radio, network menu ..........................80IP Address ......................................................111IP address .......................................................111iPod .................................................................112iPod charge on the standby mode ...................112iPod settings ...................................................112iPod universal dock connection ........................38iPod using .........................................................78iPod, troubleshooting .....................................152
JJacks .................................................................29
LLAN STANDBY ............................................143LAN standby ..................................................143LANGUAGE ..................................................144Language ........................................................144Language, GUI menu .....................................114Language, GUI menu .....................................114Level .................................................................94LFE Level .......................................................103LIGHT, remote control ....................................12Lipsync ...........................................................105LIVE/CLUB .....................................................60Liveness ............................................................93Loading system settings .................................118Locations, network menu .................................80Loudness Plus ...................................................99Loudness plus setting .......................................99Low-frequency effect level ............................103
MMAC Address .................................................112MAC address ..................................................112MACRO .........................................................129Macro programming, remote control .............128Main 11ch Stereo ...........................................109Main zone 11-channel stereo ..........................109Manual ....................................................106, 114Manual ............................................................114Manual audio delay adjustment ......................106Manual parametric equalizer configuration
of each speaker ...........................................104Manual preset tuning, FM/AM tuning .............71Manual tuning, FM/AM tuning ........................69Max Volume ...................................................102Maximum volume ..........................................102MCX-2000 using ..............................................82Media Access Control address .......................112Memory Guard ...............................................113Memory guard ................................................113MEMORY indicator, Front panel display ........45Microphone base ..............................................11MONITOR CHECK .......................................144Mono Movie .....................................................63MOVIE .............................................................62Multi CH Assign ..............................................98MULTI CH INPUT jacks .................................20Multi channel assignment .................................98Multi Zone, Manual Setup .............................109Multi zone, Manual setup ...............................109Multi-channel sources playback
with headphones ...........................................64Multi-format player connection .......................37Multi-information display,
Front panel display .......................................44Multi-zone configuration ................................133Music Video .....................................................61Muting audio output .........................................56Muting Type ...........................................103, 110Muting type ....................................................103
NNeo:6 Cinema .................................................. 86Neo:6 Music ..................................................... 86NET/USB, Manual Setup .............................. 111NET/USB, Manual setup ............................... 111Network ......................................................... 111Network connection ......................................... 40Network features using USB features using ........ 80Network information ...................................... 112Network menu .................................................. 80NETWORK port .............................................. 20Network settings ............................................ 111Network status ............................................... 112Network, troubleshooting .............................. 150neural indicator, Front panel display ............... 44Neural-THX ..................................................... 86New Stations, network menu ........................... 80
OOn Screen ....................................................... 108On-screen display time .................................. 108Operation mode selector, remote control ......... 12OPTIMIZER MIC jack .................................... 47Optimizing speaker setting .............................. 46Option, Manual Setup .................................... 112Option, Manual setup ..................................... 112Output ............................................................ 113
PPanorama ......................................................... 95Parameter initialization .................................. 144Parametric EQ ................................................ 104Parametric equalizer ...................................... 104Parametric equalizer data copy ...................... 104Parametric equalizer information ................... 164Parametric equalizer type select .................... 104party mode ..................................................... 141Party Mode Set .............................................. 109Party mode settings ........................................ 109Party mode target zone setting ....................... 109Pavilion ............................................................ 61PC server using ................................................ 82PC/MusicCAST, network feature .................... 80PEQ Data Copy .............................................. 104PEQ Select ..................................................... 104Phase .............................................................. 101Placing speakers ............................................... 21Play Style ......................................................... 98Playback basic procedure ................................. 54Playback styles ................................................. 98Playing video sources in the background ........ 55PLII Game ........................................................ 86PLII Movie ....................................................... 86PLII Music ....................................................... 86PLIIx Game ...................................................... 86PLIIx Movie ..................................................... 86PLIIx Music ..................................................... 86Podcasts, network menu .................................. 80Popular Stations, network menu ...................... 80Position .......................................................... 108Power cable connection ................................... 42PRE AMP indicator, Front panel display ........ 45PRE OUT jacks ................................................ 20PREAMP MODE ........................................... 143Pre-amplifier mode ........................................ 143Presence speaker indicators,
Front panel display ...................................... 45Presence speaker using .................................... 27Preset channel setting, XM tuning ................... 76Preset Search, XM tuning ................................ 75Preset station selection, FM/AM tuning .......... 70Preset stations exchange, FM/AM tuning ........ 71
170 En

Index
Ad
ditio
nal
Info
rmatio
n
Primary DNS server ....................................... 111PRO LOGIC .................................................... 86Program parameters initialization .................... 95Programming macro operations ..................... 129Projector connection ........................................ 31PURE DIRECT ................................................ 65Pure Direct ..................................................... 106Pure Direct ..................................................... 106
QQuick automatic setup ..................................... 47
RRear panel ........................................................ 20Rear Presence ................................................ 100Rear Presence L Level ..................................... 94Rear Presence R Level ..................................... 94Rear presence speakers ............................ 27, 100Rear USB port connection ............................... 40Recital/Opera ................................................... 61RECOUT indicator, Front panel display ......... 44REMOTE CON AMP .................................... 143Remote control code default settings ............. 124Remote control codes settings ....................... 124Remote control ID setting .............................. 143Remote control using ....................................... 12Remote control, troubleshooting ................... 149REMOTE IN jack ............................................ 38REMOTE IN/OUT jacks ................................. 20REMOTE OUT jack ........................................ 38REMOTE SENSOR ...................................... 142Remote sensor ................................................ 142Rename ............................................................ 97Rename ............................................................ 97Repeat .............................................................. 79Repeat iPod playback ...................................... 79Resetting the system ...................................... 154Rev. Delay ....................................................... 93Rev. Level ........................................................ 94Rev. Time ........................................................ 93Roleplaying Game ........................................... 62Room Size ........................................................ 92RS-232C STANDBY .................................... 143RS-232C terminal ............................................ 20
SS VIDEO jacks ................................................ 29Saving system settings ................................... 115SB Speaker Dist. .............................................. 99SB. Init. Delay ................................................. 92SB. Liveness .................................................... 93SB. Room Size ................................................. 92Sci-Fi ............................................................... 62Scroll .............................................................. 112Searching HD Radio stations ........................... 72Secondary DNS server ................................... 111Selecting audio input jacks .............................. 56Selecting decoders ........................................... 86Selecting front speaker set ............................... 55Selecting HD Radio audio programs ............... 73Selecting preset stations, FM/AM tuning ........ 70Selecting sound field programs ....................... 58Selecting the MULTI CH INPUT
component ................................................... 54Server, network menu ...................................... 80Set the main zone to the standby mode ........... 43Setting GUI language ...................................... 43Setting speaker impedance .............................. 43Set-top box connection .................................... 33Setup .............................................................. 111Setup .............................................................. 111Short Message ................................................ 108Short message display ................................... 108
Shortcut buttons, Network/USB features .........84Shuffle ..............................................................79Shuffle iPod playback ......................................79Signal Info., GUI menu ..................................114SILENT CINEMA ...........................................64SILENT CINEMA indicator,
Front panel display .......................................45SLEEP indicator, Front panel display ..............45Sleep timer .......................................................56Sound field indicators, Front panel display ......44Sound field parameter descriptions ..................92Sound field program selection .........................58Sound field programs .......................................58Sound field programs with headphones ...........64Sound field programs
without surround speakers ...........................64Sound, Manual Setup .....................................103Sound, Manual setup ......................................103SOURCE, Operation mode selector .................12SP A B indicators, Front panel display ............44Speaker B .......................................................109Speaker B setting ............................................109Speaker cable connection .................................28Speaker Distance ............................................101Speaker distance .............................................101Speaker distances ...........................................101SPEAKER IMP. .............................................142Speaker impedance .........................................142Speaker impedance setting ...............................43Speaker Level .................................................102Speaker level ..................................................102Speaker level adjustment ..................................65Speaker Set .......................................................99Speaker setting optimize ..................................46Speaker settings ................................................99Speaker terminals .............................................20Speaker wiring, Auto setup parameter .......48, 50Speakers, placement .........................................21Specifications .................................................167Spectacle ..........................................................62Sports ................................................................61Standard ............................................................62Standby Charge ..............................................112Standby mode, Zone2, Zone3 ........................139Standby Through ............................................113Standby through .............................................113Standing wave control ....................................103Station Search ...................................................96Status ..............................................................112STEREO ...........................................................63STEREO indicator, Front panel display ...........45Stereo program parameter descriptions ............94Stereo/Surround menu, GUI menu ...................91Stereo/Surround, GUI menu .............................91STRAIGHT ......................................................64Straight Enhancer .............................................63STRAIGHT mode ............................................64Subnet Mask ...................................................111Subnet mask ...................................................111Subwoofer ......................................................100Subwoofer ................................................26, 100Subwoofer configuration ................................100Subwoofer connection ......................................26Subwoofer phase ............................................101Subwoofer using ...............................................26Supplied accessories .........................................11Support Audio ................................................113Support audio .................................................113Sur. Back L Level ............................................94Sur. Back R Level ............................................94SUR. DECODE ................................................63Sur. Init. Delay .................................................92
Sur. Liveness ................................................... 93Sur. Room Size ................................................ 92Surround ........................................................ 100Surround Back ............................................... 100Surround back left/right speakers .................. 100Surround back speaker distance ...................... 99Surround Decode ............................................. 63Surround decode mode .................................... 86Surround L Level ............................................. 94Surround left/right speakers ........................... 100Surround R Level ............................................. 94S-wave control ............................................... 103System ........................................................... 112System ID ...................................................... 112System Memory ............................................. 115System memory ............................................. 115System reset ................................................... 154System setting saving .................................... 115System settings loading ................................. 118
TTarget:Zone2 ................................................. 109Target:Zone3 ................................................. 109Target:Zone4 ................................................. 109The Bottom Line .............................................. 61The Roxy Theatre ............................................ 61THX ................................................................. 63THX Set ........................................................... 99THX settings .................................................... 99THX Ultra2 subwoofer setting ........................ 99THX Ultra2 SWFR .......................................... 99Tonal quality adjustment ................................. 65Tone Control .................................................. 105Tone control ................................................... 105Transmit indicator, remote control .................. 12Treble ............................................................. 105Treble control ................................................ 105TRIGGER IN jacks ......................................... 38Trigger operation mode ................................. 114TRIGGER OUT jack ....................................... 20Trigger Output ............................................... 114Trigger output ................................................ 114Troubleshooting ............................................. 146TruBass ............................................................ 95TUNED indicator, Front panel display ............ 45Tuner indicators, Front panel display .............. 45Tuner Select ................................................... 110Tuner, troubleshooting ................................... 148Turning off this unit ......................................... 43Turning on the main zone
from the standby mode ................................ 43Turning on this unit ......................................... 43TV controlling by Remote control ................. 121TV controlling, Remote control ..................... 121TV FORMAT ................................................ 144TV format ...................................................... 144TV monitor connection .................................... 31TV, Operation mode selector ........................... 12
UUnit ................................................................ 101Unit ................................................................ 101Unprocessed input source playback ................ 64USB memory device connection ..................... 40USB memory device using .............................. 83USB menu ........................................................ 80USB port .......................................................... 20USB port select ................................................ 98USB portable audio player using ..................... 83USB Select ....................................................... 98USB, troubleshooting .................................... 150USB, USB menu .............................................. 80
171 En

Index
VVCR connection ............................................... 34Vertical dialogue position ................................ 91VIDEO AUX jacks .......................................... 39Video component jacks .................................... 20Video conversion ........................................... 107Video Info. ..................................................... 114Video information .......................................... 114VIDEO jacks .................................................... 29Video jacks ...................................................... 29Video Manual setup ....................................... 107Video signal flow ............................................. 30Video source playback in background ............. 55Video, Manual Setup ..................................... 107Village Gate ..................................................... 60Village Vanguard ............................................. 60Virtual CINEMA DSP ..................................... 64VIRTUAL indicator, Front panel display ........ 45VOLUME level indicator,
Front panel display ...................................... 45Volume Trim .................................................... 97Volume trimming ............................................. 97Volume, Manual Setup .................................. 102Volume, Manual setup ................................... 102
WWake on RS-232C access .............................. 143Wall Paper ...................................................... 108Wall paper ...................................................... 108Warehouse Loft ................................................ 61Wiring, Auto setup parameter .................... 48, 50
XXM jack ........................................................... 20XM Mini-Tuner Home Dock connection ........ 74XM Satellite Radio activation .......................... 74XM Satellite Radio information display .......... 77XM Satellite radio tuning ................................ 74XM Satellite Radio, troubleshooting ............. 149
YYPAO ............................................................... 46YPAO indicator, Front panel display .............. 45
ZZone 2 balance ............................................... 109Zone 2 initial volume setting ......................... 109Zone 2 Maximum volume setting .................. 109Zone 2 monaural mode .................................. 110Zone 2 settings ............................................... 109Zone 2/3/4 muting type .................................. 110Zone 2/3/4 tuner function select .................... 110Zone 3 balance ............................................... 109Zone 3 initial volume setting ......................... 109Zone 3 Maximum volume setting .................. 109Zone 3 monaural mode .................................. 110Zone 3 settings ............................................... 109Zone 4 balance ............................................... 109Zone 4 initial volume setting ......................... 109Zone 4 Maximum volume setting .................. 109Zone 4 monaural mode .................................. 110Zone 4 settings ............................................... 109Zone B feature ................................................. 55Zone indicators, remote control ....................... 12Zone on-screen display .................................. 110Zone OSD ...................................................... 110ZONE OUT jacks ............................................ 20Zone SP Assign .............................................. 109Zone speaker assignment ............................... 109Zone video monitor ........................................ 137Zone video out jacks ........................................ 20Zone video signal conversion ........................ 137
Zone2 Balance ................................................109Zone2 Initial Vol. ...........................................109Zone2 Max Vol. .............................................109Zone2 Mono ...................................................110Zone2 Set ........................................................109ZONE2/ZONE3/ZONE4 indicators,
Front panel display .......................................45Zone3 Balance ................................................109Zone3 Initial Vol. ...........................................109Zone3 Max Vol. .............................................109Zone3 Mono ...................................................110Zone3 Set ........................................................109Zone4 Balance ................................................109Zone4 Initial Vol. ...........................................109Zone4 Max Vol. .............................................109Zone4 Mono ...................................................110Zone4 Set ........................................................109
“BMASTER ON/OFF” or “3DVD” (example) indicates the name of the parts on the front panel or the remote control. Refer to the cover pages the end of this manual for the information about each position of the parts.
172 En

List of remote control codes
Ad
ditio
nal
Info
rmatio
n
TVACURA 00101ADDISON 01201, 01601, 08401ADMIRAL 01301, 02201, 05801ADVENT 09601AGB 06801AIKO 01201AKAI 00101, 00301, 02901,
04601, 06801, 08901, 10501
AKURA 03701ALBA 00101, 00401, 04801,
08501AMERICA ACTION
02701, AMPRO 09401AMSTRAD 00101, 00401, 02501,
04801, 05101, 05301, 06801
ANAM 00101, 02701, 03401ANAM NATIONAL
03401, 08301ANITECH 00101AOC 00101, 00301, 00901,
01201, 01301, 01601, 02601, 02701, 05601
APEX DIGITAL09301, 09701, 09901
ASA 01401AUDIOSONIC 00401, 01701AWA 00101BANG & OLUFSEN
07201BASIC 00101BAUR 00401, 04601, 06701BAYSONIC 02701BEAUMARK 02601BEKO 04701, 06201, 09001,
09101BELL & HOWELL
02001BEON 00401BLAUPUNKT 02801BLUE SKY 08501, 11401BONDSTEC 03301BRADFORD 02701BRANDT 01701, 04201BROKSONIC 03101, 05801BUSH 00101, 00101, 00401,
04801, 04901, 08501, 11401
BYDESIGN 14301, 14401, 14501, 14601
CANDLE 00301CARNIVALE 00301CARVER 00801, 02401CASCADE 00101CATHAY 00401CCE 00401CELEBRITY 00001CELERA 09701CENTURION 00401CGE 03301CHANGHONG 09701CHING TAI 00101, 01201CHUN YUN 00001, 00101, 01201,
02701CHUNG HSIN 00701, 01601, 02701CIMLINE 00101CINERAL 01201, 05601CITIZEN 00301, 00901, 01201CLARION 02701CLARIVOX 00401CLATRONIC 03301, 04701CONDOR 04101, 04701CONRAC 10301CONTEC 00101, 02701CRAIG 02701CROSLEY 00801
CROWN 00101, 00401, 02701, 04701, 05201
CTC 03301CURTIS MATHES
00301, 00501, 00801, 00901, 01301, 01801, 02001, 02301, 05601, 08901, 11801, 12201
CXC 02701DAEWOO 00101, 00301, 00401,
01201, 01601, 02001, 02401, 02601, 02701, 04901, 05601, 07901, 08201, 13101
DANSAI 00401DAYTON 00101DE GRAAF 02901, 06901DECCA 00401, 06801DENON 01801DIGATRON 00401DIXI 00101, 00401DUMONT 00201DWIN 09201, 10101ECE 00401ELBE 03501ELECTROBAND
00001ELIN 00401, 06901ELITE 04101ELTA 00101EMERSON 02001, 02601, 02701,
03101, 04601, 05801, 07901
ENVISION 00301, 10601EPSON 11001ERRES 00401ETHER 00101, 00301ETRON 00101EUROPHON 06801FERGUSON 00401, 01001, 01701,
03201, 03801, 04201, 07101
FIDELITY 04601FINLANDIA 02901, 04401FINLUX 00401, 01401, 01501,
04401, 06801FIRSTAR 00101, 03101FIRSTLINE 00101, 03301, 08501FISHER 01401, 02001, 02901,
04701FLINT 05701FORMENTI 00401, 04101FORTRESS 01301FRONTECH 02201, 03301, 03701FUJITSU 08701, 10401FUNAI 02501, 02701, 03701FUTURETECH 02701GATEWAY 13301, 13401GE 00301, 00501, 00601,
01201, 02601, 02701, 05601, 07101, 11801, 12201, 12601
GEC 00401, 06801GELOSO 00101GENEXXA 02201GIBRALTER 00201, 00301GOLDSTAR 00301, 00401, 01701,
02001, 02601, 05001GOODMANS 00401, 04801, 04901,
08201GOREMJE 04701GRADIENTE 00701, 02401GRAETZ 02201, 04601GRANADA 00401, 02901, 04301,
06801GRANDIN 07701GRUNDIG 00401, 02801, 06301,
07001, 07401GRUNPY 02701HALLMARK 02601HANKOOK 00301, 02601, 02701
HANSEATIC 00401, 04101, 04601, 05201, 07001
HANTAREX 06801HARMAN/KARDON
00801HARVARD 02701HAVERMY 01301HCM 00101, 05101HELLO KITTY 05601HINARI 00101, 00401HISAWA 05701HITACHI 00101, 00301, 01201,
01501, 01701, 01801, 02201, 02601, 03001, 04501, 06101, 06901, 07301, 11701, 12101
HUA TUN 00101HUANYU 04901HYPSON 00401, 03701ICE 03701, 04801IMPERIAL 03301, 04701, 05201INDIANA 00401INFINITY 00801INGELEN 02201INNO HIT 06801INNOVA 00401INTEQ 00201INTERFUNK 00401, 02201, 03301,
04601, 06701INTERVISION 00401, 03701, 05001ITS 04801ITT 02201, 04601, 06901JBL 00801JCB 00001JEAN 00101, 00601, 01201,
02101, 03101JENSEN 09601JVC 00701, 04801, 05801,
08401, 08701KAISUI 00101KAPSCH 02201KARCHER 07701KATHREIN 07001KEC 02701KENDO 00401KENWOOD 00301KNEISSEL 03501, 05401KOLIN 00701, 01601, 02701KORPEL 00401KOYODA 00101KTV 00301, 02701L&S ELECTRONIC
10301LEYCO 00401, 03701LG 00301, 00401, 00901,
01601, 02601, 09001LIESENK & TTER
00401LOEWE 06701LUXOR 04501, 04601LXI 00501, 00801, 02001,
02101, 02601M ELECTRONIC
00101, 00401, 01401, 01501, 01701, 02201, 03801, 04401, 04901, 06001
MAGNADYNE 03301, 06801MAGNAFON 06801MAGNAVOX 00301, 00801, 12001,
12601MANESTH 03701, 04101MARANTZ 00301, 00401, 00801,
07001MARK 00401MATSUI 00101, 00401, 02901,
04801, 06301, 06801MATSUSHITA 03401, 08301MEDIATOR 00401MEDION 08501, 10301, 11401MEGATRON 01801, 02601
MEMOREX 00101, 01901, 02001, 02601, 03401, 05801, 11401
METZ 05501MGA 00301, 01901, 02601MICROMAXX 10301MICROSTAR 10301MIDLAND 00201, 00501, 00601MINERVA 06301MINOKA 05101MITSUBISHI 00301, 01301, 01601,
01901, 02001, 02601, 02701, 03101, 03401, 06701, 11201, 11901
MIVAR 03901, 04001, 06801, 07601
MOTOROLA 01301MTC 00301, 00901, 06701MULTITECH 00101, 02701MYRYAD 07001NAD 02101, 02601, 04601,
11301NEC 00101, 00301, 00601,
02001, 02101, 02401, 02601, 05701, 06501, 13201
NECKERMANN00401, 07001
NEI 00401NETSAT 00401NEWAVE 00101, 01201, 01301,
02601NIKKAI 00401, 03701NIKKO 00301, 01201, 02601NOKIA 04601, 05901, 06001,
06901, 08101NORCENT 09301, 10801NORDMENDE 01701, 03801, 07101NTC 01201OCEANIC 02201, 04601ONWA 02701, 05301OPTIMUS 02001, 02301, 03401,
08301OPTONICA 01301ORION 00401, 03101, 04101,
05801, 06801OSAKI 03701, 05101OTTO VERSAND
00401, 04101, 06701, 07001
PALLADIUM 04701, 05201PANAMA 03701PANASONIC 00401, 00601, 00801,
02201, 03401, 08301, 12401
PATHE CINEMA03201, 04101
PAUSA 00101PENNEY 00301, 00501, 00601,
00901, 02101, 02601, 12201
PERDIO 04101PHILCO 00301, 00401, 00801,
01801, 02601, 02701, 03301, 05801, 13101
PHILIPS 00001, 00301, 00401, 00601, 00801, 01201, 01601, 02601, 04901, 07001, 08801, 12601
PHONOLA 00401PILOT 00301PIONEER 01701, 02201, 02301,
03801, 08601, 09501, 11301
PORTLAND 01201PRANDONI-PRINCE
06801PRIMA 09601PRISM 00601PROFEX 00101, 04601PROSCAN 00501
List of remote control codes
173 En

List of remote control codes
PROTECH 00101, 00401, 03301, 03701, 05201, 08501
PROTON 00101, 00301, 02601PULSAR 00201QUASAR 00601, 03401, 08301QUELLE 00401, 01401, 04601,
06701RADIOLA 00401RADIOMARELLI
06801RADIOSHACK 00301, 00501, 02001,
02601, 02701RCA 00001, 00301, 00501,
01101, 01201, 02601, 08601, 11501, 11801, 13901, 12201, 12501, 12601, 12801
REALISTIC 00301, 02001, 02601, 02701
REDIFFUSION 04601REOC 09001REVOX 00401REX 02201, 03501, 03701RFT 05201R-LINE 00401ROADSTAR 00101, 03701, 05201RUNCO 00201, 00301, 06501,
07501SABA 01701, 02201, 03801,
04201SACCS 03201SAGEM 07701SAISHO 00101, 03701, 06801SALORA 02201, 04601, 06901SAMBERS 06801SAMPO 00101, 00301, 01201,
01301, 02001, 02501, 02601, 08301, 13301
SAMSUNG 00101, 00301, 00401, 00901, 01101, 01201, 02001, 02601, 03701, 04701, 07001, 07401, 07801, 08901, 09801, 10501, 10701
SANSEI 05601SANSUI 05801SANYO 01401, 02001, 02701,
02901, 04301, 10201SBR 00401SCHAUB LORENZ
04601SCHNEIDER 00401, 03301, 04801,
08501SCOTCH 02601SCOTT 02601, 02701, 03101SEARS 00501, 00801, 02001,
02101, 02501, 02601SEG 03701, 08501SEI 06801SELECO 02201, 03501SEMIVOX 02701SEMP 02101SHARP 00301, 01301, 08301SHEN YING 00101, 01201SHENG CHIA 00101, 01301, 03101SIAREM 06801SIEMENS 00401, 02801SINUDYNE 06801SKANTIC 04501SKY 00401SKYGIANT 02701SKYWORTH 00401SOLAVOX 02201SONITRON 02901SONOKO 00101, 00401SONOLOR 02201, 02901SONTEC 00401SONY 00001, 08301, 11101,
11601, 12701, 12901SOUNDESIGN 02601, 02701SOUNDWAVE 00401, 05201SOWA 00601, 00901, 01201,
02101, 02601SQUAREVIEW 02501SSS 02701
STANDARD 00101STARLITE 02701STERN 02201, 03501SUPREME 00001SYLVANIA 00301, 00801, 02501SYMPHONIC 02501, 02701SYNCO 00001, 00901, 01201,
01301, 02601, 05601SYSLINE 00401T + A 05501TACICO 00101, 01201, 02601TAI YI 00101TANDY 01301, 02201TASHIKO 01201, 08301TATUNG 00101, 00401, 00601,
00801, 00901, 02001, 02101, 06801
TCM 10301TEAC 00101, 00401, 03701,
05101, 05201, 05701, 08501, 11401
TEC 03301TECHNEMA 04101TECHNICS 00601, 03401, 08301TECHWOOD 00601TECO 00101, 00601, 01201,
01301, 02601, 03701, 08401
TEKNIKA 00801, 00901, 01201, 01901, 02701
TELEFUNKEN 01701, 03601, 04201, 08001, 08901
TELEMEISTER04101
TELETECH 00101TENSAI 04101TERA 00301THOMSON 01701, 03801, 07101,
08001, 12501THORN 00401, 01401, 04601,
06701TMK 02601TNCI 00201TOSHIBA 00901, 02001, 02101,
06601, 07801, 08301, 10901, 12101, 12301, 13001, 13201
TRIUMPH 06801TUNTEX 00101, 00301, 01201TVS 05801UHER 04101UNIVERSUM 00401, 01401, 01501,
03701, 04401, 04701, 06401
VECTOR RESEARCH00301
VESTEL 00401VICTOR 00701, 03401, 08301,
08401VIDEOSAT 03301VIDIKRON 00801VIDTECH 02601VIEWSONIC 13301VISION 04101VOXSON 02201WALTHAM 04501WARDS 00301, 00801, 02601,
11301WATSON 00401, 04101WAYCON 02101WHITE WESTINGHOUSE
00401, 04101, 05801, 07901
Yamaha 00301, 01801, 08301, 10001, 11001, 13501, 13601, 13701, 13801, 14001, 14101, 14201
YAPSHE 03401YOKO 00401, 03701ZENITH 00201, 01201, 02601,
05801
VCRADMIRAL 01102ADVENTURA 00002
AIKO 02102AIWA 00002, 00402, 02202,
02602, 02702AKAI 00602, 02302AKIBA 01402ALBA 01402, 02102, 02302,
02702AMERICA ACTION
02102AMERICAN HIGH
00302AMSTRAD 00002ANAM 00402, 01902, 02002,
02102, 02902ANAM NATIONAL
01902, 04502ANITECH 01402ASA 00402, 01502ASHA 02002ASUKA 00402AUDIOVOX 00402, 02102BAIRD 00002, 00602, 01602BASIC LINE 01402, 02102BEAUMARK 02002BELL & HOWELL
01602BLAUPUNKT 01902BRANDT 02402BRANDT ELECTRONIC
00602BROKSONIC 01702, 02602, 04402BUSH 01402, 02102, 02702CALIX 00402CANON 00302CARVER 01502CCE 01402, 02102CGE 00002CIMLINE 01402CINERAL 02102CITIZEN 00402, 02102, 04302COLT 01402COMBITECH 02702CRAIG 00402, 01002, 01402,
02002CROWN 01402, 02102CURTIS MATHES
00302, 00602, 01202, 03702
CYBERNEX 02002CYRUS 01502DAEWOO 00902, 01602, 02102,
03402, 04302DANSAI 01402DE GRAAF 00702DECCA 00002, 01502DENON 00702DUAL 00602DUMONT 00002, 01502, 01602DYNATECH 00002ELCATECH 01402ELECTROHOME
00402ELECTROPHONIC
00402EMEREX 00102EMERSON 00002, 00302, 00402,
00802, 00902, 01702, 02002, 02102, 04302, 04402
ESC 02002, 02102FERGUSON 00602, 02402FIDELITY 00002FINLANDIA 01502, 01602FINLUX 00002, 00702, 01502,
01602FIRSTLINE 00402, 00802, 00902,
01402FISHER 01002, 01602FUJI 00202, 00302FUJITSU 00002, 00902FUNAI 00002GARRARD 00002GE 00302, 01202, 02002,
03502, 03702, 03802GEC 01502
GENERAL 00902GO VIDEO 02802GOLDHAND 01402GOLDSTAR 00402, 01802, 02902,
04202GOODMANS 00002, 00402, 01402,
02102GRADIENTE 00002GRAETZ 00602, 01602, 02002GRANADA 01502, 01602GRANDIN 00002, 00402, 01402GRUNDIG 01402, 01502, 01902,
02502HANSEATIC 00402HARLEY DAVIDSON
00002HARMAN/KARDON
01502HARWOOD 01402HCM 01402HINARI 01402, 02002, 02702HI-Q 01002HITACHI 00002, 00402, 00602,
00702, 02002HUGHES NETWORK SYSTEMS
00702HYPSON 01402IMPERIAL 00002INTERFUNK 01502ITT 00602, 01602, 02002ITV 00402, 02102JENSEN 00602JVC 00602, 00902, 01302KAISUI 01402KEC 00402, 02102KENWOOD 00602, 01302KLH 01402KODAK 00302, 00402KOLIN 00602, 00802KORPEL 01402LENCO 02102LEYCO 01402LG 00402, 00702, 00902,
02902LLOYD’S 00002LOEWE 00402, 01502, 04502LOGIK 01402, 02002LUXOR 00802, 01102, 01602LXI 00402M ELECTRONIC
00002MAGNASONIC04302MAGNAVOX 00002, 00302, 00502,
01502MAGNIN 02002MANESTH 00902, 01402MARANTZ 00302, 01502MARTA 00402MATSUI 02602, 02702MATSUSHITA 00302MEDION 02602MEI 00302MEMOREX 00002, 00302, 00402,
00502, 01002, 01102, 01602, 02002, 02202, 02602, 04202
MEMPHIS 01402METZ 00402, 02502, 04502MGA 00802, 02002MGN TECHNOLOGY
02002MINOLTA 00702MITSUBISHI 00602, 00802, 01302,
01502, 03502MOTOROLA 00302, 01102MTC 00002, 02002MULTITECH 00002, 01402MURPHY 00002MYRYAD 01502NAD 01602NATIONAL 01902NEC 00302, 00402, 00602,
01102, 01302, 01602NECKERMANN
01502
174 En

Ad
ditio
nal
Info
rmatio
nList of remote control codes
NESCO 01402NEWAVE 00402NIKKO 00402NOBLEX 02002NOKIA 00602, 01602, 02002NORDMENDE 00602, 02402OCEANIC 00002, 00602OKANO 02302, 02602OLYMPUS 00302, 01902OPTIMUS 00402, 01102, 01602,
02802ORION 01702, 02602, 02702,
04402OSAKI 00002, 00402, 01402OTTO VERSAND
01502PALLADIUM 00402, 00602, 01402PANASONIC 00302, 01802, 01902,
03102, 03702, 04502PATHE MARCONI
00602PENNEY 00302, 00402, 00702,
02002, 03702, 04202PENTAX 00702PERDIO 00002PHILCO 00302PHILIPS 00302, 01502, 03202,
03902, 04002PHONOLA 01502PILOT 00402PIONEER 00702, 01302, 01502POLK AUDIO 01502PROFITRONIC 02002PROLINE 00002PROSCAN 01202, 03802PROTEC 01402PULSAR 00502PYE 01502QUASAR 00302, 03702QUELLE 01502RADIOLA 01502RADIOSHACK 00002RADIX 00402RANDEX 00402RCA 00302, 00702, 01202,
02002, 03502, 03702, 03802
REALISTIC 00002, 00302, 00402, 01002, 01102, 01602
REOC 02602REPLAYTV 03002, 03102REX 00602ROADSTAR 00402, 01402, 02002,
02102RUNCO 00502SABA 00602, 02402SALORA 00802SAMPO 00402, 01102SAMSUNG 00902, 02002, 02802SANKY 00502, 01102SANSUI 00002, 00602, 01302,
04402SANYO 01002, 01602, 02002SAVILLE 02702SBR 01502SCHAUB LORENZ
00002, 00602, 01602SCHNEIDER 00002, 01402, 01502SCOTT 00802, 00902, 01702SEARS 00002, 00302, 00402,
00702, 01002, 01602, 04202
SEG 02002SEI 01502SELECO 00602SEMP 00902SHARP 01102, 03502SHINTOM 01402, 01602SIEMENS 00402, 01502, 01602SILVA 00402SINGER 00902, 01402SINUDYNE 01502SONIC BLUE 03002, 03102SONTEC 00402
SONY 00002, 00102, 00202, 00302, 03302, 04102
STS 00702SUNKAI 02602SUNSTAR 00002SUNTRONIC 00002SYLVANIA 00002, 00302, 00802,
01502SYMPHONIC 00002TANDY 00002, 01602TASHIKO 00002, 00402TATUNG 00002, 00602, 00902,
01302, 01502TEAC 00002, 00602, 02102,
02202, 03402TECHNICS 00302, 01902TECO 00302, 00402, 00602,
01102TEKNIKA 00002, 00302, 00402TELEAVIA 00602TELEFUNKEN 00602, 02402TENOSAL 01402TENSAI 00002THOMAS 00002THOMSON 00602, 01202, 01302,
02402THORN 00602, 01602TIVO 03202, 03302TMK 02002TOSHIBA 00602, 00802, 00902,
01302, 01502, 03602TOTEVISION 00402, 02002UHER 02002UNITECH 02002UNIVERSUM 00002, 00402, 01502,
02002VECTOR 00902VICTOR 00602, 01302VIDEO CONCEPTS
00902VIDEOMAGIC 00402VIDEOSONIC 02002VILLAIN 00002WARDS 00002, 00302, 00702,
01002, 01102, 01202, 01402, 01502, 02002
WHITE WESTINGHOUSE01402
XR-1000 00002, 00302, 01402Yamaha 00602YAMISHI 01402YOKAN 01402YOKO 02002ZENITH 00002, 00202, 00502,
04402
CABLEABC 00103, 00203AMERICAST 02003BELL SOUTH 02003BIRMINGHAM CABLE COMMUNICATIONS
00803BRITISH TELECOM
00103DAERYUNG 00203, 01403, 01903DIRECTOR 01303FILMNET 01203GENERAL INSTRUMENT
00103, 00803, 01303, 01703
GOLDSTAR 00503HAMLIN 00303, 00703JERROLD 00103, 00803, 01303,
01703LG 00503MEMOREX 00003MNET 01203MOTOROLA 00803, 01303, 01703,
02303NOOS 01803PACE 00603, 02203PANASONIC 00003, 00203, 00403PARAGON 00003
PHILIPS 01003, 01103PIONEER 00503, 01603, 01903PULSAR 00003PVP STEREO VISUAL MATRIX
00103QUASAR 00003RCA 02403, 02503REGAL 00703, 00903RUNCO 00003SAGEM 01803SAMSUNG 00003, 00503SCIENTIFIC ATLANTA
00203, 01403, 01903SONY 02103STARCOM 00103SUPERCABLE 00803TELE+1 01203TORX 00103TOSHIBA 00003TRANS PX 00803TS 00103UNITED CABLE
00103ZENITH 00003, 01503, 02003
SATELLITE TUNER@SAT 06404ABSAT 00104ALBA 01404ALPHASTAR 02504AMSTRAD 03004ASTON 00304, 05004ASTRO 00604ATSAT 06404AVALON 01304BLAUPUNKT 00604BRITISH SKY BROADCASTING
03004, 05204CANAL DIGITAL
03104CANAL SATELLITE
03104CANAL+ 03104CHAPARRAL 00804CITYCOM 05304CONNEXIONS 01304CROSSDIGITAL04604CYRUS 00704DAERYUNG 01304DAEWOO 06304D-BOX 02104, 04904DIGENIUS 01104DIRECTV 00904, 01204, 01504,
01704, 02204, 02304, 02804, 04104, 04604, 05104, 06904
DISH NETWORK SYSTEM02604, 03704
DISHPRO 02604, 03704DISTRATEL 00004DMT 04004DNT 00704, 01304DREAM MULTIMEDIA
05804ECHOSTAR 00504, 01304, 01604,
02604, 03104, 03604, 03704, 04304
ENGEL 03804EXPRESSVU 02604FINLUX 01404FOXTEL 07004, 07104, 07204,
07304, 07404FRACARRO 03604FTE 03404FUBA 01304GALAXIS 03404, 04704GE 01504GENERAL INSTRUMENT
03504GOI 02604GOLD BOX 03104GRUNDIG 00604, 03004HIRSCHMANN
00604, 01304
HITACHI 01404, 02804HTS 02604HUGHES NETWORK SYSTEM
02304, 05104, 06904HUMAX 03404, 05304INVIDEO 03604JVC 02604KATHREIN 00104, 00604, 00704,
01004, 01804, 05604KREISELMEYER
00604LABGEAR 06304LOGIX 03804LORENZEN 01104MAGNAVOX 02004, 02204MANHATTAN 01404, 03804, 04204MARANTZ 00704MEDIASAT 03104MEMOREX 02204METRONIC 00004MITSUBISHI 02304MOTOROLA 03504MYRYAD 00704NEXT LEVEL 03504NOKIA 01404, 02104, 02404,
04904, 05704, 06804OCTALTV 03704ORBITECH 04504PACE 01404, 03004, 05204,
06604PANASONIC 00904, 01904, 03004,
06504PANDA 01404PAYSAT 02204PHILIPS 00204, 00704, 01404,
02004, 02204, 02304, 03104, 04104, 05104, 06904
PIONEER 03104PROMAX 01404PROSCAN 01204, 01504RADIOLA 00704RADIOSHACK 03504RADIX 01304RCA 00404, 01204, 01504,
03204RFT 00704SABRE 01404SAGEM 02904, 04804, 05904SAMSUNG 03804, 04604, 06004,
06204SAT CONTROL06404SATSTATION 04204SCHWAIGER 04704SEEMANN 01304SIEMENS 00604SKY 03004, 03304, 05204SM ELECTRONIC
05404SONY 01704, 03004, 06704STAR CHOICE 03504STRONG 06404TANTEC 01404TECHNISAT 04404, 04504TELESTAR 04504THOMSON 01404, 03104, 03904,
06104TOPFIELD 05504TOSHIBA 02304, 02704, 06904TPS 02904, 05904ULTIMATETV 01204, 01704UNIDEN 02004, 02204UNIVERSUM 00604VENTANA 00704WISI 00604, 01304, 01404XSAT 00104ZEHNDER 04004ZENITH 03304
175 En

List of remote control codes
CD PLAYERAIWA 00605ARCAM 00605AUDIO RESEARCH
00605AUDIO TON 00605AUDIOLAB 00605AUDIOMECA 00605CAIRN 00605CALIFORNIA AUDIO LABS
00205CARVER 00605, 00805CYRUS 00605DENON 01005DKK 00005DMX ELECTRONICS
00605DYNAMIC BASS
00805EMERSON 00905FISHER 00805GENEXXA 00305, 00905GOODMANS 00905GRUNDIG 00605HARMAN/KARDON
00605, 00705HITACHI 00305JVC 00505KENWOOD 00105, 00405KRELL 00605LINN 00605LXI 00905MAGNAVOX 00605, 00905MARANTZ 00205, 00605MATSUI 00605MCS 00205MEMOREX 00905MERIDIAN 00605MICROMEGA 00605MIRO 00005MISSION 00605MYRYAD 00605NAD 00005NAIM 00605NSM 00605OPTIMUS 00005, 00305, 00405,
00805, 00905PANASONIC 00205PHILIPS 00605PIONEER 00305, 00905POLK AUDIO 00605PROTON 00605QED 00605QUAD 00605QUASAR 00205RCA 00305, 00805, 00905REALISTIC 00805REVOX 00605ROTEL 00605SAE 00605SANSUI 00605, 00905SANYO 00805SCOTT 00905SEARS 00905SHARP 00405SIMAUDIO 00605SONIC FRONTIERS
00605SONY 00005SYMPHONIC 00905TAG MCLAREN
00605TANDY 00305TECHNICS 00205THORENS 00605THULE 00605UNIVERSUM 00605VICTOR 00505WARDS 00605Yamaha 01105, 01205
CD RECORDERKENWOOD 01305MARANTZ 01305PHILIPS 01305Yamaha 01405
DVD PLAYERACOUSTIC SOLUTIONS
02806ALBA 02606AMSTRAD 02306APEX DIGITAL
02106, 02606, 03006, 03506, 03606, 03706, 04106
BLAUPINKT 02606BLUE PARADE01006BUSH 02306CENTREX 02106CLATRONIC 03406CYBERHOME 02406DAEWOO 03206, 03306DANSAI 03206DECCA 03206DENON 00006DIAMOND 03106DIGITREX 02106DVD2000 00206EMERSON 01206ENTERPRISE 01206FISHER 02006GE 00306, 02606GO VIDEO 02506GOLDSTAR 02906GRADIENTE 01806GREENHILL 02606GRUNDIG 00706HITACHI 01106, 01906HITEKER 02106JVC 00906, 01306KENWOOD 00006, 00606KLH 02606KOSS 01806LG 02906LIMIT 03106MAGNAVOX 00106, 02206MARANTZ 00706MEMOREX 03806MICO 02706MICROSOFT 00306MINTEK 02606MITSUBISHI 00206MUSTEK 02806NESA 02606ONKYO 00106ORITRON 01806PALSONIC 02106PANASONIC 00006, 01606, 04206PHILIPS 00106, 00706, 01706,
03906PIONEER 00406, 01006, 01506,
01606POLK AUDIO 00706PROSCAN 00306QWESTAR 01806RCA 00306, 01006, 02606ROTEL 01306SAMSUNG 01106, 04506SANYO 02006SHARP 01406SHERWOOD 03206SHINSONIC 00506SLIM ART 03306SM ELECTRONIC
02806SONY 00506, 04006SYLVANIA 02206TATUNG 03206TEAC 01006, 02606TECHNICS 00006THETA DIGITAL
01006THOMSON 00306
TOSHIBA 00106, 04606URBAN CONCEPTS
00106XBOX 00306Yamaha 00006, 00706, 00806,
04306, 04406ZENITH 00106, 01206, 02906ZEUS 03306
DVD RECORDERHITACHI 01507PANASONIC 00007, 00107, 00207PHILIPS 00807PIONEER 00407, 00507, 00607SHARP 01207, 01307SONY 00907, 01007, 01107TOSHIBA 00307VICTOR 01407Yamaha 00707
LD PLAYERCARVER 00108DENON 00008MARANTZ 00108MITSUBISHI 00008NAD 00008NAGSMI 00008OPTIMUS 00008PHILIPS 00108PIONEER 00008SALORA 00108SONY 00208TELEFUNKEN 00008Yamaha 00308
MD RECORDERKENWOOD 00109ONKYO 00309SHARP 00209SONY 00009Yamaha 00409, 00509, 00609
RECEIVER (TUNER)ADC 00710AIWA 00410, 01210, 03610,
03910, 04410ALCO 03810ANAM 04310APEX DIGITAL
01810AUDIOLAB 01510AUDIOTRONIC01510AUDIOVOX 03810BOSE 01610CAMBRIDGE SOUNDWORKS
03310CAPETRONIC 00710CARVER 01210, 01510CENTREX 01810DENON 03210FERGUSON 00710FINE ARTS 01510GRUNDIG 01510HARMAN/KARDON
00210, 02610INTEGRA 00310, 02510JBL 00210, 02710JVC 00110, 00710, 03410,
04110KENWOOD 01010, 03010KLH 03810, 04010MAGNAVOX 00710, 01210, 01510,
02110MARANTZ 00010, 01210, 01510,
02410MCS 00010MICROMEGA 01510MUSICMAGIC 01210MYRYAD 01510NAD 00610NORCENT 03710
ONKYO 00310, 00810, 02510OPTIMUS 00710, 00910PANASONIC 00010, 02310, 04210,
04710PHILIPS 01210, 01510, 01910,
02010, 02110, 02210, 02410
PIONEER 00710, 00910, 03510POLK AUDIO 02410PROSCAN 01710QUASAR 00010RCA 00710, 00910, 01710,
03810, 04310SABA 00710SANSUI 01210SCHNEIDER 00710SONY 00410, 01110, 01310,
04510, 04610STEREOPHONICS
00910SUNFIRE 03010TEAC 03810TECHNICS 00010, 02810, 02910,
04210TELEFUNKEN 00710THOMSON 01710THORENS 01510UHER 00710VENTURER 03810VICTOR 00110WARDS 00410Yamaha 00510, 01410, 03110,
04810, 05510, 05610, 05710, 05810
Yamaha (iPod)05310
Yamaha (NET)05410
Yamaha (TUNER ID1)04910
Yamaha (TUNER ID2)05510
Yamaha (XM ID1)05110
Yamaha (XM ID2)05610
TAPE DECKAIWA 00111CARVER 00111GRUNDIG 00111HARMAN/KARDON
00111MAGNAVOX 00111MARANTZ 00111MYRYAD 00111OPTIMUS 00011PHILIPS 00111PIONEER 00011POLK AUDIO 00111RCA 00011REVOX 00111SANSUI 00111SONY 00211THORENS 00111WARDS 00011Yamaha 00311, 00411
176 En

YAMAHA ELECTRONICS CORPORATION, USA 6660 ORANGETHORPE AVE., BUENA PARK, CALIF. 90620, U.S.A.YAMAHA CANADA MUSIC LTD. 135 MILNER AVE., SCARBOROUGH, ONTARIO M1S 3R1, CANADAYAMAHA ELECTRONIK EUROPA G.m.b.H. SIEMENSSTR. 22-34, 25462 RELLINGEN BEI HAMBURG, GERMANYYAMAHA ELECTRONIQUE FRANCE S.A. RUE AMBROISE CROIZAT BP70 CROISSY-BEAUBOURG 77312 MARNE-LA-VALLEE CEDEX02, FRANCEYAMAHA ELECTRONICS (UK) LTD. YAMAHA HOUSE, 200 RICKMANSWORTH ROAD WATFORD, HERTS WD18 7GQ, ENGLANDYAMAHA SCANDINAVIA A.B. J A WETTERGRENS GATA 1, BOX 30053, 400 43 VÄSTRA FRÖLUNDA, SWEDENYAMAHA MUSIC AUSTRALIA PTY, LTD. 17-33 MARKET ST., SOUTH MELBOURNE, 3205 VIC., AUSTRALIA
© 2007 All rights reserved.
Printed in Malaysia WK97700
UCA
AV Receiver
OWNER’S MANUALEnglish
RX-Z11_UCA-cv.fm Page 1 Thursday, October 4, 2007 4:15 PM
Black process 45.0° 240.0 LPI