Automotive Technician Training (ATT) Technician Training (ATT) Light Vehicle Maintenance and Repair...
32
IMI eLearning Automotive Technician Training (ATT) Light Vehicle Maintenance and Repair (Auto365) Accident Repair (AR365) User Guide and Help Manual v1.2 Copyright © IMI Tom Denton, BA, FIMI, MIRTE, MSAE, Cert Ed All rights reserved by the author. No part of this publication can be reproduced, stored in a retrieval system, or transmitted in any form or by any means, electronic, mechanical, photocopying, recording or otherwise, without the prior permission of the publishers and/or authors. This publication does not form part of any photocopying license agreement. 1
Transcript of Automotive Technician Training (ATT) Technician Training (ATT) Light Vehicle Maintenance and Repair...

IMI eLearning
Automotive Technician Training (ATT) Light Vehicle Maintenance and Repair (Auto365)
Accident Repair (AR365)
User Guide and Help Manual v1.2
Copyright © IMI
Tom Denton, BA, FIMI, MIRTE, MSAE, Cert Ed
All rights reserved by the author. No part of this publication can be reproduced, stored in a retrieval system, or transmitted in any form or by any means, electronic, mechanical, photocopying, recording or
otherwise, without the prior permission of the publishers and/or authors.
This publication does not form part of any photocopying license agreement.
1

IMI eLearning
Contents
1 Start Here! ........................................................................................................................................... 3
1.1 Introduction................................................................................................................................... 3
1.2 Copyright and License .................................................................................................................... 3
2 Offline Centre-Based Version ............................................................................................................... 4
2.1 Installation ..................................................................................................................................... 4
2.1.1 Identifier, Access Codes and Passwords .................................................................................... 4
2.1.2 Quick Start ............................................................................................................................... 4
2.1.3 Setup/Install ............................................................................................................................. 4
2.1.4 Network Installation ................................................................................................................. 7
2.2 Updating ........................................................................................................................................ 7
2.3 Offline Overview ............................................................................................................................ 7
2.3.1 Interface Features .................................................................................................................... 7
2.3.2 Accessing the Multimedia Learning .........................................................................................10
2.3.3 Glossaries ................................................................................................................................14
2.3.4 Tools and Equipment ...............................................................................................................15
2.3.5 Interfaces/Skins .......................................................................................................................15
2.3.6 Annotator ...............................................................................................................................15
2.4 Questions .....................................................................................................................................17
2.4.1 Multiple-choice Questions .......................................................................................................17
2.4.2 Certificates ..............................................................................................................................19
2.4.3 Printing Questions ...................................................................................................................19
2.5 Books and Support ........................................................................................................................20
2.5.1 Documents ..............................................................................................................................20
2.5.2 Textbooks................................................................................................................................21
2.6 3d Feature ....................................................................................................................................22
2.6.1 Introduction ............................................................................................................................22
2.6.2 Teaching and Learning with 3d ................................................................................................23
3 Online VLE Version ..............................................................................................................................24
3.1 Creating a Login ............................................................................................................................24
3.2 How to Find the Learning in the ATT Virtual Learning Environment! ..............................................25
3.3 VLE Tracking Feature– Teachers Only ............................................................................................27
4 ATT interactive ....................................................................................................................................29
4.1 Introduction..................................................................................................................................29
4.2 interactive ....................................................................................................................................30
2

IMI eLearning
1 Start Here!
1.1 Introduction This help manual contains everything you need to know about setting up and using the IMI eLearning system. It is split into four main parts:
1. Start Here! 2. Offline Centre-Based Version 3. Online VLE Version 4. ATT interactive
There is more help available at:
• www.automotivett.org (UK and Rest of the World) • www.automotivett.com (North America)
1.2 Copyright and License Copyright of the content is retained by the IMI, the Author and other companies who have allowed their materials to be used for educational purposes. Registered clients are granted permission to use the materials during an agreed license period.
In most cases a site license is issued and this gives permission for all aspects of the materials to be used by employed staff and students enrolled and studying at that site. Any aspect of the material may be duplicated and used in whatever way is preferred during the licensed period.
If a license expires, no parts of the material may continue to be used other than work already created for student portfolios or assignments.
3

IMI eLearning
2 Offline Centre-Based Version
2.1 Installation
2.1.1 Identifier, Access Codes and Passwords The information you need to access the material locally or online is presented on a certificate with information similar to the following:
LICENSE ACCESS KEY DETAILS - KEEP SAFE! Identifier College or School Name
Course Build Expires Access Code Automotive Auto365 31 Aug 2099 XXX-XXX-XXXX Accident Repair AR365 31 Aug 2099 XXX-XXX-XXXX
2.1.2 Quick Start The offline eLearning system is designed for computers running Windows®. The version supplied on USB is ready to run from the drive or you can copy the entire folder to other computers or a shared network drive. You can also download the latest version from the websites.
The system will run directly from the supplied USB or downloaded version, by double-clicking ATT.exe. When the ATT program is first run, enter your user Identifier and Access Code.
If not already on your system, Adobe Flash Player and Adobe Reader should be installed. VE Viewer is also needed on the local machines to run the 3d components. Click the View button on the About screen to find the setup programs in \\InstallFiles, or go to www.adobe.com for the latest versions. Note this is already built in the IE in Windows 8.
2.1.3 Setup/Install On the USB supplied, open the Auto365 and/or AR365 folder and run ATTSetup.exe.
This list of options will show:
4
IMI eLearning
Press 1 and click OK for the option to set your country or region:
Enter the appropriate code and click OK and then confirm your choice. Non-UK or -USA users can choose to keep UK or US English documents. To reset, enter XX in the above box. Now when the program runs it will default to your local interface and documents.
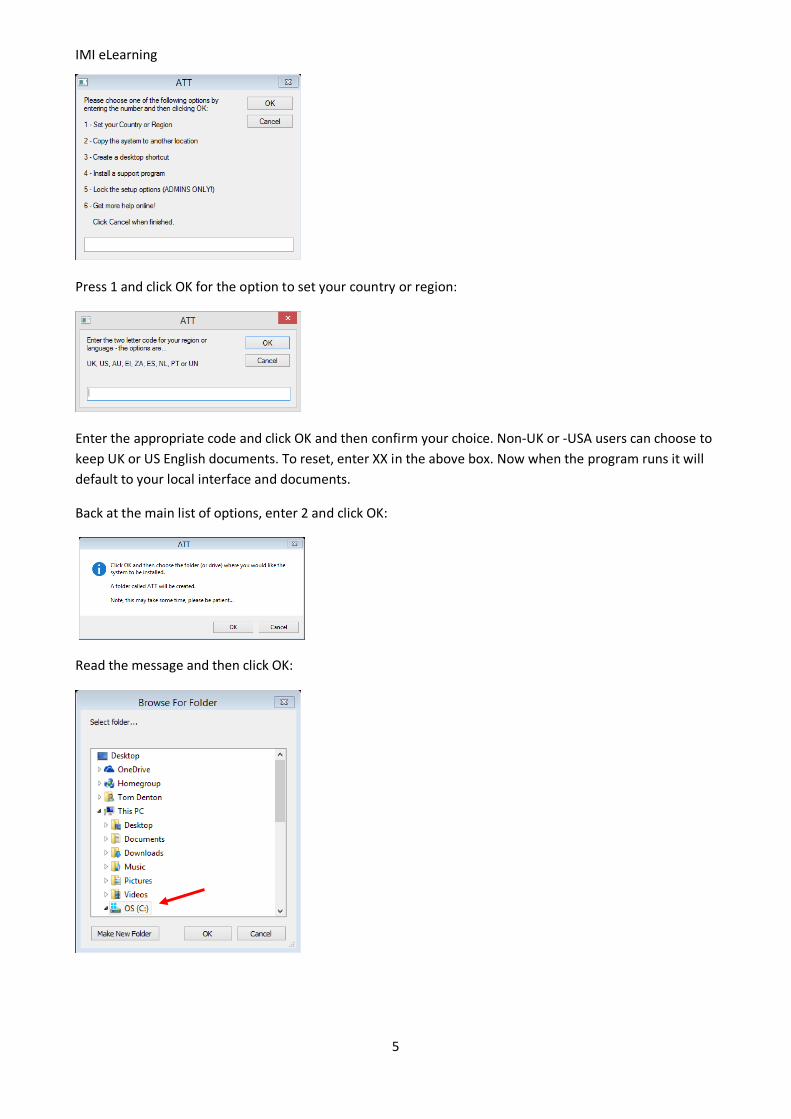
Back at the main list of options, enter 2 and click OK:
Read the message and then click OK:
5

IMI eLearning
Select the drive and folder where you want the course files to be copied (we recommend the root of the C: drive as show above). Now click the OK button. Be patient as several gigabytes may need to be copied (which is a lot!).
When all the files are copied across, you will have an option to create a shortcut on the desktop.
Choose Yes or No and you will then be returned to the main menu again:
You can install a support program by choosing option 4:
After clicking OK, a normal Windows Explorer window will show, which contains several useful setup programs. Please open the ReadMe file for more information. Adobe Player and Reader are probably already on your system, the only other one recommended is The Visual Enterprise Viewer, which is used for the 3d feature.
Finally, Admins can lock access to the setup routines to prevent students making changes! Click 5, and follow the instructions.
6

IMI eLearning
2.1.4 Network Installation To install on a server or shared network drive, run the setup program as above – or just manually copy the files to a suitable folder and then run ATTSetup.exe.
To prevent remote machines requesting the Identifier and Access Code, which is normally written into \\ProgramData\Att, a file named reg.inf can be used. In this way, the user code only needs to be entered centrally once. Explore to find reg.inf in the root folder where ATT was installed. Open the file in Notepad or similar.
Edit it to become a simple one-line text file containing the Access Code that has been issued to you. The key is in this format (dashes must be included and all characters are uppercase letters):
XXX-XXX-XXXX
Exit out of Notepad and save the changes. Once this file is in the root folder, users will no longer need to enter the code for each client computer during the current license period.
If the installation folder is read only (a normal network setting!) please give write permission to ATT3d.exe and ATTGreenshot.exe. They need to write a zero length file to determine the app.Path.
2.2 Updating We are working on new material all the time and so that we can deliver it to you as soon as it is ready we have built in an updater program. Admin access is needed for this program to work correctly. Run it directly from the installation folder or by clicking About and then Updater in the main program. You will need the Updater Password from the unlock certificate to access this feature (if it is part of your license agreement).
Alternatively, the latest version can be downloaded as a zip file from our websites.
2.3 Offline Overview
2.3.1 Interface Features Working around the interface screen, the function of each button is as follows (your interface may vary but the functions are the same). The main features, starting top left, are explained in detail below:
2.3.1.1 Website and Help Click this button to open the website where the latest Help Manual is always available. There is also an up to date list of credits and acknowledgements on the website.
7

IMI eLearning
2.3.1.2 Annotate Clicking the annotate button starts the Greenshot annotate program. You can then capture anything from the screen and annotate it with a range of tools – it is like having a ‘Smart Whiteboard’– when only using a plain screen!
2.3.1.3 Glossary Click to show a very comprehensive automotive, body, paint and engineering related glossary. The box under the glossary button shows direct links to appropriate words from the current learning screen if used.
2.3.1.4 Toolbox A list of tools and equipment is shown when this button is used. Images are shown as items in the list are selected.
2.3.1.5 Notes Click this button to open Word or WordPad for quick notes and project work. A message plus the date and time are copied to the Windows clipboard when this button is clicked. This can be pasted into the Word document so it will take the form of a time stamped log of student notes and activity. Note that there is also a Notes option on many of the learning screens too.
2.3.1.6 3d Click this button to access some amazing 3d models.
2.3.1.7 Search Click the main Search button to access the option to search screen titles. Enter words in order of importance e.g. ‘lights interior’ and then click Search.
One click on any title in the list that now shows will take you directly to that learning screen. If the same screen shows more than once it is because it is used in different structures – move the mouse over the entry from the left and the structure pops up. The search option is context sensitive so it will only search at the current level you are at in the menu structure.
2.3.1.8 Questions The Light Vehicle material (Auto365) contains about 1800 multiple-choice questions and the Accident Repair material (AR365) contains about 700. The questions are all linked to the learning. They are ideal for on-going formative assessment and preparation for final exams. The number of questions varies depending on where you are in the menu structure.
2.3.1.9 Add Bookmark When you are in a learning screen you can bookmark it for later use. For example, if you are part way through a section at the end of a lesson.
8

IMI eLearning
2.3.1.10 Go to Bookmark Click this button to show the list of previously added bookmarks. Double click the item in the list, or select it and click OK. You can also delete old book marks from here.
2.3.1.11 Support This button opens a folder containing a range of additional support materials.
2.3.1.12 Full Screen Click this button and the interface will remove the window surrounds and fill the screen, click again to restore.
2.3.1.13 Exit Quit the program (same as the X top right of the window).
2.3.1.14 Interface It is possible to change the interface look and feel by clicking this button and selecting from the list that shows. The interface chosen also sets the default language.
2.3.1.15 Menu This button allows you to switch between the classic menu that uses big buttons on the screen, and a tree view or structure menu as shown here. The structure menu shows how the material is set up and also allows access to individual learning screens.
2.3.1.16 Return/Back This button simply takes you back one step or will exit the current selection (shortcut key: F4).
9

IMI eLearning
2.3.1.17 Previous Screen Click here to move back to the previous learning screen (shortcut key: F2).
2.3.1.18 Replay This button allows the current screen to replay, or start again from the beginning.
2.3.1.19 Pause When a learning screen is running, this button pauses the voiceover to allow it to be studied in small steps or as required by the student or teacher.
2.3.1.20 Next Screen Click here to move on to the next learning screen (shortcut key: F3).
2.3.1.21 About General ‘ReadMe’ information and access to setup/install features.
2.3.2 Accessing the Multimedia Learning When you open the system you will see a screen similar to one of these (UK and USA versions shown):
If your start screen looks like the following image, please click the ‘i’ button (bottom right) and run the setup program as outlined in section 2.1 above:
The number of steps varies, but to access the learning screens click the large buttons to ‘zoom in’ to the required area. When you click one of the buttons you will be presented with a range of courses or units:
10

IMI eLearning
Select the required course or unit and you will be taken to a page which displays the various topics:
Once you have chosen the topic area, you will be taken to the screen below which shows the buttons for the sections of learning screens within the chosen topic:
A final click takes you into the actual learning material:
11

IMI eLearning
The ‘T’ button at the top left of the screen shows the text that is being narrated OR on the newer screens, the voiceover can be played by clicking the control below the text:
On the traditional screens (left image below) and when used, controls at the bottom left show different images, or control a video or animation. On these learning screens it is possible to right-click and select Zoom In.
On the new screens zoom in and out using the normal browser keys Ctrl+/-. The different resources are accessed using the row of buttons at the top (right image below):
12

IMI eLearning
The row of buttons along the top of the new type screens, allow you to select the resources that are available on each. For example the second button from the left just shows the text (and sound):
The following screen just shows the image (actually two are available in this case):
All the buttons that show when an associated resource is available, and working from left to right, operate as follows:
• All: Click or touch this button shows all the resources available for the current screen - you can scroll down to see them.
• Text: This button shows the text for the screen and an option to play the voiceover. • Copy text: This allows you to copy the main text - alternatively, just select the text and then right-
click and select 'Copy'. • Notes: This opens a basic text editor where you can keep notes and download them as a text file. • Questions: Use this button to access multiple-choice questions when available. • Images: Only the images show when this button is used. Touch or click the image (or the 'Next'
button below it) to change it if more than one is available. • Video: A video will show at the top when this option is selected. • Animation: The files here will be a representation of a vehicle system such as an engine or other
system or component. • Simulation: This shows items such as a representation of a multimeter that you can operate.
13

IMI eLearning
• 3d: A PDF file will show or open with a 3d resource that can be moved and manipulated • interactive: Opens the interactive site (or additional buttons) with different options to interact and
learn more about the current topic. • Translate: Opens Google Translate and automatically translates the text to your language (enter
the code in the box). • Glossary: Opens an online glossary. • Tools: Opens a picture toolbox. • Link: If additional hyperlinks are available they are listed when this button is clicked. • Message: Is for anything else we thought might be useful! • Credits: Acknowledgements to people who created content and those we want to thank!
Teaching/Learning Activity!
Students could be encouraged to come to the front of the class, select a particular resource zoom in on details and then explain why an aspect is important. Note: on a Flash based screen you can right-click and select zoom in or out – on the new web page screens you can press Ctrl+/- to zoom in/out.
2.3.3 Glossaries The glossary is a simple list of words and their definitions. Different languages can be selected and the word or its definition can be copied. When a learning screen is running, some key words or phrases are shown in the glossary list box on the main interface – click a word to jump directly to its definition in the glossary. The offline and online versions of the glossaries are shown here:
Teaching/Learning Activity!
Using the option to copy from the glossary, students could create a table similar to this example, and then swap it with another student to fill in the gaps:
Word Definition An electrical current that flows in forward and reverse bias alternately. Alternator Type of welder used to create small welds using two electrodes pressed either
side of the item being welded. Battery Electrical/electronic device consisting of two plates separated by an insulator.
It is capable of holding a charge. DA sander
14

IMI eLearning
2.3.4 Tools and Equipment The tools button shows a list of tools and equipment used in the automotive trade, together with a picture. To access the toolbox:
1. Click the Tools button (offline version use the interface button, for the online one use the button on the new type screens) to show the toolbox list
2. Next, click on any name to show a picture as a reminder of what the tool looks like 3. Click the Return button when finished.
This is a useful resource as it enables you to show students pictures of tools if you don’t have a real one at hand, or of course they can check tools when working on their own. Here is an example showing circlip/jump ring pliers in the offline version and a dolly in the online toolbox:
Teaching/Learning Activity!
Project the tools on the screen and see if the students can describe the purpose of each item.
2.3.5 Interfaces/Skins Changing the interface sets the language of the system as well as the general look and feel. A number of designs and languages are available. When a non-English language is selected, the interface and menu will be translated. In some case the glossary will change as well. It is also possible to translate the text on each screen using the Google Translate button – see the interactive section later in this book for more details.
2.3.6 Annotator The Annotate function is our equivalent of using an interactive whiteboard.
1. Make sure the program is running and showing either a learning screen, an image from the resource database, a 3d diagram or in fact anything you like!
2. Click the ‘Annotate’ button and the annotator will run – from now on all you need to do is press the PrtSc key (or sometimes Fn+PrtSc).
3. Drag the lines to select whatever you want and a window similar to one of the following will open:
15

IMI eLearning
4. Choose from the tools, such as a line, arrows, box or a highlighter, and then draw or write on the screen as required. Text can also be added and anything can be moved around – the image can be saved or copied for pasting anywhere else.
Teaching/Learning Activity!
Click the Copy button (top, second from the left on the annotator program toolbar) to copy the image. In this example the student pasted the screen into Word to form a basic ‘Name and state the purpose of…’ assignment:
5. Close or minimize the annotator to return to the main program.
You can access the glossary and copy words or definitions, which can then be pasted into the annotator Text tool and dropped onto the screen:
Another great use for the annotator is to highlight key words in the screen text as shown in the following picture (I right-clicked the screen and chose zoom in to show the text at this size, before copying it to the annotator):
16

IMI eLearning
Remember to save or copy work in the Annotator before you close it.
2.4 Questions
2.4.1 Multiple-choice Questions The built-in questions are ideal for formative assessment and tracking of progress.
1. Click the main access buttons to zoom in to the desired level of course material and then click the ‘Questions’ button. The maximum number of questions available at the level and subject selected is shown.
Zooming in further to this section shows that 40 questions are available, and they are specific to wherever you are in the menu system:
2. Select the number of questions you would like in the quiz and click the Next Screen button. Note that once in the questions the only way out is to complete them all or quit the program, so choose a reasonable number:
17

IMI eLearning
3. Students enter their name at this point and then click the Next Screen button again:
4. Answer all the questions by clicking the ‘answers’ until the either the Congratulations or, perhaps more likely, the Review screen shows:
5. Scroll through the incorrect answers using the ‘Next Screen’ and ‘Previous Screen’ buttons.
6. Click the ‘Link to screen’ button to access the particular learning material needed to refresh your memory:
18

IMI eLearning
7. Click Return to go back to the questions review to check the next incorrect answer as needed:
The questions can be used on the screen in the classroom or in printed form, but they are best used individually as above so that the feedback is individualized.
Note for teachers: The question timer can be stopped when using the questions on screen in the classroom, using a key combination (which is secret from the students). Email [email protected] from your college or school address if you don’t know the keys. It is also possible to skip each question if working as a class so that you can review all answers at the end.
Teaching/Learning Activity!
Stop the timer, then get the students to vote on the answers to questions projected on the screen, go 50-50, or even phone a friend!
2.4.2 Certificates After completing a quiz, and scoring over 70%, the Certificate button becomes active:
Teaching/Learning Activity!
After completing learning for a certain topic area, send the students away to do a 20 question test on that topic and tell them to bring you a certificate as proof. Of course if they don’t succeed first time, they can review incorrect answers but when repeating the test, another random selection of questions is presented – meaning they have to do a lot of questions before they finish!
And when they get the certificate at unit level – it may be a good time to book the final exam/test…
Teachers can also print the actual test result showing which questions were right and wrong by clicking the Print Results button shown here – after using the Teacher Access key combination:
2.4.3 Printing Questions After clicking the ‘Questions’ button, the Teacher Access key combination is used to see printing options:
19

IMI eLearning
Choose the number of questions and the number of copies. It is recommended that you print a tutor copy of the questions at the same time as the student copies. The questions are randomly generated and it means both copies are identical, hence easier for marking purposes. An example of a printed test is shown here (the instructor copy has answers highlighted and the student copy does not!):
2.5 Books and Support The Support button opens a Windows® folder containing a range of additional support material. While licensed you may use this as you wish to support teaching and learning. There are two sub-folders and each is examined briefly in the following sections.
2.5.1 Documents
2.5.1.1 Lesson Plans These are interactive Word document. There are individual versions available for student focused activity and more traditional lessons. Feel free to copy any aspects of these documents if your institution has a particular system in place. Turn off document protection to do this – no password is used.
2.5.1.2 Schemes of Work/Curriculum Plan The structure of the material is presented as Word or Text documents for you to use as required – it is also an effective contents page (a large one in some cases) for the learning material.
20

IMI eLearning
2.5.1.3 Job Card/Repair Order A typical industry standard job card is supplied in Word format and a repair order as an Excel file – feel free to edit as required. The job card is an ideal companion to the practical tasks in the Worksheets and Assignments book.
Teaching/Learning Activity!
Use the Job card in the workshop by getting the students to complete it as they carry out the workshop tasks in the Worksheets and Assignments book.
2.5.1.4 Service Schedule A Word version of a service schedule is included – edit as you see fit!
2.5.2 Textbooks
2.5.2.1 Technology Books The main support resource is the range of Textbooks as PDF files. A contents page is displayed on the left as the books are opened on screen and this matches the order of the material in the main structures. The main textbooks are a useful study aid and are designed to be used alongside the multimedia content. The text they contain is exactly as shown on the learning screens. Choose the ones appropriate to your region.
The textbooks are also available as hard copy – please contact us for more information or visit the website.
Teaching/Learning Activity!
The key aspect of the textbooks is that they are partly incomplete so students should add notes and label diagrams. At the end of each section in the books there are also some questions and/or bullet point boxes to be completed. Students could do these in groups or individually.
Automotive assignments using short answer questions are in the Worksheets and Assignments book.
Teaching/Learning Activity!
21

IMI eLearning
Students can either complete the assignments after learning the subject – or use the assignment as a tool for learning by looking answers up in the learning material.
2.6 3d Feature
2.6.1 Introduction An amazing feature in Auto and AR365 is the ability to manipulate 3d images. Click the 3d button on the interface and you will be presented with the following options (or similar):
Simply enter the number and click OK or press the Enter key. You now choose which 3d resource to display:
Enter a number once again and the 3d image will be displayed using VE Viewer. If this is not installed the PDF versions can still be used.
22

IMI eLearning
2.6.2 Teaching and Learning with 3d There are numerous features that you can use including rotating the components and dismantling them. This is a great activity for students – particularly if they can re assemble them! Check the Help file on the Viewer program for more details or just roll the mouse to the edge of the screen to show the tools – and experiment. It is even possible to show sectioned views.
Note: If you do not have the special SAP Viewer software installed, you can still open 3d PDF versions – these are also amazing but can’t be pulled apart. An up to date version of Adobe Reader is needed for 3d.
23

IMI eLearning
3 Online VLE Version
3.1 Creating a Login To gain access to your course material on the VLE, go to www.automotivett.org or www.automotivett.com. Click the ‘Create new account’ link. The Login box shown here is found on the top left of the screen.
Enter the details requested in the box shown here. Your username and password can be anything you like but you must use your proper name. Don’t forget that your password is case sensitive. NOTE: Be sure to use an email address that you have immediate access to as you will need this in the next step.
Note: If you don’t have an email such as .org, .edu or .ac then you may need to contact us for help – we have had to make some restrictions to reduce spam users!
When you click the ‘Create new account’ button an email is sent to the address that you have entered. Open this email and then follow the link contained within it. This will complete your registration.
After following the link in your email you will get the confirmation shown above.
Click the ‘Courses’ links to find your college, school or company name as in the list above, click this and then click the course that you would like to enrol on. You will now be asked to enter an enrolment key into the box – it is case sensitive (registered users should ignore any PayPal requests). NOTE: Your college, company or school will supply you with this key (it is set the same as the network/computer based key issued).
Simply click the ‘Enrol me in the course’ button and that’s it – you are now enrolled and ready to use the website to its fullest potential.
24
IMI eLearning
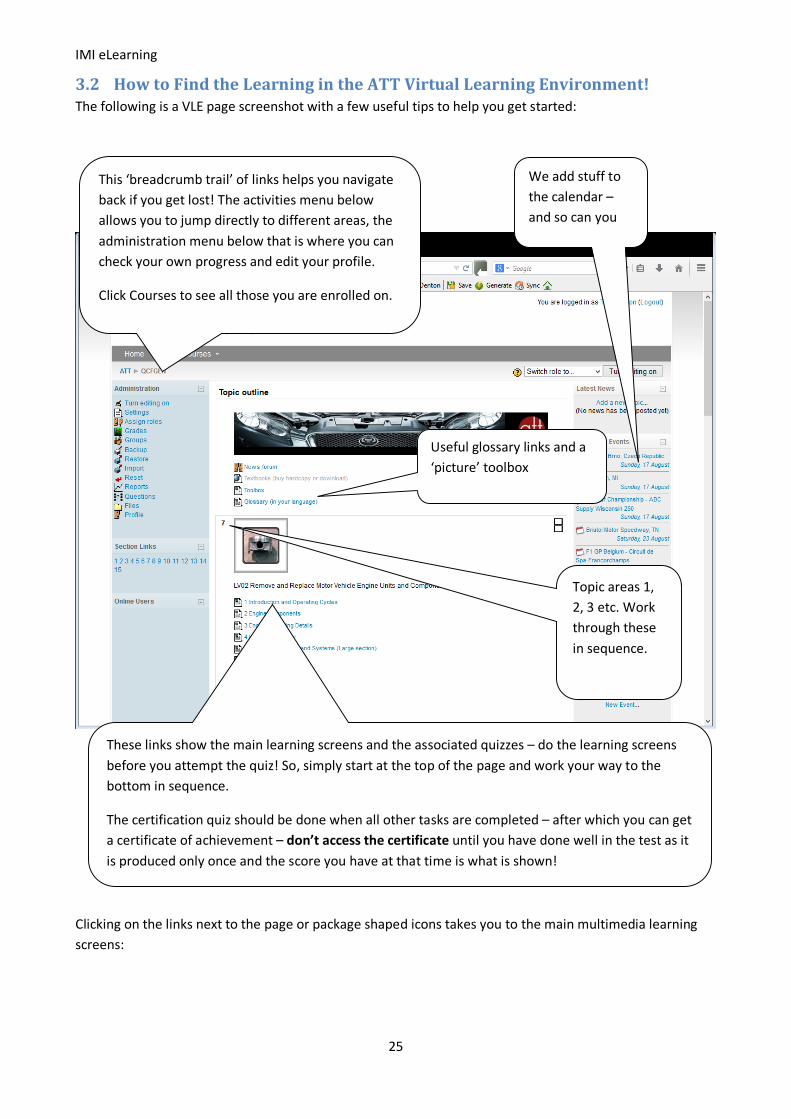
3.2 How to Find the Learning in the ATT Virtual Learning Environment! The following is a VLE page screenshot with a few useful tips to help you get started:
Clicking on the links next to the page or package shaped icons takes you to the main multimedia learning screens:
Useful glossary links and a ‘picture’ toolbox
We add stuff to the calendar – and so can you
These links show the main learning screens and the associated quizzes – do the learning screens before you attempt the quiz! So, simply start at the top of the page and work your way to the bottom in sequence.
The certification quiz should be done when all other tasks are completed – after which you can get a certificate of achievement – don’t access the certificate until you have done well in the test as it is produced only once and the score you have at that time is what is shown!
This ‘breadcrumb trail’ of links helps you navigate back if you get lost! The activities menu below allows you to jump directly to different areas, the administration menu below that is where you can check your own progress and edit your profile.
Click Courses to see all those you are enrolled on.
Topic areas 1, 2, 3 etc. Work through these in sequence.
25
IMI eLearning
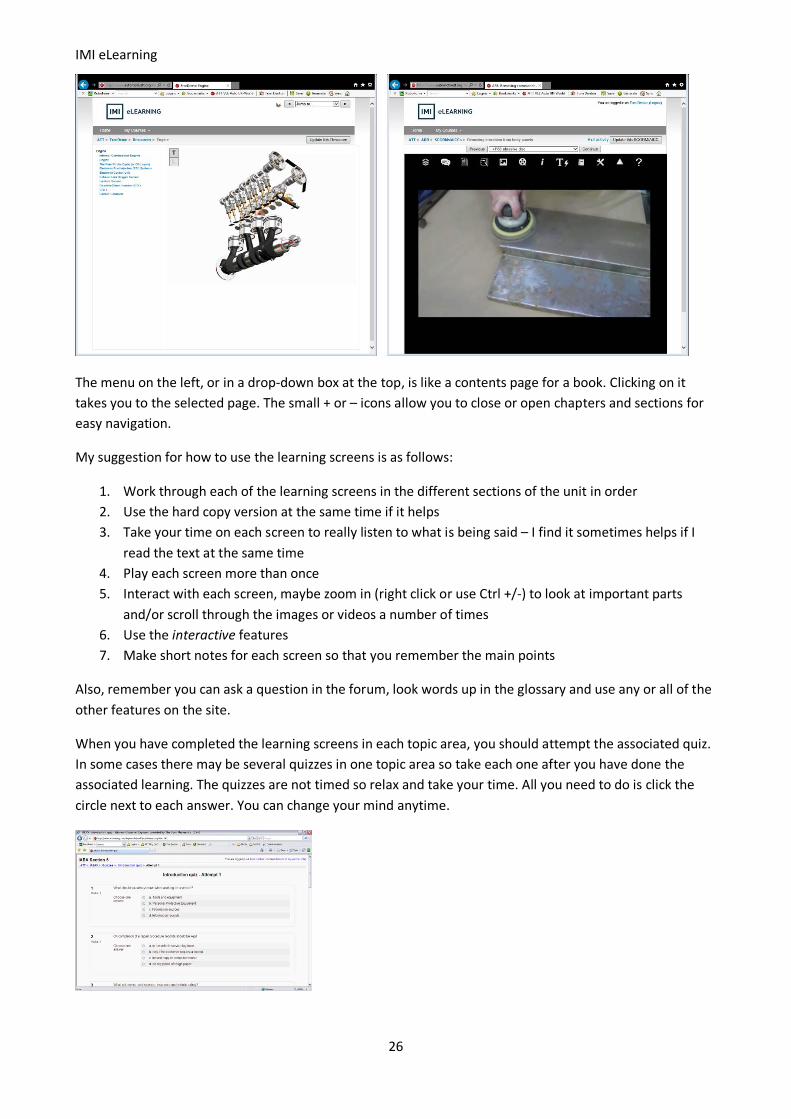
The menu on the left, or in a drop-down box at the top, is like a contents page for a book. Clicking on it takes you to the selected page. The small + or – icons allow you to close or open chapters and sections for easy navigation.
My suggestion for how to use the learning screens is as follows:
1. Work through each of the learning screens in the different sections of the unit in order 2. Use the hard copy version at the same time if it helps 3. Take your time on each screen to really listen to what is being said – I find it sometimes helps if I
read the text at the same time 4. Play each screen more than once 5. Interact with each screen, maybe zoom in (right click or use Ctrl +/-) to look at important parts
and/or scroll through the images or videos a number of times 6. Use the interactive features 7. Make short notes for each screen so that you remember the main points
Also, remember you can ask a question in the forum, look words up in the glossary and use any or all of the other features on the site.
When you have completed the learning screens in each topic area, you should attempt the associated quiz. In some cases there may be several quizzes in one topic area so take each one after you have done the associated learning. The quizzes are not timed so relax and take your time. All you need to do is click the circle next to each answer. You can change your mind anytime.
26

IMI eLearning
When you have finished click the button at the bottom of the quiz page (not shown here) to close the attempt and submit your answers. The system will then give you some feedback as to where you went wrong and suggest looking again at certain sections of the learning screens – this is good advice so follow it! After this you can do the quiz again until you are happy with your result.
When all the learning is done – take the certification quiz. Note: Don’t click the certificate link until you are happy with your test result as the certificate is only created once and you could be stuck with a low score!
3.3 VLE Tracking Feature– Teachers Only Note: These instructions assume you have already created an account, enrolled on the course(s) and we have given you ‘teacher’ status. Click Reports from the Administration menu:
Select the options from these boxes:
The first box will allow you to choose the course.
The second box allows you to select the group that you would like to track and the third box allows you to select an individual participant (a student) if you wish. Please note that lower case user details will follow on after those entered as either upper case or as a combination.
The fourth box allows you to specify the date on which you’d like search. Choosing ‘All days’ means that you can see all activity by that person since they first logged on.
The fifth box allows you to specify a certain activity from within the course if you wish. Selecting ‘All activities’ will let you see everything that person has done on the website. The sixth box allows you to check specific actions but it is usually best to leave this as all actions. Finally, the last box allows you to display or download the results.
Once you have selected an option for each of the boxes, click the ‘Get these logs’ button and the relevant information will appear lower down on the screen or be downloaded.
The report logs for, erm, Jenson Button follow:
27

IMI eLearning
To check results and general progress, return to the course page and click the Grades link:
Please be patient here as the system has a lot of sums to do and may take a few minutes. The default setting lists all participants on the course so select a group from the list if necessary. Please be patient once again as the system has even more sums to do and will take a few more minutes.
You can download the results as a spreadsheet or a text file if you wish. I have obscured some names and details for privacy reasons.
28

IMI eLearning
4 ATT interactive
4.1 Introduction Here is an example of an ATT learning screen that has Google Translate and ATT interactive features built in. Click the ‘T’ button to show the text (both buttons will stop the voice if it is playing).
Clicking the Google Translate button opens the Google Translation website and will display the text translated into the selected language (Spanish in this example). Google will even narrate the new text for most languages.
On the new type screens, the interactive and Google Translate buttons are in the row at the top:
At the time of writing, Google Translate will work with all of the following codes. The main European languages work very well, and others are improving all the time.
From top to bottom: Lang code – First, enter your language code in the box at the top right of the text. This will be used for translations (see list below) Translate – opens the Google Translate web site and will show the screen text in your language. ATT interactive – copies the text and opens the ATT interactive web site (see below for more details)
29

IMI eLearning
Language Code Language Code Language Code AFRIKAANS af GERMAN de POLISH pl ALBANIAN sq GREEK el PORTUGUESE pt ARABIC ar HAITIAN_CREOLE ht PORTUGUESE PORTUGAL pt-PT BELARUSIAN be HEBREW iw ROMANIAN ro BULGARIAN bg HINDI hi RUSSIAN ru CATALAN ca HUNGARIAN hu SERBIAN sr CHINESE zh ICELANDIC is SLOVAK sk CHINESE SIMPLIFIED zh-CN INDONESIAN id SLOVENIAN sl CHINESE TRADITIONAL zh-TW IRISH ga SPANISH es CROATIAN hr ITALIAN it SWAHILI sw CZECH cs JAPANESE ja SWEDISH sv DANISH da KOREAN ko TAGALOG tl DUTCH nl LATVIAN lv THAI th ENGLISH en LITHUANIAN lt TURKISH tr ESTONIAN et MACEDONIAN mk UKRAINIAN uk FILIPINO tl MALAY ms VIETNAMESE vi FINNISH fi MALTESE mt WELSH cy FRENCH fr NORWEGIAN no YIDDISH yi GALICIAN gl PERSIAN fa
4.2 interactive Clicking the interactive button opens a special web page where you will find a range of great interactive features. These are all features that we really like and wanted to share but just in case here is the legal stuff:
The IMI cannot be held responsible for the content and features of external websites!
When the page opens, after the button on a learning screen is clicked, it will be populated with the title and text from the screen. Interacting with this information is a great way to learn. It also allows students to extend knowledge further as well as consolidating or developing existing skills.
The interactive buttons are presented in different categories as shown above. Clicking a button in the Search or Media rows will search for the screen title OR a word selected from the text.
The Clouds buttons are a great way of emphasizing important words and phrases. The Wordle button for example, opens an amazing site where you can paste in the entire text and have it converted into a word cloud. The English text is copied by default but if you have translated it just select it with the mouse and press Ctrl+c to copy it. A Wordle cloud is shown here (you may need to install Java for this feature to work):
30

IMI eLearning
The puzzles option accesses web site to create crosswords, word searches, anagrams and more. The Mind map options allow you to create a mind map that can cover basic concepts or a wall of ‘post-its’ or images and much more – all great ways of getting students involved.
The Notes options allow easy access to Office online, Google Docs, and other note keeping systems such as Evernote.
There are links to our Facebook and Twitter sites and finally, the Help button connects you to the help page of our main website, where amongst other things you can download this manual! We are working on new features and ideas all the time so if the site looks a little different from the images here, don’t worry, just explore and…
interact!
31

IMI eLearning
Notes:
32