AUTOLOADING RIFLES INCLUDES SPECIAL · PDF filemaine: “endangering the welfare of a...
61
INSTRUCTION MANUAL FOR RUGER ® SR-556 ® AND SR-762 TM AUTOLOADING RIFLES © 2015 Sturm, Ruger & Co., Inc. This manual may not be reproduced in whole or in part without the express written permission of Sturm, Ruger & Co., Inc. For Service on This Model Please Call: (603) 865-2442 (See p. 40) THIS INSTRUCTION MANUAL SHOULD ALWAYS ACCOMPANY THIS FIREARM AND BE TRANSFERRED WITH IT UPON CHANGE OF OWNERSHIP, OR WHEN THE FIREARM IS LOANED OR PRESENTED TO ANOTHER PERSON www.ruger.com NS 7-15 R6 READ THE INSTRUCTIONS AND WARNINGS IN THIS MANUAL CAREFULLY BEFORE USING THIS FIREARM SR-762 CALIBERS 308 Win / 7.62 NATO SR-556 CALIBERS 223 Rem / 5.56 NATO S – Rugged, Reliable Firearms ® – INCLUDES SPECIAL INSTRUCTIONS FOR THE SR-556 ® TAKEDOWN RIFLE
Transcript of AUTOLOADING RIFLES INCLUDES SPECIAL · PDF filemaine: “endangering the welfare of a...

INSTRUCTIONMANUAL
FOR
RUGER®
SR-556®AND SR-762TM
AUTOLOADING RIFLES
© 2015 Sturm, Ruger & Co., Inc.
This manual may not be reproduced in whole or in part without the express writtenpermission of Sturm, Ruger & Co., Inc.
For Service on This Model Please Call:(603) 865-2442 (See p. 40)
THIS INSTRUCTION MANUAL SHOULD ALWAYS ACCOMPANY THIS FIREARM AND BETRANSFERRED WITH IT UPON CHANGE OF OWNERSHIP, OR WHEN THE FIREARM IS LOANED
OR PRESENTED TO ANOTHER PERSON
www.ruger.comNS 7-15
R6
READ THE INSTRUCTIONS AND WARNINGS IN THIS MANUAL CAREFULLY BEFORE USING THIS FIREARM
SR-762 CALIBERS308 Win / 7.62 NATO
SR-556 CALIBERS223 Rem / 5.56 NATO
S
– Rugged, Reliable Firearms® –
INCLUDES SPECIAL INSTRUCTIONS FOR THESR-556® TAKEDOWN RIFLE
2
WARNING ADVERTENCIA
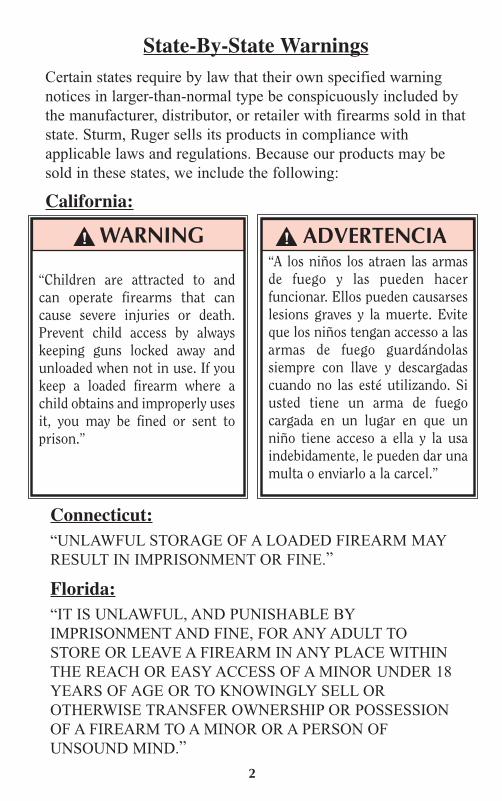
State-By-State WarningsCertain states require by law that their own specified warningnotices in larger-than-normal type be conspicuously included bythe manufacturer, distributor, or retailer with firearms sold in thatstate. Sturm, Ruger sells its products in compliance withapplicable laws and regulations. Because our products may besold in these states, we include the following:
California:
“A los niños los atraen las armasde fuego y las pueden hacerfuncionar. Ellos pueden causarseslesions graves y la muerte. Eviteque los niños tengan accesso a lasarmas de fuego guardándolassiempre con llave y descargadascuando no las esté utilizando. Siusted tiene un arma de fuegocargada en un lugar en que unniño tiene acceso a ella y la usaindebidamente, le pueden dar unamulta o enviarlo a la carcel.”
Connecticut:“UNLAWFUL STORAGE OF A LOADED FIREARM MAYRESULT IN IMPRISONMENT OR FINE.”
Florida:“IT IS UNLAWFUL, AND PUNISHABLE BYIMPRISONMENT AND FINE, FOR ANY ADULT TOSTORE OR LEAVE A FIREARM IN ANY PLACE WITHINTHE REACH OR EASY ACCESS OF A MINOR UNDER 18YEARS OF AGE OR TO KNOWINGLY SELL OROTHERWISE TRANSFER OWNERSHIP OR POSSESSIONOF A FIREARM TO A MINOR OR A PERSON OFUNSOUND MIND.”
“Children are attracted to andcan operate firearms that cancause severe injuries or death.Prevent child access by alwayskeeping guns locked away andunloaded when not in use. If youkeep a loaded firearm where achild obtains and improperly usesit, you may be fined or sent toprison.”

Maine:“ENDANGERING THE WELFARE OF A CHILD IS ACRIME. IF YOU LEAVE A FIREARM AND AMMUNITIONWITHIN EASY ACCESS OF A CHILD, YOU MAY BESUBJECT TO FINE, IMPRISONMENT OR BOTH. KEEPFIREARMS AND AMMUNITION SEPARATE. KEEPFIREARMS AND AMMUNITION LOCKED UP. USETRIGGER LOCKS.”
Maryland:“WARNING: Children can operate firearms which may causedeath or serious injury. It is a crime to store or leave a loadedfirearm in any location where an individual knew or shouldhave known that an unsupervised minor would gain access tothe firearm. Store your firearm responsibly!”
Massachusetts:“WARNING FROM THE MASSACHUSETTS ATTORNEYGENERAL: This handgun is not equipped with a device thatfully blocks use by unauthorized users. More than 200,000firearms like this one are stolen from their owners every yearin the United States. In addition, there are more than athousand suicides each year by younger children andteenagers who get access to firearms. Hundreds more die fromaccidental discharge. It is likely that many more childrensustain serious wounds, or inflict such wounds accidentally onothers. In order to limit the chance of such misuse, it isimperative that you keep this weapon locked in a secure placeand take other steps necessary to limit the possibility of theftor accident. Failure to take reasonable preventive steps mayresult in innocent lives being lost, and in some circumstancesmay result in your liability for these deaths.”
“IT IS UNLAWFUL TO STORE OR KEEP A FIREARM,RIFLE, SHOTGUN OR MACHINE GUN IN ANY PLACEUNLESS THAT WEAPON IS EQUIPPED WITH ATAMPER-RESISTANT SAFETY DEVICE OR IS STOREDOR KEPT IN A SECURELY LOCKED CONTAINER.”
3
New Jersey:“IT IS A CRIMINAL OFFENSE TO LEAVE A LOADEDFIREARM WITHIN EASY ACCESS OF A MINOR.”
New York City:
“THE USE OF A LOCKING DEVICE OR SAFETY LOCK ISONLY ONE ASPECT OF RESPONSIBLE FIREARMSTORAGE. FOR INCREASED SAFETY, FIREARMSSHOULD BE STORED UNLOADED AND LOCKED IN ALOCATION THAT IS BOTH SEPARATE FROM THEIRAMMUNITION AND INACCESSIBLE TO CHILDREN ANDUNAUTHORIZED PERSONS.”
North Carolina:“IT IS UNLAWFUL TO STORE OR LEAVE A FIREARMTHAT CAN BE DISCHARGED IN A MANNER THAT AREASONABLE PERSON SHOULD KNOW IS ACCESSIBLETO A MINOR.”
Texas:“IT IS UNLAWFUL TO STORE, TRANSPORT, ORABANDON AN UNSECURED FIREARM IN A PLACEWHERE CHILDREN ARE LIKELY TO BE AND CANOBTAIN ACCESS TO THE FIREARM.”
Wisconsin:“IF YOU LEAVE A LOADED FIREARM WITHIN THEREACH OR EASY ACCESS OF A CHILD YOU MAY BEFINED OR IMPRISONED OR BOTH IF THE CHILDIMPROPERLY DISCHARGES, POSSESSES, OR EXHIBITSTHE FIREARM.”
* * * * * * * * * * * * * * * * * * * * * *
Please check with your licensed retailer or state police foradditional warnings which may be required by local law orregulation. Such regulations change constantly, and localauthorities are in the best position to advise you on such legalmatters.
4
FIREARMS SAFETY IS YOUR RESPONSIBILITY
SAFETY MUST BE THE FIRST AND CONSTANTCONSIDERATION OF EVERY PERSON WHO HANDLES
FIREARMS AND AMMUNITION.
This Instruction Manual is designed to assist you in learning how toproperly use and care for your RUGER® SR-556® & SR-762™
rifles. Please contact us if you have any questions.
Only when you are certain you fully understand the Manual and canproperly carry out its instructions should you practice loading, unloading,etc. with live ammunition. If you have any doubts about your ability tohandle or use a particular type of gun safely, you should seek supervisedinstruction. Such personalized instruction often is available from localgun retailers, gun clubs or police departments. If none of these sourcescan help, visit www.nra.org or write to the following address:
National Rifle Association11250 Waples Mill RoadFairfax, VA 22030-7400
The person possessing a gun has a full-time job. You cannot guess; youcannot forget. You must know how to use your firearm safely. Do not useany firearm without having a complete understanding of its particularcharacteristics and safe use. Remember: There is no such thing as afoolproof gun.
5

6
TABLE OF CONTENTSPage
State-By-State Warning . . . . . . . . . . . . . . . . . . . . . . . . . . . . . . . . . . . . . . . . . . . . . . . . . . . . . .2Nomenclature . . . . . . . . . . . . . . . . . . . . . . . . . . . . . . . . . . . . . . . . . . . . . . . . . . . . . . . . . . . . . .7 Locking Device Installation Instructions . . . . . . . . . . . . . . . . . . . . . . . . . . . . . . . . . . . . . . . . .8General Information . . . . . . . . . . . . . . . . . . . . . . . . . . . . . . . . . . . . . . . . . . . . . . . . . . . . . . . .10Operation of Safety . . . . . . . . . . . . . . . . . . . . . . . . . . . . . . . . . . . . . . . . . . . . . . . . . . . . . . . . .10The Bolt Catch . . . . . . . . . . . . . . . . . . . . . . . . . . . . . . . . . . . . . . . . . . . . . . . . . . . . . . . . . . . . 11Ammunition . . . . . . . . . . . . . . . . . . . . . . . . . . . . . . . . . . . . . . . . . . . . . . . . . . . . . . . . . . . . . . 12Magazines . . . . . . . . . . . . . . . . . . . . . . . . . . . . . . . . . . . . . . . . . . . . . . . . . . . . . . . . . . . . . . . .13To Load and Fire (With Magazine) . . . . . . . . . . . . . . . . . . . . . . . . . . . . . . . . . . . . . . . . . . . . 15To Load and Fire (Without Magazine) . . . . . . . . . . . . . . . . . . . . . . . . . . . . . . . . . . . . . . . . . 17To Unload . . . . . . . . . . . . . . . . . . . . . . . . . . . . . . . . . . . . . . . . . . . . . . . . . . . . . . . . . . . . . . . . 18To Reload the Rifle . . . . . . . . . . . . . . . . . . . . . . . . . . . . . . . . . . . . . . . . . . . . . . . . . . . . . . . . .19To Extract and Eject a Chambered Cartridge . . . . . . . . . . . . . . . . . . . . . . . . . . . . . . . . . . . . 20To Remove a Bore Obstruction . . . . . . . . . . . . . . . . . . . . . . . . . . . . . . . . . . . . . . . . . . . . . . .20To Clear a Malfunction (“Jam”) . . . . . . . . . . . . . . . . . . . . . . . . . . . . . . . . . . . . . . . . . . . . . . 22To Minimize Malfunctions (“Jams”) . . . . . . . . . . . . . . . . . . . . . . . . . . . . . . . . . . . . . . . . . . .23Disassembly . . . . . . . . . . . . . . . . . . . . . . . . . . . . . . . . . . . . . . . . . . . . . . . . . . . . . . . . . . . . . . .25Reassembly . . . . . . . . . . . . . . . . . . . . . . . . . . . . . . . . . . . . . . . . . . . . . . . . . . . . . . . . . . . . . . .29SR-556® Upper Receivers . . . . . . . . . . . . . . . . . . . . . . . . . . . . . . . . . . . . . . . . . . . . . . . . . . . .31Stock Adjustment . . . . . . . . . . . . . . . . . . . . . . . . . . . . . . . . . . . . . . . . . . . . . . . . . . . . . . . . . .34Quad Rail Handguard . . . . . . . . . . . . . . . . . . . . . . . . . . . . . . . . . . . . . . . . . . . . . . . . . . . . . . .34Adjusting the Regulator . . . . . . . . . . . . . . . . . . . . . . . . . . . . . . . . . . . . . . . . . . . . . . . . . . . . .34Magazine Inspection and Care . . . . . . . . . . . . . . . . . . . . . . . . . . . . . . . . . . . . . . . . . . . . . . . .35Care and Cleaning of the Regulator . . . . . . . . . . . . . . . . . . . . . . . . . . . . . . . . . . . . . . . . . . . .35Care and Cleaning . . . . . . . . . . . . . . . . . . . . . . . . . . . . . . . . . . . . . . . . . . . . . . . . . . . . . . . . . .36Storage . . . . . . . . . . . . . . . . . . . . . . . . . . . . . . . . . . . . . . . . . . . . . . . . . . . . . . . . . . . . . . . . . . .37Sight Installation . . . . . . . . . . . . . . . . . . . . . . . . . . . . . . . . . . . . . . . . . . . . . . . . . . . . . . . . . . 38Service and Parts Policy . . . . . . . . . . . . . . . . . . . . . . . . . . . . . . . . . . . . . . . . . . . . . . . . . . . . 40Shipping Firearms for Repair . . . . . . . . . . . . . . . . . . . . . . . . . . . . . . . . . . . . . . . . . . . . . . . . .40Ordering Parts . . . . . . . . . . . . . . . . . . . . . . . . . . . . . . . . . . . . . . . . . . . . . . . . . . . . . . . . . . . . .41Parts List . . . . . . . . . . . . . . . . . . . . . . . . . . . . . . . . . . . . . . . . . . . . . . . . . . . . . . . . . . . . . . . . .42Exploded Views . . . . . . . . . . . . . . . . . . . . . . . . . . . . . . . . . . . . . . . . . . . . . . . . . . . . . . . .45 - 47SR-556E®, SR-556C™ & SR-556VT™ Supplemental Parts Lists & Exploded Views . . . . . .48SR-762™ Supplemental Parts List . . . . . . . . . . . . . . . . . . . . . . . . . . . . . . . . . . . . . . . . . . . . .49 SR-762™ Supplemental Exploded View . . . . . . . . . . . . . . . . . . . . . . . . . . . . . . . . . . . . . . . . .50 The Basic Rules of Safe Firearms Handling . . . . . . . . . . . . . . . . . . . . . . . . . . . . . . . . . . . . .51Warranty Information . . . . . . . . . . . . . . . . . . . . . . . . . . . . . . . . . . . . . . . . . . . . . . . . . . . . . . 56
“RUGER” is a registered U.S. trademark.
WARNINGS OF GREAT IMPORTANCE AREFOUND ON THE FOLLOWING PAGES:
Locking Devices 8 Unloading 18Alterations 10 Bore Obstructions 21Manual Safety 11 Malfunctions 24Ammunition 12 Disassembly 25Lead Exposure 13 Lubrication 36Firing 15 Storage 37Handling 16 Shipping 40Sustained Firing 17 Parts Purchasers 41
OTHER CAUTIONS AND WARNINGS APPEARTHROUGHOUT THE MANUAL.
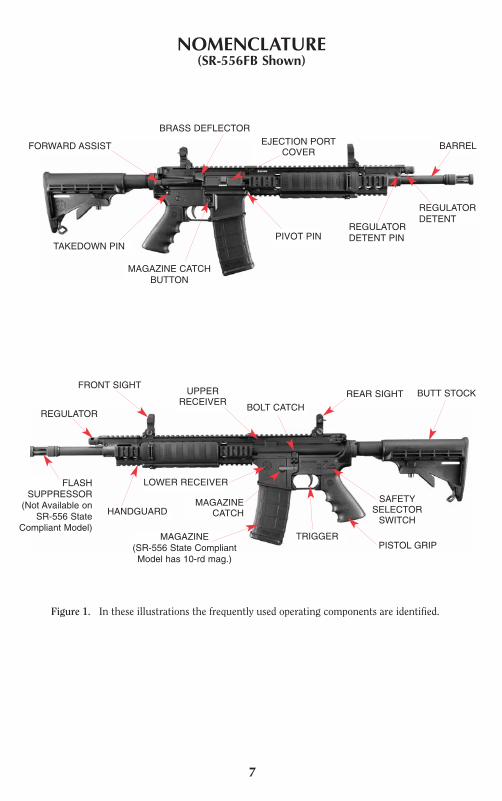
FORWARD ASSIST
BRASS DEFLECTOREJECTION PORT
COVER
TAKEDOWN PINPIVOT PIN
REGULATORDETENT PIN
REGULATORDETENT
BARREL
MAGAZINE CATCHBUTTON
7
Figure 1. In these illustrations the frequently used operating components are identified.
REAR SIGHTFRONT SIGHT
REGULATOR
HANDGUARD
MAGAZINE(SR-556 State CompliantModel has 10-rd mag.)
MAGAZINECATCH
TRIGGERPISTOL GRIP
BUTT STOCK
BOLT CATCH
UPPERRECEIVER
LOWER RECEIVER
SAFETYSELECTORSWITCH
NOMENCLATURE(SR-556FB Shown)
FLASHSUPPRESSOR(Not Available onSR-556 State
Compliant Model)
8
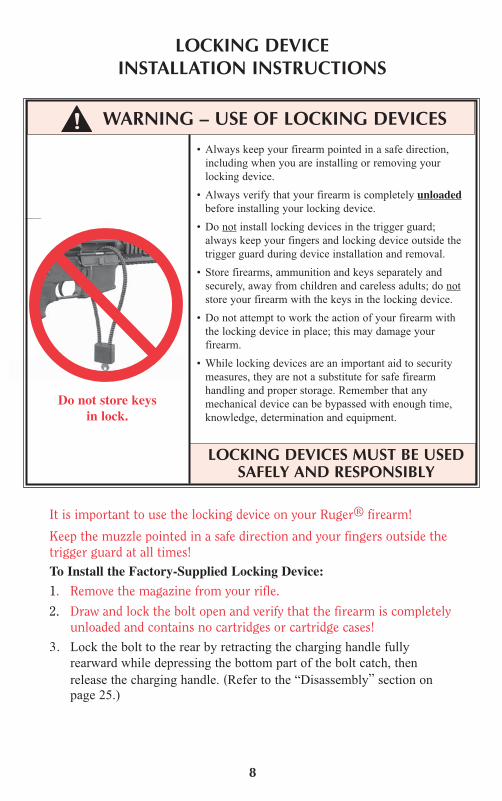
LOCKING DEVICEINSTALLATION INSTRUCTIONS
WARNING – USE OF LOCKING DEVICES• Always keep your firearm pointed in a safe direction,including when you are installing or removing yourlocking device.
• Always verify that your firearm is completely unloadedbefore installing your locking device.
• Do not install locking devices in the trigger guard;always keep your fingers and locking device outside thetrigger guard during device installation and removal.
• Store firearms, ammunition and keys separately andsecurely, away from children and careless adults; do notstore your firearm with the keys in the locking device.
• Do not attempt to work the action of your firearm withthe locking device in place; this may damage yourfirearm.
• While locking devices are an important aid to securitymeasures, they are not a substitute for safe firearmhandling and proper storage. Remember that anymechanical device can be bypassed with enough time,knowledge, determination and equipment.
LOCKING DEVICES MUST BE USEDSAFELY AND RESPONSIBLY
It is important to use the locking device on your Ruger® firearm!
Keep the muzzle pointed in a safe direction and your fingers outside thetrigger guard at all times!To Install the Factory-Supplied Locking Device:
1. Remove the magazine from your rifle.
2. Draw and lock the bolt open and verify that the firearm is completelyunloaded and contains no cartridges or cartridge cases!
3. Lock the bolt to the rear by retracting the charging handle fullyrearward while depressing the bottom part of the bolt catch, thenrelease the charging handle. (Refer to the “Disassembly” section onpage 25.)
Do not store keysin lock.
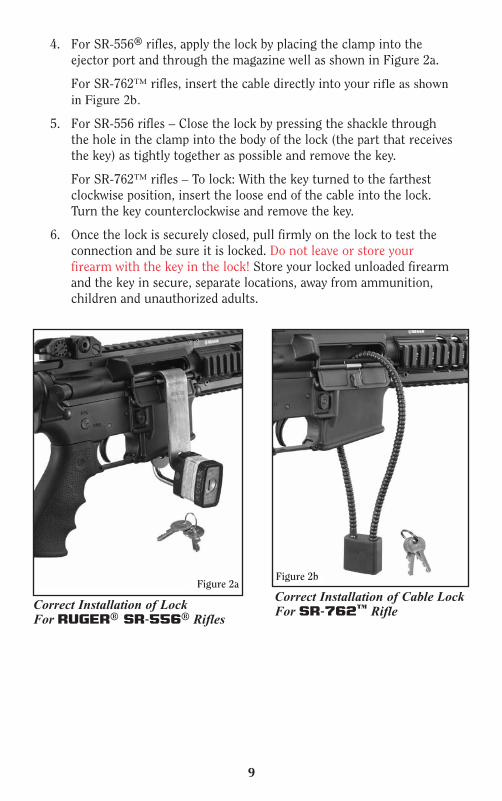
Correct Installation of Lock For RUGER® SR-556® Rifles
Figure 2a Correct Installation of Cable Lock For SR-762™ Rifle
4. For SR-556® rifles, apply the lock by placing the clamp into theejector port and through the magazine well as shown in Figure 2a.
For SR-762™ rifles, insert the cable directly into your rifle as shownin Figure 2b.
5. For SR-556 rifles – Close the lock by pressing the shackle throughthe hole in the clamp into the body of the lock (the part that receivesthe key) as tightly together as possible and remove the key.
For SR-762™ rifles – To lock: With the key turned to the farthestclockwise position, insert the loose end of the cable into the lock.Turn the key counterclockwise and remove the key.
6. Once the lock is securely closed, pull firmly on the lock to test theconnection and be sure it is locked. Do not leave or store yourfirearm with the key in the lock! Store your locked unloaded firearmand the key in secure, separate locations, away from ammunition,children and unauthorized adults.
9
Figure 2b

REMOVING THE TRANSFER ROD
1. With the barrel assembly removed, remove the retainer pin with a 1/8” punchand hammer (see Fig. 6).
2. Remove the transfer rod and transfer rod spring (see Fig. 6).
3. The front bushing can be removed at this point through the front of the hand-guard.
WARNING: Do not attempt to insert a barrel assembly and fire the weapon withoutcorrectly installing the front bushing, transfer rod and transfer rod spring first.
REMOVING THE BARREL ASSEMBLY
1. Lock the bolt carrier to the rear and make sure that the rifle is unloaded (seeInstruction Manual page 18).
2. While pulling the slider bar and slider pad to the rear, twist the barrel assemblyclockwise to unlock the barrel (see Fig. 4).
3. Slide the barrel assembly forward and out of the upper assembly (see Fig. 5).
SPECIAL INSTRUCTIONS FOR
RUGER® SR-556®
The RUGER® SR-556® TAKEDOWN RIFLE has the same opera-tional characteristics as all other SR-556® rifles.
INSTALLING THE BARREL ASSEMBLY1. Lock the bolt carrier to the rear and remove the magazine (see Fig. 1 and In-
struction Manual page 14).
2. Inspect the chamber area to be sure it is empty.
TAKEDOWN RIFLE
Figure 1
Figure 2
Figure 6
Figure 5Figure 4
Figure 3
3. Slide the barrel assembly into the upper assembly (see Fig. 2). The barrel assem-bly should be angled away from the normal upright position, tilted away from theejection port side of the rifle. If the bolt carrier unlocks during this step, removethe barrel assembly and repeat steps 1 - 3.
4. While compressing the barrel assembly into the upper assembly, twist the barrelcounterclockwise to lock the barrel (see Fig. 3). An audible “click” should be heard.
Bolt Carrier to the Rear
Rotate the Barrel AssemblyCounterclockwise 1
1
2
2

RUGER® SR-556® TAKEDOWN RIFLESUPPLEMENTAL PARTS LIST & EXPLODED VIEWPlease See Pages 33 - 39 of the Enclosed Instruction Manual For All Other
Parts Lists and Exploded View Drawings
Key No. Part No. Part Name Model
19 NS00038 Piston, 5.56mm SR-556TD NS00096 Piston, 300BLK SR-556TD 22 NS10040 Trigger Guard Assembly SR-556TD 23 NS00072 Plastic Pistol Grip SR-556TD 34 NS00045 Regulator Pin SR-556TD 35 NS00078 Regulator Pin Spring SR-556TD* 37 NS03729 Bolt Carrier SR-556TD 38 NS00089 Buffer Spring SR-556TD 39 NS00086 Buffer SR-556TD* 53 NS16610 Handguard Quad Rail SR-556TD 54 NS02500 Front Bushing SR-556TD 55 NS03603 Transfer Rod Spring SR-556TD 56 NS03605 Transfer Rod SR-556TD 57 NS00040 Regulator, 5.56mm SR-556TD NS00140 Regulator, 300BLK SR-556TD* 59 NS03513 Gas Block, 5.56mm SR-556TD NS03513 Gas Block, 300BLK SR-556TD 60 NS13401 Flash Hider SR-556TD* 63 90452 Barrel Assembly, 5.56mm, Heavy SR-556TD 90453 Barrel Assembly, 300BLK, Heavy SR-556TD 90454 Barrel Assembly, 5.56mm, Light SR-556TD 90455 Barrel Assembly, 300BLK, Light SR-556TD* 64 NS11000 Barrel Nut SR-556TD* 65 NS11002 Barrel Nut Spacer SR-556TD* 72 NS00035 Rear Bushing SR-556TD 80 NS00039 Piston Spring SR-556TD 81 NS00097 Piston Retainer 300BLK SR-556TD 82 NS00098 Piston Retainer Pin 300BLK SR-556TD 83 NS00027 Barrel Latch Spring SR-556TD 84 NS00026 Barrel Latch Detent SR-556TD 85 NS00028 Barrel Latch SR-556TD 86 NS00301 Slider Bar SR-556TD 87 NS00303 Slider Pad SR-556TD 88 NS00304 Slider Bar Roll Pin SR-556TD
* PARTS SO MARKED MUST BE FACTORY INSTALLED.
NOTE: The 5.56mm piston and piston spring are removed through the regulator sideof the gas block. The 5.56mm barrel assemblies do not use Key Nos. 81 or 82.
INSTALLING THE TRANSFER ROD
If the front bushing has been removed, reinsert it into the handguard.
1. Slide the transfer rod into the transfer rod spring and then insert those parts intothe handguard through the front bushing and into the rear bushing (see Fig. 7).
2. Compress the transfer rod flush tothe handguard and install the re-tainer pin (see Fig. 8). Verify thatthe front bushing and the transferrod collar are fully inserted behindthe retainer pin hole.
Once the retainer pin is reinstalled, check the funtion of the transfer rod. The trans-fer rod should slide freely, return under spring force and be contained inside of thehandguard by the retainer pin.
Figure 7
Figure 8
1
2

The RUGER® SR-556® TAKEDOWN RIFLE (SR-556TD™)has a patented barrel retention system that allows the user to quickly replace thebarrel of the rifle without the use of tools, while minimizing changes betweenPoint of Aim (POA) and Point of Impact (POI) when the barrel is removed andthen replaced in the system. Because all barrels shoot differently, the sightingsystem for the rifle was modified to take this into account. When replacing a bar-rel with a different one, each barrel will have a different POI. This procedure willzero in a barrel (or set of barrels) for a particular rifle. If the barrels are used in adifferent rifle, the procedure will need to be repeated using that rifle.
The front sight has adjustments for windage and elevation and all initial zero-inadjustments are made on the front sight while the rear sight is set to the middleof its windage and elevation adjustment ranges. After the zero-in procedure iscompleted, all windage and elevation adjustments should be made with the rearsight alone (provided the barrel already has been adjusted for the particular rifleusing this procedure).
Follow the steps below to sight in your SR-556TD™ rifle:1. Ensure that the sights are “up” by manually rotating the sight posts upward from
the base until they lock in place. (See Figure 1.)
ZERO-IN PROCEDUREFOR RUGER® SR-556TD™
Figure 1
The rear sight is a standard rear sight. Before you start, ensure that the rear sightwindage and elevation adjustments are at the center of their respective travels.This will be where you will have your zero-in range set. For this example, we willuse a 100-yard zero range. You can substitute whatever range you prefer.
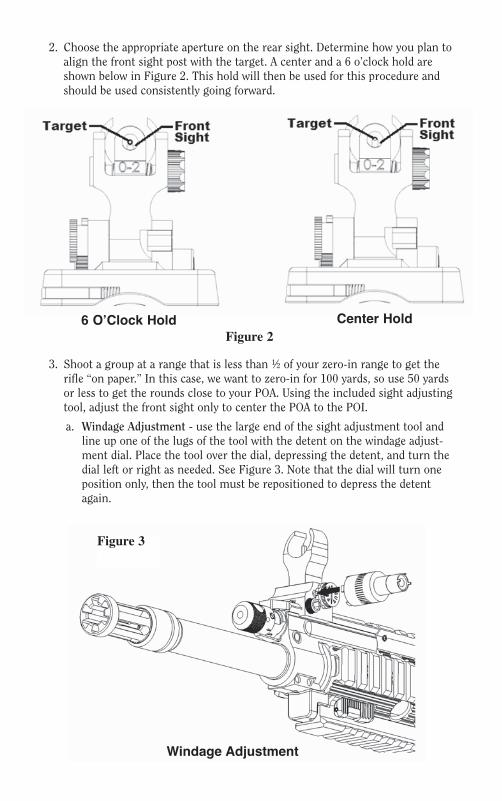
2. Choose the appropriate aperture on the rear sight. Determine how you plan toalign the front sight post with the target. A center and a 6 o’clock hold areshown below in Figure 2. This hold will then be used for this procedure andshould be used consistently going forward.
3. Shoot a group at a range that is less than ½ of your zero-in range to get therifle “on paper.” In this case, we want to zero-in for 100 yards, so use 50 yardsor less to get the rounds close to your POA. Using the included sight adjustingtool, adjust the front sight only to center the POA to the POI.
a. Windage Adjustment - use the large end of the sight adjustment tool andline up one of the lugs of the tool with the detent on the windage adjust-ment dial. Place the tool over the dial, depressing the detent, and turn thedial left or right as needed. See Figure 3. Note that the dial will turn oneposition only, then the tool must be repositioned to depress the detentagain.
Figure 2
Figure 3
6 O’Clock Hold Center Hold
Windage Adjustment

b. Elevation Adjustment - use the small end of the sight adjustment tool andline up one of the lugs of the tool with the detent on the front sight post.Place the tool over the sight post, depressing the detent and turn the postleft or right as needed. See Figure 4.
Figure 4
Elevation Adjustment
4. Now sight in the rifle at your preferred Zero-In range, in this example, 100yards. Again, use only the front sight to adjust the POA to match the POI asyou did in step 3.
5. Repeat steps 3 and 4 for any other barrels that you will be using for the rifle.
6. At this point, all barrels are zeroed for this particular rifle with the rear sightcentered. Any adjustments for elevation (holdover) or actual wind conditionsshould be made using the rear sight. All barrels properly zeroed will shoot thesame (POA to POI). Note that if a barrel is used in a different rifle, this proce-dure will need to be repeated to zero-in the barrel for that rifle.
10
FIREARMS ARE DANGEROUS WEAPONSREAD THE INSTRUCTIONS AND WARNINGS
IN THIS MANUAL THOROUGHLY ANDCAREFULLY BEFORE USING.
GENERAL INFORMATIONAND MECHANICAL CHARACTERISTICS
The RUGER® SR-556® and SR-762™ are gas-operated, piston-driven, boxmagazine fed, autoloading rifles. It is simple reliable, and consists of relativelyfew components. The mechanism employs the Ruger short stroke piston systemin conjunction with a rotating bolt. These rifles can be field stripped for cleaningto its basic subassemblies in seconds without the use of tools.
The safety, located above the trigger on the left side of the lower receiver, blocksthe trigger and permits the bolt carrier to be cycled with the safety in the on or“SAFE” position. A bolt catch mechanism is provided for convenience in holdingthe bolt open for loading and inspection. The firing pin is retracted mechanicallyas the bolt starts to unlock and the rifle will fire only when the bolt is locked.
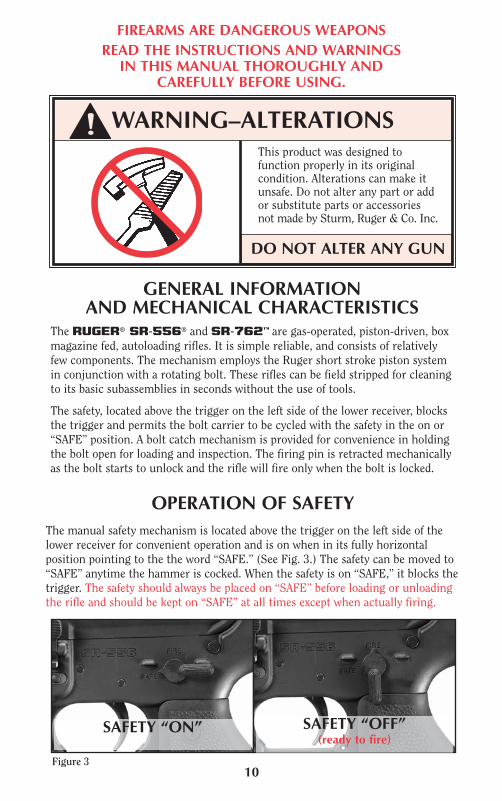
WARNING–ALTERATIONSThis product was designed tofunction properly in its originalcondition. Alterations can make itunsafe. Do not alter any part or addor substitute parts or accessoriesnot made by Sturm, Ruger & Co. Inc.
DO NOT ALTER ANY GUN
OPERATION OF SAFETYThe manual safety mechanism is located above the trigger on the left side of thelower receiver for convenient operation and is on when in its fully horizontalposition pointing to the the word “SAFE.” (See Fig. 3.) The safety can be moved to“SAFE” anytime the hammer is cocked. When the safety is on “SAFE,” it blocks thetrigger. The safety should always be placed on “SAFE” before loading or unloadingthe rifle and should be kept on “SAFE” at all times except when actually firing.
Figure 3
SAFETY “ON” SAFETY “OFF”(ready to fire)
WARNING–MANUAL SAFETY
Safety in "ON" Position
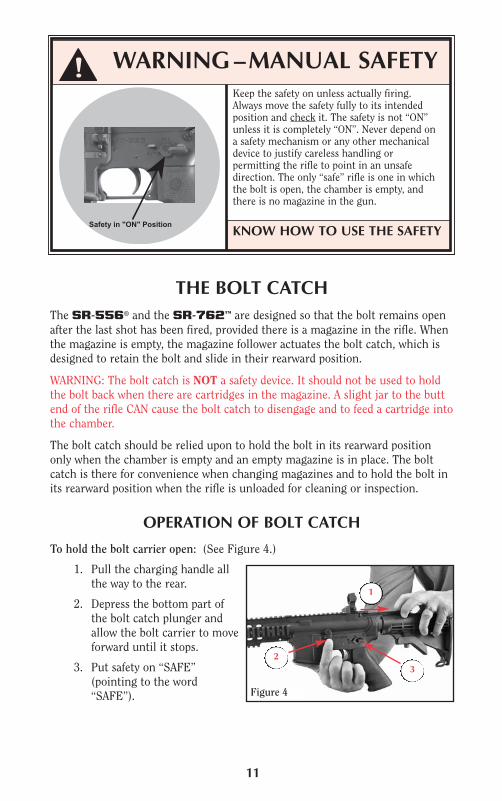
THE BOLT CATCHThe SR-556® and the SR-762™ are designed so that the bolt remains openafter the last shot has been fired, provided there is a magazine in the rifle. Whenthe magazine is empty, the magazine follower actuates the bolt catch, which isdesigned to retain the bolt and slide in their rearward position.
WARNING: The bolt catch is NOT a safety device. It should not be used to holdthe bolt back when there are cartridges in the magazine. A slight jar to the buttend of the rifle CAN cause the bolt catch to disengage and to feed a cartridge intothe chamber.
The bolt catch should be relied upon to hold the bolt in its rearward positiononly when the chamber is empty and an empty magazine is in place. The boltcatch is there for convenience when changing magazines and to hold the bolt inits rearward position when the rifle is unloaded for cleaning or inspection.
OPERATION OF BOLT CATCH
To hold the bolt carrier open: (See Figure 4.)
1. Pull the charging handle allthe way to the rear.
2. Depress the bottom part ofthe bolt catch plunger andallow the bolt carrier to moveforward until it stops.
3. Put safety on “SAFE”(pointing to the word“SAFE”).
11
Keep the safety on unless actually firing.Always move the safety fully to its intendedposition and check it. The safety is not “ON”unless it is completely “ON”. Never depend ona safety mechanism or any other mechanicaldevice to justify careless handling orpermitting the rifle to point in an unsafedirection. The only “safe” rifle is one in whichthe bolt is open, the chamber is empty, andthere is no magazine in the gun.
KNOW HOW TO USE THE SAFETY
Figure 4
1
23

12
WARNING–AMMUNITION
To release the bolt carrier (which allowsthe bolt to move forward) keep selectoron “SAFE” and either:
1. Remove the magazine, draw thecharging handle to the rear andrelease. Allow the handle to springforward freely. Do not “ride” thecharging handle or otherwiseretard the forward motion.
2. Push the top part of the bolt catchtoward the lower receiver and thebolt carrier will release. (SeeFigure 5.)
CAUTION: Bolt carrier is under heavy spring tension and can injure fingers when itslams shut.
AMMUNITIONThe RUGER® SR-556® Rifles are offered in the 5.56mm NATO (which also usesthe .223 Rem cartridge), and the RUGER® SR-762™ is chambered for the .308Win / 7.62 NATO. These rifles are designed to use either standardized U.S. military,or factory loaded sporting cartridges manufactured in accordance with U.S. industrypractice. See “Ammunition Notice” & “Warning - Ammunition,” below.
USE ONLY FACTORY AMMUNITION LOADEDTO U.S. INDUSTRY STANDARDS
Figure 5
AMMUNITION (CARTRIDGES) NOTICEWE SPECIFICALLY DISCLAIM RESPONSIBILITY FOR ANY DAMAGE ORINJURY WHATSOEVER OCCURRING IN CONNECTION WITH, OR AS
THE RESULT OF, THE USE IN RUGER FIREARMS OF FAULTY, ORNON-STANDARD, OR “REMANUFACTURED” OR HAND LOADED(RELOADED) AMMUNITION, OR OF CARTRIDGES OTHER THAN
THOSE FOR WHICH THE FIREARM WAS ORIGINALLY CHAMBERED.
Closing The Bolt
Death, serious injury and damagecan result from the use of wrongammunition, bore obstructions,powder overloads, or incorrectcartridge components. Even thestrongest gun can be “blown up” asa result of excess pressure. Alwayswear shooting glasses and hearingprotection.
IMPROPER AMMUNITIONDESTROYS GUNS

WARNING – LEAD EXPOSUREDischarging firearms in poorly ventilatedareas, cleaning firearms, or handlingammunition may result in exposure tolead and other substances known to theState of California to cause birth defects,reproductive harm, and other seriousphysical injury. Have adequate ventilationat all times. Wash hands thoroughly afterexposure.
SHOOTING OR CLEANING GUNSMAY EXPOSE YOU TO LEAD
13
MAGAZINESRUGER® SR-556® magazines are 30-round or less, 5.56mm magazines (markedon the follower). Some RUGER® SR-556® models have 5 or 10-round magazinesfor those states and locales with magazine capacity restrictions. The SR-762™
models have 20-round magazines. Use only high-quality AR-style magazines whichare clean and in good working order. The RUGER® SR-556® and SR-762™
magazines are not interchangeable. Magazines that have been tested and approved foruse with the RUGER® SR-556® are available through Ruger Accessories salesMonday through Friday, 7:30 a.m. - 6:00 p.m. at 1-888-220-1173 ET or 24 hours aday, 7 days a week on the web at www.ShopRuger.com.
LOADING THE MAGAZINEUse only clean, dry ammunition of theproper caliber manufactured to U. S.Industry specifications, in good condition.(See Notice and Warnings in other sectionsof this manual pertaining to Ammunition).
With the short end of the magazine facingforward, place a round between the lips ofthe magazine with the bullet forward. Pressthe round down until it is held by themagazine lips. Place the next round andrepeat until the desired number ofcartridges are loaded.
DAMAGED, NON-STANDARD OR IMPROPERLYASSEMBLED MAGAZINES SHOULD NOT BE USED.THEY CAN CAUSE THE RIFLE TO MALFUNCTION.
Figure 6
14
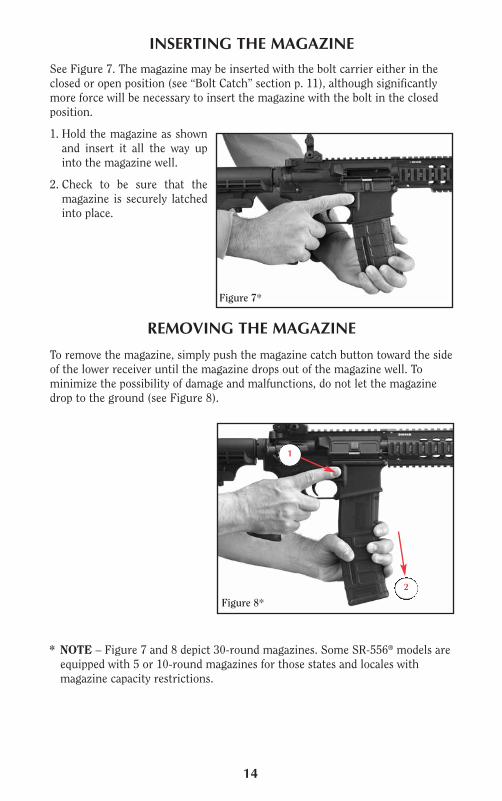
INSERTING THE MAGAZINESee Figure 7. The magazine may be inserted with the bolt carrier either in theclosed or open position (see “Bolt Catch” section p. 11), although significantlymore force will be necessary to insert the magazine with the bolt in the closedposition.
1. Hold the magazine as shownand insert it all the way upinto the magazine well.
2. Check to be sure that themagazine is securely latchedinto place.
REMOVING THE MAGAZINE
To remove the magazine, simply push the magazine catch button toward the sideof the lower receiver until the magazine drops out of the magazine well. Tominimize the possibility of damage and malfunctions, do not let the magazinedrop to the ground (see Figure 8).
Figure 7*
Figure 8*
1
2
* NOTE – Figure 7 and 8 depict 30-round magazines. Some SR-556® models areequipped with 5 or 10-round magazines for those states and locales with magazine capacity restrictions.
TO LOAD AND FIRE (WITH MAGAZINE)Practice this important aspect of gun handling (with an unloaded rifle) until youcan perform each of the steps - described below - with skill and confidence. Butbefore you do anything with the rifle, please first read completely through thismanual. This procedure begins with an empty rifle with its magazine out.
1. Be certain the muzzle is pointing in a safe direction. (See Rule 2, p. 51.)
2. The gas regulator should initially be set on setting #2. For more information,see “Adjusting the Regulator” on page 34.
3. Before inserting a loaded magazine, engage the bolt catch so the bolt carrier isheld open. Check the chamber to be certain it is empty. MOVE THE SAFETYTO THE ON “SAFE” POSITION. (See Figure 3, p. 10.)
4. Load a magazine with the desired number of cartridges.
5. Insert the loaded magazine into the magazine well, and push the upper pad onthe bolt catch towards the side of the lower receiver. A cartridge will bestripped from the magazine and chambered by the motion of the bolt carrier.
WARNING: If cartridges do not feed smoothly from the magazine into thechamber then do not use the rifle until the problem is corrected. (See“Warning - Malfunctions,” p. 24.)
6. The rifle is now cocked and a cartridge is chambered. Visually check to becertain the safety is in the on or the “SAFE” position, and keep the riflepointed in a safe direction.
7. When you are ready to fire the rifle, move the safety to the “FIRE” position.
WARNING: DO NOT TOUCH THE TRIGGER UNTIL YOU ARE ACTUALLYREADY TO FIRE. KEEP THE SAFETY “ON” UNLESS ACTUALLY FIRING.
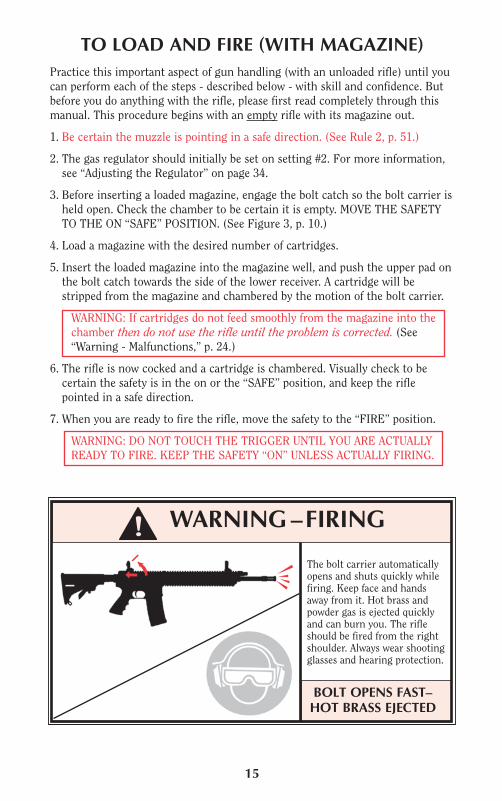
WARNING–FIRING
15
The bolt carrier automaticallyopens and shuts quickly whilefiring. Keep face and handsaway from it. Hot brass andpowder gas is ejected quicklyand can burn you. The rifleshould be fired from the rightshoulder. Always wear shootingglasses and hearing protection.
BOLT OPENS FAST–HOT BRASS EJECTED
16
8. The rifle will fire one shot each time the trigger is pulled until the magazineis empty. Some of the gas produced by the combustion of the powder in thecartridge is used to drive the piston rearward. The piston drives the transferrod rearward which, in turn, cycles the bolt carrier. This process ejects thefired cartridge case, recocks the gun, and loads a new cartridge from themagazine into the firing chamber.
9. Immediately following the firing of a shot, and if a subsequent shot is not tobe fired at once, put the safety in the on “SAFE” position while the rifle isstill pointing in a safe direction. The safety should be moved to the “SAFE”position as soon as firing is completed, and it should be on “SAFE” at alltimes except when the rifle is on target and being fired.
10. When the last cartridge in the magazine has been fired, the bolt catch will automatically engage and hold the bolt carrier in the rearward, open position.
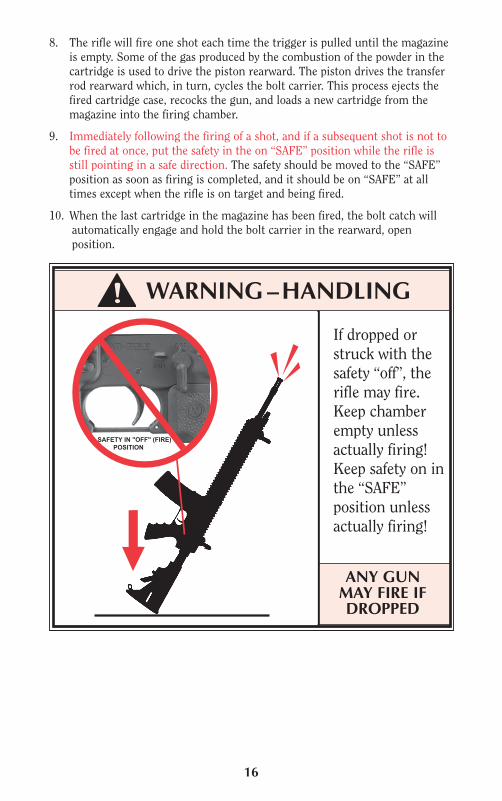
If dropped orstruck with thesafety “off”, therifle may fire.Keep chamberempty unlessactually firing!Keep safety on inthe “SAFE”position unlessactually firing!
ANY GUNMAY FIRE IFDROPPED
WARNING–HANDLING
SAFETY IN "OFF" (FIRE) POSITION
WARNING – SUSTAINED FIRING
17
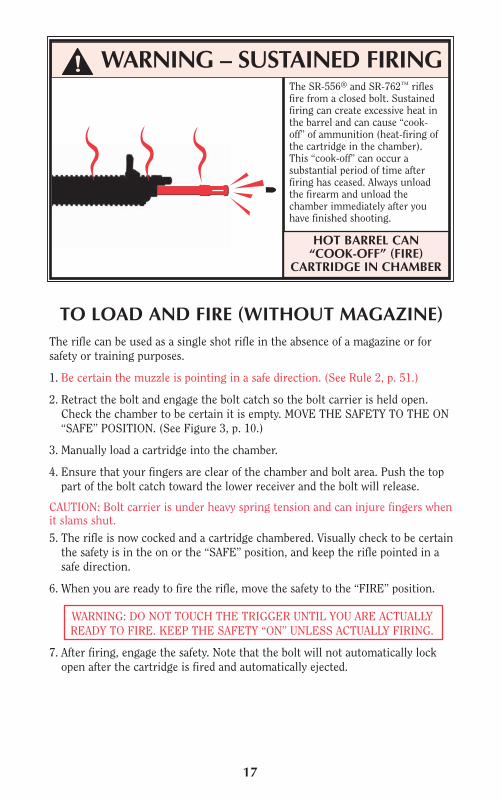
TO LOAD AND FIRE (WITHOUT MAGAZINE)The rifle can be used as a single shot rifle in the absence of a magazine or forsafety or training purposes.
1. Be certain the muzzle is pointing in a safe direction. (See Rule 2, p. 51.)
2. Retract the bolt and engage the bolt catch so the bolt carrier is held open.Check the chamber to be certain it is empty. MOVE THE SAFETY TO THE ON“SAFE” POSITION. (See Figure 3, p. 10.)
3. Manually load a cartridge into the chamber.
4. Ensure that your fingers are clear of the chamber and bolt area. Push the toppart of the bolt catch toward the lower receiver and the bolt will release.
CAUTION: Bolt carrier is under heavy spring tension and can injure fingers whenit slams shut.
5. The rifle is now cocked and a cartridge chambered. Visually check to be certainthe safety is in the on or the “SAFE” position, and keep the rifle pointed in asafe direction.
6. When you are ready to fire the rifle, move the safety to the “FIRE” position.
WARNING: DO NOT TOUCH THE TRIGGER UNTIL YOU ARE ACTUALLYREADY TO FIRE. KEEP THE SAFETY “ON” UNLESS ACTUALLY FIRING.
7. After firing, engage the safety. Note that the bolt will not automatically lockopen after the cartridge is fired and automatically ejected.
HOT BARREL CAN“COOK-OFF” (FIRE)
CARTRIDGE IN CHAMBER
The SR-556® and SR-762™ riflesfire from a closed bolt. Sustainedfiring can create excessive heat inthe barrel and can cause “cook-off” of ammunition (heat-firing ofthe cartridge in the chamber).This “cook-off” can occur asubstantial period of time afterfiring has ceased. Always unloadthe firearm and unload thechamber immediately after youhave finished shooting.

WARNING – UNLOADING
TO UNLOADWARNING: This sequence must be followed exactly as spelled out. Failure to doso can result in the rifle’s chamber becoming unintentionally loaded with acartridge!
1. Keep the muzzle pointed in a safe direction at all times and keep the fingersoutside the trigger guard. Rotate the safety to the “SAFE” position.
2. Remove the magazine. REMEMBER that even though the magazine has beenremoved, a cartridge remaining in the chamber can still be fired!
3. Pull the charging handle all the way to the rear, extracting and ejecting thecartridge in the chamber.
4. When the bolt carrier is fully retracted, push down on the bottom pad of thebolt catch and then allow the bolt carrier to move forward until it comes torest against the bolt catch.
5. Always visually double check the chamber to be certain it is empty.
6. The only “safe” rifle is one in which the bolt carrier is open and the chamberand magazine are empty, and the muzzle is pointed in a safe direction.
So that the rifle can be used as a single loader, itwill fire whether or not a magazine is in the gunif a cartridge is chambered. Removing magazinedoes not unload rifle! To unload, first removemagazine, then pull the charging handle to therear, eject chambered cartridge, and visuallyinspect chamber. The safety should always be inthe “SAFE” position when loading or unloadingthe rifle.
GUN WILL FIRE WITHMAGAZINE OUT
18
19
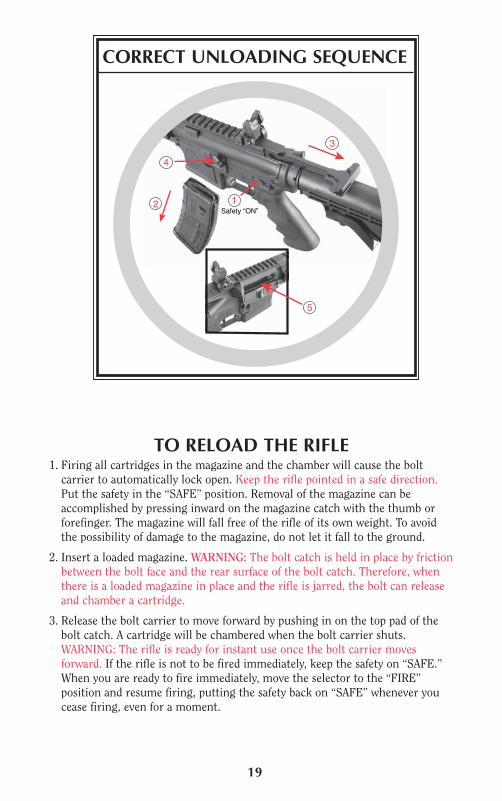
CORRECT UNLOADING SEQUENCE
12
3
4
5
Safety “ON”
TO RELOAD THE RIFLE1. Firing all cartridges in the magazine and the chamber will cause the boltcarrier to automatically lock open. Keep the rifle pointed in a safe direction.Put the safety in the “SAFE” position. Removal of the magazine can beaccomplished by pressing inward on the magazine catch with the thumb orforefinger. The magazine will fall free of the rifle of its own weight. To avoidthe possibility of damage to the magazine, do not let it fall to the ground.
2. Insert a loaded magazine. WARNING: The bolt catch is held in place by frictionbetween the bolt face and the rear surface of the bolt catch. Therefore, whenthere is a loaded magazine in place and the rifle is jarred, the bolt can releaseand chamber a cartridge.
3. Release the bolt carrier to move forward by pushing in on the top pad of thebolt catch. A cartridge will be chambered when the bolt carrier shuts.WARNING: The rifle is ready for instant use once the bolt carrier movesforward. If the rifle is not to be fired immediately, keep the safety on “SAFE.”When you are ready to fire immediately, move the selector to the “FIRE”position and resume firing, putting the safety back on “SAFE” whenever youcease firing, even for a moment.
TO EXTRACT ANDEJECT A CHAMBERED CARTRIDGE
When the rifle is fired, the same gas pressure that drives the bullet forward actsthrough the gas port to push the piston, transfer rod, and bolt carrier to the rear.This action causes extraction and ejection of the fired cartridge case. If acartridge fails to fire or if the shooter wishes to eject the chambered cartridgemanually, follow the procedure “To Unload” step 3, p. 18. When the charginghandle is operated there can be a failure to extract the cartridge from thechamber, or a failure to eject the cartridge clear of the rifle. These failuresusually are the result of the charging handle not being pulled rearwardvigorously. From the foregoing, it is clear that the user must:
1. Always visually check the chamber after opening the slide to eject a chamberedcartridge. If the charging handle is not vigorously retracted, the extractedcartridge can be “ejected” into the magazine area.
2. Thoroughly clean the chamber and the extractor as often as necessary.
If an empty magazine is in the rifle when the charging handle is being retractedto extract a cartridge, the cartridge may drop on top of the magazine or remainheld to the breech-face by the extractor. Then, when the bolt carrier goesforward, the cartridge will be chambered again! REMEMBER -- always removethe magazine before clearing the chamber, and visually check to ensure that nocartridges remain in the gun.
TO REMOVE A BORE OBSTRUCTIONRifles like the RUGER® SR-556® and SR-762™, which are chambered forsmall caliber, high-velocity cartridges, are particularly susceptible to damagefrom firing when the bore is obstructed. Excess oil, grease or water may form anobstruction which could cause damage and injury. If you suspect that your riflemay have excess oil, grease or other contaminants in the barrel, or if it may havebeen exposed to humid conditions which could cause condensation, or to rain orsnow which might have entered the bore, open the bolt carrier and clean out thebarrel. Inspect the bore visually to be sure that it is perfectly clear. (See “Warning- Ammunition,” p. 12 and “Care and Cleaning” section p. 36.)
A gun user should recognize that a lodged bullet is a fairly common form of boreobstruction. Therefore, the following information on how a bullet may becomelodged in the bore, and how it should be removed, deserves most careful readingand understanding!
20
21
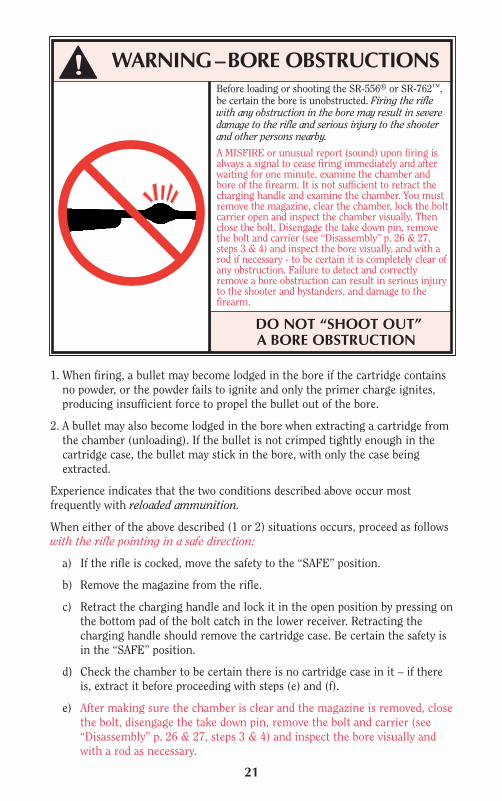
WARNING–BORE OBSTRUCTIONS
1. When firing, a bullet may become lodged in the bore if the cartridge containsno powder, or the powder fails to ignite and only the primer charge ignites,producing insufficient force to propel the bullet out of the bore.
2. A bullet may also become lodged in the bore when extracting a cartridge fromthe chamber (unloading). If the bullet is not crimped tightly enough in thecartridge case, the bullet may stick in the bore, with only the case beingextracted.
Experience indicates that the two conditions described above occur mostfrequently with reloaded ammunition.
When either of the above described (1 or 2) situations occurs, proceed as followswith the rifle pointing in a safe direction:
a) If the rifle is cocked, move the safety to the “SAFE” position.
b) Remove the magazine from the rifle.
c) Retract the charging handle and lock it in the open position by pressing onthe bottom pad of the bolt catch in the lower receiver. Retracting thecharging handle should remove the cartridge case. Be certain the safety isin the “SAFE” position.
d) Check the chamber to be certain there is no cartridge case in it – if thereis, extract it before proceeding with steps (e) and (f).
e) After making sure the chamber is clear and the magazine is removed, closethe bolt, disengage the take down pin, remove the bolt and carrier (see“Disassembly” p. 26 & 27, steps 3 & 4) and inspect the bore visually andwith a rod as necessary.
Before loading or shooting the SR-556® or SR-762™,be certain the bore is unobstructed. Firing the riflewith any obstruction in the bore may result in severedamage to the rifle and serious injury to the shooterand other persons nearby.
A MISFIRE or unusual report (sound) upon firing isalways a signal to cease firing immediately and afterwaiting for one minute, examine the chamber andbore of the firearm. It is not sufficient to retract thecharging handle and examine the chamber. You mustremove the magazine, clear the chamber, lock the boltcarrier open and inspect the chamber visually. Thenclose the bolt. Disengage the take down pin, removethe bolt and carrier (see “Disassembly” p. 26 & 27,steps 3 & 4) and inspect the bore visually, and with arod if necessary - to be certain it is completely clear ofany obstruction. Failure to detect and correctlyremove a bore obstruction can result in serious injuryto the shooter and bystanders, and damage to thefirearm.
DO NOT “SHOOT OUT” A BORE OBSTRUCTION

f) If the bore is obstructed, insert a proper size cleaning rod (without a tip orbrush) into the bore from the muzzle and dislodge and remove the bullet.If the bullet does not readily dislodge, it may be necessary to lightly tap thehandle end of the cleaning rod. If such efforts fail to dislodge the bullet,take the rifle to a gunsmith. DO NOT ATTEMPT TO REMOVE A LODGEDBULLET USING A BLANK CARTRIDGE, OR A CARTRIDGE FROM WHICHTHE BULLET HAS BEEN REMOVED, OR BY ANY MEANS OTHER THANTHE USE OF THE PROPER SIZE CLEANING ROD AND REASONABLEFORCE APPLIED TO THE ROD. BE CERTAIN ALL LOOSE POWDER HASBEEN REMOVED FROM THE BORE AND ACTION BEFOREINTRODUCING THE ROD INTO THE BORE. NEVER TRY TO SHOOT OUTA BORE OBSTRUCTION! See “Warning - Bore Obstructions,” p. 21.
g) Reinspect the bore to be certain it is free of unburned powder particles orany other debris. At the same time, clean the magazine, the magazine well and other areas of the mechanism of unburned powder grains.
It is absolutely essential that steps (a) through (g) be followed if there is anysuspicion that a bullet has been lodged in the bore because of the situationsdescribed in 1 or 2 above. Remember that a bullet can be lodged in the boreof a rifle just where the rifling begins, and a live cartridge can still bechambered and the bolt closed and locked. This can occur because the bulletin the chambered cartridge is pushed back into the cartridge case far enoughto give the shooter the impression that the loaded cartridge has chamberednormally.
Always check the bore for an obstruction if you experience difficulty inchambering a cartridge, experience a failure to extract, have a misfire or the rifledoes not make a normally loud report on firing.
RELOADERS SHOULD USE ONLY CANNELURED BULLETS AND BE SURE TOCRIMP THEM SECURELY IN THE CARTRIDGE CASE. NOTE: Sturm, Ruger &Co. specifically does not recommend the use of reloaded, hand-loaded orremanufactured cartridges. Please see “Ammunition Notice” p. 12.
TO CLEAR A MALFUNCTION (“JAM”)If you experience a malfunction, study the situation to determine the nature ofthe malfunction and how best to clear it. Any autoloading firearm mayoccasionally malfunction. If it does:
1. Be certain the muzzle is pointed in a safe direction and the safety is in the on(“SAFE”) position.
2. When attempting to free a jammed cartridge, do not use any type of tool thatis likely to act as a “firing pin” and discharge the cartridge should the toolimpact on the primer. Never use a cartridge as a “tool.”
3. After clearing a jam, inspect the gun mechanism to determine if dirt or debrismight be the cause of the problem. Excess lubricant or grease can causecartridges to feed sluggishly. An accumulation of grease, dirt or powder grainsin the magazine can contribute to cartridge feeding problems.
22

23
4. After clearing a jam, inspect all cartridges that have been removed from thegun. Safely dispose of any cartridges which are dented, nicked or have bulletsthat are loose or improperly positioned in the cartridge case.
5. If it appears that the gun and magazine are not at fault, and that the jam wascaused by the type of cartridge being used, then try another type or brand ofcartridge.
6. If the above procedures do not result in a smooth and reliable feeding firearm,don’t use the gun until it feeds cartridges smoothly and reliably. The rifleshould be returned directly to our Newport Customer Service Department forrepair. See the “Service and Parts” section p. 40, for packing and shippinginformation.
Another precaution: Form the habit of examining fired cartridge cases from timeto time. If fired cases have bulged heads or show splits on any part of the case,stop using that ammunition. If the problem persists with different types ofammunition, return the rifle to the factory for inspection. (See page 40.)
7. If a cartridge or shell is caught between the bolt carrier and receiver, put thesafety on “SAFE,” retract the bolt carrier using the charging handle, and lockit in the open position using the bolt catch. Remove the magazine; thenremove the jammed case.
8. If a fired case is in the chamber, use a cleaning rod to knock it out.
9. If an unfired cartridge is stuck in the chamber, keep the muzzle pointed in asafe direction with the safety in the “SAFE” position. Close the bolt, disengagethe take down pin, remove the bolt and carrier (see “Disassembly” p. 26 & 27,steps 3 & 4), and remove the unfired cartridge from the breech-end ratherthan trying to dislodge it with a cleaning rod inserted from the muzzle. Use apiece of 3/16” brass rod which has one end shaped like a screwdriver tip. Insertthe tip in the extractor groove of the cartridge, use the face of the ejectionport as a fulcrum and carefully pry out the cartridge. Be careful not to strikethe primer area of the live cartridge! Vigorously brush-clean the chamber withsolvent after clearing any jam involving the chamber.
TO MINIMIZE MALFUNCTIONS (“JAMS”)Autoloading firearms of all makes and types occasionally malfunction when acartridge fails to feed from the magazine to the chamber, or when a cartridge (orfired case) fails to properly extract and eject.
To minimize the possibility of such occurrences, the gun user should:
1. Use ammunition of the correct caliber and type which is loaded to IndustrySpecifications. Avoid reloads, remanufactured cartridges, and cartridges thatare dirty, corroded or deformed. (See “Warning - Ammunition,” p. 12.)
2. Clean and lubricate the gun in accordance with the instructions in thismanual.
24
WARNING–MALFUNCTIONS
3. If the mechanism shows signs of not functioning correctly, or if a part isdamaged or broken -- don’t use the gun. Have it inspected and repaired. (See“Warning - Malfunctions,” below.)
4. Use only high-quality AR-style magazines and carefully load the magazine. Donot exceed the stated magazine capacity. (See “Loading the Magazine,” p. 13.)
5. Do not ‘ride’ the charging handle when chambering a cartridge from themagazine. The bolt carrier should be permitted to snap forward under the fullforce of the buffer spring. If a cartridge does not fully chamber, use theforward assist no more than twice to force the bolt carrier closed. If thecartridge is still not chambered completely, the round should be cleared as ajam (see page and “Warning - Bore Obstructions,” p. 21.)
6. To minimize the probability of an unfired cartridge being jammed should it‘fall back’ onto the magazine, remove the magazine before retracting the slide.When extracting an unfired cartridge, tip the right side of the rifle towards theground so that gravity will assist the cartridge to fall clear of the ejection port.Always retract the charging handle briskly whenever extracting a livecartridge. Take care to see that a cartridge is not forcibly ejected against asurface where the primer might be set off.
Alterations to the rifle or use of non-Ruger accessories may cause malfunctions.See “Warning - Alterations,” on page 10. If the above procedures do not result ina smooth and reliable feeding firearm, don’t use the gun. The rifle can bereturned directly to our Newport, New Hampshire Customer Service Departmentfor repair. See the “Service and Parts Policy” section, page 40, of this manual forpacking and shipping information.
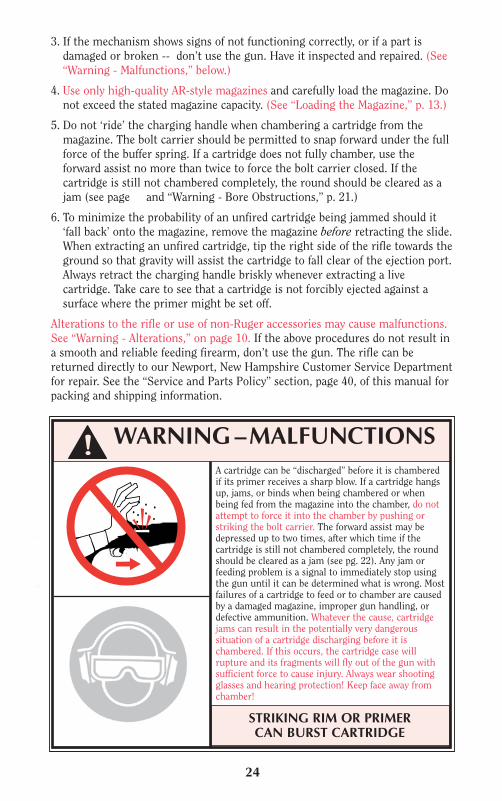
A cartridge can be “discharged” before it is chamberedif its primer receives a sharp blow. If a cartridge hangsup, jams, or binds when being chambered or whenbeing fed from the magazine into the chamber, do notattempt to force it into the chamber by pushing orstriking the bolt carrier. The forward assist may bedepressed up to two times, after which time if thecartridge is still not chambered completely, the roundshould be cleared as a jam (see pg. 22). Any jam orfeeding problem is a signal to immediately stop usingthe gun until it can be determined what is wrong. Mostfailures of a cartridge to feed or to chamber are causedby a damaged magazine, improper gun handling, ordefective ammunition. Whatever the cause, cartridgejams can result in the potentially very dangeroussituation of a cartridge discharging before it ischambered. If this occurs, the cartridge case willrupture and its fragments will fly out of the gun withsufficient force to cause injury. Always wear shootingglasses and hearing protection! Keep face away fromchamber!
STRIKING RIM OR PRIMERCAN BURST CARTRIDGE
25
WARNING–DISASSEMBLY
12
3
4
5
Safety “ON”
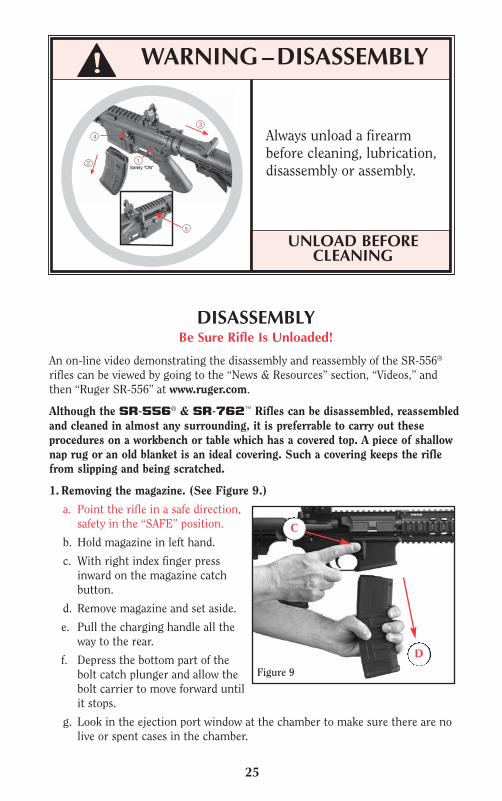
DISASSEMBLYBe Sure Rifle Is Unloaded!
An on-line video demonstrating the disassembly and reassembly of the SR-556®
rifles can be viewed by going to the “News & Resources” section, “Videos,” andthen “Ruger SR-556” at www.ruger.com.
Although the SR-556® & SR-762™ Rifles can be disassembled, reassembledand cleaned in almost any surrounding, it is preferrable to carry out theseprocedures on a workbench or table which has a covered top. A piece of shallownap rug or an old blanket is an ideal covering. Such a covering keeps the riflefrom slipping and being scratched.
1. Removing the magazine. (See Figure 9.)
a. Point the rifle in a safe direction,safety in the “SAFE” position.
b. Hold magazine in left hand.
c. With right index finger pressinward on the magazine catchbutton.
d. Remove magazine and set aside.
e. Pull the charging handle all theway to the rear.
f. Depress the bottom part of thebolt catch plunger and allow thebolt carrier to move forward untilit stops.
g. Look in the ejection port window at the chamber to make sure there are nolive or spent cases in the chamber.
Figure 9
Always unload a firearmbefore cleaning, lubrication,disassembly or assembly.
UNLOAD BEFORECLEANING
C
D
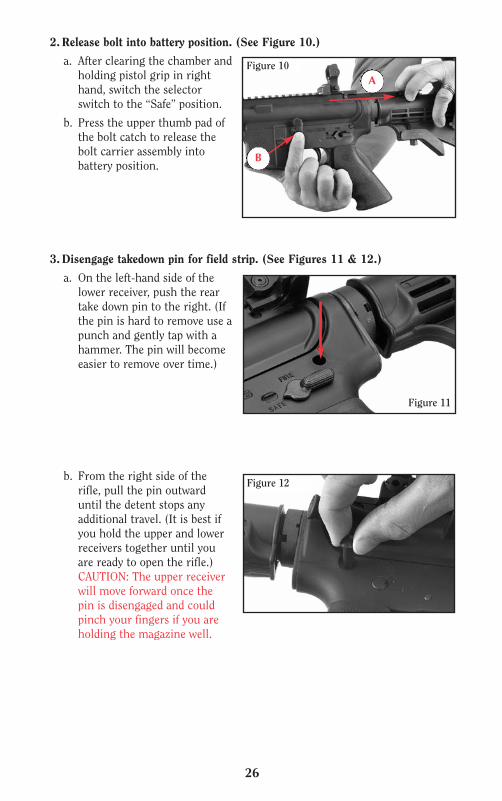
2. Release bolt into battery position. (See Figure 10.)
a. After clearing the chamber andholding pistol grip in righthand, switch the selectorswitch to the “Safe” position.
b. Press the upper thumb pad ofthe bolt catch to release thebolt carrier assembly intobattery position.
3.Disengage takedown pin for field strip. (See Figures 11 & 12.)
a. On the left-hand side of thelower receiver, push the reartake down pin to the right. (Ifthe pin is hard to remove use apunch and gently tap with ahammer. The pin will becomeeasier to remove over time.)
b. From the right side of therifle, pull the pin outwarduntil the detent stops anyadditional travel. (It is best ifyou hold the upper and lowerreceivers together until youare ready to open the rifle.)CAUTION: The upper receiverwill move forward once thepin is disengaged and couldpinch your fingers if you areholding the magazine well.
Figure 10A
B
Figure 11
Figure 12
26
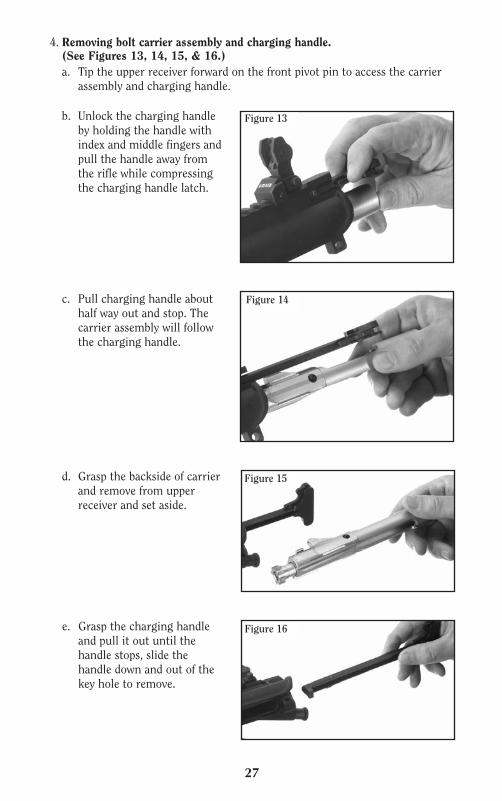
Figure 13
Figure 14
4. Removing bolt carrier assembly and charging handle.(See Figures 13, 14, 15, & 16.)a. Tip the upper receiver forward on the front pivot pin to access the carrier
assembly and charging handle.
e. Grasp the charging handleand pull it out until thehandle stops, slide thehandle down and out of thekey hole to remove.
Figure 15
Figure 16
b. Unlock the charging handleby holding the handle withindex and middle fingers andpull the handle away fromthe rifle while compressingthe charging handle latch.
c. Pull charging handle abouthalf way out and stop. Thecarrier assembly will followthe charging handle.
d. Grasp the backside of carrierand remove from upperreceiver and set aside.
27
28
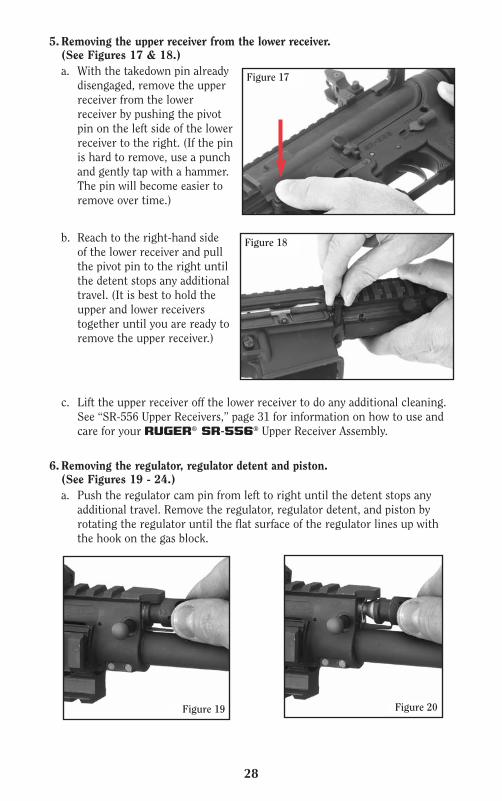
5. Removing the upper receiver from the lower receiver.(See Figures 17 & 18.)a. With the takedown pin already
disengaged, remove the upperreceiver from the lowerreceiver by pushing the pivotpin on the left side of the lowerreceiver to the right. (If the pinis hard to remove, use a punchand gently tap with a hammer.The pin will become easier toremove over time.)
b. Reach to the right-hand sideof the lower receiver and pullthe pivot pin to the right untilthe detent stops any additionaltravel. (It is best to hold theupper and lower receiverstogether until you are ready toremove the upper receiver.)
c. Lift the upper receiver off the lower receiver to do any additional cleaning.See “SR-556 Upper Receivers,” page 31 for information on how to use andcare for your RUGER® SR-556® Upper Receiver Assembly.
Figure 19
6. Removing the regulator, regulator detent and piston.(See Figures 19 - 24.)a. Push the regulator cam pin from left to right until the detent stops any
additional travel. Remove the regulator, regulator detent, and piston byrotating the regulator until the flat surface of the regulator lines up withthe hook on the gas block.
Figure 20
Figure 17
Figure 18
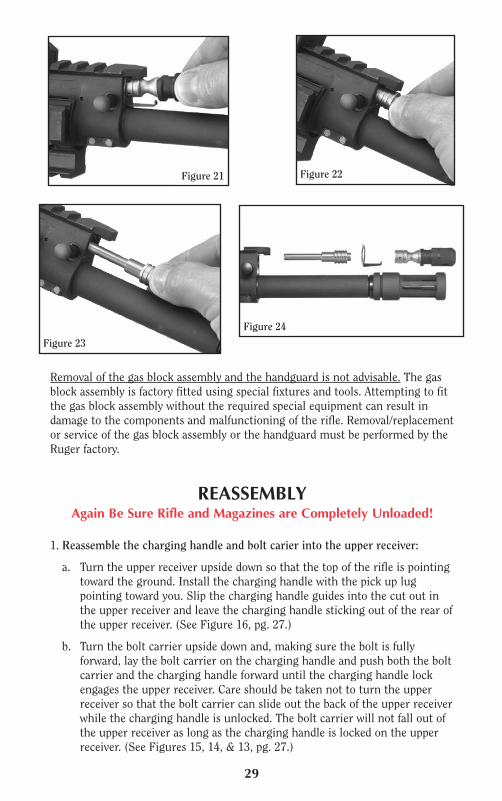
Figure 21
Figure 24
Figure 23
Figure 22
Removal of the gas block assembly and the handguard is not advisable. The gasblock assembly is factory fitted using special fixtures and tools. Attempting to fitthe gas block assembly without the required special equipment can result indamage to the components and malfunctioning of the rifle. Removal/replacementor service of the gas block assembly or the handguard must be performed by theRuger factory.
REASSEMBLYAgain Be Sure Rifle and Magazines are Completely Unloaded!
1. Reassemble the charging handle and bolt carier into the upper receiver:
a. Turn the upper receiver upside down so that the top of the rifle is pointingtoward the ground. Install the charging handle with the pick up lugpointing toward you. Slip the charging handle guides into the cut out inthe upper receiver and leave the charging handle sticking out of the rear ofthe upper receiver. (See Figure 16, pg. 27.)
b. Turn the bolt carrier upside down and, making sure the bolt is fullyforward, lay the bolt carrier on the charging handle and push both the boltcarrier and the charging handle forward until the charging handle lockengages the upper receiver. Care should be taken not to turn the upperreceiver so that the bolt carrier can slide out the back of the upper receiverwhile the charging handle is unlocked. The bolt carrier will not fall out ofthe upper receiver as long as the charging handle is locked on the upperreceiver. (See Figures 15, 14, & 13, pg. 27.)
29
2. Assemble the upper receiver to the lower receiver:
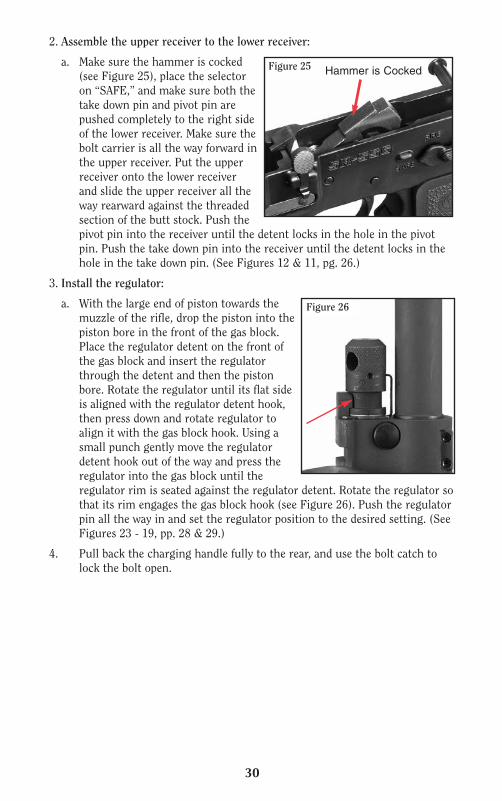
a. Make sure the hammer is cocked(see Figure 25), place the selectoron “SAFE,” and make sure both thetake down pin and pivot pin arepushed completely to the right sideof the lower receiver. Make sure thebolt carrier is all the way forward inthe upper receiver. Put the upperreceiver onto the lower receiverand slide the upper receiver all theway rearward against the threadedsection of the butt stock. Push thepivot pin into the receiver until the detent locks in the hole in the pivotpin. Push the take down pin into the receiver until the detent locks in thehole in the take down pin. (See Figures 12 & 11, pg. 26.)
3. Install the regulator:
a. With the large end of piston towards themuzzle of the rifle, drop the piston into thepiston bore in the front of the gas block.Place the regulator detent on the front ofthe gas block and insert the regulatorthrough the detent and then the pistonbore. Rotate the regulator until its flat sideis aligned with the regulator detent hook,then press down and rotate regulator toalign it with the gas block hook. Using asmall punch gently move the regulatordetent hook out of the way and press theregulator into the gas block until theregulator rim is seated against the regulator detent. Rotate the regulator sothat its rim engages the gas block hook (see Figure 26). Push the regulatorpin all the way in and set the regulator position to the desired setting. (SeeFigures 23 - 19, pp. 28 & 29.)
4. Pull back the charging handle fully to the rear, and use the bolt catch tolock the bolt open.
30
Figure 25 Hammer is Cocked
Figure 26
NOTE:The Ruger® SR-556® Upper was designed to work with standard AR-pattern(commonly referred to as “mil-spec”) components. By mating the SR-556®
Upper to a standard AR-pattern Lower, you will have an AR-15 pattern rifleupgraded with the benefits offered by the Ruger®’s two-stage piston andadjustable regulator. However, the nature of the AR-15 pattern componentmarket provides for a wide variety of components, features and options thatoften depart from the standard AR-pattern design. Any departure fromstandard AR-pattern components in your Lower may lead to compromisedperformance or damage to your SR-556® Upper, for which Ruger® cannot beheld responsible.
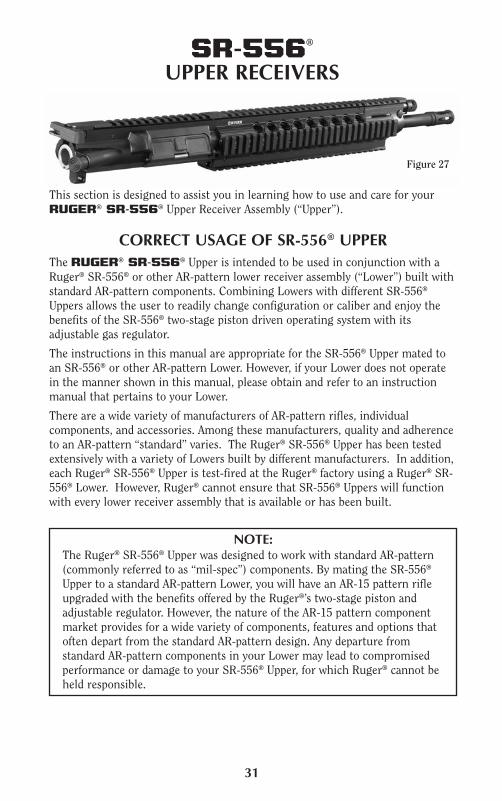
This section is designed to assist you in learning how to use and care for yourRUGER® SR-556® Upper Receiver Assembly (“Upper”).
CORRECT USAGE OF SR-556® UPPERThe RUGER® SR-556® Upper is intended to be used in conjunction with aRuger® SR-556® or other AR-pattern lower receiver assembly (“Lower”) built withstandard AR-pattern components. Combining Lowers with different SR-556®
Uppers allows the user to readily change configuration or caliber and enjoy thebenefits of the SR-556® two-stage piston driven operating system with itsadjustable gas regulator.
The instructions in this manual are appropriate for the SR-556® Upper mated toan SR-556® or other AR-pattern Lower. However, if your Lower does not operatein the manner shown in this manual, please obtain and refer to an instructionmanual that pertains to your Lower.
There are a wide variety of manufacturers of AR-pattern rifles, individualcomponents, and accessories. Among these manufacturers, quality and adherenceto an AR-pattern “standard” varies. The Ruger® SR-556® Upper has been testedextensively with a variety of Lowers built by different manufacturers. In addition,each Ruger® SR-556® Upper is test-fired at the Ruger® factory using a Ruger® SR-556® Lower. However, Ruger® cannot ensure that SR-556® Uppers will functionwith every lower receiver assembly that is available or has been built.
SR-556®
UPPER RECEIVERS
31
Figure 27
PROPER FUNCTIONING OF SR-556® UPPEREnsure you are using the correct Upper for your chosen caliber. Ruger® SR-556®
barrels are roll-marked with the caliber in which they are chambered. As an addedprecaution, other Ruger® caliber-specific components, the bolt (not the bolt carrier,just the bolt), regulator, and magazines, are marked with their respective calibers ifthey are not 5.56mm NATO/.223 Rem.
Ruger® SR-556® Uppers are test-fired at the Ruger® factory on SR-556® Lowerswhich use a standard-weight buffer and carbine-length buffer spring and receiverextension. The SR-556® also will function properly with a standard-weight bufferand rifle-length buffer spring and receiver extension. Other buffer configurationsmay require experimentation with gas regulation (See “Adjusting the GasRegulator,” page 34) and the particular ammunition desired, and a change to astandard-weight buffer may be required to obtain satisfactory results. Also, pleasenote that the Ruger® Upper’s un-shrouded bolt carrier may be incompatible withsome hammers, in particular some aftermarket hammers found in custom triggerkits. If the action does not cycle properly because the hammer on your Lower isinterfering with the bolt carrier or firing pin in the Ruger® Upper, you may need toinstall a standard AR-pattern hammer and trigger in your Lower.
If your SR-556® upper does not function properly when mated to an SR-556® orother AR pattern Lower, please follow the following steps:
1. Ensure that the Lower is properly assembled with the correct components,including the buffer, buffer spring and hammer, and operates with other Uppersthat are known to function. If not, please seek the assistance of a qualifiedgunsmith who is familiar with AR-pattern rifles, or the manufacturer of the Lowerin question. Ruger® cannot be responsible, or provide service, for Lowers otherthan Ruger® SR-556®.
2. Ensure that the assembled rifle is sufficiently lubricated. All working surfaces ofthe bolt carrier group and charging handle (See “Care and Cleaning” instructionson page 36) need a light application of quality lubricant.
3. Ensure the gas system is adjusted properly (See “Adjusting the Regulator,” page34). If a cartridge fires but the action does not cycle (eject the spent case andchamber a subsequent cartridge) properly, the regulator may need to be adjustedto a numerically higher setting.
If, after following these steps, you feel your SR-556® Upper is in need of service fromRuger®, please contact Ruger® Customer Service as indicated on the next page.Before doing so, please understand the following:
NON-RUGER LOWERSRuger® cannot provide service on any Lower other than a Ruger® SR-556® Lower.Please do not send non-Ruger Lowers to Ruger® for service.
If you send an SR-556® Upper to Ruger® for service, and it functions properly on anSR-556® Lower, the SR-556® Upper will be returned to you, and you will be advisedto seek assistance from a qualified gunsmith or the manufacturer of your Lower.
Ruger® will not be responsible for damage to an Upper caused by a non-RugerLower.
32

RECEIVER EXTENSIONAND CAM PIN WEAR-IN WITNESS MARKS
The bolt carrier group in the SR-556® is mechanically actuated by a transfer rod,rather than by system operating pressures typical of most “gas-driven” AR-pattern rifles. The Ruger®’s piston-driven technology allows the SR-556® to runcleaner and cooler than its gas-driven AR-pattern counterparts. However, themechanical actuation creates some initial wear-in witness marks in the receiverextension (“buffer tube”) and the cam pin track in the upper receiver. The Ruger®
SR-556® employs a number of features that mitigate the effects of mechanicalactuation and reduce the initial wear-in:
1. The patent-pending two-stage piston cycles the action with a reduced amountof initial operating force.
2. The gas system regulator, when properly adjusted, ensures the rifle operateswith no more force than is necessary to cycle the action with the particularammunition.
3. The rear diameter of the bolt carrier is enlarged and radiused to minimizewear-in in the receiver extension. This wear-in, however, is largely controlledby the manufacturing tolerances in the upper and lower receivers. Lowerreceiver manufacturers other than Ruger® may have different tolerances thatmay adversely affect the wear rate in the receiver extension. In the event ofhigh rates of wear due to incompatible tolerances, receiver extensions arereplaceable at relatively low cost.
4. The cam pin has radiused corners to minimize damage to the cam pin track inthe upper receiver.
Wear-in typically occurs over the first few hundred rounds of operation, afterwhich the wear does not increase appreciably. If wear-in in the receiver extensionor upper receiver continually worsens and does not stabilize, please contactRuger Customer Service.
If you have questions regarding your SR-556® Upper, please do not contactRuger® Sportswear and Accessories (“ShopRuger.com”), even if you purchasedyour SR-556® Upper from Ruger® Sportswear and Accessories. You can contactRuger® Customer Service using the contact information listed below.
Ruger® Customer Service Contacts:
Sturm, Ruger & Co. Inc.Attn: Customer Service
411 Sunapee St.Newport, NH 03773
603-865-2442www.ruger.com
If you need to return your Ruger® SR-556® Upper for service, please do notreturn your Upper to Ruger® Sportswear and Accessories (“ShopRuger.com”)even if you purchased your SR-556® Upper from Ruger® Sportswear andAccessories. Contact Ruger® Customer Service using the contact informationlisted above. Please do not send a non-Ruger Lower to Ruger®!
33

34
STOCK ADJUSTMENT(Does Not Apply to State Compliant Models)
The SR-556® comes with a 6-position adjustable stock. The stock on the statecompliant models are fixed and are not adjustable. There are locking holes onthe underside of the extension tube and there is a spring-loaded pin inside thebutt stock. To adjust the stock, squeeze the rear part of the lever on theunderside of the stock against the stock and slide the entire stock assembly intoward the lower receiver, or away from the lower receiver. Release the lever andmove the stock slightly in or outuntil the pin snaps into one of theholes on the extension tube. Try thefit, and if necessary, readjust thestock. (See Fig. 28.)
QUAD RAIL HANDGUARDThe SR-556® comes standard with a quad rail handguard. This handguard willaccept all attachments designed to fit on a Picatinny or Mil-Spec 1913 rail.
ADJUSTING THE REGULATORThe SR-556® has an adjustable regulator which controls the amount of gasthat is used to cycle the piston and in turn the bolt carrier. The “0” location doesnot allow any gas into the gas block and causes the rifle to function as a singleshot rifle. Rounds can be extracted, ejected and a fresh round loaded byretracting the charging handle briskly, fully rearward, and releasing it. (See Fig.29.) There are three other gas port settings labeled “1,” “2” and “3” which vary insize, with “1” the smallest and “3” the largest.(See Figs. 30 - 32 on page 35.) Use the smallestgas port setting that reliably cycles the actionwith the particular ammunition you are using.There is no benefit to running the rifle on a gasport setting larger than is necessary, and doing somay degrade long term endurance.
Most commercial ammunition will cycleoptimally on setting “2,” which is an idealstarting point when first shooting the rifle withnew ammunition.
Figure 28
Figure 29

To adjust the regulator, turn the knurled section by hand. A tool can be insertedinto the cross hole for increased leverage if necessary.
It is important to ensure that the regulator detent locks in the detent in theregulator so that the gas port in the barrel lines up with the gas port hole in theregulator.
MAGAZINE INSPECTION AND CARECheck the magazine frequently. The follower must move freely and have adequatespring tension so that each cartridge is quickly raised to the feeding position.
To test the spring tension, load one cartridge into the magazine and then firmlypress against the cartridge case. Remove your finger quickly. The cartridge shouldinstantly and fully move into the feeding position. If it does not, the magazineshould be cleaned. If cleaning does not restore proper spring tension, do not usethe magazine. (NOTE: After testing, remove the test cartridge.)
When cleaning is necessary, use a solvent that will not rust the metal components.
CARE AND CLEANING OF THE REGULATORIt is necessary to clean the piston, regulator and gas block on a regular basis. Thisis the drive system of the SR-556®, and keeping this area clean will provideyears of trouble free service. To clean the piston, regulator and gas block, removethe regulator, regulator detent and piston as described on pages 28 & 29. Usepowder solvent and a brass brush to clean the piston bore in the gas block. Cleanthe top of the barrel below the vent in the bottom of the gas block with powdersolvent and a tooth brush. Clean both the piston and the regulator with powdersolvent and a tooth brush as well.
Reassemble the piston, regulator and regulator detent as described on page 30.
Figure 30 Figure 31 Figure 32
35
A “late” ejection pattern, in which the brass ejects to the rear of the shooter, may bemodified by increasing the gas port size, turning the regulator to a larger setting.
An “early” ejection pattern, in which the brass ejects to the front of the shooter, maybe modified by reducing the gas port size, turning the regulator to a smaller setting.

CARE AND CLEANINGBEFORE CLEANING, BE CERTAIN THE RIFLE
AND ITS MAGAZINE CONTAIN NO CARTRIDGES.
After each shooting session, at regular intervals, or whenever the rifle has beenexposed to sand, dust, extreme humidity, condensation, immersion in water or otheradverse conditions; disassemble, clean and oil it. Proper periodic maintenance isessential to the reliable functioning of any firearm.
An on-line video demonstrating the proper cleaning procedure of the SR-556® riflescan be viewed by going to the “News & Resources” section, “Videos,” and then “RugerSR-556” at www.ruger.com.
To clean the rifle, proceed as follows:
1. Disassemble (field-strip) the rifle to the extent described on pages 25 - 29.
The handguard and gas block should not be removed for cleaning or maintenance.Do not disassemble the rifle any further than as described on pages 25 - 29.
2. Clean bore with dry patches and examine. Bore fouling can contribute to reducedaccuracy, and grease accumulation in the chamber can interfere with properfeeding of cartridges from the magazine. Using a cleaning rod, run a properly sized,solvent-wetted patch through the bore several times. Then attach a solvent-wettedbrush to a cleaning rod and run it back and forth the full length of the bore asmany times as necessary to remove grease and dirt from the gas block piston bore.
3. Using powder solvent on a clean patch or bore brush, remove powder residue fromall components of the mechanism. After cleaning, run a dry patch through thebore, then follow with a patch that is very lightly oiled. Wipe all surfaces clean witha cloth, then wipe all surfaces with a patch or cloth that has been very lightly oiled.
4. NOTE: Only a light application of oil is needed to provide adequate lubrication ofmoving parts and to prevent rust. Excess accumulations of oil tend to attractparticles of dust and dirt and many congeal in cold weather which can interferewith the safe and reliable function of the rifle.
36
WARNING–LUBRICATION
OIL
Firing a rifle with oil, grease or any othermaterial even partially obstructing the boremay result in damage to the rifle and seriousinjury to the shooter and those nearby. Do notspray or apply lubricants directly onammunition. If the powder of a cartridge isaffected by the lubricant, it may not be ignited,but the primer firing may push the bullet intothe bore where it may be lodged. Firing asubsequent bullet into the obstructed bore maydamage the rifle and cause serious injury ordeath to the shooter and those nearby. Uselubricants properly. You are responsible for theproper care and maintenance of your firearms.
IMPROPER LUBRICATIONDESTROYS GUNS

37
STORAGEGUNS SHOULD NOT BE STORED LOADED!
Do not store the rifle in a leather case or scabbard. Leather attracts moisture,even though it may appear to be dry.
USE THE LOCKING DEVICE SUPPLIED WITHTHE RIFLE FOR STORAGE.
(See Page 8)
•Never place or store any firearm insuch a manner that it may bedislodged. Firearms should always bestored securely and unloaded, awayfrom children and careless adults.
•Use the locking device supplied withthe rifle for storage. The use of alocking device or safety lock is only oneaspect of responsible firearms storage.
•For increased safety, firearms shouldbe stored unloaded in a location that isboth separate from their ammunitionand inaccessible to children and anyother unauthorized person.
STORE SECURELY & UNLOADED
WARNING–STORAGE

38
SIGHT INSTALLATION FRONT SIGHT INSTALLATION INSTRUCTIONS:
1. Remove magazine and ensure the chamber is empty.
2. Unscrew clamp assembly and place sight so as to allow the clamp screw to rest in theforward gas block cross slot. Sight should be orientated to fold to the rear. (SeeFigure 33.)
3. Apply one drop of thread locking compound on the exposed threads. Replace theclamp and tighten while pushing the sight forward against the cross slot. (See Figure34.)
OPERATION
1. To raise the sight, grasp and pull up until the sight locks in the upright position.
2. To fold, depress the button located on the left side of the base and fold (see Fig. 33).
ZEROING PROCEDURES
1. Fire a group and measure from the point of aim to the point of impact.
2. Adjust the front sight for elevation only. Adjustments can be made with an AR-15front sight tool, AK74/47 tool or needle nose pliers.
3. Confirm zero with a group of aimed shots.
ADJUSTMENT
1. To move the bullet impact up – turn sight blade to the right/clockwise.
2. To move the bullet impact down – turn the sight blade to the left/counter clockwise.
Value per 1/4 turn / 90º of adjustment 100Y 200Y 300Y
1.75 MOA 1.75” 3.50” 5.25”
Figure 33 Figure 34
Depressbutton to foldsight back.

39
REAR SIGHT INSTRUCTIONS:
1. Remove the magazine and ensure the chamber is empty.
2. Unscrew clamp assembly and place sight so as to allow the clamp screw to rest inthe rear most rail cross-slot of the flat top receiver. Sight should be orientated tofold to the rear (see Fig. 35).
3. Apply one drop of thread locking compound on exposed threads. Replace the clampand tighten while pushing the sight forward against the cross slot (see Fig. 36).
OPERATION
1. To raise the sight, grasp and pull up until the sight locks in the upright position.
2. To fold, depress the button located on the left side of the base and fold.
ZEROING PROCEDURES
1. Fire a group and measure from the point of aim to the point of impact.
2. Adjust the rear sight for windage only.(see Fig. 37).
3. Elevation adjustment is made off of thefront sight post.
4. Sight apertures are on the same planeand can be used without a change ofimpact.
5. Confirm zero with a group of aimedshots and adjust as necessary.
ADJUSTMENT
1. To move the bullet impact right – turn adjustment wheel to the right/clockwise.
2. To move the bullet impact left – turn adjustment wheel to the left/counterclockwise.
Value for one click of adjustment 100Y 200Y 300Y
.625 MOA .625” 1.25” 1.875”
Figure 35 Figure 36
Figure 37
Depress buttonto fold sight
back.
40
SERVICE AND PARTS POLICYIf you have any question with regard to the performance of your RUGER®
SR-556® or SR-762™ rifle please write or call (603-865-2442) ourCustomer Service Department in Newport, New Hampshire 03773, fullydescribing all circumstances and conditions involved. If you should return yourrifle to the factory for repair, or order parts for it, please comply with thefollowing suggestions for prompt service:
WARNING: BEFORE SHIPPING ANY FIREARM,BE ABSOLUTELY CERTAIN THAT THE FIREARM AND ITSMAGAZINE ARE UNLOADED. DO NOT SHIP CARTRIDGESWITH A FIREARM.
SHIPPING FIREARMS FOR REPAIRRUGER® SR-556® or SR-762™ rifles returned to the factory for repair shouldbe sent to: Sturm, Ruger & Company, Inc., Customer Service Department, 411Sunapee St., Newport, New Hampshire 03773. The complete revolver should beshipped. NOTE: You must obtain a Repair Authorization Number before returningyour firearm. An authorization number can be obtained by contacting CustomerService online at www.ruger.com or calling the Customer Service Dept. at 603-865-2442. Guns should be sent prepaid. We will not accept collect shipments.
The Federal Gun Control Act, as well as the laws of most states and localities, do notprohibit an individual (who is not otherwise barred from purchasing or possessing afirearm) from shipping a firearm directly to the manufacturer for repair. However,before you ship your pistol to us, be certain that your state or locality does not have alaw or regulation which will prohibit you from receiving the pistol from us after it hasbeen repaired. If such receiving is prohibited, then please have a Federally LicensedFirearms Dealer ship the gun to us. If your pistol is sent to us by a dealer, it will bereturned to that dealer after being repaired. If a handgun (pistol or revolver) is shippedby an individual who does not hold a Federal Firearms License, it must be shipped forovernight delivery via U.P.S., Federal Express or other, similar private overnightservice. NOTE: Handguns may not be shipped via U.S. Mail. Persons who do not hold aFederal Firearms License are prohibited by Federal law from shipping a handgun byMail. Handguns mailed in violation of the law are impounded by the Post Office.
DO NOT SEND GUN BOXES OR LITERATURE THAT YOU CONSIDER TO BECOLLECTOR’S ITEMS – THESE ARE INVARIABLY DAMAGED OR DESTROYED INSHIPMENT. Please do not include rifle case, sling, telescopic sights or customaccessories with a firearm being shipped to the factory for service. Rifles and shotgunsmay be shipped via U.S. Mail. Always insure your shipment.
Enclose a letter which includes your name, address, telephone number, serial number,model of the firearm, and your repair authorization number. Describe in detail thetrouble you have experienced with your firearm, or the work you wish to have done.Merely stating that the firearm “needs repair” is inadequate information.
All work performed is subject to a minimum labor charge and charges for shippingand handling. Most models can be reblued, but custom gunsmithing service ornonstandard alterations are NOT AVAILABLE from Ruger Customer ServiceDepartments. Please contact the Customer Service Department for pricinginformation.
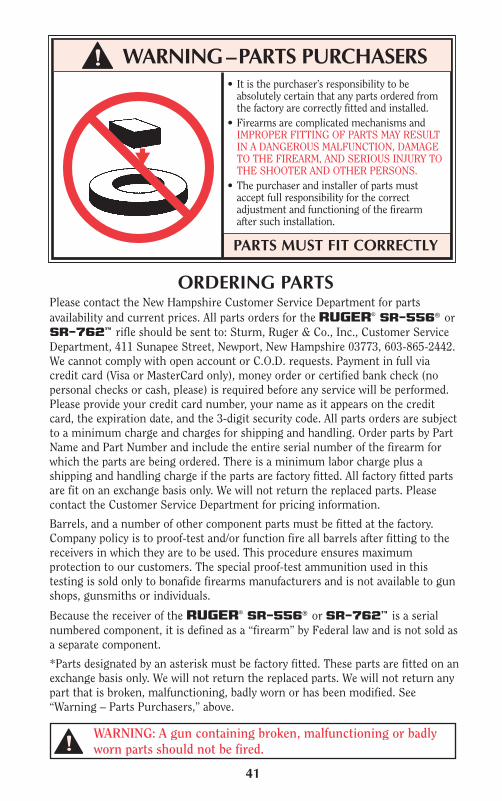
41
ORDERING PARTSPlease contact the New Hampshire Customer Service Department for partsavailability and current prices. All parts orders for the RUGER® SR-556® orSR-762™ rifle should be sent to: Sturm, Ruger & Co., Inc., Customer ServiceDepartment, 411 Sunapee Street, Newport, New Hampshire 03773, 603-865-2442.We cannot comply with open account or C.O.D. requests. Payment in full viacredit card (Visa or MasterCard only), money order or certified bank check (nopersonal checks or cash, please) is required before any service will be performed.Please provide your credit card number, your name as it appears on the creditcard, the expiration date, and the 3-digit security code. All parts orders are subjectto a minimum charge and charges for shipping and handling. Order parts by PartName and Part Number and include the entire serial number of the firearm forwhich the parts are being ordered. There is a minimum labor charge plus ashipping and handling charge if the parts are factory fitted. All factory fitted partsare fit on an exchange basis only. We will not return the replaced parts. Pleasecontact the Customer Service Department for pricing information.
Barrels, and a number of other component parts must be fitted at the factory.Company policy is to proof-test and/or function fire all barrels after fitting to thereceivers in which they are to be used. This procedure ensures maximumprotection to our customers. The special proof-test ammunition used in thistesting is sold only to bonafide firearms manufacturers and is not available to gunshops, gunsmiths or individuals.
Because the receiver of the RUGER® SR-556® or SR-762™ is a serialnumbered component, it is defined as a “firearm” by Federal law and is not sold asa separate component.
*Parts designated by an asterisk must be factory fitted. These parts are fitted on anexchange basis only. We will not return the replaced parts. We will not return anypart that is broken, malfunctioning, badly worn or has been modified. See“Warning – Parts Purchasers,” above.
WARNING: A gun containing broken, malfunctioning or badlyworn parts should not be fired.
• It is the purchaser’s responsibility to beabsolutely certain that any parts ordered fromthe factory are correctly fitted and installed.
• Firearms are complicated mechanisms andIMPROPER FITTING OF PARTS MAY RESULTIN A DANGEROUS MALFUNCTION, DAMAGETO THE FIREARM, AND SERIOUS INJURY TOTHE SHOOTER AND OTHER PERSONS.
• The purchaser and installer of parts mustaccept full responsibility for the correctadjustment and functioning of the firearmafter such installation.
PARTS MUST FIT CORRECTLY
WARNING–PARTS PURCHASERS
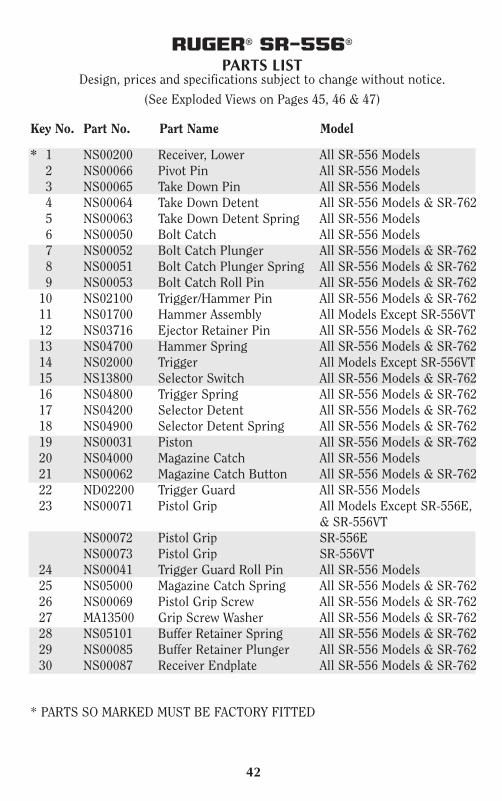
42
RUGER® SR-556®
PARTS LISTDesign, prices and specifications subject to change without notice.
(See Exploded Views on Pages 45, 46 & 47)
Key No. Part No. Part Name Model
* 1 NS00200 Receiver, Lower All SR-556 Models2 NS00066 Pivot Pin All SR-556 Models3 NS00065 Take Down Pin All SR-556 Models4 NS00064 Take Down Detent All SR-556 Models & SR-7625 NS00063 Take Down Detent Spring All SR-556 Models6 NS00050 Bolt Catch All SR-556 Models7 NS00052 Bolt Catch Plunger All SR-556 Models & SR-7628 NS00051 Bolt Catch Plunger Spring All SR-556 Models & SR-7629 NS00053 Bolt Catch Roll Pin All SR-556 Models & SR-76210 NS02100 Trigger/Hammer Pin All SR-556 Models & SR-76211 NS01700 Hammer Assembly All Models Except SR-556VT12 NS03716 Ejector Retainer Pin All SR-556 Models & SR-76213 NS04700 Hammer Spring All SR-556 Models & SR-76214 NS02000 Trigger All Models Except SR-556VT15 NS13800 Selector Switch All SR-556 Models & SR-76216 NS04800 Trigger Spring All SR-556 Models & SR-76217 NS04200 Selector Detent All SR-556 Models & SR-76218 NS04900 Selector Detent Spring All SR-556 Models & SR-76219 NS00031 Piston All SR-556 Models & SR-76220 NS04000 Magazine Catch All SR-556 Models21 NS00062 Magazine Catch Button All SR-556 Models & SR-76222 ND02200 Trigger Guard All SR-556 Models23 NS00071 Pistol Grip All Models Except SR-556E,
& SR-556VTNS00072 Pistol Grip SR-556ENS00073 Pistol Grip SR-556VT
24 NS00041 Trigger Guard Roll Pin All SR-556 Models25 NS05000 Magazine Catch Spring All SR-556 Models & SR-76226 NS00069 Pistol Grip Screw All SR-556 Models & SR-76227 MA13500 Grip Screw Washer All SR-556 Models & SR-76228 NS05101 Buffer Retainer Spring All SR-556 Models & SR-76229 NS00085 Buffer Retainer Plunger All SR-556 Models & SR-76230 NS00087 Receiver Endplate All SR-556 Models & SR-762
* PARTS SO MARKED MUST BE FACTORY FITTED

43
Key No. Part No. Part Name Model
31 NS00088 Receiver Extension Nut All SR-556 Models & SR-76232 NS00042 Retainer Pin All SR-556 Models & SR-76233 NS10400 Stock Assembly – Adjustable All Models Except State
Compliant SR-556 & SR-556E,SR-556VT, SR-762
NS10401 Stock Assembly – Non-adjustable State Compliant SR-556 & SR-556E
34 NS00045 Regulator Pin All SR-556 Models & SR-76235 NS00078 Regulator Pin Spring All SR-556 Models & SR-76236 NS03722 Extractor O Ring All SR-556 Models & SR-762*37 NS03708 Bolt Carrier All SR-556 Models38 NS00089 Buffer Spring All Models Except SR-556VT
NS00094 Buffer Spring SR-556VT39 NS00086 Buffer All Models Except SR-556VT
NS00093 Buffer SR-556VT40 NS12001 Disconnector All Models Except SR-556VT41 NS12100 Disconnector Spring All Models Except SR-556VT42 NS03713 Bolt All SR-556 Models43 NS03717 Extractor All SR-556 Models44 NS03710 Cam Pin All SR-556 Models45 NS03709 Firing Pin All SR-556 Models46 NS03711 Bolt Carrier Cotter Pin All SR-556 Models47 NS03714 Ejector All SR-556 Models48 NS03718 Extractor Pin All SR-556 Models49 NS03715 Ejector Spring All SR-556 Models50 NS10012 Charging Handle Assembly All Models Except SR-556VT
& SR-762NS10013 Charging Handle Assembly SR-556VT
51 NS00101 Receiver, Upper All SR-556 Models52 NS16603 Quad Rail Screw SR-556 & SR-556 Carbine
*53 NS16601 Quad Rail SR-556 & SR-556 Carbine54 NS02500 Front Bushing All SR-556 Models & SR-76255 NS03603 Transfer Rod Spring All SR-556 Models & SR-76256 NS03600 Transfer Rod All SR-556 Models & SR-76257 NS00040 Regulator All Models Except SR-556VT
& SR-76258 NS00043 Regulator Detent All SR-556 Models & SR-762
*59 NSF03503 Gas Block All SR-556 Models
* PARTS SO MARKED MUST BE FACTORY FITTED

44
Key No. Part No. Part Name Model
60 MA13403 Flash Hider SR-556 Except SR-556VT& State Compliant Models
61 NS00082 Crush Washer SR-556, SR-556E62 NS00081 Gas Block Solid Pins, 2 req’d All SR-556 Models & SR-762
*63 NSF10301 Barrel - 5.56 SR-556NSF10302 Barrel - 5.56SC State Compliant SR-556 NSF10303 Barrel - 5.56 SR-556 CarbineNSF10304 Barrel - 5.56E SR-556ENSF10305 Barrel - 5.56ESC State Compliant SR-556EKNSF10306 Barrel - 5.56VT SR-556VT
64 NSF11112 Barrel Nut All SR-556 Models*65 NSF00012 Barrel Extension All SR-556 Models66 NS00036 Upper Receiver/ All SR-556 Models & SR-762
Handguard Roll Pin67 NS00002 Ejection Port Cover Rod All SR-556 Models68 NS00004 Ejection Port Cover All SR-556 Models
Retaining Clip69 NS00003 Ejection Port Cover Spring All SR-556 Models & SR-76270 NS00001 Ejection Port Cover All SR-556 Models72 NS00033 Rear Bushing All SR-556 Models73 NS05206 Rear Sight – Flip Up Battle All Models Except SR-556E
Sight Assembly & SR-556VTND05200 Rear Sight – Rapid Deploy SR-556E
(Not Illustrated)74 NS10020 Forward Assist Assembly All SR-556 Models & SR-76275 NS00025 Forward Assist Spring All SR-556 Models & SR-76276 NS00023 Forward Assist Retainer Pin All SR-556 Models & SR-76277 NS04400 Front Flip-Up All Models Except SR-556E
Battle Sight Assembly & SR-556VTND04400 Front Sight – Rapid Deploy SR-556E
(Not Illustrated)78 NS03720 Extractor Spring All SR-556 Models79 NS00013 Barrel Extension Pin All SR-556 Models & SR-762
* PARTS SO MARKED MUST BE FACTORY FITTED

45
RUGER
®SR-556
®
LOWER REC
EIVER ASSEM
BLY

46
RUGER
®SR-556
®
UPP
ER REC
EIVER ASSEM
BLY
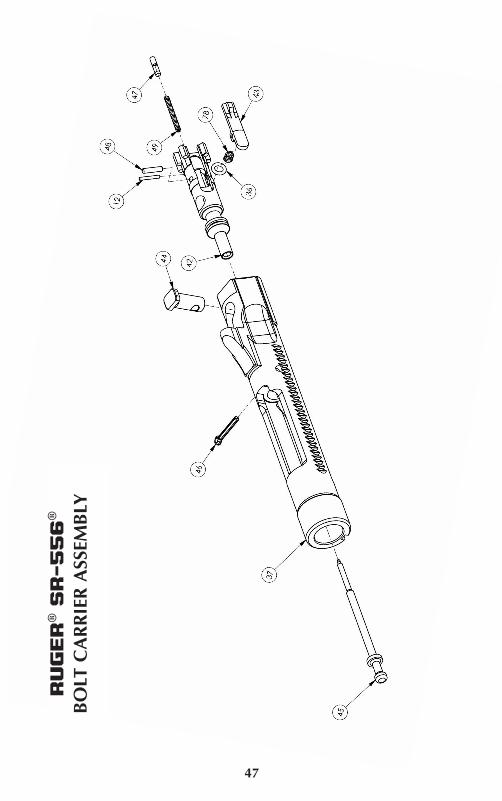
47
RUGER
®SR-556
®
BOLT CARR
IER ASSEM
BLY
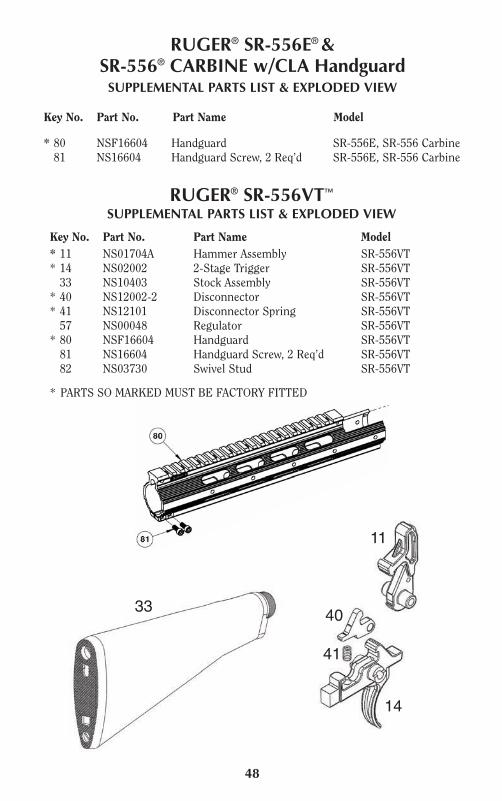
48
RUGER® SR-556E®&SR-556® CARBINE w/CLA HandguardSUPPLEMENTAL PARTS LIST & EXPLODED VIEW
Key No. Part No. Part Name Model
* 80 NSF16604 Handguard SR-556E, SR-556 Carbine81 NS16604 Handguard Screw, 2 Req’d SR-556E, SR-556 Carbine
RUGER® SR-556VT™SUPPLEMENTAL PARTS LIST & EXPLODED VIEW
Key No. Part No. Part Name Model* 11 NS01704A Hammer Assembly SR-556VT* 14 NS02002 2-Stage Trigger SR-556VT33 NS10403 Stock Assembly SR-556VT
* 40 NS12002-2 Disconnector SR-556VT* 41 NS12101 Disconnector Spring SR-556VT57 NS00048 Regulator SR-556VT
* 80 NSF16604 Handguard SR-556VT81 NS16604 Handguard Screw, 2 Req’d SR-556VT82 NS03730 Swivel Stud SR-556VT
* PARTS SO MARKED MUST BE FACTORY FITTED
33
14
40
41
11
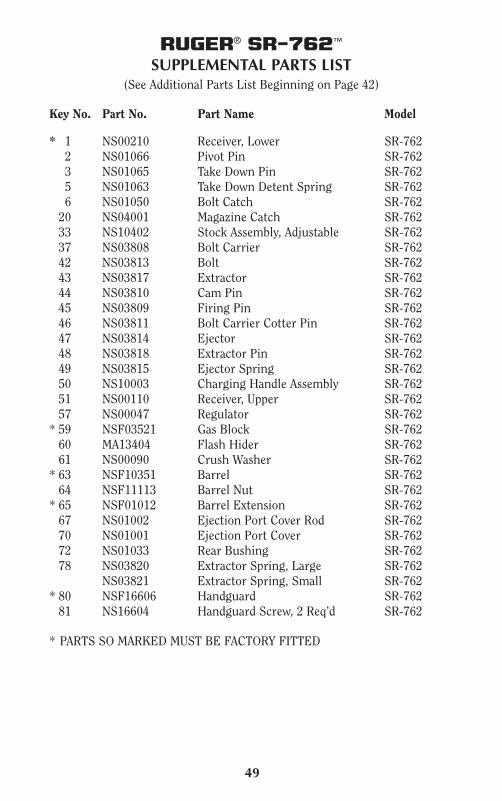
RUGER® SR-762™
SUPPLEMENTAL PARTS LIST(See Additional Parts List Beginning on Page 42)
Key No. Part No. Part Name Model
* 1 NS00210 Receiver, Lower SR-7622 NS01066 Pivot Pin SR-7623 NS01065 Take Down Pin SR-7625 NS01063 Take Down Detent Spring SR-7626 NS01050 Bolt Catch SR-76220 NS04001 Magazine Catch SR-76233 NS10402 Stock Assembly, Adjustable SR-76237 NS03808 Bolt Carrier SR-76242 NS03813 Bolt SR-76243 NS03817 Extractor SR-76244 NS03810 Cam Pin SR-76245 NS03809 Firing Pin SR-76246 NS03811 Bolt Carrier Cotter Pin SR-76247 NS03814 Ejector SR-76248 NS03818 Extractor Pin SR-76249 NS03815 Ejector Spring SR-76250 NS10003 Charging Handle Assembly SR-76251 NS00110 Receiver, Upper SR-76257 NS00047 Regulator SR-762
* 59 NSF03521 Gas Block SR-76260 MA13404 Flash Hider SR-76261 NS00090 Crush Washer SR-762
* 63 NSF10351 Barrel SR-76264 NSF11113 Barrel Nut SR-762
* 65 NSF01012 Barrel Extension SR-76267 NS01002 Ejection Port Cover Rod SR-76270 NS01001 Ejection Port Cover SR-76272 NS01033 Rear Bushing SR-76278 NS03820 Extractor Spring, Large SR-762
NS03821 Extractor Spring, Small SR-762* 80 NSF16606 Handguard SR-76281 NS16604 Handguard Screw, 2 Req’d SR-762
* PARTS SO MARKED MUST BE FACTORY FITTED
49

RUGER® SR-762™
SUPPLEMENTAL PARTSEXPLODED VIEW DRAWING
(See Additional Exploded View Drawings Beginning on Page 45)
50

51
THE BASIC RULES OF SAFE FIREARMS HANDLINGWe believe that Americans have a right to purchase and use firearms for lawfulpurposes. The private ownership of firearms in America is traditional, but thatownership imposes the responsibility on the gun owner to use his firearms in away which will ensure his own safety and that of others. When firearms are used ina safe and responsible manner, they are a great source of pleasure and satisfaction,and represent a fundamental part of our personal liberty.
Firearms do not cause accidents! Firearms accidents are almost always found tohave been the result of carelessness or ignorance on the part of the shooter of thebasic rules of safe gun handling.
The following rules must be observed by gun users at all times. Safe gun handlingis not just desirable, it is absolutely essential to your safety, the safety of others, andthe continuation of gun ownership and sport shooting as we know it today.
1. LEARN THE MECHANICAL AND HANDLINGCHARACTERISTICS OF THE FIREARM YOU ARE USING.Not all firearms are the same. The method of carrying and handling firearms
varies in accordance with themechanical provisions for avoidingaccidental discharge and the variousproper procedures for loading andunloading. No person should handleany firearm without first havingthoroughly familiarized himself withthe particular type of firearm he isusing, and with safe gun handling ingeneral.
2. ALWAYS KEEP THEMUZZLE POINTED IN ASAFE DIRECTION.Be sure of the bullet stop behindyour target, even when dry-firing.Never let the muzzle of a firearmpoint at any part of your body or atanother person. This is particularlyimportant when loading orunloading a firearm. In the event ofan accidental discharge, no injurycan occur as long as the muzzle ispointing in a safe direction. A safedirection means a direction that willnot permit a discharged bullet tostrike a person, or to strike an object from which the bullet may ricochet.

52
A safe direction must take into account the fact that a bullet maypenetrate a wall, ceiling, floor, window, etc., and strike a person ordamage property. Make it a habit to know exactly where the muzzle ofyour gun is pointing whenever you handle it, and be sure that you arealways in control of the direction in which the muzzle is pointing, evenif you fall or stumble. Keep your finger off the trigger until you are readyto shoot.
3. FIREARMS SHOULD BE UNLOADED WHEN NOT INUSE.
Firearms should be loaded onlywhen you are in the field or on thetarget range or shooting area,ready to shoot. Firearms andammunition should be securelylocked in safes, racks or cabinets,or by using the locking devicesupplied with the firearm, whennot in use. Ammunition shouldsafely be stored separate fromfirearms. Store your firearms outof sight of visitors and children. Itis the gun owner’s responsibility tobe certain that children and
persons unfamiliar with firearms cannot gain access to firearms, ammunition, or components.
4. BE SURE THE BARREL IS CLEAR OF OBSTRUCTIONSBEFORE SHOOTING.
Even a bit of mud, snow or excesslubricating oil or grease in thebore may cause the barrel tobulge, or even burst on firing, andcan cause serious injury to theshooter and bystanders. Be surethat you are using ammunition ofthe proper caliber and loading forthe gun you are using. If thereport or recoil on firing seemsweak, or doesn’t seem quite right,CEASE FIRING IMMEDIATELY,unload your firearm, and check tobe sure that no obstruction hasbecome lodged in the barrel. Nevertry to shoot out an obstruction!
12
3
4
5
Safety “ON”

53
5. BE SURE OF YOURTARGET BEFORE YOUSHOOT.Don’t shoot unless you knowexactly where your bullet is goingto strike. Be sure of the bulletstop behind your target, evenwhen dry-firing with an unloadedgun. If you are in the fieldhunting, do not fire at amovement or noise. Take the timeto be absolutely certain of yourtarget before you pull the trigger.
6. WEAR SHOOTINGGLASSES AND HEARINGPROTECTION WHENYOU SHOOT.All shooters should wearprotective shooting glasses andadequate hearing protectionwhen shooting. Exposure toshooting noise can damagehearing, and wearing adequateeye protection when shooting isessential.
7. NEVER CLIMB A TREEOR FENCE WITH ALOADED FIREARM.Put the firearm down carefullybefore climbing a fence, andunload it before climbing ordescending a tree or jumping overa ditch or other obstruction. Neverpull or push a loaded firearmtoward yourself or another person.When in doubt, or whenever youare about to do anything awkward,unload your gun!
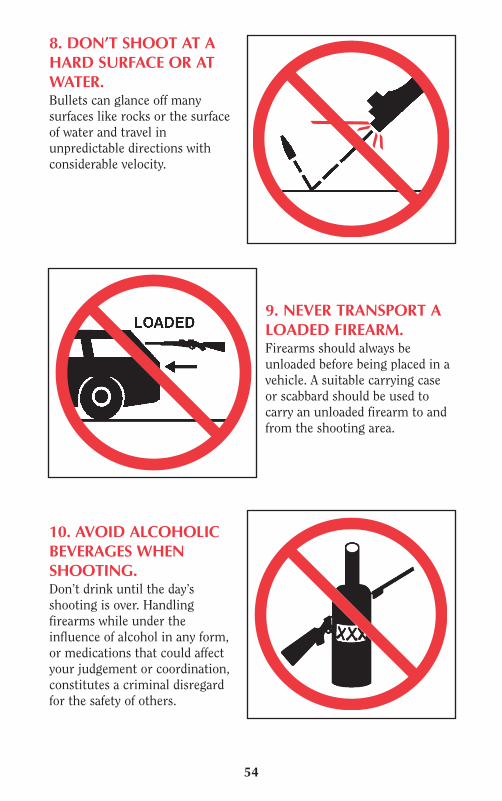
54
8. DON’T SHOOT AT AHARD SURFACE OR ATWATER.Bullets can glance off manysurfaces like rocks or the surfaceof water and travel inunpredictable directions withconsiderable velocity.
9. NEVER TRANSPORT ALOADED FIREARM.Firearms should always beunloaded before being placed in avehicle. A suitable carrying caseor scabbard should be used tocarry an unloaded firearm to andfrom the shooting area.
10. AVOID ALCOHOLICBEVERAGES WHENSHOOTING.Don’t drink until the day’sshooting is over. Handlingfirearms while under theinfluence of alcohol in any form,or medications that could affectyour judgement or coordination,constitutes a criminal disregardfor the safety of others.

A BRIEF ACCOUNT OF AN EXTRAORDINARYACHIEVEMENT: RUGER® FIREARMS
Sturm, Ruger & Company, Inc., had its beginning in a small machineshop occupying a rented frame building in Southport, Connecticut. InJanuary, 1949, with an initial investment of only $50,000 and an idea,William B. Ruger and Alexander M. Sturm started production of a .22caliber autoloading pistol–a design which was so successful that itbecame the cornerstone upon which one of the most comprehensivelines of sporting firearms ever made in America was established. AfterAlex Sturm’s death in 1951, William B. Ruger continued to direct theCompany until his death in 2002. William B. Ruger, Jr. continued toprovide guidance, which helped make this Company a sound andsuccessful enterprise, until his retirement in 2006. The Company hascontinued to prosper, under new management and guidance from ourBoard, with new products and fresh perspectives.
Ruger, in this relatively short time, has established itself as a leadingsmall arms design organization, developing a unique and broad line offine quality sporting, military and police firearms to become one of theworld’s most famous producers of revolvers, pistols, rifles and shotguns.Since 1949, Ruger craftsmen have built many millions of firearms.
During its five decades of growth and progress under the leadership ofWilliam B. Ruger, the Company developed a business philosophy andimplemented policies which represent a constructive influence in the lifeof modern America. From the beginning, Ruger played a positive role inconservation efforts and has supported the interests of shooters throughsuch groups as the National Rifle Association, National Shooting SportsFoundation, and many regional sportsmen’s organizations.
The Company has always endeavored to market its firearms forconstructive and recreational purposes, to emphasize the traditional andresponsible aspects of shooting, to render meaningful public services,and to encourage shooters in constructive, responsible, and safeparticipation in the shooting sports. Its motto, “Arms Makers ForResponsible Citizens®,” exemplifies this Company philosophy.
Today, Ruger® is particularly mindful of those elements which havecontributed to the creation of its success, and extends heartfelt thanks toits many loyal employees and customers.
The firearms catalog, and instruction manuals for all Ruger® firearms,can be downloaded from our website at:
www.ruger.com
55

WHY NO WARRANTY CARD HAS BEENPACKED WITH THIS NEW RUGER® FIREARM
The Magnuson-Moss Act (Public Law 93-637) does not require anyseller or manufacturer of a consumer product to give a writtenwarranty. It does provide that if a written warranty is given, it must bedesignated as “limited” or as “full” and sets minimum standards for a“full” warranty. Sturm, Ruger & Company, Inc. has elected not toprovide any written warranty, either “limited” or “full”, rather than toattempt to comply with the provisions of the Magnuson-Moss Act andthe regulations issued thereunder. There are certain implied warrantiesunder state law with respect to sales of consumer goods. As the extentand interpretation of these implied warranties varies from state tostate, you should refer to your state statutes. Sturm, Ruger &Company wishes to assure its customers of its continued interest inproviding service to owners of Ruger® firearms.
STURM, RUGER & Company, Inc.411 Sunapee Street
Newport, New Hampshire 03773 U.S.A.www.ruger.com
Arms Makers For Responsible Citizens®
A COPY OF THE INSTRUCTION MANUAL FOR ANY RUGER®
FIREARM IS AVAILABLE FROM THE FACTORY FREE ON REQUEST, OR IT MAY BEDOWNLOADED FROM OUR WEBSITE AT WWW.RUGER.COM.
THESE INSTRUCTION MANUALS CONTAIN IMPORTANTWARNINGS WHICH MUST BE UNDERSTOOD
BEFORE USING THESE FIREARMS.
The Following are Sturm, Ruger & Co., Inc. Trademarks: “Bisley,” “Gold Label,” “It’s Mine and It’s American,”“LC6,” “LCR-357,” “LCRx,” “Mark II,” “Mark III,” “Match Champion,” “Model 96,” “P345D,” “P345PR,” “P85,”“P90,” “P91,” “P93,” “P94,” “P95,” “P97,” “Ruger Marksman Adjustable,” “Ruger 77/50,” “Ruger 10/17,”“77/357,” “SR45,” “SR-556C,” “SR-556VT,” “SR-762,” “10/22-FS,” “22 Charger,” “22/45,” and “22/45 RP.”
The Following are Registered U.S. Trademarks Belonging to Sturm, Ruger & Co., Inc.: “RUGER,” Sturm,Ruger Logo,” “AC-556,” “Arms Makers For Responsible Citizens,” “All-Weather,” “Bearcat,” “Blackhawk,” “BX-25,” Eagle “R”, Eagle “SR”, “GP100,” Hard “R” Logo, “Hawkeye,” “LC380,” “LC9,” “LCP,” “LCR,” “M77,” “MiniThirty,” “Mini-14,” “Old Army,” “Power Bedding,” “P345,” “Redhawk,” “Ruger American Rifle,” “RugerAmerican Rimfire,” “Ruger Hunting,” “Ruger Hunting” Logo, “Ruger Inside & Out” phrase & logo design,“Ruger 77/17,” “Ruger 77/22,” “Ruger 77/44,” “Ruger SP101,” “Ruger 10/22 Takedown” phrase & logo design,“Ruger Titanium,” “Ruger 22/45 Lite,” “Ruger Vaquero,” “Rugged, Reliable Firearms,” “Security-Six,” “Service-Six,” “Single-Nine,” “Single-Six,” “Single-Ten,” “Speed-Six,” the “SR” Design, “SR9,” “SR9c,” “SR40,” “SR40c,”“SR-22,” “SR22,” “SR-556,” “SR-556E,” “SR1911,” “Super Redhawk Alaskan,” “Target Grey,” “10/22,” and“10/22 Takedown.”