Autofocus Tiling on LSM710 Kim Peifley 07/15/15. When tiling on the 710 you will notice that the...
16
Autofocus Tiling on LSM710 Kim Peifley 07/15/15
-
Upload
jessica-marshall -
Category
Documents
-
view
214 -
download
0
Transcript of Autofocus Tiling on LSM710 Kim Peifley 07/15/15. When tiling on the 710 you will notice that the...

Autofocus Tiling on LSM710
Kim Peifley07/15/15

When tiling on the 710 you will notice that the focus is uneven throughout the tile. In order to prevent this you will have to autofocus each tile.
5x5 Tile with uneven focus
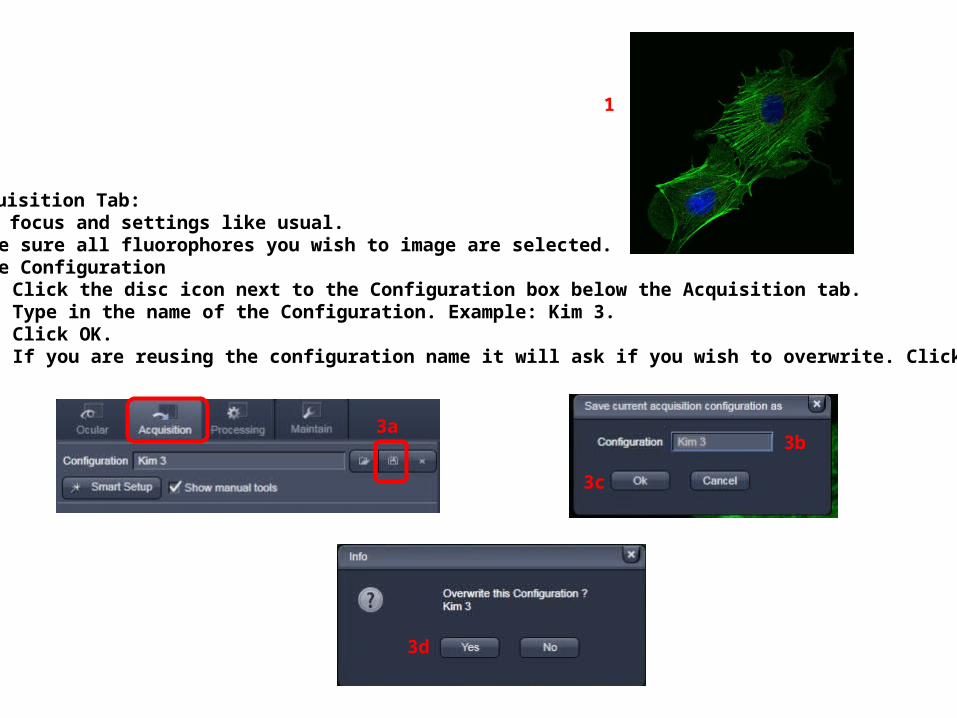
In Acquisition Tab:1. Get focus and settings like usual.2. Make sure all fluorophores you wish to image are selected.3. Save Configuration
a. Click the disc icon next to the Configuration box below the Acquisition tab.b. Type in the name of the Configuration. Example: Kim 3.c. Click OK.d. If you are reusing the configuration name it will ask if you wish to overwrite. Click Yes.
3a3b
3c
1
3d

Repeat this process to create the autofocus configuration.
You must have a single track, single color configuration for autofocus. If you have multiple tracks they will auto focus even if unchecked.
When naming the autofocus configuration it might help to have the word autofocus or AF in the configuration name. This might help keep things straight when you are loading configurations.
Note:

Open Multi-Time:4. Click on Macro.5. Click on Multi-Time.
In Multi Time Series PLUS:6. Click on Acquisition.7. In Scan Configuration select the
configuration you created. Example: Kim 3.
8. Click Load Configuration.9. Make sure Zstack box is unchecked.10. Click Update.
4
5
7
10
6
98

11. Click Tile.12. Select Tile Numbers. Example:
5x5.13. Under Scan Configuration Select
Configuration. Example: Kim 3.14. Click Load Conf.15. Click Create Tile Locations.
16. Click Update.
11
15
1413
16
12
Step 15 will have to be repeated for each location in the tile. Locations can be changed under List of Locations [indicated by the star].
Note: If you are doing a large tile start off with off with a small test tile and load the scan configuration to each location of the test tile. When you expand to the larger tile for your experiment you will not have to load scan configuration to each new location. It would not hurt to check a random location or two to confirm this.

17. Click the Autofocus tab.18. Under Autofocus - Check the
Autofocus box.19. Click on Apply to all Locations.20. Select configuration for
Autofocus. Example Kim AF.21. Click Load Configuration.22. Select Z Range. Example 10.23. Select Autofocus Z Step Size.
Example 0.5.24. Click Update.
17
18
19
2021
Steps 20 and 21 will have to be repeated for each location in the tile. Locations can be changed under List of Locations [indicated by the star].
22
23
24
Note: If you are doing a large tile start off with off with a small test tile and load the autofocus configuration to each location of the test tile. When you expand to the larger tile for your experiment you will not have to load autofocus to each new location. It would not hurt to check a random location or two to confirm this.

25. Click the Saving Tab.26. Click on Base File Name then
type in the name for the base files for this experiment. Example Tiling Autofocus.
27. Click on Select Image Folder and select where you want images to save and create a folder for the images.
28. Click on Select Temp Folder and select where you want the images to be saved
29. Check box for Single Original Image Folder
30. Click Update
25
27
30
28
29
26

Review:31. Recipe Summary: look through
to see that things will be as you want them. Example No of locations is 25 which equals a 5x5 tile which is also indicated by T1 5x5.
32. Check that it says Yes under AutoF.
33. Double check that the image files will be saved where you wish them to be saved. See red stars.
34. Go through all the tabs to make sure the configuration you want is showing. Example Kim 3. See red arrows.
35. Click Update.36. Click Start to start experiment.
31
32

Final Result
Before After
Save your result just to be sure you have a saved copy.

Appendix

How we went about determining the Z stack interval
1. First we took a tiled image. Here is the 5x5 image.

2. Using the Information Button we looked at the Dimensions of the tiled image. x: 674.49 micrometers, y: 674.49 micrometers
3. Since the tile is 5 tiles across we divided 674.49 by 5 to get 135. This is roughly the size of each tile.
2
3

4. We made sure the sample was in focus .Thus the center of the tile was focused.
5. In the Focus window click the “Manually” button to Zero the focus position.
6. In the Stage window click Set to Zero so that the current position [center of the tile] is at zero in both x and y.
7. In Step enter 135.8. By using the x or y up and down
arrows we moved the stage until we reached a corner of the tile.
9. Sample was focused and Z position in Focus window was noted.
9
5
6
8
7
9

10. We had focus numbers of +3.5, +1.8, -0.7 and -2 microns.
11. To be safe we rounded this number up to 5.
12. When setting the Z Range for Autofocus the number is 10 to include 5 microns above and below focus.
10
12

13. Once you have this figured out you go through the MulitTime process outlined and test it out. It’s suggested that you start out with small, single color, no averaging tiles to make sure it is working before working your way up to the tile you wish. Suggest starting with 2x1 tile then 3x3 tile and so forth.