Autodesk - download.e-bookshelf.de · USC Film School’s Animation program, and he has been using...
30
Transcript of Autodesk - download.e-bookshelf.de · USC Film School’s Animation program, and he has been using...

Autodesk® 3ds MAx® 2013EssEntials
Randi L . DerakhshaniDariush Derakhshani

Acquisitions Editor: Mariann BarsoloDevelopment Editor: Lisa BishopTechnical Editor: RC TorresProduction Editor: Liz BrittenCopy Editor: Kathy Grider-CarlyleEditorial Manager: Pete GaughanProduction Manager: Tim TateVice President and Executive Group Publisher: Richard SwadleyVice President and Publisher: Neil EddeBook Designer and Compositor: Jeff Lytle and Kate Kaminski; Happenstance Type-O-RamaProofreader: Nancy BellIndexer: Ted LauxProject Coordinator, Cover: Katherine CrockerCover Designer: Ryan SneedCover Image: Randi L. Derakhshani and Dariush Derakhshani
Copyright © 2012 by John Wiley & Sons, Inc., Indianapolis, Indiana
Published simultaneously in Canada
ISBN: 978-1-118-13055-1 ISBN: 978-1-118-22500-4 (ebk.)ISBN: 978-1-118-23848-6 (ebk.)ISBN: 978-1-118-26311-2 (ebk.)
No part of this publication may be reproduced, stored in a retrieval system or transmitted in any form or by any means, electronic, mechanical, photocopying, recording, scanning or otherwise, except as permitted under Sections 107 or 108 of the 1976 United States Copyright Act, without either the prior written permis-sion of the Publisher, or authorization through payment of the appropriate per-copy fee to the Copyright Clearance Center, 222 Rosewood Drive, Danvers, MA 01923, (978) 750-8400, fax (978) 646-8600. Requests to the Publisher for permission should be addressed to the Permissions Department, John Wiley & Sons, Inc., 111 River Street, Hoboken, NJ 07030, (201) 748-6011, fax (201) 748-6008, or online at http://www.wiley .com/go/permissions.
Limit of Liability/Disclaimer of Warranty: The publisher and the author make no representations or warran-ties with respect to the accuracy or completeness of the contents of this work and specifically disclaim all warranties, including without limitation warranties of fitness for a particular purpose. No warranty may be created or extended by sales or promotional materials. The advice and strategies contained herein may not be suitable for every situation. This work is sold with the understanding that the publisher is not engaged in ren-dering legal, accounting, or other professional services. If professional assistance is required, the services of a competent professional person should be sought. Neither the publisher nor the author shall be liable for dam-ages arising herefrom. The fact that an organization or Web site is referred to in this work as a citation and/or a potential source of further information does not mean that the author or the publisher endorses the infor-mation the organization or Web site may provide or recommendations it may make. Further, readers should be aware that Internet Web sites listed in this work may have changed or disappeared between when this work was written and when it is read.
For general information on our other products and services or to obtain technical support, please contact our Customer Care Department within the U.S. at (877) 762-2974, outside the U.S. at (317) 572-3993 or fax (317) 572-4002.
Wiley publishes in a variety of print and electronic formats and by print-on-demand. Some material included with standard print versions of this book may not be included in e-books or in print-on-demand. If this book refers to media such as a CD or DVD that is not included in the version you purchased, you may download this material at http://booksupport.wiley.com. For more information about Wiley products, visit www.wiley.com.
Library of Congress Control Number: 2012933618
TRADEMARKS: Wiley, the Wiley logo, and the Sybex logo are trademarks or registered trademarks of John Wiley & Sons, Inc. and/or its affiliates, in the United States and other countries, and may not be used without written permission. Autodesk and 3ds Max are registered trademarks of Autodesk, Inc. All other trademarks are the property of their respective owners. John Wiley & Sons, Inc. is not associated with any product or ven-dor mentioned in this book.
10 9 8 7 6 5 4 3 2 1

Dear Reader,
Thank you for choosing Autodesk® 3ds Max® 2013 Essentials. This book is part of a family of premium-quality Sybex books, all of which are written by out-standing authors who combine practical experience with a gift for teaching.
Sybex was founded in 1976. More than 30 years later, we’re still committed to producing consistently exceptional books. With each of our titles, we’re working hard to set a new standard for the industry. From the paper we print on, to the authors we work with, our goal is to bring you the best books available.
I hope you see all that reflected in these pages. I’d be very interested to hear your comments and get your feedback on how we’re doing. Feel free to let me know what you think about this or any other Sybex book by sending me an email at [email protected]. If you think you’ve found a technical error in this book, please visit http://sybex.custhelp.com. Customer feedback is critical to our efforts at Sybex.
Best regards,
Neil edde
Vice President and Publisher Sybex, an Imprint of Wiley

To Max Henry
Ack nowl edgments
We are thrilled to be a part of Autodesk® 3ds Max® 2013 Essentials, a complete update and style change to our previous Introducing Autodesk® 3ds Max® series. Education is an all-important goal in life and should always be approached with eagerness and earnestness. We would like to show appre-ciation to the teachers who inspired us; you can always remember the teach-ers who touched your life, and to them we say thanks. We would also like to thank all of our students, who taught us a lot during the course of our many combined academic years.
Having a good computer system is important with this type of work, so a special thank you goes to HP for keeping us on the cutting edge of workstation hardware. Special thanks go to Mariann Barsolo, Lisa Bishop, Liz Britten, and Kathy Grider-Carlyle, our editors at Sybex who have been professional, courte-ous, and ever patient. Our appreciation also goes to technical editor RC Torres, who worked hard to make sure this book is of the utmost quality. We could not have done this revision without their help.
In addition, thanks to Dariush’s mother and brother for their love and sup-port, not to mention the life-saving babysitting services.
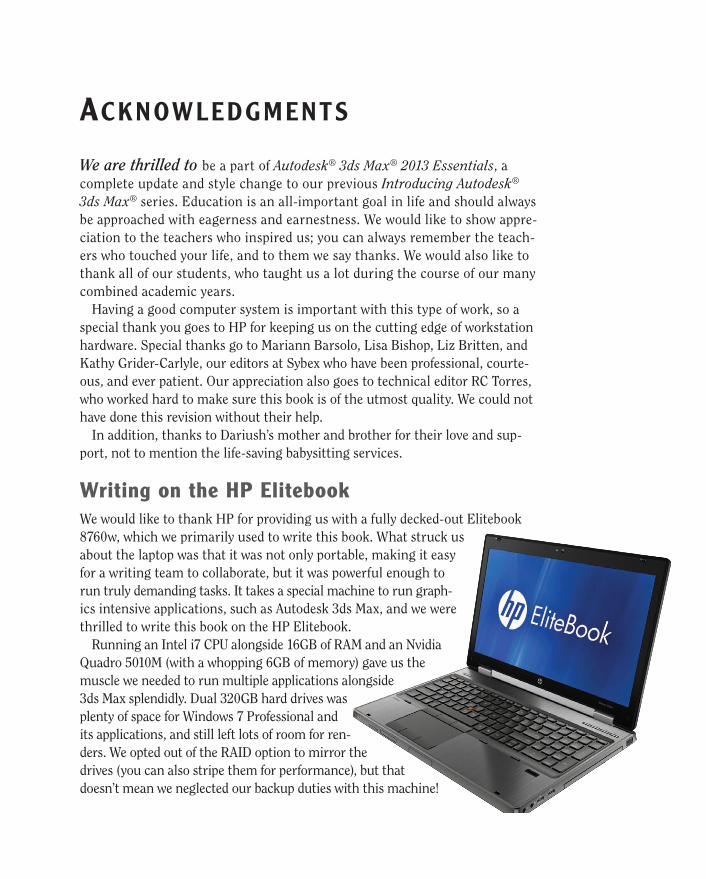
Writing on the HP elitebookWe would like to thank HP for providing us with a fully decked-out Elitebook 8760w, which we primarily used to write this book. What struck us about the laptop was that it was not only portable, making it easy for a writing team to collaborate, but it was powerful enough to run truly demanding tasks. It takes a special machine to run graph-ics intensive applications, such as Autodesk 3ds Max, and we were thrilled to write this book on the HP Elitebook.
Running an Intel i7 CPU alongside 16GB of RAM and an Nvidia Quadro 5010M (with a whopping 6GB of memory) gave us the muscle we needed to run multiple applications alongside 3ds Max splendidly. Dual 320GB hard drives was plenty of space for Windows 7 Professional and its applications, and still left lots of room for ren-ders. We opted out of the RAID option to mirror the drives (you can also stripe them for performance), but that doesn’t mean we neglected our backup duties with this machine!
v i A c k n o w l e d g m e n t s
The 8760w was easily integrated into a gigabit network in the home office, and on fast Wifi everywhere else, so we had constant access to the home network and the hundreds upon hundreds of files necessary to write this book (and all their backups!).
And since we are so very image conscious (as in the screen!), we wondered if the images we created and captured for this book would be done justice on “just a laptop screen.” The Elitebook has a stunning 17˝ 30bit IPS display panel that put those questions to rest real quick! The HP’s screen is no less than pro-fessionally accurate and calibrated for optimum image clarity and correct color. Barely a handful of high-end mobile workstations could even come close to meet-ing the demands image professionals put on their gear. But this notebook HP DreamColor display is remarkable, there’s just no other way to put it, going as far as besting any of our desktop screens in color and vibrancy.
With performance at such a high level, and in a nice portable form factor, we were easily convinced to perform all of our intensive work for this book on the Elitebook. Going back to a desk-bound tower quickly became not an option any-more. Thanks HP!

About the Authors
Randi L. Derakhshani is a staff instructor with The Art Institute of California–Los Angeles. She began working with computer graphics in 1992 and was hired by her instructor to work at Sony Pictures Imageworks, where she developed her skills with the Autodesk® 3ds Max® program and Nuke, among many other programs. A teacher since 1999, Randi enjoys sharing her wisdom with young talent and watching them develop at The Art Institute. Currently, she teaches a wide range of classes, from Autodesk® 3ds Max®, Maya, and ZBrush to compositing with The Foundry’s Nuke. Juggling her teaching activities with caring for a little boy makes Randi a pretty busy lady.
Dariush Derakhshani is a visual effects supervisor and Supervisor of Games at Zoic Studios in Culver City, California, and a writer and educator in Los Angeles, California, as well as Randi’s husband. Dariush used Autodesk® AutoCAD® soft-ware in his architectural days and migrated to using 3D programs when his firm’s principal architects needed to visualize architectural designs in 3D on the com-puter. Dariush started using Alias PowerAnimator version 6 when he enrolled in USC Film School’s Animation program, and he has been using Alias/Autodesk animation software for the past 14 years. He received an M.F.A. in Film, Video, and Computer Animation from the USC Film School in 1997. He also holds a B.A. in Architecture and Theater from Lehigh University in Pennsylvania. He worked at a New Jersey architectural firm before moving to Los Angeles for film school. He has worked on feature films, music videos, and countless commer-cials as a 3D animator, as a CG/VFX supervisor, and sometimes as a compositor. Dariush also serves as an editor and is on the advisory board of HDRI 3D, a pro-fessional computer graphics (CG) magazine from DMG Publishing.

contents At A gl Ance
Introduction xiii
ChAp ter 1 The 3ds Max Interface 1
ChAp ter 2 Your First 3ds Max Project 21
ChAp ter 3 Modeling in 3ds Max: Architectural Model Part I 53
ChAp ter 4 Modeling in 3ds Max: Architectural Model Part II 75
ChAp ter 5 Animating a Bouncing Ball 101
ChAp ter 6 Animating a Thrown Knife 119
ChAp ter 7 Character Poly Modeling: Part I 131
ChAp ter 8 Character Poly Modeling: Part II 155
ChAp ter 9 Character Poly Modeling: Part III 175
ChAp ter 10 Introduction to Materials: Interiors and Furniture 191
ChAp ter 11 Textures and UV Workflow: The Soldier 215
ChAp ter 12 Character Studio: Rigging 243
ChAp ter 13 Character Studio: Animation 269
ChAp ter 14 Introduction to Lighting: Interior Lighting 291
ChAp ter 15 3ds Max Rendering 317
ChAp ter 16 mental ray and HDRI 343
Index 375
contents
Introduction xiii
chApter 1 the 3ds Max Inter face 1
The Workspace . . . . . . . . . . . . . . . . . . . . . . . . . . . . . . . . . . . . . . . . . . . . . . . . . . . . . . . 1Transforming Objects Using Gizmos . . . . . . . . . . . . . . . . . . . . . . . . . . . . . . . . . . . . . 12Graphite Modeling Tools Ribbon . . . . . . . . . . . . . . . . . . . . . . . . . . . . . . . . . . . . . . . . 13Command Panel . . . . . . . . . . . . . . . . . . . . . . . . . . . . . . . . . . . . . . . . . . . . . . . . . . . . . 14Time Slider and Track Bar . . . . . . . . . . . . . . . . . . . . . . . . . . . . . . . . . . . . . . . . . . . . . 17File Management . . . . . . . . . . . . . . . . . . . . . . . . . . . . . . . . . . . . . . . . . . . . . . . . . . . . 17
chApter 2 Your First 3ds Max Project 21
Starting to Model a Chest of Drawers . . . . . . . . . . . . . . . . . . . . . . . . . . . . . . . . . . . . 21Modeling the Top . . . . . . . . . . . . . . . . . . . . . . . . . . . . . . . . . . . . . . . . . . . . . . . . . . . . 23I Can See Your Drawers . . . . . . . . . . . . . . . . . . . . . . . . . . . . . . . . . . . . . . . . . . . . . . . 30Modeling the Bottom . . . . . . . . . . . . . . . . . . . . . . . . . . . . . . . . . . . . . . . . . . . . . . . . . 35Creating the Knobs. . . . . . . . . . . . . . . . . . . . . . . . . . . . . . . . . . . . . . . . . . . . . . . . . . . 43
chApter 3 Modeling in 3ds Max : Architectural Model Par t I 53
Units Setup . . . . . . . . . . . . . . . . . . . . . . . . . . . . . . . . . . . . . . . . . . . . . . . . . . . . . . . . . 54Importing a CAD Drawing . . . . . . . . . . . . . . . . . . . . . . . . . . . . . . . . . . . . . . . . . . . . . 55Creating the Walls. . . . . . . . . . . . . . . . . . . . . . . . . . . . . . . . . . . . . . . . . . . . . . . . . . . . 56Creating the Doors . . . . . . . . . . . . . . . . . . . . . . . . . . . . . . . . . . . . . . . . . . . . . . . . . . . 59Creating the Window . . . . . . . . . . . . . . . . . . . . . . . . . . . . . . . . . . . . . . . . . . . . . . . . . 62Adding a Floor and Ceiling . . . . . . . . . . . . . . . . . . . . . . . . . . . . . . . . . . . . . . . . . . . . . 64Creating Baseboard Moldings. . . . . . . . . . . . . . . . . . . . . . . . . . . . . . . . . . . . . . . . . . . 66
chApter 4 Modeling in 3ds Max : Architectural Model Par t I I 75
Modeling the Couch . . . . . . . . . . . . . . . . . . . . . . . . . . . . . . . . . . . . . . . . . . . . . . . . . . 75Modeling the Chair . . . . . . . . . . . . . . . . . . . . . . . . . . . . . . . . . . . . . . . . . . . . . . . . . . . 87
chApter 5 Animating a Bouncing Ball 101
Animating the Ball . . . . . . . . . . . . . . . . . . . . . . . . . . . . . . . . . . . . . . . . . . . . . . . . . . 101Refining the Animation . . . . . . . . . . . . . . . . . . . . . . . . . . . . . . . . . . . . . . . . . . . . . . 108
x C o n t e n t s
chApter 6 Animating a thrown knife 119
Anticipation and Momentum in Knife Throwing . . . . . . . . . . . . . . . . . . . . . . . . . . 119
chApter 7 Character Poly Modeling : Par t I 131
Setting Up the Scene . . . . . . . . . . . . . . . . . . . . . . . . . . . . . . . . . . . . . . . . . . . . . . . . 131Creating the Soldier . . . . . . . . . . . . . . . . . . . . . . . . . . . . . . . . . . . . . . . . . . . . . . . . . 134
chApter 8 Character Poly Modeling : Par t I I 155
Completing the Main Body. . . . . . . . . . . . . . . . . . . . . . . . . . . . . . . . . . . . . . . . . . . . 155Creating the Accessories. . . . . . . . . . . . . . . . . . . . . . . . . . . . . . . . . . . . . . . . . . . . . . 159Putting on the Boots . . . . . . . . . . . . . . . . . . . . . . . . . . . . . . . . . . . . . . . . . . . . . . . . 166Creating the Hands. . . . . . . . . . . . . . . . . . . . . . . . . . . . . . . . . . . . . . . . . . . . . . . . . . 170
chApter 9 Character Poly Modeling : Par t I I I 175
Creating the Head. . . . . . . . . . . . . . . . . . . . . . . . . . . . . . . . . . . . . . . . . . . . . . . . . . . 175Merging and Attaching the Head’s Accessories . . . . . . . . . . . . . . . . . . . . . . . . . . . . 188
chApter 10 Introduction to Materials : Interiors and Furniture 191
The Slate Material Editor . . . . . . . . . . . . . . . . . . . . . . . . . . . . . . . . . . . . . . . . . . . . . 192Material Types . . . . . . . . . . . . . . . . . . . . . . . . . . . . . . . . . . . . . . . . . . . . . . . . . . . . . . 193mental ray Material Types . . . . . . . . . . . . . . . . . . . . . . . . . . . . . . . . . . . . . . . . . . . . 195Shaders . . . . . . . . . . . . . . . . . . . . . . . . . . . . . . . . . . . . . . . . . . . . . . . . . . . . . . . . . . . 195Mapping the Couch and Chair . . . . . . . . . . . . . . . . . . . . . . . . . . . . . . . . . . . . . . . . . 196Mapping the Window and Doors . . . . . . . . . . . . . . . . . . . . . . . . . . . . . . . . . . . . . . . 208
chApter 11 textures and uV Workf low: the soldier 215
Mapping the Soldier . . . . . . . . . . . . . . . . . . . . . . . . . . . . . . . . . . . . . . . . . . . . . . . . . 215UV Unwrapping . . . . . . . . . . . . . . . . . . . . . . . . . . . . . . . . . . . . . . . . . . . . . . . . . . . . . 216Seaming the Rest of the Body . . . . . . . . . . . . . . . . . . . . . . . . . . . . . . . . . . . . . . . . . 228Applying the Color Map . . . . . . . . . . . . . . . . . . . . . . . . . . . . . . . . . . . . . . . . . . . . . . 236Applying the Bump Map . . . . . . . . . . . . . . . . . . . . . . . . . . . . . . . . . . . . . . . . . . . . . . 237Applying the Specular Map. . . . . . . . . . . . . . . . . . . . . . . . . . . . . . . . . . . . . . . . . . . . 240
C o n t e n t s x i
chApter 12 Character studio : Rigging 243
Character Studio Workflow . . . . . . . . . . . . . . . . . . . . . . . . . . . . . . . . . . . . . . . . . . . 243Associating a Biped with the Soldier Model. . . . . . . . . . . . . . . . . . . . . . . . . . . . . . . 246
chApter 13 Character studio : Animation 269
Character Animation . . . . . . . . . . . . . . . . . . . . . . . . . . . . . . . . . . . . . . . . . . . . . . . . 269Animating the Soldier . . . . . . . . . . . . . . . . . . . . . . . . . . . . . . . . . . . . . . . . . . . . . . . 269Using Inverse Kinematics . . . . . . . . . . . . . . . . . . . . . . . . . . . . . . . . . . . . . . . . . . . . . 282
chApter 14 Introduction to Lighting : Interior Lighting 291
Three-Point Lighting . . . . . . . . . . . . . . . . . . . . . . . . . . . . . . . . . . . . . . . . . . . . . . . . 2913ds Max Lights . . . . . . . . . . . . . . . . . . . . . . . . . . . . . . . . . . . . . . . . . . . . . . . . . . . . . 293Standard Lights . . . . . . . . . . . . . . . . . . . . . . . . . . . . . . . . . . . . . . . . . . . . . . . . . . . . 293Lighting a Still Life in the Interior Space . . . . . . . . . . . . . . . . . . . . . . . . . . . . . . . . 298Selecting a Shadow Type . . . . . . . . . . . . . . . . . . . . . . . . . . . . . . . . . . . . . . . . . . . . . 305Atmospheres and Effects . . . . . . . . . . . . . . . . . . . . . . . . . . . . . . . . . . . . . . . . . . . . . 307Light Lister . . . . . . . . . . . . . . . . . . . . . . . . . . . . . . . . . . . . . . . . . . . . . . . . . . . . . . . . 315
chApter 15 3ds Max Rendering 317
Rendering Setup . . . . . . . . . . . . . . . . . . . . . . . . . . . . . . . . . . . . . . . . . . . . . . . . . . . . .317Cameras. . . . . . . . . . . . . . . . . . . . . . . . . . . . . . . . . . . . . . . . . . . . . . . . . . . . . . . . . . . 324Safe Frame . . . . . . . . . . . . . . . . . . . . . . . . . . . . . . . . . . . . . . . . . . . . . . . . . . . . . . . . 328Raytraced Reflections and Refractions . . . . . . . . . . . . . . . . . . . . . . . . . . . . . . . . . . 330Rendering the Interior and Furniture . . . . . . . . . . . . . . . . . . . . . . . . . . . . . . . . . . . 338
chApter 16 mental ray and HdRI 343
mental ray Renderer . . . . . . . . . . . . . . . . . . . . . . . . . . . . . . . . . . . . . . . . . . . . . . . . . 343Final Gather with mental ray . . . . . . . . . . . . . . . . . . . . . . . . . . . . . . . . . . . . . . . . . . 346HDRI . . . . . . . . . . . . . . . . . . . . . . . . . . . . . . . . . . . . . . . . . . . . . . . . . . . . . . . . . . . . . 367
Index 375

Introduc t IonWelcome to Autodesk® 3ds Max® 2013 Essentials. The world of computer-generated imagery (CG) is fun and ever-changing. Whether you are new to CG in general or are a CG veteran new to 3ds Max designing, you’ll find this book the perfect primer. It introduces you to Autodesk 3ds Max and shows how you can work with the program to create your art, whether it is animated or static in design.
This book exposes you to all facets of 3ds Max software by introducing and plainly explaining its tools and functions to help you understand how the pro-gram operates—but it does not stop there. This book also explains the use of the tools and the ever-critical concepts behind the tools. You’ll find hands-on examples and tutorials that give you firsthand experience with the toolsets. Working through them will develop your skills and the conceptual knowledge that will carry you to further study with confidence. These tutorials expose you to various ways to accomplish tasks with this intricate and comprehensive artistic tool. These chapters should give you the confidence you need to venture deeper into 3ds Max software’s feature set, either on your own or by using any of the software’s other learning tools and books as a guide.
Learning to use a powerful tool can be frustrating. You need to remember to pace yourself. The major complaints CG book readers have are that the pace is too fast and that the steps are too complicated or overwhelming. Addressing those complaints is a tough nut to crack, to be sure. No two readers are the same. However, this book offers the opportunity to run things at your own pace. The exercises and steps may seem confusing at times, but keep in mind that the more you try and the more you fail at some attempts, the more you will learn how to operate the 3ds Max engine. Experience is king when learning the workflow nec-essary for any software program, and with experience come failure and aggra-vation. But try and try again. You will find that further attempts will always be easier and more fruitful.
Above all, however, this book aims to inspire you to use the 3ds Max program as a creative tool to achieve and explore your own artistic vision.
Who should Read this BookAnyone who is interested in learning to use the 3ds Max tools should start with this book.
If you are an educator, you will find a solid foundation on which to build a new course. You can also treat the book as a source of raw materials that you can

x i v I n t r o d u c t i o n
adapt to fit an existing curriculum. Written in an open-ended style, Autodesk®
3ds Max® 2013 Essentials contains several self-help tutorials for home study, as well as plenty of material to fit into any class.
What You Will LearnYou will learn how to work in CG with Autodesk® 3ds Max 2013. The important thing to keep in mind, however, is that this book is merely the beginning of your CG education. With the confidence you will gain from the exercises in this book, and the peace of mind you can have by using this book as a reference, you can go on to create your own increasingly complex CG projects.
What You NeedHardware changes constantly and evolves faster than publications can keep up. Having a good solid machine is important to a production, although simple home computers will be able to run the 3ds Max software quite well. Any laptop (with discrete graphics; not a netbook) or desktop PC running Windows XP Professional, Windows Vista, or Windows 7 (32- or 64-bit) with at least 2GB of RAM and an Intel Pentium Core 2 Duo/Quad or AMD Phenom or higher processor will work. Of course, having a good video card will help; you can use any hardware-accelerated OpenGL or Direct3D video card. Your computer system should have at least a 2.4GHz Core 2 or i5/i7 processor with 2GB of RAM, a few GBs of hard drive space available, and a GeForce FX or ATI Radeon video card. Professionals may want to opt for workstation graphics cards, such as the ATI FirePro or the Quadro FX series of cards. The following systems would be good ones to use:
�� Intel i7, 4GB RAM, Quadro FX 2000, 400GB 7200 RPM hard disk
�� AMD Phenom II, 4GB RAM, ATI FirePro V5700, 400GB hard disk
You can check the list of system requirements at the following website: www .autodesk.com/3dsmax.
What Is Covered in this BookAutodesk® 3ds Max® 2013 Essentials is organized to provide you with a quick and essential experience with 3ds Max software to allow you to begin a fruitful education in the world of computer graphics.
Chapter 1, “the 3ds Max Interface,” begins with an introduction to the interface for 3ds Max® 2013 to get you up and running quickly.
I n t r o d u c t i o n x v
Chapter 2, “Your First 3ds Max Project,” is an introduction to modeling concepts and workflows in general. It shows you how to model using 3ds Max tools with polygonal meshes and modifiers to create a bedroom dresser.
Chapter 3, “Modeling in 3ds Max: Architectural Model Part I,” takes your modeling lesson from Chapter 2 a step further by showing you how to use some of the Architectural, Engineering and Construction (AEC) tools to build an interior space using a room from an image.
Chapter 4, “Modeling in 3ds Max: Architectural Model Part II,” continues with the interior space from Chapter 3 by adding some furniture. The main focus of this chapter is the Graphite Modeling ribbon and its many tools.
Chapter 5, “Animating a Bouncing Ball,” teaches you the basics of 3ds Max animation techniques and workflow by animating a bouncing ball. You will also learn how to use the Track View–Curve Editor to time, edit, and finesse your animation.
Chapter 6, “Animating a thrown knife,” rounds out your animation experi-ence by showing the animation concepts of weight, follow-through, and antic-ipation when you animate a knife thrown at a target.
Chapter 7, “Character Poly Modeling: Part I,” introduces you to the first of three chapters on creating a low-polygon mesh character model of a soldier. In this chapter, you begin by blocking out the primary parts of the body.
Chapter 8, “Character Poly Modeling: Part II,” continues the soldier model, focusing on using the Editable Poly toolset. You will finish the body and add hands and boots.
Chapter 9, “Character Poly Modeling: Part III,” finishes the model of the special operations soldier started in Chapter 7. You will create the head and merge in elements such as goggles and a face mask and integrate them into the scene.
Chapter 10, “Introduction to Materials: Interiors and Furniture,” shows you how to assign textures and materials to your models. You will learn to texture the couch, chair, and window from Chapter 4, as you learn the basics of working with 3ds Max materials and UVW mapping.
Chapter 11, “textures and uV Workflow: the soldier,” furthers your under-standing of materials and textures and introduces UV workflows in preparing and texturing the soldier.
x v i I n t r o d u c t i o n
Chapter 12, “Character studio: Rigging,” covers the basics of Character Studio in creating a biped system and associating the biped rig to the soldier model.
Chapter 13, “Character studio: Animation,” expands on Chapter 12 to show you how to use Character Studio to create and edit a walk cycle using the soldier model.
Chapter 14, “Introduction to Lighting: Interior Lighting,” begins by show-ing you how to light a 3D scene with the three-point lighting system. It then shows you how to use the tools to create and edit 3ds Max lights for illumina-tion, shadows, and special lighting effects. You will light the furniture to which you added materials in Chapter 10.
Chapter 15, “3ds Max Rendering,” explains how to create image files from your 3ds Max scene and how to achieve the best look for your animation by using proper cameras and rendering settings when you render the Interior scene.
Chapter 16, “mental ray and HdRI,” shows you how to render with mental ray. Using Final Gather, you will learn how to use indirect lighting as well as get a brief intro to HDRI lighting.
As a bonus we include this chapter on Particles to be found on the companion web page:
Chapter 17, “Particles,” introduces you to 3ds Max’s particle systems and space warps when you create a firing machine gun.
The companion web page to this book at www.sybex.com/go/ 3dsmax2013essentials provides all the sample images, movies, and files that you will need to work through the projects in Autodesk® 3ds Max® 2013 Essentials.
N O T E this book is a great primer for Autodesk 3ds Max. If you’re interested in taking the Autodesk Certification exams for 3ds Max go to www.autodesk.com/certification for information and resources.

I n t r o d u c t i o n x v i i
the essentials seriesThe Essentials series from Sybex provides outstanding instruction for readers who are just beginning to develop their professional skills. Every Essentials book includes these features:
�� Skill-based instruction with chapters organized around projects rather than abstract concepts or subjects
�� Suggestions for additional exercises at the end of each chapter, where you can practice and extend your skills
�� Digital files (via download) so you can work through the project tuto-rials yourself. Please check the book’s web page at www.sybex.com/go/3dsmax2013essentials for these companion downloads.
N O T E You can contact the authors through Wiley or on Facebook at http://www.facebook.com/3dsMaxEssentials.

CHAPteR 1
the 3ds Max InterfaceThis chapter explains the Autodesk® 3ds Max® software interface and its basic operation. You can use this chapter as a reference as you work through the rest of this book, although the following chapters and their exercises will orient you to the 3ds Max user interface (UI) quickly. It’s important to be in front of your computer when you read this chapter, so you can try out the techniques as we discuss.
Topics in this chapter include the following:
�� the workspace
�� transforming objects using gizmos
�� Graphite Modeling tools ribbon
�� Command panel
�� time slider and track bar
�� File management
the WorkspaceThis section presents a brief rundown of what you need to know about the UI and how to navigate the 3ds Max 3D workspace.
user Interface elementsFigure 1.1 shows the 3ds Max UI. At the very top left of the application window is a large button ( ) called Application; clicking it opens the Application menu, which provides access to many file operations. Also run-ning along the top is the Quick Access toolbar, which provides access to common commands, and the InfoCenter, which offers support for various
2 C h a p t e r 1 • T h e 3 d s M a x I n t e r f a c e
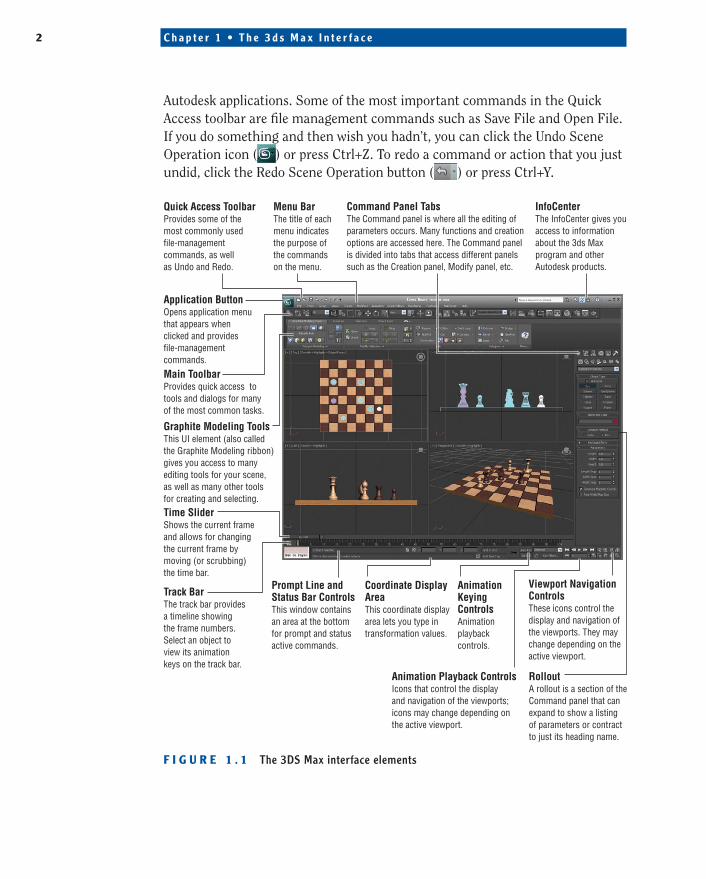
Autodesk applications. Some of the most important commands in the Quick Access toolbar are file management commands such as Save File and Open File. If you do something and then wish you hadn’t, you can click the Undo Scene Operation icon ( ) or press Ctrl+Z. To redo a command or action that you just undid, click the Redo Scene Operation button ( ) or press Ctrl+Y.
Menu BarThe title of eachmenu indicatesthe purpose ofthe commands on the menu.
RolloutA rollout is a section of theCommand panel that canexpand to show a listingof parameters or contractto just its heading name.
Animation Playback ControlsIcons that control the displayand navigation of the viewports;icons may change depending onthe active viewport.
AnimationKeyingControlsAnimationplaybackcontrols.
Coordinate DisplayAreaThis coordinate displayarea lets you type intransformation values.
Prompt Line andStatus Bar ControlsThis window containsan area at the bottomfor prompt and statusactive commands.
Track BarThe track bar providesa timeline showingthe frame numbers.Select an object toview its animation keys on the track bar.
Time SliderShows the current frame and allows for changing the current frame by moving (or scrubbing) the time bar.
Graphite Modeling ToolsThis UI element (also called the Graphite Modeling ribbon) gives you access to many editing tools for your scene,as well as many other toolsfor creating and selecting.
Main ToolbarProvides quick access totools and dialogs for manyof the most common tasks.
Quick Access ToolbarProvides some of the most commonly used file-managementcommands, as wellas Undo and Redo.
Command Panel TabsThe Command panel is where all the editing of parameters occurs. Many functions and creation options are accessed here. The Command panel is divided into tabs that access different panels such as the Creation panel, Modify panel, etc.
InfoCenterThe InfoCenter gives you access to information about the 3ds Max program and other Autodesk products.
Viewport Navigation ControlsThese icons control the display and navigation of the viewports. They may change depending on the active viewport.
Application ButtonOpens application menu that appears whenclicked and provides file-management commands.
F I g u R e 1 . 1 The 3DS Max interface elements
t h e Wo r k s p a c e 3
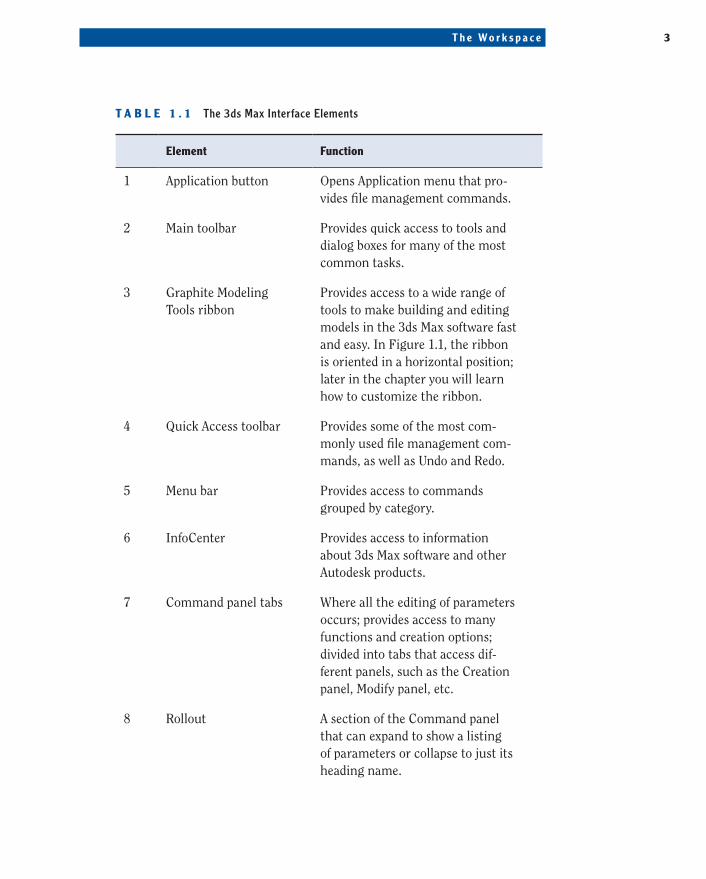
t A B L e 1 . 1 The 3ds Max Interface Elements
element Function
1 Application button Opens Application menu that pro-vides file management commands.
2 Main toolbar Provides quick access to tools and dialog boxes for many of the most common tasks.
3 Graphite Modeling Tools ribbon
Provides access to a wide range of tools to make building and editing models in the 3ds Max software fast and easy. In Figure 1.1, the ribbon is oriented in a horizontal position; later in the chapter you will learn how to customize the ribbon.
4 Quick Access toolbar Provides some of the most com-monly used file management com-mands, as well as Undo and Redo.
5 Menu bar Provides access to commands grouped by category.
6 InfoCenter Provides access to information about 3ds Max software and other Autodesk products.
7 Command panel tabs Where all the editing of parameters occurs; provides access to many functions and creation options; divided into tabs that access dif-ferent panels, such as the Creation panel, Modify panel, etc.
8 Rollout A section of the Command panel that can expand to show a listing of parameters or collapse to just its heading name.
4 C h a p t e r 1 • T h e 3 d s M a x I n t e r f a c e
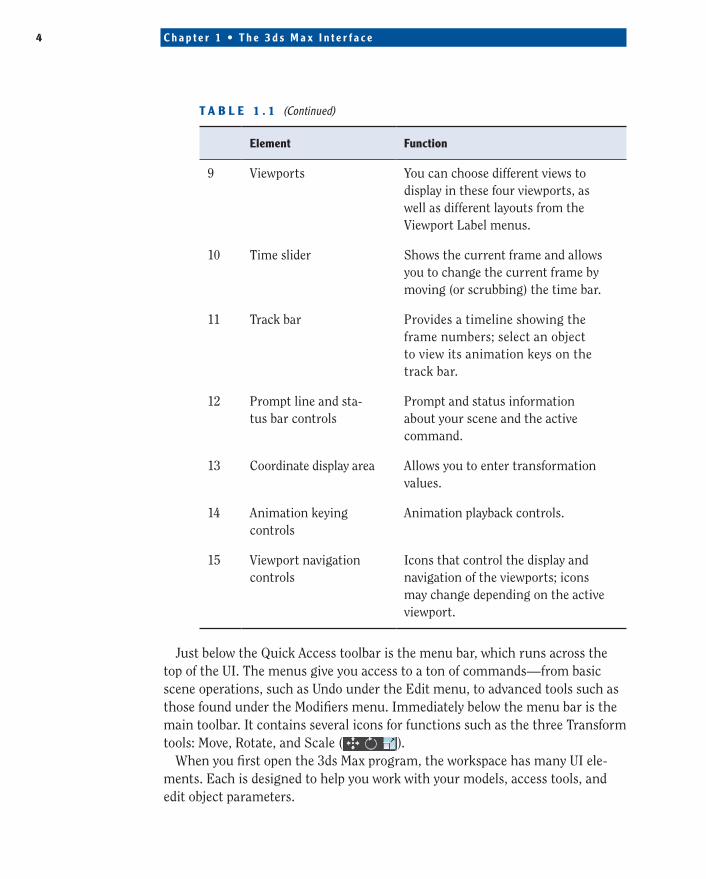
element Function
9 Viewports You can choose different views to display in these four viewports, as well as different layouts from the Viewport Label menus.
10 Time slider Shows the current frame and allows you to change the current frame by moving (or scrubbing) the time bar.
11 Track bar Provides a timeline showing the frame numbers; select an object to view its animation keys on the track bar.
12 Prompt line and sta-tus bar controls
Prompt and status information about your scene and the active command.
13 Coordinate display area Allows you to enter transformation values.
14 Animation keying controls
Animation playback controls.
15 Viewport navigation controls
Icons that control the display and navigation of the viewports; icons may change depending on the active viewport.
Just below the Quick Access toolbar is the menu bar, which runs across the top of the UI. The menus give you access to a ton of commands—from basic scene operations, such as Undo under the Edit menu, to advanced tools such as those found under the Modifiers menu. Immediately below the menu bar is the main toolbar. It contains several icons for functions such as the three Transform tools: Move, Rotate, and Scale ( ).
When you first open the 3ds Max program, the workspace has many UI ele-ments. Each is designed to help you work with your models, access tools, and edit object parameters.
t A B L e 1 . 1 (Continued)

t h e Wo r k s p a c e 5
ViewportsYou’ll be doing most of your work in the viewports. These windows represent three-dimensional space using a system based on Cartesian coordinates. That is a fancy way of saying “space on X-, Y-, and Z-axes.”
You can visualize X as left–right, Z as up–down, and Y as in–out (into and out of the screen from the Top viewport). The coordinates are expressed as a set of three numbers such as (0, 3, –7). These coordinates represent a point that is at 0 on the X-axis, 3 units up on the Y-axis, and 7 units back on the Z-axis.
Four-Viewport Layout
The 3ds Max viewports are the windows into your scene. By default, there are four main views: front, top, left, and perspective. The first three—front, top, and left—are called orthographic (2D) views. They are also referred to as modeling windows. These windows are good for expressing exact dimensions and size rela-tionships, so they are good tools for sizing up your scene objects and fine-tuning their layout. The General Viewport Label menu ( ) in the upper-left corner of each viewport provides options for overall viewport display or activation, as shown in Figure 1.2. It also gives you access to the Viewport Configuration dia-log box.
F I g u R e 1 . 2 The Viewport Label menu
The Perspective viewport displays objects in 3D space using perspective. Notice in Figure 1.1 how the distant objects seem to get smaller in the Perspective viewport. In actuality, they are the same size, as you can see in the orthographic viewports. The Perspective viewport gives you the best representation of what your output will be.
6 C h a p t e r 1 • T h e 3 d s M a x I n t e r f a c e
To select a viewport, click in a blank part of the viewport (not on an object). If you do have something selected, it will be deselected when you click in the blank space. You can also right-click anywhere in an inactive viewport to activate it without selecting or deselecting anything. When active, the view will have a mustard-yellow highlight around it. If you right-click in an already active view-port, you will get a pop-up context menu called the Quad menu. You can use the Quad menu to access some basic commands for a faster workflow. We will cover this topic in the “Quad Menus” section later in this chapter.
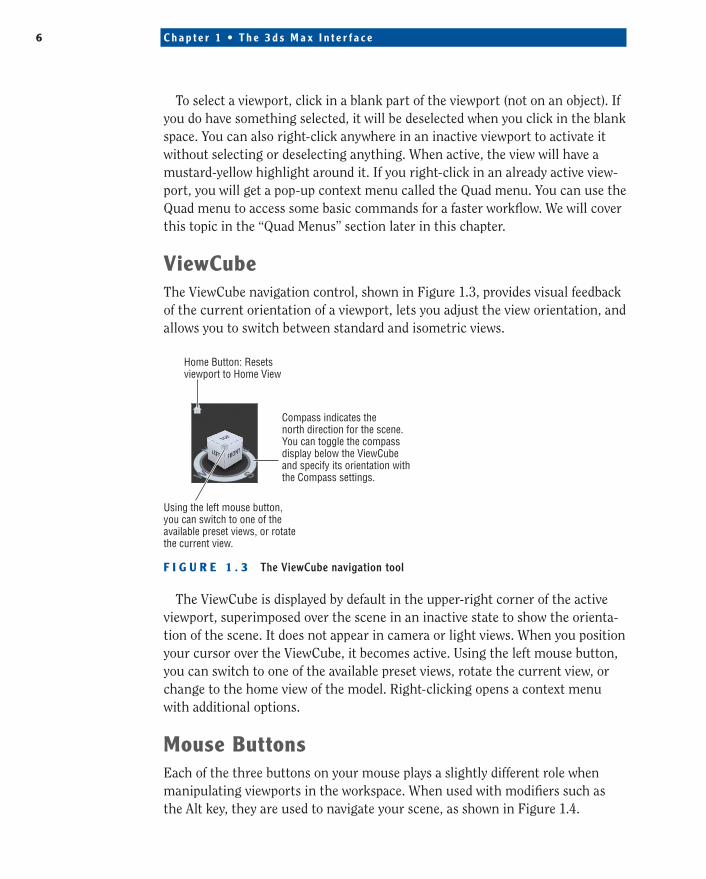
ViewCubeThe ViewCube navigation control, shown in Figure 1.3, provides visual feedback of the current orientation of a viewport, lets you adjust the view orientation, and allows you to switch between standard and isometric views.
Home Button: Resets viewport to Home View
Compass indicates the north direction for the scene.You can toggle the compassdisplay below the ViewCubeand specify its orientation withthe Compass settings.
Using the left mouse button,you can switch to one of the available preset views, or rotate the current view.
F I g u R e 1 . 3 The ViewCube navigation tool
The ViewCube is displayed by default in the upper-right corner of the active viewport, superimposed over the scene in an inactive state to show the orienta-tion of the scene. It does not appear in camera or light views. When you position your cursor over the ViewCube, it becomes active. Using the left mouse button, you can switch to one of the available preset views, rotate the current view, or change to the home view of the model. Right-clicking opens a context menu with additional options.
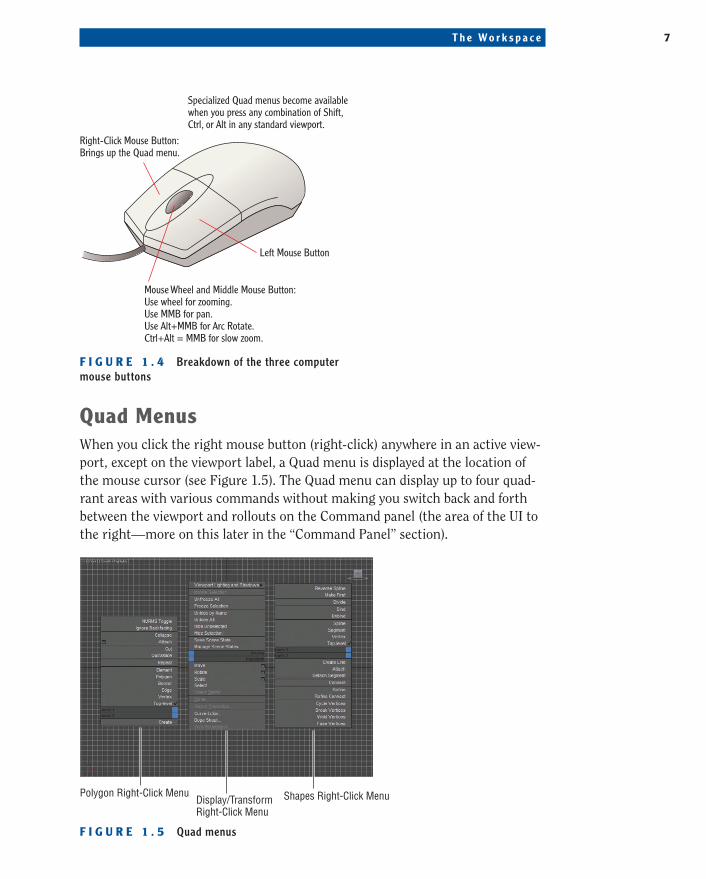
Mouse ButtonsEach of the three buttons on your mouse plays a slightly different role when manipulating viewports in the workspace. When used with modifiers such as the Alt key, they are used to navigate your scene, as shown in Figure 1.4.
t h e Wo r k s p a c e 7
Right-Click Mouse Button:Brings up the Quad menu.
Specialized Quad menus become availablewhen you press any combination of Shift,Ctrl, or Alt in any standard viewport.
Mouse Wheel and Middle Mouse Button:Use wheel for zooming.Use MMB for pan.Use Alt+MMB for Arc Rotate.Ctrl+Alt = MMB for slow zoom.
Left Mouse Button
F I g u R e 1 . 4 Breakdown of the three computer mouse buttons
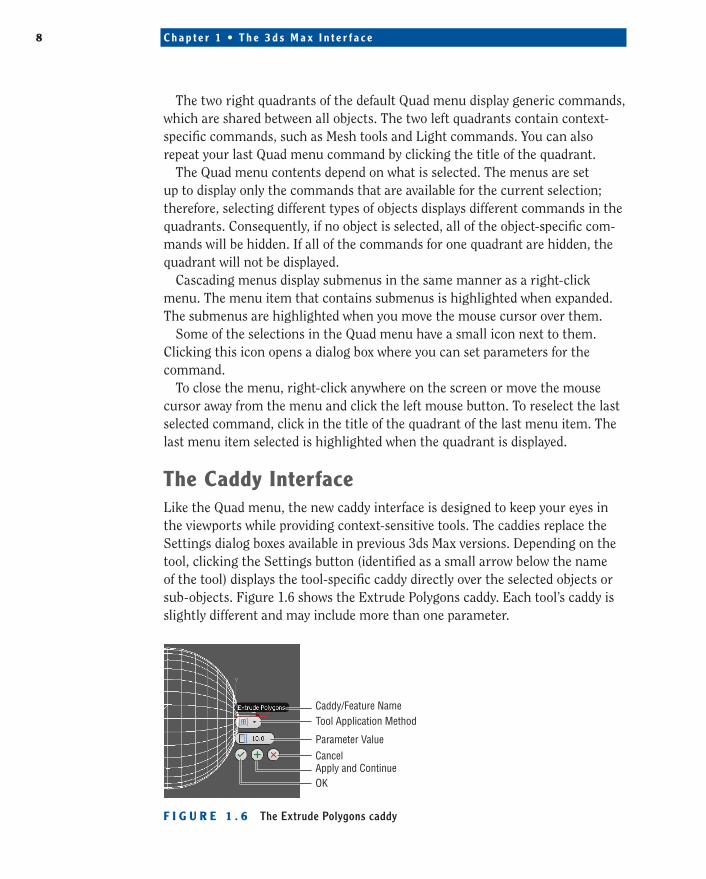
Quad MenusWhen you click the right mouse button (right-click) anywhere in an active view-port, except on the viewport label, a Quad menu is displayed at the location of the mouse cursor (see Figure 1.5). The Quad menu can display up to four quad-rant areas with various commands without making you switch back and forth between the viewport and rollouts on the Command panel (the area of the UI to the right—more on this later in the “Command Panel” section).
Polygon Right-Click MenuDisplay/TransformRight-Click Menu
Shapes Right-Click Menu
F I g u R e 1 . 5 Quad menus
8 C h a p t e r 1 • T h e 3 d s M a x I n t e r f a c e
The two right quadrants of the default Quad menu display generic commands, which are shared between all objects. The two left quadrants contain context-specific commands, such as Mesh tools and Light commands. You can also repeat your last Quad menu command by clicking the title of the quadrant.
The Quad menu contents depend on what is selected. The menus are set up to display only the commands that are available for the current selection; therefore, selecting different types of objects displays different commands in the quadrants. Consequently, if no object is selected, all of the object-specific com-mands will be hidden. If all of the commands for one quadrant are hidden, the quadrant will not be displayed.
Cascading menus display submenus in the same manner as a right-click menu. The menu item that contains submenus is highlighted when expanded. The submenus are highlighted when you move the mouse cursor over them.
Some of the selections in the Quad menu have a small icon next to them. Clicking this icon opens a dialog box where you can set parameters for the command.
To close the menu, right-click anywhere on the screen or move the mouse cursor away from the menu and click the left mouse button. To reselect the last selected command, click in the title of the quadrant of the last menu item. The last menu item selected is highlighted when the quadrant is displayed.
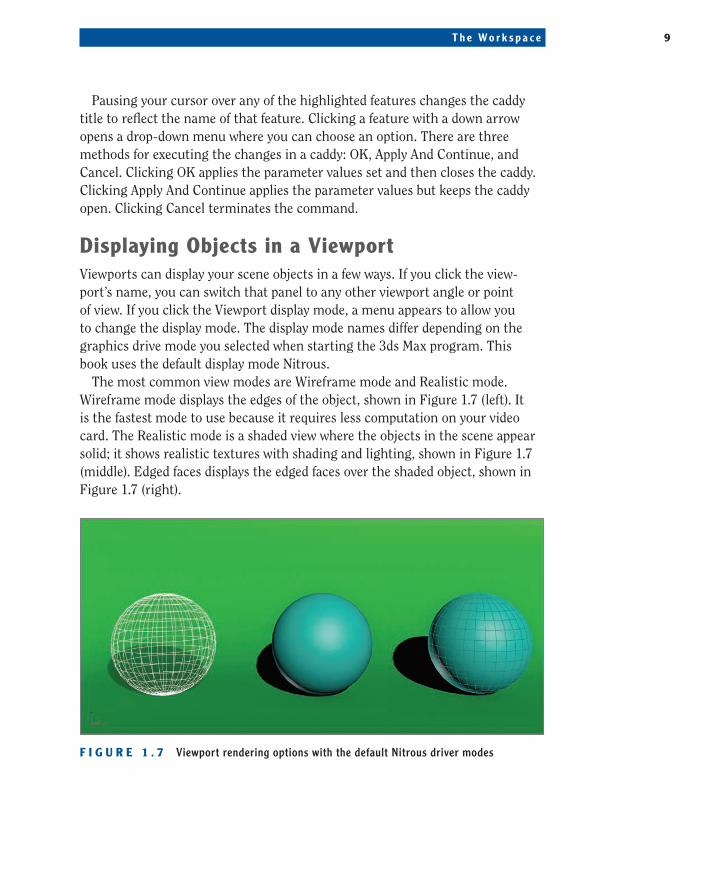
the Caddy InterfaceLike the Quad menu, the new caddy interface is designed to keep your eyes in the viewports while providing context-sensitive tools. The caddies replace the Settings dialog boxes available in previous 3ds Max versions. Depending on the tool, clicking the Settings button (identified as a small arrow below the name of the tool) displays the tool-specific caddy directly over the selected objects or sub-objects. Figure 1.6 shows the Extrude Polygons caddy. Each tool’s caddy is slightly different and may include more than one parameter.
OK
Caddy/Feature NameTool Application Method
Parameter ValueCancelApply and Continue
F I g u R e 1 . 6 The Extrude Polygons caddy
t h e Wo r k s p a c e 9
Pausing your cursor over any of the highlighted features changes the caddy title to reflect the name of that feature. Clicking a feature with a down arrow opens a drop-down menu where you can choose an option. There are three methods for executing the changes in a caddy: OK, Apply And Continue, and Cancel. Clicking OK applies the parameter values set and then closes the caddy. Clicking Apply And Continue applies the parameter values but keeps the caddy open. Clicking Cancel terminates the command.
displaying objects in a ViewportViewports can display your scene objects in a few ways. If you click the view-port’s name, you can switch that panel to any other viewport angle or point of view. If you click the Viewport display mode, a menu appears to allow you to change the display mode. The display mode names differ depending on the graphics drive mode you selected when starting the 3ds Max program. This book uses the default display mode Nitrous.
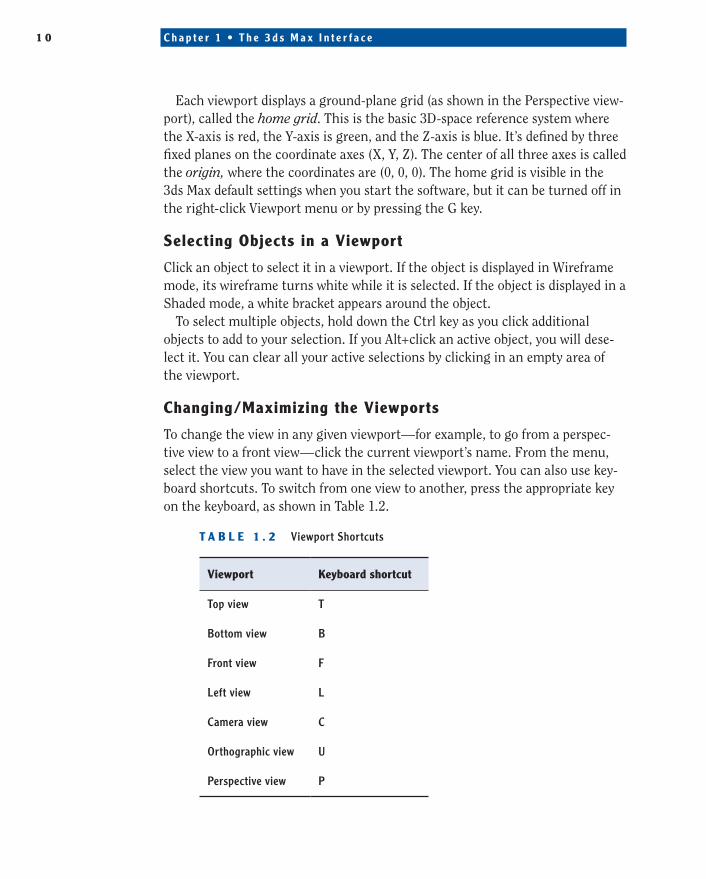
The most common view modes are Wireframe mode and Realistic mode. Wireframe mode displays the edges of the object, shown in Figure 1.7 (left). It is the fastest mode to use because it requires less computation on your video card. The Realistic mode is a shaded view where the objects in the scene appear solid; it shows realistic textures with shading and lighting, shown in Figure 1.7 (middle). Edged faces displays the edged faces over the shaded object, shown in Figure 1.7 (right).
F I g u R e 1 . 7 Viewport rendering options with the default Nitrous driver modes
1 0 C h a p t e r 1 • T h e 3 d s M a x I n t e r f a c e
Each viewport displays a ground-plane grid (as shown in the Perspective view-port), called the home grid. This is the basic 3D-space reference system where the X-axis is red, the Y-axis is green, and the Z-axis is blue. It’s defined by three fixed planes on the coordinate axes (X, Y, Z). The center of all three axes is called the origin, where the coordinates are (0, 0, 0). The home grid is visible in the 3ds Max default settings when you start the software, but it can be turned off in the right-click Viewport menu or by pressing the G key.
selecting objects in a Viewport
Click an object to select it in a viewport. If the object is displayed in Wireframe mode, its wireframe turns white while it is selected. If the object is displayed in a Shaded mode, a white bracket appears around the object.
To select multiple objects, hold down the Ctrl key as you click additional objects to add to your selection. If you Alt+click an active object, you will dese-lect it. You can clear all your active selections by clicking in an empty area of the viewport.
Changing/Maximizing the Viewports
To change the view in any given viewport—for example, to go from a perspec-tive view to a front view—click the current viewport’s name. From the menu, select the view you want to have in the selected viewport. You can also use key-board shortcuts. To switch from one view to another, press the appropriate key on the keyboard, as shown in Table 1.2.
t A B L e 1 . 2 Viewport Shortcuts
Viewport keyboard shortcut
Top view T
Bottom view B
Front view F
Left view L
Camera view C
Orthographic view U
Perspective view P