
Auto Shutdown Manager - EnviProt
123
2021 Auto Shutdown Manager Professional PC Power Management Release 5 Manual
Transcript of Auto Shutdown Manager - EnviProt

2021
Auto Shutdown Manager Professional PC Power Management
Release 5
Manual EnviProt [email protected]

Auto Shutdown Manager - Manual V5
Page 2
Table of contents
Benefits ....................................................................................................................................... 5
Why Auto Shutdown Manager? ................................................................................................. 6 So what’s different? ............................................................................................................... 7
Detailed information about PC Assets ............................................................................... 7 Most flexible operation modes .......................................................................................... 7 Central management .......................................................................................................... 8 Idle - definition and detection ............................................................................................ 9 Automatic wake up ............................................................................................................ 9 Finally… ............................................................................................................................... 9
General Functionality ............................................................................................................... 10 The Basic Operation ............................................................................................................. 10
Installation – Single PCs, Servers and Clients ........................................................................... 12 Installation on stand-alone PCs ............................................................................................ 12 Client and server installations .............................................................................................. 12
Installing the server .......................................................................................................... 12 Deployment to multiple network clients ............................................................................. 13
1) Automatic client provisioning via a file called server.ini ............................................. 13 2) Automatic client provisioning via command line arguments ...................................... 14
Deployment within image-based client systems ................................................................. 14
Configuration ............................................................................................................................ 16 Idle timer .............................................................................................................................. 18 Network ................................................................................................................................ 21
1. Configuration as a client ............................................................................................... 21 2. Wake on LAN – settings and configuration .................................................................. 21 3. Configuration as a server ............................................................................................. 22 4. Monitoring of other TCP/IP-enabled devices or disabling clients that are keeping a server up and running ...................................................................................................... 23
Applications: Detection of running applications that prevent shutting down .................... 24 Method 1: Most simple via its window title .................................................................... 24 Method 2: Temporary – with internal program IDs ......................................................... 25 Method 3 – Monitor with performance counters ........................................................... 25
Advanced .............................................................................................................................. 27 Example: Analysis of network load .................................................................................. 27
Scheduled Tasks ................................................................................................................... 28 VMware ................................................................................................................................ 29 Local Time limit for PC usage ............................................................................................... 32 Protocol ................................................................................................................................ 33 Time Rules ............................................................................................................................ 35 General ................................................................................................................................. 42
Warn with sound and display a warning before shutting down ...................................... 42 Mouse and keyboard sensitivity ...................................................................................... 42 Display settings ................................................................................................................. 42

Auto Shutdown Manager - Manual V5
Page 3
Default shutdown mode .................................................................................................. 43 Voice sensitivity ................................................................................................................ 44 Continue idle countdown if users are not logged on ....................................................... 44 Run application before shutdown .................................................................................... 44 Save documents before shutdown .................................................................................. 46 Run application at start up and wake up ......................................................................... 47 Rebooting after a number of shut downs ........................................................................ 47 Starting / stopping services and drivers before shutting down and after restarting ...... 49
Auto configuration with the “Auto Configurator” ............................................................... 50 How it works: .................................................................................................................... 50
Command Line - Arguments ..................................................................................................... 51
Management Console for Central Management ..................................................................... 52 The Client Manager .............................................................................................................. 52
Definition of groups and settings ..................................................................................... 53 Auto Group Assignment of new and current clients ........................................................ 57 Client Overview ................................................................................................................ 61 Client Energy Profiles ....................................................................................................... 67 Asset Management (Beta) ................................................................................................ 68
The License Manager............................................................................................................ 75 Update Manager .................................................................................................................. 76 Maintenance Manager ......................................................................................................... 78
Real-time Actions –> Start WOL Process .......................................................................... 78 Maintenance Mode .......................................................................................................... 79 WoL (Wake on LAN) Scheduler ........................................................................................ 80 WoL (Wake on LAN) – via SCCM and File Scanner ........................................................... 81 WoL Scheduler Exceptions ............................................................................................... 82 WoL proxies – wake up remote PCs without using directed broadcasts ......................... 83 UPS Manager – Uninterruptible power supply ................................................................ 84
User PC Time Limit ............................................................................................................... 86 Client Monitor ...................................................................................................................... 88
Central Savings Report ..................................................................................................... 89 Database Settings ............................................................................................................. 91 Reports ............................................................................................................................. 96
File Scanner – automation based on own job files .................................................................. 97 Configuration ........................................................................................................................ 97 General format of the job files ............................................................................................. 98 WoL Jobs ............................................................................................................................... 99 Add WOL proxies ................................................................................................................ 100 Remove WOL proxies ......................................................................................................... 101 Delete Clients ..................................................................................................................... 102 Assign clients to setting groups .......................................................................................... 102
Real-life examples and scenarios ........................................................................................... 103
Wake on WAN (WoW) Tool – Wake up remote Clients ......................................................... 110
SCCM plugin ........................................................................................................................... 112

Auto Shutdown Manager - Manual V5
Page 4
Installation .......................................................................................................................... 112 Application, update and package deployments ................................................................. 113
System requirements ............................................................................................................. 117
Troubleshooting ..................................................................................................................... 118
Tips and Tricks ........................................................................................................................ 119 WoL - Wake on LAN background and settings ................................................................... 119 ACPI - Background .............................................................................................................. 121
Contact and procurement information .................................................................................. 122
EULA – End-user License Agreement ..................................................................................... 123

Auto Shutdown Manager - Manual V5
Page 5
Benefits First of all, there are benefits of saving energy in terms of cost savings. According to several researchers, an average of 20 % of all computers are either not shut down properly or not shut down at all at night or over weekends. Lunch breaks or long absences from the desk are not even mentioned. Furthermore, many computers are idle – often for the entire night – to process certain long operations that would otherwise occupy the machines during the day. The major disadvantage is that, even after finalizing all operations, the computer still draws power while remaining idle until the user returns the next morning or after the weekend. This typical behavior not only wastes a tremendous amount of energy, but also shortens the machine’s life cycle. Unlike older computer generations, today’s machines are designed to be switched on and off several times per day. In particular, desktop hard drives are not designed for continuous operations; therefore, switching off the computer offers better protection than when they are overused. Apart from wasting energy, security also poses a serious problem. Computers that run unattended at night can be attacked more easily than can those that have been switched off. There are many arguments and benefits – in terms of money and security – for the minimization of the uncontrolled running times of systems.
Auto Shutdown Manager - Manual V5
Page 6
Why Auto Shutdown Manager? Nowadays, with energy prices rising, both consumers and enterprises are investigating ways to save energy effectively – but without changing the familiar working style. When looking at a typical computer’s workday, one soon notices that there are many times when it is running but is not being used. Why? First, there is the integrated Windows power management, which is a good approach, but which still leaves room for many technical improvements, particularly in networked environments in which some machines are dependent on others, and for complex business processes that require flexible and intelligent power management control that exceeds the standard. The Windows solution is mainly based on direct interactivity with the PC. However, during a long Internet download, who wants to press a key every few minutes in order for the machine to complete the download without interruptions? This also applies to many other tasks, such as encrypting data, overnight backup processes, TV recordings, PowerPoint presentations, the copying, deleting or defragmenting of hard drives, maintenance work, machine-to-machine controlling, and many others. Considering the hundreds of thousands of display PCs in shop windows, airports, universities, and at tradeshows that would usually need to run for 12-16 hours a day instead of for 24 hours, one soon gets an idea of how much energy is wasted needlessly and transformed into heat. According to latest research, 90% of all users do not enable the power management functionality of their computers – this is understandable, due to the reasons mentioned above. Many enterprises, schools, universities, and public institutions already raise awareness and calling for energy saving. Users are asked to shut down their computers before going home for the day, leaving for the weekend, during lunch hours and longer absences from their desks. However, in reality, employees are often stressed, meetings last too long, and workers are under deadline constraints, rush to catch trains in the evening, and so on. Therefore, night after night, and weekend after weekend, thousands of computers are not being shut down when they should be, thus wasting vast quantities of energy on useless operations and air-conditioning. Some enterprises even require computers to run at night or over weekends in order for important updates and patches to be deployed. While these maintenance processes only require a few hours, computers are often left running for many nights and over many weekends. All these challenges and more can be handled by Auto Shutdown Manager in an efficient way. On one hand, it relieves PC users of their imposed energy saving commitments. It removes demand with which they struggle to comply, and guarantees the scheduled behavior of systems and energy needs. The energy-saving potential is impressive. Not only is

Auto Shutdown Manager - Manual V5
Page 7
hardware used with consideration and the energy needs of the overall IT are reduced, the energy needs of the building’s climate control are lower! A bonus is increased security - when computers are not running, they cannot be attacked.
So what’s different?
First, Auto Shutdown Manager operates even if no users are logged on to the system in the so-called full background or service mode. All operations are supported in this mode, including local and remote power up, power down, restart, standby, updates and patches, deployment and receiving of new settings, executing time rule actions, remote shut down, remote wake up, rebooting, and so on.
Detailed information about PC Assets
The newly introduced asset management functionality in the Auto Shutdown Manager Version 5.7 helps IT administrators and managers stay up to date on important assets in their IT environment. Find outdated hardware components or drivers and get detailed information about your clients and servers hard- and software components.
Most flexible operation modes
The operation modes provided by Auto Shutdown Manager are extremely flexible. Depending on the required policies, it can be configured in ‘Can’, ‘Should’ or ‘Must’ shutdown modes. All systems can be grouped according to the required policies. Example:
‘CAN’ One group of PCs could be configured to enter a predefined sleep mode during lunch hours. This means that, if no activities are detected during a defined period, the systems would automatically go into a predefined sleep mode, such as standby. Therefore, the logical rules for lunch times could be:
• Keep running continuously between 7:30 am and 11:45 am (core business time)
• Check for user or system activities between 11:45 am and 1:15 pm – if there are no activities for at least 10 minutes, go into Standby
• Wake up at 1:15 pm (if required)
• Keep running continuously between 1:15 am and 5:00 pm (core business time)
• Check for user or system activities after 5 pm – if there are no activities for at least 10 minutes, shut down completely.
‘SHOULD’- with a warning message and user-allowed decision Another group of PCs could be set up to go into a sleep mode during lunch hours, say at 12:15 pm, regardless of other options. In this case, the users would see a warning window notifying them about the planned sleep mode. If a user wanted to continue working, s/he could reject the sleep mode by clicking the cancel button in the warning window and continue working.

Auto Shutdown Manager - Manual V5
Page 8
‘MUST’- without a warning message and with no user interaction Another group of PCs could be used to display stock prices, for example. However, this only makes sense until the market closes, plus some additional time for aftermarket deals. These PCs could be definitely switched off at about 6 pm every day. In this case, the warning message would be disabled and would not show up - therefore, no one could prevent the PCs from shutting down. In any event, an activated maintenance mode on the server could prevent all PCs from being shut down until the maintenance mode is deactivated by the administrator. For more details, see page 79.
Auto Shutdown Manager supports the client/server model. In enterprise environments, as well as in an increasing number of networked homes, it is essential for systems to run reliably and to be available during core business hours or whenever needed. Furthermore, systems might depend on each other. For example, client computers cannot operate properly if their servers are not available. Not all servers need to run 24/7
More and more companies are aiming to shut down servers that are only needed when clients are running. To address these requirements, Auto Shutdown Manager was designed using network-aware logic. This means that client computers can wake their servers on demand and keep them running as long as required - on the other hand, the servers detect their clients and whether they are connected – therefore, they do not go into a power saving mode until the last client disconnects.
Central management
Auto Shutdown Manager supports central management via its built-in Management Console. It allows configuration, updates, management, and deployment of settings from one central place to all network clients. It also supports daily admin tasks such as the remote restarting or shutting down of individual PCs or entire groups of PCs, the

Auto Shutdown Manager - Manual V5
Page 9
remote logging off of users, the changing of up and down times, scheduling Wake on LAN (WoL) plans and much more.
Idle - definition and detection
Another unique Auto Shutdown Manager feature is its broad flexibility to define what ‘idle’ means to the user and to the system administrator. It supports very simple analysis, such as the CPU load, HDD utilization, currently running applications, usage of the mouse and keyboard, pending scheduled tasks, or the analysis of any sounds or noises around the computer via a microphone. However, the idle analysis can also be set up as complex, as requiring the inclusion of the analysis of network traffic, the presence of terminal sessions, pending documents in the printer queue, the analysis of any running processes or services and their current activity levels, up to the detection of any network equipment that can be added to the idle analysis –be it inside the individual LAN or elsewhere in the world. This could be helpful if a networked machine or multimedia equipment has to be included in the shutdown decision, for example. It would be possible to prevent the shutdown of a computer as long as another machine was up and running (for example, TCP/IP-enabled multimedia devices, production machines, and the like).
Automatic wake up
For a seamless business operation, enterprise power management solutions not only need to offer an intelligent way of shutting down unused machines, they should also offer methods of waking selected computers up again. For this reason, Auto Shutdown Manager supports different methods of powering PCs up remotely. One is based on an internal timer that can be set up centrally to wake up PCs in designated groups automatically. The other method is the so-called Wake on LAN (WoL). This allows waking single PCs or entire PC groups not only from sleeping modes such as Standby and Hibernation, but also from the Power Off mode. Both methods can be combined and are extremely useful to ease administrative tasks such as overnight patch management or virus scans. Auto Shutdown Manager supports WOL in a local and directed broadcast mode, via WOL proxies and Wake on Internet – therefore, it can also be used to wake machines inside and outside of a company’s intranet.
Finally…
There are many other features that will be described in the following chapters. Auto Shutdown Manager will allow you to create a setup that is as easy as possible and as complex as needed to maximize your power savings and security. With your growing experience, you’ll discover more functions and resolve previous situations more effectively. When you do so, Auto Shutdown Manager will deploy your changes automatically to all relevant PCs. Its feature of not being disruptive will help you and your company to deploy and use a solid energy-saving technology without preventing them from performing their core jobs. All this ultimately helps to save money and the environment; it also increases the company’s ‘green’ image and, most importantly, the security level of your IT. Further information can be found here: www.enviprot.com

Auto Shutdown Manager - Manual V5
Page 10
General Functionality Auto Shutdown Manager was developed according to the following maxims: simplicity, reliability, and thriftiness. All functions will be described in detail in the relevant chapters of this manual. Definition of ‘shutdown’ The term ‘shutdown’ refers to all possible shutdown modes in this manual:
• Power off
• Restart
• Standby
• Hibernate
• Log off user This is because the shutdown mode can be configured flexibly based on the time and day of the week. Thus, it could be useful to use standby during lunch hours and hibernate or power off in the evenings, for example. This functionality is provided by so-called time rules, which will be explained later in the appropriate chapter. As simple as possible and as complex as needed Auto Shutdown Manager can be used as a single stand-alone solution for individual PCs or in networked environments. In essence, every Auto Shutdown Manager PC can act as client and as server at the same time. In this way, it can be used to build multi-tier power management layers starting from the top-level server, going down level by level to the department servers and, finally, to the clients. Each server can have its own client settings, groups, and so on, but it can also use licenses centrally for itself and its underlying clients directly from the next higher-level server. This makes the licensing process very easy and keeps it central to one machine. Full control Auto Shutdown Manager operates entirely in the background as a so-called windows service. Thus, it operates independently of any special logged-on user – and even if no users are logged on to the computer. The user interface can be disabled on clients to run Auto Shutdown Manager completely invisibly. Messages such as warnings before shutting down can be customized to let users know that this is a desirable process supported by the company.
The Basic Operation
Auto Shutdown Manager can be operated in two different ways. One is based on the idle timer countdown. If the timer reaches zero, which means neither system nor user activities could be detected - the machine is being prepared for a shutdown and will finally shut down in a predefined mode. Another way is not to use the countdown timer, but a scheduler.

Auto Shutdown Manager - Manual V5
Page 11
Time rules instigate actions based on a given schedule. Time rules could be used to wake and shut down PCs based on the time and day of the week, independently of the current system load or other activities. Time rules can dictate what actions to take during core business times, and the countdown timer provides for a ‘soft’ and intelligent shut down after hours. This helps to prevent unwanted shutdowns during business hours easily, and enables desirable shutdowns of unused PCs outside of business hours.

Auto Shutdown Manager - Manual V5
Page 12
Installation – Single PCs, Servers and Clients Auto Shutdown Manager can be downloaded from the Internet from thousands of sites. However, downloading the most current version directly from www.enviprot.com is recommended. If you have a previous version installed, please uninstall it first1. Changes in settings will be kept. Alternately, you can use the on-line update function to get the newest release installed automatically. You can find it under the General tab - Check for Updates. .NET Framework If the Microsoft .NET Framework 4 was not installed or has been deactivated on the computer, a notification appears and, after clicking on it, the required framework can be activated or downloaded directly from Microsoft and installed. However, it comes preinstalled with newer operating systems and does not require manual installation or activation. Antivirus and firewall settings You don’t need to open any ports or services on the client side to operate Auto Shutdown Manager. On the server side, Auto Shutdown Manager requires one incoming TCP port to which clients can connect. The default port number is 8088, but you can reconfigure it as needed. Please ensure that the firewall allows this TCP port as an incoming port.
Installation on stand-alone PCs
You should be logged in as the administrator or be able to obtain administrator rights for the installation. If you intend to use Auto Shutdown Manager on a single PC only, just follow the on-screen instructions during the installation process.
Client and server installations
Installing as a server implies that clients will be attached to it later. If this is not the case, just follow the instructions for “Installation on stand-alone PCs” above.
Installing the server
Install the Auto Shutdown Manager on the server first in the same way as described for stand-alone PCs. Once Auto Shutdown Manager is installed on the server, you first should configure it before installing the clients. Please see “Configuration as a server” on page 22.
1 Via Control Panel -> Add or Remove Programs. This is only needed for the Server. Clients can be updated via the Update Manager.

Auto Shutdown Manager - Manual V5
Page 13
Deployment to multiple network clients
Before you start installing the clients, the server should be installed and configured. Once the server is configured and running, you can start the installation process for the clients. Auto Shutdown Manager offers a simple way to configure the clients automatically with the correct server settings, such as server name or IP address and the TCP port number. This is a great advantage if many PCs are installed, as it avoids having to go from PC to PC and entering the server data manually. The first connection is done automatically immediately after installation, and the download of the client’s first settings from the server is processed automatically. Furthermore, clients can be assigned automatically to the final group and receive their final policy settings. In short: you can install the clients in the usual way that you use for other *.msi deployments. Immediately after the deployment and installation, the configuration happens automatically. Please follow these instructions to distribute the Auto Shutdown Manager server settings automatically to all new client PCs during the installation. There are two different ways to do this:
1) Automatic client provisioning via a file called server.ini
1. Store the AutoShutdownManager5.msi file in a shared network folder (the source folder), which must at least have read-access rights for all client PCs. This will be your installation source from which each client should be installed by using the AutoShutdownManager5.msi file.
2. In this folder, create an new file called “server.ini” a. It only needs to contain two simple text lines - without any comments or
additions b. As a first line, add the server IP address or its corresponding DNS name c. Add the TCP port number to the second line.
The server.ini file should now look like (these values are just examples): 192.168.1.1 8088
3. You can now install the clients in the usual way that you do other *.msi deployments from this defined shared folder. During the installation, the clients will look for the server.ini file in the source folder and use its values to configure the server data automatically. Once the installation is complete, the clients will initiate the connection to the server to retrieve their first configuration and settings data. Please be aware that this process can take up to ten minutes!
4. Reboot the clients if possible – this can be done remotely from the server 5. From now on, all settings and configuration changes, as well as the installation of
newer updates, can be done remotely from the server.

Auto Shutdown Manager - Manual V5
Page 14
Important information for a successful configuration: If you deploy the Software via Group Policy or another deployment tool, please ensure that the target computers (domain computers) have read access to the source folder! Otherwise, the provisioning will not work correctly.
2) Automatic client provisioning via command line arguments
Configure the installation command with two additional parameters: Server = Your_Server_Name or IP Port = 8088 (or your preferred port number) For example: msiexec.exe /i Autoshutdownmanager5.msi server="ASDMCTRL" port=8088
Please note: It is recommended that all drivers, as well as the operating system, are up to date. Independent from Auto Shutdown Manager, incorrect and outdated drivers are the most common sources of problems. With regard to standby and hibernation modes, this is often caused by outdated graphics drivers. When rebooting the computer, it could take a while before you can launch the tool. Before it is ready to be launched, you will receive the notification „… Starting“. This is normal and desired, as Auto Shutdown Manager deploys its resources in an economical way.
Deployment within image-based client systems
In provisioning- or image-based environments, such as XEN provisioning, Rembo and others, the OS and some partitions are overwritten or reset after each restart and are reset to a standard image. There are three different strategies regarding how Auto Shutdown Manager could be set up and used in such environments:
1. The easiest set up is to exclude the Auto Shutdown Manager Installation folder from being recovered or overwritten at each reboot. You just need to exclude the installation folder and its subfolders.
2. Let the Auto Shutdown Manager Server keep tracking the clients. Set the Unique Client ID to 00000000-0000-0000-0000-000000000000 immediately after the client has been installed in the master image. You will find it in the file called AutoShutdownManager.ini in section UID= Overwrite the old value using 00000000-0000-0000-0000-000000000000 - this is a number of zeros separated by the minus character: (8)-(4)-(4)-(4)-(12). Using this, the server will generate an individual UID for each client.

Auto Shutdown Manager - Manual V5
Page 15
Please note that this scenario requires all PC names to be unique. The disadvantage of this setup is that the local protocol of up and down times cannot be processed; thus, no reports will be available.
3. Define a separate space where local data can be saved. You can configure a path to a location where the Auto Shutdown Manager Client can store session-based data that will not be overwritten by the imaging system. To do this, open the file called AutoShutdownManager.ini There, you will find a section called [SETTINGS]. Add a line such as Application_data_path=yourPath - it will finally look like [SETTINGS] Application_data_path=F:\localdata\ASDM

Auto Shutdown Manager - Manual V5
Page 16
Configuration Configuration is explained via the different tabs. For an automatic configuration, please see the chapter “Auto configuration with the “Auto Configurator”” on page 50. In general, the configuration will allow you to set the idle or ‘useless’ up time of your computers to a minimum. You can make the system aware of many different activities and avoid unwanted shutdowns when these are detected. However, from time to time Windows executes its own internal clean-up activities that cause higher system CPU and HDD utilization, or performs important system file updates. This means that there might be times were you would have expected the system to be down – but it wasn’t. This could happen when Windows is cleaning its internal databases, re-indexing, sorting internal tables, or updating, for example. Therefore, it’s not always a good idea to perform a hard shutdown of the systems immediately after you have stopped using them. Auto Shutdown Manager can be configured to detect these important system activities and delay the shutdown for as long as necessary.
How to open Auto Shutdown Manager To open Auto Shutdown Manager, double-click on the green icon located in the notification
area – sometimes also called the system tray area. This is usually in the lower right-hand corner of the screen. Another method is to right-click on the icon and select “Open Auto Shutdown Manager” If you are using Windows 7 or newer, the icon might be not visible in the notification area after installation. Instead, it is located in the container for hidden icons. This can be opened via the Arrow-Up button, as shown in the screen shot. It is recommended to customize the setting so that the Auto Shutdown Manager Icon is always visible. This makes the access to other Auto Shutdown Manager functions, such as manual shutdown, easier. Please note: It might take up to 60 seconds immediately after the installation before you can see the Auto Shutdown Manager Icon. If the Auto Shutdown Manager Client is centrally managed by an Auto Shutdown Manager server, the administrator has the option to disable the icons on some or on all PCs. In this case, the icon will not be visible at all, which means that the Auto Shutdown Manager cannot be opened by users at any time. The program groups also become invisible.

Auto Shutdown Manager - Manual V5
Page 17
Auto Shutdown Manager opens and requests a password for the first time or after a system restart, even if no password has yet been configured.
In this case, just click Continue to proceed. To configure a password, go to the TAB General and select the Change Password function. You also can decide to disable the password screen at start up.

Auto Shutdown Manager - Manual V5
Page 18
Idle timer
To put it simply, the main functionality can be thought of as an intelligent countdown timer that can be reset by many customizable events. A shutdown action is only performed when the timer has counted down to zero. This is customizable to the time of day, and could be standby, shutdown, log off, restart or hibernation, for example. The countdown can be reset by several events or even stopped for a period to prevent shutdowns – for example, during business hours or while a PowerPoint presentation is performed.
Due to minimal system load, these events are not controlled permanently, but in different time cycles and according to priorities. Each event can be configured and switched on or off as required.

Auto Shutdown Manager - Manual V5
Page 19
For purposes of overview, reset events have been divided into several categories: 1. Mouse / keyboard – Cycle: One Second 2. Processor utilization – Cycle: One Second 3. HDD utilization – Cycle: One Second 4. Performance counters – Cycle: 1-15 Seconds 5. Running applications – Cycle: 25-35 Seconds 6. Scheduled tasks – Cycle: 25-35 Seconds 7. Network clients – Cycle: 30-60 Seconds 8. Time rules – Cycle: 40-50 Seconds 9. Sound / voice – Cycle: 1-5 Seconds
These time cycles are the reason that you may not see an event being monitored immediately after setting it up. If you set up a time rule for example, it can take up to 50 seconds before you see it working. Analysis according to cycles and priorities has the major advantage of having a very small impact on the system load –only that which is absolutely required is being evaluated. In brief: The longer the system is idle, the more events are being supervised to prevent an unwanted shutdown. In each of these categories, you can define the desired scenario to reset the countdown timer. For example, you could add “Power Point Slide Show - *” to the Application Tab to reset the countdown timer as soon and for as long as PowerPoint is used in presentation mode. The * at the end is a wildcard that filters the presentation titles so that the event is processed and prevents a shutdown every time you present, independently of the presentation title. This will be explained in more detail in the appropriate chapter about application detection. As mentioned previously, apart from the countdown timer, there are time-related events, so-called time rules, which change the program control or process different actions at the configured time. For example, it may make sense to perform a hard shutdown of computers that are still running late on a Friday night, or just reboot some servers every Sunday morning for reasons of stability. For computers that are rarely used, it may make sense to implement a flexible shutdown strategy based on hours and weekdays, for example. On the other hand, it could also make sense to keep some computers running continuously during core business hours while saving energy during other times via standby, such as during lunch times. For evening hours, it may make sense to change the shutdown mode to hibernate or power off. Another action allows waking computers from sleep at a defined time. However, this will only work if the computer had previously been in standby or hibernate mode. If the computer had been shut down completely (S5), automatic self-wakeup is not possible. Instead, Wake on LAN can be used via the Auto Shutdown Manger server. For more details, please see “WoL (Wake on LAN) ” on page 80. The timer scrollbar sets the time the PC is allowed to be in idle mode – a mode in which neither interaction nor activities are detected – and can be set in minutes. After the time has expired, the shutdown process is launched.

Auto Shutdown Manager - Manual V5
Page 20
Times of 15-20 minutes have delivered a good performance in practice. Installation on servers: As servers typically run for at least as long as the clients, it is recommended to set the time to the slowest that a client would require for a reboot. Times of 4-10 minutes have proven to have a good performance for servers in practice. For servers that need to run 24/7, the timer can be disabled completely by clicking on the green arrow. The green tray icon becomes red when the time has stopped. The CPU scrollbar sets the limit for processor utilization. This setting defines the trigger value at which the shutdown will be delayed when the CPU load is higher than the defined value. If this value is reached, meaning that the CPU is operating at some capacity, the countdown timer is reset and shutdown is postponed. As long as the CPU utilization is above the set value, the system will not be shut down via the idle timer. Depending on processors and applications, values of 70% - 90% have delivered good results in practice. The HDD scrollbar sets the limit for hard drive utilization. If this limit is exceeded, meaning the hard drive is being highly utilized, the countdown timer is reset and the shutdown is postponed. Depending on hard drive(s) and applications, values between 80% and 95% have delivered good results in practice. If some processes constantly access the hard drive, they might prevent the PC from being shut down. In this case, disabling the monitoring by removing the check mark is recommended. Instead, performance counters can be used to determine whether the system is idle or not more accurately. In the lower area of the window, all events that postponed the shutdown and other status messages can be configured and viewed in the event monitor. It is recommended to enable and watch all these events at the beginning. Sometimes the cursor moves or trembles. If this happens, it could trigger the “mouse moved” event, meaning it delays the shutdown process or stops it completely. The selection of single events, shown as a list with checkmarks on the left of the event monitor, is only used to define which events have to be displayed by the event monitor. The events themselves are not influenced by this selection. Therefore, if you remove the checkmark for mouse and keyboard for example, both will still be monitored but the results will not be shown the monitor. Later, in the “General” tab, these events can be enabled/disabled if desired.

Auto Shutdown Manager - Manual V5
Page 21
Network
The Network tab is divided into three different regions. Bear in mind that any Auto Shutdown Manager installation can be configured as client and server at the same time.
1. Configuration as a client
In the first region at the top of the screen, you can configure the server data to direct the client to it. These settings are needed for three different things:
1. When a client connects to a server, it can prevent the server from shutting down as long as the client is up and running. (If you want to avoid this, go to the network tab on the server, go to the lower part of the screen, enter the client’s IP address and select “Disabled”. Once done, the client connection status changes to “Ignored by Server” – which means the server is allowed to shut down, even if this client is running).
2. These settings allow the client to wake the server via WoL2 in the event that the server is not up and running but is needed.
3. These settings are also required if the client is to be managed remotely by the server. This is for central deployment of licenses, power management settings, updates, and the like.
Selection: Automatic reconnection if the connection is lost This setting continuously attempts to establish a connection with the server. This can be useful if the server is being rebooted or was not available when the client started. If the checkmark is removed, Auto Shutdown Manager only attempts to reach the server for a few minutes. If it is not successful, no further attempts are made. Removing the checkmark can make sense for laptops that are often on the road and therefore cannot reach the server all the time – this makes particular sense for expensive wireless connections.
2. Wake on LAN – settings and configuration
This setting is useful if you do not want to operate the server in a 24/7 ‘always on’ mode. In this case, you can configure the clients to wake the server as soon as they start. After the first client detects that the server is not available, it will begin sending wake-up commands until the server starts.
2 For an optimal configuration, please also read WoL - Wake on LAN on page 48.
Auto Shutdown Manager - Manual V5
Page 22
The fields WOL Endpoint Address and WOL Endpoint Port are only needed for WOL over Internet – for example, if the server is at a remote location. For more details about WOL background and settings, see page 119.
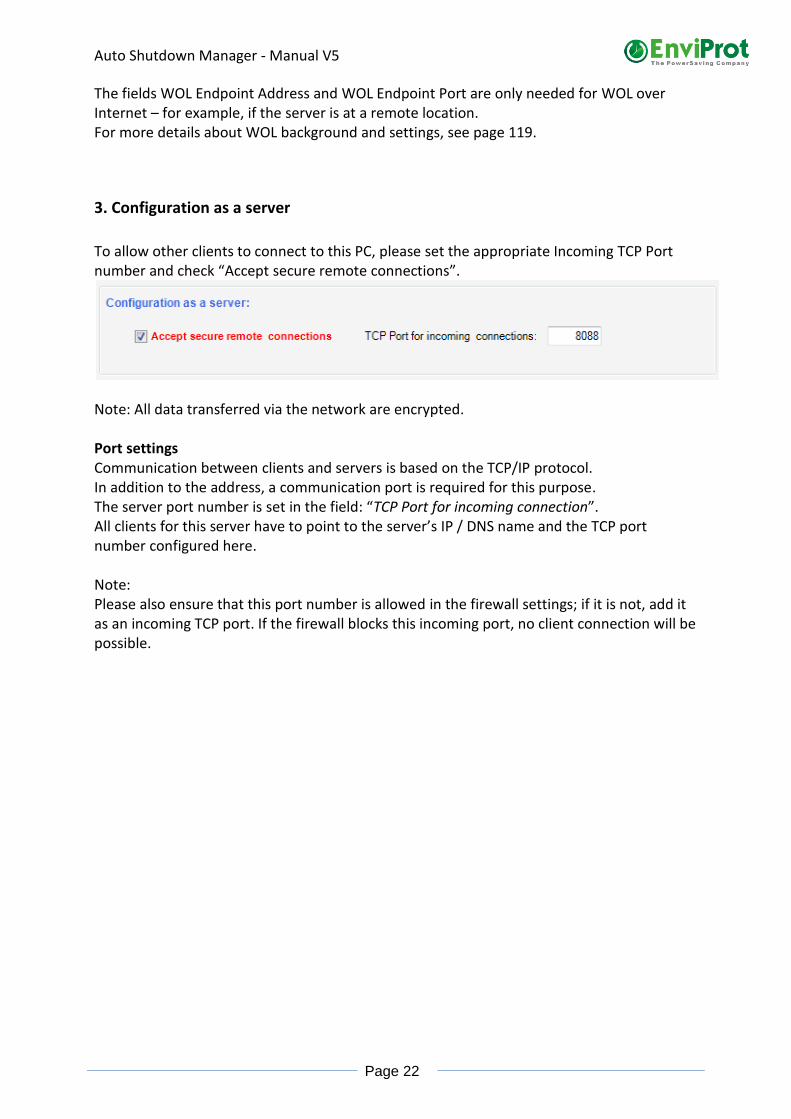
3. Configuration as a server
To allow other clients to connect to this PC, please set the appropriate Incoming TCP Port number and check “Accept secure remote connections”.
Note: All data transferred via the network are encrypted. Port settings Communication between clients and servers is based on the TCP/IP protocol. In addition to the address, a communication port is required for this purpose. The server port number is set in the field: “TCP Port for incoming connection”. All clients for this server have to point to the server’s IP / DNS name and the TCP port number configured here. Note: Please also ensure that this port number is allowed in the firewall settings; if it is not, add it as an incoming TCP port. If the firewall blocks this incoming port, no client connection will be possible.

Auto Shutdown Manager - Manual V5
Page 23
4. Monitoring of other TCP/IP-enabled devices or disabling clients that are keeping a server up and running
It may be necessary to analyze the presence of other machines running different operating systems, such as Linux, or other TCP/IP-enabled devices such as network printers or multimedia streaming devices before shutting down.
In this situation, Auto Shutdown Manager can detect the presence of such resources via the integrated PING method, which is based on ICMP (Internet Control Message Protocol). To configure these resources, please enter their addresses as displayed in the screenshot above and select the method „PING“. The method “Disabled” – to be used on Auto Shutdown Manager servers A client entered as “disabled” will not be considered by the server’s idle detection. This means that this client cannot keep the server up and running. The server behaves in the same way as if the client did not exist and will process its idle shutdown even if this client keeps running. Please Note: Use TCP/IP notation such as 192.168.1.1 with the method. DNS names are not supported by Disabled, only by the PING method. The following example shows the impact: You may want to install an Auto Shutdown Manager client on your exchange server to allow remote control, schedule maintenance times, or to process a reboot every Friday night for stability reasons. To make the shutdown decision for an Auto Shutdown Manager server that is not dependent on the exchange machine that runs 24/7, you just add its address to the list on the server, as shown in the screenshot above, and select “Disabled”. The Auto Shutdown Manager server will still be able to manage this exchange machine, deploy setting changes , licenses, updates, maintenance timing, and so on, but will ignore it when making its own decision to shut down.

Auto Shutdown Manager - Manual V5
Page 24
Applications: Detection of running applications that prevent shutting down
It may make sense to prevent the shutdown of a computer as long as some specific applications are running. In this example, this is demonstrated using the multimedia player Winamp. Of course, any other applications could be used as well. There are three different ways to detect running applications:
Method 1: Most simple via its window title
This method prevents the shutdown as soon and for as long as certain applications are running. Using this method, selected applications are monitored via their window titles. If an application with a title that complies with a title entered in “Applications that always prevent Shutdown while running” is detected, the Idle Timer is reset periodically. At the right-hand side of the screen in “Detected Applications”, all desktop programs that are currently running are listed. If you want to monitor a certain program, start the program, mark it in “Detected Applications” and select the upper add „<-“button to add it to the list of monitored applications. Use wildcards: As some titles change while applications are running –for example Winamp, by displaying the title currently being played - there is the option to set a wildcard (*). Therefore, instead of entering “My favorite song xyz - Winamp”, it should be entered as “*Winamp” only. This ensures that the running application, Winamp, is detected independently of the title of the song that is currently playing. However, there is a better way to monitor applications, as described in Method 3 below. PLEASE NOTE: Applications that do not close automatically after having finalized their tasks or that are waiting for user interaction will prevent the computer from shutting down when monitored in the way described above. If, for example, you want to copy many large files during the night, it may be the case that a dialogue waits for confirmation. Should this occur, if you monitor the application title “*copy*”,
Auto Shutdown Manager - Manual V5
Page 25
the computer would not shut down because the window with the title “*copy*” would still be open - even if it is only awaiting confirmation. To avoid this, it would make more sense to detect the actual application activity instead of the window title. This can be achieved by using Method 3 described below. The reason for detecting running applications via their window title is that it is very simple, but is only applicable to applications that close automatically after they have completed their tasks.
Method 2: Temporary – with internal program IDs
This method can be used to monitor certain applications just once or as an experiment, and only for the single time they are being run and for as long as the computer is running. Example scenario: You are evaluating a rival product to Winamp and would like to listen to a few songs without the computer shutting down. You could enter this application as described in Method 1, except that you have to enter it in the box “Applications that temp. prevent Shutdown while running in this session”. Unlike when using Method 1, this application is not detected by its window title – therefore, it does not matter if the title changes during the operating time. As soon as the application is closed again, the entry is removed automatically. Further entries can be also made by right-clicking on the Auto Shutdown Manager tray icon (next to the clock at the bottom of the screen) by choosing the menu “Add Temp Application”, and then selecting the program to be monitored temporarily.
Method 3 – Monitor with performance counters
As described in Method 1, there are certain applications that, during operation, await user interactions, and do not close automatically after having completed their tasks. Typical programs in this category are DVD- or CD-burning programs, system-cleaning tools, PVRs, multimedia programs such as Winamp, and the like. To return to the example Winamp: The modified entry using Method 1 “*Winamp” would still have a disadvantage because the system would not shut down as long as Winamp remained open – even if no further songs were played. This may be desirable for some applications, but this may not be the case for most other programs. Using the third method, the internal activities of applications and processes can be examined.

Auto Shutdown Manager - Manual V5
Page 26
First, the process name of the application has to be found. For “Winamp”, the process is called „winamp.exe“; however, this may not always be as obvious. Some process names may differ completely from their application names. The easiest way to find a process name is to:
1. Start the application 2. Open Windows Task Manager 3. In the “Applications” tab select the application
to be monitored 4. Select “Go to process” with a right-click.
The desired process name then appears. In our example, it is winamp.exe The process name must now be selected in the Auto Shutdown Manager tab “Advanced”. To achieve this, set the first selection list to “Process”. This displays all running processes in the upper right-hand box. Select the desired process name. There are now some categories available, with which the respective activity can be found. The most common categories for processes are: “IO Data Bytes/s”, “IO Other Bytes/s” and the like, showing if and how much data are being ‘moved’ by the application. Applications that ‘move’ data can usually be seen as active. There are many other options that might be of use to monitor the activity of a process, such as impact on the CPU load from the selected process. This is a matter of trial and error because it depends on the process and what should be monitored.

Auto Shutdown Manager - Manual V5
Page 27
The last task is to identify a range of values that show whether the application is active or idle. As soon as you chose the category, the current value is displayed. Watch it for a while. If it is zero or very low, this is a good hint that the application is idle. You should now use the application; in our example of Winamp, you could play a song. Again, watch the current value. If Winamp starts playing, this value will increase significantly (to more than 10,000, for example). If the playback is stopped, the value drops back to between 0 and 20. Therefore, a value of 1500 would be a safe area that will be vastly exceeded if the program were active. The values can vary for different applications. This approach can be applied to other programs that you want to monitor. The most important thing is to select the best indicator and to have the value defined as optimally as possible in order for the gap between active and idle is as large as possible.
Advanced
In the Advanced tab, the analysis of applications, drivers, or other system components can be analyzed via performance counters. For an automatic configuration, please see the chapter “Auto configuration with the “Auto Configurator” on page 50 Performance indicators are used for more complex analyses, such as data throughput or processor load for certain processes. Using these indicators, highly precise and fine-grained internal values of the applications, processes, system, memory, network, terminal sessions, device drivers and much more can be detected. Certain limits can be set that prevent the shutdown if met or exceeded. This may be useful for processes that run constantly but are not always active, such as backup, VPN, and so on, as well as for some applications that remain open after completing their tasks, such as CD/DVD-burning. They can be analyzed and the system can be shut down securely after the activity has been below the active level for the configured idle time. As some performance indicators move between values, the average is determined for the analysis. This also allows for a more reliable analysis of the limits. The analysis of applications and processes is addressed in detail in the chapter Applications: Detection of running applications that prevent shutting down on page 25. This is why only some more interesting indicators are explained in this section.
Example: Analysis of network load
It may make sense to base the shutdown decision according to the load respective to the current throughput of the network interface. A higher network load is usually a sign of some active processes.

Auto Shutdown Manager - Manual V5
Page 28
Approach: In the Advanced tab, chose Network Interface from the topmost selection list. On the right-hand side, there will be a list of all existing network adapters in the system, including both physical and virtual network interfaces. Select the interface you want to monitor. The most suitable category can be selected in the second selection list. When selecting the individual categories, watch the “current value”. This shows the current value of the complete indicator. For network interfaces, categories such as Packet/s could be suitable. When idle, small values are usually displayed. If data are transferred via the network, this value increases significantly. It is recommended to watch this value and use an average that shows a data transfer is currently undoubtedly active. If you have found a suitable value, enter it in the field “limit” and add the performance indicator via „Add“. Other suitable indicators are definable for:
• Physical disk -> Disk transfers/sec
• Logical disk -> Disk transfers/sec
• Terminal services / active sessions
• ICMP / Sent Echo Reply/sec (with this you can find out if the computer is being pinged and, if so and if desired, it can be kept running until the PINGs stop)
• Print Queue -> Jobs (do not shut down if there are jobs in the print queue)
• There are many more…
Scheduled Tasks
This functionality prevents the shutdown of the computer if a scheduled task is to take place, and if it will reactivate the system within a predefined amount of time. Therefore, short-term shut downs and wake ups can be prevented. A value of between 10 and 20 minutes has delivered good results in practice.

Auto Shutdown Manager - Manual V5
Page 29
VMware
If you don’t want to use VMware’s own processes for starting and shutting down the sessions, you can configure Auto Shutdown Manager to do this.
For reasons of stability, suspending or shutting down VMware-sessions before shutting down the host is usually recommended. On the other hand, it may make sense to restart the VMware sessions automatically after the reactivation of the host. For an interaction with the VMware system, the VMware proprietary tool “vmrun.exe” or VMware Player is required. Enter the correct path for “vmrun.exe” or “vmplayer.exe”. Support for VMware Server™ 2 and higher requires additional parameters to be entered. This can be done in the Arguments line. For example, if you want to manage virtual machines on the same PC, just enter an argument like –T server –h https://127.0.0.1:8333/sdk -u User -p Password. Suspend listed VMs before shutting down: Select this option if you wish to suspend all listed sessions before the host enters a shutdown or sleep mode. The maximum waiting period for each virtual session to suspend correctly is eight minutes. This is not supported by VMware Player. Please Note: The total waiting time before shutting down, which includes all VMware sessions to be suspended as well as a shutdown batch file, is 20 minutes. If this period expires, the system will be shut down. This is to prevent the system from continuing to run forever if one of these components were to crash or loop.

Auto Shutdown Manager - Manual V5
Page 30
A different timeout period can be configured within the configuration file AutoSutdownManager.ini. Underneath the section called [SETTINGS], add a line with the parameter: “Shutdown_Delay_Sec=3600”. This sets the timeout to 3600 seconds (= 60 minutes), for example. The entry should like look like this: [SETTINGS] Shutdown_Delay_Sec=3600 Restart listed VMs at start up Select this option if you wish to start all listed sessions when starting up or waking the machine from sleep. Wait until the VMware system is ready before starting virtual machines With some VMware systems, there are some known issues with regard to not starting some services correctly on certain machines. In particular, the Authorization and Registration services caused some issues in the past. If this is the case on your machine, you could select this option and change the start modes of these two services from “Automatic” to “Manual”. You can find the service settings in the Control Panel -> Administrative Tools -> Services. Auto Shutdown Manager will then attempt to start these services after all necessary conditions have been fulfilled and wait until they are up and running before finally starting the virtual machines. WoL – Start VM guest operating systems based on the corresponding WOL Magic Packet With this option enabled, Auto Shutdown Manager will analyze incoming WOL Magic Packets on UDP Port 7, 9, or $2FFF, and compare the coded MAC addresses to those of the known virtual machines. When they match, Auto Shutdown Manager then starts the corresponding VM guest automatically. Error message: Can’t start locked VMs Please note that, after a system crash, some virtual machines may remain in a locked state (*.lck files and folders within the VM directory). In this case, clean up the *.lck files first manually or via a start-up script; otherwise, Auto Shutdown Manager will not be able to start the locked virtual machine. HINT: If you experience problems with the virtual network adapter after restarting from the suspended mode, install the Auto Shutdown Manager on the virtual client, go to the General tab and select Services. Go to tab “devices” and look for the virtual network adapter (VMware Accelerated PCNet Adapter). Set both checkmarks to stop the device before shutting down and restart it again upon startup. This typically solves this issue. For more details, please read page 49: Starting / stopping services and drivers before shutting down and after restarting. If you want to prevent the shutdown of the host while guest operating systems are active, you can install an Auto Shutdown Manager client on the virtual guest sessions and enter the

Auto Shutdown Manager - Manual V5
Page 31
host IP address as its server. While started, the guest operating systems will keep the host up and running automatically. If this is not possible, you also could PING the virtual machine from the Auto Shutdown Manager network settings TAB on the host, thus preventing the host from shutting down as long as any guest operating system responds to the PING. For more details, please also read the chapter Network on page 21.

Auto Shutdown Manager - Manual V5
Page 32
Local Time limit for PC usage
With this functionality, you can define times at which computer access is permitted, such as the earliest time in the morning and the latest time in the evening, as well as on which day and for how long the computer may be used. First, it is important to know that settings for this functionality are only applicable to the user who is currently logged in. If more than one person works on this computer, you first have to log in as the target person. This is important, as the setting is not supposed to be the same for all users, but can be set differently for different users – for example, users who differ in terms of age or behavior. If this functionality is active, a certain time quota can be allocated per day via „Time Credits“. One credit matches a time quota of 30 minutes. In the next step, desired usage time quotas can be set per weekday. The time credits quota can be increased or decreased spontaneously. Time quotas will be saved up, meaning that daily rest quotas will be added up to a maximum of 24 hours. Therefore, during the week, you can decrease the computer time and use the computer at weekends for a longer time instead, but always within the predefined time limits. After the expiration of the time quota or after exceeding the time limit, the user is warned acoustically and visually three times so that important documents can be saved. After the first warning, the computer allows approximately five more minutes for the user to save and close everything. After this period, the system will force a hard shut down. If the user attempts to restart the system, this event will happen again, finally shutting the computer down after a further five minutes. This is repeated until the user stops trying to restart the PC. More experienced users may try to avoid this protection by simply killing the Auto Shutdown Manager process using the Windows Task Manager. To prevent this, you can use the “Advanced protection mode”. In this case, the system will shut down immediately if Auto Shutdown Manager is killed or closed.

Auto Shutdown Manager - Manual V5
Page 33
Protocol
The protocol allows a detailed overview of the operating times of the computer. In order to enable calculations, you should enter the consumption data and price per kilowatt hour along with the other values in the appropriate fields. The value changes can be applied from a specified date.
The values are locked here because they are enforced by the ASDM server
A dialog box appears after you press Save Settings:
Select the current day or another date from which the changed protocol values should be updated on the database. Based on that date, the protocol results are re-calculated.

Auto Shutdown Manager - Manual V5
Page 34
If you use an Auto Shutdown Manager Server, these values will be derived from those predefined on the server. In this case, you will see the settings are locked, as in the screenshot above. Typical average power consumption data: Normal office PC: between 60 W and 140 W High-performance -PC: between 130 W and 400 W, sometimes even 600 W + Servers: 300 W-700 W TFT display: between 35 W and 65 W Office Laptop: between 20 W and 80 W
These data are only guidance guide. You can find very good examples and more data about the energy consumption of individual components on the Internet. Please note that the power consumption depends heavily on the load of the system components – primarily on the CPU utilization. The easiest way to determine the power consumption is via a commercial power meter that is generally available. The advantage of a power meter is that, after a longer measurement – such as a couple of days – you have quite reliable values for the power consumption of your equipment. The Wake Source is supported for Windows Vista, 7, 8, 10, and future operating systems. Hover the mouse over the symbol to obtain more information about the latest wake source. Switch protocol on/off centrally: Please note that the protocol can also be switched off completely. This could be important if it doesn’t correspond to your corporate guidelines, or if it requires approval. As shown in the screen shot above, this option was enforced by the server (locked), and therefore cannot be changed on this client. In the same way, it can be disabled centrally on the server for each group, making it very easy to control.
Delete protocol data The protocol data can be deleted prior to a specified date. The date can be selected prior to the first entry, and all data will be deleted. This feature is available on the server in the Protocol Settings tab within the setting groups, as shown in the screen shot above.

Auto Shutdown Manager - Manual V5
Page 35
Time Rules
With time rules, the shutdown modes, shut down and wake-up times, as well as continuous operation hours, and more can be defined for any given timepoint or time period.
You can use time rules to define the wanted up and down times of the computers, such as keeping them up during core business hours, allowing sleep mode during lunch times, keeping them running during the afternoon again, and finally allowing them to sleep or even power off in the evening. This can be set up very flexibly according to the day of the week.
Please Note: Each time rule is defined based on its frequency, time specification, and action. Furthermore, the execution of time rules can be defined according to the AC and DC power modes. For example, it wouldn’t make sense to keep a computer running for hours if it is running on batteries. You can decide in which power mode the rules should run by changing the AC and DC checkmarks.
Frequency and time specifications – each time rule is executed according to its frequency and restrictions such as number of runs or expiration date. Set “Stop after times” to 0 and “Stop from Date” to a very high date for endless execution.

Auto Shutdown Manager - Manual V5
Page 36
Frequency modes
Based on Days of week: individual weekdays at a defined time. For example: execute the selected action every week from Monday to Friday at 06:30 am. A weekly Time Rule can be repeated every week or every x week.
Custom Timing: Execute the selected action once, daily, or by a repetition pattern like every last day of each month at a predefined time. A custom time rule supports the following repetition patterns:
• Every Day
• Every Month
• Every Last Monday, -Tuesday, -Wednesday, -Thursday, -Friday, -Saturday, -Sunday
• Every Last day of month
Select “Repeat every” to modify the repetition pattern further. For example, if you plan to restart your servers every two weeks on Saturday 4am, select the weekly Time Rule, set a start date, select Saturday and change the repetition pattern to 2:
Preview Timing displays the next execution times:

Auto Shutdown Manager - Manual V5
Page 37
Please note: When planning time rules, start thinking at midnight – 12 a.m. Example: If you want to keep the machine up and running between 10 p.m. and 2 a.m., you will need three separate rules because this implies two different days. One rule (Disable Auto Shutdown Mode) should be executed between 10 p.m. and midnight and the other rule between midnight and 2 a.m. The third at 2 a.m. to Enable the Auto Shutdown Mode again:
Actions that can be executed:
Validity Periods
Actions have two different validity periods. Some actions are only performed at the specified time. Others are active from the set time until midnight.
You can find the validity period for each action in the "Select Action" dialog box.
For example, suppose you want to stop the auto shutdown mode between 8:00 a.m. and 4:00 p.m. every day. And you want to run an application every day at 9 a.m. The time rules could look like this:

Auto Shutdown Manager - Manual V5
Page 38
If the PC is switched on at 8:30 a.m., the rule DISABLE Auto Shutdown applies because the starting point was before 8:30 a.m. The Run Application Rule is also executed at 9:00 a.m.
If the PC is switched on at 9:30 a.m., the DISABLE Auto Shutdown rule still applies because the starting time was from 8:00 a.m. However, the run application rule will not run because it only runs at the specified time.
Action: Enforce any Shutdown mode
The shutting down of the computer without consideration of other settings is guaranteed. Supports all shutdown modes, such as - Shutdown - Reboot - Standby - Hibernation - Log off user
For energy saving and security reasons, an enforced shutdown rule could be used for the hard shutdown of all computers that are still running - on Friday evenings, for example. This ensures cost savings as well as more security because computers that are not running cannot be attacked. However, if the computer was shut down before the designated time, this action will not restart it or change the shutdown mode. If you want to ensure that all PCs are powered off instead of being in sleep mode on Friday nights, you will first need to create an additional wake-up rule, which only works from sleep (standby/hibernation). Finally, the enforced shutdown mode rule should then be applied and will shut down the PCs into the power off mode. Please note: A warning screen will be displayed to the users before the shutdown is processed. When this happens, users can disable the shutdown. If this is not wanted, you can disable the user-warning screen in the General tab. When disabled, the shutdown is performed without giving the user the opportunity to prevent it. You can also disable the option for the user to cancel the shutdown by unchecking “Allow user to stop shutdown”. Tip: If you need to perform forced shutdowns, please also see “Save documents before shutdown” on page 46.
Auto Shutdown Manager - Manual V5
Page 39
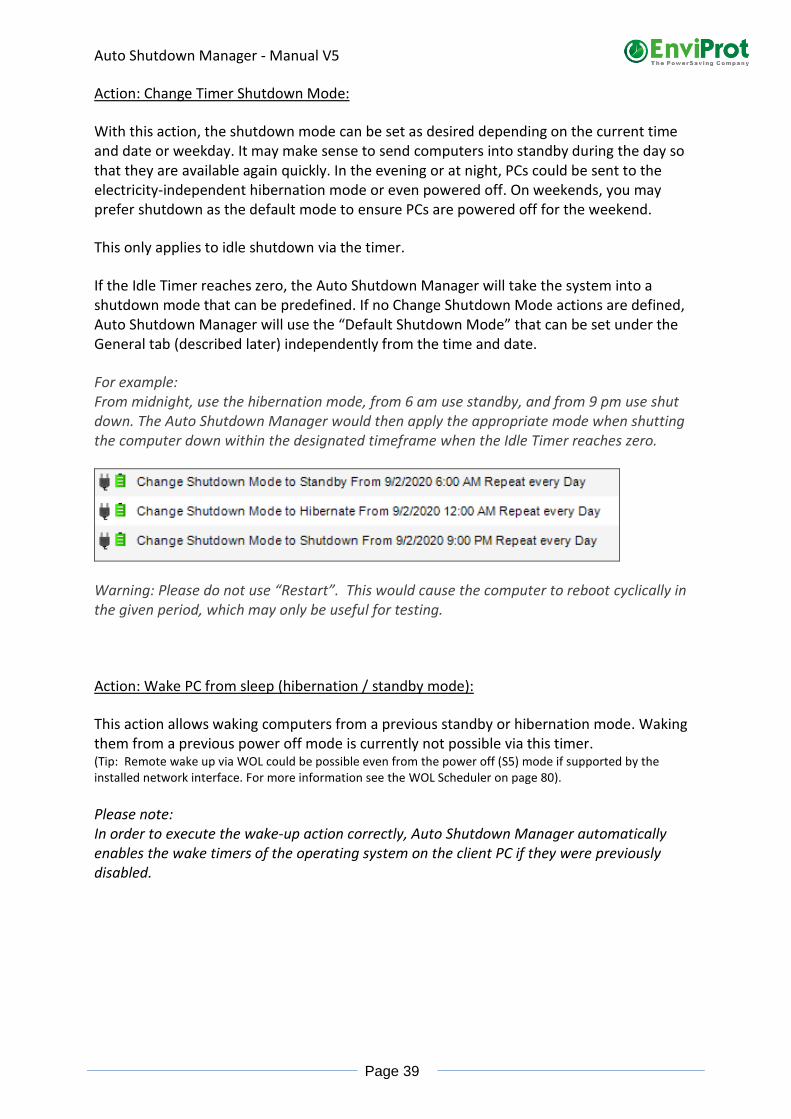
Action: Change Timer Shutdown Mode:
With this action, the shutdown mode can be set as desired depending on the current time and date or weekday. It may make sense to send computers into standby during the day so that they are available again quickly. In the evening or at night, PCs could be sent to the electricity-independent hibernation mode or even powered off. On weekends, you may prefer shutdown as the default mode to ensure PCs are powered off for the weekend.
This only applies to idle shutdown via the timer.
If the Idle Timer reaches zero, the Auto Shutdown Manager will take the system into a shutdown mode that can be predefined. If no Change Shutdown Mode actions are defined, Auto Shutdown Manager will use the “Default Shutdown Mode” that can be set under the General tab (described later) independently from the time and date.
For example: From midnight, use the hibernation mode, from 6 am use standby, and from 9 pm use shut down. The Auto Shutdown Manager would then apply the appropriate mode when shutting the computer down within the designated timeframe when the Idle Timer reaches zero.
Warning: Please do not use “Restart”. This would cause the computer to reboot cyclically in the given period, which may only be useful for testing.
Action: Wake PC from sleep (hibernation / standby mode):
This action allows waking computers from a previous standby or hibernation mode. Waking them from a previous power off mode is currently not possible via this timer. (Tip: Remote wake up via WOL could be possible even from the power off (S5) mode if supported by the installed network interface. For more information see the WOL Scheduler on page 80).
Please note: In order to execute the wake-up action correctly, Auto Shutdown Manager automatically enables the wake timers of the operating system on the client PC if they were previously disabled.
Auto Shutdown Manager - Manual V5
Page 40
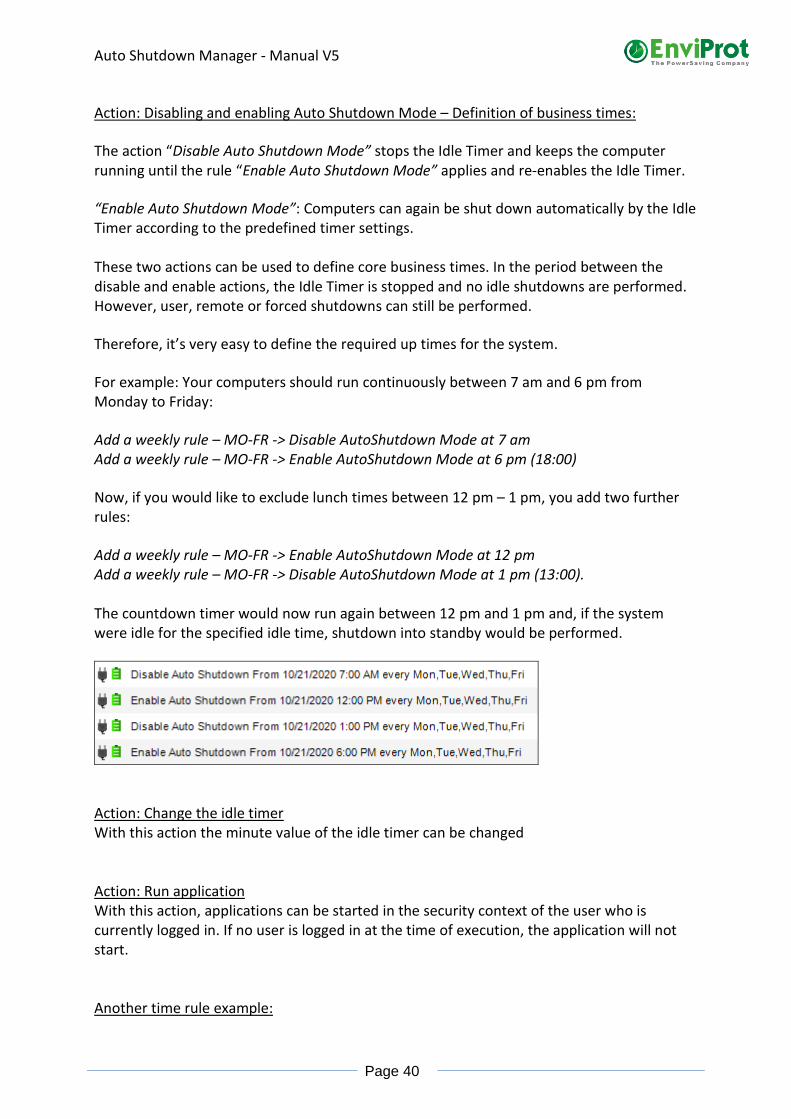
Action: Disabling and enabling Auto Shutdown Mode – Definition of business times:
The action “Disable Auto Shutdown Mode” stops the Idle Timer and keeps the computer running until the rule “Enable Auto Shutdown Mode” applies and re-enables the Idle Timer.
“Enable Auto Shutdown Mode”: Computers can again be shut down automatically by the Idle Timer according to the predefined timer settings. These two actions can be used to define core business times. In the period between the disable and enable actions, the Idle Timer is stopped and no idle shutdowns are performed. However, user, remote or forced shutdowns can still be performed.
Therefore, it’s very easy to define the required up times for the system.
For example: Your computers should run continuously between 7 am and 6 pm from Monday to Friday:
Add a weekly rule – MO-FR -> Disable AutoShutdown Mode at 7 am Add a weekly rule – MO-FR -> Enable AutoShutdown Mode at 6 pm (18:00)
Now, if you would like to exclude lunch times between 12 pm – 1 pm, you add two further rules:
Add a weekly rule – MO-FR -> Enable AutoShutdown Mode at 12 pm Add a weekly rule – MO-FR -> Disable AutoShutdown Mode at 1 pm (13:00). The countdown timer would now run again between 12 pm and 1 pm and, if the system were idle for the specified idle time, shutdown into standby would be performed.
Action: Change the idle timer With this action the minute value of the idle timer can be changed Action: Run application With this action, applications can be started in the security context of the user who is currently logged in. If no user is logged in at the time of execution, the application will not start. Another time rule example:
Auto Shutdown Manager - Manual V5
Page 41
Assume that you want to start the computer automatically every day at 7 am and have it run continuously between 7 am and 8 pm. From 8 pm, Auto Shutdown Manager should take over control again and shut the computer down into hibernation mode if it is no longer in use.
Required times rules (always start thinking at midnight):
• Custom Timing, Repeat every 1 day at 12:00 am: Change Shutdown Mode -> Hibernation
• Custom Timing, Repeat every 1 day at 07:00 am: Wake PC from sleep
• Custom Timing, Repeat every 1 day at 07:00 am: Disable Auto Shutdown Mode
• Custom Timing, repeat every 1 day at 08:00 pm: Enable Auto Shutdown Mode It is as simple as that! However, due to a new backup policy, the computer is now supposed to run continuously all day each Friday until Saturday 8 am:
Additional rules:
• Weekly -> Friday > 08:01 pm-> Disable Auto Shutdown Mode
• Weekly -> Saturday -> 12:00 am -> Disable Auto Shutdown Mode
• Weekly -> Saturday -> 08:00 am -> Enable Auto Shutdown Mode On Friday morning, the daily rule would activate the computer as it would every day, but because the new weekly rule that applies from Friday 08:01 pm has set the computer in continuous operation via the action: Disable Auto Shutdown Mode, the daily rule at 8 pm cannot switch it off. Therefore, the computer would run continuously all day Friday immediately after waking up. The Saturday rule (from Saturday midnight) would continue to keep the computer running until 8 am when the continuous operation is terminated via Enable Auto Shutdown Mode. The automatic shutdown is then reactivated. After the idle timer reaches zero, Auto Shutdown Manager would shut the computer down in hibernation mode, as specified by the daily “Change Shutdown Mode -> Hibernate” rule. If you need to perform forced shutdowns, please also see “Save documents before shutdown” on page 46.

Auto Shutdown Manager - Manual V5
Page 42
General
Warn with sound and display a warning before shutting down
These two functions, when selected, serve as acoustic and visual warning before a shutdown is performed, with about 40 seconds for the acoustic and 60-90 seconds for the visual warning. Please note: If the visual warning is selected, the user can cancel an on-going shutdown as long as the option “Allow user to stop shutdown” is selected. Uncheck this option if you do not want to allow the users to stop an on-going shutdown process (this is for scheduled shutdowns via time rules, as well as for remote shutdowns from the server).
Mouse and keyboard sensitivity
This function allows the countdown timer to be reset every time the mouse or keyboard is used.
Display settings
Select if and how Auto Shutdown Manager should control the display. If you prefer Windows to manage the display, select “Don’t manage the display”. In this case, the Windows screensaver and power management settings take over control of the display.
Select “Keep the display always on” to keep the display on, regardless of screensaver and Windows power management settings. This is useful for PCs in shop windows or terminals at airports, for example. Select “Turn off the display after x Minutes of system inactivity” if you want Auto Shutdown Manager to manage the display. Applications and performance counters (Advanced tab) can be set to keep the display on as long as they are active– for example, video players while playing a video. Select the time for the minutes of system inactivity after which the display can be turned off. User interactions and selected applications and counters will reset and reactivate the display when needed. Lock the computer The computer will be locked as soon as the display gets turned off by Auto Shutdown Manager. If this setting is checked together with "Lock the computer when going into sleep"

Auto Shutdown Manager - Manual V5
Page 43
from the Default Shutdown Options, below, in Windows 10 the option “Require sign-in” is activated under user accounts -> Sign-in options. Otherwise the Windows sign-in option will be overwritten to NEVER and the Auto Shutdown Manager locks the computer as configured.
Default shutdown mode
This option configures the default shutdown mode when the Idle Timer reaches zero. It will be used if no time rules are defined to set a different shutdown mode for the given timeframe. Time rules always have a higher priority. Force Some drivers, particularly older ones, may block the system from shutting down. If this is the case, you can try to check “Force”, or even disable the problematic drivers before shutting down. Please see “Starting / stopping services and drivers before shutting down and after restarting” on page 49. Soft Sleep Mode Use this mode if third-party software has problems waking the computer from sleep. Log off current users before going to sleep (standby / hibernate) This option logs the current user off before the system enters the standby or hibernation modes. This setting is ignored when a manual shutdown is executed by a local user. This option also prevents users from blocking PCs: When checked, this option activates the Idle Shutdown Timer if the AutoShutdownManager.exe is closed or killed by the user. Once the Idle Timer reaches zero, the current user is logged off and a shutdown or power-saving mode is entered. This can be useful at schools and universities to prevent users from blocking PCs by staying logged on for long periods. Lock the computer when going into sleep Checked: the user is not logged out and can continue working after the computer is woken up from sleep, however, the user must first identify himself with his Windows password. Not checked: No password entry is required after waking up the computer and the user can continue working immediately. Grayed out means that the Windows 10 login options will not be changed and will apply. If this setting is checked together with "Lock the computer" from the display management above, in Windows 10 the option “Require sign-in” is activated under user accounts -> Sign-in options. Otherwise the Windows sign-in option will be set to NEVER and the Auto Shutdown Manager locks the computer as configured.

Auto Shutdown Manager - Manual V5
Page 44
Voice sensitivity
The voice sensitivity function allows the monitoring of voice and sounds via a microphone to delay a shutdown when a certain volume level is exceeded. This functionality helps to prevent unwanted shutdowns during longer phone calls, in presentations or meetings, and in all other situations as long as Auto Shutdown Manager can detect a certain noise level. Select the correct input device and enter the best-suited volume level for your environment. Tip: To find the correct volume level, enter “0” first and watch all recognized volume levels under the “Timer” tab in the event monitor. Once you have found a reliable sound level, enter it and save the settings. Please note: Make sure that the microphone is selected as the standard input device in Windows, and that the sensitivity is set quite high. Auto Shutdown Manager does not record, store or process any of the sound data. It only measures the volume level to prevent a shutdown.
Continue idle countdown if users are not logged on
Sets or stops the idle countdown timer if no user is logged on to the computer. Comes into action as soon as no user is logged on and the Windows log-on screen is visible. It often happens that users choose ‘log off’ instead of ‘shut down’ by mistake. If you want the internal countdown to continue to run down to zero and then shut the computer down according to the settings, please check this function. If not checked, the idle timer countdown will be deactivated, and no idle detection will be performed. Independently of this setting, all other Auto Shutdown Manager functions, such as time rules, will remain active and will operate as planned. It is recommended to keep this setting ON.
Run application before shutdown
In this field, a program or a batch file that is to be executed just before the shutdown can be entered. Therefore, final clean-up operations can be executed, such as close databases, delete cache files, cookies, and the like. Via „Wait until finished“, Auto Shutdown Manager delays the shutdown process until the application is complete. Select the application with care – if it crashes, for example, the shutdown process will be delayed, as the system would continue to wait for the application to finish for approximately eight minutes. The application will be executed according to the current user rights. In Service-only mode, which means no user is logged on, these scripts or applications will not be executed.

Auto Shutdown Manager - Manual V5
Page 45
Parameters for a BATCH File If the file is a batch file (ending .bat), two parameters will be passed automatically: %1 contains the shutdown source name %2 contains the shutdown mode name Available shutdown source names: RULE TIMER USER REMOTESERVER TIMEOUTFORCED WINDOWS INTERNAL_MAINTENANCE UNDEFINED Available shutdown mode names: NONE AUTO STANDBY HIBERNATE LOGOFF RESTART SHUTDOWN POWEROFF MAINTENANCE_REBOOT WINDOWS File execution timeout The timeout is set to eight minutes by default. After this period, the application will be terminated and the shutdown process will continue. A different timeout period can be configured within the configuration file AutoSutdownManager.ini. Under the section called [SETTINGS], add a line with the parameter “Shutdown_Delay_Sec=3600”. This sets the timeout to 3600 seconds (= 60 minutes), for example. The entry should like look like this: [SETTINGS] Shutdown_Delay_Sec=3600 Please note that the total timeout includes the execution of the file, as mentioned above, as well as other factors such as waiting for VMware sessions to be suspended and saving open documents. Please ensure that the timeout is sufficiently long for all tasks to be completed correctly.
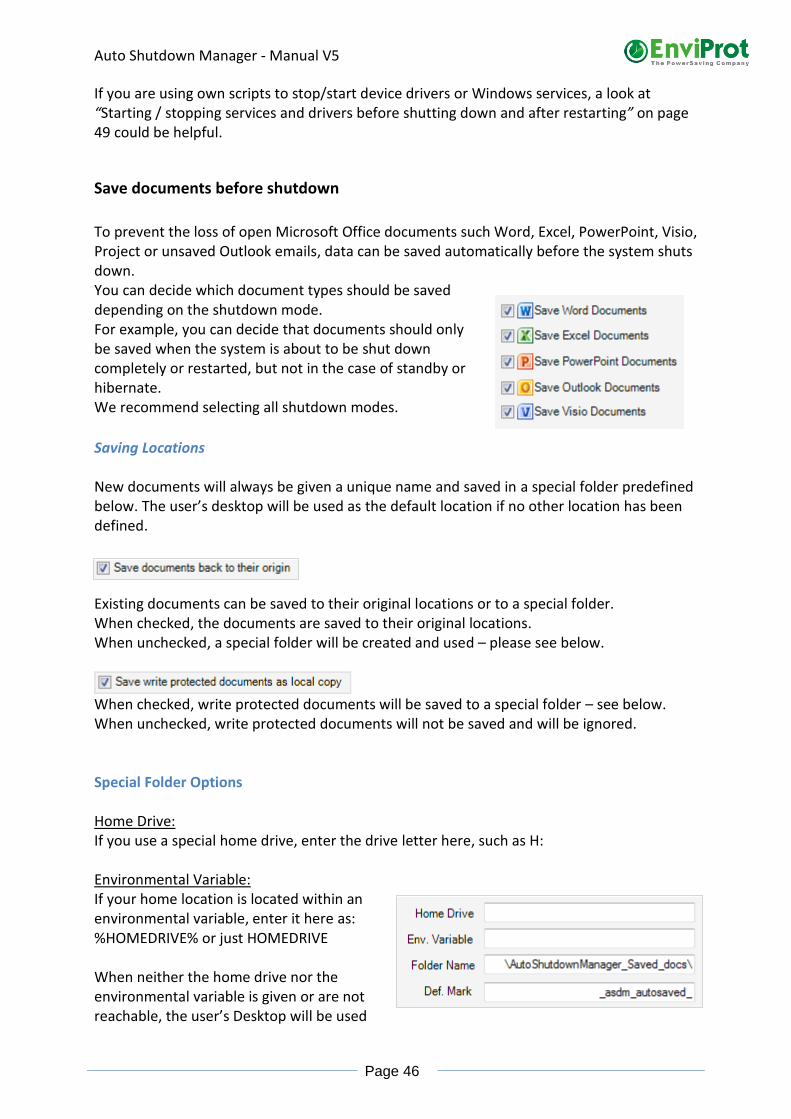
Auto Shutdown Manager - Manual V5
Page 46
If you are using own scripts to stop/start device drivers or Windows services, a look at “Starting / stopping services and drivers before shutting down and after restarting” on page 49 could be helpful.
Save documents before shutdown
To prevent the loss of open Microsoft Office documents such Word, Excel, PowerPoint, Visio, Project or unsaved Outlook emails, data can be saved automatically before the system shuts down. You can decide which document types should be saved depending on the shutdown mode. For example, you can decide that documents should only be saved when the system is about to be shut down completely or restarted, but not in the case of standby or hibernate. We recommend selecting all shutdown modes.
Saving Locations New documents will always be given a unique name and saved in a special folder predefined below. The user’s desktop will be used as the default location if no other location has been defined.
Existing documents can be saved to their original locations or to a special folder. When checked, the documents are saved to their original locations. When unchecked, a special folder will be created and used – please see below.
When checked, write protected documents will be saved to a special folder – see below. When unchecked, write protected documents will not be saved and will be ignored. Special Folder Options Home Drive: If you use a special home drive, enter the drive letter here, such as H: Environmental Variable: If your home location is located within an environmental variable, enter it here as: %HOMEDRIVE% or just HOMEDRIVE When neither the home drive nor the environmental variable is given or are not reachable, the user’s Desktop will be used

Auto Shutdown Manager - Manual V5
Page 47
as a default location. Folder Name: A new folder with the default folder name “\AutoShutdownManager_Saved_docs\” will be created within the given location or on the desktop. Def. Mark is used to name and identify new unnamed documents.
Important to know: Saving documents is only supported when the shutdown process is initiated by or via Auto Shutdown Manager or Auto Shutdown Manager Server. If the shutdown is initiated by another application, via the power button or via Windows, documents cannot be saved.
Run application at start up and wake up
In this field, you can enter a program or a batch file that will be executed immediately after rebooting or waking up. Therefore, drivers can be initialized and other necessary tasks can be executed. Via “Wait until finished”, Auto Shutdown Manager is blocked until the application reports back. Choose this application with care – if it crashes, Auto Shutdown Manager will be blocked in the waiting mode.
Please note: The application or script will be executed with the user rights of the currently logged-on user. If no user is logged on, the application will not be executed.
Rebooting after a number of shut downs
Some systems or device drivers can become instable – particularly when the computer has shut down to standby and hibernation modes many times. To prevent this, the system can be rebooted after a configurable number of standbys and hibernations.
Please note: This feature makes most sense for servers. If this setting is being used, a full system reboot occurs when the set number is achieved. Document changes that have not been saved may be lost. Therefore, this functionality is suitable primarily for servers on which users do not work directly.
Automatically log on to the system after restarting Enter a username and password to log a user onto the system automatically at startup. Please consider the possible security threat – anyone who has physical or remote access to the computer can use it in the name of the specified user. You also might need to disable the PRESS CTRL-ALT-DEL procedure (if it appears after the restart process) via the local computer security settings.

Auto Shutdown Manager - Manual V5
Page 48
Start Auto Shutdown Manager together with Windows In order to display user warnings, execute user startup and shutdown scripts, process some parts of the idle detection process, and so on It is strongly recommended to enable this option.

Auto Shutdown Manager - Manual V5
Page 49
Starting / stopping services and drivers before shutting down and after restarting
Please be aware that these settings should only be done by experts.
In the worst-case scenario, incorrect settings can make your Windows installation unusable. With this functionality, you can stop Windows services and device drivers before the computer is sent into a shutdown or sleep mode. On the other hand, you can also restart them after waking. This may be useful for some services or drivers that do not function correctly in conjunction with sleep modes. One currently well-known example is the network device driver within Windows VMware guests that can no longer connect after the VMware session has been in a sleep mode. In this case, you could select the VMware accelerated network device to be stopped before shutting down and restarted on waking up. This procedure will solve the problem for this device. There might be other devices, such as older mice or keyboard drivers, and Windows services with similar issues. Again - please make sure you know exactly what you’re doing or ask an expert – otherwise, your Windows installation might be at risk!

Auto Shutdown Manager - Manual V5
Page 50
Auto configuration with the “Auto Configurator”
Auto Shutdown Manager offers a so-called Auto Configurator. This is to make the configuration of the idle analysis setup as easy as possible. The agent helps to configure all necessary parameters automatically, such as application entries or performance counters for currently installed well-known applications and processes to be able to detect when these applications and processes are productive or idle.
This function can be found under the “General” tab in the lower part of the screen.
How it works:
The Auto Configurator analyses the system for well-known applications and processes, and automatically configures the appropriate settings. For example, if the multimedia application “Winamp” is installed on the system, Auto Configurator will automatically configure the necessary performance counters for it so that Auto Shutdown Manager will be able to detect its active or idle modes. Please let us know if you are missing important applications in the Auto Configuration. We are constantly improving and growing the database.

Auto Shutdown Manager - Manual V5
Page 51
Command Line - Arguments Auto Shutdown Manager supports the command line interface to execute special commands while running. Currently supported commands: Help Shows current commands and help
Reload Reload all settings
Reset Reset the timer
WolGroup “Group Name” Wake up all PCs in the group “Group Name” via Wake on LAN.
WolPC PCName Wake up the PC PCName via Wake on LAN. Please note that the notation for PCName must match with the notation in the Management Console for this PC exactly. For example: C:\Program Files (x86)\AutoShutdownManager\AutoShutdownManager.exe wolpc mypc123.mydomain.local
ShutdownGroup „Group Name“ optional Mode
Shutdown all PCs in the group “Group Name” to the shutdown mode Mode. Mode is optional and stands for the following shutdown modes: Standby, Hibernate, Shutdown, Restart, Log off, Auto If Mode is missing, Auto will be taken as the default shutdown mode. “Auto” means that the configured default shutdown mode on each PC will be chosen. However, the default shutdown mode can also be variable – configured by time rules. Example: C:\Program Files\AutoShutdownManager\AutoShutdownManager.exe ShutdownGroup „Sales PCs“ shutdown
ShutdownPC PCName optional Mode
Shutdown the PC PCName into the shutdown mode Mode. Mode is optional and stands for the following shutdown modes: Standby, Hibernate, Shutdown, Restart, Log off, Auto If Mode is missing, Auto will be taken as the default shutdown mode. “Auto” means that the configured default shutdown mode on each PC should be chosen. However, the default shutdown mode can also be variable – configured by time rules. Example: C:\Program Files\AutoShutdownManager\AutoShutdownManager.exe ShutdownPC DesktopPC123.mydomain
Pause Stops the Countdown Timer
Start Starts the Countdown Timer
StartGui Shows the graphical user interface (useful for Server CORE installations)
Timer n Sets the countdown time to n minutes n stands for a value between 2 and 180 Minutes Example: C:\Program Files\AutoShutdownManager\AutoShutdownManager.exe Timer 45
Display on/off Switch the display on or off Example: C:\Program Files\AutoShutdownManager\AutoShutdownManager.exe Display off
Shutdown optional Mode Shutdown the local PC into the shutdown mode Mode. Mode is optional and stands for the following shutdown modes: Standby, Hibernate, Shutdown, Restart, Logoff, Auto If Mode is missing, AUTO will be taken as default shutdown mode. This means the default shutdown mode configured in the client or a variable time dependent Shutdown Mode configured via Time Rules will be used. This command could be very useful if you plan to create shortcuts on the Desktop, such as C:\Program Files\AutoShutdownManager Shutdown STANDBY.
How to use the command line commands: Enter the command line commands as shown in the examples. It could be useful to create shortcuts on the desktop for frequently used commands. Example: C:\Program Files\AutoShutdownManager\ AutoShutdownManager.exe display off

Auto Shutdown Manager - Manual V5
Page 52
Management Console for Central Management Auto Shutdown Manager comes with a built-in Management Console (MMC) to make administration and configuration of network clients easier. The MMC allows the configuration, updating, management and deployment of settings to network clients from one central location. It also supports daily administrative tasks, such as the remote restarting or shutting down of single or entire groups of PCs, logging off users, changing up and down times, scheduling and deploying automatic power-up plans for maintenance times, and much more. Please note: Auto Shutdown Manager was developed under the premise of minimal impact on the system’s performance. Because the entire system works asynchronously to avoid bottlenecks and minimize the impact on performance, changes to the settings may take a few minutes before being seen on the clients. Therefore, once you change group settings or initiate client updates, allow up to 15 minutes before the action is executed. There are essentially five different management categories, which are described here.
The Client Manager
The Client Manager helps to create groups of settings and to assign client PCs to them. All Auto Shutdown Manager settings, as described in the previous chapters – except access protection and settings for Windows drivers/services– can be configured centrally and deployed to the appropriate PCs. For example, different settings can be defined for standard office PCs, power users, support staff, or servers. The number of groups is unlimited. Clients can be assigned to set groups very easily via drag and drop, or automatically via Auto Group Assignment, which will be described later. The Client Manager also supports remote wakeup and remote shutdown of individual PCs (entire groups of PCs can be operated via the Maintenance Manager described later). The Client Manager consists of five different parts:
- Definition of Groups and Settings - Auto Group Assignment - Client Overview - Client Energy Profiles
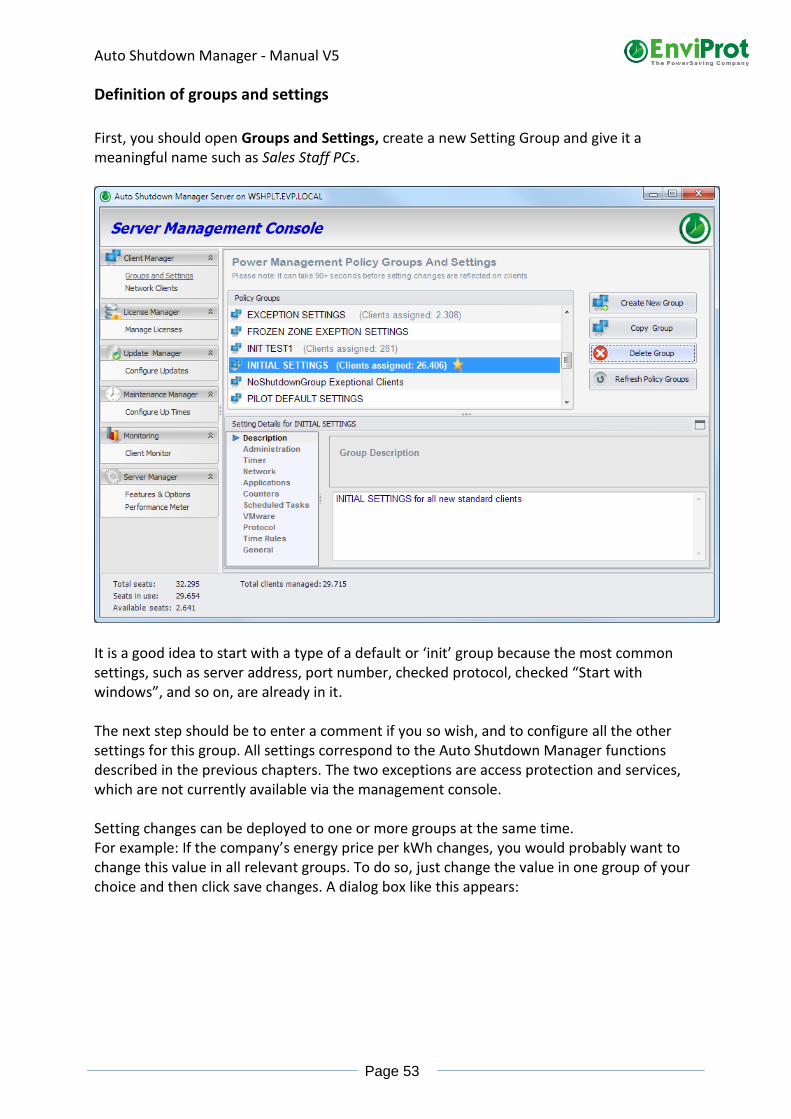
Auto Shutdown Manager - Manual V5
Page 53
Definition of groups and settings
First, you should open Groups and Settings, create a new Setting Group and give it a meaningful name such as Sales Staff PCs.
It is a good idea to start with a type of a default or ‘init’ group because the most common settings, such as server address, port number, checked protocol, checked “Start with windows”, and so on, are already in it. The next step should be to enter a comment if you so wish, and to configure all the other settings for this group. All settings correspond to the Auto Shutdown Manager functions described in the previous chapters. The two exceptions are access protection and services, which are not currently available via the management console. Setting changes can be deployed to one or more groups at the same time. For example: If the company’s energy price per kWh changes, you would probably want to change this value in all relevant groups. To do so, just change the value in one group of your choice and then click save changes. A dialog box like this appears:

Auto Shutdown Manager - Manual V5
Page 54
Select yes and another dialog box like this appears:
Select the groups for which the value should also be changed and click OK. Otherwise, click Ignore selection, and only the original settings group will be changed. Hidden mode: Auto Shutdown Manager can be operated in a hidden mode on the clients. This means that the icon in the tray area (next to the clock) will not be shown and users cannot open the tool at all. If you want to use this function, just open the Administration tab and uncheck “Show Tray Icon on clients of this group”. After the setting is processed, the icons disappear on all clients in the appropriate group. Allow users to switch configuration groups The function “Selectable Groups for Clients” allows you to define and populate some setting groups as selectable by the users on the clients. This means that users can switch the settings within the set of groups preconfigured and published by the administrator. This function is not available in hidden mode

Auto Shutdown Manager - Manual V5
Page 55
Once configured, the client can select one of the setting groups:
Settings protection: Prevent or allow users to change settings For each settings category, such as Timer, Network, Time Rules, and so on, you can decide if you want to allow the users to change the values or not. If you want to prevent the users from changing the values, you can protect the entire category by checking the LOCK function in each category. If a category is locked in this way, it will show as grayed out on the clients, and users will not be able to change these settings. More fine-grained setting protection On the other hand, you can decide if you want to enforce settings or leave it up to the users to configure their own values for nearly every setting. If you mark a checkbox such as “Activate Time Rules on all clients in this group”, it will be set on all clients in this group. If you uncheck it, it will be unchecked on each client. If you set it

Auto Shutdown Manager - Manual V5
Page 56
to be filled out (blue), users may set their own values for this setting, and these values will be respected and will not be overwritten during the setting deployment process. Please note: All values that are set or unset will be enforced on the clients. Setting states:
Value set: enforced to Enabled
Value unset: enforced to Disabled
Value not enforced by server Clients may decide
Enforced settings will appear as locked on the clients and marked with a lock symbol. For example, There are different ways and different controls to achieve this level of setting protection. Typically, you will find a description or selection next to each control, such as “Allow Client’s Own Value”. If you want to overwrite this value, just type in or select your own value. In some settings, you can define multiple entries, such as time rules or applications. If you don’t want to allow other entries on clients, select “Delete all other entries on Clients”.
Please note: Some counters depend on the installed hardware, such as network adapter names. Thus, if you select a counter for the network adapter on the server, the server’s network adapter name and type would be listed. When transferring this setting to the clients, where different network adapters might be installed, this counter will not work. To overcome this, you can add or change the instance names on the counters’ table manually. To simplify this process, first select and add the most similar hardware counter, such as the network interface, from the available lists. You can then change the setting manually. In general, you should select logical counters whenever possible, such as a logical disk, IP, TCP, and so on to avoid this issue completely.

Auto Shutdown Manager - Manual V5
Page 57
Auto Group Assignment of new and current clients
The Auto Group Assignment feature is an extremely useful mechanism if similar PCs are to be assigned to setting groups automatically. The decision regarding which PC is to be assigned to which group is made based on the PC name patterns with wildcards (*) and/or Active Directory attributes and/or the membership of a particular Active Directory Group.
Before the Auto-Assignment rules are executed, all new clients are assigned to the Default Group. This is to ensure the defined initial settings are deployed as soon as new clients connect. The assignment filter can consist of:
1) PC name patterns only 2) Active Directory Attributes only 3) PC name patterns followed by active directory attributes separated by “,” comma 4) Active Directory Group membership only, starting with the keyword “@ADGROUP:”
followed by the distinguished name (DN) of the Active Directory Group 5) PC name pattern followed by Active Directory Group membership starting with the
keyword “@ADGROUP:” separated by “,” comma

Auto Shutdown Manager - Manual V5
Page 58
PC name filter: The filter is not case sensitive. You can use wildcards before, in the middle or after the relevant PC name fragments to create flexible search patterns, such as:
• DEV* - All PCs that start with DEV, such as Development1, Devtest1.dom.com
• *local - All PCs that end with local, such as PC1_Dev.local
• *DEV* - All PCs with the fragment in between: PC1DEVTEST.local, PC2DevNYC
• *D##*.com – PC Name contains D followed by a minimum of two numbers and ends with .com, such as ABCD123abc.com or LAB_D01ab.local.com.
• DEV[12]*.com – PC name starts with DEV followed my either 1 or 2 and ends with .com
AD Attributes only: OU = Sales department, DC = local All PCs within the organizational unit “Sales department” AND the local domain PC name with AD Attributes: *admin*, OU = NY, OU = Lab All PCs that contain admin within the PC name AND are assigned to the organizational units NY and Lab Member of an Active Directory Group: @ADGROUP: CN=DOMAIN CONTROLLERS,CN=USERS,DC=ENVIPROT,DC=LOCAL All PCs that are members of the specified AD Group’s distinguished name (see below) For the @ADGROUP: filter no wildcards are allowed. PC name pattern AND member of an Active Directory Group: *admin*, @ADGROUP: CN=DOMAIN CONTROLLERS,CN=USERS,DC=ENVIPROT,DC=LOCAL All PCs that contain admin within the PC name AND that are members of the specified AD Group’s distinguished name

Auto Shutdown Manager - Manual V5
Page 59
Where to get the Distinguished Name of an AD Group: You can obtain the distinguished name of an AD group from the Attribute Editor tab within the Active Directory Users and Computer Management console on your Windows server:
Please note: Automatic detection of changes to AD group membership: If membership changes in a specific AD group, the clients report the new membership status to the Auto Shutdown Manager server. Based on the new AD group memberships, they can be automatically re-assigned to another Auto Shutdown Manager group, as long as there are appropriate filters and the scope is set to allow this. This detection process works automatically and takes about 30-45 minutes. Where to get the Distinguished Name of client: You copy the distinguished name of a client PC to the clipboard within the Client Overview tab:
Auto Shutdown Manager - Manual V5
Page 60
Scope
The Scope defines how the auto group assignment filters should be applied:
• “Apply to clients within the Default Group” Only apply to clients that are in the “default group”. Ignore all other clients in other groups.
• “Apply to all clients” Apply to all clients in all groups
• “Apply to all clients but ignore WOL Proxies” Apply to all clients in all groups, but ignore clients that are used as WOL proxies
Re-assign All Clients Now This feature can be useful if you are going to restructure the entire system. If you have changed some Auto Assignment filters and want to reassign ALL PCs right now, independently of the groups to which they are currently assigned, press “Re-assign all clients now”. This will run the Auto Assignment process for all clients and reassign them according to the new filtering rules. However, please bear in mind that the “Re-assign all clients now” feature ignores the scope setting and applies the filters to ALL clients, even to WOL proxies. However, clients that do not pass the filter settings will not be changed. How the Auto Group Assignment works: As soon as a new PC connects the server for the first time, it is assigned to the Default Group. This mechanism ensures that every client is provided with a set of initial settings before special group settings are provided. If no Default group was specified, it will be assigned to a special group called “Unassigned”. After the PC has received the Default Group settings, it is then moved to the group defined in the Auto Group Assignment if there is a filter rule that applies to it. Please note that PCs are only assigned automatically to a final group if they belong to the Default Group when the scope “Apply to clients within the Default Group” is set. Once they are moved into another group, automatically or manually, the Auto Group Assignment process does not move them again, even if you change the filters. To change this behavior, you can set the scope to “Apply to all clients”. Please note that the rules are assigned according to priority from the top down. This means that, as soon as a PC’s attributes match the assignment rule’s filter, it is assigned to the corresponding group.
Auto Shutdown Manager - Manual V5
Page 61
Client Overview
The Client Overview is what it says – it provides a uniform view of the clients to get a better overview. You can right-click on individual clients to perform some actions like remote shutdown or wake commands, assign to other groups and so on. You can select multiple clients by pressing the CTRL or the SHIFT keys while clicking. To select all filtered clients press CTRL+A.
Use search filters to find clients Supported text filters are:
1) PC Name (default) 2) MAC Address 3) Auto Shutdown Manager Client ID 4) Date / time of last connection (wildcards are not allowed for this filter when using < or > )
5) Name of assigned Auto Shutdown Manager Group 6) IP Address 7) Distinguished Name 8) Membership in an Active Directory Group (wildcards are not allowed for this filter)

Auto Shutdown Manager - Manual V5
Page 62
Special filters:
1) Clients with technical problems. Shows all clients with certain issues such as thermal -, power supply -, or power management problems as well as issues accessing the Domain Controller if the PC in question is a domain PC. Any issues found are then marked in yellow. Hover the mouse over the mark to get more details.
2) WOL Pending clients – shows all clients with an ongoing WOL process
3) Timing filters: currently connected, connected within the last 24 hours or connected within the last 10 days
4) Group filter. You can select one or more groups to filter show only clients that are assigned to them
Reverse search results ! You can invert the filtered results by using “!” in front of the search data. Examples: IP=!*.*.8[6-9].* -> exclude all clients that are in subnets 86, 87,88 or 89 @ADGROUP:!CN=NoShutdownException,OU=EVP,DC=enviprot,DC=local -> exclude al PCs that are members of the AD Group NoShutdownException.EVP.enviprot.local

Auto Shutdown Manager - Manual V5
Page 63
Assigning Clients manually to other groups To manually move selected clients to other groups you can use the context menu by right clicking and selecting “Move Clients to Group”. The Group of individual clients can be changed by double-clicking on the Group Name and selecting another one: You can also drag and drop the selected clients to the Group Name of the Group filter:
Auto Shutdown Manager - Manual V5
Page 64
Search Filter Tool
A filter tool can be opened by clicking on the search symbol There you will find examples and some help how to create useful filters.
Remote WOL Address and Port In addition to group settings, you can enter the WOL Endpoint Data (IP or DNS address and port number) for each client that you plan to wake over directly the Internet via a router at the destination. Please make sure that the router on the client site forwards the UDP packages from the defined port to the client’s broadcast address in order to reach the machine that should be woken.

Auto Shutdown Manager - Manual V5
Page 65
To enter the data, just double-click on the cells or select multiple clients, right-click and chose “Edit remote WOL Address” from the context menu.
Detailed timing overview per client
For this functionality you need to set up a database. See “Database Settings” on page 91. To see the detailed timing, right-click on a client and select Timing Details. The protocol data and some statistics about the selected client will be shown in a separate window: This PC would have caused energy costs of about 89€ (based on current German tariffs) for a 24/7 operation within the monitored time of approximately 140 days. Auto Shutdown Manager reduced it to 7€.

Auto Shutdown Manager - Manual V5
Page 66
Please note that the overall reporting can also be switched off completely. See the protocol description on page 33.

Auto Shutdown Manager - Manual V5
Page 67
Client Energy Profiles
Starting with Windows Vista, the clients report their hardware specifications such as Manufacturer, Model and System Type.
This information is used for a better power consumption classification of the individual clients. Default values are used for detected system types, but these can be overwritten with more accurate figures by clicking and changing the values within the table. The consumption categories are: Watts Off – specifies the power consumption in a shutdown mode Watts Sleep – specifies the power consumption in a power-saving (sleep) mode such as
standby or hibernate Watts Idle – specifies the power consumption with the lowest CPU utilization (0-5%) Watts Max – specifies the power consumption with the highest CPU utilization (95%-100%) The actual power consumption is calculated based on the average CPU utilization and the power mode directly on the client. The results are then reported back to the server for further analysis.

Auto Shutdown Manager - Manual V5
Page 68
Asset Management (Beta)
The newly introduced asset management functionality in the Auto Shutdown Manager version 5.7 helps IT administrators and managers staying up to date on important assets in their IT environment. The asset data is read directly on the clients and automatically updated to the server.
Requirements: An installed MS SQL database is required. We recommend MS SQL 2012 (or Express) and newer. For simple step-by-step instructions, see the Auto Shutdown Manager manual. In addition, Auto Shutdown Manager version 5.7.3.24 or later must be installed on the clients and the server. Asset management can be activated / deactivated for each group. Navigate to Groups and Settings ->
Auto Shutdown Manager - Manual V5
Page 69
Administration:
Now you can enable it for the selected group, for more - or even for all groups:
This functionality is included into the Auto Shutdown Manager license and does not require additional licenses or purchases. Assets supported Currently, the reports contain basic information of the following assets:
• BIOSes ($am.bios)
• Computer Models ($am.pcmodel)
• Computer Types (Desktops, Mobile, Servers, Workstations,…) ($am.pcmodel.Type)
• CPUs ($am.cpu)
• Hard drives ($am.nic)
• Installed Software ($am.soft)
• Monitors ($am.monitor)
• Motherboards ($am.mb)
• Network Interface Controllers ($am.nic)
• Operating Systems ($am.os)
• Printers ($am.printer)
• Video Controllers ($am.vc)
Further features Clients can be found by specifying certain asset parameters. For example, find all network drivers older than 10 years:

Auto Shutdown Manager - Manual V5
Page 70
Enter the search filter starting with $am., which stands for asset management: following by the asset category like NIC (network interface controller) followed by the asset detail like DriverDate:

Auto Shutdown Manager - Manual V5
Page 71
You can switch between all assets, only real physical or virtual assets. Clicking on a specific asset category will list all related clients:
For example, clicking on the blue Microsoft Windows Server 2016 category will list all clients with that OS installed:
Full reports deliver more specific data of the specified asset category. For example, the full report of Operating Systems shows how many licenses of each OS are installed, the different builds as well as versions:
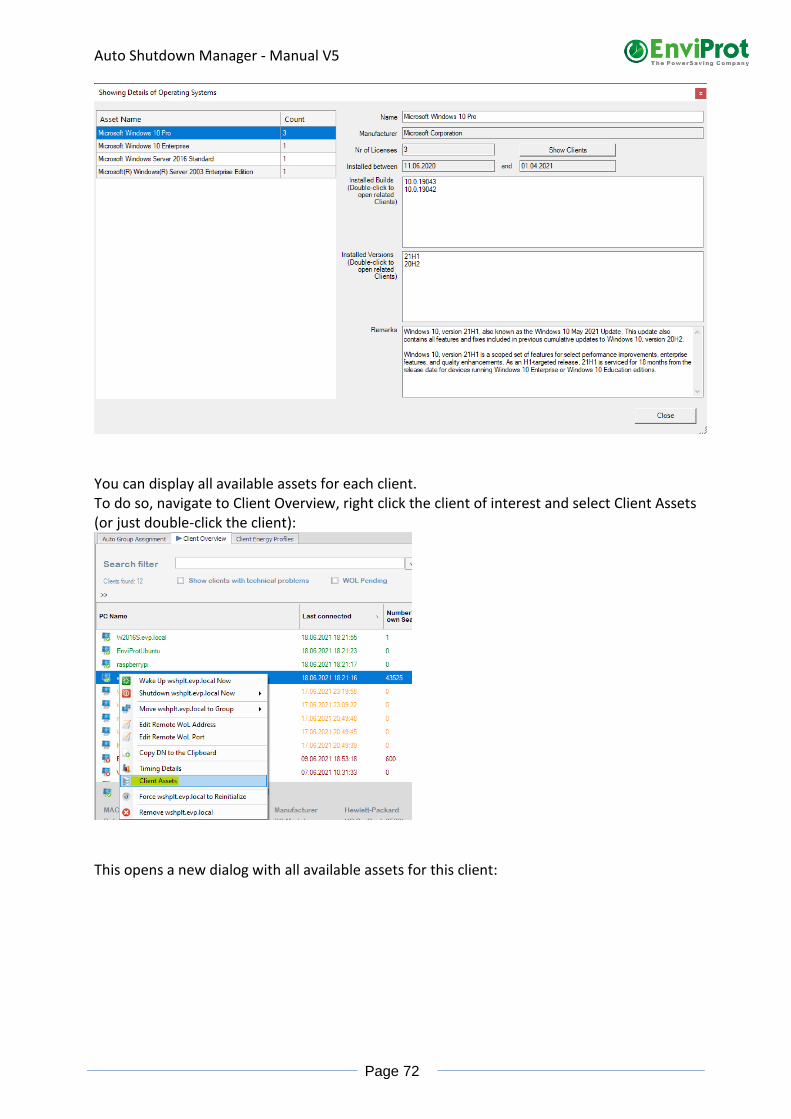
Auto Shutdown Manager - Manual V5
Page 72
You can display all available assets for each client. To do so, navigate to Client Overview, right click the client of interest and select Client Assets (or just double-click the client):
This opens a new dialog with all available assets for this client:

Auto Shutdown Manager - Manual V5
Page 73
In the Software tab, you can search for any software by name, version or vendor:
You can also find components, such as hotfixes. Another useful feature is to show all clients where a specific software or an important hotfix is missing:

Auto Shutdown Manager - Manual V5
Page 74
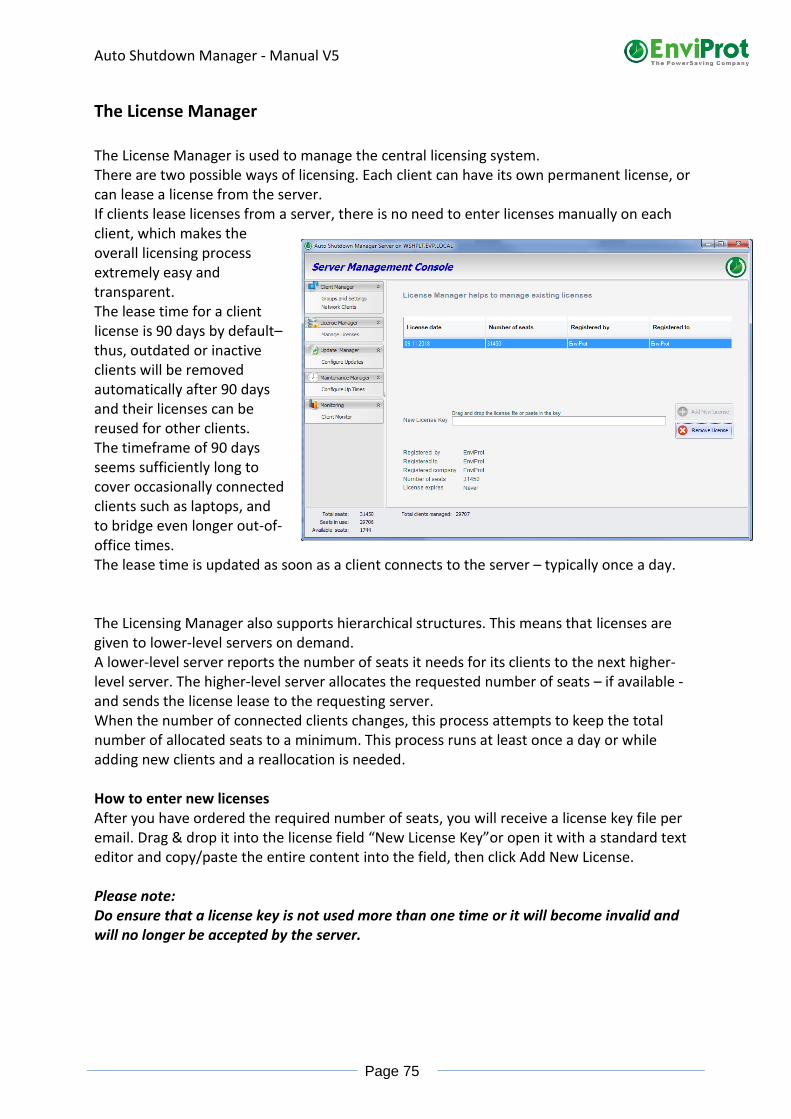
Auto Shutdown Manager - Manual V5
Page 75
The License Manager
The License Manager is used to manage the central licensing system. There are two possible ways of licensing. Each client can have its own permanent license, or can lease a license from the server. If clients lease licenses from a server, there is no need to enter licenses manually on each client, which makes the overall licensing process extremely easy and transparent. The lease time for a client license is 90 days by default– thus, outdated or inactive clients will be removed automatically after 90 days and their licenses can be reused for other clients. The timeframe of 90 days seems sufficiently long to cover occasionally connected clients such as laptops, and to bridge even longer out-of-office times. The lease time is updated as soon as a client connects to the server – typically once a day. The Licensing Manager also supports hierarchical structures. This means that licenses are given to lower-level servers on demand. A lower-level server reports the number of seats it needs for its clients to the next higher-level server. The higher-level server allocates the requested number of seats – if available - and sends the license lease to the requesting server. When the number of connected clients changes, this process attempts to keep the total number of allocated seats to a minimum. This process runs at least once a day or while adding new clients and a reallocation is needed. How to enter new licenses After you have ordered the required number of seats, you will receive a license key file per email. Drag & drop it into the license field “New License Key”or open it with a standard text editor and copy/paste the entire content into the field, then click Add New License. Please note: Do ensure that a license key is not used more than one time or it will become invalid and will no longer be accepted by the server.
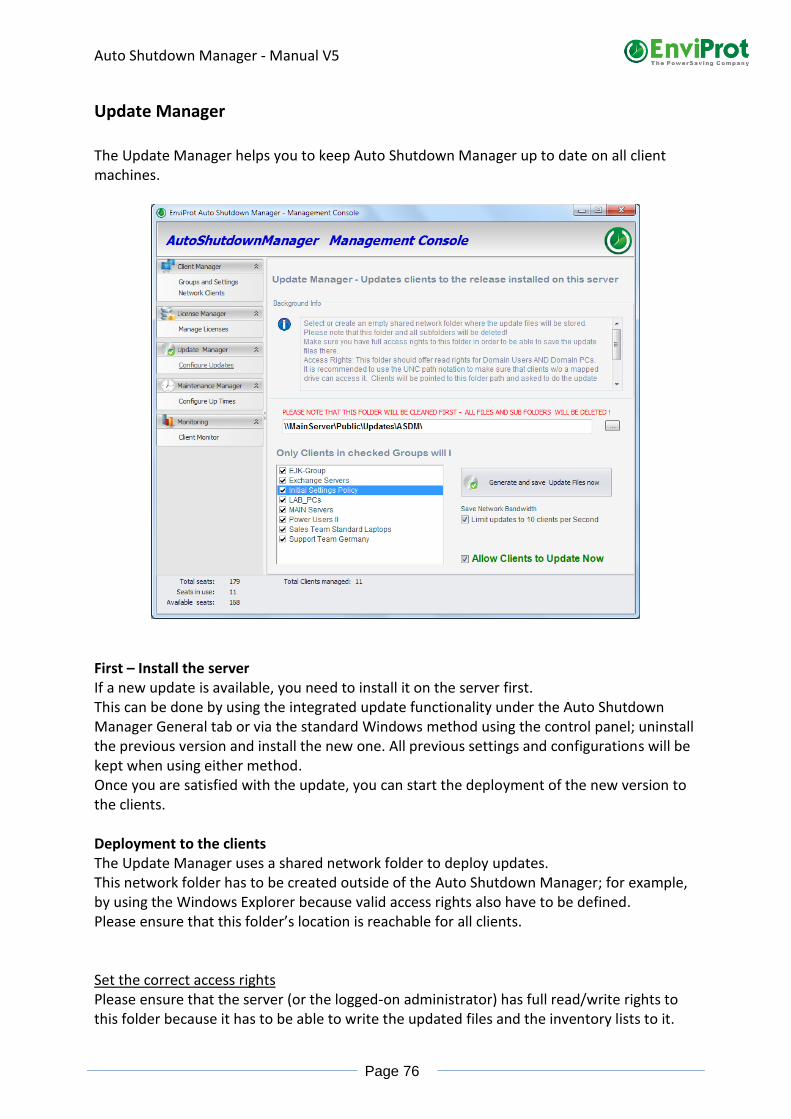
Auto Shutdown Manager - Manual V5
Page 76
Update Manager
The Update Manager helps you to keep Auto Shutdown Manager up to date on all client machines.
First – Install the server If a new update is available, you need to install it on the server first. This can be done by using the integrated update functionality under the Auto Shutdown Manager General tab or via the standard Windows method using the control panel; uninstall the previous version and install the new one. All previous settings and configurations will be kept when using either method. Once you are satisfied with the update, you can start the deployment of the new version to the clients. Deployment to the clients The Update Manager uses a shared network folder to deploy updates. This network folder has to be created outside of the Auto Shutdown Manager; for example, by using the Windows Explorer because valid access rights also have to be defined. Please ensure that this folder’s location is reachable for all clients. Set the correct access rights Please ensure that the server (or the logged-on administrator) has full read/write rights to this folder because it has to be able to write the updated files and the inventory lists to it.

Auto Shutdown Manager - Manual V5
Page 77
Domain users and domain PCs should have read rights to it. Note: It is important to add the active directory group of domain PCs with read rights in order to allow updates even if no users are logged on to their client PCs, and so to be able to process updates outside of business hours. Once created, you now can enter or select the path to the network folder and add it to the corresponding field in the UPDATE MANAGER on the server. Because this location does not usually have a corresponding mapped network drive on the clients, you should use the UNC notification that each client can read (for example, \\MainServer\Public\Updates\ASDM\ ). Please note that all files and subfolders will be deleted! Press “Generate and save Update Files now”. This process will take about 50 seconds or longer, depending on the current server load. All updated files will be generated spontaneously by the currently installed release on the server and deployed to the specified folder. Checksum and hash code checks are performed automatically during this process to guarantee the reliability and security of the entire update process. The actual update process for clients starts as soon as you check “Allow Clients to Update Now”. This will notify all clients in the selected groups about the availability of a new update and where to find the files. All files are transferred to the clients, and the checksums are checked again to ensure they are valid. If a client detects a checksum issue, the update process for this client stops and will be re-attempted. This may occur while transferring the files over the network or due to other reasons. The update process on the client starts automatically if all files have been transferred correctly and all security checks have been successful. You can see the latest update status in the Client Monitor, as will be described later. Once the update process is successful, the clients will be re-initialized and shown with the new release number in the Client Manager. To save network bandwidth, you can limit the updates to 10 clients per second by keeping the respective checkmark set.

Auto Shutdown Manager - Manual V5
Page 78
Maintenance Manager
The Maintenance Manager helps to power up PCs automatically, to keep the clients running as long as needed, and to power them down afterwards. There are two methods for waking PCs.
Real-time Actions –> Start WOL Process
To wake clients in a group immediately, select the desired groups and click on “Start WOL Process”. This function works immediately without any scheduling. All the PCs in the selected groups will start immediately. It is recommended that you keep the checkmark in “Electricity overload protection” set. This will limit the WOL process to 10 clients per second, thus helping to avoid power overload in large environments in which many hundreds or thousands of clients are starting. This setting also applies when WOL is processed via the Scheduler (described below). Good to know: Most network adapters support WOL even from the Power Off mode. Ensure you are using the latest drivers!

Auto Shutdown Manager - Manual V5
Page 79
Real-time actions –> Shutdown now Another option is to shut down all PCs in the selected groups within seconds. You can choose another shutdown mode; for example, you could select “Restart” to reboot all PCs following a maintenance task. The default method is AUTO, which allows the clients to select their preconfigured shutdown mode based on time rules or default user settings.
Maintenance Mode
Activate “Maintenance Mode” to keep all PCs running while the maintenance is underway.
While this function is checked, Auto Shutdown Manager will prevent shutdowns of clients that are running on AC. However, clients running on batteries will not be kept up and running. The Maintenance Mode prevents a local PC shutdown via the Idle Timer, if users choose to shut down via the Auto Shutdown Manager tray icon, or shut down via local time rules. However, a remote shutdown from the Management Console on the server will still work – therefore, the administrator can shut down or restart selected PCs even while the maintenance mode is on. Please note: Computers currently running on batteries (DC) will be ignored.

Auto Shutdown Manager - Manual V5
Page 80
WoL (Wake on LAN) Scheduler
The Wake on LAN Scheduler helps to manage the timing to wake up entire groups of PCs automatically at given times. This can be useful for general maintenance jobs, as well as to power on PCs automatically for other reasons, such as display PCs at airports, in shop windows, or students’ PCs in schools and universities just before the start of classes.
To schedule a new WOL timing, just select the frequency, the timing details, and the desired PC Groups. You can select multiple PC groups for the same timing by holding the Ctrl key down while making a selection, and finally add a description and press ADD to save the timing. Please note: The server will not automatically start from sleep to process planned WOL actions. If you wish to, this can be done via Wake-Up Time Rules in the Auto Shutdown Manager Tool directly on the server.

Auto Shutdown Manager - Manual V5
Page 81
WoL (Wake on LAN) – via SCCM and File Scanner
Please note that there are two automatic ways to program the WOL Scheduler.
SCCM If your organization is using Microsoft SCCM, the timing for software deployments and updates can be synchronized automatically for WOL. For more details, please see SCCM plugin on page 112. File Scanner The File Scanner is able to read and process your own WOL job files. For more details, please see “File Scanner – automation based on own job files” on page 97.

Auto Shutdown Manager - Manual V5
Page 82
WoL Scheduler Exceptions
Configure exceptions to prevent the WOL Scheduler from activating on specified days. This can be useful for schools during the holidays, for example. Enter a meaningful description and the “From” and “To” dates. Finally, select the WOL plans that should be prevented, and press ADD WOL Exception.
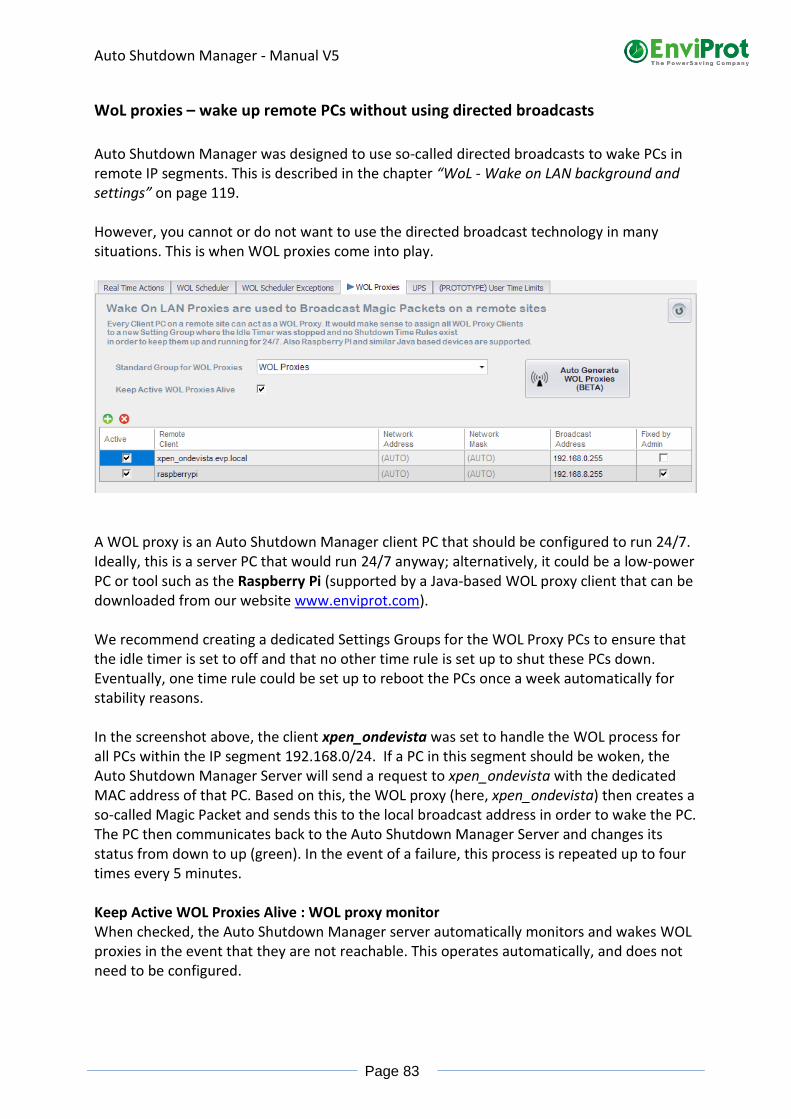
Auto Shutdown Manager - Manual V5
Page 83
WoL proxies – wake up remote PCs without using directed broadcasts
Auto Shutdown Manager was designed to use so-called directed broadcasts to wake PCs in remote IP segments. This is described in the chapter “WoL - Wake on LAN background and settings” on page 119. However, you cannot or do not want to use the directed broadcast technology in many situations. This is when WOL proxies come into play.
A WOL proxy is an Auto Shutdown Manager client PC that should be configured to run 24/7. Ideally, this is a server PC that would run 24/7 anyway; alternatively, it could be a low-power PC or tool such as the Raspberry Pi (supported by a Java-based WOL proxy client that can be downloaded from our website www.enviprot.com). We recommend creating a dedicated Settings Groups for the WOL Proxy PCs to ensure that the idle timer is set to off and that no other time rule is set up to shut these PCs down. Eventually, one time rule could be set up to reboot the PCs once a week automatically for stability reasons. In the screenshot above, the client xpen_ondevista was set to handle the WOL process for all PCs within the IP segment 192.168.0/24. If a PC in this segment should be woken, the Auto Shutdown Manager Server will send a request to xpen_ondevista with the dedicated MAC address of that PC. Based on this, the WOL proxy (here, xpen_ondevista) then creates a so-called Magic Packet and sends this to the local broadcast address in order to wake the PC. The PC then communicates back to the Auto Shutdown Manager Server and changes its status from down to up (green). In the event of a failure, this process is repeated up to four times every 5 minutes. Keep Active WOL Proxies Alive : WOL proxy monitor When checked, the Auto Shutdown Manager server automatically monitors and wakes WOL proxies in the event that they are not reachable. This operates automatically, and does not need to be configured.
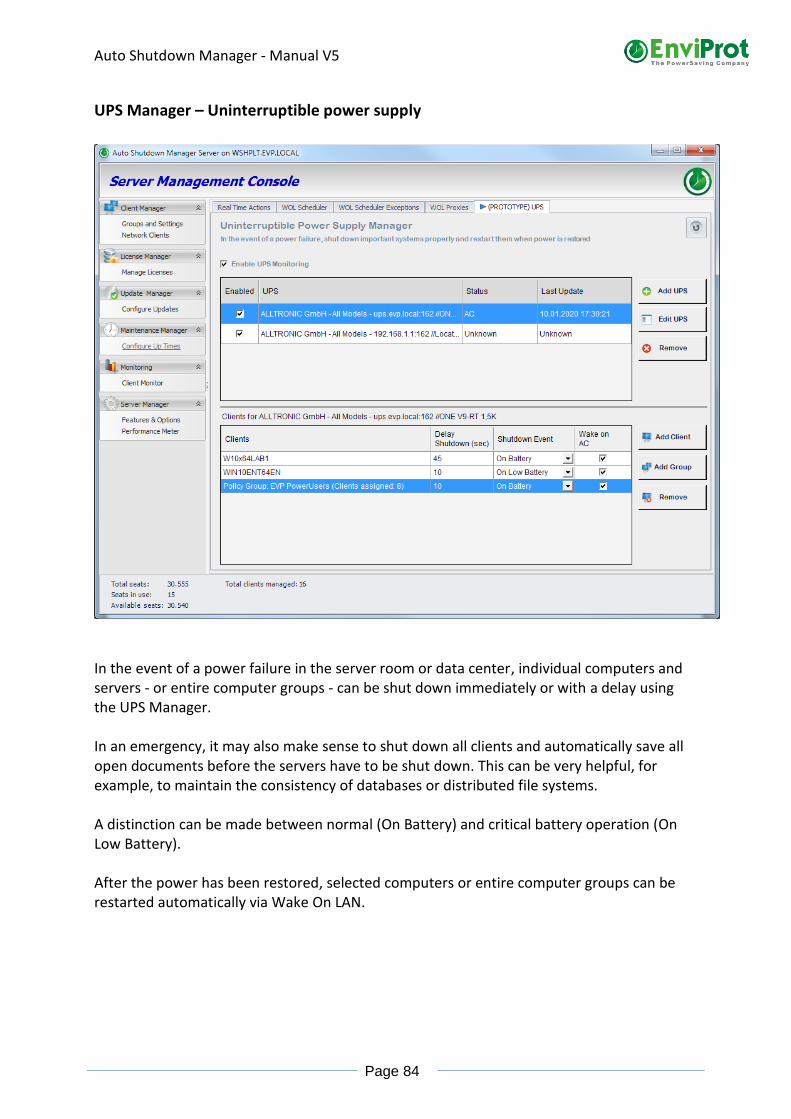
Auto Shutdown Manager - Manual V5
Page 84
UPS Manager – Uninterruptible power supply
In the event of a power failure in the server room or data center, individual computers and servers - or entire computer groups - can be shut down immediately or with a delay using the UPS Manager. In an emergency, it may also make sense to shut down all clients and automatically save all open documents before the servers have to be shut down. This can be very helpful, for example, to maintain the consistency of databases or distributed file systems. A distinction can be made between normal (On Battery) and critical battery operation (On Low Battery). After the power has been restored, selected computers or entire computer groups can be restarted automatically via Wake On LAN.

Auto Shutdown Manager - Manual V5
Page 85
Availability: The Auto Shutdown Manager Server currently supports UPS systems from the company: ALLTRONIC Powersystems GmbH Raiffeisenstr. 11 D-89438 Holzheim Germany Phone: +49 (0) 9075-95883-0 WEB: https://www.ups-stromversorgung.de/ All you need is a special driver that you can get from Alltronic. This driver is then copied to the Auto Shutdown Manager installation directory under the / Services directory. After a recommended restart of the server, the UPS Manager can be used immediately.
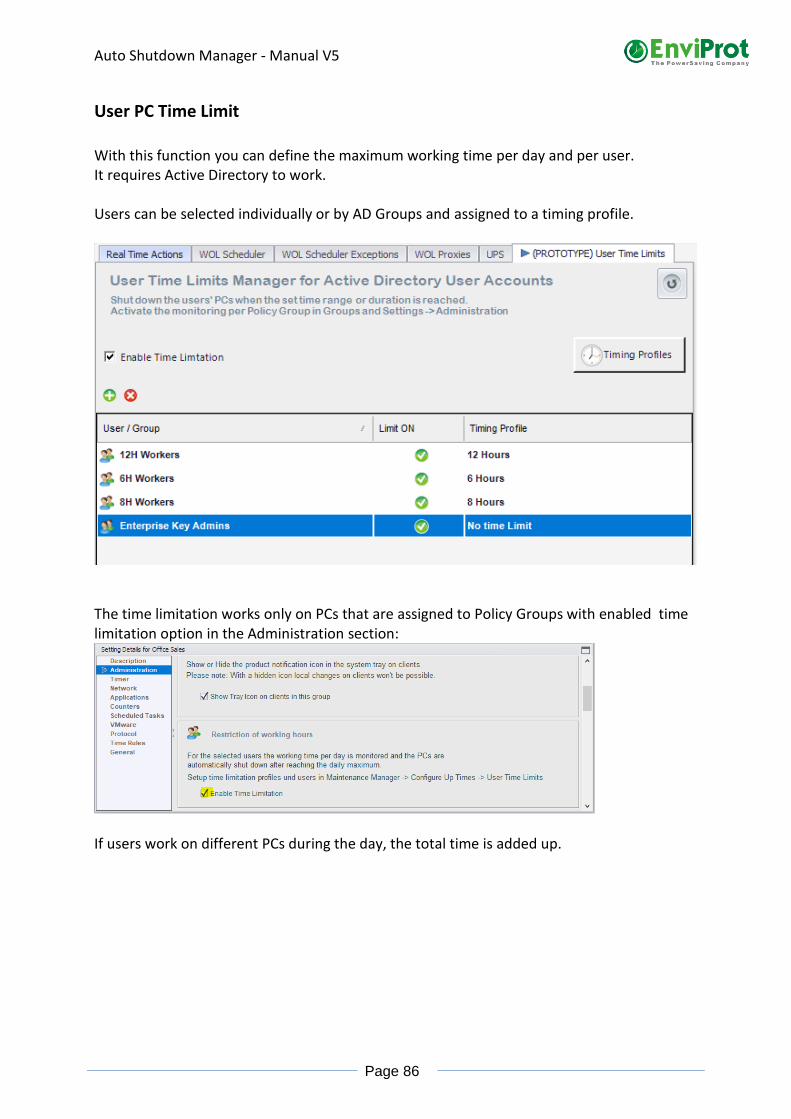
Auto Shutdown Manager - Manual V5
Page 86
User PC Time Limit
With this function you can define the maximum working time per day and per user. It requires Active Directory to work. Users can be selected individually or by AD Groups and assigned to a timing profile.
The time limitation works only on PCs that are assigned to Policy Groups with enabled time limitation option in the Administration section:
If users work on different PCs during the day, the total time is added up.

Auto Shutdown Manager - Manual V5
Page 87
The Timing Profiles editor:

Auto Shutdown Manager - Manual V5
Page 88
Client Monitor
The Client Monitor is used to show an overview of recent events. Events such as initializations, update status or issues, shutdowns or remote commands are shown. This information can be helpful when problems occur to determine the latest client status. By default, the events are stored in the memory and are deleted after the Management Console is closed.
Alternatively, all events can be saved on a database and kept for further analysis. See Database Settings below for more details.

Auto Shutdown Manager - Manual V5
Page 89
Central Savings Report
The central savings report shows the consolidated savings reported by all clients and the server. The savings calculation is based on an uncontrolled 24/7 operation. For more fine-grained and detailed data, see “

Auto Shutdown Manager - Manual V5
Page 90
Reports” on page 96.

Auto Shutdown Manager - Manual V5
Page 91
Database Settings
All client events and statistics can be saved on a database. Auto Shutdown Manager supports Microsoft SQL Databases, starting from MS SQL 2008 and MS SQL 2008 Express and newer. Database server setup: Select “Allow remote connections” to this DB server if your Auto Shutdown Manager server runs on a different machine:
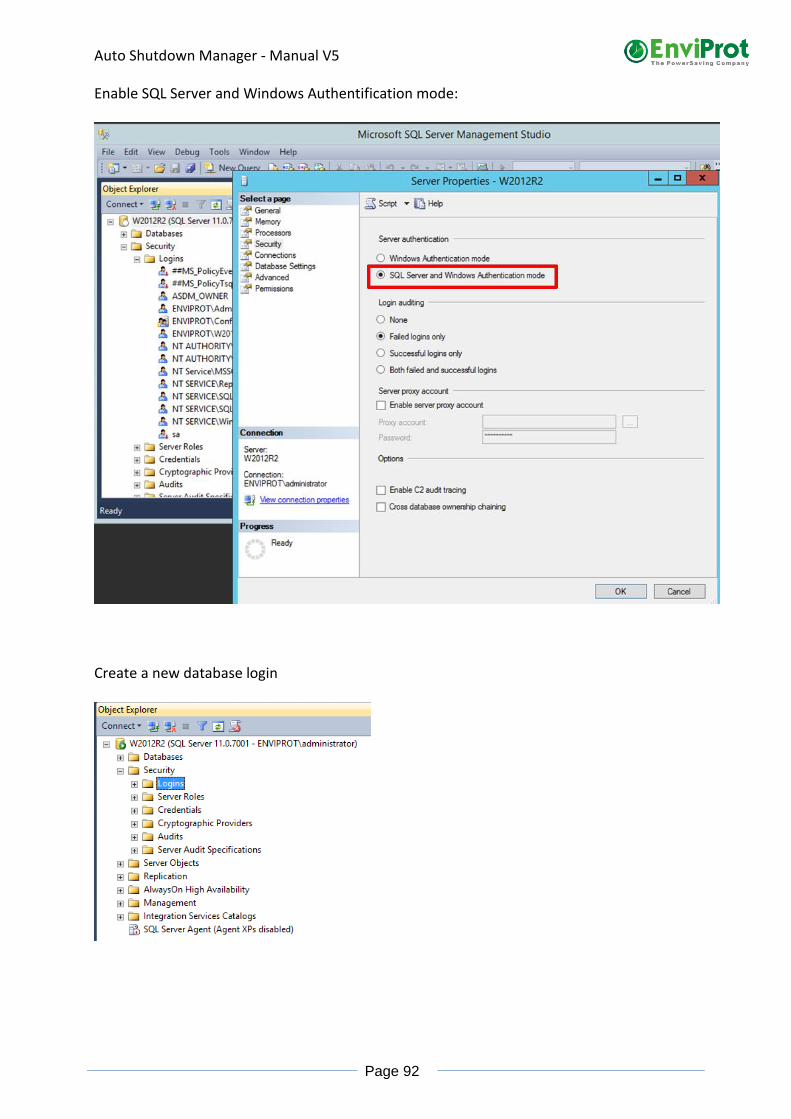
Auto Shutdown Manager - Manual V5
Page 92
Enable SQL Server and Windows Authentification mode:
Create a new database login

Auto Shutdown Manager - Manual V5
Page 93
Enter a login name and password. Make sure that the SQL Server authentification is selected.
Create a new database and select the previously created login name as the owner:

Auto Shutdown Manager - Manual V5
Page 94
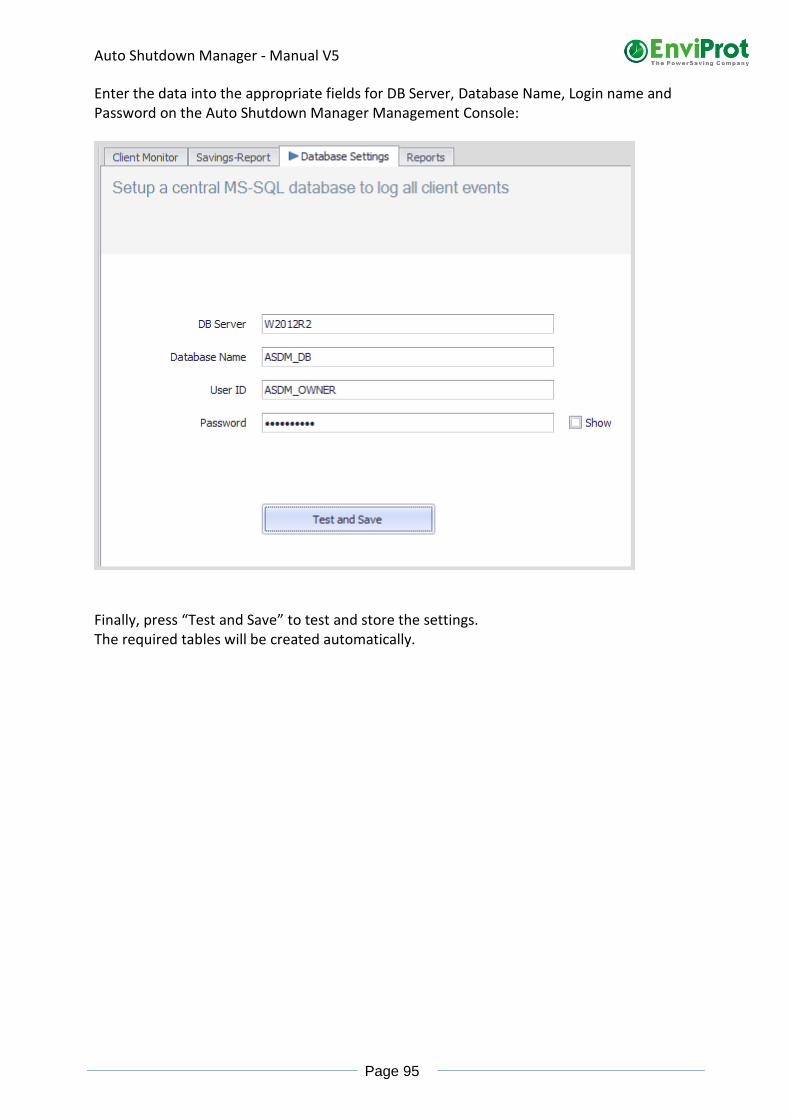
Auto Shutdown Manager - Manual V5
Page 95
Enter the data into the appropriate fields for DB Server, Database Name, Login name and Password on the Auto Shutdown Manager Management Console:
Finally, press “Test and Save” to test and store the settings. The required tables will be created automatically.

Auto Shutdown Manager - Manual V5
Page 96
Reports
Reports help you to see and analyze specific up and downtimes, costs, and CO2 related data according to individual PCs or by groups.

Auto Shutdown Manager - Manual V5
Page 97
File Scanner – automation based on own job files The File Scanner processes different types of job files and can be useful to manage the following jobs automatically: Wake on LAN
• Create WOL schedules for the WOL scheduler WOL proxies
• Create new WOL proxies
• Remove WOL proxies Clients
• Assign clients to setting groups
• Delete clients
The File Scanner requires files that are based on XML and have the format specified below.
Configuration
The basic configuration is done via the configuration file called AutoShutdownManager.ini within the installation directory. Creating a backup copy before modifying any configuration files is recommended.

Auto Shutdown Manager - Manual V5
Page 98
Copy the file to the desktop and open it with a text editor of your choice. Add a new paragraph called [FileScanner]
1) FL= stands for File Location. Please enter the location of your job files. The path can be entered in the standard Windows format such as E:\temp\tmp notation or using the Uniform Naming Convention (UNC) such as \\server\shares\temp\tmp
2) FIsec= stands for File scanner interval in seconds. Please enter a scanning interval between 60 and 86400 seconds in which the file location will be scanned for new or modified job files.
3) FSRun=1 or FSRun=0 starts or stops the file scanner.
After you are finished, copy the file back to the installation folder and restart the PC. Note: To activate the modifications made to the file AutoShutdownManager.ini, you need to restart the PC.
After the PC has restarted, you will find an entry in Monitoring -> Client Monitor that looks like this:
General format of the job files
All job files must follow this format: <?xml version="1.0" standalone="yes"?>
<EVP_LIST>
<...Entry>
</...Entry >
<...Entry >
</...Entry >
…
</EVP_LIST>
There must be at least one job entry between <EVP_LIST> and </EVP_LIST>, as described below. TIP:
For some of the jobs, you may need to enter the group ID. To receive the group ID, open the Management Console, click on “Groups and Settings”, right-click on the desired group and select Copy GroupID to the Clipboard.

Auto Shutdown Manager - Manual V5
Page 99
Please note that group IDs are expected to be correct and will not be rechecked.
Correct writing of WOL Job Files: To avoid conflicts, the File Scanner creates a “reader.lck” file while it is reading the WOL Job files. An external tool should wait until the “reader.lck” file is removed and then create an own “writer.lck” file as long as it is processing files. The File Scanner will wait until the “writer.lck” is removed (but only for a maximum of 30 minutes to avoid deadlocks after system crashes, for example. After 30 minutes, the “writer.lck” will be deleted and the file scanner will start processing the files).
WoL Jobs
Wake on LAN jobs are used to program the WOL scheduler automatically (for details, see page 80). The job file can be done manually or via a batch file, SCCM scripts, or any other application that is capable of generating xml files. The successfully scheduled jobs will finally be shown as File Scanner jobs within the WOL Scheduler:
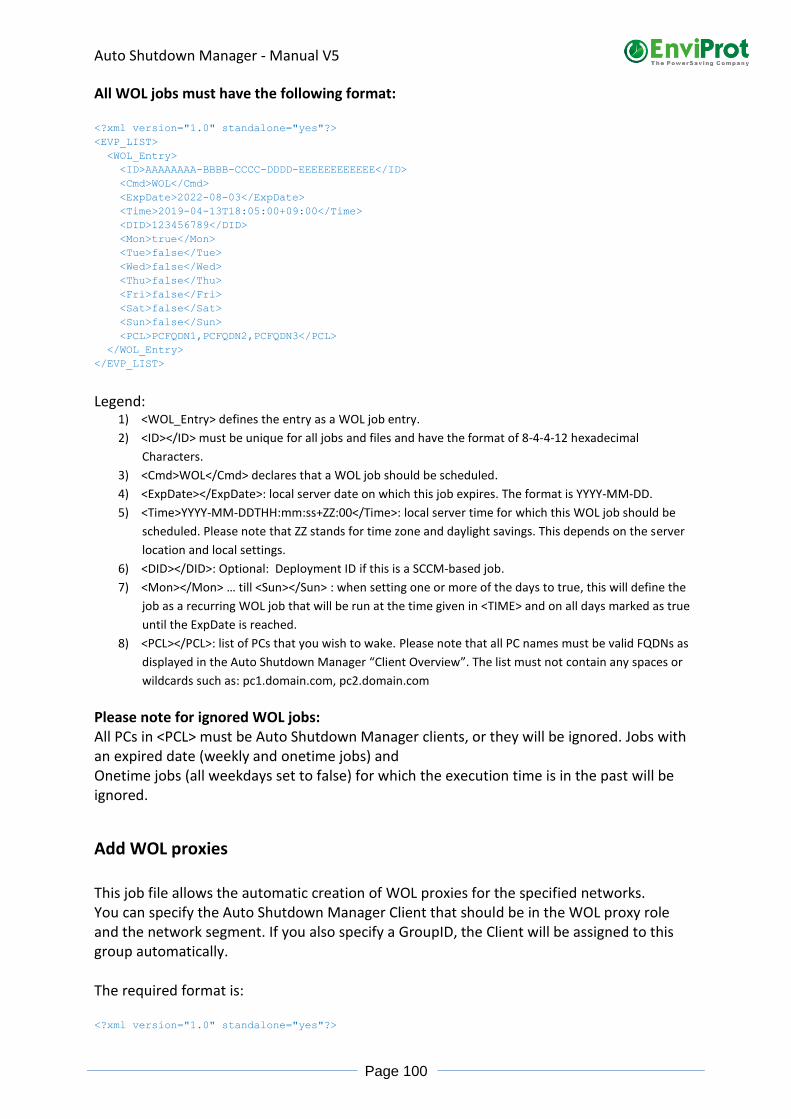
Auto Shutdown Manager - Manual V5
Page 100
All WOL jobs must have the following format: <?xml version="1.0" standalone="yes"?>
<EVP_LIST>
<WOL_Entry>
<ID>AAAAAAAA-BBBB-CCCC-DDDD-EEEEEEEEEEEE</ID>
<Cmd>WOL</Cmd>
<ExpDate>2022-08-03</ExpDate>
<Time>2019-04-13T18:05:00+09:00</Time>
<DID>123456789</DID>
<Mon>true</Mon>
<Tue>false</Tue>
<Wed>false</Wed>
<Thu>false</Thu>
<Fri>false</Fri>
<Sat>false</Sat>
<Sun>false</Sun>
<PCL>PCFQDN1,PCFQDN2,PCFQDN3</PCL>
</WOL_Entry>
</EVP_LIST>
Legend:
1) <WOL_Entry> defines the entry as a WOL job entry.
2) <ID></ID> must be unique for all jobs and files and have the format of 8-4-4-12 hexadecimal
Characters.
3) <Cmd>WOL</Cmd> declares that a WOL job should be scheduled.
4) <ExpDate></ExpDate>: local server date on which this job expires. The format is YYYY-MM-DD.
5) <Time>YYYY-MM-DDTHH:mm:ss+ZZ:00</Time>: local server time for which this WOL job should be
scheduled. Please note that ZZ stands for time zone and daylight savings. This depends on the server
location and local settings.
6) <DID></DID>: Optional: Deployment ID if this is a SCCM-based job.
7) <Mon></Mon> … till <Sun></Sun> : when setting one or more of the days to true, this will define the
job as a recurring WOL job that will be run at the time given in <TIME> and on all days marked as true
until the ExpDate is reached.
8) <PCL></PCL>: list of PCs that you wish to wake. Please note that all PC names must be valid FQDNs as
displayed in the Auto Shutdown Manager “Client Overview”. The list must not contain any spaces or
wildcards such as: pc1.domain.com, pc2.domain.com
Please note for ignored WOL jobs: All PCs in <PCL> must be Auto Shutdown Manager clients, or they will be ignored. Jobs with an expired date (weekly and onetime jobs) and Onetime jobs (all weekdays set to false) for which the execution time is in the past will be ignored.
Add WOL proxies
This job file allows the automatic creation of WOL proxies for the specified networks. You can specify the Auto Shutdown Manager Client that should be in the WOL proxy role and the network segment. If you also specify a GroupID, the Client will be assigned to this group automatically. The required format is: <?xml version="1.0" standalone="yes"?>
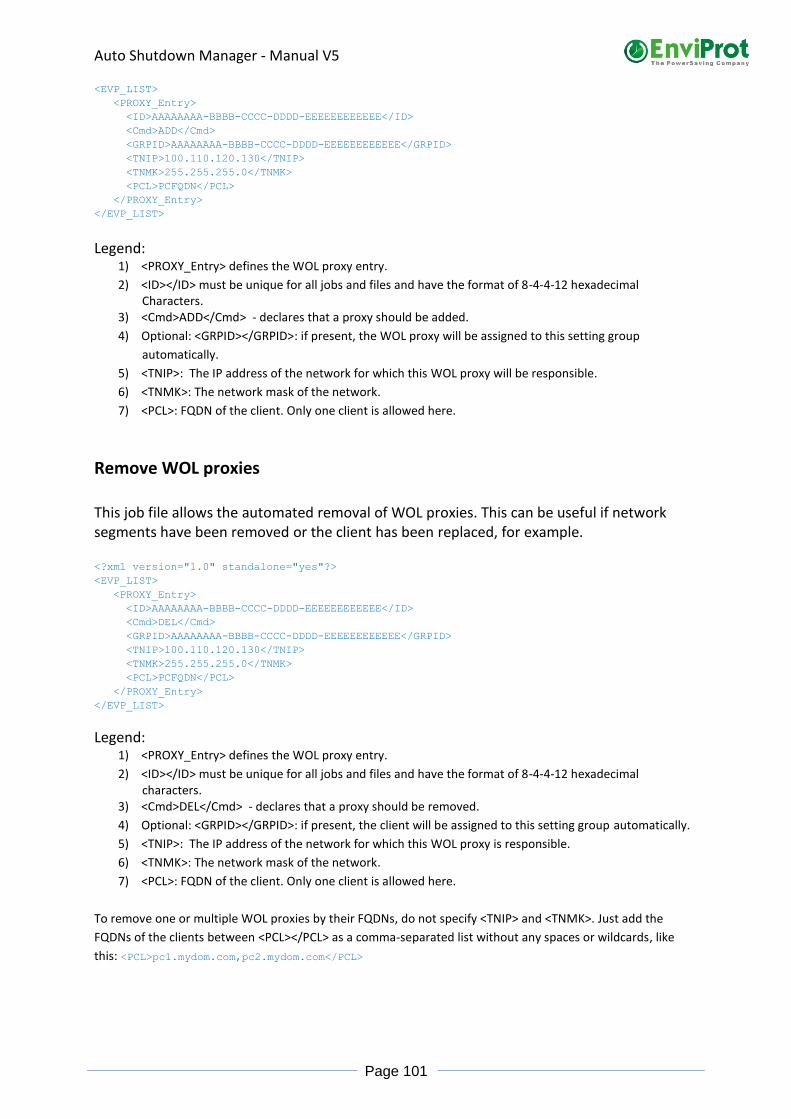
Auto Shutdown Manager - Manual V5
Page 101
<EVP_LIST>
<PROXY_Entry>
<ID>AAAAAAAA-BBBB-CCCC-DDDD-EEEEEEEEEEEE</ID>
<Cmd>ADD</Cmd>
<GRPID>AAAAAAAA-BBBB-CCCC-DDDD-EEEEEEEEEEEE</GRPID>
<TNIP>100.110.120.130</TNIP>
<TNMK>255.255.255.0</TNMK>
<PCL>PCFQDN</PCL>
</PROXY_Entry>
</EVP_LIST>
Legend: 1) <PROXY_Entry> defines the WOL proxy entry.
2) <ID></ID> must be unique for all jobs and files and have the format of 8-4-4-12 hexadecimal Characters.
3) <Cmd>ADD</Cmd> - declares that a proxy should be added.
4) Optional: <GRPID></GRPID>: if present, the WOL proxy will be assigned to this setting group automatically.
5) <TNIP>: The IP address of the network for which this WOL proxy will be responsible.
6) <TNMK>: The network mask of the network.
7) <PCL>: FQDN of the client. Only one client is allowed here.
Remove WOL proxies
This job file allows the automated removal of WOL proxies. This can be useful if network segments have been removed or the client has been replaced, for example. <?xml version="1.0" standalone="yes"?>
<EVP_LIST>
<PROXY_Entry>
<ID>AAAAAAAA-BBBB-CCCC-DDDD-EEEEEEEEEEEE</ID>
<Cmd>DEL</Cmd>
<GRPID>AAAAAAAA-BBBB-CCCC-DDDD-EEEEEEEEEEEE</GRPID>
<TNIP>100.110.120.130</TNIP>
<TNMK>255.255.255.0</TNMK>
<PCL>PCFQDN</PCL>
</PROXY_Entry>
</EVP_LIST>
Legend: 1) <PROXY_Entry> defines the WOL proxy entry.
2) <ID></ID> must be unique for all jobs and files and have the format of 8-4-4-12 hexadecimal characters.
3) <Cmd>DEL</Cmd> - declares that a proxy should be removed.
4) Optional: <GRPID></GRPID>: if present, the client will be assigned to this setting group automatically.
5) <TNIP>: The IP address of the network for which this WOL proxy is responsible.
6) <TNMK>: The network mask of the network.
7) <PCL>: FQDN of the client. Only one client is allowed here.
To remove one or multiple WOL proxies by their FQDNs, do not specify <TNIP> and <TNMK>. Just add the
FQDNs of the clients between <PCL></PCL> as a comma-separated list without any spaces or wildcards, like
this: <PCL>pc1.mydom.com,pc2.mydom.com</PCL>

Auto Shutdown Manager - Manual V5
Page 102
Example 1 <?xml version="1.0" standalone="yes"?>
<EVP_LIST>
<PROXY_Entry>
<ID>baae4dc6-b624-4c32-af2c-033bd607e689</ID>
<Cmd>DEL</Cmd>
<TNIP>100.110.120.130</TNIP>
<TNMK>255.255.255.0</TNMK>
</PROXY_Entry>
</EVP_LIST>
Example 2 <EVP_LIST>
<PROXY_Entry>
<ID>baae4dc6-b624-4c32-af2c-033bd607e68a</ID>
<Cmd>DEL</Cmd>
<PCFQDN>raspberrypi</PCFQDN>
<GRPID>beaadc0c-3f06-49cf-a5f1-9fb0cb657ae9</GRPID>
</PROXY_Entry>
</EVP_LIST>
Delete Clients
To delete one or more clients from the Auto Shutdown Manager Server, the following job file can be used. <?xml version="1.0" standalone="yes"?>
<EVP_LIST>
<CLIENT_Entry>
<ID>AAAAAAAA-BBBB-CCCC-DDDD-EEEEEEEEEEEE</ID>
<Cmd>DEL</Cmd>
<SRCGRPID>AAAAAAAA-BBBB-CCCC-DDDD-EEEEEEEEEEEE</SRCGRPID>
<PCL>PCFQDN1,PCFQDN2,PCFQDN3</PCL>
</CLIENT_Entry>
</EVP_LIST>
Legend: 1) <Client_Entry> defines this job as a client entry.
2) <ID></ID> must be unique for all jobs and files and have the format of 8-4-4-12 hexadecimal
characters.
3) <Cmd>DEL</Cmd> - declares that clients should be deleted.
4) Optional: <GRPID></GRPID>: if defined, clients will only be deleted if they are assigned to the group
specified by the GroupID.
5) <PCL></PCL>: list of PCs that should be deleted. Please note that all PC names must be valid FQDNs as
displayed in the Auto Shutdown Manager “Client Overview”, for example. The list must not contain
any spaces or wildcards such as pc1.domain.com,pc2.domain.com
Assign clients to setting groups
This job file can be used to assign clients to setting groups. It does not matter if the clients were assigned to other groups previously. Please note that, if there “Auto Group Assignment” filters are specified (see page 57 for more details), they can reset the job results under some circumstances because Auto Group Assignment filters have the highest priority.

Auto Shutdown Manager - Manual V5
Page 103
The assignment job format must follow this structure:
<?xml version="1.0" standalone="yes"?>
<EVP_LIST>
<CLIENT_Entry>
<ID>AAAAAAAA-BBBB-CCCC-DDDD-EEEEEEEEEEEE</ID>
<Cmd>MOV</Cmd>
<GRPID>AAAAAAAA-BBBB-CCCC-DDDD-EEEEEEEEEEEE</GRPID>
<SRCGRPID>AAAAAAAA-BBBB-CCCC-DDDD-EEEEEEEEEEEE</SRCGRPID>
<PCL>PCFQDN1,PCFQDN2,PCFQDN3</PCL>
</CLIENT_Entry>
</EVP_LIST>
Legend: 1) <Client_Entry> defines this job as a client entry.
2) <ID></ID> must be unique for all jobs and files and have the format of 8-4-4-12 hexadecimal
characters.
3) <Cmd>MOV</Cmd> Command to move clients into other setting groups.
4) <GRPID></GRPID>: the final group ID.
5) <SRCGRPID></SRCGRPID>: Optional. If defined, clients will only be moved if they are assigned to the
group specified by the <SRCGRPID>.
6) <PCL></PCL>: list of PCs that should be moved. Please note that all PC names must be valid FQDNs as
displayed in the Auto Shutdown Manager “Client Overview”. The list must not contain any spaces or
wildcards, such as pc1.domain.com,pc2.domain.com
If <SRCGRPID> is specified, PCL can just contain a wildcard * to move all clients: <PCL>*</PCL>
Real-life examples and scenarios Here are some typical and frequently asked questions and answers pertaining to common scenarios: Scenario - This is an office with 50 client PCs and tree servers. Server 1 – Microsoft Exchange and Backup Windows Server 2012R2 – 64-bit Server 2 – Applications and Databases Windows Server 2012R2 – 64-bit Server 3 – Storage server for home folders for all users and public shared folders Windows Server 2016 – 64-bit Clients – A combination of Windows 10 PCs, Windows 8, and Windows 7 laptops and desktops Users do not have local administration rights. Requirements: Server 1

Auto Shutdown Manager - Manual V5
Page 104
Server 1 Hosts settings for the middle-tier servers
Server 3 Hosts settings for all clients
Server 2 Keeps running at least as long as Server 3
Client PCs
Depends on
Server 1 should run constantly. For stability reasons, it should be restarted every Saturday morning at 4 am. The Auto Shutdown Manager Server should be installed on this server. Server 2 This server should run between 6 am and 9 pm from Monday to Friday. It must not shut down after 9 pm as long as at least one client is still active. It should be rebooted every Saturday morning at 4 am for stability reasons. It must be up each Saturday between 6 pm and 11 pm for backup. It must not go down after 11 pm if the backup process is not complete by then. The default shutdown mode should be hibernation. Server 3 This server should run in the same way as Server 2. It should also keep running after 9 pm if any client is still active. Client PCs The client PCs should not be started automatically each morning because people might be out of the office or on holiday. The core working times are between 7:30 am and 5 pm. Lunchtime is between 12:30 pm and 1:30 pm - unused PCs may go into standby during this time. After 5 pm, the PCs can be shut down into hibernation mode if they are no longer in use. Solution: First install and configure the Auto Shutdown Manager on Server 1. This is to host settings for the middle-tier servers and to make the licensing centrally available, as well as to restart the server once a week as stated in the requirements.

Auto Shutdown Manager - Manual V5
Page 105
Settings for Server 1 These settings for Server 1 are not configured via the management console because this is the top-level server. Instead, enter these settings directly into the Auto Shutdown Manager masks. Install the license on this server via the Licenses Manager. Timer:
Disable the idle timer Disable CPU checking Disable HDD checking
Applications: Deactivate Counters: Deactivate Scheduled Tasks Deactivate VMware Deactivate all Access Protection Deactivate Protocol On demand: Activate and set the power consumption and pricing data or deactivate Timer rules: Add the following time rules Daily Rule -> Midnight (12 am) -> Disable Auto Shutdown Mode
Weekly Rule -> Saturday 4 am -> Enforce: -> Restart In Network Settings: Make sure that the correct TCP Port is entered and the red “Accept secure remote connections” is selected.
All other settings can be disabled. In General Settings:
Set checkmark for: “Ignore Windows Power Management” Set checkmark for “Force” Set checkmark for “Start Auto Shutdown Manager with windows”
Set checkmark for “Mouse Keyboard Sensitive”. Settings for Server 2 and Server 3 can now be configured in the management console of Server 1 As mentioned above, we will create one group per server to make it easy to add other servers in the future. We will start with the group for Server 3 and configure Server 2 based on these settings later. Open the Auto Shutdown Manager Management Console on Server 1 Client Manager -> Groups and Settings
Create a new group and give it an appropriate name such as “Server 3” Timer Settings:
Activate the timer and set the timing to 10 minutes Network Settings:

Auto Shutdown Manager - Manual V5
Page 106
Check “Register to a server..:” Enter the Server Name or IP – it should be Server 1
Check the port. It should be identical to the incoming port on Server 1, which is 8088 by default
“Check Auto Reconnect” Uncheck “WOL” - Server 1 will run continuously Check “Accept Secure Remote Connection”
Check and change the port number for incoming connections if you cannot use 8088
Uncheck “Delete all other entries on clients” Gray out “Check Passive IP Clients” Application Settings: Enter applications to be monitored or disable Counter Settings: Here, we will monitor the backup process. See the special case, backup detection, below.
Scheduled Tasks: Check “Enable Schedule Tasks” Select 10 minutes
VMware Settings: Select if needed – otherwise deactivate Protocol Settings: Enter the power consumption and pricing data and select enable
Time Rule Settings Add the following time rules: This is to wake each working day and keep running until 9 pm
Weekly Rule -> MO – FR -> 6 am -> Wake PC from sleep mode Weekly Rule -> MO – FR -> 6 am -> Disable Auto Shutdown mode Weekly Rule -> MO – FR -> 9 pm -> Enable Auto Shutdown mode
This is for the weekly reboot
Weekly Rule -> SAT -> 3:55 am -> Wake PC from sleep mode Weekly Rule -> SAT -> 4 am -> Enforce: -> Restart
This is for the weekly backup
Weekly Rule -> SAT -> 5:55 pm -> Wake PC Weekly Rule -> SAT -> 5:55 pm -> Disable Auto Shutdown mode Weekly Rule -> SAT -> 11 pm -> Enable Auto Shutdown mode
General Settings Check “Mouse Keyboard Sensitive” Check “Auto Start with Windows” Check “Power Save if no user is logged on” Check “Ignore Windows Power Management” Select “Hibernate” as the standard shutdown mode + “Enforce: Operation“
The special case: Backup detection

Auto Shutdown Manager - Manual V5
Page 107
This explains how to delay the shutdown of the server if the backup process is not complete by 11 pm, as requested in the requirements. After 11 pm on Saturdays, the timer would start to countdown again and shut down the machine when 0 is reached. Therefore, we need a mechanism to reset the countdown timer for as long as the backup process is still running. First, consider how the backup process could be detected and identified as “active”. This, of course, is ultimately dependent on the backup software you are using. However, there are typically two things to consider:
1. Many networked-based backup systems use so-called backup-agents on the clients. If this is the case, the activity level of this agent could be monitored by a counter and an active backup process could be detected.
2. Because the backup data are processed via the network, the network traffic could be monitored. If a significant amount of traffic is detected, a shutdown can be delayed.
You could add a “Process” counter to monitor the activities of the backup agent process and thus prevent a shutdown after 11 pm if the backup agent still shows activity. Otherwise, you could add a “TCP” counter and monitor the network traffic. Because the backup data are transferred via the network, this will identify quite a clear level of activity, and the shutdown process can be delayed as long as necessary. See the note about hardware-dependent counter settings in the chapter “Definition of Groups and Settings” on page 56. For more details about setting up counters, please see page 27. The setting group for Server 3 is complete and should be finally saved by clicking on “Accept Changes”. Configuration for Server 2 Now click on “Copy Group” and rename it something like “Server 2“. There are some minor modifications that have to be done in order to make Server 2 dependent on Server 3. This is to keep Server 2 running for as long as Server 3 runs because both servers are needed in case one or more clients are still active after 9 pm, as dictated by the requirements. Furthermore, as we do not need any incoming connections on Server 2, this can be disabled. Go to Network Settings and scroll down to “Add TCP/IP enabled devices to prevent auto shutdown of PCs in this group” Check “Delete all other Entries on Client” Check “Check IP enabled devices to prevent automatic shut down” Press “+Add” and enter the name or IP address of Server 3 Scroll upwards and uncheck “Accept Secure Remote Connection”. Both setting groups are now configured. Finally, open the “Client Overview” in the “Client Manager” and assign the servers from “Unassigned Clients” into their dedicated groups. Then set the group “Server 2” as the “Default Group” - when adding new middle-tier servers in the future, they will be assigned to this group automatically. Hint:

Auto Shutdown Manager - Manual V5
Page 108
If you do not see the servers in Client Overview, they have not yet been configured to connect to Server 1. Open the Auto Shutdown Manager on Server 2 and Server 3, go to the Network tab and enter the server data for Server 1. A few seconds later, they should appear in the Client Overview on Server 1, and you can proceed as described above. This process can also be automated. For more details please see page 13
Configuration for the clients As described in the chapter “Deployment to multiple network clients” on page 13, client PCs can be configured with the correct server data during installation, which means that no manual entries need to be made on each client to direct it to its server. Now, open the Management Console on Server 3, create a new group and give it an appropriate name, such as “Client PCs” Set the following settings: Administration Here you can protect the settings on clients by adding a password.
You can also completely hide the Auto Shutdown Manager on the clients by unchecking “Show Tray Icon on clients in this group”.
Timer Settings: Enable the Idle Timer and set the time to 15 minutes. Enable the CPU utilization analysis and set it to 85%. Disable the HDD utilization. Enable Scheduled Tasks and set the time to 15 minutes.
Network Settings: Check “Register to a server..:“ and add the address of server 3 Ensure the port is correct.
Check “Auto Reconnect“. Uncheck “WOL” – the server will run anyway from 6 am. Uncheck “Accept Secure Remote Connection“. Uncheck “Check Passive IP Clients”. Check “Delete all other entries on client“.
Application Settings: You could set applications to be monitored here on demand or disable
Scheduled Tasks Settings: Disable VMware Settings: Disable all Protocol Settings:
Enter the power consumption and pricing data as wanted and enable this setting Timer Rule Settings:
Add the following time rules for the core business hours in the morning:
Weekly Rule -> MO – FR -> 7:30 am -> Disable Auto Shutdown Mode Weekly Rule -> MO – FR -> 12:20 pm -> Enable Auto Shutdown Mode Add the following time rules for the core business hours in the afternoon:
Weekly Rule -> MO – FR -> 1:30 pm -> Disable Auto Shutdown Mode Weekly Rule -> MO – FR -> 5 pm -> Enable Auto Shutdown Mode

Auto Shutdown Manager - Manual V5
Page 109
Add the following time rules to set the correct shutdown mode based on the time:
Daily Rule -> Midnight (12 am) -> Change Shutdown Mode -> Hibernate Daily Rule -> 7:30 am-> Change Shutdown Mode -> Standby Daily Rule -> 5 pm -> Change Shutdown Mode -> Hibernate
General Settings: Check “Ignore Windows Power Management” Check “Mouse Keyboard Sensitive” Check “Continue Idle Shutdown even if users are logged off” Check “Display Warning Message before Shutdown” Check “Enforce: Operation” Check “Auto Start with Windows”.
You can consider further useful settings for your particular situation, such as monitoring executed applications like PowerPoint in presentation mode, saving open documents, and so on. Save all changes by clicking on “Accept changes”. Now, open Network Clients -> Clients Structure Set the Default Group to “Client PCs” or whatever you have named this group. The main configuration is now complete. Of course you should review all other settings and decide what else would make sense to add, remove, or protect. Scenario 2: I want to delay the shutdown while my PC processes TV recordings via the Media Center. Solution: Start recording (does not matter what is recorded). Open the Auto Shutdown Manager and go to the Counters tab. Select “Process” from the first drop-down list. Look for the process “ehrecvr” in the right-hand box and select it (this process does the recording). Now, select IO Data Operations/sec or IO Other Operations/sec from the second drop-down list. Watch the “current value” for a few seconds. It will show a number while the recording is active. Stop the recording and watch the value again for a few seconds. Enter a value that is the average of the value shown while recording and when not recording and click the Add button. Save all settings. This scenario is identical for the analysis of all other types of processes, such as DVD-burner software, backup software, and VPN software. For more details about counters, please see page 56.
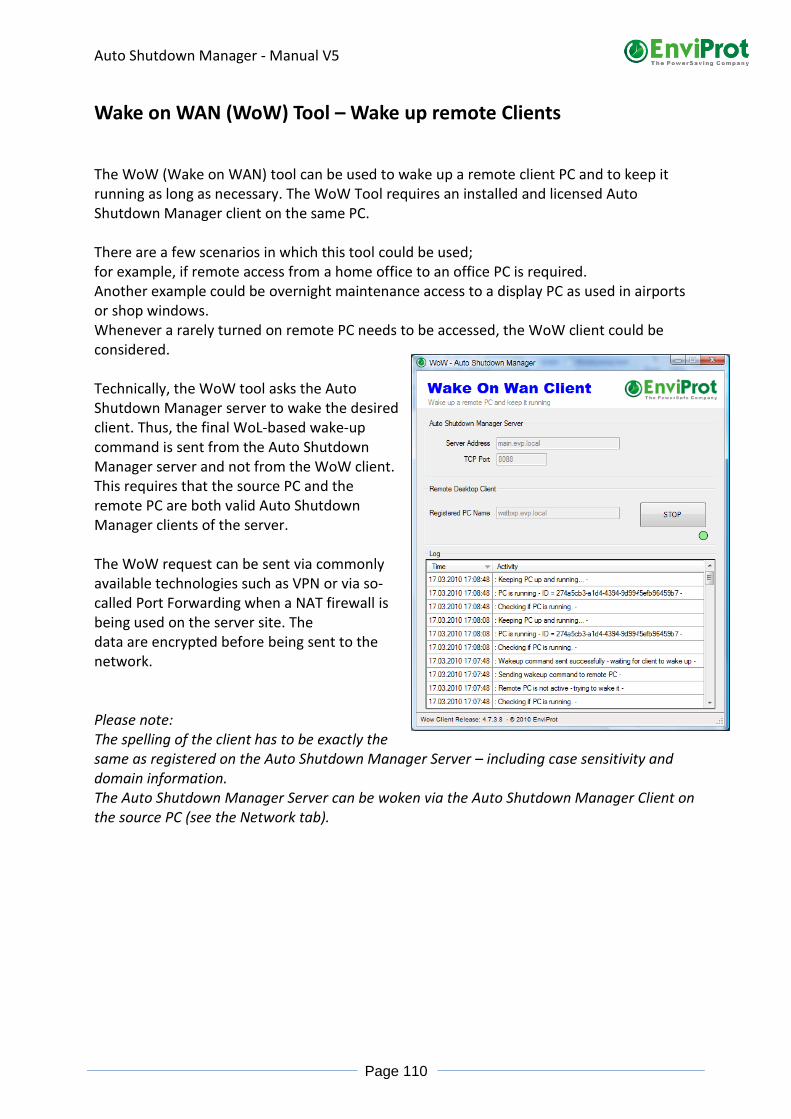
Auto Shutdown Manager - Manual V5
Page 110
Wake on WAN (WoW) Tool – Wake up remote Clients The WoW (Wake on WAN) tool can be used to wake up a remote client PC and to keep it running as long as necessary. The WoW Tool requires an installed and licensed Auto Shutdown Manager client on the same PC. There are a few scenarios in which this tool could be used; for example, if remote access from a home office to an office PC is required. Another example could be overnight maintenance access to a display PC as used in airports or shop windows. Whenever a rarely turned on remote PC needs to be accessed, the WoW client could be considered. Technically, the WoW tool asks the Auto Shutdown Manager server to wake the desired client. Thus, the final WoL-based wake-up command is sent from the Auto Shutdown Manager server and not from the WoW client. This requires that the source PC and the remote PC are both valid Auto Shutdown Manager clients of the server. The WoW request can be sent via commonly available technologies such as VPN or via so-called Port Forwarding when a NAT firewall is being used on the server site. The data are encrypted before being sent to the network. Please note: The spelling of the client has to be exactly the same as registered on the Auto Shutdown Manager Server – including case sensitivity and domain information. The Auto Shutdown Manager Server can be woken via the Auto Shutdown Manager Client on the source PC (see the Network tab).

Auto Shutdown Manager - Manual V5
Page 111
The technical functionality:
Source-PC
Plans to wake up the target PC
Target – PC
Auto Shutdown Manager Server
Internet
Internet Router / VPN
VPN Tunnel
ASDM Client wakes up the Server
Wow Client wakes up the Target PC
Target - PC
Internet
Case 1
The target PC is
located in LAN
Case 2
The target PC has to be
connected via Internet
Command Line Parameters The WoW tool supports command line parameters. This allows you to create shortcuts for different clients or servers, for example. The following commands are supported:
Server Client Port
Examples: C:\Program Files\AutoShutdownManager\wow_client.exe server Servername client Clientname Port 8088 C:\Program Files\AutoShutdownManager\wow_client.exe server main.evp.local client wstbxp.evp.local Port 8088 For more information about WoL, please see page 119.

Auto Shutdown Manager - Manual V5
Page 112
SCCM plugin Starting with Auto Shutdown Manager Release 5.0.4.x, EnviProt offers a plugin for the Microsoft System Center Configuration Manager© (SCCM 2012R2 and newer). The plugin supports two key functionalities: An add-on to the context menu within the device and device collection tabs that support on-demand WOL and various shutdown options, as well as an application deployment scanner that automatically identifies scheduled deployments and updates that will be processed via the Auto Shutdown Manager Server WOL Scheduler. By using its entire infrastructure, such as WOL proxies, it offers a very robust and reliable WOL mechanism for scheduled SCCM deployments and updates.
Installation
To run the SCCM plugin, an Auto Shutdown Manager client must be installed on the SCCM machine and connected to the Auto Shutdown Manager server. The plugin installer is called ASDM_SCCM_Bridge.exe, and can be found in the Auto Shutdown Manager installation folder - by default, under C:\Program Files (x86)\AutoShutdownManager). The path to the SCCM installation folder is the only requirement for the installation:
The plugin can be installed und uninstalled easily. To finalize the installation, the SCCM console must be re-opened.

Auto Shutdown Manager - Manual V5
Page 113
The Auto Shutdown Manager plugin functions appear by right-clicking objects within the devices and device collection overviews.
Please note: Auto Shutdown Manager actions such as WoL, shutdown or restart are processed via the Auto Shutdown Manager server on known clients only. Clients that are not managed by the Auto Shutdown Manager Server are ignored.
Application, update and package deployments
The Application Deployment Scanner will check for new SCCM applications, updates, package deployments, or modifications periodically and inform the Auto Shutdown Manager Server if changes are found. The default check frequency of 90+ minutes should be adequate in most cases in a production environment. For immediate checks, the ASDM_SCCM_Bridge.exe can be opened and closed – this causes the bridge to rerun all checks. If you are using multiple Auto Shutdown Manager servers, you can enter their IP addresses or DNS names in the “Further ASDM Servers” field, separated by commas. Actions from the context menu and from the application deployment scheduler data will then be distributed to all Auto Shutdown Manager servers. The “Scan days ahead” option is useful to limit the scan to a limited number of days ahead in future. Because the scanner runs periodically anyway, the number of days should be as small as possible to minimize the overheads. We recommend two days ahead, which means the scanner would check for deployments for the current day and one following on each run. The scanner detects application deployments that are:
• Enabled

Auto Shutdown Manager - Manual V5
Page 114
• Deployments based on Device Collections (User Collections are not supported)
• Scheduled for future dates
• Action is installation
• Purpose is required
• “Send wake-up packages” is selected. SCCM Deployment Properties:
Action can be Install or Uninstall
A time must be scheduled (please note it has to be in UTC):

Auto Shutdown Manager - Manual V5
Page 115
In SCCM – UTC-based schedule:
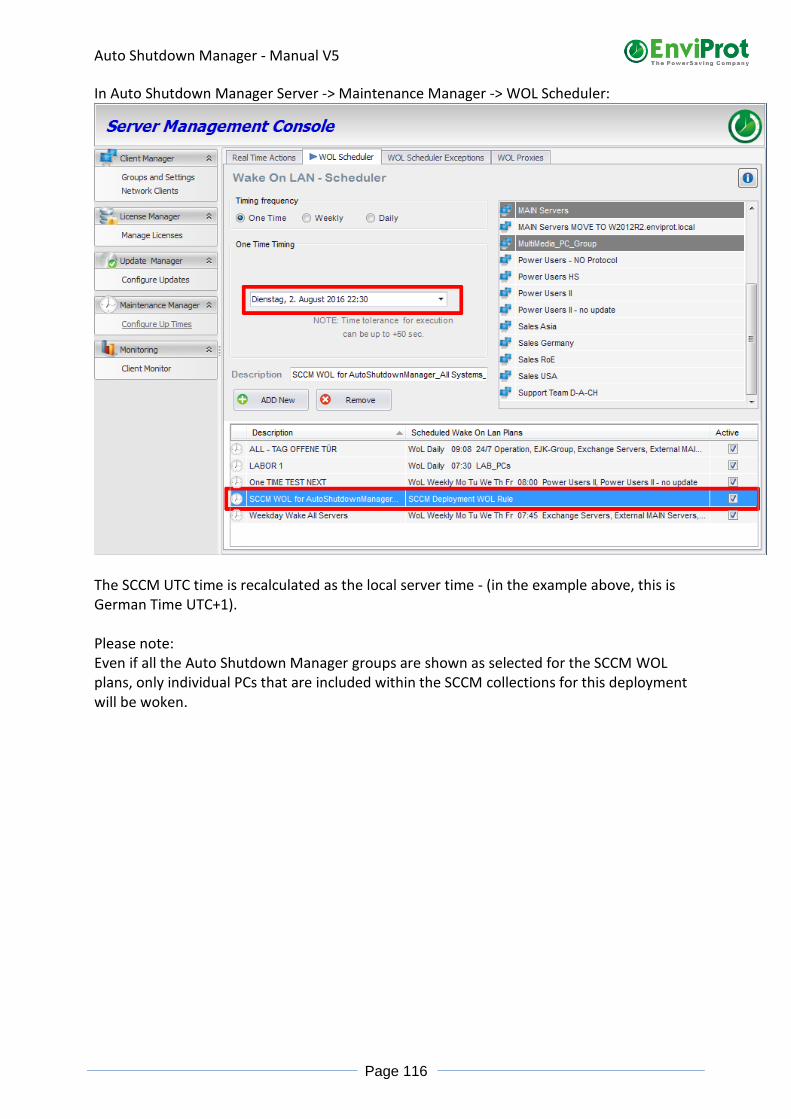
Auto Shutdown Manager - Manual V5
Page 116
In Auto Shutdown Manager Server -> Maintenance Manager -> WOL Scheduler:
The SCCM UTC time is recalculated as the local server time - (in the example above, this is German Time UTC+1). Please note: Even if all the Auto Shutdown Manager groups are shown as selected for the SCCM WOL plans, only individual PCs that are included within the SCCM collections for this deployment will be woken.

Auto Shutdown Manager - Manual V5
Page 117
System requirements
Auto Shutdown Manager currently supports for the following operating systems in both 32- and 64-bit versions: Windows-based systems from Windows 7 and beyond. This currently includes Windows 10, Windows 8, Windows 7 Windows Server 2019, 2016, 2012R2 in 32/64-bit and CORE versions. Older operating systems like Windows XP still may work correctly, but are not officially supported. Optional: Microsoft Database Server 2008 Express or newer. The SCCM Bridge supports Microsoft SCCM 2012R2 and newer. Please request the latest supported version. Administration rights are only required for the first installation. Microsoft .NET Framework Version 4 is required to install Auto Shutdown Manager.

Auto Shutdown Manager - Manual V5
Page 118
Troubleshooting For questions and problems concerning Auto Shutdown Manager, in addition to reading this manual, please contact us at: https://www.enviprot.com/en/contact/support

Auto Shutdown Manager - Manual V5
Page 119
Tips and Tricks
WoL - Wake on LAN background and settings
At a glance: Auto Shutdown Manager supports WOL within the local network segment, as well as into remote IP Segments, VLANs, and even the Internet. The technologies used to accomplish this are local broadcasts, directed broadcasts, and WOL proxies (see page 83). An additionally tool called “Wake on WAN Client” can be used to wake office PCs from a remote location such as a home office, a construction site, or from anywhere else when on road -> see “Wake on WAN (WoW) Tool – Wake up remote Clients” on page 110. Wake on LAN (WoL), which was introduced with Windows 2000, uses hardware options of WoL-compatible network cards that can wake the computer from standby and hibernation modes, as well as from the power off mode (depending on the hardware) through the Power Management signals of the system bus by receiving specific packets. The following functionality is supported:
WoL can trigger power management events for all received packets according to the selected wake-up method such as NetBIOS-broadcast requests, hardware address resolution, Unicast, and so on. This setting complies with the specifications “fully activated”. Recommended: WOL can also be activated in such a way that only certain packets, so-called Magic Packets, trigger wake-up events. Magic Packets are a de-facto standard and are used by Auto Shutdown Manager.
Note: Depending on the installed network interface, you also might be able to activate a wakeup from the power off (S5) mode. This can be useful if you need to start computers that were completely powered down previously. As mentioned above, Auto Shutdown Manager supports the WOL protocol Magic Packets. Magic Packets are generated based on the MAC address of the target computer, and then sent to the target machine. Typically, this occurs via the local network broadcast, but Auto Shutdown Manager also supports so-called directed broadcasts and WOL proxies (see page 83 for more details). For directed broadcasts this means that, if a machine is outside of the server’s IP segment, the broadcast request is send to the router, which will then forward the package to the dedicated local network of the target machine, and finally convert it into a local broadcast within the target network segment. Routers must be configured to support directed broadcasts. These packages are transported via UDP port 7 by default. The port can be reconfigured by the administrator as follows: Open the file AutoShutdownManager.ini from the installation folder. Directly below the section called [SETTINGS], add or change the line that starts with WOL_PORT= and enter your port number as shown below.
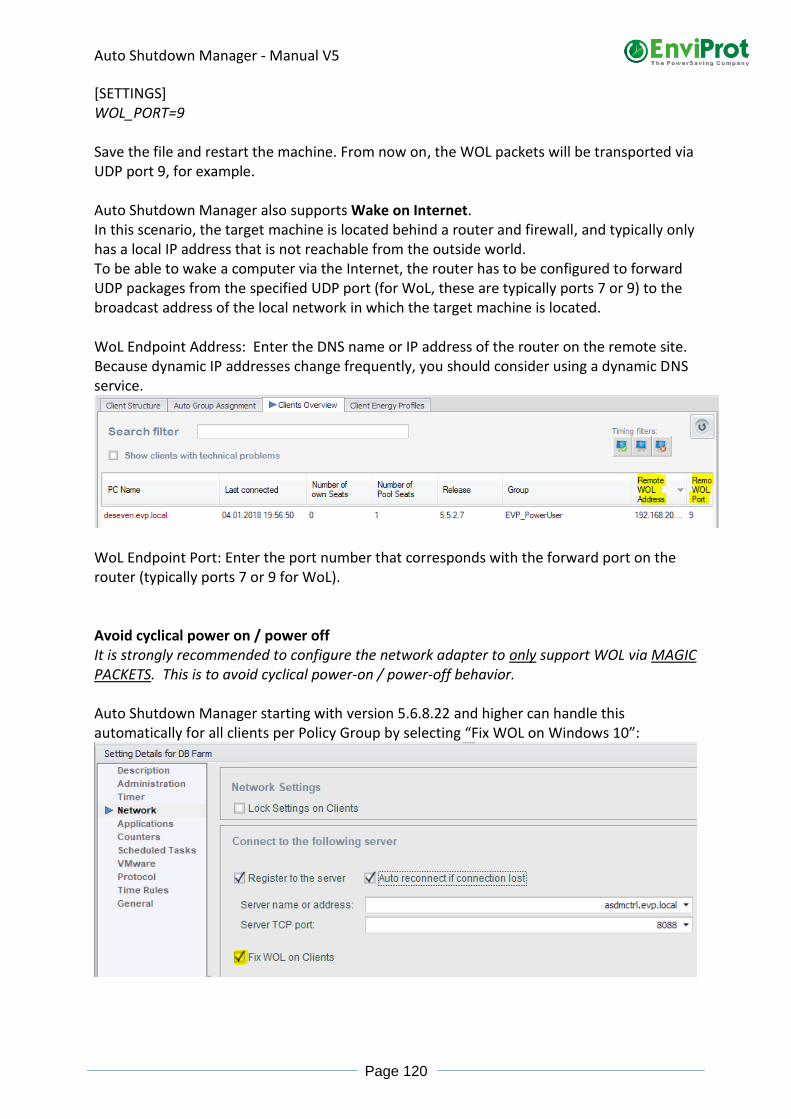
Auto Shutdown Manager - Manual V5
Page 120
[SETTINGS] WOL_PORT=9 Save the file and restart the machine. From now on, the WOL packets will be transported via UDP port 9, for example. Auto Shutdown Manager also supports Wake on Internet. In this scenario, the target machine is located behind a router and firewall, and typically only has a local IP address that is not reachable from the outside world. To be able to wake a computer via the Internet, the router has to be configured to forward UDP packages from the specified UDP port (for WoL, these are typically ports 7 or 9) to the broadcast address of the local network in which the target machine is located. WoL Endpoint Address: Enter the DNS name or IP address of the router on the remote site. Because dynamic IP addresses change frequently, you should consider using a dynamic DNS service.
WoL Endpoint Port: Enter the port number that corresponds with the forward port on the router (typically ports 7 or 9 for WoL). Avoid cyclical power on / power off It is strongly recommended to configure the network adapter to only support WOL via MAGIC PACKETS. This is to avoid cyclical power-on / power-off behavior. Auto Shutdown Manager starting with version 5.6.8.22 and higher can handle this automatically for all clients per Policy Group by selecting “Fix WOL on Windows 10”:

Auto Shutdown Manager - Manual V5
Page 121
ACPI - Background
ACPI stands for Advanced Configuration and Power Interface. It is an open standard that was introduced 1996 to specify hardware-independent power management and other management categories.
Global States and Sleeping States
Meaning Advantages Disadvantages Remote Wake-UP possible
G0 (S0) Computer is working
- - ●
G1 Sleeping Further S1 – S4
●
S1 Simple sleep mode
Moderate power saving Power to most components is still maintained
●
S2 Advanced sleep mode
Moderate power saving – but higher than S1
Power to most components is still maintained – but less than in S1
●
S3 Known as standby Suspend to RAM Current session stored in RAM
Relevant energy saving compared to G0. Typical power consumption around only 0.5-5 Watts. Back in G0 within seconds. Ideal for short periods of energy saving (such as lunch hours) during the day.
Power to RAM is still maintained. Power loss requires rebooting of the system
●
S4 Known as hibernation Suspend to disk Current session stored on hard drive
Almost the same as S3, but doesn’t depend on power. Current session can be continued even after power loss Typical power consumption is around 0-5 Watts.
Slower recovery from sleep compared to S3. (But much faster when compared to G2 and G3)
●
G2 (S5) Soft off Known as Shutdown
Almost the same as G3, but system remains available for remote management. Typical power consumption of around 0-5 Watts.
OS needs to be booted. Slowest recovery to G0
●
G3 Mechanical off
No power consumption Same as G2 plus: Remote management is not possible; therefore, this is not practicable for professional users.
o

Auto Shutdown Manager - Manual V5
Page 122
Contact and procurement information Auto Shutdown Manager is licensed per computer, irrespective of whether the computer is a server or a client PC – physical or virtual. Licenses can be purchased on-line at https://www.enviprot.com/en/purchase-pc-power-management-licenses or via email to [email protected]. For direct and bigger orders, please contact us at [email protected]. We are happy to give you a quote. Please do not forget to include the following information: Address, including company name, department (if applicable), street, city and zip code, country, contact data including first name, last name, telephone, address (if different from the company address) and your email address. Please include the number of licenses you want to purchase. License delivery takes place immediately after receipt of payment.
Further information can be found at: www.enviprot.com Or write us an email: [email protected]
Auto Shutdown Manager - Manual V5
Page 123
EULA – End-user License Agreement
NO WARRANTY
AUTO SHUTDOWN MANAGER IS DISTRIBUTED "AS IS" AND WITHOUT ANY WARRANTY AS TO MERCHANTABILITY OR FITNESS FOR A PARTICULAR PURPOSE OR ANY OTHER WARRANTIES, EITHER EXPRESSED OR IMPLIED. THE AUTHOR WILL NOT BE LIABLE FOR DATA LOSS, DAMAGES, LOSS OF PROFITS, OR ANY OTHER KIND OF LOSS WHEN USING OR MISUSING THIS SOFTWARE.
Any attempts at reverse engineering or thwarting the license protection scheme of this software are prohibited. Any evidence of tampering will be investigated and may lead to prosecution according to all applicable laws.
Distribution of the Evaluation Edition
You may copy the Evaluation Edition of this software and documentation as you wish, and give exact copies of the original Evaluation Edition to anyone, and distribute the Evaluation Edition of the software and documentation in its unmodified form via electronic means. However, you may not charge or request donations for any such copies however made, or from distributing the software and/or documentation with other products without the author's written permission.
Registered Edition
One registered copy of Auto Shutdown Manager may be used by a single person who uses the software personally on one computer, or installed on a single computer used by multiple people.
You should have received a license key, which is necessary to enable the registered edition of the software. This key must be kept in the strictest confidence and must not be given or revealed to anyone but the registered owner. Installation files for licensed users may not be distributed by you to anyone else. Failure to abide by these provisions may result in severe legal penalties and will result in the revocation of the license, which may cause the program to stop working.
Licenses
A permanent license entitles the holder to use the program forever - such license keys will never expire. Timely limited licenses expire automatically after the period purchased. The intellectual property of this software is not part of the license. The initial purchase price includes all program updates and upgrades for a period of one year following the initial purchase date. In order to receive program updates and upgrades after the first year, it is necessary to repurchase the upgraded version of the product at a special, discounted price. Prices will be defined in the newly upgraded product version as soon as it is available, or can be requested from EnviProt at any time.


![+A7V266-MX Front Matterdlsvr04.asus.com/pub/ASUS/mb/socka/km266/a7v266-mx/t1444_a7v… · Run VGA BIOS if S3 Resume [Auto] AC Loss Auto Restart [Previous State] Shutdown Temperature](https://static.fdocuments.in/doc/165x107/5f07039d7e708231d41ade1f/a7v266-mx-front-run-vga-bios-if-s3-resume-auto-ac-loss-auto-restart-previous.jpg)