Auszug Form and List Modul DotNetNuke 6 1 5 User...
40
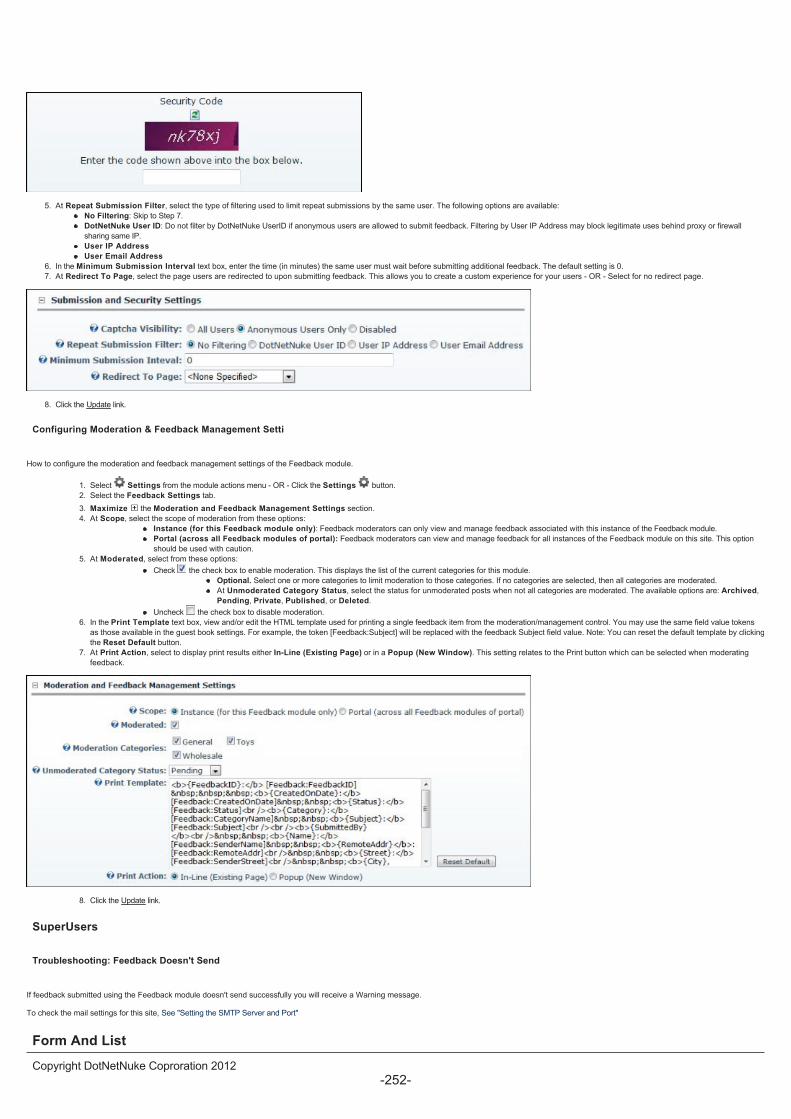
5. At Repeat Submission Filter, select the type of filtering used to limit repeat submissions by the same user. The following options are available: No Filtering: Skip to Step 7. DotNetNuke User ID: Do not filter by DotNetNuke UserID if anonymous users are allowed to submit feedback. Filtering by User IP Address may block legitimate uses behind proxy or firewall sharing same IP. User IP Address User Email Address 6. In the Minimum Submission Interval text box, enter the time (in minutes) the same user must wait before submitting additional feedback. The default setting is 0. 7. At Redirect To Page, select the page users are redirected to upon submitting feedback. This allows you to create a custom experience for your users - OR - Select for no redirect page. 8. Click the Update link. Configuring Moderation & Feedback Management Setti How to configure the moderation and feedback management settings of the Feedback module. 1. Select Settings from the module actions menu - OR - Click the Settings button. 2. Select the Feedback Settings tab. 3. Maximize the Moderation and Feedback Management Settings section. 4. At Scope, select the scope of moderation from these options: Instance (for this Feedback module only): Feedback moderators can only view and manage feedback associated with this instance of the Feedback module. Portal (across all Feedback modules of portal): Feedback moderators can view and manage feedback for all instances of the Feedback module on this site. This option should be used with caution. 5. At Moderated, select from these options: Check the check box to enable moderation. This displays the list of the current categories for this module. Optional. Select one or more categories to limit moderation to those categories. If no categories are selected, then all categories are moderated. At Unmoderated Category Status, select the status for unmoderated posts when not all categories are moderated. The available options are: Archived, Pending, Private, Published, or Deleted. Uncheck the check box to disable moderation. 6. In the Print Template text box, view and/or edit the HTML template used for printing a single feedback item from the moderation/management control. You may use the same field value tokens as those available in the guest book settings. For example, the token [Feedback:Subject] will be replaced with the feedback Subject field value. Note: You can reset the default template by clicking the Reset Default button. 7. At Print Action, select to display print results either In-Line (Existing Page) or in a Popup (New Window). This setting relates to the Print button which can be selected when moderating feedback. 8. Click the Update link. SuperUsers Troubleshooting: Feedback Doesn't Send If feedback submitted using the Feedback module doesn't send successfully you will receive a Warning message. To check the mail settings for this site, See "Setting the SMTP Server and Port" Form And List
Transcript of Auszug Form and List Modul DotNetNuke 6 1 5 User...
5. At Repeat Submission Filter, select the type of filtering used to limit repeat submissions by the same user. The following options are available:
No Filtering: Skip to Step 7.
DotNetNuke User ID: Do not filter by DotNetNuke UserID if anonymous users are allowed to submit feedback. Filtering by User IP Address may block legitimate uses behind proxy or firewall
sharing same IP.
User IP Address
User Email Address
6. In the Minimum Submission Interval text box, enter the time (in minutes) the same user must wait before submitting additional feedback. The default setting is 0.
7. At Redirect To Page, select the page users are redirected to upon submitting feedback. This allows you to create a custom experience for your users - OR - Select for no redirect page.
8. Click the Update link.
Configuring Moderation & Feedback Management Setti
How to configure the moderation and feedback management settings of the Feedback module.
1. Select Settings from the module actions menu - OR - Click the Settings button.
2. Select the Feedback Settings tab.
3. Maximize the Moderation and Feedback Management Settings section.
4. At Scope, select the scope of moderation from these options:
Instance (for this Feedback module only): Feedback moderators can only view and manage feedback associated with this instance of the Feedback module.
Portal (across all Feedback modules of portal): Feedback moderators can view and manage feedback for all instances of the Feedback module on this site. This option
should be used with caution.
5. At Moderated, select from these options:
Check the check box to enable moderation. This displays the list of the current categories for this module.
Optional. Select one or more categories to limit moderation to those categories. If no categories are selected, then all categories are moderated.
At Unmoderated Category Status, select the status for unmoderated posts when not all categories are moderated. The available options are: Archived,
Pending, Private, Published, or Deleted.
Uncheck the check box to disable moderation.
6. In the Print Template text box, view and/or edit the HTML template used for printing a single feedback item from the moderation/management control. You may use the same field value tokens
as those available in the guest book settings. For example, the token [Feedback:Subject] will be replaced with the feedback Subject field value. Note: You can reset the default template by clicking
the Reset Default button.
7. At Print Action, select to display print results either In-Line (Existing Page) or in a Popup (New Window). This setting relates to the Print button which can be selected when moderating
feedback.
8. Click the Update link.
SuperUsers
Troubleshooting: Feedback Doesn't Send
If feedback submitted using the Feedback module doesn't send successfully you will receive a Warning message.
To check the mail settings for this site, See "Setting the SMTP Server and Port"
Form And List
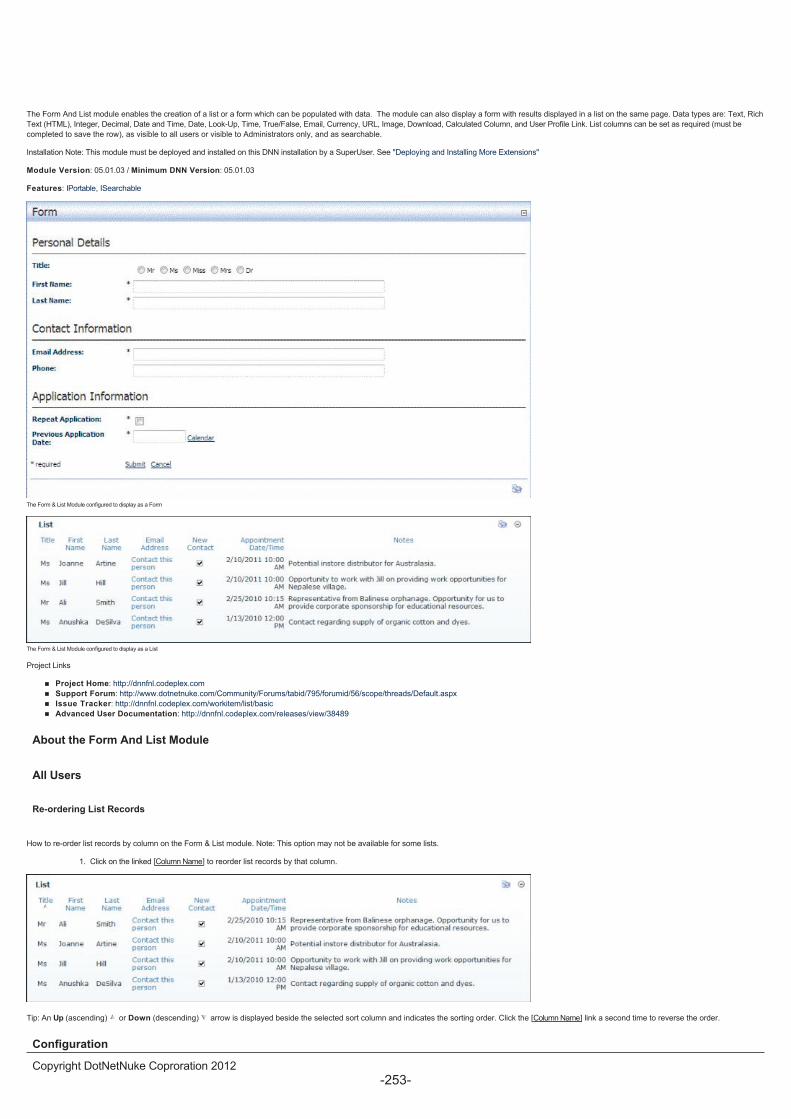
The Form And List module enables the creation of a list or a form which can be populated with data. The module can also display a form with results displayed in a list on the same page. Data types are: Text, Rich
Text (HTML), Integer, Decimal, Date and Time, Date, Look-Up, Time, True/False, Email, Currency, URL, Image, Download, Calculated Column, and User Profile Link. List columns can be set as required (must be
completed to save the row), as visible to all users or visible to Administrators only, and as searchable.
Installation Note: This module must be deployed and installed on this DNN installation by a SuperUser. See "Deploying and Installing More Extensions"
Module Version: 05.01.03 / Minimum DNN Version: 05.01.03
Features: IPortable, ISearchable
The Form & List Module configured to display as a Form
The Form & List Module configured to display as a List
Project Links
Project Home: http://dnnfnl.codeplex.com
Support Forum: http://www.dotnetnuke.com/Community/Forums/tabid/795/forumid/56/scope/threads/Default.aspx
Issue Tracker: http://dnnfnl.codeplex.com/workitem/list/basic
Advanced User Documentation: http://dnnfnl.codeplex.com/releases/view/38489
About the Form And List Module
All Users
Re-ordering List Records
How to re-order list records by column on the Form & List module. Note: This option may not be available for some lists.
1. Click on the linked [Column Name] to reorder list records by that column.
Tip: An Up (ascending) or Down (descending) arrow is displayed beside the selected sort column and indicates the sorting order. Click the [Column Name] link a second time to reverse the order.
Configuration
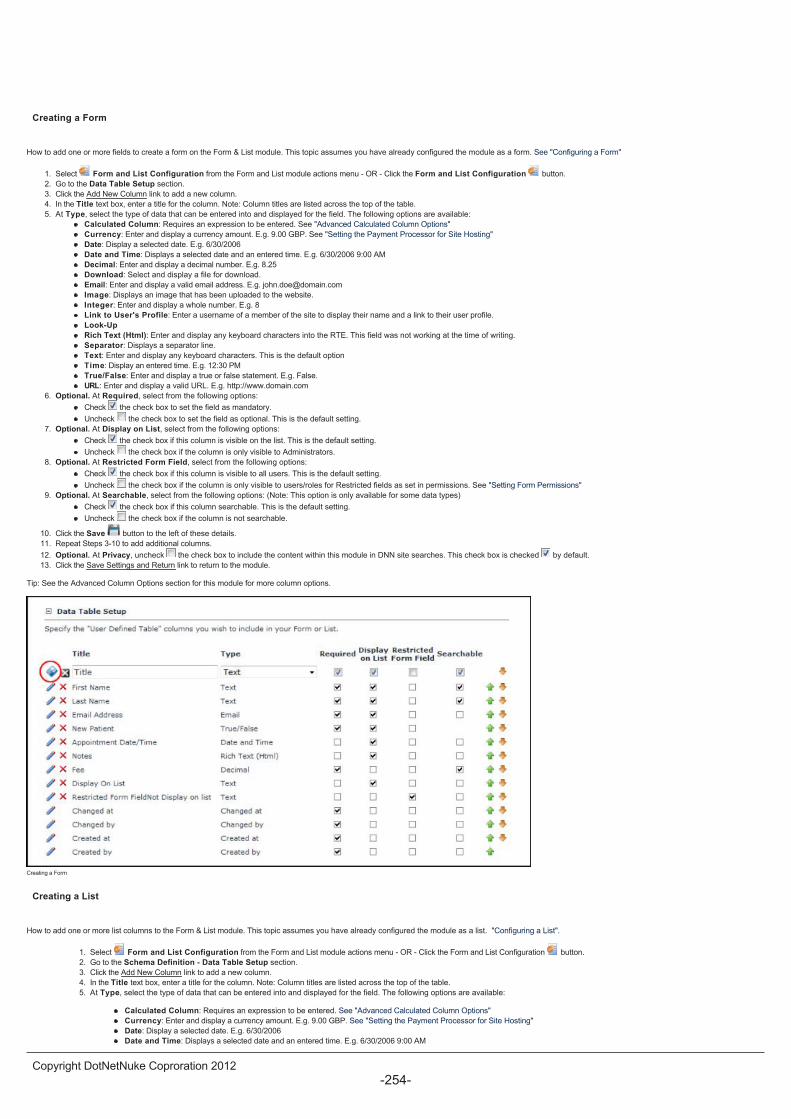
Creating a Form
How to add one or more fields to create a form on the Form & List module. This topic assumes you have already configured the module as a form. See "Configuring a Form"
1. Select Form and List Configuration from the Form and List module actions menu - OR - Click the Form and List Configuration button.
2. Go to the Data Table Setup section.
3. Click the Add New Column link to add a new column.
4. In the Title text box, enter a title for the column. Note: Column titles are listed across the top of the table.
5. At Type, select the type of data that can be entered into and displayed for the field. The following options are available:
Calculated Column: Requires an expression to be entered. See "Advanced Calculated Column Options"
Currency: Enter and display a currency amount. E.g. 9.00 GBP. See "Setting the Payment Processor for Site Hosting"
Date: Display a selected date. E.g. 6/30/2006
Date and Time: Displays a selected date and an entered time. E.g. 6/30/2006 9:00 AM
Decimal: Enter and display a decimal number. E.g. 8.25
Download: Select and display a file for download.
Email: Enter and display a valid email address. E.g. [email protected]
Image: Displays an image that has been uploaded to the website.
Integer: Enter and display a whole number. E.g. 8
Link to User's Profile: Enter a username of a member of the site to display their name and a link to their user profile.
Look-Up
Rich Text (Html): Enter and display any keyboard characters into the RTE. This field was not working at the time of writing.
Separator: Displays a separator line.
Text: Enter and display any keyboard characters. This is the default option
Time: Display an entered time. E.g. 12:30 PM
True/False: Enter and display a true or false statement. E.g. False.
URL: Enter and display a valid URL. E.g. http://www.domain.com
6. Optional. At Required, select from the following options:
Check the check box to set the field as mandatory.
Uncheck the check box to set the field as optional. This is the default setting.
7. Optional. At Display on List, select from the following options:
Check the check box if this column is visible on the list. This is the default setting.
Uncheck the check box if the column is only visible to Administrators.
8. Optional. At Restricted Form Field, select from the following options:
Check the check box if this column is visible to all users. This is the default setting.
Uncheck the check box if the column is only visible to users/roles for Restricted fields as set in permissions. See "Setting Form Permissions"
9. Optional. At Searchable, select from the following options: (Note: This option is only available for some data types)
Check the check box if this column searchable. This is the default setting.
Uncheck the check box if the column is not searchable.
10. Click the Save button to the left of these details.
11. Repeat Steps 3-10 to add additional columns.
12. Optional. At Privacy, uncheck the check box to include the content within this module in DNN site searches. This check box is checked by default.
13. Click the Save Settings and Return link to return to the module.
Tip: See the Advanced Column Options section for this module for more column options.
Creating a Form
Creating a List
How to add one or more list columns to the Form & List module. This topic assumes you have already configured the module as a list. "Configuring a List".
1. Select Form and List Configuration from the Form and List module actions menu - OR - Click the Form and List Configuration button.
2. Go to the Schema Definition - Data Table Setup section.
3. Click the Add New Column link to add a new column.
4. In the Title text box, enter a title for the column. Note: Column titles are listed across the top of the table.
5. At Type, select the type of data that can be entered into and displayed for the field. The following options are available:
Calculated Column: Requires an expression to be entered. See "Advanced Calculated Column Options"
Currency: Enter and display a currency amount. E.g. 9.00 GBP. See "Setting the Payment Processor for Site Hosting"
Date: Display a selected date. E.g. 6/30/2006
Date and Time: Displays a selected date and an entered time. E.g. 6/30/2006 9:00 AM
Decimal: Enter and display a decimal number. E.g. 8.50
Download: Select and display a file for download. Note: Link tracking for Download links can be enabled on the Edit Record page.
Email: Enter and display a valid email address. E.g. [email protected]
Image: Displays an image that has been uploaded to the website.
Integer: Enter and display a whole number. E.g. 8
Link to User's Profile: Enter a username of a member of the site to display their name and a link to their user profile.
Look-Up:
Rich Text (Html): Enter and display any keyboard characters into the RTE. This field was not working at the time of writing.
Separator: This is a read only field which display the title above a horizontal line. Use this type to separate data and format the layout of your list.
Text: Enter and display any keyboard characters. This is the default option.
Time: Display an entered time. E.g. 12:30 PM
True/False: Enter and display a true or false statement. E.g. False.
URL: Enter and display a valid URL. E.g. http://www.domain.com. Note: Link tracking for URL's can be enabled on the Edit Record page.
5. At Required, select from the following options:
Check the check box to set the field as mandatory.
Uncheck the check box to set the field as optional. This is the default setting.
6. Optional. At Display on List, select from the following options:
Check the check box if this column is visible on the list. This is the default setting.
Uncheck the check box if the column is only visible to Administrators.
7. Optional. At Restricted Form Field, select from the following options:
Check the check box if this column is visible to all users. This is the default setting.
Uncheck the check box if the column is only visible to users/roles for Restricted fields as set in permissions. "Setting List Permissions".
8. Optional. At Searchable, select from the following options: (Note: This option is only available for some data types)
Check the check box if this column searchable. This is the default setting.
Uncheck the check box if the column is not searchable.
9. Click the Save button to the left of these details.
10. Repeat Steps 3-9 to add additional columns.
11. Optional. At Privacy, uncheck the check box to include the content within this module in DNN site searches. This check box is checked by default.
12. Click the Save Configuration and Return link to return to the module.
Tip: See the Advanced Column Options section for this module for more column options.
Creating a list
Applying a Template
How to apply a form or list template to a Form & List module which has not yet been configured. This topic assumes one or more form or list templates have been created. "Saving a Template".
1. Add a Form & List module - OR - Go to a Form & List module hasn't been configured.
2. View the available list of forms/lists. Note: If no templates are listed, select Scan For New Module Templates from the module actions menu. This will refresh the templates list to show any newly
created templates.
3. Click the Apply link beside the required template.
Applying a Template
Re-ordering List or Form Columns
How to modify the order of columns in either form or a list created using the Form & List module.
1. Select Form and List Configuration from the Form and List module actions menu - OR - Click the Form and List Configuration button.
2. Go to the Data Table Setup section.
3. Click the Up button to move a column one position up in the list or form - OR - Click the Down button to move a column one position down in the list or form.
4. Repeat Step 3 until all columns are ordered as desired.
5. Click the Save Configuration and Return link to return to the module.
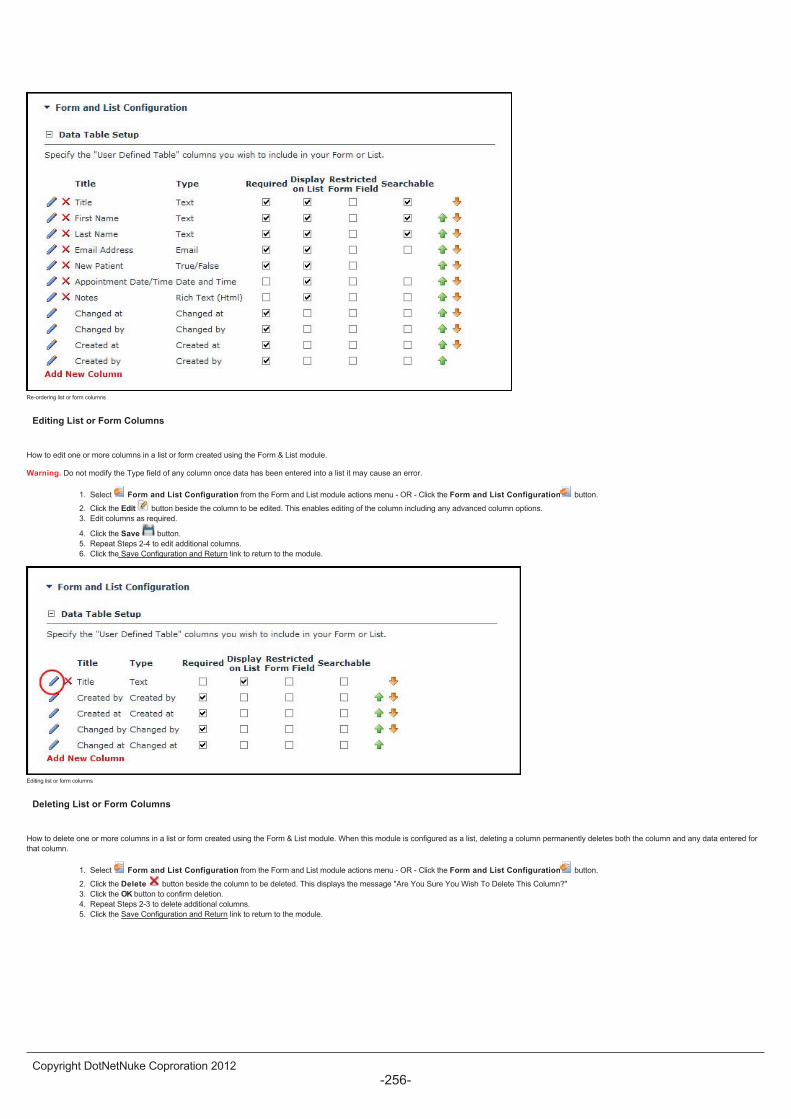
Re-ordering list or form columns
Editing List or Form Columns
How to edit one or more columns in a list or form created using the Form & List module.
Warning. Do not modify the Type field of any column once data has been entered into a list it may cause an error.
1. Select Form and List Configuration from the Form and List module actions menu - OR - Click the Form and List Configuration button.
2. Click the Edit button beside the column to be edited. This enables editing of the column including any advanced column options.
3. Edit columns as required.
4. Click the Save button.
5. Repeat Steps 2-4 to edit additional columns.
6. Click the Save Configuration and Return link to return to the module.
Editing list or form columns
Deleting List or Form Columns
How to delete one or more columns in a list or form created using the Form & List module. When this module is configured as a list, deleting a column permanently deletes both the column and any data entered for
that column.
1. Select Form and List Configuration from the Form and List module actions menu - OR - Click the Form and List Configuration button.
2. Click the Delete button beside the column to be deleted. This displays the message "Are You Sure You Wish To Delete This Column?"
3. Click the OK button to confirm deletion.
4. Repeat Steps 2-3 to delete additional columns.
5. Click the Save Configuration and Return link to return to the module.
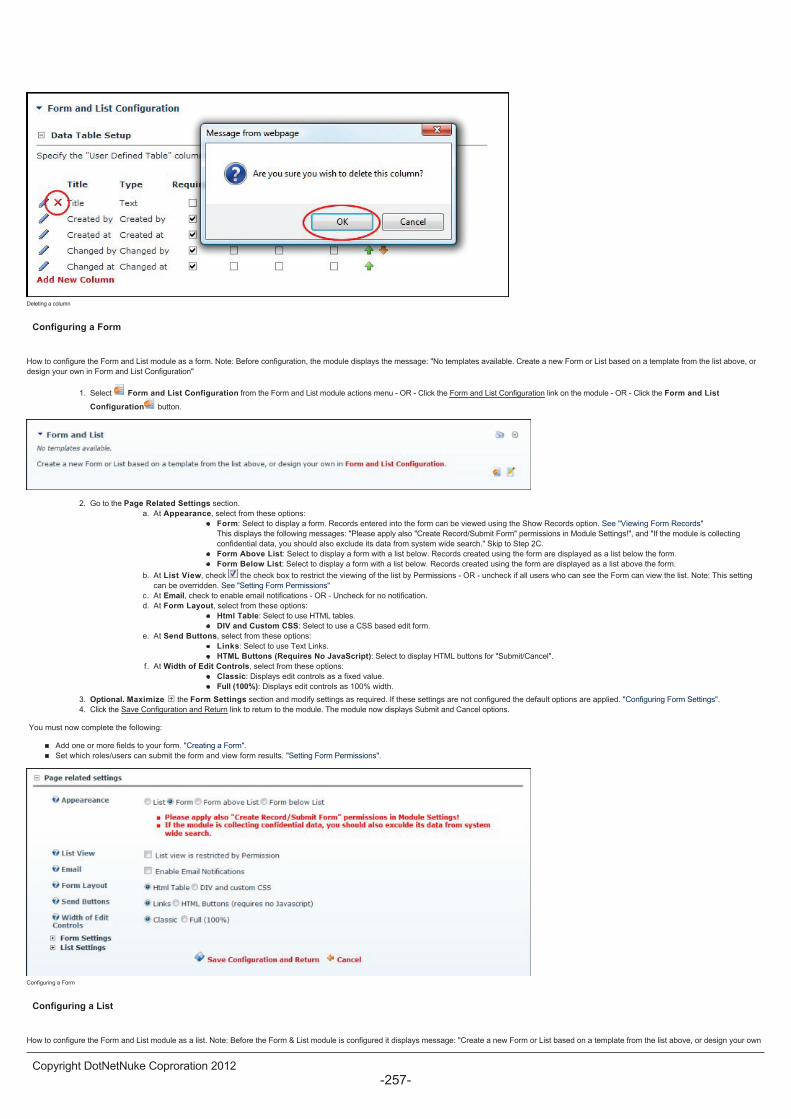
Deleting a column
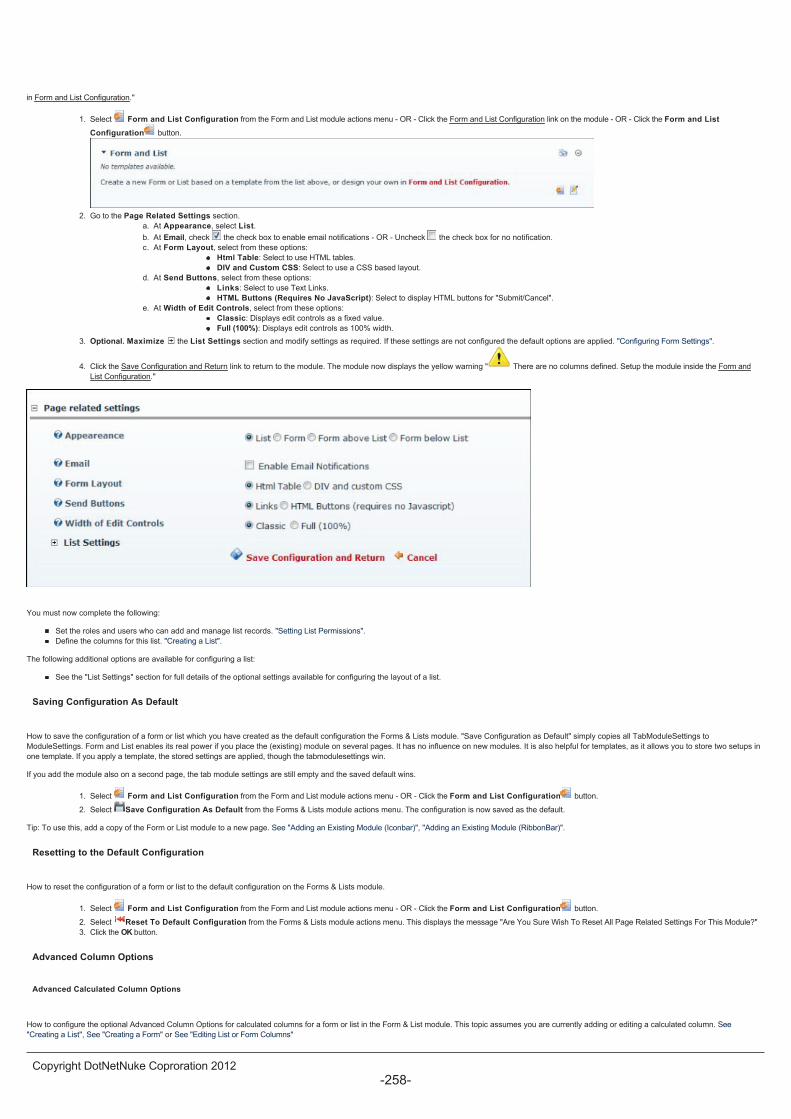
Configuring a Form
How to configure the Form and List module as a form. Note: Before configuration, the module displays the message: "No templates available. Create a new Form or List based on a template from the list above, or
design your own in Form and List Configuration"
1. Select Form and List Configuration from the Form and List module actions menu - OR - Click the Form and List Configuration link on the module - OR - Click the Form and List
Configuration button.
2. Go to the Page Related Settings section.
a. At Appearance, select from these options:
Form: Select to display a form. Records entered into the form can be viewed using the Show Records option. See "Viewing Form Records"
This displays the following messages: "Please apply also "Create Record/Submit Form" permissions in Module Settings!", and "If the module is collecting
confidential data, you should also exclude its data from system wide search." Skip to Step 2C.
Form Above List: Select to display a form with a list below. Records created using the form are displayed as a list below the form.
Form Below List: Select to display a form with a list below. Records created using the form are displayed as a list above the form.
b. At List View, check the check box to restrict the viewing of the list by Permissions - OR - uncheck if all users who can see the Form can view the list. Note: This setting
can be overridden. See "Setting Form Permissions"
c. At Email, check to enable email notifications - OR - Uncheck for no notification.
d. At Form Layout, select from these options:
Html Table: Select to use HTML tables.
DIV and Custom CSS: Select to use a CSS based edit form.
e. At Send Buttons, select from these options:
Links: Select to use Text Links.
HTML Buttons (Requires No JavaScript): Select to display HTML buttons for "Submit/Cancel".
f. At Width of Edit Controls, select from these options:
Classic: Displays edit controls as a fixed value.
Full (100%): Displays edit controls as 100% width.
3. Optional. Maximize the Form Settings section and modify settings as required. If these settings are not configured the default options are applied. "Configuring Form Settings".
4. Click the Save Configuration and Return link to return to the module. The module now displays Submit and Cancel options.
You must now complete the following:
Add one or more fields to your form. "Creating a Form".
Set which roles/users can submit the form and view form results. "Setting Form Permissions".
Configuring a Form
Configuring a List
How to configure the Form and List module as a list. Note: Before the Form & List module is configured it displays message: "Create a new Form or List based on a template from the list above, or design your own
in Form and List Configuration."
1. Select Form and List Configuration from the Form and List module actions menu - OR - Click the Form and List Configuration link on the module - OR - Click the Form and List
Configuration button.
2. Go to the Page Related Settings section.
a. At Appearance, select List.
b. At Email, check the check box to enable email notifications - OR - Uncheck the check box for no notification.
c. At Form Layout, select from these options:
Html Table: Select to use HTML tables.
DIV and Custom CSS: Select to use a CSS based layout.
d. At Send Buttons, select from these options:
Links: Select to use Text Links.
HTML Buttons (Requires No JavaScript): Select to display HTML buttons for "Submit/Cancel".
e. At Width of Edit Controls, select from these options:
Classic: Displays edit controls as a fixed value.
Full (100%): Displays edit controls as 100% width.
3. Optional. Maximize the List Settings section and modify settings as required. If these settings are not configured the default options are applied. "Configuring Form Settings".
4. Click the Save Configuration and Return link to return to the module. The module now displays the yellow warning " There are no columns defined. Setup the module inside the Form and
List Configuration."
You must now complete the following:
Set the roles and users who can add and manage list records. "Setting List Permissions".
Define the columns for this list. "Creating a List".
The following additional options are available for configuring a list:
See the "List Settings" section for full details of the optional settings available for configuring the layout of a list.
Saving Configuration As Default
How to save the configuration of a form or list which you have created as the default configuration the Forms & Lists module. "Save Configuration as Default" simply copies all TabModuleSettings to
ModuleSettings. Form and List enables its real power if you place the (existing) module on several pages. It has no influence on new modules. It is also helpful for templates, as it allows you to store two setups in
one template. If you apply a template, the stored settings are applied, though the tabmodulesettings win.
If you add the module also on a second page, the tab module settings are still empty and the saved default wins.
1. Select Form and List Configuration from the Form and List module actions menu - OR - Click the Form and List Configuration button.
2. Select Save Configuration As Default from the Forms & Lists module actions menu. The configuration is now saved as the default.
Tip: To use this, add a copy of the Form or List module to a new page. See "Adding an Existing Module (Iconbar)", "Adding an Existing Module (RibbonBar)".
Resetting to the Default Configuration
How to reset the configuration of a form or list to the default configuration on the Forms & Lists module.
1. Select Form and List Configuration from the Form and List module actions menu - OR - Click the Form and List Configuration button.
2. Select Reset To Default Configuration from the Forms & Lists module actions menu. This displays the message "Are You Sure Wish To Reset All Page Related Settings For This Module?"
3. Click the OK button.
Advanced Column Options
Advanced Calculated Column Options
How to configure the optional Advanced Column Options for calculated columns for a form or list in the Form & List module. This topic assumes you are currently adding or editing a calculated column. See
"Creating a List", See "Creating a Form" or See "Editing List or Form Columns"
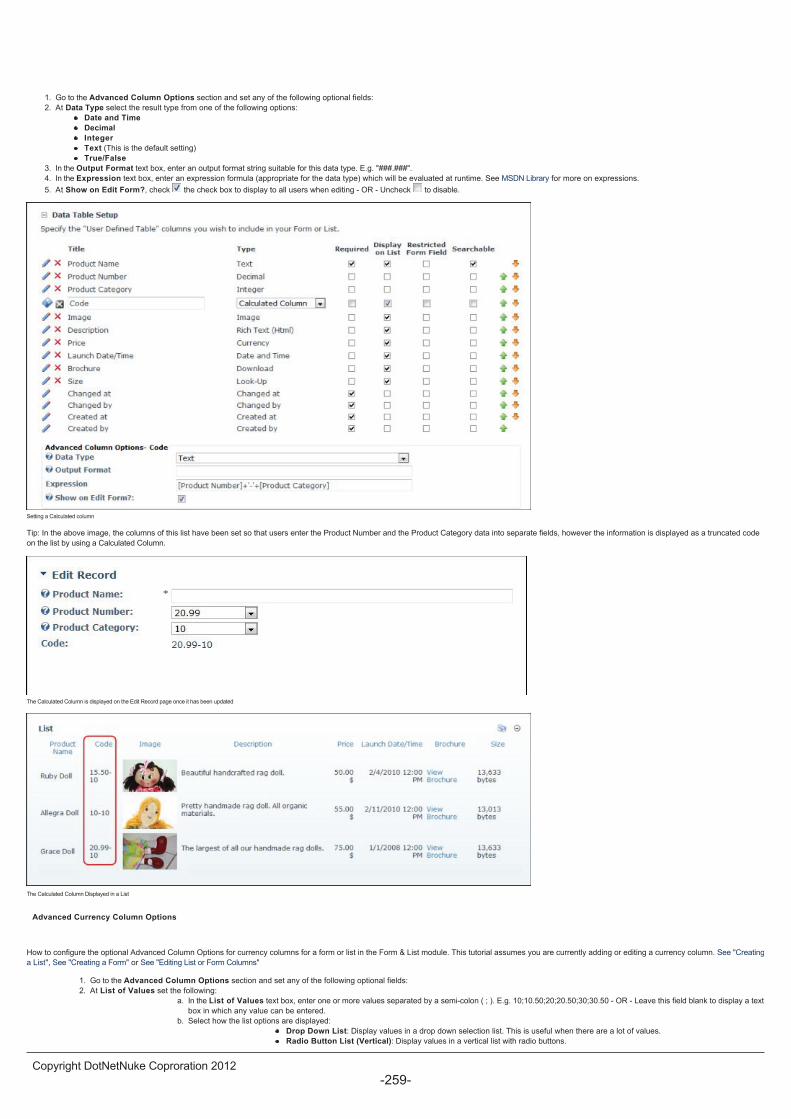
1. Go to the Advanced Column Options section and set any of the following optional fields:
2. At Data Type select the result type from one of the following options:
Date and Time
Decimal
Integer
Text (This is the default setting)
True/False
3. In the Output Format text box, enter an output format string suitable for this data type. E.g. "###.###".
4. In the Expression text box, enter an expression formula (appropriate for the data type) which will be evaluated at runtime. See MSDN Library for more on expressions.
5. At Show on Edit Form?, check the check box to display to all users when editing - OR - Uncheck to disable.
Setting a Calculated column
Tip: In the above image, the columns of this list have been set so that users enter the Product Number and the Product Category data into separate fields, however the information is displayed as a truncated code
on the list by using a Calculated Column.
The Calculated Column is displayed on the Edit Record page once it has been updated
The Calculated Column Displayed in a List
Advanced Currency Column Options
How to configure the optional Advanced Column Options for currency columns for a form or list in the Form & List module. This tutorial assumes you are currently adding or editing a currency column. See "Creating
a List", See "Creating a Form" or See "Editing List or Form Columns"
1. Go to the Advanced Column Options section and set any of the following optional fields:
2. At List of Values set the following:
a. In the List of Values text box, enter one or more values separated by a semi-colon ( ; ). E.g. 10;10.50;20;20.50;30;30.50 - OR - Leave this field blank to display a text
box in which any value can be entered.
b. Select how the list options are displayed:
Drop Down List: Display values in a drop down selection list. This is useful when there are a lot of values.
Radio Button List (Vertical): Display values in a vertical list with radio buttons.
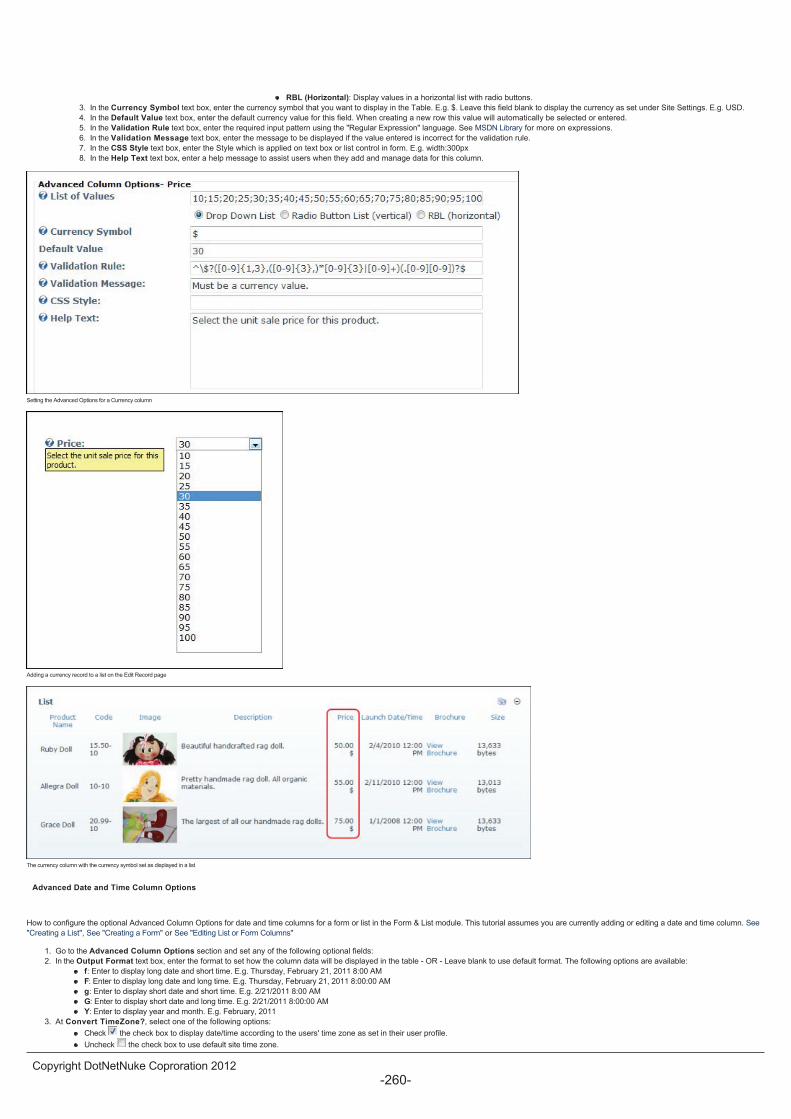
RBL (Horizontal): Display values in a horizontal list with radio buttons.
3. In the Currency Symbol text box, enter the currency symbol that you want to display in the Table. E.g. $. Leave this field blank to display the currency as set under Site Settings. E.g. USD.
4. In the Default Value text box, enter the default currency value for this field. When creating a new row this value will automatically be selected or entered.
5. In the Validation Rule text box, enter the required input pattern using the "Regular Expression" language. See MSDN Library for more on expressions.
6. In the Validation Message text box, enter the message to be displayed if the value entered is incorrect for the validation rule.
7. In the CSS Style text box, enter the Style which is applied on text box or list control in form. E.g. width:300px
8. In the Help Text text box, enter a help message to assist users when they add and manage data for this column.
Setting the Advanced Options for a Currency column
Adding a currency record to a list on the Edit Record page
The currency column with the currency symbol set as displayed in a list
Advanced Date and Time Column Options
How to configure the optional Advanced Column Options for date and time columns for a form or list in the Form & List module. This tutorial assumes you are currently adding or editing a date and time column. See
"Creating a List", See "Creating a Form" or See "Editing List or Form Columns"
1. Go to the Advanced Column Options section and set any of the following optional fields:
2. In the Output Format text box, enter the format to set how the column data will be displayed in the table - OR - Leave blank to use default format. The following options are available:
f: Enter to display long date and short time. E.g. Thursday, February 21, 2011 8:00 AM
F: Enter to display long date and long time. E.g. Thursday, February 21, 2011 8:00:00 AM
g: Enter to display short date and short time. E.g. 2/21/2011 8:00 AM
G: Enter to display short date and long time. E.g. 2/21/2011 8:00:00 AM
Y: Enter to display year and month. E.g. February, 2011
3. At Convert TimeZone?, select one of the following options:
Check the check box to display date/time according to the users' time zone as set in their user profile.
Uncheck the check box to use default site time zone.
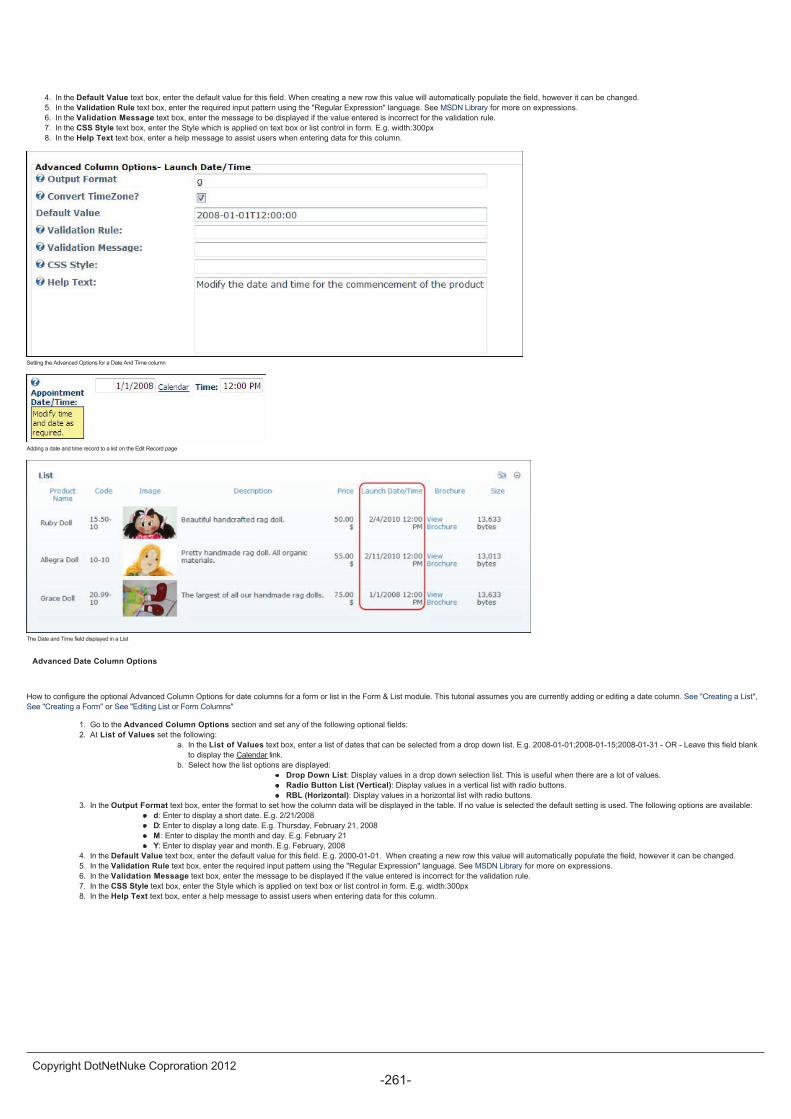
4. In the Default Value text box, enter the default value for this field. When creating a new row this value will automatically populate the field, however it can be changed.
5. In the Validation Rule text box, enter the required input pattern using the "Regular Expression" language. See MSDN Library for more on expressions.
6. In the Validation Message text box, enter the message to be displayed if the value entered is incorrect for the validation rule.
7. In the CSS Style text box, enter the Style which is applied on text box or list control in form. E.g. width:300px
8. In the Help Text text box, enter a help message to assist users when entering data for this column.
Setting the Advanced Options for a Date And Time column
Adding a date and time record to a list on the Edit Record page
The Date and Time field displayed in a List
Advanced Date Column Options
How to configure the optional Advanced Column Options for date columns for a form or list in the Form & List module. This tutorial assumes you are currently adding or editing a date column. See "Creating a List",
See "Creating a Form" or See "Editing List or Form Columns"
1. Go to the Advanced Column Options section and set any of the following optional fields:
2. At List of Values set the following:
a. In the List of Values text box, enter a list of dates that can be selected from a drop down list. E.g. 2008-01-01;2008-01-15;2008-01-31 - OR - Leave this field blank
to display the Calendar link.
b. Select how the list options are displayed:
Drop Down List: Display values in a drop down selection list. This is useful when there are a lot of values.
Radio Button List (Vertical): Display values in a vertical list with radio buttons.
RBL (Horizontal): Display values in a horizontal list with radio buttons.
3. In the Output Format text box, enter the format to set how the column data will be displayed in the table. If no value is selected the default setting is used. The following options are available:
d: Enter to display a short date. E.g. 2/21/2008
D: Enter to display a long date. E.g. Thursday, February 21, 2008
M: Enter to display the month and day. E.g. February 21
Y: Enter to display year and month. E.g. February, 2008
4. In the Default Value text box, enter the default value for this field. E.g. 2000-01-01. When creating a new row this value will automatically populate the field, however it can be changed.
5. In the Validation Rule text box, enter the required input pattern using the "Regular Expression" language. See MSDN Library for more on expressions.
6. In the Validation Message text box, enter the message to be displayed if the value entered is incorrect for the validation rule.
7. In the CSS Style text box, enter the Style which is applied on text box or list control in form. E.g. width:300px
8. In the Help Text text box, enter a help message to assist users when entering data for this column.
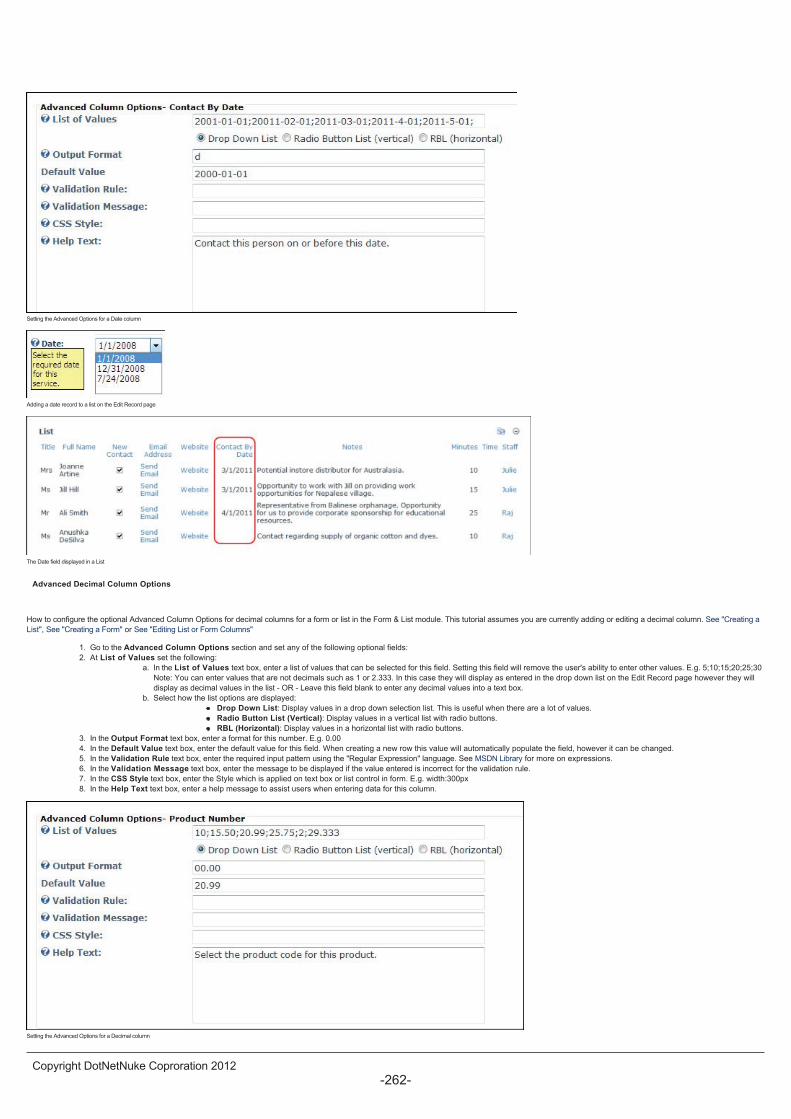
Setting the Advanced Options for a Date column
Adding a date record to a list on the Edit Record page
The Date field displayed in a List
Advanced Decimal Column Options
How to configure the optional Advanced Column Options for decimal columns for a form or list in the Form & List module. This tutorial assumes you are currently adding or editing a decimal column. See "Creating a
List", See "Creating a Form" or See "Editing List or Form Columns"
1. Go to the Advanced Column Options section and set any of the following optional fields:
2. At List of Values set the following:
a. In the List of Values text box, enter a list of values that can be selected for this field. Setting this field will remove the user's ability to enter other values. E.g. 5;10;15;20;25;30
Note: You can enter values that are not decimals such as 1 or 2.333. In this case they will display as entered in the drop down list on the Edit Record page however they will
display as decimal values in the list - OR - Leave this field blank to enter any decimal values into a text box.
b. Select how the list options are displayed:
Drop Down List: Display values in a drop down selection list. This is useful when there are a lot of values.
Radio Button List (Vertical): Display values in a vertical list with radio buttons.
RBL (Horizontal): Display values in a horizontal list with radio buttons.
3. In the Output Format text box, enter a format for this number. E.g. 0.00
4. In the Default Value text box, enter the default value for this field. When creating a new row this value will automatically populate the field, however it can be changed.
5. In the Validation Rule text box, enter the required input pattern using the "Regular Expression" language. See MSDN Library for more on expressions.
6. In the Validation Message text box, enter the message to be displayed if the value entered is incorrect for the validation rule.
7. In the CSS Style text box, enter the Style which is applied on text box or list control in form. E.g. width:300px
8. In the Help Text text box, enter a help message to assist users when entering data for this column.
Setting the Advanced Options for a Decimal column
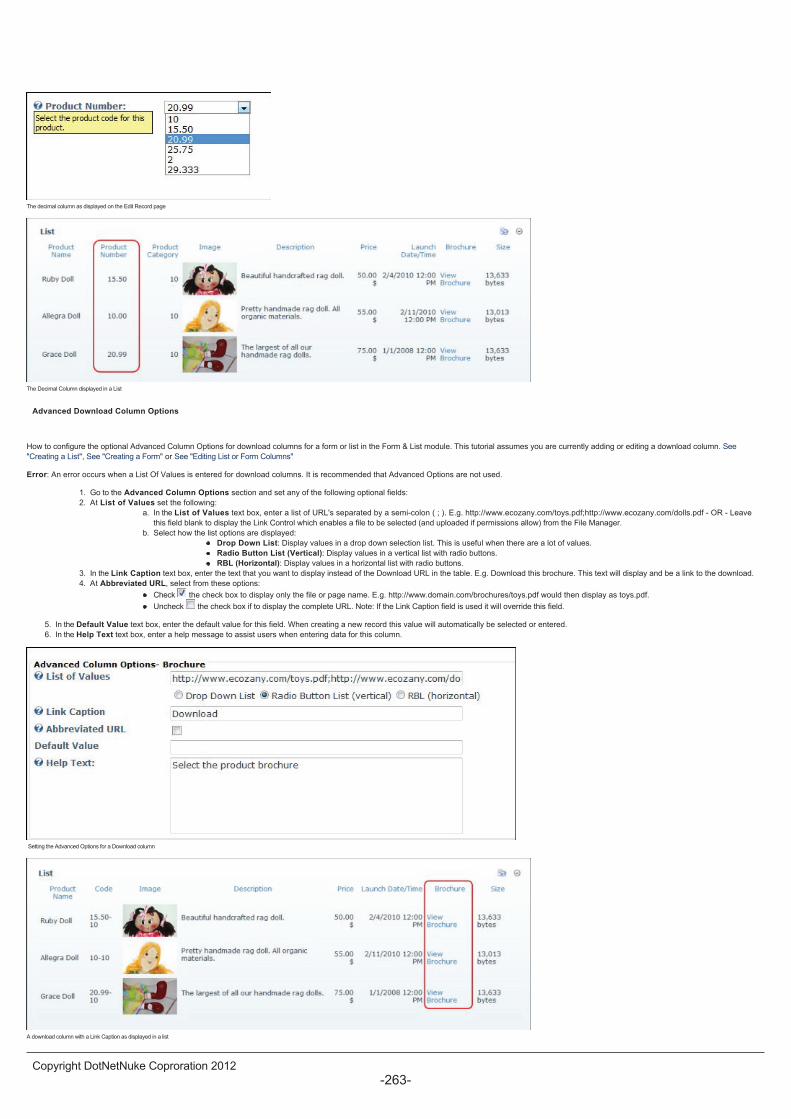
The decimal column as displayed on the Edit Record page
The Decimal Column displayed in a List
Advanced Download Column Options
How to configure the optional Advanced Column Options for download columns for a form or list in the Form & List module. This tutorial assumes you are currently adding or editing a download column. See
"Creating a List", See "Creating a Form" or See "Editing List or Form Columns"
Error: An error occurs when a List Of Values is entered for download columns. It is recommended that Advanced Options are not used.
1. Go to the Advanced Column Options section and set any of the following optional fields:
2. At List of Values set the following:
a. In the List of Values text box, enter a list of URL's separated by a semi-colon ( ; ). E.g. http://www.ecozany.com/toys.pdf;http://www.ecozany.com/dolls.pdf - OR - Leave
this field blank to display the Link Control which enables a file to be selected (and uploaded if permissions allow) from the File Manager.
b. Select how the list options are displayed:
Drop Down List: Display values in a drop down selection list. This is useful when there are a lot of values.
Radio Button List (Vertical): Display values in a vertical list with radio buttons.
RBL (Horizontal): Display values in a horizontal list with radio buttons.
3. In the Link Caption text box, enter the text that you want to display instead of the Download URL in the table. E.g. Download this brochure. This text will display and be a link to the download.
4. At Abbreviated URL, select from these options:
Check the check box to display only the file or page name. E.g. http://www.domain.com/brochures/toys.pdf would then display as toys.pdf.
Uncheck the check box if to display the complete URL. Note: If the Link Caption field is used it will override this field.
5. In the Default Value text box, enter the default value for this field. When creating a new record this value will automatically be selected or entered.
6. In the Help Text text box, enter a help message to assist users when entering data for this column.
Setting the Advanced Options for a Download column
A download column with a Link Caption as displayed in a list
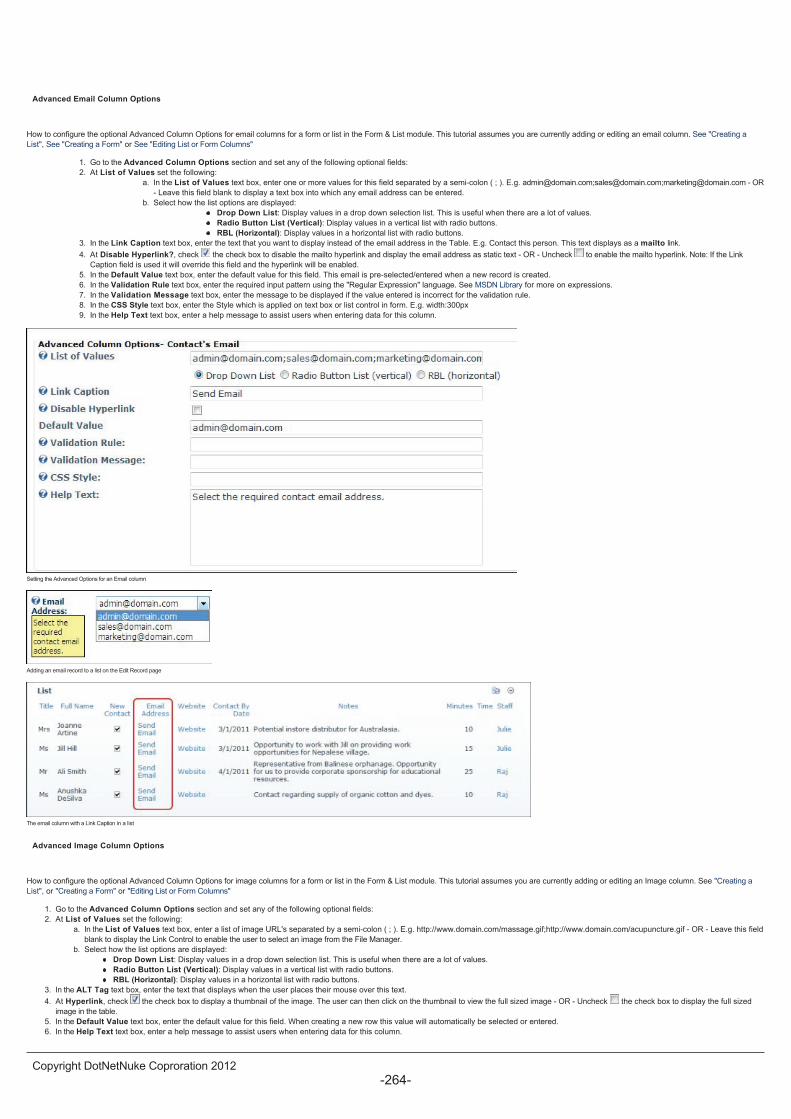
Advanced Email Column Options
How to configure the optional Advanced Column Options for email columns for a form or list in the Form & List module. This tutorial assumes you are currently adding or editing an email column. See "Creating a
List", See "Creating a Form" or See "Editing List or Form Columns"
1. Go to the Advanced Column Options section and set any of the following optional fields:
2. At List of Values set the following:
a. In the List of Values text box, enter one or more values for this field separated by a semi-colon ( ; ). E.g. [email protected];[email protected];[email protected] - OR
- Leave this field blank to display a text box into which any email address can be entered.
b. Select how the list options are displayed:
Drop Down List: Display values in a drop down selection list. This is useful when there are a lot of values.
Radio Button List (Vertical): Display values in a vertical list with radio buttons.
RBL (Horizontal): Display values in a horizontal list with radio buttons.
3. In the Link Caption text box, enter the text that you want to display instead of the email address in the Table. E.g. Contact this person. This text displays as a mailto link.
4. At Disable Hyperlink?, check the check box to disable the mailto hyperlink and display the email address as static text - OR - Uncheck to enable the mailto hyperlink. Note: If the Link
Caption field is used it will override this field and the hyperlink will be enabled.
5. In the Default Value text box, enter the default value for this field. This email is pre-selected/entered when a new record is created.
6. In the Validation Rule text box, enter the required input pattern using the "Regular Expression" language. See MSDN Library for more on expressions.
7. In the Validation Message text box, enter the message to be displayed if the value entered is incorrect for the validation rule.
8. In the CSS Style text box, enter the Style which is applied on text box or list control in form. E.g. width:300px
9. In the Help Text text box, enter a help message to assist users when entering data for this column.
Setting the Advanced Options for an Email column
Adding an email record to a list on the Edit Record page
The email column with a Link Caption in a list
Advanced Image Column Options
How to configure the optional Advanced Column Options for image columns for a form or list in the Form & List module. This tutorial assumes you are currently adding or editing an Image column. See "Creating a
List", or "Creating a Form" or "Editing List or Form Columns"
1. Go to the Advanced Column Options section and set any of the following optional fields:
2. At List of Values set the following:
a. In the List of Values text box, enter a list of image URL's separated by a semi-colon ( ; ). E.g. http://www.domain.com/massage.gif;http://www.domain.com/acupuncture.gif - OR - Leave this field
blank to display the Link Control to enable the user to select an image from the File Manager.
b. Select how the list options are displayed:
Drop Down List: Display values in a drop down selection list. This is useful when there are a lot of values.
Radio Button List (Vertical): Display values in a vertical list with radio buttons.
RBL (Horizontal): Display values in a horizontal list with radio buttons.
3. In the ALT Tag text box, enter the text that displays when the user places their mouse over this text.
4. At Hyperlink, check the check box to display a thumbnail of the image. The user can then click on the thumbnail to view the full sized image - OR - Uncheck the check box to display the full sized
image in the table.
5. In the Default Value text box, enter the default value for this field. When creating a new row this value will automatically be selected or entered.
6. In the Help Text text box, enter a help message to assist users when entering data for this column.
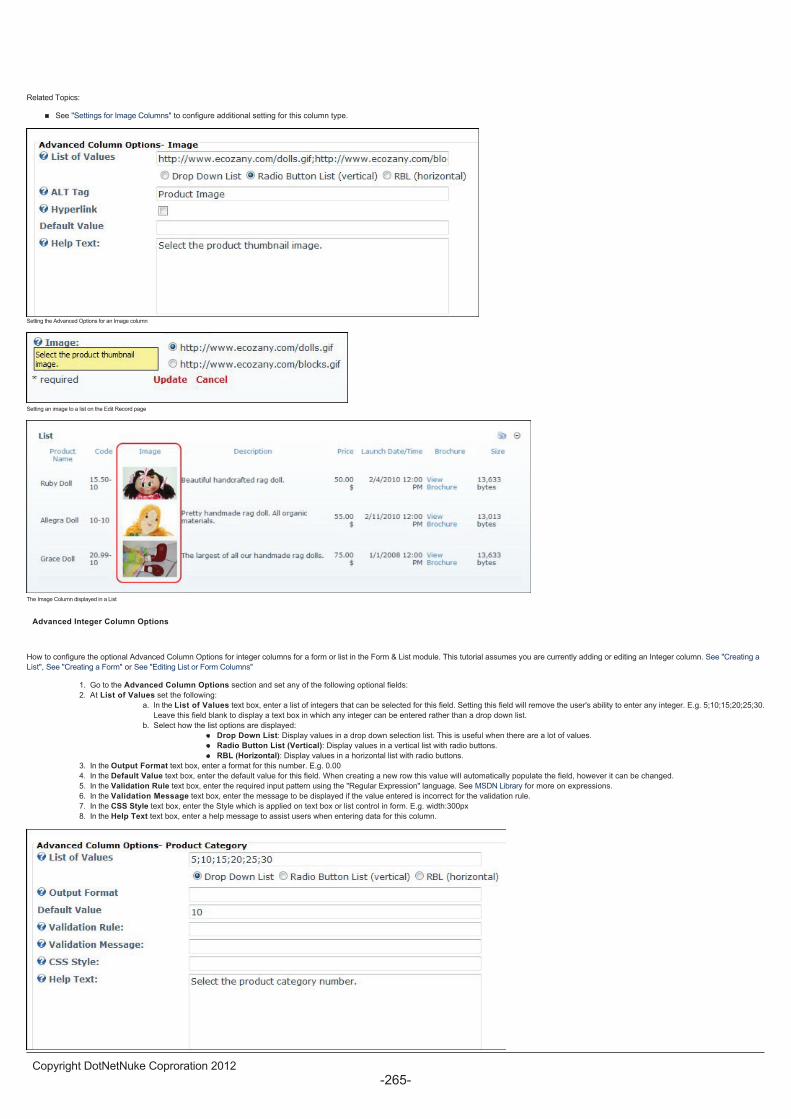
Related Topics:
See "Settings for Image Columns" to configure additional setting for this column type.
Setting the Advanced Options for an Image column
Setting an image to a list on the Edit Record page
The Image Column displayed in a List
Advanced Integer Column Options
How to configure the optional Advanced Column Options for integer columns for a form or list in the Form & List module. This tutorial assumes you are currently adding or editing an Integer column. See "Creating a
List", See "Creating a Form" or See "Editing List or Form Columns"
1. Go to the Advanced Column Options section and set any of the following optional fields:
2. At List of Values set the following:
a. In the List of Values text box, enter a list of integers that can be selected for this field. Setting this field will remove the user's ability to enter any integer. E.g. 5;10;15;20;25;30.
Leave this field blank to display a text box in which any integer can be entered rather than a drop down list.
b. Select how the list options are displayed:
Drop Down List: Display values in a drop down selection list. This is useful when there are a lot of values.
Radio Button List (Vertical): Display values in a vertical list with radio buttons.
RBL (Horizontal): Display values in a horizontal list with radio buttons.
3. In the Output Format text box, enter a format for this number. E.g. 0.00
4. In the Default Value text box, enter the default value for this field. When creating a new row this value will automatically populate the field, however it can be changed.
5. In the Validation Rule text box, enter the required input pattern using the "Regular Expression" language. See MSDN Library for more on expressions.
6. In the Validation Message text box, enter the message to be displayed if the value entered is incorrect for the validation rule.
7. In the CSS Style text box, enter the Style which is applied on text box or list control in form. E.g. width:300px
8. In the Help Text text box, enter a help message to assist users when entering data for this column.
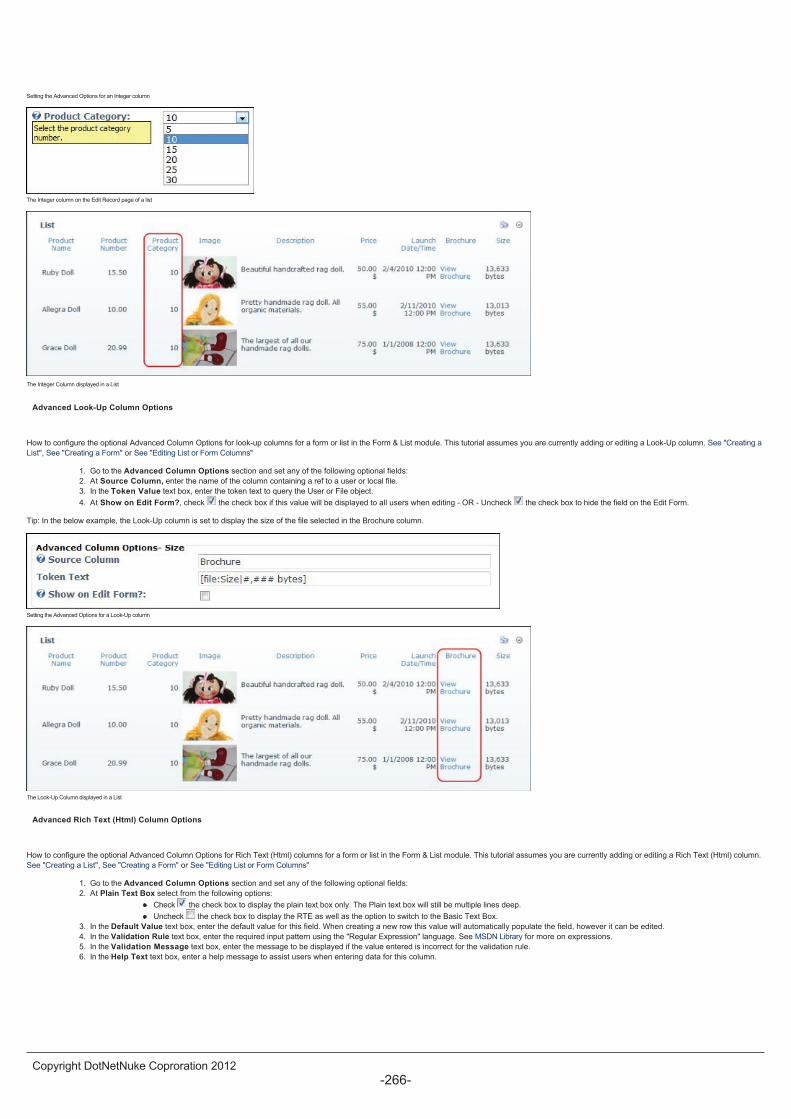
Setting the Advanced Options for an Integer column
The Integer column on the Edit Record page of a list
The Integer Column displayed in a List
Advanced Look-Up Column Options
How to configure the optional Advanced Column Options for look-up columns for a form or list in the Form & List module. This tutorial assumes you are currently adding or editing a Look-Up column. See "Creating a
List", See "Creating a Form" or See "Editing List or Form Columns"
1. Go to the Advanced Column Options section and set any of the following optional fields:
2. At Source Column, enter the name of the column containing a ref to a user or local file.
3. In the Token Value text box, enter the token text to query the User or File object.
4. At Show on Edit Form?, check the check box if this value will be displayed to all users when editing - OR - Uncheck the check box to hide the field on the Edit Form.
Tip: In the below example, the Look-Up column is set to display the size of the file selected in the Brochure column.
Setting the Advanced Options for a Look-Up column
The Look-Up Column displayed in a List
Advanced Rich Text (Html) Column Options
How to configure the optional Advanced Column Options for Rich Text (Html) columns for a form or list in the Form & List module. This tutorial assumes you are currently adding or editing a Rich Text (Html) column.
See "Creating a List", See "Creating a Form" or See "Editing List or Form Columns"
1. Go to the Advanced Column Options section and set any of the following optional fields:
2. At Plain Text Box select from the following options:
Check the check box to display the plain text box only. The Plain text box will still be multiple lines deep.
Uncheck the check box to display the RTE as well as the option to switch to the Basic Text Box.
3. In the Default Value text box, enter the default value for this field. When creating a new row this value will automatically populate the field, however it can be edited.
4. In the Validation Rule text box, enter the required input pattern using the "Regular Expression" language. See MSDN Library for more on expressions.
5. In the Validation Message text box, enter the message to be displayed if the value entered is incorrect for the validation rule.
6. In the Help Text text box, enter a help message to assist users when entering data for this column.
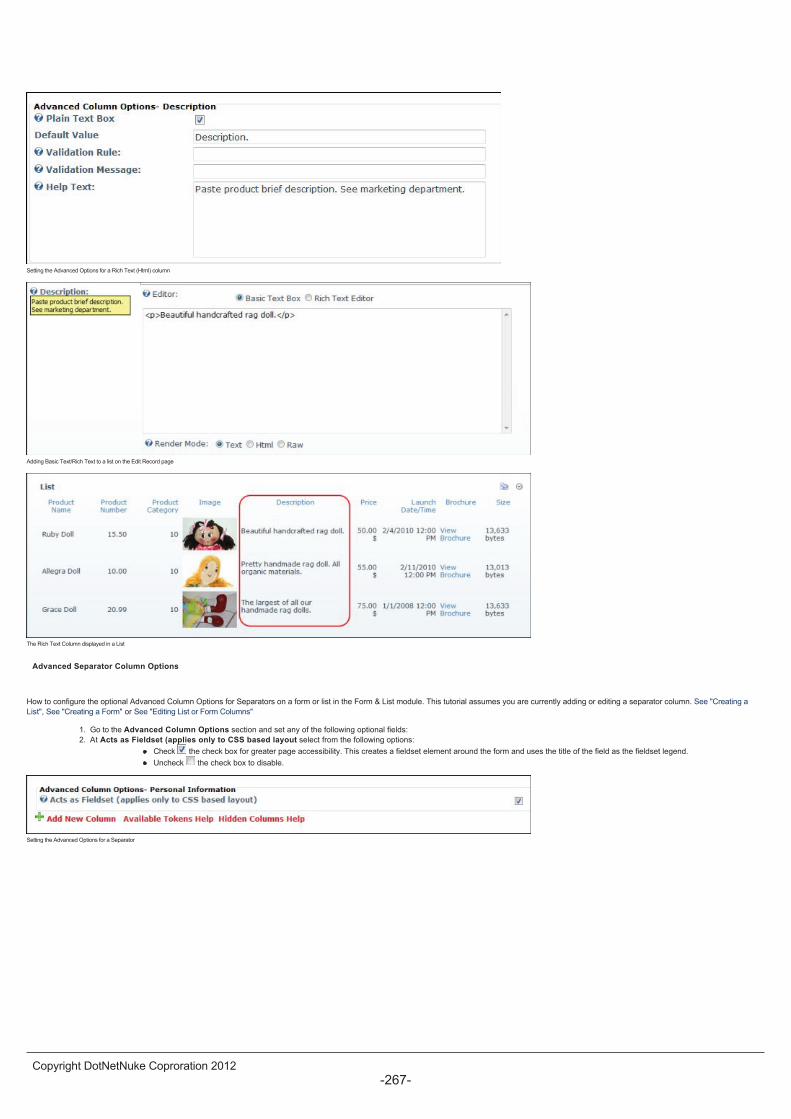
Setting the Advanced Options for a Rich Text (Html) column
Adding Basic Text/Rich Text to a list on the Edit Record page
The Rich Text Column displayed in a List
Advanced Separator Column Options
How to configure the optional Advanced Column Options for Separators on a form or list in the Form & List module. This tutorial assumes you are currently adding or editing a separator column. See "Creating a
List", See "Creating a Form" or See "Editing List or Form Columns"
1. Go to the Advanced Column Options section and set any of the following optional fields:
2. At Acts as Fieldset (applies only to CSS based layout select from the following options:
Check the check box for greater page accessibility. This creates a fieldset element around the form and uses the title of the field as the fieldset legend.
Uncheck the check box to disable.
Setting the Advanced Options for a Separator
Separators displayed on a Form
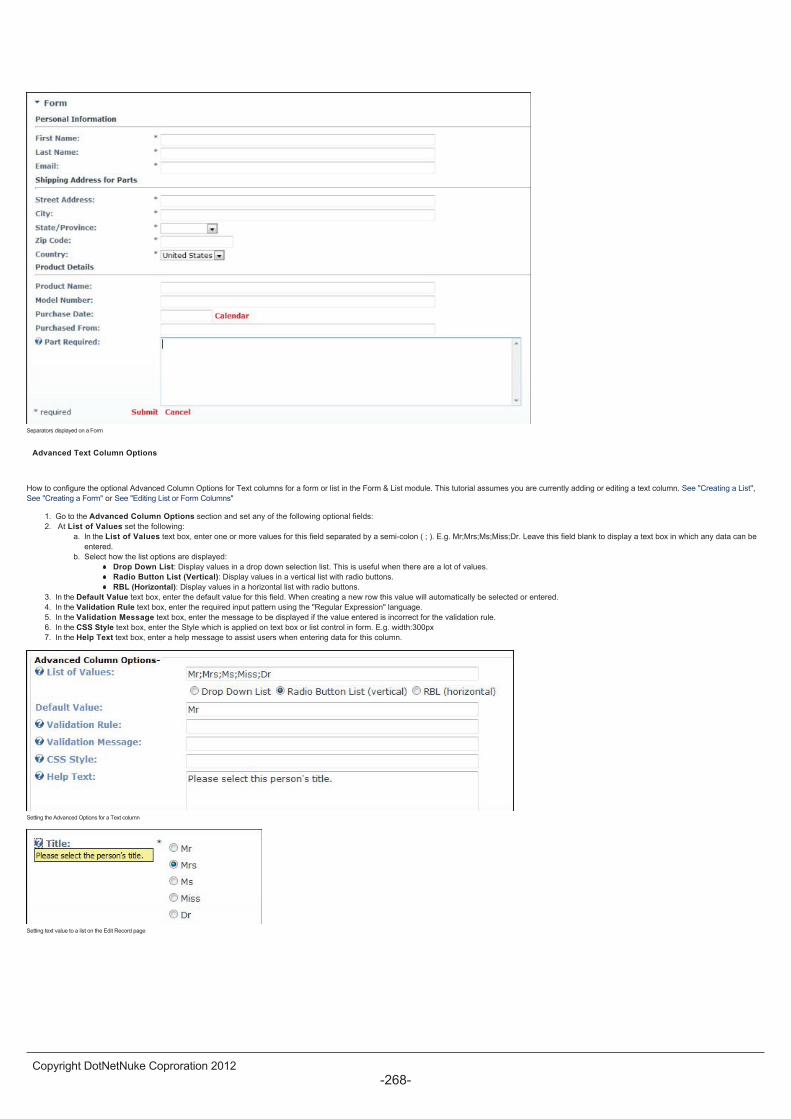
Advanced Text Column Options
How to configure the optional Advanced Column Options for Text columns for a form or list in the Form & List module. This tutorial assumes you are currently adding or editing a text column. See "Creating a List",
See "Creating a Form" or See "Editing List or Form Columns"
1. Go to the Advanced Column Options section and set any of the following optional fields:
2. At List of Values set the following:
a. In the List of Values text box, enter one or more values for this field separated by a semi-colon ( ; ). E.g. Mr;Mrs;Ms;Miss;Dr. Leave this field blank to display a text box in which any data can be
entered.
b. Select how the list options are displayed:
Drop Down List: Display values in a drop down selection list. This is useful when there are a lot of values.
Radio Button List (Vertical): Display values in a vertical list with radio buttons.
RBL (Horizontal): Display values in a horizontal list with radio buttons.
3. In the Default Value text box, enter the default value for this field. When creating a new row this value will automatically be selected or entered.
4. In the Validation Rule text box, enter the required input pattern using the "Regular Expression" language.
5. In the Validation Message text box, enter the message to be displayed if the value entered is incorrect for the validation rule.
6. In the CSS Style text box, enter the Style which is applied on text box or list control in form. E.g. width:300px
7. In the Help Text text box, enter a help message to assist users when entering data for this column.
Setting the Advanced Options for a Text column
Setting text value to a list on the Edit Record page
Text displayed on a Form
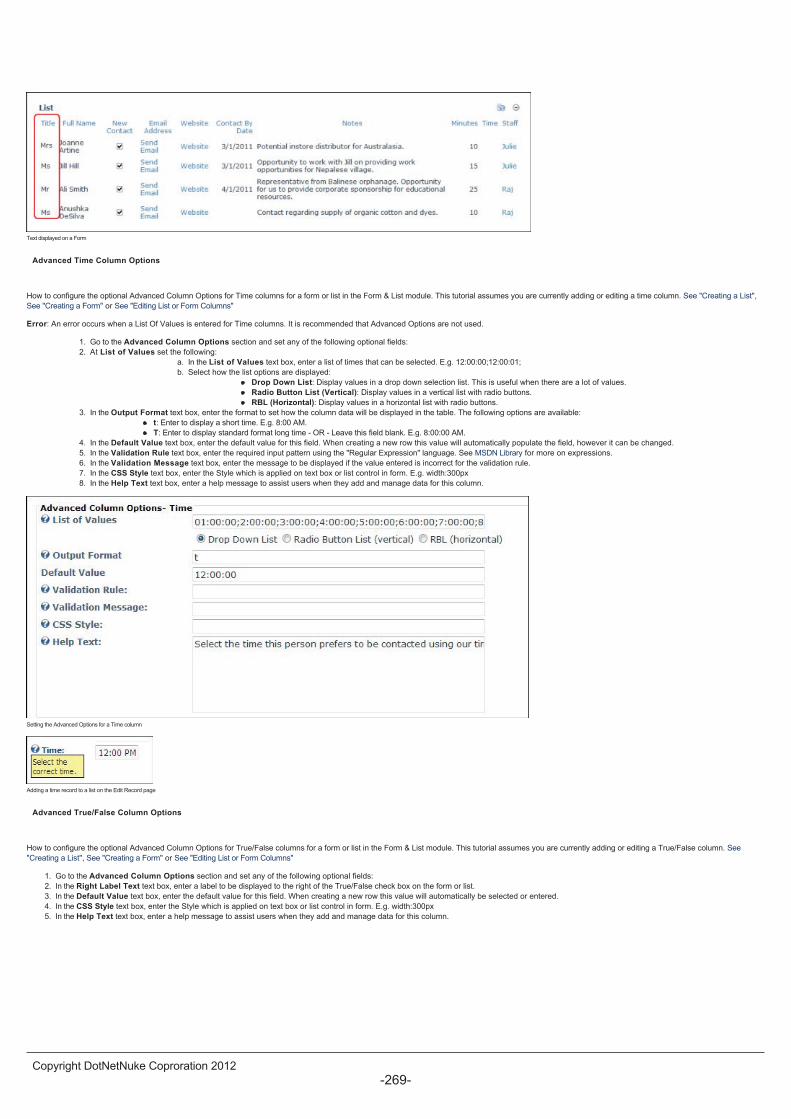
Advanced Time Column Options
How to configure the optional Advanced Column Options for Time columns for a form or list in the Form & List module. This tutorial assumes you are currently adding or editing a time column. See "Creating a List",
See "Creating a Form" or See "Editing List or Form Columns"
Error: An error occurs when a List Of Values is entered for Time columns. It is recommended that Advanced Options are not used.
1. Go to the Advanced Column Options section and set any of the following optional fields:
2. At List of Values set the following:
a. In the List of Values text box, enter a list of times that can be selected. E.g. 12:00:00;12:00:01;
b. Select how the list options are displayed:
Drop Down List: Display values in a drop down selection list. This is useful when there are a lot of values.
Radio Button List (Vertical): Display values in a vertical list with radio buttons.
RBL (Horizontal): Display values in a horizontal list with radio buttons.
3. In the Output Format text box, enter the format to set how the column data will be displayed in the table. The following options are available:
t: Enter to display a short time. E.g. 8:00 AM.
T: Enter to display standard format long time - OR - Leave this field blank. E.g. 8:00:00 AM.
4. In the Default Value text box, enter the default value for this field. When creating a new row this value will automatically populate the field, however it can be changed.
5. In the Validation Rule text box, enter the required input pattern using the "Regular Expression" language. See MSDN Library for more on expressions.
6. In the Validation Message text box, enter the message to be displayed if the value entered is incorrect for the validation rule.
7. In the CSS Style text box, enter the Style which is applied on text box or list control in form. E.g. width:300px
8. In the Help Text text box, enter a help message to assist users when they add and manage data for this column.
Setting the Advanced Options for a Time column
Adding a time record to a list on the Edit Record page
Advanced True/False Column Options
How to configure the optional Advanced Column Options for True/False columns for a form or list in the Form & List module. This tutorial assumes you are currently adding or editing a True/False column. See
"Creating a List", See "Creating a Form" or See "Editing List or Form Columns"
1. Go to the Advanced Column Options section and set any of the following optional fields:
2. In the Right Label Text text box, enter a label to be displayed to the right of the True/False check box on the form or list.
3. In the Default Value text box, enter the default value for this field. When creating a new row this value will automatically be selected or entered.
4. In the CSS Style text box, enter the Style which is applied on text box or list control in form. E.g. width:300px
5. In the Help Text text box, enter a help message to assist users when they add and manage data for this column.

Setting the Advanced Options for a True/False column
Adding a True/False record to a list on the Edit Record page
The True/False Column displayed in a List
Advanced URL Column Options
How to configure the optional Advanced Column Options for URL columns for a form or list in the Form & List module. This tutorial assumes you are currently adding or editing a URL column. See "Creating a List",
See "Creating a Form" or See "Editing List or Form Columns"
1. Go to the Advanced Column Options section and set any of the following optional fields:
2. At List of Values set the following:
a. List of Values text box, enter a list of URL's separated by a semi-colon ( ; ). E.g. http://www.domain.com/home.htm; http://www.domain.com/services.htm. Alternatively, leave this field blank to
display the Link Control which enables any URL, Page or File to be selected.
b. Select how the list options are displayed:
Drop Down List Display values in a drop down selection list. This is useful when there are a lot of values.
Radio Button List (Vertical): Display values in a vertical list with radio buttons.
RBL (Horizontal): Display values in a horizontal list with radio buttons.
3. In the Link Caption text box, enter the text that you want to display instead of the URL in the table. E.g. Visit this website. This text will then display as a mailto link.
4. At Abbreviated URL, check the check box to display only the file or page name. E.g. http://www.domain.com/home.htm would then display as home.htm - OR - Uncheck the check box if to display
the complete URL. Note: If the Link Caption field is used it will override this field.
5. In the Default Value text box, enter the default URL value for this field. When creating a new row this value will automatically be selected or entered.
6. In the Help Text text box, enter a help message to assist users when entering data for this column. See "Configuring URL Column Settings" to configure additional settings for this column type.
Setting the Advanced Options for a URL column
Adding a URL record to a list on the Edit Record page

The URL column displayed in a List
Advanced User Profile Link Column Options
userHow to configure the optional Advanced Column Options for Link To User's Profile columns for a form or list in the Form & List module. This tutorial assumes you are currently adding or editing a User Profile
Link column. See "Creating a List", or "Creating a Form" or "Editing List or Form Columns"
1. Go to the Advanced Column Options section and set any of the following optional fields:
2. At List of Values set the following:
a. In the List of Values text box, enter one or more usernames separated by a semi-colon ( ; ). E.g. Admin;Jack:Julie;. Where a non-existent username is entered it will not be displayed as an option.
Leave this field blank to display a text box into which any username can be entered.
b. Select how the list options are displayed:
Drop Down List: Display values in a drop down selection list. This is useful when you have a lot of values.
Radio Button List (Vertical): Display values in a vertical list with radio buttons.
RBL (Horizontal): Display values in a horizontal list with radio buttons.
3. In the Caption Options text box, enter the text to be displayed as the link for this user on the UDT. HTML formatting is permitted. Leave this field blank to display the user's name. Tip: Click the Available
Tokens Help link for more.
4. At Show User's Username Instead of his Displayname, check the check box to display username - OR - Uncheck to display the user's display name.
5. In the Default Value text box, enter the default value for this field. When creating a new row this value will automatically be selected or entered.
6. In the Help Text text box, enter a help message to assist users when they add and manage data for this column.
Related Topics
See "Settings for User Profile Links" to configure additional settings for this column type.
Setting the Advanced Options for a User Profile Link column
The Link to User's Profile column as displayed on the Edit Record page
The User Profile field displayed in a List
Column Settings
Configuring URL Column Settings
How to set URL columns in the Form & Lists module to display in the same or a new Web browser window.
1. Select Form and List Configuration from the Form and List module actions menu - OR - Click the Form and List Configuration button.
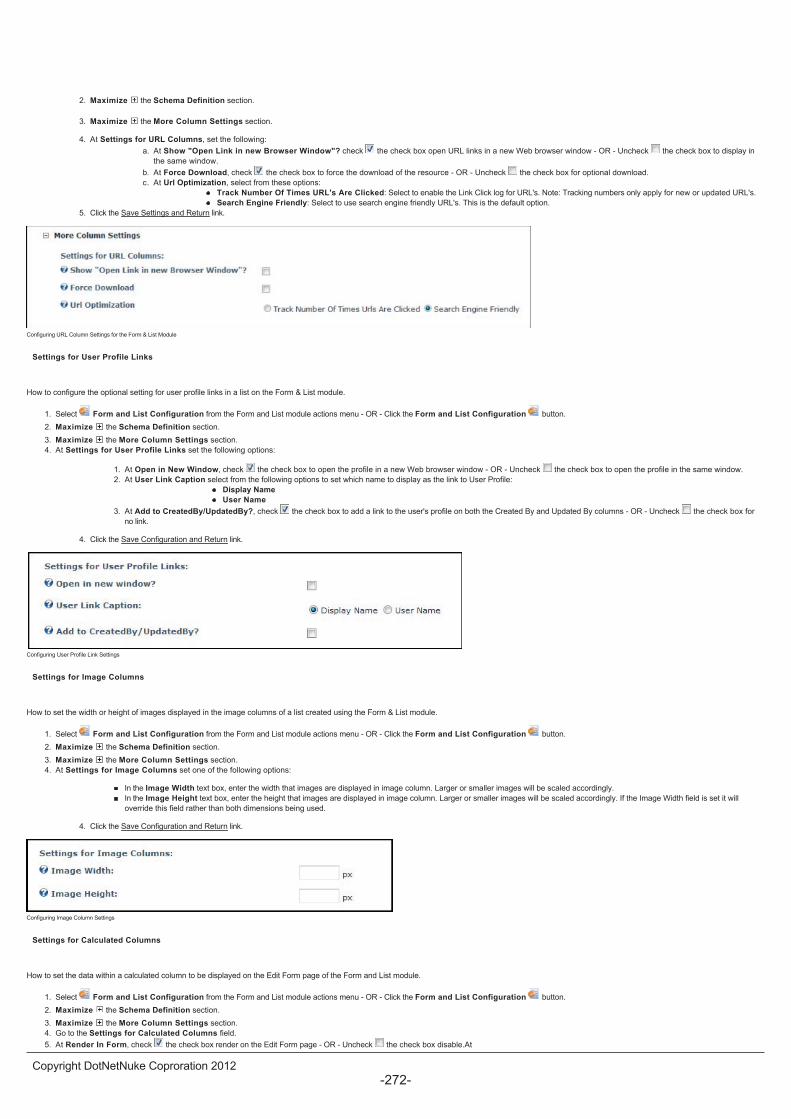
2. Maximize the Schema Definition section.
3. Maximize the More Column Settings section.
4. At Settings for URL Columns, set the following:
a. At Show "Open Link in new Browser Window"? check the check box open URL links in a new Web browser window - OR - Uncheck the check box to display in
the same window.
b. At Force Download, check the check box to force the download of the resource - OR - Uncheck the check box for optional download.
c. At Url Optimization, select from these options:
Track Number Of Times URL's Are Clicked: Select to enable the Link Click log for URL's. Note: Tracking numbers only apply for new or updated URL's.
Search Engine Friendly: Select to use search engine friendly URL's. This is the default option.
5. Click the Save Settings and Return link.
Configuring URL Column Settings for the Form & List Module
Settings for User Profile Links
How to configure the optional setting for user profile links in a list on the Form & List module.
1. Select Form and List Configuration from the Form and List module actions menu - OR - Click the Form and List Configuration button.
2. Maximize the Schema Definition section.
3. Maximize the More Column Settings section.
4. At Settings for User Profile Links set the following options:
1. At Open in New Window, check the check box to open the profile in a new Web browser window - OR - Uncheck the check box to open the profile in the same window.
2. At User Link Caption select from the following options to set which name to display as the link to User Profile:
Display Name
User Name
3. At Add to CreatedBy/UpdatedBy?, check the check box to add a link to the user's profile on both the Created By and Updated By columns - OR - Uncheck the check box for
no link.
4. Click the Save Configuration and Return link.
Configuring User Profile Link Settings
Settings for Image Columns
How to set the width or height of images displayed in the image columns of a list created using the Form & List module.
1. Select Form and List Configuration from the Form and List module actions menu - OR - Click the Form and List Configuration button.
2. Maximize the Schema Definition section.
3. Maximize the More Column Settings section.
4. At Settings for Image Columns set one of the following options:
In the Image Width text box, enter the width that images are displayed in image column. Larger or smaller images will be scaled accordingly.
In the Image Height text box, enter the height that images are displayed in image column. Larger or smaller images will be scaled accordingly. If the Image Width field is set it will
override this field rather than both dimensions being used.
4. Click the Save Configuration and Return link.
Configuring Image Column Settings
Settings for Calculated Columns
How to set the data within a calculated column to be displayed on the Edit Form page of the Form and List module.
1. Select Form and List Configuration from the Form and List module actions menu - OR - Click the Form and List Configuration button.
2. Maximize the Schema Definition section.
3. Maximize the More Column Settings section.
4. Go to the Settings for Calculated Columns field.
5. At Render In Form, check the check box render on the Edit Form page - OR - Uncheck the check box disable.At
6. Click the Save Configuration and Return link.
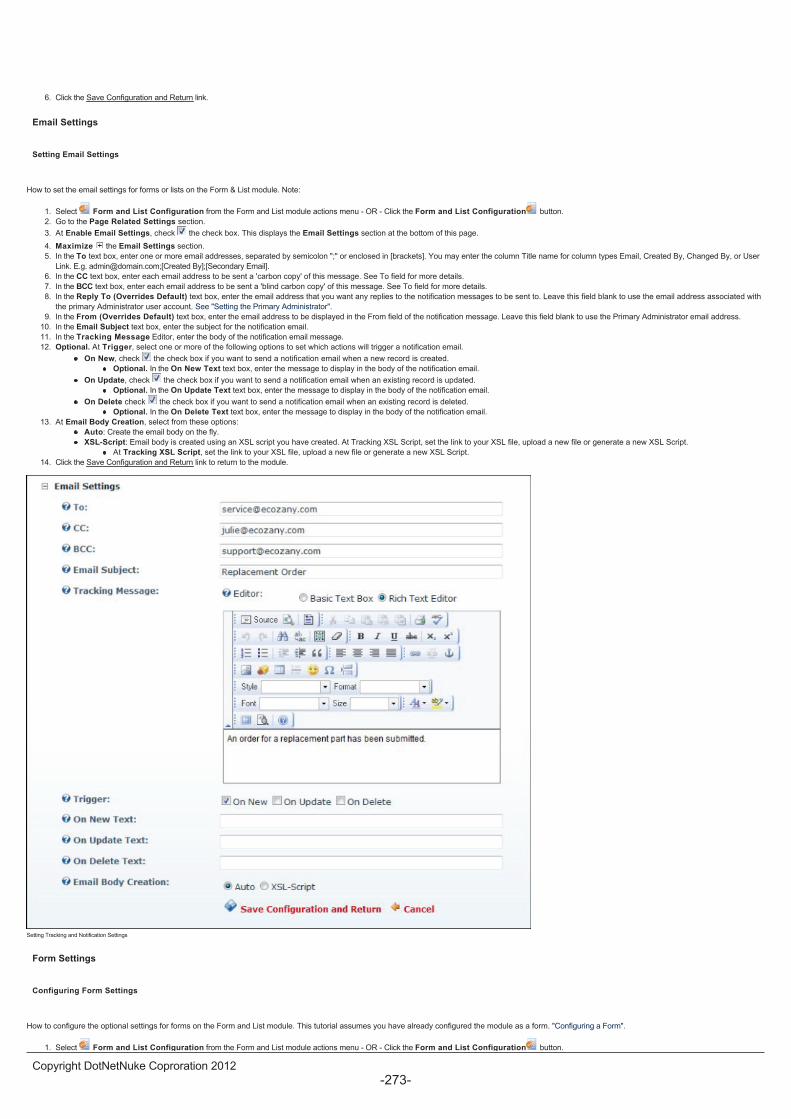
Email Settings
Setting Email Settings
How to set the email settings for forms or lists on the Form & List module. Note:
1. Select Form and List Configuration from the Form and List module actions menu - OR - Click the Form and List Configuration button.
2. Go to the Page Related Settings section.
3. At Enable Email Settings, check the check box. This displays the Email Settings section at the bottom of this page.
4. Maximize the Email Settings section.
5. In the To text box, enter one or more email addresses, separated by semicolon ";" or enclosed in [brackets]. You may enter the column Title name for column types Email, Created By, Changed By, or User
Link. E.g. [email protected];[Created By];[Secondary Email].
6. In the CC text box, enter each email address to be sent a 'carbon copy' of this message. See To field for more details.
7. In the BCC text box, enter each email address to be sent a 'blind carbon copy' of this message. See To field for more details.
8. In the Reply To (Overrides Default) text box, enter the email address that you want any replies to the notification messages to be sent to. Leave this field blank to use the email address associated with
the primary Administrator user account. See "Setting the Primary Administrator".
9. In the From (Overrides Default) text box, enter the email address to be displayed in the From field of the notification message. Leave this field blank to use the Primary Administrator email address.
10. In the Email Subject text box, enter the subject for the notification email.
11. In the Tracking Message Editor, enter the body of the notification email message.
12. Optional. At Trigger, select one or more of the following options to set which actions will trigger a notification email.
On New, check the check box if you want to send a notification email when a new record is created.
Optional. In the On New Text text box, enter the message to display in the body of the notification email.
On Update, check the check box if you want to send a notification email when an existing record is updated.
Optional. In the On Update Text text box, enter the message to display in the body of the notification email.
On Delete check the check box if you want to send a notification email when an existing record is deleted.
Optional. In the On Delete Text text box, enter the message to display in the body of the notification email.
13. At Email Body Creation, select from these options:
Auto: Create the email body on the fly.
XSL-Script: Email body is created using an XSL script you have created. At Tracking XSL Script, set the link to your XSL file, upload a new file or generate a new XSL Script.
At Tracking XSL Script, set the link to your XSL file, upload a new file or generate a new XSL Script.
14. Click the Save Configuration and Return link to return to the module.
Setting Tracking and Notification Settings
Form Settings
Configuring Form Settings
How to configure the optional settings for forms on the Form and List module. This tutorial assumes you have already configured the module as a form. "Configuring a Form".
1. Select Form and List Configuration from the Form and List module actions menu - OR - Click the Form and List Configuration button.
2. Maximize the Form Settings section and complete these optional settings. If these settings are not configured the default options are applied.
a. At Action Upon Submit select from these options to set what happens once the form is submitted:
Show Form and Text: Displays both the form and the text (as entered into the below Editor) on the page.
Show Text only: Displays the text (as entered into the below Editor) on the page.
Redirect to another page: Redirects the user to any internal or external page.
i. At Redirect Upon Submit, set the redirection link. See "Setting a Page Link", "Setting a URL Link" or "Selecting an Existing URL Link".
3. In the Displayed text after form post Editor, enter the text to be displayed on form after is has been submitted. This option on not require if Redirect To Another Page is selected.
4. Click the Save Configuration and Return link to return to the module.
Configuring Form Settings
List Settings
Editing Current XSL Script
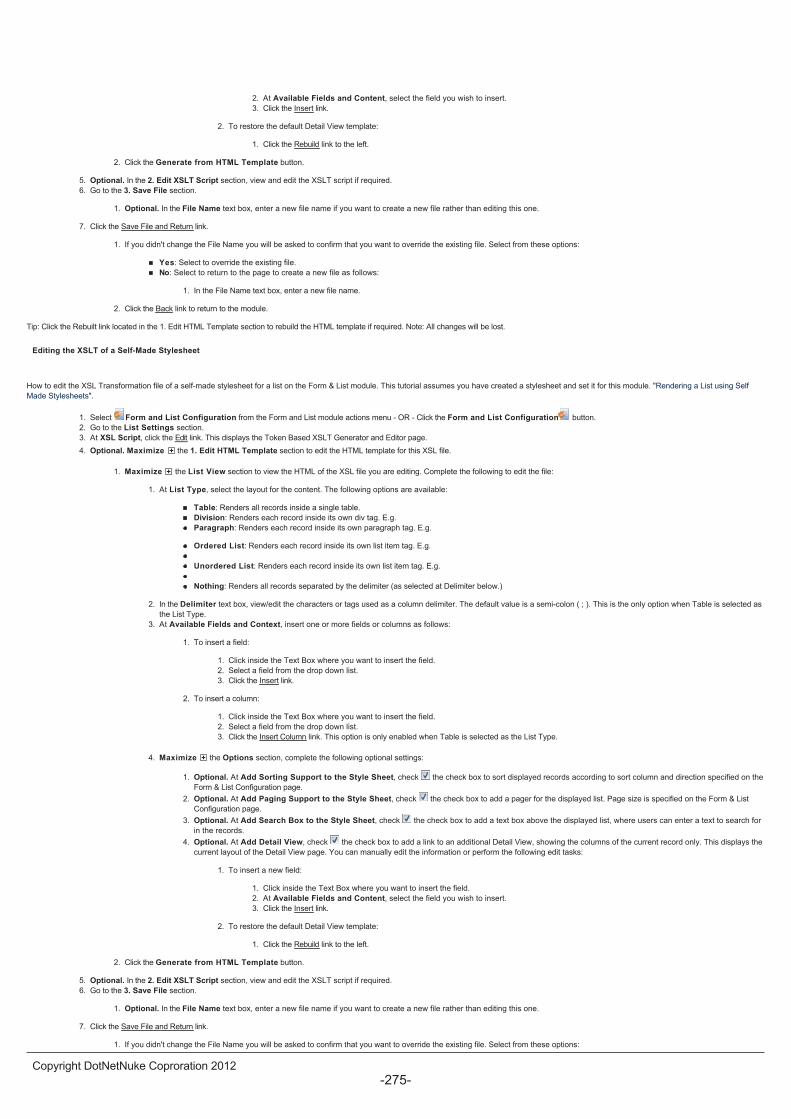
How to edit the XSL Transformation file of a self-made stylesheet for a list on the Form & List module. This tutorial assumes you have created a stylesheet and set it for this module. "Rendering a List using Self
Made Stylesheets".
1. Select Edit Current XSL Script from the Form and List module actions menu. This opens the Token Based XSLT Generator and Editor page.
2. Optional. Maximize the 1. Edit HTML Template section to edit the HTML template for this XSL file.
1. Maximize the List View section to view the HTML of the XSL file you are editing. Complete the following to edit the file:
1. At List Type, select the layout for the content. The following options are available:
Table: Renders all records inside a single table.
Division: Renders each record inside its own div tag. E.g. < div >
Paragraph: Renders each record inside its own paragraph tag. E.g. < p >
Ordered List: Renders each record inside its own list item tag. E.g. < li >
Unordered List: Renders each record inside its own list item tag. E.g. < li >
Nothing: Renders all records separated by the delimiter (as selected at Delimiter below.)
2. In the Delimiter text box, view/edit the characters or tags used as a column delimiter. The default value is a semi-colon ( ; ). This is the only option when Table is selected as
the List Type.
3. At Available Fields and Context, insert one or more fields or columns as follows:
1. To insert a field:
1. Click inside the Text Box where you want to insert the field.
2. Select a field from the drop down list.
3. Click the Insert link.
2. To insert a column:
1. Click inside the Text Box where you want to insert the field.
2. Select a field from the drop down list.
3. Click the Insert Column link. This option is only enabled when Table is selected as the List Type.
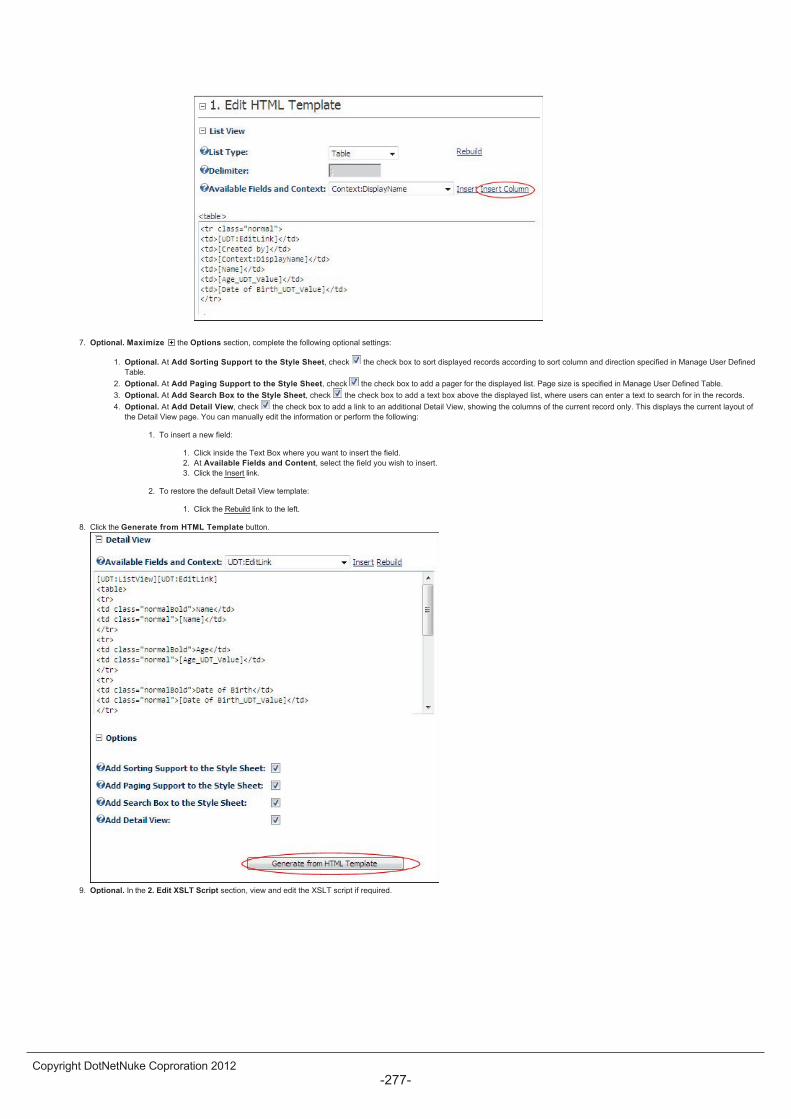
4. Maximize the Options section, complete the following optional settings:
1. Optional. At Add Sorting Support to the Style Sheet, check the check box to sort displayed records according to sort column and direction specified on the
Form & List Configuration page.
2. Optional. At Add Paging Support to the Style Sheet, check the check box to add a pager for the displayed list. Page size is specified on the Form & List
Configuration page.
3. Optional. At Add Search Box to the Style Sheet, check the check box to add a text box above the displayed list, where users can enter a text to search for
in the records.
4. Optional. At Add Detail View, check the check box to add a link to an additional Detail View, showing the columns of the current record only. This displays the
current layout of the Detail View page. You can manually edit the information or perform the following edit tasks:
1. To insert a new field:
1. Click inside the Text Box where you want to insert the field.
2. At Available Fields and Content, select the field you wish to insert.
3. Click the Insert link.
2. To restore the default Detail View template:
1. Click the Rebuild link to the left.
2. Click the Generate from HTML Template button.
5. Optional. In the 2. Edit XSLT Script section, view and edit the XSLT script if required.
6. Go to the 3. Save File section.
1. Optional. In the File Name text box, enter a new file name if you want to create a new file rather than editing this one.
7. Click the Save File and Return link.
1. If you didn't change the File Name you will be asked to confirm that you want to override the existing file. Select from these options:
Yes: Select to override the existing file.
No: Select to return to the page to create a new file as follows:
1. In the File Name text box, enter a new file name.
2. Click the Back link to return to the module.
Tip: Click the Rebuilt link located in the 1. Edit HTML Template section to rebuild the HTML template if required. Note: All changes will be lost.
Editing the XSLT of a Self-Made Stylesheet
How to edit the XSL Transformation file of a self-made stylesheet for a list on the Form & List module. This tutorial assumes you have created a stylesheet and set it for this module. "Rendering a List using Self
Made Stylesheets".
1. Select Form and List Configuration from the Form and List module actions menu - OR - Click the Form and List Configuration button.
2. Go to the List Settings section.
3. At XSL Script, click the Edit link. This displays the Token Based XSLT Generator and Editor page.
4. Optional. Maximize the 1. Edit HTML Template section to edit the HTML template for this XSL file.
1. Maximize the List View section to view the HTML of the XSL file you are editing. Complete the following to edit the file:
1. At List Type, select the layout for the content. The following options are available:
Table: Renders all records inside a single table.
Division: Renders each record inside its own div tag. E.g.
Paragraph: Renders each record inside its own paragraph tag. E.g.
Ordered List: Renders each record inside its own list item tag. E.g.
Unordered List: Renders each record inside its own list item tag. E.g.
Nothing: Renders all records separated by the delimiter (as selected at Delimiter below.)
2. In the Delimiter text box, view/edit the characters or tags used as a column delimiter. The default value is a semi-colon ( ; ). This is the only option when Table is selected as
the List Type.
3. At Available Fields and Context, insert one or more fields or columns as follows:
1. To insert a field:
1. Click inside the Text Box where you want to insert the field.
2. Select a field from the drop down list.
3. Click the Insert link.
2. To insert a column:
1. Click inside the Text Box where you want to insert the field.
2. Select a field from the drop down list.
3. Click the Insert Column link. This option is only enabled when Table is selected as the List Type.
4. Maximize the Options section, complete the following optional settings:
1. Optional. At Add Sorting Support to the Style Sheet, check the check box to sort displayed records according to sort column and direction specified on the
Form & List Configuration page.
2. Optional. At Add Paging Support to the Style Sheet, check the check box to add a pager for the displayed list. Page size is specified on the Form & List
Configuration page.
3. Optional. At Add Search Box to the Style Sheet, check the check box to add a text box above the displayed list, where users can enter a text to search for
in the records.
4. Optional. At Add Detail View, check the check box to add a link to an additional Detail View, showing the columns of the current record only. This displays the
current layout of the Detail View page. You can manually edit the information or perform the following edit tasks:
1. To insert a new field:
1. Click inside the Text Box where you want to insert the field.
2. At Available Fields and Content, select the field you wish to insert.
3. Click the Insert link.
2. To restore the default Detail View template:
1. Click the Rebuild link to the left.
2. Click the Generate from HTML Template button.
5. Optional. In the 2. Edit XSLT Script section, view and edit the XSLT script if required.
6. Go to the 3. Save File section.
1. Optional. In the File Name text box, enter a new file name if you want to create a new file rather than editing this one.
7. Click the Save File and Return link.
1. If you didn't change the File Name you will be asked to confirm that you want to override the existing file. Select from these options:
Yes: Select to override the existing file.
No: Select to return to the page to create a new file as follows:
1. In the File Name text box, enter a new file name.
2. Click the Save Configuration and Return link to continue.
Tip: Click the Rebuilt link located in the 1. Edit HTML Template section to rebuild the HTML template if required. Note: All changes will be lost.
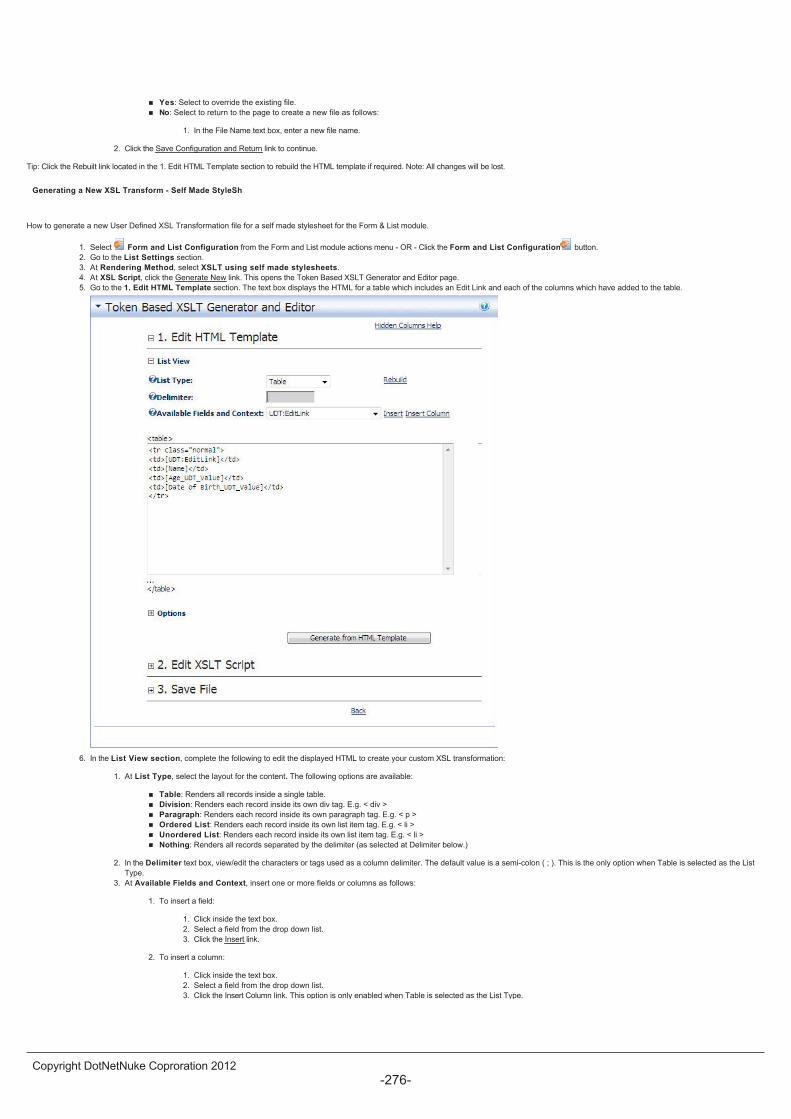
Generating a New XSL Transform - Self Made StyleSh
How to generate a new User Defined XSL Transformation file for a self made stylesheet for the Form & List module.
1. Select Form and List Configuration from the Form and List module actions menu - OR - Click the Form and List Configuration button.
2. Go to the List Settings section.
3. At Rendering Method, select XSLT using self made stylesheets.
4. At XSL Script, click the Generate New link. This opens the Token Based XSLT Generator and Editor page.
5. Go to the 1. Edit HTML Template section. The text box displays the HTML for a table which includes an Edit Link and each of the columns which have added to the table.
6. In the List View section, complete the following to edit the displayed HTML to create your custom XSL transformation:
1. At List Type, select the layout for the content. The following options are available:
Table: Renders all records inside a single table.
Division: Renders each record inside its own div tag. E.g. < div >
Paragraph: Renders each record inside its own paragraph tag. E.g. < p >
Ordered List: Renders each record inside its own list item tag. E.g. < li >
Unordered List: Renders each record inside its own list item tag. E.g. < li >
Nothing: Renders all records separated by the delimiter (as selected at Delimiter below.)
2. In the Delimiter text box, view/edit the characters or tags used as a column delimiter. The default value is a semi-colon ( ; ). This is the only option when Table is selected as the List
Type.
3. At Available Fields and Context, insert one or more fields or columns as follows:
1. To insert a field:
1. Click inside the text box.
2. Select a field from the drop down list.
3. Click the Insert link.
2. To insert a column:
1. Click inside the text box.
2. Select a field from the drop down list.
3. Click the Insert Column link. This option is only enabled when Table is selected as the List Type.
7. Optional. Maximize the Options section, complete the following optional settings:
1. Optional. At Add Sorting Support to the Style Sheet, check the check box to sort displayed records according to sort column and direction specified in Manage User Defined
Table.
2. Optional. At Add Paging Support to the Style Sheet, check the check box to add a pager for the displayed list. Page size is specified in Manage User Defined Table.
3. Optional. At Add Search Box to the Style Sheet, check the check box to add a text box above the displayed list, where users can enter a text to search for in the records.
4. Optional. At Add Detail View, check the check box to add a link to an additional Detail View, showing the columns of the current record only. This displays the current layout of
the Detail View page. You can manually edit the information or perform the following:
1. To insert a new field:
1. Click inside the Text Box where you want to insert the field.
2. At Available Fields and Content, select the field you wish to insert.
3. Click the Insert link.
2. To restore the default Detail View template:
1. Click the Rebuild link to the left.
8. Click the Generate from HTML Template button.
9. Optional. In the 2. Edit XSLT Script section, view and edit the XSLT script if required.

10. Go to the 3. Save File section.
1. In the File Name text box, enter a file name.
2. Click the Save File and Return link.
11. Click the Save Configuration and Return link to return to the module.
Tip: Click the Rebuilt link in the 1. Edit HTML Template section to rebuild the HTML template if required. Note: All changes will be lost.
The new user defined XSL transformation
Rendering a List using built-in Stylesheets
How to render list using one of the built-in stylesheets on the Forms & Lists module.
1. Select Form and List Configuration from the module actions menu - OR - Click the Form and List Configuration button.
2. Maximize the List Settings section.
3. At Rendering Method, select XSLT using built-in stylesheets.
4. At XSL Script, select one of the following designs:
Advanced Table: Includes search box and detailed view.
(Image One below shows the Advanced Table, and Image Two shows the detailed view accessed when clicking on the View button)

Basic Table (pictured below): Similar to the default grid table however this table does not have column sorting or paging.
Card View (pictured below): Records displayed in cards.
Only Own Items (pictured below): Users can only see their own items.
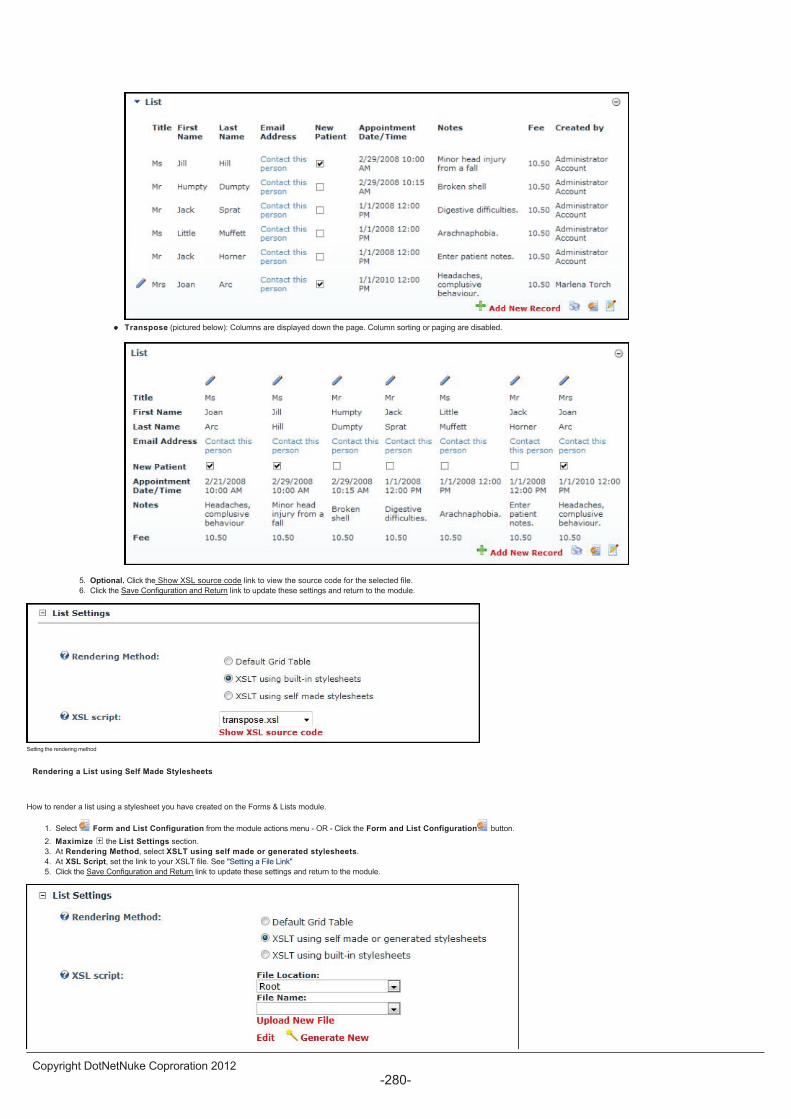
Transpose (pictured below): Columns are displayed down the page. Column sorting or paging are disabled.
5. Optional. Click the Show XSL source code link to view the source code for the selected file.
6. Click the Save Configuration and Return link to update these settings and return to the module.
Setting the rendering method
Rendering a List using Self Made Stylesheets
How to render a list using a stylesheet you have created on the Forms & Lists module.
1. Select Form and List Configuration from the module actions menu - OR - Click the Form and List Configuration button.
2. Maximize the List Settings section.
3. At Rendering Method, select XSLT using self made or generated stylesheets.
4. At XSL Script, set the link to your XSLT file. See "Setting a File Link"
5. Click the Save Configuration and Return link to update these settings and return to the module.
Rendering a List using Self Made Stylesheets
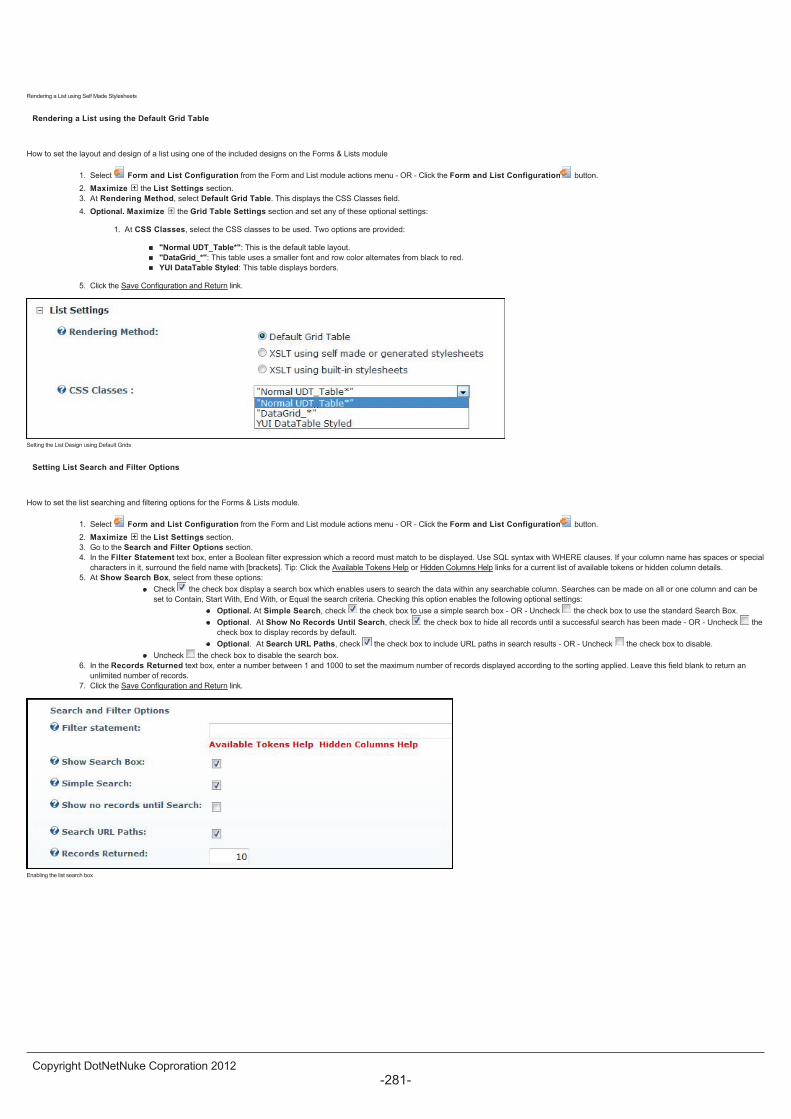
Rendering a List using the Default Grid Table
How to set the layout and design of a list using one of the included designs on the Forms & Lists module
1. Select Form and List Configuration from the Form and List module actions menu - OR - Click the Form and List Configuration button.
2. Maximize the List Settings section.
3. At Rendering Method, select Default Grid Table. This displays the CSS Classes field.
4. Optional. Maximize the Grid Table Settings section and set any of these optional settings:
1. At CSS Classes, select the CSS classes to be used. Two options are provided:
"Normal UDT_Table*": This is the default table layout.
"DataGrid_*": This table uses a smaller font and row color alternates from black to red.
YUI DataTable Styled: This table displays borders.
5. Click the Save Configuration and Return link.
Setting the List Design using Default Grids
Setting List Search and Filter Options
How to set the list searching and filtering options for the Forms & Lists module.
1. Select Form and List Configuration from the Form and List module actions menu - OR - Click the Form and List Configuration button.
2. Maximize the List Settings section.
3. Go to the Search and Filter Options section.
4. In the Filter Statement text box, enter a Boolean filter expression which a record must match to be displayed. Use SQL syntax with WHERE clauses. If your column name has spaces or special
characters in it, surround the field name with [brackets]. Tip: Click the Available Tokens Help or Hidden Columns Help links for a current list of available tokens or hidden column details.
5. At Show Search Box, select from these options:
Check the check box display a search box which enables users to search the data within any searchable column. Searches can be made on all or one column and can be
set to Contain, Start With, End With, or Equal the search criteria. Checking this option enables the following optional settings:
Optional. At Simple Search, check the check box to use a simple search box - OR - Uncheck the check box to use the standard Search Box.
Optional. At Show No Records Until Search, check the check box to hide all records until a successful search has been made - OR - Uncheck the
check box to display records by default.
Optional. At Search URL Paths, check the check box to include URL paths in search results - OR - Uncheck the check box to disable.
Uncheck the check box to disable the search box.
6. In the Records Returned text box, enter a number between 1 and 1000 to set the maximum number of records displayed according to the sorting applied. Leave this field blank to return an
unlimited number of records.
7. Click the Save Configuration and Return link.
Enabling the list search box
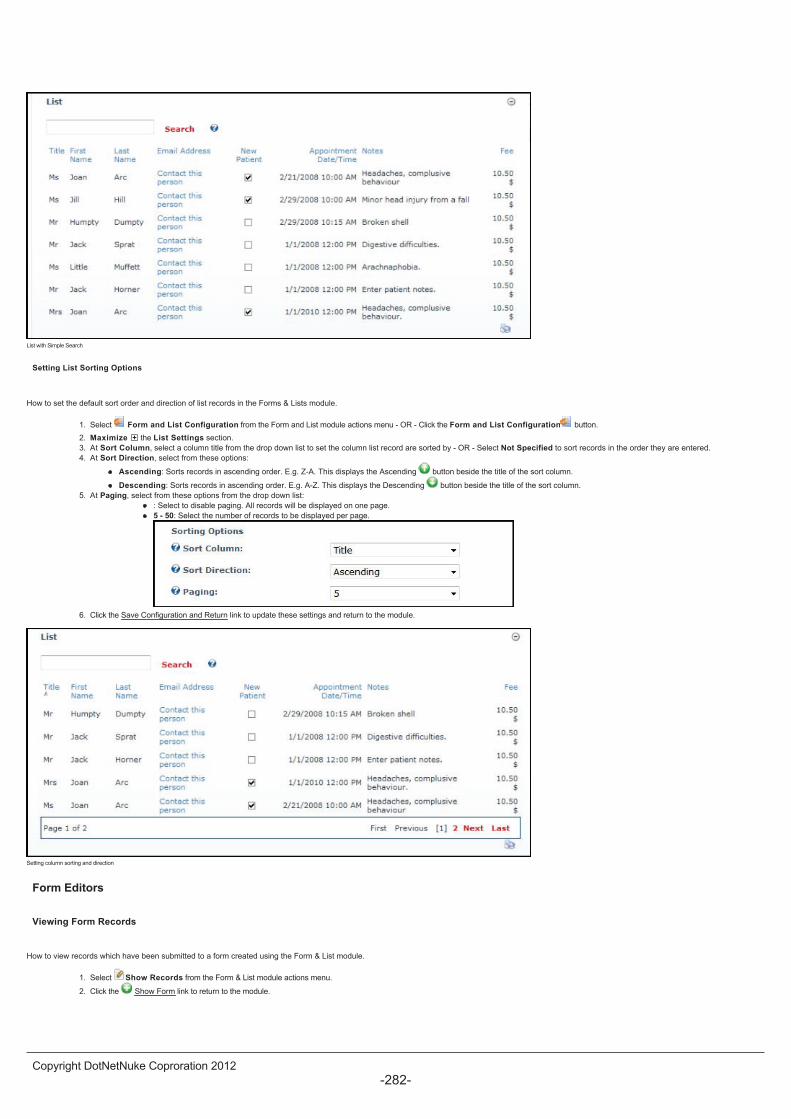
List with Simple Search
Setting List Sorting Options
How to set the default sort order and direction of list records in the Forms & Lists module.
1. Select Form and List Configuration from the Form and List module actions menu - OR - Click the Form and List Configuration button.
2. Maximize the List Settings section.
3. At Sort Column, select a column title from the drop down list to set the column list record are sorted by - OR - Select Not Specified to sort records in the order they are entered.
4. At Sort Direction, select from these options:
Ascending: Sorts records in ascending order. E.g. Z-A. This displays the Ascending button beside the title of the sort column.
Descending: Sorts records in ascending order. E.g. A-Z. This displays the Descending button beside the title of the sort column.
5. At Paging, select from these options from the drop down list:
: Select to disable paging. All records will be displayed on one page.
5 - 50: Select the number of records to be displayed per page.
6. Click the Save Configuration and Return link to update these settings and return to the module.
Setting column sorting and direction
Form Editors
Viewing Form Records
How to view records which have been submitted to a form created using the Form & List module.
1. Select Show Records from the Form & List module actions menu.
2. Click the Show Form link to return to the module.
Viewing Form Records
Editing Form Records
How to view and edit records which have been submitted to a form created using the Form & List module.
1. Select Show Records from the Form & List module actions menu.
2. Click the Edit button beside the record to be edited.
3. Edit the record as required.
4. Click the Submit link. This displays the "Your submission was successful." message.
Editing a form record
List Editors
Overview of Data Types
There are a number of different types of data that can be entered into a field when adding a record to a list created using the Form & List module. Here is an overview of these types of data:
Calculated Column: This field permits an ASP.NET developer to write code to display data that is calculated.
Currency: Enter an amount into the text box. The currency type is displayed to the right of the text box. The currency type is set under Admin > Site Settings.
Date and Time, Date, or Time: The Date fields displays a Calendar link allowing users to select a date. The Time provides a text box to enter the time. Any of the below date formats are also
acceptable, however I recommend using the Calendar link to avoid confusion:
12 February 2004
12 Feb 2004
Feb 12 2004
Feb 12, 2004
2/12/2004
Any of the below time formats are acceptable and will display as 11:00 PM:
11pm
11:00pm
23:00
Decimal: Whole numbers and numbers with a decimal point can be entered. Numbers containing a decimal point will be rounded up to the nearest two decimal point value. Numbers can be
positive, negative or zero. E.g. 8.458 will be displayed as 8.46 on the module however it will display as 8.458 in edit mode.
Email: Any a valid email address can be entered.
Image: Select or upload an image using the Link tool for files.
Integer: Only whole numbers can be entered into an integer field. Numbers can be positive, negative or zero amounts. E.g. 8, -8, 0

Text: Any keyboard characters can be entered into a text field.
True/False: Check the check box to display the True icon - OR - Uncheck the check box to display the False icon.
URL: Select or enter a URL using the Link tool. Any valid URL can be entered or a Page or File selected. Use the settings on the Manage User Defined Table page to set whether http:// is
displayed for URL's.
User Profile: Enter the username of a registered user. E.g. Admin
Adding a List Record
How to add a record to a list using the Forms & Lists module. The ability to add rows may be restricted.
1. Select Add New Record from the module actions menu - OR - click the Add New Record link. This opens the Edit Record page.
2. Enter or select your data. Required fields are denoted by an asterisk ( * ).
3. Click the Update link.
Adding a record to a list
Adding a List Record When Security Code Required
How to add a record to a list when a security code is required using the Forms & Lists module . Note: The ability to add records may be restricted.
1. Select Add New Record from the module actions menu - OR - click the Add New Record link. This opens the Edit Record page.
2. Enter or select your data. Required fields are denoted by an asterisk ( * ).
3. In the Security Code text box, enter the code displayed above the text box.
4. Click the Update link.
Tip: If you cannot read the Security Code, strike the F5 key on your keyboard to view a new code. You should be this before entering your data, as all data will be lost if you strike F5.
Adding a record to a list when a security code is required
Editing a List Record
How to edit a record in a list in the Form & List module. Note: The ability to edit rows may be restricted by users/roles or you may only be able to edit your own records.
1. Click the Edit button beside the record.
2. Edit data as required.
3. Click the Update link.
Editing a list record
Showing All Data as XML
How to view the data of a list created using the Form & List module in XML format. This data can be saved and used as required.
1. Select Show All Data As XML from the Form & List module actions menu. This displays the XML data in a new Web browser window.
2. Click the Back button on your Web browser to return to the page.
Show all list data as XML
Deleting a List Record
How to permanently delete a record from a list on a Form & List module. Note: The ability to delete rows may be restricted by users/roles or you may only be able to delete your own records.
1. Click the Edit button beside the record to be deleted.
2. Click the Delete link. This displays the message "Are You Sure You Wish To Delete This Item?"
3. Click the OK button.
4. Repeat Steps 1-3 to delete additional records.
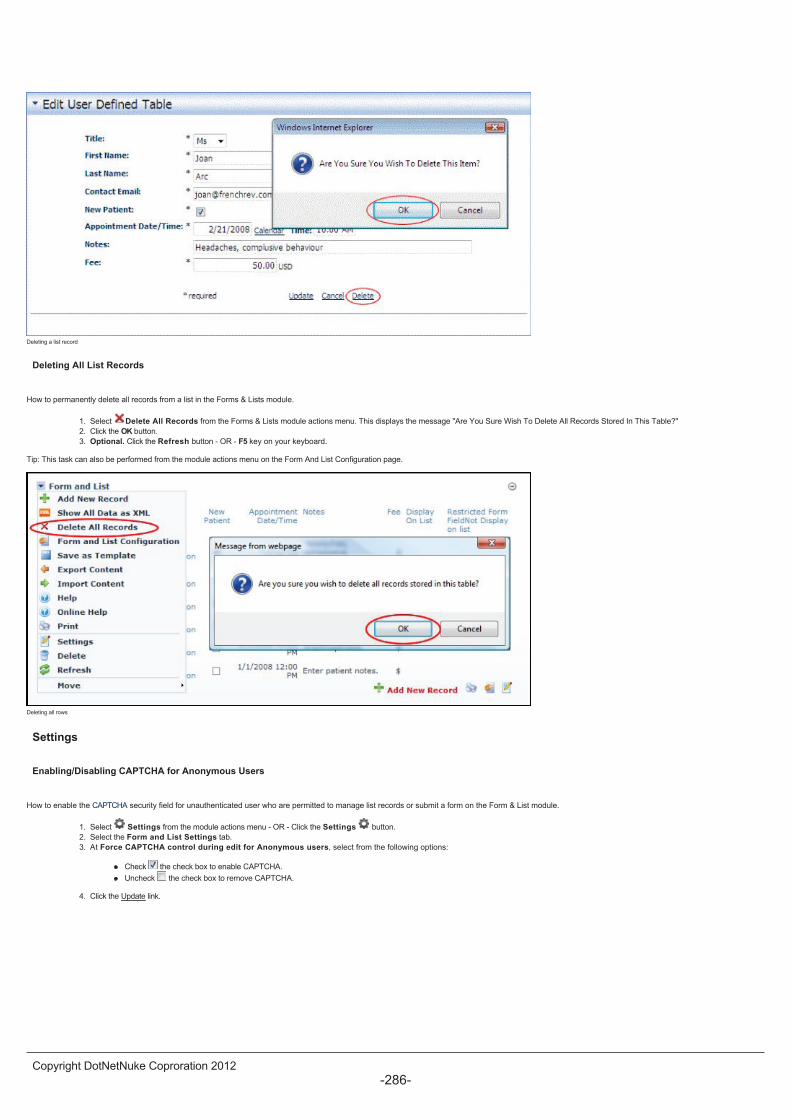
Deleting a list record
Deleting All List Records
How to permanently delete all records from a list in the Forms & Lists module.
1. Select Delete All Records from the Forms & Lists module actions menu. This displays the message "Are You Sure Wish To Delete All Records Stored In This Table?"
2. Click the OK button.
3. Optional. Click the Refresh button - OR - F5 key on your keyboard.
Tip: This task can also be performed from the module actions menu on the Form And List Configuration page.
Deleting all rows
Settings
Enabling/Disabling CAPTCHA for Anonymous Users
How to enable the CAPTCHA security field for unauthenticated user who are permitted to manage list records or submit a form on the Form & List module.
1. Select Settings from the module actions menu - OR - Click the Settings button.
2. Select the Form and List Settings tab.
3. At Force CAPTCHA control during edit for Anonymous users, select from the following options:
Check the check box to enable CAPTCHA.
Uncheck the check box to remove CAPTCHA.
4. Click the Update link.
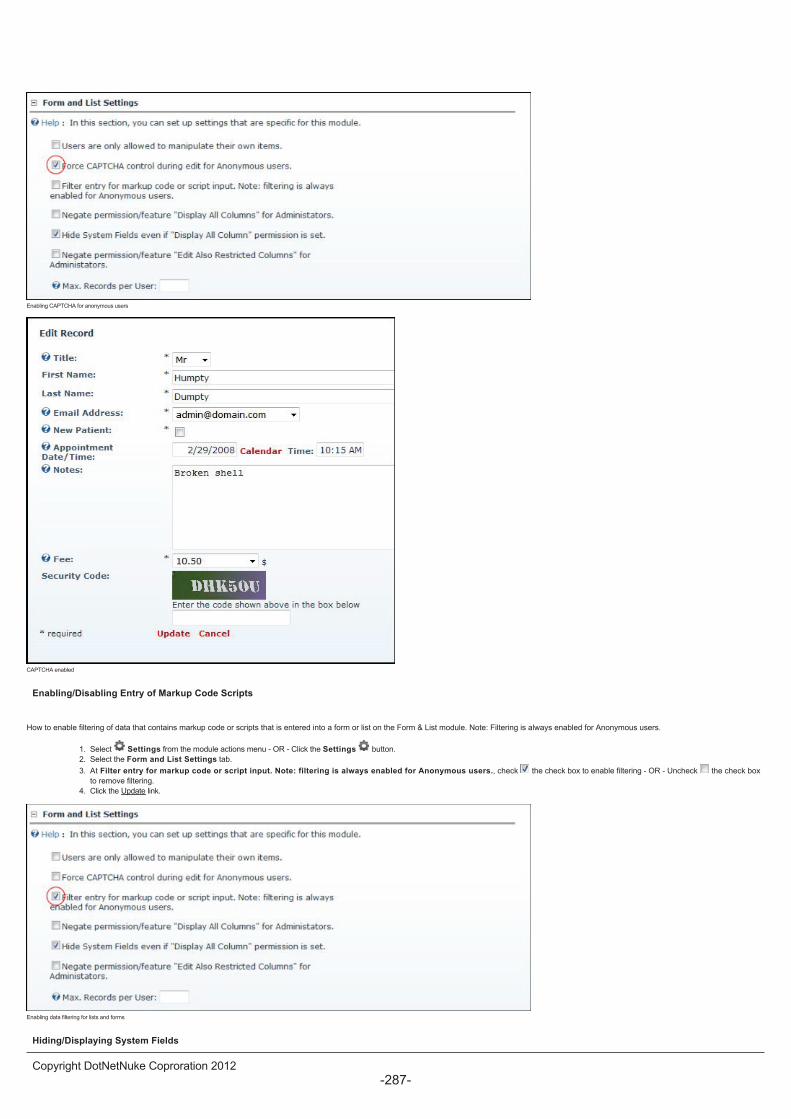
Enabling CAPTCHA for anonymous users
CAPTCHA enabled
Enabling/Disabling Entry of Markup Code Scripts
How to enable filtering of data that contains markup code or scripts that is entered into a form or list on the Form & List module. Note: Filtering is always enabled for Anonymous users.
1. Select Settings from the module actions menu - OR - Click the Settings button.
2. Select the Form and List Settings tab.
3. At Filter entry for markup code or script input. Note: filtering is always enabled for Anonymous users., check the check box to enable filtering - OR - Uncheck the check box
to remove filtering.
4. Click the Update link.
Enabling data filtering for lists and forms
Hiding/Displaying System Fields
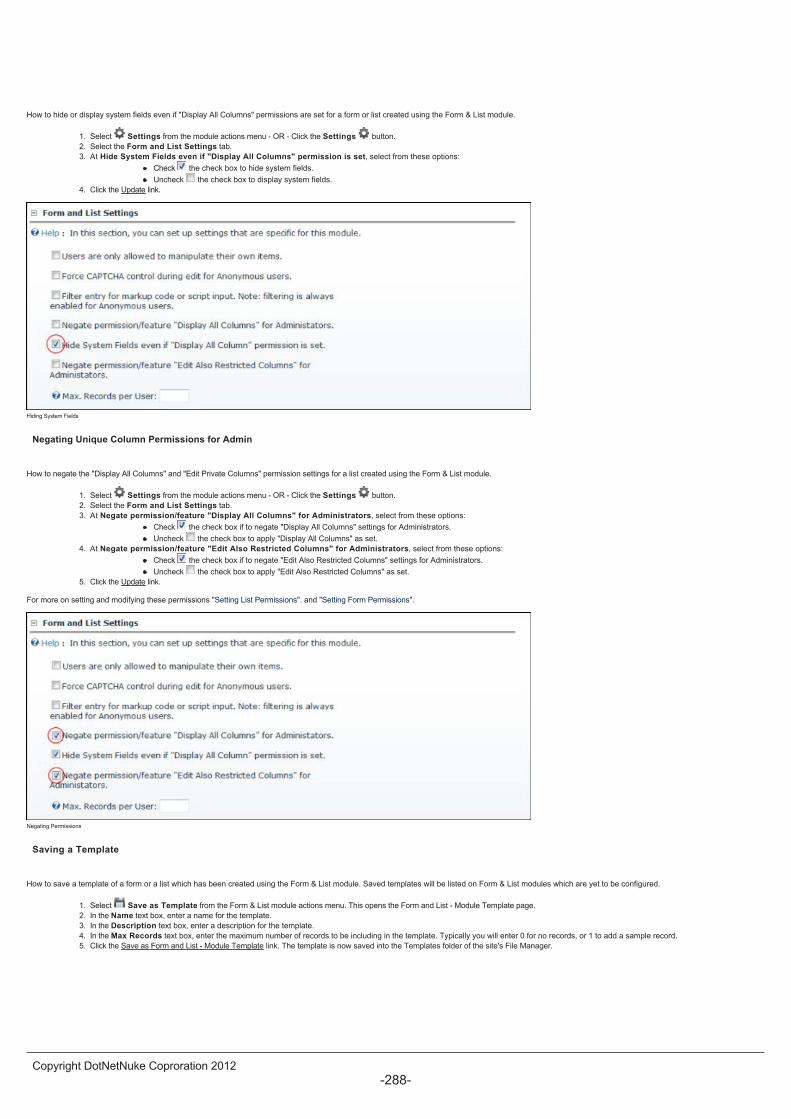
How to hide or display system fields even if "Display All Columns" permissions are set for a form or list created using the Form & List module.
1. Select Settings from the module actions menu - OR - Click the Settings button.
2. Select the Form and List Settings tab.
3. At Hide System Fields even if "Display All Columns" permission is set, select from these options:
Check the check box to hide system fields.
Uncheck the check box to display system fields.
4. Click the Update link.
Hiding System Fields
Negating Unique Column Permissions for Admin
How to negate the "Display All Columns" and "Edit Private Columns" permission settings for a list created using the Form & List module.
1. Select Settings from the module actions menu - OR - Click the Settings button.
2. Select the Form and List Settings tab.
3. At Negate permission/feature "Display All Columns" for Administrators, select from these options:
Check the check box if to negate "Display All Columns" settings for Administrators.
Uncheck the check box to apply "Display All Columns" as set.
4. At Negate permission/feature "Edit Also Restricted Columns" for Administrators, select from these options:
Check the check box if to negate "Edit Also Restricted Columns" settings for Administrators.
Uncheck the check box to apply "Edit Also Restricted Columns" as set.
5. Click the Update link.
For more on setting and modifying these permissions "Setting List Permissions". and "Setting Form Permissions".
Negating Permissions
Saving a Template
How to save a template of a form or a list which has been created using the Form & List module. Saved templates will be listed on Form & List modules which are yet to be configured.
1. Select Save as Template from the Form & List module actions menu. This opens the Form and List - Module Template page.
2. In the Name text box, enter a name for the template.
3. In the Description text box, enter a description for the template.
4. In the Max Records text box, enter the maximum number of records to be including in the template. Typically you will enter 0 for no records, or 1 to add a sample record.
5. Click the Save as Form and List - Module Template link. The template is now saved into the Templates folder of the site's File Manager.
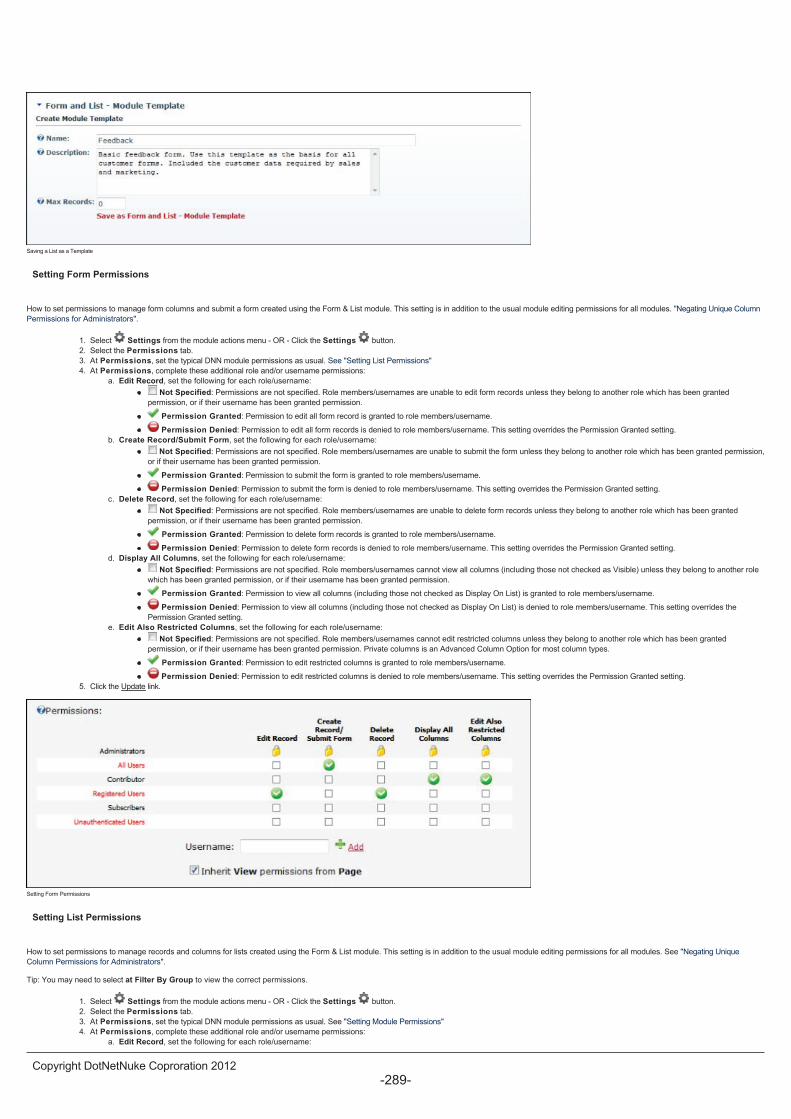
Saving a List as a Template
Setting Form Permissions
How to set permissions to manage form columns and submit a form created using the Form & List module. This setting is in addition to the usual module editing permissions for all modules. "Negating Unique Column
Permissions for Administrators".
1. Select Settings from the module actions menu - OR - Click the Settings button.
2. Select the Permissions tab.
3. At Permissions, set the typical DNN module permissions as usual. See "Setting List Permissions"
4. At Permissions, complete these additional role and/or username permissions:
a. Edit Record, set the following for each role/username:
Not Specified: Permissions are not specified. Role members/usernames are unable to edit form records unless they belong to another role which has been granted
permission, or if their username has been granted permission.
Permission Granted: Permission to edit all form record is granted to role members/username.
Permission Denied: Permission to edit all form records is denied to role members/username. This setting overrides the Permission Granted setting.
b. Create Record/Submit Form, set the following for each role/username:
Not Specified: Permissions are not specified. Role members/usernames are unable to submit the form unless they belong to another role which has been granted permission,
or if their username has been granted permission.
Permission Granted: Permission to submit the form is granted to role members/username.
Permission Denied: Permission to submit the form is denied to role members/username. This setting overrides the Permission Granted setting.
c. Delete Record, set the following for each role/username:
Not Specified: Permissions are not specified. Role members/usernames are unable to delete form records unless they belong to another role which has been granted
permission, or if their username has been granted permission.
Permission Granted: Permission to delete form records is granted to role members/username.
Permission Denied: Permission to delete form records is denied to role members/username. This setting overrides the Permission Granted setting.
d. Display All Columns, set the following for each role/username:
Not Specified: Permissions are not specified. Role members/usernames cannot view all columns (including those not checked as Visible) unless they belong to another role
which has been granted permission, or if their username has been granted permission.
Permission Granted: Permission to view all columns (including those not checked as Display On List) is granted to role members/username.
Permission Denied: Permission to view all columns (including those not checked as Display On List) is denied to role members/username. This setting overrides the
Permission Granted setting.
e. Edit Also Restricted Columns, set the following for each role/username:
Not Specified: Permissions are not specified. Role members/usernames cannot edit restricted columns unless they belong to another role which has been granted
permission, or if their username has been granted permission. Private columns is an Advanced Column Option for most column types.
Permission Granted: Permission to edit restricted columns is granted to role members/username.
Permission Denied: Permission to edit restricted columns is denied to role members/username. This setting overrides the Permission Granted setting.
5. Click the Update link.
Setting Form Permissions
Setting List Permissions
How to set permissions to manage records and columns for lists created using the Form & List module. This setting is in addition to the usual module editing permissions for all modules. See "Negating Unique
Column Permissions for Administrators".
Tip: You may need to select at Filter By Group to view the correct permissions.
1. Select Settings from the module actions menu - OR - Click the Settings button.
2. Select the Permissions tab.
3. At Permissions, set the typical DNN module permissions as usual. See "Setting Module Permissions"
4. At Permissions, complete these additional role and/or username permissions:
a. Edit Record, set the following for each role/username:
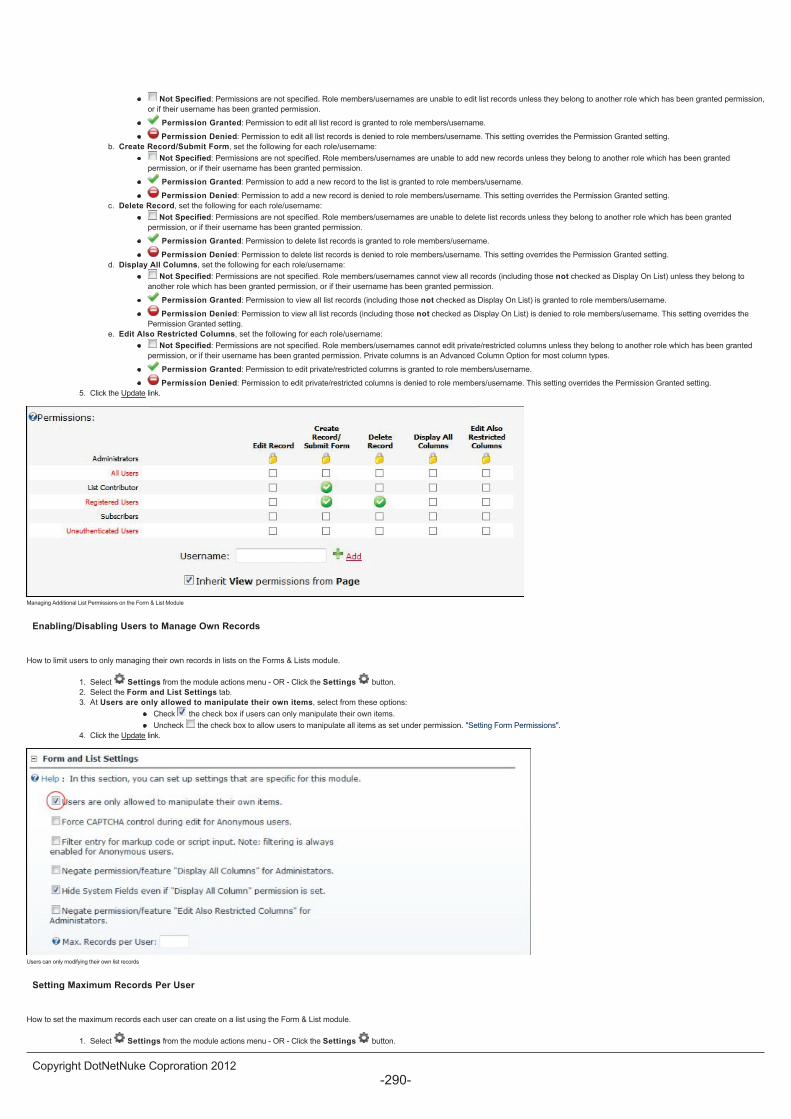
Not Specified: Permissions are not specified. Role members/usernames are unable to edit list records unless they belong to another role which has been granted permission,
or if their username has been granted permission.
Permission Granted: Permission to edit all list record is granted to role members/username.
Permission Denied: Permission to edit all list records is denied to role members/username. This setting overrides the Permission Granted setting.
b. Create Record/Submit Form, set the following for each role/username:
Not Specified: Permissions are not specified. Role members/usernames are unable to add new records unless they belong to another role which has been granted
permission, or if their username has been granted permission.
Permission Granted: Permission to add a new record to the list is granted to role members/username.
Permission Denied: Permission to add a new record is denied to role members/username. This setting overrides the Permission Granted setting.
c. Delete Record, set the following for each role/username:
Not Specified: Permissions are not specified. Role members/usernames are unable to delete list records unless they belong to another role which has been granted
permission, or if their username has been granted permission.
Permission Granted: Permission to delete list records is granted to role members/username.
Permission Denied: Permission to delete list records is denied to role members/username. This setting overrides the Permission Granted setting.
d. Display All Columns, set the following for each role/username:
Not Specified: Permissions are not specified. Role members/usernames cannot view all records (including those not checked as Display On List) unless they belong to
another role which has been granted permission, or if their username has been granted permission.
Permission Granted: Permission to view all list records (including those not checked as Display On List) is granted to role members/username.
Permission Denied: Permission to view all list records (including those not checked as Display On List) is denied to role members/username. This setting overrides the
Permission Granted setting.
e. Edit Also Restricted Columns, set the following for each role/username:
Not Specified: Permissions are not specified. Role members/usernames cannot edit private/restricted columns unless they belong to another role which has been granted
permission, or if their username has been granted permission. Private columns is an Advanced Column Option for most column types.
Permission Granted: Permission to edit private/restricted columns is granted to role members/username.
Permission Denied: Permission to edit private/restricted columns is denied to role members/username. This setting overrides the Permission Granted setting.
5. Click the Update link.
Managing Additional List Permissions on the Form & List Module
Enabling/Disabling Users to Manage Own Records
How to limit users to only managing their own records in lists on the Forms & Lists module.
1. Select Settings from the module actions menu - OR - Click the Settings button.
2. Select the Form and List Settings tab.
3. At Users are only allowed to manipulate their own items, select from these options:
Check the check box if users can only manipulate their own items.
Uncheck the check box to allow users to manipulate all items as set under permission. "Setting Form Permissions".
4. Click the Update link.
Users can only modifying their own list records
Setting Maximum Records Per User
How to set the maximum records each user can create on a list using the Form & List module.
1. Select Settings from the module actions menu - OR - Click the Settings button.
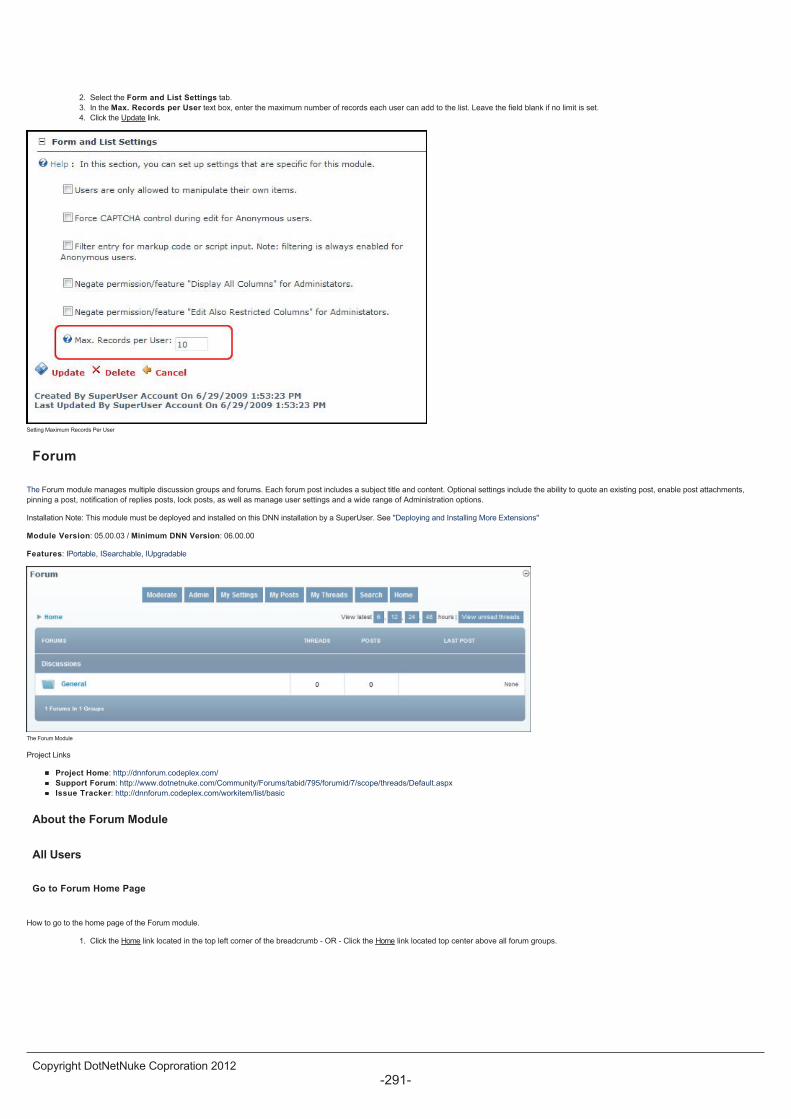
2. Select the Form and List Settings tab.
3. In the Max. Records per User text box, enter the maximum number of records each user can add to the list. Leave the field blank if no limit is set.
4. Click the Update link.
Setting Maximum Records Per User
Forum
The Forum module manages multiple discussion groups and forums. Each forum post includes a subject title and content. Optional settings include the ability to quote an existing post, enable post attachments,
pinning a post, notification of replies posts, lock posts, as well as manage user settings and a wide range of Administration options.
Installation Note: This module must be deployed and installed on this DNN installation by a SuperUser. See "Deploying and Installing More Extensions"
Module Version: 05.00.03 / Minimum DNN Version: 06.00.00
Features: IPortable, ISearchable, IUpgradable
The Forum Module
Project Links
Project Home: http://dnnforum.codeplex.com/
Support Forum: http://www.dotnetnuke.com/Community/Forums/tabid/795/forumid/7/scope/threads/Default.aspx
Issue Tracker: http://dnnforum.codeplex.com/workitem/list/basic
About the Forum Module
All Users
Go to Forum Home Page
How to go to the home page of the Forum module.
1. Click the Home link located in the top left corner of the breadcrumb - OR - Click the Home link located top center above all forum groups.